

Flip Mino2HD, Mino HD 120, MinoHD Quick Start Manual
qu ic ks tar t gu ide
Get Started
View On HD TelevisionSave, Edit, and Share
Recharge Battery
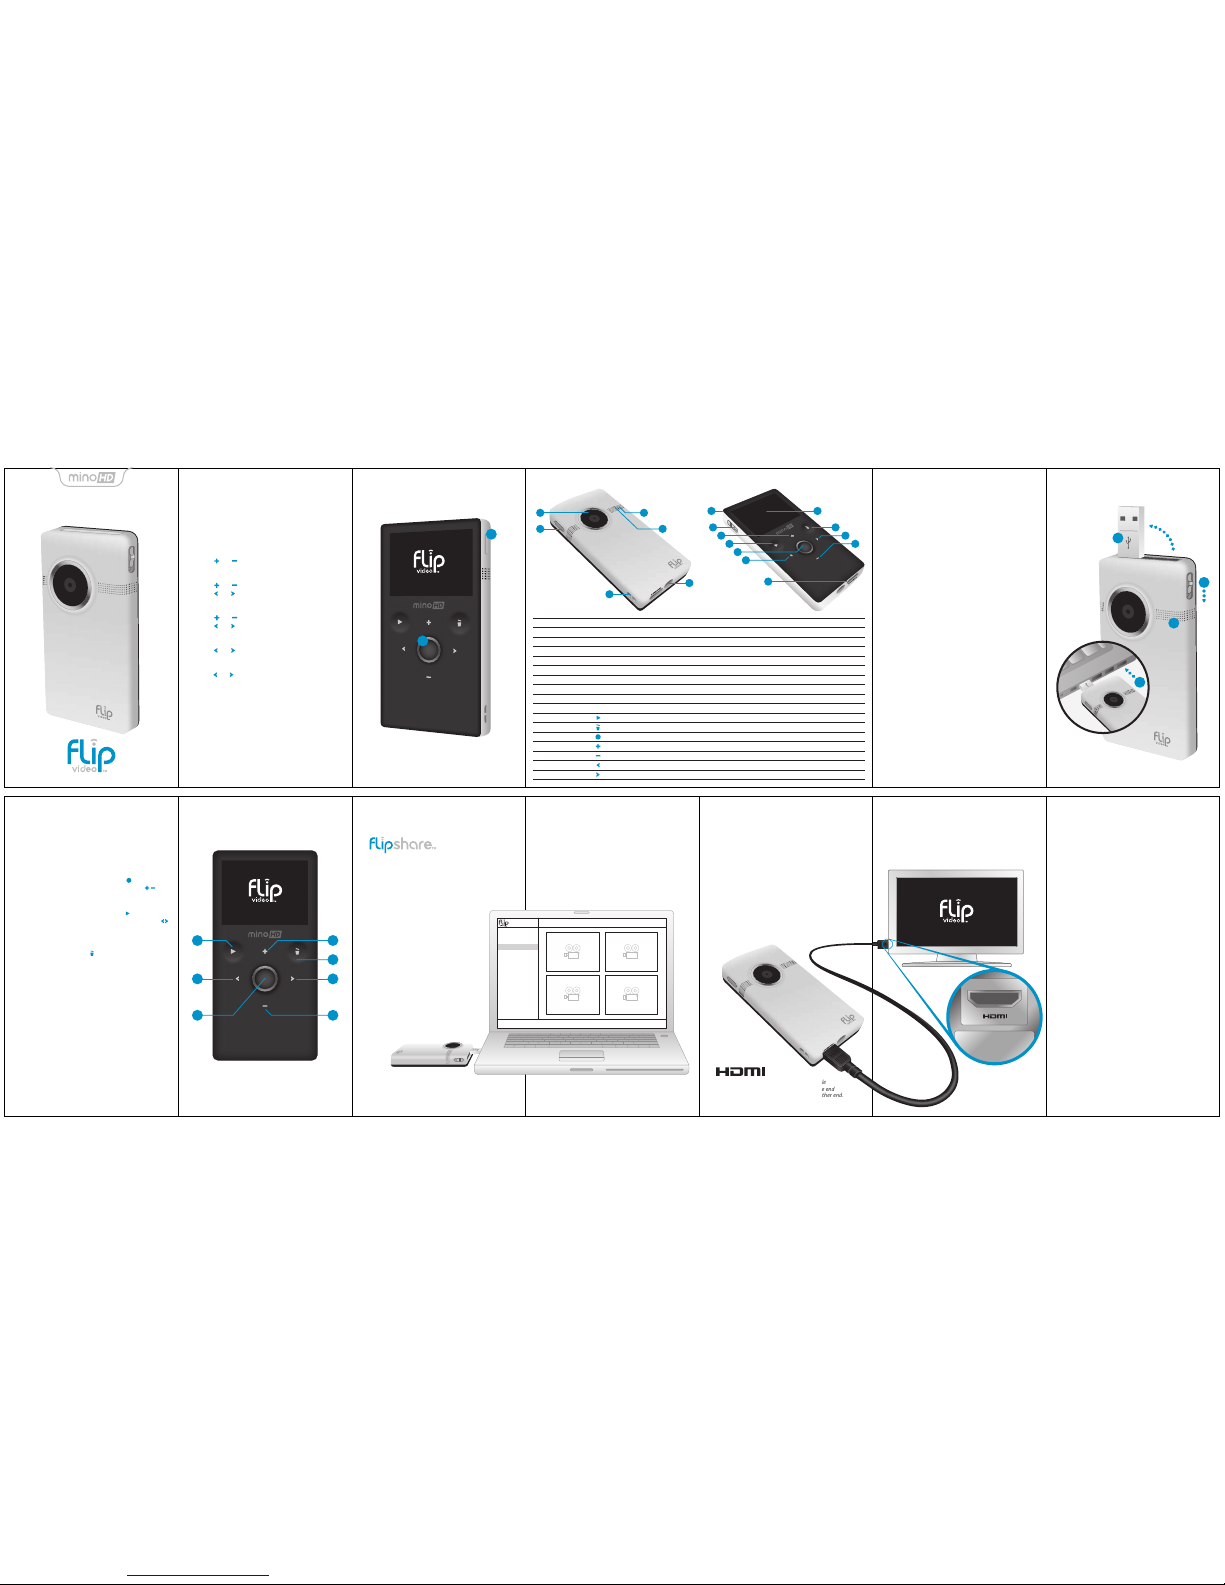
1 Slide USB latch down. USB arm flips up
automatically.
2 Connect USB arm to computer’s USB port.
3 Recording light turns on to indicate charging.
When charged, the recording light turns off.
• The camcorder uses a sealed, rechargeable battery.
• Recharging a discharged battery takes about
three hours.
• The camcorder may remain connected to
your computer after it is fully charged, but
disconnecting it will help preserve the
battery’s lifespan and performance.
• The optional Flip Video Power Adapter can
charge the battery in about two hours.
Note: Your computer must be powered on for the camcorder to charge.
Connect to Computer
1 Slide USB latch down. USB arm flips up
automatically.
2 Connect USB arm to computer’s USB port.
• Your camcorder will begin recharging and you
can install FlipShare
TM
software on your computer.
Click HELP inside FlipShareTM for
detailed instructions on all features.
FlipShareTM preloaded software makes
organizing, editing, and sharing video
incredibly simple. When you plug in your
camcorder, open FLIPVIDEO and launch
Setup FlipShare
TM
(PC) or Start FlipShareTM (Mac).
FlipShare
TM
Features
• Browse, play, and edit your videos.
• Save your videos to your computer.
• Make custom movies with music.
• Snap photos from your videos.
• Share your videos online or by email.
• Upload to Facebook
TM
, MySpaceTM,
YouTube
TM
, and others.
Camcorder Features
1 Power off camcorder and television.
2 Connect camcorder to television with
optional HDMI
TM
Cable from Flip VideoTM.
Learn more at www.theflip.com/accessories.
3 Power on camcorder and television.
• Camcorder screen turns off when
connected to television.
4 Switch your television to VIDEO input.
• See television manual for instructions.
5 Touch play button to start/pause playback.
Note: You can use any brand of HDMI™ Cable
that has an HDMI Connector (Type A) on one end
and HDMI Mini Connector (Type C) on the other end.
Welcome to Flip MinoHD
TM
1 Press power button to turn on. Camcorder setup
appears automatically when you first power on.
Note: Camcorder is shipped with a partially charged battery.
Setting Language
• Use + and – to select your language.
Setting Date
• Use + and – to adjust the current setting.
• Use < and > to select month/day/year.
Setting Time
• Use + and – to adjust the current setting.
• Use < and > to select hour/minute/am/pm.
Turning Off Tones
• Use < and > to toggle the tones on and off.
Turning Off Recording Light
• Use < and > to toggle the recording light on and off.
To Return to Camcorder Setup Later
Starting with the camcorder OFF:
1 Press power button to turn on.
2 When Flip Video
TM
logo appears, press and
hold record button until SET LANGUAGE appears.
9
16
13
11
14
7
8
12
17
15
10
1
4
5
6
2
3
Press to turn on/off.
Attach wrist strap, (included in package).
Attach a tripod or a Flip Video
TM
accessory. Learn more at www.theflip.com/accessories.
Wipe clean with a soft, dry cloth.
Red light turns on during recording.
Built-in wide-range stereo microphone.
Slide down to release USB arm.
If space does not permit proper connection, use a USB “A”-type extension cable.
Connect HDMI™ cable accessory to your HDTV. Learn more at www.theflip.com/accessories.
Recording viewfinder/playback screen.
Touch to play/pause. Touch and hold to play all.
Touch to delete. Touch and hold to lock/unlock the delete button.
Press and release to start/stop recording.
While Recording: Touch to zoom in. During Playback: Touch to increase volume.
While Recording: Touch to zoom out. During Playback: Touch to decrease volume.
While Paused: Touch to skip to previous video. During Playback: Touch and hold to rewind.
While Paused: Touch to skip to next video. During Playback: Touch and hold to fast-forward.
Power Button
Wrist Strap Hook
Tripod Mount
Lens
Recording Light
Microphone
USB Latch
USB Arm
HDMI™ Mini Port
Screen
Play Button
Delete Button
Record Button
Up Button
Down Button
Left Button
Right Button
1
2
3
4
5
6
7
8
9
10
11
12
13
14
15
16
17
My Movies
Camcorder
Computer
My Movies
Vacations
Anniversary
Birthday Party
Wedding
Concert
At The Beach
Our Dog
Baby Videos
Included In This Box
• Flip MinoHDTM Camcorder • Quickstart Guide
• Wrist Strap • Warranty/Safety Info
• Soft Case
Flip VideoTM Registration and Support
Go to www.theflip.com/support
Declaration of Conformity
Responsible Party: Cisco Systems, Inc.
30 Maiden Lane, 6th Floor, San Francisco, CA 94108
FCC Compliance Statement
This device complies with part 15 of the FCC Rules. Operation is subject
to the following two conditions: (1) This device may not cause harmful
interference, and (2) this device must accept any interference received,
including interference that may cause undesired operation.
Radio and TV Interference
This equipment has been tested and found to comply with the limits
for a Class B digital device in accordance with the specifications in Part 15
of FCC rules. These specifications are designed to provide reasonable
protection against harmful interference in a residential installation.
This equipment generates, uses, and can radiate radio frequency energy
and, if not installed and used in accordance with the manufacturer’s
instructions, may cause harmful interference to radio communications.
However, there is no guarantee that interference will not occur in a
particular installation. If this equipment does cause harmful interference
to radio or television reception, which can be determined by turning the
equipment off and on, the user is encouraged to try to correct the
interference by one or more of the following measures:
• Reorient or relocate the receiving antenna.
• Increase the separation between the equipment and the receiver.
• Connect the equipment into an outlet on a circuit different from that to
which the receiver is connected.
• Consult the dealer or an experienced radio/television technician for help.
The supplied interface cable must be used with the equipment in order to
comply with the limits for a digital device pursuant to Subpart B of Part 15
of FCC Rules.
CAUTION: Changes or modifications to this device not authorized by Cisco,
Inc. may void the user’s authority to operate this device.
Canadian ICES-003 Statement:
This Class B digital apparatus complies with Canadian ICES-003.
© 2009 Cisco Systems, Inc. and/or its affiliates (“Cisco”). All rights
reserved. THE FLIP VIDEO LOGO, FLIP VIDEO, FLIP MINO HD, and
FLIPSHARE are trademarks of Cisco. Designed in the USA. Made in China.
For more information, visit www.theflip.com. Facebook, MySpace, and
YouTube are trademarks of their respective owners. Mac is a registered
trademark of Apple Inc. HDMI, the HDMI Logo and High-Definition
Multimedia Interface are trademarks or registered trademarks of HDMI
Licensing LLC.
Record and Play
Touch-Sensitive Buttons
Gently touch lighted icons with your finger to
activate the controls on the back panel.
Recording Videos
1 Press record button to start/stop.
2 Touch up/down buttons to zoom in/out.
Playing Videos
3 Touch play button to start/pause.
4 Touch left/right buttons to view previous/next.
Tip: Hold left/right during playback to rewind/fast-forward.
Deleting Videos
5 Touch delete button. Select YES to confirm.
Tip: Delete button is locked when you first power on.
To unlock, press and hold delete button.
3
2
1
2
4
1
3
4
2
2
5
Hold
•
for setup
1
2
Consult Safety Instructions Before Use.
600-0130-100
 Loading...