


Rhein Tech Laboratories, Inc. Client: FlightScope (Pty) Ltd
360 Herndon Parkway Model: FlightScope Xi
Suite 1400 Standards: FCC 15.245/IC RSS-210
Herndon, VA 20170 FCC/IC ID: QXP-ME4411/4612A-ME441
http://www.rheintech.com Report #: 2013301
Appendix K: Manual
Please refer to the following pages.
Page 25 of 31

PERSONAL GOLF TRAINING SYSTEM
User Manual
www.ightscope.com

PAGE LEFT BLANK INTENTIONALLY
i

E19-HU086: Issue 1
ii

NOTICES
The following notices and general precautions must be observed during the operation, service and repair of this equipment. Failure to comply with these precautions or
with warnings elsewhere in the manual violates standards of the design, manufacture
and intended use of the equipment. FlightScope accepts no liability for failure to comply with these notices.
Operation of the device in any country may require approval in accordance with local
telecommunications and safety regulations.
Sheltered and Clear Weather Use Only. The equipment has been designed for sheltered or in clear weather use.
iii

Copyright
©2013 FlightScope®(Pty)Ltd. All rights reserved.
FlightScope® is a registered trademark.
Modications and errors are expected.
The information presented in this document may not be copied or reproduced in
any form whatsoever without prior written consent of FlightScope®. FlightScope®
reserves all the rights to information published in this document. Titles of information
and any copies thereof shall remain the property of FlightScope®.
iv

FCC Statement
Changes or modications not expressly approved by FlightScope (Pty) Ltd could void
the user’s authority to operate the equipment.
This equipment has been tested and found to comply with the limits for a Class B digital device, pursuant to part 15 of the FCC rules. These limits are designed to provide
reasonable protection against harmful interference in an oce or residential installation. This equipment generate, uses and can radiate radio frequency energy and, if not
installed and used in accordance with the instructions, may cause harmful interference to radio communications. However, there is no guarantee that interference will
not occur in a particular installation.
If this equipment does cause harmful interference to other electronic equipment,
which can be determined by turning this equipment o and on, the user is encouraged to try to correct the interference by one or more of the following measures:
Increase the separation between the equipment causing and experiencing the interference. Install a radio frequency shield between the equipment causing and experiencing the interference. Consult your dealer for help.
This device complies with Part 15 of the FCC Rules. Operation is subject to the following two conditions:
This device may not cause harmful interference.
This device must accept any interference received, including interference
that may cause undesired operation.
v

IC Statement
This device complies with Industry Canada license-exempt RSS standard(s). Operation
is subject to the following two conditions: (1) this device may not cause interference,
and (2) this device must accept any interference, including interference that may
cause undesired operation of the device.
Déclaration IC
Le présent appareil est conforme aux CNR d’Industrie Canada applicables aux appareils radio exempts de licence. L’exploitation est autorisée aux deux conditions suivantes : (1) l’appareil ne doit pas produire de brouillage, et (2) l’utilisateur de l’appareil
doit accepter tout brouillage radioélectrique subi, même si le brouillage est susceptible d’en compromettre le fonctionnement.
vi

INTRODUCTION
vii
This guide will help you set up and use
the FlightScope® Xi Sensor with your
Smartphone or Tablet.
FlightScope® technology includes
battery operation, wireless network
connections, and operation with a
smart phone or tablet : convenience and
portability without compromise.

TABLE OF CONTENTS
Getting Started
01. Device description
03. Indicators
04. Controls & indicators
07. Package contents
09. Charging battery
10. Replacing battery
11. Opening leg
12. Motorized feet
13. Position & alignment
19. Indoor & outdoor measurement
20. Cautions
Using The System
21. Compatible devices
22. Software applications
23. Communications
24. First time use
28. Set operating mode
30. Set units, distances, height & altitude
Care & Maintenance
31. Basic care
32. Cleaning
34. Storage & transportation
35. Troubleshooting
37. Specications
38. Technical Support
viii
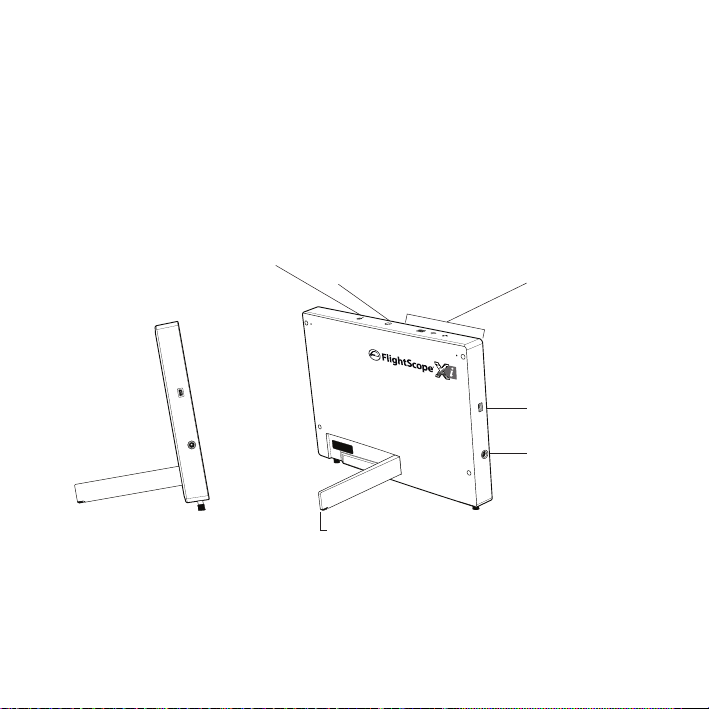
Device Description
Alignment Mark
On/O switch
Indicators
Side Rear
01
Panel
USB connector
Power connector
Extendable leg
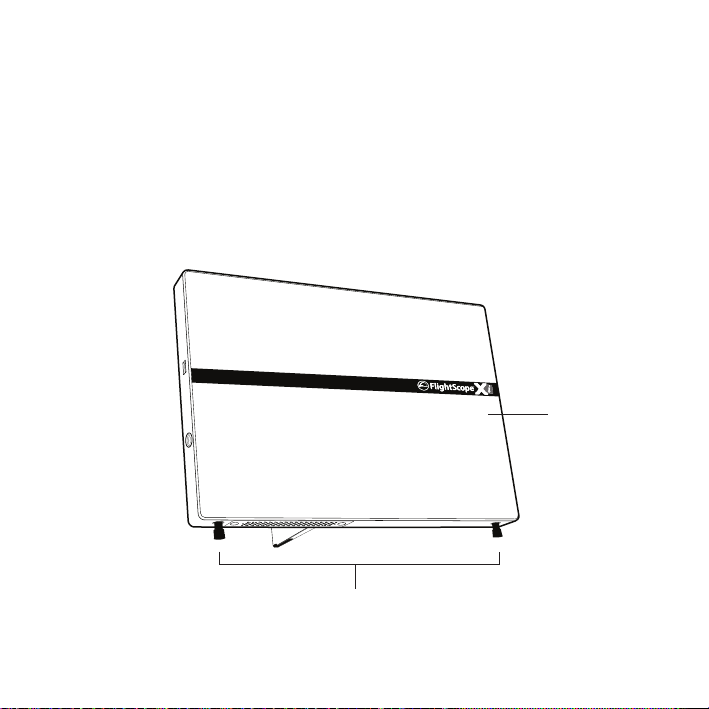
Front
Front Panel
Feet
02
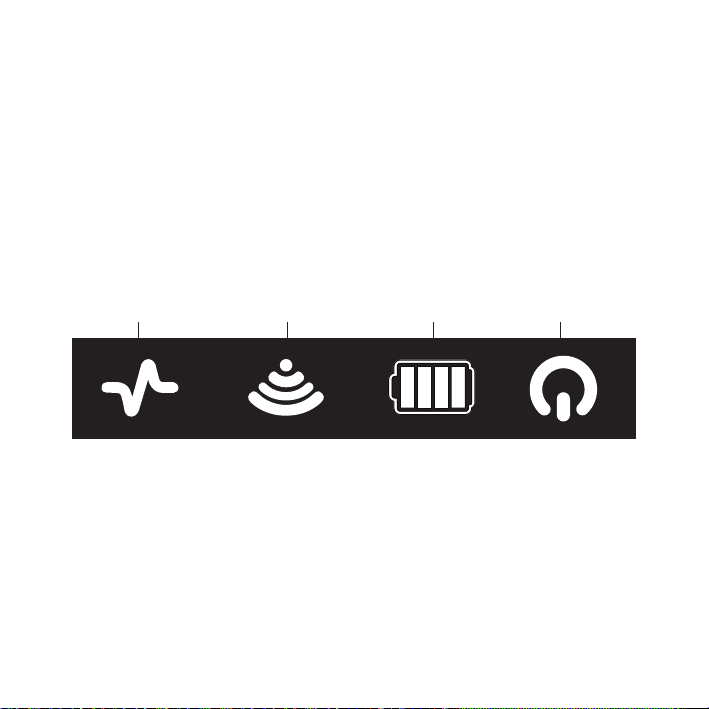
Controls & Indicators
System Status Wi Battery Power
03

Indicators
SYSTEM INDICATOR
COLOR STATUS DESCRIPTION
None
OFF
Power is OFF
Blue blinking fast
Blue blinking slow
Green blinking fast
Green blinking slow
Red/Green alternate
ashing
Red/O
Starting Up
Sleep Mode
Booting Up
Idle
Armed
Processor fault/problem
System software is
starting up
System in sleep mode
System is starting up
System ON and processor running normally.
System not armed.
System is ready to measure a shot.
04

WI FI INDICATOR
COLOR STATUS DESCRIPTION
None
OFF
USB service cable
plugged in
Blue blinking
Blue solid
05
Wi-Fi available
Wi-Fi connected
Wi-Fi available – not connected to a device
Wi-Fi connection in
process

BATTERY INDICATOR
COLOR STATUS DESCRIPTION
O
Red ashing
Yellow ashing
Green ashing
Red solid
Yellow solid
Green solid
White
Sensor o
Low range on battery
Mid range on battery
High range on battery
Low range charging
Mid range charging
High range charging
Battery full
System OFF
Running on battery, level
< 20%
Running on battery, level
>20% <70%
Running on battery, level
>70%
Busy charging, battery
level < 20%
Busy charging, battery
level >20% <70%
Busy charging, battery
level >70%
Fully charged
06

Package Contents
07
a. Sensor Unit
b. DVD
c. User Manual
d. USB Cable
e. AC Adapter & Accessories
f. Metal Discs

e.
a.
d.
b & c
f.
08

Charging Battery
1. Connect AC Adapter to wall outlet and plug
charging lead into Sensor power socket.
2. The Battery indicator will illuminate, not ashing.
NOTE: Charging time approximately 8-10 hours.
09

Replacing The Battery
1. Remove the two battery retaining screws.
2. Extract the battery.
3. Insert a new battery and fasten the screws.
10

Opening The Leg
Note: Unit will not switch on unless leg is extended
1 2 3
ngergrip
11
Pull leg out from showed
position.
CAUTION: Do not force
the leg beyond maximum
position.

Motorized Feet
FlightScope® Xi has motorized feet
that adjust the unit’s tilt and roll
when the unit is switched on or if it is
moved during use.
12

Position & Alignment
1. Choose your tee position
13

2. Select your target line (tree, ag, or other marker)
14
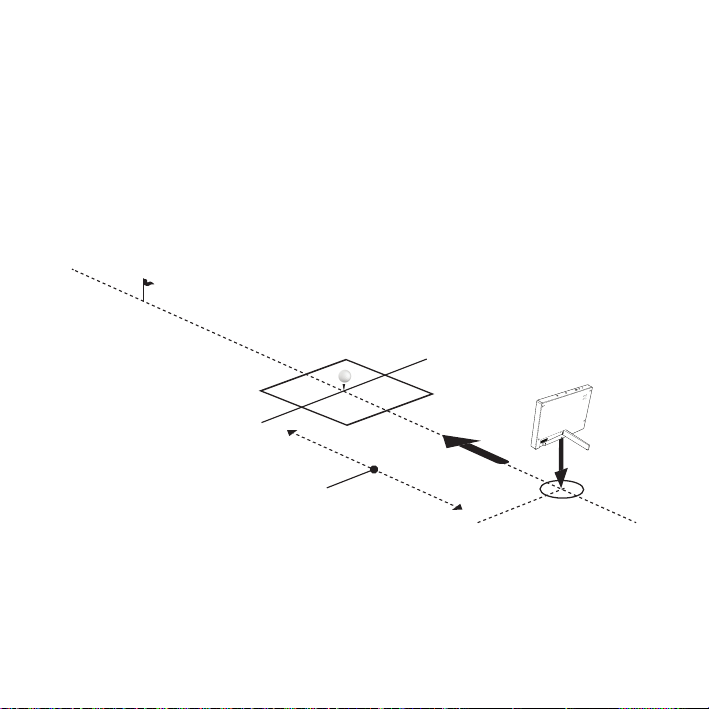
9 - 14 ‘
2.7 - 4.2m
3. Place the FlightScope® behind tee on target line
Recommended distance behind tee: 9 ft. to 14 ft. (2.7 to 4.2 m)
15

4. Rotate FlightScope® so that it points along the
target line.
16

Tilt
- Operating angle is 10˚.
- Ground slope must be < 4˚
for self-levelling to function.
at
17
up slope
down
4˚
-4˚

Roll
- Operating angle is 0˚.
- Ground slope must be < 0˚
for self-levelling to function.
>2˚
left slope
<2˚
right slope
18

Indoor & Outdoor measurement
Indoor measurement
1. Make sure ball ight is at least 13 ft (4 metres).
2. Mark ball with a single metal disc for spin measurement.
3. Tee ball up with dot facing forward (toward the target).
4. Set Software to ‘Indoor’ mode.
Outdoor measurement
Set Software to ‘Outdoor’ mode.
Long Indoor measurement
If you work in a restricted area but the ball ight distance is at least 40 yards, set
the software to ‘Long Indoor’ mode.
19

Cautions
1. Use on level surface.
2. No obstructions or steps in front of the FlightScope® Xi unit.
3. Fluorescent lights and rotating machines (fans, etc.) can interfere with
FlightScope® unit. Switch o or install a wire mesh screen in the light covers.
4. Enter distance from FlightScope® unit to tee in software before using.
20

USING THE SYSTEM
Compatible Devices
List compatible devices
Apple
- i Phone
- iPad
- iPad mini
21
Android
- Smart Phones
- Tablets

Software Applications
Download
Apple
- Go to Apple App Store
- Download FlightScope®
applications.
Android
- Go to Google Play Store
- Download FlightScope®
applications.
22

Communications
Wi-Fi
Wireless networking, or Wi-Fi, is used to connect computers at home, at work or in
public locations. Wi-Fi is easy to set up, neat, and convenient. Wi-Fi is used to make a
wireless connection from a smartphone or tablet to FlightScope® Xi.
USB
Caution:
USB is reserved for maintanence purposes only. Do not connect USB cable to sensor
for normal use.
23

First Time Use
Set up the Wi-Fi connection between
the Xi and the display device:
Note the Xi’s serial number
(example: FS Xi-00979).
Switch ON with no USB cable
connected.
1. On the smartphone or tablet,
select the Settings icon:
For Wi-Fi Setup on other devices,
go to :
www.myightscope.com/wisetup
24

2. Select the Wi-Fi function. Set Wi-Fi to ON if O.
3. Select you FlightScope® Xi serial number, e.g
FS Xi-00979 from the ‘Choose a Network’ list.
4. Enter you Password : The rst 8 characters of
the Xi serial no, eg. FS Xi-00979. Remember it is a
Capital X, and it includes the dash (-).
25

5. Press on the keyboard to be connected.
6. After connecting to the network, scroll to
the bottom of the screen and turn ‘Ask to Join
Networks’ O.
Every Time Thereafter
- Place the sensor in position and switch
power ON.
- Switch ON your smart phone or tablet.
26

27
PAGE LEFT BLANK INTENTIONALLY

Set Operating Mode
Setup must be done at least the rst time the system is used. It can be skipped if the
setup remains unchanged between use, but must be updated if the setup changes
(e.g. if the system is used in a dierent location).
Mode When to use
Indoors When ball ight is less than 40 yards.
Long Indoors When ball ight exceeds 40 yards, but does
not allow the full trajectory
Outdoors On a driving range or golf course where ball
ight is unrestricted
28

Set units, distances, height & altitude
Setup opens the Settings screen (as seen in below diagram).
SETUP
29
Height: Tee Surface
Altitude
Sleep/Time Out
Club Manufacturer
LONG INDOORINDOOR OUTDOOR
51 min
Generic AdamsC allawayC obra Nike Taylor MadeT itleistW ilson
Connection
Environmental Conditions
Debug
Version 1.5.2459 Release Date 2012-01-24
SAVECLOSE
ImperialMetricUnits
240.0 cmDistance: Sensor to Tee
0.0 cm
0 m

Set units, distances, height & altitude
Set Units
Select Metric or Imperial.
Set Sensor to Tee Distance
Enter the distance from the sensor’s face to the tee/hitting position and keep within
6 inches of specied distance for optimum club delivery measurements.
Set Tee Surface Height
Enter the height of the tee surface (not the Ball Tee) above the surface on which the
FlightScope® is placed.
Set Altitude
Enter the altitude of the location.
Close to continue. The system is now ready for use.
30

CARE & MAINTENANCE
Basic care
The FlightScope® Xi sensor is a complex electronic unit and should be handled with
care. There are a number of sensitive components inside the sensor that can be
damaged by impact and may aect its operation or functioning.
Make sure to transport and store the sensor with suitable protection and care, for
example in the optional padded carry bag or the original shipping. It should not be
dropped, banged or crushed.
Keep it away from excessive moisture including rain,
and avoid spilling anything on the sensor.
31

Cleaning
- Clean Sensor and feet regularly to remove dirt.
- Store and transport in its shipping packaging
or a padded carry bag (optional accessory).
32

33
PAGE LEFT BLANK INTENTIONALLY

Storage & Transportation
- Store and transport in its shipping packaging
or a padded carry bag (optional accessory).
34

Troubleshooting
SYMPTOM POSSIBLE CAUSE & REMEDY
Unit does not switch on
Low battery run time
Batteries run down
35
Make sure that the batteries are charged, or
otherwise connect to a mains power source
with the AC adapter.
Make sure leg is extended.
Rechargeable batteries lose capacity over time.
If your batteries have become too poor to use,
contact FlightScope® support for a new battery
module or send your battery module in so that
new cells can be inserted.
Make sure to charge batteries for 8-10 hours
until full.
When stored for any length of time, batteries
will lose charge due to self-discharge. If a unit
has not been used for a number of days, it is
recommended to charge or use AC power.

SYMPTOM POSSIBLE CAUSE & REMEDY
Does not display a shot
Cannot connect Wi-Fi to sensor
Ensure that the Wi-Fi connection between your
smartphone or tablet and the sensor is set up
and connected.
Check that the sensor is switched on and positioned correctly behind the tee from which the
shot is played.
Check if the correct mode i.e indoor, outdoor,
long indoor is selected.
Make sure that the sensor is switched on, and
check that the communications indicator is
ashing. This means the Wi-Fi is ready but not
connected. Use the smartphone or computer’s
Wi-Fi tools to connect to the FlightScope®. If
the indicator is continuously on, the Wi-Fi is
connected.
36

Specications
Dimensions 212 x 295 x 40 mm (H x W x D)
Mass (sensor) <2.0 kg with battery
Tilt and roll adjustment Roll range +/- 3 degrees
Tilt range 8 to 14 degrees
Ambient temperature:
Recommended operating range: 0ºC to 45ºC (32ºF to 104ºF)
Ingress protection: IP54 / NEMA-4
37

Electrical Characteristics
Electrical supply: Input 100-240 V AC/<0.2 Amp, 50/60Hz single phase
Output 11-13V DC/2A/25W
Communications interface: WiFi (IEEE 802.11b/g)
USB 2.0 Hi Speed (Reserved use/System integrator use)
Safety and Interference: FCC Class 15, Industry Canada, and CE
Power supply: UL 60950-1/EN60950-1:2nd edition
FlightScope® reserves the right to change specications at any time without notice.
38

Technical Support
i
Tel: 407-412-9400
Email: support@ightscope.com

PAGE LEFT BLANK INTENTIONALLY
ii

Service:
Call: +407 412 9400 (US)
+44 20 323 941 86 (UK/Europe)
Email: support@ightscope.com
 Loading...