
FlightLine RC Spitfire Mk IX User guide

Page 1
Page 2
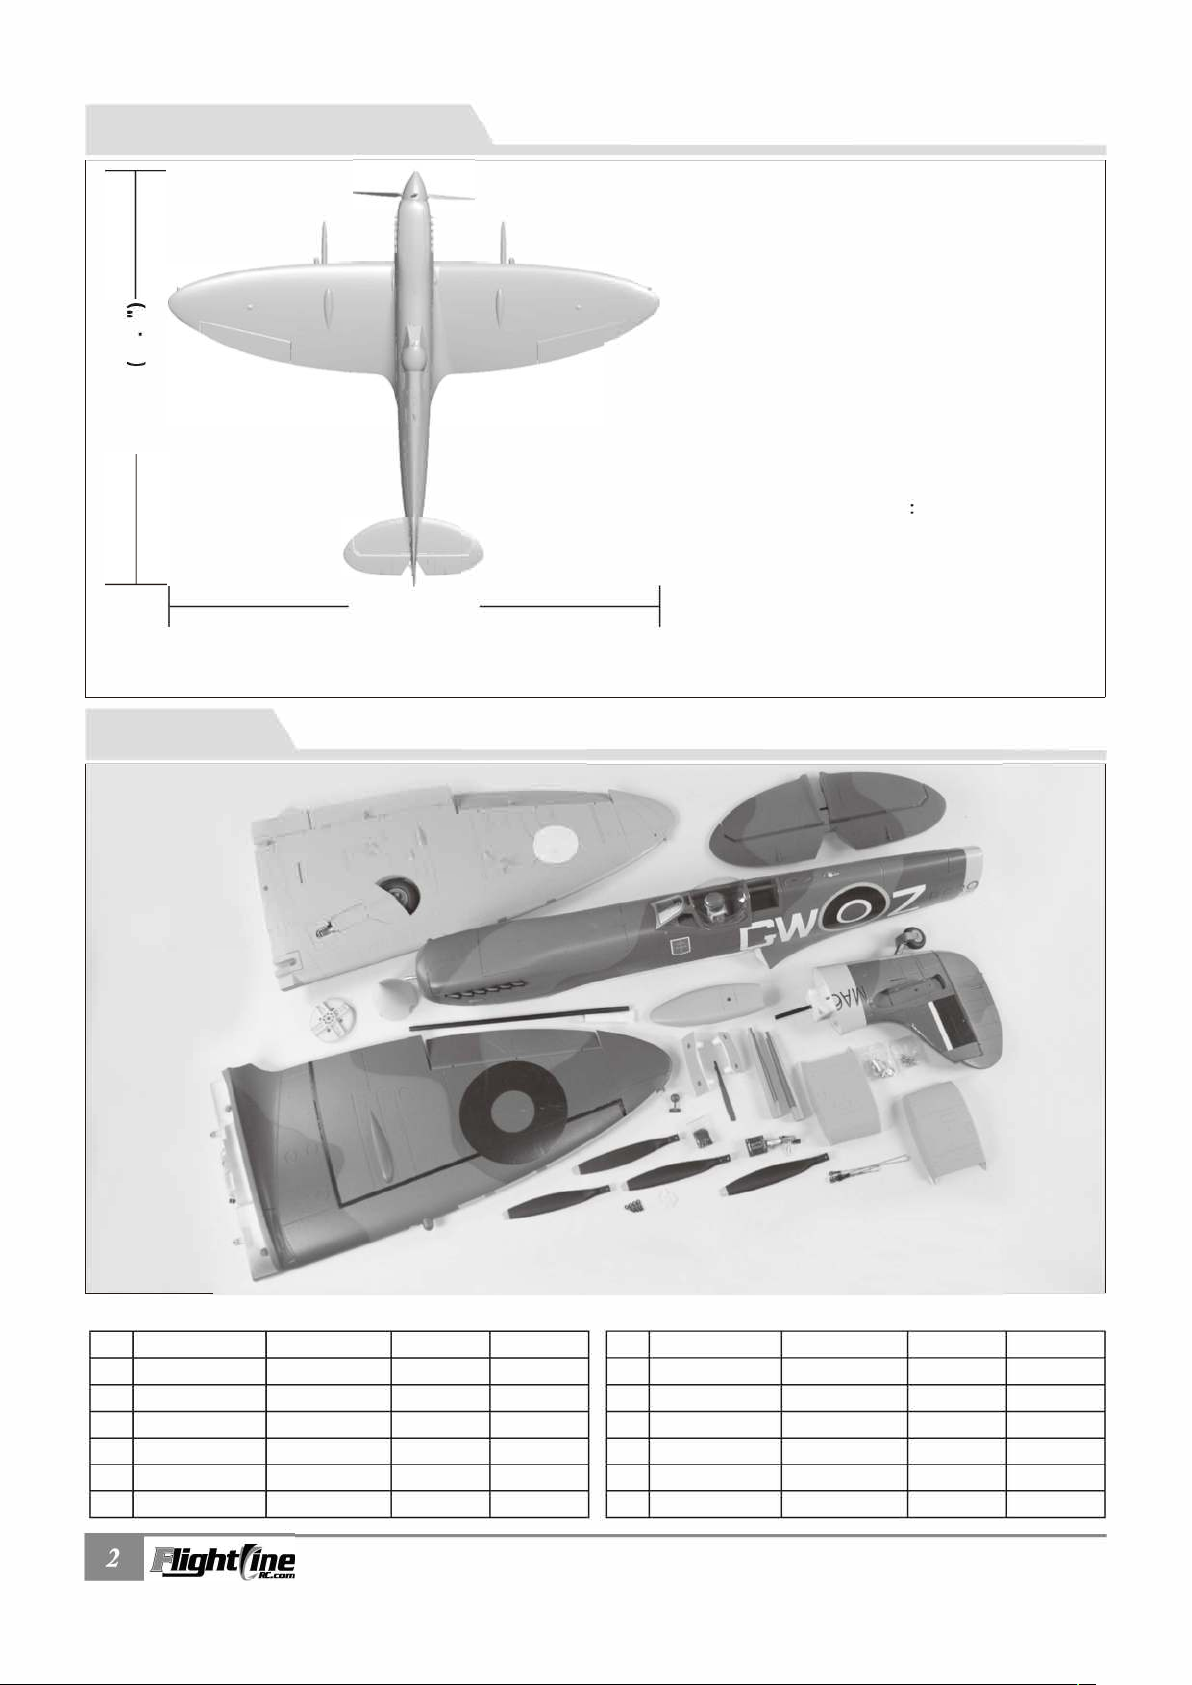
Catalog




Assembly Instructions
































PNPB












......................................................................................................................... 


 
 ................................................................................................................................................... 
1




Daf








Page 3
Introduction
Thank you for purchasing the FlightlineRC 1600mm Spitfire Mk. lXc! FlightlineRC is a leading brand produced by Freewing Models in partnership with Motion RC aimed at bringing you a new, exciting series of propeller driven aircraft at the same level of quality and value you've come to expect from Freewing Model's EDF aircraft and other products.
FlightLineRC inherits Freewing's goals of outstanding innovation, exquisite design, high quality, unbeatable value, and dependable performance.
The Supermarine Spitfire is one of the most popular warbirds in history. This British single-seat fighter was used famously by the Royal Air Force and the Allies, earning distinction during the Battle of Britain and throughout World War II. Over 20,300 aircraft were produced with more than 24 variants. The Spitfire's versatility and maneuverability made it a lethal aircraft against Axis forces. The Spitfire continues to fly in modern times as a tribute to aviation history and military veterans.
This FlightlineRC Spitfire Mk.lXc is approximately 1/7 scale, with a 1600mmm wingspan and 1350mm length. It is molded from EPO foam, featuring a scale shape and smooth surface. The main wing is assembled from hollow parts and an interlocking plywood and carbon fiber frame, providing lower weight and higher strength than a solid foam wing. The main wing and horizontal tail are attached with screws for very convenient transport. Proper ventilation is also designed to keep the electronics cool. The large battery hatch and removable battery bay floor provides easy access to an organized battery and receiver compartment.
The stock PNP version is equipped with a 5055-390KV brushless outrunner motor and scale 4­blade propeller and BOA ESC. With the recommended 6S 4000-S00OmAh lipo battery, the Spitfire MK.IXc has a level top speed of 125kph/75mph, with tall vertical power and 4-8 minutes of flight time depending on throttle management. To enhance grass performance, the main landing gear uses shock absorbing Oleo struts, a main wheel diameter of 85mm, and a tail wheel diameter of 45mm. Metal reinforcement plates, thick steel strut pins and axles, and metal trunions work together with the suspension struts and soft wheels to dampen the forces caused by operating this aircraft on rough runways. The FlightlineRC 1600mm Spitfire Mk.lXc was optimized for very gentle handling, suitable for intermediate pilots and above. The Take off, flying performance, and slow speed handling is especially stable. A very predictable stall and power on recovery make the aircraft easy to control throughout any aspect of flight. Bright LEDs also aid in the visibility of this large and beautiful foam electric model aircraft.
The FlightlineRC 1600mm Spitfire arrives completely painted and with national insignias pre­applied. To personalize your Spitfire, included in the box are two optional decal sets, depicting the aircraft of Squadron Leader F.A.O. Tony Gaze (MA621 DV-A) and Lieutenant Michel Boudier (BS383 GW-Z).
NOTE:
under the instruction and supervision of an adult. Please keep these instructions for further reference after completing model assembly.
This is not a toy. Not for children under 14 years. Young people under the age of 14 should only be permitted to operate this model
Note:
1. This is not a toy! Operators should have some basic experience. Beginners should operate only under the guidance of a professional instructor.
2. Before beginning assembly, please read through the instructions and carefully follow them through the build.
3. Freewing and it's vendors will not be held responsible for any losses due to improper assembly and operation.
4. Model airplane operators must be at least 14 years of age.
5. This airplane is made of EPO foam material, covered with surface spray paint. Don't use chemicals to clean as it may cause damage.
6. You should avoid flying in areas such as public places, areas with high voltage power lines, nearby highways or airports or an other areas where laws and regulations clearly prohibit flight.
7. Do not fly in bad weather conditions, including thunderstorms, snow, etc...
8. Lipo batteries should be properly stored in a fire safe container and be kept at a minimum of 2M distance away from flammable or explosive materials.
9. Damaged or scrap batteries must be properly discharged before disposal or recycling to avoid spontaneous combustion and fire.
10. At the Flying Field, properly dispose of any waste you have created, don't leave or burn your waste.. Ensure that your throttle is in the low position and that your radio is turned on before connecting the Lipo battery.
PITFIRE MK.IXc
lien No.: FLW303
Page 4
Product basic information

M


0
M
00mm
1
6
6
3")
Note!:




Package list
(

















2
2
\
 e
/
v


1



3
4


5

6


















v v v
v v v










Scale propeller
7
Carbon Fiber Rod
8
Linkage Set
9
& 

& 
11
& 
12


v v v
v v v
v v v
v v v
v v v
v v v


PITFIRE MK.IXc

Page 5
PNP Ass
F
uselage Assembly
�



embly
}·
�




Instructions
step8





stepO





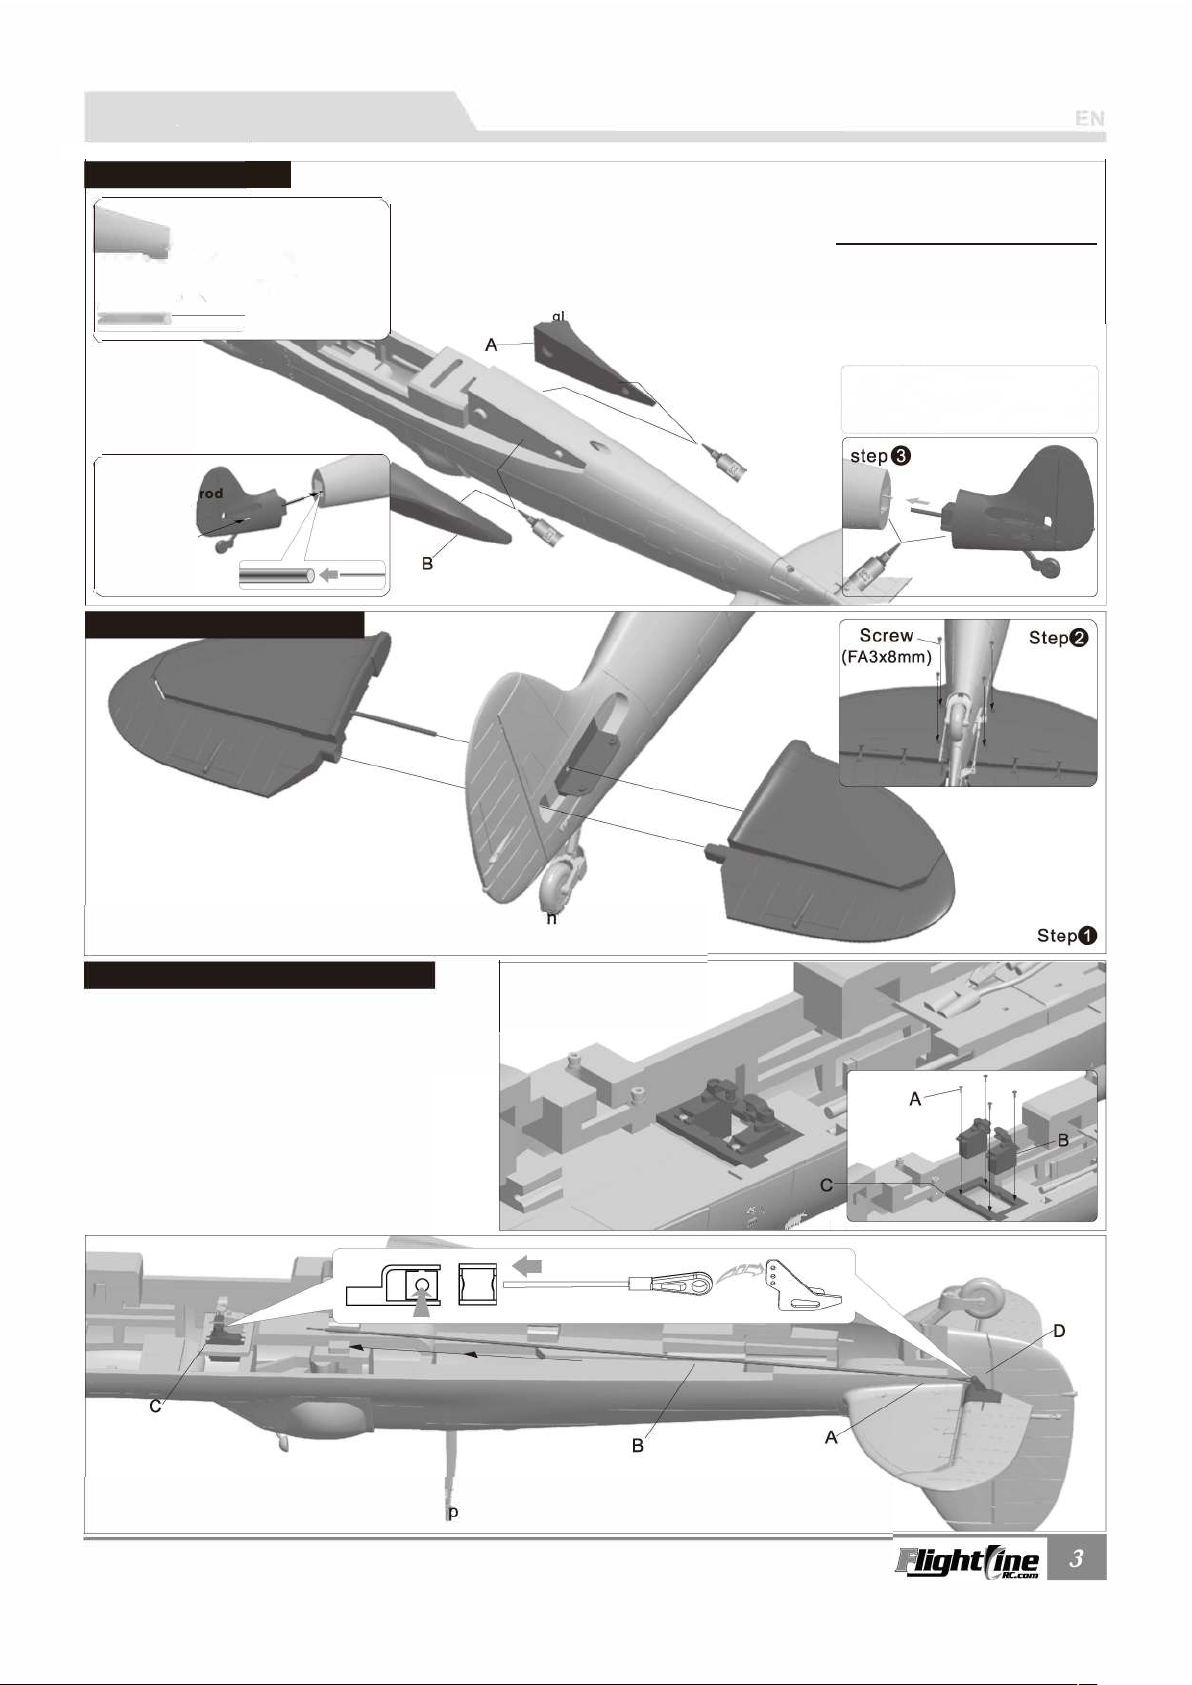
Horizontal Stabilizer Assembly
1.
Before assembly, remove the battery compartment and the fuselage pushrods in the plastic
tube. Install the ball-head buckle on the pushrods. Then insert the rudder push rod from tail
fuselage section into the front fuselage plastic tube.
2.
Insert the elevator push rod from tail fuselage section to the front fuselage plastic tube.
3.
Use the included epoxy glue to attach the front and rear fuselage. During the gluing process,
take special care to ensure that NO GLUE enters the plastic control rod tube! If any glue does
enter the tubing it will inhibit the control rods ability to function, therefore impeding the aircraft's
ability to fly. Proper execution of the build is the responsibility of the builder, Any such damage is

not covered by the manufacturer or vendor warranty.
4.
Use the included epoxy glue to attach the foam parts A and B to the fuselage.

: EPO glue is included with
the kit. Spread the glue evenly and wait 90 seconds before installation.
1. Install the left and right horizontal stabilizers to the fuselage tail.
2. Turn the fuselage over and use the 4 screws to secure the horizontal stabilizers
Elevator/Rudder push rod Installation



 





R



Note: If you choose not to use the factory servo, the servo you choose may be larger. If that's the case, you need to remove the fixed wooden platform and glue the servo to the servo position in the fuselage.
1. Insert one side of elevator pushrod A through plastic tube B, to servo arm C.
2. Snap the ball head buckle of the elevator pushrod to the ball on the rudder horn, D.
PITFIRE MK.IXc
lten No.: FLW303
Page 6
PNP Assembly Instructions
EN


&
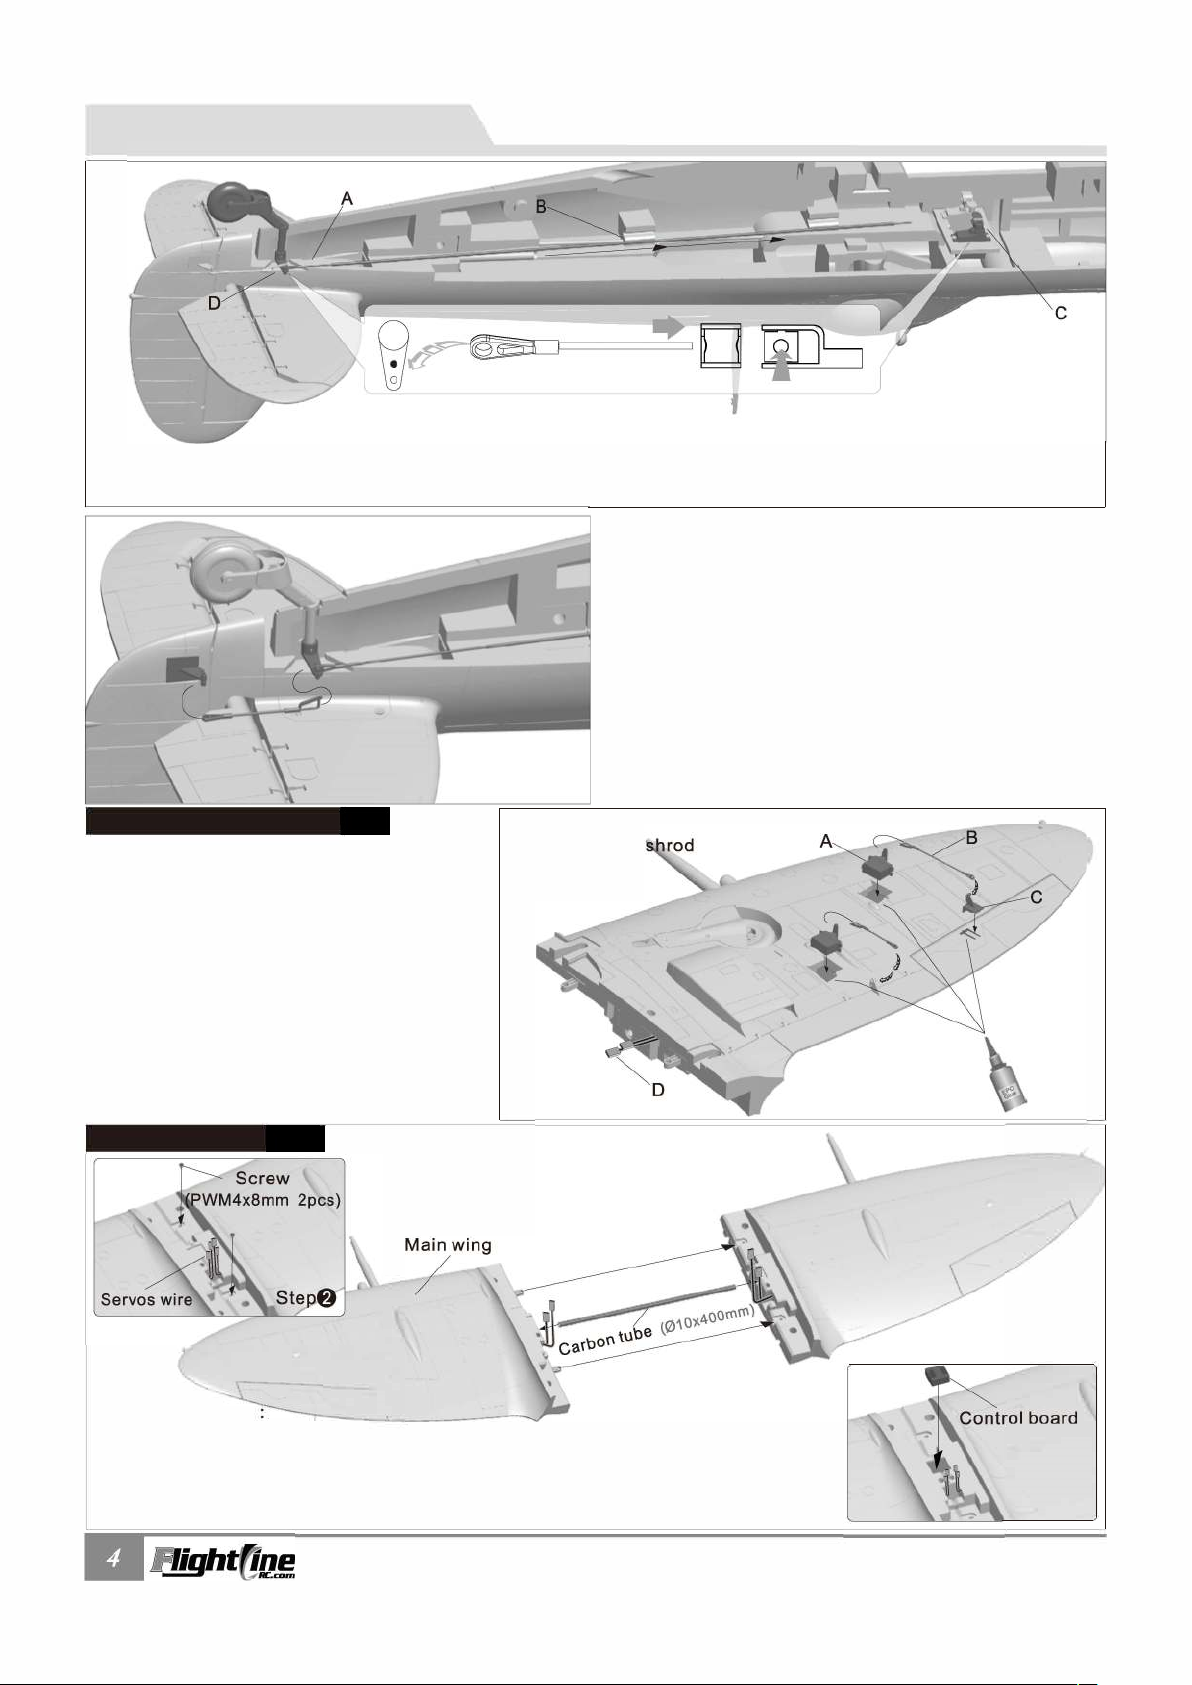
Note:
W
centered. Then install the rudder pushrod, and adjust the plastic clevis to
center the rudder.
hen installing the rudder pushrod, make sure the tail wheel is
1. Use rudder pushrod to connect the tail gear steering
arm and rudder horn.
Aileron push rod Installation
1. Use servo tester or radio to center the servo.
2.Use glue to attach the servo and aileron horn to
the main wing.
3.Run the servo cable through the trough, after all the servos are installed, apply the decal over the trough.
4.0ne side push rod insert to the servo arm, adjust its length. And insert the Ball-head to the aileron horn.
5.Repeat these steps for the other main wing.




Main wing Installation
\
1.
lnsert the carbon tube into the main wing, and slide the left and right main wings
together. Glue is not required.
2.
Use the 2machine screws to join the main wing.
3.
Match the text on the label with the text on the control board, and attach it as
shown in the photo.
Step

PITFIRE MK.IXc
lten No.: FLW303
Page 7
PNP Asse
mbly Instructions
EN
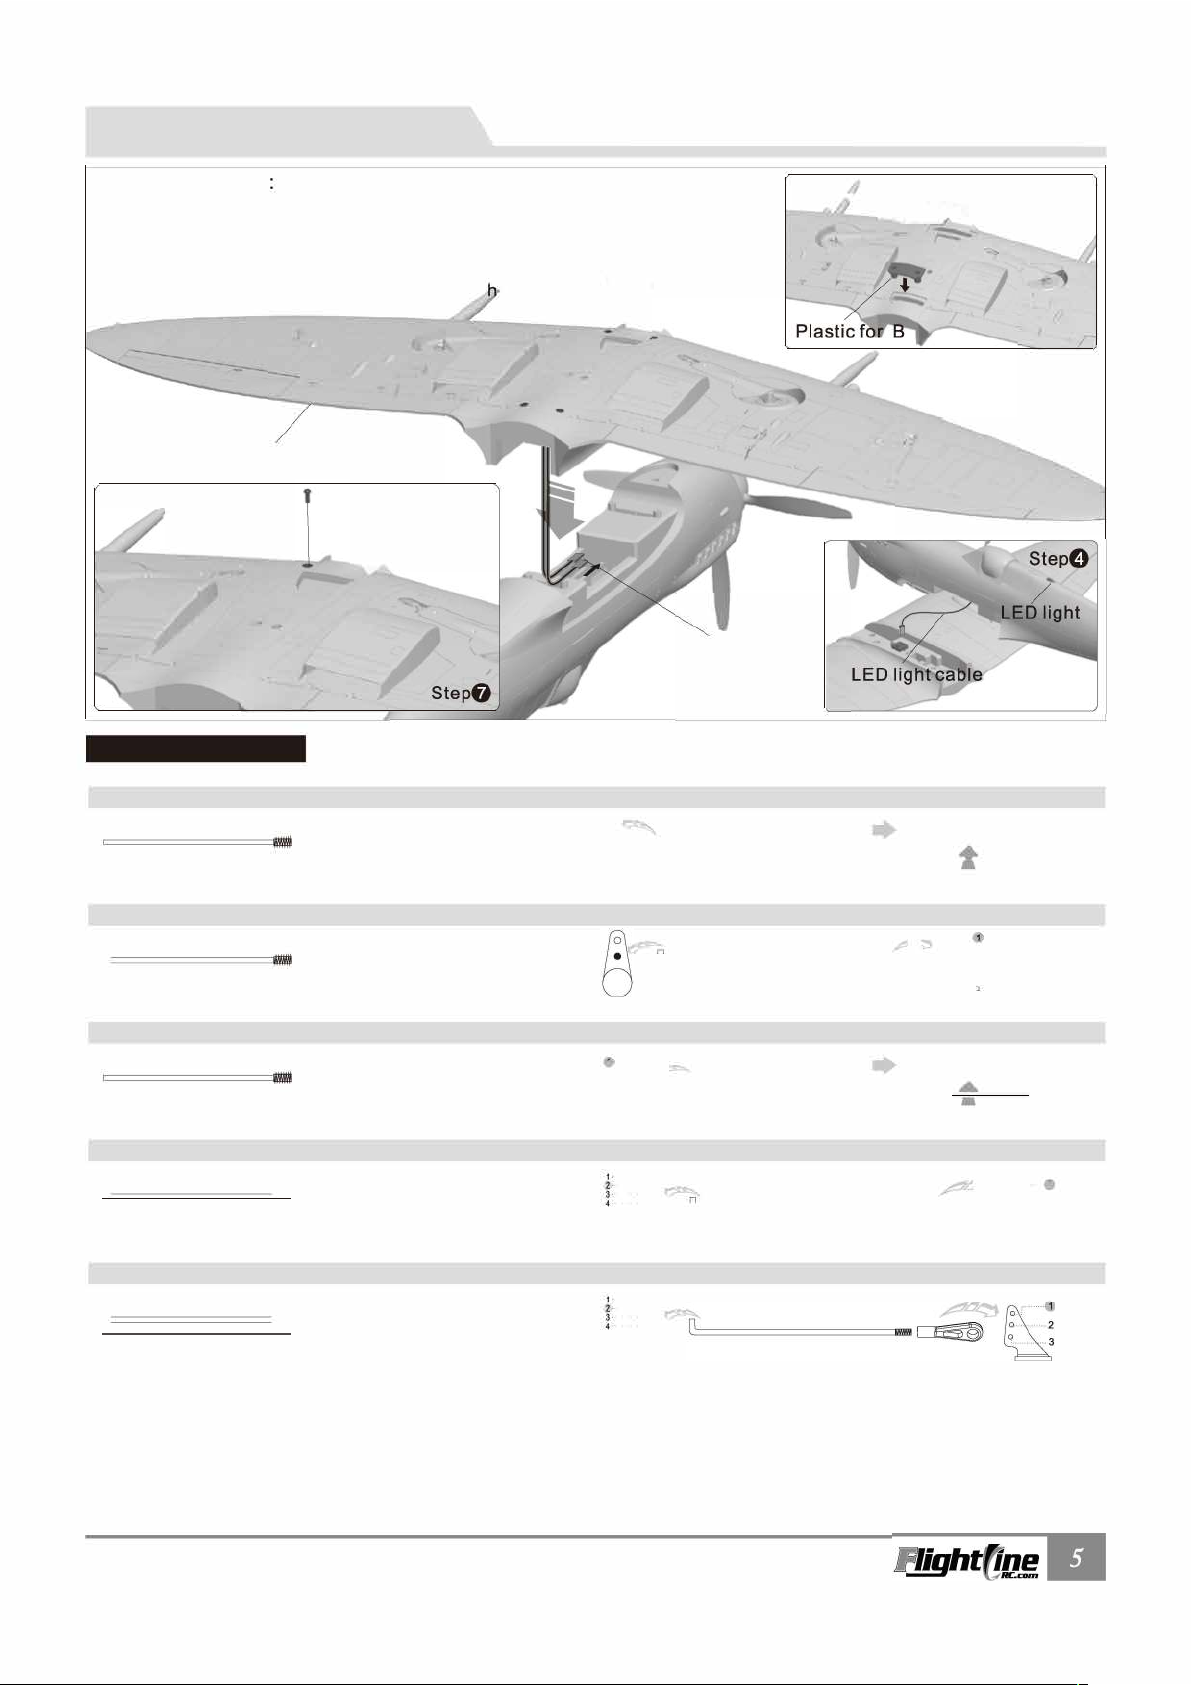
5.
Pull the main wing servo cables from the fuselage up into the battery
compartment.
6.
Insert the main wing plastic joiner pieces, A and B to the underside of the
wing, as shown.
Finally, use the four machine screws to attach the wing to the fuselage.







1 l
Pushrod instructions









Q



























aD 






O
 
 




 



PITFIRE MK.IXc
!ten No.: FLW303
Page 8
PNP Assembly Instructions
S

EN




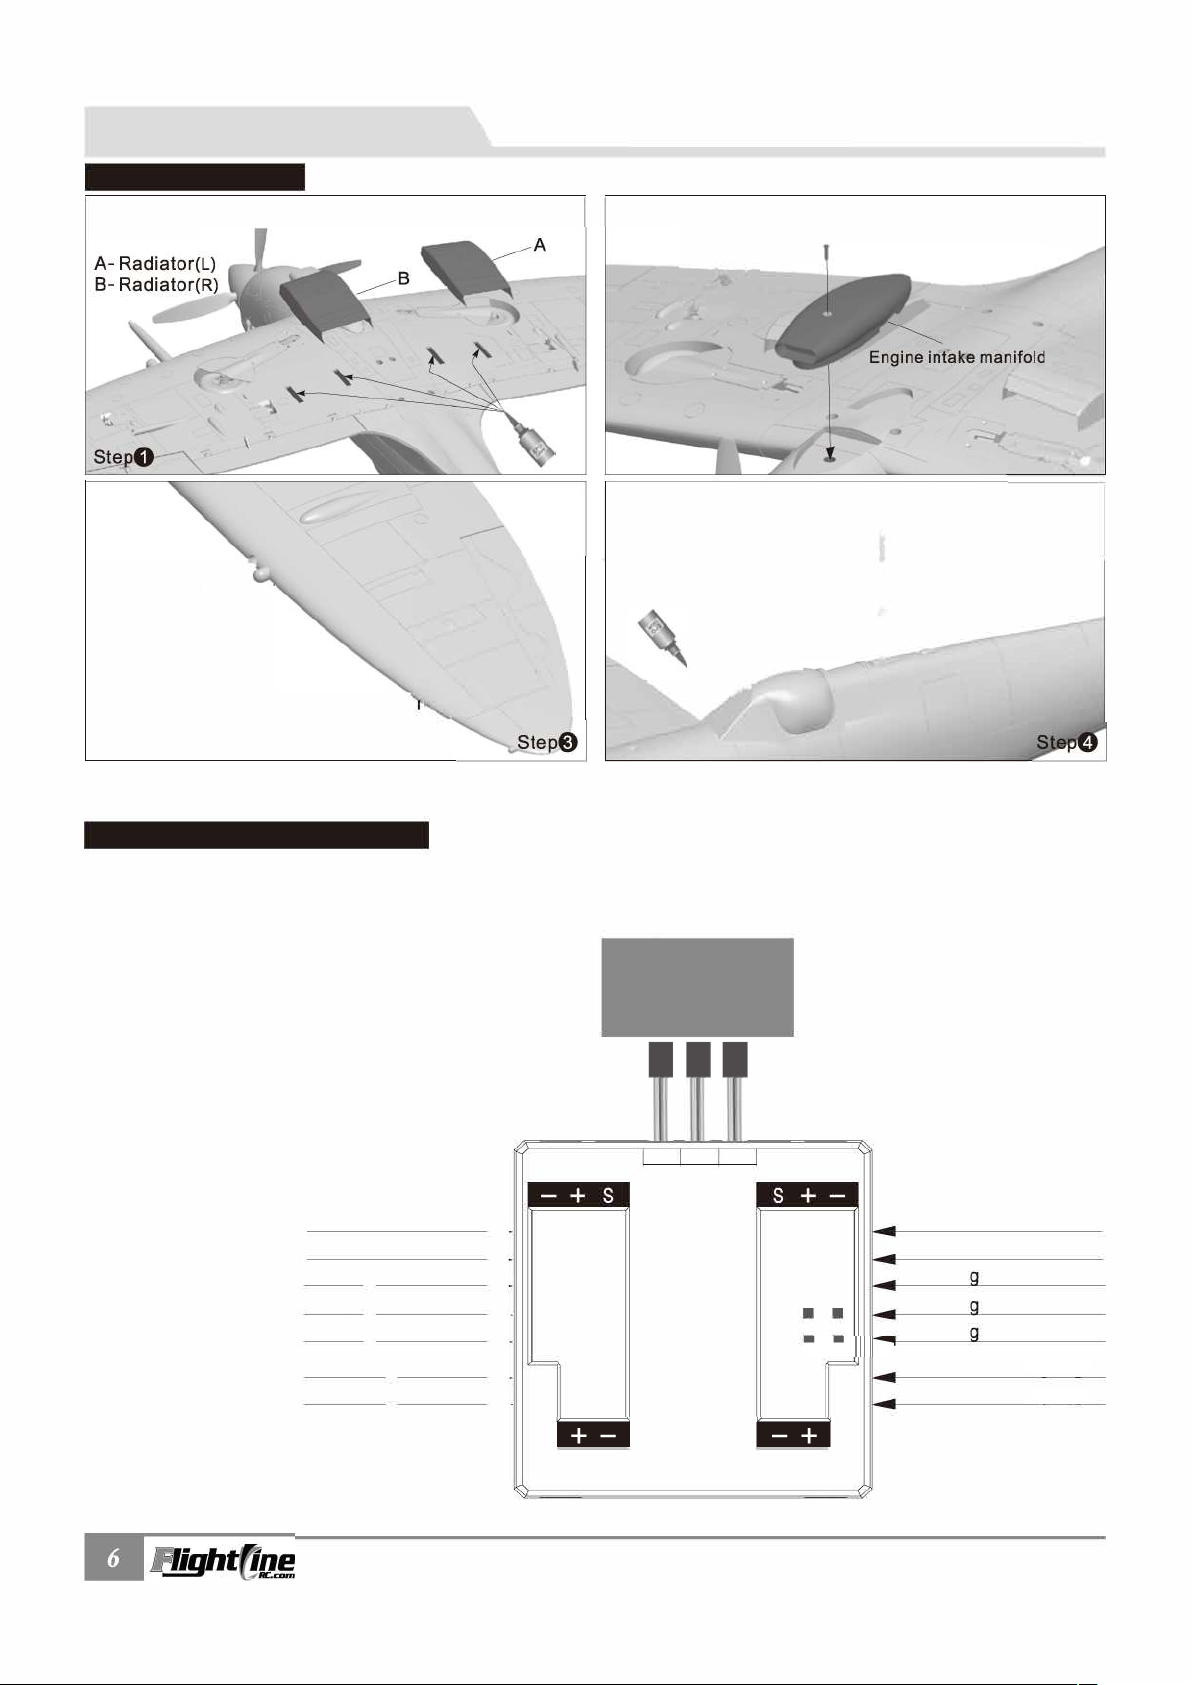
2.Use 1xPWM4x8mm screw to attach the air intake.







r
�
h
Antenna
-



Note: After completing the above steps, depending on the model of your control board, insert the
aileron, flap and landing gear cables to the control board.
h


Using the diagram as a guide, insert the landing gear, LED lights and flaps into the designated input plug. Then plug the Flap, L-G and Ail output plugs into the receiver. Rudder and elevator servos will plug directly into the receiver.
Control board functions:
1. Replaces Y-cables and other connection cables, allowing for a cleaner wiring job and better quality connections.
2. The board is an all-in-one control surface/LED light control board.




















RECEIVER













Light Light

Light Light

AIL
G-D
G-D
G-D












0





PITFIRE MK.IXc
lten No.: FLW303
Page 9
PNP Assembly Instructions
Battery Installation
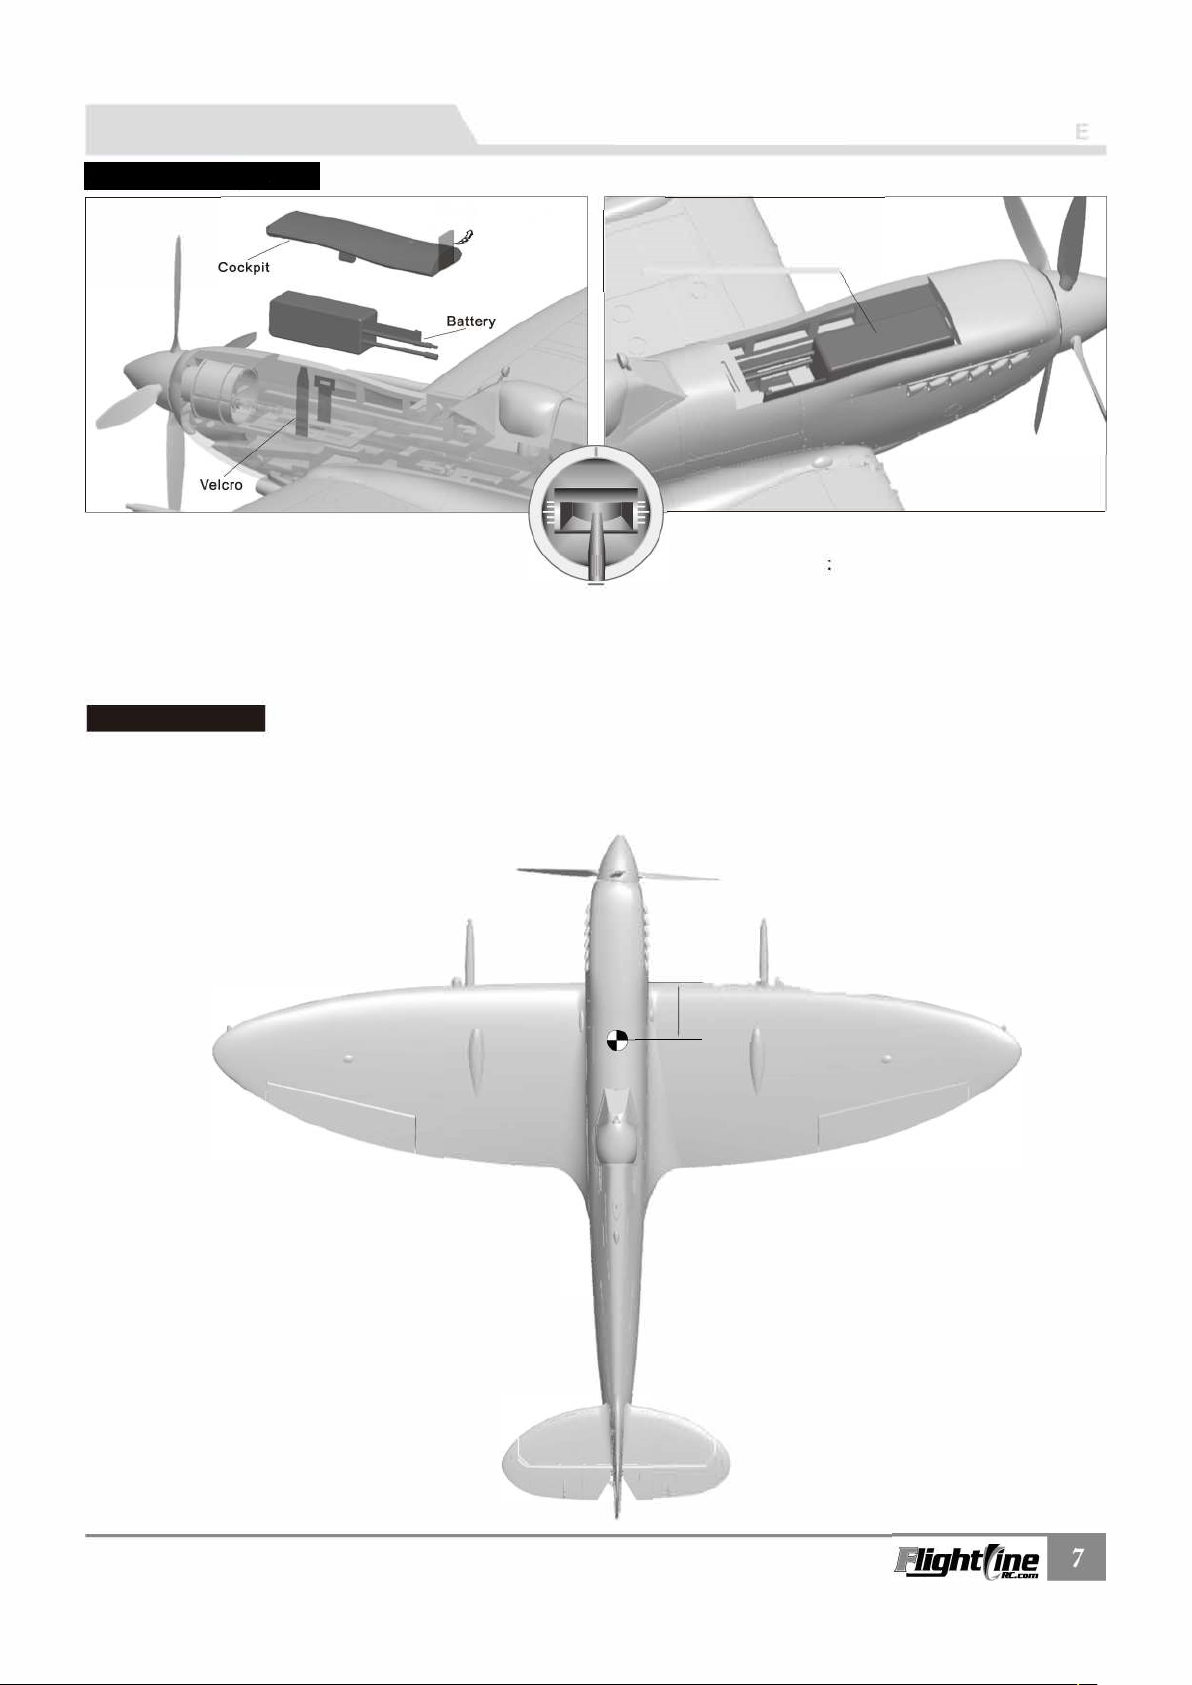
To remove the battery hatch, lift up on the tape.
N
Place the battery into the front of the fuselage using the provided rubber matting or Velcro to secure it.
Battery cabin size:
L=260 W=76 H=45(mm)
Before connecting the battery to the ESC, please
remove the propeller.
Switch on the transmitter and ensure that the
throttle is in the lowest position.
O



C
enter of gravity






:
6S 22.2V 3500mAh - 6S 22.2V 5000mAh
Discharge rate of C � 30C










90mm�
(3-1/2")
PITFIRE MK.IXc
lten No.: FLW303
Page 10
PNP Asse
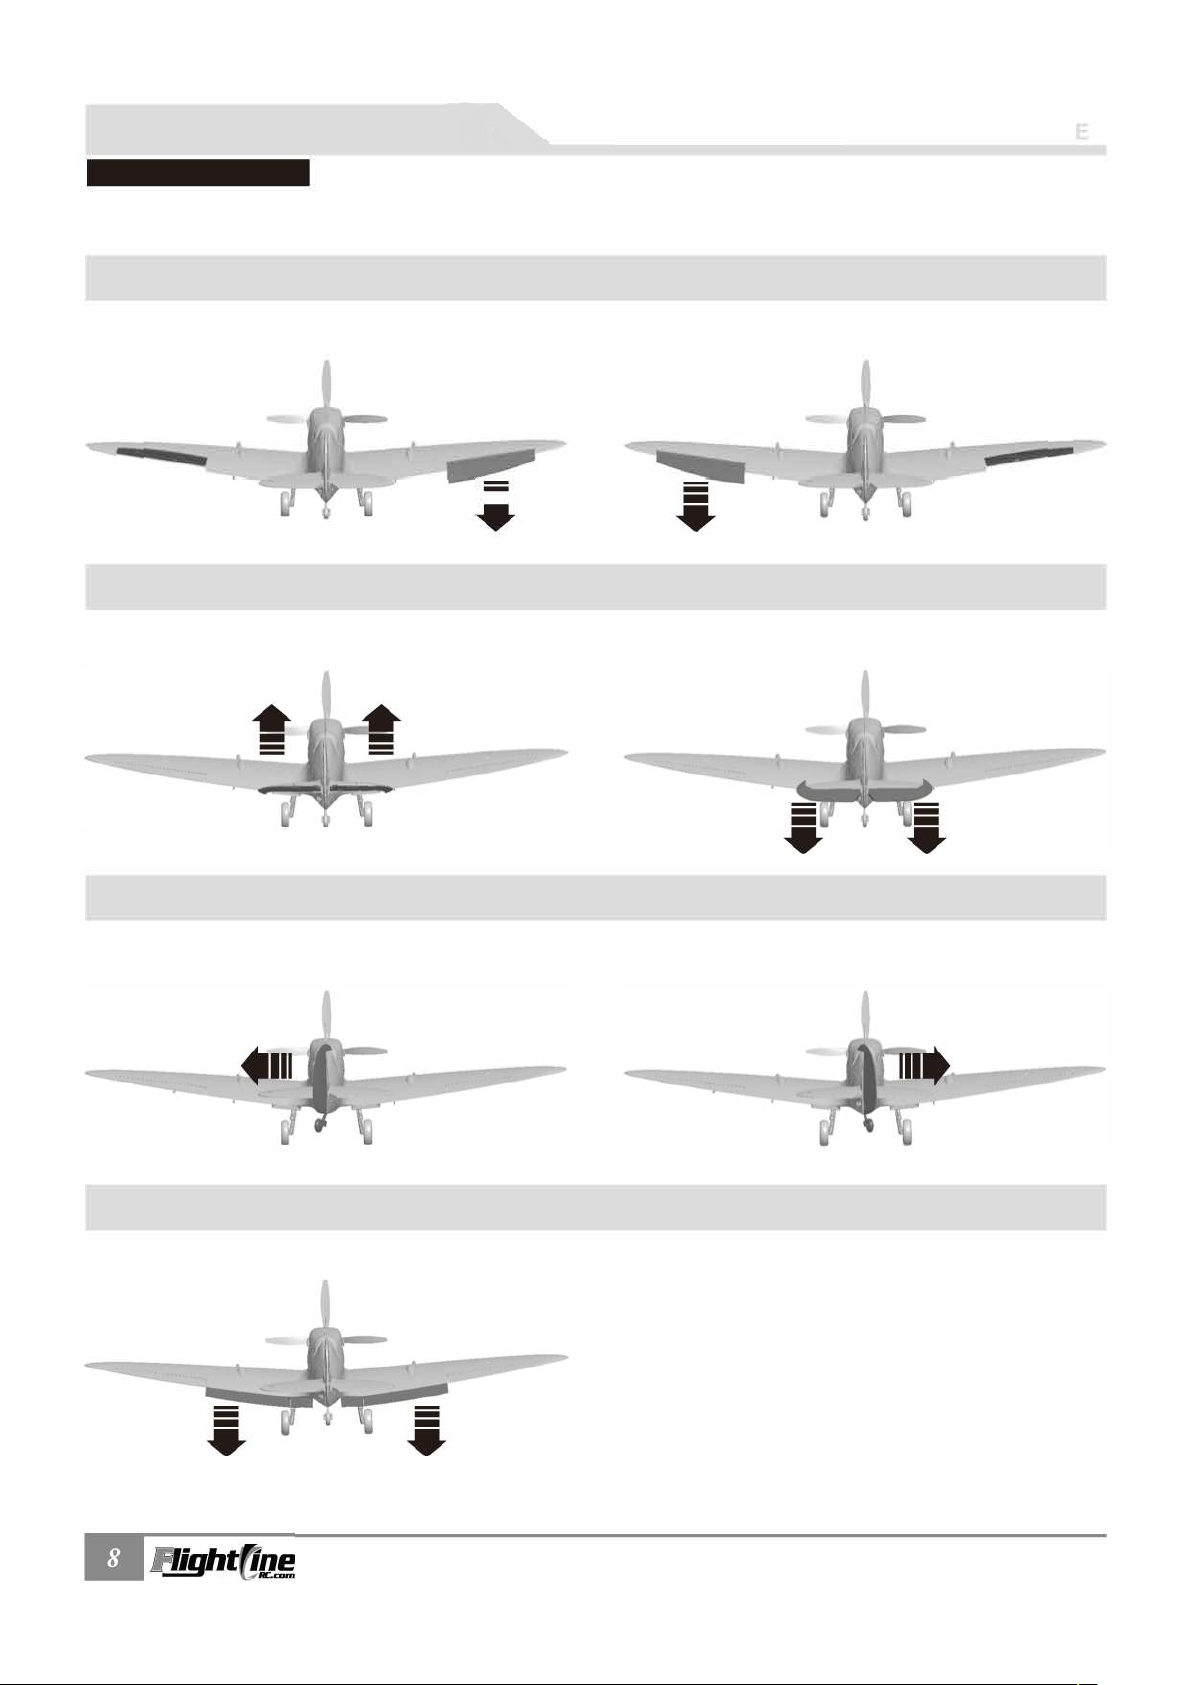
Control direction test


ilerons
A
mbly
Instructions
N
Stick Left
•
-
Elevators
Stick
B
ack
Rudder
-
Stick Right
Stick Forward
•
-
Stick Left
Flaps
Flaps down
Sitck Right
PITFIRE MK.IXc
lten No.: FLW303
Page 11
PNP Ass
embly
Instructions
l•i


j

L

N



N
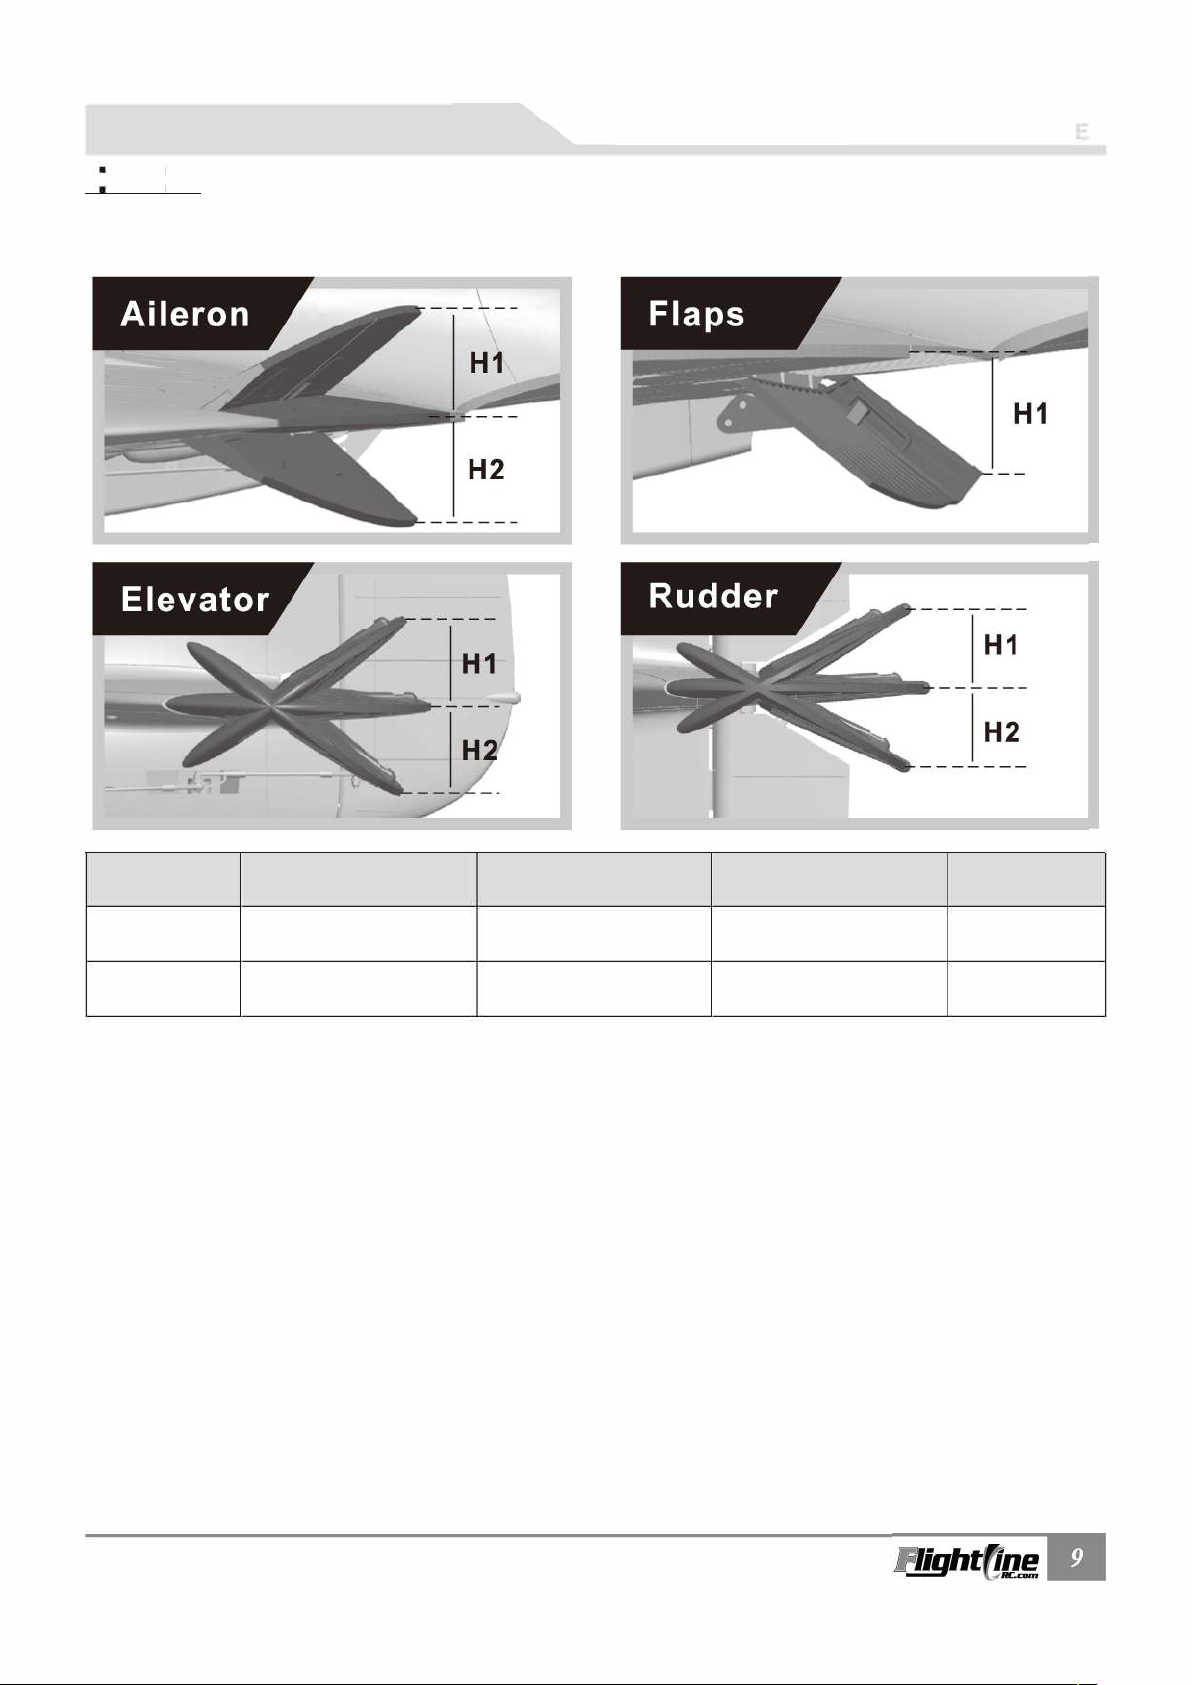
ote Before Flight 



















PITFIRE MK.IXc
lten No.: FLW303
Page 12
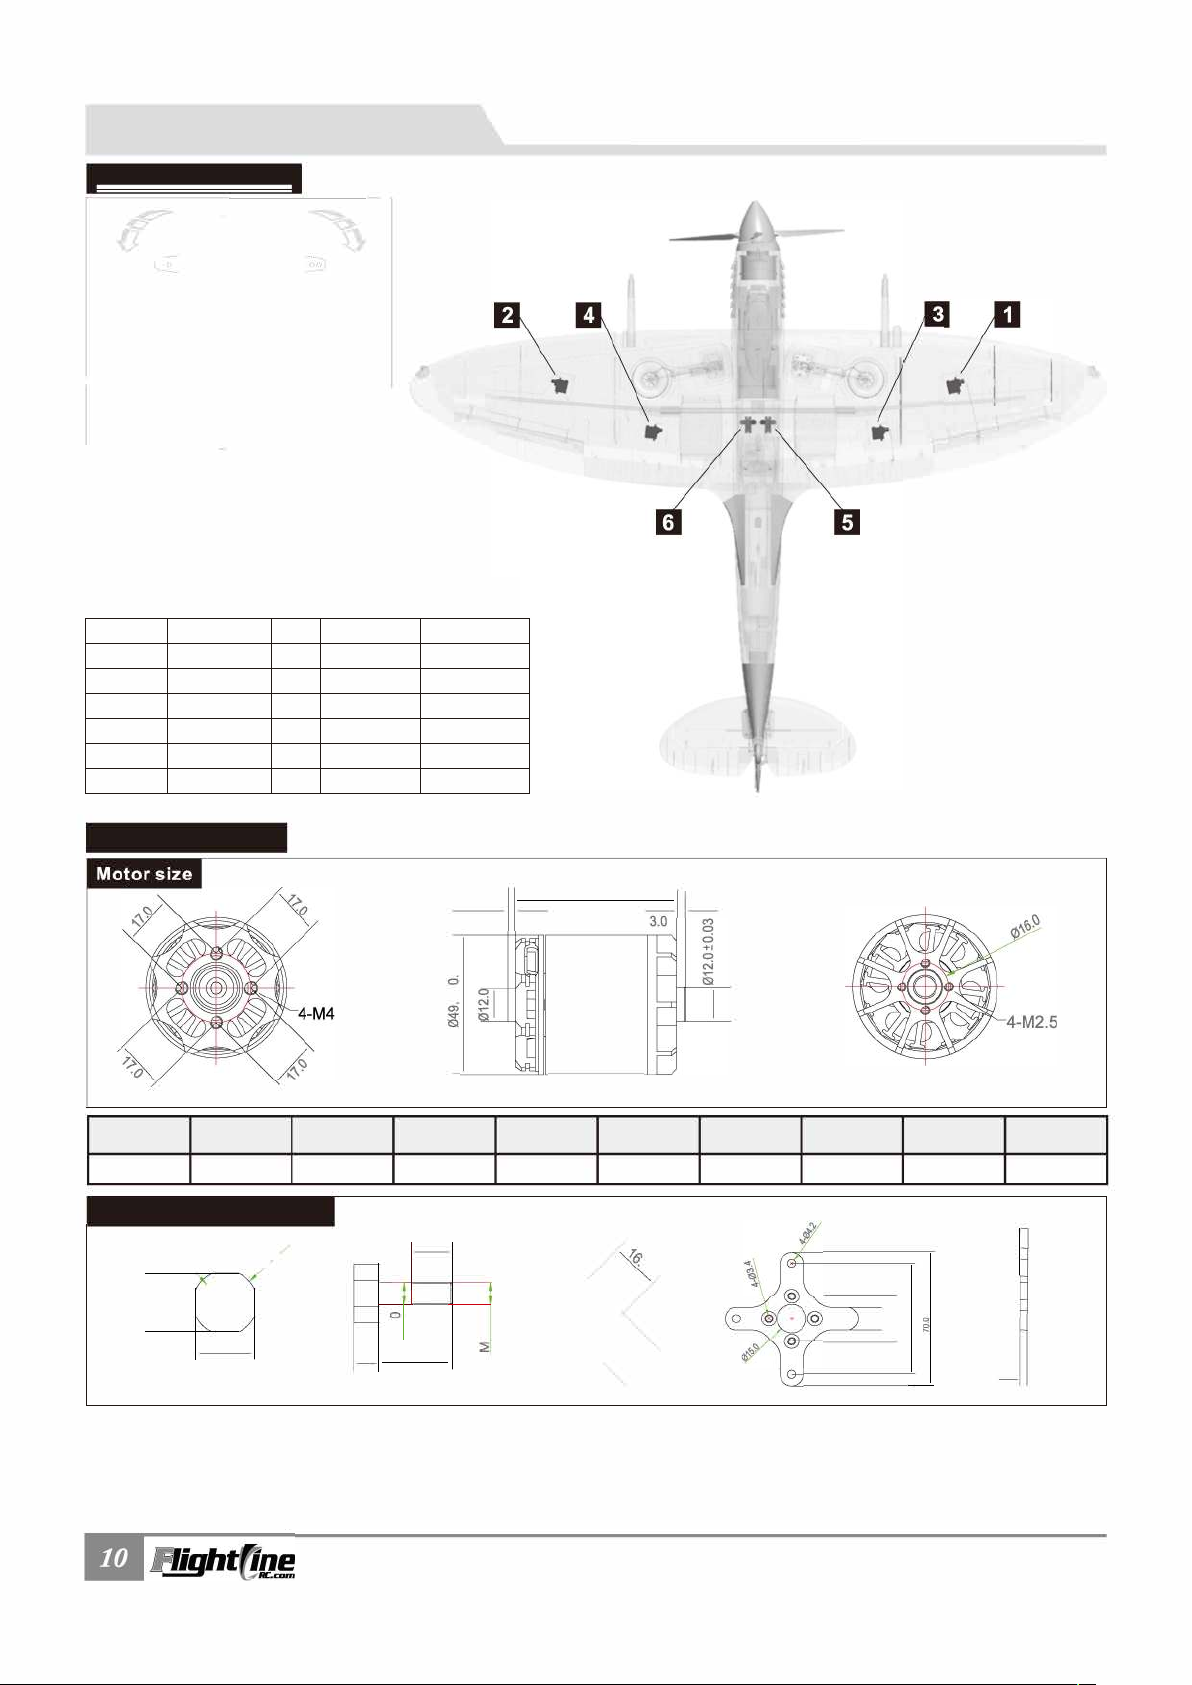
Accessories Description



No.
1
2
3
4
5
6

'

Pos./Rev.









Cable length
550mm
550mm
360mm
360mm
180mm
180mm





A


W
gg
1000ų

2000ų





Note: If you choose not to use the factory servo, the servo you choose may be larger. If that's the case, you need to remove the fixed wooden platform and glue the servo to the servo position in the fuselage.
Position













'
I
Model
EN








0










+I
a

(A)


5055-390KV



0




�


0








 


Unit: mm


PITFIRE MK.IXc
 
Page 13
Accessories Description
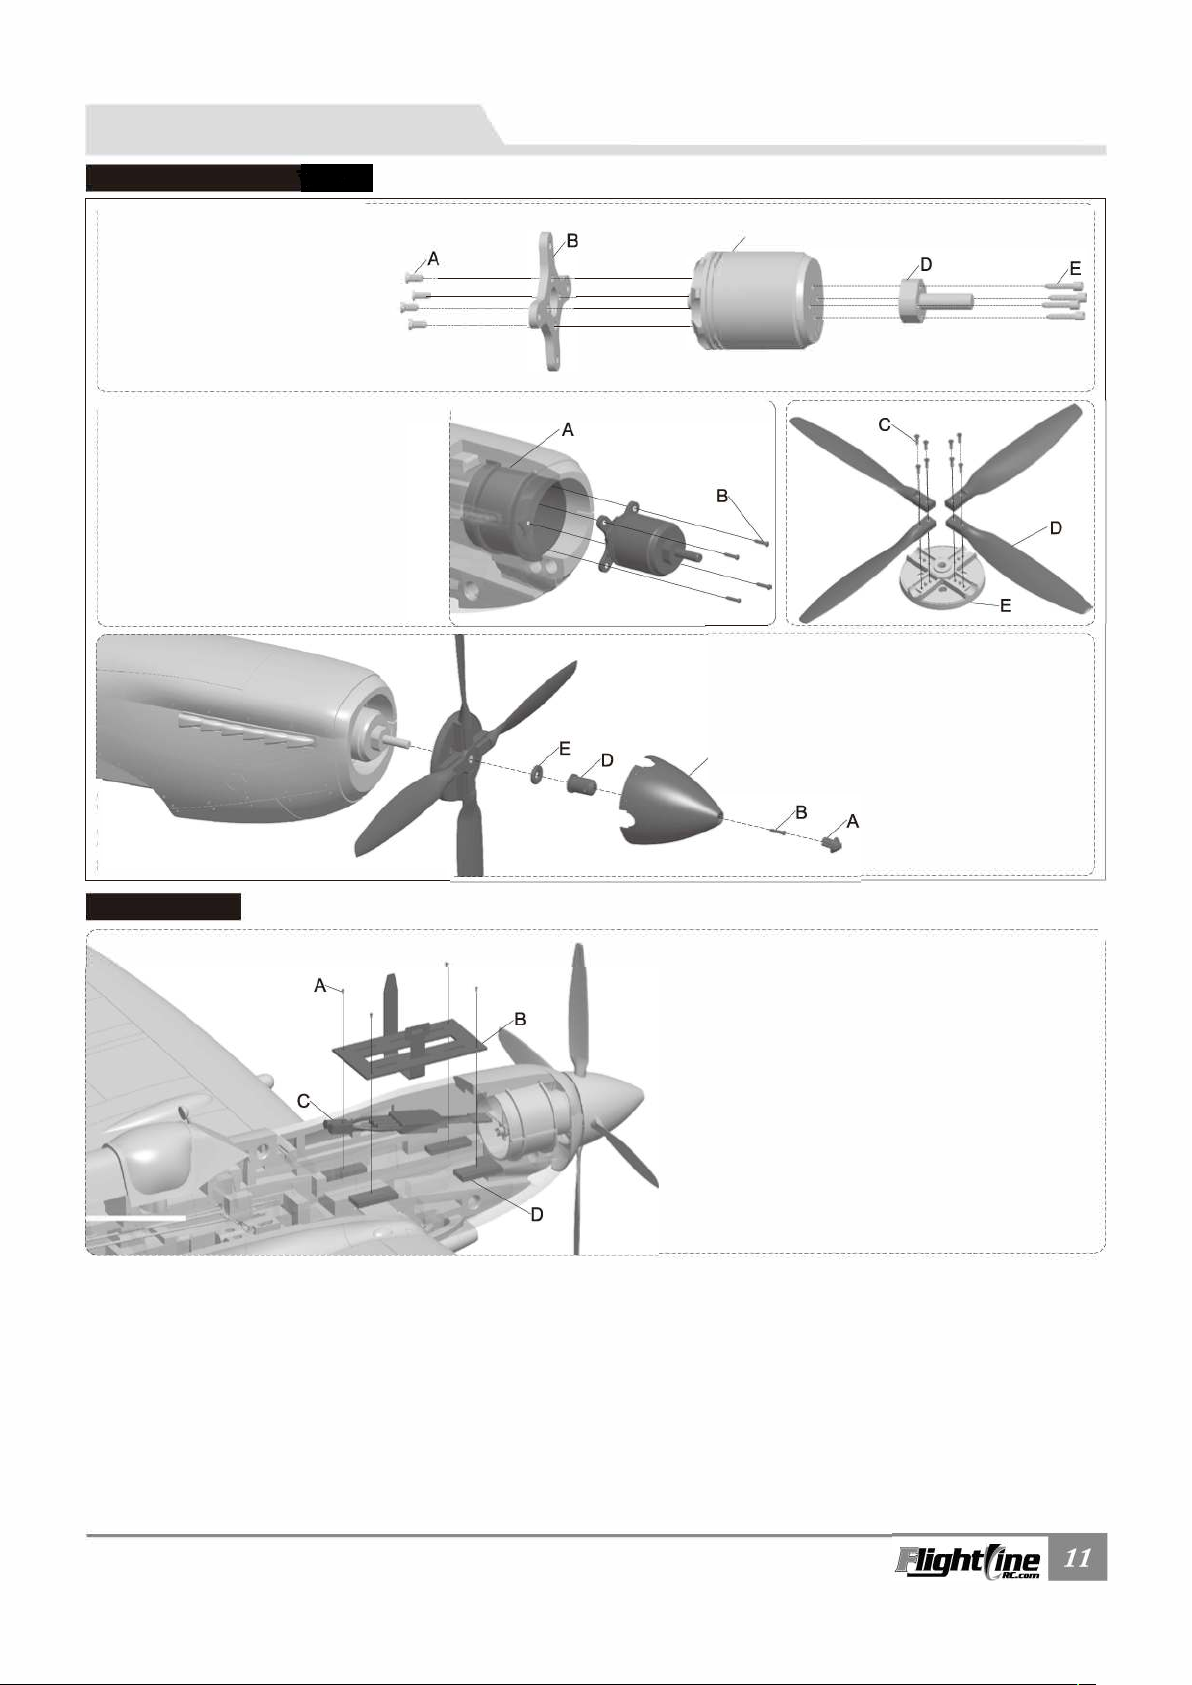
Power system installation
/�-  







EN

C







o, 
k
'
'
'
'
'
'
'
'
'
   
ESC Installation
     

As an upgrade for propeller
NOTE:
strength, a metal reinforcement
piece has been added, to be
installed over the propeller
blades. (Not shown in the
diagram.)






C




PITFIRE MK.IXc
 



Page 14
Accessories Description
Mai
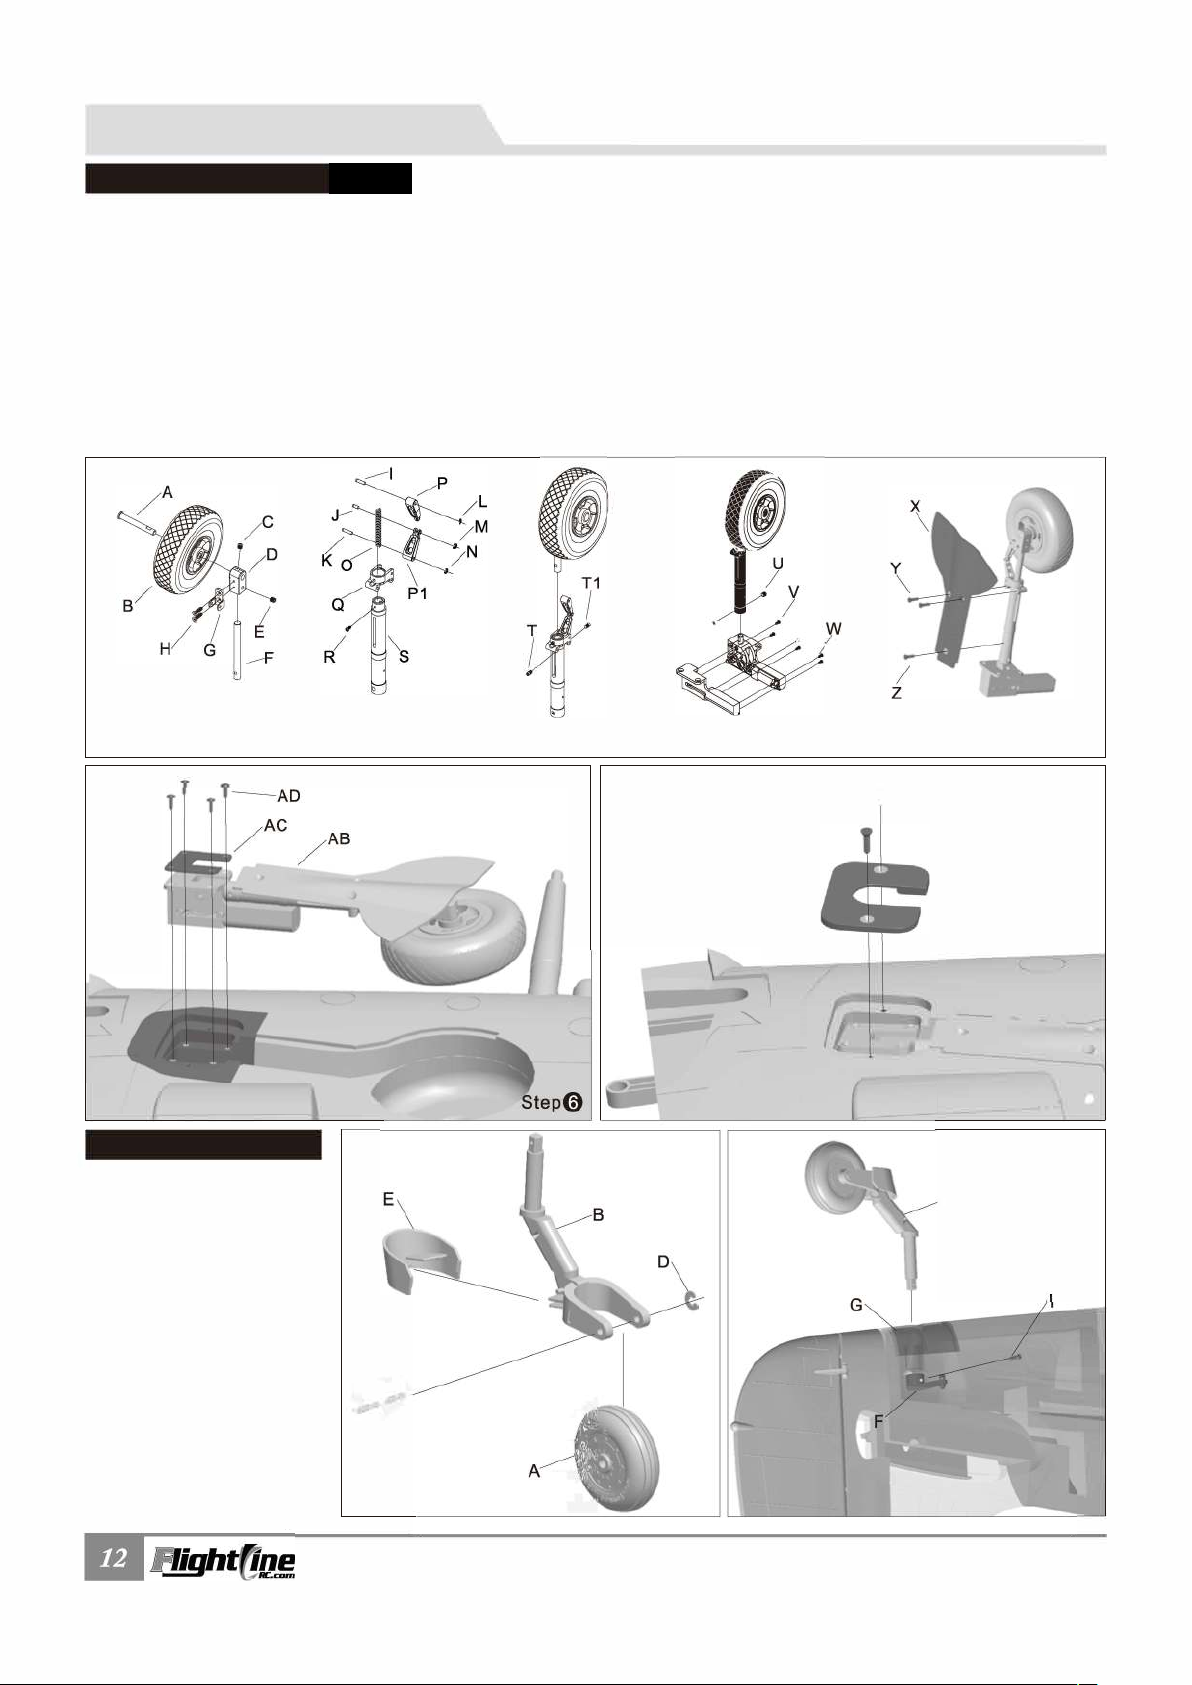
n landing gear installation
Assemble and disassemble the main landing gear according to the following photos.








T -X 
I













IMI 















EN


R
ear landing gear installation
















T

T
T



C
�




,
--

PITFIRE MK.IXc
lten No.: FLW303
Page 15










� 




Loading...