

Page 1
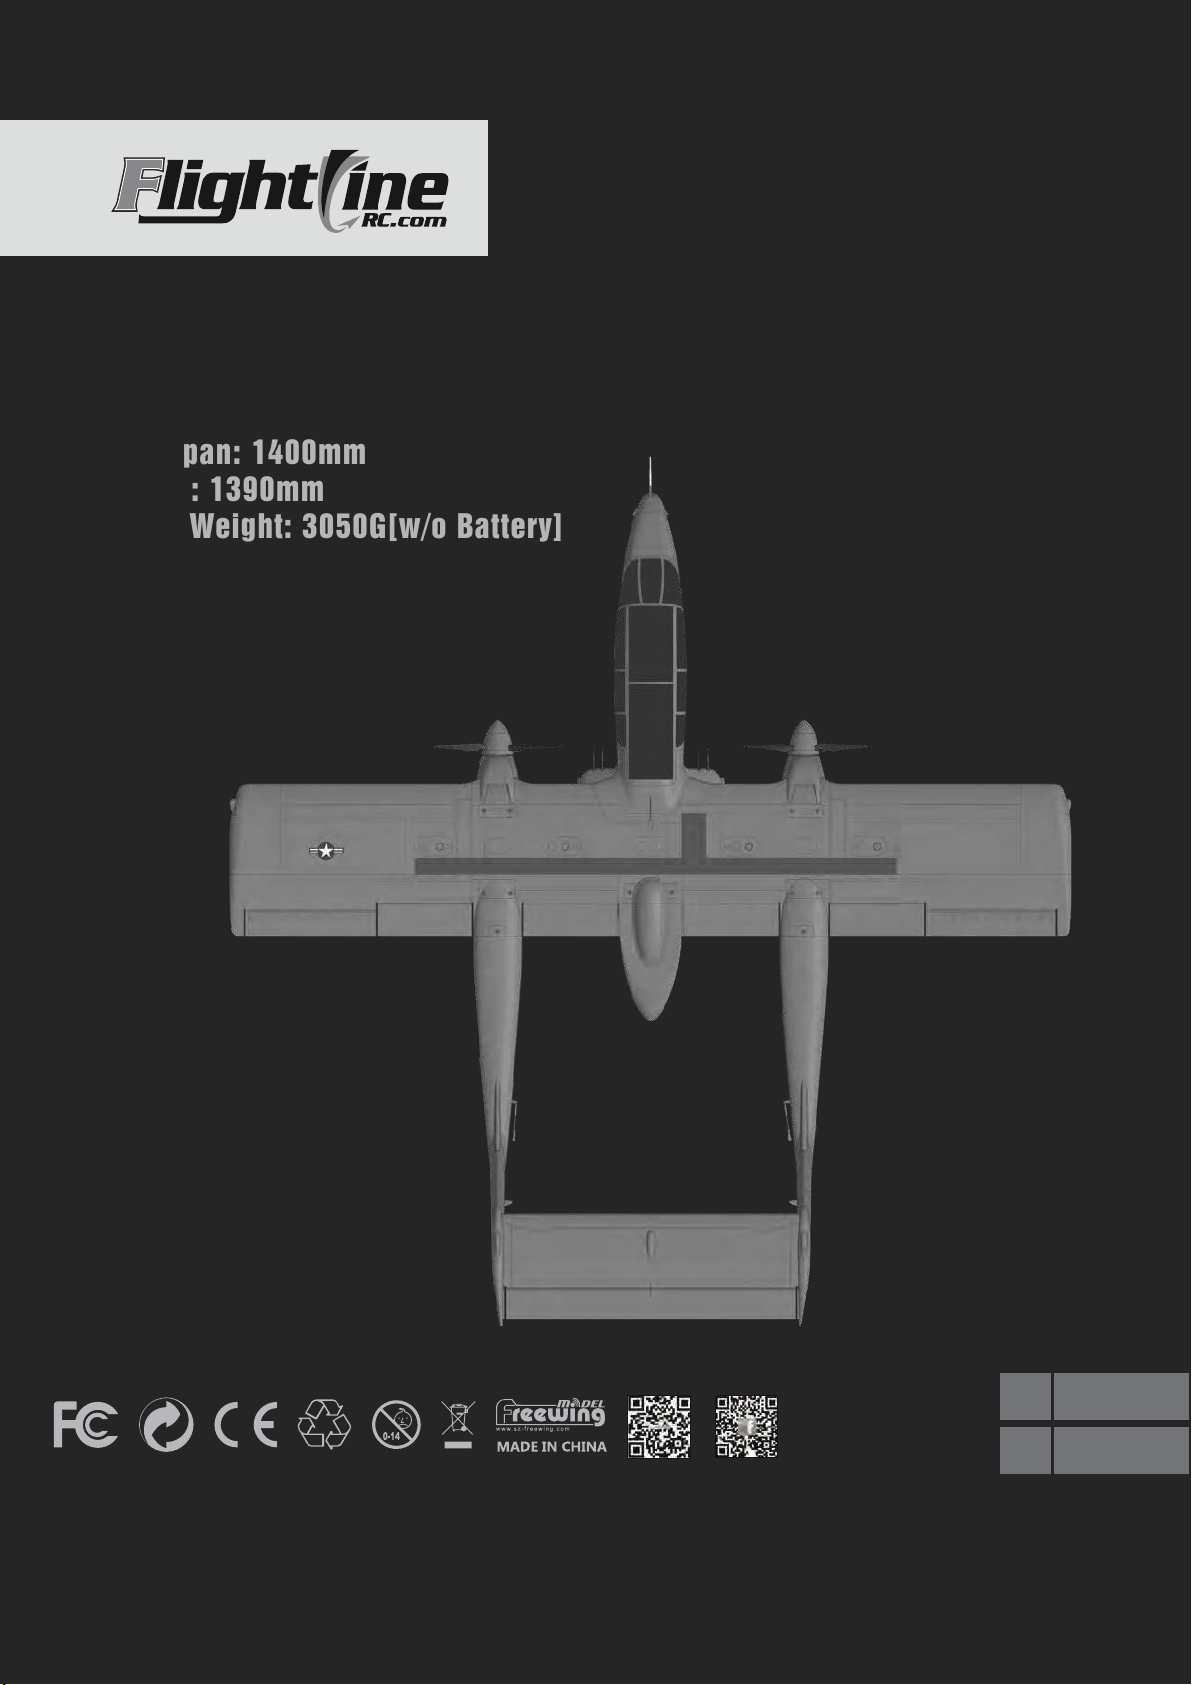
FlightLine OV-10 Bronco
User Manual
Wingspan: 1400mm
Length: 1390mm
Empty Weight: 3050G[w/o Battery]
EN
中
1~10
11~20
Page 2

10
10
1
2
2
3
3
3
4
4
5
6
6
7
8
9
9
Introduction
Product basic information
Package list
PNP Assembly instructions
Install main wing middle part
Install two sides of the fuselage
Install horizontal stabilizer
Install main wing (Left and right side)
Install propeller and spinner
Install other accessories
Pushrod instructions
Install battery
Center of Gravity
PNP Parameter setting
Control direction test
Dual rates
Flap-to-Elevator Mix
Throttle correction
Pre-installed component overview
Servo direction
Motor specification
11
12
12
13
13
13
14
14
15
16
16
17
18
19
19
20
20
基本介绍
产品规格参数
包装列表
PNP组装步骤介绍
安装中段主翼
安装左右机体
安装水平尾翼
安装左右主翼
安装螺旋桨及桨罩
其它配件安装
舵机操控钢丝安装孔位介绍
电池介绍
重心
PNP 调试介绍
模型舵面测试
舵量范围
襟翼-升降混控设定
油门校正
预装电子配件介绍
舵机介绍
电机介绍
Page 3
Products introduction
Thank you for purchasing our FlightLine OV-10A Bronco. It features an upper single-wing, double-engine, twin-tailed
beam layout with a 1390mm length and a wingspan of 1400mm. It is made of EPO material and is reinforced with
carbon and fiberglass. The modular design, in addition to a small number of parts of the imitation decorative
accessories, the body parts are fastened with screws. At the same time, the control board and the cable are used
to optimize the line connection. A dedicated wiring channel is designed inside the main wing for ease of use and
maintenance, while retaining the overall integrity.
FlightLine RC OV-10A Bronco PNP version, with 3530-860KV brushless out-runner motor, 9507 three-blade
propeller, 30A brushless ESC, 5A UBEC. The landing gear is controlled by an electric worm, the plastic has a
simulated appearance and landing gear shock absorber. The larger diameter front and rear wheels (wheel
diameter: 65mm/70mm) are suitable for the take-off and landing of most grassland environments. The landing
gear of the first three points is used, and the direction is easy to control during the take-off and running. The air
posture is beautiful and the stability of each speed range is good. After setting correctly according to the
instructions, when landing, open the flaps, the deceleration is obvious, and the posture is stable. Taken together,
this model is suitable for a group of model enthusiasts who complete the propeller-type model entry exercises.
1.This is not a toy! Operater should have a certain experience, beginners should operate under the guidance of
professional players.
2.Before install, please read through the instructions carefully and operate strictly under instructions.
3.Cause of wrong operation,Freewing and its vendors will not be held responsible for any losses.
4.Model planes’ players must be on the age of 14 years old.
5.This plane used the EPO material with surface spray paint, don’ t use chemical to clean, otherwise it will damage.
6.You should be careful to avoid flying in areas such as public places,high-voltage-intensive areas,near the highway,
near the airport or any other place where laws and regulation clearly prohibit.
7.You cannot fly in bad weather conditions such as thunderstorms,snows....
8.Model plane’s battery, don’t allowed to put in everywhere. Storage must ensure that there is no inflammable
and explosive materials in the round of 2M range.
9.Damaged or scrap battery should be properly recycled, it can’t discard to avoid spontaneous combustion
and fire.
10.In flying field, the waste after flying should be properly handled,it can’t be abandoned or burned.
11.In any case, you must ensure that the throttle is in the low position and transmitter switch on, then it can connect
the lipo-battery in aircraft.
12.Do not try to take planes by hand when flying or slow landing process. You must wait for landing stop, then carry it.
FlightLine OV-10 Bronco
Item No.:FLW305
Version No.: FLW305-01
1
Page 4
Product Basic information
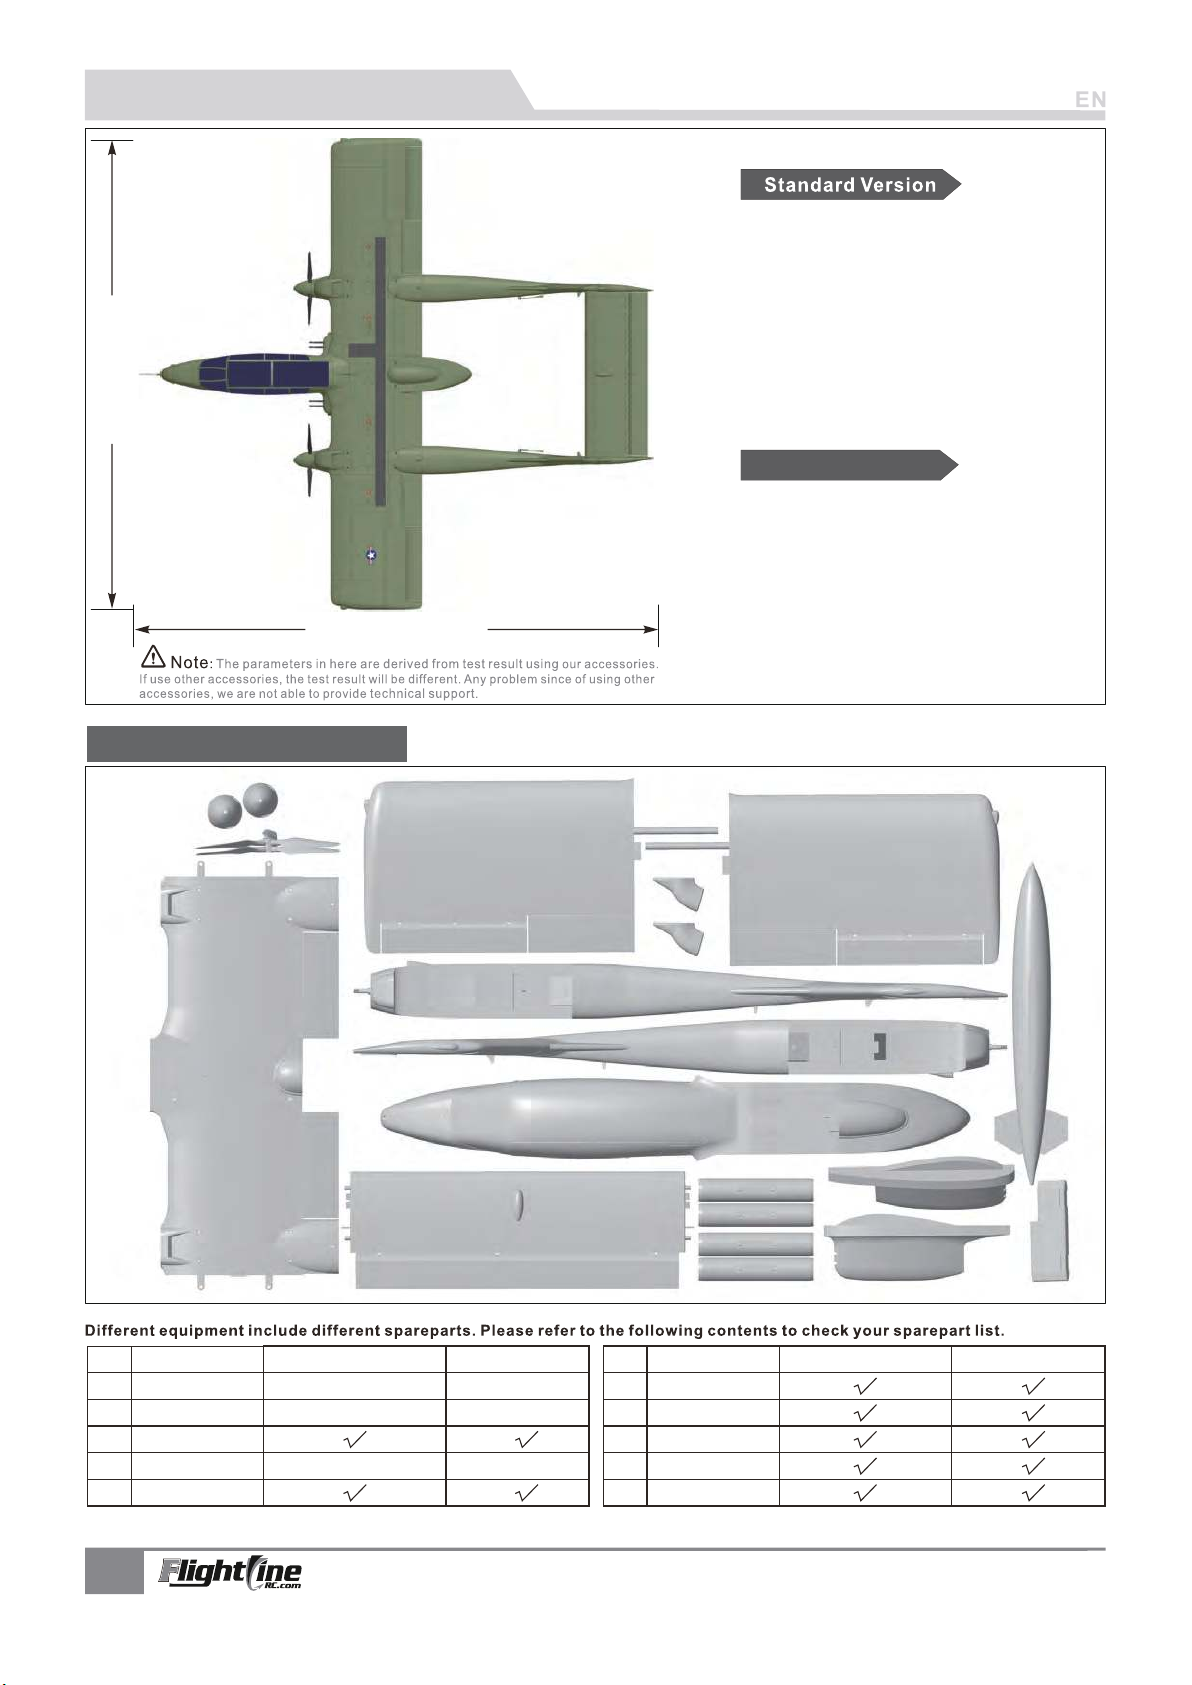
1400mm(55.12 in.)
1390mm(54.72 in)
Wingload:83.5g/dm²
Wing Area: 44.5 dm²
Motor: 3530-860KV O/R Motor
×2
Servo: 17g MG digital servo ×1
9g Hybrid digital servo
ESC: 30A ×2 5A UBEC
×9
×1
Propeller: 3-Bladed 9507
(Standard
×1, Reverse ×1
Weight: 3050g (w/o Battery)
Other features
Material:EPO & Plastic
Aileron: Yes Split Flaps: Yes
Elevator: Yes Rudder: Yes
Landing gear: Electric Landing Gear
Cabin door: No
Scale LED lights
Scale Pilot figure
Li-Po Battery: 4S 3300-4000mAh
×2
×2
)
Package List
No . Name No. Name
1
Fuselage
2
Main wing
Horizontal tail
3
4
Vertical tail
Foam parts
5
Pre-installed all electronic parts Pre-installed servo
Pre-installed all electronic parts Pre-installed servo
Pre-installed all electronic parts Pre-installed servo
PNP ARF Plus PNP ARF Plus
6
Manual
7
Pushrod
8
Non-slipmat
9
Screw bag
10
Glue
2
FlightLine OV-10 Bronco
Item No.:FLW305
Version No.: FLW305-01
Page 5
PNP Assembly Instructions
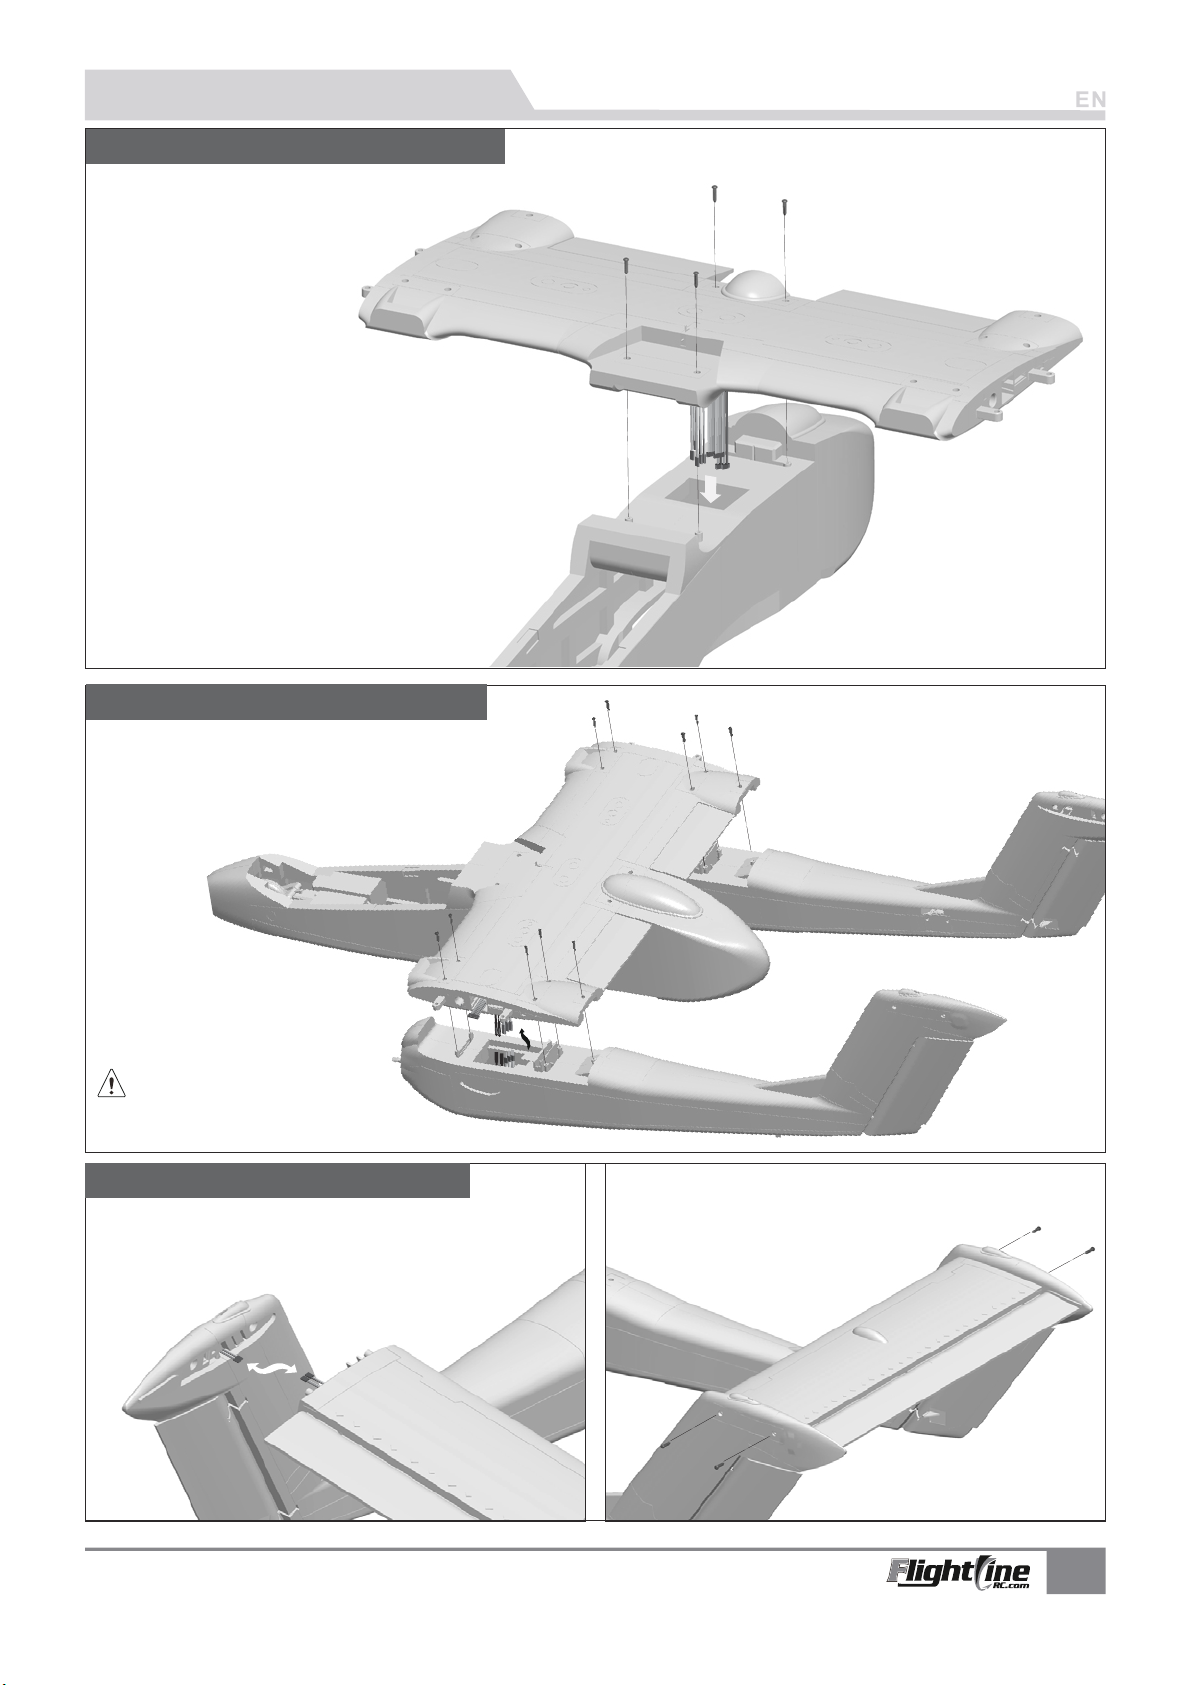
Install the main wing middle part
1.As the photo show, install the main wing
middle part on the middle of fuselage.
While placing, arrange and straighten all the cables, put
them into the space shown by the arrow, make sure that
no cables are pressed by the main wing, and then
use screws to fix.
Screw :
PA 3×12mm 4pcs
Install two sides of the fuselage
2.As shown in the figure: Connect the servo cable
and extension cable, and then fix the left fuselage
to the middle main wing with screws.
Repeat the above steps to install the right wing.
Note: Connect the ESC wire and ESC
extension wire, need to follow the rules of
red-red, black-black. Incorrect connection may
cause the motor to reverse or the electronic
device to burn out.
Install the horizontal stabilizer
3. As shown in the figure, when installing the horizontal
stabilizer, connect the elevator servo wire and the extension
line inside the vertical tail.
Screw :
PA 3×12mm 10pcs
Make sure that the plastic parts at the two ends of the
horizontal stabilizer are fully inserted into the limit holes
between the inner sides of the two vertical tails.
Finally, fix it with screws
FlightLine OV-10 Bronco
Item No.:FLW305
Version No.: FLW305-01
Screw :
PA 3×12mm 4pcs
3
Page 6
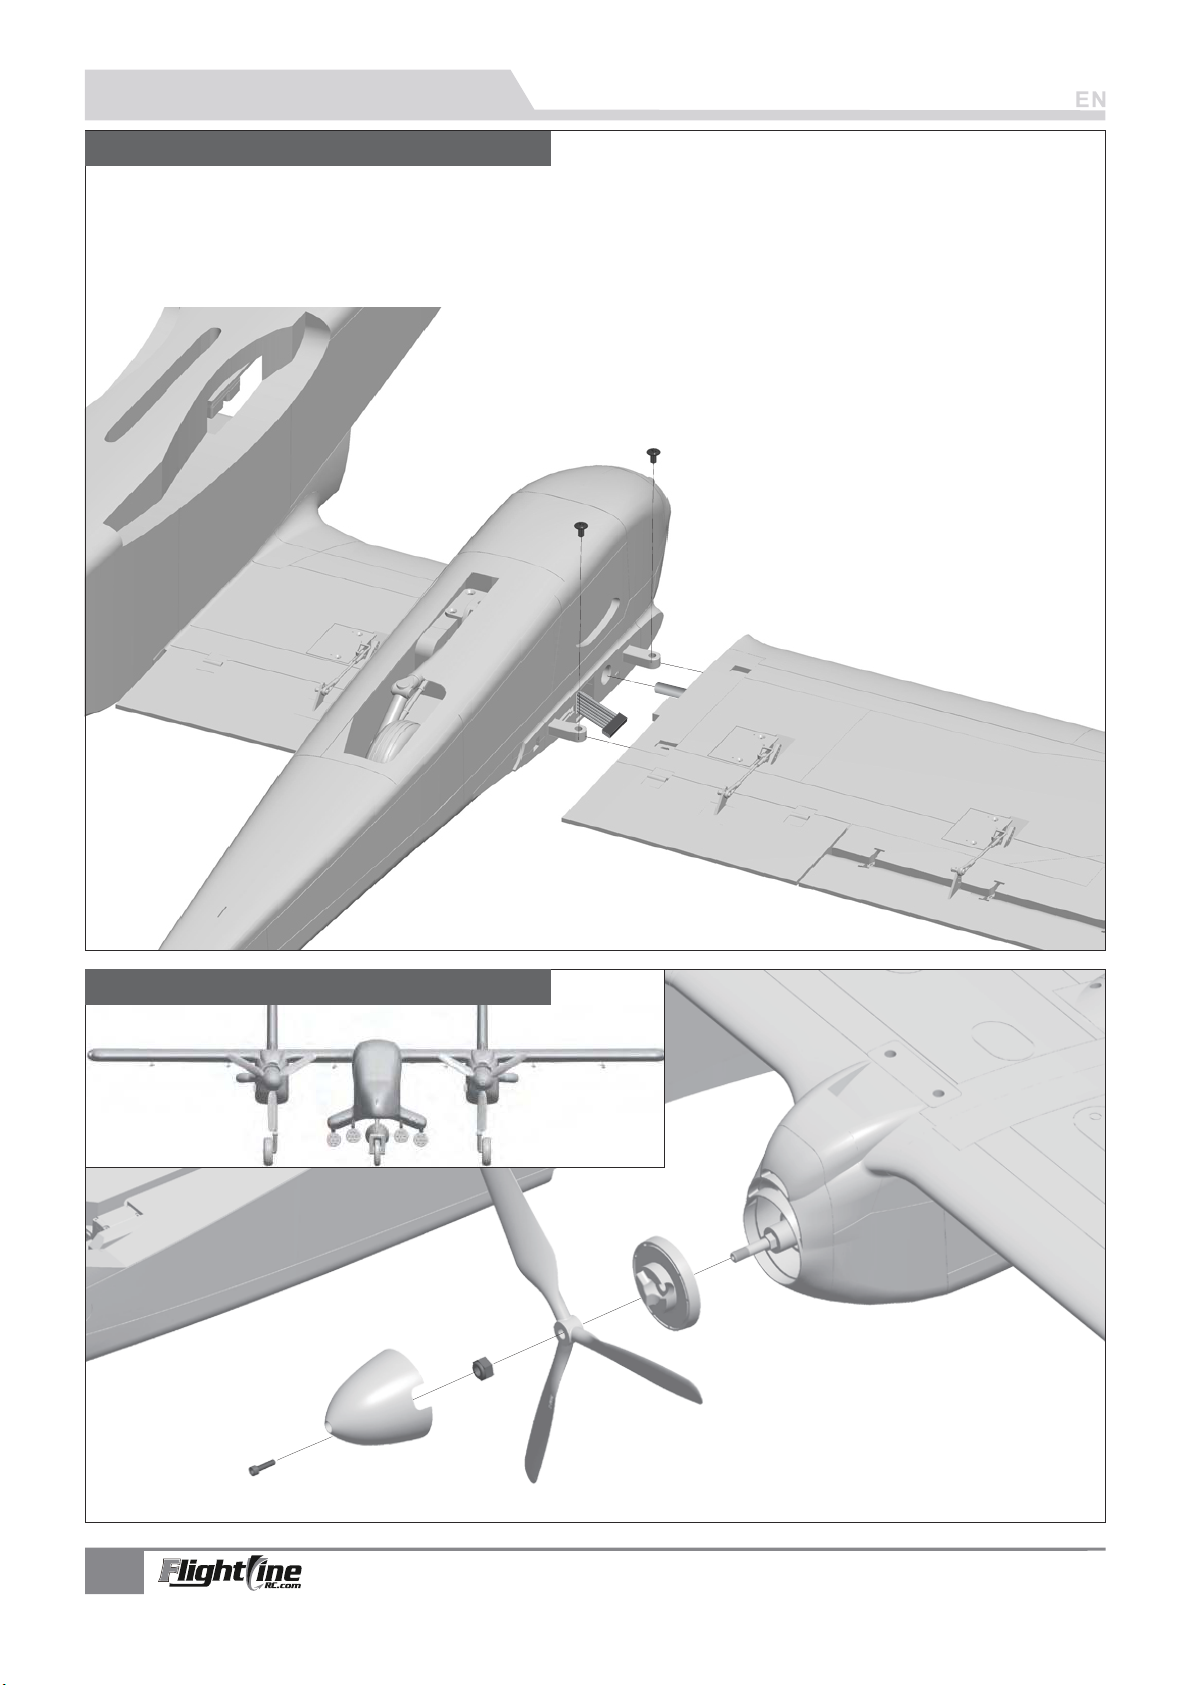
PNP Assembly Instructions
Install Main wing (Left and Right Side)
4.Loosen the screws of wing control board which installed on the left/right main wing, and confirm that the servo wires are tightly
connected. Then reinstall it.
5.Insert the ribbon wires into the left/right wing control board.
6.Fix the main wing with screws.
Screw :
Cabon tube : Φ 10×500mm 2pcs
PWM 3×6mm 4pcs
Install propeller and spinner
Reverse Propeller Standard Propeller
7.Mount the corresponding accessories on the motor shaft as shown.
4
Screw :
M3×6mm 2pcs
Nut :
M3×6mm 2pcs
FlightLine OV-10 Bronco
Item No.:FLW305
Version No.: FLW305-01
Page 7
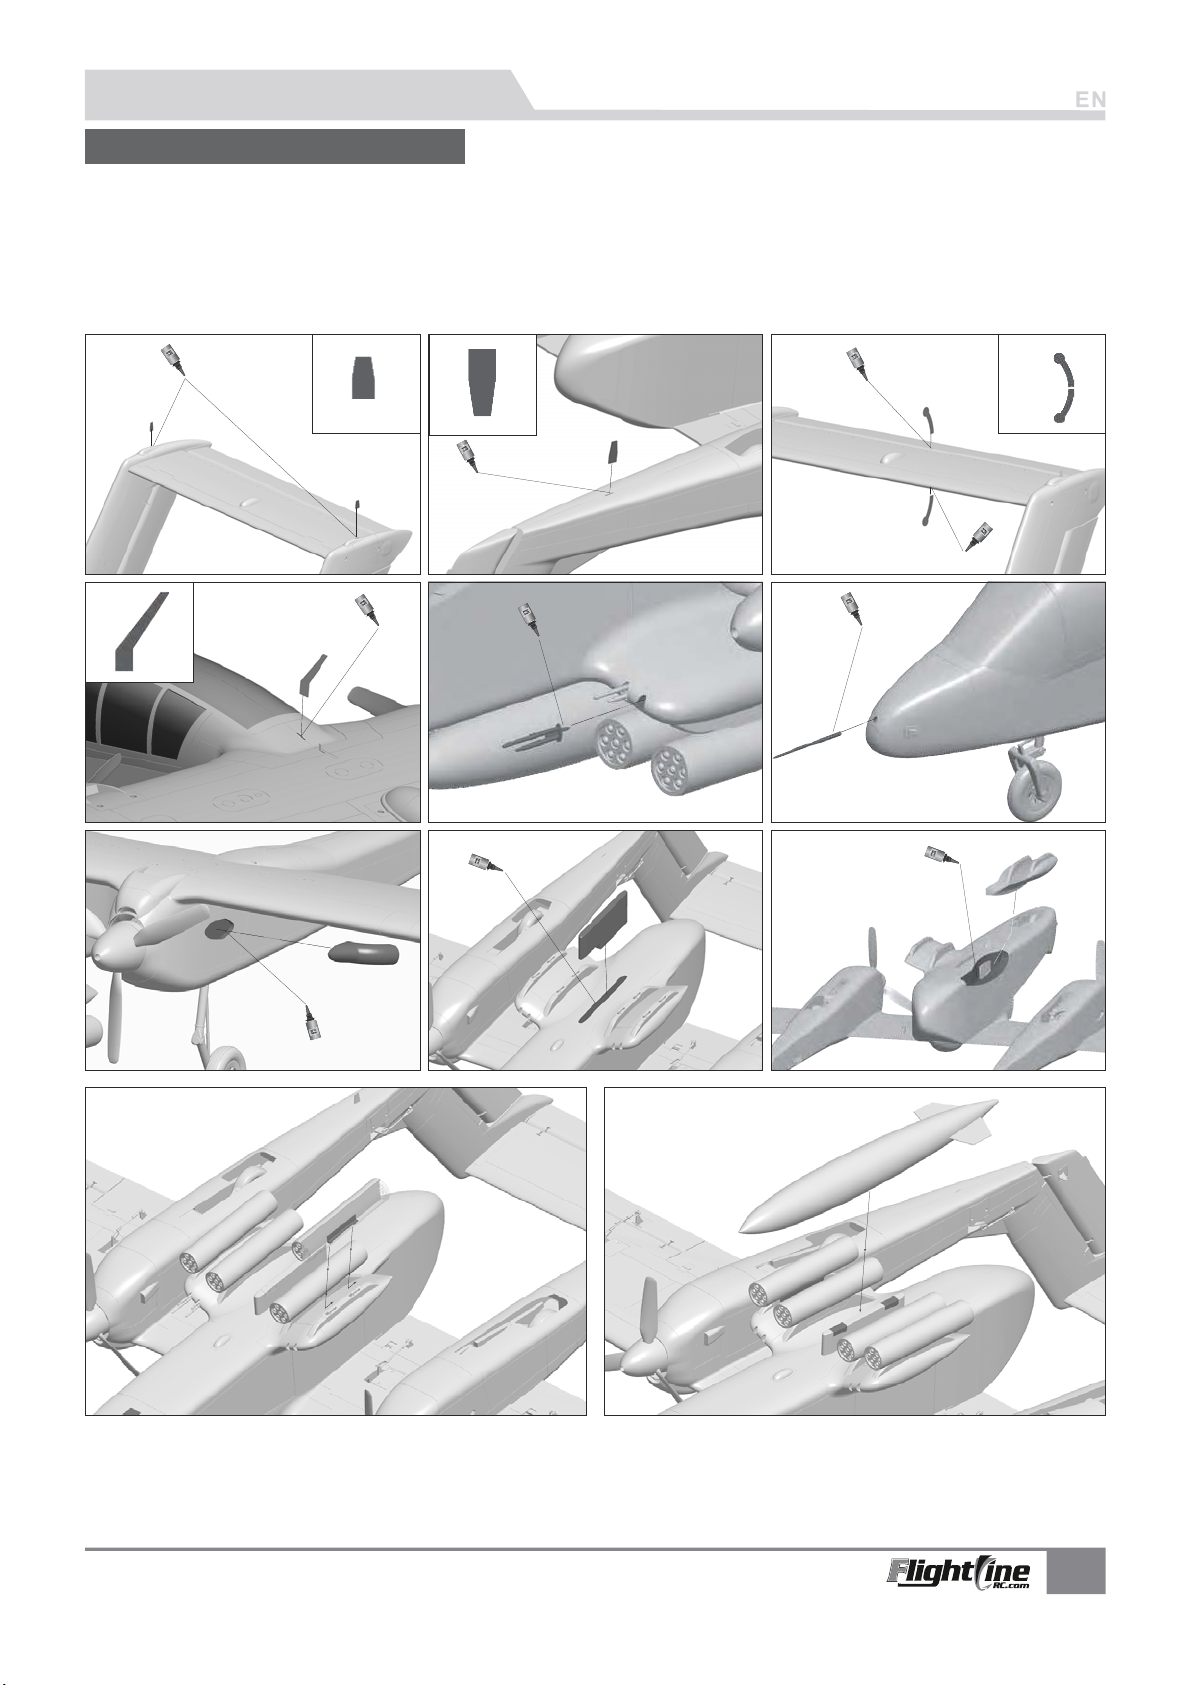
PNP Assembly Instructions
Install other accessories
8.
As shown in the photo below, install various scale accessories such as antennas, machine guns, and hangers on the fuselage.
Note: When installing, first try to install the correct accessories into the mounting holes to know the depth of the accessories
installation. Then apply a small amount of glue to the part that needs to be inserted into the foam for installation. This
method of operation is much better than dripping the glue directly into the fine foam cells, which can reduce the overflow of
the glue as much as possible and prevent the glue from staining the foam surface.
FlightLine OV-10 Bronco
Item No.:FLW305
Version No.: FLW305-01
5
Page 8
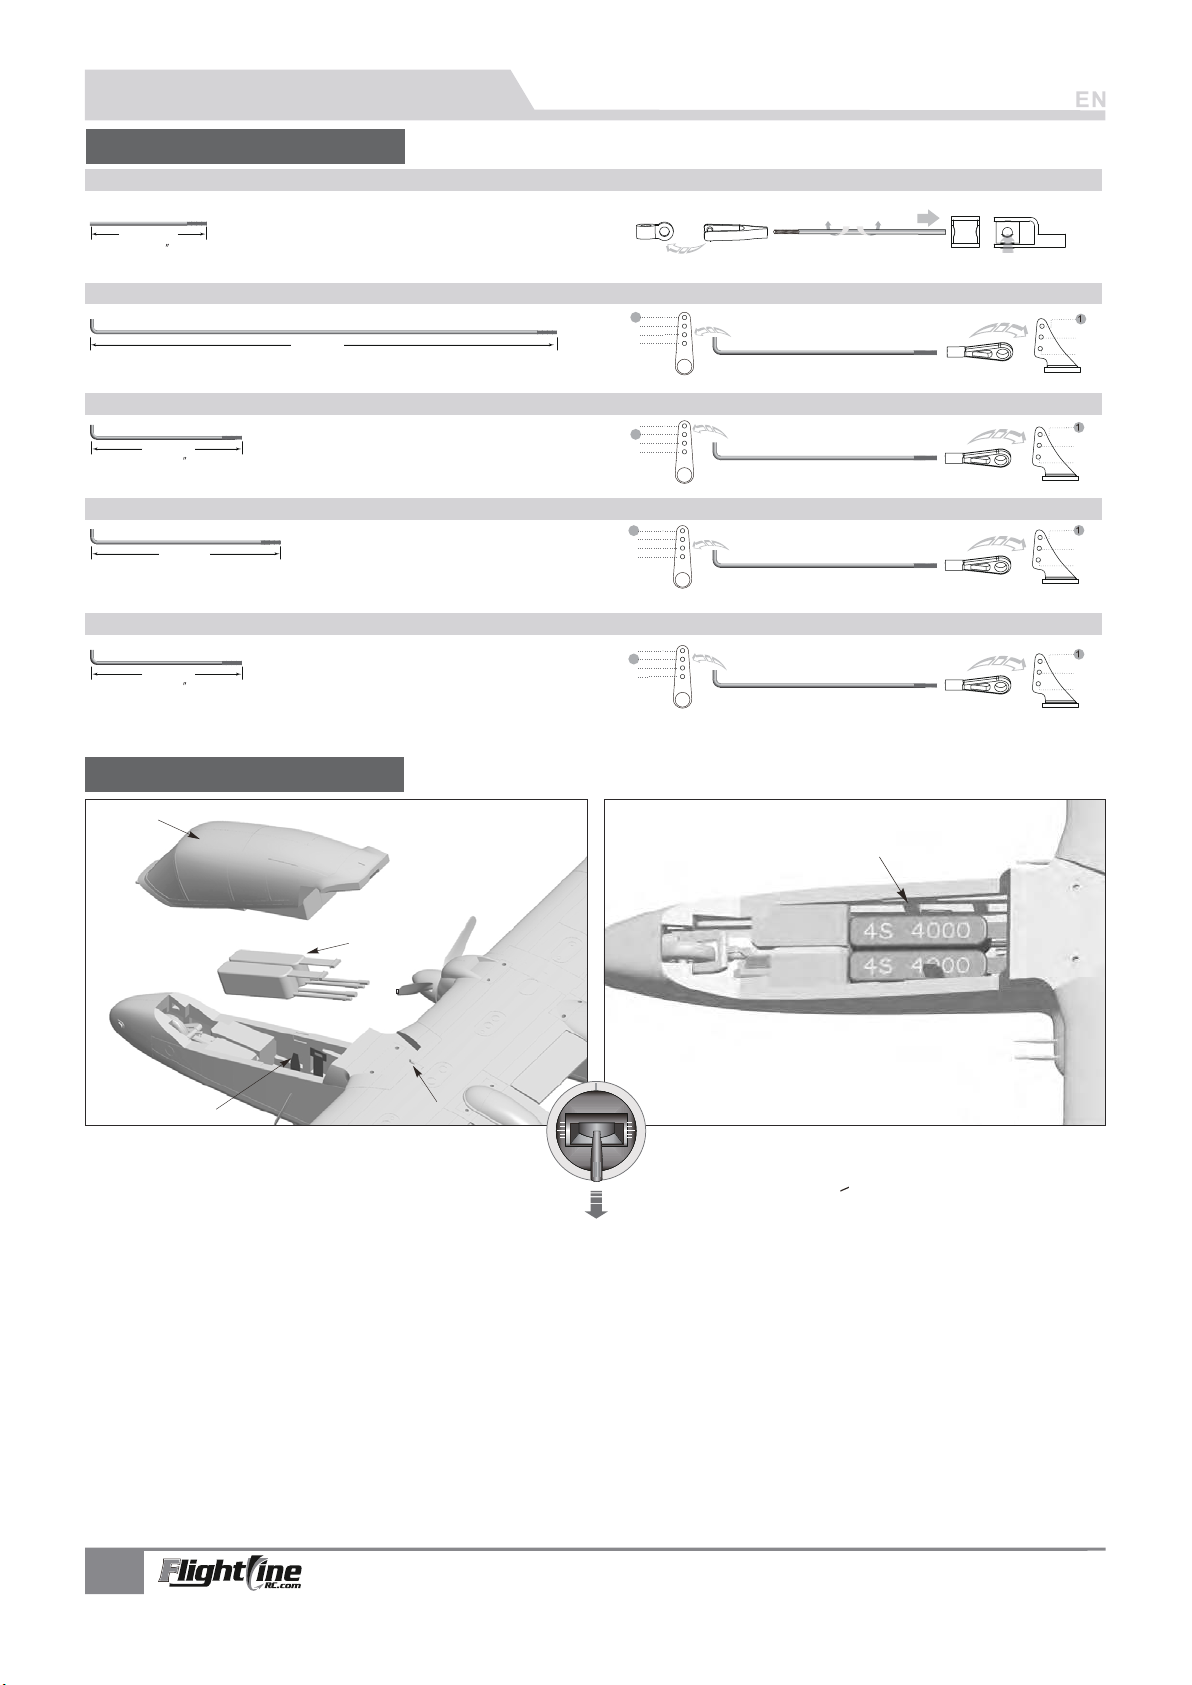
PNP Assembly Instructions
Pushrod instructions
Nose ge a r st e ering pushrod I eng t h Nose ge a r st e ering pushrod m ount ing ho le
45mm
( )
1-13/16
Pushrod diameter :
.Ø1 mm2
Rud de r pu sh ro d Ie ngt h Rud de r pu sh ro d mo un ting h ole
1
2
3
158mm
( )6-1/4
″
Pushrod diameter :
.Ø1 m m5
4
Elev at or p us hr od I e ngth Elev at or p us hr od m ou nt in g hole
1
2
58mm
( )2-5/16
Aile ro n pushr od I eng th
65mm
″
( )2-9/16
Pushrod diameter :
Pushrod diameter :
.Ø1 m m5
.Ø1 m m5
3
4
Aile ro n pushr od m ount ing hole
1
2
3
4
Flap p us hr od I e ngth Flap p us hr od m ou nt ing ho le (I nsid e )
1
2
58mm
( )2-5/16
Pushrod diameter :
.Ø1 m m5
3
4
Install Battery
Battery cover
Use rubberized non-slip tape
or hook-and-loop tape
2
3
2
3
2
3
2
3
Battery
Velcro
Pull the latch back and open the cockpit.
Before connecting the battery and receiver, please
switch on the transmitter power and make sure
the throttle stick is in the lowest position. Bind your
receiver to your transmitter according to your
transmitter’s instruction manual.
Battery recommended location
We recommend the following LiPo battery:
4S 14.8V 3300mAh~4S 14.8V 4000mAh
Discharge rate of C
>
35C
6
FlightLine OV-10 Bronco
Item No.:FLW305
Version No.: FLW305-01
Page 9
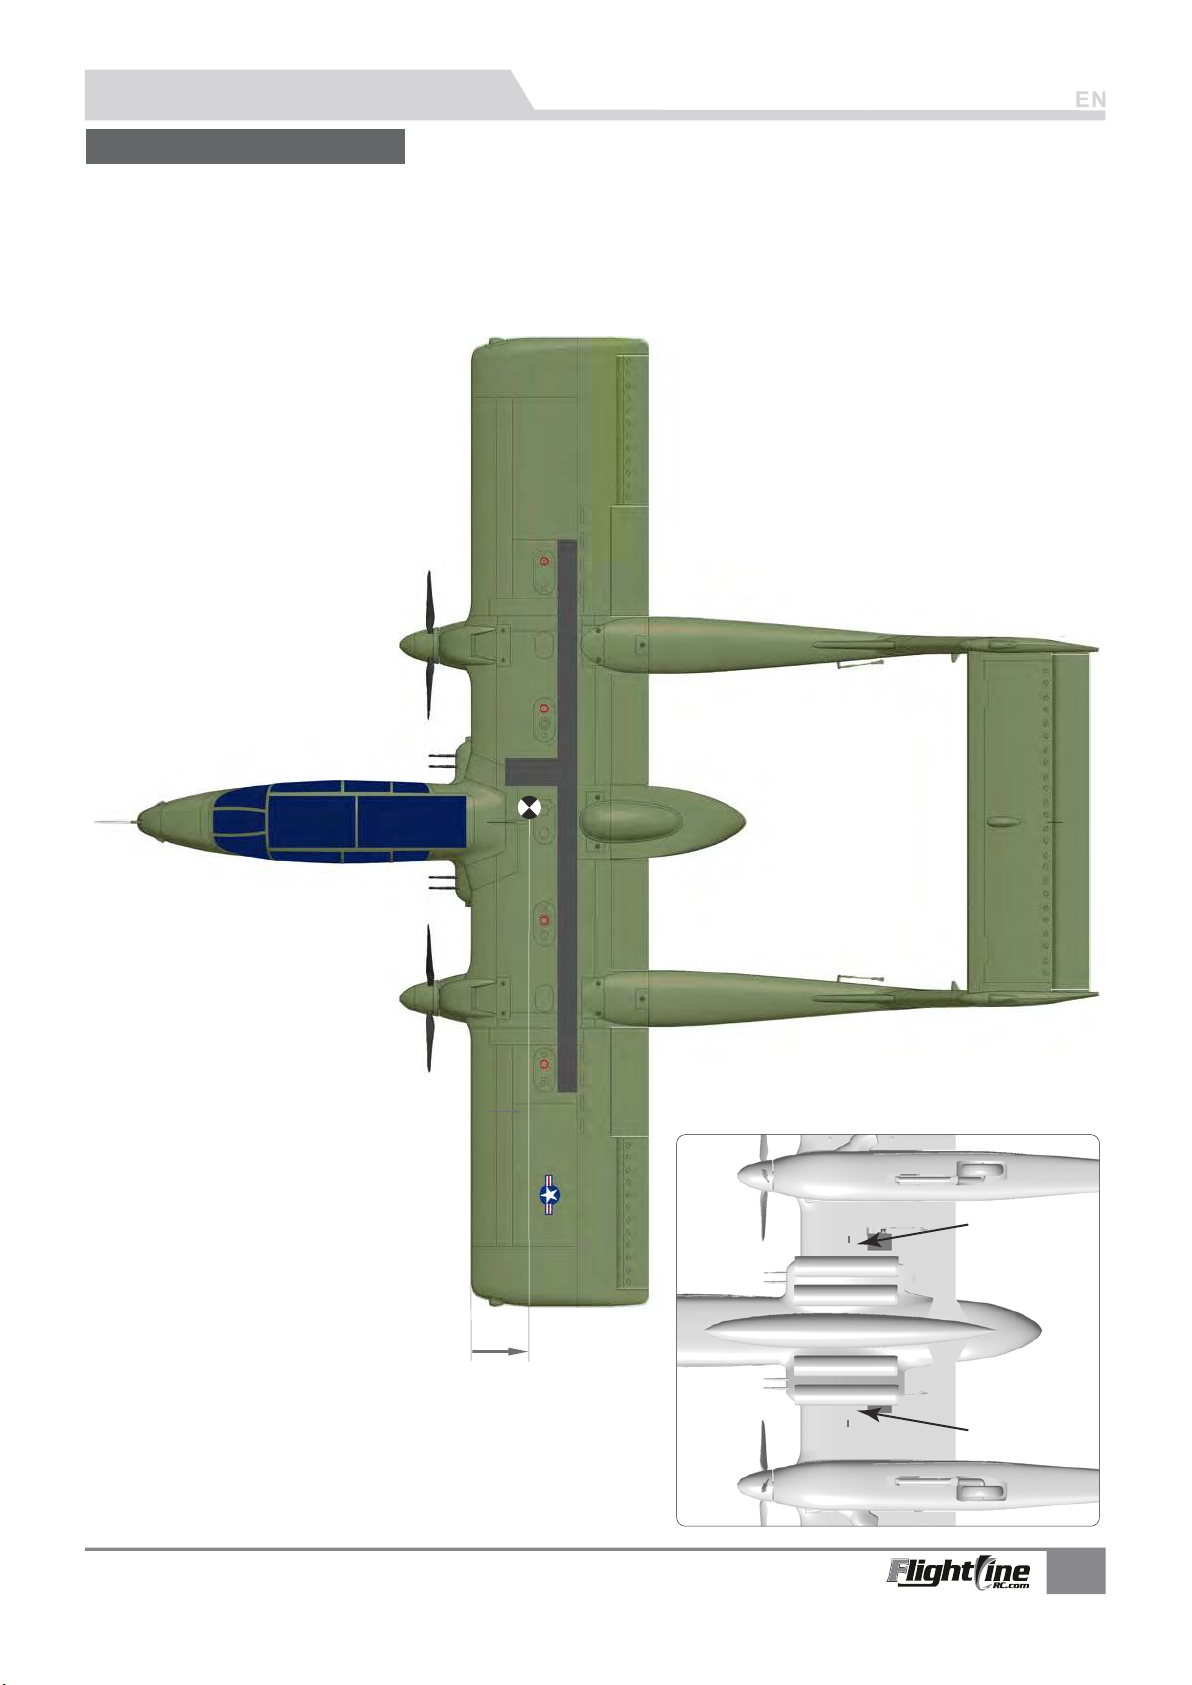
PNP Assembly Instructions
Center of Gravity
Center Of Gravity
Correct Center of Gravity (”CG”) is critical for enabling safe aircraft stability and responsive control. Please refer to the
following CG diagram to adjust your aircraft’s Center of Gravity.
- Depending on the capacity and weight of your choosen flight batteries, move the battery forward or backward
to adjust the Center of Gravity.
- If you cannot obtain the recommended CG by moving the battery to a suitable location, you can also install a counterweight to
achieve correct CG. However, with the recommended battery size,
a counterweight is not required. We recommend flying
without unnecessary counterweight.
At the buttom of middle wing, close to the fuselage.
It has a CG sign.
You can according this sign to confirm the right CG.
FlightLine OV-10 Bronco
Item No.:FLW305
Version No.: FLW305-01
76mm
CG Sign on the
CG
CG
surface of the
middle main wing
buttom.
CG Sign on the
surface of the
middle main wing
buttom.
7
Page 10
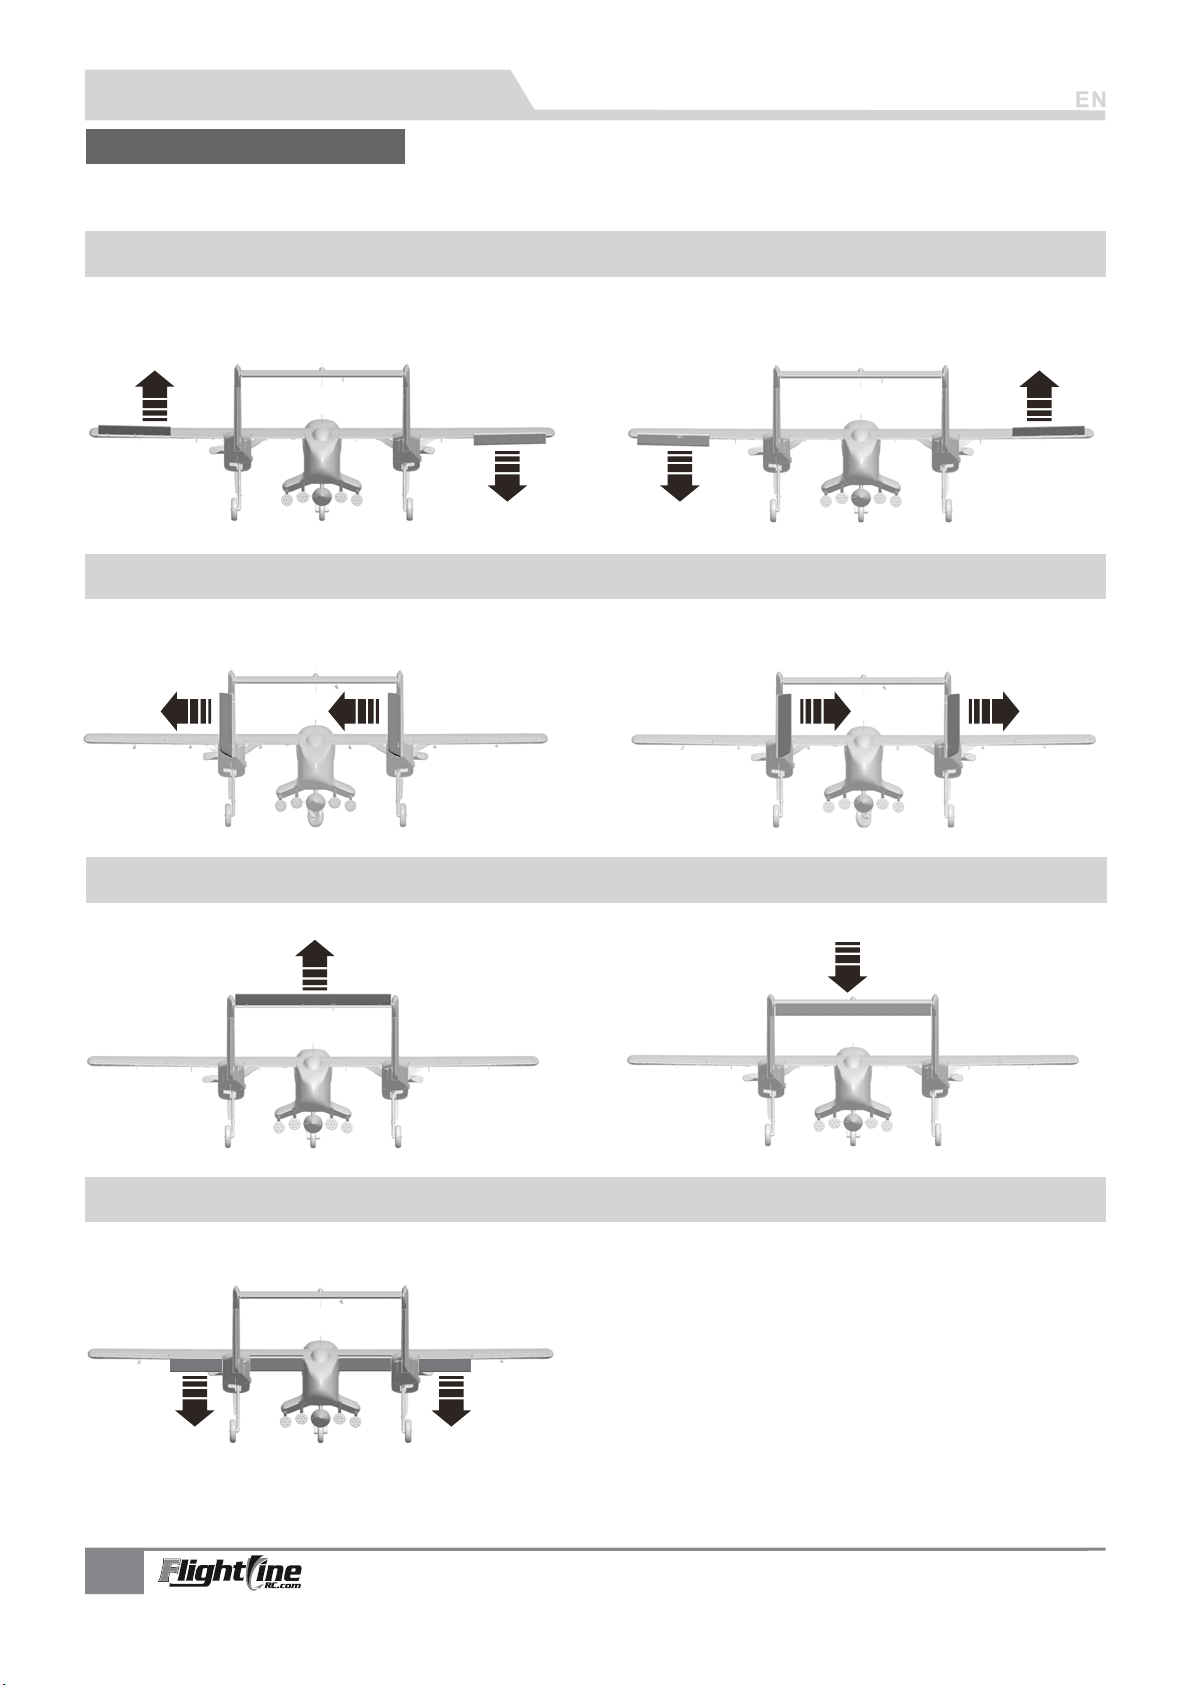
PNP Parameter Setting
Control Direction Test
After installed the plane, before flying, we need a fully charged battery and connect to the ESC, then use radio to test
and check that every control surface work properly.
Aileron
Stic k Left Stic k Right
Rudder
Stic k Left Stick R ight
Elevator
Stick down
Fla ps
Flaps down
Stick up
8
FlightLine OV-10 Bronco
Item No.:FLW305
Version No.: FLW305-01
Page 11
PNP Parameter Setting
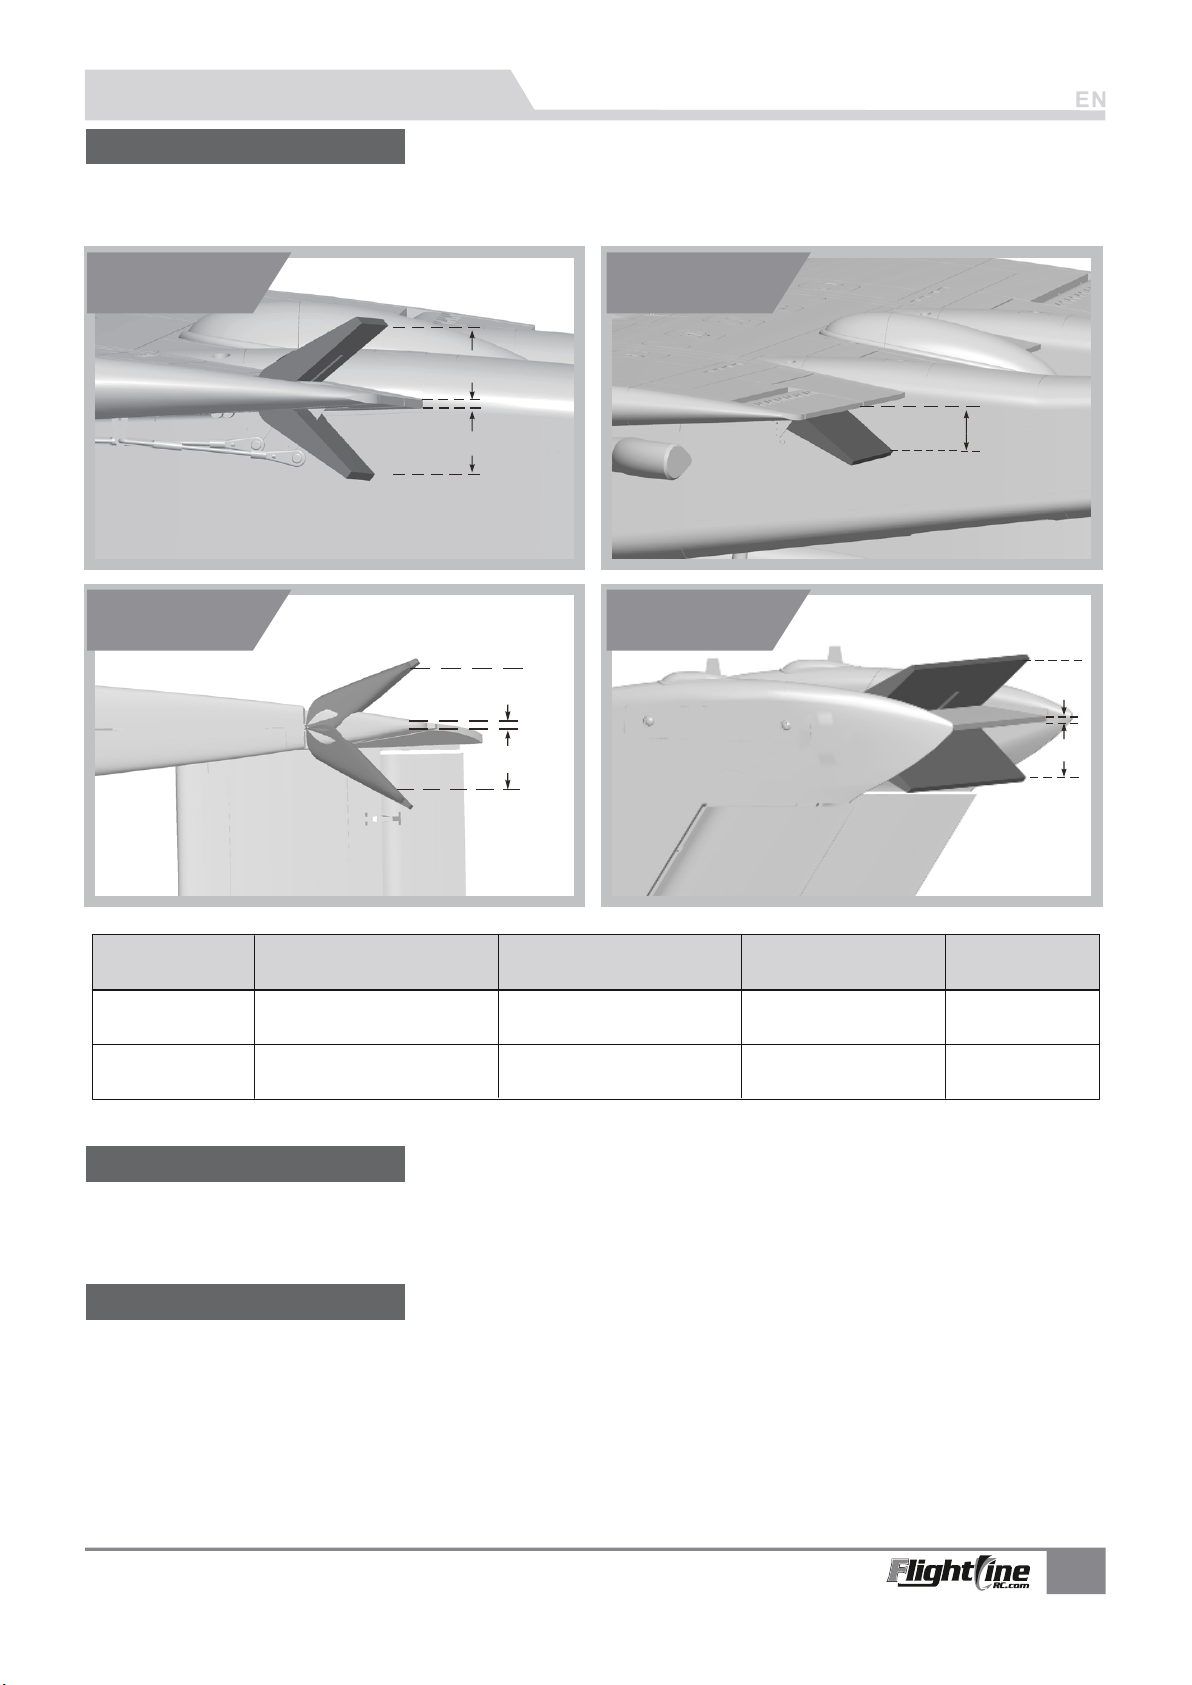
Dual Rates
According to our testing experience, use the following parameters to set Aileron/Elevator Rate. Program your preferred
Exponential % in your radio transmitter. We recommend using High Rate for the first flight, and switching to Low Rate if
you desire a lower sensitivity. On successive flights, adjust the Rates and Expo to suit your preference.
Aileron Flaps
H1
Rudder
Low Rat e
Hig h Rate
Aileron measured closest(
to the fuselage)
H1 H2 13 mm
/ / 13
D/R Rate:
H1 H2 16 mm
/ / 16
D/R Rate:
80%
100 %
mm
mm
H2
H1
H2
Elevator measured closest(
to the fuselage)
H1 H2 20mm 20mm/ /
D/R Rate:
H1 H2 26mm 26mm/ /
D/R Rate:
80%
100%
Elevator
Rudder Measured (
from the bottom)
H1 H2 23mm 23mm/ /
D/R Rate:
H1 H2 27mm 27mm/ /
D/R Rate:
80%
100%
H1
H1
H2
Flaps
H1 15mm
H1 30mm
Flap-to-Elevator Mix
A Flap-to-Elevator Mix is required to maintain level flight when the flaps are deployed. The detail is as below:
-With high rate flaps deployed, mix 4mm (18%) of UP elevator to maintain level flight.
-With low rate flaps deployed, mix 2mm (10%) of UP elevator to maintain level flight.
Throttle correction
In order to ensure the consistency of the left and right motor speeds, in the following cases, you need to refer to the ESC
manual to recalibrate the throttle.
-First time to use.
-First use after change the raido or receiver.
FlightLine OV-10 Bronco
Item No.:FLW305
Version No.: FLW305-01
9
Page 12
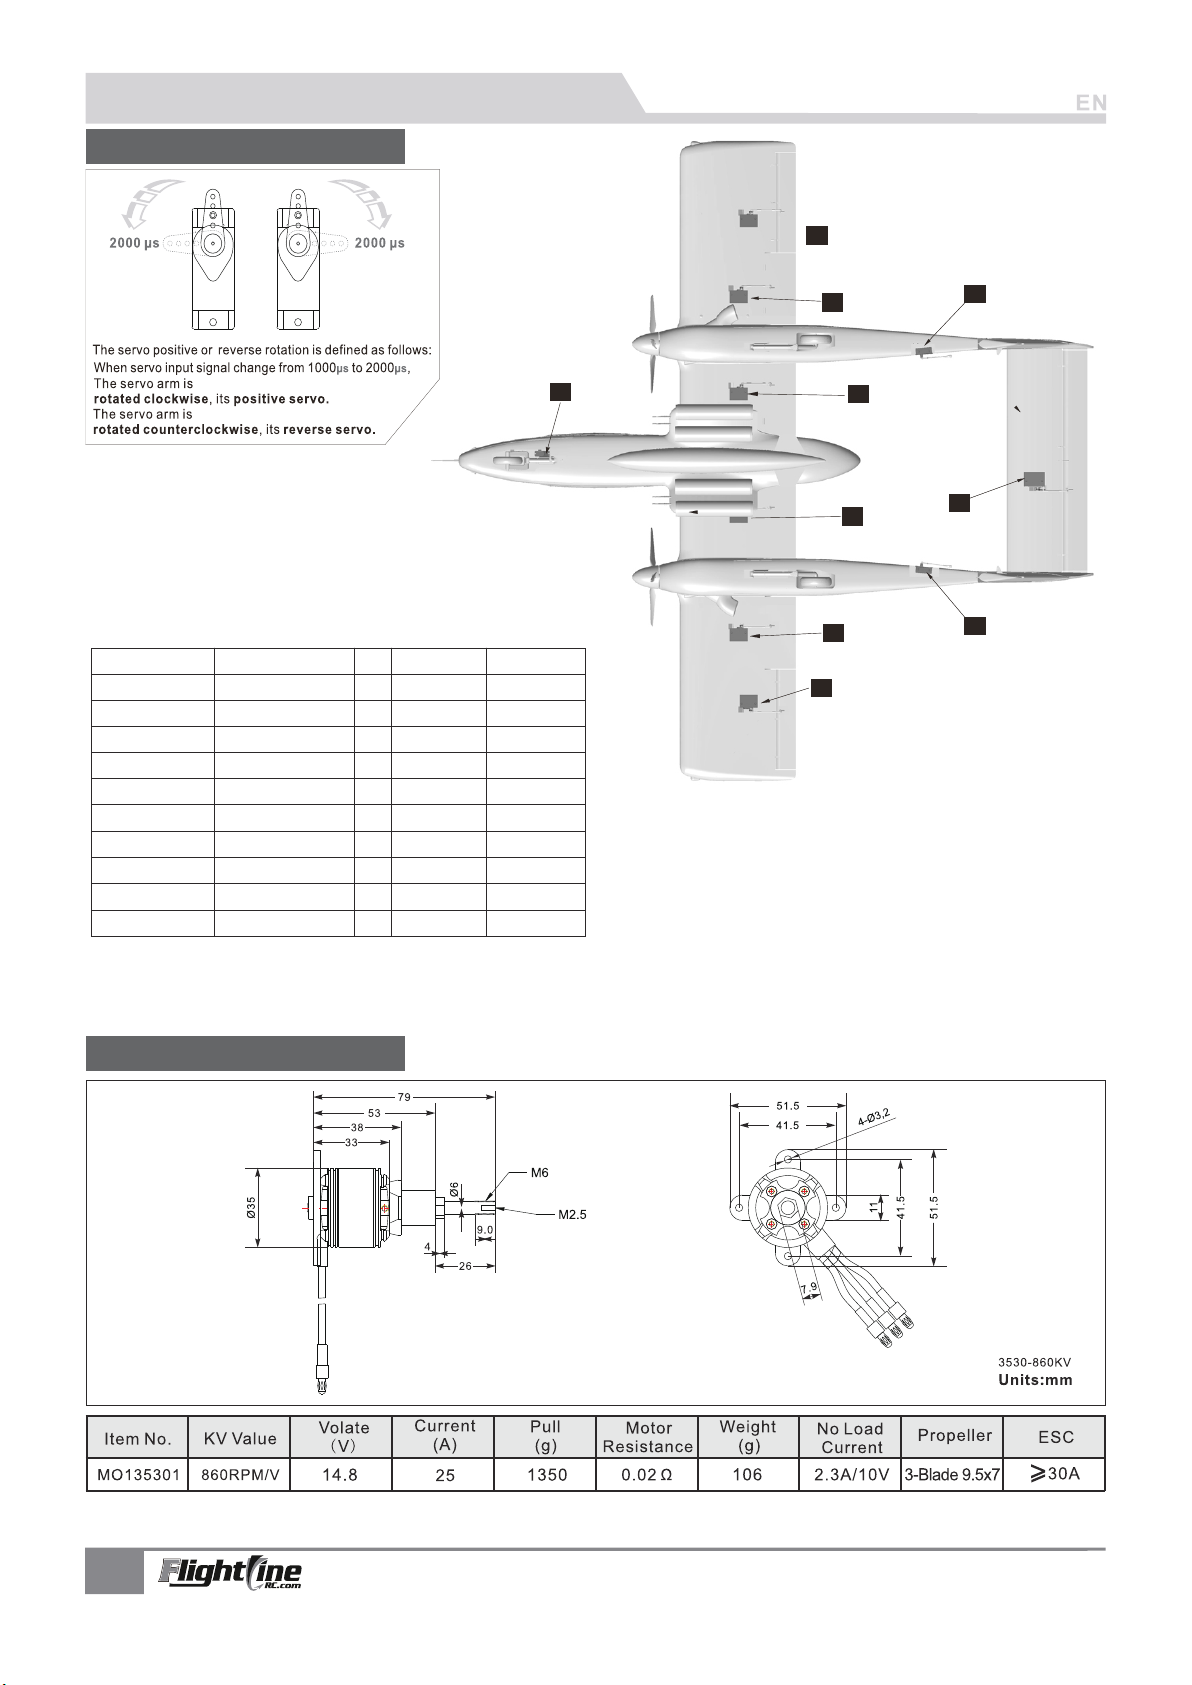
Pre-lnstalled Component Overview
Servo Direction
6
If you need to purchase another brand’s servo, please
refer to the following list to choose a suitable servo.
Position Servo regulation No. Pos. / Rev. Cable length
Nose gear
steering servo
Flap(Inside-L)
Flap(Inside-R)
Flap(L)
Flap(R)
Aileron(L)
Aileron(R)
Rudder(L)
Rudder(R)
Elevator
9g Digital-Hybrid
9g Digital-Hybrid
9g Digital-Hybrid
9g Digital-Hybrid
9g Digital-Hybrid
9g Digital-Hybrid
9g Digital-Hybrid
9g Digital-Hybrid
9g Digital-Hybrid
17g Digital-MG
10
1
2
3
4
5
6
7
8
9
Positive
Positive
Positive
Positive
Positive
Positive
Positive
Positive
Positive
Positive
500mm
400mm
400mm
200mm
200mm
300mm
300mm
600mm
600mm
300mm
4
1
2
3
5
8
10
9
Right SideLeft Side
7
Motor Specification
10
FlightLine OV-10 Bronco
Item No.:FLW305
Version No.: FLW305-01
Page 13

 Loading...