

Page 1
User Guide
iNova Portable Intercom
Page 2

___________________________________________________________________________
___________________________________________________________________________
___________________________________________________________________________
___________________________________________________________________________
___________________________________________________________________________
___________________________________________________________________________
1
ITEMS INCLUDED
Item Part Number
iNova Intercom Yellow or Blue
Cigarette Lighter Adapter 103-0614-00
Copilot Xmit Cable * 103-0027-00 For iNova use only
Aux. Input Cable 103-0613-00 Stereo Patch Cord
PTT 103-06 0 4-00 PTT Gold
9 volt Battery
*Warning: This cable is NOT compatible with other Flightcom products!
Page 3

2
GETTING STARTED
Most people choose to operate the iNova using battery power.
* To install the 9 volt battery open the door on the bottom of the iNova and
drop the battery in following the positioning diagram inside the door.
* The iNova has an auto on/off feature. Plug in the pilot or copilot headset and
the intercom is on. Remove it and the intercom is off. There is no separate
on/off control.
* If you don't remove your headsets when they are not in use, the battery
power will continue to drain.
* Depending on the number of headsets used and auxiliary inputs, you can expect
from 25-35 hours of battery life.
Instructions follow for those who prefer to operate the iNova using aircraft power.
Page 4

3
USING AIRCRAFT POWER
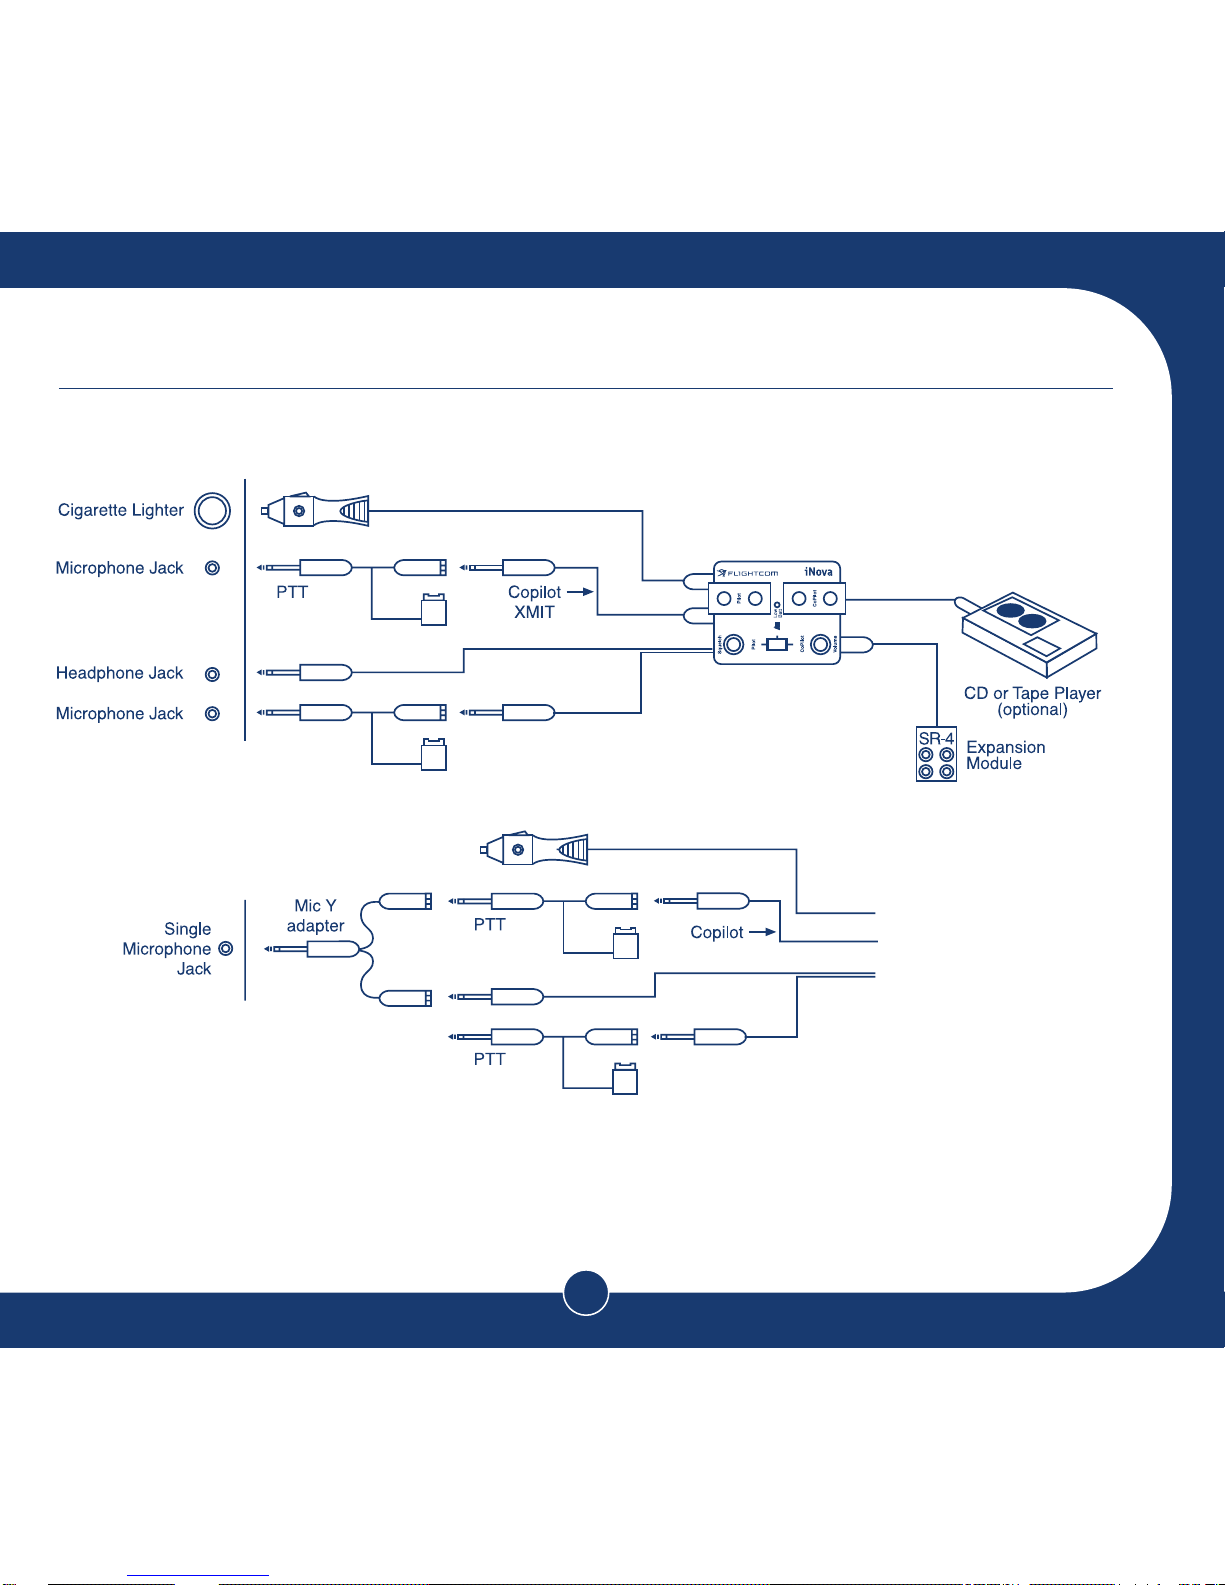
Connect the cigarette lighter adapter to the intercom’s External DC connector first.
Connect all other cables to the unit and then connect the adapter to the aircraft’s
cigarette lighter last. (When not being used to supply power to the intercom, the
cigarette lighter adapter should be unplugged from the intercom*)
Insert the 6.3 mm plug from the intercom into the aircraft headphone jack.
Insert the 5.2 mm plug from the intercom into the aircraft microphone jack.
Note: There is no “off/on” control on your iNova intercom. The intercom is on as soon as
aircraft power is on. The intercom is off when aircraft power is off.
* The LED on this unit will only illuminate to indicate Low Internal Battery Voltage.
It does not function as a “Power On” Indicator.
If your aircraft does not have a built-in Push-To-Talk-Switch (PTT), you will need to
use a portable PTT switch installed between the intercom and the aircraft microphone
jack. Both plugs on your headsets must be plugged directly into the intercom. Please
note that not all portable PTT’s may be wired for use with your iNova intercom.
(Some loss or distorting of side tone audio may occur.) One iNova compatible PTT
(p/n 103-06 0 4-00) is supplied with the unit. If you need a second PTT for copilot use,
contact your local Flightcom dealer, or contact us directly at 800-432-434 2, 5 03-684-8 229,
or by email at [email protected]
Page 5

4
ADDING COPILOT TRANSMIT CAPABILITY
Your iNova intercom is equipped with copilot transmit capability. To use this feature, attach
the copilot xmit cable (included) as shown in the connection diagram on page 13 of this
manual. Insert the two microphone plugs into separate microphone jacks in the aircraft. If
your aircraft does not have a built-in PTT on the copilot side, you will need to use a Portable
PTT switch (see paragraph above for note on PTT’s). If you only have one microphone jack
in the aircraft, you will need to use a “Y” adapter (sold separately part number 103-0603-00).
If you do not have a PTT switch, you can use a handheld microphone plugged
into the aircraft mic jack while still listening through the intercom (In this case some
features of the intercom will not work).
ADDING THE REAR SEATS
The iNova can be expanded to four places with the addition of an optional SR-4
Expansion Module. Plug the SR-4 cable into the expansion port on the end of the
intercom and route the cable to the rear seat area. Note that the iNova requires a
specific SR-4 cable. The 6-pin connector from a Model III S R-4 cable will not plug into the
iNova correctly, and will not activate the headphone drivers for the two rear positions. This
will allow the rear positions to talk on the intercom but not hear anything through
their headsets. If you have an older SR-4 module you wish to use, contact your local
Flightcom dealer or contact us directly to order the correct cable. The Flightcom Part
Number for this cable is 103-0611-40.
Page 6

5
ADDING MUSIC
A stereo or monaural tape or CD player may be connected to the aux in jack on the end
of the intercom to provide music through the intercom. Connect the stereo patch cord
(included) between the 3.5 mm input jack on the iNova and the headphone jack on the
source. (See installation diagram on page 13 of this manual). Music will not be transmitted
over the radio. Muting is provided during incoming and outgoing radio transmissions
(see muting matrix on page 7-9). Note: Stereo capable headsets or headphones (such as
the Flightcom Denali) are required in order to hear true stereo through the iNova.
Monaural headsets or headphones may be used, but will not offer true stereo listening.
OPERATING PROCEDURES
Plug headsets into the intercom and turn on the aircraft master switch. Make sure the
pilot’s headset is plugged into the pilot’s side of the intercom. Initially set the intercom
volume control to the one o’clock position and the squelch control to the 3 o’clock position.
1. Set intercom volume while talking on the intercom.
2. Set receive audio volume (radio check) with radio’s volume control.
3. Set CD or tape player volume with aux unit’s volume control.
4. Afterwards, if the noise level in the plane changes, adjusting the intercom
volume control will cause a simultaneous adjustment of the volume level of
receive audio and aux volume levels.
Note: As an added safety measure, the iNova volume control will not reduce the receive
audio of the A/C radio to zero.
Page 7

6
Position boom microphone 1/8 inch from lips and center it over your mouth for best
results. Noise canceling microphones will not operate correctly if they are more than
1/8 inch from your mouth. While speaking into the microphone, adjust the volume
control to a comfortable level. Adjust the squelch control as far clockwise as possible
while still blocking out background noise. Only adjust the squelch while no one is
talking. If the squelch is set too high (counter clockwise) your voice will cut out unless
you talk very loudly. If the squelch is set too low (clockwise) you will occasionally
hear background noise through the headphones while no one is speaking.
Normal radio use is unaffected by installation of the intercom, but passengers will
now be able to hear the aircraft radio when the isolate switch is in the ALL position
(see isolate and muting matrix on page 7). The intercom volume control does not
affect radio transmit volume. To transmit on the radio, simply press the PTT switch
associated with your headset position. There is no need (but is advisable) for the
passengers to stop talking while the pilot (or copilot) is transmitting. Only the person
whose PTT switch is depressed will be heard over the radio, thus an instructor can
talk to a student pilot while the student is transmitting without the instructors voice
being heard over the radio. If both the pilot and copilot have their PTT’s depressed
at the same time, both voices will be transmitted.
For optimum results from your iNova intercom, use high quality, stereo headsets such
as the Flightcom Denali.
Page 8

7
Pilot: Hears music
Mutes when:
Radio traffic
ICS activated
Passenger: Hears music
Mutes when:
Radio traffic
ICS activated
Copilot: Hears music
Mutes when:
Radio traffic
ICS activated
Passenger: Hears music
Mutes when:
Radio traffic
ICS activated
PILOT/CREW ISOLATE SWITCH
Setting this switch to the “Pilot” position will connect the pilot’s headset directly to the
aircraft radio while allowing the three other positions to use the intercom. Setting
this switch to the “Crew” position connects the pilot and copilot headsets to a common
intercom/radio bus and the two expansion module positions to a separate intercom
bus. Put this switch in the ALL (center) position for normal use.
iNOVA ISOLATE AND MUSIC MUTING MATRIX
In ALL mode:
In ALL mode, all positions will mute whenever aircraft radio is present,
or if the intercom (ICS) is activated by any passenger or crewmember.
Page 9

8
Pilot: No music
ICS between Crew
Does not hear passenger
Passenger: Hears music
Mutes when:
Passenger ICS activated
Does not hear crew
Copilot: No music
ICS between Crew
Does not hear passenger
Passenger: Hears music
Mutes when:
Passenger ICS activated
Does not hear crew
IN CREW ISO MODE:
In CREW mode, music audio will not be present for the pilot and copilot. The crew
will not hear passenger conversation. Passenger music audio is present and will mute
only when the passenger ICS is active. Passengers will not hear crew IC S, aircraft
radio, or crew transmissions.
Page 10

9
Pilot: No music
Sidetone is present
Connected directly to radio
Does not hear others
Passenger: Hears music
Mutes when:
ICS activated
Does not hear pilot
Copilot: Hears music
Mutes when:
ICS is activated
Does not hear pilot
Passenger: Hears music
Mutes when:
ICS activated
Does not hear pilot
IN PILOT ISO MODE:
In PILOT IS O mode, the pilot will not hear the music. The pilot will not
hear conversation between the copilot and passengers. Copilot and passenger
music audio will be present and will only mute during copilot and passenger
ICS conversation. Copilot and passengers will not hear any transmissions or
aircraft radio. Should the copilot key the mic and speak, he will transmit, but
will not monitor the receive audio.
Page 11

10
IN CASE OF DIFFICULTY
If the intercom does not work correctly when plugged in, you may have inserted
the Push-to-Talk switch between the headset and the intercom. Reconnect the PTT
between the intercom and the aircraft radio. Check the DC power cable to confirm
that voltage is available at the intercom connector.
Important Note: The polarity of the voltage at the intercom connector must match the
polarity symbol ( ) printed on the intercom.
Check the fuse in the cigarette lighter adapter plug. Replace only with a 1/4 amp, slow-blow
fuse. If this fuse continually faults, have your aircraft electrical system checked for correct
wiring. If you choose to hard wire the intercom into the aircraft, be certain that the correct
polarity is observed and a 1/4A 250V slow-blow fuse is installed in the circuit. Avoid
connecting the intercom to a
noisy
circuit, i.e., a circuit that also powers strobes or motors.
The cigarette lighter in the aircraft may be corroded or contaminated with ash deposits.
Confirm that the cigarette lighter is operable. Some aircraft have had the cigarette
lighters disconnected to comply with an AD.
Check that all cables are installed correctly and all plugs are fully inserted into their jacks.
Check volume and squelch controls, try turning both controls fully clockwise to verify
intercom operation at full volume, no squelch.
If you are using the intercoms internal 9 volt battery, make sure that the battery is still good.
Page 12

11
If you have difficulty transmitting on the radio
Is the pilot’s headset plugged into the pilot’s jacks on the intercom? Distorted sidetone
is related to improper shielding of the aircraft antenna cable. Usually your transmissions
are received clearly despite the distorted sidetone. If the copilot’s transmission is not
clear, check that the copilot transmit cable is plugged in correctly and that the plugs are
clean. Insert the 3.5 mm plug fully into the intercom jack and rotate it several times to
remove any corrosion from the jack.
If the unit isn’t loud enough or parts of your sentences are broken
Place the microphone as close to your lips as possible. Make sure the squelch is not
adjusted too high. While no one is talking, slowly rotate the squelch control clockwise
until the background noise disappears. Do not turn the knob any further than necessary.
Good headsets make a big difference here. Not all aviation headsets function the same
and you may find that one brand or model puts out a higher signal than another.
If the background noise level is too high while you are speaking
The problem here is with the microphone, not the intercom. Make sure you are using
a good quality noise canceling microphone and that you have it oriented correctly
and no more than 1/8 inch away from your lips.
If a high pitch whine is always present
It may be coming from the turn-and-bank indicator or other electric gyro. Try connecting
the power lead to a different source or use the intercom on battery power.
Page 13

12
If a high pitch whine is only present with the engine running and varies with RPM
It is from alternator or generator noise on the aircraft power bus. This may be an
indication of a weak aircraft battery or an alternator with a bad diode. You may be
able to remedy the problem with a commercially available alternator noise filter
connected in series with the intercom power lead.
If all else fails
If you cannot get the unit to function at all, try checking it out in another aircraft.
Do not return the unit for repair without first contacting our service department.
Please have as much information as possible available when you call.
List the symptoms you’ve encountered as well as any corrective actions or
troubleshooting you have tried. You may contact us at [email protected]
To return the unit for repair you MUST call and get an RMA number and
packing/shipping instructions from our service department at 800-432-4342,
or 503-684-8229.
We reserve the right to refuse delivery on any incoming packages that are not clearly
marked with an RMA number. Warranty claims require that a dated sales receipt or
proof of purchase be provided when requested and that your warranty card has been
filled out and returned to Flightcom. Repair charges for non-warranty service will be
estimated when you call for an RMA.
Page 14
13
INSTALLATION DIAGRAM
Page 15

______________________________________________________________________________
______________________________________________________________________________
______________________________________________________________________________
______________________________________________________________________________
14
OPTIONAL ITEMS NOT INCLUDED
Item Part Number
PTT Gold 103-06 0 4-00 2nd PTT
SR-4*** 103-06 0 2-40 SR-4 Expansion Module
SR-4 Cable 103-0611-40 SR-4 to iNova
Mic “Y” Adapter 103-0603-00 FC-0 6
***If you already own an SR-4 expansion module, it can be used with the iNova Intercom
by purchasing the interconnect cable only. Part number 103-0 611-40
Warranty
Your iNova Intercom comes with a warranty registration card. To help ensure that the Intercom warranty is registered with us, locate
the serial number on the back of the intercom, or on the part number/serial number label. Make sure the number is preceded by a s/n.
Write the serial number on your warranty card and return it to us. You may also register online at www.flightcom.net
Flightcom Corporation warrants to the original purchaser of this product that it will be free from defects in materials and workmanship,
under normal and proper use, for the period of two years from date of purchase. Flightcom Corporation will repair or replace, at its sole
option, any parts showing factory defects during this warranty period, subject to the following provisions. This warranty applies only to a
new product which has been sold through authorized channels of distribution. All work under warranty must be performed by Flightcom
Corporation. All returned products must be shipped to our address, freight prepaid, accompanied by a dated proof of purchase.
SAVE YOUR SALES SLIP! You must contact Flightcom to request a Return Authorization Number before
sending the product to
Flightcom for warranty or non-warranty service.
The purchaser voids this warranty if he, she or others attempt to repair, service or alter the product in any way. This warranty does not
apply in the event of accident, abuse, improper installation, unauthorized repair, tampering, modification, fire, flood, collision or other damage
from external sources, including damage which is caused by user replaceable parts (leaking batteries, etc.). This warranty does not
extend to any other equipment or aircraft to which this product may be attached or connected. The foregoing is your sole remedy for failure
in service or defect. Flightcom Corporation shall not be liable under this or any implied warranty for incidental or consequential damages,
nor for any installation or removal costs or other service fees. This warranty is in lieu of all other warranties, express or implied, including
the warranty of merchantability or fitness for use, which are hereby excluded. To the extent that this exclusion is not legally enforceable,
the duration of such implied warranties shall be limited to two years from date of purchase. No suit for breach of express or implied
warranty may be brought after two years from date of purchase.
Page 16

7340 SW Durham Road |Portland |Oregon 97224|USA
telephone: 800-432-4342 | 503-684-8229
facsimile: 503-620-2943
web address: www.flightcom.net
Copyright © 2001. Denali is a registered trademark and iNova is a trademark of Flightcom Corporation.
Flightcom is a registered trademark of Flightcom Corporation.
All rights reserved. Printed in U.S.A. Specifications subject to change without notice.
600-0058-00
 Loading...