

Flightcom DVR 300i Operation And Installation Manual
O
PERATION ANDINSTALLATION
M
ANUAL
DVR®VOICE RECORDER
DVR 300i
Digital Voice Recorder Clock
Rev. 2
Technical Specifications
Total Recording Time 5 minutes
Standby Current Drain .004 Amps typical
Active Current Drain 80 mA typical
Input Voltage 11 - 32 Volts DC
Speech Retention 30 days
Timekeeper Retention 3 years
Crystal Frequencies 2 MHz; 32.768 KHz
Weight (wit h bat te ry) 5 oun ces
Compliance FAR 91.205
Limited Warranty One Year
7340 SW Durham Road • Portland, OR 97224 • 503.684.8229 • Fax 503.620.2943
www.flightcom.net • service@flightcom.net
Flightcom and DVR are registered trademarks of Flightcom Corporation.
©2001 Flightcom Corporation.

Table of Contents
General Information.................................................................................1
Part I - Operation
Understanding the DVR Recorder..........................................................2
DVR Clock Layout ..............................................................................2
DVR Clock Operations ............................................................................3
Turning on the DVR Clock..................................................................3
Setting the Time...................................................................................3
Elapsed Timer and pseudo-Hobbs Meter.............................................4
“Cron” Countup Timer.........................................................................4
Recorder Operations ................................................................................5
Automatic Recording and Playback.....................................................5
Manual Recording and Playback .........................................................5
Periodic Alarm System ........................................................................6
Audio Checklists..................................................................................6
Changing DVR Speech Quality ...........................................................7
Backup Battery .........................................................................................8
Troublesh ooting ........................................................................................8
Part II - Installation
Power Considerations...............................................................................9
Audio Considerations .............................................................................10
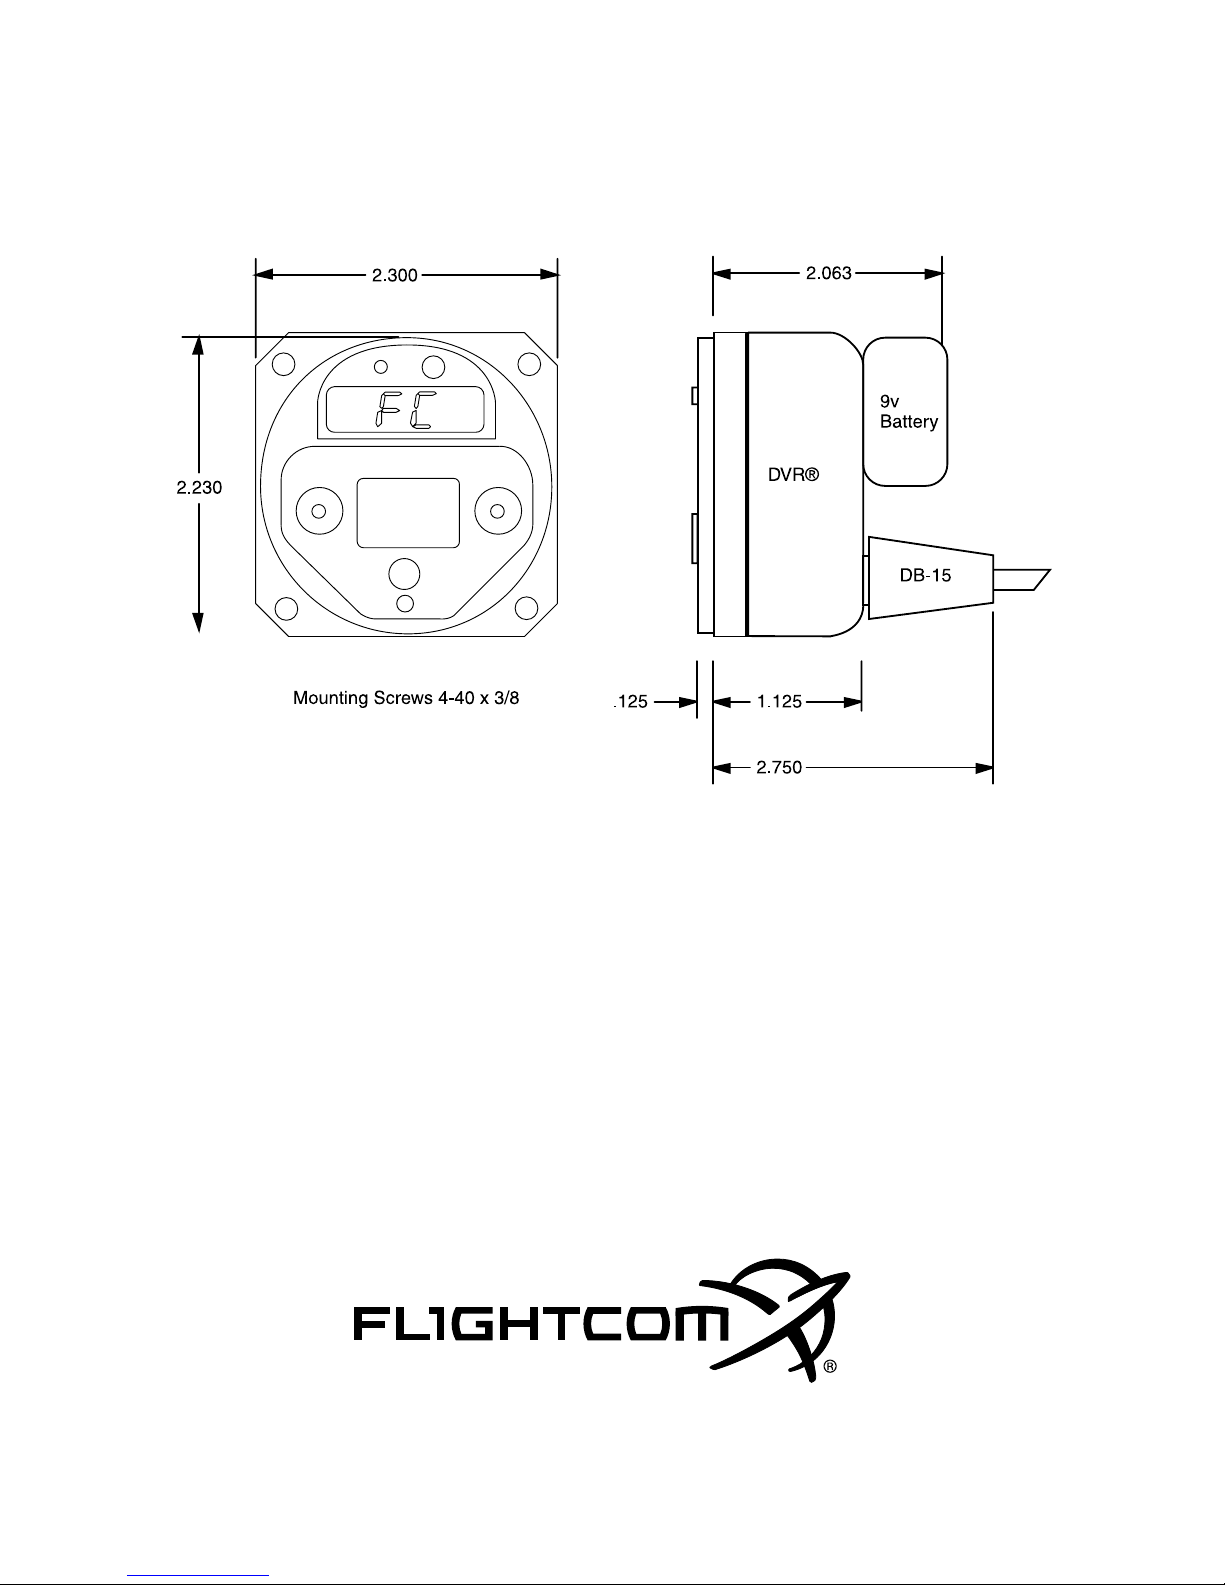
Mounting the DVR..................................................................................11
Power Connection ...................................................................................11
Fig. 1 - Power Schematics .................................................................12
Audio Connections..................................................................................13
Fig. 2 - Mono Audio Hookup ............................................................14
Fig. 3 - Stereo Audio Hookup............................................................15
Tes tin g t he Aud io Circu its .....................................................................16
Vol ume Ad jus tme nt ................................................................................16
Appendix 1: Mounting Template.............................................................17
Appendix 2: Master DB-15 Pinouts ........................................................18
Parts List..............................................................................18

-
Preface
-
DVR Questions and Answers
Is the DVR Clock TSO’d?
No. At this time, there is no TSO specification for cockpit clocks. Companies
such as Astrotech and Davtron have been installing non-TSO’d clocks in Part
135 aircraft for years, from 152’s to Air Force One.
How do I get an installation approval?
Because the DVR Clock is placed in-line with your audio path, it is similar
to an intercom installation. The installation of the DVR Clock is a
modification to your aircraft, and you’ll need to have a Form 337 filled out
and signed by your avionics shop. Flightcom has sample 337’s on file from
previous installations and we can FAX you these if your particular FAA
official is unfamiliar with the DVR recorders.
Suppose I don’t want to record cockpit audio?
You co uld wi re it be twe en th e ra dio an d t he int erco m ( see pa ge 10) ot her wis e,
the DVR Recorder has no way of distinguishing between your voice and the
controllers. Therefore, your cockpit audio is recorded as part of the voice activated loop. Remember, though, that the endless loop accounts for only one
minute of the total recording time, and it is written over with the next recording
cycle. It does not “wear out” the recorder to constantly record all audio.
Furthermore, you may want to hear what you told that controller.
What happens when I’m out of recording time?
The DVR never runs out of recording space with its endless loop. When one
minute has been recorded, the oldest audio is pushed off the end, much like a
digital conveyor belt. If you’re recording a manual message or a checklist
item, the DVR simply beeps and ceases recording when speech memory is
exhausted.
Do my passengers hear the instant replay?
It depends on where you connect the audio (see page 10) and on which intercom you have installed, if any. If an intercom has good isolation between
headsets (i.e. Flightcom), the pilot alone will hear the replay. If the intercom
uses a common audio buss (i.e. Sigtronics), all passengers will hear the replay
from the DVR.

1
General Information
s pilots, all of us have had to ask Air Traffic Control to “Say Again”
at one time or another. Asking ATC to confirm a heading, repeat
a squawk code, or reiterate a frequency can make a pilot look like
an amateur.
The DVR
®
Clock is a 2 1/4" panel-mount Digital Voice Recorder and
timekeeping device designed for commercial and general aviation use.
When installed in your aircraft panel, the DVR Clock captures all ATC
communications. You can replay missed or misunderstood clearances at
any time, similar to the “instant replay” we see on TV football games.
Since the DVR is voice-activated, it doesn’t record the “dead air” between
radio transmissions, making efficient use of its internal speech memory.
This also means you don’t have to push any buttons to initiate recording,
insuring all audio is captured automatically.
Each DVR Clock features:
•LOCAL OR ZULU TIME DISPLAY
•ELAPSED TIME DISPLAY (FLIGHT TIME)
•PSEUDO-HOBBS METER DISPLAY
•APPROACH TIMER
•UPTO5 MINUTES OF DIGITAL VOICE STORAGE
•UPTO32 VOICE CHECKLIST ITEMS
•NON-VOLATILE SPEECH MEMORY
•PERIODIC VOCAL REMINDERS
•NIGHT LIGHTING SYSTEM AND AUTO-DIM DISPLAY
Please read this guide carefully, and try out your new DVR Clock
while you’re on the ground before attempting to fly with it.
A
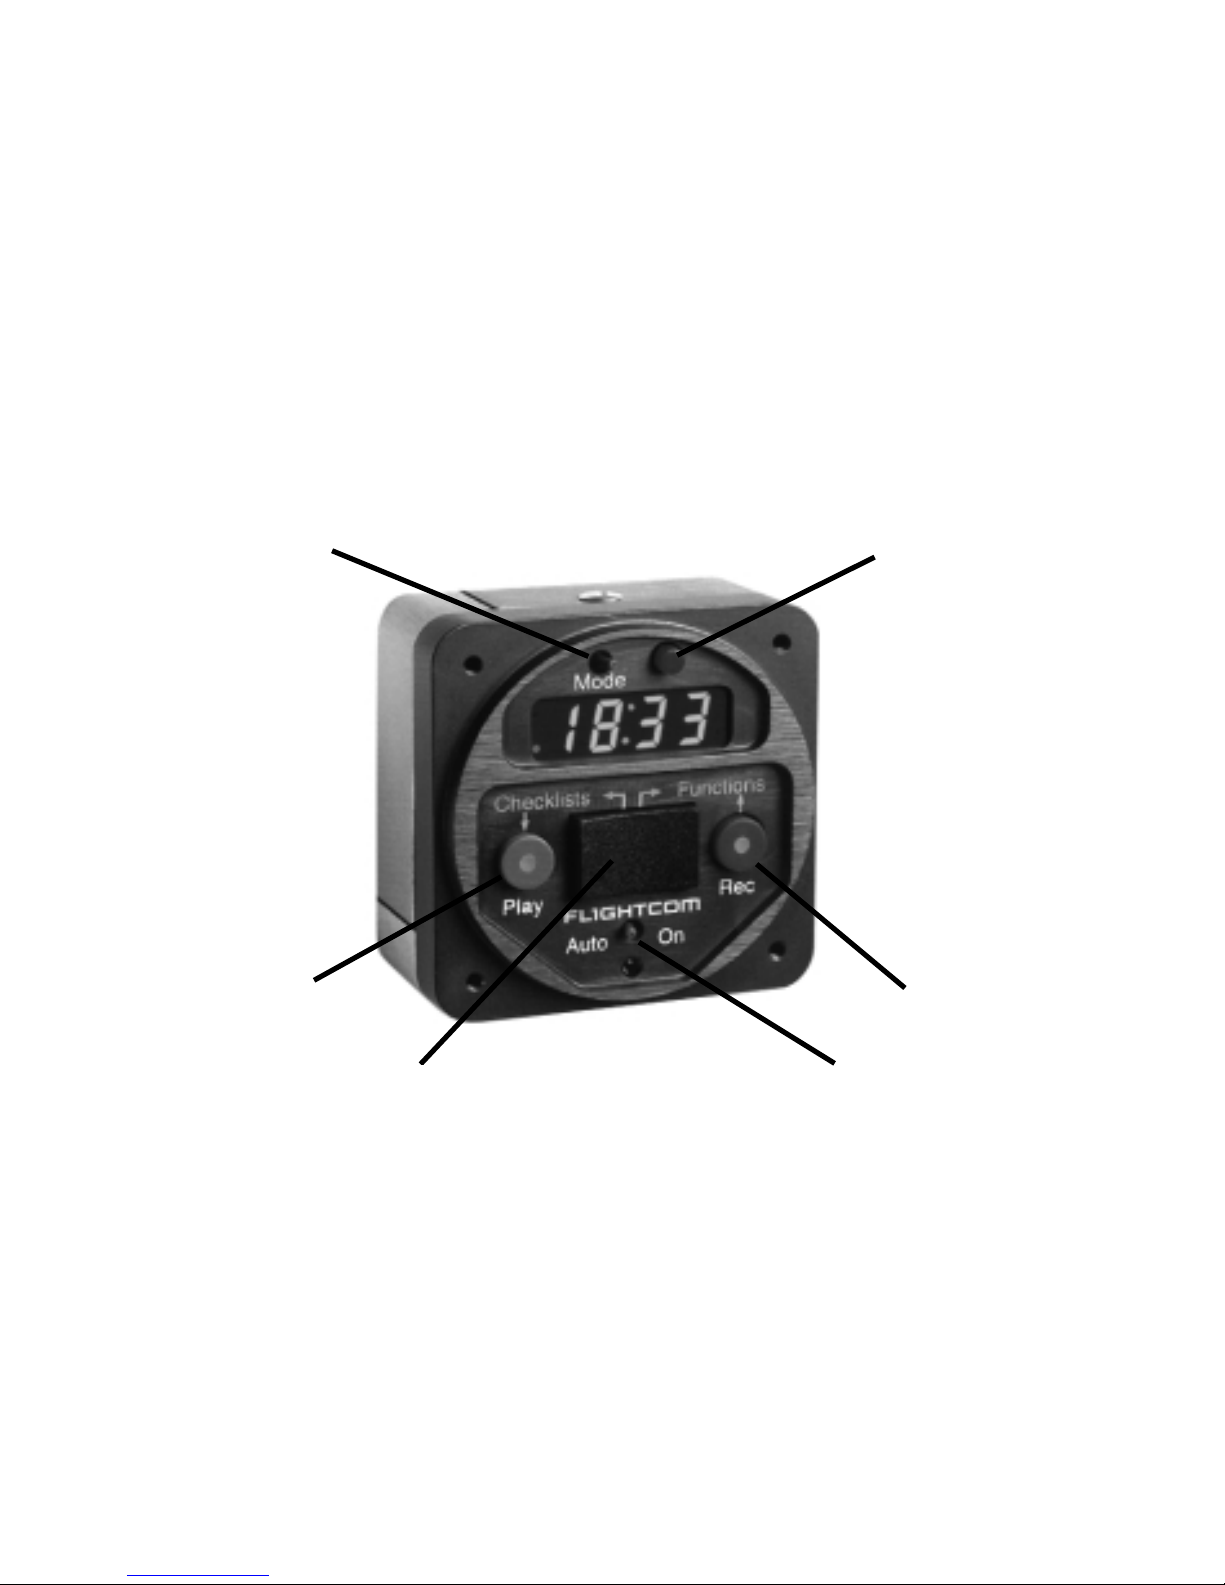
Throughout this guide, we’ll be referring to the DVR switches as:
❶ MODE ❹ POWER
❷ TIME ❺ SKIP
❸ RECORD ❻ PLAY
The DVR Model 300i has indicator lights on the buttons.
Whenever these lights flash rapidly, it is a prompt that you may
press the button to invoke a function. When the lights flash
slowly, it means some function is being carried out.
2
Part I - Using the DVR®Recorder
After you’ve had your DVR installed by a qualified avionics technician,
you should familiarize yourself with its functions while you’re still on the
ground. This way, using it in a busy cockpit environment will become
second nature.
The DVR Clock was designed to be versatile, yet remain as simple as
possible to operate. We have purposely not overloaded it with buttons or
stuffed it with complicated time functions which we found most pilots
don’t use anyway.
DVR®Clock Front Panel
❷
❶
❸
❹
❺
❻

3
Turning on the DVR®Clock
If your avionics technician has connected the aircraft battery to the DVR,
you can turn the clock on by flipping the Power switch to the far right
(“On”) position. This lets you work with the clock without turning on the
avionics master switch.
IMPORTANT: Don’t leave the power switch “On” if your
aircraft battery is connected. This position is only for your
pre-flight convenience in setting time, doing checklists, etc.
The clock’s 50 mA load will drain your aircraft battery if you forget
about it and leave it “On” for several weeks.
Normally, the Power Switch should be in the “Auto” position, which
powers up the clock only when you turn on the avionics master.
The center position of the Power switch is “Off.” If, for any reason you
need to shut the DVR down, flip the switch to the center position.
Setting the Time
You r cl oc k was sh ip pe d f ro m th e fact or y wi th Gr ee nw ic h Me an Ti me
(GMT or Zulu time) already set. You may have to set your local time.
To set local hours and minutes, make sure the Mode switch is in the far
right position, displaying the time of day. Press and hold the Skip
button, and while Skip is down, hit the Time button. You will see local
hours begin to flash.
Now hit the Play or Record button to decrease or increase the local hours.
When you have the correct hours displayed, hit Skip to go to the minutes
setting. You may now hit the Record and Play buttons to change the minutes. When minutes are correct, hit Skip to advance to Zulu hours setting.
NOTE: If you change Zulu hours, you’ll have to set local hours again.
!
 Loading...