

Page 1
CLASSIC ANR
U S E R S G U I D E
Page 2

• Insert the larger plug into the jack marked “headphone” or “phone”.
• Insert the smaller plug into the jack marked “microphone” or “mic”.
• Insert 9V battery (included) into the battery compartment.
• Set the stereo/mono switch located beside the belt clip on the battery
pack to “M” position. If connecting to a stereo intercom, set the switch to the
“S” position.
To activate the ANR, locate the switch at the top of the battery
compartment and select “I” for “on”. A Flashing green LED will indicate it is
Special placement of speakers and microphone within the eardome allow the ANR technology to sample a selection of sounds
that pose some risk for hearing damage, and create an equal
but opposite sound to cancel the noise before it enters your ear.
• The mic boom should always be worn from the left side.
• To increase the size of the headset, slide the domes in a downward
direction. To decrease, slide the domes in an upward direction.
• Properly fitting the headset to each
wearer’s head is crucial to performance. The headpad
should fit comfortably on top of the head, without a gap
or space between the head and headpad. The headset
should be centered on the head, and the ear seals should
comfortably cover the ears, without being placed too far forward on the jawbone or face. Place the mic no more than
1/8” from the lips to ensure clarity and peak performance
of the noise canceling mic.
• A volume control is provided for each ear dome.
A N R T E C H N O L O G Y
I N S T A L L A T I O N
F I T T I N G I N S T R U C T I O N S
Page 3

If the aircraft does not have a built-in push-to-talk (PTT) switch, a portable
PTT switch must be installed in order to use the radio. The master gain control located in the aircraft radio should be optimized by an avionics technician
whenever adding a new model microphone to the system.
Feedback (Squealing):
• The mic boom should always be worn from the left side. Speaker placements in this ANR system are calibrated for this configuration. Wearing the
mic boom from the right may result in feedback (squealing).
• Be sure the ear seals are against the head on both sides.
• The electronics and acoustical cavity of the ear cup were tuned to the
characteristics of the Flightcom ear seals, and
we recommend that you only use Flightcom replacement parts when performing recommended annual h y g i e n e
maintanance. Installing incorrect ear seals may result in inproper
fit and feedback (squealing).
Volume too loud (or soft) in one ear dome:
Adjust volume using control knob on each ear dome to achieve comfortable
volume balance.
No sound in one ear dome:
Switch to “M” on the M/S (Stereo/Mono) switch next to clip on ANR battery
pack.
Blinking red LED on battery pack:
Battery voltage is low and needs replacing.
No light on battery pack:
ANR is switched off, or battery needs replacing.
O P E R A T I O N A L T I P S
T R O U B L E S H O O T I N G
Page 4

QUESTIONS CALL TOLL FREE 1-800-432-4342
FLIGHTCOM CORPORATION
7340 SW Durham Road, Portland, Oregon 97224 U.S.A.
503-684-8229 • FAX 503-620-2943 • [email protected] • www.flightcom.net
© 2002 Flightcom is a registered trademark of Flightcom Corporation.
All rights reserved. Printed in U.S.A. Specifications subject to change without notice.
Three-Year Limited Warranty to Original Purchaser
Flightcom Corporation warrants to the original purchaser of this product that it will be free from defects in
materials and workmanship, under normal and proper use, for the period of three years from date of pur-
chase. Flightcom Corporation will repair or replace, at its sole option, any parts showing factory defects during
this warranty period, subject to the following provisions. This warranty applies only to a new product which
has been sold through authorized channels of distribution. All work under warranty must be performed by
Flightcom Corporation. All returned products must be shipped to our address, freight prepaid, accompanied
by a dated proof of purchase. SAVE YOUR SALES SLIP! The purchaser voids this warranty if he, she or others
attempt to repair, service or alter the product in any way. This warranty does not apply in the event of accident,
abuse, improper installation, unauthorized repair, tampering, modification, fire, flood, collision or other damage
from external sources, including damage which is caused by user replaceable parts (leaking batteries, etc.).
This warranty does not extend to any other equipment or aircraft to which this product may be attached or
connected. The foregoing is your sole remedy for failure in service or defect. Flightcom Corporation shall not
be liable under this or any implied warranty for incidental or consequential damages, nor for any installation
or removal costs or other service fees. This warranty is in lieu of all other warranties, express or implied,
including the warranty of merchantability or fitness for use, which are hereby excluded. To the extent that
this exclusion is not legally enforceable, the duration of such implied warranties shall be limited to three years
from date of purchase. No suit for breach of express or implied warranty may be brought af ter three years
from date of purchase.
600-0062-00
Page 5

Headset: Classic ANR
Sensitivity ANR off: 98 dB re .0002 microbar @ 1000
Hz, 1mW
Sensitivity ANR on: 110 dB re .0002 microbar @ 1000 Hz, 1mW
Frequency Response: 20-10,000 Hz +/- 10 dB in 6cc coupler
Impedance: 300 ohms nominal, 150 to 1200 ohm source
Weight: 17.6 ounces without comm cable
Weight of comm cable: 4.0 ounces
Shielded cable: Full floating with independent ground
Microphone:
DC Bias Supply: 8 to 16 volts, not polarity sensitive
Source Resistance: 220 to 2200 ohms
Output Voltage: 370 mV @ 114 dB spl re .0002 microbar
Frequency Response: Optimized for speech clarity and noise
reduction
Maximum Ambient
Noise Level: 120 dB spl re .0002 microbar
Caution:
Bias voltage supplied to the microphone must come from voltage and resistance ranges specified above. Voltages supplied in excess of those stated
in the specifications can cause microphone failure and void warranty. The
mic audio signal is present between the ring and barrel of the mic plug; tip is
reserved for transmit keyline.
Inside each ear cup of your headset you will notice an oval fabric piece. This
is intended to prevent debris from entering the speaker element and to help
prevent feedback of the ANR system. Do not operate the ANR modules
without these fabric pieces in place.
S P E C I F I C A T I O N S
Page 6
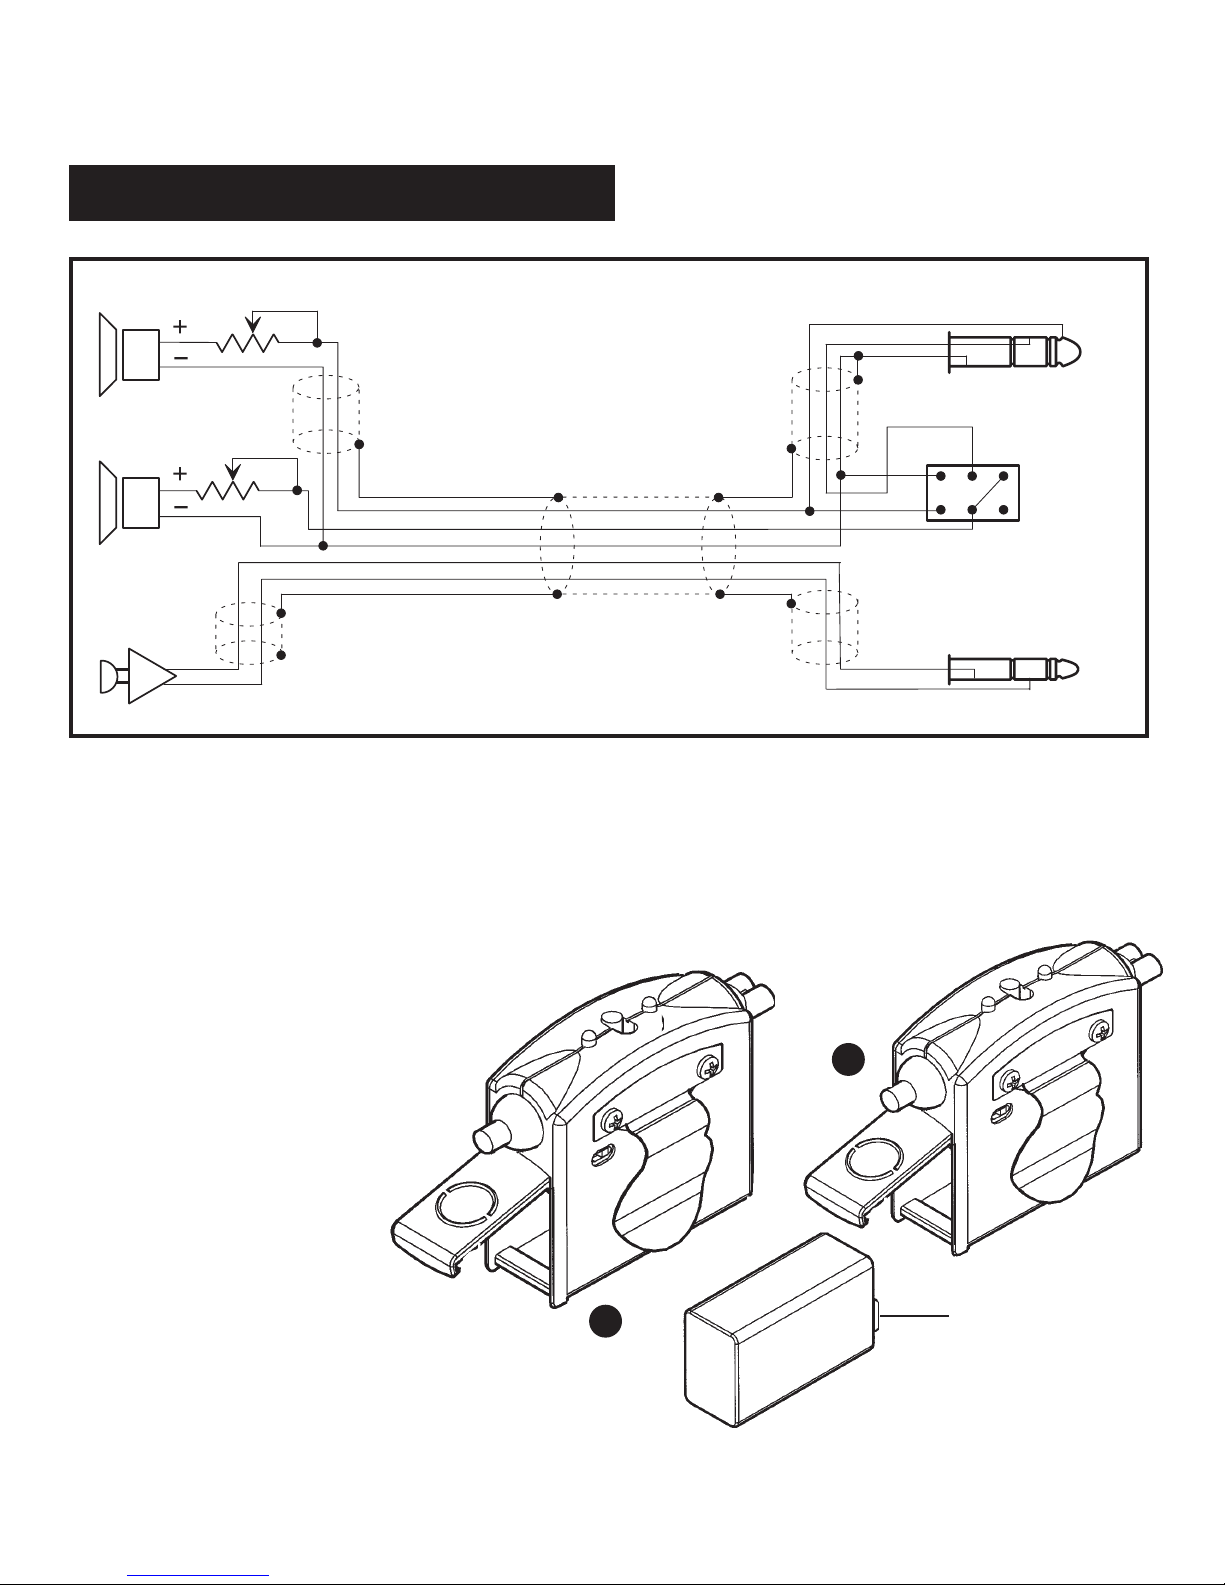
W I R I N G D I A G R A M
Right
Left
Speakers
Mic.
6.3 mm Plug
5.2 mm Plug
M
S
ANR circuitry is not represented in this diagram.
Questions? Call toll free 1-800-432-4342
Replacing the Battery:
Do not use rechargeable batteries.
To install or replace the ANR Battery,
open the battery door by sliding
the door in a downward motion till it
unlatches, and lift up as shown
in diagram A.
Slide the 9 volt battery in with
the large battery contact on
the bottom. If you put the
battery in upside down,
it will not activate.
See diagram B.
Battery life is dependent on
the ambient noise in the aircraft,
but should provide an average
of 20 hours of continuous use.
larger contact
on bottom
A
B
 Loading...