

Page 1
Flightcell InternationalLTD
DZMx Operator's Manual
Version: 2.8.0
Flightcell DZMx Operator's Manual
MAN_DZ4_002
Document Version 11.0
Wednesday, 6 July 2016
Page 2

CONTENTS
Section 1 Operator's Manual 1
Overview of DZMx Functions 1
DZMx Keypad References 2
Section 2 Operator Interface 3
LCDDisplay 4
Understanding the Main Screen 5
DZMx Menus 6
Navigating the Menus 6
Status Messages 7
Network Status Messages 7
Error Messages 7
Calling Status 7
Messaging Status 8
Data Status 8
Tracking Status 8
Backlighting 9
Switching Backlight Modes 9
Altering Backlight Brightness Levels 9
Global Positioning System (GPS) 11
Setting the GPSDisplay 11
Section 3 Phone Calls 12
Initiating a Call 12
Answering a Call 12
Extra Call Features 13
Audio Settings 14
Adjusting DZMx Audio Levels 14
Section 4 DZMx Messaging 15
Incoming Messages 15
Viewing an incoming message 15
Viewing messages in the Inbox 15
Missed Call Notifications 15
Sending Messages to the DZMx 15
Outgoing Messages 16
Sending Messages from the DZMx 16
Replying to a Message 16
Cancelling unsent messages 16
Section 5 Phone Book 17
Adding a New Contact 17
Editing an Existing Contact 17
Deleting an Existing Contact 17
CONTENTS
Page 3

Section 6 DZMx Data 18
Cellular Data 18
Satellite Data 18
Section 7 G.P.S. Tracking 19
Automatic Position Reports 19
Manual Position Reports 19
Enabling Tracking 19
Suspending or Disabling Tracking 20
Adjusting Tracking Settings 20
Section 8 DZMx Applications 21
Forms 22
What is Forms? 22
Forms Settings 22
Creating Forms 23
Completing a Form 23
Retrieving Form History 24
Cellular Flightmode 25
Toggling Flightmode 25
Cabin Phone 26
Dialling a Phone Number 26
Intercom Calls Between Cabin and Cockpit 26
Transferring a Call to the Pilot 27
Transferring a Call to the Cabin Phone 27
Cabin Phone Status Messages 27
Automated Rescue Monitoring (A.R.M.) 28
Activating A.R.M. 28
Deactivating A.R.M. 28
A.R.M. Status Messages 28
Alert Mode 30
Activating Alert Mode 30
Emergency and Distress Mode 31
Activating Emergency Mode 31
Contact Details 32
Mailing Address 32
Physical Address 32
Warranty 33
CONTENTS
Page 4
Section 1 Operator's Manual
The Flightcell DZMx provides global voice, data communications and aircraft tracking. This manual is
designed to help users learn how to use their DZMx, from basic to more advanced features. The DZMx
Installation Manual provides the instructions for the initial set up and configuration of a DZMx.
Overview of DZMx Functions
The Flightcell DZMx is a powerful communications system that uses the Iridium satellite and/or 3G cellular
networks to provide:
Voice calling and Data
The DZMx provides a global phone service, enabling calls to virtually any phone in the world.
The DZMx is interfaced to the aircraft audio system, providing all crew connected to the audio
system with access to the available phone networks.
A cabin phone may also be installed for passengers’ use.
Calls are dialled from the DZMx keypad, or by using the phone directory or speed dial keys to
retrieve and call stored phone numbers.
Other parties can call the aircraft by dialling the aircraft’s satellite or cell phone numbers.
Connect to the Iridium or 3G/4G cellular networks to provide a data connection via the DZMx
Ethernet port.
Two-way messaging
SMS text messages can be sent to the DZMx over either the satellite or cellular networks.
SMS/SBD messages can also be sent to the DZMx over the Iridium network from an Iridium web
application or any email program.
Messages from the DZMx’s message library can be sent either to another satellite phone or cell
phone, or to your tracking service provider.
Aircraft tracking
The DZMx can send periodic position reports automatically and manually triggered position reports to one
of a number of tracking service providers. Additionally, the DZMx can be configured to send position
reports that mark specific events, including:
Start-up
Engine start and stop
Take-off and landing
Course change
Manual position
Emergency (mayday)
Automated Rescue Monitoring (A.R.M.)
Other special purpose events.
SECTION 1 Operator's Manual 1
Page 5
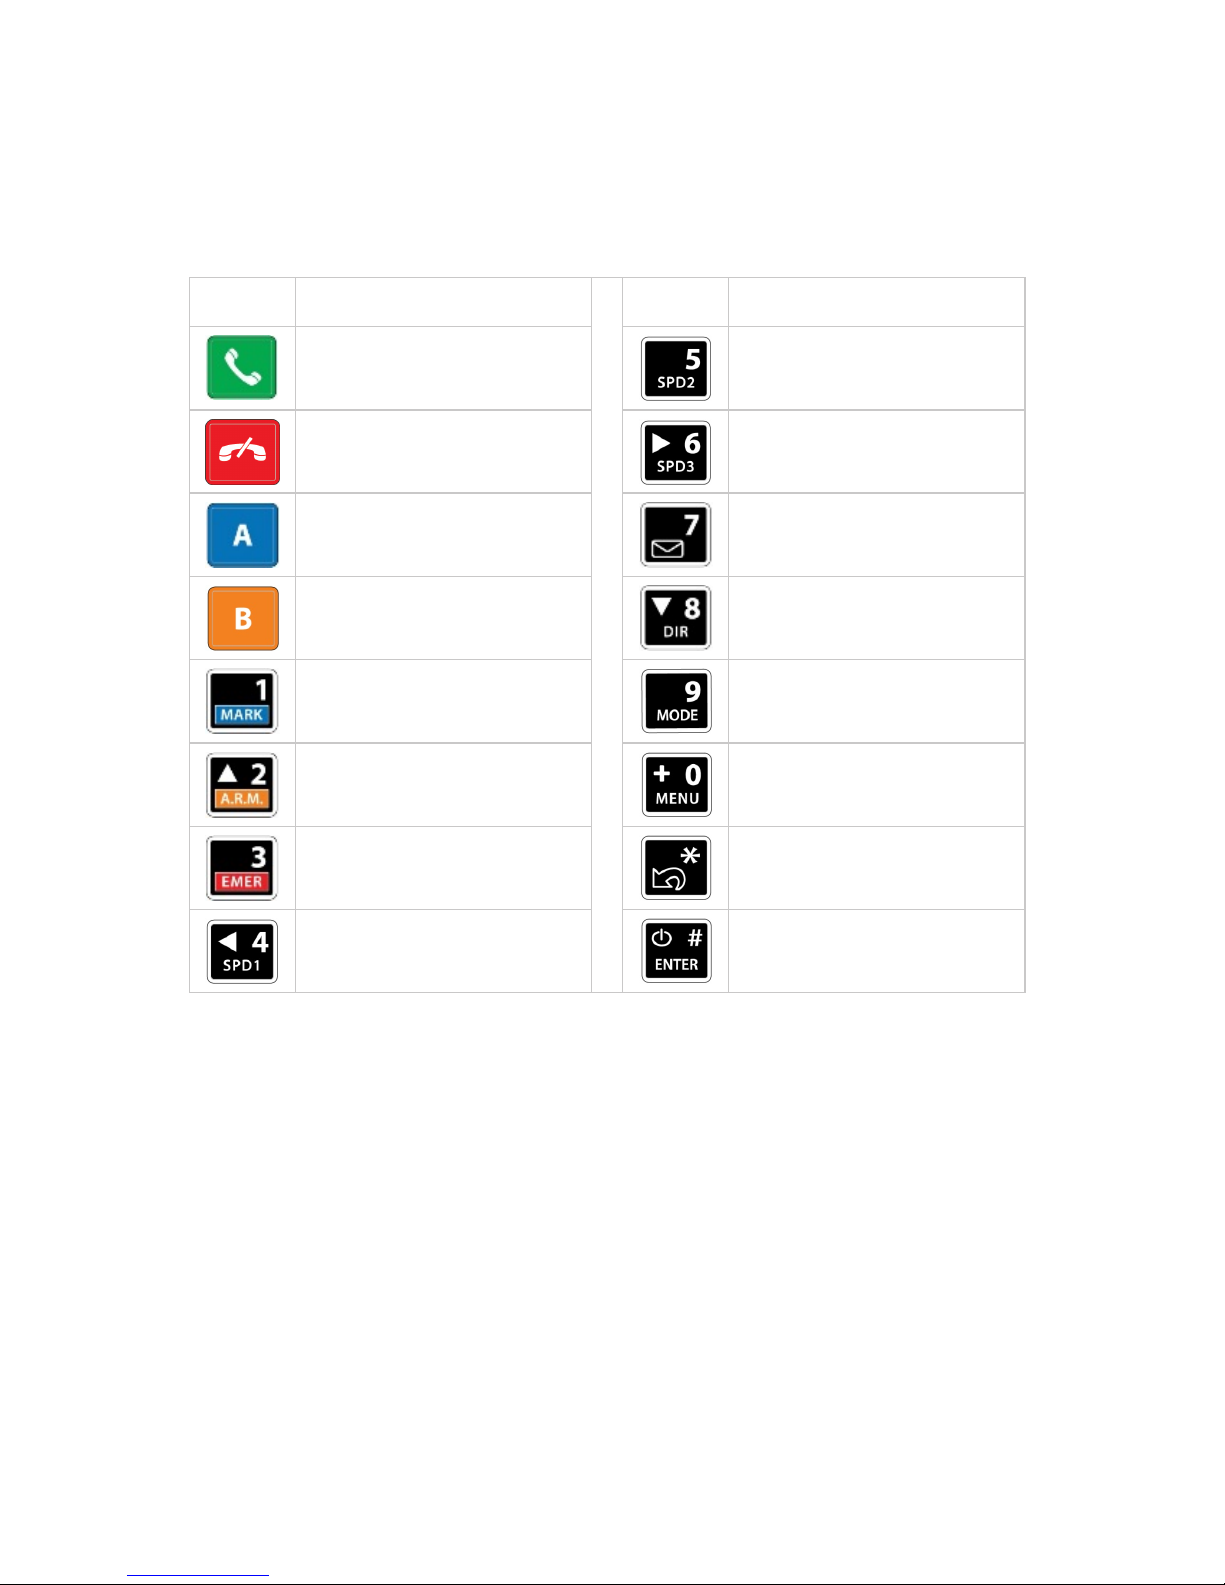
DZMx Keypad References
The following table outlines the DZMx keypad buttons and how they are referenced throughout the
manual. This will be a handy page to return to when unsure which button is being referenced.
Icon Manual Reference Icon Manual Reference
CALL 5, SPD2
END 6, RIGHT, SPD3
A 7, MSG
B 8, DOWN, DIR
1, MARK 9, MODE
2, UP, A.R.M., ALERT 0, +, MENU
3, EMER *, BACK
4, LEFT, SPD1 #, ENTER, POWER
SECTION 1 Operator's Manual 2
Page 6

Section 2 Operator Interface
This manual contains several sections to help guide you through the DZMx operation and settings. The
display and user interface consists of:
"LCDDisplay" on the next page
"DZMx Menus" on page 6
"Status Messages" on page 7
"Backlighting" on page 9
SECTION 2 Operator Interface 3
Page 7
LCDDisplay
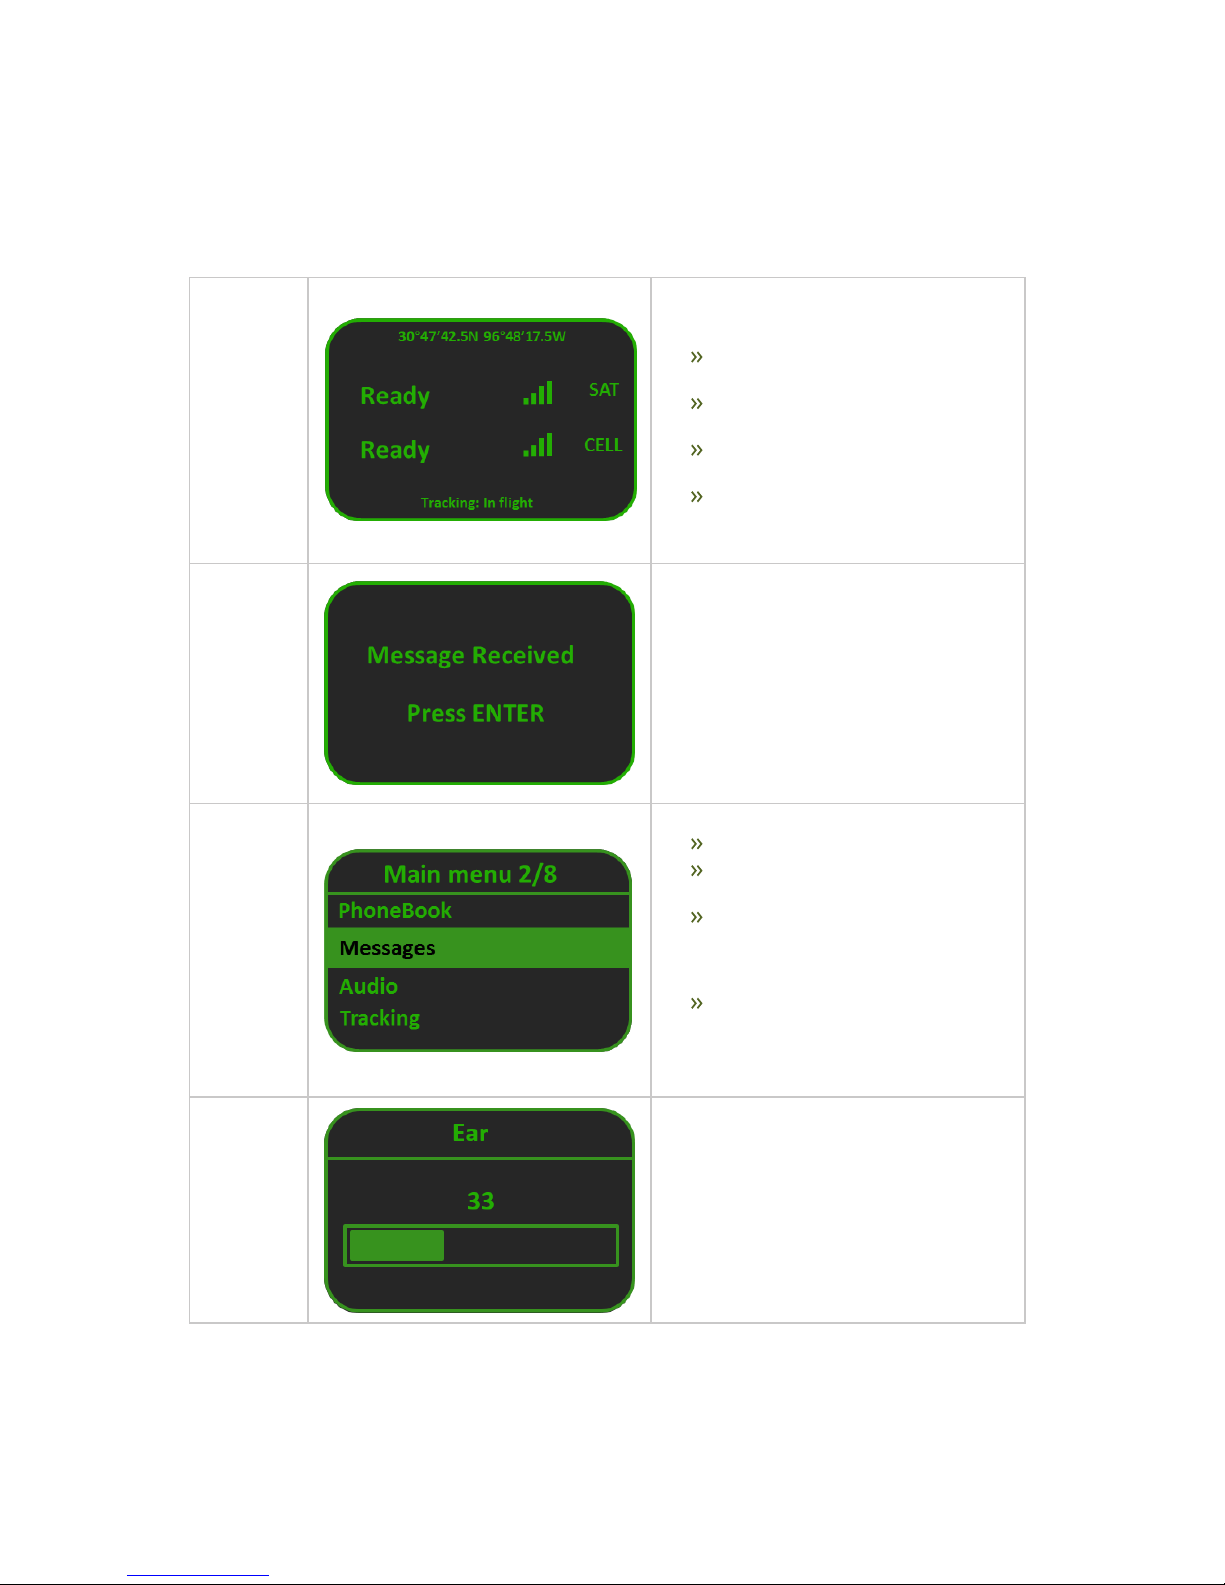
The DZMx is installed with an inbuilt LCD display to show timely and important information to users. The
LCD can show several different views:
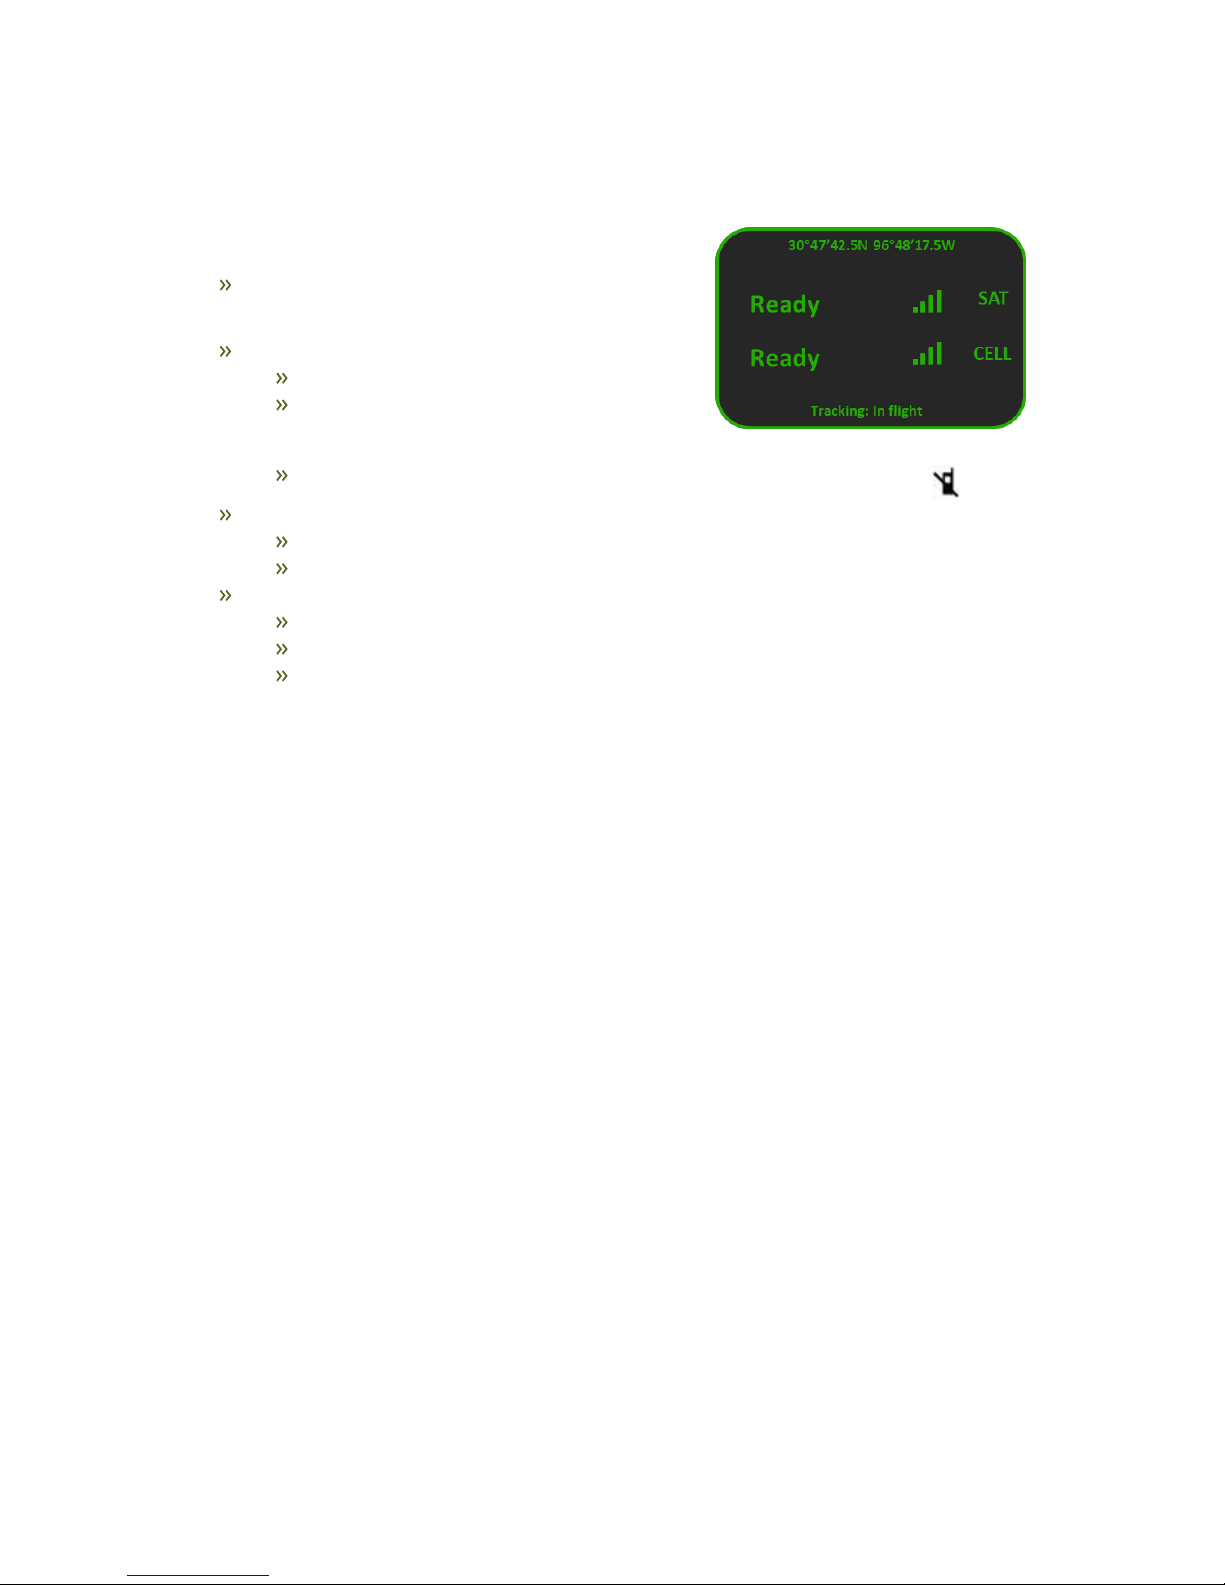
The Main
Screen
After the DZMx has booted and initialised,
the display will show the main screen. This
shows:
GPS information (at the top line of the
screen).
Phone networks designated to the two
soft keys, A and B.
Network connection status and signal
strength for the installed modem(s).
Other status messages (at the bottom
line of the screen)
Pop-up
Screens
Pop-up screens are used to announce events
such as incoming calls and messages.
Some pop-up screens will be accompanied
by an audible alert (e.g. for an incoming call
or text message) or warning (e.g. if
Automated Rescue Monitoring remains
active after landing).
Most Pop-up screens will have a time-out and
will automatically disappear, but all can be
cleared from the display at any time by
pressing the Enter key.
Menu and
List
Screens
These show either:
Available menu options, or
A list of items, e.g. received
messages, phone book entries.
The currently selected item will be
highlighted. The user can navigate the
list using UP and DOWN and select
the item by pressing ENTER.
Next to the title of the list will appear
two numbers, the first one is the index
of the current item selected, the
second one is the total number of
items in the list.
Settings
Adjustment
Screens
These show the current value when adjusting
or viewing settings such as audio volumes or
backlight brightness.
The slider bar shows the setting as a
percentage of the maximum available value
and can be adjusted using LEFT and RIGHT.
Changes can be confirmed by using ENTER,
or aborted by using BACK or END.
SECTION 2 Operator Interface 4
Page 8
Understanding the Main Screen
During normal operation, the DZMx LCD display shows the Main
Screen. This displays:
On the top line: The current GPS information, which can be
changed in the GPSsettings (see "Global Positioning
System (GPS)" on page 11).
In the centre of the display, modem information:
Modems installed in each position in the DZMx
Status of each of the installed modems; this
changes depending on the operation currently
being performed
Signal strength (up to five bars); if the phone doesn’t have a connection, it shows .
Above the "modem information", additional information on:
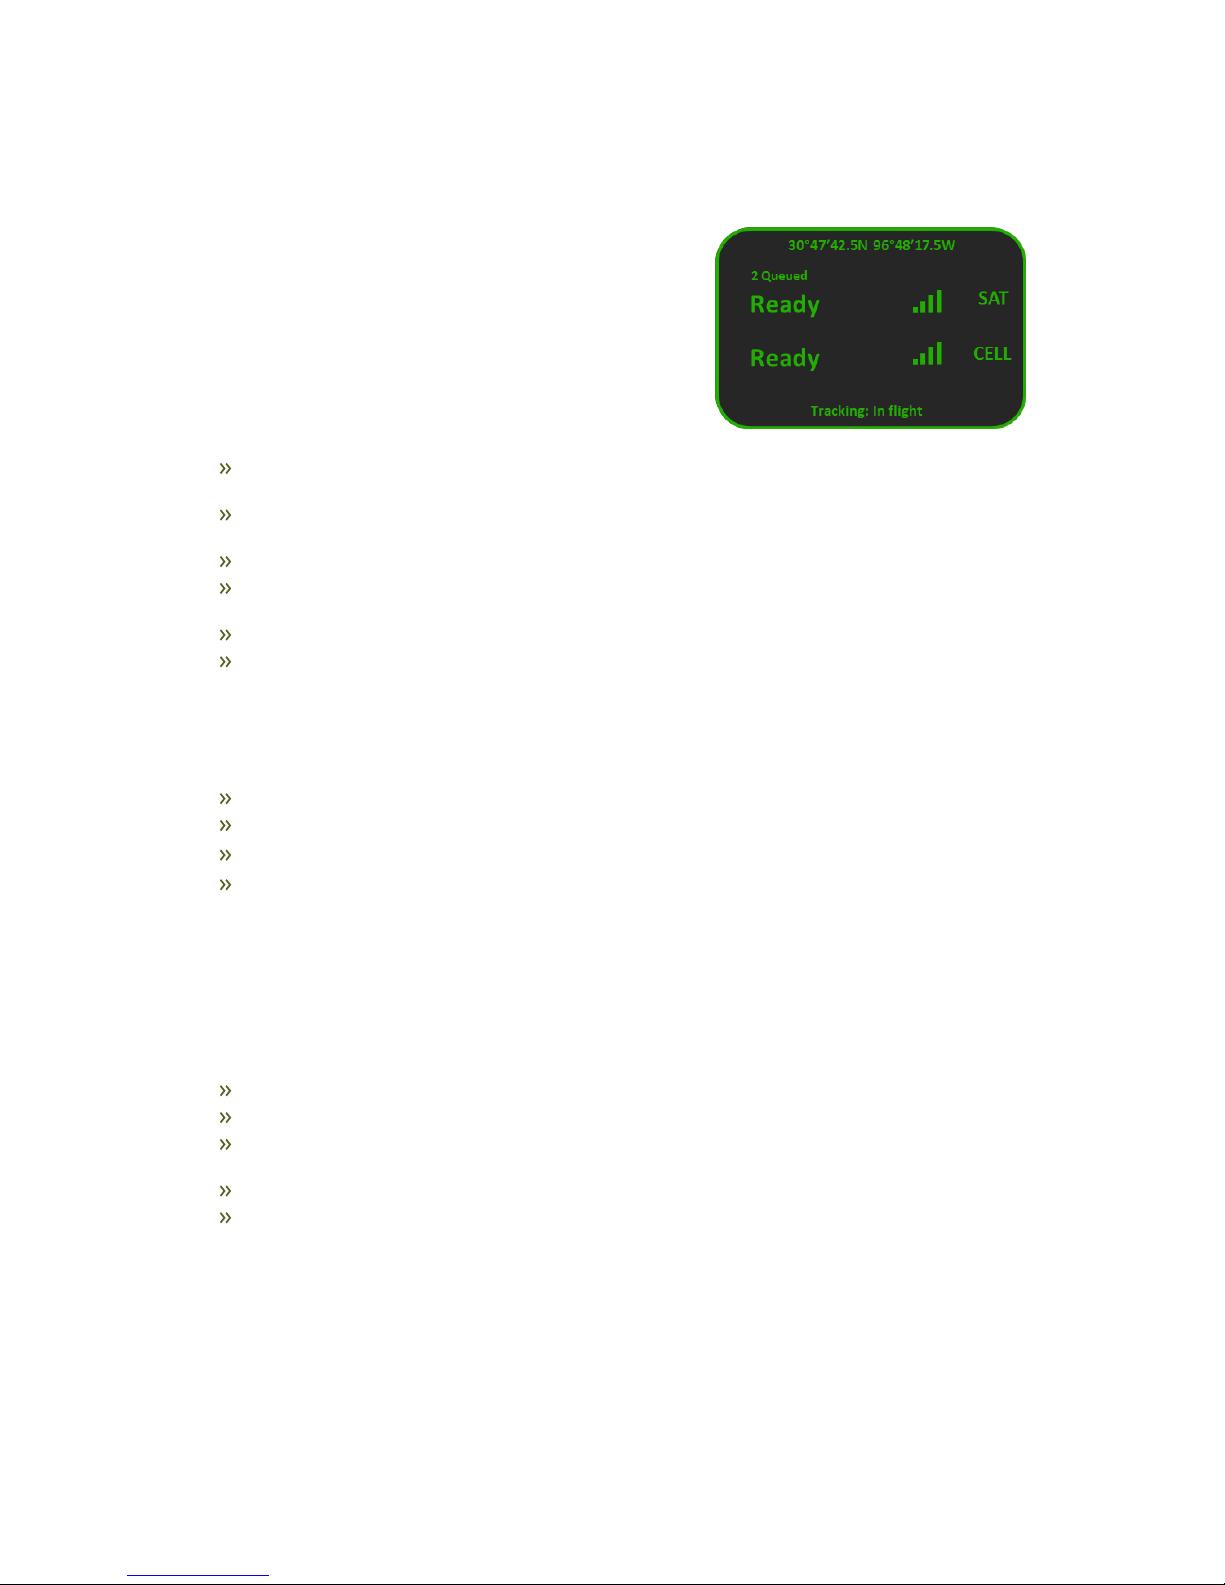
Messaging activity, including number of queued messages
Phone number or name of the other party to an active phone call.
On the bottom line, information for:
Tracking status (messages and events)
A.R.M status.
Distress/Emergency status
SECTION 2 Operator Interface 5
Page 9
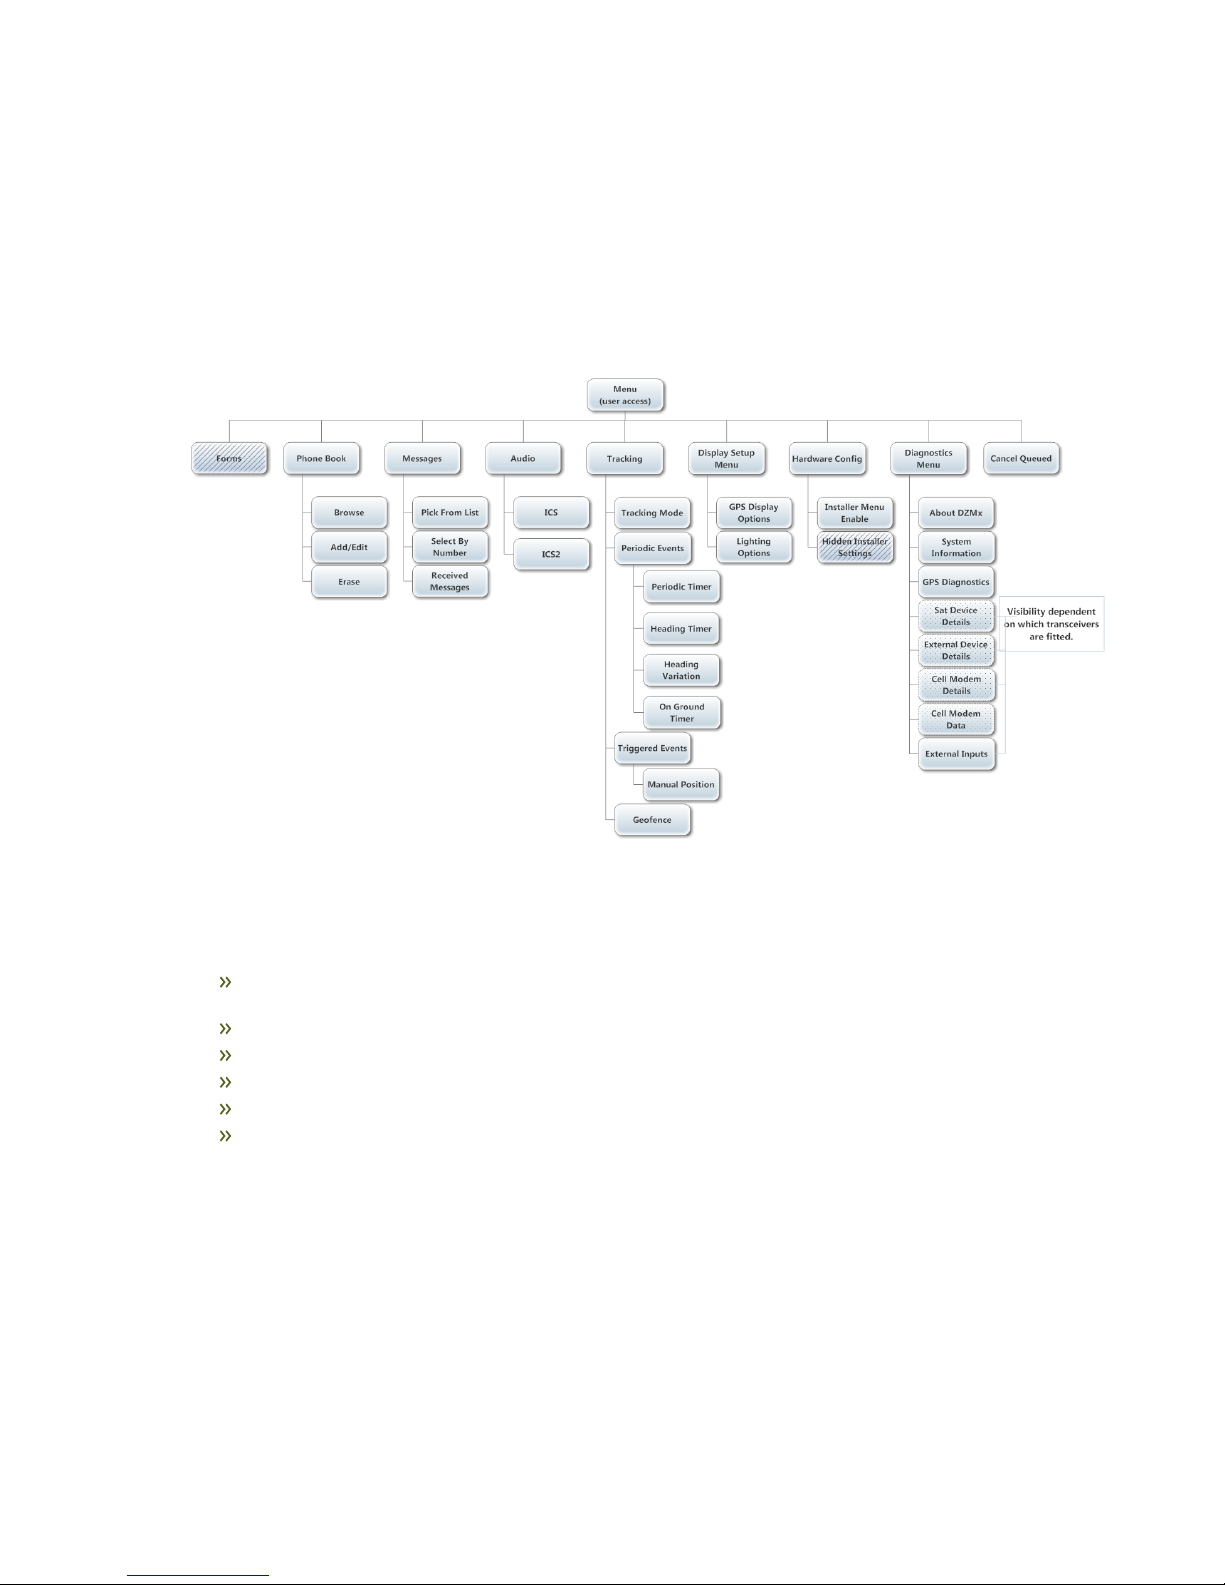
DZMx Menus
The DZMx has an extensive menu system providing access to a range of functions, settings and diagnostic
information.
The menu system provides access to user level settings, such as tracking timers, basic audio configuration,
GPS display options and phone book management.
A number of settings are used to configure the DZMx for a specific operation or application; these are
normally hidden from the user and an installer password is required to access and change them.
Navigating the Menus
The DZMx keypad is used to access the menu system:
Press MENU. If the DZMx is on a phone call, press and hold MENU for 2 seconds to access the
menus
Use UP and DOWN to navigate between menu options
Press ENTER to select the highlighted item
Press BACK to cancel a setting change and to move back up a menu level
Press ENTER to confirm a setting change
Press END to cancel a setting change and exit the menu system.
SECTION 2 Operator Interface 6
Page 10
Status Messages
The DZMx has four status message regions on the main display
for GPS, the modems, queued messages and tracking. For
information on the GPS status line, including configuration, see
"Global Positioning System (GPS)" on page 11. The modem status
lines are used for reporting to the user various messages
including network status and call/messaging activity.
Network Status Messages
The modem status message will change as the DZMx powers up
and establishes a connection to the network:
Initialising: The modem has established a connection to the modem and is in the process of
initialising the device
Ready: The modem is powered on, successfully initialised, registered on the network, and is
reporting a good signal strength
Searching: The modem is searching for a good signal
Disabled: Flightmode has been activated. The modem is disabled until flightmode is deactivated,
see "Cellular Flightmode" on page 25
Online: Modem Data connection has been established
Going Online: The modem is establishing a data connection.
Error Messages
The modem status lines will show error messages if the DZMx is unable to connect to the network for the
following reasons:
SIM Error: Either no SIM is inserted, or is not registered with the network provider.
SIMPINRequired: The SIMcard is locked and requires a PIN
Not Inserted: The DZMx cradle is reporting there is no phone in the cradle (external cradles only)
Not Responding: The modem is not responding to the DZMx. Occurs when the modem is not
configured correctly.
Calling Status
While you are making a phone call, the modem status lines will show you which device is currently being
used for the call, and on the line above, who you are calling, or being called by. If the other party is listed in
the DZMx’s phone book, then the information line will display their name.
The phone or modem status message changes as the DZMx establishes a connection with the other party:
Calling: The DZMx has dialled the number but a connection has not yet been established
On Call: The DZMx has established a connection and the other party has accepted the call
Incoming Call: flashed on the DZMx display, an audible ringing tone will sound over the audio
system and the call annunciator light (if installed) will flash if there is an incoming call
Call Queued: The DZMx has queued the call, and will start the call when the modem is next free
Disconnecting: The phone call has been terminated at either end of the call or the modem loses
the connection.
SECTION 2 Operator Interface 7
Page 11
Messaging Status
The modem status messages will briefly show the status of the transmitted messages:
Receiving SMS: An SMS is being received
Sending Data: An SMS or SBD message is being transmitted
SMS Failed! or SBD Failed!: Transmission has failed, usually because of a low signal. The DZMx
will attempt to resend the message
SMS Sent or SBD Sent: An SMS or SBD message has been successfully transmitted.
The line above the messaging status will show the number of untransmitted messages in the message
queue.
Data Status
The modem status messages will show the status of the data connections:
Going Online: The modem is connecting to the network for data
Online: An SMS or SBD message is being transmitted
Tracking Status
The tracking status line on the bottom of the display will show aircraft and tracking status:
Tracking: Queuing is displayed if there are more than two messages in the message queue. This
indicates poor cellular and/or Iridium signal strength or that position reports are not being sent or
are being sent at a slower rate than they are being queued
Tracking: Queue Full! is displayed if messages have not been transmitted for quite some time due
to poor signal strength and now the queue is full. Any new position reports will be added to the
queue and the oldest one removed from the queue
Not Tracking: No GPS is displayed when the GPS does not have a fix. Position reports will not be
generated if there is no GPS fix
Not Tracking: Disabled is displayed when tracking has been disabled
Not Tracking: Suspended is displayed when tracking has been suspended
Not Tracking: On Ground is displayed when the DZMx is configured to only send tracking data
when the aircraft is in the air
Tracking: On Ground is displayed when the aircraft is on the ground and the DZMx is configured
to send on-ground position reports
Tracking:Inflight is displayed when aircraft is tracking and currently in a flight
Tracking: Takeoff and Tracking: Landed is displayed after the DZMx has sent take-off and landing
reports, if the DZMx is configured to record these events
Tracking: Hovering is displayed if DZMx detects the flight speed has dropped below the hover
speed threshold
Engine Start and Engine Stop is displayed after the DZMx has sent engine start and stop reports,
if the DZMx is configured to record these events
Geofence Active: nn NM is displayed if Geofence Suspend mode has been activated. nn is the
distance , in nautical miles, of the aircraft from the centre of the geofence area. Tracking will be
suspended for as long as the DZMx detects that the aircraft is within the geofence radius (see the
Flightcell DZMx Installation and Configuration manual for details of how to configure the DZMx
Geofence settings).
Additional status messages can also be generated when using "Emergency and Distress Mode" on page
31, or "Automated Rescue Monitoring (A.R.M.)" on page 28.
SECTION 2 Operator Interface 8
Page 12
Backlighting
The DZMx and DZMx Remote Head have a backlit keypad and LCD display. Backlight levels are adjusted
separately for the DZMx and remote head. The DZMx can support variable lighting controlled from the
aircraft dimmer control. Aircraft without dimmer controls can manually set the brightness to Day and Night
levels. Day backlight is set at maximum brightness on both keypad and display. Night backlight can be
adjusted separately for the keypad and LCD display.
External lighting provides the user with the ability to dim or brighten the display by adjusting the lighting
control input. External lighting is only available if the DZMx has been connected to the cockpit dimmer
control. See Flightcell DZMx Installation and Configuration manual for external lighting installation options.
Switching Backlight Modes
To switch modes between Day, Night and External backlighting:
Press and hold the "*" key on the DZMx or remote head for 2 seconds
Scroll to Backlight Mode
Use LEFT and RIGHT to change the setting
Press END to exit the menu.
Altering Backlight Brightness Levels
Day and Night Modes
Backlight settings can be adjusted separately for the keypad and LCD display. To configure backlight
settings on the DZMx or a remote head for Day and Night modes:
Press and hold the "*" key on the remote head for 2 seconds
Select the Day or Night setting as above
Scroll down to Display Brightness or Keypad Brightness
Use LEFT and RIGHT to decrease/increase the brightness
Press END to save the setting and exit the menu.
External Lighting Mode
The minimum and maximum brightness levels can be set individually for both the DZMx and any remote
heads. To change the minimum brightness options for the external lighting on the DZMx or remote head:
Press and hold the "*" key on the remote head for 2 seconds
Scroll to Advanced and press ENTER
Scroll to Ext Lighting Config Low and press ENTER
Set the dimmer control to the minimum position
Adjust the keypad and display minimum brightness using LEFT and RIGHT to match cockpit lighting
levels
Scroll to Input Calib. then press ENTER
Press END to save the settings and exit the menu.
To change the maximum brightness options for the external lighting on the DZMx or remote head:
Press and hold the "*" key on the remote head for 2 seconds
Scroll to Advanced and press ENTER
Scroll to Ext Lighting Config High and press ENTER
SECTION 2 Operator Interface 9
Page 13

Set the dimmer control to the maximum position
Adjust the keypad and display maximum brightness using LEFT and RIGHT to match cockpit lighting
levels
Scroll to Input Calib. then press ENTER
Press END to save the setting and exit the menu.
Note: While the lighting control input is reduced below the “minimum position”, the brightness
levels will switch to “Day” brightness.
SECTION 2 Operator Interface 10
Page 14
Global Positioning System (GPS)
The GPS information is displayed on the top line of the DZMx screen and can be varied to meet your needs.
The current available options for the display line are:
Off: no information shown
dddmm.mmmm: the aircraft’s position is shown in degrees and minutes (to 4 decimal points)
ddmmss: the aircraft’s position is shown in degrees, minutes and seconds
Speed and Heading: the aircraft’s speed and heading is shown in knots and degrees relative to
true north (rather than magnetic north)
Clock: the current time and date is shown.
Setting the GPSDisplay
To set the GPS display:
1. Press MENU then navigate to Display Setup Menu>>GPS Display Options
2. Press ENTER to select and use UP or DOWN to the required GPS display option
3. Press ENTER to save the setting or BACK to abort and return to the Display Setup Menu.
Note: The GPS will display No GPSLock, if the DZMx is unable to connect to the GPS network.
SECTION 2 Operator Interface 11
Page 15
Section 3 Phone Calls
The DZMx allows users to initiate phone calls over the Iridium and cellular networks, providing global call
coverage. Phone calls can be made directly from the DZMx or remote heads. The DZMx provides the user
with flexibility in choosing how to make their calls. This section describes the various options available for
making calls from the DZMx or remote heads.
Initiating a Call
Dialling a Phone Number
Select the modem to be used for the call by pressing A or B to display the
Enter Phone Number
screen
Enter the number using the "0" to "9" keys. For international calls requiring the dialling prefix “+”,
press and hold "0". Press BACK to delete the last digit entered.
Press CALL or ENTER to initiate the call
Press END to terminate the call at any time.
Calling a number in the phone book
Press DIR to display the phone book
Scroll through the phone book to the required contact using UP and DOWN
Press A or B to select the modem and initiate the call
Press END to terminate the call at any time.
Calling using Speed Dial
The speed dial keys are automatically linked to the first three numbers in the phonebook, respectively.
Press SPD1, SPD2 or SPD3 as appropriate, then the contact name and number will be displayed
Press A or B to select the modem and initiate the call
Press END to terminate the call at any time.
Redialling the last called number
Select the modem to be used for the call by pressing A or B to display the
Enter Phone Number
screen
Instead of entering a number, just press CALL; the contact name (if in the phone book) and number
of the last number dialled will be displayed
Press CALL or ENTER to initiate the call
Press END to terminate the call at any time.
Calling the sender of a text message
Open the message so it is displayed on the screen (see "Incoming Messages" on page 15 for how to
access received messages)
Press A or B to select the modem and initiate the call.
Answering a Call
When the DZMx detects an incoming call, and the pilot is not already in a call, an
Incoming Call
pop-up will
flash on the DZMx. If caller ID is supported by the network, the caller’s phone number, or name, if the
number matches any in the phone book, will also be displayed.
SECTION 3 Phone Calls 12
Page 16

Press CALL to answer an incoming call, or press END to reject the call
Press END at any time to hang up .
Extra Call Features
Touch tone dialling (DTMF) during a call
When calling through a switchboard or call centre, you may be asked to press various keys. This is called
touch-tone or DTMF dialling. The DZMx provides touch tone dialling when in a call. Simply press the 0 to 9
or * or # keys when prompted during a call.
Dual Calling
DZMx installations with more than one modem are able to make two calls simultaneously. When Dual
Calling is enabled (see Installation Manual), audio from calls made by using modems on A will be outputted
on the ICS1 audio channel, and calls made by using modems on B will be outputted on the ICS2 audio
channel.
Making and receiving the first call works the same way as described above. However, to make the second
call, a long press is required to use the speed dial, phonebook or menu keys.
To hang up an individual call:
Press END, a pop-up will display
Press A or B to hang up a call
.
Press A or B to hang up the individual call.
Using other DZMx Features during a call
To use the MARK, A.R.M., EMER, MSG, or MENU keys during a call, press and hold the applicable key for 2
seconds to override DTMF dialling on that key. The audio can also be adjusted while on a call, see "Audio
Settings" on the facing page for more details.
Missed Calls
If a call is missed, a pop-up will flash on the main screen indicating a missed call. Additionally, a missed call
message will be added to the received message list with details on the caller and which modem the caller
dialled. The missed call can be returned by:
Opening the message so it is displayed on the screen (see "Incoming Messages" on page 15 for
how to access received messages)
Press A or B to select the modem and initiate the call.
SECTION 3 Phone Calls 13
Page 17
Audio Settings
Only the level of audio from the DZMx to the ICS (ear volume) can be adjusted by the user. An installer will
have access to more audio settings (keypad beep volume, mic volume, warning tone volume) within the
menu system and via the DZMx Manager utility.
If the audio settings are set up correctly, the pilot will only need to adjust the ear volume for changes in the
following:
Incoming call volume levels.
Switching headsets.
Ambient noise conditions.
Adjusting DZMx Audio Levels
To adjust incoming audio level:
1. Press MENU then navigate to Audio>>ICS>>Ear; the DZMx will display the setting.
2. Use LEFT or RIGHT to adjust the audio level.
3. Press ENTER to confirm the setting change and return the audio menu.
4. Press BACK to abort the change and return to the audio menu.
5. If ICS2 is enabled; Repeat for Audio>>ICS2>>Ear.
Note: If adjusting the audio while on a call, it is necessary to hold MENU for 2 seconds to open
the DZMx menus.
SECTION 3 Phone Calls 14
Page 18

Section 4 DZMx Messaging
Incoming Messages
Viewing an incoming message
When a message is received on the DZMx, a pop-up window announces
Message received
. To open the
message, press CALL or ENTER. Scroll through the message using UP and DOWN. The bottom lines of the
message show the sender and the time the message was sent.
Viewing messages in the Inbox
Received messages are stored in the DZMx inbox. The inbox will hold up to 30 messages. Once full, the
oldest message will be deleted each time a new message is received.
To read messages saved in the inbox:
Either press and hold MSG until the message list is displayed or alternatively, using the menus,
press MENU then scroll to Messages>>Received Messages
The received message list will show the first few words of the received message; use UP and
DOWN to scroll to the message to be read
Press ENTER to view the entire message, then UP and DOWN to scroll through the message
Press BACK to return to the message list
Press END to exit the menu system and return to the main screen.
Missed Call Notifications
Missed calls notifications will be added to the received message list. This message will contain details on
the missed call, including the call date, caller ID and the modem the call originated from. A message can
be sent to the caller, see "Replying to a Message" on the next page.
Sending Messages to the DZMx
SMS text messages can be sent to the DZMx in several ways. From any cell phone or satellite phone, send
the message to the DZMx’s cell or satellite phone number. Messages can also be sent via Iridium's online
services:
By email:
Address the email to [email protected] (where 8816xxxxxx is the Iridium phone
number for the DZMx)
From the Iridium website:
Go to the Iridium website at http://messaging.iridium.com/.
Enter the satellite phone number of the DZMx
Fill in the subject line
Fill in the message
Click Send Message.
SECTION 4 DZMx Messaging 15
Page 19
Outgoing Messages
The DZMx has powerful text messaging capabilities. Text messages can be sent and received over cellular
and satellite networks using any of the installed and connected modems. The DZMx has a 50-entry library
of pre- configured messages. Only these preconfigured messages can be sent, as there is currently no
method for manually entering a message from the main DZMx screen.
Note: Messages in the DZMx message library can only be entered or edited using DZMx
Manager.
Sending Messages from the DZMx
Using a number from the DZMx Phonebook
Press MSG, scroll to the required message and press ENTER to open the message
Press the speed dial keys SPD1, SPD2 or SPD3 or press DIR and scroll to the number, then press
ENTER
Press A or B to send via the selected network.
Using an number NOT in the DZMx Phonebook
Press MSG, scroll to the required message and press ENTER to open the message
Press A or B to select the network
When prompted, enter the destination phone number, then press ENTER to send the message.
Replying to a Message
Open the received message, then press MSG to open the message library
Scroll to the message to be sent in reply, and press A or B to send the message via the selected
network.
Cancelling unsent messages
If for any reason you wish to remove all unsent messages (including position reports) from the outgoing
message queue:
Press MENU and scroll to Cancel Queued and then press ENTER
A pop-up message will be displayed showing
Message Queue Deleted
.
This command will remove all messages, both tracking and text messages, from the queue.
SECTION 4 DZMx Messaging 16
Page 20

Section 5 Phone Book
Phone book entries can be added, edited or deleted by either using the DZMx menu system or through the
DZMx Manager. DZMx Manager provides a quick and simple interface for importing contacts into the
DZMx. It is recommended that DZMx Manager is used for making large changes to the phone book.
Note: The phone book is only able to store a maximum of 50 contacts.
Adding a New Contact
1. Press MENU then navigate to PhoneBook>>Add/Edit; the phone book will be displayed.
2. Scroll down to an empty contact and press ENTER; the DZMx will display
Enter number
.
3. Enter the number using the full international dialling string including country code and area code
(e.g. +6435458659); press and hold the "0" key to get the “+” prefix.
4. Press ENTER; the DZMx will display
Enter name
.
5. Use UP and DOWN to scroll through the letters of the alphabet to the required letter, press RIGHT
to move to the next character or BACK to backspace the last digit.
6. When the name has been entered, press ENTER to save the new contact.
Editing an Existing Contact
1. Press MENU then navigate to PhoneBook>>Add/Edit; the phone book will be displayed.
2. Scroll down to the contact to be altered and press ENTER; the DZMx will display the phone number.
3. Edit the number using the BACK key and the number keys.
4. After the number has been edited, press ENTER; the DZMx will then display the contact name.
5. Use the BACK key to remove characters from the name. The UP and DOWN keys are used to scroll
through the letters of the alphabet to the required letter. Press RIGHT to move to the next character.
6. When the name has been entered, press ENTER to save the contact.
Deleting an Existing Contact
1. Press MENU then navigate to PhoneBook>>Erase; the phone book will be displayed.
2. Use UP and DOWN to scroll to the contact to be deleted.
3. Press ENTER to delete the selected contact.
SECTION 5 Phone Book 17
Page 21
Section 6 DZMx Data
Both the cellular and satellite modems are capable of providing data connections, . The DZMx can provide
the data service to a connected PC or laptop via the DZMx Ethernet port. The DZMx operates as an
internet router. When a PC or laptop is plugged into the DZMx’s Ethernet port, the DZMx will allocate an IP
address in the range 192.168.4.xxx, and you will then be connected to the internet.
Cellular Data
When the DZMx is successfully connected to the cellular data service, the DZMx status line for the modem
will display "
Online
". See "Status Messages" on page 7 for more details on the DZMx display and status
lines.
Satellite Data
To start/stop the satellite data connection, press and hold the corresponding modem key, A or B. The
modem will display "
Going Online
". When the data has successfully connected, the modem will display
"
Data Online
".
Note: Your DZMx must be configured using DZMx Manager to be able to activate cellular and
Iridium data. See the Flightcell DZMx Installation Manual for further details.
SECTION 6 DZMx Data 18
Page 22
Section 7 G.P.S. Tracking
The DZMx can send position reports to a tracking system using the Iridium and/or cellular network. The
DZMx has several configurable periodic tracking timers and triggered tracking events. These generate
automatic position reports at appropriate intervals, or when triggered (e.g. a takeoff or landing report).
The user can also manually trigger a position report using MARK. Changes in the tracking status of the
DZMx are displayed on the bottom line of the DZMx display and remote heads, see "Status Messages" on
page 7 for further information.
In order to for periodic tracking to work correctly, the DZMx must have a valid GPS lock, tracking must be
enabled and the DZMx must be correctly configured with the tracking gateway email address and phone
number of your tracking provider. There are many settings available to allow you to customise your
tracking setup. Please see the DZMx Installation Manual for details on how to configure your DZMx
tracking system.
Automatic Position Reports
The DZMx can be configured to automatically send a range of routine position reports. These are:
Aircraft power up – triggered when power supplied to the DZMx.
Engine start and stop – triggered by an external input from the engine.
Take-off and landing – triggered by aircraft speed and/or a extra input.
Periodic events – triggered at regular intervals.
Aircraft heading changes – based on change in heading and time since last message sent.
Manual Position Reports
Position reports are usually sent automatically, but manual position reports may also be sent to mark a
point of interest. You can send a position only, or a position with preconfigured message attached. The
aircraft position and time are taken from the time and location when MARK is pressed, so this feature can
be used to mark a point of interest on your tracking system.
To send a manual position
Press MARK
The DZMx will display
Position Marked
A tracking message will be added to the outgoing message queue.
To send a manual position report with a message attached
Press and hold MARK until the message library opens
Scroll down to the message to be sent
Press ENTER to display the message then press ENTER to send; the DZMx will display Position
marked and a tracking message will be added to the outgoing message queue.
Note: To send messages attached to position reports, this feature must be enabled in the DZMx
configuration menus.
Enabling Tracking
Press MENU then scroll to Tracking>>Tracking Mode
Scroll to On as required and press ENTER.
SECTION 7 G.P.S. Tracking 19
Page 23
Suspending or Disabling Tracking
Automatic tracking reports may be suspended temporarily, for example when an aircraft is working for a
period at a known location, or disabled. If suspended, tracking is disabled for the current flight only, and will
be automatically re-enabled when the DZMx is next powered up. If disabled, tracking will remain off until
re-enabled.
Press MENU then scroll to Tracking>>Tracking Mode
Scroll to Suspend or Disable as required and press ENTER.
Adjusting Tracking Settings
The DZMx tracking timers and operation of the mark button can be configured using the DZMx menu
system or via DZMx Manager. The tracking system can also be disabled or suspended if required.
Periodic Tracking Timers
The time interval for sending tracking reports can be varied to suit operational requirements. An automatic
position report will be created at the specified number of minutes after the last position report. For
example, if the last tracking position message was triggered by a take-off event, this will effectively reset
the tracking timer and the next automated transmission will occur the specified number of minutes after
the last transmission was sent.
Four periodic timer settings can be adjusted by the user:
Periodic Timer: The delay between scheduled tracking messages during flight. The minimum
interval is 1 minute
Heading Timer: Position reports are sent more frequently when the aircraft is changing heading
Heading Variation: Configures the change (in degrees) by which the aircraft's heading must vary
in order to trigger a course change position report.
On Ground Timer: The tracking interval on the ground. On Ground tracking can be disabled.
To change the settings of the periodic timer settings:
1. Press MENU and scroll to Tracking>>Periodic Events and select the appropriate setting from the
menu; the DZMx will display a slider indicating the current settings value
2. Use LEFT or RIGHT to adjust the tracking timer or heading angle
3. Press ENTER to confirm the setting change and return the Tracking menu
4. Press BACK to abort the setting change and return to the Tracking menu or END to exit the menu
system.
Note: On Ground tracking can disabled by reducing the "On Ground Timer" setting to Disabled by
moving the slider to the very left.
Note: The Periodic Timer setting must have a higher value than the heading timer.
SECTION 7 G.P.S. Tracking 20
Page 24

Section 8 DZMx Applications
Flightcell provides DZMx users with additional software support with their DZMx. The DZMx currently
supports the following applications:
"Automated Rescue Monitoring (A.R.M.)" on page 28 (also known as A.F.F.)
"Emergency and Distress Mode" on page 31
"Cellular Flightmode" on page 25
"Forms" on the next page
"Cabin Phone" on page 26
Geofence
Firefighting App
Airline App
Agriculture App.
For enquiries about upcoming applications or to request new applications, contact Flightcell (see "Contact
Details" on page 32).
SECTION 8 DZMx Applications 21
Page 25
Forms
What is Forms?
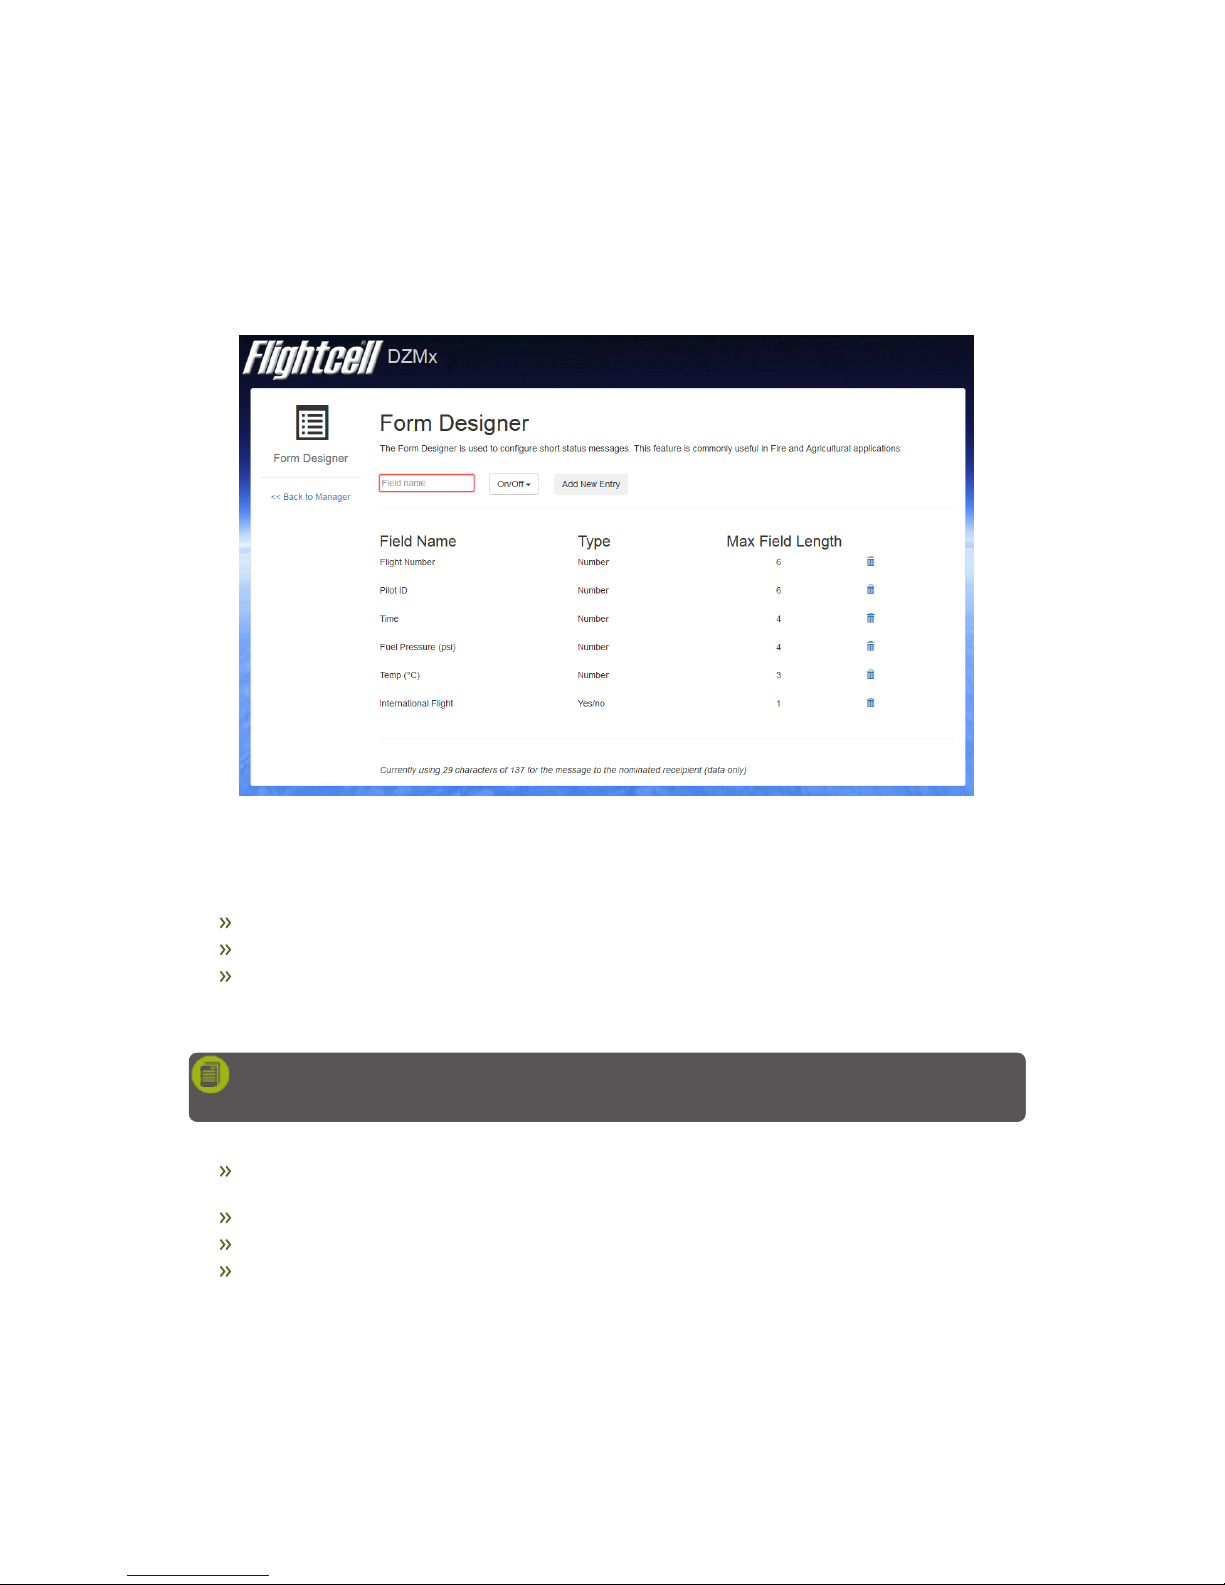
Forms is a powerful feature developed to aid operators with analysing flight trends. Users can create
custom fields for the form using the DZMx Manager, which can be filled in by an operator at specified
intervals or events. An example of a typical form is:
Form Designer example in the DZMx Manager
Forms Settings
The DZMx can be configured to send the completed forms to:
Tracking Provider
Custom email address
Custom phone number
The settings for the Forms application can be found in the DZMx Manager in the Settings section.
Alternatively, Forms can be configured using the DZMx menu system.
Note: The Forms option in the DZMx menu will only appear when a field has been added through
the Form Designer.
The configurable settings for Forms are:
Send To Tracking Provider: Send completed forms to the configured Tracking Provider (see
Installation Manual).
Send To Recipient: Send completed forms to a configurable recipient. Using email, SMS or SBD.
Recipient Destination: Recipient destination address (email address or phone number).
Form Prompt Config: Select an event which will prompt the operator to complete a new form.
SECTION 8 DZMx Applications 22
Page 26
Form Prompt Timer: Time between triggering a new prompt to complete a new form. Between 0
(Disabled) and 1200 minutes.
Note: If SBD is selected as the recipient type, the Recipient Destination will be ignored, and
completed forms will be sent to all addresses configured in Iridium SPNet.
Creating Forms
Forms Designer in the DZMx Manager is used to create forms. This utility allows users to create custom
fields, using the following supported field types:
Number (with a length)
On/Off
Yes/No
Since the forms are designed to be sent via SMS, SBD or email, there is a fixed character limit on the size
of the forms. Therefore, it is recommended to keep the field names as short as possible. Messages sent to
Tracking Providers have different size limits than messages sent to Recipients. Refer to the table before for
size limits:
Recipient Limit (characters) Tracking Provider Limit (characters)
Email 137 88
SMS 137 88
SBD 1940 1940
Note: The Forms Designer will warn you when the limit for your configured Forms settings has
been reached.
Adding a Field
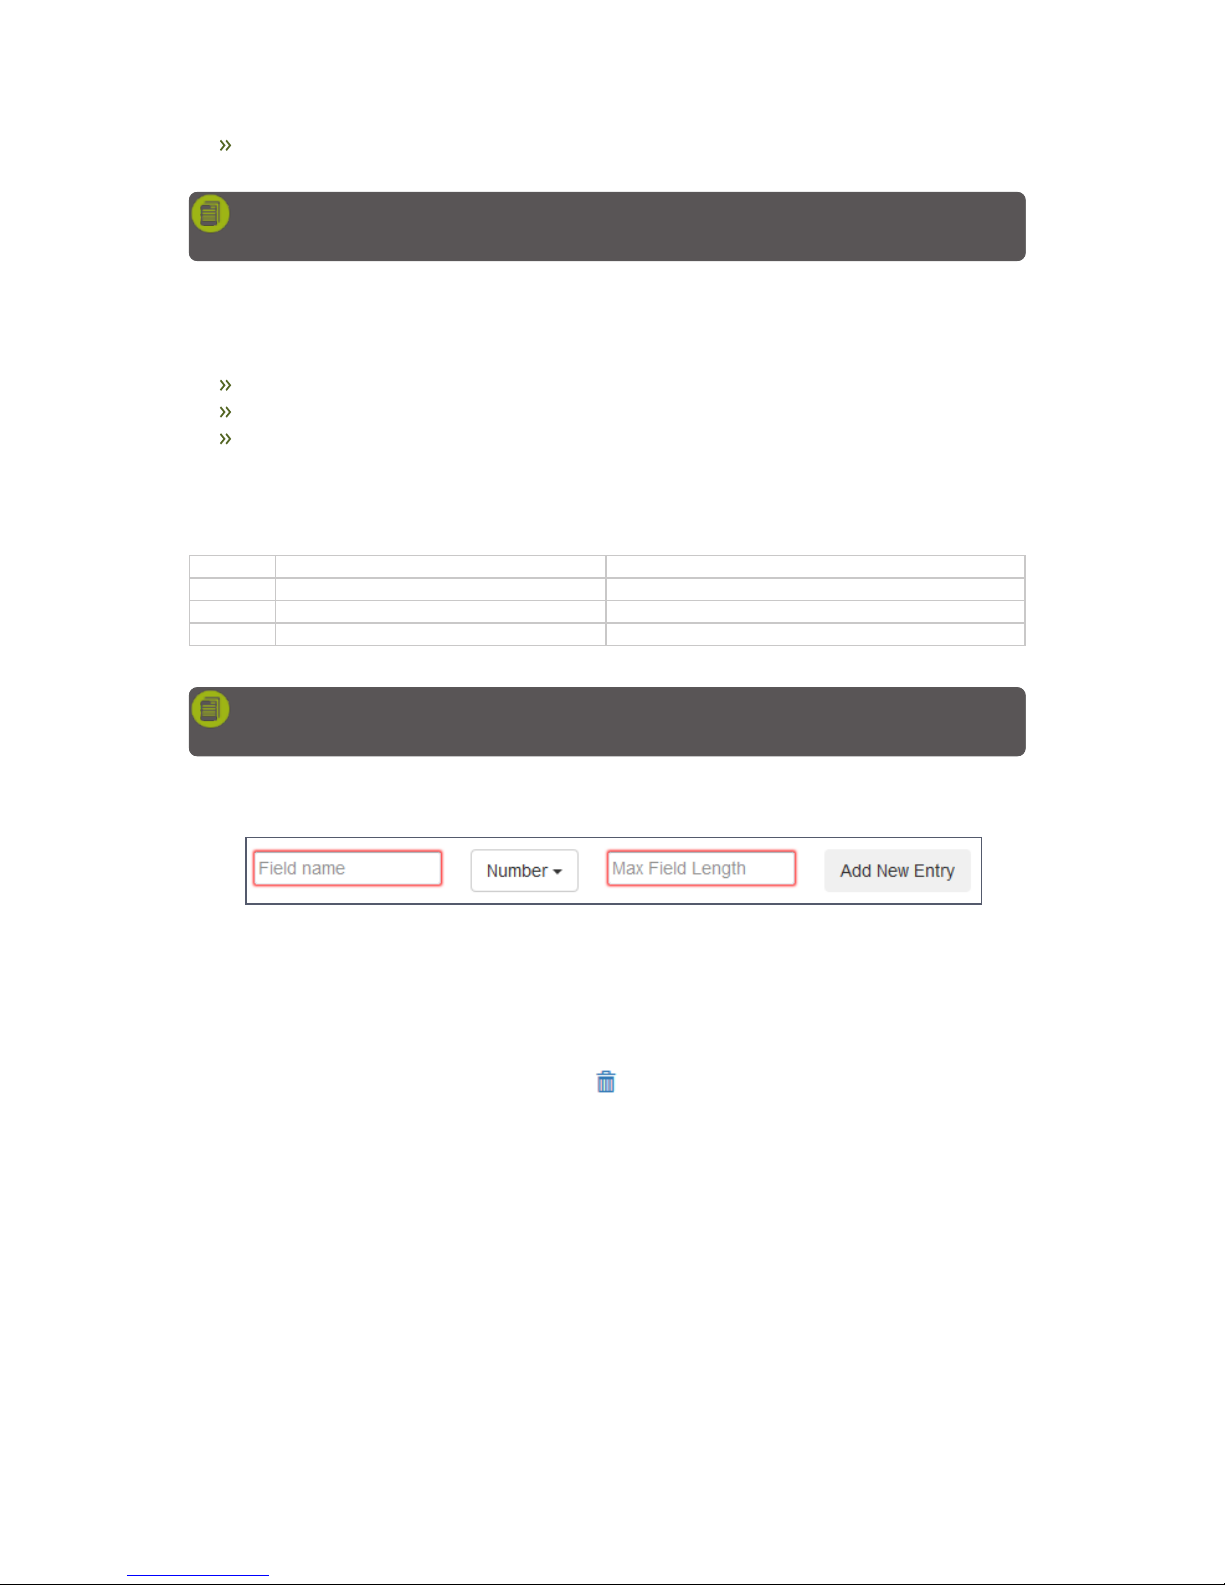
Fields can be added using the Form Designer:
1. Enter a field name into the first text box (E.g. "Flight Number")
2. Select a field type
3. Add a field length (only valid for the Number type)
4. Click Add New Entry.
Deleting a Field
Fields can be deleted by pressing the delete button, , located to the right of the field. The Form Designer
will pop-up a box to confirm the deletion of the field.
Reordering Field Layout
Fields can be reordered using the "Drag & Drop" feature. Simply click and hold on a field and drag it to the
desired position on the form.
Completing a Form
When a form requires completion,
Form Entry Required
will be displayed on the top of the DZMx main
screen. To begin filling in the form field:
SECTION 8 DZMx Applications 23
Page 27

Press MODE from the main screen, this will take you to the Form Entry menu.
Fill in the fields. Navigating the menu with UP and DOWN. Not all fields are required to be filled in.
Select Form Complete to finish the form and send it to the required destinations.
Alternatively, a form can be completed at any time by selecting Forms>>Form Entry, from the DZMx
menus.
Retrieving Form History
The DZMx stores the latest 50 records. These forms can be downloaded using the Export Form Data
button on the DZMx Manager (located on the main screen), or exported onto a USB stick using the DZMx
main menu:
Ensure a USB stick is plugged into the DZMx USB Port.
Press MENU then select Forms.
Select Export Form History. This will save a copy of the Form history to the USB stick.
SECTION 8 DZMx Applications 24
Page 28

Cellular Flightmode
The cellular modem is able to be set to Flightmode so that it does not transmit or operate in-flight. When
Flightmode is enabled, the modem is put into a low-power state and cannot be used for incoming or
outgoing calls, tracking, SMS or data.
Toggling Flightmode
To turn Flightmode on or off:
Press and hold the relevant modem button, A or B.
If starting Flightmode, a status message will show saying
Disabled
.
If stopping Flightmode, a status message will show
Searching
, until a good signal is obtained.
SECTION 8 DZMx Applications 25
Page 29
Cabin Phone
A corded or cordless phone may be installed in the cabin and connected to the DZMx to provide
passengers with access to the DZMx Iridium satellite phone and/or cell phone connections. Calls are
private to the connected party (cockpit or cabin) unless a three-way call is established. If the DZMx has two
modems (e.g. one Iridium and one cellular, or two Iridium), the cockpit and cabin may each use a modem
to make simultaneous calls.
The cabin phone can also be used with the DZMx as an intercom between cockpit and cabin. If the cabin
phone is in use, the call status is shown on the bottom line of the DZMx display. The dialling method is
similar to that on the DZMx keypad in that a modem must be selected first before dialling the phone
number. If a cabin phone is connected, and is not already in a call, this will also ring when the DZMx
receives a phonecall.
Making an internal call between the cabin phone and the pilot, or to transfer a call to the pilot, requires the
use of either the ‘hook/flash’ or ‘flash’ key, or optionally programming one of the speed-dial buttons on the
cabin handset to ‘701#’. The best method used will depend on your handset type.
Dialling a Phone Number
Pick up the handset and press the off hook button and wait until you hear the dial tone
Select the desired modem by pressing either "1" for modem A or "2" for modem B
Dial the phone number
Press # after dialling your number to initiate the call immediately, or wait a few seconds for the
DZMx to recognise no further numbers will be entered, after which it will initiate the call
automatically.
Hang up to end the call
If the modem selected is already in use (for example, by a pilot), then the passenger will hear an
engaged tone. If the modem selected has no signal, is unavailable (not fitted or not in cradle), or the
other party has hung up, then the passenger will hear a busy tone. In either case, they will need to
hang up and try again later, or try again using another modem.
Note: If the Cabin Phone does not have a "+" key for international dialling, enter "00" instead.
Intercom Calls Between Cabin and Cockpit
Starting Intercom from the Cabin
Pick up the handset and press the off hook button and wait until you hear the dial tone.
Press ‘hook flash’, or the appropriate speed-dial key to initiate a call to the pilot. If the pilot is already
busy on a call, then the passenger will hear an engaged tone. If the pilot is available, then a ring
tone will be generated on the ICS until the pilot answers or until either party hangs up the call.
The call will be terminated if either the cabin phone goes on hook, or the pilot presses END.
If the pilot hangs up, the passenger will hear the busy tone through the handset.
Starting Intercom from the Cockpit
Press CALL to ring the Cabin phone.
The call will begin when the Cabin phone is picked up.
The call will be terminated when either END is pressed or the Cabin phone hangs up.
SECTION 8 DZMx Applications 26
Page 30
Transferring a Call to the Pilot
If the cabin phone is on a call using one of the modems, and the pilot is not busy on another call, it is
possible to transfer the call to the pilot. During a call, the cabin phone can invite the pilot into a three-way
call to initiate the call transfer, or once connected, maintain a three-way call between the cabin phone,
modem and the pilot.
While on a call, the cabin phone can invite the pilot into the call by pressing ‘flash’. If the pilot is
available, then a ring tone will be generated on the ICS until the pilot answers or the pilot can reject
the invite by pressing END.
Once the pilot has answered, a three-way call is established. The cabin phone party can choose to
hang up at that point, or continue to have a three-way conversation.
Once a three-way call is established, if either the pilot or the cabin phone hang up, the call will turn
into a standard two-party call between the remaining parties. If the party at the modem end hangsup, the call is terminated.
Transferring a Call to the Cabin Phone
If the pilot is on a call using one of the modems, and the cabin phone is not busy on another call, it is
possible to transfer the call to the cabin-phone.
While on a call, the pilot can invite the cabin phone into the call by pressing CALL. If the cabin phone
is available, then the handset will ring until the cabin phone answers the call.
Once the passenger has answered, a three-way call is established. The pilot can choose to hang up
at that point, or continue to have a three-way conversation.
Cabin Phone Status Messages
Cabin phone status messages will be displayed on the bottom status line on the DZMx. These status
message could display the following:
Cabin Phone: Off Hook - The cabin phone has been picked up, and is out of its cradle
Cabin Phone: Dialling - The cabin phone is dialling through one of the modems
Cabin Phone: In Call - The cabin phone is currently in a call.
SECTION 8 DZMx Applications 27
Page 31
Automated Rescue Monitoring (A.R.M.)
A.R.M. (also known as Automated Flight Following, or A.F.F.) is an optional automated flight monitoring
system. When A.R.M. is activated, your tracking service provider monitors position reports from the aircraft
and raises an alert when reports are overdue by a specified period, or (optionally) if the aircraft is
stationary for a specified period.
Your DZMx and your tracking service must be appropriately configured to use A.R.M. functions. Installation
instructions for activating and configuring the A.R.M. service are provided in Installation Manual.
Note: A.R.M. is only supported by some tracking service providers.
Activating A.R.M.
To activate A.R.M. before a flight commences:
1. Press and hold the A.R.M. key for 2 seconds then release. This will trigger the DZMx to send an
A.R.M. activation request message to the tracking server. The DZMx will show "
A.R.M. Requesting
"
on the status line of the display.
2. When the DZMx receives an acknowledgement from the tracking server, A.R.M. mode is considered
active and the status display will show
A.R.M. Active
.
Deactivating A.R.M.
To terminate A.R.M. at the end of a flight:
1. Press and hold the A.R.M. key for 2 seconds then release. This will trigger the DZMx to send an
A.R.M. cancellation request message to the tracking server. The DZMx will show "
A.R.M. Can-
celling
" on the status line of the display
2. When the DZMx receives and acknowledgement from the tracking server, A.R.M. mode is considered terminated and the status display will show A.R.M. Terminated for a few seconds before
returning to displaying the tracking status.
Note: If A.R.M. has been activated for a flight, it is essential to terminate A.R.M. at the end of the
flight, otherwise your tracking system will send overdue alerts. If A.R.M. has not been terminated
after landing, beeps will sound in your headset to remind you.
A.R.M. Status Messages
Automated Rescue Monitoring status information is displayed on tracking status line when A.R.M. is active.
Enabling and disabling A.R.M. mode causes the DZMx to send an activate or deactivate message to the
tracking server followed by the DZMx receiving an acknowledgement. The status of this process is
displayed on the status line:
A.R.M. Active is displayed when the tracking server has responded and confirmed that A.R.M. is
active; the current aircraft status is appended to this message
A.R.M. Terminated is displayed briefly when the tracking server has responded confirming A.R.M.
has been deactivated
Requesting is displayed when A.R.M. mode is activated by the user and indicates that confirmation
of A.R.M. operation has been requested from the tracking server
Cancelling is displayed when A.R.M. mode has been disabled by the user and a termination
acknowledgement has been requested from the tracking server
SECTION 8 DZMx Applications 28
Page 32

No Response. Retry? is displayed when A.R.M. mode activation or termination confirmation has
not been received from the tracking server after several attempts; press ENTER to keep re-trying
No Server Reply Is displayed to advise that confirmation of A.R.M. activation or deactivation has
not been received. No further automated attempts are made.
SECTION 8 DZMx Applications 29
Page 33

Alert Mode
The DZMx allows users to activate an "Alert" mode. When Alert mode has been activated by the user,
Under Fire Mode!
will flash in the tracking display line to indicate Alert messages are being transmitted to
the tracking provider at programmed intervals. See "Status Messages" on page 7 for more information on
the DZMx display and status lines.
Activating Alert Mode
Alert messages may be sent from the DZMx in emergency. Your tracking provider will have a system for
raising an alert or alarm when an Alert message is received.
To send an Alert message:
Press and hold A.R.M. until the DZMx beeps and flashes
Alert Queued!
A tracking message will be added to the front of the outgoing message queue
Alert messages will continue to be sent at pre-programmed intervals (usually set at minute) until
Alert mode is terminated
To terminate Alert mode, press and hold A.R.M. until the DZMx beeps and
Under Fire Mode!
is no
longer displayed on the DZMx display; the DZMx will NOT transmit a message that Alert mode has
been terminated.
SECTION 8 DZMx Applications 30
Page 34

Emergency and Distress Mode
The DZMx allows users to activate an Emergency (distress) mode. When Emergency mode has been
activated by the user,
Emergency Mode!
will flash in the tracking display line to indicate emergency
messages are being transmitted to the tracking provider at programmed intervals. See "Status Messages"
on page 7 for more information on the DZMx display and status lines.
Activating Emergency Mode
Distress messages may be sent from the DZMx in emergency. Your tracking provider will have a system
for raising an alert or alarm when a distress message is received.
To send a distress message:
Press and hold EMER until the DZMx beeps and flashes
DISTRESS queued
The DZMx will display Position marked
A tracking message will be added to the front of the outgoing message queue
Distress messages will continue to be sent at pre-programmed intervals (usually set at minute)
until distress mode is terminated
To terminate distress mode, press and hold EMER until the DZMx beeps and Emergency Mode is no
longer displayed on the DZMx display; the DZMx will transmit a message that emergency mode has
been terminated.
SECTION 8 DZMx Applications 31
Page 35

Contact Details
Mailing Address
Flightcell International Limited
PO Box 1481
Nelson 7040
New Zealand
Physical Address
Flightcell International Limited
98 Vickerman Street
Nelson 7010
New Zealand
Page 36

Warranty
Flightcell International Limited’s quality products are proudly designed and manufactured to the
highest standards in New Zealand. Your DZMx is warranted for one year from date of sale. Your
warranty can be extended to two years if your DZMx is registered on our product registration
system, http://www.flightcell.com/register.
The DZMx warranty covers Flightcell manufactured items only. Any ancillary items may be
covered by individual manufacturer warranties. The warranty is void if any labels are removed or
if it is determined that your DZMx has been:
Connected to a power supply delivering more than 32 Volts
Connected with reverse polarity
Installed in direct contravention to the guidelines outlined in the Flightcell DZMx
Installation and Configuration Manual
Physically damaged, or a fault has occurred due to the product being used beyond what is
considered normal use, causing unusual deterioration of the product.
If the product is deemed to be faulty or in need of repair, please complete a Returned Materials
Authorization form on www.flightcell.com/rma or contact Flightcell International (see "Contact
Details" on the previous page).
 Loading...