

Page 1
Flightcell® DZM
The world’s most advanced all-in-one communications and tracking system
Global communications over the
Iridium satellite network
Cellular network
GPS flight following
Audio/MP3 integration
Operation Manual
www.flightcell.com
| Flightcell® DZM Operating Manual | Firmware v2.00 Page 1 of 88 |
Page 2

Issue 1
20 Dec 2005
.
Firmware 1.30
D
Issue 2
26 Jan 2006
.
Firmware 1.33
D
Issue 3
30 Jan 2006
.
Firmware 1.34
D
Issue 4
13 Mar 2006
.
Firmware 1.40
E
Issue 5
14 Mar 2
006 . Firmware 1.40
E
Issue 6
23 Mar 2006
.
Firmware 1.42
E
Issue 7
13 Apr 2006
.
Firmware 1.42
E
Issue 8
20 Dec 2006
.
Firmware 1.62
E
Issue 9
02 Jan 2007
.
Firmware 1.66
E
Issue 10
11 May 2007
.
Firmware 1.69
E
Issue 11
14 Jun 2007
.
Firmware 1.73
E
Issue 12
21 Sep 2007
A. Whitlock
Firmware 1.77
E
Issue 13
13 Dec 2007
A. Whitlock
Firmware 1.81
E
Issue 14
20 Mar 2008
A. Whitlock
Updated sat phone compatibility
E
Issue 15
09 Sep 2008 A. Whitlock
Firmware 2.00 and new
doc
format
E
Issue 16
22 Jul
2009 A. Whitlock
Firmware 2.
14 E
Issue 17
18
Aug 2010
J. Mace/H.
Twissel
l Firmware 2.23
E
Issue 2.24 10 Nov 2010
J Mace
/H. Twisse
ll
Firmware 2.24
E
Issue 2.24b
20 Jan
2010 J Mace
Firmware 2.24
E
VERSION HISTORY (STANDARD OPERATION
MANUAL)
Issue Date Author Description PCB Revision
FCN0132
FCN0152
| Flightcell® DZM Operating Manual | Firmware v2.00 Page 2 of 88 |
Page 3

Contents
Version History (Standard Operation Manual) ....................................................................................... 2
Contents .................................................................................................................................................. 3
Flightcell® DZM features ......................................................................................................................... 6
Your Flightcell® DZM at a glance ............................................................................................................ 7
Flightcell® DZM specifications ........................................................................................................................ 7
Getting to know your Flightcell® DZM .................................................................................................... 8
Switching the Flightcell® DZM on and off ....................................................................................................... 9
The LCD display .......................................................................................................................................... 10
The keypad ................................................................................................................................................. 14
Using the Flightcell® DZM menu .................................................................................................................. 16
Menu overview ....................................................................................................................................... 16
Accessing the menu................................................................................................................................ 17
Navigating the menu .............................................................................................................................. 17
Selecting a menu option ......................................................................................................................... 17
Returning to the previous screen ............................................................................................................ 17
Altering a menu setting .......................................................................................................................... 18
Saving a menu setting ............................................................................................................................ 18
Aborting a menu setting ......................................................................................................................... 18
Exiting the menu .................................................................................................................................... 18
Flightcell® DZM operator's guide .......................................................................................................... 19
Making and answering calls ......................................................................................................................... 20
Making a call using manual dial ............................................................................................................... 20
Making a call using the DZM phonebook ................................................................................................. 21
Making a call using speed dial ................................................................................................................. 23
Answering an incoming call ..................................................................................................................... 24
Using touch-tone dialing (DTMF) during a call ......................................................................................... 25
Editing phonebook entries .......................................................................................................................... 26
Adding, editing or moving a phonebook entry ......................................................................................... 26
Deleting a phonebook entry .................................................................................................................... 28
Using text messaging .................................................................................................................................. 29
Receiving a text message ....................................................................................................................... 29
Using the Received Messages screen ...................................................................................................... 29
Canceling unsent text messages ............................................................................................................. 30
Using GPS tracking ...................................................................................................................................... 31
Accessing the Tracking Menu .................................................................................................................. 31
Manually transmitting GPS position ......................................................................................................... 31
Automatically transmitting GPS position .................................................................................................. 32
Enabling, disabling and suspending automated GPS tracking ................................................................... 32
Setting automatic GPS transmission based on time interval...................................................................... 34
| Flightcell® DZM Operating Manual | Firmware v2.00 Page 3 of 88 |
Page 4

Setting automatic GPS transmission based on heading change ................................................................ 35
Heading Timer ....................................................................................................................................... 36
Setting GPS display options .................................................................................................................... 37
Using automated flight following (AFF) ........................................................................................................ 38
Registering AFF mission start and end points .......................................................................................... 38
Controlling audio settings ............................................................................................................................ 40
Accessing the Audio Menu ...................................................................................................................... 40
Setting satellite phone audio volume ....................................................................................................... 41
Setting cell modem audio volume ........................................................................................................... 41
Isolating (muting) phones....................................................................................................................... 42
Setting auxiliary device audio volume ...................................................................................................... 43
Muting auxiliary devices .......................................................................................................................... 44
Using Flightcell® DZM common setup features ............................................................................................. 45
Accessing the Setup Menu ...................................................................................................................... 45
Using Auto Power On ............................................................................................................................. 45
Setting backlight brightness .................................................................................................................... 46
Setting backlight mode ........................................................................................................................... 46
Setting LCD contrast ............................................................................................................................... 47
Identifying firmware version and serial number ....................................................................................... 48
Emergency procedures ................................................................................................................................ 49
Sending a distress signal ........................................................................................................................ 49
Flightcell® advanced setup guide ......................................................................................................... 50
Configuring your Iridium satellite phone ...................................................................................................... 51
Configuring satellite phone service center number ................................................................................... 51
Overriding satellite phone antenna lock ................................................................................................... 51
Configuring GPS tracking ............................................................................................................................. 52
Using the Installation Settings Menu to access advanced settings ................................................................. 54
Configuring Advanced Tracking Settings ...................................................................................................... 55
Enabling manual GPS tracking ................................................................................................................ 55
Using GPS antenna diagnostics ............................................................................................................... 56
Setting automatic GPS transmission based on low speed limit .................................................................. 57
Setting automatic GPS transmission for takeoff and landing based on collective switch position ................ 58
Setting automatic GPS transmission for takeoff and landing based on squat switch position ..................... 60
Configuring oil pressure switch to record aircraft operating time .............................................................. 60
Finding messaging destination addresses ................................................................................................ 62
Configuring satellite messaging destination ............................................................................................. 62
Configuring cellular messaging destination .............................................................................................. 64
Configuring position report transmission options ..................................................................................... 65
Setting preferred messaging device ........................................................................................................ 66
Enabling Iridium SBD transmission .......................................................................................................... 66
Setting satellite message size ................................................................................................................. 67
Sending GPS location upon power up ...................................................................................................... 67
Enabling and disabling automated flight following (AFF) .......................................................................... 68
| Flightcell® DZM Operating Manual | Firmware v2.00 Page 4 of 88 |
Page 5

Configuring advanced audio settings............................................................................................................ 69
Controlling which microphones connect to the Flightcell® DZM ................................................................ 69
Altering microphone selection settings .................................................................................................... 69
Setting satellite phone MIC gain .............................................................................................................. 70
Setting cell modem MIC gain .................................................................................................................. 71
Setting DZM to ICS audio level ................................................................................................................ 72
Setting ICS to DZM audio level ................................................................................................................ 73
Setting Flightcell® DZM Sidetone ............................................................................................................ 73
Switching GPS/SMS confirm tones on and off .......................................................................................... 74
Switching keypad tones on and off.......................................................................................................... 75
Muting DZM audio when phones are not in use ....................................................................................... 75
Configuring other Flightcell® DZM advanced setup features .......................................................................... 76
Setting satellite phone type .................................................................................................................... 76
Setting cellular modem type ................................................................................................................... 77
Specifying keypad type ........................................................................................................................... 78
Inverting LCD color display ..................................................................................................................... 78
Restoring factory default settings ............................................................................................................ 79
APPENDIX A: Upgrading Flightcell® DZM firmware ............................................................................. 80
APPENDIX B: Installing and using Flightcell® SMS text messaging software .................................... 82
About Flightcell® SMS Console software ....................................................................................................... 82
System requirements for using Flightcell® SMS Console software ................................................................. 82
Installing Flightcell® SMS Console software .................................................................................................. 83
Using Flightcell® SMS Console software ....................................................................................................... 83
APPENDIX C: Sending SMS text messages to a Flightcell® DZM ........................................................ 86
Warranty and contact details ............................................................................................................... 87
Limited warranty for your Flightcell® DZM ................................................................................................... 87
Flightcell® International contact details ........................................................................................................ 87
User notes ............................................................................................................................................. 88
| Flightcell® DZM Operating Manual | Firmware v2.00 Page 5 of 88 |
Page 6

FLIGHTCELL® DZM FEATURES
Integrated voice communications
The DZM connects an Iridium satellite phone and/or cell modem to the aircraft or vehicle intercom/interphone
system (ICS).
Connected devices can be used at all ICS positions, providing crew and passengers with global point-to-point
communications.
Remote dialing and operation
The DZM provides remote dialing and operation of Iridium 9505, 9505A and 9555 portable satellite phones,
the Iridium 9522A L Band Transceiver (LBT), and cellular modules.
GPS flight tracking
The DZM has a sophisticated Adaptive Tracking System. It transmits aircraft or vehicle data on demand, or
according to operator configured rules. Several tracking providers support DZM tracking data. Contact your
Flightcell® supplier or Flightcell® International Ltd for details of available service providers.
Automatic flight following
The DZM has Automated Flight Following capabilities. If supported by your tracking service provider, this
provides surveillance over an aircraft or vehicle and automatically raises alerts if regular position data are not
received for any reason, within a specified time period.
Auxiliary audio input
The DZM also allows connection of an external audio device (e.g. music player) into the ICS.
NOTE! If you are using earlier firmware than specified on page 2, some features might differ to those
described in this manual.
| Flightcell® DZM Operating Manual | Firmware v2.00 Page 6 of 88 |
Page 7
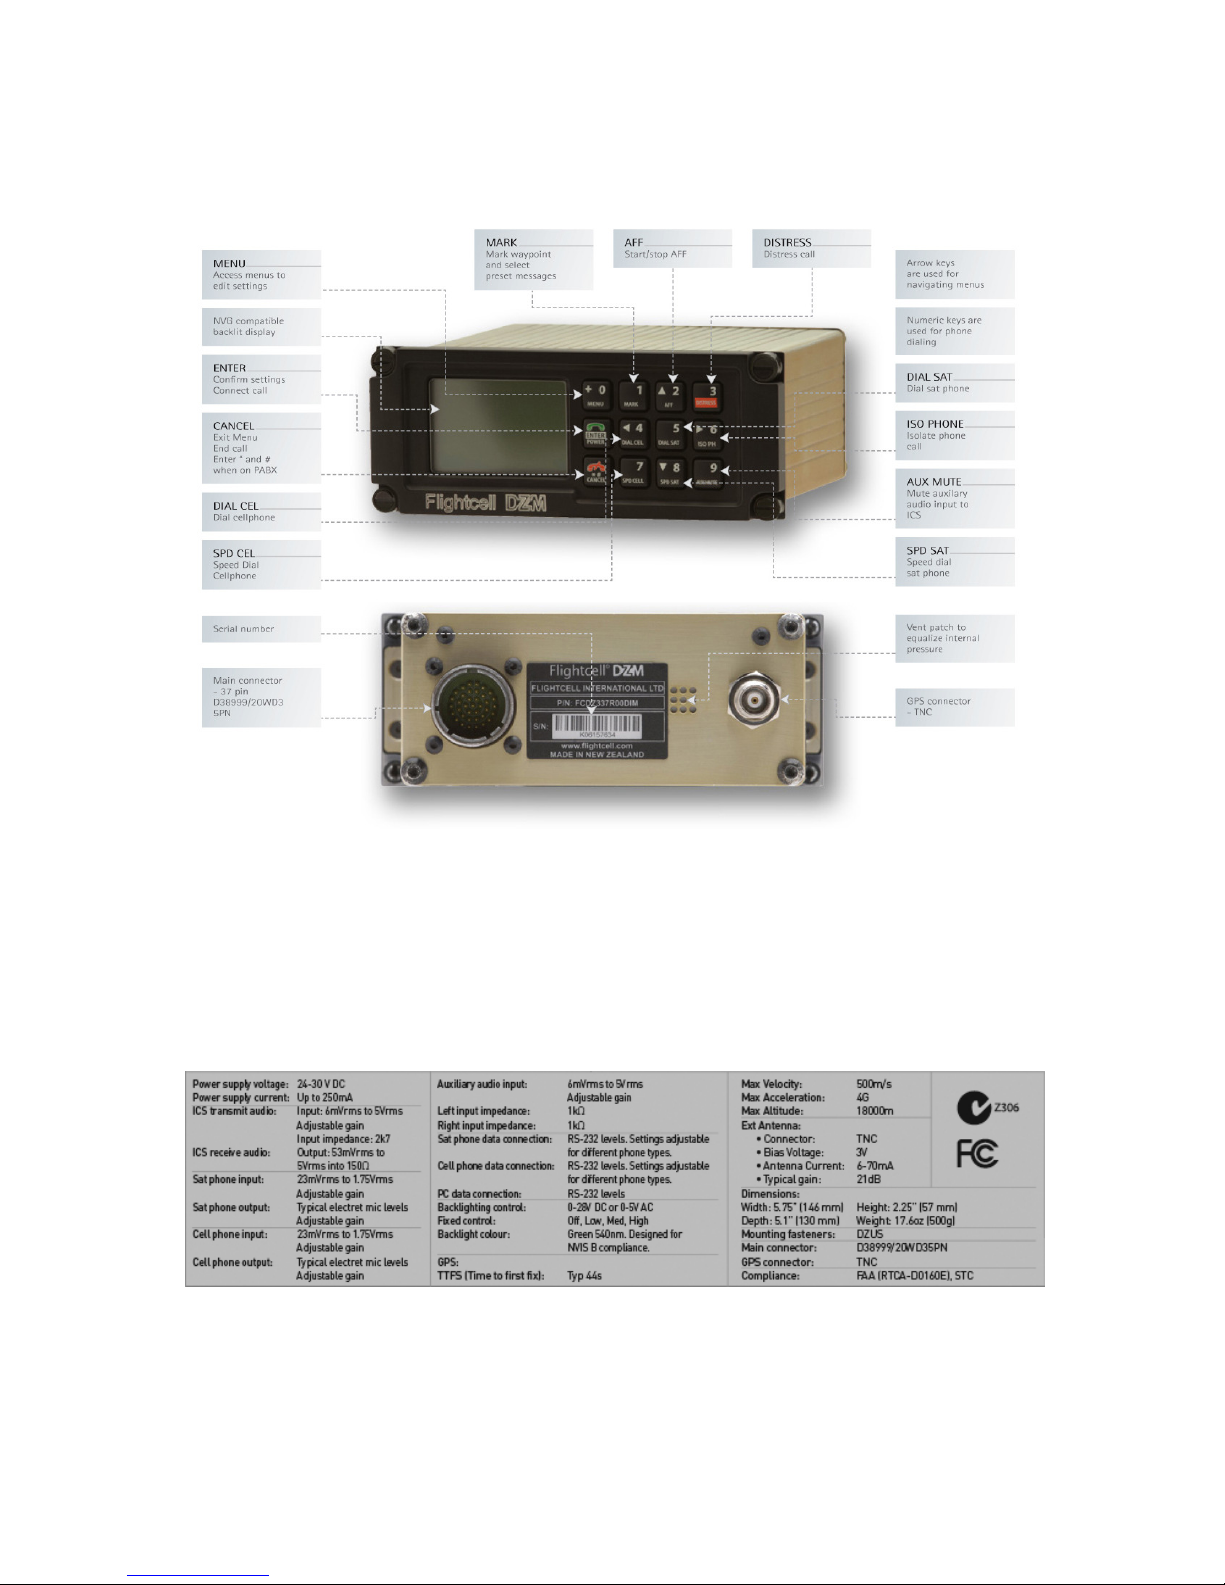
YOUR FLIGHTCELL® DZM AT A GLANCE
The serial number is used to identify the aircraft or vehicle when position data is transmitted from the DZM. You
will also need to know the serial number when contacting Flightcell® International about your DZM product.
Refer to "Identifying firmware version and serial number" on page 47 for further information about how to
identify the serial number of your DZM.
Flightcell® DZM specifications
DZM conforms and is tested to FAA DO160E. A supplementary Type Certificate (STC) has been issued for specific
airframes. The full Flightcell® part number of the DZM is FCDZ337R00DIC.
| Flightcell® DZM Operating Manual | Firmware v2.00 Page 7 of 88 |
Page 8

GETTING TO KNOW YOUR FLIGHTCELL® DZM
Learn how to:
Switch your DZM on and off
Read the DZM LCD display
Use the DZM keypad
Use the DZM menu
| Flightcell® DZM Operating Manual | Firmware v2.00 Page 8 of 88 |
Page 9
Switching the Flightcell® DZM on and off
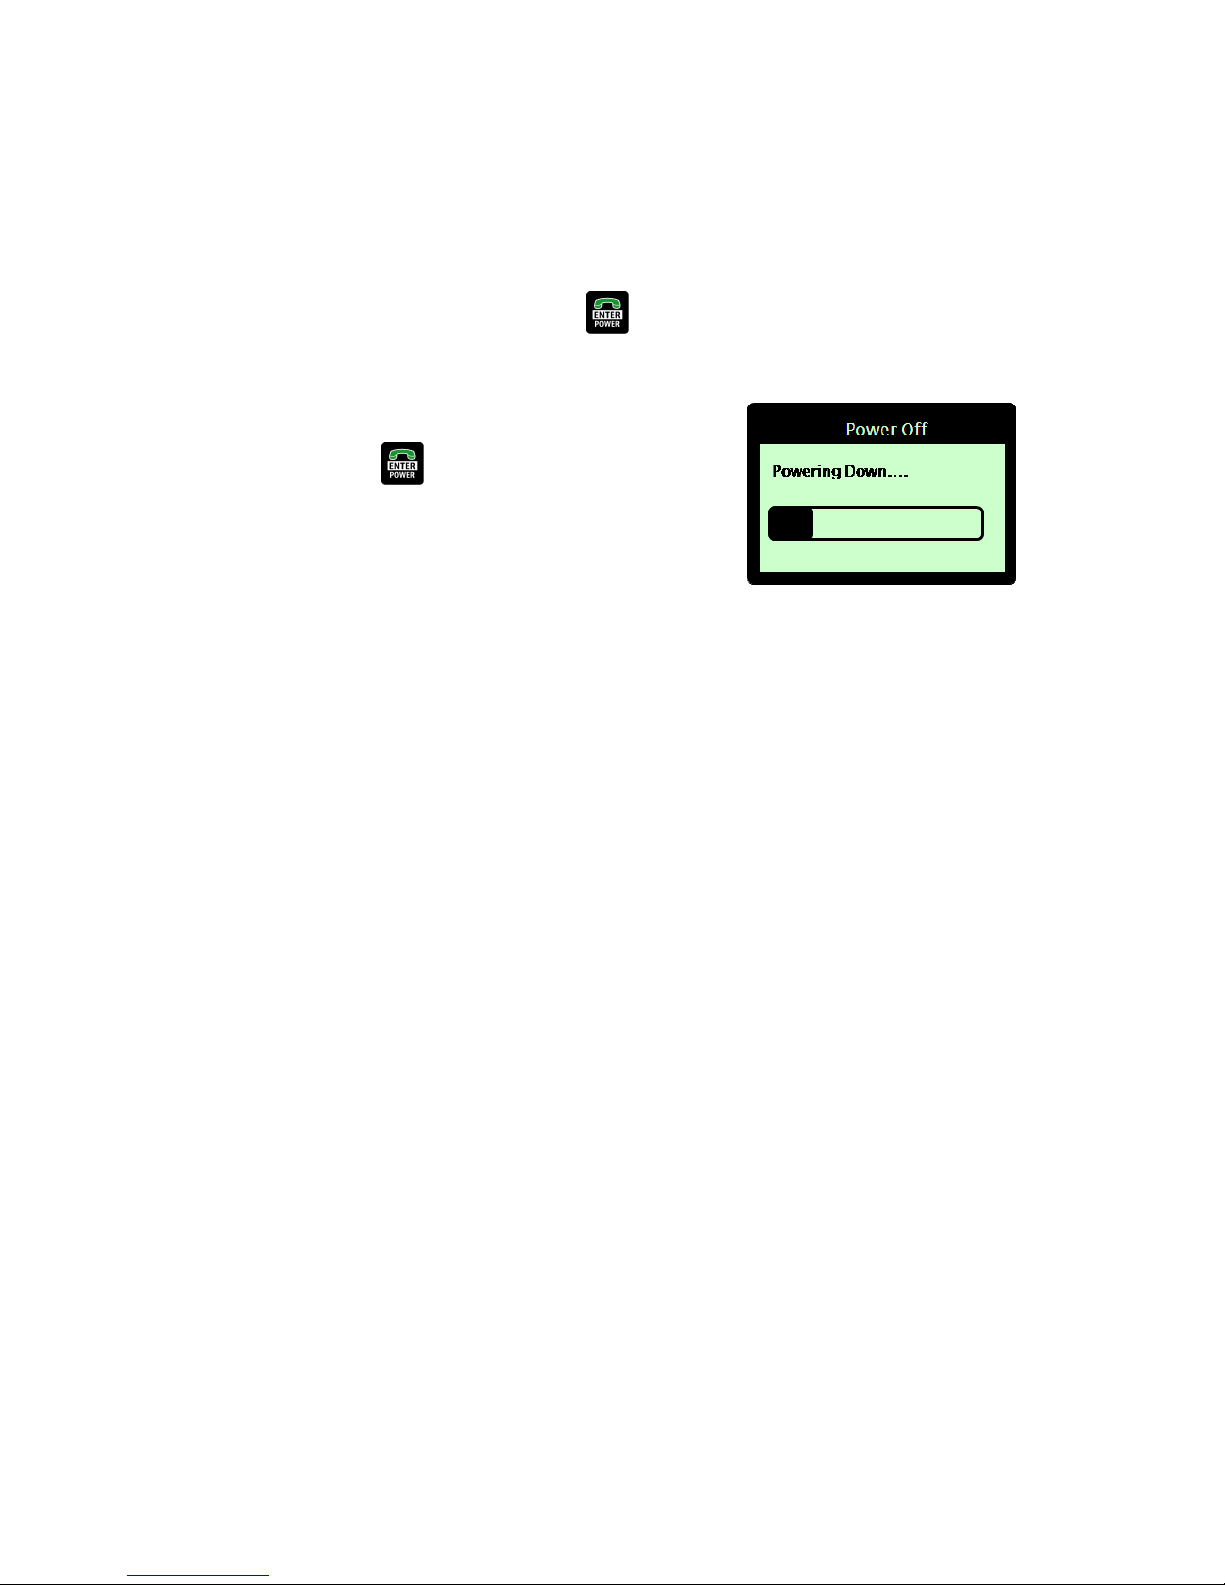
Switching the DZM on:
If 'Auto Power On' is enabled, the DZM will automatically switch on when power supply is connected.
OR to switch on manually, press and hold the POWER key.
Refer to "Using Auto Power On" on page 45 for further information about 'Auto Power On'.
Switching the DZM off:
Press and hold the POWER key until the progress bar on
the LCD display screen reaches the end.
| Flightcell® DZM Operating Manual | Firmware v2.00 Page 9 of 88 |
Page 10
The LCD display
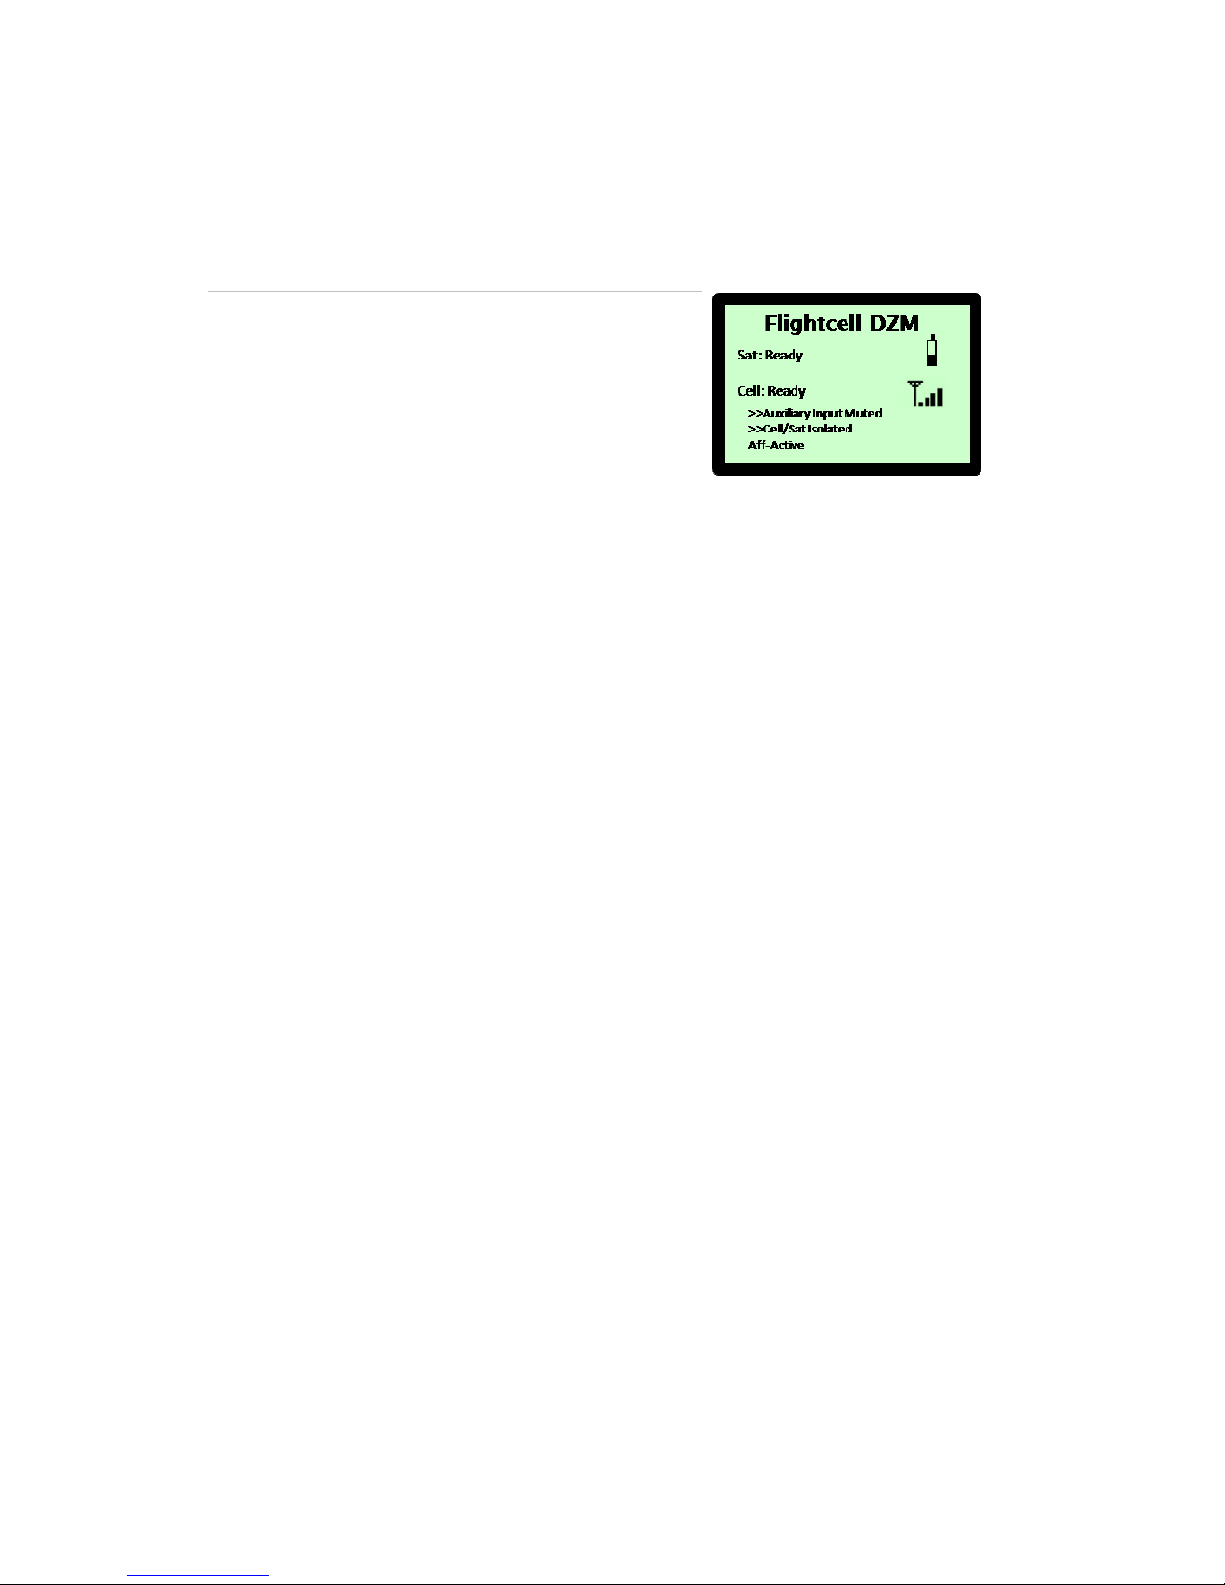
The LCD display screen on the DZM has Main Screen and Menu Screen modes:
The 'Main Screen' displays the operating status of the DZM:
The satellite phone status displays on the 'Main Screen'.
SAT: Powering Up displays when the DZM has powered up
and is attempting to connect to the satellite phone. The
satellite phone is not available for use at this time.
SAT: Initialising displays when the DZM is attempting to
initialize the satellite phone. The phone is not available for
use at this time.
If the DZM can’t detect a satellite phone (either because a
phone is not installed in the cradle, or the phone is turned
off, a warning message displays advising that “Sat
phone/LBT is not responding…”.
SAT: Ready displays when the satellite phone is powered
on, but not in use.
SAT: Calling displays when the satellite phone is dialing a
number before connection is made.
SAT: On Call displays when the satellite phone is connected
on a call.
SAT: Disconnecting displays when a call using the satellite
phone is terminated by the user, if the user doesn’t answer
an incoming call, or if the called party doesn’t pick up the call
within a minute.
Refer to "Making and answering calls" on page 20 for further
information about using the satellite phone to make and
receive calls.
SAT: Sending Data displays when the DZM is attempting to
send an SBD or SMS message over the Iridium network.
SMS Sent or SBD Sent shows when a message has been
successfully transmitted.
SMS Failed or SBD Failed display if an SMS or SBD
transmission has failed (usually due to low signal strength).
In this case the DZM will retain the message in the queue
and attempt to resend.
| Flightcell® DZM Operating Manual | Firmware v2.00 Page 10 of 88 |
Page 11

The cell modem status displays on the 'Main Screen'.
CELL: Initialising displays when the cell modem is
attempting to power on. The cell modem is not available for
use at this time
CELL: Ready displays when the cell modem is powered on,
but not in use.
CELL: Calling displays when the cell modem is dialing a
number before connection is made.
CELL: On Call displays when the cell modem is connected
on a call.
CELL: Disconnecting displays when a call using the cell
modem is terminated by the user, if the user doesn’t answer
an incoming call, or if the called party doesn’t pick up the call
within a minute.
Refer to "Making and answering calls" on page 20 for further
information about using the cell modem to make and receive
calls.
CELL: Sending Data displays when the DZM is attempting
to send an SMS message over the cellular network.
SMS Sent displays when a message has been successfully
transmitted.
SMS Failed displays if an SMS transmission has failed
(usually due to low signal strength). In this case the DZM will
retain the message in the queue and attempt to resend. If
the message has not been sent after several retries, the DZM
will resend via Iridium SBD or SMS (depending on DZM
configuration).
Refer to page 64 for more information on configuring DZM
message transmission options.
Satellite phone activity indicators display on the right of the
'Main Screen'.
displays when the satellite phone is powered on and
Ready for use.
displays when the satellite phone is offline or still
attempting to power on.
| Flightcell® DZM Operating Manual | Firmware v2.00 Page 11 of 88 |
Page 12
Cell modem signal strength indicators display on the right of the
'Main Screen'.
A minimum of three bars must be shown on the
signal strength indicator to attempt transmission.
Low Signal displays if the cell signal strength is too low to
send an SMS message
>>Auxiliary Input Muted displays at the bottom of the 'Main
Screen' when audio from auxiliary devices is muted.
Refer to "Muting auxiliary devices" on page 42 for further
information about auxiliary mute.
>>Cell/Sat Isolated displays at the bottom of the 'Main
Screen' when satellite or cell modems are isolated (muted).
Refer to "Isolating (muting) phones" on page 42 for further
information about muting phones.
Automated Flight Following (AFF) status information displays at
the bottom of the 'Main Screen' when AFF is switched on.
AFF - Requesting displays when AFF is switched on and
confirmation of AFF activation is requested from the receiving
server.
AFF – Active displays when the receiving server confirms
AFF is operating.
AFF - Cancelling displays when AFF is switched off and
confirmation of AFF termination is requested from the
receiving server.
AFF - Terminated displays briefly when the receiving server
confirms AFF has been terminated.
No Response – Retry? displays when AFF operation or
termination confirmation has not been received after several
attempts. Press the ENTER key to keep re-trying.
No AFF Server Response displays to advise AFF operation
or termination confirmation has not been received. No
further automated attempts are made.
Refer to "Using automated flight following (AFF)" on page 38
for further information about AFF.
| Flightcell® DZM Operating Manual | Firmware v2.00 Page 12 of 88 |
Page 13
Distress Mode! flashes at the bottom of the 'Main Screen'
when in distress mode.
Refer to "Sending a distress signal" on page 49 for further
information about distress mode.
The bottom line of the DZM display also shows status messages
for the tracking system, including:
Not Tracking: No GPS if there is a GPS fault
Not tracking: Disabled if tracking has been disabled or
suspended
No Tracking: On Ground if the DZM is configured to only send
tracking data when the aircraft is in the air
Tracking: On Ground if the DZM is configured to send tracking
data when the aircraft is still on the ground (see page 32 for
further information)
Tracking: Takeoff and Tracking: Landed after the DZM has
sent takeoff and landing reports
Engine Start and Engine Stop if the DZM is configured to
record these events.
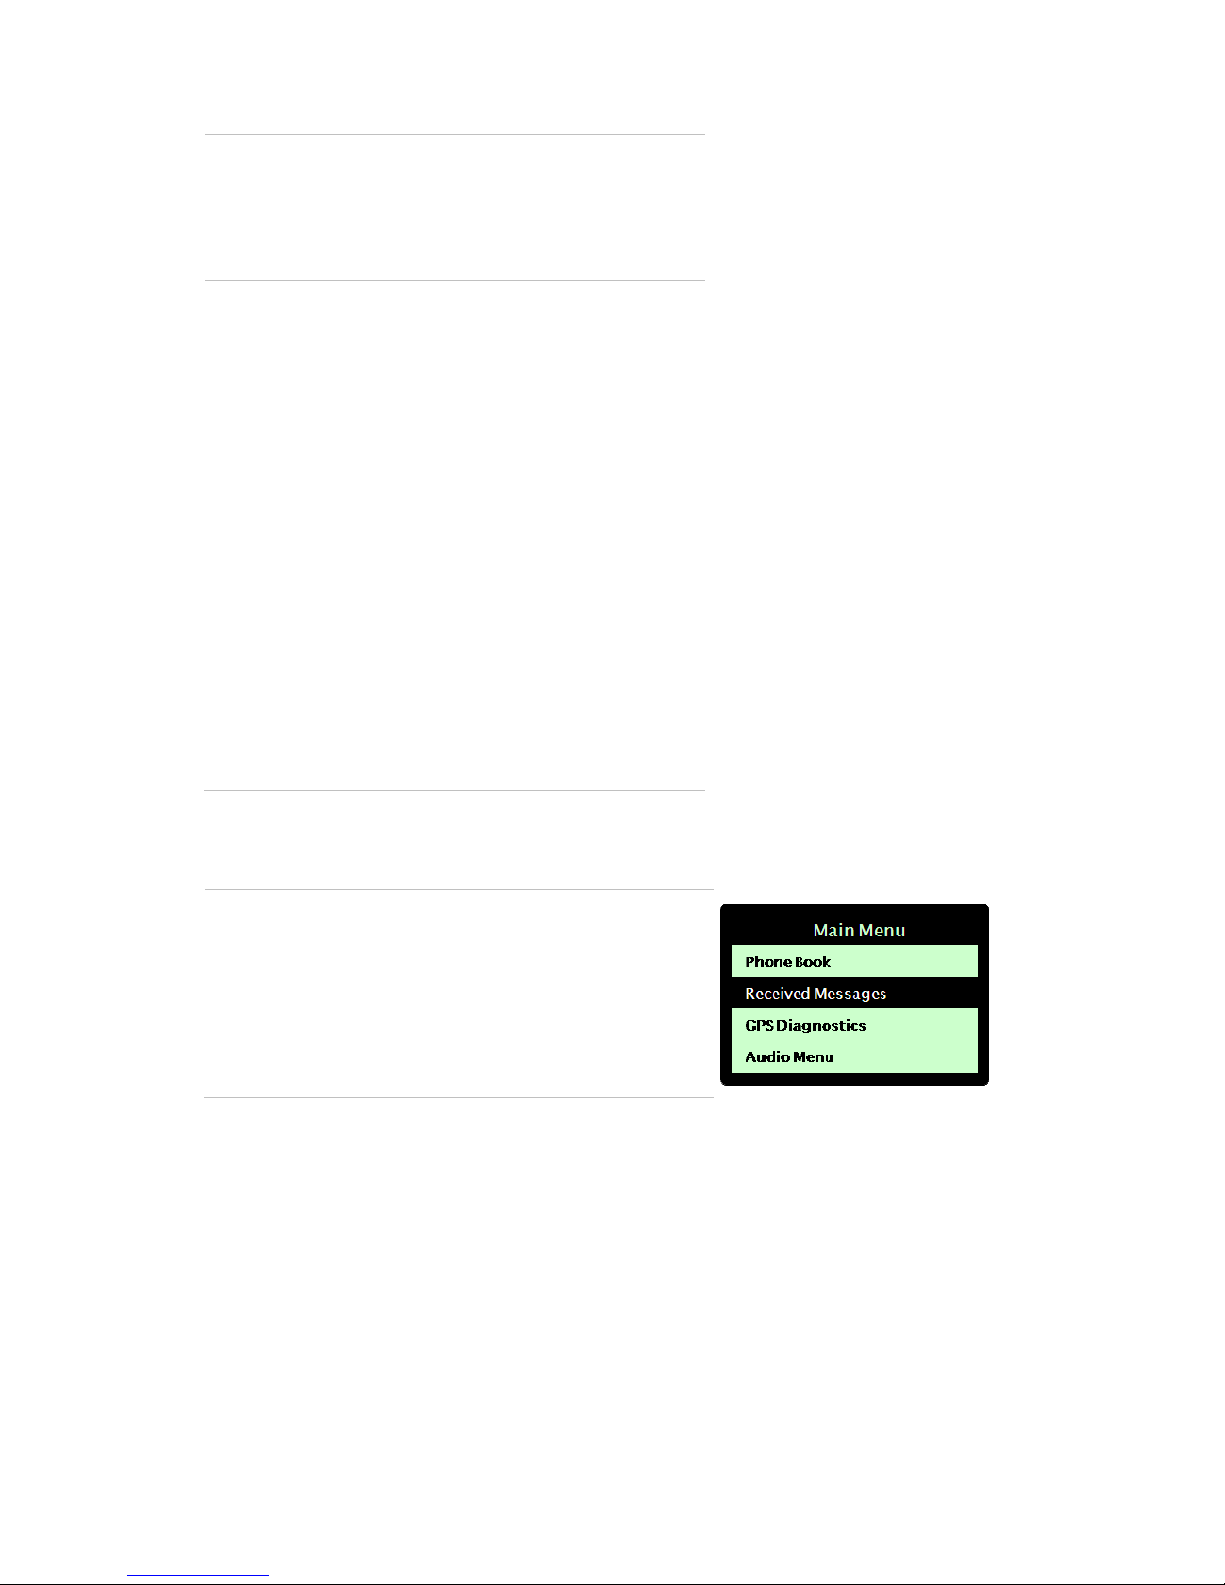
The 'Menu Screen' displays when you are accessing the DZM menu system:
The menu system is used to view and configure DZM settings.
Refer to "Using the DZM menu" on page 16 for further
information about using the menu.
| Flightcell® DZM Operating Manual | Firmware v2.00 Page 13 of 88 |
Page 14
Press to call a phone number that has been entered (page
20)
Press to enter a phone number to dial from the satellite phone (page
Press to isolate (mute) audio between the
DZM and the cell and
Press to terminate a call, undo last action
or delete text or numbers
Press to sele
ct a speed dial number to call from the
cell modem
(page
Press to select a speed dial number to call from the satellite phone
Press the 3 key to move directly to the first item in a menu list
Press to select a menu item
Press to deselect a menu option, cancel any unsaved settings and
The keypad
The keypad on the DZM has various modes as described below. Refer to the page number in brackets for further
information about each key's function.
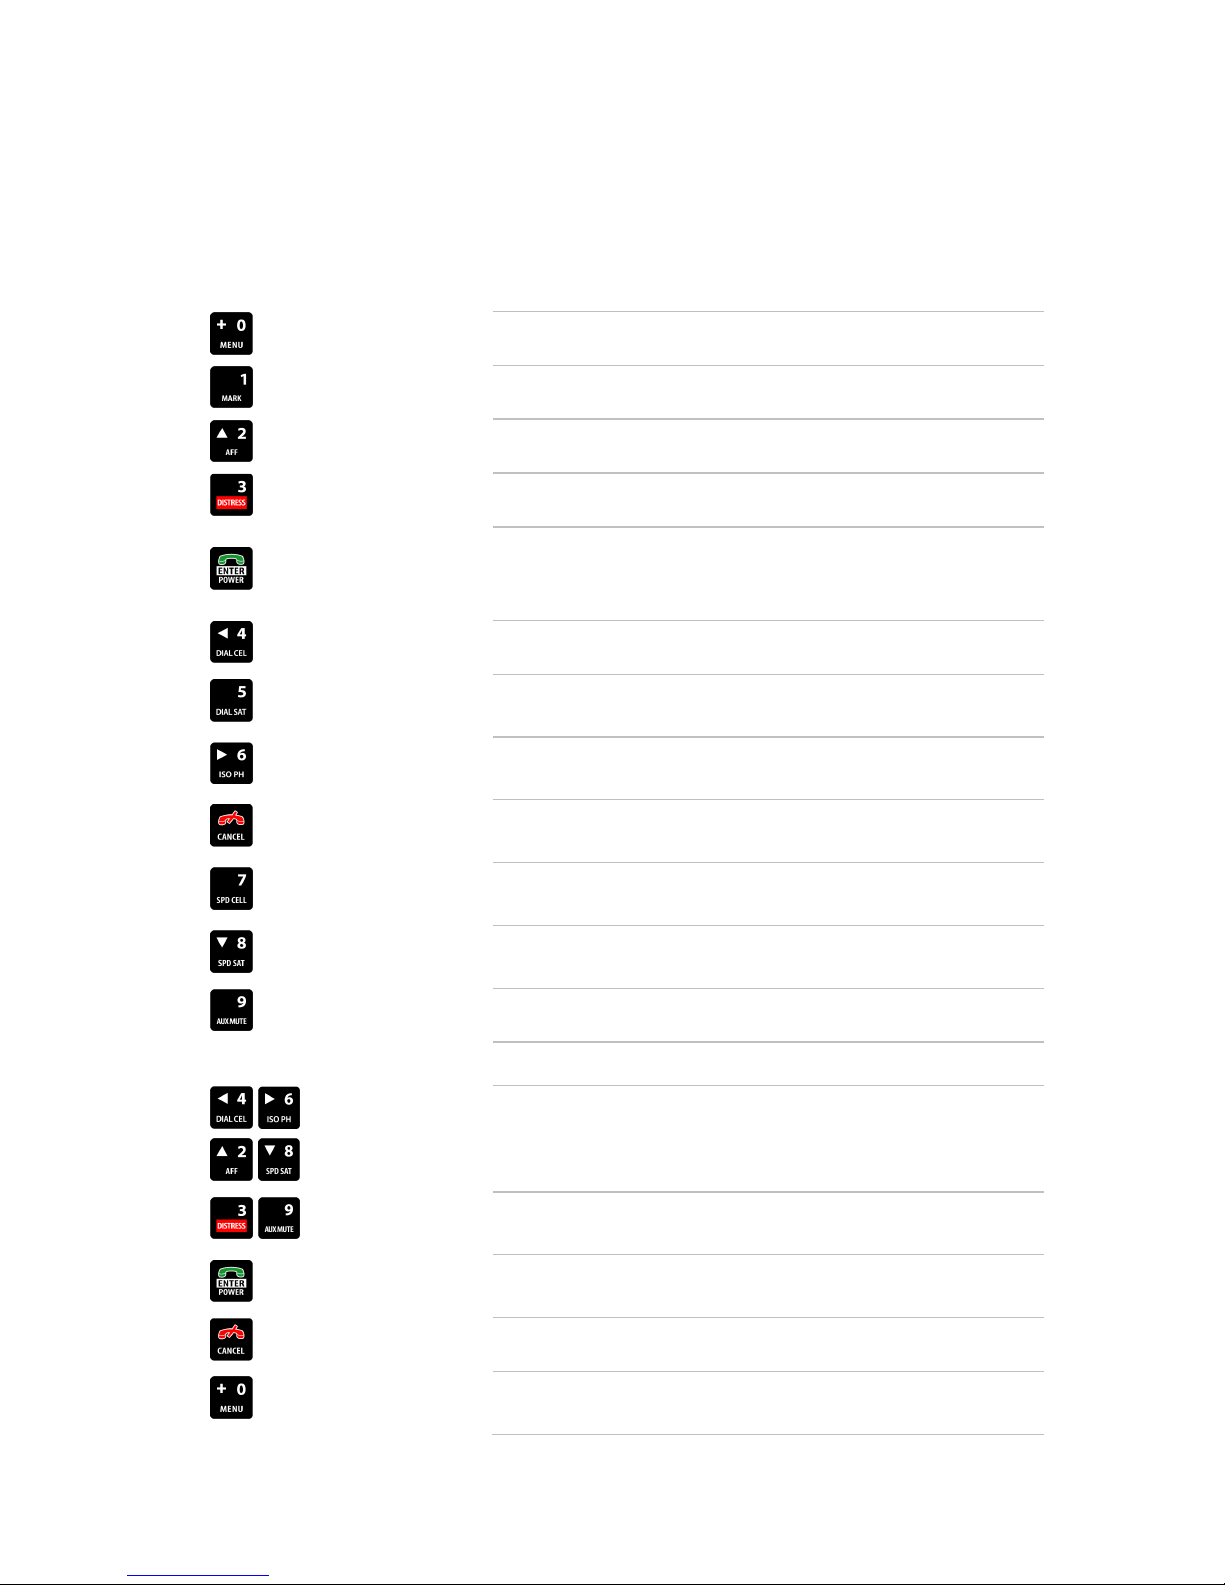
When the 'Main Screen' displays, each key has a quick key function:
MENU key Press to enter the menu system to configure DZM settings (page 16)
MARK key Press to send current GPS position data (page 31)
AFF key Press to start and stop Automated Flight Following (AFF) (page 38)
DISTRESS key Press and hold for 15 seconds to send a distress signal (page 49)
ENTER and
POWER key
DIAL CEL key Press to enter a phone number to dial from the cell modem (page 20)
DIAL SAT key
ISO PH key
CANCEL key
SPD CELL key
Press to answer an incoming call (page 22)
Press and hold to switch the DZM off or on (page 9)
20)
satellite phones (page 42)
entered on the display
22)
When the 'Menu Screen' displays, the following key functions are available:
| Flightcell® DZM Operating Manual | Firmware v2.00 Page 14 of 88 |
SPD SAT key
AUX MUTE key Press to mute any auxiliary audio devices (page 43)
ARROW keys
QUICK keys
ENTER key
CANCEL key Press to exit the menu system and return to the 'Main Screen'
MENU key
(page 22)
Press the arrow keys to navigate through the menu options
Use the arrow keys to increase or decrease audio volume during a call
Press the 9 key to move directly to the last item in a menu list
Press to save modified settings for a selected menu item
return to the previous screen
Page 15
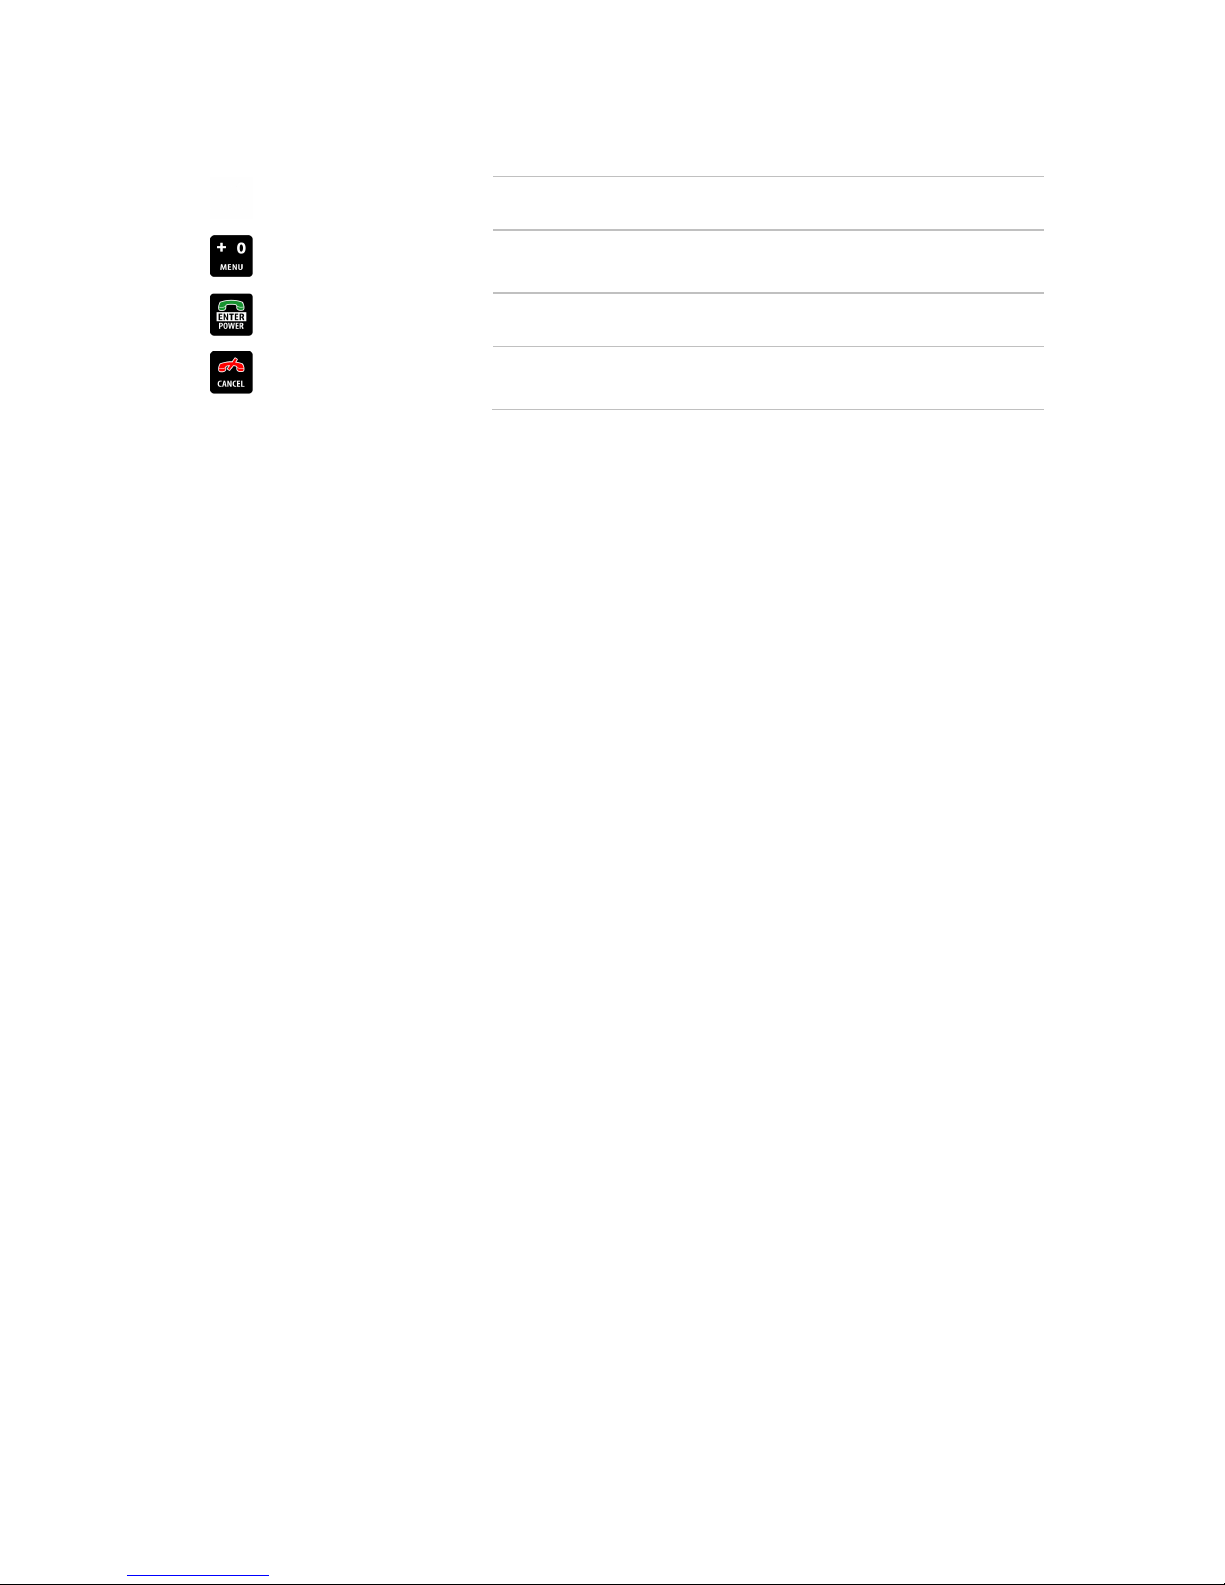
Press and hold for the international dialing prefix "+" (for GSM and
Press to end a call, undo last action or delete
When dialing calls, the following key functions are available:
DIGIT keys Press the 0 to 9 digit keys to dial a phone number
+ key
Iridium networks only)
ENTER key Press to dial a phone number that has been entered (page 20)
CANCEL key
Use to enter * or # symbols when using touch-tone dialing (page 24)
| Flightcell® DZM Operating Manual | Firmware v2.00 Page 15 of 88 |
Page 16
Using the Flightcell® DZM menu
The menu system is used to access and configure a wide range of DZM settings.
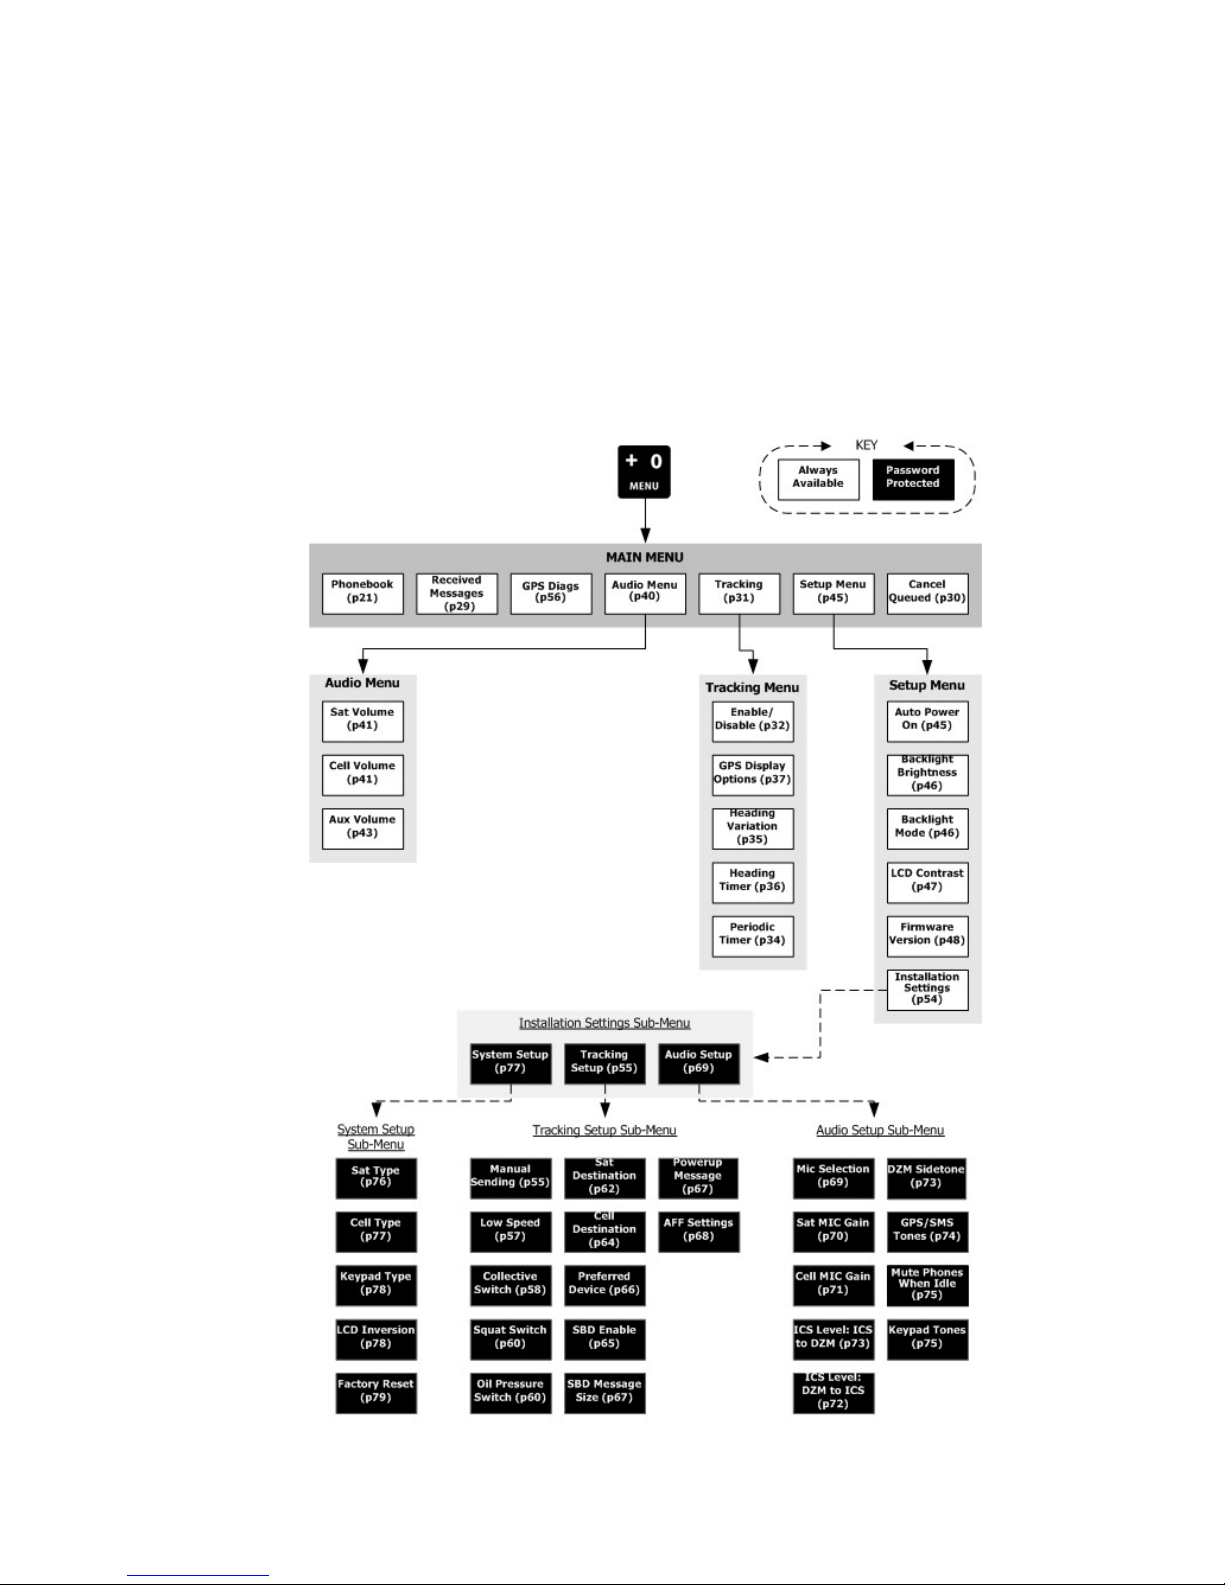
Menu overview
The DZM menu layout is shown in the diagram below. Refer to the page number displayed in brackets
for more detailed information about each menu option.
For information on accessing password protected settings in the Installation Settings menu, see page 54.
| Flightcell® DZM Operating Manual | Firmware v2.00 Page 16 of 88 |
Page 17
Accessing the menu
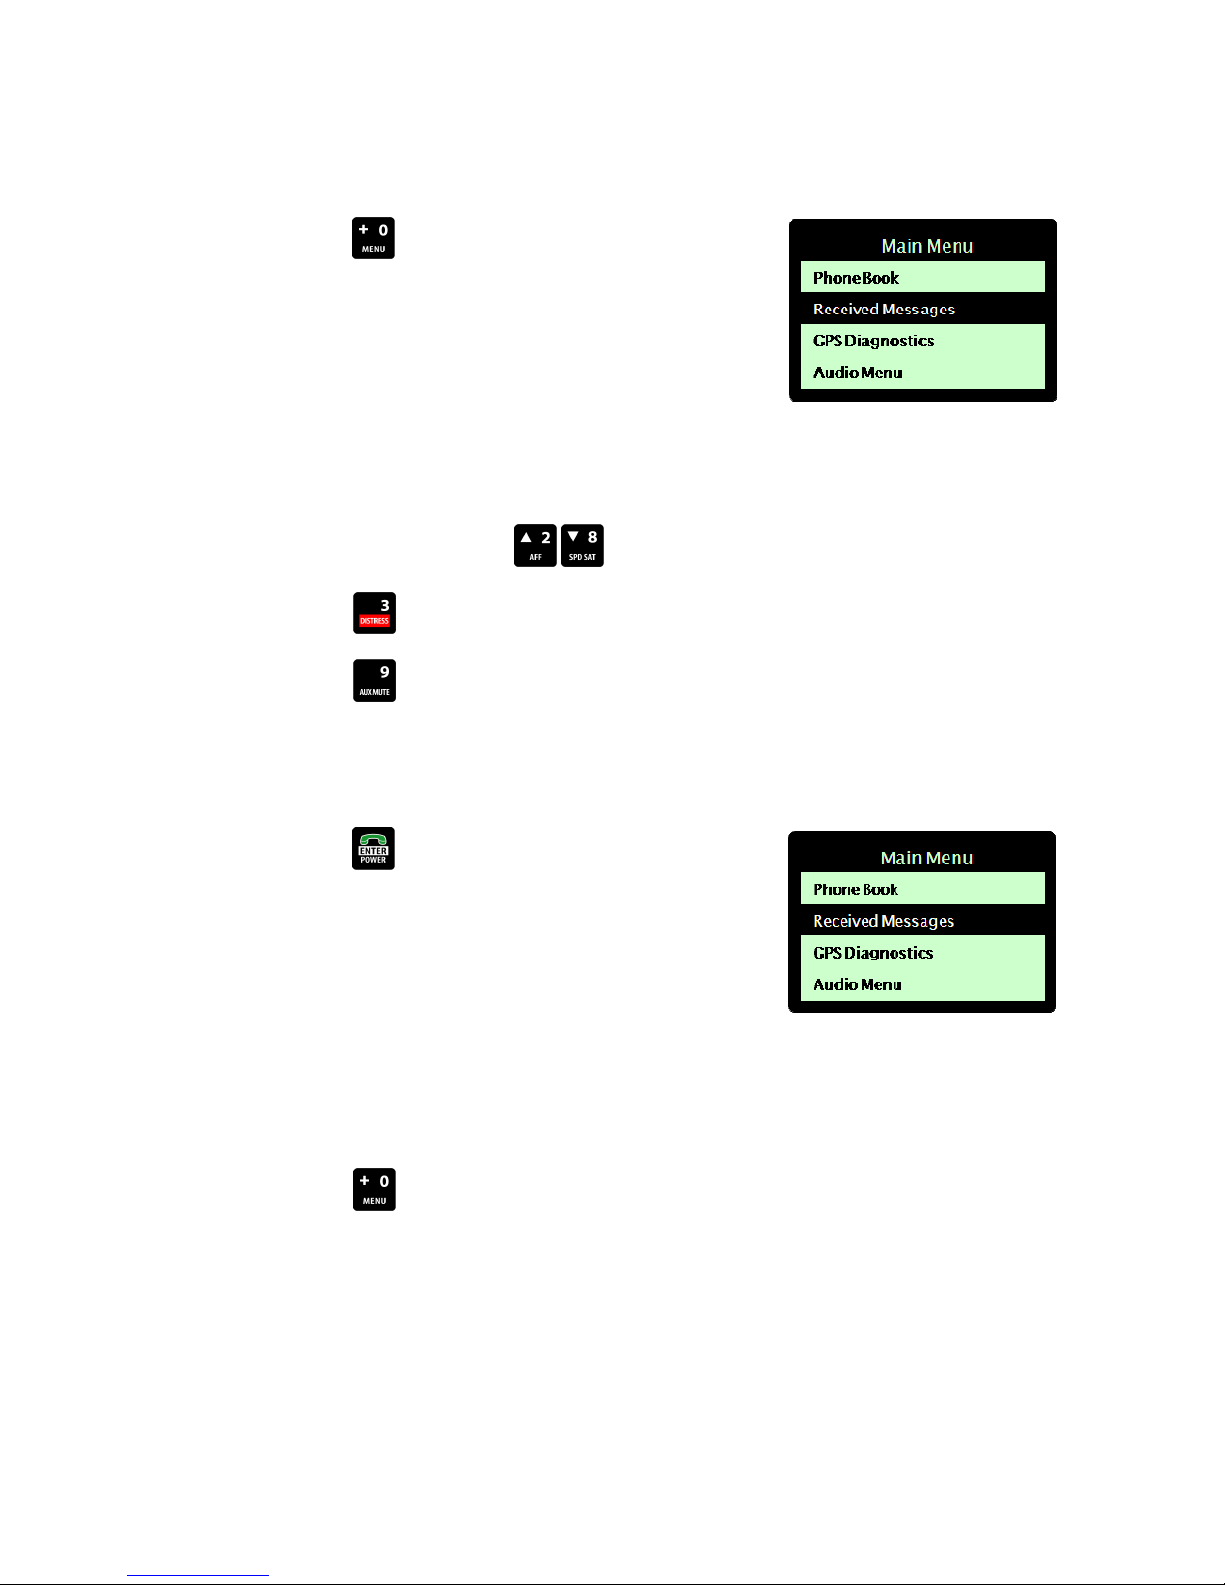
Press the MENU key to enter the menu system.
When in the menu system, the DZM will automatically return
to the 'Main Screen' after 20 seconds unless another key is
pressed.
Navigating the menu
In the menu system, press the arrow keys to move up and down the menu options.
Press the quick key to move directly to the first item in the menu list.
Press the quick key to move directly to the last item in the menu list.
Selecting a menu option
Press the ENTER key to select a highlighted menu option.
Returning to the previous screen
Press the MENU key to deselect a menu option and return to the previous screen.
| Flightcell® DZM Operating Manual | Firmware v2.00 Page 17 of 88 |
Page 18
Altering a menu setting
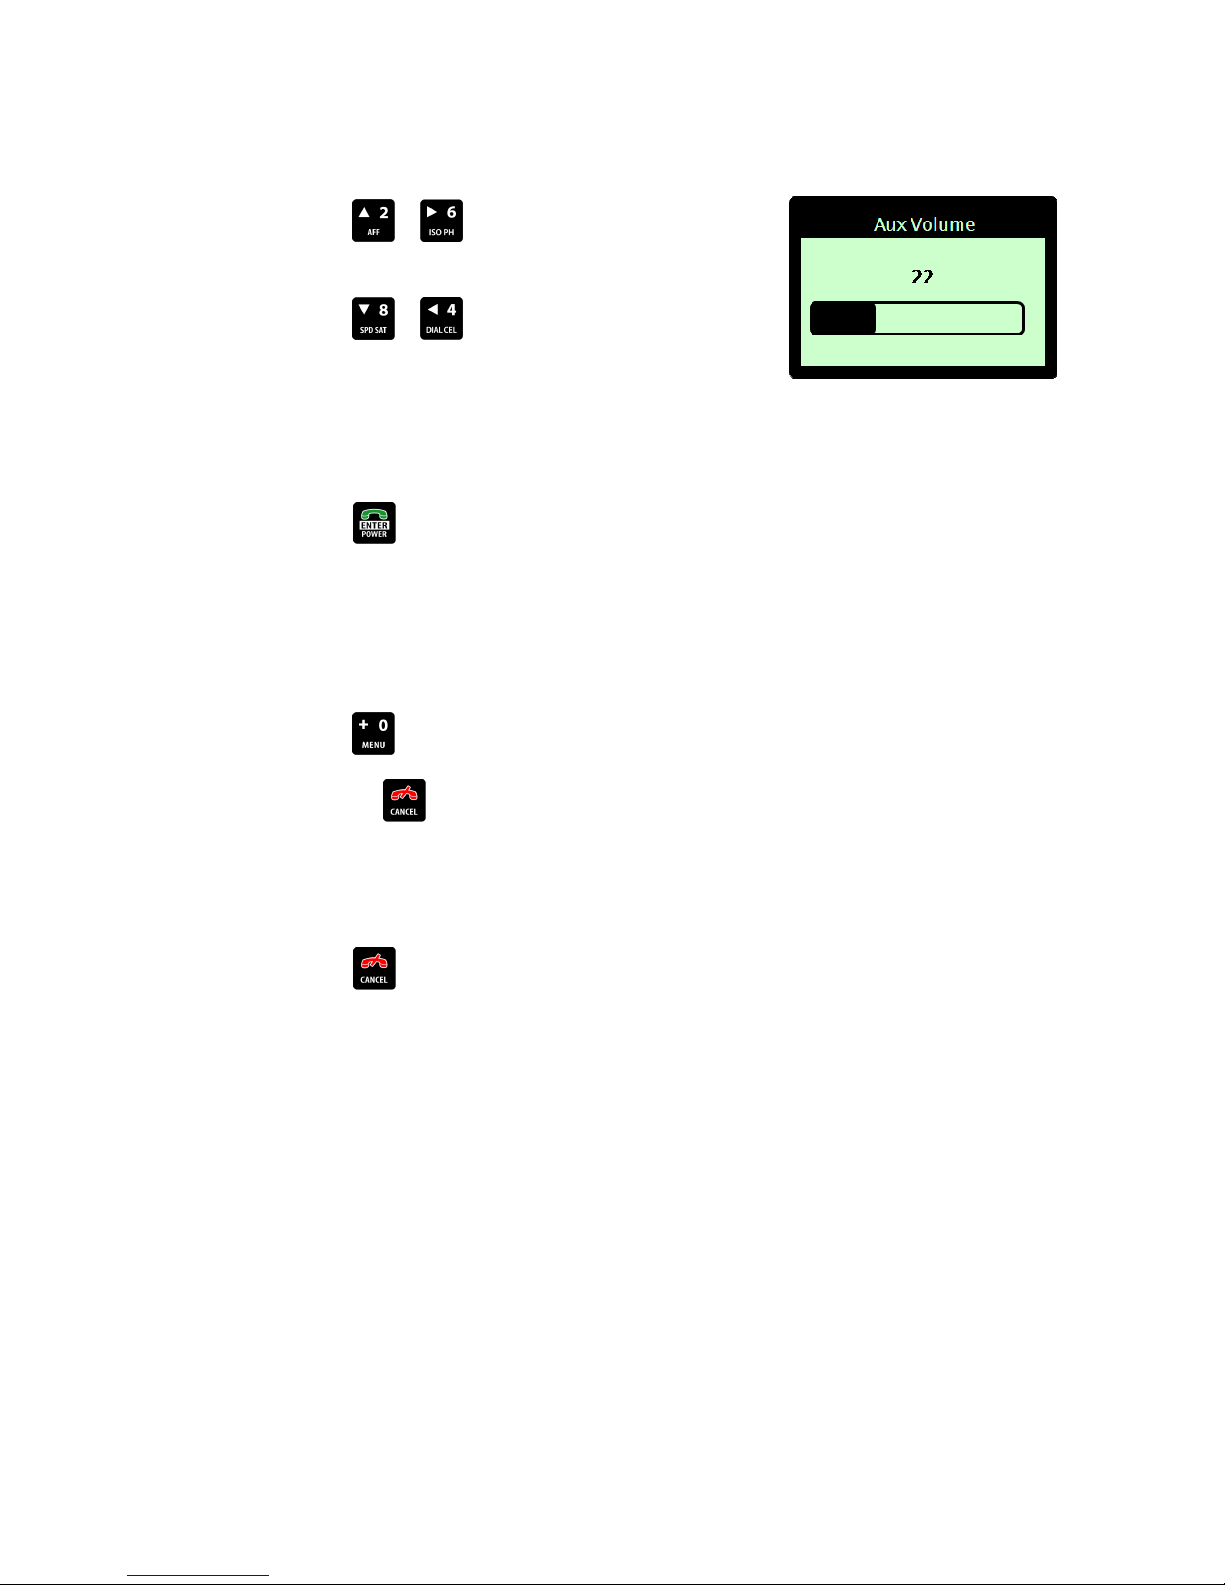
Press the or arrow keys to increase a setting (e.g. a
volume or level setting).
Press the or arrow keys to decrease a setting (e.g. a
volume or level setting).
Saving a menu setting
Press the ENTER key to save modified settings for a selected menu item.
Aborting a menu setting
If a menu setting has not been saved:
Press the MENU key to abort the change and return to the previous screen.
OR press the CANCEL key to abort the change and exit the menu system.
Exiting the menu
Press the CANCEL key to exit the menu system and return to the 'Main Screen'.
When in the menu system, the DZM will automatically return to the Main Screen after 20 seconds
unless another key is pressed.
| Flightcell® DZM Operating Manual | Firmware v2.00 Page 18 of 88 |
Page 19

FLIGHTCELL® DZM OPERATOR'S GUIDE
Learn how to:
Use the DZM functions that are often required by the pilot during flight.
Refer to "Flightcell® advanced setup guide" on page 50 for further information about how to configure
advanced DZM settings.
| Flightcell® DZM Operating Manual | Firmware v2.00 Page 19 of 88 |
Page 20
Making and answering calls
Making a call using manual dial
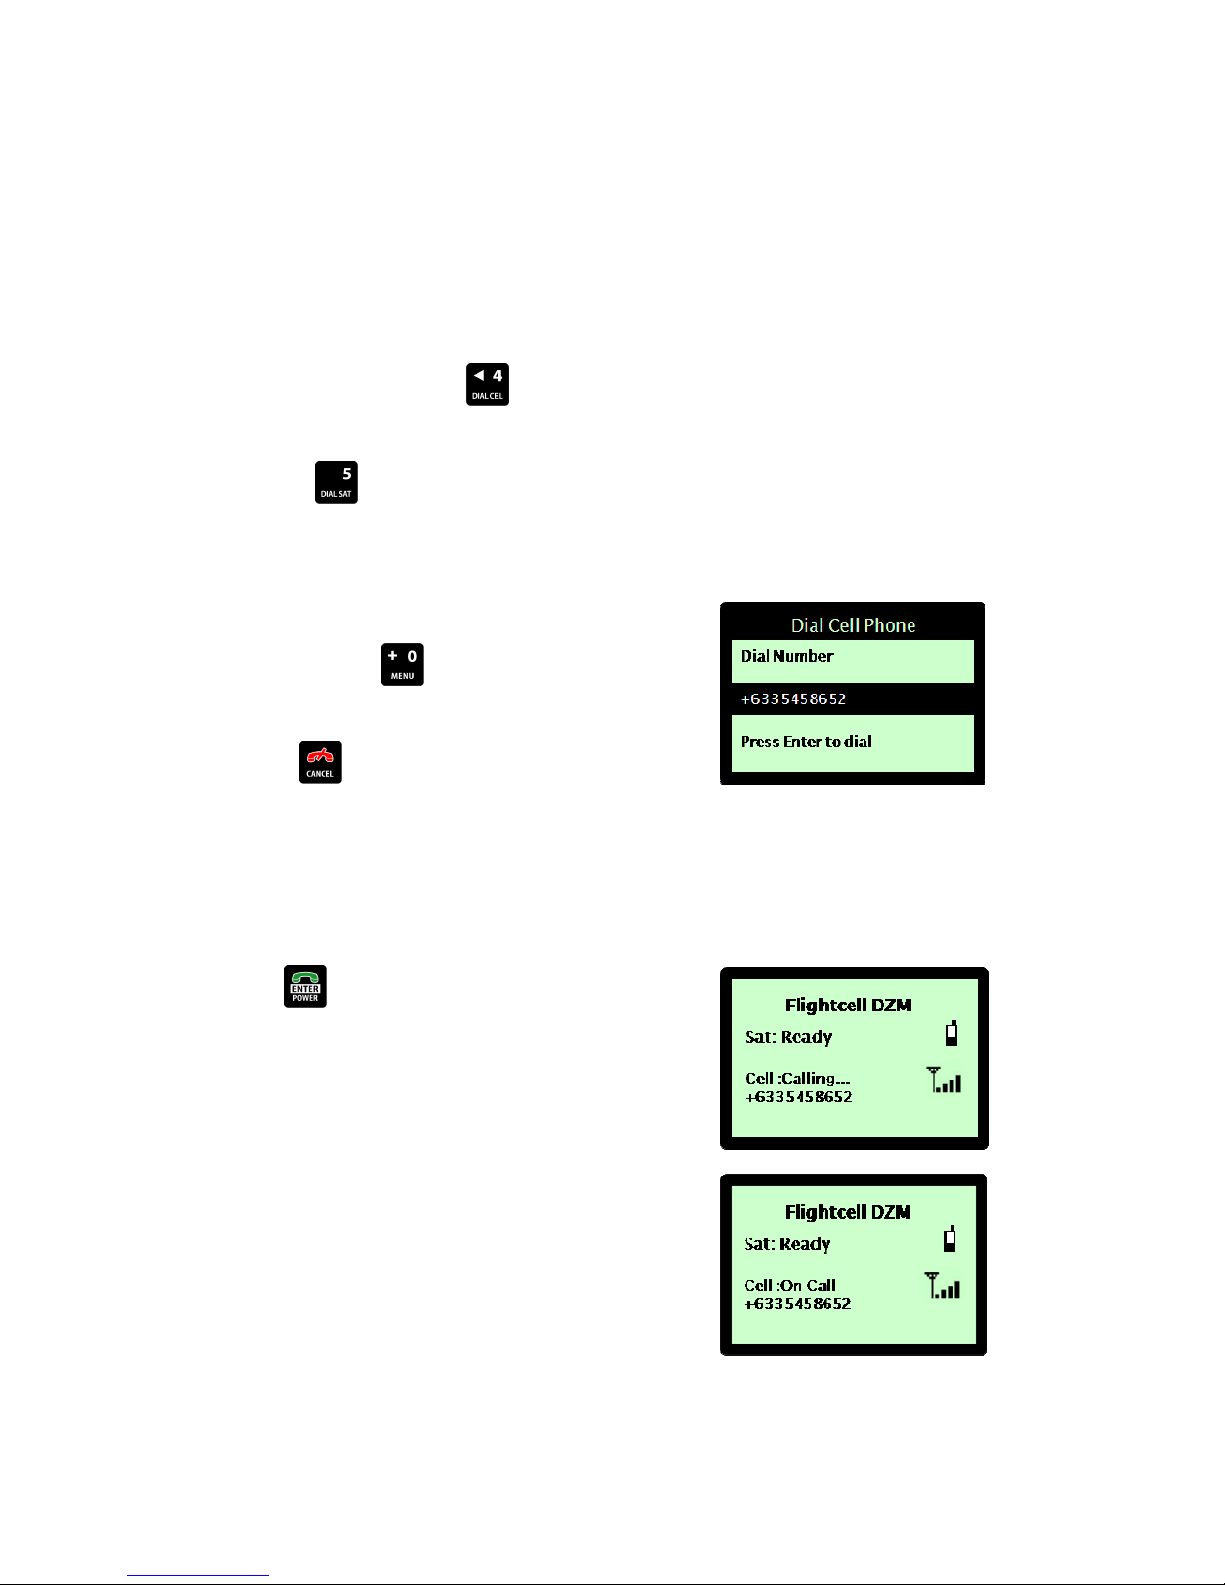
You may manually enter phone numbers into the DZM to make a call.
STEP 1 - Selecting cell modem or satellite phone:
From the 'Main Screen', press the DIAL CEL key to make a manual call from the cell modem. The 'Dial
Cell modem' screen displays.
OR press the DIAL SAT key to make a manual call from the satellite phone. The 'Dial Sat Phone' screen
displays.
STEP 2 - Entering the phone number:
Using the 0 to 9 keys, enter the phone number.
Press and hold the MENU key to enter the international
dialing prefix "+" (for GSM and Iridium networks).
Use the CANCEL key to delete the last digit entered if
required.
The phone number entered will display.
Press and hold the CANCEL key to abort the call completely.
STEP 3 - Calling the number:
Press the ENTER key to call the number displayed. The
phone status on the 'Main Screen' displays Calling. When the call
is connected the phone status displays On Call. If the DZM
matches the phone number dialed to an existing number in the
phonebook, then the contact’s name will appear underneath the
phone status instead of the number.
NOTE! It may take up to 30 seconds for the satellite phone to
respond.
| Flightcell® DZM Operating Manual | Firmware v2.00 Page 20 of 88 |
Page 21
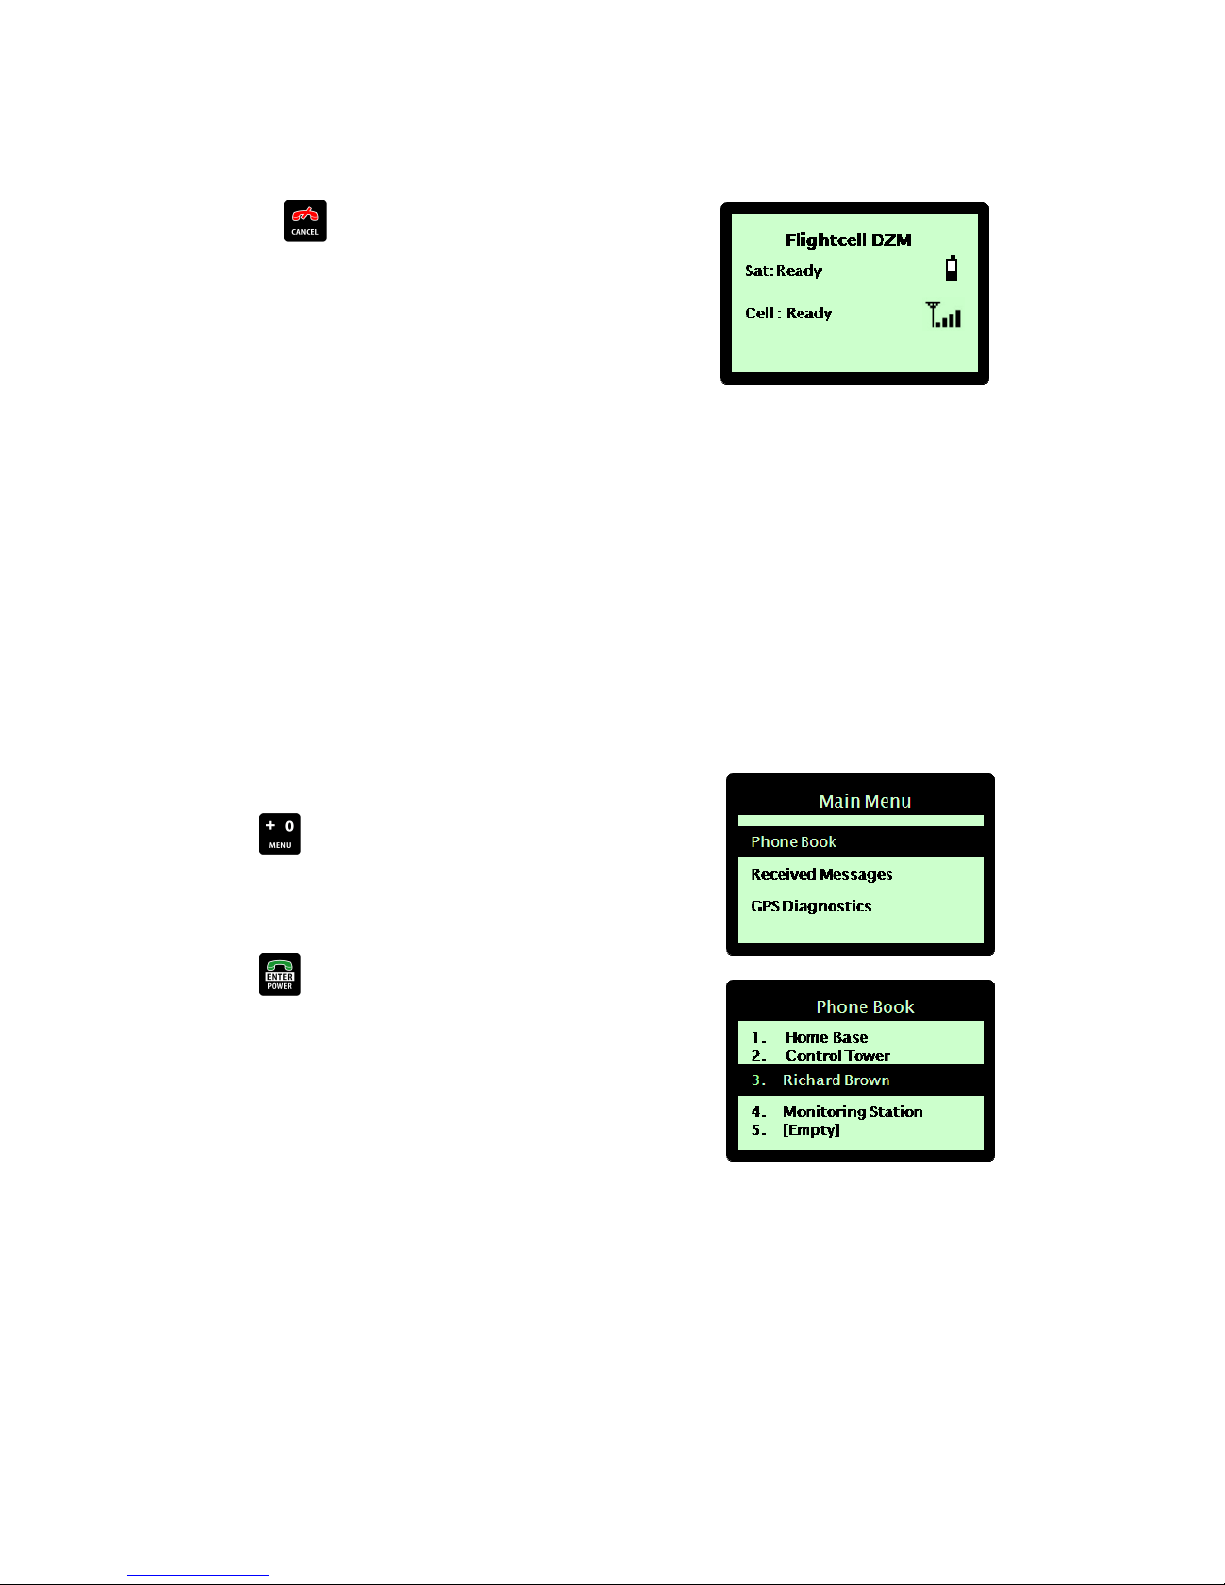
STEP 4 - Terminating the call:
Press the CANCEL key to terminate a call at any time. The
phone status shows Disconnecting then returns to Ready.
Making a call using the DZM phonebook
The DZM phonebook stores up to 50 phone numbers for quick dialing and caller identification (where supported).
Entries stored in the phonebook may be used to make calls using the satellite phone or cell modem (i.e. the same
set of speed dial entries is used for both devices).
Entries in the phonebook are stored within the DZM. This means that the phonebook entries may be used by any
satellite or cell modem connected to the DZM.
The first 9 numbers stored in the phonebook are also available as speed dial numbers. Refer to ‘Making a call
using speed dial’ on page 23 for information about how to use the speed dial function.
STEP 1: Accessing the phonebook
Press the MENU key to enter the menu system. The 'Main
Menu' displays.
Using the arrow keys, navigate to Phone Book.
Press the ENTER key to select. Your phonebook entries are
displayed.
“Empty” will display next to a listing where no entry has been saved.
| Flightcell® DZM Operating Manual | Firmware v2.00 Page 21 of 88 |
Page 22
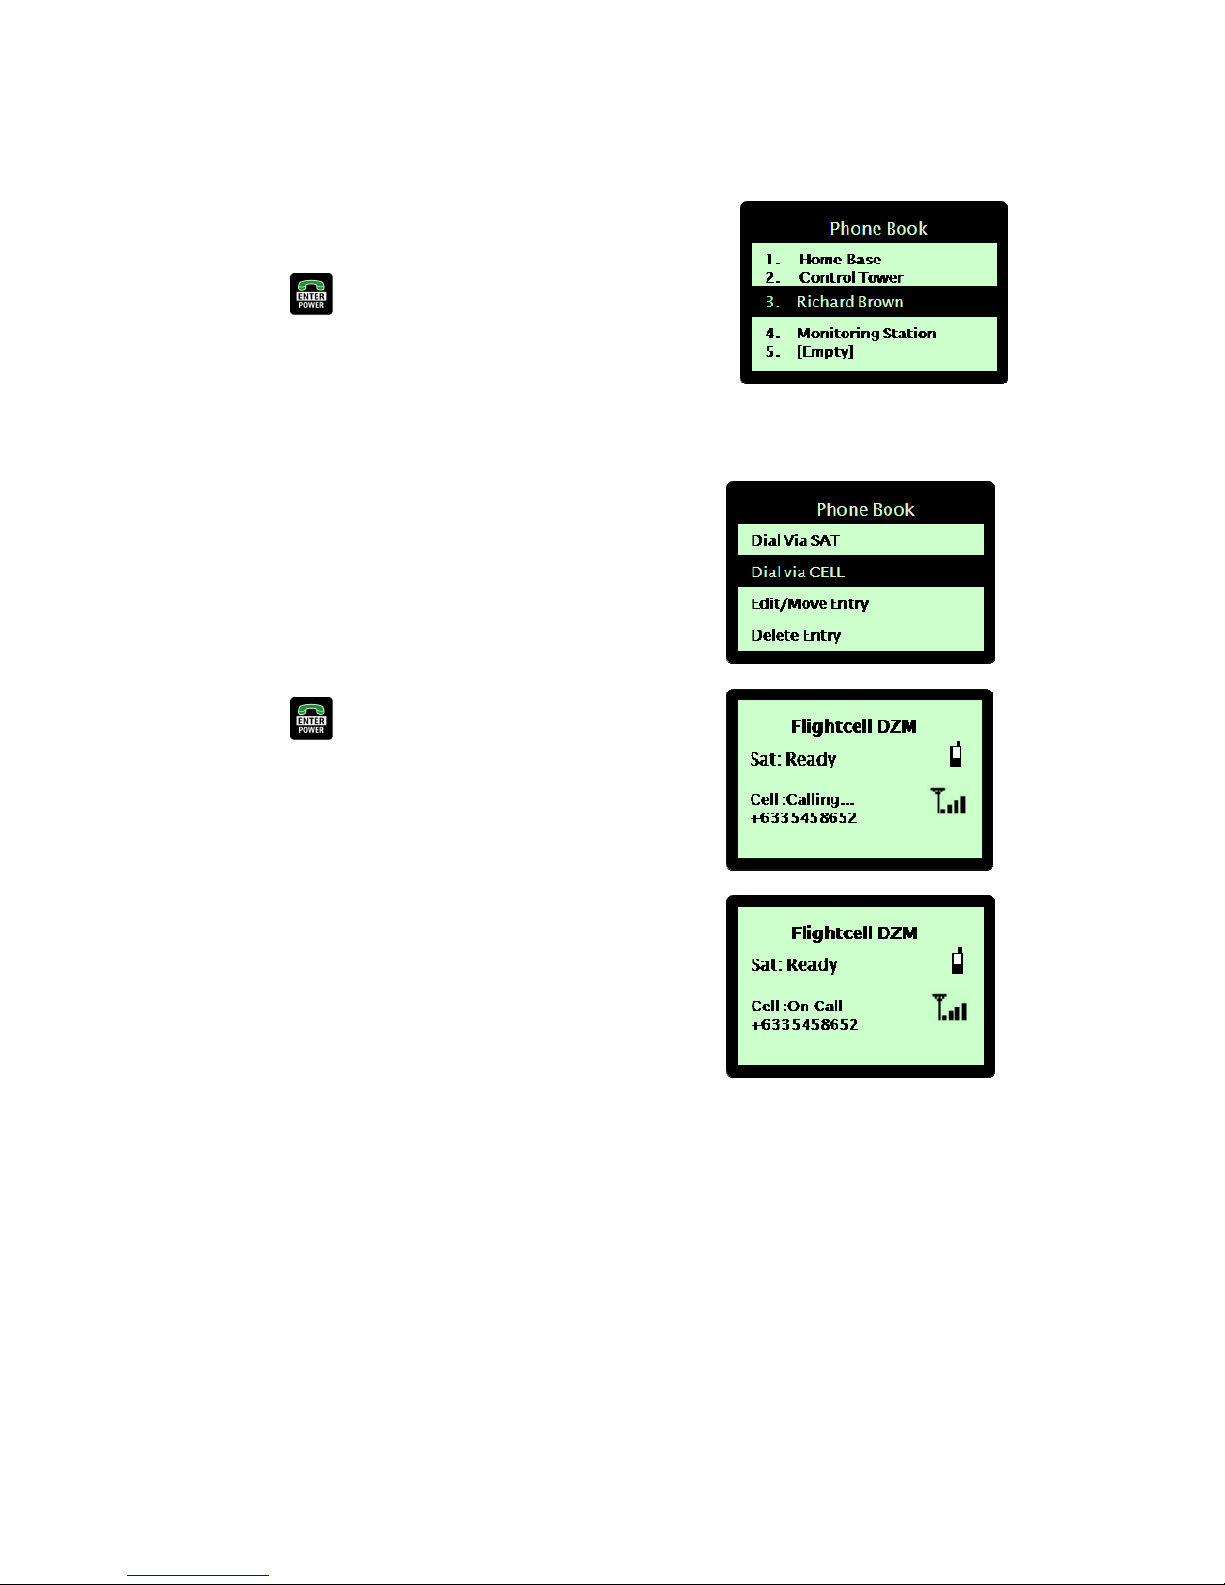
STEP 2 - Selecting a phonebook entry to call:
From the phonebook entries, use the arrow keys to navigate to
the entry to call.
Press the ENTER key to select. The phonebook select action
screen displays.
STEP 3 – Calling the selected entry:
Using the arrow keys, navigate to “Dial via SAT” to make the call
using your satellite phone
OR navigate to “Dial via CELL” to make the call using your cell
modem.
SAT and CELL options only display where these devices are
connected to your DZM.
Press the ENTER key to dial the number. The phone status
on the 'Main Screen' displays Calling. When the call is connected
the phone status displays On Call.
It may take up to 30 seconds for the satellite phone to respond.
| Flightcell® DZM Operating Manual | Firmware v2.00 Page 22 of 88 |
Page 23
Making a call using speed dial
The speed dial function enables you to dial any of the first 9 numbers stored in the phonebook quickly from the
DZM keypad.
Refer to "Using the phonebook" on page 26 for further information about the DZM phonebook.
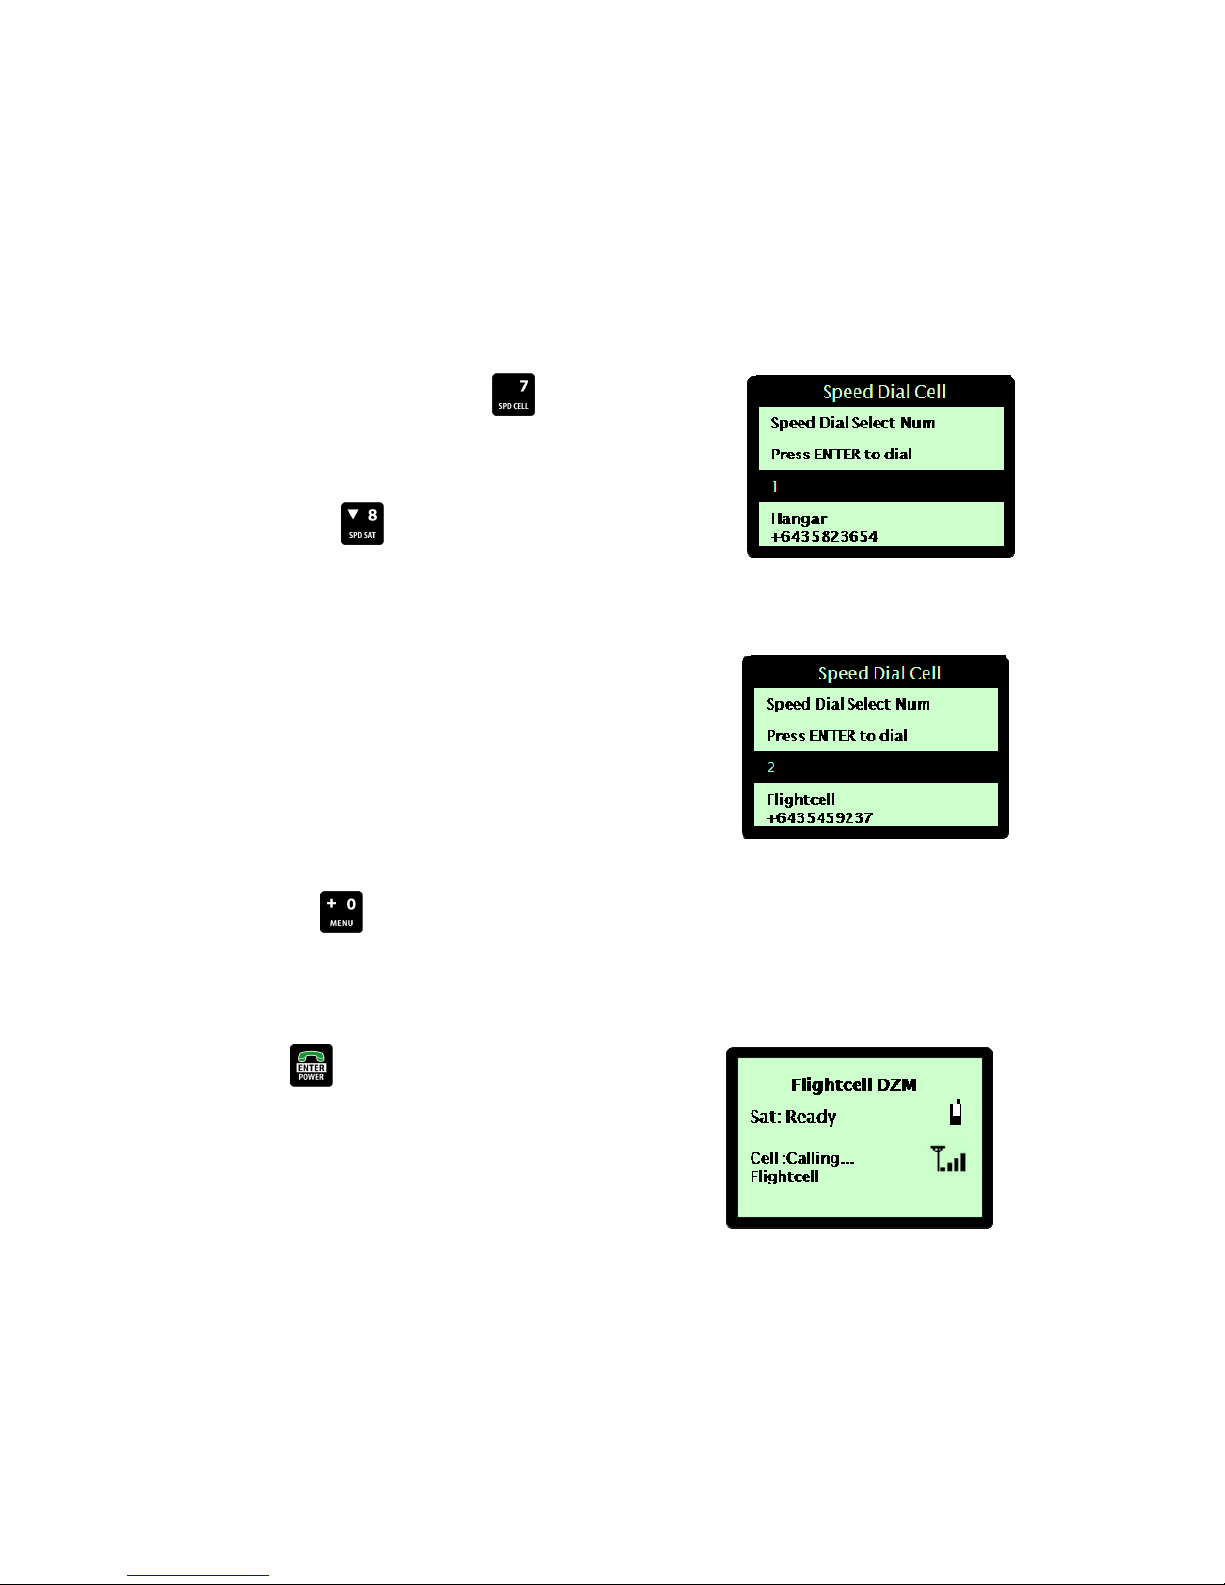
STEP 1 - Selecting the cell modem or satellite phone:
From the 'Main Screen', press the SPD CELL key to make a
speed dial call from the cell modem. The 'Speed Dial Cell' screen
displays.
OR press the SPD SAT key to make a speed dial call from
the satellite phone. The 'Speed Dial Sat' screen displays.
STEP 2 - Selecting the speed dial number:
Using the 1 to 9 keys, select a speed dial entry from the
phonebook to dial.
When a speed dial number is selected, the name and number
details will display. Entry Empty will display if the speed dial
entry is blank.
If the wrong number is selected, another entry can be
selected by pressing the appropriate key.
OR press the MENU key for the last manually dialed
number.
STEP 3 - Dialing the number:
Press the ENTER key to dial the number. The phone status
on the 'Main Screen' displays Calling. When the call is connected
the phone status displays On Call.
It may take up to 30 seconds for the satellite phone to respond.
| Flightcell® DZM Operating Manual | Firmware v2.00 Page 23 of 88 |
Page 24
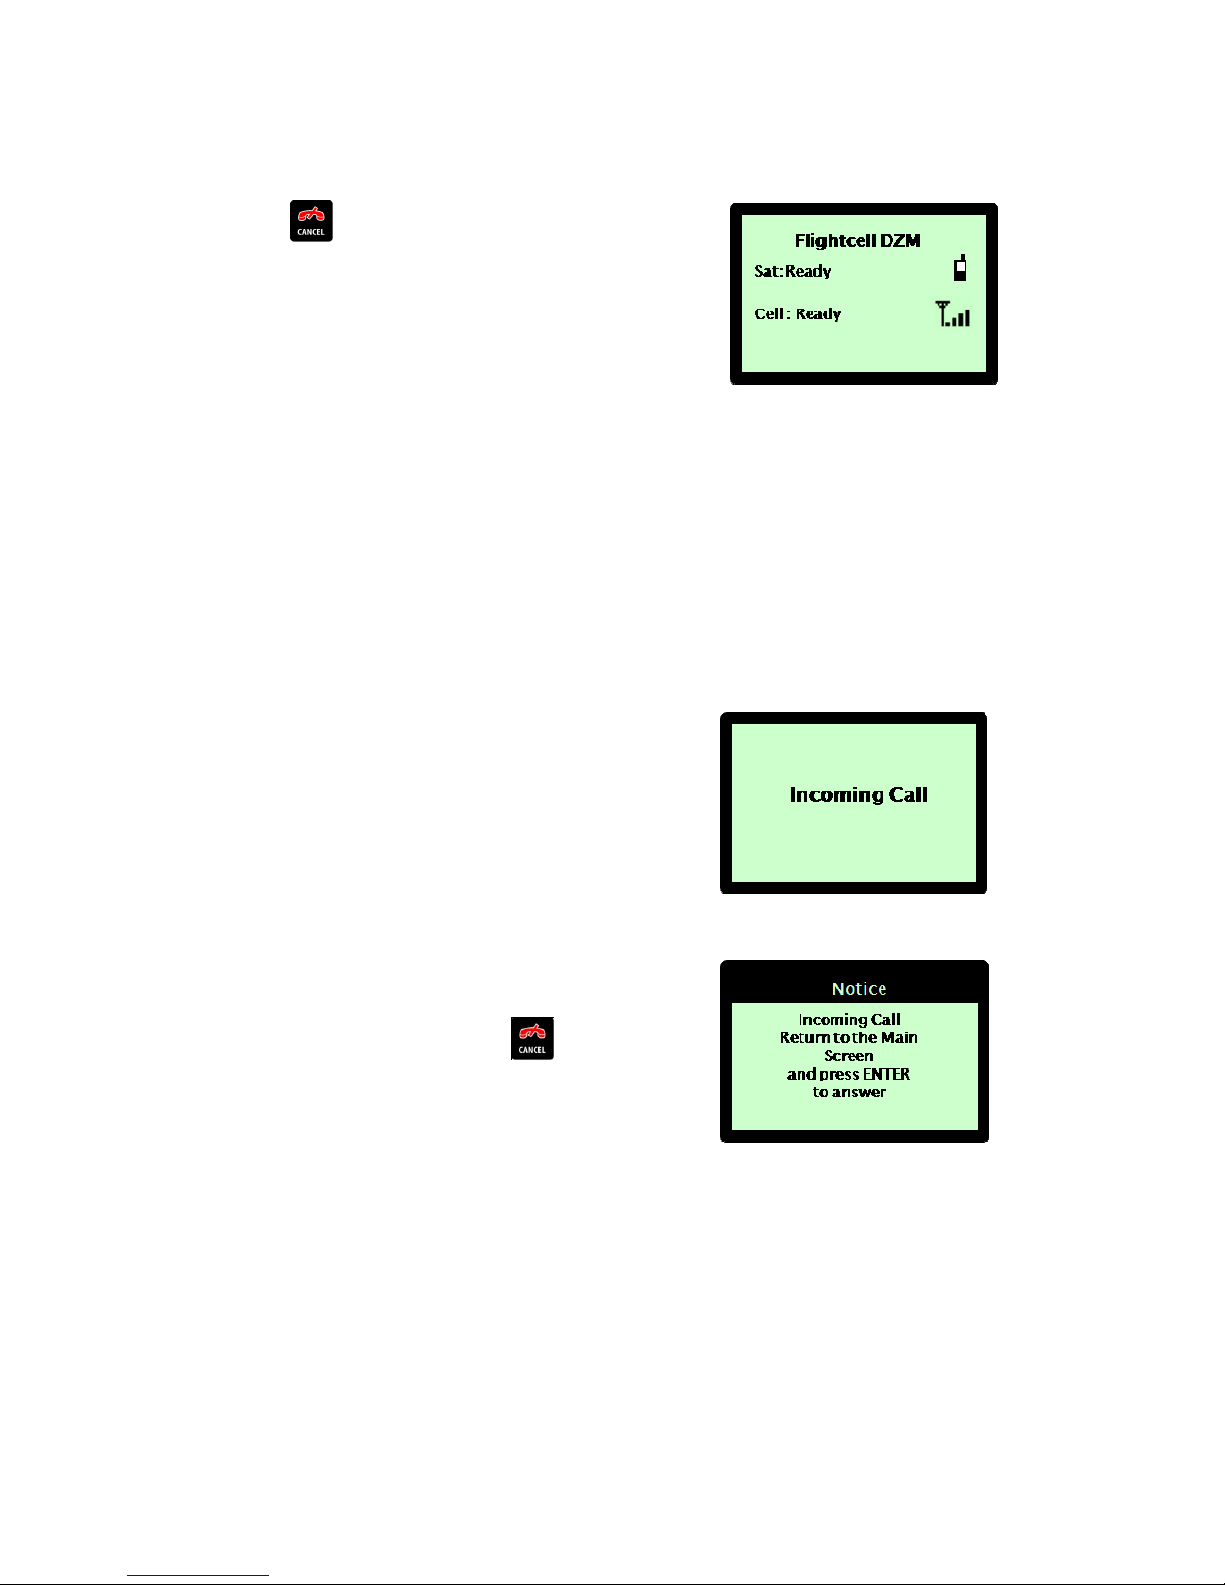
STEP 4 - Terminating the call:
Press the CANCEL key to terminate a call at any time. The
phone status will show Disconnected then return to Ready.
The call will also be terminated if the party at the other end of the
call hangs up.
Answering an incoming call
The DZM can receive incoming calls through the satellite phone or the cell modem.
STEP 1 - Incoming call detected:
When the DZM detects an incoming call on the satellite phone or
cell modem, an alert displays on the LCD screen for a few
seconds before displaying the ‘Main Screen’ again. The phone
status on the 'Main Screen' will display Incoming Call. If the
network provides the caller ID, and the DZM finds the caller’s
number in the phonebook, then the caller’s name will flash
beneath the phone status line. If the caller cannot be identified,
then the phone number will flash beneath the status line instead.
No name or number will appear below the status line in cases
where the network does not provide the information.
If you are in a menu screen, a message will flash reminding you
to return to the main screen. Press the CANCEL key to
return to the 'Main Screen' before attempting to answer the
incoming call.
| Flightcell® DZM Operating Manual | Firmware v2.00 Page 24 of 88 |
Page 25
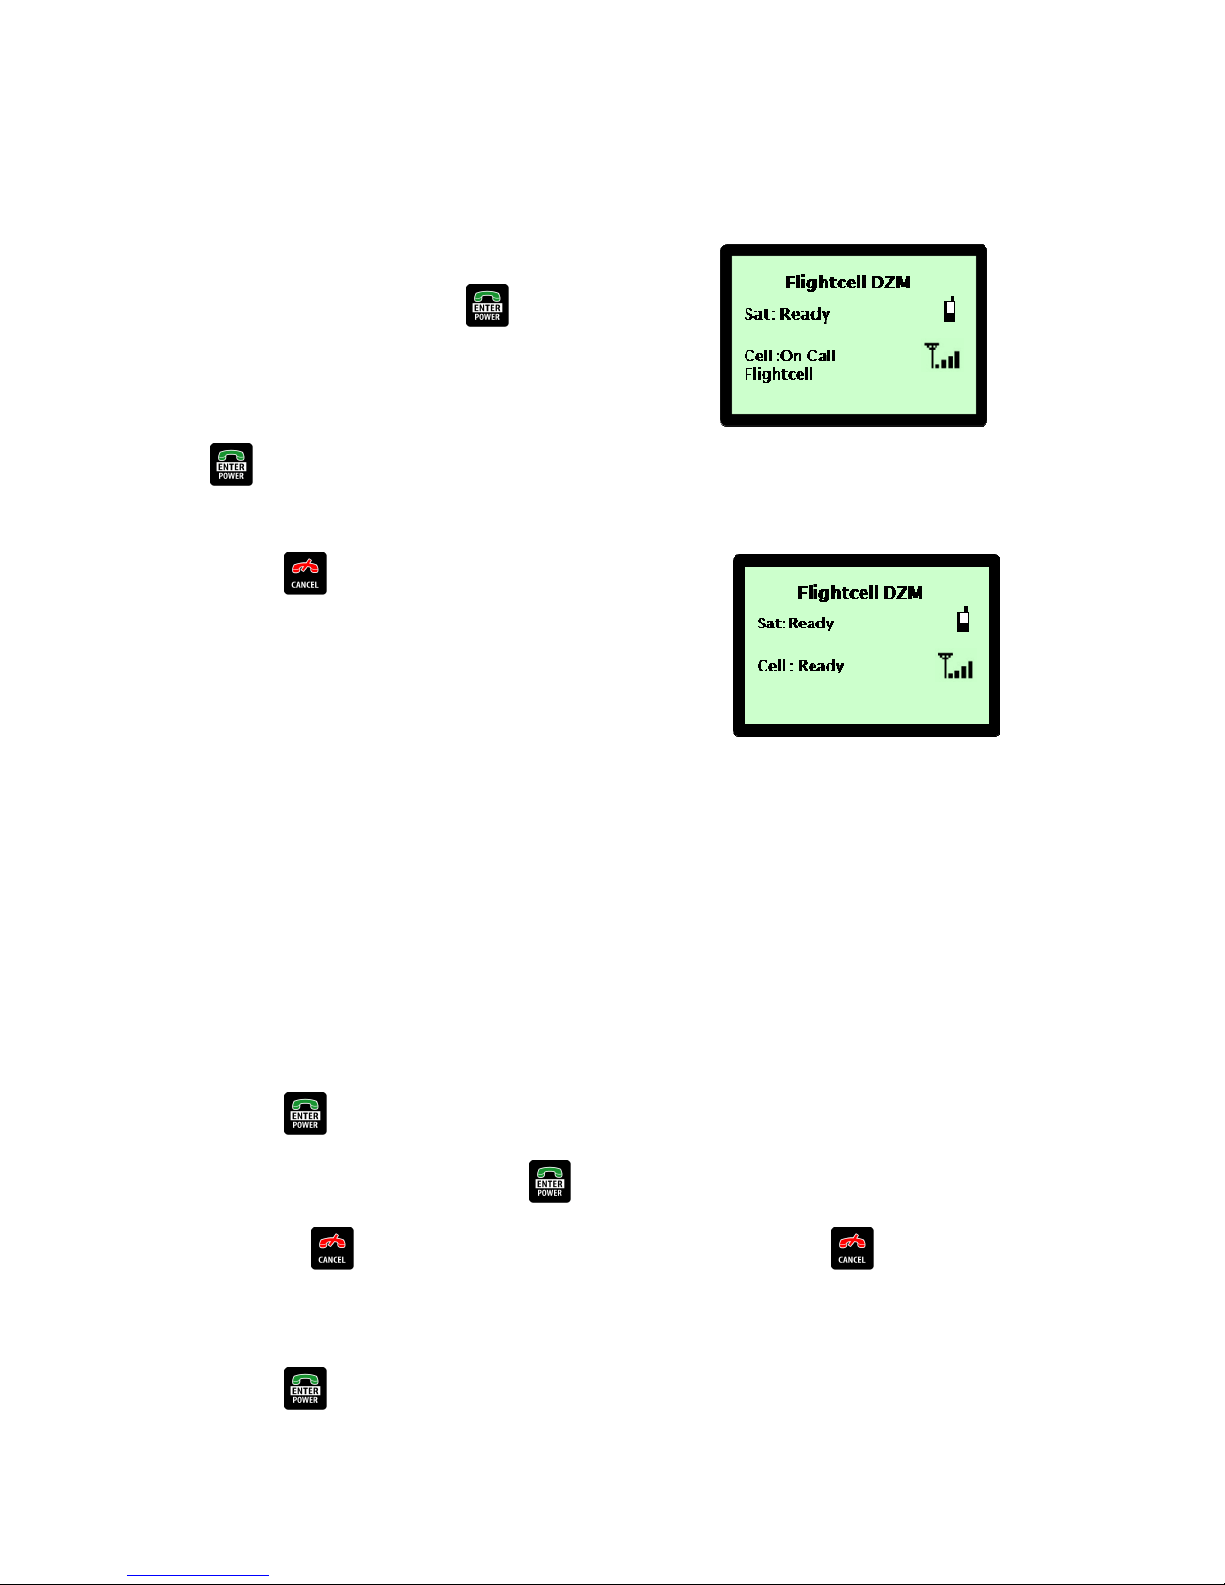
STEP 2 - Answering the call:
Incoming calls are answered from the 'Main Screen'.
The phone status on the 'Main Screen' displays Incoming Call.
From the 'Main Screen', press the ENTER key to answer the
incoming call. The phone status displays On Call.
In the unlikely event that calls are received on both the satellite
and cell modems simultaneously, both will be answered when the
ENTER key is pressed.
STEP 3 - Terminating the call:
Press the CANCEL key to terminate a call at any time. The
phone status returns to Ready.
Using touch-tone dialing (DTMF) during a call
Dual-tone multi-frequency (DTMF) signaling, commonly known as touch-tone dialing, uses key tones to signal to
automated operator services and some PABX systems. Common examples of where DTMF signaling is used are
when selecting choices from telephone menus of call centres, using phone banking, etc.
The DZM can send DTMF tones during a call when required.
STEP 1 - Selecting DTMF mode:
During a call, when DTMF is available, Press ENTER for DTMF flashes on the LCD display.
Press the ENTER key to select DTMF mode.
When in DTMF mode, all keys (except the ENTER key) represent tones.
Press the CANCEL key for the * character if required. Press and hold the CANCEL key for the
# character if required.
STEP 2 - Returning to normal key mode:
Press the ENTER key when in DTMF mode to return to normal key mode.
| Flightcell® DZM Operating Manual | Firmware v2.00 Page 25 of 88 |
Page 26
Editing phonebook entries
Using the DZM keypad, new entries can be added to the phonebook, or existing entries can edited or their
position in the list can be changed.
Adding, editing or moving a phonebook entry
STEP 1 - Selecting an entry to add/edit/move:
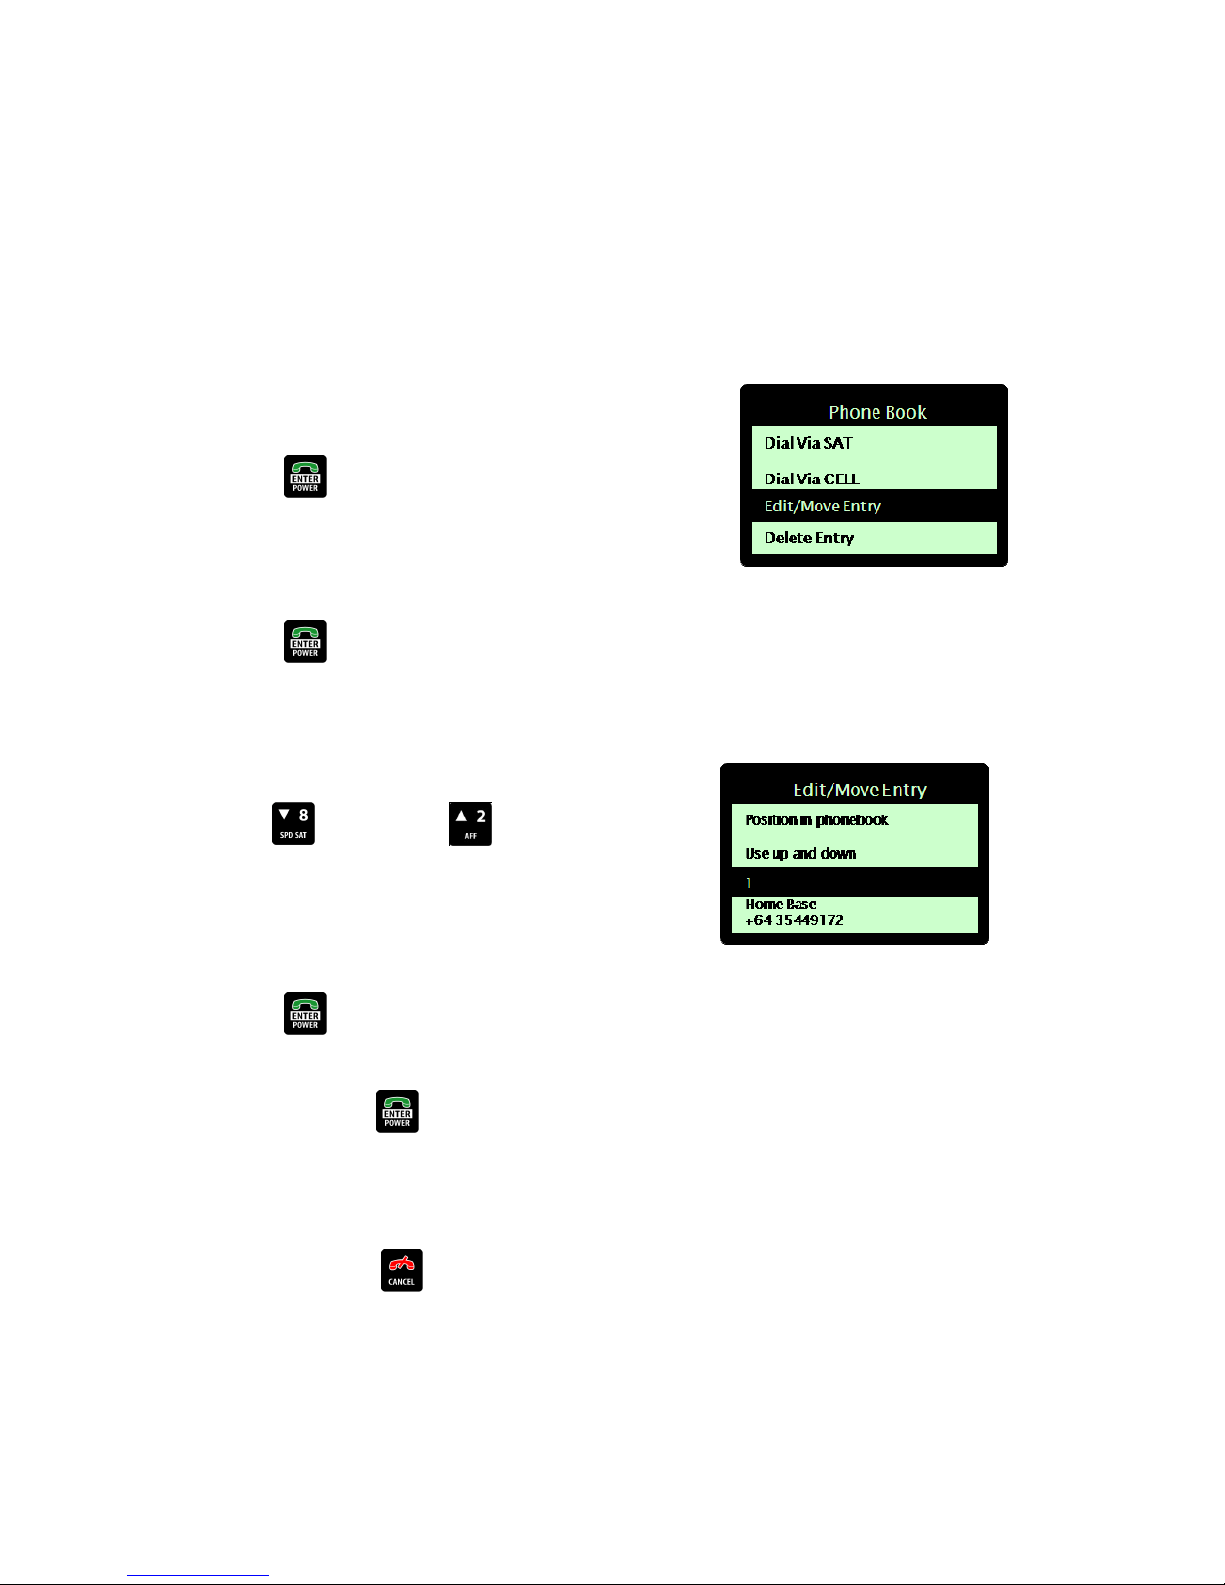
In the phonebook, use the arrow keys to navigate to the entry to
be changed.
Press the ENTER key. The phonebook options screen
displays.
Using the arrow keys, navigate down to ‘Edit/Move Entry’.
Press the ENTER key to select. The Edit/Move Entry screen
displays.
STEP 2 - Moving position (changing the list order) of an entry:
From the Edit/Move Entry screen:
Use the arrow key or the arrow key to move that
entry to a different position in the listing. The position of the two
entries will be exchanged, e.g. if the entry in position 2 is moved
to position 4 in the phone book, then the number originally in
position 4 will be moved to position 2.
Press the ENTER key to save the phonebook position. The
name field will now be selected.
Continue to press the ENTER key to move through the
remaining lines until you are returned to the original screen
showing your phonebook entries, at which point your changes will
be saved.
At any time, press the CANCEL key to cancel the change.
| Flightcell® DZM Operating Manual | Firmware v2.00 Page 26 of 88 |
Page 27
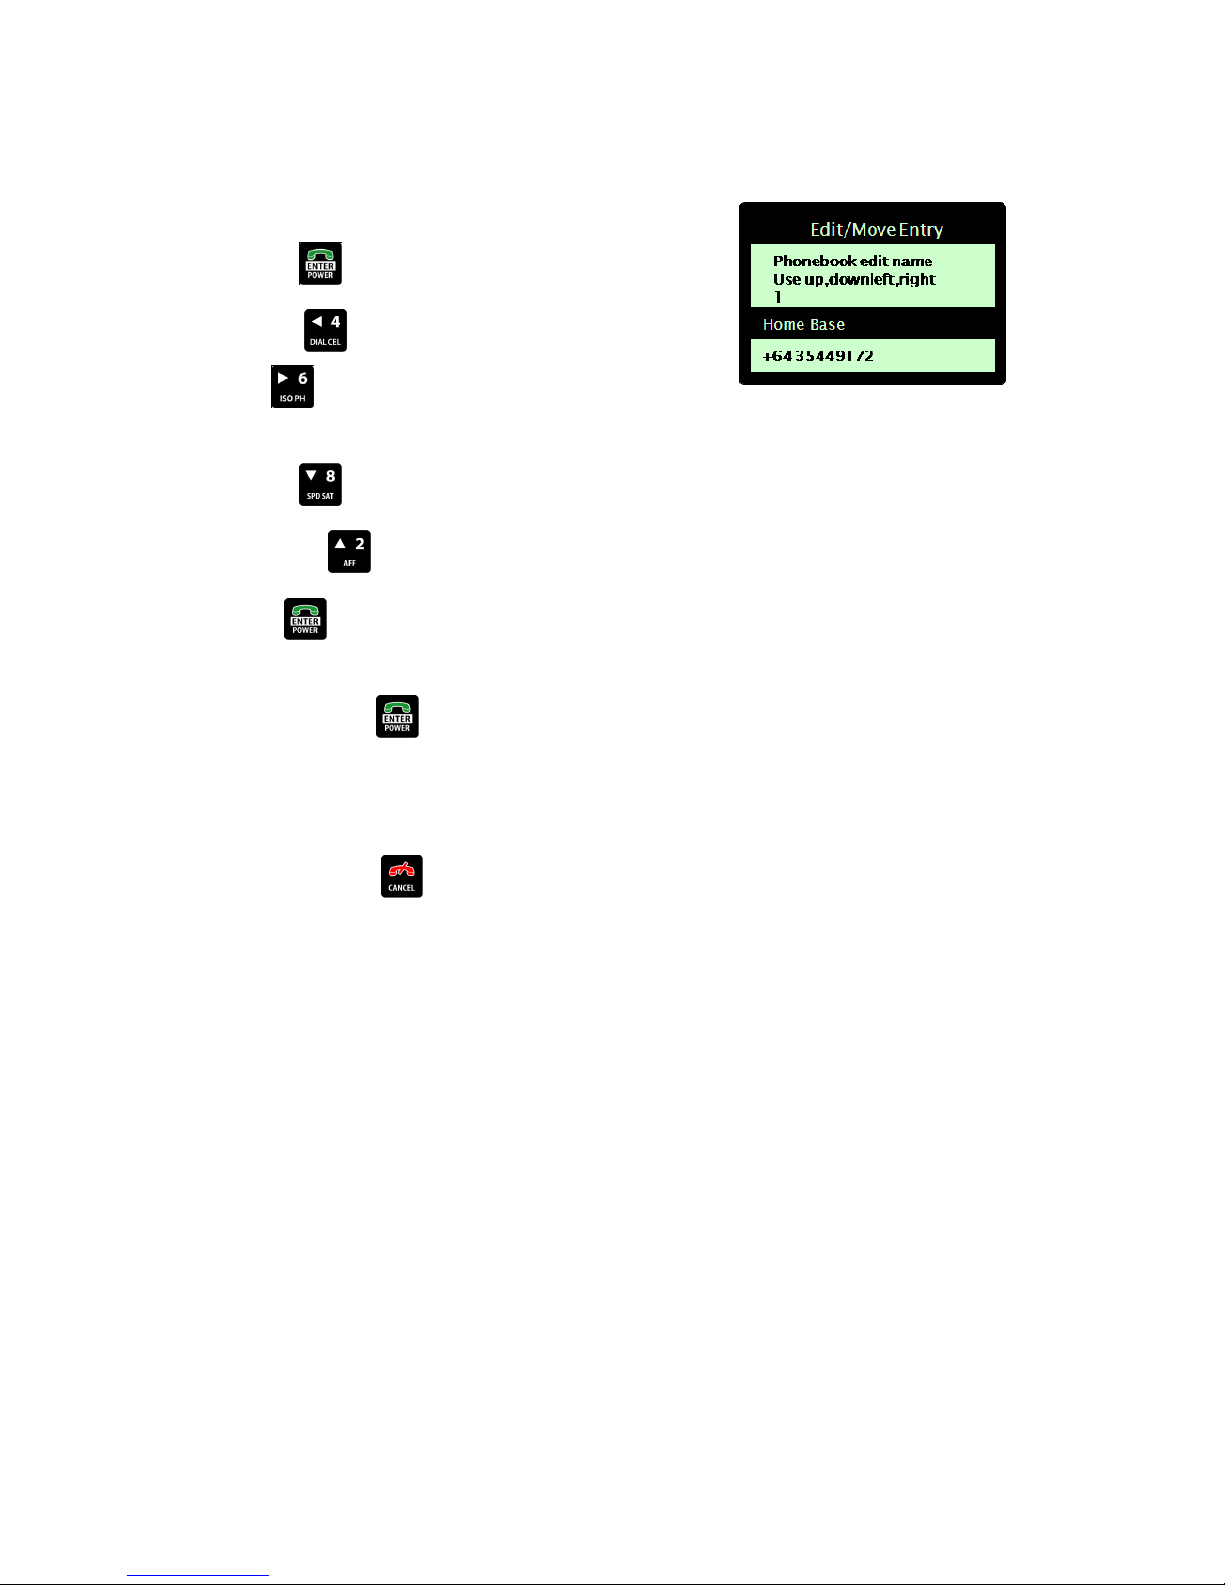
STEP 3 - Adding/editing the name of an entry:
From the Edit/Move Entry screen:
Use the ENTER key to move to the name field
Use the arrow key to delete the last letter displayed or
the arrow key to save the last letter displayed and add
another letter of the name.
Use the arrow key to scroll down through the alphabet.
OR use the arrow key to scroll up through the alphabet.
Press the ENTER key to save. The edit entry name screen
displays.
Continue to press the ENTER key to move through the
remaining lines until you are returned to the original screen
showing your phonebook entries, at which point your changes will
be saved.
At any time, press the CANCEL key to cancel the change.
| Flightcell® DZM Operating Manual | Firmware v2.00 Page 27 of 88 |
Page 28
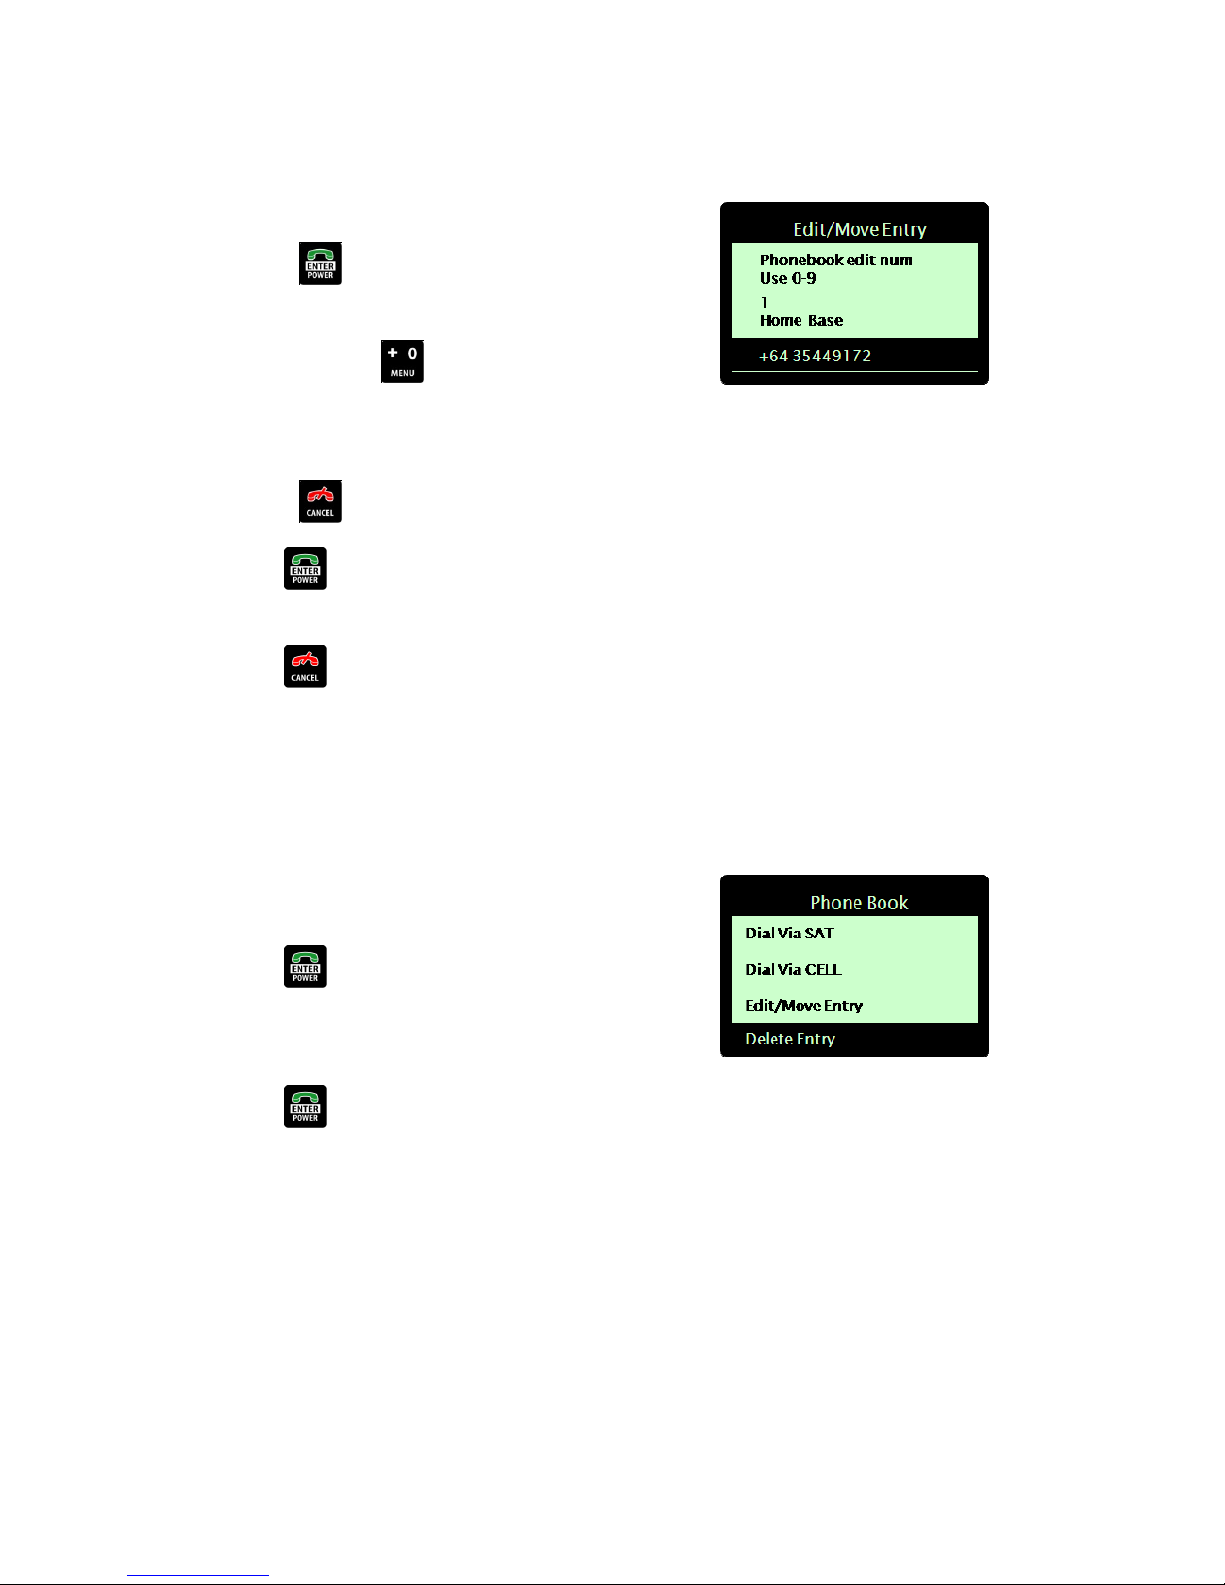
STEP 4 - Adding/editing the phone number stored for an entry:
From the Edit/Move Entry screen:
Use the ENTER key twice to move to the phone number
field
Press and hold the key to enter the + international
dialing prefix
Use the 0 to 9 keys to enter the phone number
Use the key to delete the last digit.
Press the ENTER key to save. You will be returned to the
main ‘Phone Book’ screen showing your saved entries.
Press the CANCEL to exit the menu system and return to
the main screen.
Deleting a phonebook entry
Deleting an entry:
From listing of your saved entries, use the arrow keys to navigate
to the entry to be deleted.
Press the ENTER key to select. The phonebook select action
screen displays.
Using the arrow keys, navigate to ‘Delete Entry’.
Press the ENTER key to select. The entry selected is
deleted.
| Flightcell® DZM Operating Manual | Firmware v2.00 Page 28 of 88 |
Page 29
Using text messaging
The DZM uses text messaging functionality to:
Receive text messages sent via the Iridium satellite network from another satellite or cell modem or by email.
Refer to "APPENDIX C: Sending SMS text messages to a DZM" on page 86 for further information about how
messages can be sent to your DZM.
Transmit GPS position data. Refer to "Using GPS tracking" on page 31 for further information about
transmitting GPS position data.
Text messages may be received or transmitted using a laptop computer connected to the DZM. The laptop
computer must have specialized Flightcell® SMS Console software installed. Refer to "APPENDIX B: Installing
and using Flightcell® SMS text messaging software" on page 82 for further information about installing and
using this text messaging software.
Receiving a text message
When a new text message is received:
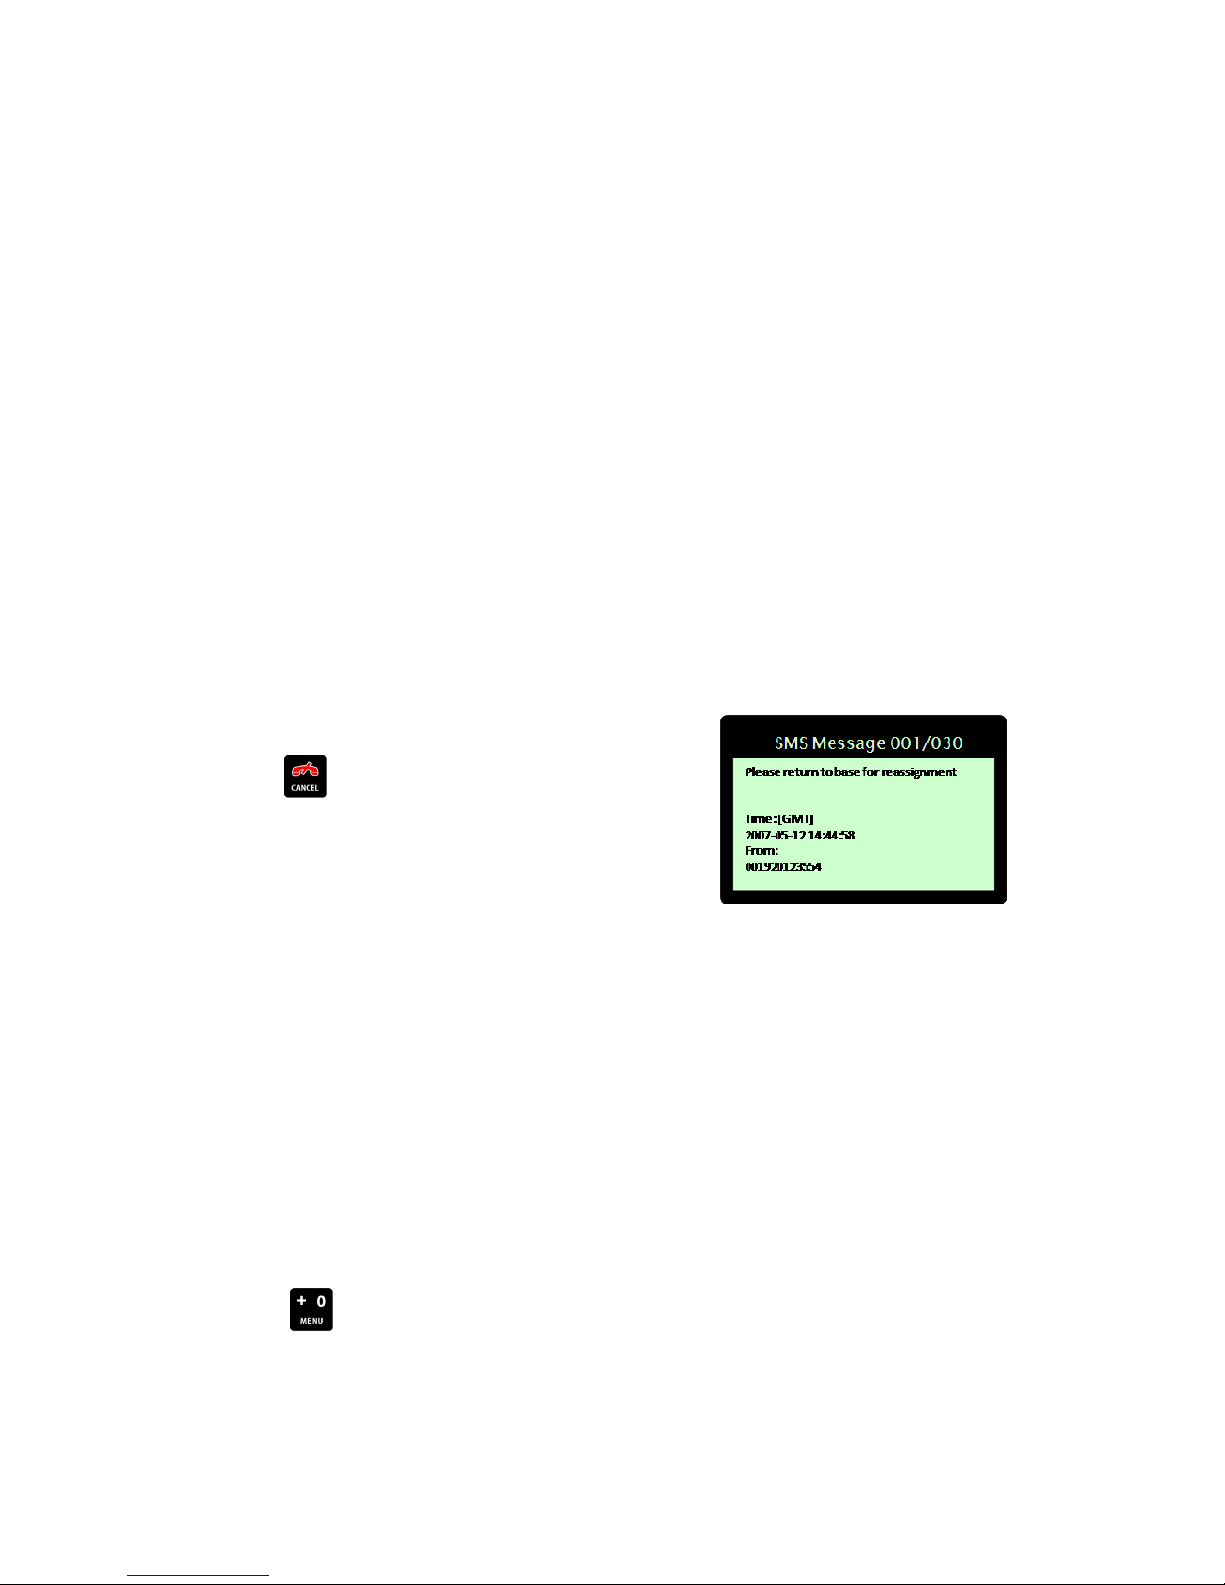
The message will display on the LCD screen of the DZM.
Press the CANCEL key to return to the 'Main Screen'.
Using the Received Messages screen
The last 30 text messages received will remain in the 'Received Messages' memory. The most recent message will
have the lowest message number.
The oldest message (i.e. message number 30) will be replaced when a new message is received. Messages
cannot be deleted manually.
NOTE! All received messages are deleted when the DZM is powered off.
STEP 1 - Accessing the Received Messages screen:
Press the MENU key to enter the menu system. The 'Main Menu' displays.
| Flightcell® DZM Operating Manual | Firmware v2.00 Page 29 of 88 |
Page 30
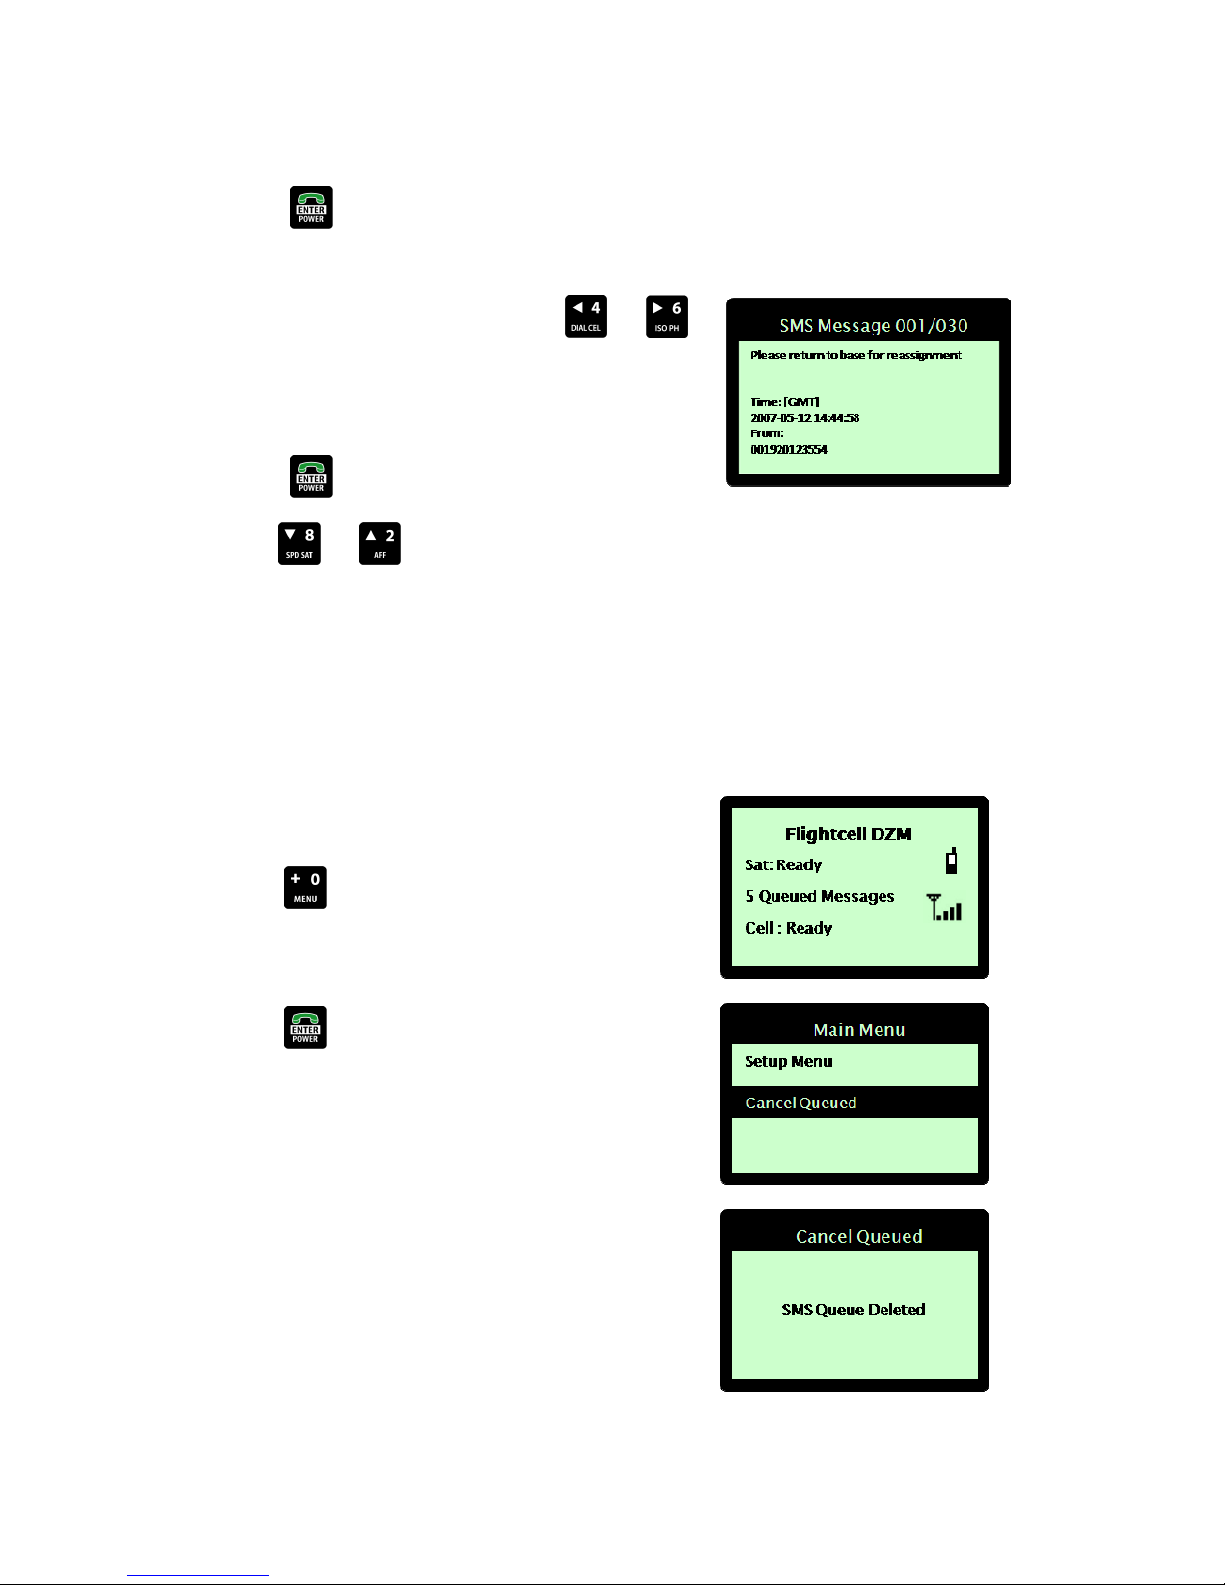
Using the arrow keys, navigate to 'Received Messages'.
Press the ENTER key to select. The 'Received Messages' screen displays.
STEP 2 - Viewing received messages:
From the 'Received Messages' screen, use the and
arrow keys, navigate to the required message (the newest
message being message number 1 and the oldest message being
message number 30)
Press the ENTER key to select. The message displays.
Use the and arrow keys as required to scroll through
the complete message.
Canceling unsent text messages
A queue of unsent text messages may build up due to low satellite or cellular network levels, or because a lot of
text messages were generated in a short time. Unsent text messages may be deleted from the queue if required.
The number of queued text messages displays on the 'Main
Screen'.
Press the MENU key to enter the menu system. The 'Main
Menu' displays.
Using the arrow keys, navigate to 'Cancel Queued'.
Press the ENTER key to select. The 'Cancel Queued' screen
displays briefly, confirming the queued messages have been
deleted, before returning to the 'Main Screen'.
| Flightcell® DZM Operating Manual | Firmware v2.00 Page 30 of 88 |
Page 31
Using GPS tracking
The DZM can transmit GPS position data to an authorized recipient destination using a satellite phone and/or a
cell modem. The operator may manually transmit GPS position data, or configure the DZM to transmit
automatically based on predefined rules.
Refer to "Configuring GPS tracking" on page 52 for further information about important settings that need to be
configured before GPS data will be transmitted.
NOTE! GPS tracking is not a comprehensive surveillance and alert system. Refer to "Using automated flight
following (AFF)" on page 38 for further information about automatic surveillance and alerting.
Accessing the Tracking Menu
The main DZM tracking settings are configured using the 'Tracking Menu'.
Accessing the Tracking Menu:
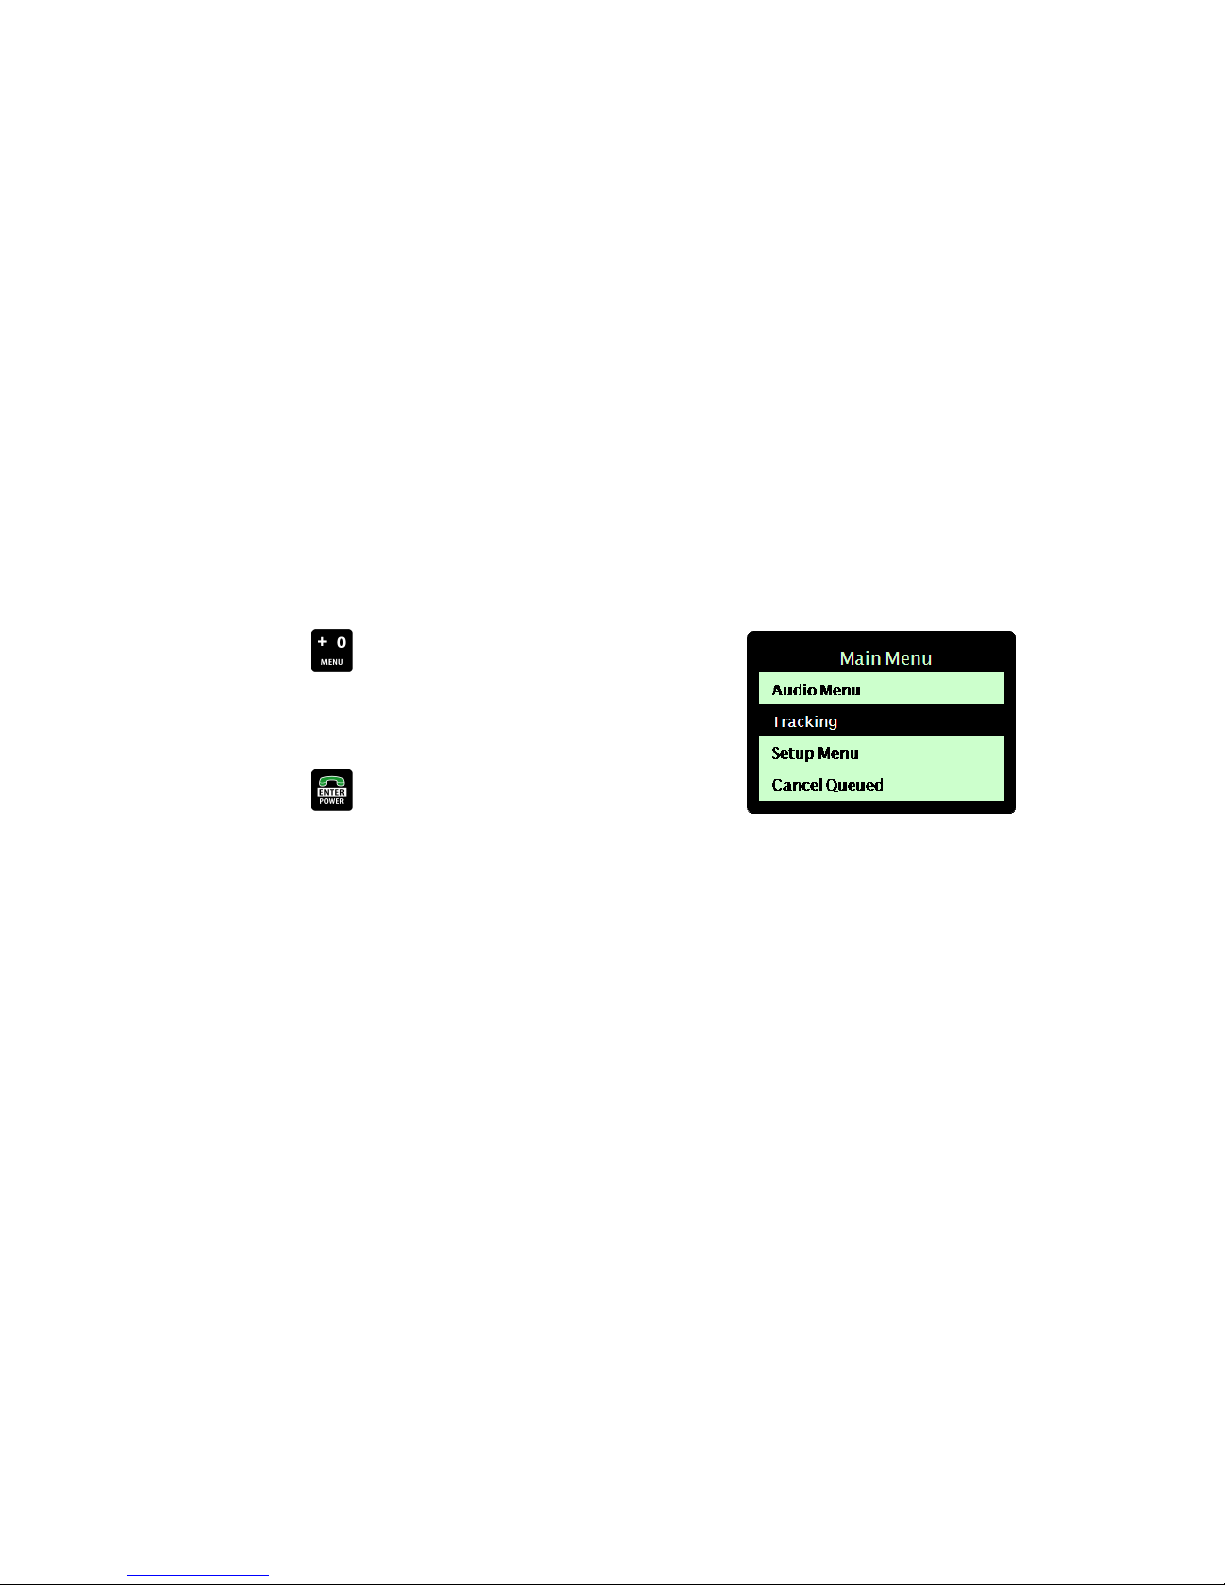
Press the MENU key to enter the menu system. The 'Main
Menu' displays.
Using the arrow keys, navigate to 'Tracking'.
Press the ENTER key to select. The 'Tracking Menu'
displays.
Manually transmitting GPS position
Using the DZM, your current GPS position may be manually transmitted to an authorized recipient destination.
STEP 1 - Enabling manual transmission of GPS data:
Manual GPS tracking must be enabled before any manual GPS data can be transmitted.
Refer to "Enabling manual GPS tracking" on page 55 for further information about configuring manual GPS
tracking before data will be transmitted.
| Flightcell® DZM Operating Manual | Firmware v2.00 Page 31 of 88 |
Page 32
STEP 2 - Manually transmitting GPS data:
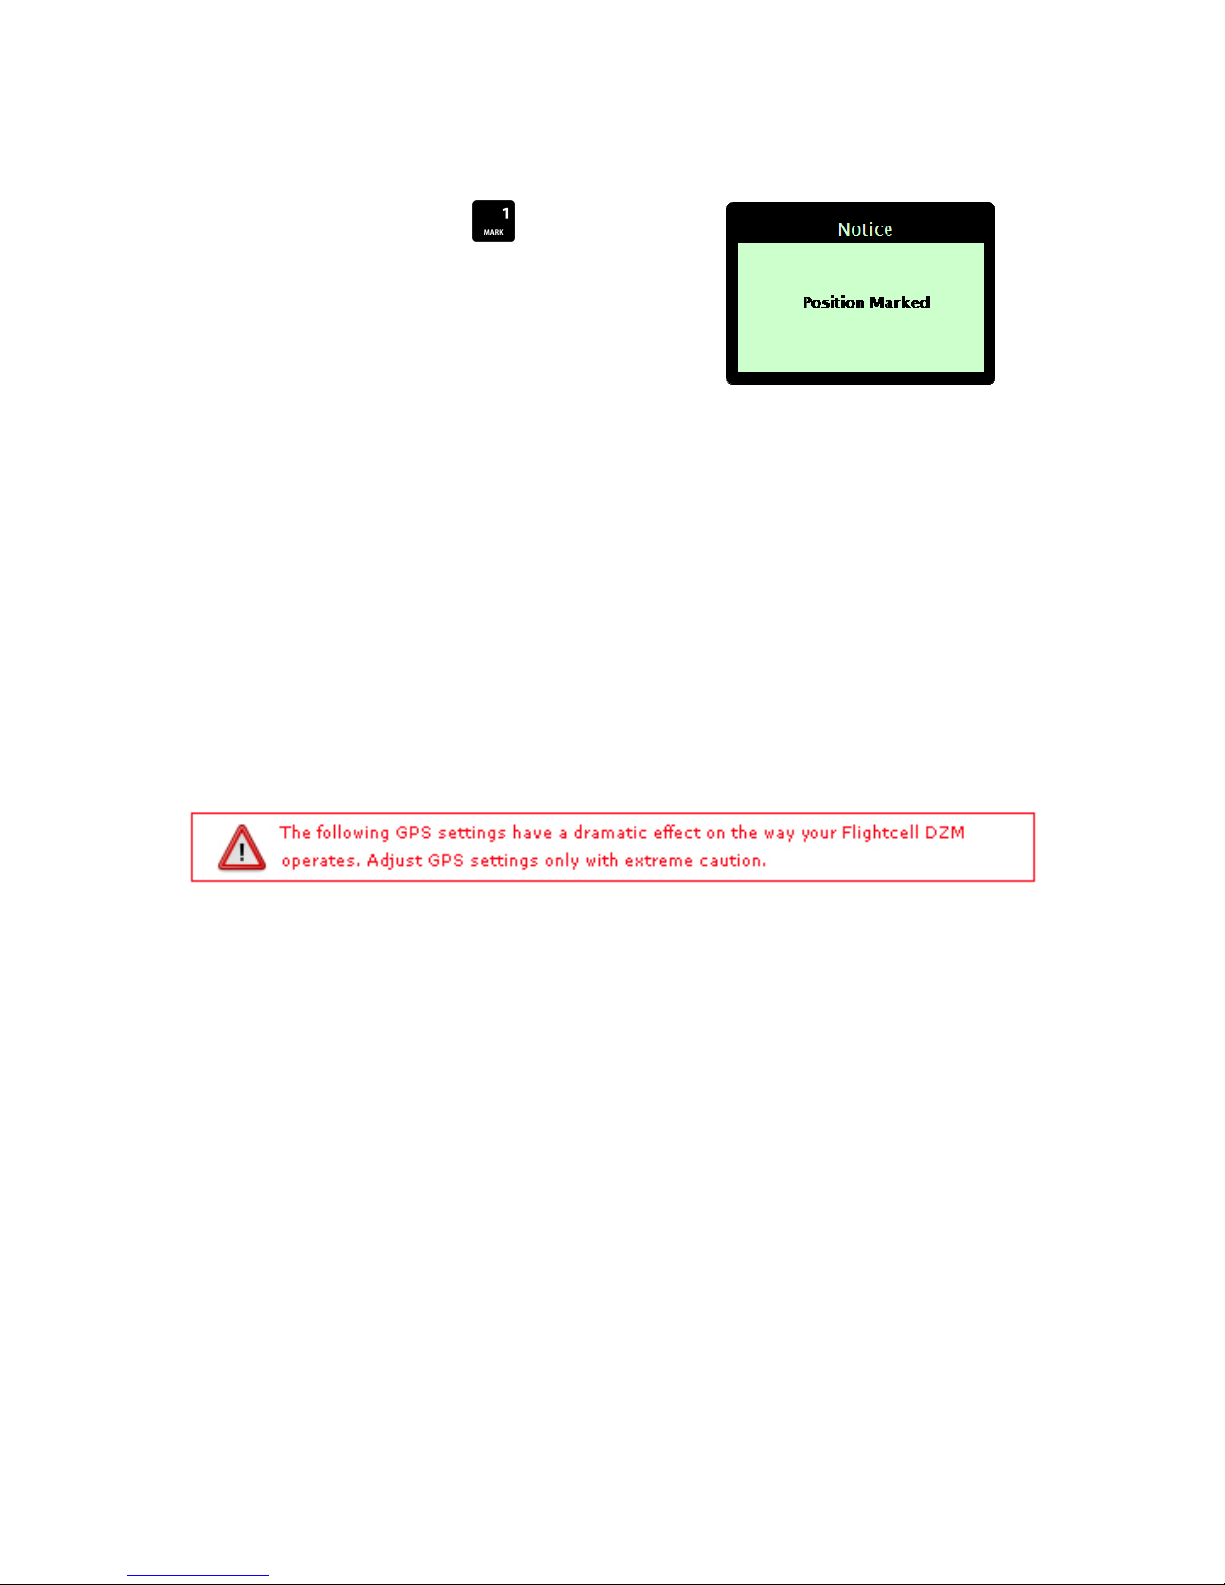
From the 'Main Screen', press the MARK quick key to send
current GPS position data to an authorized recipient destination.
The 'Position Marked' screen displays, before returning to the
'Main Screen'. A notification message will display confirming the
network (satellite or cellular) the GPS data was transmitted on.
Automatically transmitting GPS position
Using the DZM, your current GPS position may be automatically transmitted to an authorized recipient. Automatic
transmissions may be based on one or many of the factors below:
A specified time interval
Changes in heading
Aircraft takeoff and landing, based on aircraft speed or, for a helicopter, lifting and lowering the collective
combined with takeoff and landing speed
NOTE! The DZM requires a valid GPS lock in order to automatically transmit GPS position data. Refer to
"Using GPS antenna diagnostics" on page 55 for further information on GPS lock.
Enabling, disabling and suspending automated GPS tracking
You may determine whether or not automated GPS tracking is activated on the aircraft or vehicle. By default, GPS
tracking is enabled unless manually overridden.
Enabling, disabling or suspending GPS tracking:
From the 'Tracking Menu', use the arrow keys to navigate to
'Enable/Disable'.
| Flightcell® DZM Operating Manual | Firmware v2.00 Page 32 of 88 |
Page 33
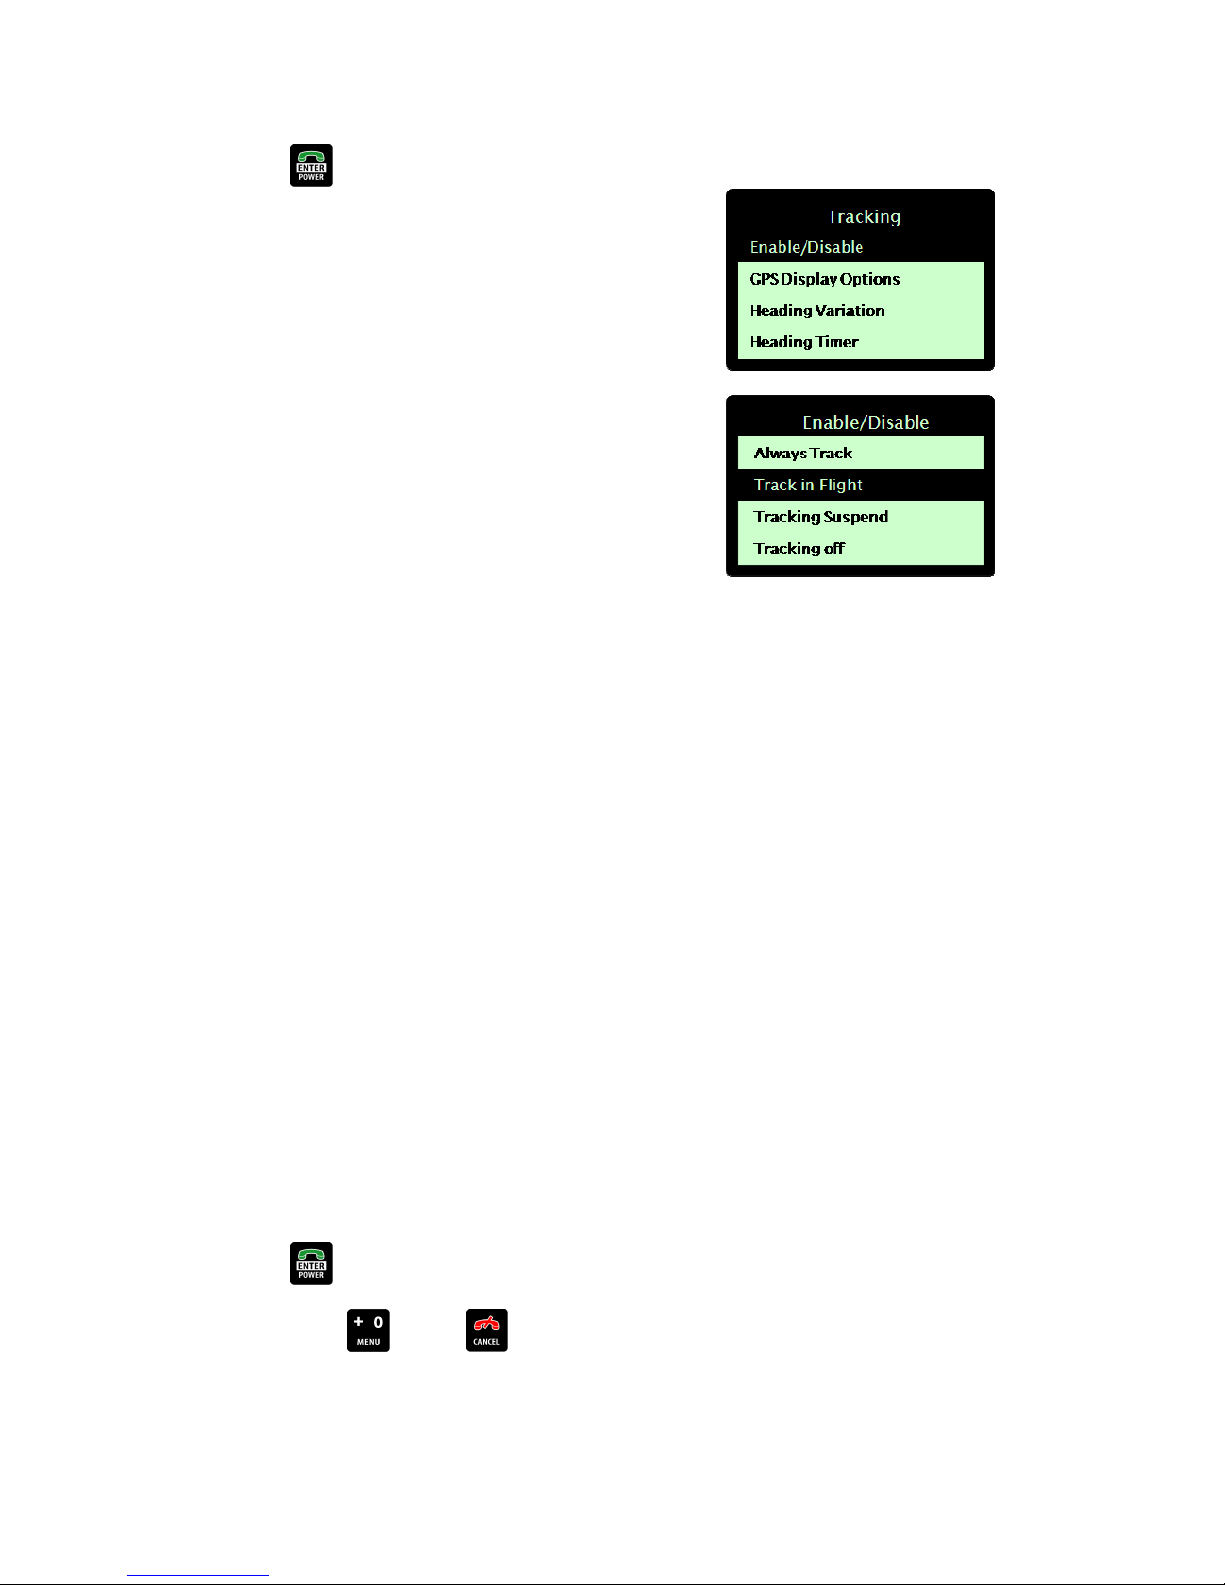
Press the ENTER key to select. The 'Enable/Disable' screen
displays.
Using the arrow keys, navigate to the GPS tracking setting
required:
Always Track enables GPS tracking so that the DZM will
automatically send tracking messages at the configured rate
as long as it has a valid GPS lock and periodic messages are
enabled and the aircraft is in the air. When on the ground,
the DZM will switch from the configured periodic reporting
rate to sending position messages at a fixed 20 minute
interval.
Track in Flight enables GPS tracking so that the DZM will
produce tracking messages only while the aircraft is in flight,
has a valid GPS lock and periodic messages are enabled.
Periodic messages will be disabled while the aircraft is on the
ground.
The DZM can be configured to determine whether an aircraft
is airborne based on speed and/or a digital input connected to
a squat or collective switch. If none of these settings are
configured, the unit will operate as if in a permanent ‘airborne’
state, in which case, both the Always Tracking and Track
in Flight settings will have the same effect of permanently
enabling GPS Tracking.
Tracking Suspend disables GPS tracking for the current
flight only. GPS tracking will automatically be re-enabled when
the DZM is next powered up. On power-up, tracking will
recommence according to the preconfigured settings.
If a user selects Tracking Suspend and the previous setting
was Tracking Off, then on power-up, the GPS Tracking
setting will be set to Track in Flight.
Tracking Off disables GPS tracking until it is manually re-
enabled.
Press the ENTER key to save
OR press the MENU or CANCEL key to abort the
change.
| Flightcell® DZM Operating Manual | Firmware v2.00 Page 33 of 88 |
Page 34
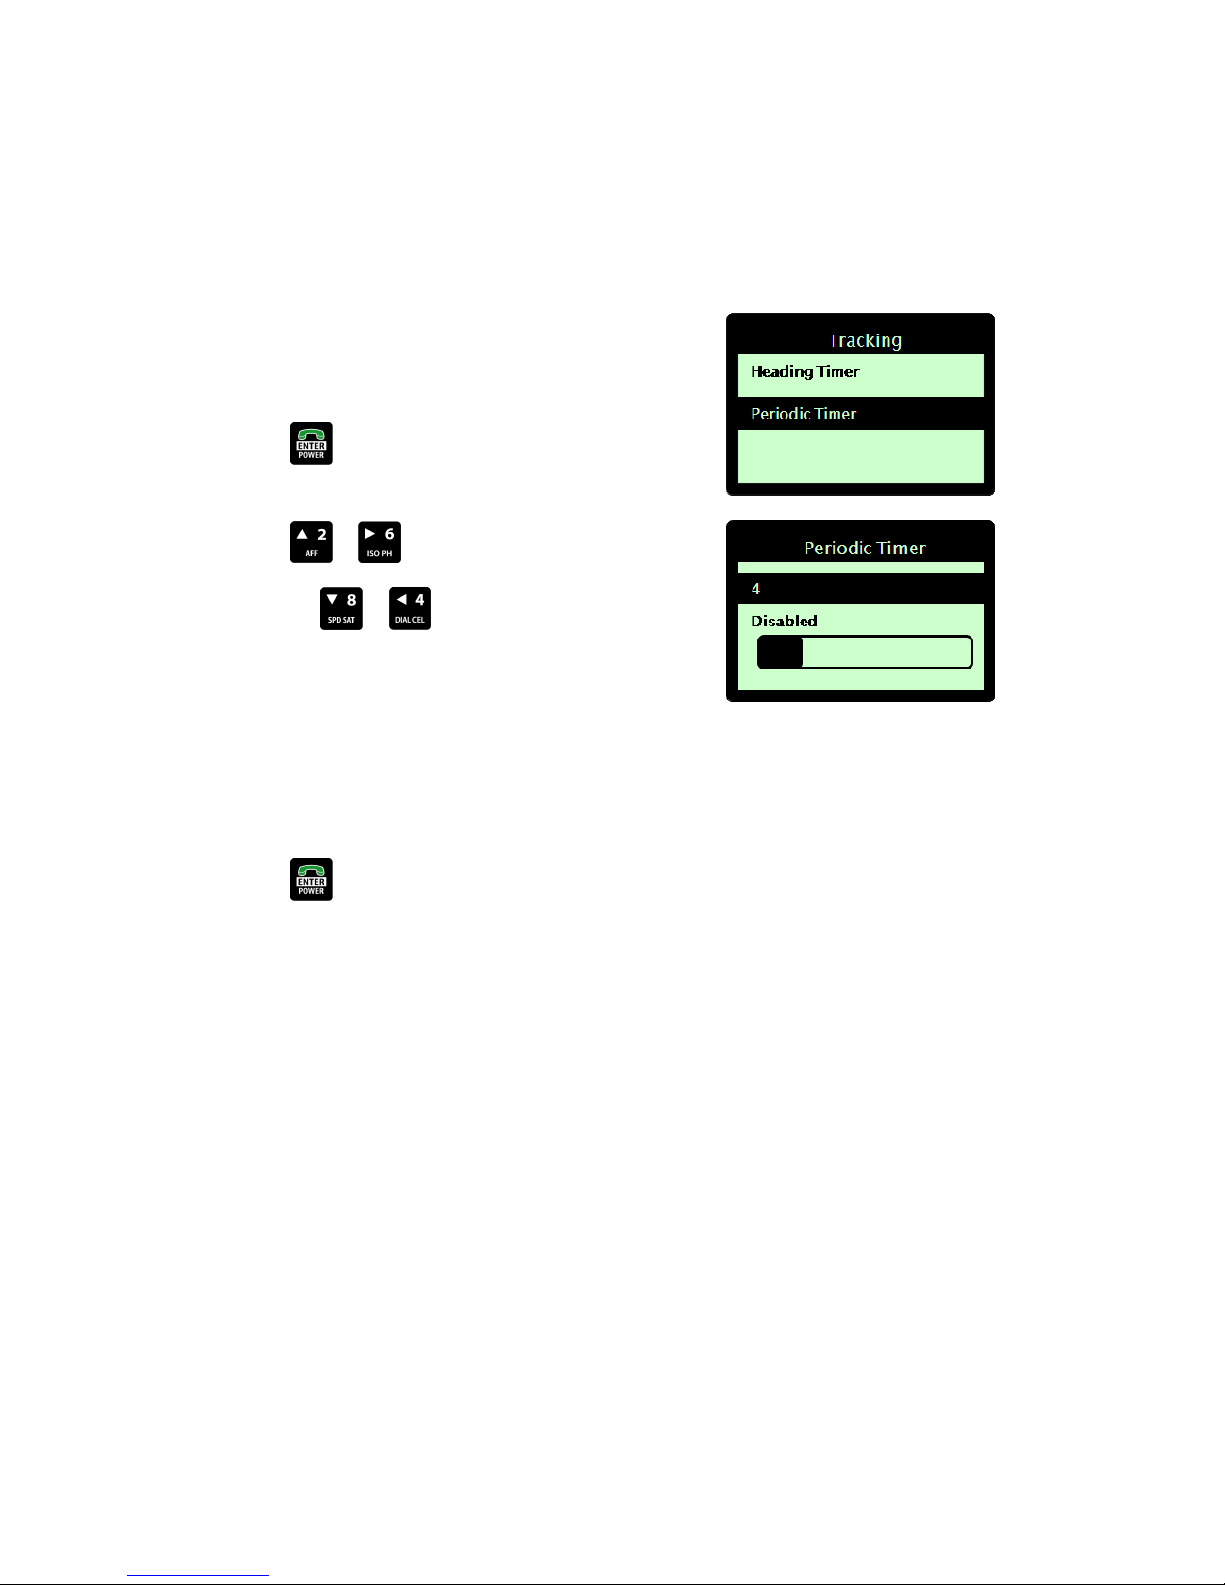
Setting automatic GPS transmission based on time interval
The DZM can be set to automatically transmit current GPS position to an authorized recipient destination at
specified time intervals.
Enabling automated transmission of GPS data based on periodic time interval:
From the 'Tracking Menu', use the arrow keys to navigate to
Periodic Timer'.
Press the ENTER key to select. The 'Periodic Timer' screen
displays.
Press the or arrow keys to increase the time interval.
OR press the or arrow keys to decrease the time
interval.
The 'Periodic Timer' may be set between 0 to 60 minutes. The
default is 4 minutes. To disable automatic GPS transmission,
decrease the time interval to 0. This will default to 'Disabled'.
When disabled, the DZM will not automatically transmit GPS data.
Press the ENTER key to save. You are returned to the
'Tracking Setup' sub-menu.
Automatic GPS transmission occurs the defined number of
minutes after the last GPS transmission. If the last transmission
was sent using manual transmission, the next automated
transmission will occur the defined number of minutes after the
manual transmission was sent.
| Flightcell® DZM Operating Manual | Firmware v2.00 Page 34 of 88 |
Page 35
Setting automatic GPS transmission based on heading change
The DZM can be set to automatically transmit current GPS position to an authorized recipient destination
whenever a change in heading is identified.
Heading Variation Angle
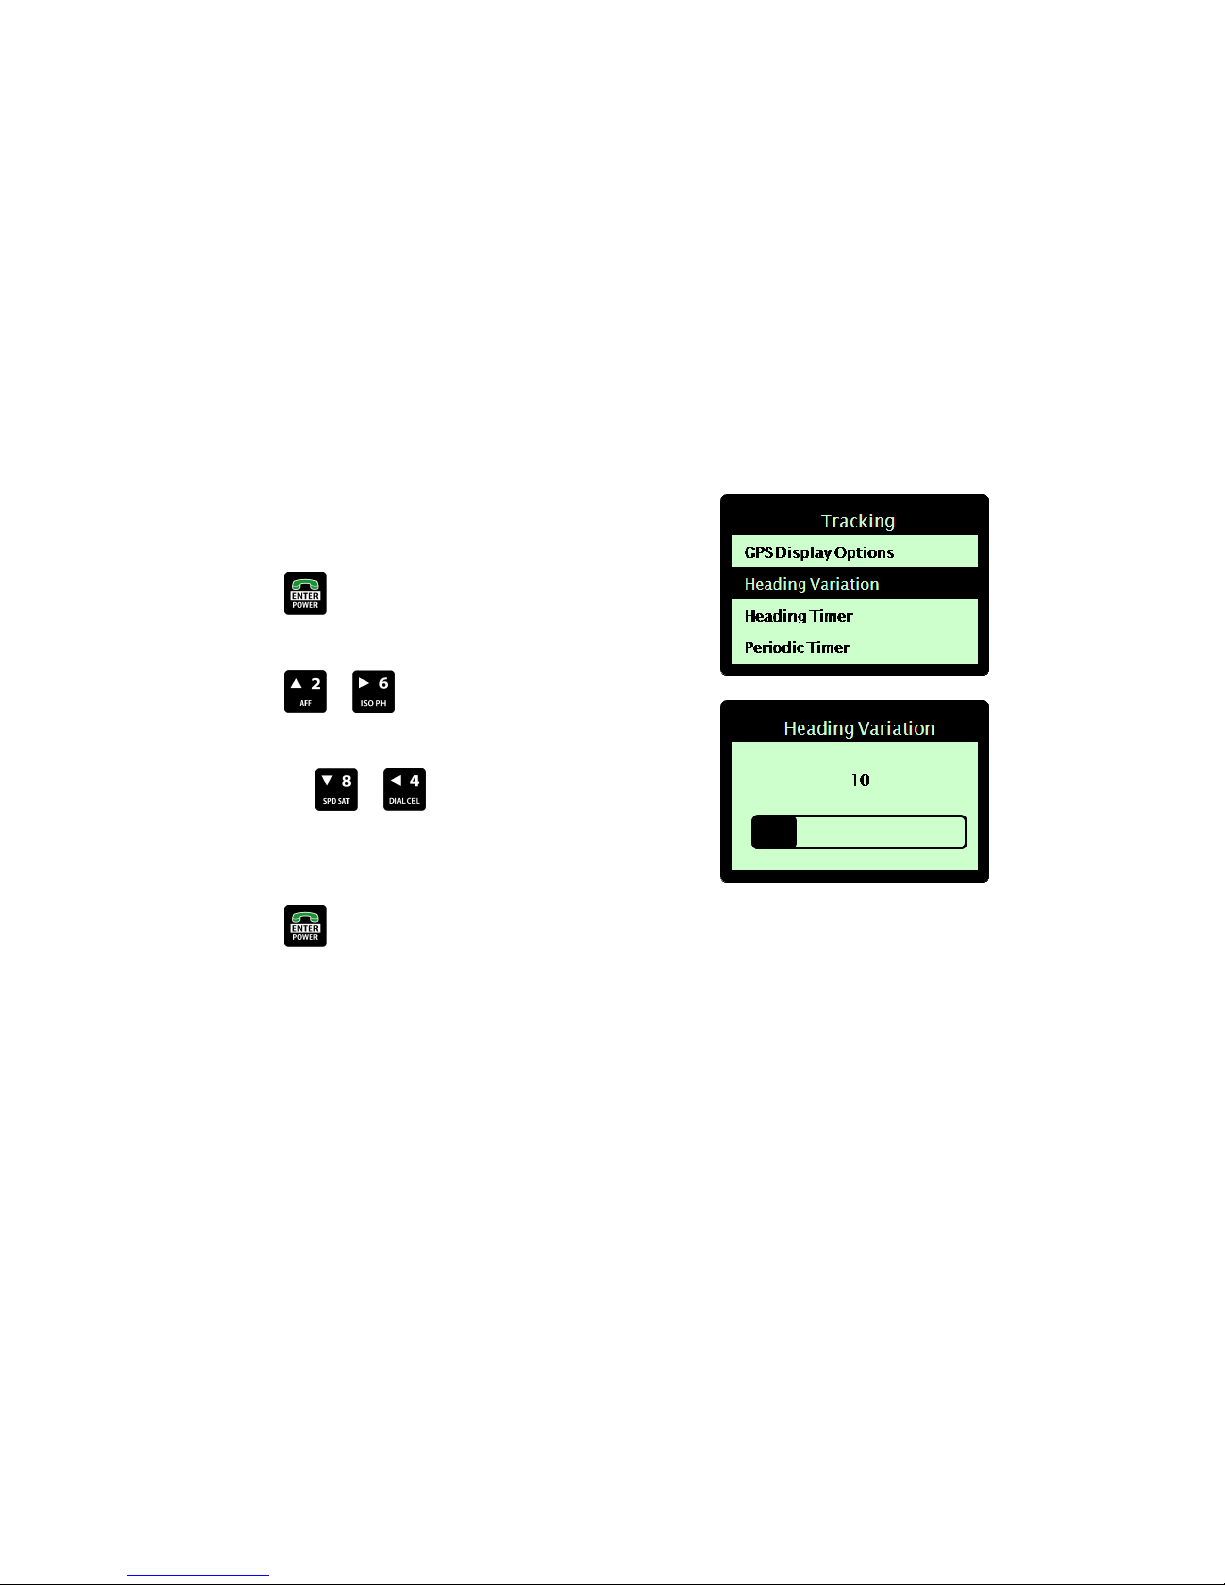
The 'Heading Variation' defines the angle by which the aircraft's heading direction must change in order to trigger
an automated GPS transmission. For example, if the 'Heading Variation' is set to 10 degrees, changing heading by
fewer than 10 degrees will not generate an automated GPS transmission.
Setting the Heading Variation:
From the 'Tracking Menu', use the arrow keys to navigate to
'Heading Variation'.
Press the ENTER key to select. The 'Heading Variation'
screen displays.
Press the or arrow keys to increase the heading
variation angle.
OR press the or arrow keys to decrease the heading
variation angle. 'Heading Variation' may be set between 2 and 90
degrees. The default is 10 degrees.
Press the ENTER key to select and save. You are returned
to the 'Tracking Setup' sub-menu.
| Flightcell® DZM Operating Manual | Firmware v2.00 Page 35 of 88 |
Page 36
Heading Timer
The 'Heading Timer' defines how soon after the last position report the next GPS position transmission triggered
by a heading change will be automatically transmitted. For example, an aircraft that is circling is constantly
changing heading, so the time period between automated GPS transmissions will be determined according to the
'Heading Timer'.
Setting the Heading Timer:
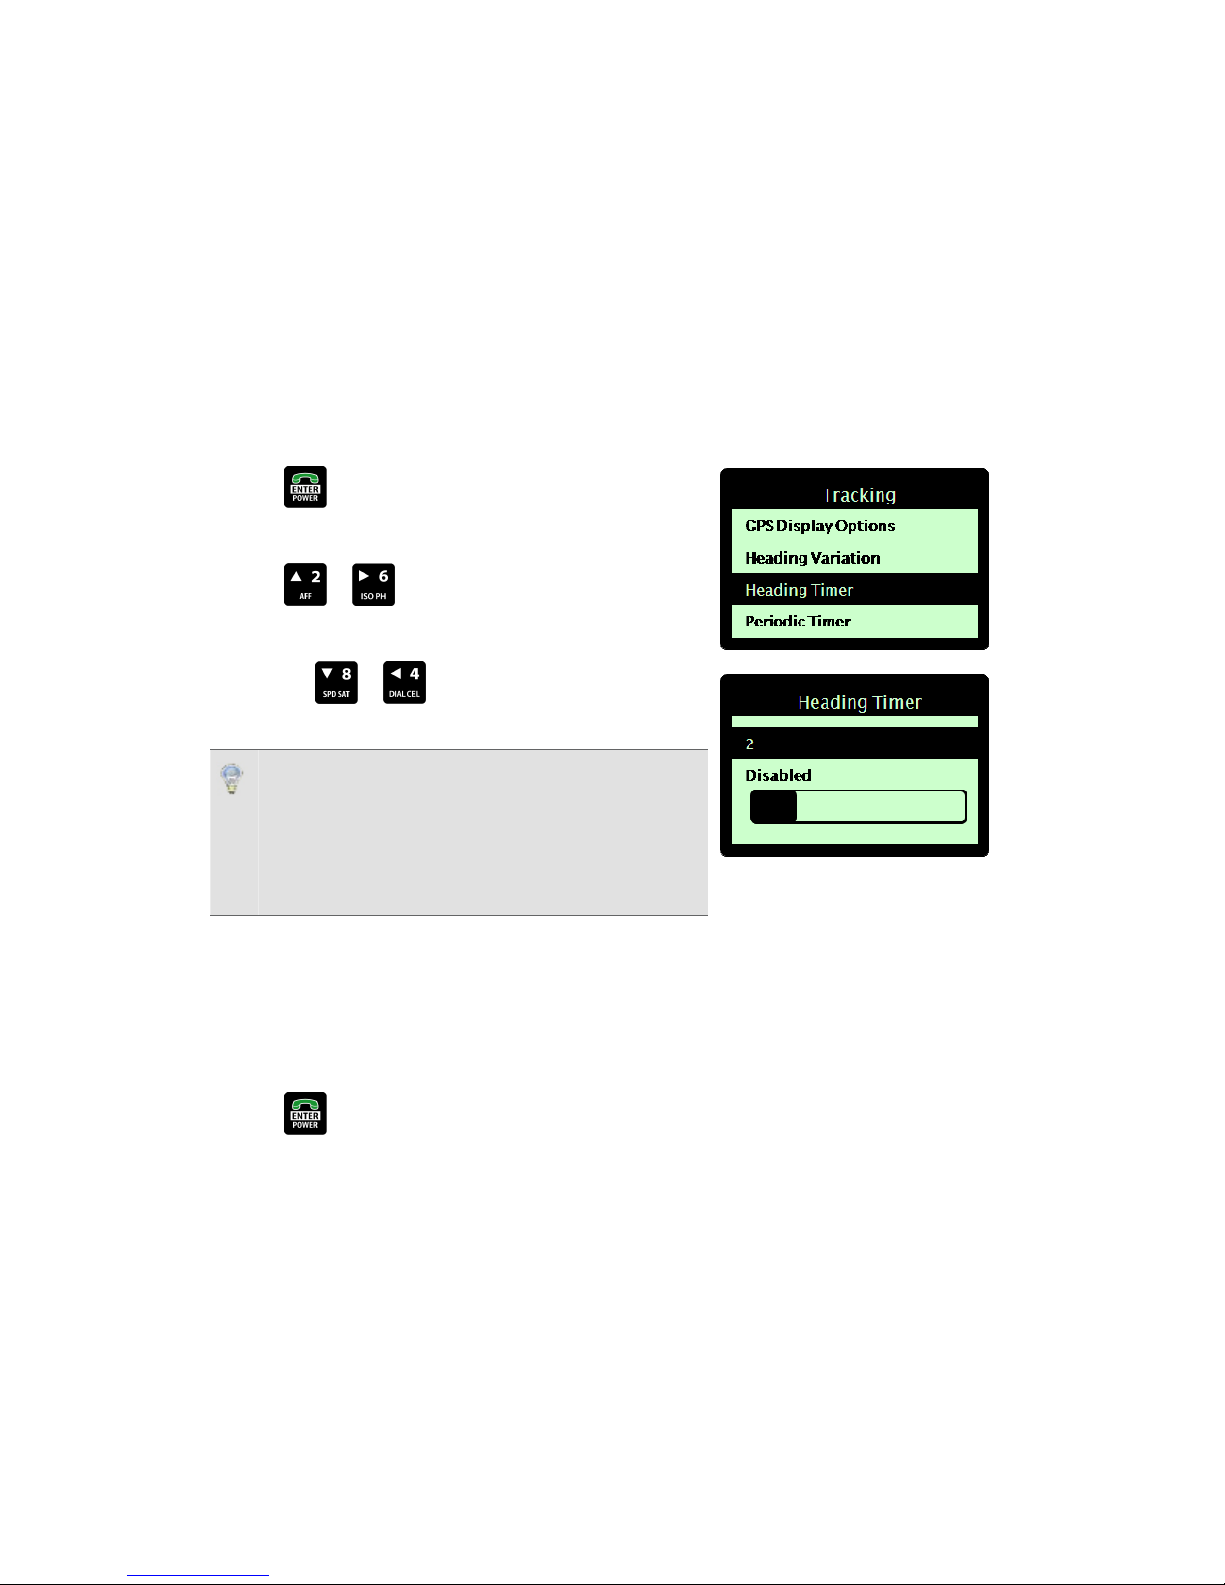
From the 'Tracking Menu', use the arrow keys to navigate to
Heading Timer'.
Press the ENTER key to select. The 'Heading Timer' screen
displays.
Press the or arrow keys to increase the automated
heading variation time interval.
OR press the or arrow keys to decrease the
automated heading variation time interval.
CRITICAL NOTE! The ‘Heading Timer' must be set to a
lower value than the 'Periodic Timer' to function
successfully. The heading timer will never expire and
trigger a heading change message if periodic messages
are being sent more frequently.
The ‘Heading Timer' may be set between 0 to 60 minutes. The
default is 2 minutes. To disable automatic heading change GPS
transmission, decrease the heading variation time interval to 0.
This will default to 'Disabled'. When disabled, the DZM will not
automatically transmit GPS data on heading change.
Press the ENTER key to select and save. You are returned
to the 'Tracking Setup' sub-menu.
| Flightcell® DZM Operating Manual | Firmware v2.00 Page 36 of 88 |
Page 37
Setting GPS display options
You may set your current GPS position to display at all times at the top of the DZM 'Main Screen'. By default,
onscreen GPS position is switched off unless manually overridden.
Setting GPS display options:
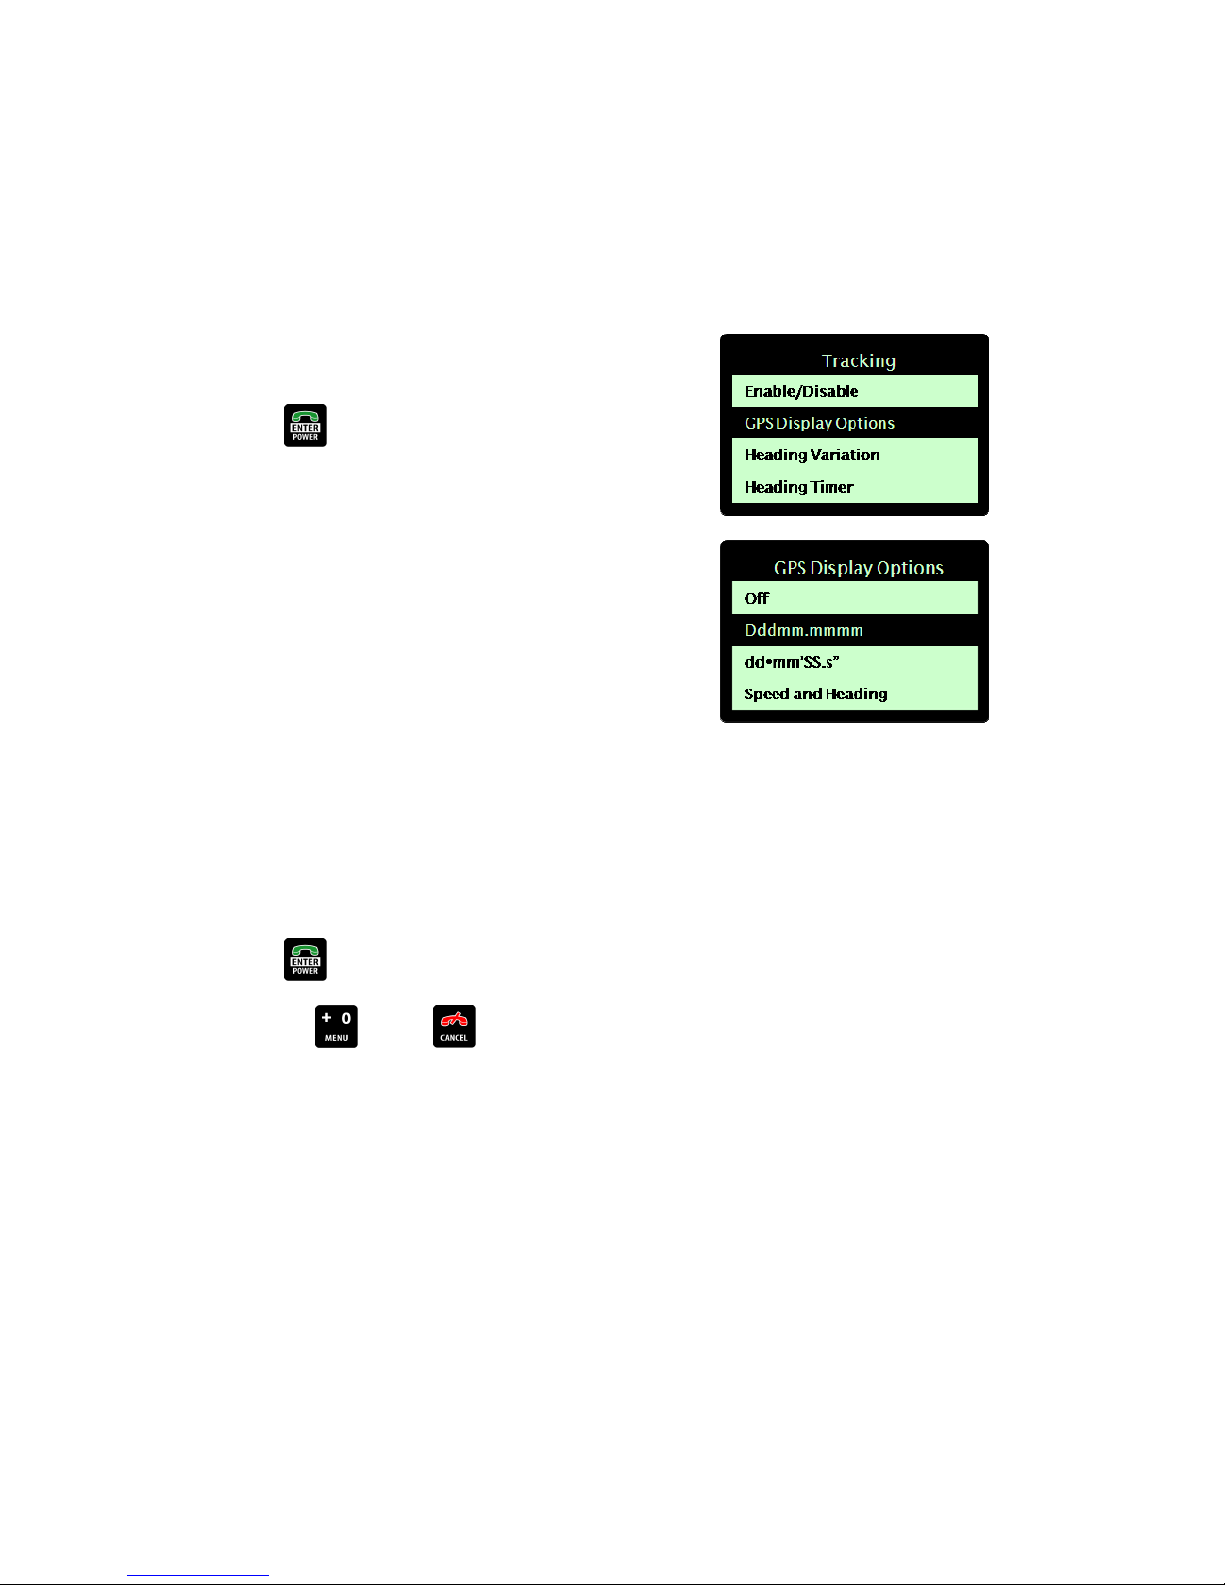
From the 'Tracking Menu', use the arrow keys to navigate to 'GPS
Display Options'.
Press the ENTER key to select. The 'GPS Display Options'
screen displays.
Using the arrow keys, navigate to the GPS display option
required:
Off switches onscreen GPS position display off.
dddmm.mmmm sets onscreen GPS position display to
degrees and minutes (to 4 decimal points).
ddºmm'ss.s" sets onscreen GPS position display to degrees,
minutes and seconds.
Speed and Heading sets onscreen GPS position display to
knots and degrees relative to true north (rather than magnetic
north) format.
No GPS Lock will display on the 'Main Screen' if the DZM does
not have a valid GPS lock.
Press the ENTER key to save
OR press the MENU or CANCEL keys to abort the
change.
| Flightcell® DZM Operating Manual | Firmware v2.00 Page 37 of 88 |
Page 38
Using automated flight following (AFF)
In addition to GPS flight tracking, the DZM also has Automated Flight Following (AFF) capabilities. This is also
known as Automated Rescue Monitoring (ARM). Used in conjunction with an appropriately configured receiving
server and compatible computer mapping system, AFF provides automatic surveillance over an aircraft or
vehicle's mission. Registering the start and end of a flight mission, AFF tracks all points in between and
automatically raises alerts if no position data is received from the aircraft for a specified time period (set on the
receiving server).
Refer to "Enabling and disabling automated flight following (AFF)" on page 68 for further information about
enabling AFF for use in your aircraft.
This AFF feature is only available with some mapping systems. Please contact your mapping service provider
about availability of the AFF service on their network and to register for this service.
A manual distress signal may be sent from the aircraft or vehicle even when AFF is switched off. Refer to
"Sending a distress signal" on page 49 for further information about sending a distress signal.
Using AFF does not affect GPS tracking configuration and all position transmissions will be sent as normal. Refer
to "Using GPS tracking" on page 31 for further information about using GPS tracking.
Registering AFF mission start and end points
Automated flight following (AFF) must be activated and deactivated at the start and end of the flight mission.
To operate, the AFF function must be enabled for use. Refer to "Enabling and disabling automated flight following
(AFF)" on page 68 for further information on how to do this. By default the AFF function is enabled unless it has
been manually overridden.
STEP 1 - Registering AFF start point at commencement of flight mission:
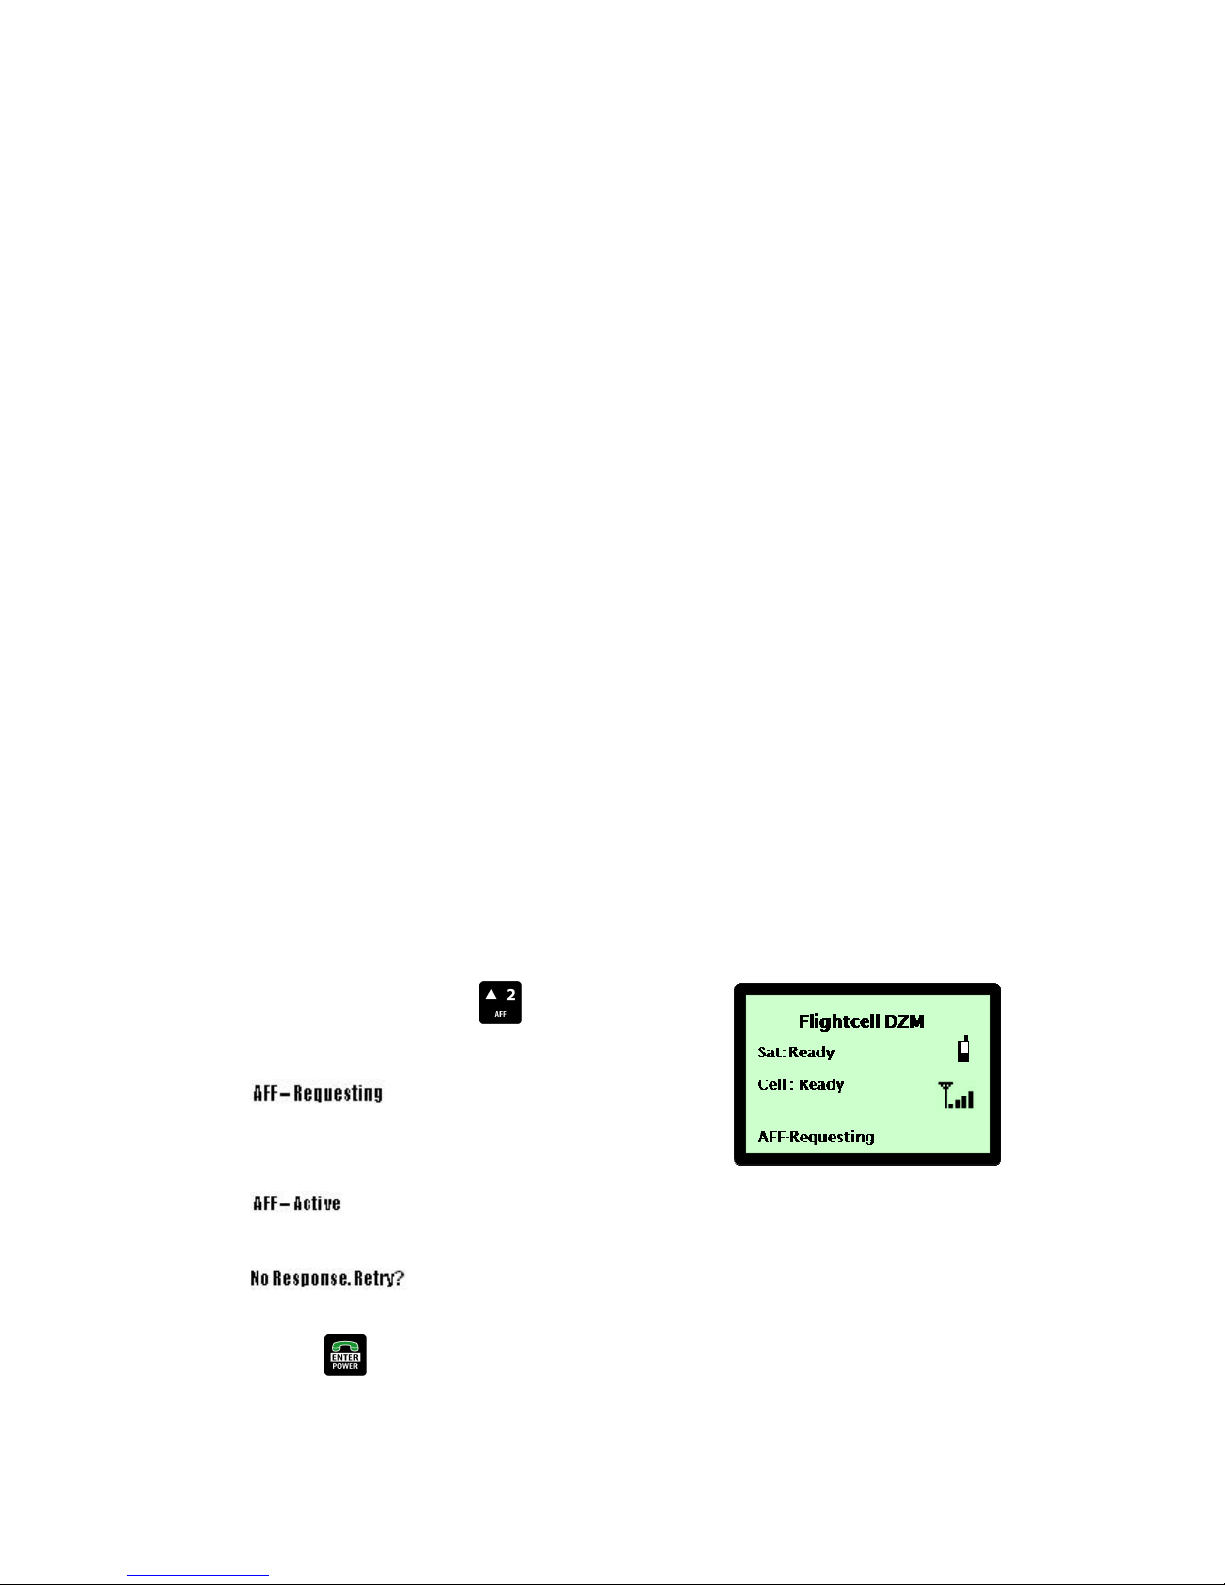
From the 'Main Screen', press the AFF key. A message is
immediately sent to the receiving server.
displays at the bottom of the screen when
AFF is activated. Confirmation of AFF operation is being
requested from the receiving server.
displays at the bottom of the screen when the
receiving server confirms AFF is operating.
displays when AFF operation
confirmation has not been received after several attempts.
Press the ENTER key to re-try.
STEP 2 - Registering AFF end point at completion of flight mission:
| Flightcell® DZM Operating Manual | Firmware v2.00 Page 38 of 88 |
Page 39
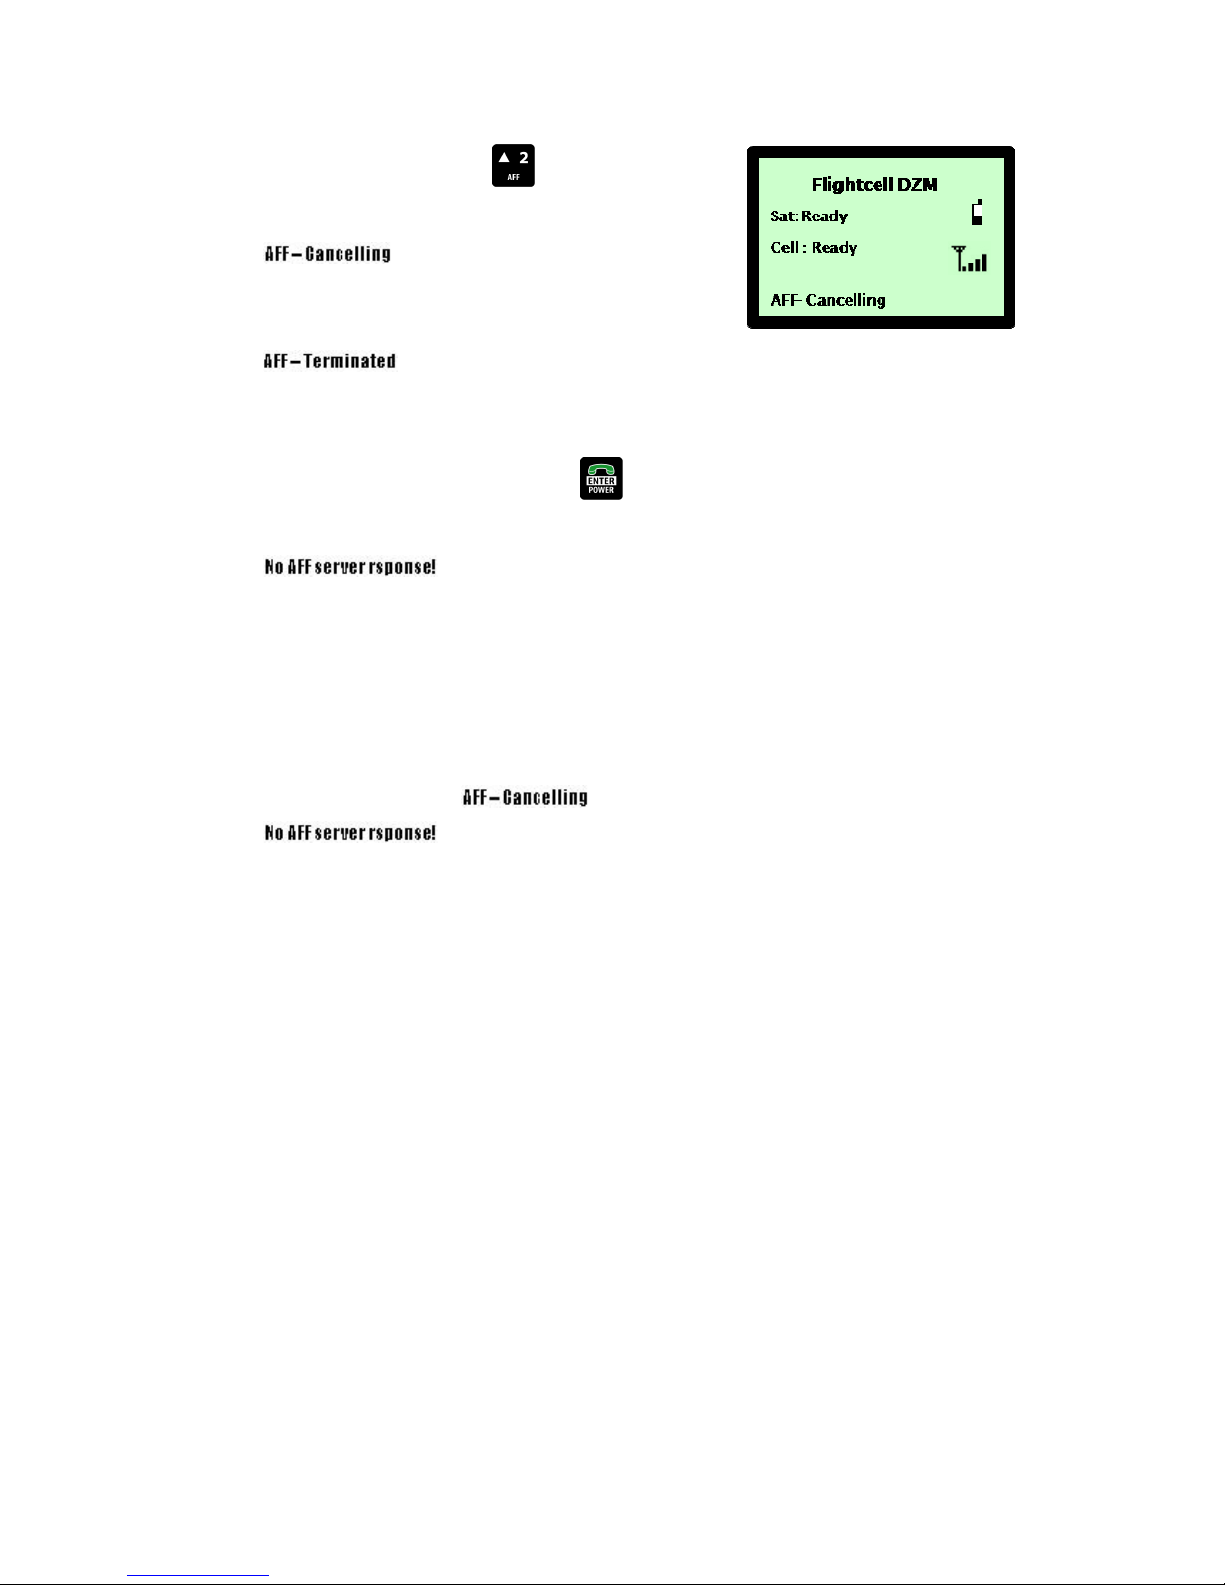
From the 'Main Screen', press the AFF key. A message is
immediately sent to the receiving server.
displays at the bottom of the screen when
AFF is terminated. Confirmation of AFF termination is being
requested from the receiving server.
displays at the bottom of the screen when
the receiving server confirms AFF has been terminated.
displays when AFF termination confirmation has not been
received after several attempts. Press the ENTER key to
re-try.
displays to confirm AFF termination
confirmation has not been received. No further automated
attempts are made.
NOTE! It is essential to register the AFF end point at
termination of flight mission, or an emergency alert will be
raised and acted upon when the DZM is powered down (i.e.
when the aircraft is switched off). If the bottom line of the
display continues to show or
, it is recommended that you make a
radio or phone call to the appropriate personnel to advise
completion of your mission.
NOTE! If AFF is not terminated after the aircraft has landed, a
reminder beep sounds over the ICS every 10 seconds. If the
aircraft takes off again, this beep stops.
| Flightcell® DZM Operating Manual | Firmware v2.00 Page 39 of 88 |
Page 40
Controlling audio settings
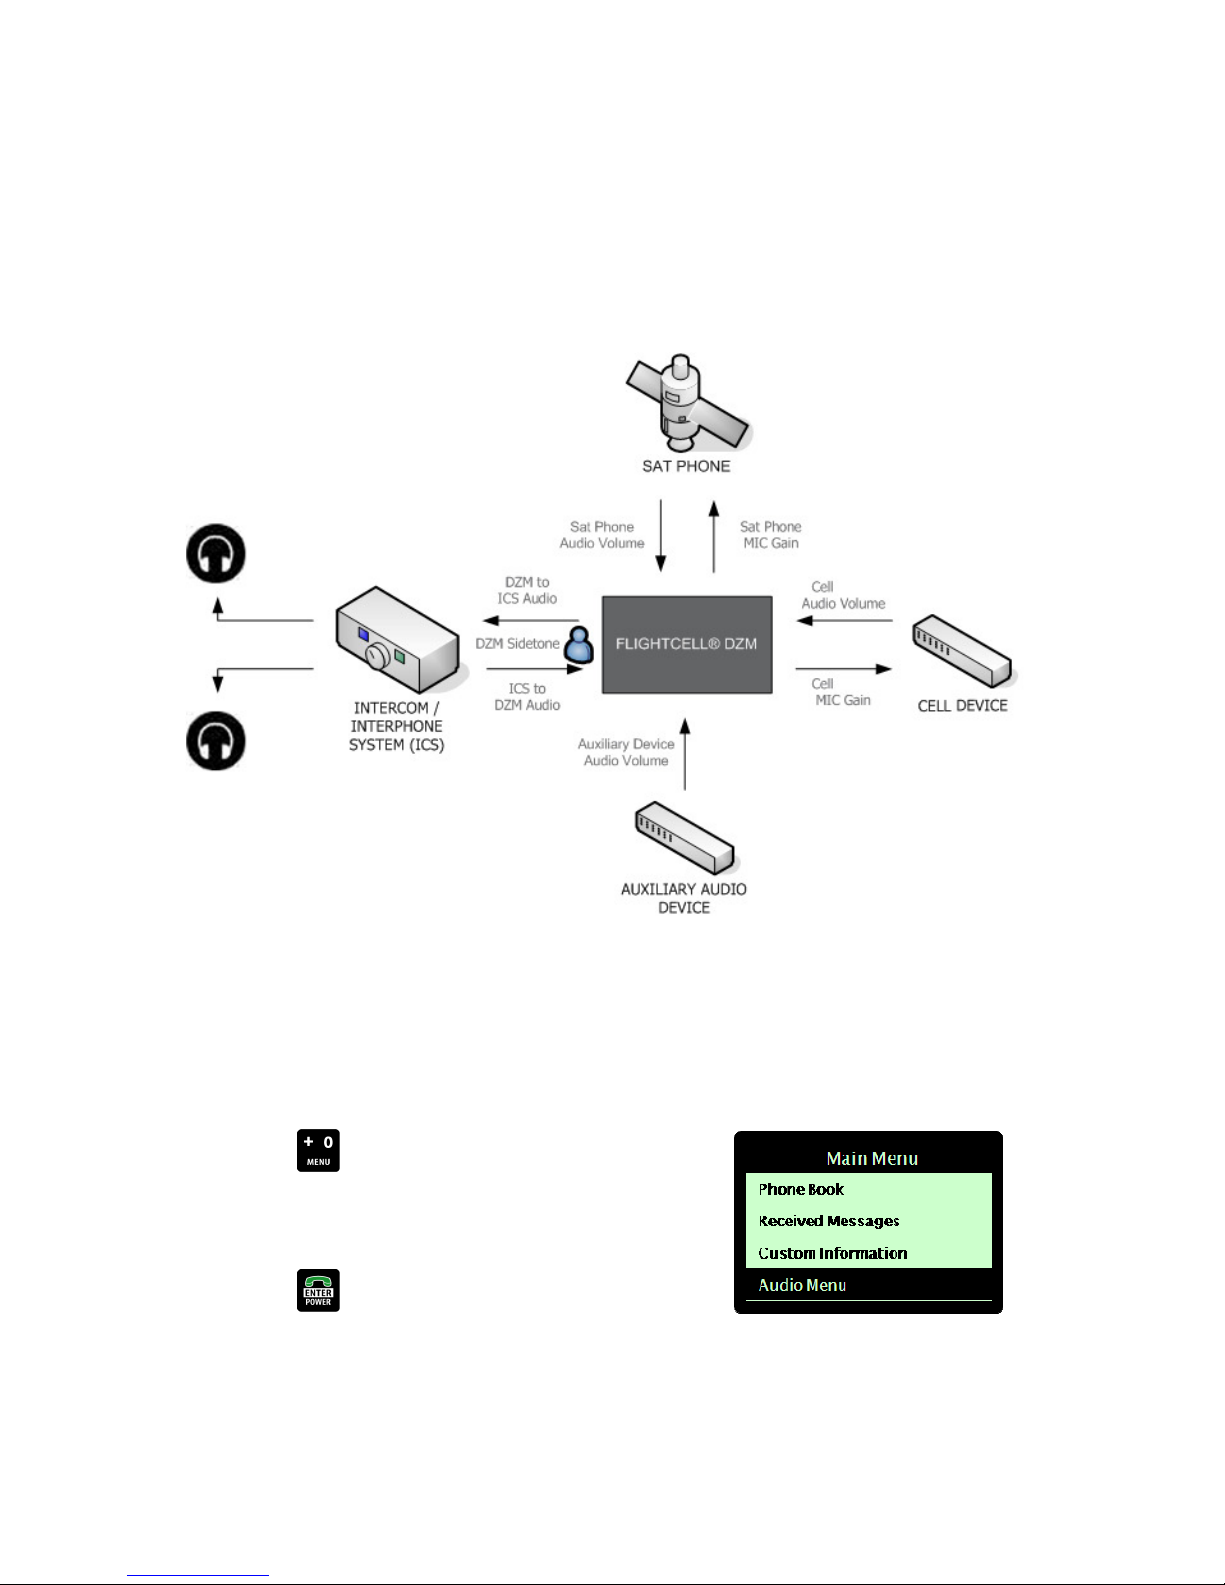
Various audio settings may be adjusted for the DZM and connected devices. These are shown in the diagram
below and further described in the following sub-sections.
Refer to "Configuring advanced audio settings" on page 69 for further information about configuring more
advanced audio settings.
Accessing the Audio Menu
Audio settings are configured using the 'Audio Menu'.
Accessing the Audio Menu:
Press the MENU key to enter the menu system. The 'Main
Menu' displays.
Using the arrow keys, navigate to 'Audio Menu'.
Press the ENTER key to select. The 'Audio Menu' displays
| Flightcell® DZM Operating Manual | Firmware v2.00 Page 40 of 88 |
Page 41
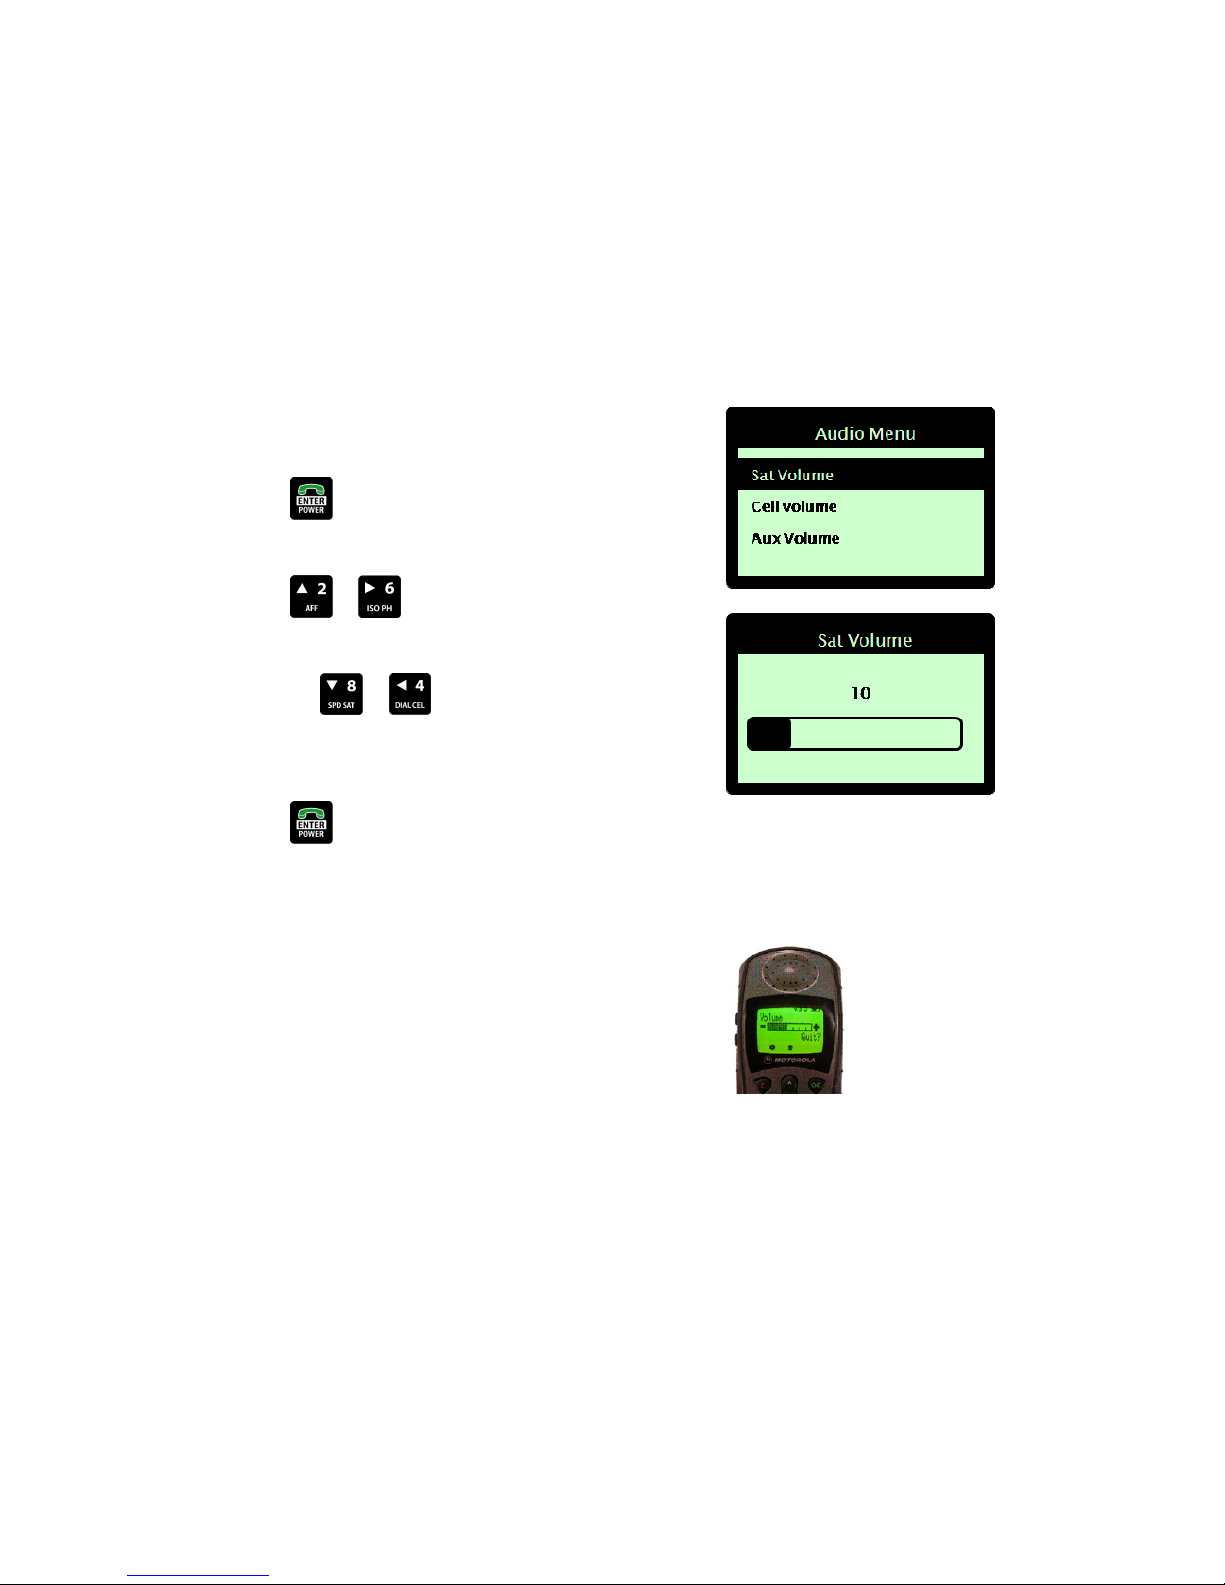
Setting satellite phone audio volume
Satellite phone audio is audio from the satellite phone to the DZM. Satellite phone audio may be adjusted on both
the DZM and the connected satellite phone.
NOTE! Do not adjust volume on the satellite phone handset to above halfway or an undesirable echo will be
heard by the party on the other end of the phone link.
STEP 1 - Altering satellite phone audio volume on the DZM:
From the 'Audio Menu', use the arrow keys to navigate to 'Sat
Volume'.
Press the ENTER key to select. The 'Sat Volume' screens
displays.
Press the or arrow keys to increase sat phone
volume.
OR press the or arrow keys to decrease sat phone
volume. 0 is the lowest volume. 100 is the highest volume. 10 is
the default volume.
Press the ENTER key to save. You are returned to the
'Audio Menu'.
STEP 2 - Altering satellite phone audio volume on the handset:
Adjust audio volume using the 'Up' and 'Down' buttons to the left
of the LCD display on the Iridium 9505/A or 9555 handset.
For best performance, set the volume on the satellite phone
handset to 3.
NOTE! Undesirable echo occurs when volume on the handset
is set to above halfway.
Setting cell modem audio volume
Cell modem audio is audio from the cell modem to the DZM. Cell modem audio volume may be adjusted on the
DZM.
| Flightcell® DZM Operating Manual | Firmware v2.00 Page 41 of 88 |
Page 42
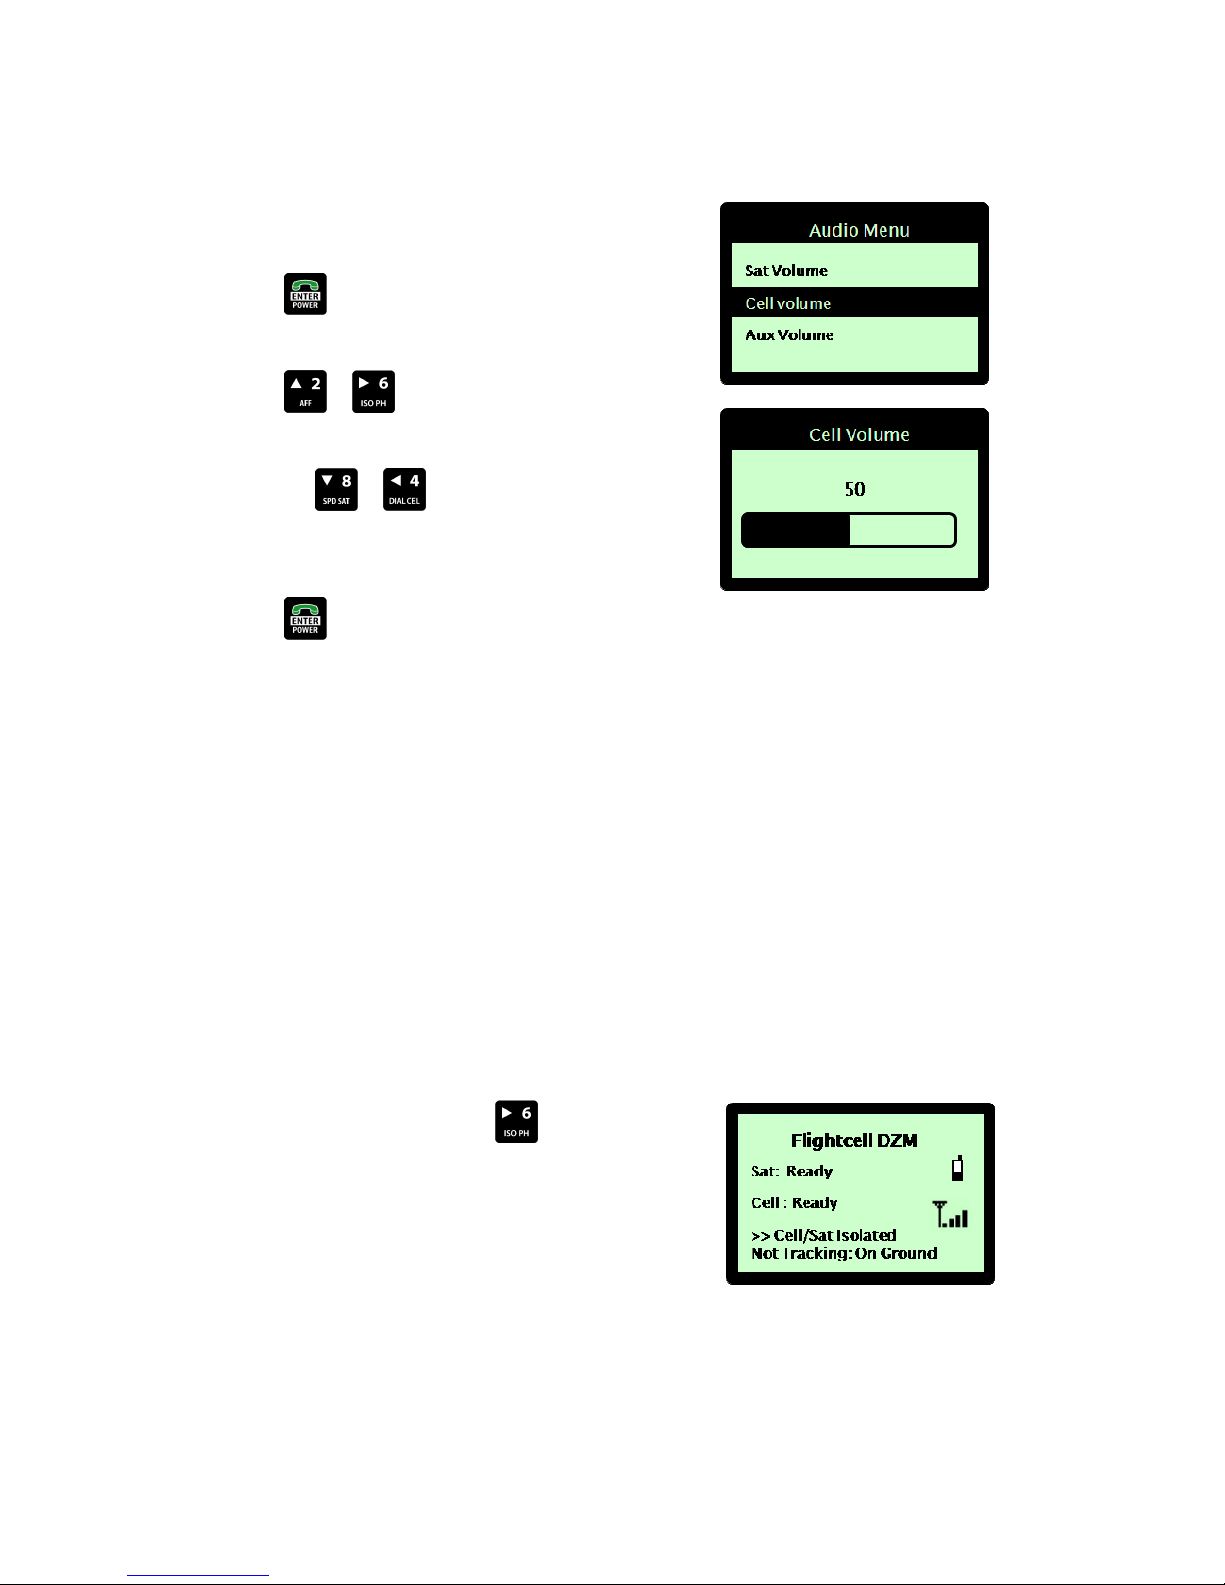
Altering the cell modem audio volume on the DZM:
From the 'Audio Menu', use the arrow keys to navigate to 'Cell
Volume'.
Press the ENTER key to select. The 'Cell Volume' screen
displays.
Press the or arrow keys to increase cell modem
volume.
OR press the or arrow keys to decrease cell modem
volume. 0 is the lowest volume. 100 is the highest volume. 50 is
the default volume
Press the ENTER key to save. You are returned to the
'Audio Menu'.
Isolating (muting) phones
Mute the audio between the DZM and connected cell and satellite phones using the Isolate Phones function.
When isolated, there is no audio from the DZM to the phones and incoming audio volume from the phones is
reduced. This means the crew can hold a private discussion, while still being able to hear the party on the other
end of the phone call.
Keypad tones (if enabled) and incoming audio from auxiliary audio devices are still audible.
Refer to "Switching keypad tones on and off" on page 75 for further information about keypad tones. Refer to
"Setting auxiliary device audio volume" on page 43 for further information about auxiliary audio devices.
STEP 1 - Isolating (muting) phones:
When in the 'Main Screen', press the ISO PH key. Cell/Sat
Isolated displays on the 'Main Screen' when phones are isolated.
| Flightcell® DZM Operating Manual | Firmware v2.00 Page 42 of 88 |
Page 43
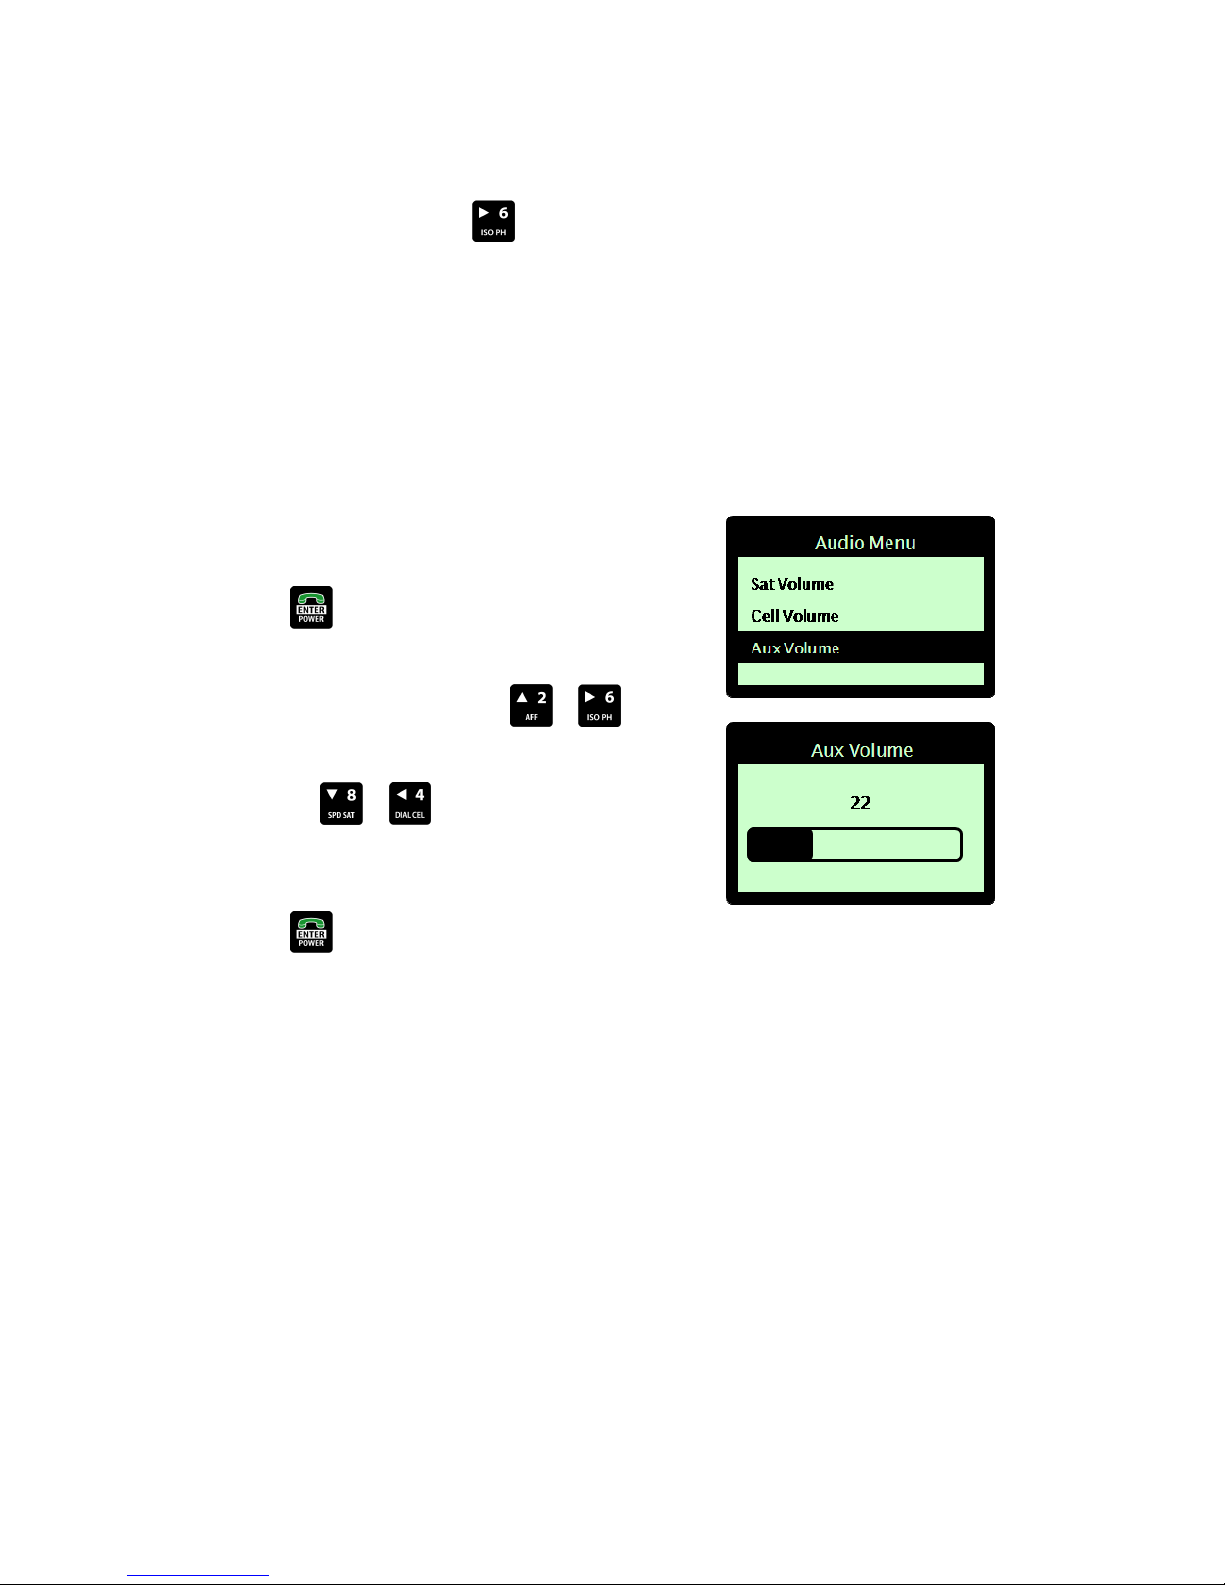
STEP 2 - Reinstating full phone audio:
From the 'Main Screen', press the ISO PH quick key to reinstate full phone audio.
Setting auxiliary device audio volume
External audio devices (e.g. music players) may be connected to the aircraft or vehicle's intercom/interphone
system (ICS) via the DZM. This is dependent on provision being made for the connection of an external audio
device by your engineers.
Altering the auxiliary volume:
From the 'Audio Menu', use the arrow keys to navigate to 'Aux
Volume'.
Press the ENTER key to select. The 'Aux Volume' screen
displays.
From the 'Aux Volume' screen, use the or arrow keys
to increase the auxiliary volume;
OR press the or arrow keys to decrease the auxiliary
volume. 0 is the lowest volume. 100 is the highest volume. 22 is
the default.
Press the ENTER key to save. You are returned to the
'Audio Menu'.
| Flightcell® DZM Operating Manual | Firmware v2.00 Page 43 of 88 |
Page 44
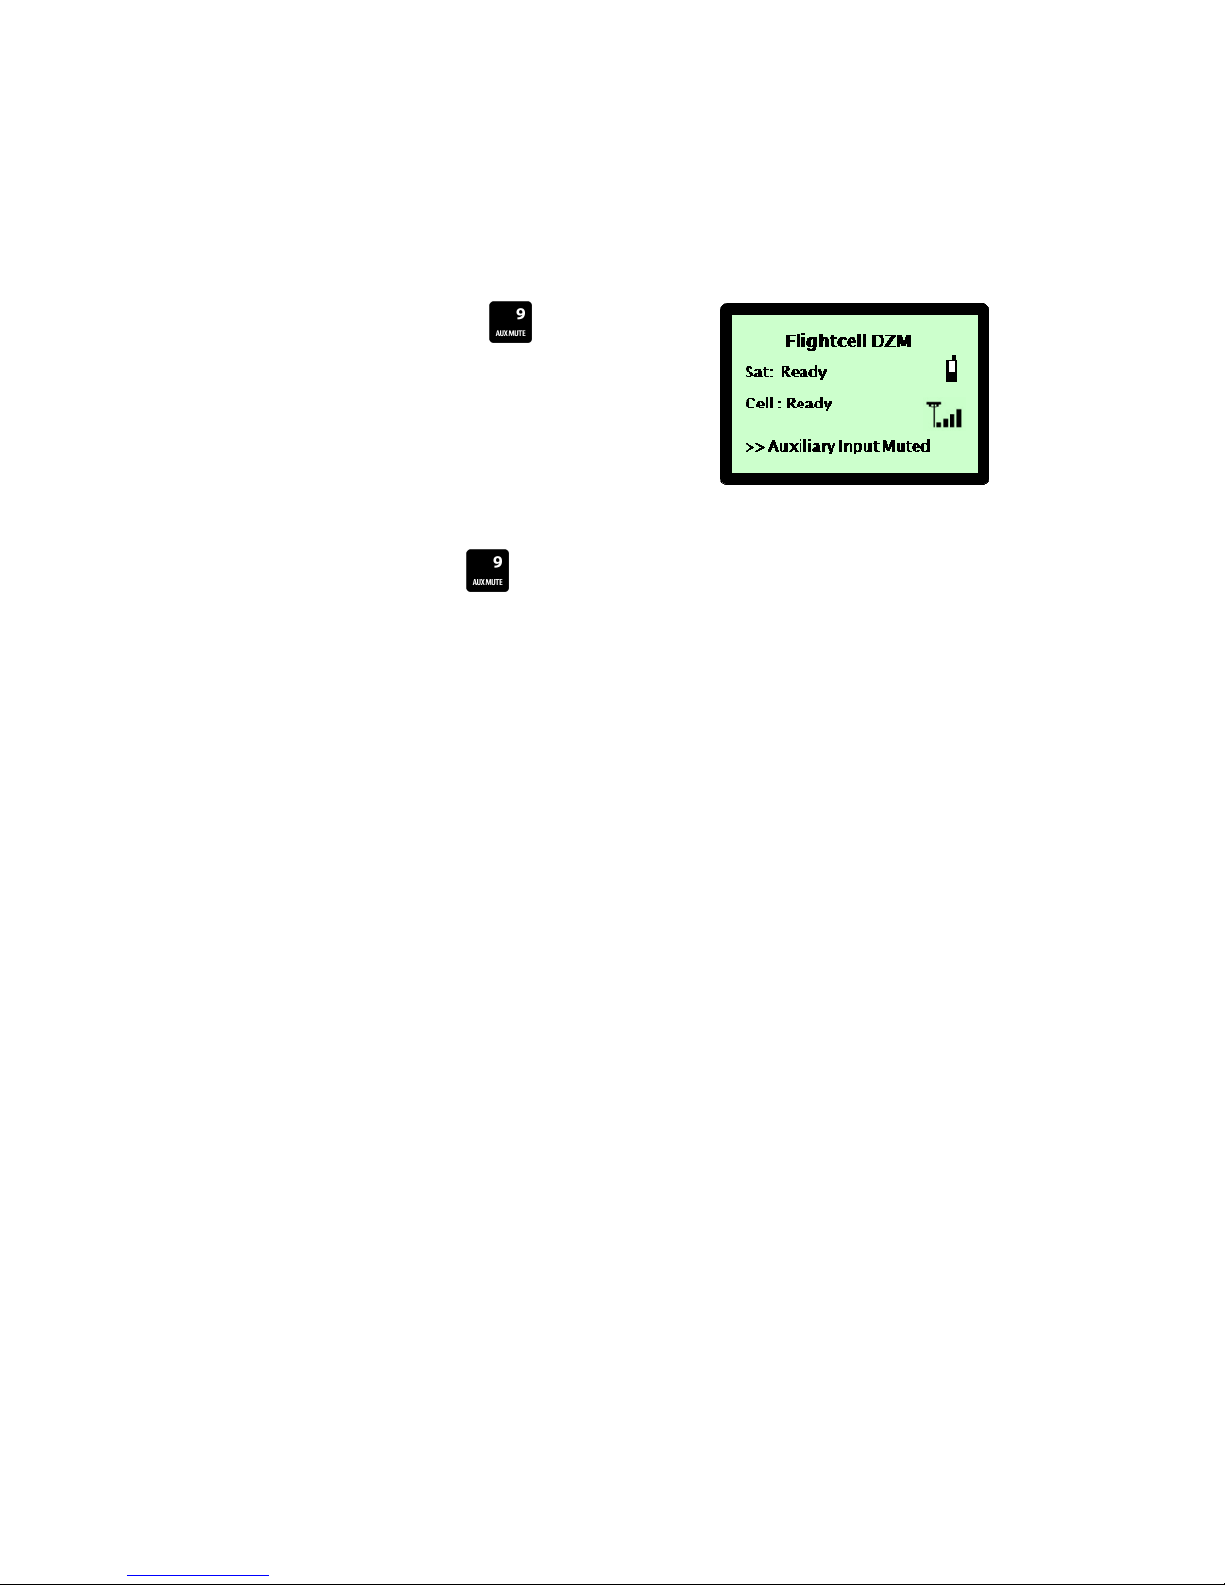
Muting auxiliary devices
You may mute the incoming audio of any auxiliary audio device connected to the DZM.
STEP 1 - Muting an auxiliary audio device:
When in the 'Main Screen', press the AUX MUTE quick key.
Auxiliary Input Muted displays on the 'Main Screen'.
STEP 2 - Reinstating full auxiliary device audio:
From the 'Main Screen', press the AUX MUTE quick key to reinstate full auxiliary device audio.
| Flightcell® DZM Operating Manual | Firmware v2.00 Page 44 of 88 |
Page 45
Using Flightcell® DZM common setup features
This section describes how common DZM settings may be configured using the 'Setup Menu'.
Refer to "Configuring other DZM advanced setup features" on page 76 for further information about configuring
other advanced setup features.
Accessing the Setup Menu
Accessing the Setup Menu:
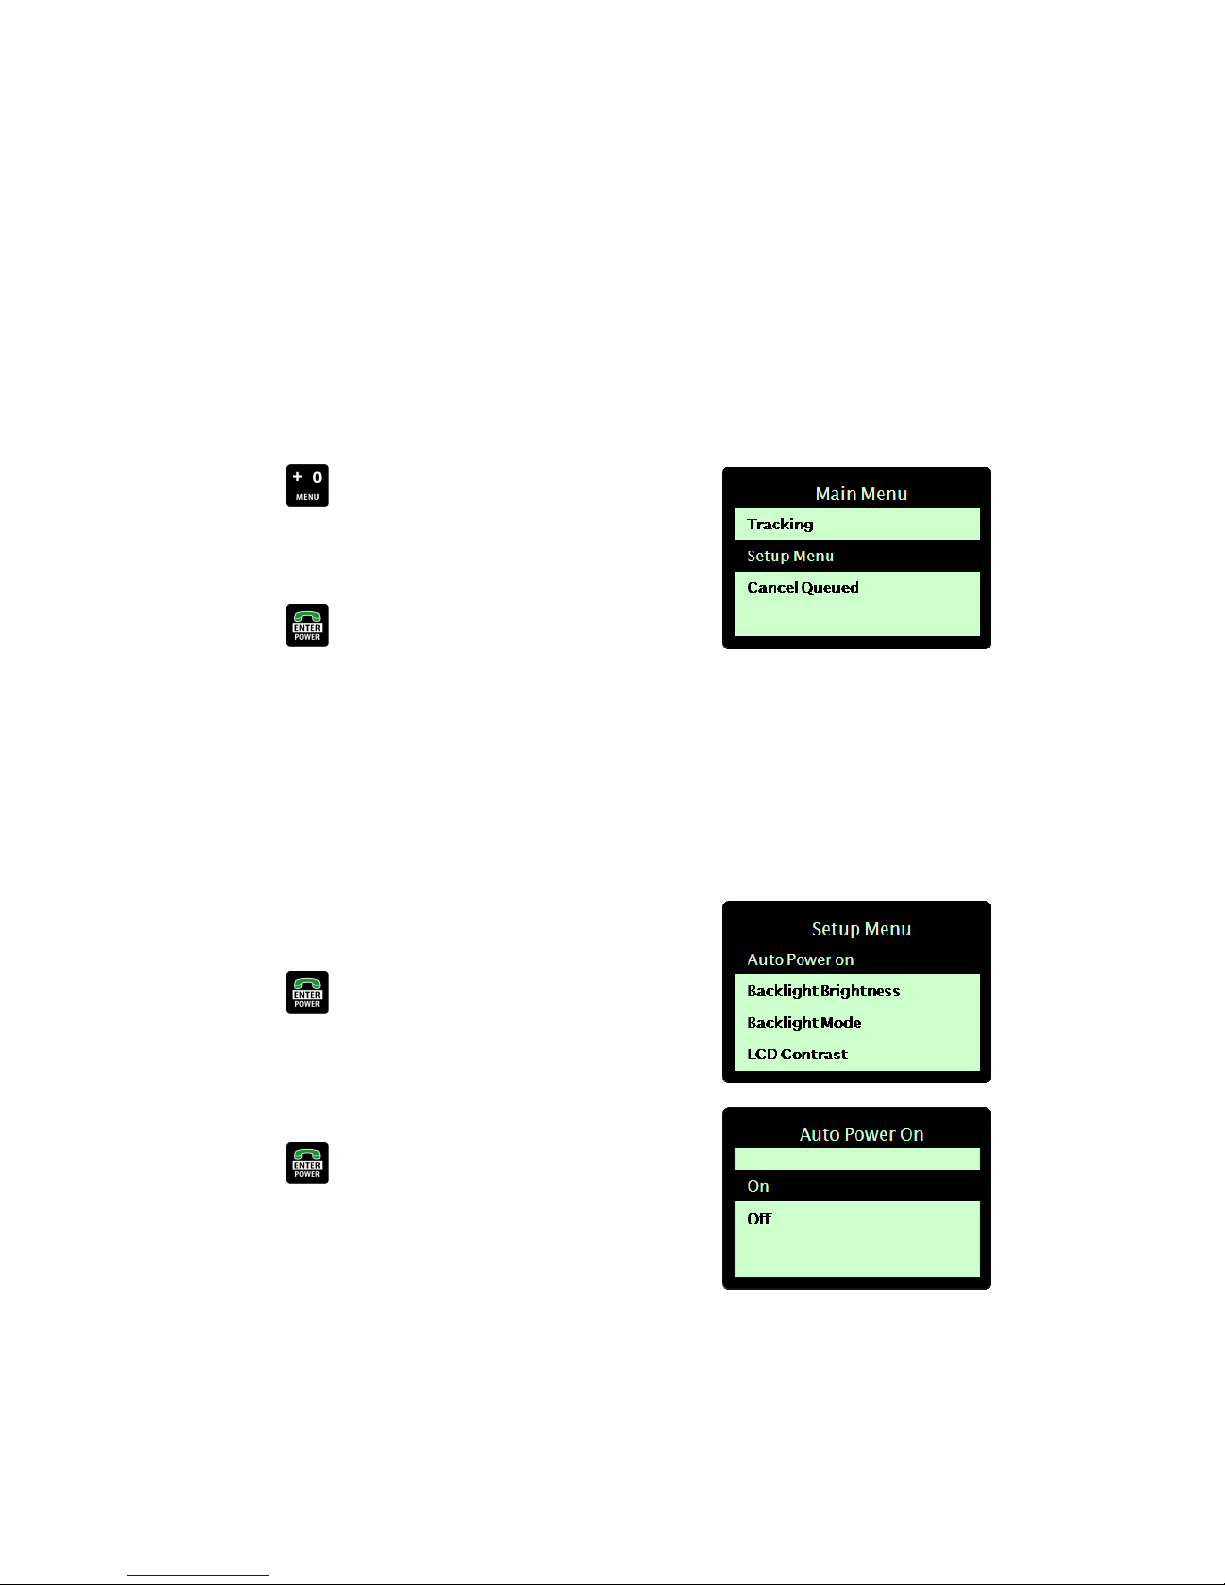
Press the MENU key to enter the menu system. The 'Main
Menu' displays.
Using the arrow keys, navigate to 'Setup Menu'.
Press the ENTER key to select. The 'Setup Menu' displays.
Using Auto Power On
When Auto Power On is enabled, the DZM switches on automatically when aircraft power is switched on.
The default setting for Auto Power On is 'On'.
Switching Auto Power on or off:
From the 'Setup Menu', use the arrow keys to navigate to 'Auto
Power On'.
Press the ENTER key to select. The 'Auto Power On' screen
displays.
Using the arrow keys, navigate to the auto power mode required
(e.g. 'On').
Press the ENTER key to save. You are returned to the
'Setup Menu'.
| Flightcell® DZM Operating Manual | Firmware v2.00 Page 45 of 88 |
Page 46
Setting backlight brightness
The DZM LCD display backlight brightness may be adjusted. Set a specific brightness level, or use an external
signal from the aircraft's instrument light control.
The DZM supports 0-5VAC and 0-28VDC external control signals.
Setting the backlight brightness:
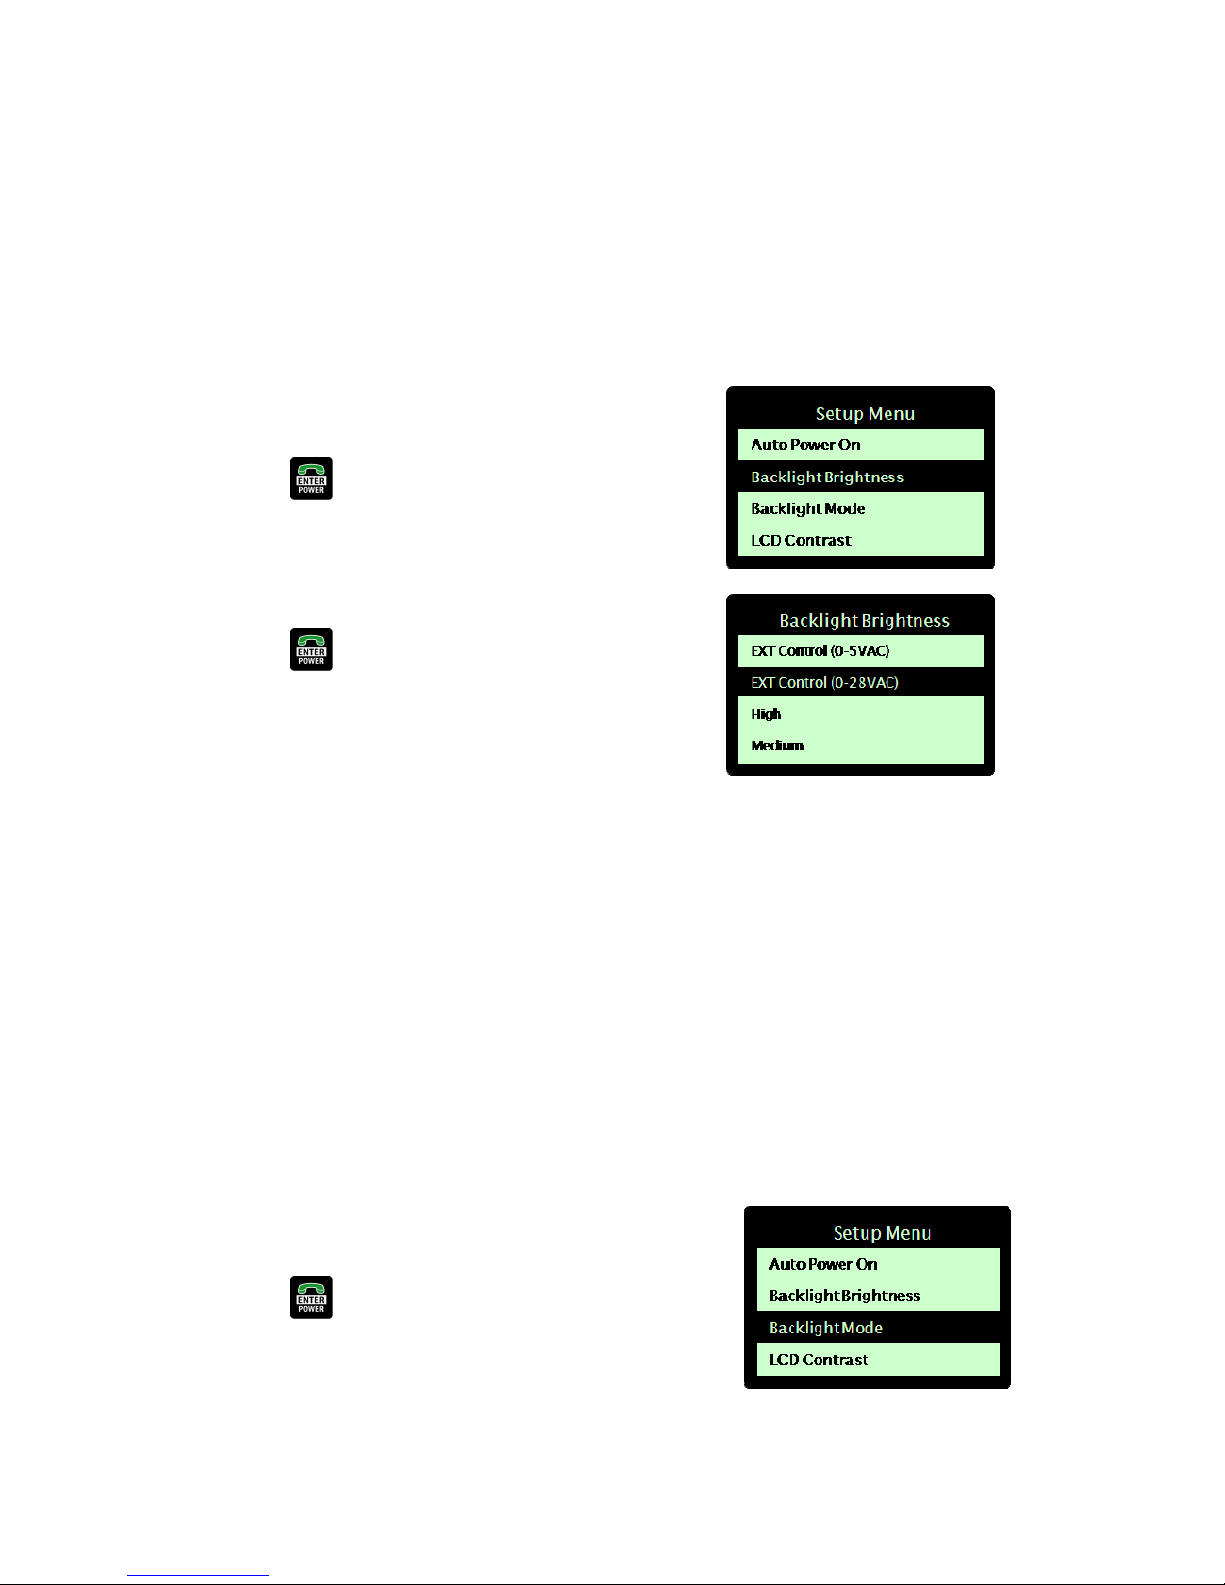
From the 'Setup Menu', use the arrow keys to navigate to
'Backlight Brightness'.
Press the ENTER key to select. The 'Backlight Brightness'
screen displays.
Using the arrow keys, navigate to the mode required (e.g. 'Ext
Control[0-28 VDC]').
Press the ENTER key to save. You are returned to the
'Setup Menu'.
Setting backlight mode
The DZM LCD display backlight mode may be customized.
Backlight mode options:
The following LCD display backlight mode options are available:
Always On - The backlight will remain on at all times when the DZM is on.
Keypad Timeout - The backlight will switch on only when a key is pressed. It will remain on for 15 seconds.
Always Off - The backlight will remain off at all times.
Setting the backlight mode:
From the 'Setup Menu', use the arrow keys to navigate to
'Backlight Mode'.
Press the ENTER key to select. The 'Backlight Mode' screen
displays.
Using the arrow keys, navigate to the mode required (e.g.
'Keypad Timeout').
| Flightcell® DZM Operating Manual | Firmware v2.00 Page 46 of 88 |
Page 47
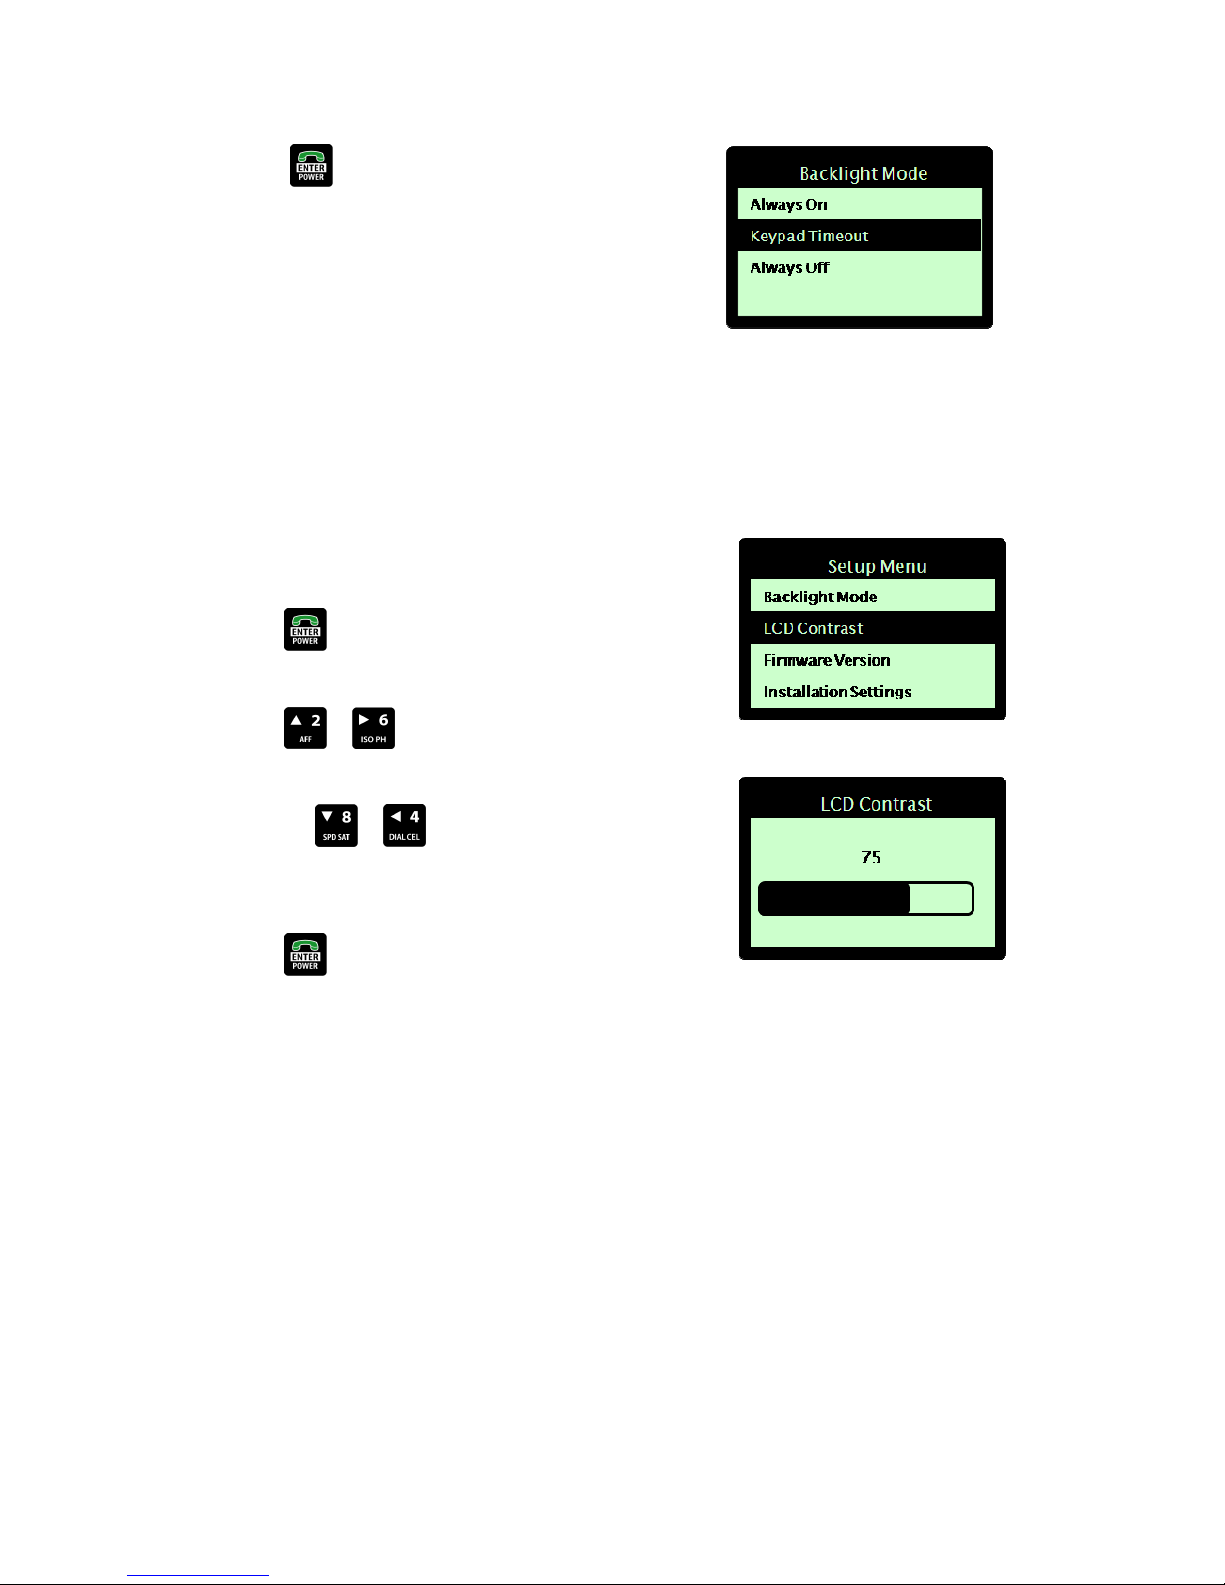
Press the ENTER key to save. You are returned to the
'Setup Menu'.
Setting LCD contrast
DZM LCD display contrast may be adjusted.
Setting LCD contrast:
From the 'Setup Menu, use the arrow keys to navigate to 'LCD
Contrast'.
Press the ENTER key to select. The 'LCD Contrast' screen
displays.
Press the or arrow keys to increase the contrast
level.
OR press the or arrow keys to decrease the contrast
level. 0 is the lowest level. 100 is the highest level. 75 is the
default level.
Press the ENTER key to save. You are returned to the
'Setup Menu'.
| Flightcell® DZM Operating Manual | Firmware v2.00 Page 47 of 88 |
Page 48
Identifying firmware version and serial number
The DZM firmware version and serial number may be identified. Refer to "APPENDIX A: Upgrading DZM firmware"
on page 80 for further information on installing a firmware upgrade.
Viewing firmware version and serial number:
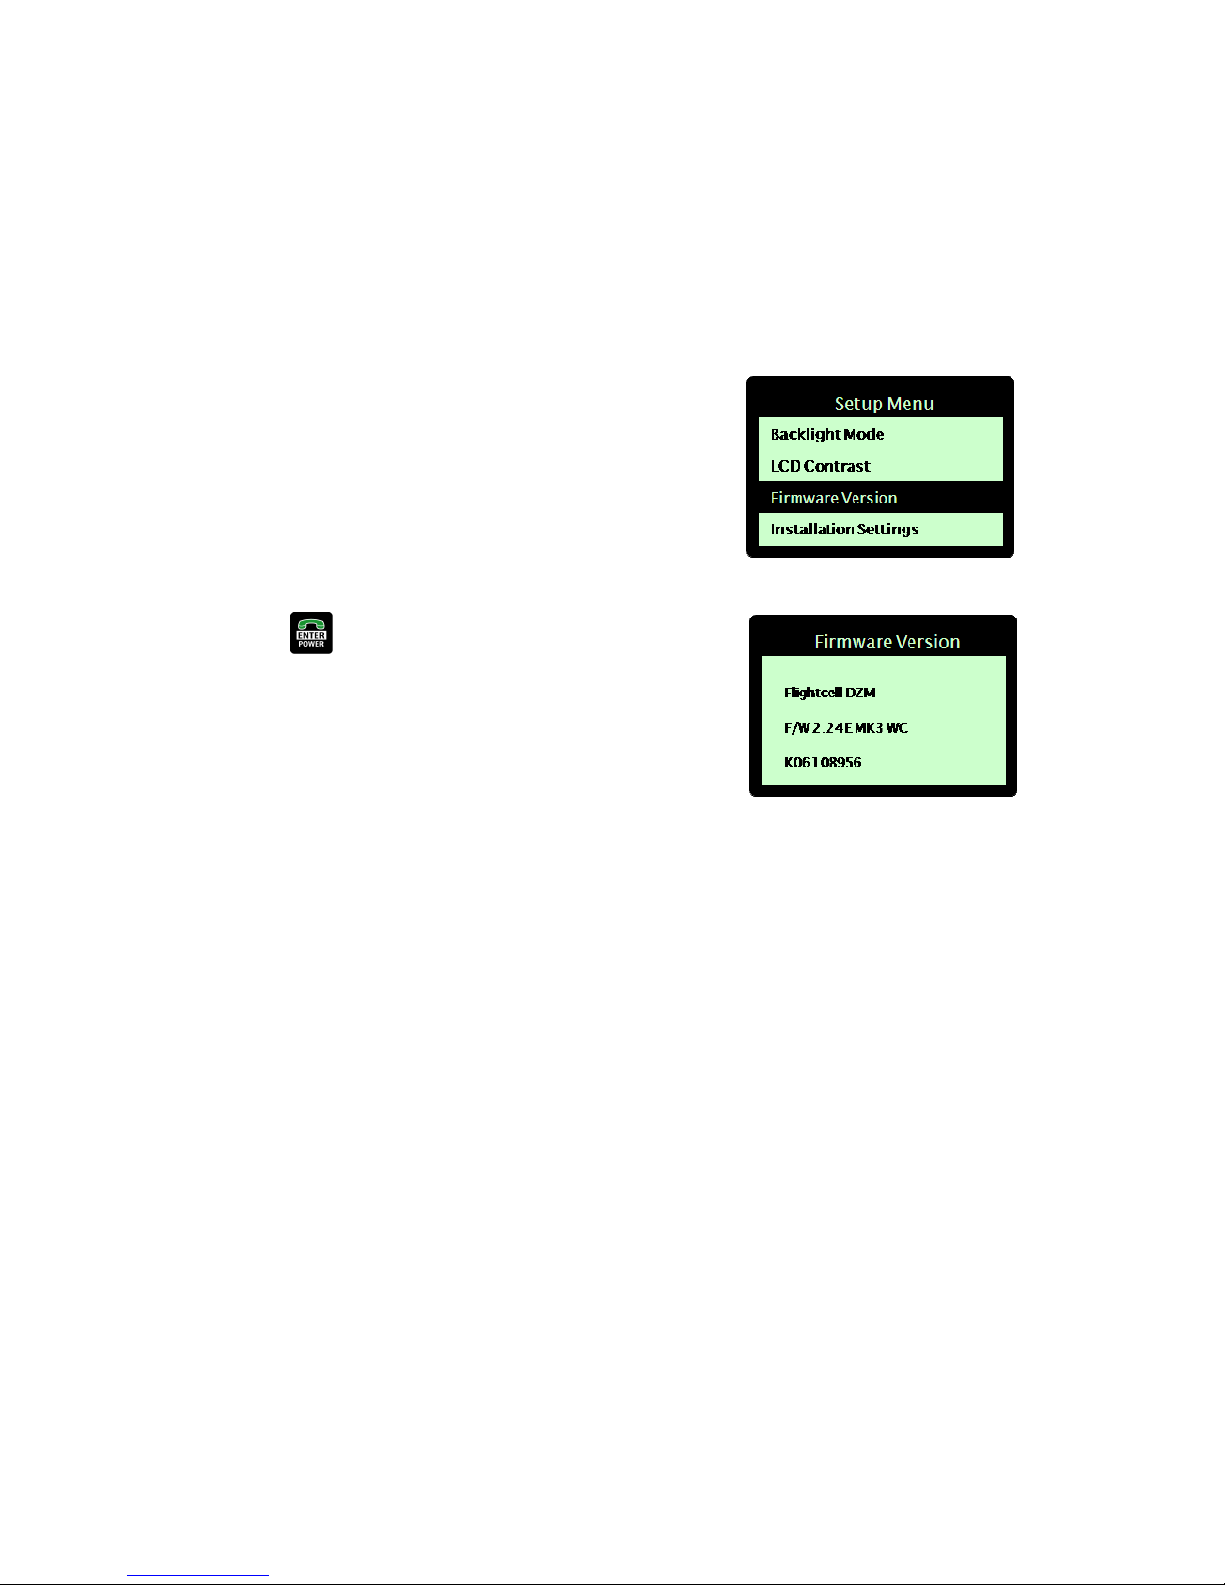
From the 'Setup Menu, use the arrow keys to navigate to
'Firmware Version'.
Press the ENTER key to select. The 'Firmware Version'
screen displays, showing model, firmware version and serial
number information.
On the second line of the firmware version screen:
‘MK3’ indicates that this firmware version is compatible with 9505
and 9505A satellite phones.
‘MK4’ indicates that this firmware version is compatible with 9555
satellite phones.
‘WC’ indicates that this firmware version is compatible with
Wavecom Wizmo, Supreme and Xtend modems when fitted.
‘MT’ indicate that this firmware version is compatible with a
Multitech modem when fitted.
‘FP’ indicates that this firmware version has the Flight Plan
message menu option enabled.
| Flightcell® DZM Operating Manual | Firmware v2.00 Page 48 of 88 |
Page 49
Emergency procedures
Sending a distress signal
In emergency, a distress signal may be transmitted using the DZM. In distress mode, the DZM transmits position
data every 60 seconds with a distress tag attached. The receiving server identifies the distress signal and
automatically raises an alarm, alerting nominated parties by text message, pager or email (if supported by your
tracking service provider).
If the pilot terminates distress mode, a Distress Cancelled message is sent by the Flightcell DZM to indicate that
distress mode has been deliberately cancelled.
An appropriately configured receiving server is required to receive distress signals and alert nominated parties.
STEP 1 - Transmitting a distress signal:
From the 'Main Screen', press and hold the DISTRESS quick key for 1.5 seconds to send a distress
signal. DISTRESS MODE! flashes at the bottom of the LCD 'Main Screen' when in distress mode.
STEP 2 - Reinstating normal mode:
From the 'Main Screen', press and hold the DISTRESS quick key for 1.5 seconds to return to normal
mode.
| Flightcell® DZM Operating Manual | Firmware v2.00 Page 49 of 88 |
Page 50

FLIGHTCELL® ADVANCED SETUP GUIDE
Learn how to:
Configure your Iridium satellite phone handset
Configure advanced DZM settings not commonly requiring change by the pilot during flight.
Refer to "DZM operator's guide" on page 19 for further information about common DZM functions used by the
pilot during flight.
| Flightcell® DZM Operating Manual | Firmware v2.00 Page 50 of 88 |
Page 51

Configuring your Iridium satellite phone
This section describes how to carry out initial configuration of your Iridium satellite phone handset.
Configuring satellite phone service center number
The service center must be set up on your Iridium satellite phone before you can send SMS messages.
NOTE! The service center number is set up only once, after which it is permanently stored in the satellite
phone.
Refer to "Configuring GPS tracking" on page 52 for further information about important settings that need to
be configured before GPS data will be transmitted.
Setting the service center number on the satellite phone handset:
Press the 'Envelope' key on the keypad of the Iridium satellite phone.
Scroll to 'Message Settings' and press 'OK'.
Scroll to 'Service Center' and press 'OK'.
Enter 00881662900005 or +881662900005
Press 'OK'.
Overriding satellite phone antenna lock
Some early versions of the Iridium satellite phone will not work unless the antenna is locked in the 10 o'clock or 2
o'clock position. If you receive an antenna alert when the satellite phone handset is installed in the Iridium phone
mount, you will need to override this antenna lock.
Overriding the antenna lock:
Enter the code *#92# into the satellite phone. "ANTENNA ALERT OFF" displays.
Power the satellite phone off and re-start for the override code to take effect. Once the satellite phone has
been powered-on again it will not require the antenna to be rotated.
For the 9505 satellite phone, the override code operates in handsets operating firmware version LAC0307. For
the 9505A satellite phone, the override code operates in handsets operating firmware versions LAC0307,
ISO5004 or ISO6004. Enter the code *#91# to identify the firmware version of your Iridium satellite phone
handset.
| Flightcell® DZM Operating Manual | Firmware v2.00 Page 51 of 88 |
Page 52

Notify your tracking service provider of:
Request from your tracking service provider:
If you will be using SBD messaging to transmit GPS position data:
If you will be using SMS messaging to transmit GPS position data:
Configuring GPS tracking
Whether you plan to use the DZM to transmit GPS data manually or automatically, you need to do the following:
Setting up your tracking service
The serial number of your DZM. Refer to "Identifying firmware version and serial number" on page 47
for further information about how to identify the serial number of your DZM
The IMEI identification number of your satellite phone handset. This is a 16 digit number located on a
sticker under the Iridium battery
The satellite phone SMS destination address
The satellite phone SBD destination address
The cellular SMS destination address
Refer to "Finding messaging destination addresses" on page 62 for messaging destination addresses for
some known tracking providers.
Setting up your satellite network service
Notify your satellite network service provider of the IMEI identification number of your satellite phone
handset. This is a 16 digit number located on a sticker under the Iridium battery
Notify your satellite network service provider of the satellite phone SBD destination address. This
should be provided by your tracking service provider or refer to "Finding messaging destination addresses"
on page 62.
You will also need to agree a contract for the SBD service with your satellite network service provider
Check your satellite network service provider supports SMS messaging
You will also need to agree a bulk SMS message plan with your satellite network service provider
| Flightcell® DZM Operating Manual | Firmware v2.00 Page 52 of 88 |
Page 53

If you will be using a cellular modem to transmit GPS position data:
If you will be using a satellite phone
to transmit GPS position data:
Set satellite messaging
To send data over the satellite network, the recipient destination must
To send audio or data over the cellular network, the type of cellular
Set
cellular messaging
To send data over the cellular network, the recipient destination must
Where both satellite and cellular devices are configured, you may
GPS data may be transmitted using different messaging modes. A
When transmitting GPS position data using SBD messaging mode, the
Setting up your cellular network service
Notify your cellular service provider of the phone number of your cellular modem
You will also need to agree a bulk SMS message plan with your cellular network provider
Setting up your Iridium satellite phone handset
Enter the satellite phone service center number into your satellite phone handset. Refer to
"Configuring satellite phone service center number" on page 51 for further information about configuring
the satellite phone service center number.
Ensure the antenna override is activated on your satellite phone handset. Refer to "Overriding satellite
phone antenna lock" on page 51 for further information about how to override the antenna lock.
Setting up your DZM:
Set satellite phone type
To send audio or data over the satellite network, the type of satellite
phone connected to the DZM must be specified (page 76)
destination
Set cellular modem type
destination
Set preferred messaging device
Set messaging mode
Set message size
be specified (page 62)
modem connected to the DZM must be specified (page 76)
be specified (page 64)
specify a preferred device to be used by the DZM (page 66)
messaging mode needs to be configured to send GPS data (page 65)
level of detail included within each message may be defined (page 66)
Refer to "Using GPS tracking" on page 31 for further information about how to use GPS Tracking during flight.
| Flightcell® DZM Operating Manual | Firmware v2.00 Page 53 of 88 |
Page 54
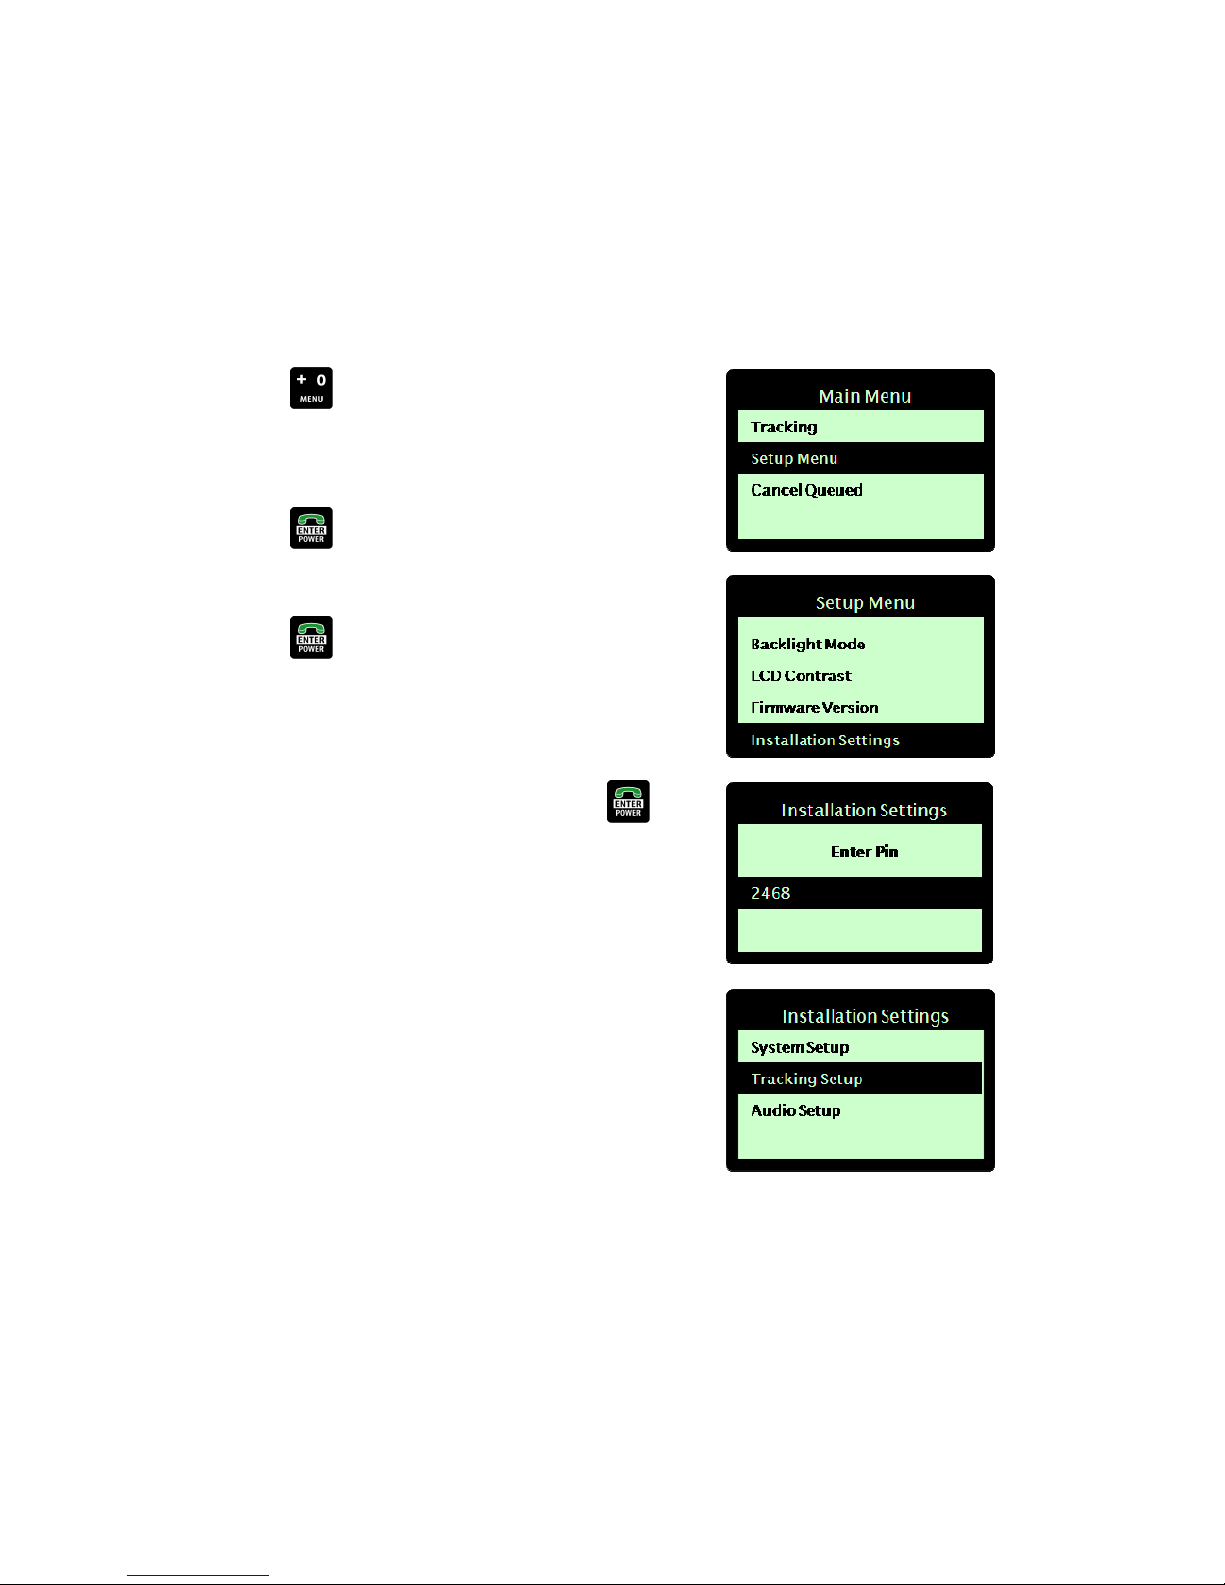
Using the Installation Settings Menu to access
advanced settings
Advanced settings are found in the Installation Settings Menu, which is a sub-menu of the Setup Menu. The
Installation Settings Menu is password protected.
Accessing the ‘Installation Settings’ sub-menu:
Press the MENU key to enter the menu system. The 'Main
Menu' displays.
Using the arrow keys, navigate to ‘Setup Menu’.
Press the ENTER key to select. The 'Setup Menu' displays.
Using the arrow keys, navigate to ‘Installation Settings’.
Press the ENTER key to select. The security pin screen
displays.
Enter the security pin number “2468” and press the ENTER
key.
The 'Installation Settings' screen displays, showing the three
installation settings sub-menus.
| Flightcell® DZM Operating Manual | Firmware v2.00 Page 54 of 88 |
Page 55
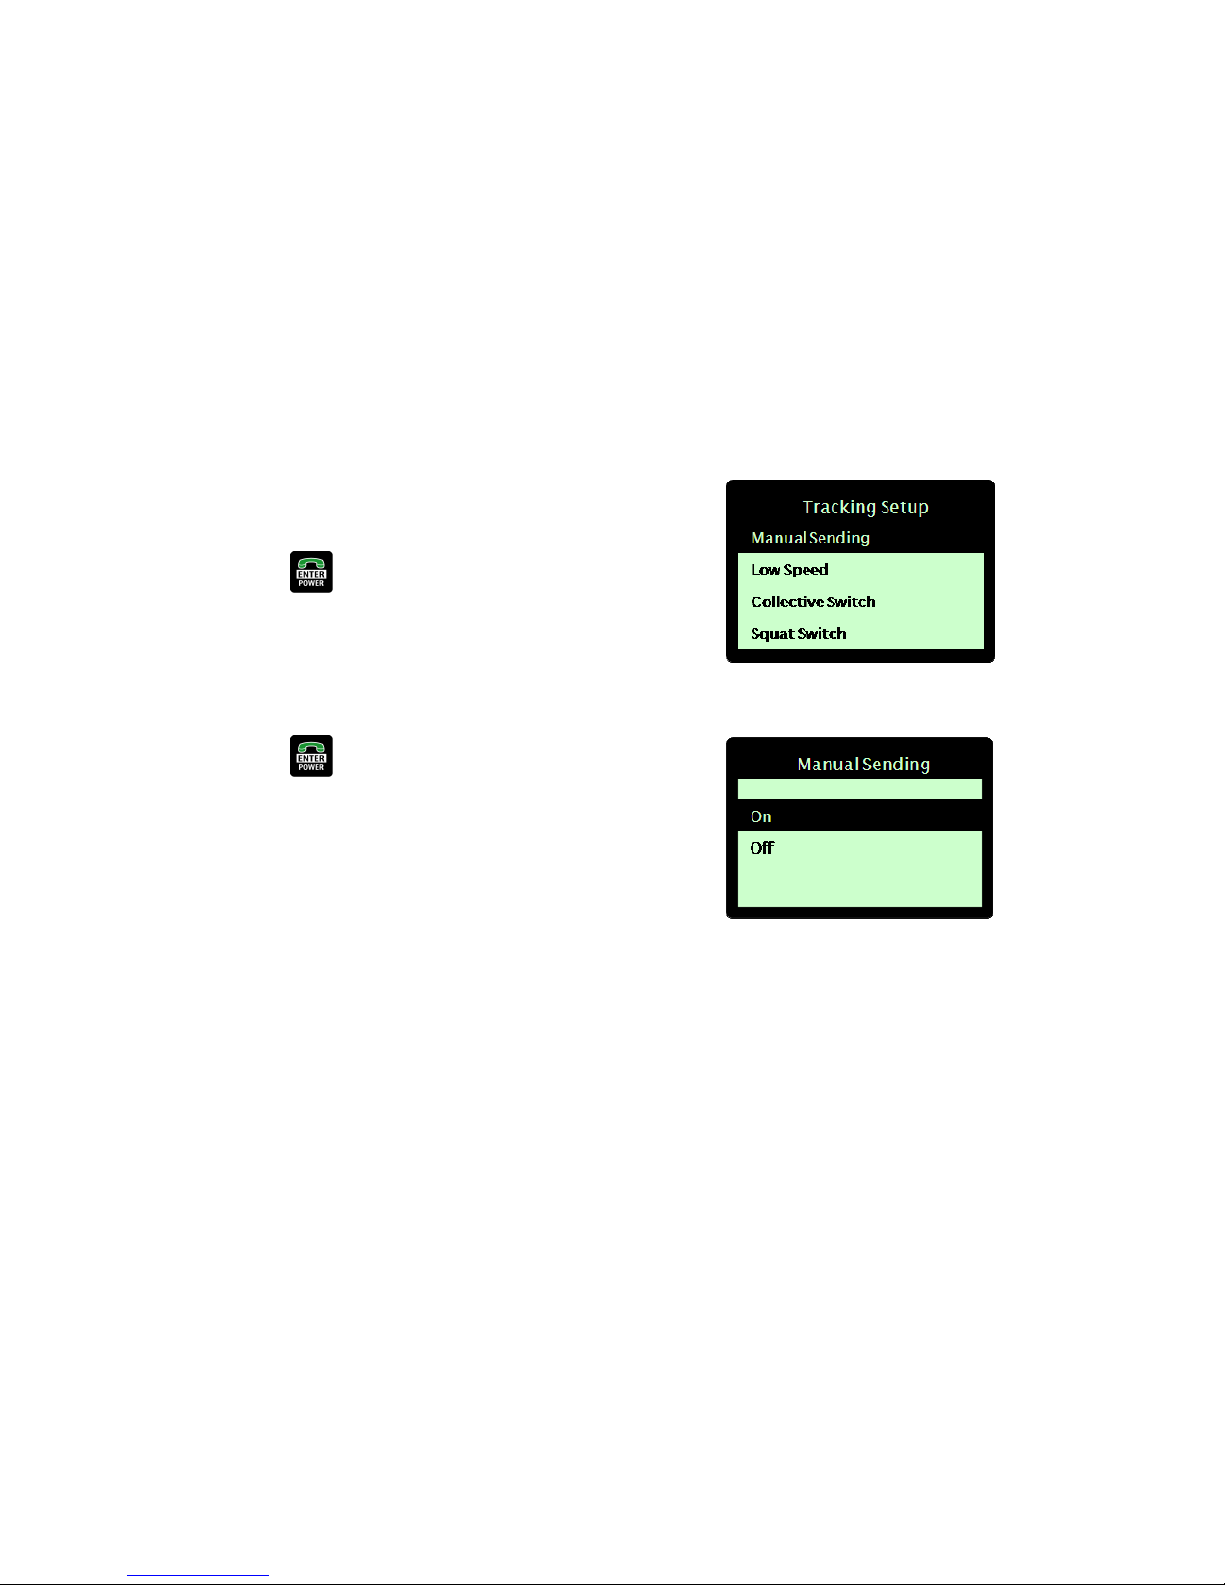
Configuring Advanced Tracking Settings
Navigate to the Tracking Setup sub-menu following the steps on page 54.
Enabling manual GPS tracking
Manual GPS tracking must be enabled before positions can be manually transmitted using the Mark key.
Refer to “Manually transmitting GPS position” on page 31 for further information about manually transmitting
current GPS to an authorized recipient destination.
Enabling manual transmission of GPS data:
From the ‘Tracking Setup’ sub-menu, use the arrow keys to
navigate to 'Manual Sending’.
Press the ENTER key to select. The 'Manual Sending' screen
displays.
Using the arrow keys, navigate to the manual sending mode
required (e.g. 'On').
Press the ENTER key to select and save.
| Flightcell® DZM Operating Manual | Firmware v2.00 Page 55 of 88 |
Page 56
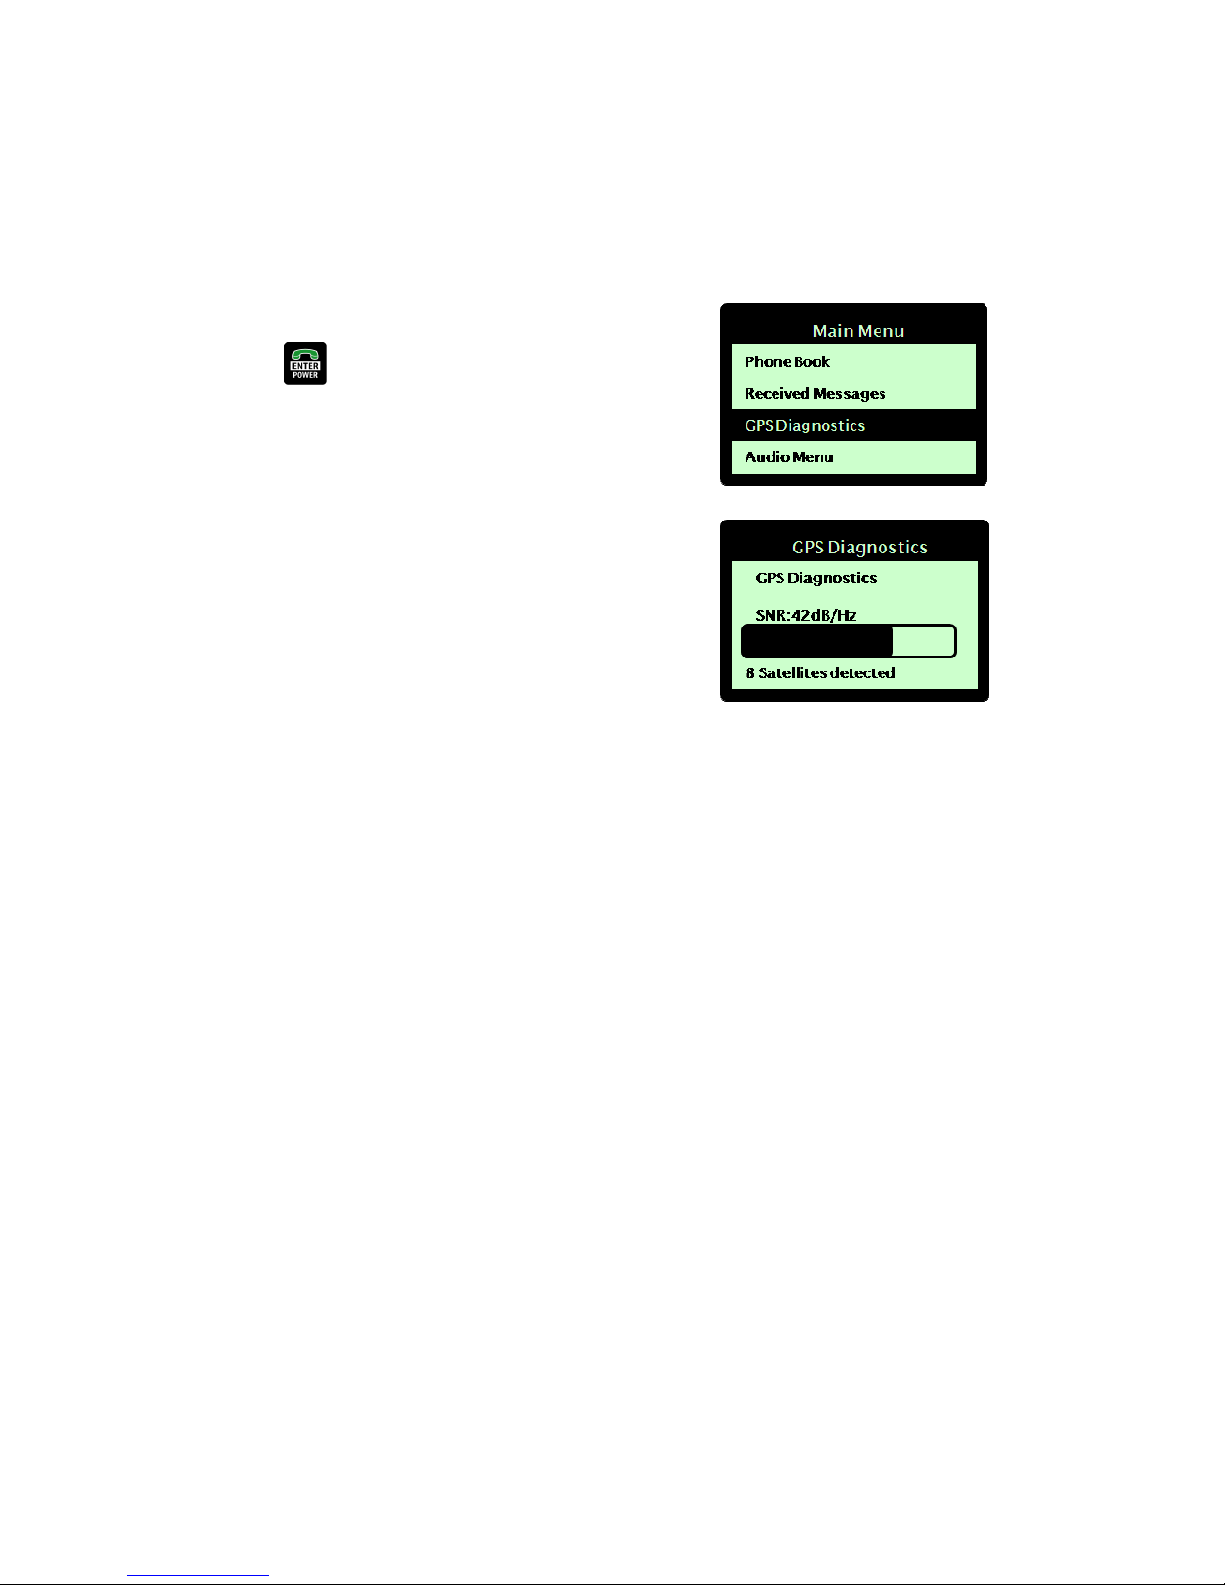
Using GPS antenna diagnostics
Use the DZM antenna diagnostics function to view information about GPS antenna and signal quality.
Viewing GPS diagnostics information:
On the main menu, use the arrow keys to navigate to ‘GPS Diags’.
Press the ENTER key to select. The ‘GPS Diags' screen
displays, showing antenna/GPS status, signal to noise ratio and
satellite information.
What does the GPS diagnostics information mean?
Antenna/GPS status information is shown on line one of the display.
GPS Lock displays when there is a good GPS signal providing positioning information;
Waiting For Lock displays after the DZM has recently been re-powered and is calculating, or waiting for
sufficient signal before providing position information. Even under good conditions, it may take up to 2
minutes to acquire a GPS lock (or 15 minutes the first time the DZM is used in a different hemisphere);
No Antenna displays when no GPS antenna is connected, or if there is an antenna cable fault;
Antenna Fault displays when the GPS antenna and/or cable has a low impedance short. This message is
also displayed when using an active antenna where the energy consumption on power-up is too high.
Signal to noise ratio (SNR) shows on line two of the display in numerical and graphical form. This provides the
average strength of the five best incoming satellite signals (or an average of all visible satellites if there are fewer
than five).
Normal SNR value is around 40db/Hz. A minimum of 30db/Hz is usually required to obtain a GPS lock.
Low values are usually due to weak signals from satellites which can be caused by some sort of physical
obstruction. Low values can also be caused by excessive electrical noise being imposed on a strong signal,
such as nearby arc welding equipment or variable speed drives.
It is possible that the SNR may be high but a GPS lock cannot be achieved. This may be due to a low number
of visible satellites (a minimum of 4 satellites is required) or satellites not in suitable strategic locations to
acquire a GPS lock (i.e. they may be close to the horizon).
| Flightcell® DZM Operating Manual | Firmware v2.00 Page 56 of 88 |
Page 57
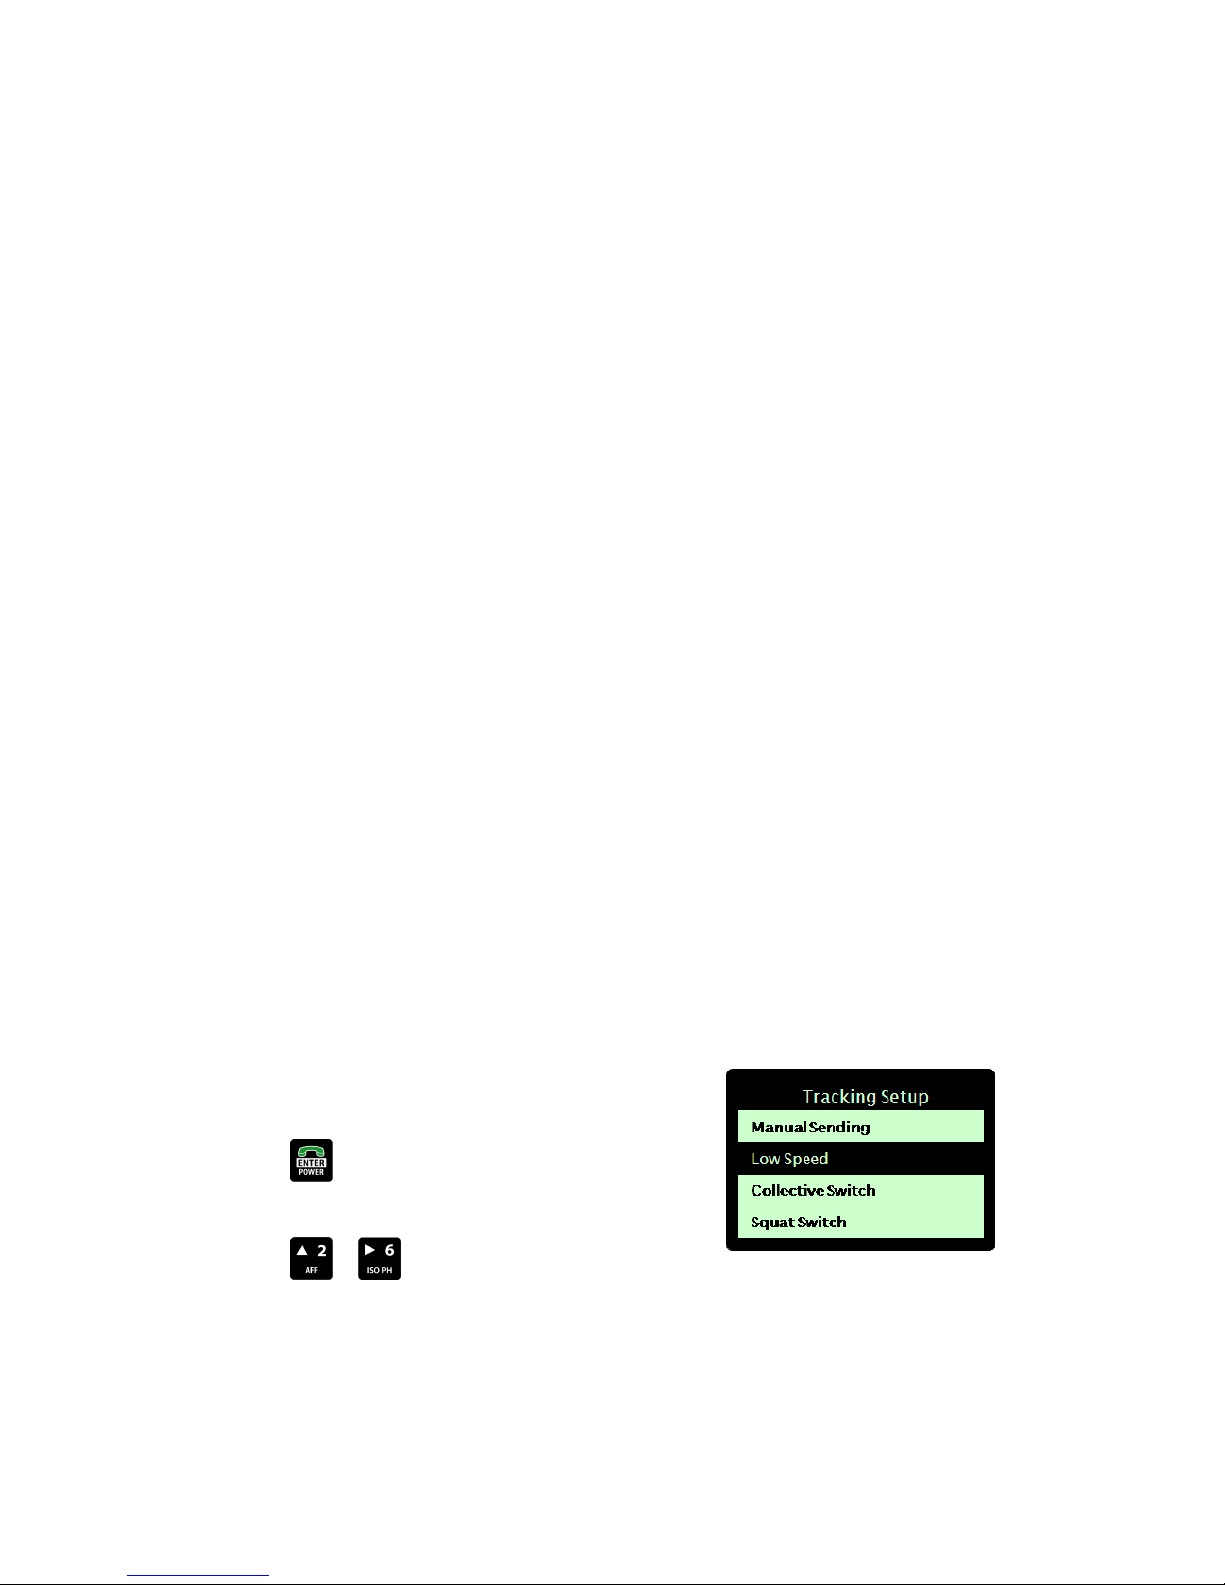
Number of satellites currently visible shows on line three of the display.
Satellites Used displays when you have a GPS lock. The greater number of satellites being used to calculate
your position, the more accurate the position.
Satellites Detected displays when the DZM is attempting to acquire a GPS lock. This defines how many
satellite signals are being received.
Setting automatic GPS transmission based on low speed limit
The DZM uses the 'Low Speed' setting to transmit GPS information on takeoff and landing, providing good start
and end points to flight paths.
When aircraft speed increases above this limit it transmits as a takeoff event message. When aircraft speed
decreases below this limit it transmits as a landing event message.
For helicopters, the 'Low Speed' setting should be set as low as possible to ensure automated GPS transmissions
continue to occur when there are small changes in speed while hovering. Alternatively, use the DZM 'Collective
Switch' function to transmit helicopter takeoff and landing information. Refer to "Setting automatic GPS
transmission based on collective switch position" on page 58 for further information about using the 'Collective
Switch' function.
‘Low Speed’, ‘Collective Switch’ or ‘Squat Switch’ settings, when enabled, are used to detect when an aircraft
is airborne. This ‘in flight’ state is used in conjunction with the GPS Tracking setting. Automated GPS position
reports will either stop or switch to the lower rate of every 20 minutes after the aircraft is considered ‘on the
ground’ and will revert to their configured rate again after the aircraft is considered ‘in flight’.
Manual GPS data will be transmitted regardless of the 'Low Speed' setting and the GPS Tracking setting. This
allows positions to be marked while on the ground or hovering in a helicopter.
Refer to "Configuring GPS tracking" on page 52 for further information about important settings that need to
be configured before GPS data will be transmitted.
Setting the Low Speed Limit:
From the ’Tracking Setup’ sub-menu, use the arrow keys to
navigate to ‘Low Speed’.
Press the ENTER key to select. The 'Low Speed' screen
displays.
Press the or arrow keys to increase the low speed
limit.
| Flightcell® DZM Operating Manual | Firmware v2.00 Page 57 of 88 |
Page 58
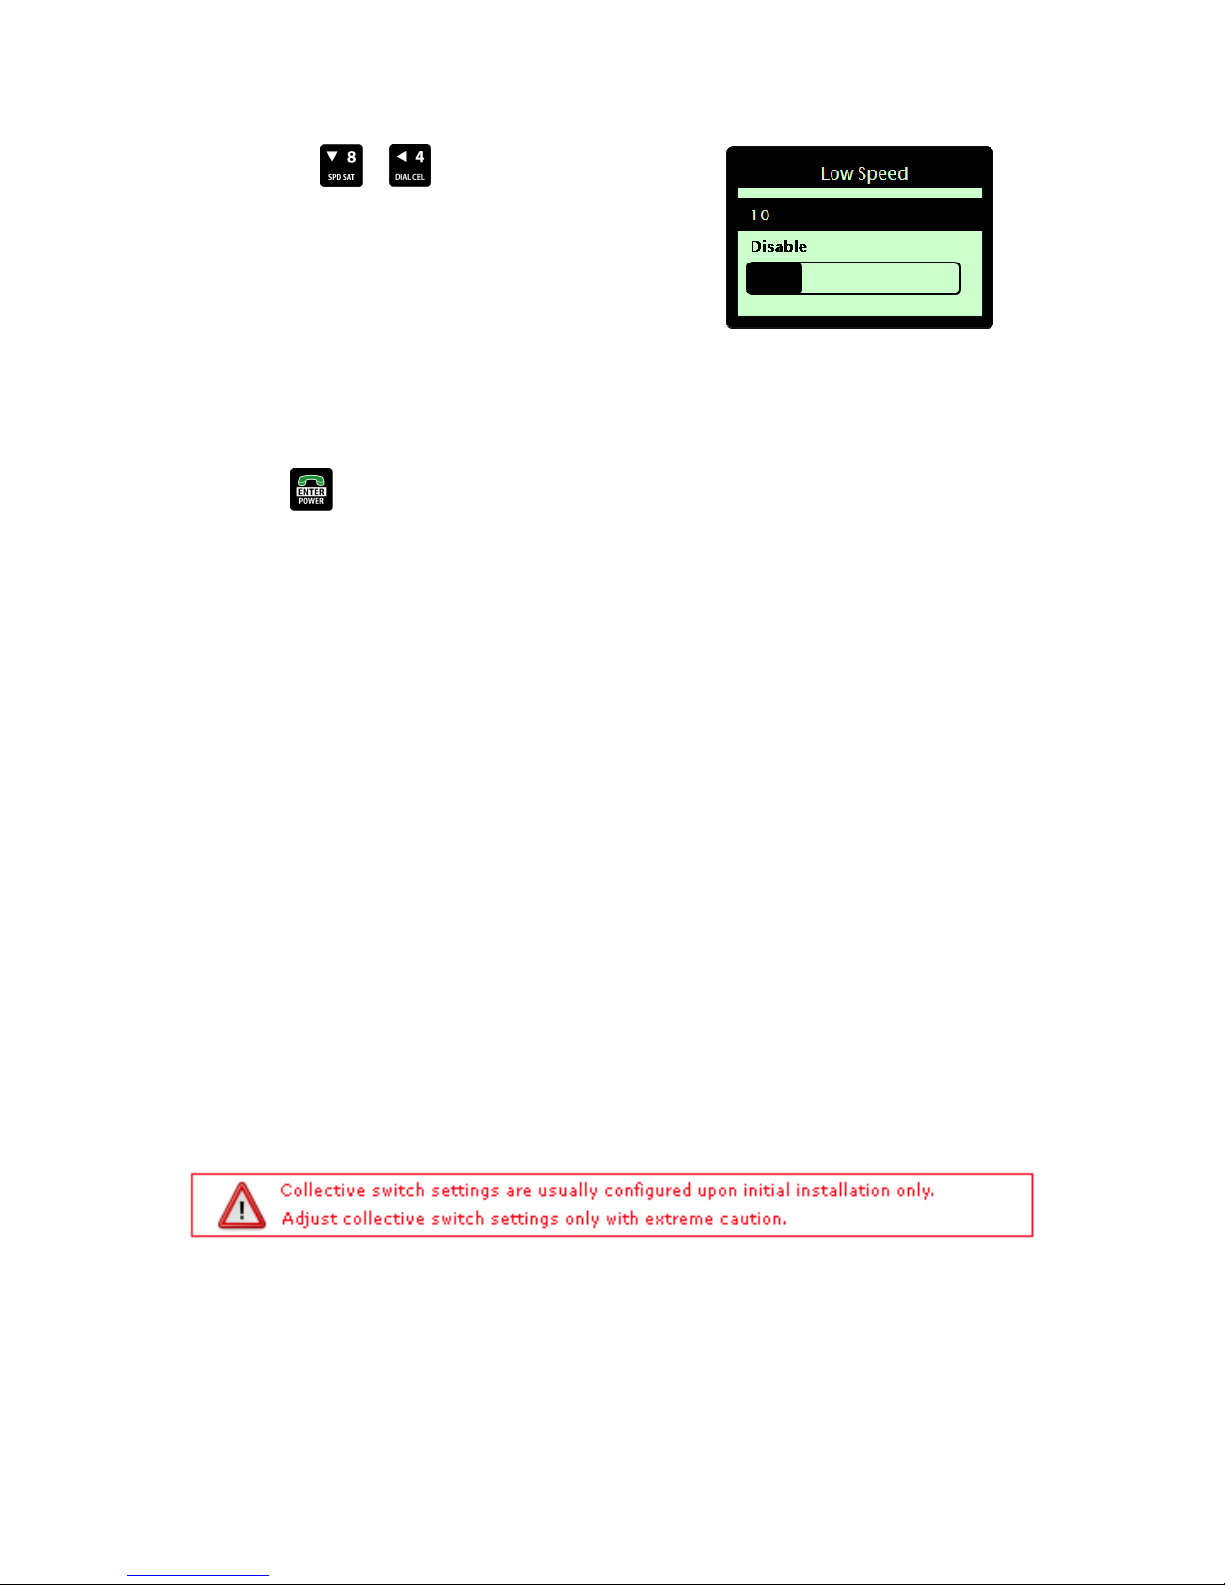
OR press the or arrow keys to decrease the low
speed limit. The 'Low Speed' limit may be set between 5 and 100
knots. The default is 10 knots. To disable, decrease the 'Low
Speed' setting to 0. This will default to 'Disabled'. When disabled,
the DZM will transmit GPS data even when stationary and will not
register takeoff and landings.
If the 'Collective Switch' is used to trigger takeoff and landing
information, the 'Low Speed' setting will be automatically set and
cannot be disabled.
Press the ENTER key to save.
Setting automatic GPS transmission for takeoff and landing based on collective
switch position
The DZM 'Collective Switch' feature is used as an alternative to the 'Low Speed' setting for helicopters. As
helicopters are used for hovering, using just the 'Low Speed' setting, takeoffs and landings may be recorded
when the helicopter is still flying.
With a connection to the helicopter's collective switch, the DZM instead records takeoff and landing events based
on the lifting and lowering of the collective plus the helicopter’s speed.
The DZM's collective switch configuration is set based on the normal status of the switch during flight. For
example, if the collective switch is normally open (when the collective is off the floor) during flight, the DZM will
not transmit GPS positions, or will transmit GPS positions at the lower rate (depending on the GPS Tracking
setting), when the switch is closed (collective on the floor). GPS positions will only be transmitted at their
configured rate when the switch is open and the helicopter deemed to be in flight.
If the 'Collective Switch' is used to record takeoff and landing information, the 'Low Speed' setting will be
automatically set and cannot be disabled. Refer to "Setting automatic GPS transmission based on low speed limit"
on page 57 for further information about using the 'Low Speed' setting.
| Flightcell® DZM Operating Manual | Firmware v2.00 Page 58 of 88 |
Page 59
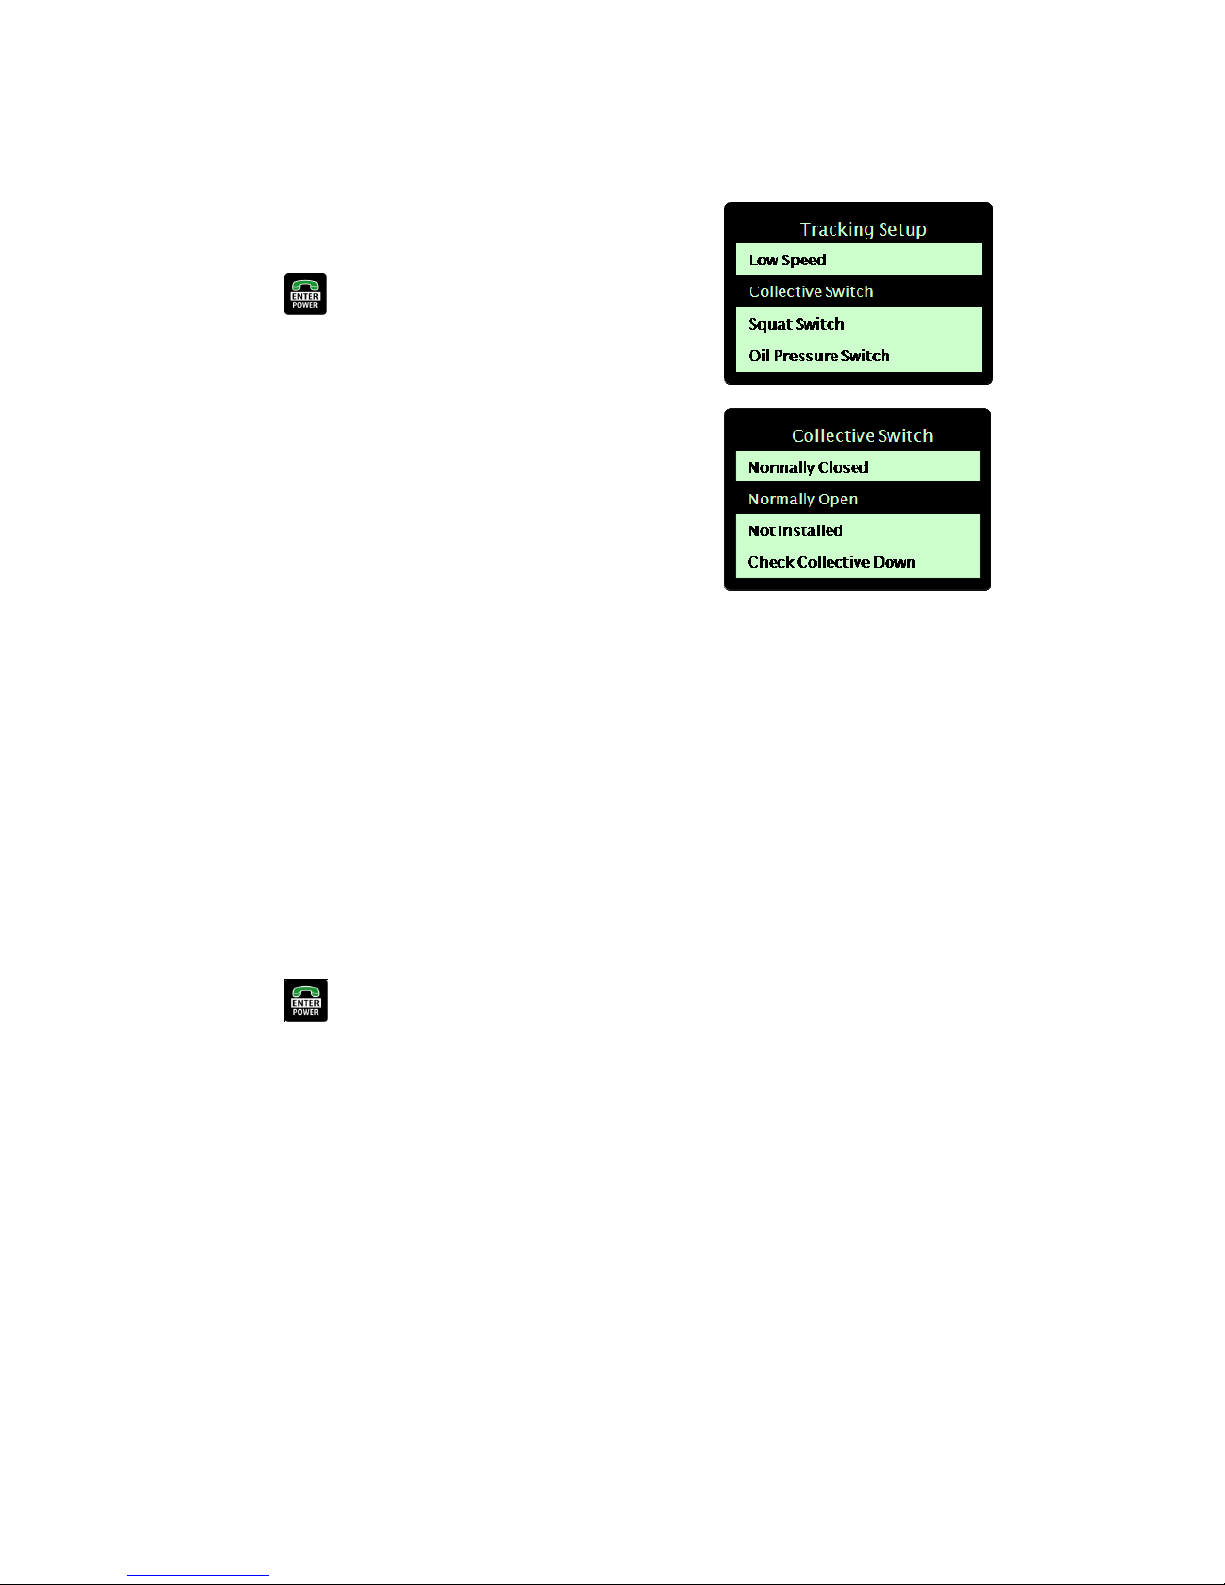
Setting the Collective Switch:
From the ’Tracking Setup’ sub-menu, use the arrow keys to
navigate to ’Collective Switch’.
Press the ENTER key to select. The 'Collective Switch'
screen displays.
Using the arrow keys, navigate to the collective switch mode
required.
Select Normally Closed if the collective switch is closed
when the helicopter is in flight (check that the message
at the bottom of the screen reflects the current position
of the collective, i.e. down for down and up for up).
Select Normally Open if the collective switch is open
when the helicopter is in flight. This is the most common
configuration of a collective switch (check that the
message at the bottom of the screen reflects the current
position of the collective, i.e. down for down and up for
up).
Select Not Installed if the DZM collective switch hardware is
not connected to a collective switch.
The bottom line of the 'Collective Switch' screen enables
you to check that the collective switch mode is configured
correctly - the "Check Collective..." message enables you
to check that the collective switch setting is correct.
Press the ENTER key to save.
Manual GPS data will be transmitted regardless of 'Collective
Switch' settings. This allows positions to be marked while on the
ground or hovering.
| Flightcell® DZM Operating Manual | Firmware v2.00 Page 59 of 88 |
Page 60
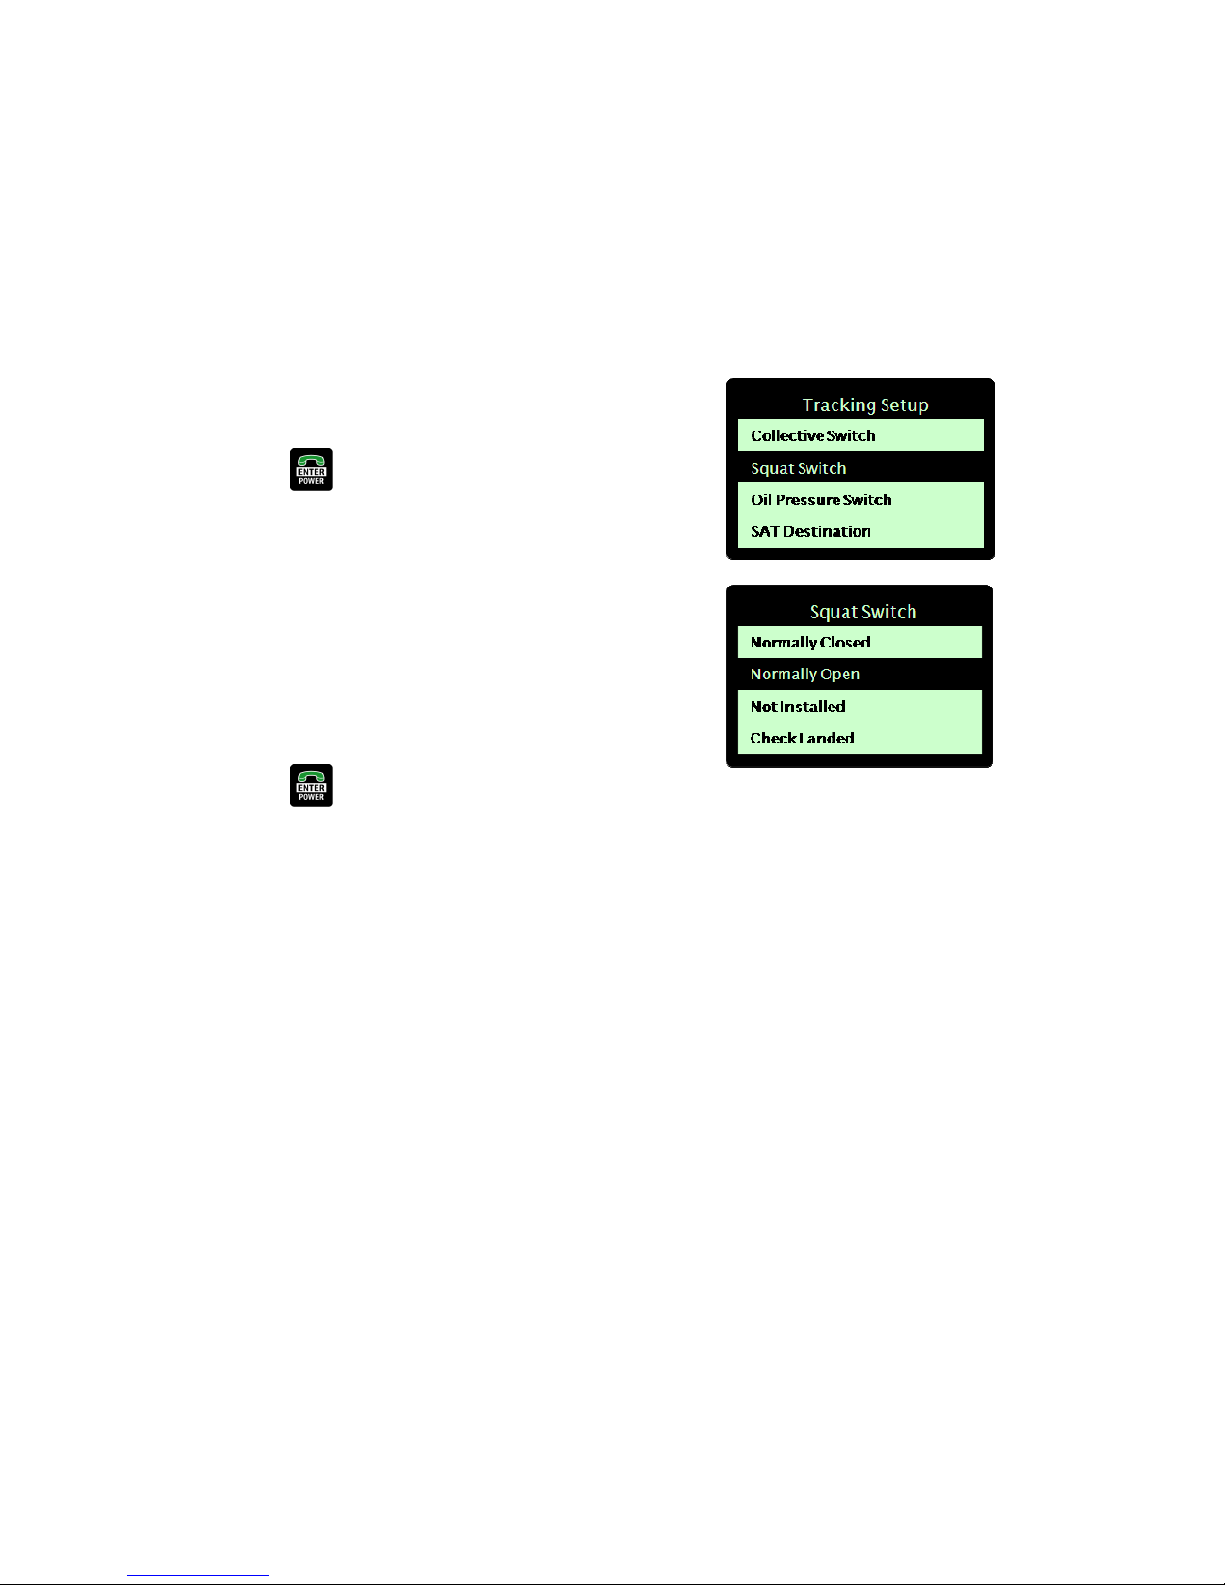
Setting automatic GPS transmission for takeoff and landing based on squat
switch position
The DZM squat switch input is used as an alternative to the collective switch to indicate takeoff and landing of
either a helicopter of fixed wing aircraft. This is also sometimes known as the wheels on ground (WOG) switch.
Setting the squat switch:
From the ’Tracking Setup’ sub-menu, use the arrow keys to
navigate to ‘Squat Switch’.
Press the ENTER key to select. The ‘Squat Switch’ screen
displays.
Using the arrow keys, navigate to the squat switch mode required
(Normally Closed/Normally Open/Not Installed).
This screen should indicate Check LANDED when the aircraft
is on the ground.
This screen should indicate Check AIRBORNE when the
aircraft is in flight.
Press the ENTER key to save.
Configuring oil pressure switch to record aircraft operating time
The DZM oil pressure switch feature may be used to report engine start and engine stop to enable engine
operating time to be calculated (e.g. for the purpose of billing customers for aircraft use) in the following ways:
Upon engine start up oil pressure increases significantly. This increase in oil pressure prompts the DZM to
automatically transmit GPS position data, identifying engine start time.
Upon engine shut down oil pressure decreases significantly. This decrease in oil pressure prompts the DZM
to automatically transmit GPS position data, identifying engine stop time.
If this function is enabled, a position report and timestamp is sent when the engine starts and stops.
Some GPS tracking providers further support this function by providing automated information for billing
purposes. Contact Flightcell® International Ltd should you require further information.
NOTE! In order for this function work correctly, power to the DZM must not be interrupted until after
engine shutdown. Flightcell® International Ltd recommends that the DZM be wired to the emergency bus.
If the Flightcell DZM does not have a GPS fix when the engine is started, transmission of the message will
be delayed until a fix is obtained, but the timestamp in the position report will report the actual engine
start up time.
| Flightcell® DZM Operating Manual | Firmware v2.00 Page 60 of 88 |
Page 61
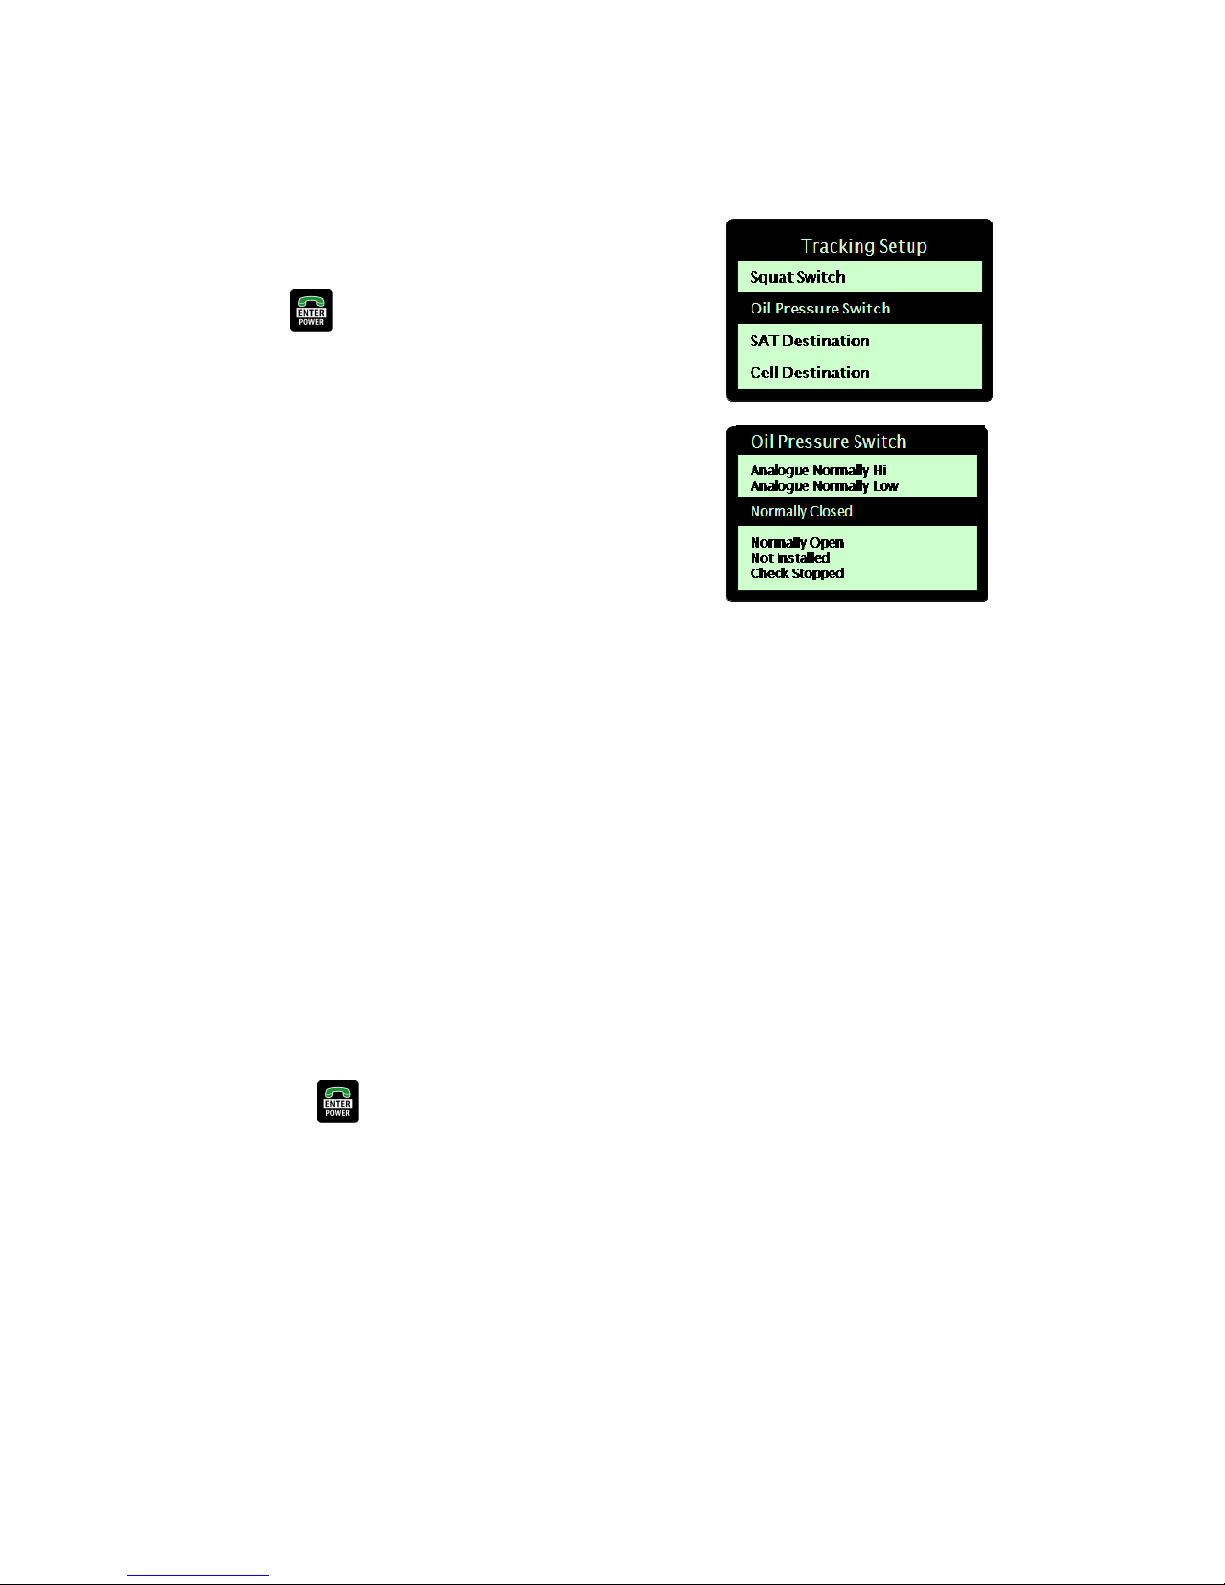
Setting the oil pressure switch:
From the ’Tracking Setup’ sub-menu, use the arrow keys to
navigate to ‘Oil Pressure Switch’.
Press the ENTER key to select. The ‘Oil Pressure Switch’
screen displays.
Using the arrow keys, navigate to the oil pressure switch mode
required.
Select Analogue Normally Hi if the oil pressure sensor is
connected to the DZM’s analogue input, and the analogue
sensor receives a high voltage when the engine is operating
Select Analogue Normally Low if the oil pressure sensor is
connected to the DZM’s analogue input, and the analogue
sensor receives a low voltage when the engine is operating
Select Normally Closed if the oil pressure switch is
connected to one of the DZM’s digital inputs and is closed
when the helicopter is in flight.
Select Normally Open if the oil pressure switch is open when
the helicopter is in flight. This is the most common
configuration of an oil pressure switch.
Select Not Installed if the DZM oil pressure switch hardware
is not connected to the physical switch in the aircraft.
The bottom line of the 'Oil Pressure Switch' screen
enables you to check that the oil pressure switch mode is
configured correctly - the "Check..." message enables you
to check that the setting is correct.
Press the ENTER key to save.
| Flightcell® DZM Operating Manual | Firmware v2.00 Page 61 of 88 |
Page 62
Finding messaging destination addresses
The messaging destination addresses for some commonly known tracking providers are detailed below. If your
tracking service provider is not listed here, contact your provider directly to request the appropriate messaging
destination addresses.
Tracking Provider Cellular Network Satellite Network
SMS Destination SMS Destination SBD Destination
TracPlus New Zealand Telecom:
202.191.51.6:11001
202.191.51.158:11002
Flight Explorer
(using SatCom Direct 3PDI)
- 027 222 1169
Australia:
- +61 427 767958
Configuring satellite messaging destination
The recipient destination for messages sent over the satellite network must be specified. This is critical to the
delivery of tracking, mapping and other data to appropriate parties. Messages are usually sent to a central
ground data server, which follows pre-configured rules to distribute any received data appropriately.
Your Iridium satellite phone can use 2 different transmission modes to send data; Short Burst Data (SBD) and
Short Message System (SMS). Only the recipient destination for SMS messages may be specified from the DZM.
Contact your satellite network service provider to configure the recipient destination for SBD messages.
| Flightcell® DZM Operating Manual | Firmware v2.00 Page 62 of 88 |
Page 63
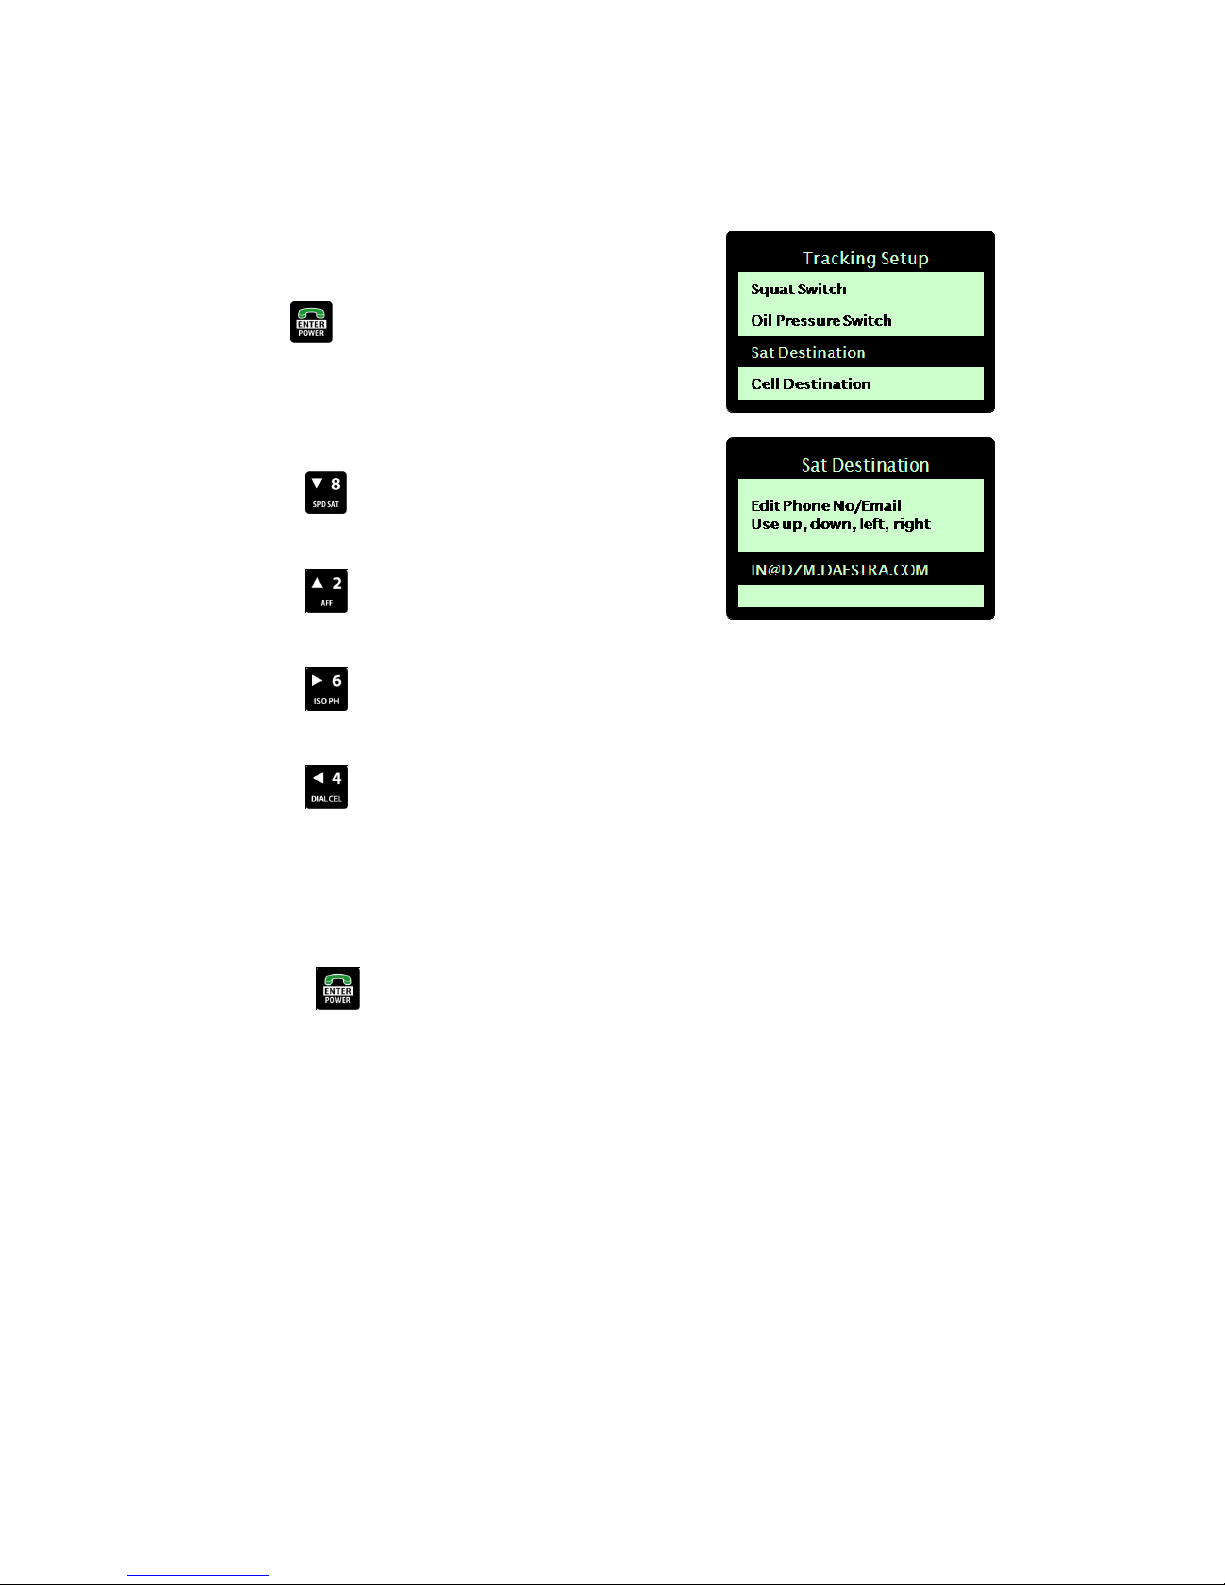
Configuring satellite phone messaging destination (SMS only):
From the ’Tracking Setup’ sub-menu, use the arrow keys to
navigate to ‘Sat Destination'.
Press the ENTER key to select. The 'Sat Destination' screen
displays.
Use the arrow keys to enter the destination email address or
phone number:
Use the arrow key to scroll up letters, numbers and
other characters in ascending order.
Use the arrow key to scroll down letters, numbers and
other characters in descending order.
Use the arrow key to accept the last character and
begin entering the next character.
Use the arrow key to delete the last character when
required.
The maximum length of a destination email address is 21
characters. Email addresses are not case sensitive so may be
entered using uppercase letters.
Press the ENTER key to save.
The satellite messaging destination can also be set using the DZM firmware upload utility. Refer to "APPENDIX
A: Upgrading DZM firmware" on page 80 for further information about this utility.
| Flightcell® DZM Operating Manual | Firmware v2.00 Page 63 of 88 |
Page 64
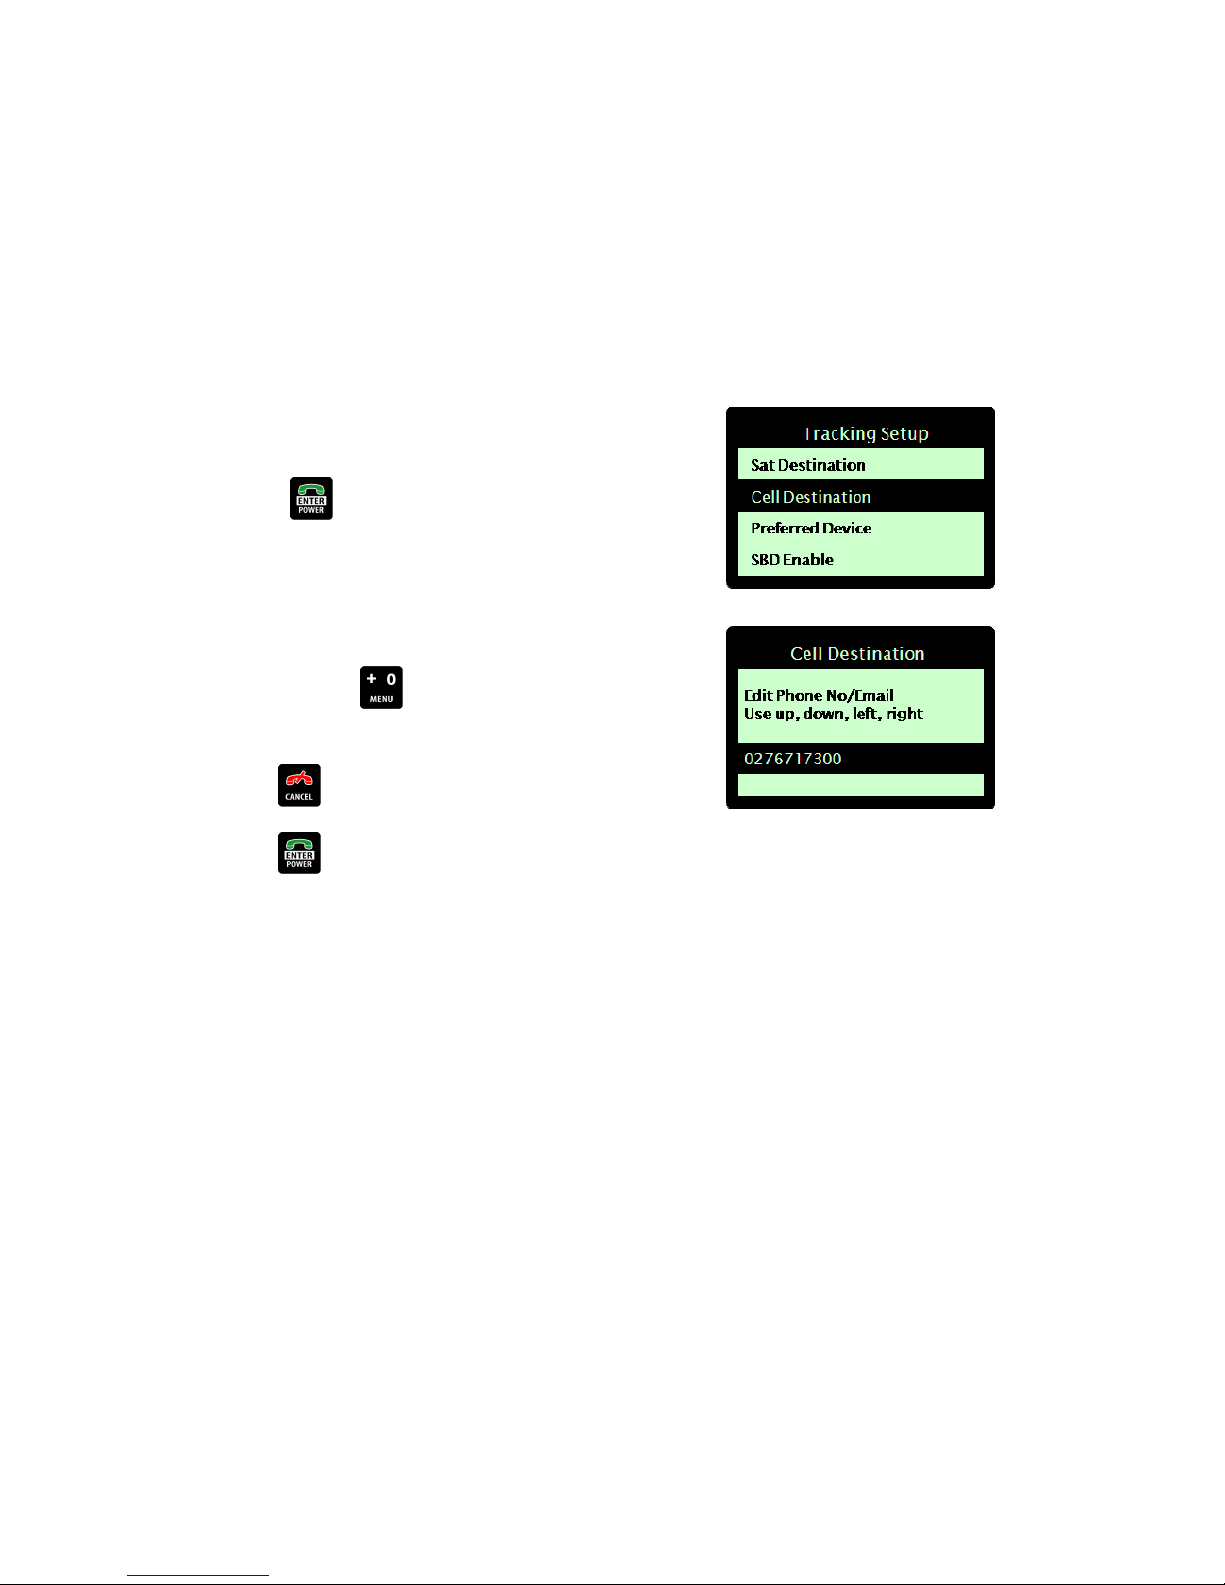
Configuring cellular messaging destination
The recipient destination for messages sent over the cellular network must be specified. This is critical to the
delivery of tracking, mapping and other data to appropriate parties. Messages are usually sent to a central
ground data server, which follows pre-configured rules to distribute any received data appropriately.
The DZM currently supports WaveCom GSM, Wavecom 3G and MultiTech CDMA cell modems.
Configuring cellular messaging destination:
From the ’Tracking Setup’ sub-menu, use the arrow keys to
navigate to ’Cell Destination’.
Press the ENTER key to select. The 'Cell Destination' screen
displays.
Use the number keys to enter the destination phone number.
Press and hold the 0 key to enter the international dialing
prefix +
Use the Cancel key to backspace one digit
Use the Enter key to confirm the number entered.
The cellular messaging destination can also be set using the DZM firmware upload utility. Refer to "APPENDIX
A: Upgrading DZM firmware" on page 80 for further information about this utility.
| Flightcell® DZM Operating Manual | Firmware v2.00 Page 64 of 88 |
Page 65
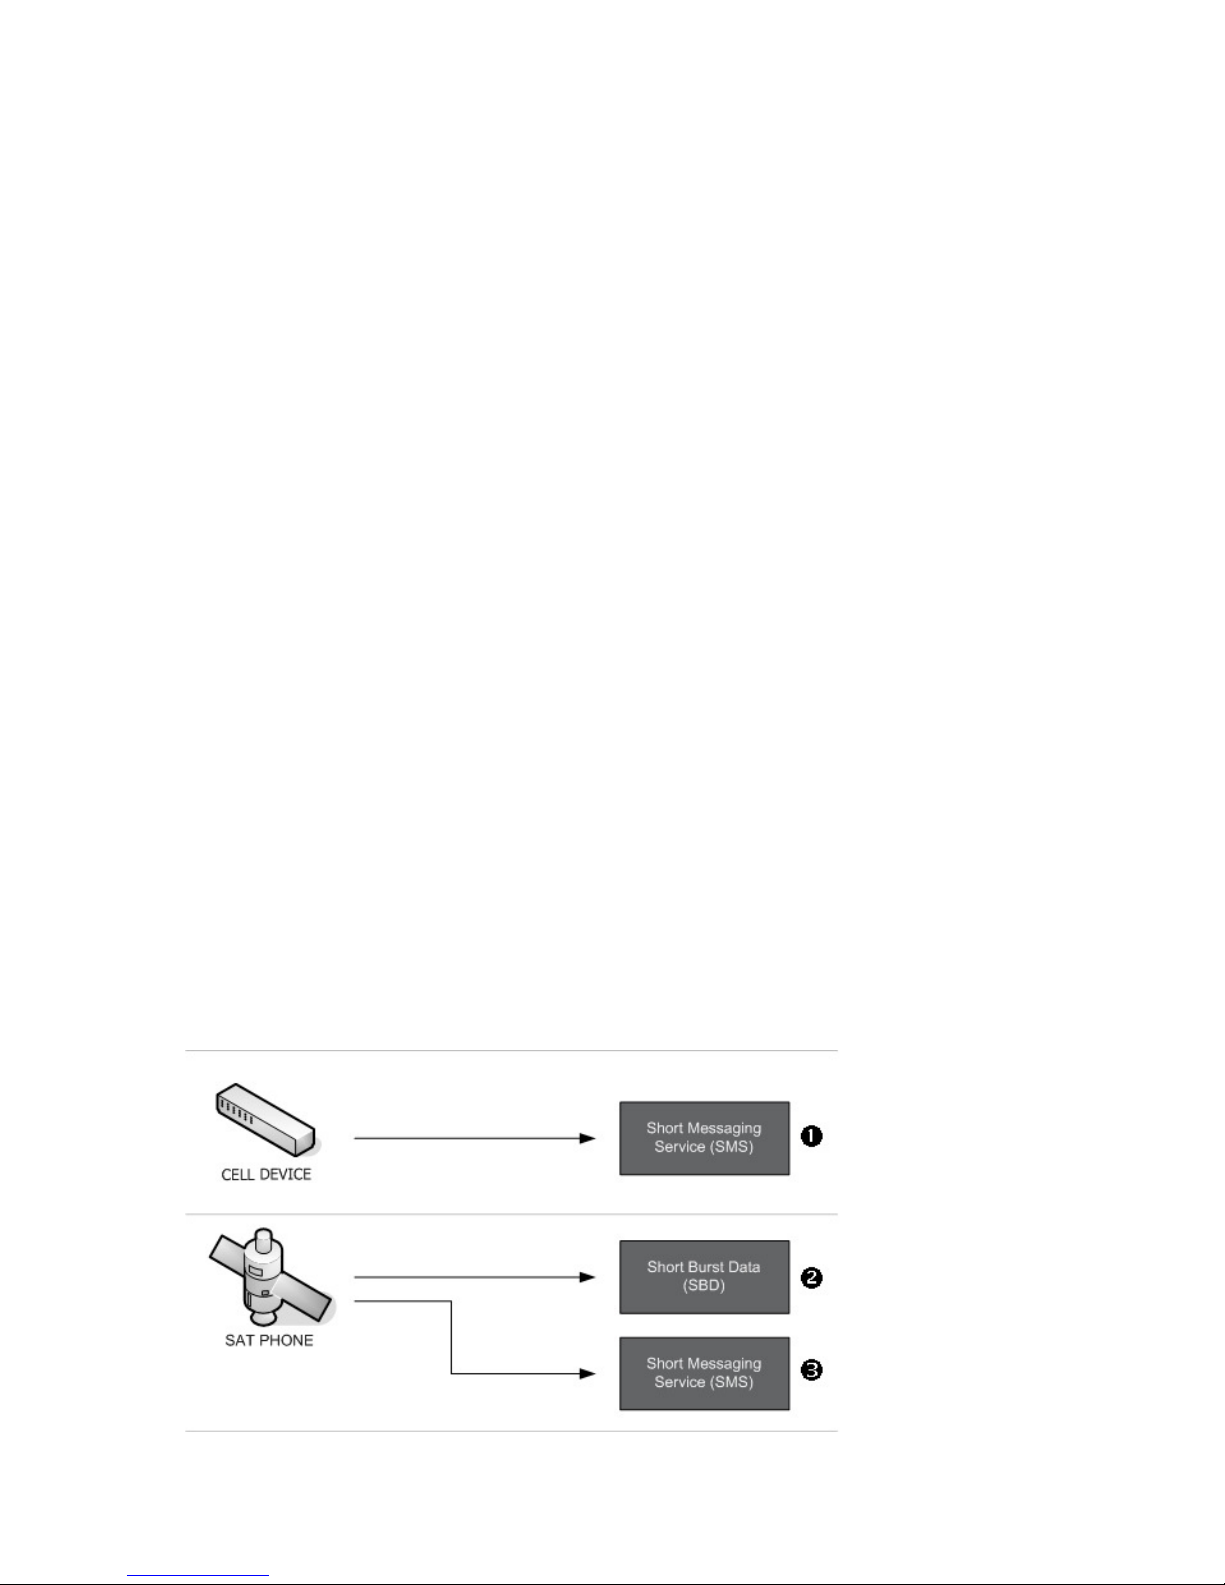
Configuring position report transmission options
The DZM can transmit GPS positions using three different options:
SMS over the cellular network
SMS or SBD over the Iridium satellite network.
NOTE! Messaging via the cellular network is currently only supported by TracPlus Global in New Zealand and
Australia. In other countries or with other tracking providers, position reports may only be sent via the Iridium
satellite network.
The cost of messaging differs between these three options:
If messaging via the cellular network is available, this is usually the cheapest option.
When using the Iridium network, SBD is the default mode as it is usually faster and more economic than SMS.
However, if you are only flying a small number of hours, SMS may be more economic.
Your tracking service provider will be able to recommend the most economic option based on your operation.
The DZM is designed to switch between these three options depending on network availability, as shown in the
following drawing, and on the preferences programmed into the DZM.
If the DZM has a cell modem connected, and Cell Phone is selected as the preferred device (see page 66),
and the cell modem has a network lock, then the DZM will first attempt to transmit via cellular SMS
If a message can’t be transmitted via the cellular network, the DZM will send the message via Iridium
If the Iridium SBD service is enabled on the DZM (see page 66), the DZM will first attempt to send the
message via SBD
If the message can’t be sent via SBD (because the Iridium phone is being used for a voice call), the DZM will
send the message via Iridium SMS (messages reports can be sent via SMS even when the phone is in use for
a voice call).
| Flightcell® DZM Operating Manual | Firmware v2.00 Page 65 of 88 |
Page 66
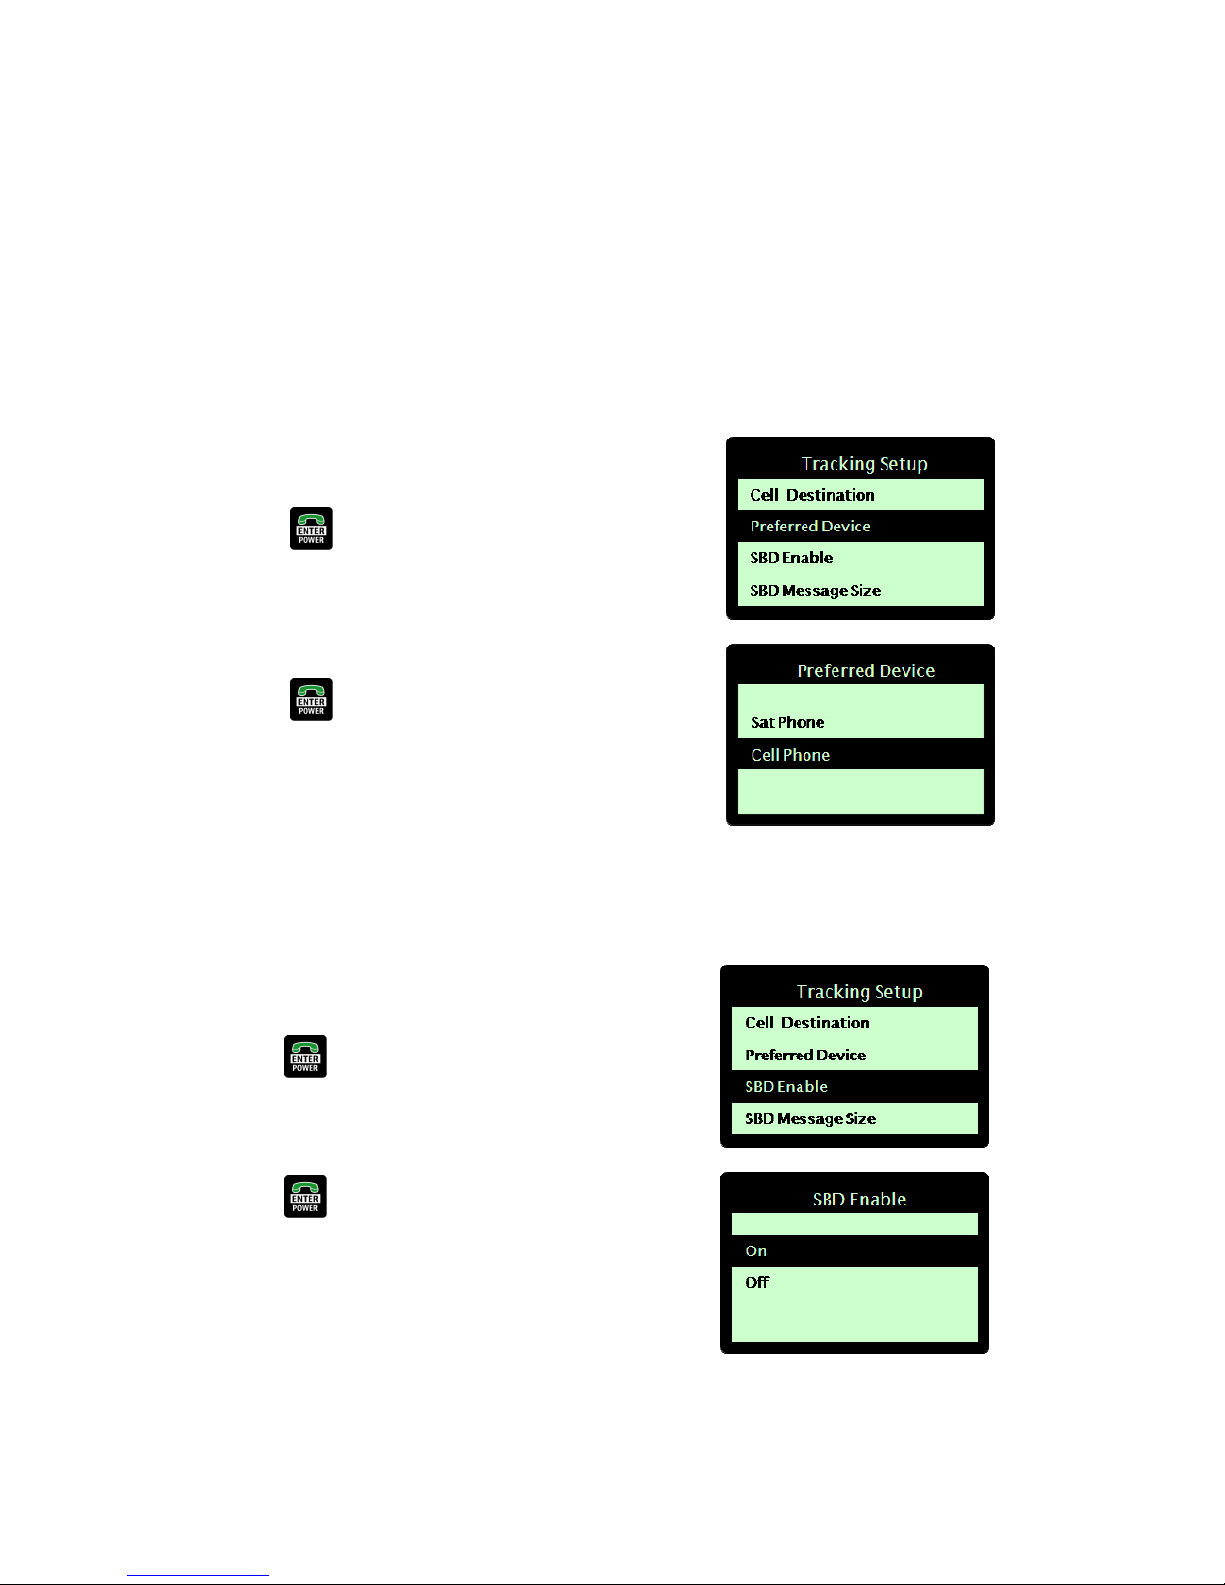
Setting preferred messaging device
If you have a cellular modem installed and your tracking service provider can support data sent via the cellular
network, set the cell modem as the preferred device. Setting the preferred device to Cell Phone will instruct the
DZM to use the cell modem in preference for sending position reports, but it will also use the sat device when
there is low or no cell signal. If the preferred device is set to Sat Phone, the DZM will only ever use the Sat
phone and will never use the cell modem to send a position report.
Specifying the preferred messaging device:
From the ’Tracking Setup’ sub-menu, use the arrow keys to
navigate to 'Preferred Device'.
Press the ENTER key to select. The 'Preferred Device'
screen displays.
Using the arrow keys, navigate to the preferred device required
(e.g. 'Cell modem').
Press the ENTER key to save. You are returned to the
'Setup Menu'.
Enabling Iridium SBD transmission
Setting up transmission via the satellite network:
From the ’Tracking Setup’ sub-menu, use the arrow keys to
navigate to 'SBD Enable'.
Press the ENTER key to select. The 'SBD Enable' screen
displays.
Using the arrow keys, navigate to the mode required (e.g. 'On').
Press the ENTER key to save.
If SBD transmission is disabled, all position data sent via your
satellite phone will be transmitted by SMS.
| Flightcell® DZM Operating Manual | Firmware v2.00 Page 66 of 88 |
Page 67
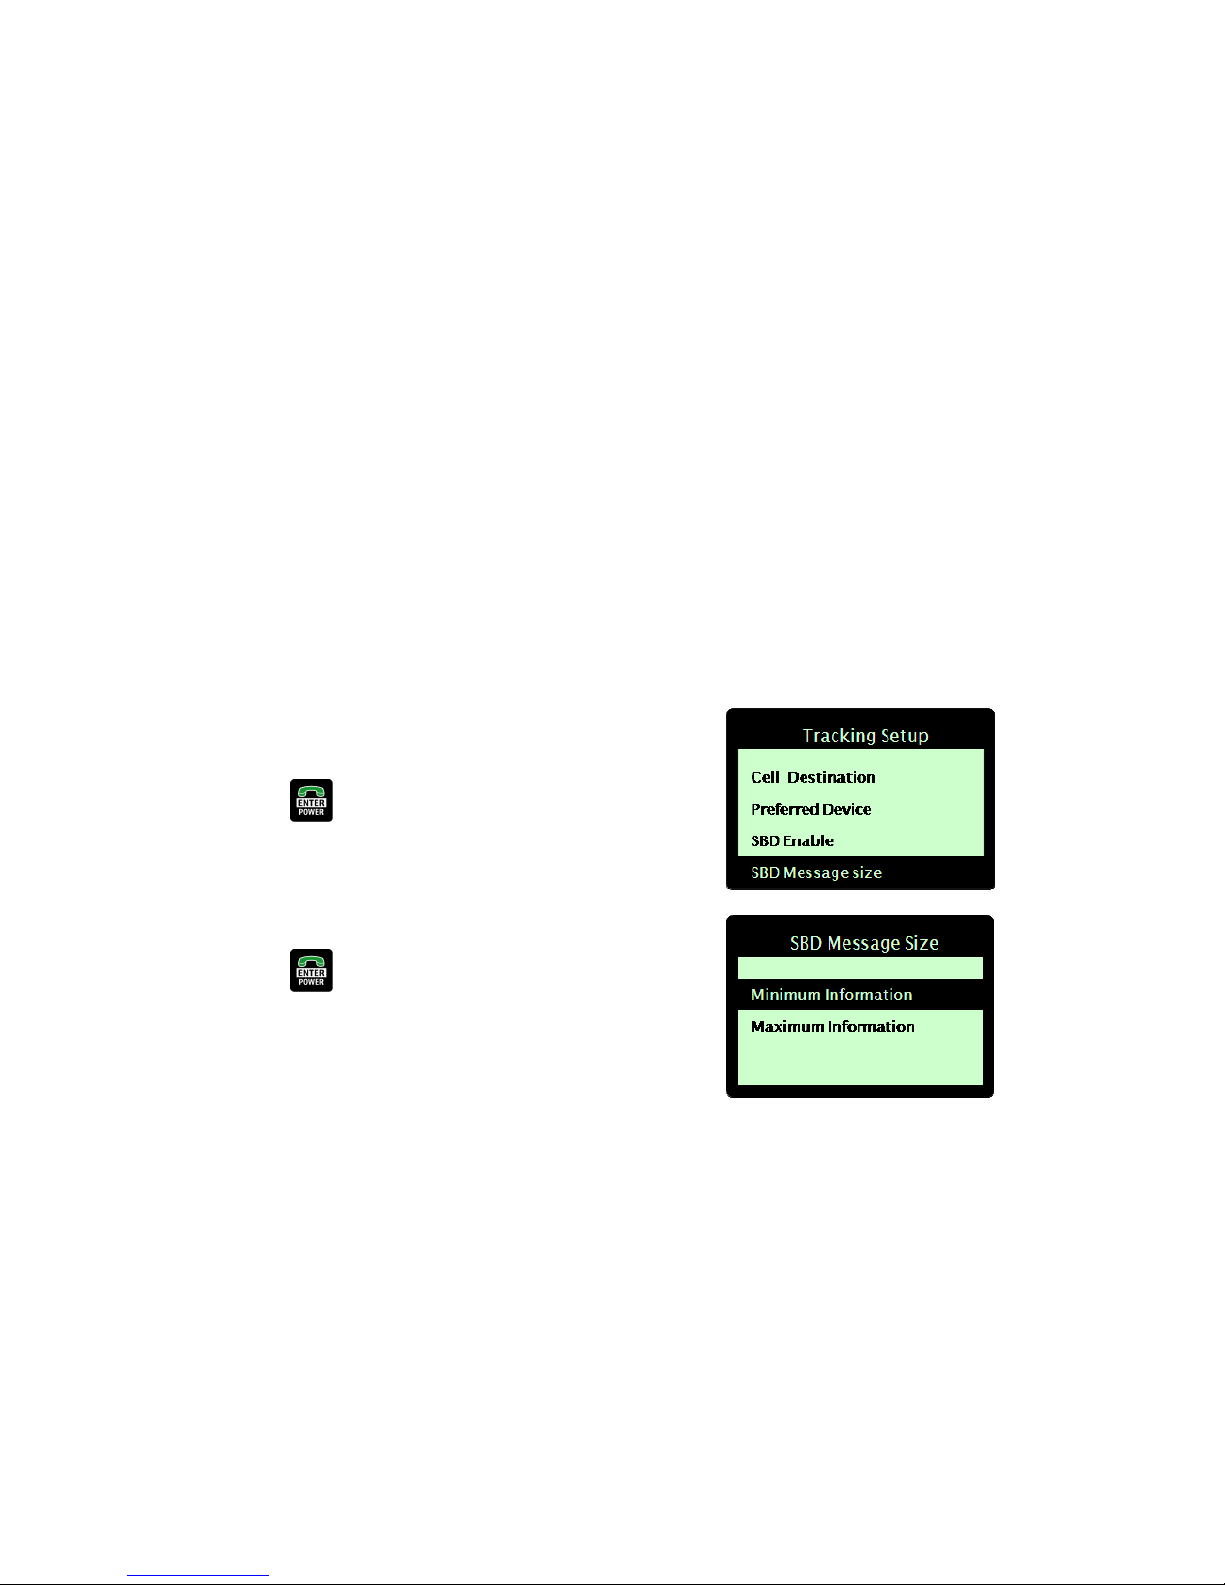
Setting satellite message size
When transmitting GPS positions over the satellite network using Short Burst Data (SBD) mode, you may define
the level of detail included within each message.
The DZM sends full position reports at programmed intervals. Between each position report it also records
intermediate positions (known as breadcrumbs or True Path) that provide additional course information.
Breadcrumbs are transmitted with the next position report.
SBD message size options:
The following SBD message size options are available:
Minimum Information – The current GPS position plus the previous 2 breadcrumbs will be transmitted.
Maximum Information – The current GPS position plus the previous 3 breadcrumbs will be transmitted.
By selecting 'Minimum Information' you should only be charged for the 30 byte minimum message charge by
your satellite network provider. By selecting 'Maximum Information', each message will be approximately 32
bytes so will cost around 10% more to transmit.
Specifying SBD message size:
From the ’Tracking Setup’ sub-menu, use the arrow keys to
navigate to ’SBD Message Size’.
Press the ENTER key to select. The 'SBD Message Size'
screen displays.
Using the arrow keys, navigate to the mode required (e.g.
'Minimum Information').
Press the ENTER key to save
Sending GPS location upon power up
When Power up messaging is switched on, the DZM will send the current GPS location of the aircraft as soon as it
powers up and the unit has a GPS lock. If power up messaging is switched off, GPS transmissions will not begin
until aircraft takeoff.
| Flightcell® DZM Operating Manual | Firmware v2.00 Page 67 of 88 |
Page 68
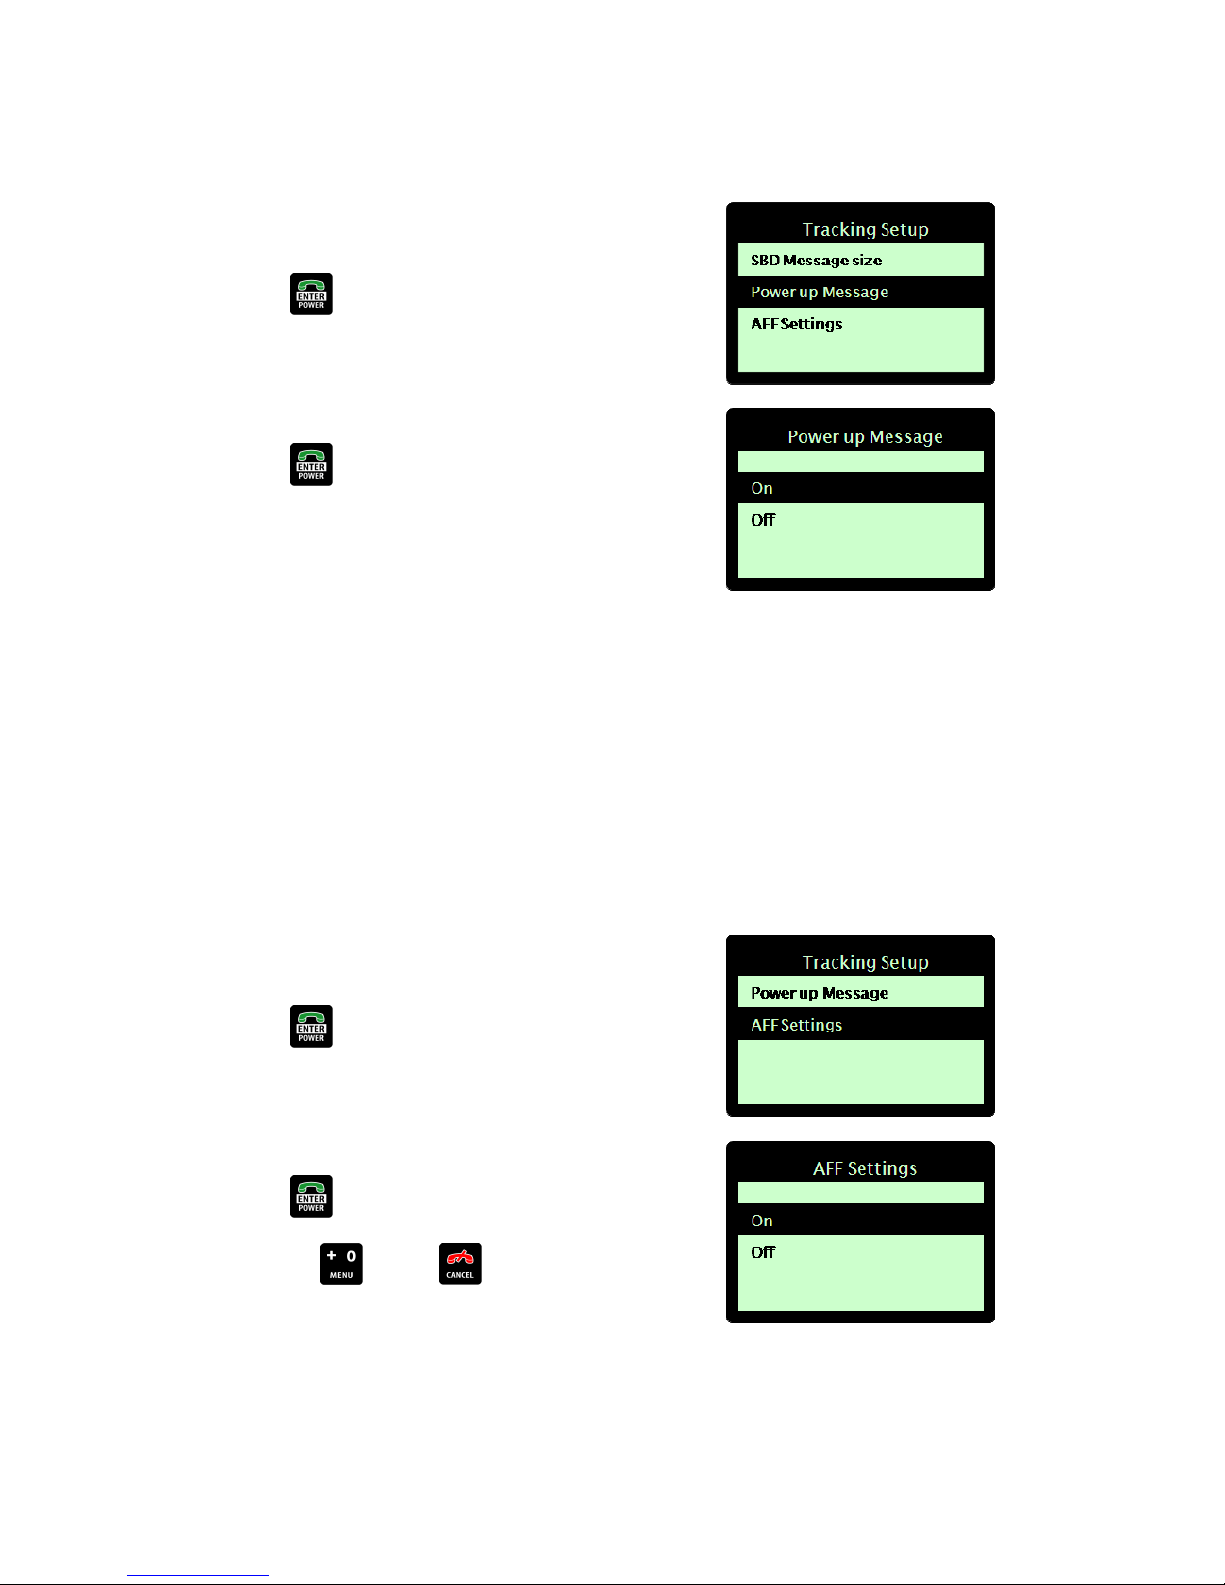
Switching power up messaging on or off:
From the ’Tracking Setup’ sub-menu, use the arrow keys to
navigate to ’Power up Message’.
Press the ENTER key to select. The Power up Message’
screen displays.
Using the arrow keys, navigate to the power up mode required
(e.g. ‘On’).
Press the ENTER key to save.
Enabling and disabling automated flight following (AFF)
You may define whether or not the automated flight following (AFF) function may be used on the aircraft or
vehicle. By default the AFF function is disabled.
NOTE! To use AFF, the keypad type in use on your DZM must be specified as civilian and must have AFF
displayed on key 2. Refer to "Specifying keypad type" on page 77 for further information about keypad
selection.
Enabling and disabling AFF use:
From the ’Tracking Setup’ sub-menu, use the arrow keys to
navigate to ’AFF Settings’.
Press the ENTER key to select. The 'AFF Settings' screen
displays.
Using the arrow keys, navigate to the AFF setting required (e.g.
'On').
Press the ENTER key to save
OR press the MENU or CANCEL keys to abort the
change.
| Flightcell® DZM Operating Manual | Firmware v2.00 Page 68 of 88 |
Page 69
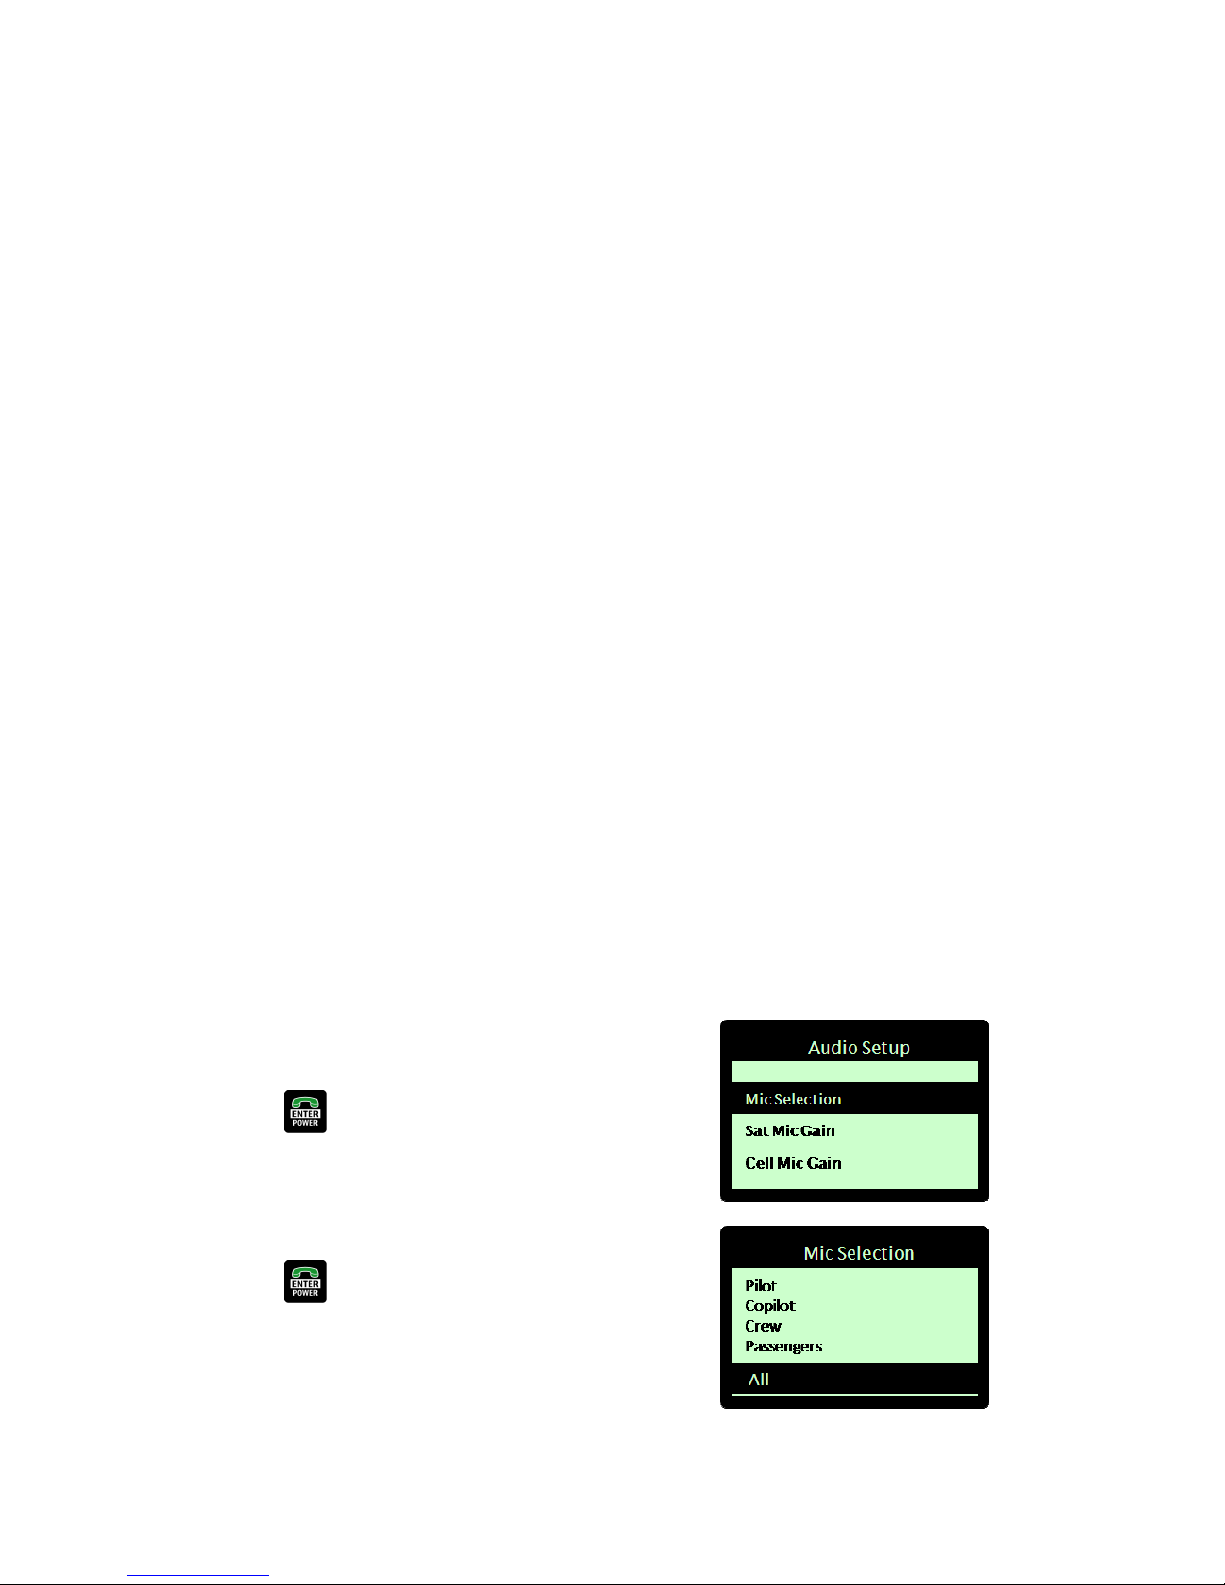
Configuring advanced audio settings
Various advanced audio settings may be adjusted for the DZM and connected devices. These are described in the
following sub-sections.
Refer to "Controlling audio settings" on page 40 for further information about controlling basic audio settings
during flight.
All advanced audio settings are configured from the ‘Audio Setup’ sub-menu. Navigate to the ‘Audio Setup’ sub-
menu following the steps on page 54.
Controlling which microphones connect to the Flightcell® DZM
If the DZM Microphone Controller is installed, the DZM can control which microphones within the aircraft or
vehicle intercom/interphone system (ICS) are mixed together. Each microphone selection mode specifies who
from within the aircraft or vehicle can be heard by the party at the other end of a phone or radio link.
The DZM Microphone Controller is a separate auxiliary device that may be installed with the DZM. Contact
Flightcell® International for further information about the DZM Microphone Controller.
Microphone selection settings do not alter who hears the incoming audio from the DZM. This is normally
controlled from the ICS.
Technical setup notes:
When using the DZM Microphone Controller, the DZM sends a command to the Microphone Controller instructing
which ICS microphone lines provide audio to the DZM.
Altering microphone selection settings
DZM microphone audio output settings are configured using the 'Mic Selection' screen.
Altering the Mic Selection settings:
From the ’Audio Setup’ sub-menu, use the arrow keys to navigate
to ‘Mic Selection’.
Press the ENTER key to select. The ‘Mic Selection’ screen
displays.
Using the arrow keys, navigate to the mic selection mode
required (e.g. 'All').
Press the ENTER key to select and save.
| Flightcell® DZM Operating Manual | Firmware v2.00 Page 69 of 88 |
Page 70
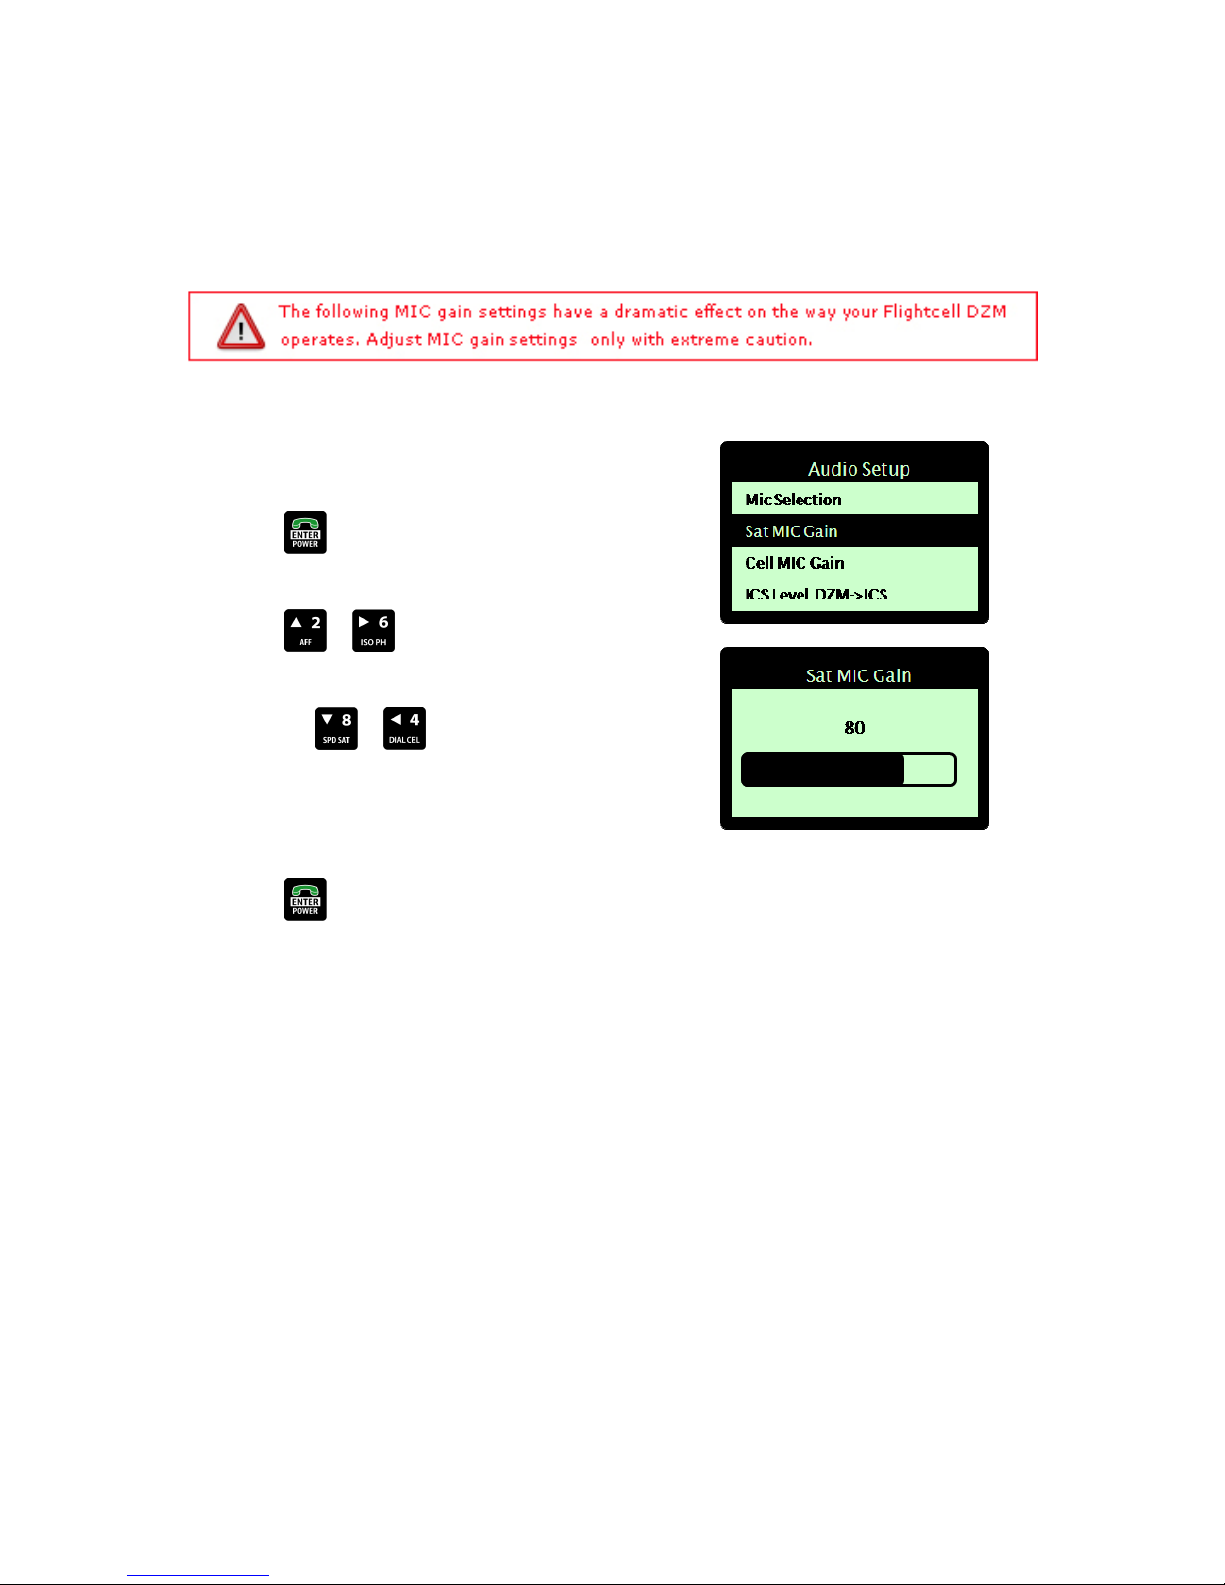
Setting satellite phone MIC gain
Satellite phone MIC gain is audio from the DZM going out to the connected satellite phone. The satellite phone
MIC gain may be adjusted on the DZM.
Altering the satellite phone MIC gain on the DZM:
From the ’Audio Setup’ sub-menu, use the arrow keys to navigate
to 'Sat MIC Gain'.
Press the ENTER key to select. The 'Sat MIC Gain' screen
displays.
Press the or arrow keys to increase the sat phone
MIC gain.
OR press the or arrow keys to decrease the sat
phone MIC gain.
0 is the lowest volume. 100 is the highest volume. 80 is the
default volume.
Press the ENTER key to save.
| Flightcell® DZM Operating Manual | Firmware v2.00 Page 70 of 88 |
Page 71
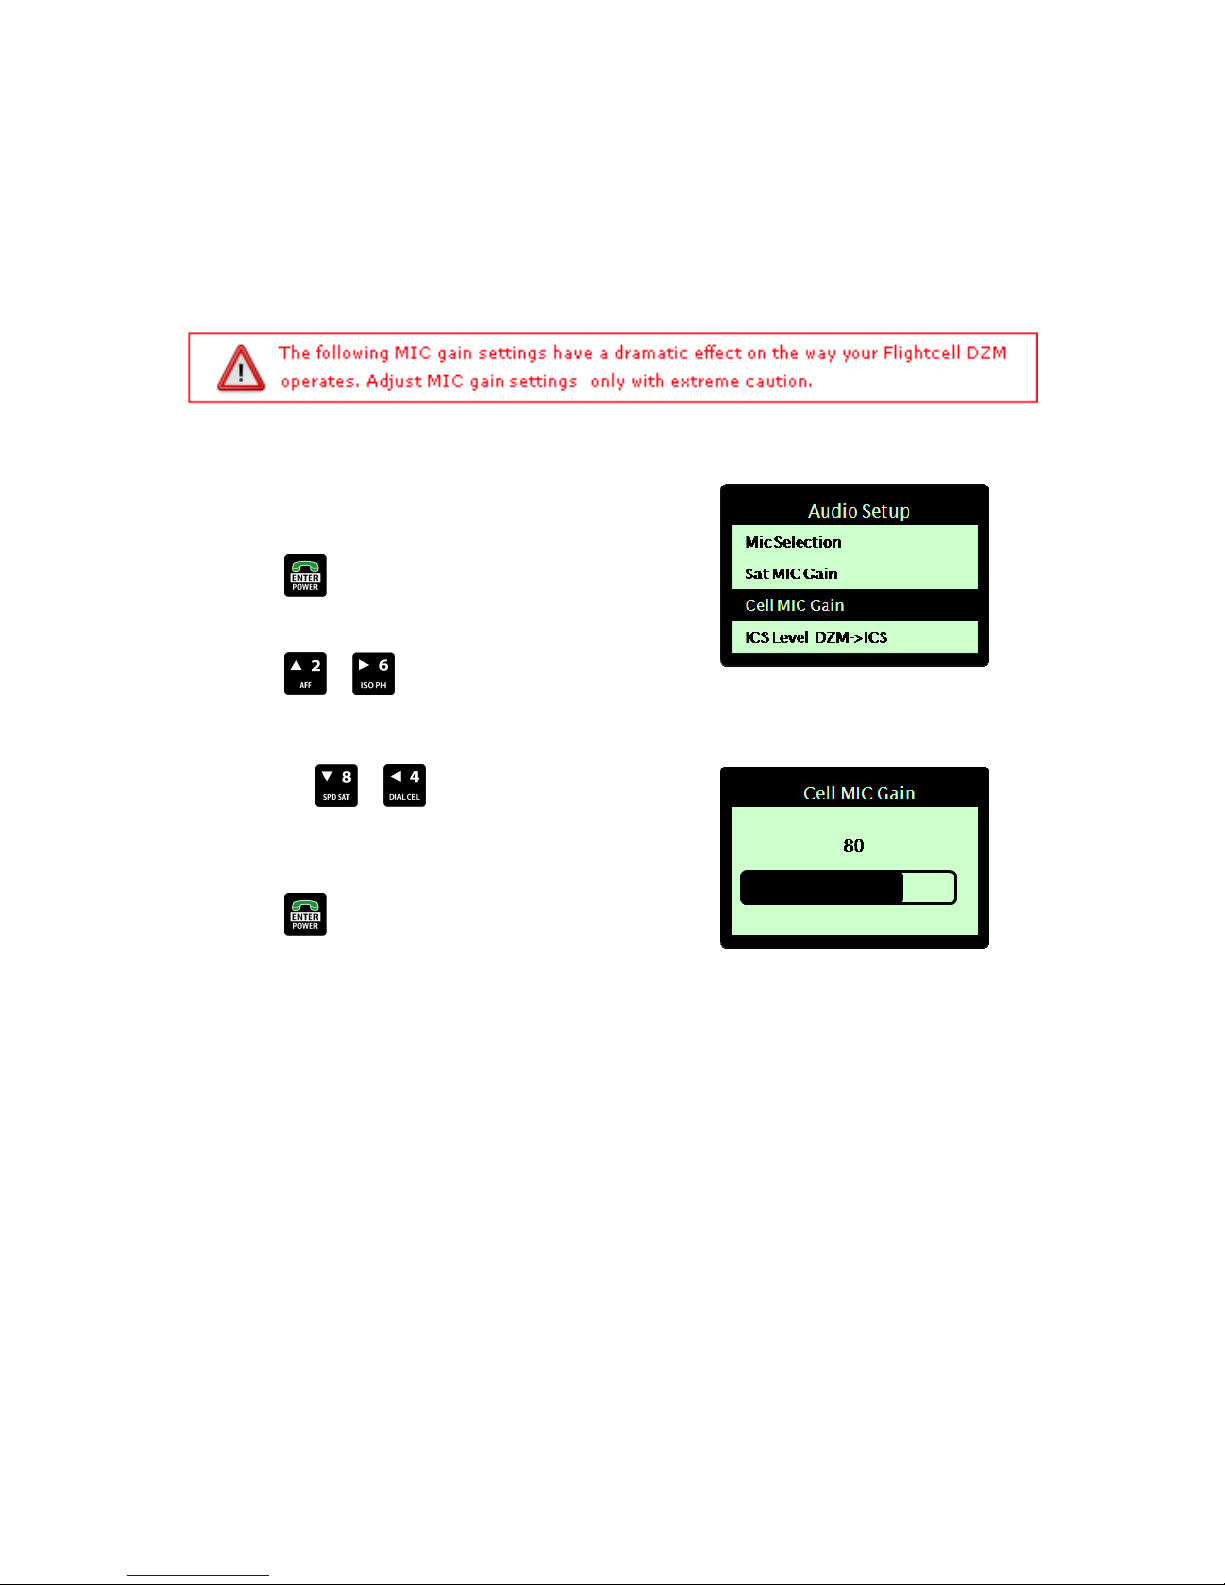
Setting cell modem MIC gain
Cellular MIC gain is audio from the DZM going out to the connected cell modem. The cell modem MIC gain may
be adjusted on the DZM.
Altering the cell modem MIC gain on the DZM:
From the ’Audio Setup’ sub-menu, use the arrow keys to navigate
to 'Cell MIC Gain'.
Press the ENTER key to select. The 'Cell MIC Gain' screen
displays.
Press the or arrow keys to increase the cell modem
MIC gain.
OR press the or arrow keys to decrease the cell
modem MIC gain. 0 is the lowest volume. 100 is the highest
volume. 80 is the default volume.
Press the ENTER key to save.
| Flightcell® DZM Operating Manual | Firmware v2.00 Page 71 of 88 |
Page 72
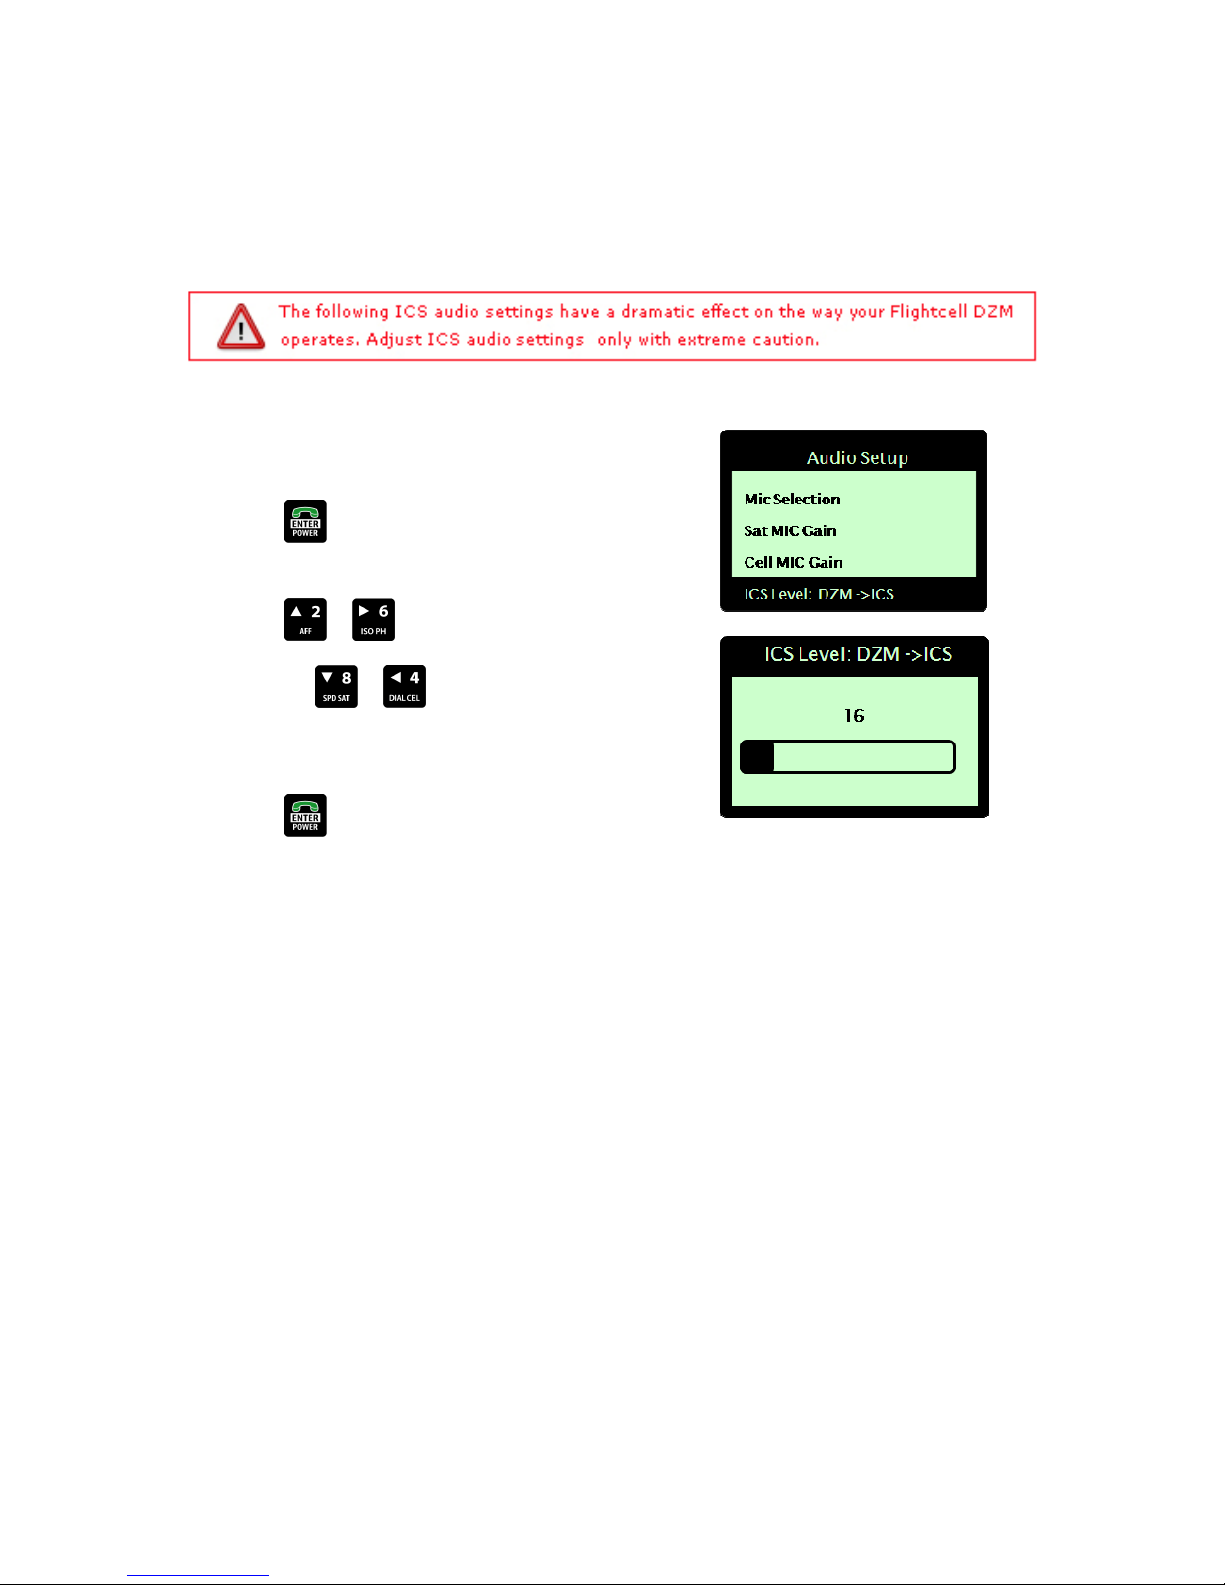
Setting DZM to ICS audio level
The audio level from the DZM being received into the intercom/interphone system (ICS) may be adjusted on the
DZM.
Altering the DZM to ICS audio level on the DZM:
From the ’Audio Setup’ sub-menu, use the arrow keys to navigate
to 'ICS Level DZM --> ICS'.
Press the ENTER key to select. The 'ICS Level DZM --> ICS'
screen displays.
Press the or arrow keys to increase the audio level.
OR press the or arrow keys to decrease the audio
level. 0 is the lowest volume. 100 is the highest volume. 16 is the
default volume.
Press the ENTER key to save.
| Flightcell® DZM Operating Manual | Firmware v2.00 Page 72 of 88 |
Page 73
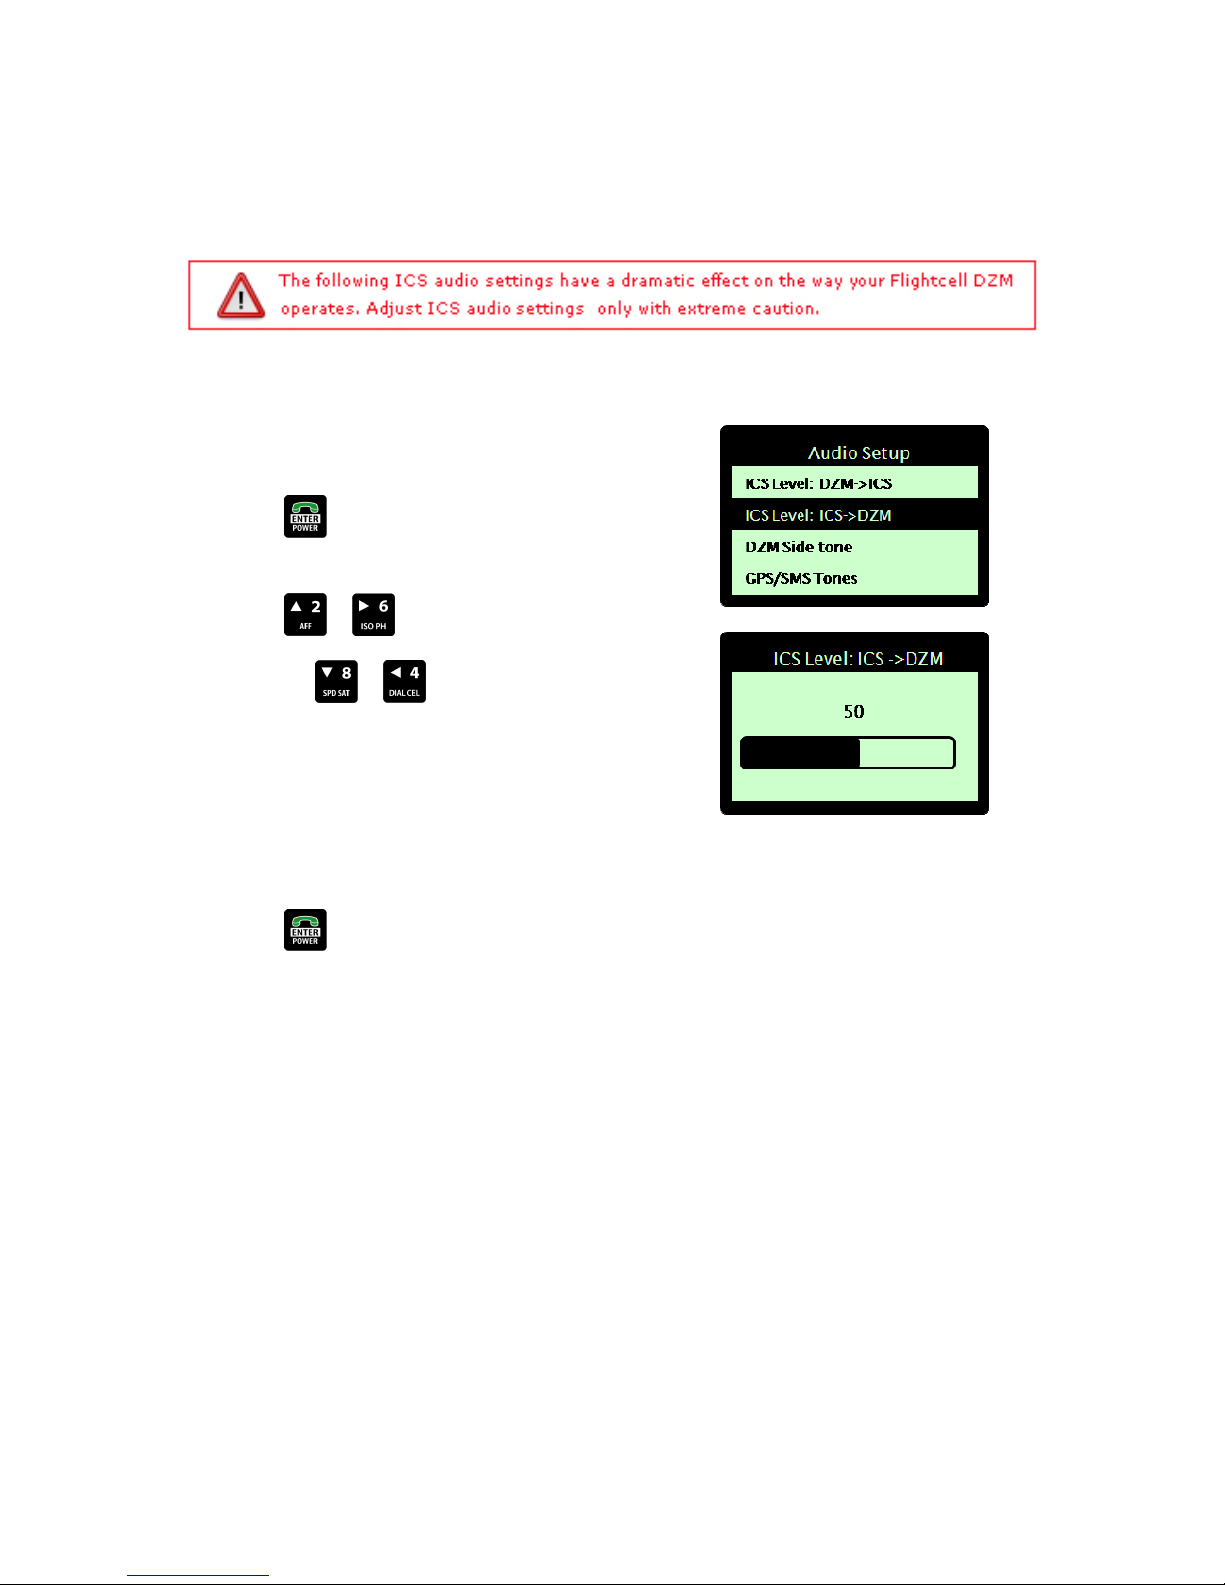
Setting ICS to DZM audio level
The audio level from the intercom/interphone system (ICS) going out to the DZM may be adjusted on the DZM.
Altering the ICS to DZM audio level on the DZM:
From the ’Audio Setup’ sub-menu, use the arrow keys to navigate
to 'ICS Level ICS --> DZM'.
Press the ENTER key to select. The 'ICS Level ICS --> DZM'
screen displays.
Press the or arrow keys to increase the audio level.
OR press the or arrow keys to decrease the audio
level. 0 is the lowest volume. 100 is the highest volume. 50 is the
default volume.
This value should never be set to 0. Setting to 0 prevents all
audio going out to the ICS from being heard.
Press the ENTER key to save.
Setting Flightcell® DZM Sidetone
When users wear a headset, they can hear their own voice in their headphones. The audio from their microphone
is amplified and sent to the headphones. This is called sidetone.
Some installation configurations may require the DZM to provide sidetone. The intercom/interphone (ICS)
sidetone setting is used to enable or disable the DZM's sidetone. When ICS sidetone is 'On', audio received from
the ICS into the DZM is passed back out to the ICS. ICS sidetone is required to be activated where no sidetone is
provided by an ICS, or if there is no ICS.
| Flightcell® DZM Operating Manual | Firmware v2.00 Page 73 of 88 |
Page 74
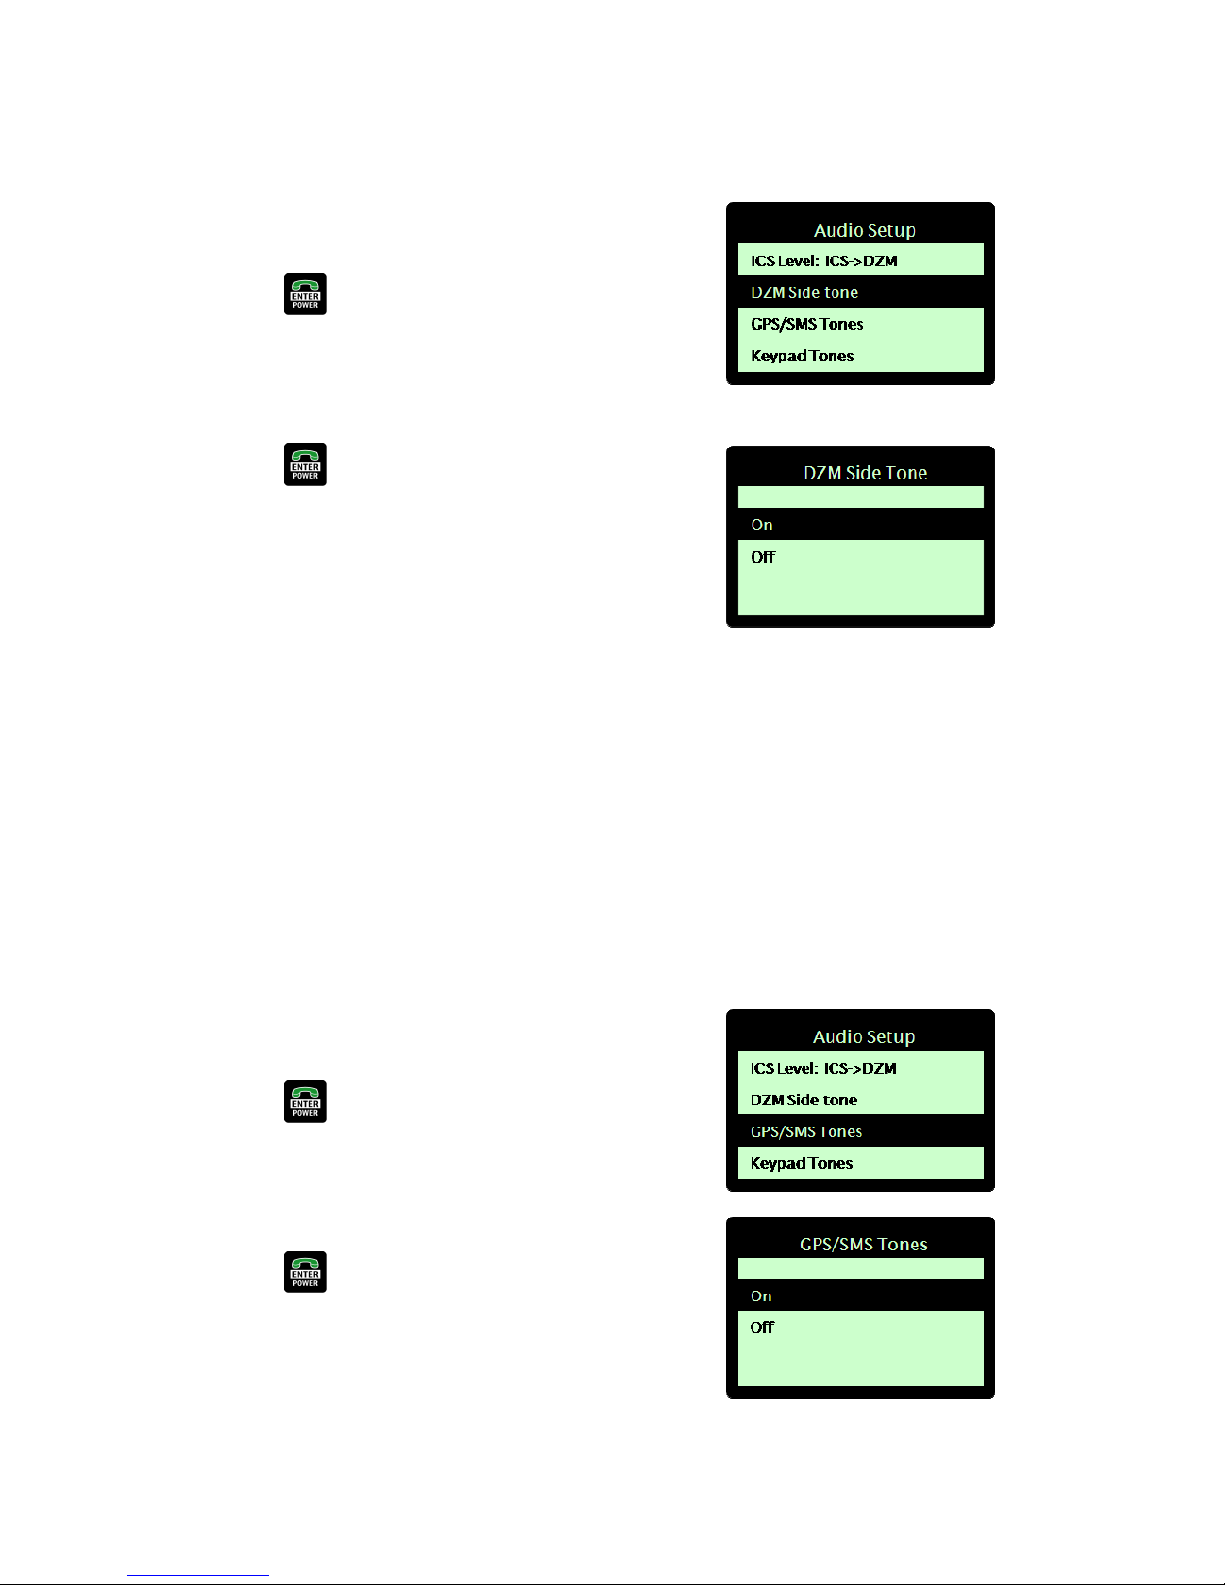
Switching DZM side tone on or off:
From the ’Audio Setup’ sub-menu, use the arrow keys to navigate
to 'DZM Side tone'.
Press the ENTER key to select. The 'DZM Side tone' screen
displays.
Use the arrow keys to navigate to the DZM side tone option
required (e.g. 'On' or 'Off').
Press the ENTER key to select and save.
The DZM side tone is switched 'On' by default. This may cause
excessive noise in some systems, so if side tone is provided by the
aircraft ICS during calls, DZM side tone should be switched to 'Off'.
Switching GPS/SMS confirm tones on and off
DZM GPS/SMS tones may be switched on or off as required. GPS/SMS tones are sounds that are emitted when an
alert condition is raised by the DZM’s tracking system:
When there is no GPS lock when the aircraft takes off.
When the DZM cannot send position reports after several retries due to low signal strength.
When the DZM has a full message queue (usually due to low signal or the sat phone not present in the
cradle) and the oldest message has been deleted to make room for a newly created position report.
Switching GPS/SMS confirm tones on and off:
From the ’Audio Setup’ sub-menu, use the arrow keys to navigate
to 'GPS/SMS Tones'.
Press the ENTER key to select. The 'GPS/SMS Tones' screen
displays.
Using the arrow keys, navigate to the keypad mode required (e.g.
'On').
Press the ENTER key to save.
| Flightcell® DZM Operating Manual | Firmware v2.00 Page 74 of 88 |
Page 75
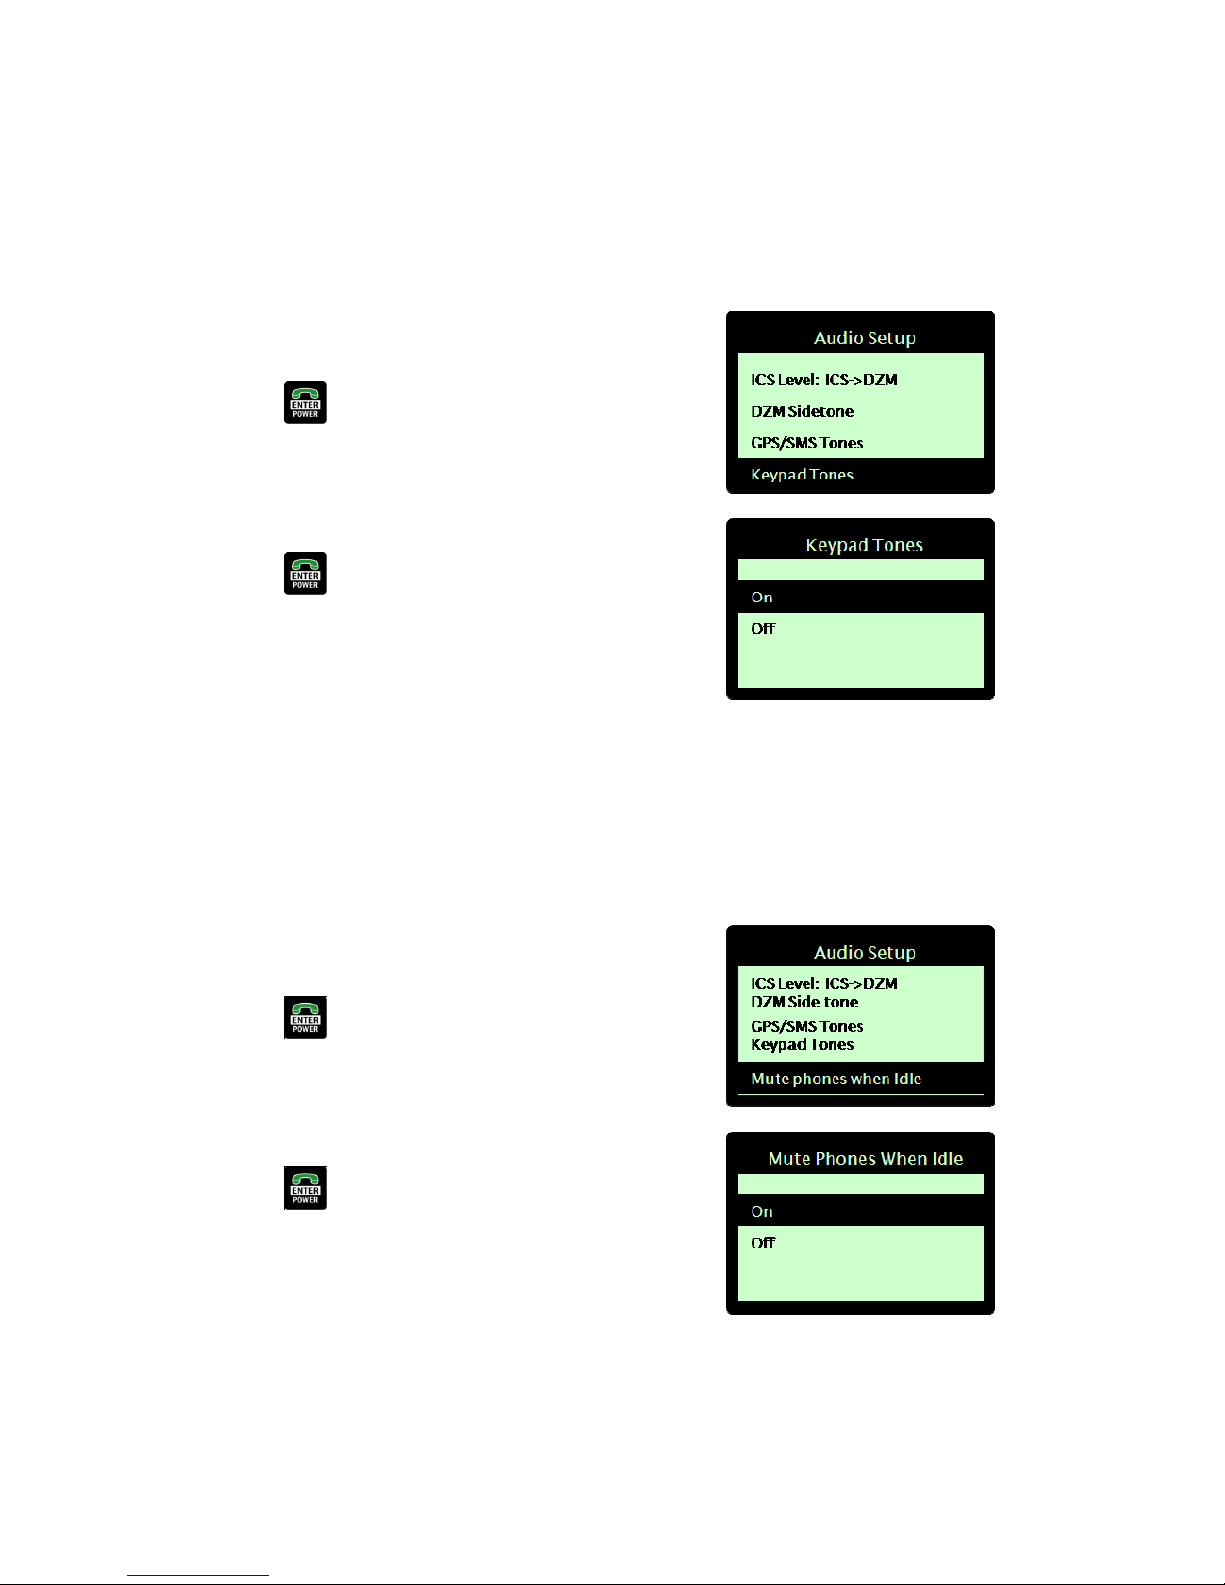
Switching keypad tones on and off
DZM keypad tones may be switched on or off as required. Keypad tones are the sounds that are emitted when
keys on the DZM are pressed.
Turning keypad tones on and off:
From the ’Audio Setup’ sub-menu, use the arrow keys to navigate
to 'Keypad Tones'.
Press the ENTER key to select. The 'Keypad Tones' screen
displays.
Using the arrow keys, navigate to the keypad mode required (e.g.
'On').
Press the ENTER key to save.
Muting DZM audio when phones are not in use
DZM audio to the ICS may be switched off when the phones are not on a call. This is used to avoid noise from
the satellite phone or cell modem breaking into the ICS.
Muting DZM audio when phones are Ready:
From the ’Audio Setup’ sub-menu, use the arrow keys to navigate
to ’Mute Phones When Ready’.
Press the ENTER key to select. The ’Mute Phones When
Ready’ screen displays.
Using the arrow keys, navigate to the keypad mode required (e.g.
'On').
Press the ENTER key to save.
| Flightcell® DZM Operating Manual | Firmware v2.00 Page 75 of 88 |
Page 76
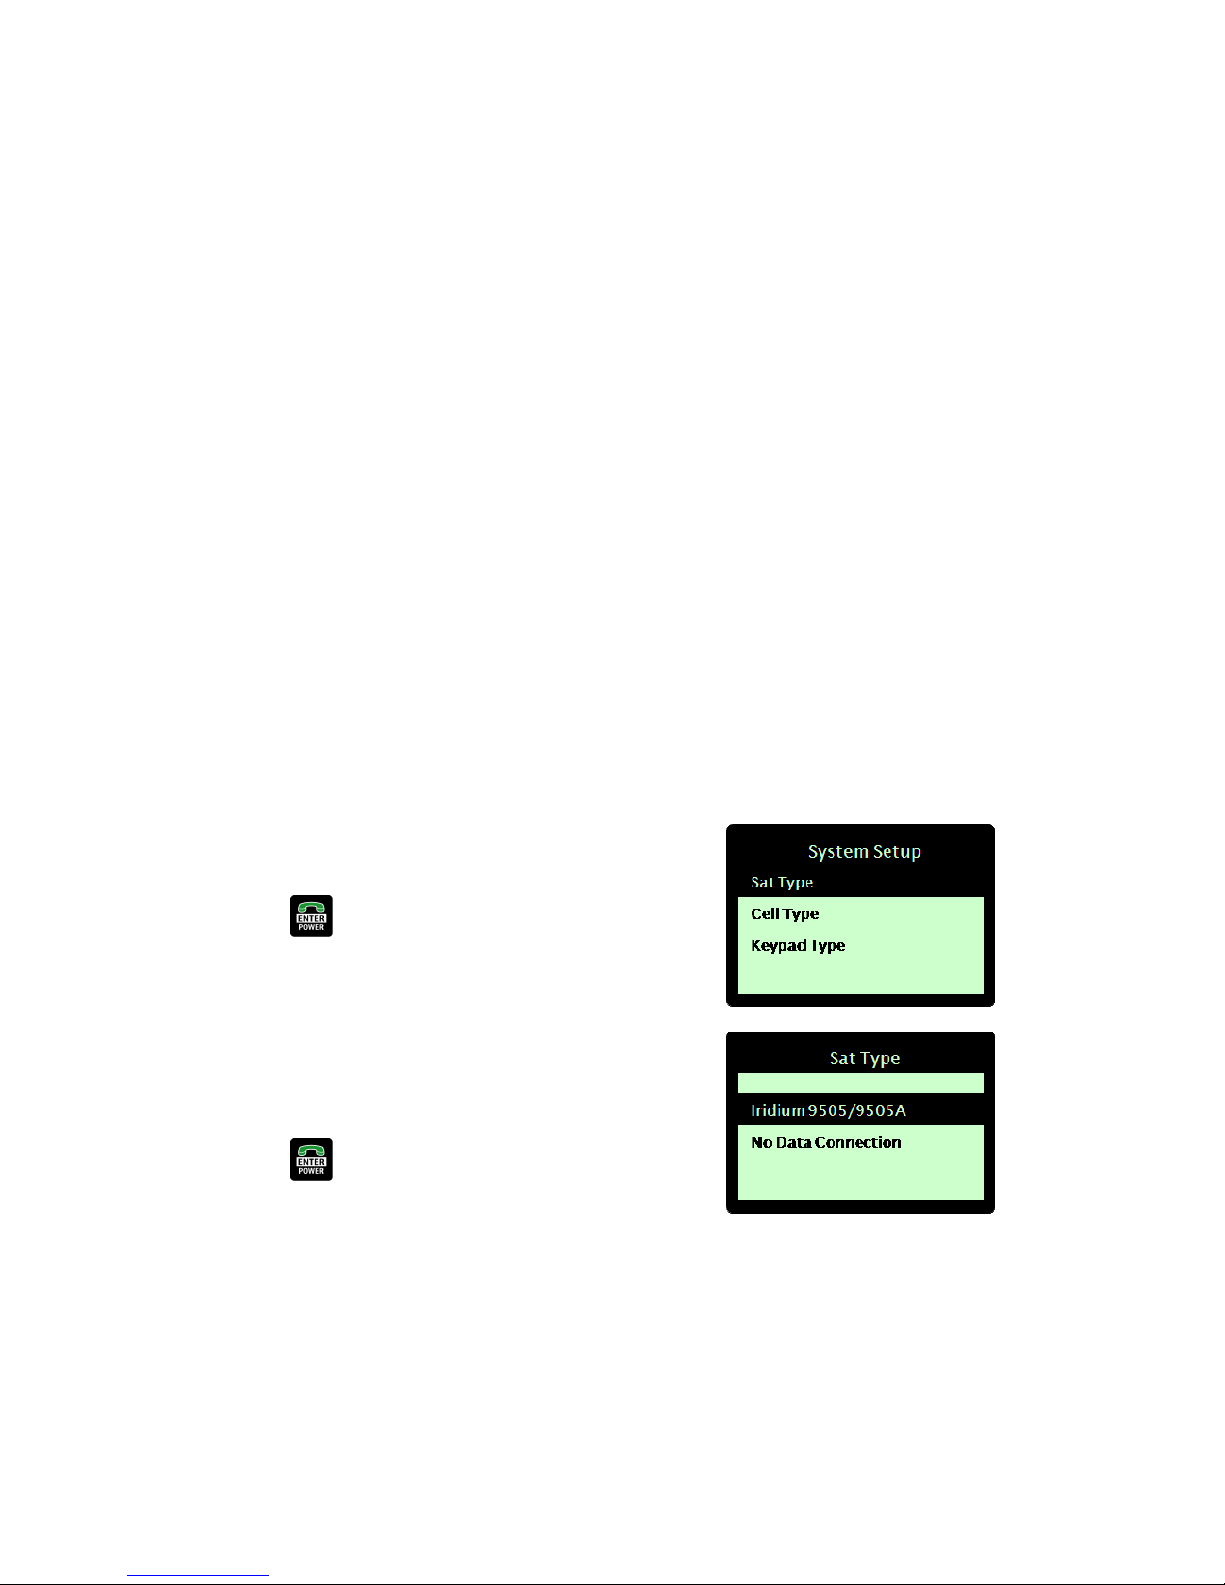
Configuring other Flightcell® DZM advanced setup
features
This section describes how more advanced DZM settings may be configured using the 'Setup Menu'.
Refer to "Using DZM common setup features" on page 45 for further information about configuring common
setup features using the 'Setup Menu'.
Advanced system settings are configured from the ‘System Setup’ sub-menu. Navigate to the ‘System Setup’ sub-
menu following the steps on page 54.
Setting satellite phone type
To send audio and data over the satellite network, the DZM must be set up so that it knows a satellite phone is
connected and the type of satellite phone connected to the DZM must be specified. Note that the type of satellite
phone connected to the DZM cannot be specified via the menu system. This can only be configured by installing
the correct DZM firmware for the type of phone that will be used in your installation. DZM Firmware versions
available include support for Iridium 9505 and 9505A, and 9555 satellite phones with the latest firmware
releases. Ensure the Iridium phone type listed in the Sat Type menu matches your phone type. If not, a DZM
firmware upgrade will be required. Refer to Appendix A for information related to upgrading you DZM.
Specifying satellite phone type (or no satellite connection):
From the ’System Setup’ sub-menu, use the arrow keys to
navigate to 'Sat Type'.
Press the ENTER key to select. The 'Sat Type' screen
displays.
Using the arrow keys, navigate to the connection type required
(e.g. 'Iridium 9505/9505A').
If the DZM is not connected to a supported satellite phone, select
No Data Connection.
Press the ENTER key to save.
NOTE: For the 9505 model phone, the latest phone firmware version is LAC0307. For the 9505A model phone,
the phone firmware versions operating may be LAC0307, ISO5004 or ISO6004. To check the firmware version of
Iridium satellite phones, type *#91# into the phone. Compatible satellite phones can be supplied by Flightcell®
International.
| Flightcell® DZM Operating Manual | Firmware v2.00 Page 76 of 88 |
Page 77
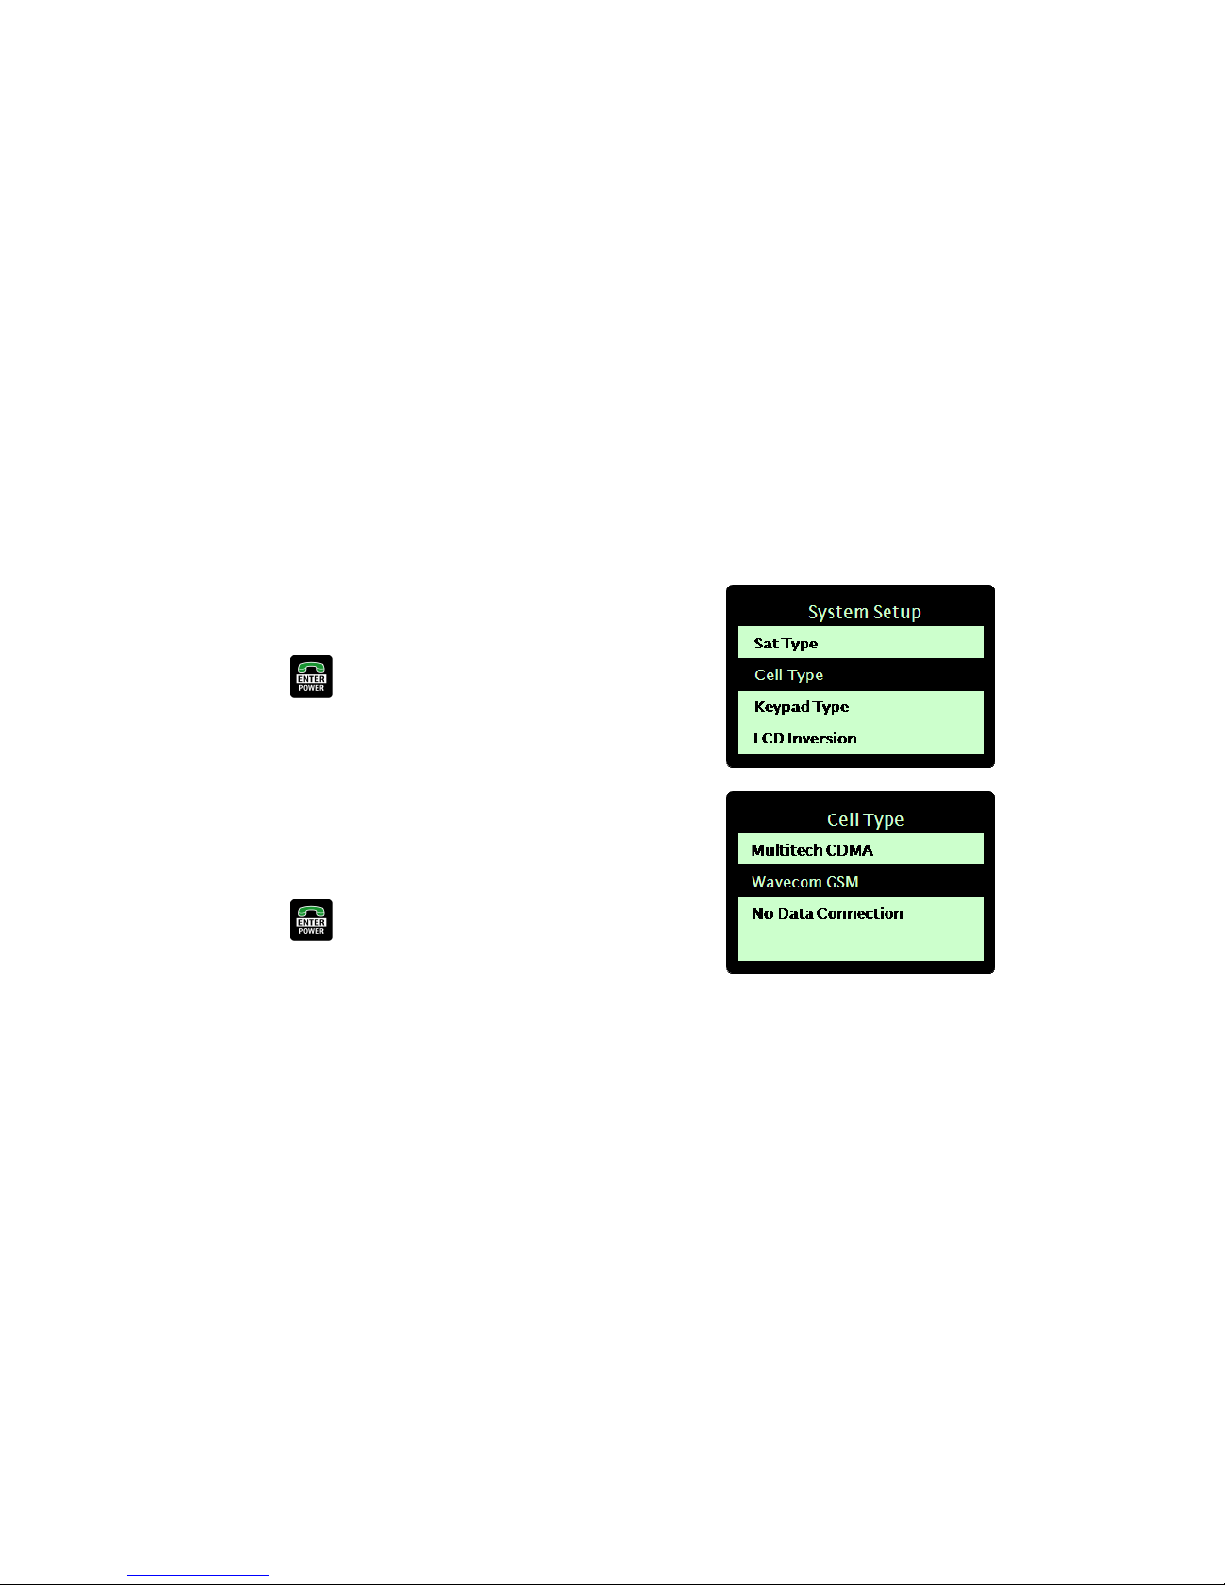
Setting cellular modem type
To send audio and data over the cellular network, the DZM must be set up so that it knows a cell modem is
connected and the type of cell modem connected to the DZM must be specified.
Note that the type of modem connected to the DZM cannot be specified via the menu system. This can only be
configured by installing the correct DZM firmware for the type of modem that will be used in your installation.
The DZM firmware versions available currently support WaveCom GSM, Wavecom 3G and MultiTech CDMA
cellular modems. There is a single Wavecom version that supports all Wavecom Wizmo, Wavecom Supreme and
Wavecom Xtend modem types. Compatible cell modems can be supplied by Flightcell® International.
Ensure the modem type that can be selected in the Cell Type menu matches your modem type. If not, a DZM
firmware upgrade will be required..
Specifying cell modem type (or no cellular connection):
From the ’System Setup’ sub-menu, use the arrow keys to
navigate to 'Cell Type'.
Press the ENTER key to select. The 'Cell Type' screen
displays.
Using the arrow keys, navigate to the connection type required
(e.g. 'WaveCom GSM').
If the DZM is not connected to a supported cell modem, select No
Data Connection.
Press the ENTER key to save.
| Flightcell® DZM Operating Manual | Firmware v2.00 Page 77 of 88 |
Page 78
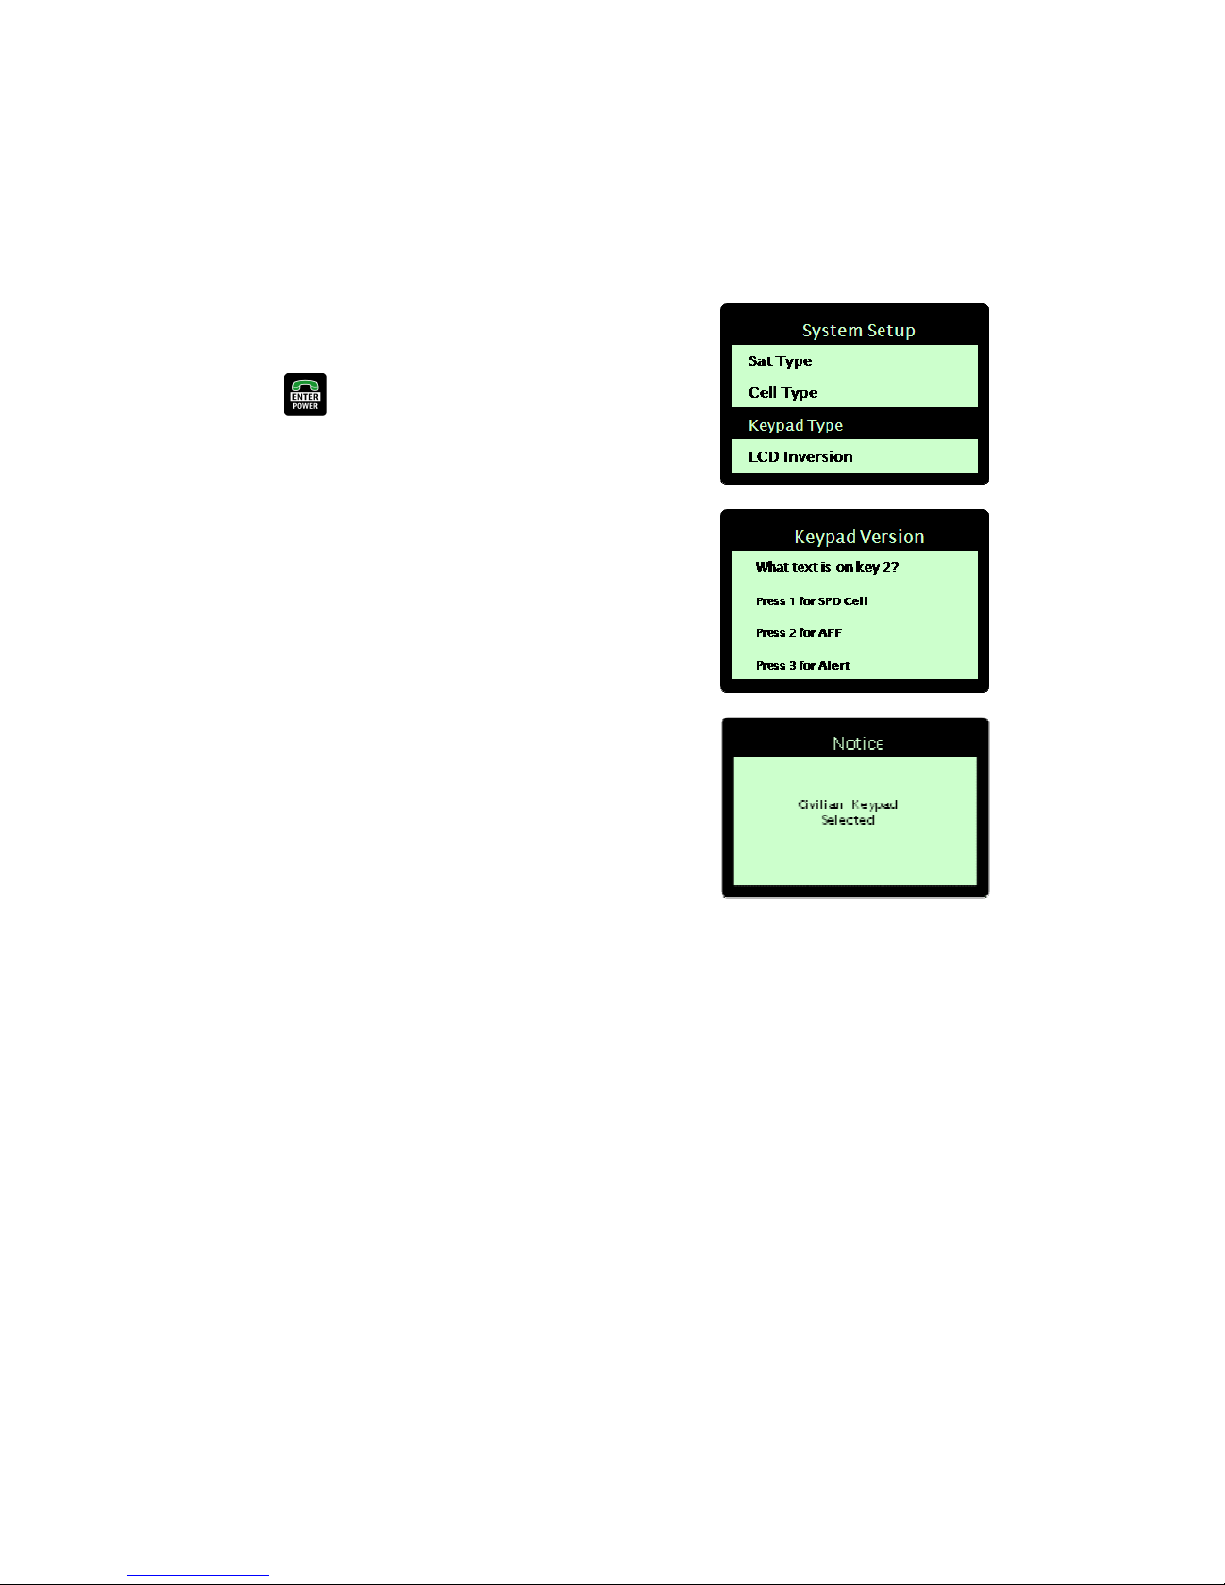
Specifying keypad type
There are different keypad types used with the DZM. The keypad type currently in use may be identified.
Specifying the keypad type in use:
From the ’System Setup’ sub-menu, use the arrow keys to
navigate to ‘Keypad Type'.
Press the ENTER key to select. The 'Keypad Type' screen
displays.
Press the appropriate digit key to identify the keypad version in
use on your DZM.
NOTE! Keypad type 1 is installed on early DZM models only.
Keypad type 2 is fitted to DZMs used in commercial or private
aircraft. Keypad type 3 is usually fitted to military aircraft.
Inverting LCD color display
DZM LCD display colors may be inverted, so that coloured lettering is shown on a black background.
NOTE! Inverting LCD color display does not work as well on early versions of the DZM.
LCD display color options:
The following LCD display color options are available:
On - Displays colored lettering
Off - Displays black lettering
Inverting LCD display color:
| Flightcell® DZM Operating Manual | Firmware v2.00 Page 78 of 88 |
Page 79
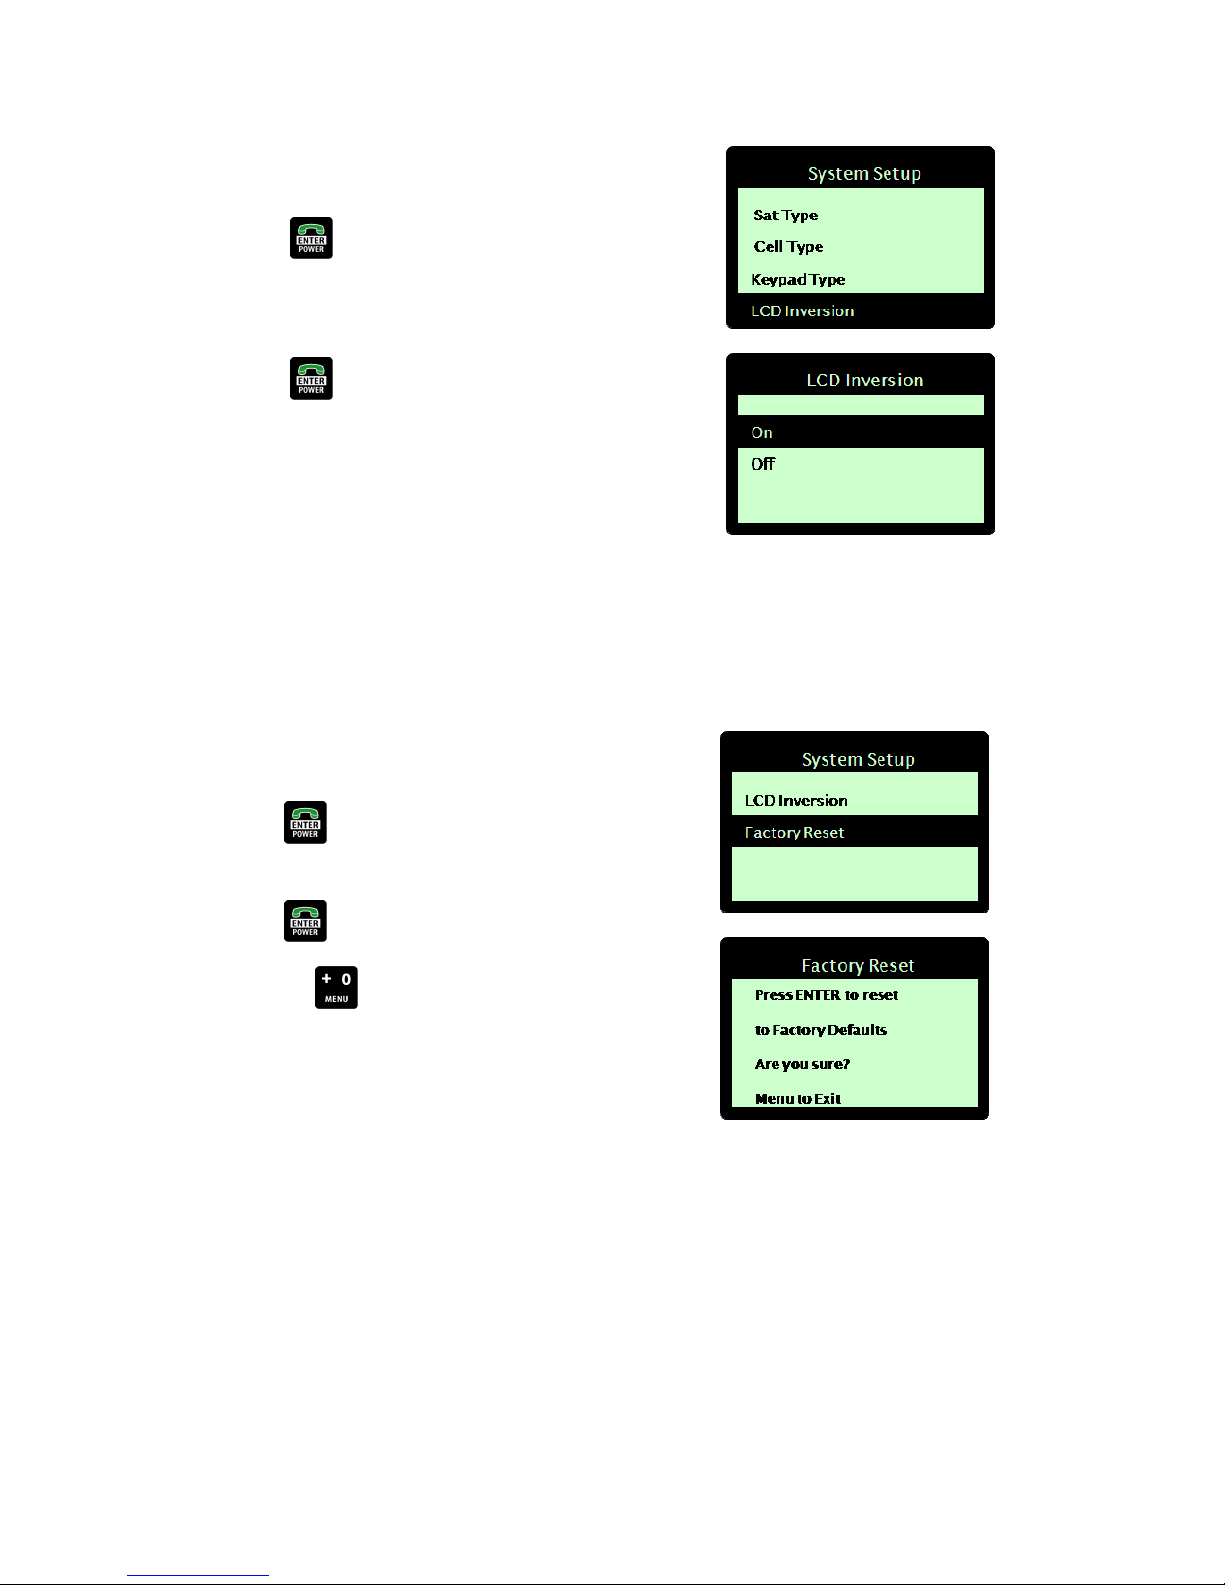
From the ’System Setup’ sub-menu, use the arrow keys to
navigate to 'LCD Inversion'.
Press the ENTER key to select. The 'LCD Inversion' screen
displays.
Using the arrow keys, navigate to the mode required (e.g. 'On').
Press the ENTER key to save.
Restoring factory default settings
The DZM factory default settings may be restored if required.
Restoring to factory default settings:
From the ’System Setup’ sub-menu, use the arrow keys to
navigate to 'Factory Reset'.
Press the ENTER key to select. The 'Factory Reset' screen
displays.
Press the ENTER key to reset factory settings.
OR press the MENU key to leave settings unchanged.
You are returned to the 'Setup Menu'.
| Flightcell® DZM Operating Manual | Firmware v2.00 Page 79 of 88 |
Page 80

APPENDIX A: UPGRADING FLIGHTCELL® DZM
FIRMWARE
Firmware upgrades are released periodically to keep your DZM updated with the latest features.
The latest firmware upgrade is provided on the CD-ROM provided with your DZM, or may be downloaded from
the Flightcell® International website at http://flightcell.net/advancedcustomerdownloads.aspx.
To download firmware upgrades from the Flightcell® International website you require a valid login and
password. Contact Flightcell® International to obtain these details.
Refer to "Identifying firmware version and serial number" on page 47 for information on identifying the firmware
version required for your DZM installation.
STEP 1 - Installing the DZM Firmware Download Utility:
The DZM Firmware Download Utility program needs to be installed onto your computer in order to upgrade
your DZM with the latest firmware version. The utility is made available on the CD-ROM at the time you
receive your DZM, or may also be downloaded from the Flightcell® International website at
http://flightcell.net/advancedcustomerdownloads.aspx.
Save the DZM Firmware Download Utility files to your computer (as these are provided in a zip file, all files
will need to be extracted to an appropriate location on your computer).
Double-click the Setup.exe file and follow instructions to install the DZM Firmware Download Utility. The
message “DZM download setup was completed successfully” will display when installation is complete.
STEP 2 - Preparing to perform a firmware upgrade:
From the CD-ROM or Flightcell® International website, save the latest firmware file to an appropriate location
on your computer. (If this is provided in a zip file, the file will need to be extracted to an appropriate location
on your computer).
Connect your computer to the DZM data connection.
STEP 3 - Opening and preparing the DZM Download Utility:
Open the DZM Download Utility. This may be found in the programs list on your laptop computer by Selecting
Start and All Programs (and may be labeled as DZM Download).
Using the drop-down menu in the 'COM port' field, select a COM port. You may have to try several ports until
you locate one that is available. The 'DZM Information' window will display information when the DZM is
connected through an available port.
If you are using a serial port on your computer you will normally select COM1. If you are using a USB
connection on your computer, you will usually use the highest numbered COM port.
| Flightcell® DZM Operating Manual | Firmware v2.00 Page 80 of 88 |
Page 81
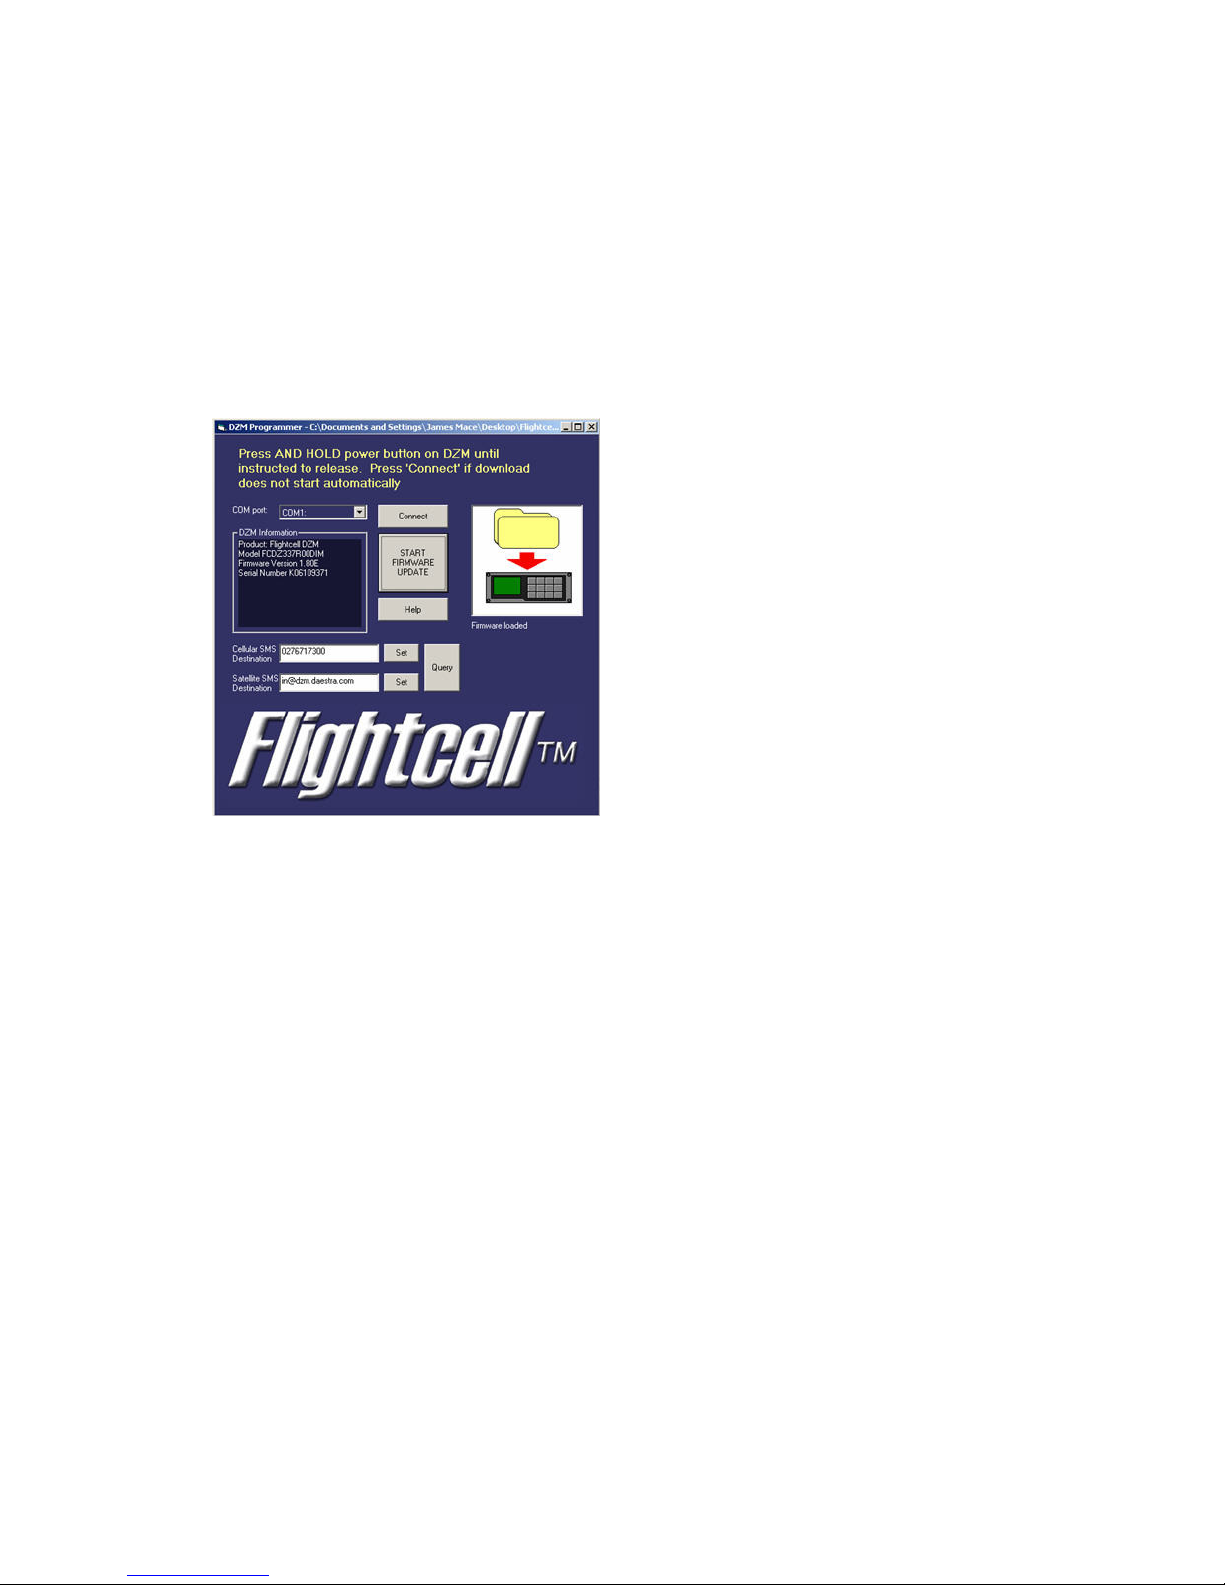
STEP 4 - Performing the firmware upgrade:
Click and drag the latest firmware upgrade file (from where it was saved in Step 2 above) into the large white
'Firmware Loaded' box.
Click the START FIRMWARE UPGRADE button to the left of the 'Firmware Loaded' box.
Follow the instructions that display on the top of the DZM Programmer. This will also advise when the
firmware upgrade is complete.
Follow any further instructions that display on the DZM LCD screen.
STEP 5 - Setting SMS destination:
The DZM Firmware Download Utility may also be used to check or change the satellite or cellular modem SMS
destinations.
Click the Query button to check SMS destinations.
To change an SMS destination, enter the new destination into the Cellular SMS Destination or
Satellite SMS Destination field. Click the Set button alongside the amended field to confirm the
change.
| Flightcell® DZM Operating Manual | Firmware v2.00 Page 81 of 88 |
Page 82

|
APPENDIX B: INSTALLING AND USING
FLIGHTCELL® SMS TEXT MESSAGING SOFTWARE
The DZM can receive and transmit SMS text messages:
Incoming messages are displayed on the LCD screen of the DZM. They may also be viewed via laptop
computer connected to the DZM. The laptop computer must have Flightcell® SMS Console software installed.
Specific types of outgoing messages may be transmitted directly from the DZM. However, most SMS text
messages need to be created and transmitted using a laptop computer connected to the DZM. The laptop
computer must have specialized Flightcell® SMS Console software installed.
Refer to "Using text messaging" on page 29 for further information on receiving and sending SMS text
messages directly from the DZM.
About Flightcell® SMS Console software
The Flightcell® SMS Console software is installed on a laptop computer. When the laptop computer is connected
to the DZM it may be used to create, transmit and receive text messages via the Iridium satellite phone's Short
Message Service (SMS).
Use Flightcell® SMS Console software to:
Receive SMS text messages sent from the Iridium satellite network or by email. Refer to "APPENDIX C:
Sending SMS text messages to a DZM" on page 86 for further information about how messages can be sent to
your DZM.
Transmit SMS text messages to another Iridium satellite phone, any email address, or cell modems on some
US cellular networks.
Note that not all cellular networks currently support SMS transmission to and from Iridium phones.
System requirements for using Flightcell® SMS
Console software
To install and operate Flightcell® SMS Console software, you will need:
A laptop computer installed with MS Windows 2000 or above.
A data connection to the DZM.
Firmware versions 1.79 to 2.20, and 2.24 or above installed on your DZM.
| Flightcell® DZM Operating Manual | Firmware v2.00 Page 82 of 88 |
Page 83

|
Installing Flightcell® SMS Console software
Flightcell® SMS Console software must be installed on your laptop computer before use.
Refer to "System requirements for using Flightcell® SMS Console software" on page 82 for further information
about important system requirements for using Flightcell® SMS Console software.
If you have received the Flightcell® SMS Console software on a CD-ROM, go directly to Step 2 below.
Installing Flightcell® SMS Console software files:
The Flightcell® SMS Console Software files need to be installed onto your computer. This utility is made
available on the CD-ROM supplied with your DZM, or may also be downloaded from the Flightcell®
International website at http://flightcell.net/advancedcustomerdownloads.aspx.
To download from the Flightcell® International website you require a valid login and password. Contact
Flightcell® International to obtain these details.
Save the Flightcell SMS Software files to your computer (as these are provided in a zip file, all files will
need to be extracted to an appropriate location on your computer).
Double-click the Setup.exe file and follow instructions to install the Flightcell SMS Software. The message
“Flightcell SMS Software setup was completed successfully” will display when installation is complete.
Using Flightcell® SMS Console software
Using a laptop computer installed with Flightcell® SMS Console software you may create, transmit and receive
SMS text messages via the DZM.
Refer to "Using text messaging" on page 29 for further information on receiving and sending SMS text messages
directly from the DZM.
STEP 1 - Connecting your laptop computer to the DZM:
Connect your laptop computer to your DZM using the data connection.
STEP 2 - Opening and preparing the Flightcell® SMS Console program:
Once your laptop computer is connected to the DZM, from the bottom of your computer screen click the
button.
Select All Programs --> Flightcell -->Flightcell SMS Console. The Flightcell SMS Console displays.
Using the drop-down menu in the COM port field, select a COM port. You may have to try several ports until
you locate an appropriate port.
If you are using a serial port on your computer you will normally select COM1. If you are using a USB
connection on your computer, you will usually use the highest numbered COM port.
Click the button. The yellow text displaying at the top of the program window advises when
you are connected.
| Flightcell® DZM Operating Manual | Firmware v2.00 Page 83 of 88 |
Page 84
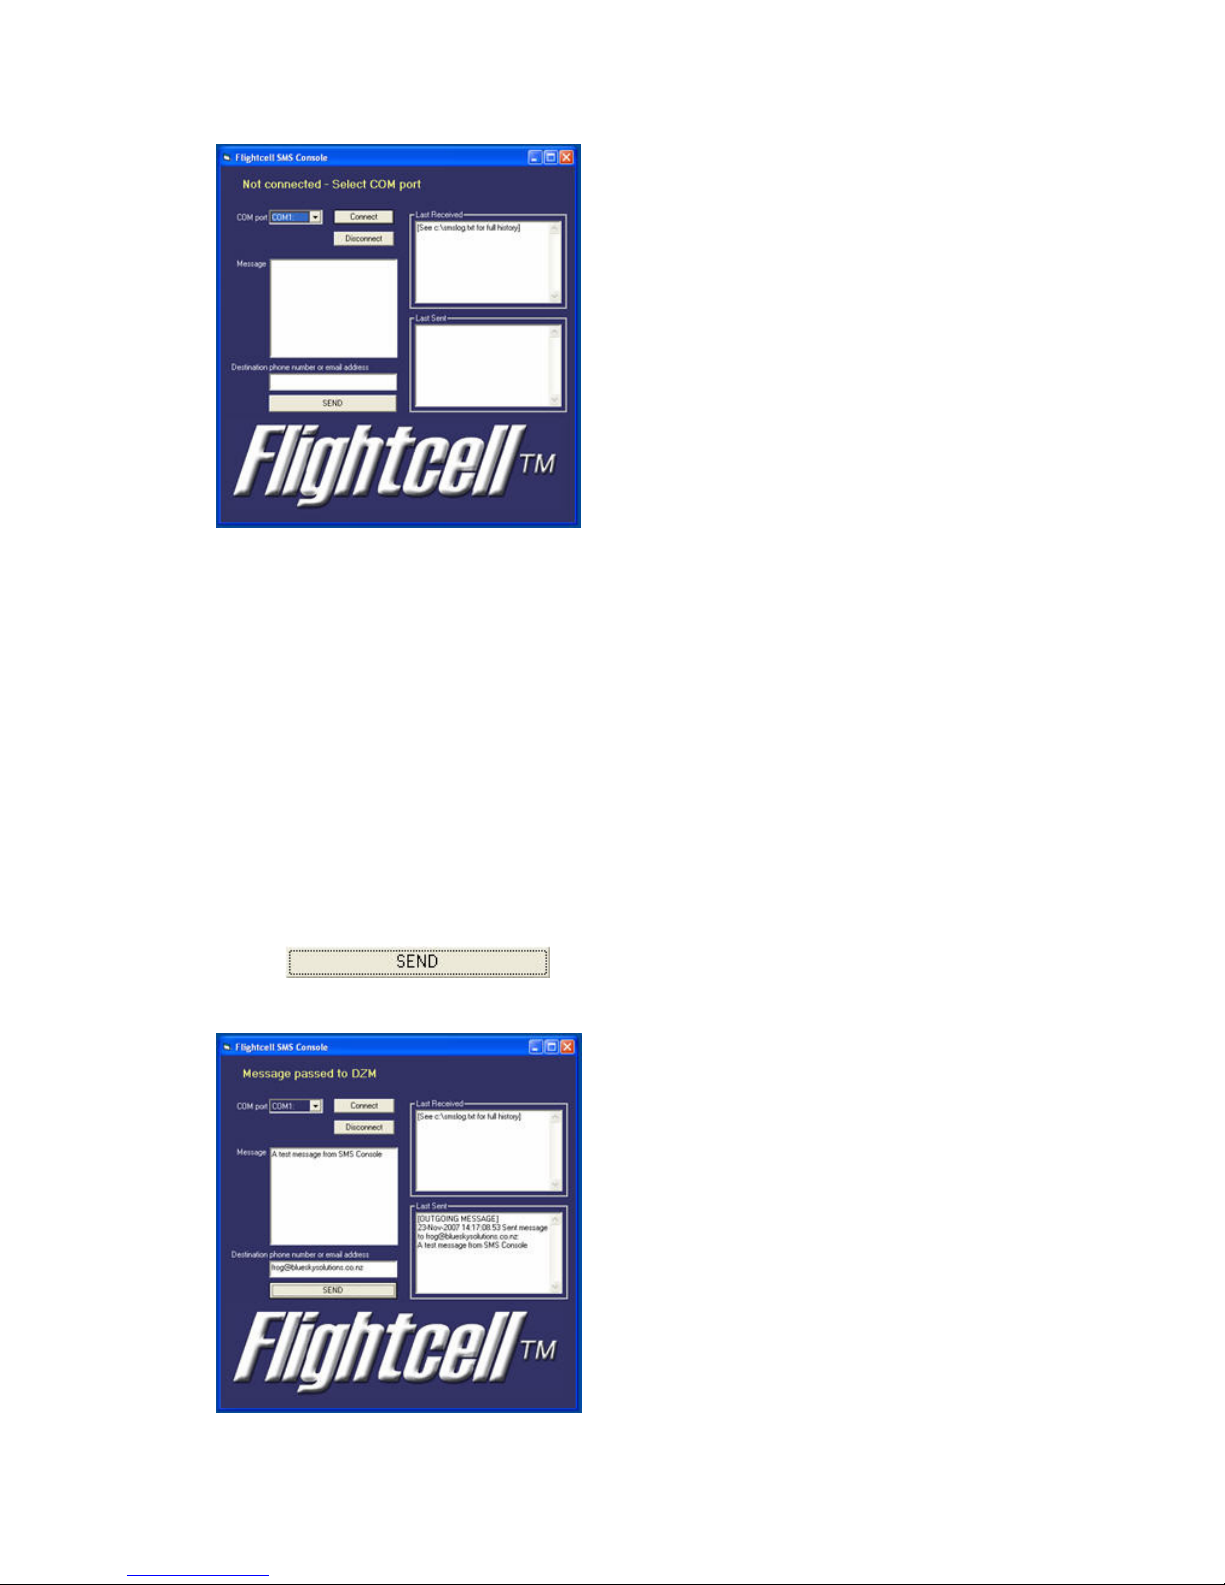
|
STEP 3 - Creating and transmitting an SMS text message:
Once the SMS Console program is connected (refer Step 2 above), enter your message text in the 'Message'
field of the Flightcell® SMS Console.
The maximum message length is 160 characters. Messages longer than 160 characters will be truncated.
In the 'Destination Phone Number or Email Address' field, enter either:
Another Iridium satellite phone number. Enter the full phone number (e.g. +88 162 XXX XXXX);
An email address;
A cell modem number connected to your US cellular network.
Only limited cellular networks are currently serviced. Connections to further US networks and other selected
countries will be available during early 2009).
Click the button. The message text will display in the 'Last Sent' field of
the Flightcell® SMS Console.
| Flightcell® DZM Operating Manual | Firmware v2.00 Page 84 of 88 |
Page 85
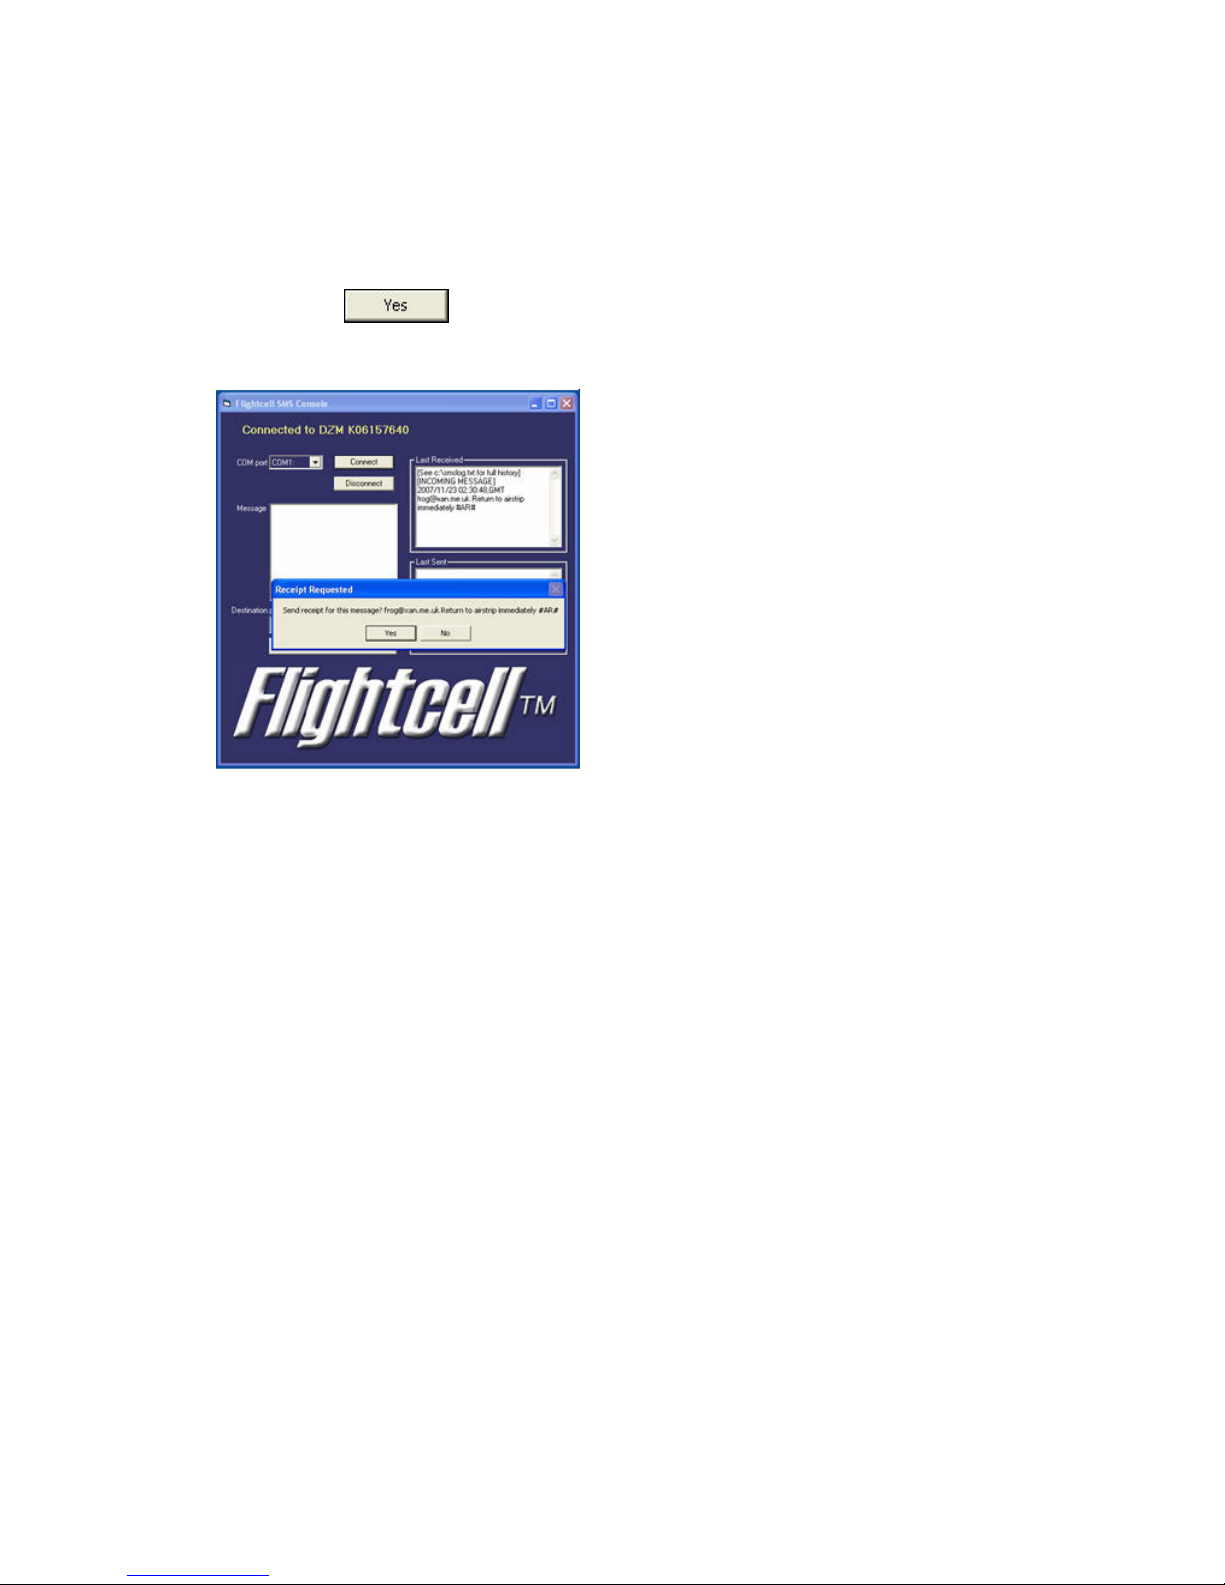
|
STEP 4 - Receiving an SMS text message:
Once the SMS Console program is connected (refer Step 2 above), incoming SMS text messages will display
in the 'Last Received' field.
If the sender has requested confirmation that the message has been received, a pop-up box displays on the
screen. Click the button to send an acknowledgement.
SMS messages will not be received on your laptop computer when the Flightcell® SMS Console is not active.
| Flightcell® DZM Operating Manual | Firmware v2.00 Page 85 of 88 |
Page 86

APPENDIX C: SENDING SMS TEXT MESSAGES TO
A FLIGHTCELL® DZM
SMS text messages can be sent to an aircraft or vehicle equipped with a DZM. Messages may be sent using the
different methods outlined below.
Incoming text messages will display on the DZM LCD screen when received. If a computer with Flightcell® SMS
Console software is connected to the DZM, the incoming text message will also display on the computer screen
when received.
Sending an SMS text message from another Iridium satellite phone:
SMS text messages may be sent from an Iridium satellite phone in the usual manner.
Sending an SMS text message from the Iridium network website:
Iridium provides a quick utility for sending SMS text messages via their website.
Using an internet browser, go to the Iridium website at http://www.iridium.com. This is also
accessible from the left column of the Flightcell® International homepage at
http://www.flightcell.net.
From the top-right of the page, click on ‘Send a Satellite Message’. The ‘Send a Satellite Message’ window
displays.
Enter the destination phone number of the Iridium satellite phone in the ‘To’ field.
Enter your message in the ‘Message’ field.
Click ‘Send Message’. The message will be sent.
Sending an SMS text message from another cell modem:
SMS text messages may be sent from most cell modems.
Some cellular networks may not send messages to Iridium phones. It is suggested that you send a test
transmission to determine whether this service is available on your cellular network.
Sending an SMS text message from an email program:
SMS text messages may be sent from any email program (e.g. Microsoft Outlook) in the usual manner.
Use the destination phone number in the ‘To’ field of the email (e.g. [email protected]).
Requesting SMS text message delivery confirmation:
When sending an SMS text message, you may request confirmation that the recipient has received and read
the message. To request acknowledgement:
Enter #AR# anywhere in the body of the message. This activates a pop-up box on the connected laptop
computer of the aircraft receiving the message requesting the recipient to acknowledge receipt.
Refer to “Using Flightcell® SMS Console software” on page 83 for further information about how to
acknowledge receipt of an SMS text message if you are the recipient.
| Flightcell® DZM Operating Manual | Firmware v2.00 Page 86 of 88 |
Page 87

WARRANTY AND CONTACT DETAILS
Limited warranty for your Flightcell® DZM
Flightcell® International Ltd's quality products are proudly designed and manufactured to the highest standards in
New Zealand.
Your DZM is warranted for 12 months from date of sale. This warranty covers Flightcell® manufactured items
only. Any ancillary items may be covered by individual manufacturer warranties.
The warranty is void if any labels are removed or if it is determined that your DZM has been:
connected to a power supply delivering more than 32 Volts;
connected with reverse polarity;
installed in direct contravention to the guidelines outlined in the technical installation manual;
physically damaged, or a fault has occurred due to the product being used beyond what is considered normal
use, causing unusual deterioration of the product.
If the product is deemed to be faulty or in need of repair, please contact Flightcell® International Ltd to obtain a
Returned Materials Authorization.
Flightcell® International contact details
Flightcell® International Ltd
PO Box 1481
98 Vickerman Street
Nelson 7040
New Zealand
Telephone +64 3 5458651
Fax +64 3 5488091
Website http://www.flightcell.com
| Flightcell® DZM Operating Manual | Firmware v2.00 Page 87 of 88 |
Page 88

USER NOTES
| Flightcell® DZM Operating Manual | Firmware v2.00 Page 88 of 88 |
 Loading...