

Page 1

Table of Contents
Introduction
What is SYNC? 4
Safety information 5
Phone dependent features 5
SYNC voice recognition feature 6
Voice recognition system overview
Using voice commands with SYNC 8
SYNC system controls
Quick reference chart 10
SYNC phone features
Voice commands in phone mode 12
Making a call 14
Ending a call 14
Exiting phone mode 14
Answering an incoming call 14
Incoming new text message 15
Using the quick dial feature 16
Active call menu options 16
Using privacy mode 17
Putting a call on/off hold 17
Joining two calls (multiparty/conference call) 17
Accessing call history/phone book during active call 18
How SYNC interacts with your Bluetooth device 19
Phone redial 19
Call history 20
Accessing your phone book 20
Text messaging 21
Sending new text messages 22
Downloading unread text messages 23
Deleting all text messages 24
Phone settings 24
Phone status 25
Setting a ring tone 25
Message notification 26
Modifying your phone book 26
4
8
10
12
See
End User License Agreement
at the end of this book
1
Page 2

Table of Contents
Automatically download your phone book 27
Applications 28
System settings 28
Adding a phone 29
Connecting a phone 30
Setting a phone as primary 31
Turning Bluetooth on/off 31
Deleting a phone 32
Deleting all phones 32
Turning prompts on/off 32
Changing the SYNC language setting 33
Returning to factory defaults 34
Performing a master reset 34
Installing new vehicle applications 35
SYNC media features
Voice commands in media mode 36
Connecting a digital media player to SYNC 38
What’s playing? 38
Using your media menu 38
Selecting different media sources 39
Using your USB port 40
Streaming music from your phone 41
Using the Auxiliary input jack (Line in) 41
Using the media settings 42
Accessing vehicle applications 43
Accessing system settings 43
Adding a Bluetooth media device which is in discovery mode 44
Adding a Bluetooth media device which is in discoverable mode 45
Connecting a Bluetooth media device 45
Delete a device 46
Using SYNC’s play menu 50
Using the play all feature 51
Selecting and playing specific artists 52
Selecting and playing specific albums 53
Selecting different genres 54
Accessing your playlists 55
Playing a specific track 56
Exploring the USB device 56
Playing similar music 57
36
2
See
End User License Agreement
at the end of this book
Page 3

Table of Contents
DVD interaction
Glossary
End user license agreement
Index
59
66
67
74
All rights reserved. Reproduction by any means, electronic or mechanical
including photocopying, recording or by any information storage and retrieval
system or translation in whole or part is not permitted without written
authorization from Ford Motor Company. Ford may change the contents without
notice and without incurring obligation.
Copyright © 2007 Ford Motor Company
See
End User License Agreement
at the end of this book
3
Page 4
Introduction
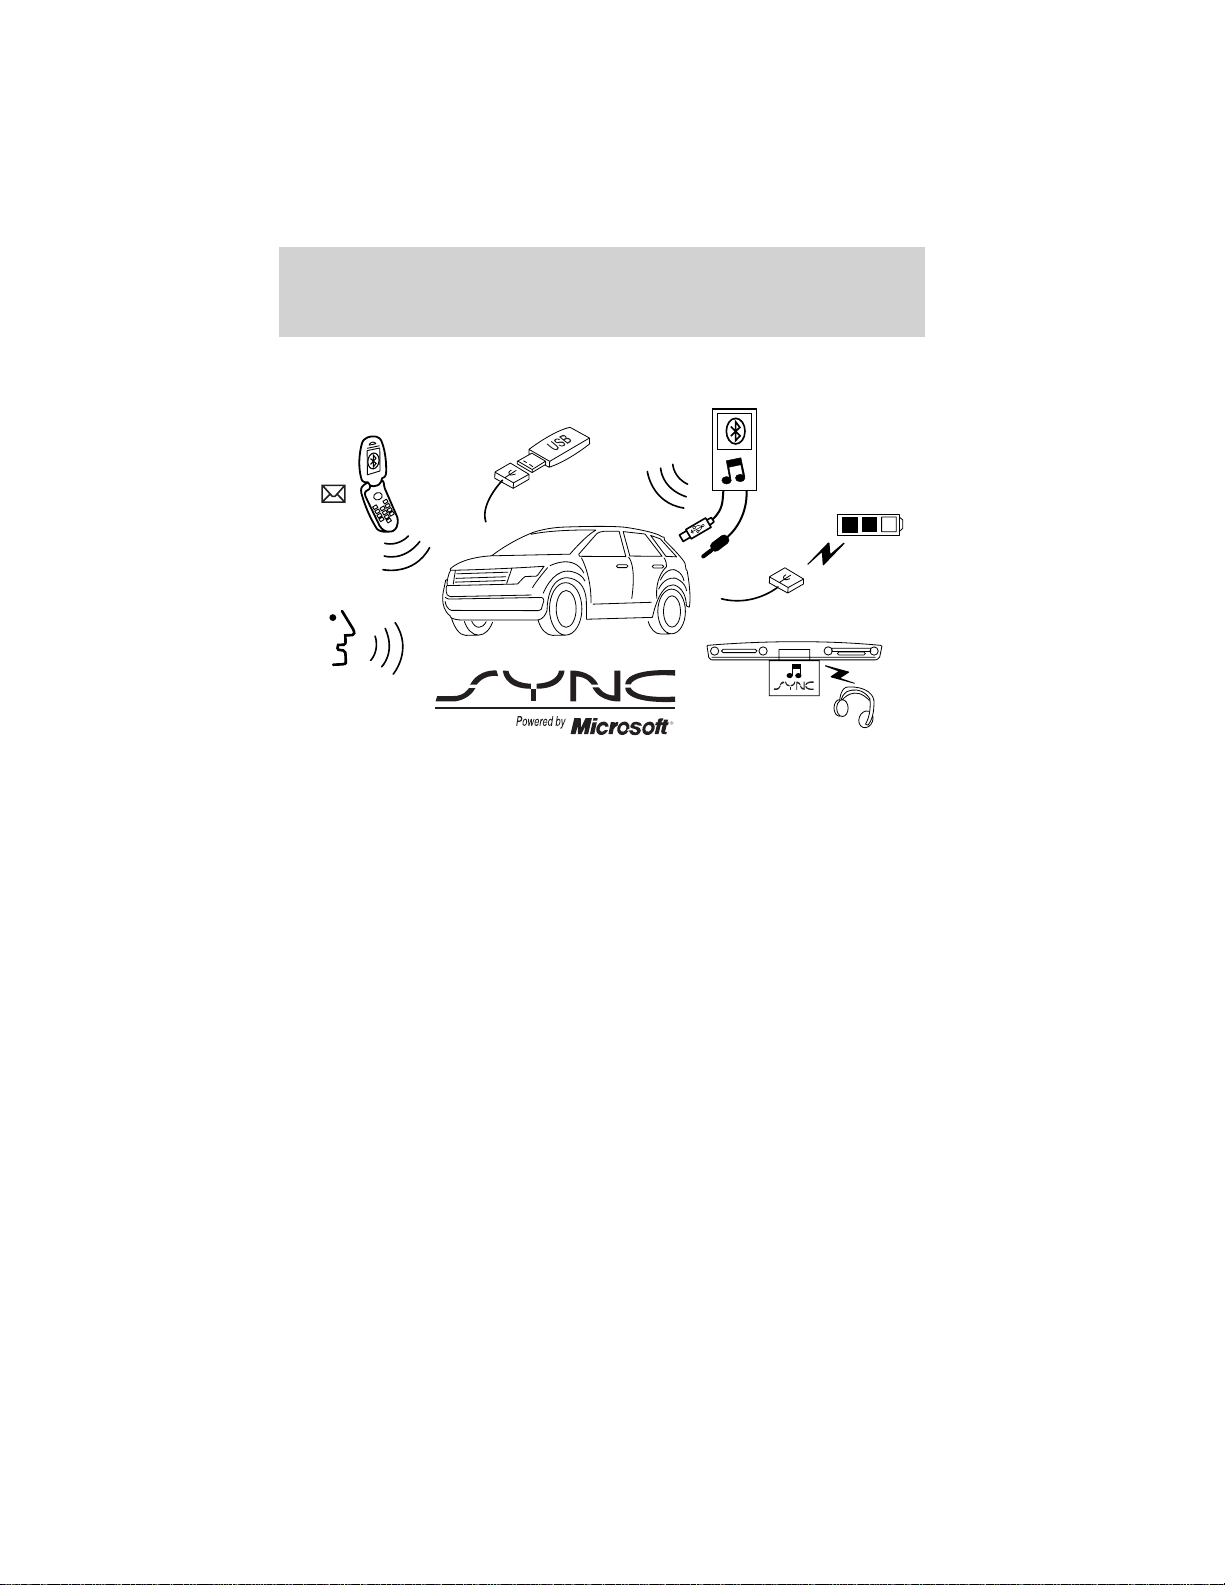
WHAT IS SYNC?
Thank you for purchasing SYNC!
SYNC is a hands-free communications and entertainment system that
literally ‘syncs up’ with all other multimedia systems in your vehicle.
SYNC delivers convenience with voice activated calling and hands-free
conversations, digital media player command and control as well as easy
to use voice commands. The world outside your vehicle cabin may be
chaotic, but inside, with SYNC, it’s always a smooth ride. All you have to
do is sync it and stow it. We’ll take care of the rest.
Welcome to the new world of ingenuity and passion - technology that is
both fun and functional. Welcome to SYNC.
For more information, please visit www.SyncMyRide.com.
4
See
End User License Agreement
at the end of this book
Page 5

Introduction
SAFETY INFORMATION
Driving while distracted can result in loss of vehicle control,
accident and injury. Ford strongly recommends that drivers use
extreme caution when using any device that may take their focus off
the road. The driver’s primary responsibility is the safe operation of
their vehicle. Only use cell phones and other devices not essential to
the driving task when it is safe to do so.
• Do not attempt to service or repair SYNC. See your authorized dealer.
• Do not operate playing devices if the power cords and/or cables are
broken, split or damaged. Carefully place cords and/or cables where
they will not be stepped on or interfere with the operation of pedals,
seats and/or compartments, or safe driving abilities.
• Do not leave playing devices in the vehicle in extreme conditions as it
could cause damage to your device. Refer to your device’s user guide
for further information.
• For your safety, some SYNC functions are speed dependent and
cannot be performed when the vehicle is traveling at speeds greater
than 3 mph (4.82 km/h).
•
Ensure that you review your device’s user guide before using with SYNC.
PHONE DEPENDENT FEATURES
While SYNC supports a variety of features, many are dependent upon the
functionality of your cell phone with Bluetootht wireless technology. At
a minimum, most cellular phones with Bluetooth wireless technology
support the following functions:
• Answering an incoming call
• Ending a call
• Using privacy mode
• Dial a number
• Redial
• Call waiting notification
• Caller ID
Other features, such as text messaging via Bluetooth, and automatic
phone book download are phone dependent features. To ensure that you
have a compatible cellular phone, refer to your phone’s user manual and
visit www.SyncMyRide.com.
See
End User License Agreement
at the end of this book
5
Page 6

Introduction
SYNC VOICE RECOGNITION FEATURE
SYNC is equipped with an advanced interactive Voice Recognition (VR)
system. This system allows you to perform many operations by
“speaking” certain commands to the system. The system will respond
with a series of audible tones, prompts, questions and spoken
confirmations depending on the situation and the chosen level of
dialogue interaction.
Feedback through audible tones
Your VR system will respond through various audible tones. You may
hear a tone at the following times:
• When you press VOICE or
• When you access the help feature.
• When the VR system does not understand your request
• When a VR session is completed successfully
• When a VR session is ended unsuccessfully
• When a speed dependent feature has been accessed
• When a new device is connected
SYNC has five different audible tones that will play depending on the
circumstance.
• Initial: Sounds when you are entering a new mode.
• Positive: Sounds for a positive recognition or a successful VR session
completion.
• Negative: Sounds for a negative recognition, an unsuccessful VR
session, or when a speed dependent feature has been accessed.
• Listening: Sounds when the system is ready to listen for a command.
• Help: Sounds when you ask for ‘Help’.
on your steering wheel controls.
6
See
End User License Agreement
at the end of this book
Page 7

Introduction
Confirmation prompts
Confirmation prompts are short questions asked by the system when the
system has not clearly understood your request or when there are many
possible responses to your request. For example, if you have
Confirmation prompts ON, the system may say, “Phone, is that correct?”.
The system will then listen for a “Yes” or “No” confirmation from you. If
you say “Yes”, the system will proceed. If you say “No”, the system will
ask you to say the command again. If you have Confirmation prompts
OFF, the system will simply make a best guess as to what you requested.
If the system has a low confidence level of what was asked, it will
prompt you to try again or ask for help.
Note: Even with Confirmation prompts turned OFF, you may be asked to
confirm certain settings occasionally.
Clarification through candidate lists
Candidate lists are created when the system has several possible options
of similar level of confidence as a result of your request. The system will
submit back to you as many as four possibilities for your clarification.
This may happen either with your phone book and/or music selections.
Example #1:
You want to call John Doe at home, so you say, “Call John Doe at home”.
If the system has a similar confidence level for a few items, it may
respond with:
• (initial tone) “Say 1 after the tone to call John Doe at home. Say 2
after the tone to call Johnny Doe on mobile. Say 3 after the tone to
call Jane Doe at home.” (listen tone)
Example #2:
You want to listen to a certain artist, so you say, “Search Artist John”. If
the system has a similar confidence level for two possible options, it may
respond with:
• (initial tone) “Say 1 after the tone to search John Doe. Say 2 after the
tone to search Johnny Doe.” (listen tone)
See
End User License Agreement
at the end of this book
7
Page 8

Voice recognition system overview
USING VOICE COMMANDS WITH SYNC
There is a push to talk button on your steering wheel controls labeled
either VOICE or
tone and LISTENING will appear in the radio display signaling that the
system is ready to accept your command. Speak the command clearly to
ensure that the system is able to recognize and perform the desired
function.
For the best voice recognition performance:
• Ensure that the interior of the vehicle is as quiet as possible. Wind
noise from open windows and road vibrations may prevent the system
from correctly recognizing spoken voice commands.
• After pressing VOICE or
LISTENING appears in the radio display before speaking a command.
Any command spoken prior to this will not register with the system.
• At any time, you can interrupt the system while it is speaking by
pressing VOICE or
and allow you to speak a command.
• Speak naturally without large pauses in between words.
At any time, you may say these commands:
• USB • SYNC
• Bluetooth audio • Line in
• Phone • Voice settings
• Cancel • Help
USB: Say to access the device connected to the USB port.
SYNC: Say to return to the main menu.
Bluetooth audio: Say to access/use streaming music from your cellular
phone enabled with Bluetooth wireless technology.
Line in: Say to access the device plugged into your auxiliary input jack.
Phone: Say to access hands-free phone mode.
Voice Settings: Say to access the voice settings menu. Refer to
Commands for voice settings in the following section.
Help: Say at any time for options in a specific mode. SYNC will list
various options for you audibly. The ‘help’ request is always available.
Cancel: Say to cancel the requested action.
. Press to activate Voice Recognition. You will hear a
, wait until the tone sounds and
. The system will respond with a listening tone
8
See
End User License Agreement
at the end of this book
Page 9

Voice recognition system overview
Commands for voice settings
In voice settings, you can customize the level of system interaction, help
and feedback. The system default settings include standard interaction as
well as candidate lists and confirmation prompts as all provide the most
guidance and feedback.
At any time, while in voice settings, you may say these commands
to adjust the voice settings:
• Interaction mode advanced • Interaction mode standard
• Confirmation prompts on • Confirmation prompts off
• Media candidate lists on • Media candidate lists off
• Phone candidate lists on • Phone candidate lists off
Interaction mode standard/advanced: Standard interaction mode
provides more detailed interaction and guidance while the advanced
mode has less audible interaction and more tone prompts.
Confirmation prompts on/off: Confirmation prompts are short
questions asked by the system when the system has not clearly heard or
understood your request. Note: Even with Confirmation prompts turned
OFF, you may be asked to confirm settings occasionally.
Phone/media candidate lists on/off: Candidate lists are a list of
possible results from your voice commands. These occur when SYNC has
equal confidence of several possible results from your voice command.
For voice commands available in SYNC phone mode, refer to Voice
commands in phone mode in the Phone chapter.
For voice commands available in SYNC media mode, refer to Voice
commands in media mode in the Media chapter.
See
End User License Agreement
at the end of this book
9
Page 10
SYNC system controls
SYSTEM CONTROLS
SYNC will interact with your audio system, steering wheel controls, and
DVD system (if equipped).
QUICK REFERENCE CHART
The following chart is a quick summary of your radio and steering wheel
controls as well as their respective function(s).
Radio control
N/A VOICE
SEEK
/
TUNE knob
OK OK Press to confirm your selection.
Steering
wheel control
,
,
Function
Press to activate SYNC hands-free
calling or to answer an incoming call.
When in phone mode, press to send
a call, text message, to put a call on
hold and answer another call, or to
initiate a multi-party call.
Press and hold to end a call.
Press and hold to exit phone mode
when not in an active call.
Press to activate Voice Recognition.
Press and hold to end an active
voice session.
Refer to the Voice recognition
system overview chapter for further
information.
Press / turn to scroll through various
menus and selections.
10
See
End User License Agreement
at the end of this book
Page 11
SYNC system controls
Radio control
MENU N/A Press while in an active call to
AUX N/A Press repeatedly to cycle through
TEXT N/A When the > indicator appears, press
REV, REW,
FF, FWD,
SHUFFLE
(if available)
/
(Play/Pause)
Steering
wheel control
access SYNC active call options.
Refer to Active call menu options
in the SYNC phone features
chapter.
Press MENU while in media to
access SYNC MEDIA MENU. Refer to
the SYNC media features chapter
for further information.
available auxiliary sources. For
further information, refer to Using
your media menu in the SYNC
media features chapter.
to advance the text in the radio
display. Press repeatedly to view
additional phone contact information
or media information.
N/A Press and hold to reverse within a
track.
N/A Press and hold to advance within a
track .
N/A Press and release to shuffle current
music content.
N/A Press to play / pause the currently
playing music.
Function
See
End User License Agreement
at the end of this book
11
Page 12

SYNC phone features
VOICE COMMANDS IN PHONE MODE
Driving while distracted can result in loss of vehicle control,
accident and injury. Ford strongly recommends that drivers use
extreme caution when using cell phones, even with voice commands.
The driver’s primary responsibility is the safe operation of their vehicle.
Only use cell phones and other devices not essential to the driving task
when it is safe to do so.
While in phone mode, you may say any of the following
commands:
• Dial • Call <name>
• Call <name> at home • Call <name> on mobile OR cell
• Call <name> at work OR call
name in office
• Phone book <name> at home
• Phone book <name> on mobile
OR cell
• Call history outgoing
1
1
• Phone book <name> on other1• Connections
• Call history missed
• Menu
1
1
• Join
1
Voice commands are not available until downloading phone information
via Bluetooth is complete.
Phone book commands: When you ask SYNC to access a phone book
name, number, etc., the requested information will appear in the display
to view. Press
or say “Call” to call the contact.
Note: In the above possible commands, “<name>” is a dynamic listing in
that it could be any desired name from your phone book.
• Call <name> on other
1
• Phone book <name>
1
• Phone book <name> at work OR
Phone book <name> in office
• Call history incoming
1
1
• Go to privacy
• Hold
1
12
See
End User License Agreement
at the end of this book
Page 13

SYNC phone features
While in phone mode, you may also say “Menu” and then any of
the following commands:
• (Phone) settings (message)
notification on
• (Phone) connections • Phone name
• Signal • Battery
• (Phone) settings (set) phone
ringer
• (Phone) settings (set) ringer 2 • (Phone) settings (set) ringer 3
• Text message inbox • (Phone) settings (set) ringer off
Note: With the above commands, words in ( ) are optional and do not
have to be spoken for the system to understand the command.
You may also say “Dial” to access any of the following commands:
• Number 0–9 • Dial
• Delete (deletes one digit) • Clear (deletes all entered digits)
• Plus • Star
• Asterisk (*) • 800 (eight hundred)
• 700 (seven hundred) • 900 (nine hundred)
• 411, 911, (etc.) • # / (pound, slash)
Note: To exit Dial mode, press and hold
PHONE MENU.
• (Phone) settings (message)
notification off
• (Phone) settings (set) ringer 1
or press MENU to go to the
Voice commands when connecting devices
When attempting to connect a phone to SYNC, you may say any of
the following commands:
• Connect <device name> • Bluetooth ON
• Bluetooth OFF • Delete device <name>
Note: You can only connect a device to SYNC after it has successfully
gone through the pairing process.
Note: In the above possible commands, “<name>” is a dynamic listing in
that it could be the name of any previously paired device.
See
End User License Agreement
at the end of this book
13
Page 14

SYNC phone features
At any time, you may say these commands:
• SYNC • USB
• Line in • Bluetooth Audio
• Phone • Voice settings
• Cancel • Help
MAKING A CALL
Making a hands-free phone call using SYNC is easy.
1. Press
2. When prompted, say, “Call <phone book contact name>” or say the
desired number and then say “Dial”.
To erase the last spoken digit, say “Delete” or press
To erase all spoken digits, say “Clear” or press and hold
3. Once the desired number/contact is on the screen, either say “Call” or
“Dial”. The system will connect to the desired number.
Note: Once the call is placed, it will be logged into your outgoing call
history folder.
Note: If your audio system is equipped with 10 memory presets (0–9),
you can also manually enter the desired number by pressing the presets.
ENDING A CALL
At any time, you can end an active phone call by pressing and
holding
or VOICE.
SEEK.
SEEK.
.
EXITING PHONE MODE
When in phone mode but not in an active call, press and hold
phone mode.
ANSWERING AN INCOMING CALL
An incoming call interacts with SYNC in much the same way it interacts
with your Bluetooth enabled cellular phone. During an incoming call:
• An audible ring tone will sound. If available, call information will
appear in the display.
• Press TEXT to view additional caller information, if the call matches a
contact in your downloaded phonebook.
14
See
End User License Agreement
at the end of this book
to exit
Page 15

SYNC phone features
• Select from the following options:
Accept the call by pressing
hands-free and logged into the incoming call history folder.
Ignore the call by doing nothing. The display will read MISSED CALL
and SYNC will log the call as a missed call.
Reject the call by pressing and holding
REJECTED and SYNC will log the call.
INCOMING NEW TEXT MESSAGE
Note: This is a phone dependent feature.
If your Bluetooth enabled phone is connected and supports downloading
text messages via Bluetooth, you can receive incoming text messages.
When you are being sent a text message, an audible tone will sound and
NEW MESSAGE will appear in the radio display. You can say “Read
Message” and SYNC will read the message to you.
. The call will be transferred to
. The display will read
Note: To scroll, press
1. Press OK to receive and open the text message or do nothing and the
message will go into your text message inbox. Press OK again and SYNC
will read your message aloud as you are not able to view the message.
You can then also choose whether you’d like to reply or forward the
message.
2. Press OK and scroll to toggle between REPLY TO MESSAGE or
FORWARD MESSAGE.
3. When the desired selection appears in the display, press OK.
If you choose REPLY TO MSG, SYNC will take you back to the text
messaging menu and allow you to again cycle through the list of
predefined messages to send.
If you choose FORWARD MSG, SYNC will take you to your calling
options. Choose to forward the message to anyone in your PHONE
BOOK, CALL HISTORY, or you can choose ENTER NUMBER.
Note: Forwarding a text message is a speed dependent feature and can
only be done when the vehicle is traveling at 3 mph (4.82 km/h) or less.
Note: Only one recipient is allowed per text message.
See
End User License Agreement
SEEK or / .
at the end of this book
15
Page 16

SYNC phone features
USING THE QUICK DIAL FEATURE
SYNC allows you to store phone book contacts and numbers from your
call history folder in 1–5 of your memory presets for quick access.
Note: This feature is not available if your audio system has 10 memory
presets (0–9).
To store a number as a Quick Dial to a memory preset: When in
phone book or call history and the contact’s information is active in the
display, press and hold a memory preset until confirmation appears in
the display.
Note: Quick dials are only available when the phone with which they
were saved is actively paired with SYNC.
To access/call numbers stored in the Quick Dial:
1. Press
2. Press the memory preset (1–5) containing the desired contact
information. The stored information will appear in the radio display.
3. To initiate the call, press
again.
ACTIVE CALL MENU OPTIONS
Once a call is active within SYNC, the following commands are available:
• PRIVACY ON/OFF
• HOLD ON/OFF
• ENTER TONES
• JOIN ON/OFF (Available when you have two active calls)
• PHONE BOOK
• CALL HISTORY
• RETURN
Refer to the following sections for further information.
to enter PHONE MENU.
or press the respective memory preset
16
See
End User License Agreement
at the end of this book
Page 17

SYNC phone features
Using privacy mode
SYNC allows you to easily switch a call from an active hands-free
environment to your Bluetooth enabled cellular phone for a more private
conversation. To turn privacy mode on/off:
Note: To scroll, press
1. Press MENU. The radio display will read CALL MENU.
2. Scroll repeatedly until PRIVACY appears in the radio display.
3. Press OK. The radio display will read PRIVACY ON/PRIVACY OFF?
4. Press OK to activate privacy mode. The radio display will read IN
PRIVACY and the system will transfer the call to your Bluetooth enabled
cellular phone.
Note: Some phones will disconnect from SYNC and transfer the active
call directly to the connected phone.
Putting a call on/off hold
You can put an active phone call on hold to have a private conversation
within the vehicle cabin, or to answer another incoming call. To put an
active call on hold:
Note: To scroll, press
1. Press MENU. The display will read CALL MENU.
2. Scroll repeatedly until HOLD appears in the radio display.
3. Press OK. The display will read HOLD ON/OFF.
4. Press OK when the desired selection appears in the radio display.
Note: If you are putting the current call on hold to answer another call,
press
put the active call on hold and reactivate the call on hold.
to answer the incoming call. Each subsequent press of will
SEEK or / .
SEEK or / .
Enter tones
While in an active call, SYNC allows you to enter tones (i.e. entering
numbers for passwords), using the radio display.
Note: To scroll, press
1. When on an active call, press MENU.
2. Scroll repeatedly until ENTER TONES appears in the radio display.
See
End User License Agreement
SEEK or / .
at the end of this book
17
Page 18

SYNC phone features
3. Press OK.
4. Scroll repeatedly until the desired number appears in the radio
display.
5. Press OK. An audible tone will sound as confirmation. Repeat the
process as many times as necessary.
Joining two calls (multiparty /conference call)
To join two separate calls and speak to both through SYNC:
Note: To scroll, press
1. When on an active call, press
and generate a dial tone indicating the system is waiting for the second
number.
2. Place the second call by accessing the contact information through
SYNC or by using voice recognition and saying the contact name or
number and placing the call.
3. Once you are actively in the second call, press MENU. CALL MENU
will appear.
4. Scroll repeatedly until JOIN CALLS appears in the radio display.
5. Press OK. The display will read JOIN CALLS?
6. Press OK to confirm. The system will join both calls into one and you
will be able to speak to both parties at the same time. The radio display
will indicate that your conference call is active.
Note: SYNC supports a maximum of three callers on a
multiparty/conference call.
Accessing your call history and phone book during an active call
Note: Accessing your phone book is a speed dependent feature. The
vehicle must be moving less than 3 mph (4.82 km/h) to use this feature.
You can access your call history and phone book while on an active call.
Note: To scroll, press
1. Press MENU. The display will read CALL MENU.
2. Scroll repeatedly until CALL HISTORY / PHONEBOOK appears in the
display.
3. Press OK. The system will take you to the chosen menu item.
Refer to Call History and Accessing Your Phone Book for further
details on making selections in those menus.
SEEK or / .
. This will put your first call on hold
SEEK or / .
18
See
End User License Agreement
at the end of this book
Page 19

SYNC phone features
HOW SYNC INTERACTS WITH YOUR BLUETOOTH ENABLED
CELLULAR PHONE
While SYNC has a variety of features, many of them are dependent on
your device’s functionality. To ensure that you have a compatible device
or to check which features are compatible with SYNC, please check your
device’s user guide and also visit www.SyncMyRide.com.
Hands-free calling is one of the main features of SYNC. SYNC works in
conjunction with your Bluetooth enabled cellular phone to offer many
options within SYNC’s PHONE MENU.
Press
call:
PHONE MENU
Note: PHONE MENU will appear briefly to indicate that you are in the
PHONE MENU.
• PHONE REDIAL
• CALL HISTORY
• PHONE BOOK
• TEXT MESSAGE
• PHONE SETTINGS
• APPLICATIONS (if available)
• SYSTEM SETTINGS
• EXIT PHONE
to access the following items when you are not in an active
PHONE REDIAL
Phone redial will prompt your cellular phone with Bluetooth wireless
technology to redial the last number called (if available).
Note: To scroll, press
1. Press
2. PHONE REDIAL will appear in the radio display.
3. Press OK to confirm the selection.
4. The display will read REDIAL? Press OK to confirm. The radio display
will read REDIALING....asitisplacing the call.
to enter PHONE MENU.
See
End User License Agreement
SEEK or / .
at the end of this book
19
Page 20

SYNC phone features
CALL HISTORY
Note: This is a phone dependent feature. If your phone doesn’t support
downloading call history via Bluetooth, SYNC will keep track of calls
made with SYNC.
You can access any previously dialed, received or missed calls while your
Bluetooth enabled phone has been connected to SYNC.
Note: To scroll, press
1. Press
2. Scroll repeatedly until CALL HISTORY appears in the radio display.
3. Press OK to confirm the selection and enter the CALL HISTORY menu.
4. Scroll repeatedly to cycle through INCOMING, OUTGOING or MISSED.
5. Press OK when the desired selection appears in the radio display.
6. Scroll repeatedly to cycle through the desired calls.
7. Press OK or
Note: SYNC will attempt to automatically re-download your phone
book/call history each time your phone connects to SYNC (if the auto
download feature is on and if your Bluetooth enabled cellular phone
supports this feature).
ACCESSING YOUR PHONE BOOK
Note: This is a phone dependent feature.
Note: This is a speed dependent feature. The vehicle must be moving
less than 3 mph (4.82 km/h) to browse your phone book. However, if
your phone supports phone book downloads, you can access your
contacts at any time by pressing VOICE or
name.
When you pair your phone with SYNC, you can choose to download your
cellular phone book. SYNC can support downloading up to approximately
2,000 entries per Bluetooth enabled phone.
to enter PHONE MENU.
to call the desired selection.
SEEK or / .
and saying the contact’s
Note: To scroll, press
1. Press
2. Scroll repeatedly until PHONE BOOK appears in the radio display.
3. Press OK to confirm the selection. If there are fewer than 255 listings,
SYNC will list them alphabetically in flat file mode. If there are more
20
to enter PHONE MENU.
See
End User License Agreement
SEEK or / .
at the end of this book
Page 21

SYNC phone features
than 255 entries listed, SYNC will organize them into quick select
alphabetical categories (i.e. AAAAA-MMMMM and MMMMN — ZZZZZ).
The number of categories will vary depending on the number of entries
downloaded.
4. If there are more than 255 entries, scroll repeatedly to cycle through
these categories until the desired category appears in the radio display.
5. Press OK to confirm.
6. Scroll repeatedly to cycle through the desired contact.
7. Once the desired entry is reached, press OK or
For further information, refer to Modifying your phone book.
Note: If the auto download feature is on, SYNC will automatically
re-download your phone book/call history every time your Bluetooth
enabled cellular phone connects to SYNC.
TEXT MESSAGING
Note: Downloading and sending text messages via Bluetooth is a phone
dependent feature.
To access the text messaging menu:
to call the entry.
Note: To scroll, press
1. Press
2. Scroll repeatedly until TEXT MESSAGE appears in the radio display.
3. Press OK to confirm the selection. If SYNC detects that your
Bluetooth enabled cellular phone does not support downloading text
messaging via Bluetooth, UNSUPPORTED will appear in the radio display
and SYNC will return you to the main menu.
4. INBOX XX will appear in the radio display showing the number of
messages in your inbox.
5. Press OK to have SYNC read your message back to you.
6. Scroll repeatedly to cycle through:
• SEND NEW MSG
• DOWNLOAD MSG
• DELETE ALL
• RETURN
7. Once your desired selection appears on the screen, press OK to
confirm your selection. Refer to the following specific section(s) for
further details on these options.
to enter PHONE MENU.
See
End User License Agreement
SEEK or / .
at the end of this book
21
Page 22

SYNC phone features
Sending new text messages
Note: This is a speed dependent feature. The vehicle must be moving
less than 3 mph (4.82 km/h) to use this feature.
SYNC allows you to send new text messages using a predefined set of 15
messages. To access and choose from these messages:
Note: To scroll, press
1. Press
2. Scroll repeatedly until TEXT MESSAGE appears in the radio display.
3. Press OK to confirm the selection. If SYNC detects that your
Bluetooth enabled cellular phone does not support downloading text
messaging via Bluetooth, UNSUPPORTED will appear in the radio display
and SYNC will return you to the main menu.
4. INBOX XX will appear in the radio display showing the number of
messages in your inbox.
5. Scroll repeatedly until SEND NEW MSG appears in the radio display.
6. Press OK to confirm. SYNC will now allow you to cycle through the
list.
7. Scroll repeatedly to cycle through the following predefined messages:
• Can’t talk right now • Call me
• Call U later • C U in 10 minutes
• C U in 20 minutes • Yes
• No • Why?
• Thanks • Where r you?
• I need more directions • I love you
• Too funny • Can’t wait to see you
• I’m stuck in traffic
Note: Your text messages may vary depending on your audio system.
For example, your system may have the text message ‘B there in 5
minutes’ instead of ‘C U in 5 minutes’.
8. When the desired listing appears on the screen, press OK to confirm
the selection. Once you know the message you want to send, you will
now select to whom you are sending the message.
to enter PHONE MENU.
SEEK or / .
22
See
End User License Agreement
at the end of this book
Page 23

SYNC phone features
9. Scroll repeatedly to cycle through:
PHONE BOOK : Allows you to select a name within your phone book to
send the message.
CALL HISTORY: Allows you to select from your recent calls.
ENTER NUMBER: Allows you to audibly enter phone numbers.
10. When the desired selection appears in the radio display, press OK to
confirm and scroll to cycle through the selections to reach the desired
phone number.
11. The display will read SEND MESSAGE? Press OK to confirm. SYNC
will take you back to your inbox.
Note: Each text message sent by SYNC will be followed by the
signature: “This message was sent from my __”. The message will say
either Ford, Lincoln or Mercury, depending on your vehicle.
Downloading your unread text messages
If your phone supports downloading text messages via Bluetooth wireless
technology, you can download your unread text messages to SYNC.
Note: SYNC does not download read text messages from your phone.
Note: Once the messages are downloaded, they will be noted as ‘read’ in
your Bluetooth enabled cellular phone.
Note: To scroll, press
1. Press
2. Scroll repeatedly until TEXT MESSAGE appears in the radio display.
3. Press OK on your audio system to confirm the selection. INBOX XX
will appear in the display showing the number of messages in your inbox.
4. Scroll repeatedly until DOWNLOAD MSG appears in the radio display.
5. Press OK to confirm your selection. The radio display will read
DOWNLOADING MESSAGES.
6. Once the downloaded text messages have been retrieved, SYNC will
take you into your inbox.
to enter PHONE MENU.
See
End User License Agreement
SEEK or / .
at the end of this book
23
Page 24

SYNC phone features
Deleting all your text messages
You can delete all your current text messages from SYNC.
Note: This will not delete messages from your Bluetooth enabled cellular
phone.
Note: To scroll, press
1. Press
2. Scroll repeatedly until TEXT MESSAGE appears in the radio display.
3. Press OK to confirm the selection. INBOX XX will appear in the radio
display showing the number of messages in your inbox.
4. Scroll repeatedly until DELETE ALL appears in the radio display.
5. Press OK to confirm your selection. The radio display will read ALL
DELETED and the system will return you to your TEXT MESSAGE menu.
Note: SYNC does not automatically download all of your unread text
messages at every connection cycle (as it does with call history and
phone book if automatic download is on).
PHONE SETTINGS
Note: These are phone dependent features.
Under the phone settings menu on SYNC, you can view the status of
your paired phone with Bluetooth wireless technology, select from
various ring tones, select message notification on/off, change phone book
entries and auto download your cellular phone book among other
features. To access the phone settings menu:
Note: To scroll, press
1. Press
2. Scroll repeatedly until PHONE SETTINGS appears in the radio display.
3. Press OK to confirm and enter the PHONE SETTINGS menu.
4. Scroll repeatedly to cycle through the following selections:
• PHONE STATUS
• SET RINGER
• MESSAGE NOTIFICATION
• MODIFY PHONEBOOK
• AUTO DOWNLOAD
• RETURN
to enter PHONE MENU.
to enter PHONE MENU.
SEEK or / .
SEEK or / .
24
See
End User License Agreement
at the end of this book
Page 25

SYNC phone features
Phone status
Note: This is a phone dependent feature.
This feature shows you the provider, name, signal power, battery power
and roaming status of the connected phone. To view your phone’s status:
Note: To scroll, press
1. Press
2. Scroll repeatedly until PHONE SETTINGS appears in the radio display.
3. Press OK to confirm selection. This will take you into the PHONE
SETTINGS menu.
4. Scroll repeatedly until PHONE STATUS appears in the radio display.
5. Press OK to confirm and enter the PHONE STATUS menu.
6. Scroll to view the paired phone’s name, signal level, battery level and
roaming status.
After viewing any of these selections, press OK to return to the PHONE
STATUS menu.
Setting a ring tone
SYNC allows you to select from three ring tones or your cellular phone’s
ring tone. To access:
Note: To scroll, press
1. Press
2. Scroll repeatedly until PHONE SETTINGS appears in the radio display.
3. Press OK to confirm selection. This will take you into the PHONE
SETTINGS menu.
4. Scroll repeatedly until SET RINGER appears in the radio display.
5. Press OK to confirm and take you into the SET RINGER menu.
6. Scroll repeatedly to cycle through and hear RINGER 1, RINGER 2,
RINGER 3 and PHONE RINGER.
Note: In-band ringing is a phone dependent feature. If your phone
supports in-band ringing, your phone’s ringer will play through the
vehicle audio system when PHONE RINGER is chosen.
to access the PHONE MENU.
to enter PHONE MENU.
SEEK or / .
SEEK or / .
See
End User License Agreement
at the end of this book
25
Page 26

SYNC phone features
Message notification
Note: This is a phone dependent feature.
SYNC gives you the option of choosing if you’d like to hear an audible tone
to notify you of an incoming text message. To turn this feature on/off:
Note: To scroll, press SEEK or / .
1. Press
2. Scroll repeatedly until PHONE SETTINGS appears in the radio display.
3. Press OK to confirm and enter the PHONE SETTINGS menu.
4. Scroll repeatedly until MESSAGE NOTIFY appears in the radio display.
5. Press OK to confirm and enter the MESSAGE NOTIFY menu. SYNC
will automatically check to see if your connected phone is equipped with
downloading text messaging via Bluetooth.
6. Scroll to select MESSAGE NOTIFY ON or MESSAGE NOTIFY OFF.
7. Press OK to confirm. NOTIFY SET ON or NOTIFY SET OFF will
appear in the radio display.
Modifying your phone book
Note: This is a phone dependent feature.
SYNC allows you to modify the contents of your downloaded phone book
(i.e. adding/deleting contacts). To access:
Note: To scroll, press
1. Press
2. Scroll repeatedly until PHONE SETTINGS appears in the radio display.
3. Press OK to confirm selection and enter the PHONE SETTINGS menu.
4. Scroll repeatedly until MODIFY PHONEBOOK appears in the radio display.
5. Press OK to confirm the selection.
6. Scroll repeatedly to cycle through contact(s):
• ADD CONTACTS: Press OK when ADD CONTACTS appears in the
radio display to add more contacts from your phone book. ‘Push’ the
desired contact(s) on your Bluetooth enabled cellular phone. The
radio display will read SEND VIA PHONE. Note: Refer to your
phone’s user guide on how to ‘push’ contact(s).
Note: This is a speed dependent feature and cannot be operated if
the vehicle is traveling at speeds greater than 3 mph (4.82 km/h).
to access PHONE MENU.
SEEK or / .
to enter PHONE MENU.
26
See
End User License Agreement
at the end of this book
Page 27

SYNC phone features
• DELETE PHONE BOOK: Press OK to select when DELETE PHONE
BOOK appears in the display to delete the current phone book and
call history. When DELETE? appears in the display, press OK. The
display will read DELETED and SYNC will take you back to the
PHONE SETTINGS menu.
• DOWNLOAD PHONE BOOK: When DOWNLOAD PHONE BOOK
appears in the radio display, press OK. DOWNLOAD? will appear in
the radio display. Press OK. The radio display will read
DOWNLOADING and then DOWNLOADED when complete.
• DELETE CONTACT: When DELETE CONTACT appears in the radio
display, press OK to delete a specific contact. Press OK when SELECT
CONTACT appears and scroll until the desired name appears in the
radio display. Press OK to select. DELETE CONTACT? will appear in
the radio display. Press OK to confirm, and DELETED will appear in
the radio display.
Note: If Automatic download is on, the contact may appear on the
next download from your Bluetooth enabled cellular phone.
Note: This is a speed dependent feature and cannot be operated if
the vehicle is traveling at speeds greater than 3 mph (4.82 km/h).
• RETURN: Select to go back.
Automatically downloading your phone book
Note: This is a phone dependent feature.
SYNC allows you to automatically download your Bluetooth enabled
cellular phone’s phone book with location type (i.e., cell, work, other), if
supported, each time your phone connects with SYNC.
Note: Your phone book, call history and text messages can only be
accessed when your specific Bluetooth enabled cellular phone is
connected.
Note: To scroll, press
1. Press
2. Scroll repeatedly until PHONE SETTINGS appears in the radio display.
3. Press OK to confirm selection and enter the PHONE SETTINGS menu.
4. Scroll repeatedly until AUTO DOWNLOAD appears in the radio
display.
5. Press OK. AUTO ON? will appear in the radio display.
to access the PHONE MENU.
See
End User License Agreement
SEEK or / .
at the end of this book
27
Page 28

SYNC phone features
6. Press OK. AUTO SET ON will appear and your phone book will be
automatically downloaded each time your Bluetooth enabled cellular
phone connects with SYNC.
Or, select AUTO OFF and your phone book will not be automatically
downloaded each time your phone connects with SYNC.
7. Press OK to confirm your selection.
Note: Downloading times are phone and quantity dependent.
Note: If you choose to automatically download your cellular phone’s
phone book every time your Bluetooth enabled phone reconnects to
SYNC, any changes, additions or deletions that have been saved since
your last download will be deleted.
APPLICATIONS
The applications listing will show you any software applications that have
been downloaded to SYNC. To access:
Note: To scroll, press
1. Press
2. Scroll repeatedly until the application name appears in the radio
display.
3. Press OK.
SYSTEM SETTINGS
To access SYSTEM SETTINGS of BT (BLUETOOTH) DEVICES and
ADVANCED SETTINGS:
Note: To scroll, press
1. Press
2. Scroll repeatedly until SYSTEM SETTINGS appears in the radio
display.
3. Press OK to confirm and enter the SYSTEM SETTINGS menu.
4. Scroll repeatedly to access:
BT (BLUETOOTH) DEVICES:
• ADD DEVICE
• CONNECT BT
• SET PRIMARY
28
to enter PHONE MENU.
to enter PHONE MENU.
See
End User License Agreement
SEEK or / .
SEEK or / .
at the end of this book
Page 29

SYNC phone features
• BT (BLUETOOTH) ON/OFF
• DELETE DEVICE
• DELETE ALL
• RETURN
ADVANCED:
• PROMPTS
• LANGUAGES
• DEFAULTS
• MASTER RESET
• INSTALL APPLICATIONS
• SYSTEM INFO
• RETURN
Refer to the following sections for further information.
Adding a phone
Note: This is a speed dependent feature and cannot be performed when
the vehicle is traveling at speeds greater than 3 mph (4.82 km/h).
Note: SYNC can store up to 12 previously paired devices.
To add/pair an additional Bluetooth enabled device(s) to SYNC:
Note: To scroll, press
1. Press
2. Scroll repeatedly until SYSTEM SETTINGS appears in the radio
display.
3. Press OK to confirm and enter the SYSTEM SETTINGS menu.
4. Scroll repeatedly until BT DEVICES appears in the radio display.
5. Press OK to confirm and enter the BT DEVICES menu.
6. Scroll repeatedly until ADD DEVICE appears in the display. Press OK
to confirm.
7. When FIND SYNC appears in the display, press OK. Follow the
instructions in your device’s user guide to put your phone into discovery
mode. A six digit PIN will appear in the radio display.
8. When prompted on your phone display, enter the six digit PIN.
9. Once pairing is successful, DEVICE NAME and then CONNECTING
and then CONNECTED will appear in the radio display. Depending on
the functionality of your phone, you may be asked additional questions.
to enter PHONE MENU.
See
End User License Agreement
SEEK or / .
at the end of this book
29
Page 30

SYNC phone features
10. SYNC will ask if you would like to set this phone as a PRIMARY?
phone. (This means that SYNC will automatically attempt to connect to
this phone with every connection cycle.) Press OK.
11. Scroll to toggle between YES? and NO?. When the appropriate
response is in the display, press OK. If you choose YES, PRIMARY SET
will appear in the radio display. If you choose NO? , NOT PRIMARY will
appear in the display.
12. If you selected this as your primary phone, SYNC may ask if you
would like to DOWNLOAD? your Bluetooth enabled cellular phone’s
phone book/call history (if supported).
13. Scroll to toggle between YES? and NO? When the appropriate
response is in the radio display, press OK.
14. If you choose YES, the display will read DOWNLOADING. PHONE
BOOK DOWNLOADED will appear and SYNC will take you back to the
main menu.
Connecting a phone
To connect a previously paired Bluetooth enabled phone:
Note: To scroll, press
1. Press
2. Scroll repeatedly until SYSTEM SETTINGS appears in the radio
display.
3. Press OK to confirm and enter the SYSTEM SETTINGS menu.
4. Scroll repeatedly until BT DEVICES appears in the radio display.
5. Press OK to confirm the selection. This will take you into the BT
DEVICES menu.
6. Scroll repeatedly until CONNECT DEVICE appears in the radio
display.
7. Press OK to confirm and view the list of previously paired phone.
8. Select the desired device and press OK to connect to the phone.
Note: Only one device can be connected at a time. When another phone
is connected, the previous one will be disconnected.
30
to enter PHONE MENU.
See
End User License Agreement
SEEK or / .
at the end of this book
Page 31

SYNC phone features
Setting a phone as primary
To set a previously paired phone as your primary phone:
Note: To scroll, press
1. Press
2. Scroll repeatedly until SYSTEM SETTINGS appears in the radio
display.
3. Press OK to confirm and enter the SYSTEM SETTINGS menu.
4. Scroll repeatedly until BT DEVICES appears in the radio display.
5. Press OK to confirm and enter the BT DEVICES menu.
6. Scroll repeatedly until SET PRIMARY? appears in the radio display.
7. Select the desired phone and press OK to confirm. PRIMARY SET will
appear in the radio display.
SYNC will now attempt to connect to this primary Bluetooth enabled
phone with each connection cycle.
Note: When a phone is selected as primary, it will appear first in the list
and also be marked with an *.
Bluetooth on/off
To turn the Bluetooth feature on SYNC on/off:
Note: To scroll, press
1. Press
2. Scroll repeatedly until SYSTEM SETTINGS appears in the radio
display.
3. Press OK to confirm and enter the SYSTEM SETTINGS menu.
4. Scroll repeatedly until BT DEVICES appears in the radio display.
5. Press OK to confirm and enter the BT DEVICES menu.
6. Scroll repeatedly until BT ON/OFF appears in the radio display.
7. When the desired selection appears in the display, press OK.
Note: Turning BT OFF will disconnect all Bluetooth devices and
deactivate all Bluetooth features.
to enter PHONE MENU.
to enter PHONE MENU.
SEEK or / .
SEEK or / .
See
End User License Agreement
at the end of this book
31
Page 32

SYNC phone features
Deleting a phone
To delete a paired phone from SYNC:
Note: To scroll, press
1. Press
2. Scroll repeatedly until SYSTEM SETTINGS appears in the radio
display.
3. Press OK to confirm and enter the SYSTEM SETTINGS menu.
4. Scroll repeatedly until BT DEVICES appears in the radio display.
5. Press OK to confirm and enter the BT DEVICES menu.
6. Scroll repeatedly until DELETE DEVICE appears in the radio display.
Press OK.
7. Scroll to select the previously paired device to delete and press OK to
confirm.
Deleting all phones
To delete all previously paired phones from SYNC:
Note: To scroll, press
1. Press
2. Scroll repeatedly until SYSTEM SETTINGS appears in the radio
display.
3. Press OK to confirm and enter the SYSTEM SETTINGS menu.
4. Scroll repeatedly until BT DEVICES appears in the radio display.
5. Press OK to confirm and enter the BT DEVICES menu.
6. Scroll repeatedly until DELETE ALL appears in the radio display.
7. OK to confirm.
Note: Deleting a phone will also delete all information in SYNC originally
saved with that phone.
to enter PHONE MENU.
to enter PHONE MENU.
SEEK or / .
SEEK or / .
Turning prompts on/off
Prompts from SYNC can help guide you via questions, helpful hints or
ask you for a specific action. To turn prompts on/off:
Note: To scroll, press
1. Press
32
to enter the PHONE MENU.
See
End User License Agreement
SEEK or / .
at the end of this book
Page 33

SYNC phone features
2. Scroll repeatedly until SYSTEM SETTINGS appears in the radio
display.
3. Press OK to confirm and enter the SYSTEM SETTINGS menu.
4. Scroll repeatedly until ADVANCED appears in the radio display.
5. Press OK to confirm and enter the ADVANCED menu.
6. Scroll repeatedly until PROMPTS appears in the radio display.
7. Press OK to enter the PROMPTS menu.
8. Scroll to toggle between PROMPTS ON or PROMPTS OFF. (The
default setting is ON).
9. Press OK when the desired selection appears in the radio display. SET
ON or SET OFF will appear in the radio display as a confirmation. SYNC
will then take you back to the ADVANCED menu.
Changing the language setting
SYNC allows you to select from three languages: English, French and
Spanish. Once selected, all radio display messages and prompts will be in
the selected language. To access the language menu:
Note: To scroll, press
1. Press
2. Scroll repeatedly until SYSTEM SETTINGS appears in the radio
display.
3. Press OK to confirm and enter the SYSTEM SETTINGS menu.
4. Scroll repeatedly until ADVANCED appears in the radio display.
5. Press OK to confirm and enter the ADVANCED menu.
6. Scroll repeatedly until LANGUAGE appears in the radio display.
7. Press OK to enter the LANGUAGE menu.
8. Scroll repeatedly to cycle through ENGLISH, FRANCAIS and
ESPANOL.
9. Press OK when the desired selection appears in the radio display. If
you have changed the language setting, the radio display will read
UPDATING. Once the change is complete, SYNC will confirm the change
audibly and in the radio display. SYNC will then take you back to the
LANGUAGES menu.
to enter the PHONE MENU.
See
End User License Agreement
SEEK or / .
at the end of this book
33
Page 34

SYNC phone features
Returning to the factory defaults
SYNC allows you to return to its factory defaults settings. This selection
will not erase your downloaded phone book, call history, text messages,
etc. If you wish to erase all information, refer to Performing a master
reset.
Note: To scroll, press
1. Press
2. Scroll repeatedly until SYSTEM SETTINGS appears in the radio
display.
3. Press OK to confirm and enter the SYSTEM SETTINGS menu.
4. Scroll repeatedly until ADVANCED appears in the radio display.
5. Press OK to confirm and enter the ADVANCED menu.
6. Scroll repeatedly until DEFAULTS appears in the radio display.
7. Press OK. The display will read RESTORE DEFAULTS?
8. Press OK to confirm. The display will read DEFAULTS SET. SYNC will
take you back to the DEFAULTS menu.
Performing a master reset
A master reset allows you to completely erase all information stored in
SYNC (all phone book, call history and text message information as well
as all previously paired phones) and return to the factory default
settings. To perform a master reset:
Note: To scroll, press
1. Press
2. Scroll repeatedly until SYSTEM SETTINGS appears in the radio
display.
3. Press OK to enter the SYSTEM SETTINGS menu.
4. Scroll repeatedly until ADVANCED appears in the radio display. Press
OK.
5. Scroll repeatedly until MASTER RESET appears in the radio display
6. Press OK. SYNC will ask you to confirm the reset.
7. Press OK to confirm. The radio display will read RESET DONE. SYNC
will take you back to the ADVANCED SETTINGS menu.
Note: Once a master reset has been completed, you must re-insert your
USB device to access its contents.
to enter PHONE MENU.
to enter the PHONE MENU.
SEEK or / .
SEEK or / .
34
See
End User License Agreement
at the end of this book
Page 35

SYNC phone features
Installing new vehicle applications
You can download new software applications (if available) and then load
the desired applications onto SYNC through your USB port. Please refer
to www.SyncMyRide.com for further information.
System information
The system information feature allows you to access the AutoVersion
number as well as the FDN number. To access:
Note: To scroll, press
1. Press
2. Scroll repeatedly until SYSTEM SETTINGS appears in the radio
display.
3. Press OK to enter the SYSTEM SETTINGS menu.
4. Scroll repeatedly until ADVANCED appears in the radio display. Press
OK.
5. Scroll repeatedly until SYSTEM INFO appears in the radio display
6. Press OK.
7. Scroll repeatedly until the desired selection appears in the radio
display.
8. Press OK when the desired selection appears in the radio display.
to enter the PHONE MENU.
SEEK or / .
See
End User License Agreement
at the end of this book
35
Page 36

SYNC media features
VOICE COMMANDS IN MEDIA MODE
Driving while distracted can result in loss of vehicle control,
accident and injury. Ford strongly recommends that drivers use
extreme caution when using cell phones, even with voice commands.
The driver’s primary responsibility is the safe operation of their vehicle.
Only use media and other devices not essential to the driving task
when it is safe to do so.
Voice commands when using the USB port
When using the USB port, you may say any of the following
commands:
• Play all • Play
• Pause • What’s playing?
• Connections • Play next track
• Play previous track • Play next folder
• Folder • Play previous folder
• Autoplay on • Autoplay off
• Repeat off • Repeat on
• Shuffle on • Shuffle off
• Play genre <name>
1
• Play playlist <name>
• Play album <name> • Play artist <name>
• Similar music • Play track <name>
• Search artist <name>
• Search track <name>
• Refine album <name>
• Refine track <name>
1
Voice commands are not available until indexing is complete.
2
Voice commands only available in folder mode. For more information,
1
1
1
1
• Search genre <name>
• Search album <name>
• Refine artist <name>
refer to Exploring the USB device later in this chapter.
Note: In the above possible commands, “<name>” is a dynamic listing in
that it could be the name of any desired group, artist, etc.
Autoplay: With this feature ON, SYNC allows you to listen to music
which has already been randomly indexed during the indexing process.
With this feature OFF, SYNC will not begin to play any of your music
until all media has all been indexed.
2
2
1
1
1
1
1
1
36
See
End User License Agreement
at the end of this book
Page 37

SYNC media features
Note: The larger the number of songs the system has to index, the
longer indexing will take. Indexing times can vary from device to device.
Search/Play Genre: You can search for and play a specific genre (type)
of music. SYNC will search all the data from your indexed music and, if
available, will begin to play that type of music.
Note: You can only play genres of music which are present in the
GENRE metadata tags that you have on your digital media player.
Similar music: You can tell the system to play music ‘similar’ to what
you are currently playing from the USB port. SYNC will use the metadata
information of each indexed song to compile a playlist for you.
Search/play artist/track/album: You can search for a specific
artist/track or album from the music SYNC has indexed through the USB
port.
Refine: This allows you to ‘refine’ your previous commands. For
example, if you told SYNC to search and play all music by a certain
artist, you could then tell SYNC to “refine album” and choose a specific
album from the list to view. If you then select ‘Play’, the system will only
play music from that specific album.
Voice commands while using Line in
While using the Line in feature (Auxiliary input jack), you may
speak the following commands:
• SYNC • Line in
• Bluetooth Audio • Cancel
• Phone • Voice settings
Voice commands when in Bluetooth audio mode
When in Bluetooth audio mode, you may use the following
commands:
• Play all • Play
• Pause • What’s playing?
• Connections • Play next track
• Play previous track
Note: Please refer to your device’s user guide to see if these commands
are supported for Bluetooth audio.
See
End User License Agreement
at the end of this book
37
Page 38

SYNC media features
At any time, you may say these commands:
• SYNC • USB
• Help • Bluetooth Audio
• Line in • Phone
• Voice settings • Read message
• Cancel
Connecting a digital media player to SYNC via the USB port
Note: If your digital media player has an ON/OFF switch, ensure that
the device is ON.
1. Plug the device into the vehicle’s USB port.
2. Press AUX repeatedly until SYNC USB appears in the radio display.
3. Depending on how many digital media files are on your connected
device, INDEXING may appear in the radio display until indexing is
complete. You will then be taken to the PLAY MENU. Press OK.
4. Press
Playlists, Tracks, Explore USB, Similar Music and Return.
5. When the desired PLAY MENU selection appears in the radio display,
press OK to build your desired music selection.
What’s playing?
At any time while a track is playing, you can press
“What’s playing?”. SYNC will read the metadata tags of the playing track
to you (if populated).
/ to cycle through selections of: Play All, Albums, Genres,
or VOICE and say,
USING YOUR MEDIA MENU
SELECT SRC (SOURCE) will allow you to select from various possible
SYNC media sources, such as: USB, BT STEREO or LINE IN (Auxiliary
Input jack).
To access the SELECT SRC (SOURCE) within the Media section of
SYNC:
Note: To scroll, press
1. Press AUX repeatedly until SYNC appears.
2. Press MENU to enter the MEDIA MENU.
38
See
End User License Agreement
SEEK or / .
at the end of this book
Page 39

SYNC media features
3. Scroll repeatedly to cycle through:
• PLAY MENU - Refer to Using SYNC’s play menu later in this
chapter.
• SELECT SRC (Select source)
• MEDIA SETTINGS
• APPLICATION
• SYSTEM SETTINGS
• EXIT MENU
4. When the desired selection appears in the radio display, press OK to
confirm. Refer to the following sections for further information on these
selections.
Selecting different media sources
The MEDIA MENU in SYNC allows you to select and play music from
different media sources (USB, BT STEREO or LINE IN - Auxiliary Input
jack). Once accessed, you can then play music, shuffle, access your
playlists, etc. To access this menu:
Note: To scroll, press
1. Press AUX repeatedly until SYNC appears.
2. Press MENU to access the MEDIA MENU.
3. Press OK.
4. Scroll repeatedly until SELECT SRC (Select source) appears in the
radio display.
5. Press OK to confirm.
6. Scroll repeatedly to cycle through:
USB
BT STEREO
Note: This is a device dependent feature.
LINE IN
See
End User License Agreement
SEEK or / .
at the end of this book
39
Page 40

SYNC media features
Accessing and using your USB port
Your vehicle is equipped with a USB port. (For exact location, refer to
your vehicle’s Owner’s guide.) You can use the USB port to plug in and
access media devices as well as charge devices (if supported by your
device). For a list of compatible media players, refer to
www.SyncMyRide.com.
Note: Since your USB port allows you to charge your device (if
supported by your device), SYNC will not automatically change media
modes when something is initially plugged into the USB port. To access
the USB port through your SYNC system:
Note: To scroll, press
1. Ensure that the desired device is plugged into the USB port and is
turned ON.
2. Press AUX repeatedly until SYNC appears.
3. Press MENU. MEDIA MENU will momentarily appear in the radio
display.
4. Scroll repeatedly until SELECT SRC (Select source) appears in the
radio display.
5. Press OK to confirm and enter the SELECT SRC (Select source).
6. Scroll repeatedly until SYNC USB appears in the radio display.
7. Press OK to confirm. The radio display will read USB CHOSEN.
If the connected device and media content is supported, SYNC will begin
indexing available media files. NO MEDIA will appear in the radio display
if there are no readable media files for SYNC to play. If there are
readable media files, INDEXING may appear in the radio display. If
Autoplay is ON, SYNC gives you the ability to access media files
randomly as they are indexed. If Autoplay is OFF, indexed media is not
available until the indexing process is complete. After indexing is
complete, the radio display will read INDEXED and SYNC will take you
to the PLAY MENU.
Note: The time required to complete the indexing process is dependent
upon the size of the media content being indexed.
Note: SYNC is capable of indexing thousands of average size media files.
SYNC will notify you once maximum indexing file size is reached.
If your playing device becomes disconnected from the USB port at
any time, the display will read USB REMOVED.
SEEK or / .
40
See
End User License Agreement
at the end of this book
Page 41

SYNC media features
Streaming music from your Bluetooth enabled phone
Note: This is a phone dependent feature. Refer to your phone’s user
guide for further information on how to stream Bluetooth audio.
SYNC allows you to stream music from your Bluetooth enabled cellular
phone to play through SYNC.
To access:
Note: To scroll, press
1. Ensure that the desired music is playing on your paired phone and
your phone is in Bluetooth audio streaming mode.
2. Press AUX repeatedly until SYNC appears.
3. Press MENU. MEDIA MENU will momentarily appear in the radio
display.
4. Press OK to access the PLAY MENU.
5. Scroll repeatedly until SELECT SRC (Select source) appears in the
radio display.
6. Press OK to confirm.
7. Scroll repeatedly until BT STEREO appears.
8. Press OK to confirm. The radio display will show the name of the
Bluetooth enabled cellular phone currently connected to SYNC. MEDIA
STREAM will appear in the radio display.
While the music is streaming through your audio system you can also use
the following functions (if supported by your device):
Press
Press
If your phone becomes disconnected from the system at any time,
the display will read BT DISCONNECTED.
SEEK to access the previous/next track.
to play or to pause the currently playing song.
SEEK or / .
Using Line in (auxiliary input jack) with SYNC
Your vehicle is equipped with an auxiliary input jack which allows you to
plug and play your portable music player over the vehicle speakers.
For exact location of your auxiliary input jack, refer to your vehicle’s
Owner’s guide.
To access:
Note: To scroll, press
1. Press AUX repeatedly until SYNC appears.
See
End User License Agreement
SEEK or / .
at the end of this book
41
Page 42

SYNC media features
2. Press MENU. MEDIA MENU will momentarily appear in the radio
display.
3. Press OK to access the PLAY MENU.
4. Scroll repeatedly until SELECT SRC (Select source) appears in the
radio display.
5. Press OK to confirm selection.
6. Scroll repeatedly until LINE IN appears in the radio display.
7. Press OK to confirm selection. Ensure that your device is plugged into
the auxiliary input jack and is playing. The radio display will confirm
LINE IN CHOSEN.
Note: If you already have a device connected to the USB port, you
cannot access the LINE IN feature. Some digital media players require
both USB and LINE IN ports to stream data and music separately.
Using the media settings in media menu
SYNC allows you to change the way you listen to your playing media.
Through the media settings menu, you can access Shuffle, Repeat and
Autoplay. To access these settings:
Note: To scroll, press
1. Press AUX repeatedly until SYNC appears.
2. Press MENU. MEDIA MENU will momentarily appear in the radio
display.
3. Press OK to access the PLAY MENU.
4. Scroll repeatedly until MEDIA SETTINGS appears in the radio display.
5. Press OK to confirm selection and enter the MEDIA SETTINGS menu.
6. Scroll repeatedly to cycle through:
SHUFFLE: Allows you to shuffle available media files.
REPEAT: Allows you to repeat any song.
AUTOPLAY: Allows you to listen to music which has already been
randomly indexed during the indexing process.
Note: You may also press
advance to the previous/next track.
Note: Depending on the amount of files on your device, SYNC may take
awhile to index all the metadata information.
42
See
End User License Agreement
SEEK or / .
SEEK on your audio system to
at the end of this book
Page 43

SYNC media features
7. When the desired selection appears in the radio display, press OK.
Note: Once turned on, these menu selections will remain on until they
are turned off. Some digital media players require both USB and LINE IN
ports to stream data and music separately.
Accessing your vehicle applications (if available)
SYNC allows you to view any SYNC applications which have been
downloaded via the USB port. To access:
Note: To scroll, press
1. Press AUX repeatedly until SYNC appears.
2. Press MENU. MEDIA MENU will momentarily appear in the radio
display.
3. To access the downloaded applications, scroll repeatedly until the
desired application appears in the display.
For further information on possible applications, please visit
www.SyncMyRide.com.
Accessing your media system settings
Note: To scroll, press
1. Press AUX repeatedly until SYNC appears.
2. Press MENU. MEDIA MENU will momentarily appear in the radio
display.
3. Press OK to access the PLAY MENU.
4. Scroll repeatedly until SYSTEM SETTINGS appears in the radio
display.
5. Press OK to confirm and enter the SYSTEM SETTINGS menu.
6. Scroll repeatedly to cycle through:
BT (BLUETOOTH) DEVICES:
• ADD DEVICE
• CONNECT BT
• BT (BLUETOOTH) ON/OFF
• DELETE DEVICE
• DELETE ALL
• RETURN
SEEK or / .
SEEK or / .
See
End User License Agreement
at the end of this book
43
Page 44

SYNC media features
ADVANCED:
• PROMPTS
• LANGUAGES
• DEFAULTS
• MASTER RESET
• INSTALL APPLICATIONS
• RETURN
Refer to the following sections for further information.
Adding a Bluetooth media device which is in discovery mode
Note: This is a speed dependent feature. Your vehicle must be moving
less than 3 mph (4.82 km/h) to use this feature.
Note: If your phone supports streaming Bluetooth audio and has already
been paired with SYNC as a phone, you do not have to go through the
pairing process again.
Note: To scroll, press
1. Press AUX repeatedly until SYNC appears.
2. Press MENU. MEDIA MENU will momentarily appear in the radio
display.
3. Press OK to access the PLAY MENU.
4. Scroll repeatedly until SYSTEM SETTINGS appears in the radio
display.
5. Press OK to confirm and enter the SYSTEM SETTINGS menu.
6. Scroll until BT (BLUETOOTH) DEVICES appears in the radio display.
Press OK to confirm and enter the BT DEVICES menu.
7. Scroll until ADD DEVICE appears in the radio display. Press OK to
confirm.
8. When FIND SYNC appears in the display, press OK. Follow the
instructions in your device’s user guide to put your phone into discovery
mode. A six digit PIN will appear in the radio display.
9. When prompted on your phone’s display, enter the six digit PIN in the
radio display.
10. Once pairing is successful, DEVICE NAME and then CONNECTING
and then CONNECTED will appear in the radio display.
You can now change SYNC sources to BT (BLUETOOTH) AUDIO and
stream music from your device.
44
See
End User License Agreement
SEEK or / .
at the end of this book
Page 45

SYNC media features
Adding a Bluetooth media device which is in discoverable mode
Note: This is a speed dependent feature. Your vehicle must be moving
less than 3 mph (4.82 km/h) to use this feature.
Note: If your phone supports streaming Bluetooth audio and has already
been paired with SYNC as a phone, you do not have to go through the
pairing process again.
Note: To scroll, press
1. Press AUX repeatedly until SYNC appears.
2. Press MENU. MEDIA MENU will momentarily appear in the radio display.
3. Press OK to access the PLAY MENU.
4. Scroll repeatedly until SYSTEM SETTINGS appears in the radio display.
5. Press OK to confirm and enter the SYSTEM SETTINGS menu.
6. Scroll until BT (BLUETOOTH) DEVICES appears in the display. Press
OK to confirm and enter the BT DEVICES menu.
7. When FIND SYNC appears in your radio display, scroll repeatedly until
FIND DEVICES appears. Press OK to confirm.
8. After the search for active BT DEVICES is complete, scroll to find the
desired device. Press OK to confirm.
9. Refer to your device’s user guide for instructions on how to put your
device into discoverable mode. When your media device gives you a PIN,
enter that PIN into SYNC using voice commands (or using the 0–9
memory presets on your audio system, if equipped), when prompted.
10. When you have entered your last digit via voice, say “Enter”.
11. When the process is complete, SYNC will display CONNECTED and
the name of the device will appear in the radio display.
You can now change SYNC sources to BT (BLUETOOTH) AUDIO and
stream music from your device.
SEEK or / .
Connecting a Bluetooth media device
To connect a previously paired Bluetooth device:
Note: To scroll, press
1. Press AUX repeatedly until SYNC appears.
2. Press MENU. MEDIA MENU will momentarily appear in the radio display.
3. Press OK to access PLAY MENU.
See
End User License Agreement
SEEK or / .
at the end of this book
45
Page 46

SYNC media features
4. Scroll repeatedly until SYSTEM SETTINGS appears in the radio display.
5. Press OK to confirm and enter the SYSTEM SETTINGS menu.
6. Scroll repeatedly until BT DEVICES menu appears in the radio display.
7. Press OK to confirm the selection. This will take you into the BT
DEVICES menu.
8. Scroll repeatedly until CONNECT BT appears in the radio display.
9. Select the desired device and press OK to connect to the device.
Bluetooth on/off
To turn the Bluetooth feature on SYNC on/off:
Note: To scroll, press
1. Press AUX repeatedly until SYNC appears.
2. Press MENU. MEDIA MENU will momentarily appear in the radio
display.
3. Press OK to access the PLAY MENU.
4. Scroll repeatedly until SYSTEM SETTINGS appears in the radio display.
5. Press OK to confirm and enter the SYSTEM SETTINGS menu.
6. Scroll repeatedly until BT (BLUETOOTH) DEVICES MENU appears in
the radio display.
7. Press OK to confirm the selection. This will take you into the BT
(BLUETOOTH) DEVICES menu.
8. Scroll repeatedly until BT ON/OFF appears in the radio display.
9. When the desired selection appears in the display, press OK.
Note: Selecting BLUETOOTH (BT) OFF will disconnect all Bluetooth
devices and deactivate all Bluetooth features.
SEEK or / .
Deleting a device
To delete a previously paired media device from SYNC:
Note: To scroll, press
1. Press AUX repeatedly until SYNC appears.
2. Press MENU. MEDIA MENU will momentarily appear in the radio
display.
3. Press OK to access the PLAY MENU.
4. Scroll repeatedly until SYSTEM SETTINGS appears in the radio display.
SEEK or / .
46
See
End User License Agreement
at the end of this book
Page 47

SYNC media features
5. Press OK to confirm and enter the SYSTEM SETTINGS menu.
6. Scroll repeatedly until BT (BLUETOOTH) DEVICES appears in the
radio display.
7. Press OK to confirm the selection. This will take you into the BT
DEVICES menu.
8. Scroll repeatedly until DELETE DEVICE appears in the radio display.
Press OK.
9. Scroll to select a previously paired device to delete and press OK to
confirm.
Deleting all devices
To delete all previously paired devices from SYNC:
Note: To scroll, press
1. Press AUX repeatedly until SYNC appears.
2. Press MENU. MEDIA MENU will momentarily appear in the display.
3. Press OK to access PLAY MENU.
4. Scroll repeatedly until SYSTEM SETTINGS appears in the radio display.
5. Press OK to confirm and enter the SYSTEM SETTINGS menu.
6. Scroll repeatedly until BT DEVICES appears in the radio display.
7. Press OK to confirm the selection. This will take you into the BT
DEVICES menu.
8. Scroll repeatedly until DELETE ALL appears in the radio display.
Press OK. The radio display will read ALL DELETED when complete.
SEEK or / .
Turning prompts on/off
Prompts from SYNC can help guide you via questions, helpful hints or
ask you for a specific action. To turn prompts on/off:
Note: To scroll, press
1. Press AUX repeatedly until SYNC appears.
2. Press MENU. MEDIA MENU will momentarily appear in the radio
display.
3. Press OK to access PLAY MENU.
4. Scroll repeatedly until SYSTEM SETTINGS appears in the radio display.
5. Press OK to confirm and enter the SYSTEM SETTINGS menu.
SEEK or / .
See
End User License Agreement
at the end of this book
47
Page 48

SYNC media features
6. Scroll repeatedly until ADVANCED appears in the radio display.
7. Press OK to confirm and enter the ADVANCED menu.
8. Scroll repeatedly until PROMPTS appears in the radio display.
9. Press OK to enter the PROMPTS menu.
10. Scroll to toggle between PROMPTS ON or PROMPTS OFF. (The
default setting is ON).
11. Press OK when the desired selection appears in the radio display.
SET ON or SET OFF will appear in the radio display as a confirmation.
SYNC will then take you back to the ADVANCED menu.
Changing the SYNC language setting
SYNC allows you to select from three languages: English, French and
Spanish. Once selected, all of SYNC’s radio displays and prompts will be
in the selected language. To access the language menu:
Note: To scroll, press
1. Press AUX repeatedly until SYNC appears.
2. Press MENU. MEDIA MENU will momentarily appear in the radio
display.
3. Press OK to access the PLAY MENU.
4. Scroll repeatedly until SYSTEM SETTINGS appears in the radio
display.
5. Press OK to confirm and enter the SYSTEM SETTINGS menu.
6. Scroll repeatedly until ADVANCED appears in the radio display.
7. Press OK to confirm and enter the ADVANCED menu.
8. Scroll repeatedly until LANGUAGE appears in the radio display.
9. Press OK to enter the LANGUAGE menu.
10. Scroll repeatedly to cycle through ENGLISH, FRANCAIS and
ESPANOL.
11. Press OK when the desired selection appears in the radio display. If
you have changed the language setting, the display will read UPDATING.
Once the change is complete, SYNC will confirm the change audibly and
in the radio display. SYNC will then take you back to the ADVANCED
menu.
48
See
End User License Agreement
SEEK or / .
at the end of this book
Page 49

SYNC media features
Returning to the factory defaults
SYNC allows you to return to the factory defaults settings. This selection
will not erase your indexed information. If you wish to erase all
information, refer to Performing a master reset.
Note: To scroll, press
1. Press AUX repeatedly until SYNC appears.
2. Press MENU. MEDIA MENU will momentarily appear in the display.
3. Press OK to access the PLAY MENU.
4. Scroll repeatedly until SYSTEM SETTINGS appears in the radio
display.
5. Press OK to confirm and enter the SYSTEM SETTINGS menu.
6. Scroll repeatedly until ADVANCED appears in the radio display.
7. Press OK to confirm and enter the ADVANCED menu.
8. Scroll repeatedly until DEFAULTS appears in the radio display.
9. Press OK. The display will read RESTORE?
10. Press OK to confirm. The display will read RESTORED. SYNC will
take you back to the ADVANCED SETTINGS menu.
SEEK or / .
Performing a master reset
A master reset allows you to completely erase all information stored in
SYNC (all phone book, call history and text message information as well
as all paired devices) and return to the factory default settings.
Note: Once a mast reset has been completed, you must re-insert your
USB device to access the contents.
Note: To scroll, press
1. Press AUX repeatedly until SYNC appears.
2. Press MENU. MEDIA MENU will momentarily appear in the radio
display.
3. Press OK to access PLAY MENU.
4. Scroll repeatedly until SYSTEM SETTINGS appears in the radio
display.
5. Press OK to confirm and enter the SYSTEM SETTINGS menu.
6. Scroll repeatedly until ADVANCED appears in the radio display.
7. Press OK to confirm and enter the ADVANCED menu.
SEEK or / .
See
End User License Agreement
at the end of this book
49
Page 50

SYNC media features
8. Scroll repeatedly until MASTER RESET appears in the radio display
9. Press OK. SYNC will ask you to confirm the master reset.
10. Press OK to confirm. The radio display will read RESET DONE.
SYNC will take you back to the ADVANCED SETTINGS menu.
Installing new vehicle applications
You can download new software applications (if available) and then load
the desired applications onto SYNC through your USB port. Please refer
to www.SyncMyRide.com for further information.
USING SYNC’S PLAY MENU
The SYNC PLAY MENU allows you to play your music by playing all
selections, by artist listing, album listing, genre listing, playlists, tracks,
or by selecting similar music to what is currently playing. You can also
choose to ‘Explore USB’ which will allow you to explore supported digital
music files on your playing device.
Note: The PLAY MENU is only available for indexable media through the
USB port. This is not available for LINE IN and BT AUDIO.
SYNC is able to organize and sort your indexed media from your playing
device by metadata tags. Metadata tags are descriptive software
identifiers embedded in your media files which provide information about
the media file. SYNC supports the following metadata tags:
• Artist
• Album
• Genre
• Track
If your indexed media files contain no information embedded in these
metadata tags, SYNC will automatically classify the empty metadata tags
as UNKNOWN.
To access the SYNC PLAY MENU:
Note: To scroll, press
1. Ensure that your playing device is plugged into the USB port and is
ON.
2. Press AUX repeatedly until SYNC appears.
3. Press MENU. MEDIA MENU will momentarily appear in the radio
display.
50
See
End User License Agreement
SEEK or / .
at the end of this book
Page 51

SYNC media features
4. Press OK to access the PLAY MENU.
5. Press OK. If there are no media files to access, the radio display will
read NO MEDIA.
6. In the SYNC PLAY MENU, scroll repeatedly to select from the
following options:
• PLAY ALL
• ARTISTS
• ALBUMS
• GENRES
• PLAYLISTS
• TRACKS
• EXPLORE USB
• SIMILAR MUSIC
• RETURN
Refer to the following sections for further explanation on these features.
Using the Play all feature
The PLAY ALL feature in SYNC will play all indexed media (tracks) from
your playing device in flat file mode, one at a time in numerical order. To
use this feature:
Note: To scroll, press
1. Ensure that your playing device is plugged into the USB port and is
ON.
2. Press AUX repeatedly until SYNC USB appears.
3. Press MENU. MEDIA MENU will momentarily appear in the display.
4. Press OK to access the PLAY MENU.
5. Press OK. The system will begin to play all the indexed media
alphabetically. The first track title will appear in the radio display.
Refer to Using the media settings in your media menu earlier in this
chapter for further information on making adjustments to your playing
music (i.e., Seek, Shuffle, Autoplay and Repeat).
See
End User License Agreement
SEEK or / .
at the end of this book
51
Page 52

SYNC media features
Selecting and playing specific artists
SYNC allows you to sort all indexed media by artists. Once selected, the
system will list and then play all artists and tracks alphabetically. If you
have fewer than 255 indexed artists, SYNC will list them alphabetically in
flat file mode. If there are more than 255 indexed artists, SYNC will
organize them into quick select alphabetical categories (i.e.,
AAAAA-MMMMM and MMMMN-ZZZZZ). The number of categories will
depend on the number of indexed artists.
To access:
Note: To scroll, press
1. Ensure that your playing device is plugged into the USB port and is
ON.
2. Press AUX repeatedly until SYNC USB appears.
3. Press MENU. MEDIA MENU will momentarily appear in the display.
4. Press OK to access the PLAY MENU.
5. Press OK.
6. Scroll repeatedly until ARTISTS appears in the radio display.
7. Press OK. You can now select from playing ALL ARTISTS, or from any
indexed artist.
8. Scroll repeatedly to cycle through all indexed artists.
9. Press OK when the desired artist appears in the radio display. You can
play all tracks by that artist by selecting PLAY ALL or scroll to see
specific albums. If there are multiple albums by the same artist indexed,
SYNC will ask you to select from the various indexed albums by that
artist.
10. Press OK to confirm and begin to play the first track of the selected
album.
Refer to Using the media settings in your media menu earlier in this
chapter for further information on making adjustments to your music
(i.e., Seek, Shuffle, Autoplay and Repeat).
SEEK or / .
52
See
End User License Agreement
at the end of this book
Page 53

SYNC media features
Selecting and playing specific albums
SYNC allows you view and play indexed media by ALBUMS. If you have
fewer than 255 indexed albums, SYNC will list them alphabetically in flat
file mode. If there are more than 255 indexed albums, SYNC will organize
them into quick select alphabetical categories (i.e., AAAAA-MMMMM and
MMMMN-ZZZZZ). The number of categories will depend on the number
of indexed albums.
To access:
Note: To scroll, press
1. Ensure that your playing device is plugged into the USB port and is
ON.
2. Press AUX repeatedly until SYNC USB appears.
3. Press MENU. MEDIA MENU will momentarily appear in the display.
4. Press OK to access the PLAY MENU.
5. Press OK.
6. Scroll repeatedly until PLAY ALL appears in the display. Press OK.
7. Scroll repeatedly to until ALBUMS appears in the radio display.
8. Press OK to enter the album menu and select from playing ALL
ALBUMS or from any individual indexed album.
9. Scroll repeatedly to cycle through all indexed albums.
10. Press OK when the desired album appears in the display.
11. Press OK to confirm and begin to play the first track of the selected
album.
Refer to Using the media settings in your media menu earlier in this
chapter for further information on making adjustments to your music
(i.e., Seek, Shuffle, Autoplay and Repeat).
SEEK or / .
See
End User License Agreement
at the end of this book
53
Page 54

SYNC media features
Selecting from different genres
SYNC allows you to sort indexed music by genre (category) type. SYNC
will automatically categorize your indexed music according to the
available genres. If you have fewer than 255 indexed genres, SYNC will
list them alphabetically in flat file mode. If there are more than 255
indexed genres, SYNC will organize them into quick select alphabetical
categories (i.e., AAAAA-MMMMM and MMMMN-ZZZZZ). The number of
categories will depend on the number of indexed genres.
To access:
Note: To scroll, press
1. Ensure that your playing device is plugged into the USB port and is
ON.
2. Press AUX repeatedly until SYNC USB appears.
3. Press MENU. MEDIA MENU will momentarily appear in the display.
4. Press OK to access PLAY MENU.
5. Press OK.
6. Once PLAY ALL appears in the radio display, scroll repeatedly until
GENRES appears in the radio display.
7. Press OK to enter the list of indexed genres.
8. Press OK when the desired genre appears in the radio display. SYNC
will then take you to the ALBUM menu.
9. Scroll repeatedly to cycle through all indexed albums.
10. Press OK to confirm and begin to play the first track.
Refer to Using the media settings in your media menu earlier in this
chapter for further information on making adjustments to your music
(i.e., Seek, Shuffle, Autoplay and Repeat).
SEEK or / .
54
See
End User License Agreement
at the end of this book
Page 55

SYNC media features
Accessing your playlists
SYNC supports playing many playlist formats (such as .ASX, .M3U, .WPL,
.MTP). Please refer to www.SyncMyRide.com for more information.
If you have fewer than 255 indexed playlists, SYNC will list them
alphabetically in flat file mode. If there are more than 255 indexed
playlists, SYNC will organize them into quick select alphabetical
categories (i.e., AAAAA-MMMMM and MMMMN-ZZZZZ). The number of
categories will depend on the number of indexed playlists.
To access:
Note: To scroll, press
1. Ensure that your playing device is plugged into the USB port and is
ON.
2. Press AUX repeatedly until SYNC USB appears.
3. Press MENU. MEDIA MENU will momentarily appear in the display.
4. Press OK to access PLAY MENU.
5. Press OK.
6. Once PLAY ALL appears in the radio display, scroll repeatedly until
PLAYLISTS appears in the radio display.
7. Press OK to enter the PLAYLIST menu.
8. Scroll repeatedly to cycle through all indexed playlists.
9. Press OK when the desired playlist appears in the radio display.
Refer to Using the media settings in your media menu earlier in this
chapter for further information on making adjustments to your playing
music (i.e., Seek, Shuffle, Autoplay and Repeat).
SEEK or / .
See
End User License Agreement
at the end of this book
55
Page 56

SYNC media features
Playing a specific track
SYNC will allows you to search for and play a specific track which has
been indexed. If you have fewer than 255 indexed tracks, SYNC will list
them alphabetically in flat file mode. If there are more than 255 indexed
tracks, SYNC will organize them into quick select alphabetical categories
(i.e., AAAAA-MMMMM and MMMMN-ZZZZZ). The number of categories
will depend on the number of indexed tracks.
To access:
Note: To scroll, press
1. Ensure that your playing device is plugged into the USB port and is
ON.
2. Press AUX repeatedly until SYNC USB appears.
3. Press MENU. MEDIA MENU will momentarily appear in the radio
display.
4. Press OK to access the PLAY MENU.
5. Press OK.
6. Once PLAY ALL appears in the radio display, scroll repeatedly until
TRACKS appears in the radio display.
7. Press OK to enter the TRACKS menu.
8. Scroll repeatedly to cycle through all indexed tracks.
9. Press OK when the desired track appears in the radio display. The
track will begin to play and appear in the radio display.
Refer to Using the media settings in your media menu earlier in this
chapter for further information on making adjustments to your music
(i.e., Seek, Shuffle, Autoplay and Repeat).
Exploring the USB device
SYNC allows you to explore through all supported digital media on your
media device which is connected through the USB port.
Note: When searching through various folders, you will only be able to
view media content which is compatible with SYNC. You may have other
files saved with various extensions, power point presentations for
example, but they will not be visible.
To access:
SEEK or / .
Note: To scroll, press
1. Ensure that your playing device is plugged into the USB port and is
ON.
56
See
End User License Agreement
SEEK or / .
at the end of this book
Page 57

SYNC media features
2. Press AUX repeatedly until SYNC USB appears.
3. Press MENU. MEDIA MENU will momentarily appear in the display.
4. Press OK to access the PLAY MENU.
5. Press OK.
6. Once PLAY ALL appears in the display, scroll repeatedly until
EXPLORE USB appears in the radio display.
7. Press OK.
8. Scroll repeatedly to cycle through all available folders on your media
device. An “F” will preceed folders and “T” will preceed tracks in the
radio display.
9. Press OK when the desired folder or track appears in the radio
display.
10. Scroll repeatedly to cycle through all subfolders and/or tracks in the
selected folder.
Note: When you are playing USB SYNC MEDIA using the EXPLORE
USB feature, and you folders saved on your playing device, you are in
folder mode. In folder mode, you can say “Play next folder” or “Play
previous folder” to advance within your saved folders. You may also
press
the previous/next folder. Press OK to select a folder and scroll repeatedly
through all subfolders and/or tracks in the selected folder.
Note: PLAY ALL will appear in every subfolder, giving you quick access
to play all tracks in the particular folder.
Refer to Using the media settings in your media menu earlier in this
chapter for further information on making adjustments to your music
(i.e., Seek, Shuffle, Autoplay and Repeat).
FOLDER (if available on your audio system) to advance to
Playing similar music
SYNC allows you to play music similar to what is currently playing from
the USB port. The system will use the metadata information of each song
to compile a playlist for you. To access:
Note: To scroll, press
1. Ensure that your playing device is plugged into the USB port and is
ON.
2. Ensure that you are listening to an indexed track.
3. Press AUX repeatedly until SYNC USB appears.
See
End User License Agreement
SEEK or / .
at the end of this book
57
Page 58

SYNC media features
4. Press MENU. MEDIA MENU will momentarily appear in the display.
5. Press OK to access the PLAY MENU.
6. Press OK.
7. Once PLAY ALL appears in the radio display, scroll repeatedly until
SIMILAR appears in the radio display.
8. Press OK. The system will create a new list of similar songs and begin
playing.
Note: Your metadata tags must be populated in order for the SIMILAR
MUSIC feature to include each TRACK.
Note: With certain playing devices, if your metadata tags (Artist, Album,
Track, Genre) are not populated, the tracks won’t be available in voice
recognition, the PLAY MENU or SIMILAR MUSIC. However, if you place
these tracks with unpopulated metadata tags onto your playing device in
“Mass Storage Device mode”, these tracks will be available in voice
recognition, PLAY MENU browsing or SIMILAR MUSIC. UNKNOWN will
be placed into any unpopulated metadata tag.
Refer to Using the media settings in your media menu earlier in this
chapter for further information on making adjustments to your music
(i.e., Seek, Shuffle, Autoplay and Repeat).
58
See
End User License Agreement
at the end of this book
Page 59

DVD interaction
ACCESSING SYNC MEDIA FEATURES THROUGH YOUR DVD
SYSTEM (IF EQUIPPED)
Rear seat passengers can listen to SYNC media sources (USB, BT
AUDIO, LINE IN) through the DVD system (if equipped).
To access:
1. Ensure that:
• The DVD and audio system are ON.
• Your digital media playing device is plugged into the USB port or
SYNC’s Auxiliary input jack (Line in), if desired.
• Your Bluetooth enabled cellular phone from which you wish to stream
music is ON and is currently paired to SYNC as a Bluetooth Device.
See
End User License Agreement
at the end of this book
59
Page 60

DVD interaction
2. Ensure that your wireless
headphones are set to Channel A.
(Channel A can access any possible
media source: AM, FM1, FM2, SAT
(satellite radio, if equipped), CD,
DVD, AUX, SYNC (USB, BT AUDIO
and LINE IN). Channel B can only
access DVD and AUX sources.)
3. Press
gain access to your possible media
selections.
4. Press MEDIA (on the DVD system or on the remote control)
repeatedly until SYNC appears on the DVD screen in the
bar. (You cannot access SYNC through
wait until the system times out.
After choosing the SYNC media source, you can then choose from the
media settings (Shuffle, Repeat, Autoplay) as well as choosing from
these options: Play All music, Play Artists, Play Albums, Play Genres,
Play tracks, Explore the USB device or accessing/playing your Playlists.
60
A on the DVD system to
See
End User License Agreement
A status
B.) Either press ENTER or
at the end of this book
Page 61

DVD interaction
You can use the following remote
controls to help make SYNC menu
selections:
• Use the cursor controls
( / / / ) to make menu
selections.
• Press ENTER to confirm a
selection.
• Press
reverse/advance to the next track.
Note: Once SYNC USB is chosen, SYNC will begin indexing your media
information. Depending on how much supported media content there is,
this process may take a few minutes. You can, however, choose to
activate the Autoplay feature which will begin playing the first song as
soon as possible so that you will not have to wait until all of the music is
indexed prior to playing.
/ to
Media menu
Once you have chosen a SYNC media source from which to play, you can
then make playing selections through the Media Menu.
• From the main screen, select
‘Menu’.
See
End User License Agreement
at the end of this book
61
Page 62

DVD interaction
• Then select ‘Media Menu’ to
choose from:
Play Menu: Choose how to play your SYNC USB media. Access Play All,
Artists, Albums, Tracks, Genres, Playlists and Explore USB.
Select Source: Choose another SYNC media source (USB, BT AUDIO,
LINE IN).
Media Settings: Choose to activate/deactivate Shuffle, Repeat or
Autoplay.
Play menu
The Play Menu gives the choice of how to play music from your SYNC
media source. To access:
• From the main screen, select
‘Menu’.
Select ‘Play Menu’.
62
See
End User License Agreement
at the end of this book
Page 63

DVD interaction
Select from:
Play All: Choose to play all supported media content on your playing
device alphabetically.
Artists: In the Artists screen, you
can select to play All Artists, or you
can select any available artist. Press
the cursor controls
/ / / ) to highlight the
(
desired choice and press ENTER.
Albums: The Albums screen lists all loaded albums alphabetically. Press
the cursor controls (
and press ENTER.
Genres: The Genre screen lists all available genres. Press the cursor
controls (
ENTER.
Playlists: The Playlist screen allows you to view and select from any
previously saved playlists on your playing device. Press the cursor
controls (
ENTER.
Tracks: The Track screen lists all tracks in your playing device
alphabetically. Use the scroll bar to advance/reverse in the list. Select to
begin play.
Explore USB : The Explore USB screen allows you to scroll through all
supported media content stored on your device. Press the cursor
controls (
ENTER.
/ / / ) to highlight the desired choice and press
/ / / ) to highlight the desired choice and press
/ / / ) to highlight the desired choice and press
/ / / ) to highlight the desired choice
See
End User License Agreement
at the end of this book
63
Page 64

DVD interaction
Similar Music The Similar Music screen allows you to play music similar
to what is currently playing from the USB port. The system will use the
metadata information of each song to compile a playlist for you.
Select source menu
The SYNC select source menu screen allows you to choose which SYNC
media source to access.
• From the main screen, select
‘Menu’.
• Choose ‘Select Source’.
Choose from:
• USB: Select to access any
supported device plugged into the
USB port.
• Bluetooth Stereo: Select to
stream audio from your Bluetooth
stereo enabled device over the
vehicle’s speakers.
• Line In: Select to access any
playing device plugged into the Auxiliary input jack (Line in).
64
See
End User License Agreement
at the end of this book
Page 65

DVD interaction
Media settings
The Media Settings screen allows you to turn Shuffle, Repeat and
Autoplay on/off. To access:
• From the main screen, select
‘Menu’.
• Select ‘Media Settings’.
You can now access:
Shuffle: Select to turn Shuffle
on/off. Shuffle will randomly shuffle
all selected music.
Repeat: Select to turn repeat on/off. The repeat feature will repeat the
currently chosen track until turned off.
Autoplay: Select to begin playing USB tracks as soon as possible during
the indexing process. With Autoplay turned off, the chosen USB tracks
will not begin to play until all of the USB tracks have been indexed by
SYNC. Depending on the size of the playable media and the device being
indexed, this may take a few minutes.
See
End User License Agreement
at the end of this book
65
Page 66

Glossary
GLOSSARY OF TERMS
Autoplay: With Autoplay turned ON, SYNC allows you to listen to music
which has already been randomly indexed during the indexing process.
With Autoplay turned off, the chosen music will not begin to play until
all of the music has been indexed by SYNC. Depending on the size of the
material, this may take a few minutes.
Bluetooth enabled cellular phone: Any cellular phone which has the
Bluetooth wireless technology which will enable the phone to connect
with SYNC and exchange information wirelessly.
Digital media player / USB Device: This is a generic term used to
signify any of the following media devices: iPodt, Zune™, “Plays from
device” players, and most USB drives (thumb drives, flash drives, PEN
drives, etc.)
Discoverable mode: A mode which allows other Bluetooth enabled
devices to find your Bluetooth enabled device.
Discovery mode: A mode which allows your Bluetooth enabled device
to search for other ‘discoverable’ Bluetooth enabled devices.
In-band ringing: This is a phone dependent feature. If your Bluetooth
enabled cellular phone supports this feature, SYNC can play your ring
tone during incoming calls.
Indexing: A process in which SYNC builds a voice recognition grammar
for the media content of your digital media player. While indexing, SYNC
will play already indexed media if Autoplay is on. However, voice
recognition is not available for the media until the indexing process is
complete.
Metadata: Descriptive tags embedded in your digital media which
provide SYNC with information such as ARTIST, ALBUM, GENRE and
TRACK.
Pairing: To use your Bluetooth enabled cellular phone with SYNC, you
must go through a pairing (bonding) process. “Pairing” is a special
process used when two devices connect for the first time. The pairing
process is used to generate a link key that is used for authentication
purposes during subsequent Bluetooth connections between the two
devices.
PIN (Personal Identification number): This six digit number
(sometimes referred to as a passkey) will be shown in the radio display
during the pairing process with your Bluetooth enabled device. You do
not need to write down this number as it will only be used for that
specific pairing procedure.
66
See
End User License Agreement
at the end of this book
Page 67

End user license agreement
SYNC DEVICE END USER LICENSE AGREEMENT (EULA)
You have acquired a device (“DEVICE”) that includes software licensed
by FORD MOTOR COMPANY from an affiliate of Microsoft Corporation
(“MS”). Those installed software products of MS origin, as well as
associated media, printed materials, and “online” or electronic
documentation (“SOFTWARE”) are protected by international intellectual
property laws and treaties. The SOFTWARE is licensed, not sold. All
rights reserved.
The SOFTWARE may be configured to interface with and/or
communicate with, or may be later upgraded to interface with and/or
communicate with additional software systems provided by FORD
MOTOR COMPANY. These additional software systems of FORD MOTOR
COMPANY origin, as well as associated media, printed materials, and
“online” or electronic documentation (“FORD SOFTWARE”) are
protected by international intellectual property laws and treaties. The
FORD SOFTWARE is licensed, not sold. All rights reserved.
IF YOU DO NOT AGREE TO THIS END USER LICENSE
AGREEMENT (“EULA”), DO NOT USE THE DEVICE OR COPY
THE SOFTWARE. ANY USE OF THE SOFTWARE, INCLUDING
BUT NOT LIMITED TO USE ON THE DEVICE, WILL
CONSTITUTE YOUR AGREEMENT TO THIS EULA (OR
RATIFICATION OF ANY PREVIOUS CONSENT).
GRANT OF SOFTWARE LICENSE: This EULA grants you the
following license:
• You may use the SOFTWARE as installed on the DEVICE.
• You may use the FORD SOFTWARE as installed on the vehicle.
DESCRIPTION OF OTHER RIGHTS AND LIMITATIONS:
• Speech Recognition: If the SOFTWARE includes speech recognition
component(s), you should understand that speech recognition is an
inherently statistical process and that recognition errors are inherent
in the process. Neither FORD MOTOR COMPANY nor its suppliers
shall be liable for any damages arising out of errors in the speech
recognition process.
• Limitations on Reverse Engineering, Decompilation and
Disassembly: You may not reverse engineer, decompile, or
disassemble nor permit others to reverse engineer, decompile or
disassemble the SOFTWARE, except and only to the extent that such
activity is expressly permitted by applicable law notwithstanding this
limitation.
67
Page 68

End user license agreement
You may not reverse engineer, decompile, or disassemble nor permit
others to reverse engineer, decompile or disassemble the FORD
SOFTWARE, except and only to the extent that such activity is
expressly permitted by applicable law notwithstanding this limitation.
• Single EULA: The end user documentation for the DEVICE may
contain multiple versions of this EULA, such as multiple translations
and/or multiple media versions (e.g., in the user documentation and in
the software). Even if you receive multiple versions of the EULA, you
are licensed to use only one (1) copy of the SOFTWARE and only one
(1) copy of the FORD SOFTWARE.
• SOFTWARE Transfer: You may permanently transfer all of your
rights under this EULA only as part of a sale or transfer of the
DEVICE, provided you retain no copies, you transfer all of the
SOFTWARE (including all component parts, the media and printed
materials, any upgrades, this EULA and, if applicable, the
Certificate(s) of Authenticity), and the recipient agrees to the terms
of this EULA. If the SOFTWARE is an upgrade, any transfer must
include all prior versions of the SOFTWARE.
• Termination: Without prejudice to any other rights, FORD MOTOR
COMPANY or MS may terminate this EULA if you fail to comply with
the terms and conditions of this EULA.
• Security Updates/Digital Rights Management: Content providers
are using the digital rights management technology (“DRM”) contained
in your DEVICE to protect the integrity of their content (“Secure
Content”) so that their intellectual property, including copyright, in
such content is not misappropriated. Portions of the SOFTWARE and
third party applications such as media players use DRM to play Secure
Content (“DRM Software”). If the DRM Software’s security has been
compromised, owners of Secure Content (“Secure Content Owners”)
may request that MS block the ability of DRM license servers and
personal computers to deliver new licenses that enable an affected
DEVICE to play Secure Content. This action does not alter the DRM
Software’s ability to play unprotected content. A list of revoked DRM
Software is sent to your DEVICE whenever you download a license for
Secure Content from the Internet or from your personal computer.
You therefore agree that MS may, in conjunction with such license,
also download revocation lists onto your DEVICE on behalf of Secure
Content Owners. MS will not retrieve any personally identifiable
information, or any other information, from your DEVICE by
downloading such revocation lists.
68
Page 69

End user license agreement
• Consent to Use of Data: You agree that MS, Microsoft Corporation,
their affiliates and/or their designated agent may collect and use
technical information gathered in any manner as part of product
support services related to the SOFTWARE. MS, Microsoft
Corporation, their affiliates and/or their designated agent may use this
information solely to improve their products or to provide customized
services or technologies to you. MS, Microsoft Corporation, their
affiliates and/or their designated agent may disclose this information to
others, but not in a form that personally identifies you.
• Internet-Based Services Components: The SOFTWARE may
contain components that enable and facilitate the use of certain
Internet-based services. You acknowledge and agree that MS, Microsoft
Corporation, their affiliates and/or their designated agent may
automatically check the version of the SOFTWARE and/or its
components that you are utilizing and may provide upgrades or
supplements to the SOFTWARE that may be automatically
downloaded to your DEVICE.
• Additional Software/Services: The SOFTWARE may permit FORD
MOTOR COMPANY, MS, Microsoft Corporation, their affiliates and/or
their designated agent to provide or make available to you
SOFTWARE updates, supplements, add-on components, or
Internet-based services components of the SOFTWARE after the date
you obtain your initial copy of the SOFTWARE (“Supplemental
Components”).
If FORD MOTOR COMPANY provides or makes available to you
Supplemental Components and no other EULA terms are provided along
with the Supplemental Components, then the terms of this EULA shall
apply.
If MS, Microsoft Corporation, their affiliates and/or their designated agent
make available Supplemental Components, and no other EULA terms are
provided, then the terms of this EULA shall apply, except that the MS,
Microsoft Corporation or affiliate entity providing the Supplemental
Component(s) shall be the licensor of the Supplemental Component(s).
FORD MOTOR COMPANY, MS, Microsoft Corporation, their affiliates
and/or their designated agent reserve the right to discontinue without
liability any Internet-based services provided to you or made available to
you through the use of the SOFTWARE.
• Links to Third Party Sites: The SOFTWARE may provide you with
the ability to link to third party sites through the use of the
SOFTWARE. The third party sites are not under the control of MS,
69
Page 70

End user license agreement
Microsoft Corporation, their affiliates and/or their designated agent.
Neither MS nor Microsoft Corporation nor their affiliates nor their
designated agent are responsible for (i) the contents of any third
party sites, any links contained in third party sites, or any changes or
updates to third party sites, or (ii) webcasting or any other form of
transmission received from any third party sites. If the SOFTWARE
provides links to third party sites, those links are provided to you only
as a convenience, and the inclusion of any link does not imply an
endorsement of the third party site by MS, Microsoft Corporation,
their affiliates and/or their designated agent.
• Obligation to Drive Responsibly: You recognize your obligation to
drive responsibly and keep attention on the road. You will read and
abide with the DEVICE operating instructions particularly as they
pertain to safety and assumes any risk associated with the use of the
DEVICE.
UPGRADES AND RECOVERY MEDIA:
If the SOFTWARE is provided by FORD MOTOR COMPANY separate
from the DEVICE on media such as a ROM chip, CD ROM disk(s) or via
web download or other means, and is labeled “For Upgrade Purposes
Only” or 9For Recovery Purposes Only9 you may install one (1) copy of
such SOFTWARE onto the DEVICE as a replacement copy for the
existing SOFTWARE, and use it in accordance with this EULA, including
any additional EULA terms accompanying the upgrade SOFTWARE.
INTELLECTUAL PROPERTY RIGHTS: All title and intellectual
property rights in and to the SOFTWARE (including but not limited to
any images, photographs, animations, video, audio, music, text and
“applets,” incorporated into the SOFTWARE), the accompanying printed
materials, and any copies of the SOFTWARE, are owned by MS,
Microsoft Corporation, their affiliates or suppliers. The SOFTWARE is
licensed, not sold. You may not copy the printed materials accompanying
the SOFTWARE. All title and intellectual property rights in and to the
content which may be accessed through use of the SOFTWARE is the
property of the respective content owner and may be protected by
applicable copyright or other intellectual property laws and treaties. This
EULA grants you no rights to use such content. All rights not specifically
granted under this EULA are reserved by MS, Microsoft Corporation,
their affiliates and suppliers. Use of any on-line services which may be
accessed through the SOFTWARE may be governed by the respective
terms of use relating to such services. If this SOFTWARE contains
documentation that is provided only in electronic form, you may print
one copy of such electronic documentation.
70
Page 71

End user license agreement
All title and intellectual property rights in and to the FORD SOFTWARE
(including but not limited to any images, photographs, animations, video,
audio, music, text and “applets,” incorporated into the FORD
SOFTWARE), the accompanying printed materials, and any copies of the
FORD SOFTWARE, are owned by FORD MOTOR COMPANY. The FORD
SOFTWARE is licensed, not sold. You may not copy the printed materials
accompanying the FORD SOFTWARE. All title and intellectual property
rights in and to the content which may be accessed through use of the
FORD SOFTWARE is the property of the respective content owner and
may be protected by applicable copyright or other intellectual property
laws and treaties. This EULA grants you no rights to use such content.
All rights in the FORD SOFTWARE not specifically granted under this
EULA are reserved by FORD MOTOR COMPANY. Use of any on-line
services which may be accessed through the FORD SOFTWARE may be
governed by the respective terms of use relating to such services. If the
FORD SOFTWARE contains documentation that is provided only in
electronic form, you may print one copy of such electronic
documentation.
EXPORT RESTRICTIONS: You acknowledge that the SOFTWARE is
subject to U.S. and European Union export jurisdiction. You agree to
comply with all applicable international and national laws that apply to
the SOFTWARE, including the U.S. Export Administration Regulations,
as well as end-user, end-use and destination restrictions issued by U.S.
and other governments. For additional information, see
http://www.microsoft.com/exporting/.
TRADEMARKS: This EULA does not grant you any rights in connection
with any trademarks or service marks of FORD MOTOR COMPANY, MS,
Microsoft Corporation, their affiliates or suppliers.
PRODUCT SUPPORT: Product support for the SOFTWARE is not
provided by MS, its parent corporation Microsoft Corporation, or their
affiliates or subsidiaries. For product support, please refer to FORD
MOTOR COMPANY instructions provided in the documentation for the
DEVICE. Should you have any questions concerning this EULA, or if you
desire to contact FORD MOTOR COMPANY for any other reason, please
refer to the address provided in the documentation for the DEVICE.
No Liability for Certain Damages: EXCEPT AS PROHIBITED BY
LAW, FORD MOTOR COMPANY, MS, MICROSOFT CORPORATION AND
THEIR AFFILIATES SHALL HAVE NO LIABILITY FOR ANY INDIRECT,
SPECIAL, CONSEQUENTIAL OR INCIDENTAL DAMAGES ARISING
FROM OR IN CONNECTION WITH THE USE OR PERFORMANCE OF
THE SOFTWARE AND/OR THE FORD SOFTWARE. THIS LIMITATION
71
Page 72

End user license agreement
SHALL APPLY EVEN IF ANY REMEDY FAILS OF ITS ESSENTIAL
PURPOSE. IN NO EVENT SHALL MS, MICROSOFT CORPORATION
AND/OR THEIR AFFILIATES BE LIABLE FOR ANY AMOUNT IN
EXCESS OF U.S. TWO HUNDRED FIFTY DOLLARS (U.S.$250.00).
• THERE ARE NO WARRANTIES OTHER THAN THOSE THAT MAY
EXPRESSLY BE PROVIDED FOR YOUR NEW VEHICLE.
END USER NOTICE
MICROSOFTT WINDOWST MOBILE FOR AUTOMOTIVE IMPORTANT
SAFETY INFORMATION
This system Ford SYNC™ contains software that is licensed to
Manufacturer FORD MOTOR COMPANY by an affiliate of Microsoft
Corporation pursuant to a license agreement. Any removal, reproduction,
reverse engineering or other unauthorized use of the software from this
system in violation of the license agreement is strictly prohibited and
may subject you to legal action.
Read and follow instructions
Before using your Windows Automotive-based system, read and follow all
instructions and safety information provided in this end user manual
(“User’s Guide”). Not following precautions found in this User’s Guide
can lead to an accident or other serious consequences.
Keep User’s Guide in Vehicle
When kept in the vehicle, the User’s Guide will be a ready reference for
you and other users unfamiliar with the Windows Automotive-based
system. Please make certain that before using the system for the first
time, all persons have access to the User’s Guide and read its
instructions and safety information carefully.
Operating certain parts of this system while driving can distract
your attention away from the road, and possibly cause an
accident or other serious consequences. Do not change system settings
or enter data non-verbally (using your hands) while driving. Stop the
vehicle in a safe and legal manner before attempting these operations.
This is important since while setting up or changing some functions
you might be required to distract your attention away from the road
and remove your hands from the wheel.
72
Page 73

End user license agreement
GENERAL OPERATION
Voice Command Control
Functions within the Windows Automotive-based system may be
accomplished using only voice commands. Using voice commands while
driving allows you to operate the system without removing your hands
from the wheel.
Prolonged Views of Screen
Do not access any function requiring a prolonged view of the screen
while you are driving. Pull over in a safe and legal manner before
attempting to access a function of the system requiring prolonged
attention. Even occasional short scans to the screen may be hazardous if
your attention has been diverted away from your driving task at a critical
time.
Volume Setting
Do not raise the volume excessively. Keep the volume at a level where
you can still hear outside traffic and emergency signals while driving.
Driving while unable to hear these sounds could cause an accident.
Use of Speech Recognition Functions
Speech recognition software is inherently a statistical process which is
subject to errors. It is your responsibility to monitor any speech
recognition functions included in the system and address any errors.
73
Page 74

Index
A
Accessing call history/phone
book during active call ...............18
Accessing system settings .........43
Accessing vehicle applications ..43
Accessing your phone book .......20
Accessing your playlists .............55
Active call menu options ...........16
Adding a Bluetooth media
device which is in discoverable
mode ............................................45
Adding a Bluetooth media
device which is in discovery
mode ............................................44
Adding a phone ...........................29
Answering an incoming call .......14
Applications .................................28
Automatically download your
phone book ..................................27
C
Call history ..................................20
Changing the SYNC language
setting ....................................33, 48
Connecting a Bluetooth media
device ...........................................45
Connecting a digital media
player to SYNC ............................38
Connecting a phone ....................30
Deleting all text messages .........24
Downloading unread text
messages ......................................23
E
End user license agreement ......67
Ending a call ...............................14
Exiting phone mode ...................14
Exploring the USB device ..........56
H
How SYNC interacts with your
Bluetooth device .........................19
I
Incoming new text message ......15
Installing new vehicle
applications ...........................35, 50
J
Joining two calls
(multiparty/conference
call) ........................................17–18
M
Making a call ...............................14
Message notification ...................26
Modifying your phone book .......26
D
Delete a device ...........................46
Deleting a phone .........................32
Deleting all phones .....................32
74
P
Performing a master reset ...34, 49
Phone dependent features ...........5
Phone redial ................................19
Page 75

Index
Phone settings ............................24
Phone status ...............................25
Play menu ....................................46
Playing a specific track ..............56
Playing similar music ..................57
Putting a call on/off hold ...........17
Q
Quick reference chart ................10
R
Returning to factory
defaults ..................................34, 49
S
Safety information ........................5
Selecting and playing specific
albums .........................................53
Selecting and playing specific
artists ...........................................52
Selecting different genres ..........54
Selecting different media
sources .........................................39
Sending new text messages .......22
Setting a phone as primary .......31
Setting a ring tone ......................25
Streaming music from your
phone ...........................................41
SYNC voice recognition feature ..6
System settings ...........................28
T
Text messaging ...........................21
Turning Bluetooth on/off ............31
Turning prompts on/off ........32, 47
U
Using privacy mode ....................17
Using SYNC’s play menu ............50
Using the Auxiliary input jack
(Line in) ......................................41
Using the media settings ............42
Using the play all feature ...........51
Using the quick dial feature ......16
Using voice commands with
SYNC ..............................................8
Using your media menu .............38
Using your USB port ..................40
V
Voice commands in media
mode ............................................36
Voice commands in phone
mode ............................................12
W
What is SYNC? ..............................4
What’s playing? ...........................38
7576777879
Page 76

Page 77

Page 78

Page 79

Page 80

80
 Loading...