

Page 1

2-Panel Shower Kit
Install Instructions
For missing items do not return to store.
Please call 877-941-3662
(Monday – Friday 8:00 a.m. – 5:00 p.m MT)
V.2 06/2021
Page 2
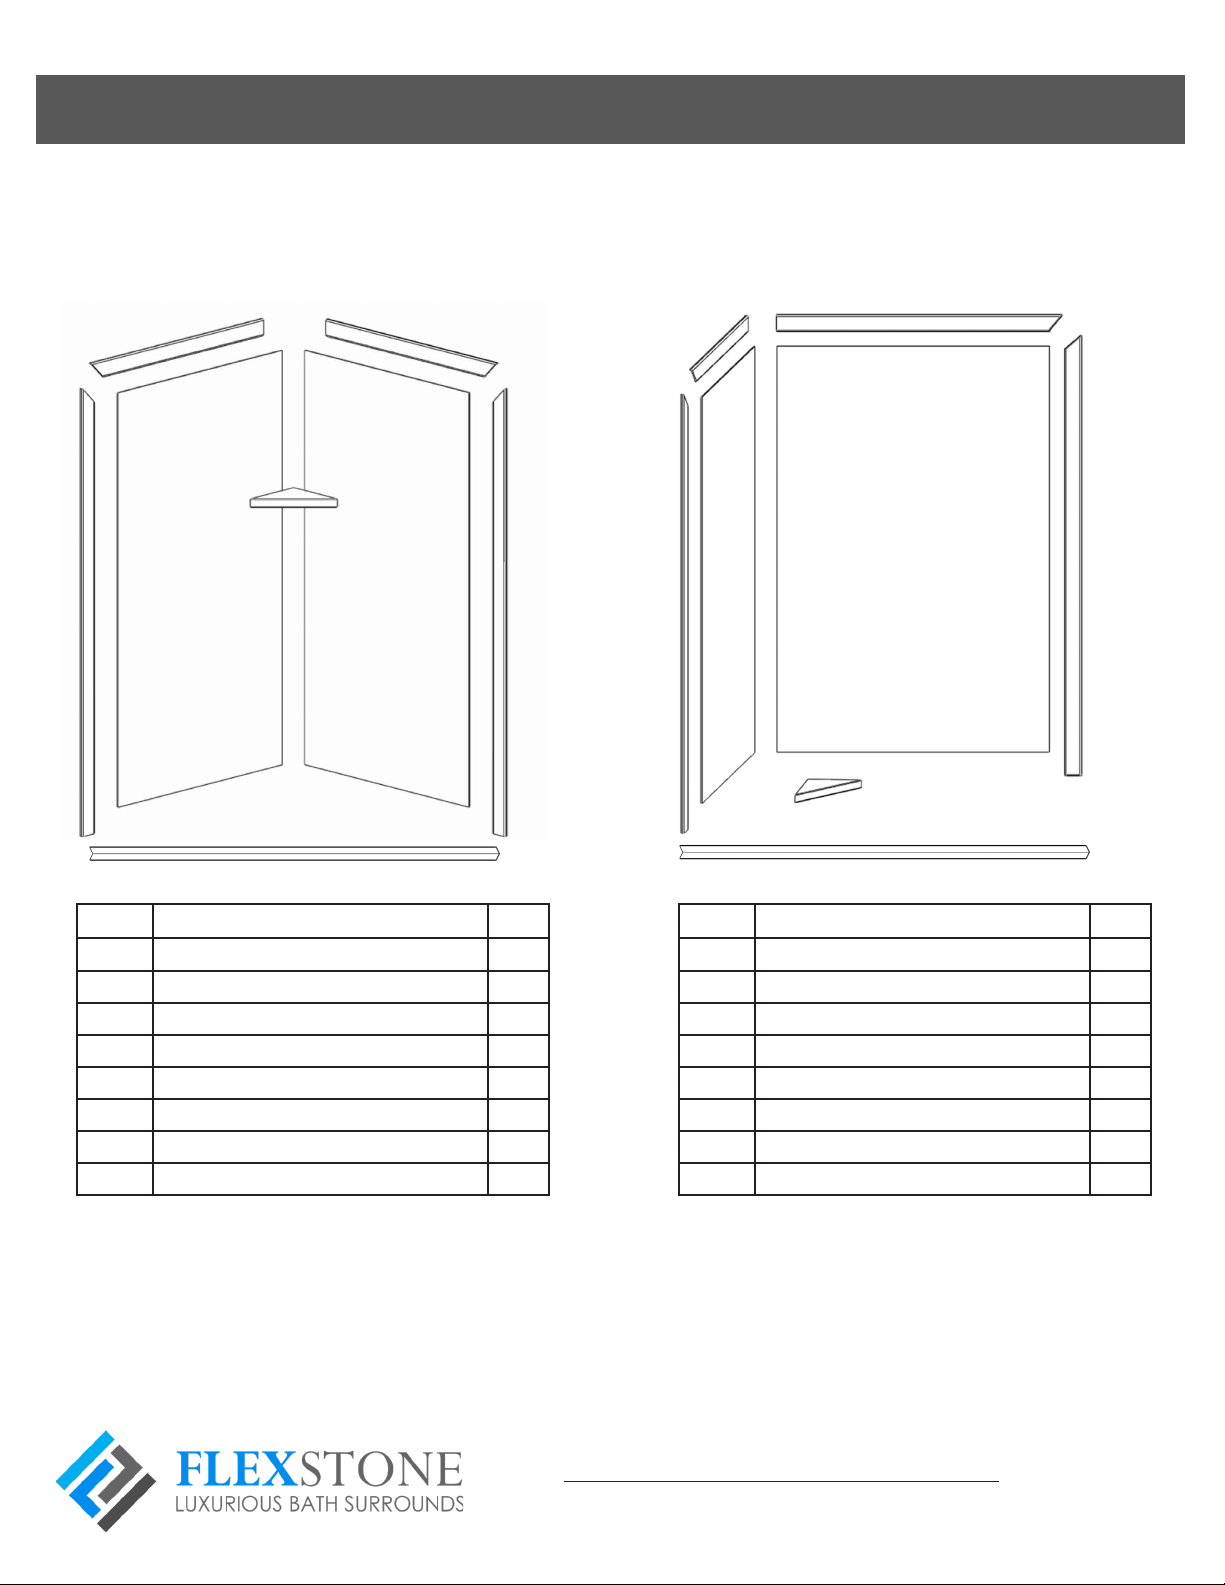
2-wall Shower Surround Instructions
Splendor Series Elegance Series
Neo-Angle/Neo-Round Models: FLX40407821 Rectangular 2-wall Models: FLX48367821
D F
I
ABC
J
F
D
E
ABC
E
I
J
Item Description Qty
A Back wall panel 1
B Side wall panel 1
C Left wall front mitered trim 1
D Left wall top mitered trim 1
E Right wall front mitered trim 1
F Right wall top mitered trim 1
I Corner shelf with bracket 1
J Inside corner reinforcement 1
Item Description Qty
A Back wall panel 1
B Side wall panel 1
C Left wall front mitered trim 1
D Left wall top mitered trim 1
E Right wall front mitered trim 1
F Right walll top mitered trim 1
I Corner shelf with bracket 1
J Inside corner reinforcement 1
Please inspect packages for damage or missing pieces, and read instructions carefully prior to
installation. All FlexStone products come with a protective masking covering the image side
of the material. If you have any questions or issues, please call our customer suppport
Monday – Friday 8:00 a.m. – 5:00 p.m. MT at 877–941–3662.
Visit http://FlexstoneProducts.com/installation to access a
walk-through video and other useful installation information.
– 1 –
V.2 06/2021
Page 3
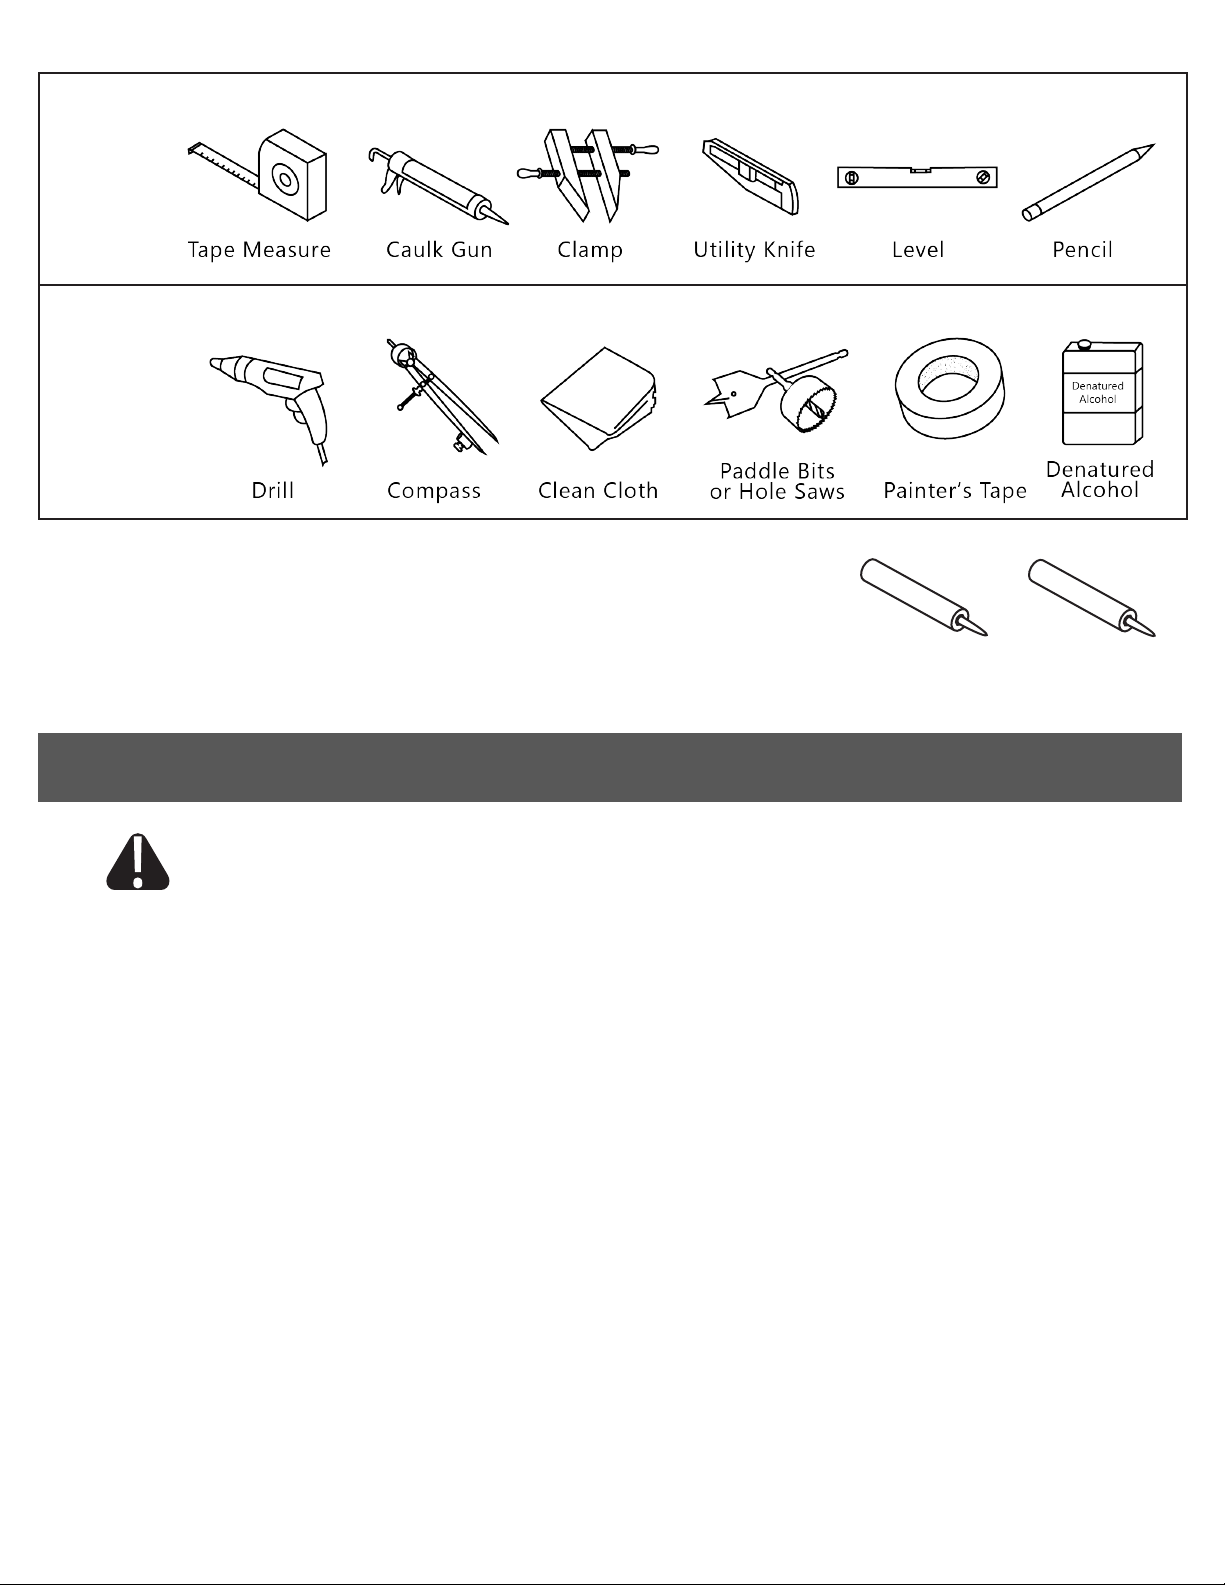
Required Tools
Helpful Tools
Installation Kit
Your shower surround kit includes eight cartridges of adhesive and
two cartridges of color-tinted 100% silicone. Refer to section 2B of
these instructions for adhesive usage guidelines.
x 8
Construction
Adhesive
x 2
100% Silicone
Before Starting
Consult your local building codes with questions on installation compliance standards.
Building and plumbing codes may vary by location, and FlexStone Bath Systems is not
responsible for code compliance standards for your project.
1. The FlexStone wall system is designed to be installed over a solid substrate such as green board,
cement board, or other water resistant backers. Substrate should be clean, dry, and free of dust or loose
paint. Unless using our Remodel Trim Kit, any existing surround material should be removed.
2. The Remodel Trim Kit (sold separately) allows FlexStone to be used over existing tile. Tile should be
in good shape, and wall surfaces should be at (i.e. remove any accessories that would interfere with the
FlexStone panels.) The 4 pieces of 96" length would replace Items C, D, E, F, and G. Follow instructions
included with Remodel Trim Kit.
3. If installing a new bathtub or shower base prior to FlexStone installation, follow the manufacturer’s
instructions, and install the tub or base level and square to walls.
4. Turn o the water supply and complete any plumbing modications prior to installing your FlexStone
surround. Leave plumbing handles o until surround is installed. Plan the placement of the shower head
such that it is either above the height of the wall panels or at least 2" below the top of the wall panels.
This will keep the trim moldings from interfering with the pipe and escutcheon plate.
5. Review Section 6 and decide how the vertical trim moldings will be installed, either outside the
shower base, or on top of the base threshold. This will impact the width of the side wall panels in
Section 3.
– 2 –
V.2 06/2021
Page 4
Install Instructions
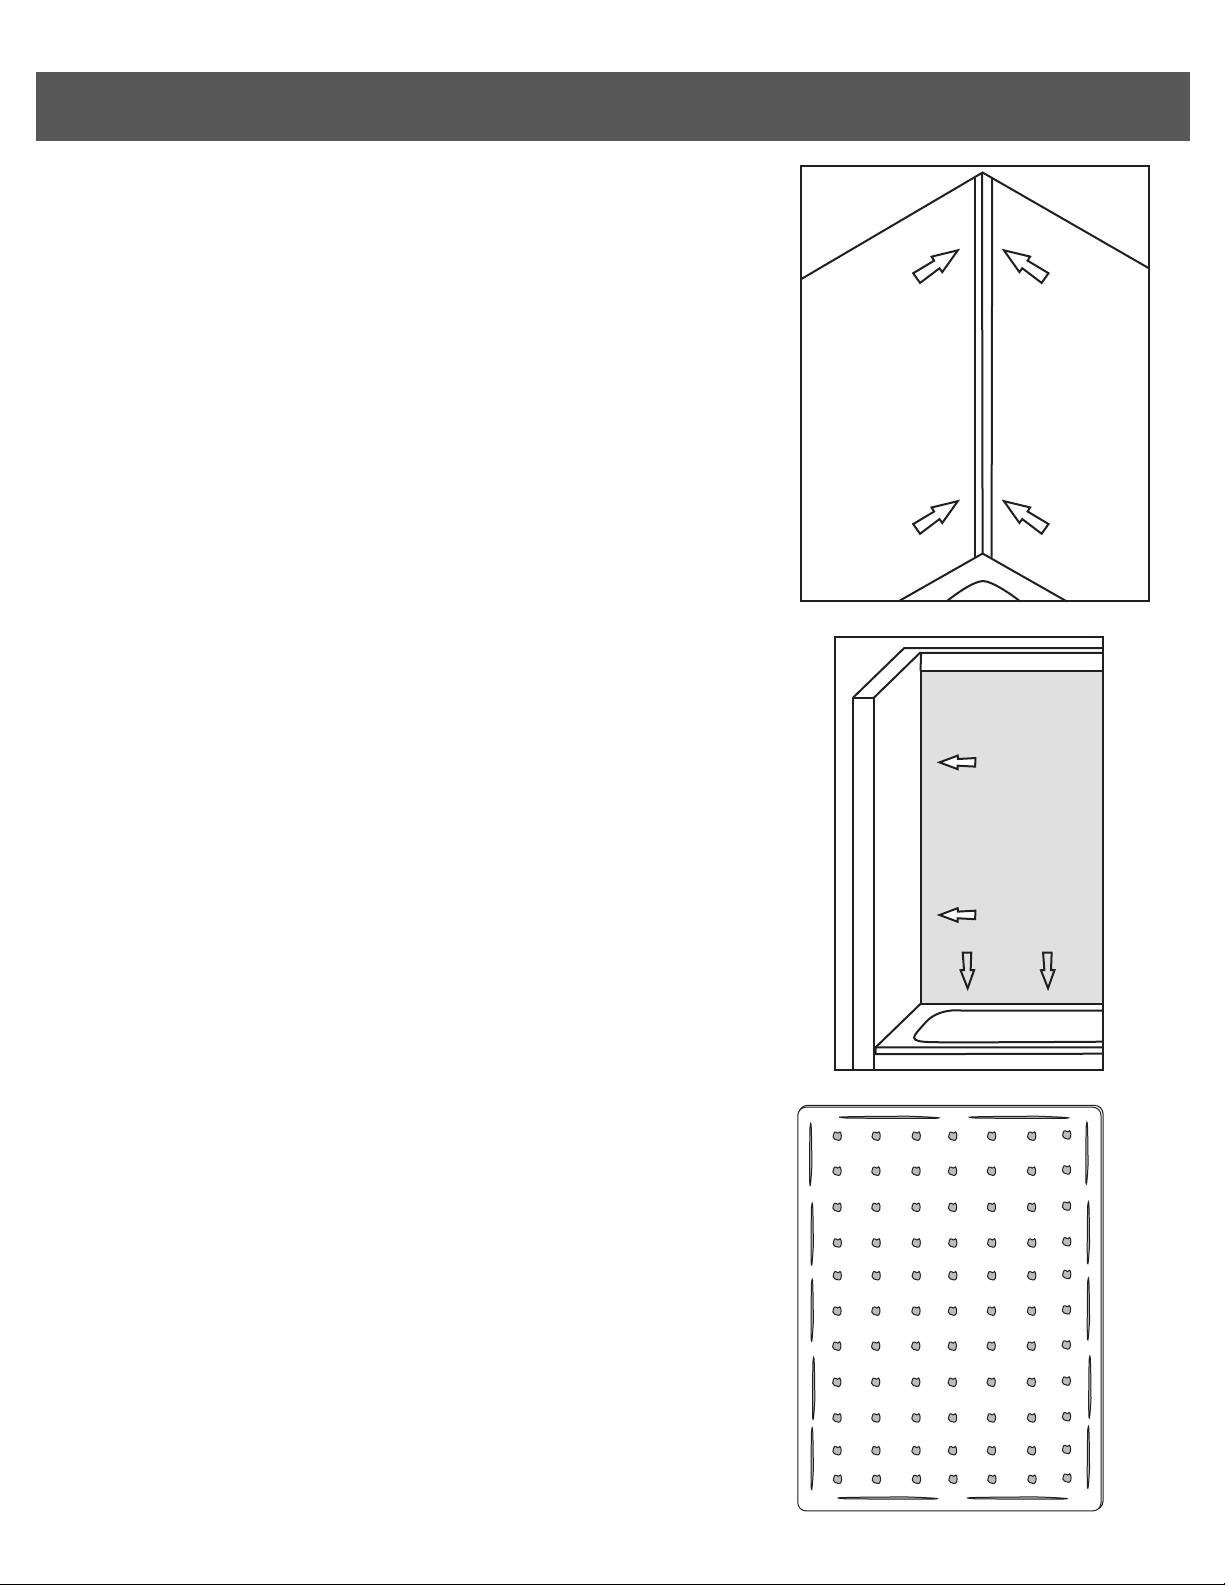
1. Installation of Inside Corner Reinforcement (J)
A. Flashing Tape Corner Reinforcements go behind the
panels in the back vertical corners for added leak protection.
This tape has been cut to length, matching the height of the
panels of your kit.
B. Apply a bead of adhesive onto both walls about 3/4 inch
away from the corner. Fold the ashing tape at the center
crease with the print side together, then press the tape into
the corner using a taping or putty type blade. Using the same
blade, atten out the tape to create a at, smooth inside
corner. Wipe away any excess adhesive.
2. Installation of Back Wall Panel (A)
NOTE: It is not necessary to cut the top edges of panels to be level,
as they will be covered by trim moldings. For right-hand plumbing
wall installs, reverse Panels A and B in these instructions.
A. Each wall panel should be t to the back corner, and to
the shower base. This may usually be done by trimming either
the vertical corner edge, or the edge that rests on the base. In
some circumstances you will need to trim both to achieve a
tight t. Dry t the panel by trimming with a utility knife, jigsaw,
or power plane.
B. When satised with the t, peel protective masking back
from the edges of the panel (approx. 4") and clean burs from
any rough edges. Apply adhesive in lines or dollops to the back
of the panel in a pattern every 4 to 6 inches. Use approximately one 10oz tube per 12 square feet following the adhesive
directions on the tube. Push the panel in place, lightly pounding to achieve good bond.
3. Installation of Wet/Plumbing Wall Panel (B)
A . Hold side panel as close to plumbing wall as possible.
Scribe and trim the inside edge and bottom edge against
the shower base for best t before measuring, marking, and
cutting holes for plumbing xtures. The depth of the side
wall panels can also be trimmed down to t the opening or
your shower base, although how you decide to install verti-
cal trims C and E will inuence the width sizing of side wall
panels (see Section 4.)
– 3 –
V.2 06/2021
Page 5
NOTE: It is not necessary to cut the top edges of panels to be level,
as they will be covered by trim moldings. For right-hand plumbing
wall installs, reverse Panels A and B in these instructions.
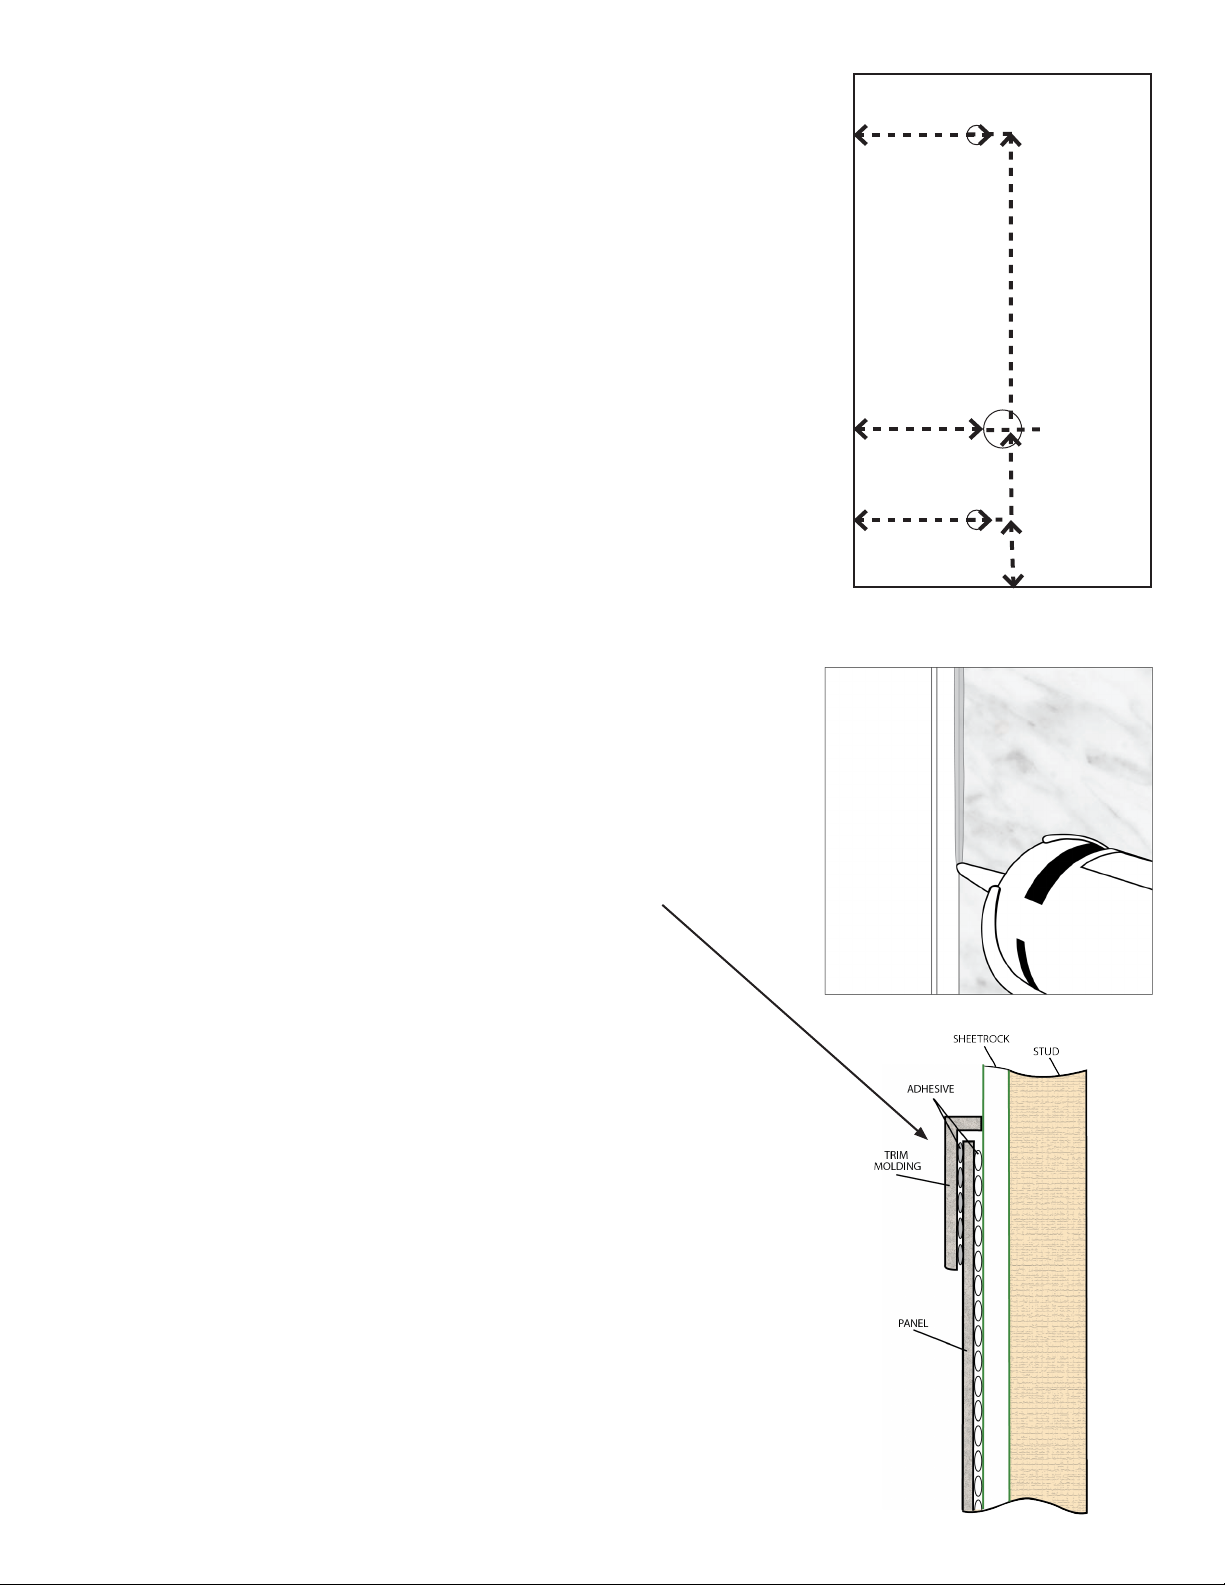
B. For each hole to be cut, measure the vertical distance
between the center of the plumbing xture and the shower
base. Measure the horizontal distance between the center of
the xture and the installed back wall panel. Mark the center of
the xtures on the face of the panel.
C. Using a drill, make a small pilot hole in marked locations.
Using a jigsaw, hole saw, or paddle bit cut out each hole in the
panel to the appropriate size for the particular pipe or xture.
Make each hole only as large as necessary for access to the
plumbing. Cover plates only cover so much!
D. With holes drilled so the panel now ts over the plumbing,
you can ne tune the t of the panel into the back corner and
against the shower base from step 3.A.
E. Prior to adhering the plumbing wall panel, seal the back
panel A to the corner reinforcement using a small bead of
Performance Pro 100% Silicone.
Inside Wall
Shower Base
F. Follow Step 2.B and adhere the side panel, but also form a
bead of adhesive on the back around each plumbing hole.
4. Installation of Side Wall Trims (C,D,E,F)
NOTE: Trim moldings are shaped like an “L”, and the long leg is
designed to overlap panels, with the short leg returning back
to the sheetrock and hiding the panel edge. Be sure to peel
protective masking back from the edges of the panels before
adhering the trim moldings.
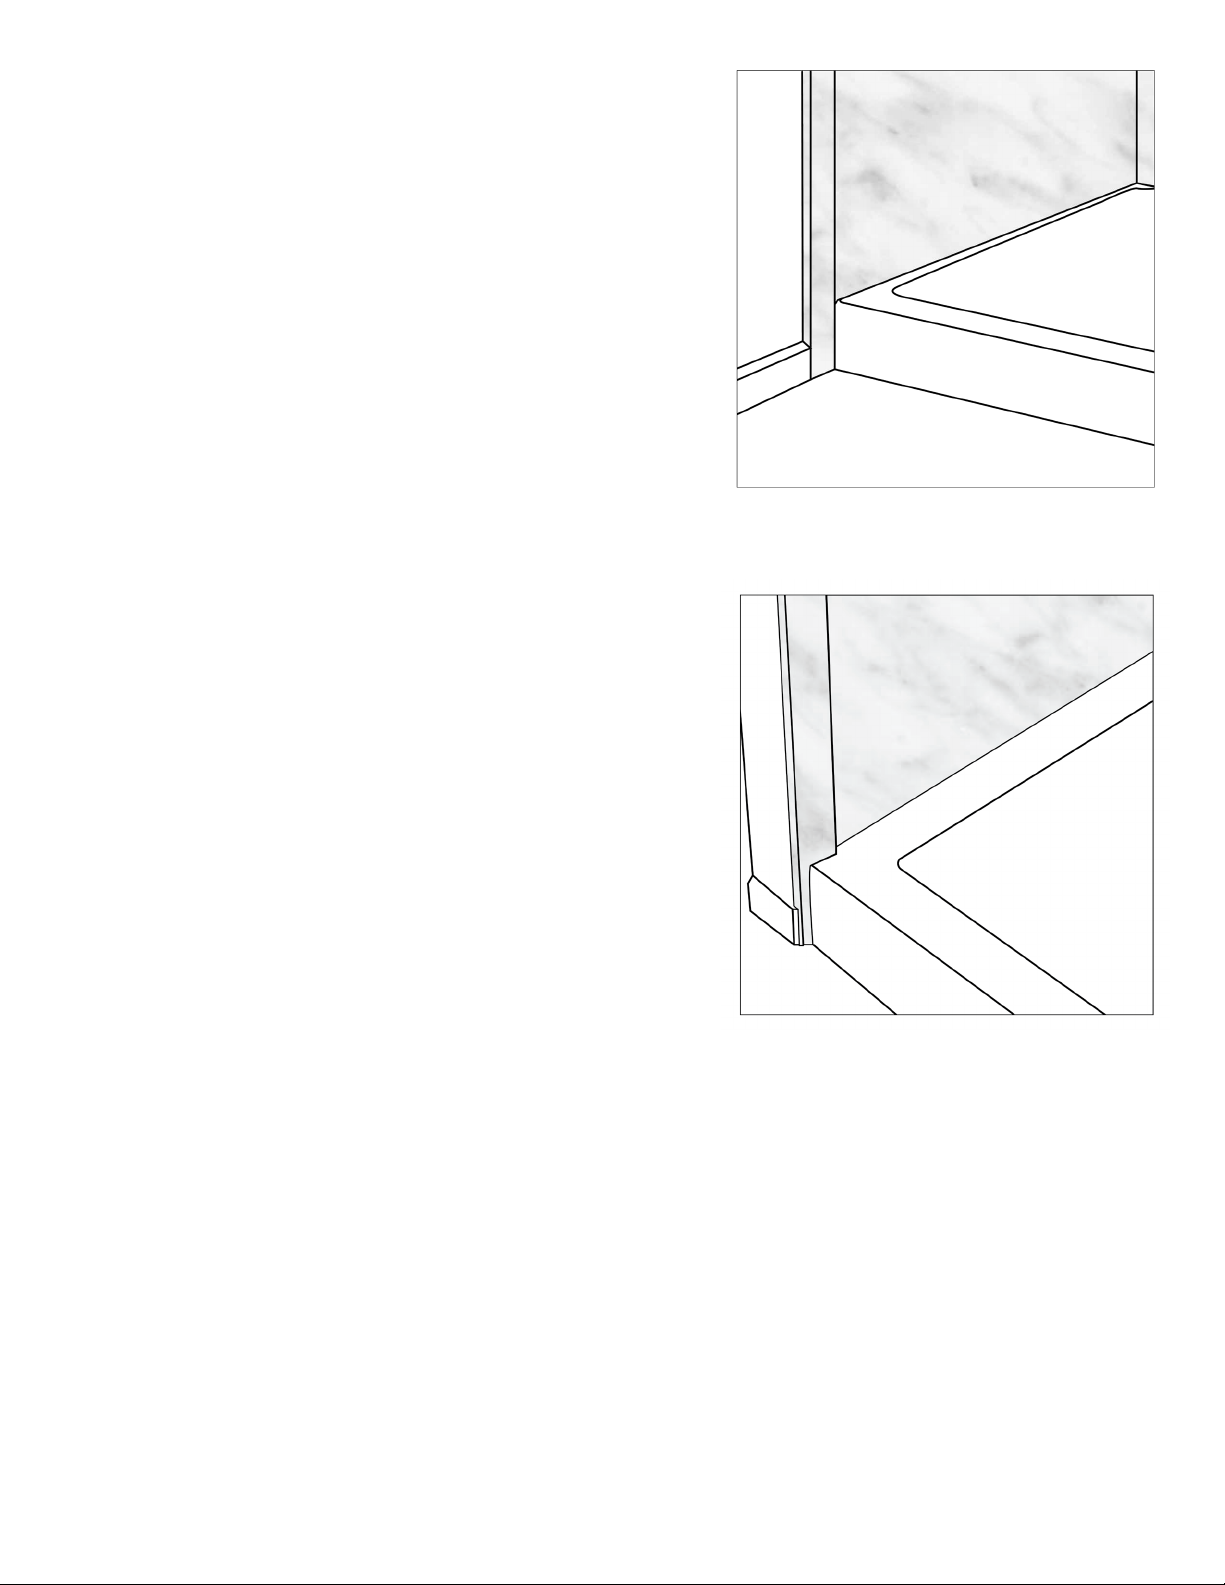
NOTE: Vertical trim moldings are designed to be installed either:
1) resting on top of the shower base threshold, or 2) outside the
threshold and running down to the oor. Depending on the
size of your opening, you may even choose to contour cut the trim
moldings to overlap the threshold partially.
A. Note the height of the shower head. Decide if top trims
will be installed above or below shower head/escutcheon,
keeping in mind that trims can overlap panels from ½” to
2-1/2”. Mark a level line at desired height of the top of the trim
on the back wall (above the back wall panel).
– 4 –
V.2 06/2021
Page 6
B. Place horizontal left wall top mitered trim (Item D) in
place, push into the corner against back wall panel, then
level it. Mark a level line on the wall on the top side of the
trim molding near the outer end. Set aside this trim piece.
C. Measure from the oor to the level mark made in 4.B
to determine the length needed for the vertical trim molding
piece (Item C). Cut vertical trim molding piece (C) to this
length, but do not cut from the pre-mitered end!
D. Fit vertical trim piece (C) over panel and plumb using
a level. If contour cutting this trim molding to match the
shower base shape, do so now. You can scribe the contour
with a compass, or by hand, and cut with a jig saw or utility
knife. Peel away protective masking from the trim, apply
adhesive to the back of the trim molding, and adhere it
over the wall panel. Secure the trim piece in place while the
adhesive cures using paint-safe masking tape.
E. Measure horizontal distance from back wall panel to the
tip of miter on the vertical molding. Cut horizontal top trim
molding (Item D) to this dimension by cutting o the end
opposite the miter. Be sure not to cut the mitered end.
Vertical trims installed outside shower base
F. Dry t the trim molding D in place for a tight t. Peel
away protective masking from the trim, apply adhesive
on the backside of the molding and adhere to the wall as
before. Make any minor adjustments necessary to ensure
that the mitered end makes a tight joint.
G. Repeat 4.B-4.F for the opposite wall trims (E, F).
Vertical trims contour cut to overlap threshold
– 5 –
V.2 06/2021
Page 7
5. Installation of Corner Shelf (I)
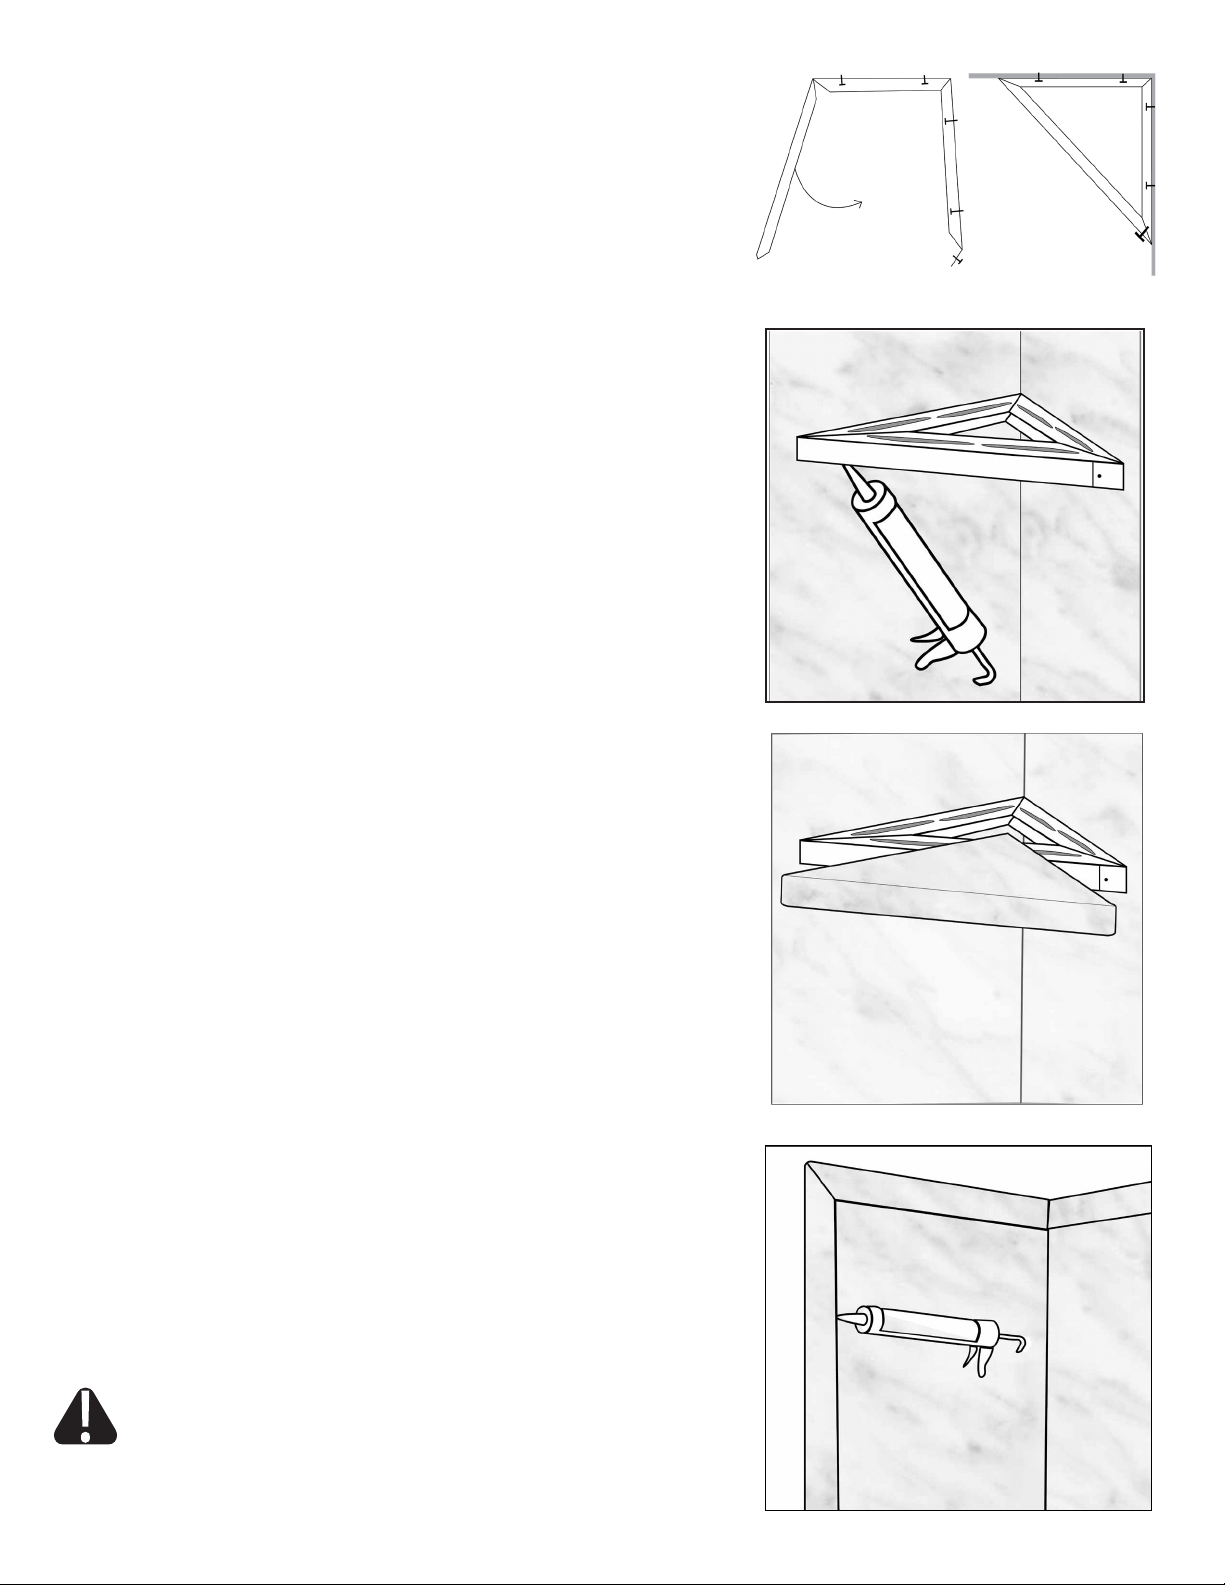
NOTE: Corner shelf includes a folding-triangle metal bracket with
screw holes which is designed to mount directly to the FlexStone
wall panels. Be sure to peel away protective masking from the
installation area before securing the bracket.
A. Position corner shelf bracket in desired corner at desired
height. Use a level to mark level lines in pencil. Adjust the
alignment to include a slight forward slope for water runo.
B. Using drywall screws or other coarse-thread screws, fasten
each side of the bracket through the FlexStone panels and the
sheetrock.
C. Fold bracket and complete triangle by bending the tab
over to secure bracket. Dry t the corner shelf material over
the bracket. If corner is out of square, trim one side of shelf to
achieve a tight t.
D. Peel back protective masking from edges of shelf, apply
adhesive to top and bottom of bracket and place FlexStone
material over bracket like a clamshell. Clamp until dry (24
hours).
6. Sealing with Silicone
A. If you desire to paint the walls now or in the future, use
paintable latex caulk where trim moldings meet sheetrock.
Use wet nger or caulk tool to shape the latex caulk to a nice
nish.
B. Using denatured alcohol, clean and prime all joints in the
surround, including vertical and horizontal joints where panel
meets tub, panel meets panel, or trim meets panel. Clean any
oils, greases, or adhesive residues from these joints.
C. Seal all joints in your surround with 100% silicone. Our
installation kit has color-matched translucent silicone, tinted to
complement your selected FlexStone color. Apply a ne bead
of silicone to all joints. Use wet nger or caulk tool to shape the
silicone to a nice nish. Follow any directions on sealant tube.
PLEASE WAIT 24 HOURS BEFORE INSTALLING FINISH
PLUMBING OR USING YOUR NEW TUB/SHOWER SURROUND.
REMOVE REMAINING PROTECTIVE MASKING PRIOR TO USE.
– 6 –
V.2 06/2021
 Loading...