

Page 1

Important
Please read PRECAUTIONS, this User’s Manual, and the Setup Guide
(separate volume) carefully to familiarize yourself with safe and
effective usage.
• Please refer to the Setup Guide for basic information ranging from
connection of the monitor to a PC to using the monitor.
• For the latest product information including the User’s Manual, refer
to our web site :
http://www.eizoglobal.com
Color LCD Monitor
User’s Manual
Page 2
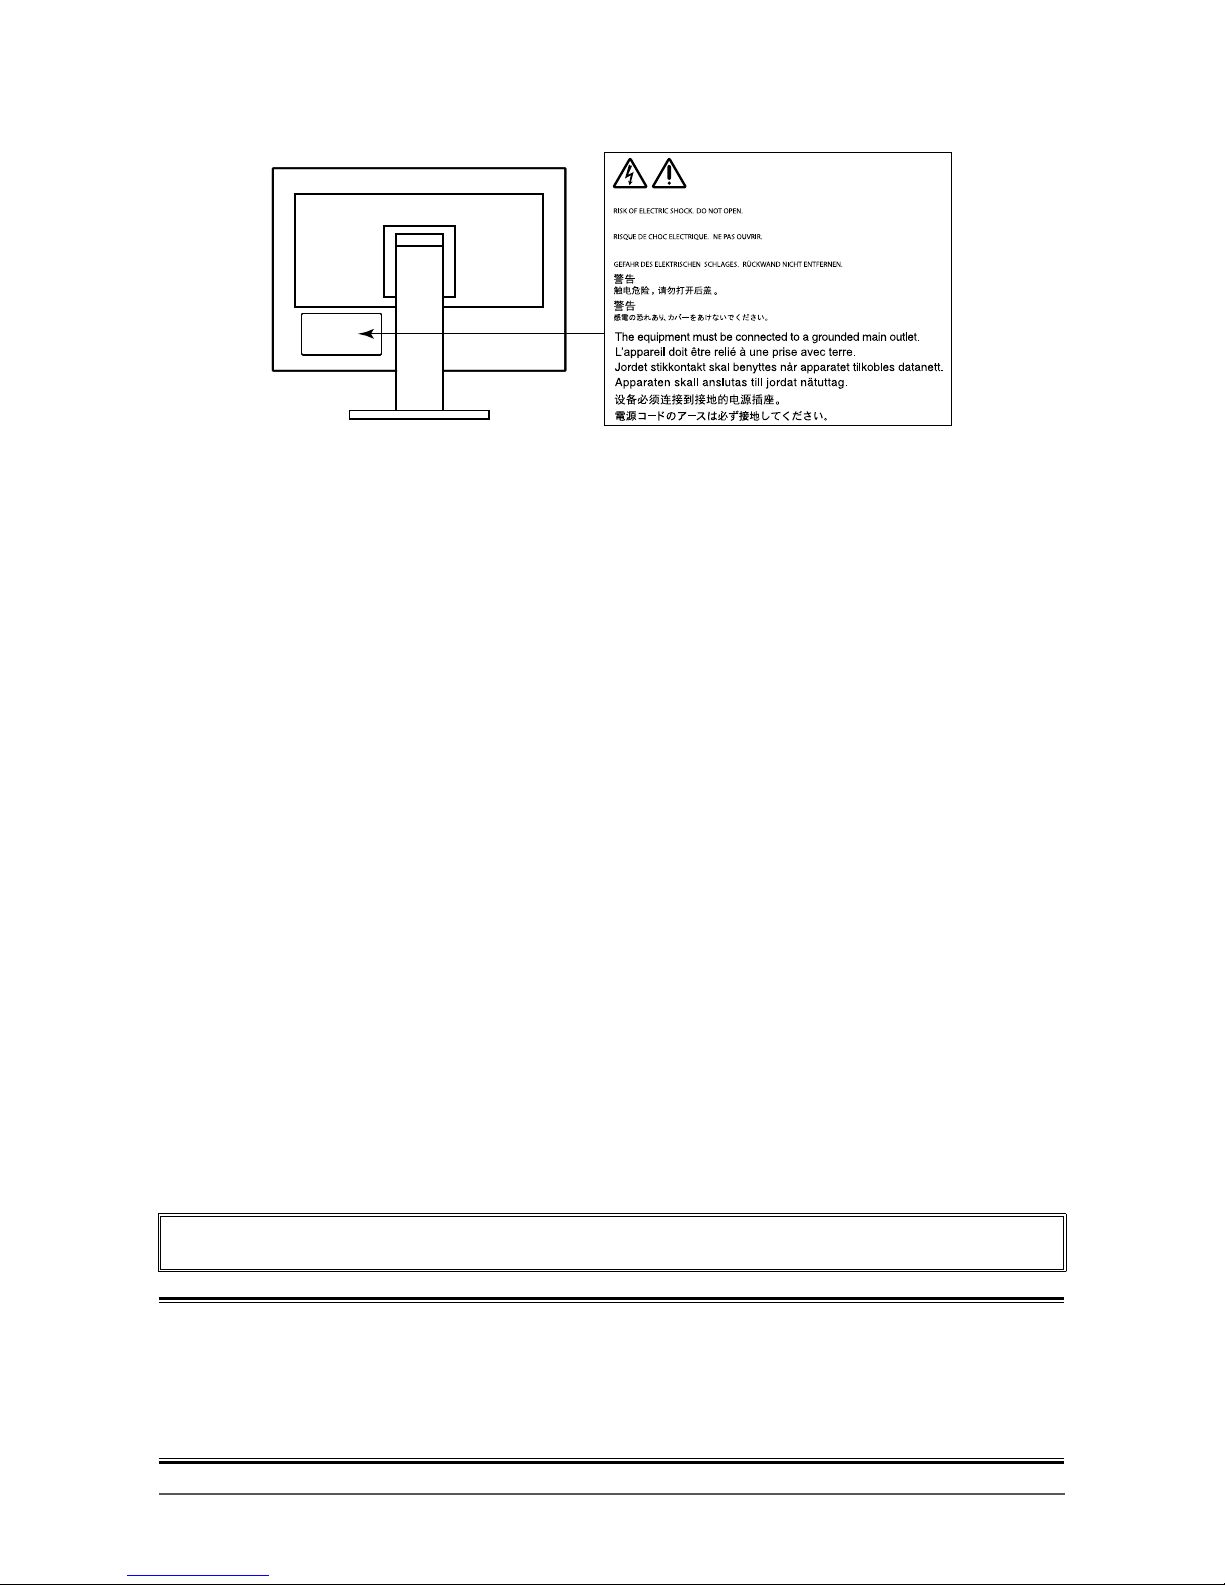
2
Location of Caution Statement
AVERTISSEMENT
WARNING
WARNUNG
This product has been adjusted specically for use in the region to which it was originally shipped. If
operated outside this region, the product may not perform as stated in the specications.
No part of this manual may be reproduced, stored in a retrieval system, or transmitted, in any form or by
any means, electronic, mechanical, or otherwise, without the prior written permission of EIZO Corporation.
EIZO Corporation is under no obligation to hold any submitted material or information condential unless
prior arrangements are made pursuant to EIZO Corporation’s receipt of said information. Although every
effort has been made to ensure that this manual provides up-to-date information, please note that EIZO
monitor specications are subject to change without notice.
Page 3
3
Notice for this monitor
Notice for this monitor
This product is suited to general purposes like creating documents, viewing multimedia content (Assuming
usage of approximately 12 hours per day).
If using this product for the following kinds of applications, where an extremely high degree of reliability and
safety is required, then measures should be in place to maintain safety while using this product.
• Transportation equipment (ships, aircraft, trains, and automobiles)
• Safety devices (Disaster prevention systems, security control systems, etc.)
• Life-critical devices (medical devices, such as life-support devices and operating room devices)
• Nuclear energy control devices (Nuclear energy control systems, security control systems of nuclear facilities, etc.)
• Major system communication devices (operation control systems of transportation systems, air trafc control systems,
etc.)
This product has been adjusted specically for use in the region to which it was originally shipped. If the
product is used outside the region, it may not operate as specied in the specications.
This product may not be covered by warranty for uses other than those described in this manual.
The specications noted in this manual are only applicable when the following are used:
• Power cords provided with the product
• Signal cables specied by us
Only use optional products manufactured or specied by us with this product.
If you place this product on a lacquer-coated desk, the color may adhere to the bottom of the stand due to
the composition of the rubber. Check the desk surface before use.
It takes about 30 minutes for the performance of electrical parts to stabilize. Please wait 30 minutes or more
after the monitor power has been turned on, and then adjust the monitor.
Monitors should be set to a lower brightness to reduce changes in luminosity caused by long-term use and
maintain a stable display.
When the screen image is changed after displaying the same image for extended periods of time, an
afterimage may appear. Use the screen saver or power save function to avoid displaying the same image for
extended periods of time. Depending on the image, an afterimage may appear even if it was displayed for
a short period of time. To remove such a phenomenon, change the image or keep the power turned off for
several hours.
If the monitor displays continuously over a long period of time, dark smudges or burn-in may appear. To
maximize the life of the monitor, we recommend the monitor be turned off periodically.
Periodic cleaning is recommended to keep the monitor looking new and to prolong its operation lifetime (refer
to “Cleaning” (page 4)).
The LCD panel is manufactured using high-precision technology. Although, missing pixels or lit pixels may
appear on the LCD panel, this is not a malfunction. Percentage of effective dots: 99.9994 % or higher.
The backlight of the LCD panel has a xed lifetime. Depending on the usage pattern, such as usage for
long continuous periods, the lifespan of the backlight may run out sooner, requiring replacement. When the
screen becomes dark or begins to icker, please contact your local EIZO representative.
Page 4

4
Notice for this monitor
Do not press on the LCD panel or edge of the frame strongly, as this may result in display malfunctions, such
as interference patterns, etc. If pressure is continuously applied to the LCD panel surface, the liquid crystal
may deteriorate or the LCD panel may be damaged. (If the pressure marks remain on the panel, leave the
monitor with a black or white screen. The symptom may disappear.)
Do not scratch or press on the LCD panel with any sharp objects, at this may result in damage to the LCD
panel. Do not attempt to brush with tissues as this may scratch the panel.
When the monitor is cold and brought into a room or the room temperature goes up quickly, dew
condensation may occur on the interior and exterior surfaces of the monitor. In that case, do not turn the
monitor on. Instead wait until the dew condensation disappears, otherwise it may cause some damage to the
monitor.
Cleaning
Attention
• Chemicals such as alcohol and antiseptic solution may cause gloss variation, tarnishing, and fading of the cabinet
or LCD panel, and also quality deterioration of the image.
• Never use thinner, benzine, wax, or abrasive cleaner as they may damage the cabinet or LCD panel surface.
Note
• It is recommended that ScreenCleaner (available as an option) be used to clean the cabinet and LCD panel
surface.
The stains on the cabinet and LCD panel surface can be removed by moistening part of a soft cloth with
water.
To use the monitor comfortably
• An excessively dark or bright screen may affect your eyes. Adjust the brightness of the monitor
according to the environmental conditions.
• Staring at the monitor for a long time tires your eyes. Take a 10-minute rest every hour.
Page 5
5
CONTENTS
CONTENTS
Notice for this monitor ......................................... 3
Cleaning .................................................................... 4
To use the monitor comfortably ............................. 4
CONTENTS ............................................................. 5
Chapter 1 Introduction ....................................... 6
1-1. Features ......................................................... 6
●
High Degree of Flexibility for Installation ........ 6
●
Reduction of Power Consumption .................. 7
●
Realizing More Convenient Operations
Using Screen InStyle ...................................... 7
1-2. Controls and Functions ............................... 8
●
Front ................................................................ 8
●
Rear ................................................................. 9
1-3. Supported Resolutions ...............................10
1-4. Setting the Resolution ................................11
●
Windows 10 ....................................................11
●
Windows 8.1 / Windows 7 ..............................11
●
OS X Mountain Lion (10.8) or later .................11
●
Mac OS X 10.7 ...............................................11
Chapter 2 Basic Adjustment/Setting .............. 12
2-1. Switch Operation Method ...........................12
2-2. Switching Input Signals ..............................12
2-3.
Switching Display Modes (Color Modes)
...13
●
Display Modes ................................................13
2-4. Conserving Energy ...................................... 13
2-5. Adjusting Brightness ..................................15
2-6. Adjusting Volume.........................................16
Chapter 3 Advanced Adjustment/Setting ...... 17
3-1. Basic Operation of the Setting menu ........17
3-2. Setting Menu Functions ..............................18
●
Color Adjustment ............................................18
●
Signal Settings ...............................................21
●
Preference Settings .......................................24
●
Language ...................................................... 25
●
Information .................................................... 25
Chapter 4 Administrator Settings ................... 26
4-1. Basic Operation of the “Administrator
Settings” Menu ............................................ 26
4-2. Functions of the “Administrator
Settings” Menu ............................................ 27
Chapter 5 Troubleshooting ..............................28
5-1. No Picture .................................................... 28
5-2. Imaging Problems (For Both Digital and
Analog) ......................................................... 29
5-3. Imaging Problems (For Analog Only) ....... 30
5-4. Other Problems ............................................31
Chapter 6 Reference ........................................ 32
6-1. Attaching the Optional Arm ....................... 32
●
Attaching the Optional Arm (or Optional
Stand) ............................................................ 33
●
Attaching the original stand .......................... 33
6-2. Detaching / Attaching the Cable Holder ... 34
●
Detaching the cable holder ........................... 34
●
Attaching the cable holder ............................ 34
6-3. Detaching / Attaching the Cable Cover .... 35
●
Attaching the cable cover .............................. 35
●
Detaching the cable cover ............................ 36
6-4. Connecting Multiple PCs ............................37
●
Connection examples ....................................37
6-5. Making Use of USB (Universal Serial
Bus) ............................................................... 38
●
Required System Environment ..................... 38
●
Connection Procedure (Setup of USB
Function) ........................................................ 38
6-6. Specications ............................................. 39
●
Main Default Settings .................................... 40
●
Accessories ................................................... 40
Appendix .............................................................. 41
Trademark ................................................................41
License .....................................................................41
ENERGY STAR .........................................................41
TCO .......................................................................... 42
FCC Declaration of Conformity ............................ 43
LIMITED WARRANTY ............................................. 44
Recycling Information ........................................... 45
Page 6
6
Chapter 1 Introduction
Chapter 1 Introduction
Thank you very much for choosing an EIZO color LCD monitor.
1-1. Features
●
High Degree of Flexibility for Installation
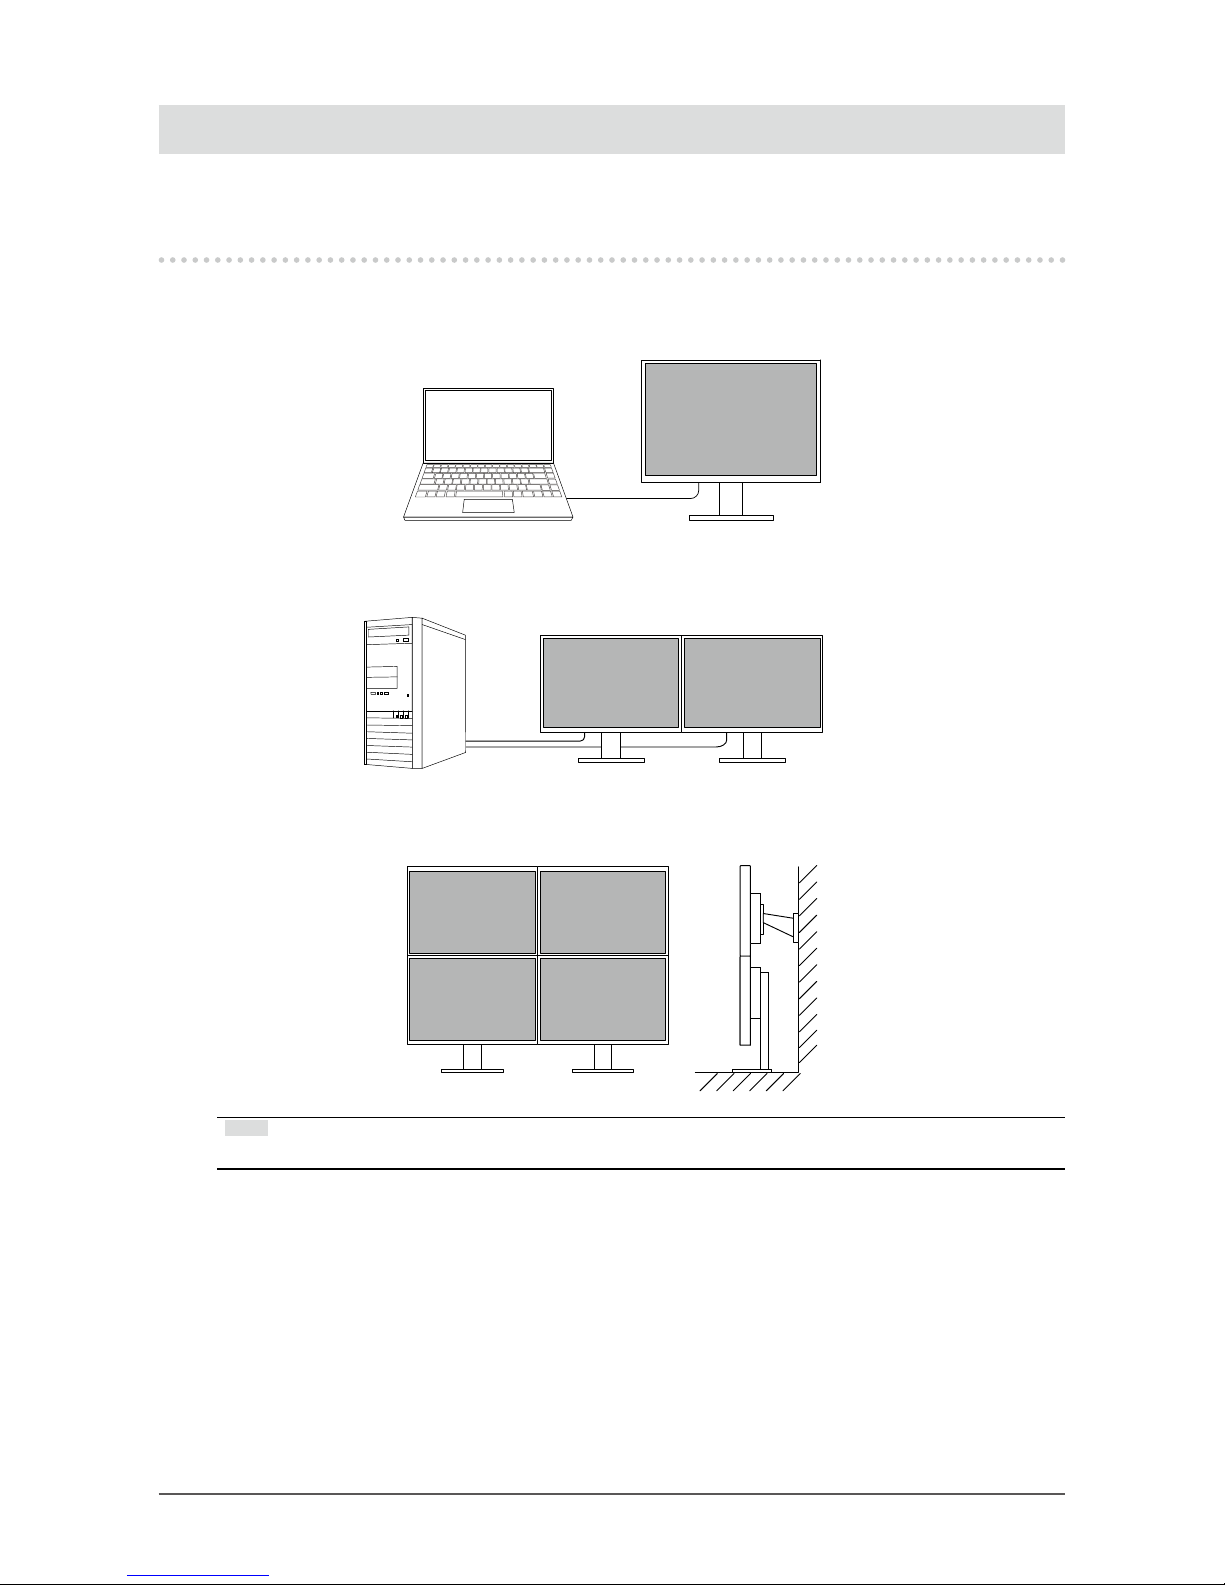
• This product can be used as an external monitor of a notebook computer.
• This product can be used in a multi-monitor conguration in which multiple monitors are connected
to a single PC.
• Mounting the monitor on an arm enables this product to be used in a multiple-monitor conguration
in which the screen is rotated by 180° (ipped vertically).
Note
• PC settings must be congured to rotate the monitor display by 180°.
Page 7
7
Chapter 1 Introduction
●
Reduction of Power Consumption
This product provides a function that automatically adjusts the screen brightness to reduce power
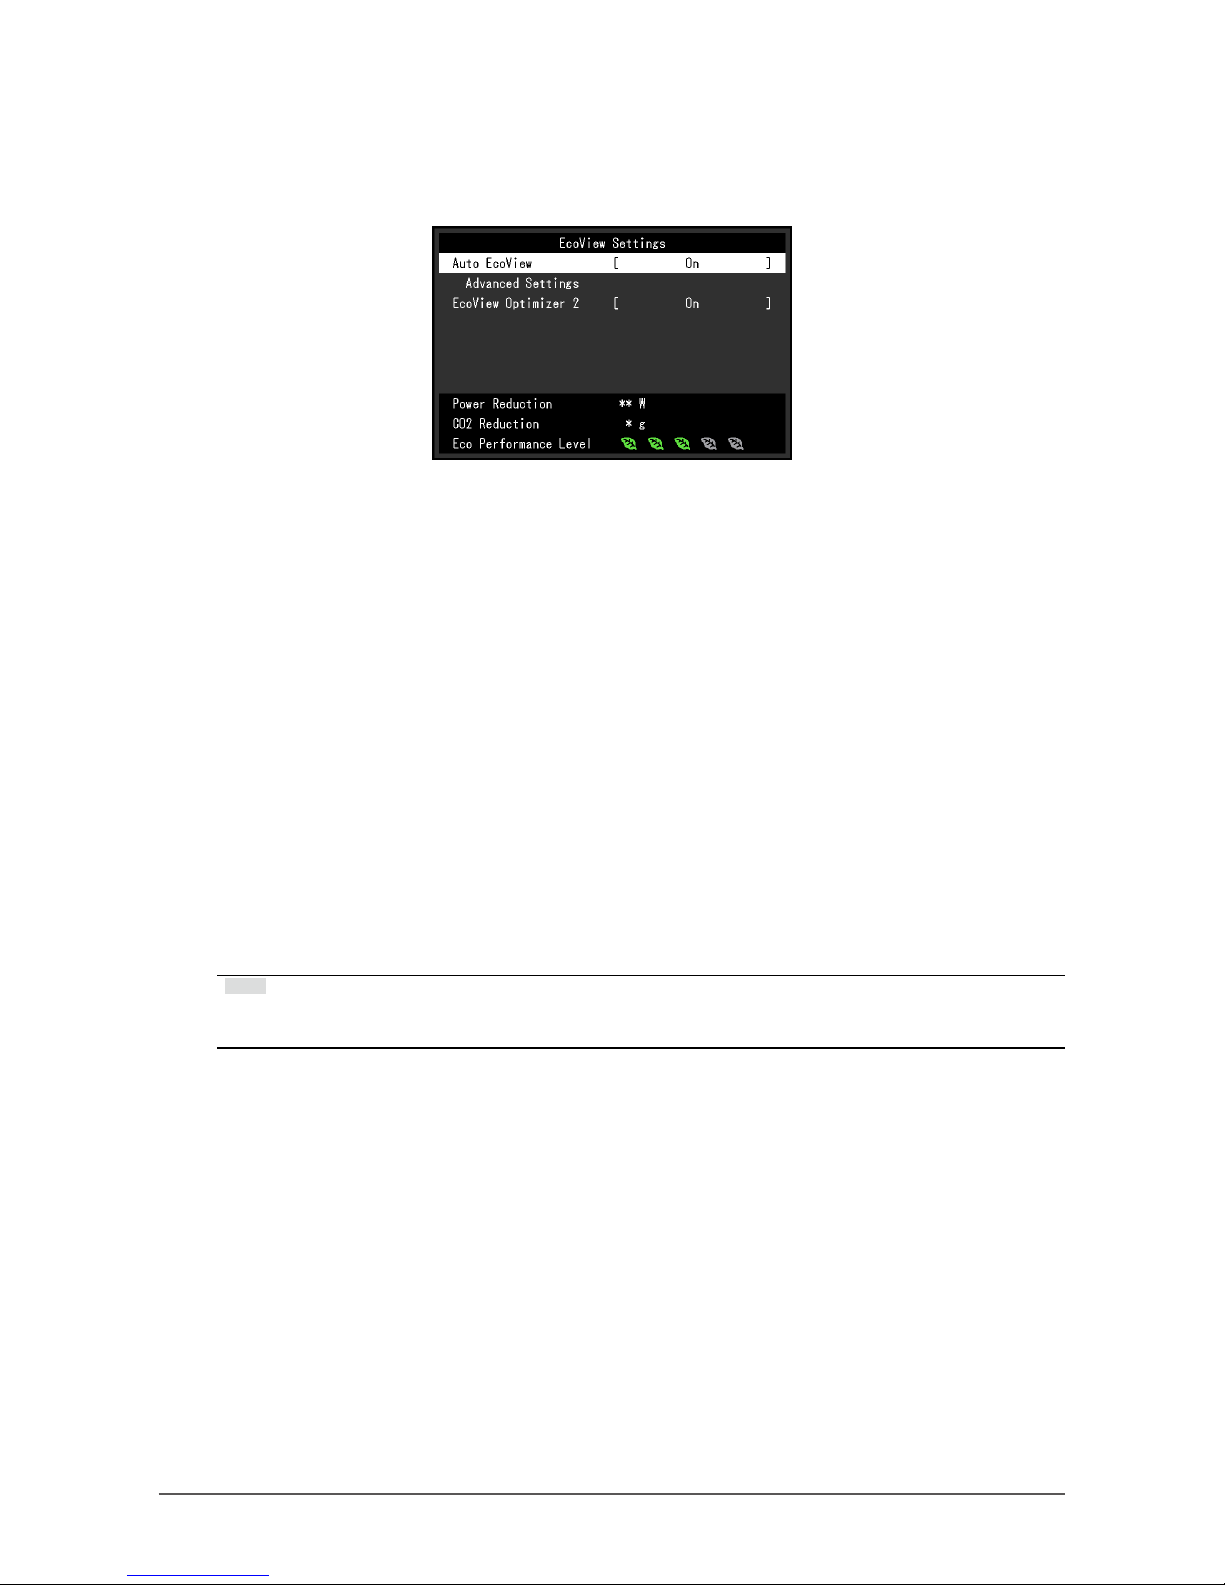
consumption *1. Power Reduction, CO2 Reduction, and Eco Performance Level can be checked on
the "EcoView Settings" menu.
• Auto EcoView
The ambient light sensor on the front of the monitor detects the ambient brightness to automatically
adjust the screen brightness to a comfortable level.
• EcoView Optimizer 2
The monitor automatically adjusts the screen brightness according to the white level of the input
signal. This function can reduce power consumption while maintaining the brightness specied by
the input signal.
*1 Reference values:
Maximum power consumption: 42 W (when a USB device is connected, speaker working), standard power
consumption: 13 W (brightness 120 cd/m
2
, when no USB device is connected, speaker not working, at
default settings)
●
Realizing More Convenient Operations Using Screen InStyle
The "Screen InStyle" monitor control utility enables you to use the monitor more conveniently.
• The monitor color mode can be switched automatically to suit the software to be used.
• When multiple monitors are installed, you can turn the power on and off or change the color mode
of all monitors at the same time.
Note
• Screen InStyle can be downloaded from our web site (http://www.eizoglobal.com).
• The Windows operating systems are only supported.
Page 8
8
Chapter 1 Introduction
1-2. Controls and Functions
●
Front
2
1 3 4
Setting menu
*1
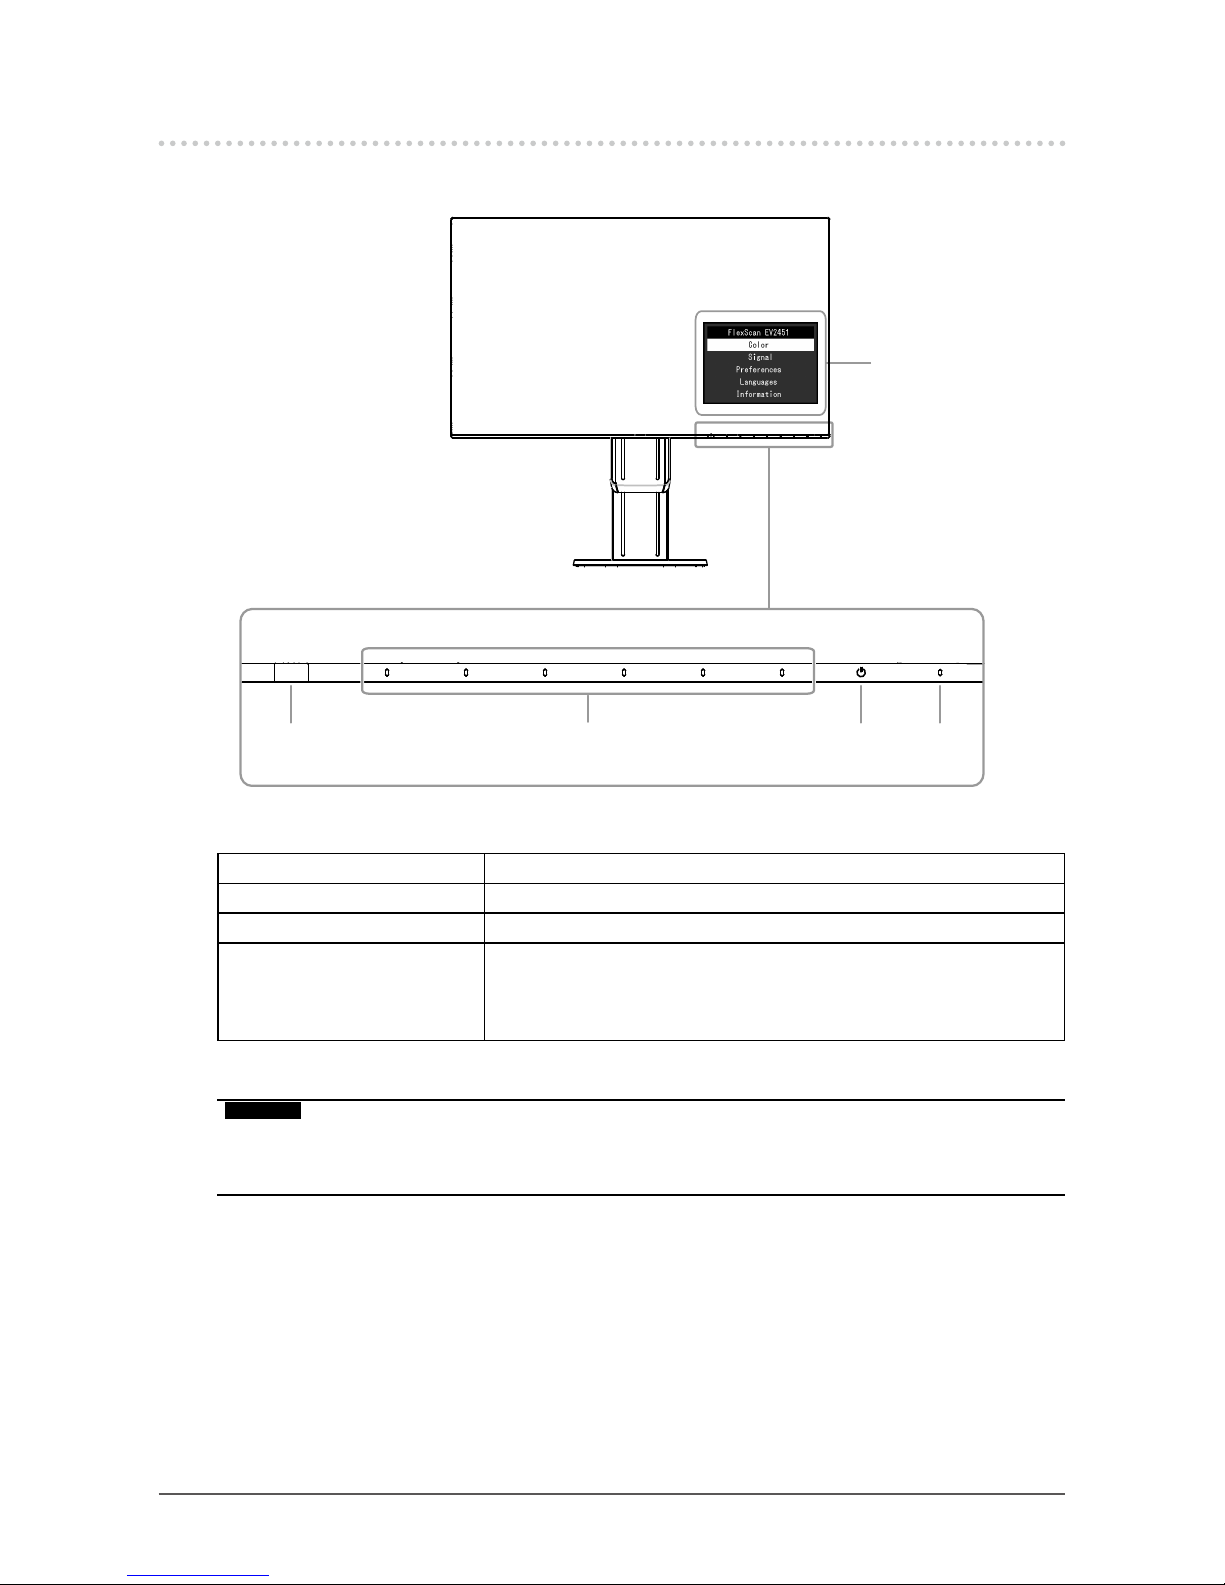
1. Ambient light sensor Detects ambient brightness (Auto EcoView function (page 14)).
2. Operation switches Displays menus. Operate the switches according to the operation guide.
3. Power switch Turns the power on or off.
4. Power indicator Indicates the monitor’s operation status.
White: Screen display
Orange: Power saving mode
OFF: Main power / power off
*1 For details on usage, see “3-1. Basic Operation of the Setting menu” (page 17).
Attention
• The operation switches and Power switch are capacitance switches that can be operated not only by
touching the front part of the switch but also by touching the bezel bottom of the switch. When turning the
monitor screen or changing the angle, be careful not to touch the bezel bottom of the switch.
Page 9
9
Chapter 1 Introduction
●
Rear
8
5 6 7
10
11
12
9
16
13 13
14
15
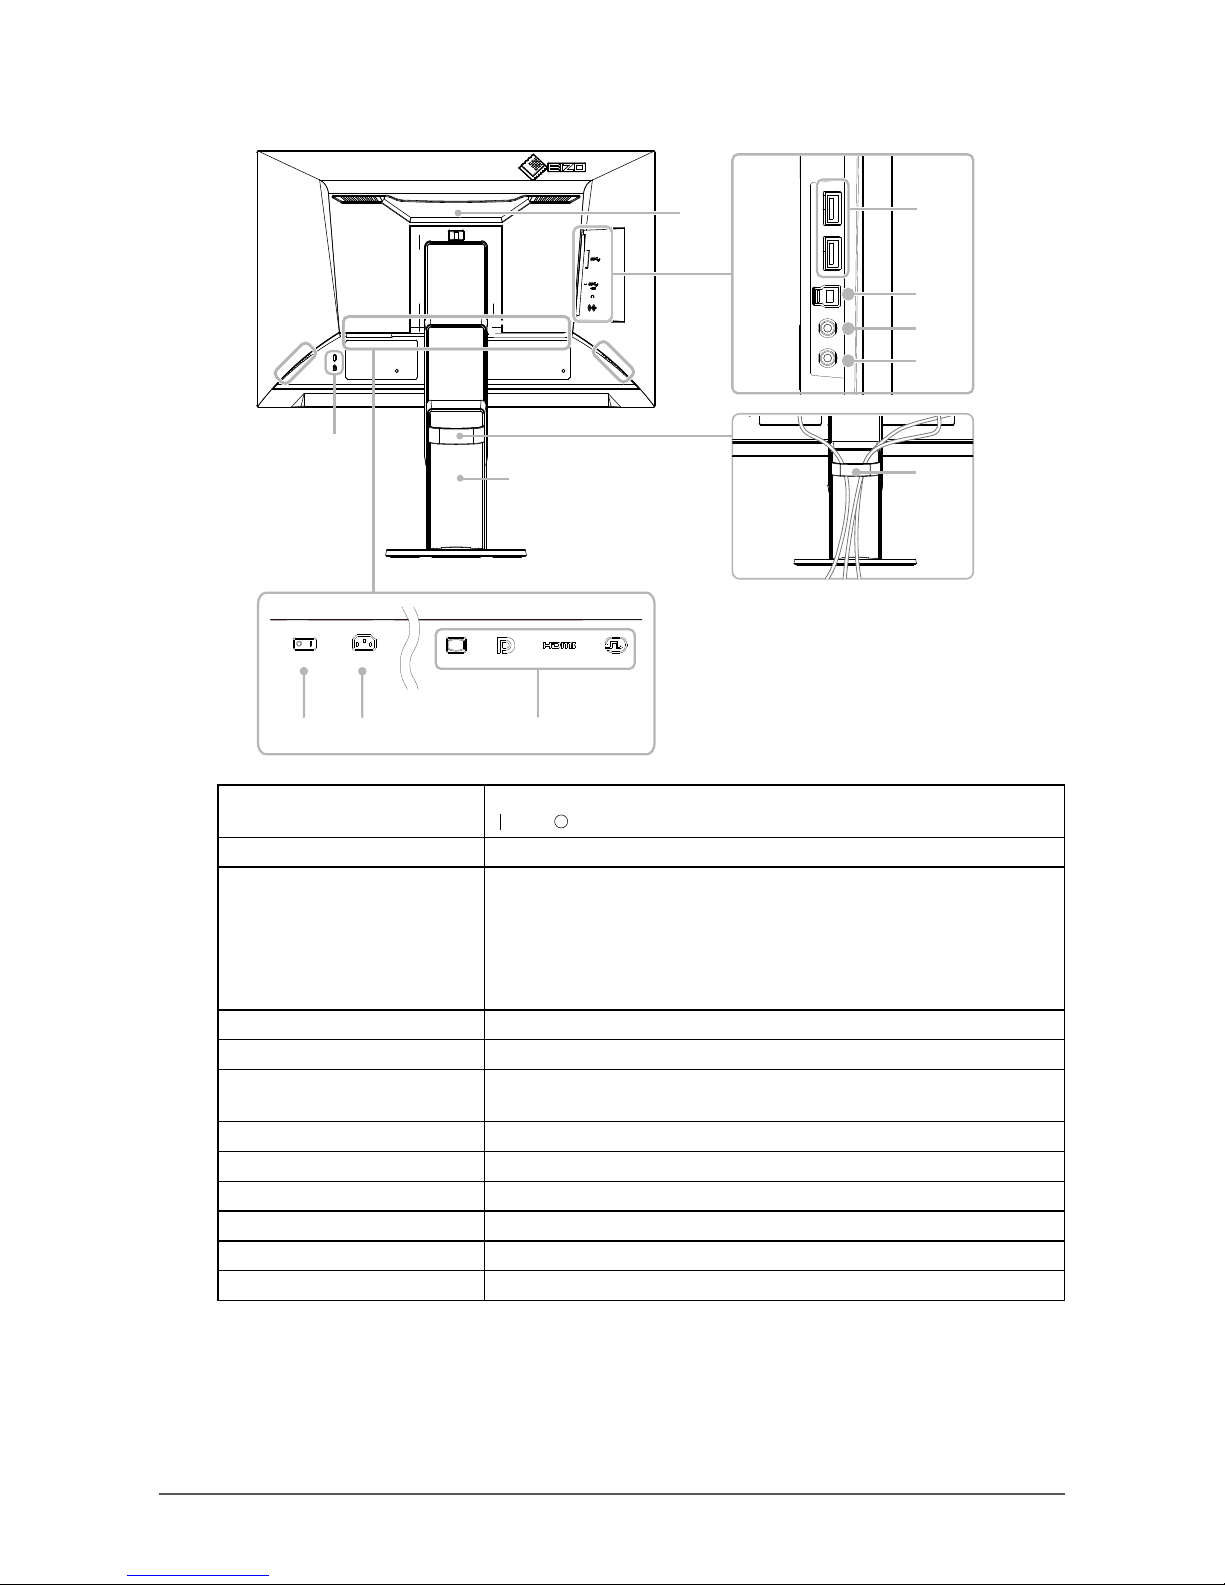
5. Main power switch Turns the main power on or off.
: On, : Off
6. Power connector Connects the power cord.
7. Input signal connectors The following connectors are available on the monitor rear in order of left
to right.
D-Sub mini 15-pin connector
DisplayPort connector
HDMI connector
DVI-D connector
8. Handle This handle is used for transportation
9. USB downstream port Connects to a peripheral USB device.
10. USB upstream port Connects to the USB cable when using software that needs a USB
connection, or when using the USB Hub function.
11. Headphone jack Connects to headphones.
12. Stereo mini jack Connects to a stereo mini jack cable.
13. Speakers Outputs audio.
14. Security lock slot Complies with Kensington’s MicroSaver security system.
15. Cable holder Holds the monitor cables.
16. Stand
*2
Adjusts the height and angle (tilt, swivel, and rotation) of the monitor.
*2 An optional arm (or optional stand) can be attached by removing the stand section (see “6-1. Attaching
the Optional Arm” (page 32)).
Page 10
10
Chapter 1 Introduction
1-3. Supported Resolutions
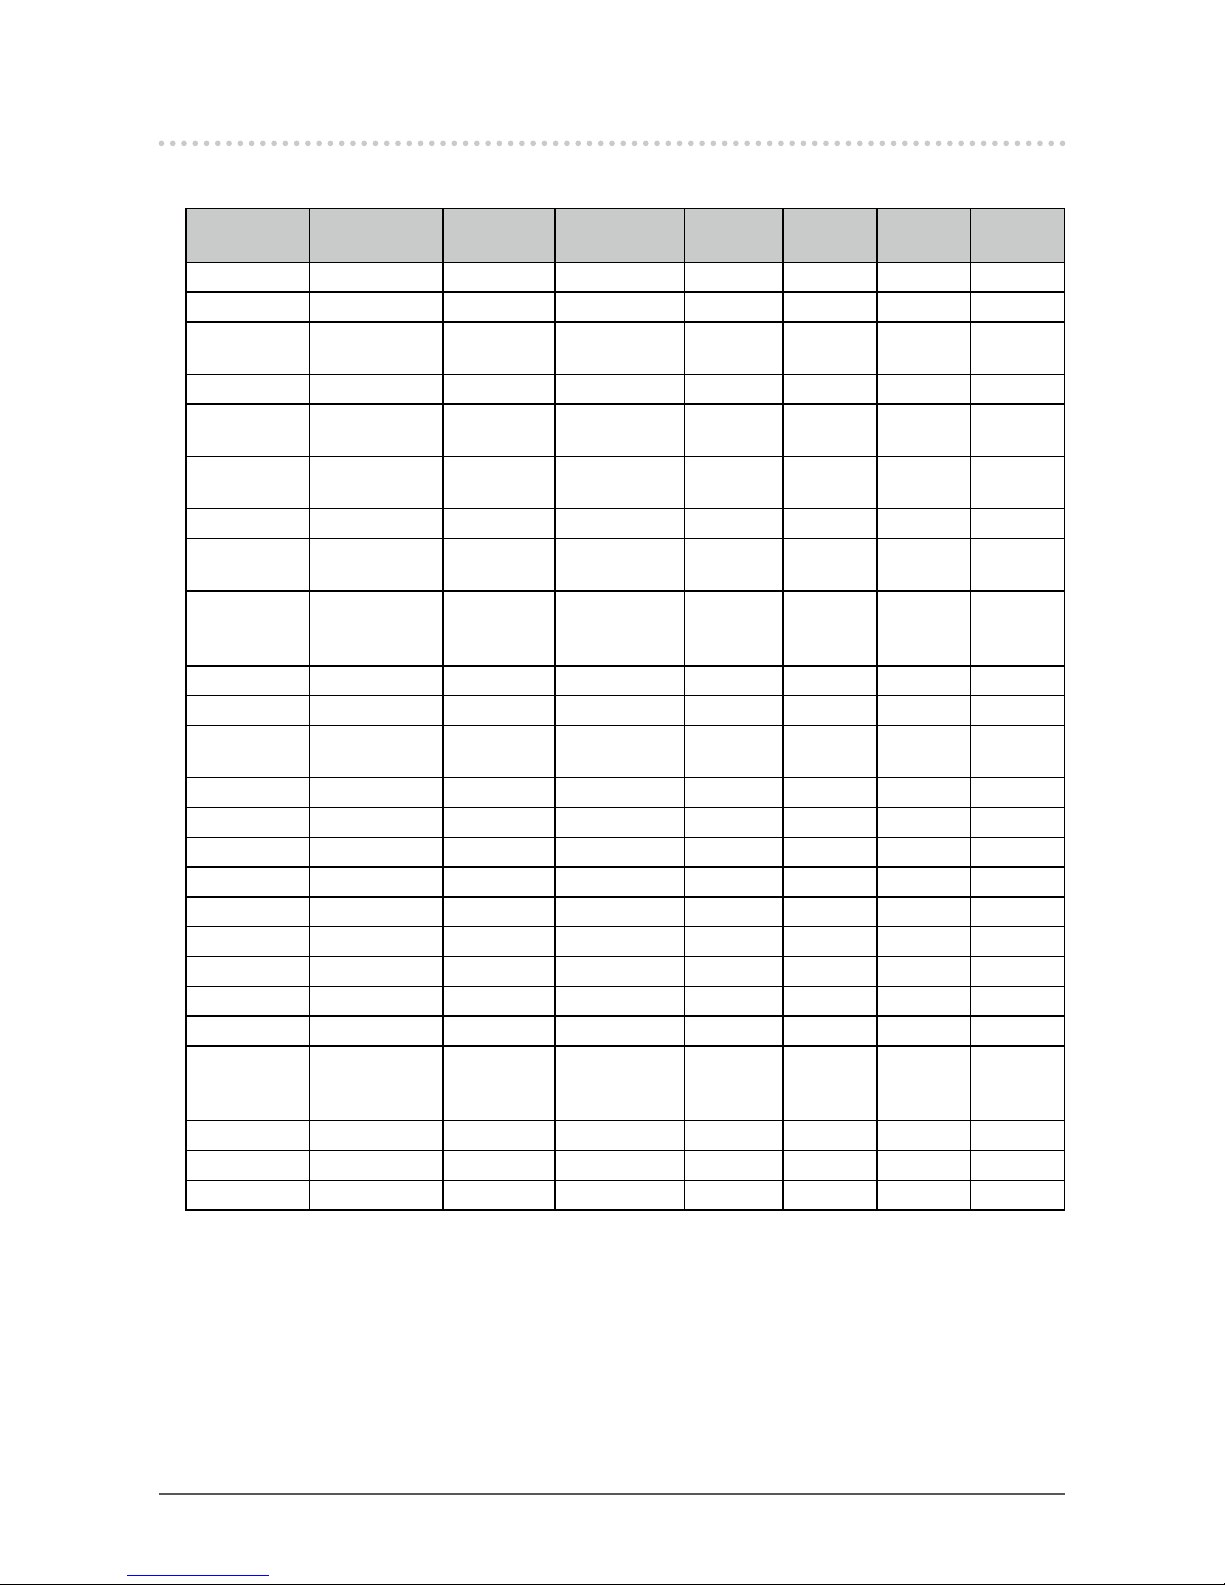
The monitor supports the following resolutions.
Resolution
Applicable
Signals
Vertical Scan
Frequency
Scan Ty p e
DisplayPort
HDMI DVI D-Sub
640 × 480
VGA / CEA-861
59.94Hz Progressive √ √ √ √
640 × 480 CEA-861 60Hz Progressive √ √ - 640 × 480 VESA 72.81Hz /
75Hz
Progressive - - - √
720 × 400 VGA TEXT 70.09Hz Progressive √ √ √ √
720 × 480 CEA-861 59.94Hz /
60Hz
Progressive √ √ - -
720 (1440) ×
480
CEA-861 59.94Hz /
60Hz
Interlace - √ - -
720 × 576 CEA-861 50Hz Progressive - √ - -
720 (1440) ×
576
CEA-861
50Hz
Interlace - √ - -
800 × 600
VESA
56.25Hz /
72.19Hz /
75Hz
Progressive - - - √
800 × 600 VESA 60.32Hz Progressive √ √ √ √
1024 × 768 VESA 60Hz Progressive √ √ √ √
1024 × 768
VESA
70.07Hz /
75.03Hz
Progressive - - - √
1280 × 720
CEA-861
50Hz Progressive - √ - -
1280 × 720 CEA-861
59.94Hz
Progressive √ √ - 1280 × 720 CEA-861 60Hz Progressive √ √ √ √
1280 × 800 VESA CVT 59.81Hz Progressive √ √ √ √
1280 × 1024 VESA 60.02Hz Progressive √ √ √ √
1280 × 1024 VESA 75.03Hz Progressive - - - √
1600 × 900 VESA RB 60Hz Progressive √ √ √ √
1680 × 1050 VESA CVT 59.95Hz Progressive √ √ √ √
1680 × 1050 VESA CVT RB 59.88Hz Progressive √ √ √ √
1920 × 1080
*1
CEA-861 50Hz /
59.94Hz /
60Hz
Interlace - √ - -
1920 × 1080
*1
CEA-861 50Hz Progressive - √ - -
1920 × 1080
*1
CEA-861
59.94Hz
Progressive √ √ - -
1920 × 1080
*1
CEA-861 60Hz Progressive √ √ √ √
*1 Recommended resolution
Page 11

11
Chapter 1 Introduction
1-4. Setting the Resolution
If the resolution is incorrect after connecting the monitor to a PC or if you want to change the resolution,
follow the procedure below.
●
Windows 10
1. Right-click the mouse anywhere on the desktop except on icons.
2. From the displayed menu, click “Display Settings”.
3. On the "Customize your display" dialog box, click "Advanced display settings".
4. Select a monitor, then choose a resolution from the "Resolution" pull-down menu.
5. Click the "Apply" button.
6. When a conrmation dialog box is displayed, click “Keep changes”.
●
Windows 8.1 / Windows 7
1. For Windows 8.1, click the "Desktop" tile on the Start Screen to display the desktop.
2. Right-click the mouse anywhere on the desktop except on icons.
3. From the displayed menu, click “Screen resolution”.
4. Select a monitor, then choose a resolution from the "Resolution" pull-down menu.
5. Click the "OK" button.
6. When a conrmation dialog box is displayed, click “Keep changes”.
●
OS X Mountain Lion (10.8) or later
1. Select “System Preferences” from the Apple menu.
2. When the “System Preferences” dialog box is displayed, click “Displays”. (For OS X Mountain Lion
(10.8), click "Displays" for "Hardware".)
3. On the displayed dialog box, select the “Display” tab, then choose "Change" for “Resolutions”.
4. The list of selectable resolutions is displayed. Select the desired resolution. If the desired
resolution is not displayed in the list, hold down the Option key and select "Change".
5. Your selection will be reected immediately. When you are satised with the selected resolution,
close the window.
●
Mac OS X 10.7
1. Select “System Preferences” from the Apple menu.
2. When the “System Preferences” dialog box is displayed, click “Displays” for “Hardware”.
3. On the displayed dialog box, select the “Display” tab and select the desired resolution in the
“Resolutions” eld.
4. Your selection will be reected immediately. If you are satised with the selected resolution, close
the window.
Page 12
12
Chapter 2 Basic Adjustment/Setting
Chapter 2 Basic Adjustment/Setting
This monitor enables users to change the brightness according to personal preference or to suit the usage
environment and reduce power consumption to conserve energy.
This chapter describes the basic functions that can be adjusted and set using the switches on the front of the
monitor.
For advanced adjustment and setting procedures using the Setting menu, see “Chapter 3 Advanced
Adjustment/Setting” (page 17).
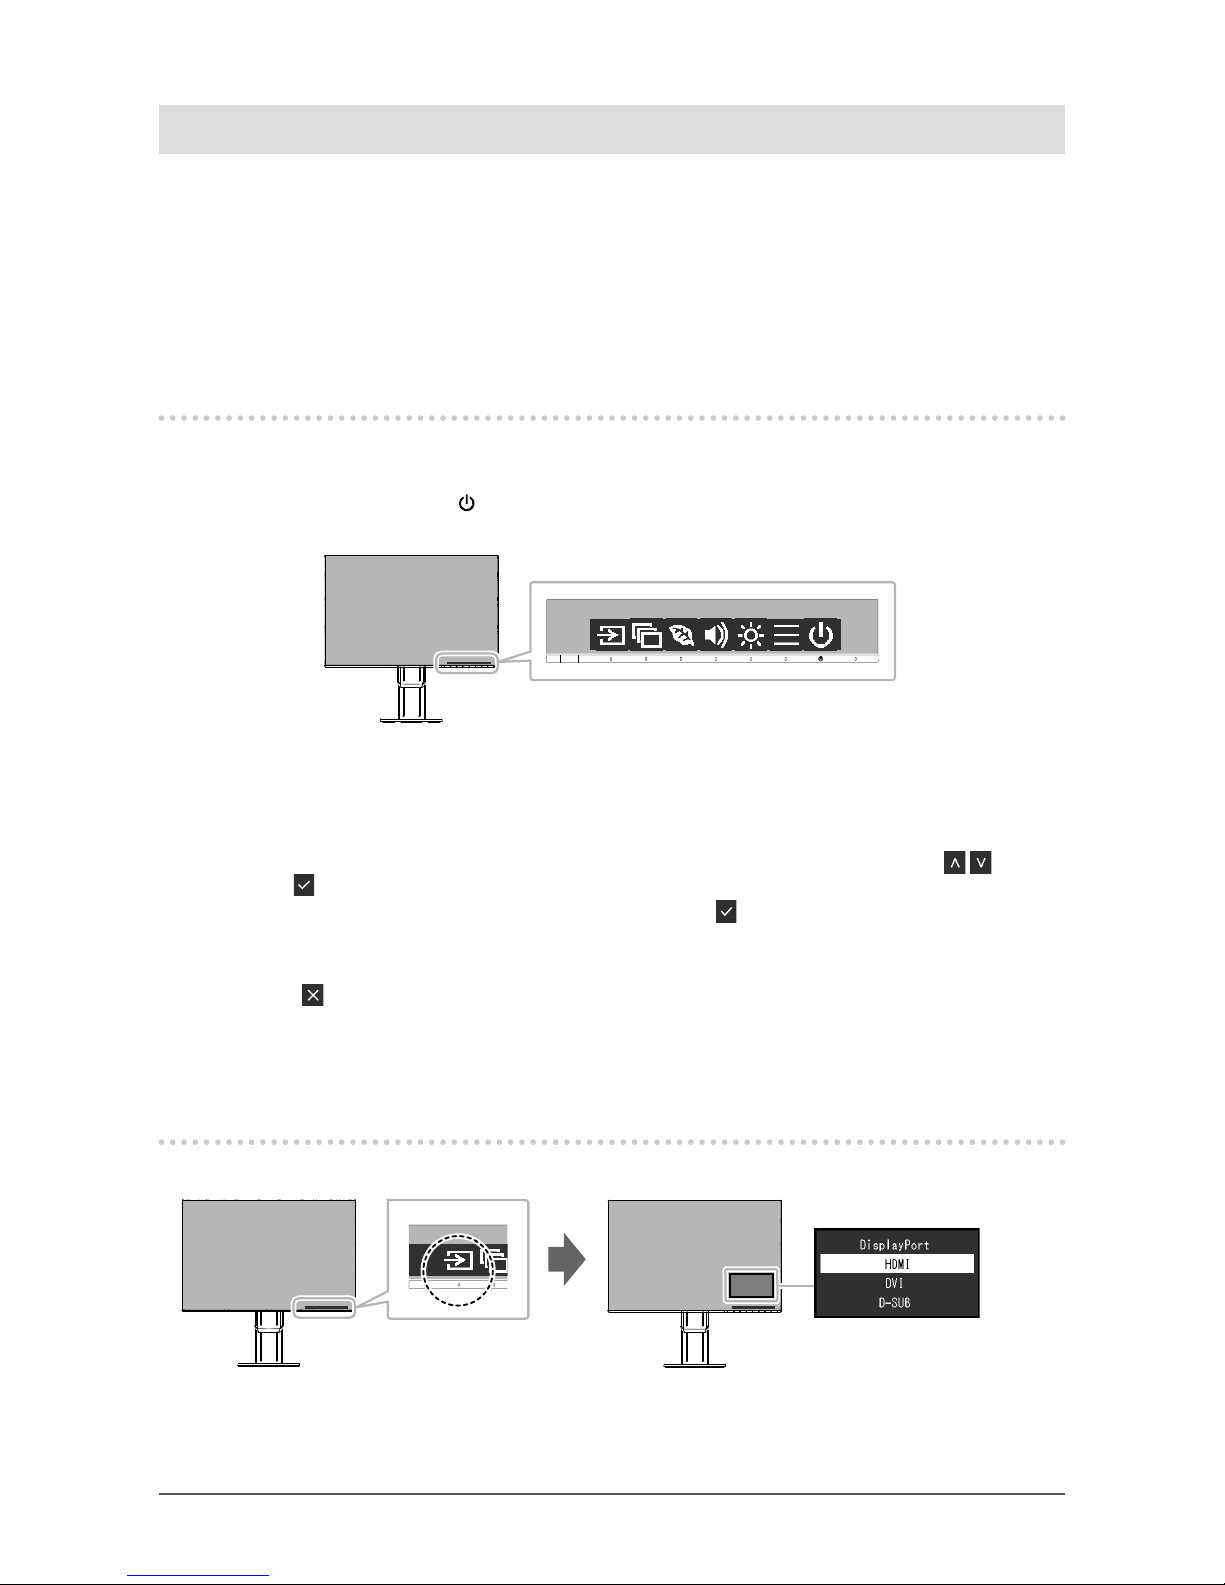
2-1. Switch Operation Method
1.
Displaying the operation guide
1. Touch any switch (except ).
The operation guide appears on the screen.
2.
Adjusting/setting
1. Touch a switch for adjustment/setting.
The Adjustment/Setting menu appears.
(A submenu may also be displayed. In this case, select the item for adjustment/setting using
and
select
.)
2. Perform adjustment/setting with the switches and select to accept the changes.
3.
Exiting
1. Select to exit the menu.
2. When no menu is displayed, the operation guide will automatically disappear after a few seconds
if no switches are operated.
2-2. Switching Input Signals
When a monitor has multiple signal inputs, the signal to display on-screen can be changed.
Page 13
13
Chapter 2 Basic Adjustment/Setting
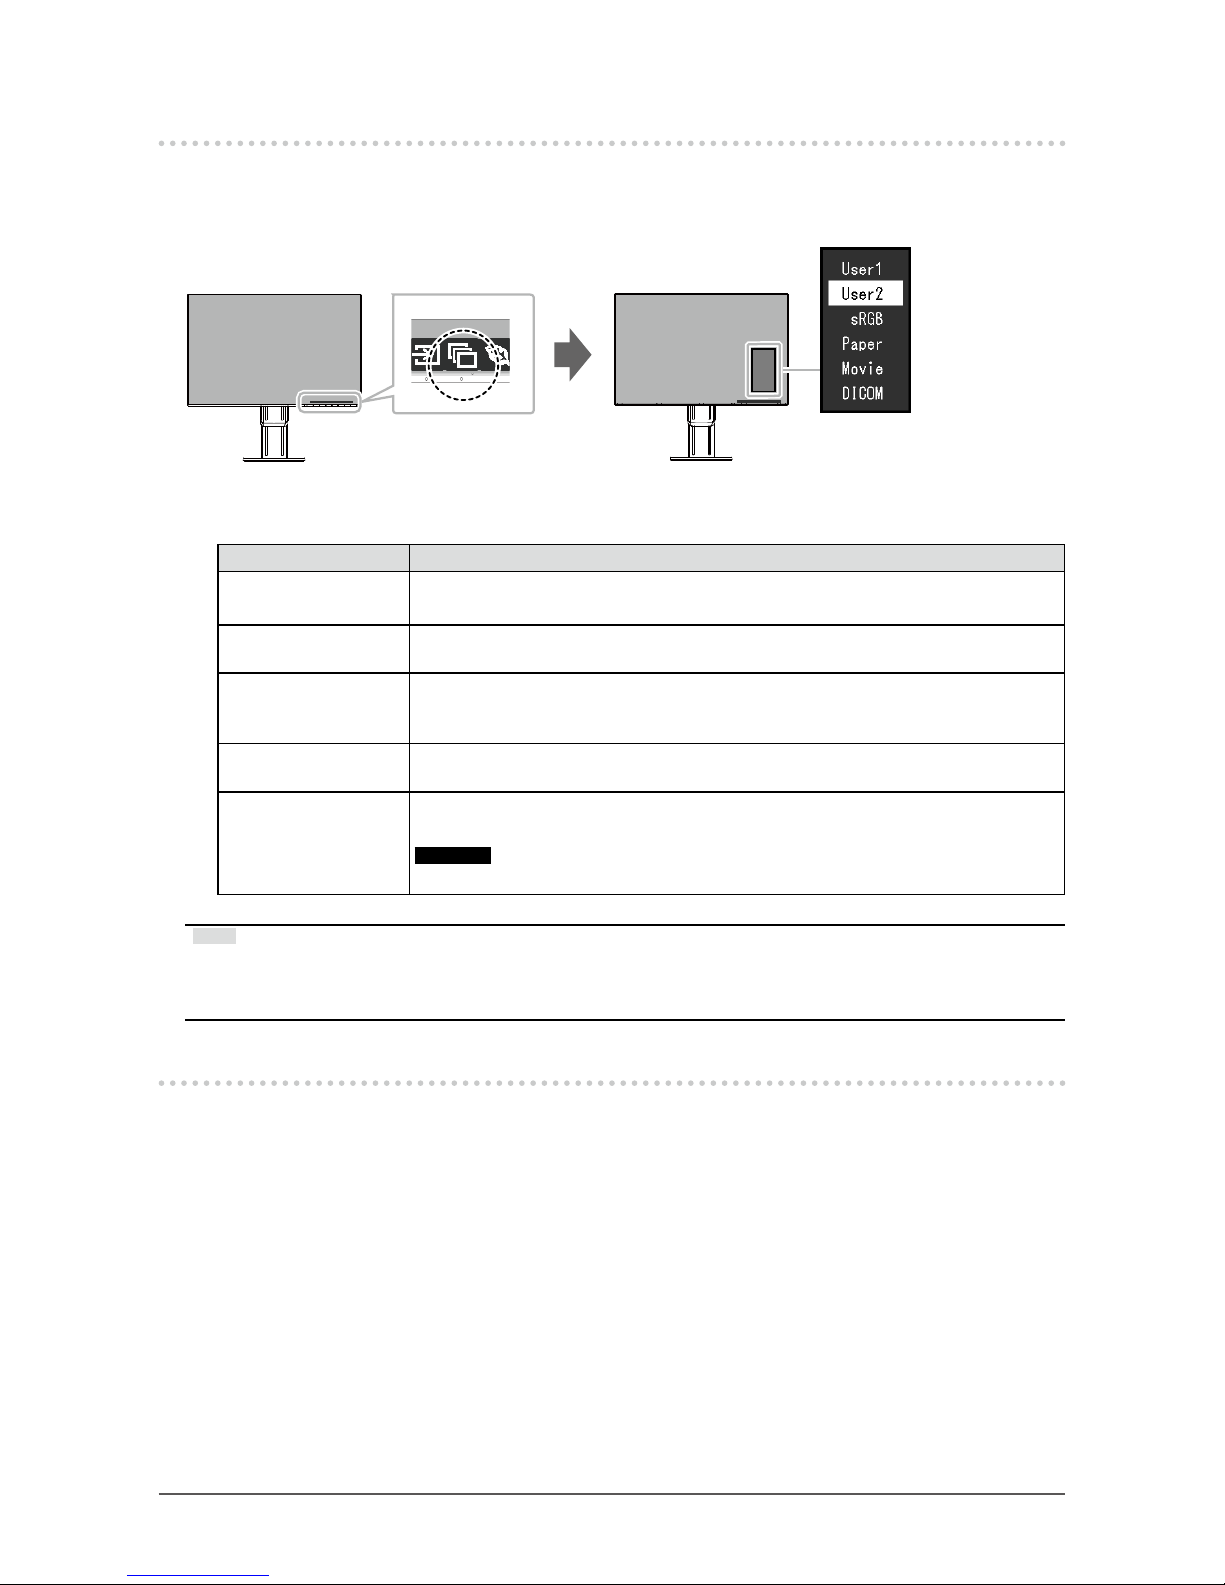
2-3. Switching Display Modes (Color Modes)
This product is preinstalled with color modes for various display purposes.
Switch the mode according to the purpose and content for display. This allows the monitor to display
images in a manner appropriate to the display content.
●
Display Modes
Color Mode Purpose
User1
User2
Select either of these modes to set a user-dened display mode.
sRGB
This mode is suitable for matching color reproduction with peripheral devices that
support sRGB, such as when printing photos taken using a digital camera.
Paper
This mode uses color tones and contrast similar to that of paper to produce a printed
paper effect. It is suitable for displaying images from media such as books and
documents.
Movie
This mode displays moving images brightly and with a clear-cut three-dimensional
appearance. It is suitable for playing back video content.
DICOM
Select this mode to simply display medical purpose digital images based on DICOM
Part 14
.
Attention
• This is not intended to be used for diagnostic purposes.
Note
• “Screen InStyle” allows you to select the color mode automatically according to the application in use.
• In Paper mode, the amount of blue light emitted from the screen is reduced by changing the color tone and
controlling the brightness.
2-4. Conserving Energy
This monitor is equipped with EcoView functions to enable users to conserve energy.
Use this function to curtail unnecessary power consumption and save on electricity expenses. Saving
power also reduces carbon dioxide emissions.
Page 14

14
Chapter 2 Basic Adjustment/Setting
Note
• The power saving level (Power Reduction, CO2 Reduction, and Eco Performance Level) can be checked on the
“EcoView Settings” menu. The more indicators that light up representing the Eco Performance Level, the higher
the power saving level attained.
- Power Reduction: the reduction in the backlight’s power consumption as a result of the adjusted brightness
value.
- CO
2
Reduction: converted from the “Power Reduction” value, this is an estimate of the quantity of CO2
emissions reduced when using the monitor for 1 hour.
• The numeric value is a result of calculation based on a default setting (0.000555t-CO2/kWh) determined by a
Japanese ministerial ordinance (2006, Ministry of Economy, Trade and Industry, Ministry of Environment, civil
code article 3) and may differ depending on country and year.
Function
Setting
Range
Description
Auto EcoView
On
Off
The ambient light sensor on the front of the monitor detects
the ambient brightness to automatically adjust the screen
brightness to a comfortable level using Auto EcoView. The
power consumption of the backlight can be curtailed by
adjusting the brightness to an appropriate level.
This function can also mitigate eye strain and tiredness
caused by a screen that is too bright or too dark.
Use the “Advanced Settings” to set the automatic adjustment
range to suit the monitor’s usage environment or personal
preference.
Note
• Be careful not to block the ambient light sensor on the
lower side of the monitor when using Auto EcoView.
• Even when the Auto EcoView setting is “On”, the
operation switch on the front of the monitor or color
adjustment can be used to change the “Brightness” to
suit your personal preference. Moreover, the manner in
which the Auto EcoView function changes brightness
also differs according to the changed value.
• When “DICOM” is selected for the color mode, the Auto
EcoView setting is turned “Off”.
Page 15
15
Chapter 2 Basic Adjustment/Setting
Function
Setting
Range
Description
Advanced
Settings
Maximum
Minimum
Brightness 0 to 100 Set the range for automatic brightness adjustment.
By setting the maximum value and minimum value of the
adjustment range in advance, the brightness will be adjusted
automatically within the set range.
Note
• The maximum and minimum brightness values cannot
be set to the same value.
Ambient
Light
Bright
Standard
Dark
Using the default setting is recommended.
(Default setting: “Bright” for maximum value, “Dark” for
minimum value)
Note
• For details on the “Ambient Light” setting, refer to our
web site (http://www.eizoglobal.com/i/autoecoview/).
Reset - Return the advanced settings to their default values.
EcoView Optimizer 2
On
Off
The monitor automatically adjusts the screen brightness
according to the white level of the input signal.
This function can reduce power consumption while
maintaining the brightness specied by the input signal.
Note
• The setting is turned “Off” in the following cases:
- When “Movie” or “DICOM” is selected for the color
mode
• When set to “On”, the appearance of pale colors may
change. If this bothers you, set this function to “Off”.
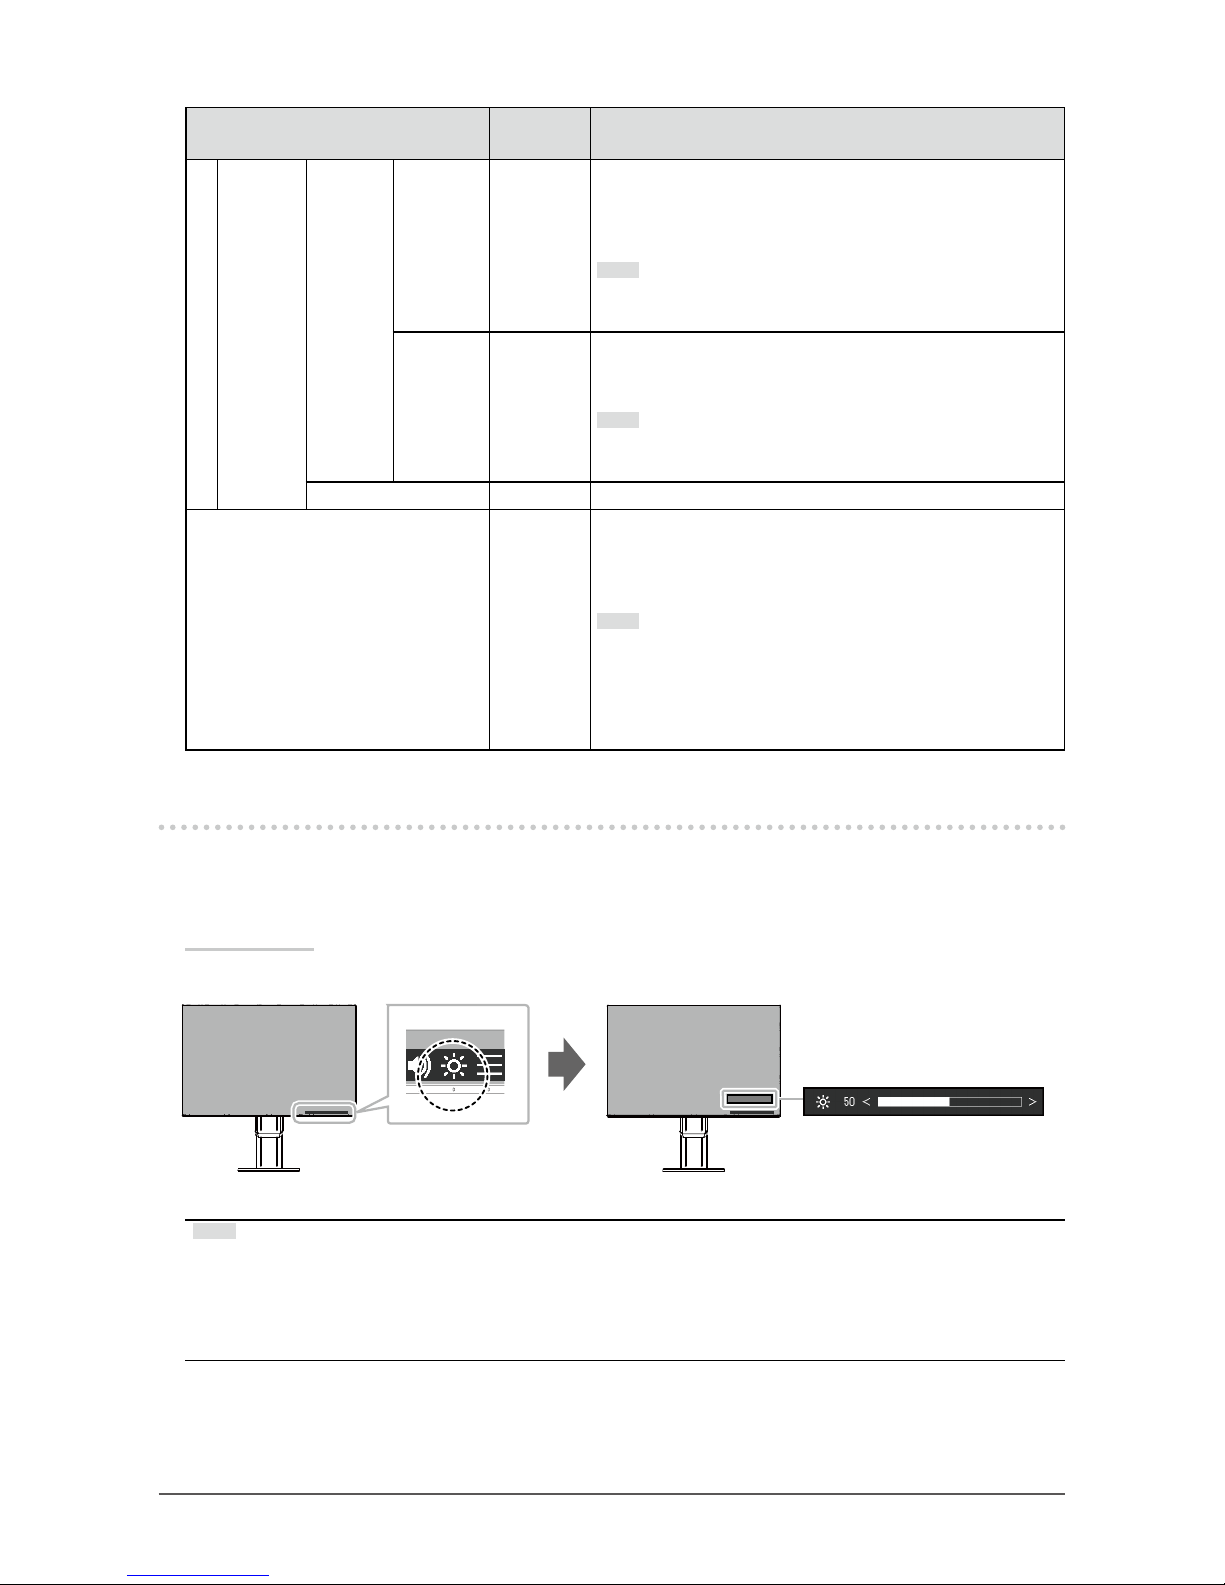
2-5. Adjusting Brightness
The brightness of the screen can be adjusted to suit the installation environment or personal preference.
The screen brightness is adjusted by changing the brightness of the backlight (light source from the LCD
back panel).
Setting Range
0 to 100
Note
• When Auto EcoView is set to “On”, the adjustment range is restricted as follows. (For details on Auto EcoView,
see “Auto EcoView” (page 14).)
- The brightness setting cannot be increased or decreased past the maximum and minimum brightness values
specied in the advanced settings of Auto EcoView.
- Brightness may not be adjusted when the installation environment of the monitor is excessively bright or dark.
Page 16
16
Chapter 2 Basic Adjustment/Setting
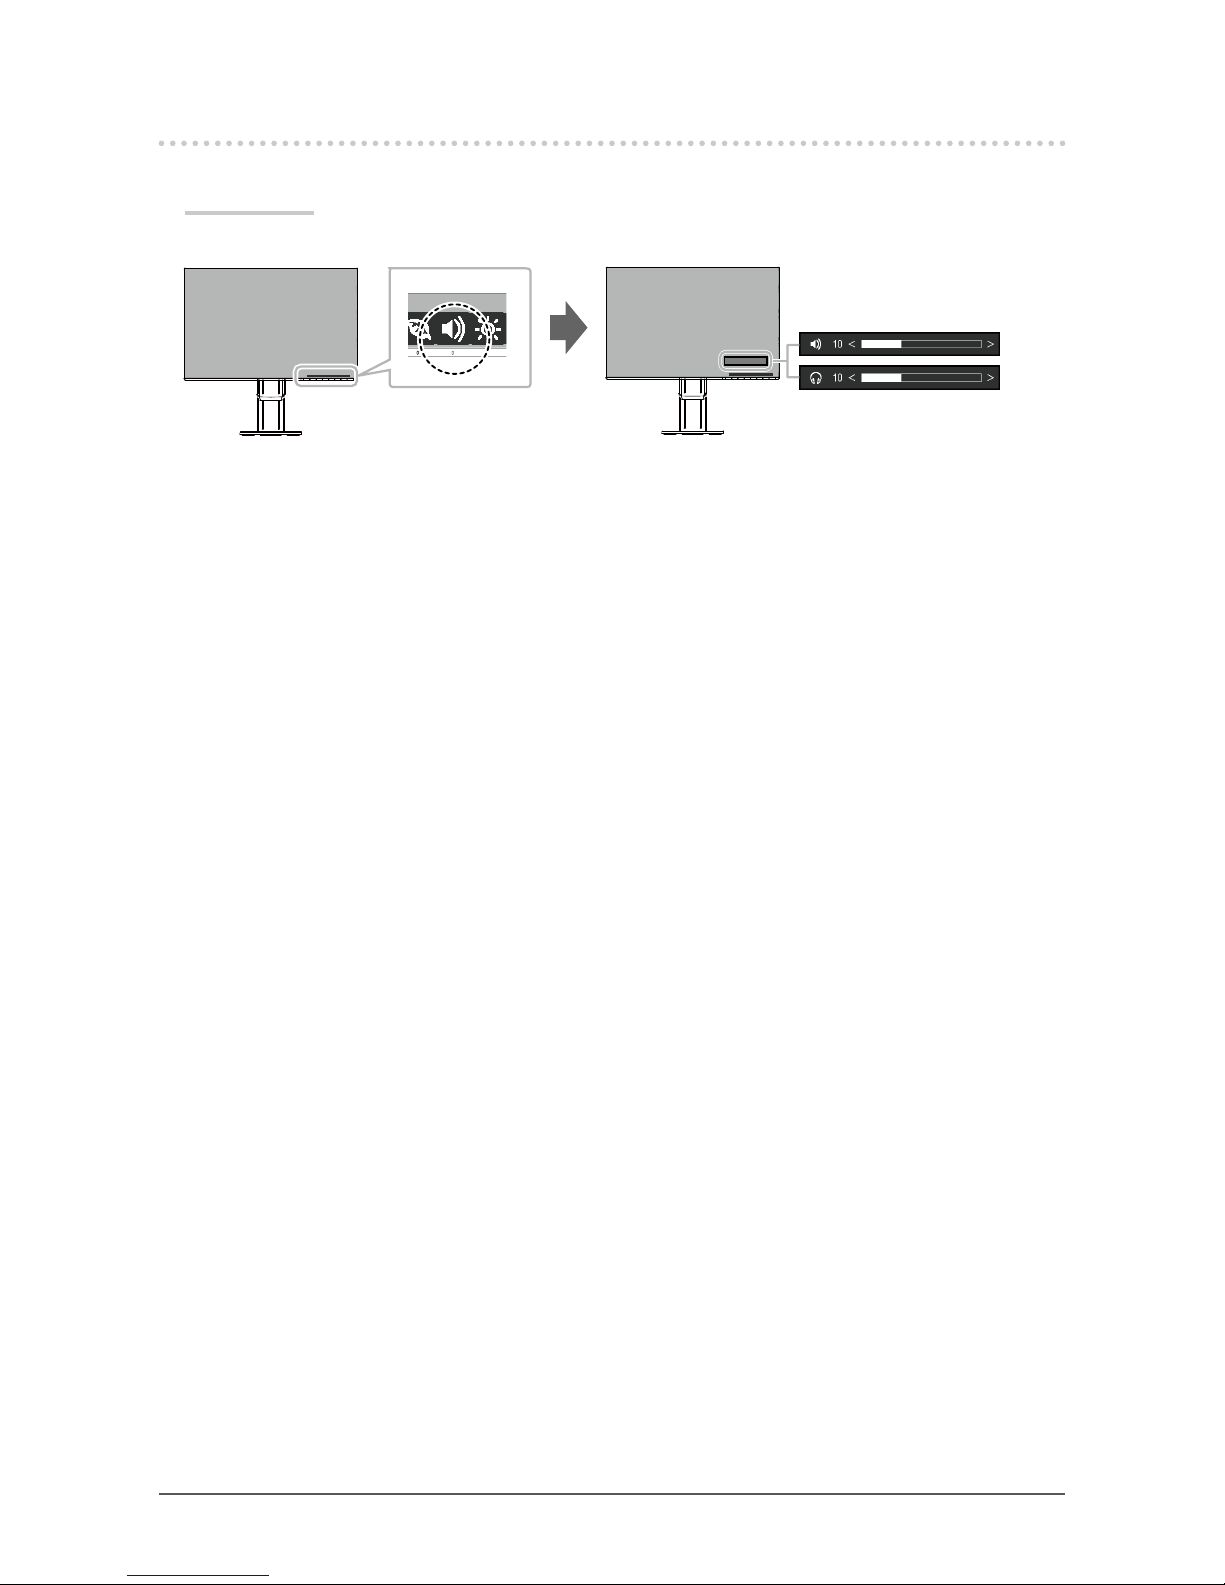
2-6. Adjusting Volume
The volume of the speakers and headphones can be set individually.
Setting Range
0 to 30
Page 17
17
Chapter 3 Advanced Adjustment/Setting
Chapter 3 Advanced Adjustment/Setting
This chapter describes the advanced monitor adjustment and setting procedures using the Setting menu.
For basic functions, see “Chapter 2 Basic Adjustment/Setting” (page 12).
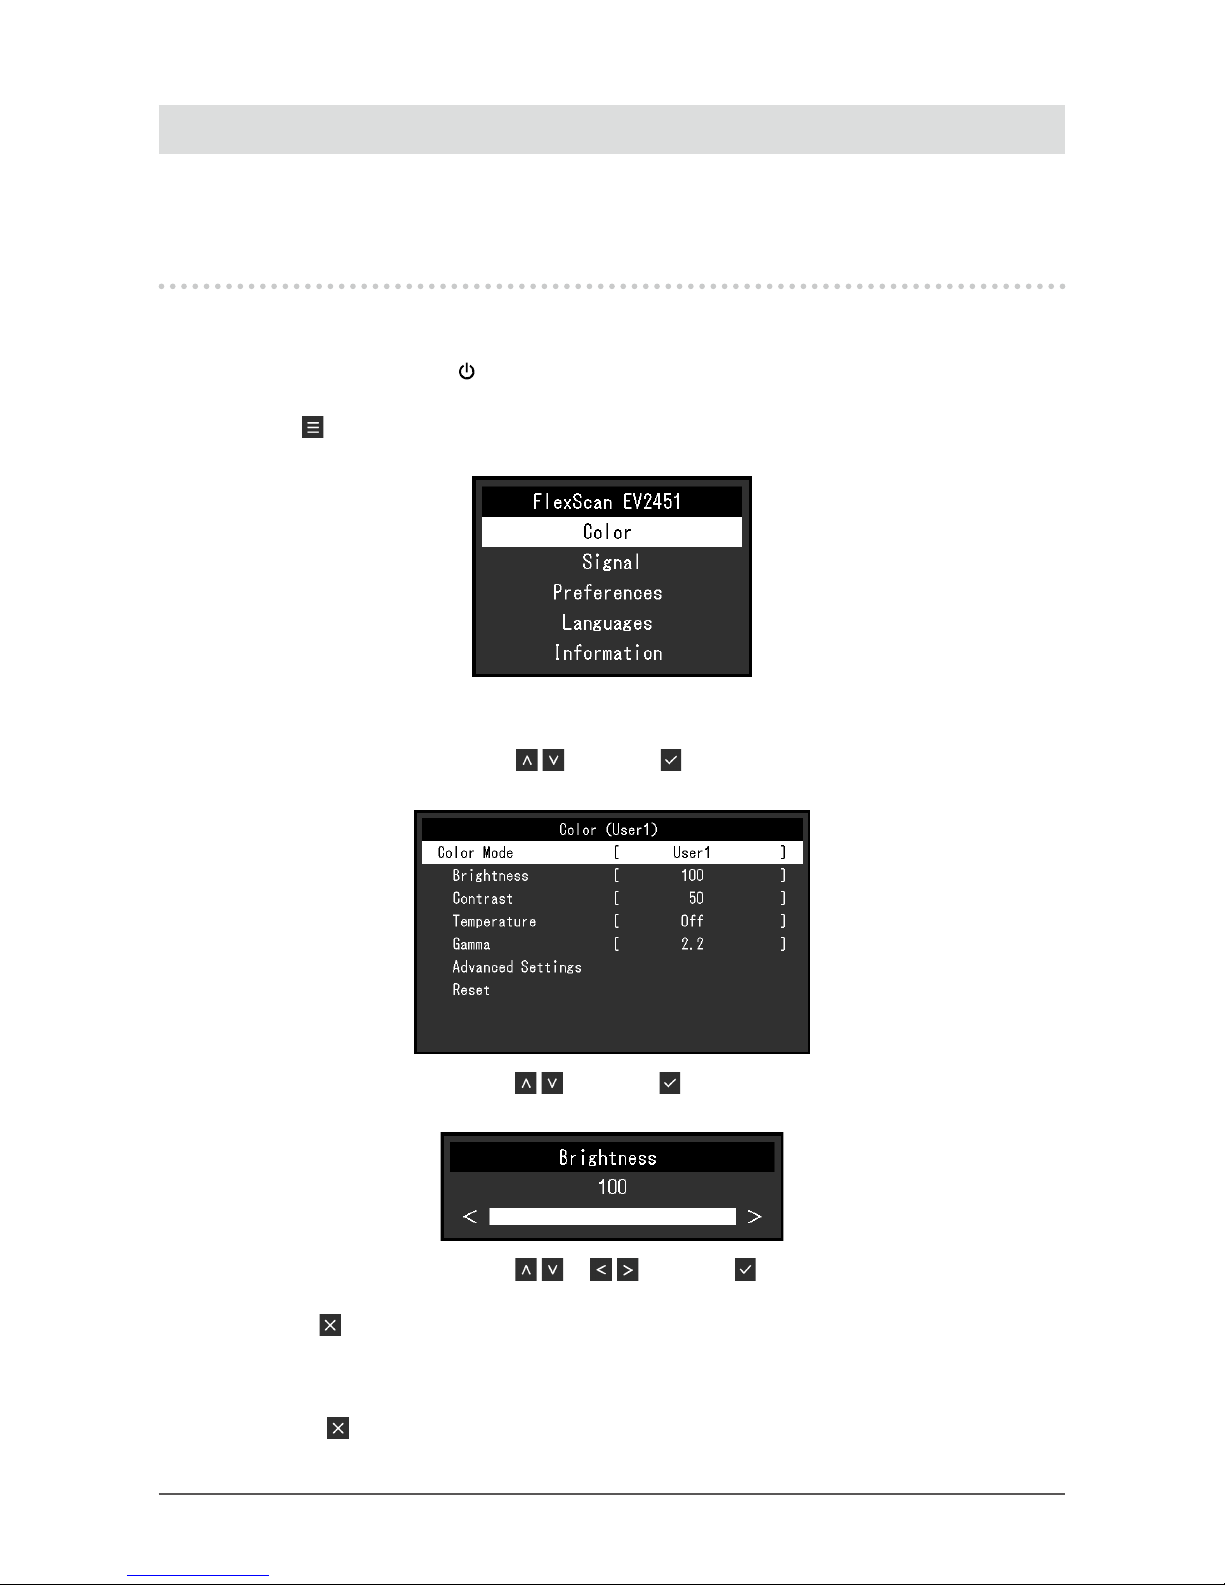
3-1. Basic Operation of the Setting menu
1.
Menu display
1. Touch any switch (except ).
The operation guide appears.
2. Select .
The Setting menu appears.
2.
Adjusting/setting
1. Select a menu to adjust/set with and select .
The Sub menu appears.
2. Select an item to adjust/set with and select .
The Adjustment/Setting menu appears.
3. Perform adjustment/setting with or and select to accept the changes.
The Sub menu appears.
Selecting
during adjustment/setting will cancel the adjustment/setting and restore the state prior to
making changes.
3.
Exiting
1. Selecting several times will terminate the Setting menu.
Page 18
18
Chapter 3 Advanced Adjustment/Setting
3-2. Setting Menu Functions
●
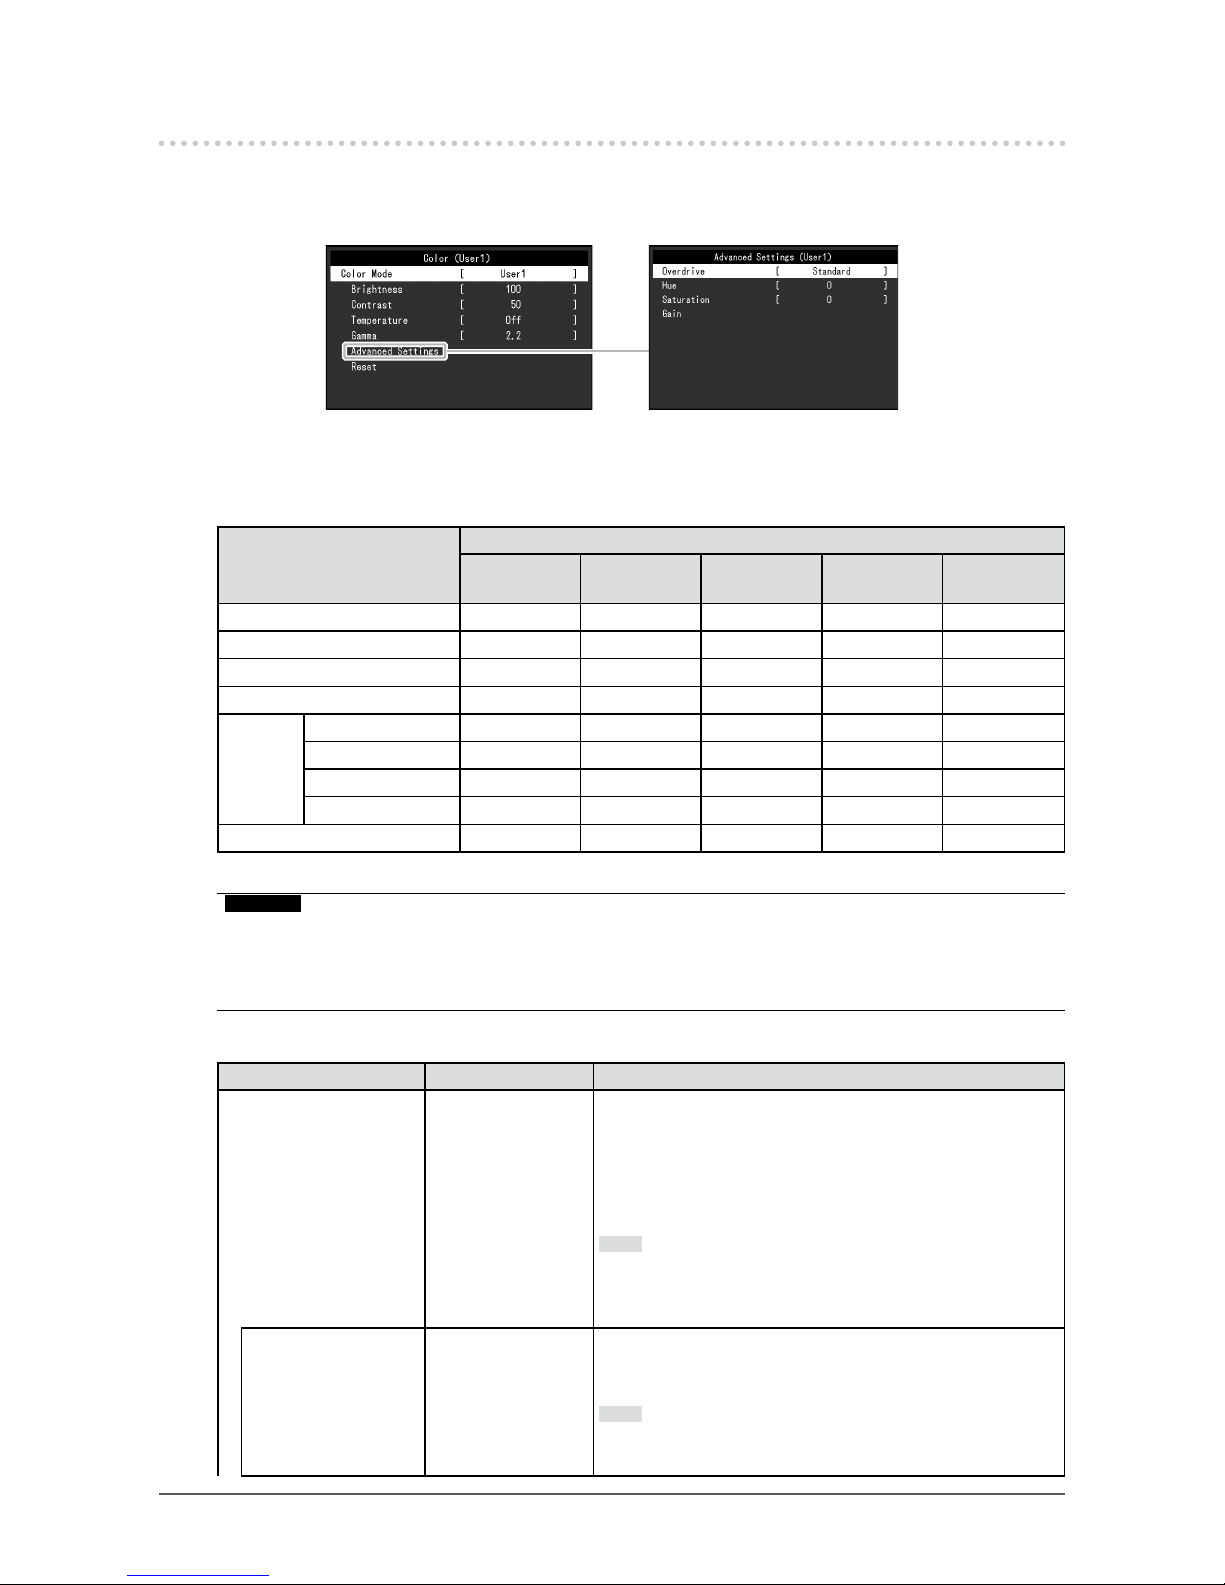
Color Adjustment
The color mode setting status can be adjusted according to personal preference.
Functions that can be adjusted differ depending on the color mode.
√: Adjustable -: Not adjustable
Function
Color Mode
User1
User2
sRGB Paper Movie DICOM
Brightness √ √ √ √ Contrast √ - - √ Temperature √ - √ √ Gamma √ - - - Advanced
Settings
Overdrive √ - - - -
Hue √ - - √ -
Saturation √ - - √ -
Gain √ - - - -
Reset √ √ √ √ -
Attention
• It takes about 30 minutes for the performance of electrical parts to stabilize. Please wait 30 minutes or more
after power to the monitor has been turned on before adjusting the monitor.
• The same image may be observed in different colors on multiple monitors due to monitor-specic
characteristics. Make ne color adjustments visually when matching colors across multiple monitors.
Function Setting Range Description
Color Mode User1
User2
sRGB
Paper
Movie
DICOM
Select the desired mode according to the monitor
application.
The color setting status can also be adjusted according to
personal preference. Select the mode for adjustment and
perform adjustment using the relevant functions.
Note
• For details on the adjustment status of each mode, see
“2-3. Switching Display Modes (Color Modes)” (page
13).
Brightness 0 to 100
The screen brightness is adjusted by changing the
brightness of the backlight (light source from the LCD back
panel).
Note
• If the image is too dark even when the brightness is set
to 100, adjust the contrast.
Page 19
19
Chapter 3 Advanced Adjustment/Setting
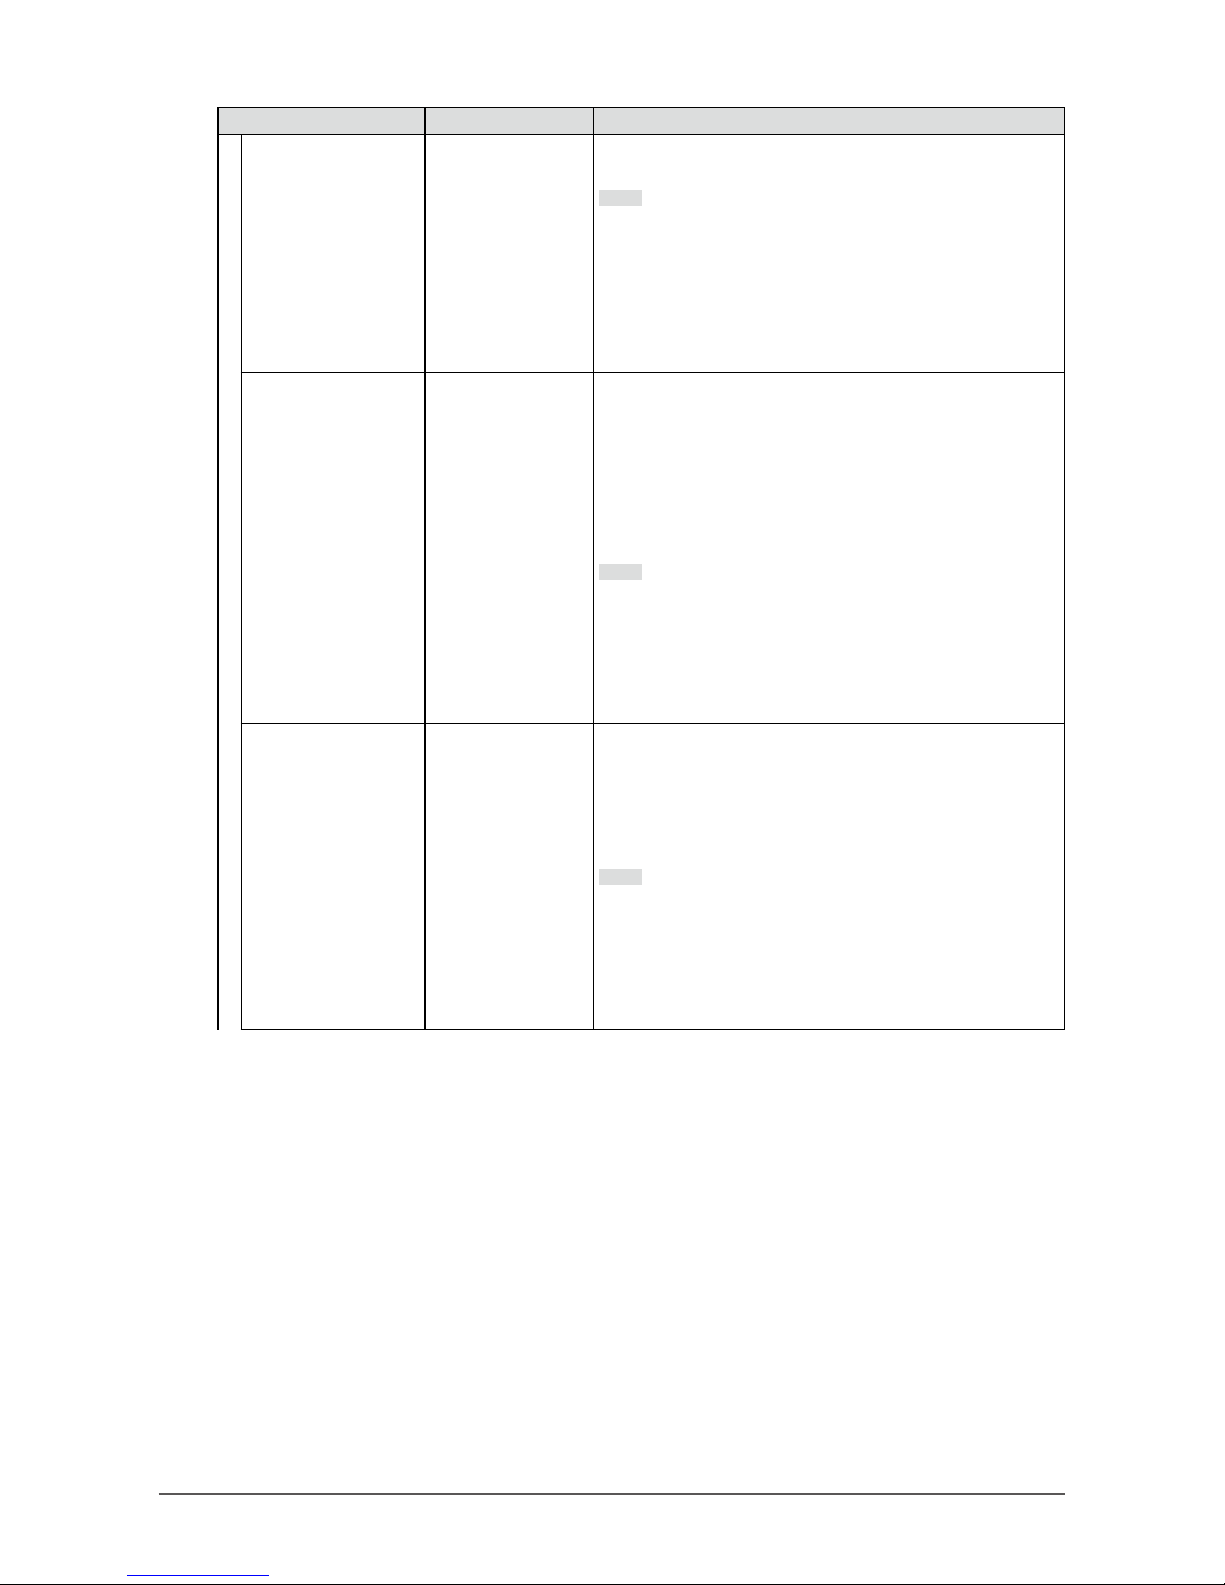
Function Setting Range Description
Contrast 0 to 100 The brightness of the screen is adjusted by varying the video
signal level.
Note
• A contrast of 50 displays every color gradation.
• When adjusting the monitor, it is recommended to
perform brightness adjustment, which does not lose
gradation characteristics, prior to contrast adjustment.
• Perform contrast adjustment in the following cases.
- If the image is too dark even when the brightness is
set to 100 (Set the contrast to higher than 50.)
Temperature
Off
4000 K to 10000 K
(in increments of
5
00 K. 9300 K is
included.)
Adjust the color temperature.
The color temperature is normally used to express the hue of
“White” and/or “Black” with a numerical value. The value is
expressed in degrees “K” (Kelvin).
The screen becomes reddish at low color temperatures and
bluish at high color temperatures, similar to the temperatures
of a ame. A gain preset value is set for each color
temperature setting value.
Note
• The value shown in “K” is available only as a reference.
• “Gain” allows you to perform more advanced adjustment.
• If set to “Off”, the image is displayed in the preset color
of the monitor (Gain: 100 for each RGB channel).
• When the gain is changed, the color temperature setting
changes to “Off”.
Gamma 1.8
2.0
2.2
2.4
Adjust the gamma.
While the brightness of the monitor varies depending on the
input signal, the variation rate is not proportional to the input
signal. Maintaining the balance between the input signal
and brightness of the monitor is referred to as “Gamma
correction”.
Note
• If “
sRGB
” is selected for the color mode, “
sRGB
” is
displayed for the gamma value.
• If “Paper” is selected for the color mode, “Paper” is
displayed for the gamma value.
• If “DICOM” is selected for the color mode, “DICOM” is
displayed for the gamma value.
Page 20
20
Chapter 3 Advanced Adjustment/Setting
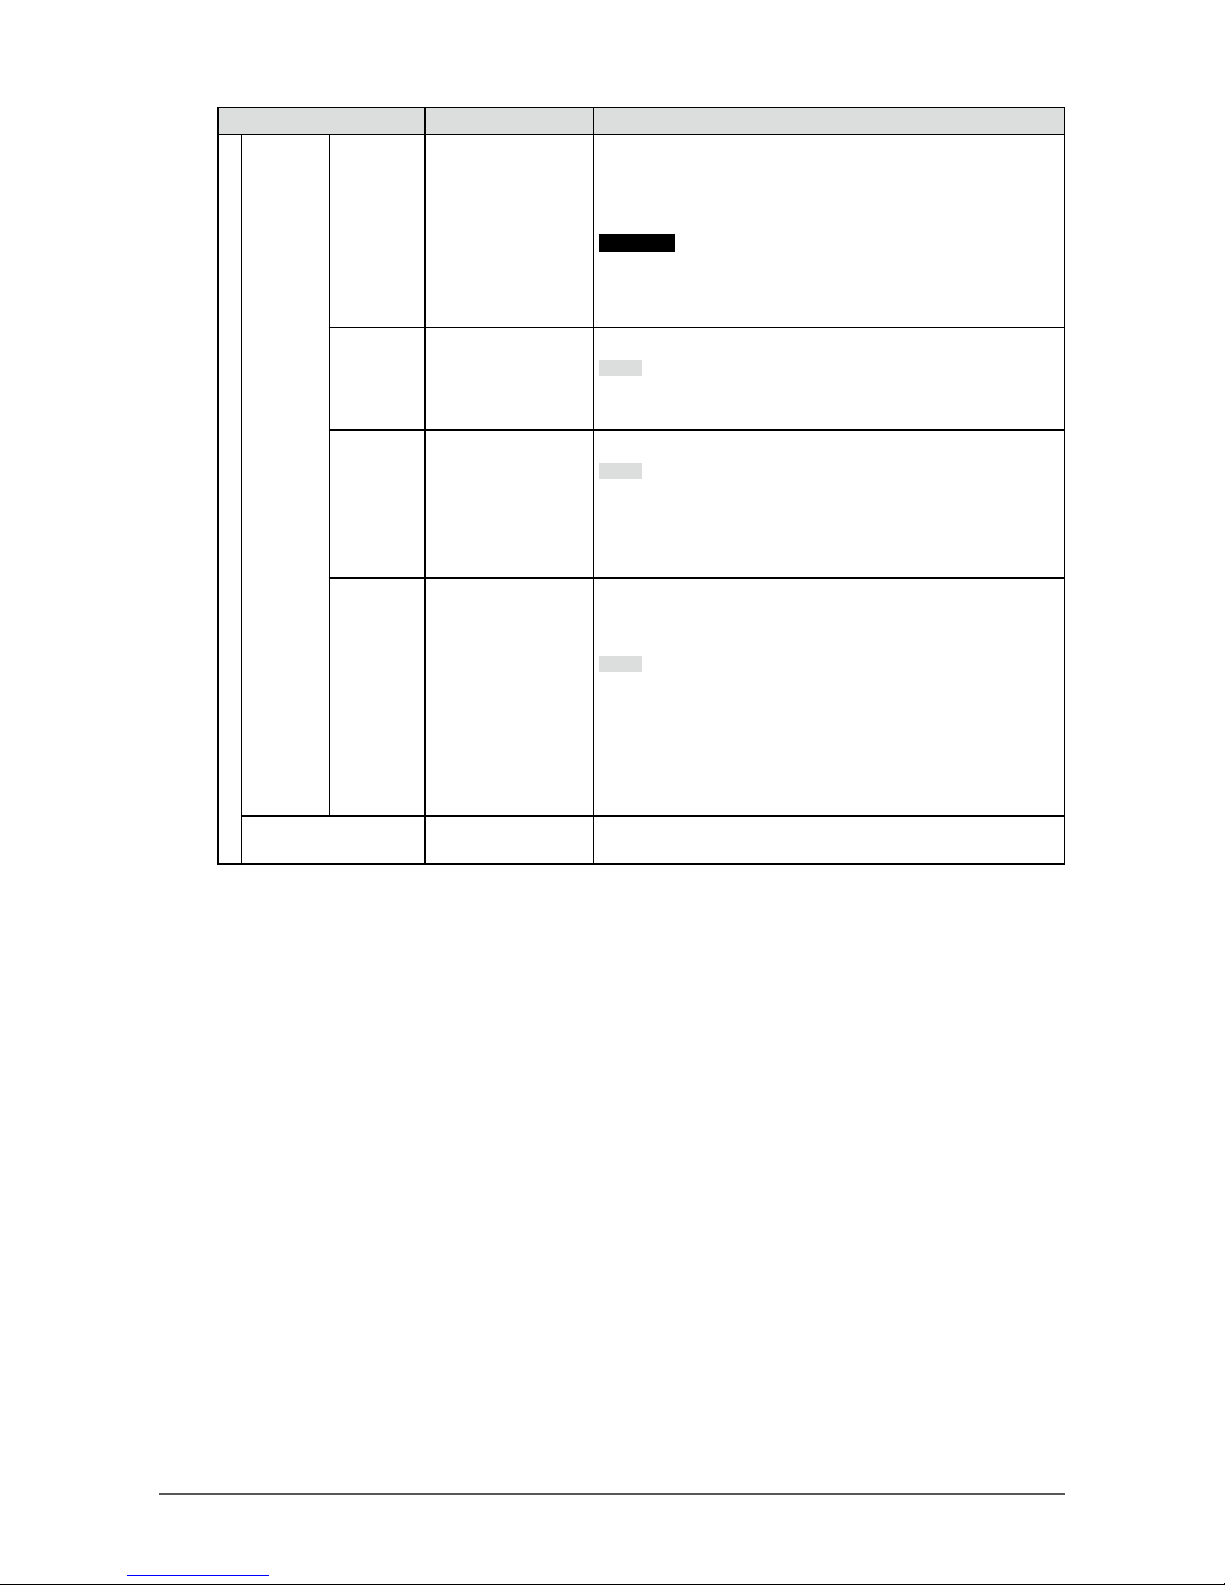
Function Setting Range Description
Advanced
Settings
Overdrive Enhanced
Standard
Off
This function allows you to set the overdrive intensity based
on the use of the monitor.
Image lag can be reduced by using the “Enhanced” setting
when displaying moving images.
Attention
• Depending on the combination of “Picture Expansion”
(page 21) setting and resolution, this function may not
work.
Hue -50 to 50
Adjust the hue.
Note
• Using this function may prevent some color gradations
from being able to be displayed.
Saturation -50 to 50
Adjust the color saturation.
Note
• Using this function may prevent some color gradations
from being able to be displayed.
• The minimum value (-50) changes the screen to
monochrome.
Gain 0 to 100
The brightness of each red, green, and blue color component
is referred to as “Gain”. The hue of “white” can be changed
by adjusting the gain.
Note
• Using this function may prevent some color gradations
from being able to be displayed.
• The gain value changes according to the color
temperature.
• When the gain is changed, the color temperature setting
changes to “Off”.
Reset - Reset any color adjustments for the currently selected color
mode back to the default settings.
Page 21
21
Chapter 3 Advanced Adjustment/Setting
●
Signal Settings
Set the method for outputting the signal input from the PC to the monitor.
Function Setting Range Description
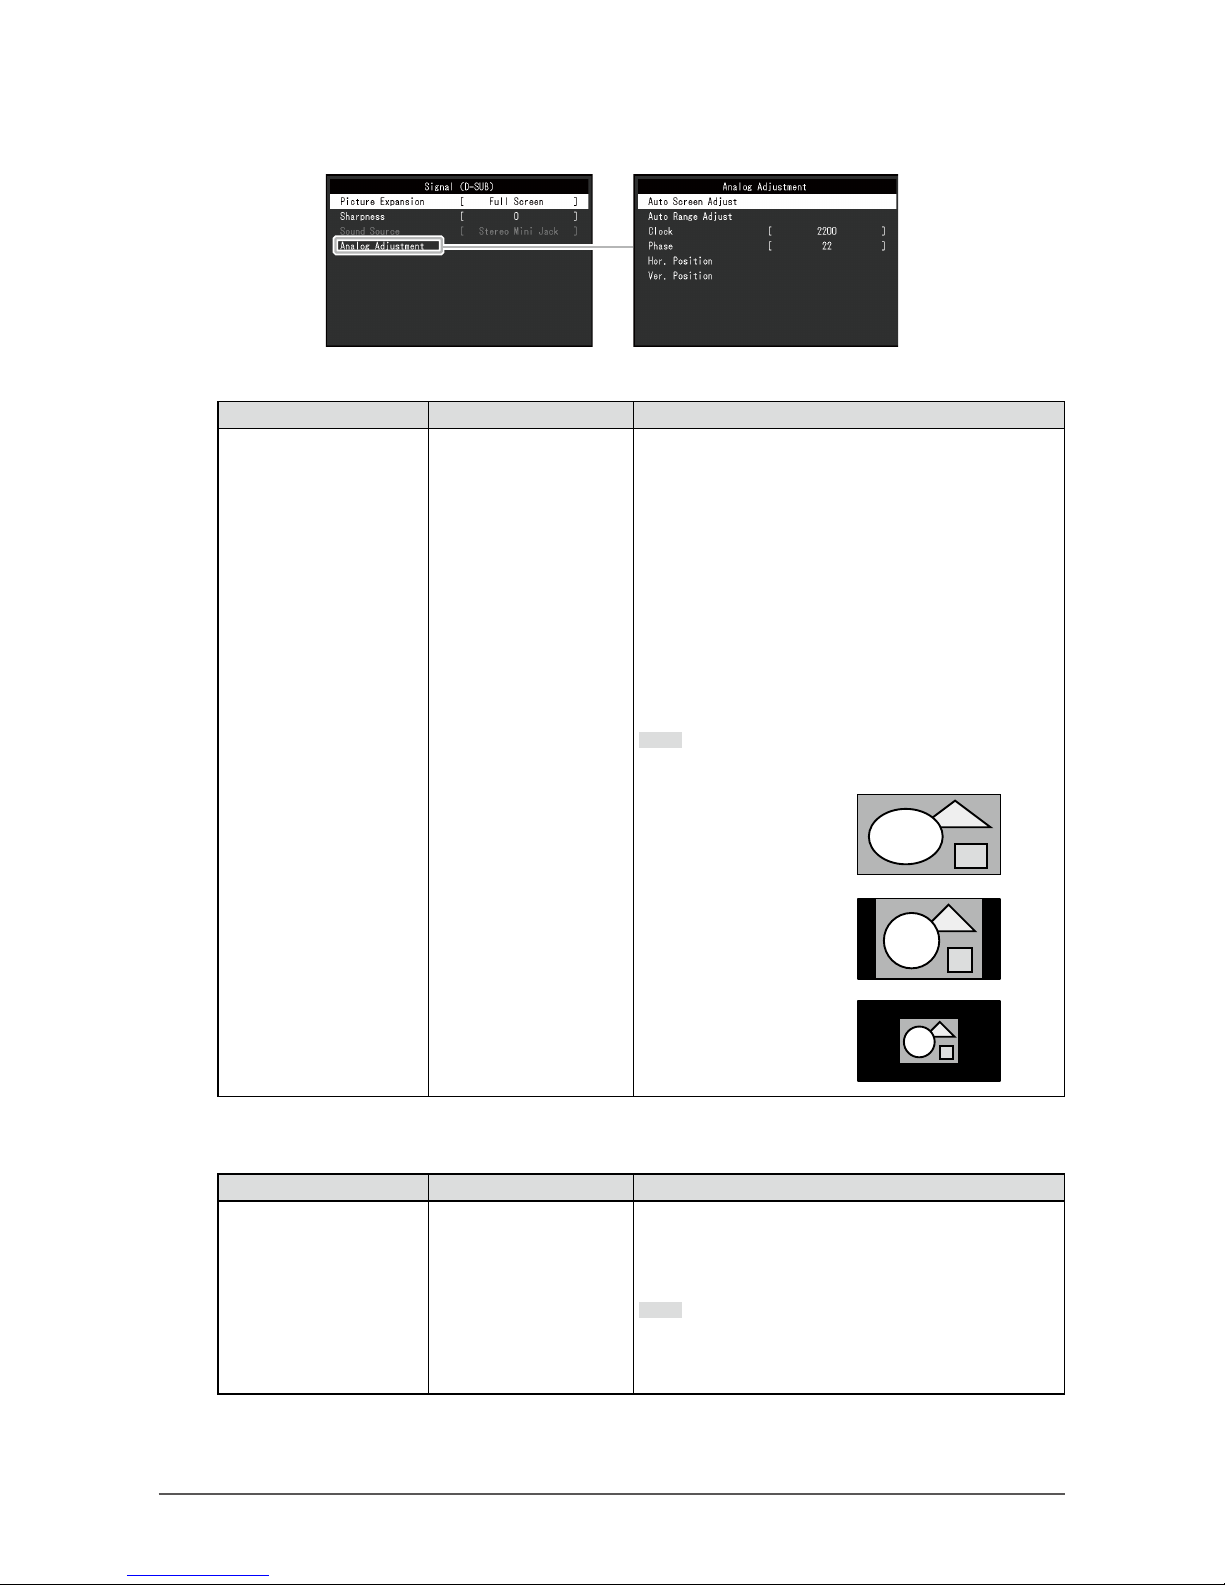
Picture Expansion Auto
*1
Full Screen
Aspect Ratio
Dot by Dot
The screen size of the monitor display can be changed.
• “Auto” The monitor automatically changes the
screen size according to the aspect ratio and
resolution information from the PC.
• “Full Screen” Images are stretched to full screen.
Since aspect ratios are not maintained, images
may be distorted in some cases.
• “Aspect Ratio” Images are enlarged to full screen
without changing the aspect ratio. Since aspect
ratios are maintained, blank horizontal or vertical
borders may appear.
• “Dot by Dot” Displays the image at the set
resolution or size specied by the input signal.
Note
• Example settings
- Full Screen
- Aspect Ratio
- Dot by Dot
*1 Only enabled when input signal information according to which the setting can be automatically
determined is detected during HDMI input
Function Setting Range Description
Sharpness 2 to -2 When a low-resolution image is displayed in “Full
Screen” or “Aspect Ratio” mode, text or lines in the
displayed image may be blurred. This function reduces
this blurring effect.
Note
• The sharpening setting may not be required
depending on the display resolution. (“Sharpness”
cannot be selected in such cases.)
Page 22
22
Chapter 3 Advanced Adjustment/Setting
Function Setting Range Description
Input Color Format Auto
*2
YUV 4:2:2
*3
YUV 4:4:4
*3
YUV
*4
RGB
The color format of the input signal can be specied.
Try changing this setting if colors are not displayed
correctly.
Note
• This can only be set during DisplayPort or HDMI
input.
• This setting is required when a DVI device is
connected to the monitor via the HDMI connector
port using a DVI-HDMI conversion connector.
• This setting is xed to “RGB” when receiving a DVI
signal from the DVI connector.
*2 Only enabled when input signal information according to which the setting can be automatically
determined is detected
*3 Only enabled during HDMI input
*4 Only enabled during DisplayPort input
Function Setting Range Description
Input Range Auto
Full
Limited
Depending on the PC, black and white of the video
level of the signal output to the monitor may be limited.
If a limited signal is displayed on the monitor, black
will appear faint and white will appear dull, leading to a
reduction in contrast. The output range of such signals
can be extended to match the actual contrast ratio of
the monitor.
• “Auto” Automatically identies the brightness
range of the input signal and displays the image
accordingly.
• “Full” Extension of the signal output range is not
performed.
• “Limited” Extends the signal output range through
0 to 255 and displays the image.
Note
• This can only be set during DisplayPort or HDMI
input.
• This setting is xed to “Full” for DVI signal input.
Function Description
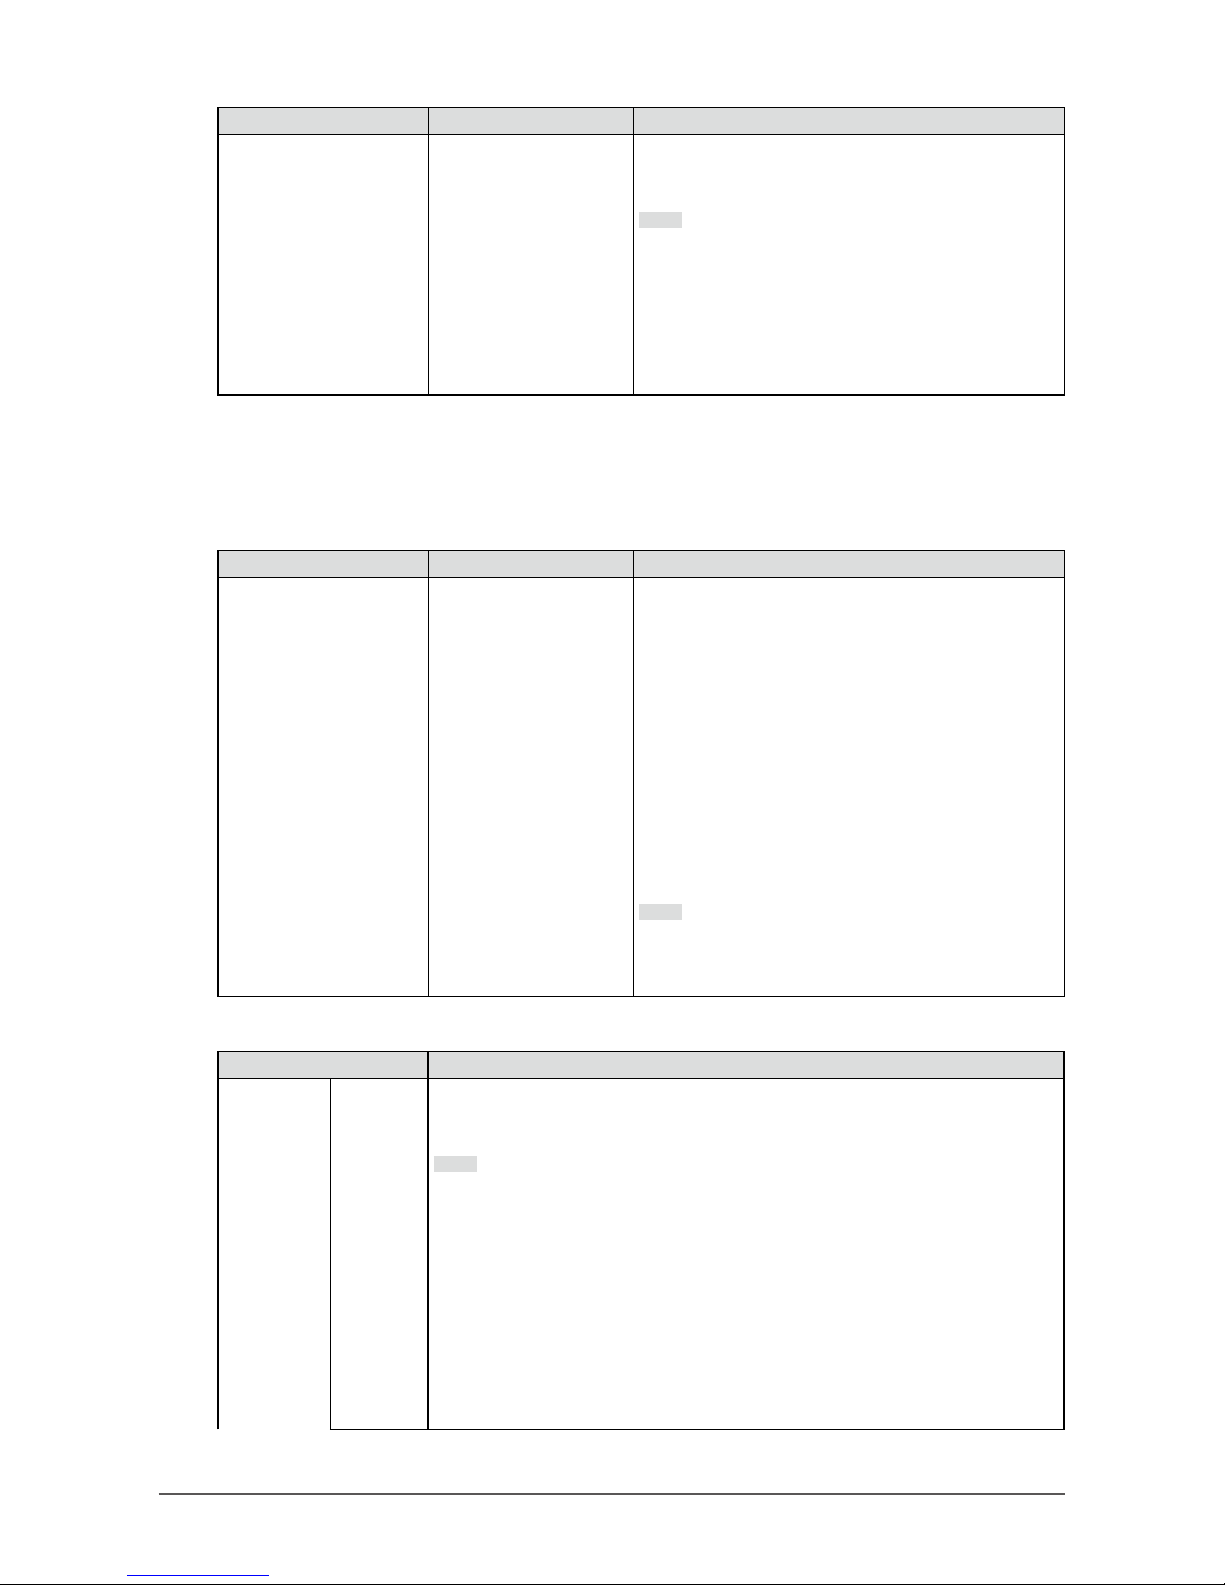
Analog
Adjustment
*5
Auto
Screen
Adjust
Screen ickering, display position, and size can be adjusted automatically.
Selecting “Auto Screen Adjust” displays a message. Select “Yes” to enable this
function.
Note
• The automatic screen adjustment function works correctly when an image is
fully displayed over the entire displayable area of the screen. It does not work
properly in the following cases:
- When an image is only displayed on part of the screen (command prompt
window, for example)
- When a black background (wallpaper, etc.) is used
Also, this function may not work properly with some graphic boards.
• When a signal is input into the monitor for the rst time or when a resolution
or vertical/horizontal scan frequency not used before is set, adjustment is
performed automatically (only for signals with a resolution of 800×600 (SVGA)
or higher).
Page 23
23
Chapter 3 Advanced Adjustment/Setting
Function Description
Auto
Range
Adjust
Every color gradation (0 to 255) can be displayed by automatically adjusting the
signal output level. Selecting “Auto Range Adjust” displays a message. Select “Yes”
to enable this function.
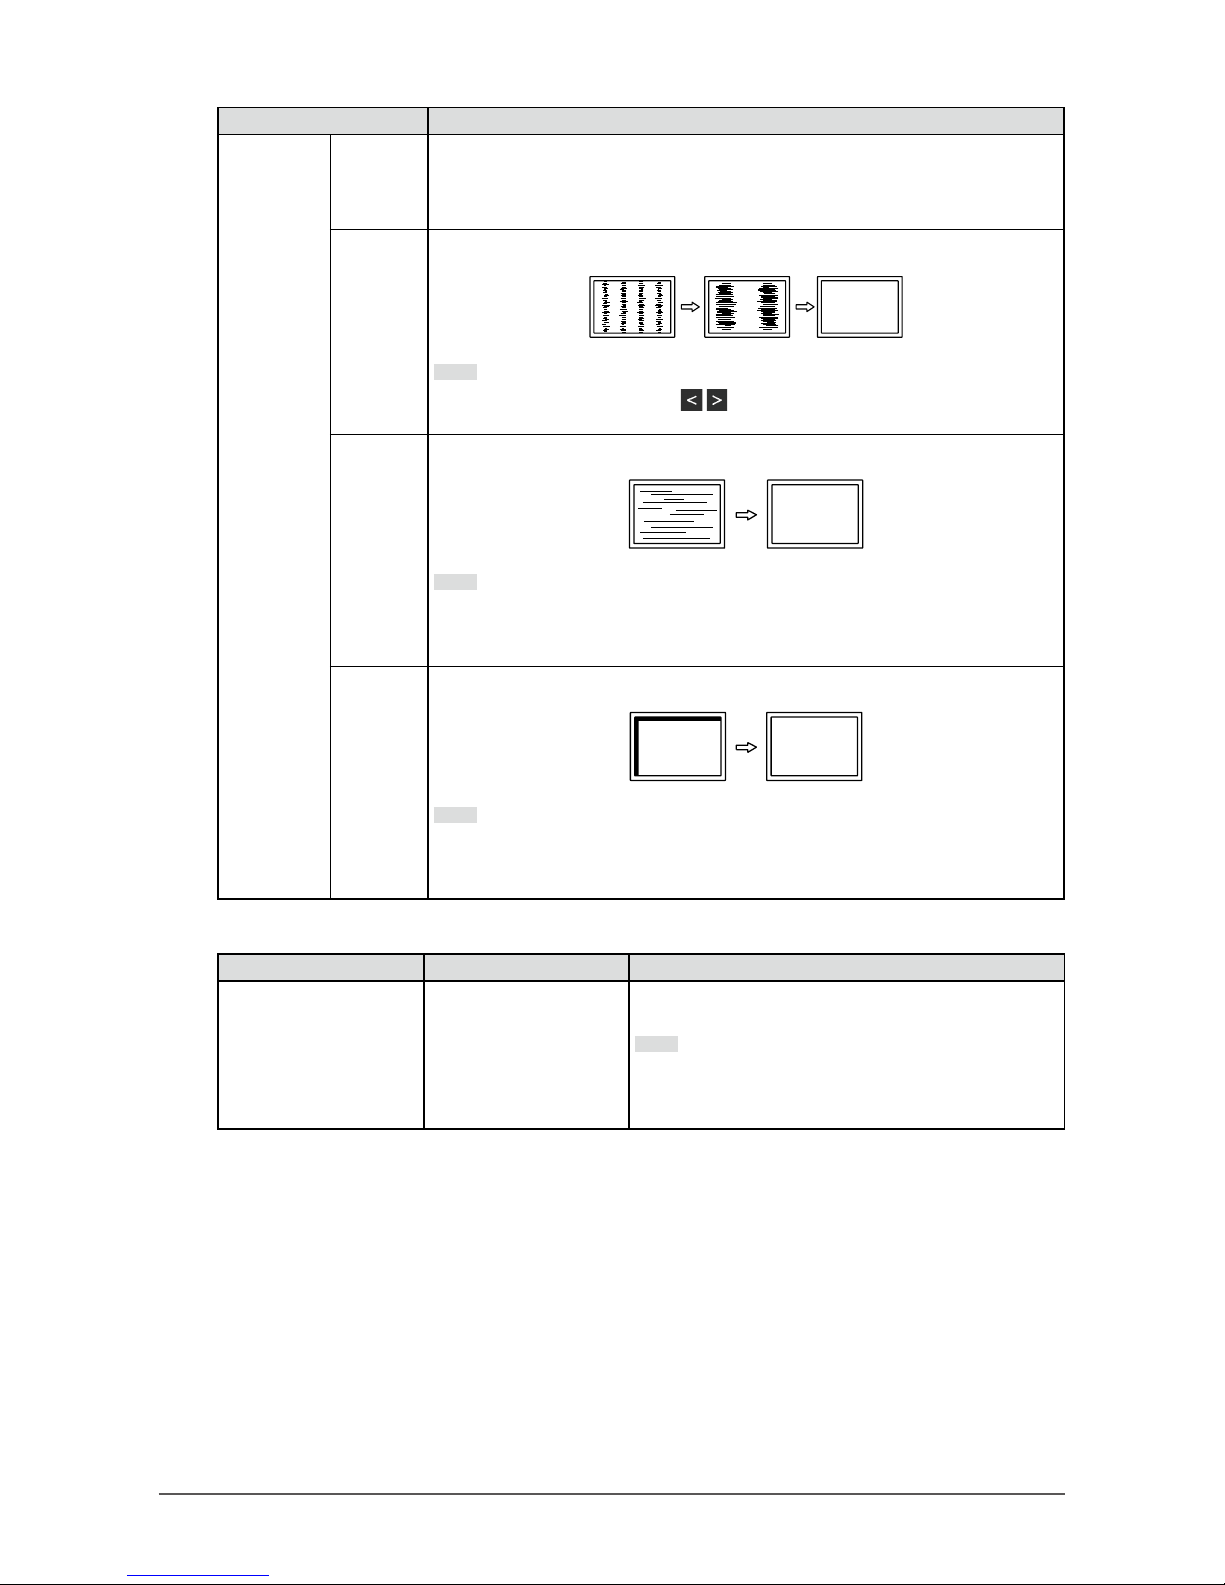
Clock
Flickering of vertical lines on the screen or part of the screen can be reduced.
Note
• Use the operation switches ( ) to make ne adjustments so as not to miss
any adjustment points.
Phase
Flickering and blurring over the entire screen can be reduced.
Note
• Flickering and blurring may not be completely eliminated depending on your
PC or graphics board.
• After setting, adjust the “Clock” again if vertical bars appear.
Hor.
Position
Ver.
Position
The display position (horizontal and vertical) of the screen can be adjusted.
Note
• Since the number of pixels and pixel positions are xed on the LCD monitor,
only one position is provided to display images correctly. Position adjustment
is made to shift an image to the correct position.
*5 Only enabled during D-sub input
Function Setting Range Description
Sound Source Stereo Mini Jack
DisplayPort
*6
HDMI
*7
The audio source can be changed when receiving
DisplayPort signal input or HDMI signal input.
Note
• This setting is xed to “Stereo Mini Jack” when
receiving DVI signal input, HDMI (PC signal) input,
or D-Sub signal input.
*6 Only enabled during DisplayPort input
*7 Only enabled during HDMI (video signal) input
Page 24
24
Chapter 3 Advanced Adjustment/Setting
●
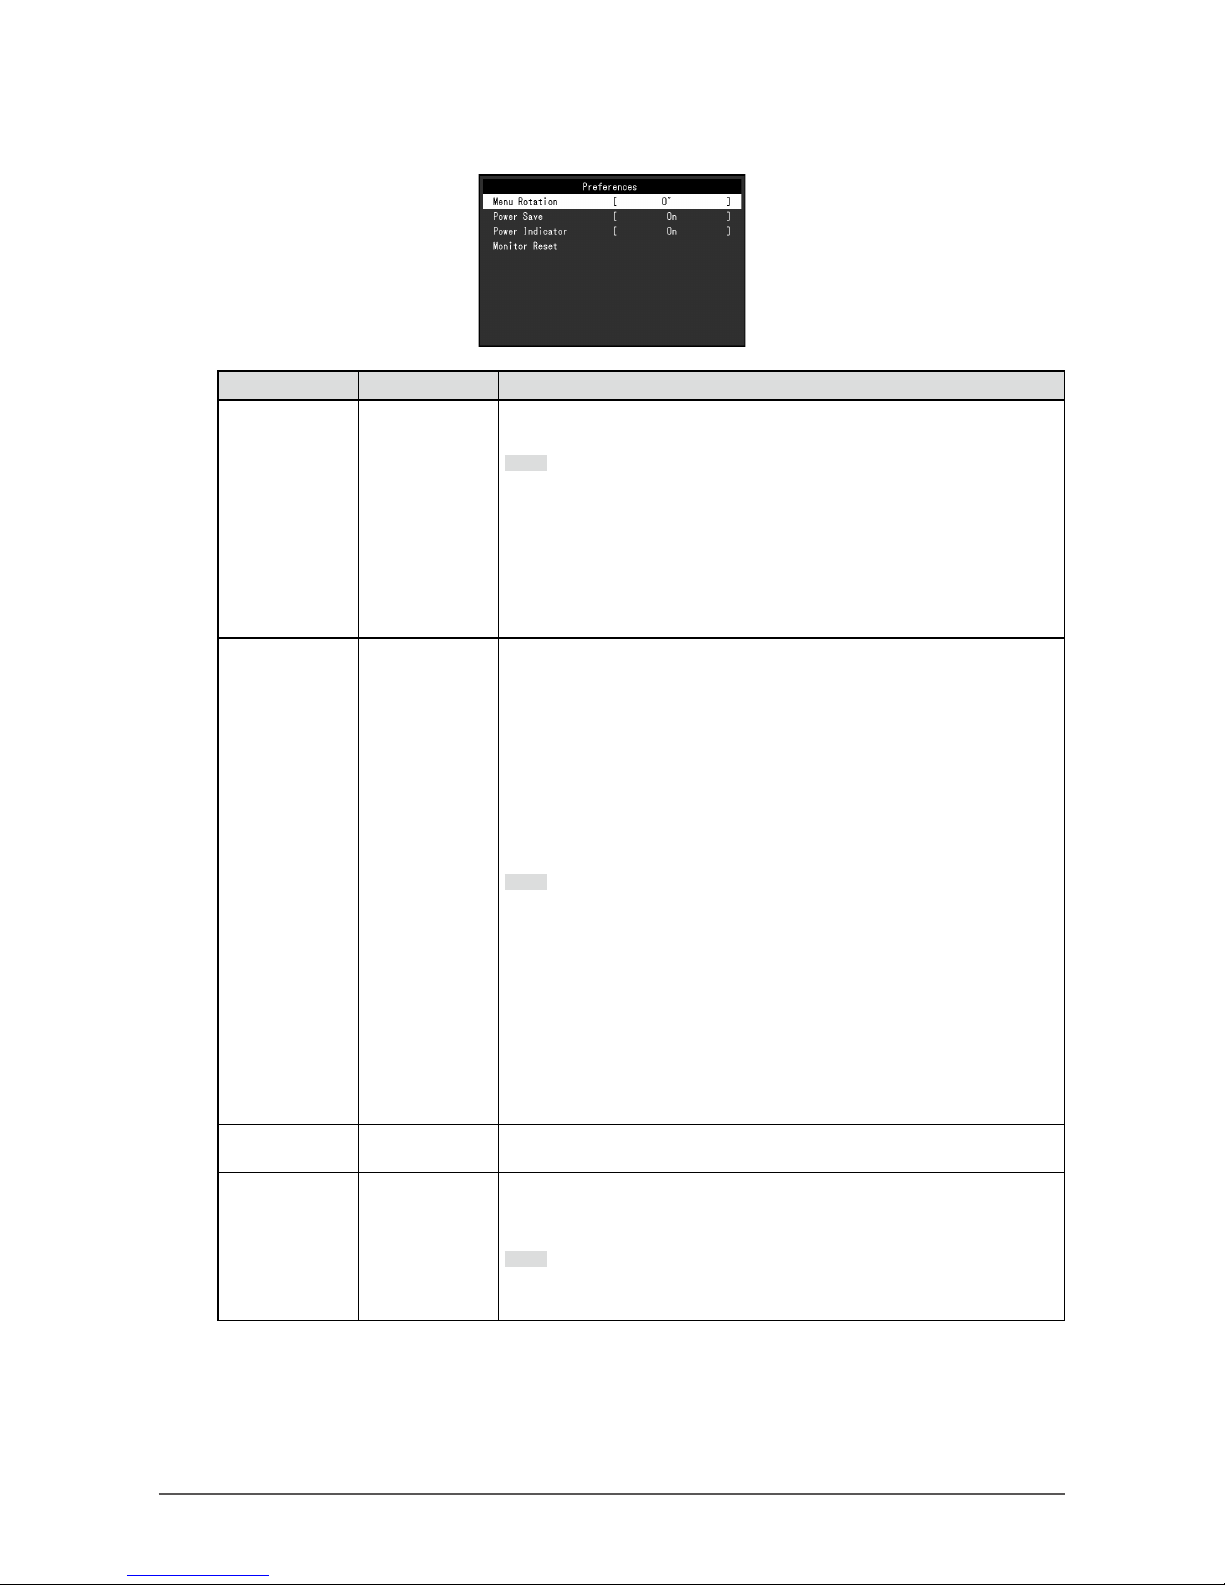
Preference Settings
The monitor’s settings can be congured to suit the usage environment or personal preference.
Function Setting Range Description
Menu Rotation 0°
90°
270°
Change the orientation of the Setting menu when using the monitor
screen in the portrait display position.
Note
• Make sure that the cables are correctly connected.
• PC settings must be congured to use the monitor in a portrait
position. For details, refer to our web site. (http://www.eizoglobal.
com).
• The menu cannot be rotated by 180˚. To install the monitor rotated
by 180˚, perform monitor adjustment/settings before rotating the
monitor.
Power Save On
Off
The monitor can be set to enter power saving mode according to the
state of the PC.
The monitor changes to power saving mode about 15 seconds after
signal input ceases to be detected.
When the monitor has shifted to power saving mode, images are not
displayed on the screen.
• Exiting power saving mode
- If the monitor receives input, it automatically exits power saving
mode and returns to the normal display mode.
Note
• At the time of shifting to power saving mode, a message that
indicates the transition is displayed 5 seconds in advance.
• When not using the monitor, you can turn off the main power supply
or disconnect the power plug so that the power is cut completely.
• When the monitor is in power saving mode, devices connected to the
USB downstream port will still work. Therefore, power consumption
of the monitor varies with connected devices even in power saving
mode.
• Power consumption varies even when the stereo mini jack cable is
connected.
Power Indicator On
Off
The power indicator (white) can be turned off during screen display.
Monitor Reset -
Restore all settings to their default values except for the following
settings.
• Settings on the “Administrator Settings” menu
Note
• For details on default settings, see “Main Default Settings” (page
40).
Page 25
25
Chapter 3 Advanced Adjustment/Setting
●
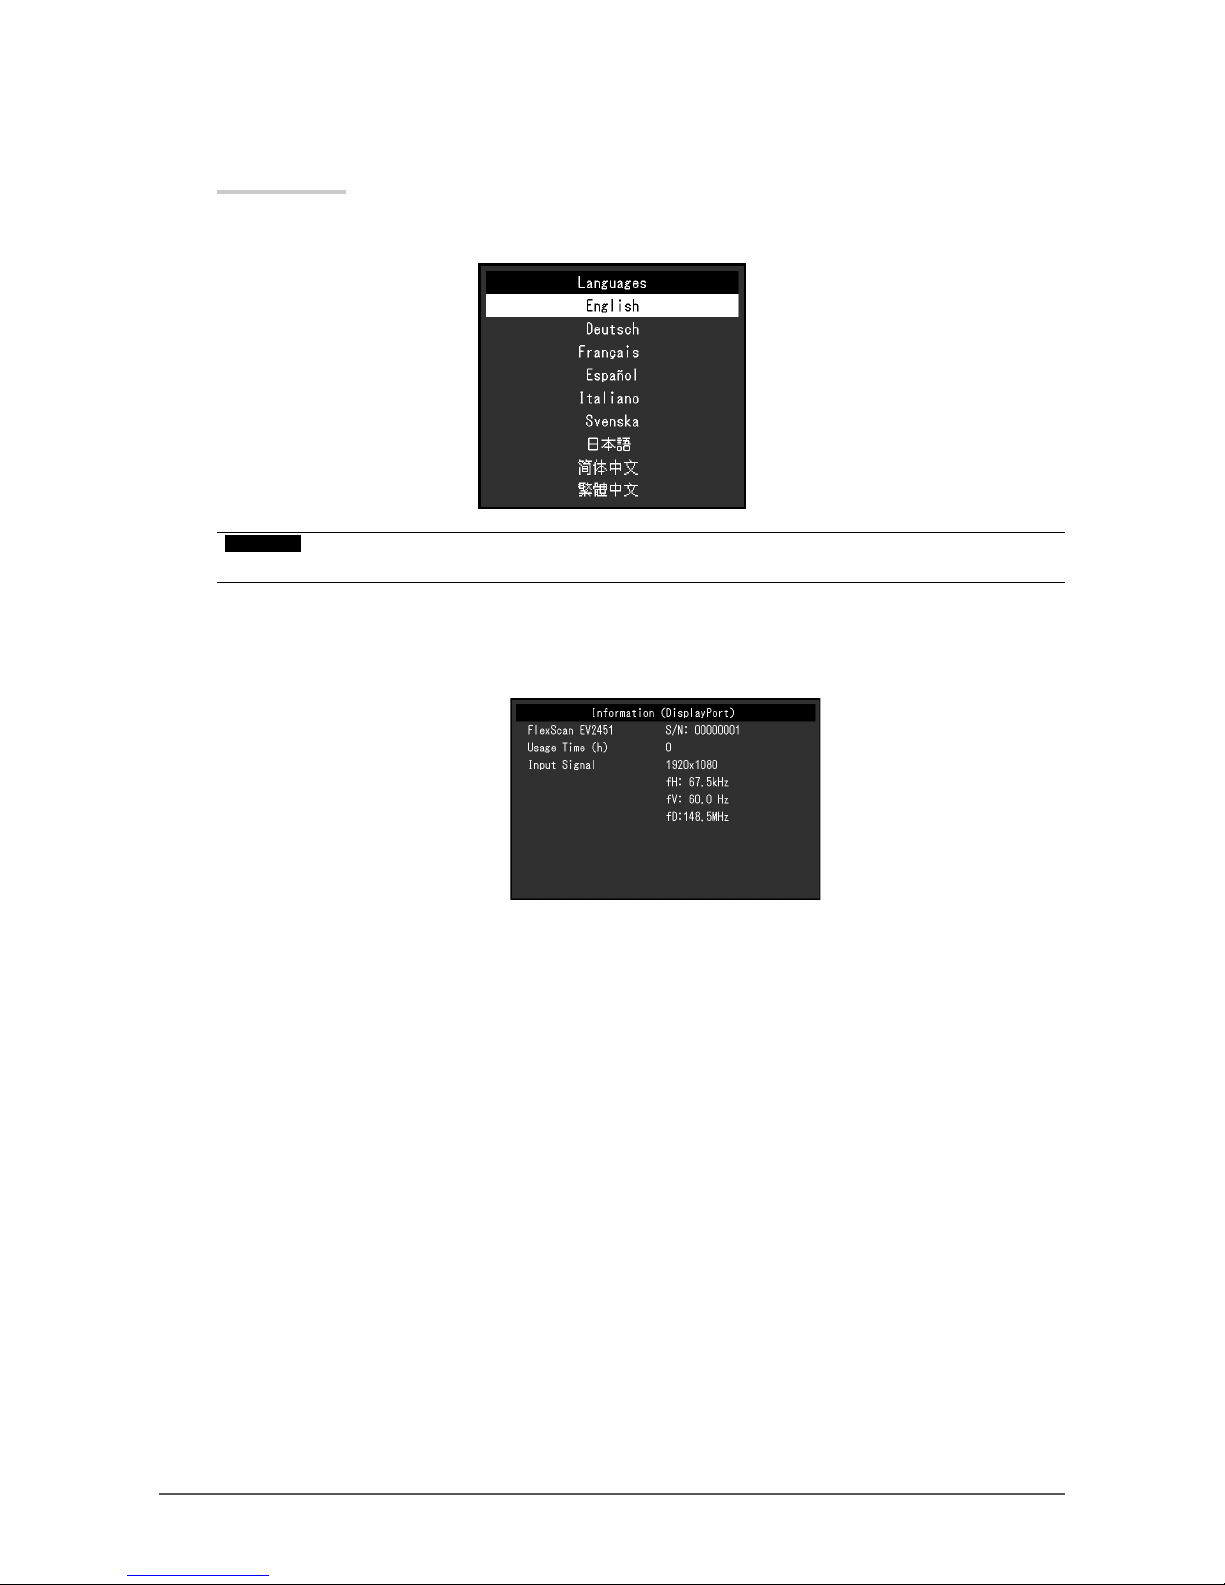
Language
The display language for menus and messages can be selected.
Setting Range
English, Deutsch, Français, Español, Italiano, Svenska, Japanese, Simplied Chinese, Traditional
Chinese
Attention
• The display language of the “Administrator Settings” menu cannot be changed.
●
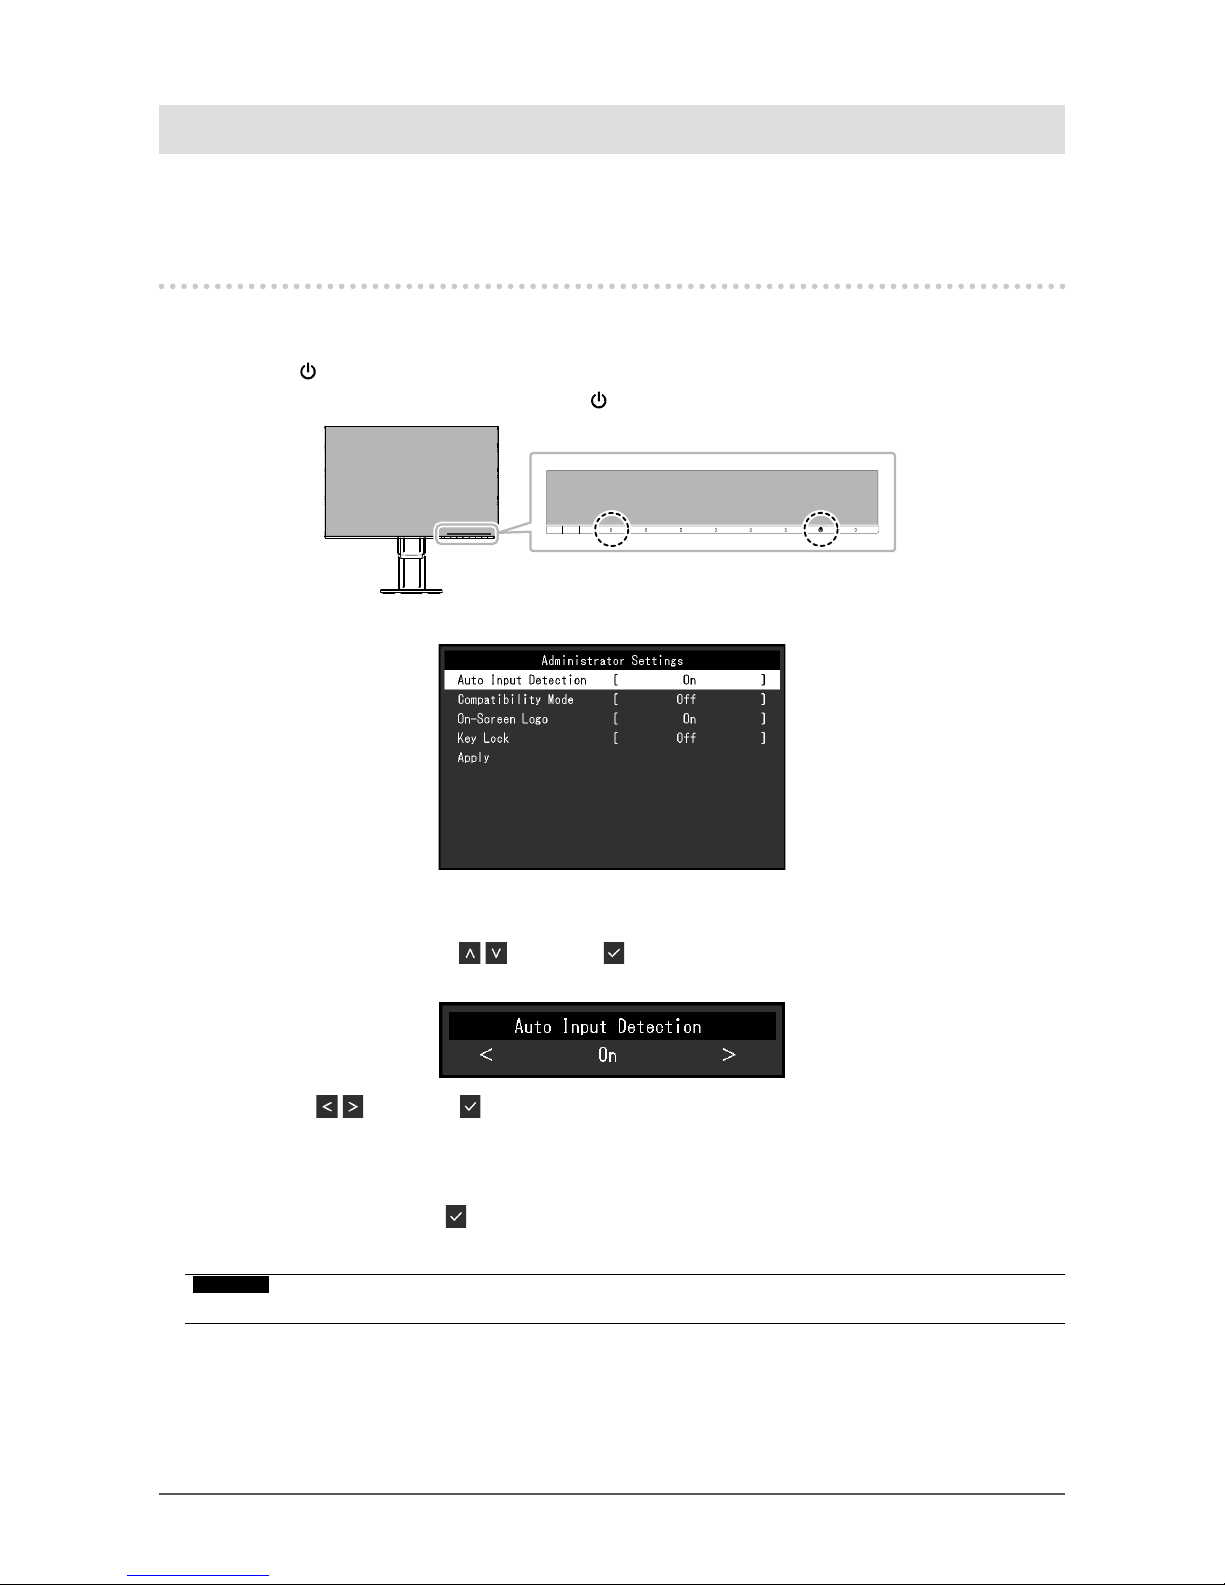
Information
Monitor information (product name, serial number, usage time, resolution, and input signal) can be
checked.
Example:
Page 26
26
Chapter 4 Administrator Settings
Chapter 4 Administrator Settings
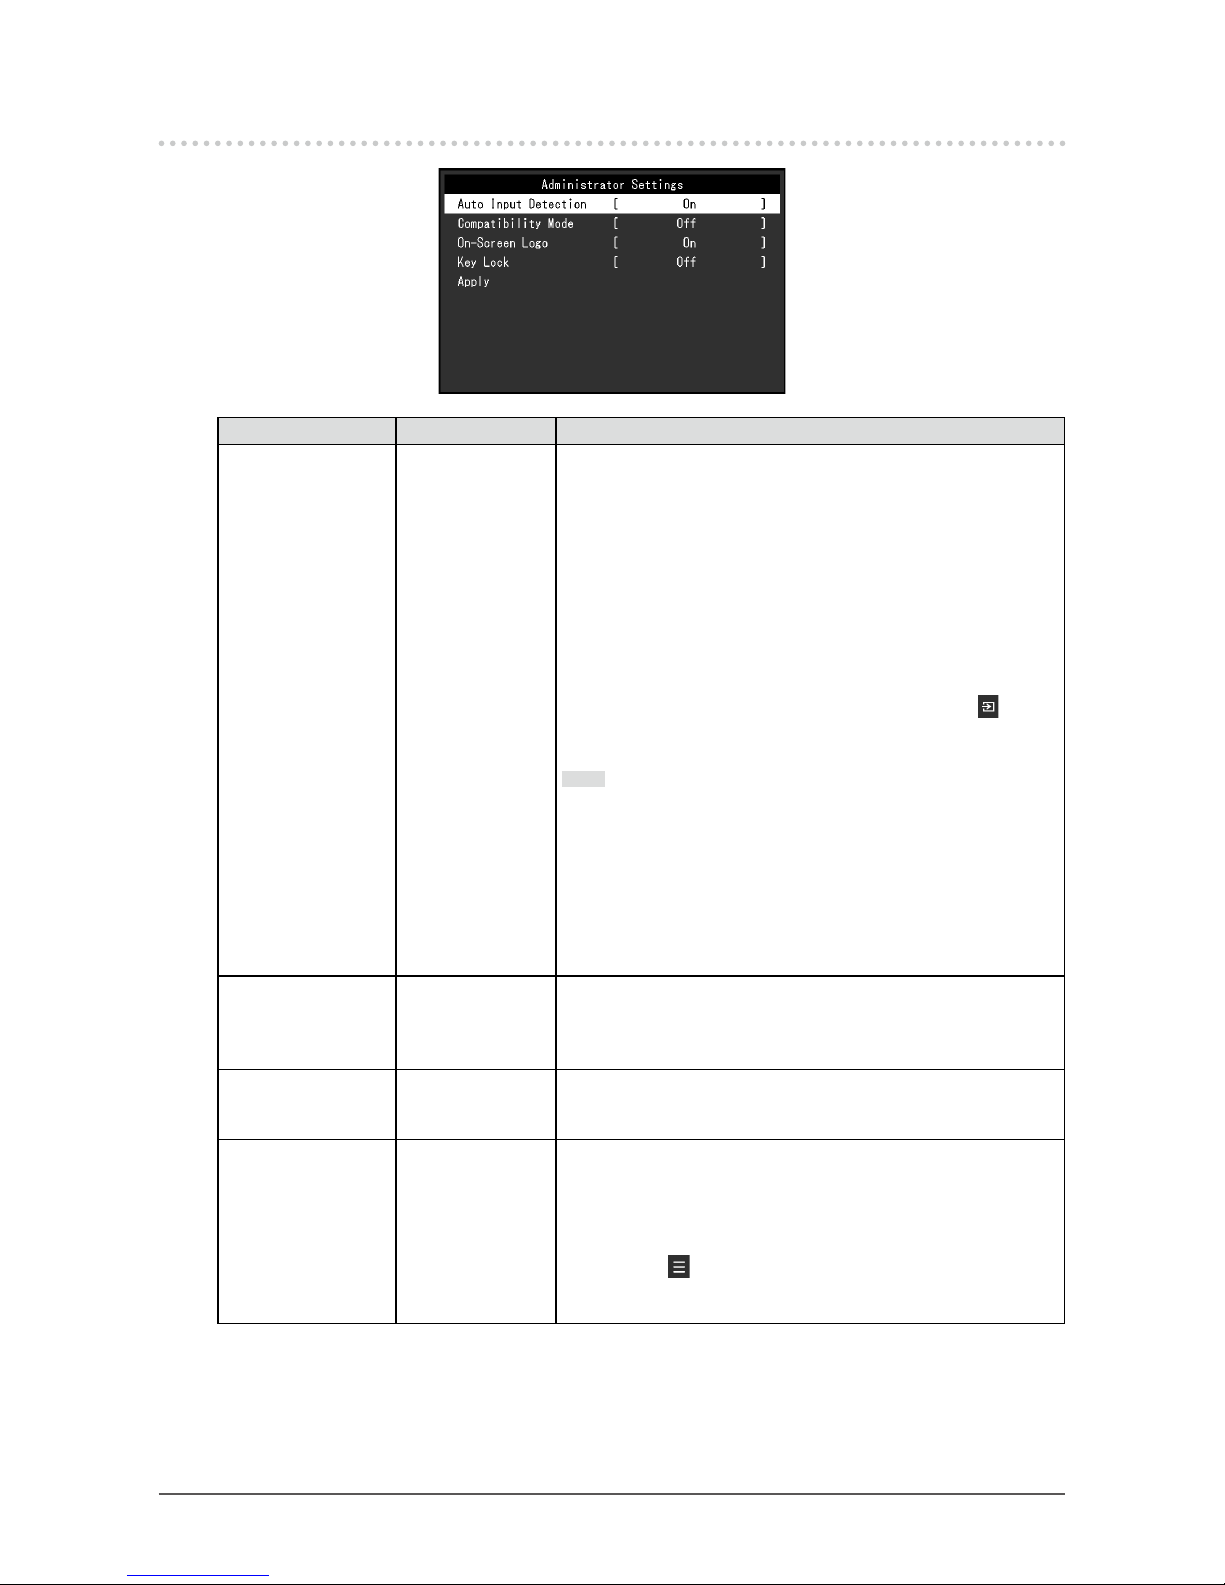
This chapter describes how to congure monitor operation using the “Administrator Settings” menu.
This menu is for administrators. Conguration on this menu is not required for normal monitor use.
4-1.
Basic Operation of the “Administrator Settings” Menu
1.
Menu display
1. Touch to turn off the monitor.
2. While touching the leftmost switch, touch
for more than 2 seconds to turn on the monitor.
The “Administrator Settings” menu appears.
2.
Setting
1. Select an item to set with and select .
The Adjustment/Setting menu appears.
2. Set with and select .
The “Administrator Settings” menu appears.
3.
Applying and exiting
1. Select “Apply” and then .
The settings are applied and the “Administrator Settings” menu exits.
Attention
• The language (English) of the “Administrator Settings” menu cannot be changed.
Page 27
27
Chapter 4 Administrator Settings
4-2. Functions of the “Administrator Settings” Menu
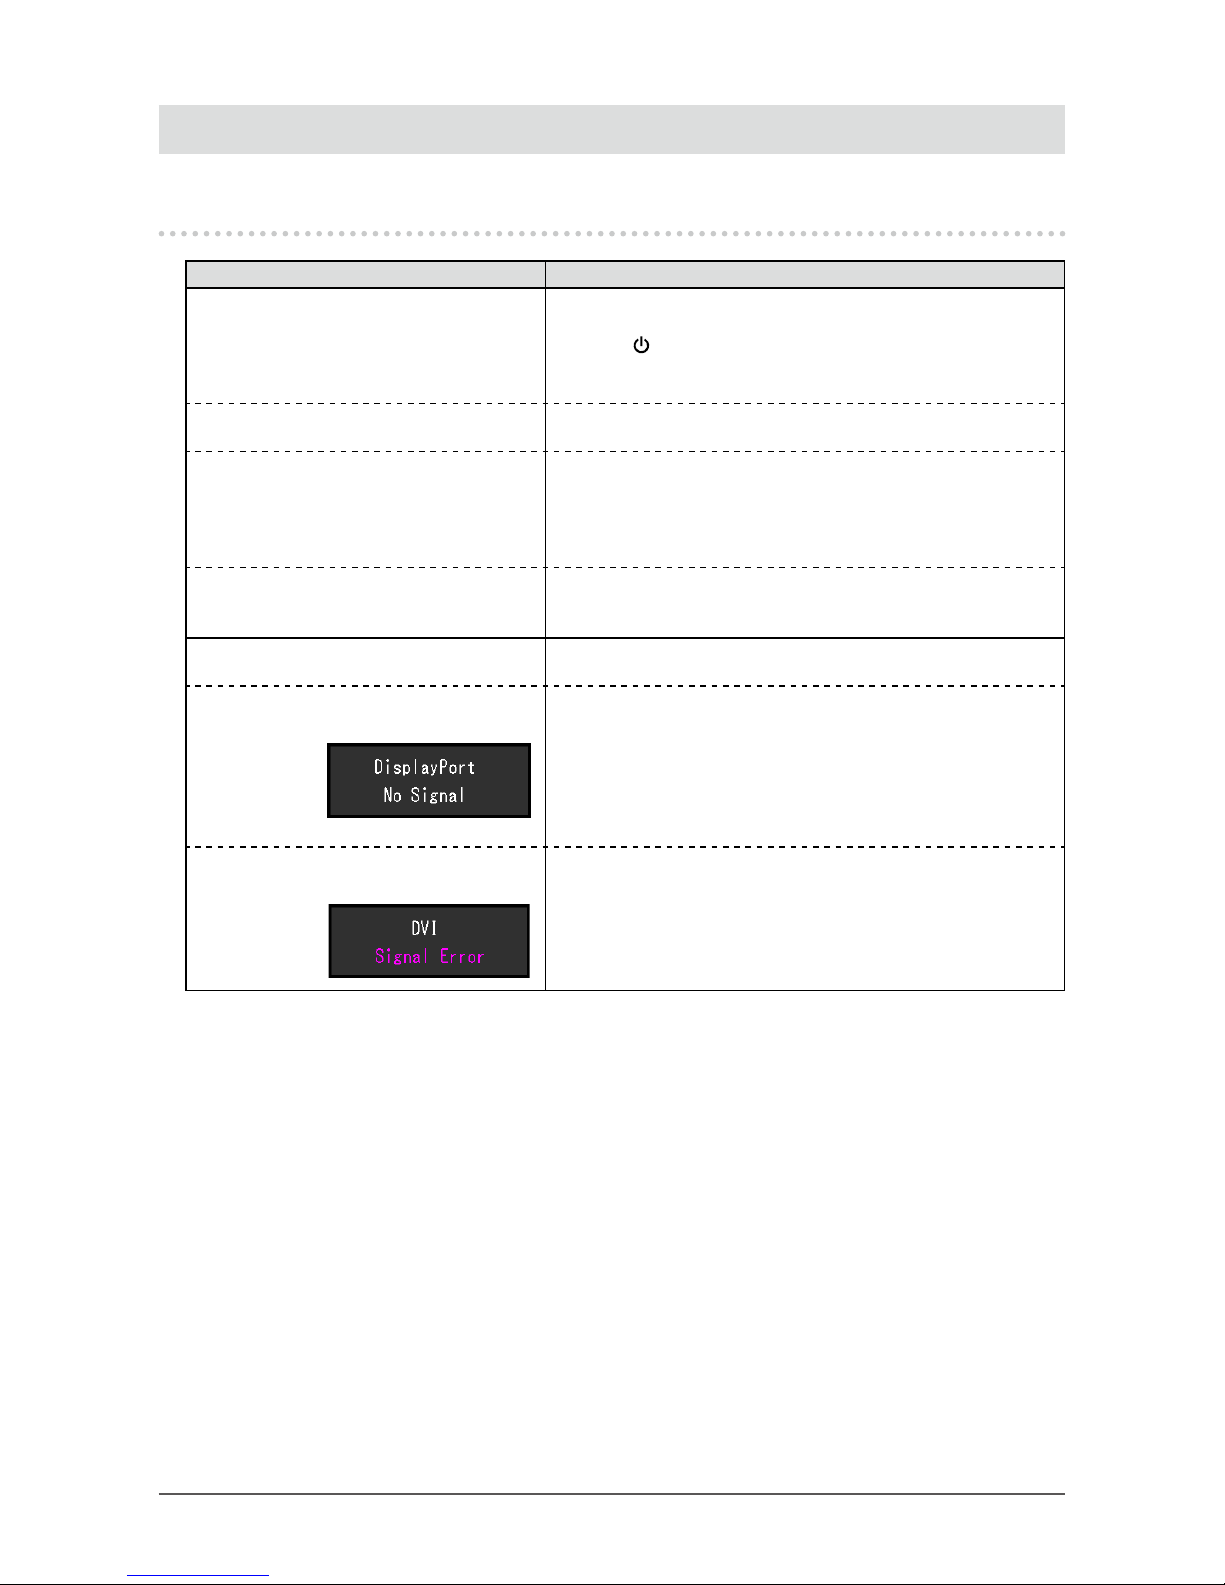
Function Setting Range Description
Auto Input Detection On
Off
This function automatically recognizes the connector through
which PC signals are input, and displays images on the screen
accordingly.
• “On”
When the monitor is connected to multiple PCs, if a specic
PC enters power saving mode or no signals are input to the
monitor, the connector is automatically changed to another
one to which signals are input.
• “Off”
This function displays the signal from the selected connector
regardless of whether a signal is input or not. In this case,
you can select the input signal to display using the
operation switch on the front of the monitor. For details, see
“2-2. Switching Input Signals” (page 12).
Note
• This product automatically recognizes the connector through
which PC signals are input, and displays images on the
screen accordingly regardless of whether this function is set
to On or Off just after the main power switch on the rear side
of the monitor has been turned on.
• When this function is set to “On”, the monitor only enters
power saving mode after all connected PCs have entered
power saving mode or have been switched off.
Compatibility Mode On
Off
When the monitor power is turned off/on with a PC connected
via the DisplayPort connector, window and icon positions may
have shifted or the image may not be displayed normally. If this
happens, set this function to “On”.
On-Screen Logo On
Off
When the monitor is turned on, the EIZO logo appears on the
screen.
When this function is set to “Off”, the EIZO logo does not appear.
Key Lock Off
Menu
All
In order to prevent changes to settings, the operation switches on
the front of the monitor can be locked.
• “Off”
Enable all switches.
• “Menu”
Lock the
switch.
• “All”
Lock all switches except the power switch.
Page 28
28
Chapter 5 Troubleshooting
Chapter 5 Troubleshooting
5-1. No Picture
Problem Possible cause and remedy
1. No picture
• Power indicator does not light up.
• Check whether the power cord is connected properly.
• Turn on the main power switch on the rear side of the monitor.
• Tou c h
.
• Turn off the main power switch on the rear side of the monitor,
and then turn it on again a few minutes later.
• Power indicator is lighting white. • Increase “Brightness”, “Contrast”, or “Gain” in the Setting menu
(see “Color Adjustment” (page 18)).
• Power indicator is lighting orange. • Switch the input signal.
• Move the mouse or press any key on the keyboard.
• Check whether the PC is turned on.
• Turn off the main power switch on the rear side of the monitor,
and then turn it on again.
• Power indicator is ashing orange and
white.
• This symptom may occur when the PC is connected to the
DisplayPort connector. Use a signal cable recommended by us
for the connection. Turn the monitor off and on.
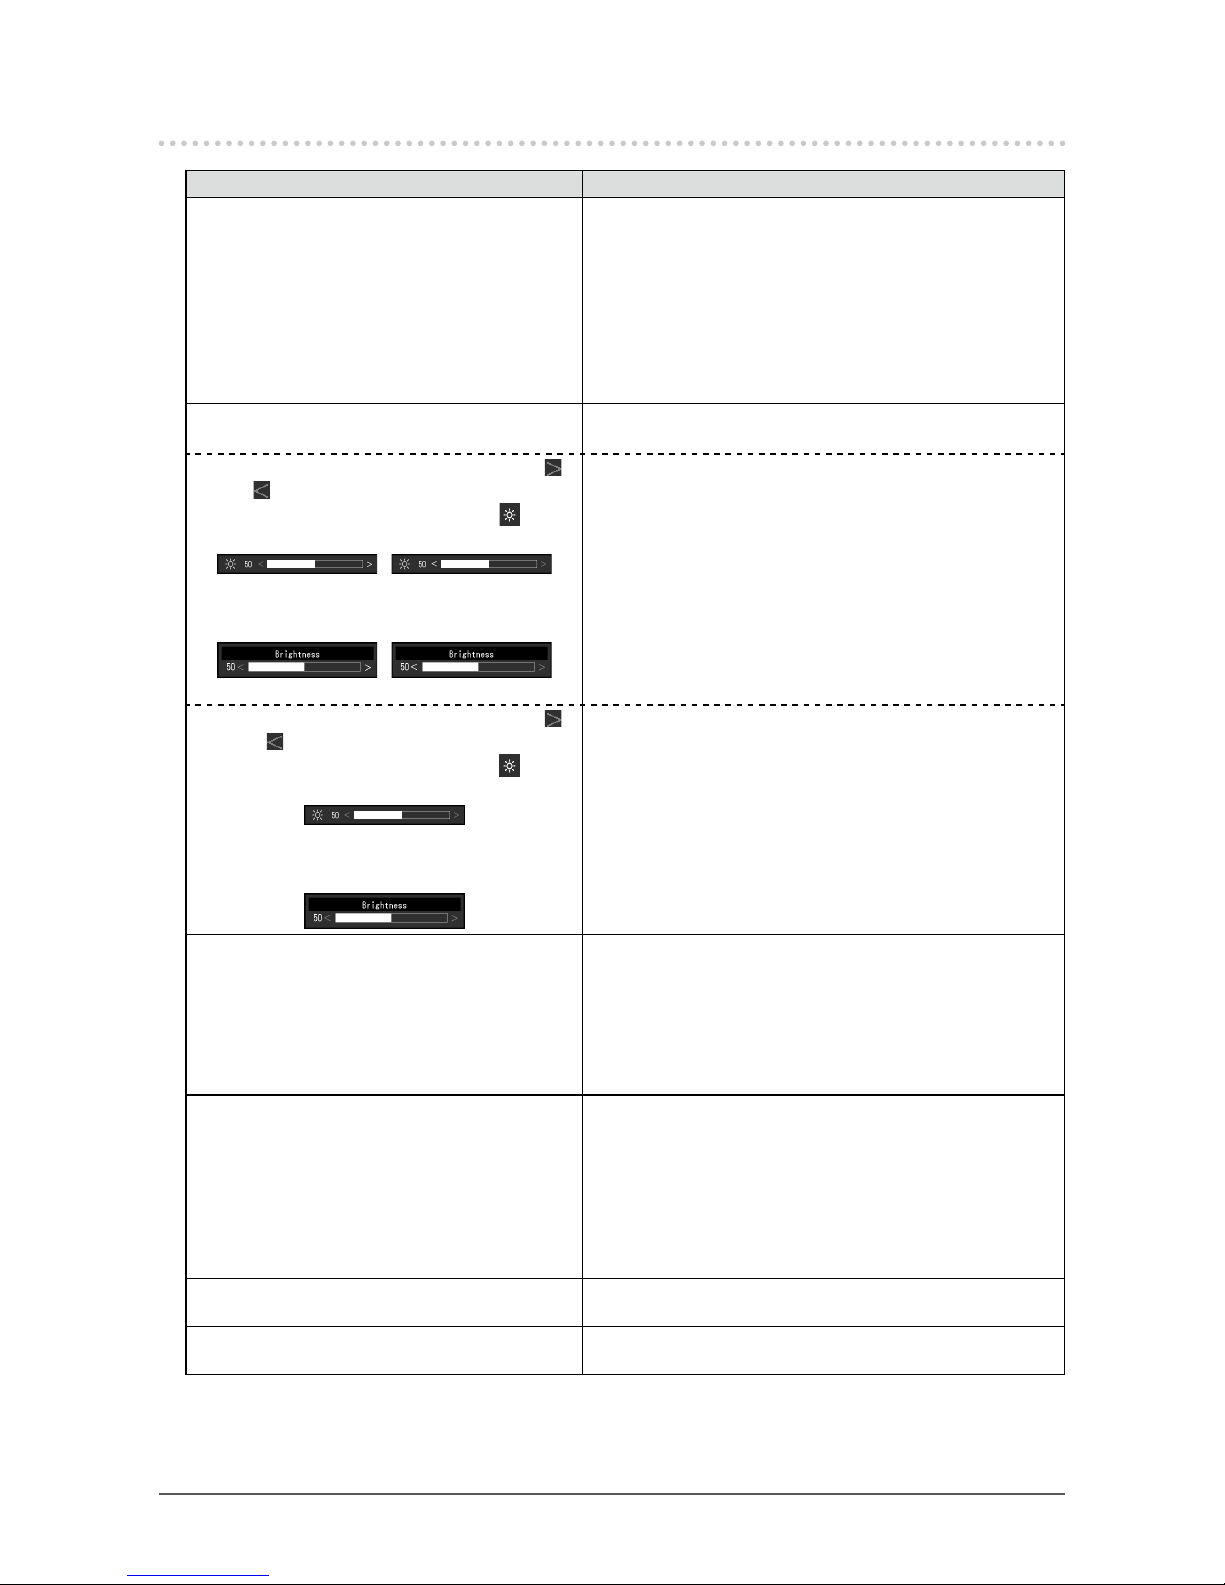
2. The message below appears. This message appears when the signal is not input correctly even
though the monitor is functioning properly.
• This message appears when no signal is
input.
Example:
• The message shown left may appear, because some PCs do
not output the signal immediately after power-on.
• Check whether the PC is turned on.
• Check whether the signal cable is connected properly.
• Switch the input signal.
• Turn off the main power switch on the rear side of the monitor,
and then turn it on again.
• The message shows that the input signal
is out of the specied frequency range.
Example:
• Check whether the PC is congured to meet the resolution and
vertical scan frequency requirements of the monitor (see “1-3.
Supported Resolutions” (page 10)).
• Reboot the PC.
• Select an appropriate setting using the graphics board’s utility.
Refer to the User’s Manual of the graphics board for details.
Page 29
29
Chapter 5 Troubleshooting
5-2. Imaging Problems (For Both Digital and Analog)
Problem Possible cause and remedy
1. The screen is too bright or too dark. • Use “Brightness” or “Contrast” in the Setting menu to
adjust it (see “Color Adjustment” (page 18)). (The LCD
monitor backlight has a limited life span. If the screen
becomes dark or begins to icker, contact your local EIZO
representative.)
• If the screen is too bright, try changing the Auto EcoView
setting to “On”. The monitor detects the ambient
brightness to adjust the screen brightness automatically
(see “Auto EcoView” (page 14)).
2. “Brightness” cannot be adjusted When Auto EcoView is set to “On”, “Brightness” may not be
adjustable due to the advanced settings of Auto EcoView.
• Cannot increase/decrease setting value (“
”
or “
” is displayed in gray)
- “Brightness” adjustment menu via
operation switch
/
- “Brightness” adjustment menu in color
adjustment
/
• The bright adjustment range of the Auto EcoView function
can be limited to ensure that the screen is neither too
bright nor too dark. When the adjustment range is limited,
values outside the range cannot be set. If you want to
set a value outside the range, try changing the following
settings.
- Change the maximum and minimum values for
“Brightness” in the Auto EcoView advanced settings.
- Set Auto EcoView to “Off”.
For details on Auto EcoView settings, see “Auto EcoView”
(page 14).
• Cannot increase/decrease setting value (“
”
and “
” are displayed in gray)
- “Brightness” adjustment menu via
operation switch
- “Brightness” adjustment menu in color
adjustment
• Brightness adjustment may not be possible when the
installation environment of the monitor is excessively
bright or dark. In this case, try changing the following
settings.
- Change the maximum and minimum values for “Ambient
Light” in the Auto EcoView advanced settings.
- Set Auto EcoView to “Off”.
For details on Auto EcoView settings, see “Auto EcoView”
(page 14).
3. Text is blurred
• Check whether the PC is congured to meet the resolution
and vertical scan frequency requirements of the monitor
(see “1-3. Supported Resolutions” (page 10)).
• When an image is displayed with a resolution other than
recommended, text or lines in the displayed image may
blur. In this case, try adjusting “Sharpness” in the Setting
menu (see “Sharpness” (page 21)).
4. Afterimages appear • Afterimages are particular to LCD monitors. Avoid
displaying the same image for a long time.
• Use the screen saver or power saving function to avoid
displaying the same image for extended periods of time.
Depending on the image, an afterimage may appear even
if it was displayed for a short period of time. To remove
such a phenomenon, change the image or keep the power
turned off for several hours.
5. Green / red / blue / white dots or dark dots
remain on the screen.
• This is due to LCD panel characteristics and not a
malfunction.
6. Interference patterns or pressure marks
remain on the screen.
• Leave the monitor with a white or black screen. The
symptom may disappear.
Page 30
30
Chapter 5 Troubleshooting
Problem Possible cause and remedy
7. Noise appears on the screen. • In the Setting menu, set “Overdrive” to “Off” (see
“Overdrive” (page 20)).
• When inputting HDCP system signals, normal images
may not be displayed immediately.
8. (DisplayPort signal input)
When you switch the power back on or
return from power save mode, windows or
icons may have shifted position.
• Turn the setting “On” for “Compatibility Mode” on the
“Administrator Settings” menu (see “Compatibility Mode”
(page 27)).
9. (DisplayPort or HDMI input)
The color shown on the screen is not
correct.
• Try changing “Input Color Format” in the Setting menu (see
“Input Color Format” (page 22)).
10. The image does not display on the entire
screen.
• Try changing “Picture Expansion” in the Setting menu (see
“Picture Expansion” (page 21)).
5-3. Imaging Problems (For Analog Only)
Problem Possible cause and remedy
1. Display position is incorrect. • Use “Position” in the Setting menu to correct the image
position (see “Hor. Position”, “Ver. Position” (page 23)).
• If the problem persists, use the graphics board’s utility if
available to change the display position.
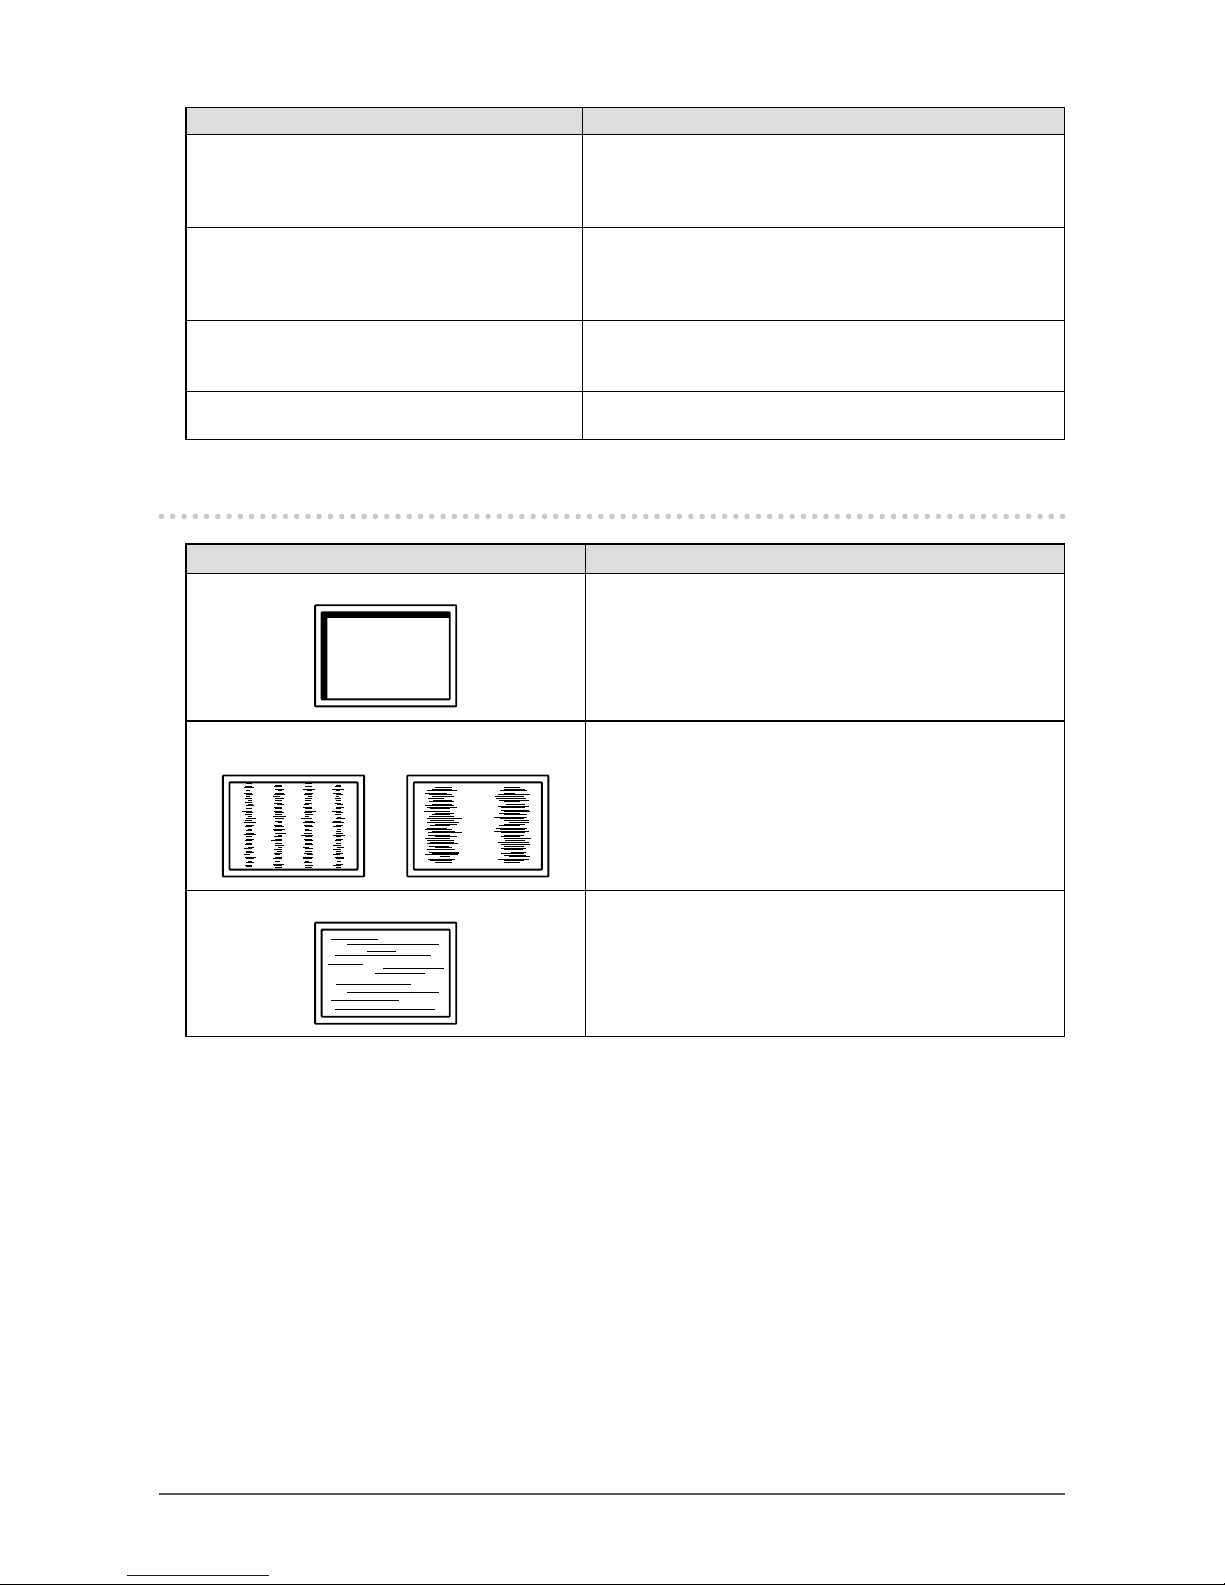
2. Vertical bars appear on the screen or a part
oftheimageisickering.
• Use “Clock” in the Setting menu to adjust it (see “Clock”
(page 23)).
3. Wholescreenisickeringorblurring.
• Use “Phase” in the Setting menu to adjust it (see “Phase”
(page 23)).
Page 31
31
Chapter 5 Troubleshooting
5-4. Other Problems
Problem Possible cause and remedy
1. The Setting menu does not appear. • Check whether the switch operation lock function is active
(see “Key Lock” (page 27)).
2. No audio output. • Check whether the stereo mini jack cable is connected
properly.
• Check whether volume is set to 0.
• Check the PC and audio playback software to see
whether they are congured correctly.
• Check the “Sound Source” setting when using
DisplayPort input or HDMI input (see “Sound Source”
(page 23)).
3. USB devices connected to the monitor do
not work.
• Check whether the USB cable is connected correctly (see
“6-5. Making Use of USB (Universal Serial Bus)” (page
38)).
• Try using a different USB port on the monitor.
• Try using a different USB port on the PC.
• Reboot the PC.
• If the peripheral devices work correctly when they are
directly connected to the PC, contact your local EIZO
representative.
• Check whether the PC and OS are USB compliant. (For
USB compliance of the respective devices, consult their
manufacturers.)
• Depending on the USB 3.0 host controller that you are
using, connected USB devices may not be recognized
correctly. Update to the latest USB 3.0 driver provided by
each manufacturer, or connect the monitor to the USB 2.0
port.
• Check the PC’s BIOS setting for USB when using
Windows. (Refer to the manual of the PC for details.)
4. Powerindicatorisashingorangeand
white.
• This symptom may occur when the PC is connected
to the DisplayPort connector. Use a signal cable
recommended by us for the connection. Turn the monitor
off and on.
• Check the connection and condition of the USB devices
connected to the monitor.
• Turn off the main power switch on the rear side of the
monitor, and then turn it on again.
Page 32
32
Chapter 6 Reference
Chapter 6 Reference
6-1. Attaching the Optional Arm
An optional arm (or an optional stand) can be attached by removing the stand section. Please refer to our
web site for the supported optional arm (or optional stand). http://www.eizoglobal.com
Attention
• When attaching an arm or stand, follow the instructions of the respective User’s Manual.
• When using another manufacturer’s arm or stand, conrm the following in advance and select one conforming to
the VESA standard. Use the VESA mounting screws supplied with this product when attaching the arm or stand.
- Clearance between screw holes: 100 mm × 100 mm
- VESA mount of the arm or stand, external dimensions: 122 mm x 122 mm or less
- Plate thickness: 2.6 mm
- Strong enough to support weight of the monitor unit (excluding the stand) and attachments such as cables.
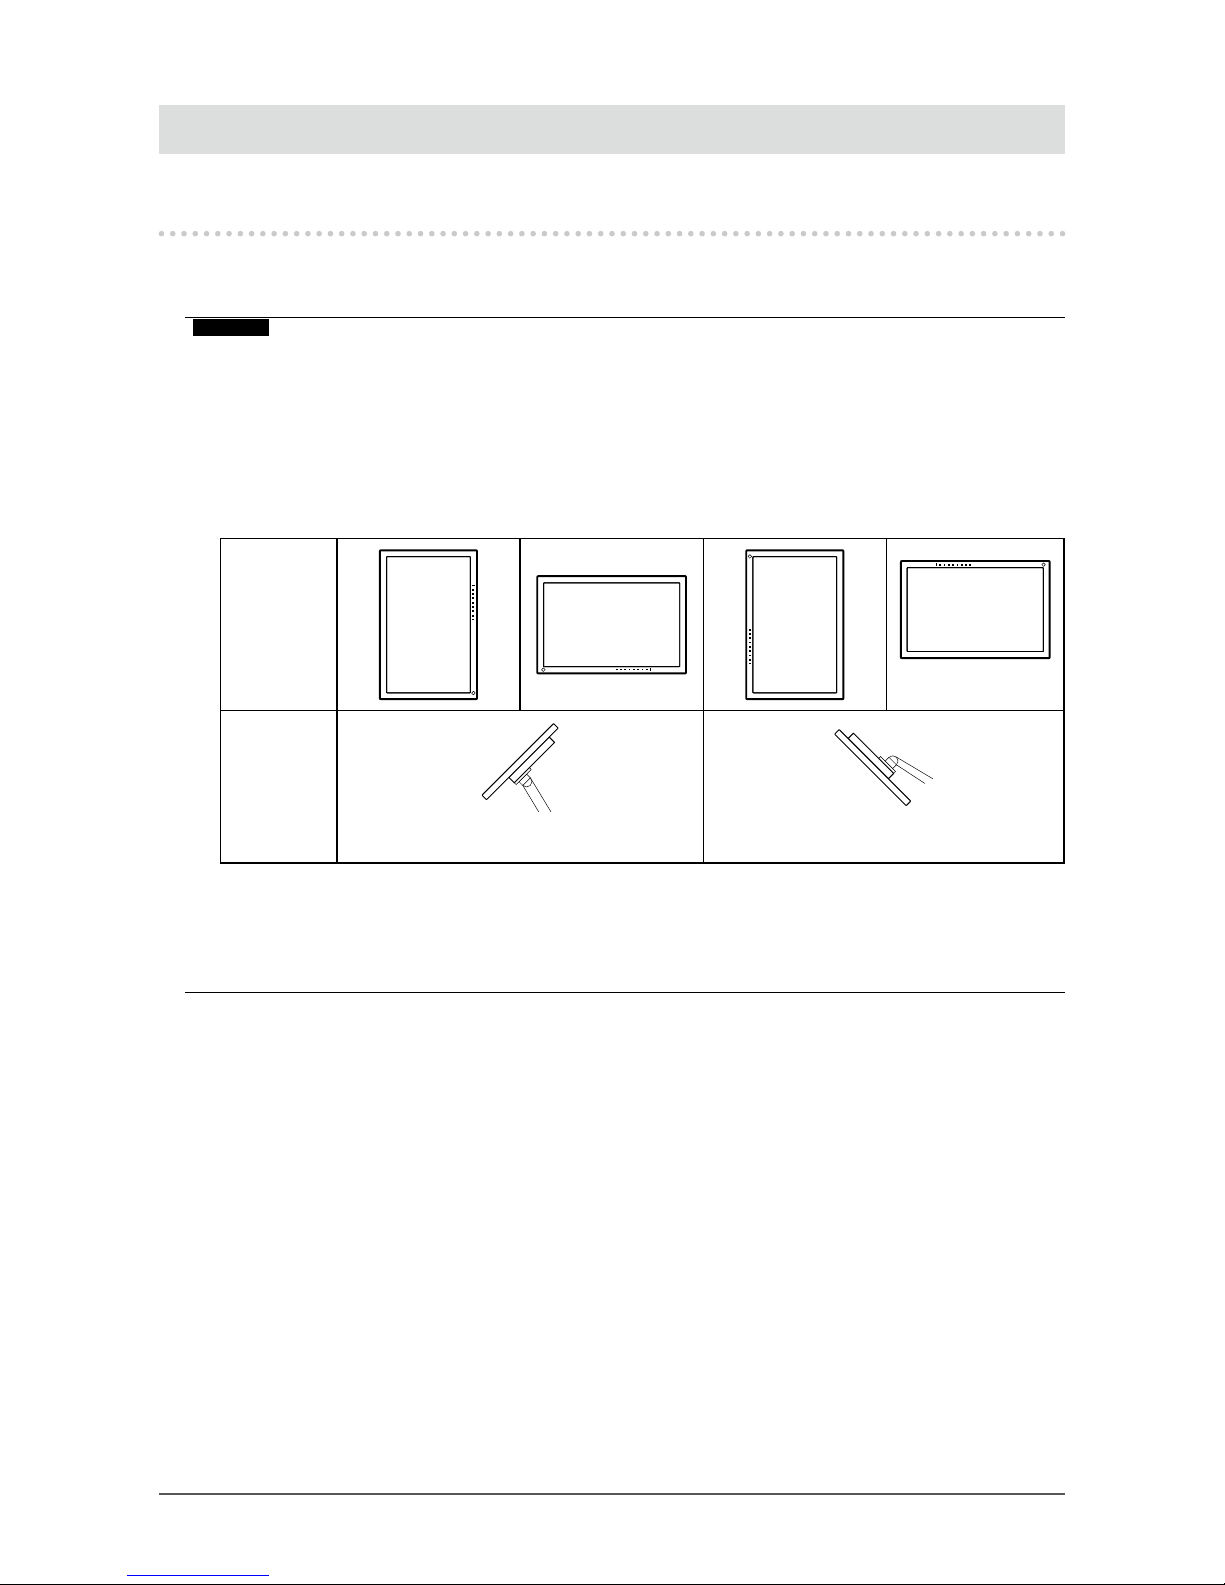
• When attaching an arm or stand, the installable orientations and movement range (tilt angle) are as follows:
Orientation
*1
Movement
range
(tilt angle)
Up: 45˚ Down: 45˚
*1 When installed in this orientation, periodically clean the area around the power connector. Dust, water, or
oil adhered to this area may result in re.
• Connect the cables after attaching an arm or stand.
• Do not move the removed stand up and down. Doing so may result in injury or device damage.
• The monitor, arm, and stand are heavy. Dropping them may result in injury or equipment damage.
Page 33
33
Chapter 6 Reference
●
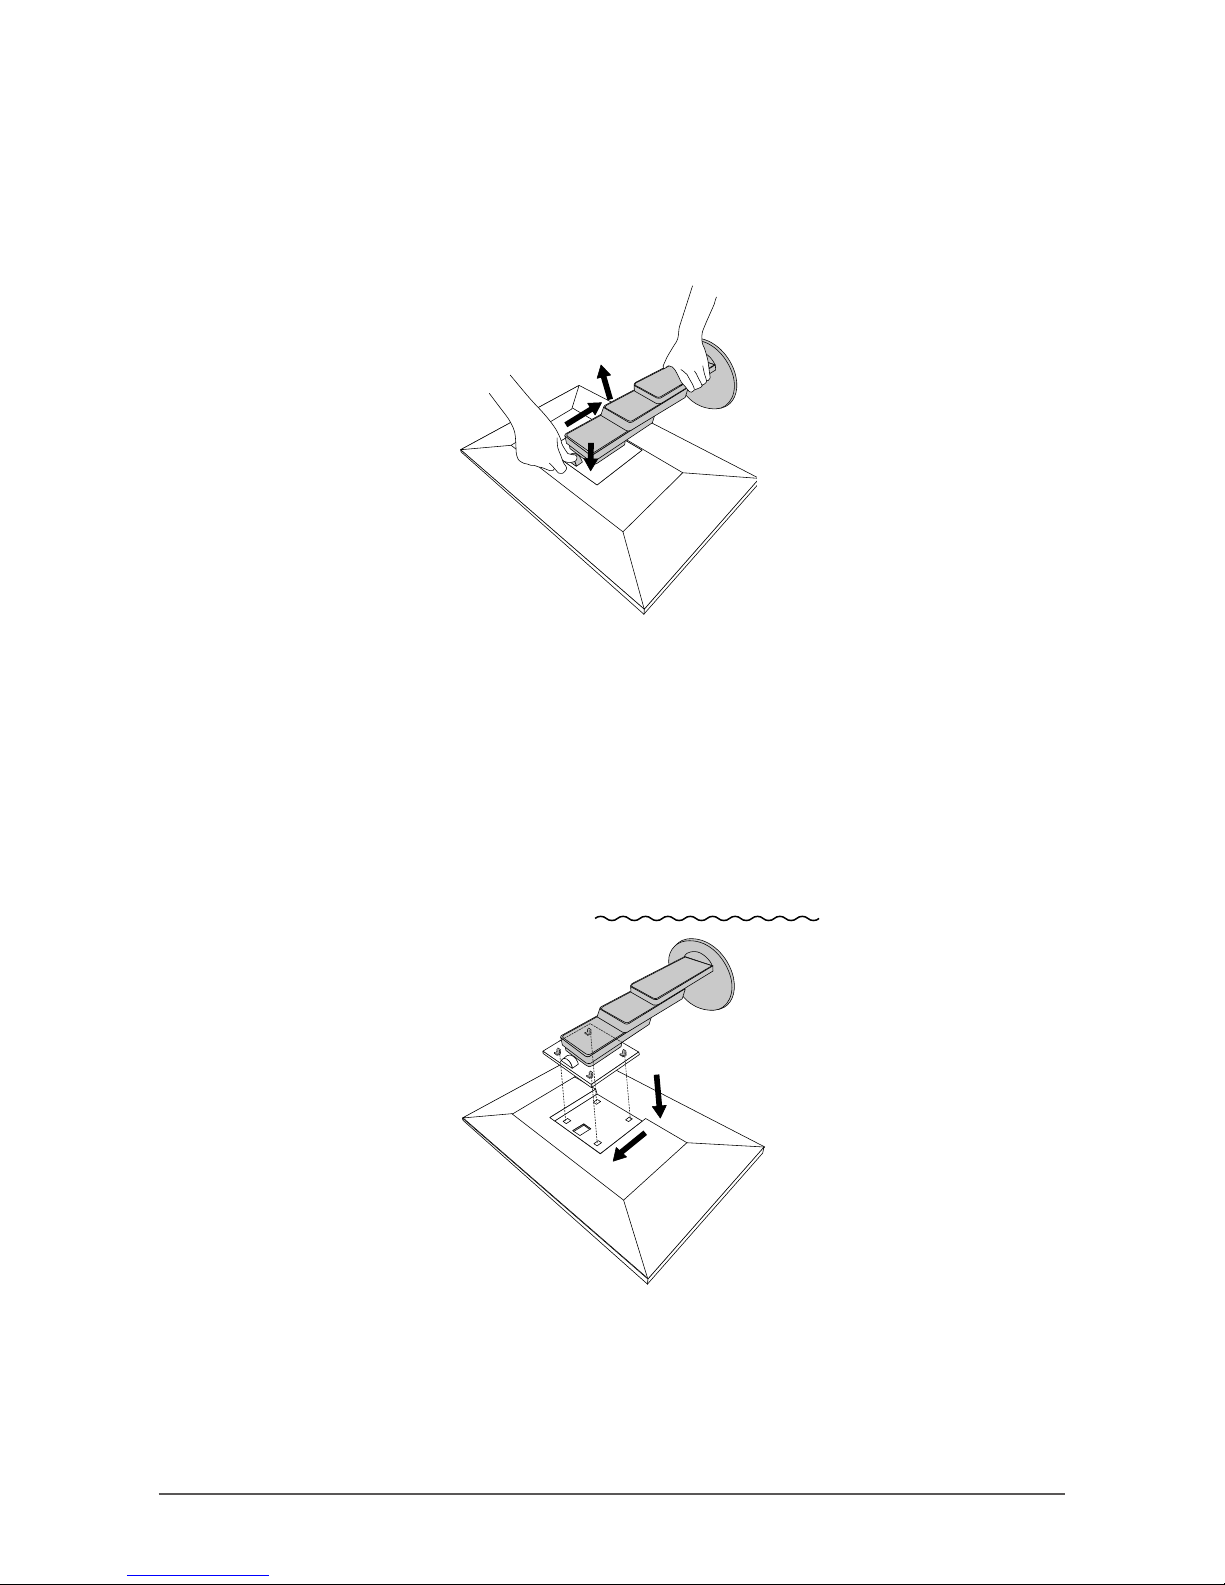
Attaching the Optional Arm (or Optional Stand)
1. Lay the LCD monitor on a soft cloth spread over a stable and at surface with the panel surface
facing down.
2. Remove the stand.
As shown in the gure, while holding down the lock button (1), slide the stand toward the stand base until it
touches the stand base (2). Then, lift the stand up (3).
(3)
(1)
(2)
3. Attach the arm or stand to the monitor.
Use the VESA mounting screws supplied with this product when attaching the arm or stand.
●
Attaching the original stand
1. Remove the xing screws on the optional arm (or optional stand), and detach the optional arm (or
optional stand).
2. To prevent damaging the panel surface, lay the monitor with its panel surface facing down on a
soft cloth spread on a stable surface.
3. Attach the original stand.
As shown below, insert the four tabs on the stand into the square holes on the back panel (1) and slide the
stand towards the upper portion of the monitor until it makes a clicking sound (2).
(1)
(2)
Click
!
Page 34
34
Chapter 6 Reference
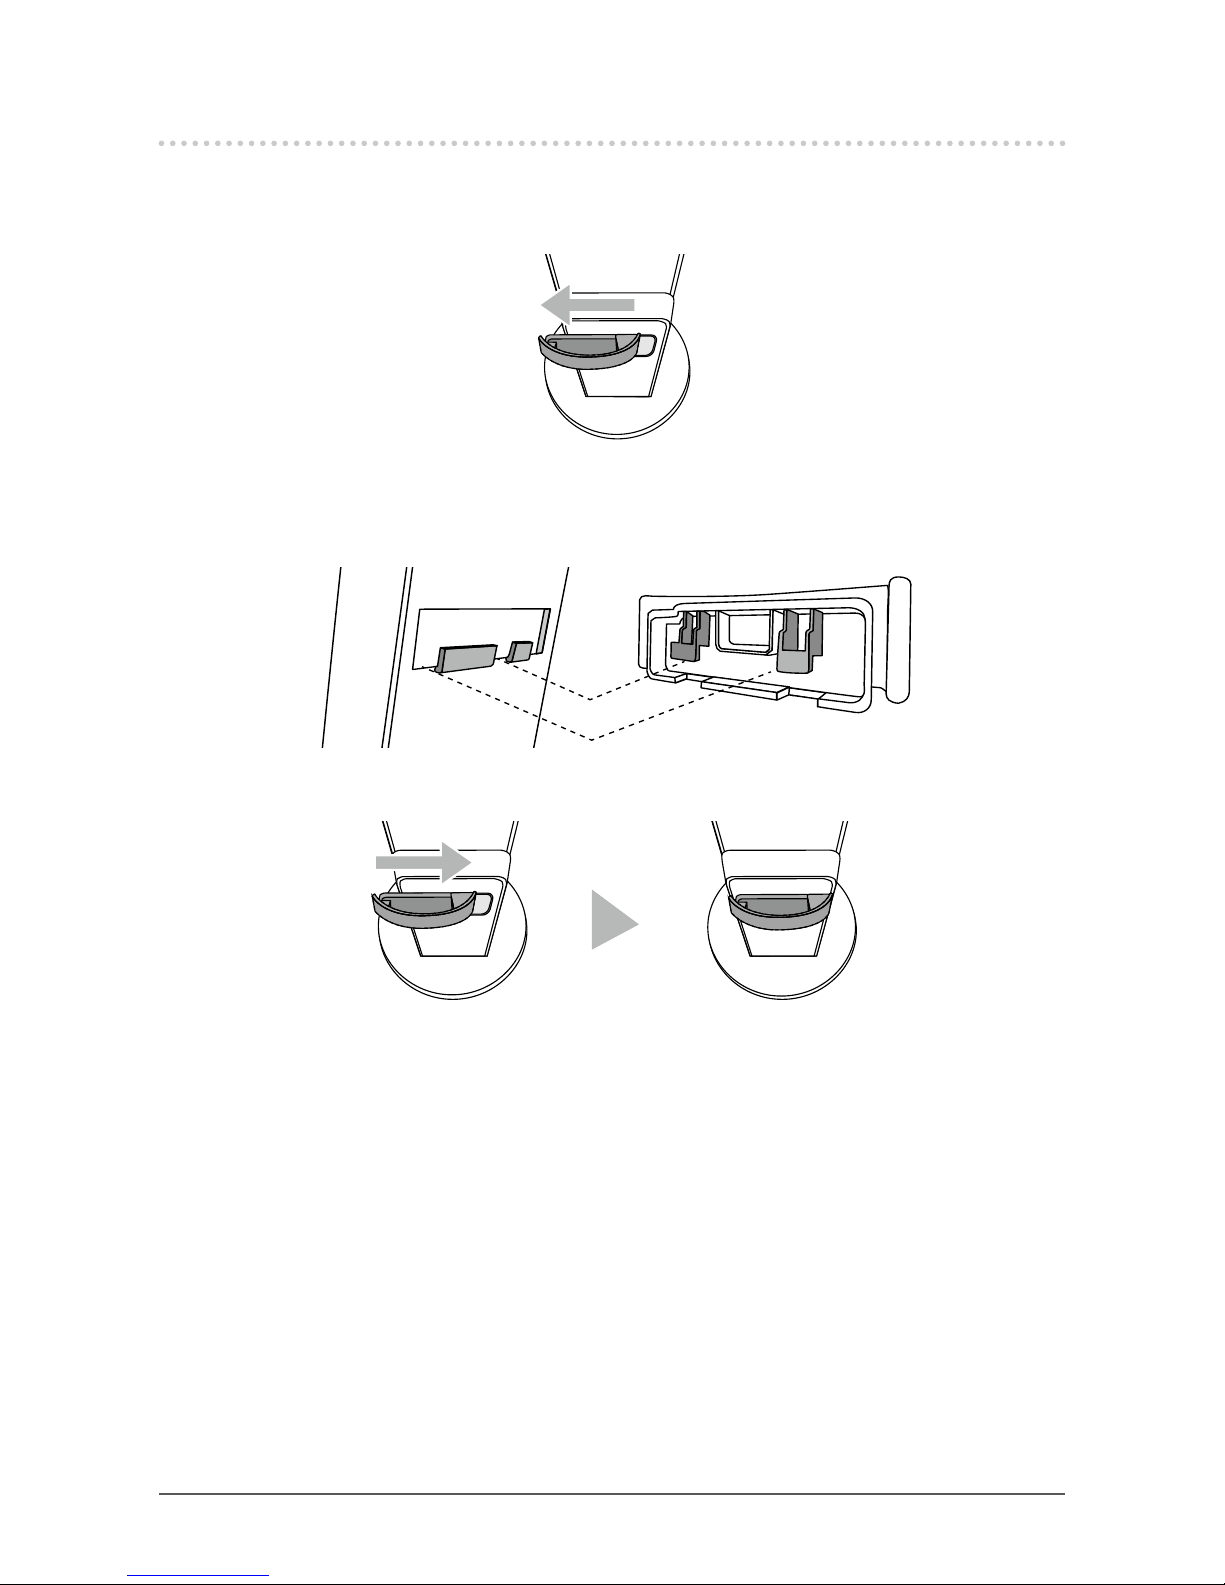
6-2. Detaching / Attaching the Cable Holder
●
Detaching the cable holder
1. Slide the cable holder to the left, and detach it from the stand.
●
Attaching the cable holder
1. Align the tabs of the cable holder with the attachment parts of the stand.
2. Slide the cable holder to the right, and attach it to the stand.
Page 35
35
Chapter 6 Reference
6-3. Detaching / Attaching the Cable Cover
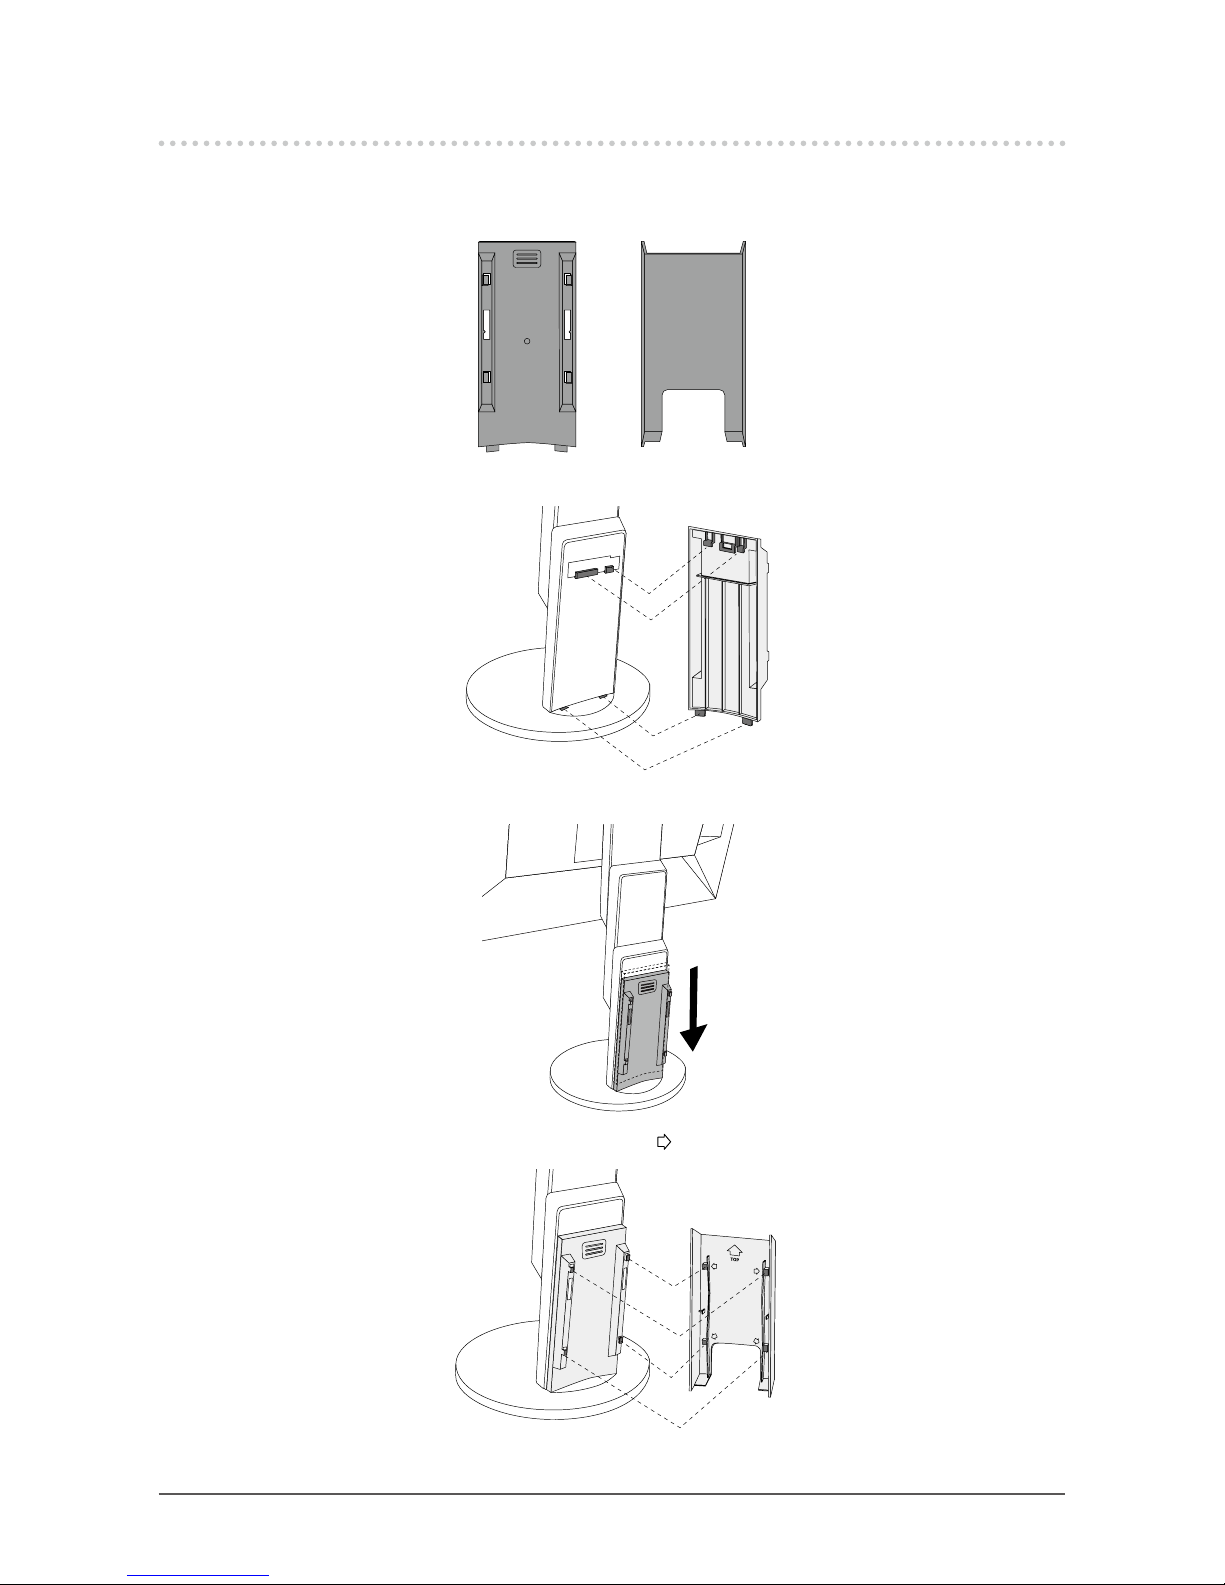
●
Attaching the cable cover
A
B
1. Align the tabs of (A) with the attachment parts of the stand.
A
2. Slide (A) downward to secure the tabs to the attachment parts of the stand.
3. Check the tabs of (B) (four locations indicated by ) and the attachment locations of (A).
B
A
4. Pass the cables between (A) and (B), and align (B) with (A) to t in.
Page 36
36
Chapter 6 Reference
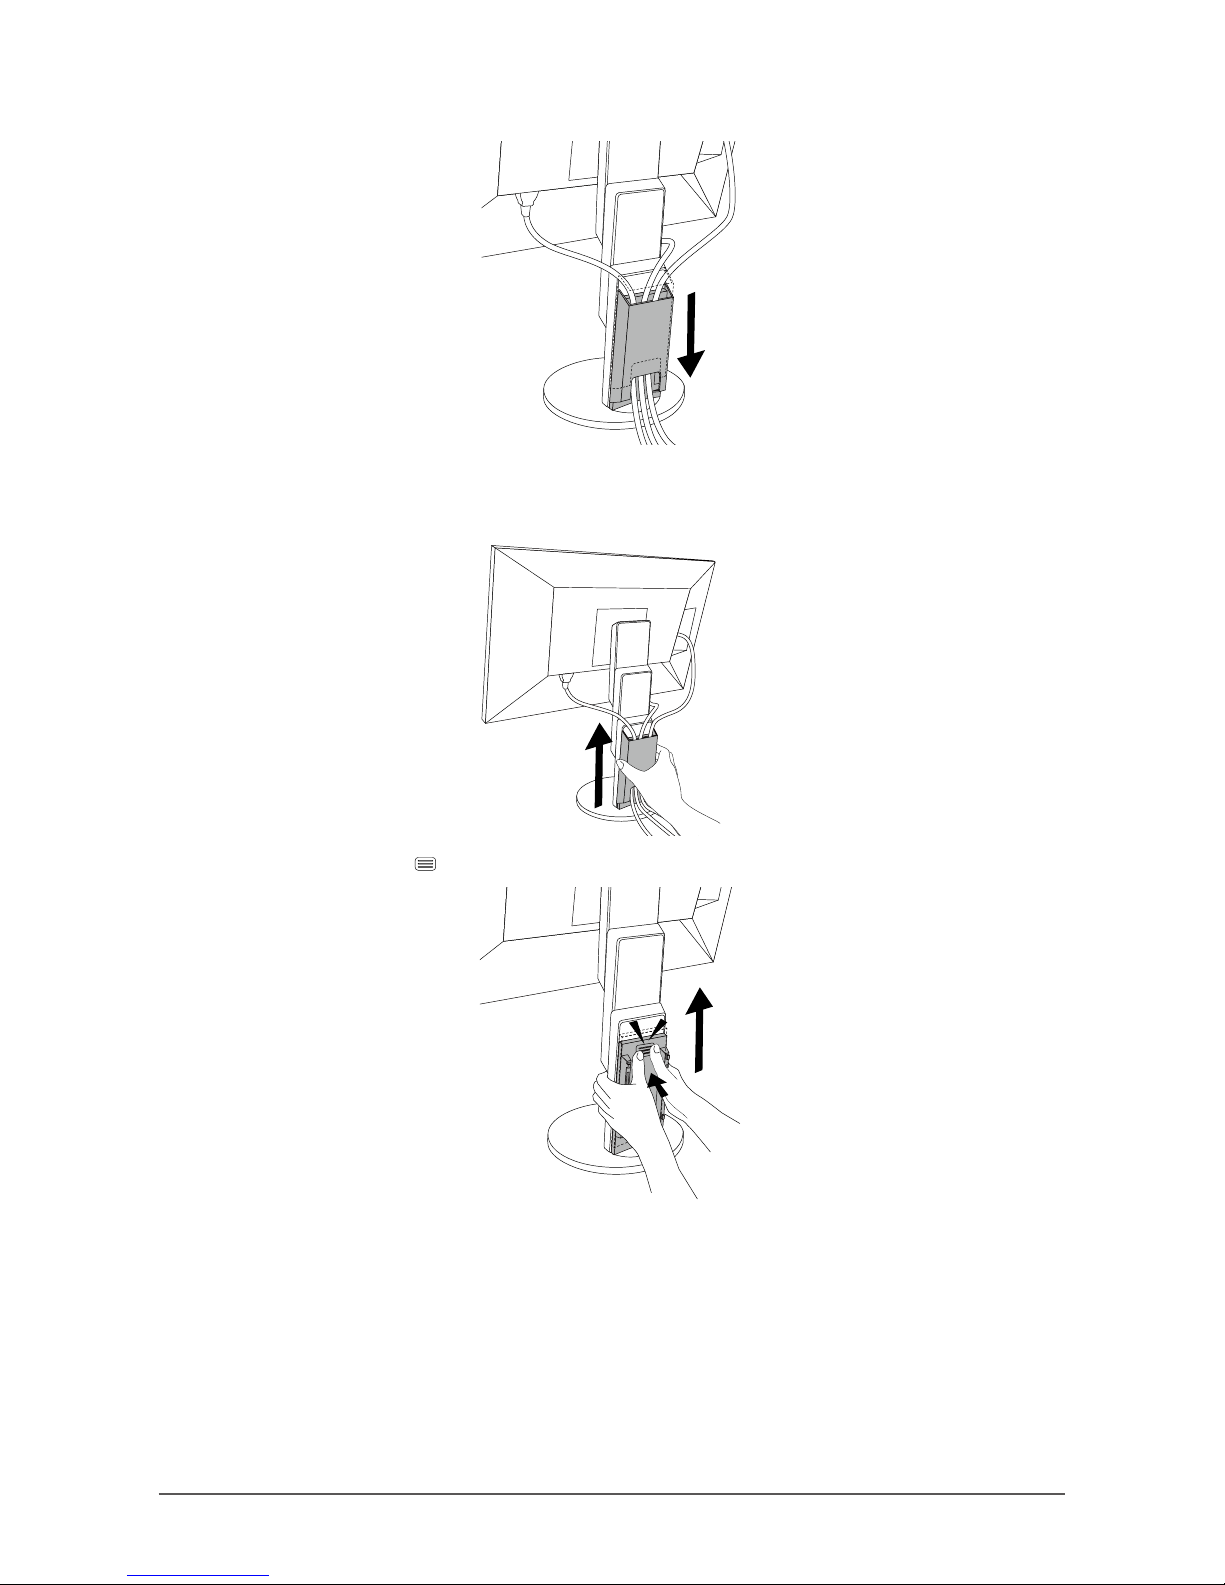
5. Slide (B) downward and secure it to (A).
●
Detaching the cable cover
1. Slide (B) upward, and detach it from (A).
2. While holding down of (A) lightly, slide (A) upward to detach it from the stand.
Page 37
37
Chapter 6 Reference
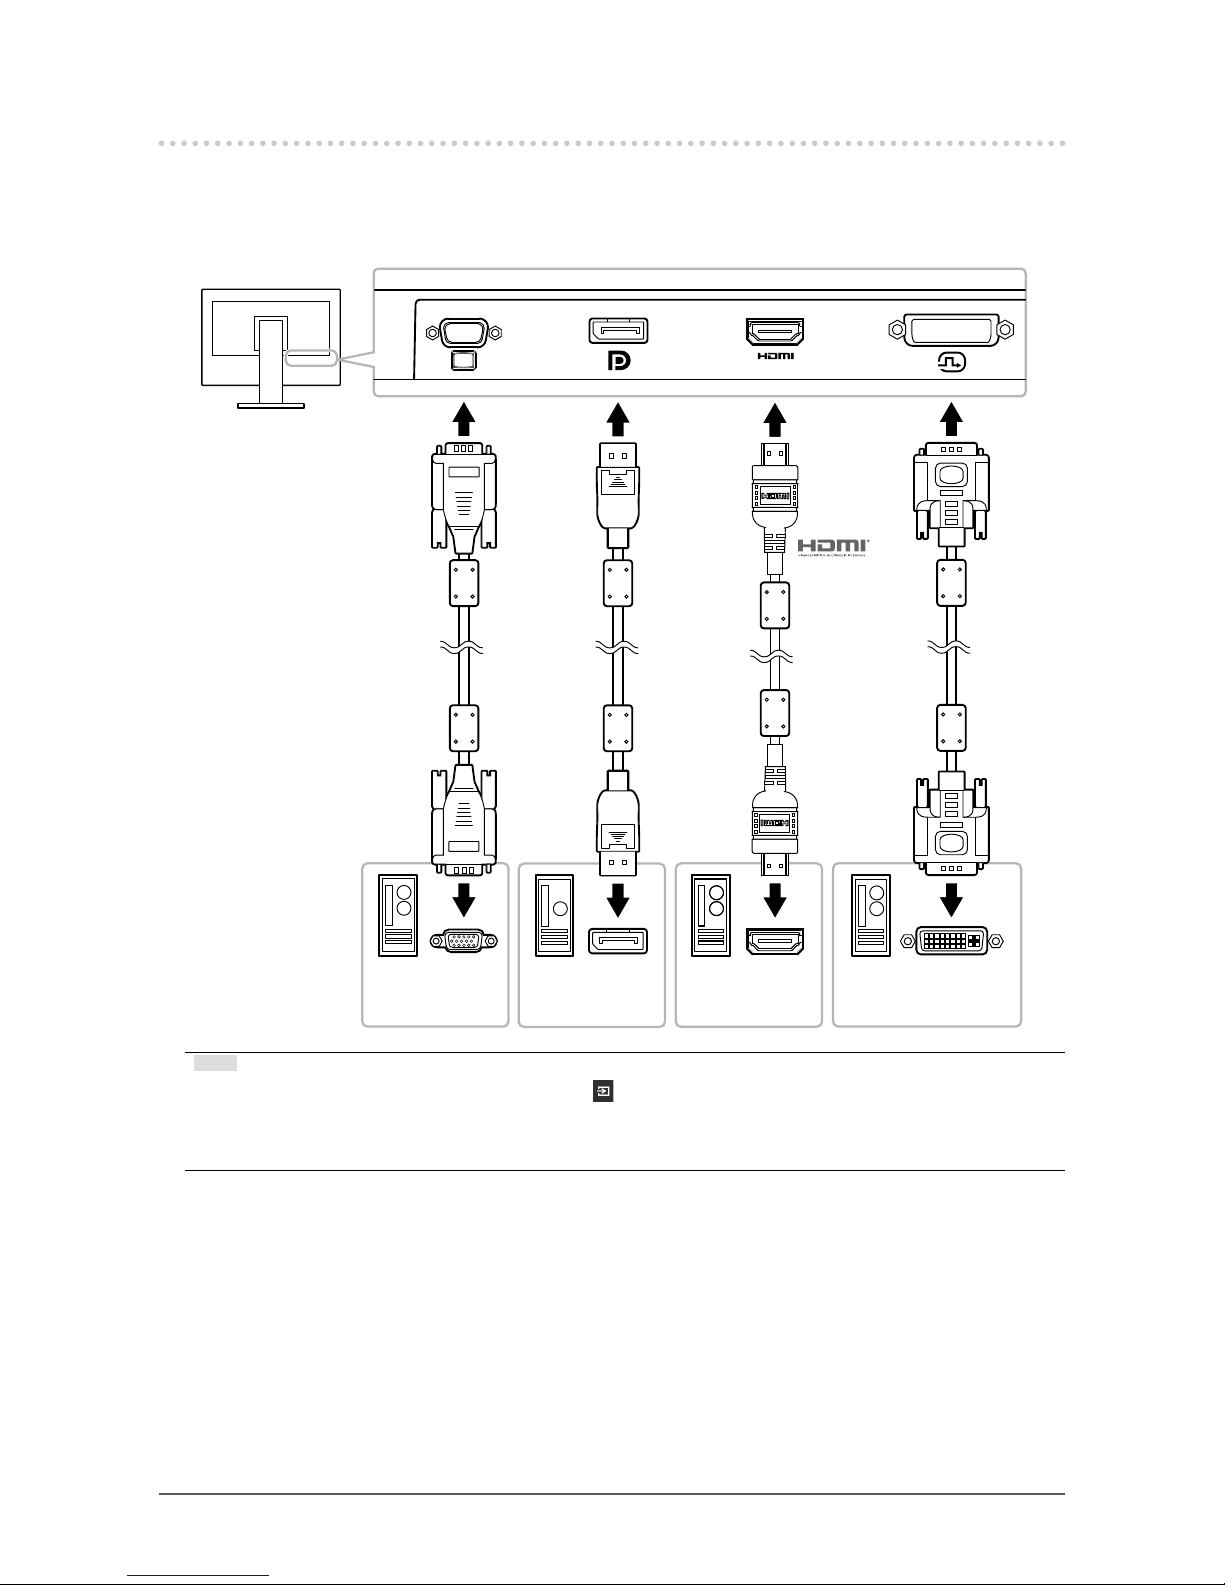
6-4. Connecting Multiple PCs
This product can be connected to multiple PCs and allows you to switch between the connections for
display.
●
Connection examples
Signal cable
HH200HS
(option)
Signal cable
FD-C39
(option)
Digital
(DVI)
Digital
(HDMI)
Signal cable
MD-C87
(option)
Analog Input
(D -Sub)
To PC 1 To PC 2 To PC 3 To PC 4
DVI connectorHDMI connector
D-Sub mini
15-pin connector
DisplayPort
connector
Digital
(DisplayPor)
Signal cable
PP200
(supplied)
Note
• You can select the input signal to display using the operation switch on the front of the monitor. For details,
see “2-2. Switching Input Signals” (page 12).
• This product provides a function that automatically recognizes the connector through which PC signals are input,
and displays images on the screen accordingly. For details, see “Auto Input Detection” (page 27).
Page 38
38
Chapter 6 Reference
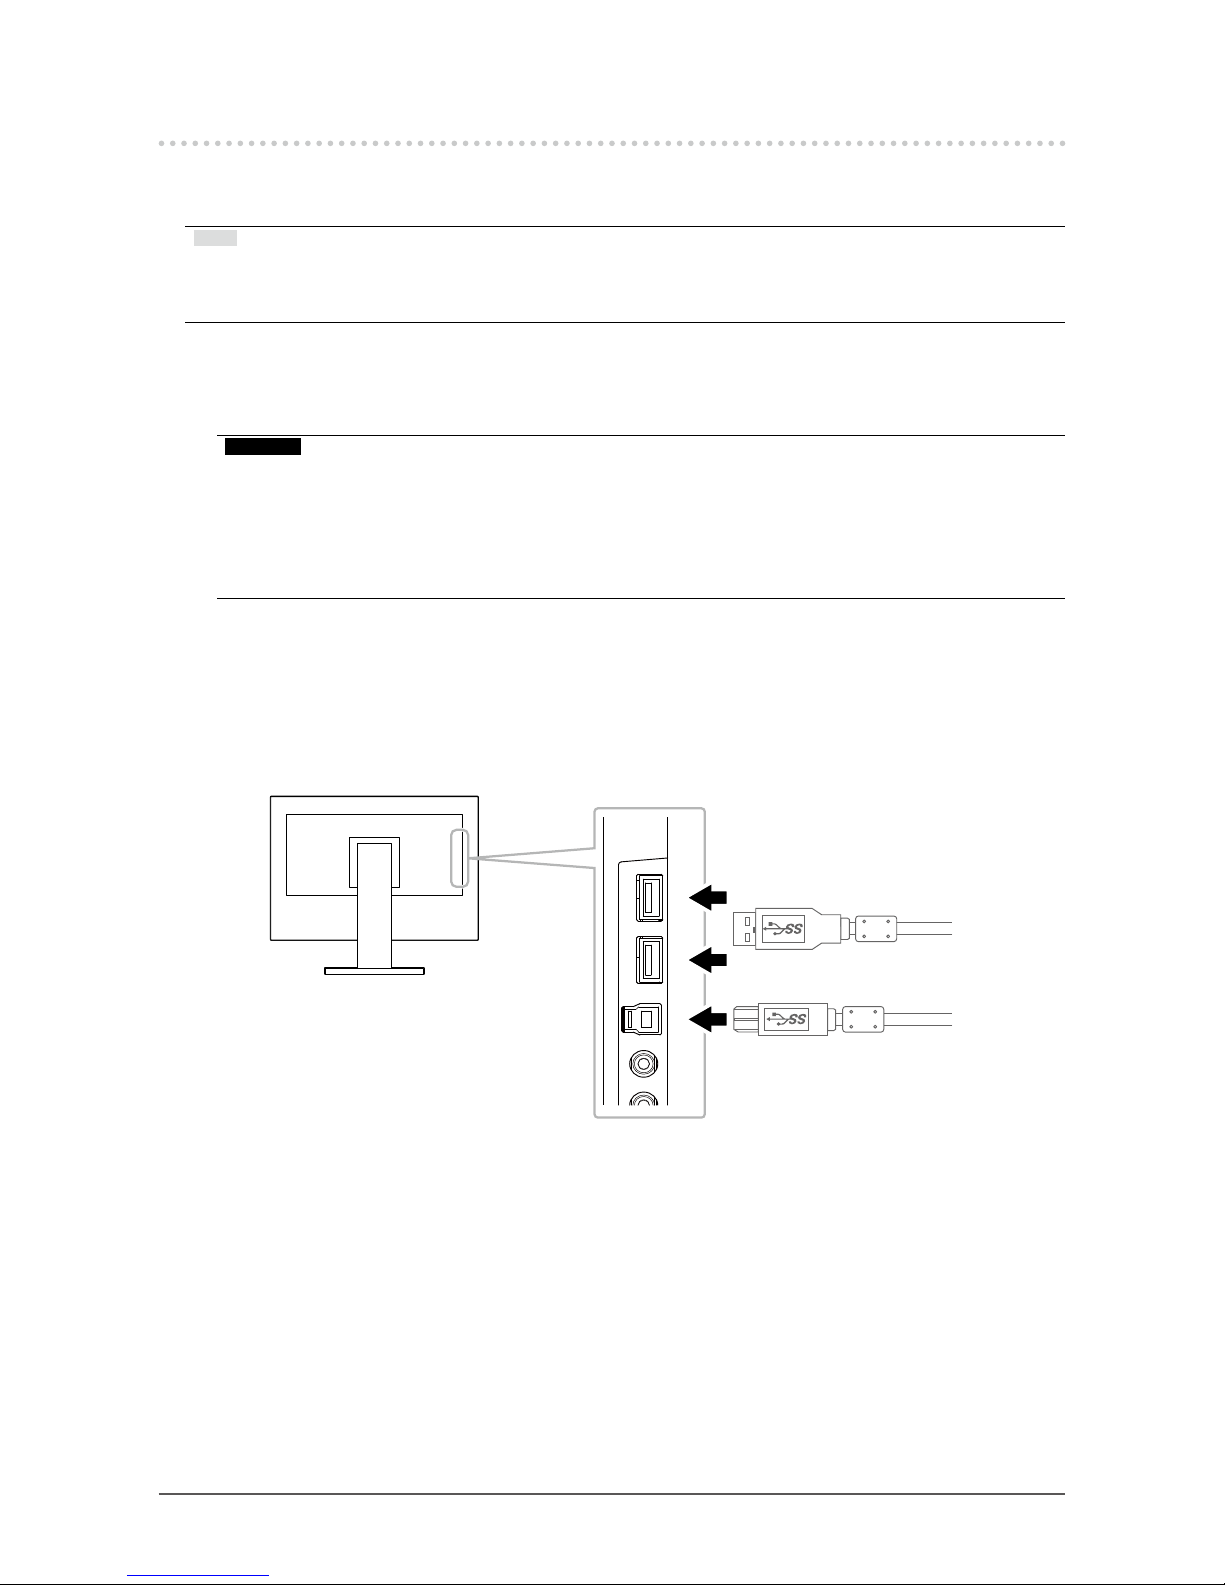
6-5. Making Use of USB (Universal Serial Bus)
This monitor is equipped with a USB hub. It functions as a USB hub when connected to a USBcompatible PC, allowing the connection of peripheral USB devices.
Note
• This product supports USB 3.0. When connecting to peripheral devices that support USB 3.0, high-speed data
communication is possible (however, only when the USB cable used to connect the PC and peripheral device is
USB 3.0 compliant).
●
Required System Environment
• A PC equipped with a USB port
• USB cable
Attention
• This monitor may not work depending on the PC, OS, or peripheral devices to be used. For USB
compatibility of peripheral devices, contact their manufacturers.
• Even when the monitor is in power saving mode, devices connected to the USB downstream port will still
work. Therefore, power consumption of the monitor varies with connected devices even in power saving
mode.
• When the main power of the monitor is off, a device connected to the USB downstream port will not operate.
●
Connection Procedure (Setup of USB Function)
1. Connect the monitor rst to a PC using the signal cable, and start the PC.
2. Connect the USB cable between the USB downstream port of the PC and the USB upstream port
of the monitor.
The USB hub function is set up automatically upon connection of the USB cable.
3. Connect a peripheral USB device to the USB downstream port of the monitor.
USB
downstream
port
USB upstream
port
Page 39
39
Chapter 6 Reference
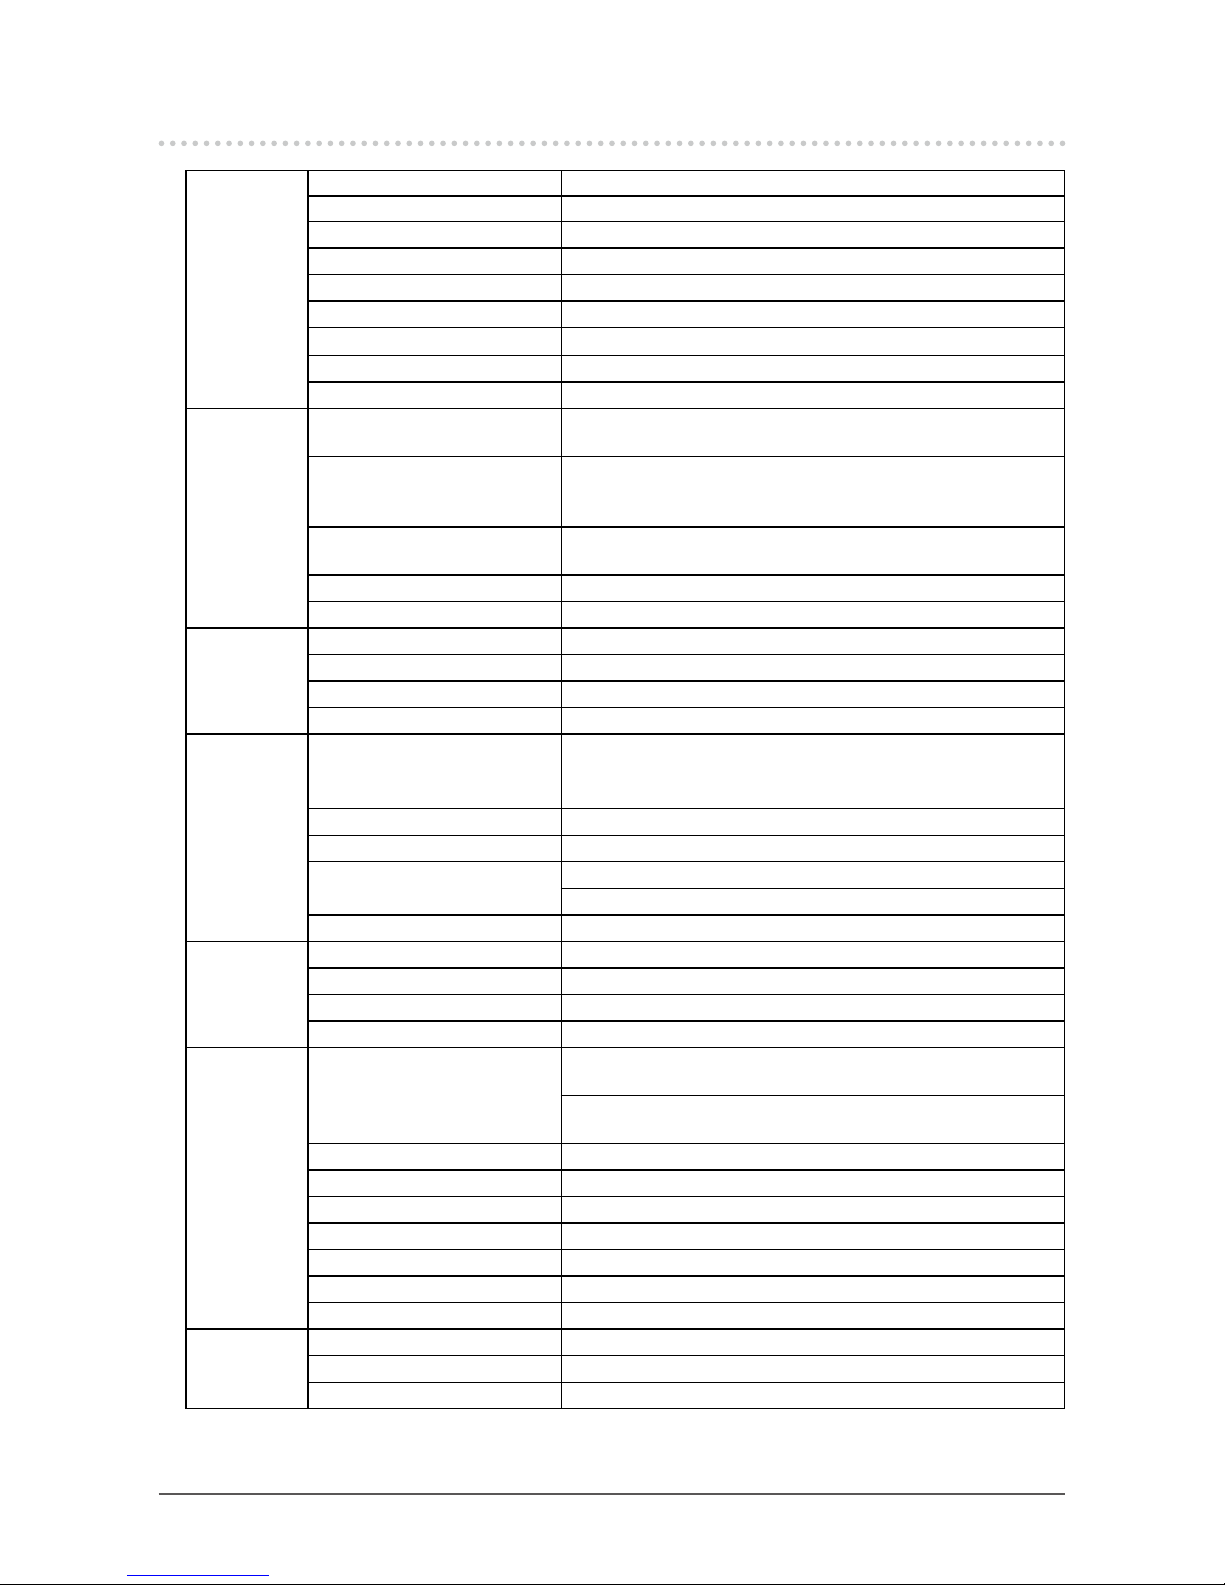
6-6. Specications
LCD Panel Ty p e IPS (Anti-Glare)
Backlight LED
Size 60 cm (23.8 inch)
Native Resolution 1920 dots × 1080 lines
Display Size (H × V) 527.0 mm × 296.5 mm
Pixel Pitch 0.2745 mm
Display Colors 8-bit colors: 16.77 million colors
Viewing Angle (H / V, typical) 178˚ / 178˚
Response Time (typical) Gray-to-gray: 14 ms
Video Signals Input Terminals DisplayPort (HDCP) × 1, HDMI TypeA (HDCP)
*1
× 1, DVI-D
(HDCP) × 1, and D-Sub mini 15-pin × 1
Digital Scanning Frequency
(H / V)
31 kHz to 68 kHz (DisplayPort, DVI), 15 kHz to 68 kHz (HDMI) /
59 Hz to 61 Hz (DisplayPort, DVI), 49 Hz to 61 Hz (HDMI) (VGA
TEXT: 69 Hz to 71 Hz)
Analog Scanning Frequency
(H / V)
31 kHz to 81 kHz / 55 Hz to 76 Hz
Synchronization Signal Separate
Max. Dot Clock 148.5 MHz
USB Port Upstream port × 1, downstream port × 2
Standard USB Specication Revision 3.0
Communication Speed 5 Gbps (super), 480 Mbps (high), 12 Mbps (full), 1.5 Mbps (low)
Supply Current Downstream: Max. 900 mA per port
Audio Audio Input Format DisplayPort: 2ch linear PCM (32 kHz / 44.1 kHz / 48 kHz / 88.2
kHz / 96 kHz)
HDMI: 2ch linear PCM (32 kHz / 44.1 kHz / 48 kHz)
Speakers 1 W + 1 W
Headphones 2 mW + 2 mW (32 Ω)
Input Terminals Line: Stereo mini jack × 1
DisplayPort × 1, HDMI TypeA × 1 (shared with video signal)
Output Terminals Headphones: Stereo mini jack × 1
Power Input 100 - 240 VAC ±10 %, 50 / 60 Hz 0.75 A - 0.40 A
Maximum Power Consumption 42 W or less
Power Save Mode 0.5 W or less (no USB device connected, default settings)
Standby Mode 0.5 W or less (no USB device connected, default settings)
Physical
Specications
Dimensions Min. height: 537.7 mm × 322.7 mm × 190 mm (W × H × D)
(Tilt: 0˚)
Max. height: 537.7 mm × 506.6 mm × 199.1 mm (W × H × D)
(Tilt: 35˚)
Dimensions (Without Stand) 537.7 mm × 313.1 mm × 45.5 mm (W × H × D)
Net Weight Approx. 5.5 kg
Net Weight (Without Stand) Approx. 3.5 kg
Height Adjustment Range 180 mm (Tilt: 35˚) / 172.7 mm (Tilt: 0˚)
Tilt Up 35˚, down 5˚
Swivel 344˚
Vertical Rotation Left 90˚, right 90˚
Operating
Environmental
Requirements
Temperature 5 ˚C to 35 ˚C (41 ˚F to 95 ˚F)
Humidity 20 % to 80 % R.H. (no condensation)
Air Pressure 540 hPa to 1060 hPa
Page 40
40
Chapter 6 Reference
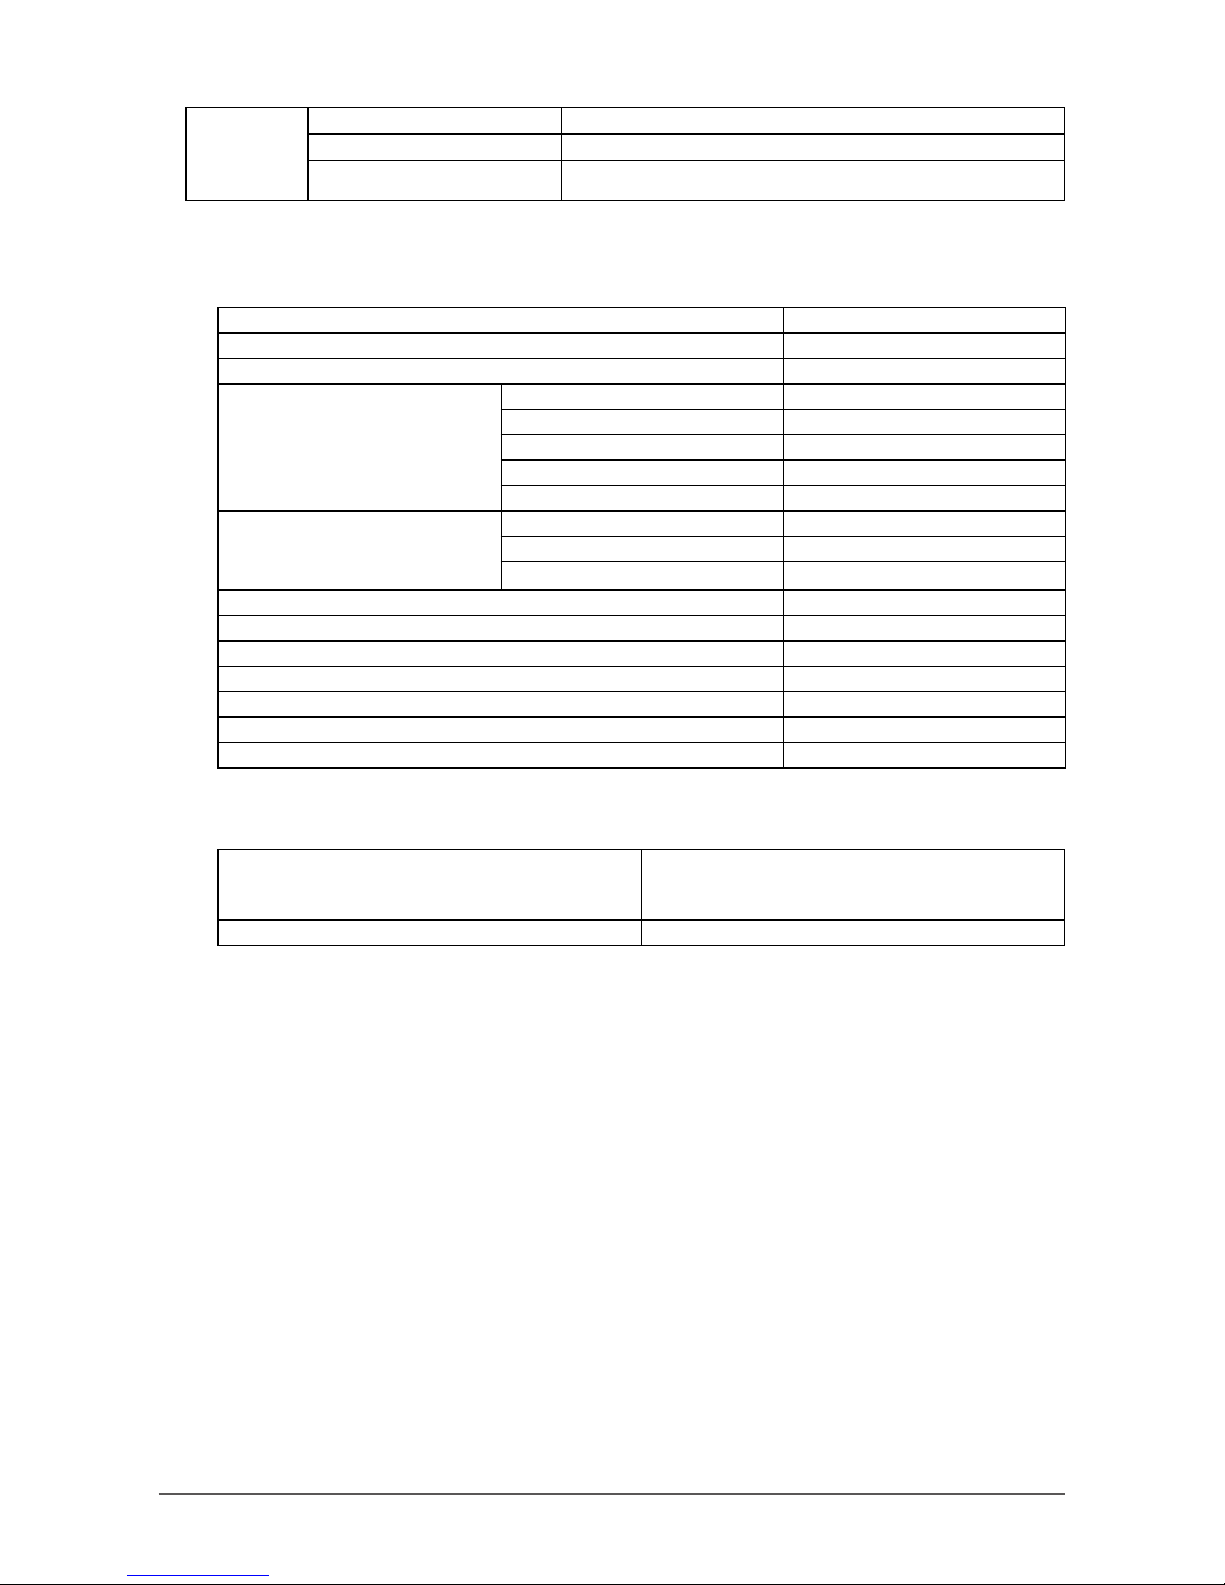
Transportation/
Storage
Environmental
Requirements
Temperature -20 ˚C to 60 ˚C (-4 ˚F to 140 ˚F)
Humidity 10 % to 90 % R.H. (no condensation)
Air Pressure 200 hPa to 1060 hPa
*1 HDMI CEC (or mutual control) is not supported.
●
Main Default Settings
Auto EcoView On
EcoView Optimizer 2 On
Color Mode User 1
Picture Expansion DisplayPort input Aspect Ratio
HDMI (PC signal) input Aspect Ratio
HDMI (video signal) input Auto
DVI-D input Aspect Ratio
D-Sub input Aspect Ratio
Input Color Format DisplayPort input Auto
HDMI (PC signal) input RGB
HDMI (video signal) input Auto
Power Save On
Language English
Power Indicator On
Auto Input Detection Off
Compatibility Mode Off
On-Screen Logo On
Key Lock Off
●
Accessories
Signal cable • HH200HS (HDMI-HDMI)
• FD-C39 (DVI-DVI)
• MD-C87 (D-Sub-D-Sub)
Cleaning Kit EIZO “ScreenCleaner”
For the latest information about accessories, refer to our web site. http://www.eizoglobal.com
Page 41
41
Appendix
Appendix
Trademark
The terms HDMI and HDMI High-Denition Multimedia Interface, and the HDMI Logo are trademarks or
registered trademarks of HDMI Licensing, LLC in the United States and other countries.
The DisplayPort Compliance Logo and VESA are registered trademarks of the Video Electronics
Standards Association.
The SuperSpeed USB Trident Logo is a registered trademark of USB Implementers
Forum, Inc.
Kensington and Microsaver are registered trademarks of ACCO Brands Corporation.
Thunderbolt is a trademark of Intel Corporation in the United States and/or other countries.
Microsoft, Windows and Windows Vista are registered trademarks of Microsoft Corporation in the United
States and other countries.
Adobe is a registered trademark of Adobe Systems Incorporated in the United States and other
countries.
Apple, macOS, Mac OS, OS X, Macintosh and ColorSync are registered trademarks of Apple Inc.
EIZO, the EIZO Logo, ColorEdge, DuraVision, FlexScan, FORIS, RadiCS, RadiForce, RadiNET, Raptor
and ScreenManager are registered trademarks of EIZO Corporation in Japan and other countries.
ColorEdge Tablet Controller, ColorNavigator, CuratOR, EcoView NET, EIZO EasyPIX, EIZO Monitor
Congurator, EIZO ScreenSlicer, G-Ignition, i • Sound, Quick Color Match, RadiLight, Re/Vue, Screen
Administrator, Screen InStyle and UniColor Pro are trademarks of EIZO Corporation.
All other company and product names are trademarks or registered trademarks of their respective
owners.
License
The bitmap font used for this product is designed by Ricoh Industrial Solutions Inc.
ENERGY STAR
As an ENERGY STAR Partner, EIZO Corporation has determined that this product meets
the ENERGY STAR guidelines for energy efciency.
Page 42
42
Appendix
TCO
This product has acquired the TCO standard that relates to the safety, ergonomics, environment and so
forth of ofce equipment.
Congratulations!
ThisproductisTCOCertied–forSustainableIT
TCO Certi ed is an international third party sustainability certi cation for IT
products. TCO Certi ed ensures that the manufacture, use and recycling of IT
products re ect environmental, social and economic responsibility. Every TCO
Certi ed product model is veri ed by an accredited independent test laboratory.
This product has been veri ed to meet all the criteria in TCO Certi ed, including:
Corporate Social Responsibility
Socially responsible production – working conditions and labor law in manufacturing country
EnergyEfciency
Energy ef ciency of product and power supply. Energy Star compliant, where applicable
Environmental Management System
Manufacturer must be certi ed according to either ISO 14001 or EMAS
Minimization of Hazardous Substances
Limits on cadmium, mercury, lead & hexavalent chromium including requirements for mercury-free
products, halogenated substances and hazardous ame retardants
Design for Recycling
Coding of plastics for easy recycling. Limit on the number of different plastics used.
Product Lifetime, Product Take Back
Minimum one-year product warranty. Minimum three-year availability of spare parts. Product takeback
Packaging
Limits on hazardous substances in product packaging. Packaging prepared for recycling
Ergonomic, User-centered design
Visual ergonomics in products with a display. Adjustability for user comfort (displays, headsets)
Acoustic performance – protection against sound spikes (headsets) and fan noise (projectors, computers)
Ergonomically designed keyboard (notebooks)
Electrical Safety, minimal electro-magnetic Emissions
Third Party Testing
All certi ed product models have been tested in an independent, accredited laboratory.
A detailed criteria set is available for download at www.tcodevelopment.com, where you can also nd a
searchable database of all TCO Certi ed IT products.
TCO Development, the organization behind TCO Certi ed, has been an international driver in the eld
of Sustainable IT for 20 years. Criteria in TCO Certi ed are developed in collaboration with scientists,
experts, users and manufacturers. Organizations around the world rely on TCO Certi ed as a tool to
help them reach their sustainable IT goals. We are owned by TCO, a non-pro t organization representing
of ce workers. TCO Development is headquartered in Stockholm, Sweden, with regional presence in
North America and Asia
For more information, please visit
www.tcodevelopment.com
Page 43
43
Appendix
FCC Declaration of Conformity
For U.S.A., Canada Only
FCC Declaration of Conformity
We, the Responsible Party EIZO Inc.
5710 Warland Drive, Cypress, CA 90630
Phone: (562) 431-5011
declare that the product Trade name: EIZO
Model: FlexScan EV2451
is in conformity with Part 15 of the FCC Rules. Operation of this product is subject to the
following two conditions: (1) this device may not cause harmful interference, and (2) this
device must accept any interference received, including interference that may cause undesired
operation.
This equipment has been tested and found to comply with the limits for a Class B digital
device, pursuant to Part 15 of the FCC Rules. These limits are designed to provide reasonable
protection against harmful interference in a residential installation. This equipment generates,
uses, and can radiate radio frequency energy and, if not installed and used in accordance with
the instructions, may cause harmful interference to radio communications. However, there is
no guarantee that interference will not occur in a particular installation. If this equipment does
cause harmful interference to radio or television reception, which can be determined by turning
the equipment off and on, the user is encouraged to try to correct the interference by one or
more of the following measures.
* Reorient or relocate the receiving antenna.
* Increase the separation between the equipment and receiver.
* Connect the equipment into an outlet on a circuit different from that to which the receiver is
connected.
* Consult the dealer or an experienced radio/TV technician for help.
Changesormodicationsnotexpresslyapprovedbythepartyresponsibleforcompliancecould
void the user’s authority to operate the equipment.
Note
UsetheattachedspeciedcablebeloworEIZOsignalcablewiththismonitorsoastokeep
interference within the limits of a Class B digital device.
- AC Cord
- Shielded Signal Cable (enclosed)
Canadian Notice
This Class B information technology equipment complies with Canadian ICES-003.
Cet équipement informatique de classe B est conforme à la norme ICES-003 du Canada.
Page 44

44
Appendix
LIMITED WARRANTY
EIZO Corporation (hereinafter referred to as “EIZO”) and distributors authorized by EIZO (hereinafter referred to as the
“
Distributors
”) warrant, subject to and in accordance with the terms of this limited warranty (hereinafter referred to as the
“
Warranty”), to the original purchaser (hereinafter referred to as the “Original Purchaser
”) who purchased the product
speci ed in this document (hereinafter referred to as the “
Product
”) from EIZO or Distributors, that EIZO and Distributors
shall, at their sole discretion, either repair or replace the Product at no charge if the Original Purchaser becomes aware
within the Warranty Period (de ned below) that the Product malfunctions or is damaged in the course of normal use of
the Product in accordance with the description in the instruction manual attached to the Product (hereinafter referred to
as the “
User’s Manual”).
The period of this Warranty is limited to (i) five (5) years from the date of purchase of the Product; or, limited to the
expiration of (ii) 30,000 hours of its use of the Product (hereinafter referred to as the “
Warranty Period
”). EIZO and
Distributors shall bear no liability or obligation with regard to the Product in relation to the Original Purchaser or any third
parties other than as provided under this Warranty.
EIZO and Distributors will cease to hold or store any parts (excluding design parts) of the Product upon expiration of ve (5)
years after the production of the product is discontinued. In repairing the monitor, EIZO and Distributors will use renewal
parts which comply with our QC standards. If the unit cannot be repaired due to its condition or the stockout of
a relevant
part, EIZO and Distributors may offer the replacement by a product with equivalent performance instead of repairing it.
The Warranty is valid only in the countries or territories where the Distributors are located. The Warranty does not restrict
any legal rights of the Original Purchaser.
Notwithstanding any other provision of this Warranty, EIZO and Distributors shall have no obligation under this Warranty
whatsoever in any of the cases as set forth below:
(a) Any defect of the Product caused by freight damage, modi cation, alteration, abuse, misuse, accident, incorrect
installation, disaster, faulty maintenance and/or improper repair by third party other than EIZO and Distributors;
(b) Any incompatibility of the Product due to possible technical innovations and/or regulations;
(c) Any deterioration of the sensor;
(d) Any deterioration of display performance caused by the deterioration of expendable parts such as the LCD panel
and/or backlight, etc. (e.g. changes in brightness, changes in brightness uniformity, changes in color, changes in
color uniformity, defects in pixels including burnt pixels, etc.);
(e) Any defect of the Product caused by external equipment;
(f) Any defect of the Product on which the original serial number has been altered or removed;
(g) Any normal deterioration of the product, particularly that of consumables, accessories, and/or attachments (e.g.
buttons, rotating parts, cables, User’s Manual, etc.); and
(h) Any deformation, discoloration, and/or warp of the exterior of the product including that of the surface of the LCD
panel.
To obtain service under the Warranty, the Original Purchaser must deliver the Product, freight prepaid, in its original
package or other adequate package affording an equal degree of protection, assuming the risk of damage and/or loss
in transit, to the local Distributor. The Original Purchaser must present proof of purchase of the Product and the date of
such purchase when requesting services under the Warranty.
The Warranty Period for any replaced and/or repaired product under this Warranty shall expire at the end of the original
Warranty Period.
EIZO OR DISTRIBUTORS ARE NOT RESPONSIBLE FOR ANY DAMAGE TO, OR LOSS OF, DATA OR OTHER
INFORMATION STORED IN ANY MEDIA OR ANY PART OF ANY PRODUCT RETURNED TO EIZO OR DISTRIBUTORS
FOR REPAIR.
EIZO AND DISTRIBUTORS MAKE NO FURTHER WARRANTIES, EXPRESSED OR IMPLIED, WITH RESPECT TO
THE PRODUCT AND ITS QUALITY, PERFORMANCE, MERCHANTABILITY OR FITNESS FOR ANY PARTICULAR
USE. IN NO EVENT SHALL EIZO OR DISTRIBUTORS BE LIABLE FOR ANY INCIDENTAL, INDIRECT, SPECIAL,
CONSEQUENTIAL OR OTHER DAMAGE WHATSOEVER (INCLUDING, WITHOUT LIMITATION, DAMAGES FOR
LOSS OF PROFIT, BUSINESS INTERRUPTION, LOSS OF BUSINESS INFORMATION, OR ANY OTHER PECUNIARY
LOSS) ARISING OUT OF THE USE OR INABILITY TO USE THE PRODUCT OR IN ANY CONNECTION WITH THE
PRODUCT, WHETHER BASED ON CONTRACT, TORT, NEGLIGENCE, STRICT LIABILITY OR OTHERWISE, EVEN
IF EIZO OR DISTRIBUTORS HAVE BEEN ADVISED OF THE POSSIBILITY OF SUCH DAMAGES. THIS EXCLUSION
ALSO INCLUDES ANY LIABILITY WHICH MAY ARISE OUT OF THIRD PARTY CLAIMS AGAINST THE ORIGINAL
PURCHASER. THE ESSENCE OF THIS PROVISION IS TO LIMIT THE POTENTIAL LIABILITY OF EIZO AND
DISTRIBUTORS ARISING OUT OF THIS LIMITED WARRANTY AND/OR SALES.
Page 45

45
Appendix
Recycling Information
Recycling Information
This product, when disposed of, is supposed to be collected and recycled according to your country’s
legislation to reduce environmental burden. When you dispose of this product, please contact a distributor or
an af liate in your country.
The contact addressees are listed on the EIZO website below.
http://www.eizoglobal.com
For recycling information for customers in Switzerland, please refer to the following website.
http://www.swico.ch
For customers in the United States, a free take-back program for the product and packaging materials is
available. Please refer to the following website for details.
http://www.eizo.com/warranty/recycling/
Informationen zum Thema Recycling
Dieses Produkt muss gemäß den Vorschriften Ihres Landes zur Entlastung der Umwelt recyclet werden.
Wenden Sie sich bei der Entsorgung dieses Produkts an einen Verteiler oder eine Tochtergesellschaft in
Ihrem Land.
Die Adressen zur Kontaktaufnahme sind auf der unten angegebenen Website von EIZO aufgeführt.
http://www.eizoglobal.com
Kunden in der Schweiz entnehmen Informationen zum Recycling der folgenden Website:
http://www.swico.ch
Informations sur le recyclage
Ce produit doit être jeté aux points de collecte prévus à cet effet et recyclé conformément à la législation de
votre pays, a n de réduire l’impact sur l’environnement. Lorsque vous jetez ce produit, veuillez contacter un
distributeur ou une société af liée de votre pays.
Les adresses des distributeurs sont répertoriées sur le site Web EIZO ci-dessous.
http://www.eizoglobal.com
Pour les clients en Suisse, veuillez consulter le site Web suivant afin d’obtenir des informations sur le
recyclage.
http://www.swico.ch
Información sobre reciclaje
Este producto debe desecharse y reciclarse según la legislación del país para reducir el impacto
medioambiental. Cuando desee deshacerse de este producto, póngase en contacto con un distribuidor o
una lial de su país.
Encontrará las direcciones de contacto en el sitio web de EIZO que se indica a continuación.
http://www.eizoglobal.com
Informazioni sul riciclaggio
Per lo smaltimento e il riciclaggio del presente prodotto, attenersi alle normative vigenti nel proprio paese per
ridurre l’impatto ambientale. Per lo smaltimento, rivolgersi ad un distributore o un af liato presenti nel proprio
paese.
Gli indirizzi sono elencati nel sito Web EIZO riportato di seguito.
http://www.eizoglobal.com
Per informazioni sul riciclaggio per i clienti in Svizzera, consultare il sito Web riportato di seguito.
http://www.swico.ch
Page 46

46
Appendix
Återvinningsinformation
När denna produkt kasseras ska den hanteras och återvinnas enligt landets föreskrifter för att reducera
miljöpåverkan. När du kasserar produkten ska du kontakta en distributör eller representant i ditt land.
Kontaktadresserna listas på EIZO-webbplatsen nedan.
http://www.eizoglobal.com
Πληροφορίεςανακύκλωσης
Το προϊόν αυτό, όταν απορρίπτεται, πρέπει να συλλέγεται και να ανακυκλώνεται σύμφωνα με τη νομοθεσία
της χώρας σας έτσι ώστε να μην επιβαρύνει το περιβάλλον. Για να απορρίψετε το προϊόν, επικοινωνήστε με
έναν αντιπρόσωπο ή μια θυγατρική εταιρεία στη χώρα σας.
Οι διευθύνσεις επικοινωνίας αναγράφονται στην τοποθεσία web της EIZO παρακάτω.
http://www.eizoglobal.com
Сведенияпоутилизации
По истечении срока службы данного продукта его следует принести на сборный пункт и
утилизировать в соответствии с действующими предписаниями в вашей стране, чтобы уменьшить
вредное воздействие на окружающую среду. Прежде чем выбросить данный продукт, обратитесь к
дистрибьютору или в местное представительство компании в вашей стране.
Контактные адреса можно найти на веб-узле EIZO.
http://www.eizoglobal.com
Informatie over recycling
Wanneer u dit product wilt weggooien, moet het uit milieu-overwegingen worden verzameld en gerecycled
volgens de betreffende wetgeving van uw land. Wanneer u dit product wilt weggooien, moet u contact
opnemen met een distributeur of een partner in uw land.
De contactadressen worden vermeld op de volgende EIZO-website.
http://www.eizoglobal.com
Informação sobre reciclagem
Este produto, quando o deitar fora, deve ser recolhido e reciclado de acordo com a legislação do seu país
para reduzir a poluição. Quando deitar fora este produto, contacte um distribuidor ou uma lial no seu país.
Os endereços de contacto estão listados no website do EIZO, abaixo.
http://www.eizoglobal.com
Oplysninger om genbrug
Dette produkt forventes ved bortskaffelse at blive indsamlet og genbrugt i overensstemmelse med
lovgivningen i dit land for at reducere belastningen af miljøet. Når du bortskaffer denne produkt, skal du
kontakte en distributør eller et tilknyttet selskab i dit land.
Adresserne på kontaktpersonerne er angivet på EIZO’s websted nedenfor.
http://www.eizoglobal.com
Kierrätystä koskevia tietoja
Tuote tulee hävittää kierrättämällä maan lainsäädännön mukaisesti ympäristön kuormittumisen
vähentämiseksi. Kun hävität tuotteen, ota yhteyttä jälleenmyyjään tai tytäryhtiöön maassasi.
Yhteystiedot löytyvät EIZOn Internet-sivustolta.
http://www.eizoglobal.com
Page 47

47
Appendix
Wykorzystanie surowców wtórnych
Ten produkt po zużyciu powinien być zbierany i przetwarzany zgodnie z krajowymi przepisami dotyczącymi
ochrony środowiska. Wyrzucając ten produkt, należy skontaktować się z lokalnym dystrybutorem lub
partnerem. Adresy kontaktowe można znaleźć we wskazanej poniżej witrynie internetowej rmy EIZO.
http://www.eizoglobal.com
Informace o recyklaci
Při likvidaci produktu musí být produkt vyzvednut a recyklován podle zákonů příslušné země, aby
nedocházelo k zatěžování životního prostředí. Zbavujete-li se produktu, kontaktujte distributora nebo
pobočku ve své zemi.
Kontaktní adresy jsou uvedeny na následující webové stránce společnosti EIZO.
http://www.eizoglobal.com
Ringlussevõtu alane teave
Keskkonnakoormuse vähendamiseks tuleks kasutatud tooted kokku koguda ja võtta ringlusse vastavalt teie
riigi seadustele. Kui kõrvaldate käesoleva toote, võtke palun ühendust turustaja või liaaliga oma riigis.
Kontaktisikud on toodud EIZO veebilehel järgmisel aadressil:
http://www.eizoglobal.com
Újrahasznosítási információ
Jelen terméket, amikor eldobjuk, az illető ország törvényei alapján kell összegyűjteni és újrahasznosítani,
hogy csökkentsük a környezet terhelését. Amikor ezt a terméket eldobja, kérjük lépjen kapcsolatba egy
országon belüli forgalmazóval vagy társvállalkozással.
A kapcsolat címei az EIZO alábbi weboldalán találhatók felsorolva:
http://www.eizoglobal.com
Podatki o recikliranju
Ob koncu uporabe odslužen izdelek izročite na zbirno mesto za recikliranje v skladu z okoljevarstveno
zakonodajo vaše države. Prosimo, da se pri odstranjevanju izdelka obrnete na lokalnega distributerja ali
podružnico.
Kontaktni naslovi so objavljeni na spodaj navedenih spletnih straneh EIZO:
http://www.eizoglobal.com
Informácie o recyklácii
Pri likvidácii musí byť tento výrobok recyklovaný v súlade s legislatívou vašej krajiny, aby sa znížilo zaťaženie
životného prostredia. Keď sa chcete zbaviť tohto výrobku, kontaktujte prosím distribútora alebo pobočku vo
vašej krajine.
Zoznam kontaktných adries je uvedený na nasledovnej webovej stránke rmy EIZO:
http://www.eizoglobal.com
Pārstrādesinformācija
Utilizējot šo produktu, tā savākšana un pārstrāde veicama atbilstoši jūsu valsts likumdošanas prasībām
attiecībā uz slodzes uz vidi samazināšanu. Lai veiktu šī produkta utilizāciju, sazinieties ar izplatītāju vai
pārstāvniecību jūsu valstī.
Kontaktadreses ir norādītas zemāk minētajā EIZO tīmekļa vietnē.
http://www.eizoglobal.com
Page 48
48
Appendix
Informacijaapiegrąžinamąjįperdirbimą
Šalinant (išmetant) šiuos gaminius juos reikia surinkti ir perdirbti grąžinamuoju būdu pagal jūsų šalies teisės
aktus, siekiant sumažinti aplinkos teršimą. Kai reikia išmesti šį gaminį, kreipkitės į jūsų šalyje veikiančią
gaminių pardavimo atstovybę arba jos lialą.
Kontaktiniai adresatai nurodyti EIZO interneto svetainėje.
http://www.eizoglobal.com
Информацияотноснорециклиране
При изхвърлянето на този продукт се предлага събирането и рециклирането му съобразно законите на
вашата страна за да се намали замърсяването на околната среда. Когато искате да се освободите от
този продукт, моля свържете се с търговския му представител или със съответните органи отговарящи
за това във вашата страна.
Данните за връзка с нас са описани на следния Интернет сайт на EIZO:
http://www.eizoglobal.com
Informaţiereferitoarelareciclare
Acest produs, când debarasat, trebuie colectat şi reciclat conform legislaţiei ţării rspective ca să reducem
sarcina mediului. Când se debarasează de acest produs, vă rugăm să contactaţi un distribuitor sau un a liat
al ţării respective.
Adresele de contact le găsiţi pe pagina de web al EIZO:
http://www.eizoglobal.com
GeriDönüşümBilgisi
Bu ürünün, atılacağı zaman, ülkenizin çevre kirliliğinin azaltılması konusundaki mevzuatına göre toplanması
ve yeniden değerlendirilmesi gerekmektedir. Ürünü atacağınız zaman lütfen ülkenizdeki bir distribütör veya
ilgili kuruluşla temasa geçiniz.
İrtibat adresleri aşağıdaki EIZO web sitesinde verilmiştir.
http://www.eizoglobal.com
Page 49

(UM-EV2451)
03V25976B1
2nd Edition-April, 2017
Copyright © 2016-2017 EIZO Corporation. All rights reserved.
 Loading...