


F l e x s Q 5 / Q 5 P r o
A D V A N C E D R E M O T E S I T E M O N I T O R I N G
R e v : 3 . 2 L a s t U p d a t e d : 2 0 1 9 / 0 1 / 2 1
U S E R G U I D E

T A B L E O F C O N T E N T S
G O T Q U E S T I O N S ?
Can't find what you're looking for?
We love hearing from our customers!
Please contact us with any questions.
C O N T A C T
+1 877.352.7398
support@flexscada.com
www.flexscada.com
P.O. Box 277
Lytton, B.C. V0K 1Z0
Canada
C O N T E N T S
Section 1.0: Hardware Specifications
Section 1.1: What's included
Section 1.2: Getting Started
Section 1.3: Web Interface Overview
Section 1.4: Main Menu
Section 1.5: Visualization Menu
Section 1.6: Input Graphing
Section 1.7: Input Oscilloscope
Section 1.8: Device Options Page
Section 1.9: Ping Probes Page
Section 1.10: Network Page
Section 2.0: Analog Inputs
Section 2.1: Voltage Inputs
Section 2.2: Current Inputs
Section 2.3: 1-wire sensors
Section 2.5: AC Power Metrics
Section 3.0: Relay Configuration
Section 4.0: Scripting
Section 5.0: SNMP
Section 6.0: Device Firmware Updater
Section 7.0: Device Interface
Section 8.0: Expansion Interfaces
Section 9.0: Warranty Terms
G L O S S A R Y
1-wire/one-wire - a sensor protocol developed by Dallas Semiconductors
A - Amps (Unit of Current)
AC - Alternating Current
AVG - Average
Bit - The smallest possible amount of data: 0 or 1
Bool or Boolean - true or false, usually represented with a single bit
Byte - 8 bits
CH - Channel
CT - Current Transformer
DC or VDC - Direct Current
DFU - Define Firmware Updater
DHCP - Dynamic Host Configuration Protocol
DNS/NS - Domain Name Service (server that converts names to IPs)
FET - MOSFET (Type of semiconductor switch)
FW - Firmware
Floating Point - Any non-whole number
HTTP - HyperText Transfer Protocol
HTTPS - Secure HyperText Transfer Protocol
HVD - High Voltage Disconnect
HW - Hardware
Hz - Hertz (Cycles per second)
I2C - Communication protocol
INS - Instantaneous Value
IP - Internet Protocol v4
IPv6 - Internet Protocol v6
IoT - Internet of Things
JSON - JavaScript Object Notation
kSPS - Thousand Samples Per Second
LAT/LNG - GPS Latitude/Longitude (Decimal Degrees Format)
LTE - 4G Cellular Service
LVD - Low Voltage Disconnect
MAC - Media Access Control
mA - Milliamps (1000th of an Amp)
mJ - Megajoules
MODBUS - Communication protocol used for Industrial PLC's
Mbps - Megabits Per Second
Ohms - Unit of Impedance
PF - Power Factor
PING or IMCP - Internet Control Message Protocol
PoE - Power Over Ethernet
RMS - Root Mean Square
SLAAC - IPv6 Stateless Address Autoconfiguration
SNMP - Simple Network Management Protocol
SW - Switch
Subnet/Netmask/NM - Refer to Internet Protocol
TCP - Transmission Control Protocol
THD - Total Harmonic Distortion
TX - Transmit
Typ - Typical
UART - TTL Level Serial
UID - Unique Identifier
V - Volts
VDC - Volts DC
VT - Voltage Transformer
W - Watt (Unit of Power)

1 . 0 - H a r d w a r e S p e c i f i c a t i o n s
P H Y S I C A L
Dimensions: 157 mm x 108 mm x 40 mm (Mounting Holes: 96 mm x 144 mm - 4 x 3mm)
Also mount with standard DIN Rail - Recommended DIN Rail space: 120 mm
Temperature Rating: –40 to 85°C (industrial rated components)
Environment: Max 95% relative humidity, non-condensing ( ETSI300-019-1.4 Standard )
Weight: 200g
P O W E R R E Q U I R E M E N T S
Voltage: 9 - 60 VDC (reverse polarity protected)
Power Consumption: 0.6 W @ 12V Typical (varies based on configuration)
A N A L O G I N P U T S
Analog Conversion: 24 bit; 0.05 mV @ ±60 V range; 0.004 mV precision @ ±5 V range
Voltage Range: ±60 V (fully differential, bi-polar) (0.5 MΩ. Imp)
Current Range: 0 - 25 mA (requires hardware jumper change)
L O A D S W I T C H E S
Max Voltage: 60 VDC
Max Current: 8 A Max Cont (100 A Surge <1 ms) (50% derating above 50° C)
Switch Type: Isolated solid state N-Channel FET /w fly-back protection
Fusing: ATO blade style fuse (replace only with fuses rated for correct voltage range)
Software Fuse: 500 mA to 5 A ***PRO ONLY***
Current Sensing: 0 to 5 A ***PRO ONLY***
R E G U L A T E D O U T P U T S
5.0 V output: 500 mA Max
3.3 V output: 500 mA Max (Typ 3.47V)
3.3 V Output /w LTE Module: 150 mA Max (Typ 3.47V)
E T H E R N E T
10/100 Mbps Operation
Long-Range 300 Meter at 10 Mbps
IEEE 802.3az Energy Efficient Ethernet
±15 kV IEC 61000-4-2 Level 4 ESD Protection
IEEE 802.3 Auto-Negotiation
IPv4: DHCP, Static; IPv6: SLAAC, DHCPv6, Static
Passive PoE: Pins 4, 5+; 7, 8- @ 9 to 56V
LTE SPECS ***LTE VERSION ONLY***
LTE CAT–M1/NB–IoT 3GPP release 13 LTE Adv. Pro
SMA Connector: SMA-Female
LTE Bands: 2, 3, 4, 5, 8, 12, 13, 20, 28
Modem: ublox SARA-R410M-02B
Certified by: FCC, ISED, PTCRB, NCC, RCM, RED,
AT&T, Telus, Telstra, Verizon, GITEKI 2
1 . 1 - W h a t ' s I n c l u d e d
1 x Flexs Q5
1 x DIN Rail Mounting Kit
1 x Product Manual
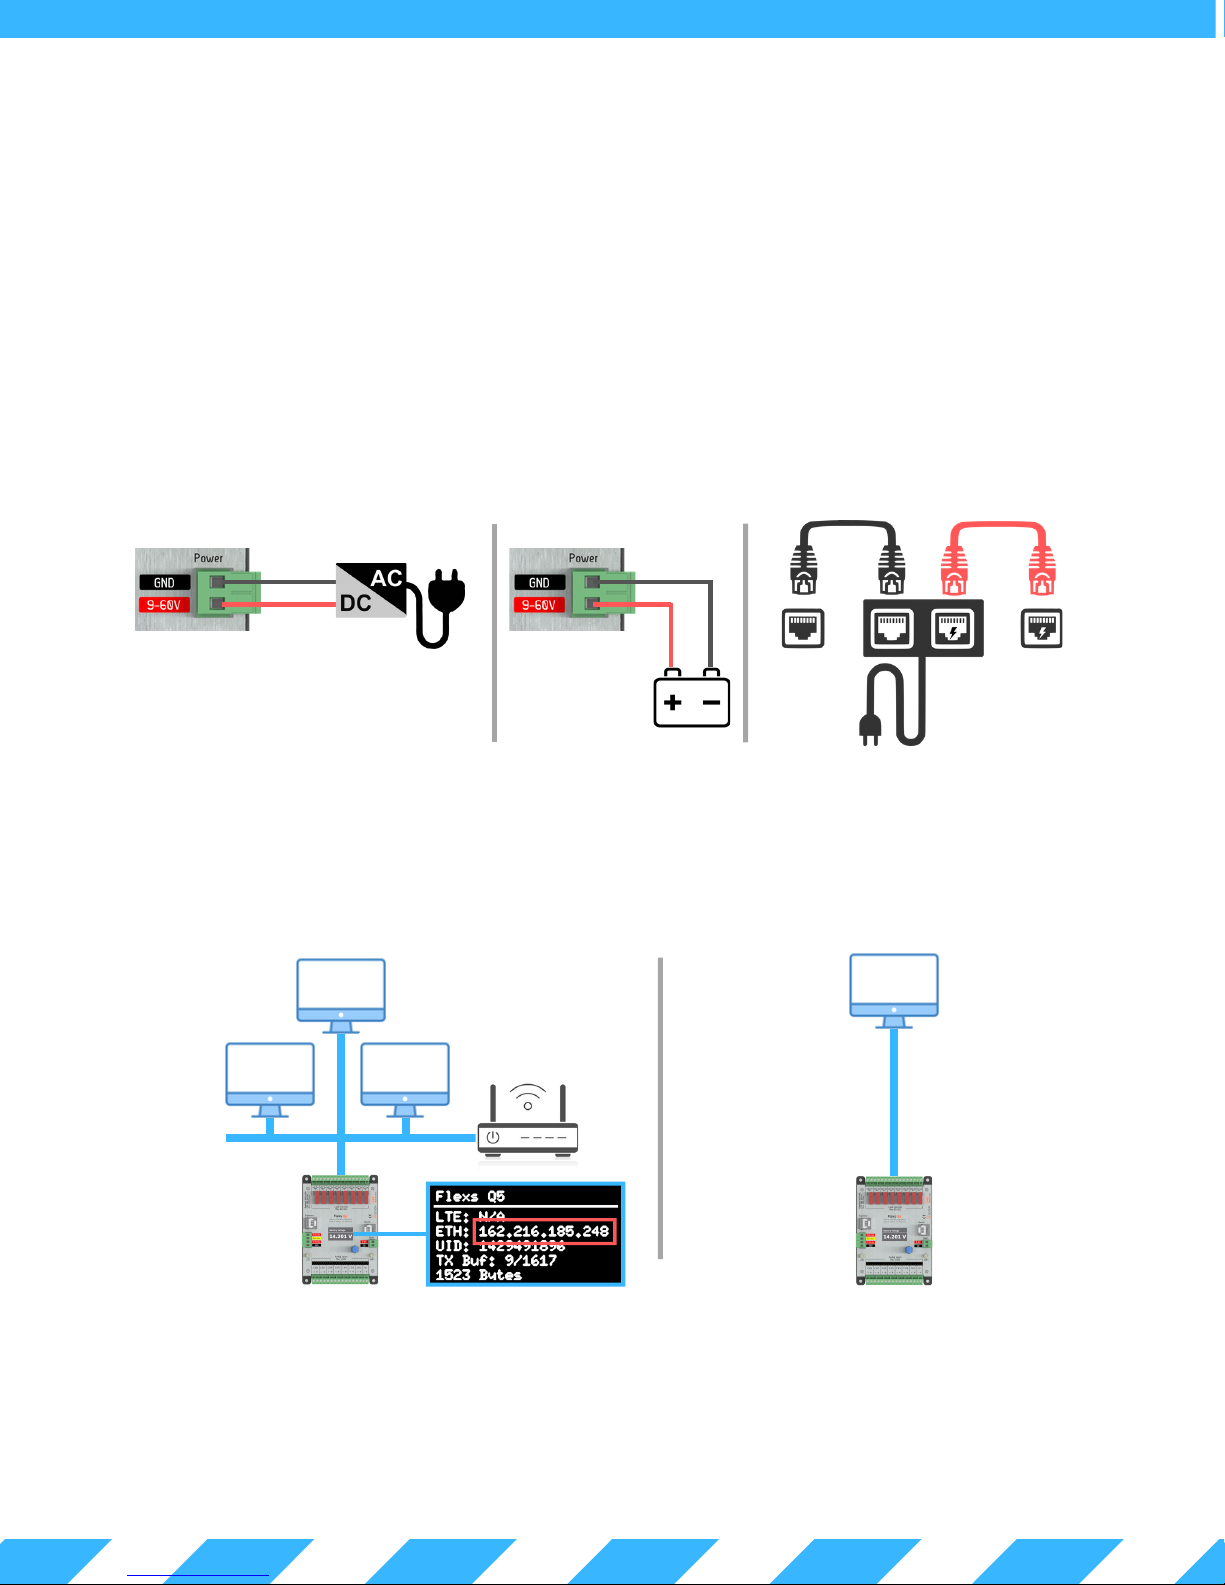
1. 2 - G e t t in g St a r t ed
This section provides a brief overview on how to connect to a FlexsQ5 for the first time.
Attach the Q5 to a power source (9 to 60 VDC) using the two pin power terminal located beside the Ethernet port.
The Q5 can alternatively be powered via POE over the Ethernet port.
DO NOT POWER THIS DEVICE DIRECTLY FROM AN AC POWER SOURCE! DOING SO WILL VOID YOUR WARRANTY!
Powering with a Passive PoEPowering with a DC Power Supply Powering with a Battery
AC Power
Q5 Power Input
Once power is connected, the Q5 display will illuminate indicating that the Q5 has successfully started.
The Q5 will then search for a router on the network to get an IP address. If the Q5 fails to find a router within the first 10s
of bootup, it will fallback to standalone mode. In standalone mode, the Q5 will use the fallback IP (default 192.168.1.20).
Network Connected Mode
DC Power
Supply
Q5 Power Input
9 - 60 V Battery
PC Ethernet Q5 Ethernet
AC Power
Standalone Mode
24 V PoE
Connect using the IP assigned by your network.
This IP can be found on the Q5 display
(highlighted in red above)
Using Chrome, Firefox or Safari enter the device IP in the address bar to load the Q5's web interface.
The default password for the device is "flexscada".
IT IS HIGHLY RECOMMENDED TO CHANGE THIS PASSWORD WITH A SECURE PASSWORD TO AVOID
UNAUTHORIZED ACCESS TO THE DEVICE.
Connect using the following addresses:
http://192.168.1.20 OR with IPv6
http://[fe80::744]
Main Menu
(see sec. 1.4)
Configured
Analog Inputs
(see sec. 2.0)
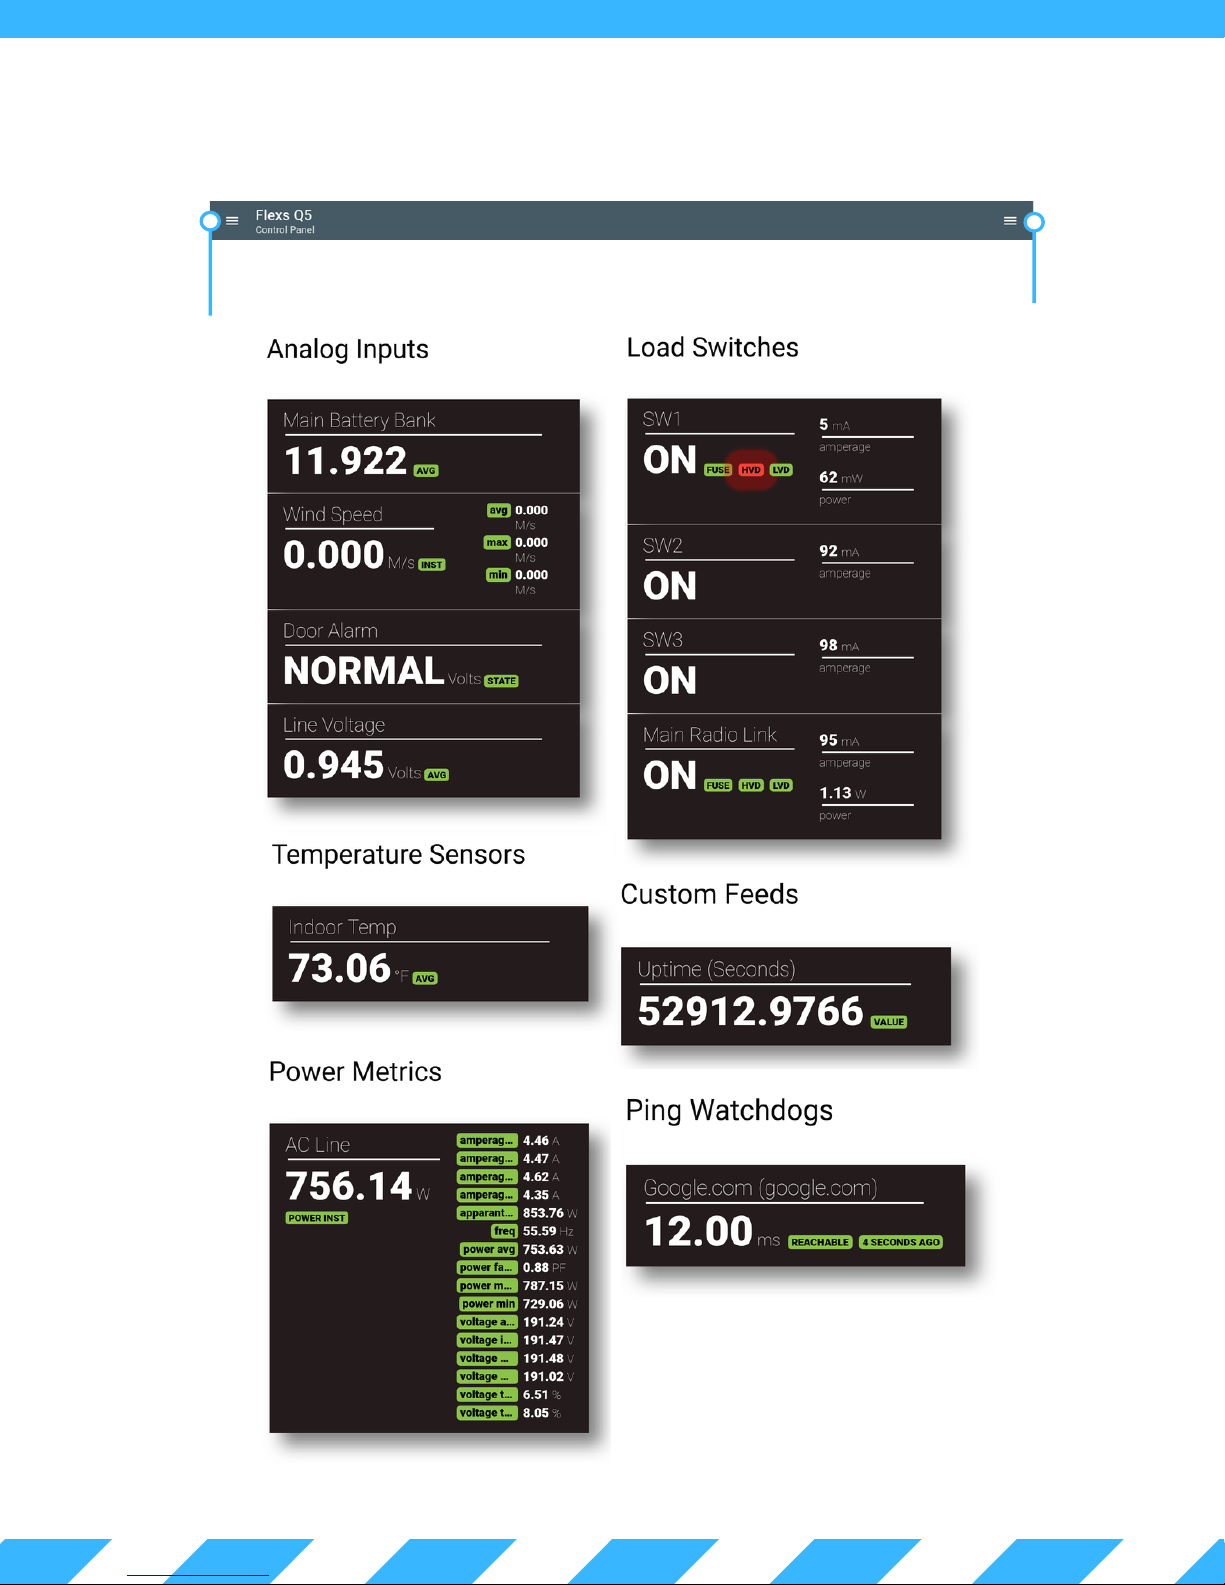
1 . 3 W e b I n t e r f a c e O v e r v i e w
Visualization Menu
(see sec. 1.5)
Load Control
(see sec. 3.0)
Adopted 1Wire Temp
Sensors
(see sec. 2.1)
Computed
Power Metrics
(see sec. 2.5)
Registers set from
custom scripting
(see sec. 4.0)
Ping Watchdog
Status (see sec. 1.9)
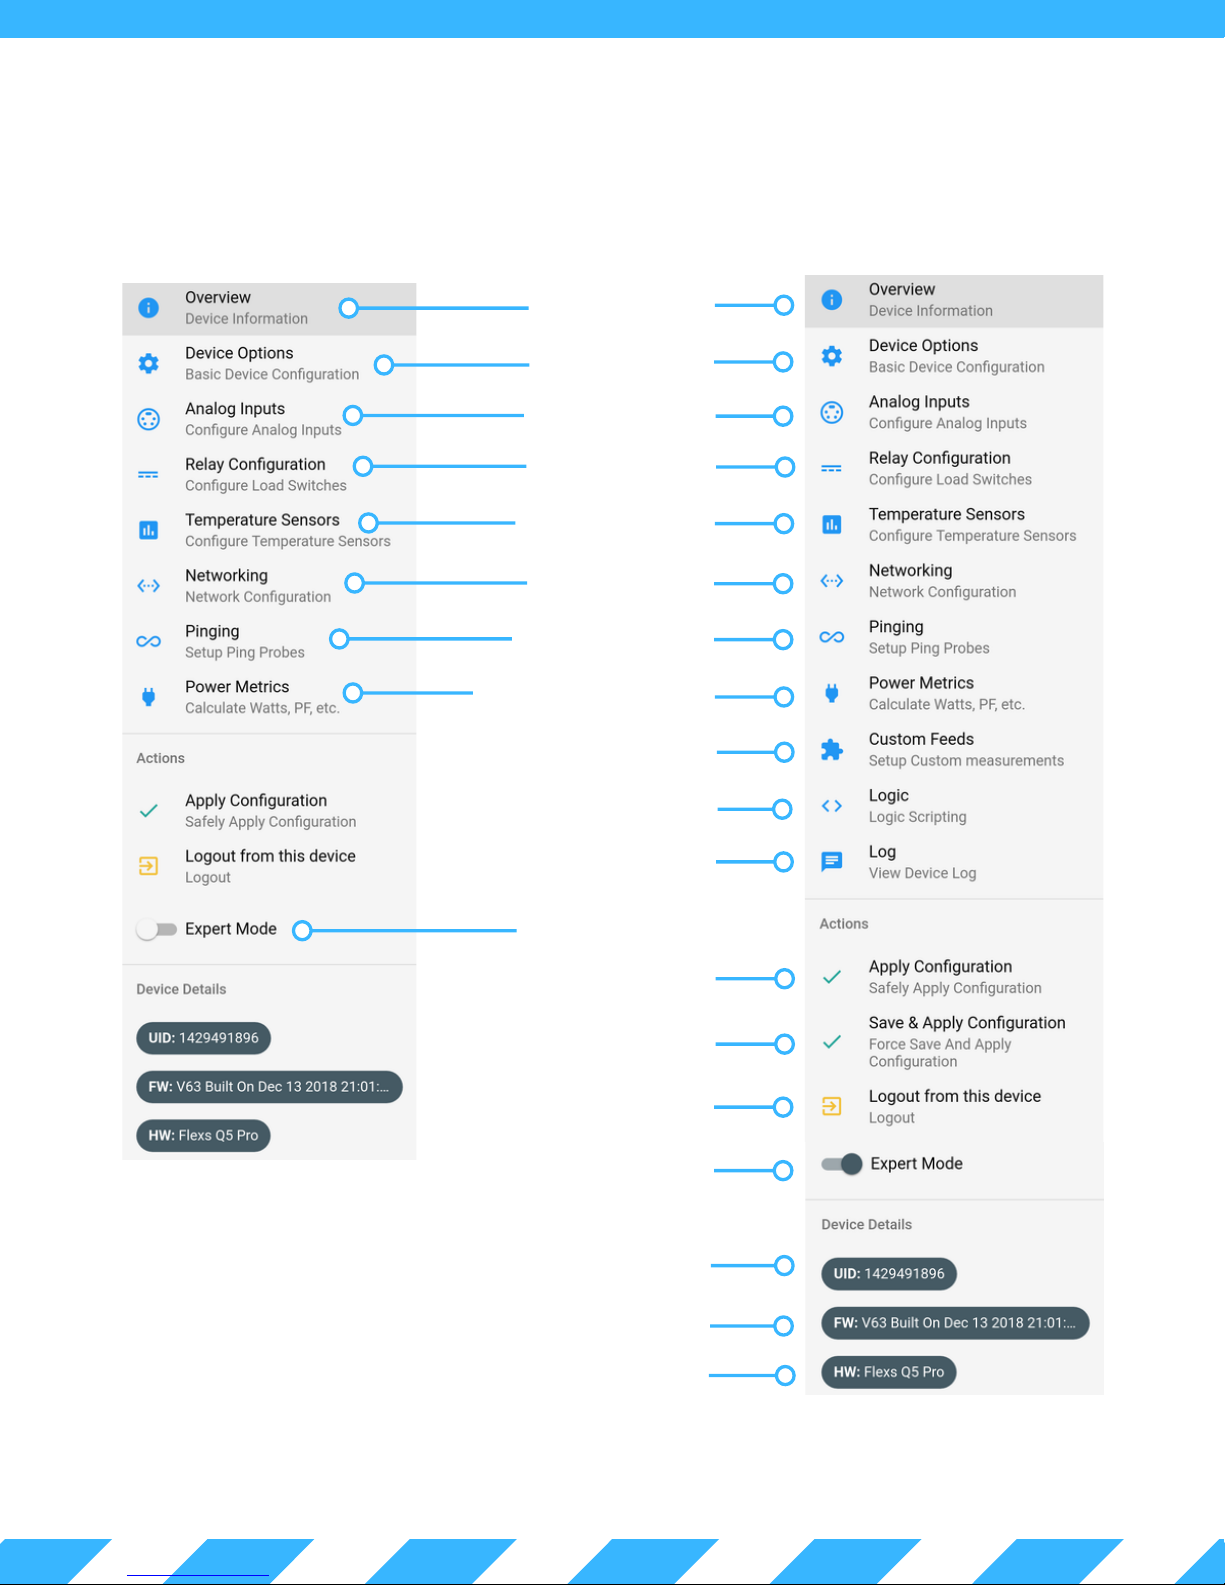
1 . 4 - M a i n M e n u
Expert Mode - Disabled Expert Mode - Enabled
Dashboard Page
(see sec. 1.3)
Device Options Page
(see sec. 1.8)
Analog Inputs Page
(see sec. 2.0)
Load Outputs Page
(see sec. 3.0)
1-Wire Sensors Page
(see sec. 2.3)
Networking Page
(see sec. 1.10)
Ping Watchdog Page
(see sec. 1.9)
Calculated Power Metrics
(see sec. 2.5)
Custom Feeds (see sec. 4.0)
Custom Scripts (see sec. 4.0)
System Log Page
Expert Mode (disabled)
Safely Apply Settings
(user must confirm after saving.)
Save and apply settings
(without confirm option)
Logout
Expert Mode (enabled)
Unique Device ID (UID)
Firmware Version
Hardware Type
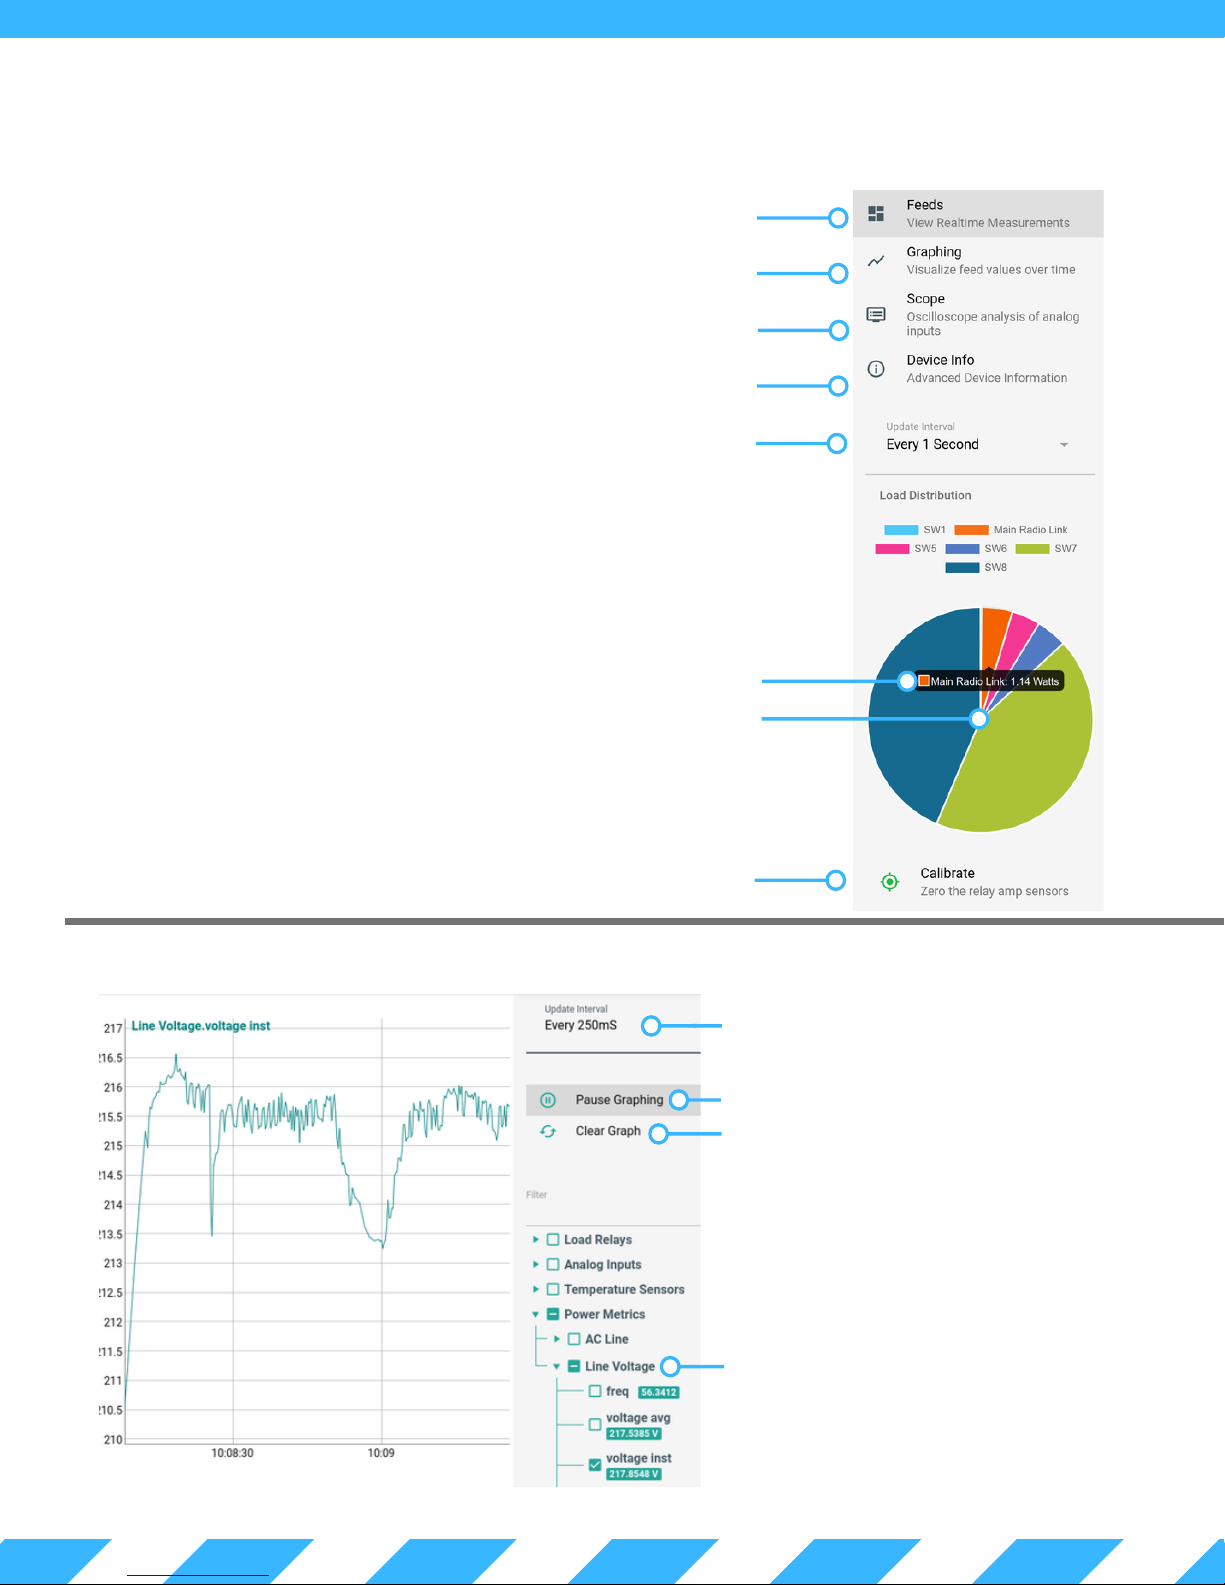
1 . 5 - V i s u a l i s a t i o n M e n u
Dashboard Page (see sec. 1.3)
Input Graphing Page (see sec. 1.6)
Input Oscilloscope Page (see sec. 1.7)
Advanced Device Info
Data Update Interval
View Load Watts (PRO ONLY)
Load Distribution (PRO ONLY)
Manually Zero Load Sensors (PRO ONLY)
1 . 6 - I n p u t G r a p h i n g P a g e
Data Update Interval
Pause/Start Data Collection
Clear Graph Of All Data
The graphing tool is used to view short
term trends, such as current or voltage
readings. The Update Interval range
can be configured from 100ms to 1
minute.
Select Data Metrics to Graph
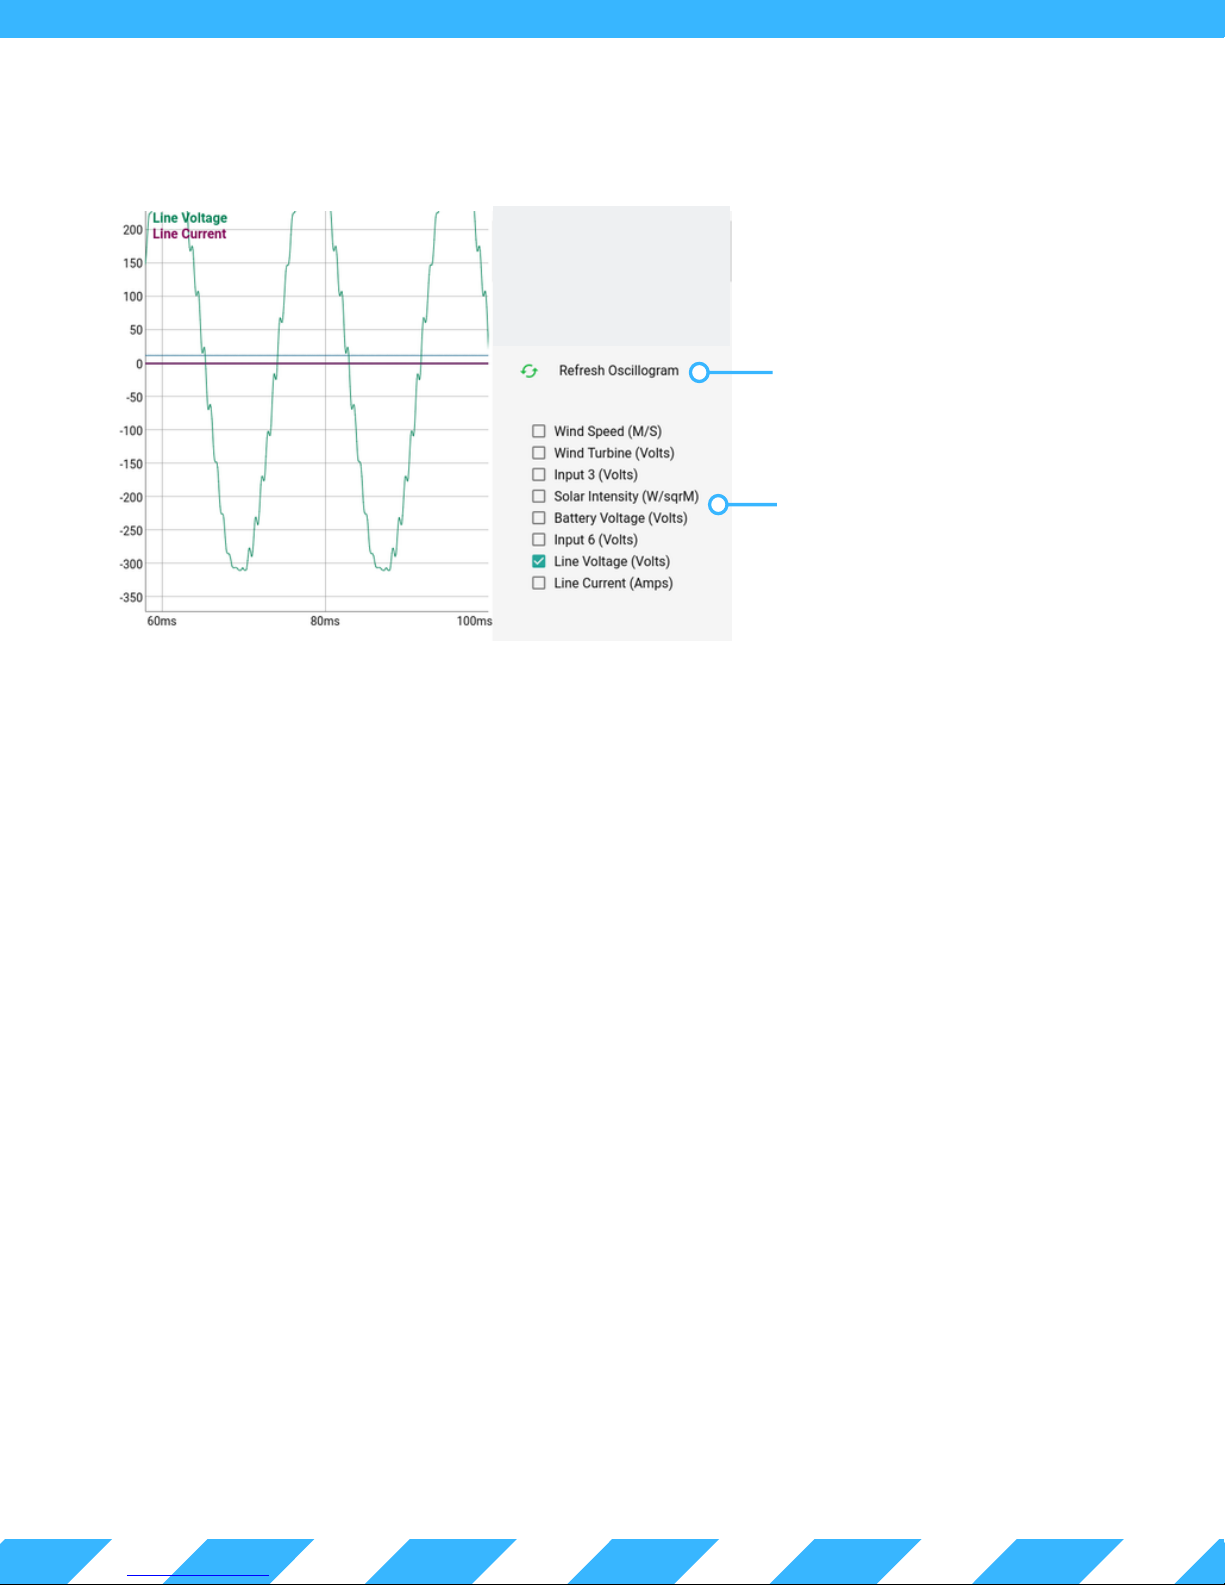
1 . 7 - I n p u t O s c i l l o s c o p e P a g e
Sample Data and
Regenerate Graph
Select Data Channels
to Display
The oscilloscope tool provides a close-up look at how "clean" your power source is.
When the refresh button is clicked, 2,000 simultaneous readings are taken across all 8 channels and then displayed
in the web interface. The sample rate of the Q5 is 8,000 samples/second (i.e. 8 samples taken each millisecond).

Device Name and
Description are displayed
in the cloud platform.
These are useful when
searching for a device.
Tags are used in the
filtering of graph data
in Grafana.
Coordinates will autofill
when a GPS module is
attached.
Event logging level.
Transmit measurements
to cloud at this interval.
Also used for avg, min
and max values on the
dashboard.
Sync configuration
data with cloud at this
interval.
1 . 8 - De v i c e O p ti o n s P a g e
Default address change this only when
running customer
hosted cloud software.
If enabled Q5 will check
cloud for available
updates at boot. See
Section 6.0.
UPDATE FIRMWARE allows you to
manually enter the Device Firmware
Updater (DFU) to manually update the
device firmware. More on this in
section 6.0.
EDIT CONFIG FILE allows the advanced
feature of editing the actual JSON
config file. This is only recommended
for expert users.

1 . 9 - Pi n g P r o b es P a g e
Ping Probe Label.
Status of a probe as found on the
dashboard.
Ping this Host
Ping Timeout
1 . 1 0 - N e t w o r k Pa g e
Select a relay to run
action on (optional).
Perform an action if
destination is
unreachable
If the network mode is set to DHCP, the device will
request an IP from a DHCP server on the network.
Should the Q5 fail to get an IP it will fall back to the
IP configuration entered here. The same applies to
IPv6. The FlexesQ5 supports both IPv4 and IPv6 at
the same time.
Additionally, this page includes options for enabling
and disabling SNMP, Modbus TCP and modifying
the SSL Certificate.
See Section 5.0 SNMP

2 . 0 - An a l o g I n pu t s
There are several types of inputs, each of which can be roughly categorized as
Analog, Frequency, Pulse Counter and Alarm Contacts. This section provides
greater detail on how to use and configure each of these input types.
Enable/Disable this input.
Channel Name (displayed on dashboard).
Channel Description (optional).
Used for most applications with DC or AC.
Eg. wind speed, RPMs, pulse inputs.
Always up counting. Eg. total gallons.
Eg. Door open, or water detected.
See section 2.4 for more details on
measurement types.
These expert
options should
not be changed
unless directed
by FlexSCADA.
Units shown on dashboard.
The Q5 hardware has been designed to accept a wide range of inputs.
To insure proper operation, it is important to select the correct Channel
Mode and corresponding hardware configuration.
Voltage Mode accepts a wide voltage range (±60V AC/DC) and can be
used for a number of functions (alarm contacts, battery voltages, 0-5V
sensors, AC Power Metrics, etc). See sec 2.1 for examples
Current Mode is used for current based sensors, such as 4-20mA sensors
and current transformers. See sec 2.2 for examples.
Extra low Voltage Mode is used where high accuracy in a very low voltage
range is required. The max voltage range for this mode is ±2.4V AC/DC.
When changing between input Channel Modes, you will be alerted
about a required hardware change to the jumpers on the Q5. When
making this change the Q5 must be powered down.
FAILURE TO MAKE THIS HARDWARE CONFIGURATION CHANGE BEFORE CONNECTING YOUR INPUT MAY
DAMAGE YOUR DEVICE AND VOID YOUR WARRANTY!
In the Logging / Dashboard section, you must enable the
metrics you wish to be visible on the dashboard or sent to
the cloud for graphing. Some items may be grayed out,
depending on the input configuration chosen. For
example, the State metric is only valid when the
Measurement Type is set to Alarm Contact.
For min, max and average time period see Section 1.8 Measurement Interval.

2 . 1 - Vo l t a g e I np u t
Below is an example of a typical 0-10V sensor attached and configured for use with the Q5. When installing, first confirm
that the Q5 is configured in Voltage Mode (see section 2.0 for details on voltage mode). Next, attach the analog output
from your sensor to the + terminal on the Q5 channel (shown in the diagram below).
Navigate to the Analog Inputs menu, select the channel, then select Voltage Mode under Channel Mode. Next select
Analog Value under the Measurement Type drop down (Channel Mode and Measurement Type are highlighted in the
blue box).
Set the sensor range using the specs found on the side of the sensor or in the provided data sheet. In the above
example, 0V corresponds to 0 PSI and 10V corresponds to 100 PSI. Enter the voltage output range of the sensor's
analog output in the green box. If the sensor output was a 0-5V signal level, the values in the green box would be 0
and 5 instead of 0 and 10.
The Multiplier, Offset and Gain are automatically set when using the Input Scaling section.
For higher voltages (up to 300V) the Q5 Voltage Reducer hardware module may be used with the following
configuration. For more details on AC power, refer to section 2.5.
Q5 Voltage Reducer
Module (for voltages
up to 300V RMS).
Input Scaling for Q5 Voltage Reducer Module
Q5 Voltage Reducer
Module (installed).

Current Sensors
Current sensors (not to be confused with current transformers) take a current signal and convert it to an analog voltage
output. FlexSCADA and its resellers can provide a 100 A non-invasive current sensor which can be configured as shown
below.
Scale Ratio
Load wire
shown in
blue.
To double the accuracy and halve
the range the load wire can be
looped through the sensor a
second time. In the above example,
the new max range is ±50 A.
Input Scaling with two loops.
The load wire can be looped
through the sensor as many times
as needed to get the desired scale.
Only the Full Scale field is modified
to reflect this ratio change.
Load wire
shown in
blue.
Sensor Power Requirements: 5 V DC
Max Current: ±100 A
Part No. ACC-AMP-100NI
1:1 ratio
Example channel configuration.
The exact values to be entered can be found on
the calibration document included with the
current sensor.
Example calibration report included with each current sensor.

2 . 2 - Cu r r e n t I np u t s
The 4 - 20 mA sensor is the de facto industry standard. This section details how to configure the Q5 to accept
this type of input. As the Q5 does not power current loops, external power will need to be provided in order for
your current loop to function.
To utilize this feature the hardware jumpers must be configured in Current Mode (see section 2.0). Next,
configure the input from the Analog Inputs menu. The Channel Mode and Measurement Type must be configured
as shown below. The configuration example below shows a 4 - 20 mA sensor with a range of 0 - 150 PSI. The
sensor range for the specific sensor must be entered as shown in the red boxes.
WARNING! EXCEEDING THE CURRENT RATINGS OF THE Q5 WILL DAMAGE YOUR DEVICE AND VOID THE WARRANTY!
Hardware configuration example for a 4 - 20 mA sensor.
Current transformers can also be used
with the Q5 without the need for
additional conditioning. Current
transformers are connected as shown
above.
Note: Current transformers are not to
be confused with the 100A noninvasive current sensors sold by
FlexSCADA. The non-invasive current
sensor converts current readings into a
0-5V voltage style reading. See sec 2.1

2 . 3 - 1- W i r e S e ns o r s
The Q5 supports 1-wire sensors. The below diagram shows how to connect and provide a 1-wire sensor with power
and data communication. The Q5 supports up to 64 sensors, each sharing the same 3 wires.
To attach additional one-wire sensors a standard wiring
bus will be required, as the terminals are not physically
capable of holding more than a few sensors.
Each one-wire sensors has a unique digital ID that makes
it possible to view its value without interfering with the
other sensors.
Once the sensors have been connected, they must be configured. In the web interface, navigate to the Temperature
Sensors menu. Located at the bottom of the page you will see "1 unconfigured sensors found on this device" followed by
the unconfigured sensor showing an ADD button (any one-wire sensor can be used in this way).
Alternately, it is possible to pre-add the sensors using the ID found on the sensors sold by FlexSCADA and its resellers. All one-wire sensors will have a unique ID. FlexSCADA one-wire sensors have been labeled with this preexisting ID for ease of use.
Adopt unconfigured
temp sensor.
The below example shows a newly added temp sensor, along with the options to name the sensor and choose which
metrics to log or add to the dashboard.
Manually add temp sensor.
(Sensor ID found on sensor
wire shown right.)
Show/Hide sensor options.
ID of the sensor, this can be updated
if a sensor needs to be replaced.
Sensor Label - this label is used on the
dashboard and in the graphing.
Detailed sensor description. (optional)
Select what metrics you wish to graph or
display on the dashboard. For min, max
and average time period see Section 1.8 Measurement Interval.
The display units can be modified in the
Device Options menu.
New temp sensor displayed
on the dashboard.
Tags help in selecting datasets when graphing. An example might be "greenhouse 1"
allowing an easy way to select sensors belonging to that greenhouse.
Delete this sensor.

2 . 4 - Un d e r s t a n di n g M e a s u r e m e n t T y p e s
Not all measurements utilize an analog value. This section details the various Measurement Types supported by the
Q5.
Each channel provides the following Measurement Type's option:
For additional information on
the Analog Value option
and Input Scaling calculator
refer to sections 2.1 and 2.2.
Both Frequency and Pulse Counter require a threshold to recognize when a valid
signal has been detected. This is known as the Pulse Detection Threshold. To
avoid counting the same rising edge twice, the signal must exceed 20% of the
Pulse Detection Threshold in order to be considered a valid pulse (see graphic
below).
20% Over Threshold
Pulse Detection Threshold
Frequency is the number of valid pulses per second or hertz (Hz).
Alternately, Power Metrics can be used to find the frequency of an input (see
section 2.5 for more information).
Pulse Counter is a total count of all pulses since the Q5 has booted.
Pulse Multiplier is used to adjust sensor readouts. For example, the spec sheet
for an anemometer reads as follows: Output Frequency: 1,1 HZ / m/s. But we
want the sensor to read out the exact m/s on our graphs. The multiplier could
be set to 1 / 1.1 = 0.909 multiplier.
In another example a flow sensor reads 450 output pulses/liter. The multiplier
could adjust the output to read in liters/minute. We are looking at Hz (pulses
per second) so we need to divide by 60 seconds. 450 / 60 = 1 liter per 7.5
pules/s = 1 (liter) / 7.5 (pulses) = 0.133333 multiplier.
Alarm under threshold.
Send update to cloud
when alarm is triggered.
Threshold over or under
which to trigger alarm.

2 . 5 - Po w e r M e t ri c s
The Power Metrics menu provides the ability to calculate a number of power related metrics for both DC and AC
power. With AC power it is possible to calculate watts, amps, volts, power factor, apparent power, frequency and
Total Harmonic Distortion (THD). With DC the main use for power metrics is for calculating wattage.
Metric Label
Detailed sensor description (optional).
See sec 2.0 for
more details on
source channels.
Select AC or DC mode
Expert options for AC metrics.
Power Metrics as displayed
on the dashboard.
Instantaneous, Average, Minimum
and Maximum can be selected for
Calculated Real Power
Calculated as Volts x Amps
Ratio of Real Power to Apparent Power
Calculated Voltage
Total Harmonic Distortion
Calculated Amperage
graphing or logging of each available
metric. For min, max and average
time period see Section 1.8 Measurement Interval.
Calculated AC Frequency

3 . 0 - Re l a y C o n fi g u r a t i o n
Both the Q5 and Q5 Pro include 8 solid state load relays capable of switching up to 10A DC (Max
100W). The pro version includes internal current sensing on all 8 relays capable of accurately measuring loads up to
5 Amps DC.
Toggle State
ATO Style Fuse
(PRO ONLY)
Polarity must
be correct, or
load will not
turn off.
Load switch only,
circuit must be
powered.
Load Name
Default state after Q5 is rebooted
Toggle State for
10 seconds
Load Relay as found on the dashboard
Digital Fusing
(PRO ONLY)
Eg Battery voltage powering this device,
required for Low/High Voltage Disconnect.
Reset Low/High Voltage
Disconnect or Digital
Fusing (PRO ONLY)
Load Current
(PRO ONLY)
Load Voltage is
required to calculate
wattage (PRO ONLY).
Low and High Voltage Disconnect serve
the same purpose; protecting the load
from damage in the event of extreme
power fluctuations.
Choose the metrics to be logged or
displayed on the dashboard. LVD, HVD and
Load Power require Load Voltage to be
provided. Load Amperage, Load Power and
Digital Fusing are available with the Q5 Pro
only.

Switched Load
Power Distributor Bus
No. ACC-Q5-DIST15A
Power Source
For systems using a single voltage we offer a distribution bus to cut down on
the required wiring. When using the distributor each channel acts as a power
source rather than an isolated switch. The max combined load across all
channels must not exceed 15 A. No software configuration is required for this
hardware accessory.
3 . 1 - Re l a y S p e ci f i c a t i o n s
The Q5 Relays are subject to environmental de-rating as detailed below.
8 Amps
6 Amps
4 Amps
2 Amps
0 Amps
41 to 55° C
-45 to 40° C
Red - under 30 Volts.
Blue - 30 to 60 Volts.
55 to 100° C
50 Amps
40 Amps
30 Amps
20 Amps
10 Amps
0 Amps
10 S
30 S
100 mS
Max on time in 1 minutes period.
Technical Specifications
Switch Impedance: 8 mOhms (Not including fuse)
Max Open Voltage: 70 VDC
Power Consumption: 2 mW in closed state
Isolation Level: +/- 125 V (Channel to Channel or
Channel to Q5 Ground)
Max Surge Rating: 250 A transient pulsed; tp ≤ 10 µs
Max Current Sensing: 5 A (PRO ONLY)
Contains fly-back suppression for switching inductive
loads such as relays, motors, etc.(up to 140 mJ (Max
250 A Peak Current)

4 . 0 - Sc r i p t i n g
The FlexsQ5 has an on-board scripting language that utilizes JavaScript syntax. This scripting provides access to
all on-board analog inputs, temperature sensors, load outputs, custom feeds and Modbus TCP.
Custom feeds are a location where you can store data generated by your scripts. This data is uploaded to the cloud
server and can also be viewed on the dashboard. Additionally you can access custom feeds from SNMP. See
section 5.0.
Custom feeds can be configured as either a bool (true or false) or as a floating point number (a number with
decimal places). See the on board "Custom Feeds" example for more info on how to write to the custom feeds.
Custom Feed Label
Status of custom feed as
Delete this custom feed.
Warning: Deleting a feed
will increment all other
feeds requiring change to
the scripting.
displayed on the dashboard.
Add a new custom feed.
Logic menu is where all the action with scripting takes place. Included on this page are a number of helpful
examples (highlighted in blue). Below you will find the syntax highlighted code editor (highlighted in red).
All scripting is managed as a secondary priority to the
main functions of the Q5 (to avoid interruptions to
system tasks). For a more in-depth look at scripting,
please see the on board examples.
Any errors in the scripting will prevent all of the script
from functioning. Details on where the error is located
can be seen at the top of the page upon saving the
settings.
The line in your
script causing the
error.
Error shown at top of page,
indicating the line causing the
problem.

4 . 1 - HT T P A P I
The FlexsQ5 has a HTTP/HTTPS API that allows for a number of
parameters to be accessed or modified. Below are some
examples of how to use this API.
All requests must be authenticated using the BASIC AUTH
headers with the password hashed using SHA256.
This PHP example requests all the metrics from the FlexsQ5. The
response shown left includes all enabled channels and relays. The
/crypto endpoint displays IP Address info and other system
parameters.
The above example code can be downloaded here:
https://pastebin.com/y66r1niS

This PHP example shows how to
set a relay state on the flexsQ5.
The Q5 will respond with the
above reply indicating that the
state change was successful.
Using this same API endpoint it
is also possible to reset the soft
fuse, toggle the relay and toggle
the relay for a timed 10
seconds.
The example shown left can be
downloaded here:
https://pastebin.com/fsvaPpP4
In this manual we have only
shown examples written in PHP,
however the Q5 API can be
accessed from any code
language using the correct HTTP
requests.

5 . 0 - SN M P
Simple Network Management Protocol (SNMP) has been used by networks for over 30 years, making it one of
the most widely supported protocols.
The Q5 supports SNMP version 1 and 2c, with the default community of "public". At this time, the community
can not be changed to encourage better security methods such as a VPN.
Enable SNMP in the Networking menu as shown.
1.3.6.1.4.1.412.A.B.C.D
Base OID
Type
0: Analog Input
2: Load Relay
4: Custom Feeds
8: Temp Sensors
10: Power Metrics
Power Metrics
0: Real Power (W)
1: Voltage (V or Vrms)
2: Min Voltage (V or Vrms)
3: Max Voltage (V or Vrms)
4: Amperage (A)
5: Min Amperage (A)
6: Max Amperage (A)
7: Real Power (W)
8: Min Real Power (W)
9: Max Real Power (W)
10: Power Factor
11: Apparant Power (W)
12: Freqency (Hz)
13: THD Voltage (%)
Metric
SNMP Return Format
0: Text String
1: Numerical - SNMP does not support floating
numbers. All numbers are rounded to the third
decimal place and then multiplied by 1,000. For
example, 24.123 would be sent over SNMP as
24,123.
Analog Input
0: Avg Value / Alarm State
1: Instantaneous Value
2: Minimum Value
3: Max Value
4: Alarm State
5: Ripple
Load Relay
0: Switch State
1: Load Current Avg (Pro Only)
2: Load Power (W) (Pro Only)
3: HVD Trip Alarm
4: LVD Trip Alarm
5: Fuse Trip Alarm (Pro Only)
Custom Feed
0: Value / Sate
Temp Sensor
0: Instantaneous Value
Channel ID
Under the Analog
Inputs or Relay
Configuration menu
Under Temperature
Sensor Menu
Under Custom Feed
Menu
Example: Poll the Average
Value of analog channel 1
OID:1.3.6.1.4.1.412.0.1.0.1
Example: Poll the Frequency of
Power Metric ID:0
OID: 1.3.6.1.4.1.412.10.0.12.1
Example: Poll the Current
Average of Load Relay Channel 2
OID: 1.3.6.1.4.1.412.2.2.1.1
Example: Poll the average value of channel 1 using the NetSNMP command line tool.
# snmpget -v2c -c public <IP Address> 1.3.6.1.4.1.412.0.1.0.1

6 . 0 - De v i c e F i rm w a r e U p d a t e r
FlexSCADA will occasional release new firmware to add additional functionality to the Q5. This section explains how
the Device Firmware Updater (DFU) mode works to upgrade your Q5's firmware.
Select Device Options from the main menu. On the Device Options Page, you will find two options relating to firmware
updates.
When enabled, the Q5 will check for available updates on the FlexSCADA server when the Q5 is rebooted. If using
scripting this option is discouraged, as future updates may affect script operation.
The UPDATE FIRMWARE button allows you to manually update the firmware of the Q5
using the DFU mode.
After selecting and starting the upload do not
unplug or refresh the page for 30 seconds.
After refreshing the page, you should be in
DFU mode (shown at right).
You have 5 minutes to find and upload your
firmware before the Q5 will revert back to the
main operating system. You can also exit the
DFU mode by clicking the link marked "Exit
DFU".
The UID, MAC and current IP configuration
are also visible from the DFU mode.
It is also possible to manually force the device into DFU mode by holding the control knob down while power is applied to
the device. This is also mentioned in Section 7.0.

7 . 0 - De v i c e I n te r f a c e
Using the multi-function knob on the Q5, it is possible to view a number of
parameters without using the web interface. The knob can be rotated and pressed to
Rotating goes between
pages, clicking accesses
additional views.
Pressing the knob while the power is applied will put the device in DFU mode - See
Section 6.0. Continuing to hold the knob for an additional 60 seconds will reset the
configuration to factory default.
Ethernet Page - Shows current
IP, Gateway, Netmask, Name
Server and MAC Address.
navigate between pages or access additional views. In the case of relays, clicking the
knob allows you to change the state of the relay. The naming and scaling of each
view found below corresponds to what has been configured in the web interface.
Q5 Homes Page - showing
current IP, device UID,
available buffer for readings
and Bytes of readings taken.
Analog Input Page - See
Section 2.0. There will
be one page for each
enabled analog input.
Press the knob to
switch between views.
Load Relay Page - Press the knob to
switch relay ON/OFF. See Section 3.0
for more info on naming relay channels.
Custom Feed Page - See
Section 4.0 for more details.
One Wire Sensors Page - See
Section 2.3 for more details.
Ping Page - See Section 1.9
for more details.
Power Metrics Page - See
Section 2.5 for more details.

8 . 0 - Ex p a n s i o n I n t e r f a c e s
This section details how some of the expansion interfaces on the Q5 can be used.
RJ45 Expansion Connector
Expansion Pinout
1 . . . . . I2C-SCL / UART-TX (I/O)
2 . . . . . I2C-SDA / UART-RX (I/O)
1 . . . . . . 8
Expansion
3 . . . . . 3.3V DC OUT (500 mA Max)
4 . . . . . GND
5 . . . . . 5V DC OUT (500 mA Max)
6 . . . . . IO Push/Pull 1.8 V / 5 V Open Drain Out
7 . . . . . GND
8 . . . . . One-Wire (I/O)
Memory Expansion
WARNING! CONNECTING A POE TO THIS PLUG WILL
DAMAGE YOUR Q5 AND VOID YOUR WARRANTY!
Note: The I2C, UART and IO
pins are not accessible via
the Q5 software at this time.
Customers that need access
to one of these interfaces
should contact FlexSCADA.
The Q5's internal memory allows for roughly 1 month* of readings
to be stored before older data is erased. In applications where
extensive long term data-logging is required the Q5 may be
outfitted with an external memory card for additional capacity.
For more info on how to use this feature please contact
FlexSCADA.
*Actual duration depends on measurement interval and number of
metrics being logged.
9 . 0 - Wa r r a n t y Te r m s
The FlexsQ5 comes with a 3 yearLimited Manufacturer'swarranty. The FlexsQ5 Pro comes with a 5
yearlimitedManufacturer'swarranty.
For warranty coverage the following terms and conditions apply:
The product must have failed while operating within the specifications outlined in this document.
Water or moisture damage is not covered.
Physical damage to the product as a result of improper use will not be covered.
Buyer must submit an RMA via our website showing proof of purchase.
Buyer must ship the product to our RMA department for review.
Please contact us with any additional warranty questions.
 Loading...