

Page 1
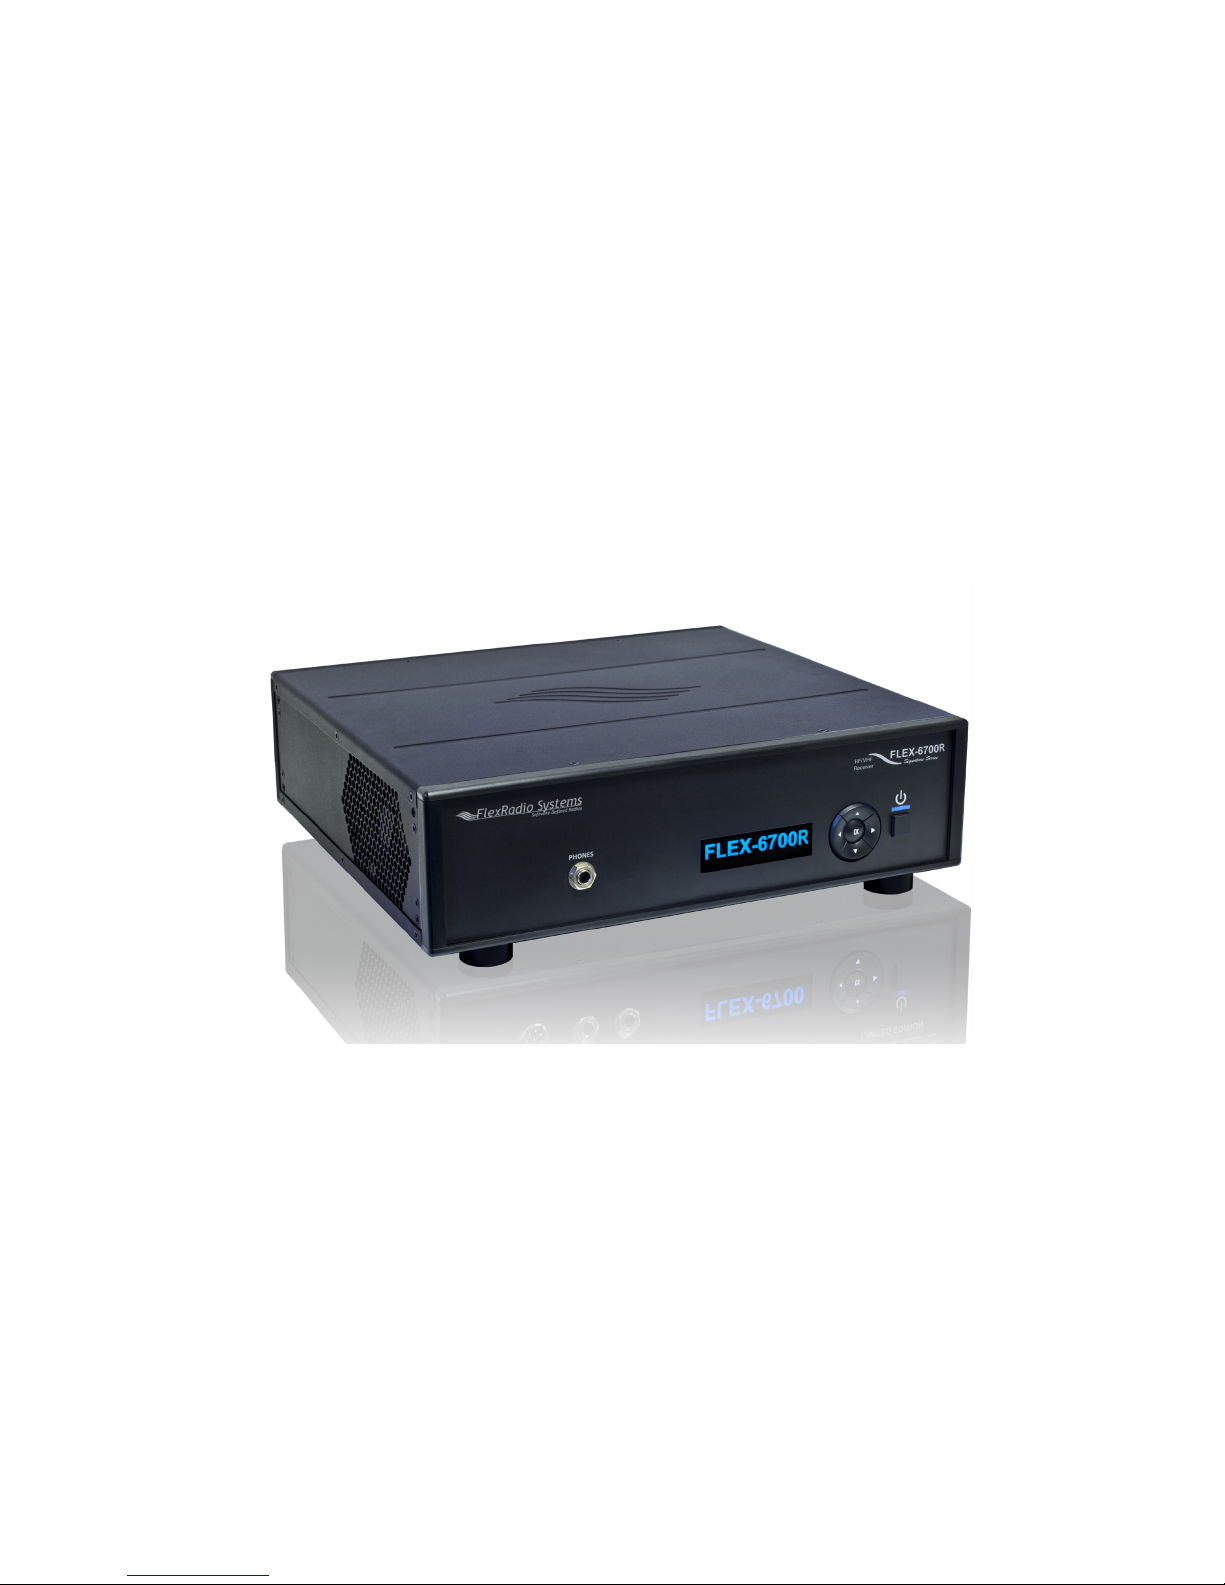
FLEX-6700R Signature Series
with SmartSDR
™
Copyright 2015 by FlexRadio Systems. All Rights Reserved. FlexRadio Systems, 4616 W. Howard Lane, Ste. 1-150, Austin, TX 78728 USA
FlexRadio Systems® is a registered trademark and SmartSDR™ is a trademark of FlexRadio Systems in the United States of America and other countries/regions. Other brand or
product names are trademarks of their respective holders. This product incorporates copyright protection technology that is protected by method claims of certain U.S. patents and
other intellectual property rights. Reverse engineering or disassembly is prohibited.
QUICK START GUIDE
Page 2

Thank you for purchasing the FLEX Signature Series software
dened radio (SDR) from FlexRadio Systems. This Quick
Start Guide (QSG) will walk you through the steps for installing
the FLEX-6700R in your operating position and loading the
SmartSDR for Windows software on a network connected PC.
Please read all included documentation before proceeding and
store this guide and all other contents, including the shipping
container, for future reference and use.
The Quick Start Guide is designed to get you on the air with
minimum effort. To do this, we assume a basic HF installation
knowledge and do not delve into all the FLEX-6700R and
SmartSDR for Windows' many possibilities.
This QSG provides only the basic steps to set up your FLEX-
FLEX-6700R For more information, you are referred to the
FLEX-6000 Signature Series SDR documentation, which can
be found in the Documentation folder on the CD-ROM that
came with your transceiver.
If you run into any trouble during the set-up process, please:
• Re-check your steps.
• Refer to next paragraph, "Need Assistance"
Need Assistance?
If you encounter any issues installing or operating SmartSDR
with FlexRadio Systems' Signature Series radios, please use
our Community (http://community.exradio.com) to search for
your trouble issue, as it may have already been answered by
other FLEX-6000 Signature Series users.
If you do not nd an acceptable answer in the Community, you
can contact FlexRadio Systems technical support by opening
a HelpDesk ticket on-line at: http://helpdesk.exradio.com
or by phone at +1 (512) 535-4713, extension #2. For EU
countries please contact your national distributor or contact
FlexRadio Systems Representative for EU (see back cover).
Please leave a voice mail message if you don't get an answer.
Hours of operation:
Our Technical Support engineers are available Monday
through Friday from 9:00am to 5:30pm Central Standard Time
(CST). If you call after business hours, on a holiday or week-
end, please leave a detailed message and we will return your
call during regular business hours in the order it was received.
You may always submit a HelpDesk support ticket at any time.
If you need assistance opening a HelpDesk ticket, please refer
to the HelpDesk Assistance Center home page for step-bystep instructions at http://support.exradio.com
Page 3

IMPORTANT NOTICE - READ BEFORE OPERATING THIS
UNIT
WARNING!
This radio has been congured to operate in your country
according to your nation's regulations. It will operate on
frequencies which are not allowed for public use.
Except those actions which have been described in the Quick
Start Guide and in the FLEX-6000 Signature Series Hardware
Manual and SmartSDR Software Manual which are available
for this radio, no other manipulations to the radio are allowed.
The unit must only be opened and/or serviced by a qualied
technician.
Please study the Quick Start Guide and the FLEX-6000
Signature Series Hardware Manual and SmartSDR Software
Manual prior to operating the unit. These documents contain
important information for safe operation.
If you have any questions due to misunderstanding,
translation errors and alike, please refer to the FLEX-6000
Signature Series Hardware Manual and SmartSDR Software
manual rst. Please contact the appropriate party for futher
information.
Page 4

Δ - This unit must only be opened and/or serviced by
a qualied technician. Opening the unit may void the
manufacturer’s warranty.
Δ - Do not operate this unit in areas of extreme humidity.
Δ - Avoid operating this radio in direct sunlight or other areas
of extreme heat, excessive vibration, or mechanical force.
Δ - When using earphones, use caution when adjusting the
volume to prevent any harm to your hearing.
Δ - If this unit is intended for use in commercial applications,
special safety regulations and cautions may apply to prevent
accidents.
Δ - If any defect, abnormal result, or other observations occur
that are not covered by this Quick Start Guide; immediately
cease operation and contact the manufacturer or local
distributor for operational advice or repair of the unit.
i - No other physical modication of this radio is allowed. Any
other use or modication (including software changes that
affect operational characteristics) will void the manufacturer’s
warranty.
IMPORTANT NOTICE - READ BEFORE OPERATING THIS
UNIT
! – WARNING!
Δ - Caution
i - Information
! – This unit is NOT A TOY. It must not be handled by children
nor placed/operated within reach of children.
! – Do not leave packing material for this unit unattended. It
may be harmful to children if misused.
! – This unit contains small parts that could be a choking
hazard to small children. Do not leave accessories
unattended.
! – Do not operate this unit in potentially explosive
environments.
! – Never attempt to insert wires or any tools into the interior
of this unit during operation. This may cause re or electric
shock.
! – This unit must only be operated with the electrical power
described in this Quick Start Guide. Unsafe operation may
cause a re, injury, or electrical shock.
Page 5

i - Ensure proper ventilation around the radio; this includes 2”
clearance on the sides and back.
i - the FLEX-6700R is a desktop unit but may be rack mounted
with the optional rack mount hardware kit.
i - the FLEX-6700R can also be ordered with an optional
handle kit.
i - Please study the complete Quick Start Guide and Owner’s
Manual. These documents contain important information
regarding the safe operation of this unit. If you have any
questions, please contact the manufacturer or local distributor
for further information.
1.0 GETTING STARTED
Supplied Accessories:
The following accessories and materials are included with
your FLEX Signature Series SDR. Carefully remove the
FLEX-6700R from its shipping container, unpack and identify
the items listed below.
• One (1) FLEX-6700R Signature Series Unit
• One (1) 6 ft. (1.8m) CAT 5 Ethernet cable
• One (1) IEC AC power cord compliant with your country
• One (1) SmartSDR for Windows installation CD
• One (1) Hardware & Software Installation Quick Start
Guide
• One (1) Rack Mount Kit Option (if ordered)
• One (1) Handle Kit Option (if ordered)
• One (1) GPS patch antenna and RG-174 coax cable (if
GPSDO ordered)
1.0 GETTING STARTED
Page 6
2.0 MAKING THE CONNECTIONS
The following steps will describe the required connections for
getting your FLEX-6000 Signature Series software dened
radio on the air.
First Steps:
1. Carefully remove the packaged accessories and the
receiver (FLEX-6700R) from the shipping carton.
Remove the plastic covering from the radio.
2. Identify all of the supplied accessories listed above.
3. Place the radio in your operating position making sure it
has adequate ventilation.
Back Panel Connections
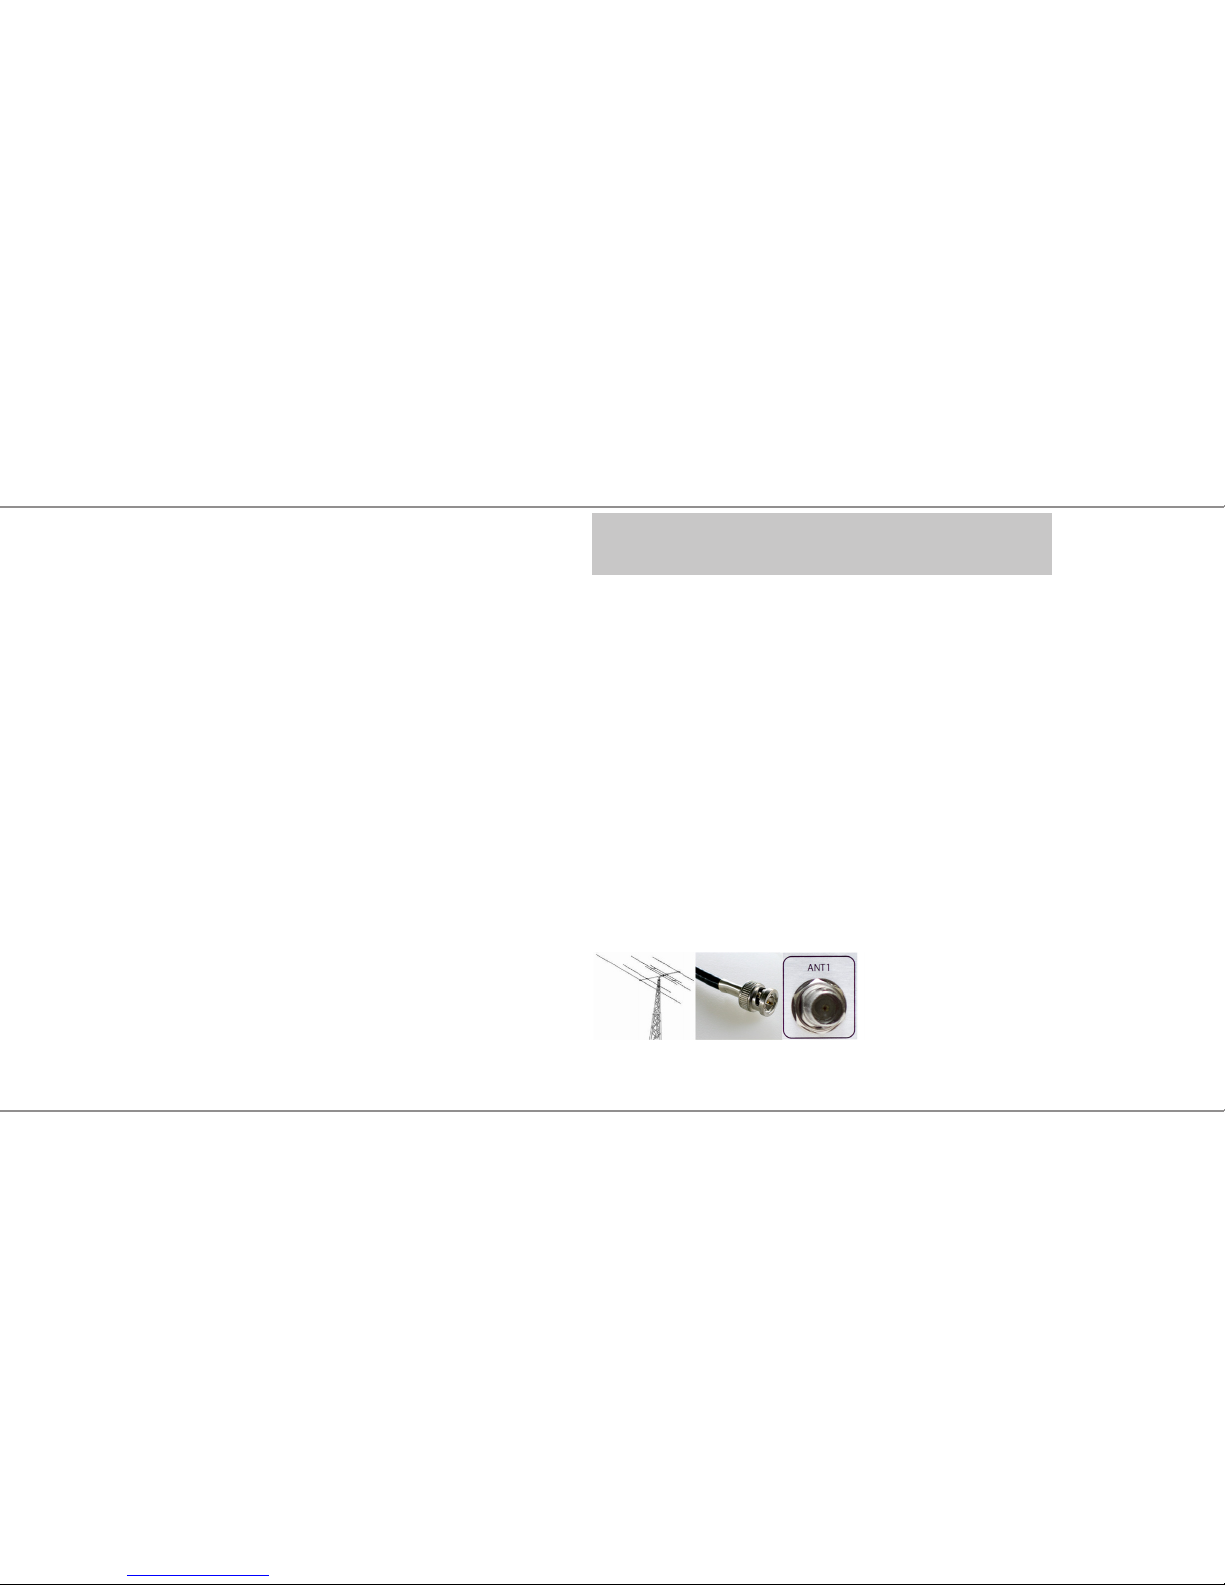
1.) Antenna - Connect an HF antenna with nominal 50 Ohm
impedence to one of the BNC receive antenna connectors
labeled ANT1 (DEFAULT) or ANT2.
Additional Required Items Not Supplied with the Radio:
In addition to the supplied accessories, software and cables
supplied with the FLEX-6700R Signature Series SDR, you will
need to provide the following:
• An HF- Receiving Antenna
• A good RF ground.
• Powered stereo speakers (computer type) or stereo
headphones.
• A personal computer (PC) running Windows XP Service
Pack 3 or above. Either 32 or 64-bit operating systems
are supported.
• A 100/1000BaseT Ethernet Access - either an open port
on your computer or on your local area network (LAN)
Ethernet switch.
2.0 MAKING THE CONNECTIONS
Page 7
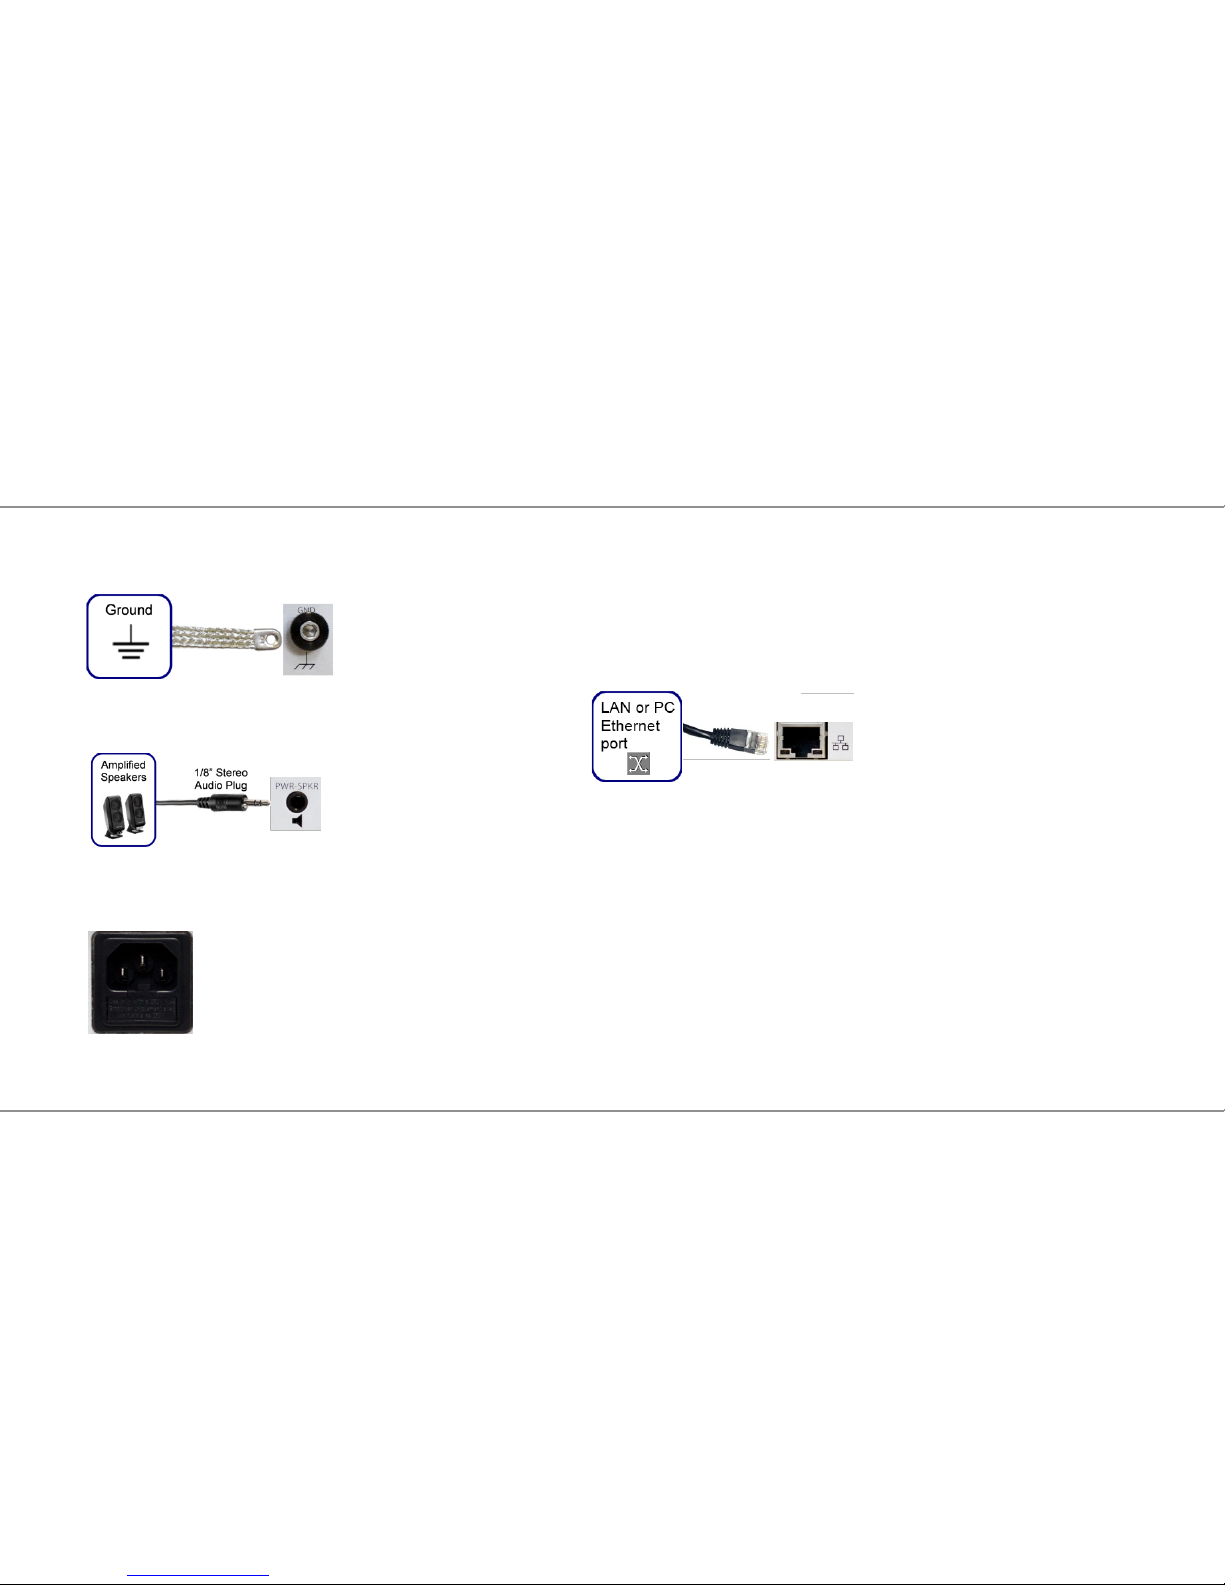
2.) Ground - Remove the thumb screw marked GND. Connect
your central station ground to the thumb screw and screw it
back into the radio.
3.) Speakers - Connect powered stereo speakers to the jack
marked PWR-SPKR using a 1/8" (3.5mm) stereo TRS plug.
4.) This receiver requires an AC input of 90 to 264 VAC
frequency 47-63 Hz (auto sensing).
5.) Ethernet Connection - Connect one end of the supplied
CAT 5 Ethernet cable to the transceiver. The other end of
the CAT 5 Ethernet cable can be connected directly to the
100/1000BaseT Ethernet port on your computer if you do
not have a wired Ethernet network in your shack. Otherwise
connect the CAT 5 Ethernet cable to an open 100/1000BaseT
Ethernet port on your rewall/router or Ethernet switch.
For a more detailed description of connecting a FLEX-6000
to a LAN or directly to your PC, please refer to the HelpDesk
article "How to Connect Your FLEX-6000 to a LAN"
(http://helpdesk.exradio.com/entries/23497553-How-toConnect-your-FLEX-6000-to-a-LAN).
Page 8
Front Panel Connections
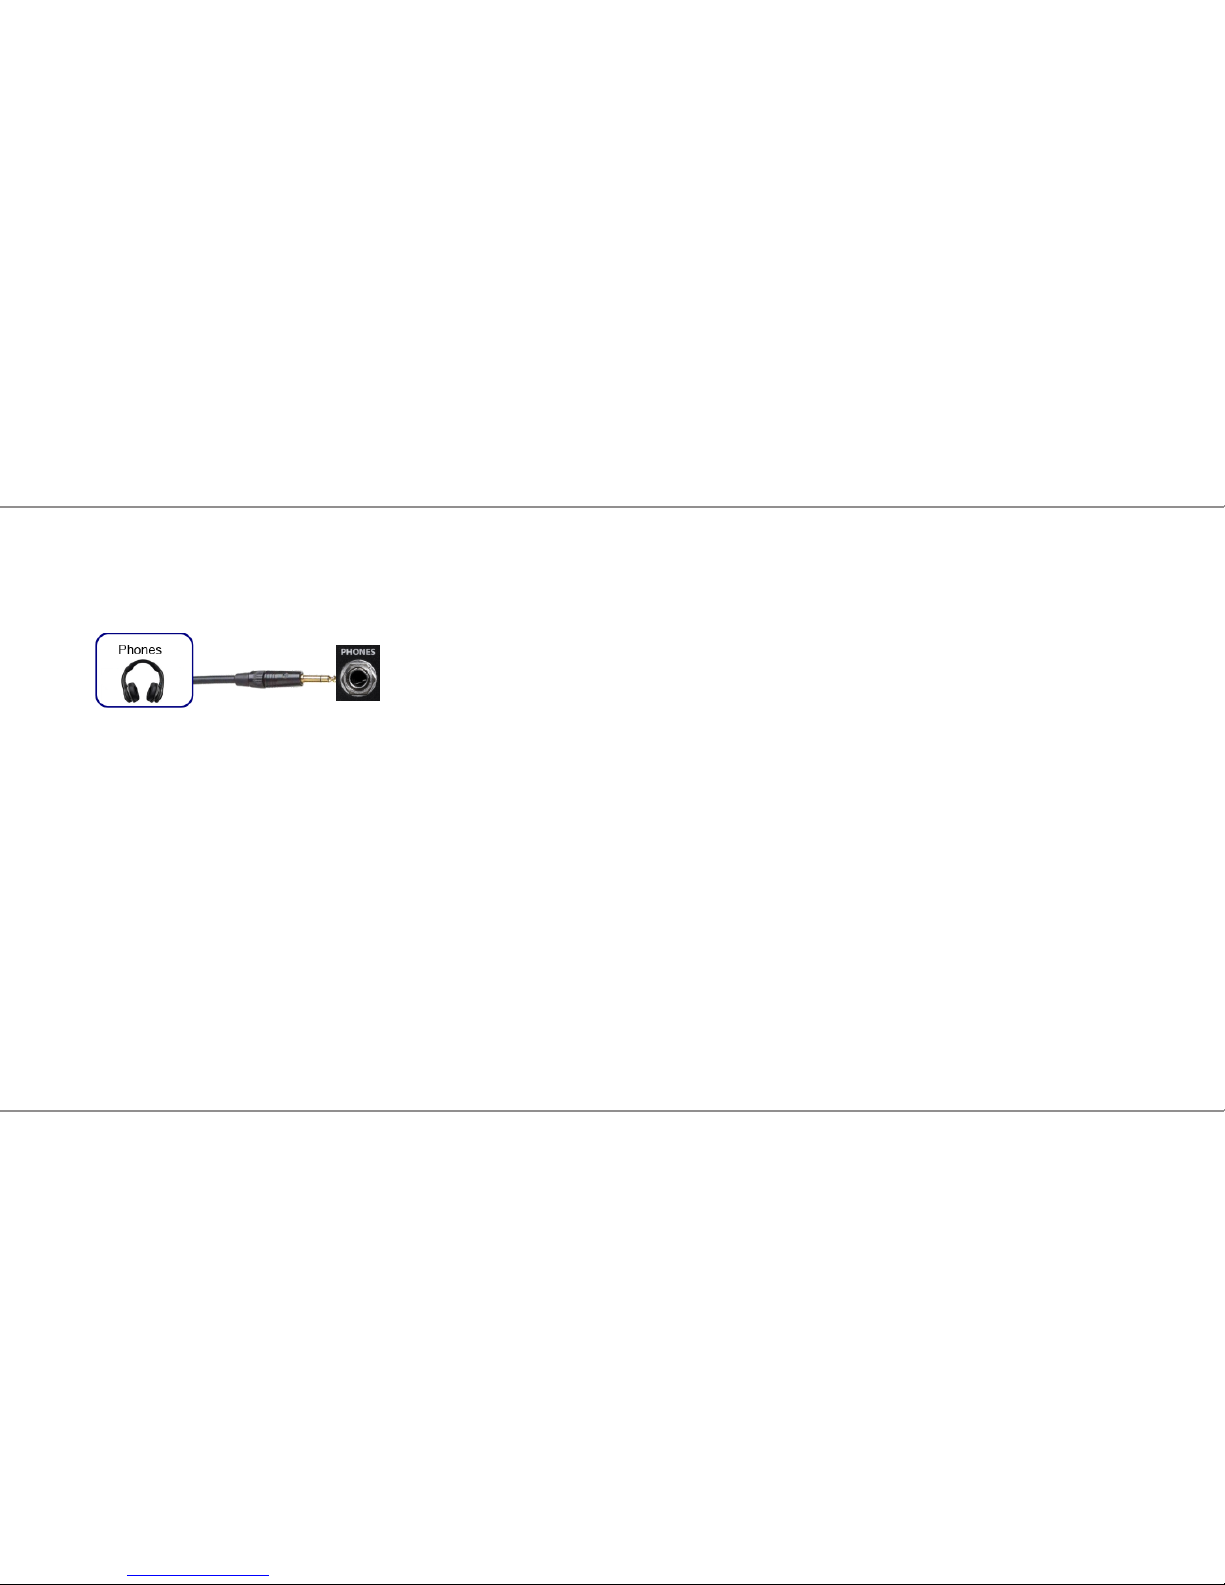
1.) Phones (Headphones) - Connect a pair of stereo head-
phones to the jack marked Phones using a 1/4" Stereo (TRS)
plug. This connection is optional if you are using Stereo
Speakers connected to the back panel.
Page 9
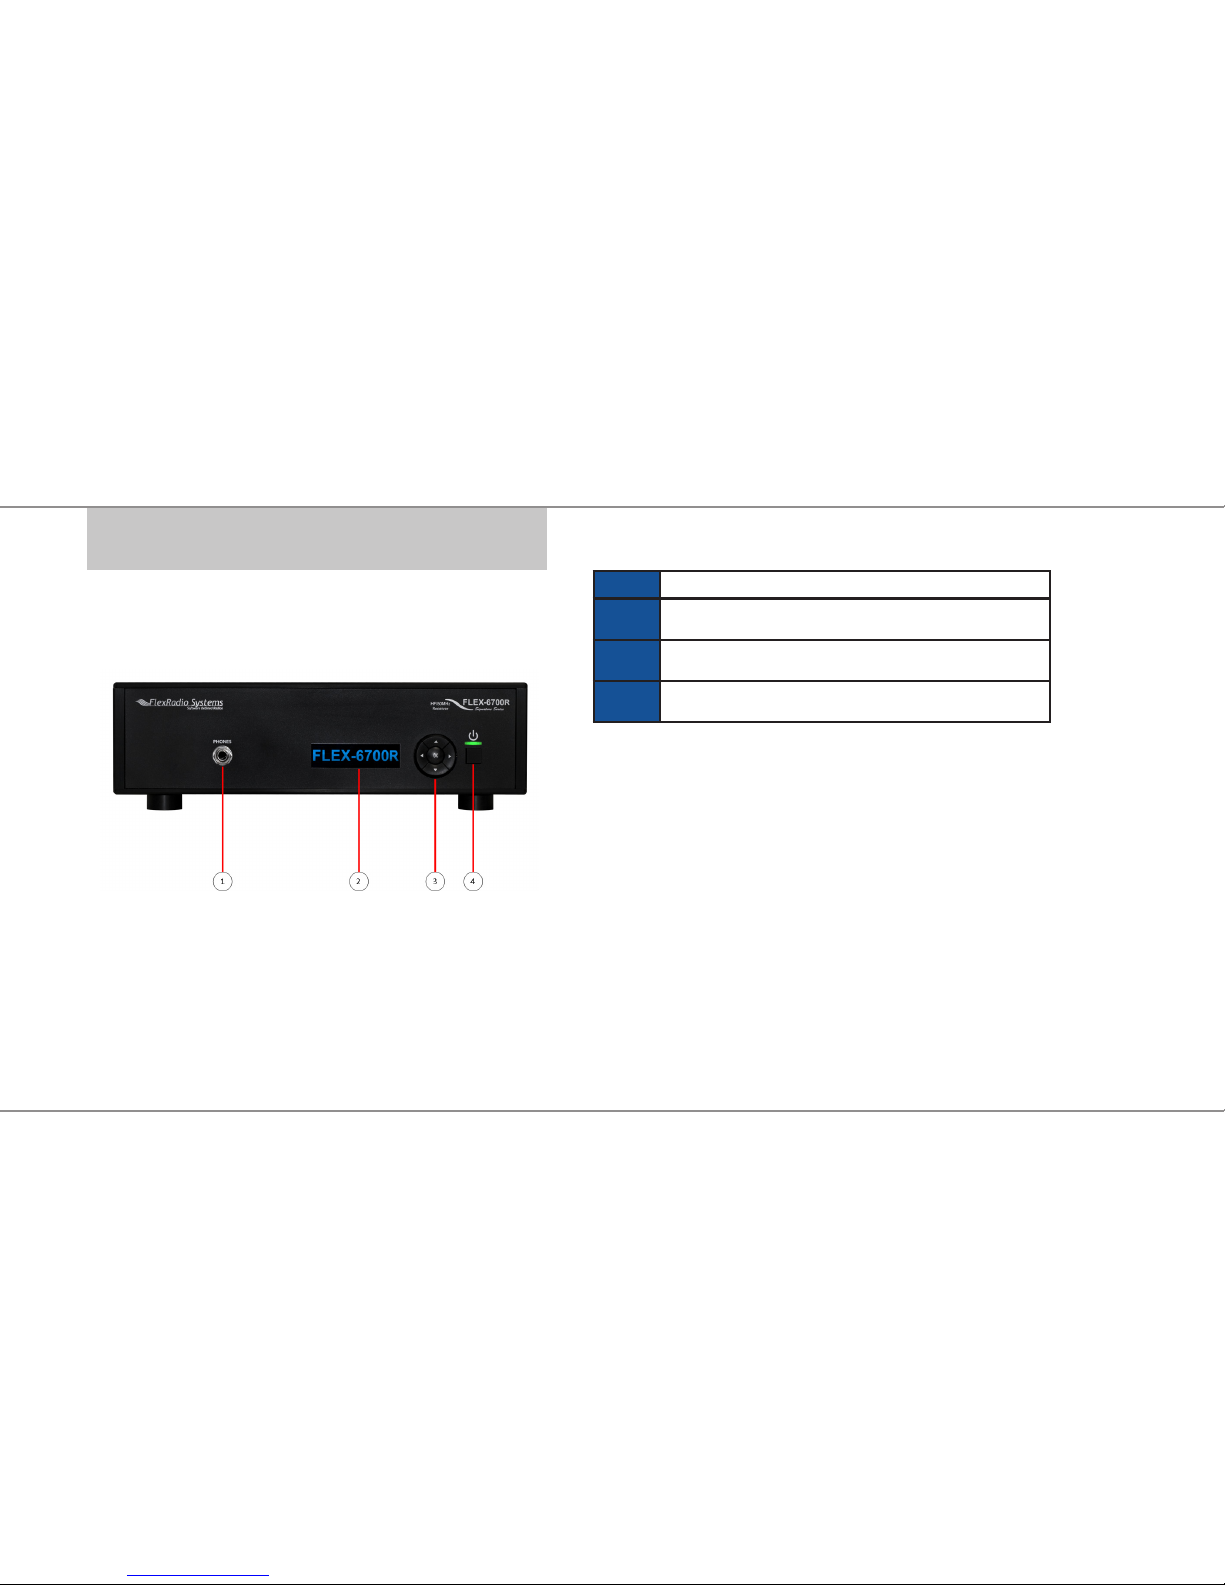
Below is a description of the FLEX-6700R front and rear panel
controls and connectors.
NEED NEW IMAGE HERE
3.0 GETTING TO KNOW YOUR FLEX-6700R
SIGNATURE SERIES RECEIVER
3.0 GETTING TO KNOW YOUR FLEX-6700R SIGNATURE SERIES RECEIVER
FLEX-6700R Front Panel
1 Stereo Headphone: 1/4" (0.64cm) TRS phono connector
2 LED Status Display Indicator
3 Conguration Keypad
4 Power Button with colored LED status indicator
Page 10
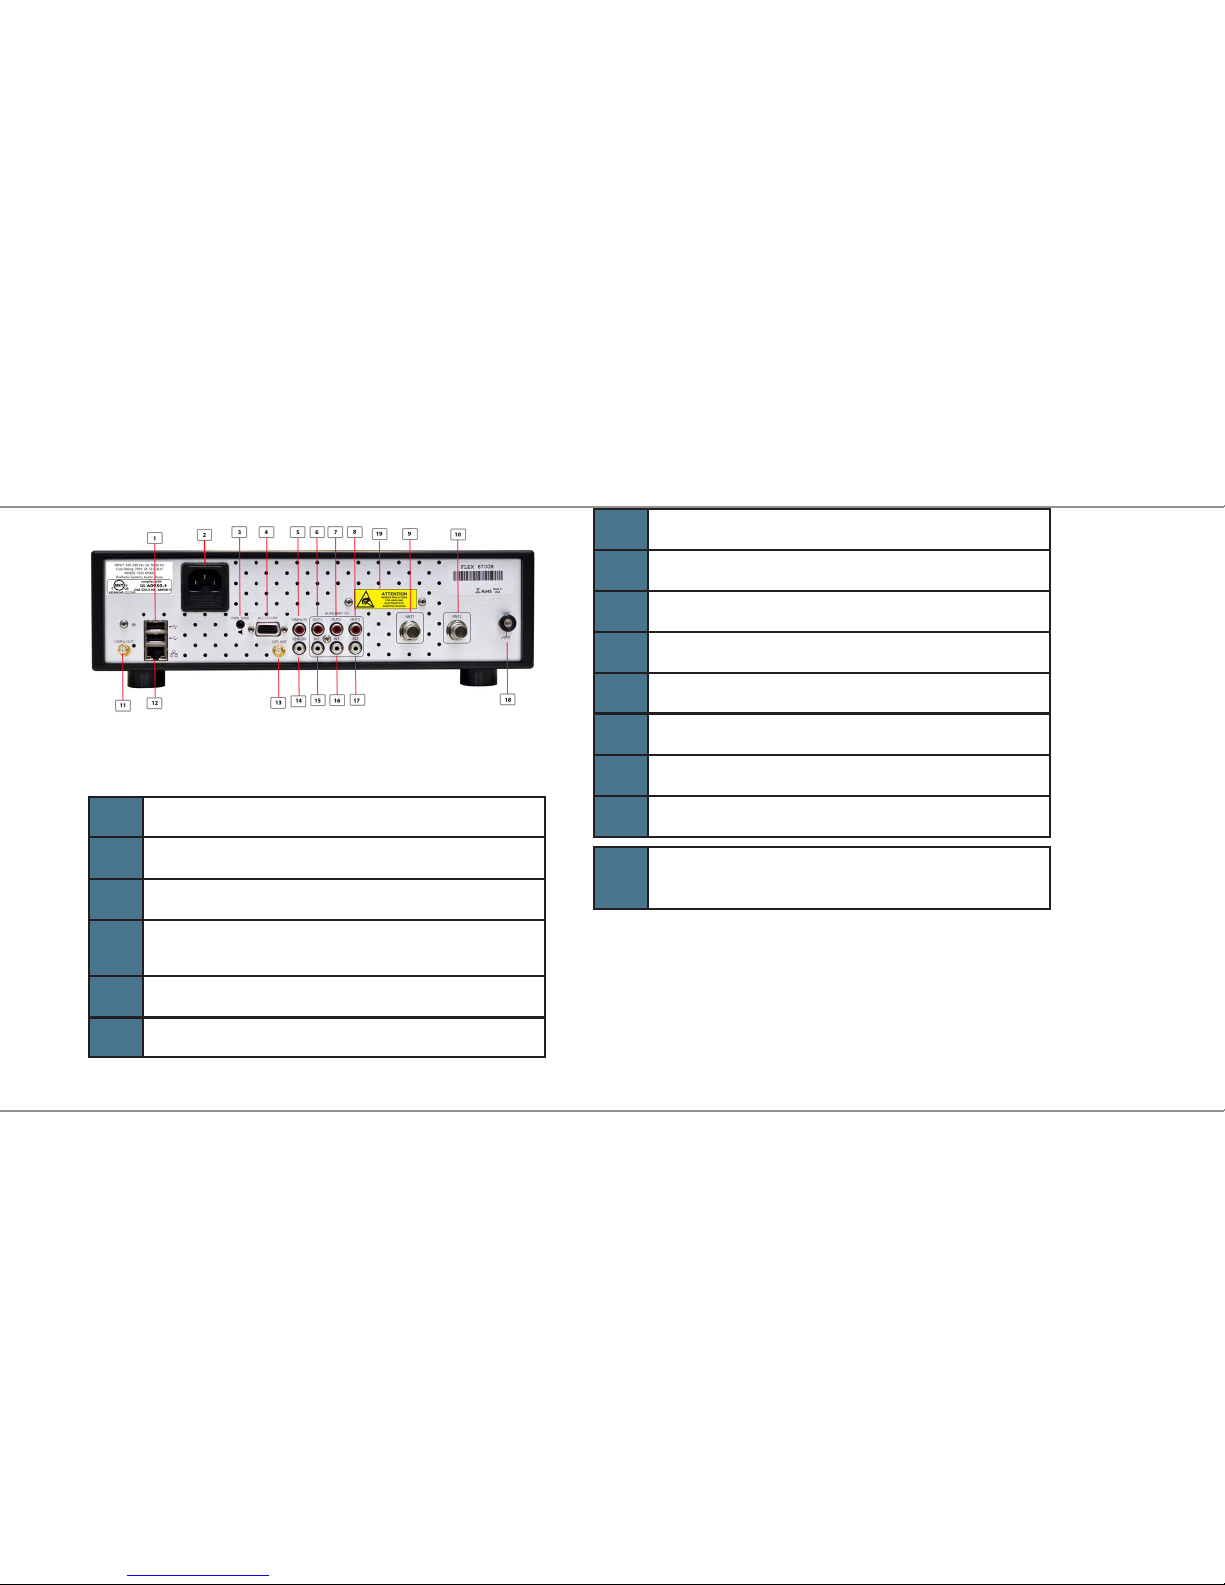
FLEX-6700R Rear Panel
1 USB 2.0 Port (x2): for peripheral connections
2 IEC AC Power Connector (100-240VAC, 50-60Hz)
3 Powered Speaker: 1/8" (0.32cm) TRS phono connector
4 Accessory Connector: DB-15HD - see pin out in FLEX-6000 HW
manual
5 10 MHz Reference Clock Input: RCA connector
6-8 Auxiliary Open Collector outputs #1, #2, #3; RCA connectors
9-10 Receiver Antenna Ports #1 and #2: BNC
11 10MHz Reference Output: SMA connector (with GPSDO option only)
12 Twisted Pair Ethernet port: RJ-45 - 100/1000 Twisted Pair
13 GPS Antenna Input: SMA connector - (with GPSDO option only)
14 Remote Power On: RCA connector
15 No Connection
16-17 Auxillary Input #1, #2; RCA connectors
18 Chassis Ground: #8 Thumb screw
19 Attention Label: !Warning: All Input/Output connections, including
front panel I/O connections, may be static sensitive!
Page 11

4.0 INSTALLING SMARTSDR™ FOR WINDOWS APPLICATION ON YOUR PC
4.0 INSTALLING SMARTSDR™ FOR WINDOWS
APPLICATION ON YOUR PC
The SmartSDR™ for Windows application is the software used
to interface with the FLEX-6700R receiver hardware for viewing spectrum and controlling the radio.
Recommendations and Requirements
Minimum recommended CPU for SmartSDR for Windows is
the Intel® Core™ 2 Duo or AMD® Athlon™ 64 x2 processor.
Minimum Windows and .NET Requirements
SmartSDR is a 64 and 32-bit Windows .NET Framework
application designed to operate on Windows XP SP3, Vista,
Windows 7 and Windows 8. The .NET Framework 4.0 Client
Prole is required.
The minimum version of Windows supported by SmartSDR
is Windows XP Service Pack 3 (SP3). The SmartSDR for
Windows Installer will automatically detect your current
Windows version and will notify you if it does not meet the
minimum operating system requirements. If your Windows
XP PC has not been upgraded to SP3, you must do so
before installing SmartSDR. See minimum Windows and
.NET requirements below for obtaining the Windows XP SP3
software update.
If you need to install SP3 for Windows XP, install it before
installing the .NET Framework 4.0 Client Prole. The easiest
method for obtaining it is to use the Windows Update service.
An optional update method is to download the SP3 update
software via the Internet directly from Microsoft using this web
link:
http://www.microsoft.com/en-us/downloads/details.aspx?id=24.
Note: this is a very large download (approximately 316 MB)
which may take over an hour to download using slower
Internet connections.
If you need to install the .NET Framework 4.0 Client Prole,
the SmartSDR for Windows Installer will automatically install it
from the SmartSDR Installation CD or attempt to download the
necessary software from the Internet if the CD is not available.
Alternately, you can download it directly from Microsoft using
this web link BEFORE installing SmartSDR for Windows.
http://www.microsoft.com/en-us/download/details.aspx?id=17113.
Page 12
Installing the Software
If you are installing SmartSDR for Windows from the CD, place
it in your CD drive and close the drive door. The SmartSDR
software installer will automatically begin. If you are installing
SmartSDR for Windows from the installer downloaded from the
Internet, double click on the SmartSDR installer (SmartSDR_
v1.x.x_Installer.exe) to begin.
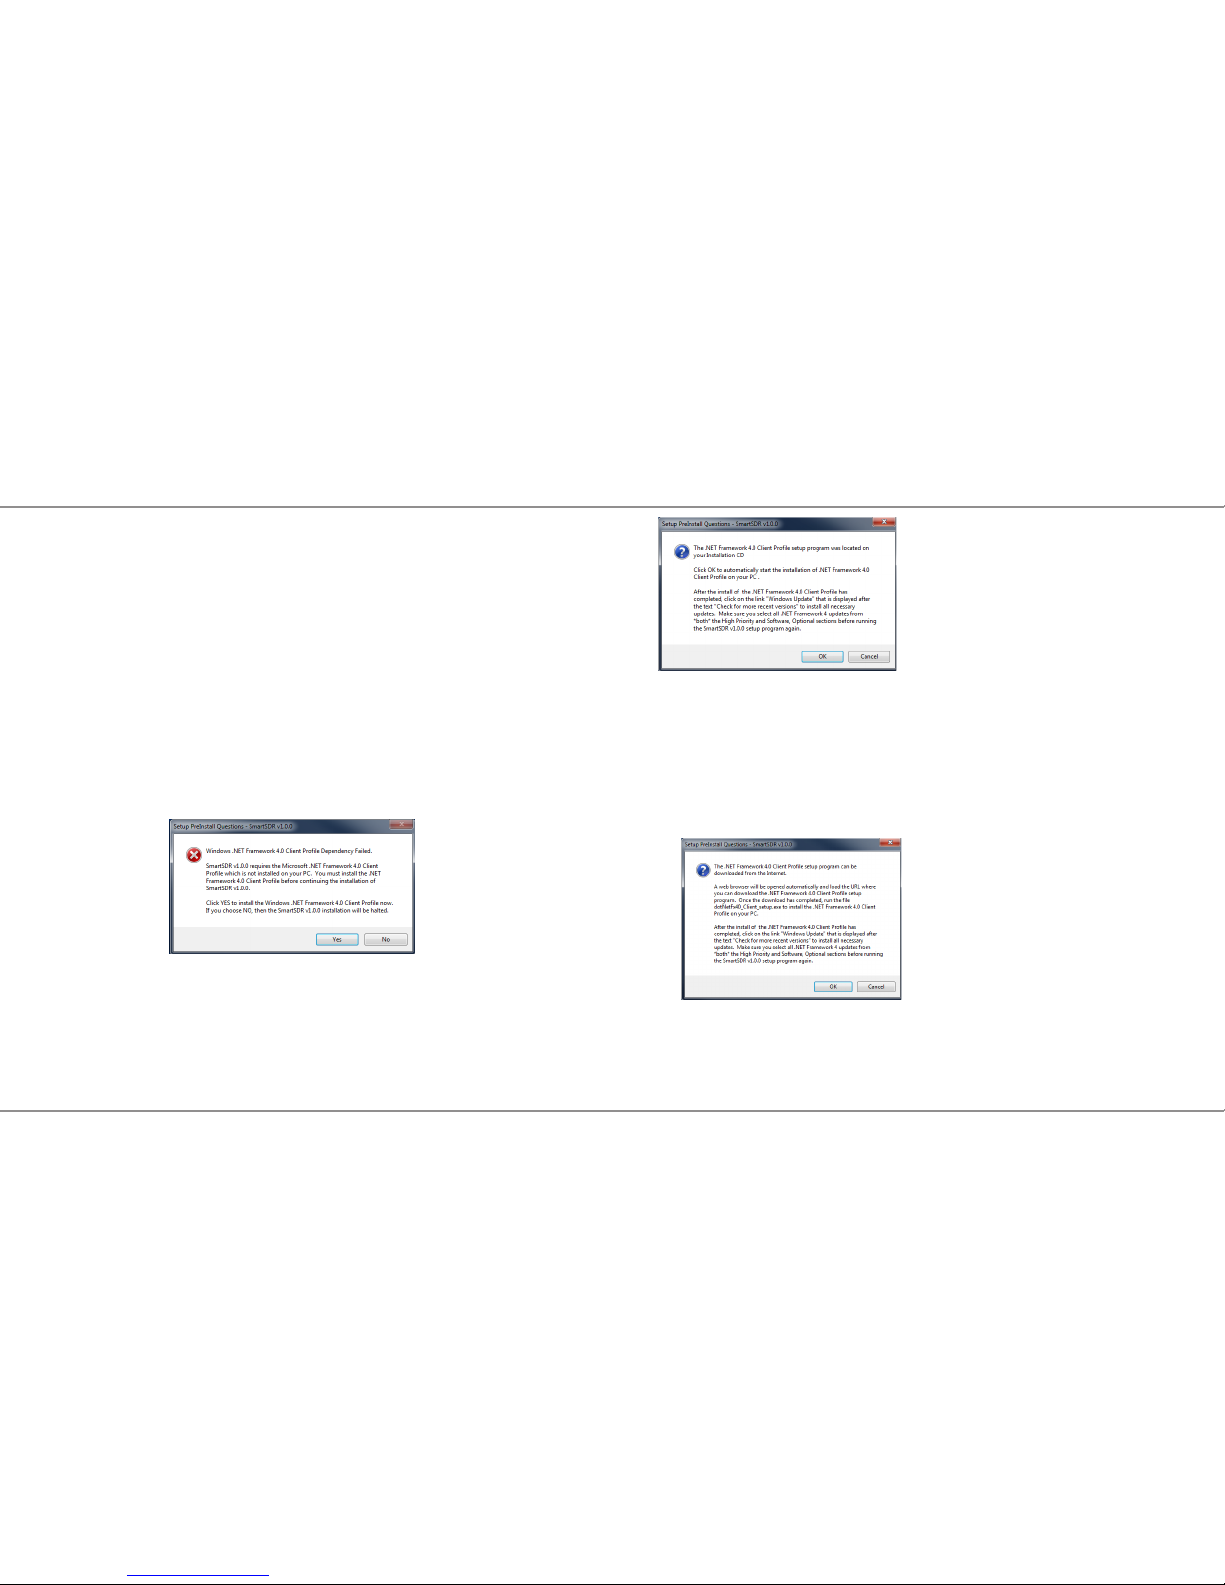
Step 1. Pre-Installation Tasks
The rst thing the SmartSDR software installer will do is
determine if your PC's operating system and installed .NET
version meets the minimum requirements. If your PC does
not have the required .NET Framework 4.0 Client Prole
software loaded, the following Setup Pre-Install screen will be
displayed.
If you see this screen, click YES to install the .NET Framework
4.0 Client Prole software or click on NO to stop installing
SmartSDR for Windows. If you are installing from the
SmartSDR for Windows CD, and selected YES, the following
screen will be displayed.
Click OK to begin the .NET Framework 4.0 Client Prole
software install or click on CANCEL to stop installing
SmartSDR for Windows.
If you choose not to install SmartSDR for Windows in order
to install the .NET Framework 4.0 Client Prole, the following
screen will be displayed.
Click on OK to open a web browser and download the .NET
Framework 4.0 Client Prole software from the Internet or
click on CANCEL to stop installing SmartSDR for Windows.
Page 13
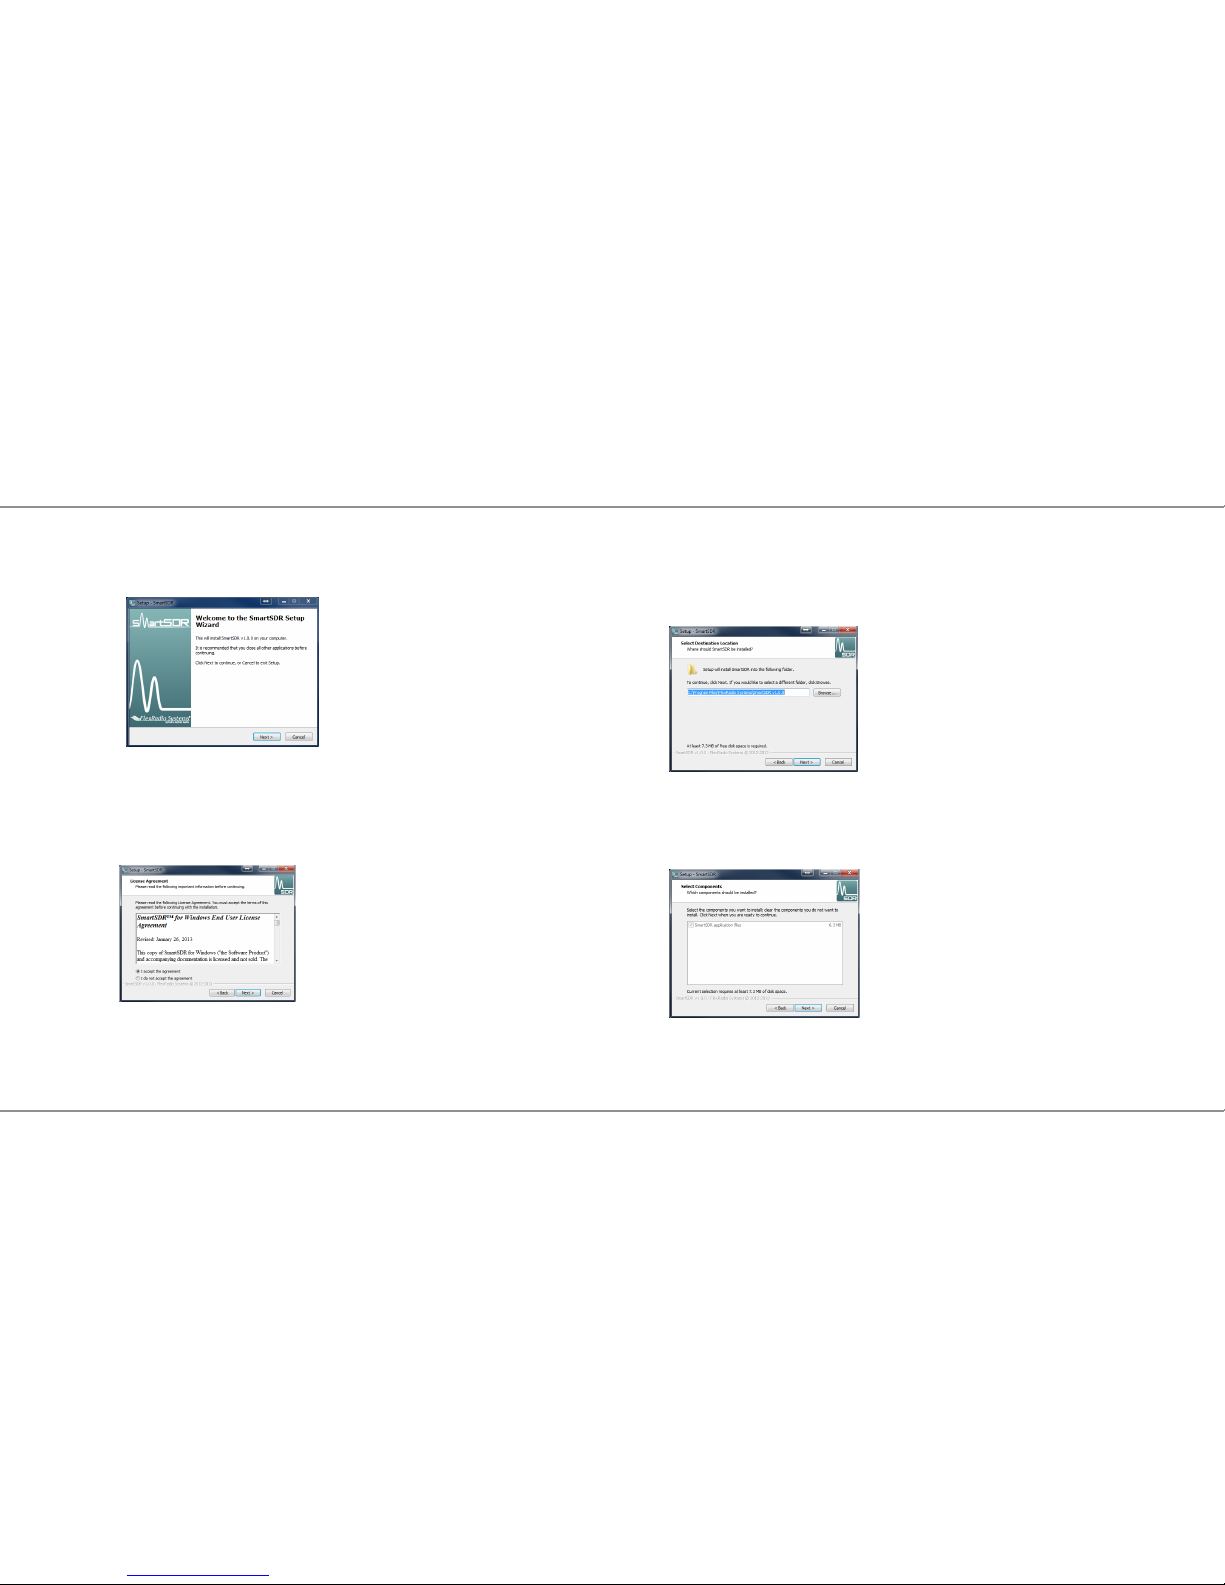
Step 2. Installing SmartSDR for Windows
The rst screen displayed is the Welcome to the SmartSDR
Setup Wizard as shown below.
Click NEXT to continue.
The SmartSDR for Windows End User's License Agreement
screen is displayed as shown below.
To accept the license agreement, click on the "I accept the
agreement" radio button and then click NEXT.
The Select Destination Location Screen is displayed as shown
below. It is recommended that you use the default installation
location, as it will use the Windows recommended location for
the application les depending on if you have a 32 or 64-bit
operating system. You may however choose an alternate
location.
Once you have decided on the installation location for
SmartSDR for Windows, click NEXT to continue. The Select
Components screen is displayed as shown below.
Click NEXT to continue.
Page 14
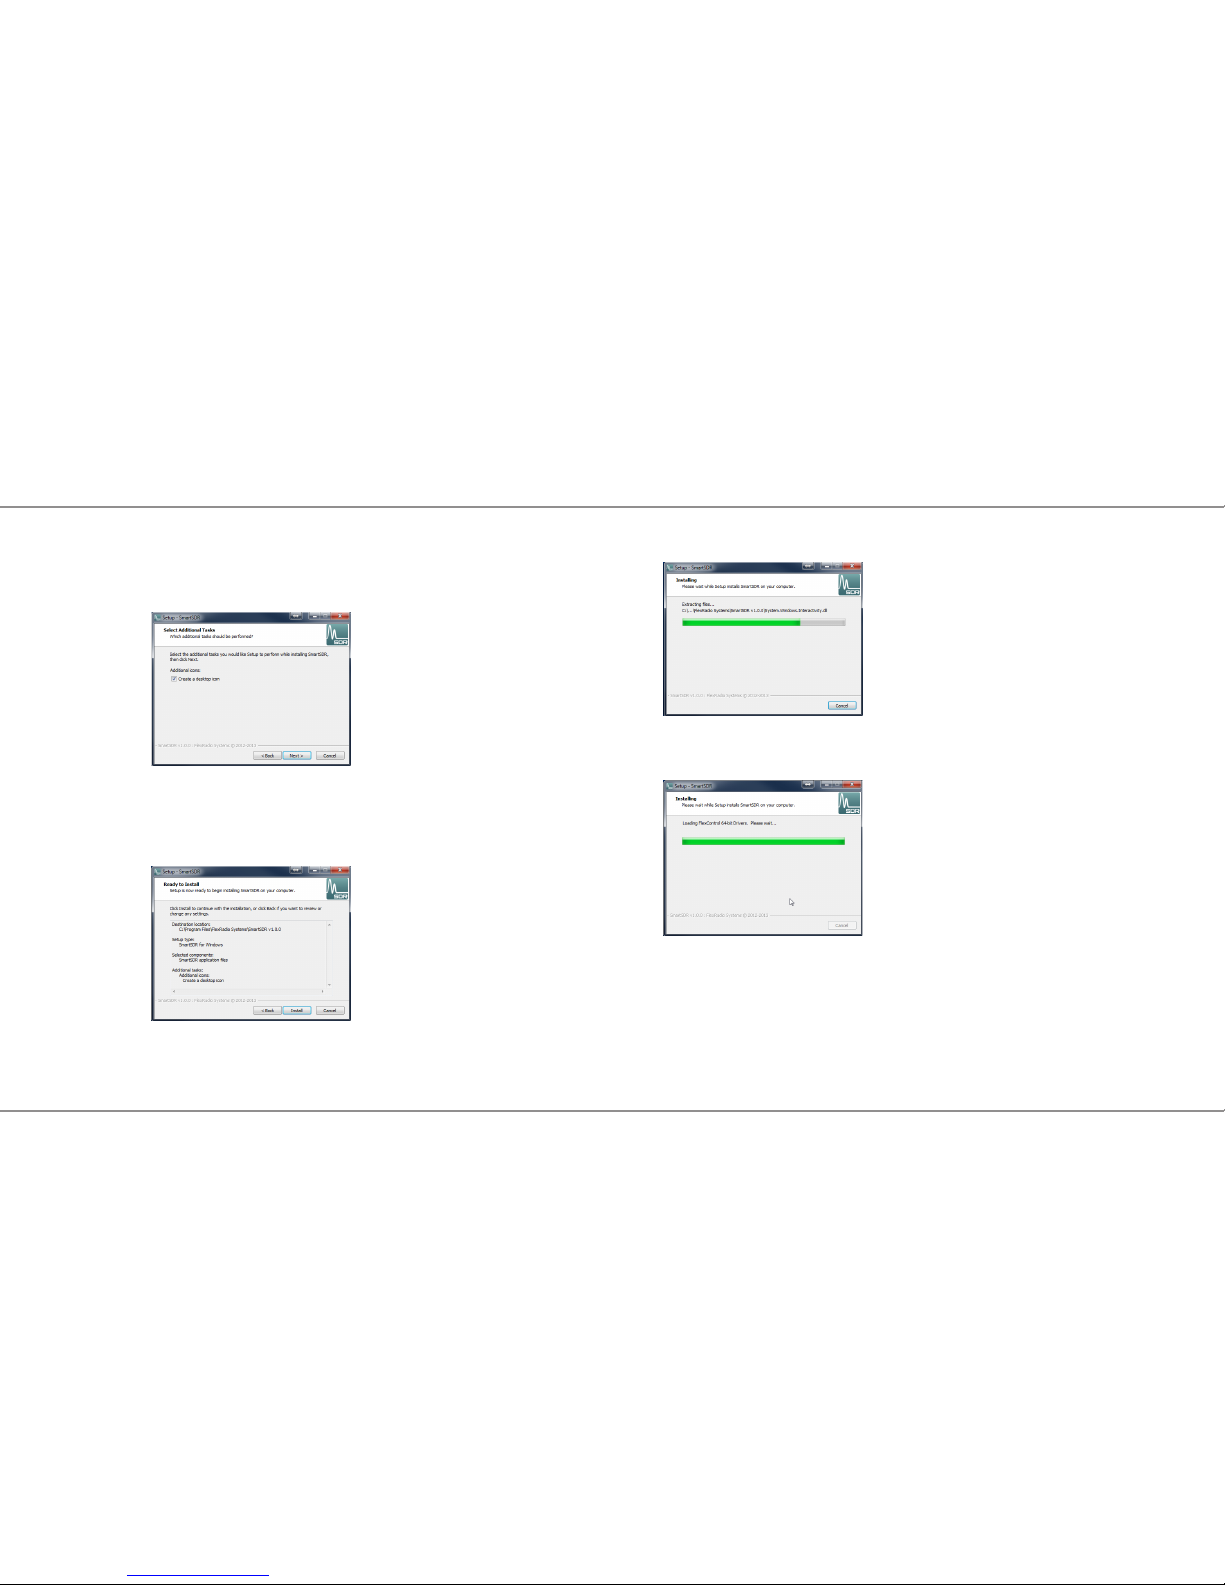
The Select Additional Tasks screen is displayed as shown
below. It is recommended that you leave the "Create a
desktop icon" option checked to provide a convenient way of
starting SmartSDR for Windows from your Windows Desktop.
Click NEXT to continue.
The Ready to Install screen is displayed as shown below.
Click NEXT to continue.
The Installing screen will be displayed showing the les being
loaded.
After the Files have been installed, the FlexControl™ driver
will be installed as shown below.
After a few moments, the Completing the SmartSDR Setup
Wizard screen will be displayed as shown below. It is
recommended that you review the SmartSDR for Windows
release notes as they contain important information regarding
the features and operation for this specic release of
SmartSDR. Check the "View the Release Notes (requires a
Page 15
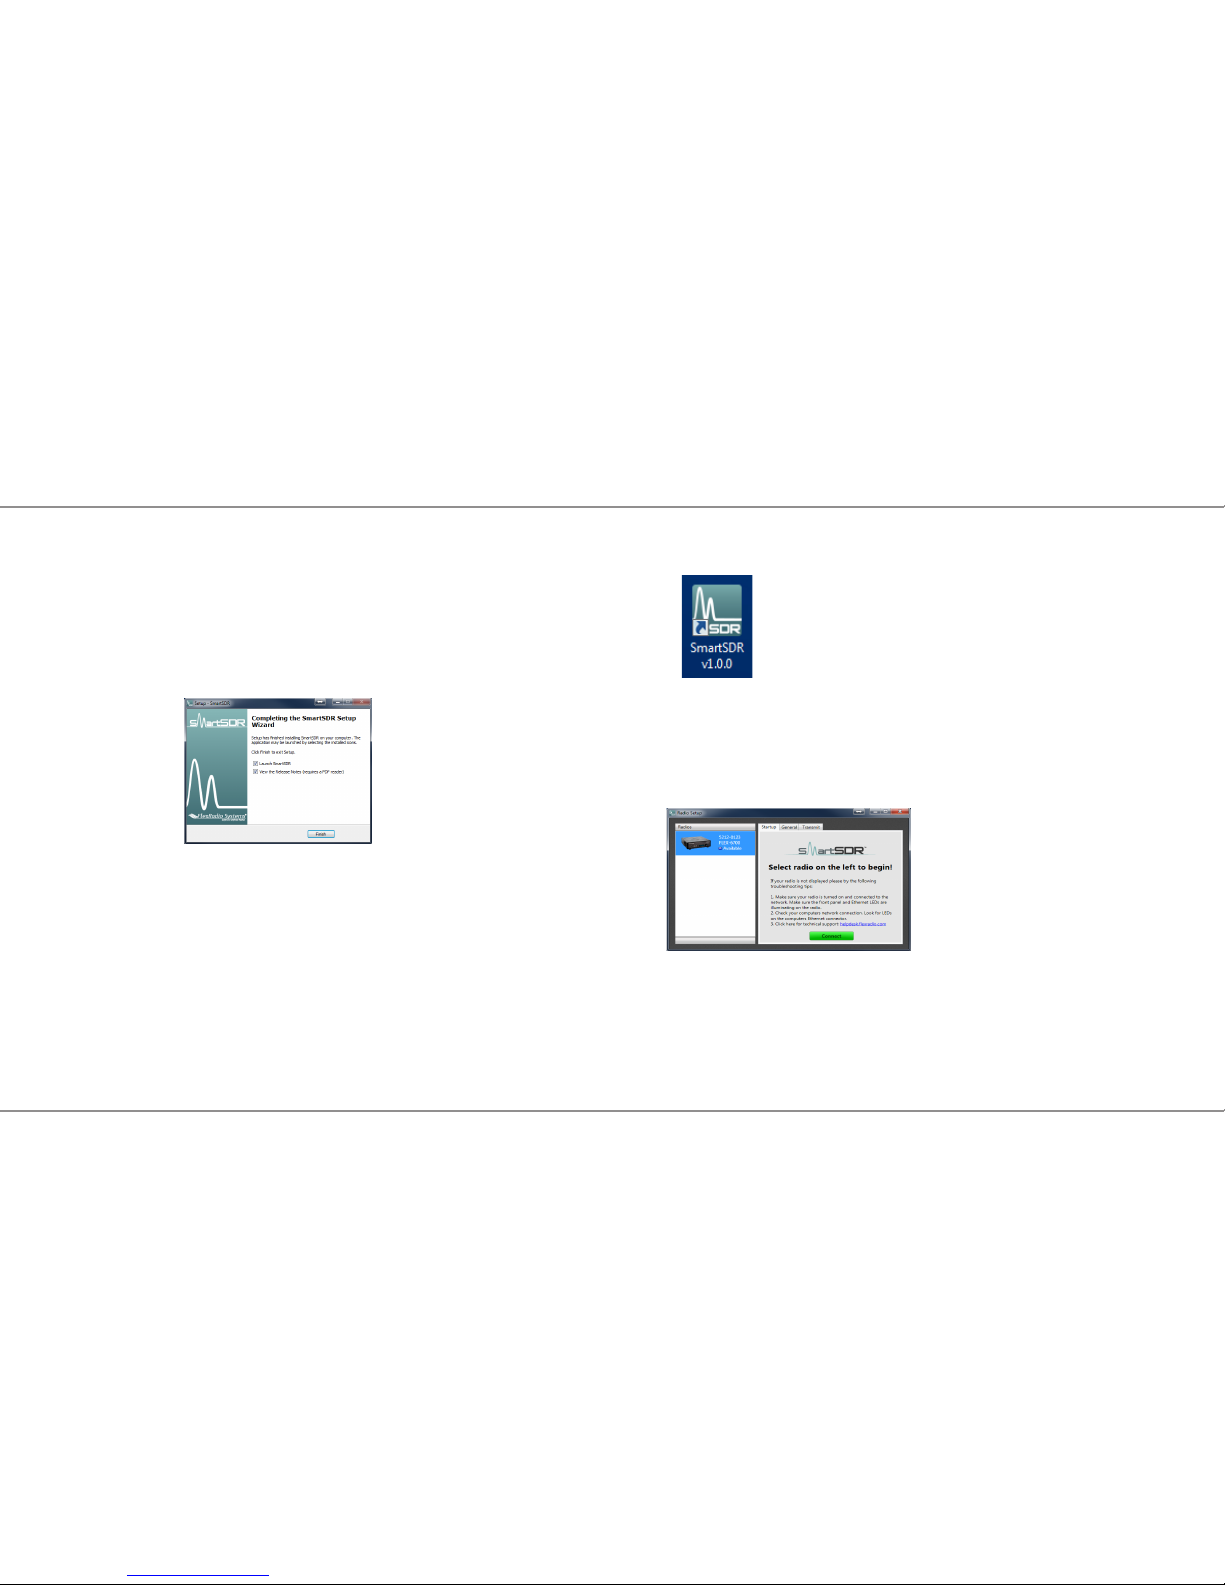
PDF reader)" option to display the SmartSDR for Windows
Release Notes after SmartSDR installer has completed the
software install.
If you want to start the SmartSDR for Windows application
after the SmartSDR installer has completed, leave the
"Launch SmartSDR" option checked.
Click FINISH when you have made your selections.
Step 3. Starting the SmartSDR for Windows Application
for the First Time
Plug in the AC power cord that is connected to the FLEX-
6700R Signature Series SDR. (Note: the fans will run anytime
the receiver has power applied.)
Power on the FLEX-6700R by pressing the power button. The
LED display will initially show the text "Calibrating...". Once
the FLEX-6700R is ready, it will display the receiver model
name and the Power button LED will be illuminated green.
Locate the SmartSDR application icon on the desktop as
shown below and double click on it to start SmartSDR for
Windows.
The SmartSDR Radio Setup screen will be displayed. Click on
your FLEX-6000 Signature Series SDR displayed on the left
hand side to select and then click on the Connect button as
shown below.
Page 16
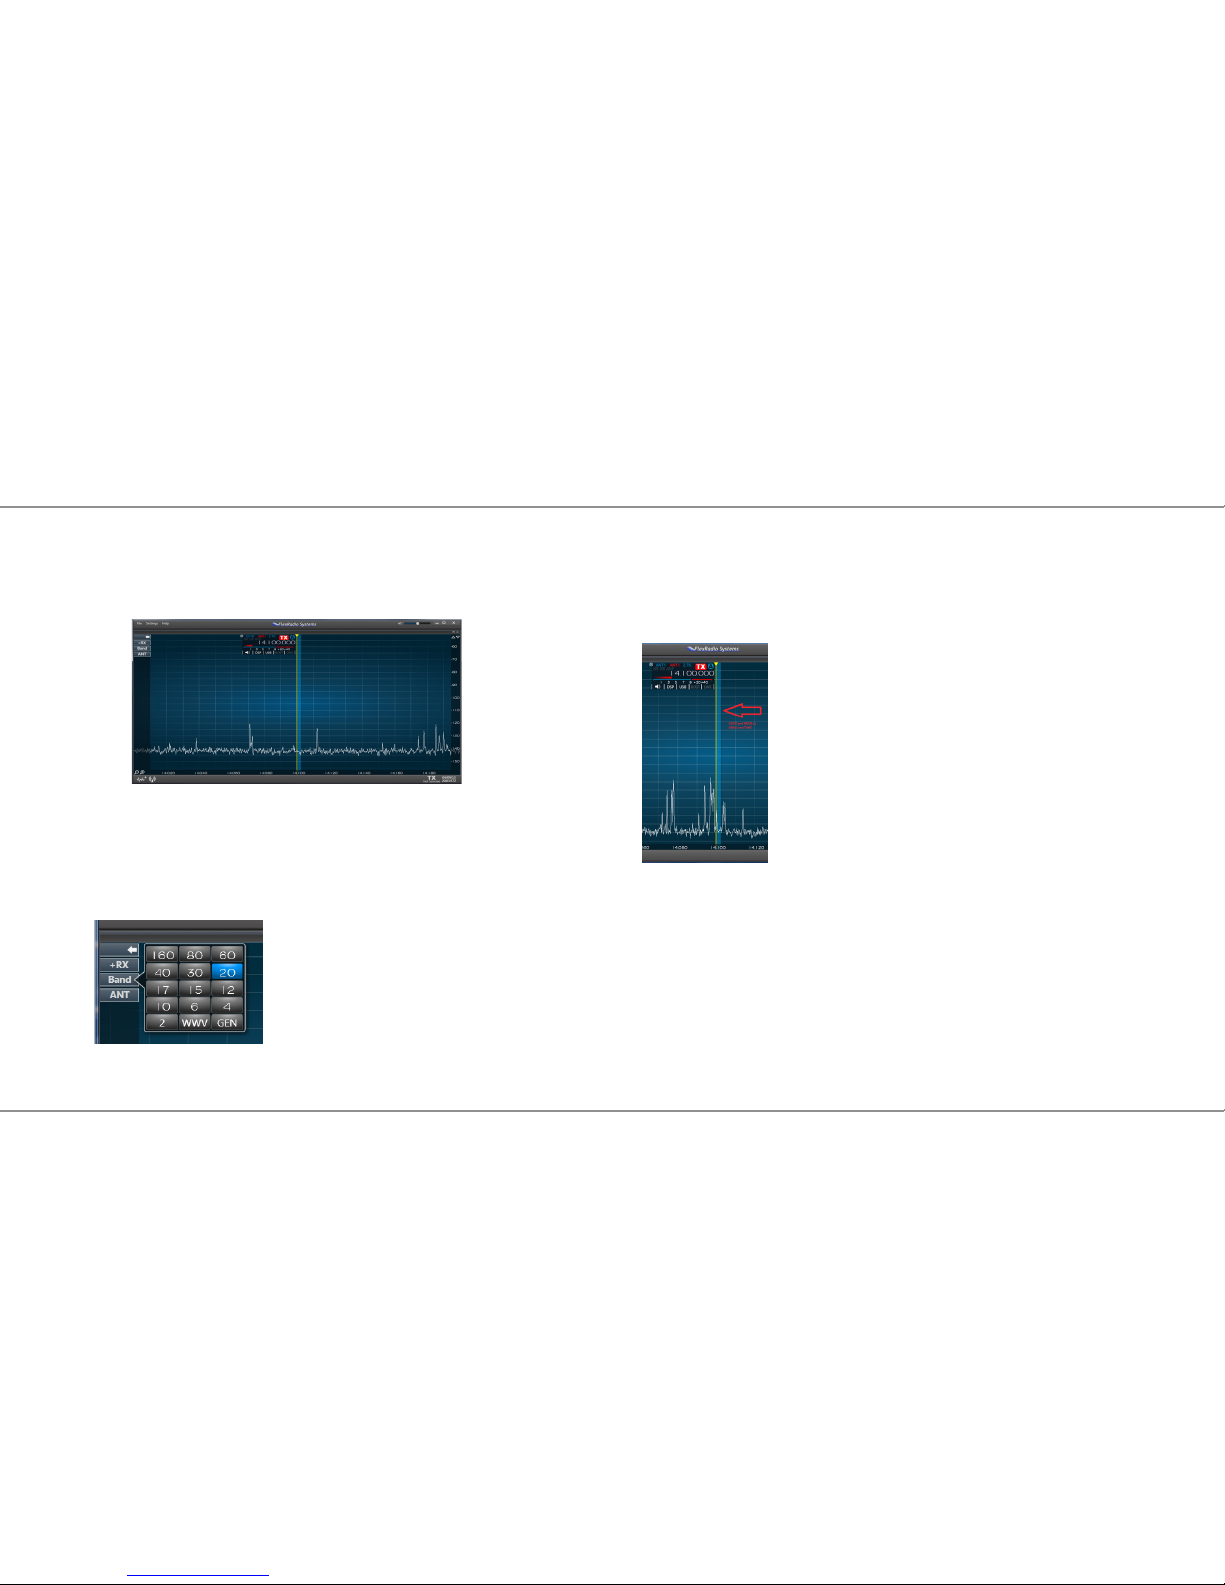
Step 4. Operating Your FLEX-6700R Receiver
The SmartSDR console will be displayed with one (1) High
Denition Panadapter Spectrum Display and one Slice
Receiver tuned to 14.100.000 MHz as shown below.
To TUNE the receive slice to another frequency:
1.) Click the BAND button on the left side of the panadapter
then click the desired BAND.
2.) (PAN-EDGE-TUNE) Hover your mouse over the blue bar
in the panadapter window. Using the left mouse button, click
and hold the button while dragging the slice to the desired
frequency. Note that as you approach the edge of the
displayed panadapter, it will begin to PAN so you can see the
desired frequency segment.
3.) (DIRECT FREQUENCY INPUT) Hover your mouse over
the Frequency numbers in the Slice Panel. Click once with
the left mouse button to highlight the frequency. Type in the
desired frequency and press ENTER. Note that you can enter
frequency in kHz or MHz directly. If the entered frequency is
beyond the displayed panadapter screen an OFF-SCREEN
indicator will be displayed on the panadapter display. Simply
double-click on the indicator to re-center the panadapter to
your desired frequency.
Page 17

To set the operating MODE:
1.) On the slice receive control panel, left click current MODE
(USB, LSB, CW, AM, FM, DIGU, DIGL).
2.) Left Click the left-most MODE and select your desired
active MODE. Note that you can select and display 3
additional favorite MODEs. Just right-click the displayed
MODE and choose your favorite.
Congratulations! Your FLEX-6700R Signature Series SDR
should be operational and receiving signals. Please refer
to the FLEX-6000 Signature Series Hardware Manual and
SmartSDR Software Manual, which are available for this
radio, for instructions and additional information regarding the
operation of your FLEX-6000 Signature Series SDR.
NOTES:
Page 18
Waste Disposal
The device may not be disposed of with household waste! This
device complies with EU Directive on Electronic and electrical
equipment (WEEE regulation) and will therefore not be disposed of with household waste. Dispose of the device at your
local collection points for electronic equipment!
Federal Communication Commission Interference
Statement
FlexRadio Systems
FLEX-6700R
This equipment has been tested and found to comply with
the limits for a Class B digital device, pursuant to Part 15
of the FCC Rules. These limits are designed to provide
reasonable protection against harmful interference in a
residential installation. This equipment generates,uses and
can radiate radio frequency energy and, if not installed and
used in accordance with the instructions, may cause harmful
interference to radio communications. However, there is
no guarantee that interference will not occur in a particular
installation. If this equipment does cause harmful interference
to radio or television reception, which can be determined by
turning the equipment off and on, the user is encouraged to try
to correct the interference by one of the following measures:
• Reorient or relocate the receiving antenna.
• Increase the separation between the equipment and
receiver.
• Connect the equipment into an outlet on a circuit different
from that to which the receiver is connected.
• Consult a FlexRadio dealer or technician for help.
FCC Caution: Any changes or modications not expressly
approved by the party responsible for compliance could void
the user’s authority to operate this equipment.
This device complies with Part 15 of the FCC Rules. Operation
is subject to the following two conditions: (1) This device
may not cause harmful interference, and (2) this device must
accept any interference received, including interference that
may cause undesired operation.
Page 19
"CE" marked devices meet the essential requirements of
Directive 1999/5/EC
European Union Declaration of Conformity
FLEX-6700R Receiver
According to Radio and Telecommunications Terminal Equip-
ment Directive, (R&TTE) 1999/5/EC - using the Standards:
EN 301 48901 v1.9.2 (2011-09)
EN 60950-1 : (2005)
EN 60950-1 : (2006)
Type of Equipment: Information Technology Equipment
WE THE UNDERSIGNED HEREBY DECLARE THAT THE EQUIPMENT
SPECIFIED ABOVE CONFORMS TO THE ABOVE STANDARDS.
FlexRadio Systems Dates of Testing:
April 2, 2015 on the FLEX-6700R
FlexRadio Systems, 4616 W. Howard Lane, Ste. 1-150, Austin,
Texas 78728 U.S.A.
Person Responsible: Gerald Youngblood (Signature on le)
Page 20
FlexRadio Systems - U.S.A
4616 W. Howard Lane, Ste. 1-150
Austin, TX 78728
U.S.A.
Phone: 512-535-4713 / Fax: 512-233-5143
Email: sales@exradio.com
support@exradio.com
FlexRadio Systems Representative for EU
SDR-Funktechnik GmbH
Godeke-Michels-Weg 12
D-21762 Otterndorf
Germany
Phone: (+49) 4751 900501 / Fax: (+49) 4751 998569
Email: [email protected]
www.exradio.com
Software Defined Radios
FlexRadio Systems
®
 Loading...