

Page 1
Version 2.0/12
®
www.flexradio.com
[email protected] 512-535-4713
©2011. All rights reserved. FlexRadio Systems is a registered trademark.
Flex-1500 and Excitement to go! are trademarks of FlexRadio Systems.
Specifications are subject to change without notice. Personal computer
and monitor required but not included.
Page 2

F1.5K-Q2.0/12 ` © 2011 FlexRadio Systems
Introduction
Important Notice – Read Before Operating This Unit
i - Information
Δ - Caution
! – WARNING!
i - This radio has been configured to operate in your country according to your nation's
regulations. It will operate on frequencies which are not allowed for public use. You are
required to possess a valid amateur radio license of an appropriate class from your government
to transmit on amateur radio frequencies.
i - Except as described in this Quick Start Guide and the included FLEX-1500 Owner’s Manual,
no other operation or modification of this radio is allowed. Any other use or modification
(including software changes that affect operational characteristics) will void the manufacturer’s
warranty.
! – This unit is NOT A TOY. It must not be handled by children nor placed/operated within
reach of children.
! – Do not leave packing material for this unit unattended. It may be harmful to children if
misused.
! – This unit contains small parts that could be a choking hazard to small children. Do not
leave accessories unattended.
Δ - This unit must only be opened and/or serviced by a qualified technician.
! – Do not operate this unit in potentially explosive environments.
Δ - Do not operate this unit in areas of extreme humidity.
Δ - Avoid operating this radio in direct sunlight or other areas of extreme heat, excessive
vibration, or mechanical force.
i - Ensure proper ventilation around the radio.
! – Never attempt to insert wires or any tools into the interior of this unit during operation.
This may cause fire or electric shock.
! – This unit must only be operated with the electrical power described in this Quick Start
Guide. NEVER CONNECT THE +13.8VDC POWER CONNECTOR DIRECTLY TO AN AC OUTLET. This
may cause a fire, injury, or electrical shock.
Δ - This unit generates Radio Frequency (RF) energy. Use caution and observe proper safety
practices regarding your system configuration.
! – Never connect or disconnect antennas while in TRANSMIT mode. This may cause electrical
shock or RF burns to your skin.
Δ - When using earphones, use caution when adjusting the volume to prevent any harm to
your hearing.
i - If you operate this unit in conjunction with an appropriate linear amplifier, always make
sure your output power is below the maximum input limits of the amplifier. Consult your
amplifier owner’s manual for proper connection and operation.
Δ - If this unit is intended for use in commercial applications, special safety regulations and
cautions may apply to prevent accidents.
Δ - If any defect, abnormal result, or other observations occur that are not covered by this
Quick Start Guide or the Owner’s Manual; immediately cease operation and contact the
manufacturer or local distributor for operational advice or repair of the unit.
i - Please study the complete Quick Start Guide and Owner’s Manual. These documents
contain important information regarding the safe operation of this unit. If you have any
questions, please contact the manufacturer or local distributor for further information.
Page 3

F1.5K-Q2.0/12 ` © 2011 FlexRadio Systems
Introduction
Thank you for choosing the FlexRadio Systems® FLEX-1500™
transceiver. The FLEX-1500 is a highly versatile, ultra-compact
transceiver, designed to meet your demanding Amateur Radio
needs. The FLEX-1500 transceiver powered by our World
Famous PowerSDR™ operating software create the perfect
Software Defined Radio Environment
Although setting up the FLEX-1500 is possibly a little different
than you may have experienced with a traditional transceiver, it
is not any more difficult, as this Quick Start Guide will
demonstrate.
The Quick Start Guide is designed to get you on the air with
minimum effort. To do this, we assume a basic HF installation
and do not delve into all the FLEX-1500's and PowerSDR's many
possibilities. For that, we urge you to review the FLEX-1500
Owner's Manual.
To get your FLEX-1500 on the air you will need:
The two cables and CD-ROM that came with your FLEX-
1500.
An HF-Antenna or dummy load.
A good RF ground.
Powered (computer type) speakers, or headphones.
A stabilized 13.8V DC power supply, capable of 1.5A
continuous, 2A peak duty.
A Windows® PC, with a USB 2.0 port.
A microphone/PTT and/or CW paddles/keyer/straight key.
If you run into any trouble during the set-up process, please:
Recheck your steps.
Review the Owner's Manual.
Check our website http://www.flexradio.com/ for our
many available support options.
Follow these 4 steps to get on the air.
Make the physical connections to your FLEX-1500.
Install the PowerSDR software.
Power-up your FLEX-1500 to complete the driver installation.
Select the correct audio input and output ports using
PowerSDR's Mixer and select the correct antenna ports with the
Antenna Form.
Step 3: Power-Up the FLEX-1500™
Step 1: Hook Up the FLEX-1500™
Step 2: Install PowerSDR™
Step 4: Configure PowerSDR™
Page 4
F1.5K-Q2.0/12 © 2011 FlexRadio Systems
Step 1: Hook Up the FLEX-1500™
In Step 1 you will make all the physical connections required for
basic HF operation of the FLEX-1500.
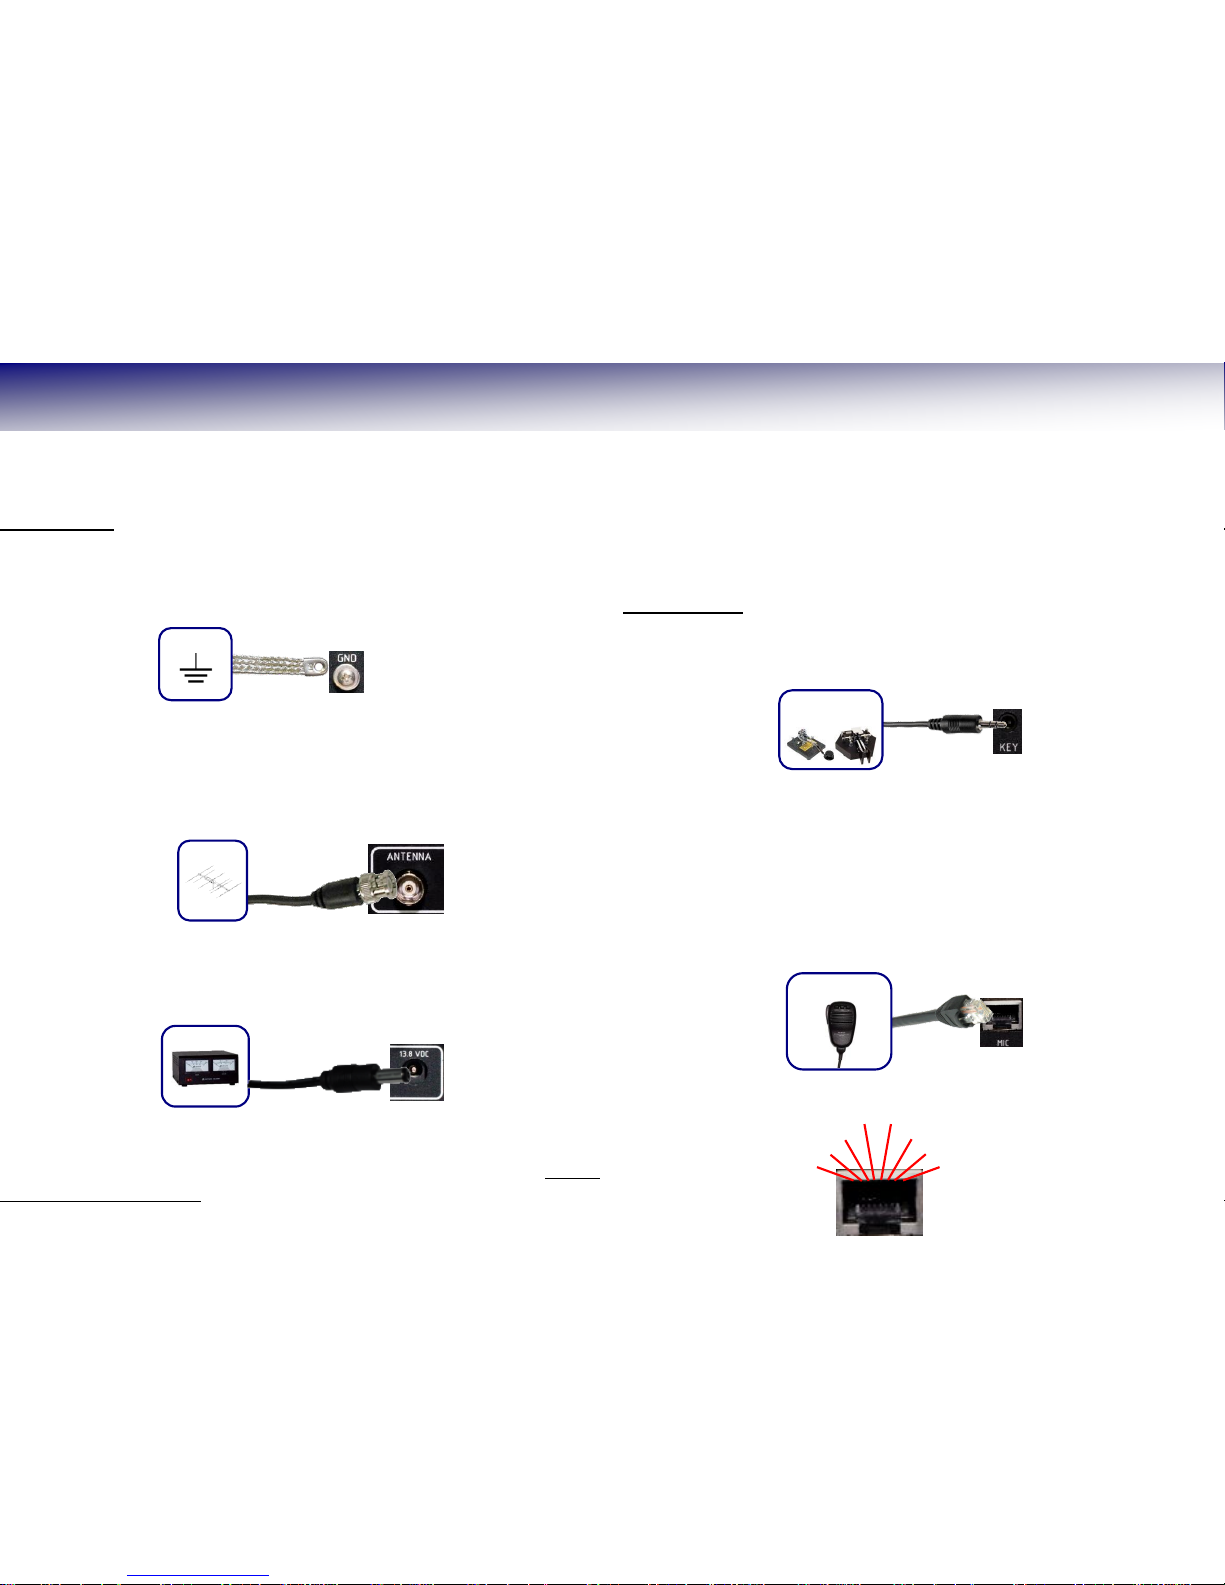
Back Panel
A: Ground
Connect the terminal marked GND to your central station
ground. NOTE: Make your GROUND connection FIRST!
B: Antenna
Connect an HF antenna with a 50 Ohm impedance or a dummy
load to the BNC antenna port marked ANTENNA.
C: Power Supply
Use the power supply cable that came with your FLEX-1500 to
hook up a stabilized 13.8V DC power supply to the jack marked
13.8 VDC .
The power supply must be rated for 1.5A continuous duty, 2A
max. The power cable is unterminated at one end to allow you
to attach your own connector(s) if needed. Make sure the black
wire with white stripe goes to the positive and the black wire to
the negative terminal of your power supply.
NOTE: If your power source is not current limited, you
must add a 5amp fuse (not included) to the power supply
cable.
DO NOT POWER UP THE TRANSCEIVER AT THIS TIME.
Front Panel
D: Paddles/Keyer/Key
Connect your CW paddles, keyer or straight key to the jack
marked KEY using a 1/8” stereo (TRS) plug.
For paddles or a keyer, connect the Tip to DOT, Ring to DASH
and Sleeve to common. For a straight key, connect Tip to KEY
and Sleeve to common. Do not connect the Ring.
The PowerSDR Keyer is configured for iambic paddles by default. To change
this, please see the FLEX-1500 Owner's Manual.
E: Microphone/PTT
Connect your microphone/PTT to the RJ-45 MIC jack.
The pin-out of the microphone jack is as follows:
Power Cable
(included)
Power
Supply
13.8V, 1.5A
HF
Antenna
50 Ω
Ground
Paddles, Keyer
or Straight Key
Microphone/PTT
6 PTT
8 N.C.
7 Chassis Ground
MIC (-) 4
N.C. 1
N.C. 2
+5VDC 3
5 MIC (+)
Page 5
F1.5K-Q2.0/12 © 2011 FlexRadio Systems
Step 1: Hook Up the FLEX-1500™
Cont i n u e d
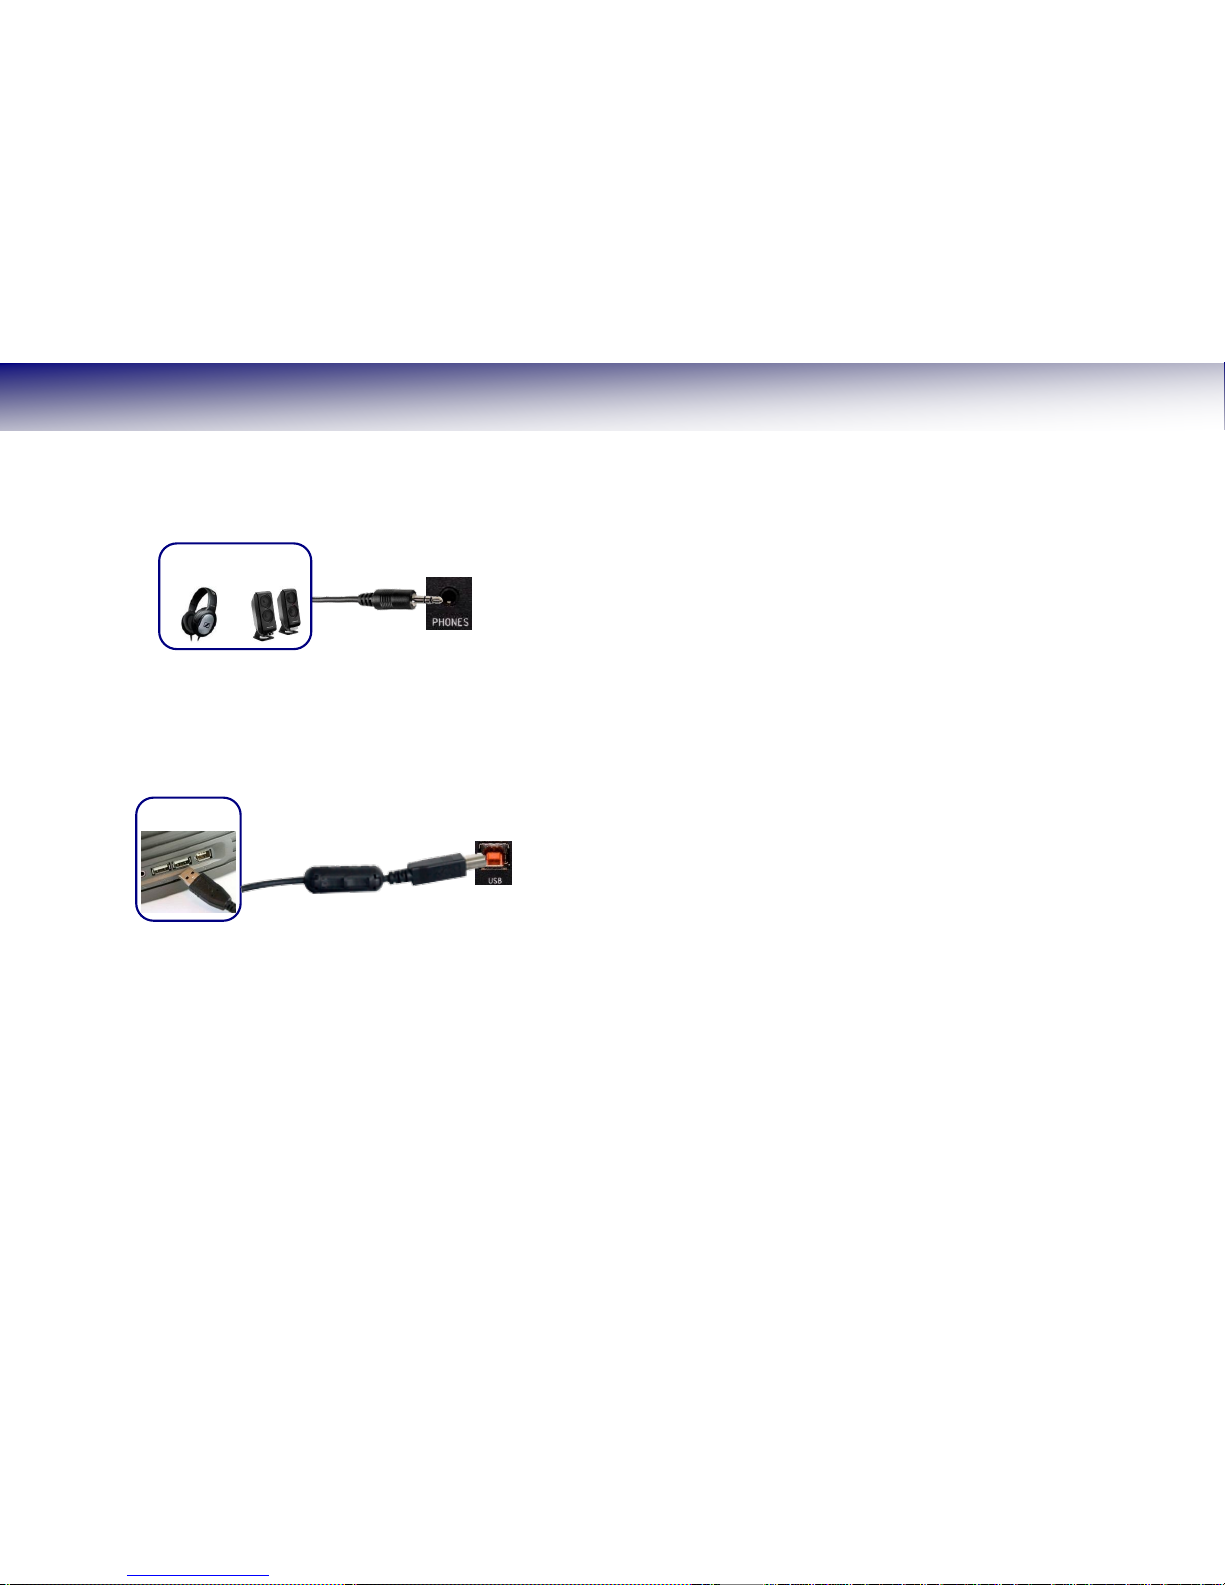
F: Phones
Connect either headphones or powered speakers, e.g. a pair of
computer speakers, to the jack marked Phones using a 1/8”
stereo plug.
G: USB
Locate the USB cable that came with your transceiver. Connect
the end with the ferrite core to the jack marked USB. Connect
the other end to the USB 2.0 jack on your computer. The plugs
should insert easily with no extra force.
Proceed to Step 2: Install PowerSDR on the next page.
1/8” Stereo
Audio Plug
Amplified
Speakers
Headphones
USB Cable
(included)
Computer
USB Port
Page 6
F1.5K-Q2.0/12 ` © 2011 FlexRadio Systems
Step 2: Install PowerSDR™
In Step 2 you will run the PowerSDR Setup application to install
the software.
Insert the CD-ROM that came with your FLEX-1500 and
PowerSDR Setup will automatically run. Alternatively,
PowerSDR Setup can be downloaded from the FlexRadio
website:
http://www.flexradio.com/
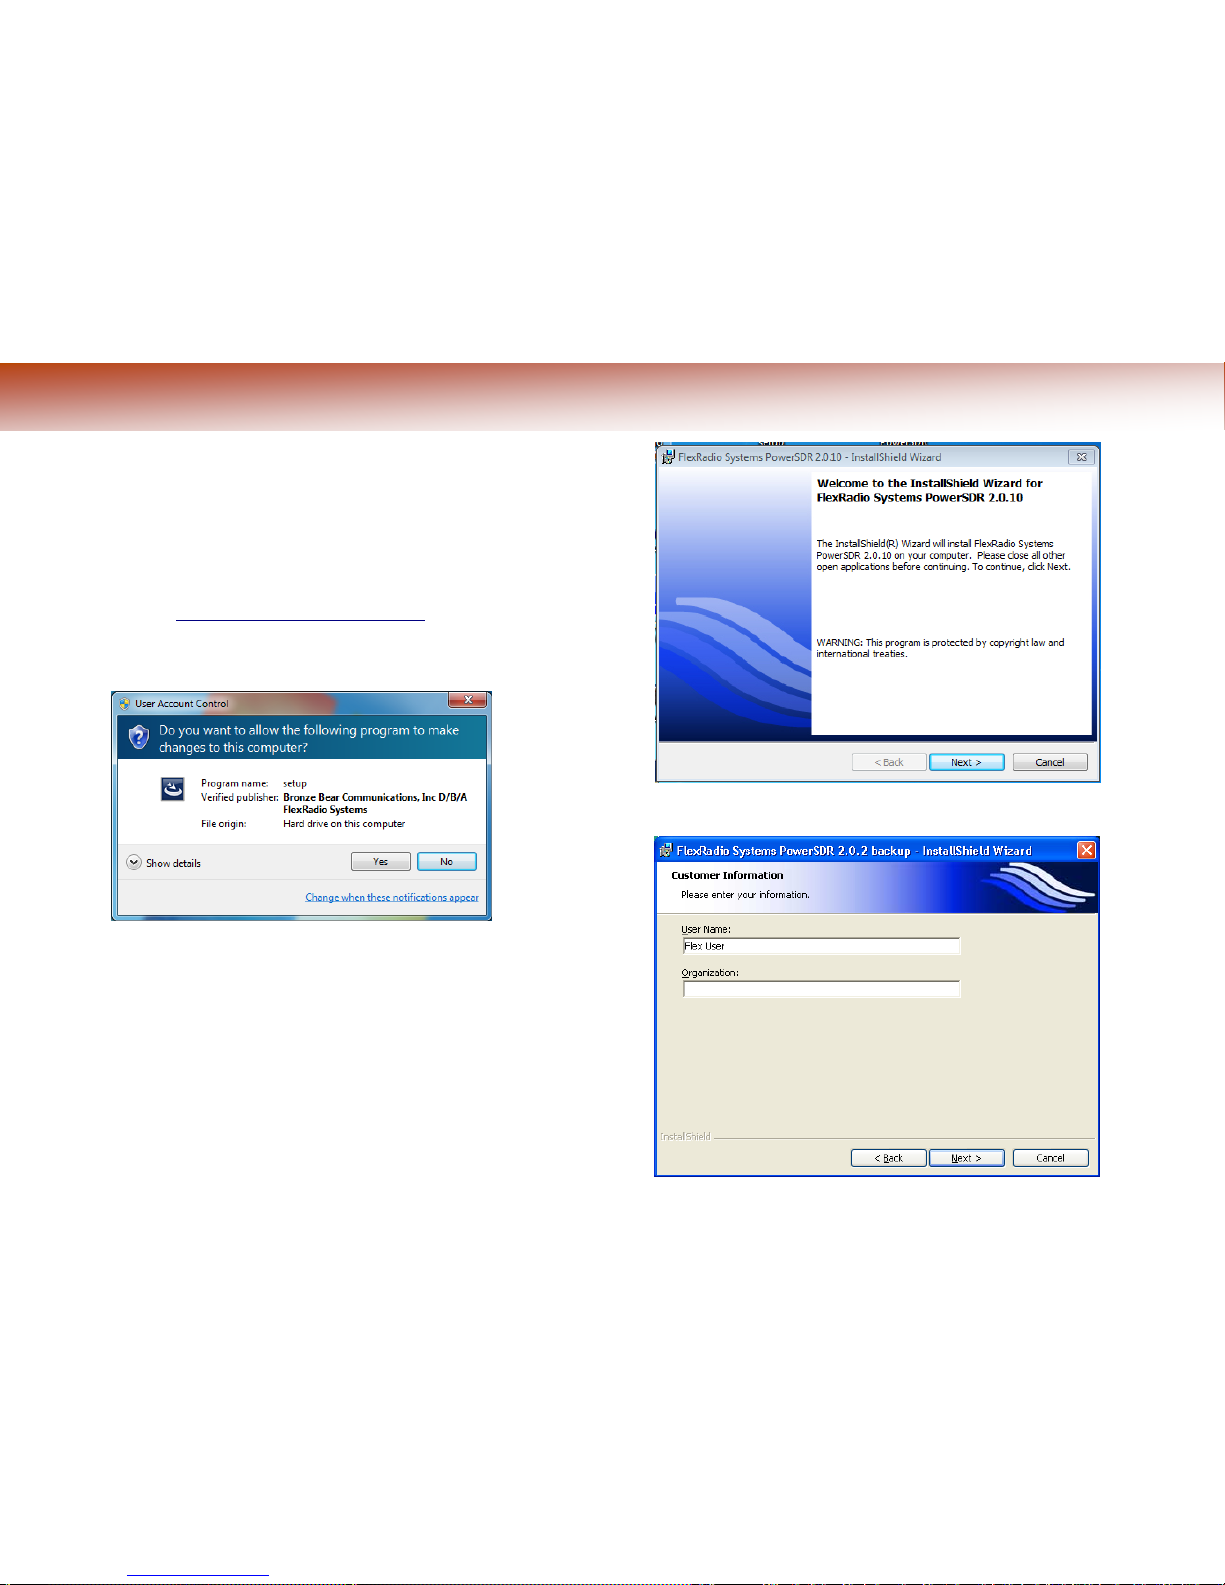
If you see a User Account Control screen (Windows Vista or
Windows 7), click Yes.
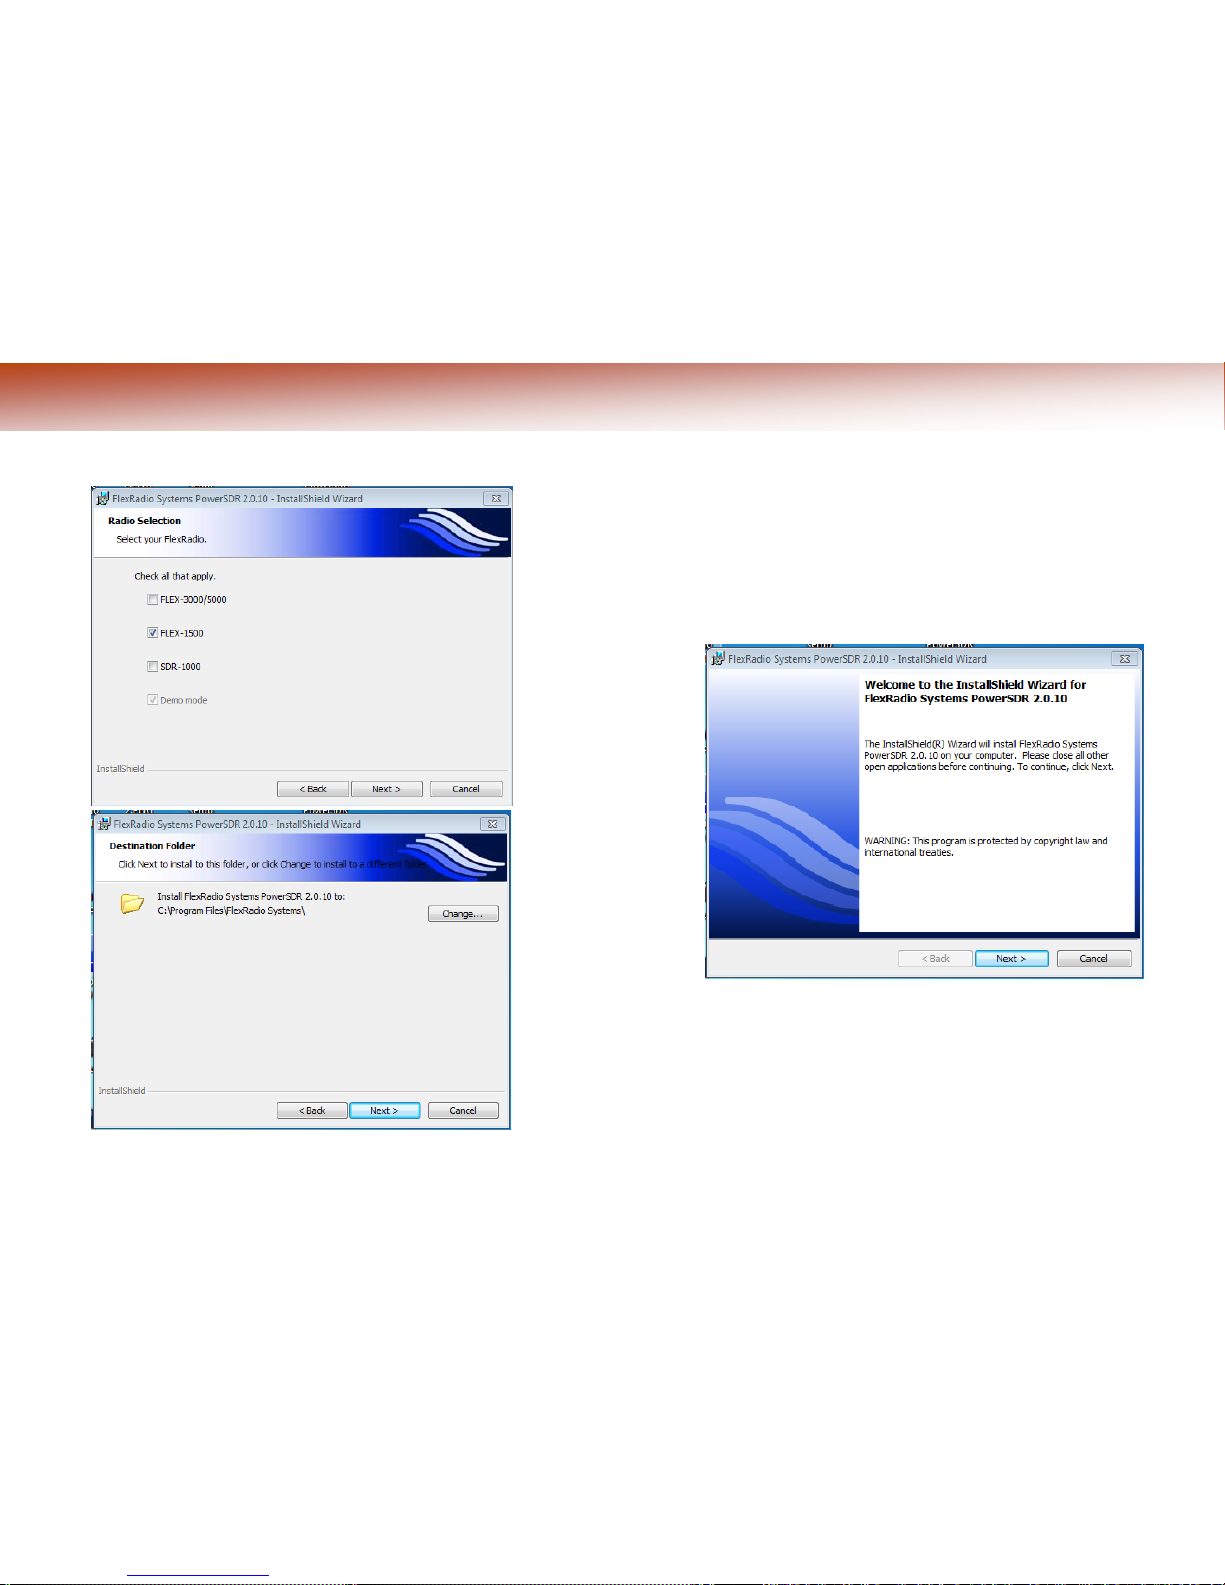
The FlexRadio Systems InstallShield Wizard will start with a
welcome screen:
Click Next and then click I accept twice for the two license
agreements. Enter your information and click Next:
Page 7
F1.5K-Q2.0/12 ` © 2011 FlexRadio Systems
Step 2: Install PowerSDR™
Cont i n u e d
Select FLEX-1500 as your radio type and click Next:
You can change the Installation Folder location by clicking the
“CHANGE…” button. Otherwise, click NEXT.
The InstallShield Wizard will now indicate that it is ready to
install. Click Install and the InstallShield Wizard will proceed to
install all the software.
If any security dialog boxes appear (Windows Vista or Windows
7), click Install to proceed.
Finally click Finish to complete the installation:
Proceed to Step 3: Power-Up the FLEX-1500 on the next
page.
Page 8
F1.5K-Q2.0/12 ` © 2011 FlexRadio Systems
Step 3: Power-Up the FLEX-1500™
In Step 3 you will power-up your FLEX-1500 to complete driver
installation.
Power up your FLEX-1500: press and latch the Power button
(the LED will light up). What happens next depends on your
operating system.
Windows® Vista® & Windows® 7®:
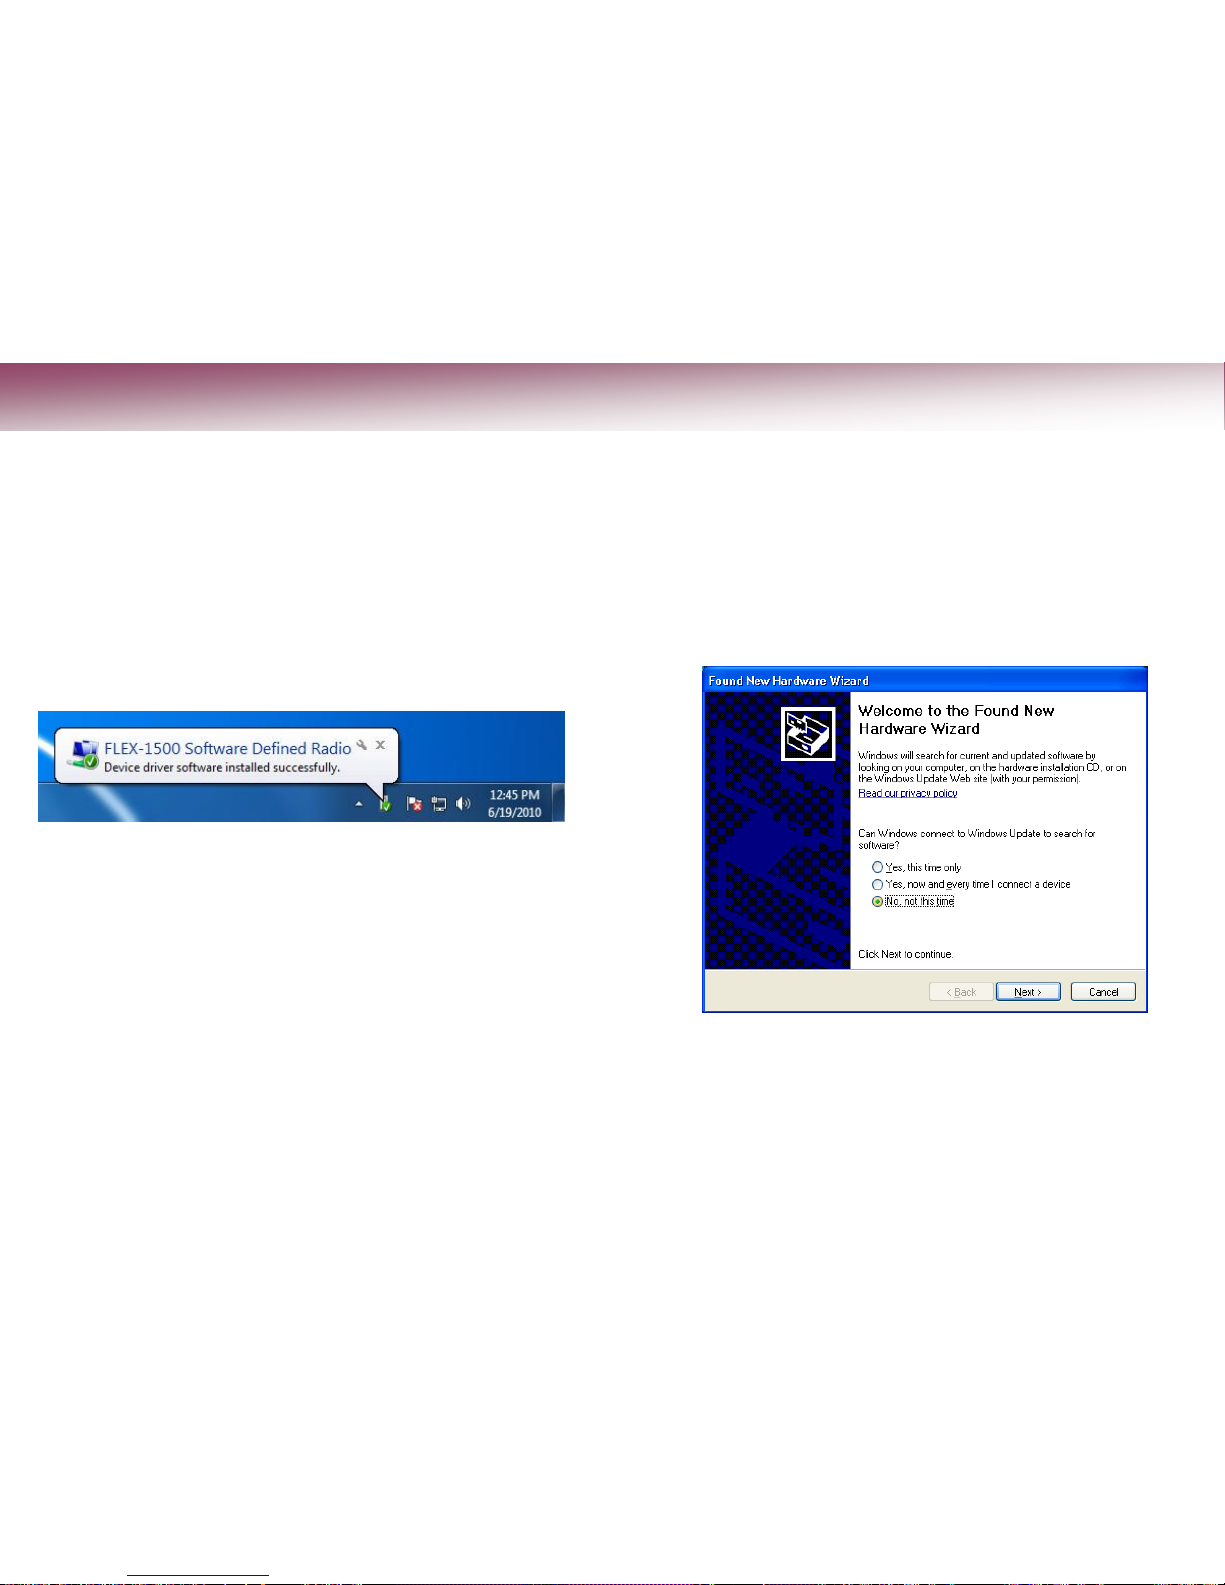
Windows will indicate that it recognizes the FLEX-1500 and load
the drivers in the background. When completed, a notification
will appear on the task bar indicating successful installation:
Proceed to Step 4: Configure PowerSDR on the next
page.
Windows® XP®:
(NOTE: Depending on your PC/software, you may be
asked to install up to 5 drivers. Repeat the following
steps up to 5 times. Please complete every step as
shown below.)
Your computer will detect the FLEX-1500 and display the Found
New Hardware Wizard Welcome screen:
Select No, not at this time and click Next.
[continued on next page]
Page 9
F1.5K-Q2.0/12 ` © 2011 FlexRadio Systems
Step 3: Power-Up the FLEX-1500™
Cont i n u e d
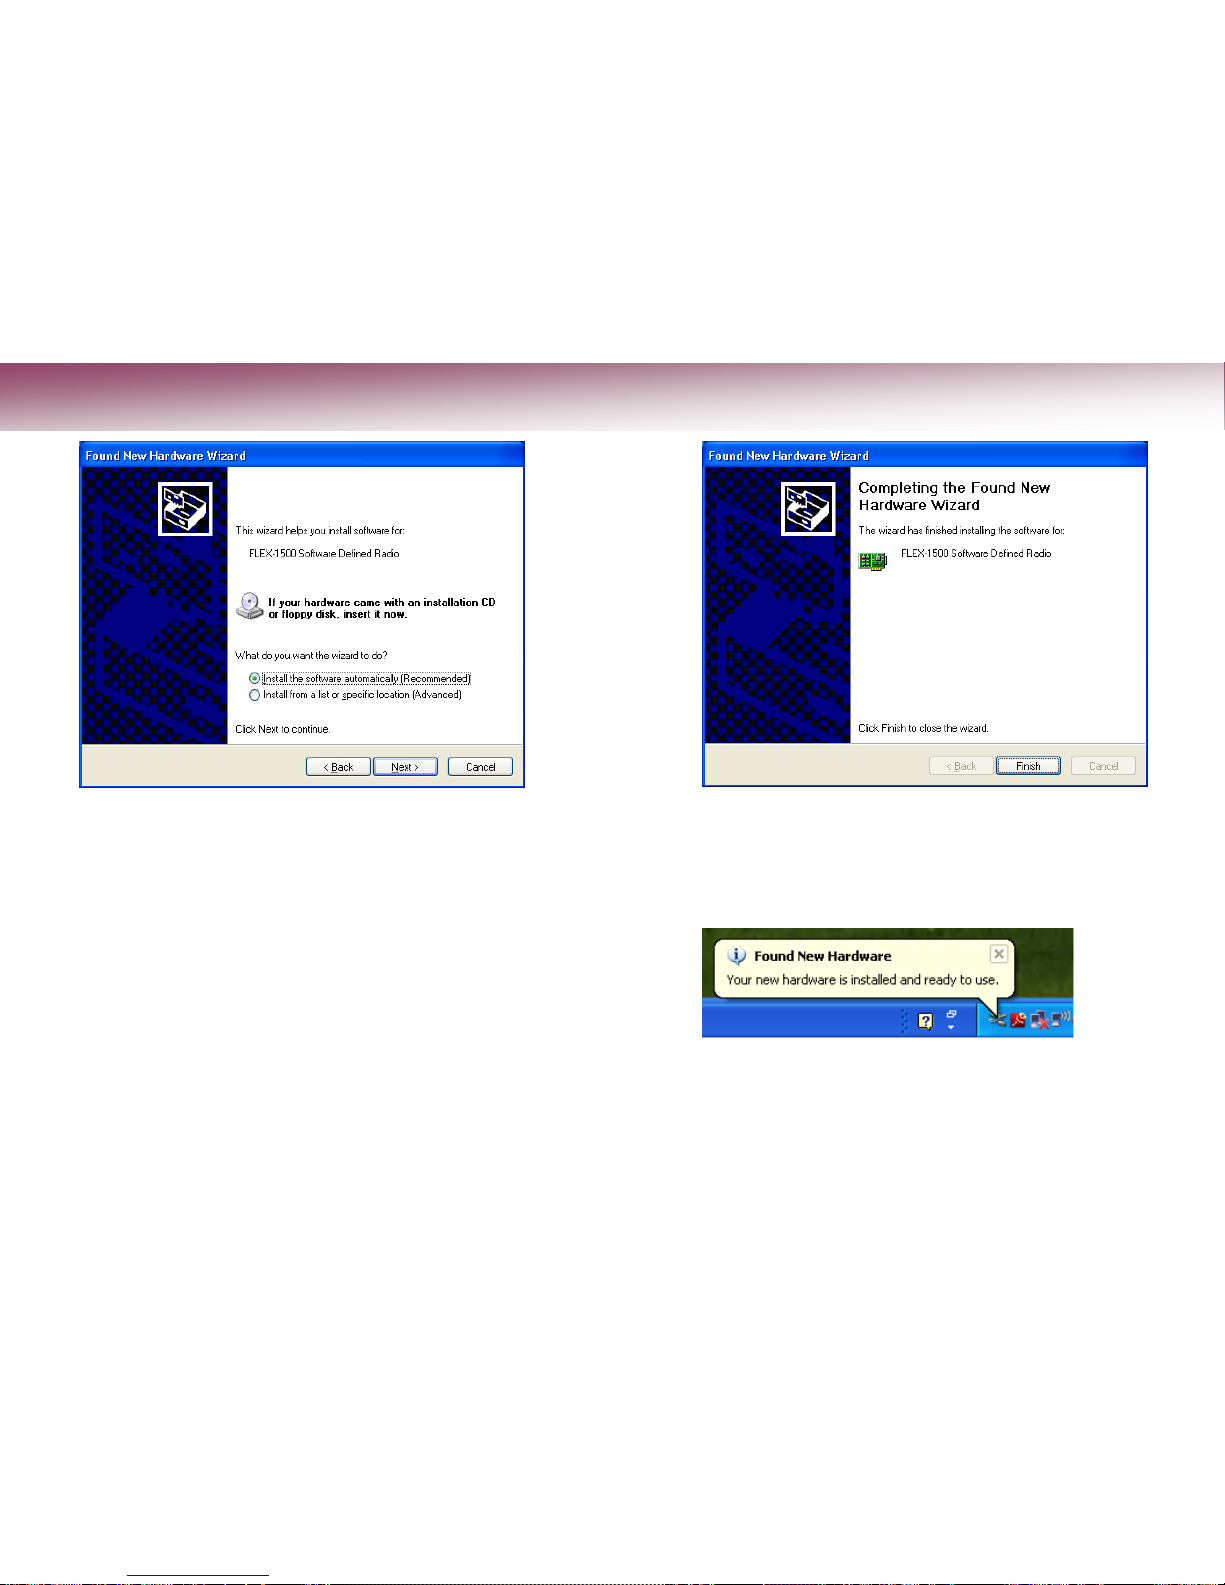
Select Install the software automatically (Recommended)
and click Next. The Wizard will now find and install the FLEX1500 driver, after which it will display an installation complete
screen:
Click Finish to complete the installation of this driver.
Repeat this process until ALL drivers are installed. When all
drivers are installed you will see this in the lower right portion
of your PC screen:
Proceed to Step 4: Configure PowerSDR on the next
page.
Page 10
F1.5K-Q2.0/12 ` © 2011 FlexRadio Systems
Step 4: Configure PowerSDR
Cont i n u e d
A: Run the PowerSDR Setup Wizard
Make sure your FLEX-1500 is powered up and run PowerSDR,
either by double-clicking on the desktop icon you created
during installation, or clicking on Start, then All Programs,
FlexRadio Systems, FlexRadio Systems Software and
select the PowerSDR version you just installed (if this is not
the first time you have installed PowerSDR, you may have
multiple versions on your computer).
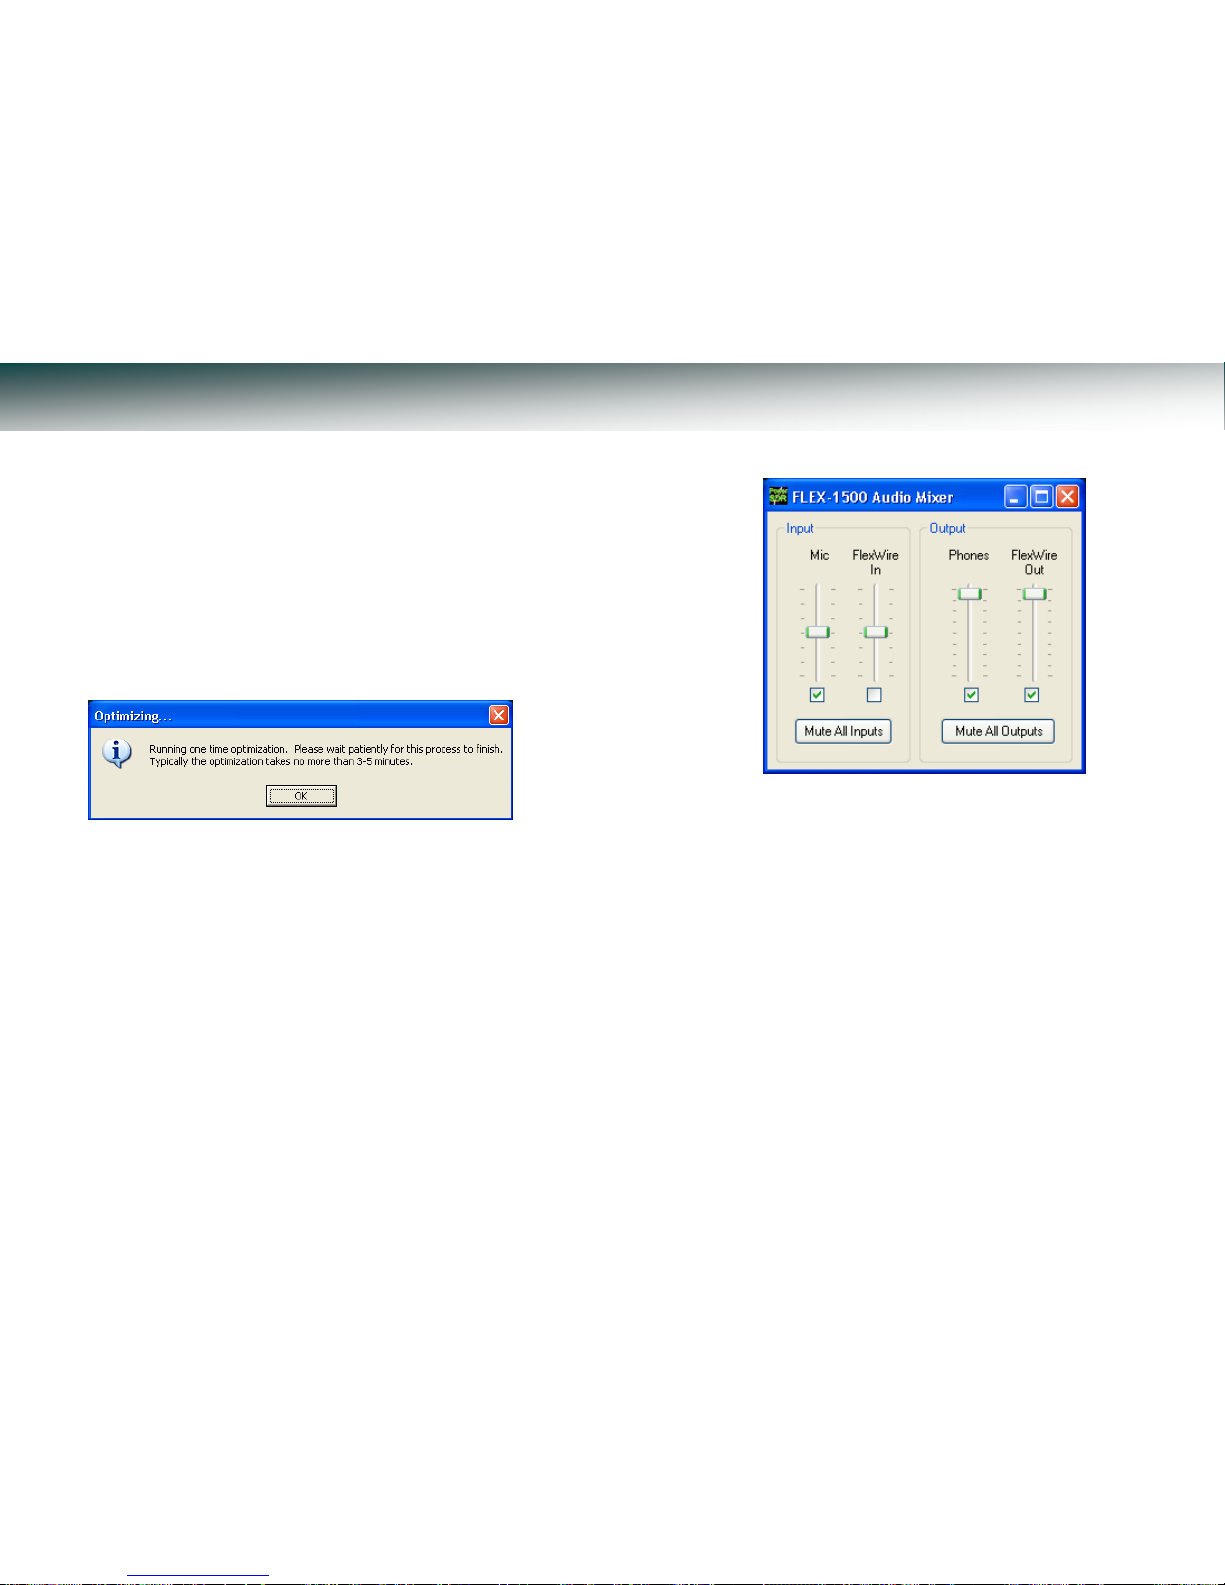
The first time PowerSDR starts up it will run an optimization
routine. Click OK and let the routine run.
Next the PowerSDR Setup Wizard will start and a Mobile
Warning screen will open. Click Continue.
B: Configure the FLEX-1500 Audio Mixer
Your FLEX-1500 has two inputs (MIC, FlexWire In) and two
outputs (Phones, FlexWire Out). The Audio Mixer is used to
select the ones you are using and set their audio levels (just
like with a sound card).
Click Mixer in the menu bar of PowerSDR. Check Mic as the
Input to select the front Mic jack. Check Phones to select the
front Phones jack.
Click the red X at the top right to close.
C: Configure the Antenna Selection
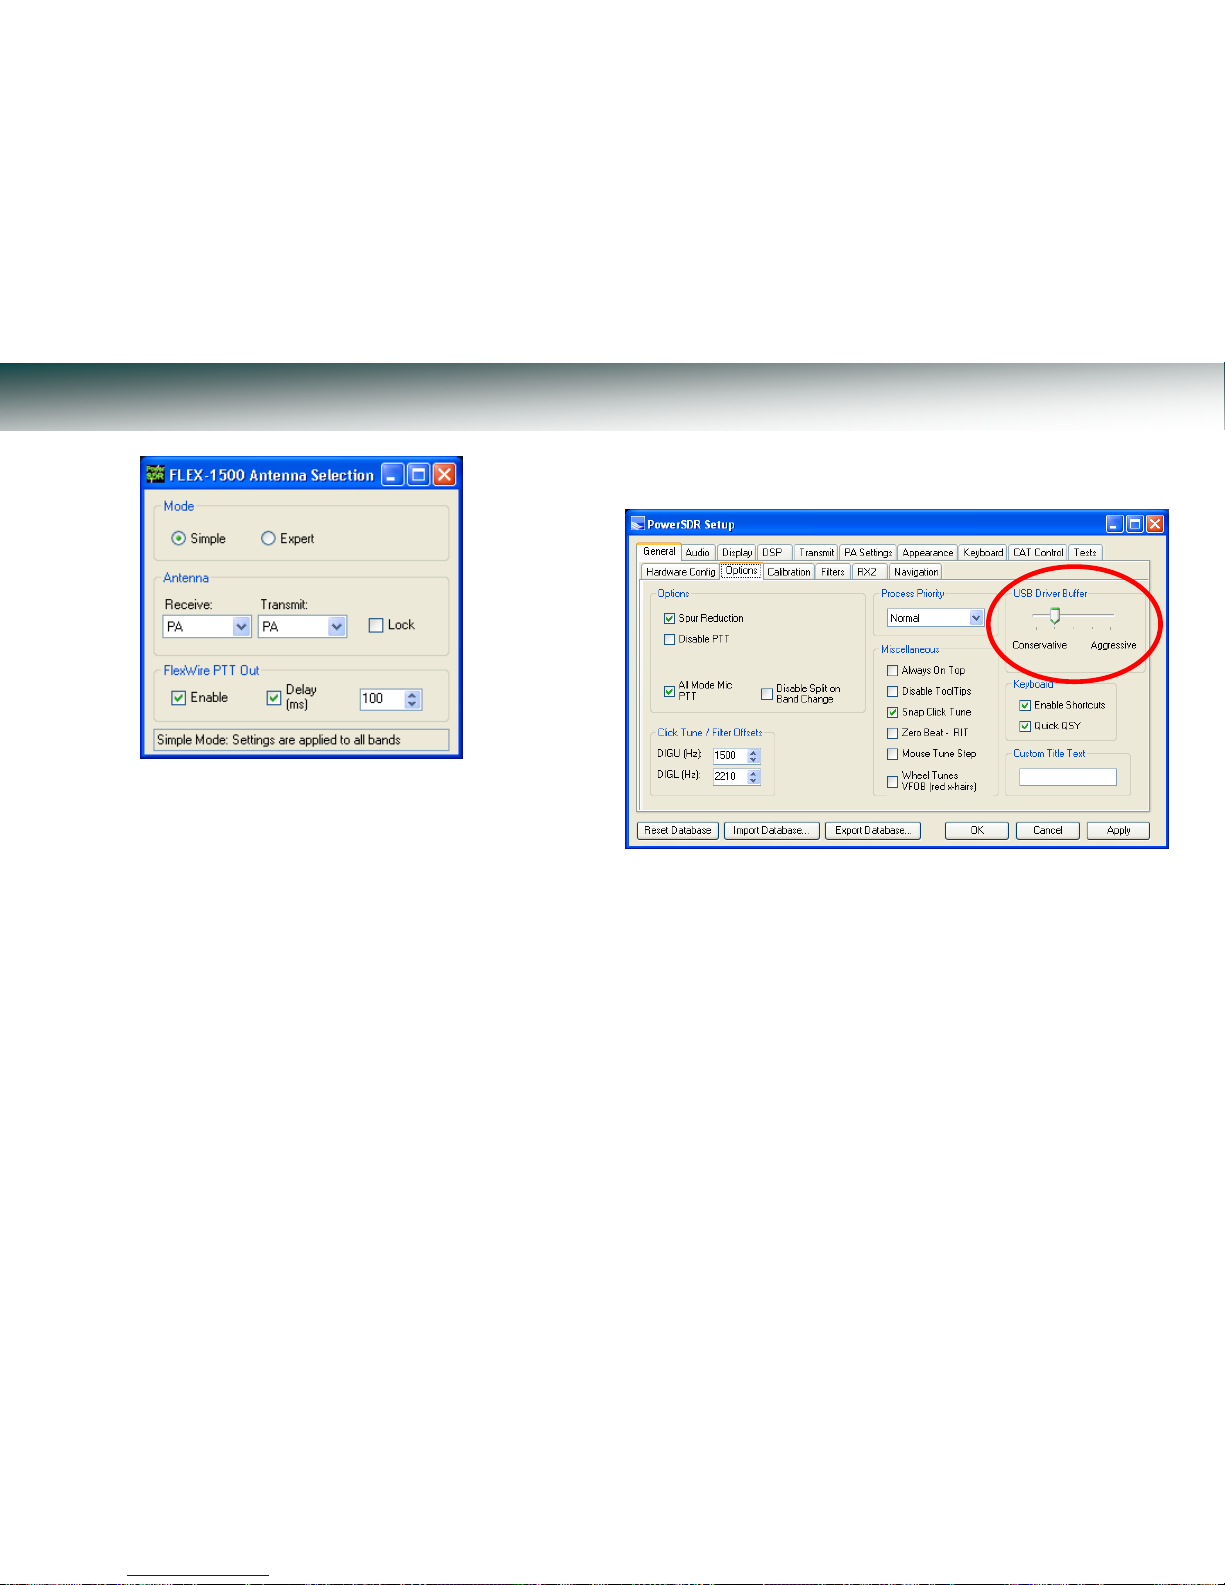
Click Antenna in the menu bar of PowerSDR to open the
Antenna Selection window. Set the Receive and Transmit
Antenna both to PA.
Page 11
F1.5K-Q2.0/12 ` © 2011 FlexRadio Systems
Step 4: Configure PowerSDR
Cont i n u e d
Click the red X at the top right to close
D: Click Start
Congratulations! You've now completed all the steps required to
set up your FLEX-1500. In PowerSDR, click the Start button at
the top left to operate your FLEX-1500.
E: (OPTIONAL) Configure USB Driver Buffer control
The USB Driver Buffer control allows optimization of the low
level USB stream. This control is found on the
Setup/General/Options form as seen below. Note that
PowerSDR must be in standby in order to change this control.
The default setting has been chosen to allow successful startup
of PowerSDR on most machines but may not provide optimal
performance on your specific PC. More aggressive settings
reduce latency and improve keying performance in CW. More
conservative settings will allow lower performing USB
controllers and/or CPUs to function smoothly. Choose the most
aggressive setting that provides stable operation without
popping or distortion of the received signal.
Click the red X at the top right to close.
This Quick Start Guide provides only the basic steps to
set up your FLEX-1500. For more information, you are
referred to the FLEX-1500 Owner's Manual, which can be
found in the Docs folder on the CD-ROM that came with
your transceiver.
Page 12
F1.5K-Q2.0/12 ` © 2011 FlexRadio Systems
“CE" marked devices meet the essential requirements of Directive 1999/5/EC.
The system is to be operated in accordance with the laws of the telecommunications regulatory agency in the
country of use. A license is required to use this equipment, and the operator must comply with the national
frequency allocations for the county of use. Also see the warning on page 2 of this guide.
European Union Declaration of Conformity
Flex-1500 Amateur Radio Transceiver Series
According to Radio and Telecommunication Terminal Equipment Directive, (R&TTE) 1999/5/EC – using the Standards:
EN 301 489-1 v1.8.1 (2008-04)
EN 301 489-15 v1.2.1 (2002-08)
EN 301 783-1 v1.1.1 (2000-09)
EN 301 783-2 v1.2.1 (2010-04)
EN 60950-1 : 2001
TYPE OF EQUIPMENT: Base Station
EQUIPMENT CLASS: B
WE, THE UNDERSIGNED HEREBY DECLARE THAT THE EQUIPMENT SPECIFIED ABOVE CONFORMS TO THE ABOVE STANDARDS.
FlexRadio Systems Date of testing: May 3, 2010
FlexRadio Systems
13091 Pond Springs Road, Suite 250
Austin, TX 78729
Person Responsible: Gerald Youngblood (Signature on file)
Waste Disposal
The device may not be disposed of with household waste!
This device complies with EU Directive on Electronic
and electrical equipment (WEEE regulation) and will
therefore not be disposed of with household waste.
Dispose of the device to your local collection points
for electronic equipment!
 Loading...