

FLEXO Trim EAS 750F Operating Instructions Manual
73710612-07
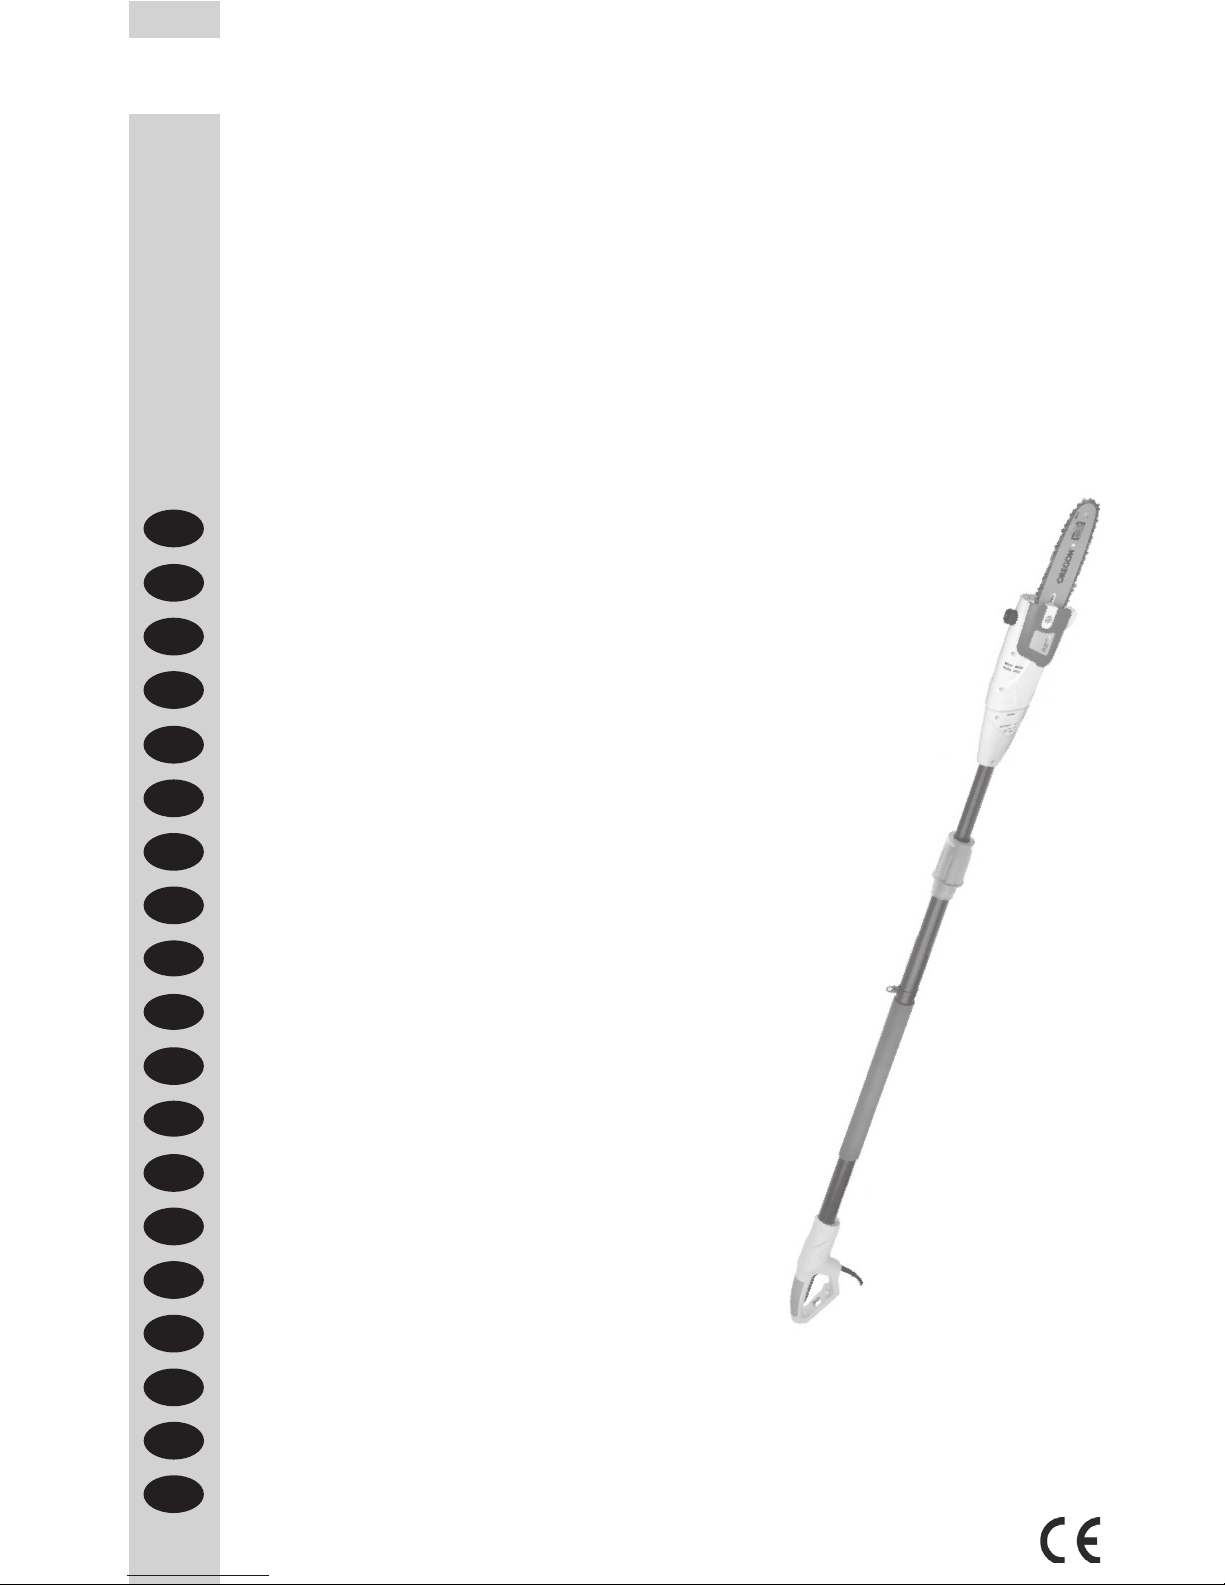
Elektro-Astsäge
Electric branch saw
Scie électrique à élaguer
Tagliarami elettrico
Motosierra eléctrica
telescópica de poda
Serra de desbaste eléctrica
Ηλεκτρικό Κονταροπρίονο
Elektrisk grensåg
Sähkökäyttöinen oksasaha
EAS 750F
Elektrikli Dal Testeresi
Elektrická prořezávací pila
Elektrická píla na konáre
Električna žaga za veje
Električna pila za grane
Elektromos ágfűrész
Електрически телескопичен трион
Електричний висоторіз
Podkrzesywarka elektryczna
Электрический высоторез
Instrucciones de Manejo - Traducción de las instrucciones de servicio originales
¡Lea las instrucciones de manejo antes de efectuar la puesta en marcha!
ES
Üzembe helyezés elõtt olvassuk el a kezelési útmutatót!
Kezelesi Utasistas - Az eredeti használati utasítás fordítása
HU
Návod k použití - Překlad původního návodu k použití
Pøed použitím je nutné si pøeèíst návod k použití!
CZ
Bruksanvisning - Översättning av den ursprungliga instruktionen
Läs bruksanvisningen före användning!
SE
Uputstvo za uporabu - Prijevod originalne upute za uporabu
Prije stavljanja u pogon proèitajte uputstvo za uporabu!
HR
Navodila za uporabo - Prevod originalnega navodila za uporabo
Pred uporabo preberite navodilo za uporabo!
SI
Vor Inbetriebnahme Gebrauchsanweisung lesen!
Gebrauchsanweisung - Originalbetriebsanleitung
DE
Lue käyttöohjeet ennen käyttöä!
Käyttöohjeet - Käännös alkuperäisestä käyttöohjeet
FI
Kullanim Talımati - Den çeviri orijinal
Çaliätirmadan önce kullanma talimatxnx okuyunuz!
TR
Instruções de Serviço - Tradução do manual de instruções original
Antes da colocação em funcionamento leia o manual de instruções!
PT
Lire attentivement le mode d‘emploi avant chaquemise en service!
Manuel d’utilisation - Traduction du mode d’emploi d’origine
FR
Prima della messa in funzione leggere le istruzioni per l‘utilizzo!
Istruzioni per l’uso - Traduzione delle istruzioni per l’uso originali
IT
Інструкція з експлуатації - Переклад з оригінального посібника з експлуатації.
Перед використанням обов’язково прочитайте інструкцію з експлуатації!
UA
Инструкция за експлоатация - Превод на оригиналното ръководство за употреба
Прочетете инструкцията за експлоатация преди започване на работа!
BG
Operating Instructions - Translation of the original Operating Instructions
Read operating instructions before use!
GB
GR
ΟΔΗΓΙΕΣ ΧΡΗΣΕΩΣ - Μετάφραση των αυθεντικών οδηγιών λειτουργίας
Πριν από την έναρξη λειτουργίας διαβάζετε τις οδηγίες χειρισμού!
Návod na obsluhu - Preklad pôvodného návodu na použitie
Pred použitím prístroja si pozorne prečítajte návod na obsluhu.
SK
Instrukcja obsługi – Oryginalna instrukcja obsługi
Przeczytać przed użyciem!
PL
Руководство по эксплуатации - Перевод оригинального Руководства по эксплуатации
Прочитайте руководство перед использованием!
RU

12
13
A
1
1
1
3
2
10
5
6
4
12
9 13
14
7
8
2
3
15
11
16
2
4
5
6
7
8
9
2 mm
10

3
14
3
15
14
10
12
13
a
b
c
11

DE | Gebrauchsanweisung
1
Elektro-Astsäge EAS 750F
Originalbetriebsanleitung
Inhaltsverzeichnis
1. Bestimmungsgemäßer Gebrauch
2. Allgemeine Sicherheitsvorschriften
3. Symbolerkärung
4. Gerätbeschreibung und Lieferumfang
5. Montage
6. Betrieb
7. Arbeiten mit der Kettensäge
8. Technische Daten
9. Wartung
10. Reinigung und Lagerung
11. Hinweise zum Umweltschutz / Entsorgung
12. Reparatur
13. Ersatzteilbestellung
14. Fehlersuche
15. Konformitätserklärung
Verpackung
Das Gerät bendet sich in einer Verpackung um Transportschäden zu verhindern. Diese Verpackung ist Rohstoff und
ist somit wiederverwendbar oder kann dem Rohstoffkreislauf zurückgeführt werden.
Beim Benutzen von Geräten müssen einige Sicherheitsvorkehrungen eingehalten werden, um Verletzungen
und Schäden zu verhindern:
• Lesen Sie die Bedienungsanleitung sorgfältig durch und beachten Sie deren Hinweise. Machen Sie sich anhand
dieser Gebrauchsanweisung mit dem Gerät, dem richtigen Gebrauch sowie den Sicherheitsvorschriften vertraut.
• Bewahren Sie diese gut auf, damit Ihnen die Informationen jederzeit zur Verfügung stehen.
• Falls Sie das Gerät an andere Personen übergeben sollten, händigen Sie diese Bedienungsanleitung bitte mit aus.
Wir übernehmen keine Haftung für Unfälle oder Schäden, die durch Nichtbeachten dieser Anleitung entstehen.
1. Bestimmungsgemäße Verwendung
Diese Kettensäge ist nur durch eine Person und nur zum Sägen von Holz zu benutzen. Die Kettensäge muss mit der
rechten Hand am hinteren Handgriff und mit der linken Hand am vorderen Handgriff gehalten werden. Vor Gebrauch
der Kettensäge muss der Benutzer alle Hinweise und Anweisungen in der Gebrauchsanweisung gelesen und verstanden haben. Der Benutzer muss angemessene persönliche Schutzausrüstung (PSA) tragen.
Mit der Kettensäge darf nur Holz gesägt werden. Das Bearbeiten von Materialien wie bspw. Kunststoff, Stein,
Metall oder Holz, welches Fremdkörper enthält (bspw. Nägel oder Schrauben), ist untersagt!
Restrisiken
Auch wenn Sie dieses Elektrowerkzeug vorschriftsmäßig bedienen, bleiben immer Restrisiken bestehen. Folgende
Gefahren können im Zusammenhang mit der Bauweise und Ausführung dieses Elektrowerkzeugs auftreten:
1. Lungenschäden, falls keine geeignete Staubschutzmaske getragen wird.
2. Gehörschäden, falls kein geeigneter Gehörschutz getragen wird.
3. Schnittverletzungen, falls keine geeignete Schutzkleidung getragen wird.
4. Gesundheitsschäden, die aus Hand-Arm-Schwingungen resultieren, falls das Gerät über einen längeren Zeitraum
verwendet wird oder nicht ordnungsgemäß geführt und gewartet wird.
Warnung! Diese Maschine erzeugt während des Betriebs ein elektromagnetisches Feld. Dieses Feld kann unter
Umständen aktive oder passive medizinische Implantate beeinträchtigen. Um die Gefahr einer ernsten oder tödlichen
Verletzung zu verringern, empfehlen wir, Personen mit medizinischen Implantaten ihren Arzt oder den Hersteller des
medizinischen Implantats zu befragen, bevor die Maschine bedient wird.
Warnung!
Die ausgedehnte Nutzung eines Werkzeugs setzt den Nutzer Erschütterungen aus, die zur Weißngerkrankheit
(Raynaud-Syndrom) oder zum Karpaltunnelsyndrom führen können.
Dieser Zustand verringert die Fähigkeit der Hand, Temperaturen zu empnden und zu regulieren, verursacht Taubheit
und Hitzeempndungen und kann zu Nerven- und Kreislaufschäden und Gewebetod führen.

DE | Gebrauchsanweisung
2
Nicht alle Faktoren, die zur Weißngerkrankheit führen, sind bekannt, aber kaltes Wetter, Rauchen und Krankheiten,
die Blutgefäße und den Blutkreislauf betreffen sowie große bzw. lang andauernde Belastung durch Erschütterungen
werden als Faktoren in der Entstehung der Weißngerkrankheit genannt. Beachten Sie Folgendes, um das Risiko der
Weißngerkrankheit und des Karpaltunnelsyndroms zu verringern:
• Tragen Sie Handschuhe und halten Sie Ihre Hände warm.
• Warten Sie das Gerät gut. Ein Werkzeug mit lockeren Komponenten oder beschädigten oder abgenutzten Dämp-
fern neigen zu größerer Vibration.
• Halten Sie den Griff stets fest, aber umklammern Sie die Handgriffe nicht ständig mit übermäßigem Druck. Machen
Sie viele Pausen.
Alle oben genannte Vorkehrungen können das Risiko der Weißngerkrankheit oder des Karpaltunnelsyndrom nicht ausschließen. Langzeit- und regelmäßigen Nutzern wird daher empfohlen, den Zustand Ihrer Hände und Finger genau zu
beobachten. Suchen Sie unverzüglich einen Arzt auf, falls eines der obigen Symptome auftauchen sollte.
2. Allgemeine Sicherheitsvorschriften
Dieses Gerät ist nicht dafür bestimmt, durch Personen (einschließlich Kinder) mit eingeschränkten physischen, sensorischen oder geistigen Fähigkeiten oder mangels Erfahrung und/oder mangels Wissen benutzt zu werden, es sei denn,
sie werden durch eine für ihre Sicherheit zuständige Person beaufsichtigt oder erhielten von ihr Anweisungen, wie das
Gerät zu benutzen ist. Kinder sollten beaufsichtigt werden, um sicherzustellen, dass sie nicht mit dem Gerät spielen.
Seien Sie aufmerksam, achten Sie darauf, was Sie tun, und gehen Sie mit Vernunft an die Arbeit mit einem Elektrowerkzeug. Benutzen Sie das Gerät nicht, wenn Sie müde sind oder unter dem Einuss von Drogen, Alkohol oder
Medikamenten stehen.
Allgemeine Sicherheitshinweise für Elektrowerkzeuge
Warnung! Lesen Sie alle Sicherheitshinweise und Anweisungen. Versäumnisse bei der
Einhaltung der Sicherheitshinweise und Anweisungen können elektrischen Schlag, Brand- und/
oder schwere Verletzungen verursachen.
Bewahren Sie alle Sicherheitshinweise und Anweisungen für die Zukunft auf.
Der in den Sicherheitshinweisen verwendete Begriff „Elektrowerkzeug“ bezieht sich auf netzbetriebene Elektrowerkzeuge (mit Netzkabel) und auf akkubetriebene Elektrowerkzeuge (ohne Netzkabel).
1) Arbeitsplatzsicherheit
a) Halten Sie Ihren Arbeitsbereich sauber und gut beleuchtet. Unordnung oder unbeleuchtete
Arbeitsbereiche können zu Unfällen führen.
b) Arbeiten Sie mit dem Elektrowerkzeug nicht in explosionsgefährdeter Umgebung, in der
sich brennbare Flüssigkeiten, Gase oder Stäube benden. Elektrowerkzeuge erzeugen Funken, die den Staub oder die Dämpfe entzünden können.
c) Halten Sie Kinder und andere Personen während der Benutzung des Elektrowerkzeugs
fern. Bei Ablenkung können Sie die Kontrolle über das Gerät verlieren.
2) Elektrische Sicherheit
a) Der Anschlussstecker des Elektrowerkzeuges muss in die Steckdose passen. Der Stecker
darf in keiner Weise verändert werden. Verwenden Sie keine Adapterstecker gemeinsam
mit schutzgeerdeten Geräten. Unveränderte Stecker und passende Steckdosen verringern das
Risiko eines elektrischen Schlages.
b) Vermeiden Sie Körperkontakt mit geerdeten Oberächen, wie von Rohren, Heizungen,
Herden und Kühlschränken. Es besteht ein erhöhtes Risiko durch elektrischen Schlag, wenn
Ihr Körper geerdet ist.
c) Halten Sie das Gerät von Regen oder Nässe fern. Das Eindringen von Wasser in ein Elektro-
gerät erhöht das Risiko eines elektrischen Schlages.
d) Zweckentfremden Sie das Kabel nicht, um das Gerät zu tragen, aufzuhängen oder um den
Stecker aus der Steckdose zu ziehen. Halten Sie das Kabel fern von Hitze, Öl, scharfen
Kanten oder sich bewegenden Geräteteilen. Beschädigte oder verwickelte Kabel erhöhen das
Risiko eines elektrischen Schlages.
e) Wenn Sie mit einem Elektrowerkzeug im Freien arbeiten, verwenden Sie nur Verlänge-
rungskabel, die auch für den Außenbereich zugelassen sind. Die Anwendung eines für den

DE | Gebrauchsanweisung
3
Außenbereich geeigneten Verlängerungskabels verringert das Risiko eines elektrischen Schlages.
f) Wenn der Betrieb eines Elektrowerkzeuges in feuchter Umgebung nicht vermeidbar ist,
verwenden Sie einen Fehlerstromschutzschalter. Der Einsatz eines Fehlerstromschutzschal-
ters vermindert das Risiko eines elektrischen Schlages.
3) Sicherheit von Personen
a) Seien Sie aufmerksam, achten Sie darauf, was Sie tun, und gehen Sie mit Vernunft an die
Arbeit mit einem Elektrowerkzeug. Benutzen Sie kein Elektrowerkzeug, wenn Sie müde
sind oder unter dem Einuss von Drogen, Alkohol oder Medikamenten stehen. Ein Moment
der Unachtsamkeit beim Gebrauch des Elektrowerkzeuges kann zu ernsthaften Verletzungen
führen.
b) Tragen Sie persönliche Schutzausrüstung und immer eine Schutzbrille. Das Tragen per-
sönlicher Schutzausrüstung, wie Staubmaske, rutschfeste Sicherheitsschuhe, Schutzhelm oder
Gehörschutz, je nach Art und Einsatz des Elektrowerkzeuges, verringert das Risiko von Verletzungen.
c) Vermeiden Sie unbeabsichtigte Inbetriebnahme. Vergewissern Sie sich, dass das Elekt-
rowerkzeug ausgeschaltet ist, bevor Sie es an die Stromversorgung und/oder den Akku
anschließen, es aufnehmen oder tragen. Wenn Sie beim Tragen des Gerätes den Finger am
Schalter haben oder das Gerät eingeschaltet an die Stromversorgung anschließen, kann dies zu
Unfällen führen.
d) Entfernen Sie Einstellwerkzeuge oder Schraubenschlüssel, bevor Sie das Elektrowerkzeug
einschalten. Ein Werkzeug oder Schlüssel, der sich in einem drehenden Geräteteil bendet, kann
zu Verletzungen führen.
e) Vermeiden Sie eine abnormale Körperhaltung. Sorgen Sie für einen sicheren Stand und hal-
ten Sie jederzeit das Gleichgewicht. Dadurch können Sie das Elektrowerkzeug in unerwarteten
Situationen besser kontrollieren.
f) Tragen Sie geeignete Kleidung. Tragen Sie keine weite Kleidung oder Schmuck. Halten
Sie Haare, Kleidung und Handschuhe fern von sich bewegenden Teilen. Lockere Kleidung,
Schmuck oder lange Haare können von sich bewegenden Teilen erfasst werden.
g) Wenn Staubabsaug- und Auffangeinrichtungen montiert werden können, vergewissern
Sie sich, dass diese angeschlossen sind und richtig verwendet werden. Verwendung einer
Staubabsaugung kann Gefährdungen durch Staub verringern.
4) Verwendung und Behandlung des Elektrowerkzeuges
a) Überlasten Sie das Gerät nicht. Verwenden Sie für Ihre Arbeit das dafür bestimmte Elekt-
rowerkzeug. Mit dem passenden Elektrowerkzeug arbeiten Sie besser und sicherer im angege-
benen Leistungsbereich.
b) Benutzen Sie kein Elektrowerkzeug, dessen Schalter defekt ist. Ein Elektrowerkzeug, das
sich nicht mehr ein- oder ausschalten lässt, ist gefährlich und muss repariert werden.
c) Ziehen Sie den Stecker aus der Steckdose und/oder entfernen Sie den Akku, bevor Sie
Geräteeinstellungen vornehmen, Zubehörteile wechseln oder das Gerät weglegen. Diese
Vorsichtsmaßnahme verhindert den unbeabsichtigten Start des Gerätes.
d) Bewahren Sie unbenutzte Elektrowerkzeuge außerhalb der Reichweite von Kindern auf.
Lassen Sie Personen das Gerät nicht benutzen, die mit diesem nicht vertraut sind oder
diese Anweisung nicht gelesen haben. Elektrowerkzeuge sind gefährlich, wenn Sie von uner-
fahrenen Personen benutzt werden.
e) Pegen Sie das Gerät mit Sorgfalt. Kontrollieren Sie, ob bewegliche Geräteteile einwand-
frei funktionieren und nicht klemmen, ob Teile gebrochen oder so beschädigt sind, dass
die Funktion des Elektrowerkzeuges beeinträchtigt ist. Lassen Sie beschädigte Teile vor
dem Einsatz des Gerätes reparieren. Viele Unfälle haben ihre Ursache in schlecht gewarteten
Elektrowerkzeugen.
f) Halten Sie Schneidwerkzeuge scharf und sauber. Sorgfältig gepegte Schneidwerkzeuge mit
scharfen Schneidkanten verklemmen sich weniger und sind leichter zu führen.

DE | Gebrauchsanweisung
4
g) Verwenden Sie Elektrowerkzeuge, Zubehör, Einsatzwerkzeuge usw. entsprechend diesen
Anweisungen und so, wie es für diesen speziellen Gerätetyp vorgeschrieben ist. Berücksichtigen Sie dabei die Arbeitsbedingungen und die auszuführende Tätigkeit. Der Gebrauch
von Elektrowerkzeugen für andere als die vorgesehenen Anwendungen kann zu gefährlichen
Situationen führen.
5) Service
a) Lassen Sie ihr Elektrowerkzeug nur von qualiziertem Fachpersonal und nur mit Original-
Ersatzteilen reparieren. Damit wird sichergestellt, dass die Sicherheit des Gerätes erhalten
bleibt.
Gerätespezische Sicherheitshinweise
• Halten Sie das Kabel vom Schneidbereich fern. Während des Arbeitsvorgangs kann das Kabel im Gebüsch
verdeckt sein und versehentlich durchtrennet werden.
• Halten Sie bei laufender Säge alle Körperteile von der Sägekette fern. Vergewissern Sie sich vor dem
Starten der Säge, dass die Sägekette nichts berührt. Beim Arbeiten mit einer Kettensäge kann ein Moment der
Unachtsamkeit dazu führen, dass Bekleidung oder Körperteile von der Sägekette erfasst werden.
• Halten Sie die Kettensäge immer mit Ihrer rechten Hand am hinteren Griff und Ihrer linken Hand am vorderen Griff. Das Festhalten der Kettensäge in umgekehrter Arbeitshaltung erhöht das Risiko von Verletzungen und
darf nicht angewendet werden.
• Tragen Sie Schutzbrille und Gehörschutz. Weitere Schutzausrüstung für Kopf, Hände, Beine und Füße wird
empfohlen. Passende Schutzkleidung mindert die Verletzungsgefahr durch herumiegendes Spanmaterial und
zufälliges Berühren der Sägekette.
• Arbeiten Sie mit der Kettensäge nicht auf einem Baum. Bei Betrieb einer Kettensäge auf einem Baum besteht
Verletzungsgefahr.
• Achten Sie immer auf festen Stand und benutzen Sie die Kettensäge nur, wenn Sie auf festem, sicherem
und ebenem Grund stehen. Rutschiger Untergrund oder instabile Standächen wie auf einer Leiter können zum
Verlust des Gleichgewichts oder zum Verlust der Kontrolle über die Kettensäge führen.
• Rechnen Sie beim Schneiden eines unter Spannung stehenden Astes damit, dass dieser zurückfedert.
Wenn die Spannung in den Holzfasern freikommt, kann der gespannte Ast die Bedienperson treffen und/oder die
Kettensäge der Kontrolle entreißen.
• Seien Sie besonders vorsichtig beim Schneiden von Unterholz und jungen Bäumen. Das dünne Material
kann sich in der Sägekette verfangen und auf Sie schlagen oder Sie aus dem Gleichgewicht bringen.
• Tragen Sie die Kettensäge am vorderen Griff im ausgeschalteten Zustand, die Sägekette von Ihrem Körper abgewandt. Bei Transport oder Aufbewahrung der Kettensäge stets die Schutzabdeckung aufziehen.
Sorgfälltiger Umgang mit der Kettensäge verringert die Wahrscheinlichkeit einer versehentlichen Berührung mit
der laufenden Sägekette.
• Befolgen Sie die Anweisungen für die Schmierung, die Kettenspannung und das Wechseln von Zubehör.
Eine unsachgemäß gespannte oder geschmierte Sägekette kann entweder reißen oder das Rückschlagrisiko
erhöhen.
• Halten Sie Griffe trocken, sauber und frei von Öl und Fett. Fettige, ölige Griffe sind rutschig und führen zum
Verlust der Kontrolle.
• Nur Holz sägen. Die Kettensäge nicht für Arbeiten verwenden, für die sie nicht bestimmt ist – Beispiel:
Verwenden Sie die Kettensäge nicht zum Sägen von Plastik, Mauerwerk oder Baumaterialien, die nicht
aus Holz sind. Die Verwendung der Kettensäge für nicht bestimmungsgemäße Arbeiten kann zu gefährlichen
Situationen führen.
• Versuchen Sie niemals eine unvollständige Maschine zu benutzen oder eine, die mit einer nicht genehmigten
Änderung versehen ist.
• Diese Geräte sind nicht dafür bestimmt, durch Personen mit mangelnder Erfahrung und/odermangels Wissen
benutzt zu werden oder durch Personen mit eingeschränkten physischen, sensorischen oder geistigen Fähigkeiten, es sei denn, sie werden durch eine für ihre Sicherheit zuständige Person beaufsichtigt oder erhielten von ihr
Anweisungen, wie diese Geräte jeweils zu benutzen sind.
• Jugendliche unter 16 Jahren dürfen die Gerätenicht bedienen.
• Es ist zu vermeiden, dass das Gerät bei schlechten Wetterbedingungen betrieben wird, insbesondere bei Blitzgefahr.
Warnung!
Die ausgedehnte Nutzung eines Werkzeugs setzt den Nutzer Erschütterungen aus, die zur Weißngerkrankheit
(Raynaud-Syndrom) oder zum Karpaltunnelsyndrom führen können.
Dieser Zustand verringert die Fähigkeit der Hand, Temperaturen zu empnden und zu regulieren, verursacht Taubheit
und Hitzeempndungen und kann zu Nerven- und Kreislaufschäden und Gewebetod führen.

DE | Gebrauchsanweisung
5
Nicht alle Faktoren, die zur Weißngerkrankheit führen, sind bekannt, aber kaltes Wetter, Rauchen und Krankheiten,
die Blutgefäße und den Blutkreislauf betreffen sowie große bzw. lang andauernde Belastung durch Erschütterungen
werden als Faktoren in der Entstehung der Weißngerkrankheit genannt. Beachten Sie Folgendes, um das Risiko der
Weißngerkrankheit und des Karpaltunnelsyndroms zu verringern:
• Tragen Sie Handschuhe und halten Sie Ihre Hände warm.
• Warten Sie das Gerät gut. Ein Werkzeug mit lockeren Komponenten oder beschädigten oder abgenutzten Dämp-
fern neigen zu größerer Vibration.
• Halten Sie den Griff stets fest, aber umklammern Sie die Handgriffe nicht ständig mit übermäßigem Druck. Machen
Sie viele Pausen.
Alle oben genannte Vorkehrungen können das Risiko der Weißngerkrankheit oder des Karpaltunnelsyndrom nicht
ausschließen. Langzeit- und regelmäßigen Nutzern wird daher empfohlen, den Zustand Ihrer Hände und Finger
genau zu beobachten. Suchen Sie unverzüglich einen Arzt auf, falls eines der obigen Symptome auftauchen sollte.
DE | Gebrauchsanweisung
6
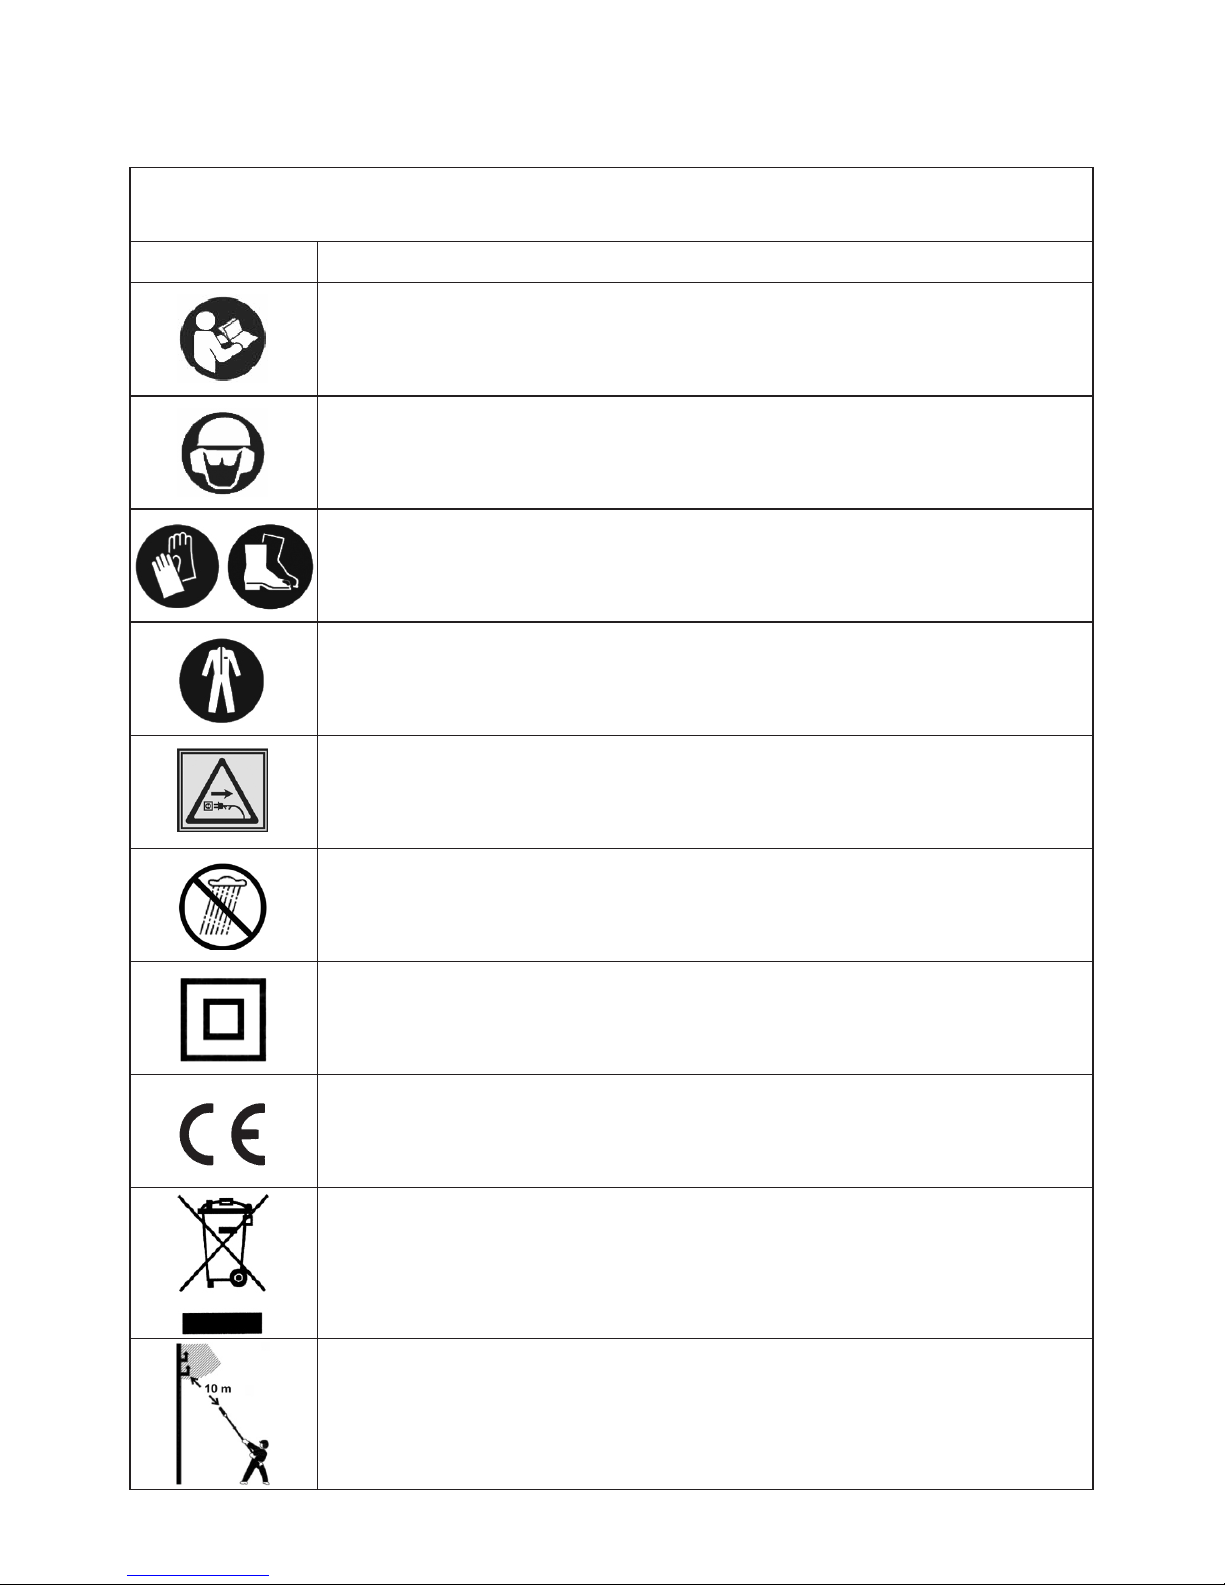
Folgenden Symbole werden auf diesem Elektrowerkzeug verwendet. Mit der richtigen Interpretation dieser Symbole können Sie das Elektrowerkzeug sicherer und effektiver bedienen.
SYMBOLE ERKLÄRUNG
Vor Inbetriebnahme und vor allen Wartungs-, Montage- und Reinigungs- arbeiten Gebrauchsanweisung gründlich lesen.
Vor dem Starten des Elektrowerkzeugs Schutzhelm, Schutzbrille und Gehörschutz tragen.
Feste Sicherheitsschuhe und Handschuhe beim Betrieb des Gerätes tragen.
Tragen Sie unbedingt eng anliegende Schutzkleidung
Bei Beschädigung des Netzkabels oder des Verlängerungskabels sofort den Netzstecker
ausstecken.
Das Elektrowerkzeug nicht bei Regen benutzen oder dem Regen aussetzen.
Schutzklasse II
Bestätigt die Konformität des Elektrowerkzeugs mit den Richtlinien der Europäischen
Gemeinschaft.
Ausgemusterte Elektrowerkzeuge und andere elektrotechnische und elektrische
Erzeugnisse getrennt sammeln und einer umweltgerechten Wiederverwertung zuführen.
Halten Sie einen Mindestabstand von 10 m zu stromführenden Leitungen ein. Es besteht
Lebensgefahr durch Stromschlag!
3. Symbolerklärung
DE | Gebrauchsanweisung
7
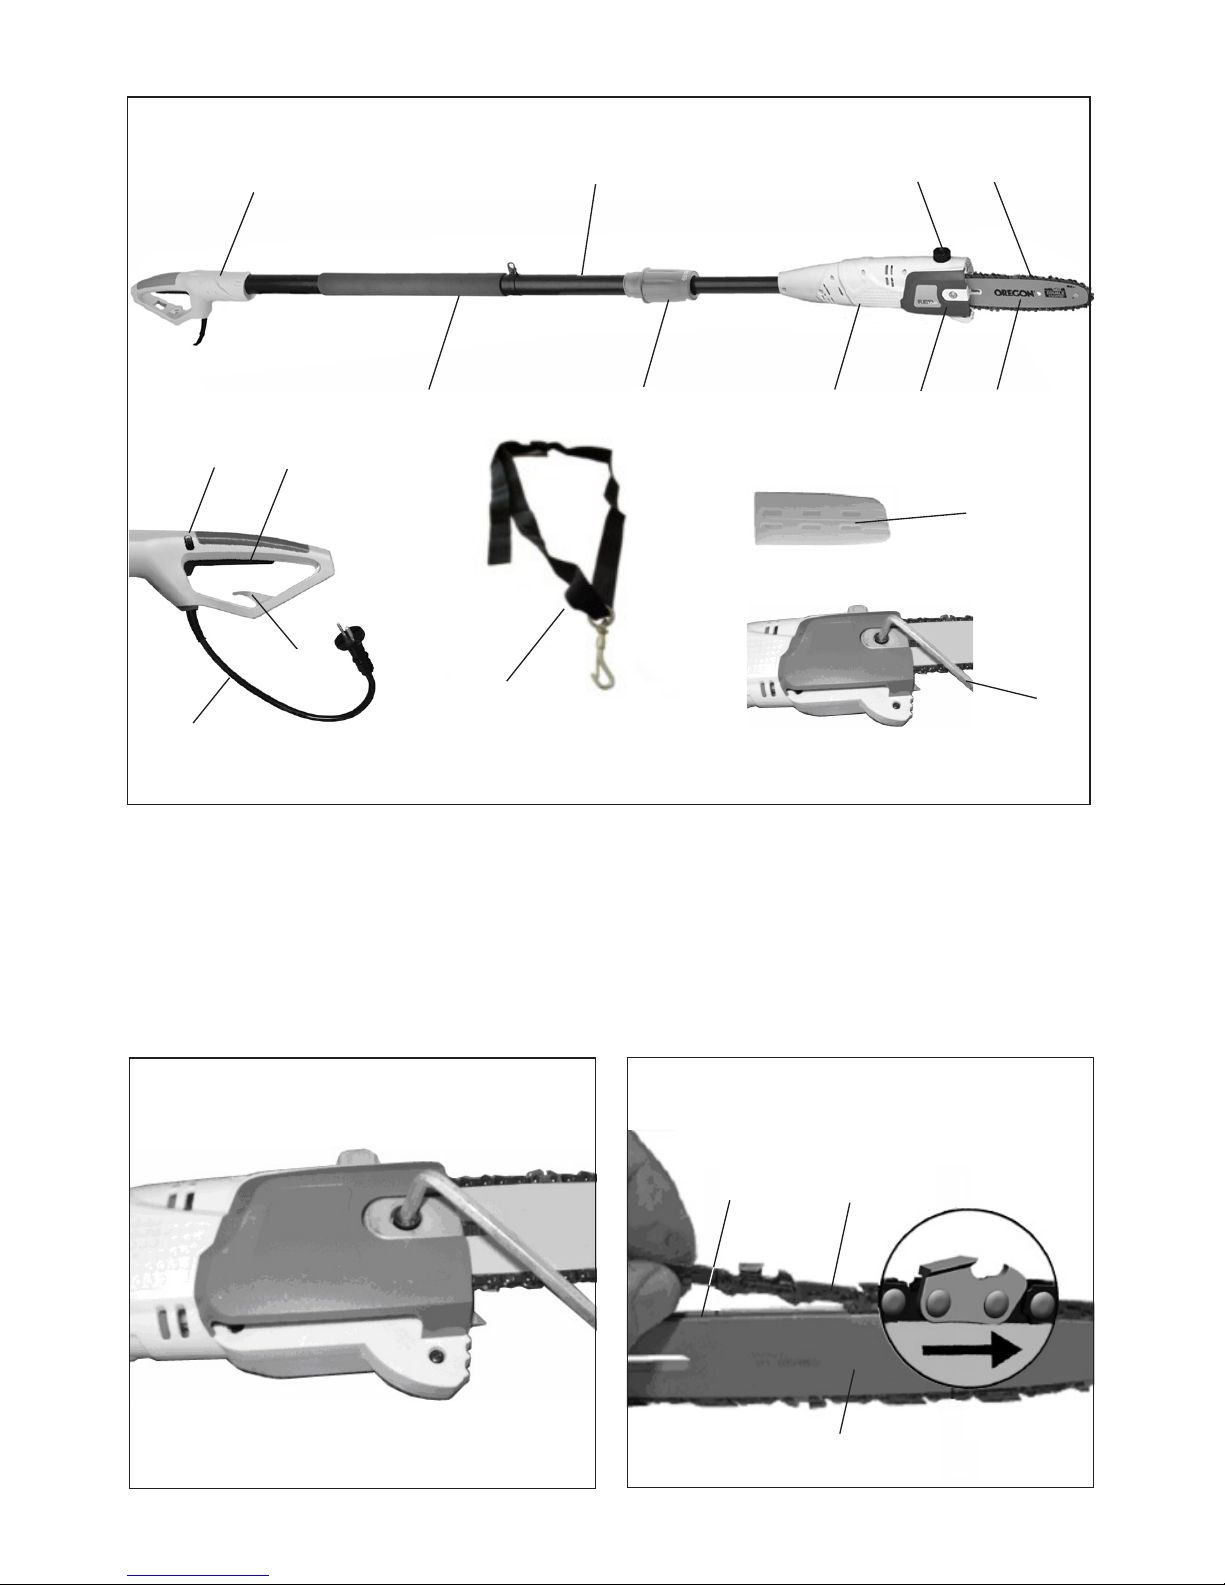
4. Gerätebeschreibung und Lieferumfang
(Abb. 1)
1. Netzleitung
2. Kabelzugentlastung
3. Ein-/Ausschalter
4. Handgriff
5. Teleskopstiel
6. Griffbereich gepolstert
7. Teleskop- Schnellverriegelung
8. Motorgehäuse
9. Kettenzahnradabdeckung
10. Öltankdeckel
11. Multifunktionswerkzeug
12. Sägekette
13. Schwert
14. Einschaltsperre
15. Schwertschutz
16. Schultertragegurt
5. Montage
Achtung! Schließen Sie die Kettensäge erst an das
Stromnetz an, wenn diese vollständig montiert ist und
die Kettenspannung eingestellt ist. Tragen Sie immer
Schutzhandschuhe, wenn Sie Arbeiten an der Kettensä-
ge vornehmen, um Verletzungen zu vermeiden.
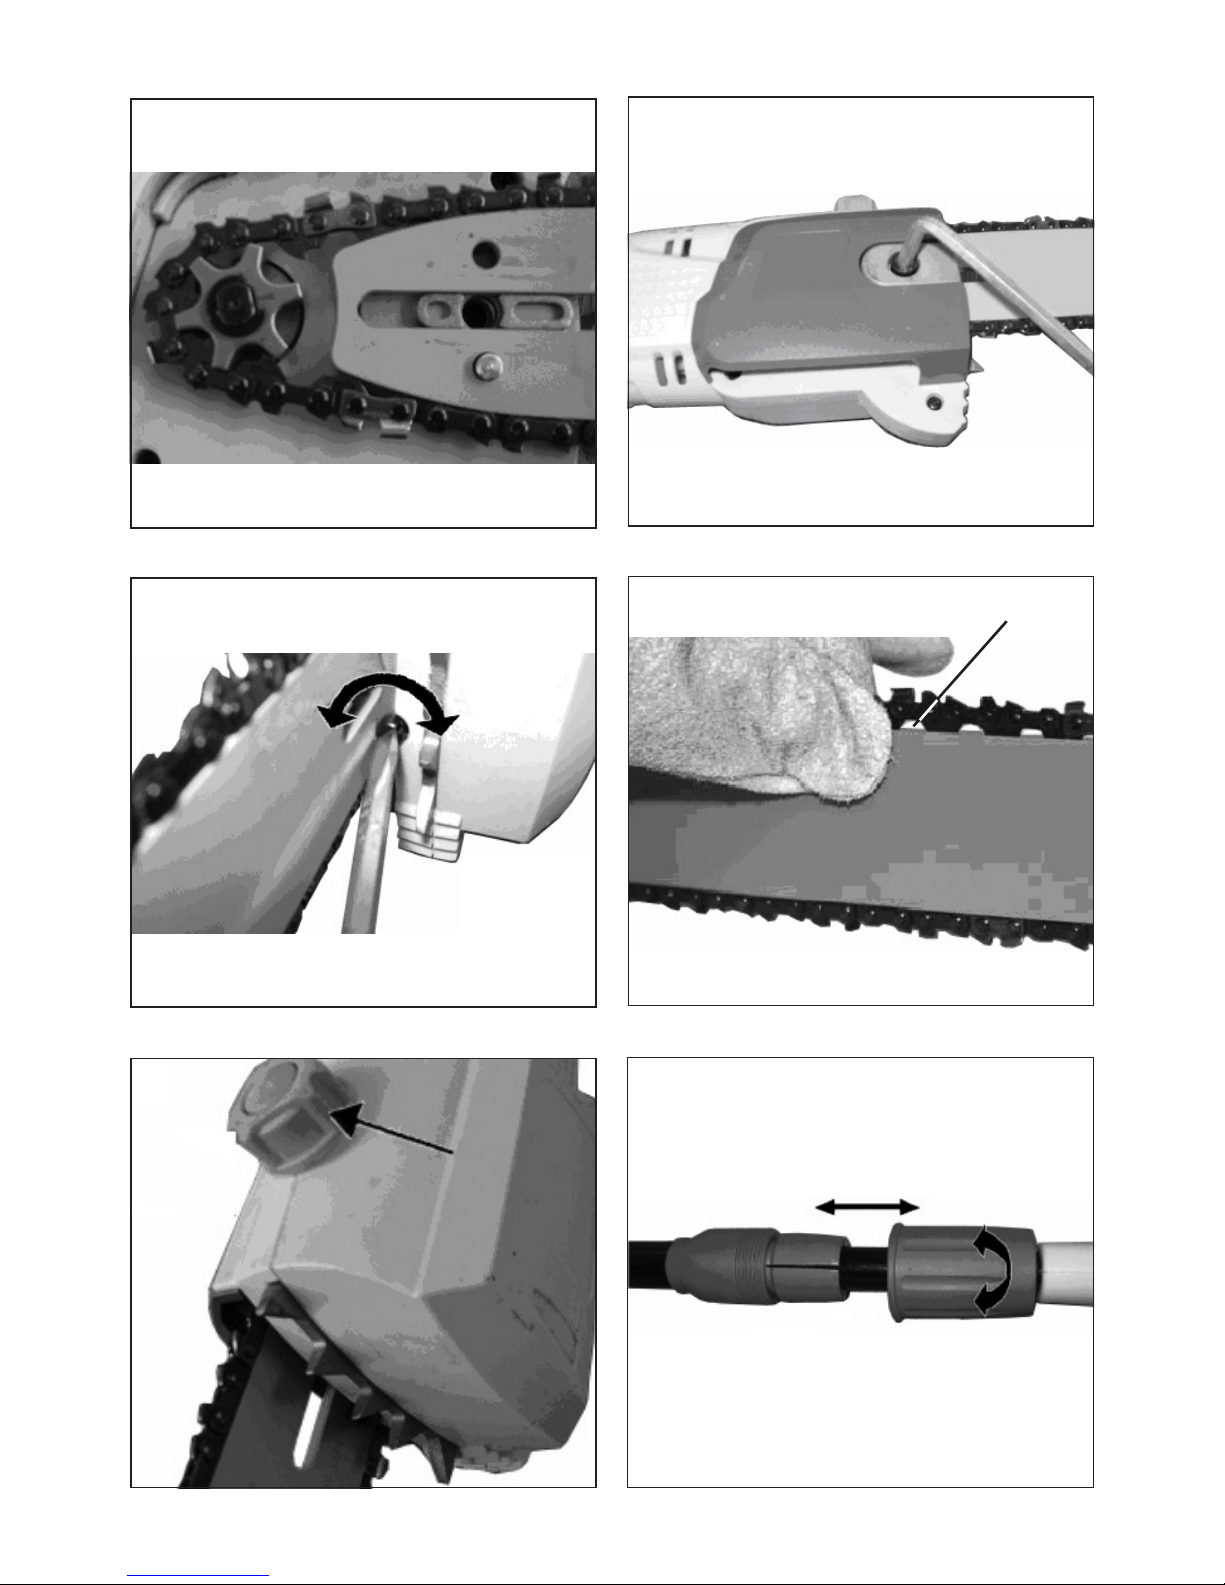
5.1 Montage von Schwert und Sägekette
Packen Sie alle Teile sorgfältig aus und überprüfen Sie
diese auf Vollständigkeit. (Abb.1)
• Befestigungsschraube für Kettenzahnradabdeckung
lösen. (Abb.2)
• Kettenzahnradabdeckung abnehmen.
• Kette wie abgebildet in die umlaufende Nut des
Schwertes legen. (Abb.3/Pos.A)
• Beachten Sie die Laufrichtung der Kette! Auf jedem
Schneideglied ist ein Pfeil eingeprägt. Dieser muss
auf der Oberseite des Schwertes nach vorn zur
Schwertspitze zeigen.
• Schwert und Kette wie abgebildet in die Aufnahme
der Kettensäge einlegen. (Abb. 4) Dabei die Kette
um das Ritzel führen und das Schwert in den Kettenspannbolzen einhängen.
• Kettenzahnradabdeckung anbringen und mit Befestigungsschraube handfest anziehen. (Abb.5)
Achtung! Befestigungsschraube erst nach dem
Einstellen der Kettenspannung (Siehe Punkt 5.2)
endgültig anziehen.
5.2 Spannen der Sägekette
Achtung! Vor Überprüfung und Einstellarbeiten
immer den Netzstecker ziehen. Tragen Sie stets
Schutzhandschuhe, wenn Sie Arbeiten an der
Kettensäge vornehmen, um Verletzungen zu vermeiden.
• Befestigungsschraube der Kettenzahnradabdeckung
einige Umdrehungen lösen.
• Kettenspannung anhand eines Schraubendrehers mit
der Kettenspannschraube einstellen.
• Rechtsdrehen erhöht die Kettenspannung, Linksdrehen verringert die Kettenspannung. Die Sägekette ist
richtig gespannt, wenn sie in der Mitte des Schwertes
um ca. 2 mm angehoben werden kann. (Abb.6 + 7)
Achtung! Alle Kettenglieder müssen ordnungsgemäß in der Führungsnut des Schwertes liegen.
Hinweise zum Spannen der Kette
Die Sägekette muss richtig gespannt sein, um einen
sicheren Betrieb zu gewährleisten. Sie erkennen die
optimale Spannung, wenn die Sägekette in der Mitte des
Schwertes um 2 mm abgehoben werden kann. Da sich
die Sägekette durch das Sägen erhitzt und dadurch ihre
Länge verändert, überprüfen Sie spätestens alle 10 min.
die Kettenspannung und regulieren Sie diese bei Bedarf.
Das gilt besonders für neue Sägeketten. Entspannen Sie
nach abgeschlossener Arbeit die Sägekette, weil sich
diese beim Abkühlen verkürzt. Damit verhindern Sie,
dass die Kette Schaden nimmt.
5.3 Sägekettenschmierung
Achtung! Vor Überprüfung und Einstellarbeiten
immer den Netzstecker ziehen. Tragen Sie stets
Schutzhandschuhe, wenn Sie Arbeiten an der
Kettensäge vornehmen, um Verletzungen zu vermeiden.
Achtung! Betreiben Sie die Kette niemals ohne
Sägekettenöl! Die Benutzung der Kettensäge ohne
Sägekettenöl oder bei einem Ölstand unterhalb
der Minimum- Markierung führt zur Beschädigung
der Kettensäge!
Achtung! Verwenden Sie nur spezielles Kettensägenöl. Bei Verwendung von Altöl erlischt die
Garantie.
Öltank befüllen (Abb.8)
• Kettensäge auf ebener Fläche abstellen.
• Bereich um den Öltankdeckel (Pos.10) reinigen und
anschließend öffnen.
• Öltank mit Sägekettenöl befüllen. Achten Sie dabei
darauf, dass kein Schmutz in den Öltank gelangt,
damit die Öldüse nicht verstopft.
• Öltankdeckel (Pos.10) schließen.
6. Betrieb
6.1 Teleskopslänge einstellen
1. Gemäß Abbildung (Abb.9) die Verriegelungsüber-
wurfmutter gegen den Uhrzeigersinn drehen.
2. Die Verriegelung ist gelöst und kann durch Ausein-
anderziehen der Enden auf die gewünschte Länge
eingestellt werden.
3. Anschließend die Verriegelungsüberwurfmutter im
Uhrzeigersinn fest andrehen.
6.2 Anschluss an die Stromversorgung
• Netzkabel an ein geeignetes Verlängerungskabel
anschließen. Achten Sie darauf, dass das Verlänge-

DE | Gebrauchsanweisung
8
rungskabel für die Leistung der Kettensäge ausgelegt
ist.
• Verlängerungskabel wie in (Abb.10) dargestellt gegen
Zugkräfte und versehentliches Abstecken sichern.
• Verlängerungskabel an eine vorschriftsmäßig installierte Schutzkontakt-Steckdose anschließen. Wir
empfehlen die Verwendung eines signalfarbenen
Kabels (rot oder gelb). Das verringert die Gefahr einer
versehentlichen Beschädigung durch die Kettensäge.
Empfehlung
Schliessen Sie das Gerät nur an eine Stromversorgung
an, die über eine Fehlerstrom-Schutzeinrichtung(RCD) mit
einem Auslösestrom von höchstens 30 mA geschützt ist.
6.3 Ein-/Auschalten
Einschalten
• Kettensäge mit beiden Händen an den Griffen festhalten (Daumen unter den Handgriff).
• Einschaltsperre (Abb.11) drücken und halten.
• Kettensäge mit Ein-/Ausschalter (Pos. 3) einschalten.
Die Einschaltsperre (Pos.14) kann jetzt wieder losgelassen werden.
Ausschalten
• Ein-/Ausschalter (Pos.3) loslassen. Ziehen Sie stets
den Netzstecker, wenn Sie die Arbeit unterbrechen.
7. Arbeiten mit der Kettensäge
7.1 Vorbereitung
Überprüfen Sie vor jedem Einsatz folgende Punkte, um
sicher arbeiten zu können:
Zustand der Kettensäge
Untersuchen Sie die Kettensäge vor Beginn der Arbeiten
auf Beschädigungen am Gehäuse, dem Netzkabel, der
Sägekette und dem Schwert. Nehmen Sie niemals ein
offensichtlich beschädigtes Gerät in Betrieb.
Ölbehälter
Füllstand des Ölbehälters. Überprüfen Sie auch während der Arbeit, ob immer ausreichend Öl vorhanden
ist. Betreiben Sie die Säge nie, wenn kein Öl vorhanden
oder der Ölstand unter die Minimum- Markierung gesunken ist, um eine Beschädigung der Kettensäge zu
vermeiden. Eine Füllung reicht im Schnitt für 10 Minuten,
abhängig von den Pausen und der Belastung.
Sägekette
Spannung der Sägekette, Zustand der Schneiden. Je
schärfer die Sägekette ist, umso leichter und kontrollierbarer lässt sich die Kettensäge bedienen. Das Gleiche
gilt für die Kettenspannung. Überprüfen Sie auch während der Arbeit spätestens alle 10 Minuten die Kettenspannung, um Ihre Sicherheit zu erhöhen! Besonders
neue Sägeketten neigen zu erhöhter Ausdehnung.
Schutzkleidung
Tragen Sie unbedingt die entsprechende, eng anliegende Schutzkleidung wie Schnittschutzhose, Handschuhe
und Sicherheitsschuhe.
Gehörschutz und Schutzbrille
Tragen Sie einen Schutzhelm mit integriertem Gehör
und Gesichtsschutz. Dieser bietet Schutz vor herabfallenden Ästen und zurückschlagenden Zweigen.
Montage des Schultergurts
1. Legen Sie den Tragegurt so an, dass der Gurt über
der rechten Schulter liegt (Abb. 12).
2. Befestigen Sie den Karabinerhaken an der Schafthalterung des Schafts (Abb. 13).
Tragen Sie den Gurt niemals diagonal über Schulter und
Brust sondern nur auf einer Schulter, dadurch können
Sie bei Gefahr das Gerät schnell vom Körper entfernen.
Sicheres Arbeiten
• Um sicheres Arbeiten zu gewährleisten ist ein Arbeits-
winkel von max. 60° vorgeschrieben.
• Nie unter dem zu sägenden Ast stehen.
• Vorsicht beim Sägen von unter Spannung stehenden
Ästen und splitterndem Holz.
• Mögliche Verletzungsgefahr durch herabfallende Äste
und wegschleudernde Holzteile!
• Wenn die Maschine in Betrieb ist Personen und Tiere
aus dem Gefahrenbereich fernhalten.
• Das Gerät ist beim Berühren von Hochspannungslei-
tungen nicht gegen Stromschläge geschützt. Halten
Sie einen Mindestabstand von 10 m zu stromführenden Leitungen ein. Es besteht Lebensgefahr durch
Stromschlag!
• Am Hang immer oberhalb oder seitlich zum zu sä-
genden Ast stehen.
• Das Gerät so nah wie möglich am Körper halten. So
haben Sie die beste Balance.
Sägetechniken
• Halten Sie beim Entasten das Gerät in einem Winkel
von maximal 60° zur Waagrechten, um nicht von
einem herabfallenden Ast getroffen zu werden.
• Sägen Sie die unteren Äste am Baum zuerst ab.
Dadurch wird ein Herabfallen der geschnittenen Äste
erleichtert.
• Nach Beenden des Schnittes erhöht sich für den
Bediener das Gewicht der Säge abrupt, da die Säge
nicht mehr auf dem Ast abgestützt ist. Es besteht die
Gefahr die Kontrolle über die Säge zu verlieren.
• Ziehen Sie die Säge nur mit laufender Sägekette aus
dem Schnitt. Damit wird ein Festklemmen vermieden.
• Sägen Sie nicht mit der Spitze des Schwertes.
• Sägen Sie nicht in den wulstigen Astansatz. Dies
verhindert die Wundheilung des Baumes.
Kleinere Äste absägen (Abb.14)
Legen Sie die Anschlagäche der Säge am Ast an. Dies
vermeidet ruckartige Bewegungen der Säge bei Beginn
des Schnittes. Führen Sie die Säge mit leichtem Druck
von oben nach unten durch den Ast.
Größere und längere Äste absägen (Abb.15)
Machen Sie bei größeren Ästen einen Entlastungs-
schnitt.

DE | Gebrauchsanweisung
9
a) Sägen Sie zuerst mit der Oberseite des Schwertes
von unten nach oben 1/3 des Astdurchmessers durch.
b) Sägen Sie anschließend mit der Unterseite des
Schwertes von oben nach unten auf den ersten
Schnitt zu.
c) Sägen Sie längere Äste in Abschnitten ab, um eine
Kontrolle über den Aufschlagort zu haben.
Rückschlag
Unter dem Rückschlag versteht man das plötzliche
Hoch- und Zurückschlagen der laufenden Kettensäge.
Die Ursachen sind meist das Berühren des Werkstücks
mit der Schwertspitze oder das Verklemmen der Sägekette.
Bei einem Rückschlag treten unvermittelt große Kräfte
auf. Daher reagiert die Kettensäge meist unkontrolliert.
Die Folge sind oft schwerste Verletzungen beim Arbeiter
oder Personen im Umfeld.
Die Gefahr eines Rückschlages ist am größten, wenn
Sie die Säge im Bereich der Schwertspitze ansetzen,
weil dort die Hebelwirkung am stärksten ist. Setzen Sie
die Säge daher immer möglichst ach an.
Achtung!
• Achten Sie immer auf die richtige Kettenspannung!
• Benutzen Sie nur einwandfreie Kettensägen!
• Arbeiten Sie nur mit einer vorschriftsmäßig geschärften Sägekette!
• Sägen Sie nie mit der Oberkante oder Spitze des
Schwertes!
• Halten Sie die Kettensäge immer fest mit beiden
Händen!
Sägen von Holz unter Spannung
Das Sägen von Holz, das unter Spannung steht, erfor-
dert besondere Vorsicht! Unter Spannung stehendes
Holz, das durch Sägen von der Spannung befreit wird,
reagiert bisweilen völlig unkontrolliert. Das kann zu
schwersten bis zu tödlichen Verletzungen führen. Solche Arbeiten dürfen nur von ausgebildeten Fachleuten
ausgeführt werden.

DE | Gebrauchsanweisung
10
8. Technische Daten
Elektro-Astsäge EAS 750F
Netzspannung 230-240 V ~ / 50 Hz
Nennleistung 750 W
Nenndrehzahl 6000 min
-1
Schwertlänge 200 mm
Schnittlänge ca. 17,5 cm
Variable Höheneinstellung von 1,95 m bis 2,90 m
Arbeitshöhe bis zu 4 m
Schnittgeschwindigkeit bei Nenndrehzahl 11 m/s
Öltank-Füllmenge 60 ml
Gewicht mit Schwert+Kette 3.6 kg
Kette 91PJ033X
Schwert 080SDEA041
Schutzklasse II
Schalldruck EN ISO 11680-1:2011 90 dB(A) K = 3 dB
Vibrationen EN ISO 11680-1:2011 2,7 m/s2 K = 1,5 m/s
2
Angaben zur Geräuschemission gemäß Produktsicherheitsgesetz (ProdSG) bzw. EG-Maschinenrichtlinie: Der Schalldruckpegel am Arbeitsplatz kann 80 dB (A) überschreiten. In dem Fall sind Schallschutzmaßnahmen für den Bediener
erforderlich (z.B. Tragen eines Gehörschutzes).
Tragen Sie einen Gehörschutz. Die Einwirkung von Lärm kann einen Gehörverlust bewirken.
Achtung!
Der Schwingungswert wird sich aufgrund des Einsatzbereiches des Elektrowerkzeuges ändern und kann in
Ausnahmefällen über dem angegebenen Wert liegen.
Beschränken Sie die Geräuschentwicklung und Vibration auf ein Minimum!
• Verwenden Sie nur einwandfreie Geräte.
• Warten und reinigen Sie das Gerät regelmäßig.
• Passen Sie Ihre Arbeitsweise dem Gerät an.
• Überlasten Sie das Gerät nicht.
• Lassen Sie das Gerät gegebenenfalls überprüfen.
• Schalten Sie das Gerät aus, wenn es nicht benutzt wird.
• Tragen Sie Handschuhe.
Bitte beachten Sie: Dieses Gerät darf in Wohngebieten nach der deutschen Maschinenlärmschutzverordnung vom
September 2002 an Sonn- und Feiertagen sowie an Werktagen von 20:00 Uhr bis 7:00 Uhr nicht in Betrieb genommen
werden.
Beachten Sie zusätzlich auch die landesrechtlichen Vorschriften zum Lärmschutz!
DE | Gebrauchsanweisung
11
• Bewahren Sie die Kettensäge an einem sicheren und
trockenen Platz und außerhalb der Reichweite von
Kindern auf.
11. Hinweise zum Umweltschutz / Entsorgung
Führen Sie das Gerät einer ordnungsgemäßen Entsorgung zu, wenn es einmal ausgedient hat. Trennen
Sie das Netzkabel ab, um Missbrauch zu vermeiden.
Entsorgen Sie das Gerät nicht über den Hausmüll, sondern geben Sie es im Interesse des Umweltschutzes an
einer Sammelstelle für Elektrogeräte ab. Ihre zuständige
Kommune informiert Sie gerne über Adressen und Öff-
nungszeiten. Geben Sie auch Verpackungsmaterialien
und abgenutzte Zubehörteile an den vorgesehenen
Sammelstellen ab.
Nur für EU-Länder
Werfen Sie Elektrowerkzeuge nicht in den
Hausmüll!
Gemäß europäischer Richtlinie 2012/19/EU über Elektro- und Elektronik- Altgeräte und Umsetzung in nationales Recht müssen verbrauchte Elektrowerkzeuge
getrennt gesammelt werden und einer umweltgerechten
Wiederverwertung zugeführt werden.
Recycling-Alternative zur Rücksendeaufforderung:
Der Eigentümer des Elektrogerätes ist alternativ anstelle
Rücksendung zur Mitwirkung bei der sachgerechten
Verwertung im Falle der Eigentumsaufgabe verpichtet.
Das Altgerät kann hierfür auch einer Rücknahmestelle
überlassen werden, die eine Beseitigung im Sinne der
nationalen Kreislaufwirtschafts und Abfallgesetze durchführt. Nicht betroffen sind den Altgeräten beigefügte
Zubehörteile und Hilfsmittel ohne Elektrobestandteile.
12. Reparaturdienst
Reparaturen an Elektrowerkzeugen dürfen nur durch
eine Elektro-Fachkraft ausgeführt werden.
Bitte beschreiben Sie bei der Einsendung zur Reparatur
den von Ihnen festgestellten Fehler.
13. Ersatzteilbestellung
Bei der Ersatzteilbestellung sollten folgende Angaben
gemacht werden:
• Typ des Gerätes
• Artikelnummer des Gerätes
14. Fehlersuche
Vorsicht!
Vor der Fehlersuche das Gerät ausschalten und
Netzstecker ziehen.
Die folgende Tabelle zeigt Fehlersymptome auf und
beschreibt wie Sie Abhilfe schaffen können, wenn Ihre
Maschine einmal nicht richtig arbeitet. Wenn Sie damit
das Problem nicht lokalisieren und beseitigen können,
wenden Sie sich an Ihre Service-Werkstatt.
9. Wartung
9.1 Sägekette und Schwert auswechseln.
Das Schwert muss erneuert werden, wenn
• die Führungsnut des Schwerts abgenutzt ist.
• das Stirnrad im Schwert beschädigt oder abgenutzt
ist.
Gehen Sie hierzu wie in Kapitel „Montage von Schwert
und Sägekette“ vor!
10.2 Prüfen der automatischen Kettenschmierung
Überprüfen Sie regelmäßig die Funktion der automatischen Kettenschmierung, um einer Überhitzung und
damit verbundenen Beschädigung von Schwert und
Sägekette vorzubeugen. Richten Sie dazu die Schwert-
spitze gegen eine glatte Oberäche (Brett, Anschnitt
eines Baumes) und lassen Sie die Kettensäge laufen.
Wenn sich während dieses Vorgangs eine zunehmende
Ölspur zeigt, arbeitet die automatische Kettenschmierung einwandfrei. Zeigt sich keine deutliche Ölspur,
lessen Sie bitte die entsprechenden Hinweise im Kapitel
„Fehlersuche“!
Wenn auch diese Hinweise nicht helfen, wenden Sie
sich an unseren Service oder eine ähnlich qualizierte
Werkstatt.
Achtung! Berühren Sie dabei nicht die Oberäche.
Halten Sie einen ausreichenden Sicherheitsabstand (ca. 20 cm) ein.
9.3 Schärfen der Sägekette
Ein effektives Arbeiten mit der Kettensäge ist nur möglich, wenn die Sägekette in gutem Zustand und scharf
ist. Dadurch verringert sich auch die Gefahr eines Rückschlages. Die Sägekette kann bei jedem Fachhändler
nachgeschliffen werden. Versuchen Sie nicht, die Sägekette selbst zu schärfen, wenn Sie nicht über ein geeignetes Werkzeug und die notwendige Erfahrung verfügen.
10. Reinigung und Lagerung
• Reinigen Sie regelmäßig den Spannmechanismus,
indem Sie ihn mit Druckluft ausblasen oder mit einer
Bürste säubern. Verwenden Sie keine Werkzeuge
zum Reinigen.
• Halten Sie die Griffe ölfrei, damit Sie immer sicheren
Halt haben.
• Reinigen Sie das Gerät bei Bedarf mit einem feuchten
Tuch und gegebenenfalls mit einem milden Spülmittel.
• Wird die Kettensäge über einen längeren Zeitraum
nicht genutzt, so entfernen Sie das Kettenöl aus dem
Tank. Legen Sie die Sägekette und das Schwert kurz
in ein Ölbad und wickeln Sie es danach in Ölpapier.
Achtung!
• Bei Transport oder Aufbewahrung der Kettensäge
stets die Schutzabdeckung aufziehen.
• Vor jeder Reinigung Netzstecker ziehen.
• Tauchen Sie das Gerät zur Reinigung keinesfalls in
Wasser oder andere Flüssigkeiten.

DE | Gebrauchsanweisung
12
Ursache Fehler Abhilfe
Kettensäge funktioniert nicht Keine Stromversorgung Stromversorgung überprüfen.
Steckdose defekt Andere Stromquelle ausprobieren,
gegebenenfalls wechseln.
Stromverlängerungskabel beschädigt Kabel überprüfen, gegebenenfalls
wechseln.
Sicherung defekt Sicherung wechseln
Kettensäge arbeitet unregelmäßig Stromkabel beschädigt Fachwerkstatt aufsuchen
Externer Wackelkontakt Fachwerkstatt aufsuchen
Interner Wackelkontakt Fachwerkstatt aufsuchen
Ein-/Ausschalter defekt Fachwerkstatt aufsuchen
Sägekette trocken Kein Öl im Tank Öl nachfüllen
Entlüftung im Öltankverschluss
verstopft
Öltankverschluss reinigen
Ölaususskanal verstopft Ölaususskanal frei machen
Kette/Führungsschiene heiß Kein Öl im Tank Öl nachfüllen
Entlüftung im Öltankverschluss
verstopft
Öltankverschluss reinigen
Ölaususskanal verstopft Ölaususskanal frei machen
Kette stumpf Kette nachschleifen oder ersetzen
Kettensäge rupft, vibriert oder
sägt nicht richtig
Kettenspannung zu locker Kettenspannung einstellen
Kette stumpf Kette nachschleifen oder ersetzen
Kette verschlissen Kette ersetzen
Sägezähne zeigen in die falsche
Richtung
Sägekette neu montieren mit Zähnen in korrekter Richtung
15. EG-Konformitätserklärung
Wir, ikra GmbH, Schlesierstraße 36, 64839 Münster GERMANY, erklären in alleiniger Verantwortung, dass das/
die Produkt/e Elektro- Astsäge EAS 750F, auf das/die sich diese Erklärung bezieht, den einschlägigen Sicherheits- und Gesundheitsanforderungen der EG-Richtlinie 2006/42/EG (Maschinenrichtlinie), 2014/30/EU (EMV-
Richtlinie), 2011/65/EU (RoHS-Richtlinie) und 2000/14/EG (Geräuschrichtlinie) einschließlich Änderungsrichtlinien
entspricht/entsprechen. Zur sachgerechten Umsetzung der in den EG-Richtlinien genannten Sicherheits- und
Gesundheitsanforderungen wurden folgende Normen und/oder technische Spezikation(en) herangezogen:
EN 60745-1:2009/A11:2010, EN ISO 11680-1:2011, AfPS GS 2014:01 PAK
EN 55014-1/A2:2011; EN 55014-2/A2:2008; EN 61000-3-2:2014; EN 61000-3-3:2013
Baumusterprüfung M6A 16 05 32082 134; TÜV Süd Product Service GmbH; 0123
gemessener Schallleistungspegel 105,1 dB(A)
garantierter Schallleistungspegel 108,0 dB(A)
Konformitätsbewertungsverfahren nach Anhang V / Richtlinie 2000/14/EG
Das Baujahr ist auf dem Typschild aufgedruckt und zusätzlich anhand der fortlaufenden Seriennummer feststellbar.
Münster, 27.09.2016
Gerhard Knorr, Technische Leitung Ikra GmbH
Aufbewahrung der technischen Unterlagen: Gerhard Knorr, Kärcherstraße 57, DE-64839 Münster

GB | Operating Instructions
1
Electric branch saw EAS 750F
Content
1. Intended use
2. General safety regulations
3. Explanation of symbols
4. Description of the machine and scope of delivery
5. Assembly
6. Operation
7. Working with the chainsaw
8. Technical data
9. Maintenance
10. Cleaning and storage
11. Information for environmental protection / disposal
12. Repair Service
13. Ordering spare parts
14. Fault remedy
15. Declaration of conformity
Packaging
This machine is packaged to prevent damage during transportation. The packaging is raw material and can thus be
reused or fed back into the raw materials cycle.
When using the machine certain safety precautions must be taken in order to prevent injuries and damage:
• Read through the operating instructions carefully and observe the instructions contained therein. Familiarise yourself with the machine, its correct use and the safety devices by means of these operating instructions.
• Store these carefully so that the information is always available to you.
• In the event of the machine being handed over to another party, please include these operating instructions with it.
We accept no liability for accidents and damage caused as a result of disregarding these instructions.
1. Intended use
This chain saw may only be used by one person to saw wood. The chain saw must be held with the right hand on the
rear handle and the left hand on the front handle. Before using the chain saw, the user must have read and understood
all information and instructions in the operating instructions. The user must wear appropriate personal protective equipment (PPE).
The chain saw is only permitted to be used to cut wood. Materials such as plastic, stone, metal or wood that
contains foreign matter (such as nails or screws) are not permitted to be cut.
Residual risks
Residual risks remain even if you use this tool as intended. The following hazards can occur due to this tool’s construction and design:
1. Lung damage if a suitable dust mask is not worn.
2. Hearing damage if suitable hearing protection is not worn.
3. Cuts if suitable protective clothing is not worn.
4. Damage to health, which results from hand and arm vibrations if the device is used for an extended period or not
operated or maintained properly.
Warning! This machine generates an electromagnetic eld when operated. This eld can affect active or passive med-
ical implants in certain circumstances. In order to reduce the risk of severe injury or death, we recommend that people
with medical implants consult their doctor or the manufacturer of the medical implant before operating the machine.
Translation of the original Operating Instructions

GB | Operating Instructions
2
Warning!
The prolonged utilisation of a tool will subject the user to vibration and shocks that could lead to Raynaud‘s syndrome
or Carpal tunnel syndrome.
This condition reduces the ability of the hand to sense and regulate temperature, causes numbness and a sensation
of heat and can lead to damage to the nervous system and the circulatory system and to necrosis.
Not all factors that lead to Raynaud‘s syndrome are known but cold water, smoking and illnesses that impact the blood
vessels and the circulatory system as well as severe or long-lasting exposure to vibrations are known to be factors in
the development of Raynaud‘s syndrome.
Observe the following in order to reduce the risk of Raynaud‘s syndrome and Carpal tunnel syndrome:
• Wear gloves and keep your hands warm.
• Make sure the device is well maintained. A tool with loose components or with damaged or worn-out dampers will have
a disposition towards increased vibrations.
• Always hold the handle rmly but do not clutch it constantly with excessive force. Take breaks often.
All of the above precautions cannot exclude the risk of Raynaud‘s syndrome or Carpal tunnel syndrome. Therefore,
with long-term or regular use it is advisable to keep a close watch on the condition of your hands and ngers. Seek
medical attention immediately in the event of any of the above symptoms appearing.
2. General safety regulations
This machine is not intended for use by persons (including children) with an impaired physical, sensory or mental capacity or insufcient experience and/or insufcient knowledge unless they are supervised by a person responsible for their safety or receive instructions from that person in the use of the
machine. Children should be supervised in order to ensure that they do not play with the machine.
Remain alert, pay attention to what you are doing and proceed sensibly when working with an electric
tool. Do not use the machine if you are tired or under the inuence of drugs, alcohol or medication.
General safety information for power tools
Warning! Read all safety-related information and safety instructions! Failure to observe
the safety information and instructions may result in electric shock, burns and/or severe injury.
Keep the safety information and instructions for future reference.
The term ‘power tool’ as used in the safety information and instructions includes both mains-operated
tools (with power cord) and battery-operated tools (without power cord).
1) Safety at the workplace
a) Keep your working area clean, tidy and well-lit. Disorder and poorly lit working areas may
result in accidents.
b) Do not operate the power tool in potentially explosive environments containing combus-
tible uids, gases or dusts. Power tools generate sparks that may ignite dusts or fumes.
c) Keep children and other persons away while you are operating the power tool. Distractions
may result in the operator loosing control over the tool.
2) Electrical safety
a) The mains plug of the power tool must t into the mains socket. The plug must not be
modied in any way. Do not use adapter plugs/connectors in combination with tools with
protective earthing. Unmodied plugs and tting sockets reduce the risk of electric shock.
b) Avoid physical contact with earthed surfaces as pipes, heaters, ovens and refrigerators.
There is an increased risk of electric shock if your body is earthed.
c) Keep the tool out of the rain or moisture in general. The penetration of water into a power
tool increases the risk of electric shock.
d) Do not use the cord to carry or hang up the tool or to pull the plug out of the socket. Keep
the cord away from heat, oil and sharp edges or moving parts of the tool. Damaged or
tangled cords increase the risk of electric shock.

GB | Operating Instructions
3
e) When operating a power tool outdoors, use exclusively extension cords that are ap-
proved for outdoor-use. The use of an extension cord that is suitable for outdoor use reduces
the risk of electric shock.
f) If the operation of a power tool in a moist environment cannot be avoided it is highly
recommended to use a residual current device (RCD). The use of an RCD reduces the risk
of electric shock.
3) Personal safety
a) Always pay attention to what you do and apply reasonable care when working with a pow-
er tool. Do not use the power tool when you are tired or under the inuence of medication,
drugs or alcohol. When working with power tools, even a short moment of inattentiveness may
result in severe injury.
b) Wear personal protection equipment and always wear eye protection (safety goggles).
Wearing personal protection equipment as a dust mask, nonslip safety shoes, safety helmet or
ear protectors (depending on the type and application of the tool) reduces the risk of injury.
c) Avoid unintentional operation. Make sure that the power tool is switched off before you
connect it to the mains supply and/or the battery and whenever you pick up or carry the
tool. When carrying the tool with your nger on the on/off switch or connecting the tool to the
mains supply with the switch in ‘ON’ position, this may result in accidents.
d) Remove adjustment tools or wrenches and the like before you switch the power tool on.
A wrench or other tool that is inside or on a rotating part of the tool may cause injury.
e) Avoid unusual postures. Make sure to have a safe footing and keep your balance at all
times. This will allow you to better control the power tool in unexpected situations.
f) Wear suitable clothes. Do not wear wide clothing or jewellery. Keep your hair, clothes
and gloves clear of all moving parts. Loose clothing, jewellery or long hair may get caught in
moving parts.
g) If dust extraction/collection devices are provided make sure that they are connected and
used properly. The use of a dust extraction device may reduce risks caused by dust.
4) Use and handling of the power tool
a) Do not overtax the power tool. Use the power tool intended for your type of work in each
case. The use of the suitable power tool within the stated range of performance makes working
more effective and safer.
b) Do not use a power tool with a damaged switch. A power tool that cannot be switched on or
off any more is dangerous and must be repaired.
c) Pull the mains plug and/or remove the battery before adjusting a tool, changing acces-
sories or putting the tool aside. This precaution avoids the unintentional start of the tool.
d) Store power tools that are currently not used out of the reach of children. Do not allow
persons to use the tool if they are not familiar with the tool or these instructions. Power
tools are dangerous if used by inexperienced persons.
e) Thoroughly maintain your power tool. Check whether moving parts are working properly
and are not jamming/sticking, and whether parts are broken or otherwise damaged in a
way that may affect the function of the power tool. Have damaged parts repaired before
using the tool. Many accidents are the result of poorly maintained power tools.
f) Keep cutting tools sharp and clean. Thoroughly maintained cutting tools with sharp cutting
edges are jamming less often and are easier to guide.
g) Use power tools, accessories, add-on tools, etc. in accordance with these instructions
and in the way prescribed for the respective type of tool. You should also consider the
working conditions and the work to be carried out. The use of power tools for purposes other
than those intended for the respective tool may result in dangerous situations.

GB | Operating Instructions
4
5) Service
a) Have the power tool serviced by qualied technical personnel only; repairs should be car-
ried out using exclusively original spare parts. This will ensure the continued safe operation
of the power tool.
Device-specic safety instructions
• Keep the cable away from the cutting area. When working with the tool the cable might be hidden in bushes
and accidentally cut through.
• Keep all parts of your body clear of the chain while the saw is running. Before starting the saw, make sure
that the chain does not touch any objects. When working with a chain saw, even a short moment of inattentive-
ness may result in clothes or parts of the body being caught by the chain.
• Always hold the chain saw with your right hand at the rear handle and your left hand at the front handle.
Holding the chain saw differently (left hand – rear handle / right hand – front handle) during operation will increase
the risk of injury and is not permitted.
• Wear eye and hearing protection. Other personal protection equipment for the head, hands, legs and feet
is recommended. Proper protective clothing and protection equipment reduce the risk of injury caused by thrown-
about wood chips and accidental contact with the chain.
• Do not operate the chain saw on trees. Operating a chain saw while situated on a tree involves a high risk of
injury.
• Make sure to have a safe stand at any time, and only use the chain saw when standing on solid, safe and
level ground. A slippery ground or instable surfaces as the steps of a ladder may lead to loosing balance or the
control over the chain saw.
• When cutting a branch that is under tension take into account that it will spring back. When the tension of the
wood bres is released the tensioned branch may hit the operator and/or the chain saw resulting in a loss of control.
• Apply particular caution when cutting brush and young trees. The thin material may get caught in the chain
and hit you or throw you off balance.
• Carry the switched-off chain saw using the front handle with the chain pointing away from your body.
Always put on the protection cover when transporting or storing the chain saw. The careful handling of the
chain saw reduces the risk of accidentally touching the sharp cutting chain.
• Follow the instructions for lubrication, chain tension and changing accessories. An improperly tensioned or
lubricated chain may either break or considerably increase the risk of a kickback.
• Keep the handles dry, clean and free from oil and grease. Fatty, oily handles are slippery and may lead to a
loss of control.
• Use the chain saw for cutting wood only! Do not use the chain saw for works it is not designed for. – Example: Do not use the chain saw for cutting plastics, brickwork or other construction materials that are not
made of wood. The use of the chain saw for applications, for which it is not designed, may result in dangerous
situations.
• Never attempt to use an incomplete machine or one which an unauthorised alteration has been implemented.
• These devices are not designed to be operated by persons who have insufcient experience and/or insufcient
knowledge or by persons with impaired physical, sensory or mental capabilities, unless they are being supervised
by a person who is responsible for their safety or they are receiving instructions about how these devices are to
be used.
• Young persons under the age of 16 are not permitted to operate these devices.
• Measures must be implemented to ensure that the device is not operated during adverse weather conditions, in
particular when there is a risk of lightening.
Warning!
The prolonged utilisation of a tool will subject the user to vibration and shocks that could lead to Raynaud‘s syndrome or
Carpal tunnel syndrome. This condition reduces the ability of the hand to sense and regulate temperature, causes numbness and a sensation of heat and can lead to damage to the nervous system and the circulatory system and to necrosis.
Not all factors that lead to Raynaud‘s syndrome are known but cold water, smoking and illnesses that impact the blood
vessels and the circulatory system as well as severe or long-lasting exposure to vibrations are known to be factors in
the development of Raynaud‘s syndrome. Observe the following in order to reduce the risk of Raynaud‘s syndrome and
Carpal tunnel syndrome:
• Wear gloves and keep your hands warm.
• Make sure the device is well maintained. A tool with loose components or with damaged or worn-out dampers will have
a disposition towards increased vibrations.
• Always hold the handle rmly but do not clutch it constantly with excessive force. Take breaks often.
All of the above precautions cannot exclude the risk of Raynaud‘s syndrome or Carpal tunnel syndrome. Therefore,
with
long-term or regular use it is advisable to keep a close watch on the condition of your hands and ngers. Seek medical
attention immediately in the event of any of the above symptoms appearing.

GB | Operating Instructions
5
The following symbols are used on this electric tool. You can operate this electric tool more safely and effectively
with the correct interpretation of these symbols.
SYMBOLS MEANING
If you do not adhere to the instructions and safety measures described in the Operating
Instructions severe injuries may occur. Read the Operating Instructions before you start and
operate this device.
Wear eye and ear protection devices when operating this device. Falling objects may cause
serious injuries of the head; wear a head protection when operating this device.
Always wear safety boots and gloves when operating the device.
Clothing must be sturdy and snug-tting, but allow complete freedom of movement.
Unplug immediately if the power cord or plug becomes damaged !
Do not use the tool under wet weather conditions!
Protection class II
Conrms the conformity of the electric tool with the Directives of the European Community.
This device may not be disposed of with general/household waste. Dispose of only at a
designated collection point.
Maintain a minimum clearance of 10 m from current-carrying lines. Life-threatening danger
from electric shock
3. Explanation of symbols

GB | Operating Instructions
6
4. Description of the machine and scope of
delivery (Fig. 1)
1. Mains cable
2. Cable strain relief
3. On/off switch
4. Handle
5. Telescope arm
6. Padded grip
7. Telescope quick-acting lock
8. Motor housing
9. Chain sprocket cover
10. Oil tank cover
11. Multi-function tool
12. Saw chain
13. Guide bar
14. Switch lock
15. Guide bar guard
16. Shoulder belt
5. Assembly
Attention! Only connect the chainsaw to the mains
supply once it has been completely assembled and
the chain tension has been set. Always wear protective
gloves when carrying out work on the chainsaw in order
to prevent injury.
5.1 Assembly of guide bar and saw chain
Carefully unpack and inspect all parts for completeness.
(Fig.1)
• Loosen the fastening bolt for the chain sprocket cover.
(Fig.2)
• Remove the chain sprocket cover.
• Place the chain in the groove of the guide bar as
shown. (Fig.3/Pos. A)
• Insert the guide bar and chain into the mount on the
chainsaw. (Fig. 4) In the process, guide the chain
around the pinion and hang the guide bar in the chain
tensioning bolts.
• Re-mount and hand-tighten the chain sprocket cover
with the fastening bolt. (Fig.5)
Attention! Only tighten the fastening bolt once the
chain tension has been adjusted (see 5.2).
5.2 Tensioning the saw chain
Attention! Always pull out the mains plug before inspection and adjustment work. Always
wear protective gloves when carrying out work
on the chainsaw in order to prevent injury.
• Loosen the fastening bolt of the chain sprocket cover
a few rotations.
• Adjust the chain tension with a screwdriver at the
chain tensioning screw.
• Clockwise rotation increases the chain tension; anticlockwise rotation reduces the chain tension. The saw
chain is correctly tensioned if it can be raised approx.
2 mm in the centre of the guide bar. (Fig.6 + 7)
Attention! All chain links must lie properly in the
guide groove of the guide bar.
Information regarding the tensioning of the chain
The saw chain must be tensioned properly in order to
ensure safe operation. The chain tension is optimal if the
saw chain can be lifted 2 mm in the centre of the guide
bar. Since the saw chain heats up during the sawing
process, whereby its length changes, you must check
the chain tension at least once every 10 min. and adjust
it as necessary. This applies in particular for new saw
chains. Slacken the saw chain after work is completed,
because it shortens when cooling down. In doing so,
you can prevent damage to the chain.
5.3 Saw chain lubrication
Attention! Always pull out the mains plug before
inspection and adjustment work. Always wear
protective gloves when carrying out work on the
chainsaw in order to prevent injury.
Attention! Never operate the chain without saw
chain oil! The use of the chainsaw without saw
chain oil or with an oil level below the minimum
oil level mark results in damage to the chainsaw!
Attention! Only use special chainsaw oil. The warranty is voided with the use of used oil.
Filling the oil tank (Fig. 8)
• Place the chain saw on a level surface.
• Clean the area around the oil tank cap (Pos.10) and
then open it.
• Fill the oil tank with saw chain oil. In doing so, make
sure that no dirt gets into the oil tank so that the oil
nozzle does not clog.
• Close the oil tank cap (Pos.10).
6. Operation
6.1 Adjusting the telescope length
1. Rotate the locking cap nut (Fig.9) anti-clockwise.
2. The lock is released and can be adjusted to the desi-
red length by pulling the ends out from one another
to the desired length.
3. Then rmly tighten the locking cap nut in clockwise
motion.
6.2 Connection to the mains supply
• Connect the mains cable to a suitable extension
cable. Make sure that the extension cable is designed
to accommodate the power of the chain saw.
• Secure the extension cable against tractive forces
and accidental unplugging as shown in (Fig.10).
• Connect the extension cable to an earthed safety
socket installed in accordance with regulations. We
recommend the use of a cable in a signal colour (red
or yellow). This reduces the risk of accidental damage
from the chainsaw.
Recommendation
Only connect the device to a power source that is pro-

GB | Operating Instructions
7
tected via a residual current protective device (RCD) with
a maximum release current of 30 mA.
6.3 Switching on/off
Switching on
• Hold the chainsaw rmly with both hands on the hand-
le (thumb under the handle).
• Press and hold the switch lock (Fig.11).
• Switch the chainsaw on with the on/off switch (3). The
switch lock (14) can now be released again.
Switching off
• Release the on/off switch (3). Always pull out the
mains plug when discontinuing the work.
7. Working with the chainsaw
7.1 Preparation
Before each use, check the following to ensure safe
work:
Condition of the chainsaw
Before beginning work, inspect the chainsaw for damage
to the housing, the mains cable, the saw chain and the
guide bar. Never use an obviously damaged machine.
Oil tank
Fill level of the oil tank. Also check whether there is
sufcient oil available while working. Never operate the
saw if there is no oil or the oil level has dropped below
the minimum oil level mark in order to prevent damage
to the chain saw. On average, an oil lling is sufcient
for 10 minutes of operation, depending on the duration
of pauses and the stress.
Saw chain
Tension of the saw chain, condition of the cutters. The
sharper the saw chain is, the easier and more manageable the chain saw is to operate. The same applies for
the chain tension. Also check the chain tension at least
once every 10 minutes while working in order to increase
safety! New saw chains, in particular, tend to have a
higher degree of elongation.
Protective clothing
Make absolutely sure to wear the appropriate, close-
tting protective clothing, such as chainsaw-protective
pants, gloves and safety shoes.
Hearing protection and protective goggles
Wear a safety helmet with integrated hearing protection
and a face guard. This provides protection against falling
branches and recoiling branches.
Attachment of the shoulder belt
1. Wear the shoulder belt so that it lies over the right
shoulder (Fig. 12).
2. Fasten the carabiner hook on the shaft bracket on
the shaft (Fig. 13).
Never carry the belt diagonally across your shoulders
and chest, but rather only on one shoulder, so that you
can rapidly move away from the tool in case of danger.
Safe work
• In order to ensure safe work, a maximum working
angle of 60° is prescribed.
• Never stand below the branch to be sawed.
• Exercise caution when sawing branches under tension or splintering wood.
• Potential risk of injury from falling branches and ying
wood projectiles!
• If the machine is in operation, keep persons and animals away from the danger area.
• The machine is not protected against electric shock
when coming into contact with high-voltage lines.
Maintain a minimum clearance of 10 m from currentcarrying lines. Life-threatening danger from electric
shock!
• When working on an incline, always stand above or to
the side of the branch to be sawed.
• Hold the machine as close as possible to your body.
By doing so, you maximise your balance.
Sawing techniques
• When removing branches, hold the machine at an angle ranging from a maximum 60° to horizontal in order
to avoid being struck by a falling branch.
• Saw off the lower branches on the tree rst. By doing so, it is easier for the cut branches to fall to the
ground.
• At the end of the cut, the weight of the saw suddenly
increases for the user, because the saw is no longer
supported on the branch. There is the risk of losing
control of the saw.
• Only pull the saw out of the cut with the saw chain
running. By doing so, you can prevent it from getting
jammed.
• Do not saw with the tip of the guide bar.
• Do not saw into thick the branch formations. This
impedes the tree‘s ability to heal the wound.
Sawing off smaller branches (Fig.14)
Place the stop face of the saw on the branch. This pre-
vents tful movements of the saw at the beginning of the
cut. Applying light pressure, guide the saw through the
branch from top to bottom.
Sawing off larger and longer branches (Fig.15)
Make a relief cut when sawing larger branches.
a) First saw through 1/3 of the branch diameter from
bottom to top using the top side of the guide bar.
b) Then saw from top to bottom to the rst cut using the
bottom side of the guide bar.
c) Saw off longer branches in sections in order to
maintain control over the location of impact.
Kickback
The term kickback refers to when the chainsaw suddenly
jumps up and back. This is usually caused by the workpiece coming into contact with the guide bar tip or the
clamping of the saw chain.
A kickback generates abrupt, powerful forces. Therefore,

GB | Operating Instructions
8
the chainsaw usually reacts in an uncontrolled manner.
The consequence is often the severe injury of the user
or nearby persons.
The danger of a kickback is greatest if you apply the area
near the guide bar tip to a branch, because the leverage
effect is greatest there. Therefore, always apply the saw
as atly as possible.
Attention!
• Always make sure that the chain tension is correct!
• Only use properly functioning chainsaws!
• Only work with a saw chain sharpened according to
regulations!
• Never saw with the upper edge or tip of the guide bar!
• Always hold the chainsaw rmly with two hands!
Sawing wood under tension
Sawing wood which is under tension necessitates elevated caution! Wood that is under tension and is then
released from that tension when cut occasionally reacts
in a completely uncontrolled manner. This can result in
severe to deadly injuries. Such work may only be performed by trained specialists.

GB | Operating Instructions
9
8. Technical specications
Electric branch saw EAS 750F
Rated Voltage 230-240 V ~ / 50 Hz
Nominal Consumption 750 W
No-load Speed 6000 min
-1
Guide Bar 200 mm
Cutting length ca. 17,5 cm
Variable height adjustment from 1.95 m to 2.90 m
Working height up to 4 m
Chain speed 11 m/s
Oil 60 ml
Weight with bar+chain 3.6 kg
Chain type 91PJ033X
Guide Bar type 080SDEA041
Class of Protection II
Sound Pressure Level EN ISO 11680-1:2011 90 dB(A) K = 3 dB
Vibration EN ISO 11680-1:2011 2,7 m/s2 K = 1,5 m/s
2
Noise emission information in accordance with the German Product Safety Act (ProdSG) and the EC Machine Directive: the noise pressure level at the place of work can exceed 80 dB(A). In such cases the operator will require noise
protection (e.g. wearing of ear protectors).
Wear hearing protection. The inuence of noise can cause hearing loss.
Attention!
The vibration value will change on the basis of the area of application of the electric tool and may lie above the
specied value in exceptional situations.
Keep the development of noise and vibration to a minimum!
• Only use properly functioning machines.
• Maintain and clean the machine regularly.
• Adapt your working method to the machine.
• Do not overstress the machine.
• If necessary, have the machine inspected.
• Switch the machine off when it is not in use.
• Wear work gloves.
Attention: Noise protection! Please observe the local regulations when operating your device.
GB | Operating Instructions
10
11. Information for environmental protection/
disposal
Dispose of the machine properly after it is worn out. Disconnect the mains cable in order to prevent misuse. Do
not dispose of the machine with the household waste. In
the interest of environmental protection, take it to a collection point for electric machines. Your responsible local
authority can provide you with addresses and operating
times. Also take the packaging materials and worn out
accessories to the appropriate collection points.
Only for EU countries
Do not discard electric tools in the household
waste!
In accordance with European Directive 2012/19/EU
on waste electrical and electronic equipment and its
implementation in national law, waste electric tools must
be collected separately for environmentally-compatible
re-use.
Recycling alternative to the return invitation:
Instead of returning the electric equipment, the owner is
alternatively obligated to take part in the proper recycling
in the case of relinquishment of ownership. The waste
equipment can also be taken to a collection facility which
disposes of it in the sense of the national recycling management and waste acts. This does not pertain to the
accessory parts and auxiliary equipment without electrical components accompanying the waste equipment.
12. Repair Service
Repairs to electric power tools should only be carried out
by specialist electrical personnel.
Always keep the original packaging for a possibly required shipping of the tool.
13. Ordering spare parts
The following information should be provided when
ordering spare parts:
• Type of machine
• Item number of the machine
14. Fault nding
Caution!
Switch off the machine and pull out the mains plug
before commencing fault nding.
The following table shows fault symptoms and describes
how they can be rectied if your machine is not functioning properly. If this does not help you localise and rectify
the problem, contact your service workshop..
9. Maintenance
9.1 Replacing the saw chain and guide bar
The guide bar must be replaced if the guide
• groove of the guide bar is worn out.
• the spur wheel in the guide bar is damaged or worn
out.
For this purpose, proceed as described in the chapter
“Assembly of the guide bar and saw chain“!
9.2 Checking the automatic chain lubrication
Regularly check the functionality of the automatic chain
lubrication in order to prevent overheating and the
subsequent damage to the guide bar and saw chain
associated with it. For this purpose, align the guide bar
tip against a smooth surface (board, cut-in of a tree)
and allow the chainsaw to run. If an increasing amount
of oil appears, the automatic chain lubrication functions
properly. If no clear trace of oil appears, please read the
appropriate information in the chapter “Fault remedy“!
If this information does not help, please contact our cu-
stomer service or a similarly qualied workshop.
Attention! Do not touch the surface during the
process. Maintain a sufcient safety clearance
(approx. 20 cm).
9.3 Sharpening the saw chain
Effective work with the chainsaw is only possible if the
saw chain is in good condition and sharp. This also
reduces the danger of a kickback. The saw chain can
be resharpened by a specialty dealer. Do not attempt
to sharpen the saw chain yourself if you do not have a
suitable tool and the necessary experience.
10. Cleaning and storage
• Regularly clean the tensioning mechanism by blowing
compressed air onto or cleaning it with a brush. Do
not use any tools for the cleaning.
• Keep oil away from the handle in order to ensure a
secure hold.
• Clean the machine as necessary with a damp cloth
and a mild cleanser, if appropriate.
• If the chainsaw is not used for an extended period of
time, remove the chain oil from the tank. Briey place
the chainsaw and the guide bar in an oil bath and then
wrap it in oil paper.
Attention!
• Always replace the protective cover for transport or
storage of the chainsaw.
• Pull out the mains plug before cleaning.
• Never immerse the machine in water or other liquids.
• Store the chainsaw in a safe and dry place and out of
the reach of children.

GB | Operating Instructions
11
Cause Fault Remedy
Chainsaw does not operate No current supply Check current supply.
Defective outlet Try a different source of current,
change as necessary.
Extension cable damaged Check cable, replace if necessary.
Defective fuse Replace fuse
Chainsaw operates irregularly Mains cable damaged Take saw to a specialty workshop
External loose connection Take saw to a specialty workshop
Internal loose connection Take saw to a specialty workshop
Defective on/off switch Take saw to a specialty workshop
Saw chain dry No oil in the tank Re-ll oil
Ventilation in the oil tank cap clogged Clean oil tank cap
Oil tank ow channel clogged Unclog oil ow channel
Chain/guide rail hot No oil in the tank Re-ll oil
Ventilation in the oil tank cap clogged Clean oil tank cap
Oil tank ow channel clogged Unclog oil ow channel
Dull chain Re-sharpen or replace chain
Chainsaw jumps up, vibrates or
does not saw properly
Chain tension too loose Adjust chain tension
Dull chain Re-sharpen or replace chain
Chain worn out Replace chain
Saw teeth pulling in the wrong
direction
Re-mount saw chain with
teeth in the correct direction
15. EC Declaration of Conformity
We, ikra GmbH, Schlesierstraße 36, 64839 Münster GERMANY, declare under our sole responsibility that the
product Electric branch saw EAS 750F, to which this declaration relates correspond to the relevant basic safety
and health requirements of Directives 2006/42/EC (Machinery Directive), 2014/30/EU (EMC-Guideline), 2011/65/
EU (RoHS-Guideline) and 2000/14/EC (noise directive) incl. modications. For the relevant implementation of the
safety and health requirements mentioned in the Directives, the following standards and/or technical specication(s)
have been respected:
EN 60745-1:2009/A11:2010, EN ISO 11680-1:2011, AfPS GS 2014:01 PAK
EN 55014-1/A2:2011; EN 55014-2/A2:2008; EN 61000-3-2:2014; EN 61000-3-3:2013
Type examination certicate No. M6A 16 05 32082 134; TÜV SÜD Product GmbH, Identity no. 0123
measured acoustic capacity level 105,1 dB (A)
guaranteed acoustic capacity level 108,0 dB (A)
Conformity assessment method to annexe V / Directive 2000/14/EC
The year of manufacture is printed on the nameplate and can be additionally retrieved via the consecutive serial number.
Münster, 27.09.2016
Gerhard Knorr, Technical Management Ikra GmbH
Maintenance of technical documentation: Gerhard Knorr, Kärcherstraße 57, DE-64839 Münster

FR | Manuel d’utilisation
1
Scie électrique à élaguer EAS 750F
Table des matiéres
1. Utilisation conforme aux dispositions
2. Prescriptions générales de sécurité
3. Explication des symboles
4. Description de l‘appareil et contenu de la livraison
5. Montage
6. Fonctionnement
7. Utilisation de la scie à chaîne
8. Caractéristiques techniques
9. Maintenance
10. Nettoyage et stockage
11. Consignes de protection de l‘environnement/d‘élimination
12. Service de réparation
13. Commande de pièces de rechange
14. Recherche des erreurs
15. Déclaration de conformité
Emballage
Cet appareil se trouve dans un emballage permettant d‘éviter tout dommage dû au transport. Cet emballage est constitué de matières premières et peut donc être recyclé ou réintégré dans le circuit des matières premières.
Lors de l‘utilisation d‘appareils, il convient de respecter certaines mesures de sécurité an de prévenir tous
risques de blessures et de dommages:
• Lisez attentivement la notice d‘utilisation et respectez-en les consignes. Cette notice vous permettra de vous familiariser avec l‘appareil, avec son utilisation correcte et avec les prescriptions de sécurité.
• Conservez-bien celle-ci an de vous pouvoir la consulter à tout moment.
• Si l‘appareil doit être transmis à d‘autres personnes, veuillez leur remettre également la présente notice d‘utilisation.
Nous déclinons toute responsabilité pour les accidents ou les dommages résultant du non-respect de cette
notice.
1. Utilisation conforme
La scie à chaîne ne doit être utilisée que par une seule personne, et uniquement pour scier du bois. La scie à chaîne
doit être tenue avec la main droite sur la poignée arrière et la main gauche sur la poignée avant. Avant d’utiliser la scie
à chaîne, l’utilisateur doit avoir lu et compris les instructions et consignes du mode d’emploi. L’utilisateur doit porter un
équipement de protection individuelle (EPI) adéquat.
La scie à chaîne doit servir exclusivement à scier du bois. Aucun autre matériau, tels que le plastique, la
pierre, le métal ou du bois contenant des corps étrangers (vis ou clous) ne doit être coupé.
Dangers résiduels
Même si vous utilisez cet outil de manière conforme, il reste toujours des dangers résiduels. Les dangers suivants
peuvent survenir en raison de la structure et de la conception de cet outil:
1. Lésions pulmonaires si aucun masque adéquat de protection contre la poussière n’est porté.
2. Troubles auditifs si aucune protection auditive adaptée n’est portée.
3. Coupures si aucun vêtement adéquat de protection n’est porté.
4. Dommages sur la santé en raison des vibrations transmises au système main-bras, si l’appareil est utilisé pendant
une longue durée ou s’il n’est pas utilisé et entretenu correctement.
Avertissement! Pendant son fonctionnement, cette machine crée un champ électromagnétique. Ce champ peut,
dans certaines circonstances, avoir des effets néfastes sur les implants médicaux actifs ou passifs. Pour réduire
le risque de blessures graves ou mortelles, nous recommandons aux personnes ayant des implants médicaux de
consulter leur médecin et le fabricant de l’implant avant d’utiliser la machine.
Avertissement !
L’utilisation prolongée d’un outil soumet l’utilisateur à des vibrations susceptibles de causer un syndrome de Raynaud
(se caractérisant par une décoloration des doigts) ou un syndrome du canal carpien.
Cet état diminue la capacité pour la main de ressentir et de réguler les températures, ce qui entraîne un engourdissement et des sensations de chaleur et peut endommager les nerfs et le système circulatoire, voire la mort des tissus.
Traduction du mode d’emploi d’origine

FR | Manuel d’utilisation
2
Tous les facteurs entraînant le syndrome de Raynaud ne sont pas identiés, mais le temps froid, fumer et les maladies
qui concernent les vaisseaux sanguins et le système circulatoire, de même que les vibrations importantes et subies
de manière prolongée gurent parmi les causes signalées. Pour réduire les risques de syndrome de Raynaud et de
syndrome du canal carpien, respectez les précautions suivantes:
• Portez des gants et maintenez vos mains au chaud.
• Procédez à une maintenance correcte de l’appareil. Un outil dont les composants sont desserrés ou les amortisseurs endommagés ou usés entraînent des vibrations importantes.
• Maintenez une pression ferme mais n’enserrez pas constamment les poignées en exerçant une pression excessive. Observez de nombreuses pauses.
Les précautions susmentionnées ne peuvent pas exclure l’apparition du syndrome de Raynaud ou de syndrome
du canal carpien. Il est recommandé aux personnes utilisant le matériel régulièrement et de manière prolongée de
faire examiner avec attention l’état de leurs mains et de leurs doigts. Consultez immédiatement un médecin si vous
constatez l’apparition des symptômes susmentionnés.
2. Prescriptions générales de sécurité
Cet appareil n‘a pas été conçu pour être utilisé par des personnes (y compris les enfants) aux
capacités physiques, sensorielles ou intellectuelles réduites ou manquant d‘expérience et/ou de
connaissances sauf si ces personnes agissent sous la supervision d‘une personne responsable de
la sécurité ou reçoivent d‘elle des instructions quant à la manière d‘utiliser l‘appareil. Les enfants
doivent être surveillés an de s‘assurer qu‘ils ne jouent pas avec l‘appareil.
Faites preuve de la plus grande prudence et faites attention à ce que vous faites. Prenez les précautions qui s‘imposent lors de l‘utilisation d‘un appareil électrique. N‘utilisez pas l‘appareil lorsque vous
êtes fatigué ou sous l‘emprise de drogues, d‘alcool ou de médicaments.
Consignes de sécurité générales pour appareils électriques
Attention! Lisez l’intégralité des consignes de sécurité et instructions. La négligence des
consignes de sécurité ou des instructions peut se solder par un choc électrique, des brûlures et/
ou des blessures graves.
Conservez toutes les consignes de sécurité et instructions pour une utilisation ultérieure.
Le terme «appareil électrique» utilisé dans les consignes de sécurité se rapporte à des appareils
électriques fonctionnant sur le réseau électrique (liaison par câble) et à des appareils électriques
fonctionnant au moyen d’accumulateurs (sans liaison par câble).
1) Sécurité au poste de travail
a) Veillez à la propreté et au bon éclairage de votre zone de travail. Le désordre ou le manque
d’éclairage peuvent entraîner des accidents.
b) N’utilisez pas votre appareil électrique dans un environnement menacé d’explosion dans
lequel se trouvent des liquides, des gaz ou des poussières inammables. Les appareils
électriques produisent des étincelles qui risquent d’enammer les poussières ou les vapeurs.
c) N’utilisez pas votre appareil électrique à proximité des enfants ou d’autres per-
sonnes. Un moment d’inattention peut vous faire perdre le contrôle de votre appareil.
2) Sécurité électrique
a) La che de raccordement de l’appareil électrique doit être adaptée à la prise. La che ne
doit surtout pas être modiée. N’utilisez pas d’adaptateur avec des appareils reliés à la
terre. Les prises non modiées diminuent le risque de choc électrique.
b) Evitez tout contact physique avec les surfaces reliées à la terre telles que tuyaux, radia-
teurs, cuisinières ou réfrigérateurs. Il existe un risque accru de choc électrique dans le cas
où votre corps est relié à la terre.
c) Ne laissez pas l’appareil sous la pluie ou dans un endroit humide. La pénétration d’eau
dans un appareil électrique augmente le risque de choc électrique.
d) N’utilisez pas le câble à d’autres ns que celles prévues à l’origine, par exemple pour
porter l’appareil, pour l’accrocher ou tirer sur la che pour la débrancher de la prise de
courant. Veillez à maintenir le câble à distance raisonnable de toute source de chaleur,
de l’huile, d’arêtes acérées ou des pièces en mouvement de l’appareil. Les câbles endom-
 Loading...