

Page 1
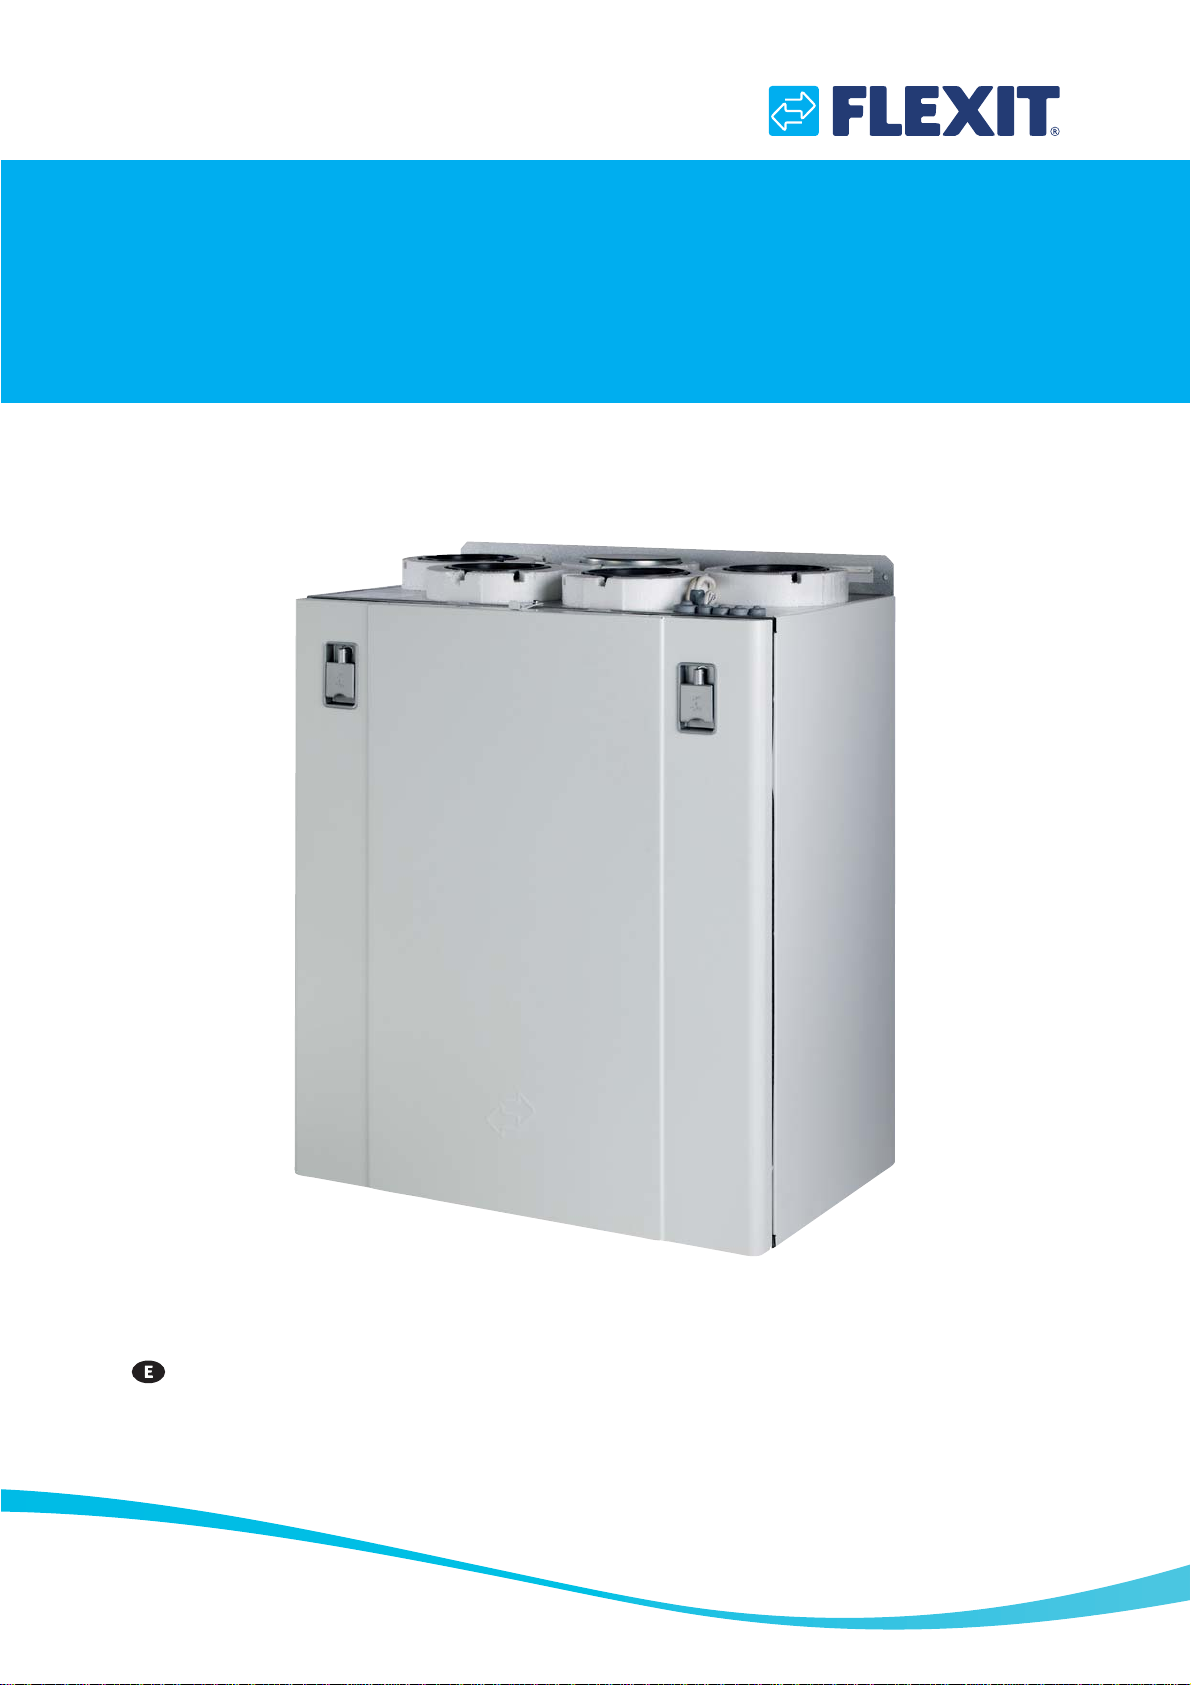
111537EN-11
2019-10
UNI 2
User Manual
Air Handling Unit & Automatic Control
Page 2

Contents
1 Functional description of balanced ventilation
1.1 Fans (M1, M2)
1.2 Filters (FI1, FI2)
1.3 Rotor (HR-R)
1.4 Heating element (EB1) (for UNI 2 E)
1.5 Temperature sensors (B1, B4)
2 Operating the door
2.1 Wall-mounted unit
2.2 Floor-mounted unit
2.3 Ceiling-mounted unit
3 Overview of CI60 control panel
4 CI60 in use
.............................................................................................................................................. 9
4.1 General
4.2 Increasing/reducing air supply
4.3 Adjusting the air supply
4.4 Temperature adjustment
4.5 Filter replacement
4.6 Alarm
4.7 Reset
............................................................................................................................................... 9
.............................................................................................................................................. 10
5 Overview of CI600 control panel
6 CI600 in use
6.1 General
6.2 Idle mode
6.3 Menu navigation
6.4 Startup
6.5 Operating status
7 CI600 main menu
7.1 Fan speeds
7.2 Max timer
7.3 Settings
7.4 Temperature
7.5 Timer
...............................................................................................................................................13
7.6 Daily/weekly timer
7.7 Time and date
7.8 Language
7.9 Filters
7.10 Alarm
..............................................................................................................................................14
..............................................................................................................................................14
7.11 Operating information
8 CI600 advanced user menu
8.1 PIN
...................................................................................................................................................15
8.2 Advanced user
8.3 Temperature regulation
8.4 Fan control
8.5 Configuration
8.6 Operating time
8.7 Service
8.8 Menu tree
9 Cleaning and maintenance
9.1 Changing the filters
9.2 Cleaning the fans
9.3 Changing the brush strips
9.4 Tightening of rotor belt
9.5 Cleaning the rotor
9.6 External cleaning
10 Maintenance table
11 Troubleshooting
12 CE Declaration of Conformity
................................................................................................................................. 4
............................................................................................................................... 4
................................................................................................................................. 4
.......................................................................................... 4
.................................................................................................... 4
............................................................................................................................... 5
........................................................................................................................ 5
...................................................................................................................... 6
................................................................................................................... 7
.......................................................................................................... 8
............................................................................................................................................ 9
................................................................................................... 9
............................................................................................................... 9
............................................................................................................. 9
......................................................................................................................... 9
..................................................................................................... 10
.......................................................................................................................................... 11
........................................................................................................................................... 11
...................................................................................................................................... 11
........................................................................................................................... 11
........................................................................................................................................... 11
.......................................................................................................................... 11
.................................................................................................................................12
.....................................................................................................................................12
.......................................................................................................................................12
..........................................................................................................................................12
..................................................................................................................................12
.......................................................................................................................13
............................................................................................................................... 14
.......................................................................................................................................14
................................................................................................................14
...............................................................................................................15
..............................................................................................................................15
..............................................................................................................15
.................................................................................................................................... 16
................................................................................................................................17
............................................................................................................................. 18
.......................................................................................................................................... 18
...................................................................................................................................... 19
............................................................................................................. 20
................................................................................................................... 20
.........................................................................................................................21
..........................................................................................................24
..............................................................................................................25
.......................................................................................................................25
.........................................................................................................................25
..............................................................................................................................26
..................................................................................................................................26
........................................................................................................... 27
.............................................................................. 4
2
Page 3
Important Safety Instructions:
!
!
It is the installer's responsibility to carry out a full safety and function assessment of the appliance.
To reduce the risk of fire, electric shock or injury, read all the safety instructions and warning texts before using the unit.
• This unit is only designed for ventilation air in homes and commercial buildings.
• It must not be used to extract combustible or flammable gases.
• Remove the power plug before commencing any service and maintenance work.
• Before opening the door: switch off the heat, let the fans continue for 3 minutes to remove hot air, unplug the unit and wait 2
minutes before opening the doors.
• If the power lead is damaged, it must be replaced by the manufacturer, the manufacturer's service agent or a similarly
qualified person.
• The unit contains heating elements that must not be touched when they are hot.
• The unit must not be operated without the filters being in place.
• Do not cook any combustible substances under the kitchen hood if one is installed.
• Do not leave a saucepan or frying pan containing oil or grease unsupervised when using a kitchen hood.
• The instructions in the user manual must be followed for complaints to be accepted.
To maintain a good indoor climate, comply with regulations and avoid condensation damage, the unit must never be
stopped apart from during service/maintenance or in connection with an accident.
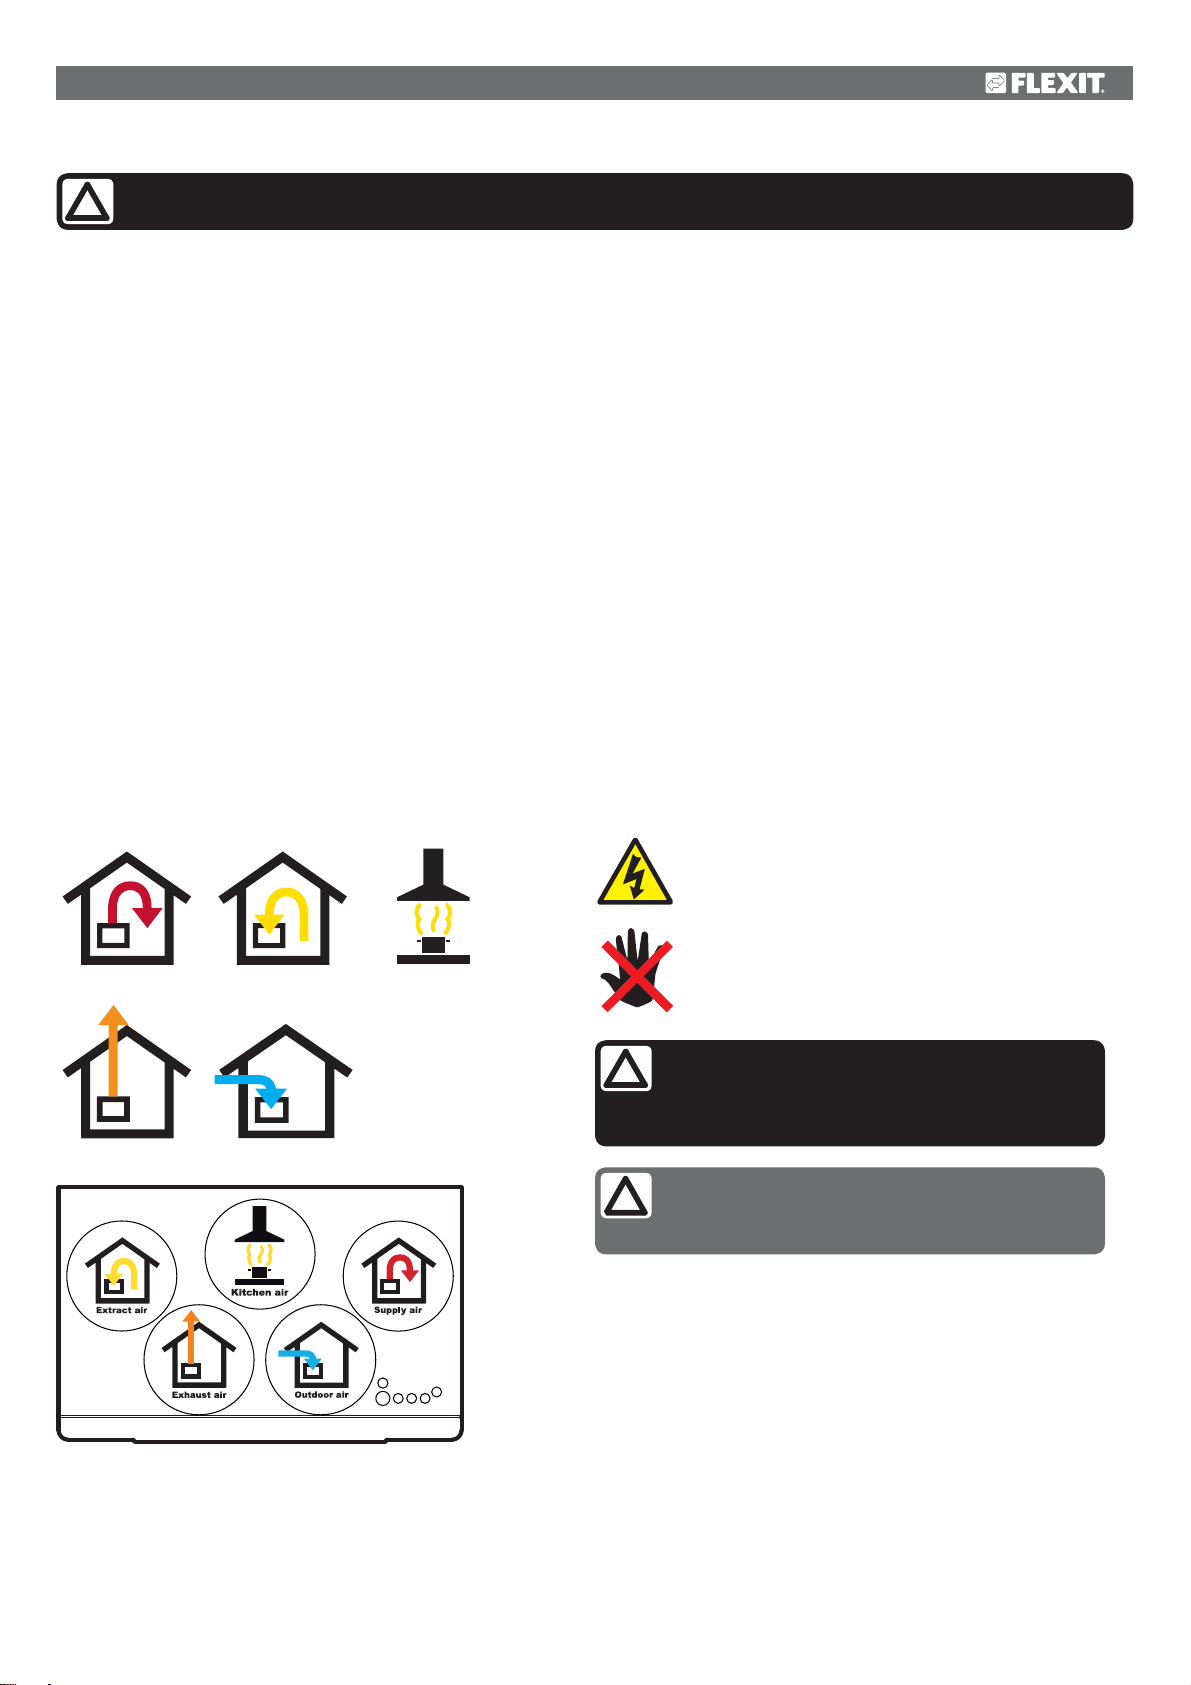
Symbols used
These products have a number of symbols that are used to label the product itself and in the installation and user documentation.
Supply air
Exhaust air
Extract air Kitchen air
Outdoor air
EXAMPLE OF NIPPLE LOCATION
(shown as a right-hand model)
DANGER! ELECTRICITY
DANGER! DO NOT
TOUCH
CAUTION! When a text bears this symbol, it
means that personal injury or serious damage to
the equipment may result if the instructions are
not followed.
NB! When a text bears this symbol, damage to
equipment or poor efficiency may be the consequence of not following the instructions.
This appliance can be used by children aged from 8 years and above
and persons with reduced physical, sensory or mental capabilities or
lack of experience and knowledge if they have been given supervision or
instruction concerning use of the appliance in a safe way and understand the hazards involved.
use by children.
Children shall not play with the appliance. Cleaning and user maintenanc
shall not be made by children without supervision.
Our products are subject to continuous development and we therefore
reserve the right to make changes.
We also disclaim liability for any printing errors that may occur.
Note that the product is not intended for
e
Our products are subject to continuous development and we therefore reserve the right to make changes.
We also disclaim liability for any printing errors that may occur.
3
Page 4
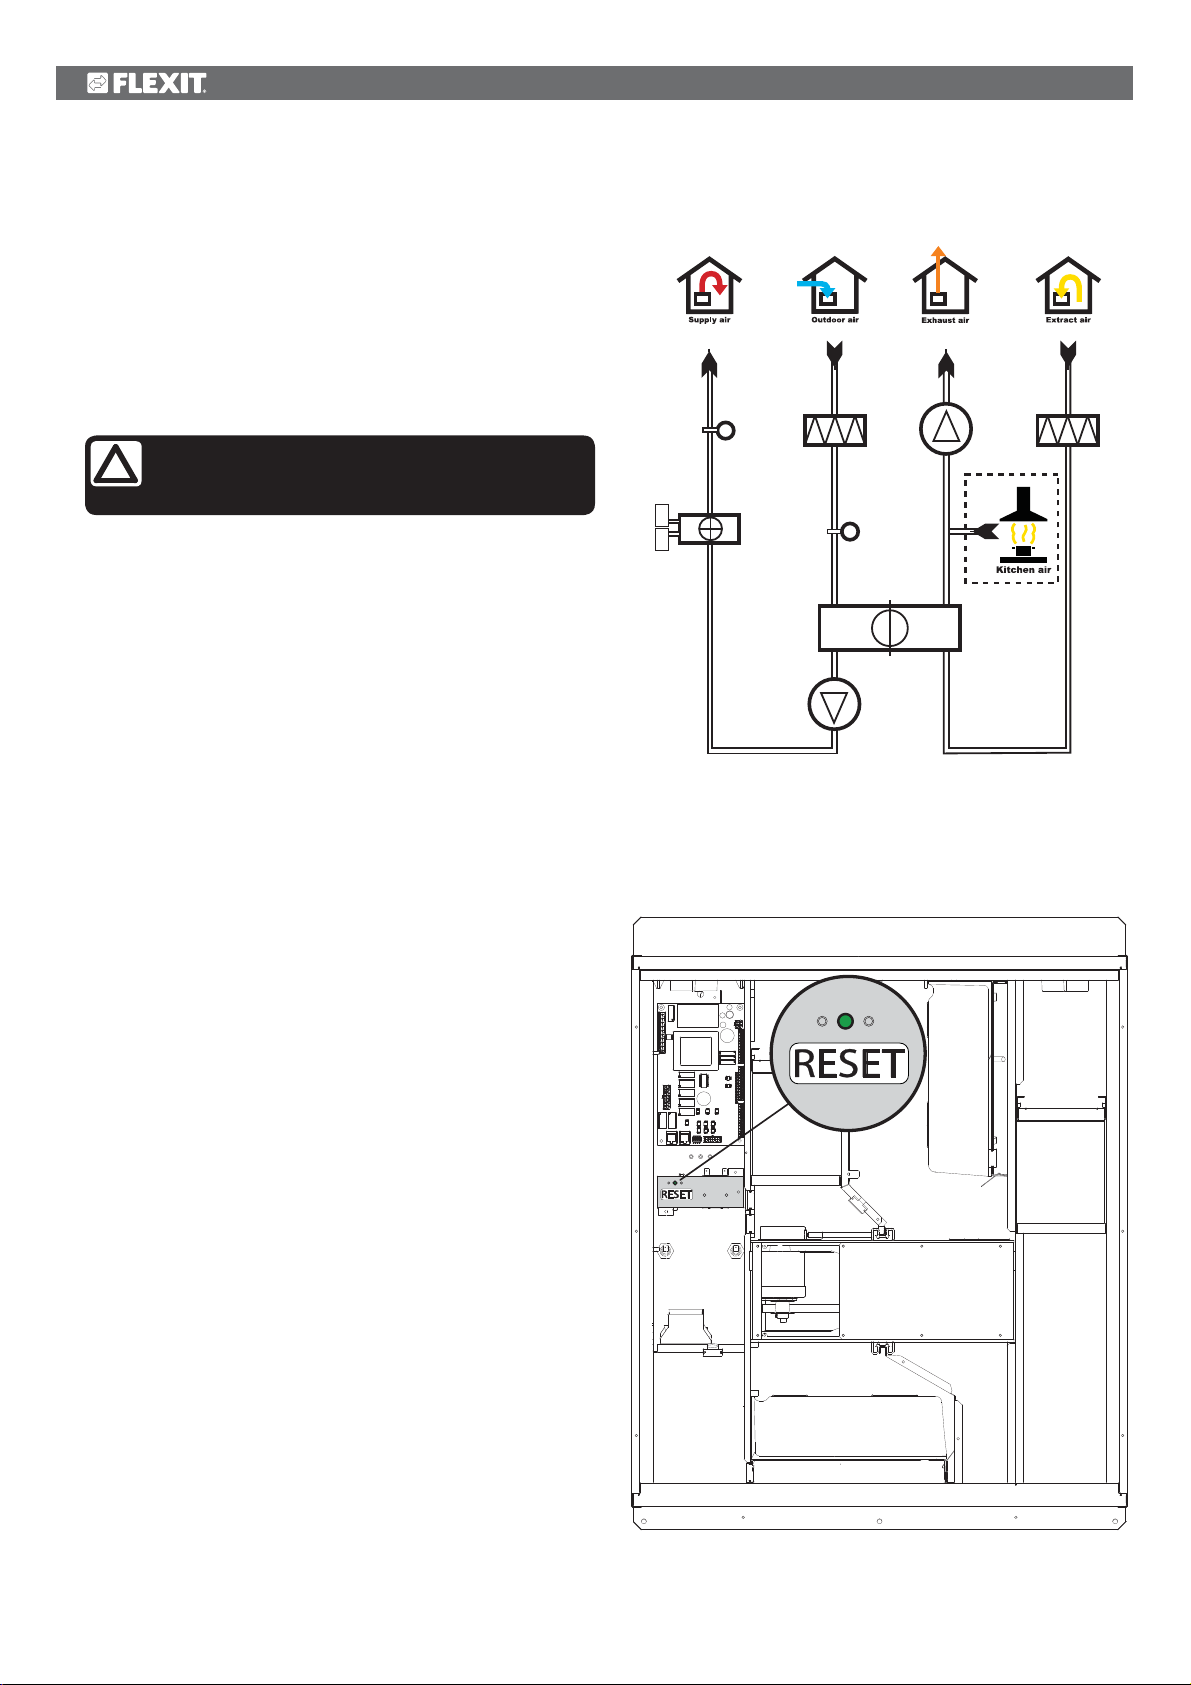
1 Functional description of balanced
!
ventilation
1.1 Fans (M1, M2)
The fans ensure that air enters and leaves the building.
They can be individually adjusted for optimal operation.
The unit can be regulated at three different speeds via the
control panel: Min, Normal and Max. See chapter 5.1 for more
information.
Adjustment must always be carried out by
qualified staff before the installation is used for
the first time.
1.2 Filters (FI1, FI2)
Filters with a high filter grade (ePM1 55% F7) are used as
standard for both supply air and extract air so that the air
which enters the building is clean. The filters also ensure that
the unit stays clean and can maintain thermal efficiency and
air flow.
Fig. 1
F10
F20
EB1
M4
M2
FI2
K
FI1
B1
B4
HR-R
M1
1.3 Rotor (
HR-R)
The air passes through the rotary wheel-type heat
exchanger (recovery). The rotor functions as a heat
magazine. The heat from the extract air heats up one part of
the rotor. When the heated part comes over to the supply
air side, the heat is transferred to the supply air.
1.4 Heating element (EB1) (for UNI 2 E)
If the energy recovered from the extract air is insufficient to
maintain the set supply air temperature, an electric heating
element will help raise the temperature. The heating element
is protected against overheating by the thermostat (F20)
which cuts out at high temperature. For extra safety, the
thermostat (F10) cuts out at critical temperatures. If the
thermostat (F10) is tripped, it has to be reset manually by
pressing the reset button (see Fig. 2). If the alarm is tripped
repeatedly, contact the service company or distributor. See
chapters 4.7 and 7.10 for more information.
1.5 Temperature sensors (B1, B4)
The unit has two temperature sensors as standard. The
supply air sensor (B1) registers the temperature after the
heating battery. The outdoor air sensor (B4) registers the
temperature of the outdoor air.
Fig. 2
4
Page 5
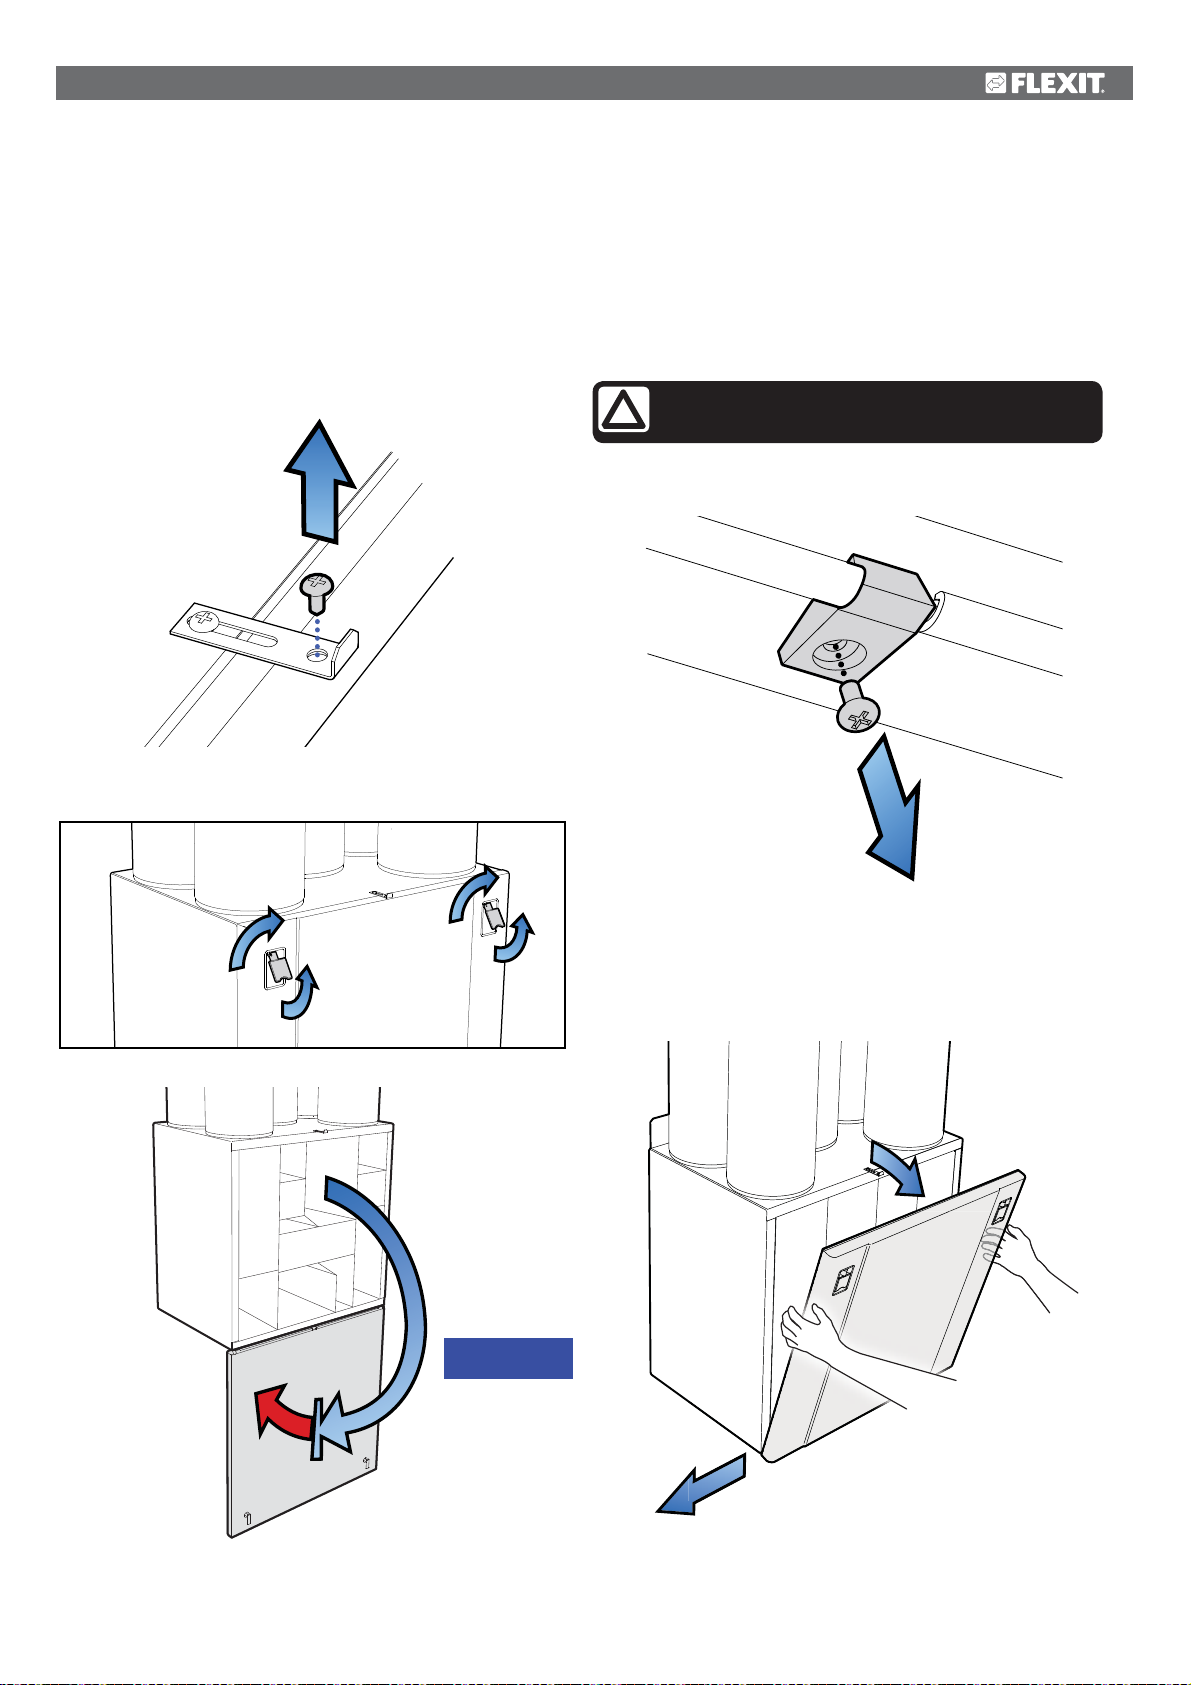
2 Operating the door
!
2.1 Wall-mounted unit
1. First undo the screw in the top of the door (see Fig. 3).
2. Pull the handles out and rotate to the side (see Fig. 4).
3. The door can now be opened to hang open at 180º
(see Fig. 5) or unhooked (see point 2.4).
Fig. 3
Fig. 4
If the door needs to be removed
The door can be removed when it is open between 40º
and 105º. If there is limited space in front of the unit, the
lock screw on the underside of the unit can be unscrewed
temporarily (see Fig. 6). Then the door can be pushed out
sideways (see Fig. 7).
The door is heavy, so take care when
removing it.
Fig. 6
Fig. 5
Fig. 7
MAX 180°
5
Page 6
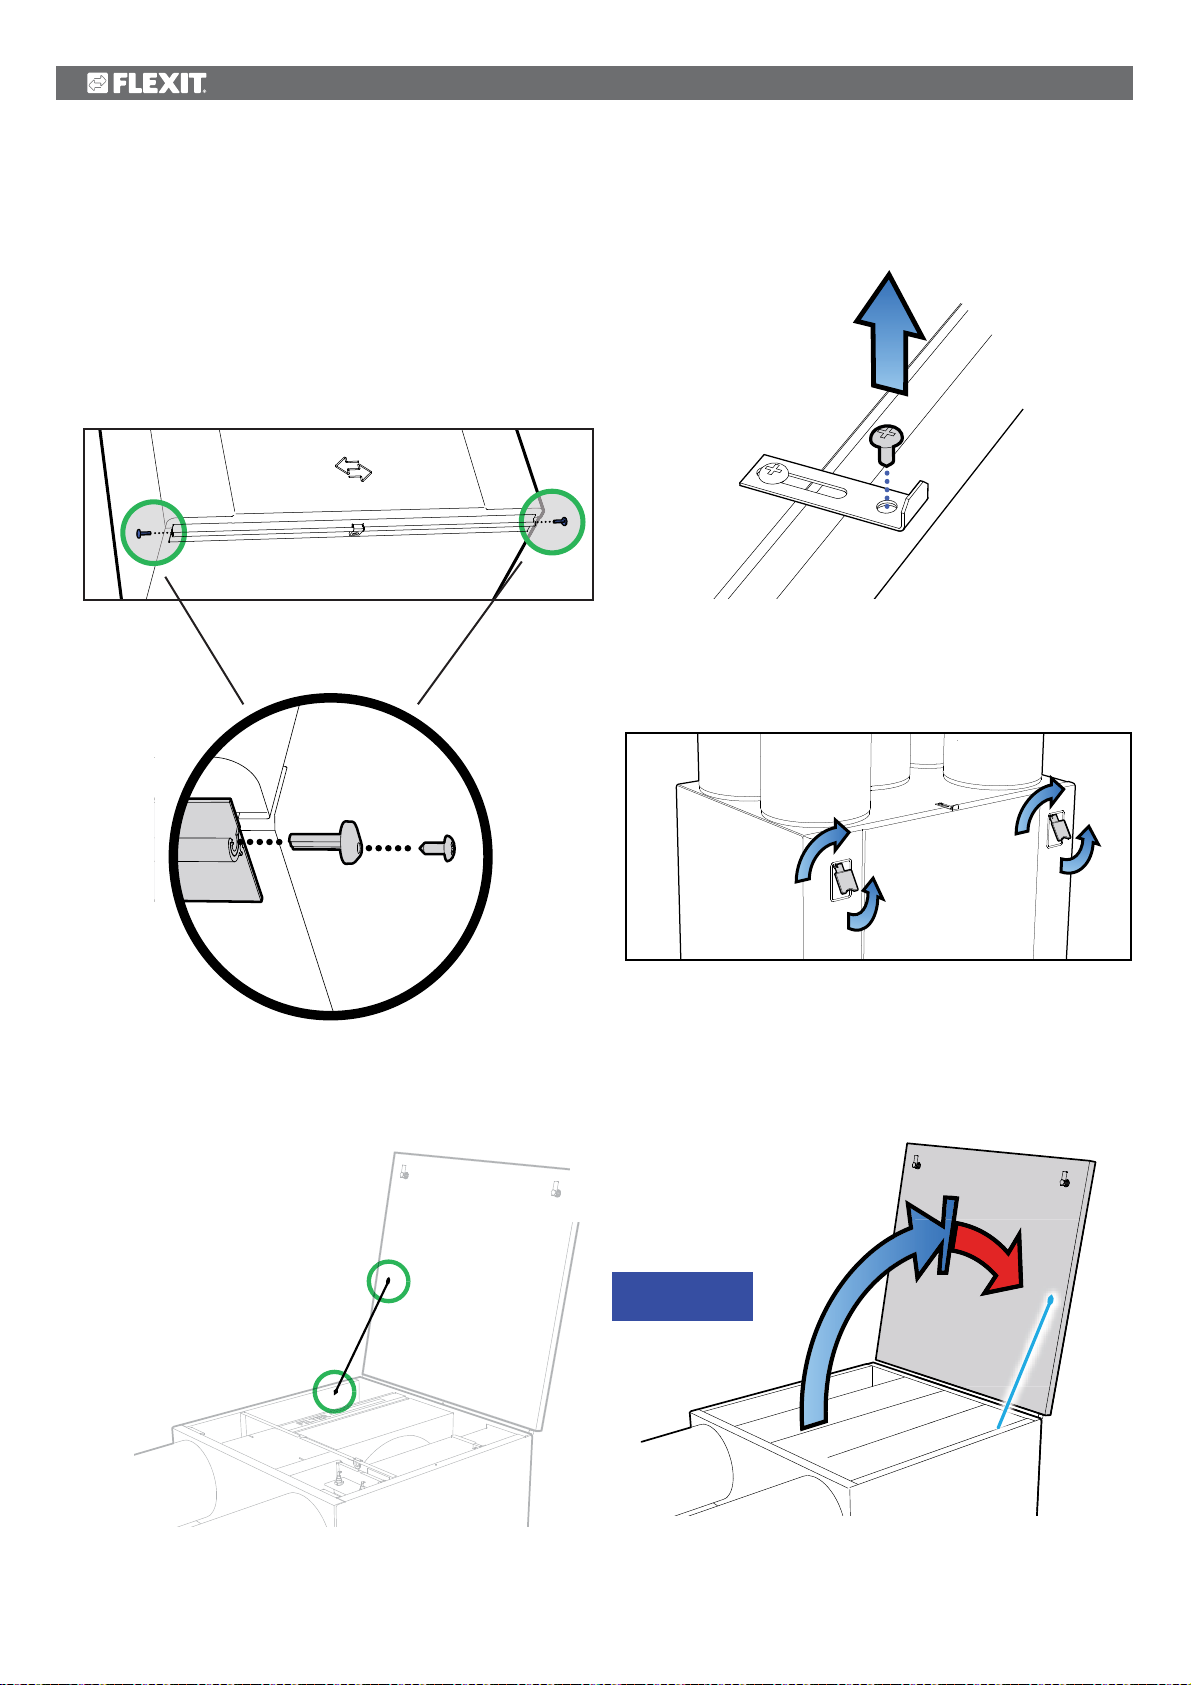
2.2 Floor-mounted unit
1. Make sure that hinge stops and a door strap are fitted
(see Fig. 8, 9 and 10).
2. Undo the screw in the top (see Fig. 11).
3. Pull the handles out and rotate to the side (see Fig. 4).
4. The door can now be opened to a maximum of 105º
(se Fig. 8).
Fig. 8
Fig. 9
Fig. 11
Fig. 12
Fig. 10
Fig. 13
AX 105°
MAX. 105°
6
Page 7
X
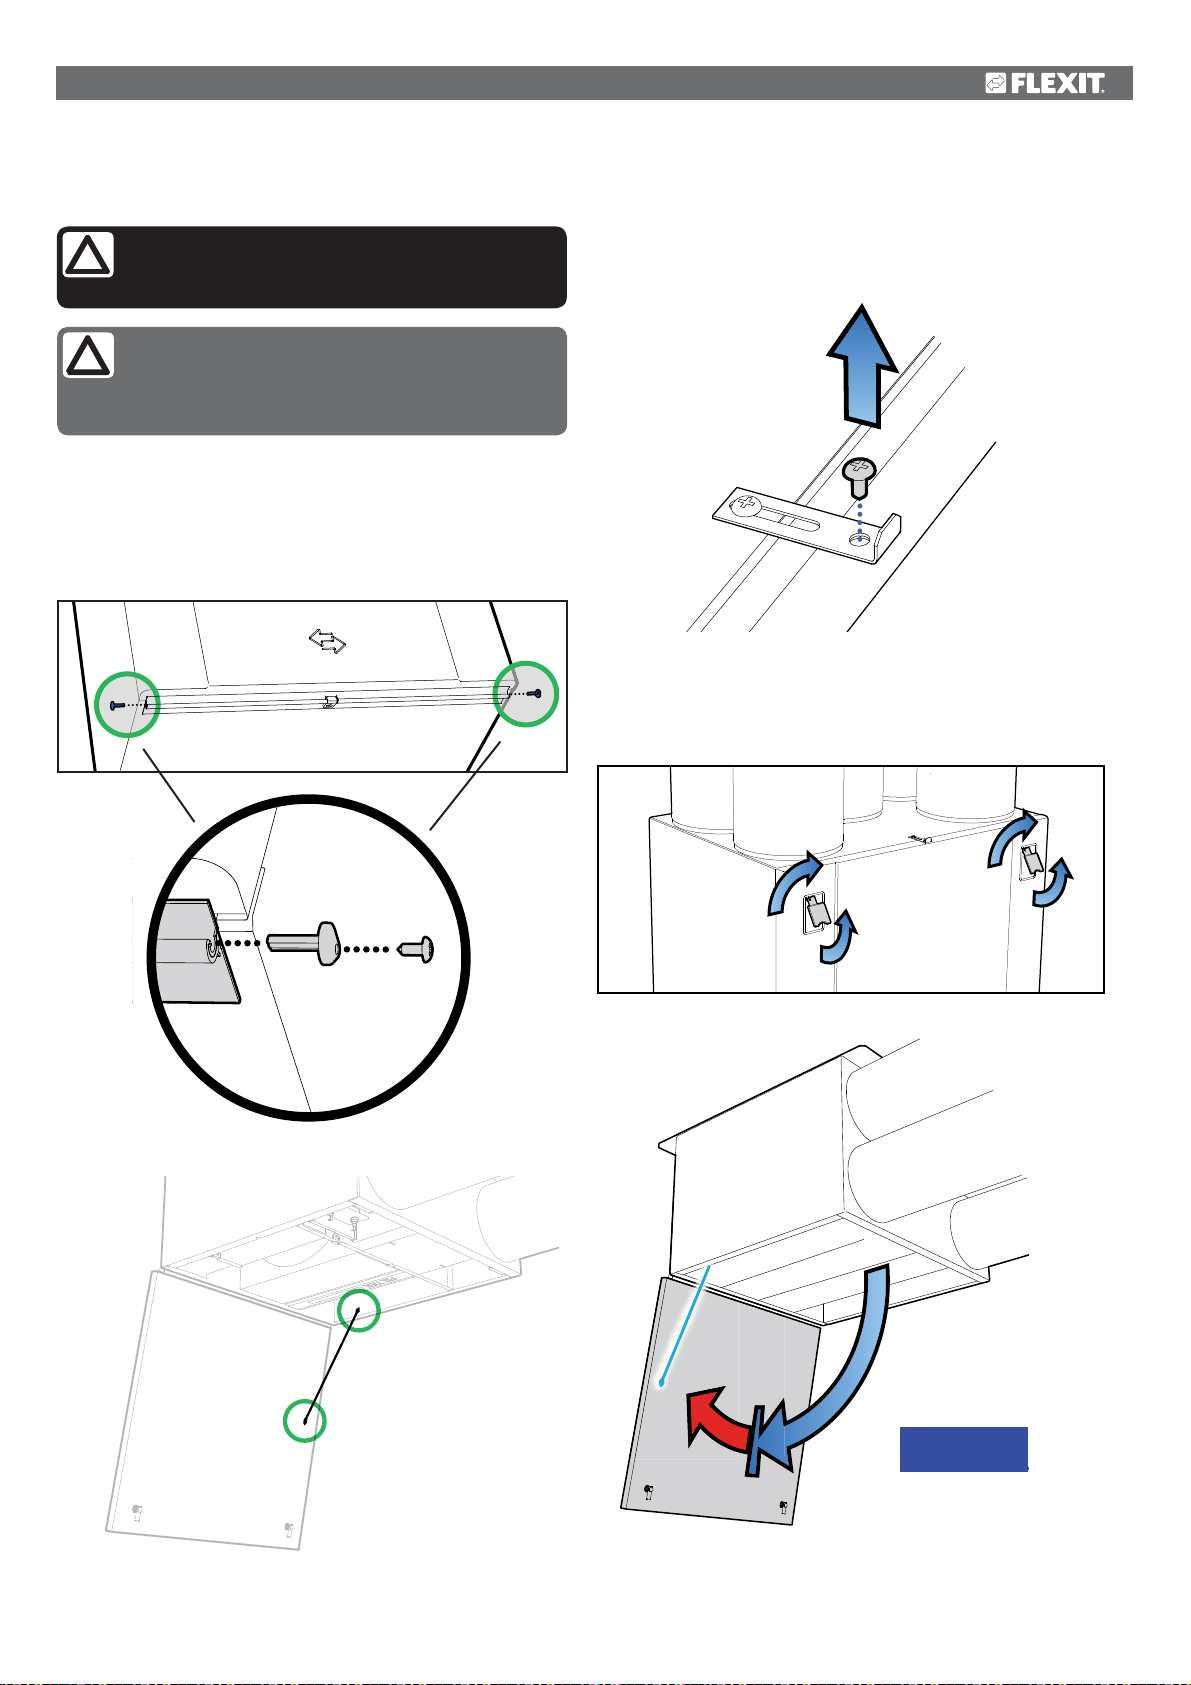
2.3 Ceiling-mounted unit
!
Check first that hinge stops are fitted (see Fig.
14 and 15). If not, the door could fall off when
opened! Be careful!
Note that a door strap also needs to be fitted if
the unit is mounted on the ceiling. This protects
the hinge stops against damage and prevents
the door from opening more than 105° (see Fig. 16).
1. First undo the screw in the top of the door (see Fig. 17).
2. Pull the handles out and rotate to the side (see Fig. 18).
3. The door can now be opened to a maximum of 105º (see
Fig. 19).
Fig. 14
Fig. 17
Fig. 18
Fig. 15
Fig. 16
Fig. 19
MAX. 105°
105°
7
Page 8
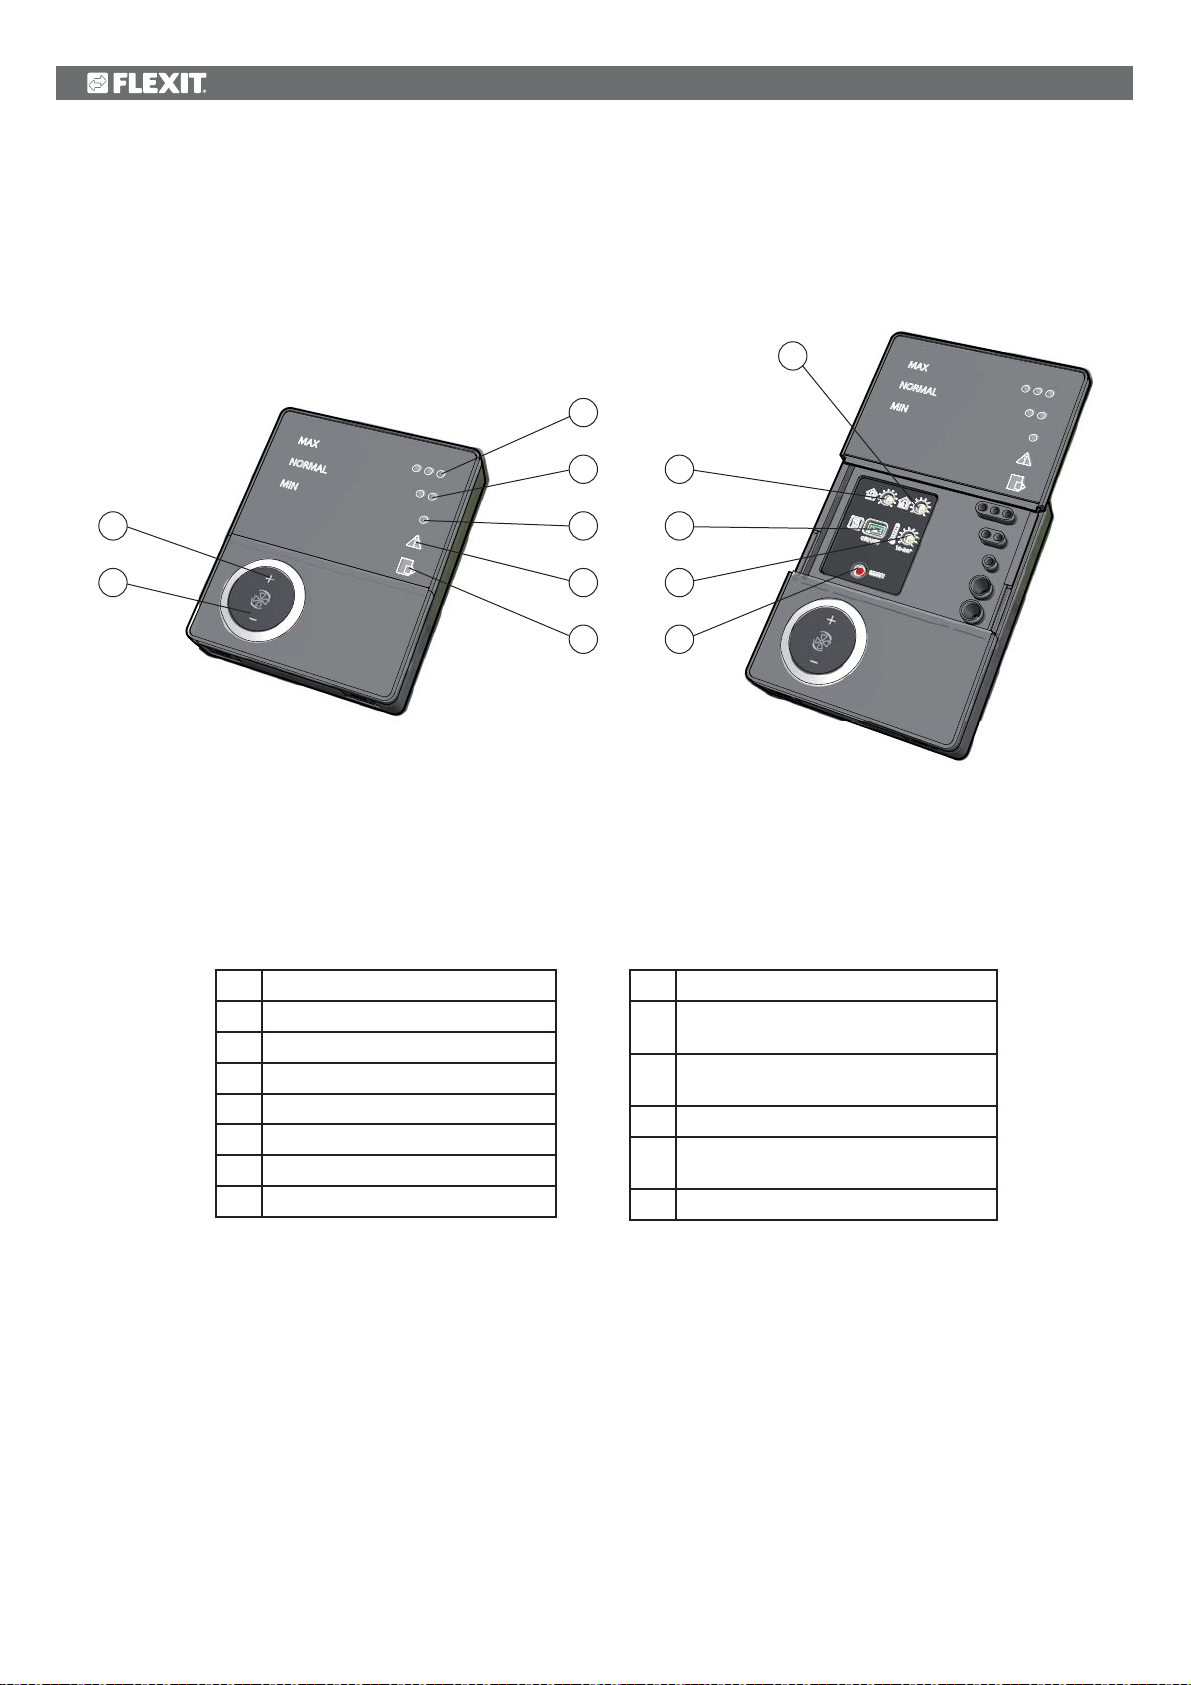
3 Overview of CI60 control panel
Fig. 20
8
3
4
*
1
2
5
6
7
No. Description
*
1
Switch for increased ventilation
2 Switch for decreased ventilation
3
Indication of MAX speed
4
Indication of NORMAL speed
5
Indication of MIN speed
6
Indication of ALARM
7
Indication of FILTER CHANGE
9
10
11
12
No. Description
8 Potentiometer for adjusting extract air
at NORMAL speed
9 Potentiometer for adjusting supply air at
NORMAL speed
10
Switch for additional heating ON/OFF
11 Potentiometer for adjusting supply air
temperature
12 Switch to reset alarm
Nos. 8, 9 and 10 are used to adjust the unit before it
is used for the first time.
*The numbers are used as references in subsequent descriptions
8
Page 9

4 CI60 in use
4.1 General
The control unit consists of a touch panel with pushbuttons,
LEDs for indication and adjustment potentiometers and
switches for adjusting the ventilation unit. The control unit
communicates with the ventilation unit via a low-voltage
cable.
4.2 Increasing/reducing air supply
Use switches 1 and 2 to increase and reduce the fan speed
and thus the air flow. Different speeds depending on the
operating situation.
MIN
NORMAL
MAX
Do not use during first year of operation, or
when the building is in use.
Used under normal conditions. In this
setting, the air supply must be adjusted
according to current regulations.
Used if there is a need for increased air
supply on account of increased occupancy
or a higher humidity level, for example
during showering or when clothes are being
dried. This setting is usually used for limited
periods of time.
4.4 Temperature adjustment
The temperature required in the supply air can be set with
potentiometer 11. The adjustment range is 10 - 30 °C. Using
the factory settings is recommended.
If necessary, the ventilation unit’s heating can also be
switched ON/OFF with switch 10. In this case only the rotating
heat exchanger is used as a source of heat. It is best to leave
it in ON position, as the unit will then respond automatically
when there is a need for additional heating.
ON
ITEM 10
OFF
4.5 Filter replacement
Every six months, LED 7 lights up to remind you that it is time
to replace the air filters in the unit. See section 2 for more
information on filter r
After the activity has been carried out, the
indicator must be reset. See more under the
Reset section.
eplacement.
The different speeds are indicated with LEDs 3, 4 and 5.
4.3 Adjusting the air supply
At NORMAL speed level, the air flow must be adjusted
according to project data. Potentiometer 9 is used for the
supply air level and potentiometer 8 for the extract air level.
The adjustment range is 20-100% of the maximum level
according to the scale of the potentiometer.
Factory settings:
MIN
NORMAL
MAX
Fig. 21
50% (fixed)
75% (variable)
100% (fixed)
9
10 11
8
4.6 Alarm
If anything unforeseen occurs with the
ventilation unit, indicator 6 lights up.
The signal given by the indicator depends on the
reason for the indication.
A permanent light indicates:
• Fault return water detector (B5)
• Heat recovery fault (B)
A permanent light with indicator 5 (MIN speed) flashing
indicates:
• Fault supply air detector (B1)
• Fault extract air detector (B3)
• Fault outdoor air detector (B4)
A flashing light indicates:
• Overheating thermostat fault (applies only to electric hea-
ting)
• Fault in external fire/smoke detector (accessory)
• Heat recovery fault (A)
• Additional heating fault (applies only if the unit has a water
battery)
!
9
Page 10
4.7 Reset
After the filter has been replaced or the cause of the
alarm repaired, the alarm must be reset. This is done by
pressing switch 12.
If the indicator goes out, the action has been carried out
correctly. If the indicator remains on, the fault has not
been repaired correctly.
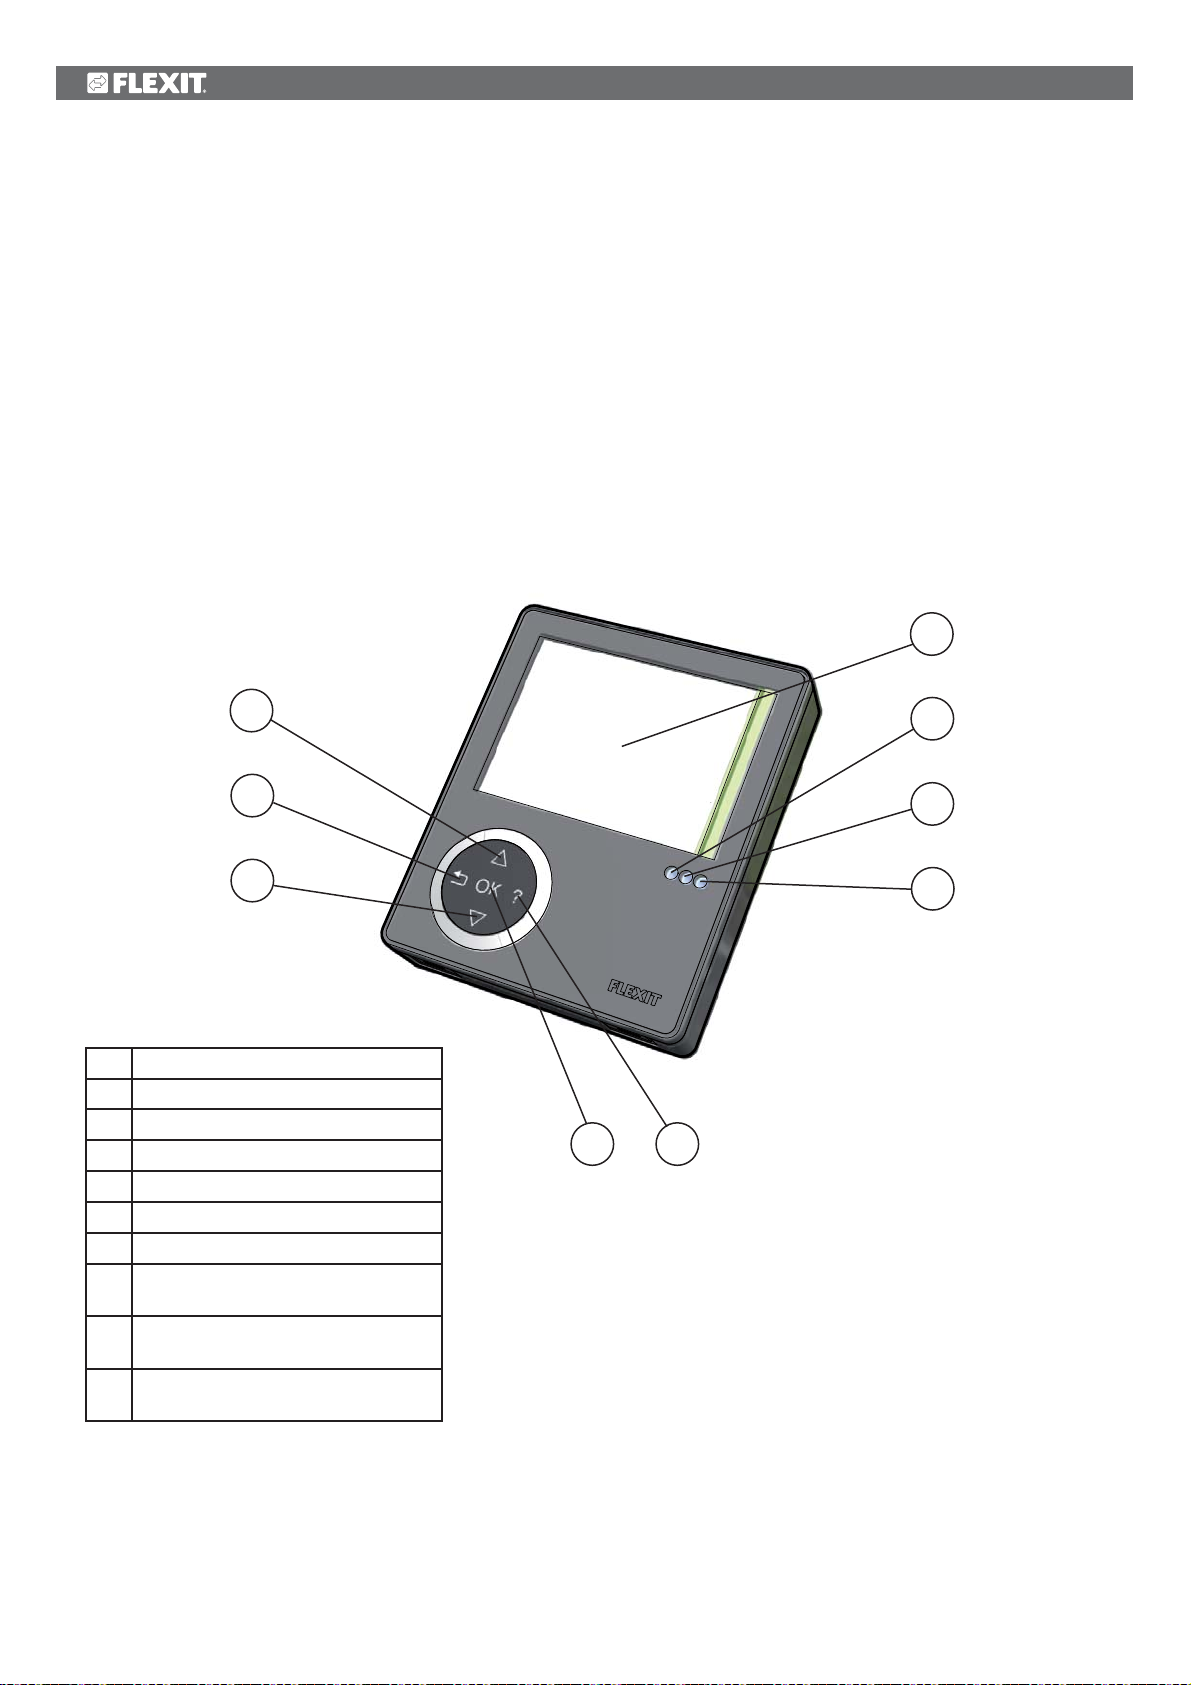
5 Overview of CI600 control panel
Fig. 22
*
1
NB! If thermostat F10 trips, the unit will have to be
opened up and physically reset before resetting on
the panel. If the alarm trips repeatedly, contact the
service company or distributor.
See chapter 1.4 for more
information.
6
7
2
3
No. Description
*
1
UP/INCREASE switch
2
BACK/CANCEL/NO switch
3
DOWN/DECREASE switch
4
OK/YES switch
5
HELP switch
6 Display
7
Indication of OPERATION/OK
-Green light
8
Indication of FILTER CHANGE
-Yellow light
9
Indication of ALARM
-Red light
8
9
4 5
*The numbers are used as references in subsequent descriptions
10
Page 11
45
040709
6 CI600 in use
6.1 General
The control unit consists of a colour display, pressure
switches and indicators (LEDs). See figure on left for more
information. The unit communicates with the ventilation unit
via a low-voltage cable.
If you select a function that has numerical values, the
current value is displayed with a light blue cursor. The value
is changed with buttons 1 and 3 and then confirmed by
pressing button 4.
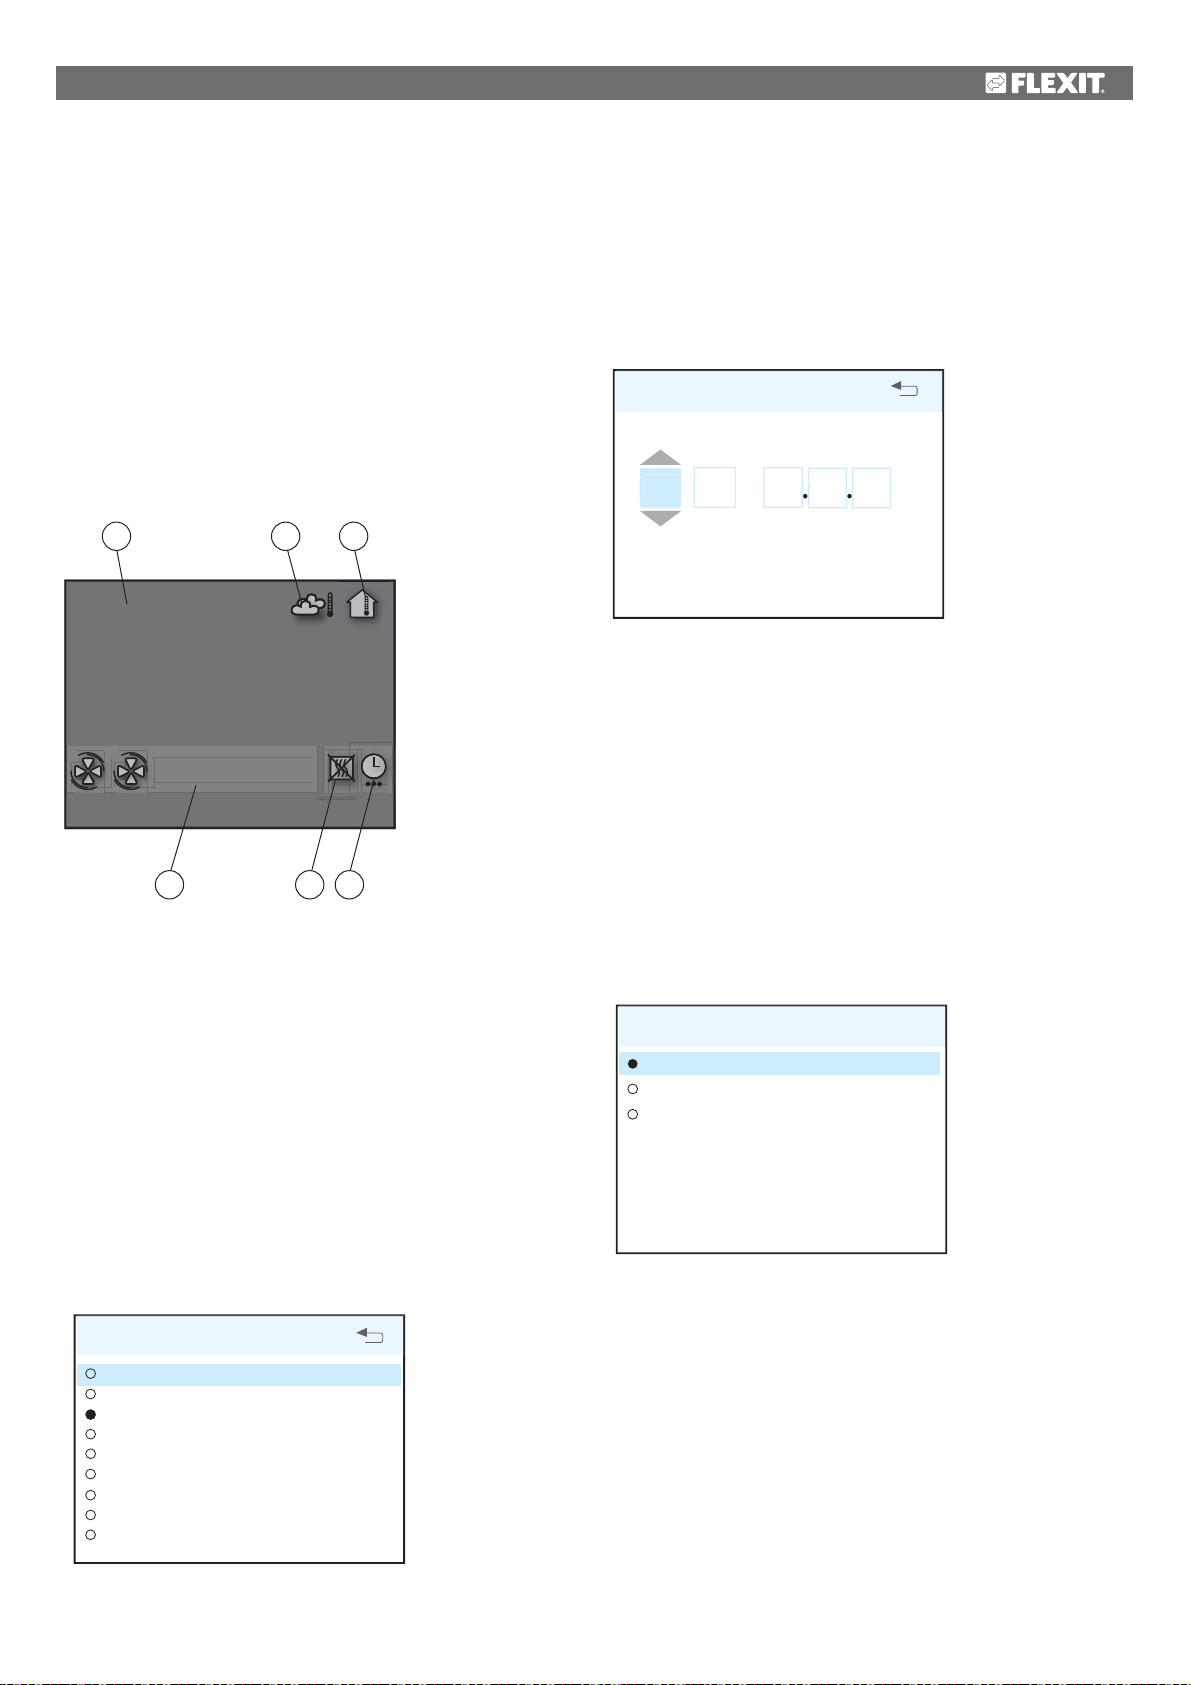
6.2 Idle mode
The panel will go into idle mode if it is not used for a while.
Operating information is displayed in idle mode. The panel
will come out of idle mode if one of the buttons is pressed.
A
13.08.2009
16:43
B C
18°C 22°C
- NORMAL
D E F
A. Time and date
B. Outdoor air temperature
C. Room temperature
D. Current speed
E. Additional heating activated/deactivated
F. Daily/weekly timer active
6.3 Menu navigation
Buttons 1 and 3 are used to navigate through the menu
lines. The cursor is illustrated by the line being light blue. If
it is possible to make a selection on the current menu line,
this is displayed with OK? to the right of the line. A selection
is confirmed by pressing button 4. If a menu line contains
submenus, this is illustrated with a '>' sign at the end of the
line.
SETTINGS
TEMPERATURE
TIMER
DAY/WEEK SETTINGS
TIME AND DATE
LANGUAGE
FILTER
ALARM
ADVANCED USER
OPERATING INFORMATION
>
>
OK?
>
>
>
>
>
>
TIME AND DATE
TIME DAY MONTH YEAR
13 : 45 04.07.09
If several values can be changed, the cursor jumps to
the right when a selection is confirmed with button 4. The
procedure is repeated until all settings have been changed
to the desired values.
If you want to cancel a function or return to the previous
menu screen, use button 2.
Button 5 activates a help text that briefly describes the
current menu screen.
OK?
6.4 Startup
When the system is started, a special startup menu is
opened.
START MENU
LANGUAGE
TIME AND DATE
MAIN MENU
OK?
>
>
The basic language and date settings are set in this menu.
When this activity has been carried out, you choose to go to
the main menu.
6.5 Operating status
In normal operation without problems, the green LED 7
lights up to confirm that everything is working normally. How
any problems affect the system is described in subsequent
sections.
11
Page 12
M
7 CI600 main menu
7.1 Fan speeds
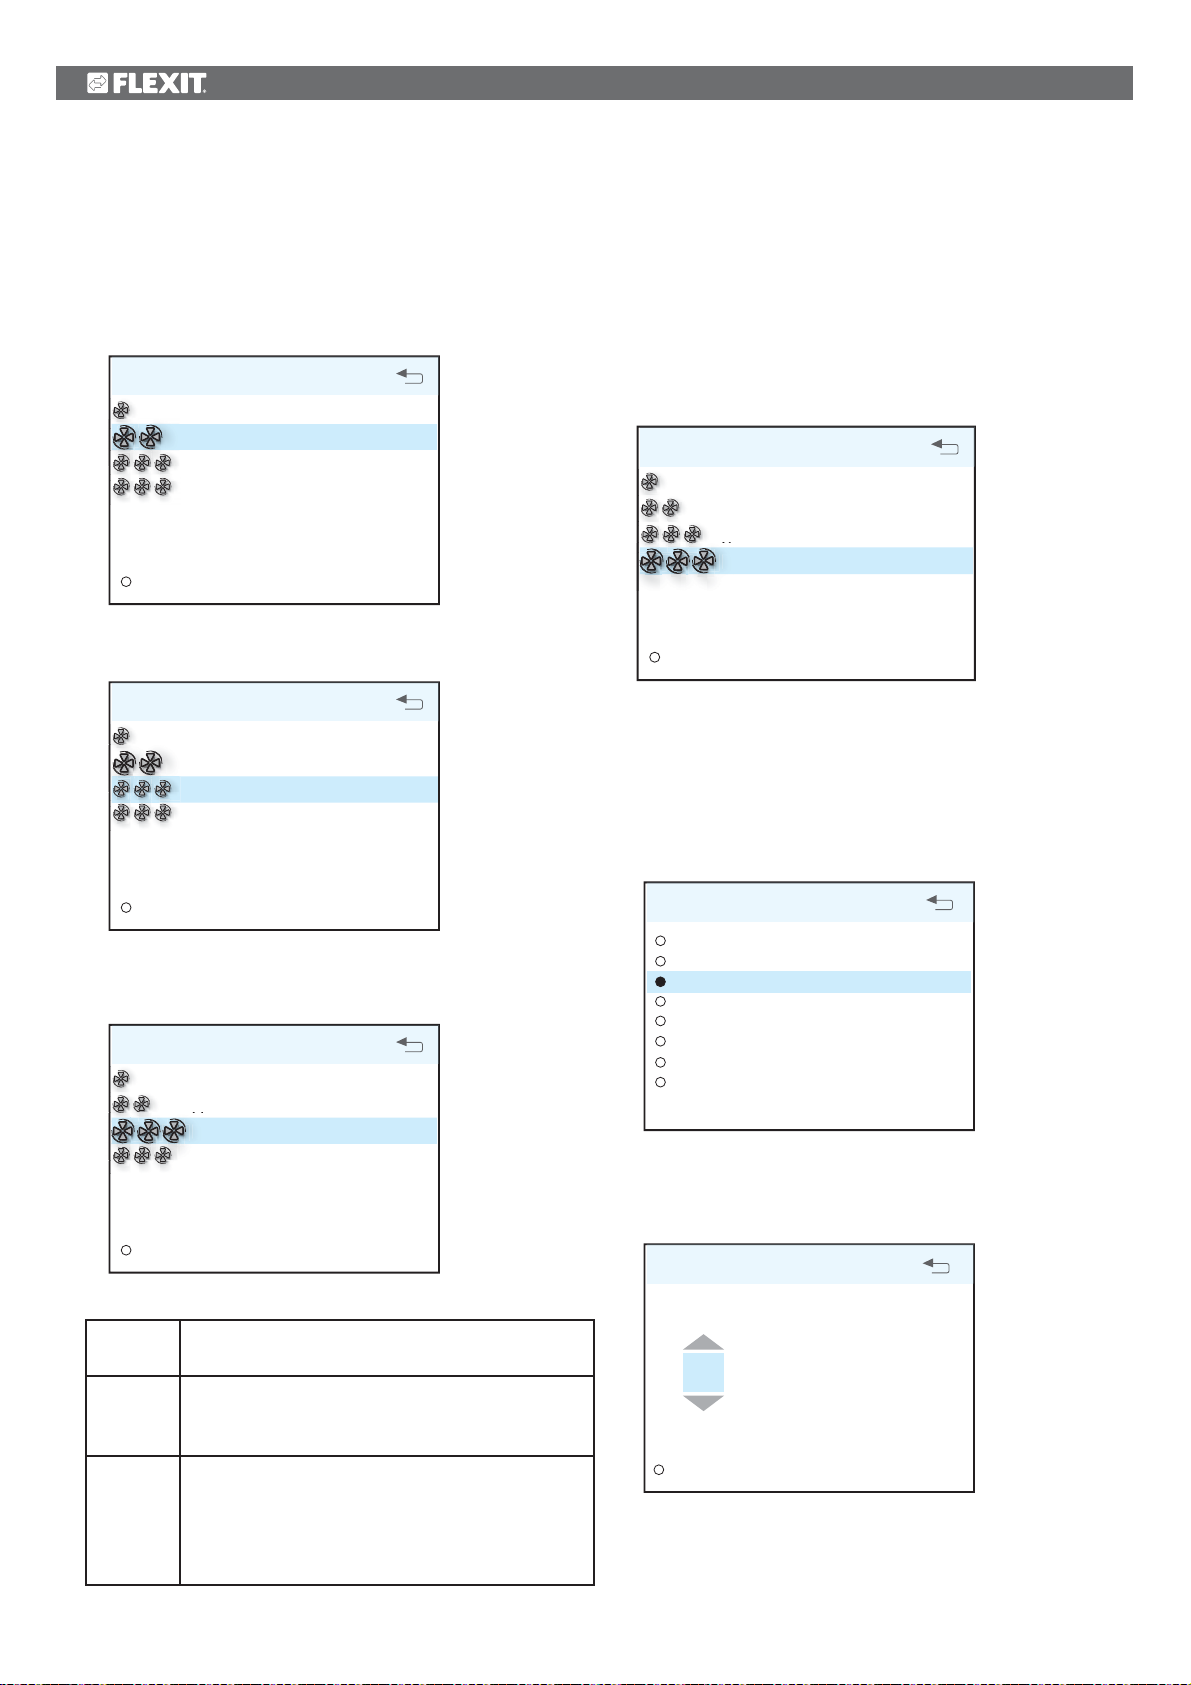
The main menu contains various choices. Most concern
fan speeds. The speed selected is indicated with large fan
symbols and bold text.
MAIN MENU
MIN
NORMAL
OK?
MAX
MAX TIMER
SETTINGS
>
To change the speed, move the cursor with buttons 1 and 3.
MAIN MENU
MIN
NORMAL
MAX
OK?
MAX TIMER
7.2 Max timer
This menu item activates a function that increases the speed
to MAX for a limited period before returning to the speed
selected previously. The period of time can be adjusted
under the SETTINGS menu item. This function is ideal during
showering, for example, when there is a greater need for
extraction for a limited period.
MAIN MENU
MIN
NORMAL
MAX
MAX TIMER
OK?
SETTINGS
When the function is active, the time is counted down on the
display. If you select TIMER OFF, the function will be cancelled
and the speed will return to the previous selection.
>
7.3 Settings
Under the SETTINGS menu item, you can adapt the system
as you want.
SETTINGS
>
Then confirm your selection with button 4 and the speed selected will be highlighted with large fan symbols and bold font.
MAIN MENU
MIN
NORMAL
MAX
OK?
MAX TIMER
SETTINGS
>
MIN Must not be used when the home is in use. Must
not be used in the first two heating seasons.
NORMAL Used under normal conditions. On this setting
the air supply must be adjusted according to
current regulations.
MAX Used if there is a need for increased air supply
on account of higher occupancy or a raised
humidity level, for example during showering
or when clothes are being dried. This setting is
normally used for limited periods.
SETTINGS
TEMPERATURE
TIMER
DAY/WEEK SETTINGS
TIME AND DATE
LANGUAGE
FILTER
ALARM
ADVANCED USER
>
>
OK?
>
>
>
>
>
7.4 Temperature
This is where the desired temperature of the supply air is set.
TEMPERATURE
18
°C
HEATING ELEMENT ON/OFF
OK?
>
12
Page 13
A good rule is to adjust the temperature to max. 18° so that
the air is mixed optimally with the air already in the building.
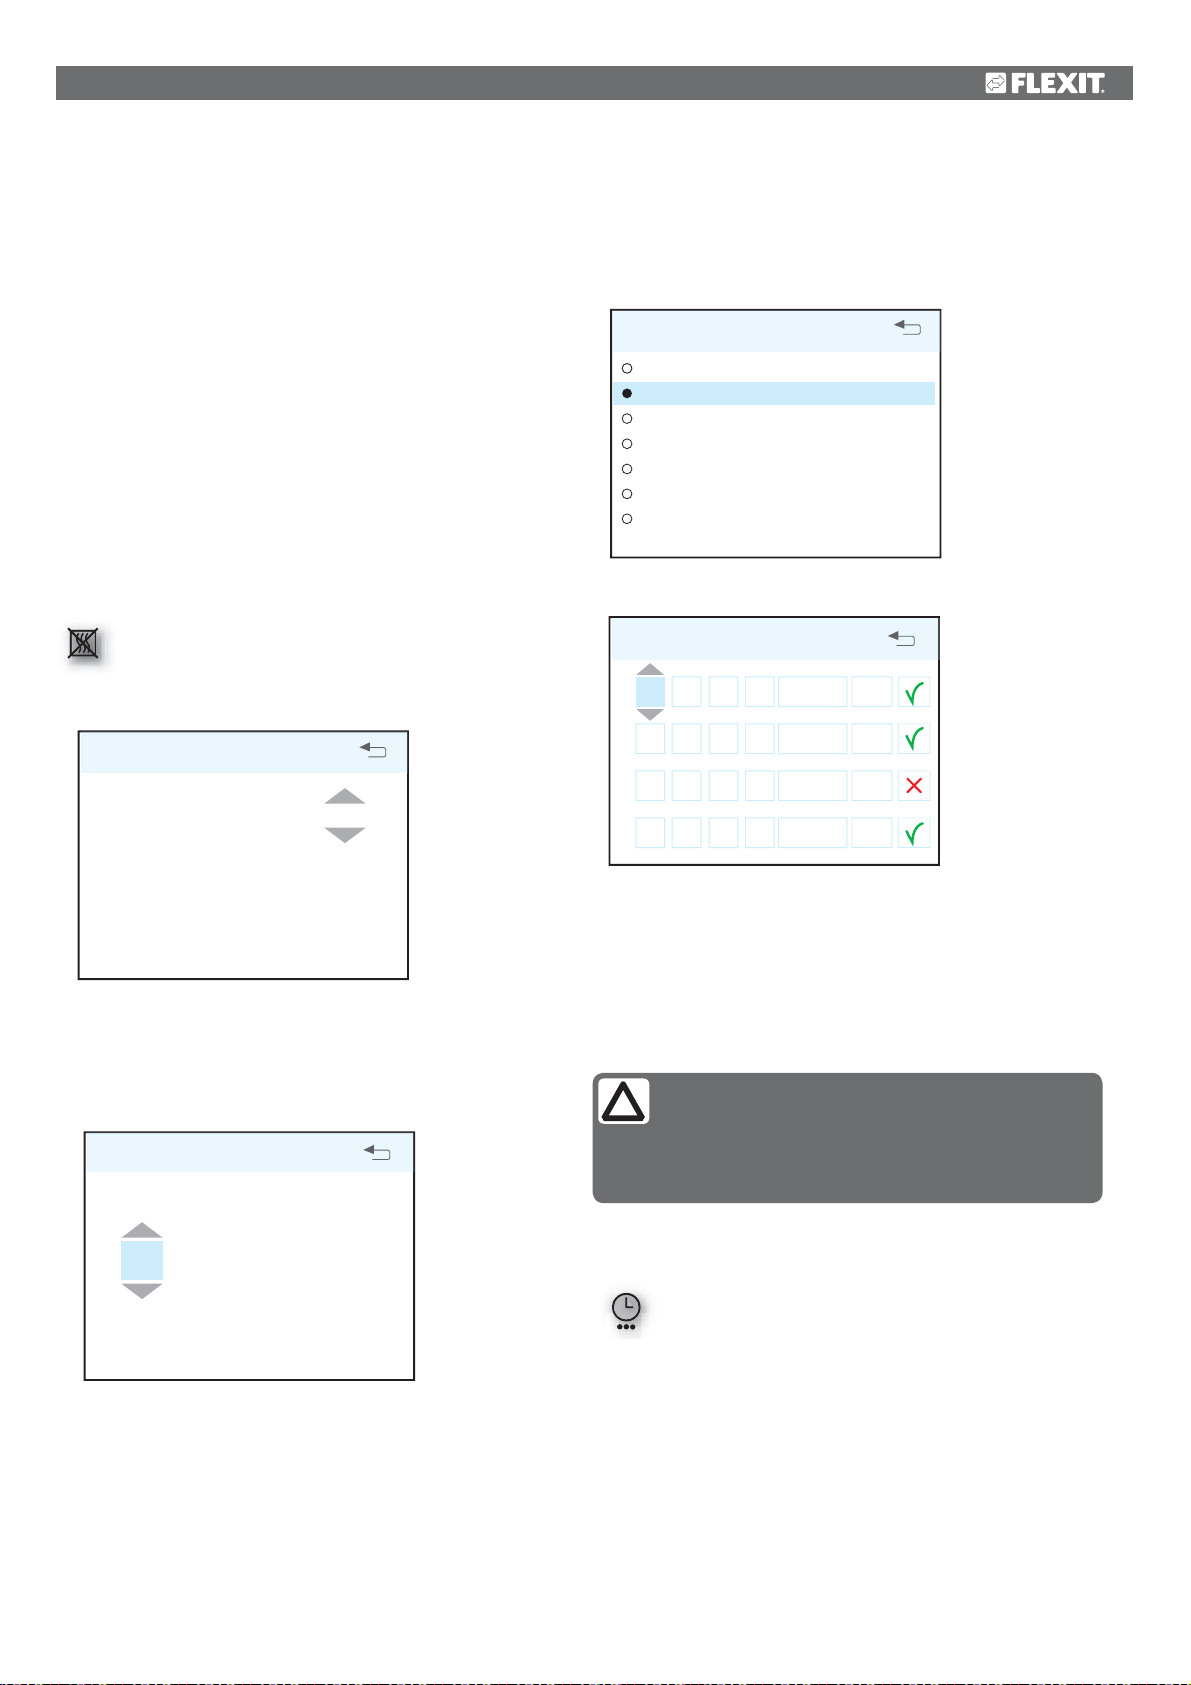
7.6 Daily/weekly timer
Programming the timer begins with selecting the day.
In the HEATING ELEMENT OFF/ON menu item, the additional
heating in the ventilation unit can be switched off. In such
case, only the rotating heat exchanger is used as a source of
heat.
If necessary, the ventilation unit's heating can also be turned
off. In this case only the rotating heat exchanger is used as
a source of heat. It is best to leave it ON, as the unit will then
respond automatically when there is a need for additional
heating.
NB! This does not apply if the unit has a water battery.
If the heating element is switched off, this symbol is
displayed when the display enters idle mode.
HEATING ELEMENT ON/OFF
HEATING ELEMENT ON
7.5 Timer
Here you set the time you want for the MAX TIMER function.
This is used when the function is activated from the main
menu.
TIMER
OK?
DAY / WEEK SETTINGS
MONDAY
TUESDAY
WEDNESDAY
THURSDAY
FRIDAY
SATURDAY
SUNDAY
A new menu screen appears under each day.
TUESDAY
:
00
1 08
:
2 16
00
:
3 18
00
:
00
4 19
Each day can be programmed with four different time
intervals. Adjust the start and stop times for each interval
and then adjust the desired speed and temperature. To
activate the interval, select a green tick. The interval will then
be active for the selected time and day of the week. A red
cross means that the interval is not activated. If necessary,
then select another interval and repeat the procedure.
The following rules apply to the programming:
• An interval can never be started before the
previous one has ended.
• The stop time can never be before the start
time.
-
16
-
18
-
19
-
24
:
:
:
:
00
00
00
00
MIN
NORMAL
MAX
NORMAL
OK?
16°
18°
16°
18°
min
60
To adjust the time interval for MAX TIMER, see chapter 8.4
under "Timer".
OK?
Once you have finished programming a day, repeat the
procedure for the other days.
When the timer is active, this symbol is displayed
when the display enters idle mode.
If there is no new time interval registered after the finished
period, the speed and temperature return to the setting that
was previously active.
13
Page 14
7.7 Time and date
45
040709
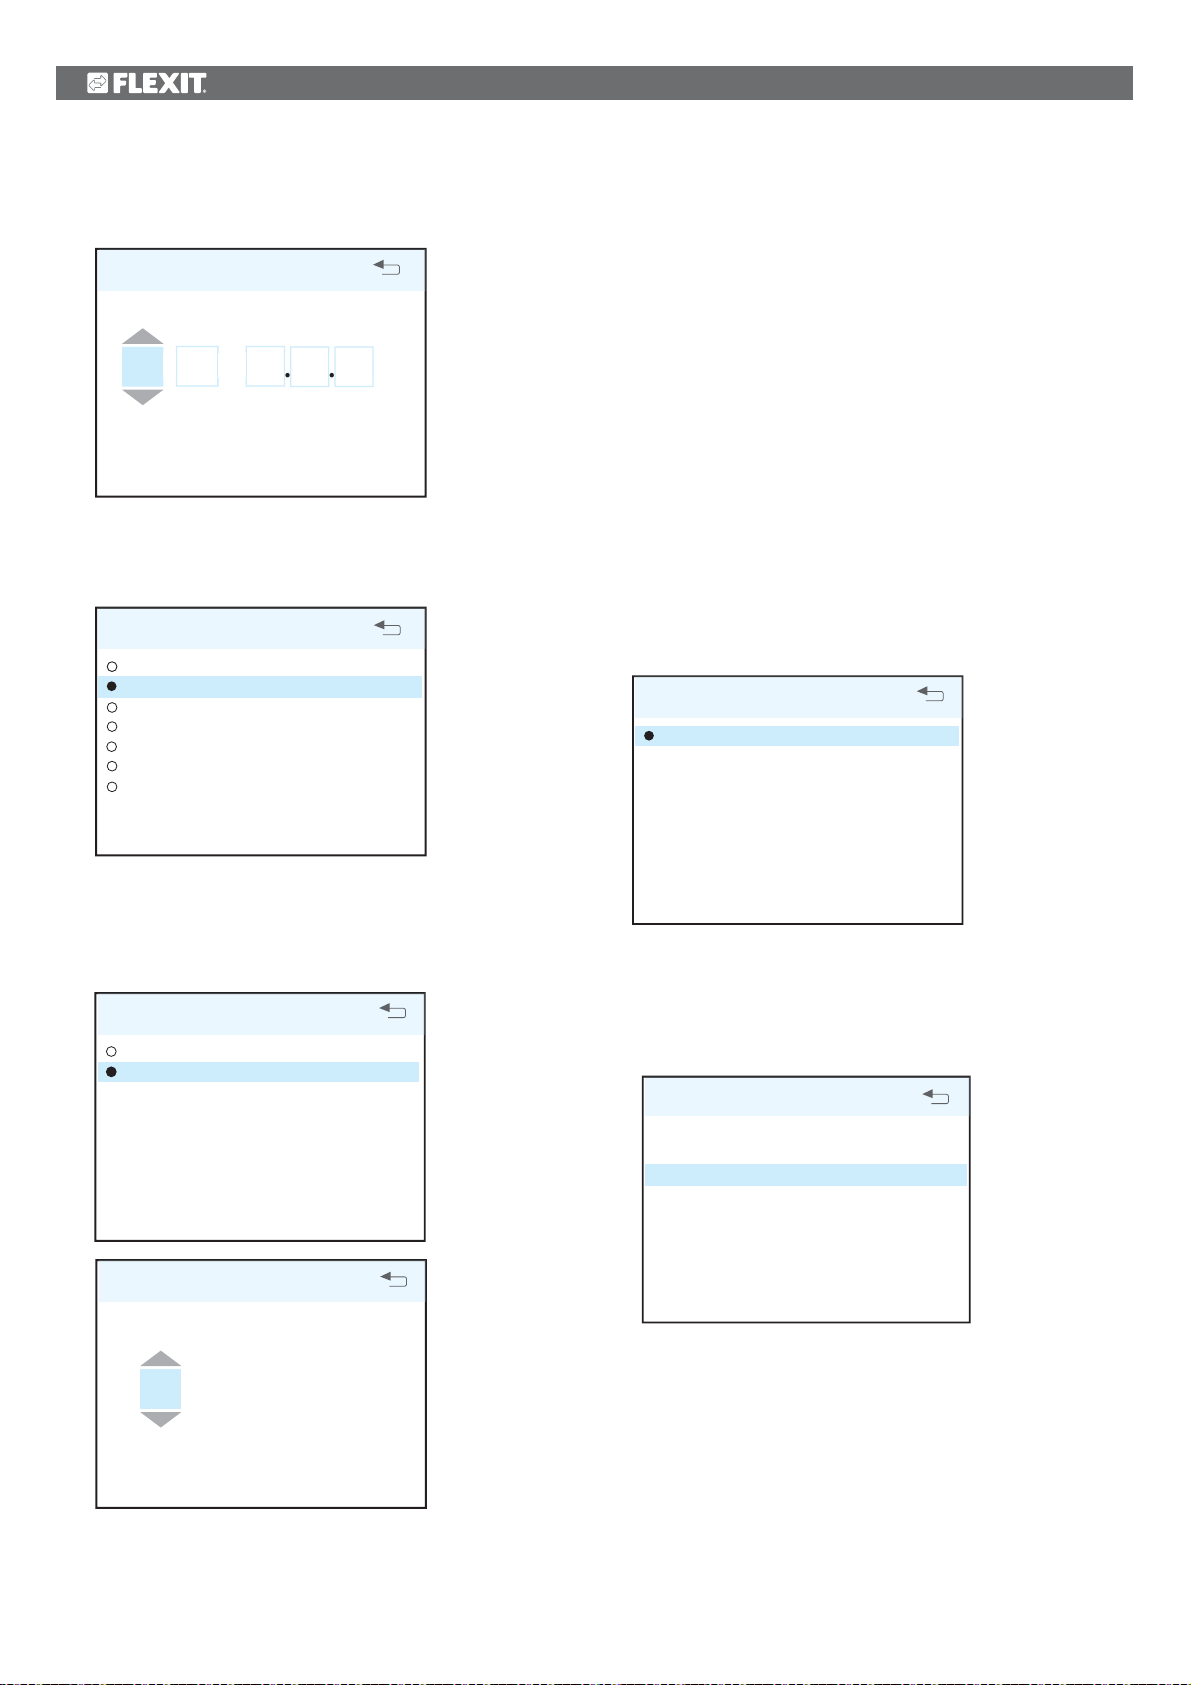
The time and date can be adjusted in this dialog.
The normal time is 6 - 12 months, depending on the
environment.
TIME AND DATE
TIME DAY MONTH YEAR
13 : 45 04.07.09
OK?
7.8 Language
The language selected can be changed in this dialog.
LANGUAGE
NORSK
ENGLISH
SVENSKA
DEUTCH
NEDERLANDS
SUOMI
DANSK
OK?
When the filter alarm is tripped, the yellow indicator 8 lights
up and an information text appears. Follow the instructions
in the text. It is possible to go directly to this dialog from
the message or via the menu tree. After the alarm has been
reset, the countdown to the next filter change begins.
7.10 Alarm
If a problem occurs in the operation of the ventilation
unit, an alarm will be tripped. The red indicator 9 lights up
and an information text appears in the display. Follow the
instructions in the text. It is possible to go directly to this
dialog from the message or via the menu tree.
NB! If thermostat F10 trips, the unit will have to be opened
up and physically reset
before resetting on the panel. If the
alarm is tripped repeatedly, contact the service company or
distributor. See chapter 1.4 for more information.
ALARM
RESET ALARM
OK?
7.9 Filters
A reminder appears regularly on the display. In this dialog,
the time interval can be adjusted and the filter alarm reset.
FILTER
INTERVAL CHANGE OF FILTER
RESET FILTER ALARM
>
OK?
INTERVAL CHANGE OF FILTER
6 MND
OK?
7.11 Operating information
This general screen displays current temperature values,
whether the daily/weekly timer is active and activity as
0-100% for cooling, heat exchanger and additional heating.
OPERATING INFORMATION
SET TEMPERATURE
DAY / WEEK SETTINGS
SUPPLY AIR
EXTRACT AIR
OUTDOOR AIR
RETURN WATER
HEAT RECOVERY SYSTEM
COOLING
HEATING
22°
AKTIV
22°
21°
0°
35°
100%
0%
100%
14
Page 15
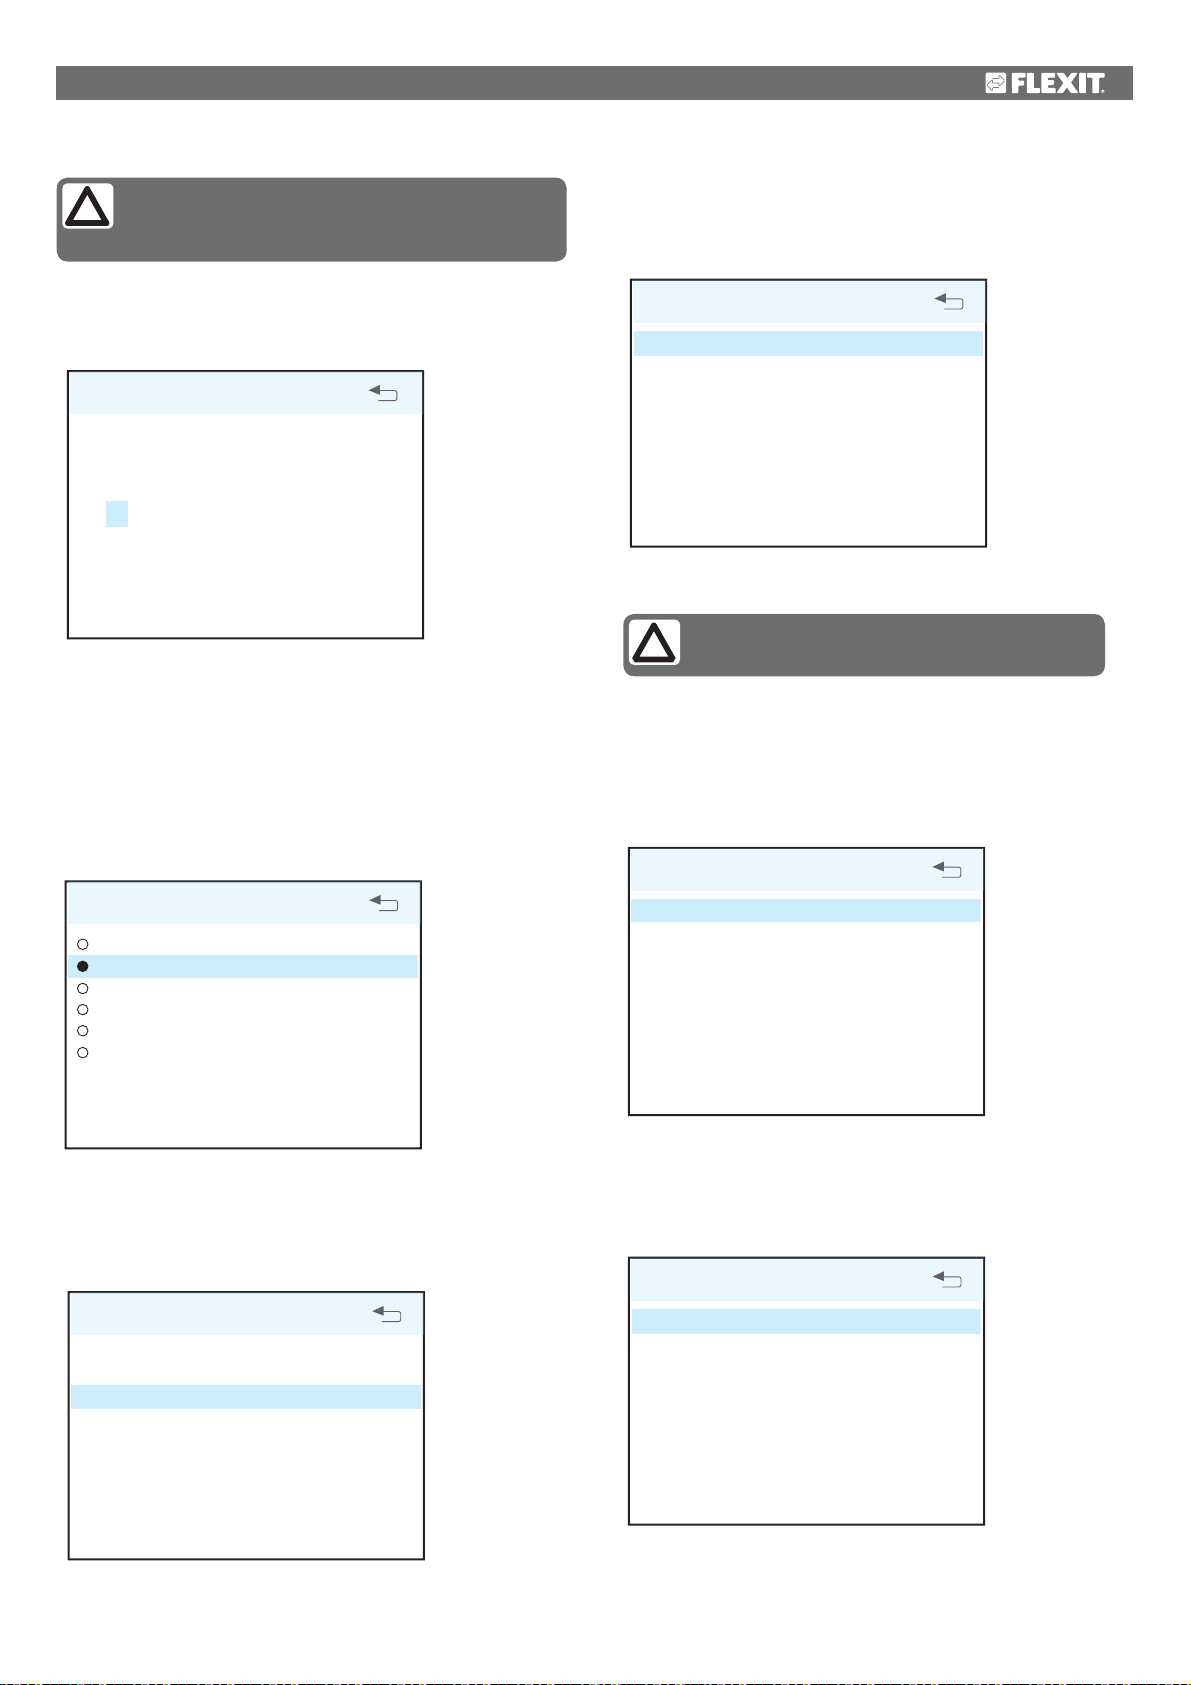
8 CI600 advanced user menu
NB! For more information on the ”Advanced
User” menu, refer to the ”CI600 Reference
Manual” on Flexit’s homepage.
Regulation type
If supply air regulation is selected, no further settings can
be set here. If extract air regulation is selected, the max. and
min. supply air temperatures can also be specified.
8.1 PIN
To access the menu item, you need to enter the PIN 1 0 0 0.
PIN CODE
1 0 0 0
OK?
8.2 Advanced user
This menu contains functions for monitoring, configuration
and troubleshooting. Information to do with adjustment
can be found in the installation instructions. Complete
documentation of all menus, including configuration for
accessories and extras, etc., is described in the CI600
reference manual, which is available at www.flexit.no.
ADVANCED USER
TEMPERATURE REGULATION
FAN REGULATION
CONFIGURATION
OPERATING TIME
FACTORY SETTINGS
SERVICE
>
OK?
>
>
>
>
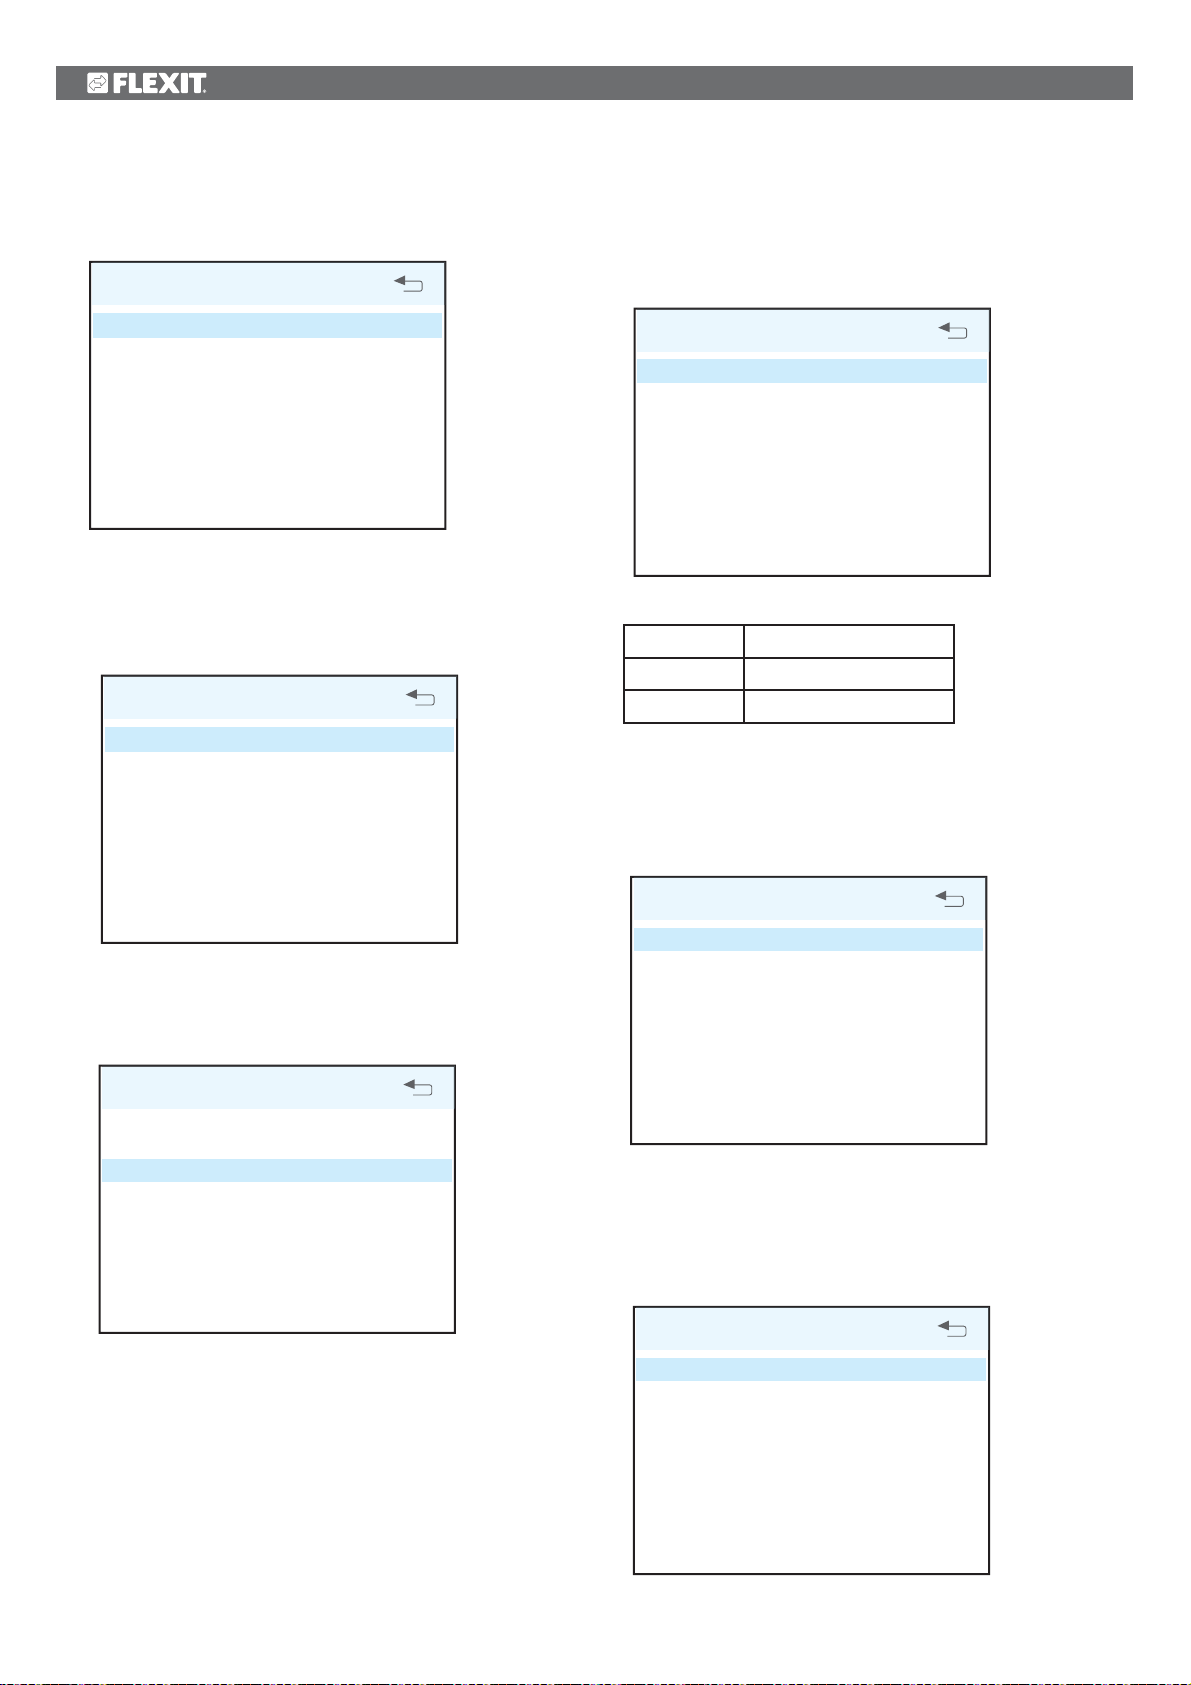
REGULATION TYPE
REGULATION
MAX SUPPLY AIR TEMP
MIN SUPPLY AIR TEMP
EXTR OK?
35°
15°
Cooling
NB! Flexit does not supply or project cooling
machines.
In this dialog, the cooling function is activated and the
parameters MIN OUTDOOR AIR TEMP for supply of cooling
and MIN SPEED for supply of cooling are specified. If a DX
cooling machine is used, the supply delay interval can be
specified.
COOLING
OK?
COOLING
MIN OUTDOOR TEMP
MIN SPEED
RESTART DELAY
COOLNESS RECOVERY
AV
18°
MIN
180 s
>
8.3 Temperature regulation
In this menu screen, you configure the temperature
regulation and cooling functions.
TEMPERATURE REGULATION
REGULATION TYPE
COOLING
NEUTRAL ZONE
EXT. TEMP. CONTROL
>
>
OK?
>
It is also possible to activate a function to recover cooling
in the building using the rotating heat exchanger. Enter
the desired difference between the outdoor and indoor air
temperatures for when the function is activated.
COOLNESS RECOVERY
COOLNESS RECOVERY
DIFF
OFF
1°
OK?
15
Page 16
Neutral zones
To achieve more even temperature regulation, the
neutral zones can be set in this menu.
NEUTRAL ZONE
Adjustment (supply air and extract air)
This dialog is identical for the supply air and extract air
fans. The fans are adjusted individually to the desired
capacity for the respective speed.
COOLNESS RECOVERY
HEAT RECOVERY SYSTEM
2°
OK?
1°
External temperature control
Control of the temperature settings from an overall
system must be entered in this menu. In this case, the
temperature settings in the control unit are overridden.
EXT. TEMP. CONTROL
EXT. TEMP. CONTROL
OFF
OK?
SUPPLY AIR
MIN SPEED
NORMAL SPEED
MAX SPEED
Factory settings:
MIN
NORMAL
MAX
50%
75%
100%
Timer
Settings are entered in this menu for the speed and time
that are to apply to the ‘MAX TIMER’ function in the main
menu.
OK?50%
75%
100%
TIMER
8.4 Fan control
The fans are selected and configured in this menu screen.
FAN REGULATION
SUPPLY AIR
EXTRACT AIR
TIMER
AIR VOLUME COMP
>
>
OK?
>
STANDARD SPEED
STANDARD TIME
OK?MAX
30 m
Air flow rate compensation
This function can be activated via an input on the control
card. The speeds required for each fan are selected here.
The function can be used with a kitchen fan or other
device that requires additional supply air.
AIR VOLUME COMPENSATION
SUPPLY AIR
EXTRACT AIR
OK?MAX
MIN
16
Page 17
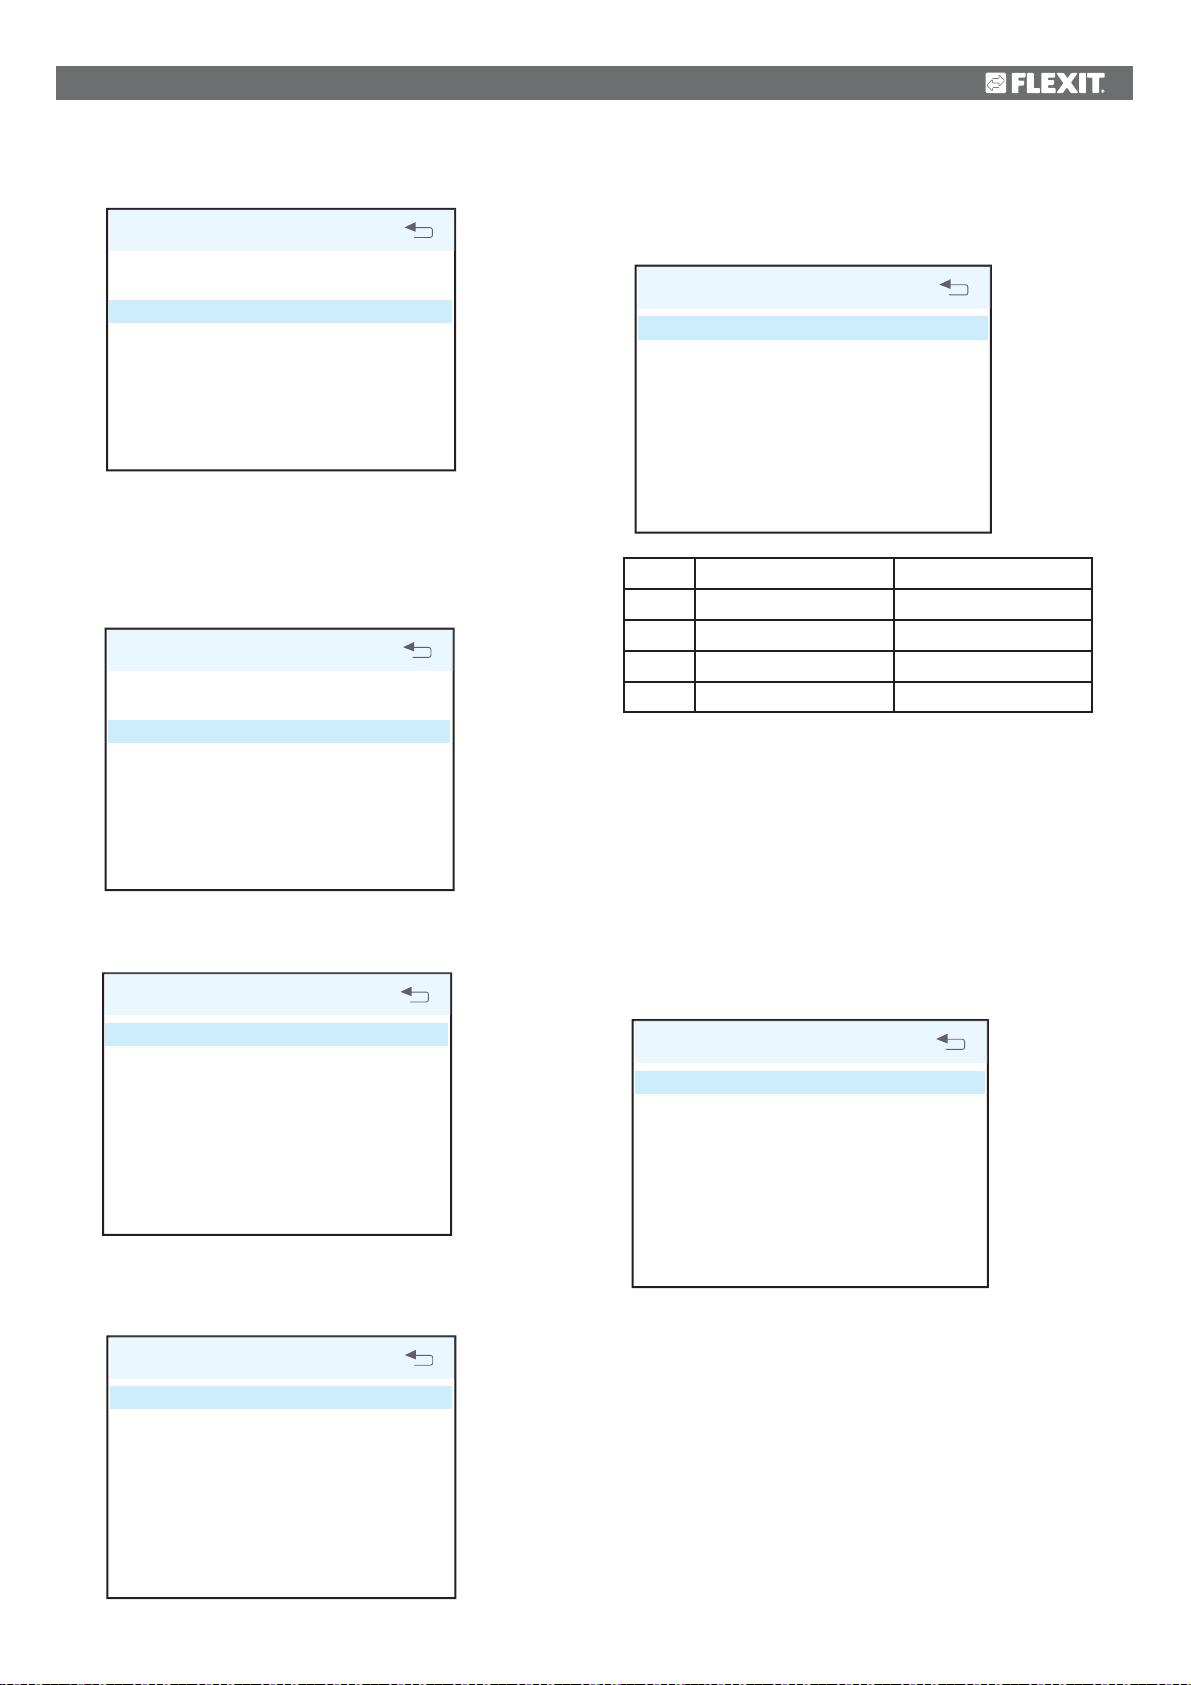
8.5 Configuration
The general configuration is set in this menu screen.
CONFIGURATION
Fire/Smoke
This function requires an external sensor to be connected
to the control card.
SENSORS
FIRE/SMOKE
COMMUNICATION
START/STOP SEQUENCE
REST MODE
>
>
OK?
>
>
Sensors
The temperature sensors can be calibrated in this menu
to be better coordinated with the real situation, and a
pressure sensor is activated as a pressure guard instead
of the integrated time control.
SENSORS
SUPPLY AIR
EXTRACT AIR
OUTDOOR AIR
RETURN WATER
FILTER GUARD
>
>
OK?
>
>
FIRE/SMOKE
MODE
Mode Supply air fan Extract air fan
1 STOP STOP
2MAX MAX
3 STOP MAX
4 MAX STOP
OK?1
Communication
Proceed to the “HOME/AWAY”submenu. This function can
be used to make the unit run on other operating settings
using an external switch.
The menu screen is identical for all temperature sensors
and they can be adjusted within an interval of 5 °C.
SUPPLY AIR
CALIBRATION
If the pressure guard is activated, an external sensor must
be connected to the control card. The sensor replaces
the integrated filter time control.
OK?0
FILTER GUARD
ACTIVATION
OK?OFF
NB! The settings have no effect unless an external switch
is connected.
The settings are entered for the AWAY selection. Speed
and temperature can be selected, plus how long after
activation the new setting should take effect.
COMMUNICATION
HOME/AWAY
OK?
17
Page 18
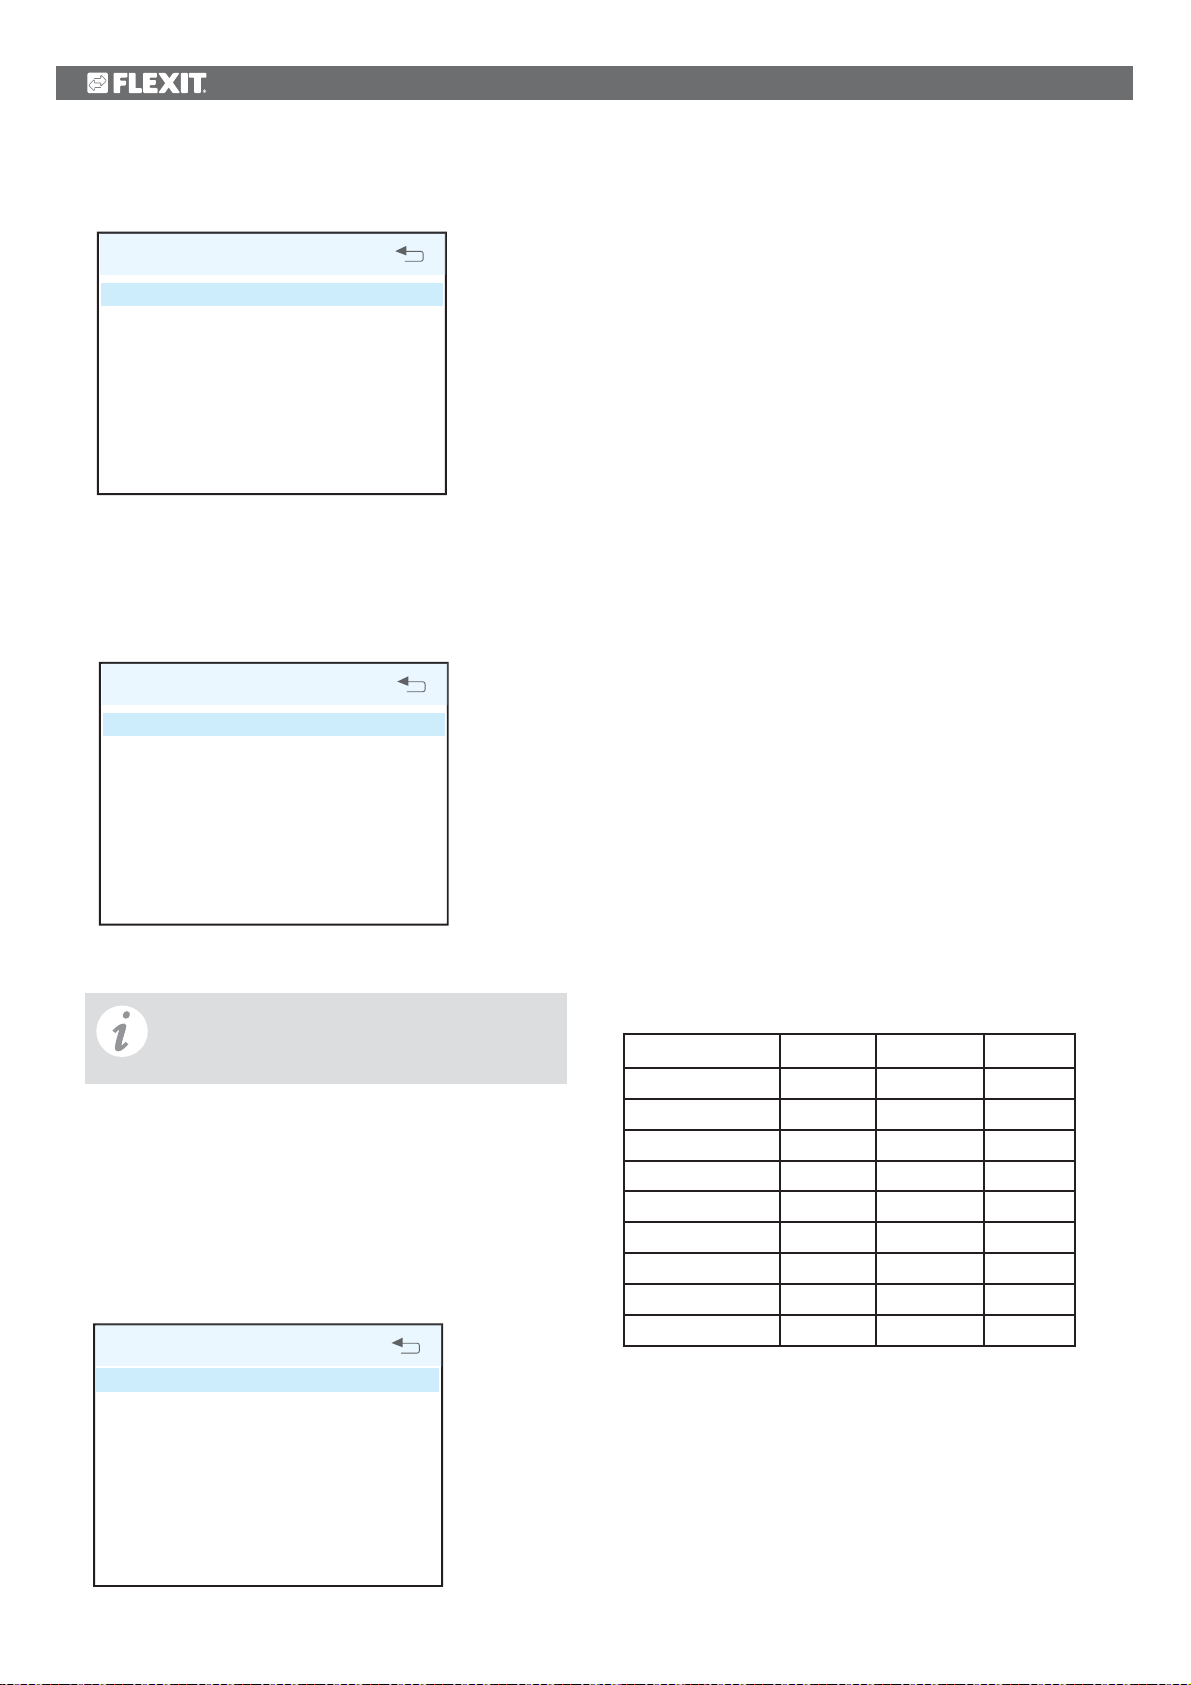
Standby mode
In this menu you can adjust the time it takes before the
display enters idle mode.
REST MODE
TIME DELAY
2 min OK?
De-icing
Activates/deactivates the function.
Start temperature
The start temperature for the defrosting function is set here.
The temperature in question is the outdoor temperature.
Period time
Period time for de-icing operation.
Frequency
Decides how many times the period shall be repeated per
hour.
8.6 Operating time
This menu screen displays the ventilation unit’s total
operating time and how much time has passed since the
last filter replacement.
OPERATIONS COUNTER
OPERATING TIME
FILTER
STOP
MIN
NORMAL
MAX
ROTOR
HEATING ELEMENT
459.7 TIM
459.7 TIM
0.0 TIM
123.0 TIM
161.4 TIM
178.0 TIM
0.4 TIM
0.3 TIM
8.7 Service
Passwords are only revealed in consultation
with Flexit's service department.
De-icing
The integrated de-icing function is not activated at the
time of delivery of the ventilation unit.
The function can be configured and activated in this
menu screen.
Search path for menu selection:
MAIN MENU/SETTINGS/ADVANCED USER/SERVICE/DEFROSTING
DE-ICING
DE-ICING
START TEMPERATURE
PERIOD TIME
FREQUENCY
ROTOR SPEED
START FAN REDUCTION
PERIOD TIME
FREQUENCY
FAN SPEED
OK?OFF
-9°
60 min
1/TIM
15
-14°
60 min
1/TIM
50%
Rotor speed
When the start temperature has been reached, the speed of
the drive motor of the rotating heat exchanger is reduced to
the specified RPM.
Start fan reduction
As an additional safety function, the speed of the supply
air fan can be reduced. This takes effect at the set outdoor
temperature.
Period time
Period time for de-icing operation.
Frequency
Decides how many times the period shall be repeated per
hour.
Fan speed
As an additional safety function, the speed of the supply
air fan can be reduced. This takes effect at the set outdoor
temperature.
De-icing - Parameters
Parameter Default Range Unit
De-icing OFF OFF/ON
Start temperature
Period time 60 1–60 min
Frequency 1 1–10 no./hour
Rotor speed 15 15–180 rpm
Fan reduction -14 (-5)–(-45) °C
Period time 60 1–60 min
Frequency 1 1–10 no./hour
Fan speed 50 20–100 %
-9 (-5)–(-45) °C
18
Page 19
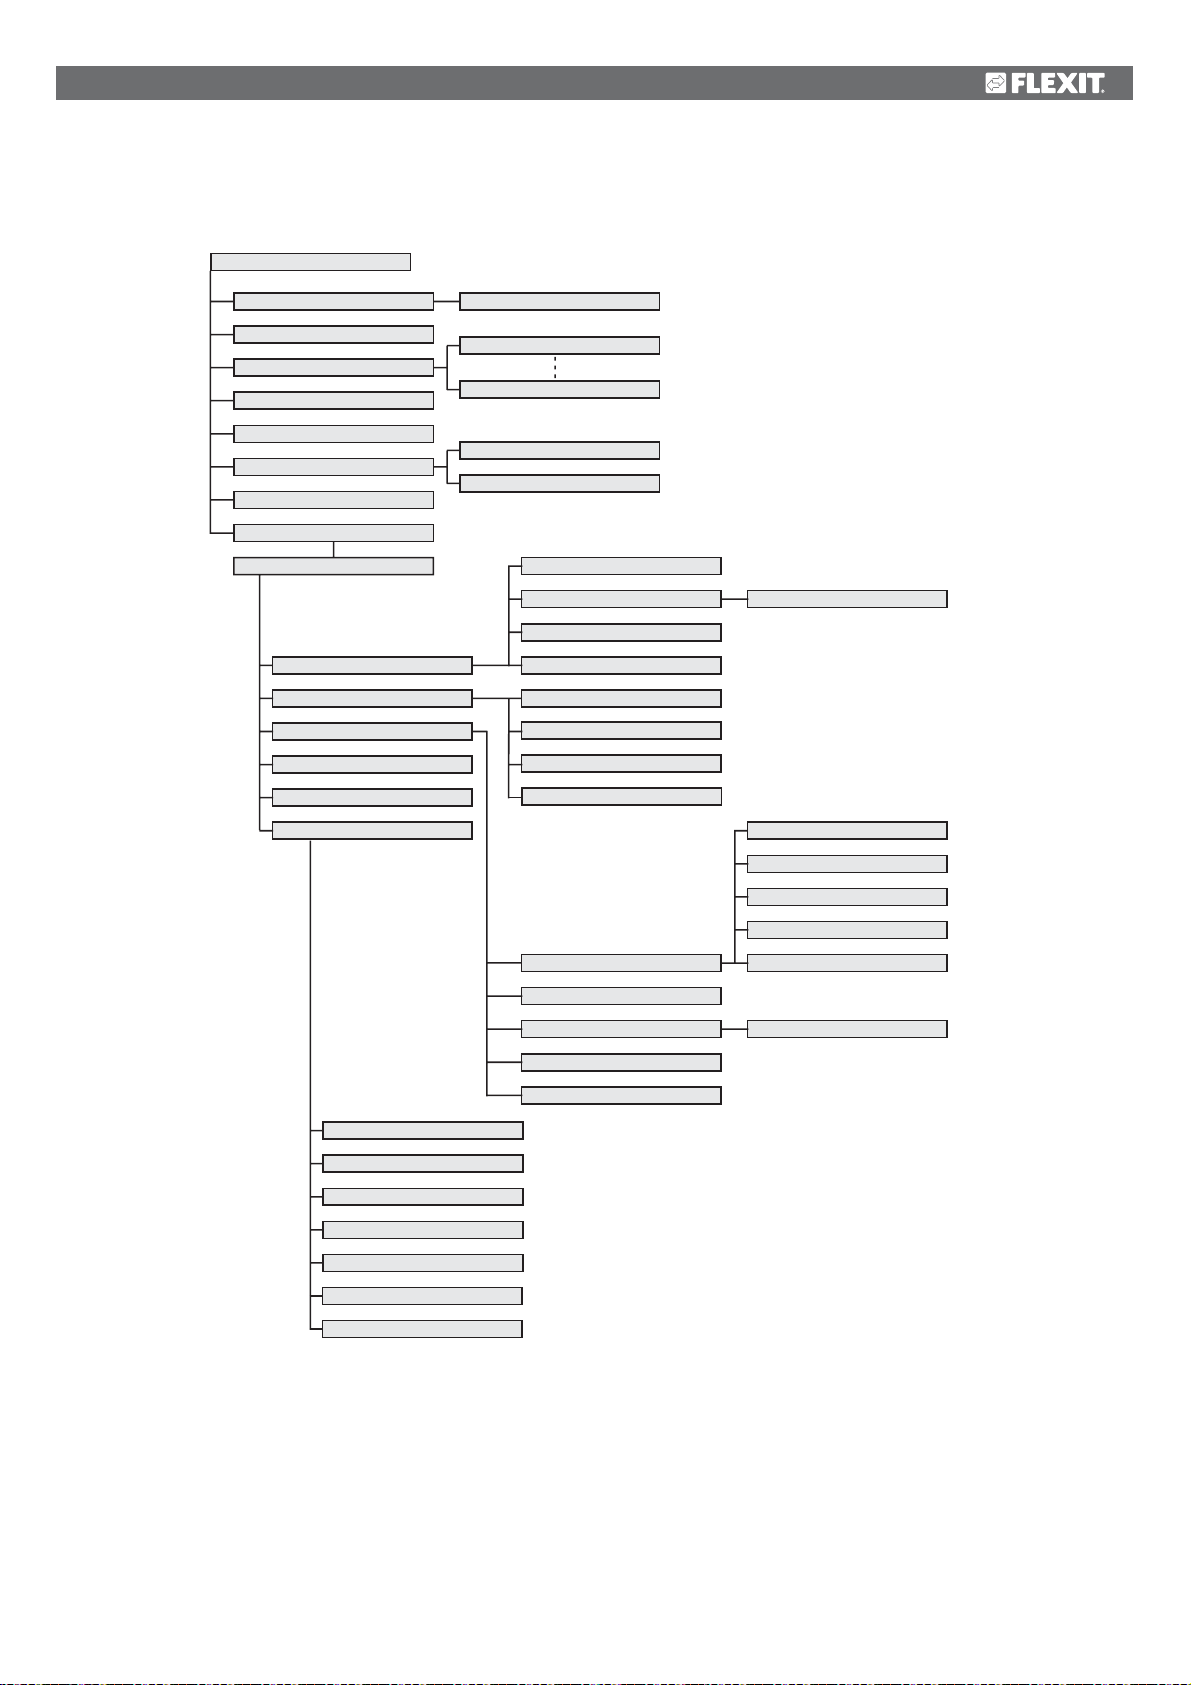
8.8 Menu tree
Fig. 23
MAIN MENU
TEMPERATURE
TIMER
DAY/WEEK SETTINGS
TIME AND DATE
LANGUAGE
FILTER
ALARM
ADVANCED USER
PIN
TEMPERATURE REGULATION
FAN CONTROL
CONFIGURATION
OPERATING TIME
FACTORY SETTINGS
SERVICE
HEATING ELEMENT ON/OFF
MONDAY
SUNDAY
RESET FILTER ALARM
FILTER CHANGE INTERVAL
REGULATION TYPE
COOLING COOLING RECOVERY
NEUTRAL ZONE
EXT. TEMPERATURE CONT.
SUPPLY AIR
EXTRACT AIR
TIMER
AIR FLOW RATE COMP.
SENSORS
FIRE/SMOKE
COMMUNICATION HOME/AWAY
START/STOP SEQUENCE
IDLE MODE
SUPPLY AIR
EXTRACT AIR
OUTDOOR AIR
RETURN WATER
FILTER GUARD
SYSTEM INFORMATION
PRODUCTION DATA
TEST
ALARM
SPECIAL FUNCTIONS
DE-ICING
PARAMETERS
19
Page 20
9 Cleaning and maintenance
!
Before opening the door: Switch off the heat, let
the fans continue for 3 minutes to remove hot
air, unplug the unit and wait 2 minutes before
opening the doors.
9.1 Changing the filters
The filters have a limited life, and to preserve a healthy
indoor air quality it is important to change them when
they are dirty.
How often the filters need to be changed depends on the
degree of contamination of the air where they are installed. In
general, the filters need to be changed at least once a year,
preferably in the autumn (after the pollen season). In areas
with a lot of dust and contamination, the filters should be
changed in the spring and autumn.
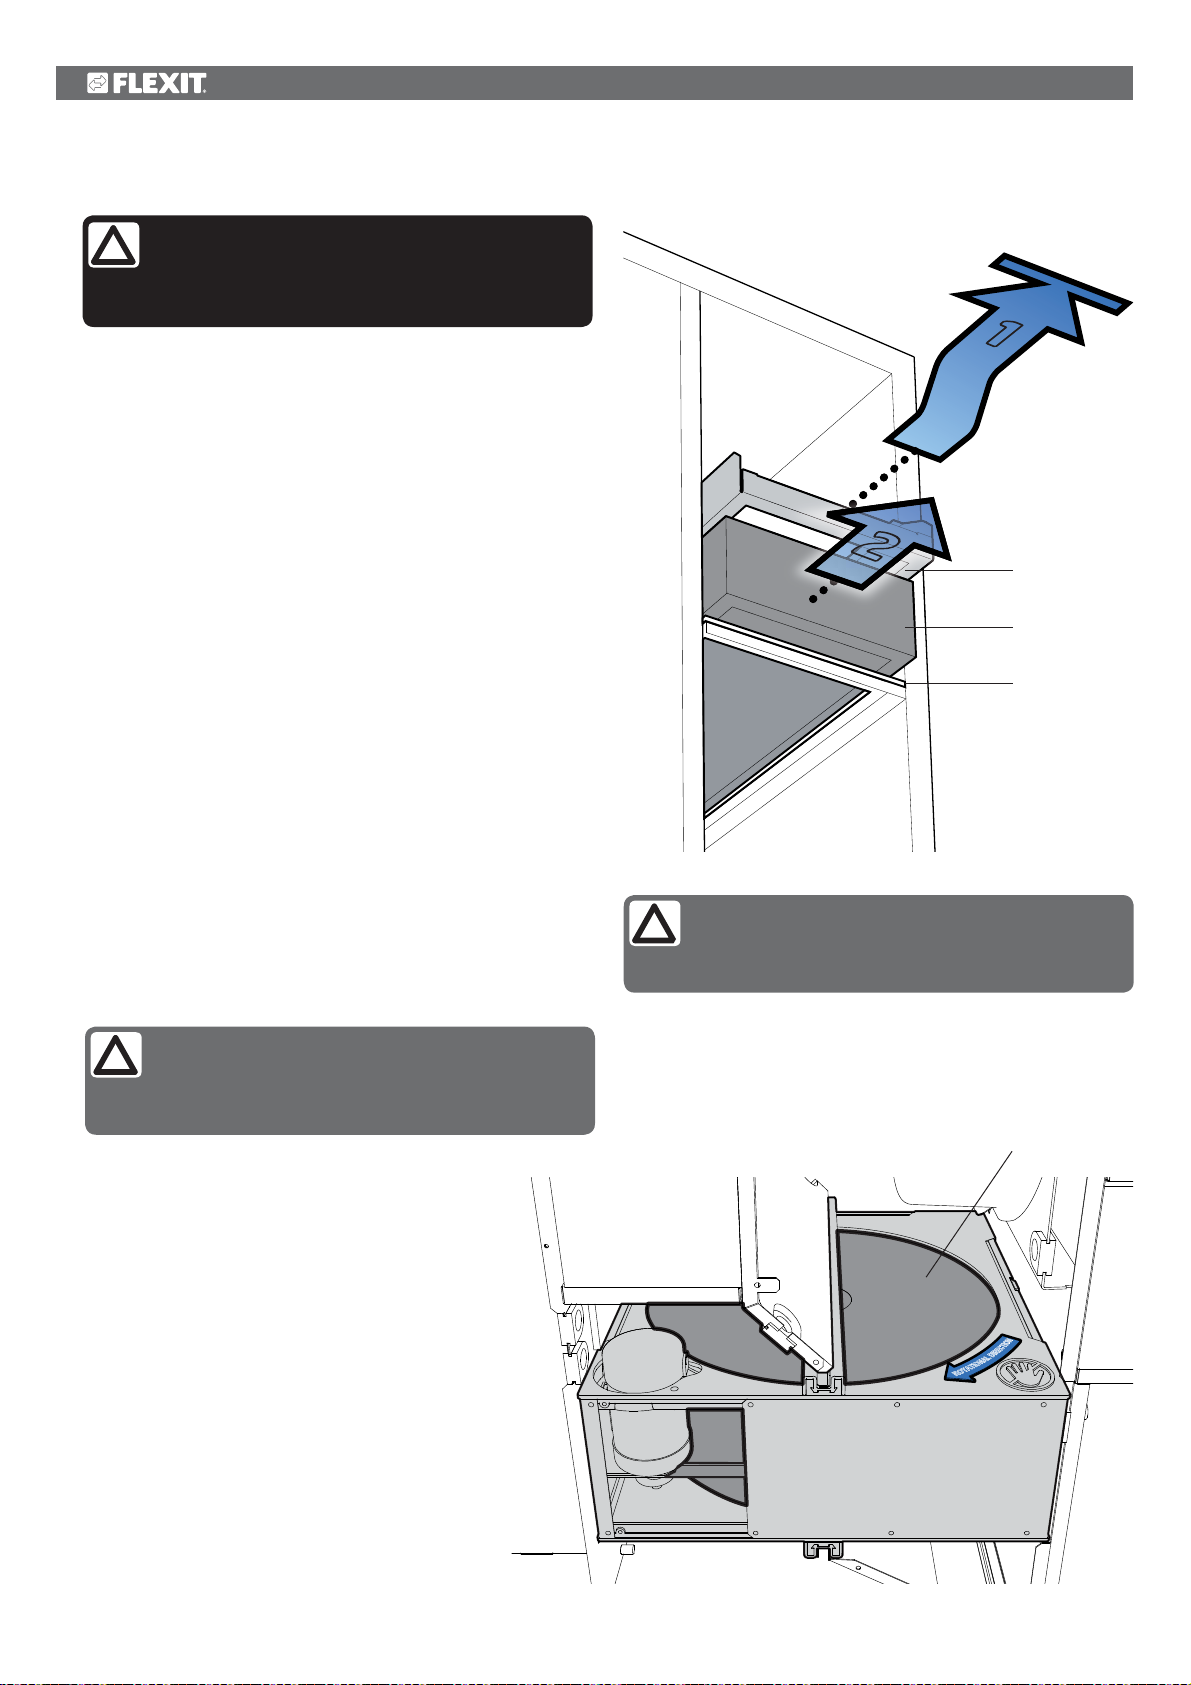
Fig. 24
1
2
Drawer
Filter
Dirty filters can, among other things, lead to:
• Reduced performance of the unit
• The unit becoming dirty
• Humidity damage in the home
• Reduced indoor air quality
A filter subscription is recommended to ensure full benefit
from the system.
111738.
To take out the filters:
1. Pull the filter drawer out as far as it will go (see Fig. 24).
2. The filter is now loose and can be removed.
3. Put a new filter in and push the drawer properly into place.
When changing the filter, check that the
whole unit is working normally.
Both filters should always be changed.
The drawer does not have to be removed completely.
Make sure that the filter is not damaged during
fitting. Use the filter's outer edge to push it in. A
damaged filter reduces the unit's effect and the
air's purity.
The order no. for a new set of filters is
Fig. 25
Seal
Check that the seal is intact before inserting the
filter. Then push the filter drawer properly into
place to prevent air leakage.
Rotor
Use the following checklist:
• Check that the rotor is rotating. Turn
the rotor in the direction of rotation as
shown on the rotor cassette (see Fig. 25).
• If necessary, clean the rotor
(see chapter 9.4).
• Check that the fans are clean
(see chapter 9.2).
20
Page 21
9.2 Cleaning the fans
The fans must be cleaned at least once a year. Clean the
fan blades with a grease solvent on a cloth (e.g. methylated
spirits) and compressed air if possible. NB! Do not use water.
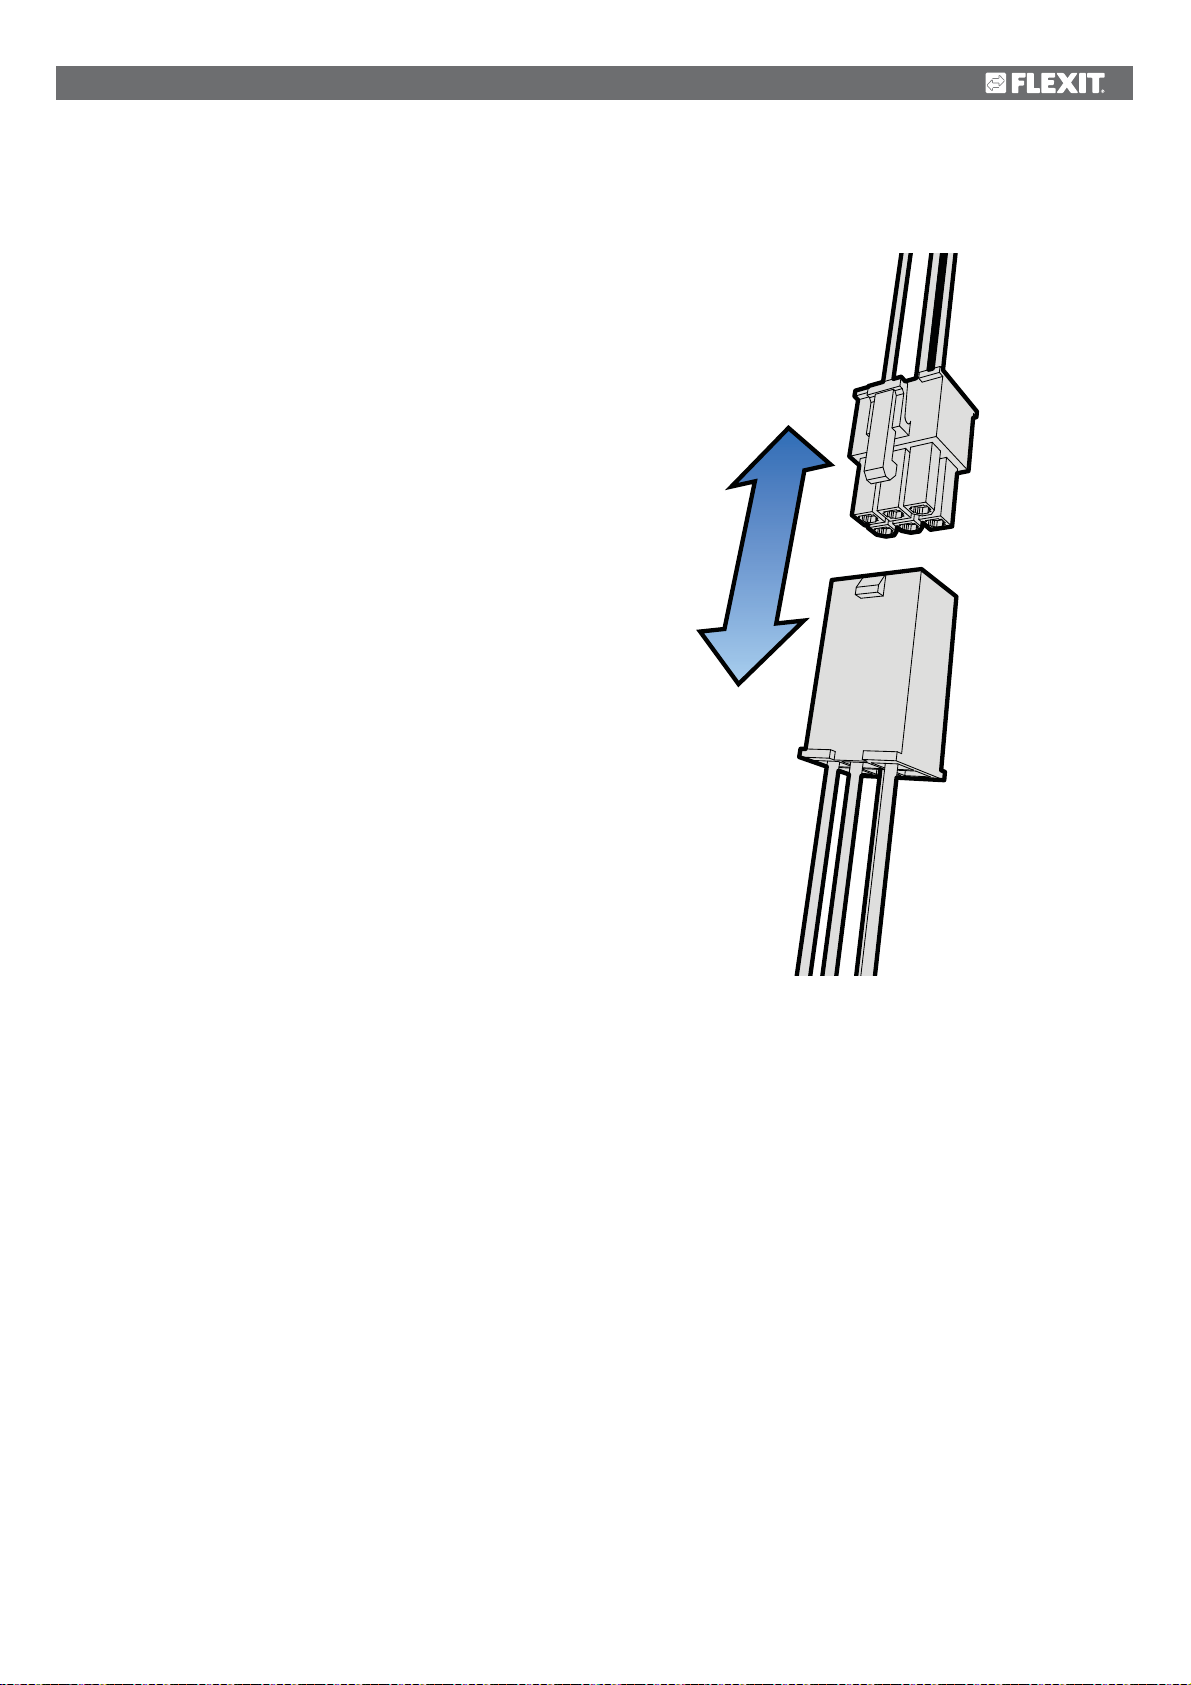
To take out the top fan:
1. Pull out the electric quick-release contact for the fan
(see Fig. 26).
2. Press down the hook on the spring under the fan housing
and pull the housing sideways (see Fig. 27-1 and 27-2).
Then take the fan housing out of the unit. Take care not
to damage the seal when you pull the fan housing out.
To take out the bottom fan:
1. Pull out the electric quick-release contact for the fan
(see Fig. 26).
2. Undo the safety screw and pull the fan housing out
of the unit (see Fig. 27-1 and 27-2). Take care not to
damage the seal when you pull the fan housing out.
To put the fan back, follow points 1 and 2 in reverse order.
Fig. 26
21
Page 22
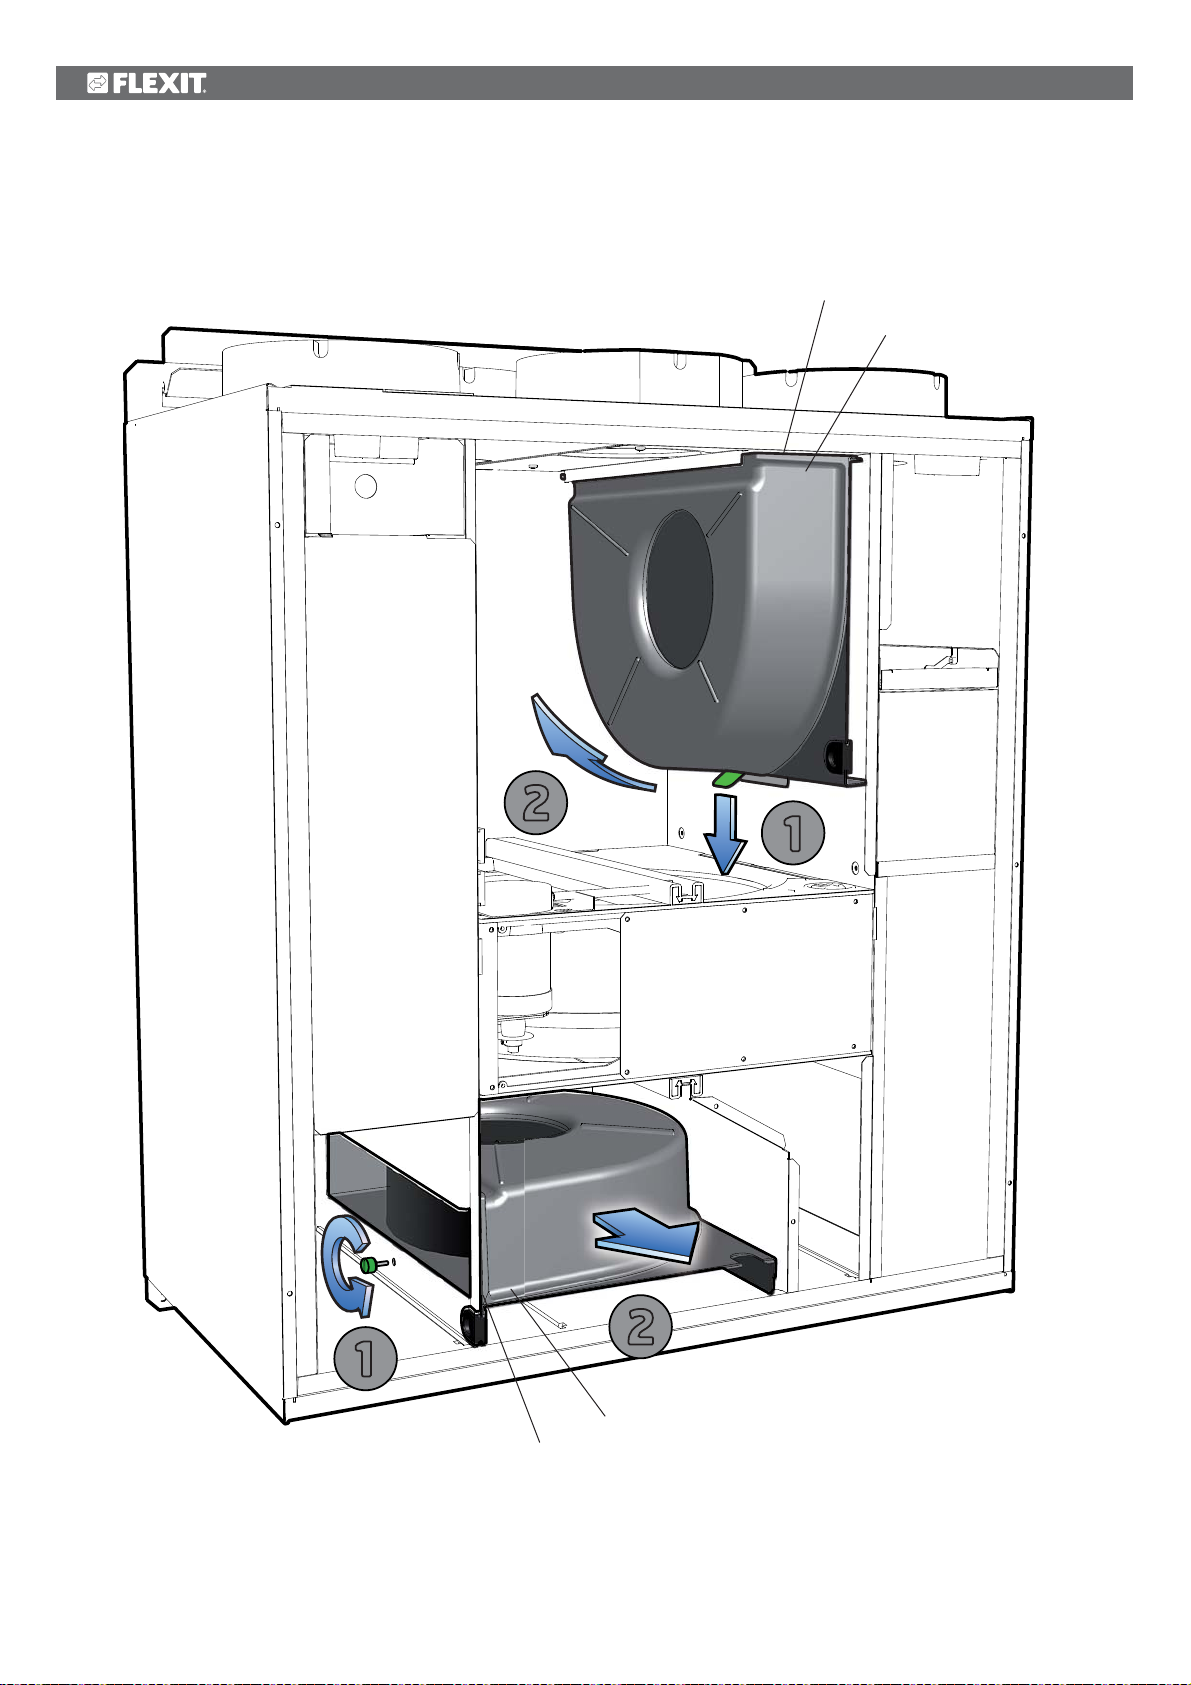
Fig. 27
Seal
Fan
1
2
1
2
Seal
Fan
22
Page 23
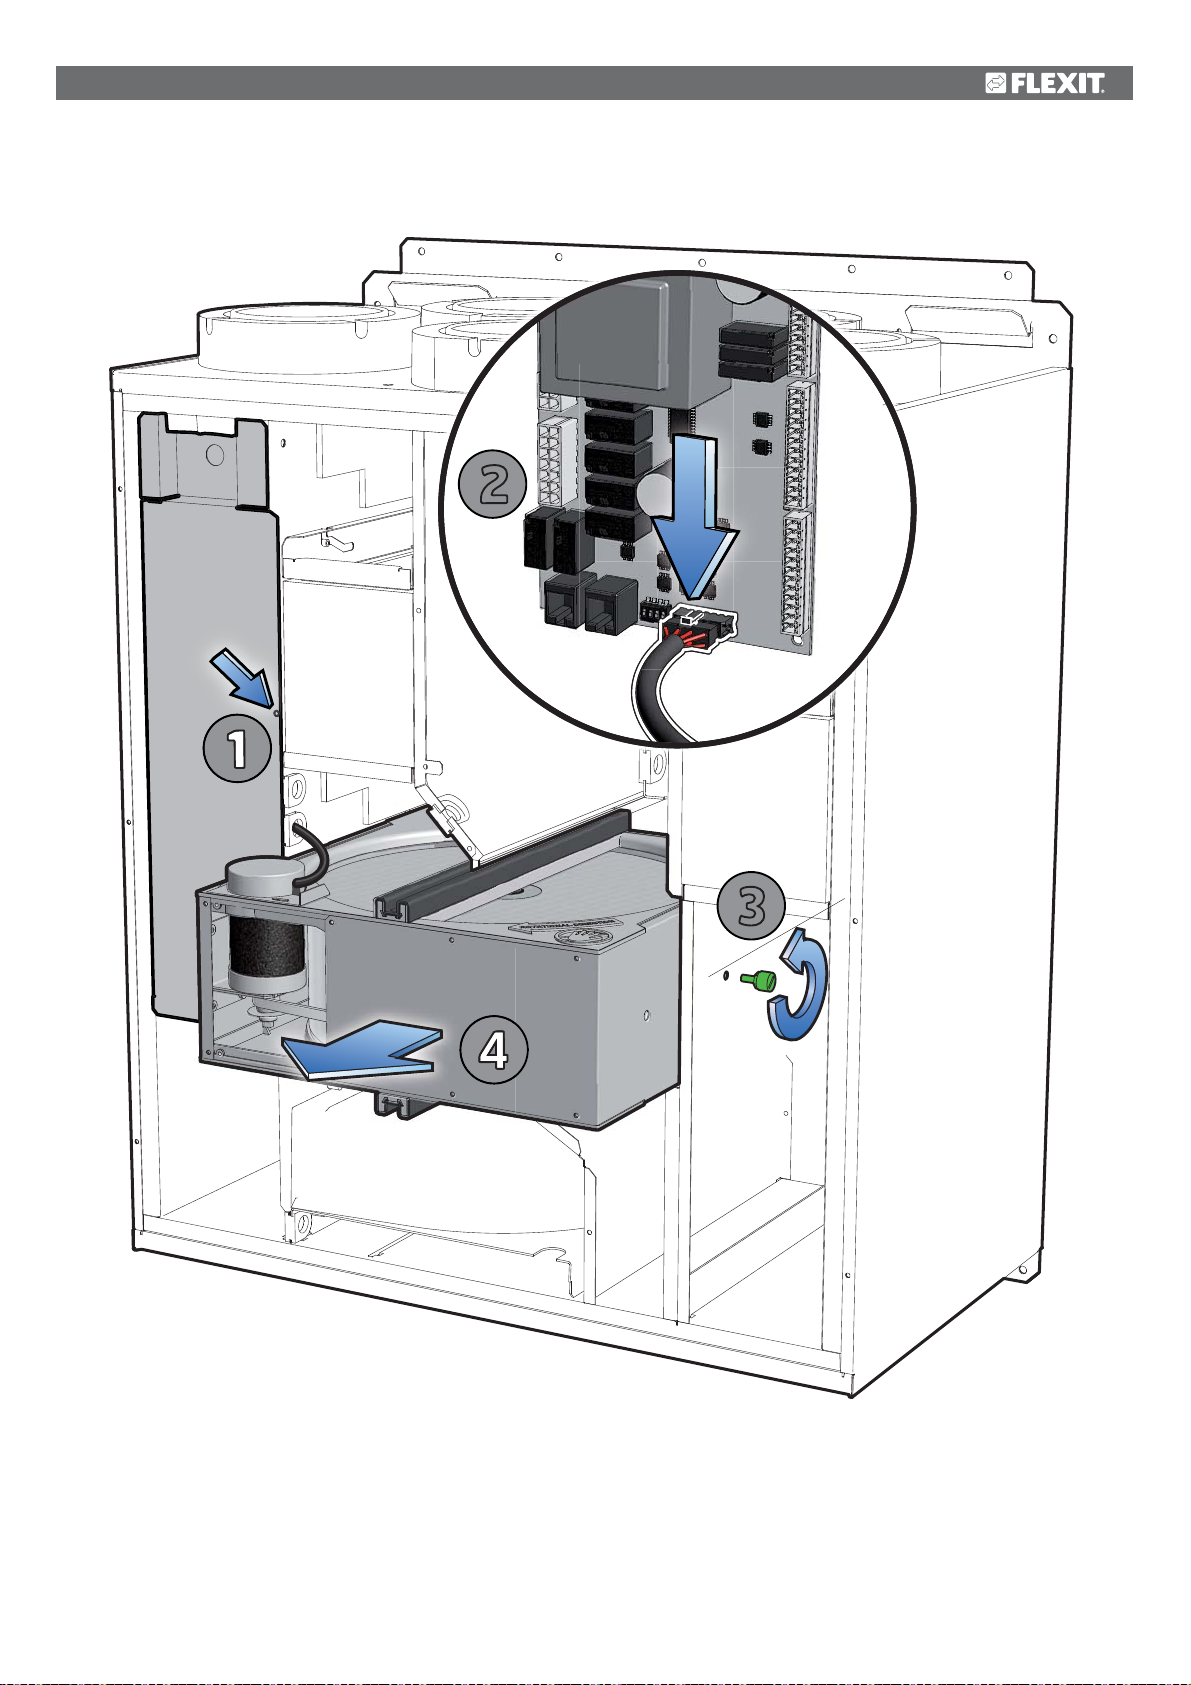
Fig. 28
2
1
4
3
23
Page 24
9.3 Changing the brush strips
!
The brush strips become worn over time. If they do
not sit tightly against the rotary
exchanger, it may be necessary to change them
(product code 102686). Alternatively, they can be
moved closer to the rotor, as the aluminium profile they
are mounted in has two grooves.
Unplug before starting!
Proceed as follows:
1. Undo the screw for the electric cover (see Fig. 28-1)
and take the cover off.
2. Disconnect the rotor's quick-release contact from
the circuit board by pressing the release down and
pulling the contact (see Fig. 28-2).
3. Undo the safety screw for the rotor module
(see Fig. 28-3).
4. Pull the rotor module straight out.
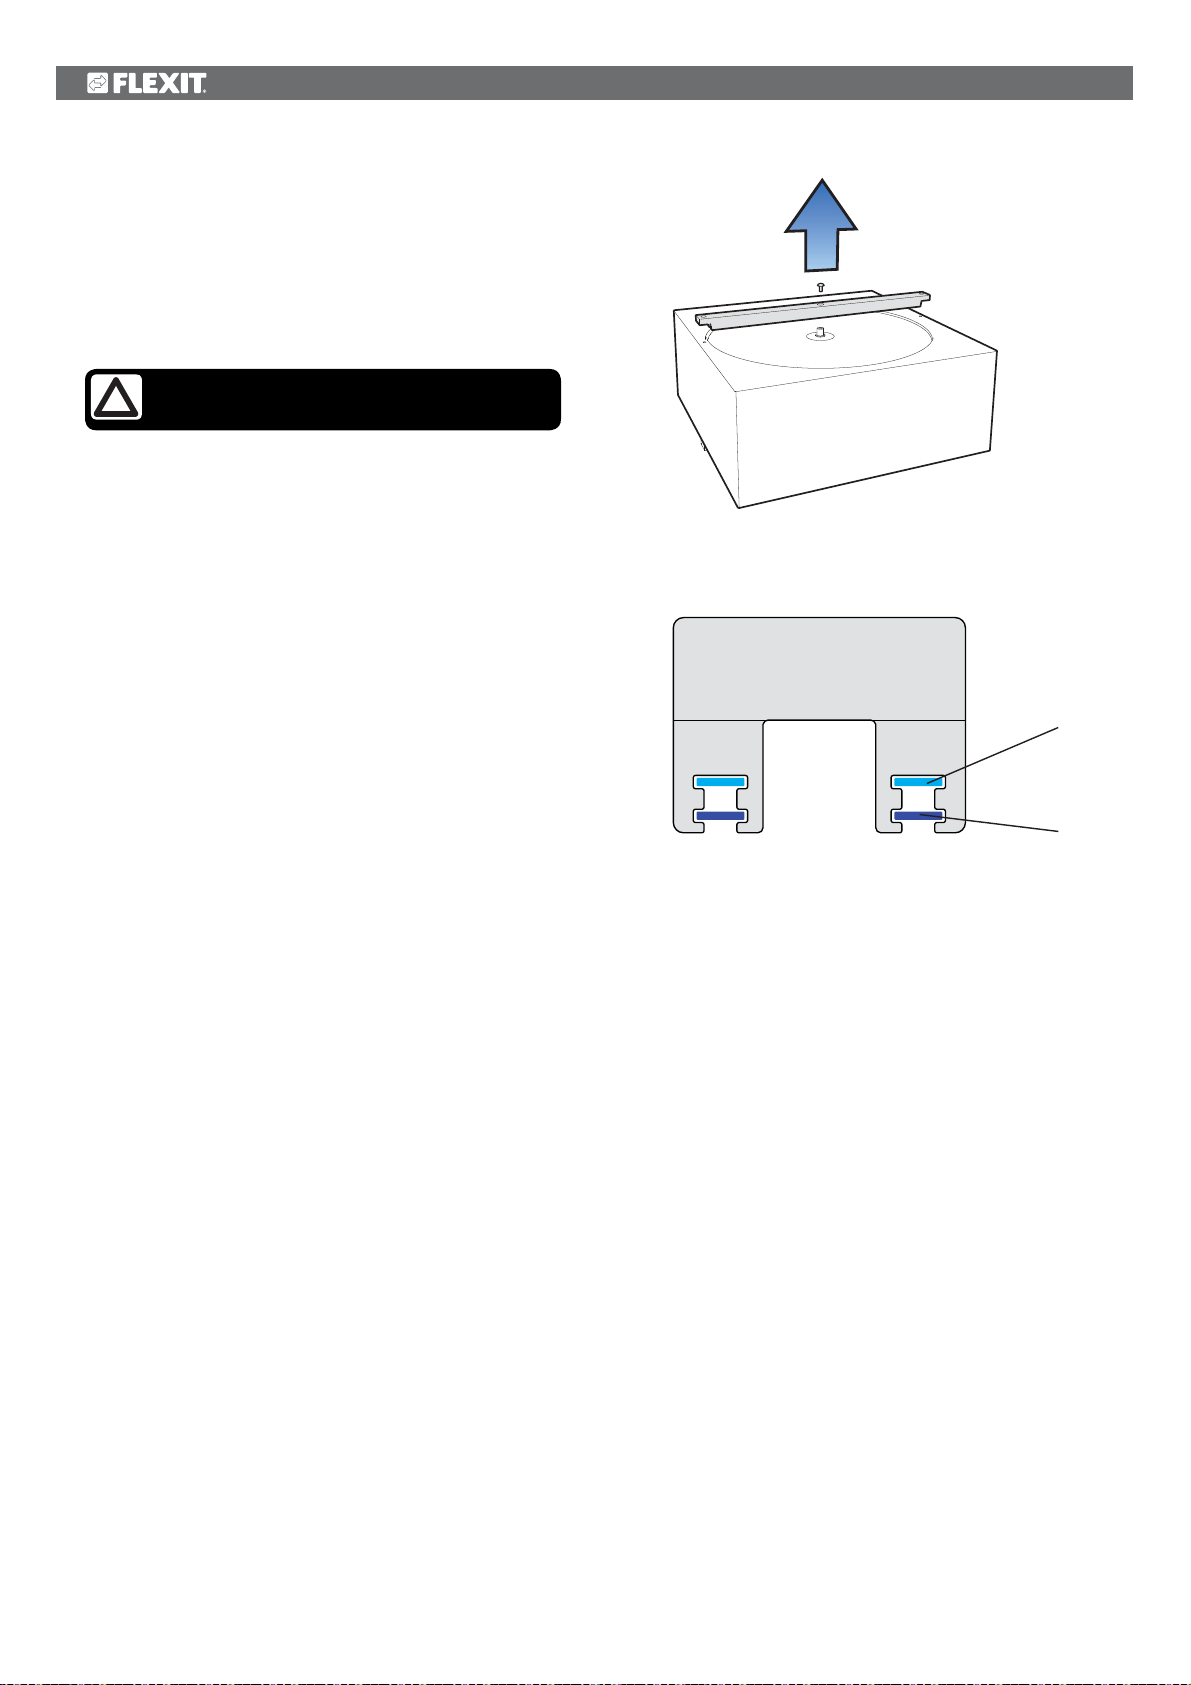
5. Remove the screw in the centre of the aluminium
profile and pull the profile out (see Fig. 29).
6. Pull the brush strips out of the groove. Move them
up from level 1 to level 2 (see Fig. 30), or replace
them with new ones if they are completely worn out.
wheel-type heat
Fig. 29
Fig. 30
level 1
level 2
24
Page 25
9.4 Tightening of rotor belt
Proceed as follows:
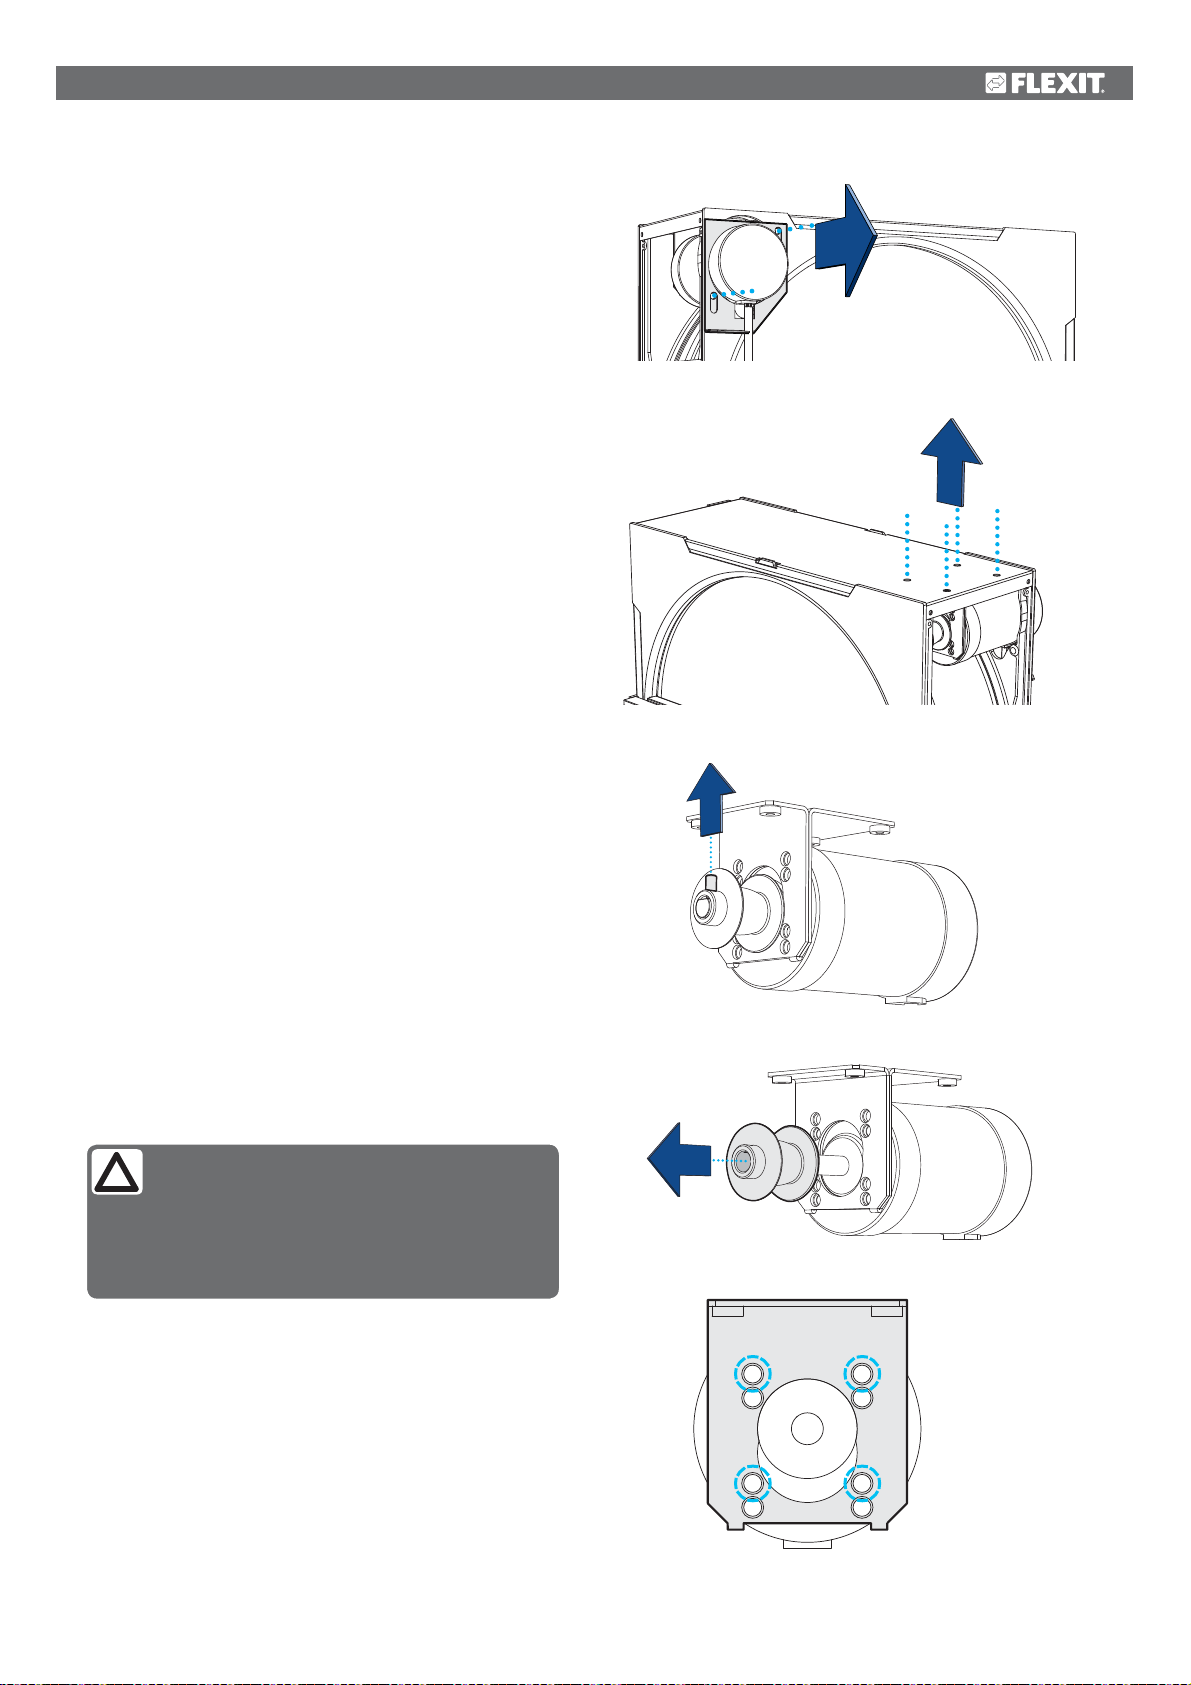
1. Remove qty. 2 screws in the plate on the outer side
of the rotor cassette (see Fig. 31).
2. Remove qty. 4 screws in the rotor cassette in order
to loosen the rotor motor bracket (see Fig. 32).
3. Screw out the Allen screw in the drive roller (see Fig.
33) and pull out the drive roller (see Fig. 34).
Note: Do not screw the drive roller all the way
in when it is screwed in again. Leave 1-2 mm of
clearance mm to the rotor motor bracket.
4. Screw out the screws (qty. 4) that fasten the rotor
motor to the bracket and move the screws to the
uppermost holes (see Fig. 35), and the rotor belt
will consequently be tightened when the parts are
mounted back in place.
9.5 Cleaning the rotor
As the unit has high impermeability filters installed,
it is not usually necessary to clean the rotor. If, for
various reasons, it should still be necessary, dust can be
removed with a soft brush. Further cleaning is possible by
removing the rotor, spraying it with a grease solvent and
then blowing it clean from the opposite side. Distance
approximately 60 mm and max. pressure 8 bar. Ensure
that the motor is not exposed to water during cleaning.
Ensure that all seals around the rotor are intact and
tight. Ensure that there is no damage to the rotor belt,
and that the rotor rotates freely.
Fig. 31
Fig. 32
Fig. 33
9.6 External cleaning
Many kitchen surface cleaners contain chemicals
that may damage the product’s plastic components.
Therefore use a soft cloth moistened with warm water
and a neutral detergent to clean the outside of the
product.
Do not use abrasive cleaners or scouring
powder, as such products can damage the
surfaces. Cleaners containing ammonia
or citrus must not be used. Products that give
stainless steel an anti-fingerprint coating must not
be used either.
Fig. 34
Fig. 35
25
Page 26
10 Maintenance table
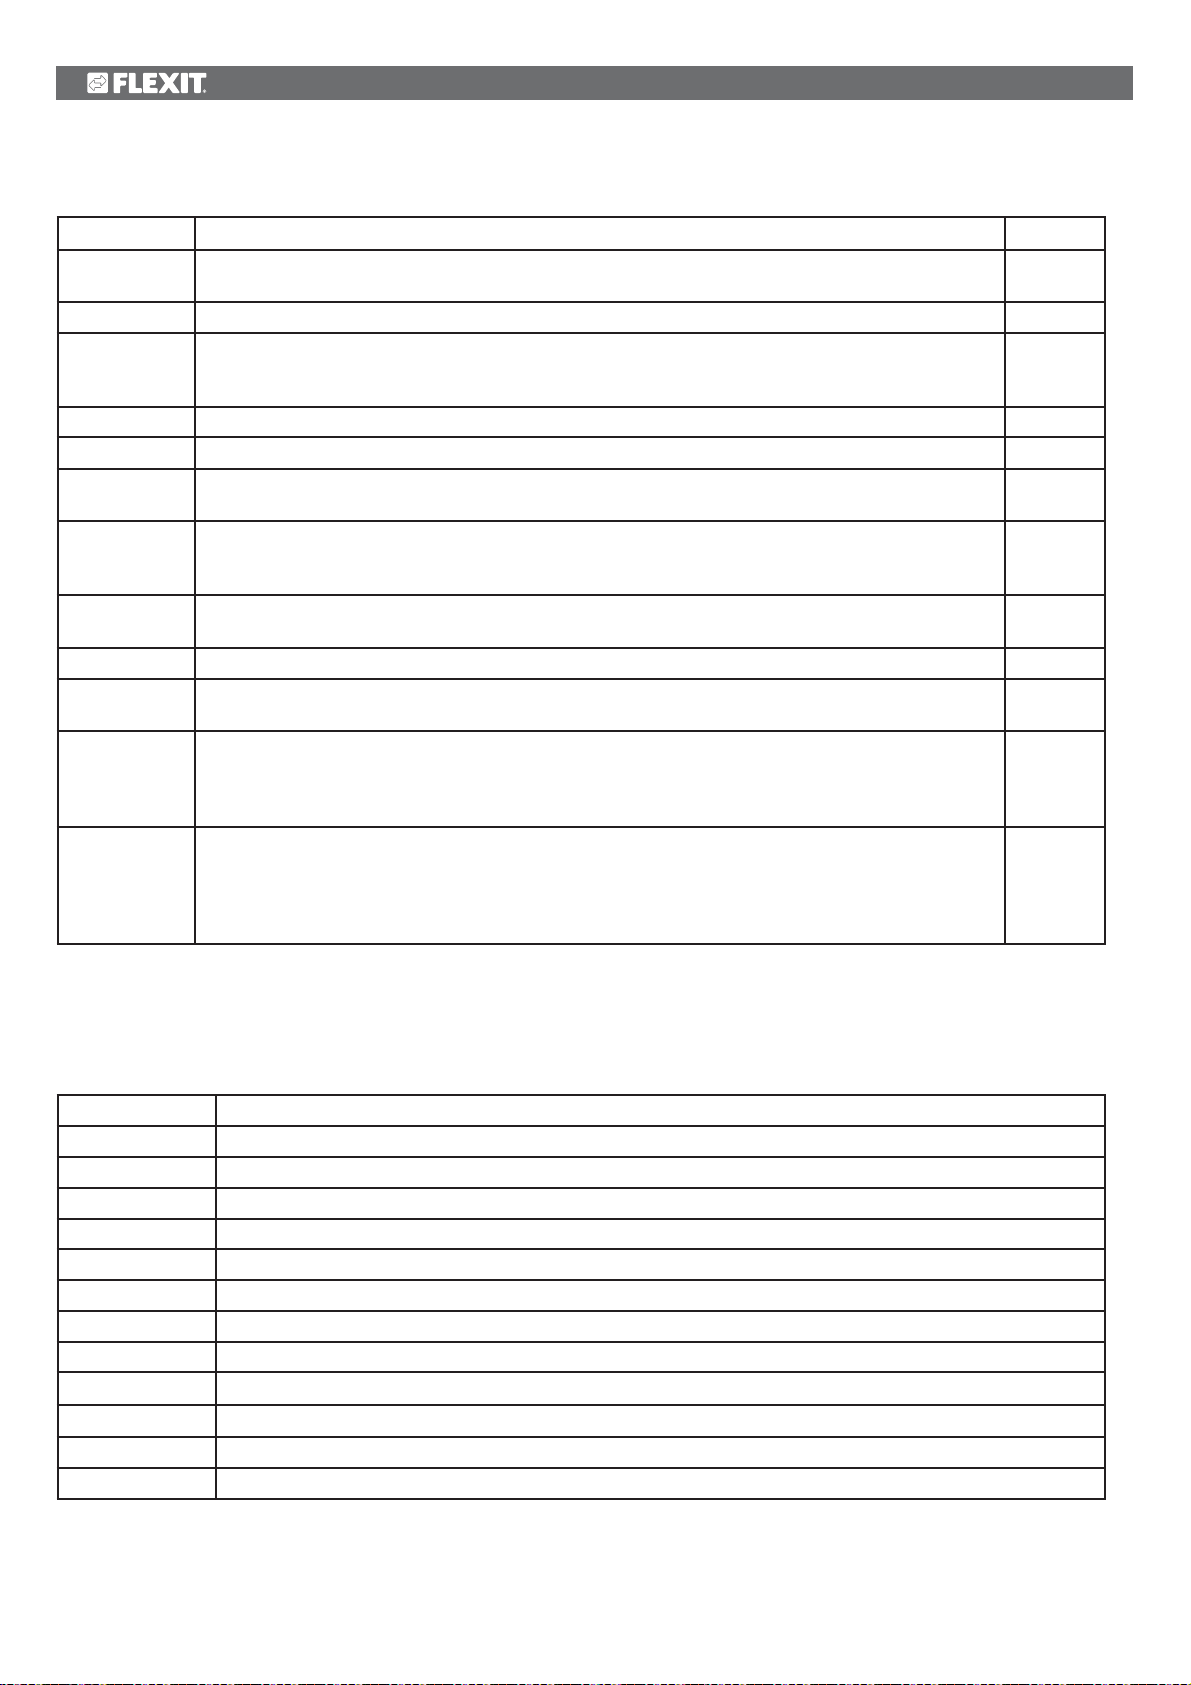
Component Action Interval
Filter Filters must be changed at least once a year. It is best to change them twice a year, before and after the
pollen season. Check that the filter seal is completely tight.
Fans Fans must be cleaned at least once a year to maintain fan efficiency. 12 months
Rotary wheeltype heat
exchanger
Kitchen hood* Wash the grease filter. Check that the damper is clean and closes fully. 2 weeks
Seals Check that the seals on the door, under the filters, on the fan modules and on the rotor module are intact. 12 months
Valves The supply air and extract air valves (for the bathroom, bedroom, laundry room, etc.) must be cleaned at
Air intake Check that no leaves and other items have caught on the grille.
Roof cowl If the unit has a roof cowl, this must be checked for leaves and the like. Also check that the drain slots are
Ducts Check that the ducts are clean. 10 years
Brush strips Check that the brush strips are intact and sit tightly against the rotor. If they are worn, they can be moved
Inside unit A combination of a very low outside temperature and damp extract air can lead to the formation of
Capacitor In the electrical compartment there are two cylindrical electrical components called capacitors. The
Check that the surfaces are clean. Check that the sealing strips face in towards the rotary wheel-type
heat exchanger. Check that the rotor belt is intact and not too slack.
least once a year.
In periods of sea smoke during winter the air intake can freeze up. If necessary it must be scraped clean so
that the air can pass through.
open.
to the next groove in the profile so that they are closer to the rotor.
ice. Normally this will not be a problem - when normal operating conditions return the ice crystals will
be converted to steam and removed from the unit via the exhaust air. In the case of extreme cold over
extended periods the unit should be checked for ice.
life span of these components are limited to about 5 years, after which they will need to be replaced. An
exhausted capacitor may damage the fan motor.
The capacitors must be replaced by a professional.
New capacitors can be ordered from Flexit (art. no. 110354).
6-12
months
12 months
12 months
12 months
12 months
3 years
5 years
*For units with extract air from the kitchen hood connected to the unit.
11 Troubleshooting
Type of fault Remedial action
Cold draughts Check what supply temperature has been selected. See control panel.
Check that the rotor is rotating.
Check that heating comes on.
New extract filter needed.
Fans not working Check that power is connected to the unit.
Check that the overheating thermostat has not cut out.
Reset by pressing the button. Must also be reset on the automatic panel. See chapters 1.4, 4.7 and 7.10.
Low air flow rate Check what speed the unit is set to.
Check that the filters are tight.
Check the intake grille.
26
Page 27
12 CE Declaration of Conformity
This declaration confirms that the products meet the
requirements in the following Council Directives and
standards:
2014/30/EC Electromagnetic Compatibility (EMC)
2014/35/EC Low-voltage Directive (LVD)
1253/2014 Ecodesign regulation
1254/2014 Energy labelling regulation
Our products have been tested in accordance with parts of:
2006/42/EC Machinery Directive (Safety)
Producer: FLEXIT AS, Televeien 15,
1870 Ørje, Norway
Type: UNI 2 R Ventilation unit
Compliance with valid versions of the following standards on
the date on which the declaration of conformity was signed:
Safety standard: EN 60335-1
EN 60335-2-80
EMF standard: EN 62233
EMC standard: EN 55014-1
EN 55014-2
EN 61000-3-2
EN 61000-3-3
The product is CE-marked: 2011
FLEXIT AS
29.11.2016
Frank Petersen
CEO
The right to give notice of lack of conformity applies to this product in
accordance with the existing terms of sale, provided that the product is
correctly used and maintained. Filters are consumables.
The symbol on the product shows that this product must not be
treated as household waste. It must be taken to a reception station
for recycling of electrical and electronic equipment.
By ensuring correct disposal of the equipment, you will contribute
to preventing negative consequences for the environment and
on recycling of this product, please contact your local authority, your refuse
collection company or the company from which you purchased it.
Notice of lack of conformity as a result of incorrect or defective installation must
be submitted to the installation company responsible. The right to give notice of
lack of conformity may lapse if the system is used incorrectly or maintenance is
grossly neglected.
health that incorrect handling may entail. For further information
27
Page 28

Flexit AS, Televeien 15, N-1870 Ørje www.flexit.no
 Loading...