

Flexispot ET203H Installation Manual
Item No.:ET203 H
Installation guide
Step 1
A
5x5
1
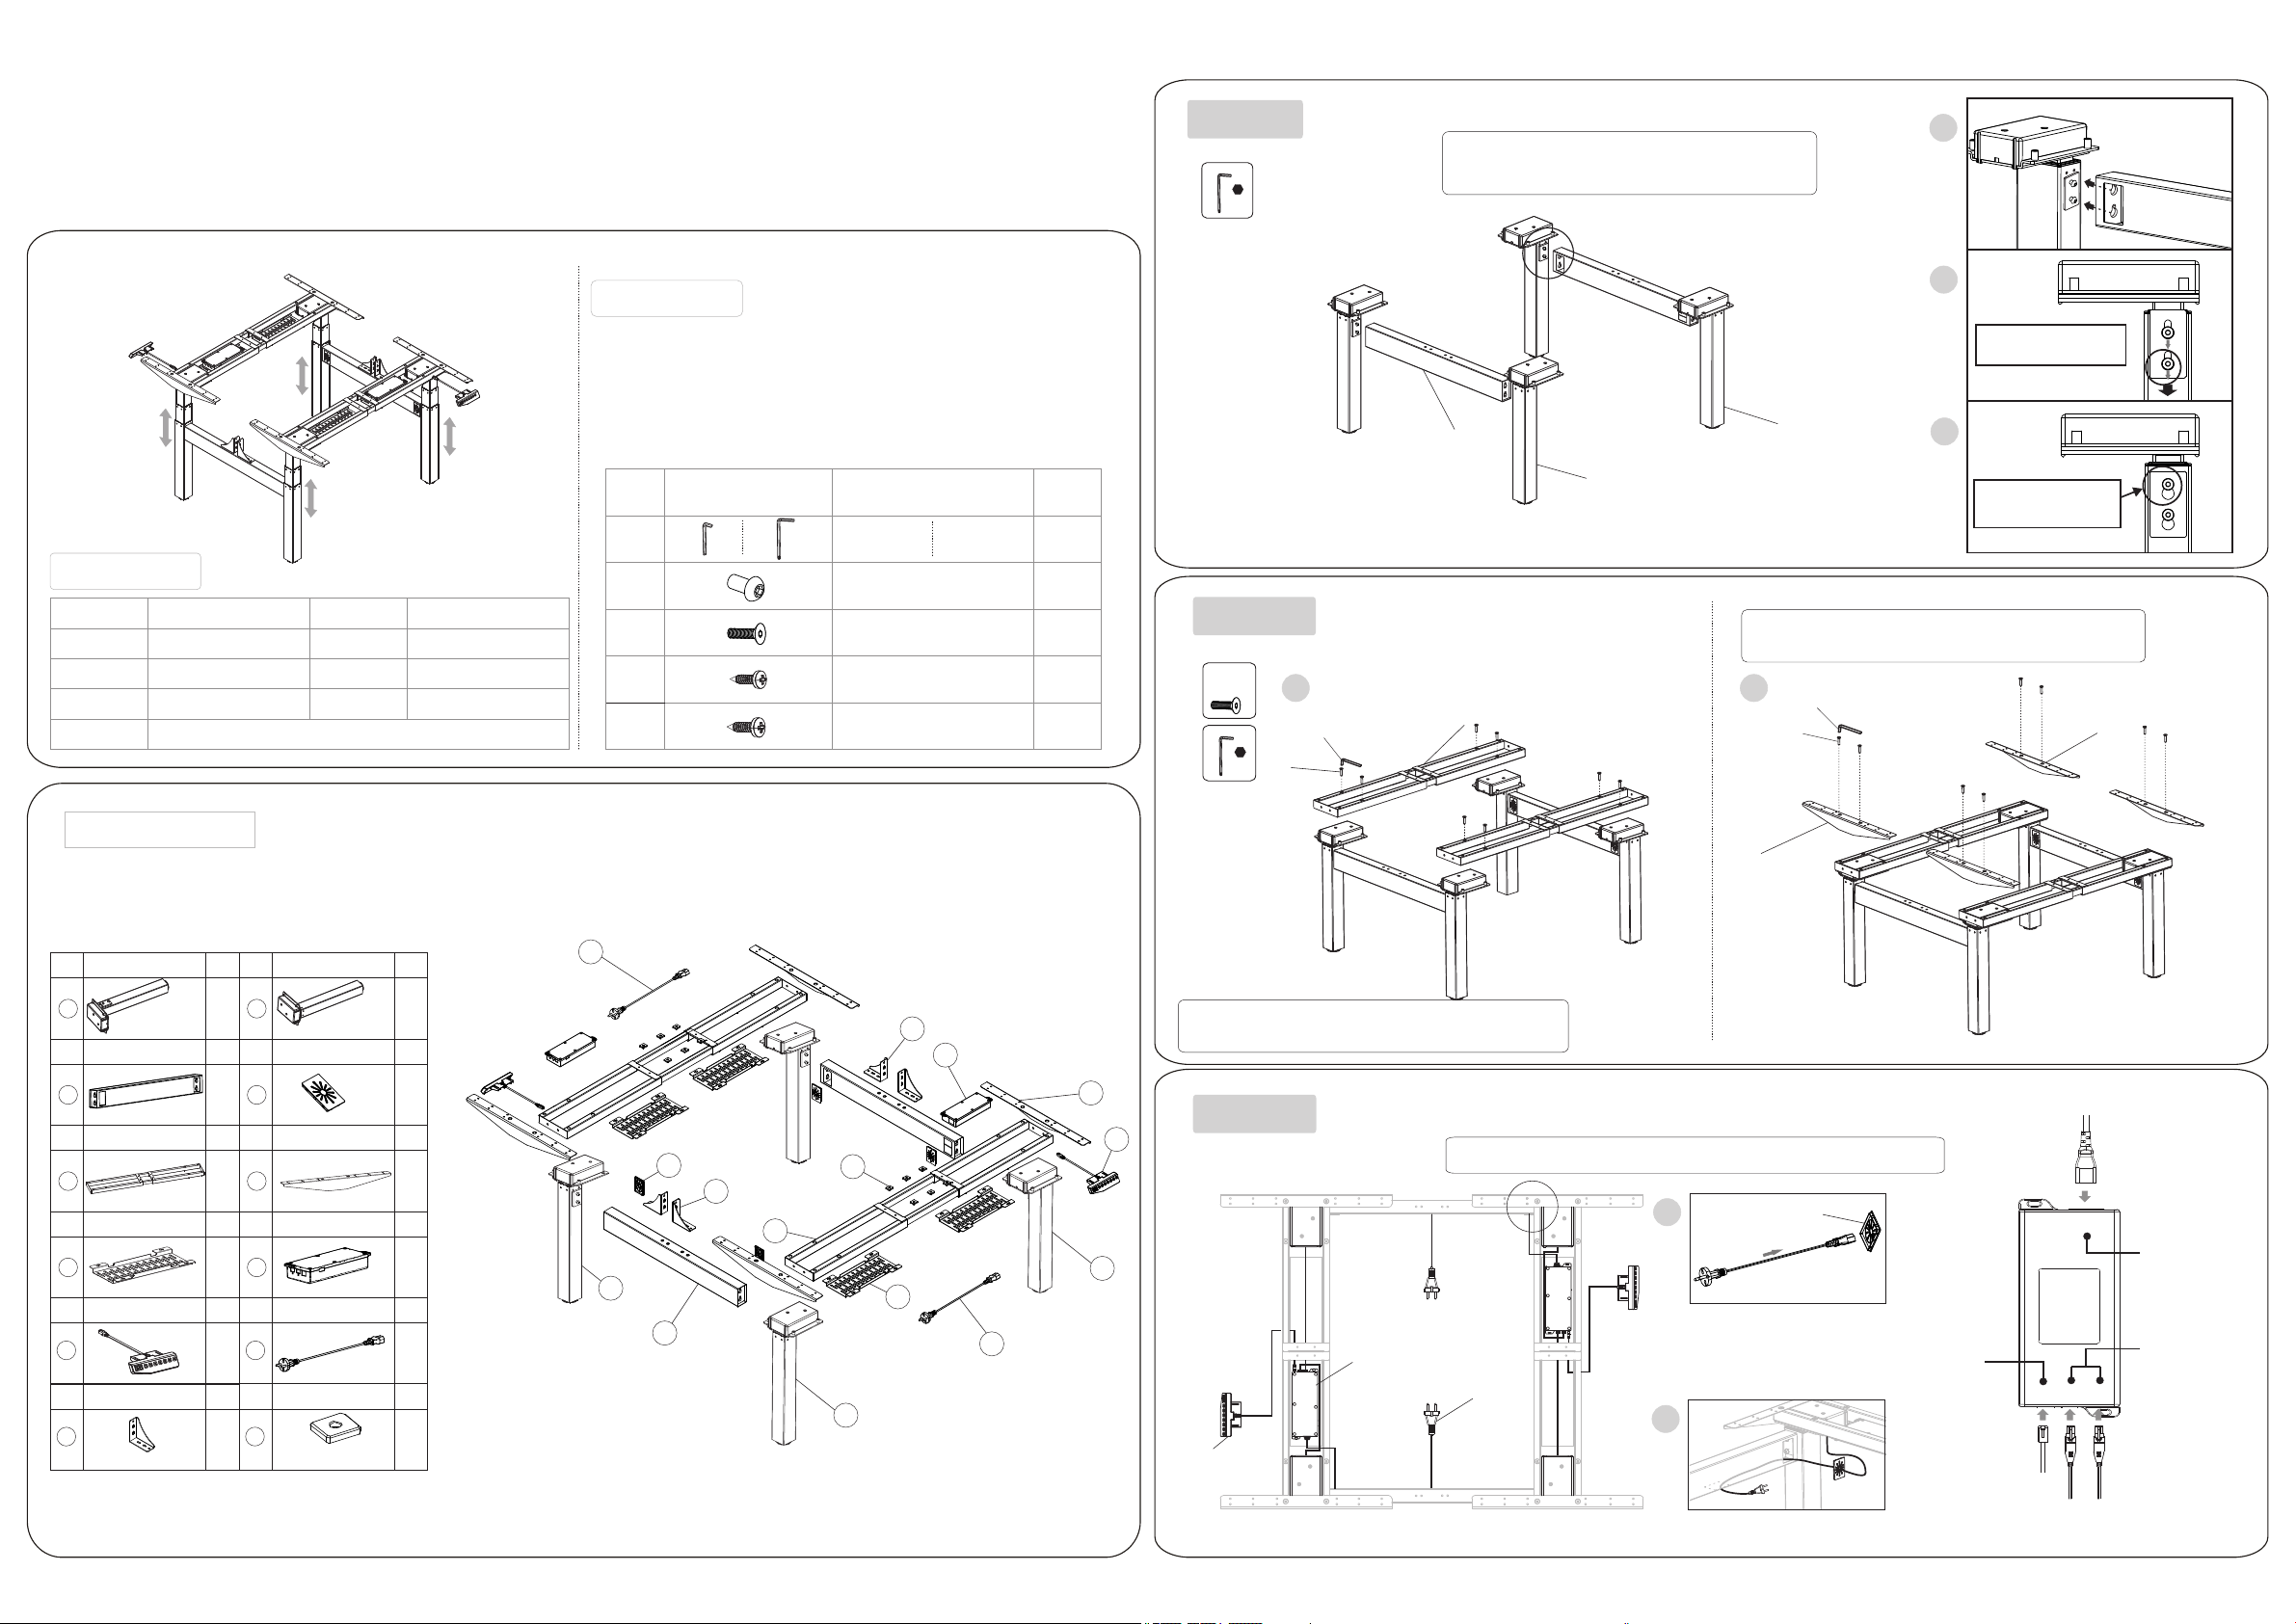
Install the connecting beam(3) use
5*5 wrench(A ) to tighten the screws.
Technical d ata
Column qty
Max L oadin g capac ity
Height range
Length range
Frequency continuous o pe ra ti on f or 2 m in s at m os t af te r pa us e fo r 18 m in s
3
125KG
600-1230mm
1100 -1 800mm
Input Voltage
Max Speed
Temperatur e
Certificat io n
100- 240V
38mm/s
0- 40°C
CE FCC CUL
Component list
Accessory list
Atte ntion: The dr awing s be low are o nly for ref erenc e wh ich mig ht be
slig htly di ffer ent fro m th e actua l object, p lease i n ki nd prev ail. Any
tool s missing o r insta ll ation p roble ms , pleas e contact t he cust om er
serv ice first ly.
No. Image Spec Qty
A
B
C
D
E
Wrench
4x4mm
M6X16mm
M8×35mm
ST4.2x16mm
ST4.8x16mm
Wrench
5x5mm
1
8
16
52
10
Step 2
C
x1 6
A
5x5
3
1
1 2
5
A
C
2
Install the co nn ec ti ng
beam(3)
2
3
Use 5*5 wrench (A )
to tighten the s cr ew s
Install the su pporting plate(6) use
5*5 wrench(A ) to tighten the screws(C).
A
C
6
6
No. Part Qty No. Part Qty
1 2 2 2
Lef t Lift ing C olumn
No. Part Qty
3 2 4 4
Con necti ng beam Cov er
No. Part Qty No. Part Qty
5
Sup port ing b eam
No. Part Qty
7 4 8 2
Cab le mana gemen t
No. Part Qty No. Part Qty
9
No. Part Qty
11
Han dswit ch
Scr een fix ing ba se
2
2
4
Rig ht Lif tin g Col umn
No. Part Qty
6 4
Sup port ing p late
No. Part Qty
Con trol bo x
10
Pow er cabl e
No. Part Qty
12
Squ are spa cer
2
12
10
11
Install the su pporting beam(5) use 5*5
wrench(A) to t ighten the screws(C).
8
6
Step 3
9
4
12
11
5
2
2
3
7
10
8
1
Connect all th e cables onto the control box(8 ).
1
4
Handswitch
10
2
H S
M 1 M 2
A C
Power port
Port for cable
connected to
the lifting
column
9
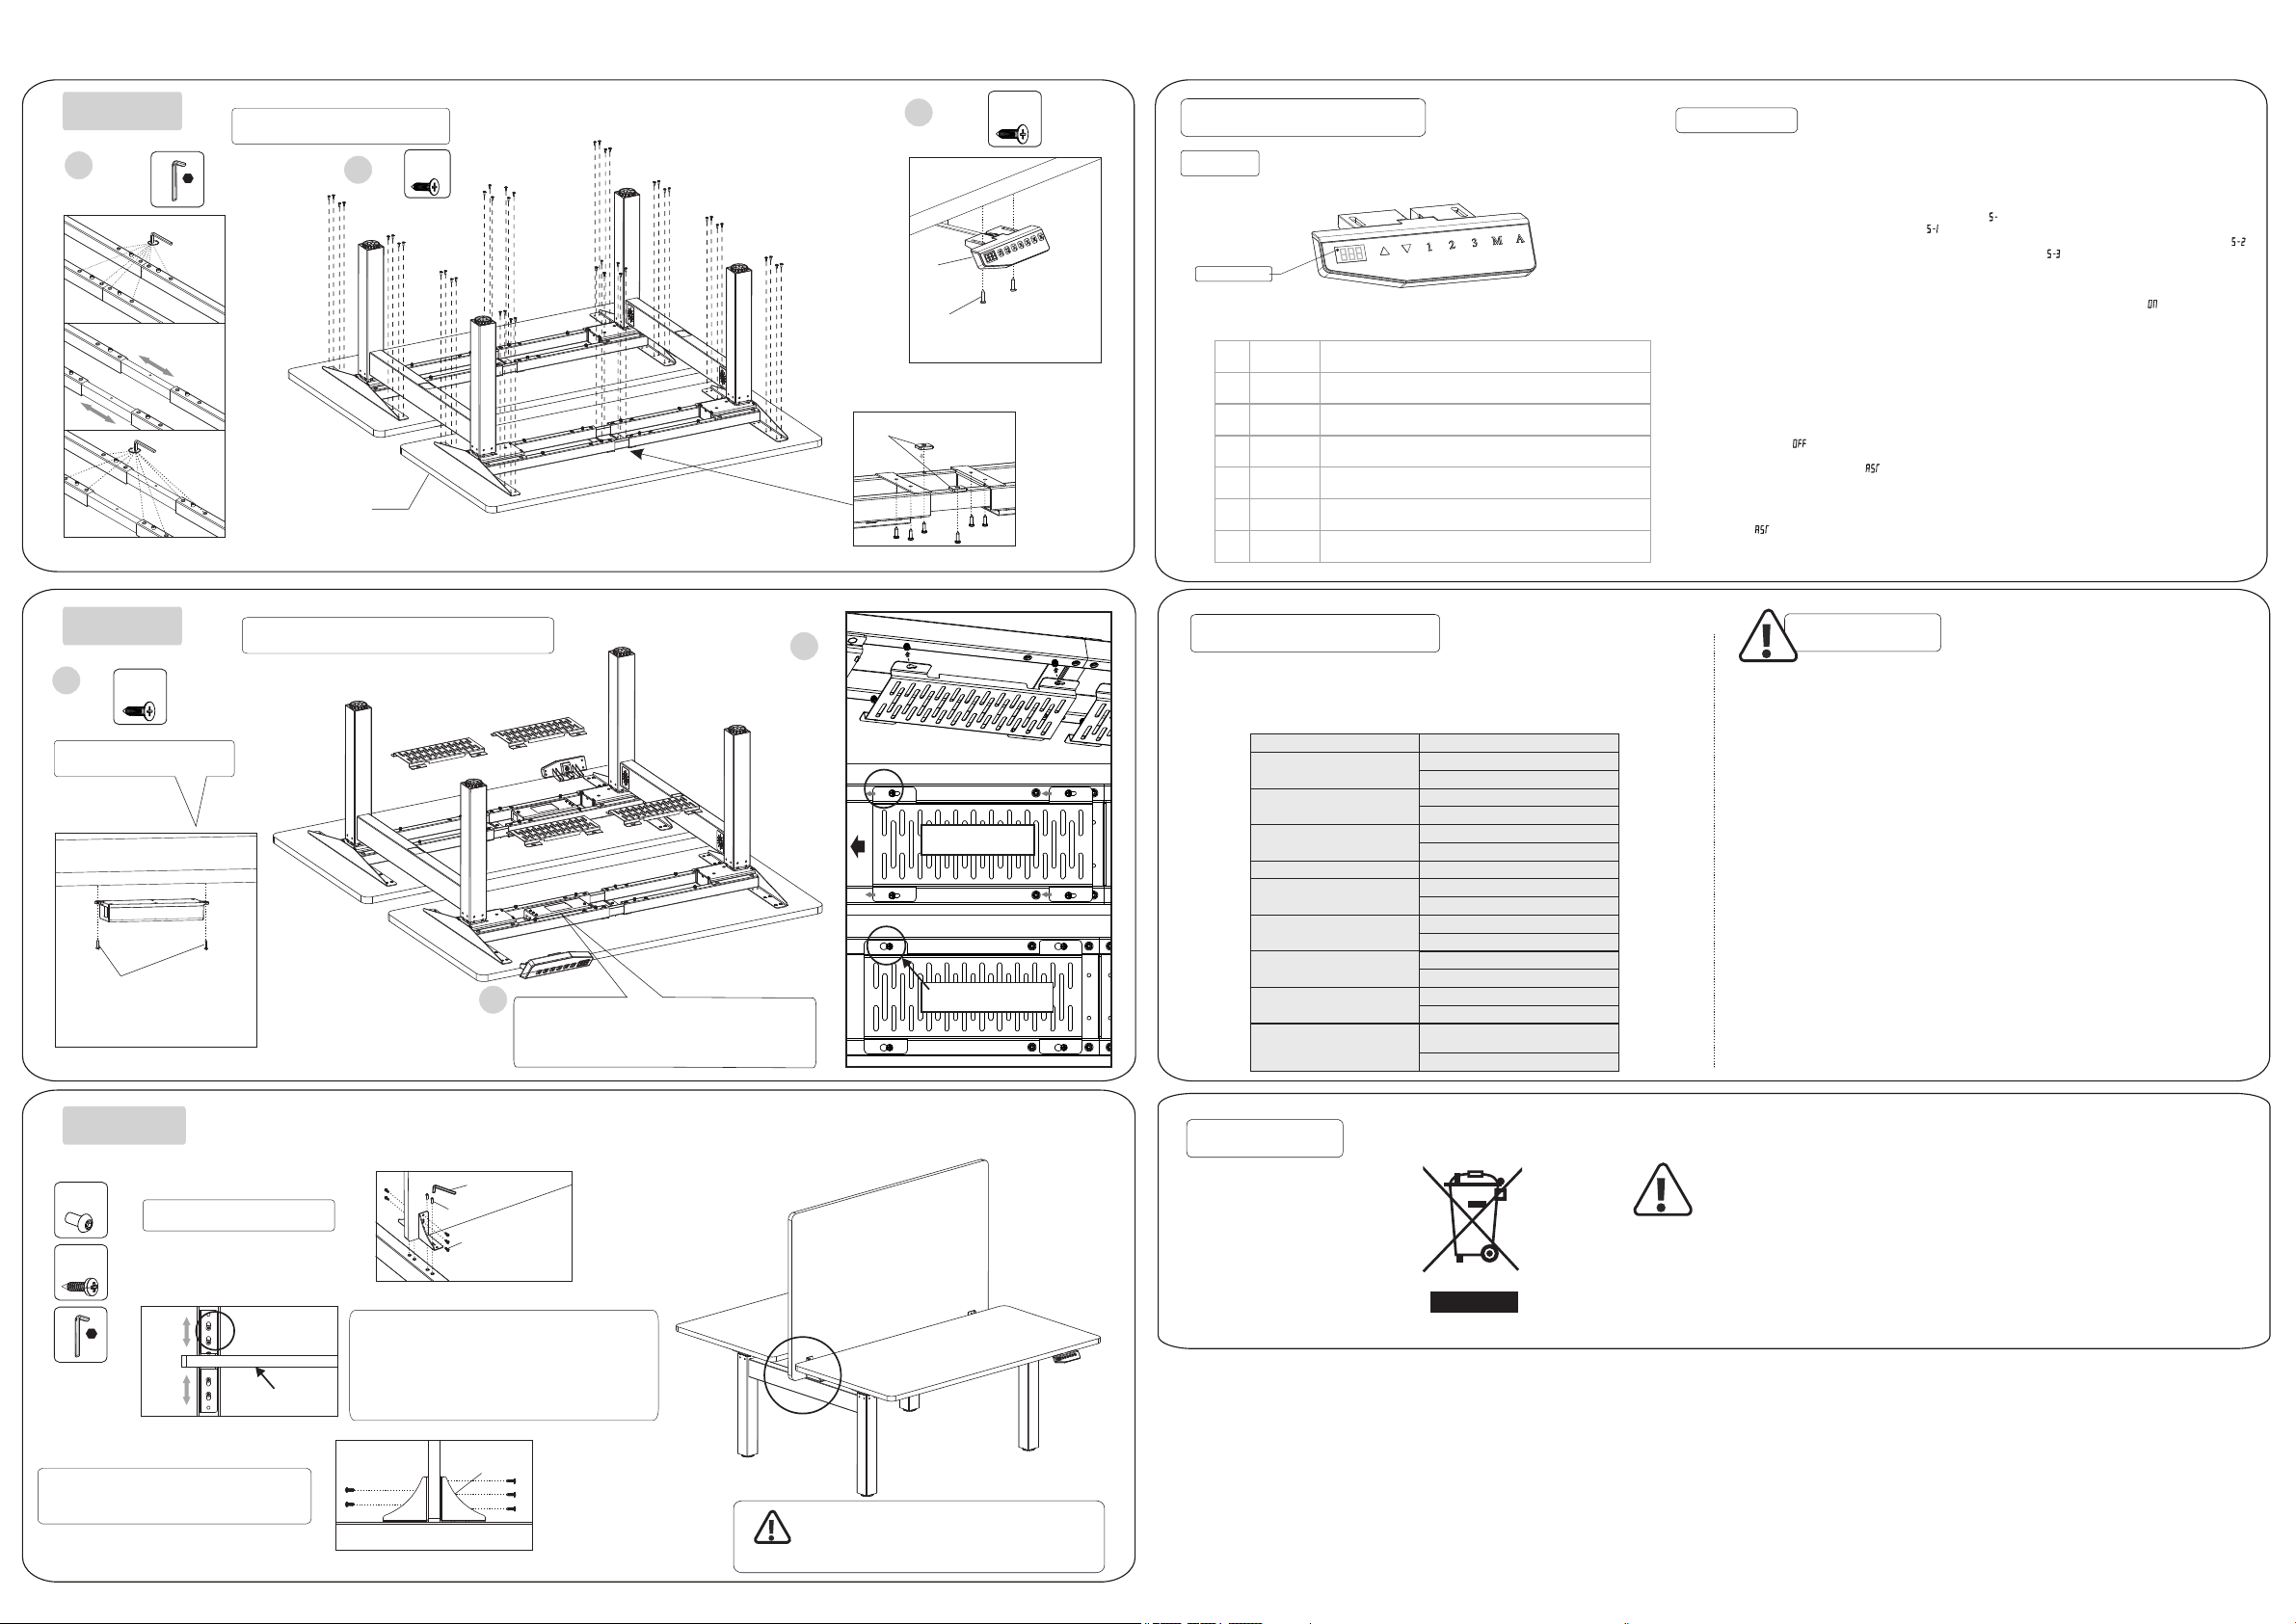
Step 4
1
A
4x4
Unscr ew
Pull open
Lock
Install the ta ble plate
D
2
x4 4
Table plate
12
D
3
x2
9
D
Install the ha nd sw it ch ( 9)
onto the table .
Put the square s pa ce r( 12 )
onto the squar e tu be .
How to use hand switch
Butt on
LED d is pl ay
●
●
●
●
●
●
●
“▲”
“▼”
“1”
“2”
“3”
“M”
“A”
Adjust the desk upwards
Adjust the desk downwards
Position 1, first height position saved by us er
Position 2, second height position saved by user
Position 3, third height position saved by us er
Memory button for height memory function
Alarm button for remindin g of keepi ng same
position for long time
Instruction
• Pr es s th e UP b ut to n or D OW N bu tton to l if t or l ow er t he h ei gh t of d es k su rface . Th e LE D di sp la y
sh ow s th e re al t im e va lu e. T he ra ng e of t he h ei gh t va lu e: 6 0. 0c m-1 23 cm .
• Sa vi ng A H ei gh t Po si ti on
a. P re ss t he U P bu tt on o r DO WN b utton t o li ft o r lo we r th e he ig ht o f de sk s urfac e. F or i ns ta nc e, y ou
ad ju st t he h ei gh t to 8 0c m.
b. P re ss " M" S AV E bu tt on a nd t he LED di sp la y sh ow s" " , th en p re ss " 1" t o sav e th e 1s t he ig ht
po si ti on t o 80 cm . Th e LE D di splay s ho ws " " .
c. R ep ea t st ep a a nd s te p b to s av e the 2nd h ei gh t po si ti on t o 10 0c m Th e LED dis pl ay s ho ws " " .
Sa ve t he 3 rd h ei gh t po si ti on to 120 cm T he L ED d is pl ay s ho ws " " .
d. P re ss " 1" , "2 ", "3 ", t o au tom at ic al ly r ea ch t he h ei gh t sa ved bef or e.
• Lo ng -T im e Si tt in g Re mi nde r
a. P re ss R EM IN DE R bu tt on " A" to act iv at e th e fu nc ti on . Th e LE D di spl ay s ho ws " "
b. T wo s ec on ds l at er , pr es s the "▲" or "▼" bu tt on t o ad ju st t he r em in de r ti me on ly w he n th e di sp la y
sc re en f la sh es . Th en p ress an y bu tt on t o sa ve t he t im e se tu p, o r wai t 5 se co nd s an d sy st em w il l
sa ve t he t im e se tu p au to ma tic al ly . Du ri ng t he c ou nt do wn , any ope ra ti on w il l le ad t o a re pe at
st ar ti ng o f th e ti me r. W he n the c ou nt do wn f in is he s, t he b uz zer wil l be a ct iv e wi th a 1 0- se co nd
"D iD i. .. Di Di .. .D iD i.. ." to ne .
c. W it hi n th e 10 -s ec on d remin de r bu zz , pr es s an y bu tt on t o re activ at e th e ti me c ou nt do wn t ha t is
se t up i n (b ) st ep . If n o op er at ion dur in g th e 10 -s ec on d re mi nd er buzz , th er e wi ll b e an ot he r
re mi nd er b uz z af te r 5 mi nu tes . No o pe ra ti on d ur in g th e se co nd buzz w il l tu rn o ff t he L on g- Ti me
Si tt in g Re mi nd er .
d. P re ss a nd h ol d th e "A " bu tt on for th re e se co nd s to t ur n of f th e Lo ng -Ti me S it ti ng R em in de r. T he
LE D di sp la y sh ow s " ".
•
Tr ou bl es ho ot in g
a. Re se t: Wh en t he L ED s ho ws ” ” , press " ▼" b ut to n un ti l th e de sk r ea ch es it s lo we st h ei gh t an d
re bo un ds t o st op , it m ea ns t he rese t ha s be en f in is he d.
b. Wh en i t do es n' t wo rk a nd t he L ED show s ”E 01 ” or “ E0 2” , pl ea se r et ry 18 min s la te r.
c. If t he " ▼" b ut to n do es n' t wo rk, ple as e ch ec k th e ca bl e co nn ec tion an d th en c ut o ff t he p ow er f or
at l ea st 1 0 se co nd s. R ec on nec t to t he p ow er a nd p re ss " ▼" b ut to n to s tar t th e re se t pr oc es s wh en
it s ho ws t he “ ” .
d. If a ll t he se a bo ve p ro ce ss a re inef fi ci en t, p lz c on ta ct o ur c ustom er s er vi ce .
Step 5
D
1
x2
Step 1 o f install ing
the co ntrol box (8)
D
Fix th e control b ox(8) o n
the ta ble by scre w(B)
Step 6
B
x8
E
x1 0
Install the sc reen
Install the ca ble management
1
Step 2 of instal ling the control
box(8): Put th e control box(8)
on the cable man agement(7)
A
B
E
2
Slide the cabl e
management
Tig ht en t he s cr ew s
Common faul t treatment
The followin g ti ps w il l he lp y ou d et ec te d an d el im in at e th e co mm on f ault and error.
If the fault you met i s no t li st ed b el ow , pl ea se c on ta ct w it h yo ur s up pl ie r. Only the
manufactur er a nd p ro fe ss io na ls a re c ap ab le f or i nv es ti ga ti ng and correcting
those fault an d er ro r.
Fau lt p he no men on
No re spons e while l ong pre ssing
dow n arrow a fter co nnect ed with
a pow er supp ly
No re spons e while p ressi ng up
arr ow/ dow n arrow a fter
con necte d with a po wer sup ply
Risin g in a l ow s pee d
The m otor no t move as i nstru cted
Go do wn b ut n ot g o up
Downw ar d sl idi ng
Fre qu en tl y Rep os it ion
Ove rw or k
(Dut y cycle: Ma x 2min on /18mi n OFF)
Not e nough u p&dow n heigh t
Waste disposal
1.C heck if al l the ca bles be c onnec ted wel l
2.C ontact y our sup plie r or deal er
1.C heck if al l the ca bles be c onnec ted wel l
2.C ontact y our sup plie r or deal er
1.C heck if o verlo aded, m ax load ing: 12 5kg;
2.C ontac t your su pplie r or deal er
1. Co ntact yo ur supp lier o r deale r
1.Re posi tion
2.C ontac t your sup plie r or deal er
1.C heck if o verlo aded, m ax load ing: 12 5kg;
2.C ontac t your su pplie r or deal er
1.C heck if o verlo aded, m ax load ing: 12 5kg;
2.C ontac t your su pplie r or deal er
1.R estar t after s uspen d for 18m ins whi le
conn ectin g with po wer;
2.C ontac t your su pplie r or deal er;
1. Pre ss "M"a nd "3" to gethe r for 3 sec onds or
mor e, after h earin g conti nuou s beepi ng for tw ice,
it wi ll rest ore fac tory set tings
2.C ontac t your sup plie r or deal er
Metho d
1. Po we r su pp ly: AC 10 0V -2 40 V, 50/ 60 HZ
2. Se rv ic e Envir on me nt: 0 -4 0℃
3. Unpl ug t he p owe r pl ug b efo re c le aning , wi pe t he du st o n su rfa ce w it h sligh t we t di shc lo th
when cl ea ni ng, b e ca re ful n ot t o le t the dro ps i nt o the i nt er nal p ar ts , not loo se t he c onn ec to r.
4. Th e el ectri c bo x co nta in s el ect ro ni c compo ne nt s, me ta ls , plast ic s, w ire s et c. , so di sp os e of
it in acc or da nce w it h ea ch co un tr y's env ir on men ta l le gis la ti on, not t he g en era l ho us eho ld
waste .
5. Chec k ca reful ly t o en sur e co rr ect and c om pl ete a ss em bly b ef or e using .
6. Be f am il ia r wit h al l fu nct io ns a nd prog ra m se tti ng s of t he pr od uc t befor e fi rs t use .
7. Chil dr en a re fo rb id den t o pl ay o n the pro du ct b eca us e of u nfo re se en acti on w he n pla yi ng ,
so any da ng er ous c on se que nc es c aused b y th is i mpr op er a cti on w il l not be on
8. Sl ig ht n oi se ca us ed b y the V- ri bb ed belt o r br ak e sys te m du e to st ru ct ure wil l no t ha ve an y
eff ec t on the us e of t he e qui pm en t.
9. Corr os iv e or ab ra si ve ma te ri als are f or bi dde n to c le an th e eq ui pment . Mu st e nsu re t ha t the
clean er u se d wil l no t po llu te t he e nviro nm en t.
10. Thi s ap pl ian ce c an b e use d by c hi ldren a ge d fr om 8 ye ar s an d abo ve a nd p erson s wi th
reduc ed p hy sic al , se nso ry o r me ntal ca pa bi lit ie s or l ack o f ex pe rienc e an d kn owl ed ge i f they
have be en g iv en su pe rv isi on o r in struc ti on c onc er ni ng us e of t he a pplia nc e in a s afe w ay a nd
under st an d the h az ar ds in vo lv ed. Chi ld re n sha ll n ot p lay w it h th e appli an ce .
11. Cl ea ning an d us er m ain te na nce sha ll n ot b e mad e by c hi ldr en w it hout su pe rv isi on .
12. If th e su pply co rd i s da mag ed , it m ust be re pl ac ed by t he m an ufa ct ur er, its se rv ic e age nt o r
a simil ar ly
quali fi ed p ers on i n or der t o av oi d a hazar d.
13. Ple as e ma ke su re t he re is n o ha za rd sour ce s in y our o pe ra tin g en vi ronme nt . e. g., d o no t
litte r th e tools a ro un d. Alw ay s be c arefu l to t re at th e pa ck agi ng m at erial s in o rd er to a vo id a ny
possi bl e da nge r, e. g. p las ti c ba g may lea d to c ho kin g ha za rd to c hi ld ren.
14. Kee p th e or igi na l pa cka ge o f th e equip me nt i f nec es sa ry in c as e of t he futu re u se i n
tra ns po rtati on .
This mark in g in dicates t hat this prod uct should not be dis po se d wi th other
Attention
househo ld w astes . To preven t po ss ible harm to th e environ me nt or human
health fr om uncont rolled wa ste dispo sa l, recycl e it responsibl y to p romote
the sustainable re us e of mate ri al resource s. To return yo ur used device,
please us e th e return an d co ll ection sy ste ms o r co nta ct t he reta il er w here the
pro du ct was purc ha sed. They can t ake t hi s product for envi ronment al safe
rec ycling.
A
4x4
Screen
Install the sc reen and
the screen fix ing base(11).
Adjust the scr een fixing bases
(11) according to the thickness
of screen, use 4 *4 wrench(A)
to tighten the s crews(B).
11
Atten ti on
Firs t fix the scree n when install it
to avo id the da ng er of tip pi ng-ov er.
 Loading...