

Page 1
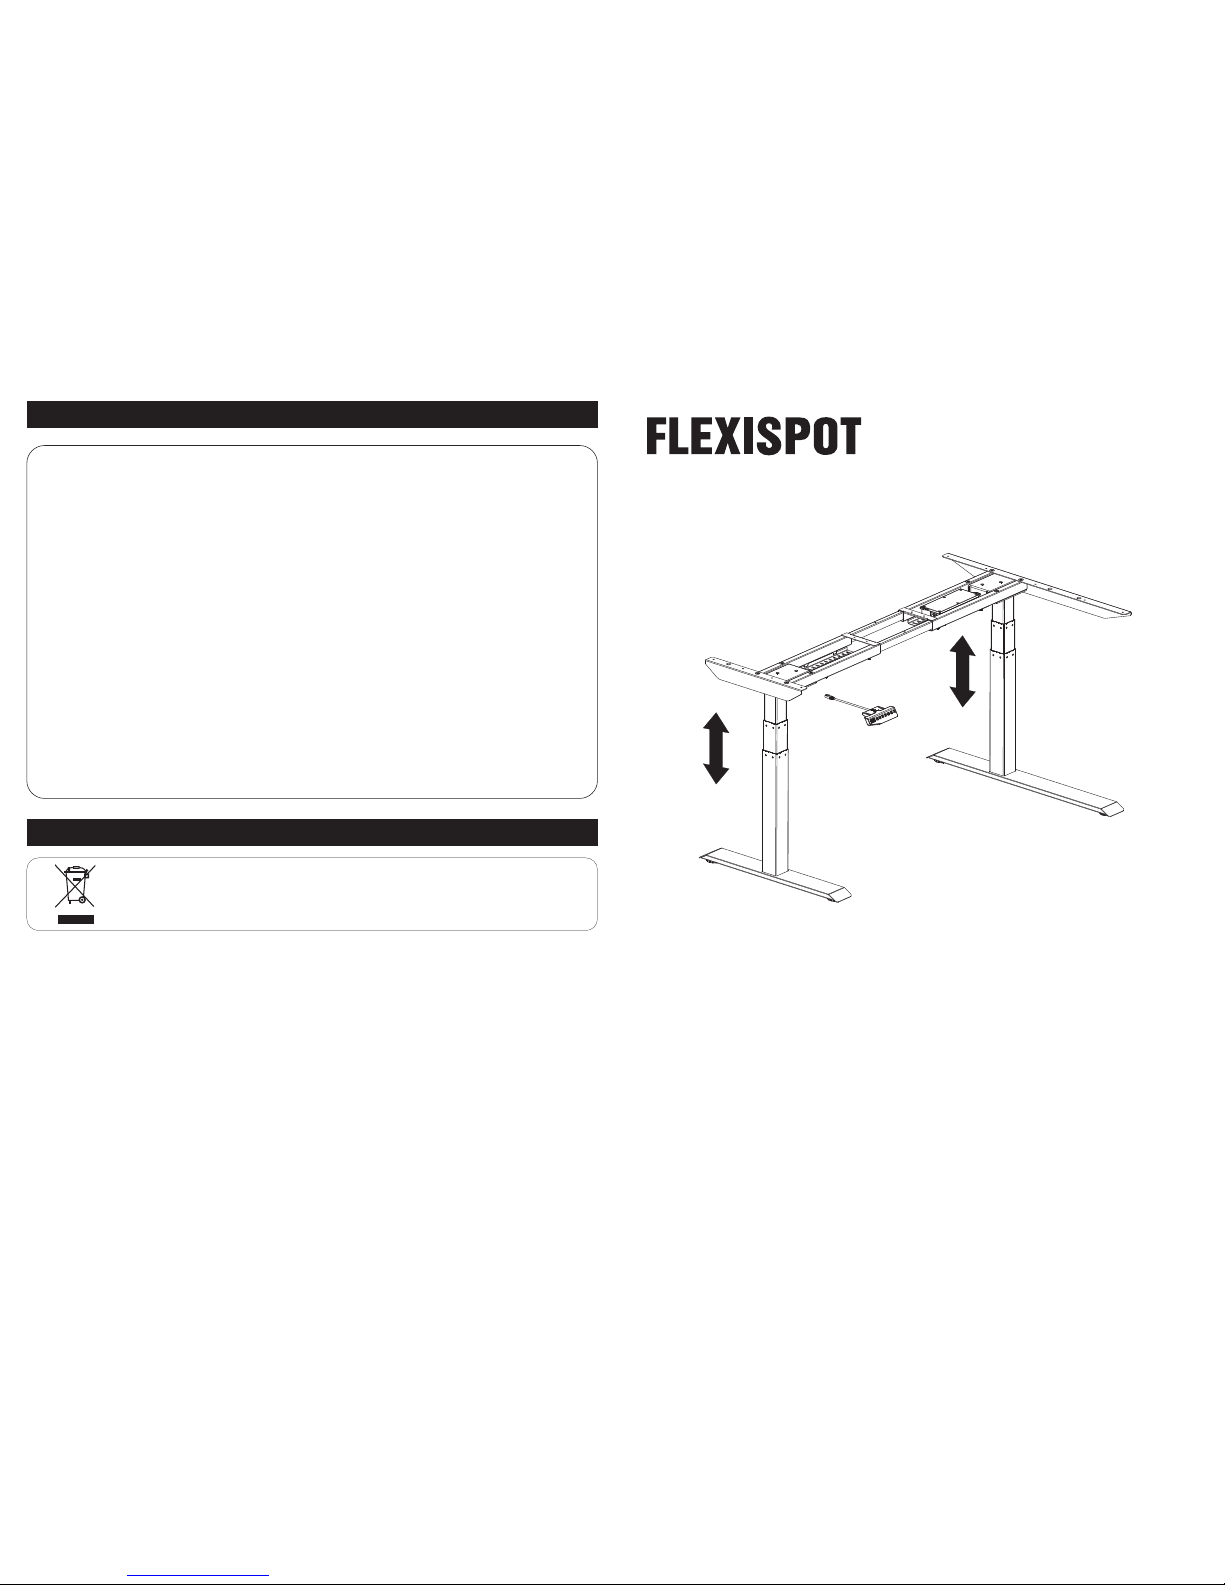
Item No. E3LB/E3LS
Instal lation Guid e
Atten tion
·Pow er supp ly: AC10 0V - 240V, f req uency 5 0/60H Z;
·Wor ki ng e nvi ro nm ent : 32º- 104º F;
·Bef ore cle aning , you hav e to unpl ug the po wer sup ply cab le. Cle an with a s light ly damp c loth to
wip e away th e surfa ce dust . Keep al l elect rical c ompon ents aw ay from l iquid s. Do not d amage t he
con necti on line a nd keep t he plug i n a safe po sitio n.
·Ins ide the c ontro l box, th ere are e lectr onic co mpone nts, me tal par ts, pla stic pa rts, wi res and s o on.
The y sh ou ld be d is po sed i n accor dance w ith the l ocal la ws and re gulat ions. T he y ca nno t be disp osed
as ho useho ld wast e.
·Bef ore usi ng the pr oduct , pleas e make su re the pr oduct h as been i nstal led cor rectl y.
·Bef ore sta rting u se of the p roduc t, plea se read t he inst ructi ons to fu lly und ersta nd all th e produ ct's
fun ction s and set tings .
·Kee p child ren awa y from el ectri c heigh t-adj ustab le desk s, cont rol uni ts and ha ndset s.
Man ufact urer is n ot resp onsib le of any d amage s that re sult fr om chil dren' s unpre dicta ble beh aviou r.
·Sli ght noi se caus ed by the m ulti we dge bel t or brak e syste m will no t impac t the use o f this pr oduct .
·Do no t use cor rosiv e or abra sive ma teria ls to cle an this p roduc t and ple ase dis pose of c leani ng
sol ution s in an env ironm ental ly frie ndly ma nner.
·Und ersta nd the ri sks ass ociat ed with u sing th is prod uct. Ch ildre n or thos e with co gniti ve impa irmen t
sho uld not u se this p roduc t witho ut supe rvisi on.
·If th e power s upply c ord is da maged o r broke n, it mus t be repl aced by t he manu factu rer or a re levan t
spe ciali st to avo id any in jurie s.
·Ple ase ope rate in a c lean an d safe en viron ment. F or exam ple, do n ot left a round y our too ls. And
alw ays be ca reful t o deal wi th pack aging m ateri als, in o rder to a void an y kinds o f possi ble dan ger.
Pot entia l chock ing ris k exist s when ch ildre n play wi th plas tic bag s!
·If ne cessa ry, reta in t he or igina l packa ge for fu ture tr anspo rtati on.
Recyc ling and Di sposal
Thi s produ ct cann ot be dis posed o f as hous ehold w aste. To pr ev en t dam ag e to t he
env ironm ent, th is prod uct sho uld be re cycle d. Plea se use th e relev ant rec yclin g
sys tems av ailab le to you o r contr act the d istri butor o r manuf actur er for re cycli ng
ass istan ce.
Web si te : www. fl ex isp ot.co m
Tel: 1- 855-4 21-28 08
Page 2

E
5x5
C
x4
Acces sory Pack age
Speci ficatio ns
01 02
Fig ures sh own are f or refe rence o nly, spe ci fic p lease i n kind p rev ai l. I f the re is any a ccess ory or to ol
mis sing, c ontac t custo mer ser vice pl ease. .
Step 2
Max . Weigh t Ca pa cit y
220 I bs (100 k g)
Spe ed
38mm /s
Inp ut Volta ge
100 - 2 40 V
Adj ustab le Heig ht
23. 6" - 48.4 " (600 - 12 30 mm)
Wid e Expan d
43. 3" - 70.9 " (1100 - 18 00 m m)
32º-1 04º F
CE FC C CUL
Dut y Cycle
10% ( Worki ng 2 m in ute s th en s top 1 8 minut es)
Wor ki ng Temp er at ure
Cer tific ation
Col umn
3
A
M8X35mm
B
M6X16mm
C
x8
D E
x26
St4.2X20mm
x8
Square washer
x6
x1
4x4
x1
5x5
Parts I ncluded Diagr am of Compo nents
1
1
1
1
1
Par ts
2
3
4
5
6
7
8
9
1
2
1
1
2
NO.
Qty
Sho rt foot
Lon g foot
Leg
Acc essor y
Cab le
man ageme nt
pla te
Sup porti ng
bea m
Sho rt
sup porti ng plat e
Lon g
sup porti ng plat e
Con trol bo x
Han dset
1
2
3
4
6
7
8
9
10
5
1
Con necti ng
cab le
10
Insta llation 1
Rig ht-ha nd corn er desk
Insta llation 2
Lef t-han d corne r desk
Step 1
E
5x5
C
x4
Floor
3
5
C
E
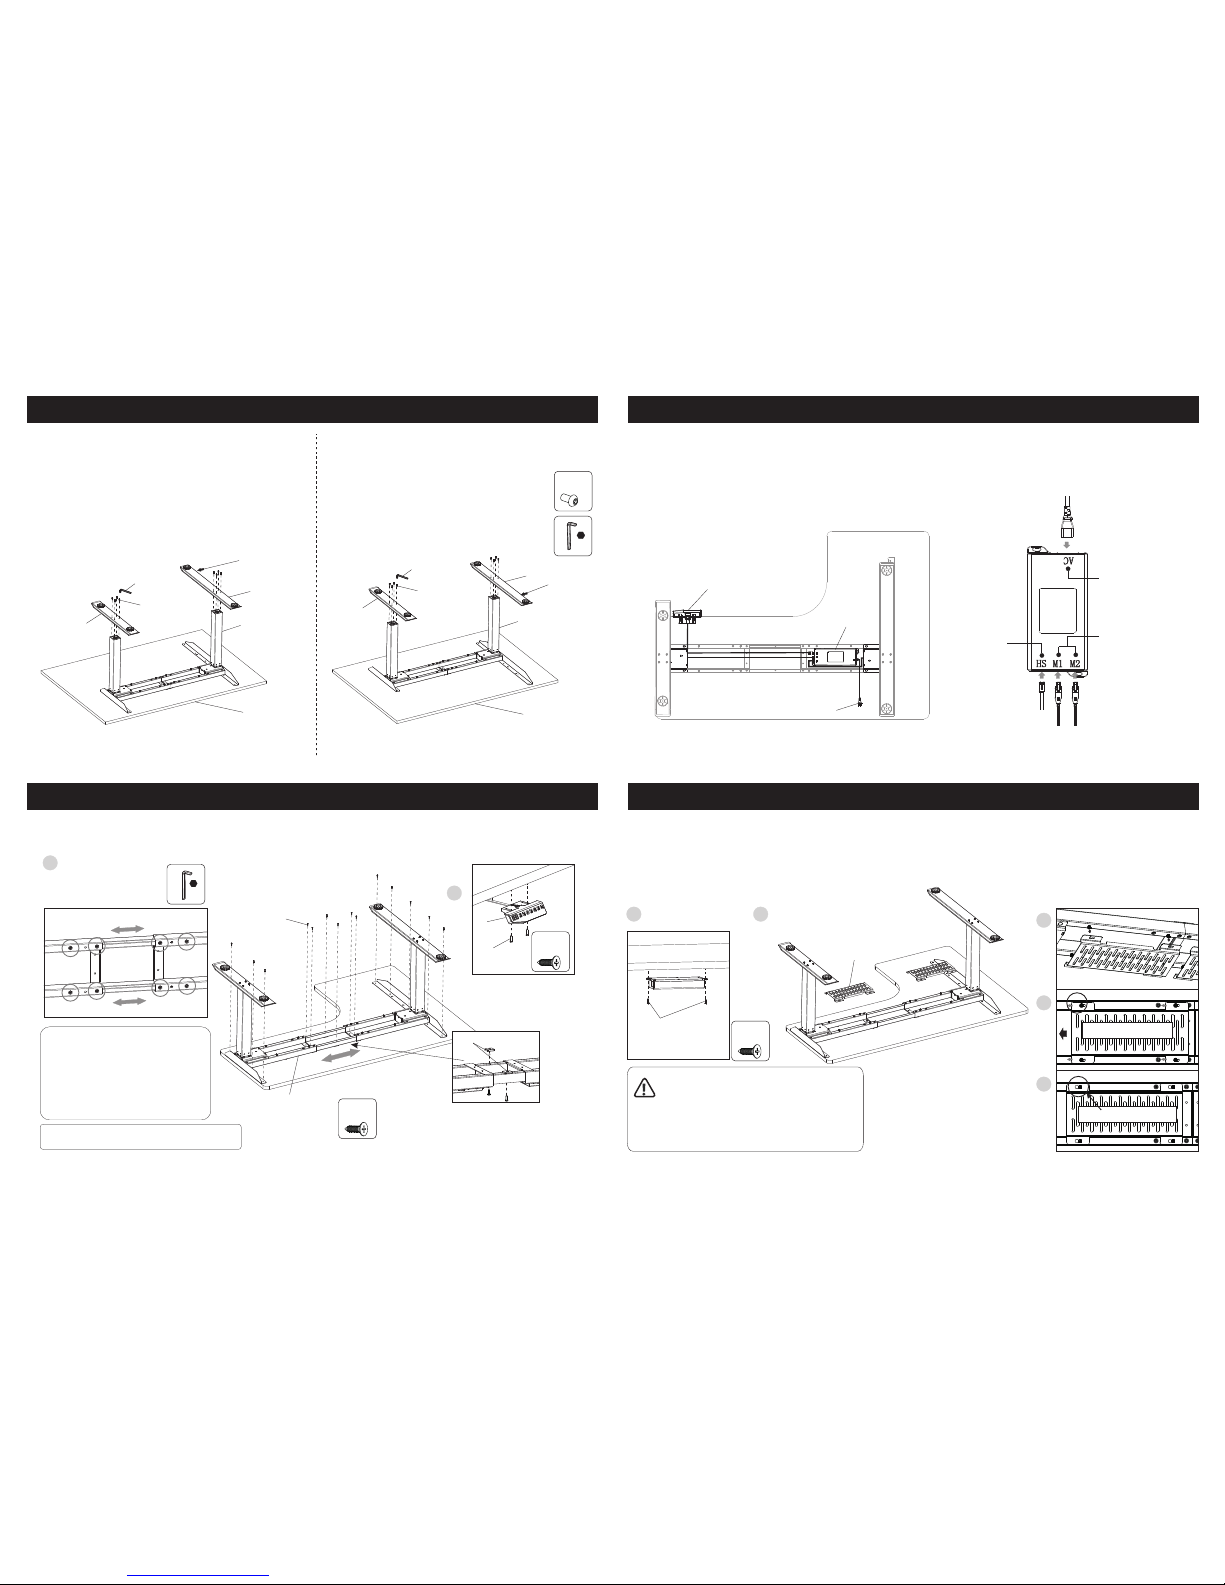
Att ach the l egs (3) t o the sup porti ng beam ( 5) usin g screw s (C). Tig hten wi th the 5x 5 hex key ( E).
Not ice:
Whe n set up th e insta llati on,
the b ackin g board s hould b e
lai d on the fl oor to av oid scr atch.
C
6
7
E
C
6
7
E
Floor
Floor
Ins talla tion 1:
Rig ht-ha nd corn er desk i nstal latio n
Ins talla tion 2:
Lef t-han d corne r desk in stall ation
Att ach the s hort su pport ing pla te (6) an d
lon g suppo rting p late (7 ) to the su pport ing
bea m (5) usi ng scre ws (C). Ti ghten w ith
the 5 x5 hex ke y (E).
Page 3
8
9
10
Step 4
04
Step 3 Step 5
Step 6
Take in stall ation 1 a s examp le, con nect th e cable s to the co ntrol b ox (8)
Not ice: Ch oose th e locat ion tha t will be st suit y our nee ds.
Pow er port
Por t for cab le
con necte d to
the l eg
Por t for
han dset
E
4x4
A
x8
Ins talla tion 1:
Rig ht-ha nd corn er desk i nstal latio n
Ins talla tion 2:
Lef t-han d corne r desk in stall ation
E
3
1
2
1
A
3
2
E
A
Floor
Floor
Long end
Att ach the s hort fo ot (1) an d long fo ot (2) to t he
leg s (3) usi ng scre ws (A). Ti ghten w ith the
4x4 h ex key (E ).
Long end
E
4x4
1
B
x2
B
9
2
D
B
5
B
x14
Att ach the h andse t (9) to
the b ack of th e deskt op.
Pas te the sq uare wa shers
in th e squar e tube.
Adj ust the t ightn ess of 8
scr ews on th e back of
sup porti ng beam ( 5) by
usi ng 4x4 he x key (E) , make
sur e the sup porti ng beam c an
mov e freel y to fit th e actua l
siz e of your t able.
Tig hte n screw s up afte r adjus ting
Attach control box (8)
to the desktop.
B
1
1
2
3
Tighten screws up
Slide the plate
4
2
B
x2
Not ice: wa ys to ins tall co ntrol b ox,
you c an put co ntrol b ox (8) on t he
cab le mana gemen t plate ( 4), sho wn
as st ep 5 and st ep 6-2; o r you can
att ach it to t he desk top, sh own as
ste p 6-1.
Take in stall ation 1 a s examp le, ass emble c able ma nagem ent pla tes.Take in stall ation 1 a s examp le, ass emble t he desk top.
03
Page 4
05 06
Troubl eshooti ng
This list is used for checking and solving common faults and errors. Please contact the manufacturer if
problem you encounter is not on the list below.
Problem
No response when pressing the UP
button and DOWN button
No re spons e when pr essin g and
hol ding th e DOWN bu tton
The distance lifted or lowered is not
accurate
Overworked beyond duty cycle:
Max 2 min on/18 min off
Automatically reset a lot
Worksurface downward sliding
Can lift but cannot lower down
Motor does not work properly
Speed of lifting is slow
Solution
1. Check the cable connection.
2. Contact the distributor or the manufacturer.
1. Check the cable connection.
2. Contact the distributor or the manufacturer.
1. Check if the load weighs more than 220 lbs.
2. Contact the distributor or the manufacturer.
1. Contact the distributor or the manufacturer.
1. St art the r eset pr ocess .
2. Co ntact t he dist ribut or or the m anufa cture r.
1. Check if the load weighs more than 220 lbs.
2. Contact the distributor or the manufacturer.
1. Check if the load weighs more than 220 lbs.
2. Contact the distributor or the manufacturer.
1. Keep the power on and stop working for
18 minutes.
2. Contact the distributor or the manufacturer.
1. Press and hold the "M" and "3" button for
three seconds until you hear BEEP twice
to restore the factory settings.
2. Contact the distributor or the manufacturer.
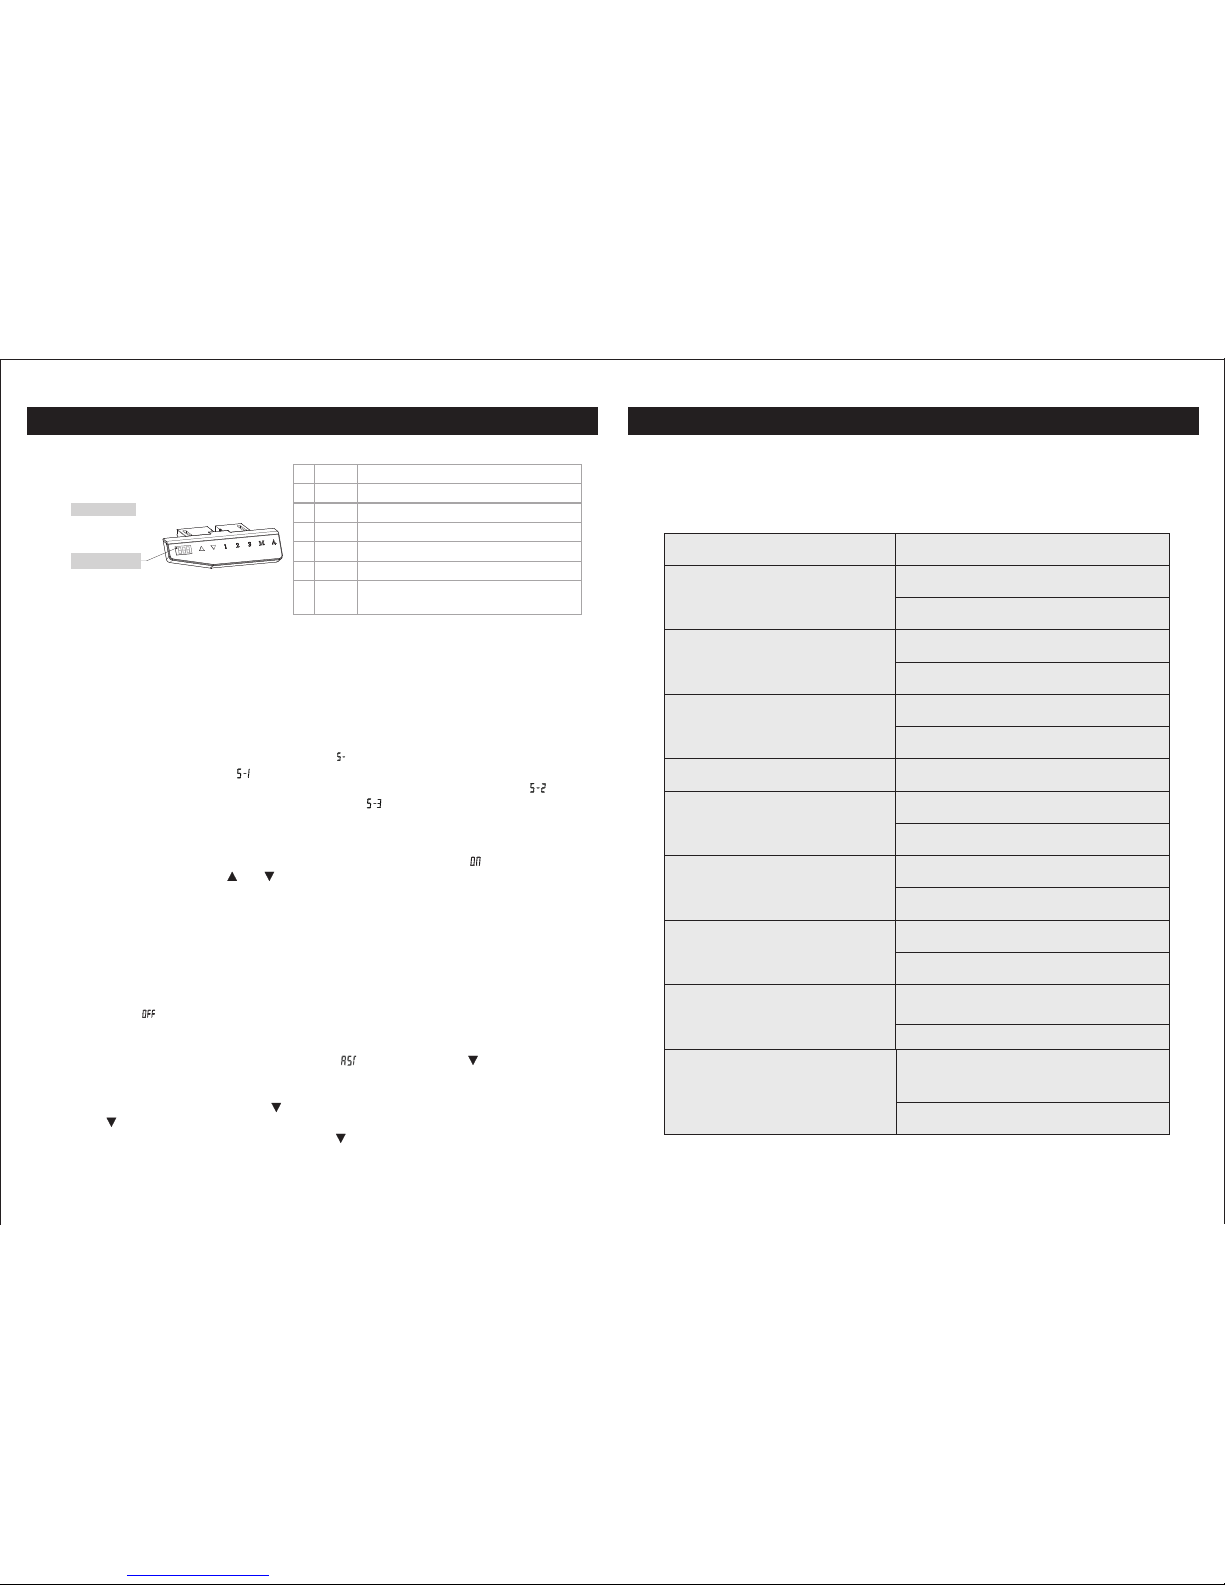
Hands et Instru ction
UP Button, used to lift the desk surface
●
●
●
●
●
●
●
Operation Guide
·Press the UP button or DOWN button to lift or lower the height of desk surface. The LED display
shows the real time value. The range of the height value: .23.6" - 48.4"
·Saving A Height Position
a. Press the UP button or DOWN button to lift or lower the height of desk surface. For instance, you
adjust the height to 29.5''.
b. Press "M" SAVE button and the LED display shows" ", then press "1" to save the 1st height position
to 29.5''. The LED display shows " ".
c. Repeat step a and step b to save the 2nd height position to 39.5'' The LED display shows " ".
Save the 3rd height position to 48'' The LED display shows " ".
d. Press "1", "2","3", to automatically reach the height saved before.
·Long-Time Sitting Reminder
a. Press REMINDER button "A" to activate the function. The LED display shows " "
b. Two seconds later, press the " " or "" button to adjust the reminder time only when the display
screen flashes. Then press any button to save the time setup, or wait 5 seconds and system will save
the time setup automatically. After time setting is finished, the system will automatically enter the
countdown, during the countdown, any operation will lead to a repeat starting of the timer. When the
countdown finishes, the buzzer will be active with a 10-second "DiDi...DiDi...DiDi..." tone.
c. Within the 10-second reminder buzz, press any button to reactivate the time countdown that is set up
in (b) step. If no operation during the 10-second reminder buzz, there will be another reminder buzz
after 5 minutes. No operation during the second buzz will turn off the Long-Time Sitting Reminder.
d. Press and hold the "A" button for three seconds to turn off the Long-Time Sitting Reminder. The LED
display shows " ".
·Troubleshooting
a. Reset function definition:When LED display shows " ", press and hold the " " button until the
desk reaches its lowest height and rebound to stop and display shows the lowest height, reset process
finished.
b. When exception code occurred, press " " button to reset.
c. If the " " button doesn't work, please check the cable connection and then cut off the power for at
least 10 seconds. Reconnect to the power and press " " button to start the reset process. If it still
doesn't work, please retry 18 mins later. (Please avoid overtime working for more than 2 mins.)
Handset
LED Display
DOWN Button, used to lower the desk surface
Position 1, saves the 1st Height Position
Position 2, saves the 2nd Height Position
Position 3, saves the 3rd Height Position
SAVE button, used to save the height position
REMINDER button, used to activate the "LongTime Sitting Reminder" function
▲
▼
1
2
3
M
A
" "
" "
" "
" "
" "
" "
" "
 Loading...