

Page 1
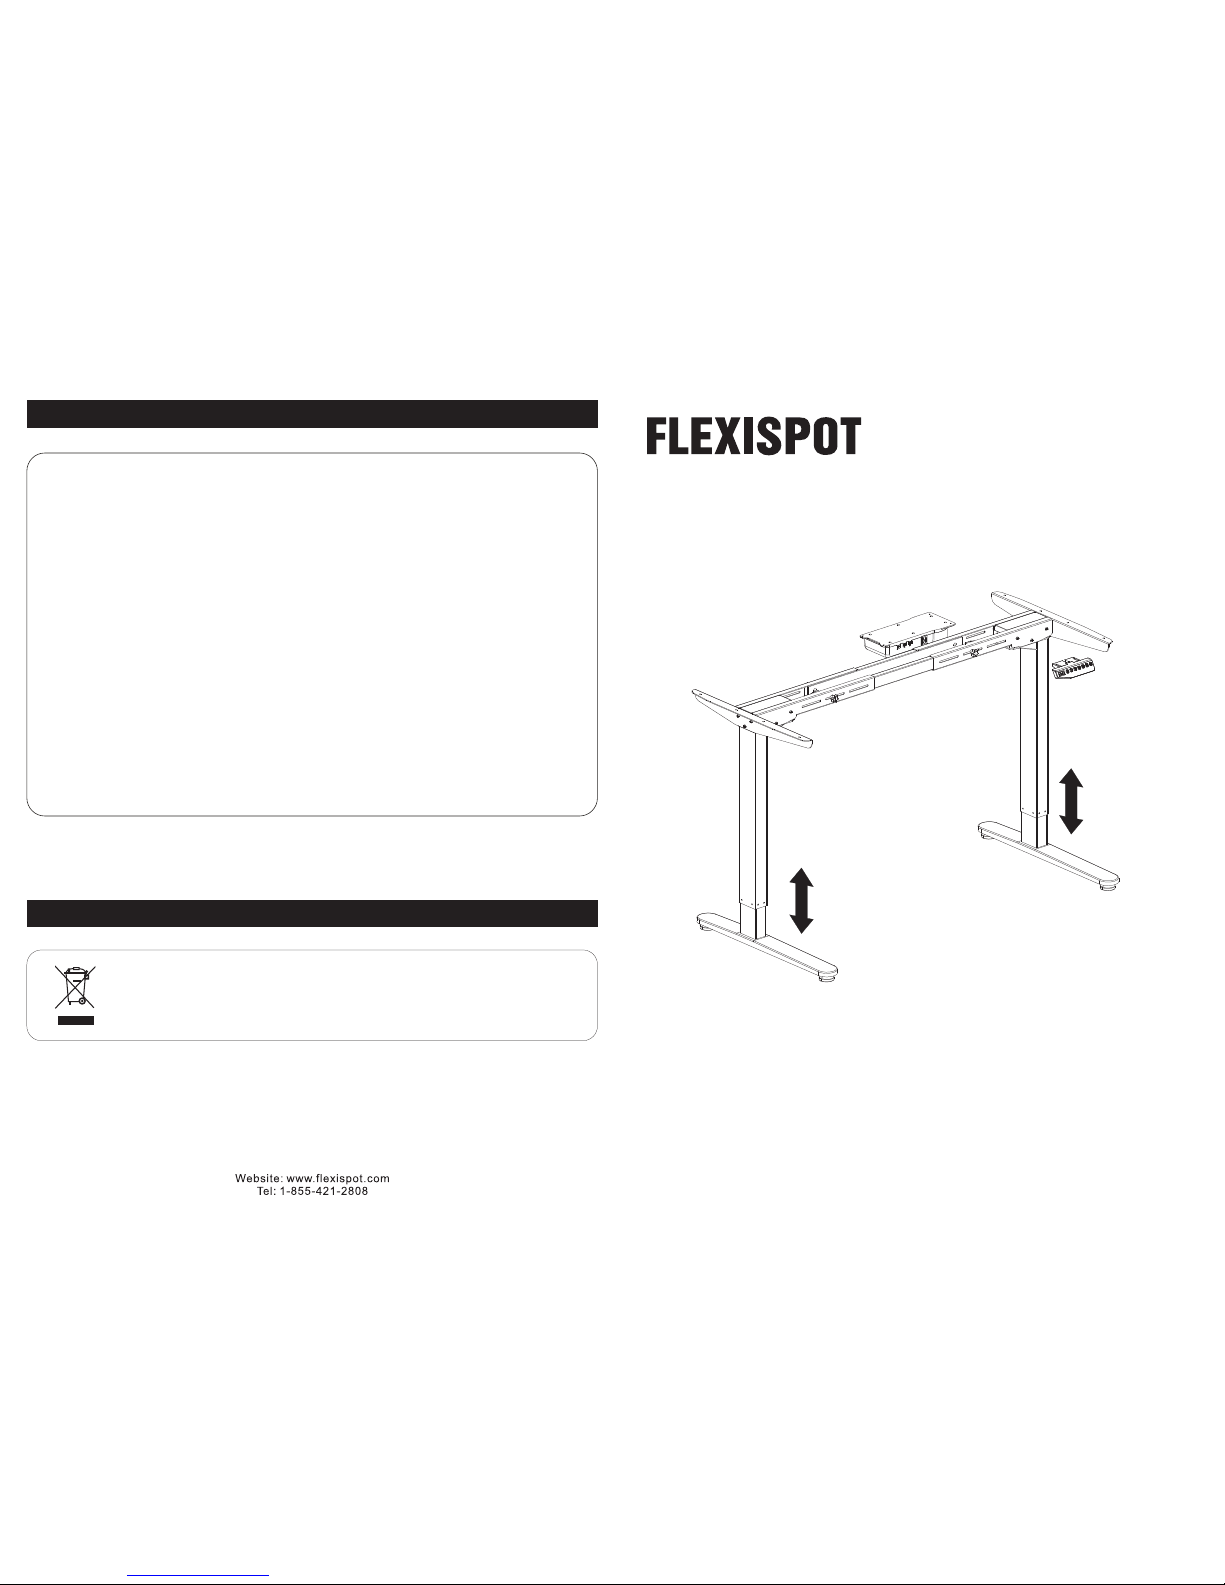
Item No. E2W
Installation Guide
01
Atten tion
·Pow er supp ly: AC12 0V ± 10%, f reque ncy 60H Z;
·Wor ki ng en viron ment: 0 -40℃;
·Bef ore cle aning , you hav e to unpl ug the po wer sup ply cab le. Cle an with a s light ly damp c loth to
wip e away th e surfa ce dust . Keep al l elect rical c ompon ents aw ay from l iquid s. Do not d amage t he
con necti on line a nd keep t he plug i n a safe po sitio n.
·Ins ide the c ontro l box, th ere are e lectr onic co mpone nts, me tal par ts, pla stic pa rts, wi res and s o on.
The y sh oul d be disp osed in a ccord ance wi th the lo cal law s and reg ulati ons. Th ey c an not b e dispo sed
as ho useho ld wast e.
·Bef ore usi ng the pr oduct , pleas e make su re the pr oduct h as been i nstal led cor rectl y.
·Bef ore sta rting u se of the p roduc t, plea se read t he inst ructi ons to fu lly und ersta nd all th e produ ct's
fun ction s and set tings .
·Kee p child ren awa y from el ectri c heigh t-adj ustab le desk s, cont rol uni ts and ha ndset s.
Man ufact urer is n ot resp onsib le of any d amage s that re sult fr om chil dren' s unpre dicta ble beh aviou r.
·Sli ght noi se caus ed by the m ulti we dge bel t or brak e syste m will no t impac t the use o f this pr oduct .
·Do no t use cor rosiv e or abra sive ma teria ls to cle an this p roduc t and ple ase dis pose of c leani ng
sol ution s in an env ironm ental ly frie ndly ma nner.
·Und ersta nd the ri sks ass ociat ed with u sing th is prod uct. Ch ildre n or thos e with co gniti ve impa irmen t
sho uld not u se this p roduc t witho ut supe rvisi on.
·If th e power s upply c ord is da maged o r broke n, it mus t be repl aced by t he manu factu rer or a re levan t
spe ciali st to avo id any in jurie s.
·Ple ase ope rate in a c lean an d safe en viron ment. F or exam ple, do n ot left a round y our too ls. And
alw ays be ca reful t o deal wi th pack aging m ateri als, in o rder to a void an y kinds o f possi ble dan ger.
Pot entia l chock ing ris k exist s when ch ildre n play wi th plas tic bag s!
·If ne cessa ry, reta in t he or igina l packa ge for fu ture tr anspo rtati on.
Recyc ling and Di sposal
Thi s produ ct cann ot be dis posed o f as hous ehold w aste. To pr ev ent d amage t o the
env ironm ent, th is prod uct sho uld be re cycle d. Plea se use th e relev ant rec yclin g
sys tems av ailab le to you o r contr act the d istri butor o r manuf actur er for re cycli ng
ass istan ce.
08
Page 2

Speci ficatio ns
Acces sory Pack age
Parts I ncluded
Step 1
02 03
Max . Weigh t Ca pac ity
220 I bs (100 kg)
Spe ed
0.87"/s
Inp ut Volta ge
120 V
Min . Heigh t
29. 5" (750 mm)
Max . Hei ght
48. 4" (123 0mm)
Col or
Whi te
0~4 0°C
FCC
Dut y Cycle
10% ( Worki ng 2 m inu tes the n stop 18 m inute s)
Wor ki ng Temp er at ure
Cer tific ation
A
M6X10mm
B
x8
M6X16mm
C
x18
D E
x14
St4.2X20mm
F
x1
4x4
M6X30mm
x4 x4
Fig ures sh own are f or refe rence o nly. Ple as e con tact cu stome r servi ce if the re are an y acces sory or
too ls miss ing.
Diagr am of Compo nents
1
2
2
1
2
1
6
NO. Par ts
Qty
NO. Par ts
Qty
NO. Par ts
Qty
2 3
4 5 6
7 8 9
10 11 12
1
2
2
2
1
1
1
2
3
4
5
6
7
8
9
10
11
12
C
x12
A
4x4
3
4
3
4
C
A
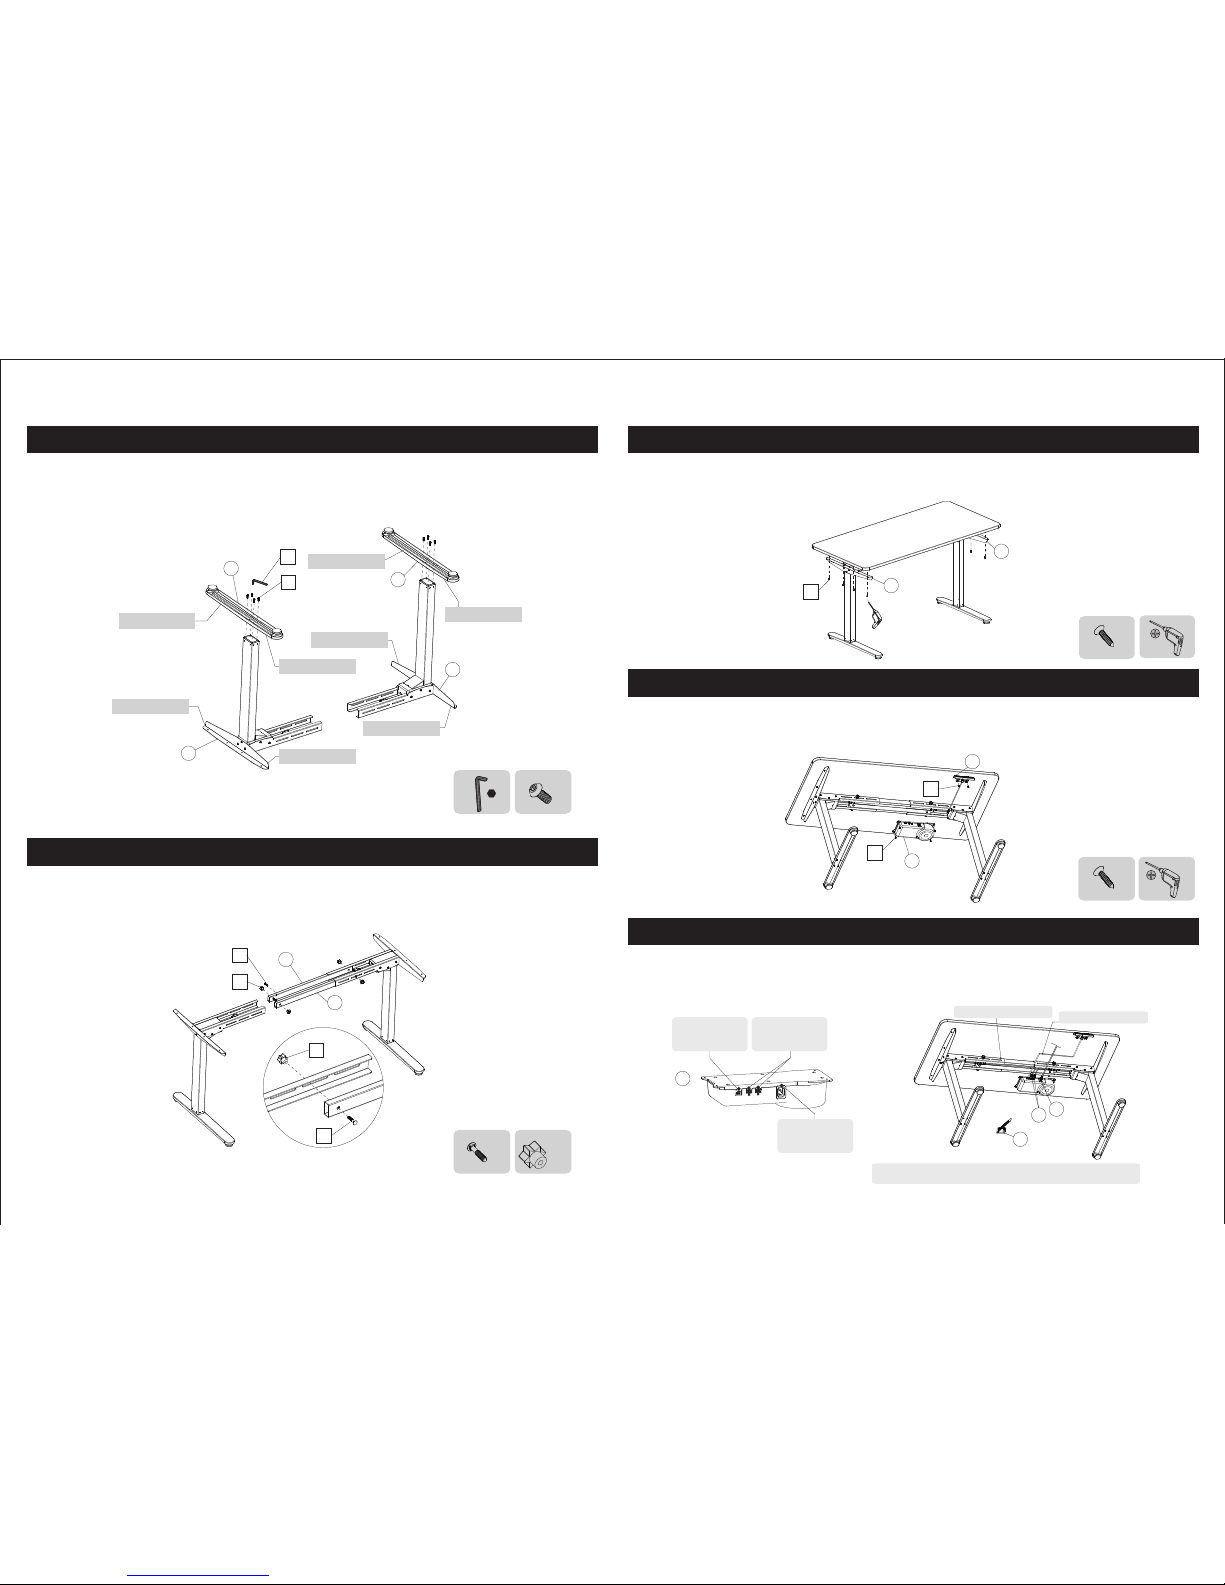
Att ach the c onnec ting ar ms (3&4 ) to the le gs usin g twelv e M6x10 mm bolt s (C). Tig hten wi th
4x4 h ex key (A ).
Step 2
C
A
6
7
C
x6
A
4x4
Att ach the l eft sid e brack et (6) an d right s ide bra cket (7 ) to the le gs usin g three M 6x10m m
bol ts (C) on e ach sid e. Tight en with 4 x4 hex ke y (A).
Page 3
Step 3
04
1
1
6
7
A
B
B
x8
A
4x4
Step 4
Lon ger end
Lon ger end
Lon ger end
Lon ger end
Sho rter en d
Sho rter en d
Sho rter en d
Sho rter en d
Tur n the l egs ups ide dow n. Attac h the fee t (1) to th e botto m of the le gs usin g eight M 6x16m m
bol ts (B) an d tight en with 4 x4 hex ke y (A). Pl ease no te: Kee p the lon ger end o f the fee t (1) and
sid e brack et (6&7 ) on the sa me side .
5
5
F
E
E
F
E
x4
F
x4
Con nect th e arms (3 &4) wit h two cro ss bars ( 5) usin g four M6 x30mm b olts (E ) and ful ly atta ch with
the f our kno bs (F). C hoose p roper s crew ho les acc ordin g to the ac tual si ze of wor k surfa ce.
05
Step 5
Step 6
Not e: Work s ur fac e is sepa ratel y avail able fo r purch ase.
Pla ce the wo rksur face an d attac h it to the s ide bra ckets ( 6&7) us ing eig ht St4. 2x20m m screw s
and t ighte n with dr ill.
Ins tall th e contr ol box (8 ) and to th e works urfac e as show n on pict ure usi ng six St 4.2x2 0mm han dset
scr ews and t ighte n with dr ill.
Ple ase not e: plac e the wit hin the l ength r ange of t he cabl e. han dset
D
x6
8
9
D
D
6
7
D
D
x8
Step 7
8
Interface for
cablehandset
11
10
12
Con nect th e cable ( 9), pow er cord ( 10) and m otor ca ble (11) t o th e con trol bo x as show n on han dset
the p ictur e.
Tur n on th e power a nd use th e desk in a ccord ance wi th the in struc tions .
Int erfac e for
mot or cabl e
Int erfac e for
pow er cord
Con necti ng Arms
Han dset ca ble
Use t he cabl e ties to f ix and or ganiz e the cab les
Page 4
06 07
Troubl eshooti ng
This list is used for checking and solving common faults and errors. Please contact the manufacturer if
problem you encounter is not on the list below.
Faults
No response when pressing the UP
button and DOWN button
No re spons e when pr essin g and
hol ding th e DOWN bu tton
The distance lifted or lowered is not
accurate
Overworked beyond duty cycle:
Max 4min on/13 min off
Automatically reset a lot
Worksurface downward sliding
Can lift but cannot lower down
Motor does not work properly
Speed of lifting is slow
Solution
1. Check the cable connection.
2. Contact the distributor or the manufacturer.
1. Check the cable connection.
2. Contact the distributor or the manufacturer.
1. Check if the loading weighs more than 100kg.
2. Contact the distributor or the manufacturer.
1. Contact the distributor or the manufacturer.
1. St art the r eset pr ocess .
2. Co ntact t he dist ribut or or the m anufa cture r.
1. Check if the loading weighs more than 100kg.
2. Contact the distributor or the manufacturer.
1. Check if the loading weighs more than 100kg.
2. Contact the distributor or the manufacturer.
1. Keep the power on and stop working for
13 minutes.
2. Contact the distributor or the manufacturer.
1. Press and hold the "M" and "3" button for
three seconds until you hear BEEP twice
to restore the factory settings.
2. Contact the distributor or the manufacturer.
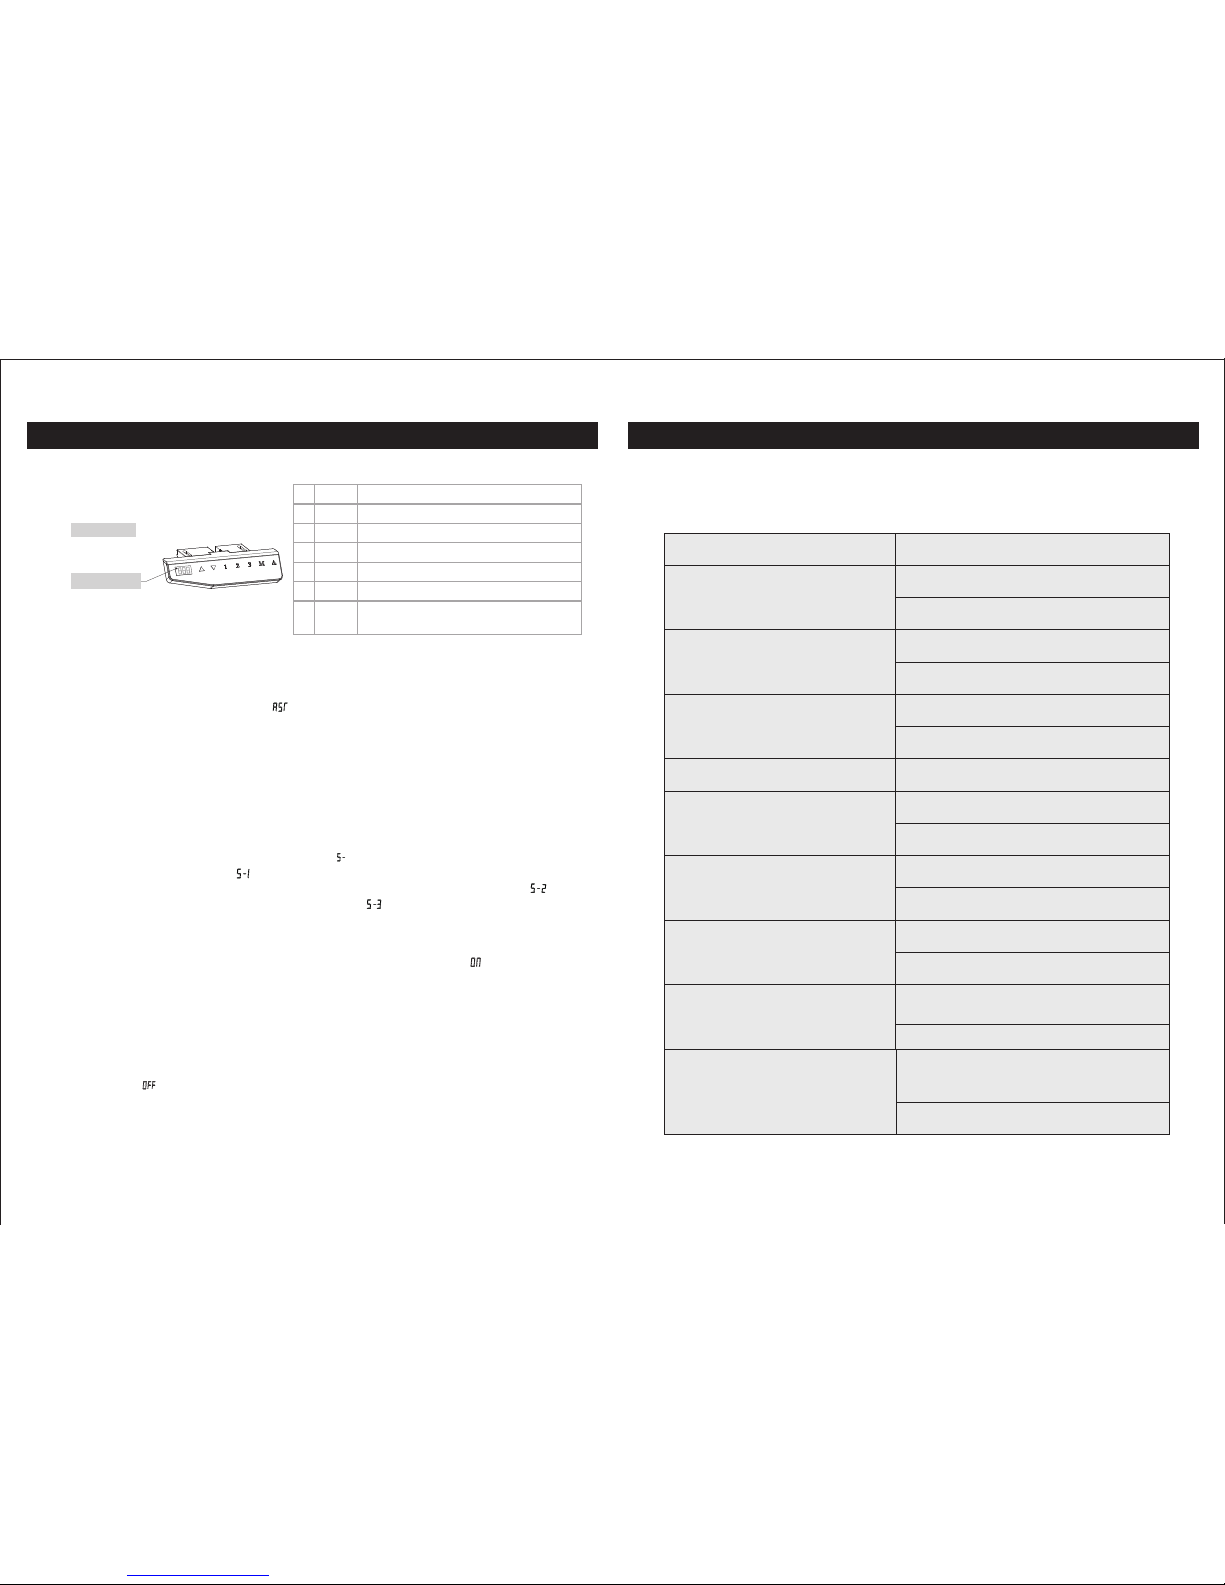
Hands et Instru ction
UP Button, used to lift the desk surface
●
●
●
●
●
●
●
Operation Guide
·Reset when using product for the first time or when the power becomes cut off due to electrical
problems. When the LED display shows " ", only the DOWN button works. Press and hold the
DOWN button on the Handset until the desk reaches its lowest height and rebound to 29.5'' height (the
display shows "29.5" ), which means the reset process finished.
·After the reset process, press the UP button or DOWN button to lift or lower the height of desk
surface. The LED display shows the real time value. The range of the height value: 29.5'' - 48.4''.
·Save Height Position
a. Press the UP button or DOWN button to lift or lower the height of desk surface. For instance, you
adjust the height to 29.5''.
b. Press "M" SAVE button and the LED display shows" ", then press "1" to save the 1st height position
to 29.5''. The LED display shows " ".
c. Repeat step a and step b to save the 2nd height position to 39.5'' The LED display shows " ".
Save the 3rd height position to 48'' The LED display shows " ".
d. Press "1", "2","3", to automatically reach the height saved before.
·Long-Time Sitting Reminder
a. Press REMINDER button "A" to activate the function. The LED display shows " "
b. Two seconds later, the 45-minute countdown starts. When the countdown finishes, the buzzer will be
active with a 10-second "DiDi...DiDi... DiDi..." tone.
c. Within the 10-second reminder buzz, press the REMINDER button to start another 45-minute
countdown. Reminder will be reactivated 5 minutes later if no operation occurs after the second
reminder buzz. No operation after the second reminder buzz, the Long-Time Sitting Reminder will be
automatically turned off.
d. Press and hold the "A" button for three seconds to turn off the Long-Time Sitting Reminder. The LED
display shows " ".
Handset
LED Display
DOWN Button, used to lower the desk surface
Position 1, User saves the 1st Height Position
Position 2, User saves the 2nd Height Position
Position 3, User saves the 3rd Height Position
SAVE button, used to save the height position
REMINDER button, used to activate the "LongTime Sitting Reminder" function
▲
▼
1
2
3
M
A
" "
" "
" "
" "
" "
" "
" "
 Loading...