

Flex innovations MAMBA 10 Instruction Manual

DESIGNED BY

1
ATTENTION
BEFORE CONTINUING WITH THIS INSTRUCTION MANUAL OR ASSEMBLY OF YOUR MAMBA
10, PLEASE VISIT OUR WIKI SUPPORT SITE FOR THE LATEST PRODUCT UPDATES , FEATURE
CHANGES, MANUAL ADDENDUMS AND FIRMWARE CHANGES FOR BOTH YOUR MAMBA 10
AND THE INSTALLED AURA 8 ADVANCED FLIGHT CONTROL SYSTEM.
http://wiki.exinnovations.com/wiki/Mamba10
http://wiki.exinnovations.com/wiki/Aura

TABLE OF CONTENTS
Introduction ......................................................................................2
Box Contents .................................................................................... 2
Specications.................................................................................... 3
Replacement Parts Listing............................................................3
Optional Completion Items......................................................... 3
Completion Items ..........................................................................3
Battery Charging Guidelines.......................................................3
Special Language Denitions.....................................................4
Important Information Regarding Warranty......................... 4
Safety Warnings and Precautions..............................................4
Low Voltage....................................................................................... 4
Main Landing Gear Installation ..................................................5
Tailwheel Installation.....................................................................5
Horizontal Stabilizer Installation................................................ 6
Transmitter Setup............................................................................7
Aura 8 ACFS.......................................................................................7
Receiver Installation/Servo Connections................................ 8
Connecting Battery/Arming ESC ...............................................9
Main Wing Installation.................................................................10
Control Direction Test..................................................................12
Flight Control Direction Sensing Test.....................................13
Linkage Setup.................................................................................14
Propeller/Spinner Installation...................................................14
Battery Installation........................................................................15
Center of Gravity............................................................................15
Flying your Mamba 10.................................................................16
Advanced Mamba 10 Setup.....................................................17
Airframe Repairs ............................................................................18
Replacing Servos ...........................................................................18
Servicing the Power System......................................................19
Optional Wheelpant Removal ..................................................19
Aircraft Troubleshooting Guide................................................20
Limited Warranty...........................................................................21
AMA Safety Code...........................................................................22
BOX CONTENTS
INTRODUCTION
Biplanes oer a unique challenge as every aspect of the design must be
optimized, from the structure, to the aerodynamics, and control system.
Only years of experience designing aircraft in this category can produce
the Mamba 10's aggressive, yet forgiving characteristics. Designer Quique
Somenzini knows how to optimize biplane aerodynamics like no other,
having won F3A and 3D world championships with his biplane designs. A
biplane with less coupling or better manners cannot be found. The
structure is highly optimized oering an aircraft that is sti and strong,
yet light in weight.
Couple a phenomenal airframe with the Aura 8 Advanced Flight Control
System, the latest in stabilization technology, and you get an incredible
performance package; one that remains stable, yet maneuverable. Pilots
rave about its direct and non-interfering feeling, and its ability to bring
out the best in aircraft.
2
§ Available in red/silver and green/silver schemes
§ Advanced Aura 8 Control System
§ SIX Servos included! FOUR for Ailerons
§ Innovative plywood sub-frame connects the motor
securely to the fuselage while providing superior
battery mounting and cooling
§ Extreme 3D Performance
§ Light wing loading for easy handling
§ Large control surfaces for excellent maneuverability
§ Factory-installed Shark Teeth for low speed control
§ Precise aerobatics with minimal control coupling
§ Easy disassembly for transport in small cars
3
FPM3270A Mamba 10 Super PNP Green
FPM3270B Mamba 10 Super PNP Red
FPM327001 Mamba 10 Fuselage
FPM327002 Mamba 10 Wing Set w/Struts
FPM327003 Mamba 10 Tail set
FPM327004 Mamba 10 Hatch set
FPM327005 Mamba 10 Landing gear set
FPM327006 Mamba 10 Stab Tube Joiner Cabane
Tube Set
FPM327007 Mamba 10 Pushrod set
FPM327008 Mamba 10 Green/Blue Decal Set
FPM327009 Mamba 10 Red/Black Decal set
FPM327010 Mamba 10 Spinner 50mm
FPM327011 Mamba 10 Hardware Package
FPZM1010C Potenza 10 1400 Kv BL Motor
HW-BQ8015 Hobby Wing 50A Skywalker 5A BEC
FPZDS15 Potenza DS15 Digital Sub-Micro Servo
FPZA1015 Servo Custom Y-Harness (Mamba 10)
FPZAURA08ZZM10 Aura 8 for Mamba 10
REPLACEMENT PARTS LISTING
The assembly of the Mamba 10 can be accomplished in less than one
hour. Prior to assembling the airplane, it is advisable to charge your
battery so that you are ready to begin setup upon completion of the
assembly of your model.
We recommend the use of an advanced LiPo balancing charger, such as
our Potenza C80 Multi Chemistry Touch Screen AC/DC balancing charger
for your batteries to get the maximum performance and lifespan from
them.
Our airplanes are designed around our Potenza LiPo batteries and we
recommend the Potenza 3S 2200mAh 45C LiPo and the 4S 2200mAh 40C
LiPo in the Mamba 10 based on our extensive testing and development.
This battery features an EC3 connector, so no soldering is required for use
in your Mamba.
All are available online at www.exinnovations.com and your local Flex
Innovations retailer.
WARNING
FOLLOW ALL INSTRUCTIONS PROVIDED BY YOUR
BATTERY AND CHARGER MANUFACTURER. FAILURE
TO COMPLY CAN RESULT IN FIRE.
INSTALLED!
INSTALLED!
INSTALLED!
NEEDED TO
COMPLETE
NEEDED TO
COMPLETE
2200mAh 3S 11.1v 45C LiPo
(FPZB22003S45 )
3S 11.1v 2100-3300mAh minimum 45C+ LiPo
6-Channel Computer Transmitter*
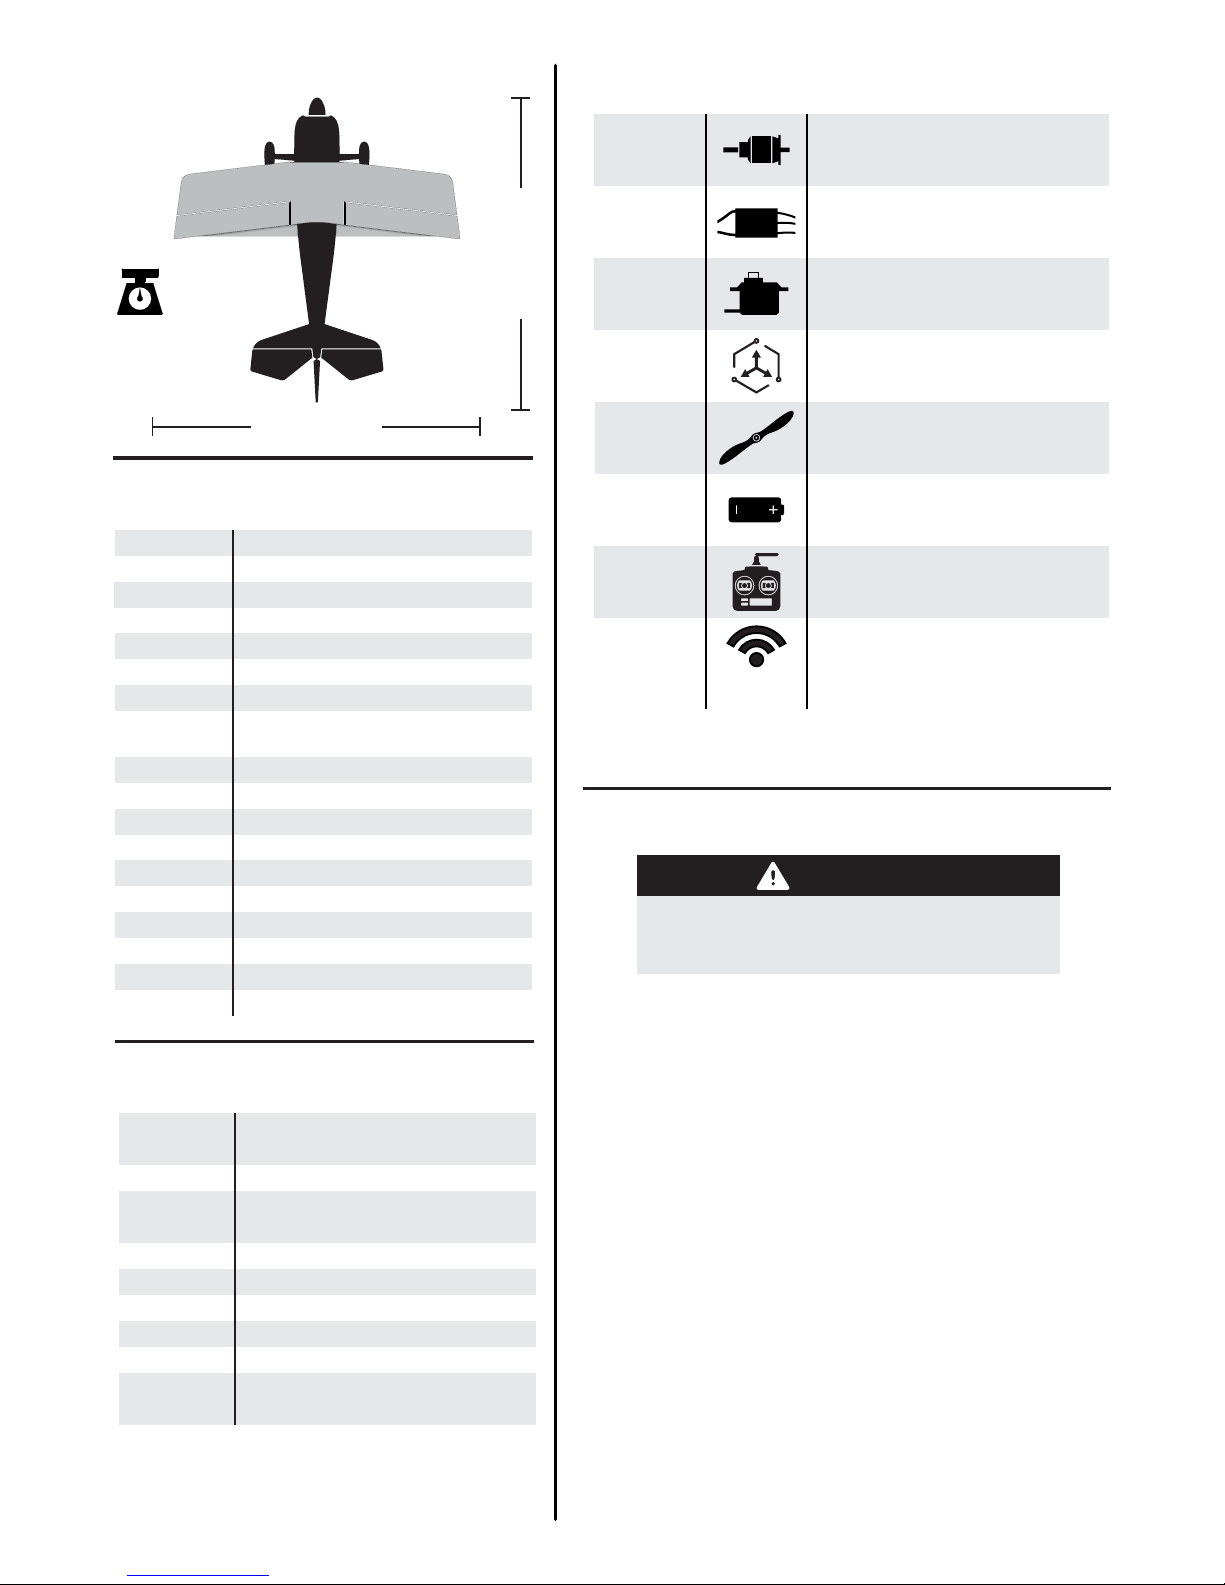
Potenza 10 1400 Kv Brushless
Outrunner Motor (FPZM1010C)
HobbyWing SkyWalker 50A ESC
with 5V/5A SBEC (FTVHWBQ8015)
INSTALLED!
Aura 8 Advanced Flight Control System
(FPZAURA08)
Potenza DS15 Digital Full Metal
Gear 15g Servo (FPZDS15)
DSM2/DSMX remote receiver(s)
SRXL/S.Bus Futaba/Graupner HOTT/
JR XBus/Jeti UDI
5+ Channel RX (any brand)
NEEDED TO
COMPLETE
COMPLETION ITEMS
INCLUDED!
SR 11.5x4.5 Thin Electric Propeller
(FPMP11545E)
*DX4/5e class transmitter supported with special model program download
RECEIVER
SPECIFICATIONS
54.0 oz (1520g)
RTF with 3S 2200mAh
battery installed
40.7 in (1033mm)
43.4 in (1102mm)
691.3 sq. in
(44.6 dm2)
BATTERY CHARGING GUIDELINES
OPTIONAL COMPLETION ITEMS
Potenza 10 1070 Kv BL Motor
(For 4S LiPo Battery Only)
FPZB22004S40 Potenza 2200mAh 4S 14.8v 40C LiPo
C80 Multi-Chemistry Touch Screen
AC/DC Smart Charger
FTVHWBQ2006 Hobbywing ESC Programming Card
FPZA1010 Potenza Digital Battery Analyzer
FPZAU01 Male to Male Servo Connectors (3)
FPZ327012 Mamba 10 4CH Aileron Servo Ext. Kit
FPMTT2 TruTurn 2-in Aluminum Spinner
APC 12x4.5MR Propeller
(For 4S LiPo Battery Only)
FPZM1010D
FPZC80
LP12045MR

NOTICE: Procedures, which if not properly followed, create a possibility of physical property
damage AND a little or no possibility of injury.
CAUTION: Procedures, which if not properly followed, create the probability of physical
property damage AND a possibility of serious injury.
WARNING: Procedures, which if not properly followed, create the probability of property damage,
collateral damage, and serious injury OR create a high probability of serious injury.
ATTENTION
Read the ENTIRE instruction manual to become familiar with the features of the product before
operating. Failure to assemble or operate the product correctly can result in damage to the
product, personal property, and cause serious or fatal injury.
All instructions, warranties and other collateral documents are subject to change at the sole
discretion of Flex Innovations, Inc. For up-to-date product literature, please visit our website at
www.exinnovations.com and click on the Mamba 10 and Aura 8 product pages.
SPECIAL LANGUAGE DEFINITIONS
The following terms are used throughout the product literature to indicate various levels of potential harm when operating this product:
WARNING
This product is not intended for use by
children under 14 years without direct
adult supervision.
AGES 14+
IMPORTANT INFORMATION REGARDING WARRANTY
Please read our Warranty and Liability Limitations section before building this product. If you as the Purchaser or user are not prepared to
accept the liability associated with the use of this Product, you are advised to return this Product immediately in new and unused condition
to the place of purchase.
SAFETY WARNINGS AND PRECAUTIONS
Protect yourself and others by following these basic safety guidelines.
1. This manual contains instructions for safety, operation and maintenance. It is essential to read and follow all the instructions and warnings
in the manual, prior to assembly, setup or use, in order to operate correctly and avoid damage or serious injury.
2. This model is not a toy, rather it is a sophisticated hobby product and must be operated with caution and common sense. This product
requires some basic mechanical ability. Failure to operate this product in a safe and responsible manner could result in injury or damage
to the product or other property.
3. This model must be assembled according to these instructions. Do not alter or modify the model outside of these instructions provided by
Flex Innovations, Inc, as doing so may render it unsafe and/or unyable. It is your responsibility to ensure the airworthiness of the model.
4. Inspect and check operation of the model and all its components before every ight.
5. If you are not an experienced pilot or have not own a high-performance model before, it is recommended that you seek assistance from
an experienced pilot in your R/C club for your rst ights. If you’re not a member of a club, the Academy of Model Aeronautics (AMA) has
information about clubs in your area whose membership includes experienced pilots.
6. Keep the propeller area clear from such items such as loose clothing, jewelry, long hair, or tools as they can become entangled. Keep your
hands and body parts away from the propeller as injury can occur.
7. Never y in visible moisture or submerge the airplane or any of its electronic components in water. Permanent damage to electronic
components may occur, or corrosion of components may lead to intermittent failures.
LOW VOLTAGE CUTOFF
LiPo batteries have a nominal (rated) voltage of 3.7v per cell, and fully charged, reach 4.2v per cell. Batteries are designed to be discharged
below the nominal voltage, however, if they are discharged below 3.0v per cell, damage will occur and the pack will lose capacity. For best
long term battery life, set a timer and land after a time that leaves approximately 15% of the battery’s capacity remaining.
Low voltage cuto is a feature that is built into the Hobby Wing SkyWalker 50A ESC that is designed to protect the connected battery from
being discharged too far and causing permanent damage to the cells. Circuitry within the ESC will automatically detect when the input
voltage from the battery pack reaches below 3.15v per cell (average) and will remove power to the motor, but still deliver power to the
servos so that a safe landing may be made. If the motor begins to lose power rapidly during ight, the LVC has sensed that the total voltage
of the pack has dropped below 3.15v per cell average, and the airplane should be landed immediately.
4
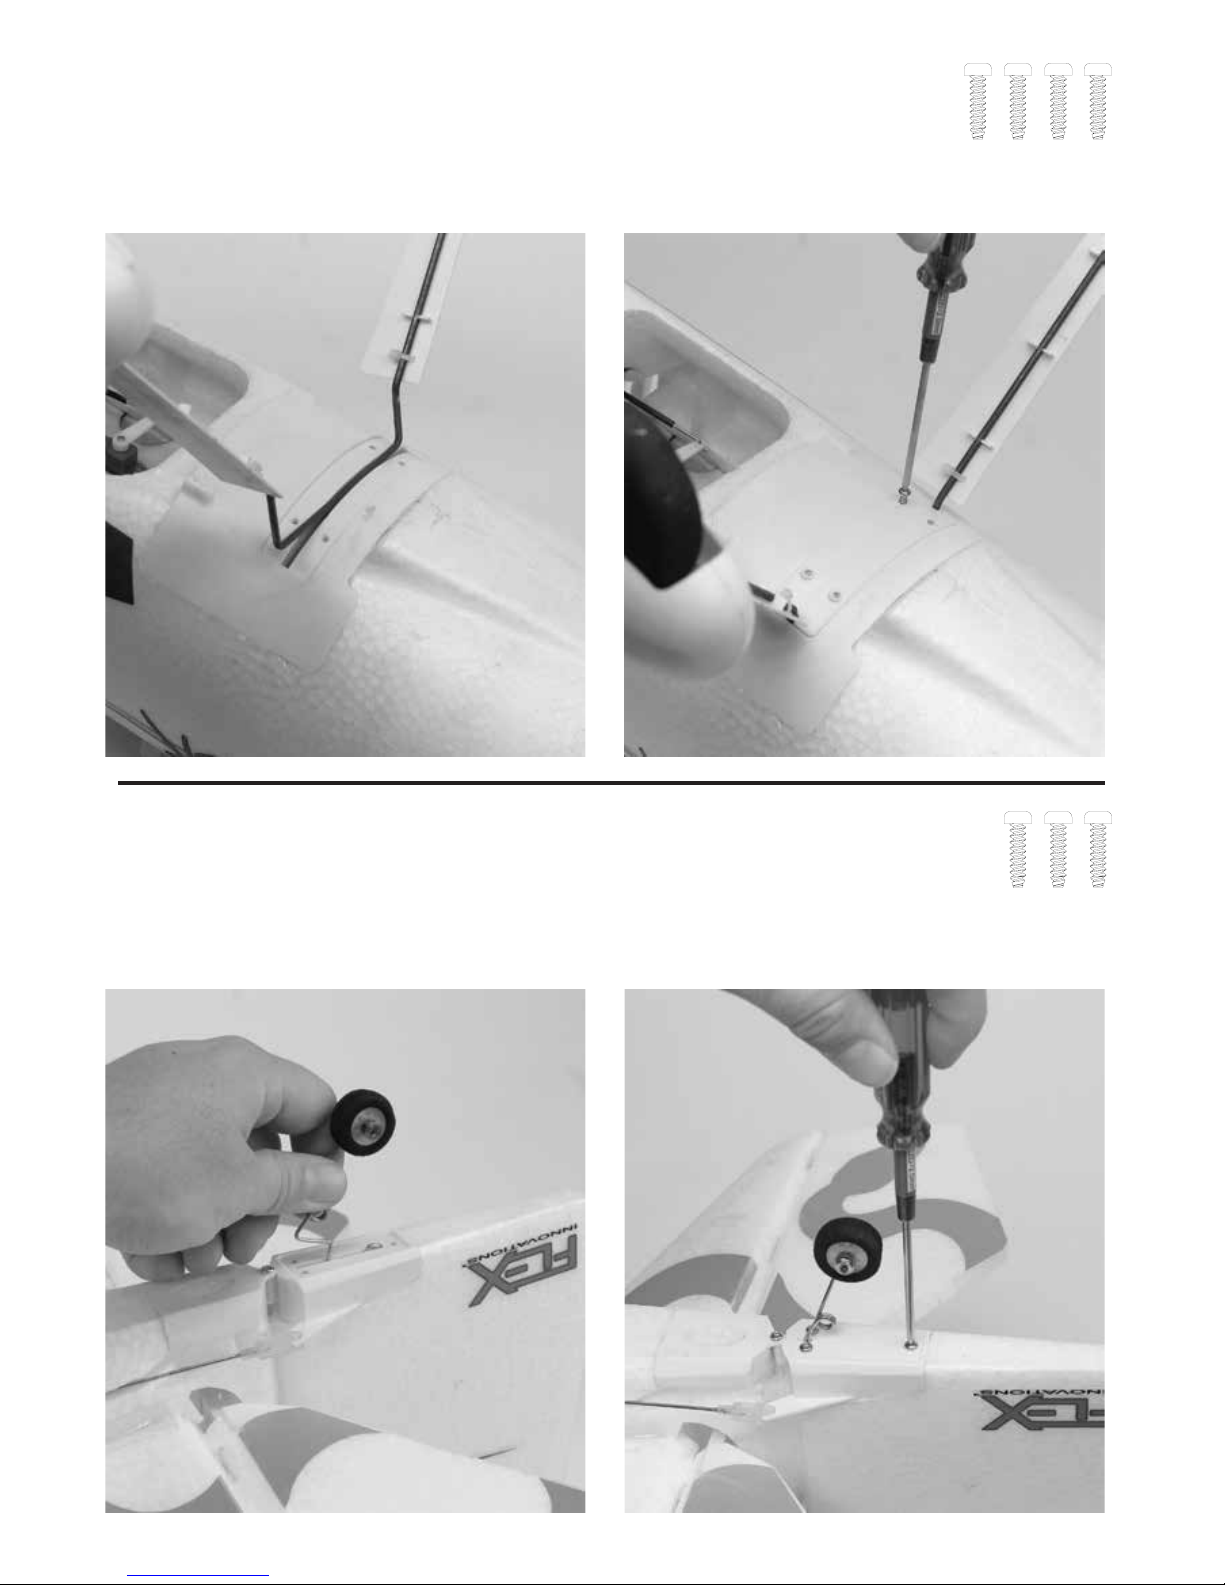
MAIN LANDING GEAR INSTALLATION
Required Tools and Fasteners: #1 Phillips Screwdriver, (4) M3x12 self-tapping Phillips head cap screws
1. Insert the landing gear assembly into the slot in the bottom of the fuselage. The gear will sweep forward.
2. Install the cover plate over the landing gear slot and attach with (4)
M3x12 self-tapping Phillips head cap screws.
TAILWHEEL INSTALLATION
Required Tools and Fasteners: #1 Phillips Screwdriver, (3) M3x12 self-tapping Phillips head cap screws
1. Insert the tailwheel assembly in the slot in the bottom of the rudder.
2. Install the cover plate over the tailwheel slot and attach with (3)
M3x12 self-tapping Phillips head cap screws.
5

HORIZONTAL STABILIZER INSTALLATION
Required Tools and Fasteners: Clear Tape (4 strips)
1. Insert the horizontal stabilizer tube into the fuselage and roughly center.
2. Slide the left and right stabilizer halves onto the tube. Ensure that the control horn orients towards the belly of the airplane and that the
elevator joiner tabs are properly indexed. Do not force the stabilizer into place.
3. Apply 4 pieces of clear tape to the joint between the stabilizer and the plastic mounts. Be sure to apply tape to both the top and bottom.
4. Attach the clevis to the elevator control horn in the innermost hole. Slide the clear tubing over the forks.
6
TRANSMITTER SETUP
Start with a freshly reset new model memory in your transmitter.
Make ONLY the changes shown in the Transmitter Setup Guide.
The Aura 8 in the Mamba 10 defaults to 3 ight modes that are
switched via CH5/Gear in your transmitter. You may need to
reassign CH5/Gear to a 3-position switch. Consult your transmitter
manufacturer for directions on channel assignment.
For large (greater than 5%) changes in expo or dual rates, it is
highly recommended to reset all expos and rates to default in the
transmitter and tune through the Aura Cong Tool.
The Aura Cong Tool can be used on any Windows-based PC or
tablet. Download at www.exinnovations.com/AuraCongTool.
WARNING
DO NOT ATTEMPT RADIO SETUP WITH PROPELLER INSTALLED. INADVERTENT POWER UP COULD CAUSE PERSONAL INJURY.
Description of Pre-Loaded Aura Flight Modes
Mode 1 (Gyro O): Rates are set for general ight (same as
Sport Mode). Exponential is tuned for comfortable ight.
Mode 2 (Sport Mode): Gains are moderate and tuned for
comfortable feel/best performance for precision aerobatics.
Expo is tuned for comfortable ight.
Mode 3 (3D Mode): Gains are highest and tuned for 3D
aerobatics. Rate are set to highest. Exponential is tuned for
comfortable ight.
NOTE- Rudder stick movement will also move ailerons and
elevator. This is NORMAL and is the pre-programmed mixing.
Each of the modes has been tuned by our team to oer a solid
start. Because tastes in control feel are unique, if changes in rate
and expo are needed adjustments should be made through Aura.
Changes on gain value may only be made through the Aura.
7
End Points
Sub Trim
Trim Levers Veried neutral
CH 5 (Gear)
Reversing
Timer
Wing Type
‡ The shown Aura 8 settings are pre-congured and the unit is ready to use. The chart shown is
for information purposes only. Do not program these rates and expos in to your transmitter.
No additional action is required to y the airplane.
‡Aura 8
Rate Setup
‡Aura 8
Expo Setup
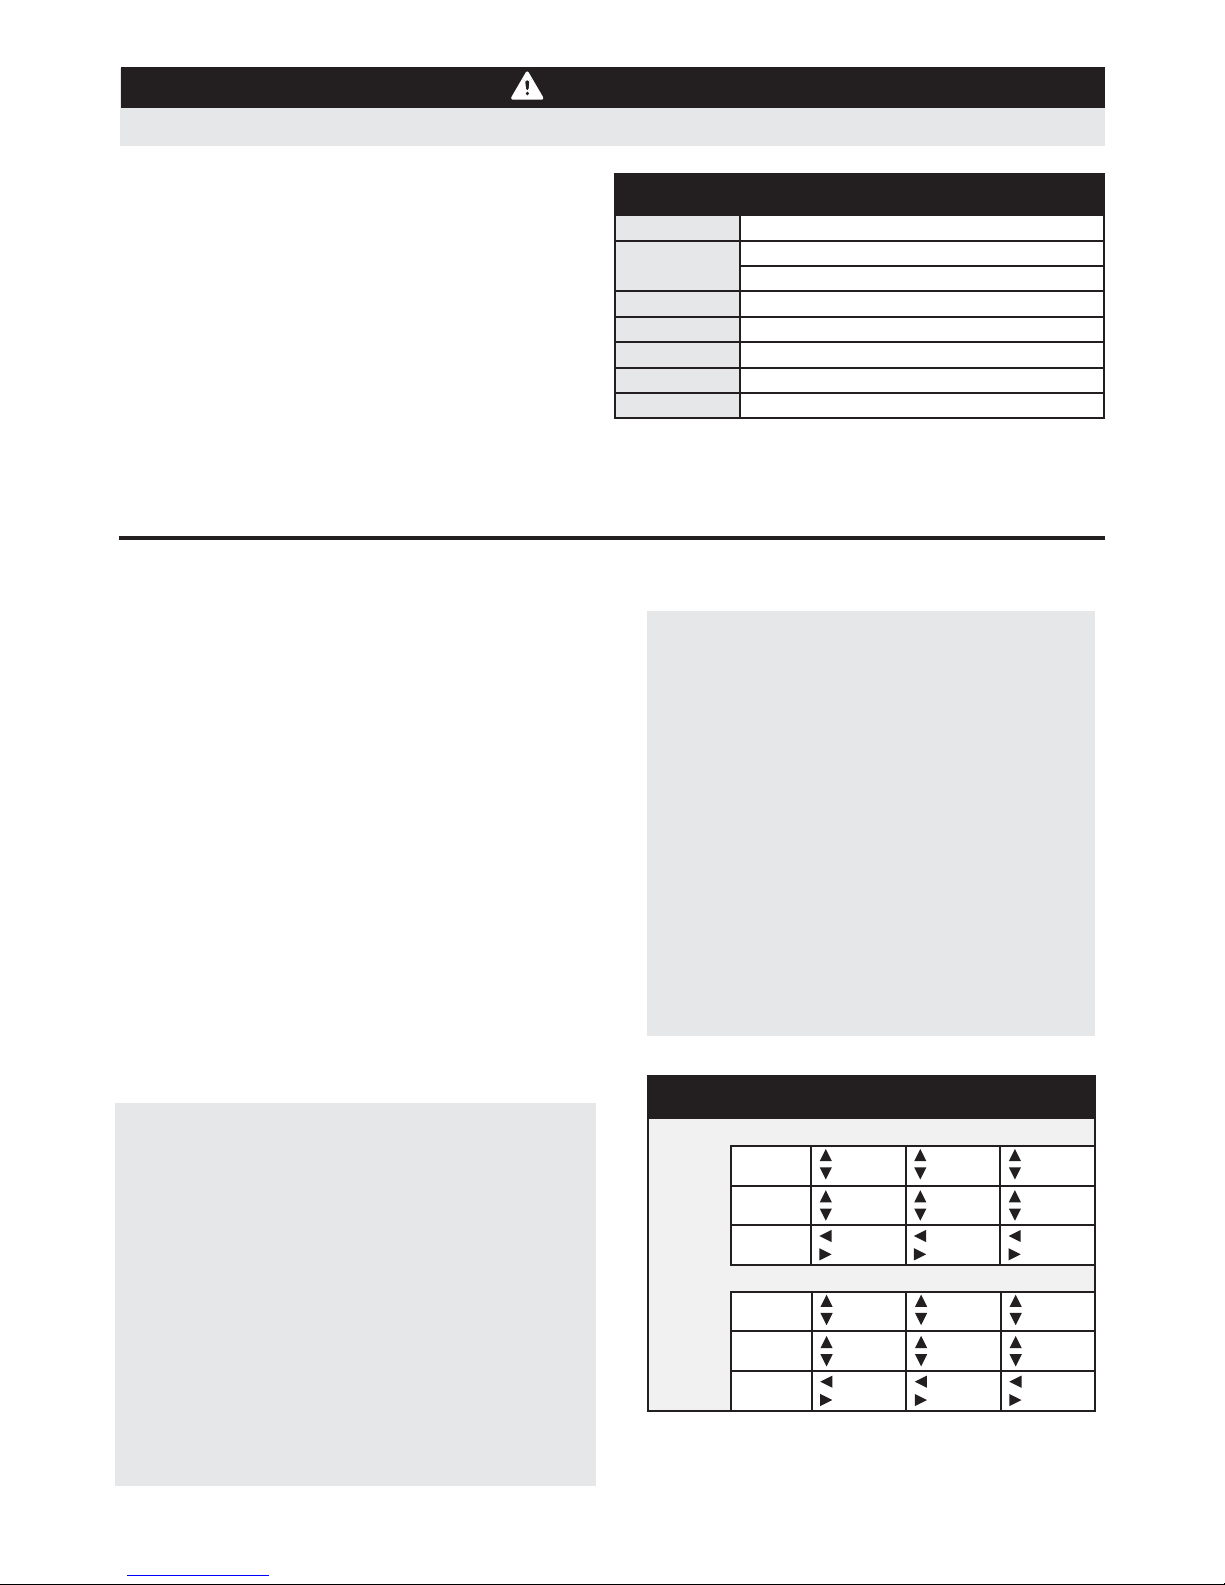
AURA CONFIGURATION REFERENCE
Aileron
40% 40% 100%
Elevator
22% 22% 100%
Rudder
70% 90% 90%
Aileron
Mode 3Mode 1
30%
Mode 2
20% 32%
Elevator
25% 10% 40%
Rudder
30% 30% 20%
Mode 3Mode 1 Mode 2
TRANSMITTER CONFIGURATION GUIDE
125%
Aileron/Elevator/Rudder
Throttle/CH5 (Gear)
100%
Veried neutral, sub trim not allowed
Assigned to a 3-position switch
Aileron/Elevator/Rudder Normal
Set to 3:30 for initial ights
Normal - 1 Aileron, 1 Elevator, 1 Rudder
JR Mode B users should set throttle/aileron/elevator/rudder/gear travel values to 88%
It is reccomended that for pilots with less experience, set up a transmitter dual rate of 75% for the
aileron channel only if using end points of 125%. The ailerons of the Mamba 10 are very responsive
and produce a very high roll rate. 125% end point should be reserved for advanced pilots ONLY.
Throttle direction depends on transmitter manufacturer, but leave at transmitter default setting
The Mamba 10 can y anywhere between 3:30 to 5:30 depending on ying style
§ Works conveniently with all major radio systems
§ Accepts signals from PPM Stream, Futaba S.Bus, DSM
remote receiver(s), Spektrum SRXL, Graupner Hott (Sum
D of 8), JR XBus (Mode B), Jeti UDI12 (standard), or any
brand of receiver via male to male servo connectors
§ Expertly tuned and ready to use
§ USB port allows loading model congurations, user
programming, and rmware updates (cable included)
§ Flexible and extensive programming through Windows-
based PC or tablet Aura Cong Tool app
§ 3+ ight modes allow precise or aggressive settings to
be selected in ight
§ 3-axis gyro utilized in Mamba 10 programming
§ Powerful 32-bit processor and 6 axis sensor for future
updates and re-use
Visit http://wiki.exinnovations.com/wiki/aura for the
latest Aura-related product information.
AURA 8 ACFS
The Aura 8 advanced ight control system installed in your Mamba 10
is a giant leap forward in aircraft ight control system technology.
Compatible with virtually every receiver on the market today, the
Aura features special conguration for DSM systems via remote
receiver connection(s), and serial data connection for Futaba S.Bus,
Spektrum SRXL Graupner HOTT (Sum D of 8), JR XBus (Mode B), and
Jeti UDI12 (standard) systems, as well as being compatible with
traditional receivers via PWM servo connections.
The Aura 8 advanced ight control system in your Mamba 10 has been
pre-tuned for ease of use, eliminating many hours of tedious setup.
For the latest Aura Features, programs, transmitter downloads, and
instructions, please visit wiki.exinnovations.com/wiki/Aura.
The Aura is fully customizable through any Windows-based PC or
tablet. All dual rate, expo, travel, and assignable mode programs are
adjusted inside the Aura through the PC application. An assignable
master gain that is OFF by default can be enabled by the Aura
application. If desired, assign CH 8/AUX 3 on a proportional dial or
slider.
By default CH5/Gear is used to select the 3 ight modes by 3
position transmitter switch.
 Loading...