

Flex innovations FV-31 Cypher Instruction Manual


BEFORE CONTINUING WITH THIS INSTRUCTION MANUAL OR ASSEMBLY
OF YOUR AIRCRAFT, PLEASE VISIT OUR WIKI SUPPORT SITE FOR THE
LATEST PRODUCT UPDATES, FEATURE CHANGES, MANUAL ADDENDUMS
AND FIRMWARE CHANGES FOR BOTH YOUR AIRCRAFT AND THE
INSTALLED FLEXF3 STABILIZATION SYSTEM.
wiki.flexinnovations.com/wiki/Cypher
1

TABLE OF CONTENTS
Introduction
Specifications
Completion Items
Replacement Parts
Battery Charging Guidelines
Special Language Definitions
Important Information Regarding Warranty
Safety Warnings and Precautions
FLEXF3 Control System
Transmitter Setup
Spektrum Transmitter & Receiver Setup
Futaba Transmitter & Receiver Setup
Connecting a Battery/Arming the ESC
Low Voltage Cutoff
Rear Fan Angle Adjustment
Landing Gear Installation
Ventral Fin Installation
..........................................................................
.......................................................................
.................................................................
..............................................................
...............................................
..............................................
.......................................
......................................................
................................................................
.................................
................................
...............................................................
.................................................
.....................................................
.........................................................
.........................
.............................
2
3
3
3
3
4
4
4
5
6
7-13
14-19
20
20
21,22
23, 24
25
INTRODUCTION
Unparalleled Flight Performance
The Flex Innovations Plug-and-Play FV-31 Cypher VTOL EDF is the
most advanced and versatile vertical take off and landing (VTOL) and
short take off and landing (STOL) model aircraft of its type. Two fixed
EDF units are mounted toward the leading edge of the wing, while two
larger EDF units are mounted to a rotating pod at the rear of the
aircraft. This advanced EDF configuration provides the greatest in total
performance versatility, while remaining simple to use and easy to fly.
Thanks to the Flex Innovations developed, FLEXF3 stabilization
board, you get a total of six unique ways you can fly, while being able
to choose between any of them, at any time during the flight. These
flight modes work seamlessly together to offer the most stable and
predictable flight experience possible. Pilots will always retain total
control, even during tansitions between modes.
For the latest updates, features, addendums and more, before
assembly, please visit:
wiki.flexinnovations.com/wiki/Cypher
Vertical Fin Installation
Main Wing Installation
Elevon Setup
Beginner Profile Calibration
Transmitter Control Direction Test
Flight Control Sensing Direction Test
Fan Installation
Center of Gravity Verification
Pre-Flight Checks
Flying Tips - Controls and Flight Profiles
Flying Tips - Flight Configurations and First Flights
Flying Tips - First Flights, Transitions and Trimming
Troubleshooting Guide
FLEXF3 Wiring Diagram
AMA Safety Code
Limited Warranty
.............................................................................
Factory-installed and custom-tuned FLEXF3 Flight
Control System
4 EDF units for great power, control and improved
safety
Bluetooth module and Micro-USB cable included
Assemble and set up in less than one hour
(4) 40A, 32-bit brushless ESC unit with switching BEC
(3) Potenza DS-15 digital servos for controls
(1) S0090 Standard-size, metal gear servo for fan tilt
Light Weight EPO foam that is durable and easy to
repair
...............................................................
................................................................
.......................................................
.............................................
........................................
..........................................................................
.....................................................
......................................................................
......................................................................
..............................................................
............................................................
........................................................................
........................................................................
26
27, 28
29
30, 31
32
33
34-36
37
37
38
39
40
41, 42
43
44
45
2
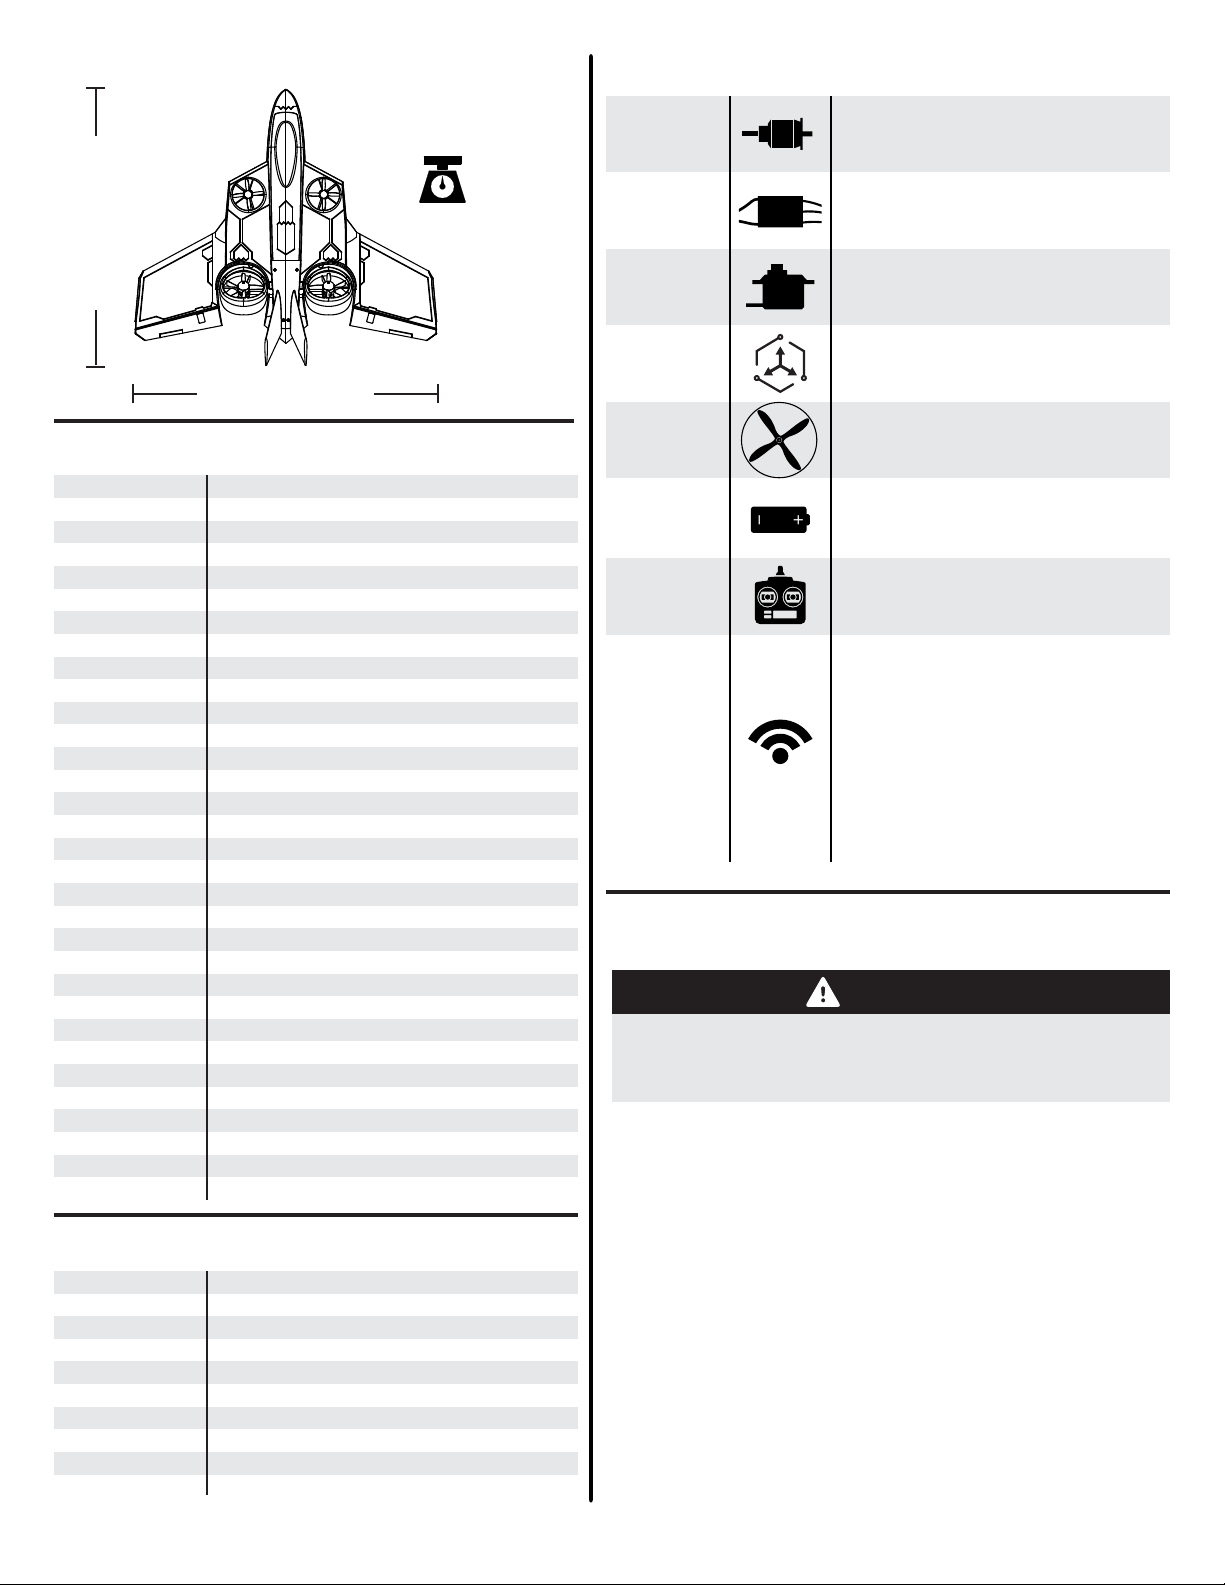
SPECIFICATIONS
3lb 10oz (1.68 kg)
RTF with 3S 3500mAh ba�ery installed
BATTERY CHARGING GUIDELINES
35.0 in. (890mm)
38.2 in. (970mm)
COMPLETION ITEMS
(2) Potenza Front &
(2) Potenza Rear
INSTALLED!
INSTALLED!
INSTALLED!
INSTALLED!
Brushless Outrunner Motors
(FPZMCYPR, FPZMCYPL, FPZMCYPFR & FPZMCYPFL)
(4) 40A 32-Bit ESC with BEC
(FPZCYPESC)
Potenza DS-15 & S0090 Servos
(FPZDS15 & FPZS0090)
FLEXF3 Flight Control System
(FPZFLEXF3)
REPLACEMENT PARTS
FPM387001A
FPM387001B
FPM387002A
FPM387002B
FPM387003A
FPM387003B
FPM387004A
FPM387004B
FPM387005
FPM387006
FPM387007
FPM387008
FPM387009A
FPM387009B
FPM387010
FPM387011A
FPM387011B
FPM387012
FPM387013
FPM387014
FPM387015
FPZA1030
FPZA1031
FPZFLEXF3
FPZCYPESC
FPZCYPBT
FPZS0090
FPZDS15
FPZMCYPR
FPZMCYPL
FPZMCYPFR
FPZMCYPFL
Fuselage, no hatches or fins (White)
Fuselage, no hatches or fins (Grey)
Wing Panels (White)
Wing Panels (Grey)
Fin Set, Upper and Lower (White)
Fin Set, Upper and Lower (Grey)
Canopy/Hatch Set (White)
Canopy/Hatch Set (Grey)
Landing Gear Set (No Wheels)
Wheel and Collar Set (3)
Wing Tubes
Pushrod Set
Air Force White Decal Set
Marines Grey Decal Set
Gauge Set
Rear Nacelle Set (White)
Rear Nacelle Set (Grey)
Rear Left and Right Fan Blades
Front Left and Right Fan Blades
Rear, Left and Right Motor/Fan Adapters
Tray and Hardware Set
FLEXF3 RX Cable Set (3-3 & 3-4)
Servo Extension Lead (480mm)
FLEXF3 with Hardware (no cables)
4 x 40A ESC w/BEC
Bluetooth Module for FLEXF3
Standard Servo, Metal Gear w/Arm
DS-15 Sub-Micro Servo (370mm lead)
Cypher Rear Motor - Right
Cypher Rear Motor - Left
Cypher Front Motor - Right
Cypher Front Motor - Left
4 EDF Units (FPM387012 & FPM387013)
INCLUDED!
NEEDED TO
COMPLETE
NEEDED TO
COMPLETE
2200-5200mAh 3S 11.1V 40C+ Li-Po
(FPZB35003S75)
6+ Channel Computer Transmitter
Spektrum SRXL Receiver
Futaba S.Bus Receiver
FrSky S.Bus Receiver
NEEDED TO
COMPLETE
Receiver
Hitec S.Bus Receiver
Graupner SumD Receiver
JR XBus Mode B Receiver
Jeti EX-Bus Receiver
PPM 6+ Channel Receiver (Any
Brand)
WARNING
FOLLOW ALL INSTRUCTIONS PROVIDED BY YOUR
BATTERY AND CHARGER MANUFACTURER.
FAILURE TO COMPLY CAN RESULT IN FIRE.
The assembly of the FV-31 Cypher can be accomplished in
less than one hour. Prior to assembling the aircraft, it is
advisable to charge your battery so that you are ready to begin
setup upon completion of the assembly of your model.
OPTIONAL ACCESSORIES
FPZB26003S45
FPZB35003S75
SPM4649T
SPMAR8010T
FUTR2001SB
FUTR7003SB
FPM387016
FPZA1010
ISDTD2
ISDTT8
Potenza 3S 2600mAh 45C Li-Po
Potenza 3S 3500mAh 75C Li-Po
Spektrum Serial Telemetry Receiver
Spektrum AR8010T DSMX Receiver
R2001SB S.BUS S-FHSS Receiver
R7003SB S.BUS FASSTest Receiver
Keychain Camera Mount (Cypher)
Potenza Digital Battery Analyzer
ISDT 2-Port 200W AC Charger
ISDT 1000W DC Charger
(Recomended
SPM Receiver)
(Recomended
FUT Receiver)
We recommend the use of an advanced Li-Po balancing
charger for your batteries to get the maximum performance
and lifespan.
Our aircraft are designed around our Potenza Li-Po batteries,
and we recommend the Potenza 3S 3500mAh 75C Li-Po
based on our extensive testing and development. These
batteries feature an EC3 connector, so no soldering is required
for use in your Cypher.
All are available at flexinnovations.com
3

SPECIAL LANGUAGE DEFINITIONS
WARNING
AGES 14+
NOTICE:
CAUTION:
WARNING:
Procedures, which if not properly followed, create a possibility of physical
property damage AND a little or no possibility of injury.
Procedures, which if not properly followed, create the probability of physical
property damage AND a possibility of serious injury.
Procedures, which if not properly followed, create the probability of property
damage, collateral damage, and serious injury OR create a high probability of
serious injury.
Read the ENTIRE instruction manual to become familiar with the features of the
product before operating. Failure to assemble or operate the product correctly can
result in damage to the product, personal property, and cause serious or fatal injury.
All instructions, warranties and other collateral documents are subject to change at
the sole discretion of Flex Innovations, LLC. For up-to-date product literature, please
visit our website at www.flexinnovations.com, click on your aircraft and the FLEXF3
product pages.
This product is not intended for
use by children under 14 years
without direct adult supervision.
IMPORTANT INFORMATION REGARDING WARRANTY
SAFETY WARNINGS AND PRECAUTIONS
Please read our Warranty and Liability Limitations section before building this product. If you as the Purchaser or user are not
prepared to accept the liability associated with the use of this Product, you are advised to return this product immediately in
new and unused condition to the place of purchase.
Protect yourself and others by following these basic safety guidelines.
1. This manual contains instructions for safety, operation and maintenance. It is essential to read and follow all the
instructions and warnings in the manual, prior to assembly, setup or use, in order to operate correctly and avoid damage or
serious injury.
2. This model is not a toy, rather it is a sophisticated hobby product and must be operated with caution and common sense.
This product requires some basic mechanical ability. Failure to operate this product in a safe and responsible manner could
result in injury or damage to the product or other property.
3. This model must be assembled according to these instructions. Do not alter or modify the model outside of these
instructions provided by Flex Innovations LLC as doing so may render it unsafe and/or unflyable. It is your responsibility to
ensure the airworthiness of the model.
4. Inspect and check operation of the model and all its components before every flight.
5. If you are not an experienced pilot or have not flown a high-performance model before, it is recommended that you seek
assistance from an experienced pilot in your R/C club for your first flights. If you're not a member of a club, the Academy of
Model Aeronautics (AMA) has information about clubs in your area whose membership includes experienced pilots.
6. Keep the fan area clear from such items as loose clothing, jewelry, long hair, or tools as they can become entangled. Keep
your hands and body parts away from the propeller as injury can occur.
7. Never fly in visible moisture, or submerge the airplane or any of its electronic components in water. Permanent damage to
electronic components may occur, or corrosion of components may lead to intermittent failures.
4
The following terms are used throughout the product literature to indicate various levels of potential harm when operating this product:
ATTENTION
FLEXF3 CONTROL SYSTEM
The FLEXF3 Control System installed in your aircraft is
specifically tuned and configured for the FV-31 Cypher.
Compatible with virtually every serial-based receiver on the
market, the FLEXF3 features special configuration for serial
data connections using Spektrum SRXL, Futaba, Hitec and
FrSky S.Bus, Graupner HOTT (Sum D of 8), JR XBus (Mode B),
and Jeti EX-Bus (standard) systems, as well as PPM
connections.
The FLEXF3 Control System installed in your aircraft has been
pre-tuned for ease of use, eliminating many hours of tedious
setup. For the latest features, programs, transmitter downloads,
and instructions, please visit:
wiki.flexinnovations.com/wiki/Cypher
The FLEXF3 is programmable through any Windows or Mac OS
based PC or tablet utilizing the Betaflight Configurator or
through any Android or iOS device using the SpeedyBee
application. All dual rate, expo, travel and assignable mode
programs are adjusted inside the FLEXF3 System through the
PC or mobile application.
Description of Pre-Configured Control Modes and Flight Configurations
The FV-31 Cypher comes pre-configured with two Control Profiles (Beginner or Advanced) that are controlled by your transmitter's
channel 5 and three Flight Configurations (Hover Configuration, 45° "Magic" Configuration and Conventional Configuration) that are
controlled by transmitter channel 6. The pilot can select between any of these at any time during the flight. Reference the charts below for
further information.
Works conveniently with all major radio systems
Accepts signals from Spektrum SRXL, Futaba, Hitec or
FrSky S.Bus, Graupner Hott (Sum D of 8), JR XBus (Mode
B), Jeti EX-Bus (standard), or PPM Stream.
Expertly tuned and ready to use
USB port allows, user programming, and firmware updates
(bluetooth module included)
3 Flight Configurations and 2 Control Profiles allow
assistive or aggressive settings to be selected in flight
3-axis and 6-axis gyro utilized in aircraft programming
Visit wiki.flexinnovations.com/wiki/Cypher for
the latest product information and tips for your
particular radio brand.
Beginner Profile
(6-axis)
Advanced Profile
(3-axis)
Hover Configuration
45° "Magic" Configuration
Conventional Configuration
Hover Configuration
In this profile, the aicraft will return to upright level flight when the transmitter
sticks are returned to neutral. Also, bank and pitch angles are limited to
approximately 68 degrees and the aircraft will not fly inverted.
In this profile, the aicraft has no pitch or bank limits and will not try to return to
level flight when the transmitter sticks are centered. The aircraft is fully
aerobatic in this profile, including loops, rolls, flips and more.
Channel 5
In this configuration, the rear fans are tilted near parallel to the wings. The
aircraft will hover and flies primarily like a helicopter or multirotor in this
configuration. Takeoffs and landings can be done in this flight configuration.
In this configuration, the rear fans are tilted to a 45 degree angle. The aircraft
will fly forward at approximately 12 mph (19kph) and flies like a hybrid between
a helicopter (or multirotor) and an airplane. Short takeoffs and landings can be
done in this flight configuration.
In this configuration, the rear fans are tilted perpendicular to the wings. The
aircraft will fly like a traditional airplane in this configuration, using differential
thrust from the rear fans for yaw control. Traditional airplane takeoffs and
landings can be done in this flight configuration.
45° "Magic" Configuration
Channel 6
Conventional Configuration
5

WARNING
DO NOT ATTEMPT RADIO SETUP WITH PROPELLERS INSTALLED. INADVERTENT POWER UP COULD CAUSE
DEATH OR SERIOUS INJURY.
TRANSMITTER SETUP
The FLEXF3 system is designed to work with all major transmitter and receiver brands. The FV-31 Cypher requires a
minimum 6-channel programmable transmitter for proper function. When programming your transmitter, start with a freshly
reset new model memory in your transmitter. Make ONLY the changes shown in the Transmitter Configuration Guide
unless otherwise noted.
The FLEXF3 in your aircraft defaults to three flight configurations that are switched via CH6 in your transmitter. In your
transmitter, you may need to reassign CH6 to a three-position switch.
The FLEXF3 in your aircraft also defaults to two flight profiles that are switched via CH5 in your transmitter. In your
transmitter, you may need to reassign CH5 to a two-position switch.
Consult your transmitter manual if you have questions on how to change the switch or channel assignments.
The FLEXF3 comes pre-programmed with rates and expos specifically designed for your aircraft and its flight configurations.
For changes in expo or dual rates, it is highly recommended to tune through the Betaflight Configurator or Speedy Bee mobile
app.
The Betaflight Configurator is free to download, and can be used on any Windows or MacOS based PC or tablet.
Download at:
https://github.com/betaflight/betaflight-configurator/releases
The SpeedyBee mobile application is free to download and can be used on both android and iOS devices. Simply
search "SpeedyBee"in your device's application store.
NOTICE
The following pages provide specific information for transmitter setup and
receiver selection for some of the most common transmitter and receiver brands.
Please follow the instructions closely.
For transmitter and receiver brands not covered in this instruction manual,
please visit our wiki page for this aircraft at the web address below:
wiki.flexinnovations.com/wiki/Cypher
You can skip ahead to the section in this instruction manual that pertains to your particular transmitter
and receiver type. Use the info below for specific page information.
Spektrum
Futaba
Page 7
Page 14
6
SPEKTRUM TRANSMITTER AND RECEIVER SETUP
Transmiter Setup
Follow the chart below for setup of your Spektrum transmitter. Be sure to start with a blank and freshly reset model
memory before starting setup.
TRANSMITTER CONFIGURATION GUIDE
Spektrum
Frame Rate
Wing/Tail Type
End Points
(Travel Adjust
or ATV)
Reversing
Sub Trim
Trim Levers
CH. 5 (Gear)
CH. 6 (Aux 1)
Timer
Channel Assignment
Your transmitter's instruction manual is the best place to find information on how to assign channels in your transmitter. For
most Spektrum transmitters, you can follow the instructions below.
11ms Preferred (22ms OK)
1 Aileron, 1 Elevator, 1 Rudder
Thro/Ail/Ele/Rud
CH5/CH6
Throttle - Normal
Verify at zero, NOT ALLOWED
Verify at zero
Assigned to a 2-position switch (selects FLEXF3 Control Profiles)
Assigned to a 3-position switch (selects FLEXF3 Flight Configurations)
4
Start with: 2:20 (3S 2200mAh), 3:00 (3S 2600mAh), 3:40 (3S 3500mAh)
148%
100%
(CH6 set to 100% initially, fine tuned later in this manual)
Rudder - ReversedAileron - Reversed Elevator - Normal
Navigate to your transitter's "System Setup" menu. This is typically done by holding the scroll wheel down while powering
1.
on your transmitter.
Locate the "Channel Assign" menu and enter it by selecting with a press of the scroll wheel.
2.
Once in the Channel Assign menu, navigate to the page titled "Channel Input Configuration."
3.
Locate Channel 5 (Gear) and select the two-position switch you want to control the Flex F3 Profiles (Beginner/Advanced
4.
Profiles). You can reverse Channel 5 to reverse the switch direction if desired.
Locate Channel 6 (Aux 1) and select the three-position switch you want to control the Flight Configurations (Hover/45°
5.
Magic/Conventional Configurations). We set this on a switch so that the up or forward switch position is the Conventional
Flight Configuration (forward flight = forward switch). You can reverse Channel 6 to reverse the switch direction if desired.
Use the back button to navigate back the home flying screen.
6.
Click the scroll wheel and navigate to your transmitter's "Monitor." Verify Channel 5 (Gear) and Channel 6 (Aux 1) move
7.
accordingly when you move the switches assigned in steps 4 and 5.
7
SPEKTRUM TRANSMITTER AND RECEIVER SETUP (CONTINUED)
Laps/V Batt
GND
4V-8.4V
GND
Serial/Bn
N/C
Receiver Selection
For Spektrum users, you must use an SRXL capable receiver. We've listed a few options below for FLEXF3 compatible
receivers:
Spektrum Quad Race Serial Receiver with Telemetry (SPM4649T) - Highest Recommended
Spektrum AR8010T (SPMAR8010T)
Spektrum AR9030T (SPMAR9030T)
Spektrum AR7700 (SPMAR7700) - no telemetry
Spektrum remote receivers are not supported with this product.
Receiver Installation
Install your Spektrum receiver and antennas according to your receiver's instruction manual.
There are two recommended methods to connect your Spektrum receiver to the FLEXF3. CHOOSE ONE METHOD.
Connection A
Connect to the FLEXF3 board in this manner to simplify setup, as it does not require the use of a PC or mobile application
for receiver setup. PC or mobile application setup still required for Beginner profile calibration. This works with ALL Spektrum
SRXL capable receivers.
Connection B
Connect to the FLEXF3 board in this manner to gain the use of Betaflight telemetry. This does require the use of the Betaflight
PC application or SpeedyBee mobile application to configure. This also requires the use of a telemetry capable receiver.
Telemetry setup in your transmitter is required for the transmitter to receive telemetry data. See the Cypher wiki page for
further details.
wiki.flexinnovations.com/wiki/Cypher
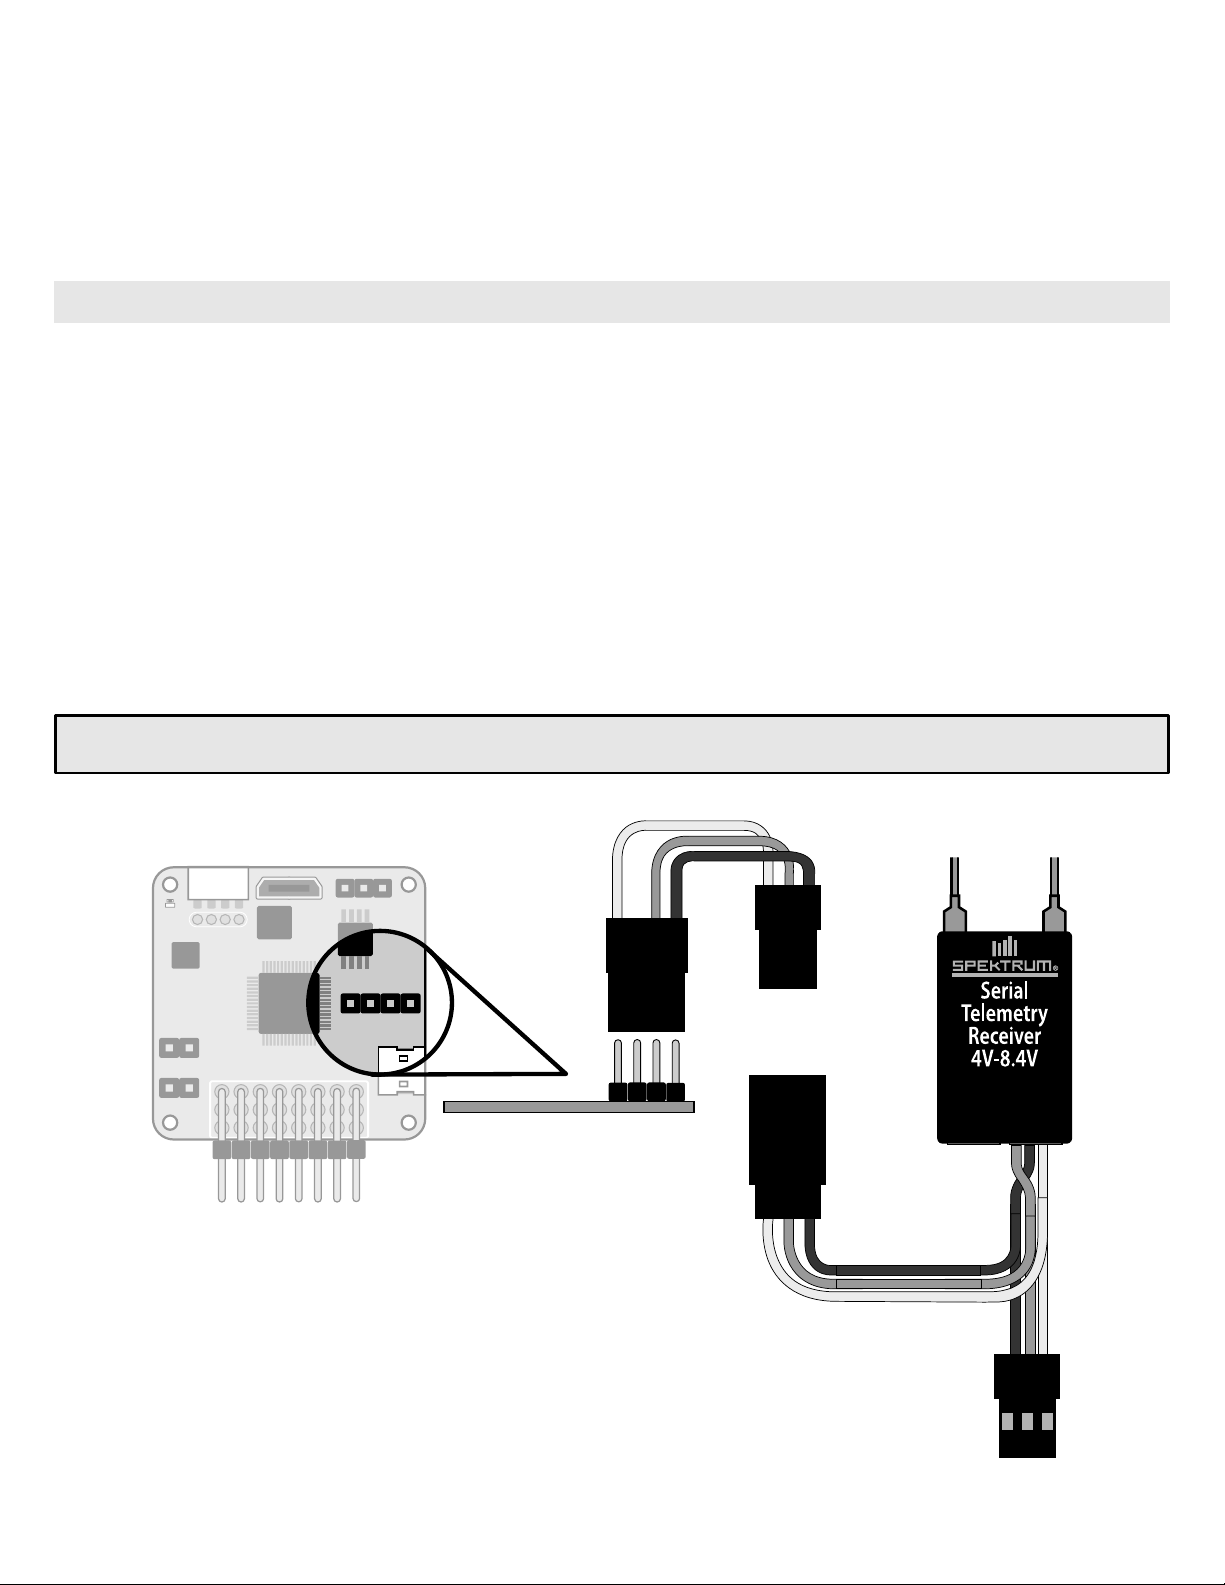
Connection A (without Betaflight Telemetry)
Spektrum AR4649T
3 to 4 Pin
Male to Male
(Provided)
S + -
Male End
(Bind)
8
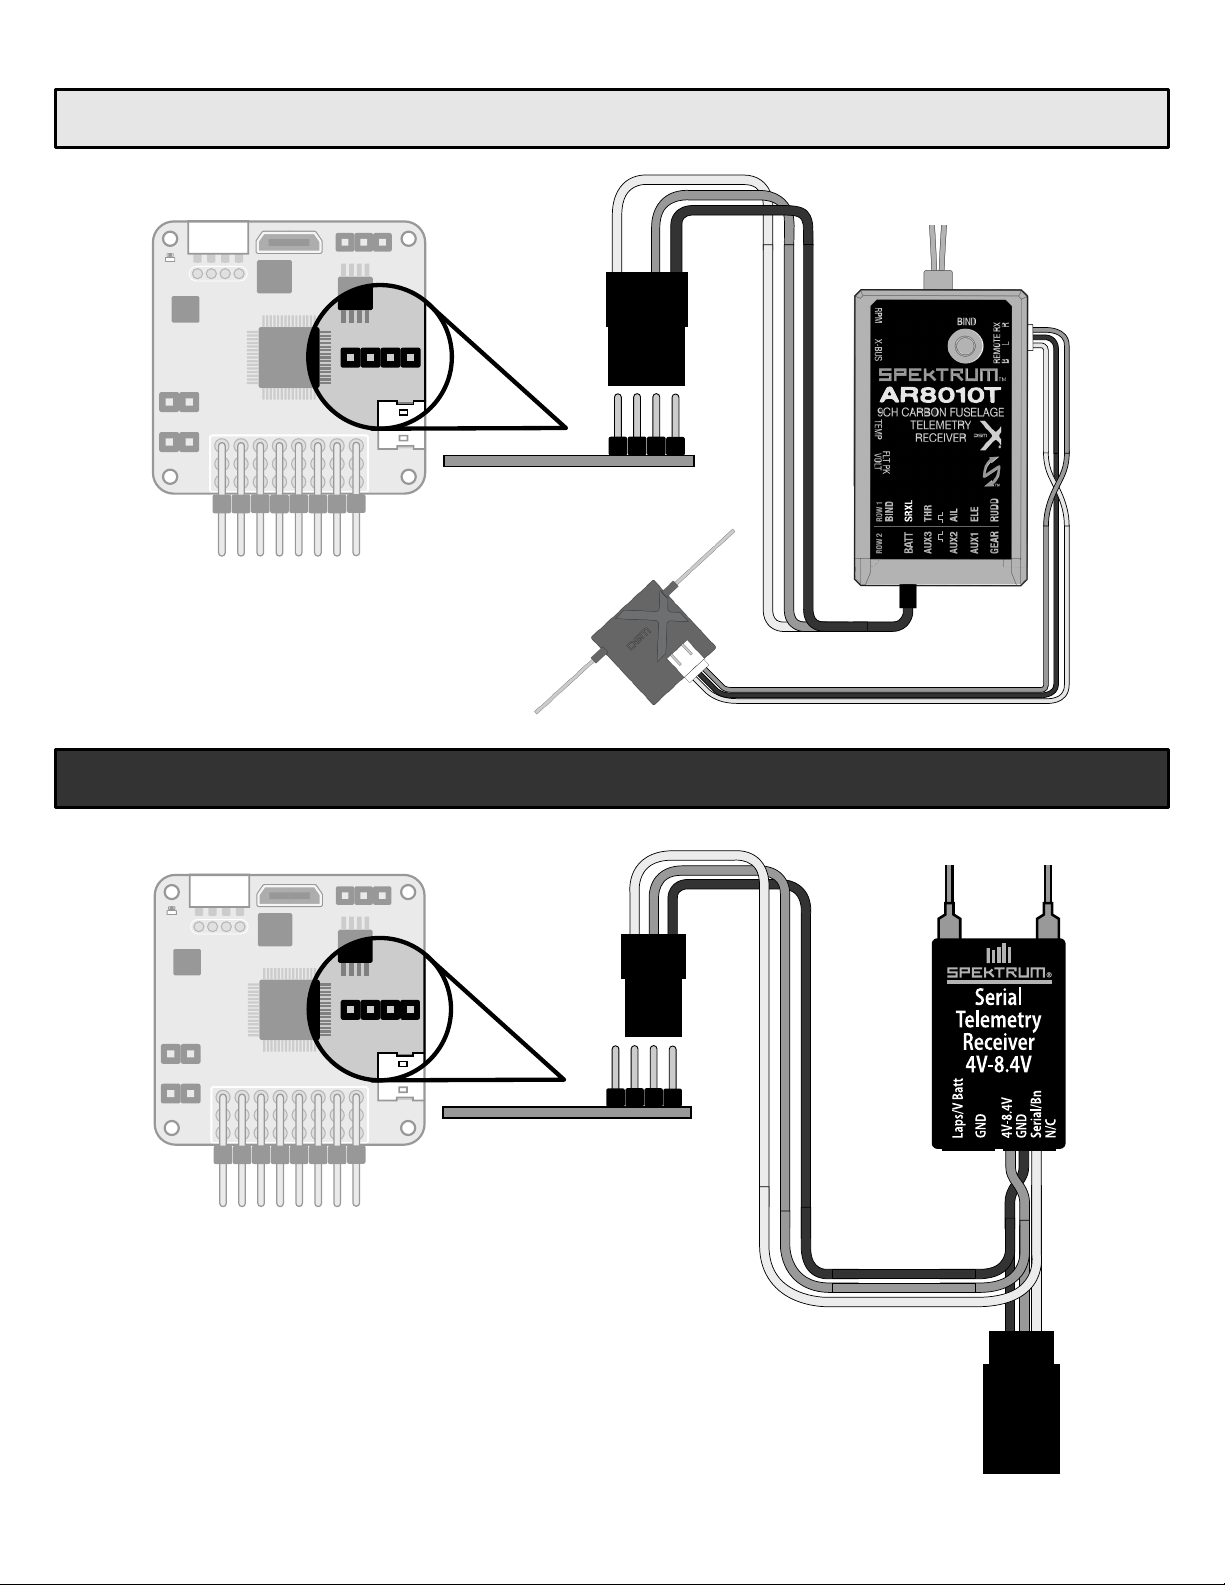
SPEKTRUM TRANSMITTER AND RECEIVER SETUP (CONTINUED)
Connection A (without Betaflight Telemetry) (Continued)
Spektrum AR8010T with SRXL
3 to 4 Pin
Male to Male
(Provided)
Spektrum AR4649T
S + -
To SRXL Port
Connection B (with Betaflight Telemetry)
Male End
+
+
-
Betaflight (PC) or SpeedyBee (mobile) application setup required for Connection B.
9
Female End
(Bind)
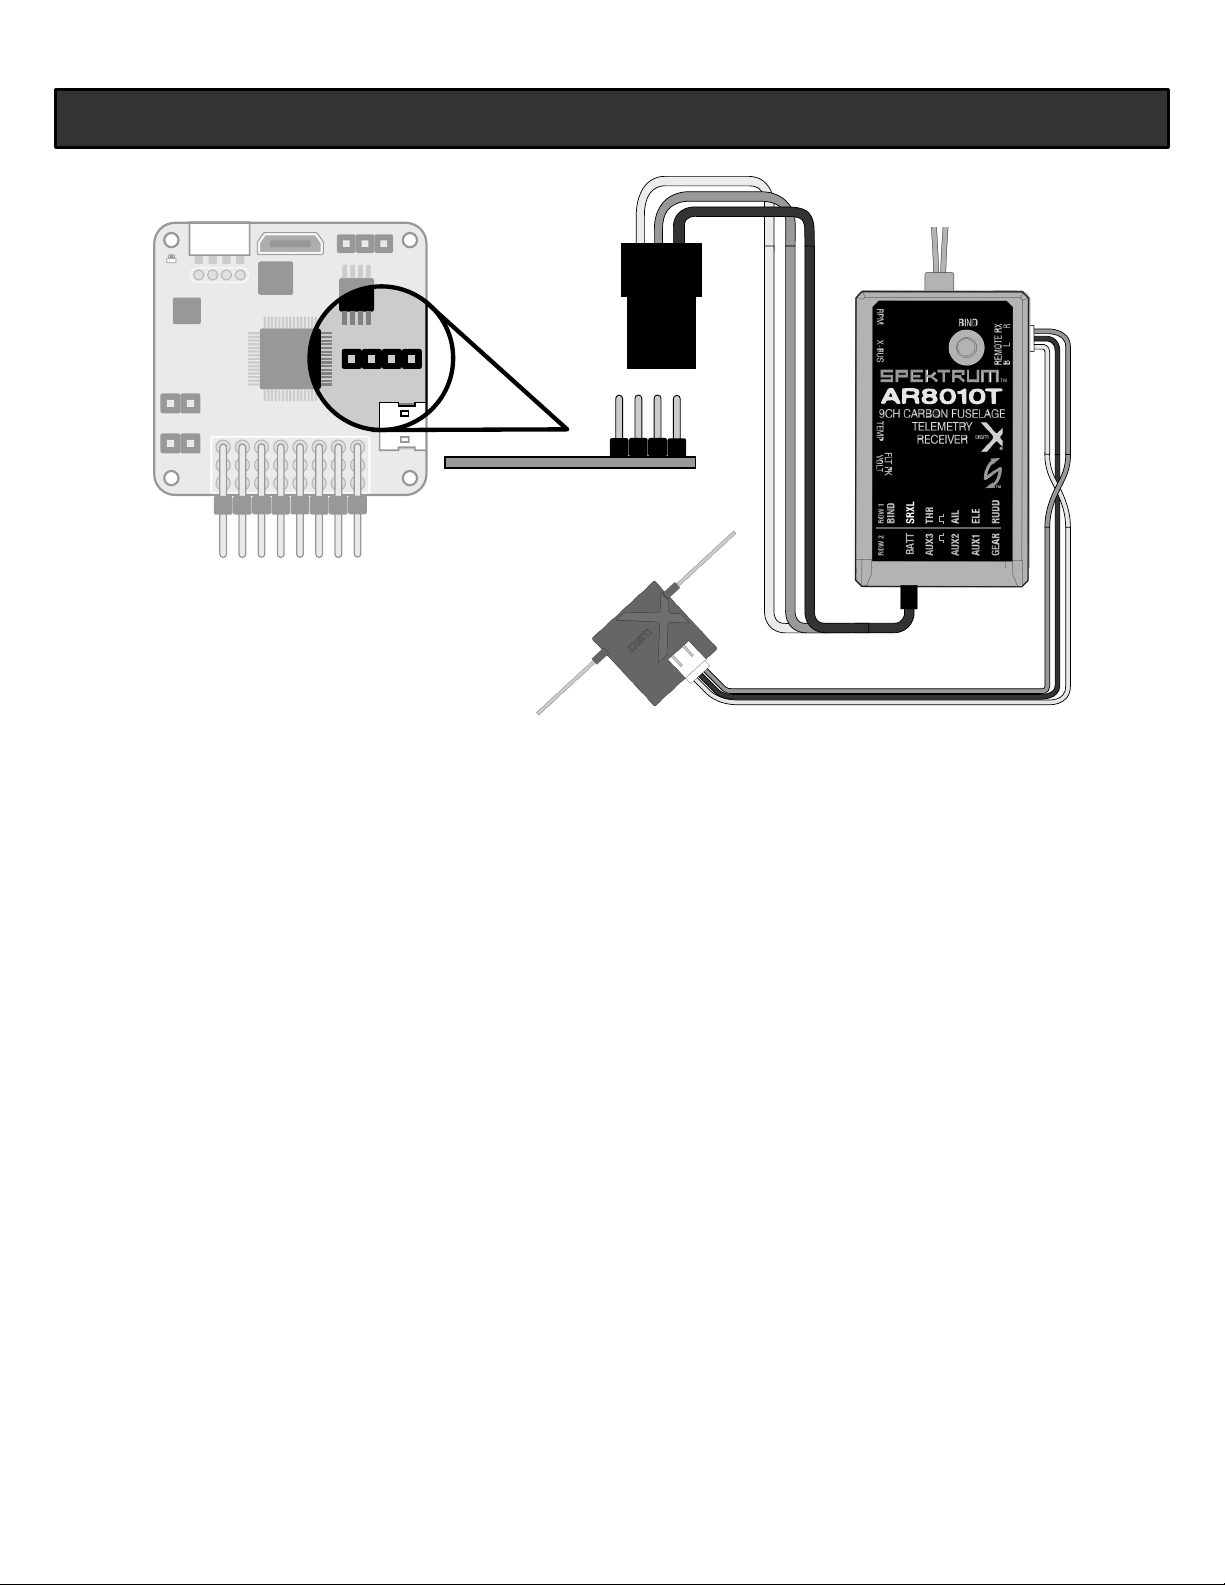
SPEKTRUM TRANSMITTER AND RECEIVER SETUP (CONTINUED)
Connection B (with Betaflight Telemetry) (Continued)
Spektrum AR8010T with SRXL
3 to 4 Pin
Male to Male
(Provided)
S + -
Betaflight (PC) or SpeedyBee (mobile) application setup required for Connection B.
To SRXL Port
+
+
-
10

SPEKTRUM TRANSMITTER AND RECEIVER SETUP (CONTINUED)
Connection B (with Betaflight Telemetry) Application Setup
If you have chosen to utilize a Betaflight Telemetry connection (Connection B), please follow the steps below to activate
Telemetry on the Betaflight PC application or SpeedyBee mobile application. If you have chosen Connection A (without
Betaflight Telemetry, please proceed to the section on page 14 titled "Binding".
1.
Download the Betaflight Configurator for your computer or the SpeedyBee Application for your mobile device. You can
search for these applications online (or in your mobile device's app store) or visit the web addresses shown below.
Betaflight Configurator
SpeedyBee Mobile App for iOS
SpeedyBee Mobile App for Android
2.
Computer
Connect the FLEXF3 controller to the computer via the provided USB cable. You do not need to power the aircraft with
your flight battery.
Mobile Device
Connect the provided bluetooth module to the FLEXF3 controller. You will then need to power the aircraft in order to
provide power to the bluetooth module. You do not need to pair the device in your mobile device settings menu.
3.
Open the application. Click "Connect" in the upper right hand corner to connect to the FLEXF3 controller.
https://github.com/betaflight/betaflight-configurator/releases/
Search for "SpeedyBee" in your device's application store
11
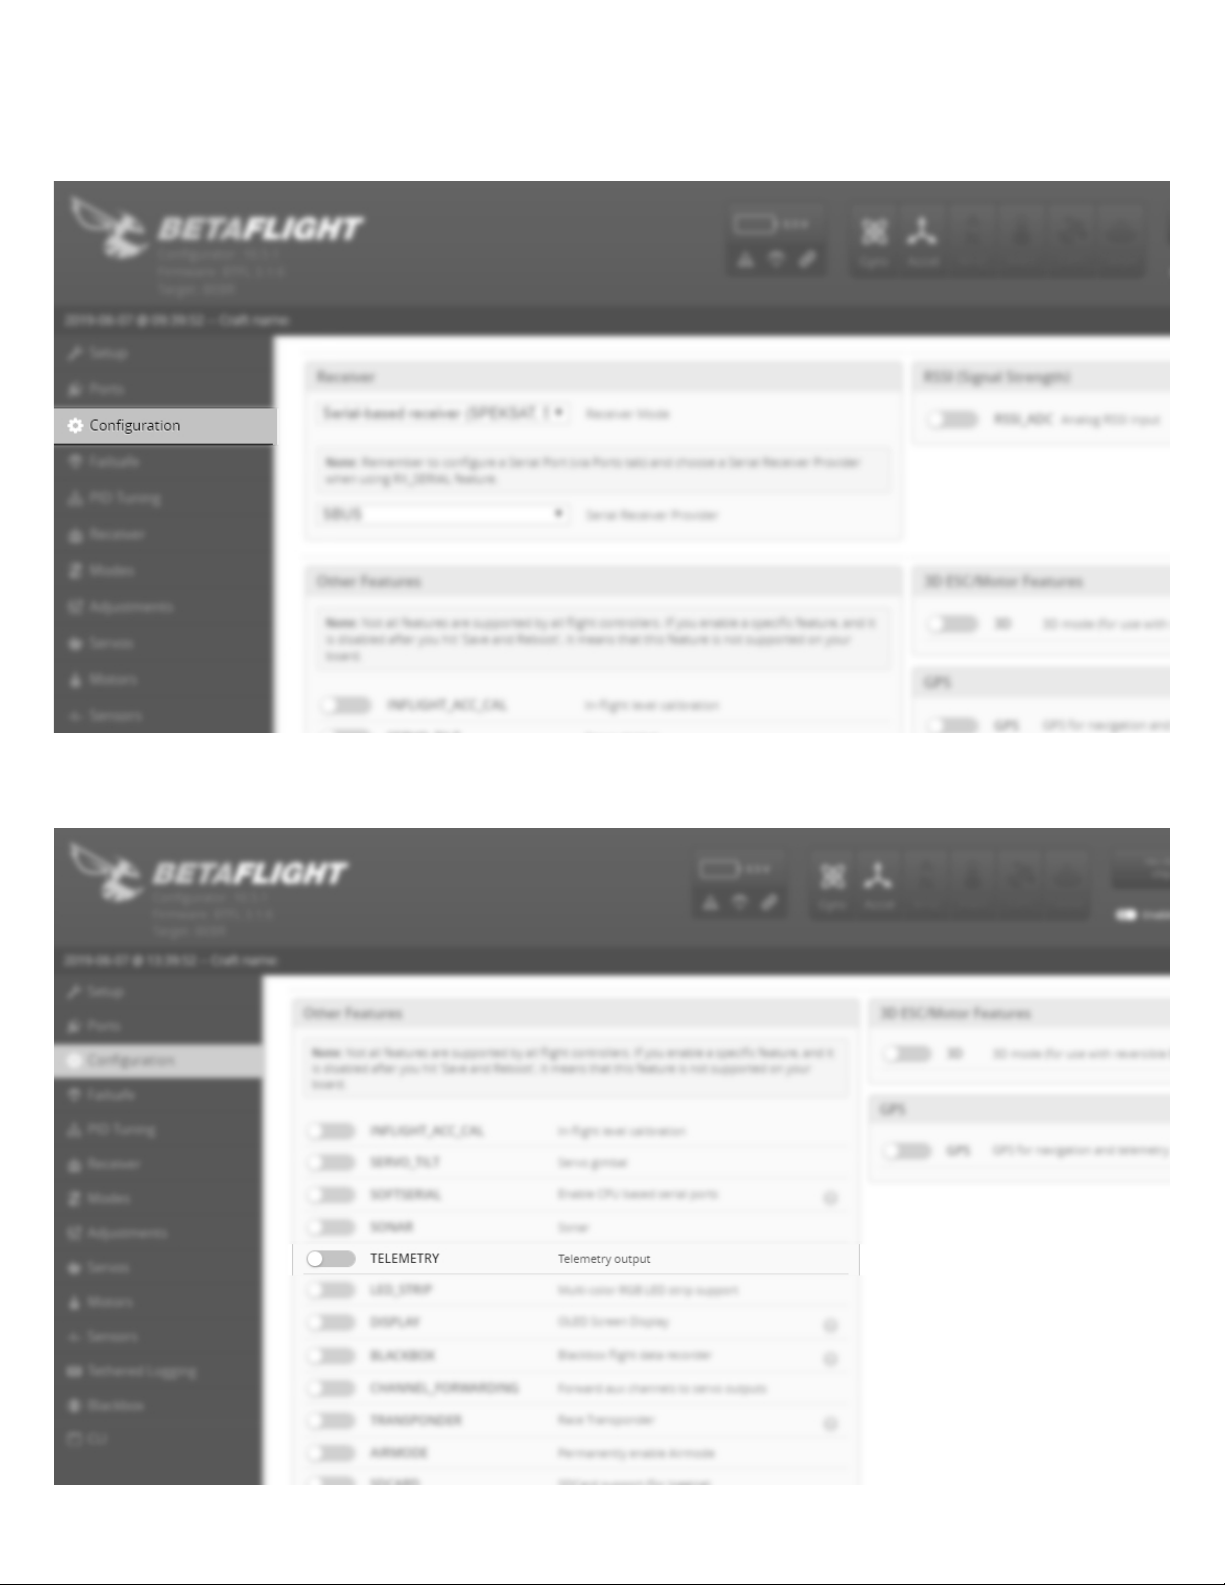
Connection B (with Betaflight Telemetry) Application Setup (Continued)
If you have chosen Connection A (without Betaflight Telemetry, please proceed to the section on Page 13 titled "Binding".
Click the Configuration tab on the left side of the application.
4.
Scroll down until you see the switch tab for Telemetry. Slide this tab into the on (yellow) position. Click Save and Reboot in
5.
the lower right hand corner to save the settings to the F3 controller. Click disconnect to complete the process. Remove the
USB cable from the FLEXF3 controller.
12

SPEKTRUM TRANSMITTER AND RECEIVER SETUP (CONTINUED)
Binding
Reference your transmitter and receiver's instruction manual for specifics on the bind process.
1.
With the aircraft and transmitter powered off, insert a bind plug into your receiver's bind port (or press and hold the bind
button on your receiver if available).
Note: If you are using the AR4649T Serial Telemetry receiver, this may be the male or female lead depending on your
connection type. Reference the receiver connection drawings in the previous pages for details.
2.
Power on the aircraft with the flight battery. Confirm the receiver has entered bind mode by looking for a rapidly flashing
LED on the Spektrum receiver.
Follow your transmitter's instructions on placing the transmitter into bind mode. Once bound, the LED on the receiver will
be solid orange.
NOTICE
You will not gain control after the bind process until you remove the bind plug from the
receiver. Remove the bind plug, wait two seconds, and then check for control function.
13
 Loading...