

Page 1
INSTALLATION, USE AND MAINTENANCE BY THE INSTALLER
© All rights reserved. FlexiForce
®
2017
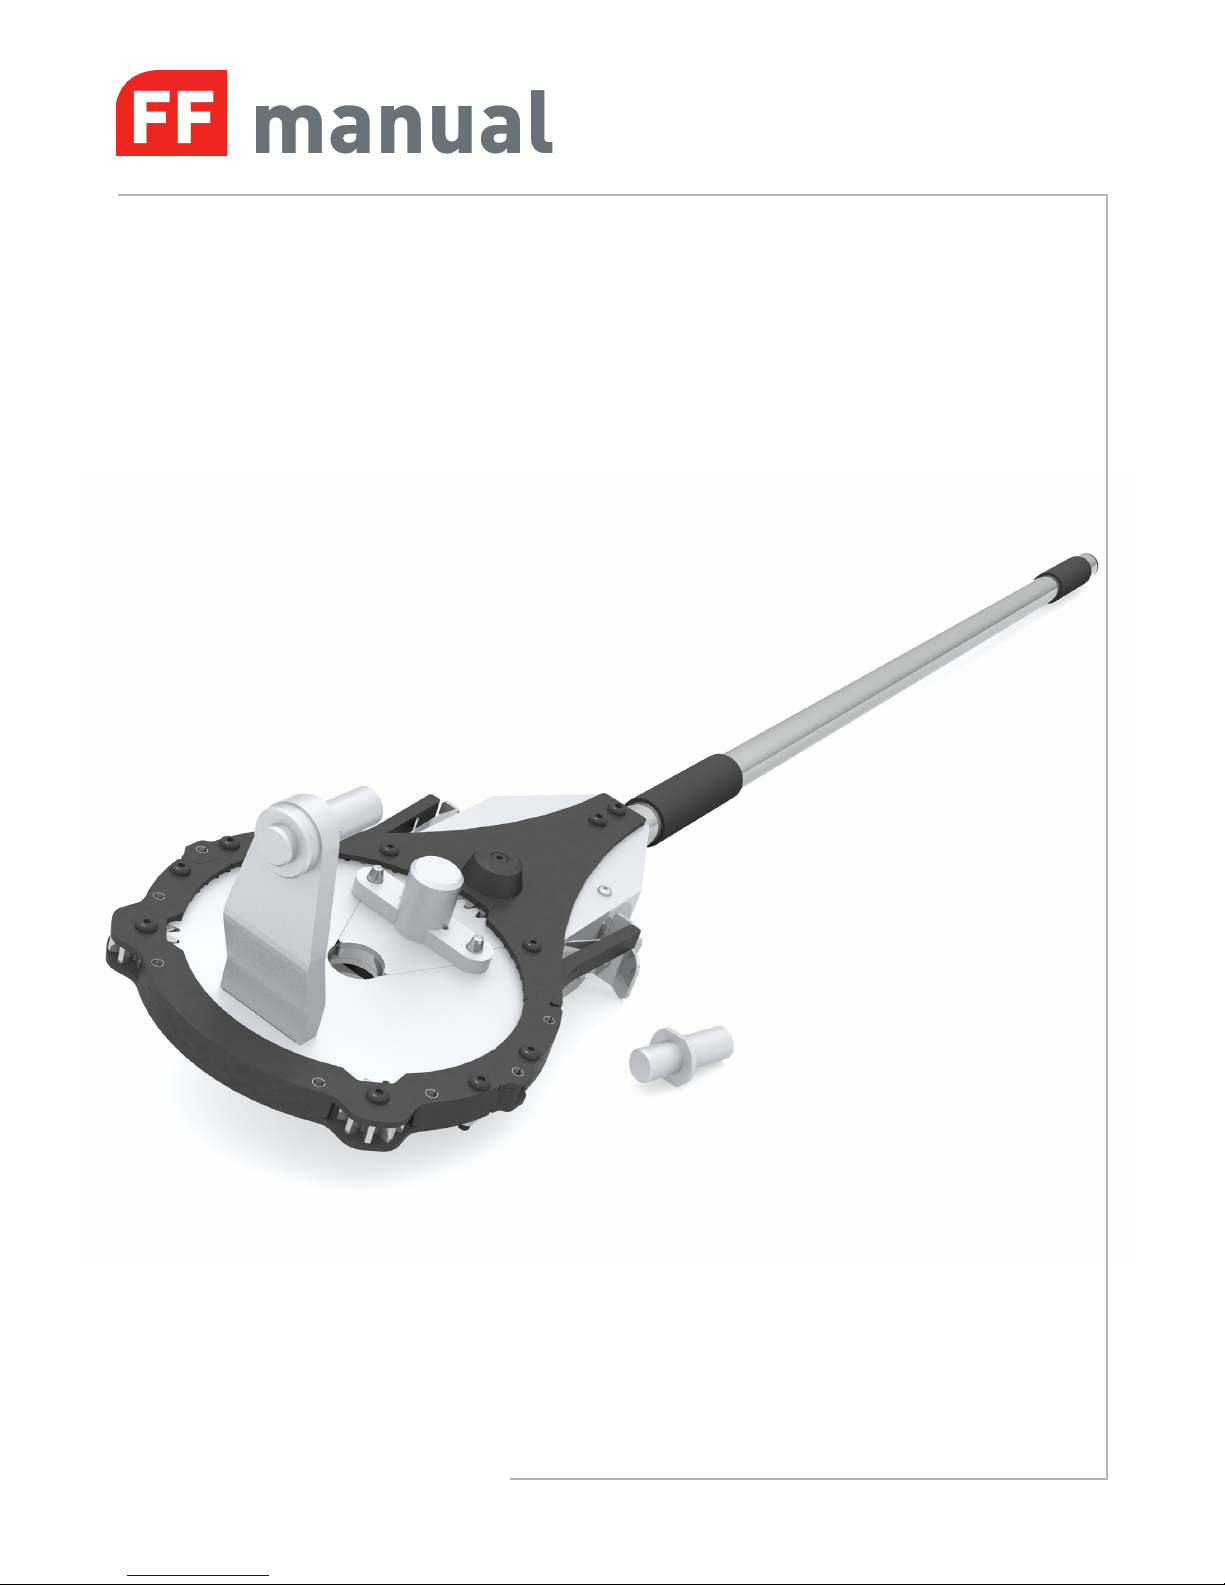
User manual ISTT
ISTT & ISTT-125:
Industrial Spring Tensioning Tool
ISTT use in combination with FlexiForce spring fittings and 1”shaft
ISTT-125 use in combination with FlexiForce spring fittings and 1¼”shaft
Max. Torque 210Nm
Max. RPM 2500
www.flexiforce.com
GB
Page 2
manual
Before you start; read this manual carefully and check the video on youtube
It is advised to practise the use of the tool in a test enviroment
If anything is unclear or should you have queries, please contact FlexiForce or you supplier
ATTENTION! GENERAL WARNINGS!
To use, operate and service this tool, a number of precautions must be taken.
For safety reasons pay heed to the warnings and instructions given below !
If in doubt, contact your supplier
9 This manual has been written for use by experienced fitters and as such is not suitable for d.i.y. purposes or for use by
trainee fitters.
9 This manual only describes the operation and servicing of the industrial spring tensioning tool.
9 All safety warnings or remarks valid for the installation of the compleet sectional overhead door need to be considered
9 Certain components may be sharp or have jagged edges. As such you are advised to wear safety gloves.
9 The guarantee will terminate in case components will be added or changed without any consultation with the supplier
9 During tensioning, springs can exert large forces. Ensure that you are standing in a steady position.
9 Ensure that there is sufficient light during installation. Make sure that there is no one else present other than the fitters.
9 All rights derived from this manual are reserved. Technical information is subject to change without notice
CHECK THE TOOL FOR DAMAGES BEFORE TENSIONING A SPRING, DO NOT USE THE TOOL WHEN DAMAGED
UNDER NO CIRCUMSTANCES DISASSEMBLE THE TOOL, BEFORE FIXING THE WINDING PLUG TO THE SHAFT !
ALWAYSE USE THE SICKLE LEVER TO SECURE THE TOOL
MAKE SURE THE GEAR COVER IS FIXED TO THE DRIVE UNIT BEFORE TENSIONING
MAKE SURE THE PROPER SIZE INSERT PIN IS USED ON THE SPRING WINDING PLUG
DO NOT EXCEED THE PRESCRIBED MAX. RPM AND MAX. TORQUE
ONLY USE ISTT ON 1” (25.4MM) SHAFT
ONLY USE ISTT-125 ON 1¼” (31.75MM) SHAFT
ONLY USE ON FF SPRING WINDING PLUGS
MAKE SURE THE INSERT PIN IS TIGHTENED CORRECTLY IN THE GEAR WHEEL
ALWAYSE USE THE RIGHT HAND DIRECTION OF THE DRILL TO WIND UP SPRINGS
USE PROPER DRILL
DO NOT DISMANTLE OR BEND AWAY THE SAFETY LEVER FROM THE DRIVE UNIT
CARRY OUT THE MAINTENANCE AS PRESCRIBED
With the proper maintenance and correct usage the ISTT is suitable to tension at least 3000 torsion springs without any problems.
User Manual ISTT www.flexiforce.com
GB
Page 3
Maintenance and checks
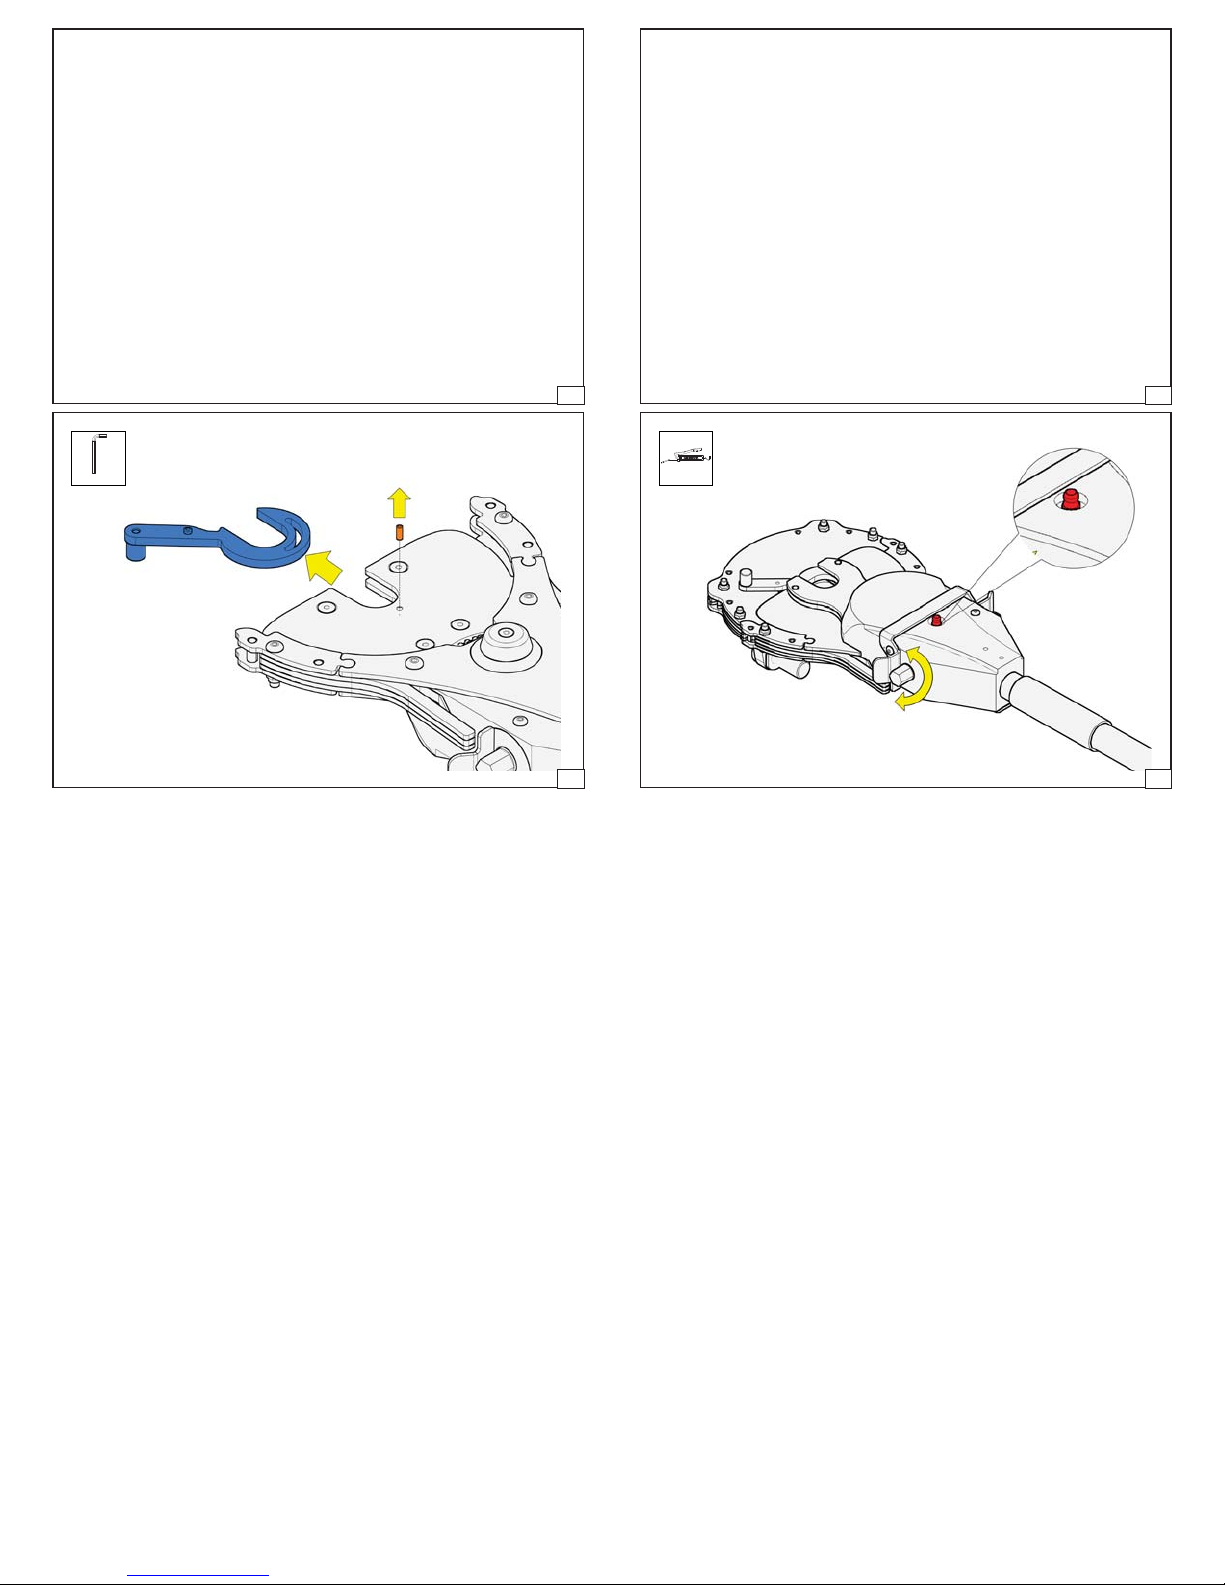
Maintenance and checks
Keep the teeth of the gear wheel clean and
greased.
Keep the bore of the gear wheel clean and
grease the surface of the bore before use.
Inspect the tool for wear, clearance, damage
before use. Do not use the spring tensioning
tool if safety is not assured !
95 122 991 rev. 30-10-2018
Keep sickle lever clean.
1,5 mm
Check dimensions A,B,C and D !
(See page 9,10 and 11)
Do not use the spring tensioning
tool if wear limits are crossed !
1
95 122 991 rev. 30-10-2018
Grease the nipple on the rear
after tensioning 50 springs
2
95 122 991 rev. 30-10-2018
Test run the device,the surplus of grease
will come out of the drive unit
3
95 122 991 rev. 30-10-2018
4
Page 4
1
Needed tools
2
3
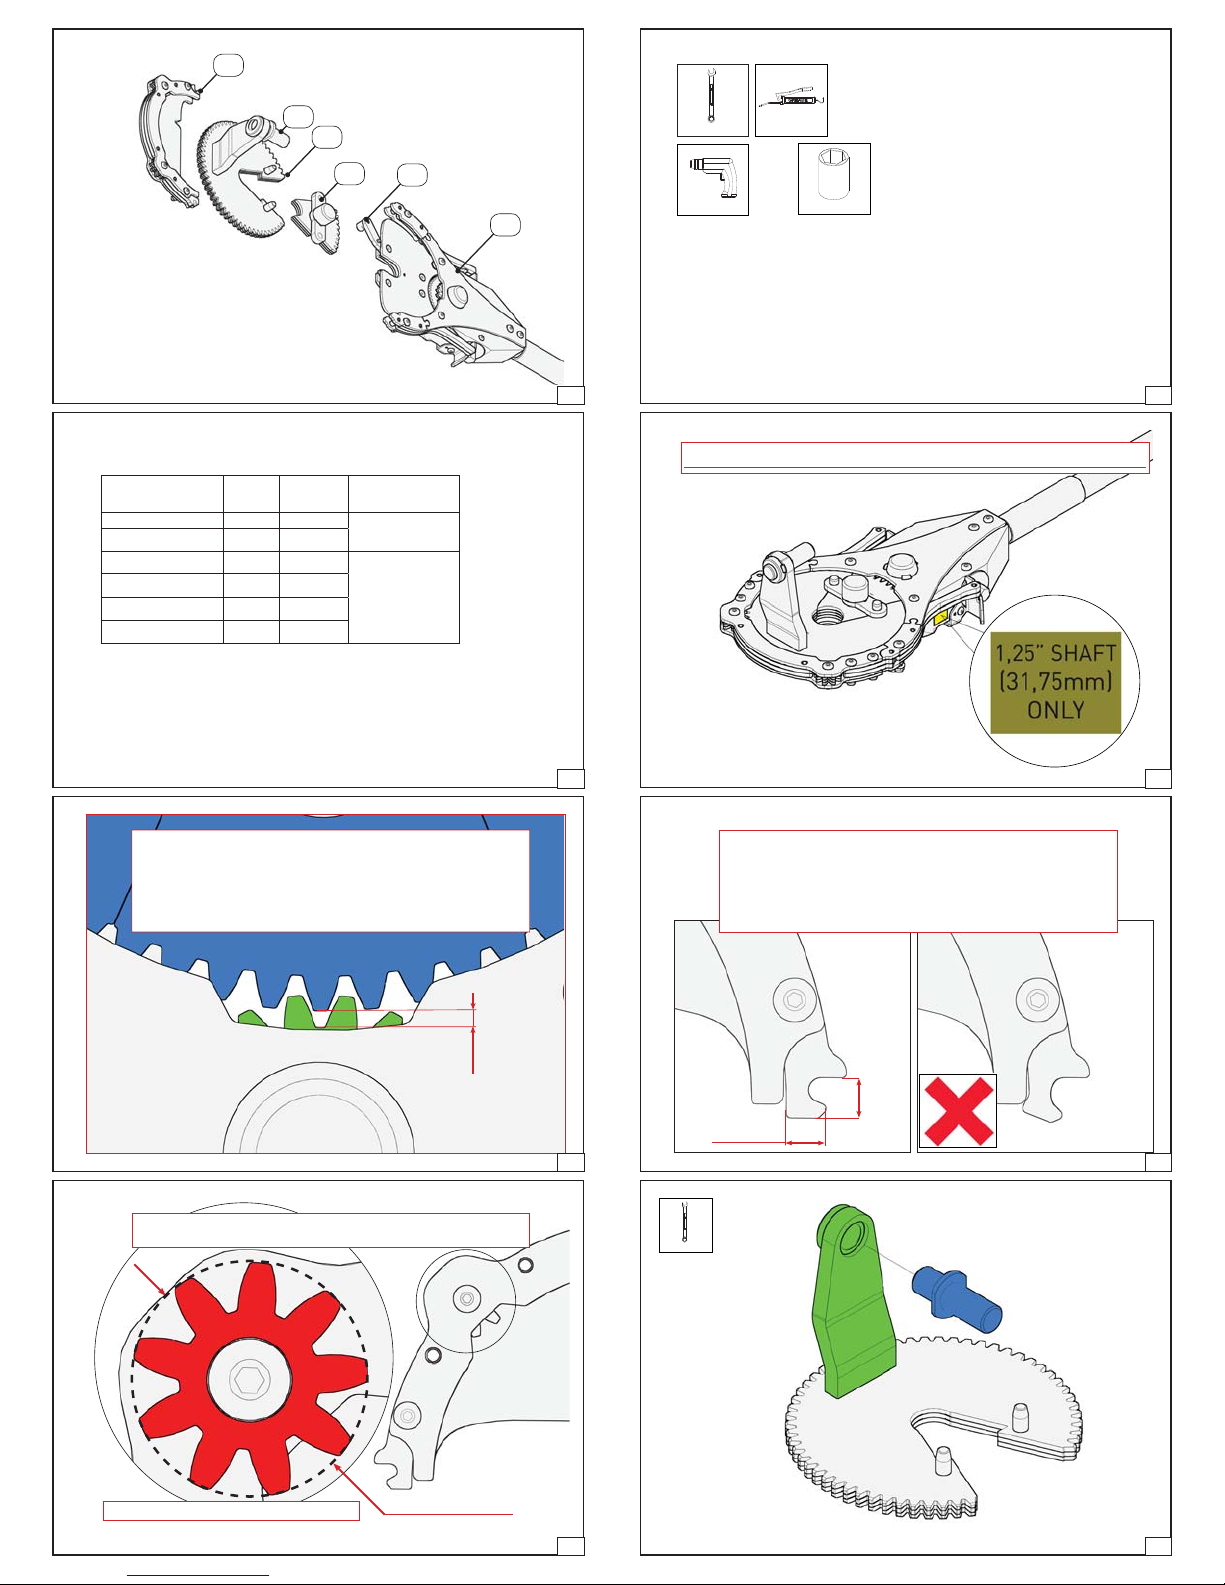
1 : Gear Cover
2 : Select Insert Pin
3 : Large Gear Wheel
4 : Insert Gear Wheel
5 : Sickle Lever
6 : Drive Unit
95 122 991 rev. 30-10-2018
Select ISTT & Insert Pin
FF Sping plug SHAFT TOOL Insert Pin
FF200 1” ISTT
FF263 1” ISTT
FF375 1” ISTT
FF375N 1” ISTT
FF600N 1” ISTT
FF600N125 1¼” ISTT-125
4
5
Ø13,3x43
Ø16x33
* Use with FF spring plugs only !!!
* Only use FF insert pins
1HYHUDOWHUWKHLQVHUWSLQVWR¿WWRWKHUEUDQGSOXJV
24 mm
+
PP
6
5
Suitable drill
Cordless drill: 18V n = 1500 RPM direction of rotation left hand and right hand.
Power drill: 230V, 750 W n = 2500 RPM max. direction of rotation left hand and right hand.
To wind up a spring always use the right hand direction of rotation of the drill.
95 122 991 rev. 30-10-2018
NEVER USE THE ISTT-125 ON A 1” SHAFT !
6
95 122 991 rev. 30-10-2018
Check before using the tool !
Do not use the tool when the
wear limit is crossed
95 122 991 rev. 30-10-2018
Check before using the tool !
DIM. A
Max 2,5mm
7
95 122 991 rev. 30-10-2018
8
Check before using the tool !
Do not use the tool when the
wear limit is crossed
DIM.C
Max
DIM. B
Min 10mm
9
95 122 991 rev. 30-10-2018
24 mm
9mm
10
10Nm
Do not use the tool when the wear limit is crossed
95 122 991 rev. 30-10-2018
DIM.D Max 1mm
11
95 122 991 rev. 30-10-2018
12
Page 5
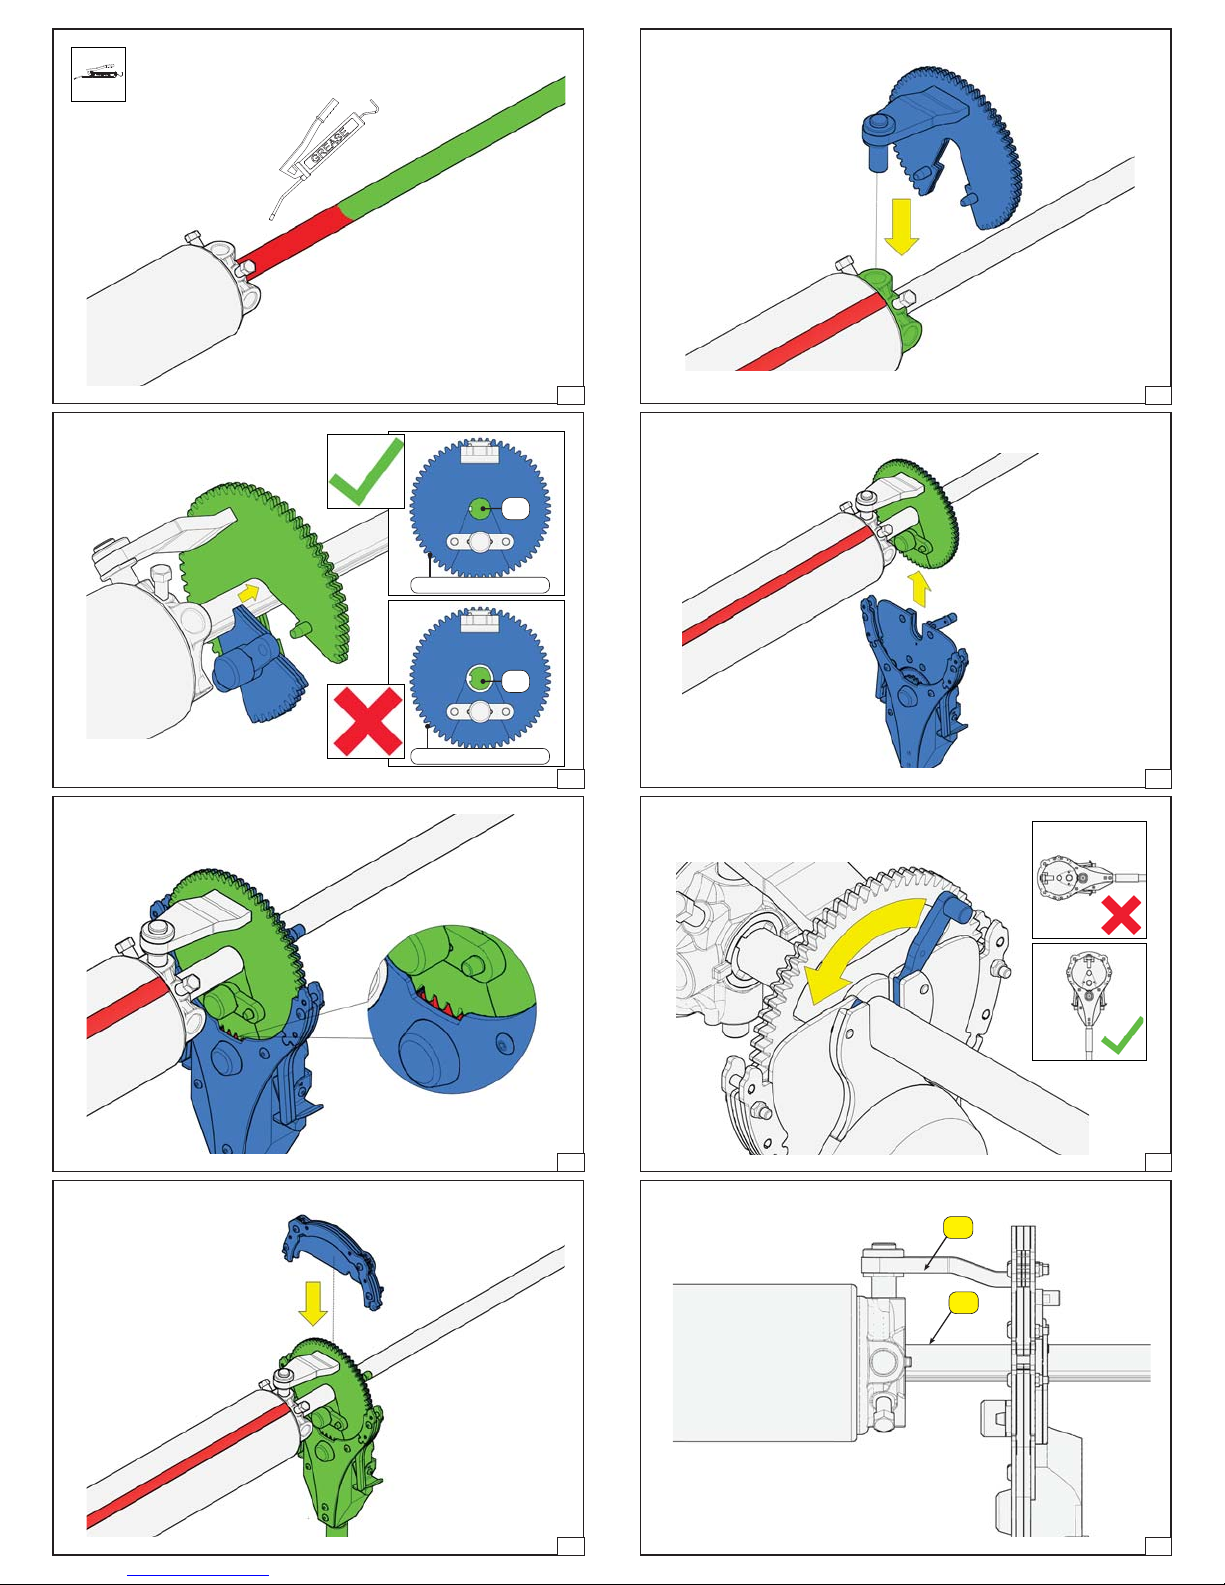
95 122 991 rev. 30-10-2018
95 122 991 rev. 30-10-2018
1”
ISTT-GEARWHEEL
1”
ISTT-125 GEARWHEEL
13
15
95 122 991 rev. 30-10-2018
95 122 991 rev. 30-10-2018
14
16
95 122 991 rev. 30-10-2018
95 122 991 rev. 30-10-2018
Check !!!
17
19
95 122 991 rev. 30-10-2018
95 122 991 rev. 30-10-2018
18
//
//
20
Page 6
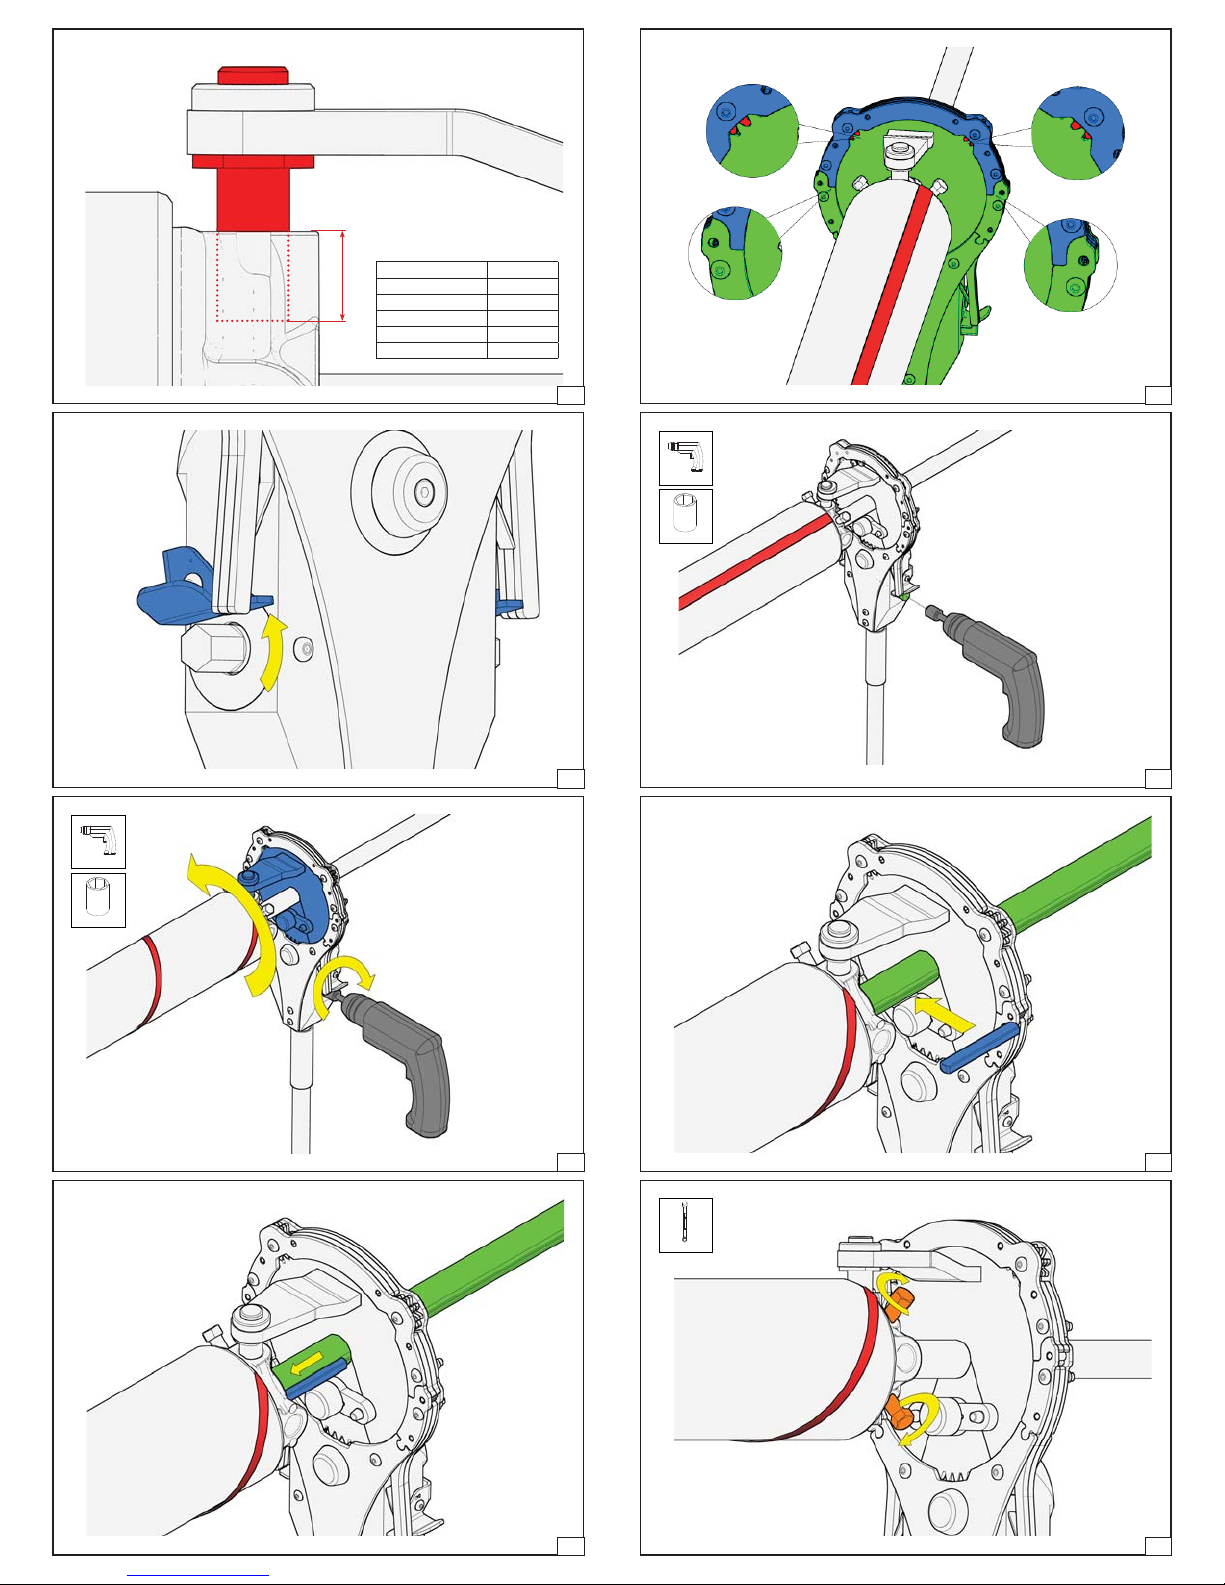
FF Spring plug Dim X
FF200 20,6mm
Dim X
FF263 21,1mm
FF375 17,6mm
FF375N 17,6mm
FF600N(-125) 30,6mm
Check !!!
Click !!!
Check !!!
Click !!!
95 122 991 rev. 30-10-2018
95 122 991 rev. 30-10-2018
PP
21
23
95 122 991 rev. 30-10-2018
PP
95 122 991 rev. 30-10-2018
22
24
95 122 991 rev. 30-10-2018
95 122 991 rev. 30-10-2018
25
27
95 122 991 rev. 30-10-2018
95 122 991 rev. 30-10-2018
26
28
Page 7
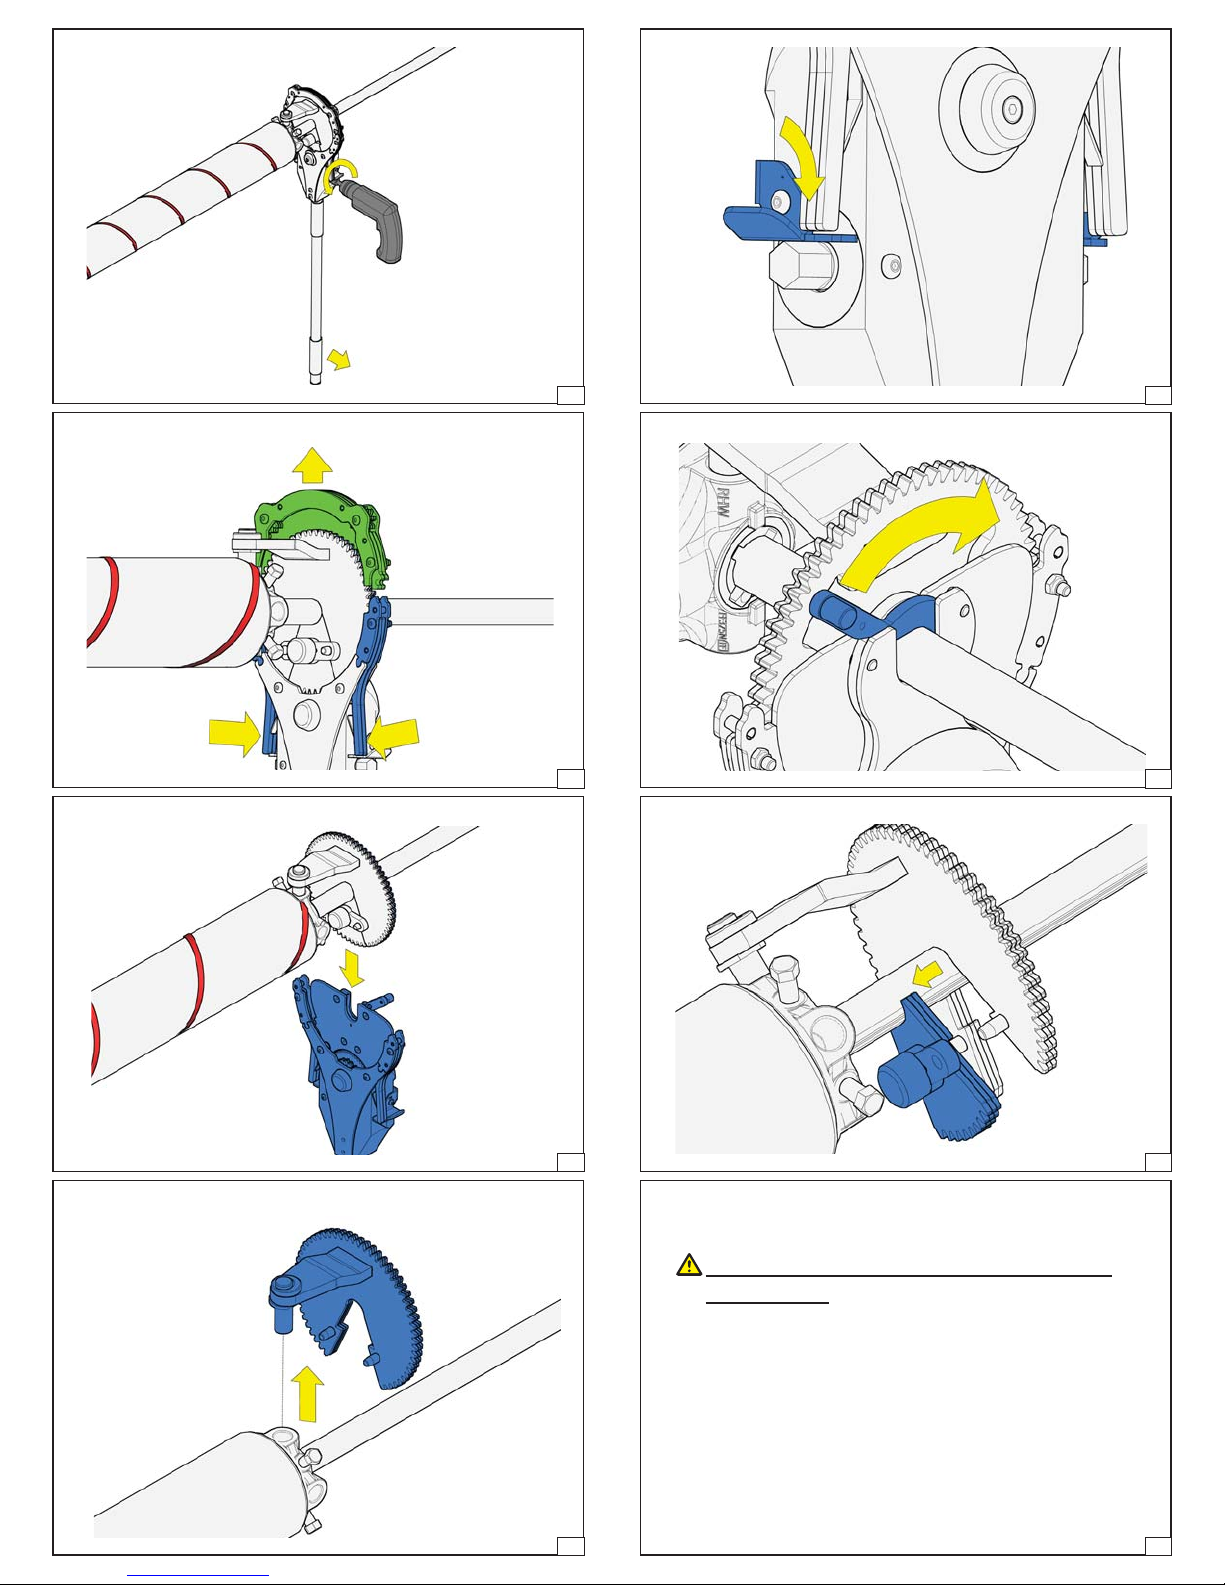
Release tension
95 122 991 rev. 30-10-2018
95 122 991 rev. 30-10-2018
29
31
95 122 991 rev. 30-10-2018
95 122 991 rev. 30-10-2018
30
32
95 122 991 rev. 30-10-2018
95 122 991 rev. 30-10-2018
33
35
95 122 991 rev. 30-10-2018
Use of the ISTT / ISTT-125
Select the correct version ISTT for used
type of shaft
Make sure that one always uses the
DSSURSLDWHLQVHUWSHQ¿WWLQJWKHFRUUHVSRQGLQJ
plug! (page 7)
During tensioning the driveshaft of the device
will get warm, this is normal, the aluminiumcasing will absorbe the heat.
95 122 991 rev. 30-10-2018
34
36
 Loading...