

Page 1
FLEXEL
TH132-AF
DIGITAL THERMOSTAT TH132-AF (230 VAC)
SUMMARY
• OPTIONS SELECTION
At the back of the thermostat, there are 2 selection switches to set at your
preferences.
• Temperature in °C or °F
• Early Start function.
• TO SET TIME AND DAY
Press on DAY, HOUR and MIN buttons to adjust time and day.
• TO RECORD THE (COMFORT) SETPOINT TEMPERATURE
Select chosen setpoint temperature by using or button. Press on
button (2 to 3 seconds) until icon appears on display.
• TO RECORD THE (ECONOMY) SETPOINT TEMPERATURE
Select chosen setpoint temperature by using or button. Press on
button (2 to 3 seconds) until icon appears on display.
• TO RECORD THE (VACATION) SETPOINT TEMPERATURE
Select chosen setpoint temperature by using or button. Press on
button (2 to 3 seconds) until icon appears on display.
• OPERATING MODES
To select an operating mode, use Mode/Return button.
AUTO : Runs the programs. or shows temperature setting and
can override temporarily your programming up to the next program.
MAN : Maintains the selected temperature. or changes the tem-
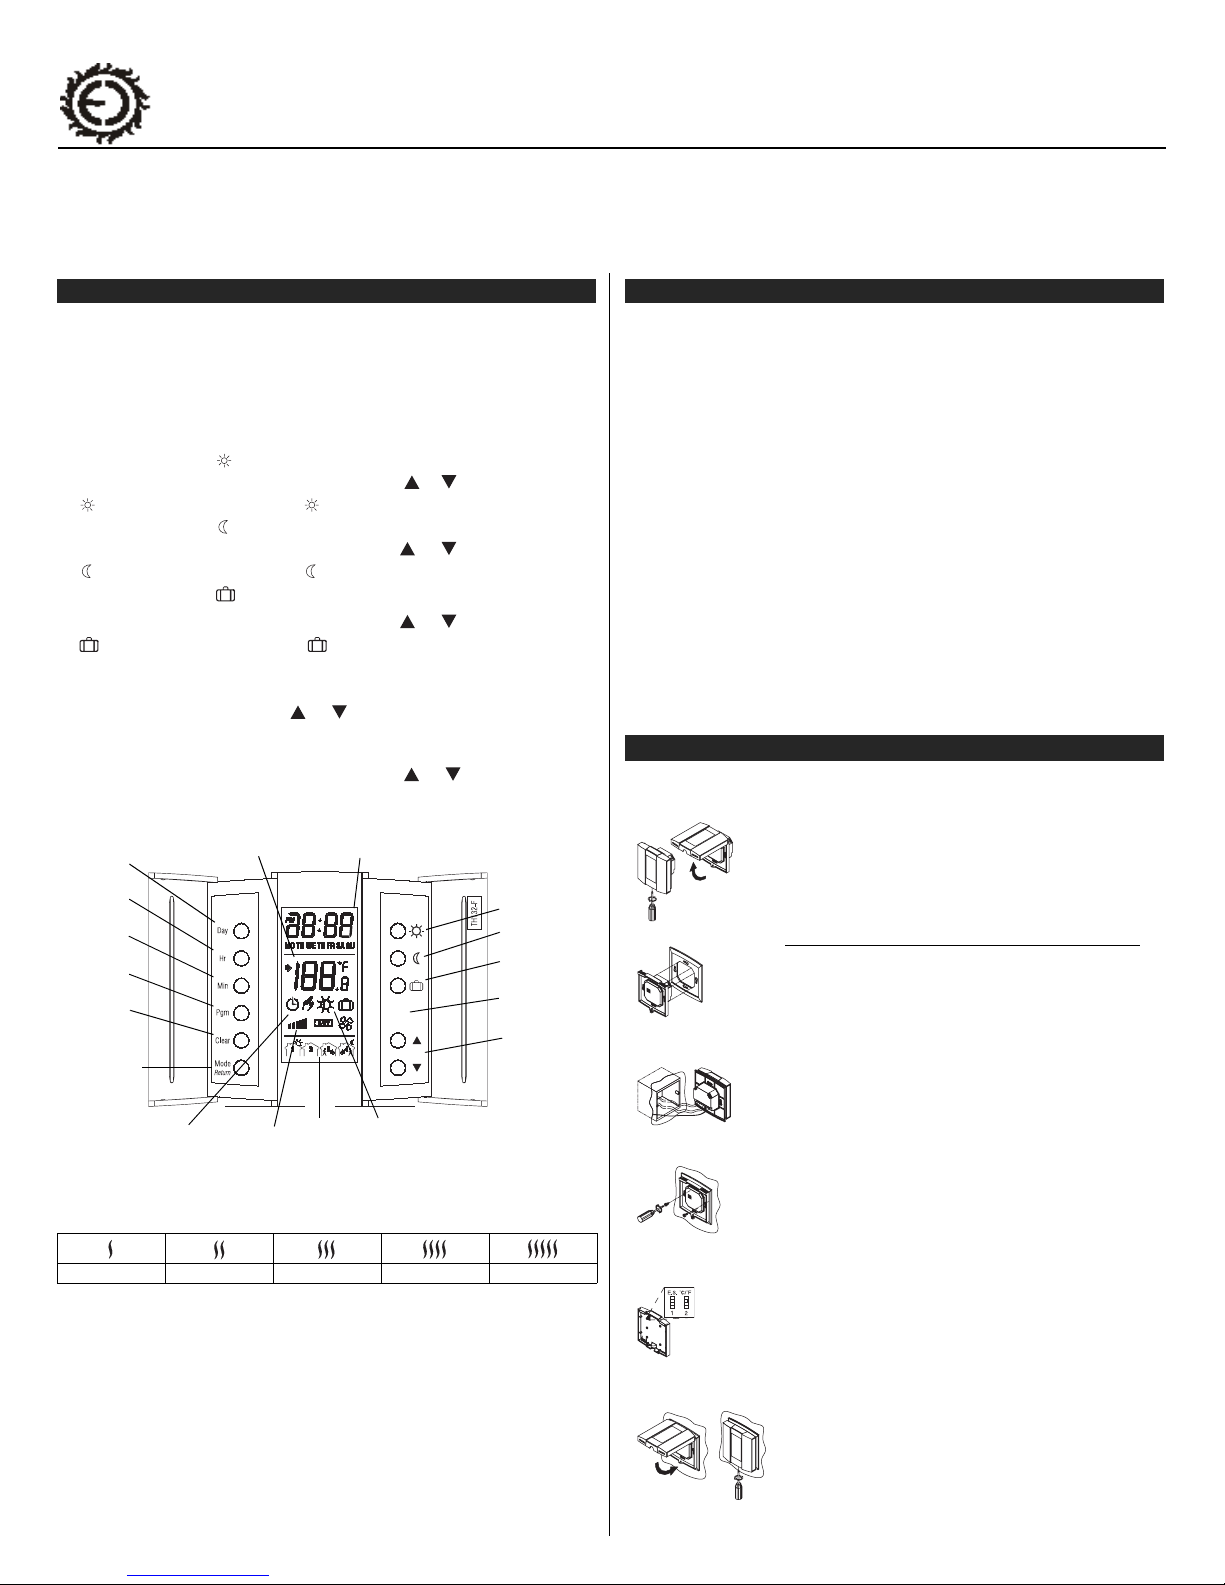
To set
the day
To set
the hour
T o set the
minutes
T o set the
program
T o erase a
program
T o select the
operating mode
or to exit the
programming
mode
* Percentage (%) of energy sent to the heating system to maintain the
desired temperature.
perature setting.
Setting temperature
Operating
modes
Heating
indicator *
Time and day
of the week
Program
number
Comfort, Economy and
Vacation temperature
settings
Comfort
Economy
Vacation
To limit the floor
temperature
Up and down
to adjust the
temperature
setting
INSTALLATION
This thermostat is designed to use a floor-heating sensor to regulate room
temperature.
The TH132-AF has two temperature sensors. The first one, installed in the
box, controls the ambient temperature. The second one, installed in the
floor, limits the floor temperature. Electricians or experienced technicians
should install the thermostat.
This thermostat should be connected on a circuit equipped with a fuse or a
circuit breaker. It must be installed on a certified electrical box.
For a new installation, choose a location about 1.5 meters above the floor,
with good air circulation. The thermostat must be installed on an inside wall.
Avoid locations where there are air drafts (top of a staircase, air outlet), dead
air spots (behind a door), direct sunlight or concealed chimneys or stove
pipes.
TURN OFF POWER TO THE HEATING SYSTEM AT THE MAIN POWER
PANEL TO AVOID ELECTRICAL SHOCK. Keep air vents of the thermostat
clean and free from obstructions.
PARTS INCLUDED
- One (1) TH132-AF (230 VAC) thermostat
- One (1) temperature sensor with a 3 meter extension
- One (1) wall plate (in certain countries)
1. Installation of thermostat
Turn off power to the heating system at the main power panel to avoid electrical shock.
Unscrew and remove the front part of the thermostat
from the base.
Please take note that the screw cannot be completely
retracted.
If your thermostat is equipped with a wall plate
Before making the connections, make sure that the
base covers the electrical box entirely. If not, insert
the wall plate on rear of the base. (The wall plate can
be used to cover the plate for aesthetics.)
Connect the wires (see section 1.1).
Connect the sensor (see section 1.2).
Secure the base to the electrical box anchorage.
(The head of the screw must be less than 2mm of
thickness.)
0 - 20% 20 - 40% 40 - 60% 60 - 80% 80 - 100%
Set the switches located at the back of the front part
of the thermostat before replacing it in the base.
(see section 1.3)
Affix the front part of the thermostat to the base
using the enclosed screw.
You can now turn the power back on.
TH132-AF (230 VAC) 400-132-019-A 16/12/04 1/3
Page 2
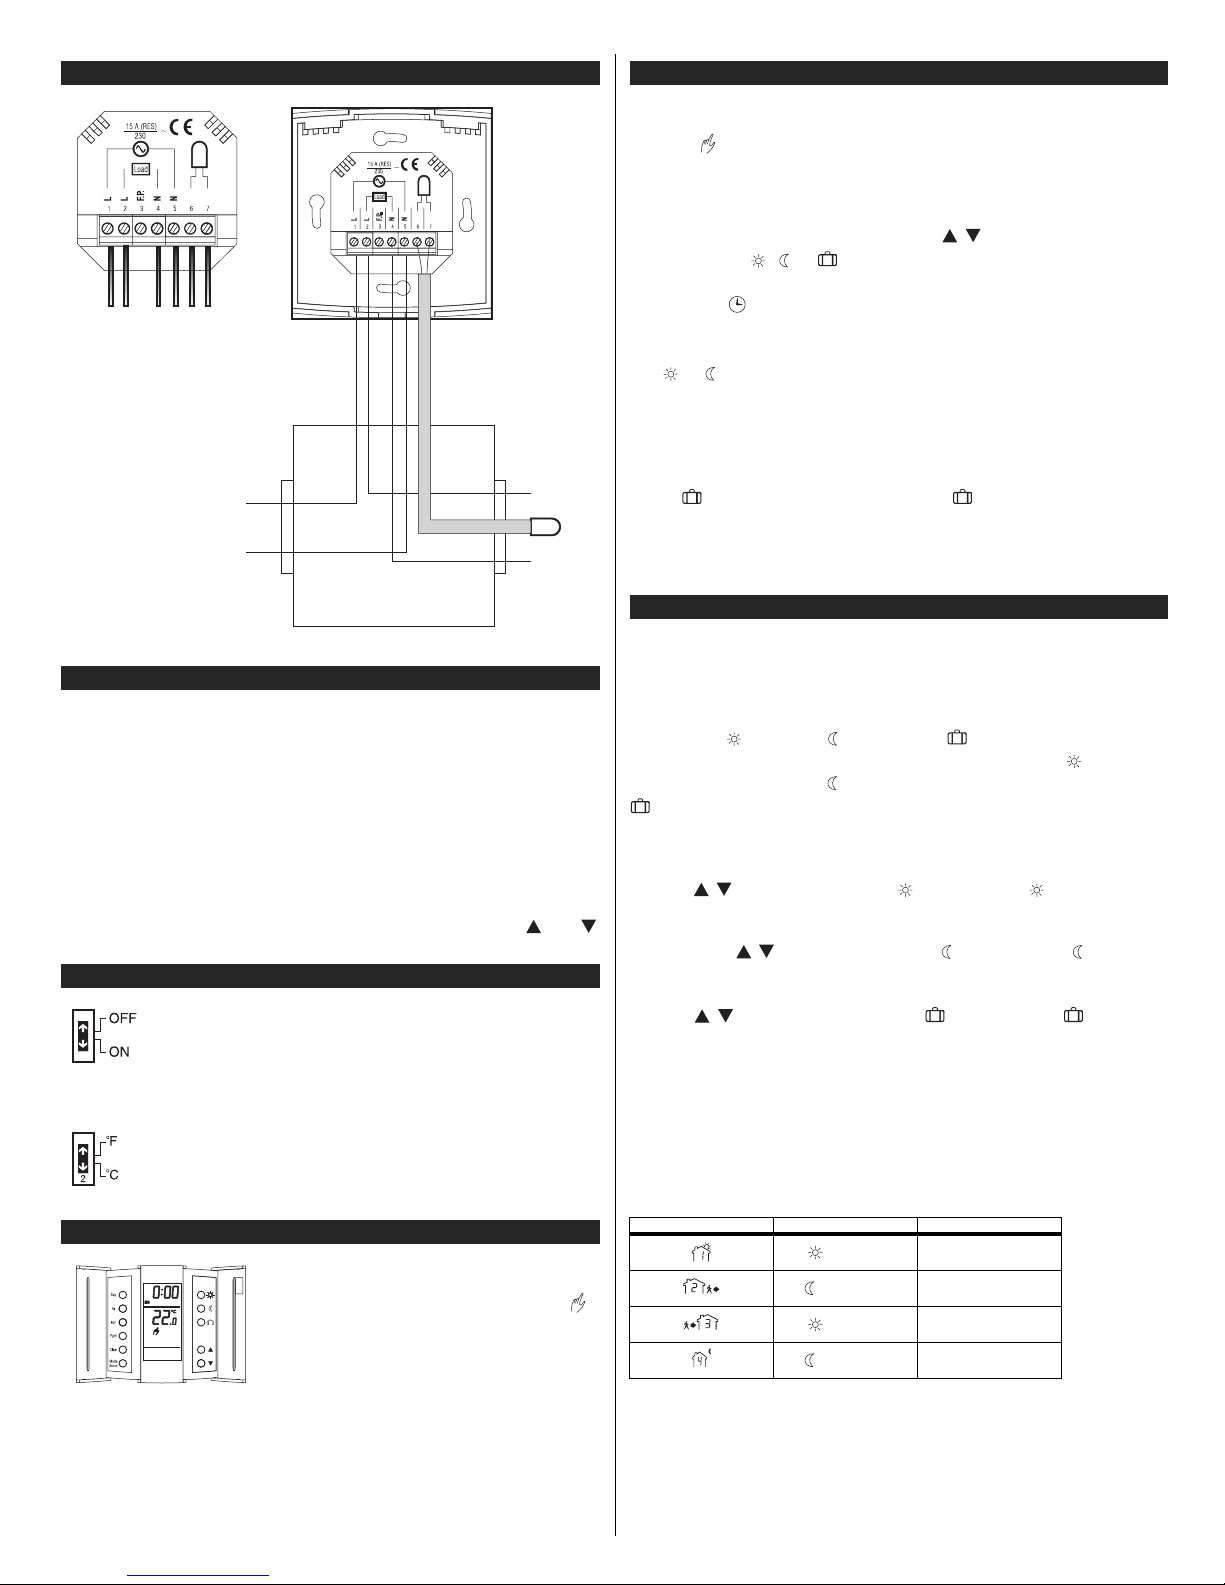
2. Wire connections
d
Electrical Box
F.P. : Unconnected
Line
BROWN
Sensor
Neutral
BLUE
Loa
Supply
Line
BLACK
Neutral
BLUE
3. Connecting temperature sensor wire
Connect the temperature sensor wires to the sensor terminals located at the
back of the thermostat (no polarity needs to be respected).
Note: Do not place the sensor probe directly next to an element but rather,
for maximum performances, the sensor probe should be centered between
the wires in the mat (80 °C max.). The temperature sensor wire cannot lay
across any heater wires.
Adjusting the floor’s maximum temperature
When the floor sensor is installed, the temperature of the floor will automatically be limited the set maximum regardless of the ambient setpoint. To
adjust the floor’s maximum temperature, press on the adjustment button
(see drawing for its position) using a pointed object, and use the and
buttons until the desired setpoint appears.
4. Configuration of switches
a)Early Start function
The thermostat is providing a built-in function enabling it to
calculate the optimum time to start the heating system to
achieve the desired temperature setting at the programmed
time. To enable this function, set the switch E.S. (#1) to “ON”.
b)Temperature in °C or °F
The default configuration of the TH132-AF is in °C. If you wish
to change the temperature to °F, push the switch #2 upward.
Please note that if you change from °C to °F, your Comfort
and Economy settings will need to be reconfigured as well.
POWER-UP
When power is applied for the first time, the
display must show the time 0:00, the floor
ET 32 AF
temperature and the Manual mode icon ( ).
Other information might show up on the display if installation is defective or does not
comply with the instructions.
The message L0 or HI will appear on the display if the temperature sensor is defective or
the temperature is below 0 °C or higher than
60 °C. Also, if the LO message is displayed,
the heating indicator will be present on display and the relay will be closed (current
going in the load).
OPERATING MODES
The TH132-AF has two (2) operating modes.
MANual ( )
This mode allows you to maintain a constant temperature.
1- To activate this mode, press on Mode/Return button to display the
icon.
2- Set the desired temperature using the buttons or select the pre-
determined , or settings.
AUTOmatic ( )
This mode executes your own programming.
To activate this mode, press on Mode/Retur n button to display the icon.
k
The or icon indicates which temperature setting is used. Also, the icon
of the program number will be shown.
Vacation function
This function sets your thermostat to your specified Vacation temperature.
You can switch to the Vacation setting for a prolonged absence by pressing
on the button. The display will show the icon. T he temperature will
remain at this setting until it is returned to the normal operating mode by
selecting the Mode/Return button. The Vacation function is also accessible
through the CT240 telephone controller. If you wish to immediately return to
the programmed settings, press on Mode/Return button.
PROGRAMMING
Programming the time and day
1- Set the time using the Hour and Min buttons.
2- Set the day using the Day button.
Programming the Comfort, Economy and Vacation settings
The Comfort , Economy and Vacation settings respectively repre-
sent the temperatures that you wish to have during the day , at night or
while you are away at work , or while you are away for an extended period
.
To program your settings
a) To p rogram the Comfort temperature, select the desired setpoint using
the buttons and press the button until the icon is displayed
(app. 3 seconds).
b) To program the Economy temperature, select the desired setpoint
using the buttons and press the button until the icon is displayed (app. 3 seconds).
c) To program the Vacation temperature, select the desired setpoint using
the buttons and press on the button until the icon is d isplayed (app. 3 seconds).
d) Press the Mode/Return button to exit this function and return to the nor-
mal operating mode.
Schedule programming
The TH132-AF allows 4 setting changes for each day of the week. There are
no pre-set programs. The programs are tailored to perfectly adapt to your life
style. The principle is very simple. For each day, enter the time at which you
wake up (P1), the time you leave for work (P2), the time you arrive back
home (P3) and the time you go to bed (P4).
Program Mode Time
Comfort
Economy
Comfort
Economy
For savings to be obtained, you must lower the temperature for a period of at
least 2 times the delay required to bring the temperature back to your comfort level.
Example: If your system takes one hour to go from your saving temperature
level to your comfort temperature level, it is useless to lower the temperature
for a period less than 2 hours.
Wake-up time
Leaving time
Return time
Bed time
*
TH132-AF 400-132-019-A 16/12/04 2/3
Page 3
a) To program your schedule
1- Press on Pgm button to access the programming mode.
2- Press on Day button to select the day to be programmed. You can
select all days of the week by pressing on Day button for 3 seconds.
3- Press on Pgm button to select program 1, 2, 3 or 4.
4- Press on Hour and Min buttons to program the time.
5- When you have completed your programming, press on Mode/Return
button to exit this function.
b) To erase a program
Select the program using Pgm and Day buttons, and press on Clear button.
The time field displays -:- when the program is inactive.
Example 1: Comfort period from 7:00 AM to 10:30 PM
Economy period from 10:30 PM to 7:00 AM
Identical schedule for all days of the week.
Schedule / Day MO TU WE TH FR SA SU
PROG. 1
PROG. 2
PROG. 3
PROG. 4
7:00 7:00 7:00 7:00 7:00 7:00 7:00
--:-- --:-- --:-- --:-- --:-- --:-- --:--
--:-- --:-- --:-- --:-- --:-- --:-- --:--
22:30 22:30 22:30 22:30 22:30 22:30 22:30
1- Press on Pgm button to access the programming mode.
2- Press on Day button 3 seconds to select every day of the week.
3- Press on Hour button to enter 7:00 AM, Prog. 1 ( ).
4- Press 3 times on Pgm button to select Prog. 4 ( ), and press on Hour
and Min buttons to enter 10:30 PM.
5- Press on Mode/Return button to exit this function.
Example 2: Comfort period : Monday to Friday from 6:15 AM to 8:15
AM and from 5:00 PM to 10:00 PM.
Saturday and Sunday from 7:30 AM to 11:00 PM.
Schedule / Day MO TU WE TH FR SA SU
PROG. 1
PROG. 2
PROG. 3
PROG. 4
6:15 6:15 6:15 6:15 6:15 7.30 7:30
8:15 8:15 8:15 8:15 8:15 --:-- --:-17:00 17:00 17:00 17:00 17:00 --:-- --:-22:00 22:00 22:00 22:00 22:00 23:00 23:00
Note: It is faster to program the same schedule for every day and then modify the exception days.
1- Press on Pgm button to access the programming mode.
2- Press on Day button 3 seconds to select every day of the week.
3- Press on Hour and Min buttons to enter 6:15 AM Prog. 1 ( ).
4- Press on Pgm button to select Prog. 2 ( ) and Hour and Min buttons
to enter 8:15 AM.
5- Repeat step 4 to enter Prog. 3 (5:00 PM) and Prog. 4 (10:00 PM).
Note: When making modifications, make sure you are in the right program.
CHARACTERISTICS
• Model:TH132-AF
• Supply:230 VAC 50 Hz
• Load:15 A max. (resistive only)
• Power:3450 W (NI) @ 230 VAC
• Approvals:EN60730-2-9
EN50081-1 / EN50082-2
• Display range:0 to 60 °C
• Setting range, ambient temp.:5 to 30 °C
• Setting range, floor temp.:5 to 40 °C
• default setting:20 °C
• default setting:18 °C
• default setting:10 °C
• • Storage:-20 to 50 °C
• Software:Class A
• Controller:Electronic
• Protection:Class 2
• Protection degree: IP20
• Automatic action:Type 1B
• Environment:Normally polluted
• Programming protection: Memory back-up
• Clock protection:2 hours
The terminals are designed to handle a cross-section of wire measuring
0.33 to 3.1 mm
2
in diameter.
SERVICE
Flexel International Ltd.
Queensway Industrial Estate, Glenrothes, Fife. KY7 5QF, Scotland
Tel: (01592) 757313
Fax: (01592) 754535
Email: [email protected]
Web: www.flexel.co.uk
To modify the Saturday and Sunday schedules:
6- Press on Day button until SA or SU is displayed.
7- Press on Pgm button to select Prog. 1 ( ) and Hour and Min buttons to
enter 7:30 AM.
8- Press on Pgm button to select Prog. 2 ( ) and then Clear button to erase
it.
9- Press on Pgm button to select Prog. 3 ( ) and then Clear button to erase
it.
10- Press on Pgm button to select Prog. 4 ( ) and then Hour and Min but-
tons to enter 11:00 PM.
11- Press on Mode/Return button to exit this function.
Memory back-up
In the event of a power failure, an internal circuit will maintain the programming and the time. The time would have to be reset if the power failure
exceeds 2 hours.
Temporary or permanent temperature bypass
This operation allows you to temporarily modify the temperature while you
are in the Automatic mode. Simply press on or button to select the
desired temperature, or the or button to select the Comfort or Econo
settings you have programmed. This temperature will be maintained until the
beginning of the next programmed schedule.
If you wish to immediately return to the programmed settings, press on
Mode/Return button twice.
TH132-AF 400-132-019-A 16/12/04 3/3
 Loading...