

Page 1
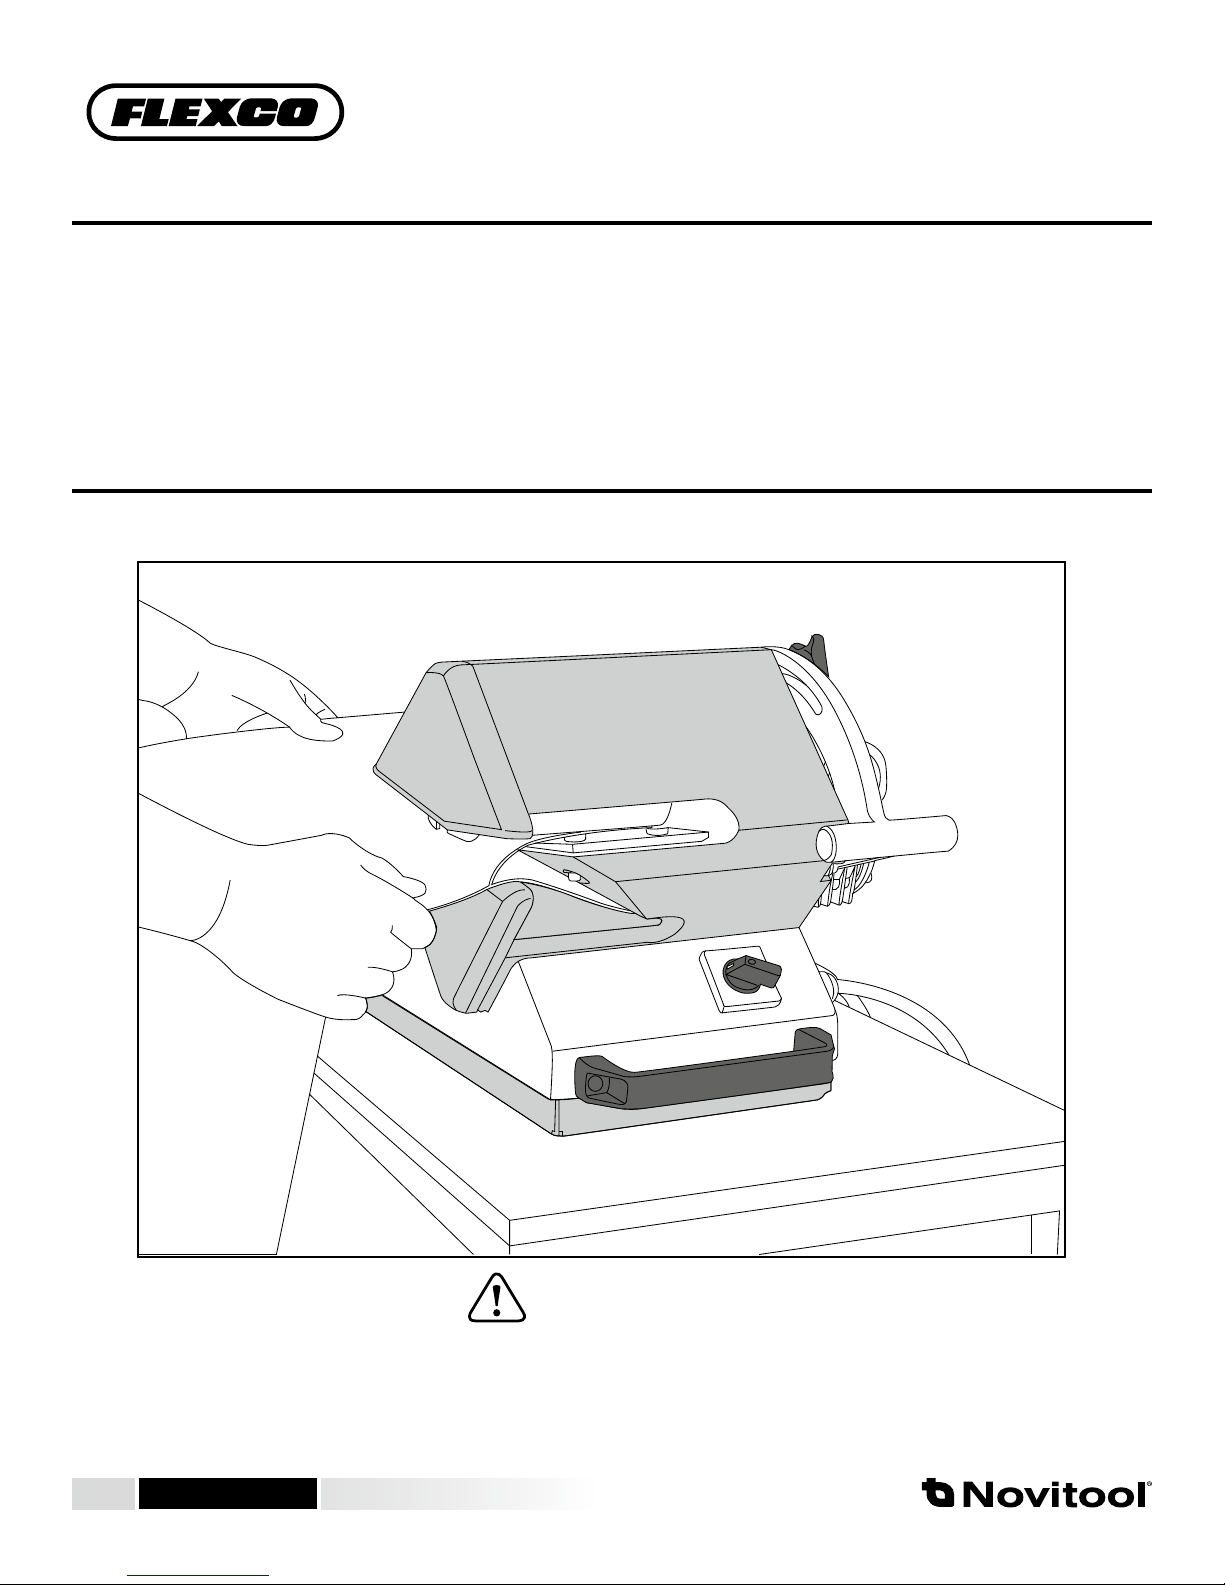
Ply Separator
PLY 130 WB + Optional Workshop Cart
Safety and Operation Manual
Separate between the plies of a conveyor belt.
IMPROPER OR UNSAFE use of this tool can result in serious bodily injury! is manual contains important information
about product function and safety. Please read and understand this manual BEFORE operating the tool. Please keep this
manual available for other users and owners before they use the tool. is manual should be stored in a safe place.
www.flexco.com
www.flexco.com
WARNING
Page 2

www.flexco.com
—2—
Page 3

Table of Contents
Main Components Ply 130™ ........................................................................ 4
Main Components Ply Cart™ ......................................................................5
Description .....................................................................................................6
Tool Specications .........................................................................................6
General Safety Rules ......................................................................................7
Retrot Tray .................................................................................................11
Workbench Installation ..............................................................................13
Cart Installation ...........................................................................................15
Separating for Finger over Finger Joints ..................................................19
Maintenance: Ply Separation Blade Replacement ................................... 23
Adjustment of clearance between rollers and blade ...............................29
Disclaimer e Ply 130 ply separator has been tested successfully with dierent
belt types. However this is no guarantee for good results. Fabricating belts does
require the operator to master skills and have a certain level of crasmanship.
Results also depend on good practice, material composition and sharpness of
blade. If results are not as expected, please contact Flexco.
—3—
Page 4
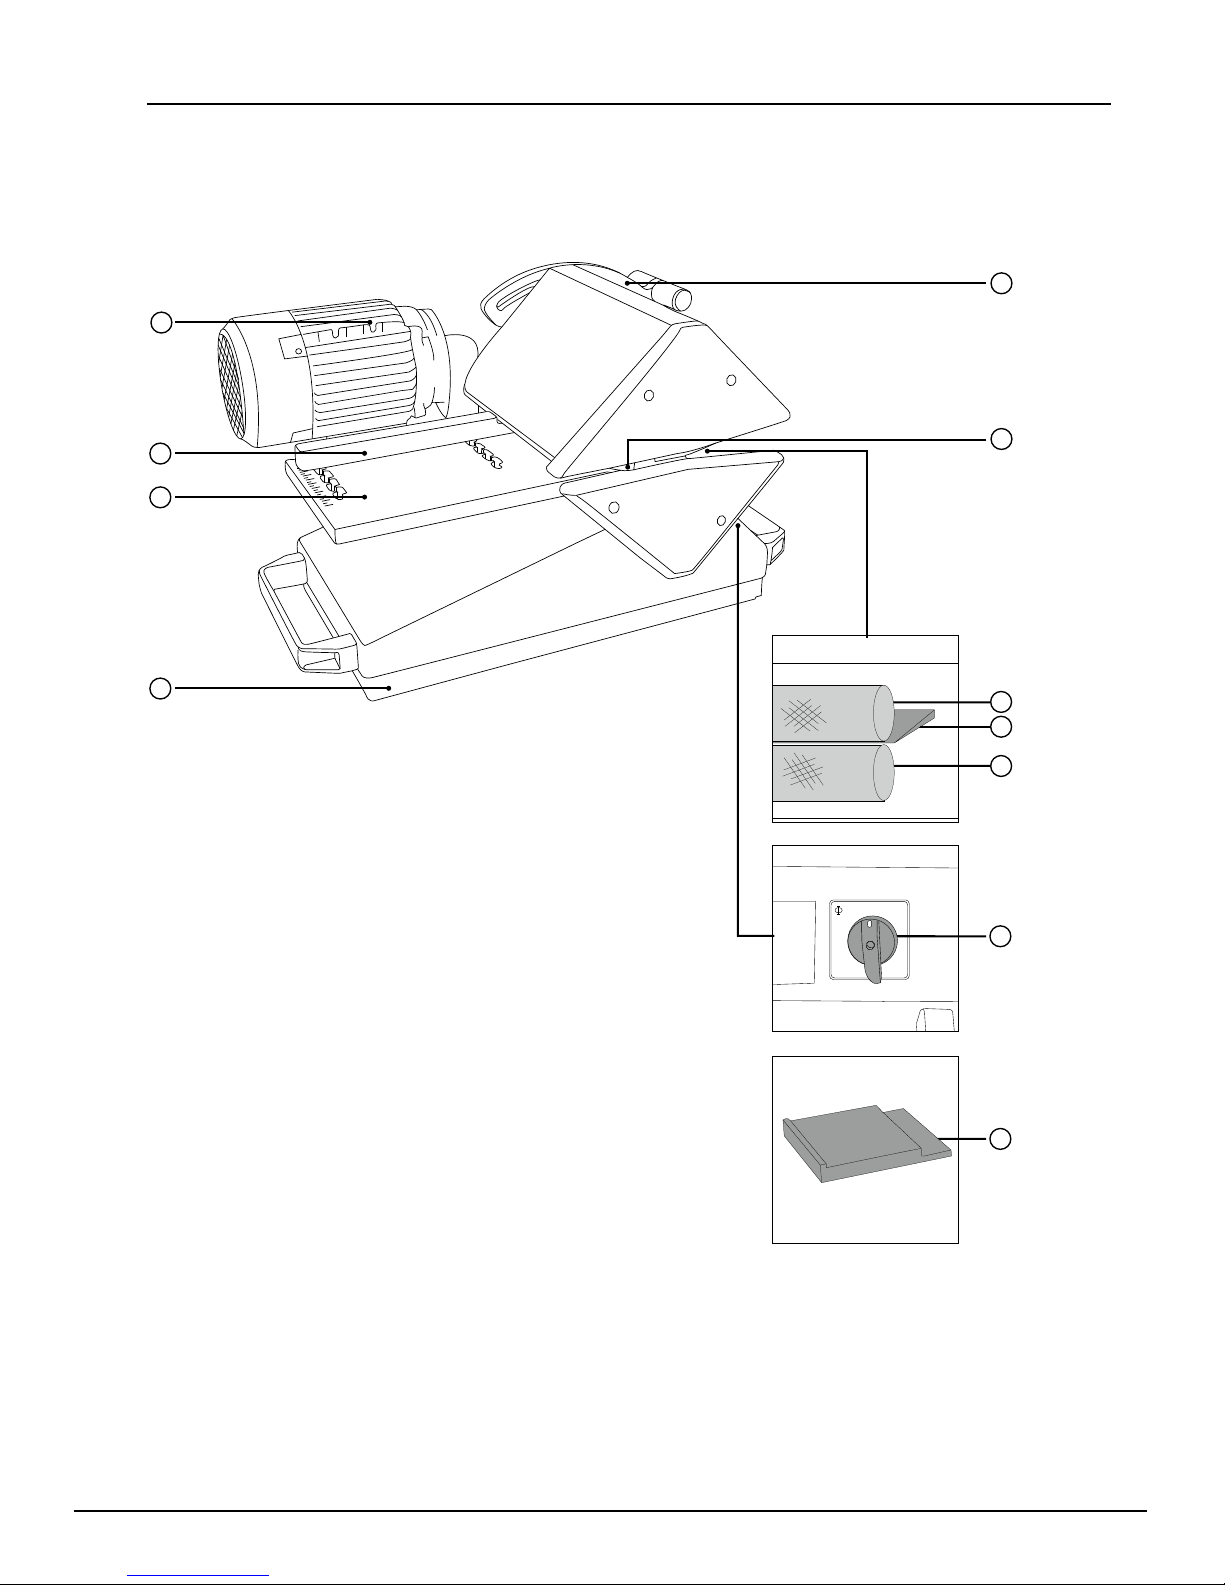
Main Components Ply 130
6
™
1
7
8
11
1. Adjuster handle
2. Finger catcher
3. Upper traction roll
4. Ply Separation Blade
FORWARD
2
3
4
5
OFF
REVERSE
9
5. Lower traction roll
6. Electric motor
7. Adjustable guide
8. Input table
9. Operating switch
10. Calibration jig
11. Ply tray
www.flexco.com
10
—4—
Page 5
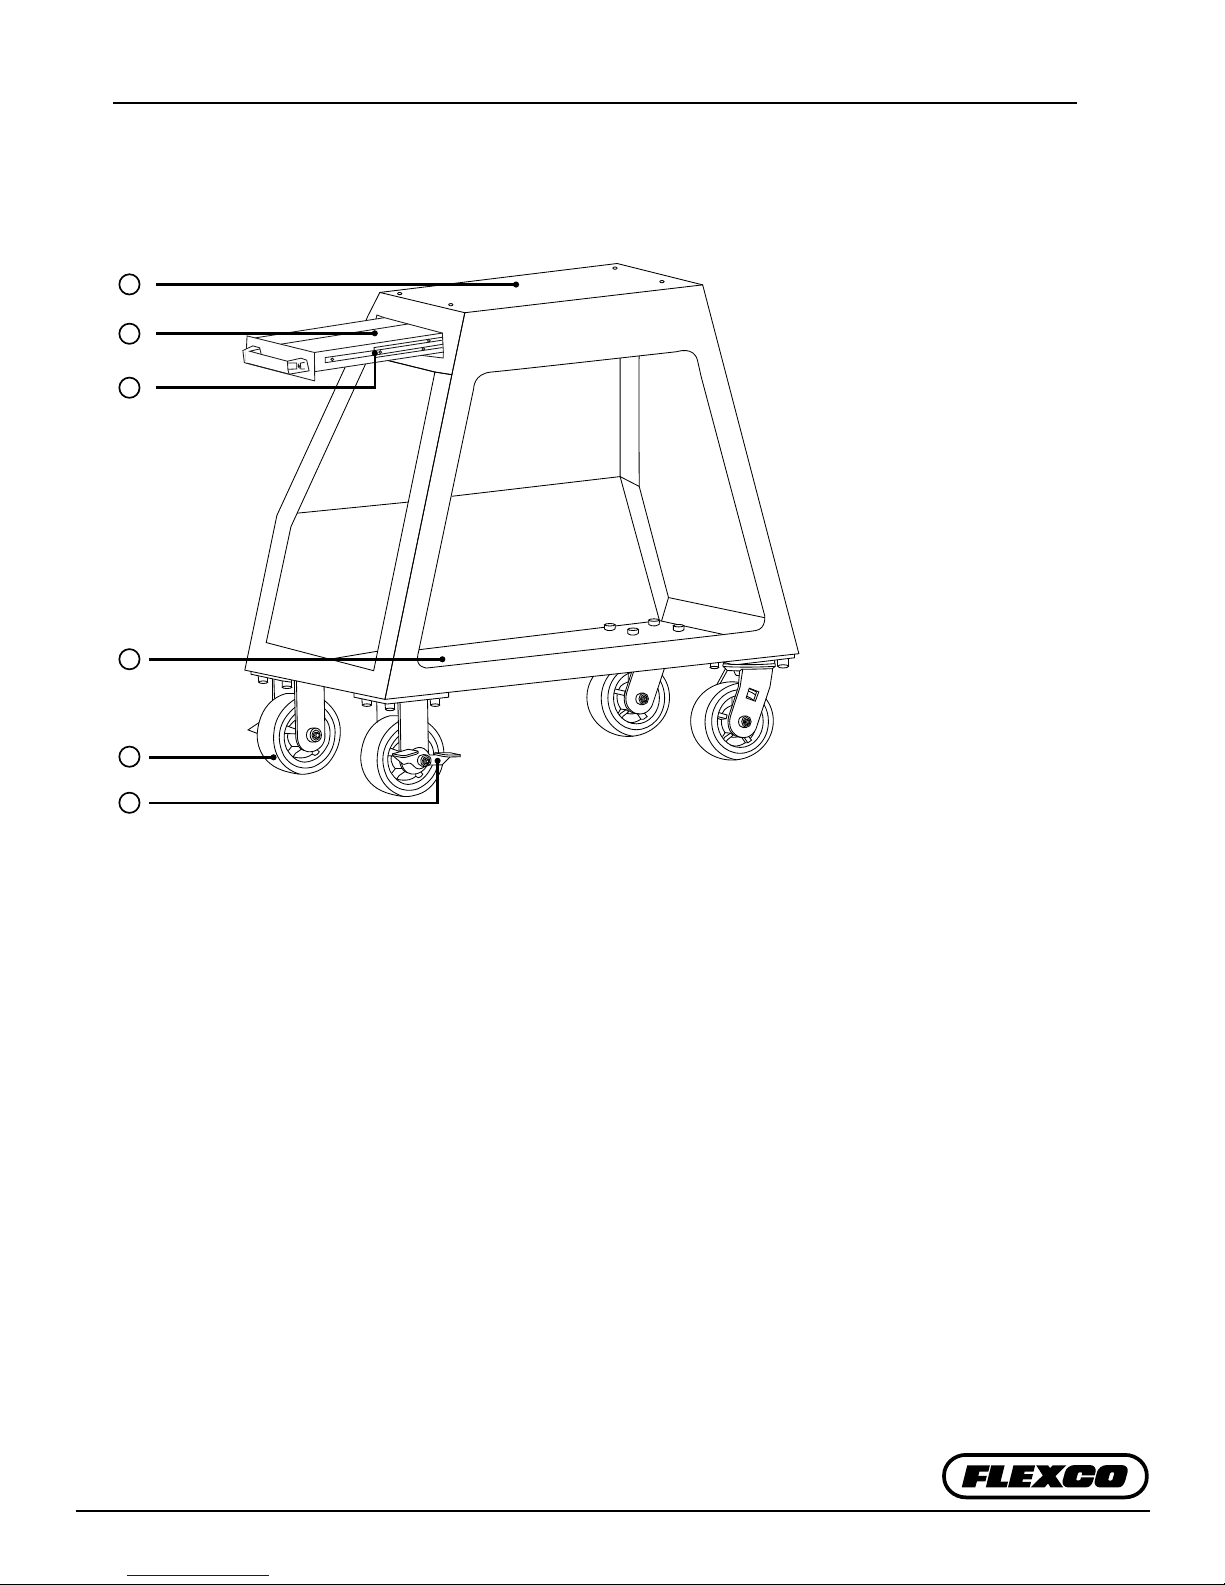
Main Components Ply Cart
1
2
3
4
™
5
6
1. Support Deck
2. Drawer
3. Drawer Slides
4. Housing
5. Casters
6. Locking Brake
—5—
Page 6

Description
e Ply 130™ is used to separate between the plies of a
conveyor belt. is cutting action is oen required in
preparation before splicing a belt with a splice press.
A great advantage of this ply separator is that it can
split as deep as 5” (130 mm) in one action. is is
especially helpful when splitting very thin belts which
are dicult to cut, such as thin polyurethane belts.
Tool Specifications
Ply 130™ Tool Specifications
Specifications
Splitting Depth 1.5” (40 mm) 5.1” (130 mm)
Belt thickness above cut .014” (0.35 mm) .3” (8 mm)
Belt thickness below cut .014” (0.35 mm) .2” (5 mm)
Maximum belt thickness N/A .4” (10 mm)
Tool dimensions
Tool weight 121 lbs (55kgs)
Minimum Maximum
22” x 17” x 17”
(550 x 420 x 420 mm)
e robust construction of the Ply 130™ allows for precise
splitting of thermoplastic belts - both thin and thick. As little
as 0.014” (0.35 mm) can be separated - allowing for users to
create lm from the belt used in the splicing process.
e Ply 130™ can be used to prepare nger over nger
splices and stepped splices. With only one handle you
determine the depth you want to split the belt. It may be
possible to split between every layer of the belt and in this
way generate two or three separations within one belt.
Ply 130™ Ordering Information
Ordering
Number
Work Bench Model
PLY130-WB-460V3PH60HZ 08013 no plug
PLY130-WB-460V3PH60HZ-L16-20 08053 L16-20
PLY130-WB-460V3PH60HZ-L16-30 08054 L16-30
PLY130-WB-400V50HZ 08102 no plug
PLY130-WB-230V3PH50HZ 08046 no plug
PLY130-WB-230V3PH50HZ-L15-20 08055 L15-20
PLY130-WB-230V3PH50HZ-L15-30 08056 L15-30
PLY130-WB-230V50HZ 08246 no plug
Cart Model
Ply-130-CART-ONLY 08100 no plug
Replacement Parts
PLY-BL Blade & Jig 08014 N/A
PLY-JG Jig Only 08015 N/A
Item
Code
NEMA
Plug
www.flexco.com
—6—
Page 7
General Safety Rules
Signal words:
“DANGER” indicates an imminently hazardous
situation which, if not avoided, will result in
death or serious injury. e signal word is
limited to the most extreme situations.
–Save These Instructions–
1. WORK AREA
!
CAUTION
Keep your work area clean and well lit.
Cluttered benches and dark areas invite accidents.
“WARNING” indicates a potentially hazardous
situation which, if not avoided, could result in
death or serious injury.
“CAUTION” indicates a potentially hazardous
situation which, if not avoided, may result in
minor or moderate injury. It may also be used
to alert against unsafe practices.
Safety Symbol
!
is international safety symbol is used to
identify and call attention to specic
safety matters.
Safety Information
To Avoid Severe Personal Injury or Property
Damage, read carefully and understand the
following Safety Precautions.
!
DANGER
Do not operate power tools in explosive
atmospheres, such as in the presence of
ammable liquids, gases, or dust. Power tools
create sparks which may ignite the dust or fumes.
!
CAUTION
Keep bystanders, children, and visitors away
while operating a power tool. Distractions can
cause you to lose control.
!
WARNING
Never leave tool until it comes to a complete stop.
!
WARNING
Store idle tools out of reach of children and other
untrained persons. Tools are dangerous in the
hands of untrained users.
—7—
2. ELECTRICAL SAFETY
!
DANGER
e Ply Separator is a single insulated tool and
needs a multiple wire grounded power cord
and grounded power supply system. Contact
a qualied electrical installation company to
connect the right plug.
!
WARNING
Avoid body contact with grounded surfaces such
as pipes, radiators, ranges, and refrigerators.
ere is an increased risk of electric shock.
Page 8

General Safety Rules -Save These Instructions-
!
WARNING
Do not expose power tools to rain or wet
conditions. Water entering a power tool will
increase the risk of electric shock and will
damage the tool.
!
DANGER
Do not abuse the cord. Never use the cord to
carry the tool or pull the plug from a receptacle.
Keep cord away from heat, oil, sharp edges,
or moving parts. Replace damaged cords
immediately. Damaged cords increase the risk of
electric shock.
!
WARNING
Do not use outdoors. is power tool is
designed for indoor use only.
!
WARNING
Avoid accidental starting. Be sure switch is o
before plugging in. Carrying tools with your
nger on the switch or plugging in tools that
have the switch on invites accidents.
!
WARNING
Do not overreach. Keep proper footing and
balance at all times. Proper footing and
balance enables better control of the tool in
unexpected situations.
!
CAUTION
Use safety equipment. Always wear eye
protection. Dust mask, non-skid safety shoes,
hard hat, or hearing protection must be used for
appropriate conditions.
!
WARNING
Do not use tool if switch does not turn it on or
o. Any tool that cannot be controlled with the
switch is dangerous and must be repaired.
3. PERSONAL SAFETY
!
WARNING
Stay alert, watch what you are doing and use
common sense when operating a power tool. Do
not use tool while tired or under the inuence
of drugs, alcohol, or medication. A moment of
inattention while operating power tools may
result in serious personal injury.
!
WARNING
Dress properly. Do not wear loose clothing
or jewelry. Contain long hair. Keep your hair,
clothing, and gloves away from moving parts.
Loose clothes, jewelry, or long hair can be
caught in moving parts.
!
WARNING
Never alter or remove safety devices.
!
WARNING
Keep your hands and ngers away from all
moving and sharp parts, e.g. rolls and blade, at
all times.
!
WARNING
Engage caster locks on cart when not
transporting
4. TOOL USE AND CARE
!
WARNING
Always use the ply separator on a level, rm
surface. Splitting should be performed operating
the machine with two hands on the material.
www.flexco.com
—8—
Page 9

General Safety Rules -Save These Instructions-
!
CAUTION
Do not force tool when the belt material blocks
or jams and do not continue feeding the material
through tool. When jamed put the operating
direction in reverse to remove the material.
!
WARNING
Do not use tool if switch does not turn it on or
o. Any tool that cannot be controlled with the
switch is dangerous and must be repaired.
!
WARNING
Disconnect the plug from the power source
before making any adjustments, changing
accessories, or storing or transporting the tool.
Such preventive safety measures reduce the risk
of starting the tool accidentally.
!
WARNING
Store idle tools out of reach of children and
other untrained persons. Tools are dangerous in
the hands of untrained users.
!
CAUTION
e Ply Separator should not be used to split
other materials than thermoplastic belting
materials. e thickness of the belting material
should never exceed 10 mm.
5. SERVICE AND MAINTENANCE
!
WARNING
Tool service must be performed only by
qualied repair personnel. Service or
maintenance performed by unqualied
personnel could result in a risk of injury.
!
CAUTION
When servicing a tool, use only identical
replacement parts. Use of unauthorized parts or
failure to follow Maintenance Instruction may
create a risk of electric shock or injury.
!
DANGER
Do not use power tools if the housing is
damaged or not closed. Damaged or (partially)
open housing can lead to electric shock. Such
tools should not be used until repaired or closed.
!
CAUTION
Do not wipe plastic parts with solvent.
Solvents such as gasoline, thinner, benzene,
carbon tetrachloride, and alcohol may damage
and crack plastic parts. Do not wipe them with
such solvents. Wipe plastic parts with a so
cloth lightly dampened with soapy water and
dry throughly.
!
WARNING
!
CAUTION
Check for misalignment or binding of moving
parts, breakage of parts, and any other condition
that may aect the tool’s operation. If damaged,
have the tool serviced before using. Many
accidents are caused by poorly maintained tools.
!
WARNING
Stow foot pedal when not in use.
!
WARNING
Disconnect and stow cables before moving.
—9—
NEVER use a tool which is defective or
operating abnormally. If the tool appears to be
operating unusually, making strange noises,
or otherwise appears defective, stop using it
immediately and arrange for repairs.
!
CAUTION
Maintain tools with care. Keep blades sharp
and clean. Properly serviced tools and knifes
with sharp edges are less likely to bind or clutter
material and are easier to control.
Page 10

General Safety Rules -Save These Instructions-
6. PLY CUTTER SAFETY
!
WARNING
Make sure that the power cable is not near the
material entrance opening.
!
WARNING
Keep your body positioned perpedicular to the
material feeding direction on the oposite side of
the electric motor.
!
WARNING
Keep your hands away from the feeding rolls
and splitting area. Always guide the material in a
way that your hands have a minimum distance of
3.94” (10 cm) from this area.
!
CAUTION
Do not use dull or damaged blades/ knives.
!
WARNING
Avoid inclines, declines and oor obstructions
when pushing cart. Only push cart in directions
permitted by xed casters, never pull or attempt
to slide sideways.
!
WARNING
Ensure Ply 130 WB plug is disconnected and
cables are stored before transporting cart.
!
WARNING
Ply cart is for Ply 130 WB installation only.
8. REPLACING THE BLADE
!
CAUTION
Do not attempt to resharpen blades. is will
aect splitting completely through belt.
7. PLY CART SAFETY
!
WARNING
Install casters onto Ply Cart before installing
Ply 130 WB.
!
WARNING
Casters must be locked, and cart blocked from
moving during Ply 130 WB installation.
!
WARNING
Installing Ply 130 WB onto Ply Cart requires
two persons. Ensure Ply 130WB is tightly secured
to Ply Cart using mounting bolts provided.
!
WARNING
Do not push or tow the Ply Cart with a driven
machine.
!
WARNING
Always wear cut-proof safety gloves and safety
glasses when replacing blade. Blade is razor
sharp, treat it accordingly.
!
WARNING
Before performing a blade replacement, follow
all procedures stated in manual.
!
WARNING
Only authorized and trained technicians should
work on the ply separator.
!
WARNING
Test the splitter aer blade / knife replacements
to make sure that it can be used safely.
!
WARNING
www.flexco.com
www.flexco.com
Stow spare blades safely.
—10—
Page 11
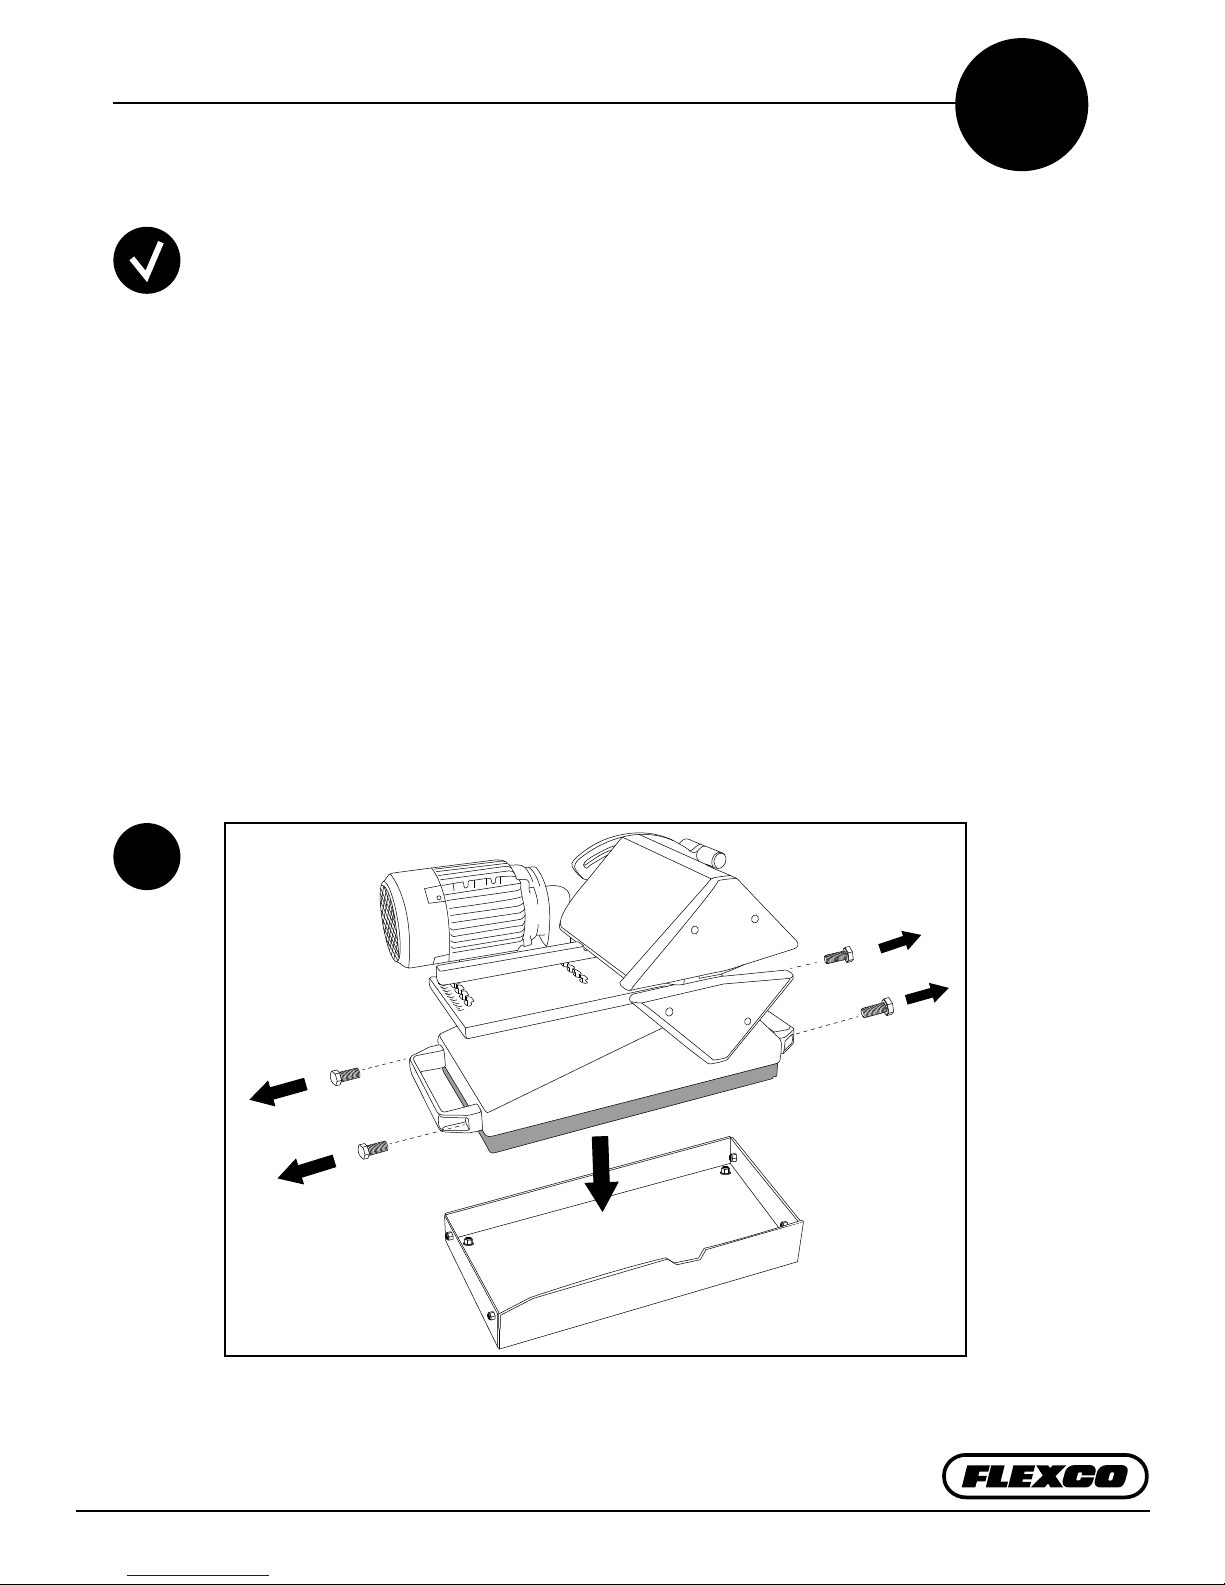
Retrofit Tray
To mount an earlier model Ply 130 WB on a new model Ply 130 Cart (item
code 08100) the Ply tray on the earlier ply 130 WB, must be replaced with
retrot Ply 130 Tray (item 08233).
A
A1
To remove existing tray from the Ply 130, remove fasteners from handles and
remove handles. The tray can now be removed. Then install new tray (item
code 08233) oriented as shown in above illustration and reinstall handles.
—11—
Page 12

www.flexco.com
—12—
Page 13

Workbench Installation
e Workbench version should for safety reasons be mounted on a rm and
level workbench (A1).
B
B1
Tighten 4 bolts in holes on bottom of machine.
—13—
Page 14

www.flexco.com
—14—
Page 15

Cart Installation
A
C
C
B
Bottom View
A
B
C
2x Fixed casters with brake
1x
1x
16x
Swiver caster with brake
Swiver caster
Bolt M10x25
Bolt M8x204x
16x
M10 Nylok anged
—15—
Page 16

Cart Installation
C1
A
A
C
C
B
B
C2
Mount wheels. For position and materials refer to drawing on page 15.
A
For access to Ply 130WB mounting bolt hole positions (A), remove drawer by
pushing the drawer latch on two sides.
www.flexco.com
—16—
Page 17

Cart Installation
C3
C4
Lock casters and block cart before installing Ply 130.
A
B
Center Ply 130 onto cart with motor (A) toward the logo side (B). Mount Ply 130
on cart. Ensure keyed patterns of cart and Ply tray t properly. Tighten M8x20
bolts (included with Ply 130 Cart) rmly.
—17—
Page 18

Cart Installation
C5
C6
Reinstall drawer by pushing it fully into the cart.
2
1
For moving cart; 1. Put foot pedal in cart. 2. Hang power cord on cart.
www.flexco.com
—18—
Page 19

Separating for Finger over Finger Joints
Prior to splitting ensure:
• e Ply 130 is mounted properly (B-C).
• When using the Ply 130 in combination with the Ply Cart; always lock three
casters before starting to work with the Ply 130.
To prepare for a nger over nger splice the
i
material is separated between the plys . e
point of separation should be determined by the
operator since it will depend on belt material,
number of plys and desired splice.
e stepped pattern and ngers are created with
a nger punching tool aer the separation.
D
D1
Release side guide and move to set to desired splitting depth. Setting is
performed in steps of 5 mm. Lock guide.
—19—
Page 20

Separating for Finger over Finger Joints
D2
0
5
D3
Set the belt thickness point of separation using the adjuster handle to position
the lower traction roller.
NOTE: Scale is for reference only and not a linear dimension.
OFF
REVERSE
FORWARD
Set switch to forward.
CAUTION: When engaging in “REVERSE”, traction rollers are
immediately powered.
www.flexco.com
—20—
Page 21

Separating for Finger over Finger Joints
D4
D5
Operate traction rolls in the forward direction by pressing footpedal.
Use sample piece to verify the thick point of separation, adjusting position (D2)
as needed. When required, separate trailing corner (as illustrated) to prepare
sample for full width ply separation.
—21—
Page 22

Separating for Finger over Finger Joints
D6
Feed belt material through machine.
TIP! make your own logbook of belting material and settings for
future reference. Set operating switch to o when separation is complete.
www.flexco.com
—22—
Page 23

E
Maintenance Ply Separation Blade Replacement
Prior to the replacement ensure:
• Acquire ocial Flexco replacement set PLY BL Blade & Jig
(item code 08014).
• When replacing Ply Separation Blade always wear cut-proof safety gloves
and safety glasses as mentioned in chapter General Safety Rules.
E1
!
Before replacing Ply Separation Blade, check for burs, straightness
and atness. WARNING: DO NOT TOUCH EDGE OF BLADE
—23—
Page 24

Maintenance Ply Separation Blade Replacement
E2
! !
E3
Put handle in position 3 and guide at 125 mm.
FORWARD
OFF
REVERSE
Put calibration jig on feed table with thin edge toward rollers and turn switch
to forward.
www.flexco.com
—24—
Page 25

Maintenance Ply Separation Blade Replacement
E4
E5
Push block into machine and simultaneously turn on machine with foot pedal.
When jig stops, stop machine.
NOTE: calibration jig must be parallel to frame!
Release blade by unscrewing two bolts at bottom of blade with an allen key.
Carefully remove blade nuts.
DISCONNECT POWER CABLE FROM ELECTRICAL POWER SOURCE.
—25—
Page 26

Maintenance Ply Separation Blade Replacement
E6
E7
Remove blade carefully.
WARNING: DO NOT TOUCH EDGE OF BLADE
Install new Ply Separation Blade with bevel side down. Mount bolts and blade nuts.
WARNING: DO NOT TOUCH EDGE OF BLADE
www.flexco.com
—26—
Page 27

Maintenance Ply Separation Blade Replacement
E8
E9
Tighten bolts suciently to allow blade to slide but not li.
1
2
1. Push Ply Separation Blade by hand so it presses against calibration block.
2. Tighten bolts rmly.
—27—
Page 28

Maintenance Ply Separation Blade Replacement
E10
FORWARD
OFF
REVERSE
Reconnect power cable to electrical power supply. Rotate switch to reverse
to release calibration block from machine.
www.flexco.com
—28—
Page 29

F
Adjustment of clearance between rollers and blade
Aer replacing the Ply Separation Blade, it may be necessary to adjust the
traction rolls.
e recommended traction roller clearance is 0.2mm (0.008”).
F1
F1
To evaluate clearance, begin by positioning the adjustment handle to 0. Insert the white
clearance shim between the ply separation blade and the traction rolls. e shim should
move freely. e black clearance shim should not t between the ply separation blade
and the traction rolls.
—29—
Page 30

Ply 130™ ply separator
F2
F3
If adjustment is needed, unscrew electric motor to gain sucient access for
adjustment of traction rolls.
Put handle in position 3.
www.flexco.com
—30—
Page 31

Ply 130™ ply separator
F4
A
F5
Unscrew (A) and take out tting bolt of the air spring.
Loosen xation screw of air spring.
—31—
Page 32

Ply 130™ ply separator
F6
B
F7
Pull air spring down slightly to rolate the black arm (B).
B
C
D
For increasing the clearance: Loosen the screw (D) a small amount and tighten screw (C).
is rotates the sha counterclockwise, related to lever (B). A short 5 mm Hex
wrench is required to reach the screws.
www.fl exco.com
—32—
Page 33

Ply 130™ ply separator
F8
F9
B
For decreasing the clearance: Loosen screw (C) a small amount and tighten screw (D).
is rotates the sha clockwise, relative to lever (B).
C
D
A
Put air spring in its original position and reinstall bolt (A). See item F3.
—33—
Page 34

Ply 130™ ply separator
F10
F11
Check for the clearance between the top roller and the blade by inserting the
clearance shims. ere should be no/little pressure on the white shim, but the
black shim should not pass through.
Lock the air spring.
www.flexco.com
—34—
Page 35

Ply 130™ ply separator
F12
E
F
F13
Repeat operation for bottom roll with screws (E) and (F) but move handle to
position 0. Use clearance shims to achieve a clearance of 0.2 mm (0.008”).
Reinstall motor aer adjustments are complete.
—35—
Page 36

Ply 130™ ply separator
ank you for choosing the Novitool® Ply 130™ ply separator.
Your feedback is appreciated and may be directed to Flexco Customer Service at 1-800-541-8028
2525 Wisconsin Avenue • Downers Grove, IL 60515-4200 U.S.A.
Telephone: (630)-971-0150 • Fax: (630)-971-1180 • E-mail: info@exco.com • Web: www.flexco.com
Australia: 61-2-9680-3322 • China: 86-21-33528388 • England: 44-1274-600-942
Germany: 49-7428-9406-0 • Mexico: 52 -55- 5674-5326 • South Africa: 27-11-608-4180
©2010 Flexible Steel Lacing Company. 04-10. For reorder: X2660 01/08-5. For Reorder: X0000
 Loading...