

Flex-A-Seal Style 58, STYLE 63, STYLE 66 Installation, Operation, Maintenance Manual
INSTALLATION,
OPERATION &
MAINTENANCE
GUIDE
STYLE 58
INTERNATIONAL BRAZIL SOUTHERN USA
HEADQUARTERS REPAIR & SERVICE
1 Jackson Street Rua Javaés, 441/443 1719 South Sonny Avenue
Essex Junction, VT 05452 Bom Retiro, Sao Paulo Gonzales, LA 70737
Brazil CEP 01130-010
TEL: (802) 878-8307 TEL: 55-11-3736-7373 TEL: (225) 484-0007
FAX: (802) 878-2479 FAX: 55-11-3736-7355 FAX: (225) 341-8922
REVISED: February 2019
Installation, Operation & Maintenance Guide
Style 58
OVERVIEW
This guide outlines the installation, operation and maintenance of the Flex-A-Seal Style 58 Single Heavy Duty
Stationary Multi-Spring Cartridge Seal. The Style 58 can also be designed to comply with API 682 Standards,
giving it the designation Style 58A. This guide, in addition to the manuals provided by the pump manufacturer
and the manufacturer of any auxiliary equipment, should be read in its entirety prior to installation.
NOTICE
Flex-A-Seal does not assume responsibility for misuse, or any damages incurred as a result of the misuse of the
supplied sealing system. Contact a Flex-A-Seal representative before making any changes to the provided
system or design.
WARRANTY
Flex-A-Seal’s limited warranty covers material defects and workmanship for its goods and/or services for a
period of six (6) months for new items, or three (3) months for repaired items, from the date of their initial
use/installation or delivery, whichever occurs first.
SAFETY
1. Read all instructions thoroughly prior to
beginning installation. Review engineering
prints for special notes and/or instructions.
• Lockout/tagout procedures
• SDS consultation for any hazardous
materials involved
2. Removal, installation, operation, and
maintenance must only be carried out by
qualified personnel who have thoroughly read
all instructions.
3. The seal must only be used for its intended
application. Flex-A-Seal cannot be held liable
for use outside the scope of the recommended
application.
4. Inspect the replacement seal prior to removal
of the old seal or installation of the new seal
using the technical information provided in this
document. Contact a Flex-A-Seal
representative if there are any questions.
5. Follow plant safety regulations and procedures
throughout the disassembly/installation process
including, but not limited to, the following:
Style 58 Maximum Operating Conditions
Temperature 550◦F (290◦C)
Pressure 1200 psi (80 bar)
Speed 10000 fpm (50 m/s)
• Use of proper personal protective
equipment
• Relief of any system pressure and
mechanical energy
6. The following symbols have been used
throughout the document to highlight important
information:
Instructions intended to prevent damage to
the seal or equipment.
Mandatory instructions intended to prevent
personal injury or extensive damage to
equipment.
Information to note while installing, or for
later use.
• Maximum temperature, pressure, and speed indicate operating extremes independently and
do not imply the seal will function at these extremes at the same time. Contact Flex-A-Seal if
in doubt or for special applications.
Page 1 of 6
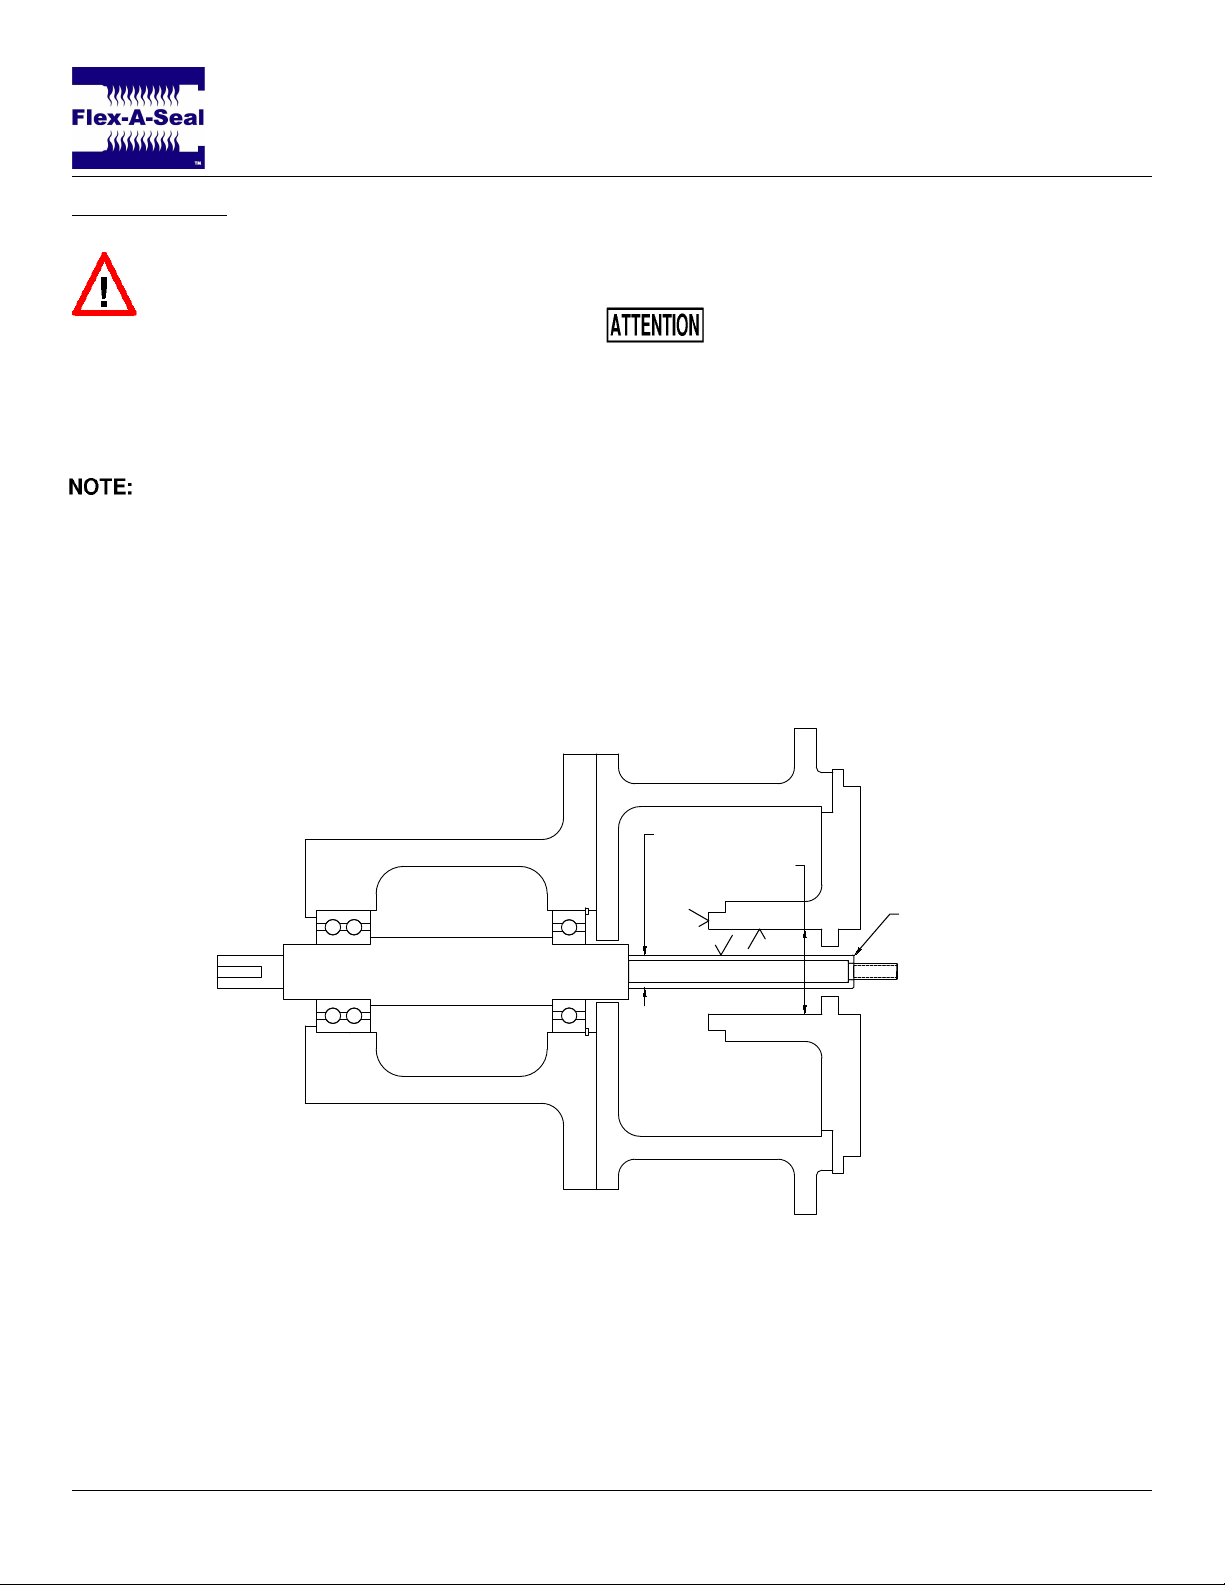
PREPARATION
(B) BORE ID
(A) SLEEVE OD
.030 MIN. x 30°
63
63
63
Installation, Operation & Maintenance Guide
Style 58
• Verify that equipment has been properly
shut off and rendered inoperative according
to plant safety protocol (e.g. lockout/tagout
procedures).
1. Disassemble the pump seal chamber, in
accordance with the pump OEM instructions, to
expose the existing seal.
Document how the seal chamber is
disassembled for re-assembly.
2. Carefully remove the existing sealing device,
taking care not to damage the shaft.
3. Clean the shaft, shaft sleeve (if present), and
seal chamber face of rust, burrs, grit, sharp
edges, and set screw damage using fine emery
cloth. Wipe clean.
Avoid making flat spots or reducing the
shaft diameter.
4. If the pump is equipped with a shaft sleeve,
verify the condition of its O-ring or gasket and
ensure that it is properly located (fully engaged
against step/hook/snap ring).
5. Sealing surfaces and the shaft or shaft sleeve
must have at least a 63 Ra-µin surface finish as
seen in Figure 1.
6. For ease of installation, the leading edge of the
shaft or sleeve should be chamfered as shown
in Figure 1 and all parts should be deburred.
Figure 1: Surface finish and chamfer locations. Fully assembled pump without seal.
Page 2 of 6
 Loading...