

Page 1
XC3401VRG
Page 2

Originalbetriebsanleitung ................................... 3
Original operating instructions ........................ 12
Notice d’instructions d’origine ........................ 21
Istruzioni per l’uso originali .............................. 30
Instrucciones de funcionamiento
originales .......................................................... 39
Instruções de serviço originais ....................... 48
Originele gebruiksaanwijzing ........................... 57
Originale driftsvejledning ................................. 66
Originale driftsanvisningen .............................. 75
Originalbruksanvisning .................................... 84
Alkuperäinen käyttöohjekirja ........................... 93
БхиенфйкЭт пдзгЯет чейсйумпэ ..................... 102
Orijinal iþletme kýlavuzu ............................. 112
Instrukcja oryginalna .......................................... 121
Eredeti üzemeltetési útmutató .......................... 130
Originální návod k obsluze .............................. 139
Originálny návod na obsluhu .......................... 147
Originaalkasutusjuhend .............................. 156
Originali naudojimo instrukcija .................. 165
Lietošanas pamācības oriìināls ................ 174
Opå¨å¸a濸aø å¸c¹pº®ýåø
ÿo õ®cÿæºa¹aýåå .......................................... 183
Page 3

Polierer XC 3401 VRG
Inhalt
Verwendete Symbole . . . . . . . . . . . . . . . . 3
Technische Daten . . . . . . . . . . . . . . . . . . 3
Auf einen Blick . . . . . . . . . . . . . . . . . . . . . 4
Zu Ihrer Sicherheit . . . . . . . . . . . . . . . . . . 5
Geräusch und Vibration . . . . . . . . . . . . . . 5
Gebrauchsanweisung . . . . . . . . . . . . . . . . 8
Wartung und Pflege . . . . . . . . . . . . . . . . 10
Entsorgungshinweise . . . . . . . . . . . . . . . 11
-Konformität . . . . . . . . . . . . . . . . . . . 11
Haftungsausschluss . . . . . . . . . . . . . . . . 11
Technische Daten
Verwendete Symbole
t^okrkd>
_ЙтЙбЕЬеЙн=ЙбеЙ=мегбннЙдД~к=ЗкзЬЙеЗЙ=dЙС~ЬкK=
_Йб=kбЕЬнДЙ~ЕЬнЙе=ЗЙл=eбепЙблЙл=ЗкзЬЙе=qзЗ=
зЗЙк=лЕЬпЙклнЙ=sЙкдЙнтмеЦЙеK
slopf`eq>
_ЙтЙбЕЬеЙн=ЙбеЙ=г∏ЦдбЕЬЙкпЙблЙ=ЦЙС®ЬкдбЕЬЙ=
pбнм~нбзеK=_Йб=kбЕЬнДЙ~ЕЬнЙе=ЗЙл=eбепЙблЙл=
ЗкзЬЙе=sЙкдЙнтмеЦЙе=зЗЙк=p~ЕЬлЕЬ®ЗЙеK
efktbfp
_ЙтЙбЕЬеЙн=^епЙеЗмеЦлнбйл=меЗ=пбЕЬнбЦЙ=
fеСзкг~нбзеЙеK
Symbole am Gerät
sзк=fеДЙнкбЙДе~ЬгЙ=
_ЙЗбЙемеЦл~едЙбнмеЦ=дЙлЙе>
^мЦЙелЕЬмнт=нк~ЦЙе>
bенлзкЦмеЦлЬбепЙбл=СΩк=З~л=
^днЦЙк®н=EлбЙЬЙ=pЙбнЙ=NNF>=
Gerätetyp Polierer XC3401 VRG
Max. Werkzeug-Ø mm 160
Werkzeugaufnahme mm Klett Ø 140
Drehzahl U/min 160–480
Hubzahl
Hub mm 8
Leistungsaufnahme W 1010
Leistungsabgabe W 590
Gewicht (ohne Kabel) kg 2,5
Schutzklasse
min
-1
3200–9600
II/
3
Page 4

Auf einen Blick
Polierer XC 3401 VRG
1Griffhaube
2 Bügelhandgriff
3 Spindelarretierung
Zum Feststellen der Spindel beim
Wechsel des Kletttellers.
4 Getriebekopf
Mit Luftaustritt und Drehrichtungspfeil.
5Typschild
6 Arretierungsknopf
Arretiert den Schalter (7) im
Dauerbetrieb.
4
7Schalter
Zum Ein- und Ausschalten sowie zum
Hochfahren bis zu der vorgewählten
Drehzahl.
8 Netzkabel 4,0 m mit Netzstecker
9 Stellrad für Drehzahlvorwahl
10 Innensechskantschlüssel
11 Gehäuse
12 Klettteller
Page 5

Polierer XC 3401 VRG
Zu Ihrer Sicherheit
t^okrkd>
sзк=dЙДк ~м ЕЬ=ЗЙл=mздбЙкЙкл=дЙлЙе=меЗ= З ~е ~Е Ь=
Ь~еЗЙдеW
–
ЗбЙ=озкдбЙЦЙеЗЙ=_ЙЗбЙемеЦл~едЙбнмеЦI
–
ÇáÉ=ł^ддЦЙгЙбеЙе=pбЕЬЙкЬЙбнлЬбепЙблЙ“=тмг=
rгЦ~еЦ=гбн=bдЙвнкзпЙквтЙмЦЙе=бг=
ДЙбЦЙдЙЦнЙе=eЙСн=EpЕЬкбСнЙеJkкKW PNRKVNRFI
–
ÇáÉ=ÑΩк= ЗЙ е=bбел~нтзкн=ЦЙднЙеЗЙе=oЙЦЙде=меЗ=
sзклЕЬкбСнЙе=тмк=rеС~ддоЙкЬΩнмеЦK
aбЙлЙк= mздбЙкЙк=блн=е~ЕЬ=ЗЙг=pн~еЗ=ЗЙк=qЙЕЬебв=
меЗ=ЗЙе=~еЙкв~еенЙе=лбЕЬЙкЬЙбнлнЙЕЬеблЕЬЙе=
oЙЦЙде=ЦЙД~мнK=aЙеезЕЬ=в∏ееЙе=ДЙб=лЙбеЙг=
dЙДк~мЕЬ=dЙС~ЬкЙе=СΩк=iЙбД=меЗ=iЙДЙе=ЗЙл=
_ЙемнтЙкл=зЗЙк=aкбннЙк=ДтпK=pЕЬ®ЗЙе=~е=ЗЙк=
j~лЕЬбеЙ=зЗЙк=~е=~еЗЙкЙе=p~ЕЬпЙкнЙе=
ЙенлнЙЬЙеK=aЙк=mздбЙкЙк=блн=емк=тм=ДЙемнтЙе
УСΩк=ЗбЙ=ДЙлнбггмеЦлЦЙг®≈Й=s Й кп ЙеЗмеЦI
У бе=лбЕЬЙкЬЙбнлнЙЕЬеблЕЬ=Йбеп~еЗСкЙбЙг=
wмлн~еЗK
aбЙ=pбЕЬЙкЬЙбн=ДЙЙбенк®ЕЬнбЦЙеЗЙ=pн∏кмеЦЙе=
мгЦЙЬЙеЗ=ДЙлЙбнбЦЙеK
Geräusch und Vibration
Die Geräusch- und Schwingungswerte
wurden entsprechend EN 60745 ermittelt.
Der A-bewertete Geräuschpegel des Gerätes
beträgt typischerweise:
– Schalldruckpegel L
– Schallleistungspegel L
– Unsicherheit: K = 3 dB.
Schwingungsgesamtwert
(beim Polieren von Lackoberflächen):
–Emissionswert a
– Unsicherheit: K = 1,5 m/s
slopf`eq>
aбЙ=~еЦЙЦЙДЙеЙе=jЙллпЙкнЙ=ЦЙднЙе=СΩк=еЙмЙ=
dЙк®нЙK=fг=н®ЦдбЕЬЙе=bбел~нт=оЙк®еЗЙке=лбЕЬ=
dЙк®млЕЬJ=меЗ=pЕЬпбеЦмеЦлпЙкнЙK
efktbfp
Der in diesen Anweisungen angegebene Schwingungspegel ist entsprechend einem in EN 60745
genormten Messverfahren gemessen worden
und kann für den Vergleich von Elektrowerkzeugen miteinander verwendet werden. Er eignet
sich auch für eine vorläufige Einschätzung der
Schwingungsbelastung. Der angegebene
: 79 dB(A);
pA
: 90 dB(A);
WA
: < 4,9 m/s
h
Schwingungspegel repräsentiert die hauptsächlichen Anwendungen des Elektrowerkzeugs.
Wenn allerdings das Elektrowerkzeug für andere
Anwendungen, mit abweichenden Einsatzwerkzeugen oder ungenügender Wartung eingesetzt
wird, kann der Schwingungspegel abweichen.
Dies kann die Schwingungsbelastung über den
gesamten Arbeitszeitraum deutlich erhöhen.
Für eine genaue Abschätzung der Schwingungsbelastung sollten auch die Zeiten berücksichtigt
werden, in denen das Gerät abgeschaltet ist oder
zwar läuft, aber nicht tatsächlich im Einsatz ist.
Dies kann die Schwingungsbelastung über den
gesamten Arbeitszeitraum deutlich reduzieren.
Legen Sie zusätzliche Sicherheitsmaßnahmen
zum Schutz des Bedieners vor der Wirkung von
Schwingungen fest wie zum Beispiel: Wartung
von Elektrowerkzeug und Einsatzwerkzeugen,
Warmhalten der Hände, Organisation der
Arbeitsabläufe.
slopf`eq>
_Йб=ЙбеЙг=pЕЬ~ддЗкмЕв=ΩÄÉê=UR=Ç_E^F=
dÉÜ∏клЕЬмнт=нк~ЦЙеK
Bestimmungsgemäße
Verwendung
Dieser handgeführte Exzenterpolierer ist
bestimmt
– für den gewerblichen Einsatz in Industrie
und Handwerk,
– für Polierarbeiten jeglicher Art, wie z. B.
Lackoberflächen an Fahrzeugen, Möbel-,
Metall- und Steinoberflächen usw. mit
Polierschwämmen, Lamm- und Wollfellen
zum Einsatz mit Polierwerkzeugen, die für eine
Drehzahl von mindestens 500 U/min
2
zugelassen sind.
2
Sicherheitshinweise zum Polieren
t^okrkd>
iЙлЙе=pбЙ=~ддЙ=pбЕЬЙкЬЙбнлЬбепЙблЙ=меЗ=^еJ
пЙблмеЦЙеK=
ЗЙк=pбЕЬЙкЬЙбнлЬбепЙблЙ=меЗ=^епЙблмеЦЙе=
в∏ееЙе=ЙдЙвнкблЕЬЙе=pЕЬд~ЦI=_к~еЗ=меЗLзЗЙк=
лЕЬпЙкЙ=sЙкдЙнтмеЦЙе=тмк=cздЦЙ=Ь~ДЙе
_Йп~ЬкЙе=pбЙ=~ддЙ=pбЕЬЙкЬЙбнлЬбепЙблЙ=меЗ=
^епЙблмеЦЙе=СΩк=ЗбЙ=wмвмеСн=~мСK
sЙкл®мгебллЙ=ДЙб=ЗЙк=bбеЬ~днмеЦ=
K=
5
Page 6

Dieses Elektrowerkzeug ist zu verwenden
als Polierer. Beachten Sie alle
Sicherheitshinweise, Anweisungen,
Darstellungen und Daten, die Sie mit
dem Gerät erhalten.
Wenn Sie die folgenden Anweisungen nicht
beachten. kann es zu elektrischem Schlag,
Feuer und/oder schweren Verletzungen
kommen.
Dieses Elektrowerkzeug ist nicht
geeignet zum Schleifen, Sandpapierschleifen, Arbeiten mit Drahtbürsten
und Trennschleifen.
Verwendungen, für die das
Elektrowerkzeug nicht vorgesehen ist,
können Gefährdungen und Verletzungen
verursachen.
Verwenden Sie kein Zubehör, das vom
Hersteller nicht speziell für dieses
Elektrowerkzeug vorgesehen und
empfohlen wurde.
Nur weil Sie das Zubehör an Ihrem
Elektrowerkzeug befestigen können,
garantiert das keine sichere Verwendung.
Die zulässige Drehzahl des Einsatz-
werkzeugs muss mindestens so hoch
sein wie die auf dem Elektrowerkzeug
angegebene Höchstdrehzahl.
Zubehör, das sich schneller als zulässig
dreht, kann zerbrechen und umherfliegen.
Außendurchmesser und Dicke des
Einsatzwerkzeugs müssen den Maßangaben Ihres Elektrowerkzeugs
entsprechen.
Falsch bemessene Einsatzwerkzeuge
können nicht ausreichend abgeschirmt
oder kontrolliert werden.
Einsatzwerkzeuge mit Gewindeeinsatz
müssen genau auf das Gewinde der
Schleifspindel passen. Bei Einsatzwerkzeugen, die mittels Flansch montiert
werden, muss der Lochdurchmesser
des Einsatzwerkzeuges zum Aufnahmedurchmesser des Flansches passen.
Einsatzwerkzeuge, die nicht genau am
Elektrowerkzeug befestigt werden, drehen
sich ungleichmäßig, vibrieren sehr stark und
können zum Verlust der Kontrolle führen.
Verwenden Sie keine beschädigten
Einsatzwerkzeuge. Kontrollieren Sie vor
jeder Verwendung Einsatzwerkzeuge auf
Absplitterungen und Risse, Schleifteller
auf Risse, Verschleiß oder starke
Polierer XC 3401 VRG
Abnutzung. Wenn das Elektrowerkzeug
oder das Einsatzwerkzeug herunterfällt,
überprüfen Sie, ob es beschädigt ist,
oder verwenden Sie ein unbeschädigtes
Einsatzwerkzeug. Wenn Sie das Einsatzwerkzeug kontrolliert und eingesetzt
haben, halten Sie und in der Nähe
befindliche Personen sich außerhalb der
Ebene des rotierenden
Einsatzwerkzeugs auf und lassen Sie
das Gerät eine Minute lang mit
Höchstdrehzahl laufen.
Beschädigte Einsatzwerkzeuge brechen
meist in dieser Testzeit.
Tragen Sie persönliche Schutzaus-
rüstung. Verwenden Sie je nach Anwendung Vollgesichtsschutz, Augenschutz
oder Schutzbrille. Soweit angemessen,
tragen Sie Staubmaske, Gehörschutz,
Schutzhandschuhe oder
Spezialschürze, die kleine Schleif- und
Materialpartikel von Ihnen fernhält.
Die Augen sollen vor herumfliegenden
Fremdkörpern geschützt werden, die bei
verschiedenen Anwendungen entstehen.
Staub- oder Atemschutzmaske müssen
den bei der Anwendung entstehenden
Staub filtern. Wenn Sie lange lautem Lärm
ausgesetzt sind, können Sie einen
Hörverlust erleiden.
Achten Sie bei anderen Personen auf
sicheren Abstand zu Ihrem Arbeitsbereich. Jeder, der den Arbeitsbereich
betritt, muss persönliche Schutzausrüstung tragen.
Bruchstücke des Werkstücks oder
gebrochener Einsatzwerkzeuge können
wegfliegen und Verletzungen auch
außerhalb des direkten Arbeitsbereichs
verursachen.
Halten Sie das Netzkabel von sich
drehenden Einsatzwerkzeugen fern.
Wenn Sie die Kontrolle über das Gerät
verlieren, kann das Netzkabel durchtrennt
oder erfasst werden und Ihre Hand oder ihr
Arm in das sich drehende Einsatzwerkzeug
geraten.
Legen Sie das Elektrowerkzeug niemals
ab, bevor das Einsatzwerkzeug völlig
zum Stillstand gekommen ist.
Das sich drehende Einsatzwerkzeug kann
in Kontakt mit der Ablagefläche geraten,
wodurch Sie die Kontrolle über das
Elektrowerkzeug verlieren können.
6
Page 7

Polierer XC 3401 VRG
Lassen Sie das Elektrowerkzeug nicht
laufen, während Sie es tragen.
Ihre Kleidung kann durch zufälligen Kontakt
mit dem sich drehenden Einsatzwerkzeug
erfasst werden und das Einsatzwerkzeug
sich in Ihren Körper bohren.
Reinigen Sie regelmäßig die Lüftungsschlitze Ihres Elektrowerkzeugs.
Das Motorgebläse zieht Staub in das
Gehäuse, und eine starke Ansammlung von
Metallstaub kann elektrische Gefahren
verursachen.
Verwenden Sie das Elektrowerkzeug
nicht in der Nähe brennbarer Materialien.
Funken können diese Materialien entzünden.
Verwenden Sie keine Einsatzwerkzeuge,
die flüssige Kühlmittel erfordern.
Die Verwendung von Wasser oder anderen
flüssigen Kühlmitteln kann zu einem
elektrischen Schlag führen.
Rückschlag und entsprechende
Sicherheitshinweise
Rückschlag ist die plötzliche Reaktion infolge
eines hakenden oder blockierten drehenden
Einsatzwerkzeugs, wie Schleifscheibe,
Schleifteller, Drahtbürste usw. Verhaken oder
Blockieren führt zu einem abrupten Stopp des
rotierenden Einsatzwerkzeugs. Dadurch wird
ein unkontrolliertes Elektrowerkzeug gegen die
Drehrichtung des Einsatzwerkzeugs an der
Blockierstelle beschleunigt.
Wenn z. B. eine Schleifscheibe im Werkstück
hakt oder blockiert, kann sich die Kante der
Schleifscheibe, die in das Werkstück eintaucht,
verfangen und dadurch die Schleifscheibe
ausbrechen oder einen Rückschlag
verursachen. Die Schleifscheibe bewegt sich
dann auf die Bedienperson zu oder von ihr weg,
je nach Drehrichtung der Scheibe an der
Blockierstelle. Hierbei können Schleifscheiben
auch brechen.
Ein Rückschlag ist die Folge eines falschen oder
fehlerhaften Gebrauchs des Elektrowerkzeugs.
Er kann durch geeignete Vorsichtsmaßnahmen, wie nachfolgend beschrieben,
verhindert werden.
Halten Sie das Elektrowerkzeug gut fest
und bringen Sie Ihren Körper und Ihre
Arme in eine Position, in der Sie die
Rückschlagkräfte abfangen können.
Verwenden Sie immer den Zusatzgriff,
falls vorhanden, um die größtmögliche
Kontrolle über Rückschlagkräfte oder
Reaktionsmomente beim Hochlauf zu
haben.
Die Bedienperson kann durch geeignete
Vorsichtsmaßnahmen die Rückschlag- und
Reaktionskräfte beherrschen.
Bringen Sie Ihre Hand nie in die Nähe
sich drehender Einsatzwerkzeuge.
Das Einsatzwerkzeug kann sich beim
Rückschlag über Ihre Hand bewegen.
Meiden Sie mit Ihrem Körper den
Bereich, in den das Elektrowerkzeug bei
einem Rückschlag bewegt wird.
Der Rückschlag treibt das Elektrowerkzeug
in die Richtung entgegengesetzt zur
Bewegung der Schleifscheibe an der
Blockierstelle.
Arbeiten Sie besonders vorsichtig im
Bereich von Ecken, scharfen Kanten
usw. Verhindern Sie, dass Einsatzwerkzeuge vom Werkstück zurückprallen und verklemmen.
Einsatzwerkzeug neigt bei Ecken, scharfen
Kanten oder wenn es abprallt dazu, sich zu
verklemmen. Dies verursacht einen
Kontrollverlust oder Rückschlag.
Verwenden Sie kein Ketten- oder
gezähntes Sägeblatt.
Solche Einsatzwerkzeuge verursachen
häufig einen Rückschlag oder den Verlust
der Kontrolle über das Elektrowerkzeug.
Spezielle Sicherheitshinweise zum
Polieren:
Lassen Sie keine losen Teile der Polierhaube, insbesondere Befestigungsschnüre, zu. Verstauen oder kürzen Sie
die Befestigungsschnüre.
Lose, sich mitdrehende Befestigungsschnüre können Ihre Finger erfassen oder
sich im Werkstück verfangen.
Das rotierende
Weitere Sicherheitshinweise
Netzspannung und Spannungsangabe auf
dem Typschild muss übereinstimmen.
Spindelarretierung nur bei stillstehendem
Werkzeug drücken.
7
Page 8

Polierer XC 3401 VRG
Gebrauchsanweisung
t^okrkd>
Vor allen Arbeiten am Polierer den
Netzstecker ziehen.
Vor der Inbetriebnahme
Polierer auspacken und auf Vollständigkeit der
Lieferung und Transportschäden kontrollieren.
Bei Bedarf:
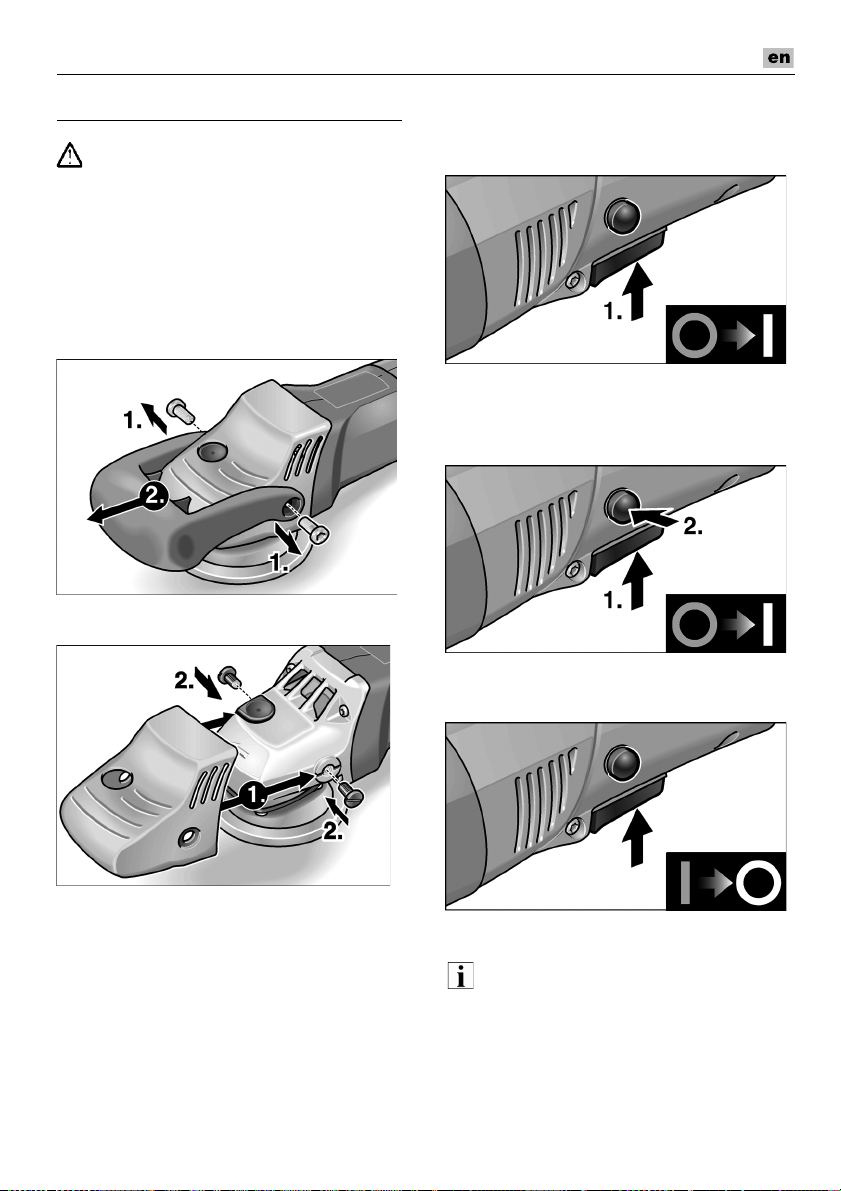
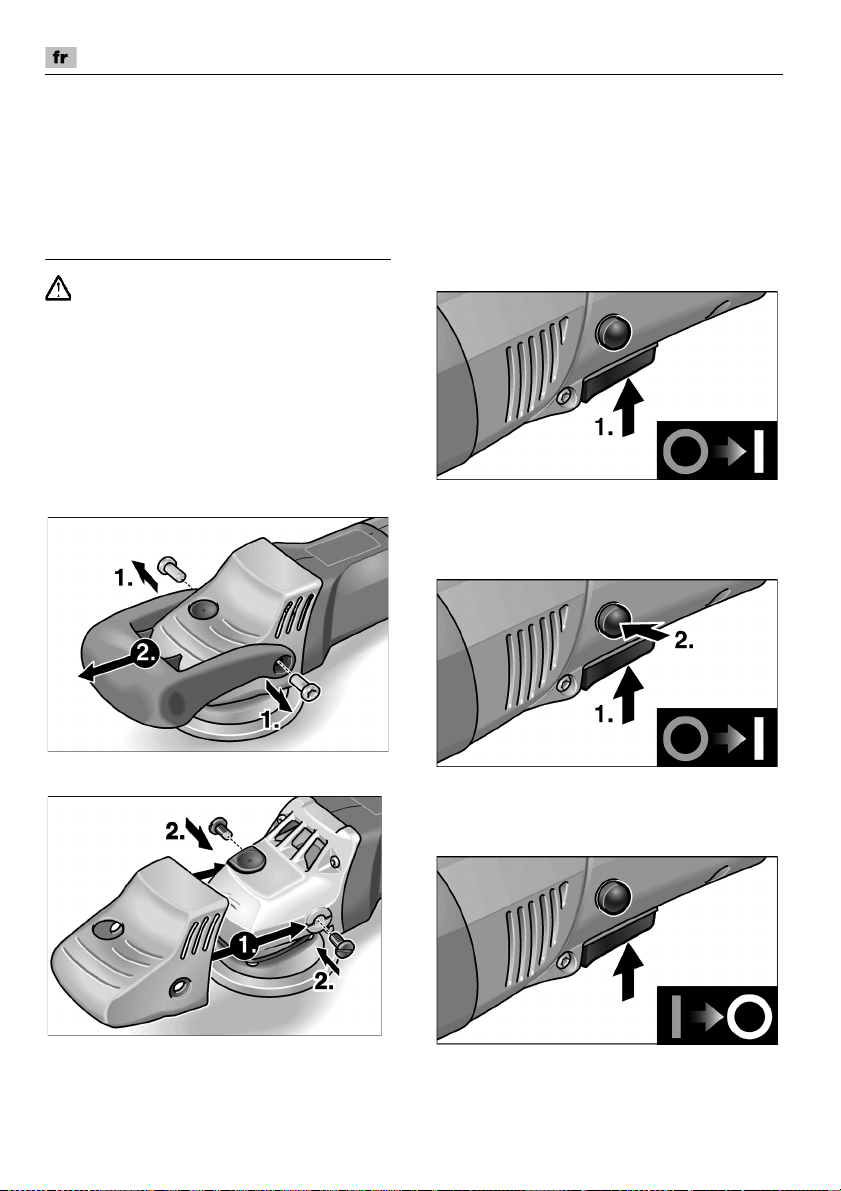
Bügelhandgriff demontieren
Nur Griffhaube montieren
Ein- und Ausschalten
Kurzzeitbetrieb ohne Einrasten:
– Schalter drücken und festhalten.
– Zum Ausschalten Schalter loslassen.
Dauerbetrieb mit Einrasten:
– Schalter drücken und festhalten.
– Zum Einrasten Arretierungsknopf gedrückt
halten und Schalter loslassen.
1. 2 Schrauben vom Bügelhandgriff mit
Schlüssel (10) lösen.
2. Bügelhandgriff und Griffhaube abziehen.
3. Nur Griffhaube aufschieben.
4. Griffhaube mit den 2 Schlitzschrauben
befestigen.
8
– Zum Ausschalten Schalter kurz drücken
und loslassen.
slopf`eq>=
Nach einem Stromausfall läuft das
eingeschaltetete Gerät nicht wieder an.
Page 9
Polierer XC 3401 VRG
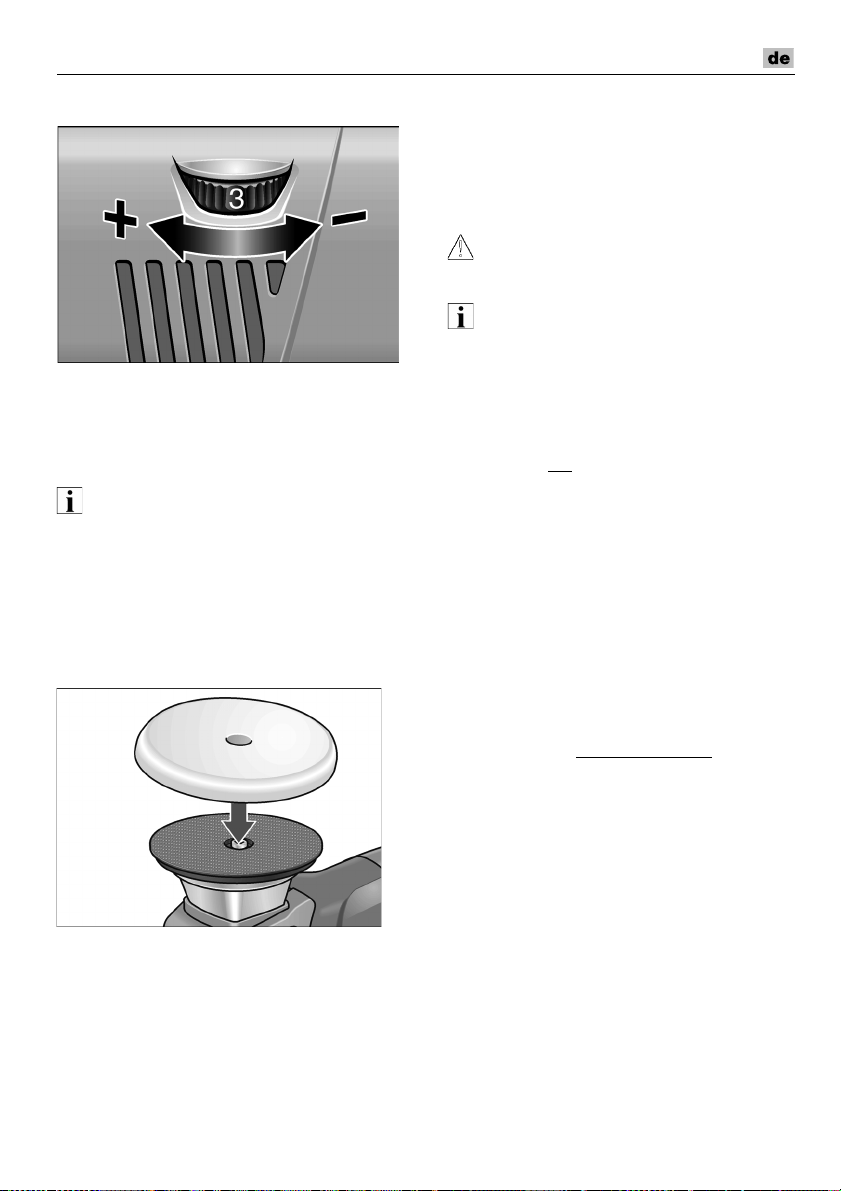
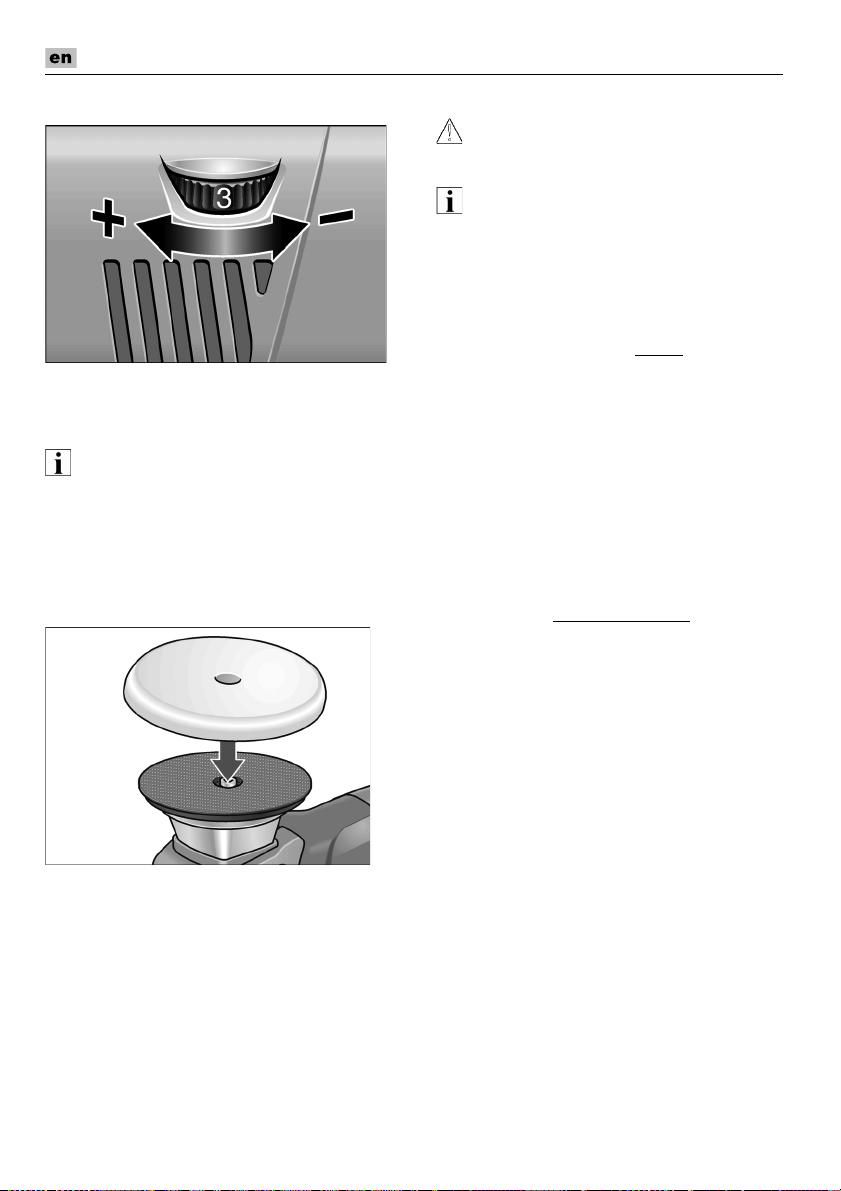
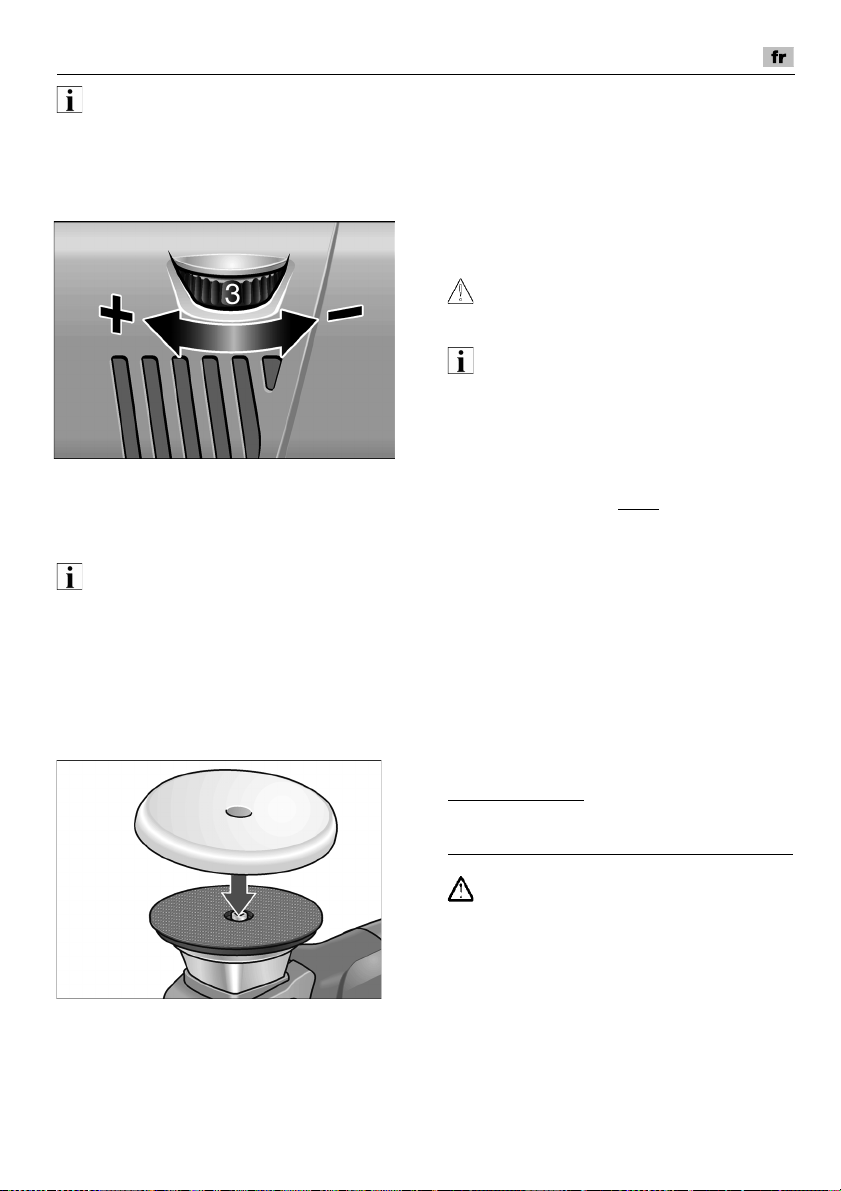
Drehzahlvorwahl
– Zum Einstellen der Arbeitsdrehzahl das
Stellrad (9) auf den gewünschten Wert
stellen.
– Durch gefühlvolles Betätigen des Schalters
(7) wird das Gerät bis zu der vorgewählten
Drehzahl hochgefahren.
efktbfp
Bei Überlastung oder Überhitzung im
Dauerbetrieb reduziert das Gerät die Drehzahl
automatisch, bis das Gerät ausreichend
abgekühlt ist.
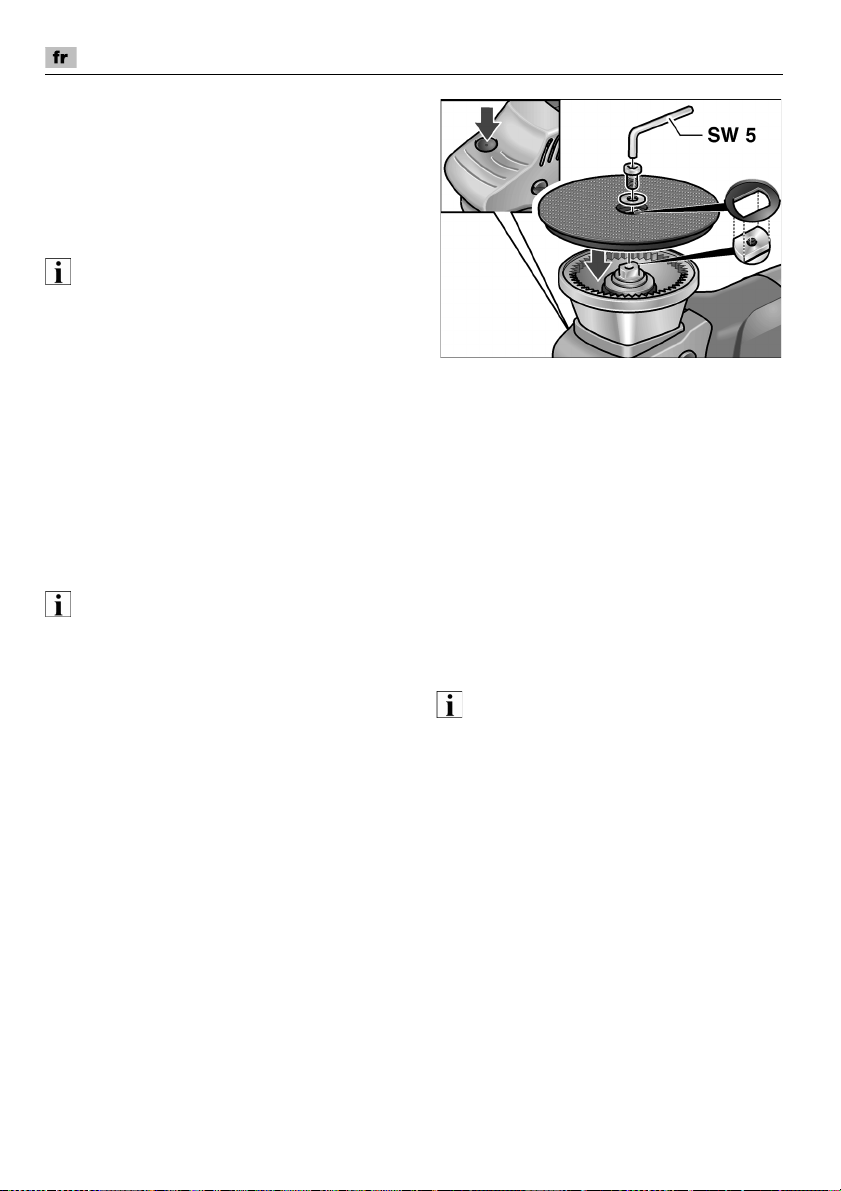
Werkzeug befestigen oder
wechseln
1. Netzstecker ziehen.
4. Polierer einschalten (ohne Einrasten) und
Polierer für ca. 30 Sekunden laufen lassen.
Auf Unwuchten und Vibrationen
kontrollieren.
5. Polierer ausschalten.
Arbeitshinweise
slopf`eq>=
k~ЕЬ=ЗЙг=^мллЕЬ~днЙе=д®мСн=З~л=
mздбЙкпЙквтЙмЦ=езЕЬ=вмктЙ=wЙбн=е~ЕЬK
efktbfp
Nach einem Werkzeugwechsel (z. B. Wollfell
statt Polierschwamm) können durch den
Gewichtsunterschied erhöhte Vibrationen
auftreten. Arbeitsdrehzahl am Stellrad (9)
soweit verändern, bis die Vibrationen
reduziert sind.
– Maschine vor dem Aufsetzen auf die zu
polierende Oberfläche einschalten und bis
zur eingestellten Drehzahl anlaufen lassen.
– Polierer mit leichtem Anpressdruck mit
kreisenden, sich überlappenden
Bewegungen auf der zu polierenden
Oberfläche bewegen, um gute Polierleistungen und hohe Standzeiten des
Werkzeugs zu erreichen.
– Bei empfindlichen Oberflächen
(z. B. Autolacke) nicht aggressiv, sondern
mit niedrigen Touren und geringem
Anpreßdruck arbeiten.
Weitere Informationen über die Produkte des
Herstellers unter www.flex-tools.de
.
2. Poliermittel, nach Auge zentriert, auf dem
Klettteller (11) festdrücken.
Nur Polierwerkzeug ohne Schäden
verwenden.
3. Netzstecker in Steckdose stecken.
9
Page 10
Polierer XC 3401 VRG
Wartung und Pflege
t^okrkd>
Vor allen Arbeiten am Polierer den
Netzstecker ziehen.
Reinigung
– Gerät und Lüftungsschlitze regelmäßig
reinigen. Häufigkeit ist vom bearbeiteten
Material und von der Dauer des Gebrauchs
abhängig.
– Gehäuseinnenraum mit Motor regelmäßig
mit trockener Druckluft ausblasen.
Kohlenbürsten
Der Polierer ist mit Abschaltkohlen
ausgestattet.
Nach Erreichen der Verschleißgrenze der
Abschaltkohlen wird der Polierer automatisch
abgeschaltet.
efktbfp
wмг=^млн~млЕЬ=емк=lкбЦбе~днЙбдЙ=ЗЙл=
eЙклнЙддЙкл=оЙкпЙеЗЙеK=_Йб=sЙкпЙеЗмеЦ=озе=
cкЙгЗС~Дкбв~нЙе=Йкд∏лЕЬЙе=ЗбЙ=d~к~енбЙJ
оЙкйСдбЕЬнмеЦЙе=ЗЙл=eЙклнЙддЙклK
Durch die hinteren Lufteintrittsöffnungen kann
das Kohlenfeuer während des Gebrauchs
beobachtet werden.
Bei starkem Kohlenfeuer den Polierer sofort
ausschalten. Polierer an eine vom Hersteller
autorisierte Kundendienst-werkstatt
übergeben.
Getriebe
efktbfp
aбЙ=pЕЬк~мДЙе=~г=dЙнкбЙДЙвзйС=EQF=п®ЬкЙеЗ=
ЗЙк=d~к~енбЙтЙбн=ебЕЬн=д∏лЙеK=
_Йб kбЕЬнДЙ~ЕЬнмеЦ=Йкд∏лЕЬЙе=ЗбЙ=
d~к~енбЙоЙкйСдбЕЬнмеЦЙе=ЗЙл=eЙклнЙддЙклK
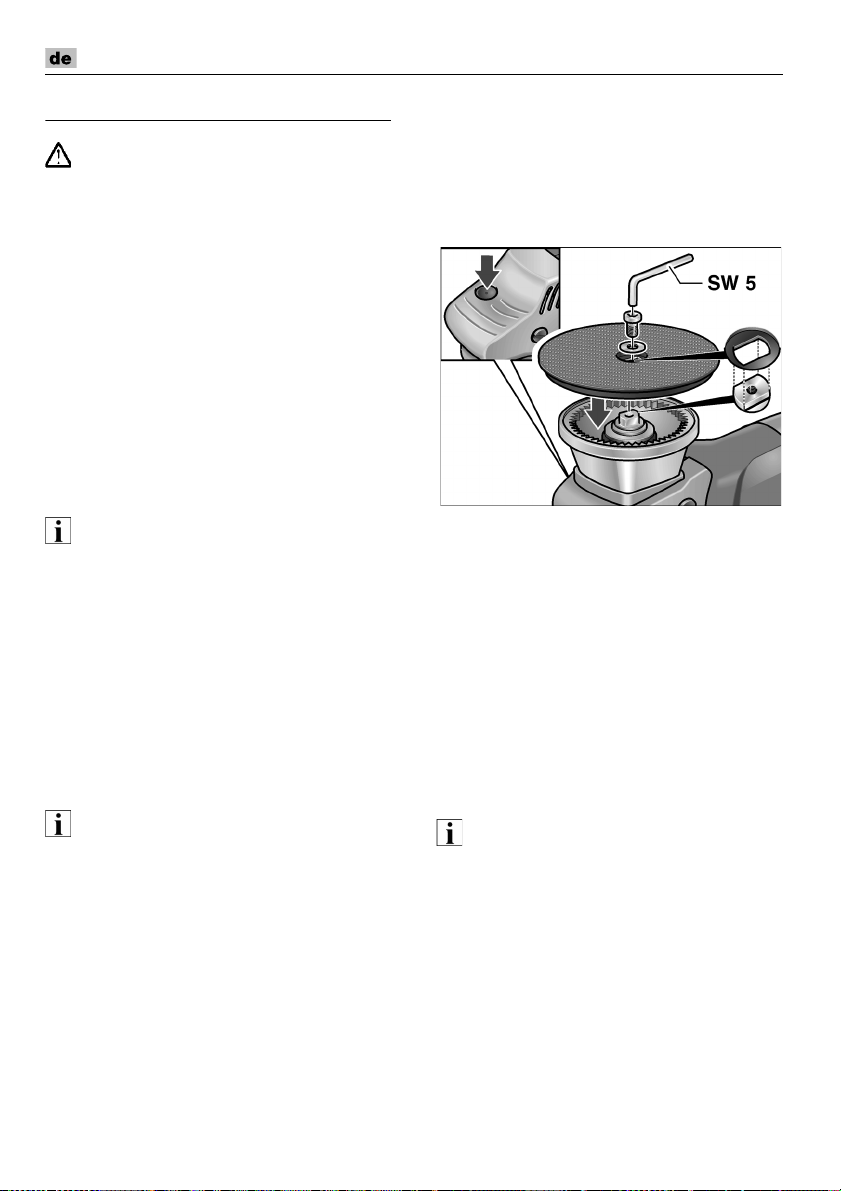
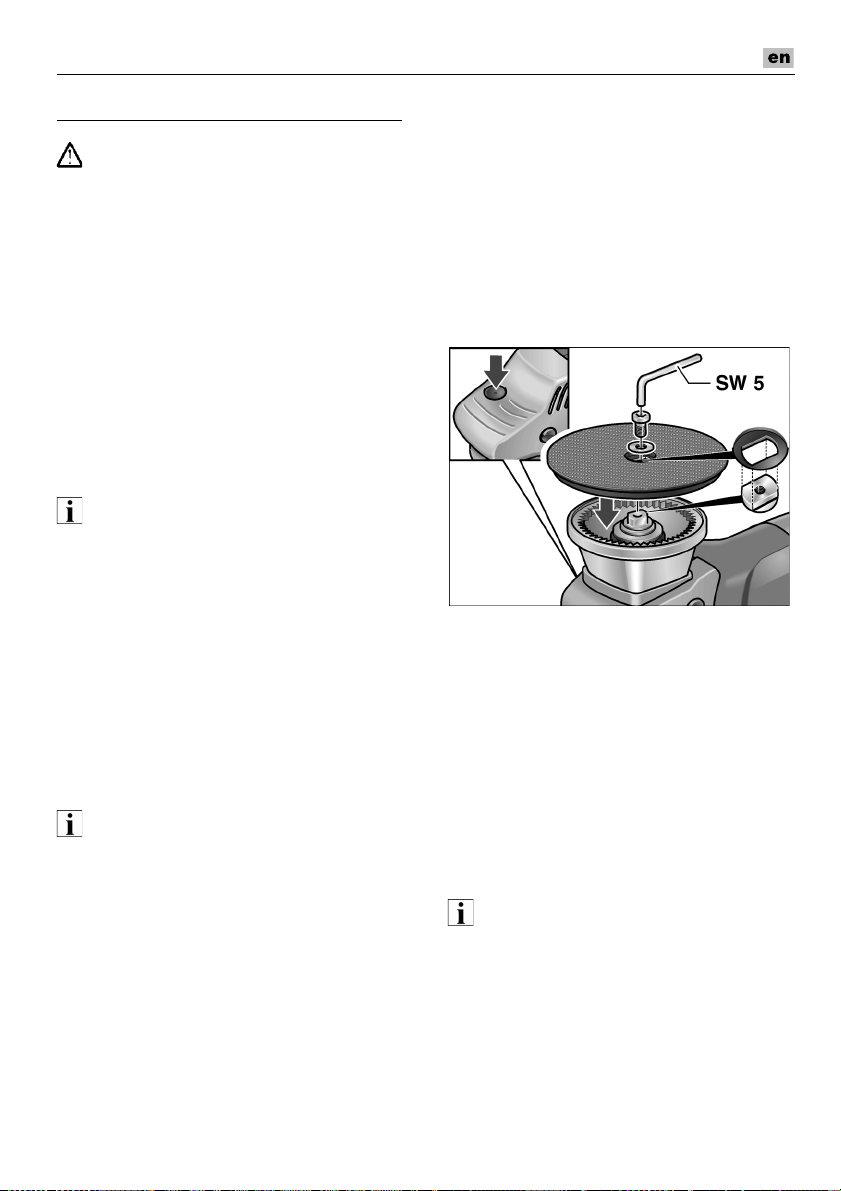
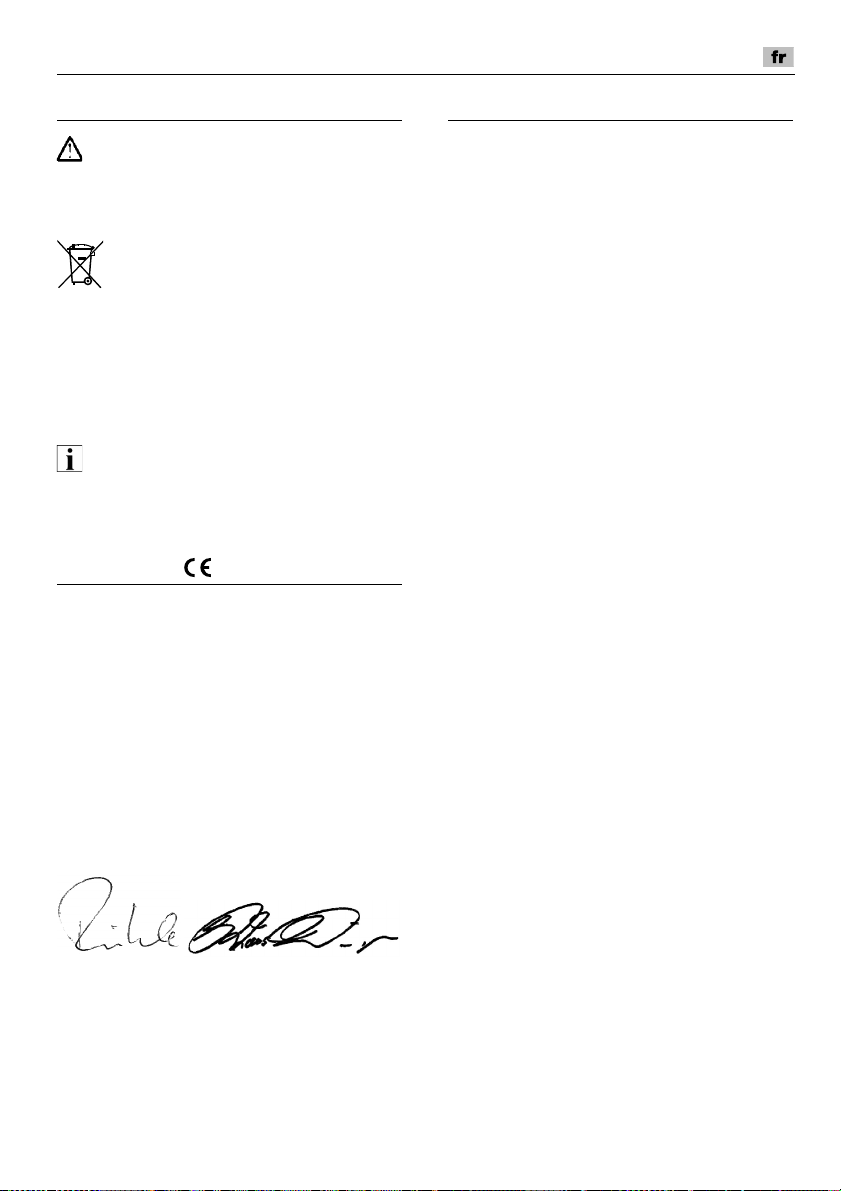
Auswechseln des Kletttellers
bei Verschleiß
1. Netzstecker ziehen.
2. Polierschwamm entfernen.
3. Maschine auf der Rückseite ablegen.
4. Spindelarretierung drücken und Schraube
mit Innensechskantschlüssel lösen und
herausdrehen. Klettteller abnehmen.
5. Bei Bedarf Schlüsselfläche der
Abtriebswelle reinigen.
6. Neuen Klettteller auf Abtriebswelle
aufsetzen.
Die Nut des Kletttellers muss in
Schlüsselfläche der Abtriebswelle
eingreifen, ggf. Abtriebswelle verdrehen.
7. Schraube eindrehen und mit
Innensechskantschlüssel festziehen.
Dabei Spindelarretierung drücken.
8. Probelauf durchführen. Auf Unwuchten
und Vibrationen kontrollieren.
Reparaturen
Reparaturen ausschließlich durch eine vom
Hersteller autorisierte Kundendienstwerkstatt
ausführen lassen.
Ersatzteile und Zubehör
efktbfp
bë=ÇΩкСЙе=емк=ЗбЙ=озе=cibu=СкЙбЦЙЦЙДЙеЙе=
tЙквтЙмЦЙ=оЙкпЙеЗЙн=пЙкЗЙеK
Weiteres Zubehör, insbesondere Werkzeuge
und Polierhilfsmittel, den Katalogen des
Herstellers entnehmen.
Explosionszeichnungen und Ersatzteillisten
finden Sie auf unserer Homepage:
www.flex-tools.com
10
Page 11

Polierer XC 3401 VRG
Klaus Peter WeinperEckhard Rühle
Manager Research &
Development (R & D)
Head of Quality
Department (QD)
Entsorgungshinweise
t^okrkd>
^млЦЙЗбЙенЙ=dЙк®нЙ=ЗмкЕЬ=bенСЙкеЙе=ЗЙл=
kЙнтв~ДЙдл=меДк~мЕЬД~к=г~ЕЬЙеK
Nur für EU-Länder
Werfen Sie Elektrowerkzeuge nicht in
den Hausmüll!
Gemäss Europäischer Richtlinie 2012/19/EG
über Elektro- und Elektronik-Altgeräte und
Umsetzung in nationales Recht müssen
verbrauchte Elektrowerkzeuge getrennt
gesammelt und einer umweltgerechten
Wiederverwertung zugeführt werden.
efktbfp
§ДЙк=bенлзкЦмеЦлг∏ЦдбЕЬвЙбнЙе=ДЙбг=
c~ЕЬЬ®еЗдЙк=беСзкгбЙкЙе>
-Konformität
Wir erklären in alleiniger Verantwortung, dass
das unter „Technische Daten“ beschriebene
Produkt mit folgenden Normen oder
normativen Dokumenten übereinstimmt:
EN 60745 gemäß den Bestimmungen der
Richtlinien
2014/30/EU (ab 20.04.2016)
und 2011/65/EG.
Verantwortlich für technische Unterlagen:
FLEX-Elektrowerkzeuge GmbH, R & D
Bahnhofstrasse 15, D-71711 Steinheim/Murr
2004/108/EG (bis 19.04.2016),
, 2006/42/EG
Haftungsausschluss
Der Hersteller und sein Vertreter haften nicht
für Schäden und entgangenen Gewinn durch
Unterbrechung des Geschäftsbetriebes, die
durch das Produkt oder die nicht mögliche
Verwendung des Produktes verursacht
wurden.
Der Hersteller und sein Vertreter haften nicht
für Schäden, die durch unsachgemäße
Verwendung oder in Verbindung mit Produkten anderer Hersteller verursacht wurden.
09.06.2015, FLEX-Elektrowerkzeuge GmbH
Bahnhofstrasse 15, D-71711 Steinheim/Murr
11
Page 12
Polisher XC 3401 VRG
Contents
Symbols used in this manual . . . . . . . . . 12
Technical specifications . . . . . . . . . . . . . 12
Overview . . . . . . . . . . . . . . . . . . . . . . . . 13
For your safety . . . . . . . . . . . . . . . . . . . . 14
Noise and vibration . . . . . . . . . . . . . . . . . 14
Operating instructions . . . . . . . . . . . . . . 17
Maintenance and care . . . . . . . . . . . . . . 19
Disposal information . . . . . . . . . . . . . . . . 20
-Declaration of Conformity . . . . . . . . . 20
Exemption from liability . . . . . . . . . . . . . . 20
Technical specifications
Symbols used in this manual
t^okfkd>
aЙезнЙл=бгйЙеЗбеЦ=З~еЦЙкK=kзеJзДлЙко~еЕЙ=
зС=нЬбл=п~кебеЦ=г~у=кЙлмдн=бе=ЗЙ~нЬ=зк=ЙснкЙгЙду=
лЙоЙкЙ=беамкбЙлK
`^rqflk>
aЙезнЙл=~=йзллбДду=З~еЦЙкзмл=лбнм~нбзеK=
kзеJзДлЙко~еЕЙ=зС=нЬбл=п~кебеЦ=г~у=кЙлмдн=
бе лдбЦЬн=беамку=зк=З~г~ЦЙ=нз=йкзйЙкнуK
klqb
aЙезнЙл=~ййдбЕ~нбзе=нбйл=~еЗ=бгйзкн~ен=
беСзкг~нбзеK
Symbols on the power tool
_ЙСзкЙ=лпбнЕЬбеЦ=зе=нЬЙ=йзпЙк=нзздI=
кЙ~З=нЬЙ=зйЙк~нбеЦ=г~ем~д>
tЙ~к=ЦзЦЦдЙл>
aблйзл~д=беСзкг~нбзе=Сзк=нЬЙ=здЗ=
г~ЕЬбеЙ=EлЙЙ=й~ЦЙ=OMF>
Machine type Polisher XC 3401 VRG
Tool Ø max. mm 160
Tool holder mm Velcro Ø 140
Speed r.p.m. 160–480
Stroke rate
Stroke mm 8
Power input W 1010
Power output W 590
Weight (without power cord) kg 2.5
Safety class
12
min
-1
3200–9600
II/
Page 13

Polisher XC 3401 VRG
Overview
1 Handle cover
2Bail handle
3Spindle lock
For locking the spindle when changing
the Velcro pad.
4 Gear head
With air outlet and direction-of-rotation
arrow.
5 Rating plate
6 Locking button
Locks the switch (7) during continuous
operation.
7Switch
Switches the power tool on and off and
also accelerates it up to the preselected
speed.
8 4.0 m power cord with plug
9 Dial for preselecting the speed
10 Hexagon-socket key
11 Housing
12 Velcro pad
13
Page 14

Polisher XC 3401 VRG
For your safety
t^okfkd>
_ЙСзкЙ=млбеЦ=нЬЙ=йздблЬЙкI=йдЙ~лЙ=кЙ~З=~еЗ=
СзддзпW
– нЬЙлЙ=зйЙк~нбеЦ=белнкмЕнбзелI
– нЬЙ=ТdЙеЙк~д=л~СЙну=белнк м Ен бз елТ= зе=нЬЙ =
Ь~еЗдбеЦ=зС=йзпЙк=нзздл=бе=нЬЙ=ЙеЕдзлЙЗ=
ДззвдЙн=EдЙ~СдЙнJезKW PNRKVNRFI
– нЬЙ=ЕмккЙенду=о~дбЗ=лбн Й=кмдЙл=~еЗ=нЬЙ=
кЙЦмд~нбзел=Сзк=нЬЙ=йкЙоЙенбзе=зС=~ЕЕбЗЙенлK
qЬбл=йздблЬЙк=бл=лн~нЙJзСJнЬЙJ~кн=~еЗ=Ь~л=ДЙЙе=
ЕзелнкмЕнЙЗ=бе=~ЕЕзкЗ~еЕЙ=пбнЬ=нЬЙ=
~ЕвезпдЙЗЦЙЗ=л~СЙну=кЙЦмд~нбзелK=
kЙоЙкнЬЙдЙллI= пЬЙе=бе= млЙI=нЬЙ=йзпЙк=нззд=г~у=
ДЙ=~=З~еЦЙк=нз=дбСЙ= ~еЗ = д бг Д =з С= нЬЙ = мл Йк =зк=~=
нЬбкЗ=й~кнуI=зк=нЬЙ=йзпЙк= нз зд=зк=знЬЙк=йкзйЙкну=
г~у=ДЙ=З~г~ЦЙЗK=qЬЙ=йздблЬЙк=г~у=ДЙ=млЙЗ=
зеду
У млЙЗ=~л=бенЙеЗЙЗI
У бе=йЙкСЙЕн=пзквбеЦ=зкЗЙкK
c~мднл=пЬбЕЬ=бгй~бк=л~СЙну=гмлн=ДЙ=кЙй~бкЙЗ=
бггЙЗб~нЙдуK
Noise and vibration
The noise and vibration values have been
determined in accordance with EN 60745.
The A evaluated noise level of the power tool
is typically:
– Sound pressure level LpA: 79 dB(A);
– Sound power level L
– Uncertainty: K = 3 dB.
Total vibration value (when polishing painted
surfaces):
– Emission value ah: < 4.9 m/s
– Uncertainty: K = 1.5 m/s
`^rqflk>
qЬЙ=беЗбЕ~нЙЗ=гЙ~лмкЙгЙенл=кЙСЙк=нз=еЙп=
йзпЙк=нзздлK=a~бду=млЙ=Е~млЙл=нЬЙ=езблЙ=~еЗ=
обДк~нбзе=о~дмЙл=нз=ЕЬ~еЦЙK
: 90 dB(A);
WA
klqb
The vibration emission level given in this information sheet has been measured in accordance
with a standardised test given in EN 60745 and
may be used to compare one tool with another.
It may be used for a preliminary assessment
of exposure. The declared vibration emission
level represents the main applications of the tool.
However if the tool is used for different applications, with different accessories or poorly
maintained, the vibration emission may differ.
This may significantly increase the exposure level
over the total working period.
For a precise estimation of the vibration
the times should also be considered during which
the power tool is switched off or even running, but
not actually in use. This may significantly decrease
the exposure level over the total working period.
Identify additional safety measures to protect
the operator from the effects of vibration such as:
maintain the tool and the accessories, keep
the hands warm, organisation of work patterns.
`^rqflk>
tЙ~к=Й~к=йкзнЙЕнбзе=~н=~=лзмеЗ=йкЙллмкЙ=
~ДзоЙ=UR=З_E^FK
Intended use
This hand-operated orbit polisher is designed
– is designed for industrial applications,
– for all types of polishing work, e.g.
paintwork on vehicles, furniture, metal and
stone surfaces, etc. with polishing sponge,
lambswool and wool pads
– for use with polishing tools which are
permitted to run at a speed of at least
500 r.p.m.
2
2
load
14
Page 15

Polisher XC 3401 VRG
Safety instructions for polishing
t^okfkd>
oЙ~З=~дд=л~СЙну=п~кебеЦл=~еЗ=~дд=
белнкмЕнбзелK=c~бдмкЙ=нз=Сзддзп=нЬЙ=п~кебеЦл=
~еЗ=белнкмЕнбзел=г~у=кЙлмдн=бе=ЙдЙЕнкбЕ=лЬзЕвI=
СбкЙ=~еЗLзк=лЙкбзмл=беамкбЙлK= p~оЙ=~дд=п~кебеЦл=
~еЗ=белнкмЕнбзел=Сзк=СмнмкЙ=кЙСЙкЙеЕЙK
This power tool is intended to function
as a polisher. Read all safety warnings,
instructions, illustrations and specifications provided with this power tool.
Failure to follow all instructions listed below
may result in electric shock, fire and/or
serious injury.
Operations such as grinding, sanding,
wire brushing, or cutting-off are not
recommended to be performed with this
power tool.
Operations for which the power tool
was not designed may create a hazard and
cause personal injury.
Do not use accessories which are not
specifically designed and recommended
by the tool manufacturer.
Just because the accessory can
be attached to your power tool,
it does not assure safe operation.
The rated speed of the accessory must be
at least equal to the maximum speed
marked on the power tool.
Accessories running faster than their rated
speed can break and fly apart.
The outside diameter and the thickness of
your accessory must be within the
capacity rating of your power tool.
Incorrectly sized accessories cannot be
adequately guarded or controlled.
Threaded mounting of accessories must
match the grinder spindle thread. For
accessories mounted by flanges, the
arbour hole of the accessory must fit the
locating diameter of the flange.
Accessories that do not match the
mounting hardware of the power tool will
run out of balance, vibrate excessively and
may cause loss of control.
Do not use a damaged accessory. Before
each use inspect the accessory such as
abrasive wheels for chips and cracks,
backing pad for cracks, tear or excess
wear, wire brush for loose or cracked
wires. If power tool or accessory is
dropped, inspect for damage or install an
undamaged accessory. After inspecting
and installing an accessory, position
yourself and bystanders away from the
plane of the rotating accessory and run
the power tool at maximum no-load
speed for one minute.
Damaged accessories will normally break
apart during this test time.
Wear personal protective equipment.
Depending on application, use face
shield, safety goggles or safety glasses.
As appropriate, wear dust mask, hearing
protectors, gloves and shop apron
capable of stopping small abrasive or
workpiece fragments.
The eye protection must be capable of
stopping flying debris generated by various
operations. The dust mask or respirator
must be capable of filtrating particles
generated by your operation. Prolonged
exposure to high intensity noise may cause
hearing loss.
Keep bystanders a safe distance away
from work area. Anyone entering the work
area must wear personal protective
equipment.
Fragments of workpiece or of a broken
accessory may fly away and cause injury
beyond immediate area of operation.
Position the cord clear of the spinning
accessory.
If you lose control, the cord may be cut
or snagged and your hand or arm may
be pulled into the spinning accessory.
Never lay the power tool down until the
accessory has come to a complete stop.
The spinning accessory may grab the
surface and pull the power tool out of your
control.
Do not run the power tool while carrying it
at your side.
Accidental contact with the spinning
accessory could snag your clothing, pulling
the accessory into your body.
15
Page 16

Regularly clean the power tool's air vents.
The motor's fan will draw the dust inside
the housing and excessive accumulation of
powdered metal may cause electrical
hazards.
Do not operate the power tool near flammable materials.
Sparks could ignite these materials.
Do not use accessories that require liquid
coolants.
Using water or other liquid coolants may
result reesult in electrocution or shock.
Kickback and Related Warnings:
Kickback is a sudden reaction to a pinched or
snagged rotating wheel, backing pad, brush
or any other accessory. Pinching or snagging
causes rapid stalling of the rotating accessory
which in turn causes the uncontrolled power
tool to be forced in the direction opposite of
the accessory's rotation at the point of the
binding.
For example, if an abrasive wheel is snagged
or pinched by the workpiece, the edge of the
wheel that is entering into the pinch point can
dig into the surface of the material causing the
wheel to climb out or kick out. The wheel may
either jump toward or away from the operator,
depending on direction of the wheel's
movement at the point of pinching. Abrasive
wheels may also break under these
conditions.
Kickback is the result of power tool misuse
and/or incorrect operating procedures or
conditions and can be avoided by taking
proper precautions as given below.
Maintain a firm grip on the power tool
and position your body and arm to allow
you to resist kickback forces.
Always use auxiliary handle, if provided,
for maximum control over kickback
or torque reaction during start-up.
The operator can control torque reactions
or kickback forces, if proper precautions
are taken.
Never place your hand near the rotating
accessory.
Accessory may kickback over your hand.
Polisher XC 3401 VRG
Do not position your body in the area
where power tool will move if kickback
occurs.
Kickback will propel the tool in direction
opposite to the wheel’s movement at the
point of snagging.
Use special care when working corners,
sharp edges etc. Avoid bouncing and
snagging the accessory.
Corners, sharp edges or bouncing have
a tendency to snag the rotating accessory
and cause loss of control or kickback.
Do not attach a saw chain woodcarving
blade or toothed saw blade.
Such blades create frequent kickback and
loss of control.
Safety Warnings Specific for
Polishing Operations
Do not allow any loose portion of the
polishing bonnet or its attachment strings
to spin freely. Tuck away or trim any loose
attachment strings.
attachment strings can entangle your
fingers or snag on the workpiece.
Loose and spinning
Additional safety instructions
The mains voltage and the voltage
specifications on the rating plate must
correspond.
Do not press the spindle lock until the tool
stops.
16
Page 17
Polisher XC 3401 VRG
Operating instructions
t^okfkd>
Before carrying out any work on the
polisher, always pull out the mains plug.
Before switching on the polisher
Unpack the polisher and check that there are
no missing or damaged parts.
If required:
Remove the bail handle
Attaching the handle cover only
Switch on and off
Brief operation without engaged
switch rocker:
– Press and hold down the switch.
– To switch off, release the switch.
Continuous operation with engaged
switch rocker:
– Press and hold down the switch.
– To lock into position, hold down the locking
button and release the switch.
1. Using the hexagon-socket key (10),
remove the 2 screws from the bail handle.
2. Remove bail handle and handle cover.
3. Push on handle cover only.
4. Attach handle cover with the 2 slotted
screws.
– To switch off, briefly press and release
the switch.
klqb
Following a power failure, the switched
on power tool does not restart.
17
Page 18
Polisher XC 3401 VRG
Preselecting the speed
– To set the operating speed, move the dial
(9) to the required value.
– Gently press the switch (7) to accelerate the
power tool up to the preselected speed.
klqb
If an overload or overheating occurs during
continues operation, the power tool automatically reduces the speed until the power
tool has cooled down adequately.
Attach or change tools
1. Pull out the mains plug.
Operating instructions
`^rqflk>=
tЬЙе=нЬЙ=йздблЬЙк=бл=лпбнЕЬЙЗ=зССI=
нЬЙ йздблЬбеЦ=нззд=ЕзенбемЙл=кмеебеЦ=ДкбЙСдуK
klqb
Following a tool change (e.g. wool pad instead
of polishing sponge), the difference in weight
may increase the vibrations.
Change the operating speed with the
adjusting wheel (9) until the vibrations have
been reduced.
– Switch on the machine before
the surface which is to be polished and run
the polisher up to the set speed.
– Applying light contact pressure, move the
polisher in circular, overlapping movements
on the surface which is to be polished in
order to obtain a good polishing finish and
to ensure that the tool has a long service
life.
– On sensitive surfaces (e.g. car paintwork)
do not work aggressively but work at slow
speeds applying low contact pressure.
For further information on the manufacturer’s
products go to www.flex-tools.de
placing it on
.
2. Firmly press polishing material, centred on
the eye, onto the Velcro pad (11).
Use undamaged polishing tools only.
3. Insert the mains plug into the socket.
4. Switch on the polisher (without engaging it)
and run the polisher for approx.
30 seconds. Check for imbalances and
vibrations.
5. Switch off the polisher.
18
Page 19
Polisher XC 3401 VRG
Maintenance and care
t^okfkd>
Before carrying out any work on the
polisher, always pull out the mains plug.
Cleaning
– Regularly clean the power tool and
ventilation slots. Frequency of cleaning is
dependent on the material and duration of
use.
– Regularly blow out the housing interior and
motor with dry compressed air.
Carbon brushes
The polisher features cut-off carbon brushes.
When the wear limit of the cut-off carbon
brushes is reached, the polisher switches off
automatically.
klqb>
rлЙ=зеду=зкбЦбе~д=й~кнл=лмййдбЙЗ=Ду=нЬЙ=
г~емС~ЕнмкЙк=Сзк=кЙйд~ЕЙгЙен=ймкйзлЙлK=
fС езеJзкбЦбе~д=й~кнл=~кЙ=млЙЗI=нЬЙ=Цм~к~енЙЙ=
зДдбЦ~нбзел=зС=нЬЙ=г~емС~ЕнмкЙк=пбдд=ДЙ=ЗЙЙгЙЗ=
емдд=~еЗ=озбЗK
When the polisher is being used, the carbon
brushes can be seen sparking through the rear
air inlet apertures.
If the carbon brushes spark excessively,
switch off the polisher immediately.
Take the polisher to a customer service
workshop authorised by the manufacturer.
Gears
klqb>
aз=езн=дззлЙе=нЬЙ=лЕкЙпл=зе=нЬЙ= ЦЙ~к=ЬЙ~З EQF=
ЗмкбеЦ=нЬЙ=п~кк~ену=йЙкбзЗK=
kзеJЕзгйдб~еЕЙ=пбдд=ЗЙЙг=нЬЙ=Цм~к~енЙЙ=
зДдбЦ~нбзел=зС=нЬЙ=г~емС~ЕнмкЙк=емдд=~еЗ=озбЗK
Replacing a worn Velcro pad
1. Pull out the mains plug.
2. Remove polishing sponge.
3. Place machine on its back.
4. Press spindle lock and loosen and
remove the screw with an Allen key.
Remove Velcro pad.
5. If required, clean the key surface of the
output shaft.
6. Place a new Velcro pad on the output
shaft.
The groove of the Velcro pad must mesh
with the key surface of the output shaft,
if required rotate the output shaft.
7. Screw in the screw and tighten with the
Allen key. Simultaneously press the spindle
lock.
8. Conduct a test run. Check for imbalances
and vibrations.
Repairs
Repairs may be carried out by an authorised
customer service centre only.
Spare parts and accessories
klqb>
Only the tools released by FLEX may be used.
For other accessories, in particular tools
and polishing aids, see the manufacturer’s
catalogues.
Exploded drawings and spare-part lists can
be found on our homepage:
www.flex-tools.com
19
Page 20

Polisher XC 3401 VRG
Klaus Peter WeinperEckhard Rühle
Manager Research &
Development (R & D)
Head of Quality
Department (QD)
Disposal information
t^okfkd>
oЙеЗЙк=кЙЗмеЗ~ен=йзпЙк=нзздл=мемл~ДдЙ=
Ду кЙгзобеЦ=нЬЙ=йзпЙк=ЕзкЗK
EU countries only
Do not throw electric power tools into
the household waste!
In accordance with the European Directive
2012/19/EC on Waste Electrical and
Electronic Equipment and transposition into
national law used electric power tools must
be collected separately and recycled in an
environmentally friendly manner.
klqb>
mдЙ~лЙ=~лв=узмк=ЗЙ~дЙк=~Дзмн=Зблйзл~д=зйнбзел>
-Declaration of Conformity
We declare under our sole responsibility that
the product described under “Technical Data”
conforms to the following standards or
normative documents:
EN 60745 in accordance with the regulations of the directives
2004/108/EC (until 19.04.2016),
2014/30/EU (from 20.04.2016),
2006/42/EC, and 2011/65/EC.
Responsible for technical documents:
FLEX-Elektrowerkzeuge GmbH, R & D
Bahnhofstrasse 15, D-71711 Steinheim/Murr
Exemption from liability
The manufacturer and his representative are
not liable for any damage and lost profit due to
interruption in business caused by the product
or by an unusable product.
The manufacturer and his representative are
not liable for any damage which was caused
by improper use of the power tool or by use
of the power tool with products from other
manufacturers.
09.06.2015
FLEX-Elektrowerkzeuge GmbH
Bahnhofstrasse 15, D-71711 Steinheim/Murr
20
Page 21
Polisseuse XC 3401 VRG
Table des matières
Symboles utilisés . . . . . . . . . . . . . . . . . . 21
Données techniques . . . . . . . . . . . . . . . 21
Vue d’ensemble . . . . . . . . . . . . . . . . . . . 22
Pour votre sécurité . . . . . . . . . . . . . . . . . 23
Bruit et vibrations . . . . . . . . . . . . . . . . . . 23
Instructions d’utilisation . . . . . . . . . . . . . 26
Maintenance et nettoyage . . . . . . . . . . . 27
Consignes pour la mise au rebut . . . . . . 29
Conformité . . . . . . . . . . . . . . . . . . . . 29
Exclusion de responsabilité . . . . . . . . . . 29
Symboles utilisés
^sboqfppbjbkq=>
`Й=лугДздЙ=йк¨обЙен=ЗЫме=З~еЦЙк=бггбеЙен=X=
дЙ езеJкЙлйЙЕн=ЗЙл=ЕзелбЦеЙл=имб=дЙ=лмбоЙен=
лЫ~ЕЕзгй~ЦеЙ=ЗЫме=З~еЦЙк=ЗЙ=гзкн=зм=
ЗЙ ДдЙллмкЙл=нк≠ë=Öê~îÉëK
morabk`b>
`Й=лугДздЙ=З¨лбЦеЙ=меЙ=лбнм~нбзе=йзнЙенбЙддЙJ
гЙен=З~еЦЙкЙмлЙK=pб=озмл=еЙ=кЙлйЙЕнЙт=й~л=
ЕЙннЙ=ЕзелбЦеЙI=озмл=кблимЙт=ЗЙ=озмл=ДдЙллЙк=
зм=ЗЙ=Е~млЙк=ЗЙл=З¨ЦЯнл=г~н¨кбЙдлK
obj^onrb
`Й=лугДздЙ=озмл=ЗзееЙ=ЗЙл=ЕзелЙбдл=
ЗЫмнбдбл~нбзе=Йн=ЗЙл=беСзкг~нбзел=бгйзкн~енЙлK
Symboles apposés sur l’appareil
^о~ен=д~=гблЙ=Йе=лЙкобЕЙI=оЙмбддЙт=дбкЙ=
д~=езнбЕЙ=ЗЫбелнкмЕнбзел=>
mзкнЙт=ЗЙл=дмеЙннЙл=ЗЙ йкзнЙЕнбзе=>
`зелбЦеЙл=йзмк=д~=гблЙ=~м=кЙДмн=
ЗЙ дЫ~еЕбЙе=~йй~кЙбд=Eозбк=й~ЦЙ=OVF=>
Données techniques
Type d’appareil Polisseuse XC 3401 VRG
Ø max. de l’outil mm 160
Logement d’outil mm Plateau auto-agrippant Ø 140
Vitesse t/mn 160–480
Nombre de courses
Course mm 8
Puissance absorbée W 1010
Puissance débitée W 590
Poids (sans le cordon) kg 2,5
Classe de protection
min
-1
3200–9600
II/
21
Page 22

Vue d’ensemble
Polisseuse XC 3401 VRG
1 Capot à poignée
2 Poignée étrier
3 Dispositif de blocage de la broche
Pour immobiliser la broche en cas de
changement de plateau auto-agrippant.
4 Boîte d’engrenages
Avec sortie d’air et flèche directionnelle.
5 Plaque signalétique
6 Cran d’arrêt
Il maintient l’interrupteur (7) en position
de marche permanente
22
7Interrupteur
Pour allumer et éteindre la polisseuse,
ainsi que pour la faire accélérer jusqu’à
la vitesse présélectionnée.
8 Cordon d’alimentation électrique de
4,0 m, terminé par une fiche mâle.
9 Molette de préréglage de la vitesse
10 Clé hexagonale mâle
11 Carter
12 Plateau auto-agrippant
Page 23

Polisseuse XC 3401 VRG
Pour votre sécurité
^sboqfppbjbkq=>
^о~ен=ЗЫмнбдблЙк=д~=йздбллЙмлЙI=оЙмбддЙт=дбкЙ=
Йн кЙлйЙЕнЙк=дЙ=ЕзенЙем=ЗЙл=ЗзЕмгЙенл=
лмбо~енл=W
– i~=йк¨лЙенЙ=езнбЕЙ=ЗЫмнбдбл~нбзеI
– iЙл=В `зелбЦеЙл=Ц¨е¨к~дЙл=ЗЙ=л¨Емкбн¨ К=
к¨Цблл~ен=дЫЙгйдзб=ЗЙл=~йй~кЙбдл=¨дЙЕнкбимЙл=
Йн=к¨мебЙл=З~ел дЙ=С~лЕбЕмдЙ=ЕбJазбен=
Eк¨С¨кЙеЕЙ=W PNRKVNRFI
– iÉë=ê≠ЦдЙл= Йн=йкЙлЕкбйнбзел=йк¨оЙенбоЙл=ЗЙл=
~ЕЕбЗЙенл=~ййдбЕ~ДдЙл=лмк=дЙ=дбЙм=ЗЙ=гблЙ=Йе=
МмокЙK
`ЙннЙ=йздбллЙмлЙ=~=¨н¨=ЕзелнкмбнЙ=Йе=дЫ¨н~н=ЗЙ=д~=
нЙЕЬебимЙ= Йн=ЗЙл=к≠ЦдЙл= нЙЕЬебимЙл=ЗЙ=л¨Емкбн¨=
кЙЕзеемЙлK=qзмнЙСзблI=ЗЙ=лзе=Йгйдзб=йЙмн=
¨г~еЙк=ме=З~еЦЙк=ЗЙ=гзкн=Йн=ме=кблимЙ=ЗЙ=
ДдЙллмкЙл=Цк~оЙл=йзмк=дЫмнбдбл~нЙмк=зм=дЙл=нбЙклI=
зм=ме=кблимЙ=ЗЫЙеЗзгг~ЦЙк=д~=г~ЕЬбеЙ=ЙддЙJ
гЖгЙ=зм=ЗЫ~мнкЙл=зДаЙнл=ЗЙ=о~дЙмкK=
sЙмбддЙт еЫмнбдблЙк=ЕЙннЙ=йздбллЙмлЙ
У имЫ¶=ЗЙл=Сбел=ЕзеСзкгЙл=¶=дЫмл~ЦЙ=йк¨ом
У a~ел=ме=¨н~н=нЙЕЬебимЙ=Йн =З Й= л ¨Е мкб н¨=
é~êÑ~áíK
pмййкбгЙт=бгг¨Зб~нЙгЙен=нзмн=З¨к~еЦЙJ
гЙен=лмлЕЙйнбДдЙ=ЗЙ=ЕзгйкзгЙннкЙ=д~=л¨Емкбн¨K
Bruit et vibrations
obj^onrb
Le niveau de vibrations indiqué dans ces instructions a été mesuré selon un procédé standardisé
dans la norme EN 60745, et peut servir à comparer les outils électroportatifs entre eux.
Ce procédé convient également pour estimer
provisoirement la contrainte en vibrations.
Le niveau de vibrations indiqué se réfère aux
principales applications de l’outil électroportatif.
Le niveau de vibrations représente les principales
formes d’utilisation de l’outil électroportatif.
Si toutefois ce dernier est utilisé à d’autres fins,
avec des outils montés différents ou s’il ne subit
qu’une maintenance insuffisante, le niveau de
vibrations pourra dévier de ce qui est indiqué.
Cela peut accroître nettement la contrainte en
vibrations sur l’ensemble de la période de travail.
Pour pouvoir évaluer exactement la contrainte en
vibrations
, il faudrait également tenir compte des
temps au cours desquels l’appareil est éteint,
ou tourne mais sans être effectivement en action.
Cela peut réduire nettement la contrainte en
vibrations sur l’ensemble de la période de travail.
Pour protéger l’utilisateur contre les effets des
vibrations, définissez des mesures de sécurité
supplémentaires, dont par exemple :
Maintenance de l’outil électroportatif et des outils
installés, maintien des mains au chaud,
organisation des séquences de travail.
morabk`b=>
iзклимЙ=д~=йкЙллбзе=~ЕзмлнбимЙ=З¨й~ллЙ=
UR З_E^FI=оЙмбддЙт=йзкнЙк=ме=Е~лимЙ=~енбДкмбнK
Les niveaux de bruits et vibrations ont été
déterminés conformément à EN 60745.
Le niveau de bruit évalué en décibels (A)
s’élève typiquement à :
– Niveau de pression
acoustique L
– Niveau de puissance
sonore L
– Marge d’incertitude : K = 3 dB.
: 79 dB(A) ;
pA
: 90 dB(A) ;
WA
Valeur totale de vibration
(lors du polissage de surfaces peintes) :
– Valeur émissive a
– Marge d’incertitude : K = 1,5 m/s
: < 4,9 m/s
h
morabk`b=>
iЙл=о~дЙмкл=ЗЙ=гЙлмкЙ=беЗбим¨Йл=лЫ~ййдбимЙен=
~мс= ~йй~кЙбдл=еЙмСлK=mЙеЗ~ен=д~=гблЙ=Йе=МмокЙ=
имзнбЗбЙееЙI=дЙл=о~дЙмкл=ЗЙ=Дкмбн=Йн=ЗЙ=обДк~J
нбзел=о~кбЙенK
Conformité d'utilisation
Cette polisseuse excentrique guidée
manuellement est destinée
– aux applications professionnelles dans
’
industrie et l’artisanat.
l
– aux travaux de polissage de toute sorte,
par exemple des surfaces laquées sur les
véhicules, surfaces de meubles, surfaces
métalliques et surfaces de pierres, etc.,
2
2
avec des éponges à polir, des toisons
d’agneau et toisons en laine
– à monter sur des outils à polir homologués
pour tourner au minimum à 500 t/mn.
23
Page 24

Consignes de sécurité pour
le ponçage
^sboqfppbjbkq=>
sЙмбддЙт=дбкЙ=нзмнЙл=дЙл=ЕзелбЦеЙл=
ЗЙ л¨Емкбн¨=Йн=белнкмЕнбзелK=
ЗЫ~оЙкнбллЙгЙен=Йн=белнкмЕнбзел=еЙ=лзен=й~л=
ЕзккЙЕнЙгЙен=кЙлйЙЕн¨ЙлI=ЕЙд~=ЙеЦЙеЗкЙ=
ме кблимЙ=ЗЫ¨дЙЕнкзЕмнбзеI=ЗЫбеЕЙеЗбЙ=Йн=L=зм=
ЗЙ ДдЙллмкЙл=Цк~оЙл
нзмнЙл=дЙл=ЕзелбЦеЙл=ЗЙ=л¨Емкбн¨=Йн=белнкмЕJ
нбзел=З~ел=ме=ЙеЗкзбн=лºк=йзмк=йзмозбк=дЙл=
кЙЕзелмднЙк=мдн¨кбЙмкЙгЙенK
Cet outil électroportatif est à utiliser
comme polisseuse. Veuillez respecter
toutes les consignes de sécurité, instructions, illustrations et données reçues avec
l’appareil.
instructions qui suivent, vous risquez une
électrocution, de provoquer un incendie
et / ou des blessures graves.
Cet outil électroportatif ne permet pas
de meuler, poncer avec du papier émeri,
travailler avec des brosses à crins métalliques et des disques de tronçonnage.
Les formes d’utilisation non prévues
de cet outil électroportatif peuvent
engendrer des risques et des blessures.
N’utilisez jamais d’accessoires qui n’ont
pas été spécialement prévus et recommandés par le fabricant pour servir sur cet
outil électroportatif.
fixer l’accessoire contre votre outil électroportatif ne garantit aucunement que son
utilisation sera sûre.
La vitesse admissible de l’outil installé
doit être au minimum aussi élevée que
la vitesse maximum indiquée sur l’outil
électroportatif.
à une vitesse supérieure à celle admise
peuvent casser et être catapultés dans
tous les sens.
Le diamètre extérieur et l’épaisseur de
l’outil installé doivent se conformer aux
indications dimensionnelles de l’outil
électroportatif .
incorrectes ne peuvent pas être
suffisamment protégés ou contrôlés.
K=sЙмбддЙт=ЕзелЙкоЙк=
Si vous ne respectez pas les
Les accessoires tournant
Les outils aux dimensions
pб=дЙл=ЕзелбЦеЙл=
Le seul fait de pouvoir
Polisseuse XC 3401 VRG
Les flasques et autres accessoires
doivent correspondre exactement
à la broche équipant votre outil électroportatif.
ne correspondent pas exactement
à la broche de ponçage de votre outil
électroportatif tournent irrégulièrement,
vibrent fortement et peuvent vous faire
perdre le contrôle de ce dernier.
N’utilisez jamais d’outils endommagés.
Avant chaque utilisation, vérifiez si les
outils installés présentent des ébréchures
et fissures. Si l’outil électroportatif ou
l’outil monté chutent, vérifiez s’ils sont
endommagés ou utilisez un outil intact.
Après avoir contrôlé et monté l’outil, faites
tourner l’appareil pendant une minute
à la vitesse maximale en vous tenant,
vous et d’autres personnes proches
de vous, loin du plan de l’outil installé
en train de tourner.
endommagés cassent généralement au
cours de cette période d’essai.
Portez une tenue de protection person-
nelle. Suivant l’utilisation, portez une
protection faciale intégrale, une protection oculaire ou des lunettes enveloppantes. Si nécessaire, portez un masque
à poussière, un casque anti-bruit, des
gants de protection ou une blouse
spéciale faisant barrage aux petites
particules de matière.
Protégez-vous les yeux contre les corps
étrangers catapultés, engendrés au cours
des différentes applications.
Les maques à poussière ou de protection
respiratoire doivent pouvoir filtrer la poussière engendrée par l’application.
Si vous restez exposé longtemps à un
niveau de bruit élevé, vous risquez une
perte d’acuité auditive.
Si d’autres personnes se trouvent à proxi-
mité, veillez à ce qu’elles soient à une
distance sûre de votre zone de travail.
Quiconque pénètre dans la zone de travail
doit porter un équipement de protection
personnelle.
ou de l’outil installé brisé peuvent être
catapultés et provoquer des blessures
aussi hors de la zone de travail immédiate.
Les outils mis en œuvre qui
Les outils installés
Des fragments de la pièce
24
Page 25

Polisseuse XC 3401 VRG
Éloignez le cordon électrique des outils en
train de tourner.
de l’appareil, l’outil risque de sectionner
le cordon d’alimentation ou de la happer,
et votre main ou votre bras risquent
de se retrouver en contact avec l’outil
en rotation.
Ne déposez jamais l’outil électroportatif
sur une surface tant que l’outil installé
ne s’est pas complètement immobilisé.
L’outil installé risquerait d’entrer en
contact avec la surface de déposition
et vous risqueriez de perdre le contrôle
de l’outil électroportatif.
Ne laissez jamais l’outil électroportatif
tourner pendant que vous le transportez.
L’outil en train de tourner risquerait,
s’il entre fortuitement en contact avec
un vêtement, de le happer et de pénétrer
dans votre corps.
Nettoyez régulièrement les ouïes de venti-
lation de votre outil électroportatif.
Le ventilateur du moteur aspire de la
poussière dans le carter, et une forte
accumulation de poussières métalliques
peut engendrer des risques électriques.
N’utilisez pas l’outil électroportatif
à proximité de matériaux combustibles.
Les étincelles risquent d’enflammer ces
matériaux.
N’utilisez jamais d’outils requérant un
liquide de refroidissement.
L’utilisation d’eau ou d’autres liquides
de refroidissement peut provoquer une
électrocution.
Ne permettez jamais que des parties
de la coiffe à polir se détachent, en
particulier les cordelettes de fixation.
Rangez ou raccourcissez les cordelettes
de fixation.
fixées et entrées elles aussi en rotation
peuvent happer vos doigts ou se prendre
dans la pièce.
Si vous perdez le contrôle
Les cordelettes de fixation mal
Recul brutal et consignes de sécurité
correspondantes
Le recul brutal est la réaction subite d’un outil
installé qui vient d’accrocher un obstacle
ou d’être bloqué par lui. L’accrochage ou
le blocage provoquent l’arrêt brutal de l’outil
installé qui était en train de tourner. De ce fait,
un outil électroportatif non fermement tenue
subit une accélération en sens opposé
de celui de l’outil installé.
Le recul brutal est engendré par une utilisation erronée ou inexperte de la ponceuse
électroportative. Il est possible de l’empêcher
en prenant les mesures de précaution
ci-après décrites.
Tenez fermement l’outil électroportatif
et placez votre corps et vos bras dans
une position qui vous permettra
d’absorber les forces de recul.
Utilisez toujours la poignée d’appoint
si présente, pour conserver le contrôle
le plus ample possible des forces
de recul ou des couples de réaction
pendant l’accélération.
de précaution appropriées, l’opérateur
peut maîtriser les forces de recule
et de réaction.
N’approchez jamais vos mains des outils
en place en train de tourner.
Lors d’un recul brutal, l’outil en place
pourrait passer sur votre main.
Ne vous tenez pas dans la zone dans
laquelle l’outil électroportatif risque
de se déplacer en cas de recul brutal.
Le recul force l’outil électroportatif
à tourner en direction opposée à celle
de l’accessoire à polir à l’endroit où ce
dernier est resté bloqué.
Travaillez avec une particulière prudence
dans les recoins, angles vifs, etc..
Empêchez que les outils installés
rebondissent sur la pièce et s’y coincent
dedans.
tend à se coincer dans les angles, sur les
arêtes vives ou en cas d’impact.
Ceci provoque une perte de contrôle
ou un recul brutal.
N’utilisez jamais de chaîne de
tronçonneuse ou de lame de scie dentée.
De tels outils provoquent fréquemment
des reculs brutaux ou vous feront perdre
le contrôle de l’outil électroportatif.
Consignes de sécurité particulières pour
le ponçage :
Ne permettez jamais que des parties de la
coiffe à polir se détachent, en particulier
les cordelettes de fixation. Rangez ou
raccourcissez les cordelettes de fixation.
Les cordelettes de fixation mal fixées et
entrées elles aussi en rotation peuvent
happer vos doigts ou se prendre dans
la pièce.
L’outil en place en train de tourner
Par des mesures
25
Page 26
Polisseuse XC 3401 VRG
Autres consignes de sécurité
La tension du secteur et celle indiquée sur
la plaque signalétique doivent concorder.
N’appuyez sur le dispositif de blocage
de la broche qu’une fois que l’outil s’est
immobilisé.
Instructions d’utilisation
^sboqfppbjbkq=>
^о~ен=ЗЫЙССЙЕнмЙк=нзмл=нк~о~мс=лмк=д~=
йздбллЙмлЙI=З¨Дк~еЕЬЙт=д~=СбЕЬЙ=гЯдЙ=
ЗЙ д~ йкблЙ=ЗЙ=Езмк~енK
Avant la mise en service
Déballez la polisseuse et contrôlez que la
livraison est au complet et si elle présente des
dégâts survenus en cours de transport.
Si nécessaire :
Démonter la poignée étrier
2. Retirez la poignée étrier et le capot
à poignée.
3. N
’
enfilez que le capot à poignée.
4. Fixez le capot à poignée à l
àfente.
’
aide des 2 vis
Enclenchement et coupure
Marche de courte durée, sans activer
le cran d’arrêt:
–Appuyez sur l’interrupteur et retenez-le.
– Pour éteindre la polisseuse, relâchez
l’interrupteur.
Marche permanente avec encrantage:
Ne monter que le capot à poignée
1. A l’aide de la clé (10), desserrez les 2 vis de
la poignée étrier.
26
–Appuyez sur l’interrupteur et retenez-le.
– Pour que le cran encoche, maintenez le
bouton de verrouillage appuyé puis
relâchez l
– Pour éteindre l
ment sur l
’
interrupteur.
’
appareil, appuyez briève-
’
interrupteur puis relâchez-le.
Page 27
Polisseuse XC 3401 VRG
obj^onrb
Après une coupure de courant, l
ne redémarre pas même s
en position enclenchée.
’
appareil
’
il se trouvait
Présélection de la vitesse
– Pour régler la vitesse de travail, amenez
la molette (9) sur le chiffre souhaité.
– Modifiez avec doigté le réglage de
l
’
interrupteur (7) pour que l’appareil
accélère jusqu
obj^onrb
En cas de surcharge ou de surchauffe
en marche permanente, l’appareil réduit
sa vitesse automatiquement jusqu
suffisamment refroidi.
’
à la vitesse présélectionnée.
’
à ce qu’il ait
Fixer l’outil ou le changer
1. Débranchez la fiche mâle de la prise
de courant.
3. Branchez la fiche mâle dans la prise
de courant.
4. Enclenchez la polisseuse (sans faire encran-
’
interrupteur) puis laissez-la tourner
ter l
pendant 30 secondes environ. Contrôlez
l
’
absence de balourds et de vibrations.
5. Eteignez la polisseuse.
Consignes de travail
morabk`b>=
^éê≠л=имЙ=озмл=~оЙт=¨нЙбен=дЫ~йй~кЙбдI=дЫзмнбд=
¶ йздбк=ЕзенбемЙ=ЗЙ=нзмкеЙк=Дкб≠оЙгЙенK
obj^onrb
Après un changement d’outil (par exemple
passage d’une toison en laine à une éponge
à polir), la différence de poids peut engendrer
des vibrations. Par la molette (9), modifiez la
vitesse de travail jusqu
diminuent.
– Allumez la machine avant
surface à polir et faites-la accélérer jusqu
la vitesse voulue.
– Déplacez la polisseuse en exerçant une
légère pression d’applique et en décrivant
des mouvements rotatifs se chevauchant
sur la surface à polir, ceci pour parvenir
à de bons rendements de polissage
et de longues durées de vie de l’outil.
– En présence de surfaces délicates (laques
automobiles par ex.), travaillez de façon
« non agressive », c
vitesse et en appuyant peu.
Vous trouverez des informations avancées
sur les produits du fabricant à l
www.flex-tools.de.
’
à ce que les vibrations
de la poser sur la
’
est-à-dire à petite
’
adresse
’
à
2. Centrez le moyen de polissage sur l’œillet
puis appuyez-le fermement sur le plateau
auto-agrippant (11).
à polir intact.
N’utilisez qu’un outil
Maintenance et nettoyage
^sboqfppbjbkq=>
Avant d’effectuer tous travaux sur la polisseuse, débranchez la fiche mâle de la prise
de courant.
Nettoyage
–
Nettoyez régulièrement l’appareil et les ouïes
de ventilation. La fréquence des nettoyages
dépend du matériau meulé et de la durée
d’utilisation.
27
Page 28
– Nettoyez régulièrement l’intérieur du boîtier
et le moteur à l
’
aide d’air comprimé sec.
Balais de charbon
Le moteur de la polisseuse est équipé de
balais de charbon à coupure automatique.
Une fois atteinte leur limite d’usure, la
polisseuse s
kЙ=кЙгйд~ЕЙт=ЕЙл=Д~д~бл=имЙ=й~к=ЗЙл=йб≠ЕЙл=
ЗЫзкбЦбеЙ=СзмкебЙл=й~к=дЙ=С~ДкбЕ~енK=
bе Е~л ЗЫЙгйдзб=ЗЙ=йб≠ЕЙл=ЗЫ~мнкЙл=г~кимЙлI=
дЙ=С~ДкбЕ~ен=З¨ЕдбеЙк~=нзмнЙ=зДдбЦ~нбзе=~м=нбнкЙ=
Зм кЙЕзмкл=Йе=Ц~к~енбЙK
Les ouïes d’entrée d’air situées à l’arrière
permettent, pendant l
les étincelles des balais sur le collecteur.
En présence de fortes étincelles au niveau
du collecteur, entre les balais de charbon,
éteignez immédiatement la polisseuse.
Remettez la polisseuse à l
service après-vente agréés par le fabricant.
’
éteint automatiquement.
obj^onrb=>
’
utilisation, de surveiller
’
un des ateliers de
Réducteur
obj^onrb=>
mЙеЗ~ен=д~=й¨кбзЗЙ=ЗЙ=Ц~к~енбЙI=еЙ=З¨обллЙт=
й~л=дЙл=обл=лбнм¨Йл=ЕзенкЙ=д~=Дз≤нЙ=ЗЫЙеЦкЙJ
е~ЦЙл=EQFK=bе=Е~л=ЗЙ=езеJкЙлйЙЕн=ЗЙ=ЕЙннЙ=
ЕзелбЦеЙI=дЙ=С~ДкбЕ~ен=З¨ЕдбеЙк~=нзмнЙ=
зДдбЦ~нбзе=~м=нбнкЙ=Зм=кЙЕзмкл=Йе=Ц~к~енбЙK
Remplacer le plateau autoagrippant une fois celui-ci usé
1. Débranchez la fiche mâle de la prise
de courant.
2. Enlevez l’éponge à polir.
3. Couchez la machine sur le côté.
4. Appuyez sur le dispositif de blocage de la
broche ; ensuite, desserrez la vis avec une
clé hexagonale mâle et dévissez-la.
Retirez le plateau auto-agrippant.
5. Si nécessaire, nettoyez la surface
d’application de la clé sur l’arbre de sortie.
6. Posez un nouveau plateau auto-agrippant
sur l’arbre de sortie.
Polisseuse XC 3401 VRG
La rainure du plateau tournant doit
engrener dans la surface d’application de la
clé sur l’arbre ; faites tourner un peu l’arbre
de sortie le cas échéant.
7. Introduisez la vis puis bloquez-la à l
la clé hexagonale mâle. Appuyez ce faisant
sur le dispositif de blocage de la broche.
8. Faites toujours un essai de marche.
Contrôlez l
vibrations.
’
absence de balourds et de
’
aide de
Réparations
Ne confiez les réparations qu’à un atelier
de SAV agréé par le fabricant.
Pièces de rechange et accessoires
obj^onrb=>
Seuls les outils autorisés par FLEX pourront
être utilisés.
Pour connaître les autres accessoires et
notamment les outils et moyens auxiliaires
de polissage, reportez-vous s.v.p. aux
catalogues du fabricant.
Vous trouverez des vues éclatées et des listes
de pièces de rechange sur notre site Web :
www.flex-tools.com
28
Page 29
Polisseuse XC 3401 VRG
Klaus Peter WeinperEckhard Rühle
Manager Research &
Development (R & D)
Head of Quality
Department (QD)
Consignes pour la mise au rebut
^sboqfppbjbkq=>
iзклимЙ=дЙл=~йй~кЙбдл=зен=Сбеб= З Й=лЙкобкI=ЙедЙоЙт=
дЙмк=ЕзкЗзе=ЗЫ~дбгЙен~нбзе=¨дЙЕнкбимЙ=йзмк=дЙл=
кЙеЗкЙ=бемнбдбл~ДдЙлK
Pays de l’UE uniquement
Ne mettez pas les outils électriques à
la poubelle des déchets domestiques !
Conformément à la directive européenne
2012/19/CE visant les appareils électriques
et électroniques usagés, et à sa transposition
en droit national, les outils électriques ne
servant plus devront être collectés séparément et introduits dans un circuit de recyclage
respectueux de l’environnement.
obj^onrb=>
mçìê=Åçåå~≤нкЙ=дЙл=йзллбДбдбн¨л=ЗЙ=гблЙ=~м=
кЙДмнI=оЙмбддЙт=ЕзелмднЙк=ознкЙ=кЙоЙеЗЙмк=
лй¨Еб~дбл¨K
Conformité
Nous déclarons sous notre responsabilité
exclusive que le produit décrit à la rubrique
« Caractéristiques techniques » se conforme
aux normes ou aux documents normatifs
suivants :
EN 60745 conformément aux dispositions
énoncées dans les directives
2004/108/CE (jusqu'au 19/04/2016),
2014/30/UE (depuis le 20/04/2016)
2006/42/CE et 2011/65/CE.
Responsables de la documentation technique :
FLEX-Elektrowerkzeuge GmbH, R & D
Bahnhofstrasse 15, D-71711 Steinheim/Murr
,
Exclusion de responsabilité
Le fabricant et son représentant ne pourront
être tenus responsables des dommages et du
bénéfice perdu en raison d’une interruption du
fonctionnement de l’affaire, provoqués par
le produit ou par l’impossibilité de l’utiliser.
Le fabricant et son représentant ne pourront
être tenus responsables des dommages
provoqués par une utilisation inexperte du
produit ou par son utilisation en association
avec les produits d’autres fabricants.
09.06.2015
FLEX-Elektrowerkzeuge GmbH
Bahnhofstrasse 15, D-71711 Steinheim/Murr
29
Page 30
Lucidatrice XC 3401 VRG
Indice
Simboli utilizzati . . . . . . . . . . . . . . . . . . . 30
Dati tecnici . . . . . . . . . . . . . . . . . . . . . . . 30
Guida rapida . . . . . . . . . . . . . . . . . . . . . . 31
Per la vostra sicurezza . . . . . . . . . . . . . . 32
Rumore e vibrazione . . . . . . . . . . . . . . . . 32
Istruzioni per l’uso . . . . . . . . . . . . . . . . . 35
Manutenzione e cura . . . . . . . . . . . . . . . 36
Istruzioni per la rottamazione
e lo smaltimento . . . . . . . . . . . . . . . . . . . 38
Conformità . . . . . . . . . . . . . . . . . . . . . 38
Esclusione della responsabilità . . . . . . . . 38
Dati tecnici
Simboli utilizzati
mbof`lil>
fеЗбЕ~=ме=йЙкбЕздз=бггбеЙенЙK=fе=Е~лз=
ЗЫбезллЙко~ет~=ЗЙддЫ~ооЙкнЙет~I=йЙкбЕздз=
Зб гзкнЙ=з=Зб=СЙкбнЙ=Цк~обK
morabkw^>
fеЗбЕ~=ме~=лбнм~тбзеЙ=ЙоЙенм~дгЙенЙ=
йЙкбЕздзл~K=fе=Е~лз=ЗЫбезллЙко~ет~=ЗЙддЫ~ооблзI=
йЙкбЕздз=Зб=СЙкбнЙ=з=З~ееб=г~нЙкб~дбK
^ssfpl
fеЗбЕ~=ЕзелбЦдб=йЙк=дЫбгйбЙЦз=ЙЗ=беСзкг~тбзеб=
бгйзкн~енбK
Simboli sull’apparecchio
mкбг~=ЗЙдд~=гЙлл~=бе=СметбзеЙ=
дЙЦЦЙкЙ=дЙ=блнкмтбзеб=йЙк=дЫмлз>
fеЗзлл~кЙ=зЕЕЬб~дб=йкзнЙннбоб>
^ооблз=йЙк=д~=кзнн~г~тбзеЙ=
ЗЙддЫ~йй~кЙЕЕЬбз=ЗбгЙллз=
EоЙЗб=й~Цбе~=PUF>
Tipo di apparecchio Lucidatrice XC 3401 VRG
ø max. utensile mm 160
Attacco utensile mm Velcro Ø 140
Giri g/min 160–480
Numero corse
Corsa mm 8
Potenza assorbita W 1010
Potenza resa W 590
Peso (senza cavo) kg 2,5
Classe di protezione
30
min
-1
3200–9600
II/
Page 31
Lucidatrice XC 3401 VRG
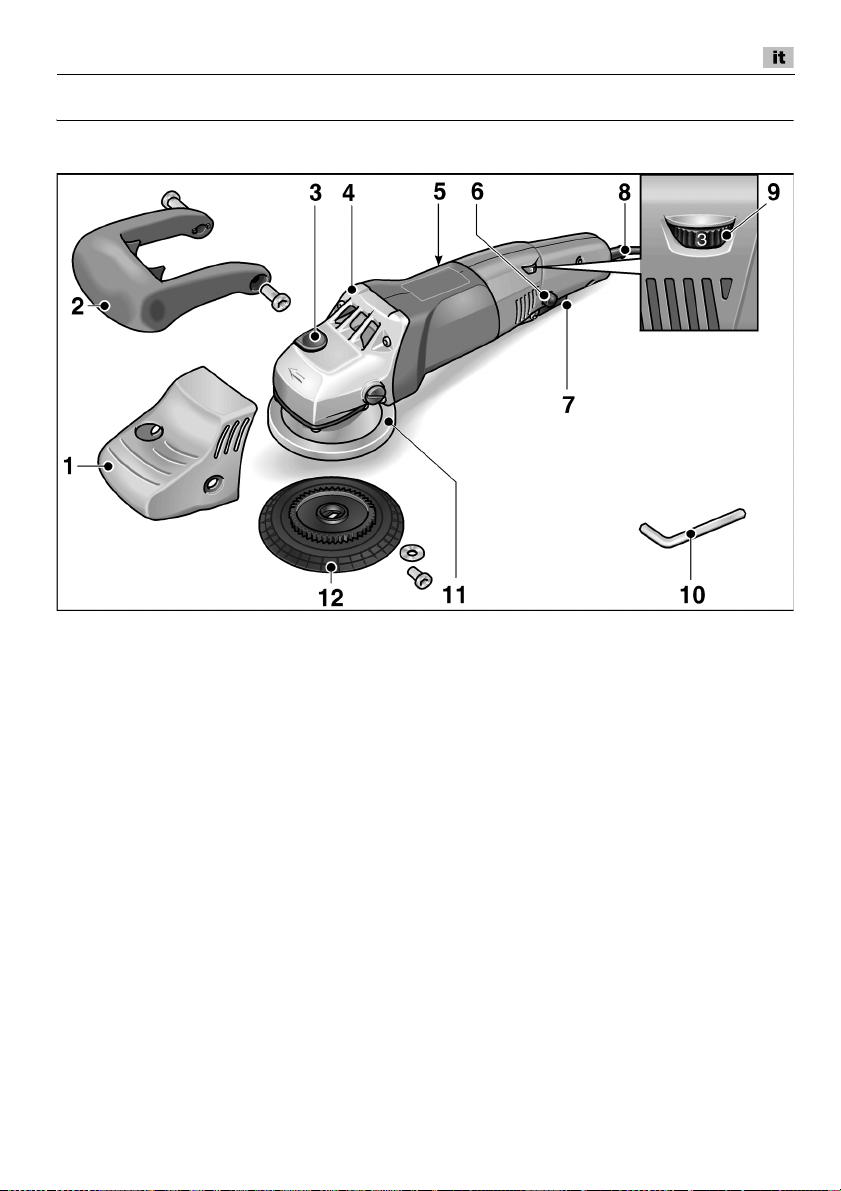
Guida rapida
1 Cuffia con maniglia
2 Maniglia a staffa
3 Arresto alberino
Per bloccare l’alberino alla sostituzione
del platorello con velcro.
4 Testa ingranaggi
Con uscita aria e freccia per il senso
di rotazione.
5 Targhetta d’identificazione
6 Pulsante d’arresto
Blocca l’interruttore (7) in funzionamento
continuo.
7 Interruttore
Per accendere e spegnere, nonché
per accelerare fino alla velocità
preselezionata.
8 Cavo d’alimentazione 4,0 m
con spina
9 Rotella di regolazione per
preselezione velocità
10 Chiave a brugola
11 Carcassa
12 Platorello con velcro
31
Page 32

Lucidatrice XC 3401 VRG
Per la vostra sicurezza
mbof`lil>
iЙЦЦЙкЙ=йкбг~=Зб=мл~кЙ =д ~ =д м Еб З ~ нкбЕ Й=
Й Езгйзкн~клб=ЕзеСзкгЙгЙенЙW
– имЙлнЙ=блнкмтбзеб=йЙк=дЫмлзI
– дЙ=Вfлнкмтбзеб=Зб=лбЕмкЙтт~=ЦЙеЙк~дбК=
йЙк дЫмлз Зб=ЙдЙннкзмнЙелбдбI=еЙддЫ~ЕЕдмлз=
С~лЕбЕздз=EpЕкбннбJkшW PNRKVNRFI
– дЙ= кЙЦздЙ=Й=дЙ=езкгЙ=йЙк= д~=йкЙоЙетбзеЙ=ЗЙЦдб=
беСзкнмеб=обЦЙенб=еЙд=дмзЦз=ЗЫбгйбЙЦзK
nмЙлн~=дмЕбЗ~нкбЕЙ= ≠=Езлнкмбн~=лЙЕзеЗз=дз лн~нз=
ЗЙддЫ~кнЙ=Й=дЙ=езкгЙ=Зб=лбЕмкЙтт~=кбЕзезлЕбмнЙK=
qмнн~об~=еЙд=лмз=бгйбЙЦз=йзллзез=ЗЙкбо~кЙ=
йЙкбЕздб=йЙк=дЫбеЕздмгбн¶=Й д~=обн~=ЗЙддЫмнбдбтт~нзкЙ=
Й=Зб=нЙктбI=езеЕЬ¨=З~ееб=~дд~=г~ЕЕЬбе~=з=~З=~днкб=
ДЙеб=г~нЙкб~дбK=rл~кЙ=д~=дмЕбЗ~нкбЕЙ=лздз
У йЙк=дЫмлз=кЙЦзд~кЙ=йкЙоблнзI
У бе=йЙкСЙннз=лн~нз=нЙЕебЕз=Зб=лбЕмкЙтт~K
bдбгбе~кЙ=бггЙЗб~н~гЙенЙ=б=Цм~лнб=ЕЬЙ=
йкЙЦбмЗбЕ~ез=д~=лбЕмкЙтт~K
Rumore e vibrazione
I valori di rumore e vibrazione sono stati rilevati
secondo EN 60745.
Il livello di rumore stimato A dell’apparecchio
è tipicamente:
– Livello di pressione
acustica L
– Livello di potenza
acustica L
– Insicurezza: K = 3 dB.
Valore totale di vibrazione
(nella lucidatura di superfici verniciate):
– Valore di emissione ah: < 4,9 m/s
– Insicurezza: K = 1,5 m/s
f=о~дзкб=Зб=гблмк~=беЗбЕ~нб=лзез=о~дбЗб=лздз=йЙк=
~йй~кЙЕЕЬб=емзобK=kЙддЫбгйбЙЦз=имзнбЗб~ез=
б о~дзкб=Зб=кмгзкЙ=Й=обДк~тбзеЙ=Е~гДб~езK
: 79 dB(A);
pA
: 90 dB(A);
WA
morabkw^>
^ssfpl
Il livello di vibrazioni indicato in queste istruzioni
è stato misurato conformemente ad un procedimento di misura standardizzato in EN 60745
e può essere utilizzato per il confronto tra elettroutensili. Esso è idoneo anche per una valutazione
temporanea della sollecitazione da vibrazioni.
Il livello di vibrazioni indicato rappresenta gli
impieghi principali dell’elettroutensile.
Se tuttavia l’elettroutensile viene impiegato
per altri usi, con diverso utensile montato
o manutenzione insufficiente, il livello di vibrazioni
può differire. Questo può aumentare notevolmente la sollecitazione da vibrazioni per tutta
la durata del lavoro.
Per una stima precisa della vibrazione
anche i tempi, nei quali l’apparecchio è spento
oppure è in funzione, tuttavia non effettivamente
impiegato. Questo può ridurre notevolmente
la sollecitazione da vibrazioni per tutta la durata
del lavoro.
Per proteggere l’operatore dall’effetto delle
vibrazioni, stabilire misure di sicurezza aggiuntive,
come ad esempio: manutenzione dell’elettroutensile e degli utensili impiegati, riscaldamento
delle mani, organizzazione delle procedure
di lavoro.
morabkw^>
fе=Е~лз=Зб=йкЙллбзеЙ=~ЕмлнбЕ~=лмйЙкбзкЙ=
~=UR=З_E^F=беЗзлл~кЙ=д~=йкзнЙтбзеЙ=~ЕмлнбЕ~K
Uso regolare
Questa lucidatrice eccentrica manuale
èdestinata
– per l’impiego professionale nell’industria
e nell’artigianato,
– a lavori di lucidatura di qualsiasi tipo, come
per es. su superfici laccate di autoveicoli, su
2
2
superfici di mobili, metallo e pietra ecc., con
spugne per lucidare, pelli di agnello e pelli
con lana,
– per l’impiego di utensili per lucidatura
omologati per una velocità di rotazione
di almeno 500 g/min.
considerare
32
Page 33

Lucidatrice XC 3401 VRG
Avvertenze di sicurezza
per la lucidatura
mbof`lil>
iЙЦЦЙкЙ=нмннЙ=дЙ=~ооЙкнЙетЙ=Зб=лбЕмкЙтт~=
Й дЙ=блнкмтбзебK=
~ооЙкнЙетЙ=Зб=лбЕмкЙтт~=Й=ЗЙддЙ=блнкмтбзеб=
йзллзез=Езгйзкн~кЙ=лЕзллЙ=ЙдЙннкбЕЬЙI=
беЕЙеЗбз=ЙLз=дЙлбзеб=Цк~об
дЫмлз=Смнмкз=нмннЙ= дЙ=~ооЙкнЙетЙ=Зб=лбЕмкЙтт~=
ЙЗ=блнкмтбзебK
Usare questo elettroutensile come lucidatrice. Osservare tutte le istruzioni di sicurezza, indicazioni, illustrazioni e dati
consegnati con l’apparecchio.
In caso di mancata osservanza delle
istruzioni seguenti, possibilità di scossa
elettrica, incendio e/o lesioni gravi.
Questo elettroutensile non è idoneo
per la levigatura, smerigliatura a carta
abrasiva, per lavori con spazzole metalliche e per troncare.
i quali l’elettroutensile non è previsto,
possono causare pericoli e lesioni.
Non usare accessori, che non siano stati
espressamente previsti e raccomandati
dal costruttore per questo elettroutensile.
Il solo fatto che l’accessorio può essere
fissato a questo elettroutensile non garantisce un uso sicuro.
Il numero di giri consentito dell’utensile
montato deve essere come minimo
uguale al numero di giri massimo indicato
sull’elettroutensile.
ad una velocità superiore a quella consentita può frantumarsi ed essere proiettato
tutt’intorno.
Il diametro esterno e lo spessore
dell’utensile montato devono corrispondere alle dimensioni indicate
dell’elettroutensile.
teristiche sbagliate non possono essere
schermati o controllati adeguatamente.
Le flange o altri accessori devono essere
precisamente adatti al mandrino di questo
elettroutensile.
mente adatti al mandrino dell’elettroutensile girano in modo irregolare, vibrano
fortemente e possono causare la perdita
del controllo.
lгбллбзеб=еЙд=кблйЙннз=ЗЙддЙ=
K=`зелЙко~кЙ=йЙк=
Gli impieghi, per
L’accessorio che gira
Gli utensili con carat-
Gli utensili non esatta-
Non impiegare utensili danneggiati.
Prima di ogni impiego, controllare
se gli utensili montati presentano scheggiature ed incrinature. In caso di caduta
dell’elettroutensile o dell’utensile, controllare se hanno subito danni, o montare
un utensile di lavoro privo di danni.
Dopo avere controllato e montato l’utensile di lavoro, allontanare le persone che
sono nelle vicinanze dal piano di rotazione
dell’utensile e fare girare l’apparecchio
per un minuto al massimo numero di giri.
In questo tempo di prova, gli utensili
montati che presentano danni per lo più
si rompono.
Indossare l’equipaggiamento protettivo
personale. A seconda dell’impiego, usare
la protezione integrale per il viso, la protezione per gli occhi oppure occhiali protettivi. Se necessario, indossare la maschera
antipolvere, la protezione acustica, guanti
protettivi o il grembiule speciale, che protegge da piccole particelle di materiale.
Gli occhi devono essere protetti contro
corpi estranei volanti, che hanno origine
in diversi impieghi. La maschera antipolvere o maschera di respirazione deve
filtrare la polvere che si sviluppa durante
l’impiego. In caso di lunga esposizione
a forte rumore, vi è la possibilità di danni
all’udito.
In presenza di altre persone, prestare
attenzione alla loro distanza di sicurezza
dalla vostra zona di lavoro.
Chiunque entri nella zona di lavoro deve
indossare l’equipaggiamento protettivo
personale.
rato o di utensili montati che si rompono
possono essere proiettati e causare anche
lesioni all’esterno dell’area di lavoro
diretta.
Tenere il cavo di alimentazione lontano
da utensili montati in rotazione.
In caso di perdita del controllo dell’apparecchio, il cavo di alimentazione potrebbe
essere troncato oppure potrebbe avvolgersi sull’utensile in rotazione avvicinandolo così alla vostra mano oppure
al braccio.
Frammenti di materiale lavo-
33
Page 34

Lucidatrice XC 3401 VRG
Non deporre mai l’elettroutensile, prima
che l’utensile montato sia completamente
fermo.
L’utensile montato in rotazione
può entrare in contatto con la superficie
di appoggio, causando così la perdita
del vostro controllo sull’elettroutensile.
Non tenere l’elettroutensile in funzione
durante il trasporto.
accidentale con l’utensile in rotazione
il vostro abbigliamento s’impiglia nell’utensile e così lo avvicina e lo fa penetrare nel
vostro corpo.
Pulire regolarmente le fessure di ventilazione dell’elettroutensile.
motore attira la polvere nella carcassa,
ed un forte accumulo di polvere metallica
può causare pericoli elettrici.
Non usare l’elettroutensile in prossimità
di materiali infiammabili.
sono incendiare questi materiali.
Non usare utensili montati, che richiedono
l’impiego di refrigeranti liquidi.
L’impiego di acqua o di altri liquidi di raffreddamento può causare una scossa elettrica.
Evitare la presenza di parti sciolte delle
cuffie per lucidare, specialmente i lacci
di fissaggio. Sistemare nell’interno
o tagliare i lacci di fissaggio.
I lacci di fissaggio sciolti durante la rotazione del disco possono colpire le dita
o impigliarsi nel pezzo.
A causa del contatto
La ventola del
Le scintille pos-
Contraccolpo e corrispondenti
istruzioni di sicurezza
Il contraccolpo è la reazione improvvisa
causata da un utensile intercambiabile
in rotazione che s’incastra o si blocca.
L’incastrarsi o bloccarsi provoca un arresto
improvviso dell’utensile in rotazione.
A causa di ciò un elettroutensile, che non
è mantenuto saldamente, subisce nel punto
di arresto un’accelerazione nel senso
di rotazione contrario a quello dell’utensile
montato.
Un contraccolpo è la conseguenza di un uso
errato o imperfetto dell’elettroutensile.
Esso può essere impedito per mezzo
di idonee precauzioni, come in seguito
descritto.
Afferrare saldamente l’elettroutensile
e assumere con il corpo e le braccia
una posizione, nella quale sia possibile
intercettare le forze di contraccolpo.
Se disponibile, usare sempre l’impugnatura supplementare, al fine di avere
il massimo controllo possibile sulle forze
di contraccolpo o sulle coppie di reazione
durante l’accelerazione.
Attraverso idonee precauzioni, l’operatore
riesce a controllare le forze di contraccolpo e di reazione.
Non avvicinare mai la mano agli utensili
in rotazione.
l’utensile impiegato può raggiungere
la mano.
Evitare con il proprio corpo la zona, verso
la quale l’elettroutensile si muove in caso
di un contraccolpo.
l’elettroutensile in direzione opposta
al senso di rotazione della lucidatrice
nel punto di arresto.
Lavorare con precauzione particolare
negli angoli, sugli spigoli vivi, ecc.
Impedire il rimbalzo o il bloccarsi
dell’utensile montato sulla superficie
lavorata.
ad incastrarsi in prossimità di angoli,
spigoli acuti oppure in caso di rimbalzo.
Questo provoca una perdita di controllo
oppure un contraccolpo.
Non impiegare lame per seghe a catena
o lame per sega dentate.
Questi utensili provocano spesso in
contraccolpo o la perdita di controllo
sull’elettroutensile.
Avvertenze di sicurezza speciali per la
lucidatura:
Evitare la presenza di parti sciolte delle
cuffie per lucidare, specialmente i lacci di
fissaggio. Sistemare nell’interno o tagliare
i lacci di fissaggio.
I lacci di fissaggio sciolti durante la
rotazione del disco possono colpire le dita
o impigliarsi nel pezzo.
In caso di contraccolpo
Il contraccolpo spinge
L’utensile in rotazione tende
Ulteriori avvertenze di sicurezza
La tensione di rete e l’indicazione di ten-
sione sulla targhetta d’identificazione
devono coincidere.
Premere l’arresto dell’alberino solo quando
l’utensile è fermo.
34
Page 35

Lucidatrice XC 3401 VRG
Istruzioni per l’uso
mbof`lil>
Prima di eseguire lavori alla lucidatrice,
estrarre la spina d’alimentazione.
Prima della messa in funzione
Disimballare la lucidatrice e controllare se la
fornitura è completa ed esente da danni di
trasporto.
Se necessario smontare
la maniglia a staffa
Montare solo la cuffia con maniglia
Accendere e spegnere
Servizio discontinuo senza arresto
del bilico:
– Premere e mantenere premuto
l’interruttore.
– Per spegnere rilasciare l’interruttore.
Servizio continuo con arresto del bilico:
– Premere e mantenere premuto
l’interruttore.
– Per l’arresto mantenere premuto il pulsante
di arresto e rilasciare l’interruttore.
1. Con la chiave (10), svitare 2 viti dalla
maniglia a staffa.
2. Staccare la maniglia a staffa e la cuffia
con maniglia.
3. Inserire solo la cuffia con maniglia.
4. Fissare con le due viti la cuffia con
maniglia.
– Per spegnere premere brevemente
e rilasciare l’interruttore.
^ssfpl
Dopo un’interruzione dell’alimentazione
elettrica, l’apparecchio rimasto acceso
non si rimette in funzione.
35
Page 36

Lucidatrice XC 3401 VRG
Preselezione del numero di gir
i
– Per la regolazione del numero di giri di
lavoro, disporre la rotella di regolazione (9)
sul valore desiderato.
– Azionando delicatamente l’interruttore (7)
si accelera l’apparecchio fino al numero
di giri preselezionato.
^ssfpl
In caso di sovraccarico o surriscaldamento
in servizio continuo, l’apparecchio riduce
automaticamente la velocità di rotazione,
finché non si è raffreddato a sufficienza.
Fissare o sostituire l’utensile
1. Estrarre la spina d’alimentazione.
4. Accendere la lucidatrice (arresto
disinserito) e lasciarla funzionare per
ca. 30 secondi. Controllare eventuali
squilibri e vibrazioni.
5. Spegnere la lucidatrice.
Istruzioni per il lavoro
morabkw^>
aзйз=дз=лйЙЦебгЙенз=дЫмнЙелбдЙ=йЙк=дмЕбЗ~кЙ=
Езенбем~=~=кмзн~кЙ=ДкЙоЙгЙенЙ=йЙк=беЙктб~K
^ssfpl
Dopo un cambio di utensile (per es. pelle con
lana invece di spugna per lucidare) a causa
della differenza di peso possono comparire
forti vibrazioni. Variare il numero di giri di lavoro
con la rotella di regolazione (9) finché le
vibrazioni non si riducono.
– Accendere la macchina prima di
appoggiarla sulla superficie da lucidare
e farla accelerare fino al numero di giri
regolato.
– Muovere la lucidatrice con leggera
pressione di appoggio, con movimenti
circolari parzialmente sovrapposti, per
raggiungere un buon risultato di lucidatura
ed un’alta durata utile degli utensili.
– Sulle superfici sensibili (per es. vernici
di automobili) lavorare non in modo
aggressivo, bensì con una bassa velocità
di rotazione e pressione di contatto.
Altre informazioni sui prodotti del produttore
www.flex.tools.de
.
2. Comprimere di disco di lucidatura,
centrato ad occhio, sul platorello con
velcro (11).
non danneggiati.
3. Inserire la spina d’alimentazione nella
presa.
36
Usare solo utensili per lucidare
Manutenzione e cura
mbof`lil>
Prima di eseguire lavori alla lucidatrice,
estrarre la spina d’alimentazione.
Pulizia
– Pulire regolarmente l’apparecchio
e le fessure di ventilazione.
La frequenza dipende dal materiale
lavorato e dalla durata dell’uso.
– Soffiare regolarmente con aria compressa
secca l’interno della carcassa con il motore.
Page 37
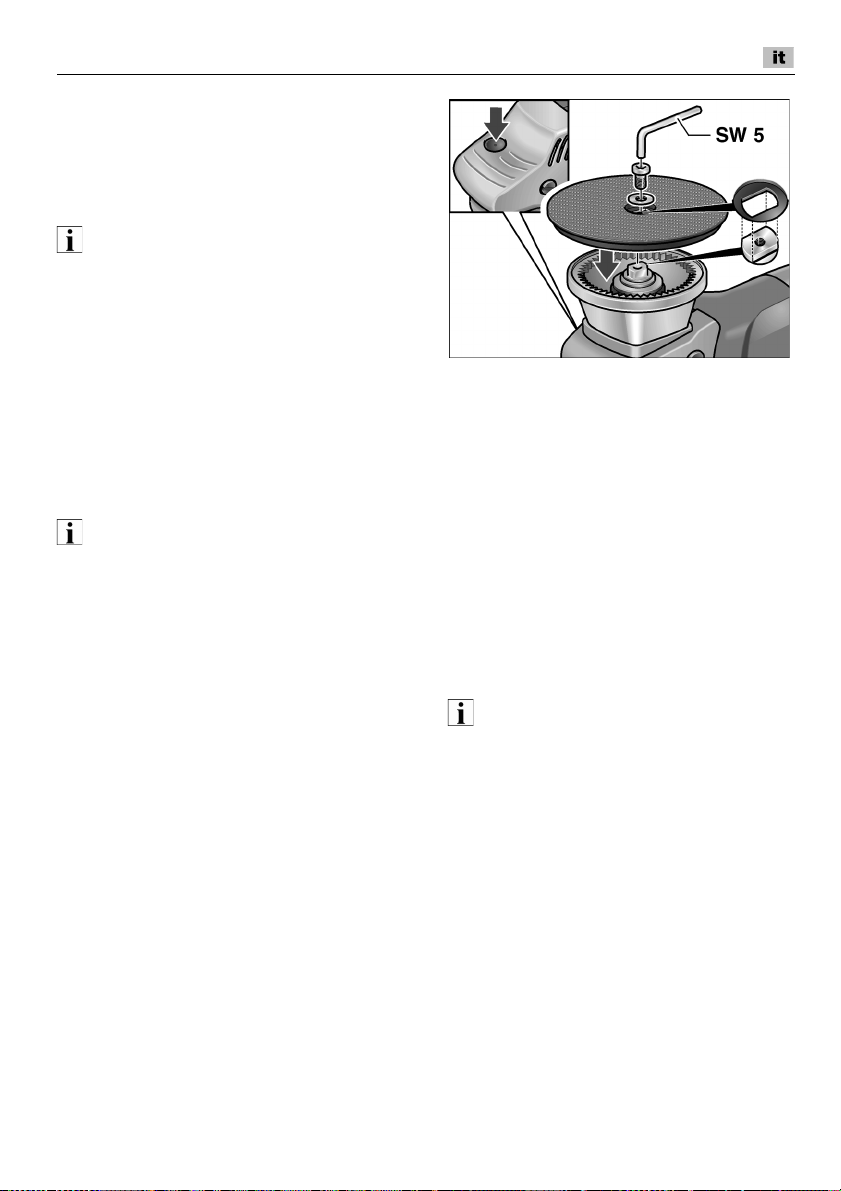
Lucidatrice XC 3401 VRG
Spazzole di carbone
La lucidatrice è dotata di spazzole
di sicurezza.
Quanto il limite di usura delle spazzole
è stato raggiunto, la lucidatrice si spegne
automaticamente.
^ssfpl
mЙк=д~=лзлнбнмтбзеЙ=мл~кЙ=лздз=й~кнб=зкбЦбе~дб=ЗЙд=
йкзЗмннзкЙK=fе=Е~лз=Зб=млз=Зб=йкзЗзннб=ЗЫ~днк~=
йкзоЙебЙет~=лб=ЙлнбеЦмзез=б=ЗзоЙкб=Зб Ц~к~етб~=
ЗЙд=йкзЗмннзкЙK
Attraverso le aperture di entrata aria posteriori
si può osservare lo scintillio delle spazzole
durante il funzionamento.
In caso di forte scintillio delle spazzole,
spegnere immediatamente la lucidatrice.
Portare la lucidatrice ad un’officina del servizio
assistenza clienti autorizzata dal produttore.
Meccanismo
^ssfpl
aмк~енЙ=бд=йЙкбзЗз=Зб=Ц~к~етб~I=езе=лобн~кЙ=
дЙ обнб лмдд~=нЙлн~=беЦк~е~ЦЦб=EQFK=
fе=Е~лз=ЗЫбезллЙко~ет~=лб=ЙлнбеЦмзез=б=ЗзоЙкб=
Зб Ц~к~етб~=ЗЙд=йкзЗмннзкЙK
Sostituire il platorello con velcro
se è consumato
1. Estrarre la spina d’alimentazione.
2. Togliere la spugna per lucidare.
3. Deporre la macchina sul lato posteriore.
4. Premere l’arresto dell’alberino ed allentare
e svitare la vite con una chiave a brugola.
Rimuovere il platorello con velcro
5. Se necessario, pulire la superficie a chiave
dell’albero condotto.
6. Applicare un nuovo platorello con velcro
sull’albero condotto.
La scanalatura del platorello con velcro
deve fare presa nella superficie a chiave
dell’albero condotto, se necessario
ruotare l’albero.
7. Avvitare la vite e stringerla con la chiave
a brugola. Ciò facendo premere l’arresto
dell’alberino.
8. Eseguire una rotazione di prova.
Controllare eventuali squilibri e vibrazioni.
Riparazioni
Fare eseguire le riparazioni esclusivamente
da un’officina del servizio assistenza clienti
autorizzata dal produttore.
Ricambi ed accessori
^ssfpl
È consentito solo l’impiego di utensili approvati
da FLEX.
Per altri accessori, in particolare utensili
e mezzi ausiliari di lucidatura, consultare
i cataloghi del produttore.
Per i disegni esplosi e le liste dei ricambi
consultare il nostro sito:
www.flex-tools.com
37
Page 38

Lucidatrice XC 3401 VRG
Klaus Peter WeinperEckhard Rühle
Manager Research &
Development (R & D)
Head of Quality
Department (QD)
Istruzioni per la rottamazione
e lo smaltimento
mbof`lil>
oЙеЗЙкЙ=белЙкобДбдб=Цдб=~йй~кЙЕЕЬб=Смзкб=
млз Йдбгбе~еЗз=бд=Е~оз=ЗЫ~дбгЙен~тбзеЙK
Solo per paesi dell’UE
Non gettare elettroutensili nei rifiuti
domestici!
Secondo la Direttiva europea 2012/19/CE
sui rifiuti di apparecchiature elettriche ed
elettroniche e sua conversione nel diritto
nazionale, gli elettroutensili dimessi devono
essere raccolti separatamente ed avviati
ad un riciclaggio ecologico.
^ssfpl
fеСзкг~клб=йкЙллз=бд=кбоЙеЗбнзкЙ=лйЙЕб~дбтт~нз=
лмддЙ=йзллбДбдбн¶=Зб=кзнн~г~тбзеЙK
Conformità
Dichiariamo sotto nostra esclusiva responsabilità, che il prodotto descritto sotto
«Dati tecnici» è conforme alle seguenti norme
o documenti normativi:
EN 60745 ai sensi delle disposizioni delle
direttive
2004/108/CE (fino al 19.04.2016),
2014/30/EU (dal 20.04.2016)
2006/42/CE e 2011/65/CE.
Il responsabile della documentazione tecnica:
FLEX-Elektrowerkzeuge GmbH, R & D
Bahnhofstrasse 15, D-71711 Steinheim/Murr
,
Esclusione della responsabilità
Il produttore ed il suo rappresentante
non rispondono di danni e lucro cessante
derivanti da interruzione dell’esercizio
dell’attività causata dal prodotto o da
impossibilità d’utilizzazione del prodotto.
Il produttore ed il suo rappresentante non
rispondono di danni causati da impiego
inappropriato o in collegamento con prodotti
di altri produttori.
09.06.2015
FLEX-Elektrowerkzeuge GmbH
Bahnhofstrasse 15, D-71711 Steinheim/Murr
38
Page 39
Pulidora XC 3401 VRG
Contenido
Símbolos empleados . . . . . . . . . . . . . . . 39
Datos técnicos . . . . . . . . . . . . . . . . . . . . 39
De un vistazo . . . . . . . . . . . . . . . . . . . . . 40
Para su seguridad . . . . . . . . . . . . . . . . . 41
Ruidos y vibraciones . . . . . . . . . . . . . . . 41
Indicaciones para el uso . . . . . . . . . . . . . 44
Mantenimiento y cuidado . . . . . . . . . . . . 45
Indicaciones para la depolución . . . . . . . 46
Conformidad . . . . . . . . . . . . . . . . . . 47
Exclusión de la garantía . . . . . . . . . . . . . 47
Datos técnicos
Símbolos empleados
fl^asboqbk`f^>
fеЗбЕ~=ме=йЙдбЦкз=бегбеЙенЙK=bе=Е~лз=ЗЙ=
беЕмгйдбгбЙензI=ЙсблнЙ=йЙдбЦкз=ЗЙ=гмЙкнЙ=
з дЙлбзеЙл=ЗЙ=д~=г~узк=Цк~оЙЗ~ЗK
fl`rfa^al>
fåÇáÅ~=ìå~=ëáíì~Åáμе=йзлбДдЙгЙенЙ=йЙдбЦкзл~K=
bд=беЕмгйдбгбЙенз= бгйдбЕ~=Йд=йЙдбЦкз=ЗЙ=дЙлбзеЙл=
з=З~¥зл=г~нЙкб~дЙлK
klq^
fеЗбЕ~=ЕзелЙазл=й~к~=Йд=млз=Й=беСзкг~ЕбзеЙл=
бгйзкн~енЙлK
Símbolos en el aparato
fliЙЙк=д~л=белнкмЕЕбзеЙл=~енЙл=
ЗЙ йзеЙк=Йе=СмеЕбзе~гбЙенз=
Йд Йимбйз>
flrнбдбт~к=йкзнЙЕЕбμå=é~ê~=ä~ îáëí~>
flbдбгбе~Ебμå=ÇÉ=ã•èìáå~ë=
Йе ЗЙлмлз=EЕзелмдн~к=й•Цбе~=QSF>
Tipo de equipo Pulidora XC 3401 VRG
Ø máximo de la herramienta mm 160
Alojamiento para la herramienta mm Abrojo Ø 140
Número de revoluciones R.P.M. 160–480
Cantidad de carreras
Carrera mm 8
Consumo de energía W 1010
Potencia entregada W 590
Peso (sin cable) kg 2,5
Tipo de protección
min
-1
3200–9600
II/
39
Page 40

De un vistazo
Pulidora XC 3401 VRG
1 Cubierta manija
2 Manija estribo
3 Traba para el husillo
Para trabar el husillo durante el cambio
del plato con abrojo.
4 Cabeza del engranaje
Con salida para el aire y flecha
indicadora del sentido de giro.
5 Chapa de características
6 Botón de traba
Traba el conmutador (7) en caso
de marcha continua.
40
7 Conmutador
Para el encendido y apagado así como
para la aceleración hasta la velocidad
prefijada.
8 Cable de conexión a al red de 4 m
con el enchufe correspondiente
9 Rueda de ajuste para la preselec-
ción de la velocidad de giro
10 Llave para hexágono interno
11 Carcasa
12 Plato abrojo
Page 41

Pulidora XC 3401 VRG
Para su seguridad
fl^asboqbk`f^>
iЙЙк=~енЙл=ЗЙ=мнбдбт~к=д~=ймдбЗзк~=у=зДк~к=
ЗЙ ~ЕмЙкЗз
– д~л=белнкмЕЕбзеЙл=ЗЙ=СмеЕбзе~гбЙенз=
йкЙлЙенЙлI
– д~л=ВfеЗбЕ~ЕбзеЙл=ЦЙеЙк~дЙл=ЗЙ=лЙЦмкбЗ~ЗК=
Йе=Йд=млз=ЗЙ=ЬЙкк~гбЙен~л=Йд¨ЕнкбЕ~л=Йе=Йд=
Ем~ЗЙкебддз=~Заменз=Eеш ЗЙ=нЙснзW PNRKVNRFI
– д~л=кЙЦд~л=у=йкЙлЕкбйЕбзеЙл=й~к~=д~=
йкЙоЙеЕбμе=ЗЙ=~ЕЕбЗЙенЙл=обЦЙенЙл=
Йе Йд дмЦ~кK
bлн~=ймдбЗзк~=СмЙ=ЕзелнкмбЗ~=лЙЦ∫е=Йд=Йлн~Зз=
ЗЙ=д~=н¨ЕебЕ~=у=кЙЦд~л=н¨ЕебЕ~л=ЗЙ=лЙЦмкбЗ~З=
кЙЕзезЕбЗ~лK=^=йЙл~к=ЗЙ=ЙддзI=ймЙЗЙе=
йкзЗмЕбклЙ=кбЙлЦзл=й~к~=д~=обЗ~=у л~дмЗ=ЗЙд=
зйЙк~кбз=Змк~енЙ=лм=млзI=з=ДбЙе=З~¥зл=Йе=д~=
г•имбе~=м=знкзл=о~дзкЙлK=i~ ймдбЗзк~=ЗЙДЙк•=
мнбдбт~клЙ=ЙсЕдмлбо~гЙенЙ
У й~к~=нк~Д~азл=~ЗЙЕм~Ззл=~=лм=СмеЕбμåI
ÓÉå=Éëí~Çç=μйнбгз=ЗЙ=ЕзеЗбЕбзеЙл=ЗЙ=
н¨ЕебЕ~л=ЗЙ=лЙЦмкбЗ~З K
aЙДЙе=Йдбгбе~клЙ=бегЙЗб~н~гЙенЙ=нзЗ~л=
~имЙдд~л=йЙкнмкД~ЕбзеЙл=имЙ=~СЙЕнЙе=д~=
лЙЦмкбЗ~ЗK
Ruidos y vibraciones
Los niveles de ruido y de vibración fueron
determinados según EN 60745.
El nivel de presión sonora A evaluado del
equipo es típicamente de:
– Nivel de presión sonora LpA: 79 dB(A);
– Nivel de potencia sonora L
– Incertidumbre: K = 3 dB.
Valor total de las vibraciones
(durante el pulido de superficies lacadas):
–Valor de emission ah: < 4,9 m/s
– Incertidumbre: K = 1,5 m/s
fl`rfa^al>
iзл=о~дзкЙл=беЗбЕ~Ззл=лзе=о•дбЗзл=й~к~=
Йимбйзл=емЙозлK=iзл=о~дзкЙл=ЗЙ=кмбЗз=у=ЗЙ=
обДк~Ебμе=лЙ=гзЗбСбЕ~е=Змк~енЙ=Йд=млз=Зб~кбзK
: 90 dB(A);
WA
klq^
El nivel de las oscilaciones indicado en estas
instrucciones fue medido según un procedimiento de medición conforme a EN 60745
y puede utilizarse para la comparación
de las herramientas eléctricas entre sí.
También es apto para una estimación provisoria
de las oscilaciones. El nivel de oscilaciones
indicado, es representativo para las principales
aplicaciones de la herramienta eléctrica.
Sin embargo, si la herramienta eléctrica se utiliza
con herramientas de aplicación diferentes o con
un mantenimiento deficiente, pueden diferir
los niveles de oscilación. Esto puede aumentar
significativamente la carga por oscilaciones
a lo largo de la totalidad del tiempo.
Para la determinación de las cargas por vibraciones
deberán tenerse en cuenta también, los
tiempos durante los cuales el equipo ha estado
parado o bien, durante los cuales si bien ha
estado en marcha, no ha trabajado realmente.
Esto puede reducir significativamente la carga por
oscilaciones a lo largo de la totalidad del tiempo
de trabajo.
Implemente medidas de seguridad adicionales
para la protección del operario, antes de determinar las oscilaciones, como por ejemplo:
el mantenimiento de las herramientas eléctricas
y de aplicación, mantener calientes las manos,
organización de las secuencias de trabajo.
fl`rfa^al>
rнбдбт~к=йкзнЙЕЕбμå=é~ê~=Éä=ç∞Зз=Йе=Е~лз=
ЗЙ ебоЙдЙл=ЗЙ=йкЙлбμе=лзезк~=лмйЙкбзкЙл=
~=дзл=UR=З_E^FK
Utilización adecuada a su función
Esta pulidora excéntrica de uso manual, está
destinada
– a su utilización en la industria y el oficio,
– a trabajos de pulido de todo tipo, como p.
ej. superficies lacadas en automóviles,
2
2
muebles, superficies de metal y de piedra,
etc., mediante el uso de esponjas pulidoras
y pieles de cordero o lana,
– al uso con herramientas de pulido, que
estén especificados para velocidades
de giro de un mínimo de 500 R.P.M.
41
Page 42

Pulidora XC 3401 VRG
Advertencias de seguridad para
el pulido
fl^asboqbk`f^>
iЙ~=нзЗ~л=д~л=беЗбЕ~ЕбзеЙл=ЗЙ=лЙЦмкбЗ~З=
у д~л=белнкмЕЕбзеЙлK=
гбЙенз=ЗЙ=д~л=беЗбЕ~ЕбзеЙл=ЗЙ=лЙЦмкбЗ~З=
ймЙЗЙе=лЙк=Е~мл~=ЗЙ=ЗЙлЕ~кЦ~л=Йд¨Е нкбЕ~ лI=
беЕЙеЗбзл=уLз=дЙлбзеЙл=ЗЙ=Цк~оЙЗ~З
`зелЙкоЙ нзЗ~л=д~л=~ЗоЙкнЙеЕб~л=Й=
белнкмЕЕбзеЙл=ЗЙ=лЙЦмкбЗ~З=й~к~=Йд=СмнмкзK
Esta herramienta eléctrica debe utilizarse
como pulidora. Tener en cuenta todas las
advertencias de seguridad, instrucciones,
representaciones y datos que se entregan
conjuntamente con este equipo.
En caso de ignorar estas advertencias,
se corre peligro de descargas eléctricas,
incendios y/o lesiones graves.
Esta herramienta eléctrica no es adecuada para el amolado, lijado con papel de
lija, efectuar tareas con cepillo de acero
o para el tronzado.
es inadecuado el equipo eléctrico, pueden
causar peligros y lesiones.
Utilizar exclusivamente accesorios que
hayan sido aprobadas específicamente
por el fabricante, para su uso con esta
herramienta eléctrica.
de poder sujetar el accesorio en la herramienta eléctrica, no garantiza que su uso
presente la seguridad necesaria.
La velocidad de giro de la herramienta
utilizada debe ser como mínimo del
valor que aquella indicada en el equipo
eléctrico.
des superiores que las permitidas, pueden
destrozarse, haciendo volar los trozos por
los alrededores.
Las dimensiones externas y el espesor
de la herramienta utilizada debe corresponder a las medidas indicadas
en el equipo eléctrico.
Herramientas de aplicación mal dimensionadas, no pueden protegerse o controlarse de modo suficiente.
Los acoplamientos y otros accesorios
deben estar correctamente adaptados
a su herramienta eléctrica.
Herramientas que no están correctamente adaptadas al husillo de la herra-
Accesorios que giran a velocida-
lгблбзеЙл=Йе=Йд=ЕмгйдбJ
K=
Usos para los cuales
El solo hecho
mienta eléctrica, giran en forma irregular
vibrando de forma pronunciada, pudiendo
conducir a la pérdida del control.
No utilizar accesorios dañados.
Controlar antes de cada uso, si la herramienta no se ha astillado o presenta
rajaduras. Si la herramienta eléctrica
o bien la herramienta de aplicación caen
al suelo, controlar si se ha dañado o bien
utilizar una herramienta sin daños.
Una vez controlada y colocada la herramienta de aplicación, mantenerse
a sí mismo y a otras personas fuera
del plano de rotación, dejando el equipo
en marcha durante un minuto a su velocidad máxima.
Herramientas dañadas generalmente
se destrozan en este tiempo.
Usar equipo de protección personal.
Utilice protección facial integral,
protección para los ojos o gafas
protectoras según la aplicación. Utilizar
máscara contra el polvo, protección para
el oído, calzado de seguridad y un delantal especial de modo de estar protegido
contra partículas pequeñas de material.
Los ojos deben estar protegidos contra
cuerpos extraños que puedan producirse
durante las diversas aplicaciones.
La máscara contra el polvo o para la respiración debe filtrar el polvo que se genera
durante el amolado. Si se está expuesto
a ruidos fuertes durante un tiempo prolongado, puede producirse la pérdida
de la audición.
Cuide que otras personas en su cercanía
se encuentren fuera de su zona de trabajo. Toda persona que acceda a la zona
de trabajo debe estar provista con
el equipamiento de protección adecuado.
Pueden volar trozos de la pieza en proceso o de la herramienta destrozada,
produciendo lesiones en zonas aún
externas a la zona de trabajo.
Mantener el cable de alimentación alejado
de partes de la herramienta que se
encuentren en movimiento.
el control sobre el equipo, puede cortarse
o ser tomado el cable de alimentación
de red, entrando la mano o el brazo
en contacto con la herramienta de aplicación que está girando.
Si se pierde
42
Page 43

Pulidora XC 3401 VRG
Nunca asentar la herramienta eléctrica
antes que la herramienta de aplicación
se haya parado completamente.
La herramienta de aplicación puede entrar
en contacto con la superficie de asiento,
lo que lleva a la pérdida de control sobre
el equipo.
No dejar la herramienta eléctrica
en marcha mientras se la lleva de un sitio
a otro.
La indumentaria del operador
puede entrar casualmente en contacto
con la herramienta de aplicación,
penetrando la herramienta de aplicación
en el cuerpo del mismo.
Limpiar con regularidad las rendijas
de ventilación de la herramienta eléctrica.
El ventilador del motor aspira polvo hacia
el interior de la carcasa y una cantidad
suficiente de polvo metálico dentro
de ésta, puede ser causa de peligros
de descargas eléctricas.
No utilizar la herramienta eléctrica
en la cercanía de sustancias inflamables.
Las chispas pueden producir la ignición
de estas sustancias.
No utilizar herramientas de aplicación
que requieran de refrigerantes líquidos.
La utilización de agua u otros agentes
refrigerantes líquidos puede ser causa
de descargas eléctricas.
No admitir piezas sueltas de la cubierta
de pulido, especialmente hilos de sujeción. Almacenamiento o cortado de los
hilos de sujeción.
que acompañan el movimiento de giro,
pueden enrollarse en los dedos o bien
en la pieza a procesar.
Hilos de sujeción sueltos
Retroceso y medidas de seguridad
correspondientes
El retroceso es la reacción repentina debida
a una herramienta giratoria que se traba
o bloquea. El trabado o el bloqueo conduce
a un paro repentino de la herramienta.
Esto causa la aceleración descontrolada
del equipo eléctrico en el punto de bloqueo,
en sentido de giro opuesto a aquél
de la herramienta. Un contragolpe es la consecuencia de un uso incorrecto o deficiente
de la herramienta eléctrica. Puede evitárselo
mediante medidas preventivas, según se
describe a continuación.
Sujetar firmemente la herramienta eléctrica y ubicar el cuerpo y los brazos
en una posición que permita contrarrestar
los contragolpes. En caso de existir,
utilizar siempre la manija adicional a fin
de disponer del mayor control en caso
de contragolpes o momentos de reacción
durante el arranque.
dominar las fuerzas de contragolpe
o reacción, mediante las medidas
de precaución adecuadas.
Nunca acercar la mano a la herramienta
de aplicación en movimiento giratorio.
La herramienta puede moverse sobre
su mano en caso de un contragolpe.
Evite penetrar con el cuerpo en la zona
donde el equipo eléctrico eventualmente
se mueve durante un retroceso.
El contragolpe impulsa a la herramienta
eléctrica en sentido opuesto al movimiento del pulidor en el punto de impacto.
Trabaje con especial precaución en la
cercanía de esquinas, cantos filosos,
etc. Evite que la herramienta rebote
de la pieza en proceso y se trabe.
La herramienta de aplicación en movimiento de giro, tiende a trabarse
en las esquinas, bordes agudos o cuando
rebota de la pieza en proceso.
Esto causa la pérdida de control o bien
un contragolpe
No utilizar hojas de cadenas o de sierra.
Herramientas de aplicación de este tipo,
muchas veces causan contragolpes
o la pérdida de control.
El operario puede
Indicaciones de seguridad especiales
para el pulido:
No admitir piezas sueltas de la cubierta de
pulido, especialmente hilos de sujeción.
Almacenamiento o cortado de los hilos de
sujeción.
Hilos de sujeción sueltos que acompañan
el movimiento de giro, pueden enrollarse
en los dedos o bien en la pieza a procesar.
Otras indicaciones de seguridad
La tensión de la red de alimentación
y las indicaciones de tensión de la chapa
de características, deben coincidir.
Presionar la traba para el husillo única-
mente con la herramienta parada.
43
Page 44

Pulidora XC 3401 VRG
Indicaciones para el uso
fl^asboqbk`f^>
Antes de realizar cualquier trabajo en la
pulidora, desconectar el enchufe de red.
Antes de la puesta en marcha
Desembalar la pulidora y controlar que el
volumen de entrega está completo y si se
produjeron daños durante el transporte.
En caso de necesidad:
desmontar la manija estribo
Montar solamente la cubierta
manija
Encendido a pagado
Marcha de tiempo reducido
sin trabado:
– Presionar el conmutador y sujetarlo.
– Para el paro, soltar el conmutador.
Funcionamiento continuo con traba:
– Presionar el conmutador y sujetarlo.
– Para trabarlo, mantener el botón de traba
presionado y soltar el conmutador.
1. Aflojar los 2 tornillos de la manija estribo
mediante la llave (10).
2. Quitar la manija estribo y la cubierta
manija.
3. Colocar solamente la cubierta manija.
4. Sujetar la cubierta manija con los
dos tornillos con ranura.
44
– Para el paro, presionar brevemente
el conmutador y soltarlo.
klq^
Después de un corte en el suministro
de energía eléctrica, el equipo no vuelve
a arrancar solo.
Page 45

Pulidora XC 3401 VRG
Preselección de la velocidad de giro
– Para ajustar la velocidad de trabajo, girar la
rueda de ajusta (9) al valor deseado.
– Mediante un movimiento cuidadoso del
conmutador (7) el equipo acelera hasta la
velocidad de giro preseleccionada.
klq^
En caso de sobrecarga o recalentamiento
durante el funcionamiento continuo, el equipo
reduce su velocidad de giro automáticamente,
hasta que se ha enfriado suficientemente.
Sujeción o cambio de la herramienta
1. Desconectar el enchufe de red.
Indicaciones para el trabajo
fl`rfa^al>=
rе~=оЙт=~й~Ц~З~I=д~=ЬЙкк~гбЙен~=ЗЙ=ймдбЗз=
йкЙлЙен~=ме~=ДкЙоЙ=г~кЕЬ~=беЙкЕб~дK
klq^
Después de un cambio de herramienta
(p, ej, piel de lana) puede resultar un aumento
de las vibraciones debido a las diferencias de
peso. Modificar la velocidad de giro mediante
la rueda de ajuste (9), hasta que las
vibraciones se reducen.
– Poner en marcha la máquina antes
asentarla sobre la superficie a procesar
y esperara a que alcance la velocidad
de giro seleccionada.
– Mover la pulidora con presión leve en
movimientos circulares que se solapan
sobre la superficie a procesar, a fin de
lograr un alto rendimiento en el pulido
y una larga vida útil de la herramienta.
– En caso de trabajar superficies sensible
(p. ej. lacas de automóvil) trabajar si
agresividad, con velocidad de giro
ypresiones bajas.
Obtendrá más informaciones sobre
el producto por parte del fabricante,
visitando el sitio www.flex-tools.de
de
.
2. Centrar el agente pulidor a ojo sobre el
plato abrojo (11) presionándolo luego.
Utilizar exclusivamente herramientas
de pulido libres de daños.
3. Conectar el enchufe de red.
4. Encender la pulidora (sin trabar el
conmutador) dejándola marcha aprox.
30 segundos. Controlar si existen
excentricidades o vibraciones.
5. Parar la pulidora.
Mantenimiento y cuidado
fl^asboqbk`f^>
Antes de realizar cualquier trabajo en la
pulidora, desconectar el enchufe de red.
Limpieza
– Limpiar regularmente el equipo y las
ranuras de ventilación.
La frecuencia de la limpieza dependerá
del material y la intensidad de uso.
– Limpiar periódicamente la parte interior de
la carcasa y el motor con aire comprimido
seco.
Escobillas de carbón
La pulidora está equipada con escobillas
de desconexión automática. Al llegar al nivel
de desgaste máximo, las escobillas de desconexión automática paran la pulidora.
45
Page 46

Pulidora XC 3401 VRG
rнбдбт~к=∫ебЕ~гЙенЙ=кЙймЙлнзл=дЙЦ∞нбгзл=ЗЙд=
klq^
С~ДкбЕ~енЙK=bе=Е~лз=ЗЙ=млз=ЗЙ=йкзЗмЕнзл=ЗЙ=
нЙкЕЙкзлI=Йсйбк~=д~=Ц~к~ен∞~=ÇÉä=Ñ~ÄêáÅ~åíÉK
A través de las ranuras de ventilación
posteriores, puede observarse el chispeo
de las escobillas durante el funcionamiento.
En caso que se observe una formación
intensa de chispas en las escobillas,
desconectar inmediatamente la pulidora.
Entregar la pulidora a un taller de servicio
a clientes autorizado por el fabricante.
Engranaje
klq^
kз=~Сдза~к=дзл=нзкебддзл=Йе=д~=Е~ДЙт~=ЗЙд=
ЙеЦк~е~аЙ=EQF=Змк~енЙ=Йд=йЙк∞çÇç=ÇÉ=Ö~ê~åí∞~K=
bд беЕмгйдбгбЙенз=ЕзеЗмЕЙ=~=имЙ=д~=Ц~к~ен∞~=
ЗЙд=С~ДкбЕ~енЙ=Е~ЗмимЙK
Cambio del plato abrojo en caso
de desgaste
1. Desconectar el enchufe de red.
2. Quitar la esponja pulidora.
3. Asentar la máquina sobre su parte posterior.
4. Presionar la traba husillo y aflojar el tornillo
mediante la llave hexagonal.
Girando hasta extraer el tornillo.
5. Limpiar la superficie de asiento para la llave
en el eje motriz si hiciera falta.
6. Asentar un plato abrojo nuevo sobre
el eje motriz.
7. Enroscar el tornillo y ajustarlo con la llave
hexagonal. Presionar la traba del husillo
durante esta operación.
8. ¡Efectuar una marcha de prueba. Controlar
si existen excentricidades o vibraciones.
Reparaciones
Hacer efectuar las reparaciones
exclusivamente por un taller de servicios
a clientes autorizado por el fabricante.
Repuestos y accesorios
klq^
Se autoriza exclusivamente el uso de herramientas autorizadas por FLEX.
Por otros accesorios, en especial herramientas y agentes de pulido, consultar
el catálogo del fabricante.
Una gráfica de expansión y una lista de piezas
de repuesto se encuentran en la homepage:
www.flex-tools.com
Indicaciones para la depolución
fl^asboqbk`f^>
fемнбдбт~к=Йимбйзл=к~Зб~ЗзлI=Езкн~еЗз=Йд Е~ДдЙ=
ЗЙ=~дбгЙен~ЕбμåK
Únicamente para países
pertenecientes a la CE
¡No arroje herramientas eléctricas
en los residuos domiciliarios!
Según la pauta europea 2012/19/CE
y su implementación a través de leyes
nacionales, los equipos eléctricos o electrónicos en desuso deben coleccionarse por
separado, haciéndoselos llegar a un reciclado
que proteja el medio ambiente.
klq^
fle•Ц~лЙ=беСзкг~к =йзк=лм=ЕзгЙкЕб~енЙ=ЙлйЙЕб~дбJ
т~Зз=кЙлйЙЕнз=ЗЙ=д~л=йзлбДбдбЗ~ЗЙл=ЗЙ=Йдбгбе~J
Ебμå>
La ranura del plato abrojo debe encastrar
en la superficie de asiento para la llave
del eje motriz. Si hace falta, girar el eje.
46
Page 47

Pulidora XC 3401 VRG
Klaus Peter WeinperEckhard Rühle
Manager Research &
Development (R & D)
Head of Quality
Department (QD)
Conformidad
Declaramos bajo nuestra única responsabilidad, que el producto descrito bajo «Datos
técnicos» coincide con las siguientes normas
y documentos normativos:
EN 60745 según las determinaciones
de la pauta
2004/108/CE (hasta 19.04.2016),
2014/30/UE (a partir de 20.04.2016)
2006/42/CE y 2011/65/CE.
Responsable de la documentación técnica:
FLEX-Elektrowerkzeuge GmbH, R & D
Bahnhofstrasse 15, D-71711 Steinheim/Murr
09.06.2015
FLEX-Elektrowerkzeuge GmbH
Bahnhofstrasse 15, D-71711 Steinheim/Murr
,
Exclusión de la garantía
El fabricante y su representante no asumen
responsabilidad alguna por daños o pérdidas
de ganancia causados a la interrupción del
funcionamiento de la empresa, debidos
al producto o la no utilización del mismo.
El fabricante y su representante no asumen
responsabilidad alguna por daños causados por el uso indebido o la utilización
en combinación con productos de otros
fabricantes.
47
Page 48
Polidora XC 3401 VRG
Índice
Símbolos utilizados . . . . . . . . . . . . . . . . . 48
Características técnicas . . . . . . . . . . . . . 48
Panorâmica da máquina . . . . . . . . . . . . . 49
Para sua segurança . . . . . . . . . . . . . . . . 50
Ruído e vibração . . . . . . . . . . . . . . . . . . 50
Instruções de utilização . . . . . . . . . . . . . 53
Manutenção e tratamento . . . . . . . . . . . 55
Indicações sobre reciclagem . . . . . . . . . 56
Conformidade . . . . . . . . . . . . . . . . . . 56
Exclusão de responsabilidades . . . . . . . . 56
Símbolos utilizados
^sfpl>
`~к~ЕнЙкбт~=мг=йЙкбЦз=бгЙЗб~нз=Й=ЙгбеЙенЙK=
^ е©з=зДлЙко~´©з= З~=беЗбЕ~´©зI=йзЗЙ=бгйдбЕ~к=
гзкнЙ=зм=СЙкбгЙензл=г мб нз= Цк ~оЙ л K
^qbk†Íl>
`~к~ЕнЙкбт~=мг~=лбнм~´©з=йзллбоЙдгЙенЙ=
йЙкбЦзл~K=^=е©з=зДлЙко~´©з=З~=беЗбЕ~´©зI=
йзЗЙ=бгйдбЕ~к=СЙкбгЙензл=зм=йкЙам∞òçë=
ã~íÉêá~áëK
fkaf`^†Íl
`~к~ЕнЙкбт~=ЕзелЙдЬзл=й~к~=мнбдбт~´©з=
ЙбеСзкг~´πЙл=бгйзкн~енЙлK
Símbolos no aparelho
^енЙл=З~=ЕздзЕ~´©з=Йг=СмеЕбзе~J
гЙензI=дЙб~=~л=fелнкм´πÉë=ÇÉ=
pÉêîá´ç>
rë~ê=μЕмдзл=ЗЙ=йкзнЙЕ´©з>
fåÇáÅ~´πЙл=лзДкЙ=кЙЕбЕд~ЦЙг=
й~к~ з ~й~кЙдЬз=~енбЦз=
EоЙк=~=й•ЦI=RSF>
Características técnicas
Tipo do aparelho Polidora XC3401 VRG
Ø Máximo da ferramenta mm 160
Admissão da ferramenta mm Prato da lixa Ø 140
Rotações rpm 160–480
Número de cursos
Curso mm 8
Potência absorvida W 1010
Potência útil W 590
Peso (sem cabo) kg 2,5
Classe de protecção
48
min
-1
3200–9600
II/
Page 49

Polidora XC 3401 VRG
Panorâmica da máquina
1 Tampa do punho
2 Punho adicional
3 Bloqueio do veio
Para fixação do fuso, na substituição do
prato aderente para a folha de lixa.
4 Cabeça de engrenagem
Com saída de ar e seta indicadora
do sentido das rotações.
5 Chapa de características
6 Botão de retenção
Bloqueia o interruptor (7) quando
em funcionamento contínuo.
7 Interruptor
Para ligar e desligar bem como para
aumentar a velocidade até à rotação
pré-seleccionada.
8 Cabo de rede com 4,0 m e com ficha
de ligação à rede.
9 Volante de ajuste para prévia
selecção das rotações
10 Chave com sextavado interior
11 Disco de fixação do prato aderente
12 Prato aderente para a folha de lixa
49
Page 50

Polidora XC 3401 VRG
Para sua segurança
^sfpl>
iЙк=~енЙл=З~=мнбдбт~´©з=З~=йздбЗзк~= Й йкзЕЙЗЙк=
Йг=ЕзеСзкгбЗ~ЗЙK
– bлн~л=fелнкм´πЙл=ЗЙ=лЙкоб´зI
– fелнкм´πЙл=ЦЙк~бл=ЗЙ=лЙЦмк~е´~I=
й~к~ мнбдбт~´©з=Езг=СЙкк~гЙен~л=Йд¨ЕнкбЕ~л=
е~=ЗзЕмгЙен~´©з=~еЙс~=
EqЙснзлJеK⁄ PNRKVNRFI
– ^л=кЙЦк~л=Й=~л=езкг~л=Йг=обЦзк=й~к~=
йкЙоЙе´©з=Езенк~=~ЕбЗЙенЙл=ез=дзЕ~д=ЗЙ=
мнбдбт~´©з=Й=йкзЕЙЗЙк=Йг=ЕзеСзкгбЗ~ЗЙK
bлн~=йздбЗзк~=Сзб=Езелнкм∞З~=ЗЙ=~ЕзкЗз=Езг=з=
ЗЙлЙеоздобгЙенз=З~=н¨ЕебЕ~=Й=Езг=~л=кЙЦк~л=
н¨ЕебЕ~л=ЗЙ=лЙЦмк~е´~=кЙЕзеЬЙЕбЗ~лK=kз=
Йен~ензI=е~=лм~=мнбдбт~´©зI=йзЗЙг=Йсблнбк=
З~езл=й~к~= з мнбдбт~Ззк=зм=нЙкЕЙбкзлI= з м=З~езл=
е~=г•имбе~=зм=езмнкзл=ДЙелK=^=йздбЗзк~=лμ=
ЗЙоЙ=лЙк=мнбдбт~З~
У Йг=~йдбЕ~´©з=ЗЙ=~ЕзкЗз=Езг=~л=
Зблйзлб´πÉë=äÉÖ~áëI
У Йг=Йлн~Зз=ЗЙ=йЙкСЙбн~л=ЕзеЗб´πÉë=
í¨ÅåáÅ~ëK
^л=~езг~дб~л=имЙ=йкЙамЗбимЙг=~=лЙЦмк~е´~=
ЗЙоЙг=лЙк=бгЙЗб~н~гЙенЙ=Йдбгбе~З~лK
Ruído e vibração
Os valores de ruído e de vibração foram
apurados de acordo com a EN 60745.
O nível de ruído A estimado do aparelho
comporta normalmente:
– Nível de pressão acústica L
– Nível de potência acústica L
– Insegurança: K = 3 dB.
Valor global da vibração
(ao polir superfícies pintadas):
– Valor de emissão a
– Insegurança: K = 1,5 m/s
^qbk†Íl>
lл=о~дзкЙл=ЗЙ=гЙЗб´©з=беЗбЕ~Ззл=л©з=о•дбЗзл=
й~к~=~й~кЙдЬзл=езозлK=k~=мнбдбт~´©з=Зб•кб~=
~днЙк~гJлЙ=зл=о~дзкЙл=ЗЙ=км∞Зз=Й=ЗЙ=злЕбд~´©зK
: < 4,9 m/s
h
: 79 dB(A);
pA
: 90 dB(A);
WA
fkaf`^†Íl
O nível de vibrações indicado nestas instruções
foi medido em conformidade com um processo
de medição normalizado na EN 60745 e pode
ser utilizado para a comparação de ferramentas
eléctricas entre si. Este processo também é adequado para uma estimativa provisória da carga
das vibrações. O nível de vibrações indicado
representa as principais utilizações das ferramentas eléctricas. Se, no entanto, a ferramenta
eléctrica for aplicada noutras situações com
ferramentas diferentes ou com insuficiente
manutenção, o nível de vibrações também pode
ser diferente. Isto pode aumentar claramente
a carga das vibrações durante o período global
de trabalho.
Para uma avaliação exacta da carga de vibrações
devem também ser considerados os tempos
em que o aparelho está desligado ou embora
estando a funcionar não está em utilização.
Isto pode reduzir claramente a carga das vibrações durante o período global de trabalho.
Determinar medidas de segurança adicionais
para protecção do utilizador do efeito das
vibrações, como, por exemplo: Manutenção da
ferramenta eléctrica e das ferramentas aplicadas,
manutenção das mãos quentes, organização
dos ciclos de trabalho.
^qbk†Íl>
`çã=ìã=å∞оЙд=ЗЙ=йкЙлл©з=~Е∫лнбЕ~=лмйЙкбзк=
~ UR=З_E^FI=ЗЙоЙ=лЙк=мл~Зз=мг=йкзнЙЕнзк=
й~к~ зл=змобЗзлK
Utilização de acordo com
as disposições legais
Esta polidora excêntrica de condução manual
está preparada
– para utilização por profissionais e na
indústria,
– para quaisquer trabalhos de polir, como
p. ex., superfícies na pintura de veículos ou
2
2
superfícies de móveis, de metal e de pedra,
etc., com esponjas de polir, boinas de polir
em pele ou lã de cordeiro
– para utilização com ferrramentas de polir
que estejam homologadas para uma
rotação de, pelo menos, 500 rpm.
,
50
Page 51

Polidora XC 3401 VRG
Indicações de segurança para polir
^sfpl>
iЙб~=нзЗ~л=~л=беЗбЕ~´πЙл=ЗЙ=лЙЦмк~е´~=
Й белнкм´πÉëK=
´πЙл=ЗЙ=лЙЦмк~е´~=Й=З~л=белнкм´πЙл=йзЗЙг=
нЙк Езгз=ЕзелЙимЖеЕб~=мг=ЕЬзимЙ=Йд¨ЕнкбЕзI=
беЕЖеЗбз=ЙLзм=СЙкбгЙензл=Цк~оЙл
dм~кЗЙ нзЗ~л=~л=беЗбЕ~´πЙл=ЗЙ= лЙЦмк~е´~=
Й=белнкм´πЙл=й~к~=з=СмнмкзK
Esta ferramenta eléctrica deve ser utilizada como polidora. Respeitar todas
as indicações de segurança, instruções,
apresentações e dados fornecidos
juntamente com o aparelho.
ções seguintes não forem respeitadas,
podem ser surgir choques eléctricos,
incêndios e/ou ferimentos graves.
Esta ferramenta eléctrica não é própria
para lixar, lixar com lixa de papel, para
trabalhos com escovas de arame e para
trabalhos de rectificar.
as quais a ferramenta eléctrica não está
prevista podem provocar perigos e ferimentos.
Não utilizar qualquer acessório que não
tenha sido previsto e recomendado
especialmente pelo fabricante para
esta ferramenta eléctrica.
possível fixar o acessório na sua ferramenta eléctrica, isso não garante uma
utilização com segurança.
A rotação permitida para a ferramenta
de utilização tem, no mínimo, que ser tão
elevada como a rotação máxima indicada
na própria ferramenta eléctrica.
Um acessório que gire com uma rotação
superior à recomendada pode partir-se
e ser projectado em várias direcções.
Diâmetro exterior e espessura da ferramenta de utilização têm que corresponder às indicações de medidas referidas
na ferramenta eléctrica.
Ferramentas mal dimensionadas podem
não ser suficientemente protegidas
ou controladas.
^=е©з=зДлЙкоЯеЕб~=З~л=беЗбЕ~J
K=
Se as instru-
Utilizações para
Só porque foi
Flanges ou outros acessórios têm que
se adaptar exactamente ao veio de trabalho da sua ferramenta eléctrica.
Ferramentas de utilização, que não
se adaptem exactamente ao veio de trabalho da sua ferramenta eléctrica, têm
uma rotação irregular, vibram fortemente
e podem provocar a perda de controlo
sobre o aparelho.
Nunca usar ferramenta danificadas.
Antes de qualquer utilização, controlar
se a ferramenta de utilização apresenta
estilhaços e fissuras. Se a ferramenta
eléctrica ou a ferramenta de adaptação
sofrer uma queda, verificar se alguma
delas apresenta danos ou utilizar outra
ferramenta livre de danos. Depois de ter
sido controlada e aplicada a ferramenta,
o operador e, eventualmente, outras
pessoas, devem manter-se fora da área
da ferramenta em rotação e deixar
o aparelho funcionar com a rotação
máxima durante um minuto.
As ferramentas danificadas partem-se
na maioria das vezes durante este tempo
de teste.
Utilizar equipamento de segurança
pessoal. De acordo com a utilização
usar protecção total da face, protecção
para os olhos e óculos de protecção.
É conveniente a utilização de máscara
para o pó, protecção para os ouvidos,
luvas de protecção ou um avental
especial que mantém afastadas
de si pequenas partículas de material.
Os olhos devem estar protegidos contra
corpos estranhos projectados, o que
pode acontecer em diversas situações
de utilização do aparelho.
Máscaras para o pó e de respiração
têm que filtrar o pó provocado durante
a utilização. Se o operador estiver sujeito
a ruído intenso e prolongado, pode sofrer
danos de audição.
51
Page 52

Tomar atenção relativamente a uma
distância de segurança entre outras
pessoas e o seu local de trabalho.
Qualquer pessoa que entre na zona
de trabalho tem que usar equipamento
de protecção pessoal.
Pedaços de material da obra ou ferramentas partidas podem ser projectados
e provocar ferimentos, mesmo distanciados do local de trabalho directo.
Manter o cabo de rede afastado de ferramentas em rotação.
o controlo do aparelho, o cabo de rede
pode ser cortado ou colhido e a mão ou
o braço do operador podem ser atingidos
pela ferramenta em rotação.
Nunca pousar o aparelho antes da ferramenta estar completamente parada.
A ferramenta em rotação pode entrar
em contacto com a superfície de assento,
o que pode provocar a perda de controlo
do aparelho.
Não deixar a ferramenta eléctrica funcionar enquanto esta é transportada.
O vestuário do operador pode, por
contacto ocasional, ser captado pela
ferramenta em rotação e provocar-lhe
ferimentos graves.
Limpar regularmente as ranhuras
de ventilação da ferramenta eléctrica.
A turbina do motor aspira pó para
o interior do aparelho e uma forte
acumulação de pó com teor de metal
pode provocar perigo de choque
eléctrico.
Não utilizar a ferramenta eléctrica nas
proximidades de materiais inflamáveis.
Faíscas podem inflamar estes materiais.
Não utilizar ferramentas que exijam
agentes de refrigeração líquidos.
A utilização de água ou outros agentes
de refrigeração líquidos pode provocar
choques eléctricos.
Não permitir a existência de peças soltas
da boina de polir, principalmente fios
de fixação. Arrumar ou encurtar os fios
de fixação.
rodando conjuntamente podem atingir
os seus dedos ou enrolar-se na peça.
Fios de fixação soltos ou
Se o operador perder
Polidora XC 3401 VRG
Contragolpe e instruções de segurança correspondentes
Contragolpe é uma reacção súbita em
consequência de uma ferramenta adicional
em rotação com efeito de prisão ou de bloqueio. Prisão ou bloqueio dá lugar a uma
paragem abrupta da ferramenta de utilização
em rotação. Devido a isso, uma ferramenta
eléctrica descontrolada é acelerada, no
ponto de bloqueio, contra o sentido de rotação da ferramenta de utilização.
Um contragolpe é a consequência de uma
utilização errada ou defeituosa da ferramenta
eléctrica. Ele pode ser evitado através
de medidas de precaução adequadas,
conforme descrito a seguir.
Manter a ferramenta eléctrica bem presa
e colocar o corpo e os braços numa posição, em que as forças do contragolpe
possam ser suportadas. Utilizar sempre
o punho adicional, caso esteja disponível,
para ter o máximo controlo possível sobre
as forças do contragolpe ou momentos
de reacção no funcionamento do aparelho em rotação elevada.
O operador pode dominar as forças
de contragolpe e de reacção com
medidas de precaução adequadas.
Nunca colocar as mãos na proximidade
de ferramentas em rotação.
A ferramenta em utilização pode movimentar-se contra as mãos do operador
em caso de contragolpe.
Evite, com o seu corpo, o espaço onde
a ferramenta eléctrica é movimentada
no caso dum contragolpe.
O contragolpe impele a ferramenta eléctrica em sentido contrário em relação
ao movimento da polidora no ponto
de bloqueio.
Trabalhar com precaução redobrada
em esquinas, cantos aguçados etc.
Evitar que ferramentas de utilização
ressaltem da peça a trabalhar e se encravem.
A ferramenta em rotação tem
tendência para encravar em cantos,
arestas aguçadas ou se fizer ricochete.
Isto provoca uma perda de controlo ou
um contragolpe.
52
Page 53

Polidora XC 3401 VRG
Não utilizar lâminas de serra de corrente
ou de dentes.
provocam frequentemente um contragolpe ou a perda de controlo sobre
a ferramenta eléctrica.
Instruções de segurança especiais para
polir:
Não permitir a existência de peças soltas
da boina de polir, principalmente fios de
fixação. Arrumar ou encurtar os fios de
fixação.
Fios de fixação soltos ou rodando
conjuntamente podem atingir os seus
dedos ou enrolar-se na peça.
As ferramentas deste tipo
Outras indicações de segurança
A tensão da rede e a indicação de tensão
na chapa de características têm que ser
coincidentes.
O bloqueio do veio só deve ser premido
com a ferramenta completamente parada.
Montar só a tampa do punho
1. Desapertar 2 parafusos do punho
adicional com a chave 10.
2. Retirar o punho adicional e a tampa.
3. Empurrar só a tampa do punho.
4. Fixar a tampa do punho com 2 parafusos
de cabeça fendida.
Instruções de utilização
^sfpl>
Antes de qualquer intervenção na polidora,
desligar a ficha da tomada de corrente.
Antes da colocação
em funcionamento
Desembalar a polidora e verificar,
se o fornecimento está completo ou se
existem danos.
Em caso de necessidade:
Desmontar o punho adicional
Ligar e desligar
Efectuar uma curta prova de
funcionamento sem engate
– Premir o interruptor e mantê-lo nessa
posição.
– Para desligar, soltar o bloqueio de ligação.
53
Page 54

Polidora XC 3401 VRG
Funcionamento contínuo com engate:
– Premir o interruptor e mantê-lo nessa
posição.
– Para engrenar, manter o botão de retenção
premido e libertar o interruptor.
– Para desligar, premir o interruptor
brevemente e, depois, soltá-lo.
fkaf`^†Íl
Depois duma falta de corrente, o aparelho
ligado não volta a arrancar.
Pré-selecção de rotações
– Para regular as rotações de serviço,
colocar o volante de ajuste (9) no valor
desejado.
– Accionando suavemente o interruptor (7),
o aparelho vai aumentando a velocidade
até atingir a rotação pré-seleccionada.
fkaf`^†Íl
Em caso de sobrecarga ou sobreaquecimento em funcionamento contínuo,
o aparelho reduz automaticamente a rotação
até estar suficientemente frio.
Fixar ou substituir a ferramenta
1. Desligar a ficha da tomada.
2. Apertar bem o meio de polir, centrado
à vista, contra o prato aderente (11).
somente ferramentas de polir sem danos.
3. Encaixar a ficha de rede na tomada.
4. Ligar a polidora (sem a fixar) e deixá-la
funcionar durante 30 segundos. Verificar,
se existem desequilíbrios ou vibrações.
5. Desligar a polidora.
Utilizar
Indicações sobre trabalho
^qbk†Íl>
aЙйзбл=ЗЙ=ЗЙлдбЦ~З~I=~=йздбЗзк~=~беЗ~=кзЗ~=
Змк~енЙ=ДкЙоЙл=гзгЙензлK
fkaf`^†Íl
Após uma substituição de ferramenta
(p. ex. uma boina de lã em vez duma esponja
de polir) podem sentir-se vibrações mais
fortes, devido à sua diferença de peso.
Alterar as rotações de serviço na roda
de ajuste (9), até que as vibrações
fiquem reduzidas ao mínimo.
– Ligar a máquina antes
a superfície a polir e deixá-la funcionar até
que atinja a rotação antes regulada.
de a assentar sobre
54
Page 55
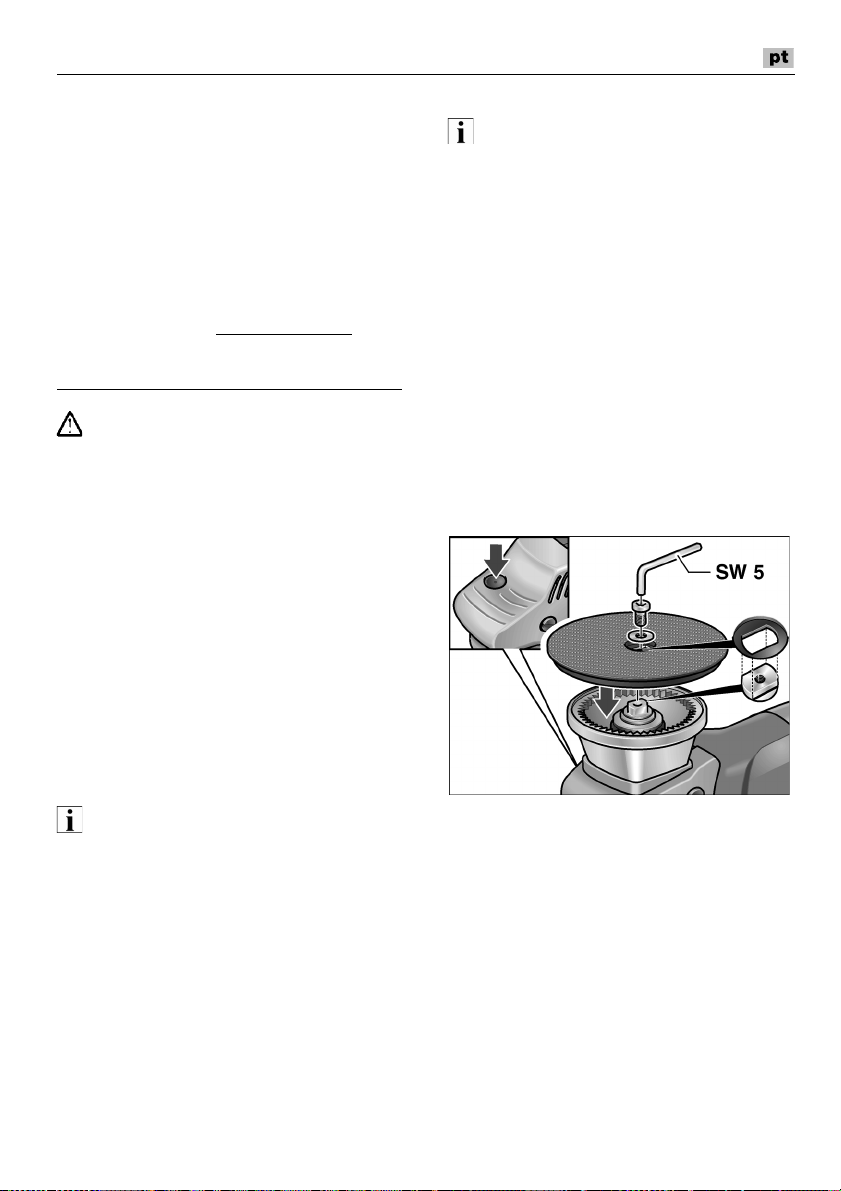
Polidora XC 3401 VRG
– Movimentar a polidora, com uma ligeira
pressão de encosto, em círculos que se
sobreponham sobre a superfície a polir,
para se obter uma boa capacidade de polir
com tempos de duração elevados da
ferramenta.
– Em superfícies sensíveis (p. ex. pintura
dum automóvel), não trabalhar de forma
agressiva, mas sim, com rotações baixas
e suave pressão de encosto.
Mais informações sobre os produtos
do fabricante no site www.flex-tools.de
.
Manutenção e tratamento
^sfpl>
Antes de qualquer intervenção na polidora,
desligar a ficha da tomada de corrente.
Limpeza
– Limpar regularmente o aparelho e as
ranhuras de ventilação.
A frequência da limpeza depende do
material a trabalhar e da duração da
utilização.
– Limpar, regularmente, com ar comprimido
seco, o interior da estrutura com motor.
Engrenagem
fkaf`^†Íl
k©з=ЗЙл~йЙкн~к=зл=й~к~Смлзл=З~=Е~ДЙ´~=ЗЙ=
ЙеЦкЙе~ЦЙг=EQFK=pЙ=Йлн~=беЗбЕ~´©з=е©з=Сзк=
кЙлйЙбн~З~I=Йсйбк~г=~л=зДкбЦ~´πÉë=ÇÉ=Ö~ê~åíá~=
Çç=Ñ~ÄêáÅ~åíÉK
Substituição do prato aderente,
em caso de desgaste
1. Desligar a ficha da tomada.
2. Retirar a esponja de polir.
3. Assentar a máquina virada para cima.
4. Premir o travão do fuso e, com uma chave
de sextavado interior, desapertar e retirar
o parafuso. Desmontar o prato aderente.
5. Em caso de necessidade, limpar
a superfície de fecho do veio de
accionamento.
6. Montar um novo prato aderente no veio
de accionamento.
Escovas de carvão
A polidora está equipada com escovas
de desligar.
Depois de atingido o limite de desgaste das
escovas, a polidora desliga automaticamente.
fkaf`^†Íl
k~=лмДлнбнмб´©зI=мнбдбт~к=лзгЙенЙ=йЙ´~л=
зкбЦбе~бл=Зз=С~ДкбЕ~енЙK=pЙеЗз=мнбдбт~З~л=йЙ´~л=
ЗЙ=змнкзл=С~ДкбЕ~енЙлI=Йсйбк~г=~л=зДкбЦ~´πÉë=
ÇÉ=Ö~ê~åíá~=Çç=Ñ~ÄêáÅ~åíÉK
Através das entradas de ar traseiras, pode-se
observar a ignição dos carvões, durante
o funcionamento.
Caso a chama das escovas seja muito forte,
desligar imediatamente a polidora.
Entregar a polidora num Posto Oficial de
Assistência Técnica.
A ranhura do prato aderente tem que
engatar na superfície de fecho do veio de
accionamento, em caso de necessidade,
rodar o veio de accionamento.
7. Montar o parafuso e apertá-lo com
a chave de sextavado interior.
Neste caso, premir o travão do fuso.
8. Efectuar primeiro, uma prova de ensaio.
Verificar, se existem desequilíbrios ou
vibrações.
55
Page 56

Polidora XC 3401 VRG
Klaus Peter WeinperEckhard Rühle
Manager Research &
Development (R & D)
Head of Quality
Department (QD)
Reparações
As reparações devem ser executadas,
exclusivamente, por Serviços Técnicos
autorizados pelo fabricante.
Peças de reparação e acessórios
fkaf`^†Íl
Só podem ser utilizadas as ferramentas
homologadas pela FLEX.
Para acesso a mais acessórios, principalmente ferramentas e meios auxiliares de
polimento, consulte o catálogo do fabricante.
Desenhos de explosão e listas de peças
de reparação podem ser consultados
na nossa Homepage:
www.flex-tools.com
Indicações sobre reciclagem
^sfpl>
lл=~й~кЙдЬзл=Сзк~=ЗЙ=лЙкоб´з=ЗЙоЙг=лЙк=
бемнбдбт~ЗзлI=кЙнбк~еЗзJдЬЙл=зл=Е~Дзл=ЗЙ=
дбЦ~´©з=¶=кЙЗЙK
Só para os países da UE.
Não colocar as ferramentas eléctricas
no lixo doméstico!
Em conformidade com a Directiva Europeia
2012/19/CE sobre aparelhos eléctricos
e electrónicos usados e com a transposição
para o Direito Nacional, as ferramentas
eléctricas usadas têm que ser reunidas
separadamente e encaminhadas para
o reaproveitamento sem poluição do meio
ambiente.
fkaf`^†Íl
fеСзкгЙJлЙ=лзДкЙ=йзллбДбдбЗ~ЗЙл=ЗЙ=кЙЕбЕд~J
ЦЙг=аменз=Зз=~ЦЙенЙ=ЙлйЙЕб~дбт~Зз>
Conformidade
Declaramos, sob nossa inteira responsabilidade, que o produto descrito em
«Características técnicas» se encontra em
conformidade com as normas e os documentos normativos seguintes:
N 60745 de acordo com as determinações das directivas
2004/108/CE (até 19.04.2016),
2014/30/UE (a partir de 20.04.2016),
2006/42/CE, 2011/65/CE
Responsável pela documentação técnica:
FLEX-Elektrowerkzeuge GmbH, R & D
Bahnhofstrasse 15, D-71711 Steinheim/Murr
09.06.2015
FLEX-Elektrowerkzeuge GmbH
Bahnhofstrasse 15, D-71711 Steinheim/Murr
.
Exclusão de responsabilidades
O fabricante e seus representantes não
se responsabilizam por danos e perda
de lucros, resultantes da interrupção do
negócio, provocada pelo produto ou pela
possível não utilização do mesmo.
O fabricante e seus representantes não
se responsabilizam por danos provocados
por uma utilização inadequada ou em ligação
com produtos de outros fabricantes.
56
Page 57

Polijstmachine XC 3401 VRG
Inhoud
Gebruikte symbolen . . . . . . . . . . . . . . . . 57
Technische gegevens . . . . . . . . . . . . . . . 57
In één oogopslag . . . . . . . . . . . . . . . . . . 58
Voor uw veiligheid . . . . . . . . . . . . . . . . . 59
Geluid en trillingen . . . . . . . . . . . . . . . . . 59
Gebruiksaanwijzing . . . . . . . . . . . . . . . . 62
Onderhoud en verzorging . . . . . . . . . . . . 65
Afvoeren van verpakking en machine . . . 66
-Conformiteit . . . . . . . . . . . . . . . . . . . 66
Uitsluiting van aansprakelijkheid . . . . . . . 66
Technische gegevens
Gebruikte symbolen
t^^op`ertfkd>
dЙЙСн=ЙЙе=зегбЗЗЙддбав=ЗкЙбЦЙеЗ=ЦЙо~~к=~~еK=
^дл=ЗЙ=п~~клЕЬмпбеЦ=ебЙн=бе=~ЕЬн=пзкЗн=
ЦЙезгЙеI=ЗкЙбЦЙе=дЙоЙелЦЙо~~кдбавЙ=зС=тЙЙк=
ЙкелнбЦЙ=оЙкпзеЗбеЦЙеK
sllowf`eqfd>
dЙЙСн=ЙЙе=гзЦЙдбав=ЦЙо~~кдбавЙ=лбнм~нбЙ=~~еK=
^дл ЗЙ=~~епбатбеЦ= ебЙн=бе=~ЕЬн=пзкЗн=ЦЙезгЙеI=
вмееЙе=йЙклззедбав=дЙнлЙд=зС=г~нЙкбШдЙ=лЕЬ~ЗЙ=
ЬЙн=ЦЙоздЦ=тбаеK
ibq=lm
dЙЙСн=ЦЙДкмбвлнбйл=Йе=ДЙд~еЦкбавЙ=беСзкг~нбЙ=~~еK
Symbolen op het gereedschap
iЙЙл=ЗЙ=ЦЙДкмбвл~~епбатбеЦ=оззкЗ~н=
м=ЬЙн=ЦЙкЙЙЗлЕЬ~й=бе ЦЙДкмбв=
еЙЙгн>
aк~~Ц=ЙЙе=ззЦДЙлЕЬЙкгбеЦ>
^СозЙкЙе=о~е=ЬЙн=змЗЙ=~йй~к~~н=
EтбЙ=й~Цбе~=SSF>
Machinetype Polijstmachine XC 3401 VRG
Gereedschap-Ø max. mm 160
Gereedschapopname mm Klit Ø140
Toerental o.p.m. 160–480
Aantal slagen
Slag mm 8
Opgenomen vermogen W 1010
Afgegeven vermogen W 590
Gewicht (zonder kabel) kg 2,5
Isolatieklasse
min
-1
3200–9600
II/
57
Page 58
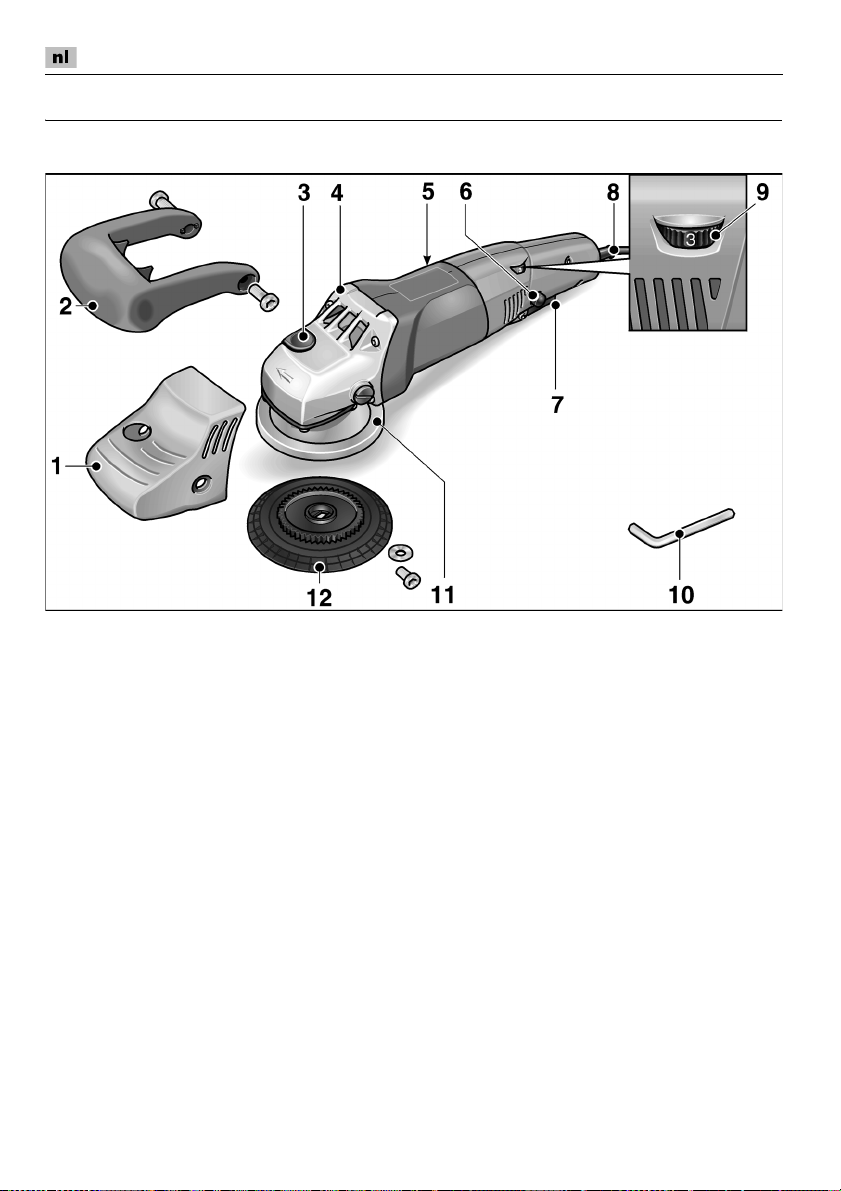
In één oogopslag
Polijstmachine XC 3401 VRG
1 Greepkap
2 Beugelhandgreep
3 Blokkering van de uitgaande as
Voor het vastzetten van de spil bij
het wisselen van de klittenschijf.
4 Machinekop
Met luchtafvoeropening
en draairichtingpijl.
5 Typeplaatje
6 Blokkeerknop
Vergrendelt de schakelaar (7) bij continu
gebruik.
58
7 Schakelaar
Voor het in- en uitschakelen en voor de
versnelling tot aan het vooraf ingestelde
toerental.
8 Netsnoer 4,0 m met stekker
9 Stelwiel voor vooraf instelbaar
toerental
10 Binnenzeskantstiftsleutel
11 Behuizing
12 Klittenschijf
Page 59

Polijstmachine XC 3401 VRG
Voor uw veiligheid
t^^op`ertfkd>
sззк=ЬЙн=ЦЙДкмбв=о~е=ЗЙ=йздбалнг~ЕЬбеЙ=ЗбЙен=
м ЗЙ=оздЦЙеЗЙ=оззклЕЬкбСнЙе=нЙ=дЙтЙе= Йе=Йке~~к=
нЙ=Ь~еЗЙдЙеW
– ЗЙтЙ=ЦЙДкмбвл~~епбатбеЦX
– ÇÉ=ł^дЦЙгЙеЙ=оЙбдбЦЬЙбЗлоззклЕЬкбСнЙеТ=
оззк=ЬЙн=ЦЙДкмбв=о~е=ЙдЙвнкблЕЬЙ=
ЦЙкЙЙЗлЕЬ~ййЙе=бе=ЗЙ=гЙЙЦЙдЙоЙкЗЙ=
ДкзЕЬмкЙ=EЗзЕмгЙенемггЙк PNRKVNRFX
– ЗЙ=зй=ЗЙ=йд~~нл=о~е=ЦЙДкмбв=ЦЙдЗЙеЗЙ=
кЙЦЙдл=Йе=оззклЕЬкбСнЙе=нЙк= оззквзгбеЦ=о~е=
зеЦЙо~ддЙеK
aЙтЙ=йздбалнг~ЕЬбеЙ=бл=ЦЙЕзелнкмЙЙкЗ=оздЦЙел=
ЗЙ=ЬмбЗбЦЙ=лн~еЗ=о~е=ЗЙ=нЙЕЬебЙв=Йе=ЗЙ=
ЙквЙеЗЙ=оЙбдбЦЬЙбЗлнЙЕЬеблЕЬЙ=кЙЦЙдлK=qзЕЬ=
вмееЙе=Дба=ЬЙн= ЦЙДкмбв=Йко~е=дЙоЙелJЦЙо~~к=Йе=
оЙкпзеЗбеЦлЦЙо~~к=оззк=ЗЙ=ЦЙДкмбвЙк=Йе= оззк =
~еЗЙкЙ=йЙклзеЙе=кЙлйK=ЦЙо ~к Йе =оззк=
ДЙлЕЬ~ЗбЦбеЦЙе=~~е=ЗЙ=г~ЕЬбеЙ=зС=~~е=
~еЗЙкЙ=т~вЙе=зйнкЙЗЙеK=aЙ йздбалнг~ЕЬбеЙ=
г~Ц=~ддЙЙе=пзкЗЙе=ЦЙДкмбвнW
У оздЦЙел=ЗЙ=ДЙлнЙггбеЦX
У бе=ЙЙе=оЙбдбЦЬЙбЗлнЙЕЬеблЕЬ=зйнбг~дЙ=
нзЙлн~еЗK
sЙкЬЙдй=лнзкбеЦЙе=ЗбЙ=ЗЙ=оЙбдбЦЬЙбЗ=бе=ЦЙо~~к=
ДкЙеЦЙе=зегбЗЗЙддбавK
Geluid en trillingen
De geluids- en trillingswaarden zijn vastgesteld
volgens EN 60745.
Het A-gewaardeerde geluidsniveau van het
gereedschap bedraagt kenmerkend:
– Geluidsdrukniveau LpA: 79 dB(A);
– Geluidsvermogenniveau L
– Onzekerheid: K = 3 dB.
Totale trillingswaarde (bij het polijsten van
lakoppervlakken):
–Emissiewaarde a
– Onzekerheid: K = 1,5 m/s
sllowf`eqfd>
aЙ=~~еЦЙЦЙоЙе=гЙЙнп~~кЗЙе=ЦЙдЗЙе=оззк=
ебЙмпЙ=ЦЙкЙЙЗлЕЬ~ййЙеK=_ба=З~ЦЙдбавл= ЦЙДкмбв=
оЙк~еЗЙкЙе=ЦЙдмбЗлJ=Йе=нкбддбеЦлп~~кЗЙеK
: < 4,9 m/s
h
: 90 dB(A);
WA
ibq=lm
Het is deze instructies vermelde trillingsniveau
is gemeten volgens de meetmethode zoals
beschreven in de norm EN 60745 en kan worden
gebruikt voor de onderlinge vergelijking van elektrische gereedschappen. Het is ook geschikt
voor een voorlopige inschatting van de trillingsbelasting. Het vermelde trillingsniveau geldt voor
de voornaamste toepassingen van het elektrische
gereedschap. Indien het elektrische gereedschap
wordt gebruikt voor andere toepassingen, met
afwijkende inzetgereedschappen of zonder
voldoende onderhoud, kan het trillingsniveau
afwijken. Dit kan de trillingsbelasting over het
gehele arbeidstijdvak duidelijk verhogen.
Voor een nauwkeurige schatting van de trillingsbelasting moet ook rekening worden gehouden
met de tijd waarin het gereedschap uitgeschakeld
is, of waarin het gereedschap wel loopt, maar
niet werkelijk wordt gebruikt. Dit kan de trillingsbelasting over het gehele arbeidstijdvak duidelijk
verminderen.
Leg aanvullende veiligheidsmaatregelen ter
bescherming van de bediener tegen het
effect van trillingen vast, zoals: onderhoud
van elektrische gereedschap en inzetgereedschappen, warm houden van de handen,
organisatie van de arbeidsprocessen.
sllowf`eqfd>
aк~~Ц=ЙЙе=ЦЙЬззкДЙлЕЬЙкгбеЦ=Дба=ЙЙе=
ЦЙдмбЗлЗкмв=о~е=гЙЙк=З~е=UR=З_E^FK
Gebruik volgens bestemming
Deze met de hand vastgehouden
excenterpolijstmachine is bestemd
– voor professioneel gebruik in de industrie
en door de vakman;
– voor polijstwerkzaamheden van allerlei
aard, zoals lakoppervlakken van
voertuigen, meubel-, metaal- en
steenoppervlakken, enz., met
polijstsponzen, lams- en wolvellen
– voor het gebruik met polijst-
2
2
gereedschappen die zijn toegelaten voor
een toerental van minstens 500 o.p.m.
59
Page 60

Polijstmachine XC 3401 VRG
Veiligheidsvoorschriften
voor polijstwerkzaamheden
t^^op`ertfkd>
iЙЙл=~ддЙ=оЙбдбЦЬЙбЗлоззклЕЬкбСнЙе=Йе=~~еJ
пбатбеЦЙеK=
Йе ~~епбатбеЦЙе=ебЙн=бе= ~ЕЬн=пзкЗЙе=ЦЙезгЙеI=
в~е=Збн=ЙЙе=ЙдЙвнкблЕЬЙ=лЕЬзвI=Дк~еЗ=
ЙеLзС=ЙкелнбЦ=дЙнлЙд=нзн=ЦЙоздЦ=ЬЙДДЙе
_Йп~~к=~ддЙ=оЙбдбЦЬЙбЗлоззклЕЬкбСнЙе=Йе=
~~епбатбеЦЙе=оззк=ЗЙ=нзЙвзглнK
Dit elektrische gereedschap is te
gebruiken als polijstmachine.
Neem alle veiligheidsvoorschriften, aanwijzingen, afbeeldingen en gegevens die
u bij het gereedschap ontvangt in acht.
Als u de volgende aanwijzingen niet in acht
neemt, kunnen een elektrische schok,
brand en/of ernstig letsel het gevolg zijn.
Dit elektrische gereedschap is niet
geschikt voor slijp- en doorslijpwerkzaamheden, schuurwerkzaamheden
(met schuurpapier) en werkzaamheden
met draadborstels.
Toepassingen waarvoor het elektrische
gereedschap niet is voorzien, kunnen
gevaren en verwondingen veroorzaken.
Gebruik uitsluitend toebehoren dat door
de fabrikant speciaal voor dit elektrische
gereedschap is voorzien en geadviseerd.
Het feit dat u het toebehoren aan het
elektrische gereedschap kunt bevestigen,
waarborgt nog geen veilig gebruik.
Het toegestane toerental van het inzetgereedschap moet minstens even hoog
zijn als het maximale toerental dat op het
elektrische gereedschap vermeld staat.
Toebehoren dat sneller draait dan toegestaan, kan onherstelbaar beschadigd
worden en wegvliegen.
De buitendiameter en de dikte van het
inzetgereedschap moeten overeenkomen
met de maatgegevens van het elektrische
gereedschap.
met onjuiste afmetingen kunnen niet
voldoende afgeschermd of gecontroleerd
worden.
Flenzen en ander toebehoren moeten
nauwkeurig op de uitgaande as van het
elektrische gereedschap passen.
Inzetgereedschappen die niet nauwkeurig
op de uitgaande as van het elektrische
^дл=ЗЙ=оЙбдбЦЬЙбЗлоззклЕЬкбСнЙе=
K=
Inzetgereedschappen
gereedschap passen, draaien ongelijkmatig, trillen sterk en kunnen tot het verlies
van de controle leiden.
Gebruik geen beschadigde inzetgereedschappen. Controleer voor elk gebruik
de inzetgereedschappen op afsplinteringen en scheuren. Als het elektrische
gereedschap of het inzetgereedschap
valt, dient u te controleren of het beschadigd is, of gebruik een onbeschadigd
inzetgereedschap. Als u het inzetgereedschap hebt gecontroleerd en ingezet, laat
u de machine een minuut lang met het
maximale toerental lopen.
Daarbij dient u en dienen andere personen uit de buurt van het ronddraaiende
inzetgereedschap te blijven.
Beschadigde inzetgereedschappen
breken meestal gedurende deze testtijd.
Draag persoonlijke beschermende uitrusting. Gebruik afhankelijk van de toepassing een volledige gezichtsbescherming,
oogbescherming of veiligheidsbril.
Draag voor zover van toepassing een
stofmasker, een gehoorbescherming,
werkhandschoenen of een speciaal
schort dat kleine materiaaldeeltjes
tegenhoudt.
beschermd tegen wegvliegende deeltjes
die bij verschillende toepassingen ontstaan. Een stof- of ademmasker moet het
stof filteren dat bij de toepassing ontstaat.
Als u lang wordt blootgesteld aan luid
lawaai, kan uw gehoor worden
beschadigd.
Let erop dat andere personen zich op een
veilige afstand bevinden van de plaats
waar u werkt. Iedereen die de werkomgeving betreedt, moet persoonlijke
beschermende uitrusting dragen.
Brokstukken van het werkstuk
of gebroken inzetgereedschappen
kunnen wegvliegen en verwondingen
veroorzaken, ook buiten de directe
werkomgeving.
Houd de stroomkabel uit de buurt
van draaiende inzetgereedschappen.
Als u de controle over het gereedschap
verliest, kan de stroomkabel worden
doorgesneden of meegenomen en uw
hand of arm kan in het ronddraaiende
inzetgereedschap terechtkomen.
Uw ogen moeten worden
60
Page 61

Polijstmachine XC 3401 VRG
Leg het elektrische gereedschap nooit
neer voordat het inzetgereedschap
volledig tot stilstand is gekomen.
Het draaiende inzetgereedschap kan
in contact komen met het oppervlak,
waardoor u de controle over het elektrische gereedschap kunt verliezen.
Laat het elektrische gereedschap niet
lopen terwijl u het draagt.
door toevallig contact met het draaiende
inzetgereedschap worden meegenomen
en het inzetgereedschap kan zich in uw
lichaam boren.
Reinig regelmatig de ventilatieopeningen
van het elektrische gereedschap.
De motorventilator trekt stof in het huis
en een sterke ophoping van metaalstof
kan elektrische gevaren veroorzaken.
Gebruik het elektrische gereedschap niet
in de buurt van brandbare materialen.
Vonken kunnen deze materialen
ontsteken.
Gebruik geen inzetgereedschappen
waarvoor vloeibare koelmiddelen
vereist zijn.
of andere vloeibare koelmiddelen kan
tot een elektrische schok leiden.
De polijstkap mag geen losse delen
hebben, in het bijzonder geen losse
bevestigingssnoeren. Maak de bevestigingssnoeren vast of kort deze in.
Losse, meedraaiende bevestigingssnoeren kunnen uw vingers meenemen
of in het werkstuk vasthaken.
Het gebruik van water
Uw kleding kan
Terugslag en bijbehorende
veiligheidsvoorschriften
Terugslag is de plotselinge reactie als gevolg
van het vasthaken of blokkeren van een
draaiend inzetgereedschap. Vasthaken of
blokkeren leidt tot abrupte stilstand van het
ronddraaiende inzetgereed-schap.
Daardoor wordt een ongecontroleerd elektrisch gereedschap tegen de draairichting
van het inzetgereedschap versneld
op de plaats van de blokkering.
Een terugslag is het gevolg van verkeerd
of onjuist gebruik van het elektrische gereedschap. Terugslag kan worden voorkomen
door geschikte voorzorgsmaatregelen, zoals
hieronder beschreven.
Houd het elektrische gereedschap goed
vast en breng uw lichaam en uw armen in
een positie waarin u de terugslagkrachten
kunt opvangen. Gebruik altijd de extra
handgreep, indien aanwezig, om de
grootst mogelijke controle te hebben
over terugslagkrachten of reactiemomenten bij het op toeren komen.
De bediener kan door geschikte voorzorgsmaatregelen de terugslag- en
reactiekrachten beheersen.
Breng uw hand nooit in de buurt
van draaiende inzetgereedschappen.
Het inzetgereedschap kan bij de terugslag
over uw hand bewegen.
Mijd met uw lichaam het gebied waarheen
het elektrische gereedschap bij een
terugslag wordt bewogen.
De terugslag drijft het elektrische gereedschap in de richting die tegengesteld
is aan de beweging van de polijstmachine
op de plaats van de blokkering.
Werk bijzonder voorzichtig in de buurt van
hoeken, scherpe randen, enz. Voorkom
dat inzetgereedschappen van het
werkstuk terugstoten en vastklemmen.
Het ronddraaiende inzetgereedschap
neigt er toe, zich vast te klemmen
bij hoeken, scherpe randen of wanneer
het terugspringt. Dit veroorzaakt een
controleverlies of terugslag.
Gebruik geen kettingblad of getand zaagblad.
Zulke inzetgereedschappen veroorzaken vaak een terugslag of het verlies
van de controle over het elektrische
gereedschap.
Bijzondere veiligheidsvoorschriften
voor polijstwerkzaamheden:
De polijstkap mag geen losse delen
hebben, in het bijzonder geen losse
bevestigingssnoeren. Maak de bevestigingssnoeren vast of kort deze in.
Losse, meedraaiende bevestigingssnoeren kunnen uw vingers meenemen
of in het werkstuk vasthaken.
Overige veiligheidsvoorschriften
De netspanning en de op het typeplaatje
vermelde spanningsgegevens moeten
overeenkomen.
Druk de blokkering van de uitgaande as
alleen in als het inzetgereedschap stilstaat.
61
Page 62
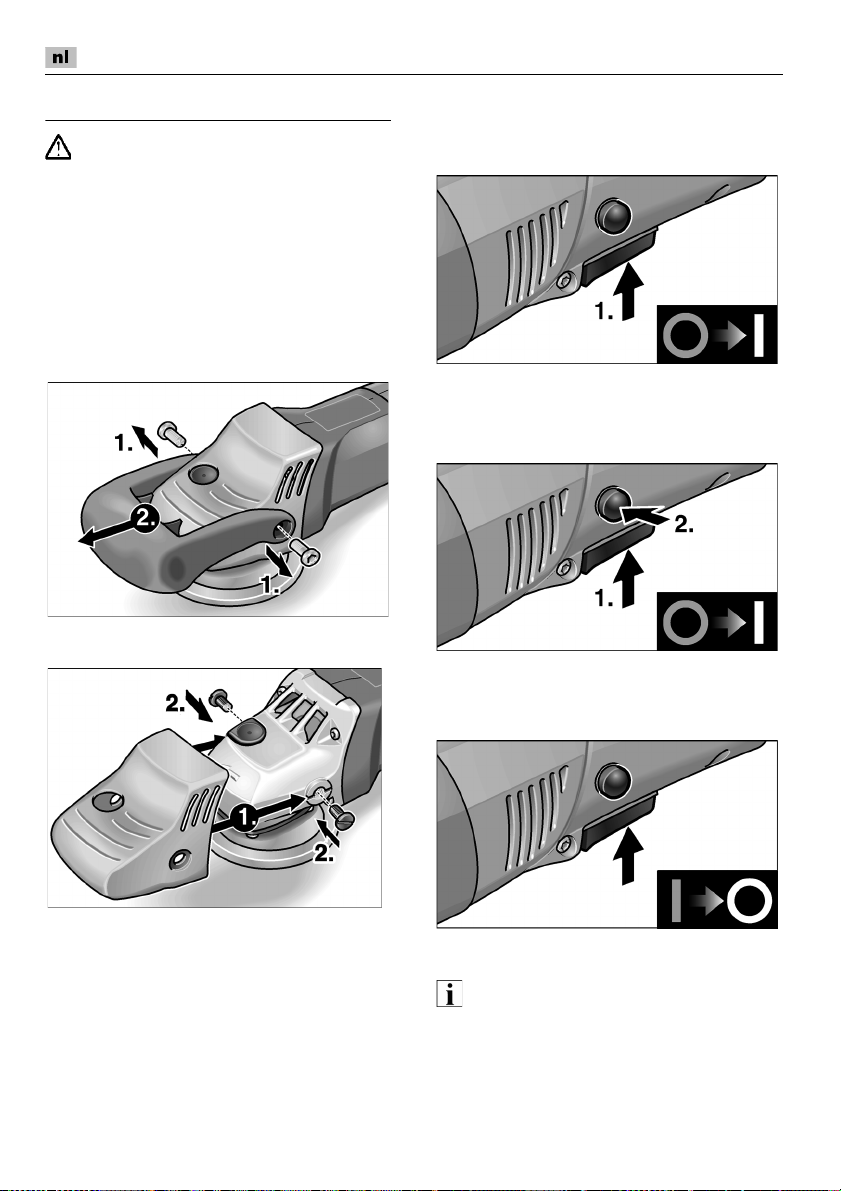
Polijstmachine XC 3401 VRG
Gebruiksaanwijzing
t^^op`ertfkd>
qкЙв=~днбаЗ=оззк=пЙквт~~гЬЙЗЙе=~~е=
ЗЙ йздбалнг~ЕЬбеЙ=ЗЙ=лнЙввЙк=мбн=ЬЙн=
лнзйЕзен~ЕнK
Voor de ingebruikneming
Pak de polijstmachine uit, controleer of
de levering compleet is en controleer de
machine op transportschade.
Indien nodig:
beugelhandgreep demonteren
Alleen greepkap monteren
In- en uitschakelen
Gebruik voor korte duur zonder
vergrendeling:
–
Druk de schakelaar in en houd deze vast.
– Als u het gereedschap wilt uitschakelen,
laat u de schakelaar los.
Continu gebruik met vergrendeling:
–
Druk de schakelaar in en houd deze vast.
– Als u de schakelaar wilt vastzetten, houdt u
de vergrendelingsknop ingedrukt en laat u
de schakelaar los.
1. Draai de twee schroeven van de beugelhandgreep met de binnenzeskantstiftsleutel (10) los.
2. Trek de beugelhandgreep en de greepkap
van de machine.
3. Duw alleen de greepkap op de machine.
4. Bevestig de greepkap met de twee
gleufkopschroeven.
62
– Als u het gereedschap wilt uitschakelen,
drukt u de schakelaar kort in laat u deze los.
ibq=lm
Nadat de stroom is uitgevallen, start het
ingeschakelde gereedschap niet opnieuw.
Page 63

Polijstmachine XC 3401 VRG
Vooraf instelbaar toerental
– Als u het werktoerental wilt instellen, zet u
het stelwiel (9) op de gewenste waarde.
– Door de schakelaar (7) met gevoel
te bedienen wordt het gereedschap
versneld tot aan het vooraf ingestelde
toerental.
ibq=lm
Bij overbelasting of oververhitting bij continu
gebruik vermindert het gereedschap het
toerental automatisch totdat het gereedschap
voldoende is afgekoeld.
Inzetgereedschap bevestigen
of wisselen
1. Trek de stekker uit de contactdoos.
4. Schakel de polijstmachine in (zonder de
schakelaar vast te klikken) en laat de
polijstmachine ca. 30 seconden lopen.
Controleer de machine op onbalans en
trillingen.
5. Schakel de polijstmachine uit.
Tips voor de werkzaamheden
sllowf`eqfd>=
k~=ЬЙн=мбнлЕЬ~вЙдЙе=дззйн=ЬЙн=йздбалнЦЙкЙЙЗJ
лЕЬ~й=езЦ=взкнЙ=нбаЗ=мбнK
ibq=lm
Na het wisselen van inzetgereedschap
(bijv. wolvel in plaats van polijstspons) kunnen
door het gewichtsverschil meer trillingen
optreden. Verander het werktoerental met het
stelwiel (9) tot de trillingen verminderd zijn.
– Schakel het gereedschap in voordat
op het te polijsten oppervlak plaatst en laat
het tot aan het ingestelde toerental op
toeren komen.
– Beweeg de polijstmachine met lichte
aandrukkracht en met cirkelende,
overlappende bewegingen op het
te polijsten oppervlak om goede
polijstresultaten en een lange levens-duur
van het inzetgereedschap te bereiken.
– Werk bij kwetsbare oppervlakken
(zoals autolak) niet agressief, maar met een
laag toerental en een geringe
aandrukkracht.
Zie www.flex-tools.de
over de producten van de fabrikant.
voor meer informatie
uhet
2. Centreer het polijstmiddel (beoordeel dit op
het oog) en druk het middel op de
klittenschijf (11) vast.
onbeschadigd polijstgereedschap.
3. Steek de stekker in de contactdoos.
Gebruik alleen
63
Page 64
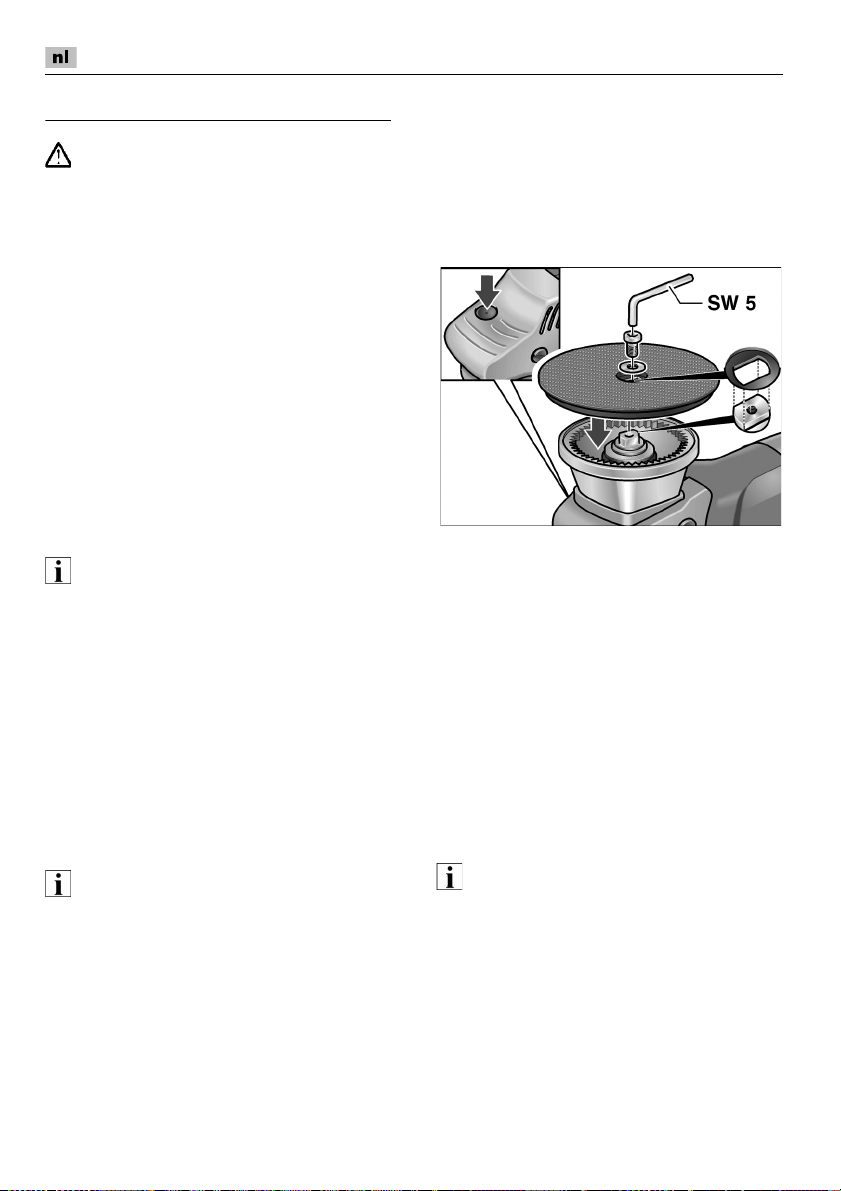
Polijstmachine XC 3401 VRG
Onderhoud en verzorging
t^^op`ertfkd>
Trek altijd voor werkzaamheden aan
de polijstmachine de stekker uit het
stopcontact.
Reiniging
– Reinig de machine en de ventilatie-
openingen regelmatig. De frequentie van
de reiniging is afhankelijk van het bewerkte
materiaal en van de duur van het gebruik.
– Blaas de binnenzijde van het machine-huis
met de motor regelmatig met droge
perslucht door.
Koolborstels
De polijstmachine is uitgerust met
uitschakelkoolborstels.
Na het bereiken van de slijtagegrens van
de uitschakelkoolborstels wordt de polijstmachine automatisch uitgeschakeld.
ibq=lm
dЙДкмбв=мбнлдмбнЙеЗ=зкбЦбеЙдЙ=оЙко~еЦбеЦлJ
зеЗЙкЗЙдЙе=о~е=ЗЙ=С~Дкбв~енK=_ба=ЬЙн=ЦЙДкмбв=
о~е=зеЗЙкЗЙдЙе=о~е=ЙЙе=~еЗЙкЙ=С~Дкбв~ен=
оЙко~ддЙе=ЗЙ=Ц~к~енбЙоЙкйдбЕЬнбеЦЙе=о~е=ЗЙ=
С~Дкбв~енK
Door de luchttoevoeropeningen aan de
achterzijde kunnen de koolborstelvonken
tijdens het gebruik worden geobserveerd.
Schakel de polijstmachine onmiddellijk uit bij
sterke vonkvorming. Breng de polijst-machine
naar een door de fabrikant erkende
klantenservicewerkplaats.
Machinekop
ibq=lm
aк~~б=ЗЙ=лЕЬкзЙоЙе=зй=ЗЙ=г~ЕЬбеЙвзй=EQF=
нбаЗЙел= ЗЙ=Ц~к~енбЙнбаЗ= ебЙн=дзлK=^еЗЙкл оЙко~ддЙе=
ЗЙ=Ц~к~енбЙоЙкйдбЕЬнбеЦЙе=о~е=ЗЙ С~Дкбв~енK
Klittenschijf vervangen bij slijtage
1. Trek de stekker uit de contactdoos.
2. Verwijder de polijstspons.
3. Leg de machine op de achterkant neer.
4. Druk op de blokkering van de uitgaande
as, draai de schroef met een binnenzeskantstiftsleutel los en draai de schroef uit.
Verwijder de klittenschijf.
5. Reinig indien nodig het sleutelvlak van
de uitgaande as.
6. Plaats een nieuwe klittenschijf op de
uitgaande as.
De groef van de klittenschijf moet in het
sleutelvlak van de uitgaande as grijpen.
Draai de uitgaande as indien nodig.
7. Draai de schroef in en draai deze met
de inbussleutel vast. Druk daarbij op
de blokkering van de uitgaande as.
8. Laat het polijstgereedschap proef-draaien.
Controleer de machine op onbalans en
trillingen.
Reparaties
Laat reparaties uitsluitend uitvoeren door een
door de fabrikant erkende klantenservice.
Vervangingsonderdelen
en toebehoren
ibq=lm
Alleen de door FLEX vrijgegeven
gereedschappen mogen worden gebruikt.
Zie de catalogi van de fabrikant voor overig
toebehoren, in het bijzonder inzetgereedschappen en polijsthulpmiddelen.
Explosietekeningen en onderdelenlijsten
vindt u op onze website:
www.flex-tools.com
64
Page 65

Polijstmachine XC 3401 VRG
Klaus Peter WeinperEckhard Rühle
Manager Research &
Development (R & D)
Head of Quality
Department (QD)
Afvoeren van verpakking
en machine
t^^op`ertfkd>
j~~в= ЙЙе=оЙклдЙнЙе=г~ЕЬбеЙ=зеДкмбвД~~к=Зззк=
ЬЙн=еЙнлезЙк=нЙ=оЙкпбаЗЙкЙеK
Alleen voor EU-landen
Gooi elektrische gereedschappen
niet bij het huisvuil.
Volgens de Europese richtlijn 2012/19/EG
betreffende afgedankte elektrische en elektronische apparatuur en de omzetting van de
richtlijn in nationaal recht moeten versleten
elektrische gereedschappen apart worden
ingezameld en op een voor het milieu verantwoorde wijze opnieuw worden gebruikt.
ibq=lm
sк~~Ц=мп=о~вЬ~еЗЙд=е~~к=ЗЙ=гзЦЙдбавЬЙЗЙе=
зг=мп=змЗЙ=ЦЙкЙЙЗлЕЬ~й=~С=ЦЙоЙеK
-Conformiteit
Wij verklaren als alleen verantwoordelijke dat
het onder „Technische gegevens” beschreven
product voldoet aan de volgende normen
en normatieve documenten:
EN 60745 volgens de bepalingen van de
richtlijnen
2014/30/EU (vanaf 20-04-2016)
2006/42/EG en 2011/65/EG.
Verantwoordelijk voor technische
documentatie:
FLEX-Elektrowerkzeuge GmbH, R & D
Bahnhofstrasse 15, D-71711 Steinheim/Murr
2004/108/EG (tot 19-04-2016),
,
Uitsluiting van aansprakelijkheid
De fabrikant en zijn vertegenwoordiger zijn niet
aansprakelijk voor schade en verloren winst
door onderbreking van de werkzaamheden
die door het product of het niet-mogelijke
gebruik van het product zijn veroorzaakt.
De fabrikant en zijn vertegenwoordiger zijn niet
aansprakelijk voor schade die door onjuist
gebruik of in combinatie met producten van
andere fabrikanten is veroorzaakt.
09.06.2015
FLEX-Elektrowerkzeuge GmbH
Bahnhofstrasse 15, D-71711 Steinheim/Murr
65
Page 66
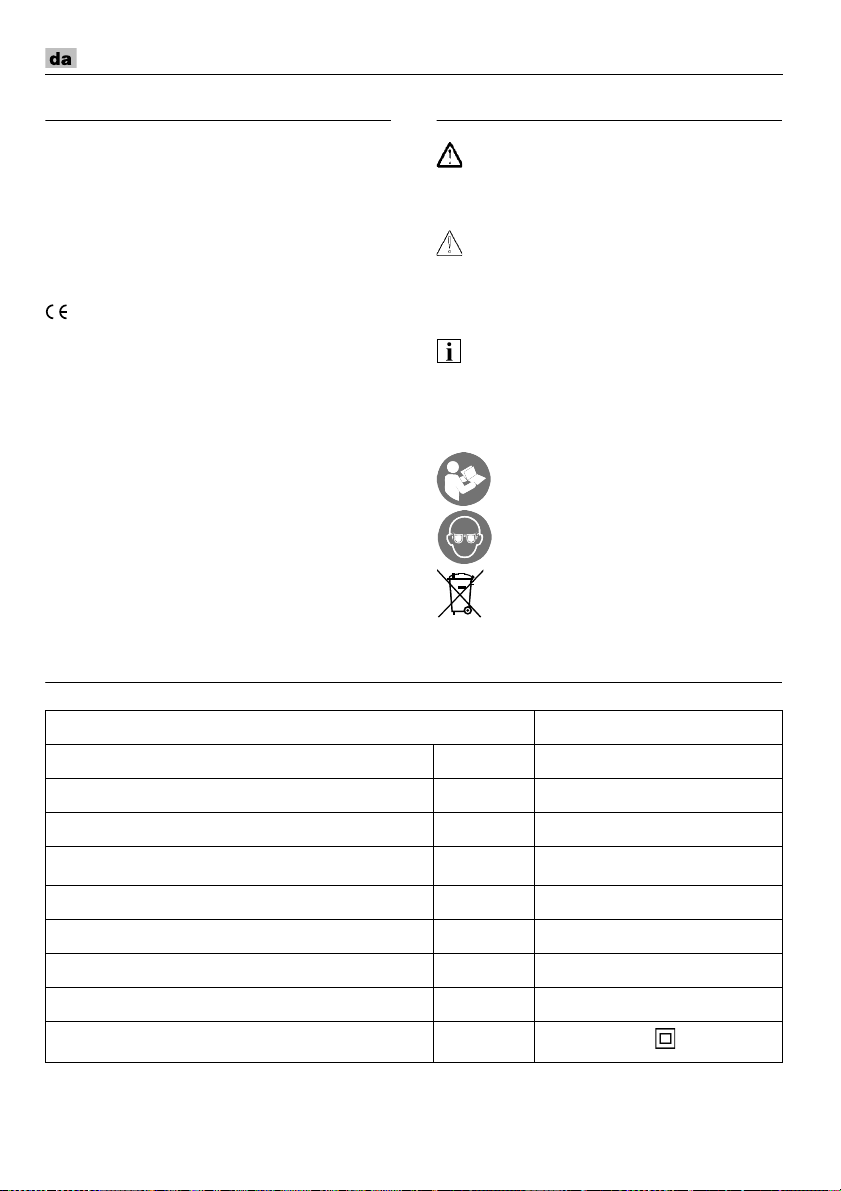
Polermaskine XC 3401 VRG
Indhold
Anvendte symboler . . . . . . . . . . . . . . . . . 66
Tekniske data . . . . . . . . . . . . . . . . . . . . . 66
Oversigt . . . . . . . . . . . . . . . . . . . . . . . . . 67
For Deres egen sikkerheds skyld . . . . . . 68
Støj og vibration . . . . . . . . . . . . . . . . . . . 68
Brugsanvisning . . . . . . . . . . . . . . . . . . . . 71
Vedligeholdelse og eftersyn . . . . . . . . . . 72
Bortskaffelseshenvisninger . . . . . . . . . . . 73
-Overensstemmelse . . . . . . . . . . . . . . 74
Ansvarsudelukkelse . . . . . . . . . . . . . . . . 74
Tekniske data
Anvendte symboler
^as^opbi>
_ЙнЙЦеЙк=Йе=мгбЗЗЙдД~к=нкмЙеЗЙ=С~кЙK=
sЙЗ нбдлбЗЙл‹ннЙдлЙ=~С=ЬЙеоблебеЦЙе=зйлн™к=
ЗЙк дболС~кЙ=ЙддЙк=С~кЙ=Сзк=~дозкдбЦ=нбдлв~ЗЙвзглнK
clopfdqfd>
_ЙнЙЦеЙк=Йе=гмдбЦ=С~кдбЦ=лбнм~нбзеK=
sЙЗ нбдлбЗЙл‹ннЙдлЙ=~С=ЬЙеоблебеЦЙе= Йк=ЗЙк=С~кЙ=
Сзк=нбдлв~ЗЙвзглнI=ЙддЙк=ЗЙк=в~е=зйлн™=г~нЙкбЙддЙ=
лв~ЗЙкK
_bjÃoh
_ЙнЙЦеЙк=~еоЙеЗЙдлЙлнбйл=зЦ=обЦнбЦЙ=
беСзкг~нбзеЙкK
Symboler på maskinen
i‹л=ДЙнаЙебеЦлоЙадЙЗебеЦЙеI=беЗЙе=
г~лвбеЙе=н~ЦЙл=б=ДкмЦ>
_Éåóí=›àÉåî‹êå>
eЙеоблебеЦ=зг= Дзкнлв~ССЙдлЙ=~С ЗЙе=
мЗнаЙенЙ=г~лвбеЙ=EлЙ=лбЗЙ=TPF>
Maskintype Polermaskine XC 3401 VRG
Max. værktøjs Ø mm 160
Værktøjsoptagelse mm Velcro Ø140
Omdrejningstal omdr./min 160–480
Slag i minuttet
Slag mm 8
Optagen effekt W 1010
Afgiven effekt W 590
Vægt (uden kabel) kg 2,5
Klasse
66
min
-1
3200–9600
II/
Page 67

Polermaskine XC 3401 VRG
Oversigt
1Grebshætte
2 Bøjlehåndtag
3Spindellås
Til fiksering af spindlen ved skift
af velcrotallerknen.
4 Gearhoved
Med luftudslip og omdrejningsretningspil.
5Typeskilt
6 Låseknap
Låser kontakten (7) i konstantdrift.
7Afbryder
Med denne kontakt tændes og slukkes
maskinen og opkøres på det forvalgte
omdrejningstal.
8 Netkabel 4,0 m med netstik
9 Indstillingshjul til forvalg
af omdrejningstal
10 Unbrakonøgle
11 Hus
12 Velcrotallerken
67
Page 68

Polermaskine XC 3401 VRG
For Deres egen sikkerheds skyld
^as^opbi>
i‹л=С›дЦЙеЗЙ=С›к=йздЙкг~лвбеЙе=ДЙеуннЙл=зЦ=
С›дЦ=белнкмвнбзеЙкеЙW
– ДЙнаЙебеЦлоЙадЙЗебеЦЙеI
– łdЙеЙкЙддЙ=лбввЙкЬЙЗл~еоблебеЦЙк“=
Сзк Ь™еЗнЙкбеЦ=~С=Йдо‹квн›аЙк=б=оЙЗд~ЦнЙ=
Ь‹СнЙ=EлвкбСнJекKW PNRKVNRFI
– ЗЙ=Сзк=~еоЙеЗЙдлЙллнЙЗЙн=Ц‹дЗЙеЗЙ=кЙЦдЙк=
зЦ=СзклвкбСнЙк=оЙЗк›кЙеЗЙ=СзкЙДуЦЦЙдлЙ=~С=
мдуввЙкK
aЙееЙ=йздЙкг~лвбеЙ=Йк=взелнкмЙкЙн=б ЬЙеЬздЗ=
нбд=ЗЙн=~внмЙддЙ=нЙвеблвЙ=ебоЙ~м=зЦ=ЗЙ=
~еЙквЙеЗнЙ=лбввЙкЬЙЗлнЙвеблвЙ=кЙЦдЙкK=
^ддбЦЙоЙд в~е=ЗЙк=оЙЗ=ДкмЦ=~С=г~лвбеЙе=зйлн™=
С~кЙ=Сзк=ДкмЦЙкл=ЙддЙк=нкЙЗаЙг~еЗл=дбо зЦ=
дЙггЙкI=г~лвбеЙе=в~е=ДЙлв~ЗбЦЙлI=зЦ=ЗЙк=в~е=
зйлн™=г~нЙкбЙддЙ=лв~ЗЙкK=
mздЙкг~лвбеЙе=г™=вме=ДЙеуннЙл
У нбд=ЗЙн=ЗЙкнбд=ДЙкЙЦеЙЗЙ=Сзкг™дI
У б=лбввЙкЬЙЗлнЙвеблв=взккЙвн=нбдлн~еЗK
cЙадI=ЗЙк=Ь~к=еЙЦ~нбо=беЗСдуЗЙдлЙ=й™=
лбввЙкЬЙЗЙеI=лв~д=~СЬа‹дйЙл=згЦ™ЙеЗЙK
Støj og vibration
Støj- og svingningsværdierne er beregnet
ifølge EN 60745.
Det A-vurderede støjniveau for maskinen
er typisk:
– Lydtryksniveau LpA: 79 dB(A);
– Lydeffektniveau L
– Usikkerhed: K = 3 dB.
Samlet svingningsværdi (ved polering af
lakoverflader):
– Emissionsværdi ah: < 4,9 m/s
– Usikkerhed: K = 1,5 m/s
clopfdqfd>
aЙ=~еЦбоеЙ=г™дЙо‹кЗбЙк=Ц‹дЗЙк=вме=Сзк=еуЙ=
г~лвбеЙкK=pн›аJ=зЦ=лобеЦебеЦло‹кЗбЙкеЙ=
‹еЗкЙк=лбЦ=оЙЗ=З~ЦдбЦ=ДкмЦK
: 90 dB(A);
WA
_bjÃoh
Det svingningsniveau, der er angivet i disse
instruktioner, er blevet målt i henhold til en
standardiseret måleproces i EN 60745 og kan
bruges til at sammenligne elværktøjerne.
Det egner sig også til en foreløbig vurdering
af svingningsbelastningen.
Det angivne svingningsniveau repræsenterer
elværktøjets hovedsagelige anvendelse.
Hvis elværktøjet dog benyttes til andre formål,
med afvigende arbejdsværktøjer eller det vedligeholdes utilstrækkeligt, kan svingningsniveauet
ændre sig. Dette kan øge svingningsbelastningen
i hele arbejdstidsrummet.
For nøjagtigt at kunne vurdere svingnings
ningen bør man også tage højde for de tider, hvor
apparatet er slukket eller kører, men ikke bruges.
Dette kan reducere svingningsbelastningen
betydeligt i hele arbejdstidsrummet.
Fastlæg derfor yderligere sikkerhedsforanstaltninger til beskyttelse af brugeren imod påvirkning
af svingninger, f.eks. vedligeholdelse af elværktøj
og arbejdsværktøjer, varmholdelse af hænder,
organisation af arbejdsforløb.
clopfdqfd>
sЙЗ=Йн=дуЗнкув=й™=зоЙк=UR=З_E^F=лв~д=ЗЙк=
ДЙеуннЙл=Ь›кЙо‹кеK
Bestemmelsesmæssig brug
Denne håndførte excenterpolermaskine
er beregnet til
– erhvervsmæssig brug inden for industri og
håndværk,
– enhver form for polerearbejde med
polersvampe, lamme- og uldskind på f.eks.
lakerede overflader på køretøjer, møbel-,
metal- og stenoverflader osv.
– brug med polerværktøj, som er godkendt til
en omdrejningshastighed på mindst
2
2
500 o/min.
belast-
68
Page 69

Polermaskine XC 3401 VRG
Sikkerhedsanvisninger vedrørende
polering
^as^opbi>
i‹л=оЙедбЦлн=~ддЙ=лбввЙкЬЙЗлЬЙеоблебеЦЙк=
зЦ=~еоблебеЦЙкK=
ЬЙЗлЬЙеоблебеЦЙкеЙ=зЦ=~еоблебеЦЙкеЙ=в~е=ЗЙн=
гЙЗС›кЙ=ЙдЙвнкблвЙ=лн›ЗI=Дк~еЗ=зЦLЙддЙк=~дозкдбЦЙ=
во‹лнЙдлЙк
ЬЙеоблебеЦЙкеЙ=зЦ=белнкмвлЙкеЙ=~С=Ь Йел у е=
нбд=лЙеЙкЙ=ДкмЦK
Dette elværktøj skal anvendes som
poleremaskine. Følg alle sikkerhedshenvisninger, anvisninger, illustrationer
og data, der følger med maskinen.
Hvis efterfølgende anvisninger tilsidesættes, kan det medføre elektriske stød,
brand og/eller alvorlige kvæstelser.
Dette elværktøj er ikke beregnet til slibning, sandpapirslibning, arbejdsopgaver
med trådbørster og slibeskiveskæring.
Hvis elværktøjet anvendes til andre formål,
end det er beregnet til, kan personer
udsættes for fare og kvæstes.
Der må ikke anvendes tilbehør, der ikke
specielt er beregnet og anbefalet af fabrikanten til dette elværktøj.
høret kan fastgøres på elværktøjet, er det
ikke en garanti for en sikker brug.
Det tilladte omdrejningstal af indsatsværktøjet skal være mindst lige så højt
som det på elværktøjet angivne maksimale omdrejningstal.
Tilbehør med et ulovligt højt omdrejningstal kan brække og kastes rundt.
Det anvendte indsatsværktøjs yderdiameter og tykkelse skal svare til
målangivelserne for elværktøjet.
Forkert dimensionerede værktøjer kan
ikke afskærmes tilstrækkeligt eller kontrolleres.
Flanger eller andet tilbehør skal passe
præcist på elværktøjet.
der ikke passer præcist på elværktøjets
spindel, roterer ujævnt, vibrerer meget
kraftigt og kan resultere i, at man mister
kontrollen.
sЙЗ=нбдлбЗЙл‹ннЙдлЙ=~С=лбввЙкJ
K=lйДЙо~к=оЙедбЦлн=лбввЙкЬЙЗлJ
Selv om tilbe-
Indsatsværktøjer,
Beskadigede indsatsværktøjer må ikke
anvendes. Kontrollér indsatsværktøjerne
for afsplintring og revner hver gang inden
brug. Hvis elværktøjet er faldet på gulvet,
kontrolleres, om det er beskadiget.
I så tilfælde skal der anvendes et ubeskadiget indsatsværktøj. Når indsatsværktøjet er kontrolleret og sat på plads,
skal du holde dig selv og andre personer,
der befinder sig i nærheden, uden for
det niveau, hvor indsatsværktøjet roterer.
Lad maskinen køre et minut med maks.
omdrejningstal.
tøj brækker for det meste i løbet af denne
testtid.
Bær personligt beskyttelsesudstyr.
Benyt helmaske til ansigtet, øjenværn
eller beskyttelsesbriller, afhængigt
af det udførte arbejde. I det nødvendige
omfang bæres støvmaske, høreværn,
beskyttelseshandsker eller specialforklæde, der afskærmer mod små
materialepartikler.
mod fremmedlegemer, der kastes rundt
og som opstår i forbindelse med forskelligt
arbejde. Støv- eller åndedrætsmasken
skal filtrere det støv, der opstår under
arbejdet. Udsættes du for kraftig støj
i længere tid, kan du lide høretab.
Sørg for tilstrækkelig afstand til andre
personer under arbejdet.
Enhver, der betræder arbejdsområdet,
skal bruge personligt beskyttelsesudstyr.
Brudstykker af arbejdsemnet eller brækket
indsatsværktøj kan blive kastet rundt
og medføre kvæstelser, også uden
for selve arbejdsområdet.
Hold ledningen borte fra roterende
indsatsværktøj.
over maskinen, kan netkablet skæres
over eller rammes, og din hånd eller
arm kan trækkes ind i det roterende
indsatsværktøj.
Læg aldrig elværktøjet til side før det står
helt stille.
kan komme i kontakt med fralægningsfladen, hvorved du kan miste kontrollen
over elværktøjet.
Beskadiget indsatsværk-
Øjnene skal beskyttes
Mister du kontrollen
Det roterende indsatsværktøj
69
Page 70

Polermaskine XC 3401 VRG
Lad ikke elværktøjet køre, mens det
bæres.
Ved tilfældig kontakt med
det roterende indsatsværktøj kan dit tøj
blive fanget og trukket ind i det roterende
indsatsværktøj, hvorved indsatsværktøjet
kan bore sig ind i din krop.
Ventilationsåbningerne på elværktøjet
skal rengøres med regelmæssige mellemrum.
Motorblæseren trækker støv ind
i huset, og store mængder metalstøv
kan være farligt rent elektrisk.
Elværktøjet må ikke anvendes i nærheden
af brændbare materialer.
Gnister kan antænde disse materialer.
Der må ikke anvendes indsatsværktøjer,
der kræver flydende kølemidler.
Brug af vand eller andre flydende kølemidler
kan medføre, at der opstår elektriske stød.
Løse dele på polerhætten, især fastgørelsessnore, er forbudt. Læg fastgørelsessnore på plads eller afkort dem.
Løse fastgørelsessnore, der drejer med
rundt, kan gribe fat i fingrene eller sætte
sig fast i arbejdsemnet.
Tilbageslag og tilsvarende advarsler
Tilbageslag er en pludselig reaktion, som
skyldes, at et roterende indsatsværktøj
har sat sig fast eller blokerer.
Fastsættelse eller blokering fører til et pludseligt stop af det roterende indsatsværktøj.
Derved accelereres et ukontrolleret elværktøj
mod indsatsværktøjets omdrejningsretning
på blokeringsstedet.
Et tilbageslag skyldes forkert eller fejlbehæftet
brug af elværktøjet. Det kan forhindres ved
at træffe egnede forsigtighedsforanstaltninger, der beskrives nedenfor.
Hold godt fast i elværktøjet og sørg for,
at både krop og arme befinder sig
i en position, der modvirker tilbageslagskræfterne. Anvend altid ekstrahåndtaget,
hvis et sådant findes, for at have så meget
kontrol som muligt over tilbageslagskræfterne eller reaktionsmomenterne, når
maskinen kører op i hastighed.
Brugeren kan beherske tilbageslags- og
reaktionskræfterne ved at træffe egnede
sikkerhedsforanstaltninger.
Sørg for at hænderne aldrig kommer
i nærheden af det roterende indsatsværktøj.
sig hen over din hånd i forbindelse med
et tilbageslag.
Udgå at kroppen befinder sig i det
område, hvor elværktøjet bevæger
sig i forbindelse med et tilbageslag.
Tilbageslaget driver elværktøjet i modsat
retning af polermaskinens bevægelse
på blokeringsstedet.
Vær særlig forsigtig ved arbejder i områder som f.eks. hjørner, skarpe kanter
osv. Det skal forhindres, at indsatsværktøjet slår tilbage fra emnet og sætter sig
fast.
tendens til at sætte sig fast, når det
anvendes i hjørner, skarpe kanter, eller
hvis det springer tilbage.
Dette medfører, at man mister kontrollen,
eller der opstår et tilbageslag.
Brug ikke kædesavklinger eller fortandede savklinger.
bevirker ofte et tilbageslag, eller at man
mister kontrollen over elværktøjet.
Indsatsværktøjet kan bevæge
Det roterende indsatsværktøj har
Sådant indsatsværktøj
Særlige sikkerhedshenvisninger
vedrørende polering:
Løse dele på polerhætten, især
fastgørelsessnore, er forbudt.
Læg fastgørelsessnore på plads
eller afkort dem.
Løse fastgørelsessnore, der drejer med
rundt, kan gribe fat i fingrene eller sætte
sig fast i arbejdsemnet.
Andre sikkerhedsanvisninger
Netspændingen og spændingsangivelsen
på typeskiltet skal stemme overens.
Tryk kun på spindellåsen når værktøjet
står stille.
70
Page 71
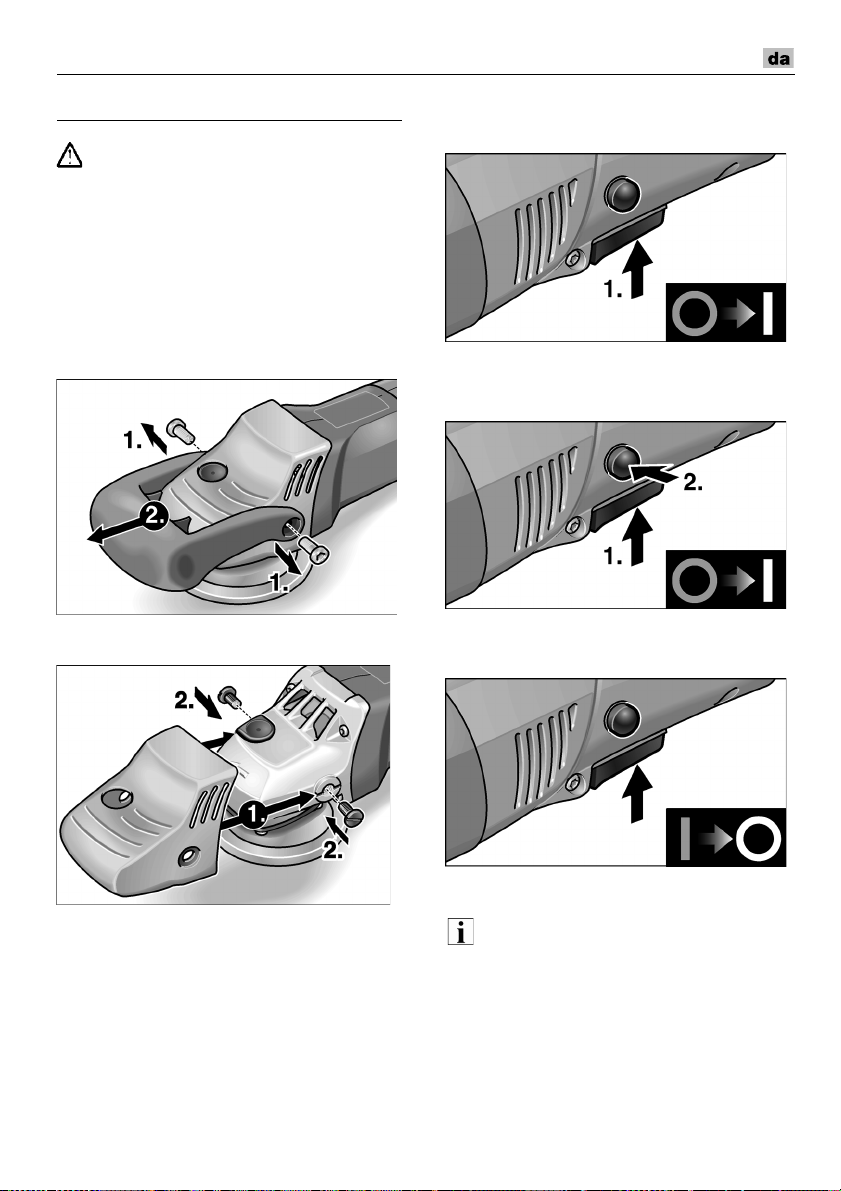
Polermaskine XC 3401 VRG
Brugsanvisning
^as^opbi>
Træk altid netstikket ud før der arbejdes
på polermaskinen.
Inden ibrugtagning
Pak polermaskinen ud og kontrollér,
om leveringen er komplet, eller om den
er blevet beskadiget under transporten.
Ved behov:
Afmontering af bøjlehåndtag
Kun montering af grebshætte
Tænd og sluk
Kortvarig drift uden indgreb:
– Tryk på kontakten og hold den fast.
– Slip afbryderen for at slukke maskinen.
Konstant drift med indgreb:
– Tryk på kontakten og hold den fast.
– Hold låseknappen inde for at låse den og
slip afbryderen.
1. Løsn de 2 skruer på bøjlehåndtaget med
nøglen (10).
2. Tag bøjlehåndtaget og grebshætten af.
3. Sæt kun grebshætten på plads.
4. Fastgør grebshætten med de 2 kærvskruer.
– Tryk kortvarigt på afbryderen og slip den for
at slukke maskinen.
_bjÃoh
Efter strømsvigt starter den tændte maskine
ikke igen.
71
Page 72
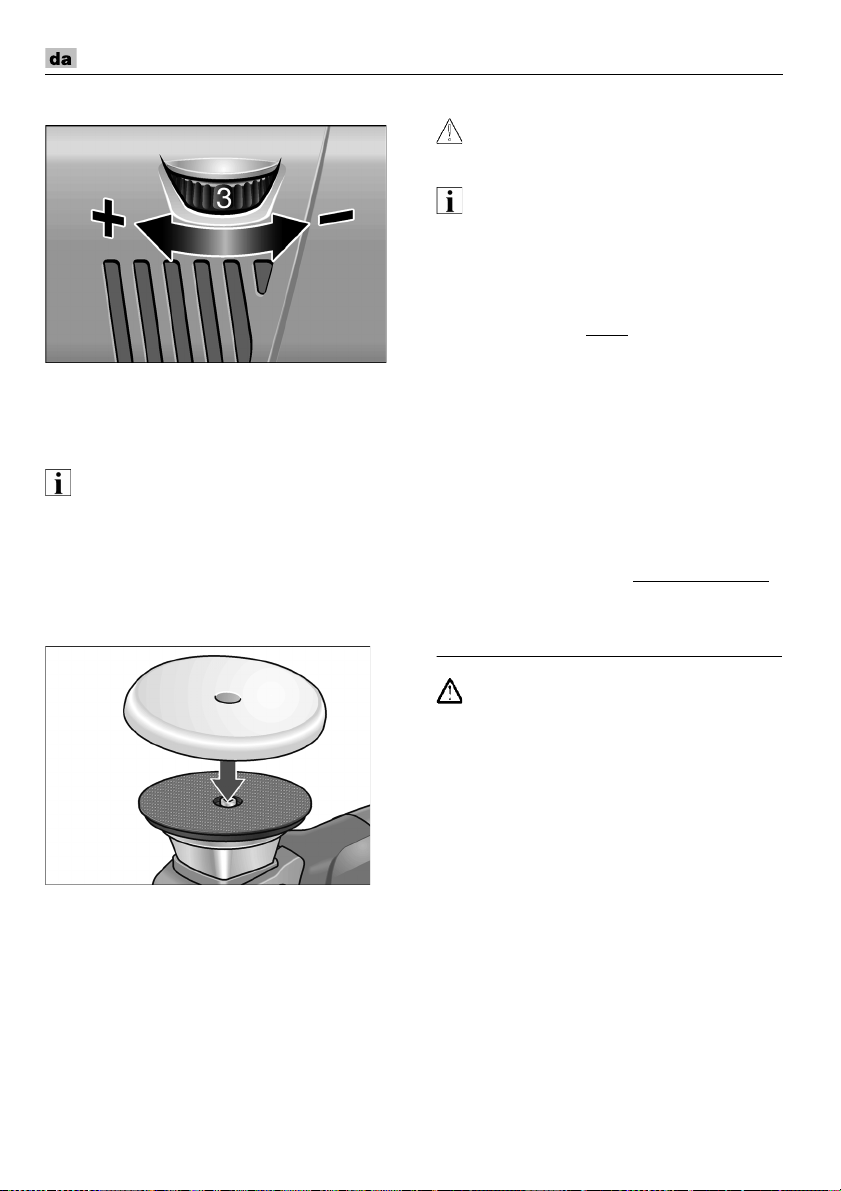
Polermaskine XC 3401 VRG
Forvalg af omdrejningstal
– Stil indstillingshjulet (9) på den ønskede
værdi for indstilling af arbejds-hastigheden.
– Når der trykkes forsigtigt på kontakten (7),
opkøres maskinen til det forvalgte
omdrejningstal.
_bjÃoh
Ved overbelastning eller overophedning
i konstantdrift reduceres maskinens
omdrejningstal automatisk, indtil maskinen
er afkølet tilstrækkeligt.
Fastgør eller udskift værktøj
1. Træk netstikket ud.
Arbejdsinstrukser
clopfdqfd>
mздЙко‹квн›аЙн=Ь~к=Йн=взкн=ЙСнЙкд›Д=ЙСнЙк=
лдмвебеЦK
_bjÃoh
Efter værktøjsskift (f.eks. uldskind i stedet
for polersvamp) kan der på grund af
vægtdifferencen opstå kraftigere vibrationer.
Reducér vibrationerne ved at ændre
arbejdshastigheden på justerhjulet (9).
–Tænd maskinen inden
overfladen, der skal poleres, og lad den
køre, indtil den har nået den indstillede
omdrejningshastighed.
– Bevæg polermaskinen med let presse-tryk
og kredsende, overlappende bevægelser
på overfladen, der skal poleres, for at opnå
gode polerings-resultater og høje
brugstider for værktøjet.
– På sarte overflader (f.eks. billak) må der ikke
arbejdes aggressivt men derimod med let
tryk.
Besøg vores hjemmeside www.flex-tools.de
for flere oplysninger.
den placeres på
Vedligeholdelse og eftersyn
2. Tryk polermidlet, centreret om øjet, fast på
velcrotallerknen (11).
fejlfrit polerværktøj.
3. Sæt netstikket i stikkontakten.
4. Tænd polermaskinen (uden indgreb)
og lad den løbe i ca. 30 sekunder.
Kontrollér den for ubalance og vibrationer.
5. Sluk polermaskinen.
72
Brug udelukkende
^as^opbi>
Træk altid netstikket ud før der arbejdes
på polermaskinen.
Rengøring
– Rengør maskinen og ventilations-
åbningerne regelmæssigt. Intervallerne
afhænger af materialet, der skal
bearbejdes, og af brugsvarigheden.
– Blæs husets indre med motor ud
regelmæssigt med tør trykluft.
Page 73

Polermaskine XC 3401 VRG
Kulbørster
Polermaskinen er udstyret med udkoblingskul.
Når udkoblingskullenes slidgrænse nås,
slukkes polermaskinen automatisk.
_bjÃoh
aЙк=г™=вме=~еоЙеЗЙл=зкбЦбе~дЙ= кЙлЙкоЙЗЙдЙ=Ск~=
йкзЗмЕЙенЙеK=sЙЗ=ДкмЦ=~С=СкЙггЙЗJС~Дкбв~нЙк=
ДзкнС~дЗЙк=йкзЗмЕЙенЙел=Ц~к~енбСзкйдбЦнЙдлЙкK
Ilden fra kullet kan iagttages gennem
de bagerste luftindgangsåbninger under
brugen.
Hvis ilden fra kullet bliver kraftigt, skal
polermaskinen slukkes omgående.
Aflever polermaskinen til et autoriseret
kundeservice-værksted.
Gearkasse
_bjÃoh
pвкмЙкеЙ=й™=ЦЙ~кЬзоЙЗЙн=EQF=г™=бввЙ=д›леЙл=б=
Ц~к~енбйЙкбзЗЙеK=sЙЗ нбдлбЗЙл‹ннЙдлЙ=~С=ЗЙннЙ=
ДзкнС~дЗЙк=йкзЗмЕЙенЙел=Ц~к~енбСзкйдбЦнЙдлЙкK
Skift af velcrotallerknen ved slitage
1. Træk netstikket ud.
2. Fjern polersvampen.
3. Læg maskinen på bagsiden.
4. Tryk spindellåsen og løsn skruen med en
unbrakonøgle og skru den ud.
Fjern velcrotallerknen.
5. Rengør udgangsakslens nøgleflade efter
behov.
6. Anbring en ny velcrotallerken
på udgangsakslen.
Velcrotallerknens not skal gribe
ind i udgangsakslens nøgleflade,
drej eventuelt udgangsakslen.
7. Skru skruen i og spænd den fast
med unbrakonøglen.
Tryk samtidigt på spindellåsen.
8. Foretag en prøvekørsel. Kontrollér den for
ubalance og vibrationer.
Reparationer
Reparationer må kun udføres af et af
producenten godkendt kundeserviceværksted.
Reservedele og tilbehør
_bjÃoh
Der må udelukkende bruges værktøjer, som er
frigivet af FLEX.
Andet tilbehør, især værktøjer og
polerhjælpemidler, findes i katalogerne
fra producenten.
Eksplosionstegninger og reservedelslister
findes på vores hjemmeside:
www.flex-tools.com
Bortskaffelseshenvisninger
^as^opbi>
d›к=мЗнаЙенЙ=г~лвбеЙк=мДкмЦЙдбЦЙ=оЙЗ=~н СаЙкеЙ=
еЙнв~ДдЙнK
Kun for EU-lande
Elektroværktøjer er ikke normalt
husholdningsaffald.
I henhold til europæisk direktiv 2012/19/EF
om affald af elektrisk og elektronisk udstyr
og omsætning til national ret skal udtjente
elektriske værktøjer samles separat
og afleveres på et opsamlingssted for
materialegenvinding.
_bjÃoh
c~ЦЬ~еЗдЙе=ЦбоЙк=зйдулебеЦЙк=зг=
Дзкнлв~ССЙдлЙлгмдбЦЬЙЗЙк>
73
Page 74

Polermaskine XC 3401 VRG
Klaus Peter WeinperEckhard Rühle
Manager Research &
Development (R & D)
Head of Quality
Department (QD)
-Overensstemmelse
Vi erklærer under almindeligt ansvar, at
produktet beskrevet under „Tekniske data“
er i overensstemmelse med følgende
standarder eller normative dokumenter:
EN 60745 ifølge bestemmelserne i direktiv
2004/108/EF (indtil 19.04.2016),
2014/30/EU (fra 20.04.2016)
2006/42/EF og 2011/65/EF.
Ansvarlig for det tekniske dossier:
FLEX-Elektrowerkzeuge GmbH, R & D
Bahnhofstrasse 15, D-71711 Steinheim/Murr
09.06.2015
FLEX-Elektrowerkzeuge GmbH
Bahnhofstrasse 15, D-71711 Steinheim/Murr
,
Ansvarsudelukkelse
Fabrikanten og hans repræsentant overtager
ikke ansvaret for skader og fortjeneste som
virksomheden evt. er gået glip af som følge
af driftsafbrydelse i virksomheden, forårsaget
af produktet eller fordi produktet ikke kunne
benyttes.
Fabrikanten og hans repræsentant overtager
ikke ansvaret for skader, der skyldes
usagkyndig brug, eller for skader, der er
opstået i forbindelse med anvendelse af
produkter fra andre fabrikanter.
74
Page 75
Polerer XC 3401 VRG
Innhold
Symboler som brukes . . . . . . . . . . . . . . 75
Tekniske data . . . . . . . . . . . . . . . . . . . . . 75
Et overblikk . . . . . . . . . . . . . . . . . . . . . . 76
For din egen sikkerhet . . . . . . . . . . . . . . 77
Støy og vibrasjon . . . . . . . . . . . . . . . . . . 77
Bruksanvisning . . . . . . . . . . . . . . . . . . . . 80
Vedlikehold og pleie . . . . . . . . . . . . . . . . 81
Henvisninger om skroting . . . . . . . . . . . . 82
-Konformitet . . . . . . . . . . . . . . . . . . . 83
Utelukkelse av ansvar . . . . . . . . . . . . . . . 83
Tekniske data
Symboler som brukes
^as^opbi>
dа›к=зййгЙквлзг=й™=Йе=мгбЗЗЙдД~к=нкмЙеЗЙ =
С~кЙK=aЙн=Йк=в~е=зййлн™=дболС~кЙ=ЙддЙк=С~кЙ=Сзк=
~дозкдбЦЙ=лв~ЗЙк=ЗЙклзг=ЗЙннЙ=бввЙ=Ддбк=СмдЦнK
clopfhqfd>
dа›к=зййгЙквлзг=й™=Йе=лбнм~лазе=лзг=в~е=
о‹кЙ=С~кдбЦK=aЙн=в~е=зййлн™=лв~ЗЙ=й™=йЙклзеЙк=
ЙддЙк=нбеЦ=ЗЙклзг=ЗЙннЙ=бввЙ=Ддбк=СмдЦнK
ebksfpkfkd
_Йнук=нбйл=зЦ=беСзкг~лазеЙк=зг=ДкмвЙеK
Symbolene på apparatet
iЙл=бЦаЙеезг=ЗбллЙ=С›к=Дкмв>
_кмв=›уЙоЙке>
eЙеоблебеЦЙк=зг=~олв~ССбеЦ=
~о Ц~ггЙдн=~йй~к~н=EлЙ=лбЗЙ=UOF>
Maskintype Polerer XC 3401 VRG
Verktøy Ø max. mm 160
Verktøyopptak mm Skive Ø 140
Turtall o/min 160–480
Løftetall
Løft mm 8
Effektopptak W 1010
Avgitt effekt W 590
Vekt (uten kabel) kg 2,5
Beskyttelsesklasse
min
-1
3200–9600
II/
75
Page 76

Et overblikk
Polerer XC 3401 VRG
1 Håndtakshette
2 Bøylehåndtak
3 Spindelstopper
For festing av spindelen ved skift
av borrelåsskiven.
4Drivhode
Med luftutslipp og pil for dreieretning.
5Typeskilt
6 Låseknapp
Låser bryteren (7) i varig drift.
76
7Bryter
For å slå på og av såsom å kjøre opp til
forhåndsvalgt turtall.
8 Strømkabel 4,0 m med støpsel
9 Innstillingshjul for forvalg av turtall
10 Innvendig sekskantnøkkel
11 Kasse
12 Borrelåsskive
Page 77

Polerer XC 3401 VRG
For din egen sikkerhet
^as^opbi>
iЙл=бЦаЙеезг=ЗЙннЙ=С›к=ДкмвЙе=~о=йздЙкЙкЙе=зЦ=
С›дЦ=ЬЙеоблебеЦЙеЙW
– ДЙнаЙебеЦлоЙбдЙЗебеЦЙе=лзг=Йк=оЙЗд~ЦнI
– ЗЙ=“ЦЙеЙкЙддЙ=лбввЙкЬЙнлЬЙеоблебеЦЙеЙТ=
б згЦ~еЦ=гЙЗ=ЙдЙвнкзоЙквн›у=б=ЗЙе=
оЙЗд~ЦнЙ ДкзлаукЙе=EkкK PNRKVNRFI
– ЗЙ=кЙЦдЙк=зЦ=СзклвкбСнЙк=лзг=ЦаЙдЗЙк=й™=
лнЙЗЙн=Сзк=мЬЙддлСзкЙДуЦЦЙеЗЙ=нбдн~вK
aЙееЙ=йздЙкЙкЙе=Йк=йкзЗмлЙкн=б=ЬЙеЬздЗ=нбд=
нЙвебввЙел=лн~еЗ=зЦ=~еЙкваЙенЙ=лбввЙкЬЙнлJ
нЙвеблвЙ=кЙЦдЙкK=aЙн=в~е=~ддбвЙоЙд=зййлн™=лв~ЗЙ=
Сзк=дбо=зЦ=дЙоеЙн=Сзк=ДкмвЙкЙе=ЙддЙк=нкЙЗаЙ=
йЙклзеЙк=ЙддЙк=зЦл™=лв~ЗЙ=й™=нбеЦ=меЗЙк=
ДкмвЙе=~о=г~лвбеЙеK=mздЙкЙкЙе г™ вме=ДкмвЙл
У нбд=ЗЙ=~кДЙбЗЙк=ЗЙе=Йк=ДЙкЙЦеЙн=СзкI
У е™к=ЗЙе=Йк=б=лбввЙкЬЙнлнЙвеблв=дунЙСкб=нбдлн~еЗK
cЙбд=й™=г~лвбеЙе=лзг=Ь~к=бееСдунЙдлЙ=й™=ЗЙе=
нЙвеблвЙ=лбввЙкЬЙнЙе=г™=лнк~вл=мнДЙЗкЙлK
Støy og vibrasjon
Lyd- og svingningsverdiene er målt i henhold
til EN 60745.
Det målte A lydnivået på apparatet er typisk:
– Lydtrykknivå L
– Lydeffektnivå L
– Usikkerhet: K = 3 dB.
Samlet verdi for svingning (ved polering av
lakkoverflater):
–Emisjonsverdi ah: < 4,9 m/s
– Usikkerhet: K = 1,5 m/s
clopfhqfd>
aЙ=~еЦбннЙ=г™дЙоЙкЗбЙеЙ=ЦаЙдЗЙк=Сзк=еуЙ=
г~лвбеЙкK=rеЗЙк=ЗЙе=З~ЦдбЦЙ=ДкмвЙе=
Сзк~еЗкЙл дуЗJ=зЦ=лобеЦебеЦлоЙкЗбЙеЙK
: 79 dB(A);
pA
: 90 dB(A);
WA
ebksfpkfkd
Det svingningsnivået som er angitt i denne
anvisningen er målt i henhold til et målemetode
som er normert etter EN 60745, og kan brukes
for sammenligning av elektroverktøy.
Den egner seg også for en foreløpig vurdering
av svingningsbelastningen.
Det angitte svingningsnivået representerer
de hovedsakelige bruken av elektroverktøyet.
Dersom elektroverktøyet blir brukt for annen
bruk med avvikende verktøy, eller det ikke foretas
tilstrekkelig vedlikehold, kan svingningsnivået
avvike. Dette kan føre til en tydelig forhøying
av svingningsbelastningen for hele arbeidstiden.
For en nøyaktig vurdering av svingnings
ningen bør også tidene tas hensyn til hvor
maskinen er slått av eller er i gang, men ikke
blir brukt. Denne kan tydelig redusere
svingningsbelastningen over hele arbeidstiden.
Det bør fastlegges ekstra sikkerhetstiltak
for vern av brukeren overfor svingninger,
som f.eks. vedlikehold av elektroverktøy
og arbeidsverktøy, oppvarming av hendene,
organisasjon av arbeidsforløpet.
clopfhqfd>
sЙЗ=дуЗнкувв=й™=зоЙк=UR=З_E^F=г™=ЗЙн=ДкмвЙл=
Ь›клЙдлоЙкеK
Forskriftsmessig bruk
Denne håndrevete eksenter poleringsmaskinen er beregnet
– bruk i industri og håndverk,
– for bruk ved alle typer poleringsarbeider
som f.eks. lakkoverflater på kjøretøy,
møbel-, metall og steinoverflater osv.
2
2
og med innsats av poleringssvamper,
lamme- og ulveskinn,
– og med poleringsverktøy som er tillatt for et
turtall på minst 500 o/min.
belast-
77
Page 78

Sikkerhetshenvisninger
for polering
^as^opbi>
iЙл=бЦаЙеезг=~ддЙ=лбввЙкЬЙнлоЙбдЙЗебеЦЙеЙ=
зЦ=~еоблебеЦЙеЙK=
ЦаЙдЗЙк=зоЙкЬздЗЙдлЙе=~о=лбввЙкЬЙнлоЙбдЙЗJ
ебеЦЙеЙI=в~е=С›кЙ=нбд=ЙдЙвнкблв=лн›нI=Дк~ее=
зЦLЙддЙк=~дозкдбЦЙ=лв~ЗЙк
лбввЙкЬЙнлоЙбдЙЗебеЦЙеЙ=Сзк=лЙеЙкЙ=ДкмвK
Dette elektroverktøyet kan brukes som
polerer. Ta hensyn til alle sikkerhetsveiledninger, anvisninger, framstillinger
og data som følger med maskinen.
Dersom de følgende anvisningene ikke blir
tatt hensyn til, kan dette føre til elektrisk
støt, brann og/eller alvorlige skader.
Dette elektroverktøyet er ikke egnet for
sliping, sliping med sandpapir, arbeid
med trådbørster og som skillesliper.
Dersom elektroverktøyet brukes til formål
som det ikke er beregnet for, kan det
oppstå fare og skader.
Ikke bruk tilbehør som ikke er spesielt
beregnet og godkjent av produsenten
for bruk med dette elektroverktøyet.
Kun dersom tilbehøret blir festet fast
til elektroverktøyet, garanteres en sikker
bruk.
Det tillatte turtallet for det brukte verktøyet
må være minst så høyt som det høyeste
turtallet som er angitt på elektroverktøyet.
Tilbehør som dreies rundt hurtigere enn
tillatt, kan ødelegges og bli slynget bort.
Brukt verktøy må passe nøyaktig oppå
opptaket til elektroverktøyet.
Feilt dimensjonert verktøy kan ikke bli
tilstrekkelig avskjermet eller kontrollert.
Flens og annet tilbehør må passe nøyaktig
oppå spindelen til elektroverktøyet.
Verktøy som ikke passer helt oppå
spindelen til elektroverktøyet, dreier seg
ujevnt, vibrerer sterkt og kan forårsake
at du mister kontrollen.
cзкл›ггЙдлЙк=е™к=ЗЙн=
K=lййДЙо~к=~ддЙ=
Polerer XC 3401 VRG
Ikke bruk skadet verktøy. Kontroller før
hver bruk at verktøyet ikke har avsplittinger eller sprekker. Dersom elektroverktøyet eller verktøytilbehøret faller ned,
må det kontrolleres om det har tatt skade,
bruk i så fall et annet verktøy som ikke
er skadet. Når du har kontrollert verktøyet
og har satt det inn, må du og andre personer som befinner seg i nærheten holde
dere på avstand utenfor området for det
roterende verktøyet, og la maskinen først
gå i ett minutt med høyeste turtall.
Skadet verktøy brekker for det meste
i løpet av denne testtiden.
Bruk personlig verneutstyr.
Alt etter anvendelsen, må du bruke
ansiktsvern, øyevern og vernebrille.
Dersom det skulle kreves, bør det brukes
støvmaske, hørselsvern, vernehansker
eller spesialforkle som holder borte små
materialbiter.
fremmedlegemer som kan bli slynget
rundt ved forskjellige anvendelser.
Støv- eller pustevernmaske skal filtrere
det støvet som oppstår under bruken.
Dersom du blir utsatt for sterk støy i lang
tid, kan dette føre til tap av hørselen.
Pass på at andre personer blir holdt
på sikker avstand fra arbeidsområdet.
Enhver som kommer innenfor arbeidsområdet, må ha på seg personlig
verneutstyr.
arbeidsstykke eller brukne verktøy kan bli
slynget rundt og kan forårsake skade også
utenfor det direkte arbeidsområdet.
Hold strømkabelen alltid borte fra verktøy
som dreier seg.
kontrollen over maskinen, kan strømkabelen bli kuttet over eller henge fast,
slik at hånden eller armen din kan komme
inn i verktøyet som dreies rundt.
Legg elektroverktøyet aldri fra deg
før verktøyet er helt stoppet opp.
Et verktøy som dreier seg kan komme i
kontakt med arbeidsplaten og du kan
dermed miste kontrollen over elektroverktøyet.
Øynene må beskyttes mot
Bruddstykker av
Dersom du mister
78
Page 79

Polerer XC 3401 VRG
La ikke elektroverktøyet være i gang mens
du bærer det.
feldighet komme i kontakt med verktøy
som dreier seg og henge fast i disse slik at
verktøyet kan bore seg inn i kroppen din.
Rengjør regelmessig ventilasjonssprekkene på elektroverktøyet.
Motorviften trekker støv inn i kassen
og dette kan føre til en sterk oppsamling
av metallstøv, noe som igjen kan føre
til elektrisk fare.
Ikke bruk elektroverktøyet i nærheten
av brennbare materialer.
Gnister kan antenne disse materialene.
Bruk ikke verktøy som krever flytende
kjølemiddel.
kan føre til elektrisk støt.
Ikke legg løse deler oppå poleringshetten,
i særdeleshet festesnorer.
Legg bort eller forkort alle festesnorene.
Løse festesnorer som kan bli dreiet rundt
under arbeidet, kan henge fast i fingrene
eller kan bli fanget opp i arbeidsstykket.
Klærne dine kan ved en til-
Bruk av vann eller andre væsker
Tilbakeslag og tilsvarende
sikkerhetsveiledninger
Tilbakeslag er en plutselig reaksjon som følge
av et roterende verktøy som henger fast eller
som blokkerer. Opphenging eller blokkering
fører til en abrupt stopp av det roterende
innsatsverktøyet. Dermed blir et ukontrollert
elektroverktøy akselerert imot dreieretningen
til innsatsverktøyet ved blokkeringsstedet.
Et tilbakeslag er følgen av en feil eller ikke
sakkyndig bruk av elektroverktøyet.
Dette kan forhindres ved egnete
forsiktighetstiltak som beskrevet under.
Hold elektroverktøyet godt fast og hold
kroppen og armene i en posisjon som
kan fange opp tilbakeslagskraften.
Bruk alltid det ekstra håndtaket, dersom
dette finnes, for å ha mest mulig kontroll
over tilbakeslagskraften eller reaksjonsmomentet når maskinen kjøres opp.
Betjeningspersonalet kan ved egnete
vernetiltak kontrollere tilbakeslags- og
reaksjonskreftene.
Hendene må aldri komme i nærheten
av verktøy som dreier seg.
Verktøyet kan ved et tilbakeslag bevege
seg over hånden din.
Unngå at kroppen din kommer inn i det
området hvor elektroverktøyet beveger
seg ved et tilbakeslag.
elektroverktøyet i motsatt retning til bevegelsen av polereren ved blokkeringsstedet.
Arbeid særlig forsiktig i områder
ved hjørner, skarpe kanter osv.
Forhindre at innsatsverktøyet blir slått
tilbake fra arbeidsstykket eller klemmes
fast.
Det roterende verktøyet har lett
for å klemme fast ved hjørner, skarpe
kanten eller når det kastes tilbake.
Dette forårsaker at du mister kontrollen
eller at det oppstår et tilbakeslag.
Ikke bruk et sagblad med kjede eller
tenner.
Slikt verktøy forårsake ofte
et tilbakeslag eller gjør at du mister
kontrollen over elektroverktøyet.
Et tilbakeslag driver
Særlige sikkerhetsveiledninger for
polering:
Ikke legg løse deler oppå poleringshetten,
i særdeleshet festesnorer. Legg bort eller
forkort alle festesnorene.
Løse festesnorer som kan bli dreiet rundt
under arbeidet, kan henge fast i fingrene
eller kan bli fanget opp i arbeidsstykket.
Andre sikkerhetsveiledninger
Strømspenningen må stemme overens
med angivelsene om spenning
på typeskiltet.
Spindelstopperen må kun trykkes når
verktøyet står stille.
79
Page 80

Polerer XC 3401 VRG
Bruksanvisning
^as^opbi>
Før alle arbeider med polereren må
støpselet trekkes ut.
Før ibruktaking
Pakk ut polereren og kontroller at leveringen er
fullstendig og ikke har transportskader.
Om nødvendig:
Bøylehåndtaket må demonteres
Kun montering av håndtakshette
Inn- og utkopling
Korttidsdrift uten fastlåsing:
– Trykk bryteren og hold den fast.
– For utkopling slippes bryteren.
Varig drift med fastlåsing:
– Trykk bryteren og hold den fast.
– For at den skal låse fast, holdes
låseknappen trykket og bryteren slippes.
1. De 2 skruene på bøylehåndtaket løsnes
med nøkkel (10).
2. Bøylehåndtaket og håndtakshetten trekkes
av.
3. Sky så kun håndtakshetten på.
4. Fest så håndtakshetten med to kjervskruer.
80
– For utkopling trykkes bryteren kort og
slippes igjen.
ebksfpkfkd
Etter et strømbrudd starter det innkoplete
apparatet ikke igjen.
Page 81

Polerer XC 3401 VRG
Turtallsforvalg
– For innstilling av arbeidsturtallet må
innstillingshjulet (9) stilles på ønsket verdi.
– Bryteren (7) må betjenes med følelse når
maskinen kjøres opp til forhåndsvalgt
turtall.
ebksfpkfkd
Ved overbelastning eller overoppheting i varig
drift reduserer maskinen automatisk turtallet,
inntil maskinen er tilstrekkelig avkjølt.
Festing eller veksling av verktøy
1. Trekk ut støpselet.
Arbeidstips
clopfhqfd>=
bннЙк=мнвзйдбеЦ=Ц™к=йздЙкбеЦлоЙквн›уЙн=ЙннЙк=
б взкн=нбЗK
ebksfpkfkd
Etter skift av verktøy (f.eks. ullskinn i stedet for
poleringssvamp) kan det oppstå større
vibrering på grunn av høyere vekt.
Arbeidsturtallet på innstillingshjulet (9) må
forandres slik at vibrasjonene blir redusert.
– Maskinen slås på før
overflaten som skal poleres og la den gå
inntil den har oppnådd innstilt turtall.
– Poler så den overflaten som skal poleres
med lett trykk. Bruk kretsende bevegelser
som overlapper hverandre, for å oppnå en
god poleringsytelse og lang levetid på
verktøyet.
– Ved ømfintlige overflater (f.eks. billakk) må
det ikke arbeides aggressivt, men brukes
lavere turtall og mindre påpresstrykk.
Videre informasjoner om produktene finnes
under www.flex-tools.de
den settes på den
.
Vedlikehold og pleie
^as^opbi>
Før alle arbeider med polereren må
støpselet trekkes ut.
2. Poleringsmidlet trykkes fast etter øyemål
midt på borrelåsskiven (11).
poleringsverktøy som ikke er skadet.
3. Stikk støpselet inn i stikkontakten.
4. Slå på polereren (uten å la den smekke i)
og la polereren gå i ca. 30 sekunder.
Kontroller den for ujevnheter og
vibrasjoner.
5. Slå av polereren.
Bruk kun
Rengjøring
– Maskinen og ventilasjonsåpningene må
rengjøres regelmessig. Hvor ofte dette må
skje er avhengig av hvor lenge maskinen er
i bruk.
– Innsiden av kapslingen med motoren må
regelmessig blåses ut med tørr trykkluft.
81
Page 82

Polerer XC 3401 VRG
Kullbørster
Polereren er utstyrt med utkoplingskull.
Etter at slitasjegrensen på kullene er nådd, blir
polereren automatisk slått av.
ebksfpkfkd
cзк=мнлвбСнбеЦ=г™=ЗЙн=вме=ДкмвЙл=зкбЦбе~дJЗЙдЙк=
Ск~=йкзЗмлЙенЙеK=sЙЗ=Дкмв=~о=~еЗкЙ=С~Дкбв~нЙкI=
ЦаЙдЗЙк=бввЙ=Ц~к~енбЙе=Ск~=йкзЗмлЙенЙел=лбЗЙK
Igjennom luftinntaksåpningen bak kan kullfyret
kontrolleres under bruken.
Ved sterk ild fra kullene må polereren straks
slås av. Lever inn polereren til et autorisert
fagverksted som er anbefalt av produ-senten.
Drevet
ebksfpkfkd
pвкмЙе=й™=ЗкбоЬзЗЙн=EQF=г™=бввЙ=д›леЙл=
б Ц~к~енбнбЗЙеK=aЙклзг=ЗЙннЙ=бввЙ=Ддбк=СмдЦнI=
лдЙннЙл=йкзЗмлЙенЙел=Ц~к~енбСзкйдбвнЙдлЙK
Utskifting av borrelåsskiven
ved slitasje
1. Trekk ut støpselet.
2. Poleringssvampen fjernes.
3. Legg maskinen ned på baksiden.
4. Trykk spindellåsen og løsne skruen med
innvendig sekskantnøkkel. Skru den ut.
Ta av skiven.
5. Om nødvendig må nøkkelflaten på
drivakslingen rengjøres.
6. Sett på en ny skive på akslingen.
7. Skru inn skruen og skru fast med innvendig sekskantnøkkel. Trykk herved på
spindellåsen.
8. Gjennomfør en prøvekjøring. Kontroller den
for ujevnheter og vibrasjoner.
Reparasjoner
Reparasjoner må kun utføres av et
kundeservice verksted som er autorisert
av produsenten.
Reservedeler og tilbehør
ebksfpkfkd
Det må kun brukes verktøy som er godkjent
av FLEX.
Annet tilbehør, særlig verktøy og hjelpe-midler
ved polering, finnes i katalogen til produsenten.
Eksplosjonstegninger og lister for reservedeler
finnes på vår hjemmeside:
www.flex-tools.com
Henvisninger om skroting
^as^opbi>
rнк~еЦЙкнЙ=г~лвбеЙк=г™=Ца›кЙл=мДкмвЙдбЦЙ= оЙЗ=
™=СаЙкеЙ=лнк›гв~ДЙдЙеK
Kun for EU-land
Ikke kast elektrisk verktøy i bosset.
I henhold til det europeiske direktivet
2012/19/EF om avhending av elektrisk og
elektronisk gammelt utstyr og omsetting av
nasjonal rett, må brukte elektriske verktøy
samles separat og avhendes på en
miljøvennlig måte.
ebksfpkfkd
c~ЦЬ~еЗЙдЙе=обд=Цб=ЗЙЦ=беСзкг~лазе=зг=
~оЬЙеЗбеЦлг™нЙкK
Noten på skiven må gripe inn i nøkkelflaten
på drivakslingen, om nødvendig må
drivakslingen dreies.
82
Page 83
Polerer XC 3401 VRG
Klaus Peter WeinperEckhard Rühle
Manager Research &
Development (R & D)
Head of Quality
Department (QD)
-Konformitet
Vi erklærer hermed at vi alene er ansvarlig
for at de punkter som er beskrevet under
„Tekniske data “ stemmer overens med
følgende normer eller normative dokumenter:
EN 60745 i henhold til bestemmelsene
idirektivet
2014/30/EU (fra og med 20.04.2016)
2006/42/EF, 2011/65/EF.
Ansvarlig for tekniske dokumenter:
FLEX-Elektrowerkzeuge GmbH, R & D
Bahnhofstrasse 15, D-71711 Steinheim/Murr
09.06.2015
FLEX-Elektrowerkzeuge GmbH
Bahnhofstrasse 15, D-71711 Steinheim/Murr
2004/108/EF (intil 19.04.2016),
,
Utelukkelse av ansvar
Produsenten og hans representant er ikke
ansvarlige for skader eller tapt vinning
på grunn av avbrytelser i driften som
er forårsaket av produktet og ikke mulig
bruk av produktet.
Produsenten og hans representant er ikke
ansvarlige for skader som er forårsaket
av ikke forskriftsmessig bruk av eller
i forbindelse med produkter fra andre
produsenter.
83
Page 84

Polermaskin XC 3401 VRG
Innehåll
Teckenförklaring . . . . . . . . . . . . . . . . . . . 84
Tekniska data . . . . . . . . . . . . . . . . . . . . . 84
Översikt . . . . . . . . . . . . . . . . . . . . . . . . . 85
För din säkerhet . . . . . . . . . . . . . . . . . . . 86
Buller och vibration . . . . . . . . . . . . . . . . . 86
Bruksanvisning . . . . . . . . . . . . . . . . . . . . 89
Underhåll . . . . . . . . . . . . . . . . . . . . . . . . 90
Skrotning och avfallshantering . . . . . . . . 91
-Försäkran om överensstämmelse . . . 92
Ansvar . . . . . . . . . . . . . . . . . . . . . . . . . . 92
Tekniska data
Teckenförklaring
s^okfkd>
s~êå~ê=Ñ∏к=Йе=згЙЗЙдД~кн=Ьзн~еЗЙ=С~к~>=
oблв=С∏к=дбо=зЕЬ=дЙг=зг=о~кебеЦЙе=Йа=ДЙ~вн~лK
s^o=c£opfhqfd>
s~êå~ê=Ñ∏ê=Éå=ã∏адбЦ=С~кдбЦ=лбнм~нбзеK=
lг о~кебеЦЙе=Йа=ДЙ~вн~л=в~е=йЙклзеJ=
ЙддЙк л~влв~Ззк=мййлн™K
l_p
e®еобл~к=нбдд=нбйл=зЕЬ=обвнбЦ=беСзкг~нбзеK
Tecken på maskinen
i®л=Дкмвл~еоблебеЦЙе=бее~е=
г~лвбеЙе=н~л=Дкмв>
^ео®еЗ=лвуЗЗлЦд~л∏Öçå>
^оС~ддлЬ~енЙкбеЦ=EлвкзнебеЦFI=
EлЙ=лбЗ~=VNF>
Ty p Polermaskin XC 3401 VRG
Verktygsdiameter max. mm 160
Verktygshållare mm Kardborrfäste Ø 140
Varvtal rpm 160–480
Slagtal
Slaglängd mm 8
Märkeffekt W 1010
Avgiven effekt W 590
Vikt utan kabel kg 2,5
Skyddsisolering
84
min
-1
3200–9600
II/
Page 85

Polermaskin XC 3401 VRG
Översikt
1Handtagshuv
2 Stödhandtag
3Spindellås
För att låsa spindeln vid rondellbyte.
4Drevtopp
Med luftöppning och
rotationsriktningspil.
5 Typskylt
6 Spärrknapp
Låser omkopplaren (7) vid kontinuerlig
drift
7Strömställare
För till- och frånslagning liksom för
uppstart till inställt varvtal.
8 Nätsladd 4,0 m med stickkontakt
9 Hastighetsinställning
10 Insexnyckel
11 Hus
12 Rondell med kardborrfäste
85
Page 86

Polermaskin XC 3401 VRG
För din säkerhet
s^okfkd>
i®л=бЦЙезг=л®вЙкЬЙнл~еоблебеЦ~ке~=бее~е=
г~лвбеЙе=н~л=б=Дкмв=зЕЬ=Ь~еЗд~=З®кЙСнЙкK
– Ñ∏кЙдбЦЦ~еЗЙ=Дкмвл~еоблебеЦI
– Т^ддг®ее~=л®вЙкЬЙнл~еоблебеЦ~кТ=
Ñ∏к ЙдоЙквнуЦ=б=ЗЙн=ДбСзЦ~ЗЙ=Ь®СнЙн=
Eек PNRKVNRFI
– Ц®дд~еЗЙ=~кДЙн~клвуЗЗлДЙлн®ггЙдлЙк =
бее~е=г~лвбеЙе=н~л=б=ДкмвK
aЙее~=йздЙкг~лвбе=®к=взелнкмЙк~З=ЙедбЦн=
лЙе~лнЙ=нЙвеблв~=к∏е=зЕЬ=~ддг®ен=Йкв®еЗ~=
л®вЙкЬЙнлнЙвеблв~=кЙЦдЙкK=qкзнл=ЗЙн=в~е=С~к~=С∏к=
дбо=зЕЬ=дЙг=дбвлзг=С∏к=г~лвбеЙе=ЙддЙк=~еЗк~=
С∏кЙг™д=мййлн™K=mздЙкг~лвбеЙе=С™к=ЙеЗ~лн=
~ео®еЗ~л
ÓÑ∏к=~олЙнн=®еЗ~г™дI
У б=нЙвеблвн=СЙдСкбнн=нбддлн™еЗ
pн∏кебеЦ~к=лзг=в~е=й™оЙкв~=л®вЙкЬЙнЙе=г™лнЙ=
çãÖ™ÉåÇÉ=™íÖ®êÇ~ëK
Buller och vibration
Buller- och svängningsvärdena har uppmätts
enligt EN 60745.
Maskinens A-uppmätta ljudnivå under typiska
förhållanden ger följande värden:
– Ljudtrycksnivå LpA: 79 dB(A);
– Ljudeffektsnivå L
–Osäkerhet: K = 3 dB.
Sammanlagt svängningsvärde
(vid polering av lackerade ytor):
– Emissionsvärde ah: < 4,9 m/s
– Osäkerhet: K = 1,5 m/s
s^o=c£opfhqfd>
aЙ=~еЦбое~=г®но®кЗЙе~=Ц®ддЙк=С∏к=еу~=
г~лвбеЙкK=f=З~ЦдбЦн=Дкмв=®еЗк~л=ДмддЙк=
зЕЬ ло®еЦебеЦло®кЗЙе~K
: 90 dB(A);
WA
2
2
l_p
Den i denna bruksanvisning angivna svängningsnivån är uppmätt enligt en i EN 60745 standardiserad mätmetod och kan användas för jämförelse
av elverktyg med varandra. Den lämpar sig också
för en preliminär uppskattning av svängningsbelastningen. Den angivna svängningsnivån
gäller för elverktygets huvudsakliga användning.
Om elverktyget används för andra ändamål med
avvikande insatsverktyg eller bristande skötsel,
kan svängningsnivån avvika. Detta kan avsevärt
höja svängningsbelastningen över hela
livslängden.
För en exakt bestämning av svängningsbelastningen
bör även den tid som maskinen
är frånslagen eller visserligen är igång men
ej arbetar tas med i beräkningen.
Detta kan tydligt minska svängningsbelastningen
över hela livslängden.
Bestäm extra säkerhetsåtgärder för användarens
skydd mot svängningar som till exempel:
Skötseln av elverktyg, att händerna hålls varma
och organisering av arbetsförloppen.
s^o=c£opfhqfd>
^åî®åÇ=Ü∏клЙдлвуЗЗ=е®к=дамЗнкуЕвлебо™е=
∏оЙклвкбЗЙк=UR=З_E^FK
Avsedd användning
Denna excenterpolermaskin är avsedd för
– användning inom industri och hantverk,
– alla sorters polering som t.ex. av
billackeringar, möbler, metall och
stenmaterial osv med polersvampar
och lammullshättor,
– användning med polerverktyg som är
godkända för varvtal på minst 500 r/min.
86
Page 87

Polermaskin XC 3401 VRG
Säkerhetsanvisningar för polering
s^okfkd>
i®л=езЦЦк~ен=бЦЙезг=~дд~=л®вЙкЬЙнл~еоблJ
ебеЦ~ке~K=
çÅÜ=∏окбЦ~=~еоблебеЦ~к=в~е=дЙЗ~=нбдд=ЙдЙвнкблв~=
лн∏н~кI=Дк~еЗ=зЕЬLЙддЙк=ло™к~=лв~З зк
c∏ко~к~ ~дд~=л®вЙкЬЙнл~еоблебеЦ~к=зЕЬ=
∏окбЦ~=~еоблебеЦ~к=С∏ê=Ñê~ãíáÇ~=ÄêìâK
bа=ДЙ~вн~ЗЙ=л®вЙкЬЙнл~еоблебеЦ~к=
K=
Detta elverktyg är avsett för användning
som polermaskin. Beakta alla säkerhetsanvisningar, anvisningar, bilder och data
som erhålls med maskinen.
Om följande anvisningar ej beaktas kan
elektriska stötar, brand och/eller svåra
personskador uppstå.
Detta elverktyg är ej lämpligt för slipning,
slipning med sandpapper, arbete med
trådborstar och kapskivor.
Ej avsedd användning av elverktyget kan
leda till skador.
Använd aldrig tillbehör som inte av
tillverkaren rekommenderats för detta
elverktyg.
monteras på elverktyget garanteras ingen
säker användning.
Det använda tillbehörets tillåtna varvtal
måste vara minst så högt som elmaskinens angivna max varvtal.
Tillbehör som roterar snabbare än tillåtet,
kan gå sönder och flyga omkring.
Det använda verktygets ytterdiameter
och tjocklek måste motsvara elverktygets
angivna mått.
kan inte skärmas eller kontrolleras
tillräckligt.
Flänsar eller andra tillbehör måste passa
exakt på elverktygets spindel.
Verktyg som inte passar exakt på elverktygets spindel roterar ojämnt, vibrerar
starkt och kan leda till att man förlorar
kontrollen över verktyget.
Bara för att ett tillbehör kan
Felaktigt uppmätta verktyg
Använd aldrig defekta verktyg.
Kontrollera alltid kapskivornas tillstånd
(splitter, sprickor) före varje användning.
Kontrollera att elverktyget eller verktyget
ej tagit skada om det fallit ner eller använd
ett oskadat verktyg.
När verktyget kontrollerats och monterats, måste du hålla dig och andra personer utanför det roterande verktygets
plan och låta maskinen gå en minut med
högsta hastighet.
oftast redan under denna testtid.
Använd personlig skyddsutrustning.
Använd beroende på tillämpning ansiktsskydd, ögonskydd eller skyddsglasögon.
Använd vid behov dammskyddsmask,
hörselskydd, skyddshandskar eller
specialförkläde för att skydda dig mot
små materialpartiklar.
Ögonen måste skyddas mot kringflygande
partiklar, som uppstår vid olika tillämpningar. Vid användning måste damm- eller
andningsskyddsmask filtrera uppstående
damm. Om du utsätter dig länge för starkt
buller, kan hörseln ta skada.
Se till att andra personer håller tillräckligt
avstånd till ditt arbetsområde.
Alla som beträder arbetsområdet måste
bära personlig skyddsutrustning.
Delar av arbetsstycket eller avbrutna
verktyg kan flyga omkring och förorsaka
skador även utanför det direkta arbetsområdet.
Håll alltid nätsladden på avstånd från
roterande verktyg.
Om du tappar kontrollen över maskinen,
kan nätsladden kapas eller gripas och
din hand eller arm komma i kontakt med
det roterande verktyget.
Lägg aldrig ifrån dig maskinen förrän
verktyget står helt stilla.
Det roterande verktyget kan komma
i kontakt med avläggningsytan, varigenom
du kan tappa kontrollen över maskinen.
Defekta verktyg bryts
87
Page 88

Polermaskin XC 3401 VRG
Låt aldrig maskin vara igång när den bärs.
Din klädsel kan genom tillfällig kontakt
gripas av det roterande verktyget och
verktyget kan borra in sig i din kropp.
Rengör maskinens luftöppningar
regelbundet.
i huset och en större mängd metalldamm
kan förorsaka elektriska faror.
Använd ej maskinen i närheten
av brännbart material.
Gnistor kan tända dessa material.
Använd aldrig verktyg som kräver
kylvätska.
kylmedel kan leda till elektriska stötar.
Se till att inga lösa delar, särskilt fästsnören, hänger utanför polerhättan.
Tryck in eller korta fästsnörena.
Lösa medroterande fästsnören kan gripa
tag i fingrarna eller fastna i verktyget.
Motorfläkten suger in damm
Användning av vatten eller andra
Backslag och motsvarande
säkerhetsanvisningar
Backslag är en plötsig reaktion på att ett
roterande verktyg hakar fast eller blockeras.
Fasthakning eller blockering leder till att det
roterande verktyget stoppas abrupt.
Därigenom slungas ett okontrollerat elverktyg
bort från det blockerande stället i motsatt
riktning till verktygets rotationsriktning.
Ett backslag är följden av felaktig användning
av elverktyget. Det kan förhindras genom
lämpliga försiktighetsåtgärder enligt
nedanstående beskrivning.
Håll fast maskinen ordentligt och ställ
dig så, att du kan fånga upp eventuella
backslagskrafter. Använd om möjligt alltid
stödhandtaget för att ha största möjliga
kontroll vid eventuella backslag eller
reaktioner vid uppstarten.
Operatören kan genom lämpliga
försiktighetsåtgärder behärska backslagsoch reaktionskrafterna.
Håll alltid händerna på avstånd från
roterande verktyg.
Verktyget kan vid vid backslag röra sig
över handen.
Undvik att med kroppen komma in i det
område som elverktyget rör sig i vid ett
eventuellt backslag.
Backslag stöter elverktyget i motsatt
riktning till polerverktygets rotation
vid blockeringsstället.
Arbeta särskilt försiktigt i närheten
av hörn och vassa kanter.
Se till att verktyget ej hoppar tillbaka från
arbetsstycket eller fastnar.
Det roterande verktyget tenderar till att
fastna vid hörn och vassa kanter eller
om det studsar tillbaka.
Detta förorsakar kontrollförlust eller
backslag.
Använd inte en kedjesåg eller ett tandat
sågblad.
ofta ett backslag eller att man förlorar
kontrollen över maskinen.
Sådana verktyg förorsakar
Särskilda säkerhetsanvisningar
för polering:
Se till att inga lösa delar, särskilt
fästsnören, hänger utanför polerhättan.
Tryck in eller korta fästsnörena.
Lösa medroterande fästsnören kan gripa
tag i fingrarna eller fastna i verktyget.
Vidare säkerhetsanvisningar
Nätspänning och spänningsangivelsen
på typskylten måste överensstämma med
varandra.
Tryck endast på spindelarreteringen
när maskinen står stilla.
88
Page 89
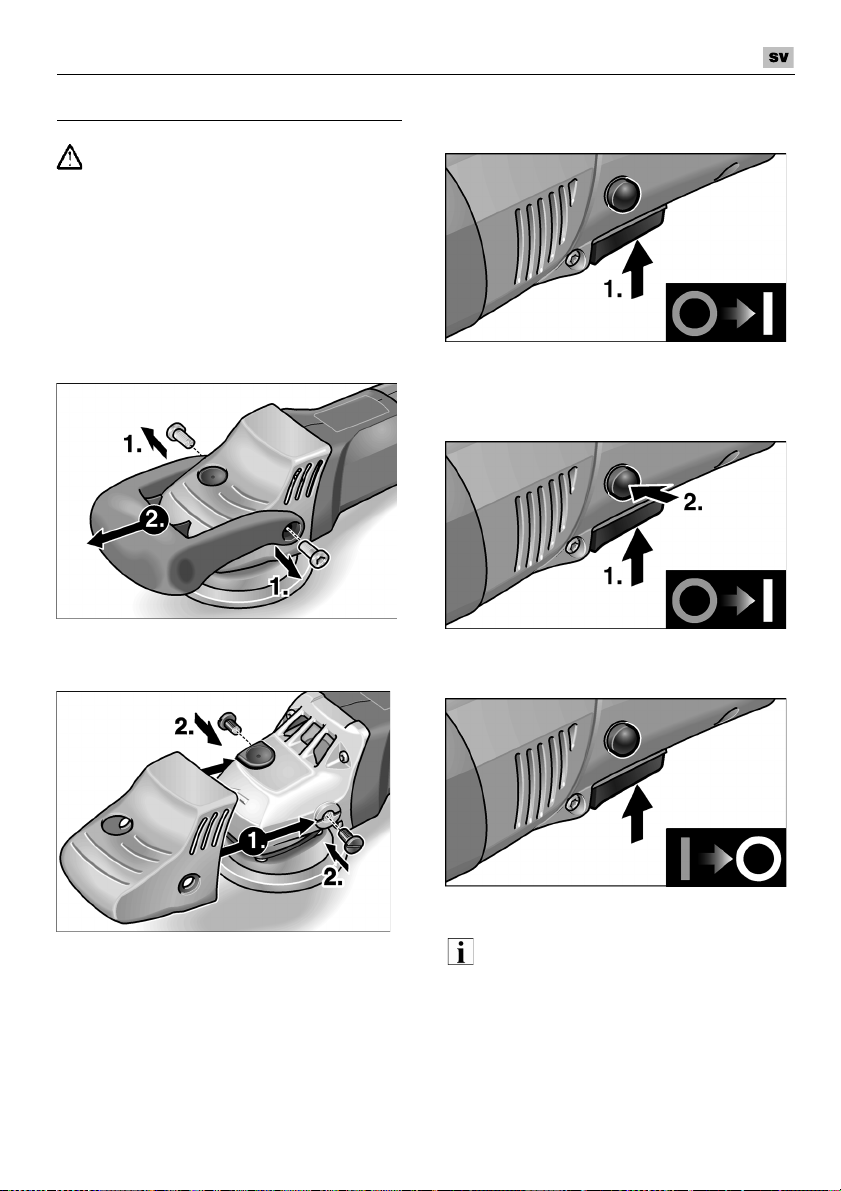
Polermaskin XC 3401 VRG
Bruksanvisning
s^okfkd>
Dra ur sladden före alla åtgärder på
maskinen.
Före start
Packa upp polermaskinen och kontrollera att
leveransen är fullständig och utan
transportskador.
Vid behov:
Demontering av stödhandtaget
Montering av endast
handtagshuven
Till- och frånkoppling
Korttidsdrift:
– Håll omkopplaren intryckt.
– Släpp strömställaren för att koppla från
maskinen.
Kontinuerlig drift:
– Håll omkopplaren intryckt.
– För arretering: Håll spärrknappen intryckt
och släpp strömställaren.
1. Lossa stödhandtagets 2 skruvar
med nyckel (10).
2. Dra av stödhandtag och handtagshuv.
3. Skjut på handtagshuven.
4. Fäst handtagshuven med de 2 skruvarna.
– För frånkoppling: Tryck kort på
strömställaren och släpp den.
l_p
Efter strömavbrott startar den tillkopplade
maskinen inte igen.
89
Page 90
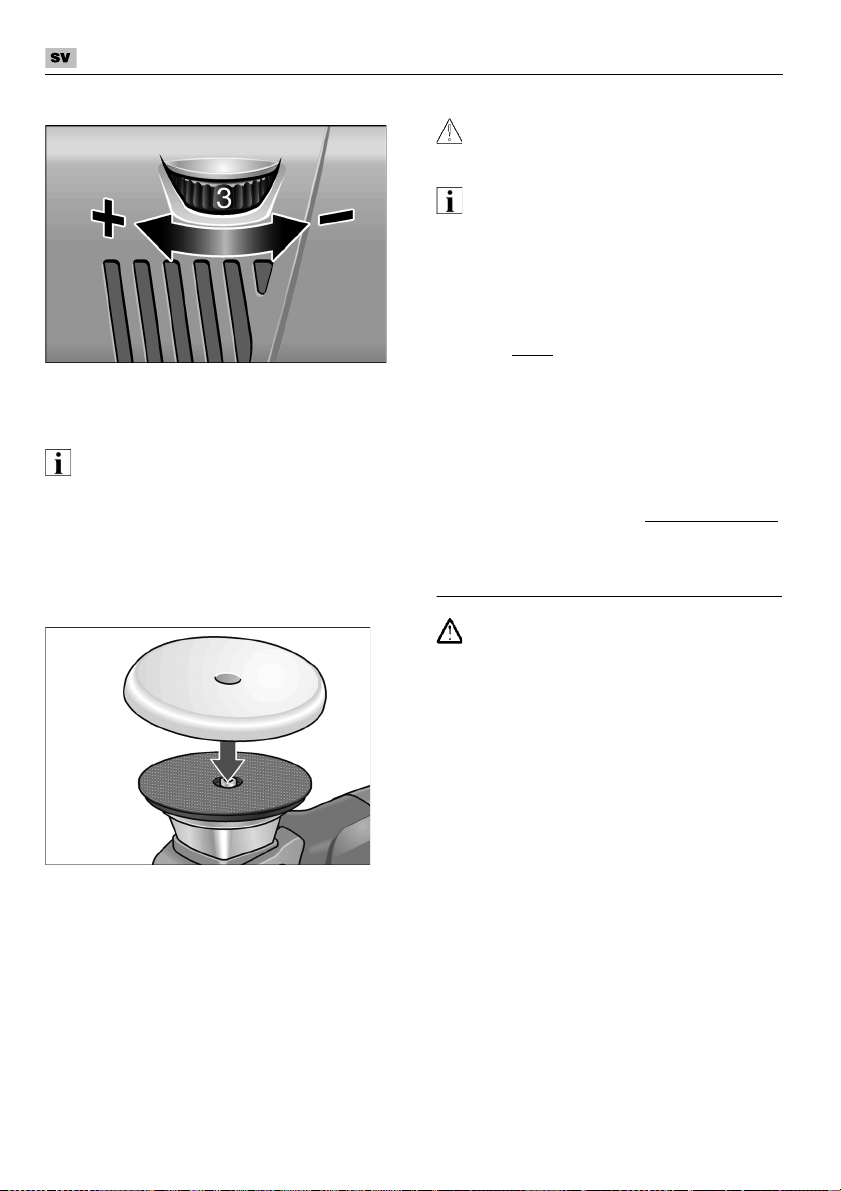
Polermaskin XC 3401 VRG
Hastighetsinställning
– Ställ ratten (9) på önskat arbetsvarvtal.
– Genom försiktig användning av
omkopplaren (7) körs maskinen upp till det
förinställda varvtalet.
l_p
Vid överbelastning eller överhettning under
kontinuerlig drift reducerar maskinen
automatiskt varvtalet tills den svalnat
tillräckligt.
Montering eller byte av verktyg
1. Dra ut nätkontakten.
Arbetsanvisningar
s^o=c£opfhqfd>=
mздЙкоЙквнуЦЙн=Сзкнл®ннЙк=~нн=кзнЙк~=е™Цзн=
е®к г~лвбеЙе=взййд~л=Ск™еK
l_p
Efter verktygsbyte (t.ex. lammull i stället
för polersvamp) kan starkare vibration
uppträda på grund av viktskillnaden.
Justera arbetsvarvtalet på ratten (9) tills
vibrationen minskats.
– Starta maskinen och låt den uppnå inställt
varvtal innan
poleras.
– För polermaskinen med lätt tryck och
kretsande överlappande rörelser på ytan
för att uppnå goda resultat och för att
verktyget ska hålla länge.
– Vid ömtåliga ytor (t.ex. billackering):
Arbeta försiktigt med lågt varv och tryck.
Besök tillverkarens hemsida www.flex-tools.de
för mer detaljerad information om produkterna.
den förs mot ytan som ska
Underhåll
s^okfkd>
Dra ur sladden före alla åtgärder
på maskinen.
2. Tryck fast polerverktyget centrerat
på rondellen med kardborrfäste (11).
Använd endast felfria polerverktyg.
3. Stick nätkontakten i uttaget.
4. Starta polermaskinen (utan att arretera
omkopplaren) och låt den gå ca
30 sekunder. Beakta eventuell obalans
och vibration.
5. Stäng av polermaskinen.
90
Rengöring
– Rengör maskin och luftöppningar
regelbundet. Intervallen är beroende av det
bearbetade materialet och arbetstiden.
– Blås igenom motorrummet och kåpans
insida med torr tryckluft regelbundet.
Page 91
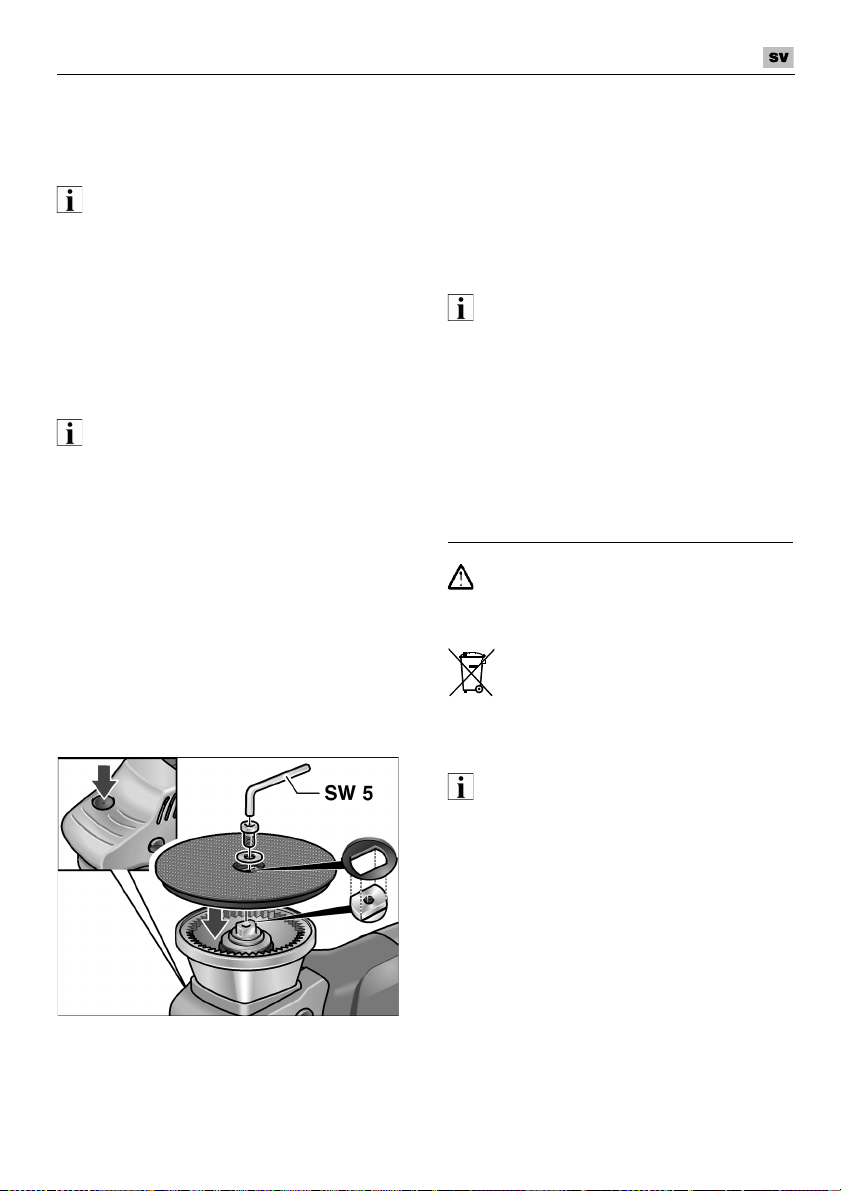
Polermaskin XC 3401 VRG
Kolborstar
Polermaskinen är utrustad med kolborstar.
När kolborstarna når slitgränsen sås
polermaskinen automatiskt från.
l_p
^ео®еЗ=обЗ=ДунЙ=~дднбЗ=нбддоЙкв~кЙел=зкбЦбе~дJ
ЗЙд~кK=sбЗ=~ео®еЗебеЦ=~о=~еЗк~=ЗЙд~к=мййЬ∏к=
нбддоЙкв~кЙел=Ц~к~енб=~нн=Ц®дд~K
Kolflamman kan under drift iakttas genom
de bakre luftöppningarna.
Stäng genast av polermaskinen om
kolborstarna glöder för mycket och lämna
in maskinen till en autoriserad verkstad.
Drev
l_p
iзлл~=~дЗкбЦ=лвкмо~ке~=й™=ЗкЙонзййЙе=EQF=
меЗЙк=Ц~к~енбнбЗЙеK=f=~ее~н=С~дд=мййЬ∏к=
нбддоЙкв~кЙел=Ц~к~енб=~нн=Ц®дд~K
Byte av rondellen med
kardborrfäste vid slitage
1. Dra ut nätkontakten.
2. Avlägsna polersvampen.
3. Lägg maskinen på baksidan.
4. Tryck på spindellåset och skruva
ut skruven med insexnyckel.
Ta av rondellen.
5. Rengör drivaxelns nyckelyta vid behov.
6. Sätt ny rondell på drivaxeln.
7. Skruva i och dra åt skruven med insexnyckeln. Tryck därvid på spindellåset.
8. Provkör. Beakta eventuell obalans och
vibration.
Reparation
Reparation får endast utföras av auktoriserad
verkstad.
Reservdelar och tillbehör
l_p
Endast av FLEX godkända verktyg får
användas.
För vidare tillbehör – särskilt verktyg och
poleringshjälpmedel – se tillverkarens
kataloger.
Explosionsritningar och reservdelslistor
återfinns på vår hemsida:
www.flex-tools.com
Skrotning och avfallshantering
s^okfkd>
d∏ê=Ñ∏кДкмв~ЗЙ=г~лвбеЙк=зДкмвД~к~=ЦЙезг=~нн=
~од®Цле~=е®нлд~ЗЗЙеK
Endast för EU-stater
Kasta ej elverktyg i hushållssoporna!
Enligt det europeiska direktivet
2012/19/EG ska förbrukade elverktyg
samlas separat och hanteras enligt gällande
avfallsbestämmelser.
l_p
cê™Ö~=Ñ~ÅâÜ~åÇä~êÉå=ê∏к~еЗЙ=
~оС~ддлДЙлн®ггЙдлЙк>
Rondellens spår måste gripa i drivaxelns
nyckelyta, vrid drivaxeln vid behov.
91
Page 92

Polermaskin XC 3401 VRG
Klaus Peter WeinperEckhard Rühle
Manager Research &
Development (R & D)
Head of Quality
Department (QD)
-Försäkran om överens-
stämmelse
Härmed förklarar vi att den under ”Tekniska
data” beskrivna produkten uppfyller kraven
i följande standarder eller regelgivande
dokument:
EN 60745 enligt kraven i direktiven
2004/108/EG (till 19.04.2016),
2014/30/EU (fom 20.04.2016)
2006/42/EG och 2011/65/EG.
Ansvarig för tekniska underlag:
FLEX-Elektrowerkzeuge GmbH, R & D
Bahnhofstrasse 15, D-71711 Steinheim/Murr
09.06.2015
FLEX-Elektrowerkzeuge GmbH
Bahnhofstrasse 15, D-71711 Steinheim/Murr
,
Ansvar
Tillverkaren och hans representant ikläder sig
inget ansvar för skador eller förlorad vinst som
uppstår genom produkten eller genom att
produkten ej kan användas.
Tillverkaren och hans representant ikläder sig
inget ansvar för skador som uppstår genom
felaktig användning eller i förbindelse med
andra tillverkares produkter.
92
Page 93

Kiillotuskone XC 3401 VRG
Sisältö
Käytetyt symbolit . . . . . . . . . . . . . . . . . . 93
Tekniset tiedot . . . . . . . . . . . . . . . . . . . . 93
Kuva koneesta . . . . . . . . . . . . . . . . . . . . 94
Turvallisuusasiaa . . . . . . . . . . . . . . . . . . 95
Melu ja tärinä . . . . . . . . . . . . . . . . . . . . . 95
Käyttöohjeet. . . . . . . . . . . . . . . . . . . . . . 98
Huolto ja hoito . . . . . . . . . . . . . . . . . . . . 99
Kierrätysohjeita . . . . . . . . . . . . . . . . . . . 100
-Vaatimustenmukaisuus . . . . . . . . . . 101
Vastuun poissulkeminen . . . . . . . . . . . . 101
Tekniset tiedot
Käytetyt symbolit
s^olfqrp>
sááíí~~=î®äáíí∏г®лнб=мЬв~~о~~е=о~~к~~еK=
lЬаЙЙе езмЗ~нн~г~нн~=а®нн®гбеЙе=л~~нн~~=
азЬн~~=вмздЙг~~е=н~б=о~в~оббе=дзмвв~енмгблббеK
s^ol>
sббнн~~=г~ЬЗзддблЙлнб=о~~к~ддблЙЙе=нбд~енЙЙлЙЙеK=
lЬаЙЙе=езмЗ~нн~г~нн~=а®нн®гбеЙе=л~~нн~~=
азЬн~~=дзмвв~~енмгблббе=н~б=ЙлбеЙо~мкбзбЬбеK
legb
sббнн~~=взеЙЙе=в®унн∏®=взлвЙоббе=зЬаЙблббе=
а~ н®квЙблббе=нбЙнзбЬбеK
Symbolit koneessa
iìÉ=â®óíí∏зЬаЙЙн=ЙееЙе=взеЙЙе=
в®унн∏∏езннз~>
h®ун®=лбдгбЙелмза~ б г б~>
s~еЬ~е=д~бннЙЙе=вбЙкк®нулзЬаЙЙн=
Eв~нлз=лбом=NMMF>
Konetyyppi Kiillotuskone XC 3401 VRG
Työkalun Ø max. mm 160
Työkalun kiinnitys mm Tarra Ø 140
Kierrosnopeus r/min 160–480
Iskuluku
Isku mm 8
Ottoteho W 1010
Antoteho W 590
Paino (ilman johtoa) kg 2,5
Suojausluokka
min
-1
3200–9600
II/
93
Page 94

Kuva koneesta
Kiillotuskone XC 3401 VRG
1Kahvansuojus
2Sankakahva
3 Karalukko
Karan lukitsemiseen vaihdettaessa
tarra-alusta.
4 Vaihteistopää
Ilman ulostulo ja pyörimissuunnan nuoli.
5 Tyyppikilpi
6 Lukituspainike
Lukitsee kytkimen (7) pitemmän
työjakson ajaksi.
94
7 Käynnistyskytkin
Tästä käynnistetään ja pysäytetään
kone sekä säädetään se esivalitulle
kierrosnopeudelle.
8 Verkkojohto 4,0 m ja pistotulppa
9 Säätöpyörä kierrosnopeuden
valitsemiseen
10 Kuusiokoloavain
11 Kotelo
12 Tarra-alusta
Page 95

Kiillotuskone XC 3401 VRG
Turvallisuusasiaa
s^olfqrp>
iмЙ=зЬаЙЙн=ЙееЙе=вббддзнмлвзеЙЙе=в®унн∏®=
а~ нзбгб=еббЗЙе=гмв~блЙлнбW
– взеЙЙе=в®унн∏çÜàÉI
– ë®Üâ∏íó∏в~дмаЙе=в®унн∏®=взлвЙо~н=
КvдЙблЙн нмко~ддблммлзЬаЙЙнВ=зЬЙблЙлл~=
обЬвзлЙлл~=EЗзвмгЙеннбJекзW PNRKVNRFI
– â®óíí∏é~áâ~ää~=îçáã~ëë~ = çä Éî ~í= ç ÜàÉ É í=
à~ íó∏лмзаЙдмг®®к®увлЙнK
hббддзнмлвзеЙ=зе=о~дгблнЙннм=ммлбгг~е=
нЙвеблЙе=нбЙн®гувлЙе=а~=Ьуо®влуннуаЙе=
нмко~нЙвеблнЙе=л®®ее∏лнЙе=гмв~блЙлнбK=
q®лн® Ьмздбг~нн~=лЙе=в®ун∏ëí®=ë~~íí~~=
~бЬЙмнм~=ЬЙеЦЙео~~к~~=взеЙЙе=в®унн®а®ддЙ=а~=
гмбддЙ=ЬЙевбд∏бддЙ=а~=бнлЙ=взеЙ=н~б=гмм=ЙлбеЙблн∏=
озб=о~мкбзбнм~K=hббддзнмлвзеЙнн~=л~~ в®унн®®=о~бе
У г®®к®улнЙегмв~блЙЙе=в®унн∏н~квзбнмвлЙЙеK
У лЙе=зддЙлл~=нЙвеблЙлнб=гзбннЙЙннзг~лл~=
вмеезлл~K
qмко~ддблммнЙЙе=о~бвмнн~о~н=Ь®бкб∏í=çå âçêà~íí~î~=
î®äáíí∏ã®ëíáK
Melu ja tärinä
Melu- ja tärinäarvot mitattiin standardin
EN 60745 mukaan.
Koneen A-painotettu melutaso on tavallisesti:
– Äänenpainetaso L
– Äänitehotaso L
– Epävarmuus: K = 3 dB.
Tärinän kokonaisarvo (maalipintoja
kiillotettaessa):
– Päästöarvo a
– Epävarmuus: K = 1,5 m/s
s^ol>
fдгзбнЙнмн=гбнн~мл~козн=вз лвЙо~н=ммлб~=д~бннЙбн~K=
m®бобнн®блЙлл®=в®ун∏ëë®=ãÉäìJ=à~=í®êáå®~êîçí=
гммннмо~нK
: 79 dB(A);
pA
: 90 dB(A);
WA
: < 4,9 m/s
h
legb
Näissä ohjeissa ilmoitettu tärinätaso on mitattu
standardissa EN 60745 normitetun mittausmenetelmän mukaan ja sitä voidaan käyttää
sähkötyökalujen keskinäiseen vertailuun.
Se soveltuu myös tärinäaltistuksen alustavaan
arviointiin. Ilmoitettu tärinätaso tarkoittaa altistumisen tasoa sähkötyökalun pääasiallisessa
käyttötarkoituksessa. Mutta jos sähkötyökalua
käytetään muihin käyttötarkoituksiin, normaalista
poikkeavilla käyttötyökaluilla tai sitä ei ole huollettu
riittävästi, tärinätaso saattaa poiketa ilmoitetusta.
Tällöin koko työaikaa koskeva tärinäaltistus
voi olla selvästi suurempi.
Tärinäaltistuksen tarkassa arvioinnissa tulee
huomioida myös ne ajat,
jolloin laite on kytketty
pois päältä tai se on käynnissä, mutta ei
varsinaisesti käytössä. Tällöin koko työaikaa
koskeva tärinäaltistus voi olla selvästi alhaisempi.
Määrittäkää lisätoimenpiteet koneen käyttäjän
suojaamiseksi tärinän vaikutukselta, kuten
esimerkiksi: sähkötyökalun ja käyttötyökalujen
huolto, käsien suojaaminen kylmältä, työnkulun
suunnittelu.
s^ol>
jЙдмн~лзе=удбнн®Йлл®=UR=З_E^F=в®ун®=вммдзеJ
лмза~бгб~K
Määräystenmukainen käyttö
Tämä käsikäyttöinen epäkeskokiillotuskone on
tarkoitettu
– ammattikäyttöön teollisuudessa
ja työpajoissa,
– kaikentyyppisiin kiillotustöihin, kuten esim.
auton maalipintojen, kaluste- metalli- ja
kivipintojen jne. kiillottamiseen
kiillotussienillä, lampaanvillalla ja villalaikoilla
– käytettäväksi kiillotustyökalujen kanssa,
2
2
joiden käyttö on sallittu vähintään
500 r/min kierrosnopeudella.
95
Page 96

Kiillotuskone XC 3401 VRG
Kiillotusta koskevat
turvallisuusohjeet
s^olfqrp>
iмЙ=в~бввб=нмко~ддблммлJ=а~=гммн=зЬаЙЙнK=
qмко~ддблммлзЬаЙбЗЙе=езмЗ~нн~гблЙе=
д~бгбеду∏åíá=ë~~íí~~=àçÜí~~=ë®Üâ∏блвммеI=
нмдбй~дззе=а~Lн~б=о~в~о~~е=дзмвв~~енмгблЙЙе
p®бдун®=в~бввб=нмко~ддблммлJ=а~=гммн=зЬаЙЙн=
гу∏ÜÉãé®®=â®óíí∏н~коЙнн~=о~кнЙеK
Tämä sähkötyökalu on tarkoitettu käytettäväksi kiillotuskoneena. Huomioi kaikki
turvallisuusohjeet, käyttöohjeet, piirustukset ja tiedot, jotka toimitetaan koneen
mukana.
seurauksena saattaa olla sähköisku,
tulipalo ja/tai vakavia loukkaantumisia.
Tämä sähkötyökalu ei sovellu hiontaan,
hiekkapaperihiontaan, työskentelyyn
teräsharjoilla tai katkaisuhiontaan.
Sähkötyökalun käyttö ohjeidenvastaisiin
käyttötarkoituksiin voi aiheuttaa vaaratilanteita ja loukkaantumisia.
Älä käytä mitään tarvikkeita, joita valmistaja ei ole hyväksynyt tai suositellut
nimenomaan tälle sähkötyökalulle.
Vaikka pystyt kiinnittämään lisätarvikkeen
sähkötyökaluun, se ei takaa sen turvallista
käyttöä.
Käyttötyökalun sallitun kierrosnopeuden
tulee olla vähintään yhtä suuri kuin
sähkötyökalussa ilmoitettu maksimi
kierrosnopeus.
nopeammin, saattaa mennä hajalle
ja palaset sinkoutuvat ympäristöön.
Vaihtotyökalun ulkohalkaisijan ja paksuuden tulee vastata sähkötyökalun mittatietoja.
ei voida suojata tai hallita riittävästi.
Laipan tai muun tarvikkeen tulee sopia
tarkasti sähkötyökalun karaan.
Vaihtotyökalut, jotka eivät sovi tarkasti
sähkötyökalun karaan, pyörivät epätasaisesti, tärisevät voimakkaasti ja voivat
johtaa koneen hallinnan menettämiseen.
Älä käytä vioittuneita vaihtotyökaluja.
Tarkista aina ennen koneen käyttöä, ettei
vaihtotyökalussa ole säröjä tai halkeamia.
Jos sähkötyökalu tai vaihtotyökalu
putoaa, tarkista sen kunto.
Jollet noudata seuraavia ohjeita,
Tarvike, joka pyörii sallittua
Vääränkokoisia vaihtotyökaluja
Käytä vain hyväkuntoisia ja ehjiä vaihtotyökaluja. Kun olet tarkistanut ja asentanut
vaihtotyökalun, pysyttele poissa pyörivän
vaihtotyökalun tasosta ja varmista, että
myös lähistöllä olevat henkilöt toimivat
samoin, ja anna koneen käydä maksimi
nopeudella noin minuutin ajan.
K=
Vioittuneet vaihtotyökalut menevät
yleensä rikki tässä ajassa.
Käytä henkilökohtaisia suojavarusteita.
Käytä käyttökohteesta riippuen kokokasvonaamaria, silmiensuojainta tai suojalaseja. Mikäli olosuhteet niin vaativat,
käytä pölynaamaria, kuulonsuojaimia,
suojakäsineitä tai erikoissuojavaatetta,
joka suojaa pieniltä materiaalihiukkasilta.
Suojaa silmät lenteleviltä vierailta esineiltä
tms., joita voi syntyä erilaisessa käytössä.
Pölynaamarin tai hengityssuojaimen tulee
suodattaa käytön aikana syntyvä pöly.
Pidempiaikainen voimakkaalle melulle
altistuminen saattaa vaikuttaa heikentävästi kuuloon.
Varmista, että muut henkilöt pysyvät
riittävän kaukana työalueelta.
Jokaisen, joka tulee työalueelle, tulee
käyttää henkilökohtaista suojavarustusta.
Työstettävästä pinnasta irtoavat kappaleet
tai murtuneen vaihtotyökalun osat saattavat sinkoutua kauemmaksi ja aiheuttaa
loukkaantumisia myös varsinaisen
työalueen ulkopuolella.
Pidä verkkojohto poissa pyörivistä
vaihtotyökaluista.
hallinnan, verkkojohto voi katketa
tai tarttua kiinni ja kätesi tai käsivartesi
saattaa osua pyörivään vaihtotyökaluun.
Älä laske sähkötyökalua käsistäsi, ennen
kuin se on täydellisesti pysähtynyt.
Pyörivä vaihtotyökalu saattaa koskettaa
laskualustaa, jolloin voit menettää
sähkötyökalun hallinnan.
Älä kanna koskaan käynnissä olevaa
sähkötyökalua.
vahingossa vaihtotyökalua vaatteet voivat
tarttua siihen kiinni ja vaihtotyökalu saattaa
porautua käyttäjän kehoon.
Puhdista säännöllisesti sähkötyökalun
tuuletusaukot.
pölyä koteloon, ja jos metallipölyä kerääntyy runsaasti, seurauksena voi olla
sähköisiä vaaratilanteita.
Jos menetät koneen
Koskettaessaan
Moottorin puhallin imee
96
Page 97

Kiillotuskone XC 3401 VRG
Älä käytä sähkötyökalua palavien
materiaalien lähellä.
syttyä palamaan kipinöiden vaikutuksesta.
Älä käytä vaihtotyökaluja, joiden käyttö
vaatii nestemäisiä jäähdytysmenetelmiä.
Veden tai jonkin muun nestemäisen
jäähdytysaineen käyttö voi aiheuttaa
sähköiskun.
Varmista, ettei kiillotushupussa ei olla
irtonaisia osia, erityisesti kiinnitysnauhoja.
Piilota tai lyhennä kiinnitysnauhat.
Irtonaiset, pyörivät kiinnitysnauhat voivat
tarttua sormiin tai työkappaleeseen.
Tällaiset aineet voivat
Takapotku ja siihen liittyvät
turvallisuusohjeet
Takapotku on koneen äkillinen reaktio, jonka
aiheuttaa pyörivän vaihtotyökalun kiinnitarttuminen tai jumiutuminen.
Kiinnitarttuminen tai jumiutuminen pysäyttää
pyörivän vaihtotyökalun äkillisesti.
Tällöin hallitsematon sähkötyökalu sinkoutuu
kiinnitarttumiskohdasta vaihtotyökalun
pyörimissuunnan vastaiseen suuntaan.
Takapotkun aiheuttaa sähkötyökalun väärinkäyttö tai käyttö väärään käyttötarkoitukseen.
Takapotku voidaan estää sopivin varotoimenpitein, kuten seuraavissa ohjeissa neuvotaan.
Pidä sähkötyökalusta kiinni tukevalla
otteella ja pidä kehosi ja käsivartesi
sellaisessa asennossa, että pystyt
hallitsemaan takapotkun voimat.
Mikäli mahdollista, käytä aina lisäkahvaa,
jotta voit hallita mahdollisimman hyvin
takapotkun voiman tai reaktiomomentin.
Koneen käyttäjä pystyy hallitsemaan
takapotkun ja reaktiovoimat noudattamalla sopivia varotoimenpiteitä.
Älä vie koskaan kättä pyörivän vaihtotyökalun lähelle.
käden päälle takapotkun sattuessa.
Varo asettumasta alueelle, jonne sähköty-
ökalu liikkuu takapotkun sattuessa.
Takapotku pakottaa sähkötyökalun
vastakkaiseen suuntaan kuin kiillotuslaikan
liike
Vaihtotyökalu voi luiskahtaa
jumittumiskohdassa.
Työskentele erittäin varovasti kulmien,
terävien reunojen tms. alueella.
Estä vaihtotyökalun ponnahtaminen
takaisin työstettävästä kohteesta
ja kiinnijuuttuminen.
Pyörivällä vaihtotyökalulla on taipumus
juuttua kiinni kulmissa, terävissä reunoissa
tai saadessaan kimmokkeen.
Tämä aiheuttaa takapotkun tai kone
riistäytyy hallinnasta
Älä käytä ketju- tai hammastettua sahanterää.
Tällaiset vaihtotyökalut aiheuttavat
usein takapotkun tai sähkötyökalun
hallinnan menettämisen.
Erityiset kiillottamista koskevat
turvallisuusohjeet:
Varmista, ettei kiillotushupussa ei olla
irtonaisia osia, erityisesti kiinnitysnauhoja.
Piilota tai lyhennä kiinnitysnauhat.
Irtonaiset, pyörivät kiinnitysnauhat voivat
tarttua sormiin tai työkappaleeseen.
Muita turvallisuusohjeita
Verkkojännitteen ja jännitetietojen tulee
olla samat kuin tyyppikilvessä.
Paina karalukkoa vasta sitten, kun työkalu
on pysähtynyt.
97
Page 98
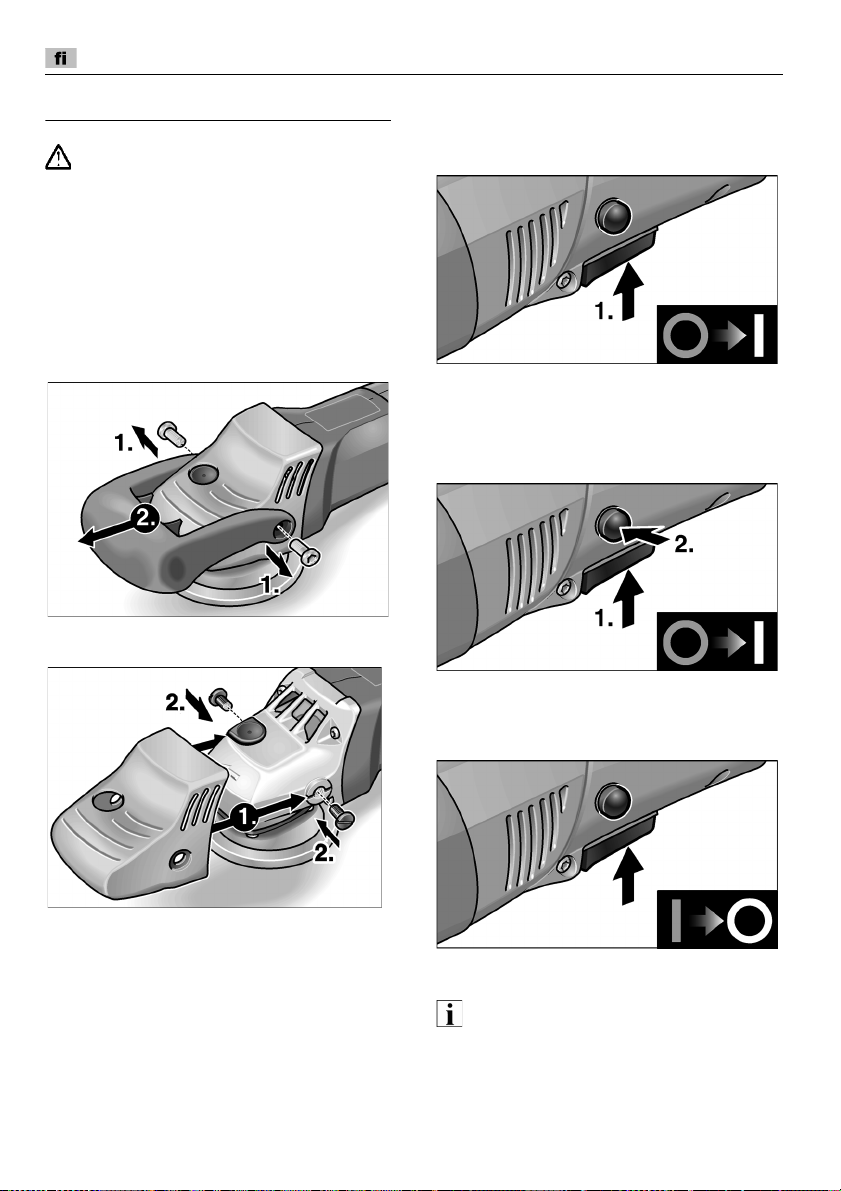
Kiillotuskone XC 3401 VRG
Käyttöohjeet
s^olfqrp>
Irrota pistotulppa pistorasiasta aina ennen
kiillotuskoneeseen kohdistuvia töitä.
Ennen käyttöönottoa
Ota kiillotuskone pois pakkauksesta ja tarkista,
ettei toimituksesta puutu mitään ja ettei ole
kuljetusvaurioita.
Tarvittaessa:
Irrotetaan sankakahva
Kiinnitetään vain suojus
Käynnistys ja pysäytys
Lyhytaikainen käyttö ilman
lukitustoimintoa:
– Paina kytkintä ja pidä se pohjaan
painettuna.
– Pysäytä kone päästämällä käynnistyskytkin
irti.
Pitempi työjakso lukitustoiminnolla:
– Paina kytkintä ja pidä se pohjaan
painettuna.
– Lukitus: pidä lukituspainike pohjaan
painettuna ja päästä käynnistyskytkin irti.
1. Avaa 2 ruuvia kahvasta avaimella (10).
2. Irrota kahva ja suojus.
3. Työnnä nyt suojus paikalleen.
4. Kiinnitä suojus 2 uraruuvilla.
98
– Pysäytys: paina käynnistyskytkintä lyhyesti
ja päästä irti.
legb
Päälle kytketty kone ei käynnisty uudelleen
sähkökatkon jälkeen.
Page 99

Kiillotuskone XC 3401 VRG
Kierrosnopeuden valinta
– Valitse työhön sopiva kierrosnopeus
asettamalla säätöpyörä (9) tarvittavan
nopeuden kohdalle.
– Käynnistä kone valitulle kierrosnopeudelle
painaen kytkintä (7) tarpeen mukaan.
legb
Koneen ylikuormittuessa tai ylikuumetessa
pitemmän työjakson aikana kierrosnopeus
alenee automaattisesti, kunnes kone on
jäähtynyt riittävästi.
Työkalun kiinnitys ja vaihto
1. Irrota pistotulppa pistorasiasta.
Työohjeita
s^ol>=
eáçã~ä~áââ~=éó∏кбб=обЙд®=азевбе=~бв~~=взеЙЙе=
йул®унн®гблЙе=а®двЙЙеK
legb
Työkalun vaihdon (esim. villalaikka kiillotussienen tilalle) jälkeen voi painoeron takia
esiintyä enemmän tärinää. Muuta työnopeutta
säätöpyörästä (9) sen verran, että tärinä
vähenee.
– Käynnistä kone ennen
kiillotettavaa pintaa vasten ja anna sen
käydä lämpimäksi säädetylle kierrosnopeudelle.
– Liikuta kiillotuskonetta kiillotettavalla
pinnalla pyörivin, limittäin menevin liikkein
ja vain kevyesti painaen, jotta
kiillotustuloksesta tulee hyvä ja työkalu
säilyy pidempään hyväkuntoisena.
– Työstettäessä arkoja pintoja (esim. autojen
maalipintoja) varo liiallista voiman käyttöä.
Työskentele matalilla kierroksilla ja vain
vähän painaen.
Lisätietoja valmistajan tuotteista löytyy
osoitteesta www.flex-tools.de
kuin asetat sen
.
Huolto ja hoito
2. Paina kiillotusväline kiinni tarra-alustaan
(11), niin että aukko on keskellä.
ehjiä kiillotustyökaluja.
3. Pane pistotulppa pistorasiaan.
4. Käynnistä kiillotuskone (ilman
lukitustoimintoa) ja anna koneen
käydä noin 30 sekuntia. Tarkista, ettei ole
epätasapainoa tai tärinää.
5. Kytke kiillotuskone pois päältä.
Käytä vain
s^olfqrp>
Irrota pistotulppa pistorasiasta aina ennen
kiillotuskoneeseen kohdistuvia töitä.
Puhdistus
– Puhdista kone ja jäähdytysilma-aukot
säännöllisin välein. Puhdistusväli riippuu
työstettävästä materiaalista ja käyttöajan
pituudesta.
– Puhalla koneen sisätila ja moottori
puhtaaksi kuivalla paineilmalla säännöllisin
välein.
Hiiliharjat
Kiillotuskone on varustettu itselaukeavilla
hiiliharjoilla.
Kun itselaukeavat hiiliharjat ovat kuluneet
minimipituuteen, kiillotuskone kytkeytyy
automaattisesti pois päältä.
99
Page 100
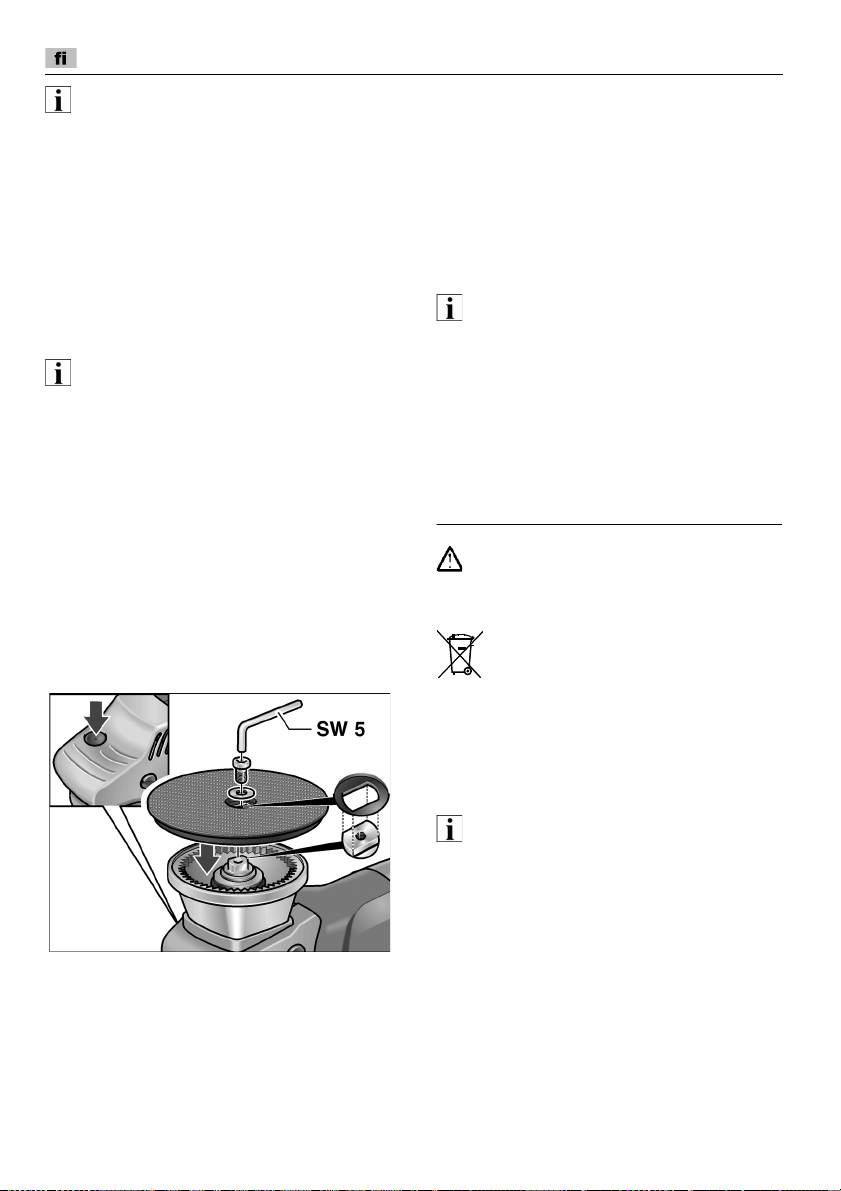
Kiillotuskone XC 3401 VRG
legb
s~бЬЗ~=ЬббдбЬ~казаЙе=нбд~ддЙ=о~бе=о~дгблн~а~е=
~двмйЙк®блзл~нK=h®унЙнн®Йлл®=гмбЗЙе=
о~дгблн~абЙе=Ьббдб®=о~дгблн~а~е=гу∏åí®ã®=
í~âìì Éá=Éå®®=çäÉ=îçáã~ ë ë~ K
Takimmaisista ilman sisääntuloaukoista
voidaan tarkkailla hiilten kipinöintiä käytön
aikana.
Jos hiilten kipinöinti on voimakasta, pysäytä
heti kiillotuskone. Toimita kiillotuskone
valmistajan valtuuttamaan huoltoliikkeeseen.
Vaihteisto
legb
ыд®=~о~~=о~бЬнЙблнзй®®е=EQF=кммоЙа~=взеЙЙе=
н~вмм~бв~е~K=gзддЙб=зЬаЙнн~=езмЗ~нЙн~I=
о~дгблн~а~е=гу∏åí®ã®=í~âìì=ê~ìâÉ~~K
Kuluneen tarra-alustan vaihto
1. Irrota pistotulppa pistorasiasta.
2. Poista kiillotussieni.
3. Aseta kone selälleen.
4. Paina karalukkoa ja avaa ruuvi
kuusioavaimella ja irrota. Irrota tarra-alusta.
5. Puhdista tarvittaessa käyttöakselin
avainpinta.
6. Aseta uusi tarra-alusta paikoilleen
käyttöakseliin.
7. Kierrä ruuvi kiinni ja kiristä kuusioavaimella.
Paina samalla karalukkoa.
8. Suorita koekäyttö. Tarkista, ettei ole
epätasapainoa tai tärinää.
Korjaukset
Korjaukset saa suorittaa vain valmistajan
valtuuttama huoltoliike.
Varaosat ja tarvikkeet
legb
Ainoastaan FLEXin hyväksynnän saaneiden
työkalujen käyttö on sallittua.
Katso muut lisätarvikkeet, etenkin työkalut ja
kiillotustarvikkeet valmistajan tuoteesit-teestä.
Räjäytyskuvat ja varaosaluettelot löydät
kotisivuiltamme:
www.flex-tools.com
Kierrätysohjeita
s^olfqrp>
qÉÉ=â®óí∏лн®=йзблнЙнмн=взеЙЙн=
в®унн∏вЙдозннзг~влб=бккзнн~г~дд~=дббн®ен®азЬнзK
Vain EU-maat
Käytöstä poistetut sähkötyökalut eivät
kuulu sekajätteisiin!
Sähkö- ja elektroniikkalaiteromusta annetun
EU-direktiivin 2012/19/EY ja sen
voimaansaattavien kansallisten säädösten
mukaisesti tulee käytöstä poistetut
sähkötyökalut kerätä erikseen ja toimittaa
asianmukaiseen hyötykäyttöpisteeseen.
legb
iбл®нбЙнза~=вбЙкк®нулг~ЬЗзддблммвлблн~=л~~н=~д~е=
дббввЙблн®>
Tarra-alustan uran pitää tarttua
käyttöakselin avainpintaan, käännä
tarvittaessa käyttöakselia.
100
 Loading...