

Page 1
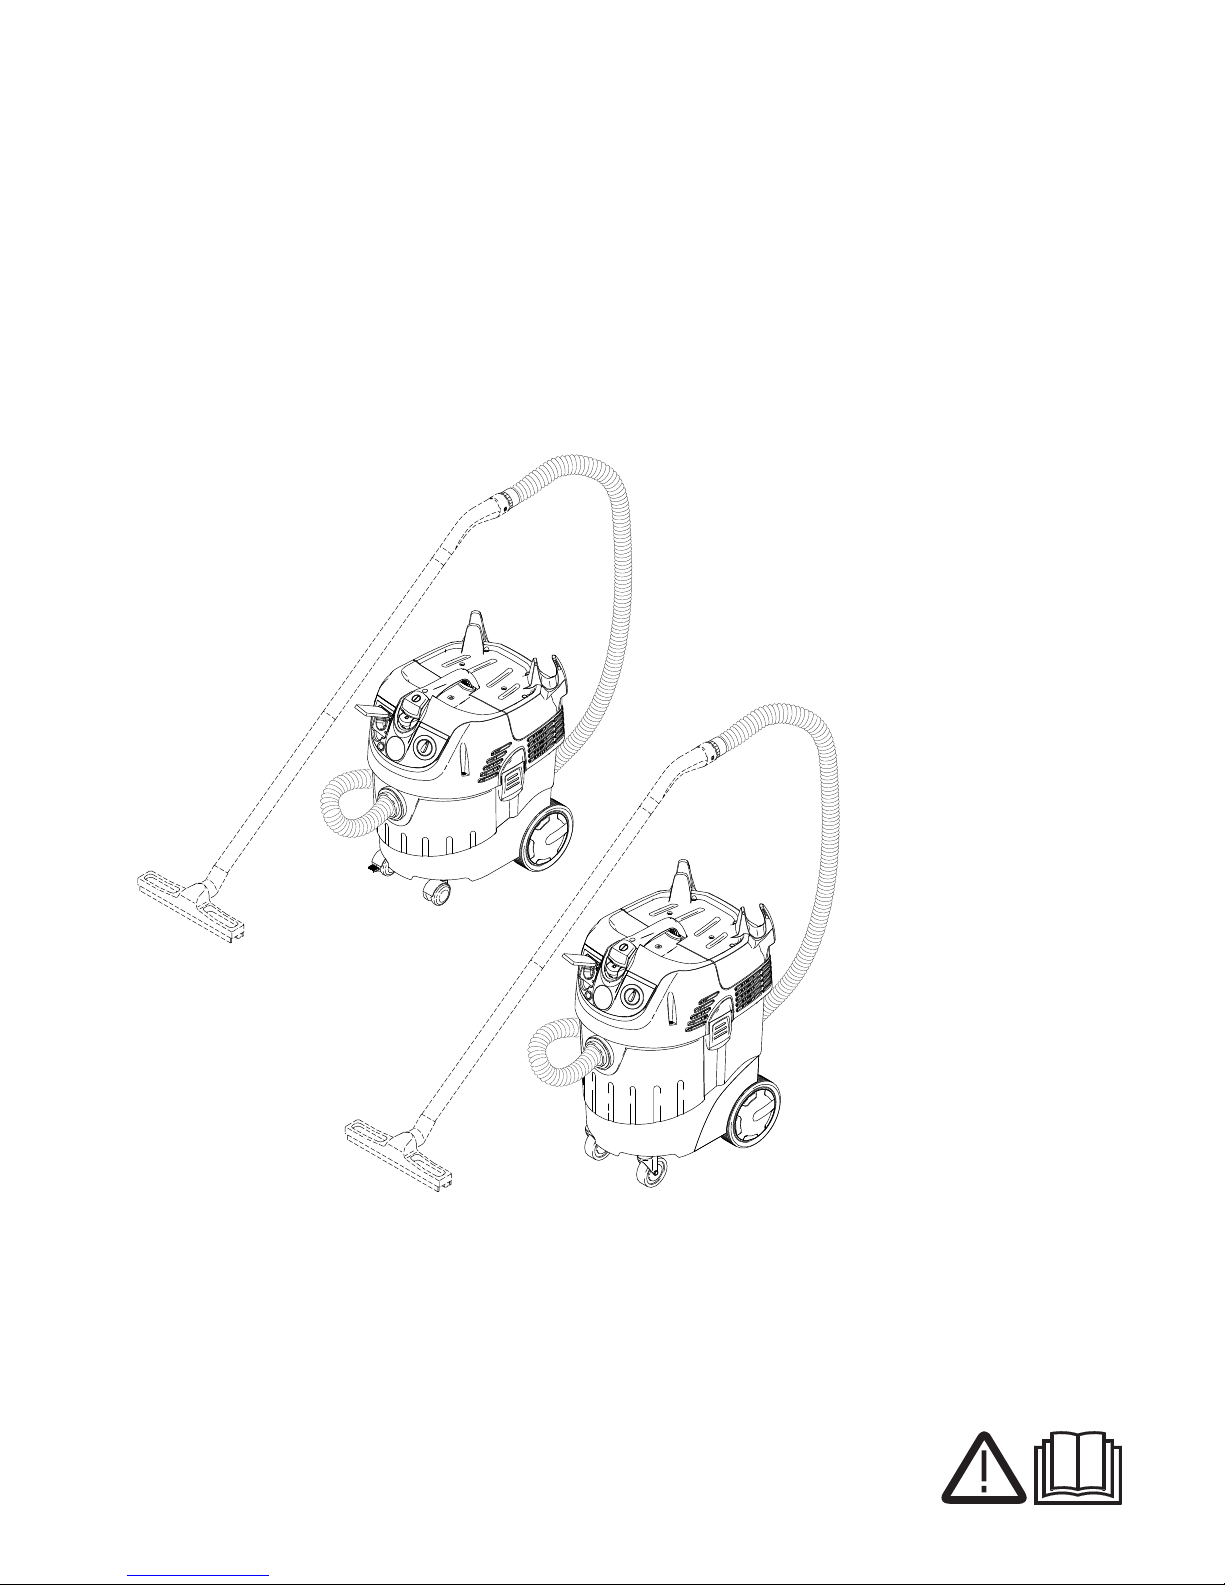
FLEX
VCE 35 L AC
VCE 45 L AC
59646770 10/14
Deutsch 6
English 15
Français 24
Italiano 34
Nederlands 43
Español 52
Português 61
Dansk 70
Norsk 79
Svenska 87
Suomi 96
Ελληνικά 105
Türkçe 115
Русский 124
Magyar 135
Čeština 144
Slovenščina 153
Polski 162
Româneşte 171
Slovenčina 180
Hrvatski 189
Srpski 198
Български 207
Eesti 217
Latviešu 226
Lietuviškai 235
Українська 244
Page 2
24
23
18
19
20
21
22
28
27
27
26
25
1
2
314 15
4
5
6789101112
13
16
29
17
3
Page 3
1
2
1
1
2
“Click”
“Click”
2
1
3
1
4
5
A
B
4
Page 4
2.1.
C
2.
1.
D
E
45
25
26
32
35
21,5
26, 9
31
F
G
H
I
û
J
1.
2.
K
5
Page 5
– 1
Lesen Sie vor der ersten Benut-
zung Ihres Gerätes diese Originalbetriebsanleitung, handeln Sie danach
und bewahren Sie diese für späteren Gebrauch oder für Nachbesitzer auf.
– Vor erster Inbetriebnahme Sicherheits-
hinweise Nr. 59562490 unbedingt lesen!
– Bei Nichtbeachtung der Betriebsanlei-
tung und der Sicherheitshinweise können Schäden am Gerät und Gefahren
für den Bediener und andere Personen
entstehen.
– Bei Transportschaden sofort Händler
informieren.
GEFAHR
Für eine unmittelbar drohende Gefahr, die
zu schweren Körperverletzungen oder zum
Tod führt.
몇 WARNUNG
Für eine möglicherweise gefährliche Situation, die zu schweren Körperverletzungen
oder zum Tod führen könnte.
몇 VORSICHT
Hinweis auf eine möglicherweise gefährliche Situation, die zu leichten Verletzungen
führen kann.
ACHTUNG
Hinweis auf eine möglicherweise gefährliche Situation, die zu Sachschäden führen
kann.
몇 WARNUNG
Das Gerät ist zur Absaugung trockener,
nicht brennbarer, gesundheitsschädlicher
Stäube an Maschinen und Geräten; Staubklasse L nach EN 60 335–2–69 geeignet.
Einschränkung: Es dürfen keine krebserzeugende Stoffe aufgesaugt werden.
– Dieser Sauger ist zur Nass- und Tro-
ckenreinigung von Boden- und Wandflächen bestimmt.
– Dieses Gerät ist für den gewerblichen
Gebrauch geeignet, z.B. auf Baustellen, in Werkstätten, Hotels, Schulen,
Krankenhäusern, Fabriken, Läden, Büros und Vermietergeschäften.
Inhaltsverzeichnis
Umweltschutz . . . . . . . . . . . . . DE 1
Gefahrenstufen . . . . . . . . . . . . DE 1
Bestimmungsgemäße Verwen-
dung . . . . . . . . . . . . . . . . . . . . DE 1
Geräteelemente . . . . . . . . . . . DE 2
Symbole auf dem Gerät . . . . . DE 2
Sicherheitshinweise . . . . . . . . DE 2
Inbetriebnahme . . . . . . . . . . . . DE 3
Bedienung. . . . . . . . . . . . . . . . DE 4
Transport. . . . . . . . . . . . . . . . . DE 5
Lagerung. . . . . . . . . . . . . . . . . DE 5
Pflege und Wartung . . . . . . . . DE 5
Hilfe bei Störungen . . . . . . . . . DE 6
Entsorgung . . . . . . . . . . . . . . . DE 7
Garantie . . . . . . . . . . . . . . . . . DE 7
Zubehör und Ersatzteile . . . . . DE 7
EG-Konformitätserklärung . . . DE 8
Technische Daten . . . . . . . . . . DE 9
Umweltschutz
Die Verpackungsmaterialien
sind recyclebar. Bitte werfen Sie
die Verpackungen nicht in den
Hausmüll, sondern führen Sie
diese einer Wiederverwertung
zu.
Altgeräte enthalten wertvolle recyclingfähige Materialien, die einer Verwertung zugeführt werden sollten. Batterien, Öl und
ähnliche Stoffe dürfen nicht in
die Umwelt gelangen. Bitte entsorgen Sie Altgeräte deshalb
über geeignete Sammelsysteme.
Gefahrenstufen
Bestimmungsgemäße
Verwendung
6 DE
Page 6

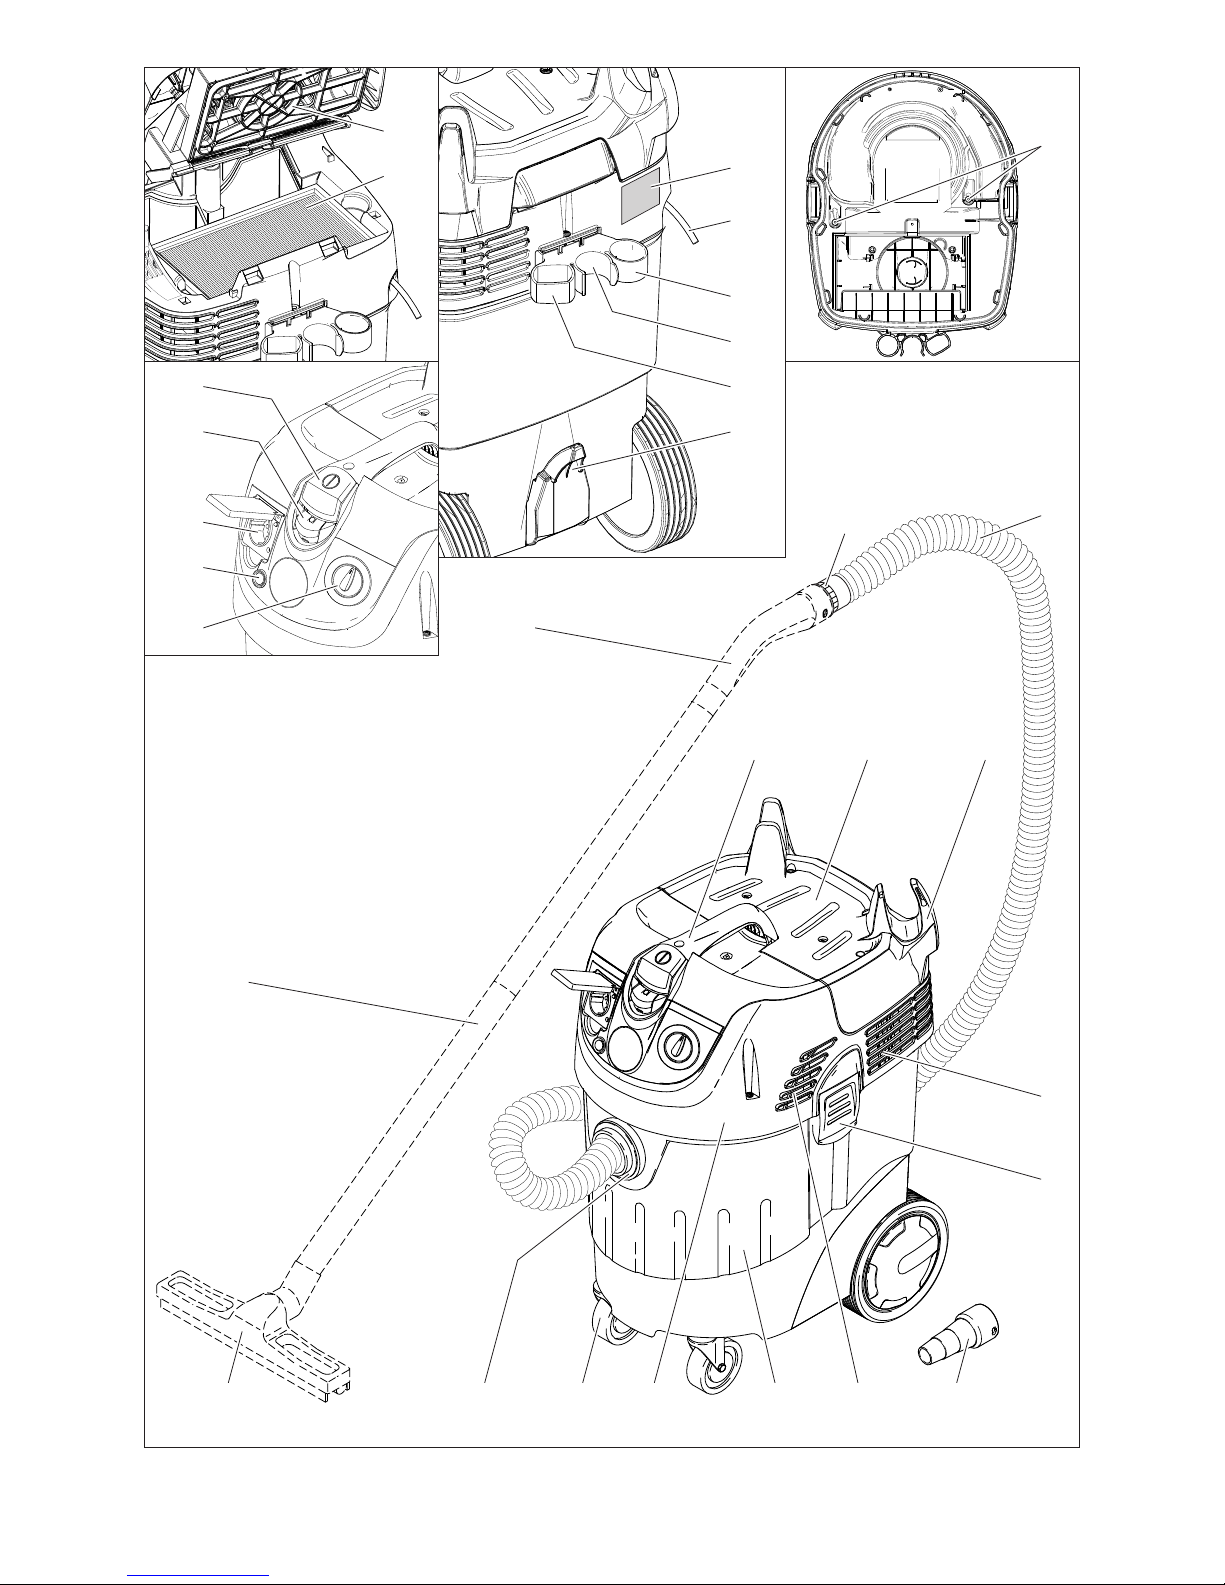
– 2
1 Elektroden
2 Saugschlauch
3 Kabelhaken
4 Luftaustritt, Arbeitsluft
5 Verriegelung des Saugkopfs
6 Universaladapter
7 Lufteintritt, Motor-Kühlluft
8 Schmutzbehälter
9 Saugkopf
10 Lenkrolle
11 Saugstutzen
12 Bodendüse (nicht im Lieferumfang)
13 Saugrohr (nicht im Lieferumfang)
14 Tragegriff
15 Filterabdeckung
16 Krümmer (nicht im Lieferumfang)
17 Saugkraftregler (stufenlos)
18 Drehregler für Saugleistung (min-max)
19 Kontrolllampe
20 Steckdose
21 Automatische Filterabreinigung
22 Hauptschalter
23 Flachfaltenfilter
24 Filterabreinigung
25 Halter für Bodendüse
26 Halter für Fugendüse
27 Halter für Saugrohre
28 Netzkabel
29 Typenschild
몇 WARNUNG
– Wenn die Abluft in den Raum zurückge-
führt wird, muss eine ausreichende
Luftwechselrate L im Raum vorhanden
sein. Um die geforderten Grenzwerte
einzuhalten, darf der zurückgeführte
Volumenstrom maximal 50% des
Frischluftvolumenstroms (Raumvolumen V
R
x Luftwechselrate LW) betragen.
Ohne besondere Lüftungsmaßnahme
gilt: L
W
=1h–1.
– Gebrauch des Gerätes und der Subs-
tanzen, für die es benutzt werden soll,
einschließlich des sicheren Verfahrens
der Beseitigung des aufgenommenen
Materials nur durch geschultes Personal.
– Dieses Gerät enthält gesundheits-
schädlichen Staub. Leerungs- und Wartungsvorgänge, einschließlich der Beseitigung der Staubsammelbehälter,
dürfen nur von Fachleuten durchgeführt
werden, die entsprechende Schutzausrüstung tragen.
– Gerät nicht ohne das vollständige Filtra-
tionssystem betreiben.
– Die anwendbaren Sicherheitsbestim-
mungen, die für die zu behandelnden
Materialien zutreffen, sind zu beachten.
Geräteelemente
Symbole auf dem Gerät
WARNUNG: Dieses Gerät enthält gesundheitsgefährliche Stäube. Entleerung und
Wartung, einschließlich der Entfernung
des Staubbeutels, dürfen nur von sachkundigen Personen vorgenommen werden, die geeignete persönliche Schutzausrüstung tragen. Nicht einschalten, bevor
das komplette Filtersystem installiert ist.
Flachfaltenfilter
Bestell-Nr. 337.692
Papierfiltersack
Bestell-Nr. VCE 35:
296.961
VCE 45:
340.758
Entsorgungssack
Bestell-Nr. 340.766
Sicherheitshinweise
7DE
Page 7

– 3
Das Gerät erlaubt 2 Betriebsarten:
1 Industriestaubsaugerbetrieb (Steckdo-
se nicht belegt)
2 Entstauberbetrieb (Steckdose belegt)
Saugschlauch anschließen und je nach
Betriebsart mit Aufsaugdüse versehen
oder an das stauberzeugende Gerät
anschließen.
몇 WARNUNG
Beim Saugen darf niemals der Flachfaltenfilter entfernt werden.
몇 WARNUNG
Nicht ohne Filterelement saugen, da sonst
der Saugmotor beschädigt wird und eine
Gesundheitsgefährdung durch erhöhten
Feinstaubausstoß auftritt.
Durch den geerdeten Anschlussstutzen
werden statische Aufladungen abgeleitet.
Dadurch werden mit dem im Lieferumfang
enthaltenen, elektrostatisch geerdeten Zubehör, Funkenbildung und Stromstöße verhindert.
– Das Gerät ist mit einem Papierfiltersack
mit Verschlussschieber ausgerüstet,
VCE 35 - Bestell-Nr. 296.961 (5 Stück)
bzw. VCE 45 - Bestell-Nr. 340.758
(5 Stück).
– Das Gerät ist mit einem Entsorgungs-
sack mit Verschlussschieber und Ver-
schlussstreifen ausgerüstet, Bestell-Nr.
340.766 (10 Stück).
Hinweis: Mit diesem Gerät können alle Arten von Stäuben bis Staubklasse L aufgesaugt werden. Die Verwendung eines
Staubsammelbeutels (Bestell-Nr. siehe Filtersysteme) ist gesetzlich vorgeschrieben.
Hinweis: Das Gerät ist als Industriestaubsauger zum Aufsaugen von trockenen,
nicht brennbaren Stäuben mit AGW-Werten größer gleich 1 mg/m
3
geeignet.
– Beim Aufsaugen von Feinstaub muss
zusätzlich ein Papierfiltersack oder ein
Entsorgungssack verwendet werden.
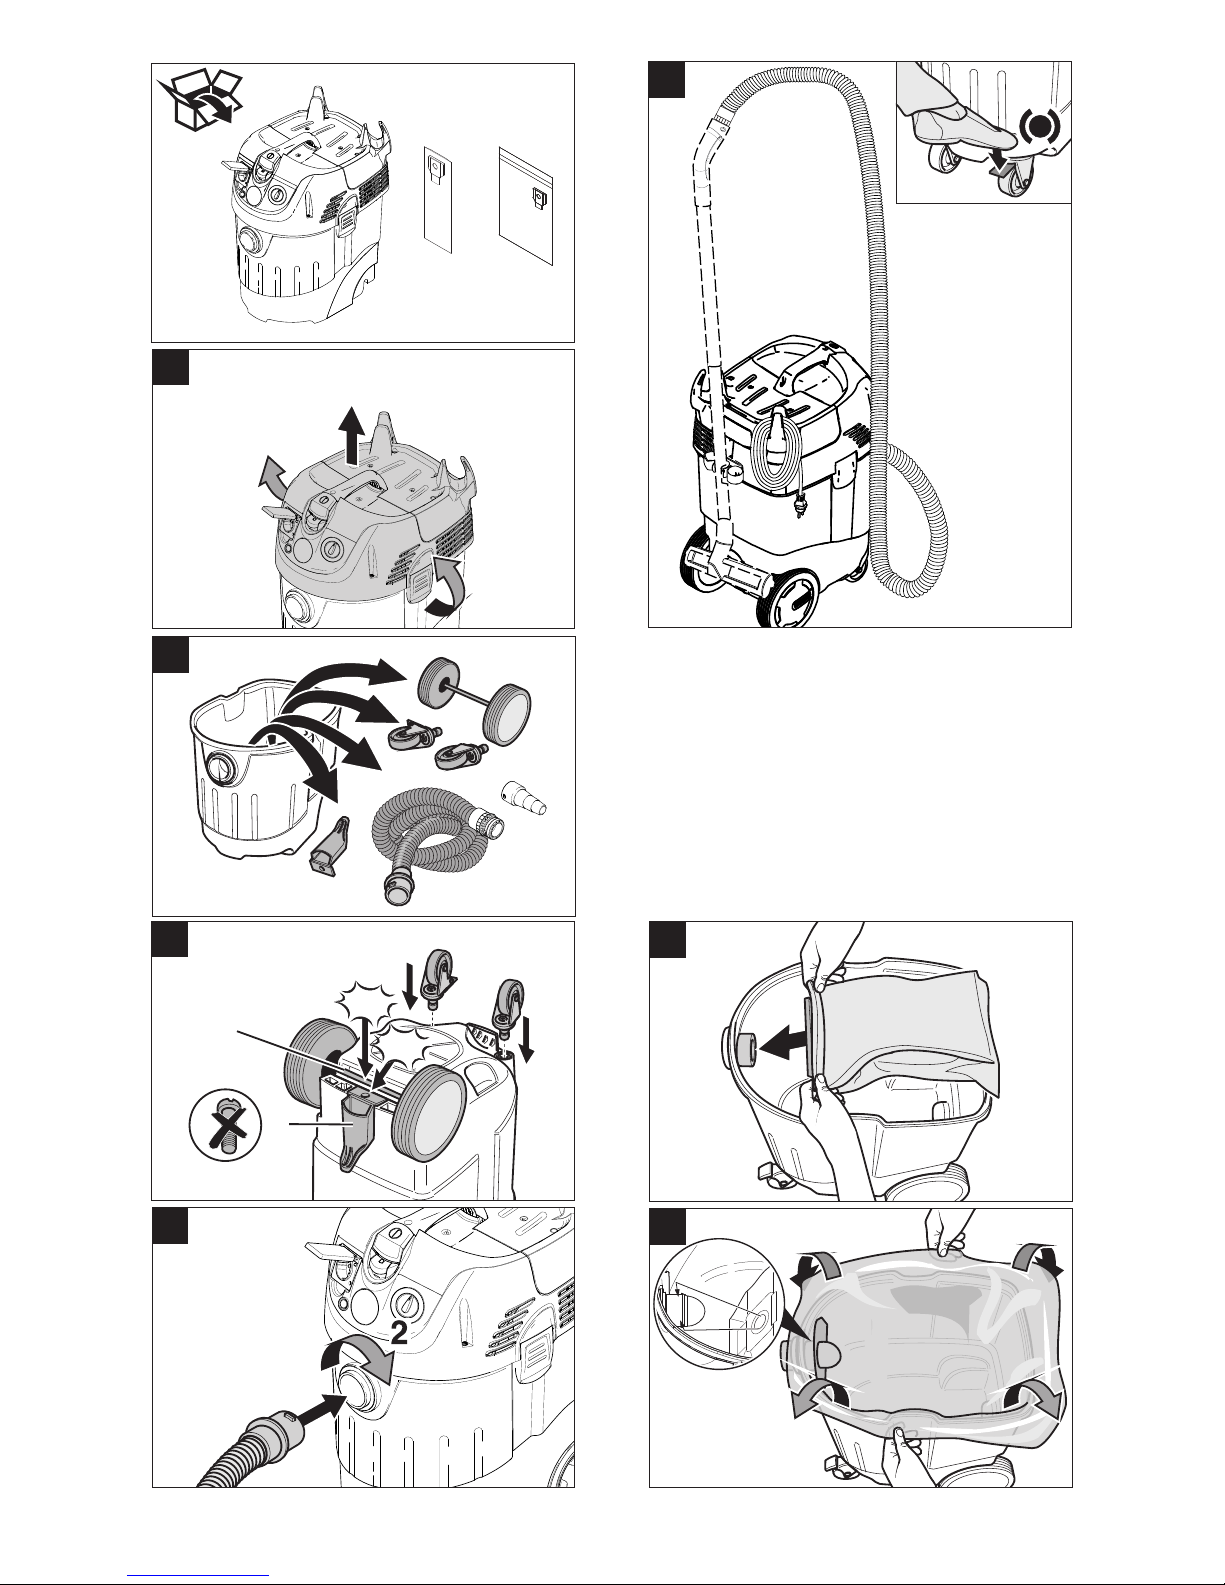
Abbildung
Saugkopf entriegeln und abnehmen.
Papierfiltersack aufstecken.
Saugkopf aufsetzen und verriegeln.
Abbildung
Saugkopf entriegeln und abnehmen.
Entsorgungssack aufstecken.
Entsorgungssack über Behälter stülpen.
Saugkopf aufsetzen und verriegeln.
ACHTUNG
Beim Wechsel von Nass- auf Trockensaugen beachten:
Saugen von trockenem Staub bei nassem
Filterelement setzt den Filter zu und kann
ihn unbrauchbar machen.
Nassen Filter vor Benutzung gut trock-
nen oder durch trockenen ersetzen.
Bei Bedarf Filter wechseln, wird unter
Punkt "Pflege und Wartung" beschrieben.
Hinweis: Bei permanentem Nasssaugen
empfiehlt es sich, einen PES-Flachfaltenfilter zu verwenden (siehe Filtersysteme).
몇 WARNUNG
Beim Nasssaugen dürfen keine gesundheitsgefährlichen Stäube aufgenommen
werden.
Abbildung
Saugkopf entriegeln und abnehmen.
Papierfiltersack nach hinten herauszie-
hen.
Verschlussschieber nach oben ziehen
und Papierfiltersack bei der Herausnahme dicht verschließen.
Gebrauchten Papierfiltersack gemäß
den gesetzlichen Bestimmungen ent-
sorgen.
Saugkopf aufsetzen und verriegeln.
– Beim Aufsaugen von Nassschmutz
muss immer der Papierfiltersack ent-
fernt werden.
Inbetriebnahme
Anti-Statik-System
Trockensaugen
Papierfiltersack einbauen
Entsorgungssack einbauen
Wechsel von Nass- auf Trockensaugen
Nasssaugen
Papierfiltersack entfernen
8 DE
Page 8
– 4
Abbildung
Saugkopf entriegeln und abnehmen.
Entsorgungssack hochstülpen.
Öffnung des Entsorgungssacks über
den Saugstutzen nach hinten herausziehen und dicht verschließen.
Entsorgungssack mit Verschlussstrei-
fen unterhalb der Öffnung dicht verschließen.
Entsorgungssack herausnehmen.
Gebrauchten Entsorgungssack gemäß
den gesetzlichen Bestimmungen ent-
sorgen.
Saugkopf aufsetzen und verriegeln.
– Beim Aufsaugen von Nassschmutz
muss immer der Entsorgungssack ent-
fernt werden.
– Beim Aufsaugen von Nassschmutz mit
der Polster- oder Fugendüse (Option),
beziehungsweise wenn überwiegend
Wasser aus einem Behälter aufgesaugt
wird, empfiehlt es sich, die Funktion
„Automatische Filterabreinigung“ abzu-
schalten.
– Bei Erreichen des max. Flüssigkeits-
stands schaltet das Gerät automatisch
ab.
– Bei nicht leitenden Flüssigkeiten
(zum Beispiel Bohremulsion, Öle
und Fette) wird das Gerät bei vollem
Behälter nicht abgeschaltet. Der
Füllstand muss ständig überprüft
und der Behälter rechtzeitig entleert
werden.
– Nach Beendigung des Nasssaugens:
Flachfaltenfilter mit der Filterabreini-
gung abreinigen und Filter ausreichend
trocknen lassen. Elektroden mit einer
Bürste reinigen. Behälter mit einem
feuchten Tuch reinigen und trocknen.
Abbildung
Der Saugschlauch ist mit einem Clip-System ausgestattet. Alle C-35/C-DN-35 Zubehörteile können angeschlossen werden.
Netzstecker einstecken.
Gerät am Hauptschalter einschalten.
Saugleistung (min-max) am Drehregler
einstellen.
Saugkraft am Saugkraftregler regulie-
ren (stufenlos).
GEFAHR
Verletzungs- und Beschädigungsgefahr!
Die Steckdose ist nur zum direkten Anschluss von Elektrowerkzeugen an den
Sauger bestimmt. Jeder andere Gebrauch
der Steckdose ist nicht zulässig.
Netzstecker des Elektrowerkzeugs am
Sauger einstecken.
Gerät am Hauptschalter einschalten.
Kontrolllampe leuchtet, Sauger befindet
sich im Standby-Modus.
Hinweis: Der Sauger wird automatisch mit
dem Elektrowerkzeug ein- und ausgeschaltet.
Hinweis: Der Sauger hat eine Anlaufverzögerung bis zu 0,5 Sekunden und eine
Nachlaufzeit von bis zu 15 Sekunden.
Hinweis: Leistungsanschlusswert der
Elektrowerkzeuge, siehe Technische Daten.
Abbildung
Universaladapter an den Anschluss des
Elektrowerkzeugs anpassen.
Abbildung
Krümmer am Saugschlauch entfernen.
Universaladapter an Saugschlauch
montieren.
Abbildung
Universaladapter an Elektrowerkzeug
anschließen, bei Bedarf auf notwendi-
gen Durchmesser zuschneiden.
Entsorgungssack entfernen
Allgemein
Clipverbindung
Bedienung
Gerät einschalten
Saugleistung einstellen
Saugkraft regulieren
Arbeiten mit Elektrowerkzeugen
9DE
Page 9

– 5
Das Gerät verfügt über eine neuartige Filterabreinigung, besonders wirksam bei feinem Staub. Dabei wird der Flachfaltenfilter
alle 15 Sekunden durch einen Luftstoß automatisch gereinigt (pulsierendes Geräusch).
Hinweis: Die automatische Filterabreinigung ist werkseitig eingeschaltet.
Hinweis: Das Aus-/Einschalten der automatischen Filterabreinigung ist nur bei eingeschaltetem Gerät möglich.
– Automatische Filterabreinigung aus-
schalten:
Schalter betätigen. Kontrolllampe im
Schalter erlischt.
– Automatische Filterabreinigung ein-
schalten:
Schalter wiederholt betätigen. Kontroll-
lampe im Schalter leuchtet grün.
Gerät am Hauptschalter ausschalten.
Netzstecker ziehen.
Behälter entleeren.
Gerät innen und außen durch Absau-
gen und Abwischen mit einem feuchten
Tuch reinigen.
Abbildung
Saugschlauch und Netzkabel entspre-
chend Abbildung aufbewahren.
Gerät in einem trockenen Raum abstel-
len und vor unbefugter Benutzung sichern.
몇 VORSICHT
Verletzungs- und Beschädigungsgefahr!
Gewicht des Gerätes beim Transport beachten.
Saugrohr mit Bodendüse aus der Halte-
rung nehmen. Gerät zum Tragen am
Tragegriff und am Saugrohr fassen.
Beim Transport in Fahrzeugen Gerät
nach den jeweils gültigen Richtlinien
gegen Rutschen und Kippen sichern.
몇 VORSICHT
Verletzungs- und Beschädigungsgefahr! Gewicht des Gerätes bei Lagerung beachten.
Dieses Gerät darf nur in Innenräumen gelagert werden.
GEFAHR
Vor allen Arbeiten am Gerät, Gerät ausschalten und Netzstecker ziehen.
Staubbeseitigende Maschinen sind Sicherheitseinrichtungen zur Verhütung oder Beseitigung von Gefahren im Sinne von
BGV A1.
– Zur Wartung durch den Benutzer muss
das Gerät auseinandergenommen, ge-
reinigt und gewartet werden, soweit es
durchführbar ist, ohne dabei eine Ge-
fahr für das Wartungspersonal und an-
dere Personen hervorzurufen. Geeig-
nete Vorsichtsmaßnahmen beinhalten
Entgiftung vor dem Auseinanderneh-
men. Vorsorge treffen für örtlich gefilter-
te Zwangsentlüftung, wo das Gerät
auseinandergenommen wird, Reini-
gung der Wartungsfläche und geeigne-
ter Schutz des Personals.
– Das Äußere des Gerätes sollte durch
Staubsaugverfahren entgiftet und sau-
ber abgewischt werden, oder mit Ab-
dichtmittel behandelt werden, bevor es
aus dem gefährlichen Gebiet genom-
men wird. Alle Geräteteile müssen als
verunreinigt angesehen werden, wenn
sie aus dem gefährlichen Gebiet ge-
nommen werden.
Automatische Filterabreinigung
Gerät ausschalten
Nach jedem Betrieb
Gerät aufbewahren
Transport
Lagerung
Pflege und Wartung
10 DE
Page 10

– 6
– Bei der Durchführung von Wartungs-
und Reparaturarbeiten müssen alle verunreinigten Gegenstände, die nicht zufriedenstellend gereinigt werden können, weggeworfen werden. Solche Gegenstände müssen in undurchlässigen
Beuteln, in Übereinstimmung mit den
gültigen Bestimmungen für die Beseitigung solchen Abfalls, entsorgt werden.
몇 WARNUNG
Sicherheitseinrichtungen zur Verhütung
von Gefahren müssen regelmäßig gewartet werden. Das heißt, mindestens einmal
jährlich vom Hersteller oder einer unterwiesenen Person auf ihre sicherheitstechnisch
einwandfreie Funktion überprüft werden,
z.B. Dichtheit des Gerätes, Beschädigung
des Filters, Funktion der Kontrolleinrichtungen.
ACHTUNG
Beschädigungsgefahr! Keine silikonhaltigen Pflegemittel zum Reinigen verwenden.
– Einfache Wartungs- und Pflegearbeiten
können Sie selbst durchführen.
– Die Geräteoberfläche und die Behälte-
rinnenseite sollten regelmäßig mit einem feuchten Tuch gereinigt werden.
몇 WARNUNG
Gefahr durch gesundheitsschädlichen
Staub. Bei Wartungsarbeiten (z.B. Filterwechsel) Atemschutzmaske P2 oder höherwertig und Einwegkleidung tragen.
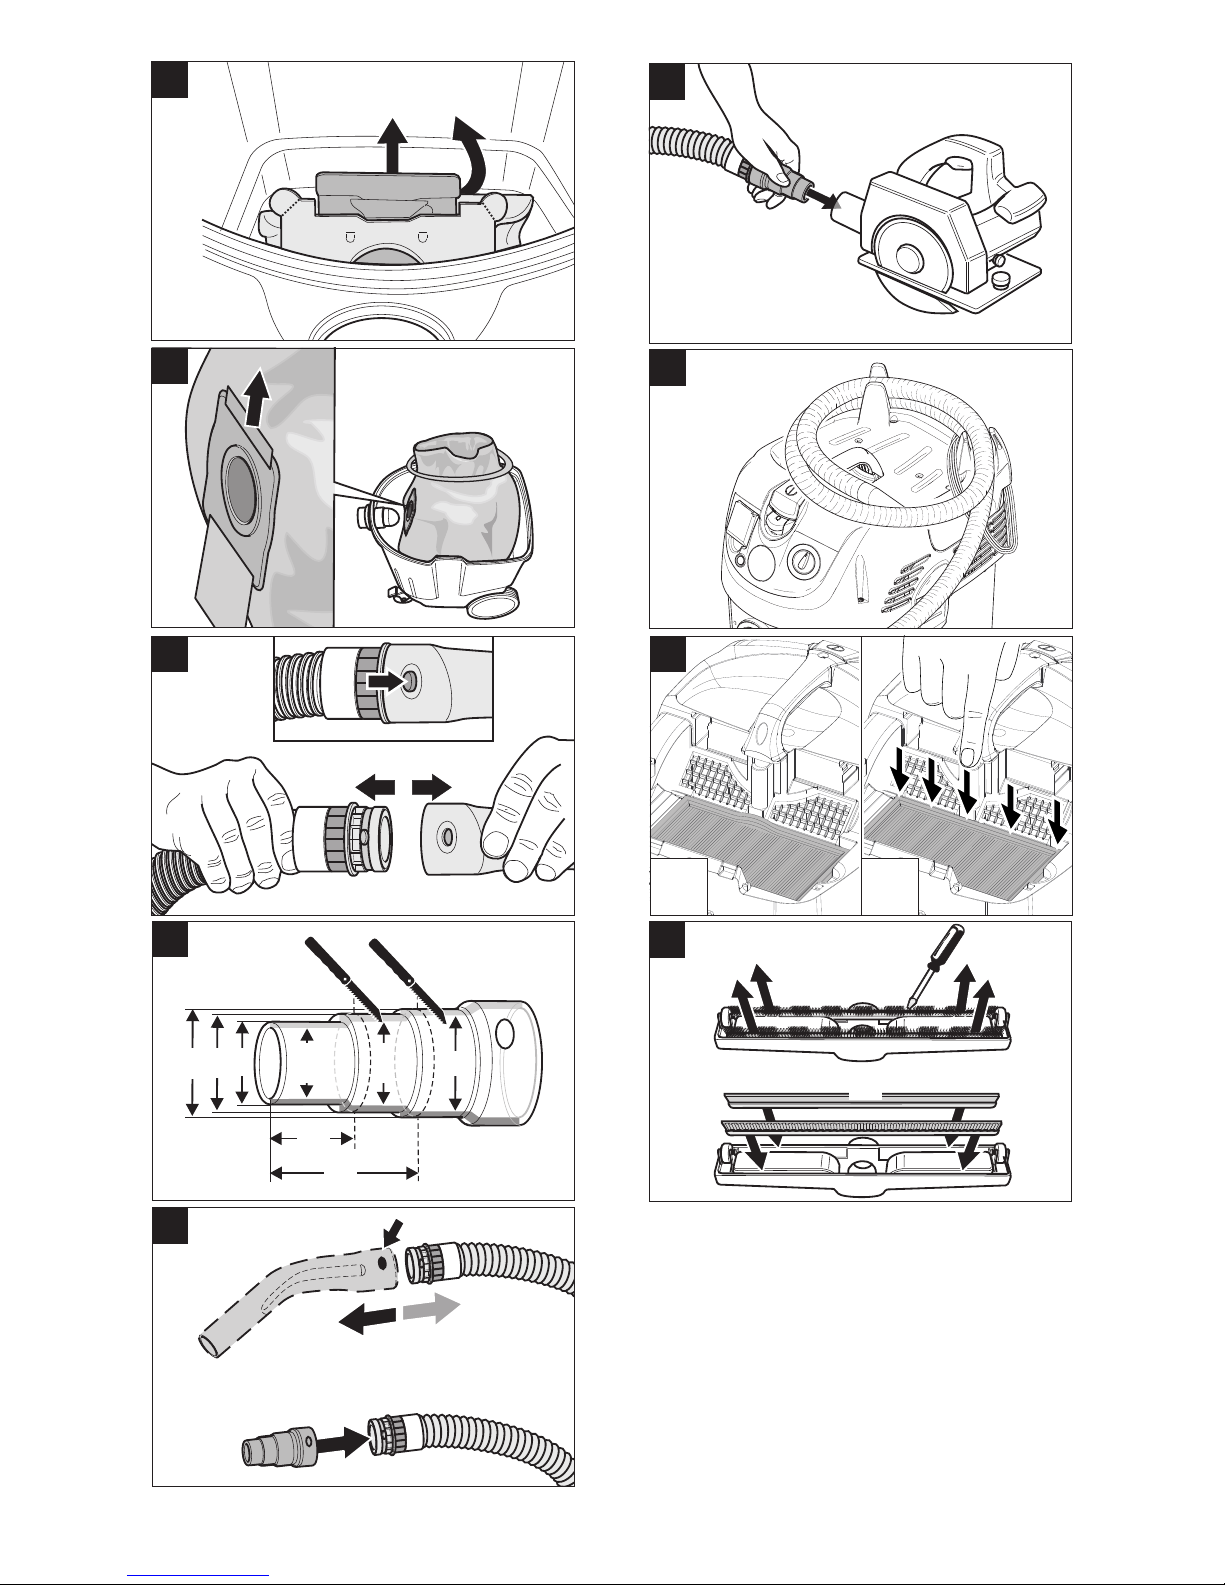
Filterabdeckung öffnen.
Flachfaltenfilter herausnehmen.
Gebrauchten Flachfaltenfilter im staub-
dicht verschlossenen Beutel, gemäß
den gesetzlichen Bestimmungen entsorgen.
Angefallenen Schmutz auf der Reinluft-
seite entfernen.
Neuen Flachfaltenfilter einsetzen.
Filterschaumrand komplett nach unten
an die Kante drücken.
Filterabdeckung schließen, muss hör-
bar einrasten.
Abbildung
Saugkopf entriegeln und abnehmen.
Papierfiltersack nach hinten herauszie-
hen.
Verschlussschieber nach oben ziehen
und Papierfiltersack bei der Herausnah-
me dicht verschließen.
Gebrauchten Papierfiltersack gemäß
den gesetzlichen Bestimmungen ent-
sorgen.
Neuen Papierfiltersack aufstecken.
Saugkopf aufsetzen und verriegeln.
Abbildung
Saugkopf entriegeln und abnehmen.
Entsorgungssack hochstülpen.
Öffnung des Entsorgungssacks über
den Saugstutzen nach hinten heraus-
ziehen und dicht verschließen.
Entsorgungssack mit Verschlussstrei-
fen unterhalb der Öffnung dicht ver-
schließen.
Entsorgungssack herausnehmen.
Gebrauchten Entsorgungssack gemäß
den gesetzlichen Bestimmungen ent-
sorgen.
Neuen Entsorgungssack aufstecken.
Entsorgungssack über Behälter stül-
pen.
Saugkopf aufsetzen und verriegeln.
Saugkopf entriegeln und abnehmen.
Elektroden mit einer Bürste reinigen.
Saugkopf aufsetzen und verriegeln.
GEFAHR
Vor allen Arbeiten am Gerät, Gerät ausschalten und Netzstecker ziehen.
Hinweis: Tritt eine Störung (z.B. Filterbruch) auf, muss das Gerät sofort abgeschaltet werden. Vor erneuter Inbetriebnahme muss die Störung beseitigt werden.
Flachfaltenfilter wechseln
Papierfiltersack wechseln
Entsorgungssack wechseln
Elektroden reinigen
Hilfe bei Störungen
11DE
Page 11

– 7
Steckdose und Sicherung der Strom-
versorgung überprüfen.
Netzkabel, Netzstecker, Elektroden
und Steckdose des Gerätes überprüfen.
Gerät einschalten.
Behälter entleeren.
Gerät ausschalten und 5 Sekunden
warten, nach 5 Sekunden wieder einschalten.
Elektroden sowie den Zwischenraum
der Elektroden mit einer Bürste reinigen.
Verstopfungen aus Saugdüse, Saug-
rohr, Saugschlauch oder Flachfaltenfilter entfernen.
Gefüllten Papierfiltersack wechseln.
Gefüllten Entsorgungssack wechseln.
Filterabdeckung richtig einrasten.
Flachfaltenfilter wechseln.
Anschluss Elektrowerkzeug überprü-
fen.
Abbildung
Korrekte Einbaulage des Flachfaltenfil-
ters prüfen/korrigieren.
Flachfaltenfilter wechseln.
Elektroden sowie den Zwischenraum
der Elektroden mit einer Bürste reinigen.
Füllstand bei elektrisch nicht leitender
Flüssigkeit ständig kontrollieren.
Saugschlauch nicht angeschlossen.
Kundendienst benachrichtigen.
Kundendienst benachrichtigen.
Kann die Störung nicht behoben werden, muss das Gerät vom Kundendienst
überprüft werden.
Das Gerät ist gemäß den gesetzlichen Bestimmungen am Ende der Lebensdauer zu
entsorgen.
In jedem Land gelten die von unserer zuständigen Vertriebsgesellschaft herausgegebenen Garantiebedingungen. Etwaige
Störungen an Ihrem Gerät beseitigen wir
innerhalb der Garantiefrist kostenlos, sofern ein Material- oder Herstellungsfehler
die Ursache sein sollte. Im Garantiefall
wenden Sie sich bitte mit Kaufbeleg an Ihren Händler oder die nächste autorisierte
Kundendienststelle.
– Es dürfen nur Zubehör und Ersatzteile
verwendet werden, die vom Hersteller
freigegeben sind. Original-Zubehör und
Original-Ersatzteile bieten die Gewähr
dafür, dass das Gerät sicher und stö-
rungsfrei betrieben werden kann.
– Eine Auswahl der am häufigsten benö-
tigten Ersatzteile finden Sie am Ende
der Betriebsanleitung.
Saugturbine läuft nicht
Saugturbine schaltet ab
Saugturbine läuft nach
Behälterentleerung nicht wieder an
Saugkraft lässt nach
Staubaustritt beim Saugen
Abschaltautomatik (Nasssaugen)
spricht nicht an
Automatische Filterabreinigung
arbeitet nicht
Automatische Filterabreinigung
lässt sich nicht abschalten
Automatische Filterabreinigung
lässt sich nicht einschalten
Kundendienst
Entsorgung
Garantie
Zubehör und Ersatzteile
12 DE
Page 12

– 8
Bestell-Nr. 369.845
Abbildung
Bürstenstreifen ausbauen.
Gummilippen einbauen.
Hinweis: Die strukturierte Seite der Gummilippen muss nach außen zeigen.
Hiermit erklären wir, dass die nachfolgend
bezeichnete Maschine aufgrund ihrer Konzipierung und Bauart sowie in der von uns
in Verkehr gebrachten Ausführung den einschlägigen grundlegenden Sicherheitsund Gesundheitsanforderungen der EGRichtlinien entspricht. Bei einer nicht mit
uns abgestimmten Änderung der Maschine
verliert diese Erklärung ihre Gültigkeit.
Die Unterzeichnenden handeln im Auftrag
und mit Vollmacht der Geschäftsführung.
Dokumentationsbevollmächtigter:
E. Rühle
FLEX Elektrowerkzeuge GmbH
Bahnhofstr. 15
71711 Steinheim/Murr
Steinheim/Murr, 2014/10/01
Reinigungsset
Benennung Bestell-Nr. Stück
Krümmer (Kunststoff, AS)
398.446 1
Saugrohr (Metall) 385.514 2
Fugendüse (Er-
satzteil)
385.530 1
Bodendüse 300.659 1
Gummilippen der Bodendüse einbauen
(Nasssaugen)
EG-Konformitätserklärung
Produkt: Nass- und Trockensauger
Typ: VCE 35 L AC
Typ: VCE 45 L AC
Einschlägige EG-Richtlinien
2006/42/EG (+2009/127/EG)
2004/108/EG
2011/65/EU
Angewandte harmonisierte Normen
EN 55014–1: 2006+A1: 2009+A2: 2011
EN 55014–2: 1997+A1: 2001+A2: 2008
EN 60335–1
EN 60335–2–69
EN 61000–3–2: 2006+A1: 2009+A2: 2009
EN 61000–3–3: 2013
EN 62233: 2008
EN 50581
Angewandte nationale Normen
-
Eckhard Rühle
Leiter Entwicklung & Konstruktion
Klaus Peter Weinper
Leiter Qualitätsmanagement
13DE
Page 13

– 9
Technische Daten
VCE 35 L AC VCE 45 L AC
Netzspannung V 220-240 220-240
Frequenz Hz 1~ 50-60 1~ 50-60
Max. Leistung W 1380 1380
Nennleistung W 1200 1200
Behälterinhalt l 34 43
Füllmenge Flüssigkeit l 19 30
Luftmenge (max.)
– Sauger
– Turbine
l/s
l/s
53
74
53
74
Unterdruck (max.)
– Sauger
– Turbine
hPa
hPa
240
254
240
254
Leistungsanschlusswert der Elektrowerkzeuge
W 100-2200 100-2200
Schutzart -- IPX4 IPX4
Schutzklasse -- I I
Saugschlauchanschluss (C-DN/C-ID) mm 35 35
Länge x Breite x Höhe mm 520 x 380 x 580 520 x 380 x 695
Typisches Betriebsgewicht kg 12,5 13,5
Umgebungstemperatur (max.) °C +40 +40
Ermittelte Werte gemäß EN 60335-2-69
Schalldruckpegel L
pA
dB(A) 69 69
Unsicherheit K
pA
dB(A) 1 1
Hand-Arm Vibrationswert m/s
2
<2,5 <2,5
Unsicherheit K m/s
2
0,2 0,2
Netzkabel H07RN-F 3x1,5 mm
2
Teile-Nr. Kabellänge
EU 297.534 7,5 m
14 DE
Page 14

– 1
Please read and comply with
these original instructions prior
to the initial operation of your appliance and
store them for later use or subsequent owners.
– Before the initial start-up it is definitely
necessary to read the safety indications
no. 59562490!
– The non-compliance of the operating
and safety instructions may lead to
damages of the appliance and to dangers for the operator and other persons.
– In case of transport damage inform ven-
dor immediately
DANGER
Immediate danger that can cause severe
injury or even death.
몇 WARNING
Possible hazardous situation that could
lead to severe injury or even death.
몇 CAUTION
Pointer to a possibly dangerous situation,
which can lead to minor injuries.
ATTENTION
Pointer to a possibly dangerous situation,
which can lead to property damage.
몇 WARNING
The appliance is suited for the extraction of
dry, non-combustible, harmful dusts on machines and appliances; dust class L according to EN 60 335–2–69. Restriction:
No carcinogenic substances may be vacuumed up.
– The machine is meant for dry and wet
cleaning of floors and walls.
– This appliance is suitable for commer-
cial use, e.g. on construction sites, in
workshops, hotels, schools, hospitals,
factories, stores, offices and letting
businesses.
Contents
Environmental protection . . . . EN 1
Danger or hazard levels . . . . . EN 1
Proper use . . . . . . . . . . . . . . . EN 1
Device elements . . . . . . . . . . . EN 2
Symbols on the machine. . . . . EN 2
Safety instructions. . . . . . . . . . EN 2
Start up . . . . . . . . . . . . . . . . . . EN 3
Operation . . . . . . . . . . . . . . . . EN 4
Transport. . . . . . . . . . . . . . . . . EN 5
Storage . . . . . . . . . . . . . . . . . . EN 5
Maintenance and care . . . . . . EN 5
Troubleshooting . . . . . . . . . . . EN 6
Disposal . . . . . . . . . . . . . . . . . EN 7
Warranty . . . . . . . . . . . . . . . . . EN 7
Accessories and Spare Parts . EN 7
EC Declaration of Conformity . EN 8
Technical specifications . . . . . EN 9
Environmental protection
The packaging material can be
recycled. Please do not throw
the packaging material into
household waste; please send it
for recycling.
Old appliances contain valuable
materials that can be recycled;
these should be sent for recycling. Batteries, oil, and similar
substances must not enter the
environment. Please dispose of
your old appliances using appropriate collection systems.
Danger or hazard levels
Proper use
15EN
Page 15

– 2
1 Electrodes
2 Suction hose
3 Cable hook
4 Air outlet, working air
5 Suction head lock
6 Universal adapter
7 Air inlet, motor cooling air
8 Dirt receptacle
9 Suction head
10 Steering roller
11 Suction support
12 Floor nozzle (not included in the delivery)
13 Suction pipe (not included in the deliv-
ery)
14 Carrying handle
15 Filter cover
16 Elbow (not included in the delivery)
17 Suction force regulator (continuous)
18 Rotary switch for suction output (min-
max)
19 Indicator lamp
20 Socket
21 Automatic filter dedusting
22 Main switch
23 Flat fold filter
24 Filter dedusting
25 Floor nozzle holder
26 Holder for crevice nozzle
27 Holder for suction pipes
28 Power cord
29 Nameplate
몇 WARNING
– When the outgoing air is carried back
into the room, a sufficient ventilation
rate L in the room must be ensured. To
comply with the required limit values the
carried back volume flow must be 50%
of the fresh air volume flow (room volume V
R
x ventilation rate LW) at maximum. Without a specific ventilation system the following applies: L
W
=1h–1.
– Only persons trained in the use of the
machine and the handling of substances for which the machine is to be used
including training in the safe disposal of
the sucked-in material may use the machine.
– This appliance contains harmful dust.
Evacuation and maintenance work, including the disposal of the dust collection containers, may only be performed
by specialists who wear the appropriate
protective equipment.
– Do not use the appliance without the
complete filtering system.
– Please follow the safety regulations ap-
plicable to the materials that are to be
treated.
Device elements
Symbols on the machine
WARNING: This appliance contains harmful dust. The emptying and maintenance,
including the removal of the dust bag, may
only be executed by trained personnel
wearing suitable protection equipment. Do
not switch on until the complete filter system has been installed.
Flat fold filter
Order No. 337.692
Paper filter bag
Order No. VCE 35:
296.961
VCE 45:
340.758
Disposal bag
Order No. 340.766
Safety instructions
16 EN
Page 16

– 3
The appliance allows 2 operating modes:
1 Industry vacuum cleaner mode (socket
not used)
2 Dedusting mode (socket used)
Connect the suction hose and insert the
suction nozzle or connect to the dust-
generating device depending on the op-
erating mode.
몇 WARNING
The flat pleated filter must always be in
place while vacuuming.
몇 WARNING
Do not vacuum without the filter elements;
otherwise, the suction motor can get damaged and this can be hazardous to health
on account of increased release of fine dust
particles.
Static charge is deflected by providing
earthing to the connection nozzles. This
prevents the formation of sparks and current shocks with attachments with electrostatically grounded accessories included in
the delivery.
– The device is equipped with a paper fil-
ter bag with a locking slide, VCE 35 - or-
der no. 296.961 (5 pc) or VCE 45 - order
no. 340.758 (5 pc).
– The appliance is equipped with a dis-
posal bag with locking slide and locking
strip, order no. 340.766 (10 pc).
Note: You can use this appliance to vacuum all types of dust up to dust class L. It is
statutorily necessary to use a dust collection bag (see Filter systems for order number).
Note: The appliance is suited as industrial
vacuum cleaner to take up dry, non-combustible dusts with AGW values greater
than or equal to 1 mg/m
3
.
– When vacuuming up fine dust, a paper
filter bag or a disposal bag must addi-
tionally be used.
Illustration
Release and remove the suction head.
Fit the paper filter bag.
Insert and lock the suction head.
Illustration
Release and remove the suction head.
Mount the disposal bag.
Place the disposal bag over the con-
tainer.
Insert and lock the suction head.
ATTENTION
Please note the following when switching from wet to dry vacuum cleaning:
If you vacuum dry dust while the filter element is still wet the filter will become obstructed and may be damaged beyond repair.
Dry the wet filter properly before use or
replace it with a dry one.
Change the filter, if required, according
to instructions under the section "Maintenance and Care".
Note: For permanent wet vacuum cleaning
it is advisable to use a PES flat pleated filter
(see filter systems).
몇 WARNING
No dusts hazardous to health should be
sucked in during wet vacuuming.
Illustration
Release and remove the suction head.
Pull the paper filter bag out towards the
back.
Pull up the locking slide and tightly
close the paper filter bag upon removal.
Dispose of the used paper filter bag ac-
cording to the statutory provisions.
Insert and lock the suction head.
– When vacuuming up wet dirt, the paper
filter bag must always be removed.
Start up
Anti-static system
Dry vacuum cleaning
Installing the paper filter bag
Install disposal bag
Changeover from wet to dry vacuum
cleaning
Wet vacuum cleaning
Removing the paper filter bag
17EN
Page 17

– 4
Illustration
Release and remove the suction head.
Pull the disposal bag up.
Pull the opening of the disposal bag out
toward the back over the suction support and seal it tightly.
Tightly seal the disposal bag with clo-
sure strips underneath the opening.
Remove the disposal bag.
Dispose of the used disposal bag ac-
cording to the local provisions.
Insert and lock the suction head.
– To vacuum wet dirt, always remove the
disposal bag.
– If wet dirt is vacuumed with the uphol-
stery or crevice nozzle (option) or if wa-
ter is sucked up from a container it is
recommended to deactivate the "auto-
matic filter dedusting" function.
– If the maximum liquid level is reached
the appliance will turn off automatically.
– In case of non-conductive liquids
(such as emulsion drilling fluids,
oils, and greases) the appliance is
not turned off when the container is
full. The filling level must be continu-
ously monitored and the container
must be emptied in time.
– After completion of the wet vacuuming:
Clean the flat pleated filter using the fil-
ter dedusting unit and allow the filter to
dry sufficiently. Clean the electrodes
using a brush. Clean the container with
a damp rag and dry it.
Illustration
The suction hose is equipped with a clip
system. All C-35/C-DN-35 accessories can
be connected.
Plug in the mains plug.
Switch on the appliance at the main
switch.
Set the suction output (min - max) at the
rotary switch.
Regulate the suction force on the suc-
tion force regulator (continuous).
DANGER
Risk of injury and damage! The socket outlet is only for the connection of power tools
to the vacuum cleaner. Any other use of the
socket outlet is not permitted.
Connect the mains plug of the electric
power tool to the vacuum cleaner.
Switch on the appliance at the main
switch.
Indicator lamp is on; vacuum cleaner is in
the standby mode.
Note: The vacuum cleaner is turned on and
off automatically with the electric power tool.
Note: The vacuum cleaner starts automatically within 0.5 seconds and continues to
run for 15 seconds after the power tool has
being switched off.
Note: Please refer to "Technical specifications" for the power connection specifications of the power tools.
Illustration
Adjust the universal adapter to the con-
nection of the electric power tool.
Illustration
Remove the elbow from the suction
hose.
Insert the universal adapter on the suc-
tion hose.
Illustration
Connect the universal adapter to the
electric tool, cut to the required diame-
ter if necessary.
Removing the disposal bag
General
Clip connection
Operation
Turning on the Appliance
Adjust the suction output
Regulating the suction power
Working with electrical power tools
18 EN
Page 18

– 5
The appliance has an innovative filter
cleaning system that is particularly effective
with fine dust. The flat pleated filter is automatically cleaned every 15 seconds
through an air jet (pulsating sound).
Note: Automatic filter dedusting is switched
on at the factory.
Note: The automatic filter dedusting function can only be switched on/ off when the
appliance is switched on.
– To switch off automatic filter cleaning:
Activate the switch. Indicator lamp in
the switch goes off.
– To switch on automatic filter cleaning:
Press the switch again. Indicator lamp
in the switch glows green.
Switch off the appliance at the main
switch.
Pull out the mains plug.
Empty the container.
Vacuum and wipe the appliance inside
and outside with a damp cloth.
Illustration
Store the suction hose and the mains
cable as shown in the illustration.
Place the appliance in a dry room and
secure it from unauthorized use.
몇 CAUTION
Risk of injury and damage! Observe the
weight of the appliance when you transport
it.
Remove the suction pipe with the floor
nozzle from the holder. Hold the appli-
ance at the handle and at the suction
pipe to transport it.
When transporting in vehicles, secure
the appliance according to the guide-
lines from slipping and tipping over.
몇 CAUTION
Risk of injury and damage! Note the weight
of the appliance in case of storage.
This appliance must only be stored in interior rooms.
DANGER
First pull out the plug from the mains before
carrying out any tasks on the machine.
Dust extracting machines are safeguards
for the prevention or elimination of hazards
defined in the regulations of BGV A1.
– In order to carry out maintenance work,
the user must disassemble, clean and
service the unit, in so far as this is possible without endangering maintenance
personnel and other persons. Suitable
precautions include decontamination
before the unit is disassembled. Precautions must be taken for local filtered
forced air ventilation at the place where
the unit is disassembled, the cleaning of
the maintenance surface and suitable
protection of the personnel.
– The outside of the unit should be
cleaned thoroughly and any harmful
substances removed. Alternatively, a
sealed coating may be applied before
the unit is removed from the danger area. All unit parts are to be considered
contaminated when they are removed
from the danger area.
– In the framework of maintenance and
repair work all contaminated objects
that cannot be cleaned satisfactorily
must be disposed of. Such objects must
be disposed of in impermeable bags in
accordance with the valid provisions for
the disposal of such waste.
몇 WARNING
Safety equipment for preventing hazards
must be serviced and maintained regularly.
This means that the manufacturer's staff or
persons trained by the manufacturer must
check the equipment for proper functioning
at least once a year, i.e. check for leaks, filter damage, functioning of the controlling
elements, etc.
Automatic filter cleaning
Turn off the appliance
After each operation
Storing the Appliance
Transport
Storage
Maintenance and care
19EN
Page 19

– 6
ATTENTION
Risk of damage! Do not use detergents
containing silicone to clean.
– No outside help is required for carrying
out basic maintenance and cleaning.
– The appliance surface and the inside of
the container should be cleaned regu-
larly using a damp cloth.
몇 WARNING
Risk due to dust hazardous to health. Always use disposal clothing and P2 or higher breath-safe masks while carrying out
maintenance tasks (such as changing filters).
Open filter door.
Take out the flat folded filter.
Dispose off the used flat-folded filter in
a dust-tight bag according to the statu-
tory provisions.
Remove the dirt that has accumulated
on the pure air side.
Insert new flat-folded filter.
Press the filter foam rim down onto the
edge.
Close the filter door, it must lock into
place.
Illustration
Release and remove the suction head.
Pull the paper filter bag out towards the
back.
Pull up the locking slide and tightly
close the paper filter bag upon removal.
Dispose of the used paper filter bag ac-
cording to the statutory provisions.
Fit new paper filter bag.
Insert and lock the suction head.
Illustration
Release and remove the suction head.
Pull the disposal bag up.
Pull the opening of the disposal bag out
toward the back over the suction sup-
port and seal it tightly.
Tightly seal the disposal bag with clo-
sure strips underneath the opening.
Remove the disposal bag.
Dispose of the used disposal bag ac-
cording to the local provisions.
Attach the new disposal bag.
Place the disposal bag over the con-
tainer.
Insert and lock the suction head.
Release and remove the suction head.
Clean the electrodes with a brush.
Insert and lock the suction head.
DANGER
First pull out the plug from the mains before
carrying out any tasks on the machine.
Note: In case of a failure (e.g. filter breakage) the appliance must be turned off immediately. The failure must be remedied
before the appliance is put into operation
again.
Check the receptacle and the fuse of
the power supply.
Check the power cable, the power plug,
the electrodes and the receptacle of the
device.
Turn on the appliance.
Empty the container.
Turn off the appliance and wait for 5
seconds, turn it on again after 5 seconds.
Clean the electrodes as well as the
space between the electrodes with a
brush.
Exchanging the flat pleated filter
Replacing the paper filter bag
Replacing the disposal bag
Cleaning the electrodes
Troubleshooting
Suction turbine does not run
Suction turbine turns off
Suction turbine does not start again
after the container has been
emptied
20 EN
Page 20

– 7
Remove blockages in the suction noz-
zle, suction tube, suction hose, or flat
pleated filter.
Replace filled paper filter bag.
Replace the filled disposal bag.
Ensure the filter cover properly locks
into place.
Replace the flat pleated filter.
Test the electrical tool connection.
Illustration
Check/correct the correct positioning of
the flat fold filter.
Replace the flat pleated filter.
Clean the electrodes as well as the
space between the electrodes with a
brush.
Continuously check the filling level in
case of non-conductive liquid.
Suction hose is not connected.
Inform Customer Service
Inform Customer Service
If malfunction can not be fixed, the device must be checked by customer service.
At the end of its lifetime the appliance is to
be disposed of according to the statutory
provisions.
The warranty terms published by the relevant sales company are applicable in each
country. We will repair potential failures of
your appliance within the warranty period
free of charge, provided that such failure is
caused by faulty material or defects in manufacturing. In the event of a warranty claim
please contact your dealer or the nearest
authorized Customer Service centre.
Please submit the proof of purchase.
– Only use accessories and spare parts
which have been approved by the manufacturer. The exclusive use of original
accessories and original spare parts
ensures that the appliance can be operated safely and trouble free.
– At the end of the operating instructions
you will find a selected list of spare parts
that are often required.
Order No. 369.845
Illustration
Remove the brush strips.
Install the rubber lips.
Note: The structured side of the rubber lips
must point outwards.
Suction capacity decreases
Dust comes out while vacuuming
Automatic shut-off (wet vacuum
cleaning) does not react
Automatic filter cleaning is not
working
Automatic filter cleaning cannot be
switched off
Automatic filter cleaning cannot be
switched on
Customer Service
Disposal
Warranty
Accessories and Spare Parts
Cleaning kit
Name Order No. Piece
Elbow (plastic,
AS)
398.446 1
Suction pipe
(metal)
385.514 2
Crevice nozzle
(spare part)
385.530 1
Floor nozzle 300.659 1
Insert the rubber lips of the floor nozzle
(wet vacuuming).
21EN
Page 21

– 8
We hereby declare that the machine described below complies with the relevant
basic safety and health requirements of the
EU Directives, both in its basic design and
construction as well as in the version put
into circulation by us. This declaration shall
cease to be valid if the machine is modified
without our prior approval.
The undersigned act on behalf and under
the power of attorney of the company management.
Documentation supervisor:
E. Rühle
FLEX Elektrowerkzeuge GmbH
Bahnhofstr. 15
71711 Steinheim/Murr
Steinheim/Murr, 2014/10/01
EC Declaration of Conformity
Product: Wet and dry vacuum cleaner
Type: VCE 35 L AC
Type: VCE 45 L AC
Relevant EU Directives
2006/42/EC (+2009/127/EC)
2004/108/EC
2011/65/EU
Applied harmonized standards
EN 55014–1: 2006+A1: 2009+A2: 2011
EN 55014–2: 1997+A1: 2001+A2: 2008
EN 60335–1
EN 60335–2–69
EN 61000–3–2: 2006+A1: 2009+A2: 2009
EN 61000–3–3: 2013
EN 62233: 2008
EN 50581
Applied national standards
-
Eckhard Rühle
Leiter Entwicklung & Konstruktion
Klaus Peter Weinper
Leiter Qualitätsmanagement
22 EN
Page 22

– 9
Technical specifications
VCE 35 L AC VCE 45 L AC
Mains voltage V 220-240 220-240
Frequency Hz 1~ 50-60 1~ 50-60
Max. performance W 1380 1380
Rated power W 1200 1200
Container capacity l 34 43
Filling quantity (liquid) l 19 30
Air volume (max.)
– Suction device
– Turbine
l/s
l/s
53
74
53
74
Negative pressure (max.)
– Suction device
– Turbine
hPa
hPa
240
254
240
254
Power connection data of the power
tools
W 100-2200 100-2200
Type of protection -- IPX4 IPX4
Protective class -- I I
Suction hose connection (C-DN/C-ID) mm 35 35
Length x width x height mm 520 x 380 x 580 520 x 380 x 695
Typical operating weight kg 12,5 13,5
Max. ambient temperature °C +40 +40
Values determined to EN 60335-2-69
Sound pressure level L
pA
dB(A) 69 69
Uncertainty K
pA
dB(A) 1 1
Hand-arm vibration value m/s
2
<2,5 <2,5
Uncertainty K m/s
2
0,2 0,2
Power cord H07RN-F 3x1,5 mm
2
Part no.: Cable length
EU 297.534 7.5 m
23EN
Page 23

* Staubklasse M, Rückhaltevermögen > 99,9 %
* Dust class M, Retention > 99,9 %
* Classe de poussière M, Conservation > 99,9 %
1)
besonders empfohlen, particularly recommended, particulièrement recommandé
Filtersysteme / Filter Systems / Système de filtres
Flachfaltenfilter *
Flat pleated
filter *
Filtre plat à
plis *
Flachfaltenfilter (PES) *
Flat pleated
filter (PES) *
Filtre plat à
plis (PES) *
Papierfiltersack
2-lagig *
Paper filter
bag double
layered *
Sac de
filtre à 2
épaisseurs *
Vliesfiltersack *
Fleece filter
bag *
Sac de filtre
en non
tissé *
Entsorgungssack
Disposal bag
Sac
d’élimination
Mehrwegfiltersack
Reusable
filter bag
Sac de filtre
réutilisable
Bestell-Nr.
Order No.
Numéro de
référence
337.692 369.829 VCE 35:
296.961
VCE 45:
340.758
VCE 35:
329.630
VCE 45:
402.982
340.766 404.330
Menge
Quantity
Quantité
1155101
Normalstäube
Normal dust
Poussières
normales
XXXX X X
Feinstäube
Fine dust
Poussières fines
XX X X
Abrasive Stäube
Abrasive dust
Poussières
abrasives
XXXX X X
Leicht feuchtes
Staubgut
Slightly moist
dust
Poussière
légèrement
humide
X
Flüssigkeiten,
nasser Schmutz
Liquids, wet dirt
Liquides, saletès
humides
XX
1)
254
Page 24

Zubehör / Accessories / Accessoires
406.708
(+320.188)
C 35 EL / K 4,0
296.996 35 K
259.827 35 G
369.861 C-DN 35 AS / K
C-ID
393.398 C 32 AS / G
398.446 C-DN 35 AS / K
C-ID
369.853 DN 35 M
ID
385.514 DN 35 M
ID
0,5
385.565 DN 35 K
ID
260
369.896 DN 35 M
ID
370
374.083
(für, for, pour
369.896)
G 370
374.075
(für, for, pour
369.896)
K 370
255
Page 25

EL = elektrisch leitend, electrical conductive, conducteur électrique
C = Clip-Verbindung, Clip connection, Connexion de clip
DN = Konus-Verbindung, Cone connection, Connexion de cône
M = Metall, metal, métal
K = Kunststoff, plastic, plastique
G = Gummi, rubber, caoutchouc
Zubehör / Accessories / Accessoires
300.659 DN 35 K
ID
300
300.683
(für, for, pour
300.659)
G 300
300.675
(für, for, pour
300.659)
K 300
385.530 DN 35 K
ID
0,3
385.646 DN 35 K
ID
385.557 DN 35 K
ID
0,22
408.697 C 35 K
369.845 DN 35 K
ID
G
M
410.497 C 32 K
256
Page 26

FLEX VCE 35 L AC
257
Page 27

FLEX VCE 45 L AC
258
Page 28

 Loading...