

Page 1
MANUAL
LD-185DCH HD COMBI TV, DVD and DVB-T
LD-216DCH HD COMBI TV, DVD and DVB-T
Please read this manual carefully
before operating your TV.
Page 2
IMPORTANT SAFETY INSTRUCTIONS
This symbol indicates “dangerous voltage” inside the
product that presents a risk of electric shock or personal
injury.
Thi s symbo l in dic a tes im p orta n t inst ruct ions
accompanying the product.
Please read this manual carefully before using this product.
Before connecting the AC power cord to the DC adapter outlet, make sure
the voltage designation of the LCD TV corresponds to the local electrical
supply. If you are unsure of your power supply, ask your local power
company.
Never insert anything metallic into the cabinet openings of the liquid crystal
display LCD TV/monitor; otherwise it may create the danger of electric
shock.
To avoid electric shock, never touch the inside of the LCD TV/monitor and
adapter. Only a qualified technician should open the case of the LCD TV/
monitor/adapter.
Never use your LCD TV/monitor/adapter if the power cord has been
damaged. Do not allow anything to rest on the power cord, and keep the
cord away from place where people can trip over it.
Be sure to hold the plug, not the cord, when disconnecting the adapter from
an electric socket.
Openings in the LCD TV/monitor/adapter cabinet are provided for ventilation.
To prevent overheating, these openings should not be blocked or covered.
Also, avoid using the LCD TV/monitor on a bed, sofa, rug, or other soft
surface. Doing so may block the ventilation openings in the bottom of the
cabinet. If you put the LCD TV/monitor in a bookcase or some other enclosed
space, be sure to provide adequate ventilation.
Do not expose the LCD TV/monitor to extreme temperature conditions or to
extreme humidity conditions.
The apparatus shall not be exposed to dripping or splashing and that no
objects filled with liquids, such as vases, shall be placed on the apparatus.
Page 3

IMPORTANT SAFETY INSTRUCTIONS
Do not place the LCD TV/monitor on an unstable cart, stand, tripod, bracket,
table, or floor where it can fall. It is damaged if dropped, hit or scratched. Do
not clean the front with keton-type materials (e.g. Acetone), ethyl alcohol,
toluene, ethyl acid, methyl, or chloride-these may damage the panel.
Locate your DC adapter near an easily accessible AC outlet.
If your LCD TV/monitor does not operate normally in particular, if there are
any unusual sounds or smells coming from it unplug it immediately and
contact an authorized dealer or service enter.
High temperature can cause problems. Don’t use your LCD TV/monitor in
direct sunlight, and keep it away from heaters, stoves, fireplaces, and other
sources of heat.
Unplug the DC adapter when it is going to be left unused for an extended
period of time.
To reduce the risk of fire or electric shock, and annoying interference, use
the recommended accessories only.
If the LCD TV/monitor is broken, do not try to repair it yourself. Contact
qualified service personnel.
Unplug your DC adapter from the AC outlet before any service.
Be sure the service technician uses authorized replacement parts or their
equivalents. Unauthorized parts may cause fire, electrical shook, or other
hazards.
Following any service or repair, be sure the service technician performs
safety checks to certify that your TFT-LCD TV/monitor is in safe operating
order.
The apparatus with CLASS I construction shall be connected to a MAINS
socket outlet with a protective earthing connection.
Page 4

SAFETY PRECAUTIONS
This Display was designed and constructed in accordance with the rules of good
manufacturing practice and in respect of European directives 2006/95/CE, and
2004/108/CE as regards safety and the elimination of radio interference. Follow
the instructions and take the operating precautions indicated; incorrect use of
the equipment could result in a fire or a risk of electrocution.
This product complies with EU Directive 2002/96/EC
The crossed bin symbol on the appliance indicates that the product, at the end
of its life span, must be disposed of separately from domestic waste, either by
taking it to a separate waste disposal site for electric and electronic appliances
or by returning it to your dealer when you buy another similar appliance. The
user is responsible for taking the appliance to a special waste disposal site
at the end of its life span. If the appliance in question is collected correctly
as separate waste, it can be recycled, treated and disposed of ecologically;
this avoids a negative impact on both the environment and the health and
contributes towards the recycling of the product's materials. For further
information regarding the waste disposal services available, contact your local
waste disposal agency or the point of sale where you bought the appliance.
Page 5
Congratulations on your choice of a Flex-TV from People of Lava, Sweden.
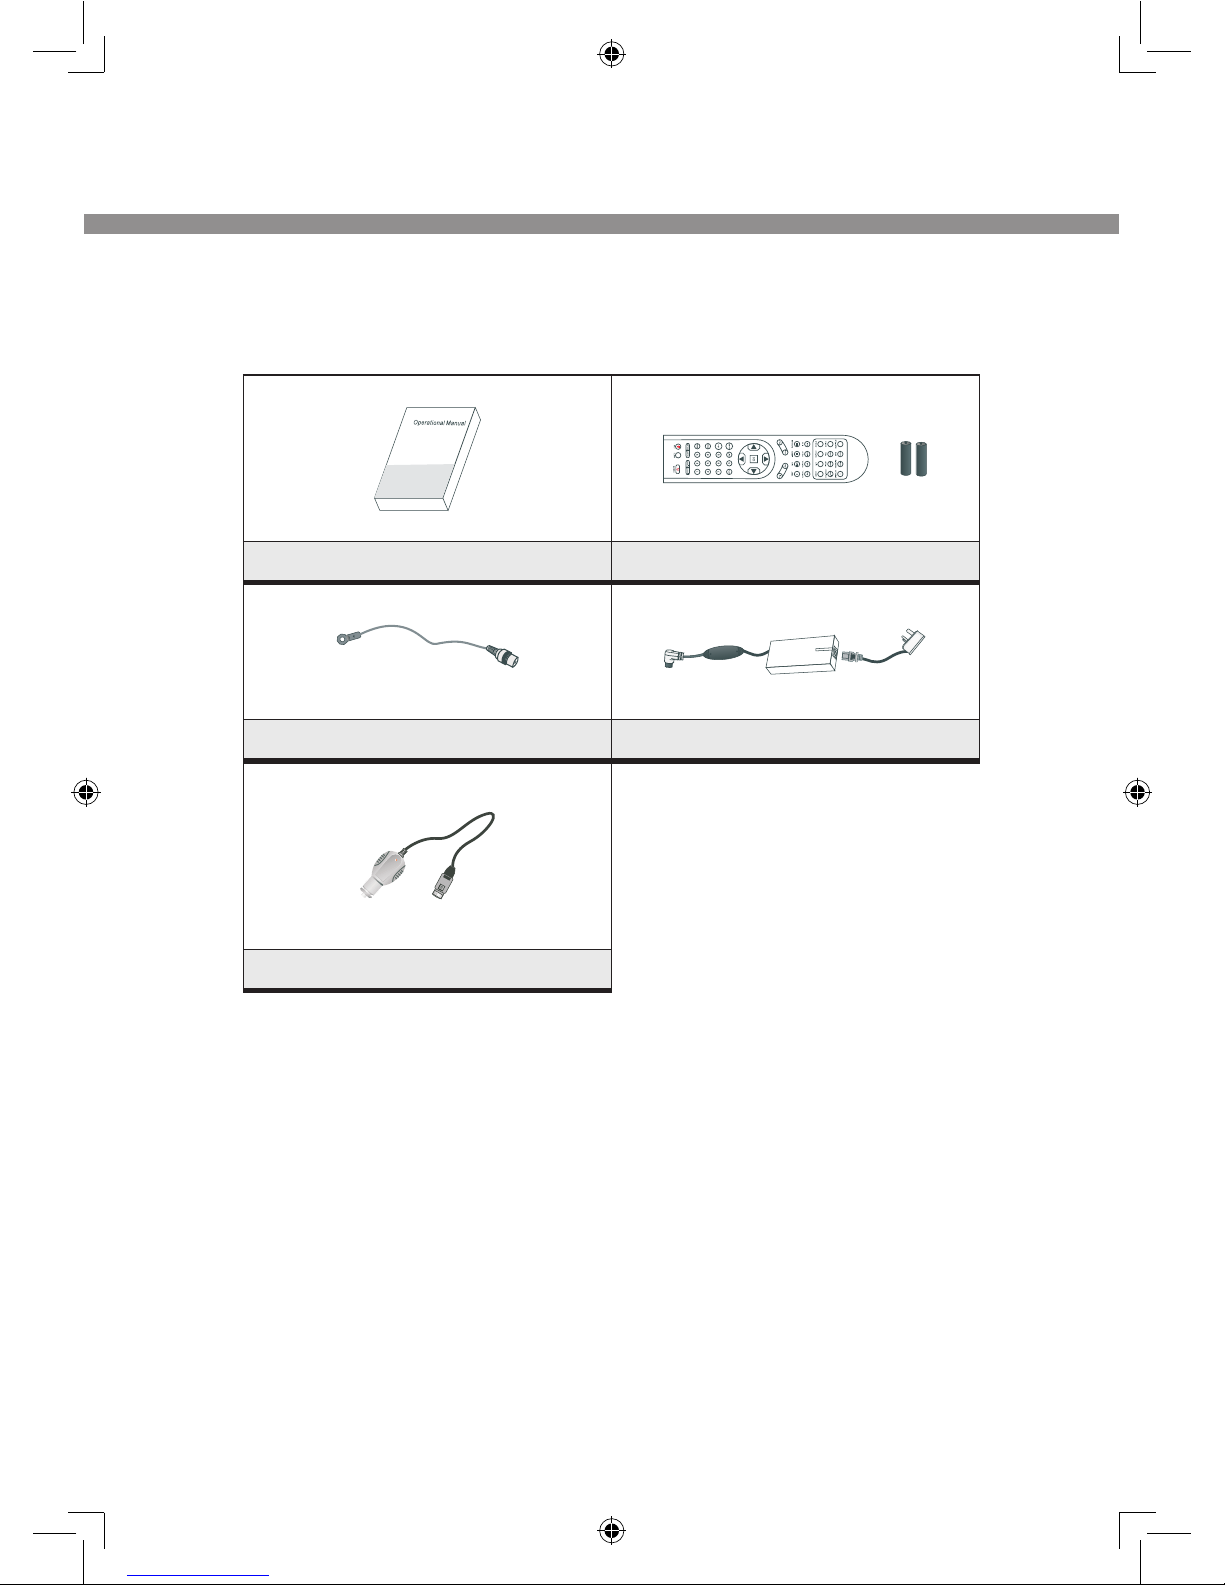
Before you begin, please do check that your box contained the following
accessories
User manual (Manual) Remote control and battery
FM antenna Power adapter
Automotive Power socket adapter
For using Automotive power socket adapter, please plug it with TV first.
As part of People of Lava’ environmental policy your machine is equipped with
a power saving feature which after four hours of inactivity (no channel change,
volume control, source switching, etc.) shuts the TV off.
This is preceded by a warning message informing that the shutdown will take place
within 60sec. Do you wish to continue watching, press any button on the remote
control and the countdown is interrupted.
ACCESSORIES
Page 6

CONTENT
PANEL BUTTON FUNCTIONS
Front panel .................................................... 1 Side panel ......................................................2
EXTERNAL EQUIPMENT
Connecting diagram ......................................3
REMOTE CONTROL
Remote buttons ............................................ 4 Battery installation ........................................6
LET'S START
Switching on ................................................. 7 Select source operation .................................7
DTV MENU SETUP
Picture ..........................................................8 Sound ............................................................8
Channel ......................................................... 9 Dtv setup ......................................................10
Function ...................................................... 13 Electronic program guide (epg) .....................13
Information .................................................13
ATV MENU SETUP
Picture ........................................................ 14 Sound ..........................................................14
Channel ....................................................... 15 Function .......................................................16
TELETEXT FUNCTION
Teletext function .........................................17
SCART/AV/S-VIDEO/HDMI/USB MENU SETUP
Video setting menu ..................................... 18
VGA MENU SETUP
VGA Setup ................................................... 19 Sound ..........................................................19
Picture ........................................................ 20 Function .......................................................20
FM MENU OPERATION
Fm setting ................................................... 21 Sound ..........................................................22
Function ...................................................... 22
Page 7

CONTENT
USB OPERATION
Brief introduction ........................................ 23 Playback ......................................................24
Play music ................................................... 26 Play movie ....................................................26
Operate in full screen state ......................... 27 Play photo ....................................................28
Operate in full screen state ......................... 28
DVD OPERATION
Playback ..................................................... 29 Volume control .............................................29
VCD, SVCD menu playback ........................... 30 Memory ........................................................30
Select track to play directly by number
buttons ....................................................... 31
Select language/audio ..................................31
Repeat playback ......................................... 32 Repeat playback of selected segment ..........32
Fast playback ............................................. 33 Play from the desired position ......................33
Zooming the displayed frame ...................... 34 MPEG4 and JPEG file playing .......................35
DVD FUNCTION SETUP
Picture ....................................................... 38 Sound ..........................................................38
DVD setting ................................................ 38 Function .......................................................40
TROUBLESHOOTING
Display troubleshooting ..............................41 Sound and tv troubleshooting ......................41
DVD troubleshooting ...................................42
SPECIFICATIONS
Specifications ............................................. 43
DISPLAY MODE
Display mode .............................................. 45
Page 8
- 1 -
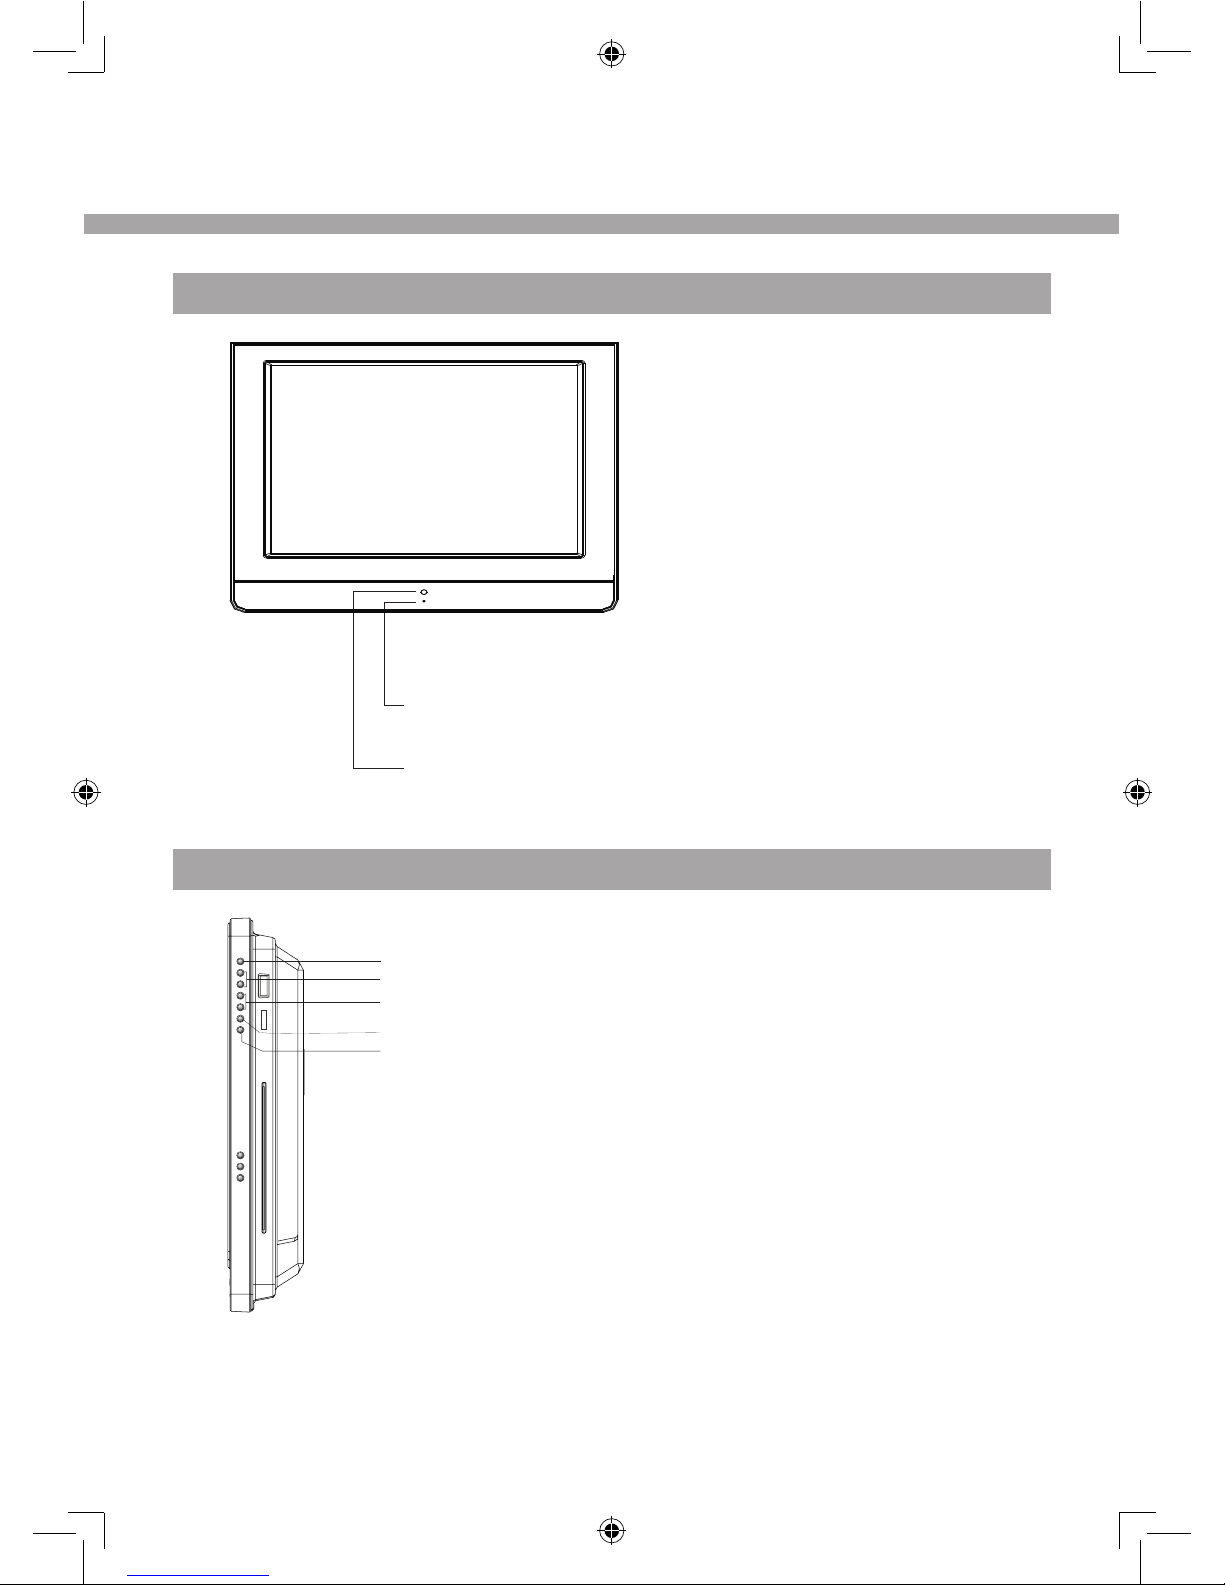
PANEL BUTTON FUNCTIONS
FRONT PANEL
Indicator (the indicator is red when in standby
mode, and green when in working normally).
IR sensor window
RIGHT PANEL
SETUP(Enter or exit TV menu)
CHANNEL(Increase or decrease channel number)
VOLUME(Increase or decrease volume)
SOURCE(Select input source )
STANDBY (To switch standby m between ode and power-on mode.)
Page 9
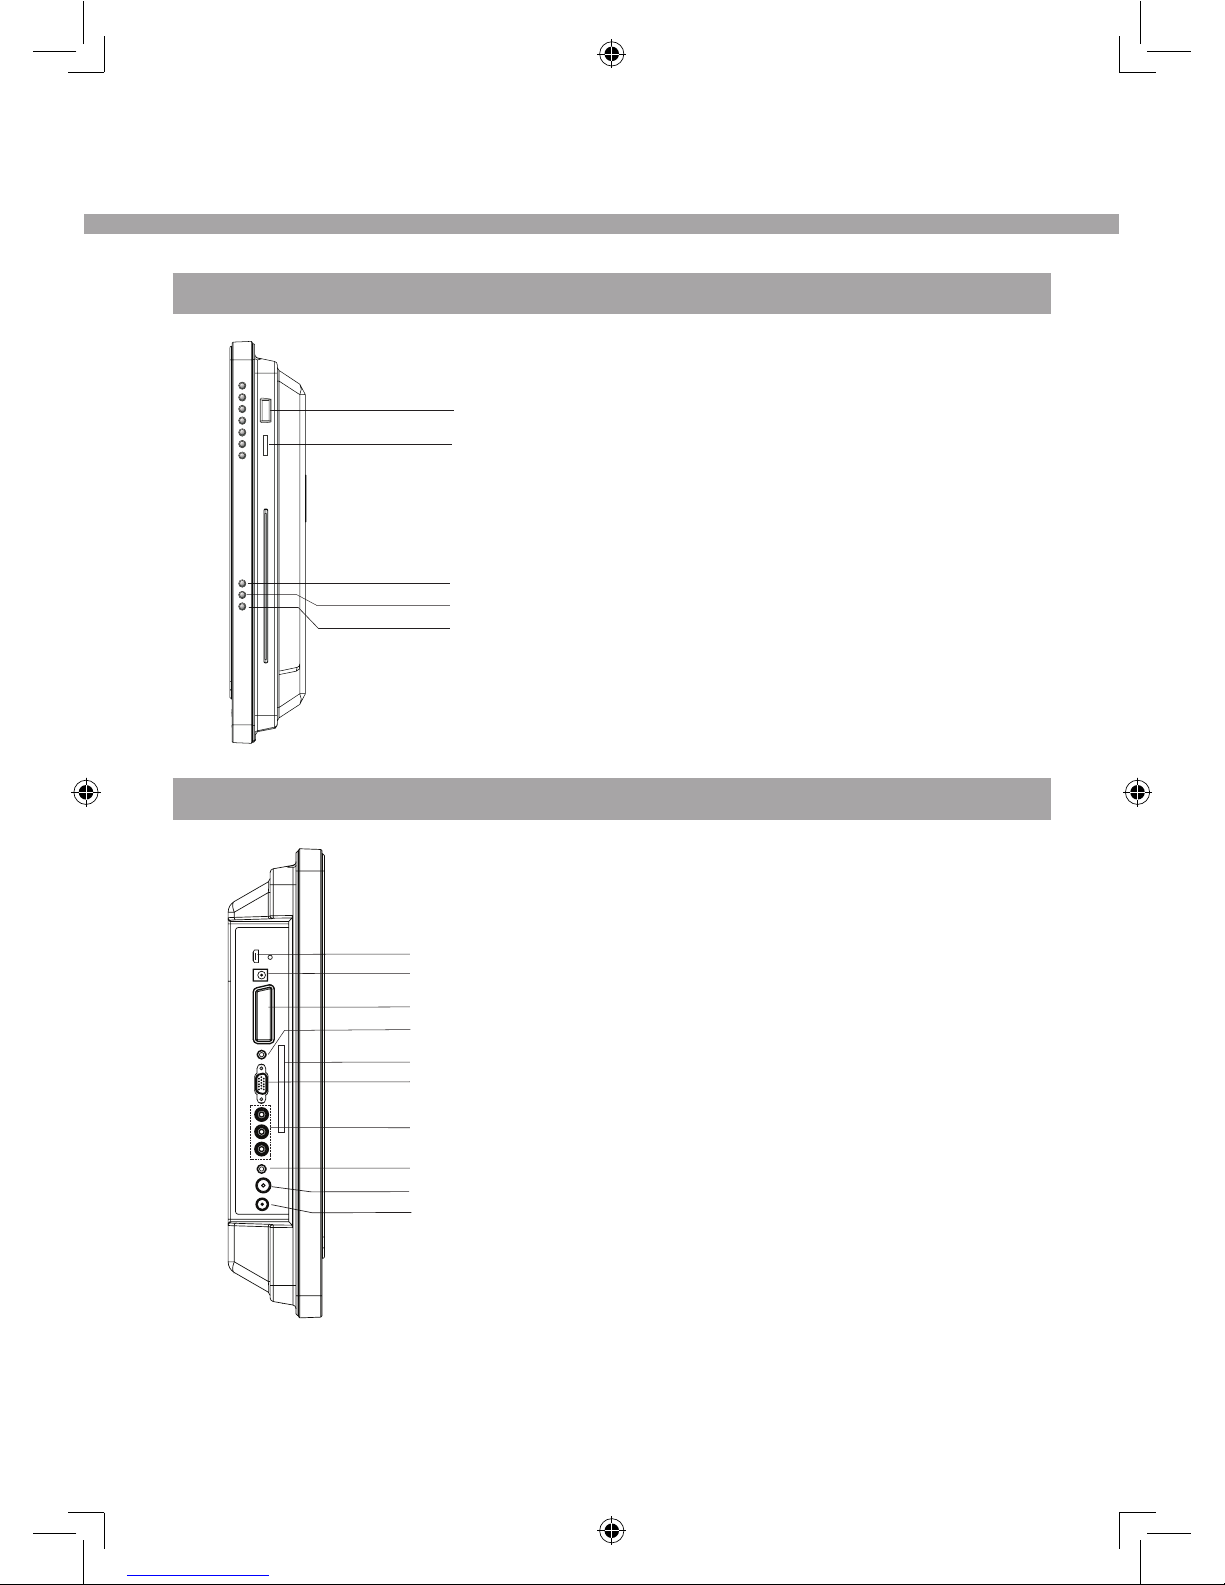
- 2 -
RIGHT PANEL
USB interface
SD/MMC/MS card reader interface
STOP button
EJECT button
PLAY/PAUSE button
LEFT PANEL
HDMI
12-24V DC
SCART
PC / Audio COMPONENT
Common Interface
VGA
COMPONENT
Headphone
TV Antenna
FM Antenna
PANEL BUTTON FUNCTIONS
Page 10

- 3 -
CONNECTING DIAGRAM
HDMI
DVD or VCR player
NOTE
You should insert all necessary cables BEFORE plugging in power cord.
EXTERNAL EQUIPMENT
Page 11
- 4 -
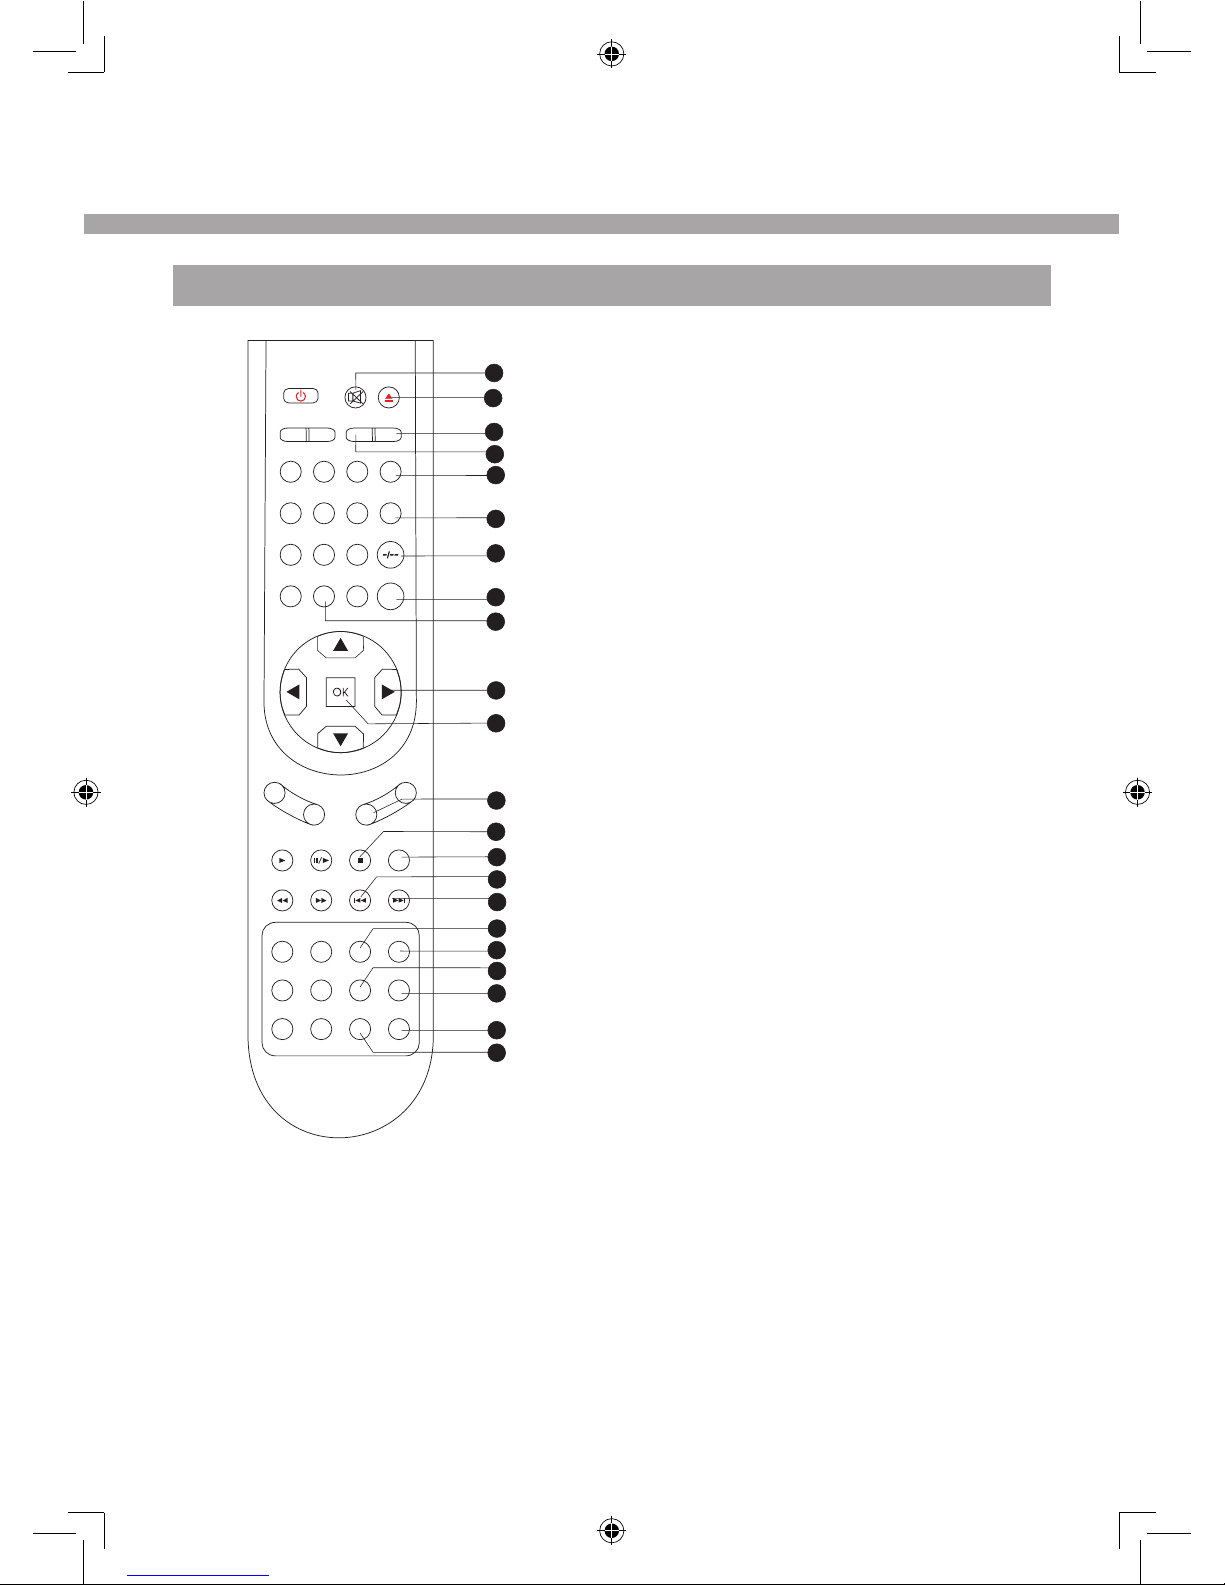
REMOTE BUTTONS
1
2
3
4
5
8
9
13
11
14
7
10
6
12
16
17
19
20
15
18
21
22
2 1
3
4
5
6
7 8 9
0
POWER
MUTE
SLEEP
I/II
RECALL
SOURCE
CALL
EXITSETUP
CH-
CH+
P.MODE
S.MODE
VOL+
VOL-
TEXT MIX INDEX
CANCEL REVEAL HOLD SIZE
GOTO A-B REPEAT ANGLE
DVD- MENU
TITLE PBC AUDIO
DISPLAY TV/RADIO
EPG
SUBTITLE
PAGE+PAGE-
ZOOM+ZOOM-
i
FAV
SCALER
S.PAGE
1. MUTE
Sound mute switch.
2. EJECT/FAV
Disc in/out, valid in DVD mode/To switch in favorite list,
valid in digital TV mode.
3. SCALER
Change aspect ratio.
4. SLEEP
To setup the sleep timer.
5. CALL
To display the information on screen.
6. RECALL
To swap between a previous program and the current
program in analog TV and digital TV.
7. TWO-DIGIT number button
To switch between one or two-digit program number.
8. SOURCE
To select input source.
9. Number button
To select program number.
10. Left/Right cursor(menu adjustment )
To move leftward/ rightward or adjust the selected
item in the menu, or adjust sound volume (invalid in
DVD, digital TV and FM mode).
11. OK button
To confirm the selections.
12. VOL+/-
To increase or decrease sound volume.
13. INDEX/
To display main content page when playing the teletext
in analog TV/To stop playing valid in DVD mode.
14. I/II
To switch the audio channel in NICAM /A2 or Mono TV
channel (valid in analog TV).
15. HOLD/
To stop teletext on current page in analog TV/To select
the previous chapter or track, valid in DVD mode.
16. SIZE/
To magnify teletext page in analog TV/To select the
next chapter or track in DVD mode.
17. REPEAT/YELLOW
To repeat playback (valid in DVD mode)/selet page in
analog TV teletext mode/Fast enter menu (invalid in
digital TV, DVD and FM).
18. ANGLE/BLUE
To change camera angle in DVD mode when playing
DVD disc/select page in analog TV teletext mode /Fast
enter menu(invalid in digital TV, DVD and FM)
19. PBC/PAGE+
To setup the PBC on/off in DVD mode /browse
the next page of teletext in analog TV mode.
20. AUDIO
To change the audio language and sound track,
valid in digital TV and DVD mode.
21. SUBTITLE
To select subtitle's language or switch to JPEG
display mode, valid in DVD and digital TV mode.
22. ZOOM+/EPG
To zoom in to the picture valid in DVD mode/
To display the program guide valid in digital TV
mode
REMOTE CONTROL
Page 12
- 5 -
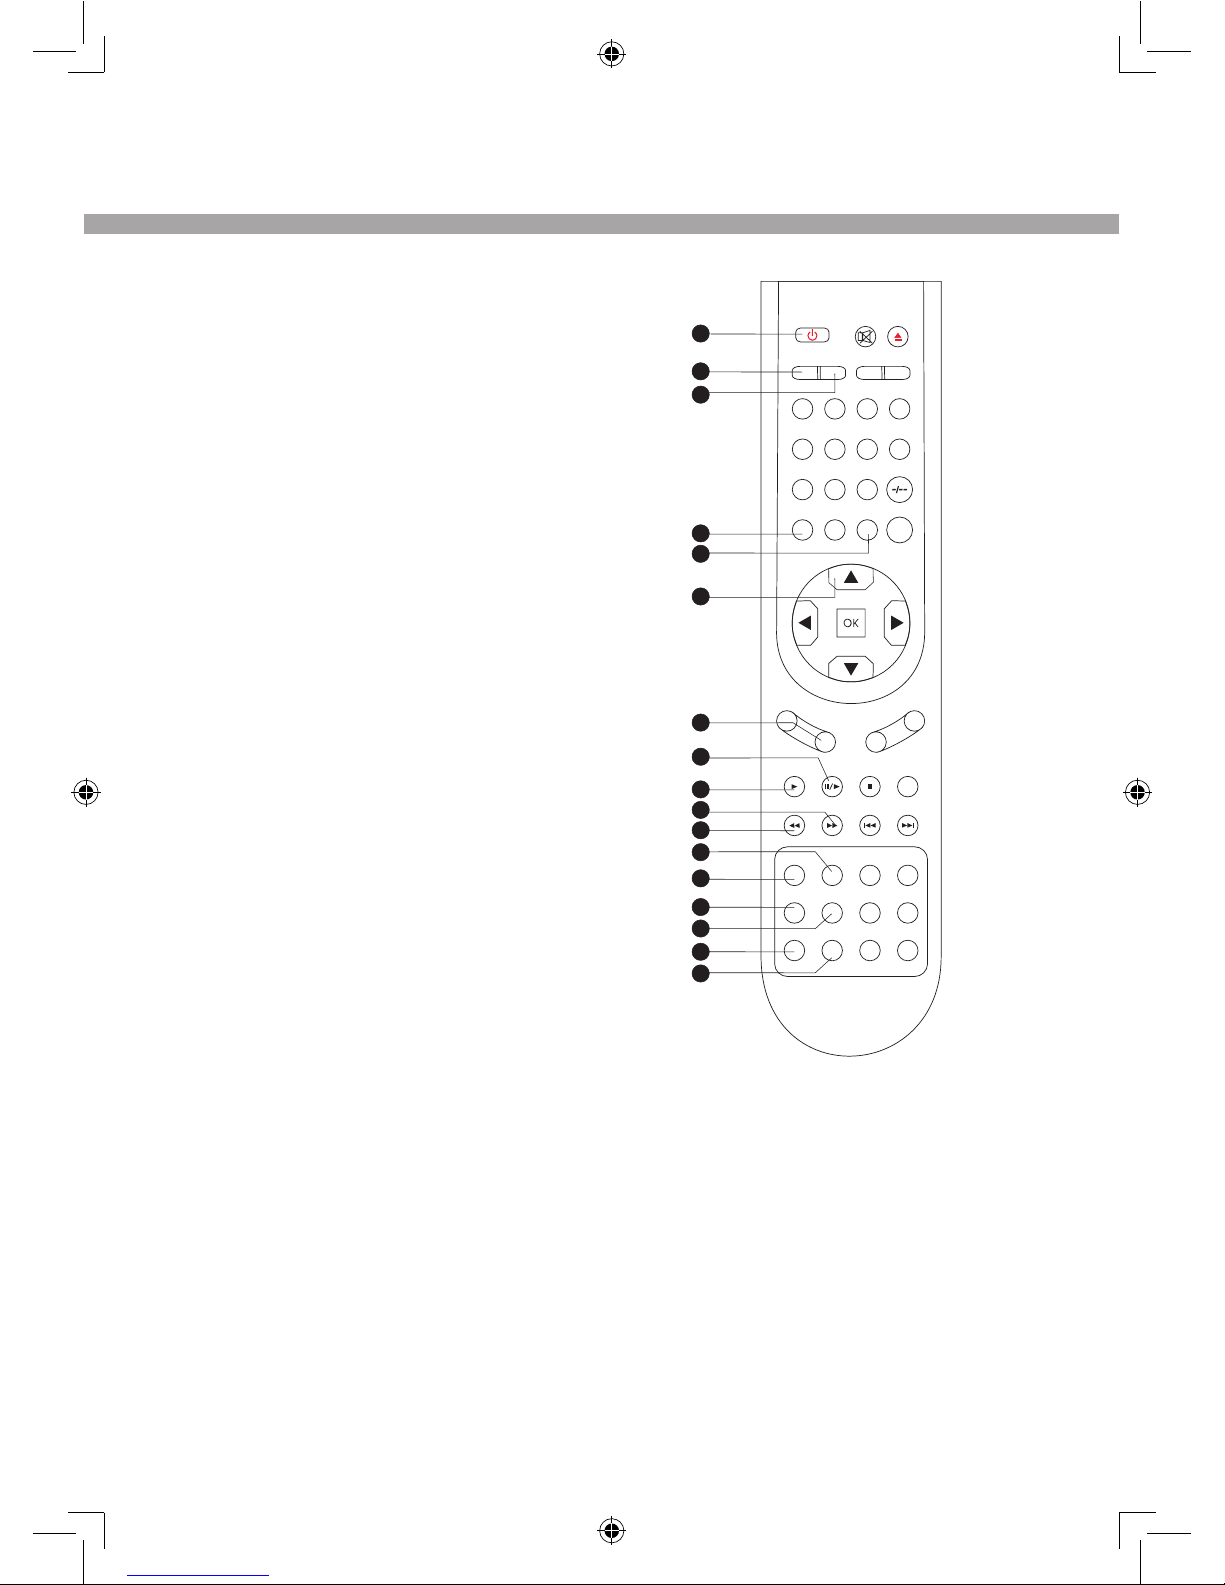
23. POWER
To switch between standby mode and poweron mode.
24. P-MODE
To select picture mode: Standard, Dynamic,
Soft, User (not valid in VGA mode).
25. S-MODE
To select sound field modes: Music, Film, News
and User.
26. SETUP
To display setup menu.
27. EXIT
To exit or back previous menu.
28. UP/DOWN cursor
To select upward/downward in the menu
or change the channel, valid in analog TV
and digital TV mode.
29. CH+/-
To increase or decrease program number
valid in analog TV and digital TV mode.
30. MIX//►
To display analog TV and teletext in the
same time/pause playing/steps playback
in pause mode, valid in DVD mode.
31. TEXT/►
To enable or disable the function of
teletext or MHEG5 /To playback, valid in
DVD mode.
32. REVEAL/
To display the hidden teletext
information in analog TV/To fastforwards DVD playback, valid in DVD
mode.
33. CANCEL/
To cancel teletext in analog TV/ To fast
backward playback, valid in DVD mode.
34. A-B/GREEN
To segment repeat (valid in DVD mode)/
select page in analog TV teletext mode/
Fast enter menu (not valid in digital TV,
DVD and FM).
35. GOTO/RED
To play from a certain time point(valid
in DVD mode)/select page in analog TV
teletext mode /fast enter menu(invalid
in digital TV, DVD and FM)/To Start
recording digital TV program: To hide
recording Dialog.
23
24
25
26
27
31
33
36
35
38
39
37
34
32
30
29
28
21
3
4
5
6
78 9
0
POWER
MUTE
SLEEP
I/II
RECALL
SOURCE
CALL
EXITSETUP
CH-
CH+
P.MODE S.MODE
VOL+
VOL-
TEXT MIX INDEX
CANCELREVEAL HOLD SIZE
GOTOA-B REPEATANGLE
DVD-MENU
TITLE PBC AUDIO
DISPLAY TV/RADIO
EPG
SUBTITLE
PAGE+PAGE-
ZOOM+ZOOM-
i
FAV
SCALER
S.PAGE
36. DVD-MENU/S.PAGE
To go to the menu of DVD menu ,valid in DVD
mode/To go to the sub page of teletext, valid in
analog TV mode.
37. TITLE/PAGE-
To go to the menu of DVD menu, valid in DVD mode/
browse the previous page of teletext in analog TV
mode.
38. DISPLAY
To display track time in DVD mode/Display information
in digital TV mode
39. TV/RADIO/ZOOM-
To switch between TV and radio modes, valid in digital
TV mode /To zoom out to the picture valid in DVD mode.
REMOTE CONTROL
Page 13
- 6 -
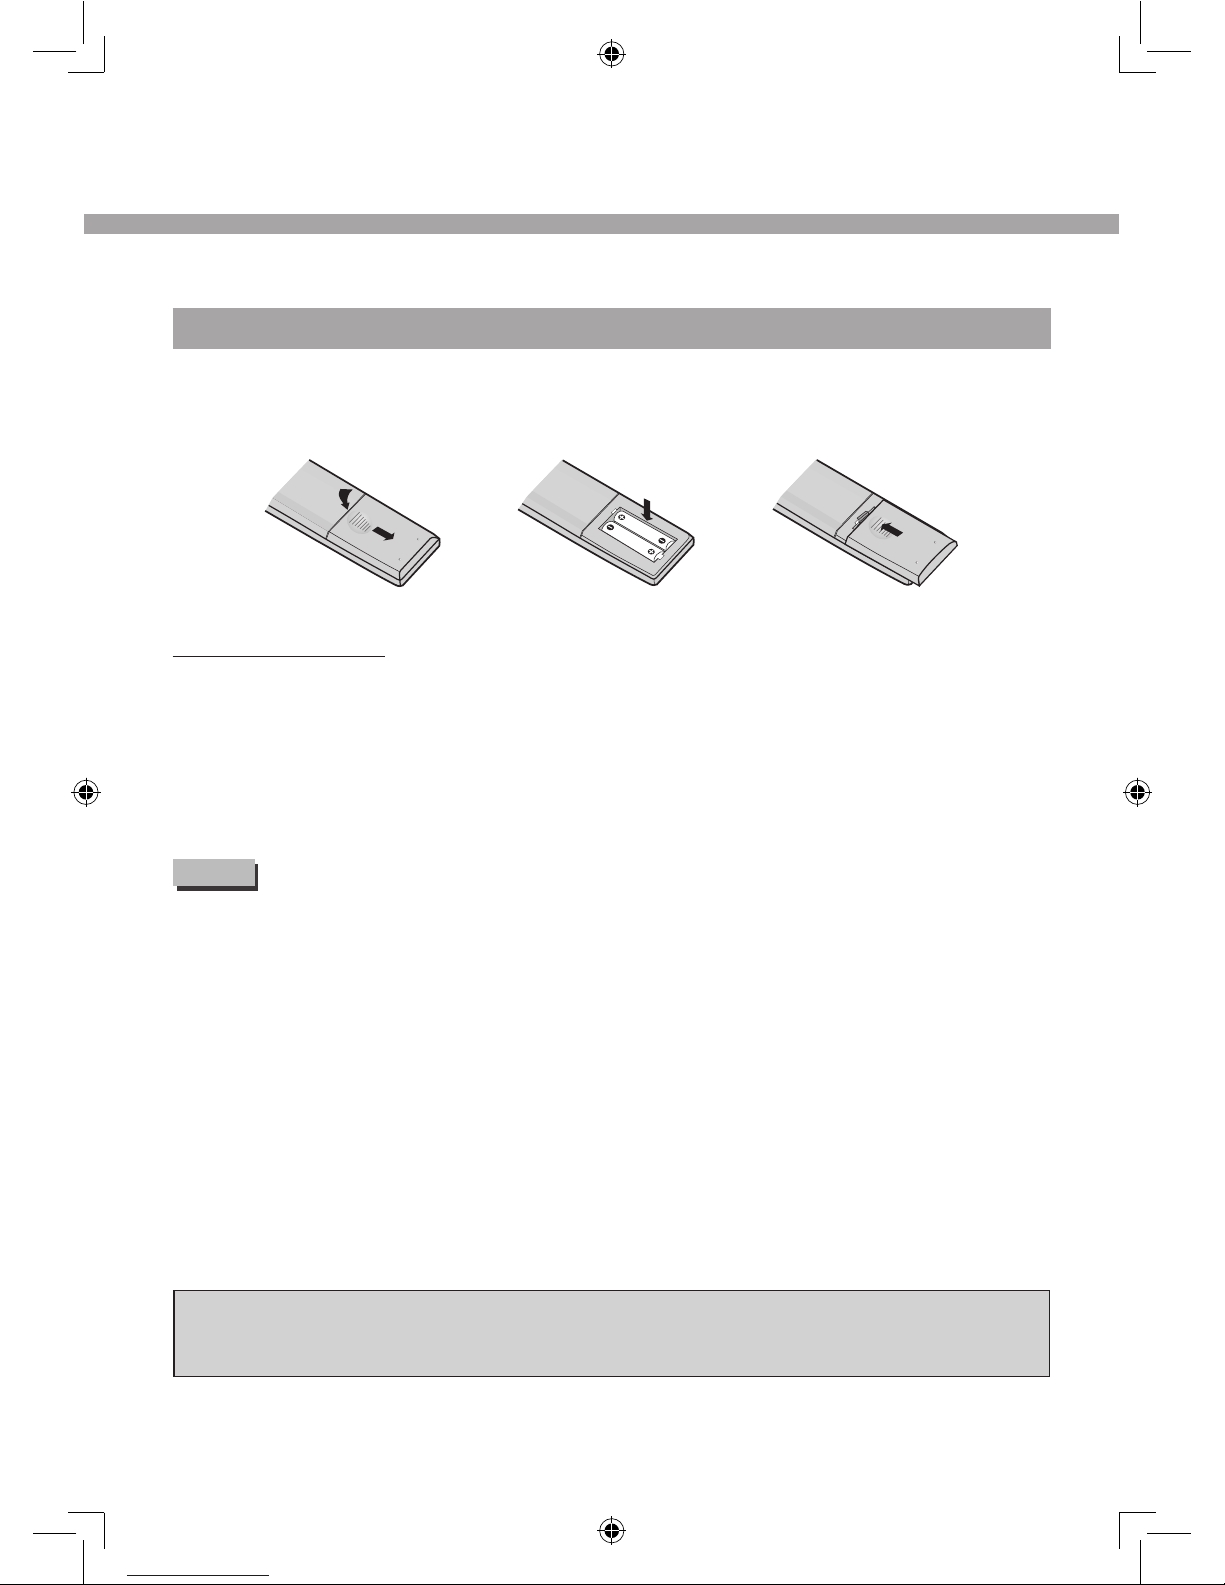
BATTERY INSTALLATION
Remove the battery cover. Insert two SUM-4(AAA) batteries matching the -/+ polarities of the
battery to the -/+ marks inside the battery compartment, as follows:
BATTERY LIFE
Normally, batteries can be used one year.
If the remote control is still invalid when very near to the TV's remote sensor window,
please use new batteries.
Please use SUM-4(AAA) battery.
NOTE
Never use rechargeable battery.
Never charge, short-circuit, disassemble and heat the battery, or throw it into fire.
Pay attention not to fall or knock the remote controller, which will cause damage or
function failure to it.
Do not use new and old battery together.
When not using the remote controller for a long time, please take out battery to avoid
liquid leakage. Before replacing new battery, please clean the electrolyte in the remote
controller.
If electrolyte splashes into body, please clean it with water.
CAUTION:
Please put battery in the place children cannot touch. If swallow by accident, please contact with
the local doctor immediately.
REMOTE CONTROL
Page 14
- 7 -
SWITCHING ON
Press the [POWER] button on the remote control to make the unit switch to power-on mode - you
will see the LED indicator turn green. Now you can enjoy the many features of your new TV.
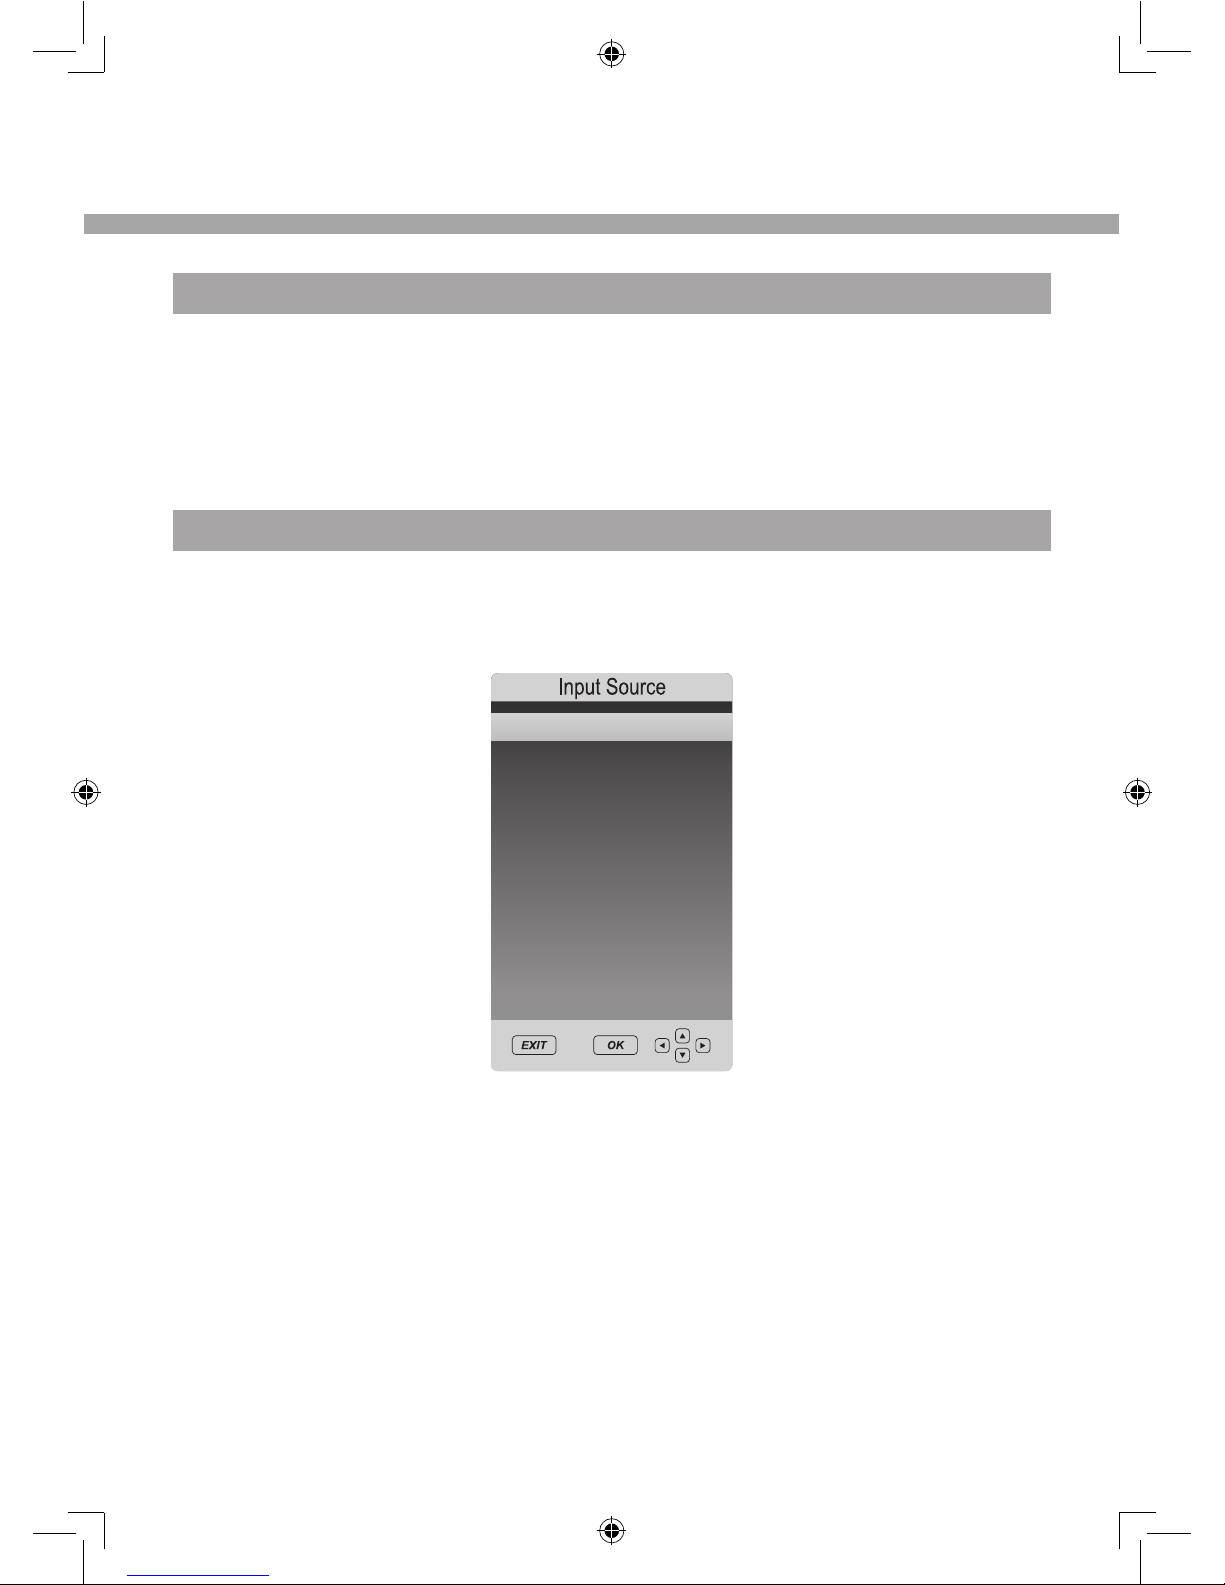
SELECT SOURCE OPERATION
You can select input source by using source menu. Press [SOURCE] button to show the
menu as follows:
DTV
ATV
DVD
COMPONENT
SCART
HDMI
VGA
USB
CARD
FM
The current source item is highlighted. Through press [▲/▼] button on the remote
control or [CH+/CH-] key on the left side of LCD TV to select your desire, press [◄/►]
button, or [OK] button, [VOL+/ VOL-] key on the side of LCD TV to confirm your choice.
LET'S START
Page 15
- 8 -
DTV MENU SETUP
In TV mode, press [SETUP] button into the main menu and the main menu will show as
follows:
♦
Through pressing [▲/▼] button on the remote control, you can select main menu
sections (main menu sections consist of "PICTURE", "SOUND", " Channel", "DTV Setup",
"Function").
Press [►] or [OK] button to enter this menu section.
♦
Press [▲/▼] button on the remote control to select the item, and then press [◄/►]
button to adjust parameter value. Press [SETUP] button to return to main menu sections.
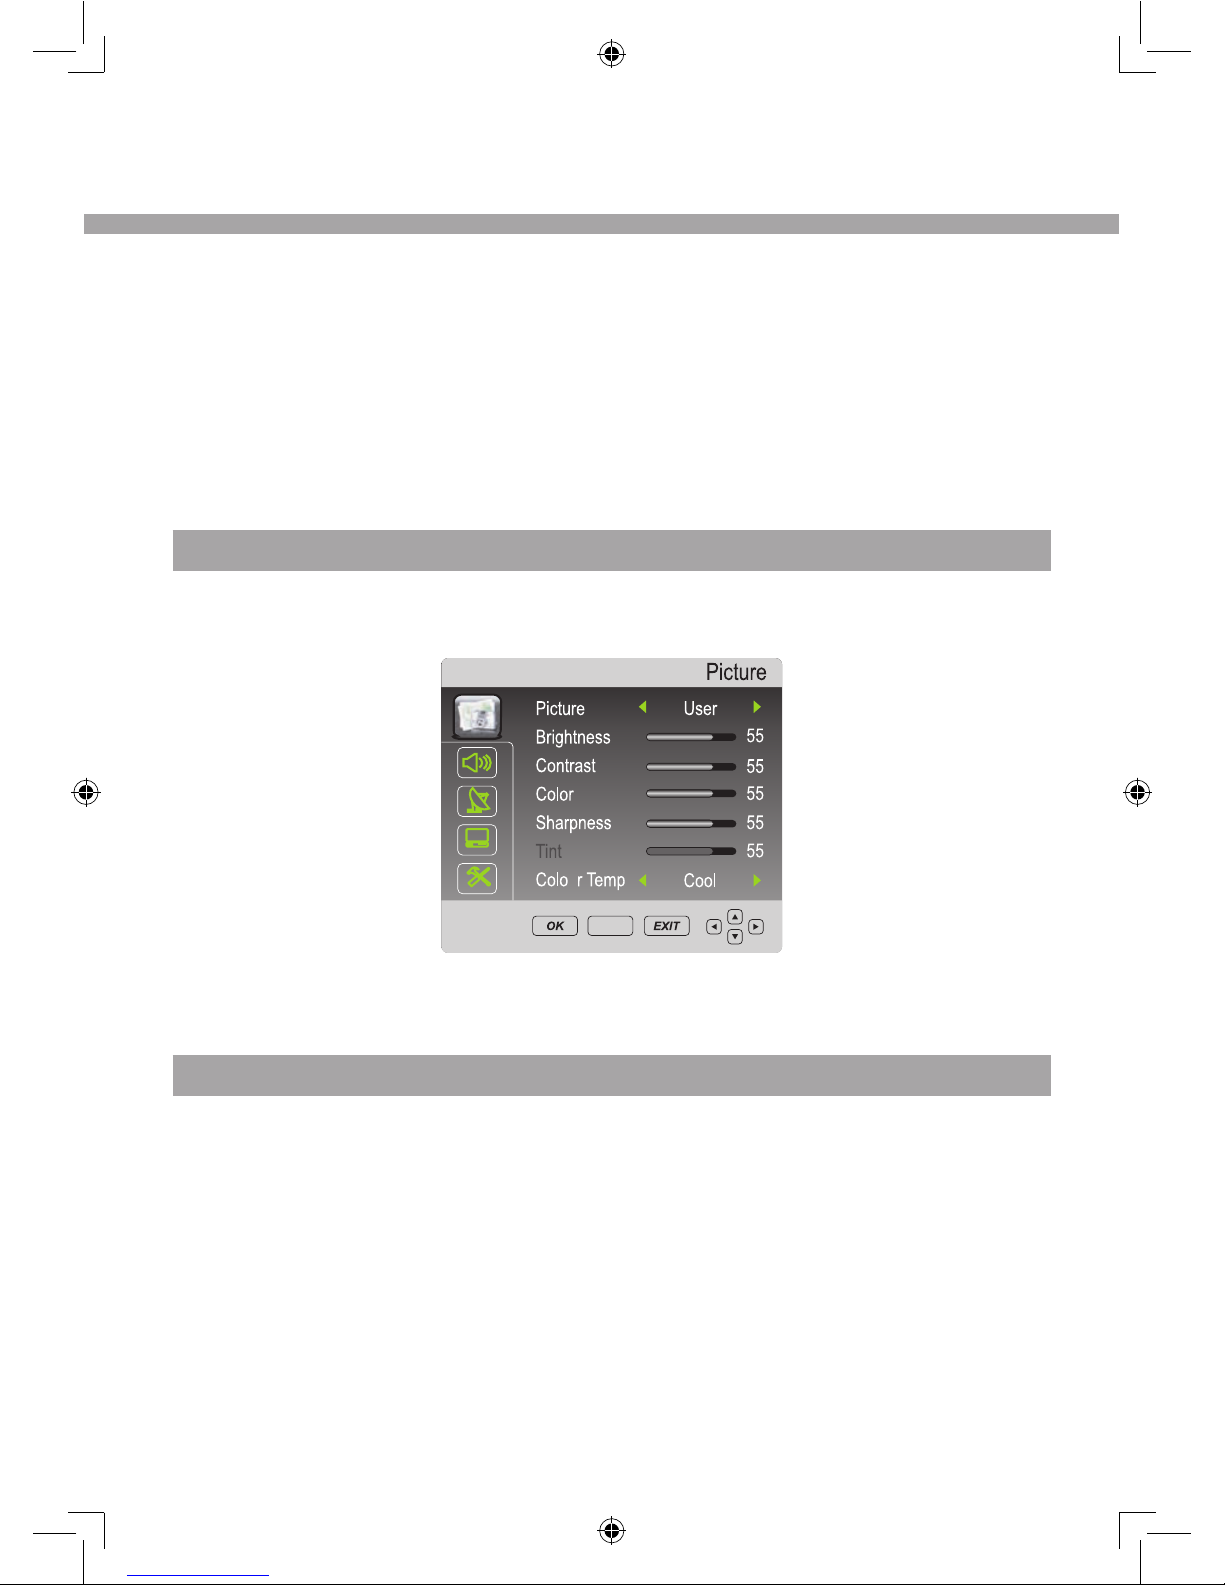
PICTURE
Select PICTURE item to adjust picture parameters. You may select Picture Mode, color temperature
and adjust Contrast, Brightness, Colour, Sharpness, Tint.
Mode
u
SETUP
■
Picture mode item can be changed between User, Standard, Soft, Dynamic.
■
Color Temperature mode item can be changed between Cool, Medium and Warm.
You may adjust Brightness, Contrast, Colour, Sharpness, Tint for User mode.
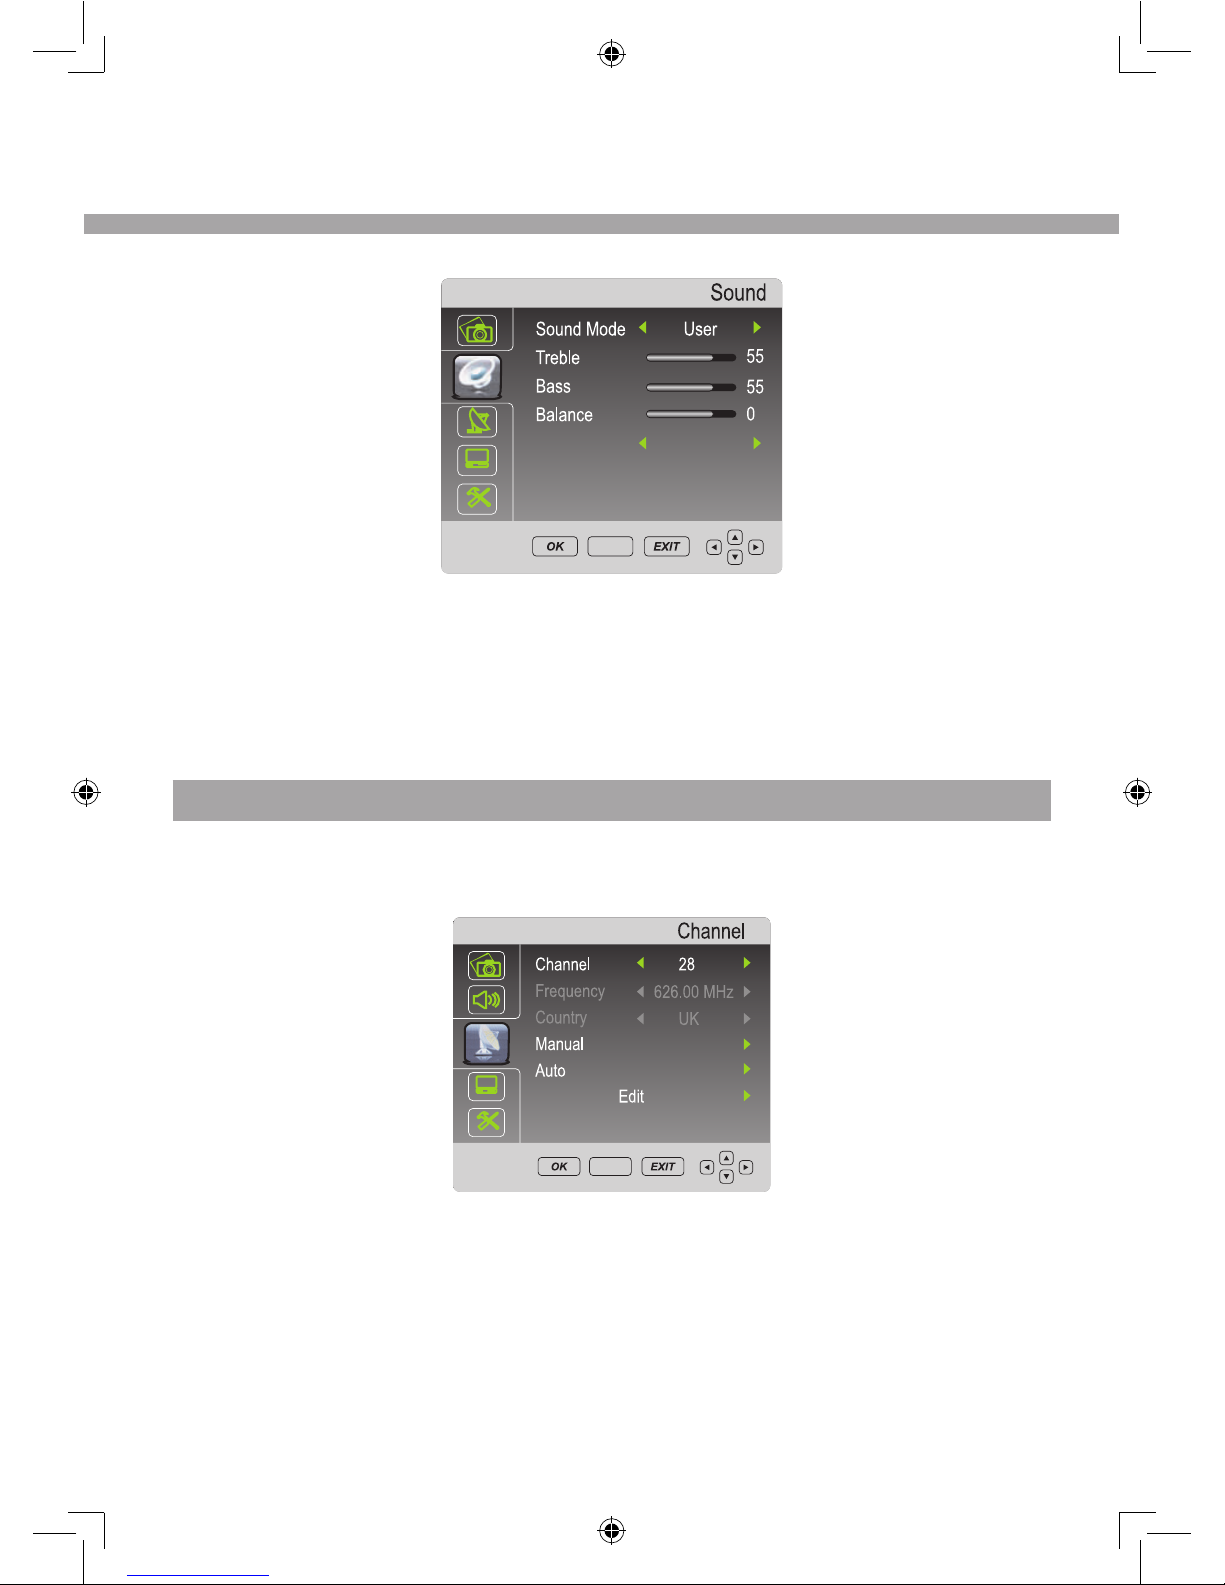
SOUND
Select SOUND item to adjust sound parameters. You may adjust Sound Mode, Treble, Bass,
Balance, and Auto Volume.
Page 16
- 9 -
Aute Volume
Off
SETUP
■
Sound Mode item can be changed between Standard, Music, Film, Sports and User.
■
Auto Volume item enables to adjust off or on for control volume automatic.
■
Treble and Bass items can be adjusted from 0 to 100
■
Balance item can be adjusted from -50 to +50 for L and R sound balance. Default is 0.
CHANNEL
Select DTV Channel item to setting DTV channels. You may select Auto Tuning, Manual Tuning,
Program Edit.
Tuning
Tuning
Programme
SETUP
■
Auto Tuning item enables to adjust channel setting automatically.
Select Auto Tuning item, press [►] or [OK] button to enter Country selection menu.
Press [◄/►] button to select Country.
Press [OK] button to start auto searching.
DTV MENU SETUP
Page 17
- 10 -
DTV SETUP
■
Manual Tuning item enables to change channel settings.
List
EXIT OK
■
Program Edit item enables to enter submenu to set channel DELETE, MOVE, SKIP and
FA V.
List
EXIT OK
DTV MENU SETUP
Page 18

- 11 -
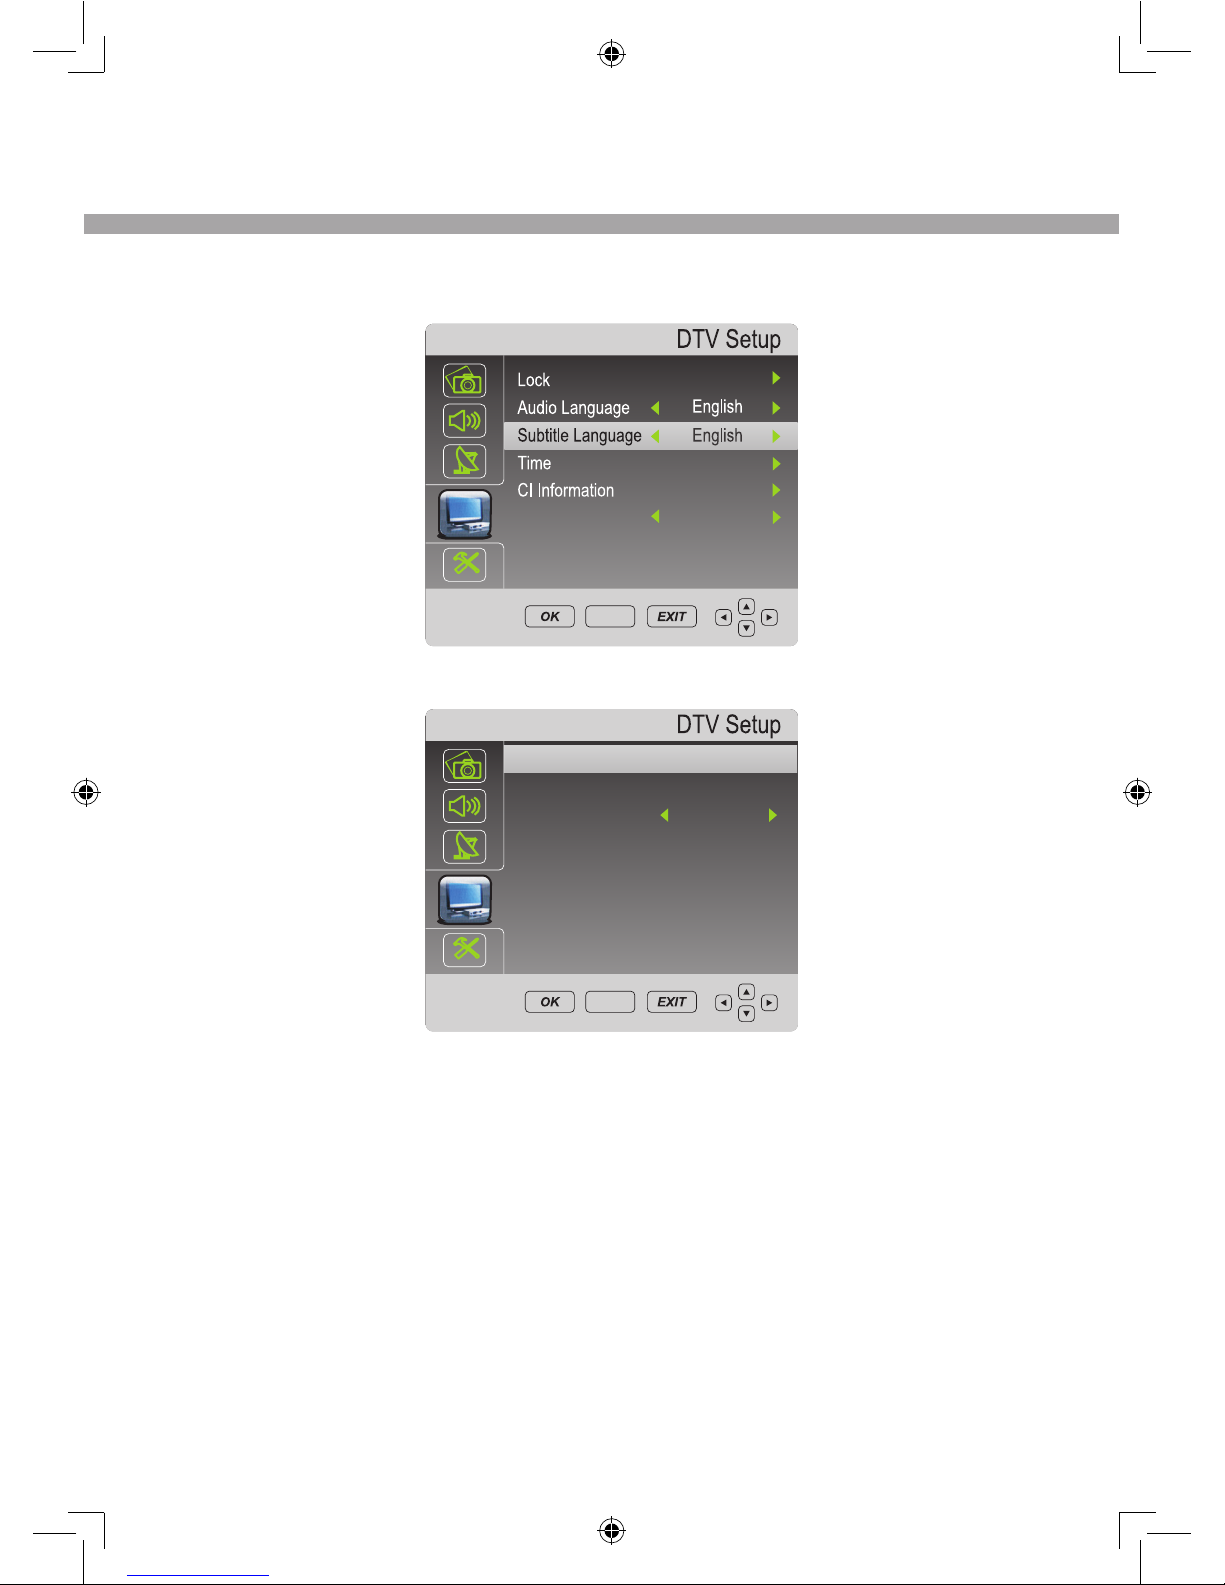
DTV MENU SETUP
Select DTV Setup item to setup lock, select audio language and subtitle language, you may
select time zone and display CI information.
Antenna Power
Off
SETUP
■
Lock item enable to lock the auto tuning, manual tuning, program edit and block
program. If you want to change the lock system, you must enter default password: 0000
first.
SETUP
■
Audio Language item enables to adjust audio language.
PVR File System
Primary English
Secondary English
SETUP
Page 19
- 12 -
■
Subtitle language item enables to adjust subtitle language.
Antenna Power
Off
SETUP
■
Time item enables to enter sub menu.
Time Zone
Daylight
Clock – – – – – –
Stockholm GMT+1
Off
SETUP
♦ Clocktoadjusttherealtime.
♦ TimeZonetoadjustthetimezone.
♦ Daylighttoadjustsummertimeofforon.
■
CI Information item enables to read the SMART card information.
DTV MENU SETUP
Page 20
- 13 -
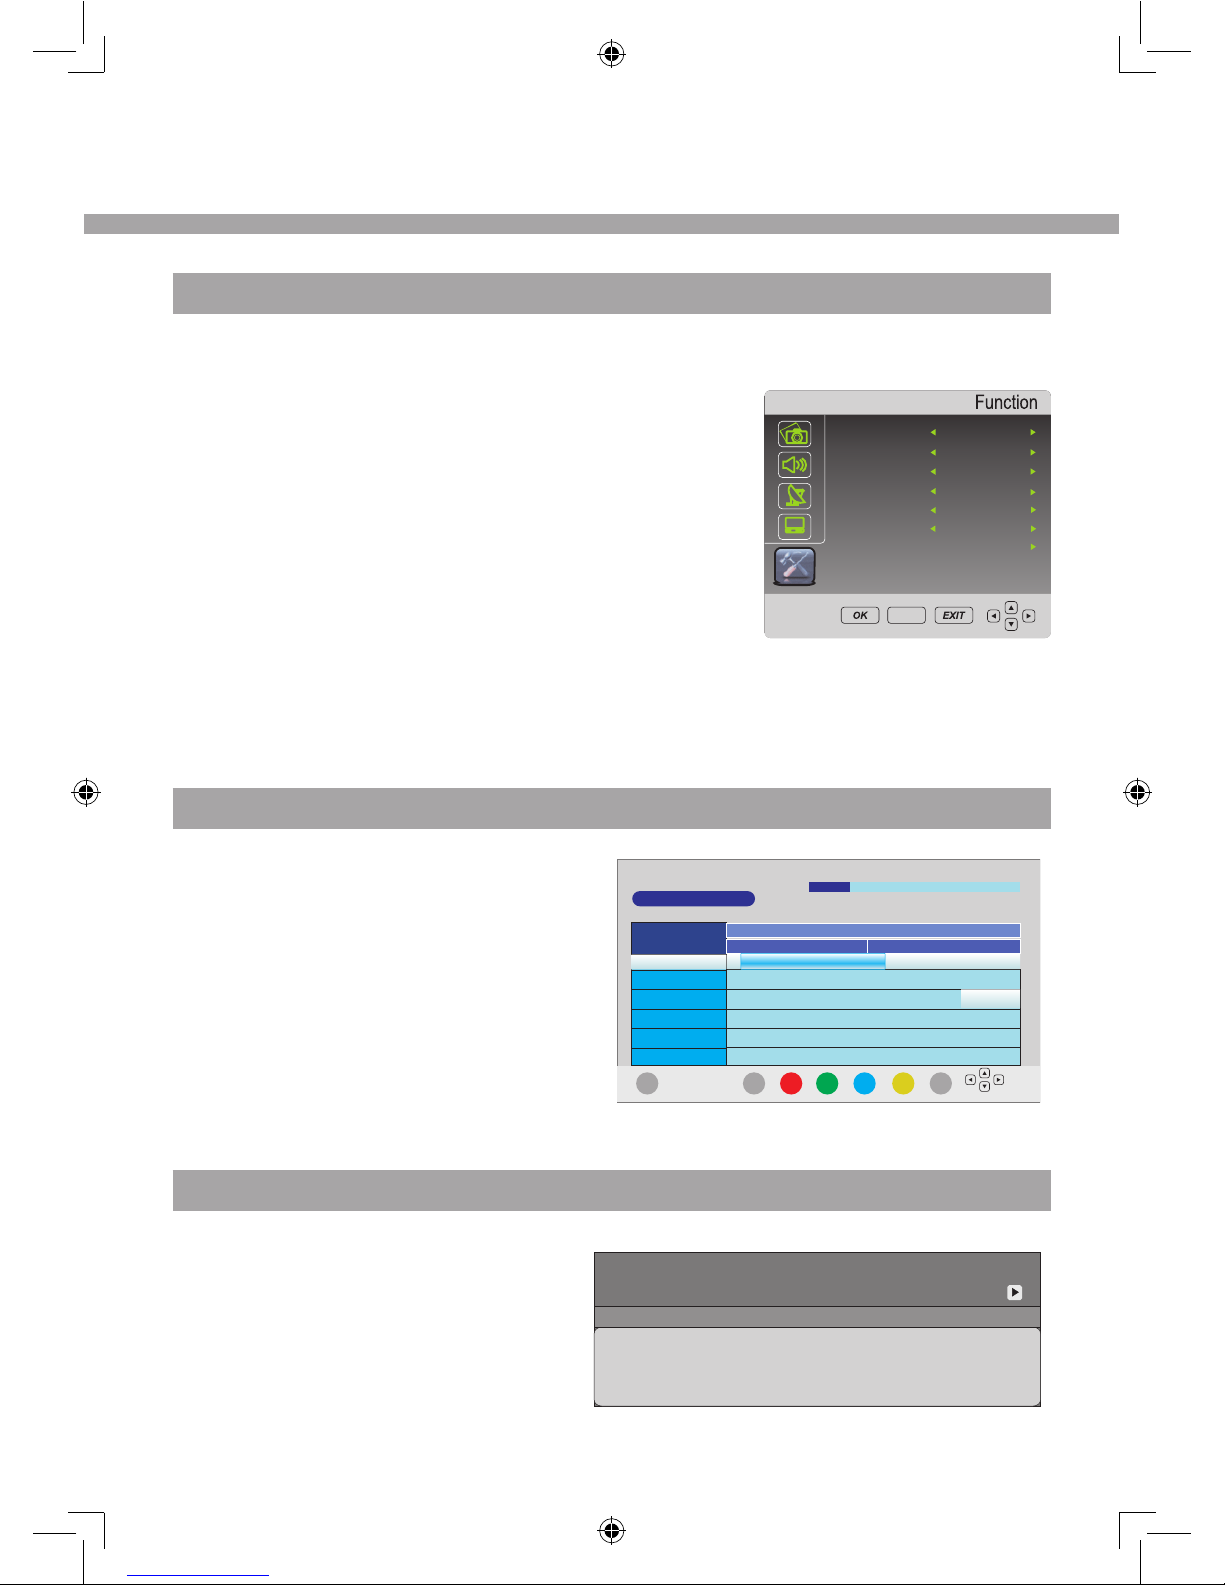
FUNCTION
Select FUNCTION item to adjust function parameters. You may select Language, Sleep Timer,
Aspect Ratio, Noise Reduction, Blue Screen and Restore
Setting.
■
Language item enables to select the OSD language.
■
Aspect Ratio item can changed between Auto, ZOOM1,
ZOOM2, 16:9, 14:9, 4:3.
■
Noise Reduction item can select reduce noise mode: Off, Low, Middle, High.
■
Sleep Timer item enables to set the sleep timer: Off, 10min, 20min, 30min, 60min, 90min,
120min, 180min and 240min. Blue Screen item can changed between On and Off.
■
Restore Setting item enables to reset all values to default
ELECTRONIC PROGRAM GUIDE (EPG)
By pressing the EPG button on the remote
control, an Electronic Program Guide is
displayed. The EPG supplies information,
such as program lists, start and end times
of all available channels. In addition, the
detailed information about the program is
often available in t he EPG. (The availability
and the amount of program details will vary
depending on the broadcaster.)
INFORMATION
To obtain more information about present
and following events, you can press [ i
] button. Like previously, the following
event is displays by pressing the [
◄/►
]
buttons (toggle between present and
following events):
Language English
Aspect Ratio 16:9
Noise Reduction Mid
Sleep Timer Off
Blue Screen On
Country Poland
Restore Factory Default
SETUP
DTV MENU SETUP
DTV
5 five
15 Ch15
16 QVC
17 UK Gold
23 bid -up.tv
25 TCM
14:30 15:30
10 Mar
Gold Workshop With Jan Springer
No Information
No Information
No Information
No Information
Programme Guide
10 Mar 2009 14:50
.
The Streets of San Francisco
No Information
Funstamps
DTV 1 BBC ONE Wales
EXIT INFO
DELETE
SCHEDULE
Reminder DATE
OK
Drama Bogas (JAV, 1996) 10:07
Wed, Aug 19 2009 10:00 12:05
No Program Information.
English 576i
Page 21

- 14 -
ATV MENU SETUP
This product can store up to 100-channel programs (0~ 99). You can select your favorite
channel through pressing [CH+/-] or number buttons, and you can scan and store all of the
channels through manual or automatic mode.
In ATV mode, press [SETUP] button into the main menu and the main menu will show as
follows:
■
Through pressing
[
▲/▼
] button on the remote control, you can select main menu
sections (main menu sections consist of "PICTURE", " SOUND" , "Channel", " Function").
Press [►] or [OK] button to enter this menu section.
■
Press [
▲/▼
] button on the remote control to select the item, and then press [
◄/►
]
button to adjust parameter value. Press [SETUP] button to return to main menu sections.
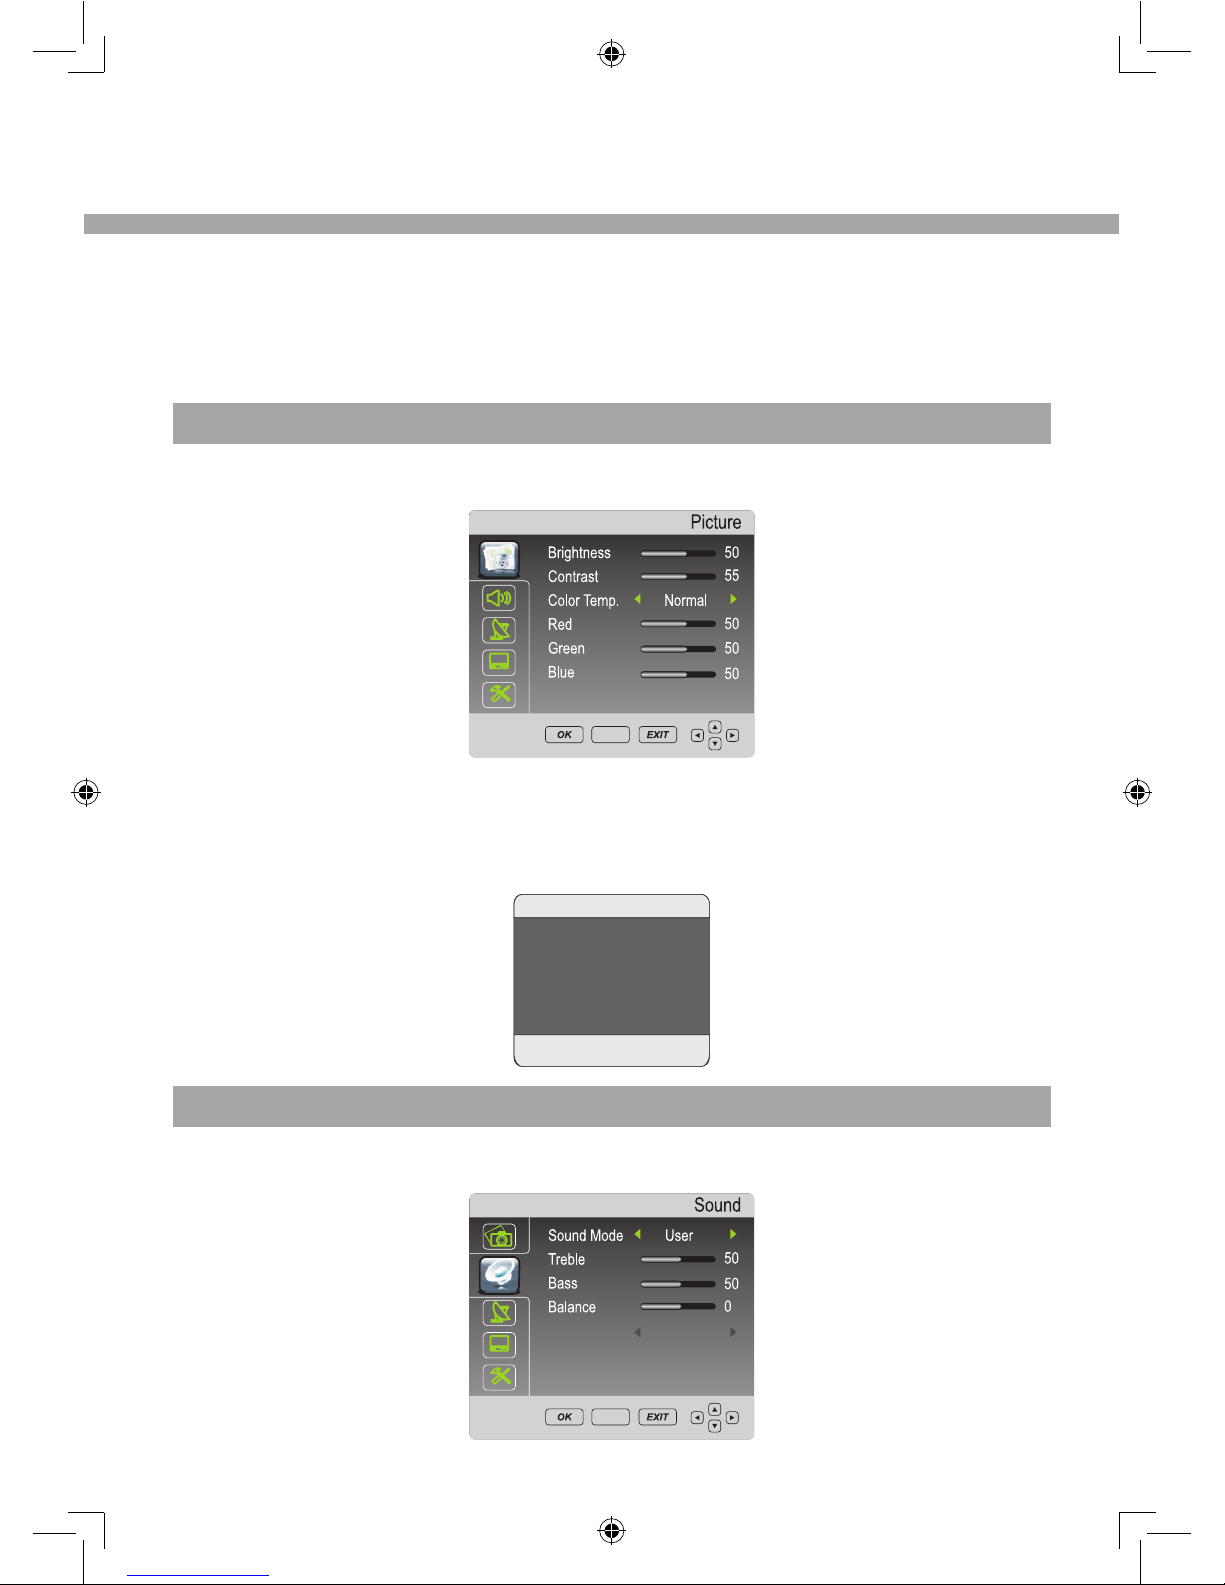
PICTURE
Select PICTURE item to adjust picture parameters. You
may adjust Picture Mode, Contrast, Brightness, Colour,
Sharpness, Tint and Colour Temperature.
■
Picture Mode item can be changed between
User, Standard, Mild, Dynamic. You may adjust
Brightness, Contrast, Colour, Sharpness, Tint for
user mode.
NOTES
You can't adjust TINT while watching TV channels.
Colour Temperature item can select colour temperature mode: Medium, Warm and Cool.
SOUND
Select SOUND item to adjust sound parameters. You may adjust Sound Mode, Treble, Bass,
Balance and Auto Volume.
Sound Mode Standard
Treble 50
Bass 50
Balance 0
Auto Volume Off
SETUP
Picture Mode Standar d
Brightness 50
Contrast
50
Colour 50
Tint 0
Sharpness 50
Colour Temp Medium
SETUP
Page 22
- 15 -
ATV MENU SETUP
■
Sound Mode item can be changed between Standard, Music, Film, Sports and User.
■
Auto Volume item enables to adjust off or on for control volume automatic.
■
Treble and Bass items can be adjusted from 0 to 100
Balance item can be adjusted from -50 to +50 for L and R sound balance. Default is 0.
Channel
Channel 1
Fine Tune 192.25 MHz
Colour System AUTO
Audio System BG
Manual Tuning
Auto Tuning
Programme
Edit
SETUP
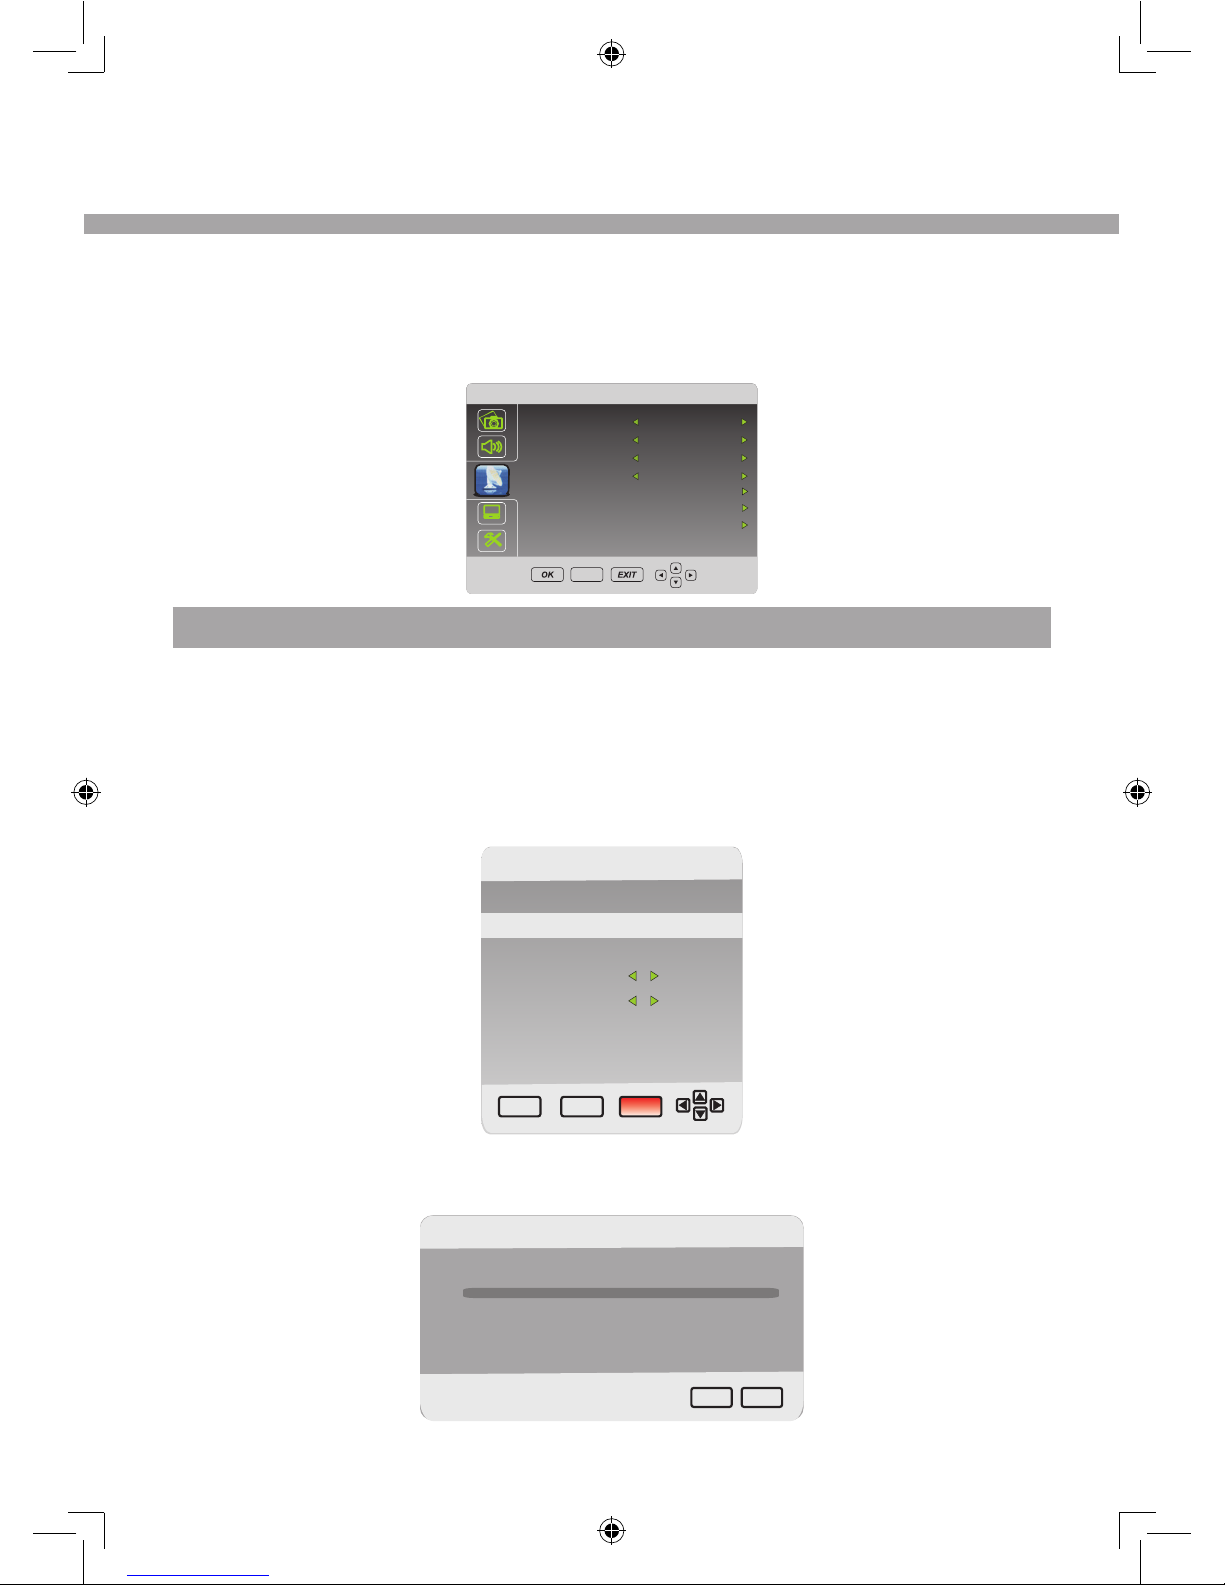
Channel
Select ATV Channel item to adjust channels. You may select Channel, Colour System, Audio
System, Fine-Tune, Manual Tuning, Auto Tuning and Program Edit.
■
Channel item enables to change the channel number.
■
Audio System item enables to select sound system "B/G","DK","I" and "L".
■
Fine-Tune item enables to adjust the channel frequency accurately to make the sound
and picture effect better (or set channel frequency directly with member buttons).
■
Manual Tuning item enables to change channel settings.
AT V Manual Tuning
Storage To 1
Current CH 1
Search
Fine-Tune
Frequency 192.25 Mhz
EXIT
SETUP
SAVE
■
Auto Tuning item enables to channel setting automatically.
■
Select the Auto Tuning item, then press [►] or [OK] button to start auto searching.
EXIT
Channel Tuning
SETUP
0 %... 46.25 MHz ATV
AT V : 0 Programme(s)
Page 23

- 16 -
■
Program Edit item enables to enter submenu to set channel DELETE, RENAME, MOVE,
SKIP, FAV.
Programme Edit
1 C-02
FAV
MOVE
SKIP
RENAME
DELETE
TV
TV
2 C-11
Press RED button to delete channel.
Press GREEN button to rename channel.
Press YELLOW button to move channel.
Press CYAN button to SKIP channel.
Press FAV button to set favourite channel.
FUNCTION
Select FUNCTION item to adjust function parameters.
You may select Language, Aspect Ratio, Noise Reduction, Sleep Timer, Blue Screen, Country
and Restore Setting.
Language English
Aspect Ratio 16:9
Noise Reduction Mid
Sleep Timer Off
Blue Screen On
Country Poland
Restore Factory Default
SETUP
■
Language item enables to select the OSD
■
Sleep Timer item enables to set the sleep timer (Off, 10min, 20min, 30min, 60min, 90min,
120min, 180min and 240min).
■
Aspect Ratio item can c hanged between Auto, ZO OM1, ZOOM 2, 16:9, 14:9, 4:3.
Auto, 14:9, ZOOM1, ZOO M2 not valid for VGA mode.
■
Blue Screen item can changed between On and Off.
■
Restore Setting item enables to reset all values to default.
■
Noise Reduction item can change between Low, Mid, High and Off.
ATV MENU SETUP
Page 24

- 17 -
TELETEXT FUNCTION
TELETEXT FUNCTION
Most TV stations provide cost-free teletext information, including the latest news, weather
information, TV program list and stock information etc. You just input the needed teletext page
according to the teletext content.
TELETEXT DISPLAY
♦
Select the channel with teletext signal;
♦
Press [TEXT] button;
♦
Select corresponding page according to the colorized buttons on the remote control;
♦
Press [TEXT] again and TV screen will display.
PAGE SELECTION
♦
You can input 3 digital numbers to enter the page you want to watch through number
buttons. If the inputted number is invalid, you need to input correct 3 digital numbers
again after you finished inputting this digital numbers.
♦
You can select to turn pages forward or backward through [CH+/-], [PAGE-/PAGE+] or
[
▲/▼
] button.
MIX MODE
This function may let you enjoy TV and teletext information at the same time.
♦
When a certain teletext page displays, press [MIX] button, TV and teletext information will
display on screen at the same time.
♦
Press [MIX] button again and only teletext image displays.
♦
In mix mode, the disturbance lines on teletext characters are easy to appear, so you are
not recommended to select this mode.
Note: Press [CANCEL] button to cancel teletext.
LOCK
You can press [HOLD] button to lock teletext page. Press this button again to cancel locking.
INDEX
Pressing [INDEX] button to display content page.
Enter a certain teletext page through inputting number buttons.
ZOOM IN TELETEXT
♦
When teletext page shows, you may double zoom in to display this teletext page;
♦
Press [SIZE] button to zoom in the upper half part of teletext page;
♦
Press [SIZE] button again to enter the under half part of teletext page;
♦
Press this button once more to return to original display mode.
DISPLAY MODE
Press [REVEAL] button to display the hidden teletext information. Press this button again to
cancel.
COLORIZED BUTTONS (RED, GREEN, YELLOW, BLUE)
Select the corresponding teletext page through colorized buttons.
Page 25

- 18 -
SCART/AV/S-VIDEO/HDMI/USB MENU SETUP
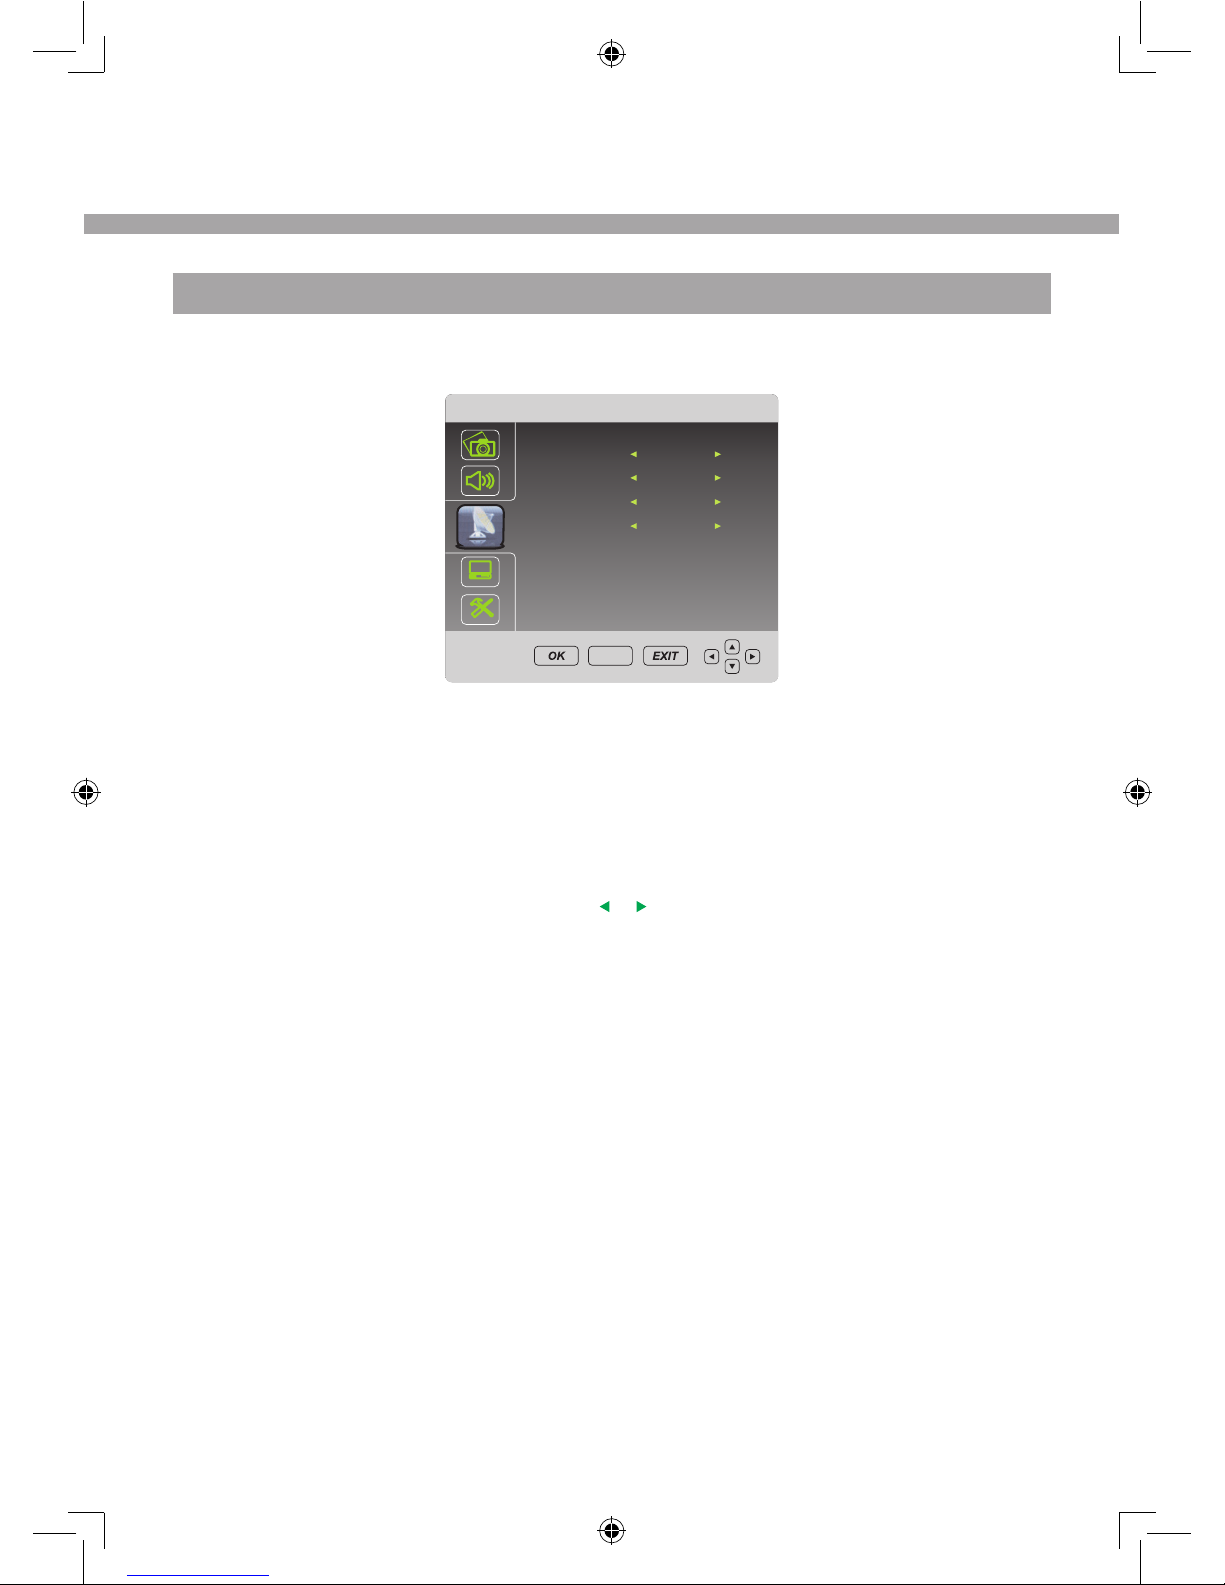
VIDEO SETTING MENU
The menu setup of SCART/ S-VIDEO/ HDMI modes is the same as that of TV mode, except the
“ ” section. You can find it in preceding pages.
NOTE
If no signal input in DTV, ATV, SCART/ AV / S-VIDEO/ HDMI, the screen will show as below.
This unit will switch to standby mode automatically if no signal input more than 5 minutes.
No Signal
SCART
4:31
Page 26
- 19 -
The VGA mode supported up to 1680X1050@75Hz (for 22"), you can use this unit as a multimedia
PC monitor. When this unit works in VGA mode, the following setup can be done.
Press [SETUP] button to enter main section. Press [
▲/▼
] button to select sections and then press
[►] button or [OK] button to enter. If all is done, please press [SETUP] button twice to exit and your
setup data will be saved automatically.
VGA Setup
Select VGA Setup item to adjust such parameters as Horizontal Pos., Vertical Pos., Size, Phase,
Auto Adjust.
SETUP
NOTE
When your PC goes into standby mode, the screen will show as bellow. This unit will go into sleep
mode if no signal input in 5 minutes. In this mode, the indicator will remains green, and the screen
will turn off. You can wake it up by waking up your PC or pressing [SETUP] or [SOURCE] button on
the remote control.
No Signal
VGA
4:31
SOUND
Select SOUND item to adjust sound parameters. You may adjust Sound Mode, Treble, Bass, Balance
and Auto Volume.
Auto Volume Off
SETUP
VGA MENU SETUP
Page 27
- 20 -
■
Sound Mode item can be changed between Standard, Music, Film, Sports, User.
■
Auto Volume item enables to adjust Off or On for control volume automatic.
■
Treble and Bass items can be adjusted from 0 to 100.
Balance item can be adjusted from -50 to +50 for L and R sound balance. Default is 0.
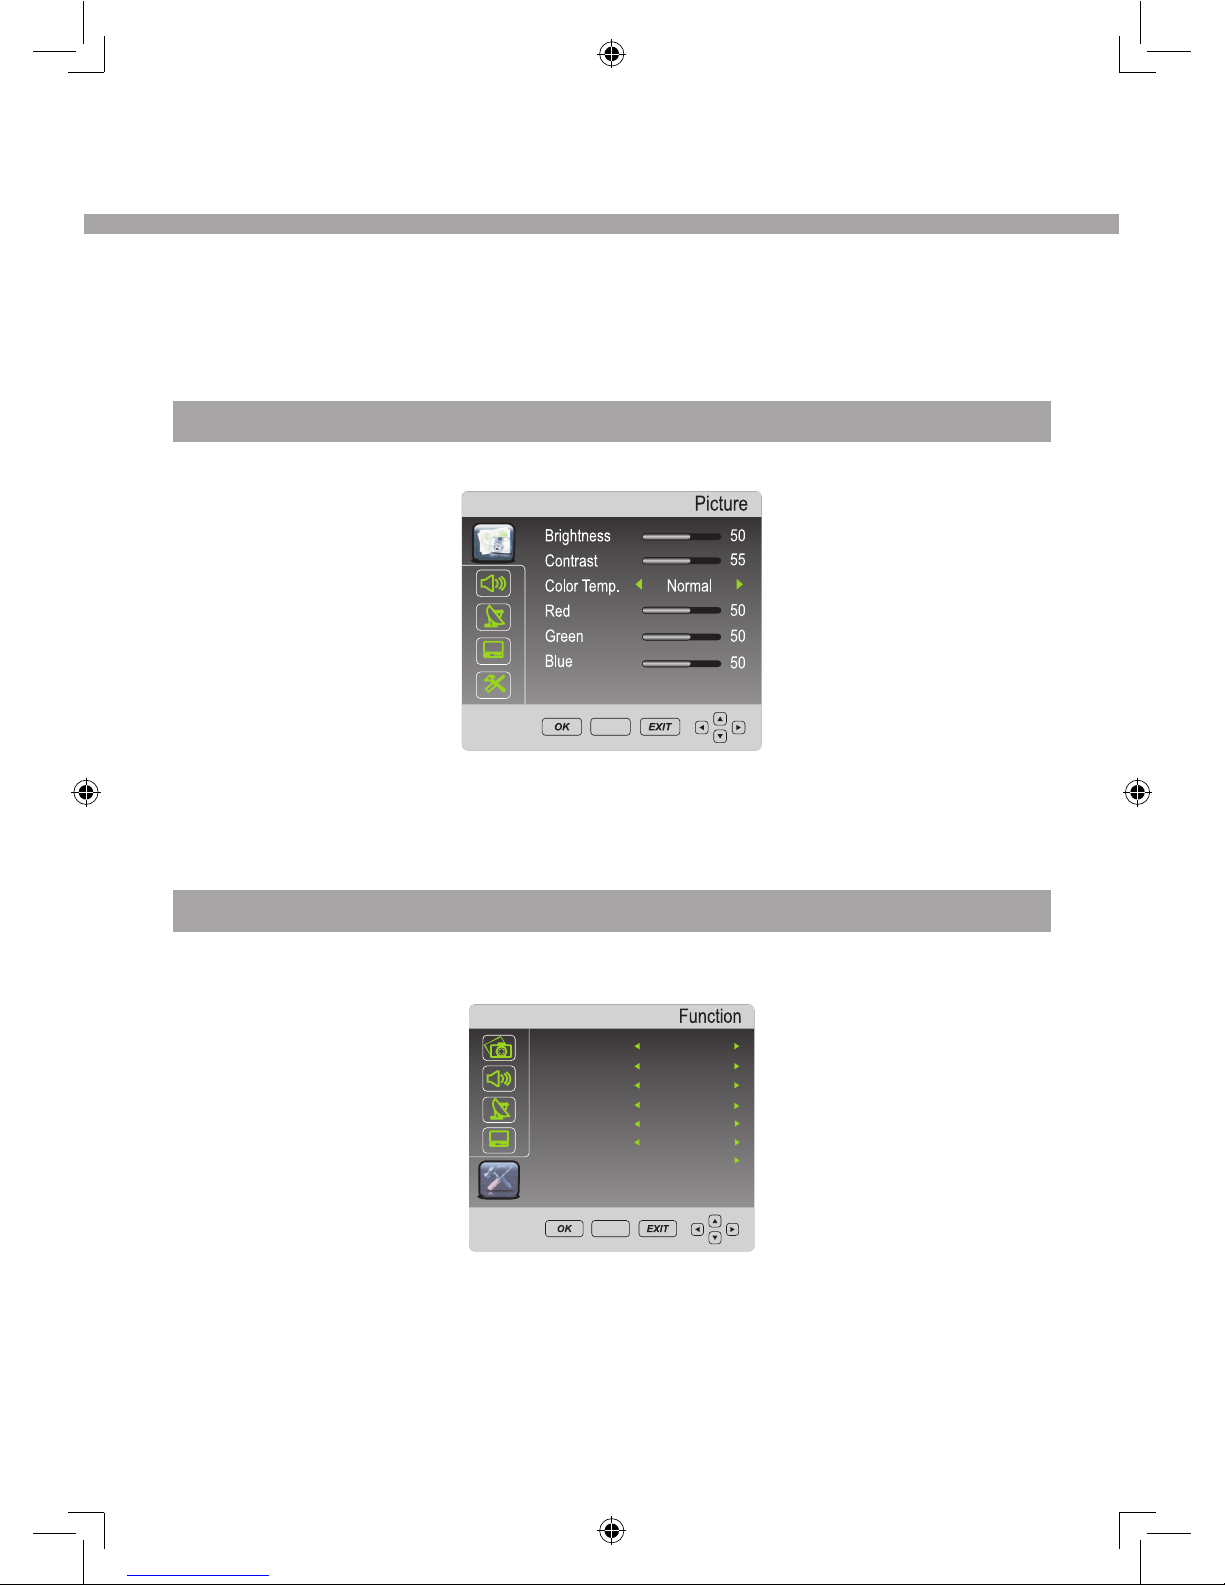
PICTURE
Select PICTURE item to adjust such parameters as Colour Temperature, Red, Green, Blue.
SETUP
■
Colour Temperature item can be set to: Medium, Warm and Cool.
■
Red, Green and Blue items enables to adjust RGB value of colour temperature.
NOTE
♦
The picture will be displayed incorrectly while adjusting.
FUNCTION
Select FUNCTION item to adjust function parameters.
You may select Language, Sleep Timer, Aspect Ratio, Blue Screen and Restore Setting.
Language English
Aspect Ratio 16:9
Noise Reduction Mid
Sleep Timer Off
Blue Screen On
Country Poland
Restore Factory Default
SETUP
■
Language item enables to select the OSD language.
■
Sleep Timer item enables to set the sleep timer: Off, 10min, 20min, 30min, 60min,
120min,180min and 240min.
■
Aspect Ratio item can be changed.
■
Blue Screen item can changed between On and Off.
■
Restore Setting item enables to reset all values to default.
VGA MENU SETUP
Page 28
- 21 -
FM SETTING
Connect FM antenna with FM terminal on the left side of analog TV, change source to FM. Press
SETUP button and a menu will show as follows:
SETUP
FM SETTING
Frequency
Auto Tuning
Manual Tuning
Channel
255
377.97MHz
■
Channel preset enables you to display current channel number, press
[◄/►]
button to change
channel.
■
When highlighted you can either enter the frequency with the numerical buttons or by
pressing cursor left/right. Press OK to save.
■
Manual Tuning enables you to decrease frequency and press SAVE button to increase
frequency. When a program is found, manual search will stop, press OK button to save the new
channel.
■
Auto Tuning item enables you to search and store all the channels in FM band 87.5-108MHz.
Move the cursor to auto search, then press or button to begin auto search. Press SETUP
button to cancel auto search.
NOTES
Up to 40 programs can be preseted/stored, and you can select them in 2 ways:
Method 1:
For programs 1.2.3 and 4, press the 1. 2. 3 and 4 button and wait for 3 seconds to access to them.
For programs 5-40, press the number buttons to access to them directly.
Method 2:
Press CH- button to decrease channel and press CH+ button to increase channel.
During scanning, you can press SETUP button to stop it.
If without any operation in 5 minute, the panel will turn off automatically. In saving power mode,
any operation can turn on the panel.
FM MENU OPERATION
Page 29

- 22 -
SOUND
Select SOUND item to adjust sound parameters. You may adjust Sound Mode, Treble, Bass,
Balance, Auto Volume and Surround Sound.
■
Sound Mode item can be changed between User, Sports, Music, Film.
■
Auto volume- Allows you open or close auto volume adjustment
Film
Auto Volume
SETUP
Off
SOUND
FUNCTION
Select FUNCTION item to adjust function parameters.
You may select Language, Sleep Timer and Restore factory default Noise reduction
■
Language item enables to select the OSD language.
■
Sleep Timer item enables to set the sleep timer (Off, 10min, 20min, 30min, 60min, 120min,
180min and 240min)
■
Restore factory default - Allows you to reset all TV settings back to the default settings.
SETUP
Language English
16:9
Mid
Blue Screen off
off
Country Sweden
Restore Factory Default
FM MENU OPERATION
Page 30

- 23 -
BRIEF INTRODUCTION
This product has a USB 2.0 interface; you can play music, movie and picture files from USB
equipment.
USB refers to Universal Serial Bus. Most of USB devices on the market are USB1.1 or USB2.0.
There are some types USB 1.1 devices:
Monitors Communication devices, Audio, Human Input Device (HID), Mass storage, Most flash
memory, USB HDD etc. Belongs to Mass Storage Class.
Mass Storage Class includes 2 transport manners:
1. USB 1.1 Mass Storage Class Control/Bulk/Interrupt (CBI) Transport
2. USB 1.1 Mass Storage Class Bulk-Only Transport. This unit supports USB
1.1 Mass Storage Class Bulk-Only Transport, we are not sure that other USB devices can be
supported! So please find out about the features of USB equipments before using it.
USB OPERATION
Page 31

- 24 -
PLAYBACK
Press [SOURCE] button to select USB source and insert USB equipment, the USB operation
menu appears on screen as below.
\SUBTITLE\
1. Avi
Size: 4240K Bytes
EXIT ENTER SELECT
EXIT
OK
1: State window Display the current playing mode.
2: DIR window Display the path.
3: File window Display the current path's file.
4: Preview window Movie playing or image preview window.
5: Information window Display the current files information.
Press [
◄/►
] to select playing mode and press [OK] button to enter.
Thus current playing mode is highlighted.
item description
Music mode
Movie mode
Photo mode
USB OPERATION
Page 32

- 25 -
Notes:
1. This product supports MP3, MPEG1, MPEG2, AVI, JPEG and BMP format files.
2. The file system supports FAT16, FAT32 and NTFS.
3. MTP (Media Transfer Protocol) is not supported.
4. Please connect directly to the USB port of your TV. If you are using a separate cable
connection, there may be a USB compatibility problem.
5. Before connecting your device to the TV, please back up your files to prevent them from
damage or loss of data. The manufacturer is not responsible for any data file damage or
data loss.
6. Do not disconnect the USB device while it is loading.
7. If you want to change playing mode, firstly you have to exit current playing mode through
pressing [EXIT] button.
8. The higher the resolution of the image, the longer it takes to display on the screen.
9. For unsupported or corrupted files, the ‘supported format’ message is displayed.
USB OPERATION
Page 33

- 26 -
PLAY MUSIC
1. Press [
◄/►
] button to select " " item and press [OK] button to enter.
2. Press [
▲/▼
] button to select the directory you desire and press [OK] button to confirm.
Select " " item and press [OK] button to return previous path.
3. Press [
▲/▼
] button to select the file you desire and press [OK] button to confirm.
4. Press [
/
►
] button to pause playing and press [►] button to resume.
5. Press [] to stop playing.
6. You can set the repeat mode. Press [REPEAT] button to set the mode: off, repeat one or
repeat all.
Press [EXIT] button to exit music mode.
PLAY MOVIE
1. Press [
◄/►
] button to select " "item and press [OK] button to enter.
2. Press [
▲/▼
] button to select the directory you desire and press [OK] button to confirm.
Select " " item and press [OK] button to return previous path.
3. Press [
▲/▼
] button to select the file you desire and press [OK] button to confirm.
4. Press [►] button to play full screen, and exit full screen by pressing [] or [exit] button.
USB OPERATION
Page 34

- 27 -
OPERATE IN FULL SCREEN STATE
1. Press [SETUP] button to enter into the main menu. The menu setup is the same as AV
mode. You can find it in preceding pages.
2. Press [/►] button to pause playing/steps playback in pause mode and press [►]
button to continue playback.
3. Press [] button and the unit begins fast forward playback.
Press [] button each time and the program playback speed switches in the following
sequence circularly:
Play -> 2x fast forward ->4x fast forward->play
4. Press [] button and the unit begins fast backward playback.
Press [] button each time and the program playback speed switches in the following
sequence circularly:
Play -> 2x fast backward ->4x fast backward->play
5. Press [] [] button can turn to the last or next page.
6. When playing a movie or photo, press the [TITLE/PAGE-]/[TITLE/PAGE-] button can open
the zoom in/out function
7. Press the [PBC/PAGE+] button continually, all the magnified modes display on the
screen in sequence.
8. Press the [TITLE/PAGE-] button continually, all the minified modes display on the screen
in sequence.
Press [EXIT] button to exit movie mode.
USB OPERATION
Page 35

- 28 -
PLAY PHOTO
1. Press [
◄/►
] button to select " " item and press [OK] button to enter.
2. Press [
▲/▼
] button to select the directory you desire and press [OK] button to confirm.
Select " " item and press [OK] button to return previous path.
3. Press [
▲/▼
] button to select the file you desire and press [OK] button to confirm.
4. Press [►] button to play full screen, and quit full screen by pressing [] or [EXIT] button.
OPERATE IN FULL SCREEN STATE
1. Press [SETUP] button to enter into the main menu. The menu setup is the same as AV
mode. You can find it in preceding pages.
2. Press [] [] button can turn to the last or next page.
3. When playing a movie or photo, press the [TITLE/PAGE-]/[TITLE/PAGE-] button can open
the zoom in/out function
4. Press the [PBC/PAGE+] button continually, all the magnified modes display on the
screen in sequence.
5. Press the [TITLE/PAGE-] button continually, all the minified modes display on the screen
in sequence.
Press [EXIT] button to exit photo mode.
USB OPERATION
Page 36

- 29 -
PLAYBACK
CDVCDSVCDDVD
MPEG4
1. Power on and switch signal source to DVD mode and the unit begins to work.
2. Place the disc (with label side facing users) to the door and the unit will draw in the disc
automatically.
The unit begins to read disc information.
2
3
CALL
POWER
MUTE
SLEEP
P.MODE
S.MODE
FAV
SCALER
1
STANDBY EJECT
3. Press [PLAY] button to begin playing disc.
When the unit playing a disc, press [►] button the firs time and the unit enters pause
state, while press [►] button again and the unit resumes playback.
4. Press [STOP] button to stop playing.
When the unit is playing a disc, press [] button the first time and the unit enters pre-
stop state, while press [] button again and the unit enters stop status.
At the pre-stop state, if you press [►] button, the unit will continue to play from the
stopped
point.
At the stop state, if you press [►] button, the unit will play from the beginning point
of the disc.
Press [] button when playing MPEG4 discs and the unit enters stop state directly.
5. Press [ ] button to take out disc.
6. When finishing playing, switch signal source to other working state and press
[ ] button to make the unit enter standby state. Please pull out the power plug from
power socket when not using the unit for a long time.
[ ] button is effective only when selecting DVD signal source. In other signal
source, such as TV, AV, etc, this button is invalid.
VOLUME CONTROL
CDVCDSVCDDVD
MPEG4
1. Press [VOL+/VOL-] buttons to adjust volume.
2. Press [VOL+/VOL-] buttons on the remote control of this unit.
Press [VOL+] button to increase volume; press [VOL-] button to decrease volume;
the maximum volume is 100.
CH-
CH+
VOL+
VOL-
TEXT MIXINDDEVXD/USB
CANCEL REVEAL HOLD SIZE
I/II
VOL+/ STOP
PLAY
DVD OPERATION
Page 37

- 30 -
VCD, SVCD MENU PLAYBACK
VCDSVCD
When playing SVCD, VCD2.0 discs with menu playback function, you may enjoy
simple menu playback alternation function. You may set menu playback state in the
setup menu and select menu playback or sequence playback.
For instance, VCD 2.0 disc menu playback.
1. TV screen displays main menu.
1.
2.
Press number buttons to select. For instance, press number button 1 to select main
menu 1.
1.
2.
2. After entering main menu 1, TV screen displays submenu.
2.
3.
4.
5.
1.
3. Press [], [] buttons to turn pages.
4. Press number buttons to select submenu content. For
instance, press number button 5 and the unit begins to
play the fifth track.
2.
3.
4.
5.
1.
5. When playing, pressing [DVD-MENU] button to return to
the root menu.
MEMORY
DVD
1. This player can save the currently played time point automatically when you leave the
current DVD disc playback (switch from DVD to card read state, switch from DVD signal
source to other signal source, enter standby status in DVD mode).
2. When switching to DVD playback status again, this player can automatically search the
time point saved last time to continue playing. If you want to play from the beginning,
please press [] button twice and then press [►] button.
XEDN I XIMTXET
CANCEL REVEAL HO LD SI ZE
I/II
PLAY
STOP
NOTE
This player may save one DVD disc for one time.
The DVD disc played the last time will be saved, and the former saved contents will be
cleared by new saved contents.
lf power is cut off unexpectedly, the DVD disc played currently will not be saved.
DVD OPERATION
CH-
CH+
VOL+
VOL-
XEDN I XIMTXET
CANCEL REVEAL HOLD SIZE
GOTO A-B R EP EAT A NGLE
DVD-MENU
TITLEPBCAUDIO
PAGE+PAGE-S.PAGE
I/II
OK
PLAY
[]
[]
DVD-MENU
Page 38

- 31 -
SELECT TRACK TO PLAY DIRECTLY BY NUMBER BUTTONS
CDVCDSVCDDVD
1. Insert disc, after disc reading and normal playback, press number buttons to select
track to play directly.
If track number is less than 10, press number buttons 1 to 9 to directly select. For
instance, select the seventh track: 7
If track number is more than or equal to 10, press [-/- -] button and then number
buttons 0 to 9. For instance, select the 16th track:
1 + 6
6
-/--
If track number is more than or equal to 20, press [-/- -] button twice and then
number buttons 0 to 9. The rest can be performed by analog.
21
3
4
5
6
7
8
9
POWER
MUTE
SLEEP
RECALL
P.MODE
S.MODE
FAV
SCALER
CALL
NUMBER
SELECT LANGUAGE/AUDIO
CDVCDSVCDDVD
1. Press [AUDIO] button.
As for DVD discs with multiple languages, you may select the desired language
when playing.
DVD disc:
Audio 1/2
French
Audio 2/2
Chinese
As for SVCD, VCD or CD disc with multiple channels, you may select audio output
from left or right channel or select stereo audio output. For VCD disc, left channel
records dubbing and right channel records singing, and you may select left channel
for dubbing.
SVCD, VCD, CD disc:
MonoRight
Mono Left
Stereo
Mix-Mono
GOTO A-B R EP EAT A NGLE
DVD-MENU
TITLEPBC AUDIO
DISPLAYTV/RADIO
EPG
SUBTITLE
PAGE+PAGE-
ZOOM+ZOOM -
i
S.PAGE
AUDIO
NOTE
Language type varies with disc recording.
For VCD story disc with double languages, you may press [AUDIO] button to select the
desired language.
When playing some DVD discs, pressing [AUDIO] button to switch language may result in
playing the track from its beginning.
DVD OPERATION
Page 39

- 32 -
REPEAT PLAYBACK
CDVCDSVCDDVD
MPEG4
The repeat playback function enables a certain title/chapter/track/disc repeated.
1. Press [REPEAT] button. Each press of REPEAT button may realize different repeat
functions.
DVD DISC:
Repeat Off
Title
Chapter
ALL
SVCD, VCD, CD discs:
To SVCD, VCD2.0 discs, the repeat function is effective in sequence playback mode;
to VCD1.1, CD discs, the repeat function may be directly operated.
Track Off Repeat
ALL
To SVCD, VCD2.0 discs, the repeat function cannot be operated in menu playback
mode.
REPEAT
GOTO A-B R EP EAT A NGLE
DVD-MENU
TITLEPBC AUDIO
REPEAT PLAYBACK OF SELECTED SEGMENT
CDVCDSVCDDVD
MPEG4
When playing disc, you may press [A-B] button to play your desired segment content
repeatedly.
1. In normal playback, press [A-B] button at the beginning point (point A) of the segment
that you desire to play repeatedly.
TV screen displays:
A
2. In normal playback, press [A-B] button at the ending point (point B) of the segment that
you desire to play repeatedly.
TV screen displays:
AB
The unit automatically returns to point A and begins to play the selected segment
(A-B).
3. Press [A-B] button for the third time.
The unit restores to normal playback.
A-B
GOTO A-B R EP EAT A NGLE
DVD-MENU
TITLE PBC AUDIO
DISPLAYTV/RADIO
EPG
SUBTITLE
PAGE+PAGE-
ZOOM+ZOOM-
i
S.PAGE
NOTE
The A-B repeat function may be invalid to some discs. In menu playback mode, the
segment can only be selected in the track.
DVD OPERATION
Page 40

- 33 -
FAST PLAYBACK
CDVCDSVCDDVD
MPEG4
When playing discs, you may select fast forward or fast backward playback to search a
certain point.
1. Press [] button and the unit begins fast forward playback.
Press [] button each time and the disc playback speed switches in the following
sequence circularly:
2X
16X
8X
4X
2. Press [] button and the unit begins fast backward playback.
Press [] button each time and the disc playback speed switches in the following
sequence circularly:
2X
16X
8X
4X
PLAY FROM THE DESIRED POSITION
DVD SVCD VCD CD
MPEG4
Play DVD disc
Inputting a certain time, title number or chapter number directly may search in the disc
fast and then play forward from this position.
1. Search title and chapter. For instance, search the 2nd chapter in title 6.
Press [GOTO] button and TV screen displays:
Title 03/30 Ch apter02 /
Press [
◄/►
] button to move cursor and lighten the title number, shown in the figure:
Title30 / C h apter1/ 0 0 2
Then press number button 6 to select Title 6, shown in the figure:
Title60 /30 C h apter02 /
Finally press number button 2 to select Chapter 2, shown in the figure:
Title 0 6 /30 C h apter 02/02
2. Search title time
Press [GOTO] button until TV screen displays the following figure. Then press number
buttons to input hour, minute and second.
Title 0 6 /30 Time : :
3. Search chapter time
Press [GOTO] button until TV screen displays the following figure. Then press number
buttons to input hour, minute and second.
Chapter 10 /04 Time ::
DVD OPERATION
CH-
CH+
VOL+
VOL-
XEDN I XIMTXET
CANCEL REVEAL HO LD SI ZE
GOTO A-B R EP EAT A NGLE
I/II
Page 41

- 34 -
Play MPEG4 disc
1. Select track
Press [GOTO] button until TV screen displays the following figure. Then press number
buttons to input the track.
Disc Go To --:--
2. Search track time
Press [GOTO] button until TV screen displays the following figure. Then press number
buttons to input hour, minute and second.
Track Go To --:--
Play SVCD, VCD and CD discs
1. Search disc time
Press [GOTO] button until TV screen displays the following figure. Then press number
buttons to input minute and second.
-:--:--
Go To
2. Search track time
Press [GOTO] button until TV screen displays the following figure. Then press number
buttons to input minute and second.
Select Track-/ 1-5
3. Select the track
Press [GOTO] button until TV screen displays the following figure. Press number buttons
to input track.
Select
ZOOMING THE DISPLAYED FRAME
VCDSVCDDVD
MPEG4
Zoom in/out the player frame.
1. When playing a disc, press the [ZOOM+/-] button can open the zoom in/out function, and the
TV screen displays( take X2 mode as an example):
The frame is magnified to 2 times of the normal size.
2. Press the [ZOOM +] button continually, all the magnified/ minified modes display on the
screen in turn. The magnified/ minified modes includes: 2X, 3X, 4X.
3. Press the [ZOOM -] button continually, all the magnified/ minified modes display on the screen
in turn. The magnified/ minified modes includes: 1/2, 1/3, 1/4.
4. When the mode is on 4X, press [ZOOM +] button to close the zoom in/ out function, and the
frame restores normal size. When the mode is on 1/4, press [ZOOM -] button.
5. When the picture is magnified, press the [
▲/▼/◄/►
] buttons to move the frame.
CANCEL REVE AL HOLD SIZE
GOTO A-B ANGLE
DVD-MENU
TITLEPBC AUDIO
DISPLAYTV/RADIO
EPG
SUBTITLE
PAGE+PAGE-
ZOOM+ZOOM-
i
S.PAGE
REPEAT
ZOOM
DVD OPERATION
CANCEL REVEAL HOLD SIZE
GOTO A-B R E P E A TANGLE
DVD-MENU
TITLEPBC AUDIO
DISPLAYTV/RADIO
EPG
SUBTITLE
PAGE+PAGE-
ZOOM+ZOOM-
i
S.PAGE
GOTO
Page 42

- 35 -
MPEG4 AND JPEG FILE PLAYING
MPEG4 is the audio standard published by MPEG (Moving Pictures Experts Group) in
November,1998. As the discrepant parts between frames of picture are only processed and
the same parts are deleted, the data number are greatly decreased. The most distinct feature
of MPEG4 is the high compression and clear imaging. Furthermore, MPEG4 provides elastic
specifications to adjust the stream according to the used requirements. The larger stream
can be used when collecting private films; and the small stream can be used in network
transferring, which makes MPEG4 use widely.
JPEG (Joint Photographic Experts Group) is the most widely used picture compression and
storage format today. Utilizing high efficiency compression algorithm, JPEG compresses the
original picture 15 to 20 times with excellent picture quality. JPEG is featuring small size
data, convenient application and supported by most picture processing software, so it is very
fit to store photos.
The strong decoding capability of this unit can decode and play the files with the above
formats. In the course of playing, an operation menu will appear and its construction is
shown as follows.
00:00 00:00
004/369
\PIC\
Du000
Du001
Du002
..
1
2
3
4
5
6
1. State window
Display the current state
information.
2. DIR window
Display the current path.
3. File window
Display the current path's
file.
4. Scroll bar window
Indicate the current file's
position.
5. Preview window
JPEG image preview.
6. Information window
Display the current operation
prompts.
The state information in state window is as follows:
4
00:57
002/073
03:31128
2
1
3
5
6
1. Elapsed playback time
2. Total playback time
3. The audio bit rate (generally the bit rate is 128kbps,
sometimes it is VBR.)
4. Current playback mode indicator
5. Track indicator
6. Dynamic frequency spectrum indicator
DVD OPERATION
Page 43

- 36 -
1. Play MPEG4 file
After you put an MPEG4 format file into the unit, it will search disc information and display
the operation menu as figure A (The displayed content varies with disc.).
A:
00:00 00:00
\
Du000
Du002
Du001
Du003
001/004
B:
00:00 00:00
001/369
\Du000\
MP000
MP001
MP002
..
A/V
A/V
A/V
Press [
▲/▼
] button to select the directory you desired and press [OK] button to
confirm. For instance, you select the directory Du000 in Figure A, press [OK] button
and TV screen displays as in Figure B. The window returns to the previous directory
when you select [ ] or press [◄] button.
In Figure B, press [
▲/▼
] button to select the MPEG4 format file you desired and
press [OK] button to confirm. The unit begins to play MPEG4 format movie.
2. Play JPEG file
After you put a JPEG format file into the unit, it will search disc information and display the
operation menu as in the following figure. After selecting JPEG file, the preview window will
appear this file's preview image to facilitate you to select. After you select the JPEG file you
desired and press [OK] button to confirm, the picture will display in full screen.
00:00 00 :00
004/369
\PIC\
Du000
Du001
Du002
RESOLUTION 640 480
..
Other basic operation methods
1. Press [], [] button may turn to the next or last page.
Other functions of JPEG file
1. When playing JPEG file, press [ZOOM] button to enter zoom in/out, and press it again to
stop this function.
2. When in zoom in/out, pressing [] button may magnify the picture and it can magnify
the frame twice at most as the original one. Pressing [] button may minify the picture
and it can minify the frame half at most as the original one.
DVD OPERATION
Page 44

- 37 -
3. When playing JPEG file, pressing [] button may realize preview playback function. At
the same time, all JPEG files are displayed on TV screen. One frame can display up to
12 pictures at most. The rest ones are shown on the next frame. Pressing [] button
may enter the next frame and [] button may enter the previous frame. You may press
number buttons or [
▲/▼
] button to select the picture you desired and press [OK] button
to confirm.
4. When in preview playback, pressing [DVD-MENU] button may exit preview playback
function.
2 1
3
4
5
6
7 8 9
0
POWER
MUTE
SLEEP
I/II
RECALL
SOURCE
CALL
EXITSETUP
CH-
CH+
P.MODE S. MODE
VOL+
VOL-
XEDN I XIMTXET
CANCEL REVE AL HOLD SIZE
GOTO A-B R EPEAT A NGLE
DVD-MENU
TITLE PBC AUDIO
DISPLAY TV/ RADI O
EPG
SUBTIT LE
PAGE+PAGE-
ZOOM+ZOOM-
i
FAV
S.PAGE
SCALER
NUMBER
UP
DOWN
DVD- MENU
OK
SUBTITLE
ZOOM
NOTE
When buttons are invalid, TV screen displays:
Please press effective button again.
DVD OPERATION
Page 45

- 38 -
PICTURE
Select PICTURE item to adjust picture parameters.
You may adjust Picture Mode, Contrast, Brightness,
Colour, Sharpness, Tint and Colour Temperature.
■
Picture mode item can be changed between
User, Standard, Mild, Dynamic.
You may adjust Brightness, Contrast, Colour,
Sharpness, Tint for User mode.
■
Colour Temp. item can select color temperature
mode: Medium, Warm, Cool.
SOUND
Select SOUND item to adjust sound parameters.
You may select Soun d Mode, Treble , Bass, Balance
and Auto Volum e.
■
Sound Mode item can be changed between
Music, Film, Sports, User and Standard.
■
Auto Volume item enables to adjust Off or On
for control volume automatic.
DVD SETTING
Select DVD item to adjust DVD parameters.
Through press [
▲/▼
] button on the remote
control, you can select the following items,
"General", Preference", press [►] or [OK] button
to confirm.
SETUP
Auto Volume Off
SETUP
DVD
DVD SETTING
SETUP
DVD FUNCTION SETUP
Page 46

- 39 -
GENERAL SETUP
You may select TV DISPLAY, SCREEN SAVE, DOWNMIX and Divx.
TV display: this item is used to set the output picture ratio of this
unit.
Optional settings: Normal/Pan-Scan, Normal/Letterbox,
Wide Screen; Default: Normal/Letterbox
Screen Save: Open or close the screen saver
Optional settings: Off, On; Default: On
Downmix: this item is used to set this unit's DOWNMIX mode to change multi-channel audio
into 2-channel audio output.
Optional settings: Stereo, LT/RT; Default: Stereo
Divx: this item is used to set the codepage (character encoding table) for MPEG-4 format
subtitles.
1252 - West European Latin (used by Western European languages)
1250 - East European Latin (used by Central & Eastern European languages)
1251 - Cyrillic (used by Belarusian, Bulgarian, Macedonian, Russian, Serbian and Ukrainian
languages)
PREFERENCE SETUP
TV Type: To set the output video system of this player.
Optional settings: Auto, PAL, NTSC; Default: PAL
PBC: this item is used to set PBC state.
When playing SVCD, VCD2.0 discs, if PBC is set On, this
unit enters PBC playback mode; if PBC is set Off, the unit
plays the disc according to track sequence.
Optional settings: On, Off; Default: On
Audio: this item is used to set the preference audio language when playing.
Subtitle: this item is used to set the preference subtitle language when playing.
Disc menu language: this item is used to set the preference disc menu language when
playing.
Default of disc menu language: English
Default of subtitle: English
DVD FUNCTION SETUP
General Setup Page
LB
Set TV Display Mode
Screen Save On
Downmix
Stereo
TV Display
Divx 1252
Preference Page
Parental
Off
Subtitle
Disc Menu
PAL
Audio
ENG
PBC
On
Password
Default
Set TV Standard
ENG
ENG
TV Type
Page 47

- 40 -
NOTE
Audio, subtitle and disc menu language are only effective to DVD disc.
If the disc is not recorded with the language you appointed, the unit will apply the
language that the disc appointed to play.
Select other languages: press [
▲/▼
] button to move cursor to "OTHER" item, press [OK]
button and then number buttons to input the language code you desired. After input
finishes, press [OK] button again.
Parental: this item is used to set the parental control ratings to prevent children from
watching the restricted contents. (In case the disc supports this function)
Optional settings: KID SAFE, G, PG, PG 13, PGR, R, NC17, ADULT, Off; Default: Off
NOTE
When changing the parental control ratings, a password is needed. Please refer to the
following password item for details.
Password: this item is used to set a four digital password to enable you to change the
parental control ratings.
Default: 7890
Default: this item is used to restore all settings to the default value
except "Parental control" and "Password" in the setup menu.
FUNCTION
Select FUNCTION item to adjust function parameters.
You may select Language, Sleep Timer, Aspect Ratio,
Blue Screen and Restore Setting.
■
Language item enables to select the OSD
language.
■
Sleep Timer item enables to set the sleep timer
(Off, 10min, 20min, 30min, 60min, 120min,
180min and 240min).
■
Aspect Ratio item can changed between Auto,
16:9 and 4:3 (Auto is invalid for VGA).
■
Blue Screen item can changed between On and
Off.
■
Restore Setting item enables to reset all values to default.
DVD FUNCTION SETUP
Old password
Confirm PWD
New password
OK
Language English
Aspect Ratio 16:9
Noise Reduction Mid
Sleep Timer Off
Blue Screen On
Country Poland
Restore Factory Default
SETUP
Page 48

- 41 -
Please check for causes of problems in accordance with the following chart before
contacting any maintenance personnel.
DISPLAY TROUBLESHOOTING
Symptom Causes and Correction
Black screen, power
indicator light off
Check whether power cord is well connected, and whether this unit
is power on
Check whether the signal cord of input device is well connected
Check whether input device is power on
Image display
flicker, unstable
Check whether the input device signal is in this unit's specification
Check computer output mode: control panel-display-setup
If the setup does not accord with this unit’s specification, please
change the display setup
Horizontal scanning frequency: 30kHz ~ 75kHz
Vertical scanning frequency: 50 Hz ~ 75Hz
SOUND AND TV TROUBLESHOOTING
Symptom Causes and Correction
Cannot power on
Please make sure the well connecting of power cord
No sound
Please make sure the well connecting of audio cord
Check volume
Make sure there is nothing plugged in the headphone jack
Volume too low
Check volume
If volume is still too low when adjusting volume to maximum, please
check whether the input device is well set
Snowy picture
Input antenna damaged or not well connected
Remote control
failure
Check whether remote control battery exhausted
Whether battery installation is correct
Whether obstacles exists between remote control and the unit’s
receiving window
Check whether receiving window has strong light
TROUBLESHOOTING
Page 49

- 42 -
DVD TROUBLESHOOTING
Symptom Causes Correction
Not play
1. Condensation on laser
head
2. Disc not properly loaded
3. Disc not compatible
with the unit
1. Switch on power and wait for 1 to 2
hours
2. Make sure label side of the disc facing
up
3. Confirm whether this unit compatible
with the placed disc
Sound
distortion
1. Too large volume of
connected device
2. Sound field mode not
suitable for disc
1. Adjust the device volume
2. Adjust appropriate sound field
No sound
1. Disc warped or dirty
2. The unit in mute state
1. Clean the disc
2. Press MUTE button to cancel it.
No image
1. TV not set for proper
system
1. Reset AV/TV state of TV
No color
1. TV system not right
2. TV color not well
adjusted
1. Try to change the color system
2. Reset the TV color
No disc
reading
1. Disc warped or dirty
2. Disc not correctly
placed
3. Condensation on laser
head
1. Clean the disc
2. Reload a disc with label side facing up
3. Witch on power, unload disc and leave
it for about 1 hour
Temporary
function
failure
1.
Mal-fabricated disc used
2. Wrong buttons pressed
3.
Static leakage into the
unit from outside
1. Wait for 5 to 10 seconds to restore to
normality automatically
2. Operate again
3. Power off for 1 to 2 minutes to power
on again
No subtitle
1. No subtitle made in disc
2. The unit subtitle is
turned off
1. Disc problem
2. Press Subtitle button to select it
Image rolling
1. System setup not
suitable for disc
1. Adjust system mode
If the above methods still cannot solve the problems or the troubles are special, please contact
the local maintenance personnel.
TROUBLESHOOTING
Page 50

- 43 -
LCD screen
Size
Display proportion
Type
Pixel distance
View angle
18.5”(diagonal)
409.8mm (H)X230.4(V)
TFT color
0.3mm(H)X0.3mm(V)
85(L)/85(R)/80(T)/80(B)(CR=10)
Frequency
Hor scanning frequency
Ver scanning frequency
Display color
30 kHz - 80 kHz
50 Hz - 75 Hz
16.7M (color)
Display mode
Recommended mode
Max mode
1366 x 768@75Hz
Panel Life Hours 50,000
Input signal
Synchronous signal
Video signal
H/V separation, TTL positive/negative;
H/V composite, TTL positive/negative
Green synchronous, 0.3Vp_p, negative
0.7 Vp_p@75ohm
TV/Video
Image system
Audio system
Video form
PAL/SECAM/NTSC(In video mode)
DK/I/BG/L
CVBS, RGB, S-VIDEO, VGA
Power Supply
Adapter input
Adapter output
~ 100V-240V (50 /60 Hz)
12-24V/5A
Unit/net weight (LXWXH) 485mmX160mmX400mm/5.0kg
Environmental
factor
Working temperature
Working humidity
Storing temperature
Storing humidity
5°C ~ 35°C
10%~80%
-20°C ~ 45°C
5%~95%
Audio parameter
Audio input
Frequency response
ø3.5 jack(L,R), 0.5±0.3Vrms
TV signal: 100 Hz~12 kHz(-3dB)
AV: 100 Hz~15 kHz (-3dB)
DVD Disc type
DVD VIDEO
MPEG4 *: SVCD**
VCD1.0, 1.1, 2.0 version; CD-DA
Digital TV
Input connector
Frequency range (VHF/UHF)
Channel range(VHF/UHF)
IEC-Type, IEC 169-2, Female
174MHz ~ 858MHz
7 & 8 Mhz
Hint: the items with “ ” symbol is related to LCD screen. Specifications and design are subject o
change without notice.
* Some discs labelled with MPEG 4 on the market actually are * .rm/* .ram/* .rmm and others
which are not compatible. Please take care when buying discs.
** This unit cannot play some SVCD discs with VCD format.
Because of disc quality and format difference, we cannot make sure smoothly read all discs;
some functions cannot be fulfilled for the disc speciality, but not machine trouble.
As for weight and size, please take actual object as standard.
18.5” SPECIFICATIONS
Page 51

- 44 -
LCD screen
Size
Display proportion
Type
Pixel distance
View angle
21.6”(diagonal)
477.50mm (H)X268.59mm(V)
TFT color
0.248mm(H)X0.248mm(V)
85(L)/85(R)/80(T)/80(B)(CR=10)
Frequency
Hor scanning frequency
Ver scanning frequency
Display color
30 kHz - 80 kHz
50 Hz - 75 Hz
16.7M (color)
Display mode
Recommended mode
Max mode
1920 x 1080@75Hz
Panel Life Hours 50,000
Input signal
Synchronous signal
Video signal
H/V separation, TTL positive/negative;
H/V composite, TTL positive/negative
Green synchronous, 0.3Vp_p, negative
0.7 Vp_p@75ohm
TV/Video
Image system
Audio system
Video form
PAL/SECAM/NTSC(In video mode)
DK/I/BG/L
CVBS, RGB, S-VIDEO, VGA
Power Supply
Adapter input
Adapter output
~ 100V-240V (50 /60 Hz)
12-24V/5A
Unit/net weight (LXWXH) 560mmX160mmX436mm/5.7kg
E n vi ro n m e n t a l
factor
Working temperature
Working humidity
Storing temperature
Storing humidity
5°C ~ 35°C
10%~80%
-20°C ~ 45°C
5%~95%
Audio parameter
Audio input
Frequency response
ø3.5 jack(L,R), 0.5±0.3Vrms
TV signal: 100 Hz~12 kHz(-3dB)
AV: 100 Hz~15 kHz (-3dB)
DVD Disc type
DVD VIDEO
MPEG4 *; SVCD**
VCD1.0, 1.1, 2.0 version; CD-DA
Digital TV
Input connector
Frequency range (VHF/UHF)
Channel range(VHF/UHF)
IEC-Type, IEC 169-2, Female
174MHz ~ 858MHz
7 & 8 Mhz
Hint: the items with “ ” symbol are related to LCD screen. Specifications and design are subject o
change without notice.
* Some discs labelled with MPEG 4 on the market actually are * .rm/* .ram/* .rmm and others
which are not compatible. Please take care when buying discs.
** This unit cannot play some SVCD discs with VCD format.
Because of disc quality and format difference, we cannot make sure smoothly read all discs;
some functions cannot be fulfilled for the disc speciality, but not machine trouble.
As for weight and size, please take actual object as standard.
21.6” SPECIFICATIONS
Page 52

- 45 -
SUPPORTED PC INPUT MODE
Resolution
Horizontal scanning frequency
(KHz)
Vertical scanning frequency
(Hz)
Format
640 X 350 31.5 70.0 DOS
720 X400 31.5 70.0 DOS
640 X480 31.5 60.0 DOS
640 X480 37.9 72.0 VESA
640 X480 37.5 75.0 VESA
800 X600 35.1 56.2 VESA
800 X600 37.9 60.0 VESA
800 X600 48.1 72.0 VESA
800 X600 46.9 75.0 VESA
1024 X768 48.4 60.0 VESA
1024 X768 56.5 70.11 VESA
1024 X768 60.5 75.0 VESA
1280X1024 64.0 60.0 VESA
1280X1024 85.0 75.0 VESA
1600X1200 75.0 60.0 VESA
1600X1200 81.3 65.0 VESA
NOTES
This product does not support the display mode not listed above. In order to achieve the best
display effect, please select the above-listed 20 display modes input signal.
Because of the difference of display card output signal (especially non-standard signal output),
the display image may appear little disturbance which can be adjusted through “AUTO CONFIG”
in the “PICTURE” menu by users.
To prolong this unit’s service life, you are suggested to use power management function of
computer.
DISPLAY MODE
Page 53

ANVÄNDARHANDBOK
LD-185DCH HD KOMBINERAD TV, DVD och DVB-T
LD-216DCH HD KOMBINERAD TV, DVD och DVB-T
Läs den här bruksanvisningen
noggrant innan du använder TV:n.
Page 54

FÖREBYGGANDE SÄKERHETSÅTGÄRDER
Denna symbol indikerar att “farlig spänning” finns inuti
enheten som kan utgöra risk för elektriska stötar eller
personskada.
Denna symbol indikerar att det finns viktiga anvisningar
för enheten.
Läs den här bruksanvisningen noggrant innan du använder TV:n.
Försäkra dig om att LCD-TV:ns spänning motsvarar eluttagets innan du
sätter i strömsladden i adapterns kontakt. Om du inte vet vilken spänning
ditt uttag har, hör med det lokala elbolaget.
Stoppa aldrig in metallföremål i LCD-TV:ns/bildskärmens öppningar då
detta kan leda till risk för elektriska stötar.
Rör aldrig insidan av LCD-TV:n/bildskärmen eller adaptern då det kan
leda till elektriska stötar. Endast behöriga tekniker får öppna LCD-TV:ns/
bildskärmens/adapterns hölje.
Använd aldrig din LCD-TV/bildskärm/adapter om strömsladden är skadad.
Ställ aldrig något på strömsladden och håll sladden borta från platser där
man kan råka trampa på den.
Se till att du håller i kontakten och inte i sladden när du drar ut adaptern
från eluttaget.
Öppningarna i LCD-TV:ns/bildskärmens/adapterns hölje är till för
ventilation. Dessa öppningar får aldrig blockeras eller övertäckas då det
kan leda till överhettning. Undvik också att använda LCD-TV:n/bildskärmen
på en säng, soffa, matta eller annan mjuk yta. Om du gör detta kan
ventilationsöppningarna på TV:ns undersida blockeras. Om du ställer LCDTV:n/bildskärmen på en bokhylla eller annan stängd plats bör du se till att
den får lämplig ventilation.
Utsätt inte LCD-TV:n/bildskärmen för extrema temperaturförhållanden eller
extrem fuktighet.
Apparaten får inte utsättas för droppande eller stänkande och inga föremål
som innehåller vätska, som t.ex. vaser, får ställas på apparaten.
Page 55

VIKTIGA SÄKERHETSANVISNINGAR
Ställ inte LCD-TV:n/bildskärmen på ostadig vagn, ställ, stativ, hylla, bord
eller golv där den kan ramla. TV:n kan skadas om den tappas, eller råkar ut
för slag eller repor. Rengör inte framsidan med medel som t.ex. aceton, etyl,
toluen, etylsyra, metyl, eller klorid – dessa kan skada panelen.
Se till att adaptern finns i närheten av ett lättåtkomligt eluttag.
Dra ut kontakten direkt om LCD-TV:n/bildskärmen inte fungerar normalt
eller om den låter eller luktar konstigt och kontakta en behörig återförsäljare
eller servicecenter.
Höga temperaturer kan orsaka problem. Använd inte LCD-TV:n/bildskärmen
i direkt solljus och håll den borta från värmeelement, spisar, eldstäder och
andra värmekällor.
Dra ut strömadaptern om TV:n inte ska användas under en längre tid.
För att minska risken för brand, elektriska stötar eller bild- och
ljudstörningar, använd endast rekommenderade tillbehör.
Om LCD-TV:n/bildskärmen är trasig, försök inte reparera den på egen hand.
Kontakta kvalificerad servicepersonal.
Dra ut strömadaptern från eluttaget innan du lämnar in den på service.
Se till att serviceteknikern använder godkända reservdelar eller
motsvarande. Om man använder delar som inte är godkända kan detta leda
till brand, elektriska stötar eller annan fara.
Efter eventuell service eller reparation, se till att serviceteknikern utför
säkerhetskontroller för att vara säker på att TFT-LCD-TV:n/bildskärmen
fungerar som den ska.
KLASS I-apparater ska anslutas till eluttag som är jordade.
Page 56

VIKTIGA SÄKERHETSANVISNINGAR
Denna apparat har designats och tillverkats i enlighet med god tillverkningssed
och de europeiska direktiven 2006/95/CE samt 2004/108/CE när det gäller
säkerhet och eliminering av radiostörningar. Följ instruktionerna och vidta de
säkerhetsåtgärder som anges. Felaktig användning av apparaten kan leda till
eldsvåda eller risk för livsfarliga elektriska stötar.
Denna apparat uppfyller kraven i EU:s direktiv 2002/96/EC
Den överkorsade soptunnan är till för att visa att denna apparat inte får kastas
bland de vanliga hushållssoporna när dess livstid är slut. Apparaten bör i
stället kasseras vid en särskild insamlingsplats för elektriska och elektroniska
apparater eller lämnas in till din återförsäljare när du köper en ny apparat.
Användaren är ansvarig för att ta apparaten till en särskild inlämningsplats
när dess livstid är slut. Om apparaten lämnas in korrekt som separat avfall,
kan den återvinnas, behandlas och kasseras på ekologiskt sätt, vilket undviker
negativ påverkan på både miljö och hälsa och dessutom bidrar till återvinning av
apparatens material. Kontakta de lokala myndigheterna eller din återförsäljare
för ytterligare information om vilka alternativ som finns på din ort när det gäller
återvinning/kassering.
Page 57

Gratulerar till ditt val av en Flex-TV från People of Lava.
Innan du sätter igång bör du kontrollera att apparatens förpackning innehåller
följande tillbehör:
Användarhandbok Fjärrkontroll och batteri
FM-antenn Strömadapter
Strömadapter för användning i bilen
För att använda strömadaptern för användning i bilen måste denna först sättas in i
TV:n.
I enlighet med People of Lavas miljöpolicy är din apparat försedd med en
energisparfunktion som stänger av apparaten efter fyra timmars inaktivitet (inga
kanalbyten, volymändringar, byten av källa etc.).
Innan detta sker, visas ett varningsmeddelande som informerar om att apparaten
kommer att stängas av inom 60 sekunder. Om du vill fortsätta använda apparaten
trycker du helt enkelt på vilken knapp som helst på fjärrkontrollen för att avbryta
avstängningen.
TILLBEHÖR
Page 58

INNEHÅLL
PANELKNAPPARNAS FUNKTIONER
FRAMPANELEN ............................................ 1 HÖGERPANELEN ............................................2
EXTERN UTRUSTNING
ANSLUTNINGSDIAGRAM ...............................3
FJÄRRKONTROLL
FJÄRRKONTROLLENS KNAPPAR .................... 4 ISÄTTNING AV BATTERIERNA ..........................6
KOMMA IGÅNG
SÄTTA PÅ APPARATEN ................................... 7 VÄLJA ANVÄNDNINGSKÄLLA ..........................7
MENYINSTÄLLNINGAR FÖR DIGITAL TV
BILD (PICTURE) .............................................. 8 LJUD ..............................................................8
KANAL (CHANNEL) ........................................9 INSTÄLLNINGAR FÖR DIGITAL TV ..................10
FUNKTION ................................................... 13 ELEKTRONISK PROGRAMGUIDE (EPG) .........13
INFORMATION .............................................13
MENYINSTÄLLNINGAR FÖR ANALOG TV
BILD (PICTURE) ............................................ 14 LJUD ............................................................14
Kanal (Channel) ........................................... 15 FUNKTION ....................................................16
TEXT-TV-FUNKTION
TEXT-TV-FUNKTION ..................................... 17
MENYINSTÄLLNINGAR FÖR SCART/AV/S-VIDEO/HDMI 18
INSTÄLLNINGAR FÖR VIDEOMENYN ............18
MENYINSTÄLLNINGAR FÖR VGA
VGA-INSTÄLLNING ....................................... 19 LJUD ............................................................19
BILD (PICTURE) ............................................ 20 FUNKTION ....................................................20
ANVÄNDA FM-MENYN
FM-INSTÄLLNINGAR (FM SETTING) ............. 21 LJUD ............................................................22
FUNKTION ................................................... 22
Page 59

CONTENT
USB-ANVÄNDNING
KORT INTRODUKTION .................................. 23 UPPSPELNING .............................................24
UPPSPELNING AV MUSIK ............................ 26 SPELA UPP FILM ..........................................26
ANVÄNDNING I FULLSKÄRMSLÄGET ........... 27 UPPSPELNING AV FOTO ................................28
ANVÄNDNING I FULLSKÄRMSLÄGET ........... 28
DVD-ANVÄNDNING
UPPSPELNING ............................................ 29 VOLYMKONTROLL .........................................29
VCD- SVCD-MENYUPPSPELNING ................30 MINNE .........................................................30
VÄLJ SPÅR ATT SPELA UPP DIREKT MED
HJÄLP AV SIFFERKNAPPARNA .................... 31
VÄLJA SPRÅK/LJUD ......................................31
REPETERAD UPPSPELNING ........................ 32 REPETERA UPPSPELNING AV VALT SEGMENT
.....................................................................32
SNABB UPPSPELNING ................................ 33 SPELA UPP FRÅN ÖNSKAD POSITION ...........33
ZOOMA IN DEN BILD SOM VISAS ................. 34 UPPSPELNING AV MPEG4- OCH JPEG-FILER 35
INSTÄLLNINGAR FÖR DVD-FUNKTIONEN
BILD (PICTURE) ............................................ 38 LJUD ............................................................38
DVD-INSTÄLLNING ...................................... 38 FUNKTION ....................................................40
FELSÖKNING
FELSÖKNING DISPLAY ................................. 41 LJUD OCH FELSÖKNING FÖR TV ...................41
FELSÖKNING FÖR DVD ................................ 42
SPECIFIKATIONER
SPECIFIKATIONER ....................................... 43
VISNINGSLÄGE
VISNINGSLÄGE ............................................ 45
Page 60

- 1 -
PANELKNAPPARNAS FUNKTIONER
FRAMPANELEN
Indikator (indikatorn är röd vid standbyläge
och grön vid vanlig användning).
IR sensorfönster
HÖGERPANELEN
SETUP (INSTÄLLNINGAR) (för att gå in och ur TV-menyn)
CHANNEL (KANAL) (byter till högre eller lägre kanalnummer)
VOLUME (VOLYM) (höjer och sänker volymen)
SOURCE (KÄLLA) (väljer ingångskälla)
STANDBY (för att växla mellan standby-läge och på)
Page 61

- 2 -
HÖGERPANELEN
USB-gränssnitt
Gränssnitt för SD/MMC/MS-kortläsare
STOPP-knapp
EJECT-knapp
PLAY-/PAUS-knapp
VÄNSTERPANELEN
HDMI
12-24V DC
SCART
PC-/ljudingång
Common Interface
VGA
COMPONENT
Hörlurar
TV-antenn
FM-antenn
PANELKNAPPARNAS FUNKTIONER
Page 62

- 3 -
ANSLUTNINGSDIAGRAM
HDMI
DVD eller videospelare
OBSERVERA
Du bör sätta i alla nödvändiga kablar INNAN du sätter i strömsladden.
EXTERN UTRUSTNING
Page 63

- 4 -
FJÄRRKONTROLLENS KNAPPAR
1
2
3
4
5
8
9
13
11
14
7
10
6
12
16
17
19
20
15
18
21
22
21
3
4
5
6
7 89
0
POWER
MUTE
SLEEP
I/II
RECALL
SOURCE
CALL
EXITSETUP
CH-
CH+
P.MODE
S.MODE
VOL+
VOL-
TEXT MIXINDEX
CANCEL REVEAL HOLD SIZE
GOTO A-B REPEAT ANGLE
DVD-MENU
TITLEPBC AUDIO
DISPLAY TV/RADIO
EPG
SUBTITLE
PAGE+PAGE-
ZOOM+ZOOM-
i
FAV
SCALER
S.PAGE
1. MUTE
Avstängning av ljud.
2. EJECT/FAV
Skiva in/ut, fungerar i DVD-läget/för att växla till
favoritlistan, fungerar i digitalt TV-läge
3. SCALER
För att ändra bildförhållande
4. SLEEP
För att ställa in sleeptimern.
5. CALL
För att visa information på bilden.
6. RECALL
För att växla mellan föregående kanal och
nuvarande kanal för analog och digital TV.
7. Knapp för tvåsiffriga nummer
För att växla mellan nummer med en eller två
siffror.
8. SOURCE
För att välja ingångskälla.
9. Sifferknappar
För att välja kanalnummer.
10. Vänster/höger markör (menyjustering)
För att flytta markören åt vänster/höger eller
justera det valda menyalternativet eller för att
justera ljudvolymen (fungerar ej i DVD-läget,
digital TV eller FM-läget).
11. Knappen OK
För att bekräfta val.
12. VOL+/-
För att öka eller minska ljudvolymen.
13. INDEX/
För att visa huvudsidan när man visar text-TV i
läget för analog TV/För att stoppa uppspelning i
DVD-läget.
14. I/II
För att ändra ljudkanal i NICAM/A 2 eller mono
TV-kanal (gäller analog TV).
15. HOLD/
För att hålla kvar nuvarande text-TV-sida i
analogt TV-läge/För att välja föregående kapitel
eller spår i DVD-läget.
16. SIZE/
För att förstora text-TV-sidan i analogt TV-läge/
För att välja nästa kapitel eller spår i DVD-läget.
17. REPEAT/GUL
För att upprepa (gäller DVD-läget)/välja sida
i analogt text-TV-läge/snabbt gå in på menyn
(gäller ej digital TV, DVD och FM).
18. ANGLE/BLÅ
För att ändra kameravinkel i DVD-läget
vid uppspelning av DVD-skivor/välja sida
i analogt text-TV-läge/snabbt gå in på
menyn (gäller ej digital TV, DVD och FM).
19. PBC/PAGE+
För att sätta på/stänga av PBC i DVDläget/bläddra till nästa sida för text-TV i
analogt TV-läge.
20. AUDIO
För att ändra ljudspråk eller ljudspår i
digitalt TV-läge och DVD-läge.
21. SUBTITLE (TEXT)
För att välja textspråk eller ändra till
JPEG-visningsläge i DVD- och digitalt TVläge.
22. ZOOM+/EPG
För att zooma in bilden i DVD-läget/för att
visa programguiden i digitalt TV-läge
FJÄRRKONTROLL
Page 64

- 5 -
23. POWER (STRÖM)
För att växla mellan standby- och ström påläge
24. P-MODE
För att välja bildläge: Standard, Dynamic
(Dynamiskt), Soft (Dämpat), User (Eget)
(gäller ej VGA-läget).
25. S-MODE
För att välja equalizerläge: Music (Musik),
Film, News (Nyheter), och User (Eget).
26. SETUP (INSTÄLLNINGAR)
För att visa inställningsmenyn.
27. EXIT
För att gå ur eller gå tillbaka till föregående
meny.
28. UPP-/NED-markören
För att gå uppåt/nedåt i en meny eller ändra
kanalnummer för analogt eller digitalt TVläge.
29. CH +/-
För att välja ett högre eller lägre
kanalnummer för analogt eller digitalt TVläge.
30. MIX//►
För att visa analog TV och text-TV samtidigt/
pausa uppspelning/stega uppspelningen i
pausläge (gäller DVD-läget).
31. TEXT/►
För att aktivera eller inaktivera text-TVfunktionen eller MHEG5/För att spela upp
(gäller DVD-läget).
32. REVEAL/
För att visa dold text-TV-information i
analogt TV-läge/För att snabbspola DVDuppspelning framåt (gäller DVD-läget).
33. CANCEL/
För att avbryta visning av text i analogt TVläge/För att snabbspola uppspelning bakåt
(gäller DVD-läget).
34. A-B/GRÖN
För att upprepa segment (gäller DVD-läget)/
välja sida i analogt text-TV-läge/snabbt gå
in på menyn (gäller ej digital TV, DVD och
FM).
35. GOTO/RÖD
För att spela upp från en viss tid (gäller
DVD-läget)/välja sida i analogt text-TVläge/snabbt gå in på menyn (gäller ej digital
TV, DVD och FM)/för att påbörja inspelning
av digitala TV-program/ För att dölja
inspelningsinfo.
23
24
25
26
27
31
33
36
35
38
39
37
34
32
30
29
28
21
3
4
5
6
78 9
0
POWER
MUTE
SLEEP
I/II
RECALL
SOURCE
CALL
EXITSETUP
CH-
CH+
P.MODE S .MODE
VOL+
VOL-
TEXT MIX INDEX
CANCELREVEAL HOLD SIZE
GOTOA-B REPEATANGLE
DVD-MENU
TITLE PBC AUDIO
DISPLAY TV/RADIO
EPG
SUBTITLE
PAGE+PAGE-
ZOOM+ZOOM-
i
FAV
SCALER
S.PAGE
36. DVD-MENU/S.PAGE
För att gå till menyn för DVD-menyn (gäller DVDläget)/För att gå till undersidan för text-TV (gäller i
analogt TV-läge).
37. TITLE/PAGE-
För att gå till menyn för DVD-menyn (gäller DVDläget)/bläddra till föregående sida för text-TV (gäller
i analogt TV-läge).
38. DISPLAY
För att visa spårtid i DVD-läget/Visa information i
digitalt TV-läge
39. TV/RADIO/ZOOM-
För att växla mellan TV- och radioläget (gäller
digitalt TV-läge)/För att zooma ut bilden (gäller
DVD-läget).
FJÄRRKONTROLL
Page 65

- 6 -
ISÄTTNING AV BATTERIERNA
Öppna batterifacket. Sätt i två stycken SUM-4 (AAA)-batterier och se till att polerna (+/-) matchar
markeringarna inuti facket (se nedan):
BATTERIERNAS LIVSLÄNGD
Normalt håller batteriet i ett år.
Om fjärrkontrollen inte fungerar trots att du använder den väldigt nära TV:ns
sensorfönster bör batteriet bytas ut.
Använd batterier av SUM-4 (AAA)-typ.
OBSERVERA
Använd aldrig uppladdningsbara batterier.
Kortslut aldrig batterierna, plocka aldrig isär med dem och värm inte upp dem eller
kasta dem på eld.
Var försiktig med fjärrkontrollen så att den inte tappas i golvet eller liknande då den kan
skadas och kanske inte fungerar som den ska.
Blanda inte gamla och nya batterier.
Plocka ur batterierna om du inte ska använda fjärrkontrollen under en längre tid, för att
undvika batteriläckage. Torka ur eventuell elektrolytvätska från fjärrkontrollen innan du
sätter i nya batterier.
Om du får elektrolytvätska på dig, skölj med vatten.
VAR FÖRSIKTIG:
Förvara batterierna oåtkomligt för barn. Om ett batteri skulle råka sväljas av misstag, kontakta
läkare omedelbart.
FJÄRRKONTROLL
Page 66

- 7 -
SÄTTA PÅ APPARATEN
Tryck på [POWER]-knappen på fjärrkontrollen för att se till att enheten sätts på (on) – LEDindikatorn kommer att bli grön. Nu kan du njuta av din nya TV:s många funktioner.
VÄLJA ANVÄNDNINGSKÄLLA
Du kan välja ingångskälla genom att använda källmenyn. Tryck på knappen [SOURCE] på LCDTV:ns högra sida för att visa följande meny:
DTV
ATV
DVD
COMPONENT
SCART
HDMI
VGA
USB
CARD
FM
Den källa som för närvarande används är markerad. Tryck på knappen [▲/▼] på
fjärrkontrollen eller [CH+/CH-] på LCD-TV:ns vänstra sida för att göra ditt val och tryck på
knappen [◄/►] eller [OK], [VOL+/ VOL-] på LCD-TV:ns sida för att bekräfta ditt val.
KOMMA IGÅNG
Page 67

- 8 -
MENYINSTÄLLNINGAR FÖR DIGITAL TV
Tryck på knappen [SETUP] i huvudmenyn i TV-läget. Huvudmenyn kommer då att visa
följande:
♦
Genom att trycka på knappen [▲/▼] på fjärrkontrollen kan du välja huvudmenyns
sektioner (huvudmenyns sektioner består av följande: "PICTURE" (BILD), "SOUND" (LJUD),
“
CHANNEL” (KANAL), “DTV SETTING” (DVD-INSTÄLLNING), "FUNCTION" (FUNKTION)).
Tryck på [►] eller [OK]-knappen för att gå till denna menysektion.
♦
Tryck på knappen [▲/▼] på fjärrkontrollen för att välja alternativ och tryck sedan på
knappen [◄/►] för att justera parameterns värde. Tryck på knappen [SETUP] för att gå
tillbaka till huvudmenyns sektioner.
BILD (PICTURE)
Välj alternativet PICTURE (BILD) för att justera bildparametrar. Du kan välja Bildläge (Picture Mode),
Färgtemperatur (Color Temperature) och justera Kontrast (Contrast), Ljusstyrka (Brightness), Färg
(Colour), Skärpa (Sharpness) och Nyans (Tint).
Mode
u
SETUP
■
Alternativet bildläge kan ändras mellan User (Eget), Standard, Soft (Dämpat) och
Dynamic (Dynamiskt).
■
Alternativet färgtemperatur (Color Temperature) kan ändras mellan kall (cool), mellan
(medium( eller varm (warm).
Du kan justera Ljusstyrka (Brightness), Kontrast (Contrast), Färg (Colour), Skärpa
(Sharpness) och Nyans (Tint) för läget Eget (User).
LJUD
Välj alternativet SOUND (LJUD) för att justera ljudparametrar. Du kan justera ljudläge (Sound
Mode), diskant (Treble), bas (Bass), balans (Balance) samt ljudvolym (Auto Volume).
Page 68

- 9 -
Aute Volume
Off
SETUP
■
Alternativet ljudläge kan ändras mellan standard, musik (Music), film, nyheter (News),
sport (Sports) och eget (User).
■
Alternativet Auto Volume (Automatisk volym) gör det möjligt att sätta på eller stänga av
automatisk ljudvolymkontroll.
■
Alternativen bas och diskant kan justeras mellan 0 och 100.
Alternativet balans kan justeras mellan -50 och +50 för ljudbalans mellan vänster och
höger (L/R). Förinställt värde är 0.
KANAL (CHANNEL)
Välj alternativet kanal (Channel) för att ställa in DTV-kanaler. Du kan välja mellan automatisk
inställning (Auto Tuning), manuell inställning (Manual Tuning) och programredigering (Program
Edit).
Tuning
Tuning
Programme
SETUP
■
Alternativet Auto Tuning (Automatisk inställning) gör det möjligt att justera kanalinställningar
automatiskt.
Välj alternativet automatisk inställning (Auto Tuning) och tryck på knappen [►] eller [OK] för
att gå till menyn för val av land (Country).
Tryck på [◄/►]-knappen för att välja land.
Tryck [OK] för att påbörja autosökning.
MENYINSTÄLLNINGAR FÖR DIGITAL TV
Page 69

- 10 -
INSTÄLLNINGAR FÖR DIGITAL TV
■
Alternativet Manual Tuning (Manuell inställning) gör det möjligt att ändra
kanalinställningar.
List
EXIT OK
■
Alternativet Programme Edit (Programredigering) gör det möjligt att gå in på undermenyn
för att ställa in DELETE (TA BORT), MOVE (FLYTTA), SKIP (HOPPA ÖVER) och FAV för
kanaler.
List
EXIT OK
MENYINSTÄLLNINGAR FÖR DIGITAL TV
Page 70

- 11 -
MENYINSTÄLLNINGAR FÖR DIGITAL TV
Välj alternativet Inställningar för DTV (DTV Setup) för att ställa in lås samt välja ljud- och
textspråk. Du kan även välja tidszon och visa CI-information.
Antenna Power
Off
SETUP
■
Alternativet Lock (Lås) gör det möjligt att låsa automatisk inställning, manuell
inställning, programredigering samt att blockera program. Om du vill ändra på
låssystemet måste du först ange det förinställda lösenordet: 0000.
SETUP
■
Alternativet Audio Language (Ljudspråk) gör det möjligt att justera ljudspråk.
PVR File System
Primary English
Secondary English
SETUP
Page 71

- 12 -
■
Alternativet Subtitle Language (Textspråk) gör det möjligt att justera textspråk.
Antenna Power
Off
SETUP
■
Genom alternativet Time (Tid) kan man gå in på undermenyn.
Time Zone
Daylight
Clock – – – – – –
Stockholm GMT+1
Off
SETUP
♦
Clock (Klocka) justerar den verkliga tiden.
♦
Tidszon (Time Zone) justerar tidszon.
♦
Daylight (Sommartid) justerar sommartid av eller på.
■
Alternativet CI Information (CI-information) gör det möjligt att läsa SMART-kortets
information.
MENYINSTÄLLNINGAR FÖR DIGITAL TV
Page 72

- 13 -
FUNKTION
Välj alternativet FUNCTION (FUNKTION) för att justera
funktionsparametrar. Du kan välja Language (Språk), Sleep
Timer (Sleeptimer), Aspect Ratio (Bildförhållande), Noise
Reduction (Brusreducering), Blue Screen (Blåskärm) och
Restore Setting (Återställning).
■
Alternativet Language (Språk) gör det möjligt att välja
OSD-språk.
■
Alternativet Aspect Ratio (Bildförhållande) kan ändras
mellan Auto, ZOOM1, ZOOM2, 16:9, 14:9, 4:3.
■
Med alternativet Noise Reduction (Brusreducering) kan man minska bildbrus: Off (Av),
Low (Låg), Middle (Mellan), High (Hög).
■
Alternativet Sleep Timer (Sleeptimer) gör det möjligt att ställa in sleeptimern. (Off (Av),
10min, 20min, 30min, 60min, 90min, 120min,180min eller 240min). Alternativet Blue
Screen (Blåskärm) kan ändras mellan On (På) och Off (Av).
■
Alternativet Restore Setting (Återställning) gör det möjligt att återställa alla värden till
standardvärden.
ELEKTRONISK PROGRAMGUIDE (EPG)
Om du trycker på EPG-knappen på
fjärrkontrollen visas en elektronisk
programguide på bilden. Den elektroniska
programguiden ger information om t.ex.
program, tider och kanaler. Dessutom finns
det ofta ytterligare detaljerad information
om program tillgänglig i den elektroniska
programguiden. (Om sådan information
finns och hur detaljerad denna är beror på
sändaren).
INFORMATION
För att få mer information om nuvarande
och kommande program kan du trycka
på [i]-knappen. Precis som tidigare
visas följande program genom att trycka
på [
◄/►
]-knapparna (växla mellan
nuvarande och följande program):
Language English
Aspect Ratio 16:9
Noise Reduction Mid
Sleep Timer Off
Blue Screen On
Country Poland
Restore Factory Default
SETUP
MENYINSTÄLLNINGAR FÖR DIGITAL TV
DTV
5 five
15 Ch15
16 QVC
17 UK Gold
23 bid -up.tv
25 TCM
14:30 15:30
10 Mar
Gold Workshop With Jan Springer
No Information
No Information
No Information
No Information
Programme Guide
10 Mar 2009 14:50
.
The Streets of San Francisco
No Information
Funstamps
DTV 1 BBC ONE Wales
EXIT INFO
DELETE
SCHEDULE
Reminder DATE
OK
Drama Bogas (JAV, 1996) 10:07
Wed, Aug 19 2009 10:00 12:05
No Program Information.
English 576i
Page 73

- 14 -
MENYINSTÄLLNINGAR FÖR ANALOG TV
Den här apparaten kan lagra upp till 100 kanaler (0-99). Du kan välja din favoritkanal genom
att trycka på [CH+/-] eller sifferknapparna, och du kan söka igenom och lagra alla kanaler
manuellt eller automatiskt.
Tryck på knappen [SETUP] i huvudmenyn i ATV-läget. Huvudmenyn kommer då att visa
följande:
■
Genom att trycka på knappen [
▲/▼
] på fjärrkontrollen kan du välja huvudmenyns
sektioner (huvudmenyns sektioner består av följande: "PICTURE" (BILD), "SOUND" (LJUD),
"CHANNEL" (KANAL) och "FUNCTION" (FUNKTION)). Tryck på [►] eller [OK]-knappen för
att gå till denna menysektion.
■
Tryck på knappen [
▲/▼
] på fjärrkontrollen för att välja alternativ och tryck sedan på
knappen [
◄/►
] för att justera parameterns värde. Tryck på knappen [SETUP] för att gå
tillbaka till huvudmenyns sektioner.
BILD (PICTURE)
Välj alternativet PICTURE (BILD) för att justera bildparametrar. Du kan justera Bildläge (Picture
Mode), Kontrast (Contrast), Ljusstyrka (Brightness), Färg (Colour), Skärpa (Sharpness), Nyans
(Tint) och Färgtemperatur (Colour Temperature).
■
Alternativet bildläge kan ändras mellan User (Eget),
Standard, Mild (Dämpat) och Dynamic (Dynamiskt).
Du kan justera Ljusstyrka (Brightness), Kontrast
(Contrast), Färg (Colour), Skärpa (Sharpness) och
Nyans (Tint) för läget Eget (User).
OBSERVERA
Du kan inte justera nyans (TINT) medan du tittar på
TV-kanalerna.
Alternativet Färgtemperatur väljer läge för färgtemperatur: Mellan (Medium), Varm
(Warm) eller Kall (Cool).
LJUD
Välj alternativet SOUND (LJUD) för att justera ljudparametrar. Du kan justera ljudläge (Sound
Mode), diskant (Treble), bas (Bass), balans (Balance) samt automatisk volym (Auto Volume).
Sound Mode St andard
Treble 50
Bass 50
Balance 0
Auto Volume Off
SETUP
Picture Mode St andard
Brightness 50
Contrast
50
Colour 50
Tint 0
Sharpness 50
Colour Temp Medium
SETUP
Page 74

- 15 -
MENYINSTÄLLNINGAR FÖR ANALOG TV
■
Alternativet ljudläge kan ändras mellan standard, musik (Music), film, nyheter (News), sport
(Sports) och eget (User).
■
Alternativet Auto Volume (Automatisk volym) gör det möjligt att sätta på eller stänga av
automatisk ljudvolymkontroll.
■
Alternativen diskant och bas kan justeras från 0 till 100
Alternativet balans kan justeras från -50 till +50 för ljudbalans mellan vänster och höger (L/R).
Förinställt värde är 0.
Kanal (Channel)
Välj alternativet ATV Channel (ATV-kanal) för att justera kanaler. Du kan välja Channel (Kanal),
Colour System (Färgsystem), Fine-Tune (Fininställning), Manual Tuning (Manuell inställning), Auto
Tuning (Automatisk inställning) och Programme Edit (Programredigering).
Channel
Channel 1
Fine Tune 192.25 MHz
Colour System AUTO
Audio System BG
Manual Tuning
Auto Tuning
Programme
Edit
SETUP
■
Alternativet Channel (Kanal) gör det möjligt att ändra kanalnummer.
■
Med alternativet ljudsystem kan man välja ljudsystem mellan "B/G","DK","I" och "L". I Sverige
används B/G
■
Alternativet Fine-Tune (Fininställning) gör det möjligt att justera kanalfrekvensen så att ljud
och bild blir bättre (eller ställa in kanalfrekvensen direkt med denna knapp).
■
Alternativet Manual Tuning (Manuell inställning) gör det möjligt att ändra kanalinställningar.
AT V Manual Tuning
Storage To 1
Current CH 1
Search
Fine-Tune
Frequency 192.25 Mhz
EXIT
SETUP
SAVE
■
Alternativet Auto Tuning (Automatisk inställning) gör det
möjligt att justera kanalinställningar automatiskt.
Välj alternativet Auto Tuning (Automatisk inställning) och
tryck sedan på [►] eller [OK] för att påbörja automatisk
inställning.
EXIT
Channel Tuning
SETUP
0 %... 46.25 MHz ATV
AT V : 0 Programme(s)
Page 75

- 16 -
■
Alternativet Programme Edit (Programredigering) gör det möjligt att gå in på undermenyn
för att ställa in DELETE (TA BORT), RENAME (ÄNDRA NAMN), MOVE (FLYTTA), SKIP (HOPPA
ÖVER) och FAV för kanaler.
Programme Edit
1 C-02
FAV
MOVE
SKIP
RENAME
DELETE
TV
TV
2 C-11
Tryck på den RÖDA knappen för att ta bort kanalen.
Tryck på den GRÖNA knappen för att byta namn på kanalen.
Tryck på den GULA knappen för att flytta kanalen.
Tryck på den BLÅ knappen för att ta hoppa över kanalen.
Tryck på FAV-knappen för att spara kanalen som favoritkanal.
FUNKTION
Välj alternativet FUNCTION (FUNKTION) för att justera funktionsparametrar.
Du kan välja Language (Språk), Aspect Ratio (Bildförhållande), Noise Reduction
(Brusreducering), Sleep Timer (Sleeptimer), Blue Screen (Blåskärm), Country (Land) och
Restore Setting (Återställning).
■
Alternativet Language (Språk) gör det möjligt att välja
OSD-språk.
■
Alternativet Sleep Timer (Sleeptimer) gör det möjligt
att ställa in sleeptimern (Off (Av), 10min, 20min, 30min,
60min, 90min, 120min, 180min eller 240min).
■
Alternativet Bildförhållande (Aspect Ratio) kan ändras
mellan Auto, ZO OM1, ZOOM 2, 16:9, 14:9 och 4:3.
Auto, 14:9, ZOOM1, ZOO M2 gäller ej för VGA-läget.
■
Alternativet Blue Screen (Blåskärm) kan ändras mellan
On (På) och Off (Av).
■
Alternativet Restore Setting (Återställning) gör det
möjligt att återställa alla värden till standardvärden.
■
Alternativet Brusreducering (Noise Reduction) kan ändras mellan Låg (Low), Mellan (Mid),
Hög (High) och Av (Off).
MENYINSTÄLLNINGAR FÖR ANALOG TV
Language English
Aspect Ratio 16:9
Noise Reduction Mid
Sleep Timer Off
Blue Screen On
Country Poland
Restore Factory Default
SETUP
Page 76

- 17 -
TEXT-TV-FUNKTION
TEXT-TV-FUNKTION
De flesta TV-stationer erbjuder kostnadsfri text-TV-information, inklusive de senaste nyheterna,
väderinformation, TV-kanallista, börsinformation etc. Du kan ange önskad text-TV-sida för att visa
det text-TV-innehåll som du vill se.
VISNINGSLÄGEN FÖR TEXT-TV
♦
Välj en kanal med text-TV-signal;
♦
Tryck på TEXT-knappen för att aktivera text-TV-läget;
♦
Välj önskad text-TV-sida med hjälp av digitala eller färgknappar;
♦
Tryck på TEXT-knappen en gång till för att inaktivera text-TV-läget.
VAL AV SIDOR
♦
Du kan mata in 3 siffror för att ange den sida du vill titta på med hjälp av sifferknapparna.
Om det nummer du matat in är ogiltigt måste du mata in korrekt 3-siffrigt nummer igen
efter att du matat in de felaktiga 3 siffrorna.
♦
Du kan välja att bläddra sida framåt eller bakåt med hjälp av knappen [CH+/-], [PAGE-/
PAGE+] eller [▲/▼].
MIX-LÄGET (MIX MODE)
Med den här funktionen kan du både se på en TV-kanal och på text-TV samtidigt.
♦
Tryck på [MIX]-knappen när du tittar på en viss sida på text-TV så kommer både TV-bilden
och text-TV-information att visas samtidigt på bilden.
♦
Tryck på [MIX]-knappen igen för att visa endast text-TV.
♦
Då text-TV:ns text kan störa TV-bilden är det inte rekommendabelt att använda detta
läge.
Observera: Tryck på knappen [CANCEL] (AVBRYT) för att avbryta visning av text-TV.
LÅS
Du kan trycka ner HOLD-knappen för att låsa en text-TV-sida. Tryck på knappen igen för att
låsa upp.
INDEX
Tryck på knappen INDEX för att visa innehållssidan.
Ange önskad text-TV-sida med hjälp av sifferknapparna.
ZOOMA IN TEXT-TV
♦
När text-TV-sidan visas kan du dubbla zoom in för att visa text-TV-sidan;
♦
Tryck på knappen SIZE för att zooma in den övre halvan av sidan;
♦
Tryck på knappen SIZE igen för att zooma in den nedre halvan av sidan;
♦
Tryck på knappen en gång till för att gå tillbaka till vanlig visning.
VISNINGSLÄGE
Tryck på REVEAL-knappen för att visa dold text-TV-information. Tryck på denna knapp igen för
att avbryta.
FÄRGKNAPPAR (RÖD, GRÖN, GUL, BLÅ)
Välj motsvarande text-TV-sida genom de färgade knapparna.
Page 77

- 18 -
MENYINSTÄLLNINGAR FÖR SCART/AV/S-VIDEO/HDMI
INSTÄLLNINGAR FÖR VIDEOMENYN
Menyinställningarna för lägena SCART/ S-VIDEO/ HDMI är samma som för TV-läget med undantag
för sektionen “ ”. Du kan hitta information om denna på följande sidor.
OBSERVERA
Om det inte finns någon insignal i lägena DTV, ATV, SCART/ AV / S-VIDEO/ HDMI, kommer bilden
nedan att visas.
Enheten kommer att slå över till standbyläget automatiskt om ingen insignal finns under mer än
5 minuter.
No Signal
SCART
4:31
Page 78

- 19 -
VGA-läget har stöd för upp till 1680 x 1050@75Hz (för 22"), och denna enhet kan användas som
en multimediaskärm för en dator. När denna enhet fungerar i VGA-läge kan följande inställningar
göras.
Tryck på knappen [SETUP] för att gå in på huvudsektionen. Tryck på knappen [▲/▼] för att välja
sektioner och tryck sedan på knappen [►] eller på [OK]-knappen för att gå in på dessa. När allt är
klart, tryck på knappen [SETUP] två gånger för att gå ur så kommer dina inställningar att sparas
automatiskt.
VGA-INSTÄLLNING
Välj alternativet VGA-inställning (VGA Setup) för att justera parametrar som t.ex Horisontell pos.
(Horizontal Pos.), Vertikal pos. (Vertical Pos.), Storlek (Size), Fas
(Phase), Autojustering (Auto Adjust).
OBSERVERA
När din dator går över till standbyläge kommer bilden att
se ut som nedan. Enheten kommer att slå över till viloläge
automatiskt om ingen insignal finns under mer än 5 minuter.
I detta läge kommer indikatorn att fortsätta vara grön och
skärmen stängs av. Du kan väcka skärmen genom att väcka din
dator eller genom att trycka på knappen [SETUP] eller [SOURCE] på fjärrkontrollen.
No Signal
VGA
4:31
LJUD
Välj alternativet SOUND (LJUD) för att justera ljudparametrar. Du kan justera ljudläge (Sound
Mode), diskant (Treble), bas (Bass), balans (Balance) samt
automatisk volym (Auto Volume)
■
Alternativet ljudläge kan ändras mellan standard, musik
(Music), film, nyheter (News), sport (Sports) och eget (User).
■
Alternativet Auto Volume (Automatisk volym) gör det möjligt
att sätta på eller stänga av automatisk ljudvolymkontroll.
■
Alternativen diskant och bas kan justeras från 0 till 100
Alternativet balans kan justeras från -50 till +50 för ljudbalans
mellan vänster och höger (L/R). Förinställt värde är 0.
MENYINSTÄLLNINGAR FÖR VGA
SETUP
Auto Volume Off
SETUP
Page 79

- 20 -
BILD (PICTURE)
Välj alternativet PICTURE (BILD) för att justera parametrar som t.ex. Färgtemperatur (Colour
Temperature), Röd (Red), Grön (Green) och Blå (Blue).
SETUP
■
Alternativet Färgtemperatur kan ställas in på: Mellan (Medium), Varm (Warm) eller Kall (Cool).
■
Alternativen Röd, Grön och Blå gör det möjligt att ställa in RGB-värdet för färgtemperaturen.
OBSERVERA
■
Bilden kommer att visas felaktigt på skärmen medan justeringarna görs.
FUNKTION
Välj alternativet FUNCTION (FUNKTION) för att justera funktionsparametrar.
Du kan välja Language (Språk), Sleep Timer (Sleeptimer), Aspect Ratio (Bildförhållande), Blue
Screen (Blåskärm) och Restore Setting (Återställning).
Language English
Aspect Ratio 16:9
Noise Reduction Mid
Sleep Timer Off
Blue Screen On
Country Poland
Restore Factory Default
SETUP
■
Alternativet Language (Språk) gör det möjligt att välja OSD-språk.
■
Alternativet Sleep Timer (Sleeptimer) gör det möjligt att ställa in sleeptimern. (Off (Av), 10min,
20min, 30min, 60min, 120min,180min eller 240min).
■
Alternativet Aspect Ratio (Bildförhållande) kan ändras.
■
Alternativet Blue Screen (Blåskärm) kan ändras mellan On (På) och Off (Av).
■
Alternativet Restore Setting (Återställning) gör det möjligt att återställa alla värden till
standardvärden.
MENYINSTÄLLNINGAR FÖR VGA
Page 80

- 21 -
FM-INSTÄLLNINGAR (FM SETTING)
Anslut FM-antennen till FM-utgången på den analoga TV:ns vänstra sida och ändra källa till FM.
Tryck på knappen SETUP. En meny kommer att visas enligt nedan:
SETUP
FM SETTING
Frequency
Auto Tuning
Manual Tuning
Channel
255
377.97MHz
■
Alternativet Channel låter dig visa nuvarande kanalnummer. Tryck på knappen ◄/◄ för att byta
kanal.
■
När alternativet frekvens (Frequency) är markerat kan du antingen ange frekvens med
sifferknapparna eller genom att flytta markören åt vänster eller höger. Tryck på OK för att
spara.
■
Manuell Tuning (Manuell inställning) låter dig minska frekvensen; tryck på knappen SAVE
(SPARA) för att öka frekvensen. När ett program hittas kommer den manuella sökningen att
stoppas. Tryck på OK-knappen för att spara den nya kanalen.
■
Alternativet Autoinställning (Auto Tuning) låter dig söka och spara alla kanaler i FM-bandet
87.5-108MHz. Flytta markören till autosökning (auto search) och tryck sedan på knappen
eller för att påbörja den automatiska sökningen. Tryck på knappen SETUP för att avbryta den
automatiska sökningen.
OBSERVERA
Upp till 40 program kan förinställas/sparas och du kan välja dem på 2 sätt:
Metod 1:
För program 1, 2, 3 och 4, tryck på knappen 1, 2, 3 och 4 och vänta i 3 sekunder för att
komma åt programmen. För program 5-40, tryck på sifferknapparna för att komma åt
programmen direkt.
Metod 2:
Tryck på knappen CH- för att välja ett lägre kanalnummer och tryck på knappen CH+ för
att välja ett högre kanalnummer.
Du kan när som helst trycka på SETUP-knappen för att stoppa sökningen medan denna
pågår.
Panelen kommer att stängas av automatiskt efter 5 minuters inaktivitet. I
energisparläge aktiveras panelen igen genom vilken aktivitet som helst.
ANVÄNDA FM-MENYN
Page 81

- 22 -
LJUD
Välj alternativet SOUND (LJUD) för att justera ljudparametrar. Du kan justera Sound Mode (Ljudläge),
Treble (Diskant), Bass (Bas), Auto Volume (Automatisk volym) och Surround Sound (Surroundljud).
■
Alternativet Ljudläge kan ändras mellan User (Eget), Sport (Sports), Music (Musik), Film.
■
Autovolym (Auto volume) – låter dig öppna eller stänga automatisk volymjustering
Film
Auto Volume
SETUP
Off
SOUND
FUNKTION
Välj alternativet FUNCTION (FUNKTION) för att justera funktionsparametrar.
Du kan välja Språk (Language), Sleeptimer (Sleep Timer) eller Återställ fabriksinställningar (Restore
Factory Default) eller Brusreducering (Noise reduction)
■
Alternativet Language (Språk) gör det möjligt att välja OSD-språk.
■
Alternativet Sleep Timer (Sleeptimer) gör det möjligt att ställa in sleeptimern (Off (Av), 10min,
20min, 30min, 60min, 120min, 180min eller 240min).
■
Återställ fabriksinställningar (Restore factory default) – Återställer alla TV-inställningar till
ursprungliga fabriksinställningar.
SETUP
Language English
16:9
Mid
Blue Screen off
off
Country Sweden
Restore Factory Default
ANVÄNDA FM-MENYN
Page 82

- 23 -
KORT INTRODUKTION
Denna apparat har ett USB 2.0-gränssnitt som gör det möjligt att spela upp musik, filmer och
bildfiler från USB-enheter.
USB står för Universal Serial Bus. De flesta USB-enheter på marknaden är USB1.1 eller
USB2.0. Det finns flera typer av USB 1.1-enheter:
Enheter för bildskärmskommunikation, ljudenheter, Human Input Device (HID), masslagring,
flashminnen, USB HDD etc. Dessa tillhör klassen Masslagring (Mass Storage).
Klassen masslagring inkluderar 2 överföringsmetoder:
1. USB 1.1 Masslagringsklassen “Kontroll/bulk/avbrott” (Control/Bulk/Interrupt eller CBI)
överföring
2. USB 1.1 Masslagringsklassen ”endast bulköverföring” (Bulk-Only). Denna enhet har stöd
för USB 1.1 masslagringsklass ”endast bulköverföring”. Vi kan inte garantera att andra USBenheter kan användas! Kontrollera därför vilka funktioner din USB-enhet har innan du
använder den.
USB-ANVÄNDNING
Page 83

- 24 -
UPPSPELNING
Tryck på knappen [SOURCE] (KÄLLA) för att välja USB-källa och sätt in USB-enheten. Menyn
för USB-användning visas på bilden enligt nedan.
\SUBTITLE\
1. Avi
Size: 4240K Bytes
EXIT ENTER SELECT
EXIT
OK
1: Statusfönster Visar nuvarande uppspelningsläge.
2: Adressfönster Visar nuvarande sökväg.
3: Filfönster Visar filen för nuvarande sökväg.
4: Förhandsgranskningsfönster Fönster för förhandsgranskning av film eller bild.
5: Informationsfönster Visar information om nuvarande filer.
Tryck på [
◄/►
] för att välja uppspelningsläge och tryck på knappen [OK] för att gå till läget.
Nuvarande uppspelningsläget kommer att visas markerat.
alternativ beskrivning
Musikläget
Filmläget
Fotoläget
USB-ANVÄNDNING
Page 84

- 25 -
Observera:
1. Denna apparat har stöd för filer i formaten MP3, MPEG1, MPEG2, AVI, JPEG och BMP.
2. Filsystemet har stöd för FAT16, FAT32 och NTFS.
3. MTP (Media Transfer Protocol) stöds ej.
4. Anslut direkt till USB-porten på TV:n. Om du använder en separat kabelanslutning
kan problem uppstå med USB-kompatibilitet.
5. Innan enheten ansluts till TV:n bör du säkerhetskopiera dina filer för att skydda
dem mot eventuell skada eller dataförlust. Tillverkaren ansvarar ej för eventuell
skada eller dataförlust.
6. Anslut ej USB-enheten medan den laddas.
7. Om du vill ändra uppspelningsläge måste du först gå ur nuvarande uppspelningsläge
genom att trycka på knappen [EXIT].
8. Ju högre bildupplösning, desto längre tid tar det innan bilden visas på skärmen.
9. För filer som inte stöds eller är korrupta, visas meddelandet ’unsupported format'
(’formatet stöds ej’) på skärmen.
USB-ANVÄNDNING
Page 85

- 26 -
UPPSPELNING AV MUSIK
1. Tryck på [
◄/►
] för att välja alternativet " " och tryck på knappen [OK] för att gå till
läget.
2. Tryck på knappen [
▲/▼
] för att välja önskad katalog och tryck på knappen [OK] för att
bekräfta. Välj alternativet " " och tryck på knappen [OK] för att återgå till föregående
sökväg.
3. Tryck på knappen [
▲/▼
] för att välja önskad fil och tryck på knappen [OK] för att
bekräfta.
4. Tryck på knappen [
/
►
] för att pausa uppspelning och tryck på knappen [►] för att
återuppta uppspelning.
5. Tryck på [] för att stoppa uppspelningen.
6. Du kan ställa in repeat-läge. Tryck på knappen [REPEAT] för att ställa in något av lägena:
off (av), repeat one (repetera en) eller repeat all (repetera alla).
Tryck på knappen [EXIT] för att gå ur musikläget.
SPELA UPP FILM
1. Tryck på [
◄/►
] för att välja alternativet " " och tryck på knappen [OK] för att gå till
läget.
2. Tryck på knappen [
▲/▼
] för att välja önskad katalog och tryck på knappen [OK] för att
bekräfta. Välj alternativet " " och tryck på knappen [OK] för att återgå till föregående
sökväg.
3. Tryck på knappen [
▲/▼
] för att välja önskad fil och tryck på knappen [OK] för att
bekräfta.
4. Tryck på knappen [►] för att spela upp i fullskärm och gå ur fullskärmsläget genom att
trycka på knappen [] eller [exit].
USB-ANVÄNDNING
Page 86

- 27 -
ANVÄNDNING I FULLSKÄRMSLÄGET
1. Tryck på knappen [SETUP] för att gå in på huvudmenyn. Menyinställningarna är
desamma som i AV-läget. Du kan hitta information om denna på följande sidor.
2. Tryck på knappen [/►] för att pausa uppspelningen/stega framåt i pausläget och tryck
på knappen [►] för att fortsätta uppspelningen.
3. Tryck på knappen [] för att påbörja snabb uppspelning framåt.
För varje tryck på knappen [] kommer hastigheten för programuppspelningen att
ändras enligt följande:
Uppspelning -> 2x snabbspolning framåt ->4x snabbspolning framåt->uppspelning
4. Tryck på knappen [] för att påbörja snabb uppspelning bakåt.
För varje tryck på knappen [] kommer hastigheten för programuppspelningen att
ändras enligt följande:
Uppspelning -> 2x snabbspolning bakåt ->4x snabbspolning bakåt->uppspelning
5. Tryck på knapparna [] []] tar dig till sista sidan eller nästa sida.
6. Vid uppspelning av en film eller ett foto kan tryck på knappen [TITLE/PAGE-]/[TITLE/
PAGE-] öppna en funktion för zoom in/ut
7. Tryck på [PBC/PAGE+] upprepade gånger så visas alla förstoringslägen på bilden i tur
och ordning.
8. Tryck på [TITLE/PAGE-] upprepade gånger så visas alla förminskningslägen på bilden i
tur och ordning.
Tryck på knappen [EXIT] för att gå ur filmläget.
USB-ANVÄNDNING
Page 87

- 28 -
UPPSPELNING AV FOTO
1. Tryck på [
◄/►
] för att välja alternativet " " och tryck på knappen [OK] för att gå till
läget.
2. Tryck på knappen [
▲/▼
] för att välja önskad katalog och tryck på knappen [OK] för att
bekräfta. Välj alternativet " " och tryck på knappen [OK] för att återgå till föregående
sökväg.
3. Tryck på knappen [
▲/▼
] för att välja önskad fil och tryck på knappen [OK] för att
bekräfta.
4. Tryck på knappen [►] för att spela upp i fullskärm och gå ur fullskärmsläget genom att
trycka på knappen [] eller [exit].
ANVÄNDNING I FULLSKÄRMSLÄGET
1. Tryck på knappen [SETUP] för att gå in på huvudmenyn. Menyinställningarna är
desamma som i AV-läget. Du kan hitta information om denna på följande sidor.
2. Tryck på knapparna [] [] tar dig till sista sidan eller nästa sida.
3. Vid uppspelning av en film eller ett foto kan tryck på knappen [TITLE/PAGE-]/[TITLE/
PAGE-] öppna en funktion för zoom in/ut
4. Tryck på [PBC/PAGE+] upprepade gånger så visas alla förstoringslägen på bilden i tur
och ordning.
5. Tryck på [TITLE/PAGE-] upprepade gånger så visas alla förminskningslägen på bilden i
tur och ordning.
Tryck på knappen [EXIT] för att gå ur fotoläget.
USB-ANVÄNDNING
Page 88

- 29 -
UPPSPELNING
CDVCDSVCDDVD
MPEG4
1. Sätt på apparaten och sätt signalkällan på DVD-läget för att börja använda enheten.
2. Sätt i skivan (med etikettsidan mot dig) i luckan. Apparaten kommer automatiskt att mata in
skivan.
Enheten börjar läsa skivinformationen.
2
3
CALL
POWER
MUTE
SLEEP
P.MODE
S.MODE
FAV
SCALER
1
STANDBY EJECT
3. Tryck på [PLAY]-knappen för att börja spela upp skivan.
När enheten spelar upp en skiva, gör tryck på knappen [►] att uppspelningen pausas. Om du
trycker på knappen [►] ännu en gång återupptas uppspelningen.
4. Tryck på STOPP-knappen för att stoppa uppspelningen.
När enheten spelar upp en skiva, gör tryck på knappen [] att uppspelningen stoppas
med funktionen ”halvstopp”. Om du trycker på knappen [] ännu en gång stoppas
uppspelningen helt och hållet.
Om spelaren är i “halv-stopp-läget” kommer den att börja spela upp från den punkt där
uppspelningen avslutats om man trycker på knappen [►].
Om spelaren är i stoppläget kommer den att börja spela upp skivan från början om man
trycker på knappen [►].
Om man trycker på knappen [] när man spelar upp MPEG4 –skivor går spelaren direkt
till stoppläge.
5. Tryck på knappen [ ] för att mata ut skivan.
6. När skivan spelat klart kan du ändra signalkälla till annat funktionsläge eller trycka på
knappen [ ] för att sätta enheten på standby. Dra ut strömsladden från eluttaget om
apparaten inte ska användas under en längre tid.
[ ]-knappen fungerar endast om DVD har valts som signalkälla. Om andra signalkällor,
som t.ex. TV, AV, etc. har valts, fungerar inte denna knapp.
VOLYMKONTROLL
CDVCDSVCDDVD
MPEG4
1. Tryck på knapparna [VOL+/VOL-] för att justera volymen.
2. Tryck på knapparna [VOL+/VOL-] på fjärrkontrollen.
Tryck på knappen [VOL+] för att öka volymen eller [VOL-] för att minska volymen; maximal
volym är 100.
CH-
CH+
VOL+
VOL-
TEXT MIXINDDEVXD/USB
CANCEL REVE AL HOLD SIZE
I/II
VOL+/ STOPP
PLAY
DVD-ANVÄNDNING
Page 89

- 30 -
VCD- SVCD-MENYUPPSPELNING
VCDSVCD
När SVCD- och VCD2.0-skivor med uppspelningsfunktion spelas, ges du enkla
menyuppspelningsfunktioner. Du kan ställa in menyuppspelningsläget i
inställningsmenyn och välja menyuppspelning eller sekvensuppspelning.
Nedan följer ett exempel på menyuppspelning för VCD 2.0-skivor.
1. TV-bilden visar huvudmenyn.
1.
2.
Tryck på sifferknapparna för att välja. Välj till exempel sifferknapp 1 för att välja
huvudmeny 1.
1.
2.
2. Efter att du gått in på huvudmeny 1 visas en undermeny på TV-bilden.
2.
3.
4.
5.
1.
3. Tryck på knapparna [], [] för att vända sida.
4. Tryck på sifferknapparna för att välja innehåll på
undermenyn. Tryck till exempel på knappen 5 för att
spela upp det femte spåret.
2.
3.
4.
5.
1.
5. När en skiva spelas upp, tryck på knappen [DVD-MENU]
för att gå tillbaka rotmenyn (root menu).
MINNE
DVD
1. 1. Den här spelaren kan automatiskt spara den tidpunkt då du avslutar uppspelning av
nuvarande DVD-skiva (om du t.ex. går från DVD-läget till kortläsningsläget, eller från
DVD till annan signalkälla eller går över till standbyläge i DVD-läget).
2. När du går över till DVD-uppspelning igen kan spelaren automatiskt söka efter den
senaste tidpunkt som sparats för att fortsätta spela upp från denna punkt. Om du
hellre vill spela upp skivan från början, tryck på knappen [] två gånger och därefter på
[►]-knappen.
XEDN I XIMTXET
CANCEL REVE AL HOLD SIZE
I/II
PLAY
STOPP
OBSERVERA
Denna spelare kan endast spara tiden för en DVD-skiva åt gången.
Den DVD-skiva som senast spelats i enheten kommer att sparas medan tidigare sparat
innehåll raderas och ersätts med det nya innehållet.
Om strömmen oväntat stängs av kommer den DVD-skiva som spelas upp inte att sparas.
DVD-ANVÄNDNING
CH-
CH+
VOL+
VOL-
XEDN I XIMTXET
CANCEL REVE AL HOLD SI ZE
GOTO A-B R EPEAT A NGLE
DVD-MENU
TITLEPBCAUDIO
PAGE+PAGE-S.PAGE
I/II
OK
PLAY
[]
[]
DVD-MENU
Page 90

- 31 -
VÄLJ SPÅR ATT SPELA UPP DIREKT MED HJÄLP AV SIFFERKNAPPARNA
CDVCDSVCDDVD
1. Sätt i en skiva. Efter att skivan börjat läsas och spelas upp kan du trycka på
sifferknapparna för att direkt välja de spår som du vill spela upp.
Om spårnumret är 10 eller mindre, tryck på sifferknapparna 1 till 9 för att välja
spårets nummer direkt. Tryck t.ex. på 7 ör att välja det sjunde spåret.
Om spårets nummer är 10 eller högre, tryck på knappen [-/- -] och därefter på
sifferknapparna 0 t.o.m. 9. För att välja spår nummer 16, använder du t.ex.
1 + 6
6
-/--
Om spårets nummer är 20 eller högre, tryck två gånger på knappen [-/- -] och
därefter på sifferknapparna 0 t.o.m. 9. Resten görs som tidigare.
21
3
4
5
6
7
8
9
POWER
MUTE
SLEEP
RECALL
P.MODE
S.MODE
FAV
SCALER
CALL
SIFFROR
VÄLJA SPRÅK/LJUD
CDVCDSVCDDVD
1. Tryck på knappen [AUDIO].
För DVD-skivor med flera språk kan du välja önskat språk för uppspelning.
DVD-skiva:
Audio 1/2
French
Audio 2/2
Chinese
För SVCD-, VCD- eller CD-skivor med flera kanaler kan du välja ljuduppspelning från
vänster eller höger kanal eller stereoljud. För VCD-skivor spelar vänster kanal in
dubbning och höger kanal sång. Du väljer således vänster kanal för dubbning.
SVCD-, VCD-, CD-skivor:
MonoRight
Mono Left
Stereo
Mix-Mono
GOTO A-B R EPEAT A NGLE
DVD-MENU
TITLEPBC AUDIO
DISPLAYTV/RADIO
EPG
SUBTITLE
PAGE+PAGE-
ZOOM+ZOOM -
i
S.PAGE
AUDIO
OBSERVERA
Vilka språk som är tillgängliga beror på vilka språk som finns inspelade på skivan.
För VCD talskivor med dubbla språk kan du trycka på [AUDIO]-knappen för att välja
önskat språk.
För vissa DVD-skivor kan ett tryck på [AUDIO]-knappen för att ändra språk leda till att
spåret spelas upp från sin början.
DVD-ANVÄNDNING
Page 91

- 32 -
CDVCDSVCDDVD
MPEG4
REPETERAD UPPSPELNING
CDVCDSVCDDVD
MPEG4
Funktionen för repeterad uppspelning gör det möjligt att repetera en viss titel/ett
kapitel/ett spår/en skiva.
1. Tryck på [REPEAT]-knappen. För varje tryck på REPEAT-knappen ändras repeatfunktionen.
DVD-skiva:
Repeat Off
Title
Chapter
ALL
SVCD-, VCD-, CD-skivor:
För SVCD- och VCD2.0-skivor fungerar repeat-funktionen i
sekvensuppspelningsläget; för VCD1.1 och CD-skivor kan repeatfunktionen
användas direkt.
Track Off Repeat
ALL
För SVCD- och VCD2.0-skivor kan repeat-funktionen användas i
menyuppspelningsläget.
REPEAT
GOTO A-B R EPEAT A NGLE
DVD-MENU
TITLEPBC AUDIO
REPETERA UPPSPELNING AV VALT SEGMENT
CDVCDSVCDDVD
MPEG4
När du spelar upp en skiva kan du trycka på knappen [A-B] för att spela upp önskat
segmentinnehåll upprepade gånger.
1. Under normal uppspelning, tryck på [A-B]-knappen där du vill att ett segment ska börja
upprepas (punkt A).
På TV-bilden visas:
A
2. Under normal uppspelning, tryck på [A-B]-knappen där du vill att ett segment ska sluta
upprepas (punkt B).
På TV-bilden visas:
AB
Enheten kommer att gå tillbaka till punkt A och börja spela upp det valda segmentet
(A-B).
3. Tryck på [A-B]-knappen en tredje gång.
Enheten kommer då att gå tillbaka till normal uppspelning.
A-B
GOTO A-B R EPEAT A NGLE
DVD-MENU
TITLE PBC AUDIO
DISPLAYTV/RADIO
EPG
SUBTITLE
PAGE+PAGE-
ZOOM+ZOOM-
i
S.PAGE
OBSERVERA
Repeat A-B-funktionen fungerar inte alltid för alla skivor. I menyuppspelningsläget kan
segmentet endast väljas i ett spår.
DVD-ANVÄNDNING
Page 92

- 33 -
SNABB UPPSPELNING
CDVCDSVCDDVD
MPEG4
När du spelar upp skivor kan du välja att spela upp dessa snabbt framåt eller bakåt för
att söka efter en viss punkt.
1. Tryck på knappen [] för att påbörja snabb uppspelning framåt.
För varje tryck på knappen [] kommer hastigheten för uppspelningen att ändras enligt
följande:
2X
16X
8X
4X
2. Tryck på knappen [] för att påbörja snabb uppspelning bakåt.
För varje tryck på knappen [] kommer hastigheten för uppspelningen att ändras enligt
följande:
2X
16X
8X
4X
SPELA UPP FRÅN ÖNSKAD POSITION
DVD SVCD VCD CD
MPEG4
Spela upp en DVD-skiva
Genom att ange en viss tid, ett titelnummer eller ett kapitelnummer kan man direkt söka
igenom skivan snabbt och spela upp från den angivna positionen.
1. Söka efter en titel och ett kapitel. Sök t.ex. efter det andra kapitlet i titel 6.
Tryck på [GOTO]-knappen. Följande kommer då att visas på TV-bilden:
Title 03/30 Ch apter02 /
Tryck på knappen [◄/►] för att flytta på markören och markera titelnumret såsom det
visas på bilden:
Title30 / C h apter1/ 0 0 2
Tryck sedan på sifferknapp 6 för att välja titel 6, såsom det visas på bilden:
Title60 /30 C h apter02 /
Tryck slutligen på sifferknapp 2 för att välja kapitel 2, såsom det visas på bilden:
Title 0 6 /30 C h apter 02/02
2. Söka efter titeltid
Tryck på [GOTO]-knappen tills följande kommer att visas på TV-bilden: Tryck sedan på
sifferknapparna för att ange timmar, minuter och sekunder.
Title 0 6 /30 Time : :
3. Söka efter kapiteltid
Tryck på [GOTO]-knappen tills följande kommer att visas på TV-bilden: Tryck sedan på
sifferknapparna för att ange timmar, minuter och sekunder.
Chapter 10 /04 Time ::
DVD-ANVÄNDNING
CH-
CH+
VOL+
VOL-
XEDN I XIMTXET
CANCEL REVE AL HOLD SIZE
GOTO A-B R EPEAT A NGLE
I/II
Page 93

- 34 -
Spela upp MPEG4-skivor
1. Välja spår
Tryck på [GOTO]-knappen tills följande kommer att visas på TV-bilden: Tryck sedan på
sifferknapparna för att ange spårets nummer.
Disc Go To --:--
2. Söka efter spårtid
Tryck på [GOTO]-knappen tills följande kommer att visas på TV-bilden: Tryck sedan på
sifferknapparna för att ange timmar, minuter och sekunder.
Track Go To --:--
Spela upp SVCD-, VCD- och CD-skivor
1. Söka efter skivtid
Tryck på [GOTO]-knappen tills följande kommer att visas på TV-bilden: Tryck sedan på
sifferknapparna för att ange minuter och sekunder.
-:--:--
Go To
2. Söka efter spårtid
Tryck på [GOTO]-knappen tills följande kommer att visas på TV-bilden: Tryck sedan på
sifferknapparna för att ange minuter och sekunder.
Select Track-/ 1-5
3. Välja spår
Tryck på [GOTO]-knappen tills följande kommer att visas på TV-bilden: Tryck på
sifferknapparna för att ange spår.
Select
ZOOMA IN DEN BILD SOM VISAS
VCDSVCDDVD
MPEG4
Zooma in/ut spelarens bild.
1. Genom att trycka på knappen [ZOOM+/-] när man spelar upp en skiva kan man öppna zoom
in/zoom ut-funktionen. På TV-bilden visas då följande (läget X2 visas som exempel):
Bilden har förstorats 2 gånger sin normala storlek.
2. Tryck på [ZOOM +] upprepade gånger så visas alla förstorings-/förminskningslägen på bilden i
tur och ordning. Förstorings-/förminskningslägena inkluderar: 2X, 3X, 4X.
3. Tryck på [ZOOM-] upprepade gånger så visas alla förstorings-/förminskningslägen på bilden i
tur och ordning. Förstorings-/förminskningslägena inkluderar: 1/2, 1/3, 1/4.
4. När läget är inställt på 4X, tryck på knappen [ZOOM +] för att stänga zoom in/ ut-funktionen
så återgår bilden till sin normala storlek. När läget är på 1/4, tryck på knappen [ZOOM -].
5. När bilden är förstorad, tryck på knapparna [▲/
▼/◄/►
] för att flytta på bilden.
CANCEL REVE AL HOLD SIZE
GOTO A-B ANGLE
DVD-MENU
TITLEPBC AUDIO
DISPLAYTV/RADIO
EPG
SUBTITLE
PAGE+PAGE-
ZOOM+ZOOM-
i
S.PAGE
REPEAT
ZOOM
DVD-ANVÄNDNING
CANCEL REVEAL HOLD SIZE
GOTO A-B R E P E A TANGLE
DVD-MENU
TITLEPBC AUDIO
DISPLAYTV/RADIO
EPG
SUBTITLE
PAGE+PAGE-
ZOOM+ZOOM-
i
S.PAGE
GOTO
Page 94

- 35 -
UPPSPELNING AV MPEG4- OCH JPEG-FILER
MPEG4 är den ljudstandard som publicerades av MPEG (Moving Pictures Experts Group) i
november,1998. MPEG4 är ett mycket komprimerat filformat avsett för strömmande media.
Den mest utmärkande egenskapen för MPEG4 är den höga komprimeringen och klara bilder.
MPEG4 kan justera strömmen efter behov. Större ström kan användas för privata filmer
och mindre ström kan användas i nätverksöverföring, vilket ger MPEG4 ett mycket brett
användningsområde.
JPEG (Joint Photographic Experts Group) är det vanligaste och mest använda
bildkomprimerings- och lagringsformatet idag. JPEG komprimerar originalbilder 15 till 20
gånger med utmärkt bildkvalitet. JPEG är mycket lätt att använda och stöds av de flesta
bildbehandlingsprogram.
Denna enhet kan med sin starka avkodningskapacitet avkoda och spela upp filer med
ovanstående format. Medan uppspelning sker kommer en användningsmeny att visas på
bilden. Denna fungerar enligt nedan.
00:00 00:00
004/369
\PIC\
Du000
Du001
Du002
..
1
2
3
4
5
6
1. Statusfönster
Visar information om
nuvarande status.
2. Adressfönster
Visar nuvarande sökväg.
3. Filfönster
Visar filen för nuvarande
sökväg.
4. Ruta med rullningslister
Visar positionen för nuvarande
fil.
5. Förhandsgranskningsfönster
Förhandsgranskning av
JPEG-bild.
6. Informationsfönster
Visar nuvarande
användningsprompter.
Statusinformationen i statusfönstret är följande:
4
00:57
002/073
03:31128
2
1
3
5
6
1. Tid som spelats upp
2. Total uppspelningstid
3. Bithastighet för ljud (vanligtvis 128 kbps; ibland VBR.)
4. Indikator för nuvarande uppspelningsläge
5. Spårindikator
6. Indikator för dynamiskt frekvensspektrum
DVD-ANVÄNDNING
Page 95

- 36 -
1. Spela upp MPEG4-filer
När du sätter i en fil med MPEG4-format i enheten kommer enheten att söka efter
skivinformation och visa en användningsmeny som på bild A (det innehåll som visas beror på
skivan).
A:
00:00 00:00
\
Du000
Du002
Du001
Du003
001/004
B:
00:00 00:00
001/369
\Du000\
MP000
MP001
MP002
..
A/V
A/V
A/V
Tryck på knappen [
▲/▼
] för att välja önskad katalog och tryck på knappen [OK] för
att bekräfta. Om du exempelvis väljer katalog Du000 i bild A, tryck på knappen [OK]
så kommer TV-bilden att se ut som på bild B. Rutan återgår till föregående katalog
om du väljer [ ] eller trycker på knappen [◄].
Tryck på knappen [
▲/▼
] i bild B för att välja önskad fil med MPEG4-format och tryck
på knappen [OK] för att bekräfta. Enheten börjar spela upp filmen i MPEG4-format.
2. Spela upp JPEG-filer
När du sätter i en fil med JPEG-format i enheten kommer enheten att söka efter
skivinformation och visa en användningsmeny som på följande bild. Efter att du valt en
JPEG-fil kommer ett förhandsgranskningsfönster att visa bilden för filen i denna vilket
gör det lättare för dig när du ska välja. Efter att du valt önskad JPEG-fil och tryckt på [OK]knappen för att bekräfta kommer bilden att visas i helskärm.
00:00 00 :00
004/369
\PIC\
Du000
Du001
Du002
RESOLUTION 640 480
..
Andra grundläggande användningsmetoder
1. Tryck på knapparna [], [] tar dig till nästa sida eller sista sidan.
Övriga funktioner för JPEG-filer
1. Tryck på [ZOOM]-knappen för att zooma in/ut när du spelar upp JPEG-filer och tryck igen
för att stoppa denna funktion.
2. När du zoomar in/ut kan tryck på knappen [] förstora bilden till maximalt dubbel
storlek av originalbilden. Tryck på knappen [] kan förminska bilden till minimalt halva
originalbildens storlek.
DVD-ANVÄNDNING
Page 96

- 37 -
3. När man spelar upp JPEG-filer kan man förhandsgranska uppspelning genom att trycka
på knappen []. Samtidigt visas alla JPEG-filer på TV-bilden. En bild kan visa upp till
12 bilder som mest. Resten visas på nästa bild. Genom att trycka på knappen [] kan
man gå till nästa bild medan knappen [] återgår till föregående bild. Du kan tryck på
sifferknapparna eller knappen [
▲/▼
] för att välja önskad bild och trycka på knappen [OK]
för att bekräfta.
4. Tryck på knappen [DVD-MENU] när du är i förhandsvisningsläget för att gå ur
förhandsvisningsfunktionen.
2 1
3
4
5
6
7 8 9
0
POWER
MUTE
SLEEP
I/II
RECALL
SOURCE
CALL
EXITSETUP
CH-
CH+
P.MODE S. MODE
VOL+
VOL-
XEDN I XIMTXET
CANCEL REVE AL HOLD SIZE
GOTO A-B R EPEAT A NGLE
DVD-MENU
TITLE PBC AUDIO
DISPLAY TV/ RADI O
EPG
SUBTIT LE
PAGE+PAGE-
ZOOM+ZOOM-
i
FAV
S.PAGE
SCALER
SIFFROR
UPP
NED
DVD- MENU
OK
SUBTITLE
ZOOM
OBSERVERA
När knapparna ej kan användas visas följande på TV-bilden:
Tryck på en giltig knapp igen.
DVD-ANVÄNDNING
Page 97

- 38 -
BILD (PICTURE)
Välj alternativet PICTURE (BILD) för att justera bildparametrar. Du kan justera Bildläge (Picture
Mode), Kontrast (Contrast), Ljusstyrka (Brightness), Färg (Colour), Skärpa (Sharpness), Nyans
(Tint) och Färgtemperatur (Colour Temperature).
■
Alternativet bildläge kan ändras mellan User
(Eget), Standard, Mild (Dämpat) och Dynamic
(Dynamiskt).
Du kan justera Ljusstyrka (Brightness), Kontrast
(Contrast), Färg (Colour), Skärpa (Sharpness)
och Nyans (Tint) för läget Eget (User).
■
Alternativet Colour Temp (Färgtemp.) väljer
färgtemperaturläge: Mellan (Medium), Varm
(Warm) eller Kall (Cool).
LJUD
Välj alternativet SOUND (LJUD) för att justera
ljudparametrar.
Du kan välja ljudläge (Sound Mode), diskant (Treble),
bas (Bass), balans (Balance) samt automatisk
volym (Auto Volume).
■
Alternativet ljudläge kan ändras mellan musik
(Music), film, sport (Sports), eget (User) och
standard.
■
Alternativet Auto Volume (Automatisk volym)
gör det möjligt att sätta på eller stänga av
automatisk ljudvolymkontroll.
DVD-INSTÄLLNING
Välj alternativet DVD för att justera DVDparametrar.
Tryck på knappen [
▲/▼
] på fjärrkontrollen för
att välja bland alternativen “General” (Allmänt)
och “Preference” (Egna inställningar) och tryck
sedan på knappen [►] eller [OK] för att bekräfta.
SETUP
Auto Volume Off
SETUP
DVD
DVD SETTING
SETUP
INSTÄLLNINGAR FÖR DVD-FUNKTIONEN
Page 98

- 39 -
ALLMÄNNA INSTÄLLNINGAR
Du kan välja TV DISPLAY (TV-VISNING), SCREEN SAVE
(SKÄRMSLÄCKARE), DOWNMIX eller Divx.
TV-visning: Detta alternativ används för att ställa in enhetens
bildförhållande.
Inställningsalternativ: Normal/Pan-Scan, Normal/Letterbox,
Wide Screen (Bredbild); Förinställt alternativ: Normal/
Letterbox
Screen Save (Skärmsläckare): Öppna eller stäng skärmsläckaren
Inställningsalternativ: Off (Av), On (På); Förinställt alternativ: På
Downmix: Detta alternativ används för att ställa in enhetens DOWNMIX-läge för att ändra
flerkanaligt ljud till 2-kanaligt ljud.
Inställningsalternativ: Stereo, LT/RT; Förinställt alternativ: Stereo
Divx: Detta alternativ används för att ställa in kodsida (teckenkodningstabell) för text för
MPEG-4-format.
1252 - West European Latin (används av västeuropeiska språk)
1250 - East European Latin (används av central- och östeuropeiska språk)
1251 - Cyrillic (används av vitryska, bulgariska, makedonska, ryska, serbiska och ukrainska
språk)
PREFERENCE SETUP (EGNA INSTÄLLNINGAR)
TV-typ (TV Type): För att ställa in videosystem för spelaren.
Inställningsalternativ: Auto, PAL, NTSC; Förinställt
alternativ: PAL
PBC: Detta alternativ används för att ställa in PBC-läge.
Om PBC är på (ON), går enheten till PBC-uppspelningsläge
när man spelar upp SVCD och VCD2.0-skivor; om PBC är
av (OFF), spelar enheten upp skivan enligt spårens ordinarie ordningsföljd.
Inställningsalternativ: Off (Av), On (På); Förinställt alternativ: På
Ljud (Audio): Detta alternativ används för att ställa in önskat ljudspråk för uppspelning.
Text (Subtitle): Detta alternativ används för att ställa in önskat textspråk för uppspelning.
Skivmenyspråk (Disc menu language): Detta alternativ används för att ställa in
skivmenyspråk vid uppspelning.
Förinställt skivmenyspråk: Engelska
Förinställt textspråk: Engelska
INSTÄLLNINGAR FÖR DVD-FUNKTIONEN
General Setup Page
LB
Set TV Display Mode
Screen Save On
Downmix
Stereo
TV Display
Divx 1252
Preference Page
Parental
Off
Subtitle
Disc Menu
PAL
Audio
ENG
PBC
On
Password
Default
Set TV Standard
ENG
ENG
TV Type
Page 99

- 40 -
OBSERVERA
Ljud-, text-, och skivmenyspråk fungerar endast för DVD-skivor.
Om skivan inte är inspelad med valt språk kommer enheten att använda det språk som
är skivans första språk.
Välja andra språk: tryck på knappen [
▲/▼
] för att flytta markören till alternativet
"OTHER" (ANNAT), tryck på [OK]-knappen och sedan på sifferknapparna för att ange
önskad språkkod. När du är klar, tryck på [OK]-knappen igen.
Föräldralås (Parental): Detta alternativ används för att ställa in klassificering för
föräldrakontroll för att hindra att barn ser på olämpligt innehåll. (Om skivan stöder denna
funktion)
Inställningsalternativ: KID SAFE, G, PG, PG 13, PGR, R, NC17, ADULT, Off (Av) Förinställt
alternativ: Av
OBSERVERA
När man ändrar klassificering för föräldrakontroll behöver man ett lösenord. Se nedan
för detaljer om lösenord.
Lösenord (Password): Detta alternativ används för att ställa in ett
fyrsiffrigt lösenord som gör det möjligt att ändra klassificering för
föräldrakontroll.
Förinställt alternativ: 7890
Förinställt alternativ: Detta alternativ används för att återställa alla
inställningar i inställningsmenyn till förinställda värden förutom
Föräldrakontroll och Lösenord.
FUNKTION
Välj alternativet FUNCTION (FUNKTION) för att justera funktionsparametrar. Du kan välja
Language (Språk), Sleep Timer (Sleeptimer), Aspect Ratio (Bildförhållande), Blue Screen
(Blåskärm) och Restore Setting (Återställning).
■
Alternativet Language (Språk) gör det möjligt att
välja OSD-språk.
■
Alternativet Sleep Timer (Sleeptimer) gör det möjligt
att ställa in sleeptimern (Off (Av), 10min, 20min,
30min, 60min, 120min, 180min eller 240min).
■
Alternativet Aspect Ratio (Bildförhållande) kan
ändras mellan Auto, 16:9 och 4:3 (Auto fungerar ej
för VGA).
■
Alternativet Blue Screen (Blåskärm) kan ändras
mellan On (På) och Off (Av).
■
Alternativet Restore Setting (Återställning) gör det
möjligt att återställa alla värden till standardvärden.
INSTÄLLNINGAR FÖR DVD-FUNKTIONEN
Old password
Confirm PWD
New password
OK
Language English
Aspect Ratio 16:9
Noise Reduction Mid
Sleep Timer Off
Blue Screen On
Country Poland
Restore Factory Default
SETUP
Page 100

- 41 -
Se efter i detta felsökningsschema innan du kontaktar servicepersonal.
FELSÖKNING DISPLAY
Problem Orsaker och lösningar
Bilden är svart och
strömindikatorns
lampa lyser inte
Kontrollera om strömsladden är ordentligt ansluten och om
apparaten är på
Kontrollera om signalkabeln för den inkopplade enheten är ordentligt
ansluten
Kontrollera om den inkopplade enheten är på
Bilden flimrar och
är ostadig
Kontrollera om den inkopplade enhetens signal finns med i
specifikationerna för apparaten
Kontrollera datorns utgångsläge: Kontrollpanel-bildskärm-
inställningar
Om inställningen inte är i enlighet med apparatens specifikationer,
ändra bildskärmsinställningen
Horisontellt frekvensområde: 30kHz ~ 75kHz
Vertikalt frekvensområde: 50 Hz~75Hz
LJUD OCH FELSÖKNING FÖR TV
Problem Orsaker och lösningar
Kan inte sätta på
Se till att strömsladden är ordentligt ansluten
Inget ljud
Se till att ljudkabeln är ordentligt ansluten
Kontrollera volymen
Se till att ingen kontakt är isatt i hörlursuttaget
Volymen är alltför
låg
Kontrollera volymen
Om volymen fortfarande är alltför låg när du ställer in volymen
på maxläge, kontrollera om den inkopplade enheten är ordentligt
inställd
Bild med snö
Ingångsantennen är skadad eller inte ordentligt ansluten
Fjärrkontrollen
fungerar inte
Kontrollera om fjärrkontrollens batteri är slut
Kontrollera om batteriet har satts i på rätt sätt
Kontrollera om det finns något i vägen mellan fjärrkontrollen och
apparatens mottagarfönster
Kontrollera om mottagarfönstret befinner sig i starkt ljus
FELSÖKNING
 Loading...