

Page 1
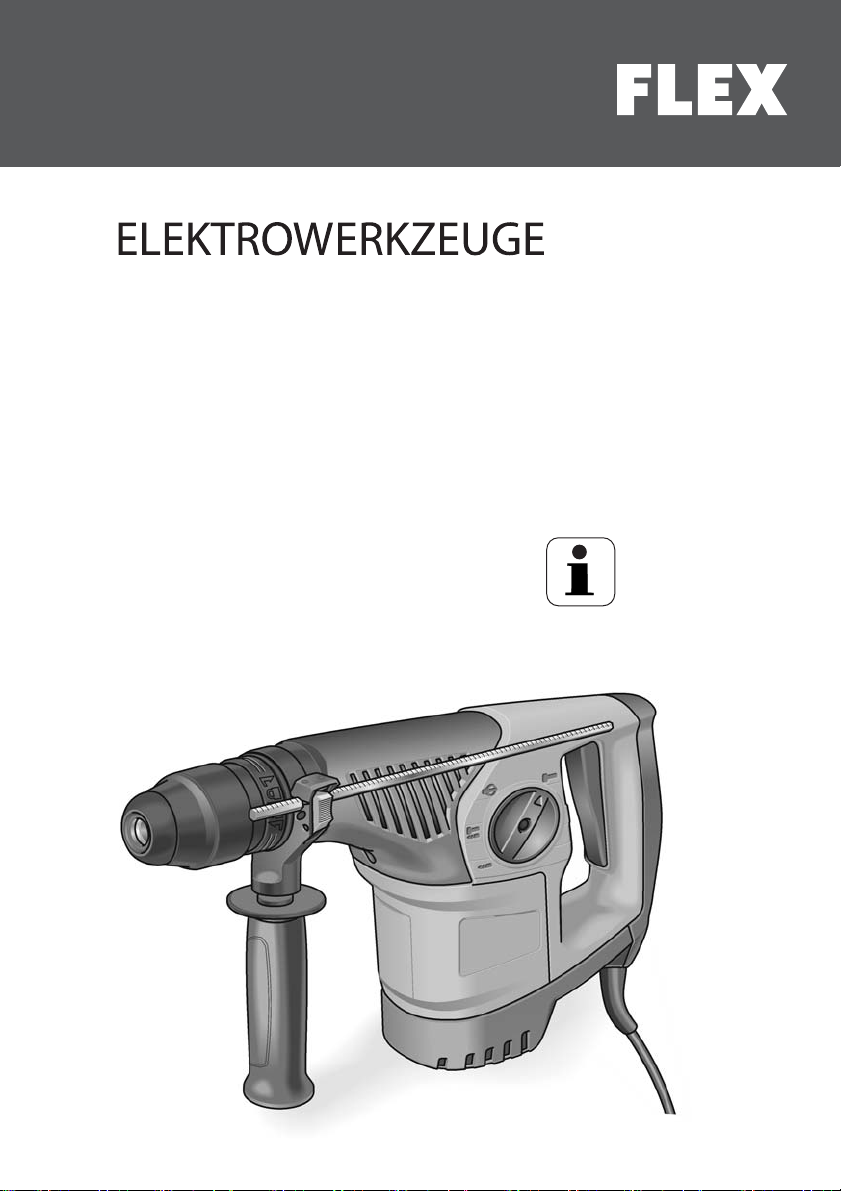
CHE 4-32 R SDS-plus
Page 2

Originalbetriebsanleitung . . . . . . . . . . . . . . . . . . . . . . . . 3
Original operating instructions . . . . . . . . . . . . . . . . . . . . 11
Notice d’instructions d’origine . . . . . . . . . . . . . . . . . . . . . 19
Istruzioni per l’uso originali . . . . . . . . . . . . . . . . . . . . . . . 27
Instrucciones de funcionamiento originales . . . . . . . . . . 35
Instruções de serviço originais . . . . . . . . . . . . . . . . . . . . 43
Originele gebruiksaanwijzing . . . . . . . . . . . . . . . . . . . . . 51
Originale driftsvejledning . . . . . . . . . . . . . . . . . . . . . . . . 59
Originale driftsanvisningen . . . . . . . . . . . . . . . . . . . . . . . 67
Originalbruksanvisning . . . . . . . . . . . . . . . . . . . . . . . . . . 75
Alkuperäinen käyttöohjekirja . . . . . . . . . . . . . . . . . . . . . . 83
Αυθεντικές οδηγίες χειρισμού . . . . . . . . . . . . . . . . . . . . . 91
Instrukcja oryginalna . . . . . . . . . . . . . . . . . . . . . . . . . . . . 99
Eredeti üzemeltetési útmutató . . . . . . . . . . . . . . . . . . . . 108
Originální návod k obsluze . . . . . . . . . . . . . . . . . . . . . . . 116
Originálny návod na obsluhu . . . . . . . . . . . . . . . . . . . . . 124
Originaalkasutusjuhend . . . . . . . . . . . . . . . . . . . . . . . . . 132
Originali naudojimo instrukcija . . . . . . . . . . . . . . . . . . . . 140
Lietošanas pamācības oriģināls . . . . . . . . . . . . . . . . . . . 148
Оригинальная инструкция по эксплуатации
. . . . . . . .
156
Page 3
CHE 4-32 R SDS-plus
Inhalt
Verwendete Symbole . . . . . . . . . . . . . . . 3
Symbole am Gerät . . . . . . . . . . . . . . . . . . 3
Technische Daten . . . . . . . . . . . . . . . . . . 3
Auf einen Blick . . . . . . . . . . . . . . . . . . . . 4
Zu Ihrer Sicherheit . . . . . . . . . . . . . . . . . . 5
Geräusch und Vibration . . . . . . . . . . . . . 6
Gebrauchsanweisung . . . . . . . . . . . . . . . 7
Wartung und Pflege . . . . . . . . . . . . . . . . 9
Entsorgungshinweise . . . . . . . . . . . . . . 10
-Konformität . . . . . . . . . . . . . . . . . . . 10
Haftungsausschluss
Verwendete Symbole
WARNUNG!
Bezeichnet eine unmittelbar drohende
Gefahr. Bei Nichtbeachten des Hinweises
drohen Tod oder schwerste Verletzungen.
VORSICHT!
Bezeichnet eine möglicherweise
gefährliche Situation.
Bei Nichtbeachten des Hinweises drohen
Verletzungen oder Sachschäden.
HINWEIS!
Bezeichnet Anwendungstips und wichtige
Informationen.
Technische Daten
Bohr- und Meißelhammer CHE 4-32 R
SDS-plus
Nennaufnahmeleistung W 900
-1
Leerlauf-Drehzahl min
Leerlauf-Schlagzahl
Max. Einzelschlagenergie (nach „EPTAprocedure 05/2009“)
Schmierung Fett
Werkzeugaufnahme SDS-plus
max. Bohrdurchmesser
– Beton
– Mauerwerk
– (HM-Bohrkrone)
– Holz
– Metall
Gewicht entsprechend
„EPTA-procedure
01/2003“
min
J4,8
mm
mm
mm
mm
kg 4,6
0–850
-1
0–3700
32
82
32
13
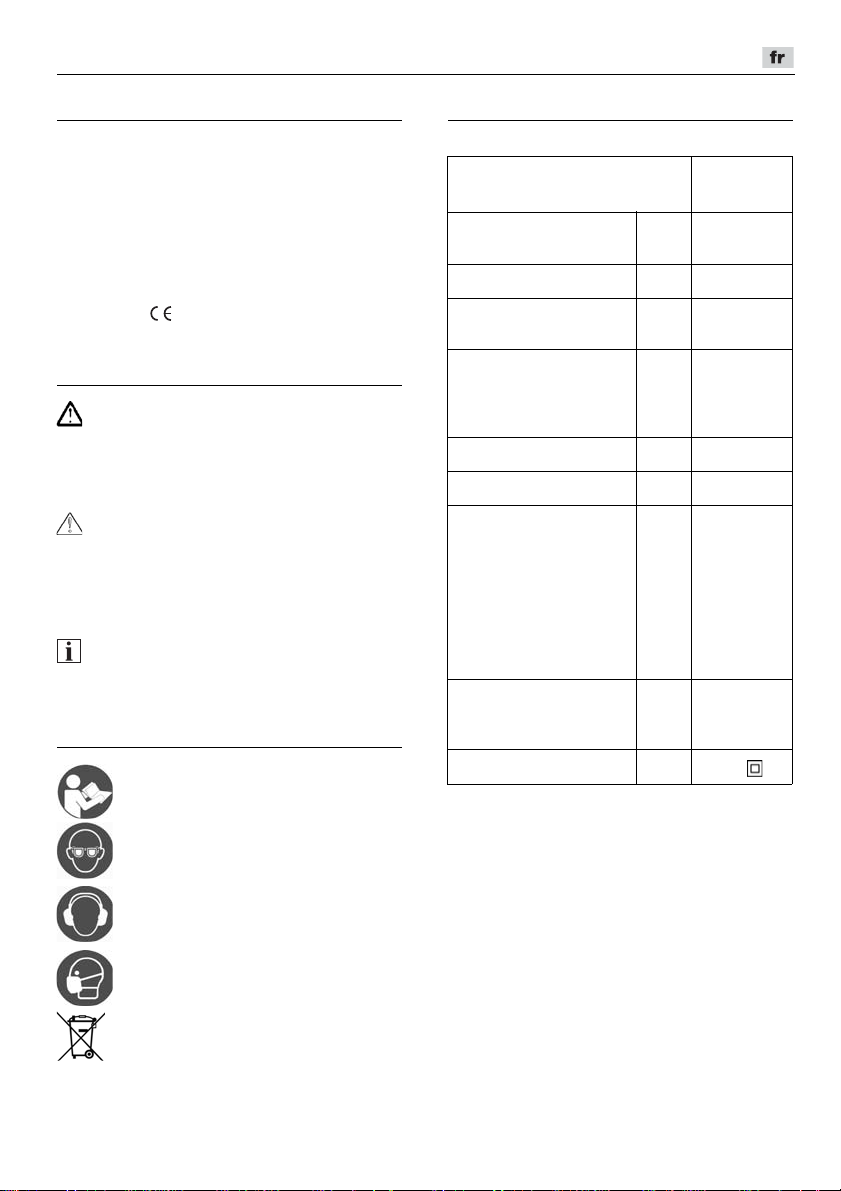
Symbole am Gerät
Vor Inbetriebnahme
Bedienungsanleitung lesen!
Augenschutz tragen!
Gehörschutz tragen!
Leichten Atemschutz benutzen!
Entsorgungshinweis für das
Altgerät (siehe Seite
Entsorgungshinweise)!
3
Page 4
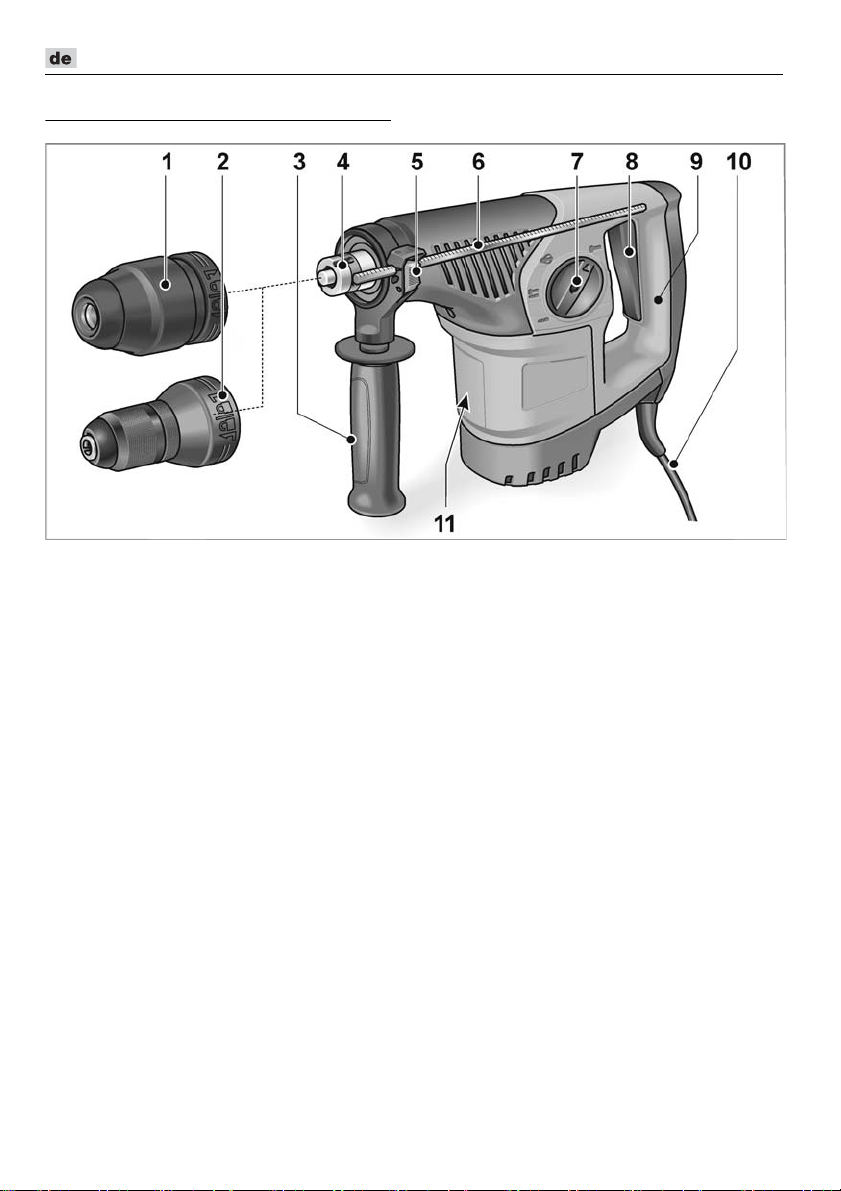
Auf einen Blick
CHE 4-32 R SDS-plus
1 SDS Bohrfutter
2 Wechselbohrfutter
3 Zusatzhandgriff
4 Spindel
5 Klemmhebel für Tiefenanschlag
6 Tiefenanschlag
7 Drehknopf für Arbeitsmodus
8 Schalter
Zum Ein- und Ausschalten sowie
zum Hochfahren bis zur maximalen
Dreh-/Schlagzahl.
4
9 Handgriff
10 Netzkabel
11 Typschild *
* nicht sichtbar
Page 5

CHE 4-32 R SDS-plus
Zu Ihrer Sicherheit
WARNUNG!
Lesen Sie alle Sicherheitshinweise und
Anweisungen.
Einhaltung der Sicherheitshinweise und
Anweisungen können elektrischen Schlag,
Brand und/oder schwere Verletzungen zur
Folge haben
heitshinweise und Anweisungen für die
Zukunft auf.
Vor Gebrauch des Elektrowerkzeuges lesen
und danach handeln:
–
die vorliegende Bedienungsanleitung,
–
die „Allgemeinen Sicherheitshinweise“
zum Umgang mit Elektrowerkzeugen im
beigelegten Heft (
–
die für den Einsatzort geltenden Regeln
und Vorschriften zur Unfallverhütung.
Dieses Elektrowerkzeug ist nach dem Stand
der Technik und den anerkannten
sicherheitstechnischen Regeln gebaut.
Dennoch können bei seinem Gebrauch
Gefahren für Leib und Leben des Benutzers
oder Dritter bzw. Schäden an der Maschine
oder an anderen Sachwerten entstehen.
Das Elektrowerkzeug ist nur zu benutzen
–
für die bestimmungsgemäße
Verwendung,
–
in sicherheitstechnisch einwandfreiem
Zustand.
Die Sicherheit beeinträchtigende Störungen
umgehend beseitigen.
Bestimmungsgemäße Verwendung
Der Bohr- und Meißelhammer
CHE 4-32 R SDS-plus ist bestimmt
– für den gewerblichen Einsatz in Industrie
und Handwerk,
– zum Hammerbohren in Mauerwerk und
Beton für Dübel- und Ankerbefestigungen und Durchgangsbohrungen,
– für leichte Stemmarbeiten zum Entfernen
von Putz und Fliesen,
– zur Verwendung mit dafür geeignetem
und vom Hersteller für dieses Gerät
empfohlenem Werkzeug.
Versäumnisse bei der
. Bewahren Sie alle Sicher-
Schriften-Nr.: 315.915),
Sicherheitshinweise für Hämmer
Tragen Sie Gehörschutz. Die Einwirkung
von Lärm kann Gehörverlust bewirken.
Benutzen Sie mit dem Gerät gelieferte
Zusatzhandgriffe. Der Verlust der
Kontrolle kann zu Verletzungen führen.
Halten Sie das Gerät an den isolierten
Griffflächen, wenn Sie Arbeiten ausführen, bei denen das Einsatzwerkzeug
verborgene Stromleitungen oder das
eigene Netzkabel treffen kann.
Der Kontakt mit einer spannungsführenden Leitung kann auch metallene
Geräteteile unter Spannung setzen und zu
einem elektrischen Schlag führen.
Weitere Sicherheitshinweise
Verwenden Sie geeignete Suchgeräte,
um verborgene Versorgungsleitungen
aufzuspüren, oder ziehen Sie die örtliche
Versorgungsgesellschaft hinzu. Kontakt
mit Elektroleitungen kann zu Feuer und
elektrischem Schlag führen. Beschädigung
einer Gasleitung kann zur Explosion
führen. Eindringen in eine Wasserleitung
verursacht Sachbeschädigung oder kann
einen elektrischen Schlag verursachen.
Halten Sie das Elektrowerkzeug beim
Arbeiten fest mit beiden Händen und
sorgen Sie für einen sicheren Stand.
Das Elektrowerkzeug wird mit zwei
Händen sicherer geführt.
Sichern Sie das Werkstück. Ein mit
Spannvorrichtung festgehaltenes Werkstück ist sicherer gehalten als mit Ihrer
Hand.
Benutzen Sie das Elektrowerkzeug nicht
mit beschädigtem Kabel. Berühren Sie
das beschädigte Kabel nicht und ziehen
Sie den Netzstecker, wenn das Kabel
während des Arbeitens beschädigt wird.
Beschädigte Kabel erhöhen das Risiko
eines elektrischen Schlages.
Nur Werkzeuge mit SDS-plus Werkzeug-
aufnahme einsetzen. Die korrekte Verriegelung durch Ziehen am Werkzeug
überprüfen.
Eine beschädigte Staubschutzkappe
sofort ersetzen lassen. Die Staubschutzkappe verhindert den Eintriitt von Staub in
die Werkzeugaufnahme.
5
Page 6
Freigesetzte Stäube von Materialien wie
bleihaltige Anstriche, einige Holzarten,
Mineralien und Metall können eine
Gefährdung der Bedienperson oder in der
Nähe befindlicher Personen darstellen.
Einatmen oder Berühren dieser Stäube
können zu Atemwegserkrankungen und/
oder allergischen Reaktionen führen.
– Für gute Belüftung des Arbeitsplatzes
sorgen!
– Wenn möglich, externe Staub-
absaugung verwenden.
– Es wird die Verwendung einer Atem-
schutzmaske mit Filterklasse P2
empfohlen.
Keine Materialien bearbeiten, bei denen
gesundheitsgefährdende Stoffe freigesetzt
werden (z. B. Asbest).
Zur Kennzeichnung des Elektrowerkzeugs
nur Klebschilder verwenden. Keine Löcher
in das Gehäuse bohren.
Netzspannung und Spannungsangabe auf
dem Typschild muss übereinstimmen.
Geräusch und Vibration
Die Geräusch- und Schwingungswerte
wurden entsprechend EN 60745 ermittelt.
Der A-bewertete Geräuschpegel des
Gerätes beträgt typischerweise:
– Schall-Druckpegel: 92 dB(A);
– Schall-Leistungspegel: 103 dB(A);
– Unsicherheit K: 3 dB.
Schwingungsgesamtwert:
– beim Hammerbohren:
– Emissionswert a
– Unsicherheit K: 1,5 m/s
– beim Meißeln:
– Emissionswert ah: 10,60 m/s
– Unsicherheit K: 1,5 m/s
ACHTUNG!
Die angegebenen Messwerte gelten
für neue Geräte. Im täglichen Einsatz
verändern sich Geräusch- und
Schwingungswerte.
: 13,34 m/s
h
CHE 4-32 R SDS-plus
HINWEIS!
Der in diesen Anweisungen angegebene
Schwingungspegel ist entsprechend einem
in EN 60745 genormten Messverfahren
gemessen worden und kann für den Vergleich von Elektrowerkzeugen miteinander
verwendet werden. Er eignet sich auch für
eine vorläufige Einschätzung der
Schwingungsbelastung.
Der angegebene Schwingungspegel repräsentiert die hauptsächlichen Anwendungen
des Elektrowerkzeugs. Wenn allerdings das
Elektrowerkzeug für andere Anwendungen,
mit abweichenden Einsatzwerkzeugen oder
ungenügender Wartung eingesetzt wird, kann
der Schwingungspegel abweichen. Dies kann
die Schwingungsbelastung über den
gesamten Arbeitszeitraum deutlich erhöhen.
Für eine genaue Abschätzung der Schwingungs
belastung sollten auch die Zeiten
berücksichtigt werden, in denen das Gerät
abgeschaltet ist oder zwar läuft, aber nicht
tatsächlich im Einsatz ist. Dies kann die
Schwingungsbelastung über den gesamten
Arbeitszeitraum deutlich reduzieren.
Legen Sie zusätzliche Sicherheitsmaßnahmen zum Schutz des Bedieners vor der
Wirkung von Schwingungen fest wie zum
Beispiel: Wartung von Elektrowerkzeug und
Einsatzwerkzeugen, Warmhalten der Hände,
Organisation der Arbeitsabläufe.
VORSICHT!
Bei einem Schalldruck über 85 dB(A)
Gehörschutz tragen.
2
2
2
2
6
Page 7
CHE 4-32 R SDS-plus
Gebrauchsanweisung
Vor der Inbetriebnahme
Elektrowerkzeug und Zubehör auspacken
und auf Vollständigkeit der Lieferung und
Transportschäden kontrollieren.
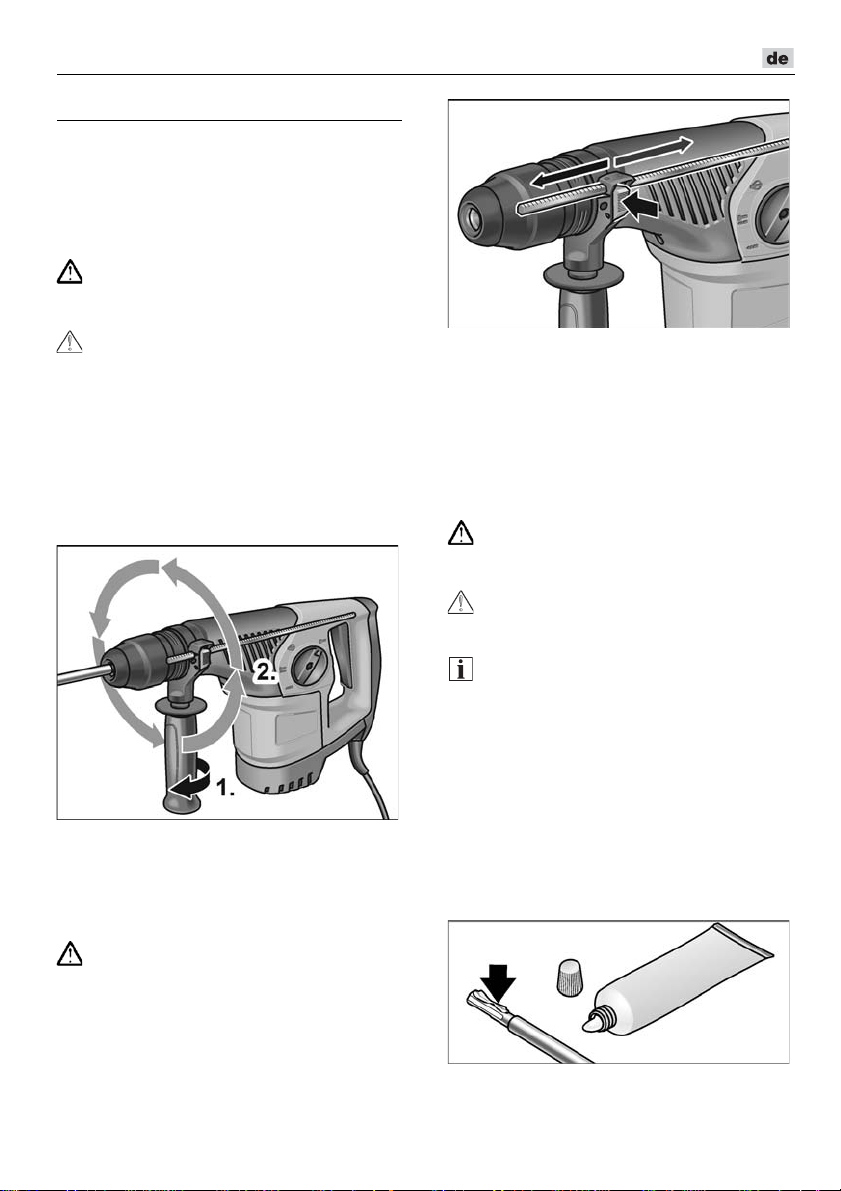
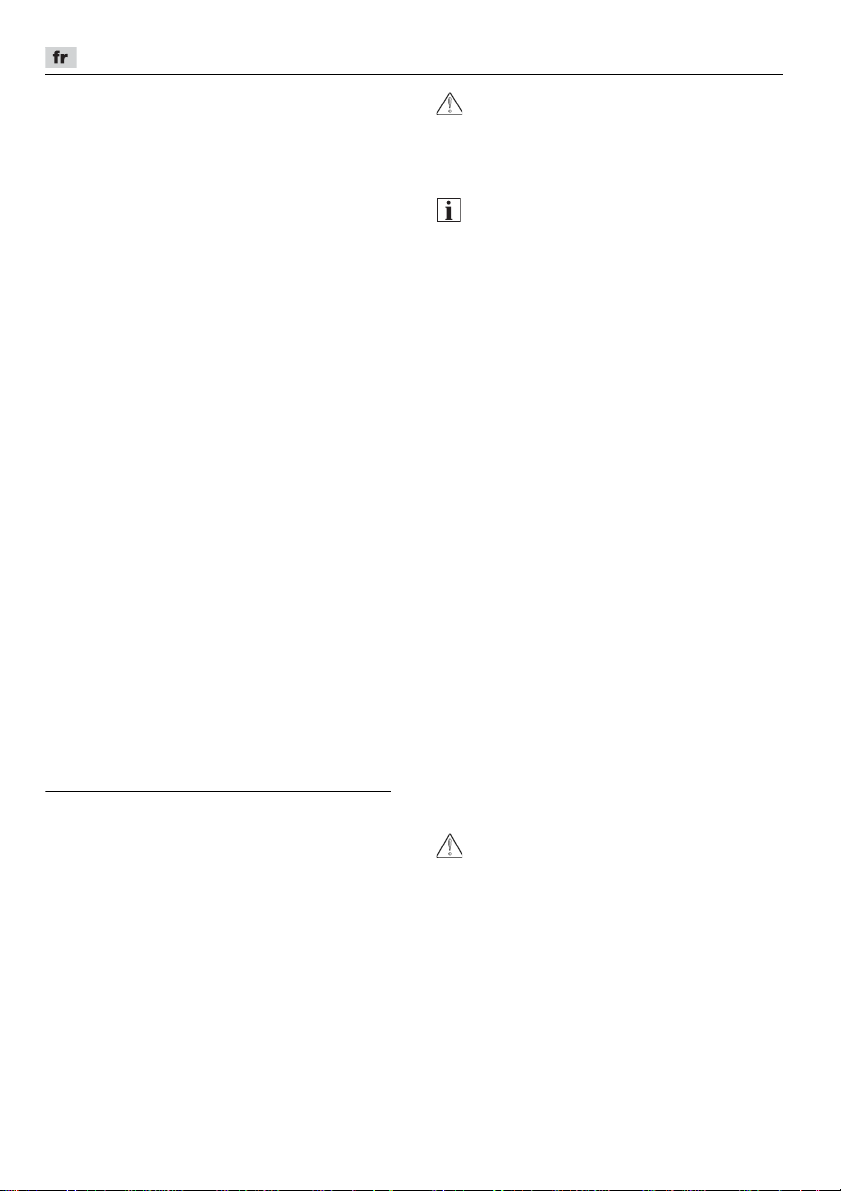
Zusatzhandgriff verstellen
WARNUNG!
Vor allen Arbeiten am Elektrowerkzeug
Netzstecker ziehen.
VORSICHT!
Elektrowerkzeug nur mit montiertem
Zusatzhandgriff verwenden.
Der Zusatzhandgriff kann in jede beliebige
Position geschwenkt werden, um sicheres
und ermüdungsfreies Arbeiten zu
gewährleisten.
Klemmung durch Drehen des Zusatz-
handgriff gegen den Uhrzeigersinn
lösen (1.).
Zusatzhandgriff in die gewünschte
Position schwenken (2.).
Durch Drehen des Zusatzhandgriffs im
Uhrzeigersinn die Einstellung fixieren.
Tiefenanschlag montieren
WARNUNG!
Vor allen Arbeiten am Elektrowerkzeug
Netzstecker ziehen.
Klemmhebel am Zusatzhandgriff im
oberen Bereich drücken und festhalten.
Tiefenanschlag einschieben.
Tiefenanschlag auf die benötigte
Bohrtiefe einstellen.
Klemmhebel loslassen.
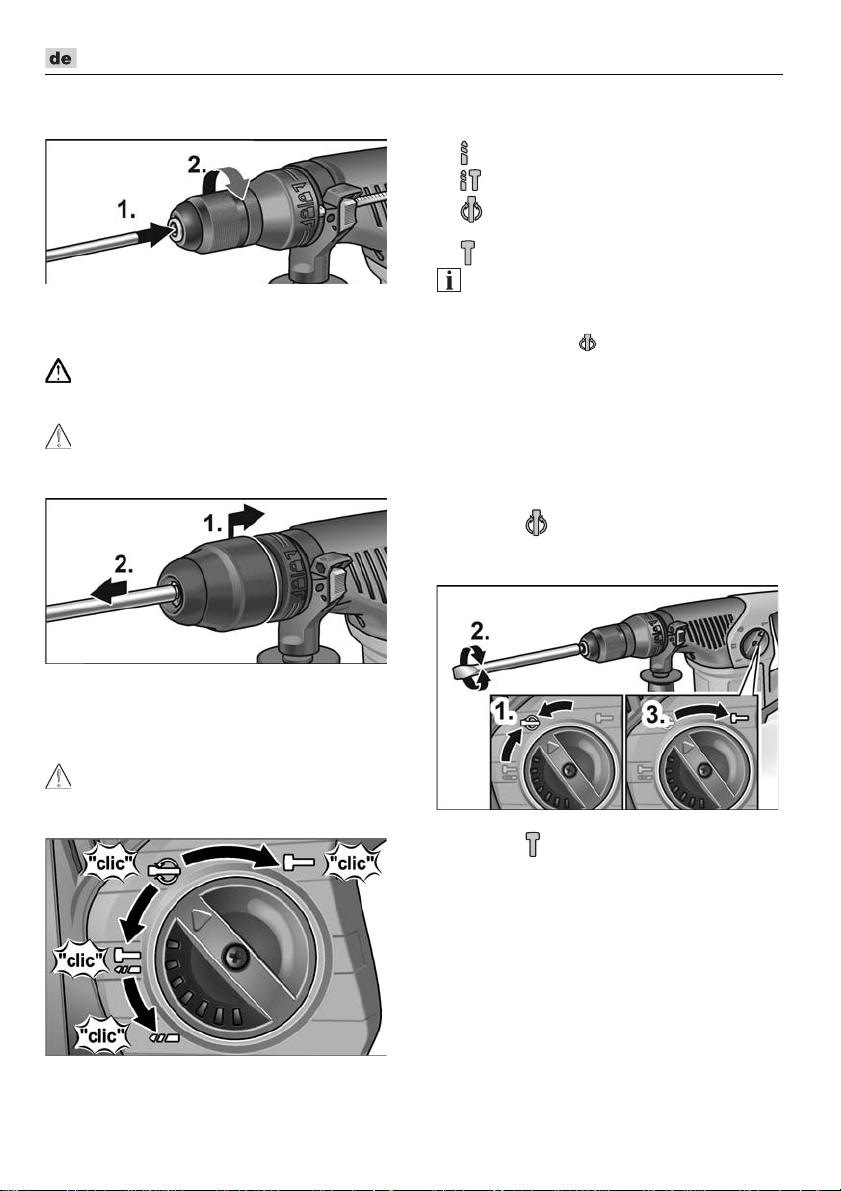
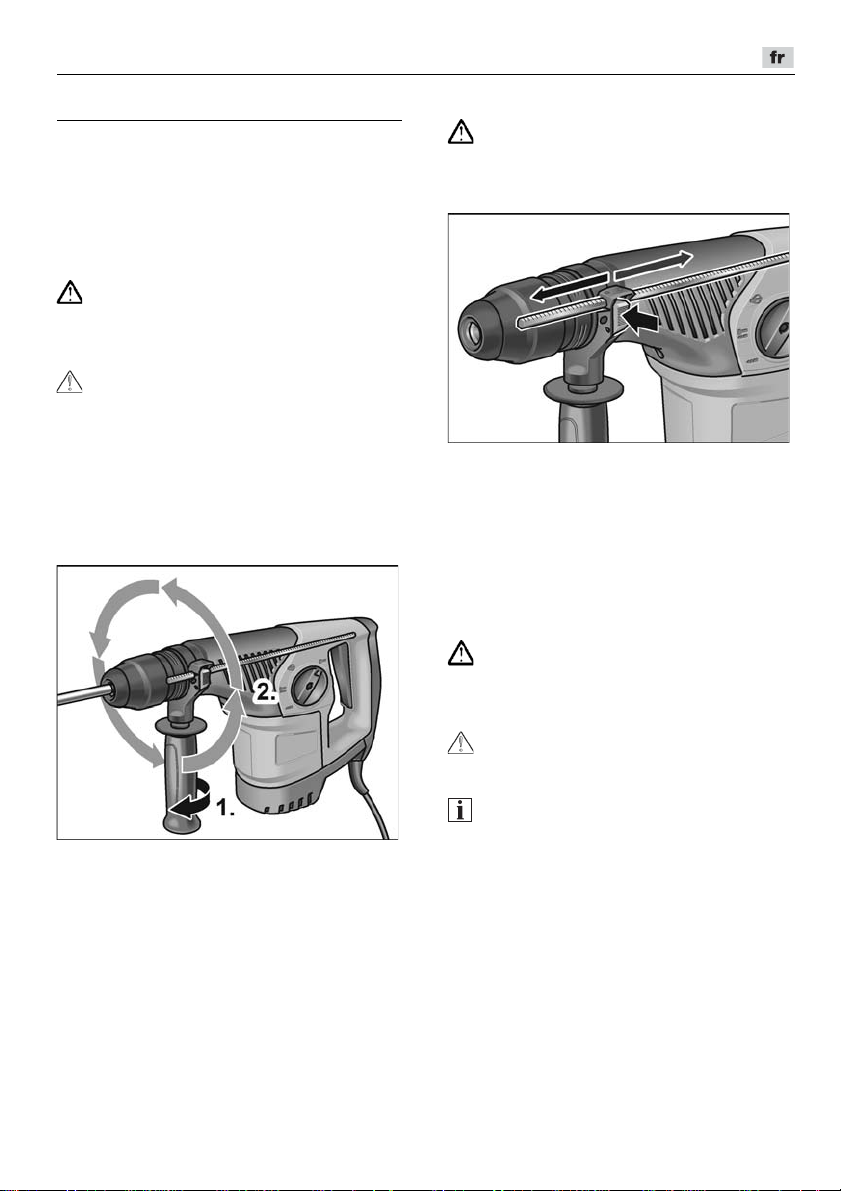
Einsetzen von Werkzeugen
mit SDS-Schaft
WARNUNG!
Vor allen Arbeiten am Elektrowerkzeug
Netzstecker ziehen.
VORSICHT!
Benutzte Einsatzwerkzeuge können heiß
werden. Schutzhandschuhe tragen!
HINWEIS!
Verwendete Werkzeuge müssen über einen
SDS-Schaft verfügen. Für Werkzeuge ohne
SDS-Schaft (z. B. Holzbohrer) ist ein
Dreibacken-Bohrfutter zu verwenden (siehe
„Arbeitsmodus einstellen“).
Staubschutzkappe überprüfen.
– Verschmutzte Kappe reinigen.
– Defekte Staubschutzkappe
austauschen lassen.
Werkzeuge reinigen und den Schaft
leicht einfetten.
7
Page 8
CHE 4-32 R SDS-plus
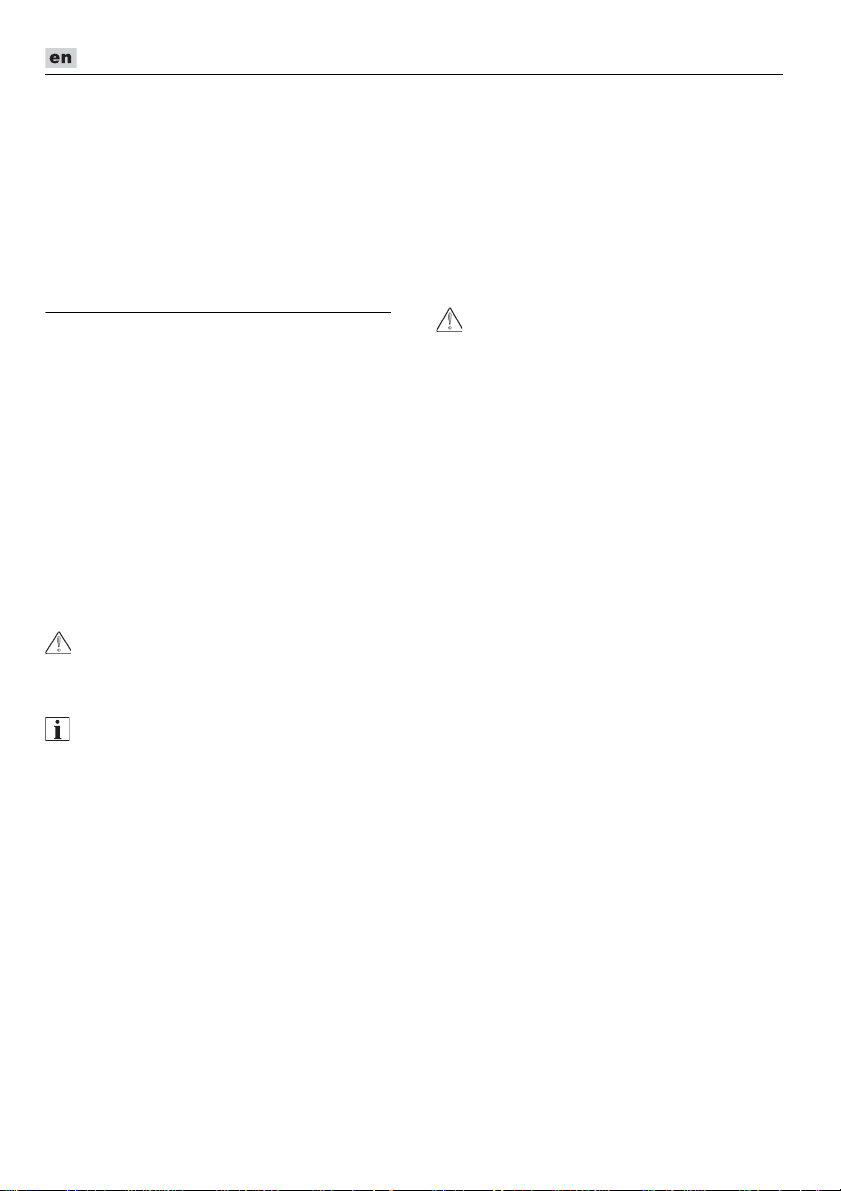
Einsatzwerkzeug einsetzen (1.) und
drehen (2.), bis es verriegelt.
Verriegelung durch Ziehen am
Einsatzwerkzeug überprüfen.
Entnehmen der Werkzeuge
WARNUNG!
Vor allen Arbeiten am Elektrowerkzeug
Netzstecker ziehen.
VORSICHT!
Benutzte Einsatzwerkzeuge können heiß
werden. Schutzhandschuhe tragen!
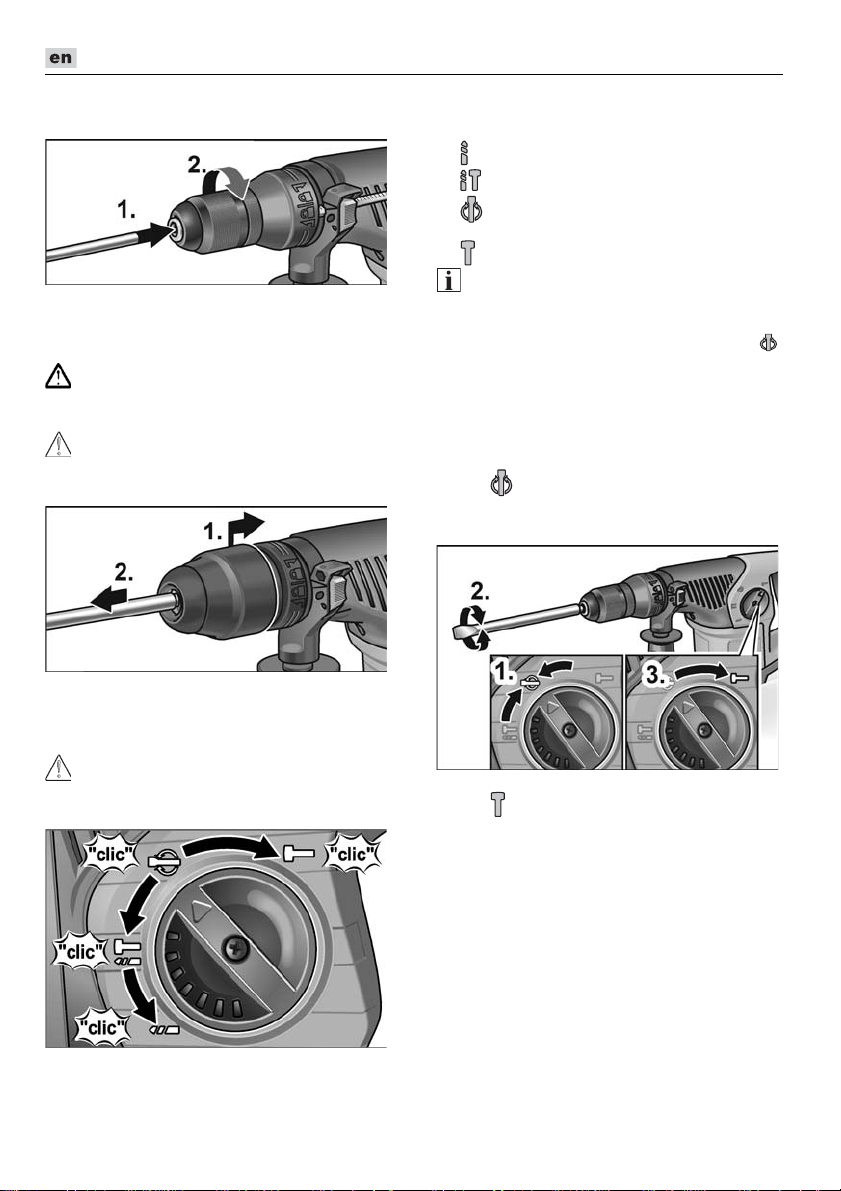
Verriegelungshülse nach hinten
ziehen (1.).
Einsatzwerkzeug entnehmen (2.).
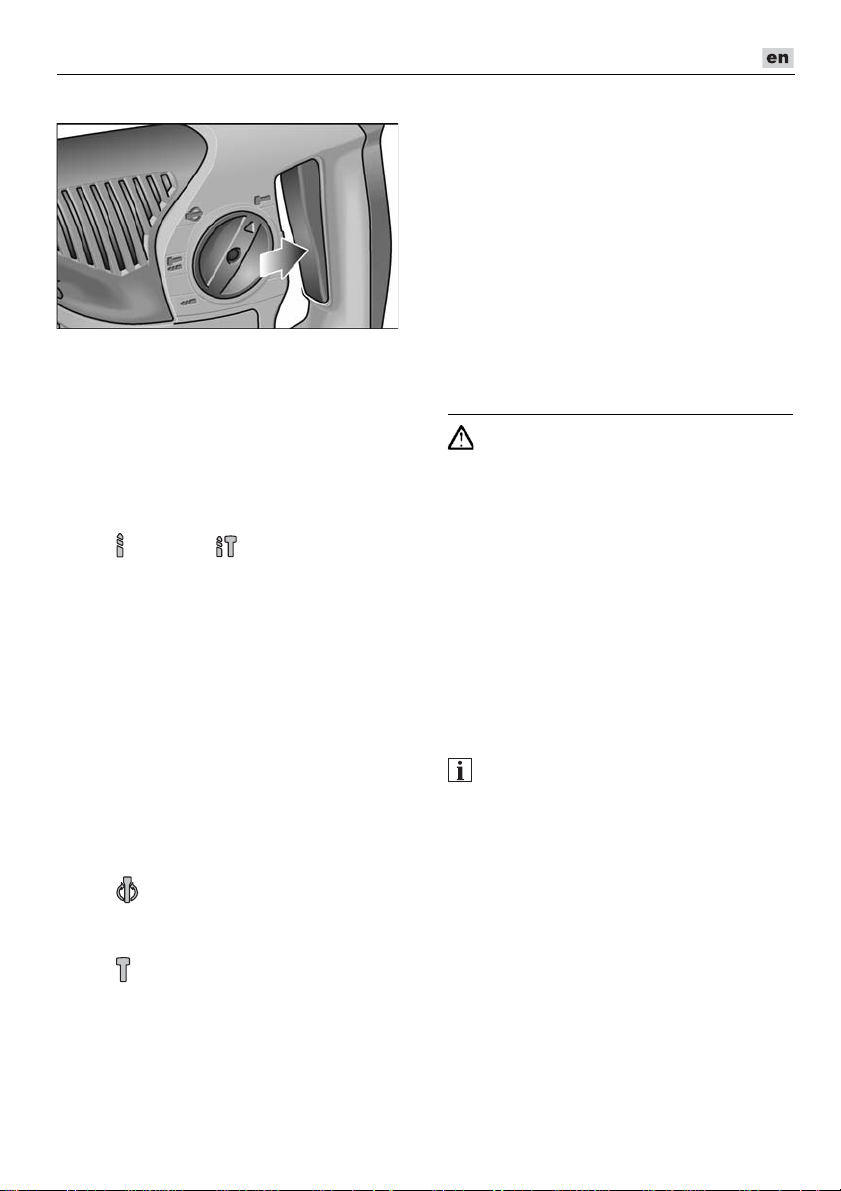
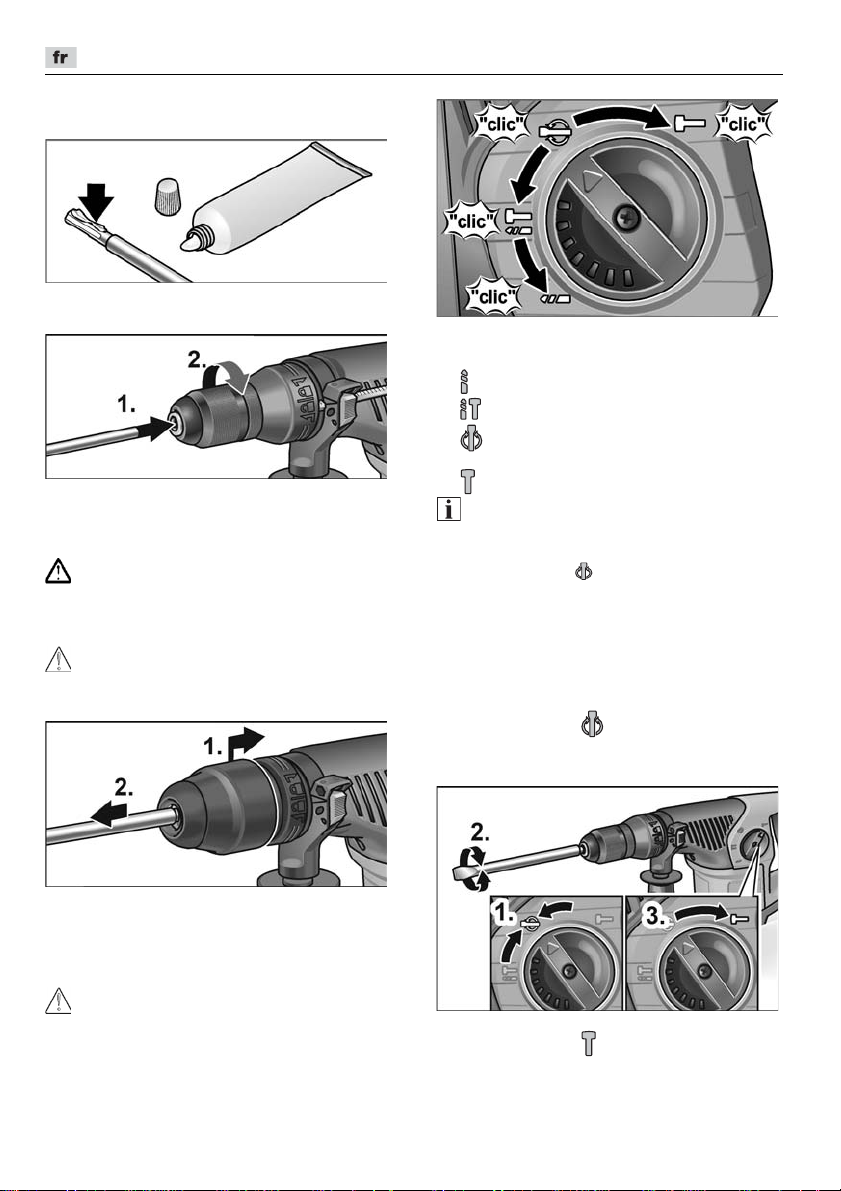
Arbeitsmodus einstellen
VORSICHT!
Arbeitsmodus nur bei Stillstand des
Elektrowerkzeugs ändern.
Drehknopf auf gewünschten
Arbeitsmodus einstellen:
Bohren
Hammerbohren
Einstellen der Meißelposition
(siehe dort)
Meißeln
HINWEIS!
– In allen Positionen muss der Drehknopf
hörbar einrasten.
– In der Position (Einstellen der
Meißelposition) das Elektrowerkzeug
nicht einschalten.
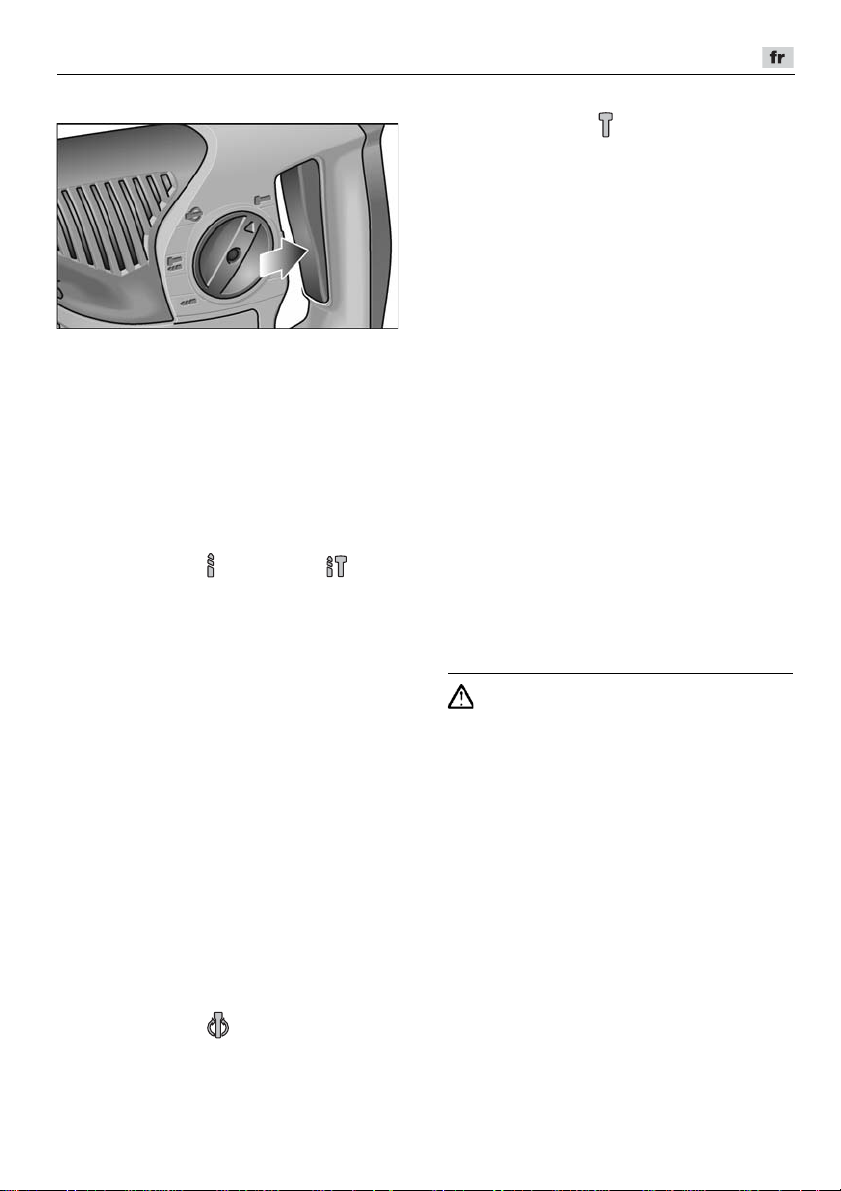
Einstellen der Meißelposition
Der Meißel kann in eine für die auszuführenden Arbeiten optimalen Position
verdreht werden.
Drehknopf für Arbeitsmodus auf das
Symbol stellen (1.).
Meißel drehen, bis der Meißel den
gewünschten Winkel aufweist (2.).
Drehknopf für Arbeitsmodus auf das
Symbol stellen (3.). Auf hörbares
Einrasten achten!
8
Page 9
CHE 4-32 R SDS-plus
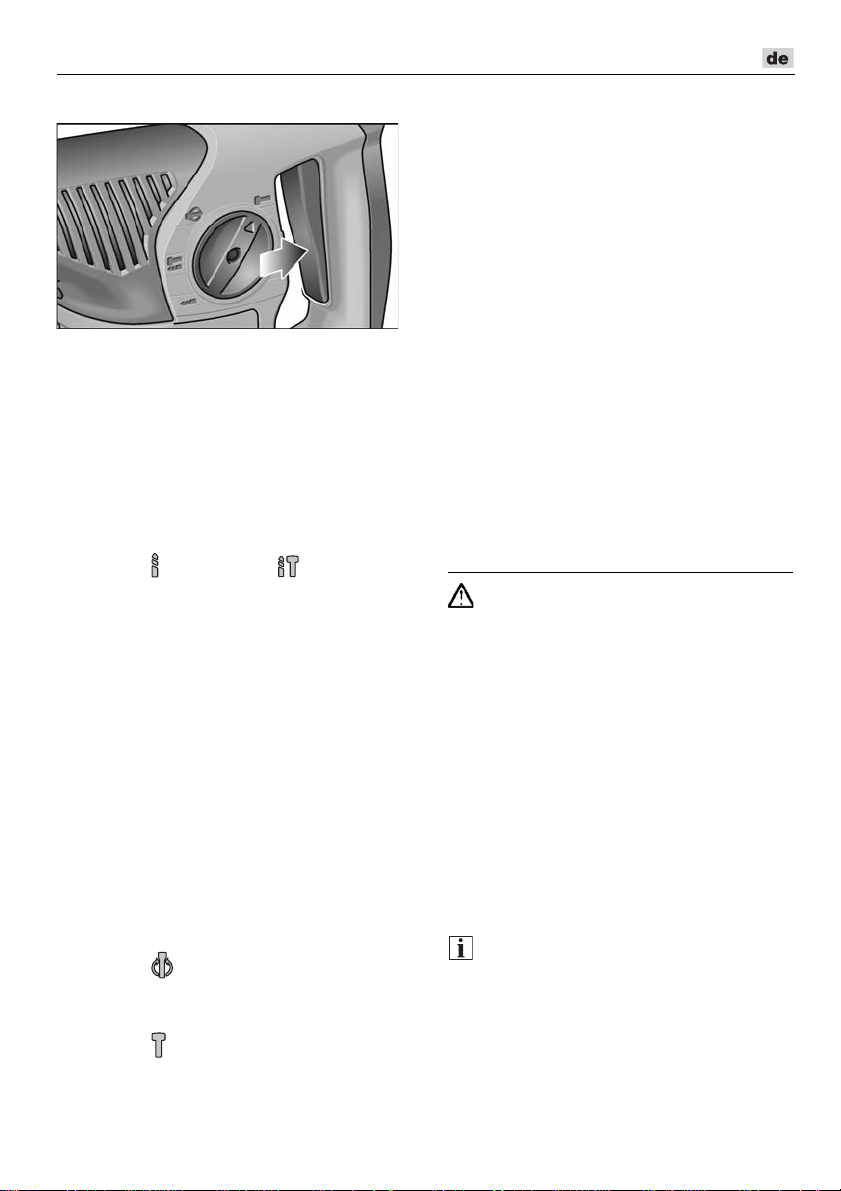
Elektrowerkzeug einschalten
Schalter drücken und festhalten.
Der Schalter des Elektrowerkzeugs
ermöglicht ein langsames Steigern der
Dreh- bzw. Schlagzahl bis zum
Maximalwert.
Gerät ausschalten:
Schalter loslassen.
Arbeitshinweise
Bohren/Hammerbohren
1. Drehknopf für Arbeitsmodus auf das
Symbol (Bohren) bzw. (Hammerbohren) stellen. Auf hörbares Einrasten
achten!
2. Bohrer einsetzen.
3. Zusatzhandgriff auf die gewünschte
Position einstellen.
4. Netzstecker einstecken.
5. Elektrowerkzeug mit beiden Händen ergreifen und Arbeitsposition einnehmen.
6. Bohrer ansetzen und Elektrowerkzeug
einschalten.
7. Elektrowerkzeug gefühlvoll nach vorn
drücken.
8. Nach Beenden der Bohrung Gerät
ausschalten.
9. Netzstecker ziehen.
Meißeln
1. Meißel einsetzen.
2. Drehknopf für Arbeitsmodus auf das
Symbol stellen.
3. Meißel in die gewünschte Position
drehen.
4. Drehknopf für Arbeitsmodus auf das
Symbol stellen. Auf hörbares
Einrasten achten!
5. Zusatzhandgriff auf die gewünschte
Position einstellen.
6. Netzstecker einstecken.
7. Elektrowerkzeug mit beiden Händen
ergreifen und Arbeitsposition
einnehmen.
8. Elektrowerkzeug einschalten.
9. Elektrowerkzeug beim Meißeln
gefühlvoll nach vorn drücken, so dass
es nicht springt.
10. Nach Beenden der Arbeit Gerät
ausschalten.
11. Netzstecker ziehen.
Sonstige Hinweise
– Die Verwendung von „scharfen“
Einsatzwerkzeugen steigert die
Arbeitsleistung und die Lebensdauer
des Elektrowerkzeugs.
– Elektrowerkzeug nach der Arbeit
reinigen und im Transportkoffer an einem
trockenen Ort aufbewahren.
Wartung und Pflege
WARNUNG!
Vor allen Arbeiten am Elektrowerkzeug den
Netzstecker ziehen.
Reinigung
Gerät und Lüftungsschlitze regelmäßig
reinigen. Häufigkeit ist vom bearbeiteten
Material und von der Dauer des Gebrauchs
abhängig. Gehäuseinnenraum mit Motor
regelmäßig mit trockener Druckluft
ausblasen.
Kohlenbürsten
Das Elektrowerkzeug ist mit Abschaltkohlen
ausgestattet.
Nach Erreichen der Verschleißgrenze der
Abschaltkohlen wird das Elektrowerkzeug
automatisch abgeschaltet.
HINWEIS!
Zum Austausch nur Originalteile des
Herstellers verwenden. Bei Verwendung
von Fremdfabrikaten erlöschen die
Garantieverpflichtungen des Herstellers.
9
Page 10

CHE 4-32 R SDS-plus
Klaus Peter WeinperEckhard Rühle
Manager Research &
Development (R & D)
Head of Quality
Department (QD)
Durch die hinteren Lufteintrittsöffnungen
kann das Kohlenfeuer während des
Gebrauchs beobachtet werden.
Bei starkem Kohlenfeuer das Elektrowerkzeug sofort ausschalten. Elektrowerkzeug
an eine vom Hersteller autorisierte
Kundendienstwerkstatt übergeben.
Getriebe
HINWEIS!
Die Schrauben am Getriebekopf während
der Garantiezeit nicht lösen.
Bei Nichtbeachtung erlöschen die
Garantieverpflichtungen des Herstellers.
Reparaturen
Reparaturen ausschließlich durch eine vom
Hersteller autorisierte Kundendienstwerkstatt ausführen lassen.
Wenn die Anschlussleitung des Elektrowerkzeugs beschädigt ist, muss sie durch
eine speziell vorgerichtete Anschlussleitung
(Anbringungsart X) ersetzt werden. Diese
ist über den FLEX-Kundendienst erhältlich.
Ersatzteile und Zubehör
Weiteres Zubehör, insbesondere Einsatzwerkzeuge, den Katalogen des Herstellers
entnehmen.
Explosionszeichnungen und Ersatzteillisten
finden Sie auf unserer Homepage:
www.flex-tools.com
Entsorgungshinweise
-Konformität
Wir erklären in alleiniger Verantwortung, dass
das unter „Technische Daten“ beschriebene
Produkt mit folgenden Normen oder
normativen Dokumenten übereinstimmt:
EN 60745 gemäß den Bestimmungen der
Richtlinien 2014/30/EU, 2006/42/EG,
2011/65/EU.
Verantwortlich für technische Unterlagen:
FLEX-Elektrowerkzeuge GmbH, R & D
Bahnhofstrasse 15, D-71711 Steinheim/Murr
07.03.2018
FLEX-Elektrowerkzeuge GmbH
Bahnhofstrasse 15, D-71711 Steinheim/Murr
Haftungsausschluss
Der Hersteller und sein Vertreter haften nicht
für Schäden und entgangenen Gewinn durch
Unterbrechung des Geschäftsbetriebes, die
durch das Produkt oder die nicht mögliche
Verwendung des Produktes verursacht wurden. Der Hersteller und sein Vertreter haften
nicht für Schäden, die durch unsachgemäße
Verwendung oder in Verbindung mit Produkten anderer Hersteller verursacht wurden.
WARNUNG!
Ausgediente Geräte durch Entfernen des
Netzkabels unbrauchbar machen.
Nur für EU-Länder.
Werfen Sie Elektrowerkzeuge
nicht in den Hausmüll!
Gemäß Europäischer Richtlinie 2012/19/EU
über Elektro- und Elektronik-Altgeräte und
Umsetzung in nationales Recht müssen
verbrauchte Elektrowerkzeuge getrennt
gesammelt und einer umweltgerechten
Wiederverwertung zugeführt werden.
HINWEIS!
Über Entsorgungsmöglichkeiten beim
Fachhändler informieren!
10
Page 11
CHE 4-32 R SDS-plus
Contents
Symbols used in this manual . . . . . . . . 11
Symbols on the power tool. . . . . . . . . . . 11
Technical data . . . . . . . . . . . . . . . . . . . . 11
Overview . . . . . . . . . . . . . . . . . . . . . . . . 12
Important safety information . . . . . . . . . 13
Noise and vibration . . . . . . . . . . . . . . . . 14
Instructions for use . . . . . . . . . . . . . . . . 15
Maintenance and care . . . . . . . . . . . . . . 17
Disposal information . . . . . . . . . . . . . . . 18
conformity . . . . . . . . . . . . . . . . . . . . 18
Exemption from liability . . . . . . . . . . . . . 18
Symbols used in this manual
WARNING!
Denotes impending danger. Nonobservance of this warning may result in
death or extremely severe injuries.
CAUTION!
Denotes a potentially dangerous situation.
Non-observance of this warning may result
in injury or damage to property.
NOTE!
Denotes application tips and important
information.
Symbols on the power tool
Technical data
Hammer drill and chisel
hammer
Rated power W 900
No-load speed rpm 0–850
No-load impact rate rpm 0–3700
Max. single impact
energy (according to
“EPTA procedure
05/2009”)
Lubrication Grease
Tool holder SDS-plus
Max. drill diameter
– concrete
– masonry
– (HM drill bit)
– wood
– metal
Weight according to
“EPTA procedure
01/2003”
Protection class
CHE 4-32 R
SDS-plus
J4.8
mm
mm
mm
mm
kg 4.6
32
82
32
13
II/
Before switching on the power
tool, read the operating manual!
Wear protective goggles!
Wear ear defenders!
Use lightweight breathing
protection!
Disposal information for the old
machine (see page Disposal
information)!
11
Page 12

Overview
CHE 4-32 R SDS-plus
1SDS Chuck
2 Changeable drill chuck
3 Auxiliary handle
4 Spindle
5 Clamping lever for depth stop
6 Depth stop
7 Rotary knob for operating mode
8 Trigger switch
For switching on and off and for
accelerating up to maximum speed/
impact rate.
12
9 Handle
10 Power cord
11 Rating plate *
* (not visible)
Page 13

CHE 4-32 R SDS-plus
Important safety information
WARNING!
Read all safety instructions and general
instructions.
safety instructions and general instructions
may result in electric shock, fire and/or
serious injuries
and general instructions in a safe place for
future reference.
Before using the power tool, please read the
following and act accordingly:
–
these operating instructions,
–
the “General safety instructions” on the
handling of power tools in the enclosed
booklet (
–
the currently valid site rules and the
regulations for the prevention of
accidents.
This power tool is state of the art and has
been constructed in accordance with the
acknowledged safety regulations.
Nevertheless, when in use, the power tool
may be a danger to life and limb of the user
or a third party, or the power tool or other
property may be damaged. The power tool
may be operated only if it is
–
for its intended use,
–
in perfect working order.
Faults which compromise safety must be
repaired immediately.
Intended use
The CHE 4-32 R SDS-plus hammer drill and
chisel hammer is intended
– for commercial use in industry and trade,
– for hammer drilling in masonry and
concrete for wall plug and anchor
attachments and through-holes,
– for light trimming work to remove plaster
and tiles,
– to be used with suitable tools
recommended by the manufacturer for
this power tool.
Failure to comply with the
. Keep all safety instructions
leaflet no.: 315.915),
Safety instructions for hammers
Wear ear defenders. The effect of noise
may result in loss of hearing.
Use auxiliary handles supplied with
the power tool. The loss of control may
result in injuries.
Hold the power tool by the insulated
gripping surfaces when performing an
operation where the cutting accessory
may contact hidden wiring or its own
cord. Cutting accessory contacting a “live”
wire may make exposed metal parts of the
power tool “live” and shock the operator.
Additional safety instructions
Use suitable detectors to detect
concealed power supply cables or
consult your local supply company.
Contact with electric cables may result in
a fire and/or electric shock. A damaged
gas pipe may cause an explosion. Cutting
into a water pipe will cause damage to
property or may cause an electric shock.
When working, hold the power tool firmly
with both hands and ensure that you
have a secure footing. The power tool is
controlled more securely if held with both
hands.
Secure the workpiece. A workpiece is
held more securely in a clamping device
than by hand.
Do not use the power tool if it has
a damaged power cord. Do not touch
the damaged power cord and pull out
the mains plug if the power cord is
damaged during work. Damaged power
cords increase the risk of an electric shock.
Only use tools with SDS-plus tool holder.
Pull on the tool to check that it is locked
properly.
Have a damaged dust cap replaced
immediately. The dust cap prevents the
ingress of dust into the tool holder.
Dust released from materials, such as
lead paints, some types of wood, minerals
and metal, may be hazardous to the
operator or people in the vicinity.
or touching such dust may result in
respiratory diseases and/or allergic
reactions.
– Ensure the workplace is well ventilated.
– If possible, use external dust extraction.
Inhaling
13
Page 14
CHE 4-32 R SDS-plus
– It is recommended to wear a respirator
mask belonging to filter class P2.
Do not work on materials which release
hazardous substances (e.g. asbestos).
Identify the power tool with stickers only.
Do not drill any holes into the housing.
The mains voltage and the voltage
specifications on the rating plate must
correspond.
Noise and vibration
The noise and vibration values have been
determined in accordance with EN 60745.
The A-weighted noise level of the power tool
is typically:
– Sound pressure level: 92 dB(A);
– Sound power level: 103 dB(A);
– Uncertainty K: 3 dB.
Total vibration value:
– when hammer drilling:
– Emission value a
: 13.34 m/s
h
– Uncertainty K: 1.5 m/s
– when chiselling:
– Emission value ah: 10.60 m/s
– Uncertainty K: 1.5 m/s
ATTENTION!
The indicated measurements refer to new
power tools. Daily use causes the noise and
vibration values to change.
NOTE!
The vibration emission level given in this
information sheet has been measured in
accordance with a standardised test given in
EN 60745 and may be used to compare one
tool with another. It may be used for a
preliminary assessment of exposure.
The declared vibration emission level
represents the main applications of the tool.
However if the tool is used for different
applications, with different accessories or
poorly maintained, the vibration emission may
differ. This may significantly increase the
exposure level over the total working period.
2
2
2
2
To make an accurate estimation of the
vibration exposure level, it is also necessary to
take into account the times when the tool is
switched off or running but not actually in use.
This may significantly decrease the exposure
level over the total working period.
Identify additional safety measures to protect
the operator from the effects of vibration such
as: maintain the tool and the accessories,
keep the hands warm, organisation of work
patterns.
CAUTION!
Wear ear defenders at a sound pressure
above 85 dB(A).
14
Page 15

CHE 4-32 R SDS-plus
Instructions for use
Before switching on the power tool
Unpack the power tool and accessories and
check that no parts are missing or
damaged.
Adjusting the auxiliary handle
WARNING!
Before performing any work on the power
tool, pull out the mains plug.
CAUTION!
Use the power tool with the attached
auxiliary handle only.
The auxiliary handle can be swivelled into
any position to ensure safe and fatigue-free
working.
Release the clamping by turning the
auxiliary handle counterclockwise (1.).
Swivel the auxiliary handle into the
desired position (2.).
Secure the adjustment by turning the
auxiliary handle clockwise.
Attaching the depth stop
WARNING!
Before performing any work on the power
tool, pull out the mains plug.
Press and hold clamping lever on the
auxiliary handle in the upper area.
Push in depth stop.
Set depth stop to the required drilling
depth.
Release clamping lever.
Inserting tools with SDS shank
WARNING!
Before performing any work on the power
tool, pull out the mains plug.
CAUTION!
Used cutting accessories may become hot.
Wear protective gloves!
NOTE!
Tools used must have an SDS shank.
If tools do not have an SDS shank
(e.g. wood drill bit), a three-jaw chuck must
be used (see “Setting the operating mode”).
Check the dust cap.
– Clean the cap if dirty.
– Have a defective dust cap replaced.
Clean tools and lightly grease the shank.
15
Page 16
CHE 4-32 R SDS-plus
Insert the cutting accessory (1.) and
turn (2.) until it locks.
Check lock by pulling on the cutting
accessory.
Removing the accessories
WARNING!
Before performing any work on the power
tool, pull out the mains plug.
CAUTION!
Used cutting accessories may become hot.
Wear protective gloves!
Setting rotary knob to the required
operating mode:
Drilling
Hammer drilling
Setting the chisel position (see
below)
Chiselling
NOTE!
– The rotary knob must audibly click into
place in all positions.
– Do not switch on the power tool in the
position (setting the chisel position).
Setting the chisel position
The chisel can be turned to a position which
is ideal for the work to be performed.
Move the operating mode rotary knob to
the symbol (1.).
Turn the chisel until it is at the required
angle (2.).
Pull the locking sleeve backwards (1.).
Remove the cutting accessory (2.).
Setting the operating mode
CAUTION!
Do not change the operating mode until
the power tool has come to a stop.
16
Move the operating mode rotary knob to
the symbol (3.). Make sure it audibly
clicks into place.
Page 17
CHE 4-32 R SDS-plus
Switching on the power tool
Press and hold down the trigger switch.
The power tool trigger switch enables
the speed or impact rate to be increased
slowly to the maximum value.
To switch off the machine:
Release the trigger switch.
Operating instructions
Drilling/hammer drilling
1. Move the operating mode rotary knob to
the (drilling) or (hammer drilling)
symbol. Make sure it audibly clicks into
place.
2. Insert the drill bit.
3. Swivel the auxiliary handle into
the required position.
4. Insert the mains plug.
5. Grip the power tool with both hands and
assume the working position.
6. Position the drill bit and switch on the
power tool.
7. Gently press the power tool forwards.
8. After drilling, switch off the power tool.
9. Pull out the mains plug.
Chiselling
1. Insert the chisel.
2. Move the operating mode rotary knob to
the symbol.
3. Turn the chisel into the required
position.
4. Move the operating mode rotary knob to
the symbol. Make sure it audibly clicks
into place.
5. Swivel the auxiliary handle into
the required position.
6. Insert the mains plug.
7. Grip the power tool with both hands and
assume the working position.
8. Switch on the power tool.
9. When chiselling, gently press the power
tool forwards to prevent it from jumping.
10. After working, switch off the power tool.
11. Pull out the mains plug.
Other information
– The use of “sharp” cutting accessories
increases performance and the service
life of the power tool.
– After work, clean the power tool and
store in the carrying case in a dry
location.
Maintenance and care
WARNING!
Before performing any work on the power
tool, pull out the mains plug.
Cleaning
Regularly clean the power tool and
ventilation slots. Frequency of cleaning is
dependent on the material and duration of
use. Regularly blow out the housing interior
and motor with dry compressed air.
Carbon brushes
The power tool is equipped with cut-off
carbon brushes.
When the cut-off carbon brushes reach their
wear limit, the power tool switches off
automatically.
NOTE!
Use only original parts supplied by
the manufacturer for replacement
purposes. The use of non-original parts or
makes will invalidate any claims under the
manufacturer's warranty.
When the power tool is being used,
the carbon brushes can be seen sparking
through the rear air inlet apertures.
If the carbon brushes are sparking
excessively, switch off the power tool
immediately. Take your power tool to
a customer service centre authorised by
the manufacturer.
17
Page 18
CHE 4-32 R SDS-plus
Klaus Peter WeinperEckhard Rühle
Manager Research &
Development (R & D)
Head of Quality
Department (QD)
Gears
NOTE!
Do not loosen the screws on the gear head
during the warranty period. Failure to
comply with this requirement will invalidate
any claims under the manufacturer's
warranty.
Repairs
Repairs may be carried out by an authorised
customer service centre only.
If the power cord of the power tool is
damaged, it must be replaced with
a specially prepared power cord
(attachment type X). This power cord is
available from FLEX customer service.
Spare parts and accessories
Other accessories, in particular cutting
accessories, can be found in the
manufacturer’s catalogues.
Exploded drawings and spare-part lists can
be found on our homepage:
www.flex-tools.com
Disposal information
WARNING!
Render disused power tools unusable by
removing the power cord.
EU countries only.
Do not dispose of electric power tools
in the household waste!
In accordance with the European Directive
2012/19/EU on Waste Electrical and
Electronic Equipment and its incorporation
into national law, used power tools must be
collected separately and recycled in an
environmentally friendly manner.
NOTE!
Please ask your dealer about disposal
options.
conformity
We declare on our sole responsibility that the
product described in “Technical
specifications” conforms to the following
standards or normative documents:
EN 60745 according to the provisions of
Directives 2014/30/EU, 2006/42/EC,
2011/65/EU.
Responsible for technical documents:
FLEX-Elektrowerkzeuge GmbH, R & D
Bahnhofstrasse 15, D-71711 Steinheim/Murr
07.03.2018
FLEX-Elektrowerkzeuge GmbH
Bahnhofstrasse 15, D-71711 Steinheim/Murr
Exemption from liability
The manufacturer and his representative are
not liable for any damage and lost profits due
to interruption in business caused by
the product or by an unusable product. The
manufacturer and his representative are not
liable for any damage which was caused by
improper use of the power tool or by use of
the power tool with products from other
manufacturers.
18
Page 19
CHE 4-32 R SDS-plus
Table des matières
Symboles utilisés . . . . . . . . . . . . . . . . . 19
Symboles apposés sur l’appareil . . . . . . 19
Données techniques . . . . . . . . . . . . . . . 19
Vue d’ensemble . . . . . . . . . . . . . . . . . . 20
Pour votre sécurité . . . . . . . . . . . . . . . . 21
Bruit et vibrations . . . . . . . . . . . . . . . . . 22
Instructions d’utilisation . . . . . . . . . . . . . 23
Maintenance et nettoyage . . . . . . . . . . . 25
Consignes pour la mise au rebut . . . . . 26
Conformité . . . . . . . . . . . . . . . . . . . . 26
Exclusion de responsabilité . . . . . . . . . . 26
Symboles utilisés
AVERTISSEMENT!
Ce symbole prévient d’un danger imminent ;
le non-respect des consignes qui le suivent
s’accompagne d’un danger de mort ou
de blessures très graves.
PRUDENCE !
Ce symbole désigne une situation
potentiellement dangereuse. Si vous ne
respectez pas cette consigne, vous risquez
de vous blesser ou de causer des dégâts
matériels.
REMARQUE !
Ce symbole vous donne des conseils
d’utilisation et des informations importantes.
Symboles apposés sur l’appareil
Avant la mise en service, veuillez
lire la notice d’instructions.
Données techniques
Marteau perforateur et
burineur
Puissance nominale
absorbée
Vitesse marche à vide tr/min 0–850
Nombre d'impacts
àvide
Énergie max. de
chaque frappe (selon
« Procédure EPTA
05/2009 »)
Lubrification Graisse
Logement d’outil SDS-plus
Diamètre max. de
perçage
– Béton
– Maçonnerie
– (couronne de perçage
en métal dur)
– Bois
– Métal
Poids conforme
à « l’EPTA Procedure
01/2003 »
Classe de protection
CHE 4-32 R
SDS-plus
W900
cps/
min
J4,8
mm
mm
mm
mm
kg 4,6
0–3700
32
82
32
13
II /
Portez des lunettes de protection !
Portez un casque anti-bruit !
Veuillez utiliser une protection
respiratoire légère !
Consignes pour la mise au rebut
de l’ancien appareil (voir page
Consignes pour la mise au rebut) !
19
Page 20

Vue d’ensemble
CHE 4-32 R SDS-plus
1 Mandrin SDS
2 Mandrin de perçage interchangeable
3 Poignée d’appoint
4 Broche
5 Levier de bridage de la butée
de profondeur
6 Butée de profondeur
7 Sélecteur de mode de travail
8 Interrupteur
Pour allumer et éteindre mais aussi
pour accélérer jusqu’à la vitesse
maximale / jusqu’au nombre maximal
de coups.
20
9 Poignée
10 Cordon d’alimentation électrique
11 Plaque signalétique *
* pas visible
Page 21

CHE 4-32 R SDS-plus
Pour votre sécurité
AVERTISSEMENT!
Veuillez lire toutes les consignes de
sécurité et instructions.
d’avertissement et instructions ne sont pas
correctement respectées, cela engendre un
risque d’électrocution, d’incendie et / ou de
blessures graves
les consignes de sécurité et instructions
dans un endroit sûr pour pouvoir les
reconsulter ultérieurement.
Avant d’utiliser cet appareil électrique,
veuillez lire ces instructions et agir en les
respectant :
–
la présente notice d’utilisation,
–
les « Consignes générales de sécurité »
régissant l’emploi des appareils
électriques et réunies dans le fascicule
ci-joint (
–
les règles et prescriptions préventives
référence : 315.915),
des accidents applicables sur le lieu
de mise en œuvre.
Cet appareil électrique a été construit en
l’état de la technique et des règles
techniques de sécurité reconnues.
Toutefois, de son emploi peuvent émaner
un danger de mort et un risque
de blessures graves pour l’utilisateur ou les
tiers, ou un risque d’endommager
la machine elle-même ou d’autres objets
de valeur. Il ne faut utiliser cet appareil
électrique
–
qu’à des fins conformes à l’usage prévu,
–
que dans un état technique
et de sécurité parfait.
Supprimez immédiatement tout
dérangement susceptible de compromettre
la sécurité.
Conformité d’utilisation
Le marteau perforateur et burineur
CHE 4-32 R SDS-plus est destiné
– aux utilisations professionnelles dans
l’industrie et l’artisanat,
– à perforer la maçonnerie et le béton en
les martelant pour fixer des chevilles et
des ancres, et à percer de part en part,
– aux travaux de creusement faciles visant
à retirer le crépi et les carrelages,
Si les consignes
. Veuillez conserver toutes
– à servir avec l’outillage adapté à
l’appareil et recommandé par le fabricant
de ce dernier.
Consignes de sécurité pour les
marteaux
Portez un casque anti-bruit ! L’impact du
bruit peut provoquer une perte d’acuité
auditive.
Veuillez utiliser les poignées d’appoint
livrées avec l’appareil. Une perte de
contrôle peut provoquer des blessures.
Ne tenez l’appareil que par ses poignées
isolantes lors de travaux au cours
desquels l’outil monté risque de toucher
des câbles électriques invisibles ou le
cordon d’alimentation de l’appareil.
Le contact avec une ligne électrique peut
mettre les pièces métalliques sous tension
et provoquer une électrocution.
Autres consignes de sécurité
Utilisez des détecteurs appropriés pour
localiser les lignes / conduites
d’alimentation occultées, ou faites appel
aux compagnies distributrices
compétentes dans votre localité. Une
entrée en contact avec des câbles
électriques peut provoquer un incendie et
une électrocution. L’endommagement
d’une conduite de gaz peut provoquer une
explosion. La pénétration de l’outil dans
une conduite d’eau engendre des dégâts
matériels ou risque de vous faire
électrocuter.
Pendant le travail, tenez l’outil électrique
avec les deux mains et veillez à bien
vous tenir en équilibre. Le guidage de
l’outil électrique est plus sûr si vous le tenez
des deux mains.
Sécurisez la pièce. Une pièce retenue au
moyen du dispositif de serrage est retenue
de manière plus sûre qu’avec votre main.
N’utilisez pas l’outil électrique si son
câble d’alimentation est endommagé.
Ne touchez pas le câble abîmé et
débranchez la fiche mâle de la prise de
courant si le câble a été endommagé
pendant les travaux. Les câbles
d’alimentation endommagés accroissent
le risque d’électrocution.
21
Page 22
CHE 4-32 R SDS-plus
Ne mettre en œuvre que des outils
à logement SDS-plus. Pour vérifier si
le verrouillage est correct, imprimez une
traction à l’outil.
Si la coiffe anti-poussière est abîmée,
faites-la immédiatement remplacer.
La coiffe anti-poussière empêche la
pénétration de poussière dans le logement
d'outil.
Les poussières de certains matériaux
poncés (peintures au plomb, certaines
essences de bois, minéraux ou métaux)
peuvent exposer l’utilisateur ou des
personnes proches de lui à des risques.
L’inhalation ou le fait de toucher ces
poussières peuvent provoquer des
maladies des voies respiratoires et / ou
des réactions allergiques.
– Veillez à ce que l’aération du poste
de travail soit suffisante !
– Si possible, utilisez un système
externe d’aspiration de la poussière.
– Il est recommandé d’utiliser un
masque de protection respiratoire
avec filtre de classe P2.
Ne travaillez sur aucun matériau
susceptible de dégager des substances
dangereuses pour la santé (amiante par
exemple).
Pour marquer l’outil électrique, n’utilisez
que des étiquettes autocollantes. Ne
percez jamais de trous dans le corps de
l’appareil.
La tension du secteur et celle indiquée sur
la plaque signalétique doivent concorder.
Bruit et vibrations
Les niveaux de bruits et vibrations ont été
déterminés conformément à EN 60745.
Le niveau de bruit évalué en décibels (A)
s’élève typiquement à :
–
Niveau de pression acoustique : 92 dB(A);
– Niveau de puissance sonore : 103 dB(A);
– Marge d’incertitude K : 3 dB.
Valeur totale des vibrations :
– Comme marteau perforateur :
– Valeur émissive a
– Marge d’incertitude K : 1,5 m/s
– Comme marteau burineur :
– Valeur émissive a
– Marge d’incertitude K : 1,5 m/s
: 13,34 m/s
h
: 10,60 m/s
h
ATTENTION !
Les valeurs de mesure indiquées
s’appliquent aux appareils neufs. Pendant
la mise en œuvre quotidienne, les valeurs
de bruit et de vibrations varient.
REMARQUE !
Le niveau de vibrations indiqué dans ces
instructions a été mesuré selon un procédé
standardisé dans la norme EN 60745, et peut
servir à comparer les outils électroportatifs
entre eux. Ce procédé convient également
pour estimer provisoirement la contrainte en
vibrations.
Le niveau de vibrations indiqué se réfère aux
principales applications de l’outil électrique.
Le niveau de vibrations représente les
principales formes d’utilisation de l’outil
électrique. Si toutefois ce dernier est utilisé
à d’autres fins, avec des outils montés
différents ou s’il ne subit qu’une maintenance
insuffisante, le niveau de vibrations pourra
dévier de ce qui est indiqué. Cela peut
accroître nettement la contrainte en vibrations
sur l’ensemble de la période de travail.
Pour une estimation précise de la contrainte en
vibrations
, il faudrait également tenir compte
des temps au cours desquels l’appareil est
éteint ou bien de ceux au cours desquels il
tourne certes, mais que l’utilisateur ne s’en
sert pas. Cela peut réduire nettement
la contrainte en vibrations sur l’ensemble
de la période de travail.
Pour protéger l’utilisateur contre les effets des
vibrations, définissez des mesures
de sécurité supplémentaires, dont par
exemple : maintenance de l’outil électrique
et des outils montés, maintien des mains au
chaud, organisation des séquences de travail.
PRUDENCE !
Lorsque la pression acoustique dépasse
85 dB(A), veuillez porter un casque antibruit.
2
2
2
2
22
Page 23
CHE 4-32 R SDS-plus
Instructions d’utilisation
Avant la mise en service
Déballez l’appareil électrique et les
accessoires, vérifiez que la livraison est au
complet et l’absence de dégâts survenus en
cours de transport.
Déplacer la poignée d’appoint
AVERTISSEMENT!
Avant d’effectuer tous travaux sur l’outil
électrique, débranchez sa fiche mâle de la
prise de courant.
PRUDENCE !
N’utilisez l’outil électrique qu’avec la
poignée d’appoint montée.
Il est possible de faire pivoter la poignée
d’appoint dans une position quelconque
pour garantir un travail sûr et sans fatigue.
Pour défaire le bridage, tournez la
poignée d'appoint dans le sens antihoraire (1).
Faites pivoter la poignée d’appoint sur la
position souhaitée (2.).
Pour immobiliser la poignée d’appoint
sur la position souhaitée, fixez le réglage.
Monter la butée de profondeur
AVERTISSEMENT!
Avant d’effectuer tous travaux sur l’outil
électrique, débranchez sa fiche mâle de la
prise de courant.
En haut sur la poignée d’appoint,
appuyez sur le levier de bridage
et retenez-le.
Introduisez la butée de profondeur.
Réglez la butée de profondeur sur la
profondeur de perçage requise.
Relâchez le levier de bridage.
Mise en place d'outils à queue SDS
AVERTISSEMENT!
Avant d’effectuer tous travaux sur l’outil
électrique, débranchez sa fiche mâle de la
prise de courant.
PRUDENCE !
Les outils montés peuvent devenir très
chauds. Portez des gants de protection !
REMARQUE !
Les outils utilisés doivent comporter une
queue SDS. Pour les outils sans queue
SDS (forets à bois par exemple), il faut
utiliser un mandrin à trois mors (voir
« Régler le mode de travail »).
Vérifiez la coiffe anti-poussière.
– Nettoyez la coiffe une fois sale.
– Faites remplacez la coiffe anti-
poussière si elle est défectueuse.
23
Page 24
Nettoyez les outils et graissez
légèrement la queue.
Mettez l’outil en place (1.) et tournez (2.)
jusqu'à ce qu'il se verrouille.
Pour vérifier le verrouillage, imprimez
une traction à l’outil monté.
Enlèvement des outils
AVERTISSEMENT!
Avant d’effectuer tous travaux sur l’outil
électrique, débranchez sa fiche mâle de la
prise de courant.
PRUDENCE !
Les outils montés peuvent devenir très
chauds. Portez des gants de protection !
CHE 4-32 R SDS-plus
Réglez le sélecteur sur le mode de travail
voulu :
Perçage
Marteau perforateur
Régler la position du burin
(voir à cet endroit)
Marteau burineur
REMARQUE !
– Dans toutes les positions, le sélecteur
s'enclenche de façon audible.
– Sur la position (Réglage de la position
du burin), n’allumez pas l’outil électrique.
Régler la position du burin
Il est possible de tourner le burin jusqu'à
une position optimale pour les travaux à
réaliser.
Amenez le sélecteur de mode de travail
sur le symbole (1.).
Tournez le burin jusqu’à ce qu’il se trouve
sur l’angle voulu (2.).
Tirez la douille de verrouillage en
arrière (1.).
Retirez l’outil monté (2.).
Régler le mode de travail
PRUDENCE !
Ne modifiez le mode de travail de l’outil
électrique que si celui-ci est immobile.
24
Amenez le sélecteur de mode de travail
sur le symbole (3.). Attendez un
enclenchement audible !
Page 25
CHE 4-32 R SDS-plus
Enclencher l’appareil électrique
Appuyez sur l’interrupteur et retenez-le.
La gâchette de l’outil électrique permet
d'augmenter lentement la vitesse de
rotation ou le nombre de coups jusqu’à la
valeur maximale choisie.
Coupure de l’appareil :
Relâchez l’interrupteur.
Consignes de travail
Perçage / Marteau perforateur
1. Amenez le sélecteur de mode de travail
sur le symbole (Perçage) ou
(Marteau perforateur). Attendez un
enclenchement audible !
2. Mettez le foret en place.
3. Réglez la poignée d’appoint sur la
position souhaitée.
4. Branchez la fiche mâle dans une prise
de courant.
5. Saisissez l’outil électrique avec les deux
mains et placez-vous en position de
travail.
6. Appliquez l’outil et allumez l’outil
électrique.
7. Poussez l’outil électrique avec doigté en
avant.
8. Après la fin du perçage, éteignez
l’appareil.
9. Débranchez la fiche mâle de la prise
de courant.
Marteau burineur
1. Mettez le burin en place.
2. Amenez le sélecteur de mode de travail
sur le symbole .
3. Tournez le burin jusqu'à la position
souhaitée.
4. Amenez le sélecteur de mode de travail
sur le symbole . Attendez un
enclenchement audible !
5. Réglez la poignée d’appoint sur la
position souhaitée.
6. Branchez la fiche mâle dans une prise
de courant.
7. Saisissez l’outil électrique avec les deux
mains et placez-vous en position de
travail.
8. Enclencher l’appareil électrique.
9. Pendant le burinage, poussez l’outil
électrique avec doigté afin qu’il ne saute
pas.
10. Après la fin du travail, éteignez
l’appareil.
11. Débranchez la fiche mâle de la prise
de courant.
Consignes diverses
– L’utilisation d’outils « tranchants » sur cet
outil électrique augmente sa puissance
de travail et sa durée de vie.
– Après le travail, nettoyez l’outil
électrique, remettez-le dans la mallette
de transport puis rangez-le dans un
endroit sec.
Maintenance et nettoyage
AVERTISSEMENT!
Avant d’effectuer tous travaux sur l’outil
électrique, débranchez sa fiche mâle de la
prise de courant.
Nettoyage
Nettoyez régulièrement l’appareil et les
ouïes de ventilation. La fréquence des
nettoyages dépend du matériau et de la
durée d’utilisation. Nettoyez régulièrement
l’intérieur du boîtier et le moteur à l’aide
d’air comprimé sec.
Balais de charbon
L’outil électrique est équipé de charbons
coupant l’alimentation électrique une fois
qu’ils sont usés.
Une fois que ces charbons ont atteint leur
limite d’usure, l’outil électrique s’éteint
automatiquement.
25
Page 26
CHE 4-32 R SDS-plus
Klaus Peter WeinperEckhard Rühle
Manager Research &
Development (R & D)
Head of Quality
Department (QD)
REMARQUE !
Ne remplacez ces balais que par des pièces
d’origine fournies par le fabricant. En cas
d’emploi de pièces d’autres marques, le
fabricant déclinera toute obligation au titre
du recours en garantie.
Les ouïes d’entrée d’air situées à l’arrière
permettent, pendant l’utilisation, de surveiller
les étincelles des balais sur le collecteur.
Si les charbons génèrent beaucoup
d’étincelles, éteignez immédiatement l’outil
électrique. Remettez l’outil électrique à un
atelier du service après-vente agréé par le
fabricant.
Réducteur
REMARQUE !
Pendant la période de garantie, ne dévissez
pas les vis du carter d’engrenages. En
cas
de non-respect de cette consigne,
le fabricant déclinera toute obligation au
titre du recours en garantie.
Réparations
Ne confiez les réparations qu’à un atelier
de SAV agréé par le fabricant.
Si le cordon d’alimentation de l’outil
électrique est endommagé, il faut le
remplacer par un cordon d’alimentation
spécial, confectionné d’avance (type de
fixation X). Ce câble est disponible via le
service après-vente FLEX.
Pièces de rechange et accessoires
Autres accessoires et notamment les outils
montés : consultez les catalogues du fabricant.
Vous trouverez des vues éclatées et des listes
de pièces de rechange sur notre site Web :
www.flex-tools.com
Consignes pour la mise au rebut
AVERTISSEMENT!
Lorsque les appareils ont fini de servir,
enlevez leur cordon d’alimentation
électrique pour les rendre inutilisables.
Pays de l’UE uniquement.
Ne mettez pas les outils électriques
à la poubelle des déchets
domestiques !
Conformément à la directive européenne
2012/19/UE visant les appareils électriques et
électroniques usagés, et à sa transposition en
droit national, les outils électriques ne servant
plus devront être collectés séparément et
introduits dans un circuit de recyclage
respectueux de l’environnement.
REMARQUE !
Pour connaître les possibilités de mise au
rebut, veuillez consulter votre revendeur
spécialisé !
Conformité
Nous déclarons sous notre responsabilité
exclusive que le produit décrit à la rubrique
« Données techniques » se conforme aux
normes ou aux documents normatifs
suivants :
EN 60745 conformément aux dispositions
énoncées dans les directives
2014/30/UE, 2006/42/CE, 2011/65/UE.
Responsables de la documentation
technique :
FLEX-Elektrowerkzeuge GmbH, R & D
Bahnhofstrasse 15, D-71711 Steinheim/Murr
07.03.2018
FLEX-Elektrowerkzeuge GmbH
Bahnhofstrasse 15, D-71711 Steinheim/Murr
Exclusion de responsabilité
Le fabricant et son représentant ne pourront
être tenus responsables des dommages et du
bénéfice perdu en raison d’une interruption
du fonctionnement de l’affaire, provoqués par
le produit ou par l’impossibilité de l’utiliser.
Le fabricant et son représentant ne pourront
être tenus responsables des dommages
provoqués par une utilisation inexperte du
produit ou par son utilisation en association
avec les produits d’autres fabricants.
26
Page 27
CHE 4-32 R SDS-plus
Indice
Simboli utilizzati . . . . . . . . . . . . . . . . . . . 27
Simboli sull’apparecchio. . . . . . . . . . . . . 27
Dati tecnici . . . . . . . . . . . . . . . . . . . . . . . 27
Guida rapida . . . . . . . . . . . . . . . . . . . . . 28
Per la vostra sicurezza . . . . . . . . . . . . . 29
Rumore e vibrazione . . . . . . . . . . . . . . . 30
Istruzioni per l’uso . . . . . . . . . . . . . . . . . 31
Manutenzione e cura . . . . . . . . . . . . . . . 33
Avvertenze per lo smaltimento . . . . . . . 34
Conformità . . . . . . . . . . . . . . . . . . . . 34
Esclusione della responsabilità . . . . . . . 34
Simboli utilizzati
ATTENZIONE!
Indica un pericolo imminente. In caso
d’inosservanza dell’avvertenza, pericolo
di morte o di gravi lesioni.
PRUDENZA!
Indica una situazione potenzialmente
pericolosa. In caso d’inosservanza di
quest’avvertenza sussiste il pericolo di
lesioni o danni alle cose.
AVVERTENZA!
Indica consigli per l’impiego ed informazioni
importanti.
Simboli sull’apparecchio
Dati tecnici
Martello perforatore
scalpellatore
Potenza assorbita
nominale
Numero di giri a vuoto min
Frequenza di
percussione a vuoto
Max. energia
di percussione singola
(secondo la “EPTAprocedure 05/2009”)
Lubrificazione Grasso
Portautensile SDS-plus
Diametro max. foro
– calcestruzzo
– muratura
– (punta a corona
in metallo duro)
– legno
– metallo
Peso secondo la
“EPTA-procedure
01/2003”
CHE 4-32 R
SDS-plus
W900
-1
0–850
-1
min
J4,8
mm
mm
mm
mm
kg 4,6
0–3700
32
82
32
13
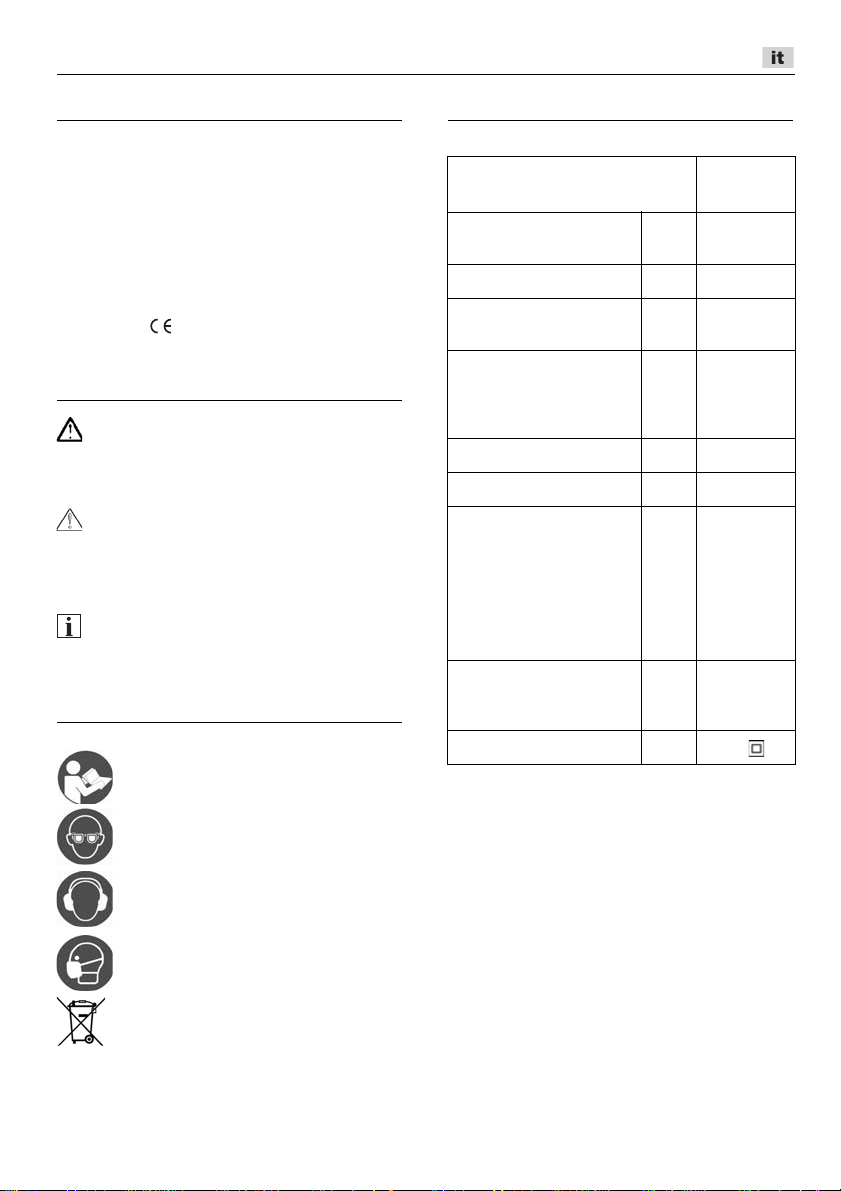
Prima della messa in funzione
leggere le istruzioni per l’uso!
Indossare occhiali protettivi!
Indossare la protezione acustica!
Usare una maschera antipolvere
leggera!
Avvertenza per lo smaltimento
dell’apparecchio dismesso
(vedi pagina Avvertenze per lo
smaltimento)!
Classe di protezione
II/
27
Page 28

Guida rapida
CHE 4-32 R SDS-plus
1 Mandrino SDS
2 Mandrino intercambiabile
3 Impugnatura supplementare
4 Alberino
5 Leva di serraggio per l’arresto
di profondità
6 Arresto di profondità
7 Manopola per la modalità di lavoro
8 Interruttore
Per accendere e spegnere e per
accelerare fino alla massima velocità
di rotazione/percussione.
28
9 Impugnatura
10 Cavo d’alimentazione
11 Targhetta d’identificazione *
* non visibile
Page 29

CHE 4-32 R SDS-plus
Per la vostra sicurezza
ATTENZIONE!
Leggere tutte le avvertenze di sicurezza e le
istruzioni.
avvertenze di sicurezza e delle istruzioni
possono comportare scosse elettriche,
incendio e/o gravi lesioni.
le avvertenze di sicurezza e le istruzioni per
poterle consultare in futuro.
Prima di usare l’elettroutensile, leggere
e rispettare i documenti elencati di seguito:
–
–
–
Questo elettroutensile è costruito secondo
lo stato dell’arte e le regole tecniche
di sicurezza riconosciute. Tuttavia dal suo
impiego possono derivare pericoli per
l’incolumità e la vita dell’utilizzatore e di
terzi, nonché danni alla macchina o ad altri
beni materiali. Usare l’elettroutensile solo
–
–
Eliminare immediatamente i guasti che
pregiudicano la sicurezza.
Utilizzo conforme alle finalità d’uso
Il martello perforatore scalpellatore
CHE 4-32 R SDS-plus è concepito
– per l’impiego professionale nell’industria
– per la foratura a percussione in muratura
– per lavori di scalpellatura leggera, per
– per l’impiego con attrezzi appropriati a
Omissioni nel rispetto delle
Conservare tutte
queste istruzioni per l’uso,
le “Istruzioni di sicurezza generali” per
l’uso di elettroutensili presenti nel
fascicolo allegato (
Scritti n°: 315.915),
le regole e le norme per la prevenzione
degli infortuni vigenti nel luogo
d’impiego.
per un utilizzo conforme alle finalità
d’uso,
in condizioni tecniche e di sicurezza
perfette.
e nell’artigianato,
e calcestruzzo, per il fissaggio di tasselli
ed ancoraggi e per fori passanti,
rimuovere intonaco e piastrelle,
tali lavori e raccomandati dal produttore
per questo elettroutensile.
Avvertenze di sicurezza per il
martello
Indossare la protezione acustica.
L’effetto del rumore può causare la perdita
dell’udito.
Usare le impugnature supplementari
fornite con l’apparecchio. La perdita del
controllo può causare lesioni.
Quando si eseguono lavori durante
i quali l’utensile montato potrebbe
toccare linee elettriche nascoste oppure
il suo stesso cavo di alimentazione,
afferrare l’elettroutensile solo sulle
superfici di presa isolate. Il contatto con
una linea elettrica sotto tensione può
mettere sotto tensione anche le parti
metalliche dell’elettroutensile e provocare
una scossa elettrica.
Ulteriori avvertenze di sicurezza
Utilizzare idonei rilevatori per sondare
la presenza di linee di alimentazione
nascoste, o consultare la locale società
di fornitura. Il contatto con linee elettriche
può causare incendi e scosse elettriche.
Il danneggiamento di una tubazione del
gas può causare un’esplosione. La
penetrazione in una conduttura dell’acqua
provoca danni materiali e può causare una
scossa elettrica.
Durante il lavoro mantenere saldamente
l’elettroutensile con entrambe le mani
ed assumere una postura sicura. Per
guidare in sicurezza l’elettroutensile
occorre usare entrambe le mani.
Bloccare il pezzo da lavorare. Un pezzo
da lavorare fissato saldamente in un
dispositivo di bloccaggio è tenuto con
sicurezza molto maggiore che con
la mano.
Non usare l’elettroutensile se il cavo
è danneggiato. Non toccare il cavo
danneggiato e, se il cavo subisce danni
durante il lavoro, estrarre la spina di rete.
Il cavo danneggiato aumenta il rischio
di una scossa elettrica.
Utilizzare solo utensili con mandrino
SDS-plus. Controllare il corretto
bloccaggio tirando l’utensile.
29
Page 30
CHE 4-32 R SDS-plus
Fare sostituire immediatamente una
ghiera antipolvere danneggiata. La
ghiera antipolvere impedisce la
penetrazione della polvere nel mandrino.
Lo sviluppo di polvere da materiali come
vernici contenenti piombo, alcuni tipi
di legno, minerali e metalli può
rappresentare un pericolo per l’operatore
o per le persone che si trovano nelle
vicinanze.
La respirazione oppure il
contatto con queste polveri possono
causare malattie delle vie respiratorio e/o
reazioni allergiche.
– Provvedere ad una buona ventilazione
del posto di lavoro!
– Se possibile, utilizzare un’aspirazione
delle polveri esterna.
– Si raccomanda l’impiego di una
maschera di respirazione con classe
di filtro P2.
Non lavorare materiali che, nella
lavorazione, liberano sostanze nocive alla
salute (ad es. amianto).
Per contrassegnare l’elettroutensile usare
solo targhette adesive. Non praticare fori
nella carcassa.
La tensione di rete e l’indicazione
di tensione sulla targhetta d’identificazione
devono coincidere.
Rumore e vibrazione
I valori di rumore e vibrazione sono stati
rilevati secondo EN 60745.
Il livello di rumore ponderato A
dell’apparecchio è tipicamente:
– Livello di pressione acustica: 92 dB(A);
– Livello di potenza acustica: 103 dB(A);
– Incertezza K: 3 dB.
Valore totale di vibrazione:
– Durante la foratura a percussione:
– Valore di emissione a
– Incertezza K: 1,5 m/s
– Durante la scalpellatura:
– Valore di emissione ah: 10,60 m/s
– Incertezza K: 1,5 m/s
: 13,34 m/s
h
ATTENZIONE!
I valori di misura indicati sono validi solo per
apparecchi nuovi. Nell’impiego quotidiano
i valori di rumore e vibrazione cambiano.
AVVERTENZA!
Il livello di vibrazioni indicato in queste
istruzioni è stato misurato conformemente ad
un procedimento di misura standardizzato
in EN 60745 e può essere utilizzato per il
confronto tra elettroutensili. Tale
procedimento è idoneo anche per una
valutazione temporanea della sollecitazione
da vibrazioni.
Il livello di vibrazioni indicato rappresenta gli
impieghi principali dell’elettroutensile. Se
tuttavia l’elettroutensile viene impiegato per
altri usi, con diverso utensile montato o
manutenzione insufficiente, il livello
di vibrazioni può differire. Ciò può aumentare
notevolmente la sollecitazione da vibrazioni
per tutta la durata del lavoro.
Per
un’esatta stima della sollecitazione da
vibrazioni si devono considerare anche i tempi
nei quali l’apparecchio è spento oppure è in
funzione ma non è effettivamente impiegato.
Ciò può ridurre notevolmente la sollecitazione
da vibrazioni per tutta la durata del lavoro.
Per proteggere l’operatore dall’effetto delle
vibrazioni, stabilire misure di sicurezza
aggiuntive, come ad esempio: manutenzione
dell’elettroutensile e degli utensili impiegati,
riscaldamento delle mani, organizzazione
delle procedure di lavoro.
PRUDENZA!
In caso di pressione acustica superiore
a 85 dB(A) indossare la protezione
acustica.
2
2
2
2
30
Page 31

CHE 4-32 R SDS-plus
Istruzioni per l’uso
Prima della messa in funzione
Disimballare elettroutensile ed accessori
e controllare la completezza della fornitura
ed eventuali danni da trasporto.
Regolazione dell’impugnatura
supplementare
ATTENZIONE!
Prima di qualsiasi lavoro sull’elettroutensile
estrarre la spina di rete.
PRUDENZA!
Usare l’elettroutensile solo con
l’impugnatura supplementare montata.
L’impugnatura supplementare può essere
ruotata in una posizione qualsiasi, per
garantire un lavoro in sicurezza
ed ergonomico.
Allentare il serraggio ruotando
l’impugnatura supplementare in senso
antiorario (1.).
Portare l’impugnatura supplementare
nella posizione desiderata (2.).
Fissare la posizione regolata girando
l’impugnatura supplementare in senso
orario.
Montaggio dell’arresto di profondità
ATTENZIONE!
Prima di qualsiasi lavoro sull’elettroutensile
estrarre la spina di rete.
Premere e mantenere la leva di serrag-
gio sull’impugnatura supplementare nella
parte superiore.
Inserire l’arresto di profondità.
Regolare l’arresto di profondità alla
prevista profondità del foro.
Rilasciare la leva di serraggio.
Inserimento di utensili con codolo
SDS
ATTENZIONE!
Prima di qualsiasi lavoro sull’elettroutensile
estrarre la spina di rete.
PRUDENZA!
Gli utensili impiegati possono surriscaldarsi.
Indossare guanti protettivi!
AVVERTENZA!
Gli utensili utilizzati devono disporre di un
codolo SDS. Per gli utensili senza codolo
SDS (ad es. punte da legno) utilizzare un
mandrino per punte da trapano a tre
morsetti (vedi “Impostazione della modalità
di lavoro”).
Controllare la ghiera antipolvere.
– Pulire la ghiera, se sporca.
– Fare sostituire la ghiera antipolvere se
difettosa.
31
Page 32

Pulire l’utensile e ingrassare
leggermente il codolo.
Inserire (1.) e ruotare (2.) l’utensile finché
non si blocca.
Controllare il bloccaggio tirando
l’utensile.
Rimozione degli utensili
ATTENZIONE!
Prima di qualsiasi lavoro sull’elettroutensile
estrarre la spina di rete.
PRUDENZA!
Gli utensili impiegati possono surriscaldarsi.
Indossare guanti protettivi!
CHE 4-32 R SDS-plus
Regolare la manopola sulla modalità
di lavoro desiderata:
Foratura
Foratura a percussione
Posizionamento dello scalpello
(vedi sotto)
Scalpellatura
AVVERTENZA!
– In tutte le posizioni la manopola deve
scattare in modo udibile.
– Nella posizione (regolazione della
posizione dello scalpello) non accendere
l’elettroutensile.
Posizionamento dello scalpello
Lo scalpello può essere ruotato nella
posizione ottimale per i lavori da eseguire.
Regolare la manopola della modalità
di lavoro sul simbolo (1.).
Ruotare lo scalpello fino a raggiungere
l’angolazione desiderata (2.).
Tirare indietro il manicotto
di serraggio (1.).
Rimuovere l’utensile (2.).
Impostazione della modalità
di lavoro
PRUDENZA!
Cambiare modalità di lavoro solo quando
l’elettroutensile è fermo.
32
Regolare la manopola della modalità
di lavoro sul simbolo (3.). Attenzione: si
deve udire lo scatto in posizione!
Page 33

CHE 4-32 R SDS-plus
Accensione dell’elettroutensile
Premere e mantenere premuto
l’interruttore.
L’interruttore dell’elettroutensile
permette un lento aumento della velocità
di rotazione e percussione fino al valore
massimo.
Spegnere l’apparecchio:
Rilasciare l’interruttore.
Istruzioni per il lavoro
Foratura/foratura a percussione
1. Portare la manopola della modalità di
lavoro sul simbolo (foratura) o
(foratura a percussione). Attenzione: si
deve udire lo scatto in posizione!
2. Introduzione della punta da trapano.
3. Regolare l’impugnatura supplementare
sulla posizione desiderata.
4. Inserire la spina di alimentazione.
5. Afferrare l’elettroutensile con entrambe
le mani ed assumere la postura
di lavoro.
6. Appoggiare la punta da trapano
ed accendere l’elettroutensile.
7. Spingere l’elettroutensile con
precauzione in avanti.
8. Eseguito il foro, spegnere
l’apparecchio.
9. Estrarre la spina d’alimentazione.
Scalpellatura
1. Introdurre lo scalpello.
2. Regolare la manopola della modalità
di lavoro sul simbolo .
3. Ruotare lo scalpello nella posizione
desiderata.
4. Regolare la manopola della modalità
di lavoro sul simbolo . Attenzione: si
deve udire lo scatto in posizione!
5. Regolare l’impugnatura supplementare
sulla posizione desiderata.
6. Inserire la spina di alimentazione.
7. Afferrare l’elettroutensile con entrambe
le mani ed assumere la postura
di lavoro.
8. Accendere l’elettroutensile.
9. Durante la scalpellatura spingere con
precauzione l’elettroutensile in avanti,
in modo che non salti.
10. Eseguito il lavoro, spegnere
l’apparecchio.
11. Estrarre la spina d’alimentazione.
Altre avvertenze
– L’uso di utensili “affilati” aumenta la
produttività del lavoro e la durata
utile dell’elettroutensile.
– Dopo il lavoro pulire l’elettroutensile
e riporlo nella valigia di trasporto in un
luogo asciutto.
Manutenzione e cura
ATTENZIONE!
Prima di qualsiasi lavoro sull’elettroutensile
estrarre la spina di rete.
Pulizia
Pulire regolarmente l’apparecchio e le
fessure di ventilazione. La frequenza
dipende dal materiale lavorato e dalla
durata dell’uso. Soffiare regolarmente
con aria compressa secca l’interno della
carcassa con il motore.
Spazzole di carbone
L’elettroutensile è dotato di spazzole
di sicurezza.
Raggiunto il limite di usura delle spazzole
di sicurezza, l’elettroutensile si spegne
automaticamente.
AVVERTENZA!
Per la sostituzione usare solo parti originali
del produttore. In caso di uso di prodotti
d’altra provenienza si estinguono i doveri
di garanzia del produttore.
33
Page 34

CHE 4-32 R SDS-plus
Klaus Peter WeinperEckhard Rühle
Manager Research &
Development (R & D)
Head of Quality
Department (QD)
Attraverso le aperture di entrata aria
posteriori si può osservare lo scintillio delle
spazzole durante il funzionamento.
In caso di forte scintillio delle spazzole,
spegnere immediatamente l’elettroutensile.
Affidare l’elettroutensile ad un’officina
di assistenza clienti autorizzata dal
costruttore.
Meccanismo
AVVERTENZA!
Durante il periodo di garanzia, non svitare
le viti sulla testa ingranaggi. In caso
d’inosservanza si estinguono i doveri
di garanzia del produttore.
Riparazioni
Fare eseguire le riparazioni esclusivamente
da un’officina del servizio assistenza clienti
autorizzata dal produttore.
Se il cavo di alimentazione
dell’elettroutensile è danneggiato, deve
essere sostituito con uno speciale cavo
di alimentazione (tipo di collegamento X).
Fornitura del cavo tramite il servizio
assistenza clienti FLEX.
Ricambi ed accessori
Per altri accessori, specialmente utensili
montati, consultare il catalogo del produttore.
Per i disegni esplosi e le liste dei ricambi
consultare il nostro sito:
www.flex-tools.com
Conformità
Dichiariamo sotto nostra esclusiva responsabilità che il prodotto descritto in “Dati tecnici”
è conforme alle seguenti norme o documenti
normativi:
EN 60745 ai sensi delle disposizioni delle
direttive 2014/30/UE, 2006/42/CE,
2011/65/UE.
Il responsabile della documentazione tecnica:
FLEX-Elektrowerkzeuge GmbH, R & D
Bahnhofstrasse 15, D-71711 Steinheim/Murr
07/03/2018
FLEX-Elektrowerkzeuge GmbH
Bahnhofstrasse 15, D-71711 Steinheim/Murr
Esclusione della responsabilità
Il produttore ed il suo rappresentante non
rispondono di danni e lucro cessante derivanti
da interruzione dell’esercizio dell’attività
causata dal prodotto o da impossibilità
d’utilizzazione del prodotto. Il costruttore ed il
suo rappresentante non rispondono di danni
causati da uso improprio o in combinazione
con prodotti di altri costruttori.
Avvertenze per lo smaltimento
ATTENZIONE!
Rendere inservibili gli apparecchi fuori uso
eliminando il cavo d’alimentazione.
Solo per paesi dell’UE.
Non gettare elettroutensili nei rifiuti
domestici!
Secondo la direttiva europea 2012/19/UE sui
rifiuti di apparecchiature elettriche ed
elettroniche e sua conversione nel diritto
nazionale, gli elettroutensili dismessi devono
essere raccolti separatamente ed avviati ad
un riciclaggio ecologico.
AVVERTENZA!
Informarsi presso il rivenditore specializzato
sulle possibilità di smaltimento!
34
Page 35

CHE 4-32 R SDS-plus
Contenido
Símbolos empleados . . . . . . . . . . . . . . . 35
Símbolos en la máquina. . . . . . . . . . . . . 35
Datos técnicos . . . . . . . . . . . . . . . . . . . . 35
Vista general . . . . . . . . . . . . . . . . . . . . . 36
Para su seguridad . . . . . . . . . . . . . . . . . 37
Ruidos y vibraciones . . . . . . . . . . . . . . . 38
Indicaciones para el uso . . . . . . . . . . . . 39
Mantenimiento y cuidado . . . . . . . . . . . 41
Indicaciones de eliminación . . . . . . . . . 42
Conformidad . . . . . . . . . . . . . . . . . . 42
Exención de responsabilidad . . . . . . . . . 42
Símbolos empleados
ADVERTENCIA
Indica un peligro inminente. En caso de
incumplimiento, existe peligro de muerte
o lesiones de la mayor gravedad.
PRECAUCIÓN
Indica una situación posiblemente
peligrosa. El incumplimiento implica el
peligro de lesiones o daños materiales.
NOTA
Indica consejos para el uso e informaciones
importantes.
Símbolos en la máquina
Datos técnicos
Martillo perforador y
cincelador
Potencia nominal W 900
Velocidad de giro en
vacío
Velocidad de percusión
en vacío
Energía máx. de cada
golpe (según «EPTAprocedure 05/2009»)
Lubricación Grasa
Portaherramientas SDS-plus
Diámetro de
perforación máx.
– hormigón
– mampostería
– (corona perforadora
de metal duro)
– madera
– metal
Peso según «EPTAprocedure 01/2003»
CHE 4-32 R
SDS-plus
r.p.m. 0–850
r.p.m. 0–3700
J4,8
mm
mm
mm
mm
kg 4,6
32
82
32
13
Leer las instrucciones antes de
poner en funcionamiento el equipo.
Utilizar protección para la vista.
Utilizar protección para el oído.
Utilizar protección ligera para las
vías respiratorias.
Indicaciones para la eliminación de
la máquina en desuso (ver la
página «Indicaciones de
eliminación»).
Tipo de protección
II /
35
Page 36

Vista general
CHE 4-32 R SDS-plus
1 Portabrocas SDS
2 Portabrocas intercambiable
3 Empuñadura adicional
4 Husillo
5 Palanca presora para el tope
de profundidad
6 Tope de profundidad
7 Botón giratorio para seleccionar el
modo de trabajo
8 Interruptor
Para encender y apagar la
herramienta y para acelerar hasta la
velocidad de giro/percusión máxima.
36
9 Empuñadura
10 Cable de conexión
11 Placa de características*
* no es visible
Page 37

CHE 4-32 R SDS-plus
Para su seguridad
ADVERTENCIA
Lea todas las indicaciones de seguridad y
las instrucciones pertinentes.
cumplen debidamente las indicaciones de
seguridad y las instrucciones, pueden
producirse una descarga eléctrica,
quemaduras o lesiones graves
todas las indicaciones de seguridad e
instrucciones en un lugar seguro.
Antes de utilizar la herramienta eléctrica,
leer y seguir:
–
las instrucciones de funcionamiento
presentes;
–
las «Indicaciones generales de
seguridad» para el uso de herramientas
eléctricas en
el cuadernillo adjunto (
texto: 315.915);
–
las reglas y prescripciones vigentes
para la prevención de accidentes en el
lugar de uso.
Esta herramienta eléctrica se ha diseñado
según los avances técnicos actuales y las
normas reconocidas de seguridad técnica.
A pesar de ello, pueden existir riesgos para
la vida y salud del operario u otras personas
durante su uso, así como producirse daños
en la máquina u otros activos. La
herramienta eléctrica deberá utilizarse
exclusivamente
–
para trabajos adecuados a su función,
–
en estado óptimo de condiciones de
técnicas de seguridad.
Deben eliminarse inmediatamente todas
aquellas perturbaciones que afecten a la
seguridad.
Utilización conforme al uso previsto
El martillo perforador y cincelador CHE 4-32 R
SDS-plus está diseñado
– para su aplicación profesional e industrial;
– para hacer perforaciones con percusión
en mampostería y hormigón para tacos y
anclajes de fijación y para agujeros de
paso;
– para tareas de cincelado ligeras para
quitar revoques y azulejos;
– para su utilización con las herramientas
adecuadas, aprobadas y recomendadas
para esta máquina por el fabricante.
Si no se
. Conserve
n° de
Indicaciones de seguridad para
martillos
Utilizar protección para el oído. La acción
del ruido puede causar pérdida de la
audición.
Utilizar las empuñaduras adicionales
entregadas con la máquina. La pérdida
de control puede ser causa de lesiones.
Sujetar la máquina por las superficies
aisladas correspondientes cuando la
herramienta de inserción pueda incidir
en conductores eléctricos ocultos o
cables pertenecientes a la red eléctrica.
El contacto con conductores bajo tensión
puede aplicar esta tensión también a las
partes metálicas de la máquina y provocar
una descarga eléctrica.
Otras indicaciones de seguridad
Utilizar equipo adecuado para la
localización de líneas de alimentación
ocultas, o bien consultar a las compañías
de abastecimiento correspondientes.
El contacto con conductores eléctricos
puede dar lugar a incendios o descargas
eléctricas. El daño causado a una línea de
gas puede ser causa de explosiones.
La penetración en una tubería de agua
causa daños materiales o de descargas
eléctricas.
Sujetar la herramienta eléctrica con
ambas manos y asegurarse de estar
bien apoyado en el suelo. Es más seguro
guiar la herramienta eléctrica con las dos
manos.
Asegurar la pieza de trabajo. Los
dispositivos de sujeción retienen la pieza
de trabajo con mayor firmeza y seguridad
que si se sujeta solo con la mano.
No utilizar la herramienta eléctrica si el
cable está dañado. No tocar el cable
dañado y desconectarlo de la toma de
corriente si el mismo se daña durante el
trabajo. Los cables dañados aumentan el
peligro de descargas eléctricas.
Utilizar exclusivamente máquinas con
portaherramientas SDS-plus. Comprobar
el bloqueo correcto tirando de la
herramienta.
37
Page 38

CHE 4-32 R SDS-plus
Sustituir inmediatamente la caperuza
antipolvo en caso de que estuviera
dañada. La caperuza antipolvo evita que
penetre polvo en el portaherramientas.
El polvo generado durante el trabajo,
procedente de materiales como pinturas
con plomo, algunos tipos de madera, los
minerales y los metales, puede suponer
un riesgo para el operario o las personas
que se encuentren en su cercanía.
La
respiración o el contacto con estos tipos de
polvo pueden ser causa de enfermedades
de las vías respiratorias o de reacciones
alérgicas.
– Procurar una buena ventilación del
espacio de trabajo.
– Utilizar aspiración de polvo externa si
fuera posible.
– Se recomienda la utilización de una
máscara de protección para la
respiración, con un grado de filtrado
P2.
No procesar materiales de los cuales
puedan desprenderse sustancias nocivas
para la salud (p. ej., amianto).
Utilizar exclusivamente etiquetas
adhesivas para la identificación de la
herramienta eléctrica. No perforar la
carcasa.
La tensión de la red de alimentación y las
indicaciones de tensión de la placa de
características deben coincidir.
Ruidos y vibraciones
Los niveles de ruido y de vibración fueron
determinados según EN 60745.
El nivel de ruido con calificación A de la
máquina es habitualmente de:
– nivel de presión sonora: 92 dB(A)
– nivel de potencia sonora: 103 dB(A)
– incertidumbre K: 3 dB
Valor total de vibración:
– durante la perforación con percusión:
– valor de emisión a
– incertidumbre K: 1,5 m/s
– durante el cincelado:
– valor de emisión ah: 10,60 m/s
– incertidumbre K: 1,5 m/s
: 13,34 m/s
h
ATENCIÓN
Los valores indicados son válidos para
máquinas nuevas. Los valores de ruido y de
vibración varían durante el uso diario.
NOTA
El nivel de vibraciones indicado en estas
instrucciones ha sido medido según el
procedimiento de medición conforme
a EN 60745 y puede utilizarse para la
comparación de herramientas eléctricas.
También es apto para una estimación
provisional de las vibraciones.
El nivel de vibraciones indicado es
representativo para las principales
aplicaciones de la herramienta eléctrica. Sin
embargo, si la herramienta eléctrica se utiliza
para otros fines, con herramientas insertables
diferentes o con un mantenimiento deficiente,
los niveles de vibraciones pueden diferir. Esto
puede aumentar significativamente la carga
por vibraciones durante todo el periodo de
trabajo.
Para una estimación exacta de la carga por
vibraciones
, deberán tenerse en cuenta
también los tiempos durante los cuales la
máquina está desconectada, o bien durante
los cuales, aun estando conectada, no se ha
utilizado. Esto puede reducir
significativamente la carga por vibraciones
durante todo el periodo de trabajo.
Implementar medidas de seguridad
adicionales para la protección del operario
frente al efecto de las vibraciones como, por
ejemplo, el mantenimiento de la herramienta
eléctrica y las herramientas insertables,
mantener calientes las manos, la
organización de las secuencias de trabajo.
PRECAUCIÓN
Utilizar protección para el oído en caso de
niveles de presión sonora superiores a los
85 dB(A).
2
2
2
2
38
Page 39

CHE 4-32 R SDS-plus
Indicaciones para el uso
Antes de la puesta en marcha
Desembalar la herramienta eléctrica y los
accesorios, comprobar que estén todos los
componentes y que no se hayan producido
daños durante el transporte.
Ajuste de la empuñadura adicional
ADVERTENCIA
Antes de efectuar cualquier trabajo en la
herramienta eléctrica, desconectar el
enchufe de red.
PRECAUCIÓN
Utilizar la herramienta eléctrica
exclusivamente con la empuñadura
adicional colocada.
La empuñadura adicional puede girarse
a cualquier posición a fin de posibilitar un
trabajo seguro y sin fatiga.
Aflojar el mecanismo de apriete girando
la empuñadura adicional en sentido
antihorario (1.).
Girar la empuñadura adicional hasta la
posición deseada (2.).
Fijar la posición girando la empuñadura
adicional en sentido horario.
Montaje del tope de profundidad
ADVERTENCIA
Antes de efectuar cualquier trabajo en la
herramienta eléctrica, desconectar el
enchufe de red.
Presionar la palanca presora en la parte
superior de la manija adicional y sujetarla.
Hacer penetrar el tope de profundidad.
Ajustar el tope de profundidad a la
profundidad de perforación deseada.
Soltar la palanca presora.
Inserción de herramientas con
vástago SDS
ADVERTENCIA
Antes de efectuar cualquier trabajo en la
herramienta eléctrica, desconectar el
enchufe de red.
PRECAUCIÓN
Las herramientas pueden calentarse
durante el uso. Usar guantes de protección.
NOTA
Las herramientas utilizadas deben disponer
de un vástago SDS. Para herramientas sin
vástago SDS (p. ej., brocas para madera),
debe utilizarse un mandril de tres mordazas
(ver «Ajuste del modo de trabajo»).
Comprobar la cubierta de protección.
– Limpiar la cubierta si está sucia.
– Sustituir la caperuza antipolvo si está
dañada.
39
Page 40

Limpiar y engrasar ligeramente el
vástago de la herramienta.
Insertar la herramienta de inserción (1.) y
girarla (2.) hasta que se enclave.
Comprobar el enclavamiento tirando de
la herramienta de inserción.
Extracción de las herramientas
ADVERTENCIA
Antes de efectuar cualquier trabajo en la
herramienta eléctrica, desconectar el
enchufe de red.
PRECAUCIÓN
Las herramientas pueden calentarse
durante el uso. Usar guantes de protección.
CHE 4-32 R SDS-plus
Ajustar la rueda giratoria al modo de
trabajo deseado:
Perforación
Perforación con percusión
Ajuste de la posición del cincel
(ver allí)
Cincelado
NOTA
– En todas las posiciones debe enclavarse
el botón giratorio de forma audible.
– En la posición (ajuste de la posición
del cincel) no debe ponerse en marcha la
herramienta eléctrica.
Ajuste de la posición del cincel
El cincel puede girarse a una posición
óptima para la tarea a realizar.
Ajustar el botón giratorio para el modo de
trabajo en el símbolo (1.).
Girar el cincel hasta que presente el
ángulo deseado (2.).
Tirar del manguito de bloqueo hacia
atrás (1.).
Retirar la herramienta de inserción (2.).
Ajuste del modo de trabajo
PRECAUCIÓN
Ajustar el modo de trabajo únicamente con
la máquina parada.
40
Ajustar el botón giratorio para el modo de
trabajo en el símbolo (3). Se debe oír
un ruido de enclavamiento.
Page 41

CHE 4-32 R SDS-plus
Encendido de la herramienta
eléctrica
Presionar el interruptor y mantenerlo así.
El interruptor de la herramienta eléctrica
permite aumentar lentamente el número
de revoluciones o la frecuencia de
percusión hasta el valor máximo.
Apagado de la máquina:
Soltar el interruptor.
Indicaciones para el trabajo
Perforación/perforación con percusión
1. Ajustar el botón giratorio para el modo
de trabajo en el símbolo (perforar) o
(perforar con percusión). Se debe oír
un ruido de enclavamiento.
2. Colocar la broca.
3. Ajustar la empuñadura adicional a la
posición deseada.
4. Conectar el enchufe de red.
5. Sujetar la herramienta eléctrica con
ambas manos y adoptar una posición
adecuada para el trabajo.
6. Asentar la broca y poner en marcha la
herramienta eléctrica.
7. Presionar la herramienta eléctrica con
cuidado hacia delante.
8. Concluida la perforación, parar la
máquina.
9. Desconectar el enchufe de red.
Cincelado
1. Colocar el cincel.
2. Ajustar el botón giratorio para el modo
de trabajo en el símbolo .
3. Girar el cincel a la posición deseada.
4. Ajustar el botón giratorio para el modo
de trabajo en el símbolo . Se debe oír
un ruido de enclavamiento.
5. Ajustar la empuñadura adicional a la
posición deseada.
6. Conectar el enchufe de red.
7. Sujetar la herramienta eléctrica con
ambas manos y adoptar una posición
adecuada para el trabajo.
8. Encender la herramienta eléctrica.
9. Presionar la herramienta eléctrica con
cuidado hacia delante durante el
cincelado para que no salte.
10. Parar la máquina una vez concluida la
tarea.
11. Desconectar el enchufe de red.
Advertencias adicionales
– La utilización de herramientas de
inserción «afiladas» aumenta el
rendimiento de trabajo y la vida útil de la
herramienta eléctrica.
– Concluida la tarea, limpiar la herramienta
eléctrica y guardar la maleta de
transporte en un sitio seco.
Mantenimiento y cuidado
ADVERTENCIA
Antes de efectuar cualquier trabajo en la
herramienta eléctrica, desconectar el
enchufe de red.
Limpieza
Limpiar regularmente la máquina y las
ranuras de ventilación. La frecuencia de la
limpieza dependerá del material y la
intensidad de uso. Limpiar periódicamente
la parte interior de la carcasa y el motor con
aire comprimido seco.
Escobillas de carbón
La herramienta eléctrica está equipada con
escobillas de desconexión automática.
Una vez alcanzado el límite de desgaste,
la herramienta eléctrica se para
automáticamente.
NOTA
Utilizar únicamente repuestos originales del
fabricante. En caso de utilizar productos de
terceros, se anula la garantía del fabricante.
41
Page 42

CHE 4-32 R SDS-plus
Klaus Peter WeinperEckhard Rühle
Manager Research &
Development (R & D)
Head of Quality
Department (QD)
A través de las ranuras de ventilación
posteriores, puede observarse el chispeo
de las escobillas durante el funcionamiento.
Parar inmediatamente la herramienta
eléctrica en caso que las chispas sean
excesivas. Entregar la herramienta eléctrica
a un taller especializado autorizado por el
fabricante.
Engranaje
NOTA
No aflojar los tornillos del cabezal del
engranaje durante el período de garantía.
En caso de incumplimiento, se extinguirá la
garantía del fabricante.
Reparaciones
Encargar las reparaciones exclusivamente
a un taller de servicio técnico autorizado por
el fabricante.
Si el conductor de alimentación de la
herramienta eléctrica está dañado, debe
cambiarse por un conductor de
alimentación preconfeccionado de manera
especial (tipo de fijación X). Este conductor
está disponible a través del Servicio de
Atención al Cliente de FLEX.
Repuestos y accesorios
Para más información sobre accesorios,
especialmente herramientas insertables,
consultar el catálogo del fabricante.
Los dibujos de despiece y las listas de
repuestos se encuentran en nuestra página
web:
www.flex-tools.com
Indicaciones de eliminación
ADVERTENCIA
Inutilizar los equipos inservibles cortando el
cable de alimentación.
Únicamente para países
pertenecientes a la UE.
No desechar las herramientas
eléctricas con la basura doméstica.
Según la Directiva Europea 2012/19/UE
sobre residuos de aparatos eléctricos y
electrónicos y su implementación a través de
leyes nacionales, los equipos eléctricos o
electrónicos en desuso deben clasificarse por
separado para su aprovechamiento de
manera respetuosa con el medio ambiente.
NOTA
Solicitar información a su distribuidor
habitual acerca de las opciones de
eliminación.
Conformidad
Declaramos bajo nuestra única responsabilidad que el producto descrito en «Datos
técnicos» cumple las siguientes normas y
documentos normativos:
EN 60745 según las determinaciones de la
pauta 2014/30/UE, 2006/42/CE,
2011/65/UE.
Responsable de la documentación técnica:
FLEX-Elektrowerkzeuge GmbH, R & D
Bahnhofstrasse 15, D-71711 Steinheim/Murr
07.03.2018
FLEX-Elektrowerkzeuge GmbH
Bahnhofstrasse 15, D-71711 Steinheim/Murr
Exención de responsabilidad
El fabricante y su representante no asumen
responsabilidad alguna por daños o pérdidas
de ganancia causados por la interrupción
del funcionamiento de la empresa, debidos
al producto o a la no utilización del mismo.
El fabricante y sus representantes no asumen
responsabilidad alguna por los daños
derivados de un uso incorrecto o del uso en
combinación con productos de terceros.
42
Page 43

CHE 4-32 R SDS-plus
Índice
Símbolos utilizados . . . . . . . . . . . . . . . . 43
Símbolos no aparelho . . . . . . . . . . . . . . 43
Caraterísticas técnicas . . . . . . . . . . . . . 43
Panorâmica da máquina . . . . . . . . . . . . 44
Para sua segurança . . . . . . . . . . . . . . . 45
Ruído e vibração . . . . . . . . . . . . . . . . . . 46
Instruções de utilização . . . . . . . . . . . . . 47
Manutenção e tratamento . . . . . . . . . . . 49
Indicações sobre reciclagem . . . . . . . . . 50
Conformidade . . . . . . . . . . . . . . . . . 50
Exclusão de responsabilidades . . . . . . . 50
Símbolos utilizados
AVISO!
Carateriza um perigo imediato e eminente.
A não observação da indicação pode
implicar morte ou ferimentos muito graves.
CUIDADO!
Carateriza uma situação possivelmente
perigosa. A não observação da indicação
pode implicar ferimentos ou prejuízos
materiais.
INDICAÇÃO!
Carateriza conselhos de utilização e
informações importantes.
Símbolos no aparelho
Antes da colocação em
funcionamento, leia as Instruções
de serviço!
Caraterísticas técnicas
Martelo para furar e cinzelar CHE 4-32 R
SDS-plus
Potência nominal
absorvida
Número de rotações
em vazio
Número de impactos
em vazio
Energia máxima de
impacto (segundo
«EPTA-procedure
05/2009»)
Lubrificação
Admissão da
ferramenta
Diâmetro máx. do furo
– Betão
– Alvenaria
– (coroa de furar HM)
– Madeira
– Metal
Peso de acordo com
«EPTA-procedure
01/2003»
Classe de proteção
W900
rpm 0–850
rpm 0–3700
J4,8
Massa
lubrificante
SDS-plus
mm
mm
mm
mm
kg 4,6
32
82
32
13
II /
Usar óculos de proteção!
Usar proteção auditiva!
Usar leve proteção respiratória!
Indicações sobre reciclagem para
o aparelho usado (ver a pág.
Indicações sobre reciclagem)!
43
Page 44

Panorâmica da máquina
CHE 4-32 R SDS-plus
1 Mandril SDS
2 Mandril intercambiável
3 Punho adicional
4 Veio roscado
5 Alavanca de retenção do batente
de profundidade
6 Batente de profundidade
7 Seletor rotativo para o modo
de trabalho
8 Interruptor
Para ligar e desligar, assim como para
aumentar a velocidade até ao número
máximo de rotações/golpes.
44
9 Punho
10 Cabo de rede
11 Chapa de caraterísticas *
* não é visível
Page 45

CHE 4-32 R SDS-plus
Para sua segurança
AVISO!
Leia todas as indicações de segurança
e instruções.
indicações de segurança e das instruções
pode ter como consequência um choque
elétrico, incêndio e/ou ferimentos graves
Guarde todas as indicações de segurança
e instruções para o futuro.
Ler antes da utilização da ferramenta
elétrica e proceder em conformidade:
–
estas Instruções de serviço,
–
as instruções gerais de segurança para
utilização de ferramentas elétricas na
documentação anexa (
315.915),
–
as regras e as normas em vigor para
prevenção de acidentes no local de
utilização.
Esta ferramenta elétrica foi fabricada de
acordo com o estado atual da técnica e com
as regras técnicas de segurança
reconhecidas. No entanto, na sua
utilização, podem existir riscos para a vida
e a integridade física do utilizador ou de
terceiros ou ocorrer danos na máquina ou
noutros bens. A ferramenta elétrica só deve
ser utilizada
–
de acordo com as disposições legais,
–
em perfeita situação de segurança
técnica.
As anomalias que prejudiquem a segurança
devem ser imediatamente eliminadas.
Utilização de acordo com as
disposições legais
O martelo para furar e cinzelar CHE 4-32 R
SDS-plus foi concebido
– para a utilização profissional na indústria
e em oficinas,
– para furar com percussão em alvenaria
e betão, para fixação de buchas e
ancoragens e furos de passagem,
– para pequenos trabalhos de encalcar
para remover reboco e ladrilhos,
– para a utilização com a ferramenta
adequada para tal e recomendada pelo
fabricante para este aparelho.
A não observação das
.
textos n.°:
Indicações de segurança para
martelos
Use proteção auditiva. O efeito de ruído
pode provocar perdas de audição.
Utilize os punhos adicionais fornecidos
com o aparelho. A perda de controlo pode
dar origem a ferimentos.
Quando efetuar trabalhos nos quais a
ferramenta utilizada possa encontrar
cabos elétricos ocultos ou o próprio cabo
de alimentação de corrente, segure o
aparelho somente pelas superfícies do
punho isoladas. O contacto com um cabo
sob tensão também pode colocar
componentes metálicos do aparelho sob
tensão e provocar um choque elétrico.
Outras instruções de segurança
Utilize aparelhos detetores adequados
para detetar tubagens de alimentação
ocultas ou peça a intervenção da
entidade local responsável pelas
tubagens de alimentação. O contacto
com cabos elétricos pode provocar um
incêndio e choque elétrico. Danos num
tubo de gás podem provocar uma
explosão. A penetração num cano de água
provoca danos materiais ou pode provocar
um choque elétrico.
Segure a ferramenta elétrica com ambas
as mãos ao trabalhar e procure manter
uma posição de segurança. A ferramenta
elétrica é mais segura quando conduzida
com ambas as mãos.
Fixe a peça a trabalhar. Uma peça
mantida fixa num dispositivo de aperto
está mais segura do que presa na sua
mão.
Não utilize a ferramenta elétrica com o
cabo danificado. Não toque no cabo
danificado e desligue a ficha da tomada,
se o cabo for danificado durante o
trabalho. Cabos de ligação danificados
aumentam o risco de choque elétrico.
Utilizar apenas ferramentas com
dispositivo de admissão da ferramenta
SDS-plus. Verificar o bloqueio correto,
puxando a ferramenta.
45
Page 46

CHE 4-32 R SDS-plus
Se a capa de proteção contra poeira
estiver danificada, requerer
imediatamente a sua substituição. A
capa de proteção contra poeira impede a
entrada de pó na admissão da ferramenta.
As poeiras libertadas de materiais, como
pinturas com teor de chumbo, alguns tipos
de madeira, minerais e metais, podem
prejudicar a saúde do operador do
aparelho ou de pessoas que se
encontrem nas proximidades.
A inalação
ou o contacto com estas poeiras pode
provocar doenças no aparelho respiratório
e/ou reações alérgicas.
– Providenciar uma boa ventilação no
local de trabalho!
– Se possível, utilizar um sistema de
aspiração de pó independente.
– Recomenda-se a utilização de uma
máscara respiratória com uma classe
de filtro P2.
Não usar em materiais que libertem
substâncias prejudiciais à saúde
(p. ex., amianto).
Para identificação da ferramenta elétrica,
utilizar somente chapas autocolantes. Não
fazer furos na estrutura.
A tensão da rede e a indicação de tensão
na chapa de caraterísticas têm de ser
coincidentes.
Ruído e vibração
Os valores de ruído e de vibração foram
apurados de acordo com a EN 60745.
O nível de ruído de valorização A do
aparelho comporta, normalmente:
– Nível de pressão acústica: 92 dB(A);
– Nível de potência acústica: 103 dB(A);
– Insegurança K: 3 dB.
Valor global de vibrações:
– Ao furar com percussão:
– Valor de emissão a
– Insegurança K: 1,5 m/s
– Ao cinzelar:
– Valor de emissão ah: 10,60 m/s
– Insegurança K: 1,5 m/s
: 13,34 m/s
h
ATENÇÃO!
Os valores de medição indicados são
válidos para aparelhos novos. Na utilização
diária, os valores de ruído e de oscilação
alteram-se.
INDICAÇÃO!
O nível de vibrações indicado nestas
instruções foi medido em conformidade com
um processo de medição normalizado na
EN 60745 e pode ser utilizado para a
comparação de ferramentas elétricas entre si.
Este processo também é adequado para uma
estimativa provisória da carga de vibrações.
O nível de vibrações indicado representa as
principais utilizações da ferramenta elétrica.
No entanto, se a ferramenta elétrica for
aplicada noutras situações com ferramentas
de aplicação diferentes ou com insuficiente
manutenção, o nível de vibrações também
pode ser diferente. Isto pode aumentar
claramente a carga das vibrações durante
o período global de trabalho.
Para uma estimativa exata da carga das
vibrações, também devem ser considerados
os tempos em que o aparelho está desligado
ou, embora estando a funcionar, não está, de
facto, em utilização. Isto pode reduzir
claramente a carga das vibrações durante
o período global de trabalho.
Determine medidas de segurança adicionais
para proteger o utilizador do efeito das
vibrações, como, por exemplo: manutenção
da ferramenta elétrica e das ferramentas
aplicadas, manutenção das mãos quentes,
organização dos ciclos de trabalho.
CUIDADO!
Com um nível de pressão acústica superior
a 85 dB(A), deve usar-se proteção auditiva.
2
2
2
2
46
Page 47

CHE 4-32 R SDS-plus
Instruções de utilização
Antes da colocação em
funcionamento
Desembalar a ferramenta elétrica e
acessórios e verificar se o fornecimento
está completo e se existem danos
provocados pelo transporte.
Ajustar o punho adicional
AVISO!
Antes de qualquer intervenção na
ferramenta elétrica, desligar a ficha da
tomada.
CUIDADO!
Utilizar a ferramenta elétrica só com o
punho adicional montado.
O punho adicional pode ser rodado para
qualquer posição, para garantir um trabalho
seguro e sem fadiga.
Eliminar encravamentos, rodando o
punho adicional no sentido contrário ao
dos ponteiros do relógio (1.).
Rodar o punho adicional para a posição
pretendida (2.).
Fixar o ajuste, rodando o punho adicional
no sentido dos ponteiros do relógio.
Montar o batente de profundidade
AVISO!
Antes de qualquer intervenção na
ferramenta elétrica, desligar a ficha da
tomada.
Premir a parte superior da alavanca
de retenção que se encontra no punho
adicional e mantê-la premida.
Inserir o batente de profundidade.
Regular o batente de profundidade para
a necessária profundidade do furo.
Soltar a alavanca de retenção.
Utilização de ferramentas com
haste SDS
AVISO!
Antes de qualquer intervenção na
ferramenta elétrica, desligar a ficha da
tomada.
CUIDADO!
As ferramentas de aplicação utilizadas
podem ficar muito quentes. Utilizar luvas de
proteção!
INDICAÇÃO!
As ferramentas utilizadas têm de ter uma
haste SDS. Para ferramentas sem haste
SDS (p. ex., broca para madeira), deve
utilizar-se um mandril com aperto de três
dentes (consultar "Regular o modo de
trabalho").
Controlar a capa de proteção contra
poeira.
– Limpar a capa suja.
– Solicitar a substituição da capa de
proteção contra poeira quando
danificada.
47
Page 48

Limpar as ferramentas e lubrificar
ligeiramente a haste.
Inserir a ferramenta de aplicação (1.)
e rodá-la (2.) até ficar bloqueada.
Controlar o bloqueio, puxando a
ferramenta de aplicação.
Desmontar as ferramentas
AVISO!
Antes de qualquer intervenção na
ferramenta elétrica, desligar a ficha da
tomada.
CUIDADO!
As ferramentas de aplicação utilizadas
podem ficar muito quentes. Utilizar luvas de
proteção!
CHE 4-32 R SDS-plus
Regular o seletor rotativo para o modo de
trabalho pretendido:
Furar
Furar com percussão
Regular a posição do cinzel
(ver aqui)
Cinzelar
INDICAÇÃO!
– Em todas as posições, deve ouvir-se o
seletor rotativo engatar.
– Na posição (Regular a posição do
cinzel), não ligar a ferramenta elétrica.
Regular a posição do cinzel
O cinzel pode ser rodado para uma posição
que seja ideal para a execução dos trabalhos.
Colocar o seletor rotativo para o modo de
trabalho no símbolo (1.).
Rodar o cinzel, até este apresentar o
ângulo pretendido (2.).
Puxar a bucha de bloqueio para trás (1.).
Desmontar a ferramenta de aplicação (2.).
Regular o modo de trabalho
CUIDADO!
Alterar o modo de trabalho somente com a
ferramenta elétrica completamente parada.
48
Colocar o seletor rotativo para o modo de
trabalho no símbolo (3.). Aguardar até
se ouvir engatar!
Page 49

CHE 4-32 R SDS-plus
Ligar a ferramenta elétrica
Premir o interruptor e mantê-lo nessa
posição.
O interruptor da ferramenta elétrica
permite um aumento lento do número de
rotações e de golpes, até ao valor máximo.
Desligar o aparelho:
Soltar o interruptor.
Indicações sobre trabalho
Furar/Furar com percussão
1. Colocar o seletor rotativo para o modo
de trabalho no símbolo (Furar) ou
(Furar com percussão). Aguardar até se
ouvir engatar!
2. Colocar a broca.
3. Regular o punho adicional para a
posição pretendida.
4. Ligar a ficha à tomada.
5. Segurar a ferramenta elétrica com
ambas as mãos e assumir a posição de
trabalho.
6. Fixar a broca e ligar a ferramenta
elétrica.
7. Pressionar suavemente a ferramenta
elétrica para a frente.
8. Depois de terminado o furo, desligar
o aparelho.
9. Desligar a ficha da tomada.
Cinzelar
1. Colocar o cinzel.
2. Colocar o seletor rotativo para o modo
de trabalho no símbolo .
3. Rodar o cinzel para a posição
pretendida.
4. Colocar o seletor rotativo para o modo
de trabalho no símbolo . Aguardar até
se ouvir engatar!
5. Regular o punho adicional para a
posição pretendida.
6. Ligar a ficha à tomada.
7. Segurar a ferramenta elétrica com
ambas as mãos e assumir a posição de
trabalho.
8. Ligar a ferramenta elétrica.
9. Ao cinzelar, pressionar suavemente
a ferramenta elétrica para a frente, de
modo a que não salte.
10. Depois de terminado o trabalho,
desligar o aparelho.
11. Desligar a ficha da tomada.
Outras indicações
– A utilização de ferramentas de aplicação
«afiadas» aumenta o rendimento e o
tempo de vida útil da ferramenta elétrica.
– Depois do trabalho, limpar a ferramenta
elétrica e guardá-la dentro da mala de
transporte, num local seco.
Manutenção e tratamento
AVISO!
Antes de qualquer intervenção na
ferramenta elétrica, desligar a ficha da
tomada.
Limpeza
Limpar regularmente o aparelho e as
ranhuras de ventilação. A frequência da
limpeza depende do material a trabalhar
e da duração da utilização. Limpar o interior
da estrutura com motor regularmente, com
ar comprimido seco.
Escovas de carvão
A ferramenta elétrica está equipada com
escovas de carvão para corte de ligação.
Depois de se atingir o limite de desgaste
das escovas de carvão, a ferramenta
elétrica desliga-se automaticamente.
49
Page 50

CHE 4-32 R SDS-plus
Klaus Peter WeinperEckhard Rühle
Manager Research &
Development (R & D)
Head of Quality
Department (QD)
INDICAÇÃO!
Na substituição, utilizar somente peças
originais do fabricante. Caso sejam
utilizadas peças de outros fabricantes,
expiram as obrigações de garantia do
fabricante.
Através das entradas de ar traseiras, pode
observar-se a ignição dos carvões durante
o funcionamento.
Com faíscas muito intensas das escovas de
carvão, desligar imediatamente a
ferramenta elétrica. Entregar a ferramenta
elétrica para reparação numa oficina de
Serviços Técnicos autorizada pelo
fabricante.
Engrenagem
INDICAÇÃO!
Não desapertar os parafusos da cabeça
de engrenagem. Se esta indicação não
for respeitada, expiram as obrigações de
garantia do fabricante.
Reparações
As reparações devem ser executadas,
exclusivamente, por Serviços Técnicos
autorizados pelo fabricante.
Se o cabo de ligação da ferramenta elétrica
apresentar danos, tem de ser substituído
por um outro especialmente preparado (tipo
de aplicação X). Este pode ser adquirido
através dos Serviços Técnicos FLEX.
Peças de substituição e acessórios
Para mais acessórios, principalmente
ferramentas de aplicação, consulte os
catálogos do fabricante.
Pode consultar desenhos de explosão e
listas de peças de substituição na nossa
Homepage:
www.flex-tools.com
Indicações sobre reciclagem
AVISO!
Os aparelhos fora de serviço devem ser
inutilizados, retirando-lhes os cabos de
ligação à rede.
Só para os países da UE.
Não coloque as ferramentas elétricas
no lixo doméstico!
Em conformidade com a Diretiva Europeia
2012/19/UE sobre aparelhos elétricos
e eletrónicos usados e com a transposição
para o Direito Nacional, as ferramentas
elétricas usadas têm de ser reunidas
separadamente e encaminhadas para
o reaproveitamento sem poluição do meio
ambiente.
INDICAÇÃO!
Informe-se sobre possibilidades de
reciclagem junto do agente especializado!
Conformidade
Declaramos, sob nossa inteira
responsabilidade, que o produto descrito em
«Caraterísticas técnicas» se encontra em
conformidade com as normas e os
documentos normativos seguintes:
EN 60745 de acordo com as determinações das diretivas 2014/30/UE,
2006/42/CE, 2011/65/UE.
Responsável pela documentação técnica:
FLEX-Elektrowerkzeuge GmbH, R & D
Bahnhofstrasse 15, D-71711 Steinheim/Murr
07/03/2018
FLEX-Elektrowerkzeuge GmbH
Bahnhofstrasse 15, D-71711 Steinheim/Murr
Exclusão de responsabilidades
O fabricante e seus representantes não
se responsabilizam por danos e perda de
lucros, resultantes de uma interrupção do
negócio provocada pelo produto ou pela
impossibilidade de utilização do mesmo.
O fabricante e seus representantes não se
responsabilizam por danos provocados por
uma utilização inadequada ou em conjugação
com produtos de outros fabricantes.
50
Page 51

CHE 4-32 R SDS-plus
Inhoud
Gebruikte symbolen . . . . . . . . . . . . . . . 51
Symbolen op het gereedschap . . . . . . . 51
Technische gegevens . . . . . . . . . . . . . . 51
In één oogopslag . . . . . . . . . . . . . . . . . . 52
Voor uw veiligheid . . . . . . . . . . . . . . . . . 53
Geluid en trillingen . . . . . . . . . . . . . . . . 54
Gebruiksaanwijzing . . . . . . . . . . . . . . . . 55
Onderhoud en verzorging . . . . . . . . . . . 57
Afvoeren van verpakking en machine . . 58
-conformiteit . . . . . . . . . . . . . . . . . . . 58
Uitsluiting van aansprakelijkheid . . . . . . 58
Gebruikte symbolen
WAARSCHUWING!
Geeft een onmiddellijk dreigend gevaar
aan. Als de waarschuwing niet in acht wordt
genomen, dreigen levensgevaarlijke of zeer
ernstige verwondingen.
VOORZICHTIG!
Geeft een mogelijk gevaarlijke situatie aan.
Als de aanwijzing niet in acht wordt
genomen, kan persoonlijk letsel of materiële
schade het gevolg zijn.
LET OP!
Geeft gebruikstips en belangrijke informatie
aan.
Technische gegevens
Boor- en hakhamer CHE 4-32 R
SDS-plus
Opgenomen vermogen W 900
-1
Onbelast toerental min
Onbelast aantal slagen
Max. slagkracht
(volgens „EPTAprocedure 05/2009”)
Smering Vet
Gereedschapsopname SDS-plus
Max. boordiameter
– Beton
– Metselwerk
– (HM-boorkroon)
– Hout
– Metaal
Gewicht volgens
„EPTA-procedure
01/2003”
Isolatieklasse
min
J4,8
mm
mm
mm
mm
kg 4,6
0–850
-1
0–3700
32
82
32
13
II/
Symbolen op het gereedschap
Lees de gebruiksaanwijzing
voordat u het gereedschap in
gebruik neemt!
Draag een oogbescherming!
Draag een gehoorbescherming!
Lichte adembescherming
gebruiken!
Afvoeren van het oude apparaat
(zie pagina Afvoeren van
verpakking en machine)!
51
Page 52

In één oogopslag
CHE 4-32 R SDS-plus
1 SDS Boorhouder
2 Wisselboorhouder
3 Extra handgreep
4 Uitgaande as
5 Klemhendel voor diepteaanslag
6 Diepteaanslag
7 Draaiknop voor werkmodus
8 Schakelaar
Voor het in- en uitschakelen en het op
toeren komen tot het maximale
toerental of aantal slagen.
52
9 Handgreep
10 Netsnoer
11 Typeplaatje *
* niet zichtbaar
Page 53

CHE 4-32 R SDS-plus
Voor uw veiligheid
WAARSCHUWING!
Lees alle veiligheidsvoorschriften en
aanwijzingen.
veiligheidsvoorschriften en aanwijzingen
niet in acht worden genomen, kan dit een
elektrische schok, brand en/of ernstig letsel
tot gevolg hebben
veiligheidsvoorschriften en aanwijzingen
voor de toekomst.
Lees voordat u het elektrische gereedschap
gebruikt en handel daarna volgens:
–
deze gebruiksaanwijzing,
–
de „Algemene veiligheidsvoorschriften”
voor het gebruik van elektrische
gereedschappen in de meegeleverde
brochure (
–
de op de plaats van gebruik geldende
regels en voorschriften ter voorkoming
van ongevallen.
Dit elektrische gereedschap is
geconstrueerd volgens de stand van de
techniek en de erkende
veiligheidstechnische regels. Toch kunnen
bij het gebruik ervan levensgevaar en
verwondingsgevaar voor de gebruiker en
voor andere personen resp. gevaren voor
beschadigingen aan de machine of aan
andere zaken optreden. Het elektrische
gereedschap mag alleen worden gebruikt
–
volgens de bestemming,
–
in een veiligheidstechnisch optimale
toestand.
Verhelp storingen die de veiligheid in
gevaar brengen onmiddellijk.
Gebruik volgens bestemming
De boor- en hakhamer CHE 4-32 R SDSplus is bestemd
– voor professioneel gebruik in de industrie
en door de vakman,
– voor hamerwerkzaamheden in
metselwerk en beton, voor deuvel- en
ankerbevestigingen en het boren van
doorvoeren,
– voor lichte breekwerkzaamheden, voor
het verwijderen van stucwerk en tegels,
– voor het gebruik met geschikt en door de
fabrikant voor deze machine
geadviseerd inzetgereedschap.
Als de
.Bewaar alle
documentnummer: 315.915),
Veiligheidsvoorschriften voor
hamers
Draag een gehoorbescherming. De
blootstelling aan lawaai kan gehoorverlies
tot gevolg hebben.
Gebruik bij het gereedschap geleverde
extra handgrepen. Het verlies van de
controle kan tot verwondingen leiden.
Houd het gereedschap alleen aan de
geïsoleerde greepvlakken vast als u
werkzaamheden uitvoert waarbij het
inzetgereedschap verborgen
stroomleidingen of de eigen stroomkabel
kan raken. Contact met een onder
spanning staande leiding kan ook metalen
delen van het gereedschap onder
spanning zetten en tot een elektrische
schok leiden.
Overige veiligheidsvoorschriften
Gebruik een geschikt detectieapparaat
om verborgen stroom-, gas- of
waterleidingen op te sporen of raadpleeg
het plaatselijke energie- of
waterleidingbedrijf. Contact met
elektrische leidingen kan tot brand of een
elektrische schok leiden. Beschadiging van
een gasleiding kan tot een explosie leiden.
Breuk van een waterleiding veroorzaakt
materiële schade en kan een elektrische
schok veroorzaken.
Houd het elektrische gereedschap
tijdens de werkzaamheden stevig met
beide handen vast en zorg ervoor dat u
stevig staat. Het elektrische gereedschap
wordt met twee handen veiliger geleid.
Zet het werkstuk vast. Een in een
spanvoorziening vastgezet werkstuk wordt
beter vastgehouden dan u met uw hand
kunt doen.
Gebruik het elektrische gereedschap niet
met een beschadigde kabel. Raak de
beschadigde kabel niet aan en trek de
stekker uit het stopcontact als de kabel
tijdens de werkzaamheden wordt
beschadigd. Beschadigde kabels
vergroten het risico van een elektrische
schok.
Alleen gereedschappen met SDS-plus
gereedschapsopname inzetten. De
correcte vergrendeling controleren door
aan het toebehoren te trekken.
53
Page 54

CHE 4-32 R SDS-plus
Een beschadigde stofbeschermingskap
onmiddellijk laten vervangen. De
stofbeschermingskap voorkomt dat er stof
in de gereedschapsopname komt.
Vrijkomend stof van materialen zoals
loodhoudende verf, enkele houtsoorten,
mineralen en metaal kunnen een gevaar
vormen voor de bedienende personen of
personen in de buurt.
Inademing of
aanraking van dit stof kan tot
aandoeningen van de ademwegen en/of
allergische reacties voeren.
– Voor goede ventilatie van de
werkomgeving zorgen!
– Indien mogelijk externe stofafzuiging
gebruiken.
– Het gebruik van een ademmasker met
filterklasse P2 wordt geadviseerd.
Geen materialen bewerken waarbij voor de
gezondheid gevaarlijke stoffen vrijkomen
(bijvoorbeeld asbest).
Gebruik voor het markeren van het
elektrische gereedschap alleen stickers.
Boor geen gaatjes in het machinehuis.
De netspanning en de op het typeplaatje
vermelde spanningsgegevens moeten
overeenkomen.
Geluid en trillingen
De geluids- en trillingswaarden zijn
vastgesteld volgens norm EN 60745.
Het A-gewaardeerde geluidsniveau van het
gereedschap bedraagt kenmerkend:
– Geluidsdrukniveau: 92 dB(A);
– Geluidsvermogenniveau: 103 dB(A);
– Onzekerheid K: 3 dB.
Totale trillingswaarde:
– bij hamerboorwerkzaamheden:
– Emissiewaarde a
– Onzekerheid K: 1,5 m/s
– bij hakwerkzaamheden:
– Emissiewaarde ah: 10,60 m/s
– Onzekerheid K: 1,5 m/s
LET OP!
De aangegeven meetwaarden gelden
voor nieuwe apparaten. Bij dagelijks
gebruik veranderen geluids- en
trillingswaarden.
: 13,34 m/s
h
LET OP!
Het is deze instructies vermelde trillingsniveau
is gemeten volgens de meetmethode zoals
beschreven in de norm EN 60745 en kan
worden gebruikt voor de onderlinge
vergelijking van elektrische gereedschappen.
Het is ook geschikt voor een voorlopige
inschatting van de trillingsbelasting.
Het vermelde trillingsniveau geldt voor de
voornaamste toepassingen van het
elektrische gereedschap. Indien het
elektrische gereedschap wordt gebruikt voor
andere toepassingen, met afwijkende
inzetgereedschappen of zonder voldoende
onderhoud, kan het trillingsniveau afwijken.
Dit kan de trillingsbelasting over het gehele
arbeidstijdvak duidelijk verhogen.
Voor een nauwkeurige schatting van de
trillingsbelasting moeten ook de tijden in
aanmerking worden genomen waarin het
gereedschap uitgeschakeld is, of waarin het
wel loopt, maar niet feitelijk wordt gebruikt. Dit
kan de trillingsbelasting over het gehele
arbeidstijdvak duidelijk verminderen.
Leg aanvullende veiligheidsmaatregelen ter
bescherming van de bediener tegen het effect
van trillingen vast, zoals: onderhoud van
elektrische gereedschap en
inzetgereedschappen, warm houden van de
handen, organisatie van de
arbeidsprocessen.
VOORZICHTIG!
Draag een gehoorbescherming bij een
geluidsdruk van meer dan 85 dB(A).
2
2
2
2
54
Page 55

CHE 4-32 R SDS-plus
Gebruiksaanwijzing
Voor de ingebruikneming
Pak het elektrische gereedschap uit en
controleer of het volledig geleverd is en
geen transportschade heeft.
Extra handgreep verstellen
WAARSCHUWING!
Trek altijd vóór werkzaamheden aan het
elektrische gereedschap de stekker uit het
stopcontact.
VOORZICHTIG!
Elektrisch gereedschap alleen met
gemonteerde extra handgreep gebruiken.
De extra handgreep kan in elke willekeurige
stand worden gedraaid om veilig en zonder
vermoeidheid te kunnen werken.
Klemschroef door draaien van de extra
handgreep tegen de wijzers van de klok
in losdraaien (1.).
Extra handgreep in de gewenste positie
draaien (2.).
Door draaien van de extra handgreep
met de wijzers van de klok mee de
instelling vastzetten.
Diepteaanslag monteren
WAARSCHUWING!
Trek altijd vóór werkzaamheden aan het
elektrische gereedschap de stekker uit het
stopcontact.
Klemhendel aan extra handgreep in
het bovenste gedeelte indrukken en
vasthouden.
Diepteaanslag induwen.
Diepteaanslag op de benodigde
boordiepte instellen.
Klemhendel loslaten.
Inzetten van gereedschappen
met SDS-schacht
WAARSCHUWING!
Trek altijd vóór werkzaamheden aan het
elektrische gereedschap de stekker uit het
stopcontact.
VOORZICHTIG!
Gebruikte inzetgereedschappen kunnen
heet worden. Draag werkhandschoenen!
LET OP!
Gebruikte gereedschappen moeten over
een SDS-schacht beschikken. Voor
gereedschappen zonder SDS-schacht
(bijv. houtboren) moet een boorhouder met
drie klauwen worden gebruikt (zie
„Werkmodus instellen“).
Stofbeschermkap controleren.
– Vuil geworden kap reinigen.
– Defecte stofbeschermkap laten
vervangen.
55
Page 56

Gereedschap reinigen en de schacht
licht invetten.
Inzetgereedschap inzetten (1.) en
draaien (2.) tot het vergrendelt.
Vergrendeling controleren door aan het
inzetgereedschap te trekken.
Verwijderen van de
inzetgereedschappen
WAARSCHUWING!
Trek altijd vóór werkzaamheden aan het
elektrische gereedschap de stekker uit het
stopcontact.
VOORZICHTIG!
Gebruikte inzetgereedschappen kunnen
heet worden. Draag werkhandschoenen!
CHE 4-32 R SDS-plus
Draaiknop op gewenste werkmodus
instellen:
Boren
Hameren
Instellen van de hakpositie
(zie daar)
Hakken
LET OP!
– In alle posities moet de draaiknop
hoorbaar vastklikken.
– In de stand (instellen van de
beitelpositie) het elektrische
gereedschap niet inschakelen.
Instellen van de hakpositie
De beitel kan worden verdraaid in een voor
de uit te voeren werkzaamheden optimale
positie.
Draaiknop voor werkmodus op het
symbool zetten (1.).
Beitel draaien tot de beitel de gewenste
hoek heeft (2.).
Vergrendelingshuls naar achteren
trekken (1.).
Inzetgereedschap verwijderen (2.).
Werkmodus instellen
VOORZICHTIG!
Werkmodus alleen veranderen als het
elektrische gereedschap stilstaat.
56
Draaiknop voor werkmodus op het
symbool zetten (3.). Let op of deze
hoorbaar vastklikt!
Page 57

CHE 4-32 R SDS-plus
Elektrisch gereedschap inschakelen
Druk de schakelaar in en houd deze vast.
Met de schakelaar van het elektrische
gereedschap kunt u het toerental of
aantal slagen langzaam verhogen tot
aan de maximumwaarde.
Apparaat uitschakelen:
Laat de schakelaar los.
Tips voor de werkzaamheden
boren/hameren
1. Draaiknop voor werkmodus op het
symbool (boren) resp.
(hamerboren) zetten. Let op of deze
hoorbaar vastklikt!
2. Boor inzetten.
3. Extra handgreep in de gewenste stand
instellen.
4. Steek de stekker in het stopcontact.
5. Elektrisch gereedschap met beide
handen vastpakken en werkstand
innemen.
6. Boor aanzetten en elektrisch
gereedschap inschakelen.
7. Elektrisch gereedschap met gevoel
naar voren duwen.
8. Na beëindigen van de boring de
machine uitschakelen.
9. Stekker uit het stopcontact trekken.
Hakken
1. Beitel inzetten.
2. Draaiknop voor werkmodus op het
symbool zetten.
3. Beitel in de gewenste stand draaien.
4. Draaiknop voor werkmodus op het
symbool zetten. Let op of deze
hoorbaar vastklikt!
5. Extra handgreep in de gewenste stand
instellen.
6. Steek de stekker in het stopcontact.
7. Elektrisch gereedschap met beide
handen vastpakken en werkstand
innemen.
8. Elektrisch gereedschap inschakelen.
9. Elektrisch gereedschap bij het hakken
met gevoel naar voren duwen, zodat
het niet springt.
10. Na beëindigen van de werkzaamheden
de machine uitschakelen.
11. Stekker uit het stopcontact trekken.
Overige opmerkingen
– Het gebruik van „scherpe”
inzetgereedschappen verhoogt het
werkvermogen en de levensduur van het
elektrische gereedschap.
– Elektrisch gereedschap na de
werkzaamheden reinigen en in de
transportkoffer op een droge plaats
bewaren.
Onderhoud en verzorging
WAARSCHUWING!
Trek altijd vóór werkzaamheden aan het
elektrische gereedschap de stekker uit het
stopcontact.
Reiniging
Reinig de machine en de ventilatieopeningen
regelmatig. De frequentie van de reiniging is
afhankelijk van het bewerkte materiaal en van
de duur van het gebruik. Blaas de binnenzijde
van het machinehuis met de motor regelmatig
met droge perslucht door.
Koolborstels
Het elektrische gereedschap is voorzien
van uitschakelkoolborstels.
Na het bereiken van de slijtagegrens van de
uitschakelkoolborstels wordt het elektrische
gereedschap automatisch uitgeschakeld.
LET OP!
Gebruik uitsluitend originele
vervangingsonderdelen van de fabrikant.
Bij het gebruik van onderdelen van een
andere fabrikant vervallen de
garantieverplichtingen van de fabrikant.
Door de luchttoevoeropeningen aan de
achterzijde kunnen de koolborstelvonken
tijdens het gebruik worden geobserveerd.
57
Page 58

CHE 4-32 R SDS-plus
Klaus Peter WeinperEckhard Rühle
Manager Research &
Development (R & D)
Head of Quality
Department (QD)
Bij ernstige vonken van de koolborstels het
elektrische gereedschap onmiddellijk
uitschakelen. Elektrisch gereedschap bij
een door de fabrikant erkende
klantenservice afgeven.
Machinekop
LET OP!
Draai de schroeven op de machinekop
tijdens de garantietijd niet los.
Anders vervallen de garantieverplichtingen
van de fabrikant.
Reparaties
Laat reparaties uitsluitend uitvoeren door
een door de fabrikant erkende
klantenservice.
Als de aansluitkabel van het elektrische
gereedschap beschadigd is, moet deze
worden vervangen door een speciaal
daarvoor bedoelde aansluitkabel
(aanbrengtype X). Deze is verkrijgbaar via
de FLEX-klantenservice.
Vervangingsonderdelen en
toebehoren
Zie voor overig toebehoren, in het bijzonder
inzetgereedschappen, de catalogi van de
fabrikant.
Explosietekeningen en onderdelenlijsten
vindt u op onze website:
www.flex-tools.com
Afvoeren van verpakking en
machine
WAARSCHUWING!
Maak een versleten machine onbruikbaar
door het netsnoer te verwijderen.
Alleen voor EU-landen.
Gooi elektrische gereedschappen
niet bij het huisvuil.
Volgens de Europese richtlijn 2012/19/EU
betreffende afgedankte elektrische en
elektronische apparatuur en de omzetting van
de richtlijn in nationaal recht moeten versleten
elektrische gereedschappen apart worden
ingezameld en op een voor het milieu
verantwoorde wijze opnieuw worden gebruikt.
LET OP!
Vraag uw vakhandel naar de mogelijkheden
om uw oude gereedschap af te geven.
-conformiteit
Wij verklaren als alleen verantwoordelijke dat
het onder "Technische gegevens"
beschreven product voldoet aan de volgende
normen en normatieve documenten:
EN 60745 volgens de bepalingen van de
richtlijnen 2014/30/EU, 2006/42/EG,
2011/65/EU.
Verantwoordelijk voor technische
documentatie:
FLEX-Elektrowerkzeuge GmbH, R & D
Bahnhofstrasse 15, D-71711 Steinheim/Murr
07-03-2018
FLEX-Elektrowerkzeuge GmbH
Bahnhofstrasse 15, D-71711 Steinheim/Murr
Uitsluiting van aansprakelijkheid
De fabrikant en zijn vertegenwoordiger zijn
niet aansprakelijk voor schade en verloren
winst door onderbreking van de
werkzaamheden die door het product of het
niet-mogelijke gebruik van het product zijn
veroorzaakt. De fabrikant en zijn
vertegenwoordiger zijn niet aansprakelijk voor
schade die door ondeskundig gebruik of in
combinatie met producten van andere
fabrikanten is veroorzaakt.
58
Page 59

CHE 4-32 R SDS-plus
Indhold
Anvendte symboler . . . . . . . . . . . . . . . . 59
Symboler på apparatet. . . . . . . . . . . . . . 59
Tekniske data . . . . . . . . . . . . . . . . . . . . 59
Oversigt . . . . . . . . . . . . . . . . . . . . . . . . . 60
For din egen sikkerheds skyld . . . . . . . . 61
Støj og vibration . . . . . . . . . . . . . . . . . . 62
Brugsanvisning . . . . . . . . . . . . . . . . . . . 63
Vedligeholdelse og pleje . . . . . . . . . . . . 65
Bortskaffelseshenvisninger . . . . . . . . . . 66
-overensstemmelse . . . . . . . . . . . . . 66
Ansvarsudelukkelse . . . . . . . . . . . . . . . . 66
Anvendte symboler
ADVARSEL!
Betegner en umiddelbart truende fare. Ved
tilsidesættelse af henvisningen opstår der
livsfare eller fare for alvorlig tilskadekomst.
FORSIGTIG!
Betegner en mulig farlig situation.
Ved tilsidesættelse af henvisningen er der
fare for tilskadekomst eller materielle
skader.
BEMÆRK!
Betegner anvendelsestips og vigtige
informationer.
Symboler på apparatet
Tekniske data
Bore- og mejselhammer CHE 4-32 R
SDS-plus
Nominel optagen effekt W 900
Omdrejningstal i
tomgang
Tomgangsslagtal o/min 0–3700
Maks. enkeltslagenergi
(iht. "EPTA-procedure
05/2009")
Smøring Fedt
Værktøjsholder SDS-plus
Maks. bordiameter
– Beton
– Murværk
– (HM-borekrone)
– Træ
– Metal
Vægt i henhold til
"EPTA-procedure
01/2003"
Beskyttelsesklasse
o/min 0–850
J4,8
mm
mm
mm
mm
kg 4,6
32
82
32
13
II /
Læs betjeningsvejledningen inden
ibrugtagning!
Brug øjenværn!
Brug høreværn!
Benyt et let åndedrætsværn!
Henvisning om bortskaffelse af den
udtjente maskine (se side med
bortskaffelseshenvisninger)!
59
Page 60

Oversigt
CHE 4-32 R SDS-plus
1 SDS Borepatron
2 Vekselpatron
3 Ekstra håndtag
4 Spindel
5 Klemarm til dybdestop
6 Dybdestop
7 Drejeknap til indstilling
af arbejdsfunktion
8Afbryder
Til tænd og sluk samt til opnåelse
af maks. omdrejnings-/slagtal.
60
9 Håndtag
10 Netledning
11 Typeskilt *
* ses ikke
Page 61

CHE 4-32 R SDS-plus
For din egen sikkerheds skyld
ADVARSEL!
Læs alle sikkerhedshenvisninger og
anvisninger.
overholdelse af sikkerhedshenvisningerne
og anvisningerne er der risiko for elektriske
stød, brand og/eller alvorlige kvæstelser
Opbevar alle sikkerhedshenvisninger og
anvisninger til senere brug.
Inden elværktøjet tages i brug, skal du læse
og følge:
–
denne betjeningsvejledning,
–
"Generelle sikkerhedsanvisninger" for
håndtering af elværktøjer i vedlagte
hæfte (
–
de for anvendelsesstedet gældende
regler og forskrifter vedrørende
forebyggelse af ulykker.
Dette elværktøj er konstrueret i henhold til
det aktuelle tekniske niveau og anerkendte
sikkerhedstekniske regler. Alligevel kan der
ved dets brug opstå fare for brugers eller
tredjemands liv og lemmer, maskinen kan
beskadiges, eller der kan opstå andre
materielle skader. Elværktøjet må kun
benyttes
–
til det dertil beregnede formål,
–
i sikkerhedsteknisk upåklagelig tilstand.
Fejl, der har negativ indflydelse på
sikkerheden, skal afhjælpes omgående.
Bestemmelsesmæssig brug
Bore- og mejselhammeren CHE 4-32 R
SDS-plus er beregnet
– til erhvervsmæssig brug inden for industri
og håndværk,
– til hammerboring i murværk og beton ved
fastgøring af dyvler og ankre samt
gennemgangsboringer,
– til let stemmearbejde for at fjerne puds og
fliser,
– til brug med passende værktøj, som
producenten har anbefalet til denne
maskine.
I tilfælde af manglende
.
skrift nr.: 315.915),
Sikkerhedshenvisninger for hamre
Brug høreværn. Man kan miste hørelsen
ved påvirkning af støj.
Benyt de medfølgende ekstrahåndtag.
Der er fare for at blive kvæstet, hvis man
mister kontrollen over maskinen.
Tag fat i det isolerede håndtag, når der
arbejdes på steder, hvor
indsatsværktøjet vil kunne ramme skjulte
strømledninger eller maskinens egen
ledning. Kontakt med en
spændingsførende ledning kan også sætte
metaldele på apparatet under spænding
og medføre elektriske stød.
Andre sikkerhedshenvisninger
Anvend egnede søgeapparater til
detektering af skjulte
forsyningsledninger, eller kontakt det
lokale forsyningsselskab. Kontakt med
elledninger kan medføre brand og
elektriske stød. Beskadigelse af en
gasledning kan medføre eksplosion.
Indtrængen i en vandledning forårsager
materielle skader, eller det kan forårsage
elektriske stød.
Hold elværktøjet fast med begge
hænder, når der arbejdes, og sørg for at
stå sikkert. Elværktøjet kan føres mere
sikkert med begge hænder.
Sørg for at sikre arbejdsemnet. Det er
mere sikkert at holde arbejdsemnet fast
med en spændeanordning end med
hånden.
Elværktøjet må ikke benyttes, hvis kablet
er beskadiget. Berør ikke et beskadiget
kabel og træk netstikket ud af
stikkontakten, hvis kablet skulle blive
beskadiget under arbejdet. Beskadigede
kabler øger risikoen for elektriske stød.
Anvend kun værktøj med SDS-plus
værktøjsholder. Kontroller låsningen ved
at trække i værktøjet.
En beskadiget støvbeskyttelseskappe
skal udskiftes straks.
Støvbeskyttelseskappen forhindrer, at der
kan trænge støv ind i værktøjsholderen.
61
Page 62

Frigivet støv fra materialer, f.eks.
blyholdige malinger, nogle træarter,
mineraler og metal kan udsætte brugeren
eller andre personer, der opholder sig i
nærheden, for fare.
Hvis dette støv
indåndes eller berøres, kan det medføre
åndedrætssygdomme og/eller allergiske
reaktioner.
– Sørg for at arbejdspladsen udluftes
godt!
– Brug om muligt ekstern
støvudsugning.
– Det anbefales at anvende en
støvmaske med filterklasse P2.
Der må ikke bearbejdes materialer, hvor
sundhedsfarlige stoffer frigives (f.eks.
asbest).
Der må kun anvendes klæbeetiketter til
mærkning af elværktøjet. Bor ikke huller i
maskinens hus.
Netspændingen og spændingsangivelsen
på typeskiltet skal stemme overens.
Støj og vibration
Støj- og svingningsværdierne er beregnet
iht. EN 60745.
Det A-vægtede støjniveau for apparatet er
typisk:
– Lydtryksniveau: 92 dB(A);
– Lydeffektniveau: 103 dB(A);
– Usikkerhed K: 3 dB.
Samlet svingningsværdi:
– ved hammerboring:
– Emissionsværdi a
– Usikkerhed K: 1,5 m/s
– ved mejsling:
– Emissionsværdi a
– Usikkerhed K: 1,5 m/s
OBS!
De angivne måleværdier gælder for nye
apparater. Støj- og svingningsværdierne
ændrer sig ved daglig brug.
: 13,34 m/s
h
: 10,60 m/s
h
CHE 4-32 R SDS-plus
BEMÆRK!
Det svingningsniveau, der er angivet i disse
anvisninger, er blevet målt i henhold til en
standardiseret måleproces i EN 60745 og kan
bruges til at sammenligne elværktøjerne. Det
egner sig også til en foreløbig vurdering af
svingningsbelastningen.
Det angivne svingningsniveau repræsenterer
elværktøjets hovedsagelige anvendelser.
Hvis elværktøjet imidlertid benyttes til andre
formål, med afvigende indsatsværktøjer eller
utilstrækkelig vedligeholdelse, kan
svingningsniveauet afvige. Dette kan øge
svingningsbelastningen betydeligt i hele
arbejdstidsrummet.
For en nøjagtig vurdering af
svingnings
belastningen bør man også tage
højde for de tider, hvor apparatet er slukket
eller kører, men faktisk ikke bruges. Dette kan
reducere svingningsbelastningen betydeligt i
hele arbejdstidsrummet.
Fastlæg yderligere sikkerhedsforanstaltninger
til beskyttelse af brugeren imod påvirkning af
svingninger, som for eksempel:
vedligeholdelse af elværktøj og
indsatsværktøjer, varmholdelse af hænder,
organisation af arbejdsforløb.
FORSIGTIG!
Ved et lydtryk på over 85 dB(A) skal der
benyttes høreværn.
2
2
2
2
62
Page 63

CHE 4-32 R SDS-plus
Brugsanvisning
Inden ibrugtagning
Pak elværktøjet og tilbehøret ud og
kontrollér, om det er komplet eller
beskadiget under transporten.
Justering af ekstra håndtag
ADVARSEL!
Træk netstikket ud af stikkontakten, før der
udføres arbejde på elværktøjet.
FORSIGTIG!
Elværktøjet må kun benyttes, når
ekstrahåndtaget er påmonteret.
Ekstrahåndtaget kan drejes til hvilken som
helst ønsket position for at garantere, at der
kan arbejdes så sikkert som muligt uden at
blive træt.
Løsn klemfunktion ved at dreje
ekstrahåndtaget mod uret (1.).
Drej ekstrahåndtaget i den ønskede
position (2.).
Ved drejning af ekstrahåndtaget med
uret fikseres indstillingen.
Montering af dybdestop
ADVARSEL!
Træk netstikket ud af stikkontakten, før der
udføres arbejde på elværktøjet.
Tryk på øverste del af klemarmen på
det ekstra håndtag og hold den inde.
Skub dybdestoppet ind.
Indstil dybdestoppet i ønsket boredybde.
Slip klemarmen.
Isætning af værktøj med SDS-skaft
ADVARSEL!
Træk netstikket ud af stikkontakten, før der
udføres arbejde på elværktøjet.
FORSIGTIG!
Benyttede indsatsværktøjer kan være
meget varme. Benyt beskyttelseshandsker!
BEMÆRK!
Værktøjet, der anvendes, skal have et
SDS-skaft. Til værktøj uden SDS-skaft
(f.eks. træbor) skal der anvendes en
trebakket borepatron (se "Indstilling af
arbejdsfunktion").
Kontrollér støvbeskyttelseskappen.
– Rengør kappen, hvis den er snavset.
– Få en defekt støvbeskyttelseskappe
udskiftet.
Rengør værktøjer, og smør skaftet med
en smule fedt.
63
Page 64

CHE 4-32 R SDS-plus
Isæt indsatsværktøjet (1.), og drej (2.),
indtil det låses.
Træk i indsatsværkøjet for at kontrollere,
om det er låst.
Udtagning af værktøjer
ADVARSEL!
Træk netstikket ud af stikkontakten, før der
udføres arbejde på elværktøjet.
FORSIGTIG!
Benyttede indsatsværktøjer kan være
meget varme. Brug beskyttelseshandsker!
Sæt drejeknappen på ønsket
arbejdsfunktion:
Boring
Hammerboring
Indstilling af mejselposition
(se der)
Mejsling
BEMÆRK!
– I alle positioner skal drejeknappen gå
hørbart i hak.
– Elværktøjet må ikke tændes i positionen
(indstilling af mejselposition).
Indstilling af mejselposition
Mejslen kan drejes til en position, der er
optimal for arbejdet, der skal udføres.
Sæt drejeknappen for arbejdsfunktion på
symbolet (1.).
Drej mejslen, indtil den har den ønskede
vinkel (2.).
Træk låsehylsen bagud (1.).
Tag indsatsværktøjet ud (2.).
Indstilling af arbejdsfunktion
FORSIGTIG!
Arbejdsfunktionen må kun ændres, når
elværktøjet står helt stille.
64
Sæt drejeknappen for arbejdsfunktion på
symbolet (3.). Sørg for, at den går
hørbart i hak!
Tilkobling af elværktøjet
Page 65

CHE 4-32 R SDS-plus
Tryk på afbryderen og hold den fast.
Omdrejnings- eller slagtallet kan øges
langsomt med kontakten på elværktøjet,
indtil den maksimale værdi er nået.
Slukke maskinen:
Slip afbryderen.
Arbejdshenvisninger
Boring/hammerboring
1. Sæt drejeknappen for arbejdsfunktion
på symbolet (boring) eller
(hammerboring). Sørg for, at den går
hørbart i hak!
2. Sæt boret i.
3. Indstil ekstrahåndtaget i ønsket position.
4. Sæt netstikket i stikkontakten.
5. Tag fat i elværktøjet med begge
hænder, og indtag arbejdspositionen.
6. Placer boret på emnet, og tænd
elværktøjet.
7. Pres elværktøjet forsigtigt fremad.
8. Sluk maskinen, når borearbejdet er
afsluttet.
9. Træk netstikket ud.
Mejsling
1. Isæt mejslen.
2. Sæt drejeknappen for arbejdsfunktion
på symbolet .
3. Drej mejslen til ønsket position.
4. Sæt drejeknappen for arbejdsfunktion
på symbolet . Sørg for, at den går
hørbart i hak!
5. Indstil ekstrahåndtaget i ønsket position.
6. Sæt netstikket i stikkontakten.
7. Tag fat i elværktøjet med begge
hænder, og indtag arbejdspositionen.
8. Tænd elværktøjet.
9. Pres elværktøjet forsigtigt fremad ved
mejsling, så det ikke "hopper".
10. Sluk maskinen efter arbejdets
afslutning.
11. Træk netstikket ud.
Yderligere henvisninger
– Brugen af "skarpe" indsatsværktøjer
øger arbejdsydelsen og
elværktøjets levetid.
– Rengør elværktøjet efter arbejdets
afslutning, læg det i transportkufferten,
og opbevar det på et tørt sted.
Vedligeholdelse og pleje
ADVARSEL!
Før alle arbejder på elværktøjet skal
netstikket trækkes ud af stikkontakten.
Rengøring
Rengør apparatet og ventilationsslidserne
regelmæssigt. Intervallerne afhænger af
materialet, der skal bearbejdes, og af
brugsvarigheden. Blæs husets indre med
motor ud regelmæssigt med tør trykluft.
Kulbørster
Elværktøjet er udstyret med udkoblingskul.
Når slidgrænsen er nået, slukkes
elværktøjet automatisk.
BEMÆRK!
Der må kun anvendes originale dele fra
producenten ved udskiftning. Ved
anvendelse af fremmede fabrikater
bortfalder producentens garantiforpligtelser.
Ilden fra kullet kan iagttages gennem de
bagerste luftindgangsåbninger under brugen.
Sluk elværktøjet omgående ved stærk kulbrand.
Aflever elværktøjet til et af producenten
autoriseret kundeserviceværksted.
Gearkasse
BEMÆRK!
Skruerne på gearhovedet må ikke løsnes
i garantiperioden. Ved tilsidesættelse af dette
bortfalder producentens garantiforpligtelser.
Reparationer
Reparationer må udelukkende udføres af et
kundeserviceværksted, der er autoriseret af
producenten.
Hvis tilslutningsledningen til elværktøjet er
beskadiget, skal den udskiftes med en
tilslutningsledning i speciel udførelse
(anbringelsesart X). Denne tilslutningsledning fås hos FLEX-kundeservice.
Reservedele og tilbehør
Yderligere tilbehør, især indsatsværktøjer,
findes i fabrikantens kataloger.
Eksplosionstegninger og reservedelslister
finder du på vores hjemmeside:
www.flex-tools.com
65
Page 66

CHE 4-32 R SDS-plus
Klaus Peter WeinperEckhard Rühle
Manager Research &
Development (R & D)
Head of Quality
Department (QD)
Bortskaffelseshenvisninger
ADVARSEL!
Gør udtjente apparater ubrugelige ved
at fjerne netkablet.
Kun for EU-lande.
Elværktøjer er ikke normalt
husholdningsaffald!
I henhold til europæisk direktiv 2012/19/EU
om affald af elektrisk og elektronisk udstyr og
implementering i national ret skal udtjente
elektroværktøjer indsamles separat og
afleveres på et indsamlingssted for
materialegenvinding.
BEMÆRK!
Forhandleren giver oplysninger om
bortskaffelsesmuligheder!
-overensstemmelse
Vi erklærer under eneansvar, at produktet, der
er beskrevet under "Tekniske data", er i
overensstemmelse med følgende standarder
eller normative dokumenter:
EN 60745 i henhold til bestemmelserne
i direktiverne 2014/30/EU, 2006/42/EF,
2011/65/EU.
Ansvarlig for det tekniske dossier:
FLEX-Elektrowerkzeuge GmbH, R & D
Bahnhofstrasse 15, D-71711 Steinheim/Murr
Ansvarsudelukkelse
Producenten og dennes repræsentant hæfter
ikke for skader og mistet fortjeneste som følge
af driftsafbrydelse i virksomheden, der er
forårsaget af produktet eller fordi produktet
ikke kunne benyttes. Producenten og dennes
repræsentant hæfter ikke for skader opstået
som følge af usagkyndig anvendelse eller
i forbindelse med produkter fra andre
producenter.
07.03.2018
FLEX-Elektrowerkzeuge GmbH
Bahnhofstrasse 15, D-71711 Steinheim/Murr
66
Page 67

CHE 4-32 R SDS-plus
Innhold
Anvendte symboler . . . . . . . . . . . . . . . . 67
Symbolene på apparatet . . . . . . . . . . . . 67
Tekniske data . . . . . . . . . . . . . . . . . . . . 67
Et overblikk . . . . . . . . . . . . . . . . . . . . . . 68
For din egen sikkerhet . . . . . . . . . . . . . . 69
Støy og vibrasjon . . . . . . . . . . . . . . . . . 70
Bruksanvisning . . . . . . . . . . . . . . . . . . . 71
Vedlikehold og pleie . . . . . . . . . . . . . . . 73
Henvisninger om skroting . . . . . . . . . . . 74
-samsvar . . . . . . . . . . . . . . . . . . . . . . 74
Ansvarsfraskrivelse . . . . . . . . . . . . . . . . 74
Anvendte symboler
ADVARSEL!
Gjør oppmerksom på en umiddelbar
truende fare. Det kan oppstå livsfare eller
fare for alvorlige skader dersom dette ikke
blir fulgt.
FORSIKTIG!
Gjør oppmerksom på en situasjon som kan
være farlig. Det kan oppstå skader på
personer eller ting dersom dette ikke blir fulgt.
HENVISNING!
Betegner tips om bruken og viktige
informasjoner.
Symbolene på apparatet
Tekniske data
Bore- og meiselhammer CHE 4-32 R
SDS-plus
Nominelt strømforbruk W 900
-1
Turtall ved tomgang min
Tomgangsslagtall
Max. enkeltslags
energi (i henhold til
“EPTA-procedure
05/2009”)
Smøring Fett
Verktøyholder SDS-plus
Max. borediameter
– Betong
– Murverk
– (HM-borekrone)
– Treverk
– Metall
Vekten er tilsvarende
“EPTA-procedure
01/2003”
Beskyttelsesklasse
min
J4,8
mm
mm
mm
mm
kg 4,6
0–850
-1
0–3700
32
82
32
13
II /
Betjeningsveiledningen må leses
før igangsetting!
Bruk øyevern!
Bruk hørselsvern!
Bruk et lett pustevern!
Henvisning om skroting av
gammelt apparat (se siden
Henvisninger om skroting)!
67
Page 68

Et overblikk
CHE 4-32 R SDS-plus
1 SDS Borkjoks
2 Skiftechuck
3 Ekstra håndtak
4 Spindel
5 Klemspak for dybdeanslag
6 Dybdeanslag
7 Dreieknapp for arbeidsmodus
8Bryter
For inn- og utkopling samt oppkjøring
til maksimalt tur-/slagtall.
68
9 Håndtak
10 Strømkabel
11 Typeskilt *
* ikke synlig
Page 69

CHE 4-32 R SDS-plus
For din egen sikkerhet
ADVARSEL!
Les gjennom alle sikkerhetshenvisningene
og anvisningene.
gjelder overholdelsen av
sikkerhetshenvisningene og anvisningene,
kan føre til elektrisk støt, brann og/eller
alvorlige skader
sikkerhetshenvisningene og anvisningene
for senere bruk.
Må leses igjennom og tas hensyn til før bruk
av elektroverktøyet:
–
den foreliggende
betjeningsveiledningen,
–
de "generelle sikkerhetshenvisningene"
i omgang med elektroverktøy i den
vedlagte brosjyren (
–
de regler og forskrifter som gjelder på
arbeidsstedet for uhellsforebyggende
tiltak.
Dette elektroverktøyet er bygget etter
teknikkens stand og anerkjente
sikkerhetstekniske regler. Det kan allikevel
oppstå skade for liv og levnet for brukeren
eller tredje personer eller også skade på
maskinen eller andre ting under bruken av
maskinen. Elektroverktøyet må kun brukes
–
til de arbeider den er beregnet for,
–
i sikkerhetsteknisk lytefri tilstand.
Feil som har innflytelse på sikkerheten må
straks utbedres.
Forskriftsmessig bruk
Bore- og meiselhammeren CHE 4-32 R
SDS-plus er konstruert
– for kommersiell bruk innenfor industri og
håndverk,
– hammerboring i murverk og betong for
ekspansjonshylse- og ankerfeste og for
gjennomgangsboring,
– for lette stemmearbeider for fjerning av
puss og fliser,
– for bruk med egnet verktøy som er
anbefalt av produsenten av dette
apparatet.
Forsømmelser når det
. Oppbevar alle
nr.: 315.915),
Sikkerhetsveiledninger for hammer
Bruk hørselsvern. Påvirkning av støy kan
føre til skade på hørselen.
Bruk det ekstra håndtaket som blir levert
med apparatet. Tap av kontrollen kan føre
til skader.
Hold maskinen kun i de isolerte
håndtakene når du utfører arbeid hvor
verktøyet kan treffe på gjemte
strømledninger eller dens egen kabel.
Kontakt med spenningsførende ledninger
kan også sette apparatdeler av metall
under spenning og føre til elektrisk støt.
Ytterligere sikkerhetshenvisninger
Bruk et egnet søkeapparat for å lete etter
skjulte forsyningsledninger eller spør hos
offentlige myndigheter hvor slike
ledninger finnes. Kontakt med
elektroledninger kan føre til brann og
elektrisk støt. Skade på gassledningen kan
føre til eksplosjon. Dersom det bores inn
i en vannledning, kan dette forårsake
skader på ting og kan føre til elektrisk støt.
Hold elektroverktøyet fast med begge
hendene under arbeidet og sørg for at du
står sikkert. Elektroverktøyet bør føres
sikkert med to hender.
Fest fast arbeidsstykket. Et arbeidsstykke
som er festet med en spenninnretning, er
sikrere enn om du holder i det med
hånden.
Ikke bruk elektroverktøy som har skadet
kabel. Ikke ta i den skadete kabelen og
trekk ut støpselet dersom kabelen blir
skadet under arbeidet. Skadete kabler
forhøyer risikoen for elektrisk støt.
Bruk kun verktøy med SDS-plus
verktøyopptak. Kontroller av det er korrekt
lukket ved å trekke i verktøyet.
En støvbeskyttelseshette som er skadet,
må straks skiftes ut.
Støvbeskyttelseshetten forhindrer at det
kommer støv inn i verktøyopptaket.
69
Page 70

CHE 4-32 R SDS-plus
Frigjort støv fra materialer som blyholdige
strøk av maling, noen tretyper, mineraler
og metall kan forårsake fare for
betjeningspersonen eller for personer som
oppholder seg i nærheten.
Innånding eller
berøring av slikt støv kan føre til
sykdommer i luftveiene og/eller allergiske
reaksjoner.
– Det må sørges for god ventilasjon på
arbeidsplassen!
– Om mulig må det brukes ekstern
støvoppsuging.
– Det anbefales bruk av en
pustevernmaske med filterklasse P2.
Det må ikke bearbeides materialer hvor
helsefarlige stoffer frigjøres (f.eks. asbest).
For kjennetegning av elektroverktøy må
det kun brukes merker/skilt som limes på.
Det må ikke bores hull i kassen.
Nettspenningen må stemme overens med
spenningsangivelsen på typeskiltet.
Støy og vibrasjon
Støy- og svingningsverdiene er målt i
henhold til EN 60745.
Det A-vurderte støynivået på apparatet
utgjør typisk:
– Lydtrykknivå: 92 dB(A);
– Lydeffektnivå: 103 dB(A);
– Usikkerhet K: 3 dB.
Samlet svingningsverdi:
– under hammerboring:
– Emisjonsverdi a
– Usikkerhet K: 1,5 m/s
– under meisling:
– Emisjonsverdi ah: 10,60 m/s
– Usikkerhet K: 1,5 m/s
OBS!
De angitte måleverdiene gjelder for nye
apparater. Under den daglige bruken
forandres støy- og svingningsverdiene.
: 13,34 m/s
h
HENVISNING!
Det svingningsnivået som er angitt i disse
anvisningene, er målt i henhold til et
målemetode som er normert etter EN 60745,
og kan brukes for sammenligning av
elektroverktøy. Det egner seg også for en
foreløpig vurdering av
svingningsbelastningen.
Det angitte svingningsnivået representerer de
hovedsakelige anvendelsene til
elektroverktøyet. Dersom elektroverktøyet blir
brukt for annen bruk med avvikende
innsatsverktøy, eller det ikke foretas
tilstrekkelig vedlikehold, kan svingningsnivået
avvike. Dette kan føre til en tydelig forhøying
av svingningsbelastningen for hele
arbeidstiden.
For en nøyaktig vurdering av
svingnings
belastningen bør også tidene tas
hensyn til hvor apparatet er slått av eller er
i gang, men faktisk ikke blir brukt. Dette kan
tydelig redusere svingningsbelastningen over
hele arbeidstiden.
Det bør fastlegges ekstra sikkerhetstiltak for
vern av brukeren overfor svingninger, som
f.eks. vedlikehold av elektroverktøy og
innsatsverktøy, oppvarming av hendene,
organisasjon av arbeidsforløpene.
FORSIKTIG!
Ved lydtrykk på over 85 dB(A) må det
brukes hørselsvern.
2
2
2
2
70
Page 71

CHE 4-32 R SDS-plus
Bruksanvisning
Før igangsetting
Elektroverktøyet og tilbehøret pakkes ut, og
det må kontrolleres at leveringen er
fullstendig og at det ikke er oppstått
transportskader.
Innstilling av ekstra håndtak
ADVARSEL!
Før alle arbeider på elektroverktøy må
støpselet trekkes ut.
FORSIKTIG!
Elektroverktøy må kun brukes med montert
ekstra håndtak.
Det ekstra håndtaket kan svinges i hvilken
som helst posisjon for å garantere et sikkert
og lite anstrengende arbeid.
Løsne klemmen ved å vri det ekstra
håndtaket mot urviseren (1.).
Sving det ekstra håndtaket til ønsket
posisjon (2.).
Fest innstillingen ved å dreie det ekstra
håndtaket med urviseren .
Montering av dybdeanslag
ADVARSEL!
Før alle arbeider på elektroverktøy må
støpselet trekkes ut.
Klemmespaken på det ekstra håndtaket
trykkes i den øver delen og holdes fast.
Skyv inn dybdeanslaget.
Dybdeanslaget innstilles på den ønskede
boredybden.
Klemmespaken slippes.
Sette inn verktøy med SDS-skaft
ADVARSEL!
Før alle arbeider på elektroverktøy må
støpselet trekkes ut.
FORSIKTIG!
Verktøy som blir brukt kan bli oppvarmet.
Bruk vernehansker!
HENVISNING!
Verktøyet som brukes, må ha et SDS-skaft.
For verktøy uten SDS-skaft (f.eks. trebor)
må det brukes en borepatron med tre kjever
(se "Still inn arbeidsmodus").
Støvdekslet må kontrolleres.
– Dekselet må rengjøres for smuss.
– Defekt støvbeskyttelseskappe må
skiftes ut.
Rengjør verktøyene og smør skaftet litt.
71
Page 72

CHE 4-32 R SDS-plus
Sett inn verktøyet som skal brukes (1.) og
vri (2.) til det går i lås.
Kontroller låsen ved å trekke i verktøyet.
Uttak av verktøyet
ADVARSEL!
Før alle arbeider på elektroverktøy må
støpselet trekkes ut.
FORSIKTIG!
Verktøy som blir brukt kan bli oppvarmet.
Bruk vernehansker!
Trekk låsehylsen bakover (1.).
Ta ut verktøyet (2.).
Still inn arbeidsmodus
FORSIKTIG!
Arbeidsmodus må kun endres når
elektroverktøyet står stille.
Dreieknappen innstilles på ønsket
arbeidsmodus:
Boring
Hammerboring
Innstilling av meiselposisjonen
(se der)
Meisling
HENVISNING!
– I alle posisjoner skal du høre at
dreieknappen går i lås.
– I posisjonen (innstilling av
meiselposisjonen) må ikke
elektroverktøyet slås på.
Innstilling av meiselposisjonen
Meiselen kan dreies slik at den står i en optimal
posisjon for det arbeidet som skal utføres.
Dreieknappen for arbeidsmodus stilles
på symbolet (1.).
Drei meiselen inntil den har den ønskede
vinkelen (2.).
Dreieknappen for arbeidsmodus settes
på symbolet (3.). Hør at den går i lås!
Innkopling av elektroverktøy
72
Page 73

CHE 4-32 R SDS-plus
Bryteren trykkes og holdes fast.
Bryteren på elektroverktøyet gjør det
mulig å la tur- hhv. slagtallet stige
langsomt inntil den maksimale verdien.
Utkobling av apparatet:
Slipp bryteren.
Arbeidshenvisninger
Boring/hammerboring
1. Dreieknappen for arbeidsmodus settes
på symbolet (boring) hhv.
(hammerboring). Hør at den går i lås!
2. Innsetting av bor.
3. Still inn det ekstra håndtaket i ønsket
posisjon.
4. Støpselet stikkes inn.
5. Grip elektroverktøyet med begge
hendene og still deg opp i
arbeidsposisjon.
6. Sett boret på og slå på elektroverktøyet.
7. Elektroverktøyet trykkes forsiktig
framover.
8. Etter avsluttet boring må apparatet slås
av.
9. Støpselet trekkes ut.
Meisling
1. Sett inn meisel.
2. Dreieknappen for arbeidsmodus settes
på symbolet .
3. Drei meiselen i ønsket posisjon.
4. Dreieknappen for arbeidsmodus settes
på symbolet . Hør at den går i lås!
5. Still inn det ekstra håndtaket i ønsket
posisjon.
6. Støpselet stikkes inn.
7. Grip elektroverktøyet med begge
hendene og still deg opp i
arbeidsposisjon.
8. Slå på elektroverktøyet.
9. Elektroverktøyet må under meislingen
trykkes forsiktig framover slik at det ikke
hopper.
10. Etter avsluttet arbeid må apparatet slås
av.
11. Støpselet trekkes ut.
Andre henvisninger
– Bruk av “skarpe” verktøy øker
arbeidsytelsen og også levetiden til
elektroverktøyet.
– Elektroverktøy må rengjøres etter
arbeidet og må oppbevares i
transportkofferten på et tørt sted.
Vedlikehold og pleie
ADVARSEL!
Før alle arbeider på elektroverktøy må
støpselet trekkes ut.
Rengjøring
Apparatet og ventilasjonsåpningene må
rengjøres regelmessig. Hvor ofte dette må
skje er avhengig av materialet som
bearbeides og av hvor lenge apparatet er
i bruk. Innsiden av kassen med motoren må
regelmessig blåses ut med tørr trykkluft.
Kullbørster
Elektroverktøyet er utstyrt med utkoplingskull.
Når disse utkoplingskullene har nådd sin
grense for slitasje, blir elektroverktøyet
automatisk slått av.
HENVISNING!
For utskifting må det kun brukes
originaldeler fra produsenten. Ved bruk av
andre fabrikater slettes produsentens
garantiforpliktelser.
Igjennom luftinntaksåpningene bak kan
kullfyret kontrolleres under bruken.
Ved sterke kullgnister må elektroverktøyet
straks slås av. Elektroverktøyet må leveres
inn på et kundeservice verksted som er
autorisert av produsenten.
Drevet
HENVISNING!
Skruene på drivhodet må ikke løsnes i
garantitiden. Dersom dette ikke blir fulgt,
slettes produsentens garantiforpliktelser.
73
Page 74

CHE 4-32 R SDS-plus
Klaus Peter WeinperEckhard Rühle
Manager Research &
Development (R & D)
Head of Quality
Department (QD)
Reparasjoner
Reparasjoner må utelukkende utføres av et
kundeserviceverksted som er autorisert av
produsenten.
Dersom strømledningen på elektroverktøy
er skadet, må den skiftes ut med en spesiell
kabel (type X). Dette fåes hos FLEX
kundeservice.
Reservedeler og tilbehør
Ytterligere tilbehør, særlig innsatsverktøy,
finnes i katalogen fra produsenten.
Sammenstillingstegninger og lister for
reservedeler finnes på vår hjemmeside:
www.flex-tools.com
Henvisninger om skroting
ADVARSEL!
Utrangerte apparater må gjøres ubrukelige
ved å fjerne nettkabelen.
Kun for EU-land.
Ikke kast elektroverktøy i hushold-
ningsavfallet! I henhold til det
europeiske direktivet 2012/19/EU om gamle
elektriske og elektroniske apparater og
omsetning til nasjonal rett, må brukte
elektroverktøy samles inn separat og
tilføres en miljøvennlig gjenvinning.
HENVISNING!
Faghandelen vil gi deg informasjon om
avhendingsmuligheter!
-samsvar
Vi erklærer hermed at vi alene er ansvarlig for
at produktet som er beskrevet under
"Tekniske data" stemmer overens med
følgende normer eller normative dokumenter:
EN 60745 i henhold til bestemmelsene
i direktivene 2014/30/EU, 2006/42/EF,
2011/65/EU.
Ansvarlig for tekniske dokumenter:
FLEX-Elektrowerkzeuge GmbH, R & D
Bahnhofstrasse 15, D-71711 Steinheim/Murr
07.03.2018
FLEX-Elektrowerkzeuge GmbH
Bahnhofstrasse 15, D-71711 Steinheim/Murr
Ansvarsfraskrivelse
Produsenten og hans representant er ikke
ansvarlige for skader eller tapt vinning på
grunn av avbrytelse i driften som er forårsaket
av produktet eller ikke mulig bruk av
produktet. Produsenten og hans representant
er ikke ansvarlige for skader som er forårsaket
av ikke sakkyndig bruk eller i forbindelse med
produkter fra andre produsenter.
74
Page 75

CHE 4-32 R SDS-plus
Innehåll
Använda symboler . . . . . . . . . . . . . . . . 75
Symboler på maskinen. . . . . . . . . . . . . . 75
Tekniska data . . . . . . . . . . . . . . . . . . . . 75
Översikt . . . . . . . . . . . . . . . . . . . . . . . . . 76
För din säkerhet . . . . . . . . . . . . . . . . . . 77
Buller och vibration . . . . . . . . . . . . . . . . 78
Bruksanvisning . . . . . . . . . . . . . . . . . . . 79
Underhåll och skötsel . . . . . . . . . . . . . . 81
Anvisningar om avfallshantering . . . . . . 82
-märkning . . . . . . . . . . . . . . . . . . . . . 82
Ansvarsfriskrivning. . . . . . . . . . . . . . . . . 82
Använda symboler
VARNING!
Varnar för en omedelbart hotande fara. Risk
för liv och lem eller svåra personskador om
varningen ej beaktas.
VAR FÖRSIKTIG!
Varnar för en möjlig farlig situation.
Om varningen ej beaktas kan person- eller
sakskador uppstå.
OBS!
Hänvisar till användningstips och viktig
information.
Symboler på maskinen
Tekniska data
Borrhammare CHE 4-32 R
SDS-plus
Nom. effektförbrukning W 900
-1
Tomgångsvarvtal min
Tomgångsslagtal
Max. enkelslagenergi
(enligt ”EPTAprocedure 05/2009”)
Smörjning Fett
Verktygshållare SDS-plus
Max. borrdiameter
– Betong
– Tegel
– (HM-borrkrona)
– Trä
– Metall
Vikt enligt ”EPTAProcedure 01/2003”
Skyddsklass
min
J4,8
mm
mm
mm
mm
kg 4,6
0–850
-1
0–3700
32
82
32
13
II /
Läs bruksanvisningen före
idrifttagning!
Använd ögonskydd!
Använd hörselskydd!
Använd lätt andningsskydd!
Anvisningar om avfallshantering för
den gamla maskinen (se sidan
Anvisningar om avfallshantering)!
75
Page 76

Översikt
CHE 4-32 R SDS-plus
1 SDS Borrchuck
2 Snabbchuck
3 Extrahandtag
4 Spindel
5 Knapp för djupanslag
6 Djupanslag
7 Vridknopp för arbetsläge
8 Strömställare
För till- och frånslagning liksom start
upp till max. varvtal och slagfrekvens.
76
9 Handtag
10 Nätkabel
11 Typskylt *
* ej synlig
Page 77

CHE 4-32 R SDS-plus
För din säkerhet
VARNING!
Läs alla säkerhetsanvisningar och övriga
anvisningar.
säkerhetsanvisningarna och övriga
anvisningar kan leda till elektriska stötar,
brand och/eller svåra skador
säkerhetsanvisningar och övriga
anvisningar för framtida bruk.
Innan elverktyget tas i bruk ska följande
dokument läsas igenom noggrant och följas:
–
den föreliggande bruksanvisningen
–
”Allmänna säkerhetsanvisningar” för
hantering av elverktyg i det bifogade
häftet (
–
regler och föreskrifter för
olycksförebyggande som gäller på
platsen där maskinen används.
Detta elverktyg är konstruerat enligt den
senaste tekniken och vedertagna
säkerhetstekniska regler. Trots det kan fara
för liv och lem uppstå under användning –
både för användaren och andra. Det finns
även risk för skador på maskinen eller andra
föremål. Elverktyget får endast användas
–
för avsett ändamål
–
i säkerhetstekniskt felfritt tillstånd.
Störningar som kan påverka säkerheten
måste omgående åtgärdas.
Avsedd användning
Borr- och mejselhammaren CHE 4-32 R
SDS-plus är avsedd för
– yrkesmässig användning inom industri
och hantverk
– hammarborrning i tegel och betong för
dybel- och ankarinfästning och
genomgångsborrning
– lätta mejselarbeten för att avlägsna puts
och kakelplattor
– användning med lämpliga och av
tillverkaren för denna maskin
rekommenderade verktyg.
Underlåtenhet att följa
. Förvara alla
skriftnr: 315.915),
Säkerhetsanvisningar för hammare
Använd hörselskydd. Buller kan leda till
hörselskador.
Använd de medlevererade
extrahandtagen. Kontrollförlust kan leda
till skador.
Håll maskinen i de isolerade handtagen
när du utför arbeten som innebär att
insatsverktyget kan träffa dolda
elledningar eller den egna nätsladden.
Kontakt med en strömförande ledning kan
även sätta metallmaskindelar under
spänning och leda till elektriska stötar.
Ytterligare säkerhetsanvisningar
Använd lämpliga sökverktyg för att hitta
dolda elledningar, eller anlita en lokal
vatten- och energileverantör. Kontakt
med elledningar kan leda till brand och
elektriska stötar. Skada på en gasledning
kan leda till explosion. Intrång i en
vattenledning förorsakar skada och utlösa
en elektrisk stöt.
Håll alltid maskinen med båda händerna
under arbetet och se till att du står
stadigt. Maskinen förs säkrare med två
händer.
Säkra arbetsstycket. Ett fastspänt
arbetsstycke hålls säkrare på plats än med
handen.
Använd inte elverktyget med skadad
kabel. Vidrör ej den skadade kabeln och
dra ut nätkontakten om kabeln skadas
under arbetet. Defekta kablar höjer risken
för elektriska stötar.
Använd endast insatsverktyg med SDS-
plus fäste. Kontrollera att insatsverktyget
sitter riktigt fast genom att dra i det.
Byt genast ut skadat dammskydd.
Dammskyddet förhindrar att damm tränger
in i chucken.
77
Page 78

Damm från material som blyhaltiga färger,
vissa träsorter, mineraler och metaller kan
vara farliga för användaren och andra
personer i närheten.
Inandning eller
beröring av sådant damm kan leda till
sjukdomar i andningsvägarna och/eller
allergiska reaktioner.
– Se till att arbetsplatsen är
välventilerad!
– Använd om möjligt extern
dammutsugning.
– Användning av en
andningsskyddsmask med filterklass
P2 rekommenderas.
Bearbeta ej material som frisläpper
hälsovådliga ämnen (t.ex. asbest).
Använd endast dekaler för att märka
maskinen. Borra ej hål i höljet.
Nätspänningen och spänningsangivelsen
på typskylten måste överensstämma med
varandra.
Buller och vibration
Buller- och vibrationsvärdena har uppmätts
enligt EN 60745.
Maskinens A-uppmätta bullernivå under
typiska förhållanden ger följande värden:
– Ljudtrycksnivå: 92 dB(A);
– Ljudeffektsnivå: 103 dB(A);
– Osäkerhet K: 3 dB.
Sammanlagt vibrationsvärde:
– vid hammarborrning:
– Emissionsvärde a
– Osäkerhet K: 1,5 m/s
– vid mejsling:
– Emissionsvärde ah: 10,60 m/s
– Osäkerhet K: 1,5 m/s
OBS!
De angivna mätvärdena gäller för nya
maskiner. Vid dagligt bruk ändras bulleroch vibrationsvärdena.
: 13,34 m/s
h
CHE 4-32 R SDS-plus
OBS!
Vibrationsnivån som anges i denna
bruksanvisning är uppmätt enligt en
EN 60745-standardiserad mätmetod som kan
användas för att jämföra elverktyg med
varandra. Den lämpar sig också för en
preliminär uppskattning av vibrationsbelastningen.
Den angivna vibrationsnivån gäller för
elverktygets huvudsakliga användningar.
Om elverktyget används för andra ändamål
med avvikande insatsverktyg eller bristande
underhåll, kan vibrationsnivån avvika. Detta
kan tydligt höja vibrationsbelastningen över
hela livslängden.
För en exakt bedömning av vibrationsbelastningen bör även den tid som maskinen är
frånslagen, eller visserligen är igång men
inte används, tas med i beräkningen. Detta
kan tydligt minska vibrationsbelastningen över
hela livslängden.
Bestäm extra säkerhetsåtgärder för
användarens skydd mot vibrationer som till
exempel: skötseln av elverktyg, att händerna
hålls varma och organisering av
arbetsförloppen.
VAR FÖRSIKTIG!
Använd hörselskydd när ljudtrycket
överskrider 85 dB(A).
2
2
2
2
78
Page 79

CHE 4-32 R SDS-plus
Bruksanvisning
Före idrifttagning
Packa upp elverktyget och motsvarande
tillbehör och kontrollera att leveransen är
fullständig och om transportskador uppstått.
Inställning av extrahandtag
VARNING!
Dra ut nätkontakten före alla arbeten på
elverktyget.
VAR FÖRSIKTIG!
Använd inte elverktyget utan extrahandtag.
Extrahandtaget kan svängas till valfritt läge
för att säkerställa säkert och icke tröttande
arbete.
Lossa klämlåsningen genom att vrida
extrahandtaget moturs (1.).
Vrid extrahandtaget till önskat läge (2.).
Fixera inställningen genom att vrida
extrahandtaget medurs.
Montering av djupanslag
VARNING!
Dra ut nätkontakten före alla arbeten på
elverktyget.
Håll knappen på stödhandtagets övre del
intryckt.
För in djupanslaget.
Ställ in djupanslaget på önskat borrdjup.
Släpp knappen.
Isättning av verktyg med SDS-skaft
VARNING!
Dra ut nätkontakten före alla arbeten på
elverktyget.
VAR FÖRSIKTIG!
Insatsverktyg kan bli heta. Använd
skyddshandskar!
OBS!
Insatsverktyg som används måste ha SDSskaft. För verktyg utan SDS-skaft (t.ex.
träborrar) ska en trebackschuck användas
(se ”Ställa in arbetsläge”).
Kontroll av dammskyddet.
– Rengör smutsigt skydd.
– Byt ut defekt dammskydd.
Rengör verktygen och fetta in skaftet lätt.
79
Page 80

CHE 4-32 R SDS-plus
Sä tt i insa tsve rkt yget (1.) och vrid (2.) tills
det går i lås.
Kontrollera låsningen genom att dra
i insatsverktyget.
Verktygsdemontering
VARNING!
Dra ut nätkontakten före alla arbeten på
elverktyget.
VAR FÖRSIKTIG!
Insatsverktyg kan bli heta. Använd
skyddshandskar!
Ställ vridknoppen i önskat arbetsläge:
Borrning
Hammarborrning
Inställning av mejselläget
(se där)
Mejsling
OBS!
– I alla lägen måste det höras att
vridknoppen går i lås.
– Koppla inte till elverktyget i läget
(inställning av mejselläget).
Inställning av mejselläget
Mejseln kan vridas till ett läge som är
optimalt för arbetena som ska utföras.
Ställ vridknoppen för arbetsläge på
symbolen (1.).
Vrid mejseln tills den står i önskad
vinkel (2.).
Dra låshylsan bakåt (1.).
Ta ut insatsverktyget (2.).
Ställa in arbetsläge
VAR FÖRSIKTIG!
Arbetsläget får endast ändras när maskinen
står stilla.
80
Ställ vridknoppen för arbetsläge på
symbolen (3.). Det ska höras att den går
i lås!
Koppla till maskinen
Page 81

CHE 4-32 R SDS-plus
Tryck strömställaren och håll den intryckt.
Maskinens strömställare medger en
stegvis höjning av varvtalet resp.
slagfrekvensen upp till maxvärdet.
Maskinens frånkoppling:
Släpp strömställaren.
Arbetsanvisningar
Borrning/hammarborrning
1. Ställ vridknoppen för arbetsläge på
symbolen (borrning) resp.
(hammarborrning). Det ska höras att den
går i lås!
2. Sätt in borret.
3. Ställ extrahandtaget i önskat läge.
4. Stick in nätkontakten.
5. Grip elverktyget med båda händerna
och inta arbetsställning.
6. Sätt an borret och starta maskinen.
7. Tryck maskinen försiktigt framåt.
8. Stäng av maskinen efter utförd
borrning.
9. Dra ut nätkontakten.
Mejsling
1. Sätt in mejseln.
2. Ställ vridknoppen för arbetsläge på
symbolen .
3. Vrid mejseln till önskat läge.
4. Ställ vridknoppen för arbetsläge på
symbolen . Det ska höras att den går
i lås!
5. Ställ extrahandtaget i önskat läge.
6. Stick in nätkontakten.
7. Grip elverktyget med båda händerna
och inta arbetsställning.
8. Koppla till maskinen.
9. Tryck maskinen försiktigt framåt vid
mejsling så att den inte hoppar.
10. Stäng av maskinen när arbetet är
färdigt.
11. Dra ut nätkontakten.
Övrigt
– Användning av ”vassa” insatsverktyg
höjer effektiviteten och
elverktygets livslängd.
– Rengör maskinen efter arbetet och
förvara den i transportväskan på en torr
plats.
Underhåll och skötsel
VARNING!
Dra ut nätkontakten före alla arbeten på
elverktyget.
Rengöring
Rengör maskin och ventilationsspringor
regelbundet. Intervallen är beroende av det
bearbetade materialet och brukstiden. Blås
regelbundet igenom höljets insida med
motor med torr tryckluft.
Kolborstar
Elverktyget är utrustat med
frånkopplingskol.
När frånkopplingskolborstarna nått slitgränsen
kopplas elverktyget automatiskt från.
OBS!
Använd vid byte endast tillverkarens
originaldelar. Vid användning av andra
tillverkares delar upphör tillverkarens
garantiförpliktelser att gälla.
Kolflamman kan under drift iakttas genom
de bakre luftöppningarna.
Stäng genast av maskinen vid stark
kolborstgnistbildning. Lämna in maskinen till
en av tillverkaren auktoriserad verkstad.
Drev
OBS!
Lossa inte skruvarna på drevtoppen under
garantitiden. I så fall upphör tillverkarens
garantiförpliktelser att gälla.
Reparationer
Reparation får uteslutande utföras av en
kundtjänstverkstad som är auktoriserad av
tillverkaren.
Om elverktygets anslutningskabel är defekt
måste den bytas ut mot en specialkabel
(beroende på typ). Denna kan erhållas hos
FLEX kundtjänst.
Reservdelar och tillbehör
För vidare tillbehör, särskilt insatsverktyg,
se tillverkarens katalog.
Sprängskisser och reservdelslistor återfinns
på vår hemsida:
www.flex-tools.com
81
Page 82

CHE 4-32 R SDS-plus
Klaus Peter WeinperEckhard Rühle
Manager Research &
Development (R & D)
Head of Quality
Department (QD)
Anvisningar om avfallshantering
VARNING!
Gör uttjänta maskiner obrukbara genom att
avlägsna nätkabeln.
Endast för EU-stater.
Kasta inte elverktyg
bland hushållssoporna!
Enligt det europeiska direktivet 2012/19/EU
om el- och elektronikavfall och dess
tillämpning i den nationella lagstiftningen ska
förbrukade elverktyg samlas in separat och
lämnas till miljöriktig återvinning.
OBS!
Fråga fackhandlaren rörande
avfallshanteringsmöjligheterna!
-märkning
Vi intygar under ensamt ansvar att den under
”Tekniska data” beskrivna produkten
överensstämmer med följande standarder
eller normativa dokument:
EN 60745 enligt bestämmelserna i
direktiven 2014/30/EU, 2006/42/EG,
2011/65/EU.
Ansvarig för tekniska underlag:
FLEX-Elektrowerkzeuge GmbH, R & D
Bahnhofstrasse 15, D-71711 Steinheim/Murr
Ansvarsfriskrivning
Tillverkaren och dennes representanter tar
inget ansvar för skador och förlorad vinst till
följd av driftavbrott som uppstår på grund av
produkten eller för att produkten inte har
kunnat användas. Tillverkaren och hans
representant tar inget ansvar för skador som
uppstår genom felaktig användning eller
i förbindelse med andra tillverkares produkter.
07.03.2018
FLEX-Elektrowerkzeuge GmbH
Bahnhofstrasse 15, D-71711 Steinheim/Murr
82
Page 83

CHE 4-32 R SDS-plus
Sisältö
Käytetyt symbolit . . . . . . . . . . . . . . . . . . 83
Symbolit koneessa. . . . . . . . . . . . . . . . . 83
Tekniset tiedot . . . . . . . . . . . . . . . . . . . . 83
Kuva koneesta . . . . . . . . . . . . . . . . . . . 84
Turvallisuusasiaa . . . . . . . . . . . . . . . . . 85
Melu ja tärinä . . . . . . . . . . . . . . . . . . . . . 86
Käyttöohjeet . . . . . . . . . . . . . . . . . . . . . 87
Huolto ja hoito . . . . . . . . . . . . . . . . . . . . 89
Kierrätysohjeita . . . . . . . . . . . . . . . . . . . 90
-vaatimustenmukaisuus . . . . . . . . . . 90
Vastuun poissulkeminen . . . . . . . . . . . . 90
Käytetyt symbolit
VAROITUS!
Viittaa välittömästi uhkaavaan vaaraan.
Ohjeen noudattamatta jättäminen saattaa
johtaa kuolemaan tai vakaviin
loukkaantumisiin.
VARO!
Viittaa mahdollisesti vaaralliseen
tilanteeseen. Ohjeen noudattamatta
jättäminen saattaa johtaa loukkaantumisiin
tai esinevaurioihin.
OHJE!
Viittaa koneen käyttöä koskeviin ohjeisiin ja
tärkeisiin tietoihin.
Tekniset tiedot
Pora- ja piikkausvasara CHE 4-32 R
SDS-plus
Nimellisottoteho W 900
-1
Tyhjäkäyntikierrosluku min
Kuormittamaton
iskuluku
Maks. iskuenergia
(EPTA 05/2009:n
mukaan)
Voitelu Rasva
Työkalun kiinnitys SDS-plus
Poranterän maks.
halkaisija
– Betoni
– Tiili
– (HM-porakruunu)
– Puu
– Metalli
Paino EPTA 01/2003:n
mukaan
Suojausluokka
min
J4,8
mm
mm
mm
mm
kg 4,6
0–850
-1
0–3700
32
82
32
13
II/
Symbolit koneessa
Lue käyttöohjeet ennen koneen
käyttöönottoa!
Käytä suojalaseja!
Käytä kuulosuojia!
Käytä kevyttä hengityssuojainta!
Vanhan koneen kierrätysohjeet
(ks. sivu Kierrätysohjeita)!
83
Page 84

Kuva koneesta
CHE 4-32 R SDS-plus
1 SDS Poraistukka
2 Poraistukka
3 Lisäkahva
4Kara
5 Syvyysrajoittimen lukitsin
6 Syvyysrajoitin
7 Käyttötapavalitsin
8 Käyttökytkin
Käynnistys ja pysäytys sekä
kierrosluvun/iskuluvun nosto enintään
maksimikierroslukuun/-iskulukuun
saakka.
84
9 Käsikahva
10 Verkkojohto
11 Tyyppikilpi *
* ei kuvassa
Page 85

CHE 4-32 R SDS-plus
Turvallisuusasiaa
VAROITUS!
Lue kaikki turvallisuus- ja muut ohjeet.
Turvallisuusohjeiden noudattamisen
laiminlyönti saattaa johtaa sähköiskuun,
tulipaloon ja/tai vakavaan
loukkaantumiseen
turvallisuus- ja muut ohjeet myöhempää
käyttötarvetta varten.
Lue ohjeet ennen sähkötyökalun käyttöä ja
toimi niiden mukaisesti:
–
koneen käyttöohje,
–
sähkötyökalujen käyttöä koskevat
"Yleiset turvallisuusohjeet" mukana
toimitetussa vihkosessa
(
dokumenttinumero: 315.915),
–
käyttöpaikalla voimassa olevat ohjeet ja
työsuojelumääräykset.
Tämä sähkötyökalu on valmistettu
uusimman teknisen tietämyksen ja
hyväksyttyjen turvateknisten säännösten
mukaisesti. Tästä huolimatta sen käytöstä
saattaa aiheutua hengenvaaraa koneen
käyttäjälle ja muille henkilöille ja itse kone
tai muu esineistö voi vaurioitua.
Sähkötyökalua saa käyttää vain
–
määräystenmukaiseen
käyttötarkoitukseen,
–
sen ollessa teknisesti moitteettomassa
kunnossa.
Turvallisuuteen vaikuttavat puutteet ja viat
on korjattava välittömästi.
Määräystenmukainen käyttö
Pora- ja piikkausvasara CHE 4-32 R SDSplus on tarkoitettu
– ammattikäyttöön teollisuudessa ja
verstailla,
– iskuporaukseen muuratuissa
rakenteissa ja betonissa ankkurointeihin
ja läpivientiporauksiin,
– kevyisiin piikkaustöihin poistettaessa
laastia ja laattoja,
– käytettäväksi tarkoitukseen sopivalla ja
valmistajan tälle koneelle suosittelemalla
työkalulla.
. Säilytä kaikki
Poravasaroita koskevat
turvallisuusohjeet
Käytä kuulosuojaimia. Melu saattaa
aiheuttaa kuulovammoja.
Käytä koneen mukana toimitettuja
lisäkahvoja. Koneen hallinnan
menettäminen voi aiheuttaa
loukkaantumisia.
Pidä kiinni koneesta vain eristetyistä
kahvaosista, kun työskentelet paikoissa,
joissa sähkötyökalu voi osua piilossa
olevaan sähköjohtoon tai koneen omaan
verkkojohtoon. Kosketus jännitteiseen
johtoon voi tehdä myös koneen metalliosat
jännitteisiksi ja johtaa sähköiskuun.
Muita turvallisuusohjeita
Käytä tarkoitukseen sopivaa
rakenneilmaisinta tms. etsintälaitetta
piilossa olevien johtojen ja putkien
paikantamiseen, tai käänny paikallisen
energiayhtiön ja vesilaitoksen puoleen.
Sähköjohtoihin osuminen saattaa
aiheuttaa tulipalon ja sähköiskun.
Kaasuputken vahingoittaminen saattaa
aiheuttaa räjähdyksen. Osuminen
vesijohtoon aiheuttaa aineellista vahinkoa
tai saattaa johtaa sähköiskuun.
Pidä työskenneltäessä sähkötyökalusta
kiinni molemmin käsin ja seiso tukevassa
asennossa. Sähkötyökalun ohjaaminen
on turvallista vain molemmin käsin.
Kiinnitä työkappale kunnolla.
Kiinnityslaitteella työkappale pysyy
varmemmin paikallaan kuin käsin kiinni
pitämällä.
Älä käytä sähkötyökalua, jos sen johto on
vaurioitunut. Älä koske vaurioituneeseen
johtoon, vaan irrota verkkopistoke
pistorasiasta, jos johto vaurioituu käytön
aikana. Vaurioituneet johdot lisäävät
sähköiskun riskiä.
Käytä vain työkaluja, joissa on SDS-plus
työkaluistukkapää. Tarkasta kunnollinen
lukittuminen vetämällä työkalusta.
Vaihda vaurioitunut pölysuojus heti.
Pölysuojus estää pölyn pääsemisen
työkaluistukkaan.
85
Page 86

Materiaaleista, kuten lyijyä sisältävistä
pinnoitteista, joistakin puulaaduista,
mineraaleista ja metallista, lähtevä pöly
voi olla vaarallista koneen käyttäjälle ja
lähellä oleville henkilöille.
Pölyjen
hengittäminen tai niiden kanssa
kosketuksiin joutuminen saattaa aiheuttaa
hengitystiesairauksia ja/tai allergisia
reaktioita.
– Varmista työpisteen hyvä ilmanvaihto!
– Jos mahdollista, käytä erillistä
pölynpoistojärjestelmää.
– P2-suodatinluokan hengityssuojaimen
käyttö on suositeltavaa.
Älä työstä materiaaleja, joista vapautuu
terveydelle vaarallisia aineita (esim.
asbestia).
Käytä sähkötyökalun merkitsemiseen vain
tarroja. Älä poraa reikiä koneen runkoon.
Verkkojännitteen ja jännitetietojen tulee
olla samat kuin tyyppikilvessä.
Melu ja tärinä
Melu- ja tärinäarvot on mitattu standardin
EN 60745 mukaan.
Koneen A-painotettu melutaso on
tyypillisesti:
– Äänenpainetaso: 92 dB(A);
– Äänitehotaso: 103 dB(A);
– Epävarmuus K: 3 dB.
Tärinän kokonaisarvo:
– iskuporattaessa:
– Päästöarvo a
– Epävarmuus K: 1,5 m/s
– piikattaessa:
– Päästöarvo ah: 10,60 m/s
– Epävarmuus K: 1,5 m/s
HUOM.!
Ilmoitetut mittausarvot koskevat uusia
koneita. Päivittäisessä käytössä melu- ja
tärinäarvot muuttuvat.
: 13,34 m/s
h
CHE 4-32 R SDS-plus
OHJE!
Näissä ohjeissa ilmoitettu tärinätaso on
mitattu standardissa EN 60745 normitetun
mittausmenetelmän mukaan, ja sitä voidaan
käyttää sähkötyökalujen keskinäiseen
vertailuun. Se soveltuu myös tärinäaltistuksen
alustavaan arviointiin.
Ilmoitettu tärinätaso tarkoittaa altistumisen
tasoa sähkötyökalun pääasiallisessa
käyttötarkoituksessa. Mutta jos
sähkötyökalua käytetään muihin
käyttötarkoituksiin, normaalista poikkeavilla
työkaluterillä tai sitä ei ole huollettu riittävästi,
tärinätaso saattaa poiketa ilmoitetusta. Tällöin
koko työaikaa koskeva tärinäaltistus voi olla
selvästi suurempi.
Tärinäaltistuksen tarkassa arvioinnissa
otettava huomioon myös ne ajat, jolloin kone
on kytketty pois päältä tai se on käynnissä,
mutta ei todellisessa käytössä. Tällöin koko
työaikaa koskeva tärinäaltistus voi olla
selvästi alhaisempi.
Määrittäkää lisätoimenpiteet koneen käyttäjän
suojaamiseksi tärinän vaikutukselta, kuten
esimerkiksi: sähkötyökalun ja työkaluterien
huolto, käsien suojaaminen kylmältä,
työnkulun suunnittelu.
VARO!
Jos melutaso ylittää 85 dB(A), käytä
kuulosuojia.
2
2
2
2
on
86
Page 87

CHE 4-32 R SDS-plus
Käyttöohjeet
Ennen käyttöönottoa
Ota sähkötyökalu ja varusteet pois
pakkauksesta ja tarkasta, ettei
toimituksesta puutu mitään ja ettei
kuljetusvaurioita ole syntynyt.
Lisäkahvan säätö
VAROITUS!
Irrota pistoke pistorasiasta ennen kaikkia
sähkötyökaluun kohdistuvia töitä.
VARO!
Käytä sähkötyökalua vain lisäkahvan
ollessa paikoillaan.
Lisäkahvan voi kääntää mihin asentoon
tahansa. Tämä mahdollistaa turvallisen
työskentelyn ja vähentää rasitusta.
Avaa lukitus kiertämällä lisäkahvaa
vastapäivään (1.).
Käännä lisäkahva sopivaan
asentoon (2.).
Lukitse säätö kiertämällä lisäkahvaa
myötäpäivään.
Syvyysrajoittimen kiinnitys
VAROITUS!
Irrota pistoke pistorasiasta ennen kaikkia
sähkötyökaluun kohdistuvia töitä.
Paina lisäkahvassa olevaa lukitsinta
yläosasta ja pidä painettuna.
Työnnä syvyysrajoitin paikalleen.
Säädä syvyysrajoitin tarvittavaan
poraussyvyyteen.
Vapauta lukitsin.
SDS-vartisten työkalujen kiinnitys
VAROITUS!
Irrota pistoke pistorasiasta ennen kaikkia
sähkötyökaluun kohdistuvia töitä.
VARO!
Työkaluterät voivat kuumentua käytössä.
Käytä suojakäsineitä!
OHJE!
Käytettävissä työkaluissa tulee olla SDSvarsi. Työkaluille, joissa ei ole SDS-vartta
(esimerkiksi puuporanterät), on käytettävä
kolmileukaista istukkaa (ks. "Käyttötavan
valinta").
Tarkasta pölysuojus.
– Puhdista likainen suojus.
– Vaihda viallinen pölysuojus.
Puhdista työkalu ja rasvaa varsi kevyesti.
87
Page 88

CHE 4-32 R SDS-plus
Laita työkalu paikalleen (1.) ja kierrä
sitä (2.), kunnes se lukittuu.
Tarkasta lukitus vetämällä
työkaluterästä.
Työkalujen irrotus
VAROITUS!
Irrota pistoke pistorasiasta ennen kaikkia
sähkötyökaluun kohdistuvia töitä.
VARO!
Työkaluterät voivat kuumentua käytössä.
Käytä suojakäsineitä!
Vedä lukitushylsyä taaksepäin (1.).
Irrota työkalu (2.).
Käyttötavan valinta
VARO!
Vaihda käyttötapaa vain sähkötyökalun
ollessa pysäytettynä.
Aseta valitsin haluamasi käyttötavan
kohdalle:
Poraus
Iskuporaus
Piikkaustaltan asennon säätö
(ks. kyseinen kohta)
Piikkaus
OHJE!
– Kaikissa asennoissa valitsimen pitää
kuultavasti lukittua.
– Älä käynnistä sähkötyökalua asennossa
(piikkaustaltan asennon säätö).
Piikkaustaltan asennon säätö
Piikkaustaltan voi kääntää optimaaliseen
asentoon riippuen työtehtävästä.
Aseta käyttötapavalitsin symbolin
kohdalle (1.).
Kierrä piikkaustalttaa, kunnes se on
sopivassa kulmassa (2.).
Aseta käyttötapavalitsin symbolin
kohdalle (3.). Varmista, että se lukittuu
kuultavasti!
Sähkötyökalun käynnistys
88
Page 89

CHE 4-32 R SDS-plus
Paina kytkintä ja pidä sitä haluamassasi
asennossa.
Sähkötyökalun käyttökytkimellä on
mahdollista lisätä vähitellen kierros- tai
iskulukua maksimiarvoon saakka.
Koneen pysäytys:
Päästä käyttökytkin vapaaksi.
Työohjeita
Poraus/iskuporaus
1. Aseta käyttötapavalitsin symbolin
(poraaminen) tai (iskuporaaminen)
kohdalle. Varmista, että se lukittuu
kuultavasti!
2. Kiinnitä poranterä.
3. Aseta lisäkahva sopivaan asentoon.
4. Liitä verkkopistoke pistorasiaan.
5. Pidä sähkötyökalusta kiinni molemmin
käsin ja asetu työasentoon.
6. Aseta poranterä työstökohdetta vasten
ja käynnistä sähkötyökalu.
7. Paina sähkötyökalua vain kevyesti.
8. Pysäytä kone, kun poraus on valmis.
9. Irrota pistoke pistorasiasta.
Piikkaus
1. Kiinnitä piikkaustaltta.
2. Aseta käyttötapavalitsin symbolin
kohdalle.
3. Käännä taltta sopivaan asentoon.
4. Aseta käyttötapavalitsin symbolin
kohdalle. Varmista, että se lukittuu
kuultavasti!
5. Aseta lisäkahva sopivaan asentoon.
6. Liitä verkkopistoke pistorasiaan.
7. Pidä sähkötyökalusta kiinni molemmin
käsin ja asetu työasentoon.
8. Käynnistä sähkötyökalu.
9. Paina sähkötyökalua piikattaessa
kevyesti, jotta taltta ei ponnahda
takaisin.
10. Pysäytä kone, kun työ on valmis.
11. Irrota pistoke pistorasiasta.
Lisäohjeita
– Terävien työkalujen käyttö lisää työtehoa
ja pidentää sähkötyökalun käyttöikää.
– Puhdista sähkötyökalu töiden jälkeen ja
säilytä sitä kuljetuslaukussa kuivassa
paikassa.
Huolto ja hoito
VAROITUS!
Irrota pistoke pistorasiasta ennen kaikkia
sähkötyökaluun kohdistuvia töitä.
Puhdistus
Puhdista kone ja jäähdytysilma-aukot
säännöllisin välein. Puhdistusväli riippuu
työstettävästä materiaalista ja käyttöajan
pituudesta. Puhalla koneen sisätila ja
moottori puhtaaksi kuivalla paineilmalla
säännöllisin välein.
Hiiliharjat
Sähkötyökalu on varustettu automaattisesti
irtikytkeytyvillä hiilillä.
Kun hiilet ovat kuluneet kulumisrajamittaan,
sähkötyökalu kytkeytyy automaattisesti pois
päältä.
OHJE!
Vaihda hiiliharjojen tilalle vain valmistajan
alkuperäisosat. Jos käytetään muiden
valmistajien hiiliä, koneen valmistajan
myöntämä takuu raukeaa.
Takimmaisista ilman sisääntuloaukoista voi
tarkkailla hiilten kipinöintiä käytön aikana.
Jos hiilten kipinöinti on voimakasta, pysäytä
sähkötyökalu heti. Toimita sähkötyökalu
valmistajan valtuuttamaan huoltoliikkeeseen.
Vaihteisto
OHJE!
Älä avaa vaihteistopään ruuveja koneen
takuuaikana. Jos ohjetta noudateta,
valmistajan myöntämä takuu raukeaa.
Korjaukset
Korjaukset saa suorittaa vain valmistajan
valtuuttama huoltoliike.
Jos sähkötyökalun verkkojohto vioittuu, sen
tilalle on vaihdettava erityisesti tähän
tarkoitukseen valmistettu verkkojohto
(kiinnitystapa X). Sen voi tilata FLEXhuoltopalvelusta.
89
Page 90

CHE 4-32 R SDS-plus
Klaus Peter WeinperEckhard Rühle
Manager Research &
Development (R & D)
Head of Quality
Department (QD)
Varaosat ja tarvikkeet
Katso muut lisätarvikkeet, erityisesti
työkaluterät, valmistajan tuote-esitteistä.
Räjäytyskuvat ja varaosaluettelot löydät
kotisivuiltamme:
www.flex-tools.com
Kierrätysohjeita
VAROITUS!
Tee käytöstä poistetut koneet
käyttökelvottomaksi irrottamalla
liitäntäjohto.
Vain EU-maat.
Käytöstä poistetut sähkötyökalut
eivät kuulu sekajätteisiin!
Käytöstä poistettavia sähkö- ja
elektroniikkalaitteita koskevan EU-direktiivin
2012/19/EU ja sen voimaansaattavien
kansallisten säädösten mukaisesti
sähkötyökalut on toimitettava ongelmajätteen
keräyspisteeseen ja ohjattava
ympäristöystävälliseen kierrätykseen.
OHJE!
Lisätietoja kierrätysmahdollisuuksista saat
alan liikkeistä!
-vaatimustenmukaisuus
Vakuutamme yksinomaisella vastuullamme,
että kohdassa "Tekniset tiedot" kuvattu tuote
on seuraavien standardien tai ohjeellisten
asiakirjojen mukainen:
EN 60745 direktiivien 2014/30/EU,
2006/42/EY, 2011/65/EU määräysten
mukaisesti.
Teknisestä dokumentaatiosta vastaa:
FLEX-Elektrowerkzeuge GmbH, R & D
Bahnhofstrasse 15, D-71711 Steinheim/Murr
Vastuun poissulkeminen
Valmistaja ja valmistajan edustaja eivät
vastaa vahingoista tai menetyksistä, joiden
syynä on liiketoiminnan keskeytyminen
johtuen tuotteesta tai siitä, ettei tuotetta
mahdollisesti voida käyttää. Valmistaja ja
tämän edustaja eivät vastaa vahingoista,
joiden syynä on epäasiallinen käyttö tai käyttö
yhdessä muiden valmistajien tuotteiden
kanssa.
07.03.2018
FLEX-Elektrowerkzeuge GmbH
Bahnhofstrasse 15, D-71711 Steinheim/Murr
90
Page 91

CHE 4-32 R SDS-plus
Περιεχόμενα
Χρησιμοποιούμενα σύμβολα . . . . . . . . . 91
Σύμβολα στο εργαλείο . . . . . . . . . . . . . . 91
Τεχνικά χαρακτηριστικά . . . . . . . . . . . . . 91
Με μια ματιά . . . . . . . . . . . . . . . . . . . . . 92
Για την ασφάλειά σας . . . . . . . . . . . . . . 93
Θόρυβος και κραδασμός . . . . . . . . . . . . 94
Οδηγίες χρήσης . . . . . . . . . . . . . . . . . . . 95
Συντήρηση και φροντίδα . . . . . . . . . . . . 97
Υποδείξεις απόσυρσης . . . . . . . . . . . . . 98
Δήλωση πιστότητας . . . . . . . . . . . . . 98
Αποκλεισμός ευθύνης . . . . . . . . . . . . . . 98
Χρησιμοποιούμενα σύμβολα
ΠΡΟΕΙΔΟΠΟΙΗΣΗ!
Δηλώνει άμεση απειλή κινδύνου. Σε
περίπτωση μη τήρησης της υπόδειξης
υπάρχει κίνδυνος θανάτου ή βαρειών
τραυματισμών.
ΠΡΟΣΟΧΗ!
Δηλώνει μία ενδεχομένως επικίνδυνη
κατάσταση. Σε περίπτωση μη τήρησης της
υπόδειξης υπάρχει κίνδυνος τραυματισμών
ή υλικών ζημιών.
ΥΠΟΔΕΙΞΗ!
Δηλώνει συμβουλές εφαρμογής και
σημαντικές πληροφορίες.
Σύμβολα στο εργαλείο
Πριν τη θέση σε λειτουργία
διαβάστε τις οδηγίες χρήσης!
Τεχνικά χαρακτηριστικά
Σφυροδράπανο και
σφυροκάλεμο
Ονομαστική
απορροφούμενη ισχύς
Αριθμός στροφών στο
ρελαντί
Αριθμός κρούσεων στο
ρελαντί
Μέγ. ενέργεια
επιμέρους κρούσης
(βάσει «EPTAprocedure 05/2009»)
Λίπανση Γράσο
Υποδοχή εργαλείου SDS-plus
Μέγ. διάμετρος
διάτρησης
– μπετόν
– τοίχοι
– (στεφάνη τρυπανιού
HM)
– ξύλο
– μέταλλο
Βάρος βάσει «EPTAprocedure 01/2003»
Κατηγορία προστασίας
(μόνωση)
CHE 4-32 R
SDS-plus
W900
-1
min
min
J4,8
mm
mm
mm
mm
kg 4,6
0–850
-1
0–3700
32
82
32
13
II/
Φοράτε προστατευτικά
ματογυάλια!
Φοράτε ωτοασπίδες!
Χρησιμοποιείτε ελαφριά προστασία
αναπνοής !
Υπόδειξη απόσυρσης για το παλιό
εργαλείο (βλέπε σελίδα Υποδείξεις
απόσυρσης)!
91
Page 92

Με μια ματιά
CHE 4-32 R SDS-plus
1Τσοκ SDS
2 Προσάρτημα τσοκ
3 Πρόσθετη χειρολαβή
4 Άτρακτος
5 Μοχλός σύσφιξης για οριοθέτη
βάθους
6 Οριοθέτης βάθους
7 Περιστροφικό κουμπί για τον τρόπο
εργασίας
8Διακόπτης
Για τη θέση σε και εκτός λειτουργίας
καθώς και για την αύξηση του αριθμού
στροφών / κρούσεων ως το μέγιστο.
92
9Χειρολαβή
10 Τροφοδοτικό καλώδιο
11 Πινακίδα τύπου *
* δε φαίνεται
Page 93

CHE 4-32 R SDS-plus
Για την ασφάλειά σας
ΠΡΟΕΙΔΟΠΟΙΗΣΗ!
Διαβάστε όλες τις υποδείξεις ασφαλείας και
τις οδηγίες.
υποδείξεων ασφαλείας και των οδηγιών
μπορεί να έχουν ως συνέπεια
ηλεκτροπληξία, πυρκαγιά και/ή βαριούς
τραυματισμούς
ασφαλείας και τις οδηγίες για μελλοντική
χρήση.
Διαβάστε πριν την χρήση του ηλεκτρικού
εργαλείου και τηρήστε:
–
τις παρούσες οδηγίες χρήσης,
–
τις «Γενικές υποδείξεις ασφαλείας»
σχετικά με τη χρήση ηλεκτρικών
εργαλείων στο επισυναπτόμενο
φυλλάδιο
–
τους κανόνες και τις προδιαγραφές
σχετικά με την πρόληψη ατυχημάτων
που ισχύουν στον τόπο εργασίας.
Αυτό το ηλεκτρικό εργαλείο έχει
κατασκευαστεί σύμφωνα με τα τελευταία
δεδομένα της τεχνολογίας και βάσει των
αναγνωρισμένων κανόνων τεχνικής
ασφάλειας. Ωστόσο μπορούν κατά τη χρήση
του να προκύψουν κίνδυνοι για τη σωματική
ακεραιότητα και τη ζωή του χρήστη ή τρίτων
ή αντίστοιχα ζημιές στο εργαλείο ή άλλες
υλικές ζημιές. Το ηλεκτρικό εργαλείο πρέπει
να χρησιμοποιείται
–
για την προσήκουσα χρήση,
–
σε άψογη κατάσταση από πλευράς
τεχνικής ασφάλειας.
Βλάβες που έχουν αρνητική επίπτωση στην
ασφάλεια, πρέπει να αντιμετωπίζονται
αμέσως.
Προσήκουσα χρήση
Το περιστροφικό και σκαπτικό πιστολέτο
CHE 4-32 R SDS-plus προορίζεται:
– για την επαγγελματική χρήση στη
βιομηχανία και βιοτεχνία,
– για την κρουστική διάτρηση σε τοίχους
και μπετόν για στερεώσεις ούπας και
αγκυρώσεων και διαμπερείς διατρήσεις,
– για ελαφριές εργασίες διάνοιξης οπών για
την απομάκρυνση σοβάδων και
πλακιδίων,
– για τη χρήση με κατάλληλο και από τον
κατασκευαστή για το παρόν εργαλείο
συνιστώμενο εργαλείο.
Παραλήψεις στην τήρηση των
. Φυλάξτε όλες τις υποδείξεις
(
Αριθμός φυλλαδίου: 315.915),
Υποδείξεις ασφαλείας για κρουστικά
εργαλεία
Να φοράτε ωτοασπίδες. Η επίδραση
θορύβου μπορεί να προξενήσει απώλεια
της ακοής.
Χρησιμοποιείτε τις πρόσθετες χειρολαβές
που παραδίδονται μαζί με το εργαλείο.
Η απώλεια του ελέγχου μπορεί να
οδηγήσει σε τραυματισμούς.
Κρατάτε το εργαλείο μόνο στις
μονωμένες επιφάνειες λαβές, κατά την
εκτέλεση εργασιών, κατά τις οποίες το
εργαλείο εφαρμογής μπορεί να
συναντήσει κρυφούς ηλεκτρικούς
αγωγούς ή το ίδιο το δικό του
τροφοδοτικό καλώδιο. Η επαφή με ένα
ηλεκτροφόρο αγωγό μπορεί να θέσει υπό
τάση επίσης μεταλλικά μέρη του
μηχανήματος και να οδηγήσει σε
ηλεκτροπληξία.
Περαιτέρω υποδείξεις ασφαλείας
Χρησιμοποιείτε κατάλληλες συσκευές
ανίχνευσης καλυμμένων τροφοδοτικών
αγωγών ή απευθυνθείτε στην τοπική
εταιρεία παροχής ρεύματος. Η επαφή με
ηλεκτρικούς αγωγούς μπορεί να οδηγήσει
σε φωτιά και ηλεκτροπληξία. Η ζημιά σε
αγωγό αερίου μπορεί να οδηγήσει σε
έκρηξη. Η διείσδυση σε αγωγό νερού
προξενεί υλικές ζημιές ή μπορεί να
προκαλέσει ηλεκτροπληξία.
Κατά την εργασία κρατάτε το ηλεκτρικό
εργαλείο γερά με τα δύο χέρια και
φροντίζετε να στέκεστε σταθερά. Το
ηλεκτρικό εργαλείο οδηγείται με ασφάλεια
με τα δύο χέρια.
Ασφαλίζετε το κατεργαζόμενο τεμάχιο. Το
κατεργαζόμενο τεμάχιο που συγκρατείται
με διά ταξ η τάνυσης κ ρατ ιέτ αι α σφαλέστερ α
απ’ ότι με το χέρι σας.
Μη χρησιμοποιείται το ηλεκτρικό
εργαλείο με κατεστραμμένο καλώδιο.
Μην αγγίζετε το κατεστραμμένο καλώδιο
και βγάλτε το φις από την πρίζα, αν το
καλώδιο πάθει ζημιά κατά την εργασία.
Τα κατεστραμμένα καλώδια αυξάνουν τον
κίνδυνο ηλεκτροπληξίας.
Χρησιμοποιείτε μόνον εργαλεία με
υποδοχή εργαλείου SDS-plus. Ελέγξτε τη
σωστή ασφάλιση με τράβηγμα του
εργαλείου.
93
Page 94

CHE 4-32 R SDS-plus
Φροντίστε άμεσα για την αντικατάσταση
τυχόν κατεστραμμένου προφυλακτήρα
σκόνης. Ο προφυλακτήρας σκόνης
εμποδίζει την είσοδο σκόνης στην
υποδοχή εργαλείου.
Οι εκλυόμενες σκόνες υλικών όπως
μολυβδούχες βαφές, μερικά είδη ξύλου,
ορυκτά και μέταλλα μπορούν να είναι
επικίνδυνες για τον χειριστή ή για
πρόσωπα που βρίσκονται κοντά στην
περιοχή εργασίας.
Η εισπνοή τους ή η
επαφή με τις σκόνες αυτές μπορούν να
οδηγήσουν σε ασθένειες της
αναπνευστικής οδού και/ή σε αλλεργικές
αντιδράσεις.
– Φροντίζετε για καλό αερισμό του
χώρου εργασίας!
– Αν είναι δυνατόν, χρησιμοποιείτε
εξωτερικό απορροφητήρα σκόνης.
– Συνιστάται η χρήση μάσκας
προστασίας της αναπνοής με φίλτρο
κατηγορίας P2.
Μην επεξεργάζεστε υλικά, από τα οποία
εκλύονται επιβλαβείς για την υγεία ύλες
(π.χ. αμίαντος).
Για τη σήμανση του ηλεκτρικού εργαλείου
χρησιμοποιείτε μόνον αυτοκόλλητες
ετικέτες. Μην ανοίγετε τρύπες στο
περίβλημα.
Η τάση του δικτύου και η αναφερόμενη
τάση στην πινακίδα τύπου πρέπει να
συμφωνούν.
Θόρυβος και κραδασμός
Οι τιμές θορύβου και κραδασμών
υπολογίστηκαν σύμφωνα με το Ευρωπαϊκό
Πρότυπο EN 60745.
Η κατά Α αξιολογημένη ακουστική στάθμη
θορύβων του μηχανήματος ανέρχεται
χαρακτηριστικά:
– Στάθμη ακουστικής πίεσης: 92 dB(A);
– Στάθμη ακουστικής ισχύος: 103 dB(A);
– Ανασφάλεια K: 3 dB.
Συνολική τιμή κραδασμών:
– στη διάτρηση με σφυροδράπανο:
– Τιμή εκπομπής a
– Ανασφάλεια K: 1,5 m/s
–στη σμίλευση:
– Τιμή εκπομπής ah: 10,60 m/s
– Ανασφάλεια K: 1,5 m/s
: 13,34 m/s
h
ΠΡΟΣΟΧΗ!
Οι τιμές μέτρησης που δίνονται ισχύουν για
καινούργια μηχανήματα. Στην καθημερινή
χρήση αλλάζουν οι τιμές θορύβων και
κραδασμών.
ΥΠΟΔΕΙΞΗ!
Η στάθμη κραδασμών που δίνεται στις
οδηγίες αυτές έχει μετρηθεί σύμφωνα με
μέθοδο μέτρησης τυποποιημένη βάσει του
προτύπου ΕΝ 60745 και μπορεί να
χρησιμοποιηθεί για τη σύγκριση ηλεκτρικών
εργαλείων μεταξύ τους. Επίσης αυτή είναι
κατάλληλη για την προσωρινή εκτίμηση της
φόρτισης με κραδασμούς.
Η στάθμη κραδασμών που δίνεται
αντιπροσωπεύει τις κύριες εφαρμογές του
ηλεκτρικού εργαλείου. Σε περίπτωση όμως
που το ηλεκτρικό εργαλείο χρησιμοποιηθεί για
άλλες εφαρμογές με αποκλίνοντα εργαλεία
εφαρμογής ή χωρίς επαρκή συντήρηση, τότε
μπορεί να αποκλίνει και η στάθμη των
κραδασμών. Αυτό μπορεί να αυξήσει
σημαντικά τη φόρτιση με κραδασμούς κατά τη
διάρκεια ολοκλήρου του χρονικού
διαστήματος εργασίας.
Για την ακριβή εκτίμηση της φόρτισης με
κραδασμούς θα πρέπει να ληφθούν υπόψη
επίσης οι χρόνοι, κατά τους οποίους το
εργαλείο είναι απενεργοποιημένο ή λειτουργεί,
χωρίς όμως να χρησιμοποιείται στην
πραγματικότητα. Αυτό μπορεί να μειώσει
σημαντικά τη φόρτιση με κραδασμούς κατά τη
διάρκεια ολοκλήρου του χρονικού
διαστήματος εργασίας.
Καθορίστε τα πρόσθετα μέτρα ασφαλείας για
την προστασία του χειριστή πριν την
επίδραση των κραδασμών, όπως για
παράδειγμα: συντήρηση του ηλεκτρικού
εργαλείου και των εργαλείων εφαρμογής,
ζέσταμα των χεριών για το κράτημα,
οργάνωση των βημάτων εργασίας.
ΠΡΟΣΟΧΗ!
Σε ακουστική πίεση άνω των 85 dB(A) να
φοράτε ωτοασπίδες.
2
2
2
2
94
Page 95

CHE 4-32 R SDS-plus
Οδηγίες χρήσης
Πριν τη θέση σε λειτουργία
Ξεπακετάρετε το ηλεκτρικό εργαλείο και τα
εξαρτήματα και ελέγξτε τα για πληρότητα της
παράδοσης και ζημιές από τη μεταφορά.
Ρύθμιση πρόσθετης χειρολαβής
ΠΡΟΕΙΔΟΠΟΙΗΣΗ!
Πριν από όλες τις εργασίες στο ηλεκτρικό
εργαλείο, βγάλτε το φις από την πρίζα.
ΠΡΟΣΟΧΗ!
Χρησιμοποιείτε το ηλεκτρικό εργαλείο μόνο
με συναρμολογημένη την πρόσθετη
χειρολαβή.
Η πρόσθετη χειρολαβή μπορεί να στραφεί
σε οποιαδήποτε θέση, ώστε να διασφαλιστεί
η ασφαλής και χωρίς κόπο εργασία.
Λύστε τη σύσφιξη γυρίζοντας την
πρόσθετη χειρολαβή αντίθετα με τη φορά
των δεικτών του ρολογιού (1.).
Γυρίστε την πρόσθετη χειρολαβή στην
επιθυμητή θέση (2.).
Σταθεροποιήστε την πρόσθετη
χειρολαβή με τη φορά των δεικτών του
ρολογιού.
Συναρμολόγηση του οριοθέτη
βάθους
ΠΡΟΕΙΔΟΠΟΙΗΣΗ!
Πριν από όλες τις εργασίες στο ηλεκτρικό
εργαλείο, βγάλτε το φις από την πρίζα.
Πιέστε τον μοχλό σύσφιξης στην
πρόσθετη χειρολαβή στην επάνω
περιοχή και κρατήστε τον γερά.
Ωθήστε τον οριοθέτη βάθους προς
τα μέσα.
Ρυθμίστε τον οριοθέτη βάθους στο
απαιτούμενο βάθος διάτρησης.
Αφήστε ελεύθερο τον μοχλό σύσφιξης.
Τοποθέτηση εργαλείων με
στέλεχος SDS
ΠΡΟΕΙΔΟΠΟΙΗΣΗ!
Πριν από όλες τις εργασίες στο ηλεκτρικό
εργαλείο, βγάλτε το φις από την πρίζα.
ΠΡΟΣΟΧΗ!
Τα χρησιμοποιημένα ηλεκτρικά εργαλεία
μπορεί να καίνε. Φοράτε προστατευτικά
γάντια!
ΥΠΟΔΕΙΞΗ!
Τα χρησιμοποιούμενα εργαλεία πρέπει να
διαθέτουν στέλεχος SDS. Για εργαλεία
χωρίς στέλεχος SDS (π.χ. ξυλοτρύπανο)
πρέπει να χρησιμοποιείται τσοκ τριών
σιαγόνων (βλέπε «Ρύθμιση τρόπου
εργασίας»).
Ελέγξτε τον προφυλακτήρα σκόνης.
– Καθαρίστε τον λερωμένο
προφυλακτήρα.
– Φροντίστε άμεσα για την
αντικατάσταση τυχόν κατεστραμμένου
προφυλακτήρα σκόνης.
95
Page 96

Καθαρίστε τα εργαλεία και λιπάνετε
ελαφρώς το στέλεχος.
Τοποθετήστε το εργαλείο εφαρμογής (1.)
και στρέψτε (2.), μέχρι να ασφαλίσει.
Ελέγξτε την ασφάλιση τραβώντας το
εργαλείο εφαρμογής.
Αφαίρεση των εργαλείων
ΠΡΟΕΙΔΟΠΟΙΗΣΗ!
Πριν από όλες τις εργασίες στο ηλεκτρικό
εργαλείο, βγάλτε το φις από την πρίζα.
ΠΡΟΣΟΧΗ!
Τα χρησιμοποιημένα ηλεκτρικά εργαλεία
μπορεί να καίνε. Φοράτε προστατευτικά
γάντια!
CHE 4-32 R SDS-plus
Ρυθμίστε το περιστροφικό κουμπί στον
επιθυμητό τρόπο εργασίας:
Τρύπημα
Τρύπημα με σφυροδράπανο
Ρύθμιση της θέσης καλεμιού
(βλέπε εκεί)
Σμίλευση
ΥΠΟΔΕΙΞΗ!
– Σε όλες τις θέσεις το περιστρεφόμενο
κουμπί πρέπει να ακούγεται να
κουμπώνει.
– Στη θέση (ρύθμιση της θέσης
καλεμιού) μη θέσετε το ηλεκτρικό
εργαλείο σε λειτουργία.
Ρύθμιση της θέσης καλεμιού
Το καλ έμι μπορεί να συστ ραφ εί σ ε μι α γι α τι ς
εκτελούμενες εργασίες ιδανική θέση.
Ρυθμίστε το περιστροφικό κουμπί για τον
τρόπο εργασίας στο σύμβολο (1.).
Στρέψτε το καλέμι, μέχρι να έχει την
επιθυμητή γωνία (2.).
Τραβήξτε τον κάλυκα ασφάλισης προς τα
πίσω (1.).
Αφαιρέστε το εργαλείο εφαρμογής (2.).
Ρύθμιση τρόπου εργασίας
ΠΡΟΣΟΧΗ!
Αλλάζετε τον τρόπο εργασίας μόνο με
ακινητοποιημένο το ηλεκτρικό εργαλείο.
96
Ρυθμίστε το περιστροφικό κουμπί για τον
τρόπο εργασίας στο σύμβολο (3.).
Προσέξτε να ακουστεί να κουμπώνει !
Page 97

CHE 4-32 R SDS-plus
Θέση του ηλεκτρικού εργαλείου σε
λειτουργία
Πιέστε τον διακόπτη και κρατήστε τον
πατημένο.
Ο διακόπτης του ηλεκτρικού εργαλείου
καθιστά δυνατή την αργή αύξηση του
αριθμού στροφών ή κρούσεων μέχρι τη
μέγιστη τιμή.
Θέση του εργαλείου εκτός λειτουργίας:
Αφήστε τον διακόπτη ελεύθερο.
Υποδείξεις εργασίας
Τρύπημα / τρύπημα με σφυροδράπανο
1. Ρυθμίστε το περιστροφικό κουμπί για
τον τρόπο εργασίας στο σύμβολο
(τρύπημα) ή (τρύπημα με
σφυροδράπανο). Προσέξτε να ακουστεί
να κουμπώνει !
2. Τοποθετήστε το τρυπάνι.
3. Ρυθμίστε την πρόσθετη χειρολαβή στη
επιθυμητή θέση.
4. Βάλτε το φις στην πρίζα.
5. Πιάστε το ηλεκτρικό εργαλείο με τα δυο
σας χέρια και πάρτε θέση εργασίας.
6. Εφαρμόστε το τρυπάνι και
ενεργοποιήστε το ηλεκτρικό εργαλείο.
7. Πιέστε το ηλεκτρικό εργαλείο μαλακά
προς τα εμπρός.
8. Μετά το πέρας της διάτρησης θέστε το
εργαλείο εκτός λειτουργίας.
9. Τραβήξτε το φις από την πρίζα.
Σμίλευση
1. Τοποθετήστε το καλέμι.
2. Ρυθμίστε το περιστροφικό κουμπί για
τον τρόπο εργασίας στο σύμβολο .
3. Γυρίστε το καλέμι στην επιθυμητή θέση.
4. Ρυθμίστε το περιστροφικό κουμπί για
τον τρόπο εργασίας στο σύμβολο .
Προσέξτε να ακουστεί να κουμπώνει !
5. Ρυθμίστε την πρόσθετη χειρολαβή στη
επιθυμητή θέση.
6. Βάλτε το φις στην πρίζα.
7. Πιάστε το ηλεκτρικό εργαλείο με τα δυο
σας χέρια και πάρτε θέση εργασίας.
8. Ενεργοποιήστε το ηλεκτρικό εργαλείο.
9. Κατά τη σμίλευση πιέζετε το ηλεκτρικό
εργαλείο μαλακά προς τα εμπρός, έτσι
ώστε να μην αναπηδήσει.
10. Μετά το πέρας της εργασίας θέστε το
εργαλείο εκτός λειτουργίας.
11. Τραβήξτε το φις από την πρίζα.
Λοιπές υποδείξεις
– Η χρήση αιχμηρών εργαλείων
εφαρμογής αυξάνει την απόδοση
εργασίας και τη διάρκεια ζωής του
ηλεκτρικού εργαλείου.
– Μετά την εργασία καθαρίζετε το
ηλεκτρικό εργαλείο και το φυλάτε στη
βαλίτσα μεταφοράς σε στεγνό μέρος.
Συντήρηση και φροντίδα
ΠΡΟΕΙΔΟΠΟΙΗΣΗ!
Πριν από όλες τις εργασίες στο ηλεκτρικό
εργαλείο, βγάλτε το φις από την πρίζα.
Καθαρισμός
Καθαρίζετε τακτικά το ηλεκτρικό εργαλείο
και τις σχισμές αερισμού. Η συχνότητα
εξαρτάται από το κατεργαζόμενο υλικό και
από τη διάρκεια της χρήσης. Στο εσωτερικό
του περιβλήματος με τον κινητήρα πρέπει να
γίνεται τακτική εκφύσηση με ξηρό
πεπιεσμένο αέρα.
Καρβουνάκια (ψήκτρες)
Το ηλεκτρικό εργαλείο είναι εφοδιασμένο με
καρβουνάκια απόζευξης.
Όταν τα καρβουνάκια απόζευξης φθάσουν
στο όριο φθοράς, το ηλεκτρικό εργαλείο
απενεργοποιείται αυτόματα.
ΥΠΟΔΕΙΞΗ!
Για την αλλαγή χρησιμοποιείτε μόνον γνήσια
ανταλλακτικά από τον κατασκευαστή. Κατά
τη χρήση ανταλλακτικών άλλου
κατασκευαστή παύουν να ισχύουν οι
υποχρεώσεις παροχής εγγύησης του
κατασκευαστή.
97
Page 98

CHE 4-32 R SDS-plus
Klaus Peter WeinperEckhard Rühle
Manager Research &
Development (R & D)
Head of Quality
Department (QD)
Από τα πίσω ανοίγματα εισόδου αέρα
μπορείτε να παρατηρείτε κατά τη χρήση τη
φλόγα στα καρβουνάκια.
Σε περίπτωση ισχυρής φλόγας στα
καρβουνάκια θέτετε το ηλεκτρικό εργαλείο
αμέσως εκτός λειτουργίας. Παραδίδετε το
ηλεκτρικό εργαλείο σε συνεργείο
εξυπηρέτησης πελατών, εξουσιοδοτημένο
από τον κατασκευαστή.
Μετάδοση κίνησης
ΥΠΟΔΕΙΞΗ!
Μη λύσετε τις βίδες στην κεφαλή μετάδοσης
κίνησης κατά τη διάρκεια ισχύος της
παροχής εγγύησης. Σε περίπτωση μη
τήρησης παύει να ισχύει η αξίωση παροχής
εγγύησης από τον κατασκευαστή.
Επισκευές
Τυχόν επισκευές επιτρέπεται να εκτελούνται
αποκλειστικά και μόνο από κάποιο
εξουσιοδοτημένο από τον κατασκευαστή
συνεργείο εξυπηρέτησης πελατών.
Σε περίπτωση που έχει υποστεί ζημιά το
τροφοδοτικό καλώδιο του ηλεκτρικού
εργαλείου, αυτό πρέπει να αντικατασταθεί
από ειδικά προετοιμασμένο τροφοδοτικό
καλώδιο (τρόπος τοποθέτησης X). Το
καλώδιο αυτό διατίθεται από την υπηρεσία
τεχνικής εξυπηρέτησης πελατών της FLEX.
Ανταλλακτικά και εξαρτήματα
Για περαιτέρω εξαρτήματα, ιδιαίτερα για
εργαλεία χρήσης, μπορείτε να ανατρέξετε
στους καταλόγους του κατασκευαστή.
Σχέδια αποσυναρμολογημένης όψης
και λίστες ανταλλακτικών θα βρείτε
στην ιστοσελίδα μας:
www.flex-tools.com
Υποδείξεις απόσυρσης
ΠΡΟΕΙΔΟΠΟΙΗΣΗ!
Αχρηστεύετε τα παλιά εργαλεία που
δεν χρησιμοποιούνται πλέον, κόβοντας
το τροφοδοτικό καλώδιο.
Μόνο για χώρες της Ευρωπαϊκής
Ένωσης.
Μην πετάτε ηλεκτρικά εργαλεία στα
οικιακά απορρίμματα!
Σύμφωνα με την Κοινοτική Οδηγία
2012/19/ΕE σχετικά με τα παλαιές
ηλεκτρικές και ηλεκτρονικές συσκευές και
της μεταφοράς της σε εθνικό δίκαιο, τα
απόβλητα ηλεκτρικά εργαλεία πρέπει να
συλλέγονται χωριστά και να οδηγούνται σε
φιλική προς το περιβάλλον ανακύκλωση.
ΥΠΟΔΕΙΞΗ!
Σχετικά με τις δυνατότητες απόρριψης
απευθυνθείτε σε εξειδικευμένο κατάστημα!
Δήλωση πιστότητας
Δηλώνουμε με αποκλειστική ευθύνη, ότι το
προϊόν που περιγράφεται στο κεφάλαιο
«Τεχνικά χαρακτηριστικά» βρίσκεται σε
συμφωνία με τα ακόλουθα πρότυπα ή
κανονιστικά έγγραφα:
EN 60745 σύμφωνα με τις διατάξεις των
οδηγιών 2014/30/EΕ, 2006/42/EΚ,
2011/65/EE.
Υπεύθυνος για τεχνικά έγγραφα:
FLEX-Elektrowerkzeuge GmbH, R & D
Bahnhofstrasse 15, D-71711 Steinheim/Murr
07/03/2018
FLEX-Elektrowerkzeuge GmbH
Bahnhofstrasse 15, D-71711 Steinheim/Murr
Αποκλεισμός ευθύνης
Ο κατασκευαστής και ο αντιπρόσωπός του
δεν αναλαμβάνουν καμία ευθύνη για ζημιές
και απώλειες κέρδους λόγω διακοπής της
λειτουργίας της επιχείρησης, που
προκλήθηκαν από το προϊόν ή από τη μη
δυνατή χρήση του προϊόντος. Ο
κατασκευαστής και ο αντιπρόσωπός του δεν
φέρουν καμία ευθύνη για ζημιές που
προξενήθηκαν από μη σωστή χρήση ή σε
συνδυασμό με προϊόντα άλλων
κατασκευαστών.
98
Page 99

CHE 4-32 R SDS-plus
Spis treści
Zastosowane symbole . . . . . . . . . . . . . 99
Symbole na urządzeniu . . . . . . . . . . . . . 99
Dane techniczne . . . . . . . . . . . . . . . . . . 99
Opis urządzenia . . . . . . . . . . . . . . . . . 100
Wskazówki bezpieczeństwa . . . . . . . . 101
Poziom hałasu i drgań . . . . . . . . . . . . . 102
Instrukcja obsługi . . . . . . . . . . . . . . . . 103
Konserwacja i czyszczenie . . . . . . . . . 105
Wskazówki dotyczące utylizacji . . . . . 106
-zgodność . . . . . . . . . . . . . . . . . . . . 107
Wykluczenie odpowiedzialności . . . . . 107
Zastosowane symbole
OSTRZEŻENIE!
Oznacza bezpośrednio zagrażające
niebezpieczeństwo. Nieprzestrzeganie tej
wskazówki grozi śmiercią lub bardzo
ciężkimi obrażeniami.
OSTROŻNIE!
Oznacza możliwość wystąpienia
niebezpiecznej sytuacji. Nieprzestrzeganie
tej wskazówki może doprowadzić do
skaleczeń lub szkód materialnych.
WSKAZÓWKA!
Oznacza wskazówki dla użytkownika
i ważne informacje.
Symbole na urządzeniu
Przed uruchomieniem urządzenia
przeczytać instrukcję obsługi!
Zastosować okulary ochronne!
Dane techniczne
Wiertarka i młot udarowy CHE 4-32 R
SDS-plus
Moc nominalna W 900
Liczba obrotów biegu
jałowego
Liczba uderzeń biegu
jałowego
Maks. energia
pojedynczego
uderzenia
(odpowiednio
do „EPTA-procedure
05/2009“)
Smarowanie Smar
Mocowanie narzędzia SDS-plus
maks. średnica wiertła
– beton
– mur
– (koronka wiertarska
HM)
– drewno
– metal
Waga zgodnie z
procedurą „EPTA
01/2003“
Klasa ochrony
-1
min
min
J4,8
mm
mm
mm
mm
kg 4,6
0–850
-1
0–3700
32
82
32
13
II /
Używać ochronników słuchu!
Stosować lekką maskę
przeciwpyłową!
Wskazówka dotycząca usuwania
zużytego urządzenia (patrz strona
Wskazówki dotyczące usuwania
opakowania i zużytego urządzenia)!
99
Page 100

Opis urządzenia
CHE 4-32 R SDS-plus
1 Zacisk wiertła SDS
2 Wymienny uchwyt wiertarski
3 Uchwyt dodatkowy
4Wrzeciono
5 Dźwignia ustalająca ogranicznik
głębokości
6 Ogranicznik głębokości
7 Pokrętło wyboru trybu pracy
8 Przełącznik
Do włączania i wyłączania, jak
również do rozbiegu aż
do maksymalnej prędkości obrotowej/
liczby uderzeń.
100
9 Uchwyt
10 Elektryczny przewód zasilający
11 Tabliczka znamionowa *
* niewidoczna
 Loading...