

Fleming Music Australia STL 120 Assembly Instructions Manual
DIY GUITAR KIT
DIY GUITAR KITDIY GUITAR KIT
DIY GUITAR KIT
STL 120
STL 120STL 120
STL 120
Joint: Bolt-on
Body: Alder
Neck: Maple
Fingerboard: Maple
Tuning Machines: Chrome Die-cast
Scale Length: 648 mm/ 25.5"
Fret: 22
Control: 1V, 1T, 3-Way Selector
Pickups: S-S
Hardware: Chrome
Bridge: Fixed Hard tail
Pickguard: 1-Ply Black Pickguard

1
STL 120 FLEMING DIY GUITAR KIT Assembly Instructions
Please read these instructions carefully before beginning in order to have a
complete overview of the project. There are six steps that you will follow to
complete your Electric Guitar Kit.
1. Check and Identify Parts
2. Finishing the Body and Neck
3. Shaping the Headstock
4. Assembling the Body
5. Assembling the Neck
6. Setup
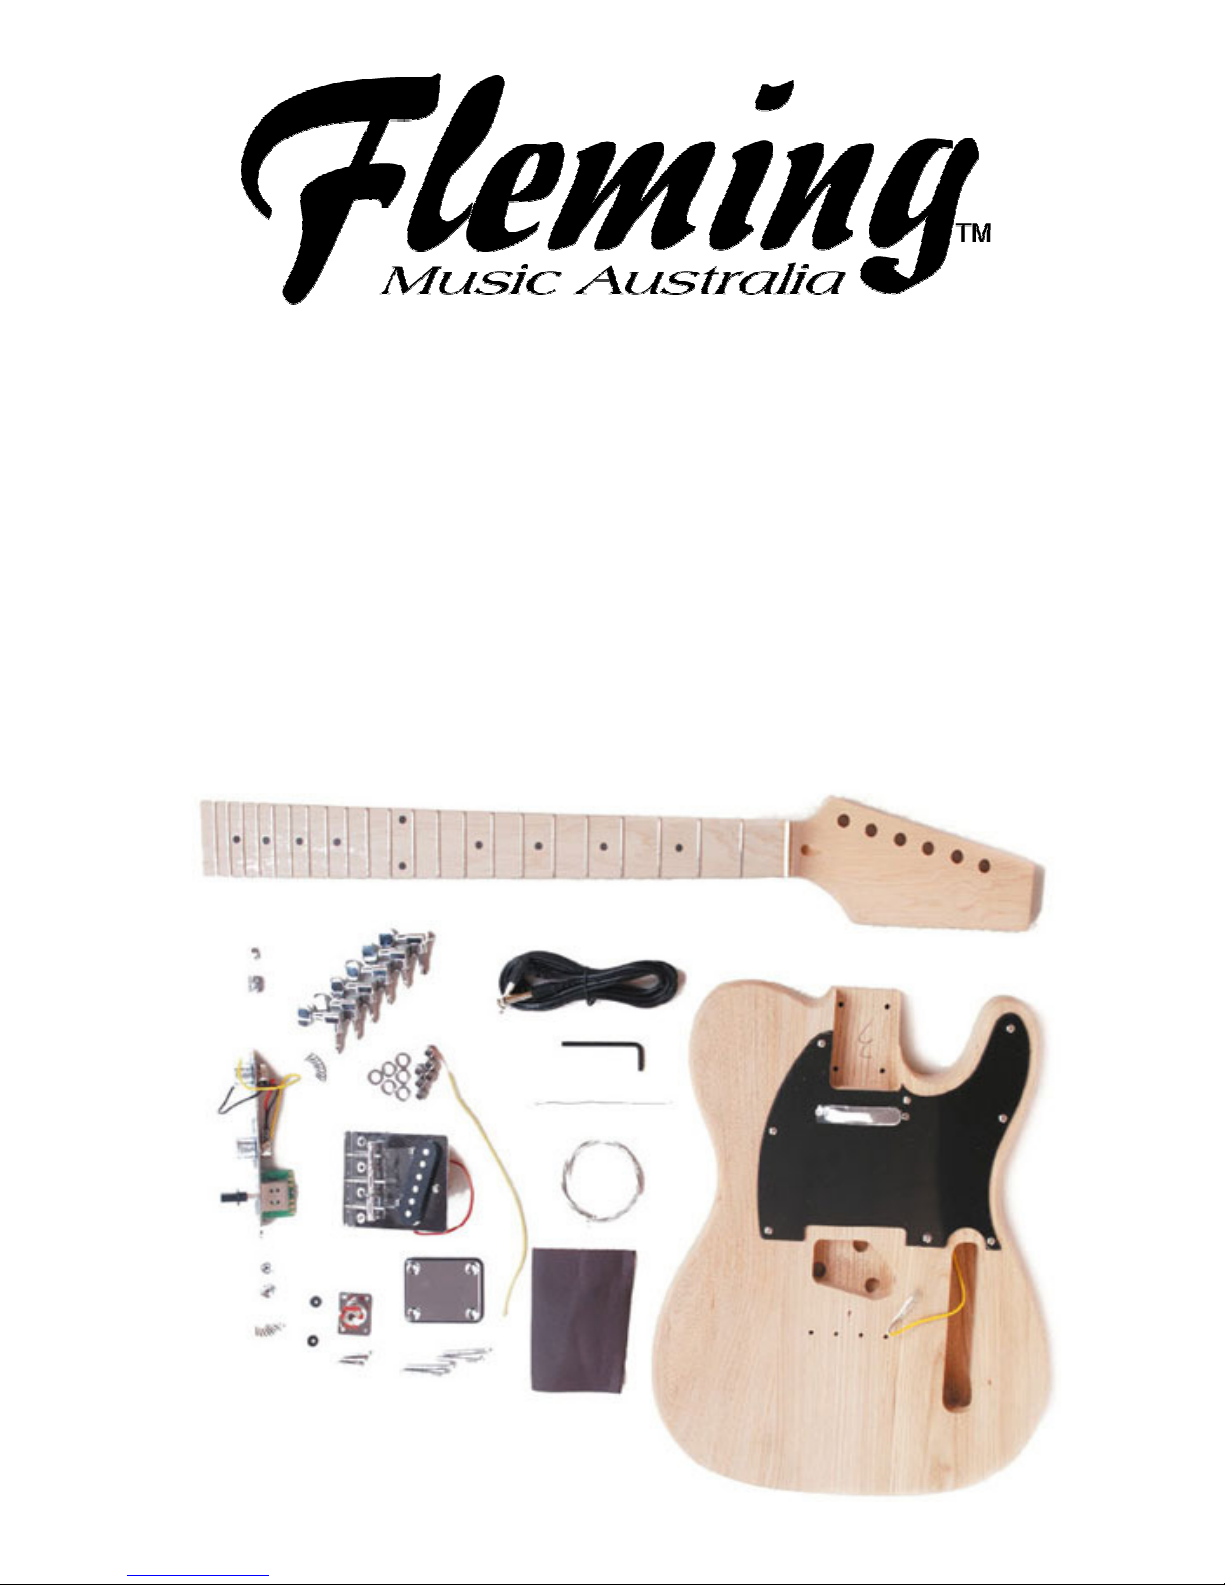
CHECK AND IDENTIFY PARTS
Following is the list of parts that are included with your kit. In the unlikely
event that parts are missing from your kit you may order replacements from
your local music shop or directly from us.
Quantity Description
A 1 Alder Body
B 1 Maple Neck (Maple Fingerboard)
C 1 Rhythm Pickup (Neck Position)
D 1 Single Ply Pickguard (Black)
E 1 Chrome Bridge Assembly
F 1 Ground Wire
G 1 Chrome Control Plate (C/W 2 x control pots and knobs)
H 1 Output Jack on Chrome Output Jack Plate
I Set of 6 Chrome Tuning Machines, Washers, Bushings & Screws
J Set of 2 Chrome Strings Tees, Spacers and Screws
K 1 Chrome Neck Plate and Neck Plate Pad
L Set of 6 Bridge Screws
M 1 Guitar Lead
N 2 Chrome Strap Buttons, Screws and Rubber Washers
FINISHING THE BODY AND NECK
Although the overall tone and playing characteristics of the instrument will not
be affected, a high quality finish is a real source of pride to the builder.
Both the neck and body of your FLEMING DIY Electric Guitar Kit have been
sanded and are ready for your final sanding and finishing.

2
FINISHING THE BODY
First you will need to decide whether you would like a natural finish or a
coloured finish on the body. For a natural finish go directly to Clear Coat.
COLOR COAT
For the colour coat your first stop is a shop that specializes in automotive
products or any shop that sells acrylic paints (e.g. your local hardware store).
The acrylic lacquer made by the automotive industry is particularly well suited
to your needs. In addition to providing a full range of colour choices, acrylic
lacquer is extremely durable and resistant to cracking.
Choose your colour from the many available shades (including metallic
options) used for automobile touch up work. A spray can will make your job
much easier and produce fine results.
Hang the body as shown in Figure 1. Begin each spray stroke in the air on
one side of the body and continue until you reach the air on the other side.
Overlap each stroke by one half, and every other stroke spray crosswise, then
length wise. This technique will provide an even colour distribution.
Although lacquer dries quickly, and successive coats may be sprayed in a
short period of time, attempts to spray too much in one coat can result in runs
or bubbles in the finish. Spraying should not be attempted on excessively
humid or rainy days.
One or two coats of colour should be enough. It should not be necessary to
sand between coats unless there are drips, runs or bug feet (!) to be levelled.
All exposed surfaces should be dead level and have a nice satin gloss.
CLEAR COAT
The clear lacquer topcoat is also available at most auto parts store. If you
have applied a colour coat, it is advisable to select the same brand of clear
lacquer to assure compatibility.
The clear coat is applied to the body using the same technique as described
for the colour coat. Two or three coats of clear should be adequate.
For best results the body finish should be allowed to harden for one week
before the final rub out and polish.
Note: To avoid runs and drips, hold can 6-10 inches from surface. For
best results follow directions on spray can.
CAUTION: Remember that spray paint is extremely flammable. Do not spray
near open flames, heat or sparks. The area where you spray must be well
ventilated while spraying and until all vapour is gone. Do not smoke! Do not
breathe the vapour and keep doors and windows open during application and
drying.
 Loading...