

Fleetworks FLTW-7632 Installation Instructions Manual

INSTALLATION(INSTRUCTIONS
FLTW-7632 Instructions 9-1-15.doc Page 1 of 4
Grand Cherokee, Dodge Durango, Dodge Caravan Factory Display Radio
Camera
(Kit # FLTW-7632) NOTE: Requires Chrysler/Dodge dealer to activate; see below
Applications: 2011 – current Chrysler Town & Country (RBZ, RHB, RER, REZ, RBZ, REW radios)
2011 – current Dodge Durango (RHR, RHB, RHZ, RHP, 8.4” radios)
2011 – current Dodge Grand Caravan (RBZ, RHB, RER, REZ, RBZ, REW radios)
2011 – current Dodge Ram Tradesman (RBZ, RHB, RER, REZ, RBZ, REW radios)
2008 – 2010 Jeep Commander (430, 730 radios)
2008 – current Jeep Grand Cherokee (430, 730, RHR, RHB, RB2, RHP, 8.4” radios)
Please read thoroughly before starting installation and check that kit contents are complete.
Items Included in the Kit:
Tools & Supplies Needed:
Camera
Hole Saw for camera mount
Chassis Harness
Power Harness
Display Harness with 22-pin connector
Loose red and black wires (if needed)
These Instructions with Template
Dealer Programmer Tool
Phillips Screwdriver
Center Punch
1/4’’ Drill Bit (if needed)
Power Drill
Wire Ties
Electrical Tape or Heat Shrink Tubing
Plastic Trim Removal Tool
Soldering Iron & Solder (Recommended)
T-taps (optional)
Small grommet or Silicone (If needed)
Vehicle service manual (If needed)
Safety Precautions:
• Work in well ventilated area that is clear of obstructions.
• Secure vehicle with tire chucks in both front and rear of tires.
• Turn vehicle accessories OFF and ensure ignition key is in OFF position.
• Wear safety goggles and snug fitting clothes.
• Use tools only for their intended purpose and which are in good repair.
• Only perform this task if confidence, skill, and physical ability permit.
NOTE: We strive to provide accurate and up-to-date installation instructions.
IMPORTANT: Use of this camera with
the factory display requires activation
by a Chrysler/Dodge dealer. See below
for Dealer Programming Instructions.
If possible, have the dealer “enable”
the camera option prior to installation.
INSTALLATION(INSTRUCTIONS
FLTW-7632 Instructions 9-1-15.doc Page 2 of 4
Step 1: Determine Camera location. Place
template in desired position to confirm fitment.
(IMPORTANT: Some states prohibit items blocking
the license plate; check local authorities to confirm
legal status for your application).
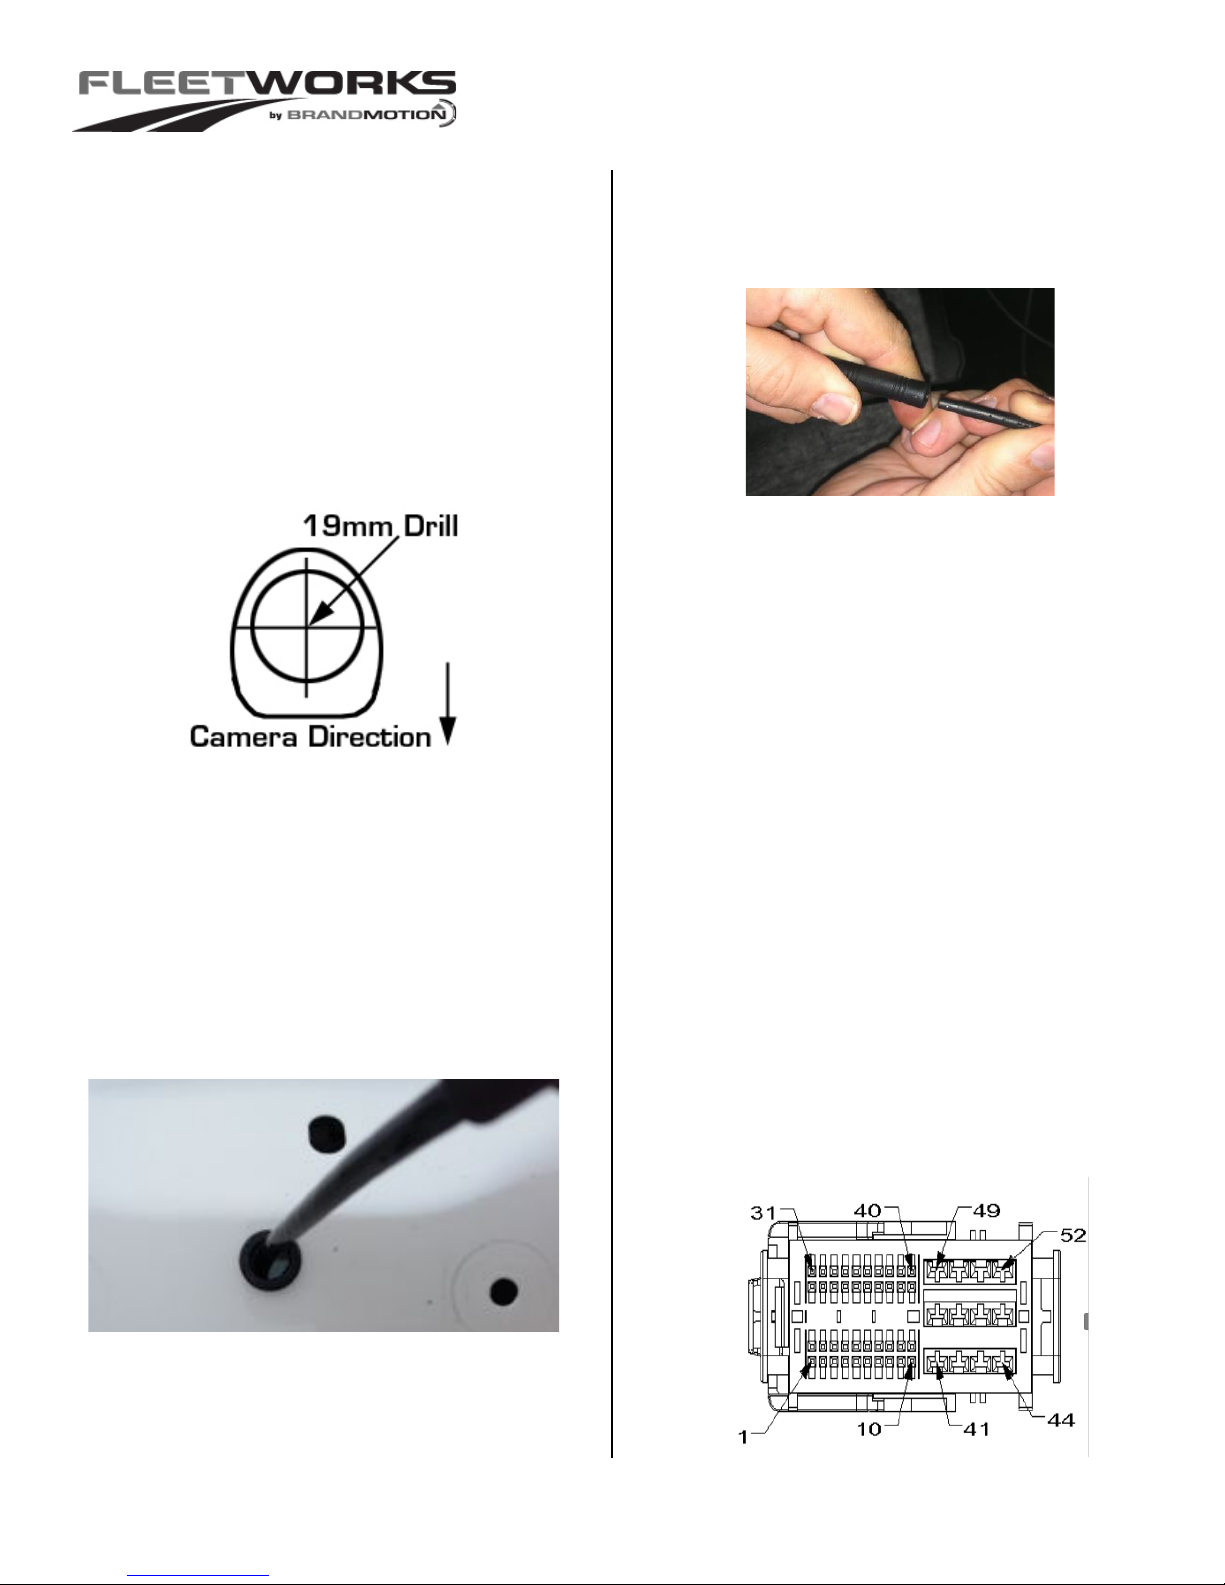
Step 2: Mark Camera location with supplied
template, Center Punch the mark, and use
supplied 19mm Hole Saw to drill Camera
mounting hole. NOTE: If your vehicle has a
liftgate panel/ trunk trim cover, it must be
removed.
Step 3: (If necessary) Use a ¼” Drill Bit to
make a pass through hole in any obstructing
panel for the Camera Harness connector.
Step 4: Insert connector end of the Camera
Harness through the hole(s) you drilled.
RECOMMENDED: Protect Camera Harness from any
sharp metal edges by applying a small amount of
silicone caulk or a rubber grommet (shown below)
to any area that may come into contact with metal.
Step 5: Route Camera and/ or Chassis
Harness along existing wiring and secure
using Wire Ties or Electrical Tape.
Step 6: Connect Camera Harness to supplied
Chassis Harness. The optimal location for this
junction may occur at the top of the liftgate or
inner trunk edge.
Step 7: Route Chassis Harness forward. It
may be necessary to remove sill plates, pillar
covers, side panels, etc. Use a Plastic Trim Removal
Tool to avoid damage to trim pieces.
Step 8: Use a Plastic Trim Removal Tool,
7mm Socket, and/or Phillips Screwdriver to
remove garnish and fasteners securing the
radio display.
Step 9: Unplug all radio connectors from the radio
head unit and set radio aside.
Only complete Step 10 for 2014 Dodge
Durango and 2014 Jeep Grand Cherokee
vehicles.
Step 10: Insert terminal from red wire on
supplied chassis harness into position 31 of
black 52-pin radio connector and insert
terminal from black wire on supplied chassis
harness into position 32 of black 52-pin radio
connector.
 Loading...