

Fleetwood Limited 1989 Owner's Manual


'.:
,.
..
.
FULL
ONE-YEAR/15,OOO
MILE
~~b·-c.o'1
-----
WARRANTY-~---"
FOR
,MOTOR
HOMES
MANUFACTURED
BY
SUBSIDIARIES
OF
FLEETWOOD
ENTERPRISES.
INC.
SOLD
IN
THE
UNITED
STATES
AND CANADA
COVERAGE
PROVIDED
Your
new
motor home, including the structure, plumbing, h,eeting and electrical systems, and all appliances and equipment installed by the
manufacturer, is warranted under normal
use
to
be 'free from manufacturing defects in material or workmanship.
The warranty extends
10
the
first retail purchaser and'his transferee!s') and begins
on
the
date
6f
original retail delivery
or
the date
the
motor
home
is
first placed into service
as
a rental, commercial or demonstrator unit (whichever occurs first). The warranty extends for a period
of
one year from such date or until the
unit
has received
15,000
total miles
of
use
as
datermined by the mileage
shown
on
the
odometer (whichavar
occurs
first!,
Written
notice
of
defects
must
be given
to
the selling dealer
or
the manufacturer
not
later
than
ten
nO) days
after
the expiration
of
the applicable
warranty
period.
OWNER'S OBLIGATIONS
The
ownar
is responsIble
for
normal maintenance
as
described in the Owner's Manual; however.
minor
adjustments (such as adjustments
to
the
inte,rior
of
exterior doors,
LP
regulator pressure, cabinet latches,
TV
antanna control,
etc.1
will
be performed
by
the
dealer during the first
90
days
of
warranty coverage. Thereafter. such adjustments are the responsibllity
of
the
owner
as·
normal maintenance unless required
as
a
direct
result
of
repair or replacement
of
a defective part under
this
warranty.
If
a problem occurs
which
the
owner
believes is covered by this warranty. the
owner
shall
contact
the SELLING DEALER,
or
other authorized
dealer. giving
him
sufficient information
to
resolve
the
matter. The
owner
shall deliver
the
motOr home to
the
DEALER
or
manufacturing
plant
location
for warranty service.
DEALER'S OBLIGATIONS
By
agreement
with
the
manufacturer. the dealer is obligated
to
maintain the
motor
home
prior to retail sale,
to
perform
a detailed predelivary
inspaction and to repair or replace any parts necessary
to
correct defects in material
or
workmanship.
WHEN THE DEALER
DOES NOT
RESOLVE
THE PROBLEM
If
the dealer is unable or unwilling to resolve a problem Which the owner
is
convinced is covered by the warranty. he should contact the MANUFAC-
TURING PLANT
at
the address listed
below
and provide
the
manufacturer
with
a description in
writing
of
the problem and
attempts
made
to
resolve it.
MANUFACTURING PLANT OBLIGATIONS
Upon
receipt
of
notice
of
a claim, where the dealer
was
unable or
unwilling
to
resolve the problem, the
manufacturing
plant
will
repair or replace
any parts necessary to correct defects
in
material or workmanship,
or
wilt take
other
appropriate action as
may
be required.
WHEN THE
MANUFACTURING PLANT DOES NOT
RESOLVE
THE PROBLEM
If
the representatives
of
the
manufacturing plant are unable
to
resolve
the
problem and the
owner
is convinced
that
it
is covered by the warranty,
the
ownar
should call
the
toll-free
number
listed
below
to describe the problem and
the
attempts
made to resolve it.
WHAT
IS NOT
COVERED
BY
THE EXPRESS WARRANTY
THIS WARRANTV DOES NOT COVER:
1.
THE
AUTOMOTIVE SYSTEM !INCLUDING THE CHASSIS AND DRIVE TRAIN),
TIRES
AND BATTERIES, WHICH ARE COVERED
BY
THE
SEPARATE
WARRANTIES
OF
THE RESPECTIVE MANUFACTURERS
OF
THESE COMPONENTS.
2.
DEFECTS
<;:AUSED
,BY
OR
RELATED
TO:
A.
ABUSE. MISUSE.
~EGLIGENCE
OR
ACCIDENT;
B,
FAILURE
TO
COMPLY WITH INSTRUCTIONS CONTAINED
IN
THE OWNER'S MANUAL:
C.
ALTERATION
OR
MODIFICATION
OF
THE MOTOR HOME;
3. NORMAL DETERIORATION
DUE
TO
WEAR
OR
EXPOSYRE, SUCH AS FADING
OF
FABRICS OR DRAPES, CARPET WEAR,
ETC.
4. NORMAL MAINTENANCE AND SERVICE ITEMS. SUCH AS LIGHT BULBS, FUSES, WIPER BLADES. LUBRICANTS,
ETC.
5.
MOTOR HOMES ON WHICH THE ODOMETER READING HAS
BEEN
ALTERED.
6.
TRANSPORTATION
TO
AND FROM DEALER
OR
MANUFACTURING PLANT LOCATION,
LOSS
OF
TIM;.
INCONVENIENCE, COMMER-
CIAL
LOSS.
~OSS,
OF
USE, TOWING CHARGES, BUS
FARES,
CAR
RENTAL,
INCIDENTAL
C;HAR,GES
SUCH AS TELEPHONE, CALLS
OR
HOTE'L
BILLS.
OR
'OTHER INCIDENTAL
OR
CONSEQUENTIAL DAMAGES. . . "
SOME
'STATES
00
NOT
ALLOW
tHE
EXCLUSION
OR
LIMitATION
OF
INCIDENTAL
OR
CONSEQUENTIAL DAMAGES.
SO
TH'E
ABOVE
, LIMITATION OR EXCLUSION MAY NOT
APPLY
TO
YOU.
THIS, WARRANTY ,GIVES
YOU
SPI;.CIFIC
LEGAL RIGHTS,
AND
YOU
MAY ALSO HAVE OTHER RIGHTS WHICH
VA~Y
FROM
STATE
TO
STATE
.
, . .
THE MANUFACTURER IS NOT RESPONSIBLE
FOR
ANY UNOERTAKING, REPRESENTATION,
OR
WARRANTY
MADE
BY
ANY
DEAL~R,
OR
OTHER
PERSON BEYOND THOSE
EXPRE~SLY
SET FORTH ,IN THIS WARRANTV.
I
Bran~
Name
_~
____
-c
______
-;_;-_Model
______
~---Serial
No.
_____
'-
___
_
LItv"-lTED
CORPORATE HEAOQUARTERS:
Consumer Affairs Department
Fleetwood Enterprises.
Inc.
P.O.
Box
7300
f1.
Riverside,' California
92523
From California: (800)
442·4804
From Outside
of
California: (800)
854·4755
printed
in
USA
!
\
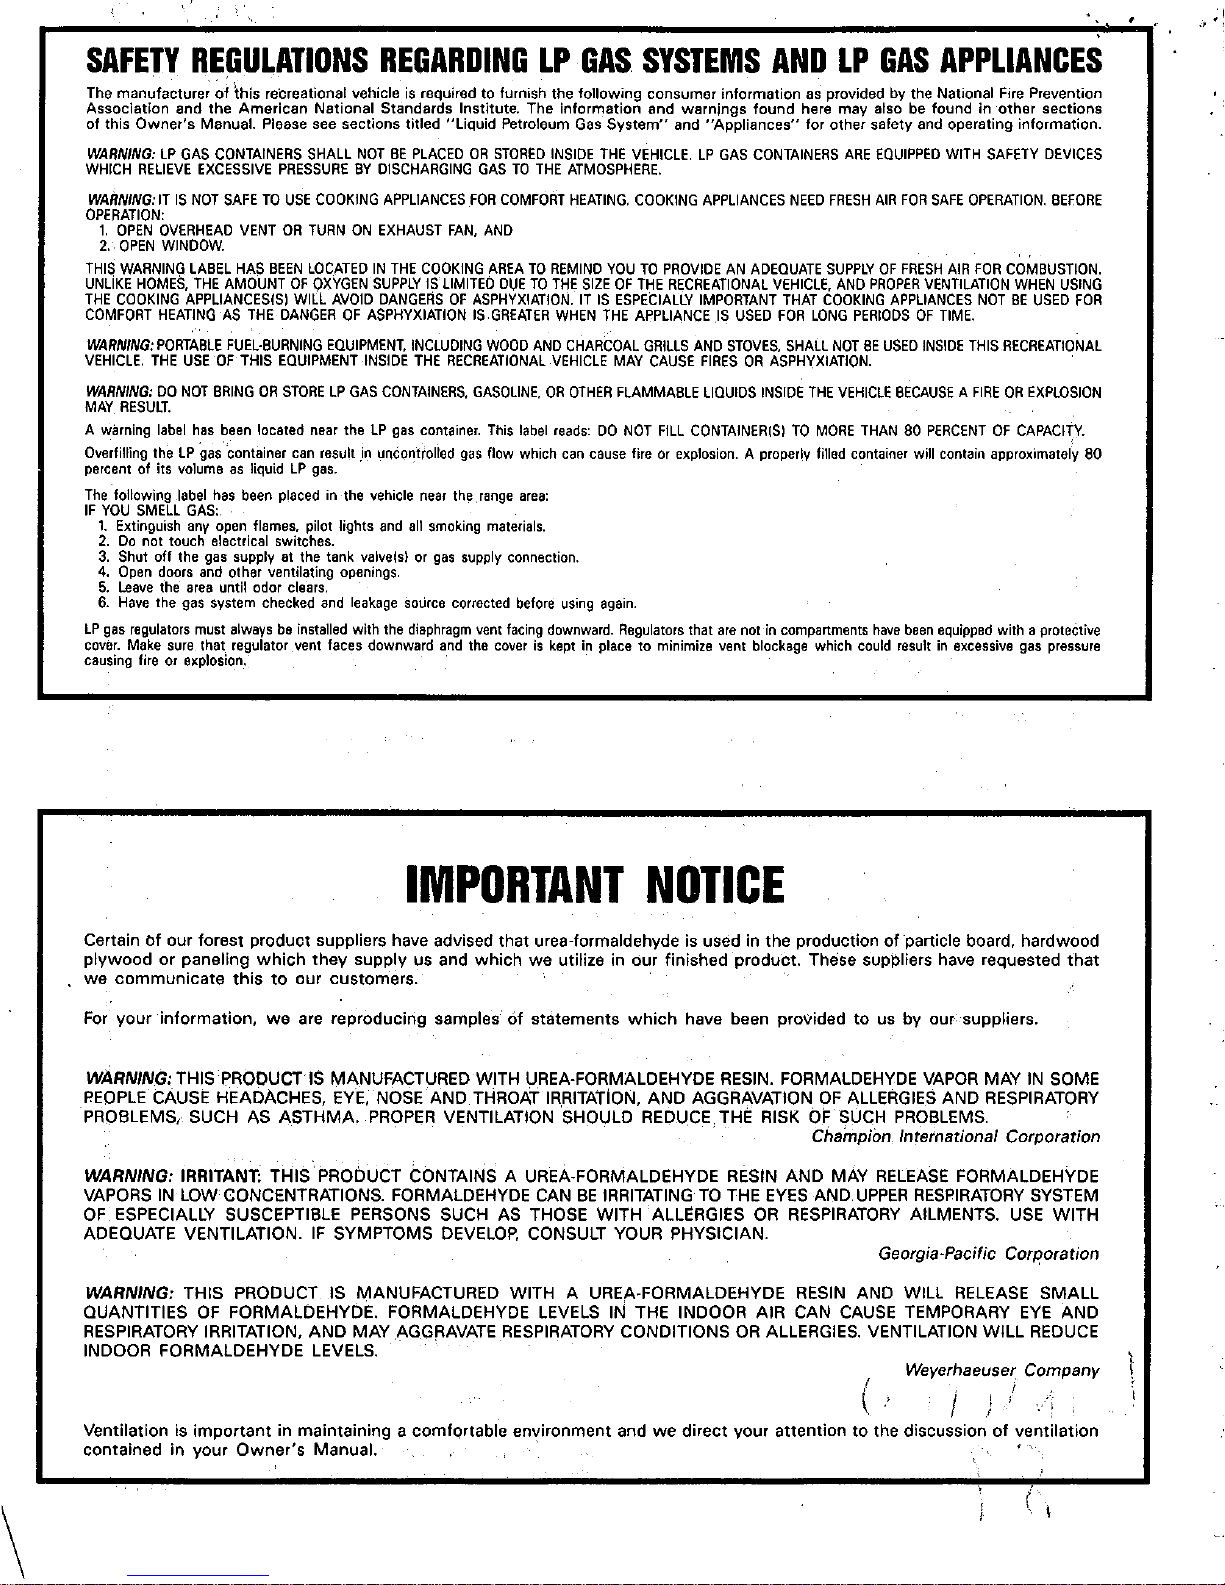
SAFETY
REGULATIONS
REGARDING
LP
GAS
SYSTEMS
AND
LP
GAS
APPLIANCES
The
man~facture;
~f
'this recreational vehicle
is
required to furnish the following consumer information
as
provided
by
the National Fire Prevention
Association and the American National Standards Institute. The information and warnings found here may
also
be
found
in
other sections
of
this Owner's Manual. Please see sections titled "liquid Petroleum
Gas
System" and "Appliances" for other safety
and
operating information.
WARNING,
LP
GAS
CONTAINERS
SHALL
NOT
BE
PLACED
OR
STORED
INSIDE
THE
VEHICLE.
LP
GAS
CONTAINERS
ARE
EQUIPPED
WITH
SAFETY
DEVICES
WHICH
RELIEVE
EXCESSIVE
PRESSURE
BY
DISCHARGING
GAS
TO
THE
ATMOSPHERE.
WARNING,
IT
IS
NOT
SAFE
TO
USE
COOKING
APPLIANCES
FOR
COMFORT
HEATING.
COOKING
APPLIANCES
NEED
FRESH
AIR
FOR
SAFE
OPERATION.
BEFORE
OPERATION,
1.
OPEN
OVERHEAD
VENT
OR
TURN
ON
EXHAUST
FAN.
AND
2.
OPEN
WINDOW.
THIS
WARNING
LABEL
HAS
BEEN
LOCATED
IN
THE
COOKING
AREA
TO
REMIND
YOU
TO
PROVIDE
AN
ADEQUATE
SUPPLY
OF
FRESH
AIR
FOR
COMBUSTION.
UNLIKE
HOMES.
THE
AMOUNT
OF
OXYGEN
SUPPLY
IS
LIMITED
DUE
TO
THE
SIZE
OF
THE
RECREATIONAL
VEHICLE.
AND
PROPER
VENTILATION
WHEN
USING
THE
COOKING
APPLIANCESISI
WILL
AVOID
DANGERS
OF
ASPHYXIATION.
IT
IS
ESPECIALLY
IMPORTANT
THAT
COOKING
APPLIANCES
NOT
BE
USED
FOR
COMFORT
HEATING
AS
THE
DANGER
OF
ASPHYXIATION
IS
GREATER
WHEN
THE
APPLIANCE
.IS
USED
FOR
LONG
PERIODS
OF
TIME.
WARNING:
PORTABLE
FUEL·BURNING
EQUIPMENT.
INCLUDING
WOOD
AND
CHARCOAL
GRILLS
AND
STOVES.
SHALL
NOT
BE
USED
INSIDE
THIS
RECREATIONAL
VEHICLE.
THE
USE
OF
THIS
EQUIPMENT
INSIDE
THE
RECREATIONAL
VEHICLE
MAY
CAUSE
FIRES
OR
ASPHYXIATION.
WARNING:
DO
NOT
BRING
OR
STORE
LP
GAS
CONTAINERS.
GASOLINE.
OR
OTHER
FLAMMABLE
LIQUIDS
INSIDE
THE
VEHICLE
BECAUSE A FIRE
OR
EXPLOSION
MAY
RESULT.
A
warning
label
has
been
located
near
the
lP
gas
container.
This
label
reads:
DO
NOT
FILL
CONTAINER(S)
TO
MORE
THAN
80
PERCENT
OF
CAPACITY.
Overfilling
the
lP
gas
container
can
result
in
uncontrolled
gas
flow
which
can
cause
fire
Or
explosion. A properly
filled
container
will
contain
approximately
80
percent
of
its
volume
as
liquid
LP
gas.
.
The
following
label
has
been
placed
in
the
vehicle
near
the,
range
area:
IF
YOU
SMELL
GAS:
1.
Extinguish
any
open
flames,
pilot
lights
and
all
smoking
materials.
2.
Do
not
touch
electrical
switches.
3.
Shut
off
the
gas
supply
at
the
tank
valvejsl
or
gas
supply
connection.
4.
Open
doors
and
other
ventilating
openings.
5.
Leave
the
area
until
odor
clears.
6.
Have
the
gas
system
checked
and
leakage
source
corrected
before
using
again.
LP
gas
regulators
must
always
be
installed
with
the
diaphragm
vent
facing
downward.
Regulators
that
are
not
in
compartments
have
been
equipped
with a protective
cover.
Make
sure
that
regulator
vent
faces
downward
and
the
cover
is
kept
in
place
to
minimize
vent
blockage
which
could
result
in
excessive
gas
pressure
causing
fire
or
explosion.
IMPORTANT
NOTICE
Certain
bf
our
forest product suppliers have advised that urea-formaldehyde
is
used
in
the production of
-particle
board,
hardwood
plywood
or
paneling which they supply
us
and
which we utilize
in
our
finished product. These
suppliers
have requested that
we communicate this to
our
customers.
For
your information, we
are
reproducing samples' 6f statements which have been provided
to
us
by
our
suppliers.
wARNING: THIS PRODUCT
IS
MANUFACTURED WITH UREA·FORMALDEHYDE
RESIN.
FORMALDEHYDE
VAPOR
MAY
IN
SOME
~~g~t~~~~~~~~~~A7:s~~~~E·p~g~~RA~~NTT~~~%~R~~~~~~.
R~~~t~~~~V~T~~NO~FS~~~R~~~~te~sRESPIRATORY
Champion. Inte;national Corporation
WARNING: IRRITANT: THIS PRODUCT CONTAINS A UREA·FORMALDEHYDE
RESIN
AND MAY
RELEASE
FORMALDEHYDE
VAPORS
IN
LOW
CONCENTRATIONS. FORMALDEHYDE
CAN
BE
IRRITATING
TO
THE
EYES
AND
UPPER
RESPIRATORY
SYSTEM
OF
ESPECIALLY SUSCEPTIBLE PERSONS SUCH
AS
THOSE WITH ALLERGIES
OR
RESPIRATORY
AILMENTS.
USE
WITH
ADEQUATE VENTILATION.
IF
SYMPTOMS
DEVELOP.
CONSULT
YOUR
PHYSICIAN.
Georgia-Pacific Corporation
WARNING: THIS PRODUCT IS MANUFACTURED WITH A UREA·FORMALDEHYDE
RESIN
ANO
WILL
RELEASE
SMALL
QUANTITIES
OF
FORMALDEHYDE. FORMALDEHYDE
LEVELS
IN
THE INDOOR AIR CAN
CAUSE
TEMPORARY
EYE
AND
RESPIRATORY
IRRITATION.
AND
MAY
.AGGRAVATE
RESPIRATORY
CONDITIONS
OR
ALLERGIES. VENTILATION WILL
REDUCE
INDOOR FORMALDEHYDE
LEVELS.
Weyerhaeuse~
Company
(
i
I
~
J
I
Ventilation
is
important
in
maintaining a comfQrtable environment
and
we direct your attention
to
the discussion of ventilation
contained
in
your Owner's Manual. • ,
(

TABLE
OF
CONTENTS
INTROOUCTION
0 0 0 0 0 0 0 0 0 0 0 0 0 0 0 0 0 0 0 0 0 0 0 0 0 0 0 0
Planning
And
Preparation 0 0 0 0 0 0 0 0 0 0 0 0 0 0 0 0 0 0 0 2
Loading
And
Weight Distribution 0 0 0 0 0 0 0 0 0 0 0 0 0 0 2
Have
It
All
Under Control 0 0 0 0 0 0 0 0 0 0 0 0 0 0 0 0 0 0 0 2
Inspect And Maintain 0 0 0 0 0 0 0 0 0 0 0 0 0 0 0 0 0 0 0 0 0 0 2
The
Owner's Information Package 0 0 0 0 0 0 0 0 0 0 0 0 0 2
Chassis And
Vehicle Identification 0 0 0 0 0 0 0 0 0 0 0 0 0 3
Keys
And Locks 0 0 0 0 0 0 0 0 0 0 0 0 0 0 0 0 0 0 0 0 0 0 0 0 0 0 3
Other Sources
of
Information 0 0 0 0 0 0 0 0 0 0 0 0 0 0 0 0 3
EMERGENCY
AND
IDENTIFICATION
INFORMATION
0 0 4
1988
LIMITED
SPECIFICATIONS
00
0 0 0 0 0 0 0 0 0 0 0 0 0 0 6
PRE-TRAVEL
CHECK
LIST
0 0 0 0 0 0 0 0 0 0 0 0 0 0 0 0 0 0 0 0 0 7
Cockpit And Driver's
Controls 0 0 0 0 0 0 0 0 0 0 0 0 0 0 0
08
Instrument Panel 0 0 0 0 0 0 0 0 0 0 0 0 0 0 0 0 0 0 0 0 0 0 0 0 0 0 8
Driver/Passenger
Seats 0 0 0 0 0 0 0 0 0 0 0 0 0 0 0 0 0 0 0
09
Seat
Belts 0 0 0 0 0 0 0 0 0 0 0 0 0 0 0 0 0 0 0 0 0 0 0 0 0 0 0 0
10
Child Restraint 0 0 0 0 0 0 0 0 0 0 0 0 0 0 0 0 0 0 0 0 0 0 0 0 0
10
Power Windows/Remote
Mirror
Control 0 0 0 0 0 0 0
10
Sunvisors 0 0 0 0 0 0 0 0 0 0 0 0 0 0 0 0 0 0 0 0 0 0 0 0 0 0 0 0 0
11
Front/Side Slider Windows 0 0 0 0 0 0 0 0 0 0 0 0 0 0 0 0
11
Driving And Parking 0 0 0 0 0 0 0 0 0 0 0 0 0 0 0 0 0 0 0 0 0 0
11
Rear View Video Monitor 0 0 0 0 0 0 0 0 0 0 0 0 : 0 0 0 0 0
11
Automatic
Leveling
System 0 0 0 0 0 0 0 0 0 0 0 0 0 0 0 0 0
12
Fuel And
Fuel
Systems 0 0 0 0 0 0 0 0 0 0 0 0 0 0 0 0 0 0 0 0
12
Fuel
Fill
0 0 0 0 0 0 0 0 0 0 0 0 0 0 0 0 0 0 0 0 0 0 0 0 0 0 0 0 0 0
12
Fuel
Types
And
Vapor
Lock
0 0 0 0 0 0 0 0 0 0 0 0 0 0 0
12
Alternative
Fuel
Types 0 0 0 0 0 0 0 0 0 0 0 0 0 0 0 0 0 0 0
12
Overheating 0 0 0 0 0 0 0 0 0 0 0 0 0 0 0 0 0 0 0 0 0 0 0 0 0 0 0
13
Variable Speed Engine
Fan
0 0 0 0 0 0 0 0 0 0 0 0 0 0 0 0
13
Carbon Monoxide Safety Precautions 0 0 0 0 0 0 0 0 0 13
Safety Tips 0 0 0 0 0 0 0 0 0 0 0 0 0 0 0 0 0 0 0 0 0 0 0 0 0 0 0 0 0
13
Engine Access 0 0 0 0 0 0 0 0 0 0 0 0 0 0 0 0 0 0 0 0 0 0 0 0 0 14
Tires
0 0 0 0 0 0 0 0 0 0 0 0 0 0 0 0 0 0 0 0 0 0 0 0 0 0 0 0 0 0 0 0 0 0
14
Tire
Replacement 0 0 0 0 0 0 0 0 0 0 0 0 0 0 0 0 0
•.
0 0 0 0 14
Changing A
Flat
Tire
0 0 0 0 0 0 0 0 0 0 0 0 0 0 0 0 0 0 0 0
15
Required
Tools
And
Equipment 0 0 0 . 0 0 0 0 0 0 0 0 0
15
Jacking Procedure 0 0 0 0 0 0 0 0 0 0 0 0 0 0 0 0 0 0 0 0 0 0 0 0
16
Towing 0
000
0 0 0 0 0 0 0 0 0 0 0 0 0 0 0 0 0 0 0 0 0 0 0 0 0 0 0 0
17
Lifting
Instructions 0 0 0 0 0 0 0 0 0 0 0 (See Back Pagel
ON
THE
ROAD
0 0 0 0 0 0 0 0 0 0 0 0 0 0 0 0 0 0 0 0 0 0 0 0 0 0 0 0
18
Motor Home Loading 0 0 0 0 0 0 0 0 0 0 0 0 0 0 0 0 0 0 0 0 0
18
Carrying Capacity 0 0 0 0 0 0 0 0 0 0 0 0 0 0 0 0 0 0 0 0 0 0 0 0
18
Determining And Distributing
Your
Motor Home
Load
0 0 0 0 0 0 0 0 0 0 0 0 0 0 0 0 0 0 0 0
18
Weighing
Your
Loaded Motor Home 0 0 0 0 0 0 0 0 0
19
Loading Tips 0 0 0 0 0 0 0 0 0 0 0 0 0 0 0 0 0 0 0 0 0 0 0 0 0 0
19
Trailer
Hitches And
Towing
0 0 0 0 0 0 0 0 0 0 0 0 0 0 0 0 0
20
Towing Automobiles 0 0 0 0 0 0 0 0 0 0 0 0 0 0 0 0 0 0 0 0 020
LIVING
WITH
YOUR
MOTOR
HOME
0 0 0 0 0 0 0 0 0 0 0 0 0
21
Power Entry Steps 0 0 0 0 0 0 0 0 0 0 0 0 0 0 0 0 0 0 0 0 0 0 0 0
21
Entry Assist Handle 0 0 0 0 0 0 0 0 0 0 0 0 0 0 0 0 0 0 0 0 • 0 0
21
Entry Doors, Screens,
And
Locks
0 0 0 0 0 0 0 0 0 0 0 0 0
21
Windows
000000000000000000000000000000021
Mini-Blinds 0 0 0 0 0 0 0 0 0 0 0 0 0 0 0 0 0 0 0
00
•.
0 . 0 .
021
Emergency
Exit
Window 0 0
..
0 0 . 0 0 . 0
...
0 0 0
21
Storage
...
0 0 . '0 0 0 0 0 0 0 0 0 0 0 0 0 . 0 0 . 0
.....
0 22
Exterior Compartments
0 0 0 0 . 0 0 0 0 0 0 . 0 0 0 0 0 0 22
Interior Storage 0 0 0 0 0 0
...
0 0 . 0 . 0 0 0
..
0 . 0 0 0 22
Interior And Furnishings. 0 0 0 0 0 0 0 0 0 0 . 0 0 . 0
..
0 22
Dinette Conversion
0 0 . 0 0
Co
0 0 0 0
...
0 0 0 0 0 0 . 22
Sofa/Lounge Conversion
.. 0 ..
0 0 0 . 0
..
0 0 . 0 . 0 22
Folding
Doors.
0 0 0 0 0 0 0
.. 0 ...
0 0 . 0 . 0 0 0 0 . 0
22
Interior Lighting 0 0 0 0 0 0
..
0 0
...
0 0 . 0 . 0 0
....
23
Overhead Vents 0 0 0 0 0 0 0
..
0 0 0 0 0 0 . 0
.. 0 ....
23
Effects Of Prolonged Occupancy. 0 . 0 0
....
0 0 0 023
Controlling
Moisture Condensation 0 0 0
..
0 0 0 0 0 0
23
Fire
Safety 0 0 0 0 0 0 0 0 0 0 0 0 0 0 0 0 0 0 0 0 0 0 0 . 0 0 0 0 .
24
Smoke Detector 0 0 0 0 0 0 0 0 0 0 0 0 0 0 0 0 0 0 0
..
0 0
24
PLUMBING
SYSTEMS
0 0 0 0
...
0 0 0 . 0 . 0 0 0 0 0 . 0 0
..
25
Fresh Water System 0 . 0 . 0 0 . 0 0 0 . 0 0 0 0 0 . 0
..
0 0
25
Water Purifier
System.
0 0 0 0 0 0 . 0 0 0 0 0 . 0
..
0 .
25
The Water Pump 0 0
...
0 0 0 0 0 0 . 0 0 0 . 0 . 0 0 0 . 0
26
The Monitor Panel 0 0 0 0 . 0 0 0 0
..
0 0 0 . 0 . 0 0 . 0 0
26
Sanitizing The Fresh Water
System. 0 ......
0
26
Troubleshooting The Fresh Water
System. 0 ...
27
Leaks 0
..
0 0 . 0 . 0 0 0 0 0
..
0 0
..
0 0 0 0 0
...
0 0 0 0
27
Clogged Water Filter 0 0 0 0 0 0 0 0 . 0 0 0 0 0 . 0 . 0 . 0
27
Excessive Water Pressure 0
00
0 0 . 0 0 0 0 . 0
...
0 27
Water Pump Troubleshooting
0
....
0 0 0 0 : 0 0
..
27
The Waste Water
System
......
0 . 0 0
... 0 ..
0 0
28
Toilet
0 0 0
..
0 0 0 0 0 0 0 0 0
... 0 ....
0 0 0 0
..
0 0
..
28
Toilet
Maintenance 0
..
0 0
..
0 0
.....
0 0 0 . 0 . 0 0
28
Dumping The Holding Tanks 0 0 0
...
0 0 0 0 0
.. 0 28
Holding
Tank
Care And Maintenance 0 0 0 0 0 0 0 .
29
Water System Winterizing 0
..
0 0 . 0
..
0 0 0
..
0 0 . 0
29
ELECTRICAL
SYSTEMS
....
0 0
..
0 . 0 0
...
0 0 0
..
0 0
31
Chassis Electrical
System
...
0 . 0 0 0 . 0 0 0 0 0 0 0 . 0
31
Chassis Bulbs & Fuses 0 0 0 0 0 0 0 0 0 0
..
0 0 0 0 0 0
31
12-volt Coach System 0 0 0 0 0 0 0 0 0 . 0 0 0 0 0 0 0 0 0 0
31
Battery Disconnect 0 0 0 0 0 0 0 0
00 0 ..
0 0 0 0 0
...
0 0
31
Battery Inspection And Care 0 0 0 . 0 0 0 0 0 0 0 0 0 0
32
Battery Charging 0 0 0 0 0 0 0 . 0 0 0 0 0
..
0 0 0 0
o.
0 0
32
Selecting A Replacement Battery 0 0 0 . 0 0 0 0 . 0 0
32
120-volt
AC
System
..
0 0 0 . 0 0 0 0 0 0 . 0 0 0 0 0 0 . 0 0
32
The Power Converter 0 0 0 0 0 0 0 0 0 0 . 0 0 0 0 0 0 0 0 0
33
Ground Fault Interrupter 0 0 0 . 0 0 . 0 0 0 0 0 0 0 0
..
0 0
33
Entertainment Equipment 0 0
..
0 0 0 0 0 0 0 0 0 0 . 0 0 0
34
TV
Antenna/Cable Connections 0 0 0 0 . 0 0 0 0
..
0 0 0
34
TV
"Ghosts"
And
FM
"Flutter"
0 0
..
0 0 0 . 0 0 0 0 0
34
Minimizing Multipath Distortion
And
Improving Signal Quality 0 . 0 0 0 0 0 0 0 0 0
..
0 0 0 0
35
Generator Power Plant 0 0 0 0 . 0 0 0 0 0 . 0 0 0 . 0 0 0 0 0
35
Generator Operating Safety Precautions 0 0 . 0 0 0
36
Warm Weather Operation 0 0 . 0 0 0 0 0 0 0 0 0 0 0 0 . 0
36
Cold Weather Operation 0 0 0 0
..
0 0 0 0 0 0 0 0 0 0 0
.37
Preparation
For
Storage.
0 0 0 0 0 0 0 0 0 0
..
0 0 0 0 .
37
Reactivating Generator System After
Long-term
Storage 0 0 0 0 0 0 . 0 0 0 0 0 0 0 . 0 0 0 0 . 0 0
37
Generator Maintenance
And
Service 0 0 . 0 0 0 0 0
37
Electrical System Wiring. 0 0 0 0 0 . 0 0 0 0 0 0 0 0 0 0
37
LPG
SYSTEM, , , , , , , , , ' , , , , , , , , , , , , " ' , , , ,
,38
LPG
Gas
Safety Precautions. , , , ,
..
, , . , , ' , , .
38
System Components, , , , , ' , , , , , , , . , , , , . , . , 39
Hoses And Fittings .
, . , , . , , , . , , , ,
.•
, , , , . 39
LP
Gas
Regulator , , , , ,
...
, , ' , , , , , . , . ' , , 39
Using
LP
Gas
System
At
Low Temperatures, , . , 39
Filling
LP
Gas
Tanks, , , , , , , , , , , ,
..
, , , . , . , '
40
LP
Gas
System Leak Checks , , . , , , , , , , , , , , .
40
LPG
Leak
Detector,
..
, , , ' , . , , , , , , , , , . , , , '
40
Lighting
LP
Gas
Appliances, , , , , . , , , , , . , , , , ,41
APPLIANCES, , . , ,
...
, . , , , ,
..
, , , ,
..
, , ,
..
, . , 42
Water Heater
, , . ' , , , , , , ,
....
, ' , , , , , . , , , , 42
Water Heater
BypaSs
System, ' , , , , , , , , , , ,
,42
Furnace , ' , , , , , , , , , ,
..
, . , . , , , , , , , , , , , , , 42
~n~".""",.""".,
•••
"""",,42
Range
Exhaust Hood , , , , , , . , , , , , , , , , , , . , , 43
Air Conditioner,
, , , , , , , , , ,
..
, , , , , , , , , , , , , 43
Refrigerator
, , , , , , , , , , , , , , , , , , , . , , , , , , , , 43
Smoke
Detector,
, . , , , , , , , , , , , , , , , , , , , , , , 43
MAINTENANCE, . , , , , , , , , , , , . , , , , , , , , , , , , , , 45
Lubrication,
, , , , , , , , , , ,
..
, , . , , , ,
..
, , , , , . 45
Wheels And Tires
..
, , , , , . , , ,
..
, , , , . , , , , ,
,45
Tire
Inspection And
Rotation.
, , , , . , , , . , , . , 45
Inflation Pressure, , , , , , . , , , , . , , , , . , , ,
..
,45
Wheel And Tire Balancing
...
, , , , . , , ,
..
, , ,
45
Tire Replacement, , ,
..
, ,
..
, , , , . , , , . , , , ,
,46
Engine , , , . , , , ,
..
, . , ,
...
, ,
..
, ,
...
, . , . , , 46
Engine
Oils,
, , , ,
.. , .......
, , . , ,
....
, , , 46
Engine
Fuel
Systems . ,
.........
, , . , , . ,
...
46
Fuel
And Air Filters. , , , ,
.....
, , , . , , , , , , .
46
Air Cleaner Element Replacement . , , , , . , . , ,
46
Cooling System
......
, , , . , , , , . , , , . , , . , , . 46
Maintenance And
Inspection ,
.. , ..
, , , . , . , , 46
Coolant
Level
...
, . , , , , , , ,
... , ...
, ,
...
, 46
Flushing Cooling
System,
, , , ,
..
, , ,
....
, ,
.47
".'
~:.'
Engine Electrical. , , , . , , , , , , , , , , , , , , , . , , , .
47
Jump
Starting.
, , , , , , , , , , . , , , , ,
..
, , , , , .
47
Transmission
.....
, , . , , , , , , ,
..
, , , , ,
..
, ,
..
47
Maintenance And Inspection, , , . ,
...
, , ,
.. , 47
Heating And Air Conditioning. , , , . , , , ,
..
, ,
..
47
Inspection
....
, , . , • , , , , , . , . , , , , , . , , , , .
47
Air Conditioner Operational Quick Checks
..
, .
47
Electrical Circuit Diagnosis, , , , , . , , . , ,
... , ,48
Vacuum System Diagnosis, ,
.....
, . , , , . , ,
,48
Refrigeration
Section,
, , , , , , , , , ,
..
, , ,
....
48
Front Suspension And Alignment . , , , , ,
....
, .
48
Rear
Suspension, , , , , ,
..
, , , , , , . , , , , ,
...
, .
48
Brakes. , , , , ,
... , ...
, , , , ,
.....
, . , , , , ,
..
48
Brake
Hose Inspection " , . , . , , , . , , , ,
...
, .
48
Lining Inspection, , , , , , , . , , ,
....
, , , , . , , ,
48
Drive
Belts,
, , , , ,
..
, , . , , , , , , . , , , ,
...
, . ,
.48
Exterior ,
...
, , , , , , , , , , , . , . , , , , , , , ,
...
, .
49
b~""
..
,.,."""""
..
,.",
..
,,49
Windows, Doors, Vents & Locks , , , , , . , , , , ,
49
Sealant Renewal , , , , , , , , , , , . , . , . , , . , , , .
49
Roof Resealing , ,
......
, , , , ,', , , , . , , , , , ,
49
Door & Window Resealing,
..
, . , , , , . , , , , . , 50
Interior,
..
, , , , , , , . , . , , , , , , . , , ,
... " ...
, 50
Upholstery & Drapes. , ,
..
, , . , ,
...
, ,
...
, . 50
Wall
& Ceiling
Panels
, , , . , . , ,
.. , ...
, , , , ,
50
Floors & Carpeting , . , . , , , , . , , . ,
.....
, , ,
50
Countertops , , , , , , ,
...
, . , , , , , ,
.......
, 50
PREPARING
THE
MOTOR
HOME
FOR
LONG-TERM
STORAGE, , . , , , , , , , , , ,
..
, , , , , ,
..
51
Storage Check
list
..
, . , , , , , , , , , , ,
.. , ..
, . , ,
51
Short-term Storage (less than
60
days)
Above Freezing
..
, , , , , . , . , . , , . , , , , , , . , ,
51
Long-term Storage Above Freezing,
...
, , , . , ,
51
Winterization And Winter Storage, , , , , . , , ,
...
51
Winter Storage Below Freezing , ,
..
, , . , . ,
..
52
Water
System Winterizing, , , . , , ,
.. , ..
, , , , 52
General Vehicle Winter
Storage Check List
..
, . 53
Reactivating The Motor Home After
Storage,
, 53
MAINTENANCE CHART, , , . , . ,
...
, . , , , , " , , , , 55
"
,
I
!
!
.!
"
·,1
,',
!
. ,
I
.J
,
. i
'1
..
_'
INTRODUCTION
Welcome to the recreational vehicle life-style and
the
growing
family of
motor
home owners. We
sincerely
thank
you
for
choosing a Fleetwood
motor
home!
Your Limited home has been designed to provide
you
with
many years of carefree, pleasant traveling
and vacationing. This manual describes many features
of
your
motor
home and provides
an
operating guide
so
that
you can obtain the best performance from
those
features. Your
motor
home has been designed
to
conform
·with,
or exceed, the American National
Standards Institute Al19.2,
NFPA
501C,
Canadian CSA
Standard
Z-240
(units built for Canada only), and ap-
plicable
motor
vehicle standards. These standards
establish the plumbing, heating, electrical and other
requirements for
quality and safety. Compliance
with
these standards is indicated by the seal attached
just
outside the entry door. This seal
is
the
outward
sign
of
internal quality.
Like all finely crafted equipment,
your
Limited will
require care and regular maintenance in order
to
deliver
maximum
value and performance. The dealer
will give you basic operating and maintenance instructions; however, supplement this instruction by reading
all instructional material furnished
with
the
motor
home in' the
Owner's
Information Package and
Chassis Operator's
Manual. If, after taking delivery
of your new
motor
home
..
you feel
it
requires addi-
tional
conditioning or adjustment, please return
it
to
your dealer
as
soon
as
possible. This Owner's Manual,
along
with
the
information
provided in your
Owner's
Information Package and Chassis Operator's Manual
outlines important areas
of
maintenance and provides
a maintenance
schedule
for
you
to
follow
to
ensure
safe,
troublefree service from your
motor
home. Study
these instructions carefully before you operate the
motor
home for the
first
time. Spend some
time
with
your dealer going over safety and operating instructions
before you leave the dealer's lot. A good work-
ing knowledge of your
motor
home and
how
to
care
for
it
will help you enjoy many miles and years
of
recreational living.
If
you have any questions regarding operation,
maintenance, or service,
please
contact
your dealer
immediately
so
he can assist you. Ypur dealer's Ser-
vice
or
Sales Department will handle any normal pro-
blems
which
might
occur.
Your
motor
home is covered by one
of
the
most
comprehensive warranty programs in the
RV
industry,
and this
manual contains a section outlining the war-
ranty
and explaining your rights and obligations, as
well as
the
rights and obligations
of
the
dealer and
manufacturer, under the terms of the warranty.
Please
read
this
section carefully.
You
will
be
better
inform-
ed in case you have a warranty-related problem, and
1
your
dealer will
be
better
able
to
get
you on the road
again.
If there is anything
about
the warranty or
what
it
does or does
not
cover, please
contact
your dealer.
The materials in your
Owner's
Information Package
contain warranty
information
on
the
various ap-
pliances
and
components
in your
motor
home. War-
ranty registration cards for these items should
be
filled
out and mailed as soon as possible after you take
delivery of your
motor
home.
Your
dealer can help you
with
this.
You
will
automatically
receive
an
Ownercare Card
approximately 3 - 4 weeks after delivery of your new
Limited. This
plastic card
is
imprinted
with
your name,
the
motor
home serial number, and manufacturing
plant location. If
your
motor
home ever needs war-
ranty service, present
this
card
to
the dealer.
Always
return your
motor
home
to
the selling dealer
for warranty service.
If
this
is
not
possible, you may
contact any
other
authorized Limited dealer, or any
authorized
Fleetwood
motor
home dealer. The ser-
vice department
at
any
of
the
plants listed in
this
manual can help you
find
a dealer in your area.
If, for some reason, a problem is
not
handled
to
your satisfaction:
1.
Discuss any warranty-related problems directly
with
the
manager or
owner
of
the dealer-
ship,
giving
him
an
opportunity
to
help his ser-
vice
department
resolve
the
matter for you.
2.
If a problem arises
that
cannot
be
resolved
to
your satisfaction by your local dealer, contact
the
factory
service manager. The factories are
listed in
this
manual. Please contact the one
nearest you.
3.
We
sincerely believe
that
your dealer and
the
factory
representative will
be
able to solve any
problem
which
might
arise.
If
their combined
efforts are
not
satisfactory, please send a let-
ter describing
the
circumstances to:
4.
Fleetwood Enterprises, Inc.
Consumer
Affairs
Department
P.O.
Box
7300
Riverside, CA
92523
Please include
the
brand name and serial
number
of
your
motor
home.
If
you
wish
to
call
for
assistance, please use
these
toll-free telephone numbers:
From
California: (800)
442-4804
From outside California: (800)
854-4755

NOTE: Some
equipment
and features described
or
shown
in
this
manual
may
be optional on
some
models.
This
instructional
manual is
of
general nature only. Because
of
the continuous
program
of
product
improvement
conducted
by
Fleetwood,
it
is possible
that
recent
product
changes may
not
be included in
this
manual.
Specifications
may
change
without
notice. The
instructions
included in
this
manual are intend-
ed as a guide,
and
in
no
respect extend the
responsibilities
of
the
manufacturing subsidiary,
parent company
or
affiliates beyond
the
stan-
dard
written
warranty
as presented in
this
manual.
Photographs
or
illustrations
in this manual are
representative
of
function
and may
not
be
specific in
their
depiction
of
actual equipment,
fabrics,
interior
or
exterior
decor
or
design op-
tions as
installed on
or
in
your
motor
home.
NOTE: This
product
is designed
for
recreational
use and
short
term
occupancy
only.
It
is
not
designed
or
intended
to
be used as permanent
housing. Use
of
this
product
for
long term or
permanent
occupancy
may lead
to
premature
.
deterioration
of
interior
finishes,
fabrics,
carpeting, and drapes. Damage
or
deterioration
due
to
long
term
occupancy
may
not
be con-
sidered
normal, and may under the terms
of
the
warranty,
constitute
misuse, abuse,
or
neglect,
and may therefore reduce your warranty protection. This
manual
contains
a discussion
of
long
term
occupancy
problems. Please refer
to
that
section before considering
this
product
for
long
term occupancy.
The
motor
home has been
thoroughly
inspected
before shipment.
YOUR DEALER IS RESPONSIBLE
FOR
PERFORMING A COMPLETE PREDELIVERY IN-
SPECTION
OF
THE CHASSIS AND ALL MOTOR
HOME COMPONENTS AS SPECiFIED
IN
THE
PREDELIVERY
CHECKLISTS SUPPLIED
BY
THE
MOTOR
HOME MANUFACTURER AND
THE
CHASSIS
MANUFACTURER. YOU SHOULD
RECEIVE A COpy
OF
THESE COMPLETED CHECKLISTS FROM
YOUR
DEALER WHEN YOUR MOTOR HOME
IS
DELIVERED
TO
YOU.
AS A PART
OF
THE PREDELIVERY INSPECTION
PRO-
CEDURE, THE DEALER
is
TO
ROAD TEST THE
MOTOR HOME, NOTING AND CORRECTING ANY
STEERING
PROBLEMS
BEFORE DELIVERY.
THEREFORE,
FLEETWOOD AND ITS SUBSIDIARIES
WILL
NOT
BE
RESPONSIBLE
FOR
FRONT
END
ALIGN-
MENT AFTER
THIS PREDELIVERY INSPECTION IS
DONE.
PLANNING
AND
PREPARATION
Each year millions
of
Americans embark on trips
using some
type
of
recreational vehicle. Proper plan-
ning
of
your
trip
will ensure a pleasurable experience.
A thorough
knowledge
of your
RV
is
important
if
you
2
are going to
get
the
most
out of
the
convenience and
safety items built into your vehicle.
Be
as familiar
with
it
as you are
with
your personal car or truck. The
booklets included in your
Owner's
Information
Package cover details
of
operation for the major ap-
pliances and equipment built into your
motor
home
for
your
comfort,
convenience and safety. Later sec-
tions
in this manual will also explain
how
to
operate,
maintain, and service
important
components and
systems in your
motor
home.
LOADING
AND
WEIGHT DISTRIBUTION
Proper loading is one
of
the
most
important
con-
siderations when traveling in
an
RV.
Your
motor
home
is
built to safely carry a certain
maximum
load.
For
safety's
sake,
NEVER
OVERLOAD
THE
MOTOR
HOME.
This manual contains a detailed section
that
explains
proper loading and weighing
of
the vehicle.
HAVE
IT
ALL UNDER CONTROL
Remember, your
new
motor
home is a large vehi-
cle and
..
requires
different
driving skills than a
passenger
car.
Later in this manual we'll outline some
tips
on
how
to
become familiar
with
the
handling
characteristics and driving techniques
that
you need
to
know
to
be
a safe
motor
home driver. Of course,
don't
overlook the laws
of
your state or province
that
govern driving a
motor
home.
Your
state or provincial
Motor
Vehicle .Department can provide you
with
the
applicable vehicle codes
that
spell
out
your rights and
responsibilities as a
motor
home owner.
INSPECT
AND
MAINTAIN
Follow a consistent schedule
of
inspection and
maintenance
for
your
motor
home. Your continuing
safety
anq comfort depend on it. This manual includes
a section outlining maintenance intervals. Adherence
to
these schedules will minimize the possibility
of
failure
of
any
important
system or
part
of
your
motor
home. The time spent inspecting and maintaining your
motor
hOme
will provide you
with
many years of
recreational pleasure.
THE OWNER'S INFORMATION PACKAGE
This package contains very valuable documents
about your
motor
home and its components and
systems. This
Owner's
Manual is in
this
package.
Since this owner's manual does
not
cover every possible detail of equipment and options installed on or
in your
motor
home, there are booklets and instruc-
tional material in the package
that
will
help you safe-
ly operate, maintain and troubleshoot those items.
Be
sure you read all
this
information and understand the
safety and operating instructions included in the
package. Keep these references handy.
If you ever
decide
to
sell or trade your
motor
home, be sure the
new
owner
gets all
the
material in
this
package.
. i
••
...l
CHASSIS
AND
VEHICLE IDENTIFICATION
Your
motor
home
is
built
on
the
John
Deere
R.V.
chassis. Several numbers
are
used
to
identify
the vehi-
cle
and
components
used on
the
vehicle. The V.LN.
or Vehicle
Identification Number is the legal identifica-
tion
of
the
completed vehicle and is
the
number
on
the vehicle registration. The
V.LN.
is
found on the DOT
certification
tag
attached to the
left
sidewall
of
the
motor
home driver
compartment.
Refer
to
this
infor-
mation
when
ordering parts
from
the
chassis
manufacturer
or chassis dealer service center. The
Fleetwood
Identification Number (F.LN.) is located on
the
plate
just
outside
the
main
entry
door
and on
the
outside
left
front
side
of
the
motor
home. Use
this
number
when
ordering parts through your Fleetwood
dealer or Service Center.
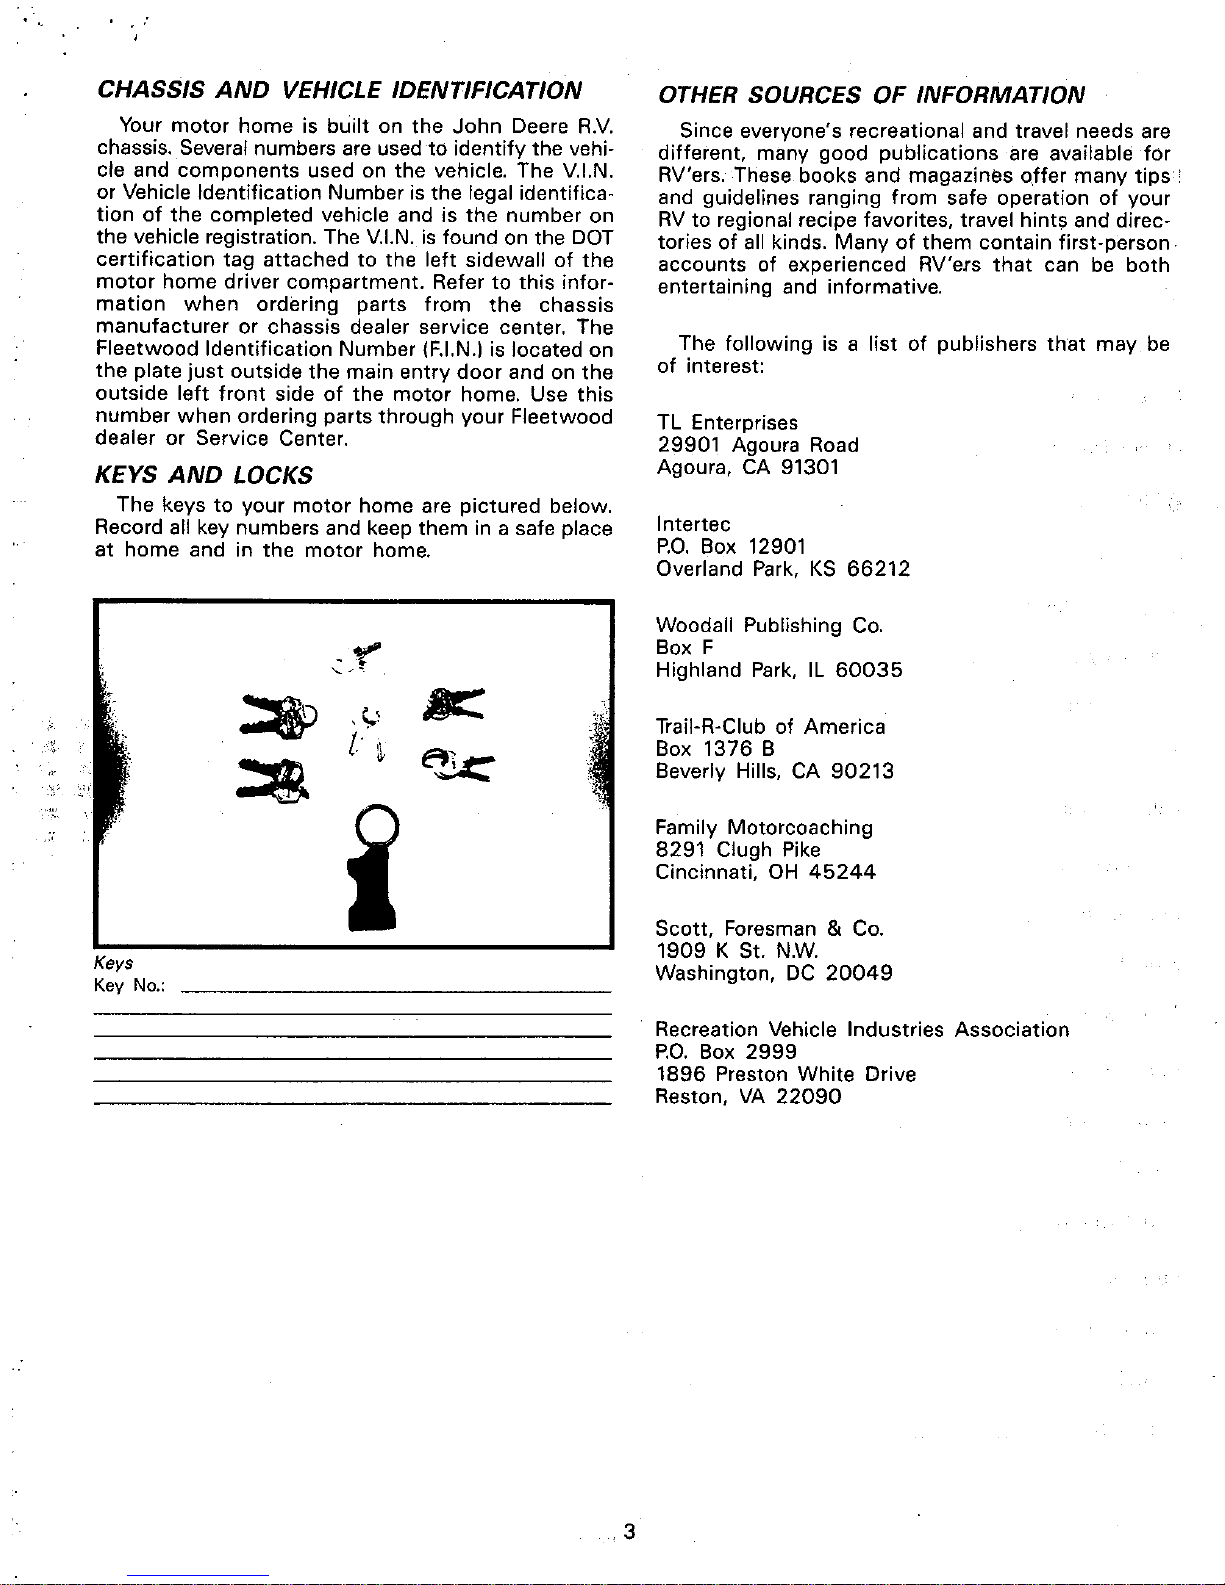
KEYS
AND
LOCKS
The
keys
to
your
motor
home are
pictured
below.
Record
all key numbers and keep them in a safe place
at
home
and in
the
motor
home.
Keys
Key
No.:
.3
OTHER SOURCES OF INFORMATION
Since everyone's recreational and travel needs are
different, many good
publications
are available
for
RV'ers. These books and magazines
offer
many
tips
and guidelines ranging
from
safe operation
of
your
RV
to regional recipe favorites, travel hints and direc-
tories
of
all kinds.
Many
of
them contain first-person·
accounts of experienced RV'ers
that
can be
both
entertaining and informative.
The
following is a
list
of
publishers
that
may
be
of
interest:
TL Enterprises
29901 Agoura Road
Agoura,
CA
91301
Intertec
P.O.
Box 12901
Overland
Park,
KS
66212
Woodall Publishing
Co.
Box F
Highland
Park,
IL
60035
Trail-R-Club
of
America
Box
1376
B
Beverly
Hills, CA
90213
Family Motorcoaching
8291
Clugh Pike
Cincinnati,
OH
45244
Scott, Foresman &
Co.
1909
K St. N.w.
Washington,
DC
20049
Recreation Vehicle Industries
Association
P.O.
Box
2999
1896
Preston
White
Drive
Reston,
VA
22090
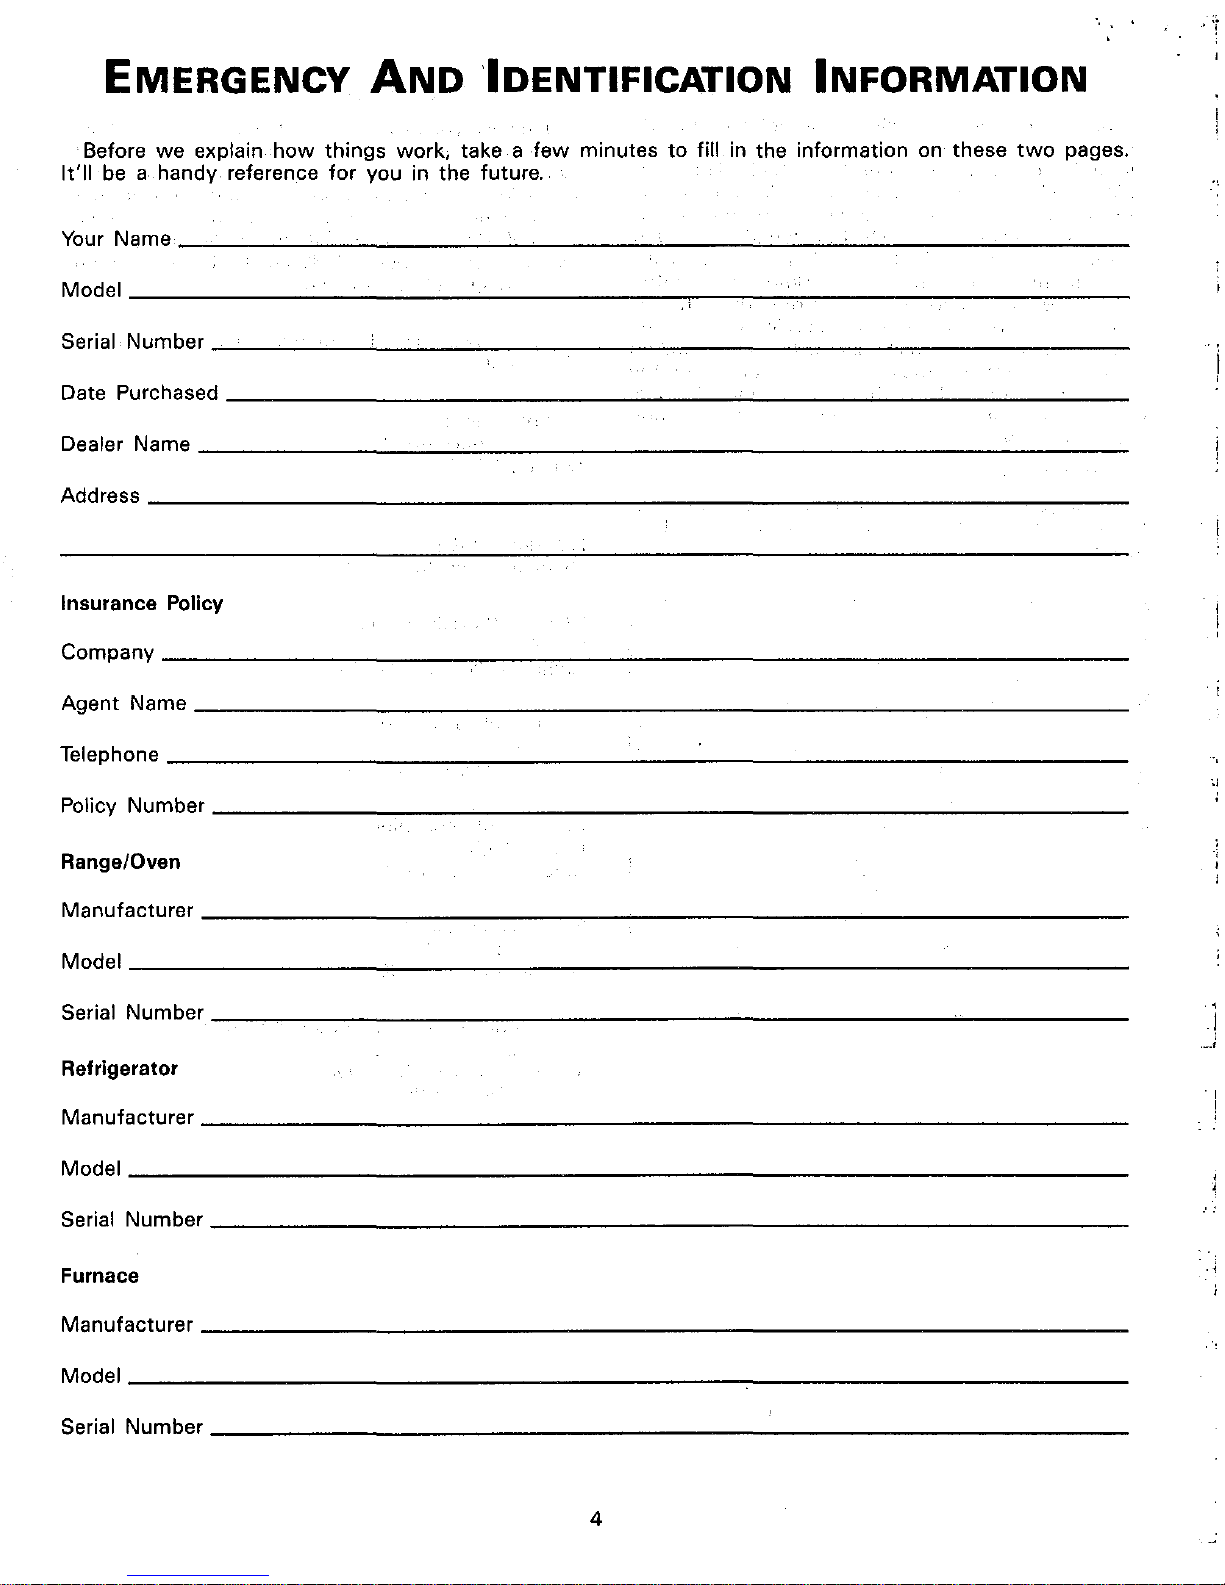
EMERGENCY
AND
IDENTIFICATION INFORMATION
Before we explain
how
things
work, take a
few
minutes
to
fill in the information on these
two
pages.
It'll
be
a handy reference
for
you in the future._
Your Name
____
~~
____ ~ ______________________ ~ ____
~~
____
~~
__
~--------~----
Model
________________________________________
r-
__
~~~----------------~----
Serial N umber
____________
'--
____
......;.
____________
------------------~
__
---------------
i
,
Date Purchased
______________________________________
~
__________________
_'_
__
__'_
__
_
Dealer Name
__________________
......;.
________________________________________________
___
Address
__________________________________________________________________
~-----
Insurance Policy
Company
Agent Name
Telephone
~;
Policy Number
,
Range/Oven
Manufacturer
Model
Serial Number
<
!
--,
Refrigerator
- I
Manufacturer
1
Model
Serial Number
. -
Furnace
-,
Manufacturer
Model
Serial Number
4
Water Heater
;.--"
Manufacturer
Model
Serial
Number
Air Conditioner
Manufacturer
Model
Serial
Number
Microwave Oven
Manufacturer
Model
Serial
Number
Stereo
Manufacturer
..
Model
Serial
Number
Generator
Manufacturer
Model
Serial
Number
Miscellaneous
Key
Number
5
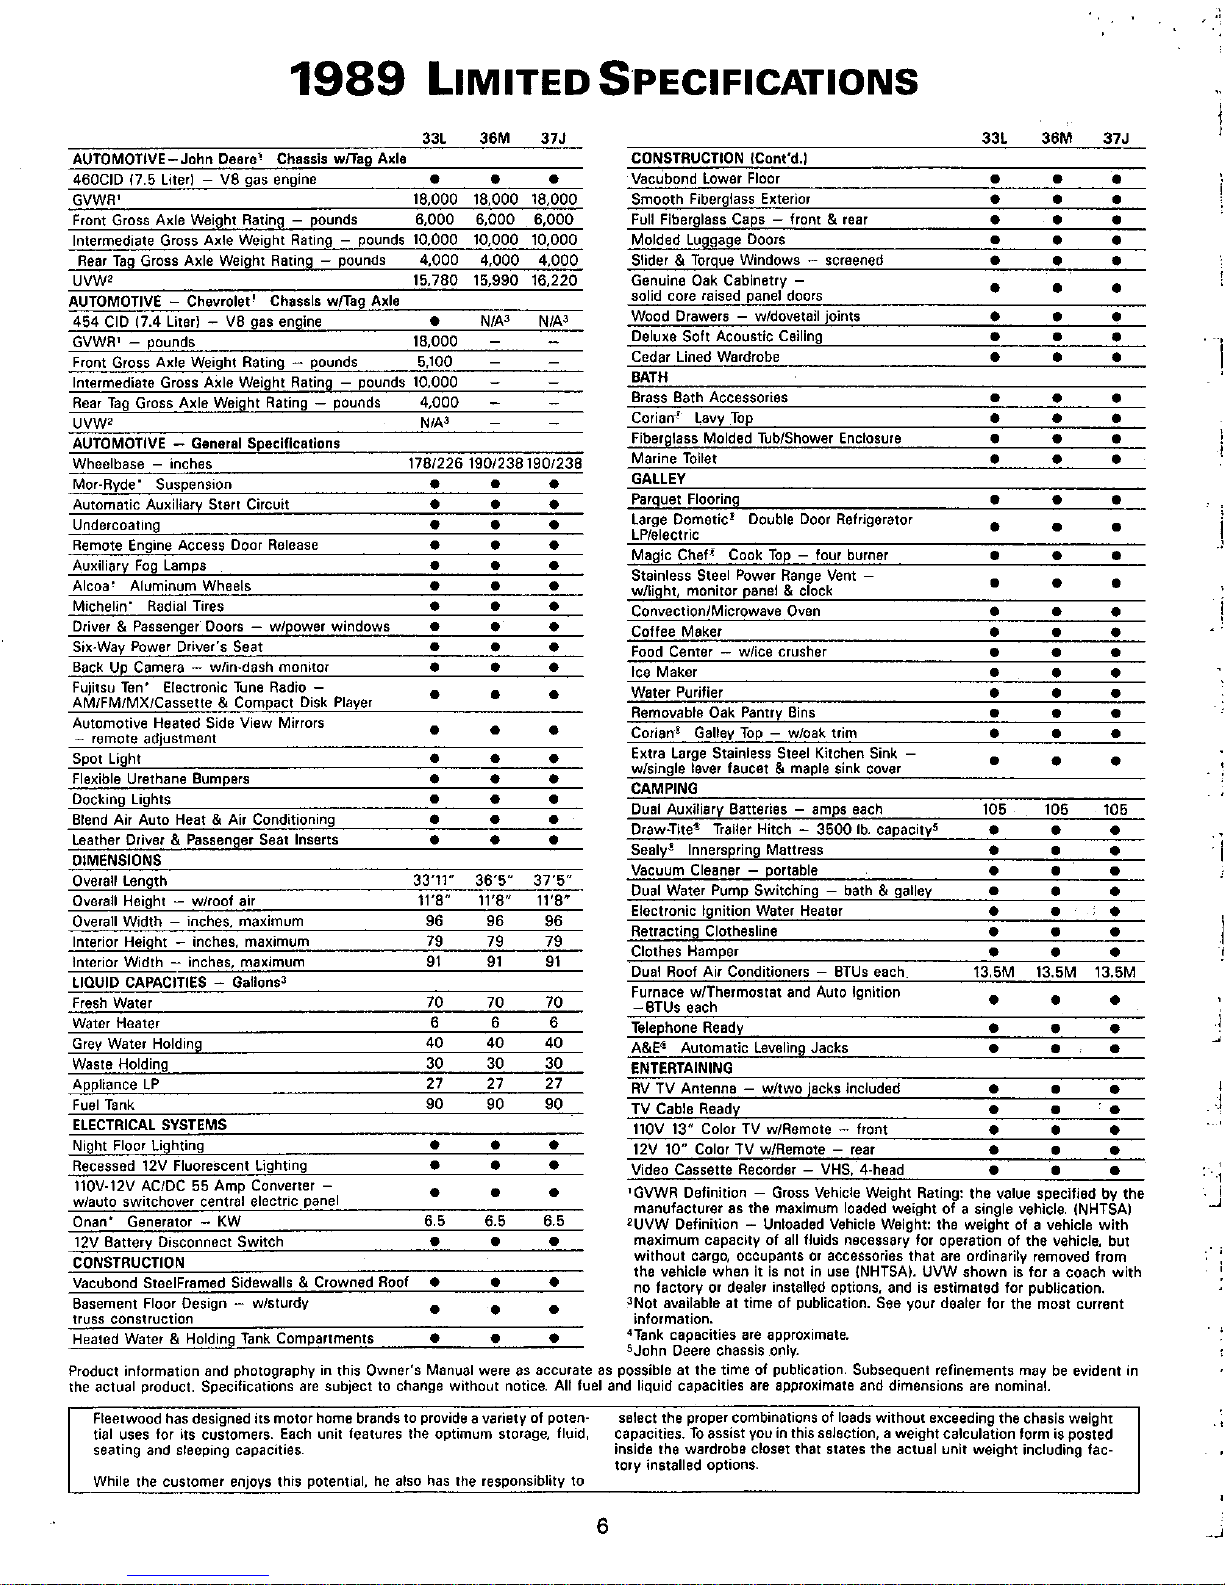
1989
LIMITED
SPECIFICATIONS
Intermediate Gross
Axle
Weight Rating - pounds 10,000
10,000
10,000
Rear
Tag
Gross
Axle
Weight Rating - pounds
4,000 4,000
4,000
UVW2
15,780 15,990
16,220
AUTOMOTIVE - Chevrolet I Chassis w/Tag Axle
454
CIO 17.4 Liter) -
VB
gas engine
•
N/A3 N/A3
GVWR' - pounds
1S,OOO
Front Gross Axle Weight Rating pounds
5,100
Intermediate Gross
Axle
Weight Rating pounds
10,000
Rear
Tag
Gross
Axle
Weight Rating pounds 4,000
UVW2
N/A3
AUTOMOTIVE - General Specifications
Wheelbase - inches
17S1226 190123S 190123S
Mor-Ryde'
Suspension
Automatic Auxiliary
Stert Circuit
Undercoating
Remote Engine Access Door Release
Auxiliary
Fog
Lamps
Alcoa'
Aluminum
Wheels
Michelin'
Radial Tires
Driver
& Passenger Doors
w/power
windows
Six-Way Power Driver's Seat
Back Up Camera w/in-dash
monitor
Fujitsu Ten' Electronic
Tune
Radio -
AM/FM/MX/Cassette
& Compact Disk Player
Automotive Heated
Side View Mirrors
- remote adjustment
Spot Light
Flexible Urethane Bumpers
Docking Lights
Blend
Air
Auto Heat & Air Conditioning
Leather Driver & Passenger Seat Inserts
DIMENSIONS
Overall Length
Overall Height -
w/roof
air
Overall
Width
- inches,
maximum
Interior Height - inches,
maximum
Interior
Width
- inches,
maximum
LIQUID CAPACITIES Gallons3
Fresh Water
Water Heater
Grey Water Holding
Waste Holding
Appliance
LP
Fuel Tank
ELECTRICAL
SYSTEMS
Night Floor Lighting
Recessed
12V Fluorescent Lighting
110V-12V ACIDC 55
Amp
Converter -
w/auto
switchover
central electric panel
Onan'
Generator -
KW
12V
Battery
Disconnect
Switch
CONSTRUCTION
Vacubond Steel Framed Sidewalls & Crowned Roof
Basement
Floor Design -
w/sturdy
truss
construction
Heated Water & Holding
Tank
Compartments
•
•
•
•
•
•
• • •
•
• •
• • •
• • •
•
• •
•
• •
•
• •
• • •
• • •
•
•
•
• •
•
• • •
•
• •
•
• •
• • •
33'11"
36'5"
37'5"
11'S" 11'S" 11'S"
96
96 96
79
79
79
91 91 91
70 70 70
6 6 6
40 40 40
30
30
30
27
27
27
90
90
90
• • •
•
• •
•
• •
6.5 6.5 6.5
• •
•
• • •
•
•
•
•
•
•
CONSTRUCTION
ICont'd.1
Vacubond Lower Floor
Smooth
Fiberglass Exterior
Full Fiberglass Caps - front & rear
Molded
Luggage Doors
Slider & Torque
Windows
- screened
Genuine Oak
Cabinetry -
solid
core raised panel doors
Wood Drawers
- wldovetail
joints
Deluxe
Soft
Acoustic
Ceiling
Cedar
Lined Wardrobe
BATH
Brass Bath Accessories
Corian~
Lavy
Top
Fiberglass Molded Tub/Shower Enclosure
Marine Toilet
GAllEY
Parquet Flooring
Large
Dometic~
Double Door Refrigerator
LPlelectric
Magic
Chef
l
Cook
Top
four burner
Stainless Steel Power Range Vent
w/light,
monitor
panel & clock
Convection/Microwave Oven
Coffee
Maker
Food
Center
w/ice
crusher
Ice Maker
Water Purifier
Removable Oak Pantry Bins
Corian~
Galley
Top
-
w/oak
trim
Extra Large Stainless Steel Kitchen Sink
w/single lever faucet & maple sink cover
CAMPING
Dual Auxiliary Batteries - amps each
Oraw·Tite~
Trailer Hitch
3500
lb.
capacityS
Sealy!
Innerspring Mattress
Vacuum Cleaner portable
Dual Water Pump Switching bath
& galley
Electronic Ignition Water Heater
Retracting
Clothesline
Clothes
Hamper
Dual Roof
Air
Conditioners - BTUs each.
Furnace
w/Thermostat
and Auto Ignition
-BTUs
each
Telephone Ready
A&E<i
Automatic
Leveling Jacks
ENTERTAINING
RV
TV
Antenna
- w/two jacks included
TV
Cable Ready
110V
13"
Color
TV
w/Remote front
12V
10"
Color
TV
w/Remote rear
Video Cassette Recorder VHS, 4-head
33l
36M
37J
• •
•
•
•
•
• • •
•
• •
•
• •
•
• •
•
• •
•
•
•
•
• •
•
• •
• • •
• • •
•
• •
• • •
•
• •
• • •
•
• •
•
•
•
•
•
•
• • •
•
• •
•
•
•
•
• •
•
• •
•
• •
105 105
105
•
• •
•
•
•
•
•
•
•
• •
•
•
•
• • •
• • •
13,5M
13.5M 13.5M
• • •
•
• •
• • •
•
• •
•
• •
• • •
•
• •
•
•
•
1 GVWR Definition - Gross Vehicle Weight Rating:
the
value specified
by
the
manufacturer
as
the
maximum loaded
weight
of
a single vehicle. (NHTSA)
2UVW
Definition - Unloaded Vehicle Weight:
the
weight
of a vehicle
with
maximum
capacity
of
all fluids necessary for operation of
the
vehicle.
but
without
cargo, occupants or accessories
that
are ordinarily removed
from
the
vehicle
when
it
is
not
in use (NHTSA).
UVW
shown
is
tor
a coach
with
no
factory
or dealer installed options, and
is
estimated
for
publication.
3Not available
at
time
of publication. See your dealer
for
the
most
current
information.
4Tank capacities are approximate.
sJohn
Deere chassis only.
Product
information
and photography in this
Owner's
Manual were as accurate
as
possible
at
the
time
of
publication. Subsequent refinements may
be
evident in
the actual product. Specifications
are
subject to change
without
notice.
All
fuel and liquid capacities are approximate and dimensions are nominal.
Fleetwood has deSigned
its
motor
home brands to provide a variety
of
poten-
tial
uses for its customers. Each unit features the
optimum
storage, fluid,
seating and sleeping capacities.
While the
customer
enjoys this potential,
he
also has the responsiblity
to
6
select
the
proper combinations of loads
without
exceeding the chasis
weight
capaCities.
To
assist you in this selection, a
weight
calculation
form is
posted
inside the wardrobe closet
that
states the actual
unit
weight
including fac-
tory
installed options.
J
.i
I
.
.\
. ;
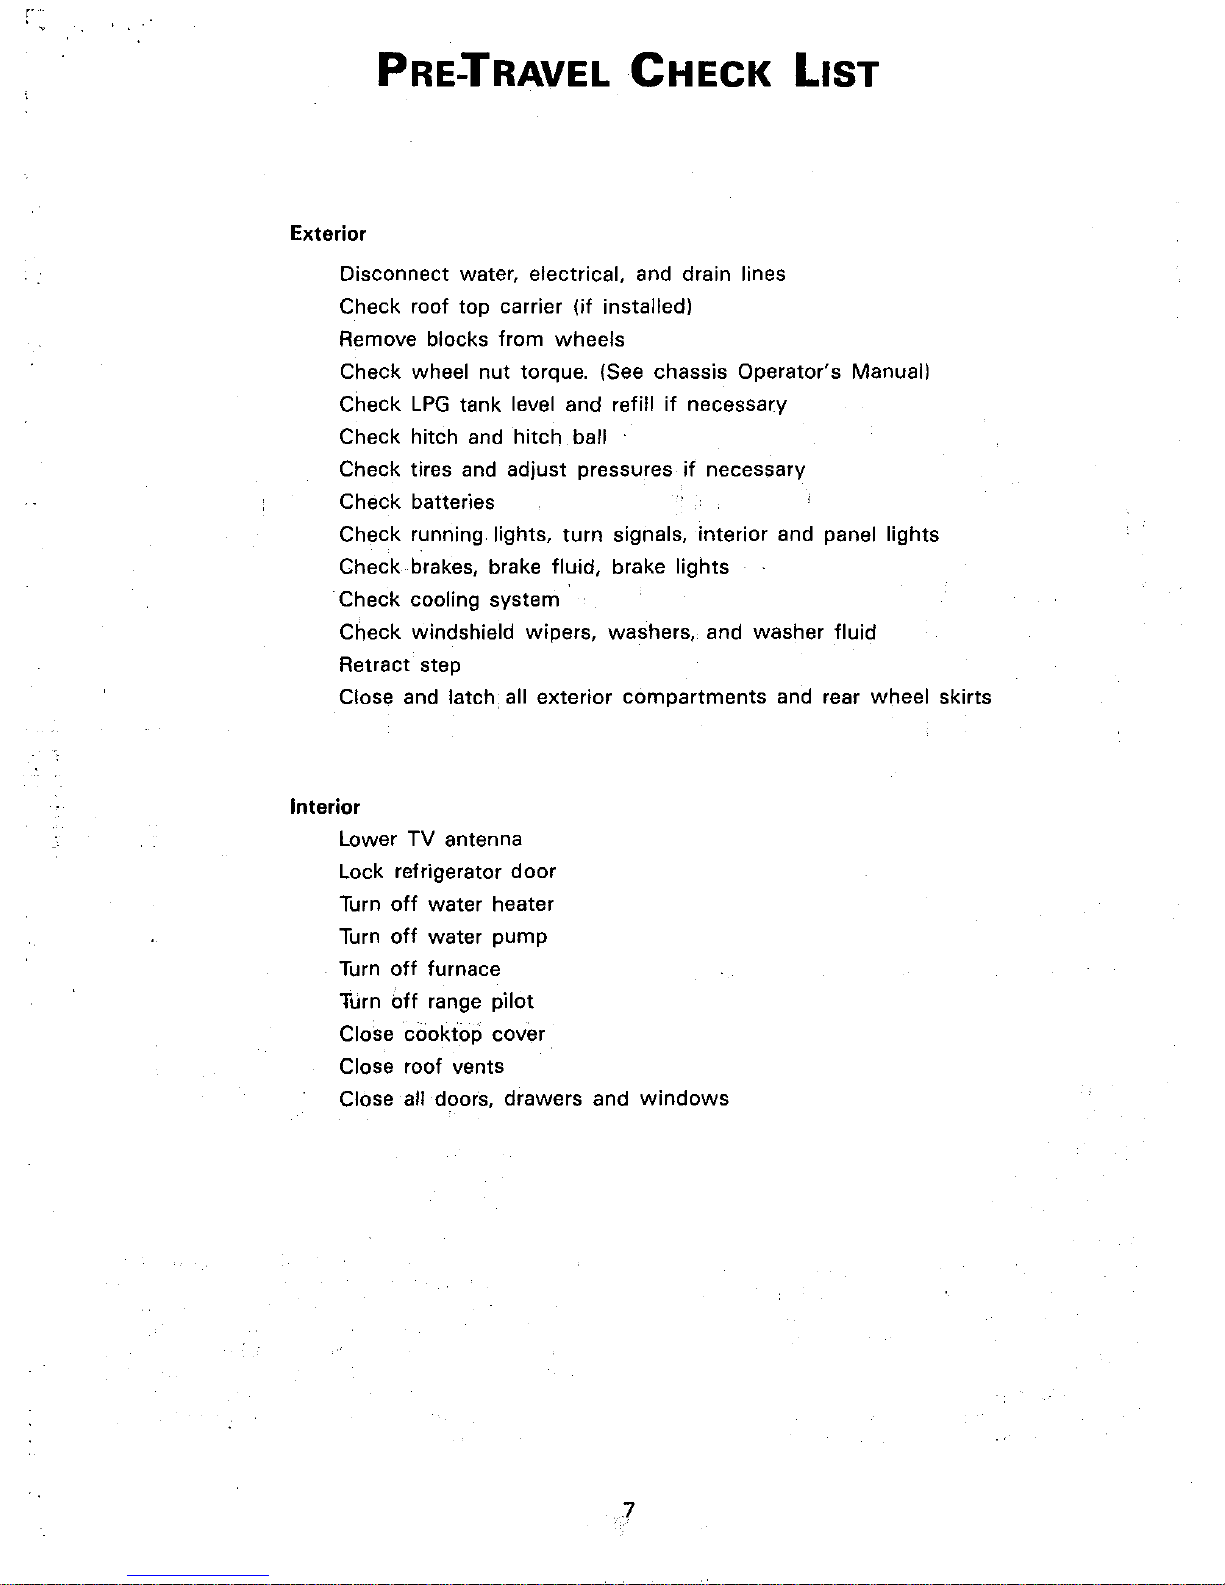
PRE.:rRAVELCHECK
LIST
Exterior
Disconnect water, electrical, and drain
lines
Check roof top carrier (if installed)
Remove blocks from wheels
Check wheel nut torque. (See chassis Operator's Manuall
Check
LPG
tank level and refill
if
necessary
Check hitch and hitch ball
Check tires and adjust pressures
if
necessary
Check batteries
Check running
lights,
turn
signals, interior and panel lights
Check brakes, brake fluid, brake lights
Check cooling system
Check windshield wipers, washers, and washer fluid
Retract step
Close and latch all exterior
compartments
and rear wheel skirts
Interior
Lower TV antenna
Lock refrigerator
door
Turn
off
water heater
Turn
off
water pump
Turn
off
furnace
Turn
off
range pilot
Close cooktop cover
Close roof vents
Close all doors, drawers and
windows
7

COCKPIT
AND
DRIVER'S
CONTROLS
3
•
Cockpit and Driver's Controls
Consult John
Deere
Chassis Operator's Manual for
details.
INSTRUMENT
PANEL
1.
Switches.
Headlights
Fog
Lights
Docking Lights
Horn Compressor
2.
Windshield WiperiWasher.
2-Speed Windshield WiperiWasher with
Delay
-Turn
outer knob clockwise for wiper action.
The
wiper
blades
are
mounted on "articulated"
arms
that allow
the blades
to
follow a wiping path
as
wide
as
possible.
OFF
- No wiper action.
1st
notch - Wiper delay
ON.
Turn
outer knob
clockwise for longer delay between wiper strokes.
8
15
I
10
12.
14
11
13
2nd notch -
Slow
wiping action.
3rd notch -
Fast
wiping action.
To
WASH,
press
inner
knob,
then
release.
One
press
of washer knob cycles wipers once. The washer
nozzles
are
located
on
the wiper arms close
to
the
wiper blades.
The
move
with the blades
and
pro-
vide continuous washer
coverage.
3.
Spot Light Controls.
a/Positioner
b/Flood/spot selector
4.
Auxiliary Start Indicator
The Auxiliary
Start System permits using the aux-
iliary battery
(see
Electrical System) to start the
motor home
engine
if the
vehicle
battery
is
discharg-
ed. The auxiliary start system
will
engage
automatically when the
main
(chassis)
battery
charge
is
insufficient to crank the
engine.
The instrument
panel indicator will show either of
two
norma) con-
ditions when the ignition switch
is
turned to the
"CRANK"
position:
r,
:
1
!
.
.1
I
.~
I
..
I
1 .
GREEN
- The main battery
is
charged,
and
capable of cranking the
engine.
Cranking power
is
being provided by the main battery.
The
green
indicator
will remain on for approximately
10
seconds after cranking.
2.
ORANGE
- The main battery
has
insufficient
charge for engine cranking.
The
auxiliary battery
system has
been
activated to crank the
engine.
The orange indicator will remain
on
for approx-
imately
10
seconds aftel cranking.
Of course,
if
both the main and auxiliary batteries
are
dead, the engine will not crank,
nor
will the panel in-
dicator
light
up.
Sufficient cranking charge may
be
restored
to
the auxiliary batteries
by
plugging in to
an
external
110V
AC
electrical source or
by
running the
generator.
The
Auxiliary Start System
has
no
effect
on
the
vehicle
except to
aid
in starting the motor home
engine.
If the
vehicle alternator
is
operating properly, the batteries will
be
recharged while driving
(see
Electrical System).
NOTE:
If
extended nonnal driving
does
not
recharge
the batteries,
see
an
authorized Fleetwood motor
home service center.
5.
Instrument Cluster.
To
p:
Engine
battery volt
meter'
Engine
oil pressure'
,
6.
Leveling Jack Master Indicator.
7.
Parking
Brake
Release'.
B.
Instrument Cluster.
To
p:
Engine
coolant temperature'
Fuel
gauge
Engine
oil pressure'
Middle:
Turn'
indicators
High beam indicator
Seat belt warning
EUL
monitor'
Brake
warning indicator'
Parking
brake indicator'
Bottom: Speedometer/odometer
Tachometer
9.
Switches. ,
Luggage compartment
Hood
light
Utility light
Entry step
RefrigElrator (12-volt operation)
Generator start
10.
Rear
View Video Monitor
and
Controls.
11.
Instrument Cluster.
Engine vacuum
Transmission
oil temperature
Generator hour meter
'See
Chassis Operator's Manual for detailed explana-
tion of these instruments.
12.
12V
DC
Socket/Cigarette Lighter.
9
13.
Radio/Tape
Player.
14.
Cab
Heater/Air Conditioner Controls
'The
cockpit Heater/Air Conditioner controls
are
located
on
the instrument panel. These controls
operate the heating and air conditioning systems
for the driver/cockpit
area
only.
,
'Cool/Heat
Lever ~ Push
this
lever
to the left or
right for cooling/heating.
'Function Selector Buttons.
'OFF -
No
heating or cooling, but fan runs at
low speed for continuous circulation of outside
air through the 'Instrument
panel outlets.
'MAX
A/C - Air conditioner compressor
is
on,
inside air
is
re·circulated through the system for
maximum cooling.
• A/C - Air conditioner compressor
is
on,
outside
air
is
circulated through instrument
panel
outlets.
'VENT
- A/C compressor
is
off, outside
air
is
cir-
culated through the instrument
panel
outlets.
'HEAT - A/C compressor
is
off, outside
airis
cir-
culated through the heating
system, and
distributed to floor outlets.
, Heated air
is
circulated to defroster
outlets.
'FAN
SWITCH
- Sets fan speed to any' of 4
speeds. The fan switch does not affect' the
fan
if
the
OFF
function button
is
pressed.
15.
Compact Disc
Player
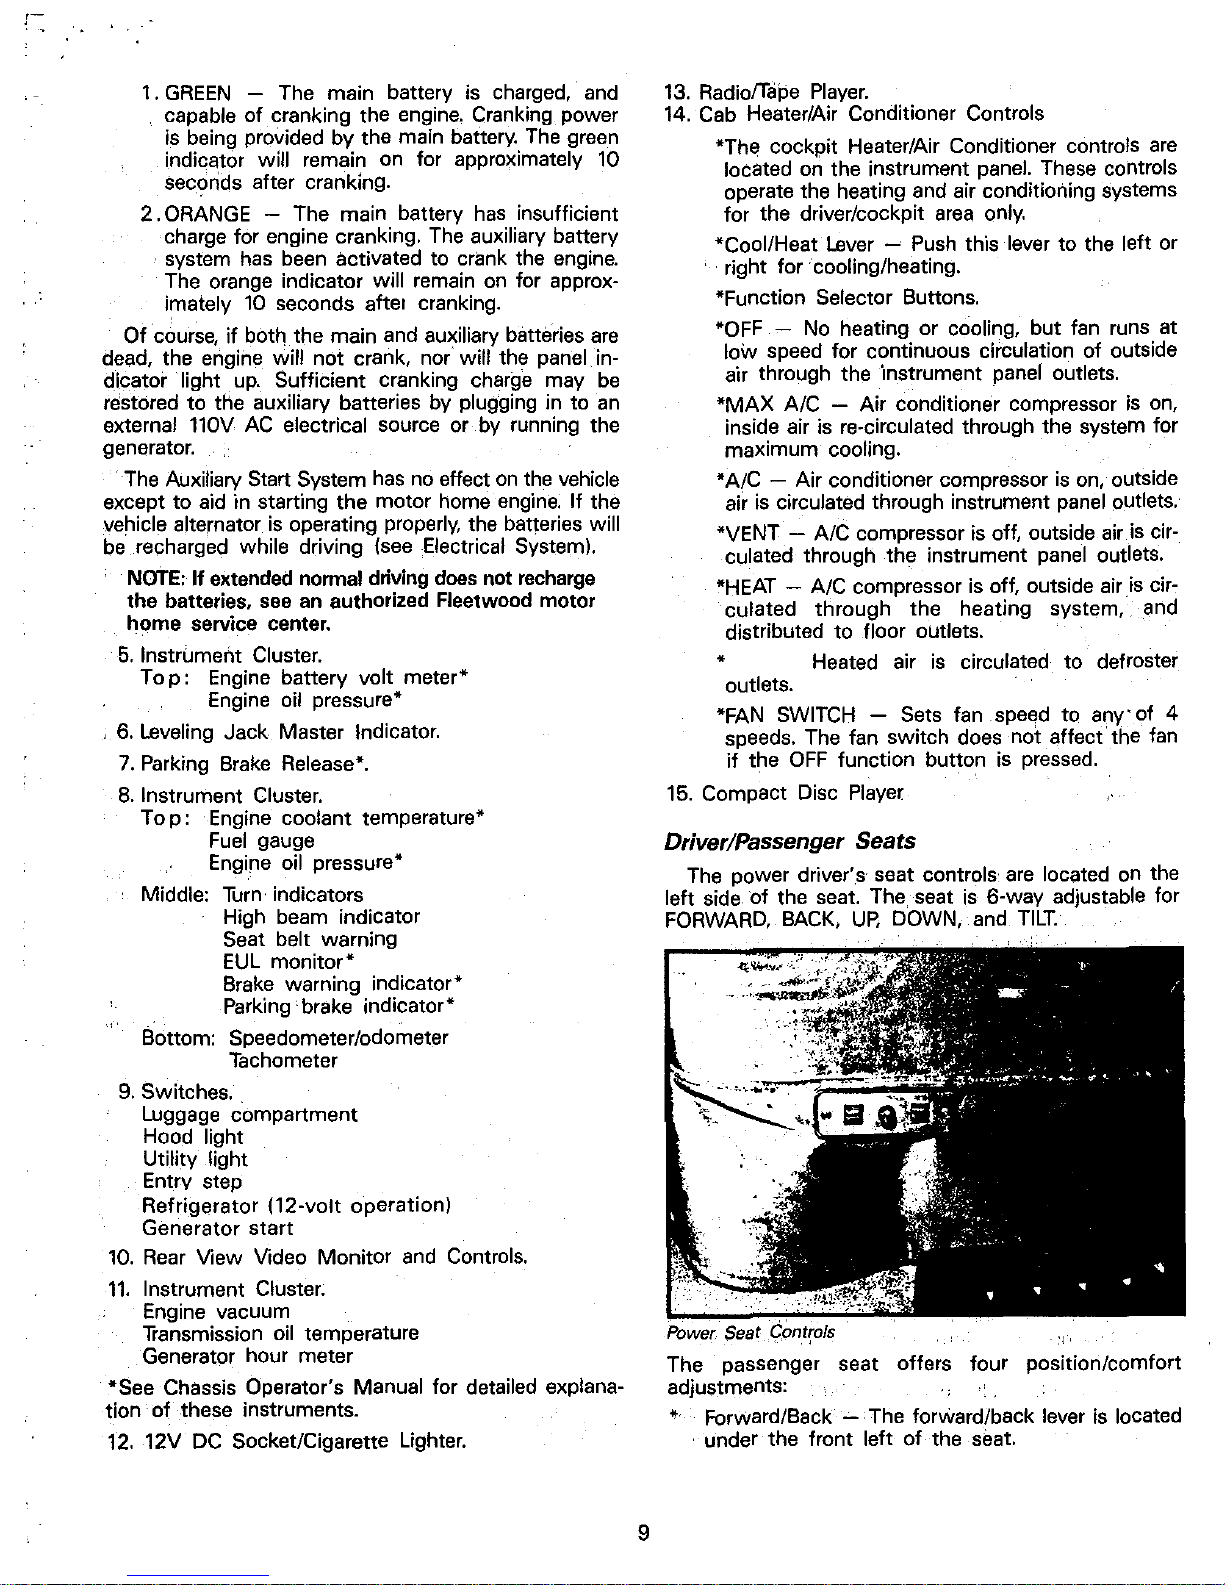
Driver/Passenger Seats
The
power driver',s seat controls
are
located on the
left side of the seat.
The,
seat
is
6-way adjustable for
FORWARD,
BACK,
UP.
DOWN, and
TILT.
The passenger seat offers four position/comfort
adjustments:
* Forward/Back
-,
The forward/back lever
is
located
, under the front left of the seat.
Pull the lever toward the
left
outside
of
the seat to
unlock. Release the
locI<
lever
to
secure the seat
position.
* Swivel - The swivel lock lever is located under the
front left of the seat.
Lift the lever forward and up
to'
swivel. The seat
locks. in the center, forward position. When unlock-
ed, the seat will swivel freely around to the center
position.
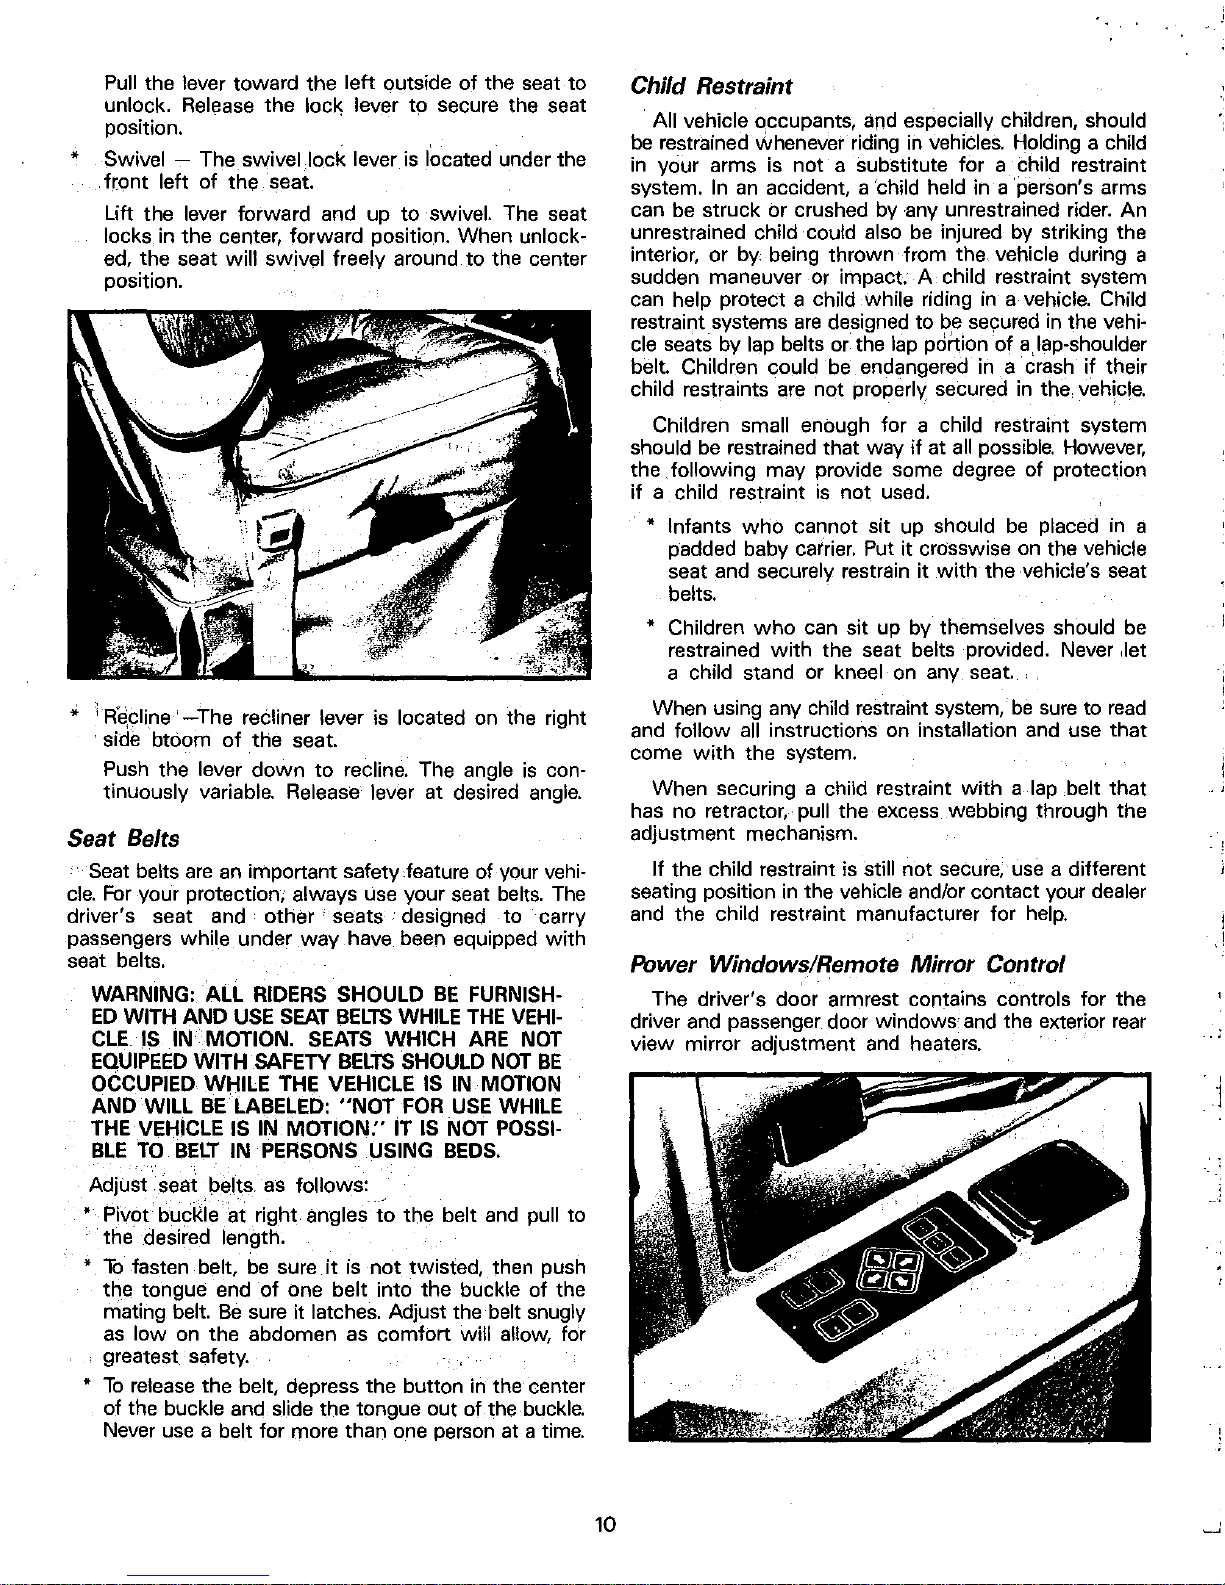
.;
He,cline '
-The
reCliner lever is located on the right
'side
btoom
of
the seat.
Push the lever
down
to recline. The angle
is
con-
tinuously variable. Release lever at desired
angle.
Seat Belts
Seat belts
are
an important safety feature of your vehi-
cle.
For
your protection; always use your seat belts.
The
driver's seat and other
seats,
designed to carry
passengers while under
way
have been equipped
with
seat belts.
WARNING: ALL RIDERS SHOULD
BE
FURNISH-
ED
WITH AND USE
SEAT
BELTS
WHILE
THE
VEHI-
CLE
IS
1111
MOTION. SEATS WHICH
ARE
NOT
EQUIPEED
WITH' SAFETY
BELTS
SHOULD NOT
BE
OCCUPIED WHILE THE VEHICLE IS IN MOTION
AND WILL
BE
LABELED:
"NOT
FOR USE WHILE
THE VEHICLE IS IN
MOTION:'
IT
IS
NOT POSSI-
BLE
TO
BELT
IN PERSONS .USING
BEDS.
Adjust' seat belts,
as
follows:
• Pivot bucKle at right angles
to
the belt
and
pull to
the desired length.
•
To
fasten belt,
be
sure
it
is
not
twisted, then push
the tongue end
of
one belt into the buckle
of
the
mating belt.
Be
sure it latches. Adjust the belt snugly
as
low
on
the abdomen as comfort will allow. for
greatest safety.
•
To
release the belt, depress the button
in
the center
of the buckle and slide the tongue out of the buckle.
Never
use
a belt for more than one person at a time.
10
Child Restraint
All vehicle
~ccupants,
and especially children, should
be
restrained whenever riding
in
vehiCles.
Holding a child
in
your arms is
not
a substitute for a child restraint
system.
In
an
accident, a 'child held in a person's arms
can be struck or crushed by
,any
unrestrained rider. An
unrestrained child could also
be
injured by striking the
interior, or
by
being thrown from the vehicle during a
sudden maneuver or impact; A child restraint system
can help protect a child
while riding
in
a vehicle. Child
restraint systems
are
designed to
be
secured
in
the vehi-
cle seats by lap belts or the lap
pdi<ionof a lap-shoulder
belt. Children could
be
endangered
in
a crash
if
their
child restraints
are
not
properly, secured
in
the, vehicle.
Children small enough for a child restraint system
should
be
restrained that way
if
at all possible. However,
the.
following may provide some degree of protection
if
a child restraint
is
not.
used.
* Infants
who
cannot sit up should
be
placed
in
a
padded baby
calrier. Put
it
crosswise
on
the vehicle
seat and securely restrain
it
with
the vehicle's seat
belts.
• Children
who
can sit up by themselves should be
restrained
with
the seat belts provided. Never ,let
a child stand or kneel
on
any
seat.,
When using any child restraint system,
be
sure
to
read
and follow
all
instructions on installation and use
that
come
with
the system.
When securing a child restraint
with
a lap belt
that
has no retractor,' pull the excess webbing through the
adjustment mechanism.
If the child restraint is still
not
secure, use a different
seating position
in
the vehicle and/or contact your dealer
and the child restraint manufacturer for
help.
Power Windows/Remote Mirror Control
The driver's door armrest contains controls for the
driver and passenger door windows and the exterior
rear
view
mirror adjustment and heaters.
, ,
,
-";
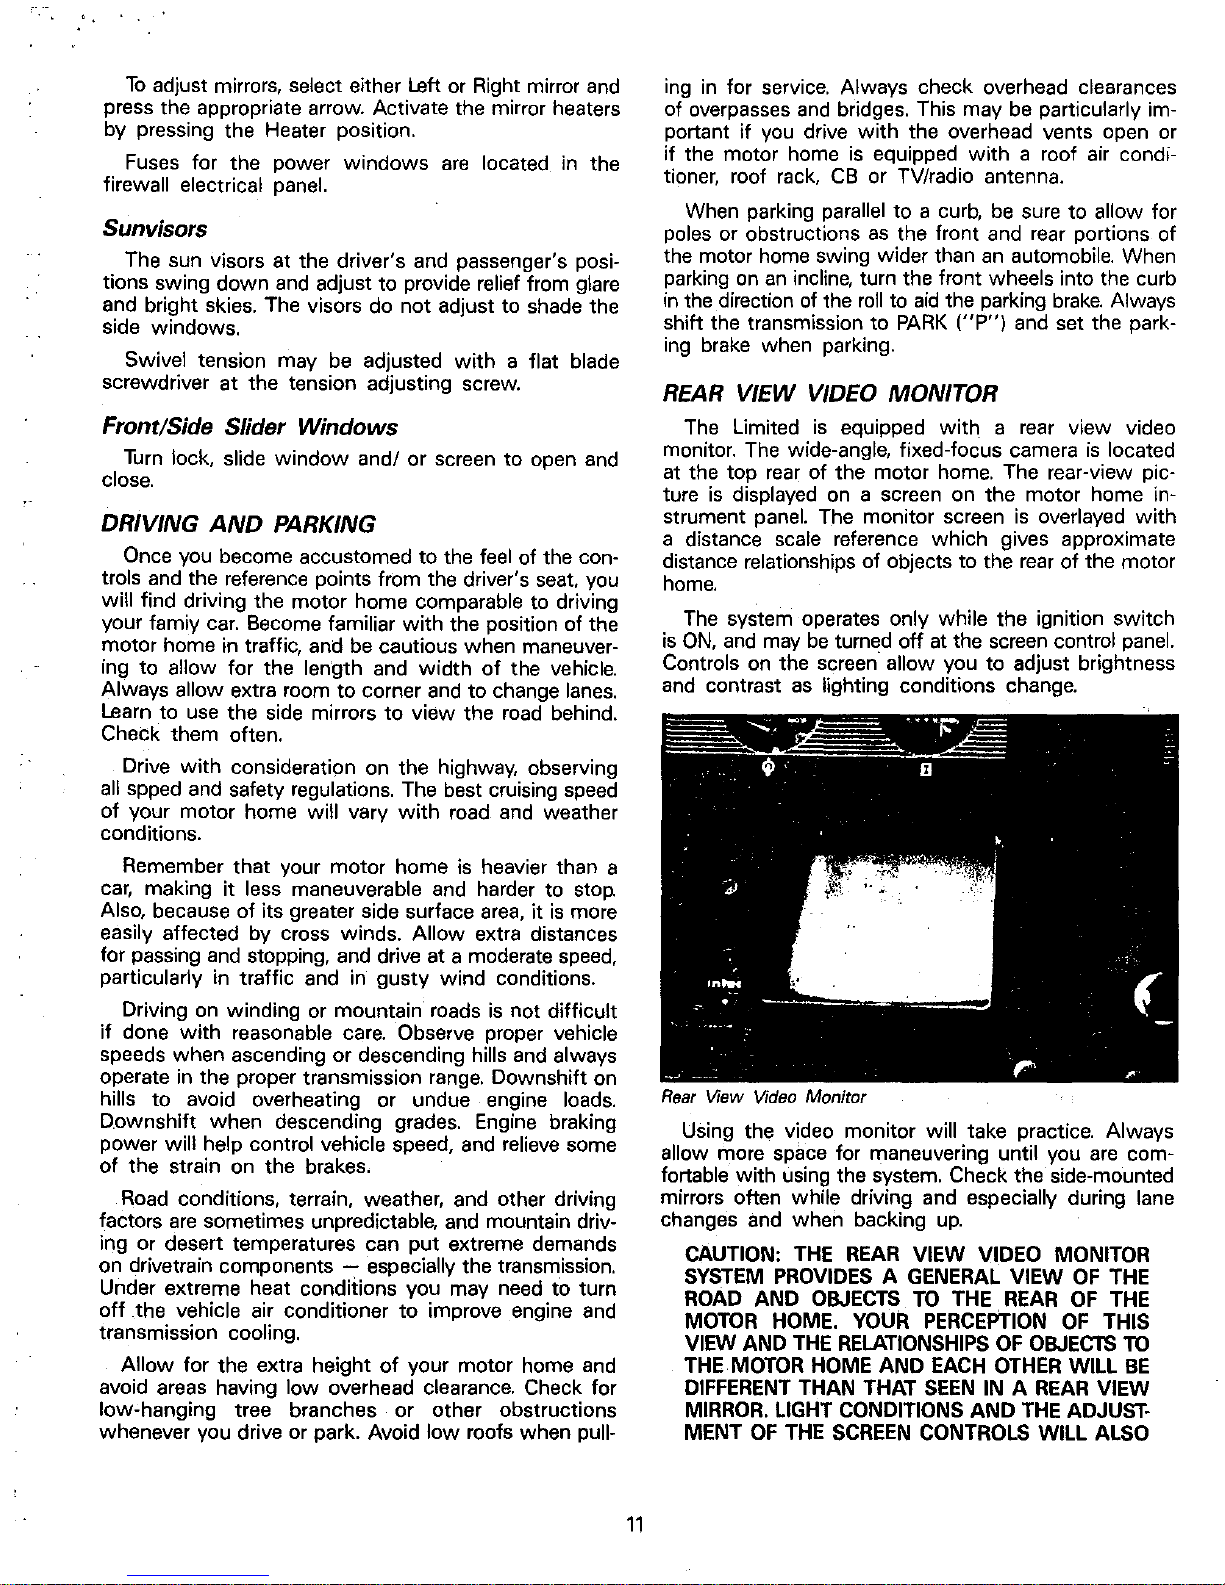
To
adjust mirrors, select either Left or Right mirror
and
press the appropriate arrow. Activate the mirror heaters
by pressing the Heater position.
Fuses for the power
windows
are
located
in
the
firewall electrical
panel.
Sunvisors
The sun visors at the driver's and passenger's posi-
tions swing
down
and
adjust to provide relief from glare
and bright skies. The visors do
not
adjust to shade the
side windows.
Swivel tension may
be
adjusted
with
a flat blade
screwdriver at the tension adjusting screw.
Front/Side Slider Windows
Turn
lock, slide
window
and/ or screen to open and
close.
DRIVING
AND
PARKING
Once you become accustomed to the feel of the con-
trols and the reference points from the driver's
seat. you
will find driving the motor home comparable to driving
your famiy
car.
Become familiar
with
the position of the
motor home in
traffic, and be cautious when maneuver-
ing to allow for the length and
width
of
the vehicle.
Always allow extra room to corner
and
to change
lanes.
Learn to use the side mirrors
to
view
the road behind.
Check them often.
Drive
with
consideration on the highway, observing
all
spped and safety regulations. The best cruising speed
of
your motor home will vary
with
road and weather
conditions.
Remember
that
your motor home is heavier than a
car,
making
it
less maneuverable and harder to
stop.
Also, because
of
its greater side surface
area,
it
is
more
easily affected by cross winds. Allow extra distances
for passing
and
stopping, and drive at a moderate
speed,
particularly in traffic and in gusty wind conditions.
Driving
on
winding or mountain roads
is
not
difficult
if
done
with
reasonable care. Observe proper vehicle
speeds when ascending or descending hills and always
operate
in
the proper transmission
range.
Downshift on
hills to avoid overheating or undue engine loads.
D.ownshlft when descending grades. Engine braking
power will help control vehicle
speed, and relieve some
of
the strain on the brakes.
Road
conditions, terrain, weather, and other driving
factors
are
sometimes unpredictable, and mountain driving or desert temperatures can put extreme demands
on drivetrain components
- especially the transmission.
Under extreme heat conditions you may need to turn
off
the vehicle air conditioner
to
improve engine and
transmission cooling.
Allow for the extra height
of
your motor home and
avoid areas having
low
overhead clearance. Check for
low-hanging tree branches or other obstructions
whenever you drive or park. Avoid
low
roofs when pull-
11
ing
in
for service. Always check overhead clearances
of overpasses
and
bridges. This may be particularly im-
portant
if
you drive
with
the overhead vents open or
if
the motor home
is
equipped
with
a roof air condi-
tioner, roof rack,
CB
or TV/radio antenna.
When parking parallel to a
curb,
be
sure to allow for
poles or obstructions
as
the front and rear portions of
the motor home swing wider than
an
automobile. When
parking
on
an
incline, turn the front wheels into the curb
in
the direction of the
roll
to
aid
the parking
brake.
Always
shift the transmission to
PARK
("P")
and set the park-
ing brake when parking.
REAR
VIEW
VIDEO
MONITOR
The Limited
is
equipped
with
a rear view video
monitor. The
wide-angle, fixed-focus camera
is
located
at the top
rear
of the motor home. The rear-view pic-
ture
is
displayed
on
a screen on the motor home in-
strument
panel. The monitor screen
is
overlayed
with
a distance scale reference which gives approximate
distance relationships
of
objects to the
rear
of
the motor
home.
The system operates only while the ignition switch
is
ON,
and
may
be
turned
off
at the screen control
panel.
Controls
on
the screen· allow you to adjust brightness
and contrast
as
lighting conditions change.
Rear
View Video Monitor
Using the video monitor will take practice. Always
allow more space for maneuvering until you
are
com-
fortable
with
using the system. Check the side-mounted
mirrors often while driving and especially during lane
changes and when backing
up.
CAUTION: THE
REAR
VIEW VIDEO MONITOR
SYSTEM PROVIDES
A GENERAL VIEW
OF
THE
ROAD AND
OBJECTS
TO
THE
REAR
OF
THE
MOTOR HOME. YOUR PERCEPTION
OF
THIS
VIEW AND
THE
RELATIONSHIPS
OF
OBJECTS
TO
THE MOTOR HOME AND EACH OTHER WILL
BE
DIFFERENT THAN THAT
SEEN
IN A
REAR
VIEW
MIRROR.
LIGHT CONDITIONS AND THE ADJUST-
MENT
OF
THE
SCREEN
CONTROLS WILL ALSO
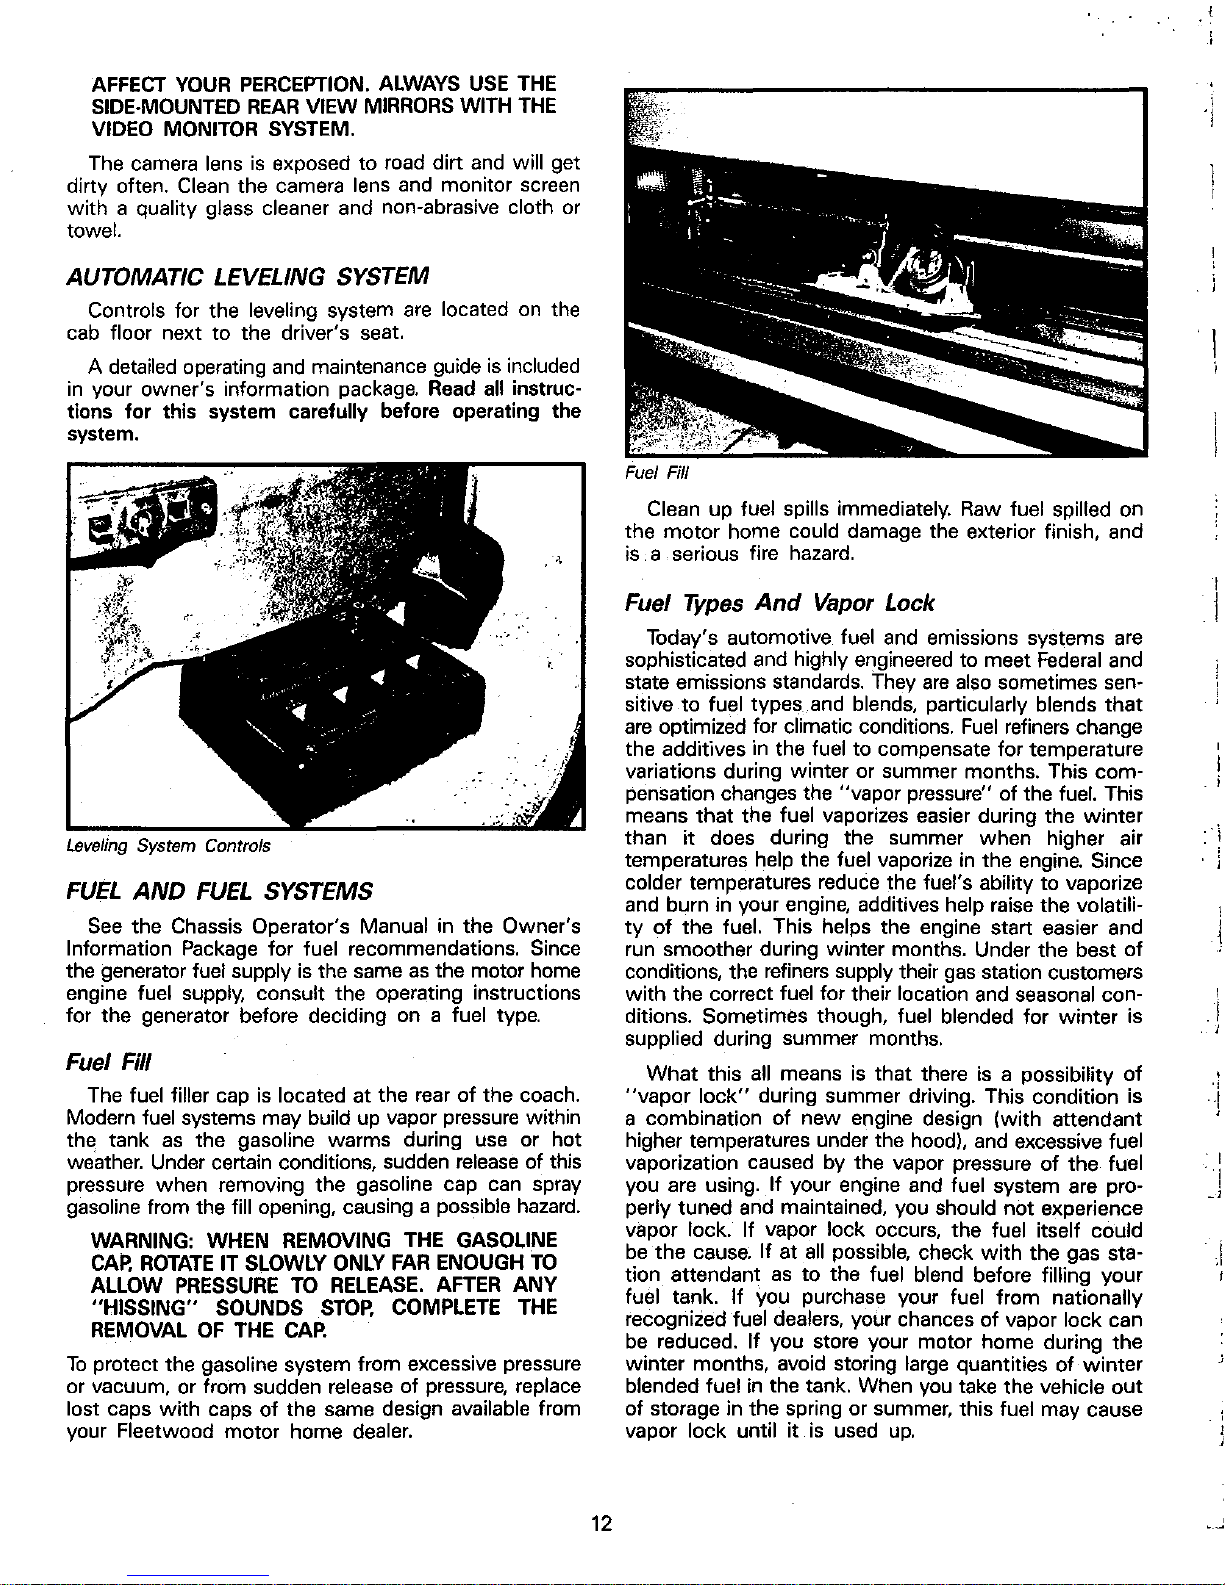
AFFECT
YOUR
PERCEPTION.
ALWAYS
USE
THE
SIDE-MOUNTED
REAR
VIEW
MIRRORS
WITH
THE
VIDEO
MONITOR
SYSTEM.
The camera lens
is
exposed to road dirt
and
will get
dirty often.
Clean
the camera lens
and
monitor screen
with
a quality glass cleaner and non-abrasive cloth
or
towel.
AUTOMATIC LEVELING SYSTEM
Controls for the leveling system
are
located
on
the
cab
floor next to the driver's seat.
A
detailed
operating
and
maintenance guide
is
included
in
your owner's information package.
Read
all instructions for this system carefully before operating the
system.
LEveling
System Controls
FUEL
AND
FUEL
SYSTEMS
See
the Chassis Operator's Manual in the Owner's
Information
Package
for fuel recommendations. Since
the generator fuel supply
is
the
same
as
the motor
home
engine fuel supply, consult the operating instructions
for the generator before deciding on a
fuel type.
Fuel Fill
The fuel filler cap
is
located at the
rear
of the coach.
Modern
fuel systems may build
up
vapor
pressure
within
the tank
as
the gasoline warms during
use
or hot
weather. Under certain conditions, sudden
release
of this
pressure when removing the
gasoline cap can spray
gasoline from the fill opening, causing a possible
hazard.
WARNING: WHEN REMOVING
THE
GASOLINE
CAP.
ROTATE
IT
SLOWLY
ONLY
FAR
ENOUGH
TO
ALLOW
PRESSURE
TO
RELEASE.
AFTER
ANY
"HISSING" SOUNDS
STOP.
COMPLETE
THE
REMOVAL
OF
THE
CAP.
To
protect the gasoline system from excessive pressure
or vacuum, or from sudden
release of pressure, replace
lost
caps
with
caps of the same design available from
your
Fleetwood motor home dealer.
12
Fuel Fill
Clean up fuel spills immediately.
Raw
fuel spilled on
the motor home
could damage the exterior finish, and
is
,a serious fire
hazard.
Fuel
Types
And
Vapor Lock
Today's automotive fuel
and
emissions systems
are
sophisticated
and
highly engineered to meet
Federal
and
state emissions standards.
They
are
also
sometimes
sen-
sitive to fuel types
and
blends, particularly blends
that
are
optimized for climatic conditions.
Fuel
refiners
change
the additives in the
fuel to compensate for temperature
variations during winter or summer months. This
com-
pensation changes the "vapor pressure" of the fuel. This
means that the
fuel vaporizes easier during the winter
than
it
does during the summer when higher air
temperatures
help the fuel vaporize
in
the
engine.
Since
colder
temperatures reduce the fuel's ability to vaporize
and
burn in your engine, additives help raise the volatili-
ty
of
the fuel. This helps the engine start easier and
run smoother during winter months. Under the best of
conditions, the
refiners
supply their
gas
station customers
with
the correct fuel for their location
and
seasonal con-
ditions. Sometimes though, fuel blended for winter
is
supplied during summer months.
What this
all
means
is
that there
is
a possibility of
"vapor
lock"
during summer driving. This condition
is
a combination of new engine design (with attendant
higher temperatures under the hood),
and
excessive fuel
vaporization caused by the vapor pressure of the fuel
you are using. If your engine
and
fuel system are pro-
perly
tuned
and
maintained, you should not experience
vapor
lock. If vapor lock occurs, the fuel itself could
be
the
cause.
If at
all
possible, check
with
the gas sta-
tion attendant
as
to the fuel blend before filling your
fuel tank. If you purchase your fuel from nationally
recognized fuel dealers, your chances of vapor lock can
be
reduced. If you store your motor home during the
winter months, avoid storing
large
quantities of winter
blended fuel
in
the tank. When
you
take the vehicle
out
of storage in the spring or summer, this fuel may cause
vapor
lock until it
is
used
up.
i
'!
I
j
, i
I
, I
J
, I
I
_1
, ,
,
,
Another note on long storage - if
you
plan
to
store
your motor home for a
long
period
in
conditions of widely
varying humidity, consider topping off the fuel tank. This
will
reduce
the buildup of condensation
in
the tank that
could
cause
rough engine operation, fuel filter blockage,
or other problems associated with water
in
the fuel.
Alternative Fuel
Types
Gasohol, a mixture of ethanol
(grain
alcohol), or
methanol
and
gasoline may
be
used
in
your motor home
engine without voiding the warranty. However,
DO
NOT
UNDER
ANY
CIRCUMSTANCES
USE
FUEL
BLENDS
CONTAINING
MORE
THAN 5% METHANOL
OR
10%
ETHANOL,
AND
DO
NOT
USE
BLENDS
THAT
CONTAIN
BOTH
METHANOL AND
ETHANOL.
Any fuel blend you
use
containing alcohol must
also
contain cosolvents
and
other additives to protect the fuel system components.
If you
are
not
sure
of the composition of the
alcohol/gasoline blend you intend to
use,
ask your ser-
vice station operator. Discontinue use
of
any
alcohol/gasoline blend if driveability or fuel system
problems occur.
Chemical reactions between the fuel components
and
the materials in the fuel lines
can
cause deterioration
of the
fuel lines during storage periods. These effects
are
especially noticeable with
gasohol
blends.
If
you
plan
to
use
alcohol blended fuel,
and
expect to store your
motor home for periods of
60
days or
more,
add
a fuel
additive that
is
formulated to counteract these oxida-
tion effects.
Your
dealer
can
advise you on the proper
additives
and
their
use.
If gasohol
is
spilled on a painted surface, some
dUll-
ing
or,
softening of the paint may result.
Overheating
Operate
and
service the engine
and
cooling systems
in
your vehicle
as
recommended
in
the Chassis
Operator's
Manual.
Variable Speed Engine
Fan
Yourmotor home engine
is
equipped with a variable
speed
fan clutch. When the engine
is
under load or
re-
quires
maximum cooling, the
fan
adjusts
and
turns
faster.
The
fan
may become very
noisy
at
high
speed
and
when
maximum
cooling
is
required. When the engine doesn't
need
maximum cooling, the fan just idels along. This
conserves
fuel
and
the fan
is
less
noisy.
High
speed
fan
noise
can
sometimes
be
misinterpreted
as
transmission slippage. This
is
not the
case.
When
the engine
is
not
and
requires
extra
cooling,
the
fan
turns
at
full speed. High engine
speed
and
temperature con-
ditions, such
as
pulling away from a stop after long
freeway driving,
can
cause
loud
fan
noise
untilthe engine
cools down. This fan noise indicates that the fan
is
do-
ing
what
it
is
supposed to
do.
This noise
is
not a defect
in the fan or the transmission.
13
CARBON MONOXIDE SAFETY PRECAUTIONS
Carbon monoxide
is
a colorless, tasteless, odorless
gas.
It
is
a by-product of combustion in engine(s). The
engines in your motor home
and
generator system (if
installed) produce it constantly while they
are
running.
CARBON
MONOXIDE
IS
DEADLY.
Please
read
and
understand the
following precautions to protect yourself
and
others from the effects of carbon monoxide
poisoning.
WARNING: EXHAUST
GASES
ARE
DEADLY.
DO
NOT
BLOCK
THE
TAILPIPES
OR
SITUATE
THE
VEHICLE
IN A PLACE
WHERE
THE
EXHAUST
GASES
HAVE
ANY
POSSIBILITY
OF
ACCUMULAT-
ING
OUTSIDE,
UNDERNEATH,
OR
INSIDE
YOUR
VEHICLE
OR
ANY
NEARBY
VEHICLES.
OUTSIDE
AIR
MOVEMENTS
CAN
CARRY
EXHAUST
GASES
INSIDE
THE
VEHICLE
THROUGH WINDOWS
OR
OTHER
OPENINGS
REMOTE
FROM
THE
EXHAUST
OUTLET.
OPERATE
THE
ENGINE(S)
ONLY
WHEN
SAFE
DISPERSION
OF
EXHAUST
GASES
CAN
BE
ASSURED,
AND
MONITOR
OUTSIDE
CONDITIONS
TO
BE
SURE
THAT EXHAUST CONTINUES
TO
BE
DISPERSED
SAFELY.
Beware of exhaust gas (carbon monoxide) poisoning
symptoms:
Dizziness
Intense Headache
Weakness
and
Sleepiness
Vomiting
Muscular Twitching
Throbbing
in
Temples
If symptoms indicate the possibility of carbon monox-
ide poisoning, turn
off
the engine(s) immediately, get
out into fresh air at
once,
and summon medical
assistance.
WARNING:
DO
NOT
UNDER
ANY CIRCUM-
STANCES OPERATE
ANY
ENGINE WHILE
SLEEPING.
You
would not
be
able to monitor outside conditions
to assure that engine exhaust does not enter the
in-
terior, and
you
would not
be
alert
to
exhaust odors or
symptoms of carbon monoxide poisoning.
During stops
while traveling, inspect the exhaust
systems for
road
damage.
Do
not operate
an
engine with
a damaged exhaust system.
Check the exhaust system(s) during routine
maintenance,
and
repair
any leaks, damage, or obstruc·
tions before further operations.
Do
not modify the exhaust system(s)
in
any way
without first
consulting the
RV
manufacturer.
SAFETY
TIPS
Read
and
understand the Chassis Operator's Manual.
When backing the motor
home,
have
a person stand
to the rear
on
the driver's side
to
guide you.
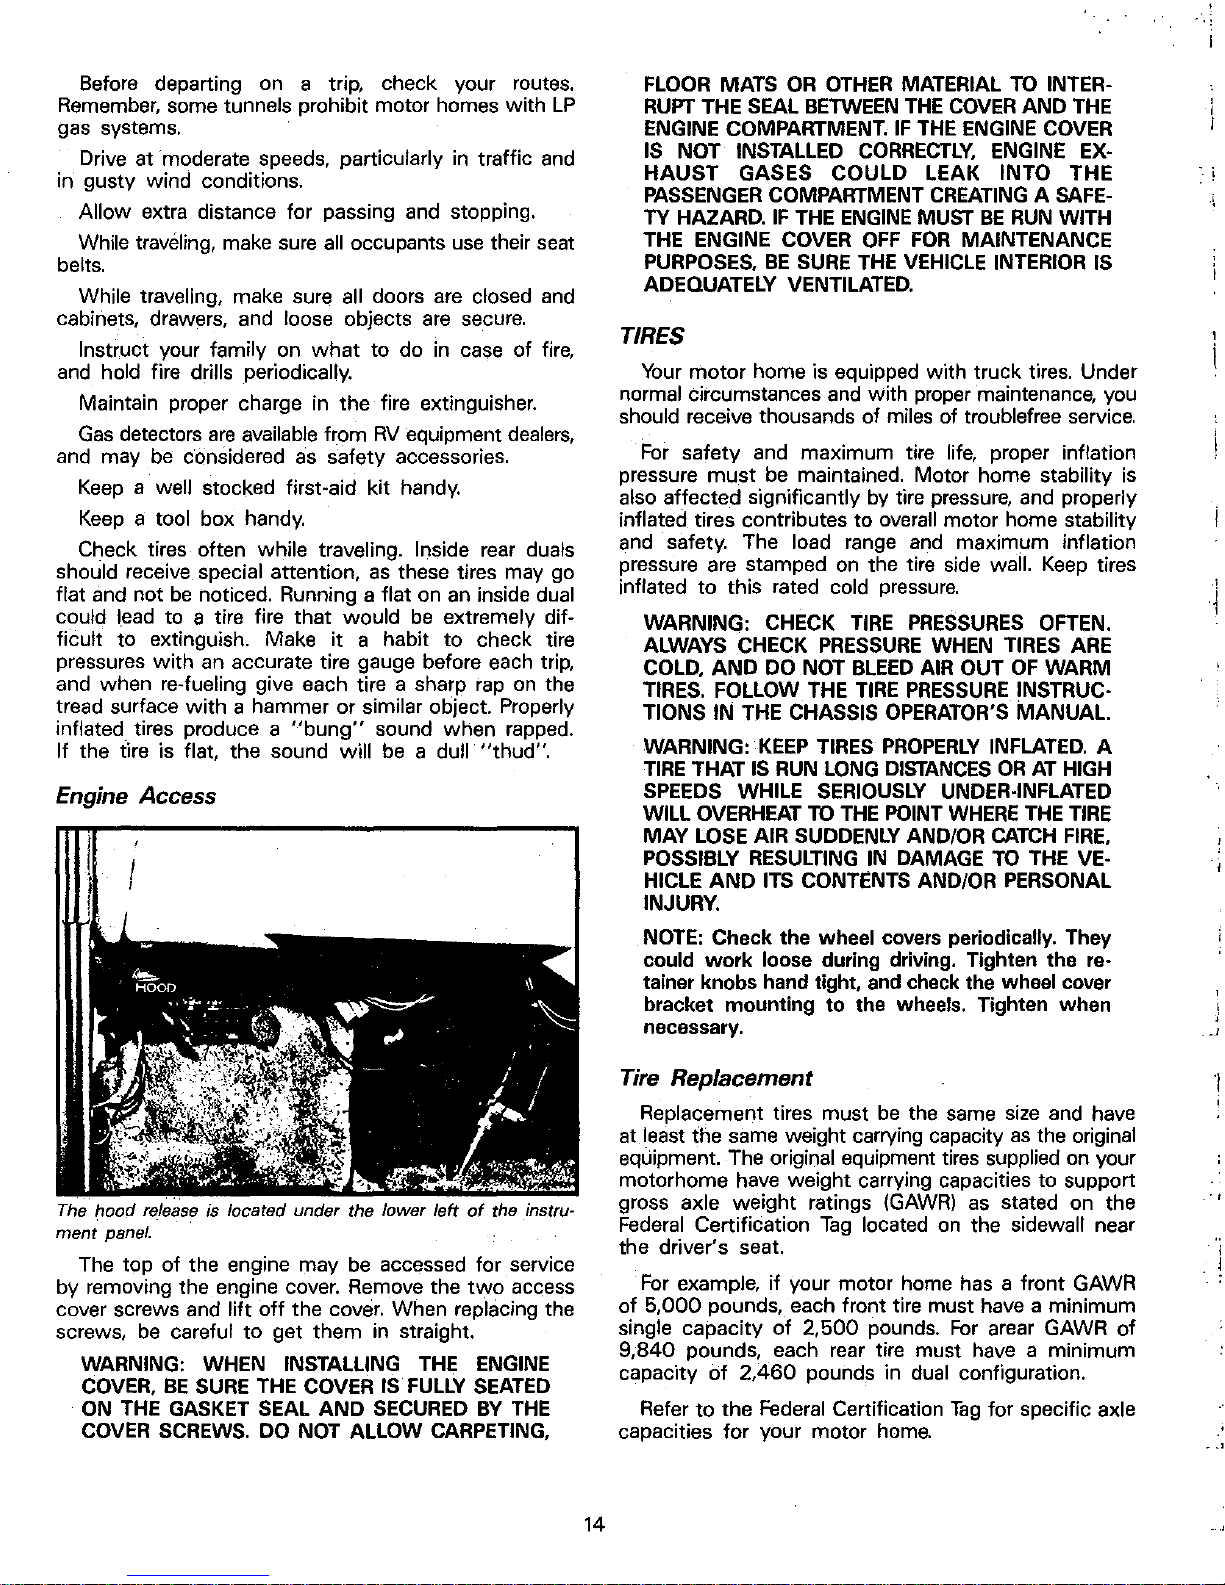
Before departing on a trip, check your routes.
Remember, some tunnels prohibit motor homes
with
LP
gas systems.
Drive at moderate speeds, particularly in traffic and
in
gusty
wind conditions.
Allow
extra distance for passing and stopping.
While
traveling, make sure all occupants use their seat
belts.
While
traveling, make sure all doors are closed and
cabinets, drawers, and loose objects are secure.
Instruct your family on
what
to
do in case
of
fire,
and hold fire drills periodically.
Maintain proper charge in
the
fire extinguisher.
Gas
detectors
are
available from
RV
equipment dealers,
and may be considered as safety accessories.
Keep
a well stocked first-aid kit handy.
Keep
a tool box handy.
Check tires often while traveling. Inside rear duals
should receive special attention, as these tires may go
flat and not
be
noticed. Running a flat on an inside dual
could
lead to a tire fire
that
would
be
extremely dif-
ficult
to
extinguish. Make
it
a habit
to
check tire
pressures
with
an accurate tire gauge before each trip,
and
when
re-fueling give each tire a sharp rap on the
tread surface
with
a hammer
or
similar object. Properly
inflated tires
produce a
"bung"
sound
when
rapped.
If the tire is flat,
the
sound will be a dull
"thud".
Engine Access
The
hood
release
is located under the lower left
of
the instru-
ment
panel.
The
top
of
the
engine may
be
accessed for service
by
removing the engine cover. Remove the
two
access
cover screws and
lift
off
the
cover. When replacing the
screws,
be
careful
to
get
them
in straight.
WARNING: WHEN INSTALLING THE ENGINE
COVER,
BE
SURE
THE COVER IS
FULLY
SEATED
ON
THE GASKET SEAL
AND
SECURED
BY
THE
COVER
SCREWS. DO NOT ALLOW CARPETING,
14
FLOOR MATS
OR
OTHER
MATERIAL
TO
INTER-
RUPT
THE SEAL
BETWEEN
THE
COVER
AND
THE
ENGINE COMPARTMENT.
IF
THE ENGINE COVER
IS NOT INSTALLED
CORRECTLY,
ENGINE EX-
HAUST
GASES
COULD
LEAK
INTO
THE
PASSENGER COMPARTMENT
CREATING
A SAFE-
TY HAZARD.
IF
THE
ENGINE
MUST
BE
RUN
WITH
THE ENGINE COVER
OFF
FOR
MAINTENANCE
PURPOSES,
BE
SURE
THE VEHICLE INTERIOR IS
ADEQUATELY VENTILATED.
TIRES
Your
motor
home is equipped
with
truck
tires. Under
normal circumstances and
with
proper maintenance, you
should receive thousands
of
miles of troublefree service.
For
safety and
maximum
tire life, proper inflation
pressure
must
be maintained. Motor home stability is
also affected significantly by tire pressure, and properly
inflated tires contributes
to
overall motor home stability
and safety. The load range and maximum inflation
pressure are stamped on the tire side wall. Keep tires
inflated
to
this rated cold pressure.
WARNING: CHECK
TIRE
PRESSURES
OFTEN.
ALWAYS
CHECK
PRESSURE
WHEN
TIRES
ARE
COLD,
AND
DO NOT
BLEED
AIR OUT
OF
WARM
TIRES. FOLLOW THE
TIRE
PRESSURE
INSTRUC-
TIONS IN
THE CHASSIS OPERATOR'S
MANUAl.
WARNING:
KEEP
TIRES
PROPERLY
INFLATED. A
TIRE
THAT IS
RUN
LONG
DISTANCES
OR
AT
HIGH
SPEEDS WHILE SERIOUSLY
UNDER-INFLATED
WILL OVERHEAT
TO
THE
POINT
WHERE
THE
TIRE
MAY
LOSE AIR SUDDENLY AND/OR
CATCH
FIRE,
POSSIBLY RESULTING
IN
DAMAGE
TO
THE VE-
HICLE
AND
ITS CONTENTS AND/OR PERSONAL
INJURY.
NOTE:
Check
the
wheel covers periodically. They
could
work
loose during driving. Tighten
the
re-
tainer knobs hand tight, and check the wheel cover
j
,
bracket
mounting
to
the wheels. Tighten
when
i
,
necessary. "
Tire Replacement
'I
Replacement tires
must
be
the same size and have
at least
the
same weight carrying capacity
as
the original
equipment. The original equipment tires supplied on your
motorhome
have
weight
carrying capacities to support
gross axle
weight
ratings
(GAWR)
as stated on
the
Federal Certification
Tag
located on the sidewall near
the
driver's seat.
For
example,
if
your motor home has a
front
GAWR
of
5,000
pounds, each front tire must have a
minimum
single
capacity
of
2,500
pounds.
For
arear GAWR
of
9,B40 pounds, each rear tire must have a minimum
capacity
of
2,460
pounds in dual configuration.
Refer
to
the
Federal Certification
Tag
for specific axle
capacities
for
your
motor
home.
 Loading...