

Fleetwood Discovery, Discovery LXE, Pace Arrow, Pace Arrow LXE Owner's Manual

Owner’s Manual
Part No. L90-0300-65
Customer Service: 1.800.322.8216
DIESEL
America’s favorite motorhomes.

Discovery, Discovery LXE, Pace Arrow, and Pace Arrow LXE
Owner’s Manual
Section 1 - General Information ...............................................................................3
Section 2 - Limited One-Year Warrenty ..................................................................9
Section 3 - Driving & Safety..................................................................................... 16
Section 4 - Exterior & Interior Care ....................................................................... 58
Section 5 - Appliances ..............................................................................................83
Section 6 - Equipment.............................................................................................106
Section 7 - Water Systems ......................................................................................127
Section 8 - House Electrical Systems .................................................................147
Index ..............................................................................................................................170
Appendix A Firey Operation Manual ...............................................................174
Discovery, Discovery LXE, Pace Arrow, and Pace Arrow LXE

The information contained in this document is intended to reect standard and optional
equipment included in a typically equipped model at the time of delivery to the initial retail
owner. Your actual unit may vary from this document as a result of optional equipment that
is not generally offered on this model. In the case that you are not the initial retail owner
of the unit, this document will not reect modications that may have been performed by
previous owners.
Product information and specications are shown herein as of the time of printing.
The motorhome manufacturer reserves the right to change product specications,
designs and standard equipment without notice and without incurring obligation.
©Copyright 2017 REV RV Group. All rights reserved. All other trademarks or registered
trademarks are property of their respective holders. Brand name products of other
companies mentioned in this manual are not endorsed by the manufacturer of the
motorhome.
Part # L90-0300-65
Discovery, Discovery LXE, Pace Arrow, and Pace Arrow LXE
2

General Information
Section 1
WARRANTY INFORMATION FILE ���������������������������������������������������������������������������� 4
REPORTING SAFETY DEFECTS ������������������������������������������������������������������������������� 4
SAFETY TERMS ������������������������������������������������������������������������������������������������������ 4
GLOSSARY OF TERMS �������������������������������������������������������������������������������������������5
CALIFORNIA PROPOSITION 65 WARNING:
Most vehicles, including this one, contain and/or emit chemicals known
to the State of California to cause cancer and birth defects or other
reproductive harm. Engine exhaust and a wide variety of vehicle uids,
components, and parts—including building materials used in the interior
furnishings in this vehicle—contain and/or emit these chemicals, including
formaldehyde. In addition, battery posts, terminals and related accessories
contain lead and lead compounds, chemicals known to the State of
California to cause cancer and reproductive harm. Wash hands after
handling. Consult with your doctor or other health professional for further
advice concerning exposure from this vehicle to chemicals known to the
State of California to cause cancer and reproductive harm.
Discovery, Discovery LXE, Pace Arrow, and Pace Arrow LXE
3

WARRANTY INFORMATION FILE
In addition to this Owner’s
Manual, a Warranty Information
File Box can be found in the
motorhome. This box contains
valuable documents about
the motorhome’s systems and
equipment. Many of the component
manufacturer warranty registration
cards can be found in the box.
They will need to be lled out
and mailed. Carefully reading
and understanding of all the
information in this box will help in
the safe operation, maintenance and
troubleshooting of the systems and
equipment.
REPORTING SAFETY DEFECTS
If you believe that your
motorhome has a defect which
could cause a crash or could
cause injury or death, you
should immediately inform
the National Highway Trafc
Safety Administration (NHTSA)
in addition to notifying Allied
Recreation Group at:
1-800-322-8216.
If NHTSA receives similar
complaints, it may open an
investigation, and if it nds that a
safety defect exists in a group of
vehicles, it may order a recall or
remedy campaign.
However, NHTSA cannot become
involved in individual problems
between you, your dealer or Allied
Recreation Group.
To contact NHTSA, you may call
the Vehicle Safety Hot line toll-free
at 1-888-327-4236 (TTY: 1-800424-9153); go to
http://www.safercar.gov; or write to:
Administrator, NHTSA, 1200 New
Jersey Avenue, SE, Washington,
DC, 20590. You can also obtain
other information about motor
vehicle safety from http://www.
safercar.gov.
Canadian Consumers:
If you believe that your vehicle
has a defect that could cause
a crash, injury, or death, you
should immediately inform Allied
Recreation Group at: 1-800-3228216 or you may call Transport
Canada toll-free at:
1-800-333-0510
SAFETY TERMS
Many of the safety terms are
personal safety instructions.
Denitions for the terms are listed
below. It is important to thoroughly
read and understand the safety
instructions displayed throughout
the manual. Failure to comply
with specic instructions may
result in personal injury or death.
Many instructions are required by
National Safety Associations.
CAUTION:
Cautions pertain to potential
damage to the motorhome
and/or its components.
POISON:
A warning or caution
pertaining to safety and/or use
of a poisonous substance or
harmful chemical.
NOTE:
Information and reminders
concerning proper operation
of the motorhome and/or its
components. WARNING:
Warnings contain information
regarding personal safety
and/or pertaining to potential
extensive or permanent
damage to the motorhome or
its components by means of
hazards or improper use.
INSPECTION:
Inspection of the motorhome and/
or its components is required.
Additional instruction may
follow.
LUBE:
Lubrication, or addition of
a lubricant product, to the
motorhome and/or a specied
component or part is required.
Additional instruction may
follow.
ASSEMBLE or REPAIR:
Assembly, disassembly or
installation of a component
or part, and/or repair to the
motorhome may be required.
Assistance of Technical Support
or Technician may be necessary.
Discovery, Discovery LXE, Pace Arrow, and Pace Arrow LXE
4

INFORMATION:
References to additional
information regarding operation
of the motorhome and/or its
components found in additional
sources, other than the Owner’s
Manual. Also refers to the
Warranty Information File, found
within the Warranty Information
Box in the motorhome.
TIP:
Tips contain information, helpful
hints and/or suggestion for ease
of operation of the motorhome or
its components.
GLOSSARY OF TERMS
AC Electricity - Alternating
current also known as household
power.
Air Compressor - Pumps air to
and builds air pressure in an air
system.
Air Dryer - Cools, lters and
dries the air delivered by an air
compressor.
Air Governor - Controls the
operation of the air compressor
by constantly monitoring air
pressure in the supply tank of
the air system. The air governor
initiates the unload cycle when
the cut-out pressure is reached.
Alternating Current (AC) - A
current that varies periodically
in magnitude and direction.
A battery does not deliver
alternating current. Also referred
to as shore power, utility power,
inverter power (if equipped),
generator power, or household
power.
Ampere (Amp) - The measure
of electron ow rate (current)
through a circuit.
Ampere-hour (Amp-hr. AH) -
A unit of measure for a battery
electrical storage capacity,
obtained by multiplying the
current in amperes by the time in
hours of discharge. Example: A
battery which delivers 5 amperes
for 20 hours, delivers 5 amperes
times 20 hours, or 100 Amp-Hr.
of capacity.
ANSI - American National
Standards Institute.
ASTM - American Society for
Testing and Materials.
Black Water - Term associated
with the sewage holding tank.
The toilet drains directly into this
tank.
CCA - Cold Cranking Amperage
is the amount of current a battery
can deliver for 30 seconds at
0° F without dropping below a
specied voltage, usually 10.5
Volts DC.
Chassis Battery - Battery used
to power the 12 Volt accessories
and start the engine.
Circuit - An electric circuit is
the path of an electric current.
A closed circuit has a complete
path. An open circuit has a
broken or disconnected path.
City Water - A term associated
with the water supply at
campgrounds. It is called city
water because water is pulled
from a central source (like in
a city) and not the fresh water
tank.
Compressor Load Cycle -
The time during which the
air compressor is building air
pressure in an air system.
Compressor Unload Cycle -
The time during which the air
compressor is idling and is not
building air pressure in an air
system.
Curbside - This refers to the
side of the motorhome that
faces the curb when it is parked.
Often called the door side or the
passenger side.
Discovery, Discovery LXE, Pace Arrow, and Pace Arrow LXE
5

Current - The rate of ow of
electricity or the movement rate
of electrons along a conductor.
It is comparable to the ow
of a stream of water. The unit
of measure for current is the
ampere.
Cut-In Pressure - The pressure
level in the air system supply
tank that triggers the compressor
load cycle.
Cut-Out Pressure - The
pressure level in the air system
supply tank which triggers the
compressor unload cycle.
Cycle - A battery discharge and
subsequent recharge equals one
cycle.
Desiccant - A granular substance
that has a high afnity for water
and is used to retain moisture
from the air stream owing
through the air dryer cartridge.
DC Electricity - Direct current
also known as battery power.
Direct Current (DC) - Type
of current that travels in one
direction. This type of current
can be stored in a battery bank.
Drain Trap - This is a curve that
is in all drains. Water is trapped
in the curve and this creates a
barrier so tank odors cannot
escape through the drain. Also
called a “P-Trap.”
Dry Camping - Camping in the
motorhome when there is no city
water hook-up or shore power.
In other words, using only the
water and power that is in the
motorhome and not from another
source.
Drying Cycle - The time during
which the air dryer cools, lters
and removes moisture from
the air delivered by the air
compressor. The drying cycle
begins and ends the same as the
compressor load cycle.
Dump Station - A site where the
waste (grey) and sewage (black)
tanks can be drained. In most
states it is illegal to drain waste
tanks anywhere other than at a
dump station.
Dump Valve - Another name for
the T-handle valve used to drain
the sewage (black) and waste
(grey) tanks.
Escape (Egress) Window - The
formal name for the emergency
exit window located in the
motorhome. Egress windows are
identied by their red handles.
Full Hook-Up Site - A
campground that has city water,
shore power and sewer hook-ups
or connections available.
Grey Water - Term associated
with the waste water holding
tank. Water from the sink drains,
the shower and the washer-dryer
(if equipped) go into this tank.
House Battery - Powers 12 Volt
DC lights and accessories inside
motorhome.
HVAC - Heating, Ventilation
and Air Conditioning.
LED (Light Emitting Diode) -
Indicator light.
Liquid Lead Acid Battery
(LLA) -
A type of battery that uses
liquid as an electrolyte. This
type of battery requires periodic
maintenance such as cleaning
the connections and checking the
electrolyte level.
Low Point Drain - The lowest
point in the plumbing. Drains
are placed here so water will
drain out of the lower end of
the motorhome. Drains must be
closed when the water tank is
lled.
OEM - Term for Original
Equipment Manufacturer.
OHM - A unit for measuring
electrical resistances.
Discovery, Discovery LXE, Pace Arrow, and Pace Arrow LXE
6

Ohm’s Law - Expresses the
relationship between Volt (E),
amperes (I) in an electrical
circuit with resistance (R). It can
be expressed as follows: I = V/R
or V = I*R. If any two of the
three values are known, the third
value can be calculated by using
the above formula.
Potable Water - Water that is
safe for human consumption.
Potentiometer - A device for
measuring an unknown potential
difference or electromotive force.
Regeneration - The reverse ow
of air through the air dryer and
out the purge valve that begins
immediately after the purge and
lasts normally 10 to 15 seconds.
This reverse ow of air, from
the air system and through the
air dryer, removes moisture
from the desiccant cartridge and
prepares the air dryer for the next
compressor load cycle.
Roadside - The side of the
motorhome that faces the road
while parked. Often called the
off-door side or the driver side.
Wet Cell Battery - A type of
battery that uses liquid as an
electrolyte. This type of battery
requires periodic maintenance to
clean the connections and check
the electrolyte level.
Pounds Per Square Inch Gauge
(psig) -
Pressure measured with respect
to that of the atmosphere. This
is a pressure gauge reading in
which the gauge is adjusted to
read zero at the surrounding
atmospheric pressure. It is
commonly called gauge pressure.
Purge - The initial blast of
air (decompression) from the
air dryer purge valve at the
beginning of the air compressor.
Purge Cycle - The time during
which the air dryer is undergoing
purge and regeneration. This
cycle starts at the beginning of
the compressor unload cycle and
normally ends well before the
beginning of the compressor load
cycle.
SCA - Term for Supplemental
Coolant Additive. Chemical
added to coolant for diesel
engines to help prevent cylinder
liner pitting and internal
corrosion.
Shore Line - The electrical cord
which runs from the motorhome
to the campground AC electrical
supply.
Stinger - An arm attachment on
a tow truck that is used to lift the
motorhome slightly for towing.
Volt - The unit of measure for
electric potential.
Watt - The unit for measuring
electrical power, i.e. the rate
of doing work, in moving
electrons by or against an electric
potential.
Discovery, Discovery LXE, Pace Arrow, and Pace Arrow LXE
7

Notes

Limited One-Year Warranty
Section 2
For Motor Homes Manufactured By REV Recreation Group, Inc., sold in the United States and Canada
COVERAGE PROVIDED ������������������������������������������������������������������������������������������������������� 10
WHAT IS NOT COVERED BY THIS WARRANTY ������������������������������������������������������������������� 10
LIMITATIONS ���������������������������������������������������������������������������������������������������������������������� 10
YOUR RIGHTS UNDER STATE LAW �������������������������������������������������������������������������������������11
LEGAL REMEDIES �������������������������������������������������������������������������������������������������������������� 11
DEALER’S OBLIGATIONS ���������������������������������������������������������������������������������������������������� 11
OWNER’S OBLIGATIONS ����������������������������������������������������������������������������������������������������11
MANUFACTURER’S OBLIGATIONS ������������������������������������������������������������������������������������� 12
DISPUTE RESOLUTION ������������������������������������������������������������������������������������������������������� 12
WARRANTY SERVICE ��������������������������������������������������������������������������������������������������������� 12
REPORTING SAFETY DEFECTS �������������������������������������������������������������������������������������������13
CANADIAN CONSUMERS ����������������������������������������������������������������������������������������������������13
Discovery, Discovery LXE, Pace Arrow, and Pace Arrow LXE
9

COVERAGE
PROVIDED
Your new motor home is warranted under normal use
to be free from manufacturing defects in
material or workmanship when rst sold by an
authorized Fleetwood Dealership. For purposes of
this warranty, “defect” means a failure of the material
or workmanship to conform to the manufacturer’s
specications and tolerances.
The warranty covers the rst retail purchaser
and all authorized transferees during the warranty.
The warranty begins on the date of original retail
delivery or the date the motor home is rst placed into
service as a rental, commercial or demonstrator unit
(whichever occurs rst) “Start Date” and extends for
the following periods:
1. For non-structural defects, one (1) year from the
Start Date or until the motor home reaches 15,000
total miles as determined by the mile age shown on the
odometer, whichever occurs rst.
2. For structural defects, three (3) years from the
Start Date or until the motor home reaches 45,000
total miles as determined by the mileage shown on the
odometer, whichever occurs rst. Structural defects
are dened only as the motor home’s roof structure,
sub-oor structure, and Vacubond® walls.
WHAT IS NOT COVERED BY THIS WARRANTY
This warranty does not cover:
1. The automotive chassis system (including the
chassis and drive train), tires and batteries, all of which
are covered by the separate warranties of the respective
manufacturers of these components.
2. Components or items expressly warranted by their
respective manufacturer.
3. Defects or performance failures caused by or
related to:
a. Abuse, misuse, negligence or accident;
b. Failure to comply with instructions contained in
the Owner’s Information Package;
c. Alteration or modication of the motor home;
d. Environmental conditions (salt, hail, chemicals in
the atmosphere, etc.):
e.Normal deterioration due to wear or exposure, such
as sealants, fading of exterior surfaces, fabrics, drapes,
and carpet wear, etc.;
f. Motor homes on which the odometer reading have
been altered;
g. Normal maintenance and service items, such as
light bulbs, fuses, sealants, lubricants, etc.;
h. Appearance
imperfections, or damage to paint, graphics, exterior
materials, or upholstery that may have occurred prior to
delivery and are normally corrected during the delivery
inspection process at the manufacturing plant or at the
dealership;
i. Transportation to and from dealer location;
j. FLEETWOOD RV SHALL NOT BE LIABLE
FOR ANY (1) INCIDENTAL OR CONSEQUENTIAL
DAMAGES, INCLUDING BUT NOT LIMITED
TO ANY CLAIMS FOR PROPERTY DAMAGE,
LOSS OF USE, LOSS OF VALUE, LOSS OF
INCOME, LOSS OF TIME, INCONVENIENCE,
COMMERCIAL LOSS, BUS FARES, VEHICLE
RENTAL, INCIDENTAL CHARGES SUCH AS
TELEPHONE CALLS OR HOTEL BILLS, (2) ANY
OTHER PROPERTY DAMAGE CAUSED OR
ALLEGED TO BE CAUSED BY MOLD, MILDEW,
FUNGUS, DRY ROT OR ANY MICROBIAL
MATTER, OR (3) LEGAL FEES OR EXPENSES;
k. Pre-mature deterioration and accelerated wear
and tear on Motor homes used for full-time living
accommodations;
l. Motor homes used for commercial or business
purposes;
m. Motor Homes that are not originally sold by
an authorized Fleetwood RV dealership, i.e., sold at
auction, repossession, salvaged or sold in an otherwise
distressed condition.
n. Residential refrigerators, which are covered by
separate warranties of the respective manufacturers of
these components.
Some states do not allow the exclusion or
limitation of incidental or consequential damages,
so the above limitation or exclusion may not apply
to you.
LIMITATIONS
ANY IMPLIED WARRANTIES, INCLUDING,
BUT NOT LIMITED TO THE IMPLIED
WARRANTIES OF MERCHANTABILITY AND
FITNESS FOR A PARTICULAR PURPOSE, ARE
LIMITED IN DURATION TO THE DURATION OF
THIS WRITTEN WARRANTY.
Some states do not allow restrictions on how long an
implied warranty lasts, so this limitation may not apply
to you.
The manufacturer is not responsible for any
undertaking, representation or warranty made by any
dealer or other person beyond those expressly set
Discovery, Discovery LXE, Pace Arrow, and Pace Arrow
10

forth in this warranty. There is no warranty of any kind
made by Fleetwood RV beyond the limited warranty
contained in this document.
YOUR RIGHTS UNDER STATE LAW
This warranty gives you specic legal rights, and you
may also have other rights which vary from state to
state.
LEGAL REMEDIES
Any claim or controversy arising out of or relating
to this limited warranty, or beach thereof, shall be
settled by arbitration administered by the American
Arbitration Association in Milwaukee, Wisconsin in
accordance with the Commercial Arbitration Rules
of the American Arbitration Association. The laws of
the State of Indiana shall be applied in any arbitration
proceedings, without regard to principles of conict
of law. Each party shall bear its own costs, fees and
expenses of arbitration. The arbitrator(s) determination
and the basis for that determination shall be in writing
and shall include an explanation of the basis for the
determination. The determination of the arbitrator(s)
shall be nal and binding and judgment upon such
determination may be entered in any court having
jurisdiction. The arbitration proceedings and arbitration
award shall be maintained by the parties as strictly
condential, except as otherwise required by court
order or as is necessary to conrm, vacate, or enforce
the award and for disclosure in condence to the
parties’ respective attorneys, tax advisors, or senior
management personnel. Furthermore, any action for
breach of warranty must be commenced within three
months following the expiration of the warranty period.
DEALER’S OBLIGATIONS
By agreement with the manufacturer, the dealer is
obligated to maintain the motor home prior to retail
sale, to perform a detailed pre-delivery inspection
and to repair or replace any parts necessary to correct
defects in material or workmanship.
OWNER’S OBLIGATIONS
The owner is responsible for normal maintenance
as described in the Owner’s Information Package;
however, minor adjustments (such as adjustments to the
interior or exterior doors, cabinet latches, TV antenna
control, etc.) will be performed by the dealer during the
rst 90 days after delivery.
Thereafter, such adjustments are the responsibility of
the owner as normal maintenance unless required as a
direct result of repair or replacement of a defective part
under this warranty.
If a problem occurs which the owner believes is
covered by this warranty, then the owner shall contact
the selling dealer, or other authorized dealer, giving
sufcient information to resolve the matter.
Written notice of defects must be given to the selling
dealer or manufacturer within thirty (30) days of
discovery by owner but no later than ten (10) days after
the expiration of the warranty period. The owner shall
deliver the motor home to the dealer or an authorized
Fleetwood RV dealer location for warranty service.
See “Warranty Service,” page 2-3, for additional
details. To the extent allowed or not prohibited by
applicable law, the manufacturer requires that the
owner rst provide it with direct written notication
of any alleged unrepaired defect, or any other
dissatisfaction experienced with the motor home so the
manufacturer has the opportunity to cure the problem
or dissatisfaction itself.
Giving the manufacturer this direct notice and
opportunity to cure enables the manufacturer to
supplement prior efforts by its authorized dealers so
any ongoing problem or dissatisfaction can be resolved
or addressed by the manufacturer.
The manufacturer’s written notice should be mailed
to:
REV RV Group
Owner Relations
P.O. Box 1007
Decatur, IN 46733
MANUFACTURER’S OBLIGATIONS
Upon receipt of notice of a claim, where the dealer
was unable or unwilling to resolve the problem, a
Fleetwood RV Service Center will repair or replace
any parts necessary to correct defects in material or
workmanship.
For Customer Service Assistance, contact:
REV RV Group
Owner Relations
P.O. Box 1007
Decatur, IN 46733
1-800-322-8216
For Chassis Customer Assistance, contact:
Ford Chassis Assistance:
1-800-444-3311
Discovery, Discovery LXE, Pace Arrow, and Pace Arrow LXE
11

DISPUTE RESOLUTION
AS TO NON-STRUCTURAL DEFECTS, ANY
ACTION TO ENFORCE THESE EXPRESS OR
ANY IMPLIED WARRANTIES SHALL NOT BE
COMMENCED MORE THAN NINETY (90) DAYS
AFTER THE EXPIRATION OF THE ONE YEAR
WARRANTY COVERAGE PERIOD DESIGNATED
ABOVE. AS TO STRUCTURAL DEFECTS,
ANY ACTION TO ENFORCE THESE EXPRESS
OR IMPLIED WARRANTIES SHALL NOT BE
COMMENCED MORE THAN NINETY (90) DAYS
AFTER THE EXPIRATION OF THE THREE YEAR
WARRANTY PERIOD DESIGNATED ABOVE.
Indiana law shall exclusively govern the
interpretation and application of this limited
warranty.
WARRANTY SERVICE
If you need warranty service or warranty information,
please see the booklets and other documents included
in your Owner’s Information Package. If you have any
questions about the warranty or what it does or does not
cover, please contact Fleetwood RV Owner Relations.
As a part of the pre-delivery inspection procedure, the
dealer is responsible for road testing the motor home,
noting and correcting any steering problems and setting
correct tire pressures before delivery.
Fleetwood RV will not be responsible for front end
alignment after this pre-delivery inspection has been
performed.
For warranty service, you should return your motor
home to the selling dealer. If this is not possible, you
may contact any other authorized Fleetwood RV motor
home dealer. The Fleetwood RV Owner Relations
group can help you nd a dealer in your area. If,
for some reason, a problem is not handled to your
satisfaction:
1. Discuss any warranty-related problems directly
with the manager and/or owner of the dealership,
giving them an opportunity to help the service
department resolve the matter for you.
2. If a problem arises that has not been resolved
to your satisfaction by your local dealer, contact
Fleetwood RV Owner Relations.
3. We sincerely believe that your dealer and the
factory representative will be able to solve any
problem that might arise. If their combined efforts
are not satisfactory, please send a letter describing the
circumstances to:
REV RV Group
Owner Relations
P.O. Box 1007
Decatur, IN 46733
Please include the brand name and Unit Identication
Number (UNI) of your motor home. The UNI is
located on the identication tag underneath the driver’s
window on the exterior of your motor home.
4. If you wish to call for assistance, please use this
toll-free telephone number.
REV RV Group
Owner Relations
1-800-322-8216
There may be times when your motor home will need
repairs or parts while you are on the road. If your motor
home is repaired by a nonauthorized repair facility
(non-Fleetwood RV dealer), be sure to save receipts
and especially any parts that are replaced. These parts
will have to be returned to your dealer before you can
be reimbursed for their cost.
Always make a written list of the motor home
problems or the specic work you want done. If you’ve
had work done that is not on your maintenance log, let
the service advisor know.
If you have a long list of service items that need
attention and you need your motor home very soon,
discuss the situation with the service advisor, listing
the items in order of priority. This will help the service
department manage its time and will help get you going
as quickly as possible. If required work is not covered
under the warranty, your dealer’s service department
can help you with getting the correct service.
The materials in your Owner’s Information Package
contain warranty information and operating instructions
on the various appliances and components in your
motor home. If you do not have operating instructions
for a particular appliance or component, contact your
dealer. Warranty registration cards for these items
should be lled out and mailed as soon as possible after
you take delivery of your motor home.
When contacting any of the equipment
manufacturers, always have the model and serial
numbers available. Appliance identication numbers
will be found on tags or plates attached to the
appliance.
Discovery, Discovery LXE, Pace Arrow, and Pace Arrow
12

If you have a warranty or service concern about
the chassis portion of your motor home, you may go
directly to an authorized chassis dealer for service. This
may save you time and effort as the chassis warranty is
administered by the chassis manufacturer. Consult your
area directory for an authorized claims dealer. If you
are unsure if the issue is chassis related, please contact
your REV RV dealer.
The motor home has been thoroughly inspected
before shipment. Your dealer is responsible for
performing a complete pre-delivery inspection of the
motor home as specied in the Owner Care delivery
checkout.
Please refer to the warranty in the front of this
manual. It explains your rights and obligations, as
well as the rights and obligations of the dealer and
manufacturer. Please read this section carefully. You
will be better informed in case you have a warrantyrelated problem, and your dealer will be better able to
get you on the road again.
CANADIAN CONSUMERS
If you believe that your vehicle has a defect that
could cause a crash, injury, or death, you should
immediately inform Fleetwood RV at:
1-800-800-322-8216
Or, you may call Transport Canada toll-free at:
1-800-333-0510.
your motor home, you may go directly to an
authorized chassis dealer for service. This may
save you time and effort as the chassis warranty is
administered by the chassis manufacturer. Consult your
area directory for an authorized claims dealer. If you
are unsure if the issue is chassis related, please contact
your Fleetwood RV dealer.
REPORTING SAFETY DEFECTS
UNITED STATES CONSUMERS:
If you believe that your vehicle has a defect that
could cause a crash, injury, or death, you should
immediately inform the National Highway Trafc
Safety Administration (NHTSA) in addition to
notifying Fleetwood RV Owner Relations at 1-800322-8216.
If NHTSA receives similar complaints, it may open
an investigation, and if it nds that a safety defect
exists in a group of vehicles, it may order a recall and
remedy campaign.
To contact NHTSA, you may either call the Vehicle
Safety Hot line toll-free at 1-888-327-4236 (TTY:
1-800-424-9153); or go to http://www.safercar.gov or
write to:
Administrator
National Highway Trafc Safety Administration
1200 New Jersey Avenue, SE
Washington, DC 20590
You can also obtain other information about motor
vehicle safety from the Vehicle Safety Hot line.
Discovery, Discovery LXE, Pace Arrow, and Pace Arrow LXE
13

Driving & Safety
Section 3
CONTENTS
DRIVING & SAFETY ���������������������������� 15
Inspections ................................... 15
Familiarize Yourself ....................... 15
Mirror Adjust ................................ 15
Safety Seat Belts .......................... 16
Child Seat Tethers (If Equipped) .... 16
DRIVING TIPS ������������������������������������ 18
Adjust to Driving Conditions .......... 18
TRIP PREPARATION ��������������������������� 21
HITCH ������������������������������������������������� 22
Using the Hitch Receiver ............... 22
Towing Systems ........................... 23
Tow Plug Connection .................... 27
REAR VISION SYSTEM ����������������������� 27
BACKING UP A MOTORHOME������������� 28
SET-UP PROCEDURES ������������������������29
DRY CAMPING ����������������������������������� 30
BREAKING CAMP ������������������������������� 31
EMERGENCY ROADSIDE PROCEDURES �
32
In Case of Flat Tire ........................ 32
Dead Chassis Battery ................... 33
TOWING PROCEDURES ���������������������� 34
Disabling Parking Brake ................ 35
Importance of Air Pressure ........... 37
Tire Inflation Information ............... 37
Inspecting & Pressure ................... 38
Air Pressure Checklist ................... 39
Tire Vibration ................................ 40
Tire Rotation ................................. 40
Tire Replacement .......................... 40
Storage of Tires - Long Term ........ 41
WHEEL MOUNTING ���������������������������� 41
WEIGHING THE MOTORHOME ������������ 42
Weight Terms ............................... 43
Tire Pressure ................................ 45
Scales .......................................... 45
Six-Point Weighing ........................46
Dangers of Overloading ................ 48
Weight Record Sheet ..... 48
SUSPENSION AND TIRE BALANCE ����� 49
MANUAL HEADLAMP AIMING ����������� 49
Operation ..................................... 50
Testing ......................................... 50
Maintenance ................................. 51
Troubleshooting ............................ 51
SMOKE DETECTOR ����������������������������� 50
Operation ..................................... 50
Testing ......................................... 50
Maintenance ................................. 51
Troubleshooting ............................ 51
CARBON MONOXIDE DETECTOR �������� 51
Operation ..................................... 52
Alarm ........................................... 52
Testing ......................................... 53
Cleaning & Maintenance ............... 53
FIRE EXTINGUISHER �������������������������� 53
Maintenance ................................. 53
ESCAPE (EGRESS) WINDOW ������������� 54
Discovery, Discovery LXE, Pace Arrow, and Pace Arrow LXE
DRIVING & SAFETY
Section Two contains information
on driving tips, emergency
situations, towing, safety devices,
weighing the motorhome and tires.
NOTE:
The motorhome has
electronic data recording
devices that may record
information about direction,
road speed, engine speed,
brake application, steering
attitude or other vehicle
operating data. Data
recording devices can
be present in engines,
transmissions, ABS (Antilock
Brake Systems) or other
systems affiliated with
operation of the vehicle.
Information from data
recording devices can
be examined in case of
an accident. Contact the
component manufacturer
to learn more about these
devices.
Inspections
Perform a general inspection prior
to moving the motorhome. Examine
the condition of the motorhome and
the surrounding area. Look “high
and low” when walking around the
motorhome.
Familiarize Yourself
The location of the driver’s seat
is higher and farther to the left than
most vehicles causing a different
perspective of the roadway. Use
the outside mirrors to gauge the
center of the road and to check
conditions behind the motorhome.
The dashboard may include
more gauges and controls than
are normally found in passenger
automobiles. Become familiar with
these gauges and their indications
before starting out.
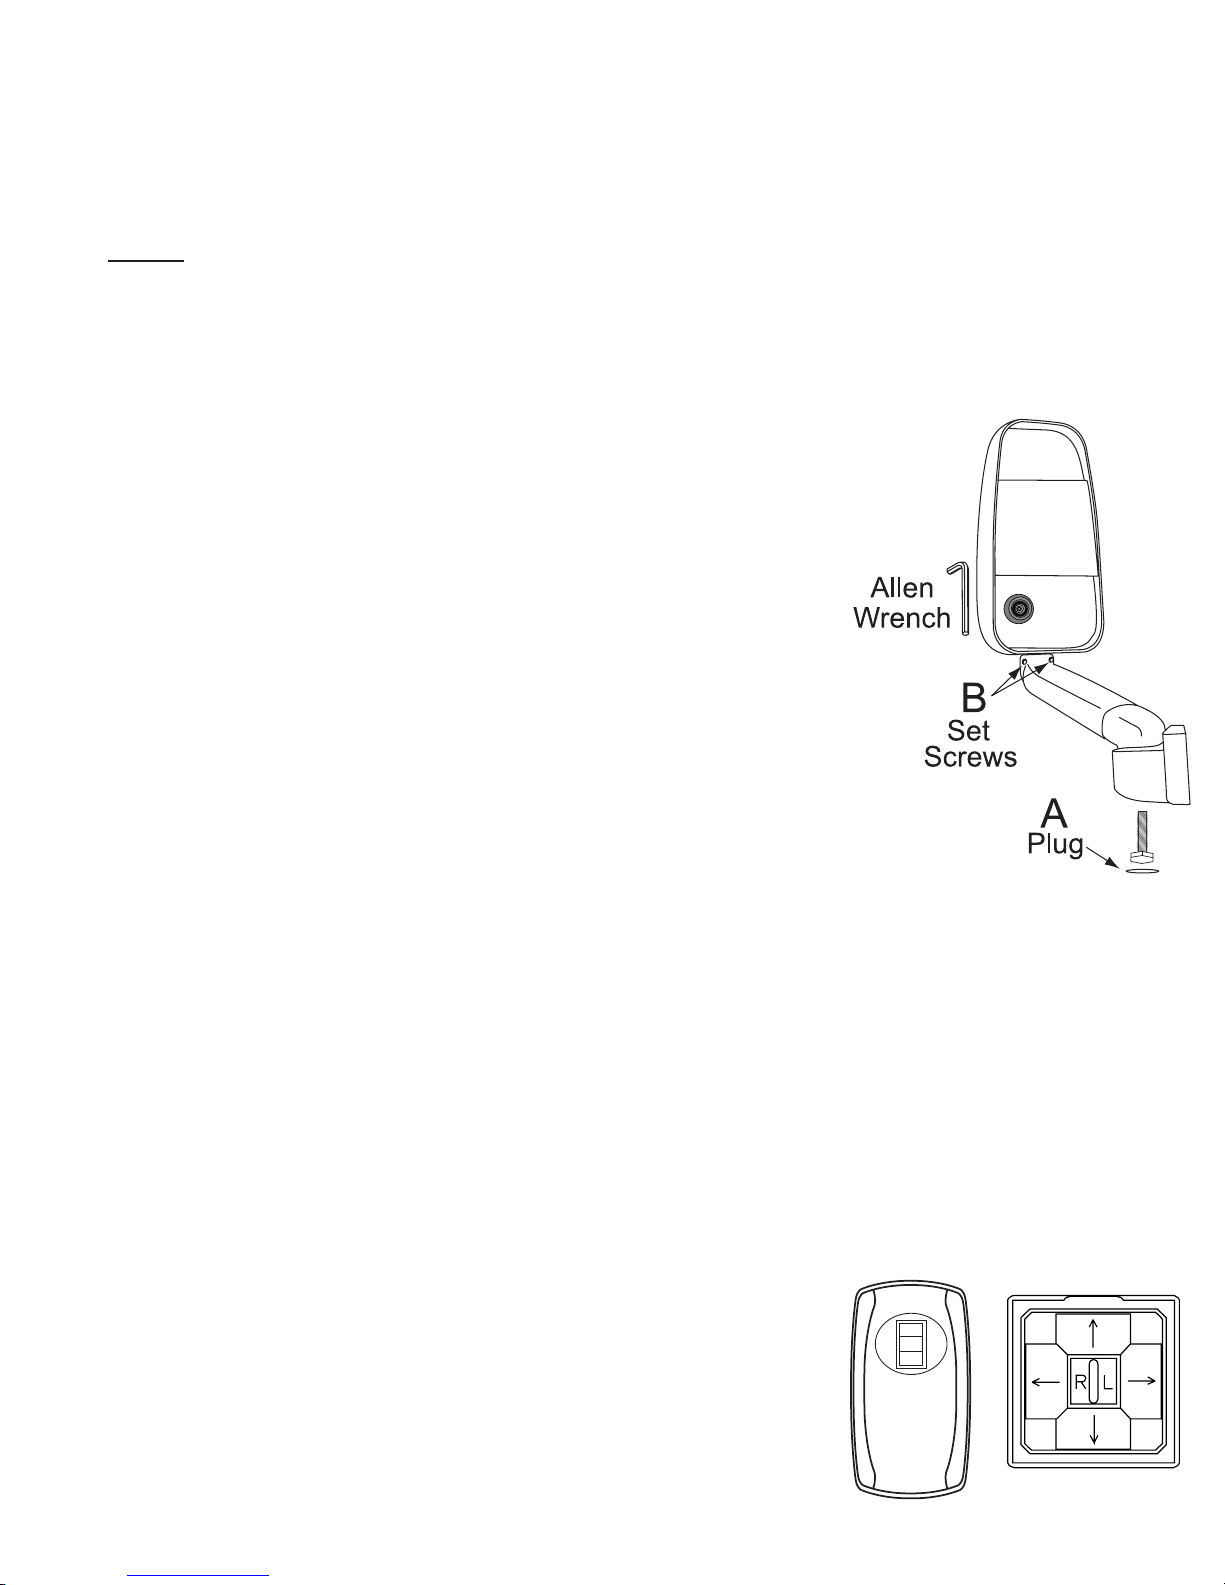
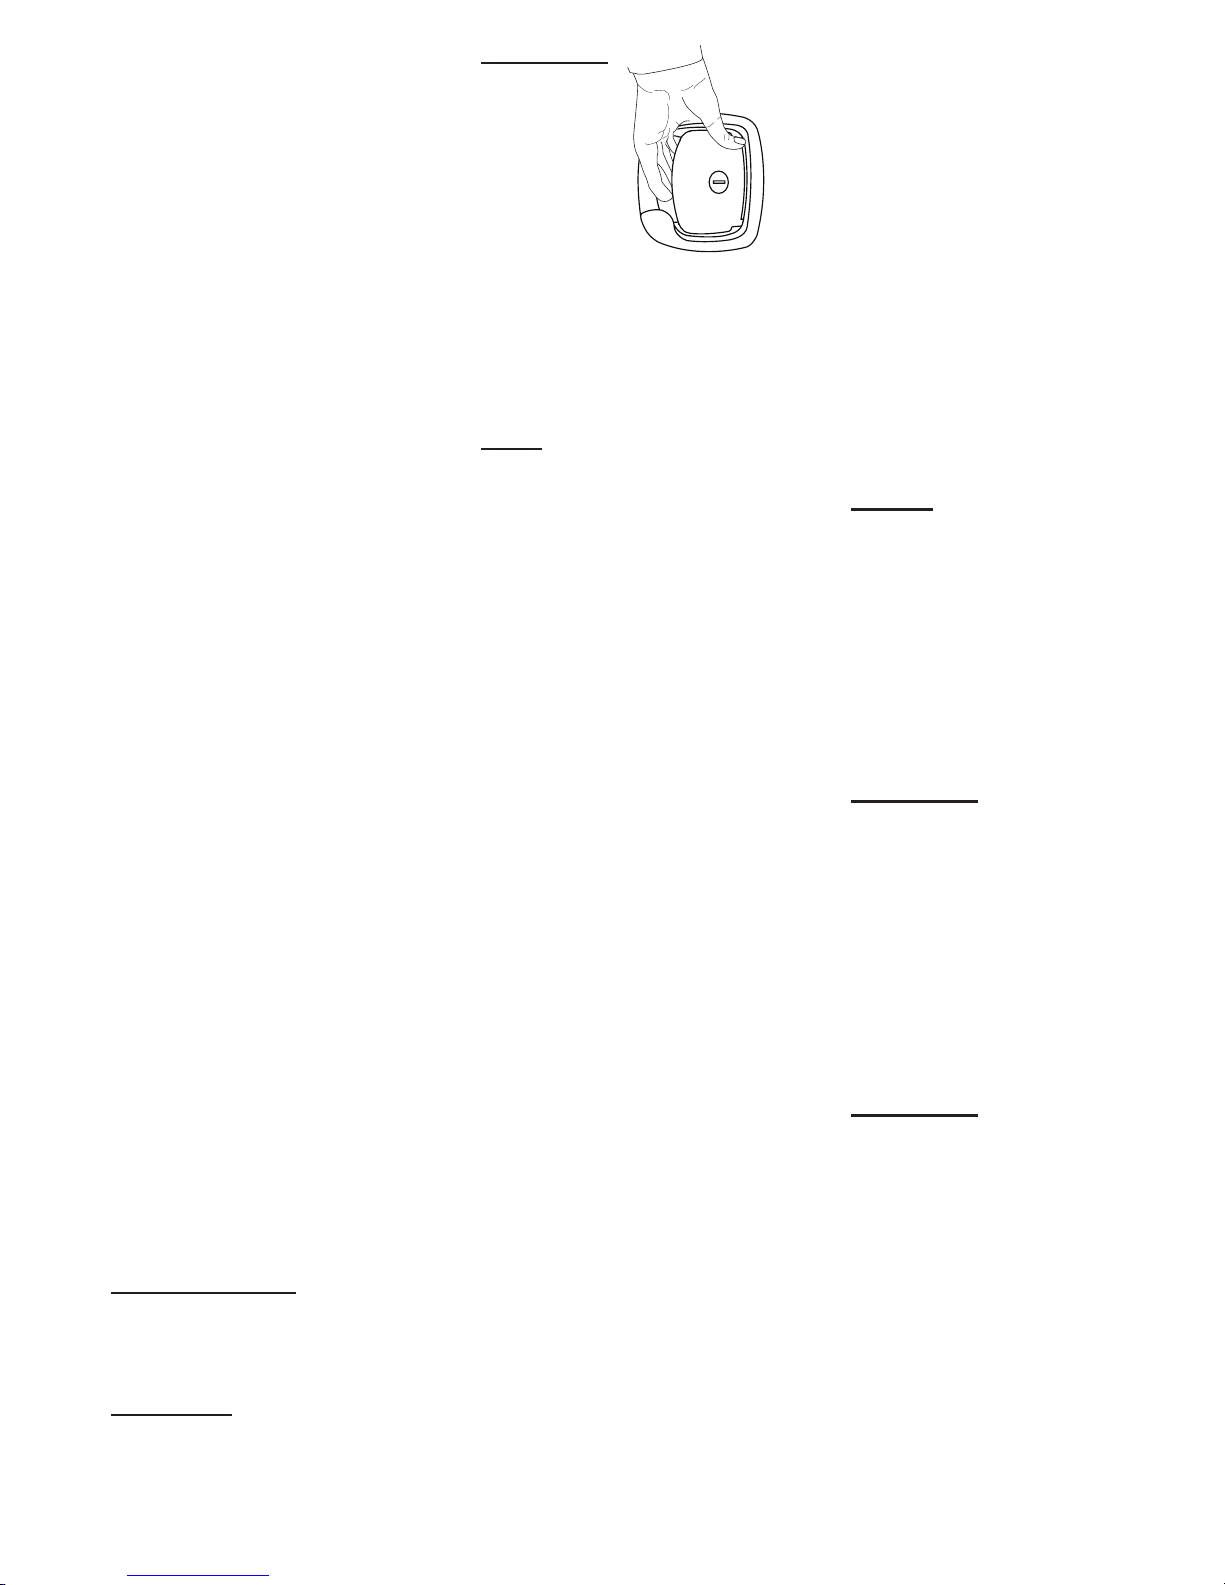
Mirror Adjust
Adjust the mirrors prior to starting
out. Have an assistant help to ease
the mirror adjustment process.
To adjust the “head” of the
mirror, loosen the set screws
located below the mirror
shown as point B. Adjust the
head of the mirror to the left
or right.
Tighten set screws once the
proper adjustment is made.
Repeat procedure for
passenger side mirror.
Differences between a passenger
automobile and a motorhome are
signicant. Always be aware of
these differences when traveling.
The key to safely operating
a motorhome is inspection.
Undetected problems could cause
problems on the road and may
result in lost time and increased
repair costs. Several states require
a special license endorsement and
motorhome inspection prior to
registration. Know and observe
the laws of the states in which
the motorhome will be traveling.
Laws vary from state to state. A
systematic inspection conducted
prior to moving the motorhome can
help ensure nothing is overlooked
and will assist in familiarizing the
owner with the motorhome.
Course Adjustment:
Tools needed: 5/32” Allen
wrench, at blade screw
driver and socket wrench.
Adjust the driver seat to the
travel position.
Remove plug at the bottom
of the arm.
Use a socket wrench to
loosen the bolt located at the
base of the arm (point A).
Adjust the mirror for a clear
side view of the motorhome.
Tighten the bolt once the
proper adjustment is made.
Reinstall the plug.
031210hc
Fine Adjustment:
Use the Mirror Select switch
to choose the desired mirror
to adjust.
Use the mirror adjust
switch to chose the left or
right mirror, and then use
the arrow buttons to make
adjustments.
MIRROR
SELECT
Discovery, Discovery LXE, Pace Arrow, and Pace Arrow LXEt
080521e
Mirror adjust switch
080378
15
Safety Seat Belts
All occupants must be furnished
with and use seat belts while
the motorhome is moving. The
driver’s seat, and all other seats
designed to carry passengers while
the motorhome is in motion, are
equipped with safety seat belts.
Do not occupy beds or seats that
are not equipped with a safety belt
while the motorhome is in motion.
The driver’s seat must be locked in
the forward facing position while
motorhome is in motion. Seat belts
are designed for individual use. Do
not use a seat belt for more than
one person.
To fasten the seat belt, pull the
belt out of the retractors and insert
the tab into the buckle; a click
will sound when the tab locks
into the buckle. Seat belt lengths
automatically adjust to each
occupants size and sitting position.
Do not route belts over armrest or
under the arm.
WARNING:
Safety belts are supplied at
affixed seating positions.
Do not occupy seats not
equipped with safety belts
while the motorhome
is in motion. Seat belts
must only be used on
permanently mounted
seats. Do not use a
single seat belt on
more than one person.
Pilot and Co-pilot
seats must be locked
in a forward facing
position with seat
belts fastened while
the motorhome is in
motion. Do not rotate
the seat while in
transit.
Child Passenger Safety:
Child restraint requirements
are determined by age and
weight. According to NHTSA
(National Highway Trafc Safety
Administration), there are four
stages to child restraint safety.
Go to: http://www.safercar.gov/
parents/RightSeat.htm
WARNING:
Refer to the manufacturer
of the child seat for
installation guidelines.
Adhere to all instructions,
cautions and warnings for
proper securement of the
child safety seat or booster
seat.
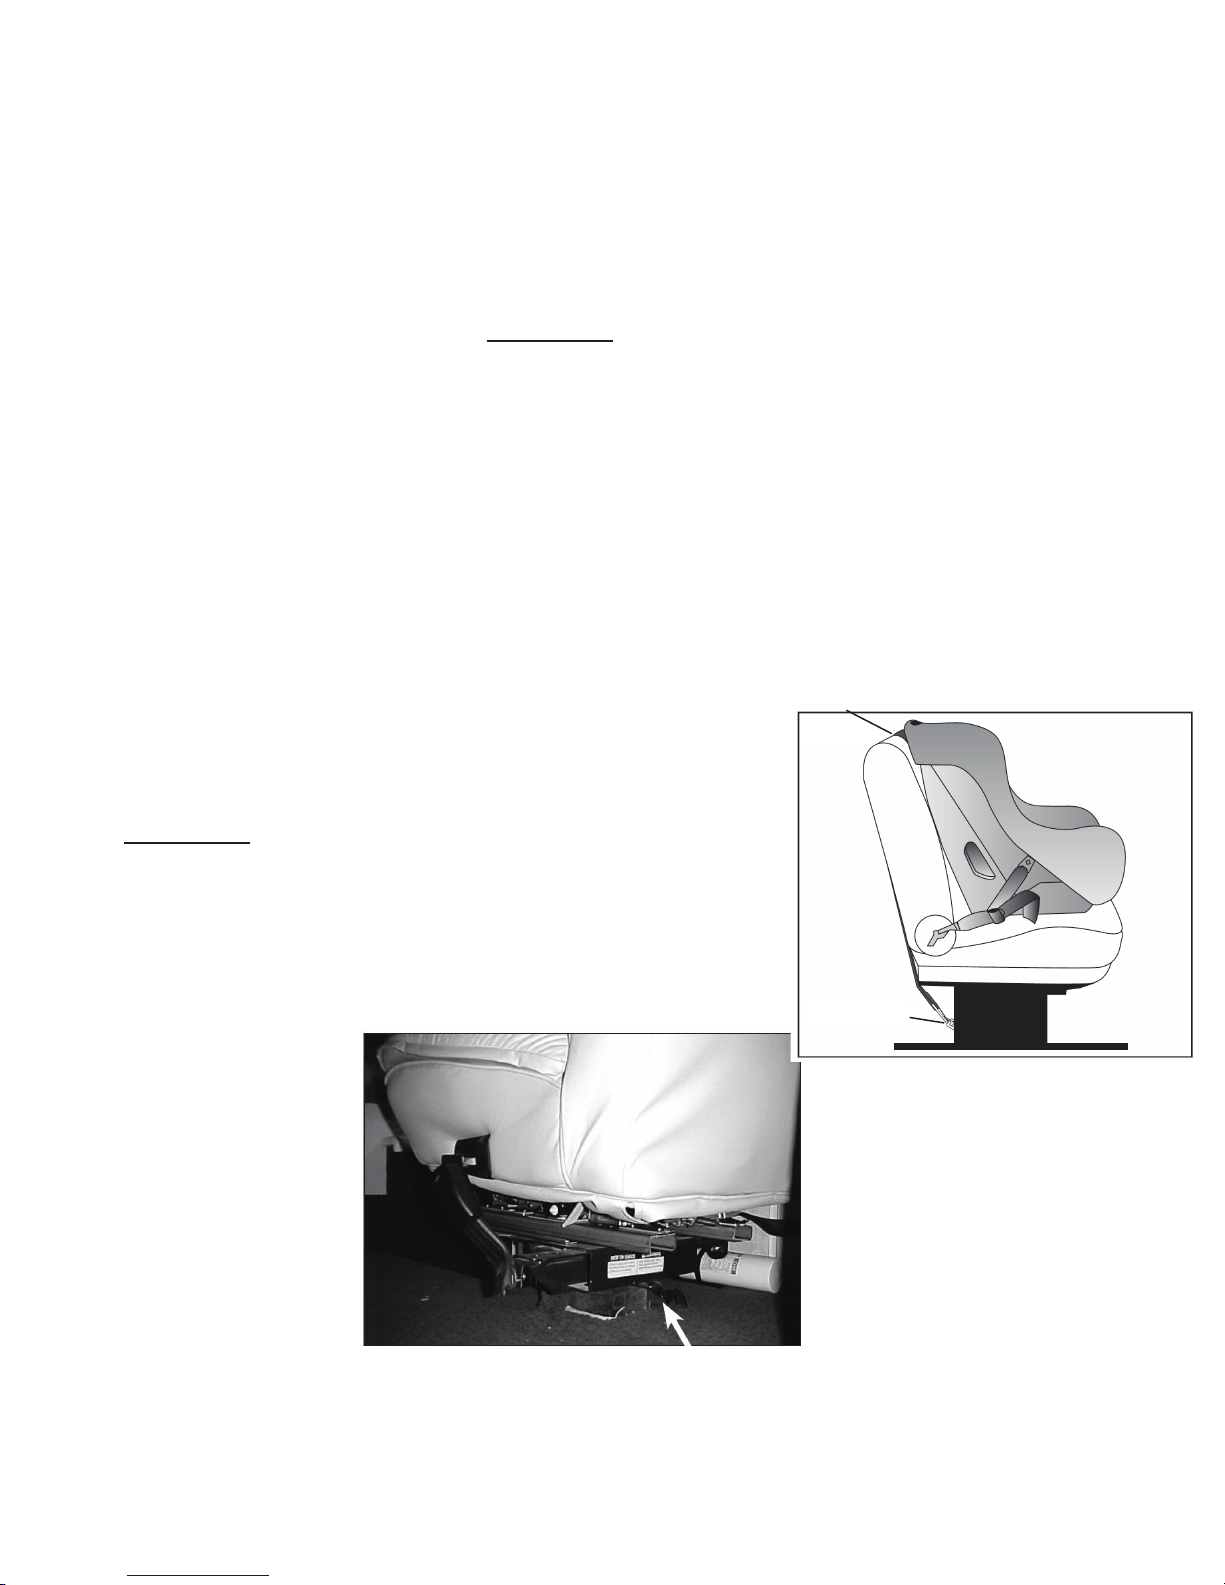
Child Seat Tethers (If Equipped)
Some child seat manufacturers
recommend the use of a top
anchorage (tether) strap in
addition to the lap belt. Since a
top anchorage (tether) strap can
provide additional security to a
child seat, we recommend using a
tether whenever one is required or
available.
The motorhome may be
equipped with a child seat top
anchorage (tether) strap anchorage
point in the forward passenger seat
location.
The anchorage hardware, if
available, is located at the lower
rear of the passenger or secondary
seat. A small metal anchorage loop
will be present which will allow
the tether strap hook to engage
(see Illustration 1).
To use, with the seat in position,
drape the tether strap over the seat
back and down (see Illustration 2).
Attach the tether strap hook to the
tether anchorage point and tighten
the strap according to the child
seat manufacturer’s instructions.
Make sure the strap is not twisted
and that the forward facing seat
is always positioned upright and
locked in the forward facing
position when the motorhome is in
motion.
Top
Attachment
Alternate
Attachment
Illustration 2
020355c
Illustration 1
020355b
16
Discovery, Discovery LXE, Pace Arrow, and Pace Arrow LXEt

Step 1:
For the best possible protection
keep infants in the back seat, in
rear-facing child safety seats,
as long as possible up to the
height or weight limit of
the particular seat. At a
minimum, keep infants
rear-facing until a minimum
of age 1 and at least 20
pounds.
Step 2:
When children outgrow their
rear-facing seats (at a minimum
age 1 and at least 20 pounds) they
should ride in forward-facing
child safety seats, in the back seat,
until they reach the upper
weight or height limit of
the particular seat (usually
around age 4 and 40
pounds).
Step 3:
Once children outgrow their
forward-facing seats (usually
around age 4 and 40 pounds),
they should ride in booster seats,
in the back seat, until the vehicle
seat belts t properly. Seat belts
t properly when the lap
belt lays across the upper
thighs and the shoulder
belt ts across the chest
(usually at age 8 or when
they are 4', 9" tall).
Step 4:
When children outgrow
their booster seats, (usually
at age 8 or when
they are 4’9” tall)
they can use the
adult seat belt in
020355
the back seat, if it
ts properly (lap belt lays across
the upper thighs and the shoulder
belt ts across the chest). All
children under age 13 should ride
in the back seat.
NOTE:
The motorhome
manufacturer is not the
author of Child Passenger
020356
Safety. The information
provided is reprinted
from the National
Highway Traffic Safety
Administration’s website.
Visit NHTSA’s website
at www.nhtsa.gov for the
most recent and up to date
information.
Tips:
Go to www.nhtsa.gov
and choose “Child Safety
Seat Information” from
the menu or click on the
child passenger safety icon.
The site includes child
safety seat installation tips,
product ratings, recalls and
other useful information.
For more information about
child safety seats, booster
seats, inspection/tting
stations in your area, seat
belts, and other highway
safety issues, call the DOT
Vehicle Safety Hotline at:
1-888-327-4236.
A certied child passenger
safety technician can check
your installation and answer
questions. To nd a technician
or an inspection station near
you, go to www.nhtsa.gov,
click on the child passenger
safety icon, and then click on
the Fitting/Inspection Station
link, or go to www.seatcheck.
org.
The child safety seat can be
positioned in two places: the
front passenger (co-pilot) seat
and forward facing permanently
mounted booth dinette seat
equipped with safety belts.
WARNING:
Individual states and
Canadian provinces may
have laws that can exceed
the requirements as
described in this section. It
is the responsibility of the
owner to know and comply
with the laws in the state
or province in which the
motorhome will travel.
NOTE:
Use of a safety or booster
seat in the front seat may
be prohibited in some states
and Canadian provinces.
WARNING:
Do not transport children
unrestrained. Infants must
be placed in approved safety
seats - small children must
be restrained in child safety
seats. Do not use a single seat
belt on more than one child.
Failure to comply with these
rules can lead to injury or
death.
Discovery, Discovery LXE, Pace Arrow, and Pace Arrow LXEt
17

WARNING:
Because many styles of
safety and booster seats
are available, refer to the
safety seat OEM manual for
proper installation and how
to properly install and secure
the safety or booster seat.
Seat Belt Care:
Keep the belt clean and dry.
Clean with mild soap and
lukewarm water. Do not use
bleach, dye or abrasive cleansers
that may weaken the belt material.
Periodically inspect belts for
cuts, frays or loose parts, and
replace damaged parts. Do not
disassemble or modify the system.
Replace the seat belt assembly
after a severe impact, even when
damage is not obvious.
DRIVING TIPS
CAUTION:
State laws in the United
States and provincial laws
in Canada vary concerning
operator licensing
requirements and vehicle
dimensional restrictions.
Check the laws in the
area where you anticipate
traveling.
The motorhome is a complex
vehicle that requires increased
driving awareness because of its
size and various components.
Turning radius will be much
wider than that of a standard
automobile due to increased
length. Pay close attention to
the perimeter of the motorhome
including front, sides, rear, roof
and undercarriage. Ensure the
surrounding area is clear of
obstacles. Use the mirrors to
observe trafc conditions as well
as the exterior including tires,
bay doors, blind spots, etc.
Use a push-pull method
of steering, with both hands
parallel on the steering wheel.
The motorhome is considerably
heavier than an automobile and has
a higher center of gravity. These
factors will necessitate advanced
reaction time. Swerving and sharp
cornering performed high speeds
could result in loss of control.
Keep size and weight of the
motorhome in mind. Drive
with increased caution to avoid
situations that might require quick
momentum changes. Increase
reaction time by paying attention
to trafc and road conditions 12 to
15 seconds ahead.
The motorhome will travel
safely and comfortably at
highway speed limits. However, it
takes more time to reach highway
speed. When passing another
vehicle, allow extra time and
space to complete the pass due to
increased length.
Manually shift
to a lower gear
when descending
a long hill. Begin
the descent at a
slow speed. Do not allow the
motorhome to gain momentum
before trying to slow down. Use
the engine brake and transmission
in conjunction with the service
brakes to help maintain a slow,
safe descent. The transmission
and engine will help control
downhill speed and can extend
the service life of the brake lining.
Distance required to stop the
motorhome is greater than an
automobile. Practice stopping
away from trafc to get the feel
of distance required to stop.
Note weight limits of bridges
before crossing. Signs should
be posted at bridge entrances.
Check posted height of all
overpasses and situations where
overhead clearance is limited.
Keep in mind road surfaces
may be repaved or packed with
snow; therefore, the actual posted
clearance would be less in such
conditions.
Use the pilot seat controls to
comfortably position the seat.
Stay seated and adjust the outside
mirrors if necessary to gain a clear
line of vision down both sides of
the motorhome.
Adjust to Driving Conditions
Adjusting to road, weather and
terrain conditions is necessary to
keep the motorhome under control.
Pay attention to road signs that
advise of local road hazards and
driving conditions. Do not operate
the motorhome when road, weather
and terrain conditions seem unsafe.
The cockpit, dash area and
windshield are larger than those
found on passenger cars and
trucks. Keep the windshield clear
of humidity in the form of water
or ice. Start the motorhome and
turn on the dash defrost to help
remove moisture from inside the
windshield. It may be necessary
to use a clean cloth to wipe away
moisture. Do not operate the
motorhome if the windshield is
not clear.
Keep windshield wipers in good
working order at all times.
Driving Cautions:
Avoid getting too close
to the shoulder of the
road. The shoulder of the
road may not support the
weight of the motorhome.
Side spacing is best
maintained by keeping the
motorhome centered in the
driving lane.
Driving lanes in work
zones can be uneven,
congested and more
narrow than usual.
Discovery, Discovery LXE, Pace Arrow, and Pace Arrow LXEt
18
Be cautious of road
debris that can damage
the undercarriage of the
motorhome or become
lodged in the dual tires and
cause damage to the tires,
wheel rims or tow vehicle.
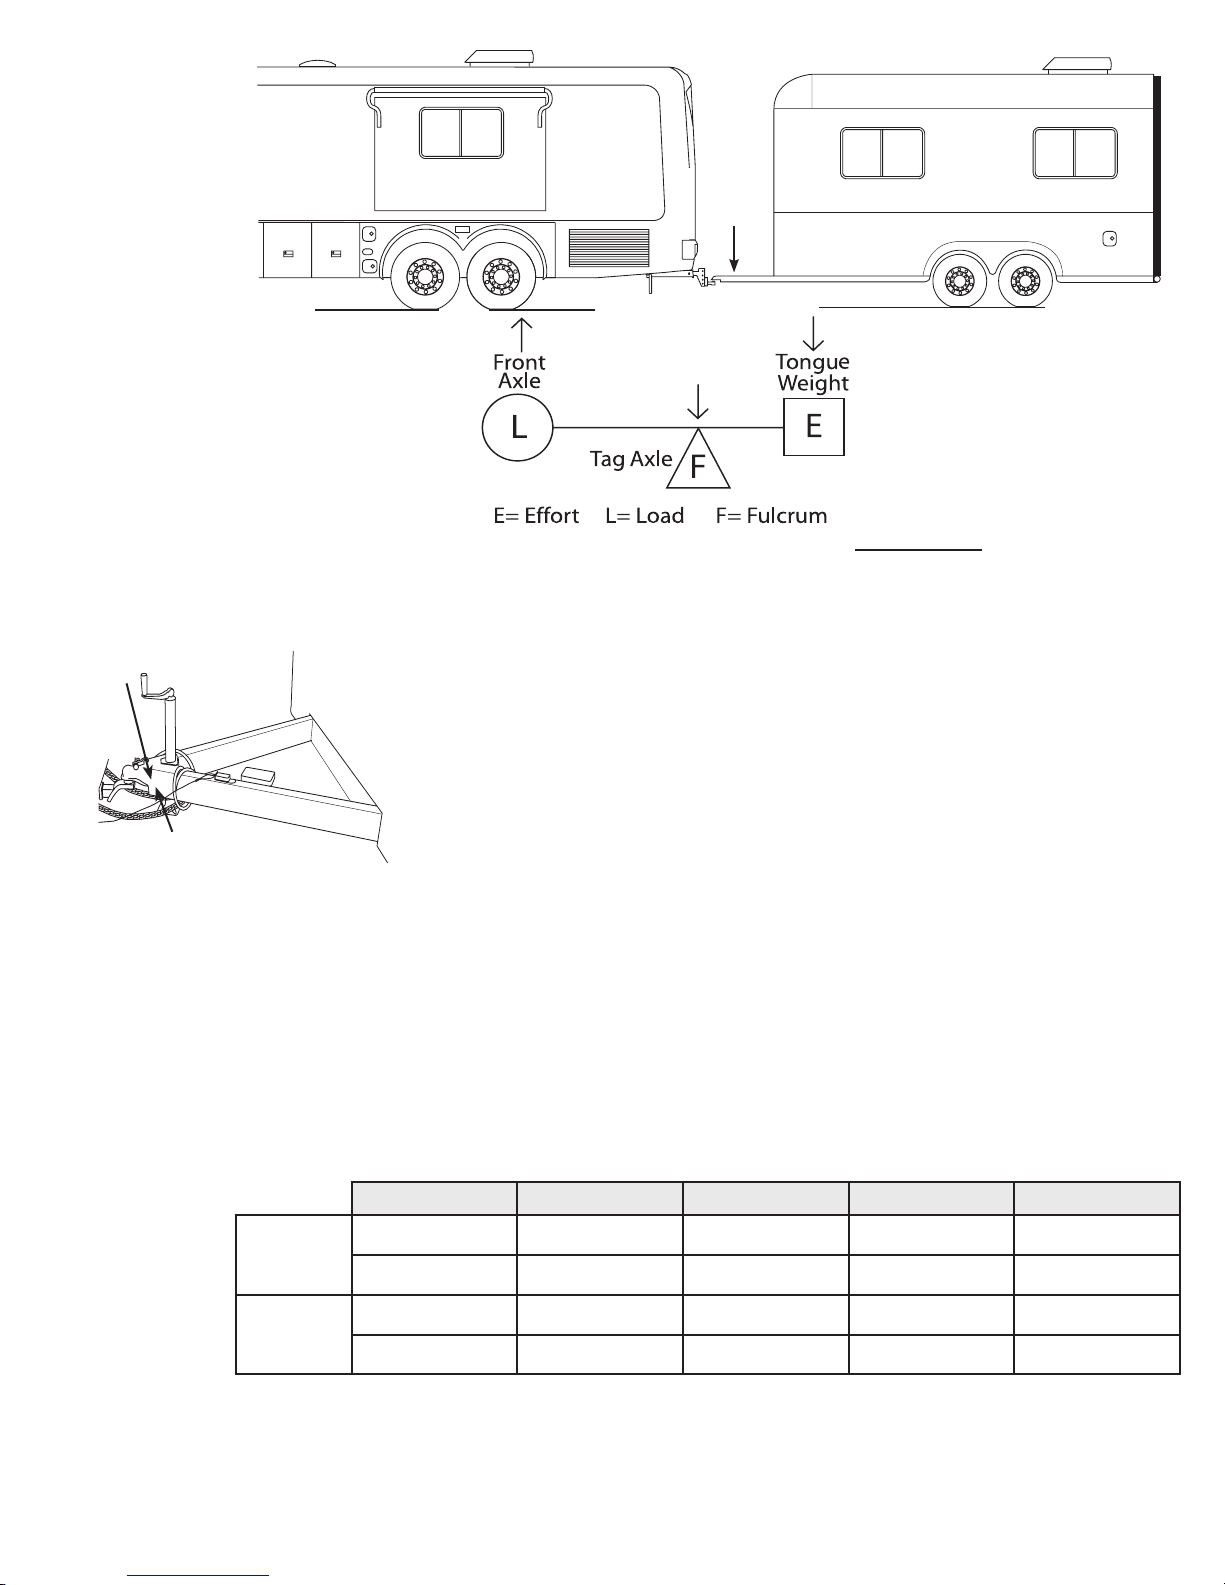
Avoid deating the tag
axle on uneven surfaces
as chassis ground
clearance is reduced. The
tag axle air springs will
automatically deate when
without entering into the other
lane or jumping the curb can be
difcult. Here are a few tips to
make a right hand turn easier:
the transmission is placed
Deating the tag axle can reduce ground clearance
in reverse.
On back roads and
single divided roads, tree
branches and shrubbery can
protrude into the roadway.
Watch for low hanging
branches especially during
inclement weather. Rain
and snow will cause
branches to hang lower
than usual.
Keep in mind that posted
speed signs are usually
passenger automobile
rated. Be extra aware of
driving conditions and
use the appropriate speed
for a motorhome when
necessary, especially on
corners and mountain
roads.
Downgrade speed should
be at least 5 mph less
than upgrade speed, or
downgrade speed should
be attainable within
three seconds of a brake
application.
Use a four second rule
when following other
vehicles at speeds under 40
mph. Use a ve second rule
when following at speeds
over 40 mph.
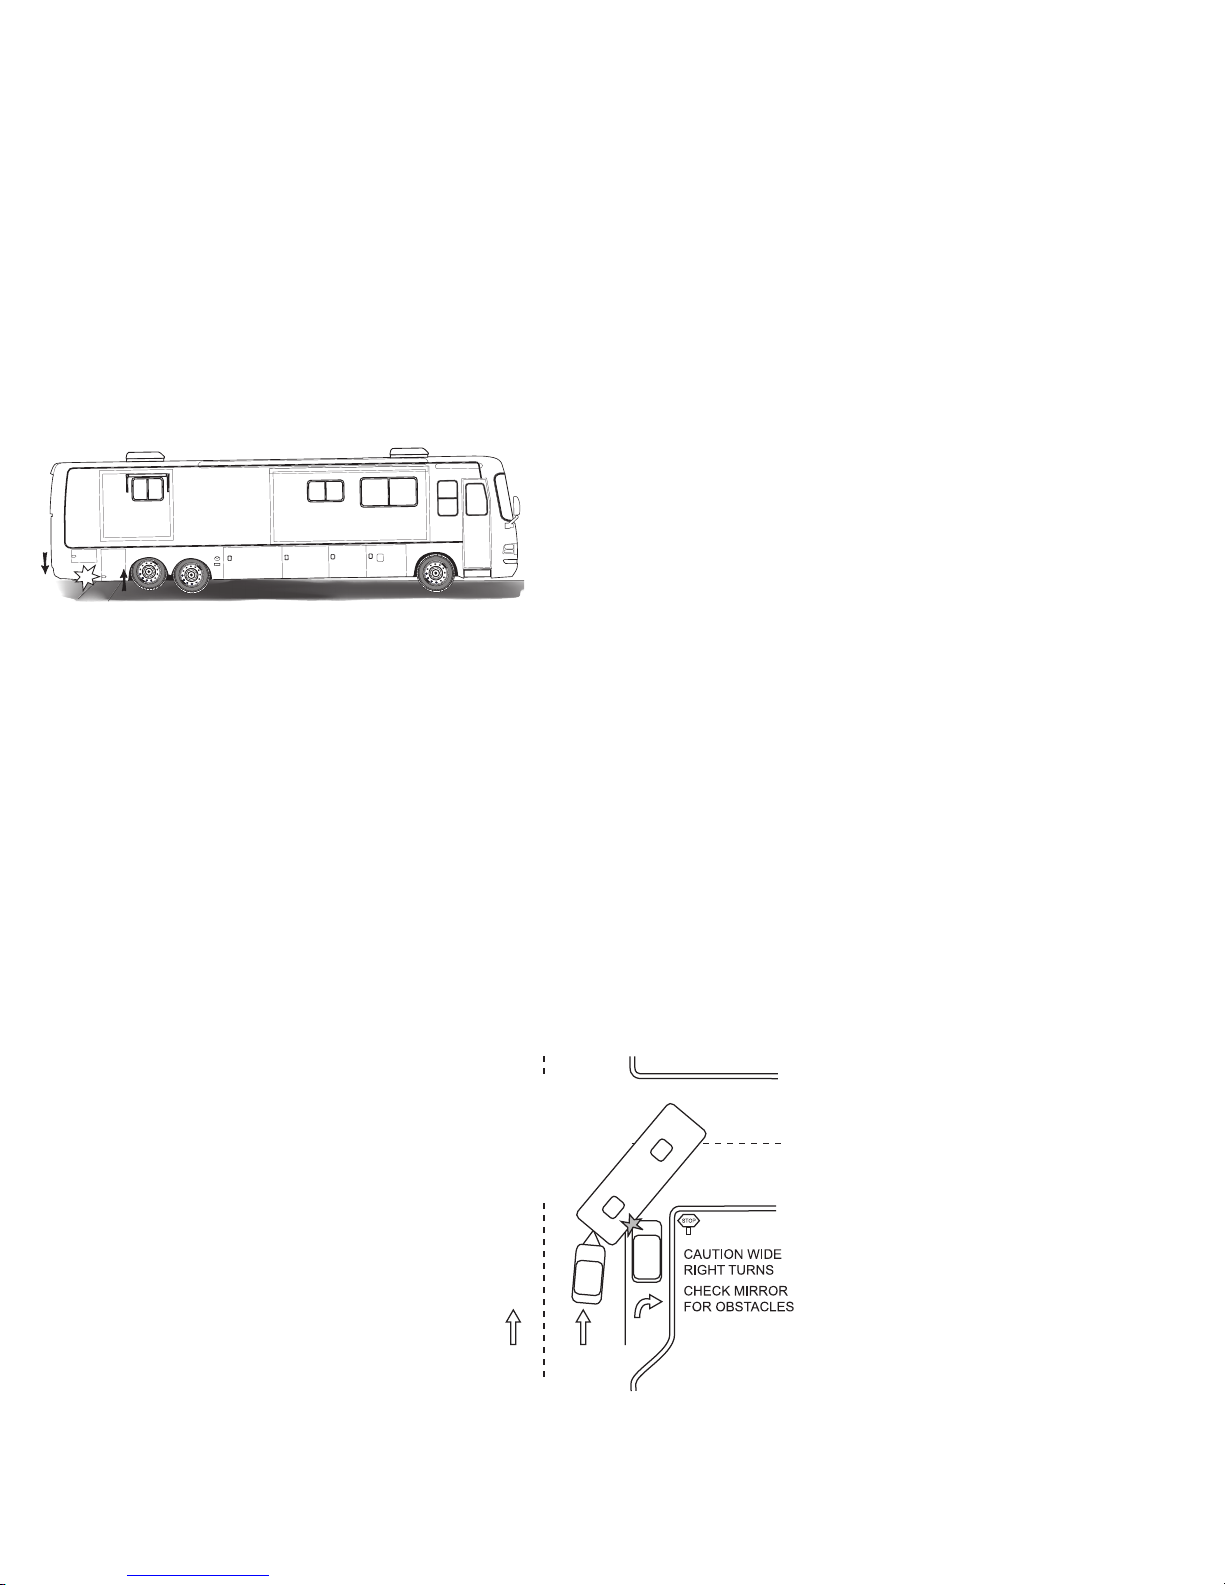
Right Turns:
Navigating a right hand turn
When
approaching the turn,
check the mirror to
ensure the lane to
the left is clear, then
move over to the left.
090502ab
When making
the right turn, the left
rear wheel should touch
the center line of the road
and the driver’s hips should
be parallel to the roadside
curb of the corner being
turned to aid in avoiding a
premature turn.
Make the turn slowly.
Check mirrors
frequently. Stay aware
of necessary clearance
and space management
of the motorhome while
negotiating the turn.
Left Turns:
Do not proceed with the
turn until the driver’s seat
is aligned with the center
of the intersection. If two
lanes are available, use the
right hand lane. Vehicles
or objects are more easily
seen by the driver on the
left hand side.
Ascending a Grade:
When approaching a grade,
assess the grade and length before
ascending. Prepare early for a long
ascent. Unlike gasoline engines,
diesels do not necessarily produce
more power by pressing further on
the accelerator.
Power output from a diesel
depends on the following
circumstances: The drivetrain is
more efcient when temperatures
remain stable during long grades.
RPM - Every engine has a
RPM range that produces
the most efcient torque
curve.
Fuel/Air Mixture -
Even though the engine
is equipped with a
turbocharger, there is a
limit to how much air
can be compressed into
the combustion chamber.
Conversely there is a limit
to how much fuel can be
injected to produce the
most efcient state of
combustion.
050250d
Discovery, Discovery LXE, Pace Arrow, and Pace Arrow LXEt
19

IMPORTANT SAFETY
TIP:
Turn on the hazard lights if
road speed decreases to the
point where the motorhome
is moving significantly
under the posted speed.
Use pullouts if traffic is
accumulating. Once in a
pullout, if there is sufficient
clearance for safety, idle the
engine for a while to allow
the exhaust and the turbo
to cool. While these are
cooling, the transmission
will also cool. Continually
monitor the gauges while
waiting.
Descending a
Grade:
Prepare
to descend a
grade at the crest of
020181d
the hill. Observe
any signs indicating grade angle
and duration. The sign may
suggest maximum downhill speed
according to Gross Combined
Weight (the combined weight
of the motorhome and a trailer/
tow car). At the crest of the hill,
manually shift the transmission
into a lower gear. Do not allow the
motorhome to gain momentum
before slowing down.
Use the engine brake to help
maintain a slow, safe downhill
speed. With the engine brake
applied, road speed may still
increase and the transmission may
automatically shift to the next
higher gear. Apply the brakes using
moderately heavy pressure on the
brake pedal to reduce speed then
manually downshift to maintain a
safe, slow speed. Do not pump the
brakes. This can result in a loss of
air pressure. Riding the brakes can
cause the brakes to overheat. Either
method can result in loss of brake
effectiveness or even brake failure.
Night Driving:
Be well rested and alert.
If necessary, nd a safe to
stop and rest until ready to
continue.
Avoid using interior lights
that create a glare on the
windshield and decrease
visibility.
Dim dash lights to a
comfortable level to reduce
glare.
Extreme Heat/Hot Weather
Conditions:
Frequently observe all
gauges. Variations from
normal conditions should
be promptly evaluated.
Check tire pressure before
traveling in hot conditions.
Tire air pressure increases
with heat. Do not let air out
of a hot tire. When the tires
cool down they will return
to the correct/previous tire
pressure.
Pay extra attention to hoses
and belts that are more
susceptible to fatigue in
extreme heat.
Winter and Cold Climate:
The motorhome should be
prepared for cold weather
use.
Keep speeds slow and
steady. Make moves
gradually and look further
ahead to increase reaction
distance.
Air pressure in the tires
decrease in cold weather.
Check tires and ensure
tires are at proper ination
pressure.
If road or weather
conditions are treacherous,
nd a safe place to stop
until conditions improve.
Avoid downshifting or
using the engine brake on
wet or slippery surfaces
that can cause the drive
wheels to skid.
Wiper blades should be
in good condition. Fill
the washer reservoir with
antifreeze
formula window
washer uid.
Use mirror heat
to keep mirrors
clear.
Remove any ice
build-up from
MIRROR
HEAT
080574d
the entry step to
avoid accidental slipping.
Wet Conditions:
Worn or improperly inated
tires can increase risk of
hydroplaning.
Heavy rain or deep standing
water can cause brakes to
apply unevenly or grab.
Refueling:
Truck stops are good
refueling points.
Check overhead clearance
before pulling into the fuel
island.
Be aware of concrete/steel
posts installed around fuel
islands.
Discovery, Discovery LXE, Pace Arrow, and Pace Arrow LXEt
20
Avoid running over the
GB
GARDNER BENDER, INC
OPEN
GROUND
OPEN
NUETRAL
OPEN HOT
HOT/GRD
REVERSE
HOT/NEU
REVERSE
CORRECT
fuel hose as it can get hung
up on the motorhome and
cause body damage.
Use of gloves is
recommended for refueling.
Store gloves in the outside
compartment.
To prevent grease and fuel
deposits from being tracked
into the motorhome when
refueling, change shoes
before entering. Store an
extra pair of shoes near the
entry door.
WARNING:
Propane and gasoline are
highly flammable and
can ignite, resulting in
explosion, fire or death.
Ensure all flames are
extinguished and all
propane appliances are
turned off and the primary
propane shut-off valve
is turned off prior to
refueling.
Fuel Economy:
Driving style, wind resistance,
terrain, vehicle weight, and engine-
driven accessories are some of the
factors that affect fuel economy.
Guidelines to Help Increase
Fuel Efciency:
When starting out, apply
the throttle lightly and
accelerate gradually.
Avoid excess throttle and
accelerating quickly.
Check tire ination
pressure. A low tire is
not only a safety hazard
but also increases rolling
resistance and fuel
consumption. Operate the
engine at a low to mid
range of 1100 to 1500
RPM. The engine requires
more fuel when operating
at higher RPMs.
Avoid using full throttle
when ascending a long
hill. This wastes fuel
and increases engine
operating temperature from
incomplete combustion.
Manually shift to a lower
gear and use less throttle.
Fuel will burn more
efciently.
Avoid extended idling
to warm-up the engine.
Start the engine and wait
for normal oil pressure to
register. Engage the high
idle feature until the engine
coolant temperature gauge
rises. The engine is now
ready for travel. Whenever
coolant temperature
is below operating
temperature (idling engine)
incomplete combustion
occurs, causing carbon
build-up and raw fuel to
wash lubricating oil from
the cylinder walls and
dilute the crankcase oil.
Excessive idling (more
than 10 or 15 minutes) can
potentially damage the
emission system.
Operate the transmission
with the Mode function
set to Economy whenever
possible; this allows for
earlier shifts and enhanced
fuel economy. Shift points
are also lower if the cruise
power switch is on. Turn
off the cruise power and set
the transmission to normal
mode when in mountainous
terrain and congested trafc.
Follow the maintenance
schedule for the engine.
TRIP PREPARATION
The following suggestions are
general guidelines to follow when
preparing for a trip:
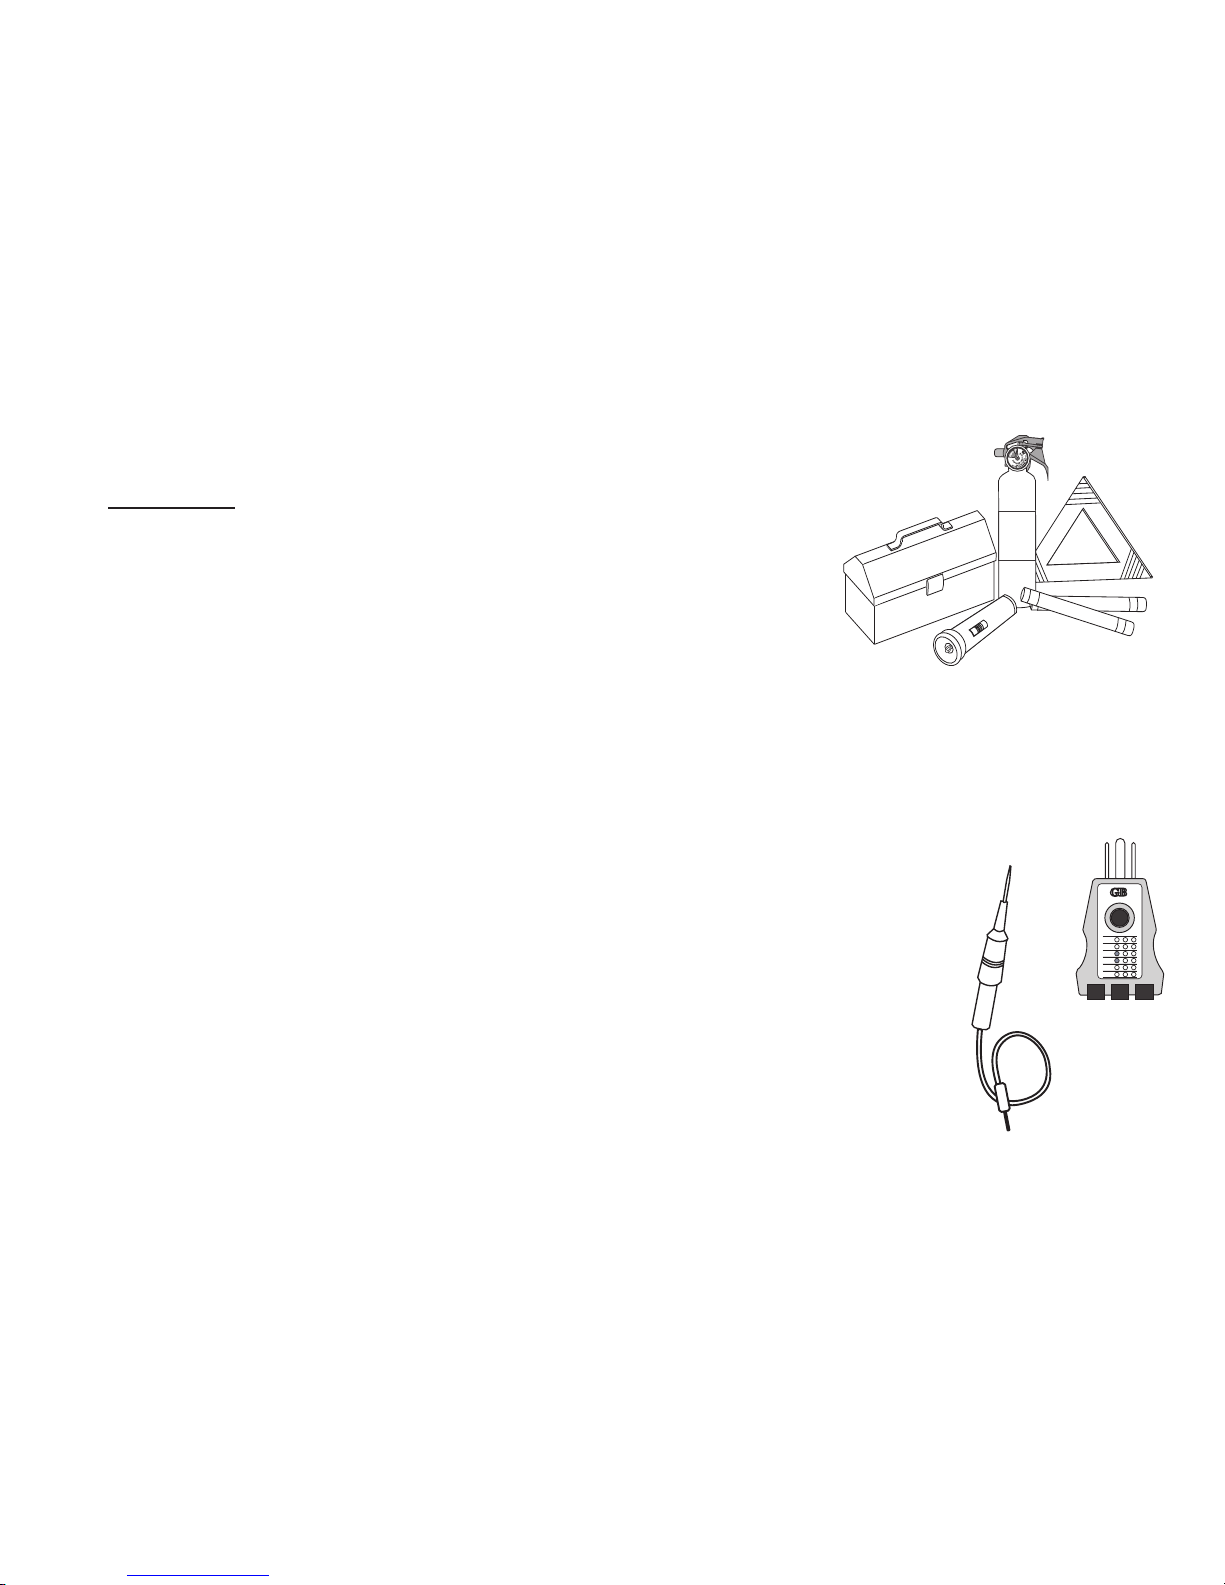
Items to Carry:
An emergency road kit
containing a ashlight, road
ares, warning signs and a
re extinguisher.
Tool Box & Emergency Road Supplies
Local, State and National
Maps, as well as a ‘Motor
Carrier’ road atlas (for
refueling station and truck
repair facility
locations).
Hand
tools, a 12
Volt DC
test light,
a 120
Volt AC
polarity
tester,
battery
Test Light
hydrometer, an
assortment of blade fuses,
mini-fuses and engine
accessory drive belts.
Potable and non-potable
water hoses, a water
pressure regulator and
various termination
connectors for sewage.
Polarity Tester
090333f
020064b
020062
Discovery, Discovery LXE, Pace Arrow, and Pace Arrow LXEt
21
Inspection:
Ensure all exterior items are
stowed or secured (i.e. TV
antenna, ceiling vents and
windows).
Check engine accessory
drive belts, hoses, battery and
engine uid levels. Inspect
the engine, transmission
and generator per the OEM
manuals.
Evenly distribute and secure
cargo. Store heavy items near
the rear axle and lighter items
toward the front to prevent
uneven stress and abnormal
handling.
Check all tires for accurate
ination pressure and
physical condition. Look
around, above and under the
motorhome for obstruction
or leaks. Test all exterior
lighting: headlamps,
taillights, brake and clearance
lights.
Inside the motorhome, store
and secure heavier objects
in the lower cabinets to
maintain a low center of
gravity for sway reduction.
Secure loose items to prevent
weight shift and damage to
cargo.
Store lighter items in the
overhead cabinets.
Close and secure all cabinet
doors and drawers, shower
and pocket doors.
Turn off interior lighting.
Adjust exterior mirrors and
check dash gauges for proper
operation.
INFORMATION:
For chassis maintenance
details refer to Chassis
section 10.
CAUTION:
Open the bay doors slowly.
Cargo may shift during
travel.
WARNING:
To avoid
injury, never
place hands
or fingers
near the
edges of the
bay door
when opening
or closing.
020134i
Always use
the latch handle. Apply
pressure with the other
hand just above the latch
handle.
TIPS:
Multi-purpose items,
versatile clothing and
periodic removal of unused
cargo will streamline cargo
storage.
HITCH
Using the Hitch Receiver
When using the hitch receiver,
remember that the motorhome is
intended for towing light loads
and is primarily designed as a
recreational vehicle. Safety and
durability of the hitch receiver
requires proper use. Avoid
excessive towing loads or other
misuse of the receiver. Towing will
affect fuel economy.
When towing a trailer or car
without use of an auxiliary
braking device, the brakes on
the motorhome must absorb the
increased energy required to stop
both the motorhome and the towed
load. This is critical and extra
awareness must be used especially
on hills and mountainous terrain
where sharp curves, steep grades
and possibly irregular road surfaces
may be encountered.
Check the motorhome Chassis
Operator’s/Owner’s Guide/
Manual for the maximum weight
the motorhome can tow and stop.
Extreme caution must be used
especially as weight of a towed
load increases.
While the motorhome has a
Gross Combination Weight Rating
(GCWR), stopping distances will
increase if the towed load is not
equipped with an auxiliary braking
device.
When weighing the motorhome,
add all passenger weight to the
GCWR total. The motorhome must
be weighed, in a fully loaded ready
to travel condition which includes
weight of fresh water, occupants,
carry on items and any vehicle or
trailer towed. Total weight must
not exceed the GCWR.
NOTE:
In most cases the GCWR of
the chassis and the finished
motorhome are the same.
In some cases, due to the
equipped hitch receiver, the
GCWR may be reduced.
Please refer to the Federal
Certification Label posted
in the motorhome for the
GCWR.
WARNING;
Most states and Canadian
provinces require trailers
and/or towed vehicles to
have adequate auxiliary
brakes and safety chains.
Failure to comply with
these State and Canadian
province requirements may
result in fines and/or pose
a safety hazard, that can
result in an accident.
WARNING;
Do not tow a trailer or
vehicle that exceeds the
rated capacity of the hitch
receiver. Overloading
the hitch receiver can
cause unusual handling
characteristics and
overstress the hitch receiver
and chassis. It could also
void the warranty. If there
are any questions, call
customer support.
Discovery, Discovery LXE, Pace Arrow, and Pace Arrow LXEt
22
Towing Systems
Hitch Receiver:
Tongue weight must not
exceed 10% of the rated capacity
when using the hitch receiver.
The ratings associated with the
particular hitch receiver supplied
with the motorhome are noted on
the federal certication weight
label and on the weight label
afxed to the hitch receiver.
Weight Label
Hitch receiver
The weight label on the hitch
receiver provides the maximum
trailer weight rating and the
maximum tongue weight rating. It
is important that these ratings not
be exceeded.
It is important that towing
devices attached to the hitch
receiver are rated equal to or
greater than the load of a towed
trailer, automobile dolly, or other
towed load.
Consult with your dealer or
towing equipment/trailer supplier
to determine the correct type of
hitch head assembly, hitch ball and
other towing equipment for a safe
and correctly assembled towing
system for the towed load.
Towing literature is also
available from vehicle
manufacturers, the National
Highway trafc Safety
Administration, towing equipment
manufacturers, trade associations,
and publications/books about how
to tow.
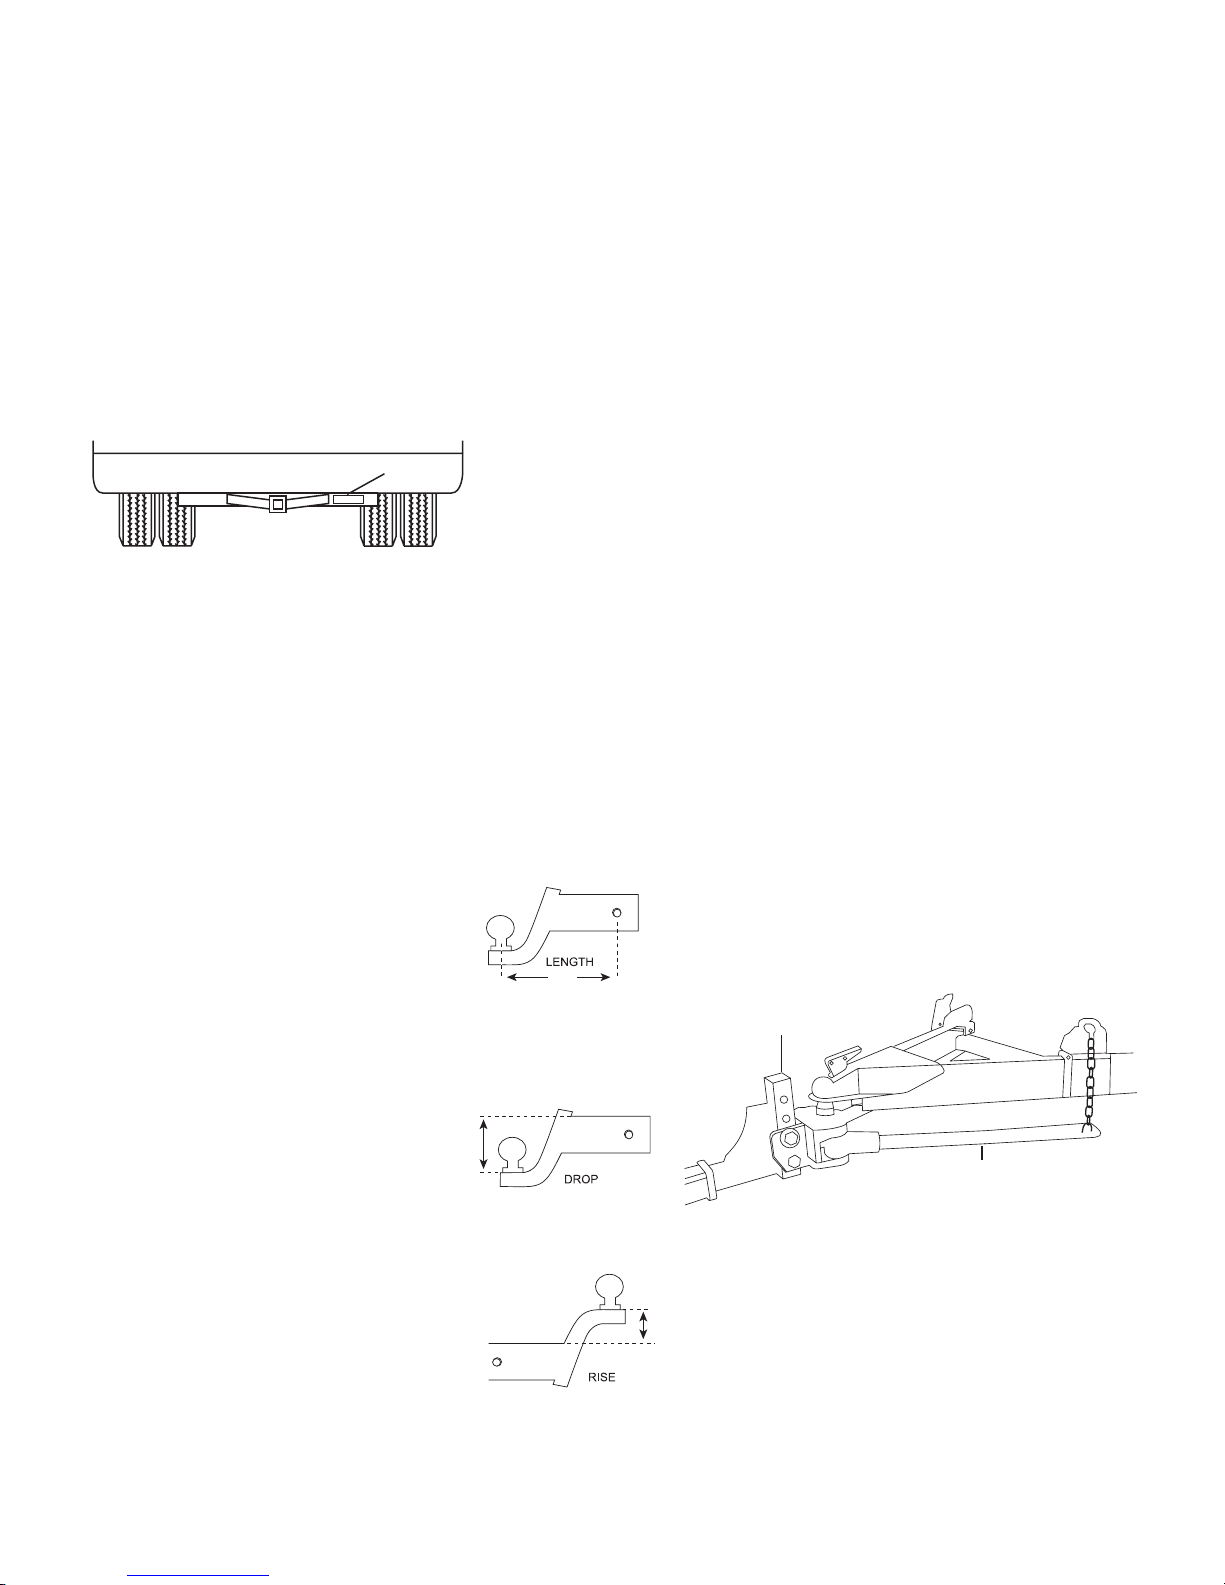
Ball Mount:
Ball mounts come in various
congurations and weight
limitations. There are three things
to consider when selecting a ball
mount: weight rating, pin to ball
center length and rise/drop. The
weight rating of the ball mount,
tongue weight and tow weight
must meet or exceed the total load
weight.
Pin to ball center should not
exceed 8". Ball mounts of longer
length will signicantly reduce
the weight rating of the hitch
receiver. Observe weight
090539
reduction percentages that may
be listed on ball mounts longer
than 8".
Selecting how much rise or
drop a ball mount will need is
relative to hitch receiver height
and height of the towed load with
respect to the type of towing
equipment between the motorhome
and towed load. When connected,
the towed load or towing
equipment should be level and
parallel with the ball mount.
8”
Distance from the
center of the hitch
ball hole to the center
of the pin hole.
Distance from the
shank to the top of
the hitch ball platform.
Weight Distributing
Weight distributing hitch
Weight Distributing Hitches:
A weight-distributing hitch
(load-equalizing) uses spring
bars attached to the trailer tongue
A-frame assembly to transfer some
of the trailer tongue weight to both
motor home axles.
A weight-carrying hitch (ball
mount) assembly does not use
spring bars. All of the tongue
weight of the trailer bears down
on the hitch assembly that loads
the motorhome rear axle(s). For
this reason, the maximum load
is limited when using only a ball
mount.
In addition to ball mounts and
weight-distributing, the hitch may
also have a tow car rating. This
rating will apply should a motor
vehicle be towed with all four
wheels down.
A major weight distributing
hitch manufacturer provides
the following information in
their installation and operation
instructions:
“…Severe bumps and badly
undulating road can damage your
towing vehicle, hitch, and trailer,
and should be negotiated at a slow
steady speed.”
Head Assembly
090512g
Spring Bars
Discovery, Discovery LXE, Pace Arrow, and Pace Arrow LXEt
020314
Distance from the
top of the shank to
the top of the hitch
ball platform.
23

A weight-distributing hitch that
has been properly adjusted for
operation on relatively level road
surfaces may cause the weight
distribution hitch to produce
enough force to bend the trailer
“A” frame, hitch head assembly,
hitch receiver, or motorhome
frame when operated over severe
bumps and badly undulating
road surfaces. Contact the weight
distributing hitch manufacturer
for further information. Frame
damage resulting from this type
of operation may void portions of
the warranty. Here are additional
guidelines to follow:
Do not use a load
equalizing hitch if
Do not use a load
equalizing hitch if the hitch
head receiver rating is
below 10,000 lbs. capacity.
It could cause structural
damage to the motorhome
frame components.
Do not exceed Maximum
Tongue Weight as listed on
the Federal Certication
label. Heavier tongue
weights can change
handling and response
which can lead to an
accident, and will restrict
coverage under the Owner
Care Warranty.
Do not tow anything
weighing more than the
GTW listed on the Federal
Certication label. Heavier
towed loads can exceed
the ability of the chassis
to pull and stop the load
and cause a vehicle crash,
damage the motorhome
structure or drive train,
and restrict coverage under
the Monaco RV or chassis
manufacturer’s warranty.
Changing the trailer hitch
will not increase the tow
capacity of the motor
home.
Operator’s/Owner’s Guide/
Manual, and U.S. state
and Canadian provincial
laws for towing weight
limits and for guidelines
for installing supplemental
braking systems that
operate with your motor
home’s brakes.
Towing equipment to
consider includes a weight
distribution system, a
sway control system, a
brake controller, and a
supplemental brake control
system. The weight of the
towed load in comparison
to the towing capacity of
the motorhome should
be evaluated during this
consultation. Installation
of tow equipment must be
performed by a competent
installer. Make sure the
installation follow the tow
equipment manufacturer’s
instructions.
WARNING:
Do not exceed the rated
load of the motor home, or
the rated load of any axle.
Exceeding the GVWR,
GAWR, GTW or GCWR
of your motor home can
cause handling problems, a
vehicle crash, damage the
motorhome and void the
warranties.
WARNING:
Failure to understand and
follow these guidelines as
presented in this section
could result in damage to
the motorhome frame or
body, could cause unstable
driving and handling
characteristics, and will
restrict warranty coverage.
Discovery, Discovery LXE, Pace Arrow, and Pace Arrow LXEt
24
Hitch Ball:
The three most
common diameters
of a hitch ball
are: 1-7/8", 2"
and 2-5/16". The
larger the diameter
of the hitch ball,
GAWR
the higher the weight rating. The
diameter of the hitch ball shank
also factors into weight rating.
Match shank diameter with the
hole in the ball mount or weight
distributing head. Shank clearance
should not exceed 1/16". There
should be at least two additional
threads extending past the nut
when the hitch ball is secure.
Hitch Ball
Weight Rating
Ball Mount
Weight Rating
090512
SafetyChains:
Safety chains are required by
law when towing any load. The
chains and any fasteners used
to attach the chains to the hitch
receiver must be rated for the load
being towed. Attach chains so
they crisscross under the towing
equipment. Allow just enough
slack in the chains to make sharp
corners. Too
much slack will
allow the chains
to drag on the
road surface. If
the towed load
does uncouple
Weight
Carrying
Hitch
Weight
Distributing
Hitch
TW - Up to 200 lbs.
GTW - Up to 2,000
lbs.
from the hitch
ball, the towing
equipment will
GTW = Gross Trailer Weight. Weight of trailer fully loaded.
TW = Tongue Weight. Weight pushing down on Tow Ball.
WC = Weight Carrying. Weight carrying capacity of the Ball Mount.
be cradled by
the safety chains. Do not make
Tongue
Weight
GAWR
Tow Weight
090512f
Towing components
are classied into weight
classes to dene weight
capacity of towing
equipment. These groups
are shown in chart:
WARNING:
a sudden stop and exacerbate
the situation. Apply the brakes
with gentle, steady pressure. Pull
over to the side of road at a safe
location.
Be sure the weight
ratings of the ball mount,
tow ball and safety chains
are equal to or greater
than the load. Use of an
extension to the receiver
or extended ball mount
Tow Capacity and Class
Ratings:
Several components may
comprise a tow hitch system.
The weight rating of individual
components of the towing system
must be greater than the gross
will significantly reduce
hitch receiver weight
ratings. Modifications to
the hitch receiver, or use
of the hitch receiver other
than intended, can void
the warranty of the hitch
receiver, chassis or both.
weight of the load being towed.
Maximum tow capacity is limited
to the component with the lowest
weight rating in the tow hitch
system. Example: a ball mount
may have a weight rating of 5,000
lbs., but the hitch ball is rated
3,500 lbs. Maximum tow capacity
is reduced to 3,500 lbs.
CLASS I CLASS II CLASS III CLASS IV CLASS V
WC TW - Up to
350 lbs.
WC GTW - Up to
3,500 lbs.
--- --- ---
--- --- ---
TW - Up to 500 lbs. TW - Up to 750 lbs.
GTW - Up to 5,000
lbs.
GTW - Up to 7,500
lbs.
TW - Up to 1,200
lbs.
GTW - Up to
12,000 lbs.
TW - Up to 1,200
lbs.
GTW - Up to
12,000 lbs.
TW - Up to 1,400
lbs.
GTW - Up to
14,000 lbs.
Discovery, Discovery LXE, Pace Arrow, and Pace Arrow LXEt
25

Towing Weight Checklist
Towed Load (Tongue Weight) ________ (Overall) ________ Yes No
Towing Equipment (Ball Mount) ______ (Hitch Ball) ______ Ye s No
Hitch Receiver (Tongue) _______ (Tow) ______ Yes No
GAWR (Rated) ______ (After Hitching) ______ Yes No
GCWR (Rated) ______ (After Hitching) ______ Yes No
Insert Weight Ratings: Check Yes or No if within specications.
Calculating Tow Capacity:
Several variables must be
considered and calculated to
properly determine towing
capacity. Limiting factors include
GCWR (Gross Combination
Weight Rating), GAWR (Gross
Axle Weight Rating), hitch
receiver weight rating and the
weight rating of each piece of
towing equipment. One or some
of these variables will limit tow
capacity.
Example: The motorhome
has a GCWR of 35,000 lbs.
The motorhome in a fully
loaded, ready for travel
condition, weighs 29,500
lbs. The hitch receiver is
rated at 700 lbs. tongue,
7000 lbs. tow. The load
being towed weighs 4,200
lbs. with a tongue weight of
400 lbs. However, the hitch
ball is rated at 3,500 lbs.
In this case tow capacity is
limited to 3,500 lbs. due to
the rating of the hitch ball,
even though the rest of the
towing equipment, hitch
receiver and vehicle GCWR
are within specications.
CWR but exceed the GAWR.
When tongue weight is applied,
mechanical advantage increases
with distance (lever) from the hitch
ball to the tag axle or drive axle.
That axle now becomes a pivot
point (fulcrum).
ue weight increases (effort),
weight on the drive axle also
increases (fulcrum) while weight
on the front axle (load) decreases
as weight is displaced from the
front axle.
It may be ncessary to weigh
both the tow vehicle and towed
load as an assembly to ensure the
GAWR has not been exceeded. It
is also possible to be within the
rating of the hitch receiver and yet
exceed the GCWR.
Due to changes in weight, the
motorhome must be weighed in a
loaded, ready for travel condition
that includes passengers, cargo
and liquids. Subtract the weight
of the motorhome in a loaded,
ready to travel condition from the
GCWR to determine tow capacity.
Whether towing a vehicle or
trailer, the load being towed
must be weighed to ensure the
towed weight, when added to the
tow vehicle, will not exceed the
GCWR and the weight ratings of
each tow system component are
equal to or greater than the load
being towed.
WARNING:
The motorhome and towed
load must be weighed
after they are loaded for
travel to determine if
actual weights are within
towing specification. Each
component of the towing
system must be rated equal
to or greater than the load
being towed. Do not exceed
the Gross Combination
Weight Rating.
Towed Vehicle Requirements
Vehicle manufacturers produce
cars and trucks that are designed
to be capable of being towed with
all wheels down. Use caution
and note all limiting factors
when selecting a vehicle to tow
(aka dingy). Things to consider
are battery drain on the tow
vehicle electrical system with the
steering wheel unlocked, can the
transmission of the towed vehicle
be damaged with all wheels down
and is the tow vehicle too heavy
as well as other concerns.
Before selecting a tow
vehicle, consult the tow vehicle
manufacturer’s instructions to
ensure the vehicle is approved
to be towed with all four wheels
down. All aftermarket products
that modify the vehicle for towing
should also be approved by the
vehicle manufacturer.
Make sure the tow vehicle
weight and attaching hardware do
not exceed the rating of the hitch
receiver. Note the hitch receiver
capacities (tongue and tow) listed
on the weight tag located on the
hitch receiver. Do not exceed
rated maximum capacities. Make
sure the weight of the motorhome
with the tow vehicle do not
exceed the gross combination
weight rating (GCWR) of the
motorhome. Make sure that tow
bars and hitch equipment is rated
for the weight of the tow vehicle.
Discovery, Discovery LXE, Pace Arrow, and Pace Arrow LXEt
26

In addition, the tow vehicle
must be equipped with its own
independent auxiliary brake
system that will activate when
the brakes on the motorhome
are applied. State/Province
regulations may require additional
lighting requirements. Check
with the DMV of the State and/
or States (and Provinces) you will
be traveling for any additional
requirements.
Tow Plug Connection
Taillight Conguration:
Taillight wiring is classied
either 2-wire or 3-wire
conguration. A 2-wire
conguration has all red lens. A
3-wire conguration usually has
red and amber lens. Amber is used
for turn signals only and red for
taillight and brake light. These
systems are electrically different.
When connecting a towed load
with a 2-wire system to a tow
vehicle with a 3-wire system, or
vice versa, a converter box must
be installed for correct function
of brake lights and turn signals.
A taillight converter is available
from auto and RV supply stores.
Do not attempt to wire a tow plug
connector if unfamiliar with these
systems. A trained technician
will install the proper converter
so the brake lights and turn
signals function correctly on the
motorhome and towed vehicle or
trailer.
The motorhome is pre-wired
from the factory with an electrical
connection for towing. The
connection is located near or on the
hitch receiver. Current draw should
not exceed 10 Amps for each
designated light circuit. Within the
electrical connection is a positive
terminal for use when towing a
trailer equipped with a battery. The
positive terminal maintains the
Discovery, Discovery LXE, Pace Arrow, and Pace Arrow LXEt
charge of the trailer battery.
To Tow a Car or Trailer:
Connect a tow car or trailer
to the motorhome with safety
chains rated for the weight
being towed.
Make the electrical connection
and perform a light check
before starting a trip and at
each rest stop.
Check the tires frequently. A
at tire on a towed vehicle
can not be detected from the
motorhome while driving. A
at tire is a safety hazard and
may result in damage to the
wheel, towed vehicle or other
vehicles.
WARNING:
Tow plug index
Never weld or modify the
chassis frame, trailer hitch
or any related parts or
components. Welding on
any of these components
may damage or weaken
the structural integrity and
void the warranty.
Rear view system
REAR VISION SYSTEM
The motorhome is equipped with
a rear vision camera and two side
vision cameras located in the side
mirrors.
INFORMATION:
Refer to the OEM manual
for detailed operating
instructions.
The rear vision camera is
designed to provide the driver with
a view of the rear when backing
up. The monitor will automatically
display the corresponding side
camera when the turn signal is
activated. The monitor will default
to the rear vision camera when the
turn signal is cancelled. The system
must be powered on for
use.
080462f
020352
Rear Camera
031249j
27

The ignition switch must be on
to power the monitor. The Power
button on the monitor turns the
system on or off. Momentarily
press to turn the system on. Press
and hold to turn off.
Precautions:
Do not expose the monitor
to excessive heat or cold.
The monitor is not
waterproof.
Do not use abrasive
cleaning materials on
monitor.
Do not strike or drop
objects on the monitor.
To Use the System When
Driving:
Turn on the ignition.
Turn on the
monitor.
Use the camera
LEFT
select switch to
select a camera
REAR
CAM
when the
turn signal is
inactive.
RIGHT
080527d
NOTE:
The rear vision system
will automatically activate
when the transmission is
placed in reverse.
Menu:
Select a feature from the
menu then use the Input (+)
and Dimmer (-) to adjust.
BACKING UP A MOTORHOME
Whether a long time owner
of recreational vehicles or just
starting out, backing up can be a
challenge. Following some simple
guidelines may help to reduce that
challenge.
When backing up, the driver
(pilot) should be comfortable using
the mirrors, the back-up camera
and the co-pilot’s directions
(ground guide) for assistance.
Practice backing up with the
co-pilot’s guidance in a large
unobstructed parking lot. Backing
up is a team effort. The backing
process should begin while the
motorhome is in forward motion.
Maneuver the motorhome to align
with the chosen site.
Aligning the motorhome with
the site after the backing process
begins may require more than one
attempt. When the motorhome is
properly aligned with the site, the
parking area will be visible in both
mirrors. Use road markings as
reference points when possible.
When pull-through sites are not
available, pick a solid, level site
on the left side for a better eld of
vision using the roadside mirror.
If the site is on the right, use the
curbside mirror for backing up.
Remain aware of blind spots.
Get out and walk the area prior
to backing in. Look for potential
hazards or obstacles that may
damage the motorhome. If the site
is satisfactory, prepare to back
in carefully. Have the co-pilot
provide guidance using the ve
hand signals. Use of walkietalkies will also aid in guidance.
The backup monitor may have a
one-way communication feature.
Have the co-pilot or spotter “speak
up” so directions can be given and
followed.
The co-pilot will perform just
as an important a job as the
driver. When guiding the driver,
the co-pilot should be located
safely at the left rear corner of the
motorhome, facing forward, while
remaining visible in the roadside
mirror at all times.
The co-pilot should make a
conscious effort to maintain
sight of the driver through the
roadside mirror as the motorhome
maneuvers. If the driver loses sight
of the co-pilot, stop backing up
until the co-pilot returns to view.
To avoid mishaps, the co-pilot
should be focused only on what
the driver is doing, with brief
observation moments.
If necessary, stop backing up so
the co-pilot can inspect other areas
or angles of concern. The driver
should receive directions only
from the co-pilot.
When the co-pilot is guiding
the driver, ve clearly dened
signals should be used, with
only one signal given at a time.
Flailing arms with indecisive
signals confuse the driver. Signals
should be given with purpose and
condence. Directional signals are
directing travel of the rear of the
motorhome.
If the desired direction is left,
the co-pilot points left. For
example: The co-pilot will use
their right arm and forenger
pointing distinctly left with arm
and nger held on a horizontal
plane, indicating desired direction
of travel of the rear of the
motorhome. The directional signal
given should remain steady until
the desired movement is complete.
Five Directional Signals:
1. Co-pilot uses left hand
and arm held horizontal,
with forenger pointing
right, to direct rear of
motorhome to the right.
2. Co-pilot uses right hand
and arm held horizontal,
with forenger pointing
left, to direct rear of
motorhome to the left.
Discovery, Discovery LXE, Pace Arrow, and Pace Arrow LXEt
28
3. Co-pilot uses both arms
and hands parallel with
thumbs pointing up and to
rear in a waving vertical
motion. This signals driver
to maintain a straight back
direction.
4. Co-pilot holds arms
horizontally, hands open
with palms facing one
another. Start with a wide
separation, gradually
closing distance of hands
in a rate appropriate to
vehicle speed to indicate
amount of distance to the
stop point.
5. Closed sts and crossed
arms indicate STOP.
020083h
Backing Up Trailers:
Towed vehicles using a tow bar
or tow dolly have more than one
pivot point and are not suitable for
backing. Attempting to back up
the motorhome while connected to
a tow bar or tow dolly can jackknife the towing device. Damage
to towing device, tow car and
motorhome can occur. If necessary,
disconnect the tow vehicle to avoid
a backing up situation.
Trailers have one pivot point and
may be backed up. The same rules
for backing a motorhome can be
applied to backing a trailer.
When preparing to back the
trailer into a space, maneuver the
motorhome sweeping wide. Turn
back to the opposite direction to
maneuver the trailer into the space.
Turn the bottom of the steering
wheel in the desired direction of
travel for the trailer.
For example: If the desired
direction of the trailer is left, rotate
the bottom of the steering wheel
left. If the trailer moves in an
undesired direction, pull forward
just far enough to re-align the
trailer with the space. The co-pilot
should stand safely at the left rear
corner of the trailer within view of
the driver in the roadside mirror,
using the ve hand signals for
guidance.
CAUTION:
Tow bars or car dollies are
generally made to travel in
a forward direction only.
Most towing equipment of
this type is not designed
for backing. Never attempt
short back up distances
with a tow bar or tow dolly.
Damage to the motorhome,
vehicle or towing device will
result.
SET-UP PROCEDURES
If the site for the motorhome
provides full hook-ups, use this
quick reference as a guide only.
This information is an overview
on hooking up the utilities and
preparing appliances for use.
Specic information on slide room,
awning, leveling system, water
system, entertainment and propane
operations is discussed in detail in
other sections.
1. Level the Motorhome:
Follow procedures and
guidelines for extending
the slideout rooms in
section 5 “Slideout
Operation”.
2. Hookup Utilities and
Prepare Appliances for
Use:
Open the primary propane
valve on the propane tank.
Prepare the shore cord
for connection. Uncoil
and inspect the cord.
Install proper electrical
adapters if 50 Amp service
is not available. Operate
electrical appliances in
sequence when hooked
to limited shore power
service. Turn the shore
power circuit breaker off
prior to plugging in the
shore cord.
If hooked to less than
50 Amp service, operate
appliances in sequence
rather than at the same
time to avoid shore power
overload. Start the water
heater and furnace (if
needed).
Discovery, Discovery LXE, Pace Arrow, and Pace Arrow LXEt
29
 Loading...