

Fleetwood Discovery 2004 User Manual
•
®
R.EEntVOOD
RV·
©2003 by Fleetwood Enterprises, Inc. All rights reserved.
transmitted in any form or by any means, electronic or mechanical, including photocopying, recording, or by
information storage or retrieval system without written permission from Fleetwood Enterprises, Inc.
Manufacturing
Pace
Arrow
Jamboree· American
Wilderness· Mallard·
subsidiaries
• Southwind • Storm· Bounder· Bounder
of Fleetwood
Eagle·
Park
Trailer·
American
Pride·
Entetprises.
Heritage·
Tdumph • Elkhorn
Inc.
build
Diesel·
American
No
part
of
this publication may be reproduced or
the
fcHawing
Discovery· Excursion. Providence· Flair· Fiesta.
Tradition· Expedition. Revolution· Pioneer· Prowler·
motor
homes,
travel
trailers
and
huck
Tena
any
campers:
• Tioga
Terry

I
1--
~
TABLE
OF
CONTENTS
WARRANTY
Coverage Provided
Owner's Obligations
Dealer's Obligations
When the Dealer Does Not
Resolve the
Manufacturer's Obligations
What is Not Covered by This Wananty
IMPORTANT NOTICES
DISCOVERY INFORMATION
Lamps and Bulbs
Motor Home Fuses and Circuit Breakers
Driver's Controls
INTRODUCTION
Wananties
Warranty Service
Reporting Safety Defects
Inspect and Maintain
Planning
Owner's
Chassis and Vehicle Identification
Suspension Alignment and Tire Balance
After-Market Steering
Warnings, Terms and Concepts for
Safe Operation
ON
THE ROAD
Motor Home Loading
Responsibility
Some Definitions First
Towing a Vehicle
Cargo
Cargo
Distribution
How to Weigh
Dangers
Loading Tips .
.........................
....................
...................
...................
Problem
......................
......................
.....................
...........................
......................
and Preparation
Information Package
of
.......................
for
Carrying Capacity Label .
Carrying Capacity and Load
......................
Your
of
Overloading
......................
.................
..............
...............
.,
........
................
...................
................
............
Aid
Devices
Your Motor Home
..................
Proper Loading
................
or
Trailer .
Laaded Motor Home
...........
..............
.........
......
......
.......
. 01-1 Tire Inflation
Air
01-1
01-1
01-1
01-1
01-1
....
01-2
. 02-1
. 03-1
03-1
...
03-1
03-2
. 04-1
04-2
04-3
04-3
04-4
04-4
04-4
04-4
....
04-4
04-5
....
04-6
. 05-1
05-1
05-1
05-1
05-2
05-4
05-5
..
05-5
05-7 Fuel and Fuel Systems
05-7
Seats, Seat Belts and Air Bags
Driving and Vehicle Control
Engine and Transmission
Engine Operation
Transmission Operation
Air Brakes
Air Suspension System
Maneuvering in Traffic
Rear View Video Monitor (If Equipped)
Body Undercoating
Pressure
Underinflation
Air
Pressure Check
Tire
Replacement .
If
You
Get a Flat
Changing a Flat
(If
Equipped)
Air
Bag Supplemental Restraint
System (SRS)
Combination Lap and Shoulder Belts
Safety Belt Maintenance
Safety Restraintsfor Children . . ,
Safety
Child
Normal Starting Procedure .
Engine Block Heater ................
Normal Shut Down Procedure
Gear Selector .
Check
Compression Brake .
System Components .
Using
Stopping Distance
Braking on Downgrades .
Parking Brake .
Using the Engine to Slow the
Fuel Types and Driveability Issues .
Beltsfor
Seat Tethers .
Trans .
..........................
Air
Motor Home .
.......................
........................
......................
..................
..................
Tire ................
Tire ................
......................
....................
Children .
.................
...............
.....................
................
.....................
.. , ...................
................
................
Brakes
...................
..................
....................
....................
................
................
...................
.................
.............
............
............
..........
........
............
......
....
...
...
05-8
05-9
05-9
05-9
05-10
05-10
05-10
05-10
05-11
05-11
05-11
05-11
05-12
05-12
05-13
05-13
05-13
05-13
05-14
05-14
05-15
05-15
05-15
05-15
05-16
05-16
05-17
05-17
05-18
05-18
05-18
05-18
05-19
05-20
05-20
05-20
05-21
Tires
................................
05-8 API Refueling Advisory
...............
05-21
00-1
·
Table
of
Contents
<-
}--
Engine Fan
Exhaust
Engine Temperature Gauges
Carbon Monoxide
Carbon Monoxide Detector/Alarm .
Emergency Towing
..........................
System Heat
..................
Safety Precautions
...................
............
.....
....
05-21
05-21
05-21
05-22
05-22
05-22
LIVING WITH YOUR MOTOR HOME . . . 06-1
Hydraulic Leveling System
Air Dump
System
Power Entry Step
Entry and
Screen Doors
.....................
(If
Equipped)
Patio Awning (If Equipped)
Windows
Emergency Exit Window(s)
............................
Remote Mirror Control (If Equipped)
Sun Visors (If Equipped)
Power Sun Visors
Window
Day/Night Shades
Shades (If Equipped)
(If
(If
Mini-Blinds (If Equipped)
Storage
..............................
Exterior Compartments .
Interior Storage
.....................
Slide-Out Rooms (If Equipped)
Interior and Furnishings
Dinette Conversion (with Built-in Table)
Dinette Conversion
(with Free-Standing Table)
Sofa Conversion
Sleeper Sofa Conversion
Free-Standing Furniture
Folding Doors/Privacy Curtain
Dividers .
Interior Lighting
Overhead
Folding Chairs
Monitor
Effects
Condensation
Dripping Ceiling Vents
Vents
Panel
of
Permanent Occupancy
(If
........................
....................
.......................
(If
Equipped)
........................
and
How to Control It
(If
Equipped)
.................
..............
............
................
Equipped)
Equipped)
...............
..............
................
Equipped)
(If
Equipped)
(If
Equipped)
...............
..........
......
........
...........
........
..........
..........
.........
..........
.........
...
...
....
..
06-1
06-1
06-1
06-2
06-2
06-2
06-2
06-2
06-3
06-3
..
06-2
06-3
06-3
06-3
06-3
06-4
06-4
06-5
06-5
06-5
06-5
06-5
06-5
06-6
06-6
06-6
06-6
06-6
06-7
06-7
06-9
Important Information
What the
Fire Safety
Fire Safety Precautions
Smoke Detector/Alarm .
RV
Owner Can Do .
..........................
..................
..............
..............
PLUMBING SYSTEMS
AND HOLDING TANKS
Fresh Water System
External Fresh Water Hookup .
Filling the On-Board Water Tank
Draining the Fresh Water Tank .
Water Pump ........................
Water Pump Filter .
Low Point Drains .
Troubleshooting the Fresh Water System
Leaks .
Sanitizing the Fresh Water System .
Exterior Shower
Drinking Water Filter System
Waste Water
Toilet
Draining the Holding Tanks
Black Tank Flush System
Holding Tank Care
Cold Weather Usage
............................
(If
Equipped)
System
.............................
....................
(If
.....................
ELECTRICAL SYSTEMS .
..............
..................
...................
Equipped)
...................
(If
..................
.................
.............
Chassis 12-Volt Electrical System
Chassis Bulbs
Fleetwood 12-
System
Batteries .
Battery Disconnect
Battery Inspection
Battery Charging .
Solar Panel
Selecting a Replacement Battery .
Auxiliary Start System .
Volt System
120-
Power Inverter .
Power Converter
............................
and
Fuses
..............
Volt House and Automotive
..........................
..................
and
Care
...................
(If
Equipped)
.............
...............
......................
.....................
....................
.........
.........
.......
........
......
.........
...........
Equipped)
.........
...........
.......
06-9
06-10
06-11
06-11
06-12
. 07-1
07-1
07-1
07-1
07-2
07-2
07-2
07-2
..
07-3
07-3
07-3
07-4
07-4
07-4
07-4
07-4
..
07-6
07-6
07-7
. 08-1
08-1
08-1
08-1
08-1
08-1
08-2
08-2
08-3
08-3
08-3
08-3
08-4
08-4
.-.
00-2
Table
of
Contents
Ground Fault Circuit Interrupter (GFCl)
Generator .
Diesel Generator Fuel Supply .
Generator Operations
Generator Operating Safety Precautions
Energy Management
Electrical Wiring Diagrams
.........................
................
System - 50 AMP
..............
Motor Home Fuses and Circuit Breakers
LP
GAS
SYSTEM
Remote
LP Gas Tank Fill
LP Gas Safety Precautions
System
Using
Components
Hoses .
LP
........................
Gas Regulator .
LP Gas System at Low
Temperatures
Filling LP Gas Tanks
LP
Gas System Check
LP
Gas Leak Detector/Alarm
Lighting LP Gas Appliances
APPLIANCES
Water Heater
Water Heater Bypass Valve .
Refrigerator
Furnace
Range
..........................
...............................
Range Exhaust Hood
Heat
Pump(s) (If Equipped)
Air Conditioner(s) (If Equipped)
Additional 12-Volt Equipment
Vd
E .
1 eo qUlpment
Video Switcher
Video Control Center
TV Antenna (If Equipped)
Antenna Operating Instructions
•....•••....•••...••••
...............
..............
...................
..................
.......................
...................
..................
............
.............
..••••...•••...••••..••••
.........................
...........
.........................
...................
.............
...........
......................
(If
Equipped)
............
...................
..............
.........
Satellite Dish Antenna (If Equipped)
Telephone Jack
......................
.........
........
......
..
08-4 WasherlDryer-Ready Option
08-5
Miscellaneous Appliances
08-5
08-5
..
08-5 Exterior
....
08-6
MAINTENANCE
08-7
...
08-7
.............................
Stains
Exterior Graphics Care .
Windows, Doors, Vents
.............................
.••••..••••...••••...••
TPO Roof System
CI .
,
...
...
09-1
09-1
09-1
09-2
09-2
09-2
09-3
09-3
09-3
09-3
09-4
10-1
10-1
10-1
.10-1
10-1
10-2
10-2
eamng .
Care ..............................
Sealant Renewal
Door, Window,
and
Acrylic Assist Handles (If Equipped)
Interior
Fabrics .
Solid Suiface
Laminate
Walls
Attaching Accessories to Your
Motor Home .
Plastic/Fiberglass Shower Stall .
Floors
Wood Floor
Engine Access
Exterior Sealants
Generator Filters
Trailer Hitch Connector Wiring
Maintenance Guideline
.................
Roof
Molding Resealing
..............................
...........................
Top
Top
Care
and
Ceiling Panels .
and
Carpeting
(If
Equipped).
......................
......................
......................
10-2
.10-2
10-3
10-3
STORAGE
Storage
Short-Term Storage (Less than 60 days)
Long-Term Storage (Over
............................
Checklists
10-3
10-3
.10-3
10-3
Winterization
Water System Winterizing
Reactivating the Motor Home
After
Storage
.........................
.......................
10-4
.1
0-4
GLOSSARY
...........................
.............
...............
...........
and
Locks .
.....................
....................
Component
.............
Care
(If
Equipped)
(If
Equipped)
.............
.....................
................
.............
...........
.................
.....................
60
days)
.............
,
........
.......
........
......
......
.,
.....
,
..
..
..
10-4
10-4
11-1
11-1
11-1
11-2
11-2
11-2
11-2
11-2
11-2
11-3
11-3
11-3
11-3
11-4
11-4
11-4
11-4
11-4
11-4
11-5
11-5
11-5
11-5
11-5
11-6
12·1
12-1
12-1
12-2
12-2
12-3
12-4
13
..
1
Microwave Oven
(If
Equipped)
...........
10-4
00-3

1-
~
This page intentionally blank.

LIMITED
For Motor Homes Manufactured and Warranted by subsidiaries of Fleetwood
ONE-YEAR/THREE
Enterprises, Inc., sold
YEAR
in
the United States and Canada
WARRANTY
COVERAGE PROVIDED
Your new motor home, including the structure,
plumbing, heating and electrical systems, all
appliances and equipment installed by the
manufacturer, is warranted under normal use to
be free from manufacturing defects in material
or workmanship. Appearance imperfections, or
damage to paint, graphics, exterior materials, or
upholstery that may have occurred prior
delivery are normally corrected during the
inspection process at the manufacturing plant or
at the dealership.
The warranty extends to the first retail purchaser
and his transferee(s) and begins on the date
original retail delivery or the date the motor
home is first placed into service
commercial or demonstrator unit (whichever
occurs first). The warranty extends for the following periods:
I.
For all defects (other than structural) the
warranty extends for a period of one year
from such date or until the unit has received
15,000 total miles
the mileage shown on the odometer
(whichever occurs first).
2.
For slluctural defects, 3 years; structural
defects are limited to the following: roof
structure, sub-floor structure, and Vacubond®
Written notice
selling dealer or manufacturer not later than ten
(l0)
days after the expiration
period.
walls.
of
of
use
defects must
as
as
determined by
be
given to the
of
the warranty
to
of
a rental,
antenna
dealer during the first
erage. Thereafter, such adjustments are the
responsibility
nance unless required as a direct result
or replacement
warranty.
If
a problem occurs which the owner believes is
covered by this warranty, the owner shall contact the selling dealer, or Fleetwood
Relations, giving sufficient information to
resolve the matter. The owner shall deliver the
motor home to the dealer or a Fleetwood
Service Center location for warranty service.
conll'ol, etc.) will be performed by the
90 days
of
the owner as normal mainte-
of
a defective part under this
of
warranty cov-
of
Owner
repair
DEALER'S OBLIGATIONS
By
agreement with the manufacturer, the dealer
is obligated to maintain the motor home prior to
retail sale, to perform a detailed predelivery
inspection and to repair or replace any parts
necessary to correct defects in material or
workmanship.
WHEN THE DEALER DOES NOT
RESOLVE
If
the dealer is unable or unwilling
problem which the owner is convinced is covered
by the warranty, the owner should contact
Fleetwood
phone number listed on the next page and provide
Fleetwood
the problem and attempts made to resolve
THE PROBLEM
to
resolve a
Owner Relations at the address or tele-
Owner Relations with a description
of
it.
OWNER'S OBLIGATIONS
The owner is responsible for normal mainte-
nance as described in the Owner's Information
Package; however, minor adjustments (such as
adjustments to the interior or exterior doors,
LPG regulator pressure, cabinet latches, TV
MANUFACTURER'S OBLIGATIONS
Upon receipt
dealer was unable or unwilling to resolve the
problem, a Fleetwood Service Center will repair
or replace any parts necessary to correct defects
in material or workmanship or will take other
appropriate action as may be required.
of
notice
of
a claim, where the
01-1
Warranty
I.
,-
~
WHAT IS NOT COVERED BY
THIS WARRANTY
This
warranty
1.
The automotive chassis system (including
the chassis and drive train), tires and batteries, which are covered by the separate warranties
these components.
2. Defects caused by or related
a.
Abuse, misuse, negligence
b.
Failure to comply with instructions contained in the
Package;
c.
Alteration or modification
home;
d.
Environmental conditions (salt, hail,
chemicals in the atmosphere, etc.)
3. Normal deterioration due to wear or exposure, such
drapes, carpet wear, etc.
4. Normal maintenance and service items,
such as light bulbs, fuses, wiper blades,
lubricants, etc.
5.
Motor homes on which the odometer reading has been altered.
6.
Transportation to and from dealer
Fleetwood Service Center location, loss
time, inconvenience, commercial loss, loss
of
use, towing charges, bus fares, vehicle
rental, incidental charges such as telephone
calls or hotel bills,
consequential damages.
7.
Fleetwood will NOT be responsible for any
losses, damages,
not limited to, property damage, personal
does
not
cover:
of
the respective manufacturers
to:
or
Owner's Information
of
as
fading
of
fiberglass, fabrics
or
other incidental or
or
claims, including, but
accident;
the motor
or
of
of
or
injury, loss
expenses, emotional distress, death, loss
of
use, loss
loss, adverse health effects, or any other
effects caused or alleged to be caused by
MICROBIAL MATTER, including, but not
limited to, mold, mildew, fungus
THE
LIMITED IN DURATION
EXPRESS TERMS OF THIS 1/3 YEAR
WARRANTY.
Some states do not allow the exclusion
tion
of
incidental or consequential damages, so
the above limitation or exclusion may not apply
to you.
This
warranty
and
you
may
vary
from
The
manufacturer/warrantor
ble
for
any
warranty
beyond those expressly
warranty.
For Motor Homes Manufactured and Warranted
by the following subsidiaries
Enterprises, Inc.:
Fleetwood
Fleetwood
Fleetwood
For Customer Service assistance, contact:
Fleetwood
of
income, legal fees or
of
value, all other economic
or
dry rot.
IMPLIED WARRANTIES ARE
TO
THE
or
gives you specific legal rights,
also have
state
to state.
undertaking,
made
by
Motor
Motor
Motor
P.O. Box 59933
Riverside,
other
any
dealer
set
Homes
Homes
Homes
Owner
CA
rights
representation
forth
of
of
California, Inc.
of
of
Pennsylvania, Inc.
Relations
92517
which
is
not
responsi-
or
other
in
this
Fleetwood
Indiana,
person
limita-
or
Inc.
(800) 322-8216
01-2
State laws in the United States and provincial
laws in Canada vary concerning operator
licensing requirements and vehicle dimensional restrictions. Check the laws in the area
where you anticipate traveling.
The particle board, hardwood plywood, or paneling used in your motor home are made with
urea-formaldehyde resin. The companies that
supply us with these materials have asked that
we tell you about urea-formaldehyde with the
statements on this page.
Ventilation is important for making the interior
of
your motor home comfortable. Please read
the section about ventilation and prolonged
occupancy in the
Home
We
chapter in this Owner's Manual.
provide you consumer information as detailed
by the National Fire
Living With Your Motor
Protection Association
(NFPA) and the American National Standards
Institute (ANSI). The information and warnings
found on these pages may also be found in other
chapters
LP
of
this Owner's Manual. Please see the
Gas System and Appliances chapters for
other safety and operating information.
A WARNING
This product is manufactured with urea·formaldehyde resin. Formaldehyde vapor
people cause headaches,
Irritation, and aggravation of allergies and respiratory
tion
problems, such as asthma. Proper ventila-
should reduce the risk of such problems.
eye,
A WARNING
This product
formaldehyde resin and will
quantities
els
in the indoor air can cause temporary eye
and respiratory irritation, and may aggravate
respiratory conditions
will reduce indoor formaldehyde
is
manufactured with a urea-
of
formaldehyde. Formaldehyde lev-
or
allergies. Ventilation
may
in some
nose and throat
release small
levels.
IMPORTANT
A WARNING
Irritant: This product contains a urea-formaldehyde resin and may
vapors in
can
be
tory system
such as those with
ments.
toms develop, consult your physician.
Do
not bring
line
or
cle because a fire
A warning label has been located near the LP
gas container_ This
CONTAINER(S)
OF
CAPACITY.
FAILURE
FIRE
Overfilling the
uncontrolled gas flow which can cause fire
explosion. A properly filled container will contain
approximately
as liquid
following warning label has been placed
The
in the vehicle near the range:
WARNING
IFYOU SMELL GAS:
1.
Extinguish any open flames, pilot lights,
and all smoking materials.
2.
Do not touch electrical switches.
3.
Shut off the
valve(s)
4.
Open doors and other ventilation openings.
5.
Leave the area until the odor clears.
6.
Have the
age source corrected before using again.
FAILURE
FIRE
low concentrations. Formaldehyde
Irritating to the eyes and upper respira-
of
especially susceptible persons
Use with adequate ventilation. If symp·
A WARNING
or
store
other flammable liquids inside the vehi-
or
TO
TO
COMPLY
OR
PERSONAL
LP
gas container can result in
LP
gas.
LP
gas supply at the container
or
gas supply connection.
LP
gas system checked and leak-
TO
COMPLY
OR
PERSONAL
NOTICES
release formaldehyde
allergies
LP
explosion may result.
label reads:
MORE
COULD
INJURY.
ao-
COULD
INJURY.
or
respiratory ail-
gas containers, gaso-
DO
NOT
THAN
percent
aO-PERCENT
RESULT
of
its volume
RESULT
FILL
IN
or
IN
02-1
Important
1-
~
Notices
A WARNING
LP gas regulators must always
with the diaphragm vent facing downward.
Regulators that are not
been equipped with a protective cover. Make
sure that regulator vent faces downward and
the cover is kept in place to minimize vent
blockage which could result in excessive
gas pressure causing fire
In compartments have
or
be
Installed
explosion.
LP
A WARNING
It is not safe to use cooking appliances for
comfort heating. Cooking appliances need
fresh air for safe operation.
Before operation:
1.
Open overhead vent
and
or
turn on exhaust fan,
A WARNING
Portable fuel-burning equipment, including
wood and charcoal grills and stoves, shall not
be used inside this recreational vehicle. The
use of this equipment inside the recreational
vehicle may cause fires
or
asphyxiation.
A WARNING
LP
gas containers shall not be placed or
stored inside the vehicle.
are equipped with safety devices which relieve
excessive pressure by discharging gas to the
atmosphere.
FAILURETO
DEATH
OR
SERIOUS
COMPLY
LP
COULD
INJURY.
gas containers
RESULT
IN
2.
Open window.
FAILURE
FIRE
This warning label has been located In the
cooking area to remind you to provide an adequate supply of fresh air for combustion.
Unlike homes, the amount of oxygen supply is
limited due
cle, and proper ventilation when using the
cooking appliance(s) will avoid dangers of
asphyxiation.
cooking appliances not be used for comfort
heating
greater when the appliance is used for long
periods of time.
TO
OR
PERSONAL
to
as
COMPLY
the size of the recreational vehi-
It is especially important that
the danger of asphyxiation is
COULD
INJURY.
RESULT
IN
02-2

DISCOVERY
LAMPS AND BULBS
Interior - I2-volt
Ceiling single incandescent... ..... GE 1141, 12-volt
Ceiling double incandescent ...... GE 1141, !2-volt
Ceiling fluorescent ............ 98FI5T8-WW, 12-volt
Ceiling
Wall
Bedroom
Bedroom reading lights ................ 1139-IF, 12-vo!t
Driver/passenger spotlights ........ GE 1141, 12-vo!t
Vanity Light ....................... RGB
Interior - I2-volt
Range hood light .... GE WB36XI0176, 12-vo!t ac
Exterior - I2-volt
Head
high/low beam ................. Sylvania 9007, 12-volt
Fog lamps .................................... H3 55W, 12-volt
Front turn signals ....................... GE 1156, 12-volt
Front clearance lights ..................... GE 67, 12-volt
Front side markers ........................ GE 194, 12-volt
Front hood light. ........................... GE 193, 12-volt
Side
Mid side markers .......................... GE 194, 12-volt
Entry step light.. ........................... GE 194, 12-volt
Porch light. ............................ Jenson 1003, 12-volt
Rear turn signals ......................... GE 1156, 12-volt
Back-up lights ............................ GE 1156, 12-volt
Stop taillights ............................. GE 1157, !2-volt
License plate lights ......................... GE 53, 12-volt
Rear markers ................................ GE 194, 12-volt
Rear clearance lights .......
Luggage compartment... .............
Utility compartment.. ................... GE 193, 12-volt
Rear engine compartment ............ GE 193, 12-volt
decor !amp ..................... GE !141, 12-vo!t
decor lamps .......................... GE
decor lamps .................. GE
92!,
92!,
12-volt
12-volt
71-9019, !2-volt
ac
lamps-
minor
light ..................... Grote 4641, 12-volt
Peterson 2502R, 12-volt
GE
1141, 12-volt
Before
ing
fuse
OFF
position.
Halogen
and
pressures
Always
dling
halogen
Do
not
touched
bing
alcohol.
Do
not
and/or
objects
Use
bulbs
style,
wattage
relamping,
or
placing
bulbs
operate
and
use a soft
bulbs.
touch
glass
with
bare
use
near
which
designed
and
INFORMATION
CAUTION
disconnect
circuit
will
dry
cloth
area
hands,
flammable
may
or
voltage.
breaker
at
extremely
shatter
or
with
wipe
be
sensitive
specific
power
source
and
high
if
not
handled
cotton
gloves
bare
hands.
the
bulb
or
combustible
to
by
manufacturer
by
control
switch
temperatures
correctly.
when
If
clean
with
materials
fading
or
remov-
in
han-
bulb
is
rub-
drying.
as
to
03-1
Discovery
Information
DRIVER'S CONTROLS
7
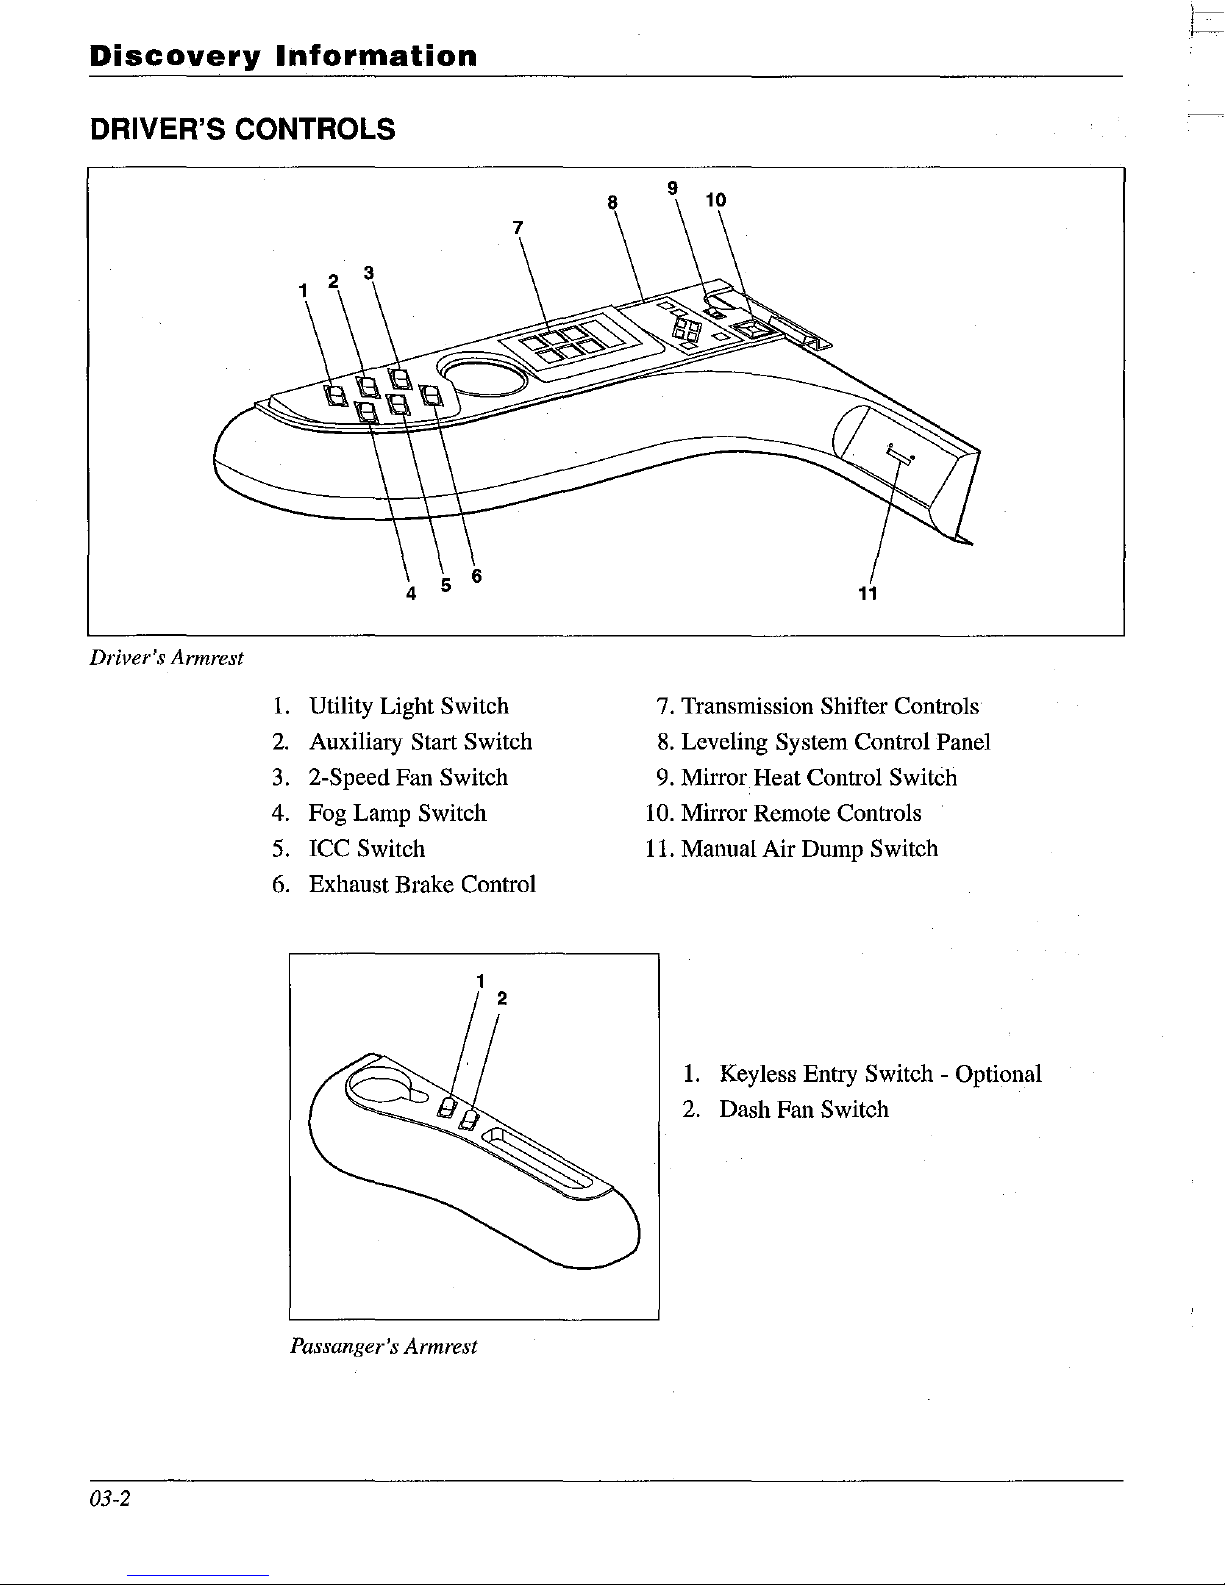
Driver's Armrest
Utility Light Switch
1.
2.
Auxiliary Start Switch
2-Speed Fan Switch
3.
4. Fog Lamp Switch
ICC Switch
5.
6. Exhaust Brake Control
1
7. Transmission Shifter Controls
8.
Leveling System Control Panel
9. Mirror Heat Control Switch
10. Mirror Remote Controls
II.
Manual Air Dump Switch
1.
Keyless Entry Switch - Optional
2. Dash Fan Switch
Passanger's Armrest
03-2
DRIVER'S CONTROLS
1
Discovery
"%00&
, ,
Information
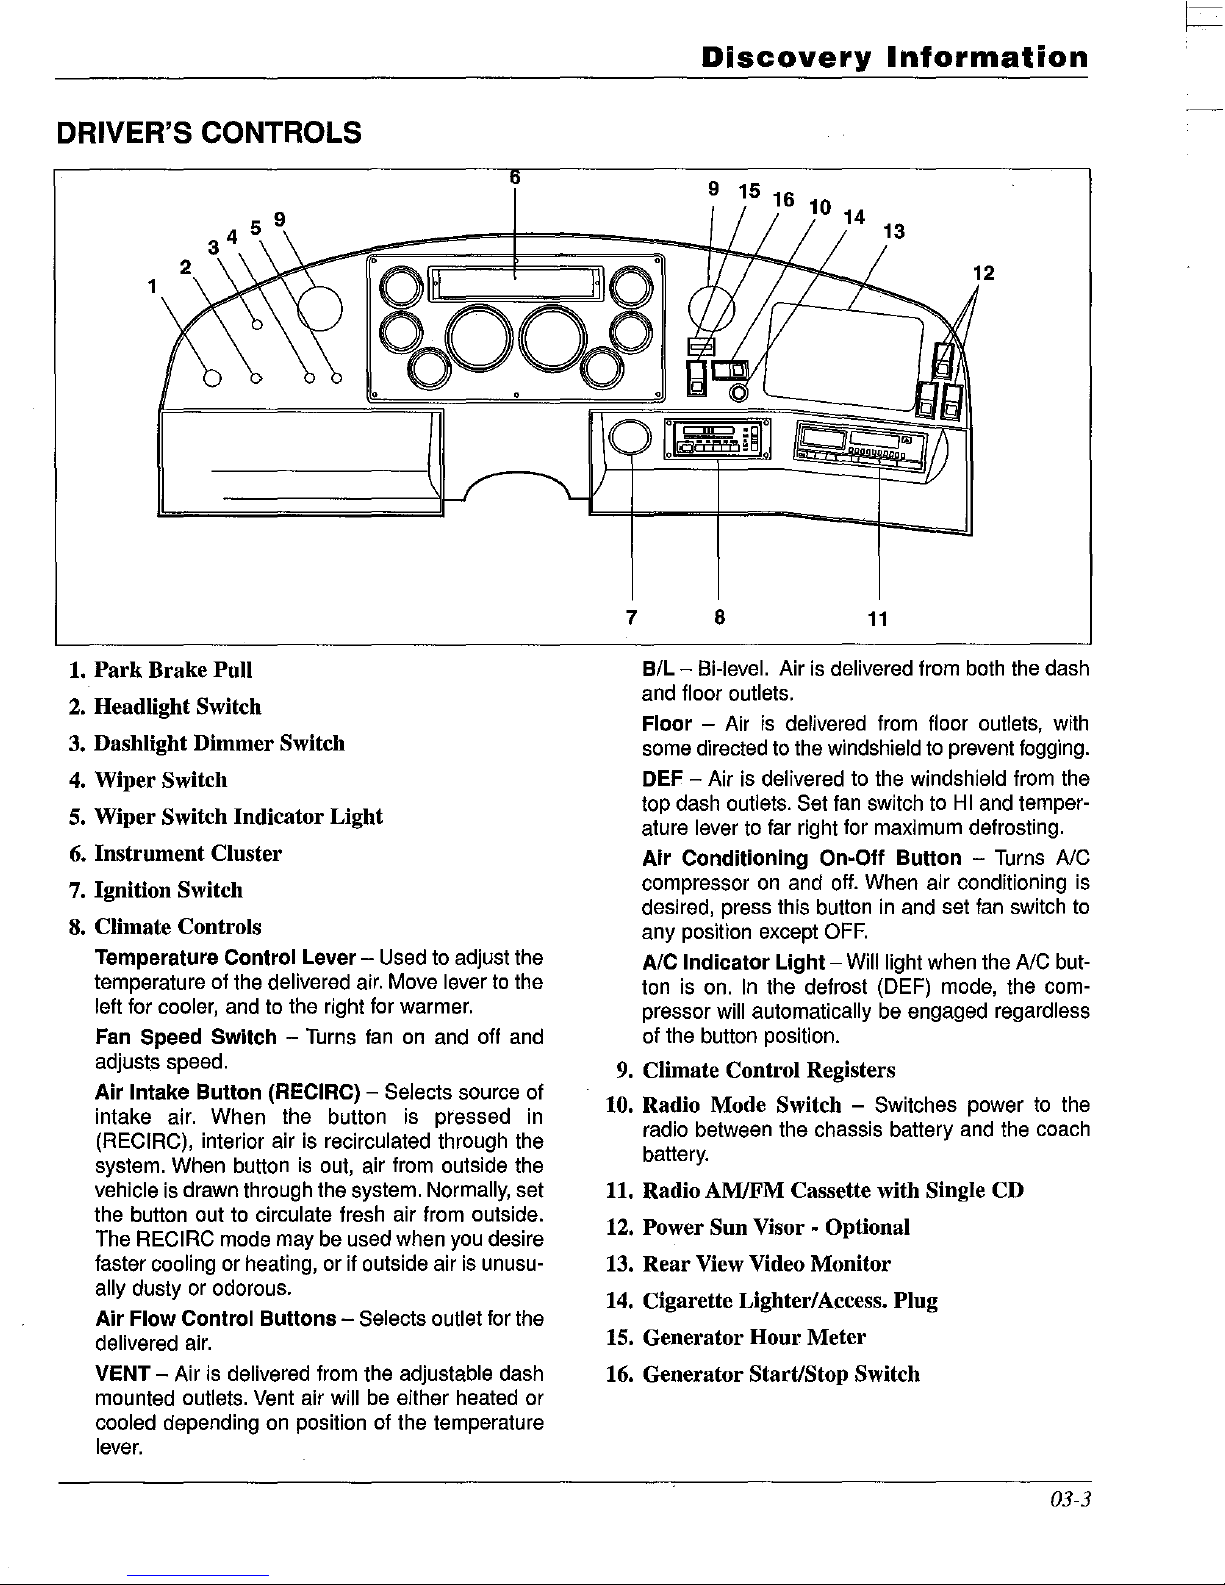
1.
Park
Brake
2.
Headlight
3.
Dashlight
4.
Wiper
5.
Wiper
6.
Instrument
7.
Ignition
8.
Climate
Temperature
temperature of the delivered
left for cooler, and to the right for warmer.
Fan Speed
adjusts speed.
Air
Intake
intake air. When the button is pressed
(RECIRC), interior air is recirculated through the
system. When button
vehicle is drawn through the system. Normally, set
the button out to circulate fresh air from outside.
The
RECIRC mode may be used when you desire
cooling or heating, or if outside air is unusu-
faster
ally dusty or odorous.
Air
Flow
delivered
VENT - Air is delivered from the adjustable dash
mounted
cooled depending on position of the temperature
lever.
Pull
Switch
Dimmer
Switch
Switch
Cluster
Switch
Controls
Switch
Button
Control
air.
outlets. Vent air will be either heated or
Switch
Indicator
Control
(RECIRC) - Selects source of
Buttons
Light
Lever - Used to adjust the
air.
Move lever
- Turns
is
fan
on
and off and
out, air from outside the
- Selects outlet for the
to
the
in
7 8
BIL
- Bi-Ievel. Air is delivered from both the dash
and floor outlets.
Floor
- Air
some directed to the windshield to prevent fogging.
DEF - Air is
top dash
ature
lever to far right for maximum defrosting.
Air
Conditioning
compressor
desired, press this button
any position except
AIC
Indicator
ton is on.
pressor will
of the button position.
9.
Climate
10.
Radio
radio between the chassis battery and the coach
battery.
Radio
11.
12.
Power
13.
Rear
View
14.
Cigarette
15.
Generator
16.
Generator
is
delivered from floor outlets, with
delivered to the windshield from the
outlets. Set
on
and off. When air conditioning is
Light
In
the defrost (DEF) mode, the com-
automatically be engaged regardless
Control
Mode
AMlFM
Sun
Lighter/Access.
Registers
Switch
Cassette
Visor -Optional
Video
Hour
Meter
StarUStop
11
fan
switch to H I and temper-
On-Off
OFF.
- Will light when the
Monitor
Button
in
and set
- Switches power
with
Single
Plug
Switch
- Turns
fan
CD
AlC
switch to
AlC
but-
to
the
03-3

This page intentionally blank.
',-
INTRODUCTION
Welcome to the recreational vehicle life-style
and the growing family
We
sincerely thank you for choosing a
of
motor home owners.
Fleetwood motor home!
~I
This
includes some instructions for its safe
ual,
eral nature only.
described
because
conducted
product changes may not be included.
~I
Throughout this manual the term "RV" represents a
"Recreational Vehicle" as defined
11921ANSI A 119.2 code. This includes motor homes,
fifth wheel trailers, travel trailers, camping trailers,
recreational
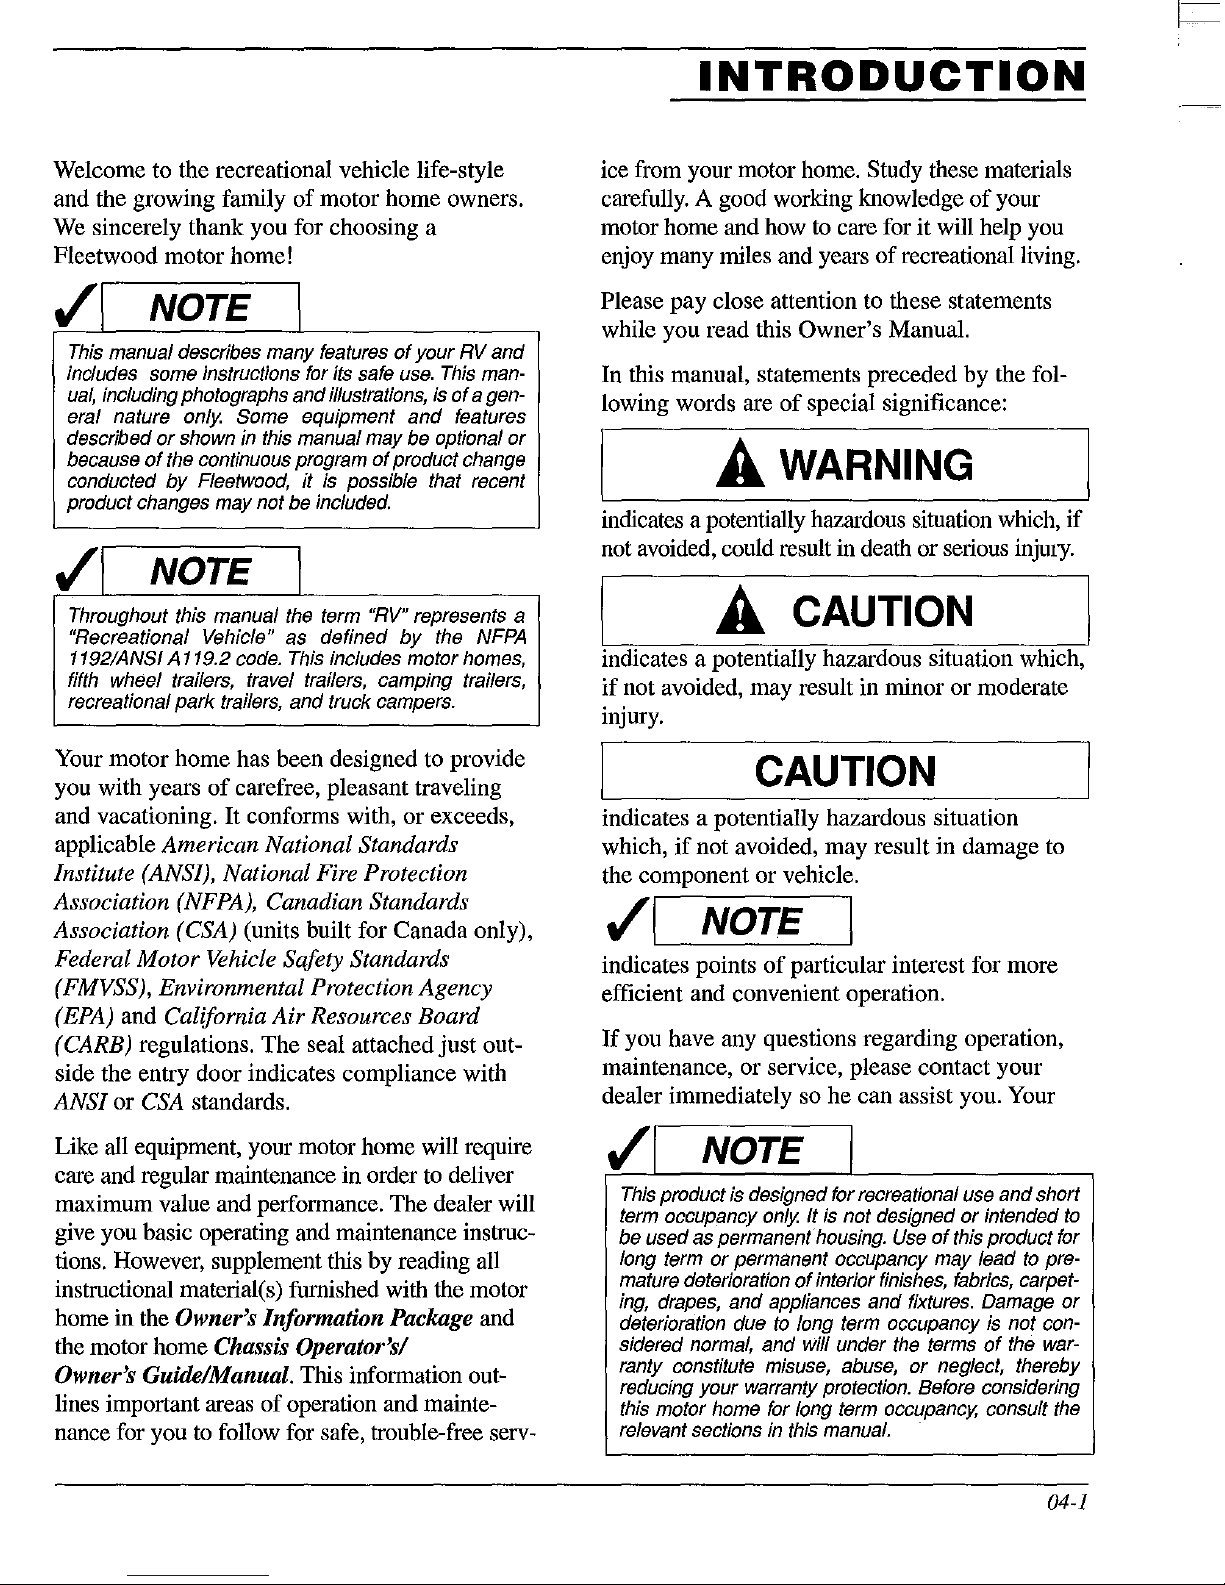
NOTE
manual describes many features
including photographs and illustrations,
or
shown
of
the continuous program
by
Fleetwood, it is possible that recent
NOTE
park
trailers, and truck campers.
I
of
your RV and
use.
Some equipment
in
this manual may be optional or
1
and
of
product change
by
This
man·
is
of
a gen-
features
the NFPA
ice from your motor home. Study these materials
carefully. A good working knowledge
motor home and how to care for
enjoy many miles and years
of
recreational living.
of
your
it
will help you
Please pay close attention to these statements
while you read this Owner's Manual.
In this manual, statements preceded by the following words are
of
special significance:
A WARNING
indicates a potentially hazardous situation which,
not avoided, could result in death or serious
I A CAUTION
indicates a potentially hazardous situation which,
if
not avoided, may result in minor or moderate
injury.
if
injUly.
Your motor home has been designed to provide
you with years
and vacationing.
of
carefree, pleasant traveling
It
conforms with, or exceeds,
applicable American National Standards
Institute
Association
Association
Federal Motor Vehicle
(ANSI), National Fire Protection
(NFPA), Canadian Standards
(CSA) (units built for Canada only),
Safety Standards
(FMVSS), Environmental Protection Agency
(EPA) and California
Air
Resources Board
(CARB) regulations. The seal attached just out-
side the entry door indicates compliance with
ANSI
or
CSA standards.
Like all equipment, your motor home will require
care and regular maintenance in order to deliver
maximum value and performance. The dealer will
give you basic operating and maintenance instructions. However, supplement this by reading all
instructional material(s) furnished with the motor
home in the Owner's Information
the motor home
Chassis Operator's/
Package and
Owner's Guide/Manual. This information out-
lines important areas
of
operation and mainte-
nance for you to follow for safe, trouble-free serv-
CAUTION
indicates a potentially hazardous situation
which,
the component or vehicle.
~I
indicates points
efficient and convenient operation.
If
maintenance, or service, please contact your
dealer immediately so he can assist you.
~I
if
not avoided, may result in damage to
NOTE
of
particular interest for more
you have any questions regarding operation,
Your
NOTE
This
product is designed for recreational use and short
term occupancy
be used as permanent housing.
long term
mature deterioration
ing,
drapes,
deterioration due to long term occupancy
sidered normal, and will under the terms
ranty constitute misuse, abuse,
reducing your warranty protection. Before considering
this motor home for long term occupancy; consult the
relevant sections
only.
or
permanent occupancy may lead
and
appliances and fixtures. Damage
in
.1
It
is
not designed or intended
Use
of
this product for
of
interior finishes, fabrics, carpet-
is
not con-
of
the war-
or
neglect, thereby
this manual.
to
to
pre-
or
04-1
Introduction
I
~
dealer's Service or Sales Department will handle
any normal problems which might occur.
Some equipment and features described or
shown in this manual may be optional or not
available on some models.
of
Because of the continuous program
improvement conducted by Fleetwood, it is possible that recent product changes may not be
included in this manual. Specifications may
change without notice.
illustrations and photography included in this
Owner's Manual were as accurate as possible at
the time
function and
depiction
or exterior decor or design options
on or in your recreational vehicle.
The instructions included in this manual are
intended
responsibilities
parent company or affiliates beyond the standard
written warranty as presented in this manual.
Fleetwood has designed its recreational vehicles
to provide a variety
Each vehicle features optimal seating, sleeping,
storage and fluid capacities. The user is respon-
sible for selecting the proper combination
loads to ensure that the recreational vehicle's
capacities are not exceeded.
of
publication, and are representative
mayor
of
actual equipment, fabrics, interior
as
a guide, and in no respect extend the
of
Product information,
may not be specific in their
the manufacturing subsidiary,
of
uses for its customers.
product
as
installed
of
of
The materials in your Owner's Information
Package
ating instructions on the various appliances .and
components in your motor home. Warranty registration cards for these items should
out and mailed as soon as possible after you
take delivery of your motor home.
have operating instructions for a particular
appliance or component, contact your dealer.
You
contain warranty information and oper-
be
If
you do not
will automatically receive an
OWnercare
filled
Card several weeks after the delivery receipt is
received from your selling dealer. This card is
imprinted with your name, the motor home serial
number, and manufacturing subsidiary location.
If
your motor home ever needs warranty service,
present this card to the dealer, or have it avail-
able when contacting a Fleetwood service center.
The motor home has been thoroughly inspected
before shipment.
Your dealer is responsible
for
performing a complete predelivery inspection
of
the motor home as specified in the
Ownercare delivery checkout.
As a part
dure, the dealer is responsible for road testing
the motor home, noting and correcting any steering problems and setting correct tire pressures
before delivery.
Fleetwood
responsible
of
the predelivery inspection proce-
and
its subsidiaries will
for
front
end
alignment after this
not
be
predelivery inspection has been performed.
WARRANTIES
Your motor home is covered by one
comprehensive warranty programs in the
industry. Please refer to the warranty in the front
of
this manual.
gations,
the dealer and manufacturer. Please read this
section carefully.
case you have awarranty-related problem, and
your dealer will be better able to get you on the
road again.
warranty or what it does or does not cover,
please contact your dealer.
04-2
as
It
explains your rights and obli-
well as the rights and obligations
You
will be better informed in
If
you have any questions about the
of
the most
RV
of
You
should retum your motor home to the selling
dealer for warranty service.
you may contact any other authorized Fleetwood
motor home dealer. The service department at
any
of
the locations listed at the back
ual can help you find a dealer in your area.
If, for some reason, a problem is not handled to
your satisfaction:
1.
Discuss any warranty-related problems
directly with the manager and/or owner
the dealership, giving them
to help the service department resolve the
matter for you.
If
this is not possible,
of
this man-
an
opportunity
of
2.
If
a problem arises that has not been
resolved to your satisfaction by your local
dealer, contact Fleetwood
The locations are listed in the back
manual.
3.
We
factory representative will be able to solve
any problem which might arise.
bined efforts are not satisfactory, please send
a letter describing the circumstances
Please contact the one nearest you.
sincerely believe that your dealer and the
Owner Relations.
of
this
If
their com-
to:
Fleetwood Owner Relations
P.O. Box 59933
Riverside, CA 92517
Please include the brand name and serial
number of your motor home. The serial number is located on the identification tag next
the entry door, and on your warranty card.
If
you wish to call for assistance, please
4.
use this toll-free telephone number:
to
Fleetwood Owner Relations
(800) 322-8216
There may be times when your motor home will
need repairs or parts while you are on the road.
If
your motor home is repaired by a non-authorized repair facility (non-Fleetwood dealer), be
sure to save receipts and especially any parts
that are replaced. These parts will usually have
to be returned to your dealer before you can be
reimbursed for their cost.
WARRANTY SERVICE
If
you need service or warranty information,
please see the booklets and other documents
included in your
When contacting any
facturers, always have the model and serial
numbers available. Appliance identification
numbers will be found on tags
to the appliance.
If
you ever need warranty work done, be sure to
have the right papers with you.
is not covered under the warranty, your dealer's
service department can help you with getting the
Own·er's Information Package.
of
the equipment manu-
or
plates attached
If
required work
Introduction
correct service. Always keep a maintenance log
of
your RV's service history.
of
Always make a written list
or the specific work you want done.
work done that is not on your maintenance log,
let the service advisor know. Don't keep secrets.
And finally,
have a long list
tion and you need your
the situation with the service advisor, listing the
items in order
service department manage their time and will
help get you going
If
you have a warranty or service concern about
the chassis portion
aware that you may go directly to an authorized
chassis dealer for service. This may save you
time and effort as the chassis warranty is
administered by the chassis manufacturer.
Consult your area phone directory for an authorized dealer and make arrangements with their
service department.
cern is chassis related, feel free to contact your
Fleetwood dealer to assist you.
be
reasonable with requests.
of
service items that need atten-
of
priority. This will help the
as
quickly as possible.
of
your vehicle please be
If
you are unsure
the RV's problems
If
RV
very soon, discuss
you've had
If
you
if
the con-
REPORTING SAFETY DEFECTS
If
you believe that your vehicle has a defect
which could cause a crash, injury, or death, you
should immediately inform the National
Highway Traffic Safety Administration (NHTSA)
in addition to notifying the Fleetwood
Relations at 1-800-322-8216.
If
NHTSA receives similar complaints, it may
open an investigation, and
defect exists in a group
a recall and remedy campaign.
To
contact NHTSA, you may either call the Auto
Safety Hotline toll-free at 1-888-327-4236 or
write to:
if
it finds that a safety
of
vehicles, it may order
NHTSA
U.S.
Department of Transportation
400 Seventh St. SW
Washington, DC 20590
Owner
04-3
Introduction
You
can also obtain other information about
motor vehicle safety from the Hotline.
INSPECT AND MAINTAIN
Follow a consistent schedule
maintenance for your motor home. Your continuing safety and comfort depend on it. This manual includes a section outlining maintenance
intervals.
If
you follow the maintenance guidelines, you will minimize the possibility
ure
of
any important system or part
motor home.
PLANNING AND PREPARATION
Each year millions
trips using some type
Proper planning
urable experience. A thorough knowledge
your
RV
is important
most out
of
the convenience and safety items
built into your motor home.
it
as
you are with your personal car or truck.
you have trouble or have questions, please con-
sult your dealer.
of
Americans embark
of
of
your trip will ensure a pleas-
if
OWNER'S INFORMATION
PACKAGE
of
inspection and
of
fail-
of
your
on
recreational vehicle.
of
you are going to get the
Be
as
familiar with
If
~I
If your Owner's Information Package does not con-
tain these
home
request
NOTE I
items,
even
if
you
purchased your motor
"used,"
please call or write Fleetwood and
the
desired or missing information.
Fleetwood Motor Home Service
P.O.
Box
59933
Riverside,
(800) 322-8216
CA
92517
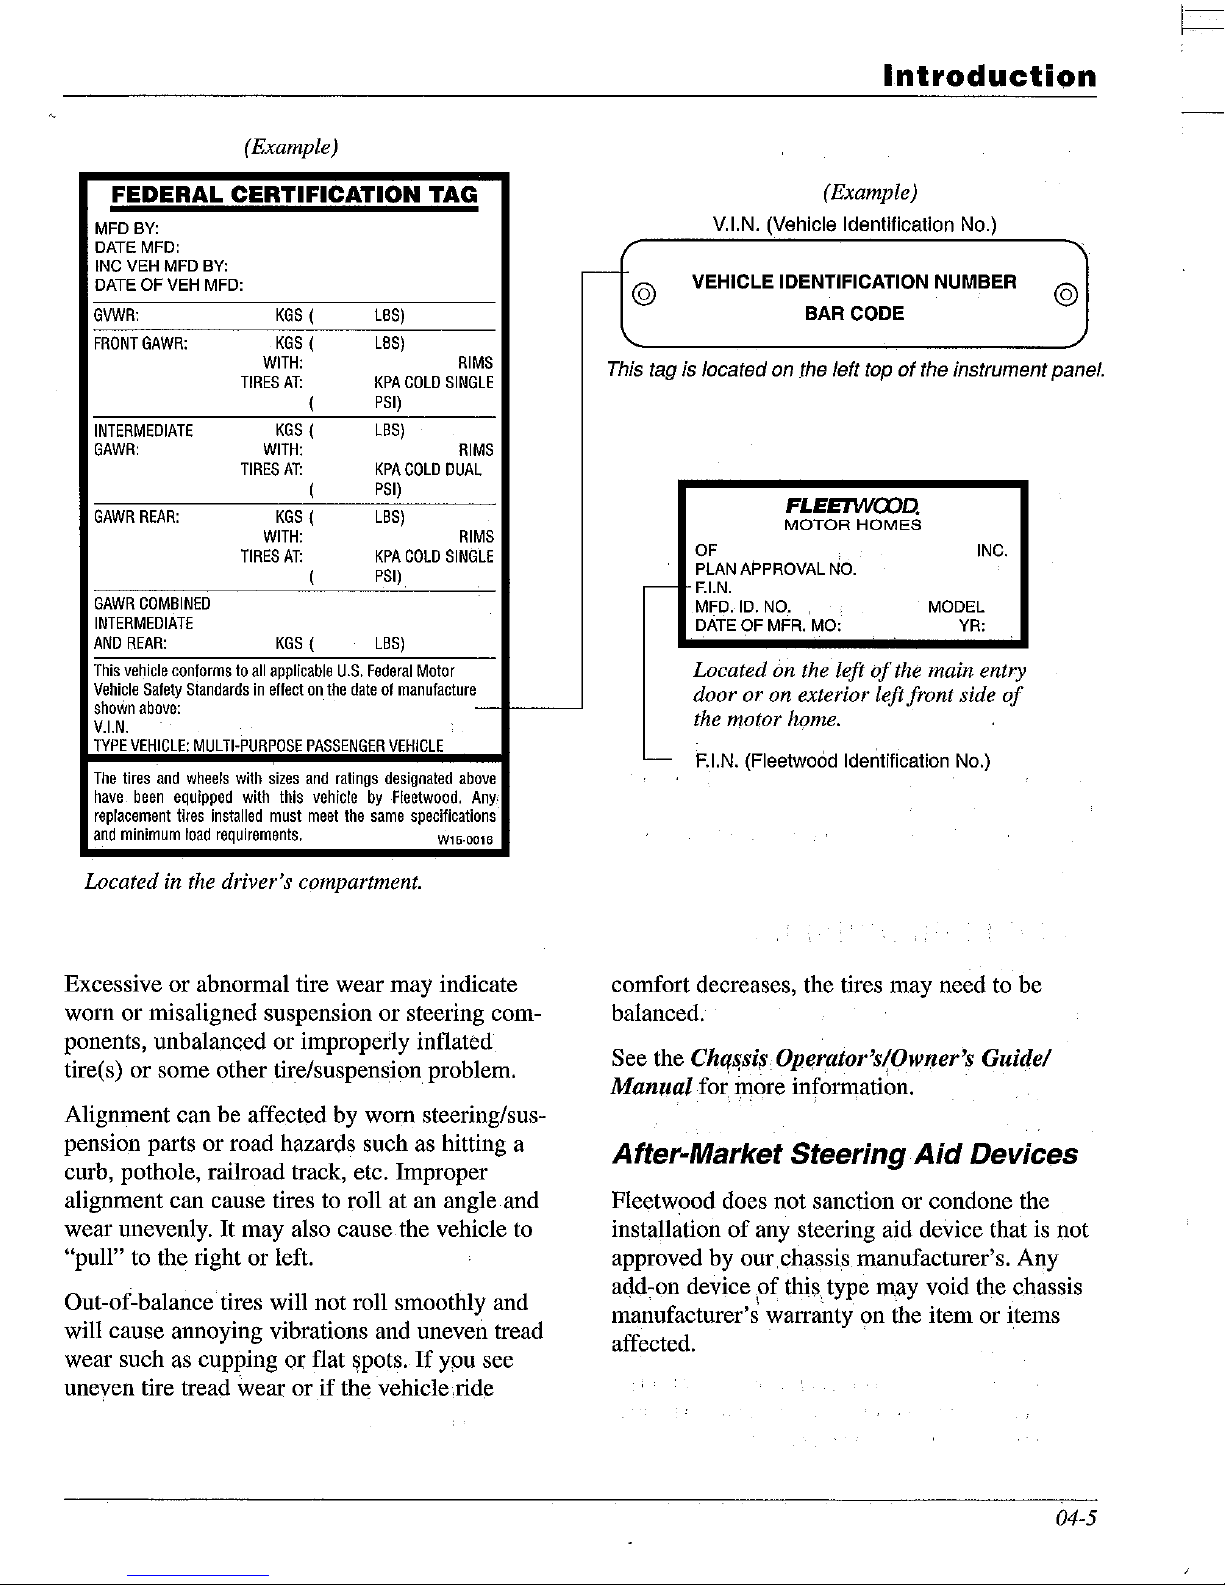
CHASSIS AND VEHICLE
IDENTIFICATION
Several numbers are used to identify the vehicle
and components used on the vehicle.
The V.I.N. or
assigned by the chassis manufacturer and
number used for vehicle registration. The
is found on the Federal Certification Tag attached
in the driver's 'compartment. Refer to this
mation when ordering parts from the chassis
manufacturer or chassis dealer service center.
The
F.I.N. or Fleetwood Identification Number
is Ideated on the tag just outside the main entry
door or on
home.
Use this number when ordeting parts
through your Fleetwood dealer or Service Center.
(See page 04-5 for examples ofY.LN., F.LN. and
Federal Certification Tag.)
Vehicle Identification Number is
the outside left front side
of
the motor
i,s
the
V.LN.
Infor-
i
0-
•
~
This package contains valuable documents about
your motor home and its equipment and systems.
This
'Owner's Manual and the Chassis
Operator's Manual
are in the package. Since this
manual does not cover every possible detail
equipment and options installed on or in your
motor home, there are booklets and instructional
material in the package that will help you safely
operate, maintain and troubleshoot those items.
Be sure you read all this information
understand the safety
included in the package.
and
operating instructions
Additionally, you must
follow all maintenance instructions to insure full
warranty coverage.
If
you decide to sell or trade
your motor home, be sure the new owner receives
all the material in this package.
04-4
and
of
SUSPENSION ALIGNMENT
AND
The front suspension and steering system
vehicle was accurately aligned
before delivery to the dealership. However, after
you have fully loaded the vehicle according to
your personal needs, have
checked and adjusted,
vent uneven tire wear, check the front-end align-
ment periodically.
Please note that front-end alignment after
retail delivery
is
TIRE BALANCE
if
necessary.
is
the owner's responsibility
not
covered under the warranty.
at the factory
the alignment
To
help pre-
of
this
and
(Example)
FEDERAL CERTIFICATION TAG
MFD
BY:
DATE
MFD:
INC
VEH
MFD
BY:
DATE
OF
VEH
MFD:
GVWR:
KGS
(
LBS)
FRONTGAWR:
KGS
(
LBS)
WITH:
RIMS
TIRES
AT:
KPA
COLD
SINGLE
(
PSI)
INTERMEDIATE
KGS
(
LBS)
GAWR:
WITH:
RIMS
TIRES
AT:
KPA
COLD
DUAL
(
PSI)
GAWR
REAR:
KGS
(
LBS)
WITH:
RIMS
TIRES
AT:
KPA
COLD
SINGLE
(
PSI)
GAWR
COMBINED
INTERMEDIATE
AND
REAR:
KGS
(
LBS)
This
vehicle
conforms
to
all
applicable
U.S.
Federal
Motor
Vehicle
Safety
Standards
in
effect
on
the
date
of
manufacture
shown
above:
V.I.N.
TYPE
VEHICLE:
MULTI-PURPOSE
PASSENGER
VEHICLE
The
tires
and
wheels
with
sizes
and
ratings
designated
above
have
been
equipped
with
this
vehicle
by
Fleetwood.
Any.
replacement
tires
installed
must
meet
the
same
specifications
and
minimum
load
requirements.
W15·Q016
Located in the driver's compartment.
Excessive or abnormal tire wear may indicate
worn or misaligned suspension or steering
components, unbalanced or improperly inflated
tire(s) or some other tire/suspension problem.
Alignment can be affected by worn
steering/sus-
pension parts or road hazards such as hitting a
curb, pothole, railroad track, etc. Improper
alignment can cause tires to roll at an angle and
wear unevenly.
It
may also cause the vehicle to
"pull" to the right or left.
Out-of-balance tires will not roll smoothly and
will cause annoying vibrations and uneven tread
wear such as cupping or flat
~pots.
If
you see
uneven tire tread wear or
if
the vehicle ,ride
Introduction
(Example)
V.LN. (Vehicle Identification No.)
r-
@
VEHICLE IDENTIFICATION NUMBER
@
BARCODE
This tag is located on the left top
of
the instrument pane
I.
FLEETWOOD.
MOTOR
HOMES
OF
INC.
PLAN
APPROVAL
NO.
r-
F.I.N.
MFD.ID.
NO.
MODEL
DATE
OF
MFR.
MO:
VR:
Located on the left
of
the main entry
door or on exterior left front side
of
the motor home.
'--
F.LN.
(Fleetwood Identification No.)
comfort decreases, the tires may need
to
be
balanced.
See the
Chqs.si~.
Op~rator's~Owf!er's
Guide/
Manual
for' more information. .
After-Market Steering
Aid
Devices
Fleetwood does not sanction or condone the
installation
of
any steering aid device that is not
approved by our.chassis manufacturer's. Any
addcon device
.of
this type may void the chassis
manufacturer's warranty on the item or items
affected.
04-5
Introduction
WARNINGS, TERMS AND
CONCEPTS FOR SAFE
OPERATION OF YOUR MOTOR
HOME
Vehicle
Crash
Like any other vehicle you may drive, your
motor home can be involved in a vehicle
crash, including a rollover. The motor home
will be damaged and you and others can be
injured or killed. Drive defensively at all
times.
DO
NOT drive
if
you are tired, have
been drinking alcoholic beverages, are under
the influence
of
any controlled substance, or
are taking any medication or drugs that may
impair your sight, hearing, judgment or coordination. Pull off the road and park
in
a safe
area until you can drive safely.
Vehicle
Handling
Your motor home is longer, wider and
higher than a typical car or truck you may
be accustomed to driving. Keep this in
mind as you become familiar with driving
your motor home. New motor home owners
should take special care to learn the driving
and handling characteristics
of
your vehicle
in safe and familiar surroundings. The distribution
of
the weight
of
your motor home
is designed so
it
will handle safely while
being driven.
• When loading the motor home, balance
the load front-to-rear and side-to-side.
• Load
and
secure heavier items lower in
the storage areas than lighter items.
If
you fail to properly load your belongings and
supplies, you will defeat the load distribution
design
of
the motor home, possibly leading to
handling problems and a vehicle crash.
Vehicle
Response
04-6
When you, the driver, accelerate, brake
or
steer the motor home, it responds to these
inputs.
If
you are faced with an emergency
while driving, the way you respond to the
emergency and the way the motor home
responds becomes more critical.
If
you
load, alter or maintain your motor home
improperly, it will not respond as it did
when you first received it in an unloaded
condition.
Improper loading, alteration,
maintenance
and
improper driver
responses to emergency conditions can
lead to handling problems and vehicle
crashes.
Vehicle
Towing
Your motor home can be equipped with a
hitch designed to allow you to tow vehicles
or
other loads behind your motor home.
The maximum amount
of
weight your
motor home can pull or stop is determined
by the manufacturer
of
the
chassis on
whiCh
'your motor home is built. Check the
Chassis Operator's/Owner's Guide/
Manual
provided by the inotor home chas-
sis manufacturer for the limits
on
the
. weight you can tow. .
If
the Chassis Operator's/Owner's Guide!
Manual, does not provide information on
towing weight limits, do not tow a load
of
more than 1900 pounds unless the towed
unit has a properly installed and operating
supplemental brake control system that
operates with the brakes on your motor
home.
o You may be able to increase the weight
of
any towed load by properly installing on the
towed load a supplemental brake control
system that operates with your motor
home's braking system. Even with addi-
tional brakes, you cannot tow more than the
GTW or GCWR for the chassis under your
motor home. Again, check the
Chassis
Opetator's/Owner's Guide/Manual.
o You
CANNOT
increase the towed weight
limit by changing the size
of
your hitch.
o Properly load what you tow to avoid a
vehicle crash.
• Do
not
attempt to tow something that is
too heavy for your chassis.
•
When
driving
in
mountainous
areas,
look for
and
obey highway signs con-
cerning grades
and
curves. Your driving
experience when pulling and stopping a
towed unit on mountain roads will be very
different from what you experience on
level ground.
• State laws in the United States and provinciallaws in Canada vary concerning towing
requirements and limits. Check the laws in
the areas where you anticipate traveling.
Alterations to Your Motor Home
Many motor home owners like to add a
personal touch to their motor home. But
there is a difference between changing
how
your motor home looks versus how
it
handles or responds to driver inputs.
If
you
expect to make any type
of
alteration to
your motor home, consult a professional
who understands the correct way to do the
alteration and how the alteration will
change or affect the stability, handling,
vehicle response, and overall performance
and safety
of
your motor home.
An
improper alteration that affects vehicle
Introduction
handling or response can cause avehicle
crash,
and
any improper alteration to the
electrical
or
LP
gas systems can cause a
fire
and
can endanger
your
motor home
and
its occupants. Fleetwood, your chassis
and other manufacturers stand behind the
motor home
as
delivered -
NOT
as altered
by someone else.
Warning Devices
Your motor home is equipped with warning
devices. Check them before a trip for
proper operation. A disabled warning
device cannot warn you or vehicle
occu-
pants
of
a life-threatening danger. Keep
them working and respond to them quickly.
Examples
of
These Devices Include:
• Carbon Monoxide Detector/Alarm
• LPG Detector/Alarm
• Smoke Detector/Alarm
• Seat Belt Warnings
• Hazard Flashers
• Brake Warning Light
• Engine Warning Light

1-
~
,
This page intentionally blank.
MOTOR HOME LOADING
Responsibility
for
Proper Loading
As
the operator
of
this motor home, you are respon-
sible for its proper and safe loading. This section
is
intended to provide you with helpful information
concerning the loading
of
your motor home.
Your motor home chassis is designed to
CatTY a
specifically rated maximum weight. This weight
includes everything: the weight
of
the empty
motor home itself, all occupants and their
belongings, fuel, fresh water, waste water and
anything else that may be in or attached to the
motor home.
The specified weights
must
never
be exceeded.
If
you do exceed them, you will
change how your motor home handles and
responds, possibly leading to a vehicle crash.
Some Definitions
First
Before discussing loading and weighing, we need
to explain some common weight terms.
We
will
use abbreviations and you should refer back to
these terms
if
you do not understand what the
abbreviation means.
GVWR
(Gross Vehicle Weight Rating)'
is the maximum permissible weight
of
this
fully loaded motor home. The GVWR is
equal to
or
greater than the sum
of
the
Unloaded Vehicle Weight plus the Cargo
Carrying Capacity.
GCWR
(Gross Combined Weight Rating)'
means the value specified by the motor
home manufacturer
as
the maximum allow-
able loaded weight
of
this motor home with
its towed trailer
or
towed vehicle. Towing
and braking capacities may be different.
Refer to Fleetwood and the chassis manufacturer,s manuals for complete information.
GTW (Gross Towed Weight)'
is the maximum loaded weight
of
a trailer or
towed vehicle this motor home with equipped
hitch has been designated
to
tow.
GTW can-
not be increased by changing the trailer hitch.
ON
THE
ROAD
GAWR
(Gross Axle Weight Rating)'
means the maximum permissible loaded
weight a specific axle is designed to carry.
MTW
(Maximum Tongue Weight)'
is the maximum permissible downward
force exerted on the hitch ball by the towed
vehicle coupler.
UVW
(Unloaded Vehicle Weight)'
means the weight
of
this motor home as
built at the factory with full fuel, engine oil
and coolants. The
UVW
does not include
cargo, fresh water,
LP gas, occupants, or
dealer installed accessories.
CCC
(Cargo Carrying Capacity)'
is equal to GVWR minus each
of
the fol-
lowing:
UVW, full fresh (potable) water
weight (including water heater), full
LP
gas
weight and
SCWR.
SCWR
(Sleeping Capacity Weight Rating)
is the manufacturer's designated number
of
sleeping positions multiplied by 154
pounds (70 kilograms).
Hitch Rating
means the maximum allowable weight
of
a
towed trailer
or
towed vehicle. The GCWR
of
the motor home must never be exceeded,
even
if
the towed trailer or towed vehicle
weight is less than the hitch rating.
Designated Seating Capacity
(Canadian units
only)
the number
of
sleeping positions desig-
nated equals the seating capacity.
*These ratings are shown on the Cargo
Carrying Capacity label.
A.
WARNING
The heaviest loaded motor home with all passengers,
goods, water, driver and towed vehicle must not
exceed any of the
following:
1.
The gross vehicle weight rating (GVWR).
2.
The gross combination weight rating (GCWR).
3.
The fronVrear gross axle weight ratings (GAWRs).
4.
The individual tire and wheel ratings.
05-1
On
The
Road
Towing a Vehicle
or
Trailer
("Towed
Load
or
Towed Unit'')
.1'1
NOTE 1
Some states and provinces require brakes
and
safety
chains when towing vehicles.
Consult the proper
authorities in the states
or
provinces through which
you will be traveling.
When you use your motor home to tow, remem-
ber that you must stop the towed load with your
motor home's brakes. This is critical on hills
and in the mountains where you may encounter
sharp curves and possibly irregular road surfaces.
Check your motor home
Chassis Operator's/
Owner's Guide/Manual for the maximum
weight your motor home can pull and stop on
both level and steep roads.
If
the Chassis
Operator's/Owner's Guide/Manual
does not
provide information on towing weight limits, do
not tow a load
of
more than 1000 pounds unless
the towed unit has a properly installed and
operating supplement brake control system that
operates with the brakes on your motor home.
The supplemental brakes will
NOT allow you to
tow more than the listed GCWR for your motor
home.
If
you
cannot stop,
you
will crash.
You must not exceed the tire capacities
or
the
weight factors listed below
if
you expect to tow
something behind your motor home, either with
or
without a dolly. The factors are:
•
GCWR
- Gross Combined Weight Rating
•
GTW
- Gross Towed Weight
•
MTW -Maximum
Tongue Weight
• GAWR - Gross
Axle
Weight Rating
The ratings for the above factors are all
listed on the Cargo Carrying Capacity label
posted inside the motor home.
• Tire Capacity
The tire capacity is dependent upon the
inflation pressure set at the load applied.
If
you expect to tow with your motor home, there
are additional guidelines that you must follow:
05-2
• Do
not
use a load equalizing hitch
if
your
hitch
head
receiver is below 10,000 lbs.
capacity.
It
could cause structural damage
to the motor
home
frame
components.
• Do
not
exceed
Maximum
Tongue Weight
as listed on the carrying capacity label.
Heavier tongue weights can change
your
vehicle's handling
and
response, can cause
a vehicle to crash,
and
will restrict
your
coverage under the Ownercare Warranty.
• Consult with
your
dealer
or
towing equip-
ment/trailer supplier to determine
the
cor-
rect type
of
hitch
head
assembly
and
equipment
you
should
use
for
towing
and
leveling the load
you
intend
to pull.
• Do not tow anything weighing more than
the
GTW
listed on the Cargo Carrying
Capacity label. Heavier towed loads can
exceed your chassis' ability to
pull
and
stop
the load
and
cause a vehicle crash,
da11Ulge
the motor home structure
or
drive train,
and
restrict your coverage under the Fleetwood
or
chassis 11Ulnufacturer's warranty.
Changing the trailer hitch will not increase
the tow capacity
of
the motor home.
• Consult the Chassis Operator's/Owner's
Guide/Manual,
and
U.S.
state
and
Canadian provincial laws
for
towing weight
limits
and
for
guidelines
for
installing supplemental braking systems that operate with
your
motor home's brakes.
A.
WARNING
Do
not exceed the
rated
load
of
the motor
home,
or
the
rated
load
of
any
axle.
Exceeding the GVWR,
GAWR,
GTW
or
GCWR
of your motor
home
can
cause handling problems, a vehicle crash, damage
your motor
home
and
void
your warranties.
The way your motor home handles and responds
will be affected by the way the towed unit is
loaded.
If
the tongue weight is too light in relation
to the GTW, handling and response will change
and your motor home will operate less safely.
Careful load planning and safe experimentation
with different loading patterns in what you are
towing can avoid this risk and make your driving
and towing experience safer and more enjoyable.
,I
--
On
The
Road
Weight-Distributing
Hitch
Head
Assembly
Chain
Loop
Chain
Bracket
".oo~'Th"
r?
Weight-Carrying
Hitch
~;:/)
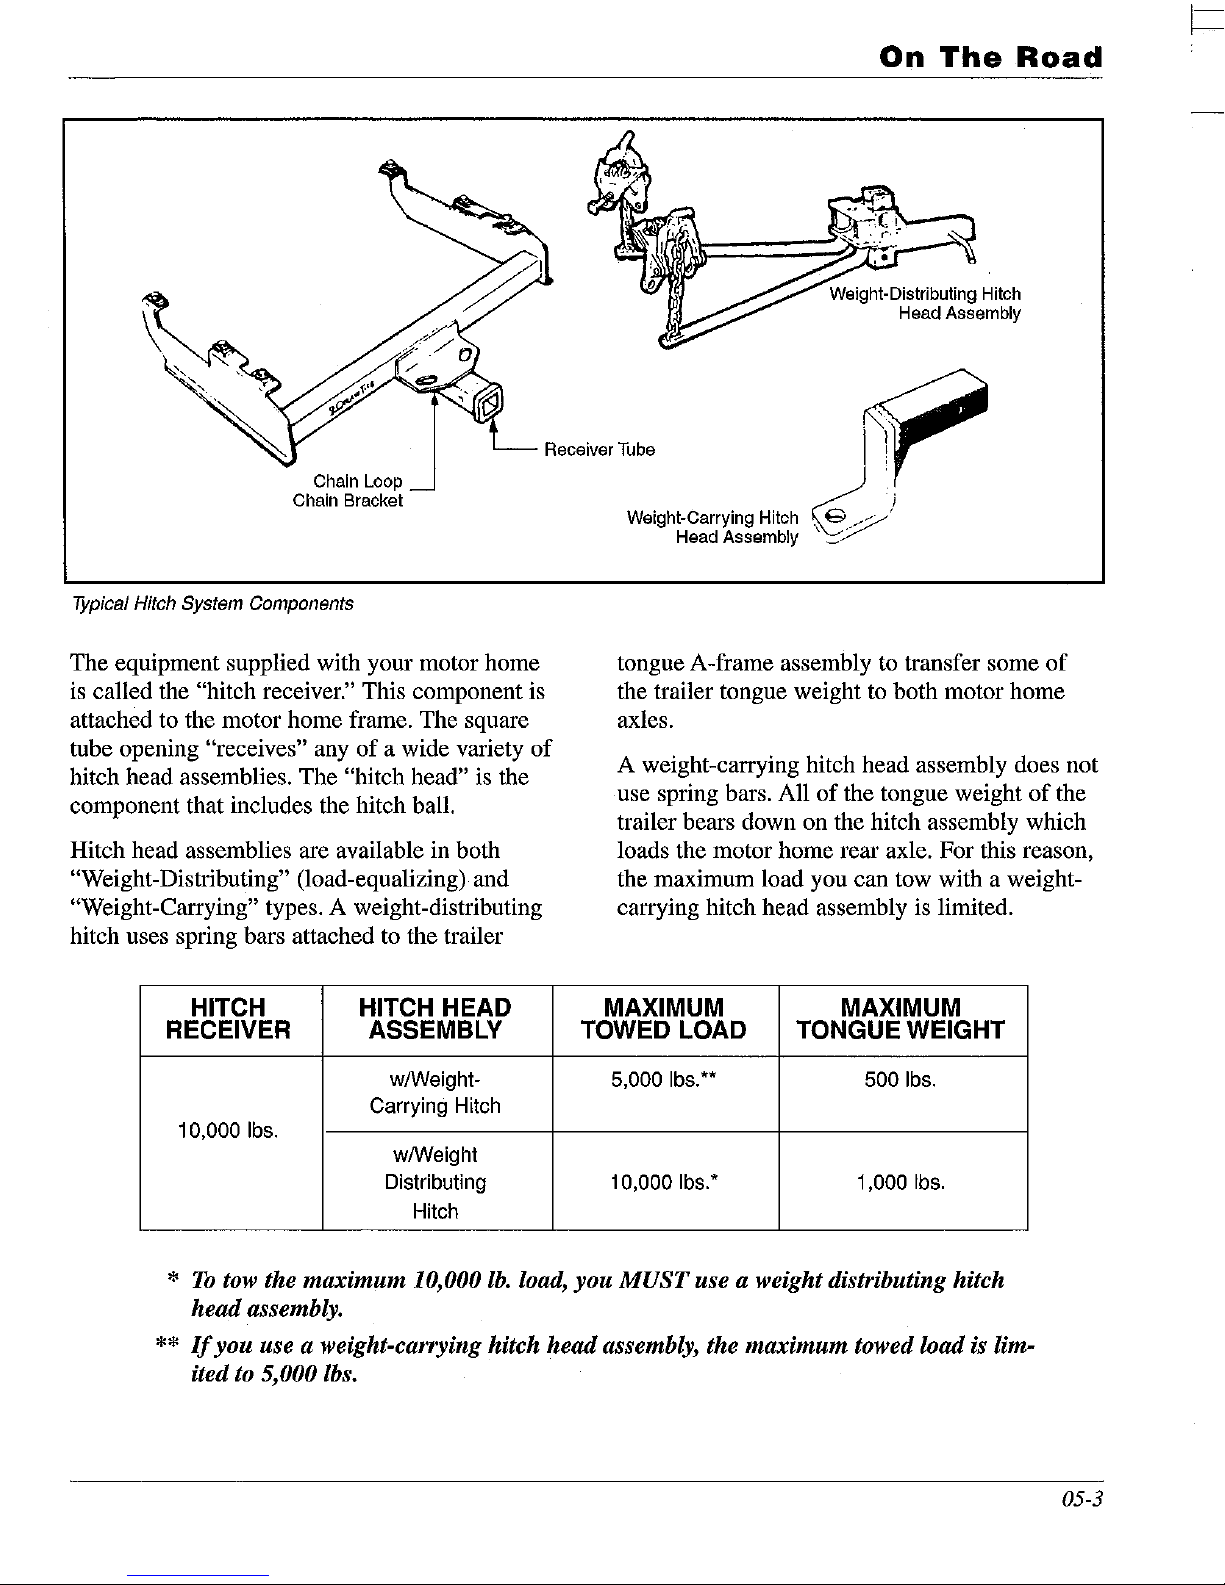
Typical
Hitch
System
Components
The equipment supplied with your motor home
is called the
"hitch receiver." This component is
attached to the motor home frame. The square
tube opening
"receives" any of a wide variety
of
hitch head assemblies. The "hitch head" is the
component that includes the hitch ball.
Hitch head assemblies are available in both
"Weight-Distributing" (load-equalizing) and
"Weight-Carrying" types. A weight-distributing
hitch uses spring bars attached to the trailer
HITCH HITCH HEAD
RECEIVER ASSEMBLY
wlWeight-
Carrying Hitch
10,000Ibs.
wlWeight
Distributing
Hitch
Head
Assembly
~'
tongue A-frame assembly
to
transfer some
of
the trailer tongue weight
to
both motor home
axles.
A weight-carrying hitch head assembly does not
use spring bars. All
of
the tongue weight
of
the
trailer bears down on the hitch assembly which
loads the motor home rear axle. For this reason,
the maximum load you can tow with a
weight-
carrying hitch head assembly is limited.
MAXIMUM MAXIMUM
TOWED LOAD
TONGUE WEIGHT
5,000 Ibs.*'
5001bs.
10,000 Ibs.* 1,000Ibs.
*
To
tow the maximum 10,000
lb.
load, you
MUST
use a weight distributing hitch
head assembly.
**
If
you use a weight-carrying hitch head assembly, the maximum towed load is lim-
ited to 5,000 lbs.
05-3

On
The
Road
The table
on
the previous page outlines the hitch
head assembly combinations and the resulting
maximum towed loads that are available to you.
The ratings associated with the particular hitch
receiver supplied with your motor home are
noted on the weight tag and on a label affixed to
the hitch receiver.
you should use for towing and leveling the load
you intend to pull.
it..
WARNING
Failure
to
understand
and
follow
these
guidelines
as
presented
in
this
section
could
result
in
damage
to
the
motor
home
frame
or
body,
could
cause
unstable
driv-
ing
and
handling
characteristics,
and
will
restrict
your
warranty
coverage.
Consult with your dealer or towing
equipment/trailer supplier to determine the cor-
rect type
of
hitch head assembly and equipment
05-4
CARGO
CARRYING CAPACITY
PRODUCT
__________
YEAR
____
'MODEL
______
'F.I.N.
______
_
FRONTGAWR
REAR GAWR (Rear GAWR Includes the Drive and
Tag
GAWR)
GTW
GCWR
GVWR
minus
UVW
minus
fresh
water weight
of
__
gallons @ 8.3
!b
I gal
minus LP-Gas weight of
__
gallons @ 4.5
Ib
I gal
minus
SCWR
of
__
persons
@ 154
Ib
I
person
cee for this Motor
Home·
pounds
'Dealer Installed equipment end towed vehlele longue weight
will
reduee CCC. Consumer's sllould request such
InfQrmallon
from
Iha
dealer.
All
WeIghts
and
Capaclt1&S
are approximate.
HITCH
RATING
weight carrying
weight distributing
MTW
5001bs.
1000 fbs.
HITCH
RATING
5000 fba,
10000 fbs.
(kilograms)
GVWR
(Gross
VehIcle
Weight Rating):
Is
the
maxllnum permissible weight
01
this motor
home.
The
GVWR
is
equal to
or
greater
than
the
sum
of
the
Unloaded
Vehicle
Weight plus
the
Cargo Carrying
CapaCity.
GCWR
(Gross Comblned,welght Rating):
Is
the
value
spec!f!ed
by
the
motor
home
manufacll.irer
as
the
maximum
allowable
loaded
weight
01
this motor
home
with its
towed
trailer or
towed
vehicle.
Towing
and
braking capabilities
may
differ.
Refer
to
Fleetwood
and
chassis manufacture manual(s) for complete Information.
GAWR
(Gross
Axle
Weight Rating):
Is
the
maximum permissible loaded weight a specific
axle
Is
designed
to
carry.
GTW
(Gross
Towed
Weight):
Is
the
maximum
loaded
weight
of
a trailer or car this
moto~
home
with
equipped
hitch
has
beliln
designed
to
tow.
GTW cannot
be
increased
by
changing
the
receiver hitch.
MTW
(Maximum
Tongue
Weight):
Is
the
maximum
permiSSible
downward
force
exerted
on
the
hitch
ball
by
the
towed
vehicle
coupler.
UVW'(Unloaded
Vehicle
Weight): is
the
weight of
the
motor
home
as
buill
at
the
factory
with
full
fUef,
engine
011,
and
coolants.
eec
(Cargo
Carrying Capacity):
Is
equal
to
GVWR
minus
each
of
the
following:
UVW,
full fresh (potable) waler weight (Including
the water heater), full
LP-Gas
weight
and
SCWR.
sewn
(Sleeping Capacity Weight Rating):
Is
the
manufaclUre's
designated number
of
sleeping positions multlplied
by
154
pounds
(70
kilograms).
HITCH
RATING
Is
the
maximum weight capacity
of
the
hitch receiver equipped wllh this vehicle.
The
GCWR
01
this motor
home
must
never
be
exceeded,
even
if
the
towed
trailer
or
towed
vehicle weight is less than
the
hitch rating.
WARNING:
The
Heaviest loaded Motor
Home
With
All
Passengers,
Goods,
Water,
Driver
and
Towed
load
Must
Not
Exceed
Any
of
the
Following:
1.)
The
front I rear gross
axle
weight ratings
(GAWR's)
2.)
The
gross vehicle weight rating
(GVWR)
3.)
The
gross combined weight
rating
(GCWR)
4.)
The
Individual tire
and
wheel
ratings
Fleetwood
has
designed
Its
recreational vehicles
to
provide a variety of
uses
for
its
customers.
Each
vehicle features optional
sealing, sleeping, storage
and
fluid
capacities.
The
user
Is
responsible for selecllng
the
proper combination of loads to ensure
that
the
recreational vehicle's capacllles
are
not
exceeded.
CONSULT
MOTOR
HOME
AND
CHASSIS MANUFACTURE'S
OWNERS,OPERATOR
MANUAl(S)
FOR
WEIGHING INSTRUCTIONS AND
TOWING
GUIDELINES INCLUDING
TOWED
VEHICLE·
AIJXILIARY BRAKE REQUIREMENTS.
Example Cargo Carrying Capacity label
'.
--
Cargo Carrying Capacity
and
Load
Distribution
The amount
of
cargo weight you can place in
your motor home is the motor home's GVWR
minus its UVW, or maximum capacity minus the
weight of your motor home
as
assembled by
Fleetwood, i.e., without dealer installed
accessories, water,
LP gas, cargo or occupants.
J'I
NOTE l
Cargo Carrying Capacities (CCC) of your motor
home are specified
on
a label affixed
to
the inside
of
the motor home.
The
label includes all factory
installed options.
If other equipment such as leveling
jacks, awnings, roof pods,
etc.,
are installed after the
motor home leaves the factory
the
weight
of
these
items must be subtracted from the total
of
the
pas·
senger and cargo carrying capacities.
When the motor home is being designed, the
number and size
of
storage compartments, the
liquid tank capacities and number
of
belted seating positions are determined for value and
convenience.
If
you fill all liquid tanks to capacity, fill all storage compartments and cupboards
to
maximum volume and fill all available seating
positions with passengers, the motor home could
be
overloaded. (See Loading Tips).
Be
aware of
the weight
of
the items you store, where you
store the items in your motor home, and weigh
your motor home after it is fully loaded.
In addition to knowing the overall weight that
can be safely loaded in or attached
to
the motor
home, you must know how
to
distribute the
weight so that correct amounts
of
weight are dis-
tributed between the axles or front-to-rear and
also between the wheels or side-to-side.
It
is also
important to place heavier items in under-thefloor storage or low in the motor home.
If
you
make the motor home top heavy or much too
heavy on one side, the motor home can be overturned and crash in a curve, turn or in an emer-
gency steering maneuver. When the load is properly distributed, your motor home will handle
and respond safely, and you
as
the driver can be
more confident and will be more comfortable.
On
The
Road
If
your motor home is improperly loaded, it may
be unsafe to drive, uncomfortable to drive, or
both. Axle load is important and it is recommended that you should load your motor home
so that the front axle is loaded to at least 80%
of
the front GA WR.
How
to
Weigh
Your
Loaded
Motor
Home
Refer to your local telephone directory
to
find a
public weigh station. The following procedures
will help you determine whether your loaded
motor home (complete with cargo, fluids, passengers, and driver) is within GAWR, GVWR,
and GCWR limits. When you arrive at a weigh
station, the attendant will guide you through the
correct positioning
of
the motor home on the
scales.
Your
RV
must be weighed fully loaded, that is,
with passengers, food, clothing, fuel, water, propane, supplies, etc. Any towed vehicle (carl
pickup, boat or trailer) or item loaded on brackets
art the back of the
RV,
such
as
bikes or motor-
cycles, should also be included in the weighing.
The following steps are suggested and are illus-
trated on the following pages:
1.
Pull onto the scale so that only the front
axle is on the platform (with the end
of
the
scale midway between the front and rear
axles), and record the scaled weight.
2.
Pull forward until the full unit is on the
scale, and record the scaled weight.
3.
Pull forward so that only the rear axle is on
the scale (again with the edge
of
the scale
midway between the front and rear axles),
and record the scaled weight.
If
the
RV
has a rear tag axle, pull forward
so that only the tag axle remains on the
scale, and record the scaled weight.
To
determine individual wheel position weights,
it
is.
necessary to repeat the first three steps, but
this time, use only one side of the scale, as
,shown on the following pages.
05-5
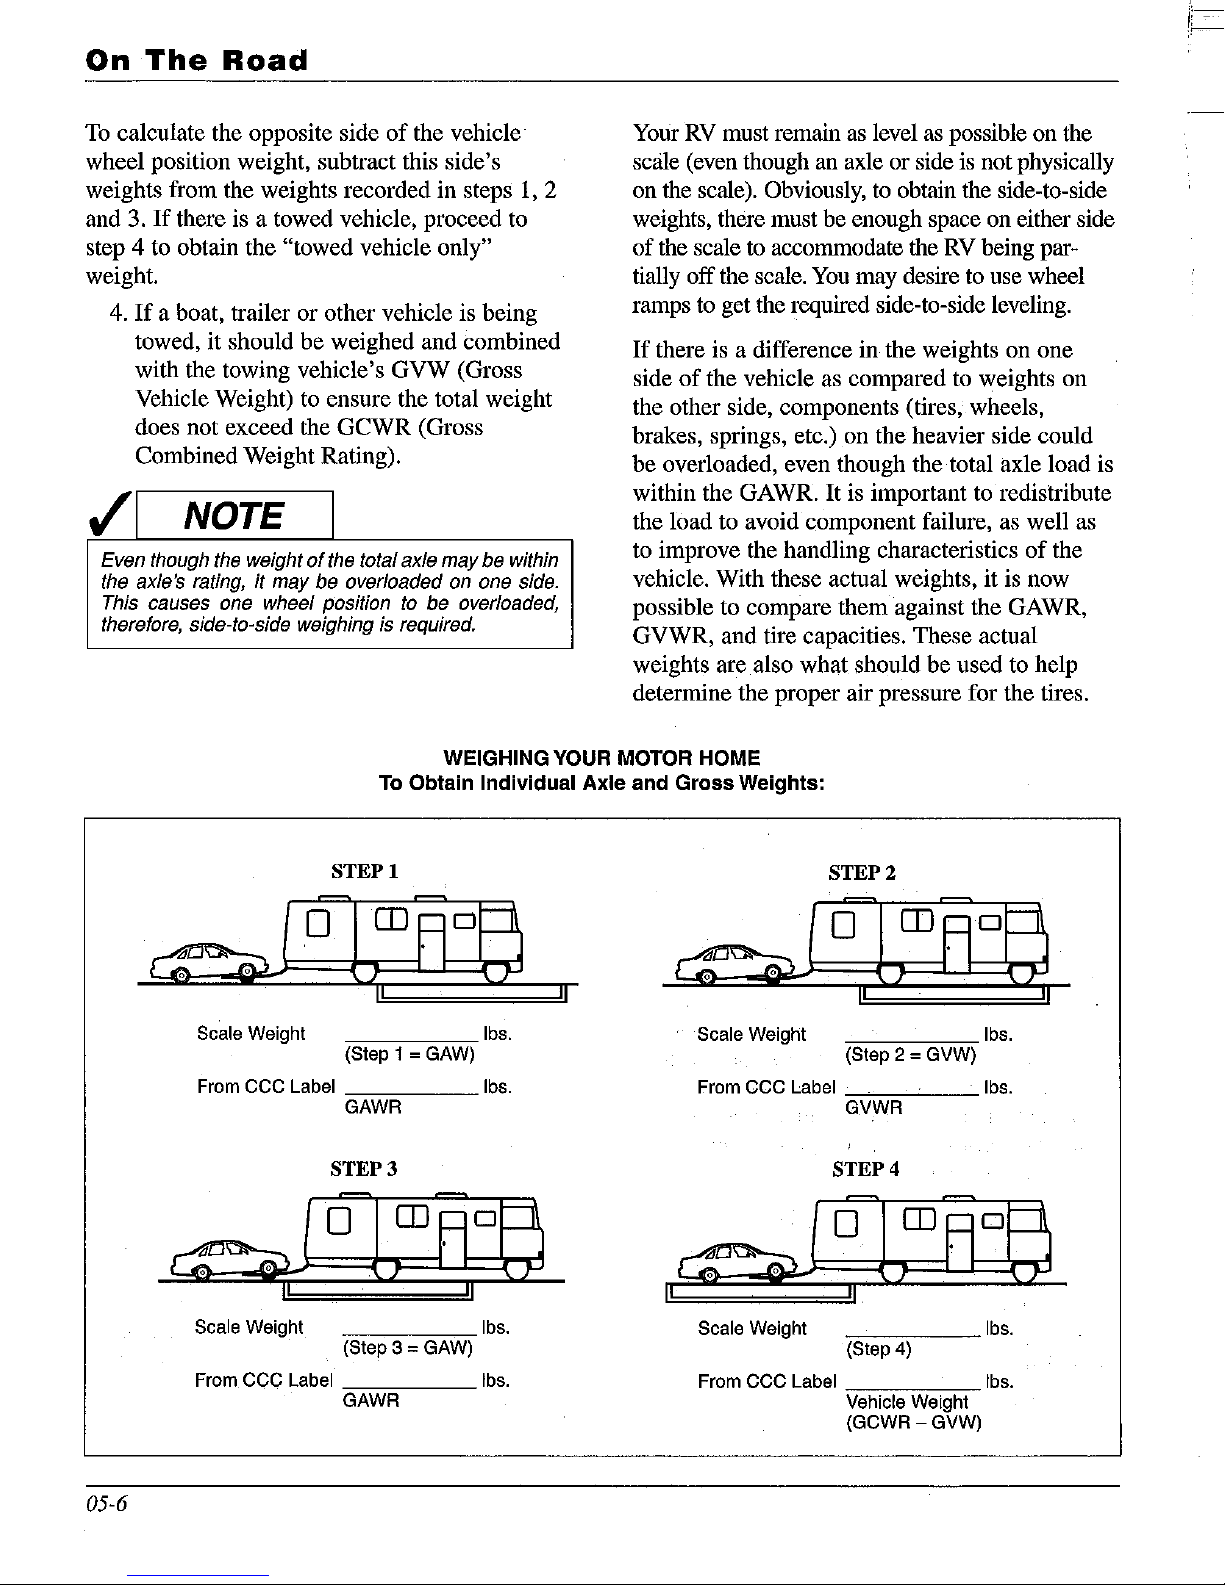
On
The
Road
To
calculate the opposite side
of
the vehicle
wheel position weight, subtract this side's
weights from the weights recorded in steps
I,
2
and 3.
If
there is a towed vehicle, proceed to
step 4 to obtain the
"towed vehicle only"
weight.
4.
If
a boat, trailer or other vehicle is being
towed, it should be weighed and combined
with the towing vehicle's GVW (Gross
Vehicle Weight) to ensure the total weight
does not exceed the GCWR (Gross
Combined Weight Rating).
v'1
NOTE I
Even though the weight
of
the total axle may be within
the axle's rating, it may be overloaded on one side.
This causes one wheel position to be overloaded,
therefore, side-to-side weighing
is
required.
Your
RV
must remain as level
as
possible on the
scale (even though an axle or side is not physically
on the
scale). Obviously, to obtain the side-to-side
weights, there must be enough space on either side
of
the scale to accommodate the
RV
being par-
tially off the scale.
You
may desire to use wheel
ramps to get the required side-to-side leveling.
If
there is a difference in the weights on one
side
of
the vehicle as compared to weights on
the other side, components (tires, wheels,
brakes, springs, etc.) on the heavier side could
be
overloaded, even though the total axle load is
within the GAWR.
It
is important to redistribute
the load to avoid component failure, as well as
to improve the handling characteristics
of
the
vehicle. With these actual weights, it is now
possible to compare them against the GAWR,
GVWR, and tire capacities. These actual
weights are also what should be used to help
determine the proper air pressure for the tires.
WEIGHING YOUR MOTOR HOME
05-6
To
Obtain Individual Axle and Gross Weights:
STEPl
Scale Weight
=
___
:;-=-;-;-;;-Ibs.
(Step
1 -
GAW)
From
eee
Label
==o-
__
Ibs.
GAWR
Scale Weight
STEP 3
=:-::-:::-=;-;;;-
Ibs.
(Step 3 =
GAW)
From
eee
Label
==,--
__
Ibs.
GAWR
II
II
Scale Weight
STEP 2
=_=-=;;-;:;-Ibs.
(Step 2 = GVW)
From
eee
Label ==::--,
__
Ibs.
GVWR
Scale Weight
STEP 4
=_-;-;--
__
Ibs.
(Step
4)
From
eee
Label
Ibs.
Vehicle Weight
(GeWR-GVW)
I
I'
-
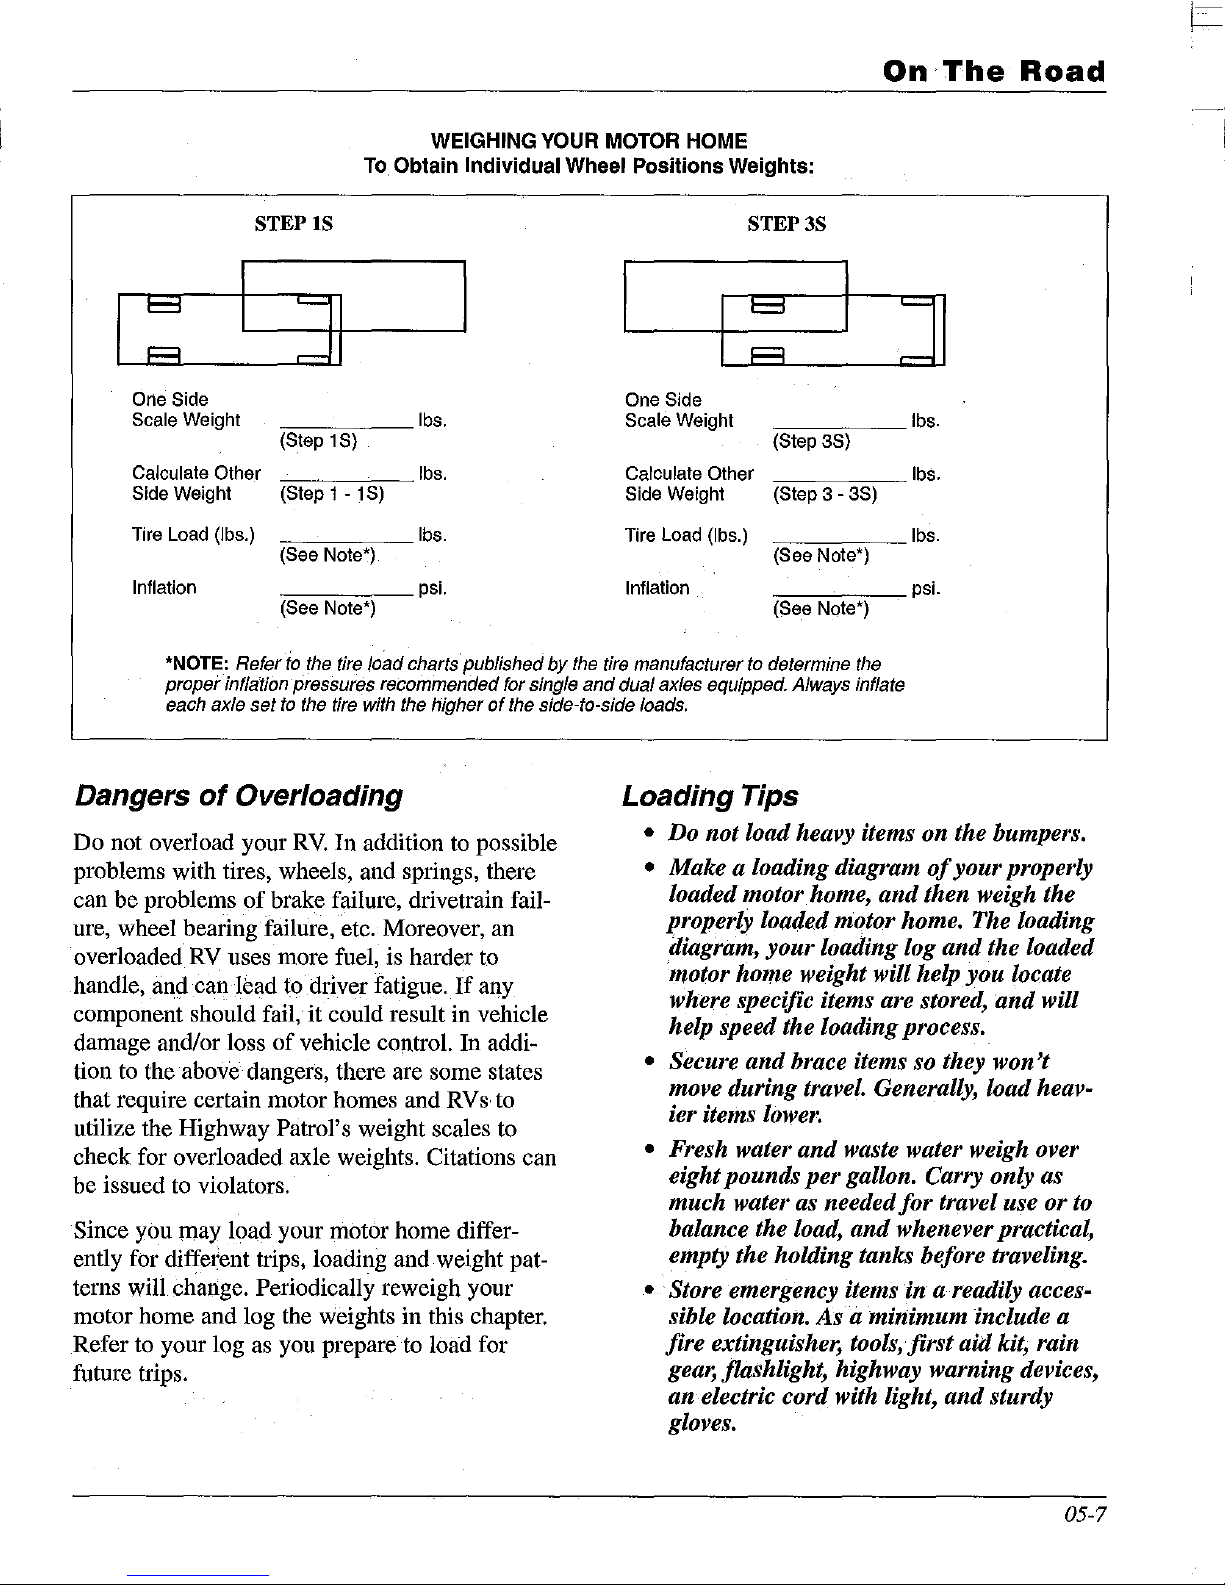
STEP
IS
To.
WEIGHING YOUR MOTOR HOME
Obtain
Individual
Wheel Positions Weights:
STEP3S
On·The
Road
I
:
I
One Side
Scale Weight Ibs. Scale Weight
Calculate Other
Side Weight (Step 1 - 1
Tire Load
Inflation
Dangers
Do
not overload your
problems with tires, wheels, and springs, there
can
be
problems
ure, wheel bearing failure, etc. Moreover, an
overloaded
handle, and can
component should fail, it could result in vehicle
damage and/or loss
tion
to
the above dangers, there are some states
that require certain motor homes and
utilize the Highway Patrol's weight scales to
check for overloaded axle weights. Citations can
be issued to violators.
Since you
ently for different trips, loading and weight patterns will change. Periodically reweigh your
motor home and log the weights in this chapter.
Refer to your log as you prepare
future trips.
(Ibs.) Ibs. Tire Load (Ibs.) Ibs.
'NOTE:
proper inflation pressures recommended
each
axle set
of
RV
uses more fuel, is harder to
Illay load your motor home differ-
31
(Step 1 S) (Step 3S)
Ibs.
S)
(See
Note')
(See
Note') (See Note')
Refer
to
the
tire
to
the
tire
Overloading
RV.
In addition to possible
of
brake failure, drivetrain fail-
lead to driver fatigue.
of
vehicle
psi.
load chartspublished by
for
with
the
COlltrol.
to
higher
If
In addi-
RV
100id
single and dual axles equipped. Always inflate
of
the
side-to-side
any
s to
for
the
tire
I
:
1
One Side
Calculate Other Ibs.
Side Weight (Step 3 - 3S)
(See
Note')
Inflation
manufacturer
loads.
to
determine
Loading Tips
• Do not load heavy items on the bumpers.
• Make a loading diagram
loaded motor home,
properly
diagram,
motor home weight will help you locate
where specific items are stored,
help speed the loading process.
• Secure
move during travel. Generally, load heavier items lower.
• Fresh water
eight pounds
much water as needed
balance the load,
empty the holding tanks before traveling_
• Store emergency items
sible location.
fire extinguisher, tools,first aid kit, rain
gear, flashlight, highway warning devices,
an
electric cord with light,
gloves.
loatled motor home. The loading
your
loading log
and
brace items so they won't
and
per
As
JI
Ibs.
psi.
the
of
your
properly
and
then weigh the
and
the loaded
and
waste water weigh over
gallon. Carry only as
for
travel use
and
whenever practical,
in
a readily acces-
a minimum include a
and
sturdy
will
or
to
05-7
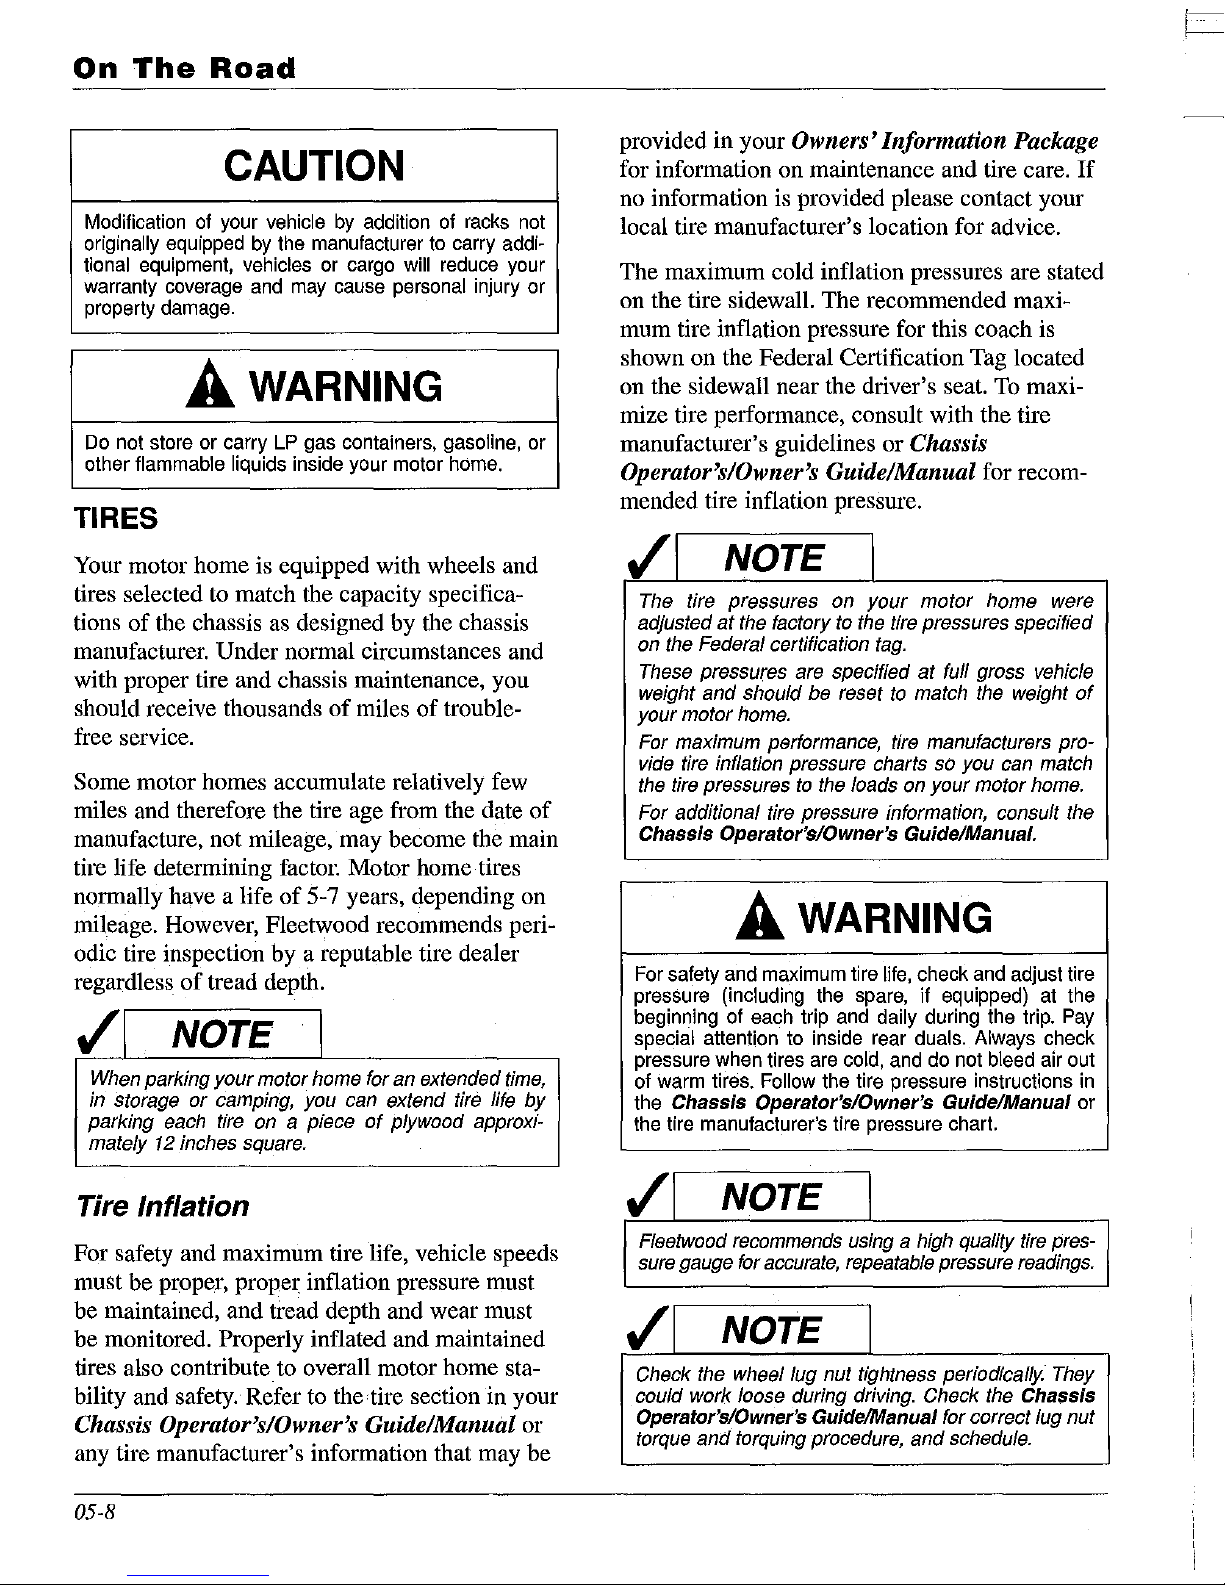
On
The
Road
CAUTION
Modification of your vehicle
originally equipped
tional equipment, vehicles or cargo will reduce your
warranty coverage
property damage.
by
and
by
addition of racks not
the manufacturer to carry addi-
may
cause personal injury or
A WARNING
Do
not store or carry
other flammable liquids inside your motor home.
TIRES
LP
gas containers, gasoline, or
provided in your Owners' Information Package
for information on maintenance and tire care.
If
no information is provided please contact your
local tire manufacturer's location for advice.
The maximum cold inflation pressures are stated
on the tire sidewall. The recommended maxi-
mum tire inflation pressure for this coach is
shown on the Federal Certification Tag located
To
on the sidewall near the driver's seat.
maximize tire performance, consult with the tire
manufacturer's guidelines or
Chassis
Operator's/Owner's Guide/Manual for recom-
mended tire inflation pressure.
Your motor home is equipped with wheels and
tires selected to match the capacity specifications
of
the chassis as designed by the chassis
manufacturer. Under normal circumstances and
with proper tire and chassis maintenance, you
should receive thousands
of
miles
of
trouble-
free service.
Some motor homes accumulate relatively few
miles and therefore the tire age from the date
of
manufacture, not mileage, may become the main
tire life determining facto!: Motor home tires
normally have a life
of
5-7 years, depending on
mileage. However, Fleetwood recommends periodic tire inspection by a reputable tire dealer
regardless
./1
When
in storage or camping, you can extend tire life by
parking each tire on
mately
of
tread depth.
NOTE 1
parking your motor home for an extended
12
inches square.
a piece
of
plywood approxi-
time,
./1
The tire pressures on your motor home were
adjusted
on the Federal certification
These pressures are specified
weight and should be reset
your motor home.
For maximum performance, tire manufacturers provide tire inflation pressure charts
the tire pressures
For
Chassis
NOTE
at
the factory to the tire pressures specified
to
additional tire pressure information, consult the
Operator's/Owner's Guide/Manual.
1
tag.
at
full gross vehicle
to
match the weight
so you can match
the loads on your motor home.
A WARNING
For safety and maximum tire
presSure (including the spare, if equipped) at the
beginning of each trip and daily during the trip.
special attention to inside rear duals. Always check
pressure when tires are cold, and do not bleed air out
of warm tires.
the Chassis Operator's/Owner's Guide/Manual or
the tire manufacturer's tire pressure chart.
Follow the tire pressure instructions
life,
check and adjust tire
Pay
of
in
Tire Inflation
For safety and maximum tire life, vehicle speeds
must
be
proper, proper inflation pressure must
be maintained, and tread depth and wear must
be monitored.
tires also contribute to overall motor home stability and safety. Refer to the tire section in your
Chassis Operator's/Owner's Guide/Manual or
any tire manufacturer's information that may
05-8
Properly inflated and maintained
be
./1
Fleetwood recommends using a high quality tire pres-
sure gauge for accurate, repeatable pressure readings.
,/1
Check the wheel lug nut tightness periodically. They
could work loose during driving.
Operator's/Owner's GuidelManual for correct lug nut
torque and torquing procedure, and schedule.
NOTE
NOTE
1
1
Check the Chassis
 Loading...