

FlavorChef EP0030K User Manual
USER’S GUIDE
MODEL No: EP0030K
© 2015 Thane IP Limited
MADE IN CHINA
Distributed by:
FlavorChef™ MNL ENG R0 511207
Thane USA, Inc.
Canton OH 44718, U.S.A.
www.thane.com
Thane Canada Inc.
Mississauga ON L4W 5M6, Canada
www.thane.ca
Operadora Ainoa, S.A.P.I. DE C.V.
C.P 02480, México. D.F.
www.mejorcompratv.com
Thane Direct UK Ltd
London WC2A 3LH, UK
www.thane.tv
TVINS
211 18 Malmö, Sweden
www.tvins.com
“Thane”, “FlavorChef” and related logos and variations are trademarks or registered trademarks,
in Canada and/or other countries, of Thane IP Limited.
Danoz Direct Pty Ltd
Alexandria NSW 2015, Australia
www.danozdirect.com.au
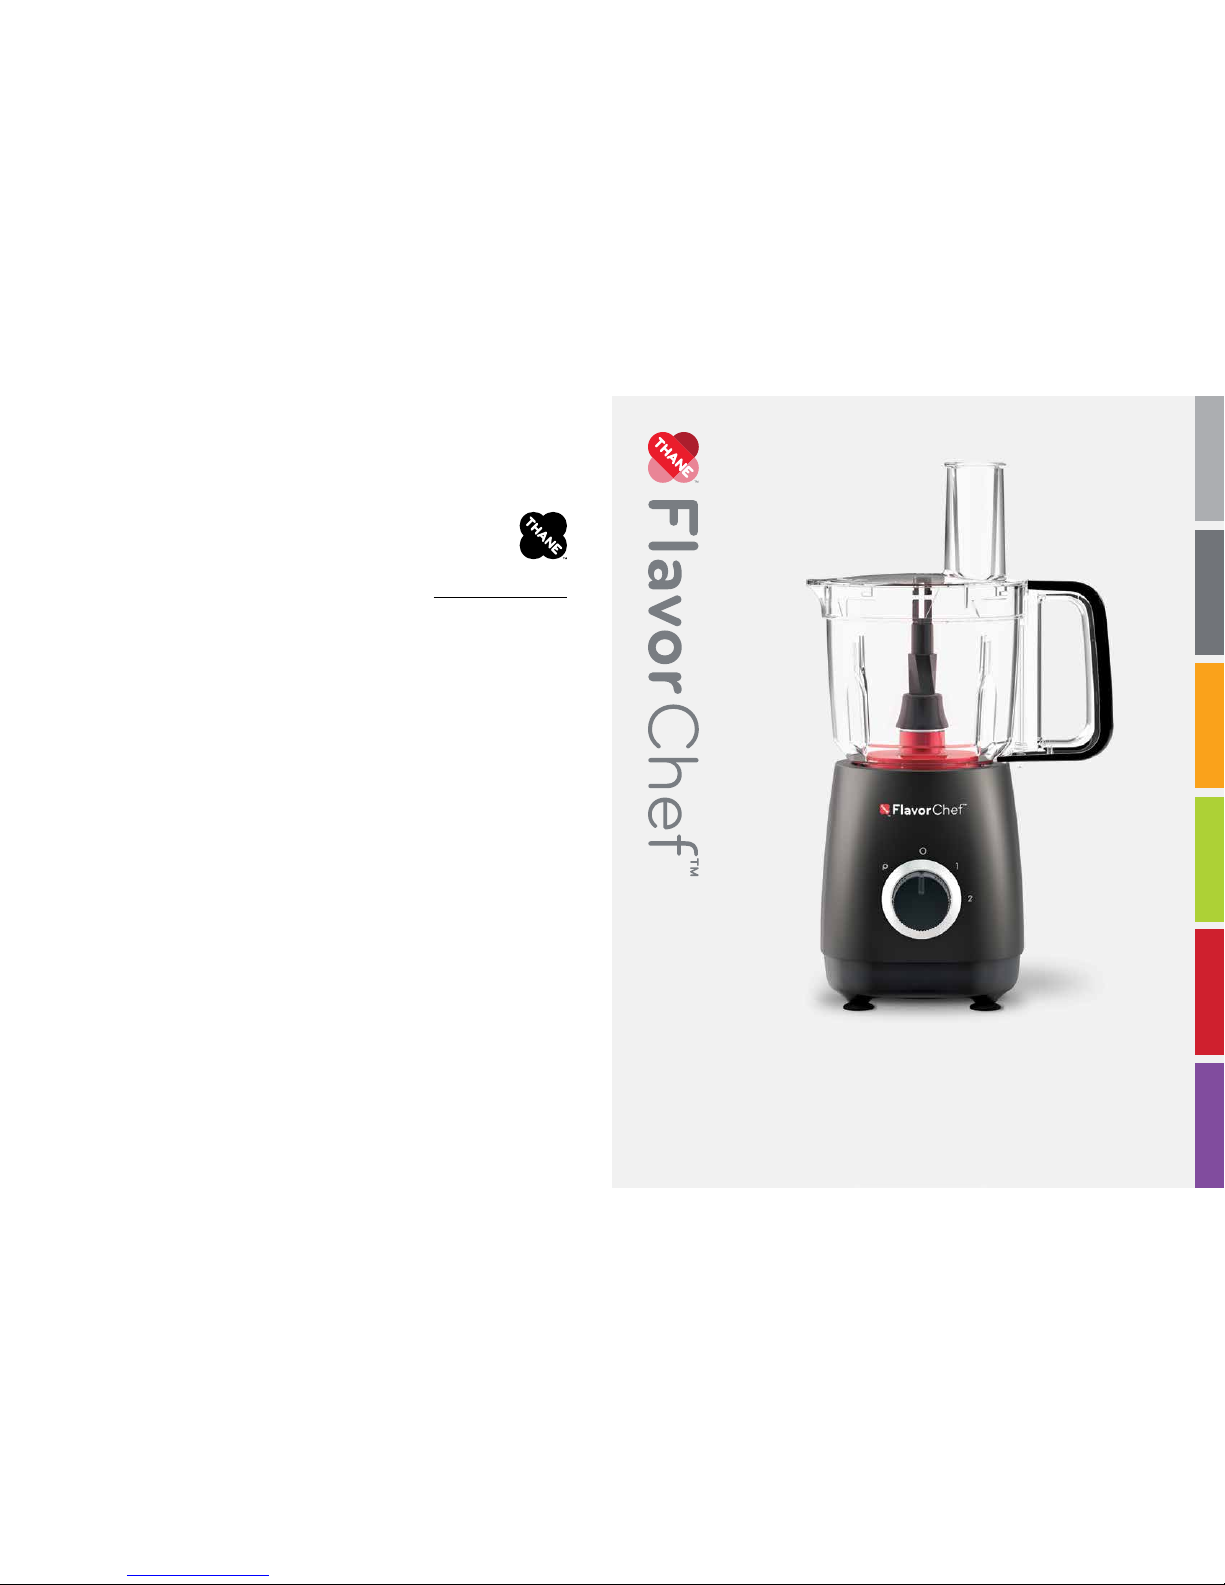
Express Kitchen System

Congratulations on the purchase of your FlavorChef™ Express Kitchen System! We know you will
enjoy all the benefits of this impressive appliance including dicing, chopping, grating, slicing, julienne,
shredding, blending, grinding, dough making, ice cream making and vacuum sealing! This product
was developed and manufactured with the utmost care and subjected to numerous quality checks.
Thank you for the trust you place in our brand and we hope that you are extremely satisfied with
the FlavorChef™ Express Kitchen System. Before operating the unit, please read the instructions
completely and carefully and keep them in case you need to refer to them at a later time.
Thanks again for trusting the FlavorChef™ brand from Thane™!
Thane™ and its affiliated companies assume no liability for personal injury or property damage resulting from
the misuse of the FlavorChef™ Express Kitchen System, including the failure to comply with the instructions
contained in this User’s Guide or provided by the manufacturer or distributor of the treated surface.
important safety information
read all instructions before using this kitchen
appliance
Note: Not all configurations include or come equipped with all the parts and attachments shown in
this manual. To order more parts, please contact your local distributor.
Thank You!
Notes

Safety Cautions and Warnings .........................................................................................................................................3
FlavorQuik™ Technology .....................................................................................................................................................5
Overview of Main Parts ........................................................................................................................................................6
Motor Housing ...................................................................................................................................................................6
Containers with Lids ........................................................................................................................................................6
Bases .....................................................................................................................................................................................6
Attachments .......................................................................................................................................................................6
Parts Overview ........................................................................................................................................................................7
Assembly Overview ................................................................................................................................................................8
Assemby and Use ...................................................................................................................................................................9
Control Knob Settings ....................................................................................................................................................9
Connecting/Disconnecting Bases ..............................................................................................................................9
Connecting the Master Jar to the Motor Housing...............................................................................................10
Connecting Attachments ..............................................................................................................................................10
Fitting the Lid to the Master Jar .................................................................................................................................10
Blending ...............................................................................................................................................................................11
Chopping .............................................................................................................................................................................12
Dough Making ...................................................................................................................................................................13
Slicing/Grating/Julienne ................................................................................................................................................14
Chopping and Grateing..................................................................................................................................................16
Dice and Chip ....................................................................................................................................................................18
Travel Mug ...........................................................................................................................................................................21
Grinding Jar ........................................................................................................................................................................22
Ice Cream Maker ..............................................................................................................................................................23
Vacuum Seal ......................................................................................................................................................................25
Maintenance & Care .............................................................................................................................................................27
Troubleshooting ....................................................................................................................................................................27
Contents
Notes

Safety Cautions and Warnings
PLEASE READ THIS USER’S GUIDE COMPLETELY AND CAREFULLY.
TO REDUCE THE RISK OF BURNS, ELECTROCUTION, FIRE, OR INJURY, PLEASE READ ALL
INSTRUCTIONS, SAFEGUARDS, AND WARNINGS IN THIS USER’S GUIDE BEFORE USING THIS
APPLIANCE.
1. Keep this User’s Guide in a safe place for future reference.
2. Verify that the main voltage indicated on the Rating Plate on this appliance corresponds with the voltage of your
electrical outlet.
3. After removing the packaging, make sure that the product is not damaged and that no pieces are missing. If in
doubt, do not use.
4. To avoid danger of suffocation or any other hazards, do not leave packaging (such as plastic bags, polystyrene, etc.)
within reach of children.
5. This appliance is not to be used by children or persons with reduced physical, sensory or mental capabilities, or lack
of experience and knowledge.
6. Cleaning and maintenance shall not be performed by children or persons with reduced physical, sensory or mental
capabilities, or lack of experience and knowledge.
7. Keep this appliance and its cord out of reach of children.
8. Close supervision is necessary when the appliance is operated near children to ensure that they do not play with this
appliance.
9. Children shall not play with this appliance.
10. Keep hands, loose clothing and other items away from the rotating blades.
11. Never feed food into the unit by hand. Always use the Food Pusher.
12. Do not use the appliance if the rotating blades are damaged.
13. Do not use the appliance without the lid securely locked in place.
14. Do not immerse this appliance (container, cord, motor housing) in water or any other liquids.
15. Do not operate this appliance with wet hands.
16. This appliance contains no user-serviceable parts. All repairs should only be carried out by a qualified engineer to
avoid hazard. Improper repairs may place the user at risk of harm.
17. Do not operate this appliance if it has malfunctioned, or if it has been dropped or damaged in any way.
18. Do not leave this appliance unattended while it is plugged into an electrical outlet.
19. This appliance must be unplugged from the electrical outlet after use and while any maintenance, such as cleaning, is
being conducted.
20. Always use the appliance on a sufficiently large, stable, dry, heat-resistant surface.
21. Place the unit securely in the center of the counter or work space.
22. Ensure that the power cord is kept away from heat or sharp edges that could cause damage.
23. Do not allow the power cord to hang over the edge of work surfaces or tabletops.
24. If the power supply cord is damaged, it must be replaced by the manufacturer, its service agent or similarly qualified
technician in order to avoid creating a hazardous condition.
25. Never force the plug into an outlet or pull or carry the unit by the cord. Do not use the cord as a handle, close a door
on the cord or pull the cord around sharp edges or corners. Keep the cord away from heated surfaces.
26. Do not pull the cord in order to remove the plug from an outlet.
27. To avoid power overload, the appliance should not be connected in the same outlet simultaneously with another high
wattage appliance.
28. Do not place this appliance where it can fall or be pulled into water or other liquid.
29. Do not reach for this appliance if it has fallen into water. Unplug immediately!
30. Always unplug this appliance before attempting to move it.
31. Always use both hands when moving the entire unit and make sure to pick it up by the unit’s base. Do not carry the
appliance by the container handle.
32. Do not move the appliance while it is in use.
33. Do not use the appliance for any purpose other than its intended use as described in this User’s Guide.
!
WARNING
3
Notes

4
34. This appliance is intended for household use only. It is designed to process normal household quantities of food and
liquids. It is not suitable for continuous or commercial operation. Commercial use of this appliance voids the
manufacturer’s warranty.
35. This appliance is intended to be used in household and similar applications such as: staff kitchen areas in shops, offices
and other working environments; farm houses; by clients in hotels, motels and other residential type environments; bed
and breakfast type environments.
36. This appliance is for indoor use only. Do not expose the appliance to outdoor weather.
37. Do not use any accessories or attachments with this appliance other than those recommended by the supplier, as
unapproved attachments may result in personal injury.
38. The manufacturer and distributor are not responsible for any damage caused to this appliance due to incorrect use.
39. Before turning the appliance on, make sure all parts are properly assembled.
40. Before placing foods in the appliance for processing, make sure all wrappers have been removed (i.e., paper, aluminum
foil or plastic).
41. Avoid contact with moving parts while the appliance is in use to prevent personal injury or damage to the appliance.
42. To avoid injury, always follow the instructions provided in this User’s Guide when it comes to handling any of the sharp
attachments and blades.
43. The metal blades and disk are extremely sharp and should be handled with extreme care. Always hold the blade
assembly by the finger grip or stem, away from the cutting edge, both when handling and cleaning.
44. To reduce the risk of injury, never place the processing blade or circle blade assembly on the drive shaft without the
processing jar locked properly in place.
45. Never put your fingers or other objects into the unit opening while it is in operation. If food becomes lodged in the
opening, use food pusher or another piece of fruit or vegetable to push it down. When this method is not possible, turn
the unit off and disassemble to remove the remaining food.
46. Make sure the Master Jar and the Master Jar Lid are secured into place before turning the appliance on. The unit will
not work if both the Jar and Lid are locked into lace properly.
47. Switch off the appliance and disconnect from the power supply before removing the container from the unit base,
changing accessories or getting near moving parts.
48. Always disconnect the appliance from the power supply if it is left unattended and before assembling, disassembling or
cleaning. To avoid overburdening the motor and possibly resulting in burning out, always follow the recommended
total operation times specified for each attachment throughout the User’s Guide.
49. Warning: Potential injury from misuse. Care shall be taken when handling the sharp cutting blades, while emptying the
various jar attachments and during cleaning.
50. To avoid overburdening the motor and possibly resulting in burning out, always follow the recommended total operation
times specified for each attachment throughout the User’s Guide.
51. Always observe the appliance carefully when it is turned on.
52. Always wait until the motor completely stops before removing any attachments or their corresponding lids.
53. Always unplug the appliance from the outlet when not in use and before removing parts for cleaning.
54. After use, make sure all the attachments that were used are cleaned properly.
55. To avoid personal injury, care must be taken when cleaning any of the attachments that have sharp blades.
56. All of the attachments and their corresponding lids (except for the Freezer Bowl that comes with the Ice Cream Maker
attachment) are NOT refrigerator and freezer safe.
57. None of the attachments and their corresponding lids are microwave safe.
58. With the exception of the unit base, all of the attachments and their corresponding blades and lids are dishwasher safe.
HOUSEHOLD USE ONLY
SAVE THESE INSTRUCTIONS
Maintenance & Care
• Never overload your FlavorChef™ unit.
• Never immerse the Motor Housing in water.
• All product parts are dishwasher safe except for the Motor Housing, Freezer Bowl, Vacuum Seal Attachment and
Vacuum Seal Bags.
27
Troubleshooting
Problem Probable Cause/Solution
Unit does not operate on
any speed or pulse
Food is not sliced or shredded uniformly
Unit stops and will not
come back on
Unit has a burning smell
Motor seems weak
Soft Cheese is not shredding well
Ice cream is not firm
enough
OR
Ice cream maker is still
running after 60 minutes
Ice Cream Maker stops
churning before the ice
cream is ready.
• Is the unit plugged in? Does the outlet work?
• Is the lid latched in place? Refer to ‘Assembly and Use’ section of this User’s Guide.
• Is the food chute overfilled? Do not add food above the MAX line.
• Packing too much food in the food chute or pushing too hard on the food pusher may
cause processed food to be irregularly sliced or shredded.
• Is the lid latched in place? Refer to ‘Assembly and Use’ section of this User’s Guide.
• Is the outlet still working? Check it by plugging in another working appliance. You may
have overloaded the circuit and blown a fuse or tripped the circuit breaker.
• Turn unit OFF (O), allow it to stand for 3 to 4 minutes, and then turn it back on. If none
of these suggestions correct the problem, DO NOT attempt to repair the unit yourself.
Call the Customer Service number.
• There may be a residue left on the motor from the manufacturing process, causing a
slight odor during initial use. This will go away. If a strong odor or any visible smoke ap
pears, unplug the unit IMMEDIATELY and call the Customer Service number.
• You may be over-packing the unit or using pieces of food that are too large. Try un
loading some of the ingredients or use smaller pieces of food. Refer to ‘Assembly and
Use’ section.
• Soft cheese should be processed immediately after being removed from the
refrigerator. Soft cheese, like mozzarella, should be placed in the freezer for 30
minutes prior to processing to ensure it is firm enough for shredding.
• The Freezer Bowl was not in the freezer long enough, which is preferably overnight.
• The freezer is not cold enough. Ice cream sets at 10° to 14°F (-12° to -10°C). If the
freezer is not at 0°F (-18°C), the ice cream will not set.
• Too much of the recipe mixture was put in the Freezer Bowl. The maximum volume of
the recipe mixture should not exceed 500ml/17oz.
• Ingredients are warm or at room temperature.
• The Freezer Bowl was left at room temperature and not placed onto the Motor Housing
immediately before use.
• The freezer door was opened and closed too many times during the freezing process.
• The Freezer Bowl has a thick coating of ice on the walls. After washing, dry completely
prior to placing back in freezer.
• Mix-in ingredients, such as chocolate chips or chopped nuts, were added too soon.
Wait until the ice cream has churned for at least 6 minutes or until the mixture is thick
and has started to freeze before adding the mix-in ingredients.
• The mix-in ingredients are too large, causing the paddle to jam. Make sure to chop
nuts or other mix-in ingredients before adding.
• Too large of a quantity of mix-in ingredients has been added.
 Loading...