

Page 1
1
I n d e x P a g e
E n g l i s h
. . . . . . . . . . . . . . . . . . . . . . . . . . . . . . . . . . . . . . . . . . . . . . . . . . . . . 1
D e u t s c h
. . . . . . . . . . . . . . . . . . . . . . . . . . . . . . . . . . . . . . . . . . . . . . . . . . . . 8
F r a n ç a i s
. . . . . . . . . . . . . . . . . . . . . . . . . . . . . . . . . . . . . . . . . . . . . . . . . 1 5
Page 2
1 2
Safety Precautions
Warning
Precaution against burns
Where to position the Flavia
®
Drinks station SB100
Place out of reach of children. Children
and persons unfamiliar with the
equipment should only use it under
supervision.
To ensure safe removal of hot drinks,
place the equipment no higher than 1.3M
(40 1/2”) from the floor.
Not observing these
precautions may cause burns, electric shock
and other injury.
Preparation
Never overfill with water
Heating water may spill causing burns.
Never heat anything other than
water in the tank
Do not heat tea bags, tea leaves, milk,
alcohol, or anything other than water in
the tank. Heating anything but water in
the tank may block up the water tank or
cause serious damage to the tank.
During use
Never turn the appliance upside
down
Even when the lid is locked, hot
water will leak through the water
outlet and the steam vent if the
appliance is turned upside down,
which may cause burns.
Hot contents - Always use
caution
N ever tilt or shake the
a p p l i a n ce or carry it by the lid,
or by holding the casing
Even when the lid is locked, hot
water will leak through the water
outlet and the steam vent if the
appliance is shaken, which may
cause burns.
N ever close the lid by fo rce
Hot water can spill causing burns.
Never block the steam vent
Hot water can heat over causing
burns.
The lid must always be
p ro p e r l y clo s e d
In case the appliance topples
over,
hot water may spill out causing
burns.
Never use without placing
a cup under the water outlet
Hot water may splash against the
drip tray causing burns.
After use
Always detach the drip tray
and the lid when disposing
of unused hot water
Hot water may get caught in the
lid and drip tray causing burns.
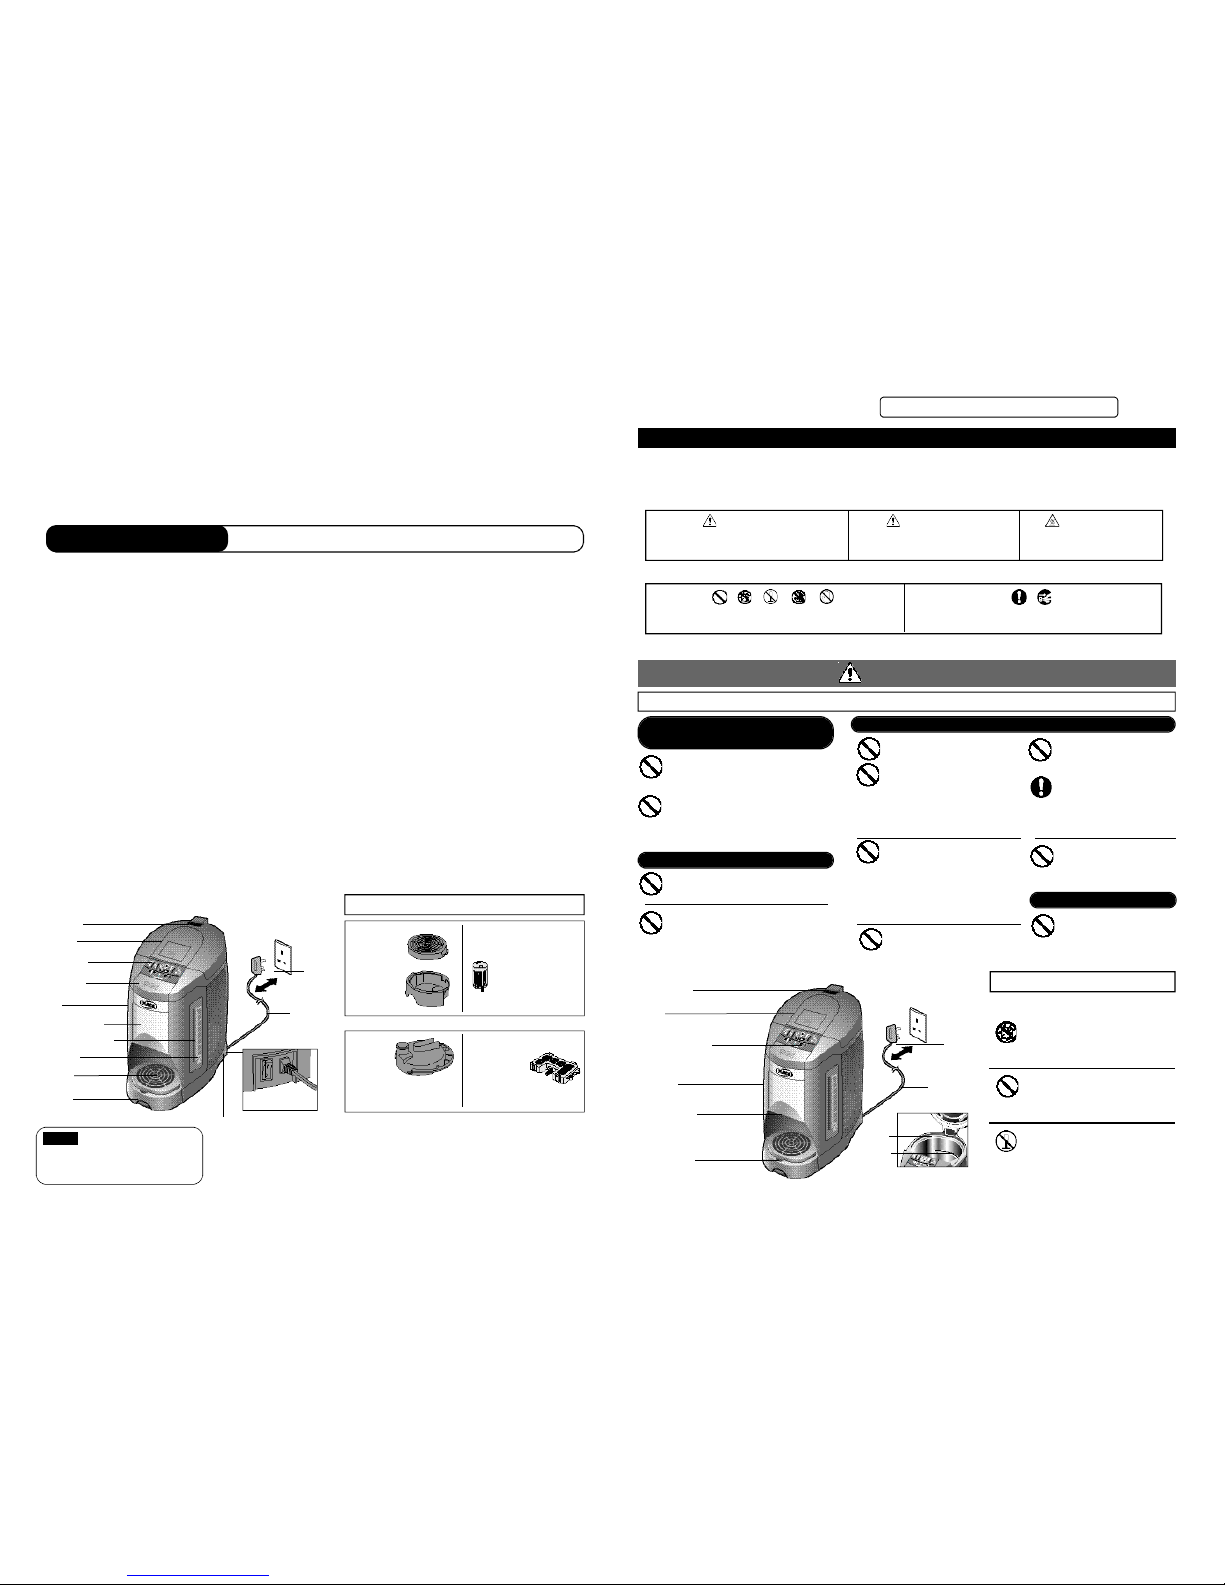
Steam vent
Lid
Power
plug
Rated current
Voltage 230V
cord
Hot water button
Casing
Water outlet
Drip tray
Maintenance
Never use to store ice
Condensation will occur, creating a
potential source of electric shock and
malfunction.
Never attempt to dismantle,
repair, or modify the appliance
Any attempt to do so may result in fire
or injury.
• If in need of repair, please contact
your local Flavia®Drinks Systems
supplier.
Protect from
getting wet
Do not
touch
Never dip in or apply water
to the appliance
This will cause a short circuit.
WARNING - Service Personnel
Pump not grounded - do NOT contact when energised
Discover the FLAVIA® experience - the Drinks Station for your every mood.
Thank you for joining the FLAVIA® community.
We believe that one size doesn't fit all. The FLAVIA SB100 drinks station offers what you need to suit your every want, situation
and mood.
Our ingenious 'brew-by-pack' technology uses individual foil sealed Filterpacks for absolute freshness until the moment they
are brewed. This unique technology allows us to offer four different categories of drinks.
The FLAVIA® SB100 is robust and reliable, and there is no need to clean between brews, making it fresh and fun, with none of
the hassle. Please read these instructions before using the FLAVIA® SB100, and keep them safe for future reference.
Drinks for Every Mood
What if coffee isn't your cup of tea? With the FLAVIA® Drinks Station you
get a wide range of inspiring drinks to fit every mood.
* The manufacturer reserves the right to alter the selection without notice.
Important. Safety Instructions
In order to prevent harm or injury to those using the appliance or to any other persons and/or property, please be sure to read
the following safety instructions.
■
Possible consequences of incorrect usage are laid out in the following pages, each marked with a sign according to the
degree of danger.
■
The following signs indicate the dangers, which may lead to injury or damage.
Details of these signs can be found on pages 2-3. Please read them carefully.
The following signs indicate actions,
which are prohibited
The following signs indicate actions, which should be
avoided at all costs
Tank
Maximum
water level
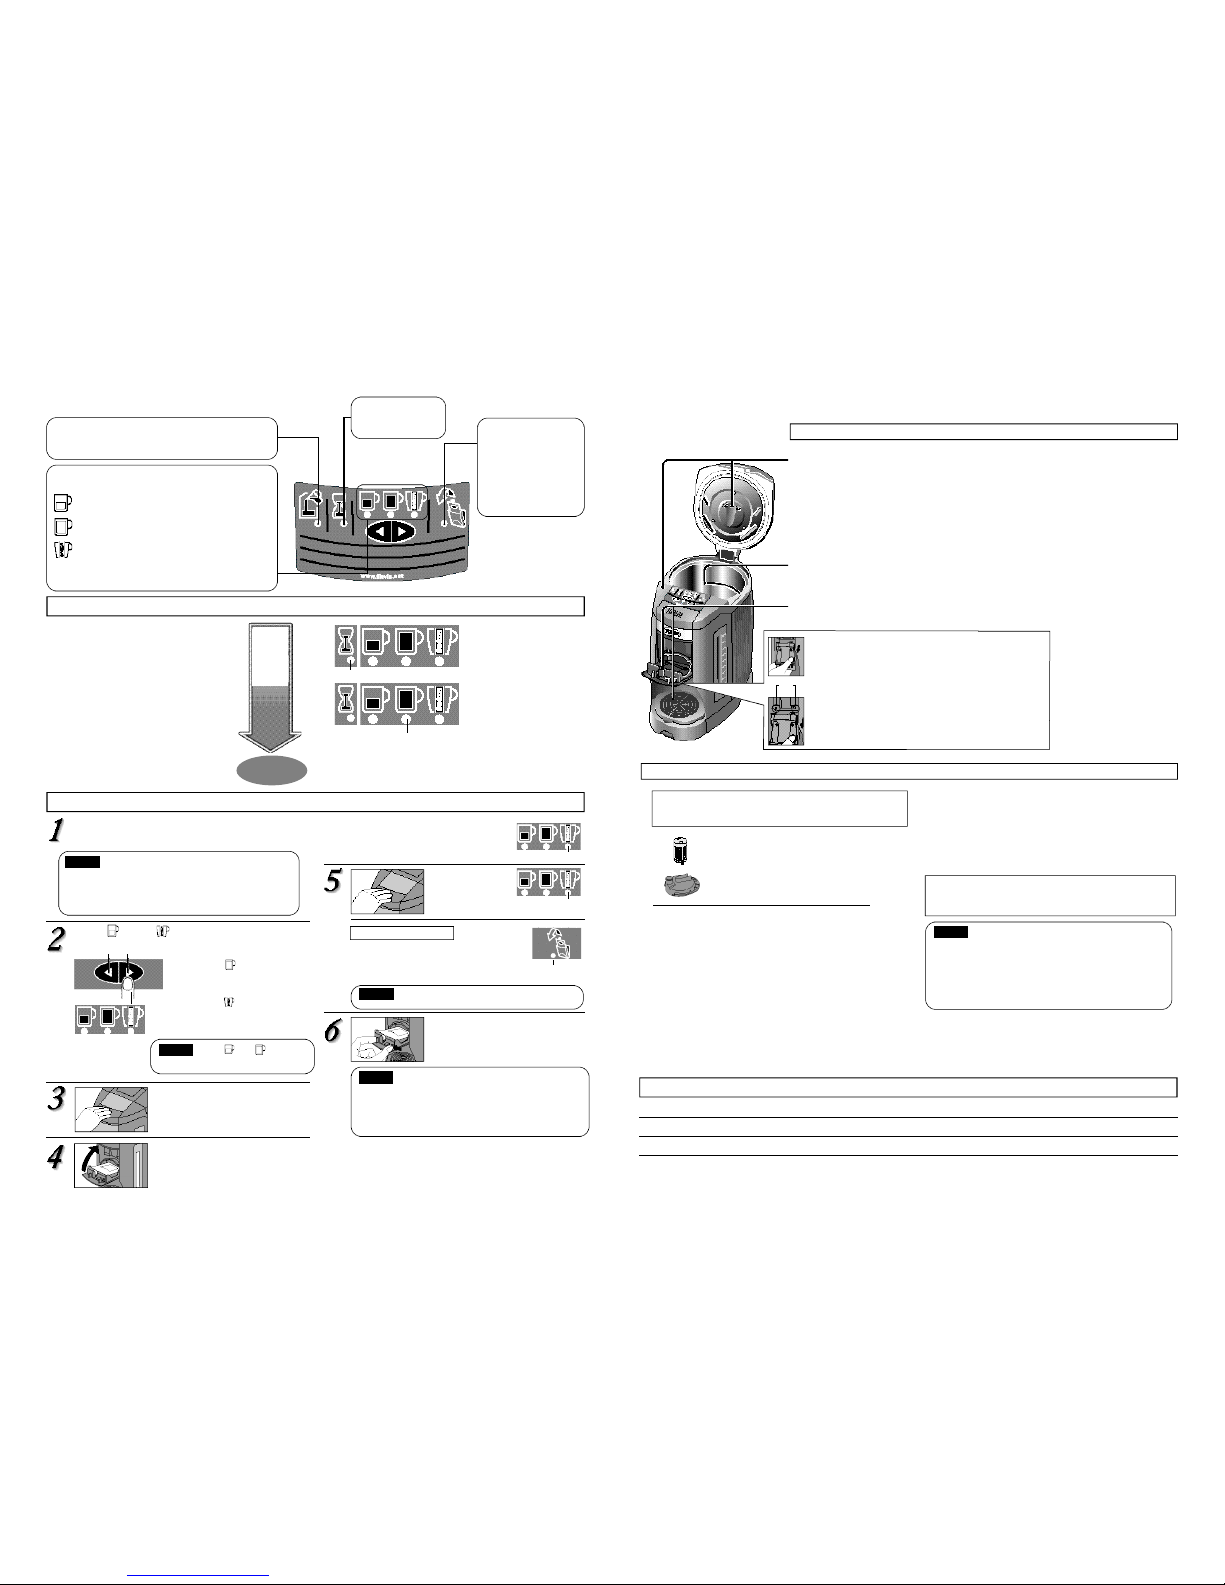
Features of your drinks station
Steam vent
Lid handle
Start button
Filterpack holder
Water level window
Cup stand
Power
plug
Rated current
Voltage 230V
Cord
Control panel
Casing
Water level
Drip tray
Handles
Power switch
(I...On, O...Off)
Removable parts recognition
Cup stand
Drip tray
Separator
Active carbon filter
(This is a
replaceable
part, please see
back cover)
Take out of the bag. Not fitted
as standard in Europe.
• For instructions on how to install please see page 4.
Please observe these precautions fully
Mesh filter
(This is a replaceable part,
please see back cover).
Please ensure the
mesh filter is inserted
in the tank correctly. If
it is not, please insert
as shown on page 4.
Your drinks station is
supplied with protection on
the
Filterpack
holder, Badge, Water
level window and Control panel.
Please remove prior to use.
Notice
Gourmet Coffees
There's a FLAVIA® coffee for every
taste. Why settle for one, when you
can sample your way around our
global menu? Savour our rich single
origin coffees, be adventurous with
flavoured coffees, give yourself an
extra kick with our stronger coffees,
or relax with lighter blends and
decaffeinated options.
Fresh Leaf Teas
FLAVIA® teas draw together the
varied traditions of Europe and the
Orient. We provide fresh leaf teas to
suit the needs of every occasion from full bodied blends to light and
delicate brews.
Wellbeing drinks
Nurture your mind, body
and soul with an inspiring
selection of delicious,
harmonious and
invigorating drinks, each
with its own unique benefit
to boost your wellbeing.
Indulgent Creations
Who doesn't love a treat?
From Choco to Exotic Chai
tea, there is something to
tempt you.
Warning
This sign warns of possible death or serious
injury to persons and/or property
.
Attention
This sign warns of possible damage or
injury to persons and/or property
Caution
This sign warns of steam
which could cause burns
Page 3
3 4
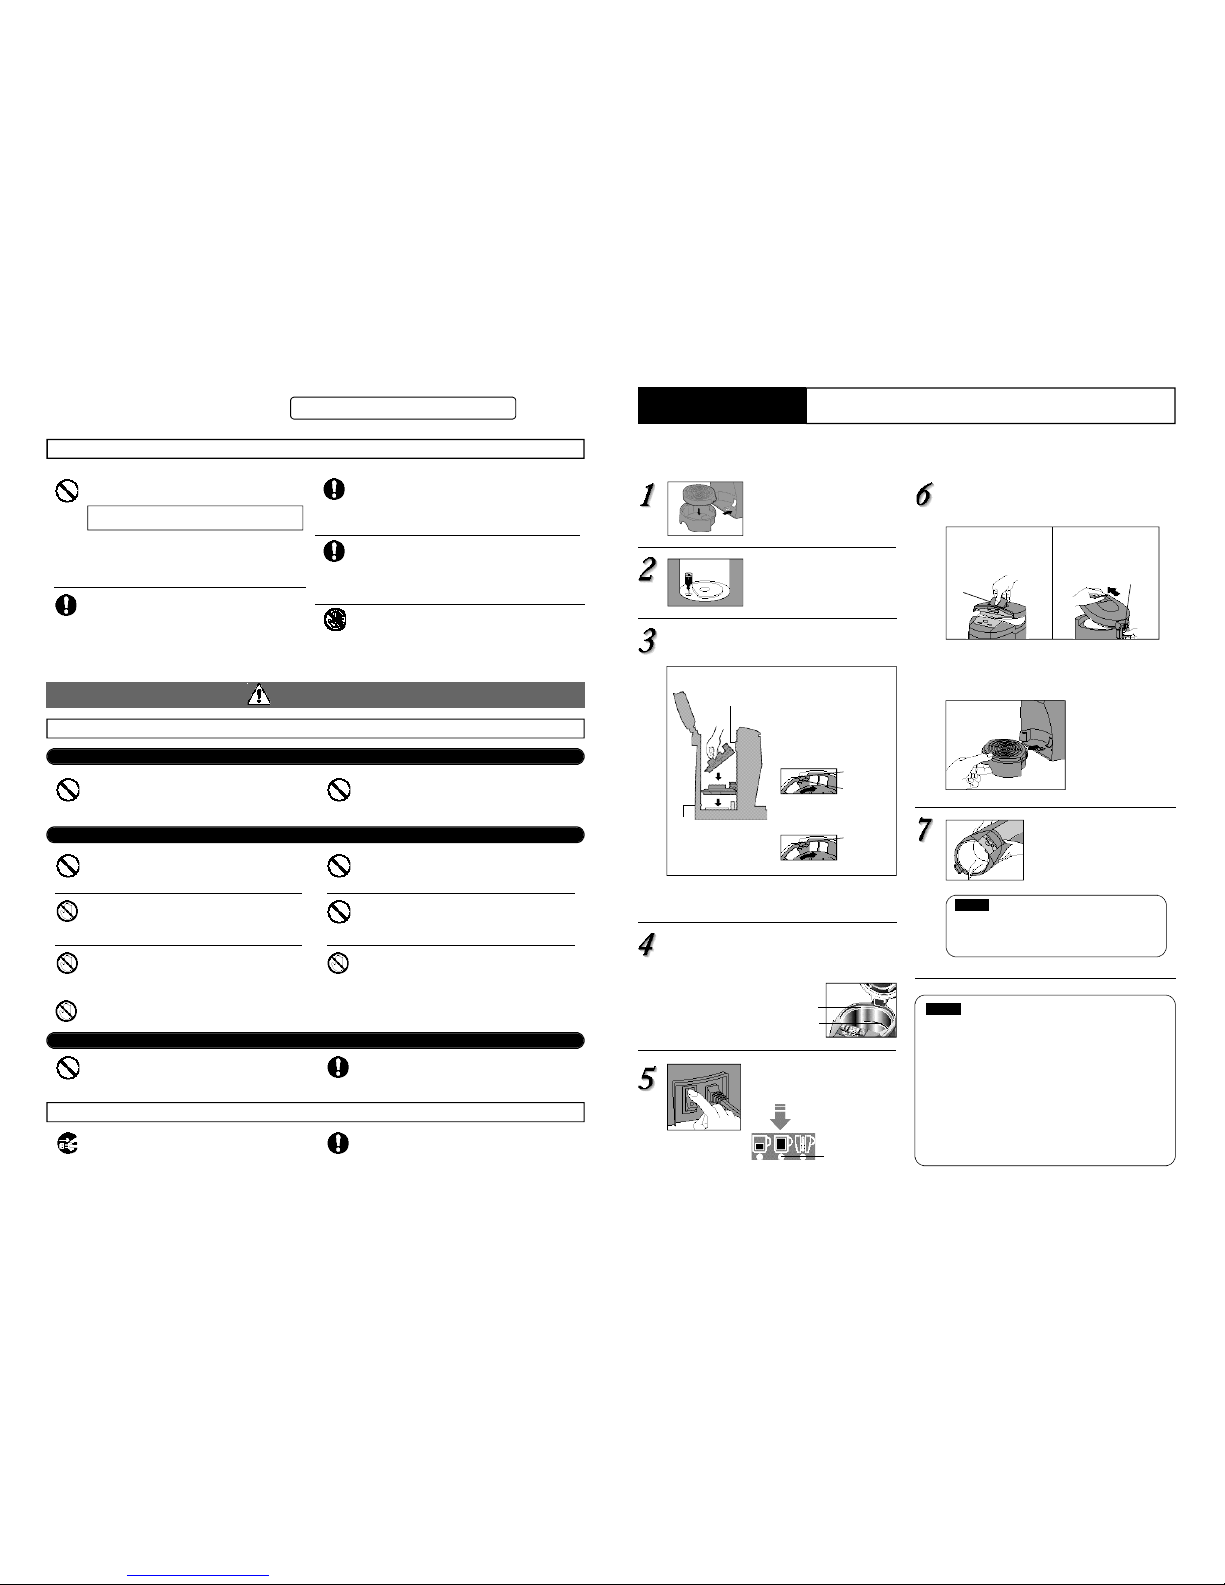
How to install
Push the drip tray in until a click
is heard.
How to insert the mesh filter
Push onto the pipe at the bottom
of the tank until a click is heard.
Insert the separator inside the tank
How to insert the separator into the tank.
Remove the separator, turn it to the left and
remove in the reverse order.
Fill the tank with water up to the maximum
water level mark
• As water enters the separator,
you will here the sound of
air escaping.
Plug in the appliance, switch the
power switch to the ON position
and heat water.
Light comes on
when water has
heated
Switch off the appliance and leave to cool.
Remove the lid and drip tray
How to remove the lid.
To replace, push diagonally in.
When closing, push into position until you hear a click.
How to remove
the drip tray.
Dispose of any remaining
hot water through the drain
Before using
Using the appliance for the first time or after a long time
■ Please clean the tank and water contact parts
Hold firmly and
pull out.
• Do not use the appliance near a
source of fire (this may result in
deformation of the casing).
• Make sure that the separator is
properly inserted in the tank
(when not properly inserted, the
separator may fall out when
disposing of unused water. Also,
heated water may become
tepid).
• Do not fill with water directly
from the tap (water may
overflow coming in contact with
internal electrical parts, which
may result in malfunction).
• Do not leave unused heated
water in the appliance (doing so
may result in corrosion to the
tank and in an unpleasant
odour).
• Do not dispose of unused water
on the side of the control panel.
Always use the drain (not doing
so can result in malfunction).
• Empty drip tray reqularly. Use
caution when emptying, possible
hot contents.
Notice
Attention
Precaution against burns
Power cord
Where to position the appliance
Do not place on unstable surfaces or surfaces that
can be affected by heat
The appliance may topple over causing burns.
Do not place near walls or furniture
Steam and heat could damage walls and furniture, causing
a change in colour and shape.
Remove the plug from the socket when the
appliance is not in use
Deteriorating insulation may result in electric
shock and/or fire.
When unplugging the appliance, pull by
the plug – not the cord!
Electric shock and short circuit may result in fire.
During use
After use
Do not open the lid while heating water
Steam can cause burns.
Do not remove cup while the beverage is being
dispensed
This may cause burns.
When carrying the appliance do not touch the lid
handle
The lid may open causing burns and other injury.
Wait for the appliance to cool before moving it
A hot appliance may cause burns.
• Take special care when disposing of unused hot water.
• Remove separator only after it has cooled.
Do not touch when the lid is open
This may cause burns.
Do not move the appliance when a cup is still on
the cup stand
This may cause burns.
Do not
touch
Do not touch the steam vent
This may cause burns. Take special care to prevent children
from touching the steam vent.
Do not touch the hot parts of the appliance during
use and for a short period after use
This may cause burns.
Do not
touch
Remove
the plug
Do not
touch
Keep Hands clear whilst beverage is being dispensed.
Never do anything that might cause damage to the
cord or plug,
If the appliance is used when damaged, electrical short
circuit or fire may result.
• If in need of repair please contact your local Flavia
®
Drinks Systems supplier.
Clean the plug from dust regularly
A build-up of dust on the plug will attract condensation,
which could cause cable damage resulting in fire.
• Remove the plug and clean with a cloth.
Never plug or unplug the appliance with wet
hands
This may result in electric shock.
Make sure the plug is correctly inserted in the power
socket
An unsafe plug may cause electric shock or generate heat
resulting in fire.
• Do not use a damaged plug or loose power socket.
15A/230V socket must not be used with other
a p p l i a n ce s
When used alongside other appliances, heat generated may
result in fire.
• The cord extension of 15A must not be used with other
appliances.
Electrical supply and cord
No wet
hands
such as modify them, place hot or heavy objects on
them, bend them, stretch them, or twist them.
• Make sure to remove the drip tray before disposing of
unused hot water (Water contained in the drip tray can
come into contact with internal electric parts resulting in
malfunction).
Notice
Tank lip
Marker
❶
When inserting the separator
inside the tank avoid touching
the lip.
➋
Once past the lip, bring the
separator into a horizontal
position.
➌
Align the separa tor indent
b e low the marker inside the
ta n k .
Mark inside
tank
Indent
➍
Turn the separator to the
right until you hear the
catch click.
Then fix the
marker into
the indent on
the other side.
Tank
Maximum
water level
Safety Precautions
Please observe these precautions fully
❶
Pull diagonally away
by pressing the ‘pips’
in the lid handle.
Lid
handle
➋ Hold down the
securing catch.
Remove the lid
by pulling by the lid
handle.
Securing catch
Page 4
5 6
1
Check that there is no filterpack left in the filterpack holder
2
Switch the power switch off and pull the plug out of the socket
3
Detach the drip tray and remove any water contained in it
4
R e m ove the lid and dispose of unused heated water (for the co r rect way to dispose of unused water please see page 4)
Storage
M a i n t e n a n c e
Storage: When you are not using the appliance for a period of time
Weekly maintenance
Wipe the dust off the casing and the lid with a well-wrung wet cloth.
• Do not wash with water.
(Water may get into the internal electrical parts resulting in malfunction.)
• Do not use cleaning agents.
(They may leave traces.)
• Do not apply any products containing benzene to the appliance.
(This may damage the surface of the appliance.)
Wipe the walls of the tank with a wet cloth.
• Do not clean with brushes or scouring agents.
(This may damage the surfaces.)
Filterpack holder, drip tray and cup stand should be washed with a wet cloth.
Bi-monthly maintenance
With use, scale deposits will form on the internal surfaces.
These need to be removed once in every two months.
How to remove
❶ Remove the drip tray.
➋ Open the filterpack holder and push down firmly until fully open.
➌ Push down again and pull out directly downwards.
How to replace
➊ Insert the bottom end of the filterpack holder by pushing
diagonally upwards until secured with the left and right pins on
the body.
➋ Close the filterpack holder.
* When the filterpack holder is put into position you will hear a loud
click.
Pins
Mesh filter and separator should be cleaned
by
dipping in water and agitating.
• Do not use washing up liquid or bleach
(If this does not prove effective please
use a suitable brush).
If you observe change of colour due to scale or a
floating layer in the tank and mesh filter.
Minerals contained in the water may form deposits on the
surfaces with which water comes in contact. This is not
corrosion of the tank itself, nor is the change in colour a
change on the tank itself. The deposits are not harmful.
This may take the form of:
• Change of co lour to milky white, brown or dark grey.
• Rough surfaces or spots of rust.
• White or shiny layer due to mineral crystallisation.
Notice
How to use
Water supply light
• Water level in the tank is low
➜ Please add water
Drink settings lights
• How to choose between the settings
Espresso type
For a stronger flavour and for ice drinks
• Volume of water extracted: approx. 120ml
Regular coffee/Standard leaf tea
• Volume of water extracted: approx. 165ml
Instant drink
• Volume of water extracted: approx. 145ml
Note: The volume of water extracted is pre-set.
The volume will vary depending on the type of drink
and drink filterpacks.
Remove filterpack
light
• This light will come
on when a used
filterpack is left in
the appliance after
making a drink
➜ Please remove the
filterpack
How to heat water
1
Fill the tank with water.
2
Plug in the appliance and
turn the power switch on.
Water
heated
in the
separator.
*Approx.
3 minutes
Water
tank
* A p p rox .
2 5
m i n u te s
Red light
Green light
Comes on automatically
when water tank starts
operation.
Time required to make
the first drink is
approximately
3 minutes. Another cup
can be made as soon as
the green light comes on.
If a drink is made
immediately after adding
water to the tank, the
water may not be
sufficiently hot.
Keep warm mode
* At a room temperature of 20˚ C and a full tank.
How to make a drink
Light on
Light on
After the drink is dispensed
Open the filterpack holder and
remove the used filterpack.
• The filterpack will be hot. Ta ke ca re when
re m oving it.
• A f ter the drink is dispensed, the used filterpack must
be re m oved (if the filterpack is not re m oved, the drink
making function and hot water dispensing function will
not opera te ) .
When the filterpack is re m ove d ➜ C lose the filterpack
holder and lower the start button into its original position.
Water heating light
• Water is heating
➜ Please wait
The light under the
selected setting will
come on.
• Do not put in a dishwasher or dryer of any kind.
( T h i s may result in the casing becoming defo r m e d . )
• When storing:
- Dry we l l .
- P ro tect from any objects getting into the appliance by
w rapping in plast i c .
• Smaller cups and those with a rounded
bottom can cause splashing when a
beverage is dispensed.
• Only use cups suitable for hot drinks.
• Do not use plastic vending cups.
Notice
On the a n d settings,
an instant drink filterpack may burst .
Completing your drink
When the Remove-filterpack light comes on
Remove cup
Caution
Do not press the start button during brewing.
• For instant drinks, please stir to fully
dissolve before drinking.
Light on
Notice
Notice
Notice
Press the start button.
Open the filterpack h o l d e r
Place the filterpack in the
filterpack holder
Approximately 15 seconds after
closing the filterpack holder, the
‘ R e m o v e-filterpack’ light will come on.
Place a cup inthe cup stand
• Recommended cup size to be used with the
appliance is 72mm in diameter and 92mm in height.
Towards Towards
Select the setting depending
on the drink you want
The setting will automatically
return to after 30 seconds.
➜ Make your selection again.
• Never use any other setting
but the with instant drink
filterpacks.
➜ Press the start button to open the
filterpack holder, re-select your
p r e f e r r e d drink setting and close the
filterpack holder.
Press the start
button to
Start Operation
Page 5

How to fix
Firmly insert the plug in the socket.
Put the power switch in the ON position.
Clean the mesh filter with a brush once
every two months (See page 3).
If this brings no improvement, please
change the filter (See the back cover).
Please contact your local Flavia®Drink
System Supplier.
This is perfectly normal.
Please contact your local Flavia®Drink
System Supplier.
To make a drink, please wait for the green
light to come on. For hot water, please
wait, for the light to go off.
➀ Press the operating lever and open the
filterpack holder.
➁ Re-select the desired drink setting.
➂ C lose the filterpack holder and pre ss
the sta r t button to start.
This is perfectly normal.
Fill with water.
Make sure the tank is filled with water.
Turn the power switch off and turn it back
on after 10 seconds.
7
■ If the following indicators are on, the appliance is malfunctioning.
Two lights are on simultaneously
and Please contact your local Flavia®Drink System supplier.
and Advise the supplier which lights are on.
and
If the problem is not fixed after checking the above given possible causes, pull the plug out of the socket and contact your local Flavia
®
Drink System supplier.
Trouble shooting
Before calling a service supplier,
please check the following possible causes.
If...
Water is not heating.
The amount of water dispensed is
repeatedly small and/or is dispensing
too slowly.
The walls of the tank have changed
colour, there is a milkywhite layer
floating on top of the water in the tank
and/or the sound of the water when
heating is louder than is usual.
Drinks and heated water are not hot
enough.
■ When making a drink,
The appliance is not operating after
inserting a drink filterpack in the
filterpack holder.
( is lit)
The appliance makes a ‘pop’ sound
when the start button is pressed to
start making a drink.
■ In case you see the following
indicators
( is lit)
Both and are lit
Possible cause
• The plug may be loose in the socket.
• The power switch may be in the OFF
position.
• The mesh filter may be blocked with
scale.
• The tank and internal parts through
which water flows are blocked with scale.
• Just before and after finishing heating
the delivered volume may be low.
• The cause of this are scale deposits.
* Water with a large content of minerals in
it such as mineral water or ionised water,
is more likely to cause a change of colour
and/or the appearance of a white layer
on the surface of the water.
• Fresh water has been added to the tank
in Keep warm mode immediately before
making a drink.
• Allow approximately 15 seconds for the
drink to be dispensed.
• On the setting, the filterpack is filled
with air which makes the ‘pop’ sound.
Water supply indicator is working.
• Make sure that the appliance has been
filled with water before turning the power
switch on.
• The level of water in the tank may be low.
This may occur temporarily when water is
poured into the tank.
8
Getränke für jede Stimmung
Welche Alternativen haben Sie, wenn Sie kein Kaffeetrinker sind? Die FLAVIA®-Getränkestation bietet Ihnen
eine Vielzahl inspirierender Getränke für jede Stimmung.
Eigenschaften Ihrer Getränkestation
Dampfabzug
Deckelklappe
Starttaste
Filterpackungshalter
Wasserniveaufenster
Tassenabstellplatz
Strom
Spannung 230V
Kabel
Bedienfeld
Gehäuse
Wasserniveau
Abtropfplatte
Griffe
An/Aus-Schalter
(I… An O… Aus)
Erkennung entfernbarer Teile
Ta ss e n a b ste l l p l a t z
Abtropfplatte
Separator
Aktivkohlefilter (Dies ist ein
austauschbares
Teil, bitte siehe
hintere
Umschlagseite)
Nehmen Sie ihn aus dem
Beutel. In Europa
standardmäßig nicht
eingebaut.
* Für Anweisungen zum Einbau bitte siehe Seite 11.
M a s c h e n f i l ter (Dies ist ein
a u sta u s c h b a res Teil, bitte siehe
h i n te re Umschlagseite ) .
B i t te ste l len Sie sicher,
daß der Maschenfilte r
ko r rekt in den Kess e l
eingefügt ist. Falls dies
nicht der Fall ist, fügen
Sie ihn bitte wie auf Seite
11 abgebildet ein.
Der Filte r p a c k u n g s h a l ter, das
Abzeichen, das Wa ss e r n i ve a u f e n s te r
und das Bedienfeld Ihre Getränkstation we rden in
S c h u t z verpackung geliefert. Bitte entfernen Sie
diesen Schutz vor Gebra u c h .
Hinweis
Gourmet-Kaffees
FLAVIA® hat einen Kaffee für jeden
Geschmack. Warum geben Sie sich
mit einer einzigen Kaffeeart
zufrieden, wenn Sie unser
weltweites Menü probieren können?
Erleben Sie unsere
geschmackvollen Kaffees aus
einem einzigen Herkunftsland,
genießen Sie einen guten Start in
den Tag mit unseren stärkeren
Kaffees oder entspannen Sie mit
den leichteren Mischungen und
koffeinfreien Optionen.
Tees aus frischen Blättern
FLAVIA®-Tees vereinigen die
vielfältigen Traditionen Europas und
des Orients. Wir bieten Ihnen Tees
aus frischen Blättern für jede
Gelegenheit - von vollmundigen
Mischungen bis zu leichten und
delikaten Zubereitungen.
Wellbeing-Getränke
Stärken Sie Geist, Körper und Seele
mit unserer inspirierenden Auswahl
an geschmackvollen, harmonischen
und belebenden Getränken, die alle
ihre besonderen Vorteile zur
Förderung Ihres Wohlbefindens
haben.
Kreationen zum Verwöhnen
Wer lässt sich nicht gerne
verwöhnen? Von Choco bis zum
exotischen Chai-Tee - eine
Verführung für jeden Geschmack.
*Der Hersteller behält sich das Recht vor, das Sortiment ohne vorherige Bekanntmachung zu ändern.
Entdecken Sie das FLAVIA®-Erlebnis - die Getränkestation für alle Stimmungen!
Vielen Dank für Ihren Beitritt zur FLAVIA®-Gemeinschaft.
Wir sind der Meinung, dass eine „Einheitsgröße“ nicht allen gerecht wird! Die FLAVIA SB100-Getränkestation bietet Ihnen das
richtige Getränk für jede Situation und Stimmung.
Unsere ausgeklügelte „Brew-by-Pack“-Technologie verwendet einzeln abgepackte Filterpakete zur Gewährleistung absoluter
Frische bis zum Zeitpunkt der Getränkezubereitung. Diese einzigartige Technologie gestattet uns, vier unterschiedliche
Getränkekategorien anzubieten.
Die FLAVIA® SB100 ist robust und zuverlässig. Der Automat braucht zwischen den einzelnen Getränkezubereitungen nicht
gereinigt zu werden - er macht einen frischen und amgenehmen Eindruck ohne Unannehmlichkeiten.
Bitte lesen Sie diese Anleitung vor dem Gebrauch der FLAVIA® SB100 und bewahren Sie sie zur zukünftigen Referenz an einem
sicheren Ort auf.
Netzstecker
Page 6

9
Vorsichtsmaßnahmen
Warnung
Vorbeugung gegen Verbrennungen
Wo man den Flavia
®
Drinks station SB100 aufstellen soll
Niemals zuviel Wasser einfüllen
Kochendes Wasser kann überkochen
und Verbrennungen verursachen.
Kochen Sie niemals etwas anderes als Wa ss e r
im Kess e l
Erhitzen Sie nicht Teebeutel, Teeblätter, Milch,
Alkohol oder irgendetwas anderes als Wasser im
Kessel. Etwas anderes als Wasser im Kessel zu
kochen, könnte den Wasserkessel verstopfen oder
ernsten Schaden am Kessel verursachen.
Während des Gebrauchs
Heißer Inhalt - stets Vo rsicht walte n
l a ss e n !
S te l len Sie das Gerät niemals auf den
K o p f
Selbst wenn der Deckel verriegelt ist, strömt
heißes Wasser durch den Wasserausfluß und
den Dampfabzug, wenn das Gerät auf den
Kopf gestellt wird. Dies könnte
Verbrennungen verursachen.
Kippen oder schütteln Sie das Gerät
niemals oder tragen Sie es niemals am
D e c kel oder indem Sie das Gehäuse halte n
Selbst wenn der Deckel verriegelt ist, strömt
heißes Wasser durch den Wasserausfluß und
den Dampfabzug, wenn das Gerät geschüttelt
wird. Dies könnte Verbrennungen
v e r u r s a c h e n .
Der Deckel muß immer richtig
g e s c h lo ssen we r d e n
Falls das Gerät umfällt, kann
heißes Wasser herausschwappen
und Verbrennungen verursachen.
Verwenden Sie das Gerät
niemals, ohne eine Tasse
unter den Wasserausfluß zu
stellen
Heißes Wasser kann gegen die
Abtropfplatte spritzen und
Verbrennungen verursachen.
Nach Gebrauch
Nehmen Sie immer die
Abtropfplatte und den Deckel
ab, wenn Sie nichtverwendetes
Wasser wegschütten
Heißes Wasser könnte sich im
Deckel und in der Abtropfplatte
verfangen und Verbrennungen
v e r u r s a c h e n .
Dampfabzug
Deckel
Netzstecker
Strom
Spannung 230V
Kabel
Heißwassertaste
Gehäuse
Wasserausfluß
Abtropfplatte
Ve r wenden Sie das Gerät niemals, um Eis
darin aufzubew a h re n
Kondensation entsteht, die eine mögliche
Quelle für einen elektrischen Schock und
Fehlfunktion schafft.
Versuchen Sie niemals, das Gerät
auseinanderzunehmen, zu reparieren
oder zu verändern
Jeder Versuch kann zu Feuer oder
Verletzungen führen.
• Wenn Sie eine Reparatur benötigen, treten
Sie bitte mit Ihrem örtlichen Flavia®Drinks
System-Lieferanten in Verbindung.
Schützen Sie
das Gerät davor, naß zu werden
Nicht
berühren
Tauchen Sie das Gerät niemals in Wasser
oder tragen Sie Wasser auf das Gerät auf
Dies hat einen Kurzschluß zur Folge.
WARNUNG - Servicepersonal.
Pumpe ist nicht geerdet - bei anliegender Spannung
NICHT berühren!
Wichtig. Sicherheitsanweisungen
Um Schäden oder Verletzungen an den Benutzern des Geräts oder an anderen Personen und/oder Eigentum vorzubeugen, lesen Sie
bitte die folgenden Sicherheitsanweisungen.
■
Mögliche Folgen inkorrekten Gebrauchs werden auf den folgenden Seiten beschrieben, jede ist mit einem Zeichen entsprechend des
Grads der dargestellten Gefahr markiert
■
Die folgenden Zeichen geben die Gefahren an, die zu Verletzung oder Schaden führen können
Details zu diesen Zeichen können auf den Seiten 9-10 gefunden werden. Bitte lesen Sie diese sorgfältig durch.
Die folgenden Zeichen zeigen Aktionen an,
die verboten sind
Die folgenden Zeichen zeigen Aktionen an, die um jeden Preis
vermieden werden sollten
Kessel
Maximales
Wasserniveau
Bitte beachten Sie diese Vorsichtsmaßnahme genau
Vorbereitung
S te l len Sie die Maschine außerhalb der
R e i c h we i te von Kindern auf. Kinder und
Pe rsonen, die sich mit dem Gerät nicht
a u s kennen, sollten es nur unter Aufsicht
b e n u t z e n
Zur Gew ä h r le i stung der sicheren Entnahme
heißer Getränke darf das Gerät nicht höher als
1,3 m (40 1/2") vom Boden aufgestellt we rden.
Die Nichtbeachtung dieser Vorsichtsmaßnahmen
kann zu Verbrennungen, elektrischen Schocks und
anderen Verletzungen führen.
Schließen Sie den Deckel niemals mit Gew a l t
Heißes Wasser kann überlaufen und Verbrennungen
v e r u r s a c h e n .
Verstopfen Sie niemals den Dampfabzug
Heißes Wasser kann überhitzen und
Verbrennungen verursachen.
10
Achtung
Vorbeugung gegen Verbrennungen
Stromkabel
Wo man das Gerät aufstellen soll
Stellen Sie es nicht auf unsicheren Oberflächen oder
Oberflächen, die von Hitze beeinträchtigt werden können, auf
Das Gerät kann umkippen und Verbrennungen verursachen.
Stellen Sie es nicht nahe an Wänden oder Möbelstücken auf
Dampf und Hitze könnte Wände und Möbel beschädigen und damit
eine Veränderung der Farbe und Form verursachen.
Ziehen Sie den Stecker aus der Steckdose,
wenn das Gerät nicht in Gebrauch ist
Alternde Isolierung kann zu elektrischem
Schock und/oder Feuer führen.
Wenn Sie den Stecker des Geräts ziehen,
ziehen Sie am Stecker, nicht am Kabel!
Elektrischer Schock und Kurzschluß kann Feuer verursachen.
Während des Gebrauchs
Nach Gebrauch
Öffnen Sie den Deckel nicht, während Wasser erhitzt wird
Dampf kann Verbrennungen verursachen.
Entfernen Sie die Tasse nicht, während das Getränk
ausgegeben wird
Dies kann Verbrennungen verursachen.
Fassen Sie die Deckelklappe nicht an, wenn Sie das Gerät
tragen
Der Deckel könnte sich öffnen und Verbrennungen und andere
Verletzungen verursachen.
Warten Sie, bis sich das Gerät abgekühlt hat, bevor sie es
woanders hinstellen
Ein heißes Gerät kann Verbrennungen verursachen.
• Seien Sie besonders vorsichtig, wenn Sie nichtverwendetes
heißes Wasser wegschütten.
• Entfernen Sie den Separator erst, nachdem er sich abgekühlt hat.
Fassen Sie es nicht an, wenn der Deckel auf ist
Dies kann Verbrennungen verursachen.
Stellen Sie das Gerät nicht woanders hin, wenn sich noch eine
Tasse auf dem Platz für Tassen befindet
Dies kann Verbrennungen verursachen.
Nicht
anfassen
Fassen Sie den Dampfabzug nicht an
Dies kann Verbrennungen verursachen. Seien Sie besonders sorgsam,
kleine Kinder davon abzuhalten, den Dampfabzug anzufassen.
Während der Abfüllung des Getränks nicht berühren!
Fassen Sie nicht die heißen Teile des Geräts während des
Gebrauchs und für eine kurze Zeit nach Gebrauch an
Dies kann Verbrennungen verursachen.
Nicht
anfassen
Stecker
ziehen
Nicht
anfassen
Tun Sie niemals etwas, was einen Schaden am Kabel oder am
Stecker verursachen könnte,
Falls die Maschine in beschädigtem Zustand verwendet wird, kann
dies zu einem Kurzschluß oder Feuer führen.
• Wenn Sie eine Reparatur benötigen, treten Sie bitte mit Ihrem
örtlichen Flavia®Drinks System-Lieferanten in Verbindung.
Stauben Sie den Stecker regelmäßig ab
Eine Ansammlung von Staub auf dem Stecker zieht Kondensation
an, die das Kabel beschädigen könnte, was zu Feuer führt.
• Ziehen Sie den Stecker heraus und reinigen Sie ihn mit einem
Tuch.
Stecken Sie niemals mit nassen Händen den Stecker des
Geräts in die Steckdose oder ziehen Sie ihn heraus
Dies kann einen elektrischen Schock verursachen.
Stellen Sie sicher, daß der Stecker korrekt in der Steckdose
steckt
Ein nicht sicherer Stecker kann elektrischen Schock oder Hitze
hervorrufen, was zu Feuer führt.
• Verwenden Sie keine beschädigten Stecker oder wacklige Steckdosen.
1 5 A / 2 3 0 V - S te c kdo se darf nicht mit anderen Geräten ve r we n d e t
we rd e n
Wenn sie zusammen mit anderen Geräten verwendet wird, kann die
erzeugte Hitze ein Feuer verursachen.
• Das 15A-Verlängerungskabel darf nicht mit anderen Geräten
verwendet werden.
Stromversorgung und -kabel
Keine
nassen
Hände
wie zum Beispiel diese zu verändern, heiße oder
schwere Gegenstände darauf zu plazieren, sie zu biegen,
dehnen, strecken oder verdrehen.
Vorsichtsmaßnahmen
Bitte beachten Sie diese Vorsichtsmaßnahmen genau
Warnung
Dieses Zeichen warnt vor möglichem Tod
oder ernster
Verletzung an Personen und/oder Eigentum
Achtung
Dieses Zeichen warnt vor möglichem Tod
oder ernster Verletzung an Personen
und/oder Eigentum
Achtung
Dieses Zeichen warnt vor
Dampf welcher Verbrennungen
verursachen kann
Wartung
Page 7

Einbau
Drücken Sie die Abtropfplatte hinein,
bis ein Klicken zu hören ist.
Wie man den Maschenfilter
einfügt
Drücken Sie ihn auf die Röhre am
Boden des Kessels, bis ein Klicken
zu hören ist.
Fügen Sie den Separator in den Kessel ein
Wie man den Separator in den Kessel einfügt.
Um den Separator zu entfernen, drehen Sie ihn nach links
und entfernen Sie ihn in der umgekehrten Reihenfolge.
Füllen Sie den Kessel bis zur Markierung für
das maximale Wasserniveau mit Wasser
• Wenn Wasser in den Separator
dringt, hören Sie das Geräusch
von entweichender Luft.
Schließen Sie das Gerät an die
Steckdose an, stellen Sie den
An/Aus-Schalter auf AN
und erhitzen Sie Wasser.
Das Licht leuchtet auf,
wenn das Wasser
erhitzt ist
Schalten Sie das Gerät ab und lassen Sie es abkühlen.
Entfernen Sie den Deckel und die Abtropfplatte
Wie man den Deckel entfernt.
Um ihn auszutauschen, drücken Sie ihn diagonal hinein.
Wenn Sie schließen, drücken Sie ihn in Position, bis Sie
ein Klicken hören.
Wie man die
Abtropfplatte entfernt.
Schütten Sie noch
verbliebenes Wasser durch
den Abfluß weg
11
■
Bitte reinigen Sie den Kessel und die Teile, die mit Wasser in Berührung kommen
Halten Sie gut fest
und ziehen Sie sie
heraus.
• Verwenden Sie das Gerät nicht
in der Nähe einer Feuerquelle
(dies kann zu einer Verformung
des Gehäuses führen).
• Stellen Sie sicher, daß der
Separator korrekt in den Kessel
eingefügt ist. (Falls er nicht
korrekt eingefügt ist, könnte der
Separator herausfallen, wenn
Sie nichtverwendetes Wasser
wegschütten. Außerdem kann
sich erhitztes Wasser abkühlen.)
• Füllen Sie Wasser nicht direkt
vom Wasserhahn ein. (Wasser
kann überlaufen und in Kontakt
mit internen elektronischen
Teilen kommen, was zu einer
Fehlfunktion führen kann.)
• Lassen Sie überschüssiges
erhitztes Wasser nicht in der
Maschine. (Dies kann zu
Korrosion des Kessels und
einem unangenehmen Geruch
führen.)
• Schütten Sie nichtverwendetes
Wasser nicht auf der Seite des
Bedienfelds weg. Verwenden Sie
immer den Abfluß.
(Nichtbefolgung kann zu
Fehlfunktion führen.)
• Tropfwanne regelmäßig
entleeren. Beim Entleeren
Vorsicht walten lassen, da der
Inhalt heiß sein könnte!
Anmerkung
• Vergewissern Sie sich, die Abtropfplatte zu entfernen,
bevor Sie nichtverwendetes heißes Wasser wegschütten.
(Wasser, das sich in der Abtropfplatte befindet, kann mit
internen elektronischen Teilen in Berührung kommen, was
zu einer Fehlfunktion führt.)
Anmerkung
Kesselschnabel
Marke
❶
Wenn Sie den Separator in den
Kessel einfügen, vermeiden Sie
es, den Schnabel zu berühren.
➋
Sobald Sie am Schnabel vorbei
sind, bringen Sie den Separator
in eine horizontale Position.
➌
R i c h ten Sie die
S e p a ra to r e i n kerbung unter der
M a r ke im Kessel aus.
Markierung
innerhalb des
Kessels
Einkerbung
➍
Drehen Sie den Separator nach
rechts, bis Sie den Verschluß
klicken hören.
Befestigen Sie
dann die Marke
in der
Einkerbung auf der anderen Seite.
Kessel
Maximales
Wasserniveau
➋ Halten Sie den Sicherungs-
riegel fest. Entfernen Sie
den Deckel, indem Sie an
Deckelklappe ziehen.
Sicherungsriegel
Vor dem Gebrauch
Das Gerät zum ersten Mal oder nach
einer langen Zeit verwenden
12
Amwendung der Maschine
Wasserversorgungslicht
• Wasserniveau im Kessel ist niedrig
➜ Bitte fügen Sie Wasser hinzu
Getränkeeinstellungsleuchten • Wie man zwischen den
Einstellungen wählt
Espresso-Typ
Für einen stärkeren Geschmack und für Eisgetränke
• Menge des entnommenen Wassers: ungefähr 120ml
Normaler Kaffee/Standardblattee
• Menge des entnommenen Wassers: ungefähr 165ml
Instantgetränk
• Menge des entnommenen Wassers: ungefähr 145ml
Anmerkung: Die Menge des entnommenen Wassers ist
voreingestellt.
Die Menge hängt von der Getränkeart und der
Getränkefilterpackung ab.
Leuchte Filterpackung
entfernen
• Diese lampe leuchtet
auf, wenn eine
Filterpackung in der
Maschine gelassen
wurde, nachdem ein
Getränk zubereitet
wurde
➜ Bitte entfernen Sie
die Filterpackung
Wie man Wasser erhitzt
1
Füllen Sie den Kessel mit
Wasser.
2
Stecken Sie den Stecker in die
Steckdose und stellen Sie die
Maschine an.
Wasser
erhitzt im
Separator
*Ungefähr
3 Minuten
Wasser-
kessel
* U n g e f ä h r
2 5
M i n u te n
Rotes Licht
Grünes Licht
Kommt automatisch an,
wenn der Wasserkessel zu
arbeiten beginnt.
Die benötigte Zeit, um das
erste Getränk zuzubereiten,
beträgt ungefähr 3 Minuten.
Eine andere Tasse kann
zubereitet werden, sobald
das grüne Licht aufleuchtet.
Falls ein Getränk sofort
nach dem Auffüllen mit
Wasser zubereitet wird, ist
es möglich, daß das Wasser
nicht heiß genug ist.
Warmhaltemodus
*Bei einer Zimmertemperatur von 20° C und
einem vollen Kessel
Wassererhitzungslicht
• Wasser wird erhitzt
➜ Bitte warten
Wie man ein Getränk zubereitet
Licht an
Licht an
Nachdem das Getränk ausgegeben wurde
Öffnen Sie den Filterpackungshalter
und entfernen Sie die gebrauchte
Filterpackung.
• Die Filterpackung ist heiß. Bitte Vo rs i c h t
beim Entfe r n e n .
• Nachdem das Getränk ausgegeben wurde, muß die
g e b ra u c h te Filterpackung entfernt we rden (falls die
F i l terpackung nicht entfernt wird, funktionieren die
G e t r ä n ke z u b e r e i t u n g s f u n k t i o n
und die Heißwass e rau sgabefunktion nicht).
Nach Enfernen der Filte r p a c k u n g
➜ Schließen Sie den
F i l te r p a c k u n g s h a l t er und lassen Sie die Sta r t ta ste in die
u rsprüngliche Position zurück.
Das Licht unter
der ausgewählten
Einstellung leuchtet
auf.
•
K le i n e re Ta ssen und solche mit einem gerundete n
Boden können Spritzer ve r u rsachen, wenn ein
Getränk ausgegeben wird .
•
Nur für heiße Getränke geeignete Tassen verwenden.
•
Keine Plastiktassen verwenden!
Anmerkung
Auf den Einstellungen u n d
kö n n ten die Filterpackungen für
I n sta n t g e t r ä n ke platzen.
Ihr Getränk beenden
Wenn das Licht Filterpackung entfernen
aufleuchtet,
entfernen Sie bitte die Tasse
A c h t u n g
D r ü c ken Sie die Sta r t ta ste nicht während des Brühvo rg a n g s.
• Bitte rühren Sie Instantgetränke um, damit sich
diese vor dem Trinken vollkommen auflösen.
Licht an
Anmerkung
Anmerkung
Anmerkung
Drücken Sie die Starttaste.
Öffnen Sie den Filterpackungshalter.
Plazieren Sie die Filterpackung in
den Filterpackungshalter
Ungefähr 15 Sekunden nachdem Sie die
Filterpackung geschlossen haben, leuchtet das
Licht ‘Filterpackung entfernen’ auf.
S te l l en Sie eine Ta sse auf den vo rgesehenen Platz für Ta ss e n
•
Die empfohlene Standardtassengröße für dieses Gerät ist 72mm im
Durchmesser und 92mm hoch.
In Richtung In Richtung
Die Einstellung kehrt
automatisch nach 30
Sekunden zu zurück.
➜
Treffen Sie Ihre Auswahl
noch einmal.
•
Verwenden Sie bei Filterpackungen
für Instantgetränke niemals eine
andere Einstellung als
➜
Drücken Sie die Starttaste, um den
Filterpackungshalter zu öffnen, wählen Sie noch
einmal ihr gewünschtes Getränk und schließen
Sie den Filterpackungshalter.
❶➊
Ziehen Sie diagonal
weg, indem Sie die
Ausbuchtungen in
der Deckelklappe
drücken.
Deckelklappe
Wählen Sie die Einstellung
abhängig von dem
gewünschten Getränk
Drücken Sie die
Starttaste, um
den Betrieb
zu starten
Page 8

1
Überprüfen Sie, daß sich keine Filterpackung im Filterpackungshalter befindet
2
Stellen Sie die Maschine ab und ziehen Sie den Stecker aus der Steckdose
3
Nehmen Sie die Abtropfplatte ab und schütten Sie darin enthaltenes Wasser weg
4
Nehmen Sie den Deckel ab und schütten Sie nichtve r we n d e t es erhitztes Wa sser weg (bitte siehe Seite 11 für die
ko r re k t e Weise, nichtve r we n d e t es Wa sser we g z u s c h ü t te n )
13
Aufbewahrung
Wa r t u n g
Aufbewahrung: Wenn Sie das Gerät über eine längere Zeit nicht gebrauchen
Wöchentliche Wartung
S tauben Sie das Gehäuse und den Deckel mit einem gut ausgewrungenen fe u c h ten Tuch ab.
• Waschen Sie es nicht mit Wasser.
(Wasser könnte in die elektrischen Teile gelangen, was zu einer Fehlfunktion führen würde.)
• Verwenden Sie keine Reinigungsmittel.
(Diese könnten Spuren hinterlassen.)
• Wenden Sie keine Produkte, die Benzol enthalten, auf das Gerät an.
(Dies könnte die Oberfläche der Maschine beschädigen.)
Wischen Sie die Wände des Kessels mit einem feuchten Tuch ab.
• Reinigen Sie sie nicht mit Bürsten oder Scheuermitteln.
(Dies könnte die Oberflächen
beschädigen.)
Filterpackungshalter, Abtropfplatte und Abstellplatz für Tassen sollten mit einem
feuchten Tuch gewaschen werden.
Zweimonatliche Wartung
Mit Gebrauch lagert sich an den inneren Oberflächen
Kesselstein ab. Dieser muß alle zwei Monate entfernt werden.
Wie abnehmen
❶
Nehmen Sie die Abtropfplatte ab.
➋ Öffnen Sie den Filterpackungshalter und drücken Sie nach unten, bis er ganz
offen ist.
➌ Drücken Sie noch einmal nach unten und ziehen Sie ihn genau nach unten heraus.
Wie austauschen
❶
Fügen Sie den Boden des Filterpackungshalters ein, indem Sie diagonal nach
oben drücken, bis er mit den linken und rechten Klammern am Gehäuse
festgemacht ist.
➋ Schließen Sie den Filterpackungshalter.
* Wenn sich der Filterpackungshalter in Position befindet, hören
Sie ein lautes Klicken.
Klammern
Maschenfilter und Separator sollten gereinigt
werden, indem sie in Wasser getaucht und hinund herbewegt werden.
• Verwenden Sie nicht Spül- oder
Reinigungsmittel. (Falls dies keine
Wirksamkeit zeigt, verwenden Sie bitte eine
geeignete Bürste).
Wenn Sie eine Fa r b veränderung aufgrund vo n
K e ss e l s tein oder eine schwimmende Schicht im
K e ssel und Maschenfilter bemerke n .
Im Wa sser enthaltene Mineralien können an den Oberflächen,
mit denen Wa sser in Berührung kommt, Ablagerungen
h e r vo r r u f en. Dies bedeutet weder eine ko r ro s sion noch eine
veränderüng des ke ssels. Dies kann die Gestalt annehmen vo n :
• Änderung der Farbe zu milchig weiß, braun oder dunke l g ra u .
• Rauhe Oberflächen oder Rostflecken.
• Weiße oder glänzende Schicht aufgrund von
Kristallisierungen
von Mineralien.
Anmerkung
• S te l len Sie das Gerät nicht in eine Spülmaschine oder
einen Trockner irg e n d we l cher Art. (Dies kann zu einer
Ve r formung des Gehäuses führe n . )
• Wenn Sie das Gerät aufbew a h ren:
- Trocknen Sie es gut.
- Schützen Sie es davor, daß Gegenstände in das Gerät
gelangen, indem Sie es in Plastik einwicke l n .
Möglicher Grund
• Der Ste c ker ist eventuell lose in der
S te c k d o s e.
• Der An/Aus-Schalter könnte in der
AUS-Stellung sein.
• Der Maschenfilter könnte mit Kesselstein
verstopft sein.
• Der Kessel und die inneren Teile, durch
die Wasser fließen, sind mit Kesselstein
verstopft.
• Kurz vor und nach Beendigung des
Heizvorgangs kann die ausgegebene
Menge gering sein.
• Der Grund dafür sind
Kesselsteinablagerungen.
* Wasser mit einem hohen Mineralgehalt
wie zum Beispiel Mineralwasser oder
ionisiertes Wasser verursacht die
Farbveränderung und/oder das
Erscheinen einer weißen Schicht auf der
Wasseroberfläche.
• Frisches Wasser wurde in
Warmhaltemodus unmittelbar vor der
Zubereitung eines Getränks in den
Kessel eingefüllt.
• Warten Sie ungefähr 15 Sekunden, bis
das Getränk ausgegeben wird.
• In der Einstellung, wird die
Filterpackung mit Luft gefüllt, was
dieses Knallgeräusch verursacht.
Die Anzeige Wasserversorgung ist an
• Ve rg ew i s sern Sie sich, daß die Maschine
mit Wa sser gefüllt wurde, bevor sie
a n g e stellt wurd e .
• Das Wa ss e r n i v eau im Kessel ist eve n t u e l l
n i e d r i g .
Dies kann vorübergehend passieren, wenn
Wasser in den Kessel gefüllt wurde.
14
■ Falls die folgenden Anzeigen leuchten, hat das Gerät eine Fehlfunktion.
Zwei Lichter sind gleichzeitig an
und Bitte treten Sie mit Ihrem lokalen Flavia®Drink System-Lieferanten in Verbindung.
und Unterrichten Sie den Lieferanten darüber, welche Lichter an sind.
und
Falls das Problem nicht behoben werden konnte, nachdem die oben genannten möglichen Gründe überprüft wurden, ziehen Sie den
Stecker aus der Steckdose und treten Sie mit Ihrem lokalen Flavia®Drink System-Lieferanten in Verbindung.
Fehlersuche
Bitte überprüfen Sie die folgenden möglichen Ursachen,
bevor Sie einen Servicevertreter rufen.
Was ist zu tun
Stecken Sie den Stecker in der Steckdose
fest.
Stellen Sie den An/Aus-Schalter auf AN.
Reinigen Sie den Maschenfilter alle zwei
Monate mit einer Bürste. (Siehe Seite 10).
Falls dies keine Besserung bringt,
wechseln Sie bitte den Filter. (Siehe hintere
Umschlagseite).
Bitte nehmen Sie Kontakt mit Ihrem
lokalen Flavia®Drink System-Lieferanten
auf.
Dies ist völlig normal.
Bitte nehmen Sie Kontakt mit Ihrem
lokalen Flavia®Drink System-Lieferanten
auf.
Um ein Getränk zu bereiten, warten Sie
bitte auf das Aufleuchten des grünen
Lichts . Für heißes Wasser warten
Sie bitte darauf, daß das Licht ausgeht.
➀ Drücken Sie den Bedienhebel und öffnen
Sie den Filterpackungshalter.
➁ Wählen Sie noch einmal Ihre
gewünschte Getränkeeinstellung.
➂ Schließen Sie den Filte r p a c k u n g s h a l te r
und drücken Sie die Sta r t ta ste, um die
Maschine zu sta r te n .
Dies ist völlig normal.
Füllen Sie Wasser auf.
Ve rg ew i ssern Sie sich, daß der Kessel mit
Wa sser gefüllt ist. Ste l len Sie die Maschine
ab und ste l len Sie sie nach 10 Sekunden
wieder an.
Problem
Wasser erhitzt sich nicht.
Die Menge des ausgegebenen Wassers
ist wiederholt gering und/oder wird zu
langsam ausgegeben.
Die Wände des Kessels haben sich
farblich verändert, eine milchig weiße
Schicht schwimmt oben auf dem Wasser
im Kessel und/oder das Geräusch des
kochenden Wassers ist lauter als
normal.
Getränke und erhitztes Wasser sind nicht
heiß genug.
■ Wenn Sie ein Getränk zubereiten.
Das Gerät funktioniert nicht, nachdem
eine Getränkefilterpackung in den
Filterpackungshalter eingefügt wurde.
( leuchtet)
Das Gerät macht ein Knallgeräusch,
wenn die Starttaste gedrückt wird, um
ein Getränk zu bereiten.
■ Falls Sie die folgenden Anzeigen sehen
( leuchtet)
und leuchten.
Page 9

16
Consignes de sécurité
Attention !
Précautions contre les brûlures
Mise en place de la
Flavia®SB100
C o n s e r ver hors de portée des enfa n t s .
Les enfants et les personnes non
familiarisées avec l'appareil ne doive n t
l'utiliser que sous supervision
La non-observation de ces consignes peut
entraîner des brûlures, une électrocution ou
d'autres dommages corporels.
Pour sortir les boissons chaudes sans
danger, ne pas placer l'appareil à plus
de 1,3 m du sol.
Préparation
Ne jamais trop remplir d'eau
De l'eau bouillante risque de se répandre
et de causer des brûlures.
Ne jamais mettre à bouillir rien
d ' a u t re que de l'eau dans la machine
Ne jamais chauffer de sachets de thé, feuilles
de thé, lait, alcool, ou quoi que ce soit d'autre
que de l'eau dans la machine. Vous risquez
d'obstruer le réservoir d'eau ou de
l'endommager fortement.
Pendant utilisation
C o n tenu chaud - To u j o u rs fa i re
p re u v e de prudence .
Ne jamais re n ve r ser la machine
Même si le couvercle est verrouillé, de
l'eau chaude s'écoulera par les sorties
d'eau et de vapeur, si l'on renverse
l'appareil, ce qui peut causer des
brûlures.
Ne jamais basculer, ni re m u e r
l ' a p p a reil, ni le porter en le te n a n t
par le co u ve rc l e ou en l'étre i g n a n t
Même si le couvercle est verrouillé, de
l'eau chaude s'écoulera par les sorties
d'eau et de vapeur, si l'on remue
l'appareil, ce qui peut causer des
brûlures.
Ne jamais fermer le
co u ve rc le en fo rça n t
De l'eau chaude risque de se
répandre, ce qui peut causer des
b r û l u r e s .
Ne jamais obturer la sortie va p e u r
L'eau en ébullition risque
de déborder, causant des
brûlures.
To u j o u rs co n s e r ver le
co u ve rc le bien fe r m é
Si l'appareil bascule, de l'eau
chaude risque de se répandre,
causant des brûlures.
Ne jamais utiliser sans
p l a cer une ta sse sous la
sortie d'eau
De l'eau chaude risque de rejaillir
sur le bac de récupération, causant
des brûlures.
Après utilisation
To u j o u rs ôter le bac de
ré c u p é ration et le
co u ve r c le quand l'on vide
l'eau chaude inutilisée
De l'eau chaude risque de se
trouver prise dans le couvercle et
le bac de récupération, causant
des brûlures.
Sortie vapeur
Couvercle
Fiche
Courant nominal
Tension 230 V
Cordon
d'alimentation
secteur
Touche eau chaude
Corps
Sortie d'eau
Bac de récupération
Entretien
Ne jamais utiliser pour co n s e r ve r
d e la glace
La condensation créée posera des risques
d'électrocution et de panne.
Ne jamais ess a yer de démonter, de
ré p a rer ou de modifier l'appare i l
Toute intervention de ce type peut
entraîner un incendie ou des dommages
c o r p o r e l s .
• En cas de réparation nécessaire, veuillez
contacter votre agent local Flavia
®
Drinks Systems.
Conserver à
l'abri de l'eau
Ne pas
toucher
Ne jamais plonger l'appareil dans
l'eau, ni le mouille r
Ceci provoquera un court-circuit.
ATTENTION - Pe rsonnel de dépannage.
Pompe non mise à la te r re - ne PAS toucher quand
l ' a p p a reil est alimenté.
Important. Consignes de sécurité.
Pour prévenir tous dommages corporels aux utilisateurs de la machine ou à toutes autres personnes et/ou tous dommages matériels,
veuillez lire les consignes de sécurité ci-après.
■
Les conséquences possibles d’utilisation incorrecte sont décrites dans les pages suivantes. Elles sont accompagnées
chacune d'un symbole indiquant la gravité du danger posé.
■
Les dangers pouvant causer des dommages corporels ou matériels sont indiqués par les symboles ci-après.
Ces symboles sont expliqués en détail en pages 16 et 17. Prière de lire attentivement ces informations.
Les symboles ci-après indiquent
qu'il s'agit d'actions interdites
Les symboles ci-après indiquent qu'il s'agit d'actions
à éviter à tout prix
Réservoi
r d'eau
Niveau
d'eau
maximum
Veuillez respecter minutieusement ces consignes
15
Faites l'expérience de FLAVIA® - le distributeur de boissons adapté à toutes vos envies.
Merci de rejoindre la communauté FLAVIA®.
Selon nous, une taille unique ne peut répondre à tous les besoins. Le distributeur automatique FLAVIA SB100 vous offre un vaste choix
pour répondre à tous vos goûts et besoins, quelle que soit la situation.
Notre technologie ingénieuse « brew-by-pack » utilise des sachets filtres scellés hermétiquement dans un emballage en papier
d'aluminium pour conserver toute la fraîcheur de l'arôme jusqu'au moment de la préparation. Cette technologie unique nous permet de
vous offrir quatre catégories différentes de boissons.
Le FLAVIA® SB100 est un distributeur robuste et fiable, ne nécessitant aucun nettoyage entre deux boissons. Fraîcheur et plaisir
assurés, en toute facilité.
Veuillez lire ces instructions avant d'utiliser le FLAVIA® SB100, et conservez-les en lieu sûr pour toute référence ultérieure.
Des boissons pour toutes les envies
Et si le café n'était pas « votre tasse de thé » ? Le distributeur FLAVIA® vous
offre un grand choix de boissons délicieuses satisfaisant toutes les humeurs.
* Le fabricant se réserve le droit de modifier la sélection sans avis préalable.
Caractéristiques de votre distributeur de boissons
Sortie vapeur
Poignée du couvercle
Touche de mise en route
Porte-sachet
Regard du niveau d'eau
Grille égouttoir
Fiche
Courant nominal
Tension 230 V
Cordon
d'alimentatio
n secteur
Panneau de commande
Corps
Niveau d'eau
Bac de récupération
Poignées
Interrupteur de
fonctionnement
(I...Marche, O...Arrêt)
Identification des pièces amovibles
Grille
égouttoir
Bac de
récupération
Séparateur
Filtre au charbon activé
(Pièce remplaçable,
voir dos de la
couverture)
Retirer du sachet
plastique.
N'est pas installé en série en
Europe.
• Pour les instructions de montage, se reporter à la page 18.
Filtre à mailles
(Pièce remplaçable, voir dos
de la couverture)
Vérifiez que le filtre à
maille est
correctement inséré
dans le réservoir. S'il
ne l'est pas, reportezvous à la page 18 pour
un montage correct.
Des protections sont placées sur le
porte-sachet, le badge, le regard de
niveau d'eau et le panneau de
commande. Veuillez les retirer avant
utilisation.
Recommandation
Cafés gourmet
Il existe un café FLAVIA® pour
tous les goûts. Pourquoi vous
limiter à un seul quand vous
pouvez essayer les nombreuses
variétés figurant sur notre
menu du monde entier ?
Dégustez nos cafés d’origine ou
n'ayez pas peur d'essayer nos
cafés aromatisés. Donnez-vous
un coup de fouet avec nos cafés
corsés ou, au contraire, relaxezvous avec nos mélanges plus
légers ou nos décaféinés.
Thés en feuilles
Les thés FLAVIA® réunissent
les diverses traditions de
l'Europe et l'Orient. Nous
proposons des thés en feuilles
répondant à tous les besoins des mélanges très parfumés
aux variétés légères et
délicates.
Boissons bien-être
Nourrissez le corps et l'esprit
avec une sélection formidable
de boissons délicieuses,
harmonieuses et tonifiantes,
chacune offrant un avantage
unique visant à promouvoir
votre bien-être.
Créations indulgentes
Qui n'aime pas les petits
plaisirs ? D'un Choco à un thé
Exotic Chai, vous ne pourrez
pas résister.
Attention !
Ce symbole indique un danger de mort
ou de blessure grave
Prudence !
Ce symbole indique des risques de
dommages corporels et/ou matériels
Attention
Ce signe avertit de vapeur qui
pourrait causer des brûlures
Page 10

18
Installation
Enfoncer le bac de récupération
jusqu'à ce qu'un clic se fasse
entendre.
Montage du filtre à mailles
Enfoncer le tuyau au fond du
réservoir jusqu'à ce qu'un clic se
fasse entendre.
Introduire le séparateur dans le réservoir
Montage du séparateur dans le réservoir
Pour démonter le séparateur, le dévisser et procéder
en ordre inverse.
Remplir le réservoir d'eau en veillant à ne pas
dépasser le niveau d'eau maximum
• Lorsque l'eau pénètre dans le séparateur,
vous entendrez l'air s'en échapper.
Brancher l'appareil, allumer
l'interrupteur de fonctionnement
(position « ON ») et mettre l'eau à
chauffer.
Le voyant
s'allume lorsque
l'eau a fini de
bouillir.
Débrancher l'appareil et laisser refroidir.
Oter le couvercle et le bac de récupération
Démontage du couvercle.
Pour replacer, pousser obliquement.
Pour fermer, pousser en place jusqu'à ce qu'un clic
se fasse entendre.
Démontage du
bac de récupération.
Jeter l'eau chaude restante
via l'évacuation
Avant utilisation
■ Prière de nettoyer le réservoir et les composants en contact avec l'eau
Tenir fermement
et tirer.
• Ne pas utiliser l'appareil à
proximité d'une flamme (risque
de déformation du corps de
l'appareil).
• S'assurer que le séparateur est
correctement monté dans le
réservoir. (En cas de montage
incorrect, le séparateur risque
de tomber quand on jette l'eau
inutilisée. De plus, l'eau bouillie
risque de devenir tiède.)
• Ne pas remplir directement à
partir du robinet. (L'eau risque
de déborder et d'entrer en
contact avec des composants
électriques internes, causant
une panne.)
• Ne pas laisser dans l'appareil
l'eau bouillie inutilisée. (En
raison des risques de corrosion
pour le réservoir et de l'odeur
désagréable pouvant s'en
dégager.)
• Ne pas jeter l'eau inutilisée du
côté du panneau de commande.
Toujours utiliser l'évacuation.
(En ne procédant pas ainsi, vous
risquez de provoquer une
panne.)
• Vider l'égouttoir à intervalles
réguliers. Attention au risque de
brûlure.
Recommandations
• Veiller à ôter le bac de récupération avant de jeter l'eau
chaude inutilisée. (L'eau contenue dans le bac risque
d'entrer en contact avec des composants électriques
internes, causant une panne.)
Recommandations
Rebord du
réservoir
Repère de
positionnement
❶
En introduisant le séparateur
dans le réservoir, éviter de
toucher le rebord.
➋
Une fois le rebord passé, tenir le
séparateur en position
horizontale.
➌
Aligner l'encoche du sépara te u r
a u - d e ssous du re p è re situé à
l'intérieur du ré s e r vo i r
Repère
à l'intérieur
du réservoir
Encoche
➍
Visser le séparateur vers la droite
jusqu'à ce qu'un clic se fasse
entendre.
Puis caler le
repère de
positionnement
dans l'encoche
sur l'autre côté.
Réservoir
Niveau d'eau
maximum
❶
Tirer obliquement en
pressant les ergots de
la poignée du
couvercle.
Poignée du
couvercle
➋ Maintenir enfoncé le
dispositif de fixation.
Oter le couvercle en le
tirant sur la poignée.
Dispositif de fixation
Première utilisation de l'appareil ou utilisation
après une longue période d'arrêt
17
Prudence !
Précautions contre les brûlures
Cordon d'alimentation secteur
Mise en place de l'appareil
Ne pas placer sur des surfa c es insta b les ou ne
ré s i stant pas à la chale u r
En basculant, l'appareil peut causer des brûlures.
Ne pas placer à proximité de parois ou de mobilier
La vapeur et la chaleur dégagées peuvent endommager la paroi ou
le mobilier et causer une déformation ou une décoloration.
D é b rancher l'appareil, lo rsqu'il n'est pas utilisé
Toute isolation endommagée peut causer
une électrocution et/ou un incendie.
Pour débrancher l'appareil,
t i rer sur la prise – et non sur le co rdon !
Ceci peut causer une électrocution et un court-circuit, provoquant
un incendie.
Pendant utilisation
Après utilisation
Ne pas ouvrir le co u ve rc le pendant que l'eau chauffe
La vapeur dégagée peut causer des brûlures.
Ne pas enlever la ta sse, pendant que la boisson est
ve rs é e
Ceci peut causer des brûlures.
En tra n s p o r tant l'appareil, ne pas toucher la poignée
du co u ve rc le
Le couvercle peut s'ouvrir et causer des brûlures ou d'autres
b l e s s u r e s .
A t te n d re que l'appareil re f ro i d i sse avant de le déplace r
Un appareil encore chaud peut causer des brûlures.
• Faire très attention en jetant l'eau chaude inutilisée.
• Enlever le séparateur seulement après refroidissement.
Ne pas toucher quand le co u ve rc le est ouve r t
Ceci peut causer des brûlures.
Ne pas déplacer l'appareil avec une ta sse enco re posée
sur la grille égoutto i r
Ceci peut causer des brûlures.
Ne pas
toucher
Ne pas toucher la sortie va p e u r
Ceci peut causer des brûlures.
Eloigner les enfants de la sortie vapeur.
Ne pas toucher les parties chaudes de l'appareil pendant
utilisation et peu aprè s
Ceci peut causer des brûlures.
Ne pas
toucher
Ne pas approcher les mains pendant la
d i stribution de la boisson.
Ne pas
toucher
Débranchr
l'appareil
Ne pas
toucher
Ne jamais te n ter quoi que ce soit pouva n t
endommager le co r don ou la fiche,
Si la machine continue à être utilisée en étant détériorée, un
court circuit ou un incendie peut en résulter.
• En cas de réparation nécessaire, veuillez contacter votre agent
local Flavia®Drinks Systems.
N e t toyer la fiche ré g u l i è re m e n t
L'accumulation de poussières sur la fiche favorise la
condensation,
ce qui pourrait détériorer le câble et causer un incendie.
• Débrancher la fiche et la nettoyer avec un chiffon.
Ne jamais brancher ou débrancher l'appareil ave c
les mains humides
Ceci peut causer une électrocution.
Ve i l ler à bien insérer la fiche dans la prise de co u ra n t
Une fiche non conforme peut causer une électrocution ou chauffer et
provoquer un incendie.
• Ne pas utiliser une fiche endommagée ou une prise de courant
lâche.
Ne pas brancher d'autres appareils électriques sur
une prise 15A/230V
En cas d'utilisation avec d'autres appareils, la chaleur générée peut
provoquer un incendie.
• Ne pas utiliser la rallonge de cordon 15A avec d'autres appareils
électriques.
Alimentation électrique et cordon
Mains
humides
interdites
comme y apporter des modifications, placer sur eux des
objets chauds ou lourds, les courber, les étirer ou les
tordre
Consignes de sécurité
Veuillez observer minutieusement ces consignes
Page 11

20
1
Assurez-vous qu'il n'y a pas de sachet dans le porte-sachet
2
Eteignez l'interrupteur de fonctionnement et débranchez l'appareil
3
Enlevez le bac de récupération et videz l'eau qu'il contient
4
E n levez le co u ve rc l e et jetez l'eau bouillie inutilisée (pour jeter co r r e c t ement l'eau inutilisée,
re p o r te z - v ous aux instructions de la page 18)
Stockage
E n t r e t i e n
Stockage : quand vous n'utilisez pas l'appareil pendant une période prolongée
Entretien hebdomadaire
Entretien bimensuel
Avec l'usage, des dépôts de tartre se formeront sur les
surfaces internes. L'appareil doit être détartré tous les deux
mois.
Démontage
❶
Oter le bac de récupération..
➋ Ouvrir le porte-sachet complètement en le poussant vers le bas.
➌ Pousser à nouveau vers le bas et tirer directement vers le bas.
Remontage
➊ Engager le fond du porte-sachet et repousser obliquement le
porte-sachet jusqu'à ce qu'il s'enclenche sur les ergots gauche et
droite situés sur le corps de l'appareil.
➋ Fermer le porte-sachet.
* Le clic que vous entendrez indiquera que le porte-sachet est bien en place
Ergots
Nettoyer le filtre à mailles et le séparateur en
les plongeant et en les agitant dans l'eau.
• N'utiliser ni liquide vaisselle ni eau de Javel.
(Si cette opération est inefficace, utiliser une
brosse adéquate).
Si vous observez une décoloration due au tartre ou
des dépôts flottants dans le réservoir.
Les minéraux contenus dans l'eau peuvent former des dépôts
sur les surfaces avec lesquelles l'eau entre en contact. Ces
dépôts n'indiquent pas que le réservoir est corrodé, et la
décoloration n'indique pas qu'il est endommagé. Ces dépôts
sont inoffensifs. Ils peuvent revêtir les formes suivantes :
• D é co l o r ation laiteuse, brunâtre, gris fo n cé .
• Surfaces rugueuses ou taches de rouille.
• Couche blanche ou brillante résultant de la cristallisation
des minéraux.
Recommandations
• Ne pas mettre dans un lave - va i s s e l l e ou tout appareil de
séchage. (Risques de déformation du corps de l'appare i l . )
• En cas de non utilisation pro l ongée :
- Bien sécher.
- Empêcher tous objets d'entrer dans l'appareil en
l ' e n ve l oppant de plastique.
Nettoyer le corps de l'appareil et le couvercle avec un chiffon humide bien essoré.
• Ne pas asperger d’eau. Ne pas plonger dans l’eau.
(De l'eau risque de pénétrer dans les composants électriques internes, causant une panne.)
• Ne pas utiliser de produits nettoyants.
(Ils peuvent laisser des résidus.)
• Ne pas appliquer sur l'appareil des produits contenant du benzène.
(Ceci risque d'endommager la surface de l'appareil.)
Nettoyer les surfaces du réservoir avec un chiffon humide.
• Ne pas utiliser de brosses ni de produits à récurer.
(Ceci risque d'endommager les surfaces.)
Le porte-sachet, la grille égouttoir et le bac de récupération doivent être nettoyés
avec un chiffon humide.
19
Placer une tasse sur la grille égouttoir.
• Dimensions de tasses recommandées pour utilisation
avec l'appareil : 72 mm de diamètre et 92 mm de hauteur.
Vers Vers
Sélectionner le réglage
correspondant à la boisson de
votre choix.
Le réglage commutera
automatiquement en mode
après 30 secondes.
➜ Sélectionner à nouveau la boisson
de votre choix.
• Ne jamais utiliser d'autre réglage
que le pour les sachets pour
boissons instantanées.
Appuyer sur la touche de mise en route.
Ouvrir le porte-sachet.
Placer le sachet dans
le porte-sachet
Environ 15 secondes après fermeture
du porte-sachet, le voyant « Enlever
sachet » s'allumera.
➜ Appuyer sur la touche de mise en route pour ouvrir le
porte-sachet, sélectionner à nouveau
la boisson de votre choix et fermer le
p o r t e - s a c h e t .
Appuyer sur la
touche de mise en
route
pour faire
démarrer l'opération.
Mode d'emploi
Voyant lumineux d'alimentation d'eau
• Niveau d'eau insuffisant dans le réservoir
➜ Veuillez ajouter de l'eau
Voyants lumineux des réglages de boissons
• Quel réglage choisir ?
Type Expresso
Pour un goût plus fort et des boissons glacées
• Volume d'eau versée : environ 120 ml
Café normal/Infusion standard
• Volume d'eau versée : environ 165 ml
Boisson instantanée
• Volume d'eau versée : environ 145 ml
Nota : Le volume d'eau versée est préréglé.
Le volume varie en fonction du type de boisson et
des sachets de boisson.
Voyant lumineux
« Enlever sachet »
• Ce voyant s'allume
quand un sachet
usagé est laissé dans
l'appareil après
préparation d'une
boisson
➜ Prière d'enlever le
sachet
Chauffage de l'eau
1
Remplir le réservoir d'eau
2
Brancher l'appareil et
allumer
l'interrupteur de
fonctionnement.
Chauffage
de l'eau
dans le
séparateur
*Environ
3 minutes
Chauffage
de l'eau
* E n v i ron
2 5
m i n u te s
Voyant rouge
Voyant vert
S'allume automatiquement
quand l'eau commence à
chauffer.
Le temps de préparation de
la première boisson est
d'environ 3 minutes. Une
autre tasse peut être
préparée aussitôt après
allumage du voyant vert.
Si une boisson est préparée
juste après avoir versé l'eau
dans le réservoir, l'eau peut
ne pas être suffisamment
chaude.
Mode thermos
* A une température ambiante de 20°C
et avec un réservoir plein.
Préparation d'une boisson
Voyant allumé
Voyant allumé
Une fois la boisson versée,
ouvrir le porte-sachet et enlever
le sachet usagé.
• Le sachet sera chaud. L'enleve r
a vec pré caution.
• Une fois la boisson ve rsée, le sachet usagé doit être re t i ré .
(Si le sachet n'est pas re t i r é, les fonctions Pré p a ration de
b o i ssons et Eco u lement d'eau chaude ne s'active ront pas)
Une fois le sachet re t i ré ➜ Fermer le porte-sachet et
ra b a i sser la touche de mise en ro u te dans sa position
d'origine.
Voyant de chauffage de l'eau
• L'eau est en train de chauffer
➜ Veuillez patienter
Le voyant sous la
boisson sélectionnée
s'allumera..
•
Les tasses plus petites et celles à fond arrondi
peuvent provoquer des éclaboussures, quand la boisson est versée.
•
Utiliser uniquement des tasses pour boissons chaudes.
•
Ne pas utiliser de gobelets de distributeur en plastique.
Recommandations
Avec les réglages e t les sachets pour
b o i ssons insta n tanées peuvent éclate r
Fin de préparation de votre boisson
Quand le voyant « Enlever sachet » s'allume,
retirer la tasse
Attention:
Ne pas appuyer sur la touche de mise en
route pendant l'infusion
S'il s'agit d'une boisson
instantanée,remuer pour bien dissoudre avant de boire.
Voyant allumé
Recommandation
Notice
Recommandation
Page 12

22
Replacement parts and consumable goods
Specification
Rubber fitting
The rubber fitting should be
replaced when it loses its
flexibility and steam starts
appearing around the edges
of the closed lid.
• Take out the 3 screws,
remove the lid cover and
replace the rubber fitting.
Mesh filter
The mesh filter should be replaced when scale deposits
can no longer be removed by brushing.
Active carbon filter
Although it will differ depending on water hardness
and usage, in order to maintain its effectiveness, the
active carbon filter should be replaced once a year.
Lid cover
Rubber
fitting
Part Serial number
Rubber fitting APH65-198-F
Mesh filter ACD30-135-OU
Active carbon filter ACA95-135-OU
* For any inquiries regarding the parts and orders, please contact your local Flavia®Drink System supplier.
®
is a registered trademark.
* Under certain conditions, such as at very high altitudes and in intense cold, the appliance may not function properly.
Please avoid using the appliance in such conditions.
* If the appliance is not used during cold conditions, make sure to empty it of water. The water left in the tank may freeze causing damage.
Powe r Vo l tage 230V 50Hz
Power consumption 1 0 0 0 W
Weight (approx,) 3 . 5 kg
Volume 3 . 7 L
Liquid pump (power consumption/period of time) 2 W / 3 0 s
Air pump (power consumption/period of time) 3W/5s
S a fety fe a t u re s
L ow - w a t er cut-out. Heat-dry cut-out.
H i g h - p re ss u re cut-out.
M e a s u re -
W i d t h 2 2 . 5 c m
ments Depth 3 4 . 0 c m
( a p p rox . )
H e i g h t 3 6 . 5 c m
Length of ca b le 1 . 5 m
Care and
Inspection
Please inspect your Drinks station regularly to ensure many years of faithful service!
Is your appliance showing any of the fo l lowing signs?
• The power plug and co rd heat up easily.
• The co rd is damaged and/or power supply is inte r r u p t ed when the co rd is to u c h e d .
• The boil mode does not switch to Keep warm mode after 5 minutes of a co n t i n u o u s
st ream of steam from the steam ve n t .
If your appliance is showing
these signs, stop using it
immediately and arrange an
inspection with your local Flavia
®
Drinks System Supplier.
(Based on a usage of
20 cups per day).
Not fitted as standard
in Europe.
Ersatzteile und Verbrauchsgüter
Spezifikation
Gummiteil
Das Gummiteil sollte
ausgetauscht werden, wenn
es seine Elastizität verliert
und Dampf an den Rändern
des geschlossenen Deckels
erscheint.
• Nehmen Sie die 3
Schrauben heraus,
entfernen Sie die
Abdeckung des Deckels und
ersetzen Sie das Gummiteil.
Maschenfilter
Der Maschenfilter sollte ausgetauscht we rden, wenn Kess e l ste i nablagerungen nicht mehr durch Bürsten entfernt we rden kö n n e n .
Aktivkohlefilter
Obwohl es von der Wasserhärte und vom Gebrauch abhängt,
sollte der Aktivkohlefilter einmal im Jahr ausgetauscht
werden, damit die Wirksamkeit nicht verloren geht.
Deckelabdeckung
Gummiteil
Teil Seriennummer
Gummiteil APH65-198-F
Maschenfilter ACD30-135-OU
Aktivkohlefilter ACA95-135-OU
* Für Auskünfte zu den Teilen und Bestellungen wenden Sie sich bitte an Ihren lokalen Flavia®Drink System-Lieferanten.
®
ist ein eingetragenes Warenzeichen.
S t ro m Spannung 230V 50Hz
S t ro m ve r b rauch 1 0 0 0 W
G ewicht (ungefähr) 3 , 5 kg
Vo l u m e n 3 , 7 L
Flüssigkeitspumpe (Stromverbrauch/Zeit) 2W/30s
Luftpumpe (Stromverbrauch / Zeit) 3W/5s
Sicherheitsmerkmale
Sicherung für niedriges Wasser. Sicherung für
ve r kochendes Wa ss e r. Sicherung für hohen Druck
M a ß e
B re i t e 2 2 , 5 c m
( u n g e f ä h r )
T i e fe 3 4 , 0 c m
H ö h e 3 6 , 5 c m
K a b e l l ä n g e 1 , 5 m
Pflege und
Inspektion
Bitte kontrollieren Sie Ihren Drinks station regelmäßig, um lange Jahre zuverlässigen Dienstes zu gewährleisten!
Zeigt Ihr Gerät eines oder mehre re der folgenden Zeichen?
• Der Netzste c ker und das Stromkabel erhitzen sich le i c h t .
• Das Kabel ist beschädigt und/oder die Stromzufuhr wird unte r b rochen, wenn das Kabel
berührt wird .
• Der Kochmodus schaltet nach 5 Minuten eines kontinuierlichen Dampfa u sst roms aus
dem Dampfabzug nicht auf Wa r m h a l temodus um.
Falls Ihr Gerät diese Zeichen zeigt,
sollten Sie sofort aufhören, die
Maschine zu ve r wenden und
a r ra n g i e r en Sie eine Inspektion mit
Ihrem lokalen Flavia®Drinks
System-Lieferanten.
( B a s i e rend auf einem Gebra u c h
von 20 Ta ssen pro Ta g ) .
In Europa standardmäßig nicht
eingebaut.
* Unter bestimmten Umständen, wie zum Beispiel in sehr großer Höhe und Kälte, ist es möglich, daß das Gerät nicht korrekt
funktioniert. Bitte vermeiden Sie es, das Gerät unter solchen Bedingungen zu gebrauchen.
* Falls das Gerät nicht während kalter Bedingungen gebraucht wird, stellen Sie sicher, das Wasser wegzuschütten. Das verbliebene Wasser
im Kocher k ö n n t e gefrieren und Schaden verursachen.
21
■ Si les voyants ci-après sont allumés, ils indiquent une anomalie de fonctionnement.
Deux voyants sont allumés simultanément
et Veuillez contacter votre agent local Flavia®Drink System.
et Informez l'agent des voyants allumés.
et
Si le problème n'a pas été résolu, après avoir vérifié les causes possibles ci-dessus, débranchez l'appareil et contactez votre agent local
Flavia®Drink System.
Détection de pannes
Avant d'appeler un agent de service,
veuillez d'abord vérifier les causes possibles ci-après.
Si...
L'eau ne chauffe pas.
Le volume d'eau versée est insuffisant
et/ou s'écoule trop lentement.
Les parois du réservoir sont
décolorées, une couche blanche
laiteuse surnage dans le réservoir
et/ou le bruit d'ébullition de l'eau est
plus accentué que d'habitude.
Les boissons et l'eau bouillie ne sont
pas assez chaudes.
■ Lors de la préparation d'une boisson
L'appareil ne fonctionne pas, après
avoir placé un sachet dans le portesachet.
(Le voyant est allumé)
On entend un « plouf », quand on
appuie sur la touche de mise en ro u te
pour mettre en ro u te la pré p a ration de
la boiss o n .
■ Voyants allumés
(Le voyant iest allumé.)
Les deux voyants et sont
a l l u m é s .
Cause possible
• La fiche est mal insérée dans la prise.
• L'interrupteur de fonctionnement est en
position OFF (arrêt).
• Le filtre à mailles est entartré.
• Le réservoir et les composants internes à
travers lesquels l'eau s'écoule, sont
entartrés.
• Immédiatement avant et après le
chauffage de l'eau, le volume d'eau
versée est insuffisant.
• Des dépôts de tartre en sont la cause.
* Les eaux à forte teneur en minéraux,
comme les eaux minérales ou ionisées,
sont plus susceptibles de causer des
décolorations et/ou l'apparition d'une
couche blanche à la surface de l'eau.
• De l'eau fraîche a été ajoutée au
réservoir en mode thermos juste avant
de préparer une boisson.
• Attendre environ 15 secondes avant de
verser la boisson.
• Sur le réglage ], le sachet est rempli
d'air, ce qui fait « plouf ».
Le voyant d'alimentation d'eau est activé.
• S'assurer que l'appareil a été rempli
d'eau avant d'allumer l'interrupteur de
fonctionnement.
• Le niveau d'eau dans le réservoir est
insuffisant.
Ceci peut survenir temporairement, quand
l'eau versée dans le réservoir est chaude.
Remède
Insérer fermement la fiche dans la prise.
Positionner l'interrupteur en position ON
(marche).
Nettoyer le filtre à mailles tous les deux
mois avec une brosse (voir page 17).
Si cela n'apporte aucune amélioration,
changer le filtre (voir dos de la
couverture)
Veuillez contacter votre agent local
Flavia®Drink System.
Ceci est tout à fait normal.
Veuillez contacter votre agent local Flavia
®
Drink System.
Avant de préparer une boisson, veuillez
attendre que le voyant vert s'allume.
Pour l'eau chaude, veuillez attendre que
le voyant s'éteigne.
➀ Appuyer sur la touche de mise en route et
ouvrir le porte-sachet
➁ S é lectionner à nouveau la boisson souhaitée.
➂ Fermer le porte-sachet et appuyer sur la
touche de mise en ro u te pour mettre en
ro u te la pré p a ration de la boiss o n .
Ceci est parfaitement normal.
Remplir d'eau.
S'assurer que le réservoir est rempli
d'eau. Eteindre l'interrupteur de
fonctionnement et le rallumer au bout de
10 secondes.
Page 13

23
Pièces de rechange et consommables
Spécification
Joint de caoutchouc
Le joint de caoutchouc doit
être remplacé lorsqu'il perd
de sa flexibilité et que la
vapeur commence à
s'échapper par les côtés du
couvercle fermé.
• Sortir les 3 vis, ôter la
protection du couvercle et
remplacer le joint de
caoutchouc.
Filtre à mailles
Le filtre à mailles doit être remplacé quand les dépôts de
tartre ne partent plus avec la brosse.
Filtre de charbon activé
Pour maintenir son efficacité, bien que ceci varie en
fonction de la dureté de l'eau et de l'utilisation, le filtre
de charbon activé doit être remplacé une fois par an.
Protection
couvercle
Joint de
caoutchouc
Pièce Numéro de série
G a r n i t u re ca o u tchouc A P H 6 5 - 1 9 8 - F
Filtre à mailles ACD30-135-OU
Filtre de charbon activé
ACA95-135-OU
* Pour tous renseignements concernant les pièces et les procédures de commande, veuillez contacter votre agent local Flavia®Drink System.
®
est une marque déposée.
Dans certaines conditions, comme à très haute altitude et en cas de froid intense, il arrive que l'appareil ne fonctionne pas correctement.
Eviter d'utiliser l'appareil dans de telles conditions.
* Si l'appareil reste inutilisé dans des conditions de basses températures, veiller à vider l'eau. L'eau laissée dans le réservoir peut geler,
causant des dommages.
D i m e n s i o n s
L 2 2 , 5 c m
( a p p rox . )
P 3 4 , 0 c m
H 3 6 , 5 c m
Longueur de câ b le 1 , 5 m
Entretien et
Inspection
Veuillez inspecter votre distributeur de boisson- régulièrement pour de nombreuses années de fonctionnement !
Vo t re appareil pré s e n te-t-il l'un des signes suivants ?
• La fiche et le co rdon d'alimentation chauffent fa c i le m e n t .
• Le co rdon est endommagé et/ou l'alimentation secteur est inte r rompue lo rsque l'on to u c h e
le co rdon.
• Le mode ré s e r voir ne co m m u t e pas en mode thermos après libération par la buse va p e u r
d'un jet continu de vapeur pendant 5 minute s .
Si votre appareil présente
ces signes, arrêter de
l'utiliser aussitôt et
organiser une visite
d'inspection avec votre agent
local Flavia®Drink System.
(Sur la base de la
préparation de 20 tasses
par jour).
N'est pas installé en série
en Europe.
P u i ss a n ce Tension 230V 50Hz
Consommation éle c t r i q u e 1 0 0 0 W
Poids (approx i m a t i f ) 3 , 5 kg
Vo l u m e 3 , 7 L
Pompe à liquide (consommation électrique/période de temps) 2W/30s
Pompe à air (consommation électrique/période de te m p s )
3W/5s
Dispositifs
A r rêt automatique en cas de niveau d’eau trop
de sécurité
bas. Arrêt automatique en cas d’éva p o ration to ta le
de l’eau. Arrêt automatique en cas de pre ssion exce ss i ve .
CZ45E135
S0999M0
 Loading...