

FLAVIA DELIA Series, BI 45 DELIA, BI 60 DELIA, KASKATA Series, BI 45 KASKATA Light S Operation And Installation Manual
...Page 1
FLAVIA I DISHWASHERS
FULLY INTEGRATED
DISHWASHER
DELIA
BI 45 DELIA
BI 60 DELIA
Page 2

Operation and installation manualOperation and installation manual
DISHWASHERS
Dear customer!
Thank you for buying a “FLAVIA” product. We hope, this appliance will meet your expectations
and be a reliable assistant of yours in your kitchen. For correct and safe operation of the
appliance, please carefully read all the chapters in the present manual. Keep your manual for
the entire service life of the product you have purchased.
Reading the rst part of the manual, you will learn some important conditions to ensure safe
operation of the appliance. To keep your appliance in good condition for a long time, we offer
you a lot of helpful advices on the product care and cleaning. In the manual you can nd
some hints on energy saving.
On the last pages of the manual you can also read recommendations which will help you
remove minor failures, if any, during operation of your appliance.
Your new appliance is made of high-quality materials and fully conforms to any standard of
the European Economic Community.
The manufacturer reserves the right to make changes to the product design in order to
improve its performance. Our household appliances are subject to continual improvement,
the performance is enhanced, and their design is updated. Therefore, drawings and symbols
in the manual may differ from those for the model you have purchased.
Serial number explanation:
1406376200013
The manufacturing date is in the serial number of the product. The serial number is on the internal label which is on
the side of the dishwasher door.
manufacturing date manufacturing month model number
TM Flavia
FLAVIA LIMITED, Hong Kong, Admiralty district, 89, Queensway, Lippo Center Tower 2, 2107
Page 3

DISHWASHERS
1
CONTENTS
Safety hints and statements .........................................................................................2
Scope of supply ............................................................................................................3
Technical data ............................................................................................................... 4
Control panel ................................................................................................................. 4
Dishwasher design ....................................................................................................... 5
Table of operating modes ............................................................................................. 7
Water softener...............................................................................................................8
Water hardness table ................................................................................................... 9
Detergent agent ...........................................................................................................9
Rinsing agent ............................................................................................................. 10
Putting dishes into the dishwasher ............................................................................. 12
Turning on the appliance............................................................................................. 13
Filter system ................................................................................................................ 14
Dishwasher care ........................................................................................................ 15
Installation preparation ............................................................................................... 17
Installation procedure ................................................................................................. 17
Decorative panels sizes and mounting ....................................................................... 18
Door spring tension adjustment ................................................................................. 20
Drain hose connection ............................................................................................... 21
Electrical connections ................................................................................................ 21
Universal adapter connection .....................................................................................21
Water supply connection.............................................................................................22
Dishwasher installation sequence ..............................................................................22
INSTALLATION INSTRUCTIONS ..............................................................................24
Hints on troubleshooting ............................................................................................. 24
Codes of errors .......................................................................................................... 29
What you may not wash using this dishwasher ..........................................................30
The product has been manufactured in line with European standards and is CE, TŰV,
ISO 9001 certied.
The manufacturer reserves the right to make changes to the product design in order
to improve its performance.
Page 4

Operation and installation manual
DISHWASHERS
2
Attention!
To avoid failures when connecting the
appliance in cold months, keep it unpacked at a room temperature within
at least 2 hours.
When using the appliance, observe
safety precautions as follows:
EARTHING
The appliance shall be earthed. In the event
of a failure or breakdown, earthing will reduce a risk of electrical shock. The appliance is equipped with a cord with an earth
wire and earth plug. Plug into a corresponding socket, installed and earthed according
to the valid regulations.
Improper connection of the earth wire
may lead to electrical shock. If you
doubt, whether earthing is correct,
please contact a qualied electrician
or representative of the Service Center.
Do not make changes to the design of
the plug supplied with the appliance. If
it doesn’t t for your socket, have the
socket replaced for which a professional electrician must be involved.
ATTENTION!
Do not break the dishwasher door and dish
grid! Do neither sit down nor stand on it!
Do not touch heating elements during heating and right after use.
Do not wash plastic dishes unless they bear
a special marking to conrm they may be
washed in a dishwasher. If the dishes are
unmarked, refer to the manufacturer’s recommendations.
Use those washing and rinsing agents specially developed for automated dishwashers. Never use soap, agents for laundry,
hand cleaners.
Keep children away from washing agents
and the open door of the dishwasher, because after use the dishwasher may contain
residuals of washing agents.
Do not leave the door open because you
can knock against that. When installing the
dishwasher, do not overbend and atten the
electric wire.
Avoid intervention on the control system.
Little children and physically disabled people are not permitted to use the appliance.
All the dishwashing detergents used are
alkali-based and very harmful, if swallowed.
Avoid contact with eyes and skin; keep children away from the open door of the dishwasher.
Do not switch on the dishwasher unless any
protection panel is installed. During use be
careful to open the dishwasher door because water may spout.
Do not place heavy objects and do not stand
on the door of the dishwasher. The appliance
may tip over in that case.
SAFETY HINTS AND STATEMENTS
Page 5

DISHWASHERS
3
When putting dishes:
1) Be careful with sharp objects – put them
avoiding damage to the door seal;
2) Put sharp knives with the handle upward
to avoid cutting yourself. During use, plastic
objects shall not touch the heating elements.
If an electric wire is found to be damaged, this
is either the manufacturer or a Service Centre
representative to replace it, or any other quali-
ed professional. The measure is to be taken
to avoid hazards of any kind.
Proper disposal of the packaging
Use the dishwasher only according to its intended purpose.
If you are going to remove the dishwasher for
maintenance or repair, take off the door of the
compartment within which the dishwasher is
installed.
Do not leave children unattended, prevent
them from playing with the appliance.
Upon completion of the washing cycle, please
check, whether the detergent agent container
is empty or not.
SCOPE OF SUPPLY
Your dishwasher is classied as a built-in
appliance.
The scope of supply includes as follows:
– dishwasher, 1 piece;
– measuring spoon, 1 piece;
– measuring cup, 1 piece;
– funnel, 1 piece;
– hose holder, 1 piece;
– hardware to fasten the decorative panel
onto the dishwasher door, 1 set;
– transparent adhesive foil, 1 piece;
– manual, 1 piece.
* the scope of supply of the dishwasher is sub-
ject to change without prior notice.
Page 6
Operation and installation manual
DISHWASHERS
4
TECHNICAL DATA
The manufacturer's plate to identify the dishwasher model is at the top of the dishwasher
door side. Open the door to see that.
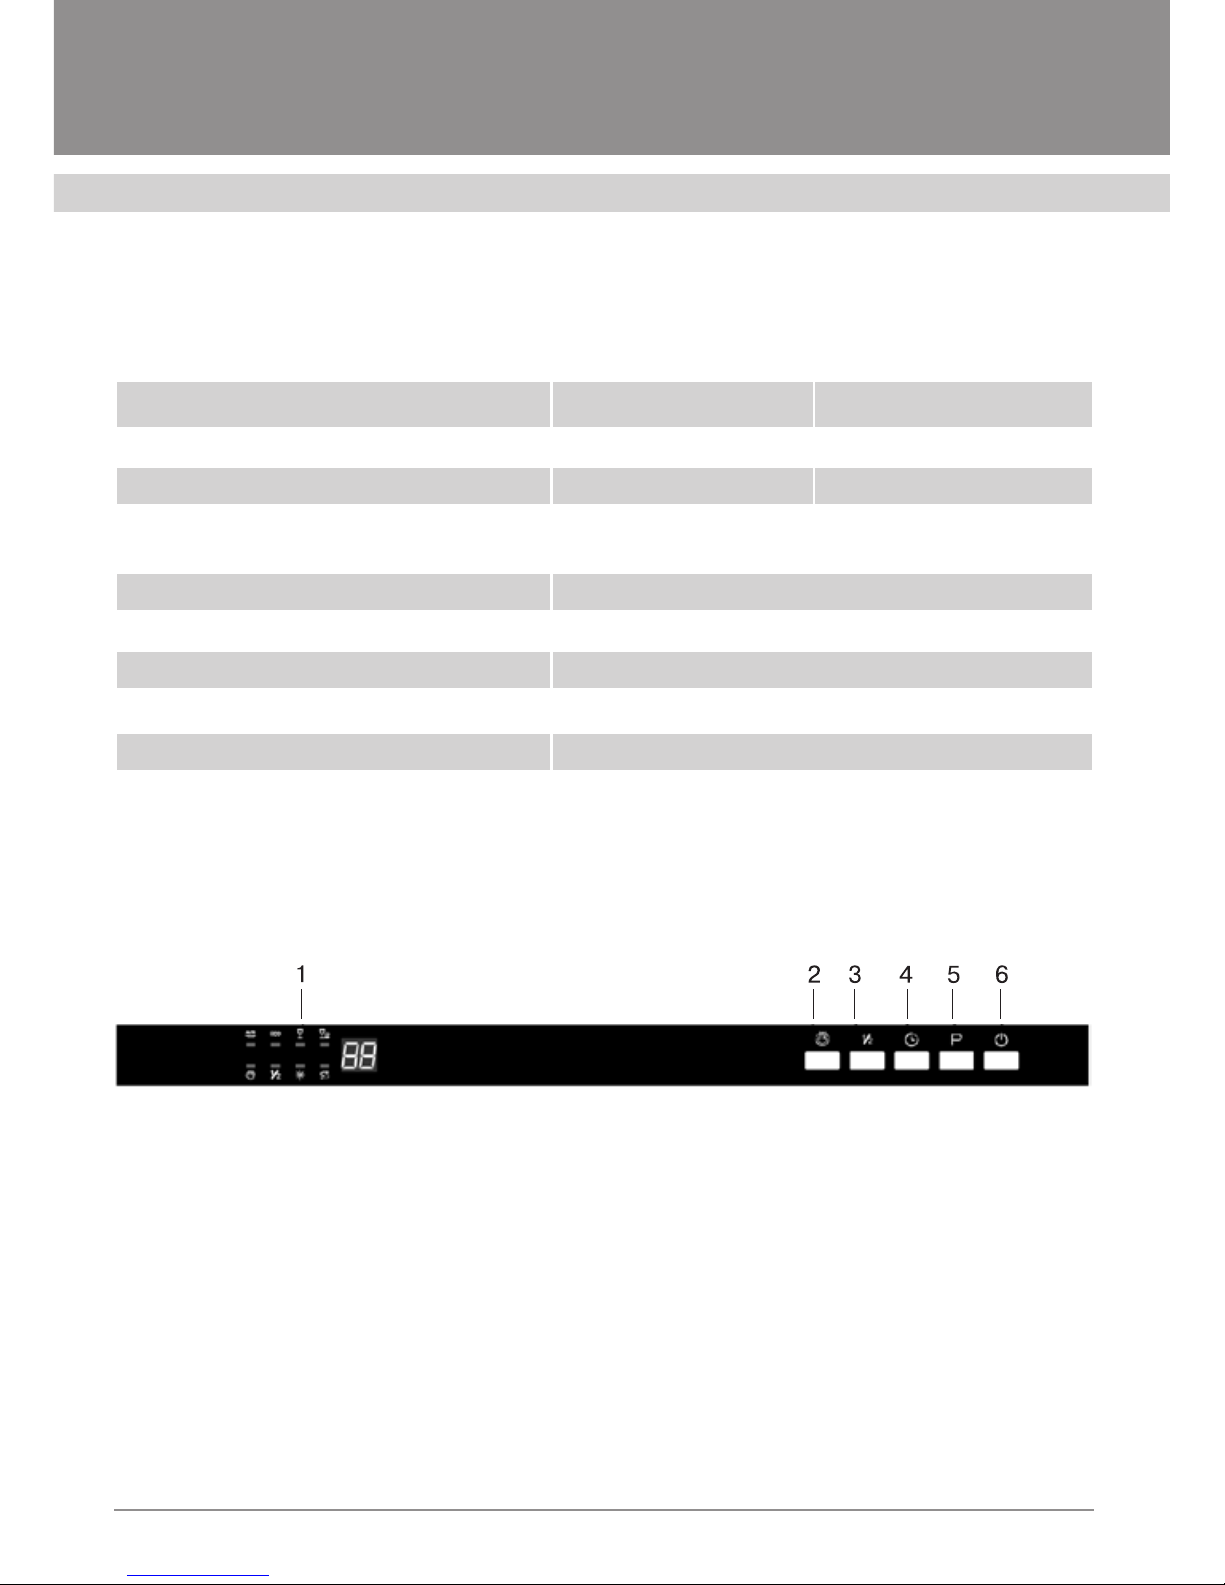
1. The display consists of the following elements:
• rinse aid lack indicator ;
• salt lack indicator;
• start delay and error codes;
• program indicators;
• additional drying indicator;
• Half load indicator
2. Additional drying function
Activates the additional drying func-
tion (the program, in which this function
works - glass, ECO).
3. Button for selecting the partial load
mode. Turns on the partial loading function, if you need to wash 5 or less sets
of dishes. Using this function saves water
and energy.
4. Washing program delayed start button:
the start delay time may range from 1 to
24 hours.
5. Button for selecting the wash program.
6. Dishwasher on/off switch button.
Pic. 1
Model
BI 45 DELIA BI 60 DELIA
Overall dimensions, mm:
Width, mm 448 598
Length (depth): 550 (1150 with the
door open)
550 (1150 with the door
open)
Height (min. – max.): 815 – 865
Mains voltage / frequency: 220 – 240 V / 50 Hz
Power consumption, max., Watt 1930
Number of sets of dishes to be put in 9 12
Energy Performance class A++
ATTENTION!
Before using the dishwasher for the rst time, read the manual to nd the best and most suitable mode of its operation.
CONTROL PANEL
Page 7
DISHWASHERS
5
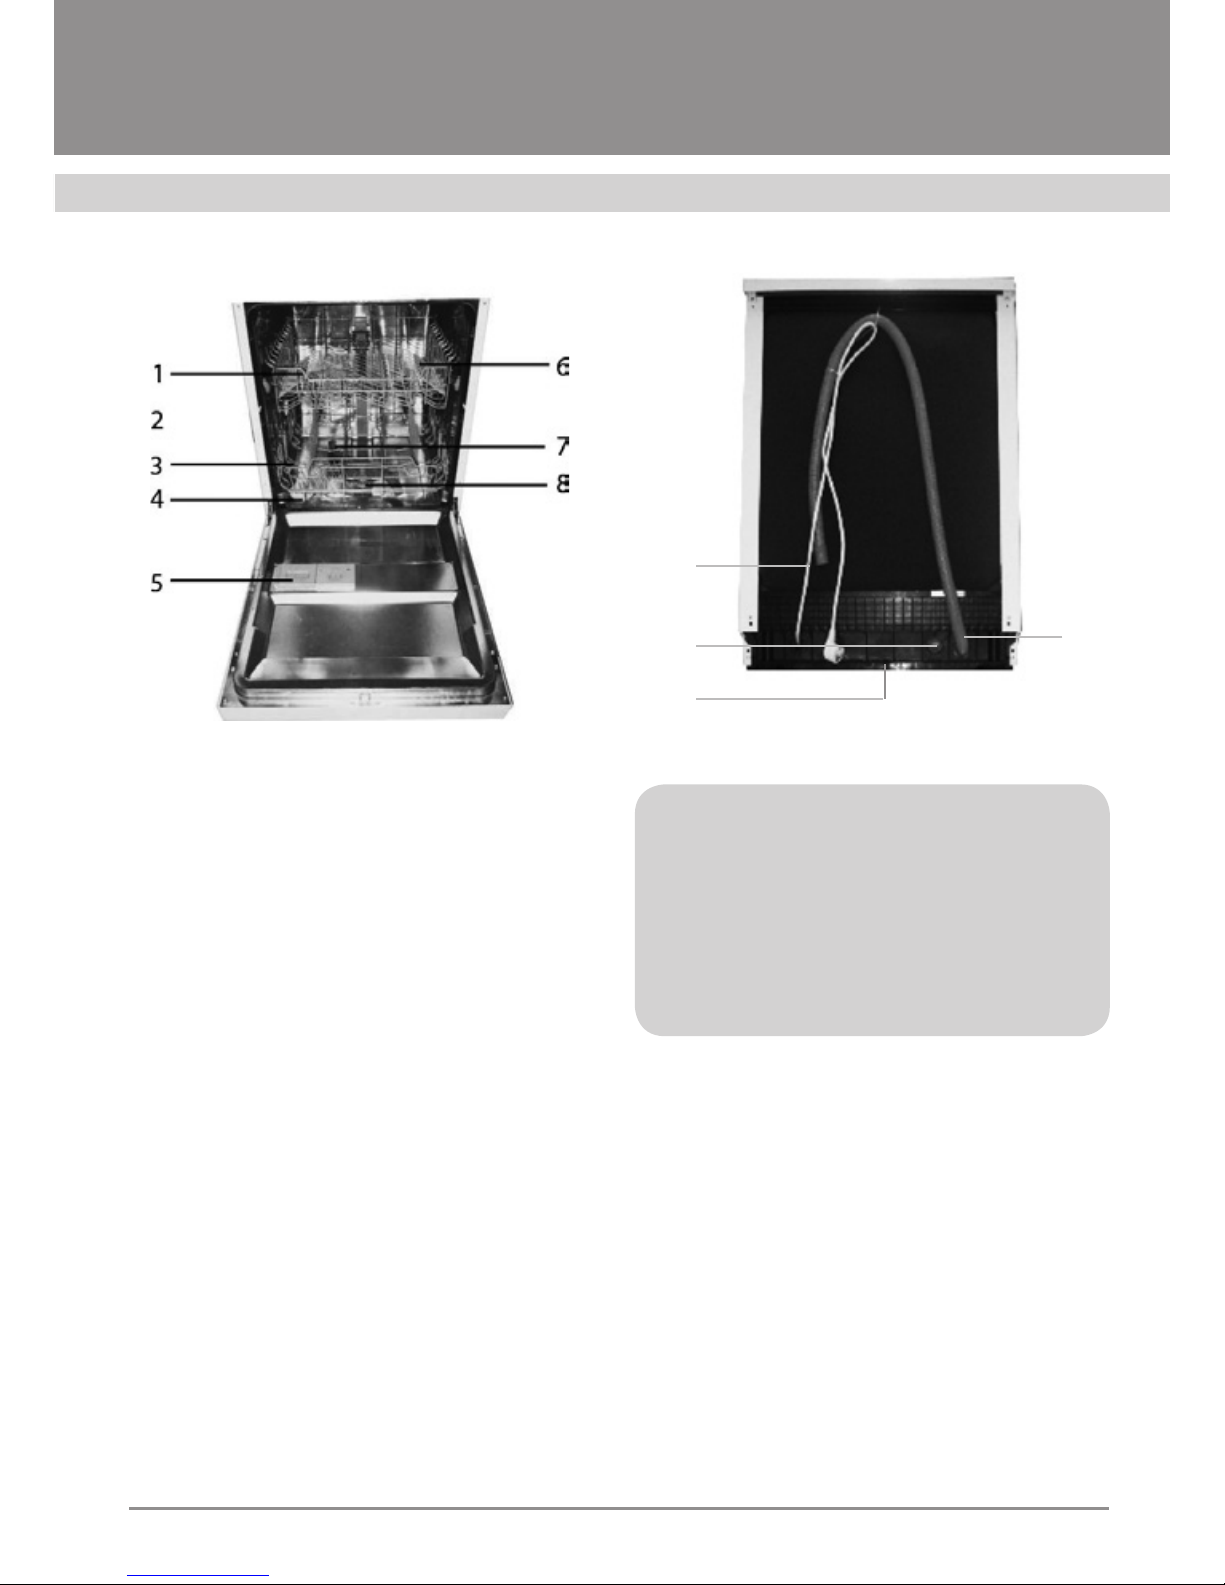
DISHWASHER DESIGN
(Picture 2)
1. Upper basket
2. Internal pipe
3. Lower basket
4. Salt container
5. Dosing chamber
6. Cups holder
7. Sprinklers
8. Filtering elements
9. Inlet pipe connecting point
10. Drain pipe
11. Power cable
12. Adjustable rear foot
ATTENTION! IMPORTANT!
During operation, the dishwasher runs
a program selected. The program run
time also includes an inactive period,
within which it may seem that the dish-
washer has completed washing.
Do not open the door of the dishwasher
before the run time of the program selected
is up. It is permitted to open the door, if you
need to put a plate you’ve forgotten to put before the start, but you may only do this during
injection of the washing (detergent) agent.
The values of various program run times
are in the column “Cycle time” in the “Table
of operating modes”.
A corresponding pictogram is blinking to
signal you that the dishwasher is on and runs
a program you have selected.
The pictogram is on Display 1, Picture 1,
and it blinks during the entire washing cycle.
Pic. 2
10
9
11
12
Page 8

Operation and installation manual
DISHWASHERS
6
A sound signal informs you of the program
run completion; the signal is given within approximately 8 seconds. The pictogram of the
program selected is off (Display 1, Picture 1).
Should you, for some reason or another,
have missed the sound signal to inform you
of the program run completion, before opening the door, make sure that the program run
has been completed. Look at the pictogram:
it must not be blinking, but be off (Picture 1,
Position 1). Press Button 5 on the control
panel to switch off the appliance, open the
door and take out the clean dishes.
Should you have accidentally opened
the door prior to the program run completion, close it at once without pressing
any buttons and wait till the program run
time is over.
IMPORTANT RECOMMENDATION!
To avoid unforeseen events upon washing cycle completion, shut off the water
cock to supply water to the dishwasher.
Page 9

DISHWASHERS
7
Program Type of dishes Informaon for mode selecon Mode descripon
Detergent
agent
consumpon:
prewashing /
washing, g
Washing
cycle me,
min.
Power
consumpon
for washing
cycle, kW/h
Water
consump-
on, L
Rinsing
agent
Automac
Automa
Dishware, atware,
big dishes (pots,
stewpots, frying pans)
To be used both for moderately
and heavily contaminated dishes.
Washing and rinsing intensity to be
adjusted and controlled automa-
cally
The selecon is opmized
automacally, for which
sensors are used, to
measure a contamina-
on level
5/30 120 – 180 0.8 – 1.2 9.2 – 12.4
«
Economy
ECO
Dishware and
atware
To be used for slightly contaminated
dishes. Minimum water and energy
consumpon within opmum me
Prewashing
Washing 50ºC
Rinsing 60ºC
Drying
25
(3 in 1)
165 0.83 9.2
«
Gentle
Glass
Glassware (jars, shot
and wine glasses),
chinaware dishes
To be used for slightly contami-
nated dishes, with no food residues.
2-hour-mode to include the full
washing cycle
Prewashing
Washing 40ºC
Rinsing 60ºC
Drying
5/30
(3 in 1)
110 0.85 15.0
«
Speed
Quick
Dishware and
atware
To be used for slightly contaminated
dishes, this is a program to speed
up washing by 4 mes (with Energy
Eciency Class A+”). Designed for
dishes that need no drying
Washing 40ºC
Rinsing
Rinsing 45ºC
20 40 0.45 10.0
Table of operating modes*
« use of a rinsing agent is obligatory with these modes selected.
* The table shows calculated values of water temperature. Actual temperatures may differ from calculated ones.
** after the slash: prewashing / washing. The modes are to be selected pressing the PROGRAM SELECTION button. Pressing the button
each time you switch to the next program in an order as follows: automatic – ECO – glass – quick
Page 10
Operation and installation manual
DISHWASHERS
8
WATER SOFTENER
There are two methods to soften water: either with a softener, or a washing agent.
Water hardness values may vary from place
to place. If your dishwasher uses hard water,
this may lead to formation of scale and deposits on dishes.
The appliance is equipped with a special
softener to use salt, specially developed for
removal of lime and minerals from water.
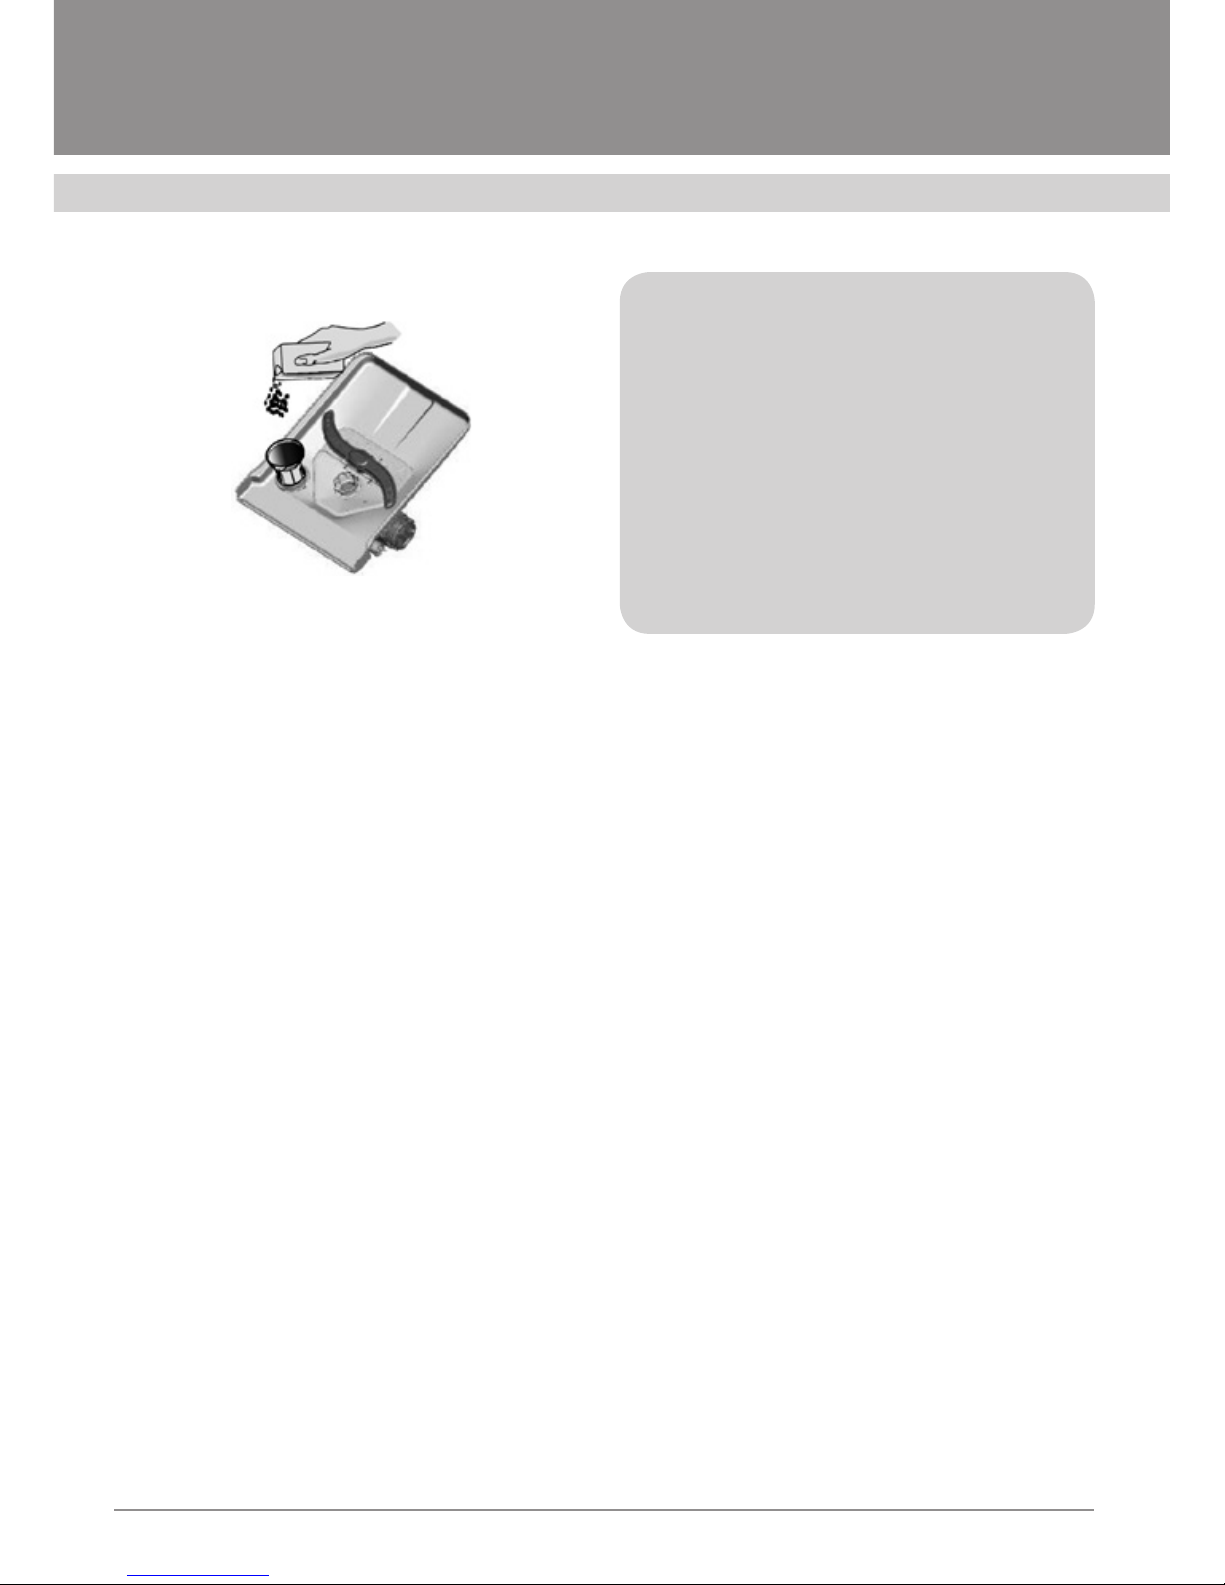
HOW TO CHARGE SALT
INTO THE SOFTENER
Make sure to always use salts meant for
dishwashers only.
The salt container is beneath the lower grid.
The way to ll it in is as follows:
1. Remove the lower basket, unscrew the
salt container cover to remove that.
2. If you ll in the container for the rst time,
ll it with water (2/3 of the vol.).
3. Insert the funnel end (included), charge
approximately 1.5 kg of salt. It is normal, if
some water ows out of the container.
4. Carefully screw in the cover.
NOTE:
1. The salt container should be relled,
when the “S” pictogram (upper left
corner of the display) starts to illuminate. Even if the container is properly
lled, the pictogram may still illuminate until salt is dissolved completely.
2. If you have spilled the salt, you can
wash it out, using the “Quick” pro-
gram
SALT CONSUMPTION CONTROL
The list of the dishwasher functions also includes the salt consumption control, depending
upon water hardness. This is to optimize salt consumption, and you can control it in the following
way:
1. Press the ON / OFF button.
2. Press and hold (60 sec) the program selection button. Wait for the sign H1 (or H2, H3 or H4)
to be displayed. At that, salt and rinsing agent indicators will blink.
3. Pressing the program selection button, select desired salt dosage, depending upon water
hardness (see the “Water hardness table”). With
each touch of the button you switch to the next
mode: Н1-Н2-Н3-Н4-Н5-Н6.
4. To complete selection, press the ON/OFF
button.
These settings are required each time you dis-
connect the dishwasher from the mains.
You may be informed of water hardness in
your location at local authorities or upon a lab research of a water sample.
Page 11
DISHWASHERS
9
DETERGENT AGENT
ATTE NT ION!
Detergent agents are very caustic!
Keep them away from children!
The dosing chamber must be lled in before start of each washing cycle, according
to instructions from the “Table of operation
modes”. Your dishwasher consumes less
washing and rinsing agents, as opposed
to conventional appliances of that kind.
For a normal (standard) washing cycle,
a table spoon of the detergent agent is
enough. For heavily contaminated dishes
you should use a larger quantity of the detergent agent. Always add the detergent
agent right before washing, otherwise it
may get soaked, without dissolving completely.
Proper use of detergent agents
Use special detergent agents only. Keep
them in a dry place. Charge the detergent
powder into the dosing chamber right before
you start washing.
Tableted detergent agents
Tableted detergent agents of different
manufacturers have different dissolution
rates. Due to this, during short programs,
tablets may not dissolve completely. As
a consequence, this would reduce their
cleaning ability. Tableted detergent agents
are better used in “intensive” modes,
and that is to ensure their complete dissolution.
Water hardness
Settings Display indication
o
dH
1)
mmol/l
2)
0 – 5 0 – 0.09 1 H1
6 – 11 1.0 – 2.0 2 H2
12 – 17 2.1 – 3.0 3 H3
18 – 22 3.1 – 4.0 4* H4
23 – 34 4.1 – 6.1 5 H5
35 – 45 6.2 – 8.0 6 H6
1)
Water hardness MU in Germany
2)
Internationally accepted MU of water hardness
* factory setting
Page 12

Operation and installation manual
DISHWASHERS
10
Detergent agent consumption
IF WATER USED IS TOO HARD, YOU
MAY AVOID FORMATION OF SCALES
AND DEPOSITS, ADDING A WASHING
AGENT!
An amount of the detergent agent used
may vary, depending upon water hardness.
To be informed of this value, please contact
the local department of water resources. For
harder water you will need a larger amount
of the detergent agent. Keep in mind that you
should select an appropriate amount, slightly
changing it with small portions, until you nd
a proper dosage according to water hardness in your location.
Descaling
To remove scales, do the following:
• Wash the dishes using a standard (“nor-
mal”) program.
• Take any metal dishes, atware, spots,
etc. out of the dishwasher.
• Do not add any detergent agent any
more.
• Fill in 2 table spoons of vinegar into a
little bowl and place it upon the lower
grid within the dishwasher.
• Run “Standard” program.
If this doesn’t work, repeat the same, us-
ing ¼ glass of сіtric acid crystals instead of
vinegar.
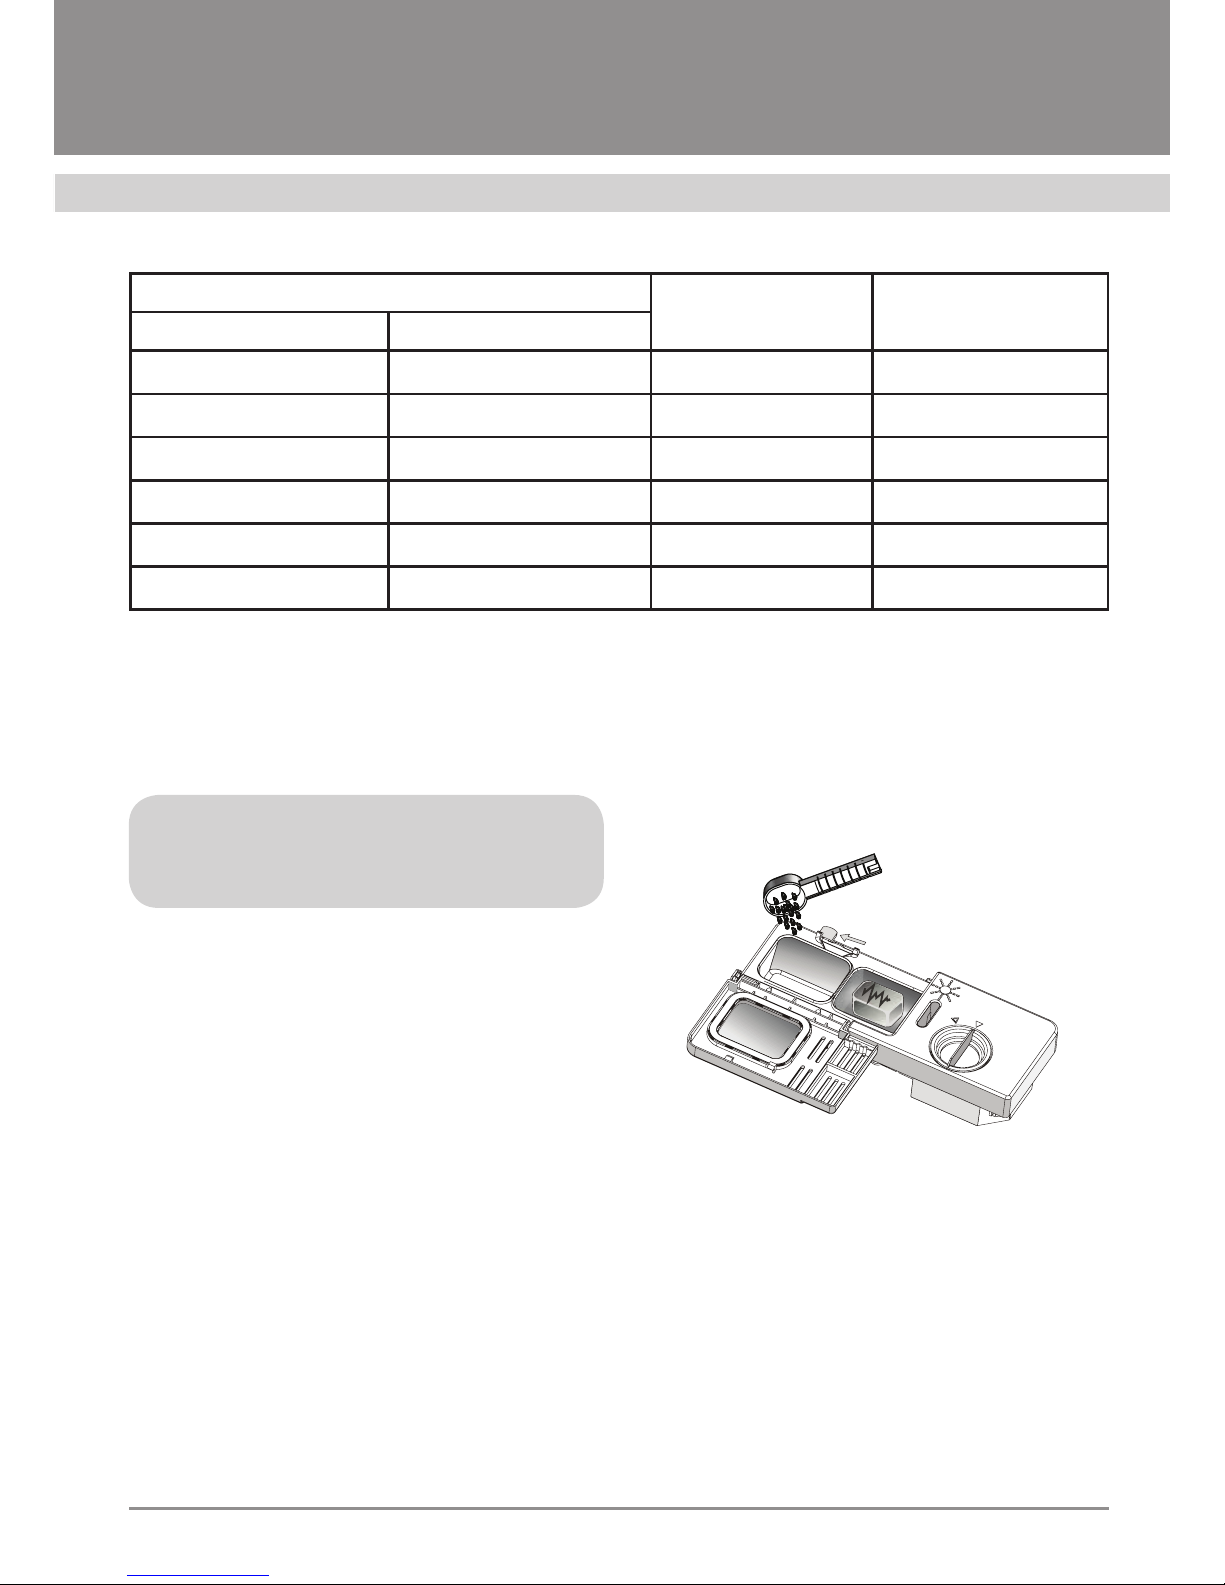
RINSING AGENT
This is to be used at the last stage to prevent
drop marks on dishes. This also improves drying, enabling water to “run off” the surface of
dishes.
Your dishwasher uses liquid rinsing agents.
The rinsing agents doser is inside, close to the
dosage chamber of the detergent agent. To ll
in the doser, open the cover and ll in water, till
the level indicator turns black.
• To open the doser cover, turn it to the left
(“Open” position) and remove it.
• Fill in the doser with you rinsing agent.
Do not overll!
• Close the cover, turning it to the right.
Do not overll the doser, for it may result in
excessive soaping. If you spill some, wipe it with
a soft cloth. Prior to opening the door, do not
forget to screw the cover.
Page 13

DISHWASHERS
11
Rinsing agent doser control
Within the last rinsing cycle, a certain
amount of the rinsing agent is used. Similar
to use of the detergent agent, the quantity of
the rinsing agent depends upon water hardness. If you use too much rinsing agent, this
may lead to excessive foaming and occurrence of stains on your dishes. If water in
your location is soft, you will need no rinsing
agent. But if you still need that, dilute it with a
corresponding amount of water.
The doser has 6 positions. Always start
with Position 2. If the dishes dry out badly, if
there are drop marks on them, increase the
amount of the rinsing agent, switching to Position 3. Continue to increase the amount, till
there are no drop marks on your dishes. We
recommend using Position 4.
How to ll in the doser
with the rinsing agent
If the control panel does not include an
agent level control lamp, you can calculate
a required amount of the rinsing agent in the
following way. The black spot decreases in
size with the liquid volume decrease. The
level below ¼ is not permitted.
Depending upon consumption of the rins-
ing agent, the size of the black spot decreas-
es in size (see the gure):
Full
3/4
1/2
1/4 - relling required
Empty
Page 14

Operation and installation manual
DISHWASHERS
12
PUTTING IN DISHES
Loading the upper basket
The upper basket is designed for light and
fragile dishes – glasses, coffee and tea cups
and saucers, as well as plates, small salad
bowls and at baking sheets (if they are not
too dirty). Place the dishes so that it does not
move with jets of water.
Loading the lower basket
We recommend you to put larger dishware
items, as well as those heavily contaminated, into the lower basket of the dishwasher.
These would include as follows: spots, pans,
covers, serving dishes and plates, as shown
in the gure below.
It is preferred to place serving dishes and
plates on the edges of the basket not to
cause interference with free rotation of the
upper water sprayer.
Please, keep in mind:
• Spots and serving dishes and plates
must be put bottom up.
• Deep spots must be put inclined, so that
water can run off.
• The lower basket features drop walls and
enables to put larger spots and pans.
Putting in dishes
Your dishwasher can hold 10 sets of dishes.
The upper basket is designed for light and
fragile dishes. Place the dishes so that it
does not move with jets of water.
Depending on the model, the upper basket
can be equiped with short levers, with which
you can easily adjust the height of the upper
basket even with put in dishes.
If there are no such levers, you can adjust
the height of the basket before putting in
the dishes, by removing the caps from the
guides and moving the basket to the desired
level.
Position 1 Position 1
Folding board
Page 15

DISHWASHERS
13
Hinged cups holders
To optimally place spots and pans you can
fold teeth, as shown in the gure on your
right.
Basket for table-ware
The table-ware shall be placed into the basket with handles downwards. If there are side
baskets, spoons shall be placed separately,
into special slots. Longer kitchenware items
shall be laid horizontally, at the front of the
basket, as shown in the gure.
To ensure high quality washing, prior to
placing the silverware make sure as follows:
• All items are separate (not put one into
another).
• Silverware items are placed with handles
upwards.
• Longer items of the kitchenware are in the
middle.
SWITCHING
ON THE APPLIANCE
Starting a washing cycle
1. Make sure the dishwasher is connected
to the mains.
2. Make sure the water cock is opened all
the way.
3. Put your dishes (See “Putting the dishes”).
4. Fill in rinsing and detergent agents
(See “Detergent agents” and “Rinsing
agents”).
5. Open the door, press ON / OFF button.
6. Press the program selection button, select a washing cycle desired (See “Table
of operating modes”).
7. Shut the door. Washing begins in 10
sec.
ATTE NT ION:
If you open the door of the dishwasher
with a program running, the program
execution may be interrupted and
stopped. The visual control function
will, correspondingly, turn off. Upon
closing the door, when the program
will continue, the luminous point will
appear on the oor again.
Program
changes or cancellation
Note: a started cycle may only be changed,
if the dishwasher operates for a very short
time. Otherwise, the detergent agent may already be released, and the dishwasher has
started supplying water. If that has already
Page 16

Operation and installation manual
DISHWASHERS
14
happened, please rell the detergent agent
doser (See “Detergent agents”).
Open the door, press and hold the program
selection mode 3 sec at least. After that you
can switch to any program desired. Close
the door.
Upon completion
of the washing cycle
Upon completion of washing, a sound signal
will be given within 8 sec. Switch off the appliance, pressing the ON / OFF button. Open
the door. Wait several minutes to let the dishes cool down. After that take them all out of
the dishwasher.
Forgot to put a plate?
You may put a forgotten plate prior to injec-
tion of the detergent agent..
1. Slightly open the door to stop the washing cycle.
2. After water nozzles have stopped operating, open the door all the way.
3. Put the forgotten plate.
4. Shut the door. The dishwasher will restart in 10 sec.
ATTE NT ION!
It is dangerous to open the door of the
dishwasher in operation due to a pos-
sible contact with hot water!
FILTER SYSTEM
The lter is within convenient reach. The l-
ter system includes three components: main
lter, coarse lter and ne lter.
1. Main lter.
Food and dirt residues, screened with this
lter, are washed down by means of water jet
from the lower nozzle.
2. Coarse lter.
Bigger particles, such as bones and pieces
of broken glass, that may clog discharge pipes,
are screened with the coarse lter. To remove
particles, screened with it, carefully squeeze
the upper tags and take out the lter.
3. Fine lter.
This is designed to screen dirt and food resi-
dues and prevent their contact with dishes during the washing cycle.
ATTE NT ION!
Do not turn the ne lter upside down!
DISHWASHER CARE
To clean the control panel, use a slightly
wet cloth. Then wipe the surface dry. To
clean other surfaces use light polishing.
Never use sharp objects or hard sponges
to clean the dishwasher surfaces.
Protection against freezing
If you are going to keep your dishwasher in
a cold room during winter, ask service engineers to do the following:
Page 17

DISHWASHERS
15
1. Disconnect the dishwasher, remove the
fuses.
2. Shut off the water supply cock, disconnect the delivery hose and inlet valve.
3. Drain water from the delivery hose and
inlet valve.
4. Connect the hose and valve again.
5. Take out the lter body and remove water
using a sponge.
Cleaning moving nozzles
The moving nozzles must be cleaned on
a regular basis, otherwise scales and hard
water deposits will clog them, as well as
water channels. For that, unscrew the nut,
remove the upper part of the mover. After
that remove the nozzles. Wash the nozzles
in warm soapy water, use a soft brush to
clean their openings.
Filter cleaning
To ensure the best results, you should
clean the lter system on a regular basis.
The lter effectively removes food parti-
cles during a washing cycle, enabling water
to circulate. For this reason, the best thing
is to remove larger particles after each
washing cycle, washing the lter with running water.
To remove the lter (see the drawing be-
low), turn the upper part of the lter box
counterclockwise. Then, remove the coarse
and ne lters. The lter system is subject to cleaning on a regular basis, once a
month at least.
1. Turn the lter counterclockwise. 2. Remove
the lter.
The assembly procedure is carried out in
reversed order.
Use a brush to clean the coarse and ne
lters. Then, assemble the entire system
and insert that into the dishwasher, to positions corresponding, slightly pushing the
system.
It is prohibited to use and operate the
dishwasher without the lter. Improper installation of the lter may result in deterio-
ration of the dishwasher performance and
damage to dishes.
ATTE NT ION!
Never use the dishwasher without the
lter!
Page 18

Operation and installation manual
DISHWASHERS
16
Cleaning the door
To clean the door edges, you should use a
piece of soft and wet cloth.
ATTE NT ION!
Never use sprays to clean the door
panel! This can damage the lock and
electrical components. It is also not
permitted to use abrasives and some
kinds of paper towels because they
can scratch the surface and leave
marks on it.
Dishwasher care
After each washing cycle shut off the water
supply cock and leave the door a bit open to
remove moisture and odors. Disconnect the
dishwasher. Always unplug the dishwasher
before cleaning and maintenance! Do not
risk! Never use any solvents and abrasives
to clean exterior parts and rubber components of the dishwasher. You better use a
piece of cloth and warm soapy water. To remove stains on surfaces use a piece of cloth,
water and a small amount of white vinegar,
or a special cleaning agent developed for
dishwashers.
If you go off on holiday
If you are going to be away on holiday,
we recommend you to start a washing cycle
without dishes. After that you have to disconnect the appliance, shut off water supply and
leave the door a bit open. This would keep
the seals in proper condition and prevent formation of odors inside the appliance.
Moving the dishwasher
Should you need to move the dishwasher,
try to keep it in a vertical position, or with the
back cover downwards at least.
Page 19

DISHWASHERS
17
PLEASE CAREFULLY READ
THE PRESENT MANUAL.
THIS CONTAINS INFORMATION THAT
WILL HELP YOU UNDERSTAND INSTALLATION PROCEDURES AND
FIND THE BEST PLACE TO INSTALL
YOUR DISHWASHER.
INSTALLATION PREPARATION
The dishwasher must be installed in close
vicinity to available water supply and discharge points, as well as a socket.
One of the walls of pieces of furniture must
be selected for connection of an inlet and
drain hoses of the dishwasher.
INSTALLATION
Note:
check whether all hardware items are
available, required for installation of
a dishwasher (fasteners, screws for a
decorative panel).
1. Choose a convenient place, where
water is supplied and discharged.
Connect the inlet and drain hoses
(Fig. 1).
2. If you place the dishwasher in a corner
piece of furniture, the minimum distance between the side part of the open
door and kitchen furniture shall be 50
mm (Fig. 2).
50мм
Figure 1. Dimensions and general view of a recess for the
dishwasher installation.
450 / 600 mm
Figure 2. Top view.
Minimum space with
the door open
cable, inlet and
drain hoses outlets
dishwasher
door
50 mm
Page 20

Operation and installation manual
DISHWASHERS
18
DECORATIVE PANEL DIMENSIONS
AND MOUNTING PROCEDURE
Preparation
1. The decorative wooden panel to be attached to the door of the dishwasher shall be
prepared according to drawings as shown in
Figures 3a and 3b.
2. Place the xtures onto the decorative
panel, fasten the panel to the door using
them (Figure 4a).
Upon mounting the decorative panel, use
the screws to nally x that (Figure 4b).
Figure 4a. Mounting the decorative panel
Figure 3a. BI 60 DELIA.
upper xture
lower xture
4 countersunk head
screws
Depth8
Depth8
Depth8
Page 21

DISHWASHERS
19
Figure 3b. BI 45 DELIA.
dp8
439
4160.2f
3900.2f
287.50.2f
286
38
8- 2
dp8
4- 2
dp8
2- 2
20 MAX()
5
Page 22

Operation and installation manual
DISHWASHERS
20
Figure 4b. Fastening the decorative
wooden panel.
DOOR SPRING
TENSION ADJUSTMENT
The door spring tension adjustment is
factory-made, to parameters required. If
you mount the decorative wooden panel,
you will have to readjust the spring tension.
Rotate the screws to increase the steel cable tension or release it.
Th door spring is tensioned properly, if
the door remains in a horizontal position
when fully open, and a gentle push with a
nger is enough to lift and close it.
Figure 5. Door spring tension adjustment.
Unscrew 4 short screws Screw in 4 long screws
Page 23

DISHWASHERS
21
DRAIN HOSE CONNECTION
Insert the drain hose into a drain opening, minimum diameter 4 cm, check, if
there are any bends. As it may be required,
use a special fastener, which is included
(Fig. 6). The free end of the hose may be
positioned at a height ranging from 40 cm
to 1 m. Do not dip it into water.
ATTE NT ION!
Be sure to properly x the plastic fastener because the hose mustn’t be
loose. Failing to do this may result in
water splashing.
Figure 6. Drain hose connection.
ELECTRICAL CONNECTIONS
ATTE NT ION!
NEVER USE EXTENION CABLES AND
CONNECTING ADAPTERS FOR THIS
APPLIANCE! UNDER NO CIRCUMSTANCES DISCONNECT THE GROUND
PLUG FROM THE WIRE.
Requirements
for electrical connections
Please, look through the table to con-
tain power values to nd out the voltage and
connect your dishwasher to a power supply
source. Use a 15 A fuse. Use copper wires
only! It is recommended to use a time-delay
fuse and circuit breaker.
The socket must be close to the appliance.
ATTE NT ION!
Check the earthing before use.
Make sure that the mains voltage value
conforms to that one in the manufacturer’s
plate. Plug in (the socket must be grounded,
too). If the socket doesn’t suit for the plug,
you better replace the socket other than use
any connecting adapters, because these
may overheat and burn.
U-JOINT CONNECTION
How to connect a U-joint
There is a new U-joint to be used to connect
the appliance to a water supply source.
Water pressure values may range from 0.04
to 1 MPa. If the water pressure is below a
minimum value, contact a representative of
your service center.
1. Pull the U-joint and all its hoses from
the compartment on the rear wall of the
dishwasher.
2. Attach the U-joint to the water cock, us-
ing ¾’’ screws.
3. Turn the water cock all the way to open
it before starting the dishwasher.
Page 24

Operation and installation manual
DISHWASHERS
22
Safe inlet hose
The safe inlet hose has two walls. The
hose system activates and shuts off water supply in the event of damage to the inlet hose, or
if air space between the inlet hose and exter-
nal corrugated hose is lled with water.
How to disconnect the U-joint
from the adapter
1. Shut off water supply.
2. Increase water pressure, slightly un-
screwing the hose nut. This will prevent
water splashing.
3. Remove the U-joint from the water cock,
squeezing the clamp on the upper part
of the U-joint.
How to disconnect the dishwasher
1. Unplug the dishwasher.
2. Disconnect the U-joint from the cock
adapter.
NOTE:
upon completion of the last rinsing,
you may remove the U-joint and store
it.
WATER CONNECTION
ATTE NT ION!
USE NEW HOSES ONLY! REPEATED
USE OF HOSES USED BEFORE IS
NOT PERMITTED. WATER PRESSURE
VALUES MAY RANGE FROM 0.04 TO
1.00 MPA.
Cold water connection
Connect the cold water supply hose to
a threaded ¾’’ adapter and make sure it is
tight. If water supply pipes are new or have
not been used for a long time, let water runoff and check whether it is clean and contains any impurities. Failing to do so, may
result in clogging the inlet valve and, as a
consequence, dishwasher breakdown.
ATTENTION!
Your dishwasher may only be connected to a cold water supply source. Hot
water connection is expressly prohib-
ited.
DISHWASHER INSTALLATION
SEQUENCE
1. Fasten a decorative door of your piece of
furniture to the door of your dishwasher,
using special xtures (Item 1, Figure 7).
2. Adjust the door spring tension, using a
box wrench, turning it clockwise to tighten up the spring and counterclockwise to
release its tension. Failing to do so, may
result in breakdown of the dishwasher
(Item 2, Figure 7).
3. Connect the inlet hose to a cold water
supply source.
4. Connect the drain hose (see Figure 6).
5. Connect the appliance to the mains.
6. Mount the dishwasher onto the guides
(Item 4, Figure 7).
7. To protect the tabletop from condensate,
apply transparent adhesive foil (included) onto the reverse side of the tabletop
(to cover the entire area above the dishwasher door).
Page 25

DISHWASHERS
23
Figure 7. Dishwasher installation sequence
Page 26

Operation and installation manual
DISHWASHERS
24
8. Bring the dishwasher into a position desired.
9. Level the dishwasher. Rear feet may be
adjusted using screws, located in front
(Item 6a, Figure 7). Adjust the front feet
using a wrench (Item 6b, Figure 7).
10. The dishwasher must be xed in its posi-
tion. There are 2 ways to do it:
A. If your tabletop is made of wood or
chip board, attach the dishwasher
to it, using wood screws. Be careful
because the weight load can draw
the screws from wood (Item 7, Figure 7).
B. If your tabletop is made of marble
or granite, fasten the dishwasher to
wall of adjoining pieces of furniture.
Cover the heads of screws with
rubber caps to avoid damage to the
tabletop surface (Item 8, Figure 7).
INSTALLATION INSTRUCTIONS
The dishwasher must be level which is to ensure its proper functioning.
1. Place a water level onto the door and
lower rail to level the dishwasher.
2. The dishwasher design enables to adjust
the feet, using the screws in front (Figure
7).
2.1. “A” marking: screws to adjust the
rear feet.
2.2. “B” marking: screws to adjust the
front feet.
3. Be careful when adjusting the feet: do not
fully unscrew them out of the dishwasher
body!
HINTS ON TROUBLESHOOTING
Problem Possible causes Remedies
The dishwasher is
out of service
Blown fuse, or safety
plugs off
Replace the fuse, switch on the safety
plugs. Disconnect any other appliances
that use the same socket
No power supply
Make sure the dishwasher is connected to
the mains.
Make sure the dishwasher is properly
plugged in.
Low water pressure
Make sure all hoses are properly connected
Page 27

DISHWASHERS
25
Problem Possible causes Remedies
The drain pump
can’t be switched
off
Overll
The system detects overll. If any, the
circulating pump is off, and the drain
pump is on.
Noise
Some natural noise
Noise due to crushing of soft food residues, or noise originating from opening
the doser cover.
Flatware is not xed in
the basket, or there is a
very little subject inside it
Make sure all the dishware items are
properly xed within the basket.
Motor noise
The dishwasher is used on rare occa-
sions. If this is really the case, ll it in with
water once a week and discharge it. This
would keep the seals wet.
Soap suds in the
settlement chamber
Improper detergent
agent
Use specially developed agents only. If
soap suds are detected, open the dishwasher and let them settle.
Add 4.5 l cold water into the settlement
chamber. Close the door, select one of
the short programs, start the dishwasher.
Repeat the same as required.
Spilled rinsing agent Wipe it at once, if spilled.
Settlement chamber stained
Detergent agent with
coloring matter used
Use detergent agents with no coloring
matters.
Wet dishware
The rinsing agent doser
is empty
Fill in the rinsing agent doser.
Dirty dishware
Improper program
Select another program for a more intensive washing
Grid improperly loaded
Make sure larger dishware items do not
interfere with operation of the moving
nozzles.
Page 28

Operation and installation manual
26
DISHWASHERS
Problem Possible causes Remedies
Stains on glasses
and atware
1. Too hard water
2. Low temperature of
inlet water
3. Dishwasher overload
4. Improper loading
5. Old or wet detergent
agent
6. Rinsing agent doser
empty
7. Improper dosage of
detergent agent
To remove stains on glass items do as
follows:
1. Take all metal dishware items out of
the dishwasher.
2. Do not add detergent agent.
3. Select the longest washing cycle.
4. Start the dishwasher; let it be in operation for 18 – 22 minutes longer than
the standard cycle.
5. Open the door, pour 2 cups of white
vinegar onto the dishwasher bottom.
6. Close the door, let the dishwasher
complete the washing cycle. If this
does not work with white vinegar, repeat the same, but use ¼ cup of citric
acid crystals.
Glassware turbidity Soft water combined
with a too large amount
of detergent agent
Use a lesser amount of detergent agent
(if water in your location is soft). Select
the longest washing cycle to wash the
glassware.
Yellow or brown lm
on surfaces inside
the dishwasher
Tea or coffee stains Use ½ cup of whitener and 3 cups of
water to manually remove the stains on
surfaces inside the dishwasher.
ATTENTION!
Wait 20 minutes after the dishwasher
stops. Let it cool down before cleaning, otherwise you can burn yourself.
Films may form due to
ferrous deposits
You have to purchase a special water
lter.
Page 29

DISHWASHERS
27
Problem Possible causes Remedies
The doser cover
can’t be closed
Position OFF not selected
Select OFF position, move the door lock
to the left.
Detergent agent
residues in the doser
Dishware blocks the
doser
Place the dishware in a proper way.
Vapors Normal occurrence
Small amounts of vapors escape via an
opening close to the door lock (during
drying and water discharging).
Black or grey marks
on dishware
Alu dishware was in
contact with other dishware items
Use semi-abrasive agents to remove
these marks.
Water remains at the
bottom of settlement
chamber
Normal occurrence
Some water at the bottom of the settlement chamber helps keep the seals wet.
Dishwasher leakage
Doser overlled, or rinsing agent spilled
Be careful, do not spill the rinsing agent.
Its spillage may result in excessive foam
formation and overll. If spilled, wipe it
using a piece of cloth.
Dishwasher not levelled
Level the dishwasher using a water
level.
Service codes
Problem Possible causes Remedies
E1
Problems with water supply to the dishwasher
Check if the water cock is open.
Check if the hose is bent.
Check if the drain is clogged.
E4 Overll
Check seals of the dishwasher door.
Check if the dishwasher is levelled horizontally.
Check if the rinsing agent is overlled.
Check the quality of the detergent agent used
(excessive foam formation must be avoided).
Page 30

Operation and installation manual
DISHWASHERS
28
– at- and table-ware made of wood
(wholly or partially) because their colors
may fade, and the dishware may lose its
attractive look;
– dishware with handles made of bronze
and horns;
– fragile / decorative glassware and vas-
es, ancient chinaware – machine washing may damage their decorative paintings;
– plastic dishware, non-resistant to hot
water;
– copper and tin-ware, items made of alu
and silver;
– some kinds of glassware may lose trans-
parency upon several washing cycles;
– never put objects made of absorbing
materials into your dishwasher (sponges, towels, etc.).
WHAT YOU MAY NOT WASH IN YOUR DISHWASHER
WARNING: do not wash dishware or
table-ware contaminated with tobacco
ashes, wax, paints and lubricants (engine oil).
Page 31

DISHWASHERS
29
END OF LIFE DISPOSAL
Electrical and electronical appliances often contain components, which are of value
even upon the end of their service life. At the
same time, the materials of these appliances also may contain hazardous substances
required for operation and safety of the
equipment above. Inadequate handling of
time-expired appliances or their disposal as
domestic waste may be very harmful both to
human health and environment. Therefore, it
is not advisable to dispose them as domestic
waste.
We recommend you to send time-expired
appliances to a licensed waste disposal and
collection point.
Prior to sending an appliance for disposal,
keep it away from children.
While preparing the product for disposal,
unplug it, make the cable and plug inoperable (for which you can cut it, for instance),
as well as the door lock. Doing this, you will
prevent any further unauthorized use of the
dishwasher that is subject to nal disposal
.
STORAGE
Keep the appliance in a dry place, away from
sources of high temperatures and sunlight.
During storage avoid rapid temperature
changes. Storage of an unpackaged product
is not permitted.
TRANSPORTATION
Package dropping and any mechanical impact upon it are strongly prohibited.
Page 32

Warranty service conditionsOperation and installation manual
DISHWASHERS
30
Page 33

DISHWASHERS
31
The products are subject to free repair, if used
only for personal, family or other needs, not related to business activities, or satisfying household
requirements in an ofce of a company, institution
or enterprise. The use of the products for purposes differing from above is deemed violation of the
operation regulations.
The warranty certicate confers a right on free
repair of the product within 12 months from the
purchase date. Should you have any questions
regarding the maintenance service, please con-
tact the ofcial representative of the brand. The
contact details are on the web site of our partner
krona-steel.com. Within the warranty period defective parts of the products are subject to free
repair or replacement with new ones. It is the Service Center that has to decide whether the defective products shall be repaired or replaced.
The service life of the product is 7 (seven) years.
The service life starts on the purchase date.
If it turns out to be impossible to determine the
purchase date, the service life shall start on the
manufacturing date, encoded in the product serial
number which is on the manufacturer's plate.
The manufacturer’s plate availability is an obligatory condition! Make sure it is available and keep
it for the entire service life of the product. If it is
not available, it may turn out impossible to determine the product model, manufacturing date. As
a consequence, a request for a free repair may
be declined.
The free repair is only possible with a properly and
duly lled in warranty certicate, sale receipt for
a product purchased, other documents to conrm
the warranty period of the product submitted for
repairs or diagnostics.
When buying a product, make sure the warrant
certicate is duly lled in, contains no corrections
and bears the purchase date, the stamp of a sales
agency and signature of a sales assistant (includ-
ing a tear-off card), model and the serial number
of the product.
Before you call a Service Center specialist,
please carefully read the operation regulations.
If the product turns out to be non-defective upon
diagnostics performed by the specialist, the Service Center reserves the right to demand an ungrounded call payment from the customer, basing
upon the current price list.
Any complaints with regard to quality of the components are subject to consideration only upon
the quality inspection (technical condition inspection) to be conducted by a representative of the
authorized Service Center.
The manufacturer shall not be liable for any damage to a customer or property of a customer and
not be obliged to perform free repairs on the occurrence of any of the following:
– documents are missing to conrm the right for
free repairs;
– repairs have not been performed by authorized
persons, the product design has been changed,
the product intervention is found, conicting
with the operation regulations;
– the operation regulations have been violated,
stated in the product manual;
– installation regulations have been violated, as
stated in the product manual;
– the product has not been timely serviced and
maintained, as the product manual requires;
– the product has been connected to a water sup-
ply system, the water pressure of which differs
from values specied in the product manual;
– the components and consumables have been
replaced (accessories, lighting lamps*, lters,
remote control devices, water supply (without
the aqua-stop system) / water drain hoses of
* Except backlight lamps, unless its replacement procedure is described in the operation manual. It is only the
replacement procedure that is free, not the lamp itself.
Page 34

Warranty service conditions
DISHWASHERS
32
dish-washing machines, accumulators, batteries, etc., plastic parts handled manually;
– consumables have been used, of improper qual-
ity;
– defects and damages have been found caused
by extreme conditions and force majeure cir-
cumstances (re, Acts of God, etc.);
– impact of water and solutions upon mechanical
and electrical components of the product;
– negligent storage and / or negligent transporta-
tion have been proved;
– damages (failures) of the equipment, its mal-
function due to animals, insects and products
of their vital functions;
– excessive scaling upon the heating elements
(with higher water hardness proper processing
is required, using special preparations);
– foreign matters inside the machine;
– mechanical damage to the product (scratches,
cracks, spalls, etc.);
– loss of the saleable condition due to impact of
chemicals;
– use of cleaning / detergent agents, non-con-
forming to the type of the product;
– thermal, mechanical and other damage of that
kind that appeared while in operation;
– the product uninstallation by a specialist of the
Service Center turns out to be impossible (complex uninstallation procedures are subject to reassignment to the company that has installed
the product);
– unintended use of the product;
– the warranty terms and conditions have been
violated, as stated in the warranty document.
The following is not subject to warranty services:
adjustments, installation, cleaning and connection.
Page 35

Page 36

www.avia-dishwasher.com
 Loading...