


VANGUARD
®
FTS 370d, 370w, 370r
LED Medium Intensity Obstruction Lighting System
Flash Technology, 332 Nichol Mill Lane, Franklin, TN 37067
Reference Manual
Part Number F7913702
SERIAL NUMBER
www.flashtechnology.com
(615) 261-2000


FTS 370d/w/r INSTALLATION CHECKLIST
System Controller (SC) 370
The SC 370 is mounted away from radio frequency interference (RFI).
The SC 370 is mounted upright.
Lightning protection is grounded to the site grounding system.
2 AWG (min.) is used from the SC 370 grounding lug to the site lightning grounding system (tested for 1ohm or less).
The bend radius for all ground wires is greater than 8" (avoid bending ground wires if possible).
Important! It is recommended that all exposed ground connections are coated with a corrosion inhibitor (NO-OX or
equivalent).
There are no holes punched or drilled in the top or sides of the enclosure.
Airflow can properly circulate around the enclosure (allow 8” min. of unused space on both sides).
Room allowed for door access (multi-unit installations).
The input power (and frequency for AC systems) matches the voltage specified on the unit’s data label.
Electrical connections, and inside cabinet hardware mounts have been double-checked for tightness before powering up.
All wire connections are installed properly into the terminal blocks (TB1 and TB2).
ALL PCB connectors are securely plugged into the board (Phoenix Connectors).
All PCB connector wires are properly inserted and screws are tightened.
RS 485 Data cables are installed on PCB1 J4 and routed between System Controllers (multi-unit installations).
Circuit Breakers are securely fastened to din rail.
The “Binding Procedure” has been performed on each SC 370 installed in the system.
(See Section 3 “Local Tower Config” for special instructions regarding the binding procedure.)
PCB1 Intensity select switch is in the “Auto” position on the System Controller (s).
The SC 370 designated as System 1 is connected to the top flashhead and programmed as AOL.
The flashhead cable is connected to TB2, and corresponds to the internal wiring diagram and color guides on the
terminal block.
Flashhead CABLE
Flashhead cable is NOT spliced except at the marker interface enclosure, if installed.
Flashhead individual conductor insulation has not been nicked.
A service loop for the flashhead cable is placed at the base of the tower near the System Controller (5 feet).
Service loop is attached to the H-Frame or Wall vertically.
The flashhead cable is properly secured to the tower so the insulation won’t become cut or damaged with wind and time.
Using the Flash Technology’s two supplied tapes and the 2-3-4 layer method, secure the cable to the tower (Not
exceeding 5’ in-between)
A service loop is placed just below the beacon.
Service loop is secured at (2) points to the tower structure using the 2-3-4 tape method.
The flashhead cable is not pulled tight against sharp edges.
1-3” of space should be between the cable and tower leg flanges or obstructions.
FTS 370d/w/r Revision 19 – 05/23/2018 a

Flashhead
The LED beacon is wired correctly.
The wires are positioned so no arcing can occur and wire colors match the terminal designations, and flashhead cable
is secured in the terminal block.
The dome nut of the beacon’s cable strain relief is tightened for cable support and to prevent moisture intrusion.
Drip loop is present for the LED beacon.
The LED beacon is securely closed with both latches in place.
The LED beacon at the top of the tower has a lightning rod(s) provided at least 36” above the top of the beacon, and a
minimum of 18” away from the beacon.
The LED beacon is level (Use separate leveling tool).
8 AWG (min.) insulated ground wire is used from the LED beacon grounding lug to the tower structure.
The LED beacon is mounted in an FAA approved location (No obstructions; allowing a 360° view of the beacon).
Marker Interface Junction Box (SC 370d or SC370r)
The Marker Interface Enclosure is mounted at the marker tier level.
Flash Technology provided hardware used for mounting the Marker Interface Enclosure (4 points of contact to Universal
Mounting brackets).
Both latches are secured to prevent water intrusion.
Marker Interface Enclosure is grounded to the tower.
8 AWG (min.) insulated ground wire is used from the Marker Interface Enclosure grounding lug to the tower structure.
Side marker cable connections match all PCB labels (Connections are polarity sensitive, correct wiring is critical).
Service loop for the flashhead cable to the ground is present near the base of the Marker Interface Enclosure.
Service loop for the flashhead cable to the flashhead is present near the base of the Marker Interface Enclosure.
MARKERS (Red LED sidelights, side-markers, or obstruction lights L-810)
Only Flash Technology provided 24 Volt DC Marker Fixtures are installed.
The dome nuts of the cable strain reliefs are tightened for cable support and to prevent moisture intrusion.
PHOTODIODE (PHD 516)
The PHD 516 is connected to PCB2 (Surge Board) P-6 (White, Black, and Drain wires correspond to the label on board).
The PHD 516 is mounted vertically to prevent water entry.
The PHD 516 cable is protected through conduit so it will not be stepped on or damaged.
The PHD 516 is facing north and no artificial lights (security lights, street lights, lighted signs, or direct sunlight) will affect
its operation.
ALARMS and ALARM WIRING
NO alarm LEDs are lit on PCB1 of the SC 370.
The display located on PCB1 of the SC 370 is showing “Status OK” along with the correct configuration of the system type
installed (Dual or White with the correct number of beacons, and markers if applicable).
A Lighting Inspection has been performed via the User Interface Panel.
Call 1-800-821-5825 if additional TECHNICAL or INSTALLATION assistance is needed.
b Revision 19 – 05/23/2018 FTS 370d/w/r

Front Matter
Abstract
This manual contains information and instructions for installing, operating and maintaining the
FTS 370d, 370w and 370r LED Medium Intensity Obstruction Lighting Systems with the
following input voltages: 120-240V AC, 24V DC and 48V DC. All model variants support
IR (infrared) output.
Copyright
Copyright © 2018, Flash Technology, Franklin, TN, 37067, U.S.A.
All rights reserved. Reproduction or use of any portion of this manual is prohibited without
express written permission from Flash Technology and/or its licenser.
Trademark Acknowledgements
Flash Technology and Vanguard are registered trademarks of SPX Corporation.
All other trademarks and product names mentioned are properties of their respective
companies, and are recognized and acknowledged as such by Flash Technology.
Applicable Specifications
This equipment meets or exceeds requirements for the following FAA Types: L-864/865, L-
865, L-866/885, L-866 and L-885.
NOTE: This equipment has been tested and found to comply with the limits for a Class A digital device,
pursuant to part 15 of the FCC Rules. These limits are designed to provide reasonable protection
against harmful interference when the equipment is operated in a commercial environment. This
equipment generates, uses, and can radiate radio frequency energy and, if not installed and used in
accordance with the instruction manual, may cause harmful interference to radio communications.
Operation of this equipment in a residential area is likely to cause harmful interference in which case
the user will be required to correct the interference at his own expense.
Patent Information
FH 370, described within this document, is covered by the following patent: Patent No.
8,926,148
MKR 371, described within this document is, covered by the following patent: Patent No.
8.998.443
Additional patents pending.
Disclaimer
While every effort has been made to ensure that the information in this manual is complete,
accurate and up-to-date, Flash Technology assumes no liability for damages resulting from any
errors or omissions in this manual, or from the use of the information contained herein. Flash
Technology reserves the right to revise this manual without obligation to notify any person or
organization of the revision.
In no event will Flash Technology be liable for direct, indirect, special, incidental, or
consequential damages arising out of the use of or the inability to use this manual.
Warranty
With proper installation and with normal operating conditions, Flash Technology warrants all
lighting components of the LED lighting system for 5 years from the date of shipment from
Flash Technology. Monitoring components such as modem or battery, if present, are only
covered by 1–2 years warranty from the date of shipment.
FTS 370d/w/r Revision 19 – 05/23/2018 i

Parts Replacement
The use of parts or components, in this equipment, not manufactured or supplied by Flash
Technology voids the warranty and invalidates the third party testing laboratory certification
which ensures compliance with FAA Advisory Circulars 150/5345-43H, 150/5345-53D, and
Engineering Brief No. 67D. The certification is valid as long as the system is maintained in
accordance with FAA guidelines (FR doc. 04-13718 filed 6-16-04).
Personnel Hazard Warning
Dangerous Voltages
Dangerous line voltages reside in certain locations in this equipment. Also, this equipment
may generate dangerous voltages. Although Flash Technology has incorporated every
practical safety precaution, exercise extreme caution at all times when you expose circuits and
components, and when you operate, maintain, or service this equipment.
Avoid Touching Live Circuits
Avoid touching any component or any part of the circuitry while the equipment is operating.
Do not change components or make adjustments inside the equipment with power on.
Dangerous Voltages Can Persist with Power Disconnected
Under certain conditions, dangerous voltages can be present because capacitors can retain
charges even after the power has been disconnected.
Protect yourself — always turn off the input (primary) power and wait for storage capacitors
to drain their charge. Then check the system controller’s TB2 output terminals with a voltmeter
for any residual charge before touching any circuit element or component.
Do Not Depend on Interlocks
Never depend on interlocks alone to remove unsafe voltages. Always check circuits with a
voltmeter. Under no circumstances remove or alter any safety interlock switch.
ii Revision 19 – 05/23/2018 FTS 370d/w/r

Table of Contents
Front Matter ............................................................................................................................... i
Personnel Hazard Warning ....................................................................................................... ii
Table of Contents ..................................................................................................................... iii
List of Figures ............................................................................................................................v
List of Tables ........................................................................................................................... vi
Section 1 – Introduction and Operation .....................................................................................1
Introduction ............................................................................................................................1
System Overview ...............................................................................................................1
Specifications .....................................................................................................................2
SC 370 ....................................................................................................................................4
Operation Overview ...........................................................................................................4
PCB1 Controller Board ......................................................................................................5
PCB2 Surge Board ...........................................................................................................12
FH 370d/w/r .........................................................................................................................13
Marker Interface Enclosure..................................................................................................14
MKR 371 .............................................................................................................................15
Section 2 – Mounting and Installation .....................................................................................16
Controller Installation ..........................................................................................................16
Verify the Installation ......................................................................................................16
SC 370 Access .................................................................................................................16
Mounting ..........................................................................................................................16
Mounting Adapter Panel (Optional) ................................................................................16
Wiring ..............................................................................................................................17
Input Power ......................................................................................................................17
Photodiode Wiring ...........................................................................................................17
Photodiode Mounting.......................................................................................................17
Cellular Antenna ..............................................................................................................18
GPS Antenna ....................................................................................................................19
Communication Cable Kit ...............................................................................................21
Wi-Fi Option Antenna Installation ..................................................................................21
USB Wi-Fi (Optional)......................................................................................................23
Dry Contact Alarm Outputs .............................................................................................24
Flashhead Cable ...................................................................................................................24
Marker Interface Enclosure..................................................................................................26
Wiring Procedure .............................................................................................................26
Flashhead Installation ..........................................................................................................28
System Wiring Diagram Notes (D1 & D2)..........................................................................43
System Wiring Diagram Notes (E1 & E2) ..........................................................................45
System Wiring Diagram Notes (Catenary) ..........................................................................47
Section 3 – Information Display ..............................................................................................57
Navigating the Information Display ....................................................................................57
Ctrl Type ..............................................................................................................................58
Site Tower Config ................................................................................................................58
Local Tower Config .............................................................................................................62
Monitoring Config ...............................................................................................................64
Monitoring Status.................................................................................................................66
Local Diagnostics.................................................................................................................66
FTS 370d/w/r Revision 19 – 05/23/2018 iii

Lighting Inspection (LI) .......................................................................................................68
Mode Override .....................................................................................................................69
System Settings ....................................................................................................................69
Factory Diagnostics .............................................................................................................69
System X Firmware .............................................................................................................70
USB Firmware Update .........................................................................................................70
Information Display Alarms ................................................................................................71
Section 4– Web Interface .........................................................................................................73
Web Interface (Optional) .....................................................................................................73
Lighting Inspection (LI) .......................................................................................................74
Mode Override .....................................................................................................................75
Auxiliary Input .....................................................................................................................76
Event Log .............................................................................................................................76
Diagnostics ...........................................................................................................................77
Download Log File ..............................................................................................................77
Configuration .......................................................................................................................77
Tower Lighting ................................................................................................................78
System “X” ......................................................................................................................79
Monitoring .......................................................................................................................80
Network............................................................................................................................80
SNMP Labels ...................................................................................................................80
SNMP Settings .................................................................................................................81
Login Settings ..................................................................................................................83
System Settings ................................................................................................................83
Cellular Modem ...............................................................................................................83
Section 5 – Maintenance and Troubleshooting ........................................................................84
Safety ...................................................................................................................................84
Preventive Maintenance .......................................................................................................84
Storage .................................................................................................................................84
RFI Problems .......................................................................................................................84
Diagnostic Test ....................................................................................................................84
Component Testing ..............................................................................................................84
Troubleshooting ...................................................................................................................85
Component Removal and Replacement ...............................................................................88
Section 6 – Recommended Spare & Replaceable Parts ...........................................................89
Ordering Parts ......................................................................................................................89
RMA Policy .........................................................................................................................89
iv Revision 19 – 05/23/2018 FTS 370d/w/r

List of Figures
Figure 1-1 – SC 370 (AC) ......................................................................................................... 4
Figure 1-2 – PCB1 Controller Board ........................................................................................ 5
Figure 1-3 – Information Display and User Interface ............................................................... 6
Figure 1-4 – Alarm Interface & Mode Indicator Connections ................................................. 9
Figure 1-5 – PCB 3 with GPS ................................................................................................. 11
Figure 1-6 – PCB2 Surge Board (PN 2420600 or 2420601) .................................................. 12
Figure 1-7 – FH 370d/w/r ....................................................................................................... 13
Figure 1-8 – Marker Interface PCB ........................................................................................ 14
Figure 1-9 – MKR 371 ............................................................................................................ 15
Figure 2-1 – Antenna Mounting Bracket with PHD 516, Cellular and GPS Antennas .......... 20
Figure 2-2 – Antenna Mounting Options ................................................................................ 20
Figure 2-3 – Wi-Fi Antenna Installation ................................................................................. 22
Figure 2-4 – USB Wi-Fi Installation ...................................................................................... 23
Figure 2-5 – SC 370 Flashhead Cable Connection ................................................................. 24
Figure 2-6 – Marker Interface Wiring .................................................................................... 27
Figure 2-7 – Flashhead Leveling ............................................................................................ 28
Figure 2-8 – Flashhead Cable Terminal Block ....................................................................... 29
Figure 2-9 – SC 370 Mounting and Outline (Painted Aluminum Option) ............................. 30
Figure 2-10 – SC 370 Mounting and Outline (Stainless Steel Option) .................................. 31
Figure 2-11 – Adapter Mounting Panel Mounting and Outline (Optional) ............................ 32
Figure 2-12 – Photodiode Mounting and Outline ................................................................... 33
Figure 2-13 – Flashhead Dimensions and Mounting Outline ................................................. 34
Figure 2-14 – MKR 371 Mounting and Outline ..................................................................... 35
Figure 2-15 – Marker Interface Mounting and Outline (Painted Aluminum Option) ............ 36
Figure 2-16 – Marker Interface Mounting and Outline (Stainless Steel Option) ................... 37
Figure 2-17 – Typical E1/D1 Component Locations .............................................................. 38
Figure 2-18 – Typical E2/D2 Component Locations .............................................................. 39
Figure 2-19 – Typical E2/D2 Avian Component Locations (AC 70/7460-1L) ...................... 40
Figure 2-20 – Typical Catenary Component Locations .......................................................... 41
Figure 2-21 – Typical D1 & D2 System Wiring Diagram...................................................... 42
Figure 2-22 – Typical E1 & E2 System Wiring Diagram ...................................................... 44
Figure 2-23 – Typical Catenary System Wiring Diagram ...................................................... 46
Figure 2-24 – SC 370 (AC) Internal Wiring Standard System ............................................... 48
Figure 2-25 – SC 370 (AC) Internal Wiring with Smart Board Option ................................. 49
Figure 2-26 – SC 370 (AC) Internal Wiring with Modem Options ........................................ 50
Figure 2-27 – SC 370 (AC) Internal Wiring with Modem & Wi-Fi Options ......................... 51
Figure 2-28 – SC 370 (AC) Internal Wiring with Wi-Fi Option ............................................ 52
Figure 2-29 – SC 370 (DC) Internal Wiring Standard System ............................................... 53
Figure 2-30 – SC 370 (DC) Internal Wiring with Smart Board Option ................................. 54
Figure 2-31 – SC 370 (DC) Internal Wiring with Modem Option ......................................... 55
Figure 2-32 – Marker Interface Enclosure Wiring Diagram .................................................. 56
Figure 3-1 – Information Display ........................................................................................... 57
Figure 6-1 – SC 370 (AC) Component Locations .................................................................. 90
Figure 6-2 – SC 370 (DC) Component Locations .................................................................. 92
FTS 370d/w/r Revision 19 – 05/23/2018 v

List of Tables
Table 1-1 – Physical Specifications ...........................................................................................2
Table 1-2 – Performance Specifications ....................................................................................3
Table 1-3 – Status & Alarm LEDs .............................................................................................7
Table 1-4 – Multitech Modem LEDs .........................................................................................8
Table 1-5 – Alarm Interface & Mode Indicator Connections ....................................................9
Table 3-1 – Controller Display Buttons 1 ................................................................................57
Table 3-2 – Top Level Menu Options 1 ...................................................................................57
Table 3-3 – Information Display Status and Alarm Definitions ..............................................71
Table 3-3 – Information Display Status and Alarm Definitions (continued) ..........................72
Table 5-1 – Troubleshooting – Initial Inspection ....................................................................85
Table 5-2 – Troubleshooting – System Voltage ......................................................................85
Table 5-3 – Troubleshooting - Flashhead. ...............................................................................86
Table 5-4 – Troubleshooting – L810 Side Markers (SC 370 Information Display) ................86
Table 5-5 – Troubleshooting – Marker Interface Box .............................................................87
Table 5-6 – Troubleshooting – GPS Synchronization .............................................................87
Table 6-1 – SC 370 (AC) Replacement Parts ..........................................................................91
Table 6-2 – SC 370 (DC) Replacement Parts ..........................................................................93
Table 6-3 – FH 370 Replacement Parts ...................................................................................94
Table 6-4 – Marker Interface Replacement Parts ....................................................................94
Table 6-5 – System Replacement Parts ...................................................................................95
vi Revision 19 – 05/23/2018 FTS 370d/w/r

Section 1 – Introduction and Operation
Introduction
FTS 370d and FTS 370w are LED Medium
Intensity Obstruction Lighting Systems.
FTS 370d series are Dual Lighting Systems
(red/white) for L-864/865 applications.
FTS 370w series are White Lighting
Systems for L-865 applications.
FTS 370 series lighting systems may also
be configured for Catenary operation.
Catenary lighting systems require three
levels (tiers) of lights. One tier is installed
at each of the following three locations: top
of the structure, lowest point of the catenary
and half way between the upper and lower
levels. Each level must be lit to provide
360-degree coverage. The flash rate is 60
flashes per minute in all modes and the
flash sequence is as follows: middle – top
– bottom.
FTS 370d Catenary series are Dual
Lighting Systems for L-866/885
applications. FTS 370w Catenary series are
White Lighting Systems for L-866
applications. FTS 370r series are Red
Lighting Systems for L-885 Catenary
applications only.
lighting system. Optional GPS
synchronization is available if additional
SC 370s are required.
The light source for the flashhead is
comprised of LEDs (Light Emitting
Diodes). The LED control circuitry and
drivers are located in the flashhead. Power
Line Communication is utilized as the
communication link between the SC 370
and the flashhead; simplifying installation
and minimizing the number of conductors
required. Installation of FTS 370d systems
(L-864/865) requiring L-810 markers is
simplified by requiring only one cable run
for both markers and flashhead. The
flashhead may be located up to 850’ (cable
length) from the controller.
Any SC 370 in the lighting system may be
configured as the control unit which is
referred to as System 1. This unit provides
overall system control including mode
control, synchronization, and alarm
collection and notification. Robust and
highly reliable communication between
multiple SC 370 units is provided by RS-
485.
System Overview
The FTS 370d, FTS 370w and FTS 370r
LED Lighting Systems have been designed
for long life, reducing the need for service.
Ease of installation and service is enhanced
by simple wiring, setup, and diagnostics.
Increased safety is provided with operating
voltages of less than 60VDC.
Each Lighting System consists of one or
more SC 370d, SC 370w or SC 370r, here
after referred to as SC 370, power and
control unit(s) and its associated flashhead.
Each flashhead requires its own SC 370. A
maximum of six (6) SC 370s and associated
flashheads may be connected to form one
FTS 370d/w/r Revision 19 – 05/23/2018 1
SC 370 systems may be ordered configured
for operation by AC or DC input power. AC
systems are not sensitive to input power
phase and have an operational voltage
range of 120-240 VAC, 50/60 Hz with no
modification necessary to the input power
module. DC powered systems are available
configured for 24 or 48 VDC. The DC input
voltage must be specified when ordering.
This manual provides guidance and
recommendations for the installation,
operation, and troubleshooting of the
lighting system. Please read this document
in its entirety before installation.

Specifications
Table 1-1 – Physical Specifications
Equipment Model Physical Specifications
SC 370 System Controller (Standard):
Dimensions H x W x D (millimeters)
Weight (kilograms)
SC 370 System Controller
(Stainless Option):
Dimensions H x W x D (millimeters)
Weight (kilograms)
Marker Interface (Standard):
Dimensions H x W x D (millimeters)
Weight (kilograms)
Marker Interface (Stainless Option):
Dimensions H x W x D (millimeters)
Weight (kilograms)
FH 370 Flashhead:
Dimensions H x D (millimeters)
Weight (kilograms)
Aerodynamic Wind Area (cm2)
23.82 x 17.25 x 8.51 in (605 x 438.3 x 216.2)
39 lb (18.1)
23.00 x 17.13 x 6.44 in (584.2 x 435.1 x 163.6)
40 lb (18.1)
16.1 x 10.5 x 4.91 in (408.9 x 266.7 x 124.8)
10.1 lb (4.6)
13.75 x 11.05 x 4.36 in (349.3 x 280.7 x 110.7)
11.7 lb (5.3)
7.5 x 15.75 in (190.5 x 400)
26.3 lb (11.9)
99.13 in2 (639.5)
MKR 371:
Dimensions H x W x D (millimeters)
Weight (kilograms)
PHD 516 Photodiode:
Dimensions H x W x D (millimeters) 4.27 x 2.02 x 1.31 in (108.4 x 51.3 x 33.3)
9.0 x 2.75 x 2.13 in (228.6 x 69.9 x 54.1)
1.6 lb (0.7)
2 Revision 19 – 05/23/2018 FTS 370d/w/r

Table 1-2 – Performance Specifications
Parameter Lighting Type
FAA
CAR 621
L-864/L-865
CL-864/CL-865
L-866/ L-885
CL-866/ CL-885
Flash Intensity (ECD ± 25%):
White Day 20,000 20,000 20,000 min. Red Night 2,000 2,000 2,000 White Night 2,000 2,000 2,000 4,000 nom.
Flash Rate (flashes per minute):
White Day 40 60 20/30/40 Red Night 20/30/40 60 20/30/40/Stdy
White Night 40 60 20/30/40 40
Primary Power
120V - 240V AC, 50/60 Hz (3A - 1.5A Peak)
+/- 24 V DC (20–30 V) (16A Peak)
+/- 48 V DC (40-60 V) (8A Peak)
Power Consumption3 (Watts ±5%)
White Day 65
Red Night 35
White Night 35
Environmental
Complies with FAA specifications in AC 150/5345-43H
55
35
35
80
60
40
40
40
40
for continuous operation which includes the following:
Temperature
Storage/shipping: -67° to 130° F / -55° to 55° C
Operating: -40° to 130° F / -40° to 55° C
Humidity
95% relative humidity
ICAO
Type A/B
Type A/C
2
80
35
2
55
40 45
4K White
Night
-
Flashhead cable
6-375 ft.
6-600 ft.
6-850 ft.
PN 4210000, 10 AWG
PN 4370000, 8 AWG
PN 4206000, 6 AWG
Notes:
1. For 60 fpm, enable Catenary, Middle
2. ICAO Type C, Steady on.
3. Power measurements are for IR and non-IR Flashheads.
FTS 370d/w/r Revision 19 – 05/23/2018 3

SC 370
Operation Overview
An internal view of the SC 370 is shown in
Figure 1-1. Component layout diagrams
with part names and numbers are shown in
Figures 6-1 (AC) and 6-2 (DC). Internal
wiring diagrams are shown in Figures 2-24
– 2-28 (AC) and 2-29 – 2-31 (DC).
Input power is connected to terminal block
TB1. Mounted on TB1 is a Metal Oxide
Varistor (VR1) which reduces line surges
and transients. Input power Circuit
Breakers are also mounted on TB1.
Disconnect power from the SC 370 before
servicing Circuit Breakers or MOV.
Flag Indicator on the 2-pole Circuit
Breakers is clearly marked with green OFF
and red ON.
The power supplies located in each SC 370
unit convert input power to the correct DC
operating voltages for the system. (Shown
with single power supply below).
The control PCB (PCB1) supervises system
operation. A User Interface with
alphanumeric display and pushbuttons
provides system configuration and alarm
notification.
Note: Shown with Modem and Wi-Fi options.
4 Revision 19 – 05/23/2018 FTS 370d/w/r
Figure 1-1 – SC 370 (AC)

Interface
Override
Connections
PCB1 Controller Board
PCB1 controls and monitors operation of
the SC 370 and its associated flashhead.
Each section of PCB1, outlined in the photo
Status &
Alarm LEDs
OLED
Display
below, is discussed in the following
subheadings.
Manual
Control
Alarm
Interface
& Mode
Indicator
PCB 3
(Optional)
Figure 1-2 – PCB1 Controller Board
Important! Do not install or remove
wires from terminal blocks or PCB’s until
DC voltage indicator on PCB2 has been
extinguished. This applies especially to
connection at PCB1 P1. If it is necessary
to remove connection or make other
wiring adjustments, power the system
down and wait until the LED on PCB2 is
off.
P1 Photodiode
& PLC Input
(See Important
Note Below)
PCB1 P1
Auxiliary Input
& PCB Input
Power
J4 RS 485
Communication
Cable Connection
FTS 370d/w/r Revision 19 – 05/23/2018 5

PCB1 Information Display and User Interface
A multi-line OLED (Organic LightEmitting Diode) display provides system
status, alarm and programming
information. Three pushbuttons located to
the immediate right of the display provide
the user interface for the system. The top
and bottom buttons move the cursor
position (*) up and down on the display.
The center button selects the action at the
cursor position. The information display
defaults to show the current system status
as well as the basic configuration for the
unit. See Section 3 for a detailed
description for all menu functions of the
information display. See Table 3-3 for a
complete list of alarms provided by the
information display.
Figure 1-3 – Information Display and User Interface
Manual Override
The Manual Mode switch
provides temporary
control of the system’s
operating mode. When
the manual mode switch
of the unit is moved to
either MAN DAY or
MAN NIGHT, the display reads “M-DAY”
or “M-NIGHT” respectively and the
corresponding Mode LED blinks. Manual
mode expires 30 minutes after initiating the
mode override. Each change to the manual
mode switch restarts the 30 minute timer.
The Manual Mode switch must be moved
after power up to activate mode override.
The switch has no effect if it is set to Day
or Night before power up.
Status and Alarm LEDs
Twelve Status and Alarm LEDs are
provided for immediate visual reference of
the current status of the unit. Table 1-3
describes the function of each LED.
6 Revision 19 – 05/23/2018 FTS 370d/w/r

Table 1-3 – Status & Alarm LEDs
LED Indication
Red to indicate one or more of the following conditions:
DAY ALARM
NIGHT ALARM
MARKER ALARM
PHOTODIODE
COMM ALARM
GPS SYNC
DAY MODE
RED NIGHT
WHITE NIGHT
1. The connected beacon is experiencing a failure in Day mode.
2. The beacon is not communicating with the SC 370. The Day Alarm will
be accompanied by the Night Alarm and the Comm. Alarm in this instance.
Red to indicate one or more of the following conditions:
1. The connected beacon is experiencing a failure in Night mode.
2. The beacon is not communicating with the SC 370. The Night Alarm
will be accompanied by the Day Alarm and the Comm. Alarm in this
instance.
3. Beacon IR failure. Activation of Night Alarm due to IR failure requires
that “IR Enable” and “IR Alarm Is Night Alarm” are set to “Yes”. See
Section 3 “Site Tower Config.” for additional information.
Red to indicate one or more of the following conditions:
1. One or more L-810 markers have failed.(FTS 370d L-864/865 only)
2. The marker interface board is not communicating with the SC 370 *.
* The Marker Alarm will be accompanied by the Comm. Alarm in this
instance.
Red when more than 19 hours have passed since the system has
changed modes via the photodiode input.
Red to indicate a communications failure in one or more of the following
conditions:
1. One or more connected units (Systems 2 – 6) are not communicating
with System 1.
2. The connected beacon is not communicating with the SC 370. The
Comm. Alarm will be accompanied by the Day Alarm and Night Alarm.
3. The connected marker tier is not communicating with the SC 370. The
Comm. Alarm will be accompanied by the Marker Alarm.
More than one hour has passed since the unit received a GPS Sync.
pulse.
Green continuous when unit is in DAY mode, blinking when the unit is in
manual DAY mode.
Green continuous when unit is in RED NIGHT mode, blinking when the
unit is in manual RED NIGHT mode.
Green continuous when unit is in WHITE NIGHT mode, blinking when the
unit is in manual WHITE NIGHT mode.
485 TX Red blinking when the unit is sending data to other units in the system.
485 RX Red blinking when the unit is receiving data from other units in the system.
FLASH
Note: See Table 3-3 for a complete list of alarms provided by the information display.
Active only if GPS is enabled. Blinks approximately once per minute when
SAT lock is achieved.
FTS 370d/w/r Revision 19 – 05/23/2018 7

Table 1-4 – Multitech Modem LEDs
LED Indication
POWER On Solid: The modem is properly powered
STATUS On Solid: Modem is starting up or saving its configuration.
Blinking: Modem initialization is complete and ready for use
CD On Solid: A data connection has been established. ON during normal
operation
LS ATT Modem:
On Solid: Not registered on the
network
Slow Blinking: Registered and
connected to the network
SIGNAL 1 Bar: Very weak signal
2 Bars: Weak Signal
3 Bars: Good Signal
Verizon Modem:
Fast Blinking: Not registered on the
network or is searching for connection
Slow Blinking: Registered and connected
to the network
On Solid: Modem is transmitting or
receiving
8 Revision 19 – 05/23/2018 FTS 370d/w/r

Alarm Interface & Mode Indicator Connections
P3
P4
Dry contact alarm connections, located on
PCB 1, are available regardless of any
additional monitoring method used. The
available dry contact alarm outputs are
listed in Table 1-5 and shown in Figure 1-
4. Each contact may be wired as normally
open or normally closed. The contacts are
labeled to indicate their state with the
system powered on without an alarm
present.
Mode indicator contacts are available on P4
terminals 10 – 12. When powered on, an
open contact between COM and NO
indicates the system is operating in Night
mode and a closed contact indicates the
system is operating in Day mode. An open
contact between COM and NC indicates the
system is operating in Day mode and a
closed contact indicates the system is
operating in Night mode. The mode
indicator contacts do not differentiate
between manual and automatic operation as
determined by the Manual Mode Switch.
Figure 1-4 – Alarm Interface & Mode Indicator Connections
Table 1-5 – Alarm Interface & Mode Indicator Connections
Connector Alarm Terminal Function
P3
P3
P3
P4
P4
P4
P4 Mode
Day
Alarm
Night
Alarm
Marker
Alarm
PhotoDiode
Alarm
GPS
Sync.
Alarm
Comm.
Alarm
COM (1)
NO (2)
NC (3)
COM (4)
NO (5)
NC (6)
COM (7)
NO (8)
NC (9)
COM (1)
NO (2)
NC (3)
COM (4)
NO (5)
NC (6)
COM (7)
NO (8)
NC (9)
COM (10)
NO (11)
NC (12)
Common
Closes to indicate an alarm in day mode.
Opens to indicate an alarm in day mode.
Common
Closes to indicate an alarm in night mode.
Opens to indicate an alarm in night mode.
Common
Closes to indicate a marker alarm.
Opens to indicate a marker alarm.
Common
Closes to indicate a photodiode alarm.
Opens to indicate a photodiode alarm.
Common
Closes to indicate a Sync Alarm.
Opens to indicate a Sync Alarm.
Common
Closes to indicate a Comm. failure.
Opens to indicate a Comm. failure.
Common
Open indicates Night mode. Closed indicates Day mode.
Open indicates Day mode. Closed indicates Night mode.
FTS 370d/w/r Revision 19 – 05/23/2018 9

P2 Auxiliary Input
The Auxiliary Input (previously labeled
LOW BAT) allows an external device, such
as a radar system, to inhibit the output of
the beacon. Control via the Auxiliary Input
is limited to systems consisting of a single SC
370 power and control unit. Control is
supplied by a dry contact from the external
device connected to “Aux In” (P2 terminal
3) and “DC –” (P2 terminal 1). The fail-safe
design requires a closed contact to inhibit
the output of the beacon.
Any unused dry contact may be reassigned
to provide confirmation that the system is
operating normally while the beacon output
is inhibited. See Figure 1-4 and Table 1-5
for available dry contacts.
J4 Communication Cable Connection
FTS 370 systems
consisting of more than
one SC 370 unit require
connection of a
communication cable
between units. J4,
located on the lower
right of PCB1, provides
connection for two RJ 45
connectors. The double RJ 45 connector
allows the communication cables to be
daisy chained from System 1 to each
subordinate unit. Either port may be
utilized as an input to or output from PCB
1. See “Communication Cable Kit” in
Section 2 for additional connection and
cable routing information.
Auxiliary Input configuration
programming is located in the “Site Tower
Configuration” menu of the controller
programmed as System 1. See Section 3 for
additional information regarding this
feature.
Note: Firmware 2.9 or above is required for
Auxiliary Input Control. The beacon output
may also be controlled by Modbus. See
Section 3 and Technical Bulletin “SC 370
SMART Modbus interface” (part number
7904502) for additional information.
10 Revision 19 – 05/23/2018 FTS 370d/w/r

PCB3 Smart Board
The optional PCB3 “Smart Board” (PN
2424500) is installed on top of PCB1 of the
SC 370 programmed as System 1. It
provides an interface to the following
advanced monitoring capabilities not
available on the standard system: Cellular
Eagle 2.0, RS 485 Modbus RTU, Ethernet
SNMP, Ethernet Eagle 2.0 and Ethernet
Modbus. The GPS enabled Smart Board
(PN 2424501), shown in Figure 1-5,
provides the same capabilities as the
standard Smart Board with the addition of
GPS synchronization. Either Smart Board
is required for the optional cellular modem
and/or Wi-Fi interface. The GPS enabled
Smart Board is strongly recommended for
Catenary systems.
GPS Sync. Kit
The FTS 370 system can be ordered with
GPS Synchronization factory installed. It is
also available as an upgrade for existing
FTS 370 systems. The kit (PN 1370185)
includes instructions and all components
necessary for installation. Antenna
installation instructions are provided in
Section 2 “GPS Antenna” for systems
ordered with GPS Sync factory installed.
Two LEDs: Antenna Open and Antenna
Short, provide status of the GPS antenna.
The Ant. Open will be lit if the GPS
antenna is not connected or is not properly
connected to the antenna connector. It will
also indicate a broken or damaged wire to
the antenna. The Ant. Short will be lit if the
antenna cable is shorted. Neither LED
should be lit in if the antenna is functioning
correctly.
USB Port
The USB port provides access to update the
system’s firmware and to interface with an
optional USB Wi-Fi adaptor. See Section 3
USB Firmware Update for additional
information regarding this feature.
GPS Antenna
Ethernet
Connection
Status LEDs
USB
Port
GPS Synchronization
(PN 2425401 Only)
GPS Antenna
Connector
FTS 370d/w/r Revision 19 – 05/23/2018 11
Figure 1-5 – PCB 3 with GPS

PCB2 Surge Board
to TB2
The PCB2 “Surge Board” (AC PN
2420600, DC PN 2420601) is installed in
the bottom of the SC 370. PCB2 has
multistage surge protection which
provides protection to the controller from
negative and positive strikes.
The Photodiode connection is at connector
P6 on the PCB2 surge board. This
connection is polarity sensitive, so it is
critical to verify wiring is as shown in
Figures 2-24 to 2-31. The board also has
screen printed labels in white text to assist
with installation.
The surge board shown in Figure 1-6 has a
Power LED. The LED will illuminate
indicating the system is operating with full
DC Voltage output (60VDC). Once AC
power is removed from the system the
LED will turn off after approx. 5-10
seconds to indicate a full voltage
discharge. It is important to verify the
output voltage is fully depleted before
replacing any circuit boards or reterminating any wires inside the system
controller as damage could occur if
voltage is still present.
60VDC Output
60VDC Input from
Power Supply(s)
If a replacement is necessary complete the
following steps:
1. Remove AC power by turning off the
breaker.
2. Verify TB2 voltage is below 5VDC.
3. Remove all green Phoenix connectors.
4. Remove the (4) mounting screws on the
outer corners of the board.
5. Install the replacement in reverse order.
Wire Harness
Connects to PCB1
ACV Output to
Power Supply(s)
Power LED
Figure 1-6 – PCB2 Surge Board (PN 2420600 or 2420601)
(This is a direct replacement for PN 2420500 or PN 2420501)
12 Revision 19 – 05/23/2018 FTS 370d/w/r
Photodiode
Input
ACV Input
from TB1

FH 370d/w/r
FH 370d/w/r, shown in Figure 1-7, is
divided into two sections: light engine, and
base assembly. The light engine is
comprised of highly efficient LEDs which
are focused by Fresnel optics to produce the
required output per FAA specifications for
the following types: L-864/865 (dual),
L865 (white), L-866/885 (dual Catenary),
L-885 (white Catenary) or L-866 (red
Catenary) beacons. ICAO, CAR621 and
4000 Candela Red Night versions are also
available.1 In the event service is required,
the light engine is field replaceable as a
single assembly. The base assembly
contains a terminal block for connection of
the flashhead cable and a surge protection
PCB that is placed in line between the
output of the terminal block and input to the
light engine.
FH 370d IR1 (Infrared) is visually identical
to Figure 1-7. It incorporates all features of
the FH 370d and adds 12 infrared LEDs.
The addition of IR ensures visibility of the
obstruction to pilots aided by NVG (night
vision goggles). The combination of
standard Red (620nm) LEDs and IR
(850nm) LEDs ensures maximum visibility
to pilots in all circumstances.
1. The application type must be specified when
ordering a flashhead or replacement light engine.
Figure 1-7 – FH 370d/w/r
FTS 370d/w/r Revision 19 – 05/23/2018 13

Marker Interface Enclosure
J1 & J2
J3 & J4
LEDs
Status LEDs
(SC 370d - L-864/865 only)
Operation Overview
The Marker Interface Enclosure mounting
diagram is shown in Figure 2-15 (Stainless
Steel option shown in Figure 2-16) and the
wiring diagram is shown in Figure 2-32.
Operational power for the Marker Interface
PCB and connected L-810 markers is
supplied by the flashhead cable. TB1,
located in the marker interface enclosure,
provides a splice point for the flashhead
cable which then continues to its
Marker Outputs
termination point at the flashhead. Marker
connections are provided at terminals J1 –
J4 located on the Marker Interface PCB.
Marker programming, control and status
are accessed through the User Interface
located on PCB 1 of the SC 370d. Power
Line Communication over the flashhead
cable is utilized as the communications link
between the SC 370d and the Marker
Interface PCB. LEDs located on the Marker
Interface PCB provide operational status
during service.
Marker Alarm
Marker Outputs
Operational Voltage
Status LEDs
14 Revision 19 – 05/23/2018 FTS 370d/w/r
Input Power
(From TB1)
Communication
Figure 1-8 – Marker Interface PCB
Power Line

MKR 371
(SC 370d L-864/865 only)
MKR 371 DC, shown in Figure 1-9, is a
24V DC LED L-810 marker. The
innovative design combines three highly
efficient LED’s and Fresnel optics into a
compact cast aluminum base which is easy
to install; requiring minimal hardware.
MKR 371 DC IR (Infrared), which is
visually identical to MKR 371 DC, adds
three IR LEDs. The addition of IR ensures
visibility of the obstruction to pilots aided
by NVG. The combination of standard
Red (620nm) LEDs and IR (850nm) LEDs
ensures maximum visibility to pilots in all
circumstances.
Operational power is supplied by the
Marker Interface Enclosure discussed in
the previous heading. A mounting diagram
for the MKR 371 is provided in Figure 2-
14. Complete installation diagrams and
instructions are provided with the marker
kit.
Note: Refer to “Vanguard® Marker Installation” (Part # 7904214) for specific information
regarding cable connection to the MKR 371.
FTS 370d/w/r Revision 19 – 05/23/2018 15
Figure 1-9 – MKR 371

Section 2 – Mounting and Installation
Unpacking
Inspect shipping cartons for signs of damage
before opening. Check package contents
against the packing list and inspect each item
for visible damage. Report damage claims
promptly to the freight handler.
Note: Record equipment serial numbers
for future reference.
Recommended Tools
Flash Technology recommends the following
tools for installation and maintenance:
• Single Beacon Installation kit.
(Part # F1370990)
o Double-eye support grip
o Small slot screwdriver
o “T” level
• 1/8” non-flared flat blade screw driver
• 9 or 12 inch, flat blade #2 screwdriver
• #2 Phillips® head screwdriver
• Set of combination wrenches
• Assorted nut driver handles: 1/4”,
5/16”, 3/8” recommended
• Long-nose pliers
• Wire Strippers
• Digital volt-ohm meter
• Level
• Cable Ties
• Tin Snips
• Camera (for documentation)
Controller Installation
WARNING!
Read the warning on Page ii now. Disconnect
primary power before opening enclosures.
Verify the Installation
Upon completion of the system installation,
verify that the Information Display, located
on PCB1, shows the correct configuration for
System 1 and each subordinate unit installed
in the system. See Section 3 for a detailed
description of the menu and all functions of
the information display.
SC 370 Access
The cover is hinged and secured with knobs
that rotate (clockwise) to latch. Rotate the
knobs counterclockwise and swing the cover
open for internal access.
Note: The stainless steel enclosure is
secured with latches.
Mounting
The SC370 enclosure mounting outline and
dimensions are shown in Figure 2-9
(Stainless Steel option shown in Figure 2-10).
Mounting hardware is not provided unless it
is ordered as part of an installation kit. Use
the following guidelines for mounting the SC
370:
• Ensure that adequate space exists around
the equipment for access during
installation, maintenance and servicing.
• Allow space for airflow around the
controller (approximately 8” separation
between enclosures).
Mounting Adapter Panel (Optional)
The optional Mounting Adapter Panel,
shown in Figure 2-11, allows for easier
installation of the FTS 370d/w/r system by
removing the need for modifying the existing
outdoor H-Frame when upgrading from
previously installed Flash Technology
products. The H-Frame may require
adjustment when upgrading from non-Flash
Technology lighting products if the adapter
panels are requested. Please contact the Flash
Technology parts department at 1-800-8215825 if this option is desired.
16 Revision 19 – 05/23/2018 FTS 370d/w/r

Wiring
Typical E1/D1 & E2/D2 component location
diagrams are shown in Figures 2-17 and 2-18.
A D1/D2 system wiring diagram is shown in
Figure 2-21 and an E1/E2 wiring diagram is
shown in Figure 2-22. A typical Catenary
component location diagram is shown in
Figure 2-20 with a wiring diagram shown in
Figure 2-23. Installation notes for system
types shown in Figures 2-21 - 2-23 are
located after each figure. Installation
instructions concerning MKR 371 L-810
marker fixtures are supplied with the marker
kit. The system installation diagrams
provided in this manual may not contain all
of the required wiring information for
installation at your site.
Important! If installation drawings
prepared specifically for your site disagree
with information provided in this manual,
the site installation drawings should take
precedence. Consult any site-specific
installation wiring diagrams supplied with
your equipment.
Flash Technology wiring diagrams define
only minimum requirements
recommended for satisfactory equipment
operation. It is the responsibility of the
installer to comply with all applicable
electrical codes.
All communication wiring should have an
insulation rating of 300 volts minimum. All
power wiring should have an insulation
rating of 600 volts. Input power wiring must
be sized to satisfy the load demand of all
connected SC 370 systems. Read the notes on
the installation wiring diagrams supplied
both in this manual and with the equipment.
Input Power
Input power conductor size depends on the
service voltage, distance from the source and
the number of units installed in the system.
Assume 340 VA per SC 370 in the
system. Connect the input power to L1, L2
(AC units) or +, - (DC units) and Ground
terminals of TB1 located in the lower right of
the cabinet.
Important! For proper operation and
optimal protection from Lighting and EMI,
ensure that Earth Ground is wired to the
Ground (Green) Terminal.
Photodiode Wiring
The photodiode must be connected to the SC
370 designated as System 1. The photodiode
connections are located on PCB2 at terminal
block P6. The white wire is connected to the
terminal marked “WHT”, the black wire is
connected to the terminal marked “BLK”,
and the drain wire is connected to the
terminal marked “SHLD”. Only one
photodiode is required per system. It may be
located any practical distance from System 1.
The standard photodiode (Part # 1855516) is
supplied with 20’ of cable. Photodiodes with
cable lengths up to 75’ are available. Also,
the cable may be spliced to provide additional
length.
Photodiode Mounting
The photodiode, also referred to as PHD 516,
is shown in Figure 2-1 and mounting and
outline dimensions are shown in Figure 2-12.
The photodiode uses a female 1/2” NPT for
mounting. Use the following guidelines to
mount the photodiode:
• Locate the photodiode where it has an
unobstructed view of the polar sky.
• It must not view direct or reflected
artificial light.
• The photodiode may be mounted at the
top end of a vertical length of rigid
conduit or to the optional Antenna
Mounting Bracket kit (P/N 1905355). It
should not be mounted underneath the
controller where it could be shadowed.
• Ensure that the installation is watertight.
FTS 370d/w/r Revision 19 – 05/23/2018 17

Note: See Cellular Antenna and GPS
Antenna for additional information
regarding the Antenna Mounting Bracket
Kit.
Cellular Antenna
A Cellular antenna is required with either of
the optional cellular modems shown in
Figure 2-1. The supplied antenna mounting
bracket accommodates bulkhead mount style
antenna as shown in Figure 2-2. Figure 2-1
shows the bulkhead mount style antenna
installed with the photodiode and GPS
antennas. The antenna connects directly to
the modem as shown in Figures 2-26 and 2-
31. Follow the method below to install the
antenna.
The system is shipped with the antenna
preinstalled and the antenna cable’s SMA
connector torqued to specification onto the
modem’s antenna connector for optimal
performance; do not remove or disconnect
unless replacing the modem or antenna.
Important! For best communication
performance and to minimize potential for
surge damage to the modem radio module,
it is very important that the supplied
antenna mounting bracket be used for
mounting the antenna and that the bracket
be grounded with a minimum 14 AWG
Ground wire connected to the site
Grounding System. Also, if any excess
antenna cable is coiled up, the coil
diameter must not be less than 18 inches.
Maximum torque for the antenna’s SMA
connector must not exceed 8 inch-pounds
(90 N-cm) using a 5/16’” torque wrench.
Damage to the modem may occur if the
connection is over tightened.
Choose a location for mounting the cellular
antenna that will provide optimal reception.
The included mounting bracket can
simultaneously accommodate a Vanguard
Photodiode, Cellular Antenna, and GPS
Antenna as shown in Figure 2-1.
Note: The antenna must be mounted
outdoors to ensure optimal reception. See
“Photodiode Mounting” and “GPS
Antenna” for additional considerations
when selecting a mounting location for the
Antenna Mounting Bracket.
1. Mount the Antenna Mounting Bracket
using one of the following methods:
a. Wall Mount: Use screws (not
included) to mount to the outside wall
of a shelter.
b. Horizontal Unistrut Mount: Use
spring-nuts (not included) to mount to
unistrut.
Vertical Pole or H-frame post Mount:
Use 3” U-bolt (included) to mount to
pole or H-frame post. The bracket
permits use of larger U-bolts, up to
5”.
Important! Regardless of the mounting
method selected, the antenna bracket
must be grounded with a minimum 14
AWG Ground wire connected to the site
Grounding System. Observe proper
Grounding procedures.
2. The cellular antenna must be mounted at
the center of the bracket as shown in
Figures 2-1 and 2-2. Follow the location
recommendations noted in “Photodiode
Mounting” and “GPS Antenna” if it is
installed along with the photodiode
and/or GPS antenna.
3. To install the bulkhead mount style
antenna, loosen the antenna mounting nut
and washer and slide the antenna mount
through the bracket’s center slot. Tighten
the hardware.
4. Secure the antenna cable to the mounting
structure using cable ties.
5. Coil up any unused antenna cable inside
the SC 370 enclosure. The diameter of
the coil should be as large as possible.
6. Tighten the cable strain relief on the
bottom of the SC 370 enclosure securely.
18 Revision 19 – 05/23/2018 FTS 370d/w/r

GPS Antenna
The GPS antenna, shown in Figure 2-1, is
required with the GPS enabled PCB3 Smart
Board shown in Figure 1-5. Follow the
method below to install the GPS antenna.
Important! The GPS antenna must be
mounted outdoors with an unobstructed
view of the sky.
1. For best reception and synchronization,
choose a location for mounting the GPS
antenna with an unobstructed view of the
sky. The included mounting bracket can
simultaneously accommodate a
Vanguard Photodiode, Cellular Antenna,
and GPS Antenna (see Figure 2-1).
Note: See “Photodiode Mounting” and
“Cellular Antenna” for additional
considerations when selecting a mounting
location for the Antenna Mounting Bracket.
2. Mount the Antenna Mounting Bracket
using one of the following methods:
a. Wall Mount: Use screws (not
included) to mount to the outside wall
of a shelter.
b. Horizontal Unistrut Mount: Use
spring-nuts (not included) to mount to
unistrut.
c. Vertical Pole or H-frame post Mount:
Use 3” U-bolt (included) to mount to
pole or H-frame post. The bracket
permits use of larger U-bolts, up to
5”.
Important! Regardless of the mounting
method selected, the antenna bracket
must be grounded with a minimum 14
AWG Ground wire connected to the site
Grounding System. Observe proper
Grounding procedures.
3. Mount the GPS antenna onto the
mounting bracket using its large
mounting nut.
4. Connect the antenna cable connector to
the GPS antenna.
5. Secure the antenna cable to the mounting
structure using cable ties.
6. Coil up any unused antenna cable inside
the SC 370 enclosure. The diameter of the
coil should be as large as possible.
7. Tighten the cable strain relief on the
bottom the of SC 370 enclosure securely.
8. Verify that neither LED: Ant. Open or
Ant. Short, shown in Figure 1-5, are lit
once system power is restored. See
Section 1 GPS Sync. Kit for additional
information regarding the Ant. Open and
Ant. Short LEDs.
FTS 370d/w/r Revision 19 – 05/23/2018 19

frame post.
PHD 516
Cellular
Antenna
GPS
Antenna
Figure 2-1 – Antenna Mounting Bracket with PHD 516, Cellular and GPS Antennas
Wall Mount
Use screws to mount to the in-
side or outside wall of a shel-
ter.
(Screws are not included in
the kit.)
Horizontal Uni-strut Mount
Use spring-nuts to mount to
Uni-strut.
(Spring-nuts are not included
in the kit.)
Vertical Pole or H-frame post
Mount
Use 3” U-bolt (included) to
mount to pole or H-
The bracket permits use of
larger U-bolts, up to 5”.
Figure 2-2 – Antenna Mounting Options
20 Revision 19 – 05/23/2018 FTS 370d/w/r

Communication Cable Kit
A CAT 5 cable provides the RS 485
communications link between the SC 370
designated as System 1 and all subordinate
units installed in the system. Two
connections at J4 on PCB1 allow multiple
units to be daisy chained together. Either
port may be utilized as an input to or output
from PCB 1.
The required number of Communication
Cable Kits (P/N 4362039) is supplied with
each complete SC 370 system. Each kit
consists of a cable and two strain relief
connectors with inserts for the cable. One
strain relief is to be installed in System 1
and the other in System 2. Follow the
method below for routing the cable if
flexible conduit is not utilized for the
installation.
1. Install the ¾” cable strain relief on the
enclosure.
2. Install the connector insert over the
cable with tapered end facing away
from the connector.
3. Push the connector through the housing
from outside the enclosure.
4. Push the cable insert into the strain
relief housing.
5. Plug the cable into PCB1 and position
the cable, providing a small amount of
slack inside the cabinet to reduce stress
on the connector. Coil excess cable
equally between enclosures. Do not cut
and splice to remove excess cable.
6. Tighten the strain relief connector
dome nut.
7. Repeat steps 1-7 to connect additional
SC 370 units (3-6).
Wi-Fi Option Antenna Installation
All internal components of the optional WiFi access point are factory installed. The
antenna must be installed after the SC 370
is mounted. The following instructions are
provided to mount the antenna to the SC
370 enclosure using the supplied hardware
kit. Figure 2-3 provides a pictorial of the
installation. Connection to the Wi-Fi access
point is discussed in Section 4.
1. Locate the following items supplied
with the SC 370 system:
d. Wi-Fi Antenna (P/N 5905131)
e. Shielded CAT 5 Cable 6’
(P/N 4362028)
f. Antenna Mounting Kit (P/N
1370191)
o Conduit Hub with lock ring
o Conduit Nipple 0.75” x 12”
o Coupling
o Cable Strain Relief
o Custom Insert (Cable Strain Relief)
o (2) Adjustable Clamp 1 1/16” – 2”
2. Attach the conduit hub to one end of the
12” nipple and the coupling to the other
end.
3. Screw the strain relief into the coupling.
4. Locate and remove the access cover
from the back of the Wi-Fi antenna.
Remove the knockout that is located
below the ground terminal.
5. Center the Wi-Fi antenna on the conduit
assembly and attach using the two
adjustable clamps. The top of the Wi-Fi
antenna must be located nearest the
conduit hub.
6. Locate an available 0.88” hole on the
SC 370C unit and install the antenna
assembly. See Figure 2-9 for the SC
370 hole configuration.
7. Connect the CAT 5 cable to the RJ 45
connector located on the Wi-Fi antenna.
Route the other end of the CAT 5 cable
through the strain relief and into the SC
370. Leave a small drip loop between
the antenna and the conduit assembly.
8. Route the CAT 5 cable to the Power
Over Ethernet (POE) Injector and
connect to the terminal labeled “POE”.
9. Install a ground wire (8 AWG
recommended) from the antenna
ground terminal to the site ground.
10. Replace the access cover.
FTS 370d/w/r Revision 19 – 05/23/2018 21

SC 370c Enclosure
(P/N 4362028)
(8 AWG recommended)
(Bottom View)
Conduit Hub
(P/N 5991618)
Conduit Nipple ¾” x 12”
(P/N 5990290)
Adjustable Clamp 1 1/16” – 2” SS
(P/N 5990253)
Wi-Fi Antenna
(P/N 5905131)
Adjustable Clamp 1 1/16” – 2” SS
(P/N 5990253)
Conduit Coupling ¾”
(P/N 5991885)
Shielded
CAT 5 Cable
Cable Strain Relief ¾” NPT
(P/N 4900156) with Custom
Insert (P/N 5362009)
Remove to
Install GND wire
Install GND wire from
Antenna to Site GND
Figure 2-3 – Wi-Fi Antenna Installation
22 Revision 19 – 05/23/2018 FTS 370d/w/r

USB Wi-Fi (Optional)
Figure 2
-4 –
USB Wi
-FiInstallation
An optional USB Wi-Fi adapter can be
carried as a diagnostic tool and plugged
into the SC 370 while onsite and then
removed before leaving the site. The
adaptor should not be left onsite in the SC
370.
All SC 370 units operating with V3.1
Firmware or higher can interface with an
optional internal USB Wi-Fi adaptor.
Connection point is on PCB3 (shown in
Figure 2-4).
Must have PCB3 Smart Board (PN 2424500 or
2424501) to utilize this feature.
The USB Wi-Fi adaptor allows the ability
to program, troubleshoot, and view critical
information about the system without
interfacing with the main display screen.
All programming will be done via a web
page interface described in Section 4.
The adaptor can be purchased directly
from Flash Technology using PN
5905233.
FTS 370d/w/r Revision 19 – 05/23/2018 23

Dry Contact Alarm Outputs
Dry contact alarm outputs, located on
PCB1, are available regardless of any
additional monitoring method used. The
available dry contact alarm outputs are
listed in Table 1-5 and shown in Figure 1-
4. Each contact can be wired as normally
open or normally closed.
NOTE: The alarm relay contacts are
labeled to represent their state with the
unit powered on and with no alarms
present.
To ensure proper alarm monitoring,
Flash Technology recommends
monitoring contacts that are open in an
alarm condition.
Flashhead Cable
Flash Technology cable provides optimal
system performance while minimizing
vulnerability to Lightning and EMI
(Electromagnetic Interference).
The cable is comprised of two conductors
with an overall aluminized Mylar shield
and drain. The flashhead cable connects to
TB2 in the lower left of the SC 370 as
shown in Figure 2-5.
For shorter cable runs up to 375 ft.,
flashhead cable PN 4210000 (10 AWG)
can be used. This cable is lighter and
easier to work with than the larger gauge
cable required for longer runs, having
smaller conductors. Flashhead Cable PN
4370000 (8 AWG) permits cable lengths
up to 600 ft. Flashhead cable PN 4206000
(6 AWG) allows cable lengths of up to
850 ft.
3. Connect the three conductor flashhead
cable to terminal strip TB2 using a nonflared flat tip screwdriver:
a. Connect the red wire to the terminal
labeled DC+.
b. Connect the black wire to the
terminal labeled DC-.
c. Connect the bare drain wire to the
terminal labeled GND.
4. Leaving slack in the flashhead cable,
tighten the dome nut so that the cable is
held securely in place.
NOTE: Install a 5’ service loop in the
cable near the controller.
Figure 2-5 – SC 370 Flashhead
Cable Connection
Wiring Procedure
1. Prepare the flashhead cable:
a. Remove 6 inches of the outer
jacket.
b. Remove the exposed aluminized
Mylar shield and any filler material
between conductors.
2. Loosen the dome nut of the ¾” cable
strain relief located in the bottom of the
enclosure near TB2 and insert the cable.
24 Revision 19 – 05/23/2018 FTS 370d/w/r

Securing the Cable: 2-3-4 Tape Method
Flash Technology provides the material for
securing the flashhead cable to a skeletal
structure with the following technique.
Always adhere to local electrical codes that
could supersede this recommended
technique:
1. Run the cable along one of the tower
legs and wrap two full turns of two-inch
Scotchrap™ #50 tape, or the
equivalent, around the cable and tower
leg.
3. Wrap four full turns of two-inch
Scotchrap #50 tape, or the equivalent,
over the Scotchrap Filament #890 tape.
4. Ensure there is at least a 4 to 5 foot (1.5
meters) separation between taping
sections per NEC.
Flange Stress Relief – Secure the cable
above and below each flange
approximately 6 inches by performing
steps 1 through 3 to allow a 1 inch to 3 inch
separation from the flange and the cable.
2. Wrap three full turns of one-inch
Scotchrap Filament #890 tape, or the
equivalent, over the Scotchrap #50
tape.
FTS 370d/w/r Revision 19 – 05/23/2018 25

Marker Interface Enclosure
(FTS 370d L-864/865 only)
Note: Complete instructions for installing
the Marker Interface Enclosure, marker
mounting brackets and MKR 371 L810
markers are provided with the marker kit.
Refer to “Vanguard® Marker Installation”
(Part # 7904214) for specific information
regarding cable connection to the MKR
371.
Wiring information is provided in the
following steps. Figure 2-6 shows the
Marker Interface Enclosure with three
markers connected. Figure 2-22 shows a
system installation diagram. Figure 2-32
shows the recommended cable routing and
an internal wiring diagram for the Marker
Interface Enclosure.
Note: The Marker Interface Enclosure
should be located at the marker tier level.
A pictorial detailing the mounting of the
Marker Interface Enclosure is included
with the Marker Kit installation
instructions (Drawing PN 7790107 or
7790108).
Wiring Procedure
1. Observing the procedures described
previously in “Flashhead Cable” and
“Securing the Cable”, install a 5’
service loop in the cable near the
marker interface enclosure.
2. Prepare the flashhead cable:
a. Remove 6 inches of the outer
jacket.
b. Remove the exposed aluminized
Mylar shield and any filler material
between conductors.
3. Loosen the dome nut of one of the ¾”
cable strain reliefs located in the bottom
of the enclosure. Route the flashhead
cable from the flashhead through the
strain relief and tighten the dome nut.
4. Connect the three conductor flashhead
cable to the terminal strip TB1 using a
non-flared flat tip screwdriver:
a. Connect the red wire to one of the
two terminals on the top row
labeled DC+.
b. Connect the black wire to one of the
two the terminals on the top row
labeled DC-.
c. Connect the bare drain wire to one
of the two the terminals labeled
GND.
5. Loosen the dome nut of one of the ½”
cable strain reliefs located in the bottom
of the enclosure. Insert 12” of marker
cable through the cable strain relief and
tighten the dome nut.
6. Prepare the marker cable by removing
4 inches of the outer jacket and any
filler material between conductors.
7. Connect the marker cable to connector
J1 located on the marker interface
board:
a. Connect the red wire to the terminal
labeled DC+.
b. Connect the black wire to the
terminal labeled GND.
Connect the drain wire to the terminal
labeled EARTH.
8. Route the cable to the marker light
following the instructions supplied with
the marker kit.
9. Repeat steps 4-8 for the remaining
markers to be installed.
10. Using 8 AWG wire minimum, ground
the enclosure to the tower utilizing the
ground lug located to the left of TB1
on the backplate. Avoid sharp bends in
the ground wire (bends must be greater
than 90 degrees). It is also recommended to run the ground wire down
and away from the enclosure.
Important! It is recommended that all exposed ground connections are coated
with a corrosion inhibitor (NO-OX or
equivalent).
11. Install the flashhead cable from the
marker interface enclosure to the FH
370d by repeating steps 1-3.
NOTE: A 5’ service loop should be
installed for each flashhead cable
section (SC 370d to Marker Interface &
Marker Interface to FH 370d) near the
marker interface enclosure.
26 Revision 19 – 05/23/2018 FTS 370d/w/r

FTS 370d/w/r Revision 19 – 05/23/2018 27
Figure 2-6 – Marker Interface Wiring

Flashhead Installation
Mounting
Flash Technology recommends the
installation of one or more lightning rods
near the uppermost flashhead(s). The
copper lightning rods should extend a
minimum of 36” above the height of the
flashhead and a minimum of 18”
horizontally away from the flashhead.
The flashhead is mounted to the tower
pedestal utilizing ½ inch galvanized or
stainless steel hardware. Four mounting
holes are provided on the flashhead base
(Figure 2-13). The mounting holes will
align with most tower pedestals. The
flashhead must be installed level to
maintain light output in accordance with
FAA requirements.
Leveling
1. Verify that the mounting surface is free
of debris.
2. Align the four mounting holes in the
base of the flashhead with the holes in
the tower or pedestal’s mounting plate.
3. Leaving the hardware assemblies loose,
secure the flashhead with ½ inch
stainless steel or galvanized hardware
(Part # 5991777).
4. With the light engine secured by the
two latches on the base, place a level on
top of the flashhead and verify that it is
level in two directions.
Note: Flash Technology’s “T”- Level
(Optional Part # 11000013455) has two
vials to simplify installation.
5. If the flashhead is not level, add
stainless steel shim material or washers
(stainless steel or galvanized) as
necessary to level the flashhead.
6. Tighten the hardware once the
flashhead is level in both directions.
Verify that the flashhead is level when
the hardware is fully tightened. If
necessary, loosen the mounting
hardware and repeat Step 5 until the
flashhead is level with the hardware
fully tightened.
28 Revision 19 – 05/23/2018 FTS 370d/w/r
Figure 2-7 – Flashhead Leveling

Wiring
NOTE: Install a 5’ service loop in the
cable near the flashhead.
1. With the flashhead securely mounted to
the tower, unfasten the two latches that
secure the light engine (top assembly)
to the base.
2. Lift the light engine assembly to expose
the flashhead terminal block.
3. Prepare the flashhead cable:
a. Remove 6 inches of the outer
jacket.
b. Remove the exposed aluminized
Mylar shield and any filler material
between conductors.
4. Loosen the dome nut of the provided
strain relief on the FH 370 and insert the
cable.
a. Connect the red wire to the terminal
labeled DC+.
b. Connect the black wire to the
terminal labeled DC-.
c. Connect the bare drain wire to the
terminal labeled GND.
6. Secure the cable by tightening the dome
nut on the strain relief.
7. Ensure all wiring is tucked inside the
flashhead base to avoid pinching.
8. Close the flashhead and secure the two
latches.
9. Using 8 AWG wire minimum, ground
the flashhead to the tower utilizing the
flashheads external ground lug. Avoid
sharp bends in the ground wire (bends
must be greater than 90 degrees).
5. Connect the three conductor flashhead
cable to the terminal strip using a nonflared flat tip screwdriver:
Important! The flashhead must be
grounded to the tower using 8 AWG wire
minimum. It is recommended that all
exposed ground connections are coated
with a corrosion inhibitor (NO-OX or
equivalent).
Figure 2-8 – Flashhead Cable Terminal Block
FTS 370d/w/r Revision 19 – 05/23/2018 29

23.82
(605.03)
22.57
(573.28)
15.00 (381.00)
7.50 (190.50)
17.25 (438.27)
12.25 (311.15)
8.51 (216.19)
22.67
(575.74)
B
A
Ø0.50 (12.70)
(2 PLACES)
ENCLOSURE
FRONT VIEW
B
B B B A
A
A
ENCLOSURE
BOTTOM VIEW
B
B
Ø0.42 (10.54)
(3 PLACES)
HINGE
Note: All dimensions are in inches (millimeters).
ENCLOSURE
RIGHT VIEW
(ALL HOLES KNOCKOUT FROM INSIDE)
LETTER
B
SHADED HOLES REPRESENT FACTORY
KNOCKOUT TABLE
KNOCKOUT SIZE DIA
A
B
0.875 (22.4)
1.093 (27.8)
REMOVED KNOCKOUTS
QTY
4
8
Figure 2-9 – SC 370 Mounting and Outline (Painted Aluminum Option)
30 Revision 19 – 05/23/2018 FTS 370d/w/r

6.44 (163.6)
12.25 (311.2)
2.25 (57.2)
0.62
(15.8)
21.75
(552.5)
0.88 (22.4)
O
0.88 (22.4)
6.00
(152.4)
0.00
DETAIL A
Note: All dimensions are in inches (millimeters).
Figure 2-10 – SC 370 Mounting and Outline (Stainless Steel Option)
SEE DETAIL A
B
A
0.00
A
HOLE LEGEND
SYM
A
B
HOLE DIA.
0.88 (22.4)
1.093 (27.8)
QTY
3
9
AB B B B
BBBB
16.75
(425.5)
FTS 370d/w/r Revision 19 – 05/23/2018 31

14.5 (368.3)
'OPTIONAL PANEL MTG.'
12.25 (311.2)
'DUAL LED PC' & 'XENON PC'
21.75
(552.5)
'DUAL
LED PC'
14.75
(374.7)
'FTM /
SMALL FLC'
12.76
(324.1)
'FTW'
A
C C
A
B
B
B
B
B B
B
C
C
15.47 (392.9)
'XENON PC' &
'OPTIONAL
PANEL MTG.'
B
C C
A
'FTM / SMALL FLC'
LETTERLETTER
AA
0.50 (12.7) DIA THRU
BB
0.38 (9.7) DIA THRU
CC
0.44 (11.2) X 0.75 (19.1) LG SLOT THRU
Note: All dimensions are in inches (millimeters).
Figure 2-11 – Adapter Mounting Panel Mounting and Outline (Optional)
8.00 (203.2)
'FTW'
10.00 (254)
HOLE CHART
HOLE SIZE
QTYQTY
44
88
8
C
C
A
32 Revision 19 – 05/23/2018 FTS 370d/w/r

4.27
(108.458)
2.02
(51.308)
1.31
(33.274)
Note: All dimensions are in inches (millimeters).
Figure 2-12 – Photodiode Mounting and Outline
FTS 370d/w/r Revision 19 – 05/23/2018 33
1/2" NPT

15.75 (400)
7.5 (190.5)
Note: All dimensions are in inches (millimeters).
Figure 2-13 – Flashhead Dimensions and Mounting Outline
34 Revision 19 – 05/23/2018 FTS 370d/w/r

2.13
(54.10)
9.00
(228.6)
7.00
(177.8)
2.75
(69.85)
3/4-14 NPS
.38
(9.65)
1.45
(36.83)
0.38
(9.65)
2.64
(67.06)
1/4-20 UNC
(TYP OF 3)
1.20
(30.48)
1.20
(30.48)
1.03
(26.16)
1.63
(41.40)
Note: All dimensions are in inches (millimeters).
Figure 2-14 – MKR 371 Mounting and Outline
FTS 370d/w/r Revision 19 – 05/23/2018 35
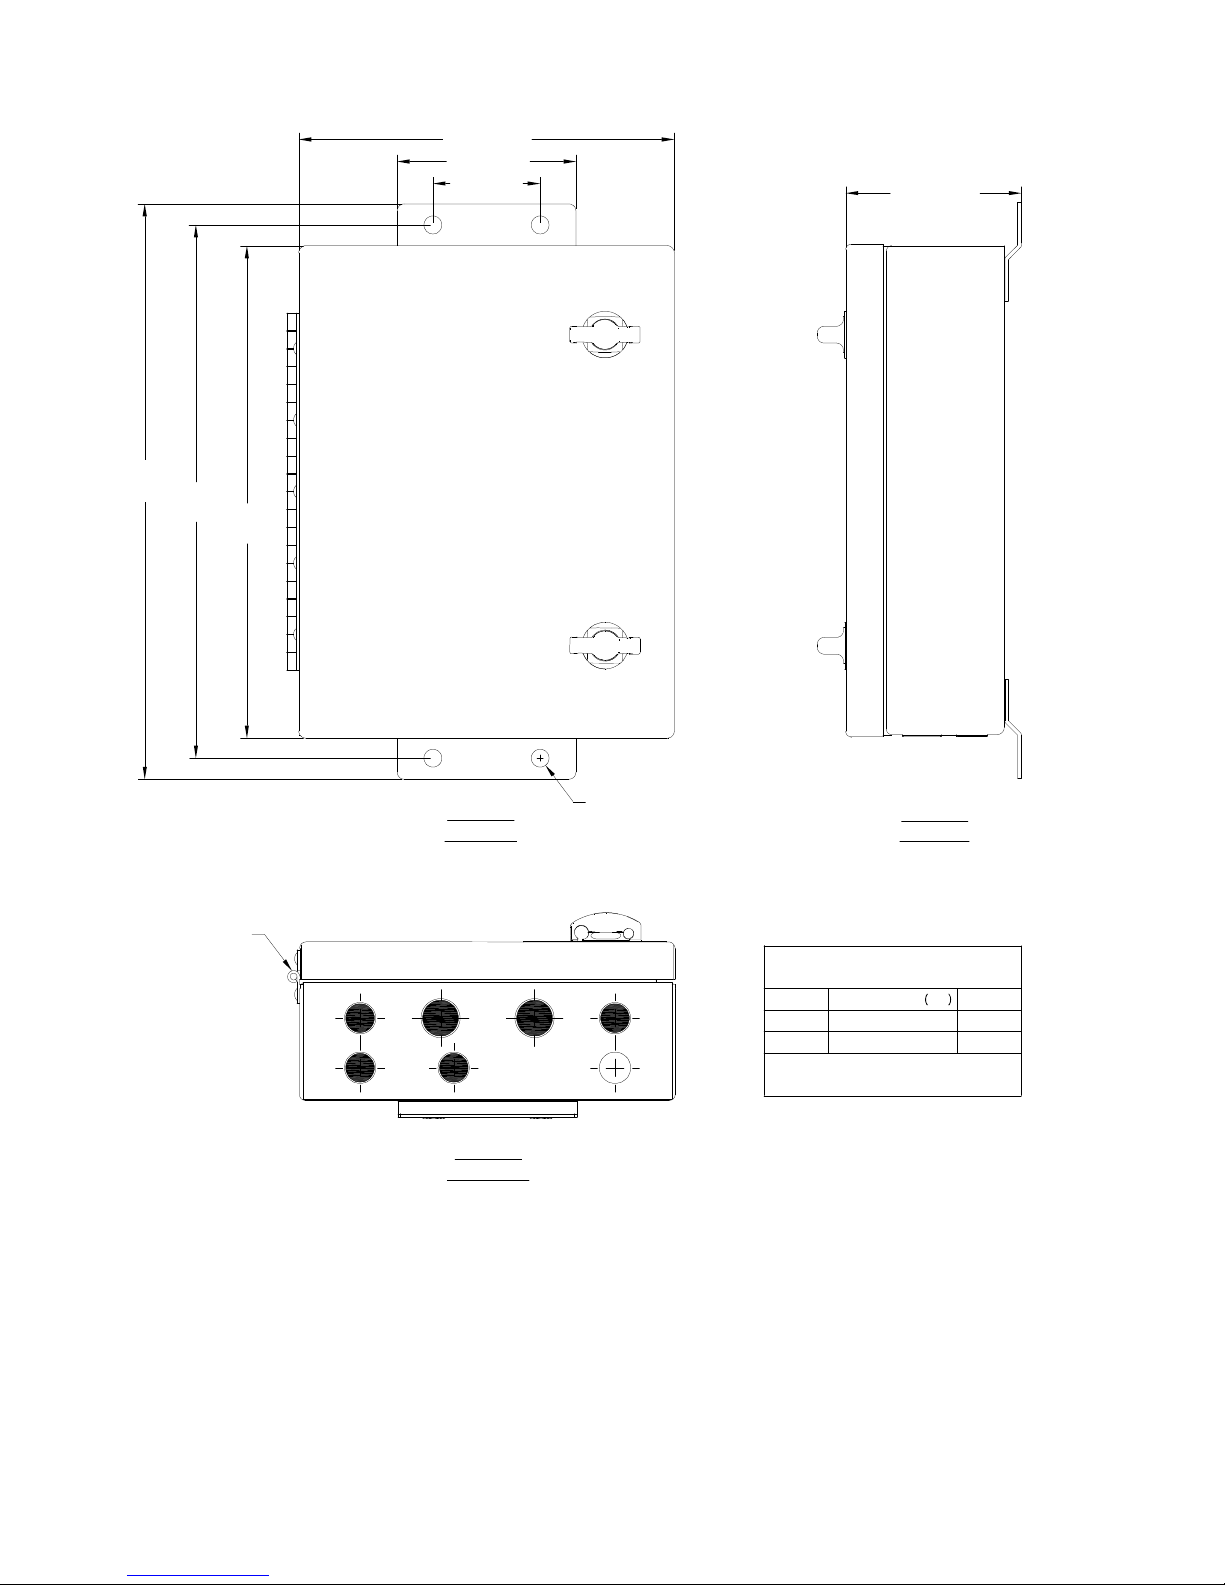
16.10
(408.94)
14.92
(378.97)
13.78
(350.01)
10.50 (266.70)
5.00 (127.00)
3.00 (76.20)
4.91 (124.79)
ENCLOSURE
FRONT VIEW
HINGE
A
A
B B
A
ENCLOSURE
BOTTOM VIEW
Note: All dimensions are in inches (millimeters).
Ø0.50 (12.70)
(2 PLACES)
A
A
ENCLOSURE
RIGHT VIEW
KNOCKOUT TABLE
(ALL HOLES KNOCKOUT FROM INSIDE)
LETTER
KNOCKOUT SIZE DIA
A
B
SHADED HOLES REPRESENT FACTORY
0.875 (22.4)
1.093 (27.8)
REMOVED KNOCKOUTS
QTY
5
2
Figure 2-15 – Marker Interface Mounting and Outline (Painted Aluminum Option)
36 Revision 19 – 05/23/2018 FTS 370d/w/r
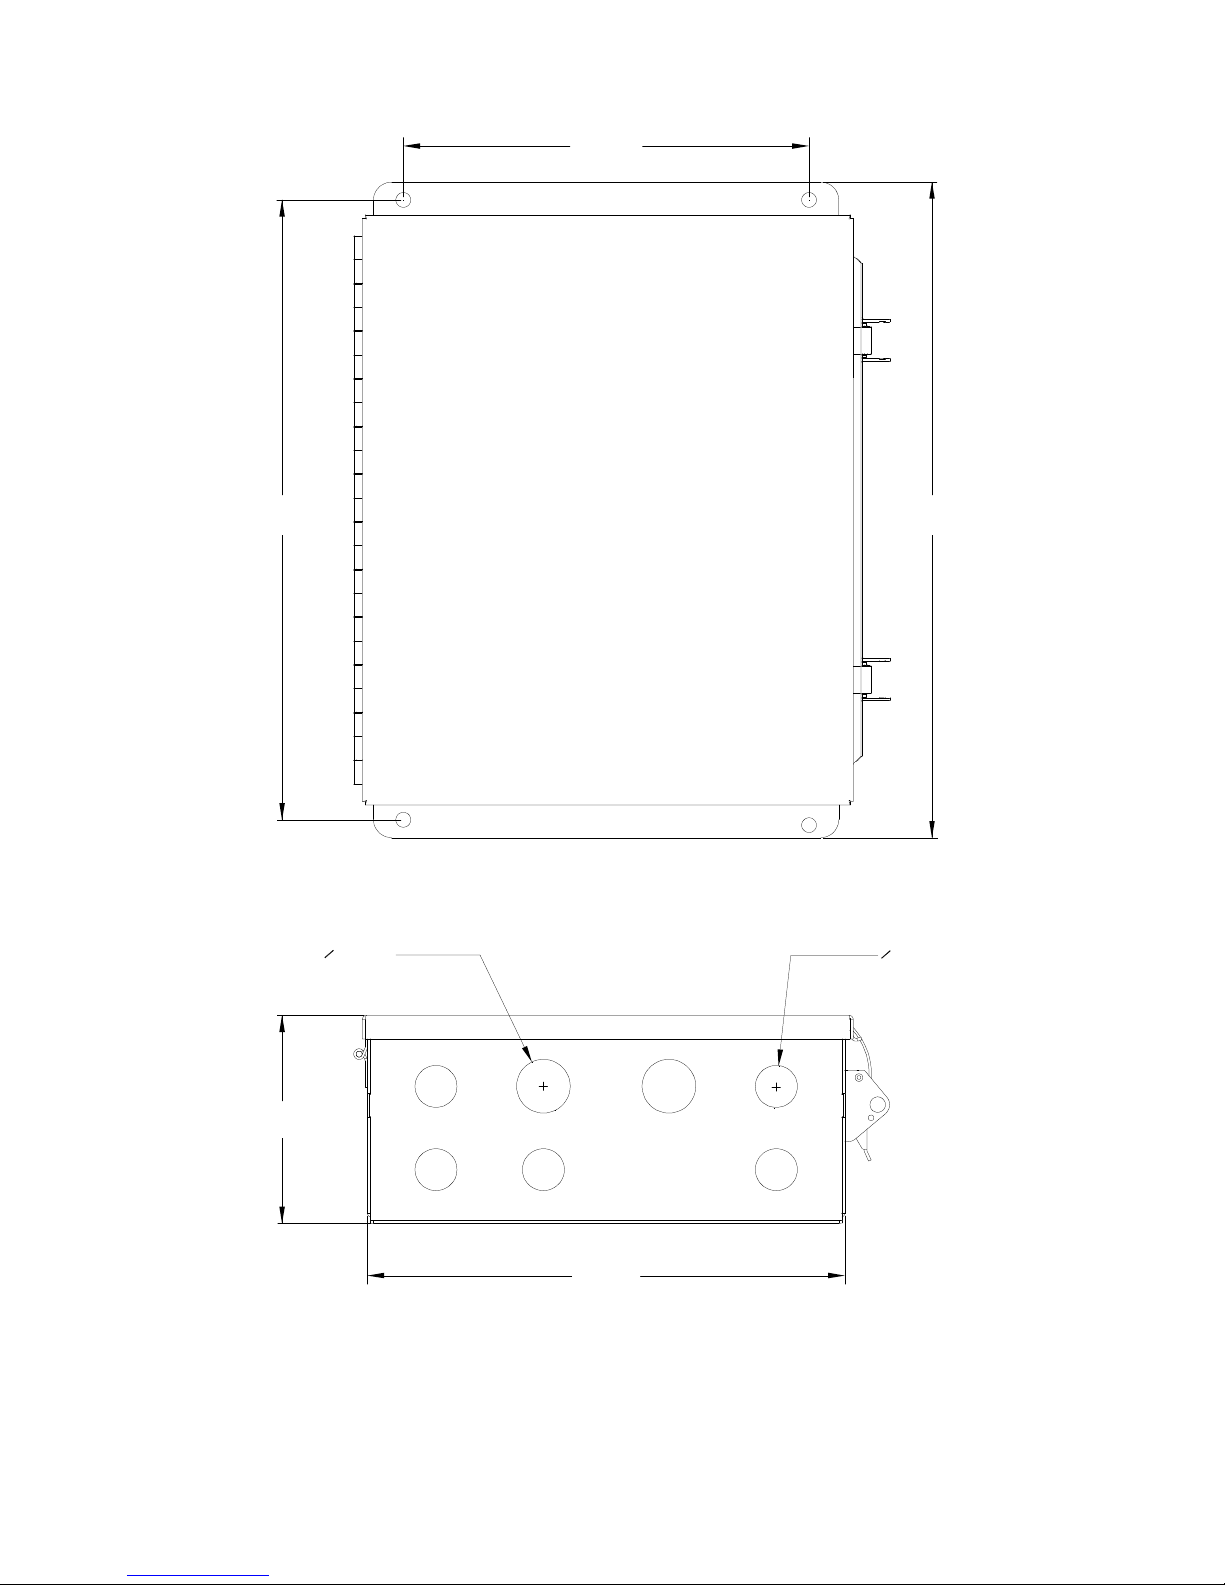
8.50 (215.9)
13.00
(330.2)
1.13 (28.7)
O
TYP OF 2
13.75
(349.3)
0.88 (22.4)
O
TYP OF 5
4.36
(110.7)
Note: All dimensions are in inches (millimeters).
Figure 2-16 – Marker Interface Mounting and Outline (Stainless Steel Option)
FTS 370d/w/r Revision 19 – 05/23/2018 37
10.00 (254)

MARKER INTERFACE
ENCLOSURE
LIGHTNING ROD
MUST EXTEND 36" (MIN)
ABOVE AND BE LOCATED 18"
HORIZONTALLY AWAY FROM
UPPERMOST FLASHHEAD(S)
FLASHHEAD
FH370d/w
#8 AWG MIN
GROUND WIRE
FROM FLASHHEAD
TO TOWER STEEL
PHOTODIODE
PHD 516
#2 AWG MIN
TO SITE
GROUNDING
SYSTEM
GPS ANTENNA
SC 370d/w
(OPTIONAL)
MKR 371 LED
L-810 MARKERS
#8 AWG MIN
GROUND WIRE FROM
MARKER INTERFACE
ENCLOSURE TO
TOWER STEEL
TO SITE
POWER
1/2 OVERALL TOWER HEIGHT
(MAY BE INSTALLED HIGHER THAN
NORMAL IF SURROUNDING OBJECTS
WOULD OBSCURE LIGHTS)
GROUND LEVEL
Note: Markers and Marker Interface Enclosure are omitted for D1 Installation and for version AC
70/7460-1L filed structure that are over 200’ but not more than 350’.
Figure 2-17 – Typical E1/D1 Component Locations
38 Revision 19 – 05/23/2018 FTS 370d/w/r

MARKER INTERFACE
ENCLOSURE
LIGHTNING ROD
MUST EXTEND 36" (MIN)
ABOVE AND BE LOCATED 18"
HORIZONTALLY AWAY FROM
UPPERMOST FLASHHEAD(S)
FLASHHEAD
FH370d/w
#8 AWG MIN
GROUND WIRE
FROM FLASHHEAD
TO TOWER STEEL
PHOTODIODE
PHD 516
SC 370d/w
TOP
SC 370d/w
MID A
GROUND WIRE FROM
MARKER INTERFACE
GROUND WIRE
FROM FLASHHEAD
TO TOWER STEEL
MARKER INTERFACE
GROUND WIRE FROM
MARKER INTERFACE
SC 370d/w
MID B
MKR 371 LED
L-810 MARKERS
#8 AWG MIN
ENCLOSURE TO
TOWER STEEL
#8 AWG MIN
(TYP OF 2)
ENCLOSURE
MKR 371 LED
L-810 MARKERS
#8 AWG MIN
ENCLOSURE TO
TOWER STEEL
FLASHHEAD
FH370d/w
3/4 OVERALL
TOWER HEIGHT
FLASHHEAD
FH370d/w
1/4 OVERALL
TOWER HEIGHT
1/2 OVERALL TOWER HEIGHT
(MAY BE INSTALLED HIGHER THAN
NORMAL IF SURROUNDING OBJECTS
WOULD OBSCURE LIGHTS, BUT NOT
LOWER THAN 200')
#2 AWG MIN
TO SITE
GROUNDING
SYSTEM
(TYP OF 3)
Note: Markers and Marker Interface Enclosure are omitted for D2 Installation and for version AC
70/7460-1L filed structure that are over 350’ but not more than 700’.
Figure 2-18 – Typical E2/D2 Component Locations
FTS 370d/w/r Revision 19 – 05/23/2018 39
GROUND LEVEL

LIGHTNING ROD
MUST EXTEND 36" (MIN)
ABOVE AND BE LOCATED 18"
HORIZONTALLY AWAY FROM
UPPERMOST FLASHHEAD(S)
FLASHHEAD
FH370d/w
#8 AWG MIN
GROUND WIRE
FROM FLASHHEAD
TO TOWER STEEL
PHOTODIODE
PHD 516
SC 370d/w
TOP
SC 370d/w
MID A
GROUND WIRE
FROM FLASHHEAD
TO TOWER STEEL
SC 370d/w
MID B
#8 AWG MIN
(TYP OF 2)
FLASHHEAD
FH370d/w
FLASHHEAD
FH370d/w
1/2 OVERALL TOWER HEIGHT
(MAY BE INSTALLED HIGHER THAN
NORMAL IF SURROUNDING
OBJECTS WOULD OBSCURE LIGHTS,
BUT NOT LOWER THAN 200')
#2 AWG MIN
TO SITE
GROUNDING
SYSTEM
(TYP OF 3)
Figure 2-19 – Typical E2/D2 Avian Component Locations (AC 70/7460-1L)
40 Revision 19 – 05/23/2018 FTS 370d/w/r
GROUND LEVEL

POWER
SITE
PHOTODIODE
TOP BEACON
MID BEACONS
DROOP EXAGERATED.
CABLE TO BE MARKED
BY LIGHTS.
BOTTOM BEACONS
TOP
MIDDLE
CATENARY
FTS 370d/w/r
BOTTOM
NATURAL CHASM, ABYSS, OR
RIVER TO BE SPANNED BY
CABLE.
BOTTOM LIGHT MARKS LOWEST POINT OF CABLE.
2. TOP LIGHT MARKS HIGHEST POINT OF STRUCTURE.
1. FLASHING SEQUENCE: MID, TOP, BOTTOM.
BOTTOM
CATENARY
TOP BEACON
MID BEACONS
BOTTOM BEACONS
FTS 370d/w/r
TOP MIDDLE
PHOTODIODE
SITE
POWER
Figure 2-20 – Typical Catenary Component Locations
FTS 370d/w/r Revision 19 – 05/23/2018 41

Figure 2-21 – Typical D1 & D2 System Wiring Diagram
42 Revision 19 – 05/23/2018 FTS 370d/w/r

System Wiring Diagram Notes (D1 & D2)
1. Input power conductor size depends on the service voltage, the distance from the source, and
number of SC 370 units connected. Assume 340 VA per SC 370. Also see Note 5.
2. Use only Flash Technology PN 4210000, 4370000, or 4206000 to connect the flashhead to the
SC 370. Splicing of the cable is not permissible on D1 and D2 systems. A 5’ service loop should
be placed at the base of the tower near the controller and just below the flashhead. The cable should
be secured to the structure using the 2/3/4 method. See “Securing The Cable” (this section).
3. Dry contact alarm output contact rating 5 ampere, 250 VAC. Contacts shown in normal
operating state with no alarms or errors.
4. User's alarm circuit not shown.
5. It is recommended that the input power is connected to L1 & L2 (AC units) or + & - (DC units)
and Ground terminals of terminal block TB1 on the SC 370 programmed as System 1. It is also
recommended to daisy chain the input power connection from System 1 TB1 L1 and L2 (AC units)
or + and – (DC units) to System 2 TB1 input and to continue the input power distribution in this
manner between remaining units.
Note: The Circuit Breaker terminals of TB1 should not be used to supply power to other units.
6. Mount the enclosures vertically.
7. The SC 370 enclosure must be grounded to the site grounding system using 2 AWG wire
minimum.
8. Install one or more lightning rods near the uppermost flashhead(s). The copper lightning rod(s)
should extend a minimum of 36” above the height of the flashhead and a minimum of 18”
horizontally away from the flashhead.
9. The FH 370(s) must be grounded to tower steel using 8 AWG wire minimum. It is recommended
that all exposed ground connections are coated with a corrosion inhibitor (NO-OX or equivalent).
10. The photodiode must be mounted vertically, outdoors facing an unobstructed polar sky. It must
not view direct or reflected artificial light. The photodiode may be mounted at the top end of a
vertical length of rigid conduit or to the optional Antenna Mounting Bracket kit (P/N 1905355).
The photodiode cable may be spliced to provide additional length.
11. Mount the GPS antenna outdoors with an unobstructed view of the sky. Antenna Mounting
Bracket kit (P/N 1905355) is recommended for installation of the GPS antenna.
FTS 370d/w/r Revision 19 – 05/23/2018 43

MKR 3
MKR 4
MKR3
MKR4
TO FH 370D
BLK
BLK
RED
J5
MARKER
MARKER
INTERFACE
RED
DRAIN
DRAIN
GND
GND
TO MARKER INTERFACE BOX
INTERFACE BOX
MKR2
MKR1
MKR 1
MKR 2
Figure 2-22 – Typical E1 & E2 System Wiring Diagram
44 Revision 19 – 05/23/2018 FTS 370d/w/r

System Wiring Diagram Notes (E1 & E2)
1. Input power conductor size depends on the service voltage, the distance from the source, the
number of SC 370 units connected and number of L-810 marker lights served. Assume 340 VA
per SC 370. Also see Note 5.
2. Use only Flash Technology PN 4210000, 4370000, or 4206000 to connect the flashhead to the
SC 370. Splicing of the cable is permissible only at the marker interface box (if installed). A 5’
service loop should be placed at the base of the tower near the controller, just below the flashhead
and above and below the marker interface box (if installed). The cable should be secured to the
structure using the 2/3/4 method. See “Securing The Cable” (this section).
3. Dry contact alarm output contact rating 5 ampere, 250 VAC. Contacts shown in normal
operating state with no alarms or errors.
4. User's alarm circuit not shown.
5. It is recommended that the input power is connected to L1 & L2 (AC units) or + & - (DC units)
and Ground terminals of terminal block TB1 on the SC 370 programmed as System 1. It is also
recommended to daisy chain the input power connection from System 1 TB1 L1 and L2 (AC units)
or + and – (DC units) to System 2 TB1 input and to continue the input power distribution in this
manner between remaining units.
Note: The Circuit Breaker terminals of TB1 should not be used to supply power to other units.
6. Mount the enclosures vertically.
7. The SC 370 enclosure must be grounded to the site grounding system using 2 AWG wire
minimum.
8. Install one or more lightning rods near the uppermost flashhead(s). The copper lightning rod(s)
should extend a minimum of 36” above the height of the flashhead and a minimum of 18”
horizontally away from the flashhead.
9. The FH 370(s) and Marker Interface Box(es) must be grounded to tower steel using 8 AWG
wire minimum. It is recommended that all exposed ground connections are coated with a corrosion
inhibitor (NO-OX or equivalent).
10. The photodiode must be mounted vertically, outdoors facing an unobstructed polar sky. It must
not view direct or reflected artificial light. The photodiode may be mounted at the top end of a
vertical length of rigid conduit or to the optional Antenna Mounting Bracket kit (P/N 1905355).
The photodiode cable may be spliced to provide additional length.
11. Mount the GPS antenna outdoors with an unobstructed view of the sky. Antenna Mounting
Bracket kit (P/N 1905355) is recommended for installation of the GPS antenna.
12. Voltage drop to the L-810 markers must not exceed 3% of the rated voltage.
13. Mount the Marker Interface Enclosure at the marker tier level. A pictorial detailing the
mounting of the Marker Interface Enclosure is included with the Marker Kit installation
instructions (P/N 7790107 or 7790108). Refer to “Vanguard® Marker Installation” (P/N 7904214)
for specific information regarding cable connection to the MKR 371.
FTS 370d/w/r Revision 19 – 05/23/2018 45

Figure 2-23 – Typical Catenary System Wiring Diagram
46 Revision 19 – 05/23/2018 FTS 370d/w/r

System Wiring Diagram Notes (Catenary)
1. Input power conductor size depends on the service voltage, the distance from the source, and
number of SC 370 units connected. Assume 340 VA per SC 370. Also see Note 5.
2. Use only Flash Technology PN 4210000, 4370000, or 4206000 to connect the flashhead to the
SC 370. Splicing of the cable is not permissible on Catenary systems. A 5’ service loop should be
placed at the base of the tower near the controller and just below the flashhead. The cable should
be secured to the structure using the 2/3/4 method. See “Securing The Cable” (this section).
3. Dry contact alarm output contact rating 5 ampere, 250 VAC. Contacts shown in normal
operating state with no alarms or errors.
4. User's alarm circuit not shown.
5. It is recommended that the input power is connected to L1 & L2 (AC units) or + & - (DC units)
and Ground terminals of terminal block TB1 on the SC 370 programmed as System 1. It is also
recommended to daisy chain the input power connection from System 1 TB1 L1 and L2 (AC units)
or + and – (DC units) to System 2 TB1 input and to continue the input power distribution in this
manner between remaining units.
Note: The Circuit Breaker terminals of TB1 should not be used to supply power to other units.
6. Mount the enclosures vertically.
7. The SC 370 enclosure must be grounded to the site grounding system using 2 AWG wire
minimum.
8. Install one or more lightning rods near the uppermost flashhead(s). The copper lightning rod(s)
should extend a minimum of 36” above the height of the flashhead and a minimum of 18”
horizontally away from the flashhead.
9. The FH 370(s) must be grounded to tower steel using 8 AWG wire minimum. It is recommended
that all exposed ground connections are coated with a corrosion inhibitor (NO-OX or equivalent).
10. The photodiode must be mounted vertically, outdoors facing an unobstructed polar sky. It must
not view direct or reflected artificial light. The photodiode may be mounted at the top end of a
vertical length of rigid conduit or to the optional Antenna Mounting Bracket kit (P/N 1905355).
The photodiode cable may be spliced to provide additional length.
11. Mount the GPS antenna outdoors with an unobstructed view of the sky. Antenna Mounting
Bracket kit (P/N 1905355) is recommended for installation of the GPS antenna.
FTS 370d/w/r Revision 19 – 05/23/2018 47

PCB1 & DISPLAY ASSEMBLY
P/N 2420101
BATTERY LITHIUM 3V COIN
P/N 11000016227
P4
NC
NO
MODE
COM
NC
NO
COMM
ALARM
COM
NC
NO
GPS
SYNC
ALARM
COM
NC
NO
DIODE
ALARM
PHOTO
COM
P3
NC
NO
ALARM
COM
MARKER
NC
NO
NIGHT
ALARM
COM
NC
NO
DAY
ALARM
COM
AUX IN
YEL
RED
+
BLK
DC
-
P2
FROM EXTERNAL
CONTROL
INTERFACE
(OPTIONAL)
AC FAIL
VDC-
VDC+
STATUS
PLC
PD-
PD+
PCB 7
POWER SUPPLY
P/N 1370800
RED
BLK
Figure 2-24 – SC 370 (AC) Internal Wiring
48 Revision 19 – 05/23/2018 FTS 370d/w/r
Standard System

TO GPS ANTENNA
(2424501 OPTION ONLY)
PCB1 & DISPLAY ASSEMBLY
P/N 2420101
BATTERY LITHIUM 3V COIN
P/N 11000016227
P4
NC
NO
MODE
COM
NC
NO
COMM
ALARM
COM
NC
NO
GPS
SYNC
ALARM
COM
NC
NO
DIODE
ALARM
PHOTO
COM
P3
NC
NO
ALARM
COM
MARKER
NC
NO
NIGHT
ALARM
COM
NC
NO
DAY
ALARM
COM
AUX IN
YEL
RED
+
BLK
DC
-
P2
FROM EXTERNAL
CONTROL
INTERFACE
(OPTIONAL)
AC FAIL
VDC-
VDC+
STATUS
PD-
PD+
PLC
PCB 7
POWER SUPPLY
P/N 1370800
RED
BLK
Figure 2-25 – SC 370 (AC) Internal Wiring
with Smart Board Option
FTS 370d/w/r Revision 19 – 05/23/2018 49
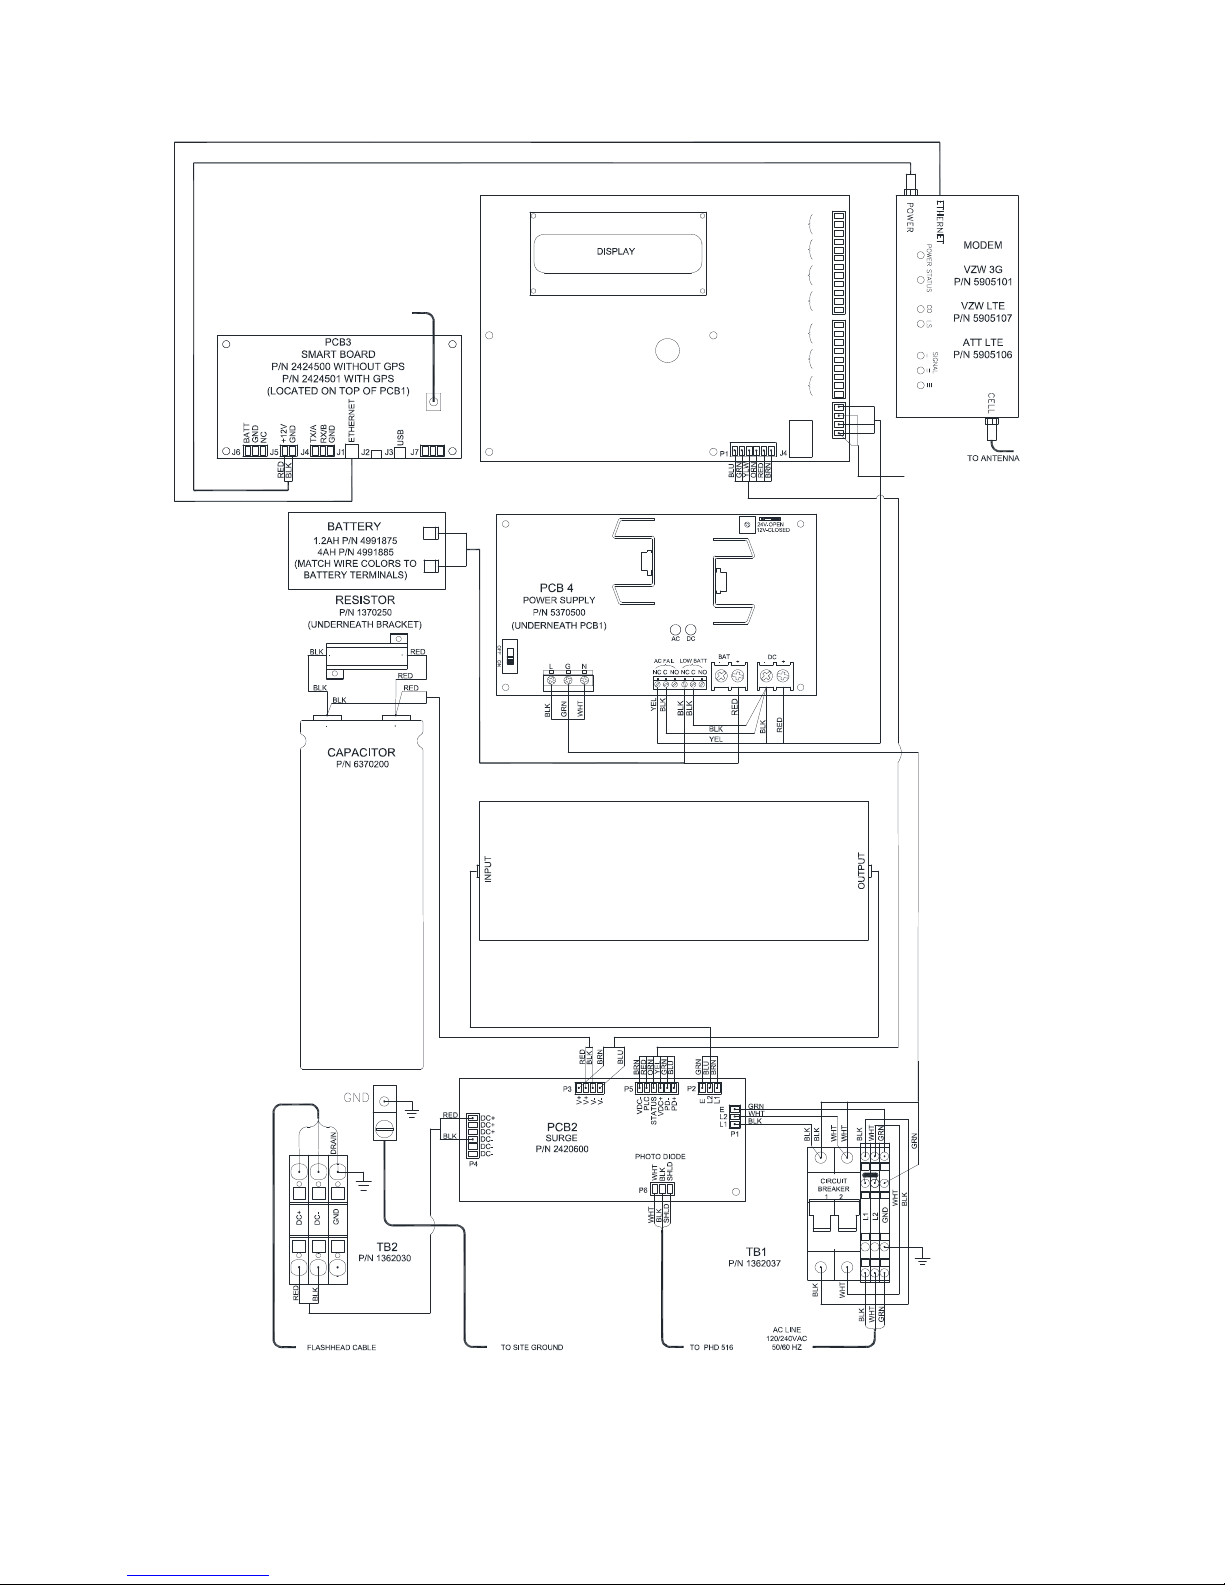
TO GPS ANTENNA
(2424501 OPTION ONLY)
PCB1 & DISPLAY ASSEMBLY
P/N 2420101
BATTERY LITHIUM 3V COIN
P/N 11000016227
P4
NC
NO
MODE
COM
NC
NO
COMM
ALARM
COM
NC
NO
GPS
SYNC
ALARM
COM
NC
NO
DIODE
ALARM
PHOTO
COM
P3
NC
NO
ALARM
COM
MARKER
NC
NO
NIGHT
ALARM
COM
NC
NO
DAY
ALARM
COM
YEL
AC FAIL
AUX IN
RED
+
BLK
DC
-
VDC-
VDC+
STATUS
PLC
PD-
PD+
P2
FROM EXTERNAL
CONTROL
INTERFACE
(OPTIONAL)
PCB 7
POWER SUPPLY
P/N 1370800
RED
BLK
Figure 2-26 – SC 370 (AC) Internal Wiring
with Modem Options
50 Revision 19 – 05/23/2018 FTS 370d/w/r

Figure 2-27 – SC 370 (AC) Internal Wiring
FTS 370d/w/r Revision 19 – 05/23/2018 51
with Modem & Wi-Fi Options

Figure 2-28 – SC 370 (AC) Internal Wiring
52 Revision 19 – 05/23/2018 FTS 370d/w/r
with Wi-Fi Option

P4
NC
NO
MODE
COM
NC
NO
COMM
ALARM
COM
NC
NO
GPS
SYNC
ALARM
COM
NC
NO
DIODE
ALARM
PHOTO
COM
P3
NC
NO
ALARM
COM
MARKER
NC
NO
NIGHT
ALARM
COM
NC
PCB1 & DISPLAY ASSEMBLY
P/N 2420101
BATTERY LITHIUM 3V COIN
P/N 11000016227
BLK
VDC+
STATUS
PD-
PD+
NO
DAY
ALARM
COM
AC FAIL
AUX IN
+
DC
-
VDC-
PLC
P2
FROM EXTERNAL
CONTROL
INTERFACE
(OPTIONAL)
Figure 2-29 – SC 370 (DC) Internal Wiring
FTS 370d/w/r Revision 19 – 05/23/2018 53
Standard System

TO GPS ANTENNA
(2424501 OPTION ONLY)
BLK
PCB1 & DISPLAY ASSEMBLY
P/N 2420101
BATTERY LITHIUM 3V COIN
P/N 11000016227
P4
NC
NO
MODE
COM
NC
NO
COMM
ALARM
COM
NC
NO
GPS
SYNC
ALARM
COM
NC
NO
DIODE
ALARM
PHOTO
COM
P3
NC
NO
ALARM
COM
MARKER
NC
NO
NIGHT
ALARM
COM
NC
NO
DAY
ALARM
COM
AC FAIL
AUX IN
+
DC
-
VDC-
VDC+
STATUS
PLC
PD-
PD+
P2
FROM EXTERNAL
CONTROL
INTERFACE
(OPTIONAL)
Figure 2-30 – SC 370 (DC) Internal Wiring
54 Revision 19 – 05/23/2018 FTS 370d/w/r
with Smart Board Option

TO GPS ANTENNA
(2424501 OPTION ONLY)
BLK
PCB1 & DISPLAY ASSEMBLY
P/N 2420101
BATTERY LITHIUM 3V COIN
P/N 11000016227
P4
NC
NO
MODE
COM
NC
NO
COMM
ALARM
COM
NC
NO
GPS
SYNC
ALARM
COM
NC
NO
DIODE
ALARM
PHOTO
COM
P3
NC
NO
ALARM
COM
MARKER
NC
NO
NIGHT
ALARM
COM
NC
NO
DAY
ALARM
COM
AC FAIL
AUX IN
+
DC
-
VDC-
VDC+
PLC
STATUS
PD-
PD+
P2
FROM EXTERNAL
CONTROL
INTERFACE
(OPTIONAL)
Figure 2-31 – SC 370 (DC) Internal Wiring
FTS 370d/w/r Revision 19 – 05/23/2018 55
with Modem Option

MKR1
MKR2
DRAIN
DRAIN
J1
GND
DC+
EARTH
J2
GND
DC+
EARTH
MARKER BOARD
(P/N 2422000)
MARKER
ALARMS
EARTH
DC+
GND
EARTH
DC+
GND
J5
J3
DRAIN
MKR3
J4
DRAIN
MKR4
GND
MKR1
MKR2
FH-IN
GND
ENCLOSURE-BOTTOM
HOLE DESIGNATION
Figure 2-32 – Marker Interface Enclosure Wiring Diagram
FH-OUT
MKR3
MKR4
FH-OUT
FH-IN
TB1
(P/N 1362034)
56 Revision 19 – 05/23/2018 FTS 370d/w/r

Section 3 – Information Display
Navigating the Information Display
Three pushbuttons to the right of the
information display provide access to
navigate the system menus, configure the
system and review diagnostic information.
Table 3-1 describes the function of each
button. The top level menu is described in
Table 3-2. Each menu option is discussed
in the headings following Table 3-2.
Figure 3-1 – Information Display
Table 3-1 – Controller Display Buttons
Button Function
S1 UP
S2 ENTER
S3 DOWN Navigates DOWN through the active menu options.
Navigates UP through the active menu options.
Confirms your selection or Advances to the NEXT option. Press and
hold for 1.5 seconds then release to return to the previous menu.
Press and hold for longer than 5 seconds to return to the main menu.
1
Table 3-2 – Top Level Menu Options
Menu Option
CONTROL TYPE Selects the role of the unit as System 1 or subordinate System 2-6
SITE TOWER CONFIG Selects the overall system configuration. (System 1 only)
LOCAL TOWER CONFIG Selects the individual unit configuration.
MONITORING CONFIG
MONITORING STATUS Provides status of the built in monitoring system. (System 1 only)
LOCAL DIAGNOSTICS
LIGHTING INSPECTION
(LI)
MODE OVERRIDE
FACTORY TEST Factory use only.
SYSTEM SETTINGS
FACTORY DIAGNOSTICS Factory use only.
SYSTEM X FIRMWARE
(System 1 only)
1. Menu options and features are based on firmware version 3.6.
2. Subordinate units must have firmware Version 3.0 or higher installed to receive firmware upgrade from System 1.
Description
Selects the type of monitoring equipment that will be used to monitor
the system. (System 1 only)
Displays the firmware revision and multiple analog values for the
controller, beacon and markers. This menu is especially helpful when
troubleshooting the system.
Allows the user to perform a lighting inspection. Automatic and Manual
modes are available.
Allows the system to be manually placed in any capable mode for a
user definable period of up to 24 hours.
Allows the user to reboot the system without physically interrupting
input power or to restore configuration settings to factory default values.
This feature allows System 1 to display, and if appropriate, upgrade the
2
firmware version of each connected subordinate unit to its current
version.
2
1
FTS 370d/w/r Revision 19 – 05/23/2018 57

Ctrl Type
Control Type allows any SC 370 in the
system to be designated as the controlling
unit for the entire system. The
programming options are “System1” –
“System 6”. System 1 is designated as the
control unit and the remaining units are
• Press the ENTER button to activate the programming menu.
• Press the down arrow to move the * to CTRL TYPE and press the ENTER button to
display the System Number menu.
• Use the DOWN button to move the * to the desired system number (1 – 6) and press
ENTER to select.
• The system will return to the home menu automatically after a selection is made.
Note: Use the UP or DOWN buttons to move the * to BACK and press ENTER to return to the
home menu if no selection is made.
• Press the DOWN button to move the * to the next programming option and press enter.
subordinate. Each unit must have a unique
address. Typically, an uppermost flashhead
is connected to the unit programmed as
System 1. The photodiode is always
connected to the unit designated as System1.
Note: The input and selection methods for the remaining menu options are the same as listed
above. Only the menu will be listed for the remaining headings.
Site Tower Config
The Site Tower Configuration menu is only
the markers will flash in synchronization
with the beacon(s).
available on the unit programmed as
System 1. This menu enables programming
of the lighting type, total quantity of
beacons installed, flash rate and the marker
operation as flashing or steady. Optional
GPS synchronization and delay
programming are provided in this menu as
well.
Important! The Site Tower
Configuration must be programmed
to match the FAA designated lighting
system type for the structure.
Red Flash Mode
Red Flash Mode provides two options:
Efficiency and Legacy. Efficiency mode
has a shorter flash duration and uses less
overall energy. Legacy produces a longer
flash duration that resembles the output of
an incandescent lighting system. Both
modes have an output of 2,000 ECD as
required by the FAA. Efficiency is
recommended for most system
installations. Legacy is recommended if the
lighting system will be required to
Marker Mode
Marker mode allows the L-810 markers to
be programmed as steady burning or
synchronize with previous generation Flash
Technology lighting systems on nearby
towers.
flashing. If the flashing option is selected,
58 Revision 19 – 05/23/2018 FTS 370d/w/r

GPS Sync
GPS Sync allows the FTS 370 system to
wirelessly synchronize with other lighting
systems without regard to distance. GPS
Delay adds the flexibility to synchronize
with lighting systems from other
manufacturers by adding an adjustable
delay (0 - 3000 ms) to the flash output.
Catenary
Catenary lighting systems require three
levels (tiers) of lights. Therefore, a
minimum of three SC 370 power and
control units and associated flashheads are
required for catenary operation. Catenary
position programming is located in the
Local Tower Configuration menu. At least
one unit must be programmed for each of
the following positions: top, middle and
bottom.
Note: The catenary flash pattern is:
middle - top - bottom.
Dry Contacts
Dry contact monitoring is available
regardless of any additional method
selected to monitor the system. The
options available in the Dry Contacts
submenu are: Combined and Separate.
Selecting the Combined option allows dry
contact information from subordinate units
to be sent to System 1. The corresponding
dry contact alarm on System 1 will be
activated. This method is typically selected
when the monitoring system has a limited
number of inputs available.
Selecting the Separate option localizes the
alarm to the affected unit. Each alarm point
in the system can be monitored
individually. This is the preferred method
when using dry contacts to monitor the
system.
Disarm Photodiode Alarm
Disarm Photodiode Alarm inhibits the
system’s 19 hour mode timer from
generating a photodiode alarm. This feature
is particularly useful in areas that are prone
to periods of light or darkness that would
exceed the 19 hour mode timer. To activate
this feature, select “ON” in the menu.
Note: The 19 hour mode timer is
intended to provide notification of a
possible failure in the system. The
disarm feature should only be activated
if the system is installed in a location
prone to conditions previously
described. Verify that the photodiode is
installed and functioning correctly before
selecting this option.
Auxiliary Input
The Auxiliary Input allows an external
device, such as a radar system, to inhibit the
output of the beacon. Control via the
Auxiliary Input is limited to systems
consisting of a single SC 370 power and
control unit. Connections for the Auxiliary
Input are discussed in Section 1 “P2
Auxiliary Input” and shown in Figures 2-24
– 2-31. A description of each Auxiliary
Input menu option is described in the
following bullet points:
• Help provides a description of the
Auxiliary Input menu.
• Command Status indicates the current
mode (On or Off) being commanded by the
external control device.
• Control Type sets the type of input for the
external control device. Options in the
Control Type menu are: Disabled
(external control not activated), Modbus
(Technical Bulletin “SC 370 SMART
Modbus interface” (part number 7904502))
and Dry Contact (contact closure required
to inhibit light output).
• Confirm Output Configuration allows any
alarm contact to be “reassigned” to
indicate that the system is operating
normally while the flash is inhibited.
• Heartbeat used only when Auxiliary
Input is controlled by Modbus to
provide a fail-safe in the event of a
communications failure between the SC
370 and the external control device.
FTS 370d/w/r Revision 19 – 05/23/2018 59

IR Enable
This option allows the system to enable or
disable IR (Infrared) output of IR capable
beacons. Verify that the beacon(s) is an FH
370d IR before enabling this option.
Note: IR Enable must be set to “Yes” for IR
operation on FH 370d IR. See Section 1 FH
370d/w/r for additional information
regarding IR.
Markers Enabled
This option allows the system to disable
markers without generating configuration
alarms and the markers will be turned off
on all the systems. Also markers per tier
value will be set to zero on all the systems.
IR Is Night Alarm
When set to “Yes”, a detected malfunction
in the IR circuit of the FH 370d IR will be
treated as a night alarm. When set to “No”,
only an “IR Alarm” is generated and no dry
contacts are activated.
Note: It is recommended that the IR Is Night
Alarm is set to “Yes” for systems monitored
by dry contacts.
Flash Specification
This option shows to which lighting
specification the system will adhere.
Choices are FAA, ICAO, 4K White
Night and CAR621. The bound
flashhead needs to match the chosen
specification.
Note: Selecting a flash specification that
doesn’t match the capabilities of the
flashhead bound to the system will generate
a config alarm.
60 Revision 19 – 05/23/2018 FTS 370d/w/r

Configuration
Red
1
3
Tower Type
White
Dual
Number of Beacons
Marker Mode
Red Flash Mode
2
3
Flashes Per Minute Red
4
1 – 6
Steady
Flashing
Efficiency
Legacy
20 FPM
30 FPM
40 FPM
GPS SYNC Enable/Disable
Yes /No
Yes Confirm?
GPS Delay
5
Load Default Value
0000 ms Valid Range 0-3000
Catenary
Dry Contacts
Yes /No
Combined
Separate
Disarm PD (Photodiode) Alarm6 On /Off
Site Tower
(System 1
only)
Help A Secondary System Can Use The Auxiliary Input To Command Lights On/Off.
Command Status On /Off
Auxiliary Input Can Be Controlled By Either Modbus Or Dry
Contact, But Not Both.
Control Type
Help
Disabled
Modbus
Dry Contact
Choose Which Dry Contact Output To Override With Auxiliary
Input Lights On/Off Command Confirmation.
Auxiliary
7
Input
Confirm Output
Configuration
Help
Disabled
Mode Status
Comm Alarm
GPS Sync. Alarm
Photodiode Alarm
Marker Alarm
Night Alarm
Day Alarm
8
IR Enable
Heartbeat
3
IR Is Night Alarm
MKRS Enabled Help
Range Is 0 – 65535
(Value 100 = 10.0s)
Help To enable infrared beacon, the beacon must support IR.
Yes/No
Help When selected, an IR alarm will also cause a night alarm.
Yes/No
When no is selected, markers will be turned off and no config
alarm will be triggered.
Yes/No
FAA
Flash Specification
ICAO
4K White Night (4000 effective candela white night output)
CAR621
1. Must be set to “1” when using Auxiliary Input.
2. If “Flashing” is selected, the markers will flash in synchronization with the beacon.
3. “Legacy” mode is operational only when 20 FPM is selected. Red Flash Mode selection is overridden in Catenary mode or when
30/40 FPM is selected. IR beacons ignore “Legacy” mode.
4. Beacon will flash in “Efficiency” or “Legacy” mode when 20 FPM is selected. Beacon will only flash in “Efficiency” mode
when 30 or 40 FPM is selected.
5. GPS SYNC must be Enabled for GPS Delay menu option to be displayed.
6. The 19 hour mode timer is intended to provide notification of a possible failure in the system. The disarm feature should only be
activated if the system is installed in a location prone to periods of light or darkness that would exceed the 19 hour mode timer.
7. Feature available in Firmware V2.9 and above. “Number Of Beacons” must be set to 1.
8. Used only when Auxiliary Input is controlled by Modbus to provide a fail-safe in the event of a communications failure between
the SC 370 and the external control device.
Note: Verify that the lighting system is programmed to operate as described by the FAA
determination for the structure.
FTS 370d/w/r Revision 19 – 05/23/2018 61

Local Tower Config
The Local Tower Configuration menu
simplifies system installation by allowing
each SC 370 to discover and bind with its
connected external components. The
binding process allows the controller to
assign an address to each of the connected
external components without the need to
manually address dipswitches or configure
jumpers. Additional programming options
in this menu include: AOL beacon
selection, Catenary level selection and L810 marker programming.
Bind Tower
The binding procedure is required for
systems consisting of two or more SC 370
units or any GPS enabled system. The
binding procedure is not required, but is
highly recommended for single SC 370
systems. The procedure must be performed
during initial system installation and when
control components are replaced. Please
familiarize yourself with the following steps
before performing this procedure.
1. Remove power from the lighting
system at the source.
2. Measure the output voltage on each SC
370 unit at TB2 DC+ and DC-. Verify
that the voltage is less than 5V DC
before proceeding.
3. Select the SC 370 unit for the binding
procedure. Flip Circuit Breaker switch
with Flag Indicator to green OFF
located on TB1 of all other SC 370 units
in the system.
4. Restore the source power to the lighting
system with Flag Indicator to red ON.
Only the SC 370 unit selected in the
previous step should be operational.
6. All discovered connected components
will be displayed at the bottom of the
screen. Press Enter to accept. Move the
* to Yes and press Enter two times to
confirm the binding procedure.
7. Repeat the procedure for all remaining
SC 370 units in the system.
Unbind Tower
If an error occurs during the binding
procedure or a control component is
replaced, you must use the Unbind Tower
option to remove the previously assigned
address. Follow the steps in the Unbind
menu option. The Bind Tower procedure
must be repeated after the Unbind Tower
request is completed.
AOL Beacon
Dual lighting systems require that the
malfunction of any uppermost red beacon
place the entire system in white night
backup. The AOL Beacon option allows
the uppermost beacons to be programmed
to meet this requirement. All SC 370 units
connected to an uppermost beacon must be
programmed as AOL beacon.
Marker Settings
The Marker Settings menu provides access
to program the total number of L-810
markers connected to each SC 370 unit.
Additionally, each marker’s power
consumption can be manually or
automatically sensed and a normal
operating threshold established. This
feature helps to ensure the system’s
compatibility with future marker designs.
It also simplifies the replacement of marker
fixtures by allowing different models of
Flash Technology approved markers to be
installed in the same system.
5. Select Bind Tower in the Local Tower
Configuration menu and follow the onscreen instructions.
62 Revision 19 – 05/23/2018 FTS 370d/w/r

Local Tower
Configuration
Bind State Bound/Unbound (Status Only)
Please Ensure All Other Systems Are Turned Off. Then Press Enter…
Verify All Disabled Systems Twr Pwr Is Less Than 5V. Then Press Enter
Bind Tower
Accept
Cancel
Yes /No
Yes Confirm?
Binding… Beacon Marker
Unbind Tower
Yes /No
Yes Confirm?
Markers Per Tier
Marker Tier Not Present
2
0 - 4
Threshold In Use Output # (1-X): XXXXXXXX
Load Threshold
Default
Markers Settings
Yes /No
Yes Confirm?
Auto Sense All
Threshold Auto
Sense
Auto Sense Output (1-
X)
Output # (1-4): XXXXXXXX
Enter Range (0 - 99999999)
AOL Beacon
Catenary Level
Threshold Manual
1
Yes /No
Middle / Top / Bottom
3
Beacon
Auto Sensing
Output # (1-4):
XXXXXXXX
Auto Sensing
Output # (1-4):
XXXXXXXX
When no is selected, beacon will be turned off and no
communication alarm will be triggered.
Beacon Enable
Man Ovr Switch
Help
Yes/No
Enable / Disable
1. All uppermost beacons in a dual system must be programmed as “AOL Beacon”.
2. Marker Tier Not Present should be selected if the Site Tower Configuration is programmed for Catenary. A
configuration alarm will be generated if a number (1-4) is selected. Selecting 0 will turn off markers without generating
a configuration alarm.
3. Catenary Level menu option is only available if the Site Tower Configuration is programmed for Catenary.
FTS 370d/w/r Revision 19 – 05/23/2018 63

Monitoring Config
The Monitoring Configuration option is
only available on the unit programmed as
System 1. This option selects the type of
monitoring for the system. The options
include Local Ethernet Configuration,
Primary Data Monitoring and Alternate
Data Monitoring.
Note: Dry contact monitoring is available
regardless of any additional method
selected to monitor the system.
Local Ethernet Configuration
The options available in the Local Ethernet
Configuration provide a way to configure
System 1 to properly operate on the
connected network.
When System 1 utilizes a cellular modem
the settings should be as follows:
IP Address Mode: Static
IP Address: 192.168.1.11
Subnet Mask: 255.255.255.0
Default Gateway: 192.168.1.10
The MAC Address is not editable.
Primary Data Monitoring
The options available in the Primary Data
Monitoring submenu are: Disabled,
Cellular Eagle 2.0, RS 485 Modbus RTU,
Ethernet SNMP, Ethernet Modbus (RTU /
TCP) and Ethernet Eagle 2.0. A brief
description of the application for each
method is listed in the following bullet
points:
• Cellular Eagle - selected when the system
is purchased with a cellular modem and
will be monitored by the Flash
Technology NOC.
• RS 485 Modbus RTU - used to connect via
serial cable to an external monitoring
device on site that supports Modbus
protocol.
• Ethernet SNMP - used to connect via
Ethernet to a server that is able to
monitor SNMP traps.
Note: See Technical Bulletin “SC 370
SNMP Trap Interface” (part number
F7904503) for complete a complete
SNMP trap list.
• Ethernet Modbus (RTU / TCP) - used to
connect via Ethernet to an external
monitoring device on site or to a server
connected to the network that is able to
monitor Modbus devices.
Note: See Technical Bulletin “SC 370
SMART Modbus interface” (part number
F7904502) for complete Modbus
specifications and map.
• Ethernet Eagle - selected when the
system is purchased with a Smart Board
only and will be monitored through a
customer supplied Ethernet connection
by Flash Technology’s NOC.
Note: A static, public IP address is
required. Network support will be
necessary on the customer supplied
connection and equipment.
Alternate Data Monitoring
Alternate Data Monitoring allows for a
secondary monitoring method. All options
available in the Primary Data Monitoring
menu are available in the Alternate Data
Monitoring menu.
Note: Monitoring Options are mutually
exclusive. Example: If RS 485 Modbus
RTU is selected in either menu, it is
removed from the available options in
the other menu.
Ethernet SNMP, if used, must be
selected as the Primary Data Monitoring
method.
64 Revision 19 – 05/23/2018 FTS 370d/w/r

Configuration
Yes /No
Load Factory Default
Yes Confirm?
Default of Primary / Alternate Monitoring
IP Address Mode
Static
Dynamic
IP Address XXX.XXX.XXX.XXX
Local Ethernet
Configuration
Subnet Mask XXX.XXX.XXX.XXX
Default Gateway XXX.XXX.XXX.XXX
MAC Address XXXXXXXXXXXX
Commit Settings
Yes /No
Yes Confirm?
Monitoring Method: Disabled
Autoupdate: XX Hours XX Minutes
Hours (Enter Value Ranging From 0 - 24)
Minutes (Enter Value Ranging From 0 -
59)
Primary Server IP Address (Enter IP Address)
Primary Server Port 54630
Alternate Server IP Address (Enter IP Address)
Monitoring
(System 1
Only)
Primary
Data
Monitoring
Monitoring
Method:
Cellular
Eagle 2.0
Monitoring
Method:
RS 485
Modbus
RTU
Monitoring
Method:
Ethernet
SNMP
Alternate Server Port 54630
Listen Port 54631
Select AT&T Direct (SIM is Blue/White
Front, Orange Back)
Sim Card: (AT&T Direct,
AT&T ROW, AT&T
ROW2 or Customized)
Select AT&T ROW (Rest Of World)
(SIM Is Solid White)
Select AT&T ROW2 (Rest Of World 2)
1
(SIM Is Solid White)
Select Customized if you know your APN
and are connecting to a third party NOC
Autoupdate: Disabled
Baud Rat: 9600
Station Address: Default is 2 (Enter Value Ranging From 0 – 255)
Autoupdate: XX Hours -
XX Minutes
Hours (Enter Value Ranging From 0 - 24)
Minutes (Enter Value Ranging From 0 -
59)
Primary Server IP Address (Enter IP Address)
Primary Server Port (Enter Port Number Range Is 0 - 65535)
2
Alternate Server IP Address (Enter IP Address)
Alternate Server Port (Enter Port Number Range Is 0 - 65535)
Listen Port (Enter Port Number Range Is 0 - 65535)
Monitoring
Method:
Autoupdate: Disabled
Listen Port: 00502
Ethernet
Modbus
Monitoring
Method:
Ethernet
Eagle 2.0
Station Address: Default is 2 (Enter Value Ranging From 0 – 255)
Autoupdate: XX Hours -
XX Minutes
Hours (Enter Value Ranging From 0 - 24)
Minutes (Enter Value Ranging From 0 -
59)
Primary Server IP Address (Enter IP Address)
Primary Server Port (Enter Port Number Range Is 0 - 65535)
Alternate Server IP Address (Enter IP Address)
Alternate Server Port (Enter Port Number Range Is 0 - 65535)
Listen Port (Enter Port Number Range Is 0 - 65535)
Alternate
Data
Same Menu as Primary Data Monitoring.
3
Monitoring
1. Menu option applies to AT&T modems only. Menu is not shown when Verizon modem is installed.
2. Ethernet SNMP, if used, must be selected as the Primary Data Monitoring method.
3. Monitoring Options are mutually exclusive. Example: If RS 485 Modbus RTU is selected in either menu, it is removed
from the available options in the other menu.
FTS 370d/w/r Revision 19 – 05/23/2018 65

Monitoring Status
The Monitoring Status menu is only
available on the unit programmed as
System 1. This menu provides information
such as signal strength, cell number, cell
ESN and time since last poll.
Signal Bars (Cellular Eagle 2.0 must be selected as Primary or Alternate Data Monitoring Method)
Signal DB (Cellular Eagle 2.0 must be selected as Primary or Alternate Data Monitoring Method)
CIP (Cellular Eagle 2.0 must be selected as Primary or Alternate Data Monitoring Method)
Monitoring
Status (System
1 Only)
Cell Number (Cellular Eagle 2.0 must be selected as Primary or Alternate Data Monitoring Method)
Cell ESN (Cellular Eagle 2.0 must be selected as Primary or Alternate Data Monitoring Method)
Since Last Poll
Test Connect
Ethernet Link: (Status)
The Test Connect option allows the user to
manually test the unit’s ability to connect to
the monitoring system. All headings in the
Monitoring Status menu, other than Test
Connect, are informational only.
Yes /No
Yes Confirm?
Local Diagnostics
The Local Diagnostics menu allows the
user to review the status of each SC 370,
beacon and marker tier, if installed. The
Local Diagnostics menu provides valuable
information when troubleshooting the
system.
Site Event History
Site Event History provides a list of the 30
most current events or alarms affecting the
operation of the SC 370. A few examples of
events that may be found in the event
history are:
• MODE OVR (Mode Override)
• BCN1 COMM (Beacon1
Communication failure)
• MKRT1 COMM (Marker Tier 1
Communication failure)
• REBOOT EVENT (System Reboot)
All events, except “REBOOT EVENT”,
are followed by an arrow and either “ALM”
(Alarm) or “RST” (Restore) to show their
state at the time of the event. Move the * to
an event and press ENTER to display the
time in days hours and minutes since the
event occurred.
Note: The SC 370 maintains event times
cumulative up to 30 are displayed. Event
age beyond the latest “REBOOT
EVENT” is for indicative purposes only.
It does not reflect how long the unit was
off.
66 Revision 19 – 05/23/2018 FTS 370d/w/r

Local Diagnostics
Site Event History
Controller
Beacon
Marker
Mode Override Off
1
Mode Override On
Mode Override Off
0D 0h 15M
Mode Override On
0d 0H 20M
Days Operating
SB Control: Month Day Year
Firmware Revision
Hours Min Sec
Firmware [Version X.X]
Temperature
Controller A2D (Values)
Tower Voltage
Photo Diode Value
Site Name
Site ID
GPS Communications
GPS (Status Only)
2
Antenna
Satellites In View
Last Sync.
Days Operating
SB Beacon: Month Day Year
Firmware Revision
Hours Min Sec
Firmware [Version X.X]
White A2D
Red A2D
Misc A2D
IR A2D
3
Days Operating
SB Marker: Month Day Year
Firmware Revision
Hours Min Sec
Firmware [Version X.X]
Marker A2D
Misc A2D
1. Examples of events that may be found in the Site Event History menu. Event time is maintained since the last “REBOOT
EVENT”. This example shows that the system was in Mode Override for five minutes.
2. GPS diagnostics menu is available only if GPS SYNC is enabled in the Site Tower Configuration menu.
3. IR Enable selection must be set to “Yes” in the “Site Tower Configuration menu” for IR A2D value to be displayed.
FTS 370d/w/r Revision 19 – 05/23/2018 67

Lighting Inspection (LI)
Inspection
The Lighting Inspection (LI) menu allows
the user to test the alarm function of the
beacon in all modes, markers and the
photodiode dry contact. The Lighting
Inspection can be performed as an
automatic function (Auto Fast LI) or
manually. The manual Lighting Inspection
has three modes available: Manual Fast LI,
Manual Staged LI and Manual LI. Manual
LI modes require the unit to already be in
the correct mode or manually placed in the
correct mode before the test can be
conducted. The system will ignore a test
request until the unit is placed in the correct
corresponding mode. A description of each
LI mode is provided in the following bullet
points:
results can be reviewed by selecting
Display Previous Results in the Auto
Fast LI menu.
• Manual Fast LI mode tests the beacons
and markers simultaneously. The
restore stage for each test is held for
user input.
• Manual Staged LI mode tests each
beacon and marker singly and
sequentially. The restore stage for each
test is held for user input.
• Manual LI requires each test point to be
selected. Once the selected function has
been tested, the function must be
restored and the next test point selected.
This method continues for all lighting
components installed in the system.
• Automatic Fast LI cycles through all
test points and logs the results for each.
No interaction is required during an
Automatic LI. The previous test
Lighting
(LI)
Display Previous
Results
Auto Fast LI
Manual Fast LI
Manual Staged LI
Manual LI
"No Valid Results" Will Be Displayed If A Lighting Inspection Has Not Been
Performed.
Begin Test (1 Button Inspection - Beacons & Markers Tested
In Parallel With No User Interaction.)
Begin Test (Beacons & Markers Tested in Parallel. Holds
Restore Stages For User Input.)
Begin Test (Beacons & Markers Tested In Each Mode Singly
& Sequentially. Holds Restore Stages for User Input.)
Beacon Day Alarm Alarm/Normal
Beacon White Night Alarm Alarm/Normal
Beacon Red Night Alarm Alarm/Normal
Beacon Comm. Alarm Alarm/Normal
Marker Alarm Alarm/Normal
Marker Comm. Alarm Alarm/Normal
Photodiode Dry Contact Test Alarm/Normal
Note: Some monitoring systems require
additional time between alarm
generation and receipt of the alarm.
Manual LI mode is recommended in this
instance.
Yes /No
Yes Confirm?
Yes /No
Yes Confirm?
Yes /No
Yes Confirm?
68 Revision 19 – 05/23/2018 FTS 370d/w/r

Mode Override
Mode Override allows the system to be
manually placed in any capable mode for a
user definable period of up to 24 hours.
Once the mode override function has been
activated, Override Mode will show the
Left displays the amount of time remaining
in the current Override Mode. Cancel
Override returns the system to normal
operation with mode control directed by the
photodiode.
operating mode of the system. Override
White Day
Override Mode
Start Mode Override
Mode
Override
Cancel Override Yes /No
Override Mode: (Displays The Current Override Mode)
Override Left: (Displays The Amount Of Time Remaining In The Current Override Mode)
1. System will not flash when Override Mode “White Day” is selected for systems programmed as “Tower Type Red”
2. Option will not be displayed for systems programmed as “Tower Type White”.
Override Time
Start Override Yes /No
White Night
Red Night
Hours (Enter Value Ranging From 0 - 24)
Minutes (Enter Value Ranging From 0 - 59)
1
2
System Settings
This menu allows an individual SC 370 to
restart without physically interrupting the
power, or allows the configuration settings
to be restored to factory default values. For
hardware with a real time clock, setting the
date and time are available here.
System Reboot Yes /No
Yes Confirm?
Reset Factory
System
Settings
1. Requires a valid password to set the customized configuration. Upon success unit will set the customized
configuration based on the password entered.
Default
Customized
Configuration
Real Time Clock Date
Yes /No
Yes Confirm?
Waiting for password
1
*****
Time
Daylight Savings Time (Enable/Disable)
Note: Firmware Version 3.4 or higher
required. Firmware Version 3.6 or higher
AND RTC capable hardware required for
clock settings
Factory Diagnostics
This menu displays diagnostic information
about the communications quality from the
controller to the lights on the tower.
BCN 1
Factory
Diagnostics
PLC
MKR 1
PLC
FTS 370d/w/r Revision 19 – 05/23/2018 69
99% 99%
98% 98%
Note: Firmware Version 3.6 or higher
required.

System X Firmware
This feature allows System 1 to display,
and if appropriate, upgrade the firmware
version of each connected subordinate unit
to its current version.
This Menu Allows You To Upgrade The Firmware Of Subordinate Vanguard System
Help
System X
Firmware
1. Firmware Version 3.1 or higher required.
2. Progress will be displayed as a percentage on the master and subordinate unit(s) during the upgrade. The upgraded
subordinate unit(s) will reboot immediately after firmware upgrade is complete.
System 1 [V 3.1]
1
Upgrade
2
All
System 2 -
6 [V X.X]
Controllers. You May Upgrade A Particular Controller Or All Controllers. When Started,
This Controller Will Transfer Its Firmware Package To The Target Controllers. Once
Complete, The Target Controllers Will Reboot With The New Firmware.
Yes/No
Yes Confirm?
Yes/No
2
Yes Confirm?
Note: Subordinate units must be firmware
Version 3.0 or higher to receive the firmware
upgrade from System 1.
USB Firmware Update
This feature allows any unit with an
installed PCB3 Smart Board to be updated
via a USB drive. Insert the drive into the
USB port located on the lower edge of
PCB3 (see Figure 1-5). Once the update
package is located on the drive, the unit’s
current firmware version will be displayed
in a menu similar to “System X Firmware”
and ask if you want to update the firmware.
Select yes to update; once completed, the
unit will reboot and the USB drive may be
removed.
Note: Subordinate units must have
firmware version 3.0 or higher to receive the
firmware update from System 1.
70 Revision 19 – 05/23/2018 FTS 370d/w/r

Information Display Alarms
The information display provides more comprehensive alarm information than the alarm
LED’s located on PCB 1.
See Table 3-3 for a complete list of possible alarms and their definitions.
Table 3-3 – Information Display Status and Alarm Definitions
Alarm Definition
STATUS: POWER UP MODE Indicates that the system is in its initial boot stage.
STATUS: DAY ALARM The connected flash head is exhibiting a white day alarm.
STATUS: WNIGHT ALARM The connected flash head is exhibiting a white night alarm.
STATUS: RNIGHT ALARM The connected flash head is exhibiting a red night alarm.
STATUS: BCN COMM
STATUS: MKR ALARM
STATUS: MKR COMM
STATUS: SYS COMM
STATUS: CFG ALARM
The SC 370X is experiencing a communications failure with the
connected flash head.
The connected marker interface PCB is reporting failure of one or
more markers.
The SC 370X is experiencing a communications failure with the
connected marker interface PCB.
General communications failure indication. Any communication
failure in the system will generate a SYS COMM failure on System
1. The SYS COMM alarm will be accompanied by a specific
communication alarm if the failure is local to System 1. Absence of
a specific communication failure on System 1 indicates a
communication failure on a subordinate unit (System 2-6). A
communication failure on any subordinate unit will be accompanied
by a SYS COMM alarm.
The system is configured incorrectly. Examples of incorrect
configurations are:
• The SC 370 has found a marker interface PCB connected to a
system programmed as white only.
• A marker interface PCB is connected to a system configured as
Catenary.
• Four SC 370’s are discovered on a system configured for three
SC 370’s.
Note: Information Display Status and Alarm Definitions continue on the next page.
FTS 370d/w/r Revision 19 – 05/23/2018 71

Table 3-3 – Information Display Status and Alarm Definitions (continued)
Alarm Definition
System 1 only. The “BIND ALARM” can be generated by either of the
following conditions:
• One or more controllers are not bound correctly. A “SYS COMM”
alarm will accompany the “BIND ALARM”.
STATUS: BIND ALARM
STATUS: TWR SYNC
STATUS: GPS ALARM
STATUS: IR ALARM The connected flashhead is exhibiting an Infrared alarm.
STATUS: IR N/A Infrared is not available or supported by the connected flashhead.
STATUS: PD ALARM
STATUS: POWER FAIL
STATUS: LOW DC
STATUS: LI TEST MODE
STATUS: SYS(x) OVR
SD CARD IS INSERTED.
PLEASE REMOVE IT
FOR NORMAL
SYSTEM OPERATION
STATUS: BCN DISABLED
STATUS: MKR DISABLED
STATUS: FLSH SPEC ALM
• Two or more controllers are bound to the same connected
equipment (beacon or marker tier). A “SYS COMM” alarm will not
accompany the “BIND ALARM” in this instance. The most noticeable
symptom is a beacon that is not flashing in “Sync.” with the rest of the
system. This alarm can be corrected by unbinding then binding the
tower. “LOCAL TOWER CONFIG” (this section) provides complete
instructions for the binding/unbinding procedure.
System 1 only. One or more subordinate units have not synchronized
with System 1 for a period of one hour or more.
System 1 only. GPS synchronization has not occurred for a period of
one hour or more. Possible causes are:
• GPS antenna is obstructed or does not have a clear view of the sky.
• GPS antenna failure. Check GPS status LEDs located on PCB 3 for
“short” or “open” indication.
• GPS receiver fault
• PCB 3 failure.
System 1 only. More than 19 hours have passed since the system
has changed modes via the photodiode input.
System 1 only. Primary input power failure. PCB 1 is operating on
battery backup to provide alarm notification.
Output voltage (60 VDC) to the connected flashhead and marker tier
(if present) is low.
Systems 2-6 only. Indicates that System 1 is conducting a Lighting
Inspection test on the system.
System 1 only. Indicates that subordinate system (x) is currently in
mode override.
An SD Card was left inserted in the controller after an upgrade. It will
need to be removed to resume normal controller function.
Indicates that beacon is disabled on this system, not flashing and no
communication alarm will be triggered
Indicates that markers are disabled on the tower, turned off and no
configuration alarm will be triggered
The chosen flash specification is not supported by the bound
flashhead.
72 Revision 19 – 05/23/2018 FTS 370d/w/r

Section 4– Web Interface
Web Interface (Optional)
The Web Interface provides a convenient
way to configure the system, perform
Lighting Inspections and temporarily
control mode remotely. Additionally,
useful information such as alarm and event
history, cumulative runtime and component
temperature may be viewed.
With the optional Wi-Fi antenna installed,
virtually any smartphone, tablet or laptop
computer with Wi-Fi capabilities may be
used to access the system locally without
the need to install additional software.
Follow the steps below to connect the
portable device to the host SC 370 unit
using either the permanently installed WiFi or temporary use USB Wi-Fi. When
connected, the web browser will display a
screen similar to the one shown to the right.
Web Interface Access (Wi-Fi):
1. Access the Wi-Fi settings menu on the
device and verify that Wi-Fi is enabled.
2. Locate the Network Selection menu
and choose “Other” or “Add Network”
3. Type “Vanguard” in the Network Name
or SSID field.
4. Select “WPA2” in the security field.
5. Enter “Flashadmin” in the password
field and press “connect”.
6. Verify that the device is connected to
the “Vanguard” network and close the
Wi-Fi settings menu.
7. Open an internet browser on the device
and enter the following web address:
192.168.1.11
Web Interface Access (USB Wi-Fi):
1. Access the Wi-Fi settings menu on the
Wi-Fi enabled device and verify that
Wi-Fi is enabled.
2. Select the “Vanguard USB” network.
3. Enter “FlashAdmin” in the password
field and connect to the network.
4. Once connected open an internet
browser on the device and enter the
following web address: 192.168.2.11
FTS 370d/w/r Revision 19 – 05/23/2018 73

Lighting Inspection (LI)
The following four options are available via
the Web interface to perform a Lighting
Inspection: Auto Fast LI, Manual Fast LI,
Manual Staged LI and Manual LI. A brief
description of each LI type is provided onscreen beside the selection. The Test Page
button displays previous LI results or
displays the current LI in progress.
Manual Fast LI
The Manual Fast LI mode tests the beacons
and markers simultaneously. The restore
stages are held awaiting user input before
advancing to the next test. In this mode, the
user must press “Cont.” (Continue) before
the system will restore the alarms and
advance to the next test. The results are
displayed once each tests is completed.
Auto Fast LI
Once initiated, the Auto Fast LI requires no
additional input from the user. The results
are displayed automatically upon
completion of each test.
Manual Staged LI
The Manual Staged LI tests each lighting
component individually in sequence. The
restore stage for each component is held
awaiting user input before advancing to test
the next component. In this mode, the user
must press “Cont.” (Continue) before the
system will restore the alarm and advance
to the next test. The results are displayed
once each tests is completed.
74 Revision 19 – 05/23/2018 FTS 370d/w/r

Manual LI
The Manual LI allows testing of an
individual lighting component. Once an
alarm is activated on the Manual LI page,
the system will not restore the alarm or
allow another lighting component to be
tested until either the current alarm is
restored or 30 minutes have passed. A
checkmark will appear next to any alarms
that have been tested in the last 8 hours. If
a mode change is required for the
requested alarm, a slight delay will occur
while a mode override is issued to the
desired system.
Mode Override
The Force Mode Override menu, located
below “Lighting Inspection” allows manual
selection of the system’s mode. System
control will return to automatic after 30
minutes.
The following screen will be displayed for
10 seconds after a mode override selection
is made.
The current override mode will be indicated
by a yellow “dot” followed by the selected
mode. Mode override can be cancelled at
any time by pressing the “Cancel” button in
the “Force Mode Override Menu”.
FTS 370d/w/r Revision 19 – 05/23/2018 75

Auxiliary Input
If enabled, “Auxiliary Input” section is
shown between “Force Mode Override”
and “Beacon 1”. This menu is
informational only and displays the
configuration and current status of the
interface.
Note: Refer to Section 1 “P2 Aux. Input”,
Section 3 “Site Tower Config. - Aux
Input”, and “Tower Lighting”
Configuration below for additional
information regarding configuration of
the Auxiliary Input.
current state. Mode Override is indicated
as either “On” of “Off”. The Age of the
event is shown in days – hours – minutes
format since the event occurred.
Event Log
The Event Log displays all events or alarms
(up to 500) affecting the operation of the
SC 370. A few examples of events that may
be found in the event log are:
• MODE OVR (Mode Override)
• BCN1 COMM (Beacon1
Communication failure)
• MKRT1 COMM (Marker Tier 1
Communication failure)
• REBOOT EVENT (System Reboot)
All events, except “REBOOT EVENT”,
Lighting Inspection and Mode Override,
are followed by an arrow and either “ALM”
(Alarm) or “RST” (Restore) to show their
Note: The SC 370 reboot events are
coded by reason. The reboot event
codes can be viewed by clicking on the
link in the Event Log page.
76 Revision 19 – 05/23/2018 FTS 370d/w/r

Diagnostics
Download Log File
The Diagnostics page includes bar graphs
and A2D values for both Beacons and
Marker Tiers.
The Download Log File page allows the
user to download the log file from the unit
and can be sent for analysis. Click on
Download button to download the log file.
Configuration
The Configuration menu provides access to
program all functions of the lighting system
except “Control Type” (System 1 – System
6) which must be programmed through the
user interface of each connected SC 370. A
pictorial of the top level Configuration
menu follows this text.
The headings following the pictorial
provide a brief overview of each top level
Configuration menu option.
Note: In the event of a communication
failure, the last known A2D values will be
displayed along with a warning
message.
FTS 370d/w/r Revision 19 – 05/23/2018 77

Tower Lighting
The Tower Lighting menu provides all
programming options discussed in Section
3 “Site Tower Config”. It also adds the
option to input the site name and site ID.
Options for configuration of Auxiliary
Input Control Type and Confirmation
Output is shown below.
78 Revision 19 – 05/23/2018 FTS 370d/w/r

System “X”
The System “X” Configuration menu is
similar to the “Local Tower Config Menu”
with one exception: the Bind and Unbind
features are only available on single beacon
systems (one SC 370 controller). Only the
bind status will be displayed when more
than one SC 370 is installed. Catenary
Level programming will be displayed if
Catenary is selected in Tower Lighting
menu.
Note: The “Bind Tower” and “Unbind
Tower” options are available on single
beacon systems only (one SC 370). See
Section 3 “Local Tower Config” for
information regarding “Bind Tower” and
“Unbind Tower”.
Reportable Events Configuration allows
the end user to determine which events are
reported to the monitoring center via Eagle
or SNMP. By default, all reportable events
are configured as “Enabled”. To disable
specific events, select the “Disable” button
located to the right of the event. Once all
desired events are selected, press the
“Commit Settings” button near the bottom
of the page. State changes for events that
have been disabled will appear on the web
interface with a gray circle as the indicator.
Disabling reportable events does not
impact alarm dry contacts, Modbus, Event
Log, alarm LED indicators or information
displayed locally by the user interface.
Disabling of alarm events, prior to issuing
all required notifications, is discouraged.
Important! Flash Technology
discourages disabling alarms prior to
issuing all required notifications.
FTS 370d/w/r Revision 19 – 05/23/2018 79

Monitoring
The Monitoring menu allows selection of
the Primary and Alternate data monitoring
methods discussed in Section 3
“Monitoring Configuration”.
SNMP Labels
The SNMP Labels menu provides access
for the end user to change the name and
severity of the SNMP trap based on their
needs. The label changes will not be
reflected locally in the system menu.
Network
Once the Primary and Alternate monitoring
methods are selected, the appropriate
configuration options for each method are
available in the Network menu. Refer to in
Section 3 “Local Network Configuration”.
80 Revision 19 – 05/23/2018 FTS 370d/w/r

SNMP Settings
This menu allows for configuration of
various settings related to SNMP. In the
System Settings menu, the option to choose
SNMP version V2C or V3 exists. The
settings available on this page will vary
based on that selection.
User Authentication Key
Passcode for authentication. Valid
range is 8 – 20 characters and may
not contain blank spaces or the following special characters: < > " ' \ /
(mandatory if Auth is selected as
part of security level)
Access List Status
When enabled, the system will enforce the
configured SNMP access control list. This
setting is disabled by default.
Authentication Traps
When enabled, a trap will be sent for every
unauthorized access attempt. This setting
is disabled by default.
Communities (V2C only)
Up to four access communities may be
configured. For each community a name,
IP address and access type may be
configured. The access type options are
“Disabled”, “Read-Only” and “ReadWrite”.
Users (V3 only)
Up to four users may be configured. Each
user will have the following settings:
User Name
Maximum 20 characters, no spaces
User Security Level
Security level adopted for access.
• Noauthnopriv (No authentication
and encryption. Not recommended.)
• Authnopriv (authentication but no
encryption)
• Authpriv (authentication and encryption)
User Privacy Key
Passcode for encryption. Valid
range is 8 – 20 characters. Mandatory if Authpriv security level is
selected.
Trap Destination Configuration
This section allows for setting up to four
trap destination endpoints. The first two
endpoints are the same as those configured
from the Monitoring Configuration
section. Endpoints three and four may
only be viewed and configured from the
SNMP Settings page.
Each endpoint requires an IP address and
port. For V3 only, a User Name will
associate a SNMP V3 user to this
particular trap destination. More than one
user can be associated to same destination
By default a trap requires a confirmation
of receipt before the system stops trying to
send it. The settings related to this may
also be configured in this section. The
default is to send a trap up to 72 times
every 20 minutes (24 hours total duration)
until an acknowledgement has been
received. To disable trap retries, simply
change the retry count to 0.
For SNMP V2C only, the trap community
string may also be modified. The default
value is “public”.
User Access Level
The options are “Disabled”, “ReadOnly” and “Read-Write”.
FTS 370d/w/r Revision 19 – 05/23/2018 81
System Information
This section allows for configuring the
System Name, System Location and
System Contact fields.

82 Revision 19 – 05/23/2018 FTS 370d/w/r

Login Settings
The login settings page contains two main
functions.
Change Password
The first is the ability to change the
password used to login to the
configuration pages.
SSH access may also be disabled on this
page. As well as restricting access to these
web pages to HTTPS only.
This page also allows the SNMP version
to be selected.
The user name is always “FlashAdmin”
and the default password is “FlashAdmin”.
The password may be changed to any
other password of 6 to 20 characters in
length (with the exception of a few special
characters).
Webpage Settings
Be default the ability to initiate and cancel
a lighting inspection, as well as the ability
to initiate or cancel a mode override
operation from the main page is allowed
without the need to login to the web
interface.
To control access to the web page, change
the “Webpage Access Restrictions” to
“None”, “Configuration Pages Only”, or
“All”.
System Settings
The Vanguard controller is capable of
accepting firmware upgrade packages via
an FTP transfer, but FTP may be disabled
from the “System Settings” page.
Cellular Modem
This menu will be displayed only if an
AT&T modem is detected in the system. It
allows selection of the installed SIM card
type as AT&T Direct, AT&T ROW, AT&T
ROW2 or Customized. This menu option is
not displayed for Verizon 3G modems. See
Section 3 “Monitoring Configuration” for
additional information.
Note: The front of the AT&T Direct SIM
card is blue / white and the back of the
card is orange. The AT&T ROW and
AT&T ROW2 card is solid white.
FTS 370d/w/r Revision 19 – 05/23/2018 83

Section 5 – Maintenance and Troubleshooting
6. Due to the extreme temperatures that
Safety
Warning!
Read the warning on Page ii now.
Disconnect primary power before opening
enclosures.
Work safely, as follows:
1. Remove rings and watches before
opening the equipment.
may be present in the field, it is recommended to replace the backup battery
every 1-2 years as part of a periodic
maintenance program.
Storage
When not in use, equipment should be
stored indoors. Circuit boards (PCB’s),
when not installed in the equipment, should
be kept in antistatic bags or containers.
2. Shut off power to the equipment.
Measure the output voltage at TB2 DC+
and DC-. Verify that the voltage is less
than 5V DC before proceeding.
3. Remove the component or connect the
test instruments.
4. Replace the component.
5. Apply power to the equipment and test
the system.
6. Shut off power to the equipment and
disconnect the test equipment.
Preventive Maintenance
Carry out the following inspection and
cleaning procedures at least once a year:
1. Verify that moisture has not
accidentally entered the equipment
through gaskets or seals, or collected
inside as condensation.
RFI Problems
The presence of radio frequency
interference (RFI) can burn out
components; cause a light to flash
intermittently, at the wrong rate, or at the
wrong intensity. RFI can enter the light by
any wire to or from the unit. The circuits
are designed to reject or bypass RFI, but
Flash Technology cannot guarantee
complete immunity. After installation, you
may find it necessary to add external filters
or use other methods to reduce RFI entering
the equipment.
Diagnostic Test
The SC 370 has built in diagnostic
capabilities to assist in troubleshooting the
system. Flash Technology recommends
that a full system diagnostic test is run
before troubleshooting individual system
components.
2. Verify that all drain holes are clear.
3. Check terminal blocks and relays for
corrosion or arcing. Clean or replace
any component that shows evidence of
high-voltage damage.
4. Check all electrical connections for
tightness and verify the absence of
corrosion or electrical arcing.
5. Clean the outside surface of the lens
with liquid detergent and water. Wipe it
gently with a soft cloth or paper towel.
84 Revision 19 – 05/23/2018 FTS 370d/w/r
Component Testing
Always make resistance measurements
with the primary power turned off.
However, you must make voltage
measurements with power applied. Thus,
for your safety, carry out all preliminary
steps such as connecting test leads or circuit
jumpers or disconnecting existing circuit
connections with the power off.

Troubleshooting
Follow the troubleshooting steps in the
tables below as applicable. Repair
procedures are provided in Component
Removal and Replacement.
Table 5-1 – Troubleshooting – Initial Inspection
Step Check/Test/Action Action
1.a Is the flashhead flashing? Yes
No
1.b Is the failure related to a connected tier of L810
side markers (marker alarm)?
1.c Are alarms present on PCB1? Yes
Yes
No
No
Go to Step 1.b
Go to Step 2.a
Go to Step 4.a
Go to Step 1.c
Review Tables 1-3 and 3-3.
System okay.
Table 5-2 – Troubleshooting – System Voltage
Step Check/Test/Action Action
2.a Is input power applied?
Measure at TB1 terminals L1 & L2.
Check Circuit Breaker Flag Indicator if green OFF
or red ON.
2.b Is power being output from TB1?
Measure at TB1 Circuit Breaker terminals (both
poles).
2.c Are any of the Status and Alarm Indicators (LEDs
or OLED display) lit on PCB1?
2.d Is the correct voltage present on PCB1?
Measure at P2 terminals 1 & 2 (12 VDC).
2.e Are the operational status LEDs lit on PCB4?
Note: Verify that the input power switch, located
on PCB4 (AC units only), is in the “On” position.
See Figure 2-24 for switch location.
2.f Is the correct input voltage present on PCB4?
Measure terminals labeled L1 & L2 for AC power.
2.g Is the correct voltage present on TB2?
Measure at TB2 DC+ & DC- (60 VDC)
2.h Is the correct voltage present with the flashhead
cable disconnected?
With input power removed, disconnect the
flashhead cable, apply power and measure as
described previously at TB2.
Yes
No
Yes
No
Yes
No
Yes
No
Yes
NO
Yes
No
Yes
No
Yes
No
Go to Step 2.b
Correct problem.
Go to Step 2.c
Check / Replace Circuit
Breaker.
Replace VR1.
Go to Step 2.g
Go to Step 2.d
Replace PCB1.
Go to Step 2.e
Check wiring and connections
between PCB4 and PCB1.
Go to Step 2.f
Replace PCB4
Repair connections between
TB1 and PCB4.
Go to Step 3.a
Go to Step 2.h
Inspect flashhead cable,
flashhead and marker interface
box (if installed) for damage.
Check PCB2, PS1 and PS2 for
damage. Replace as
necessary.
FTS 370d/w/r Revision 19 – 05/23/2018 85

Table 5-3 – Troubleshooting - Flashhead.
Step Check/Test/Action Action
3.a Is the correct voltage present in the flashhead?
Measure at flashhead terminal block DC+ & DC-
(60 VDC).
Note: If a marker tier is connected between the
SC 370 and the flashhead, verify that the correct
input and output voltage is present on TB1 of the
marker interface box before proceeding to the
flashhead.
3.b Is voltage present on the output of Surge PCB
located in the base of the flashhead?
Measure at J02 DC+ (2 terminals) & DC- (60
VDC)
3.c Are the two LEDs lit on the core board?
View through the clear polycarbonate cover on
the bottom of the light engine assembly.
Yes
No
Yes
No
Yes
No
Go to Step 3.b
Inspect flashhead cable and
connections.
Go to step 3.c
Replace Surge PCB located in
the flashhead.
Replace the light engine
assembly.
Inspect the wiring harness
between the Surge PCB and
the Core PCB for loose
connection or damage.
Repair/replace if necessary.
Replace the Core PCB if no
problem is found with the wiring
harness.
Table 5-4 – Troubleshooting – L810 Side Markers (SC 370 Information Display)
Step Check/Test/Action Action
4.a Are any of the L810 markers on the tier
functioning?
With the controller in night mode, review
diagnostics to determine the type of alarm and
the number of failed markers.
4.b Is a Marker Comm. alarm present? Yes
4.c Is the unit programmed correctly?
Review the overall system configuration. In a
multi-unit installation, verify that the unit in
question has a marker tier connected.
Yes
No
No
Yes
No
Go to step 5.b
Go to step 4.b
Go to Step 4.c
Go to Step 5.b
Go to Step 5.a
Correct the system
programming and check for
proper operation.
86 Revision 19 – 05/23/2018 FTS 370d/w/r

Table 5-5 – Troubleshooting – Marker Interface Box
Step Check/Test/Action Action
5.a Is the correct voltage present at TB1 in the
Marker Interface box?
Measure at TB1 DC+ & DC- (60 VDC).
5.b Are any marker alarm indicators (1-4) lit on the
marker interface PCB located in the marker
junction box?
5.c Is the correct voltage present on J5?
Measure at J5 DC+ & DC- (60 VDC).
5.d Are the operational voltage status LEDs lit on the
marker interface PCB?
See Figure 1-8 for location.
5.e Is the correct voltage present on the output(s) for
the failed marker(s)?
Measure DC+ to DC- (24 VDC) on the marker
output(s) (J1 – J4) corresponding to the Marker
Alarm (1-4).
5.f Is the correct voltage present on the output(s) for
the failed marker(s) with the marker connections
(J1-J4) disconnected from the marker interface
board?
With the system powered down, unplug the
marker connections (J1 – J4) from the marker
interface board. Apply power to the system and
measure DC+ to DC- (24 VDC) on the marker
output(s) (J1 – J4).
Yes
No
Yes
No
Yes
No
Yes
No
Yes
No
Yes
No.
Go to Step 5.b
Check flashhead cable between
SC 370 and Marker Interface
Box.
Go to Step 5.e
Go to Step 5.c
Go to Step 5.d
Check/repair wiring between
TB1 and the marker interface
PCB.
Go to Step 5.e
Replace the marker interface
PCB.
Check wiring for an open
connection. Replace LED
marker fixture(s) if no wiring
fault is found.
Go to Step 5.f
Check marker output wiring for
a possible short. Replace
marker fixture(s) and wiring if
necessary.
Replace the marker interface
PCB.
Table 5-6 – Troubleshooting – GPS Synchronization
Step Check/Test/Action Action
6.a Are there any obstructions that could block the
GPS antenna from receiving satellite signal?
6.b Is the “Ant. Open” or “Ant. Short” LED lit on PCB
3?
Both LED’s are located in the GPS section of
PCB3 (see Figure 1-5).
6.c Does “GPS Comm.” show “Fault”?
Navigate through the Information Display to
“GPS” in the “Local Diagnostics” menu (See
Section3).
6.d Are at least 3 satellites visible to the controller?
Navigate through the Information Display to
“GPS” in the Local Diagnostics menu (See
Section3).
Note: Table 5-6 is written with the assumption that “Status: GPS Alarm” is present on the unit
programmed as System 1.
Yes
No
Yes
No
Yes
No
Yes
No
Remove obstruction(s) or
relocate the GPS antenna.
Go to step 6.b.
Inspect antenna cable. Replace
cable and/or antenna if
necessary.
Go to Step 6.c
Replace PCB 3
Go to Step 6.d
Replace PCB3
Reposition antenna.
FTS 370d/w/r Revision 19 – 05/23/2018 87

Component Removal and
Replacement
Note the location and color of all wires that
you disconnect when troubleshooting or
replacing components. Verify that the
wiring agrees with the applicable figure in
Section 2 after testing or replacing any
component.
Important! Review the Safety
information at the beginning of
Section 5 before removing or
replacing any component.
The general procedures for removing
components with power disconnected are
as follows:
1. Obtain access to the component in
question.
2. Completely remove or relocate these
components.
3. Disconnect the wiring to the
component that you want to replace.
4. Remove the component.
5. Replace everything in the reverse
order: first the component, then the
wiring. In some cases, you may have to
place some wires on the component
before you fasten it in place, then
replace the remaining wires.
88 Revision 19 – 05/23/2018 FTS 370d/w/r

Section 6 – Recommended Spare & Replaceable Parts
Customer Service: 1-800-821-5825
Telephone: (615) 261-2000
Facsimile: (615) 261-2600
Shipping Address:
Flash Technology
332 Nichol Mill Lane
Franklin, TN 37067
Ordering Parts
To order spare or replacement parts, contact Parts Department at 1-800-821-5825.
Table 6-1 “SC 370 (AC)” lists the major replaceable parts for the SC 370.
Table 6-2 “SC 370 (DC)” lists the major replaceable parts for the SC 370 DC.
Table 6-3 “FH 370” lists the major replaceable parts for the FH 370.
Table 6-4 “Marker Interface” lists the major replaceable parts for the Marker Interface box.
Table 6-5 lists the part numbers for additional or optional system parts that are not illustrated
in the component diagrams.
RMA Policy
If any system or part(s) purchased from Flash Technology need to be returned for any reason
(subject to the warranty policy), please see the current RMA policy available online at:
flashtechnology.com/rma.
To initiate an RMA, call the Flash Technology NOC to receive technical assistance (800821-5825 Option 9, M-F, 7 a.m. to 7 p.m. CT).
Emailing a completed RMA request form to FlashSupport@spx.com can also start the process on sites not requiring detailed troubleshooting. The form can be filled out online at:
http://flashtechnology.com/rma-request-form/.
NOTE: An RMA number must be requested from Flash Technology prior to return of any
product. No returned product will be processed without an RMA number. Failure to follow
the below procedure may result in additional charges and delays. Any product received without an RMA number is subject to return back to the sender. All RMA numbers are valid for
30 days.
FTS 370d/w/r Revision 19 – 05/23/2018 89
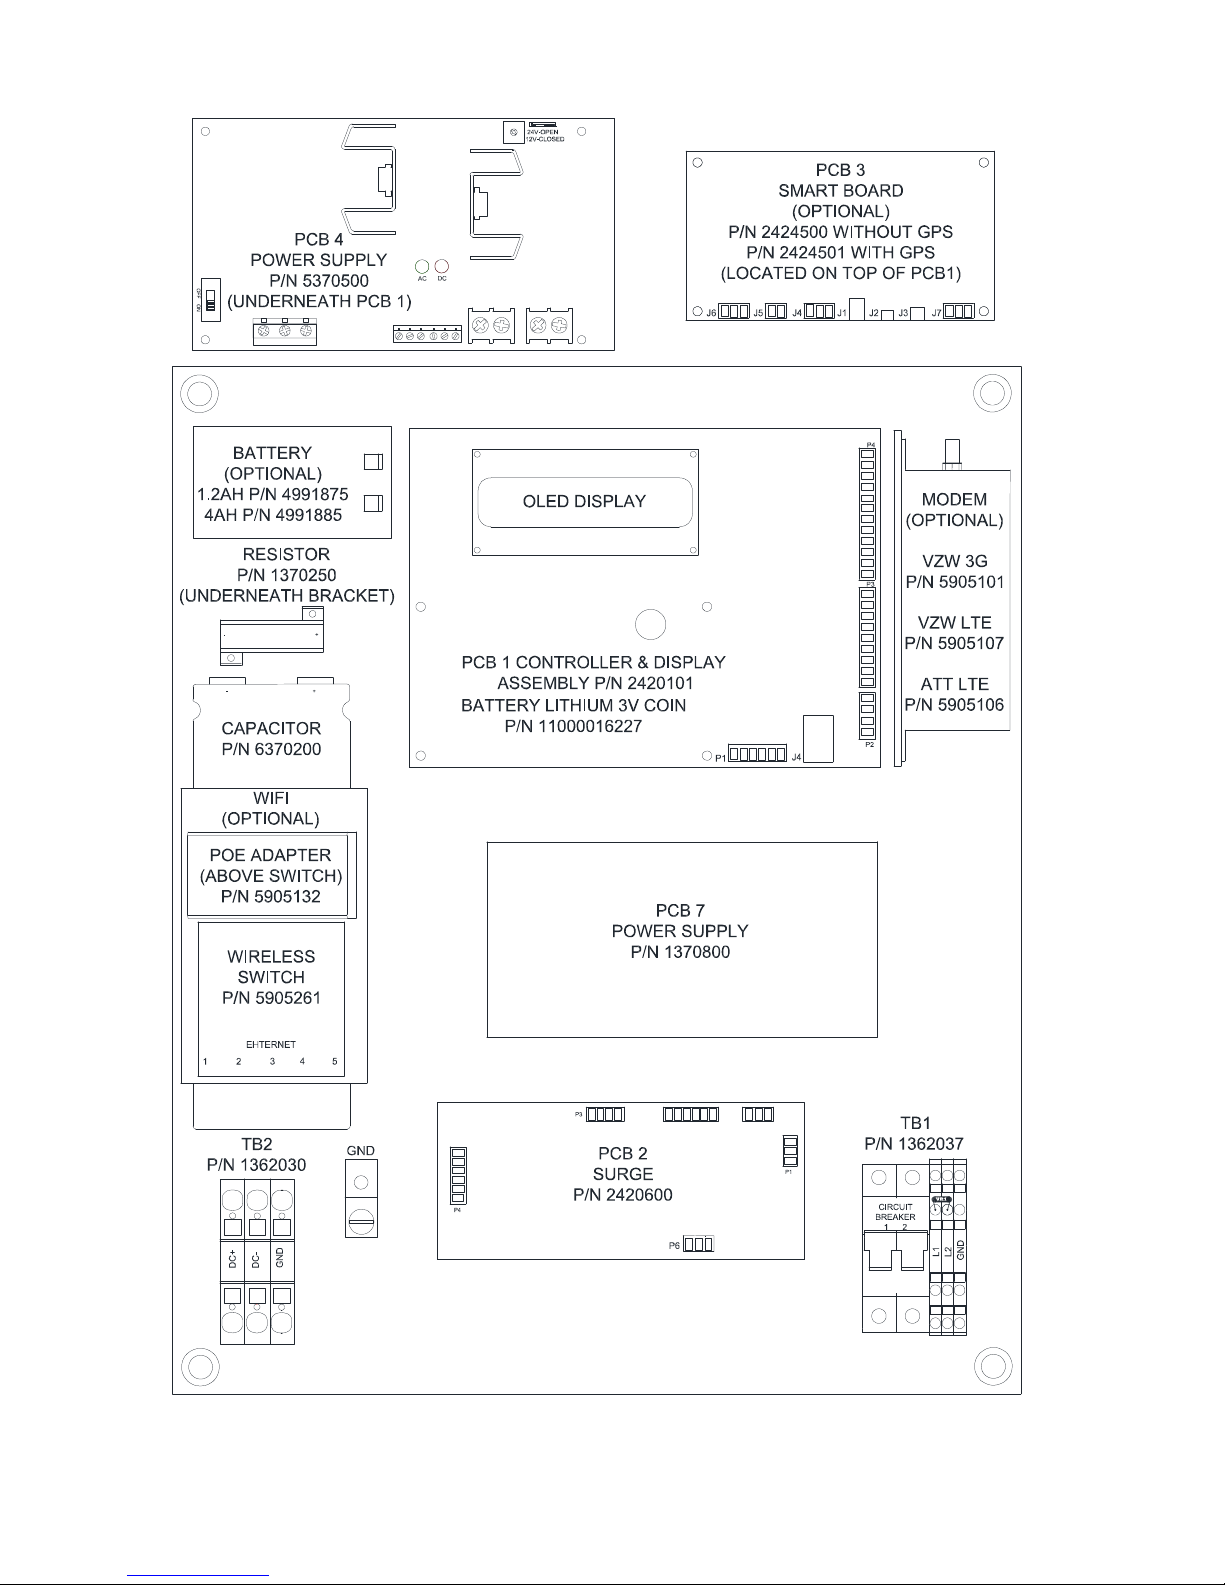
Figure 6-1 – SC 370 (AC) Component Locations
90 Revision 19 – 05/23/2018 FTS 370d/w/r
 Loading...