


This guide is only applicable to FLASHFORGE Creator Pro 3D printer
The User Guide is in the SD card.
USERGUIDE
CREATOR PRO
2. Hot! Avoid touching the heating nozzle in operation.
3. Moving parts in printer may cause injury. Do not wear gloves
or other sources of entanglement in operation.
WARNING
1. Do not remove the wrapping around the nozzle.
Quick Start Guide
SZ10-EN-A02

01
Kit Contents
3D Printer
Filament Spool x 2
Lid
After-sales Service Card
SD CardPower Cable USB Cable
Filament Guide Tube x 2
Do Not Touch
请勿触摸
CAUTION
注意
1.Extruder hot during operation.
使用过程中喷头会发热。
2.Heating plate hot during operation.Allow surface to cool before servicing.
使用过程中加热平台会发热,待平台表面冷却后再操作。
顺时针旋转螺母
升高打印平台。
即减少平台与喷嘴之 间
的距离。
逆时针旋转螺母
降低打印平台。
即增加平台与喷嘴之 间
的距离。
调整平台支架下方 的螺母,直 至纸片在喷 嘴与平台间 的
运动感受到轻微的 阻力。
打印平台调 节专用
扫描二维码,观 看调平指导视 频!
Quick Start Guide
Spool Holder x 2
Build Tape x 2
Leveling Card
Tool bag:
(Allen Wrench X 2 / Leveling knob X 1 /
M3X8 Bolt X 2 / PTFE Tube X 2 / Grease X 1)
Extruder’s accessory kit:
(M3X8 BoltX2 / M3X6 Bolt / Turbofan baffle)
Tool Bag
Extruder’s
Accessory Kit

Getting to Know Your Creator Pro
02
1. Z-Axis Guide Rod
14. Turbofan Baffle
22. Reset Button
8. SD Card Slot
23. USB Input
21. Power Switch
20. Power Input
3. Slot
7. Leveling Knob
5. Build Plate
9. LCD Panel
10. Buttons
12. Spring Presser
18. Filament Guide Tube Buckle
19. Spool Holder
2. Extruder Cable Bunch
4. Y-Axis Guide Rod
6. Build Platform
13. Turbofan
11. Cooling Fan
15. Left Nozzle
1
2
3
4
5
6
7
8
9
10
17
23
18
19
20
21
22
24
11
12
13
14
15
16
24. Spool Holder Slot
17. X-Axis Guide Rod
16. Right Nozzle
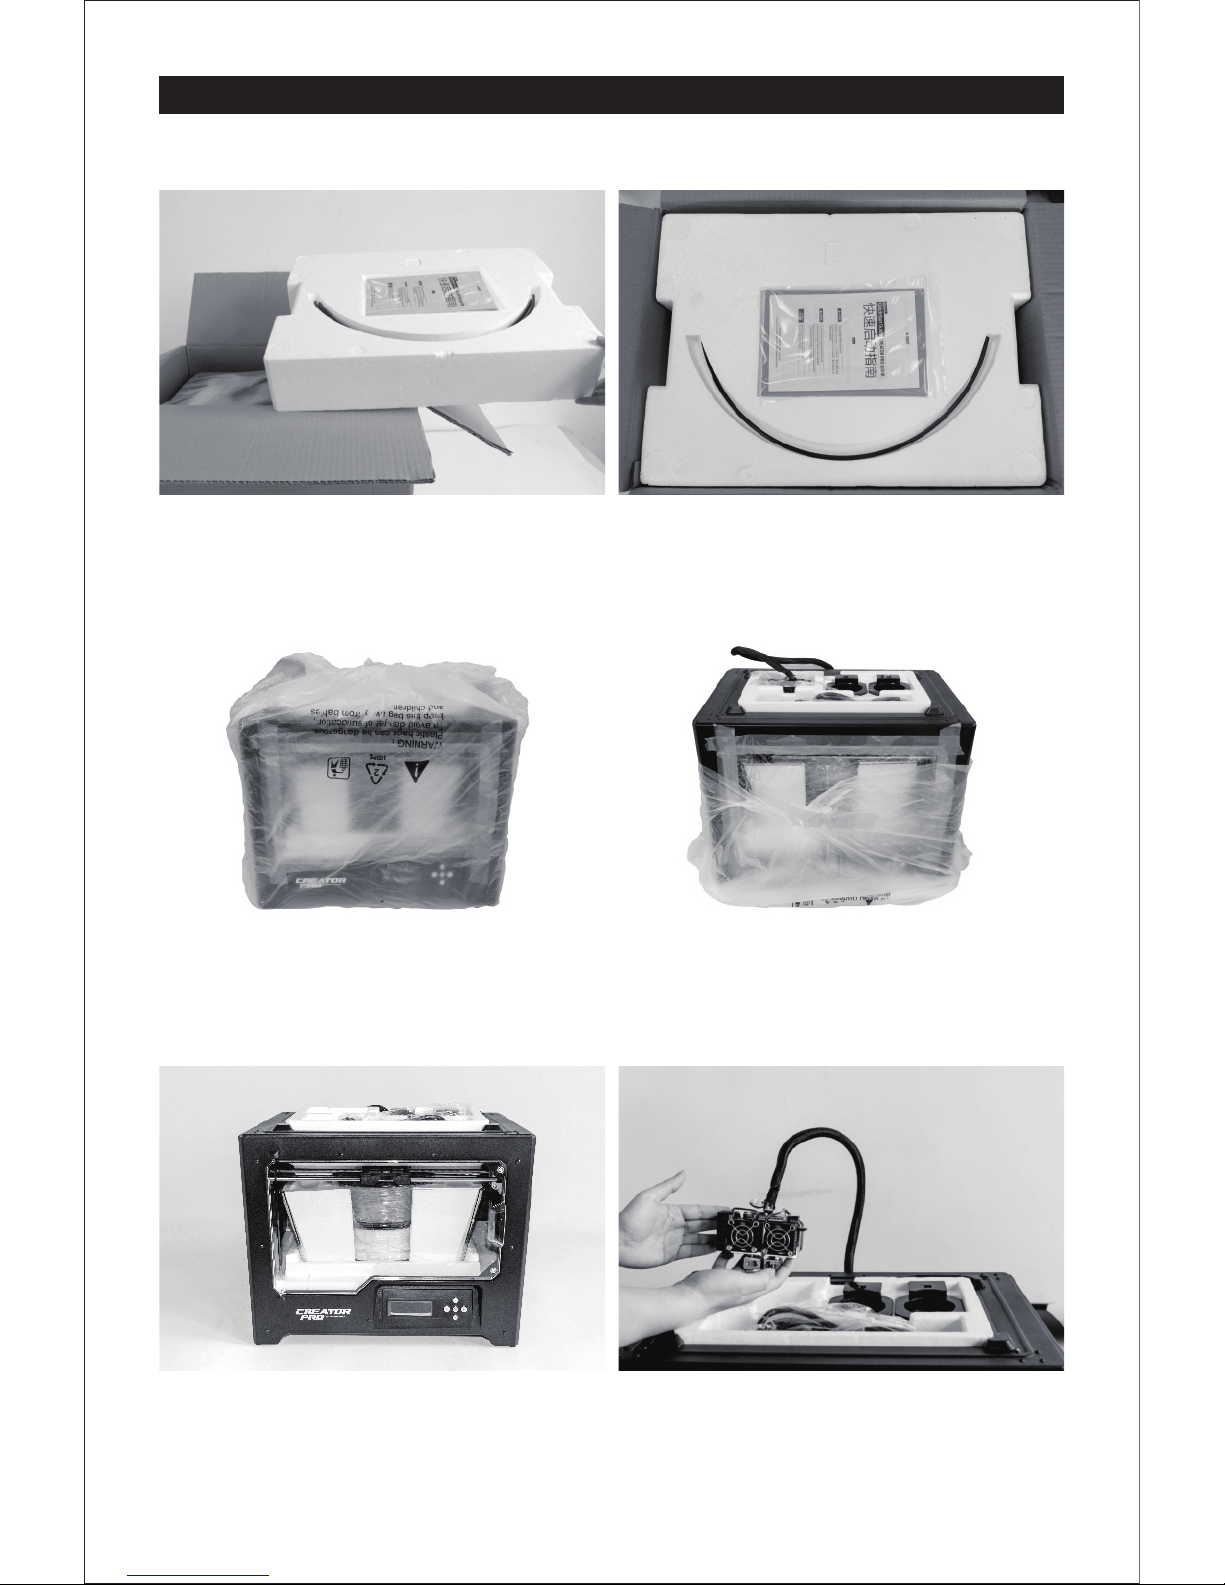
Unpacking
03
1. Open box and remove top foam piece.
4. Remove the packing bag. And then
remove the tape and plastic wrap for
protecting the front door.
2. The foam should contain: two filament guide
tubes, two piece of build tape, one Flashforge
leveling card and one Quick Start Guide.
3. Firmly grasp the two side handles of
Flashforge Creator Pro. Lift it out from the
carton and place it on a stable surface.
5. The Flashforge Creator Pro and its
accessories shall be displayed in front
of you.
6. Take the dual extruder out and place the
extruder carefully because the extruder
cable bunch is short.

04
7. Remove the foam container. It should contain: power cable, USB cable, two spool holders,
SD card, tool bag, extruder's accessory kit.
8. Slide the X-axis Rods to the very back. 9. Remove lid, which should hold two rolls of
filament.
10. Take the two rolls of filamentout from
the lid.
11. Remove side protective foam sheets from
inside the printer.

1. Place the two anterior angles of the lid into
the corresponding front slots.
2. Slightly squeeze the two relief angles to place
them into the corresponding rear slots.
To remove the lid, squeeze the relief angles to
remove them from the slots.
Anterior Angle
Relief Angle
13. Take the bottom protective foam from
the printer and then lower the build plate
back.
14. Congratulations! You’ve finished the
unpacking process. (Tip: Save your
Flashforge Creator Pro packaging for
future transportation and storage. )
12. Elevate the build plate to its limit with care.
Anterior Angle
Installation and Dismantlement
05

06
Hardware Assembly
Extruder Assembly
1. Place the dual extruder on the extruder
seat.
2. Take the M2.5 Allen Wrench from the tool
bag and two M3 x 8 bolts(longer ones)
from the extruder’s accessory kit.
3. Adjust the extruder location to align the
bolt holes.
4. Secure the extruder onto the extruder
seat by screwing the M3 x 8 bolts in.
Bolt Hole Bolt Hole
M3 x 8 bolts
X-Axis Guide Rod
Bolt Hole
Bolt Hole
07
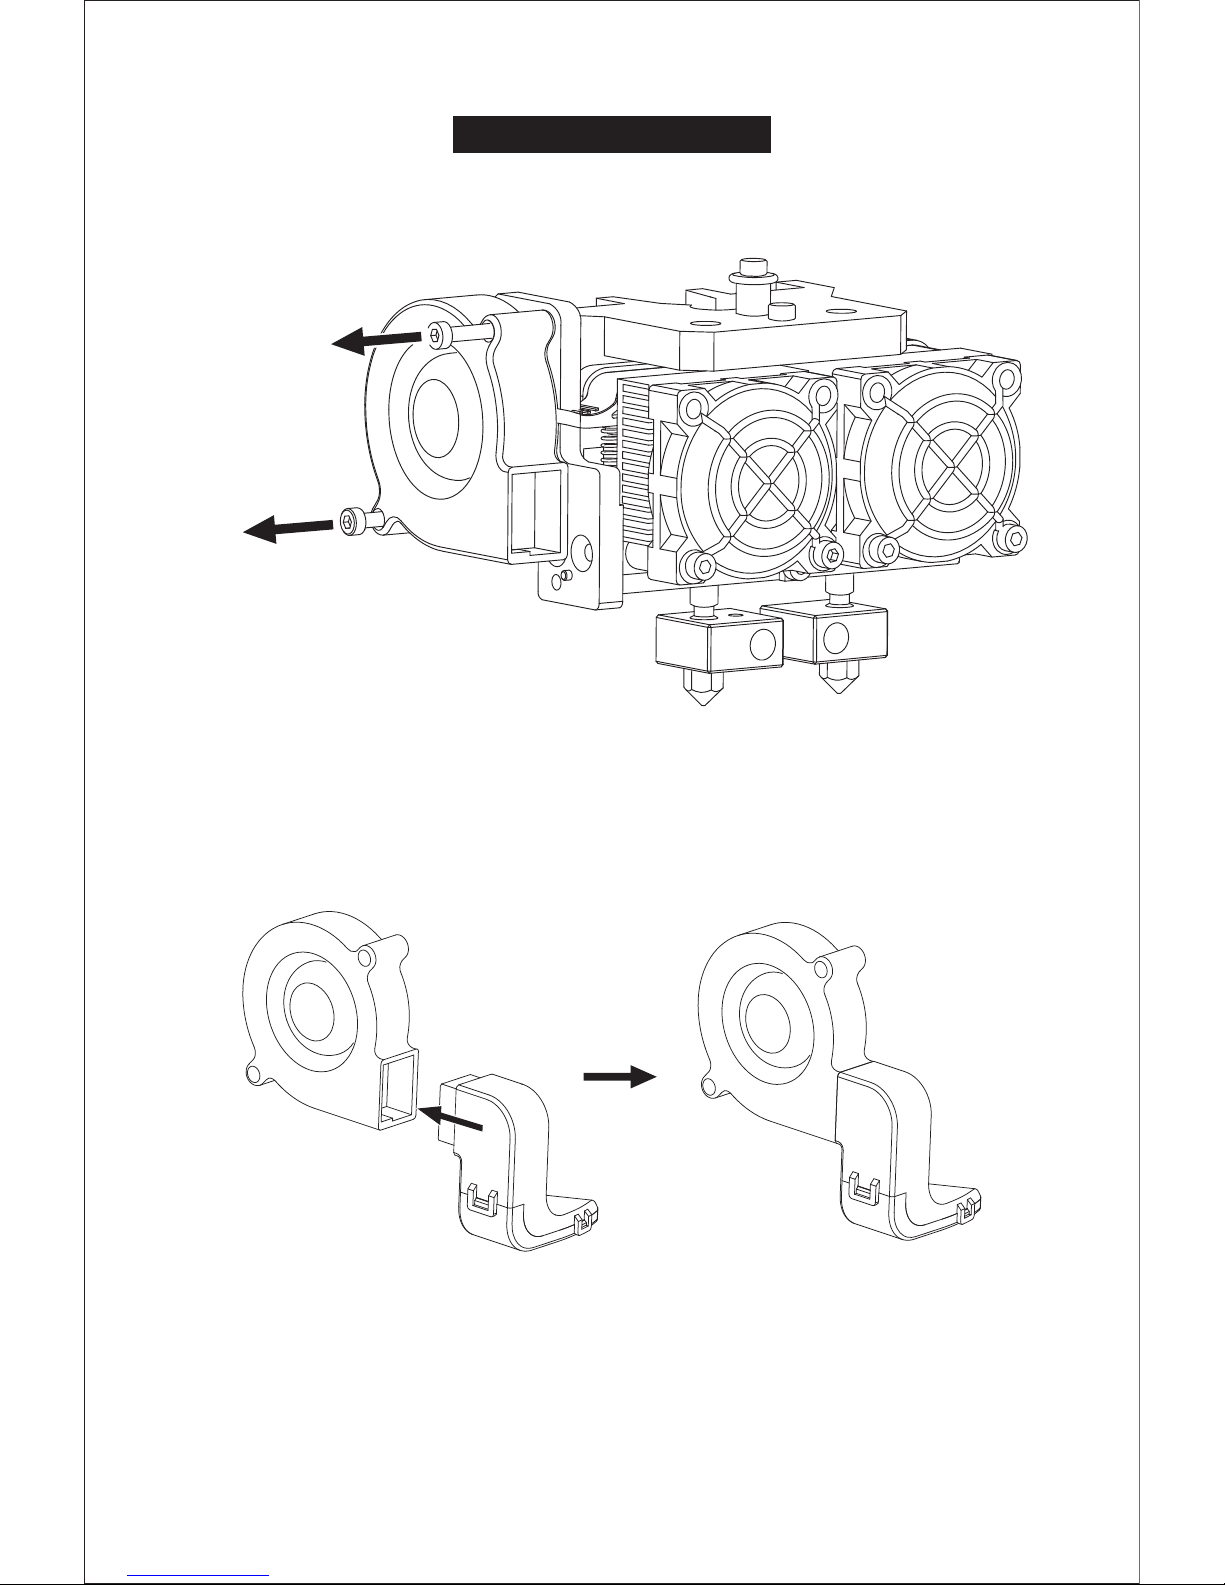
Turbofan Baffle Assembly
1. Use the M2.5 Allen Wrench to remove two turbofan bolts.
2. Take the turbofan baffle from the extruder’s accessory kit.
3. Install the turbofan baffle to the turbofan.
Bol
t
Re
m
ova
l
B
ol
t
R
emo
v
a
l

08
1. Place the turbofan sub-assembly besides the
turbofan seat.
2. Insert the bump on the turbofan seat to the
turbofan sub-assembly.
3. Screw the two bolts in.
4. Take a M3 x 6 bolt from the extruder’s accessory
kit and complete installation according to the
instruction below.
Turbofan Seat
B
ol
t Mo
un
ti
n
g
B
ol
t Mo
un
ti
n
gB
ol
t Mo
un
ti
n
g
M3 x
6
B
ol
t Mo
u
n
ti
n
g
B
ol
t
Mount
i
ng
Align the bump on the turbofan
seat to the hole in turbofan
sub-assembly.

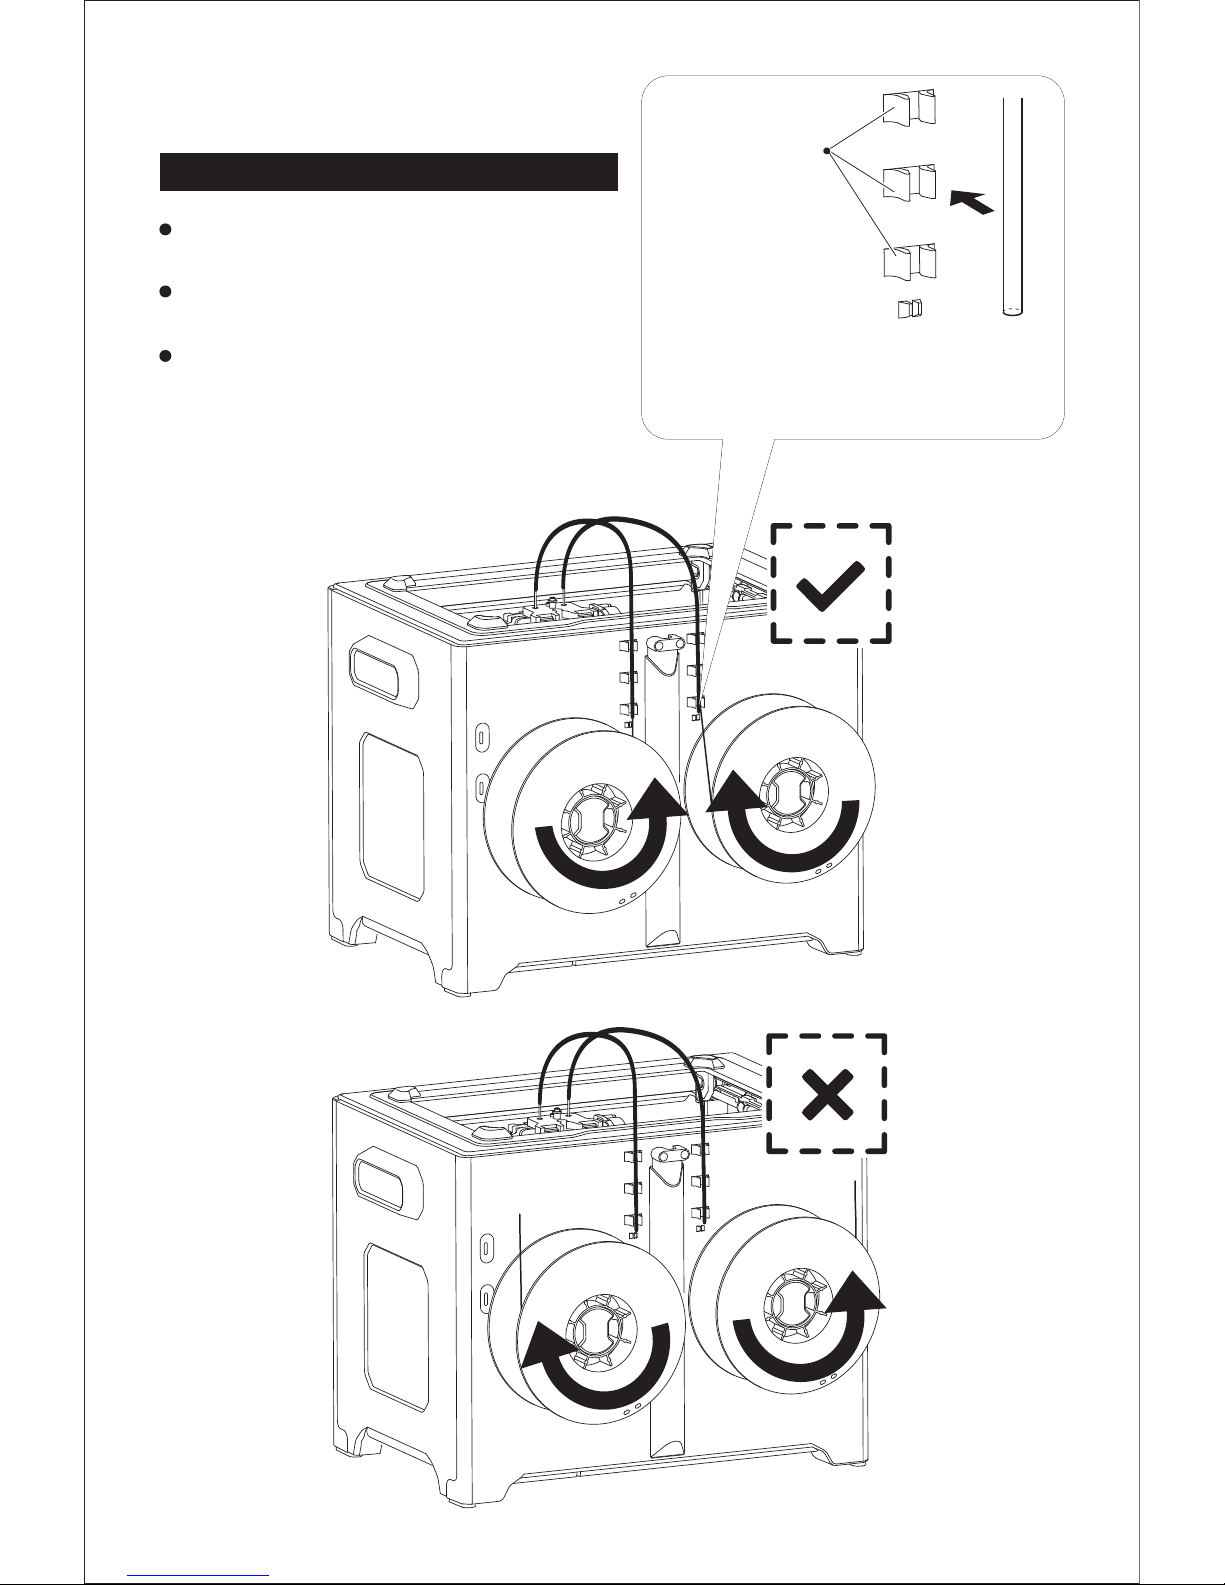
Filament Guide Tube and Filament Installation
Please refer to the next page for the right method of
filament mounting
1. To install a spool holder, level it and insert the end into the corresponding opening.
2. Turn down the spool holder to make the holder bottom cleave to the printer back.
3. Take a roll of PLA filament, then squeeze the spool holder top and mount the filament spool to the holder.
09
10
4. Lock the filament guide tube with
R-shape buckles.
Filament Guide
Tube Buckle
Tips
The filament spool must be oriented correctly
(see below).
The filament guide tube ensures stable printing
and protects the printer.
After securing the filament and guide tubes,
thread the filament through the guide tubes.
11
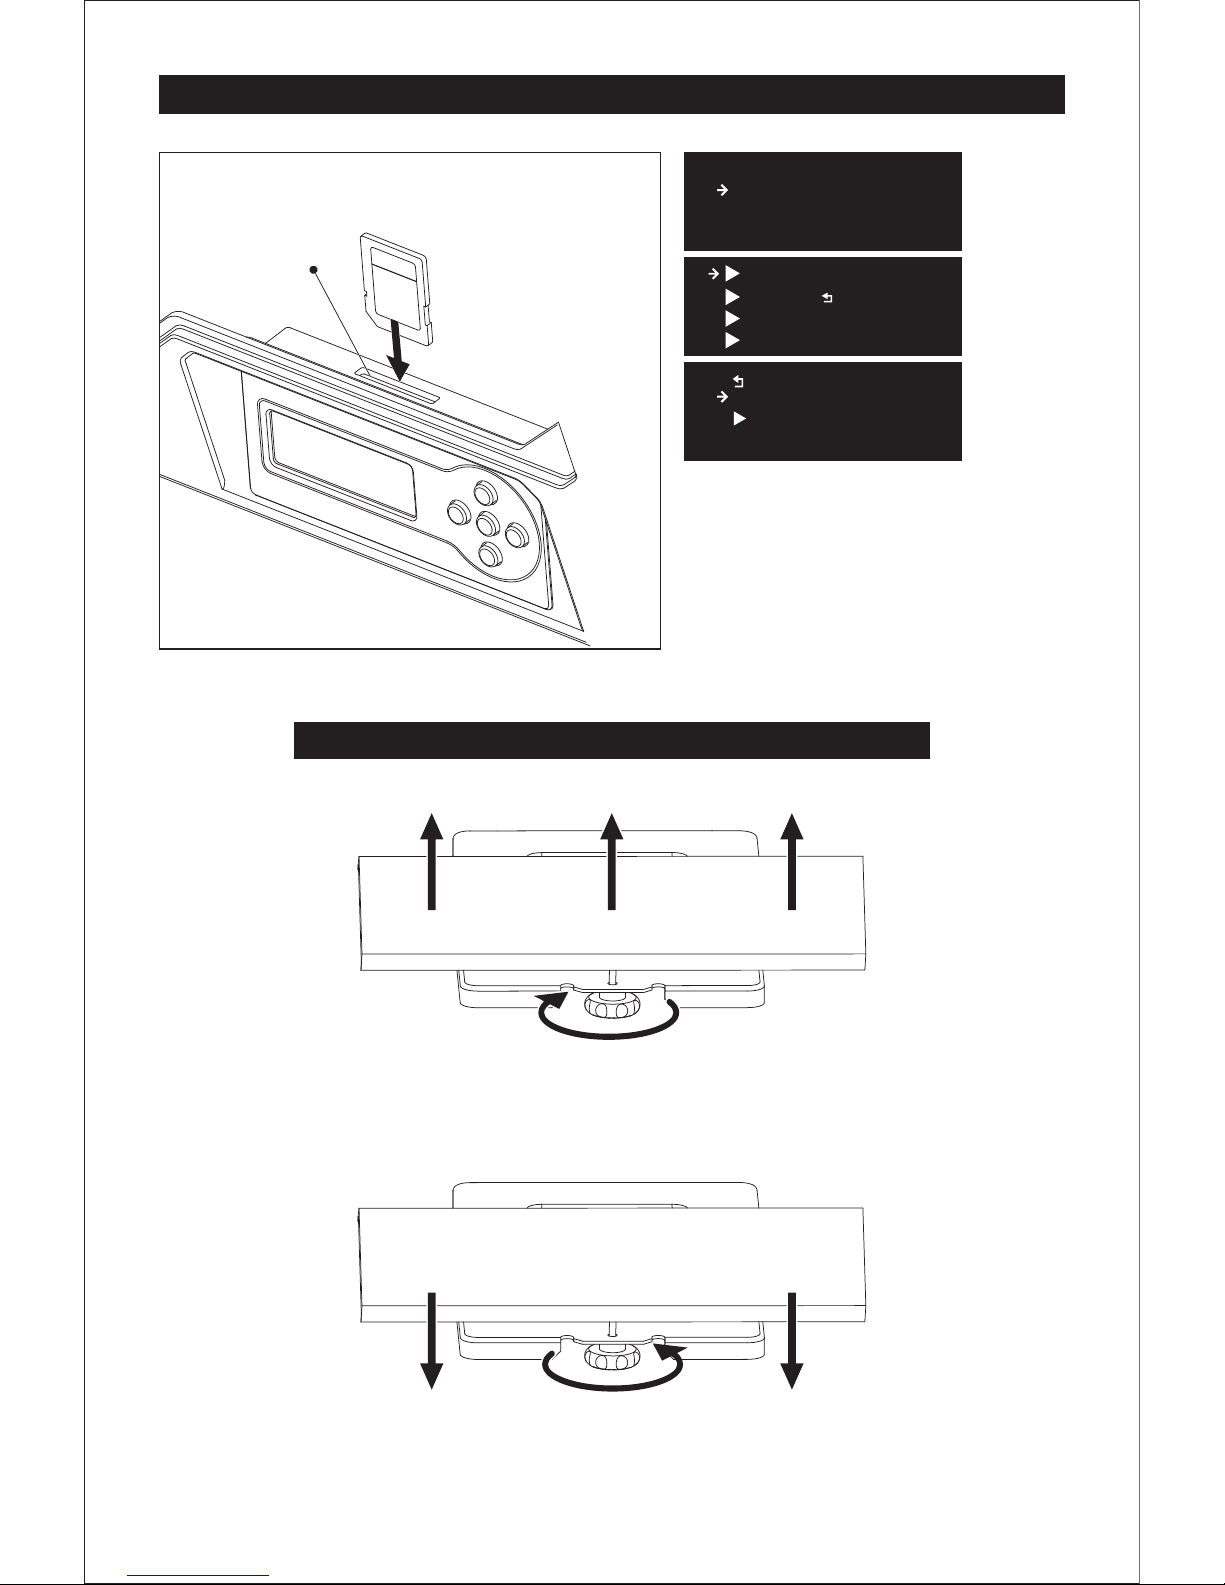
Leveling Build Platform
SD Card Slot
1. Attach the power supply, plug the power
cable into an electrical outlet and turn on
the printer.
2. Insert the SD card into the slot. Tap
[Print from SD] and Tap [OK]. Tap [ENG]
and tap [OK].
Then you will see the [Plateleveling.x3g].
How to use the leveling knobs
Raise the build plate to reduce the distance between the nozzle and build plate.
Lower the build plate to increase the distance between the nozzle and build plate.
Rotate knob clockwise
Rotate knob anticlockwise
FF Cre ator Pr o
Prin t from SD
Preh eat
Util ities
Plat eLeve lin g.x3g
test m odel
Exit M enu
ENG
..
Flas hPrin t Go
Σ
Happ y3D sof t
Σ

How to level the build plate
1. Tighten the three leveling nuts under the build platform until you cannot tighten them any more.
2. Select the PlateLeveling.x3g on the control panel, and tap [OK] to start leveling.
Then tap [OK] for page-turning to read the leveling instructions.
3. The build plate and nozzle will start to move. Wait for them to stop, then adjust the corresponding knob
under the right nozzle first using the leveling card.
4. The leveling card should slide between the nozzle and build plate with some friction/resistance.
If the card slides through easily, the nozzle and build plate are too far apart. Rotate the knob clockwise to
decrease the distance between them. If the card cannot slide through, rotate the knob anticlockwise.
5. After leveling the first point, tap [OK] to continue to the next point.
6. Adjust all three knobs as outlined above. Then, check that the nozzle is also correctly placed when it is
at the center of the build plate, using the leveling card. That's it!
Start the adjustment process with
the right nozzle, then use the distance
between it right nozzle and build
plate as a reference.
12

Loading Filament
1. Tap [Utilities] and tap [OK]. Tap [Filament Loading]-[OK] to enter the filament loading/unloading page.
2. Tap [Load Left]-[OK].
3. The extruder will be heated up automatically. Once heated, insert the filament through the filament
guide tube into the filament intake. Then the filament will be drawn through the extruder.
4. Continue extruding until the extruder provides a steady flow of filament.
5. Tap [OK] to complete filament loading and return to the home page.
First Print
1. Tap [Print from SD]--[ENG]--[test model] successively.
2. Select CP PLA 40mm_box.Left.x3g file to print.
(Note: Use the left extruder to print CP PLA 40mm_box.Left.x3g.
Use the right extruder to print CP ABS 40mm_box.Right.x3g.)
3. After selecting the file, tap [OK] and wait for the extruder to heat. Once heated, the printer will start
printing automatically.
13
FF Creator Pro
Print from SD
Preheat
Utilities
Filament Loading
Preheat Settings
General Settings
Monitor Mode
Unload right
Load right
Unload left
Load left
Heating:
R Extruder:
L Ext rud er:
Platform:
28C
28/200C
21/ 50C
FF Creator Pro
Print from SD
Preheat
Utilities
Heating:
R Extruder: 28C
L Ext rud er: 28/200C
Platform: 21/ 50C
..
CP ABS 40mm _bo x.Rig
CP PLA 40mm _bo x.Lef
Exit M enu
ENG
Flas hPrin t Go
Σ
Happ y3D sof t
Σ
Plat eLeve lin g.x3g
test m odel
Exit M enu
..
1
2
3
4
5

Scan QR to Get More
After-Sales Support
Tel: +86 579 8227398 9 Web: www.flashforge.com Add: 2/F, No.5 18, Xianyuan Road, Jin hua, Zhejia ng, China
After-Sales Service: support@ff3dp.com
Amazon.com orders only: 597891915@qq.com
 Loading...