

Page 1
1
FM-135 Operation Manual
FLARING FM-135 welding machines adopts the latest pulse width modulation (PWM) technology and insulated
gate bipolar transistor (IGBT) power module, which can change work frequency to medium frequency so as to
replace the traditional Transistor transformer with the medium frequency transformer. its characterized with portable,
small size, light weight, low consumption and etc. It is also an intelligent and easy-to-operate multi-function welding
machine with MMA, MIG GAS, MIG GASLESS and LIFT TIG. It has the characteristics of strong welding
performance and diversified usage scenarios. It can be used in both gas and gasless conditions, and the welding
effect is excellent. It is highly praised by welding enthusiasts. It is also very friendly to beginners in welding and can
quickly get started.
Part 1: Machine Introduction
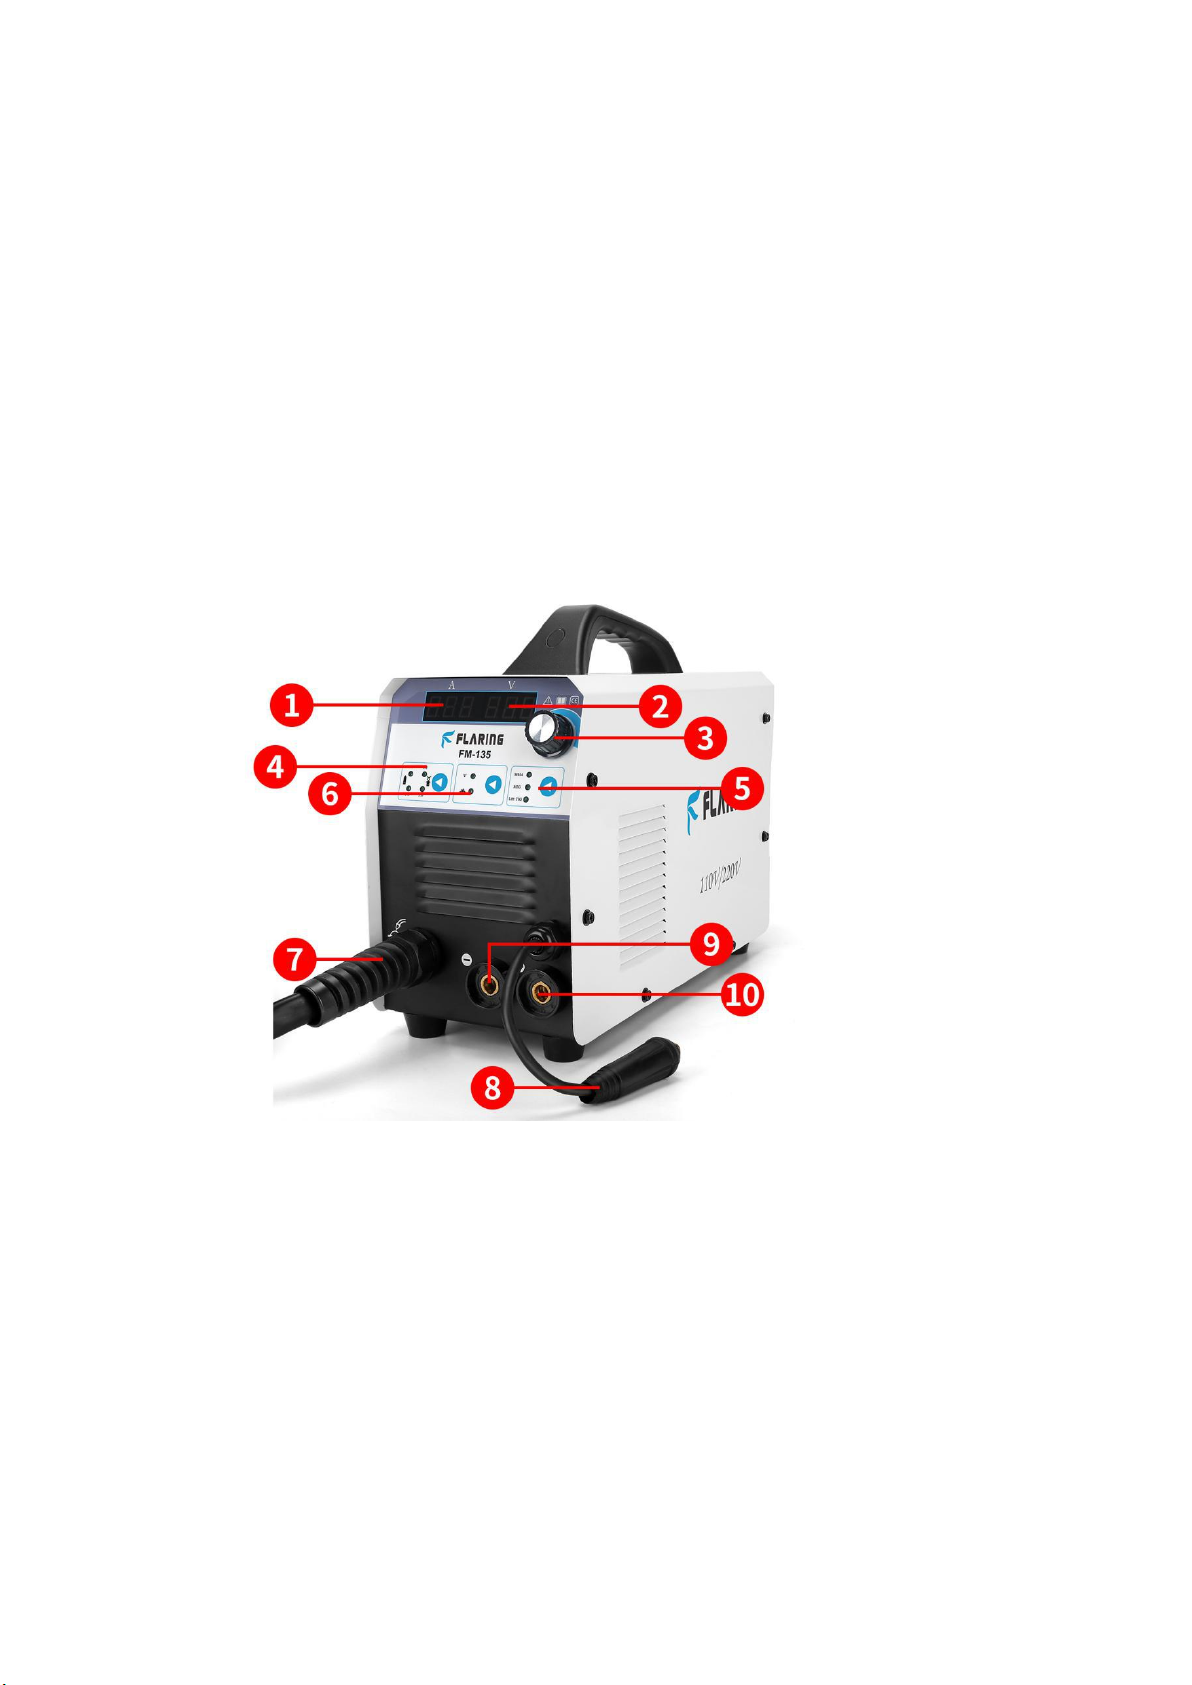
1. Current display meter
The digital Ammeter is used to display the actual output current of the power source.
It is also used to display Parameters in Programming Mode.
Depending on the Programming Parameter selected, the status indictor adjacent to the Ammeter will illuminate to show the units
of the programming parameter.
When welding, the Ammeter will display actual welding current.
2. Voltage display meter
3. MIG/MMA/LIFT TIG Function selection
4. Choose the wire diameter and the choice of gas welding and gasless welding
5. Small range voltage adjustment and inductance adjustment
It is recommended that the voltage does not need to be adjusted. The machine is a unified machine. The voltage, current and
wire feeding speed are automatically matched. Only when the deviation is too large, it can be adjusted appropriately. Inductance
adjustment: If the splash is too large or the welding pool is not deep enough, it can be adjusted to a larger value, otherwise it can
be smaller.
Page 2
2
6. Adjust the value knob
No.
Picture
Name
Qty
Remark
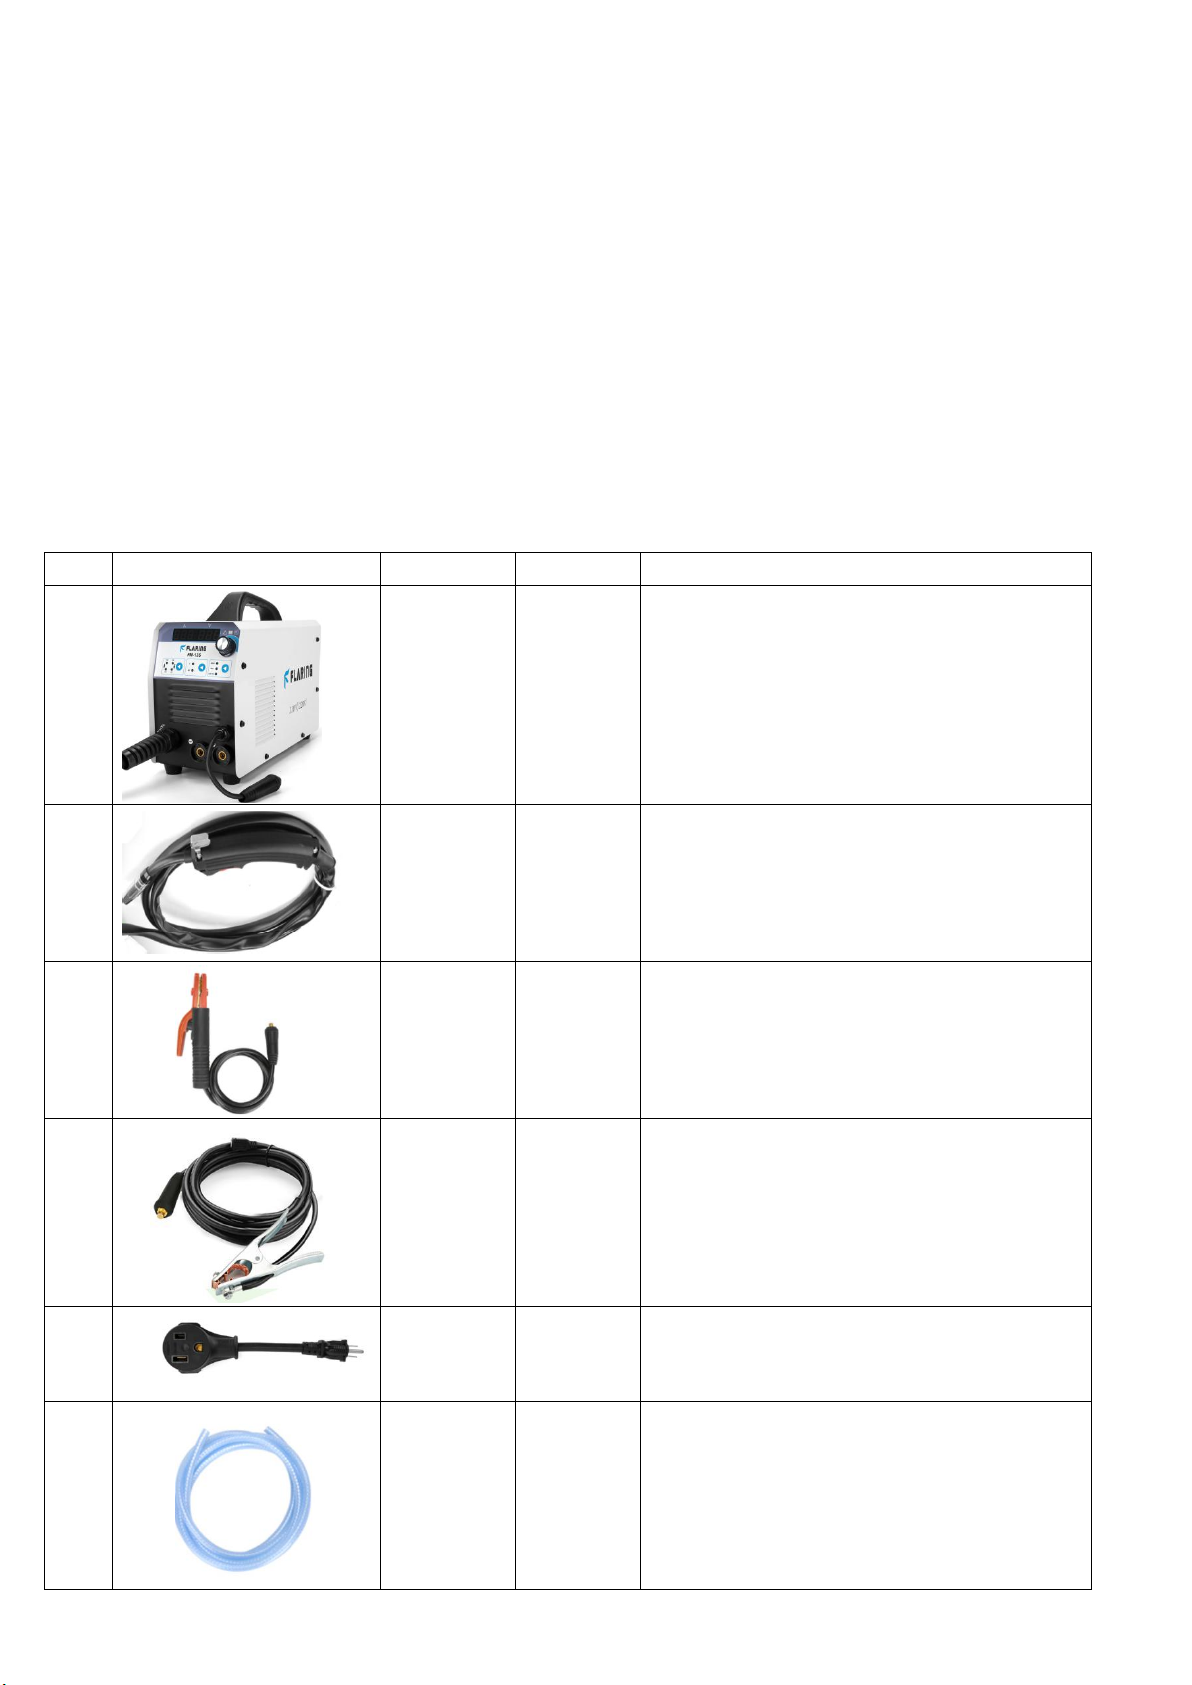
1
FM-135D
1
Please check outside of the whole machine no
scratch nd break , it can power on normally.
2
Welding
torch
1
2.2M, MIG welding torch, Installed on the
machine and connected with the machine as a
whole.
3
Welding
holder
1
2m 16MM2 cable, 300A copper American
welding holder +10-25mm2 European quick
plug.
4
Ground
clamp
1
2m 16MM2 cable, 300A Ground clamp
+10-25mm2 European quick plug.
5
Conversion
line
1
Conversion line only suit for 220V to 110V
dual-voltage input machines, if not dual-
voltage machines no this line included.
6
Transparent
hose
1
3m 8*12 transparent network hose.
Clockwise rotate to enlarge the current, and anti-clockwise rotate to reduce the current.
7. MIG Welding torch connector
8. Polarity selection plug
In MMA and LIFT TIG state, this plug does not need to be connected; in MIG gas welding state, this plug is connected to positive
terminal 8; in MIG airless welding state, this plug is connected to negative terminal 9.
9. Negative Terminal
Negative Terminal. Welding current flows from the power source via heavy duty bayonet type terminals. It is essential, however,
that the male plug is inserted and turned securely to achieve a sound electrical connection.
10. Positive Terminal
Positive Terminal. Welding current flows from the power source via heavy duty bayonet type terminals. It is essential, however,
that the male plug is inserted and turned securely to achieve a sound electrical connection.
Part 2: Introduction to the product and configuration list
Page 3
3
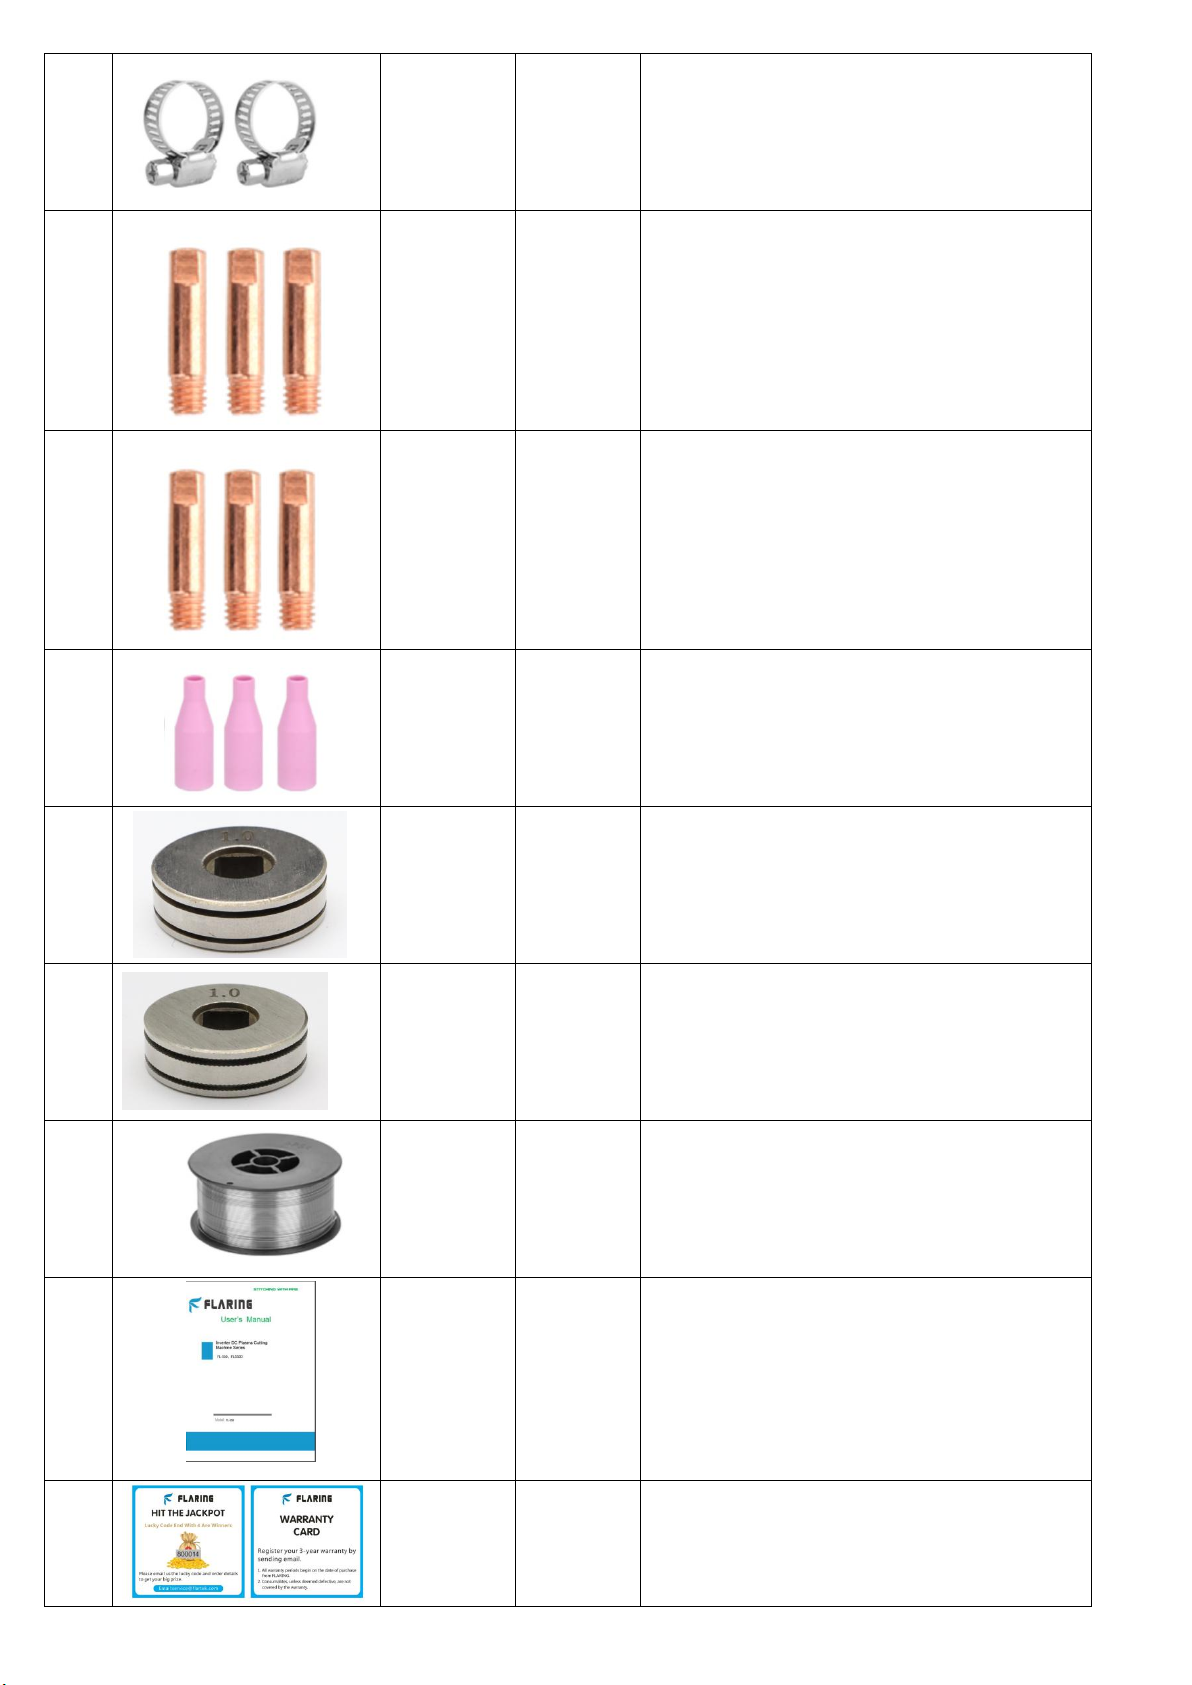
7
Hose clamp
2
Used to fix the trachea to prevent air leakage.
8
Conductive
tip0.8
3
Spare parts, need to be replaced frequently,
please keep inventory.
9
Conductive
tip1.0
3
Spare parts, need to be replaced frequently,
please keep inventory.
10
Porcelain
nozzle
3
For flux-cored welding wire,Spare parts need
to be replaced frequently, please keep
inventory.
11
Wire feed
wheel
1
V-shaped wire feed wheel adapts to solid
welding wire 0.8mm/1.0mm.
12
Wire feed
wheel
1
The gear wire feed wheel is suitable for
flux-cored welding wire diameter
0.8mm/1.0mm, installed on the machine.
13
Flux cored
wire
1
1KG diameter 0.8mm 0,030", suitable for
gasless MIG welding, consumables should be
replaced in time, please keep in stock.
14
Manual
1
Normally provides manuals in English, if you
need other language like French, German,
Italian, Spanish, and Russian please contact
us to get electronic version documents.
15
Warranty
Card
1
If you have more questions for consultation,
please contact us through the after-sales
mailbox on the card.
Page 4
4
Part 3: Simple test for powering on the machine
FLARING FM-135D Welding machines will be subjected to strict various tests when they leave the factory to
ensure that each welding machine that reaches the user is of high quality, because our machine has to go through
tens of thousands of kilometers of long-distance transportation from the factory to the delivery to you. It’s inevitable
that some uncontrollable factors will cause some internal components of the machine to become loose or even
damaged in the process. We recommend that you check the external device as soon as you get the welder, and turn
on the power to check to ensure that you receive It is a qualified product.
Precautions for power-on inspection:
1、 Please make sure your power supply voltage is 220+-15%. FLARING FM-135D just supports 220V input
voltage in North America and Japan, UK, EU and other regions; if you have a generator power supply, please
ensure that the generator is not less than 4000w.
2、 It is recommended to choose 30A circuit breaker protection when input voltage is AC 220V.
3、 Please choose the power plug that suits your local electrical law requirements.
4、Extension cord: #12 AWG or larger; 25’ (8m) or shorter.
Turn on the power switch of the machine and the fan on the back of the machine rotates, and the digital
display on the panel indicates that the power is normal.
Note:
1) The digital display shows irregular changes at the beginning, and then returns to the digital display after 3
seconds, which is normal.
2) In order to reduce the working temperature of the machine, it is normal for the fan to continue to rotate for a
few seconds after the power is turned off.
3) During high-strength continuous welding, machine protection may occur. After continuous heat dissipation, the
machine will return to normal, which is normal.
Page 5
5
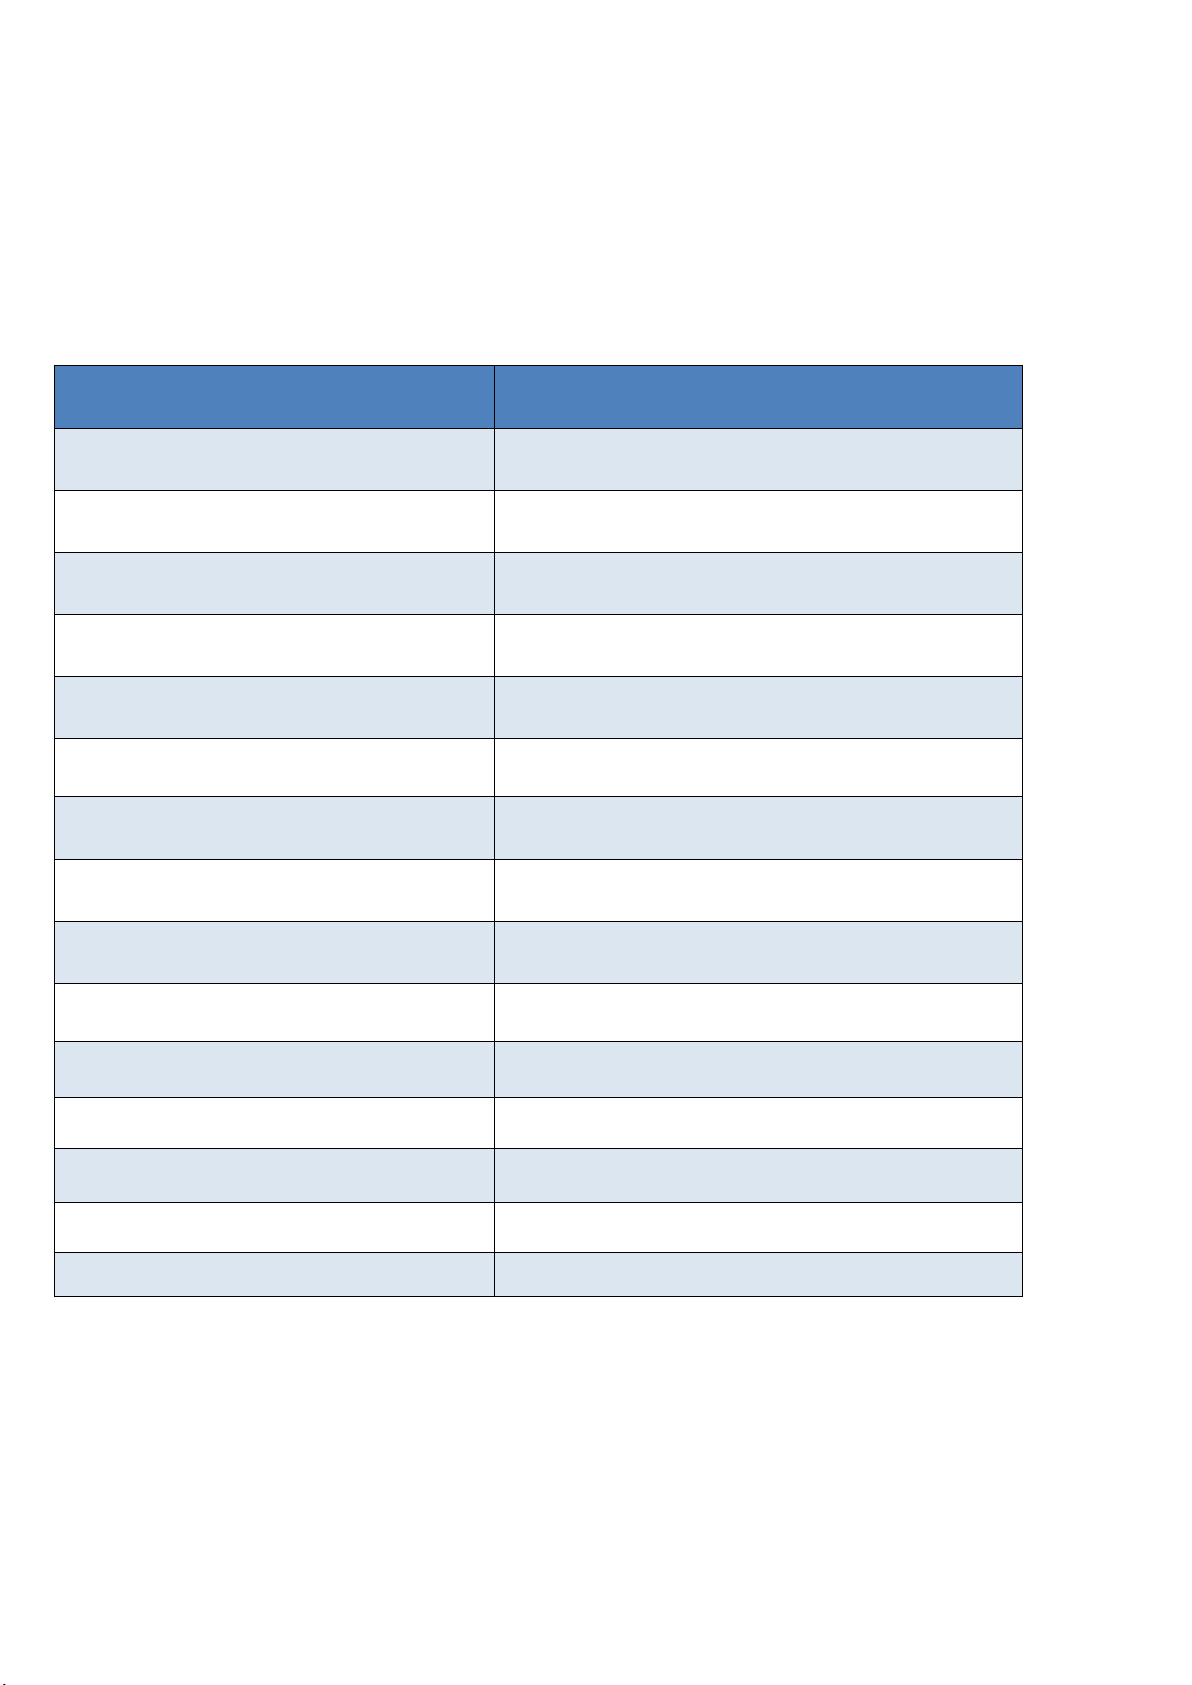
Attached table: Self-examination of abnormal conditions without response when turning on the machine:
TYPE
FM-135D
Input power voltage (V)
1phase AC220V,50/60Hz
Rated input current (A)
19.2
Rated power capacity (KVA)
2.5
Current adjustment range (A)
MIG:30-120 MMA:30-110
Welding thickness (mm)
>1.0
Voltage adjustment range (V)
15-21
No-load voltage (V)
55±5
Electrode diameter (mm)
0.8/1.0
Rated duty cycle
60%
Efficiency (%)
85%
Power factor
0.7
Protection class
IP21S
Insulation class
F
Size (mm)
420*280*310
Weight (Kg)
8.8
1. The machine's power switch is not turned on.
2. The power input voltage is wrong.
3. The power plug is loose.
4. The internal circuit is loose (due to long-distance transportation, bumps), you need to open the cover and
check the internal connection line.
Part 4: Technical specifications
Part 5: Machine operation guidance.
Tips:
1. Wear a welding helmet fitted with a proper shade of filter to protect your face and eyes when welding or watching;
2. Wear approved safety glasses. Side shields recommended;
3. Use protective screens or barriers to protect others from flash and glare; warn others not to watch the arc;
4. Wear protective clothing made from durable, flame-resistant material(wool and leather) and foot protection;
5. Use approved ear plugs or ear muffs if noise level is high;
6. Never wear contact lenses while welding.
Page 6
6
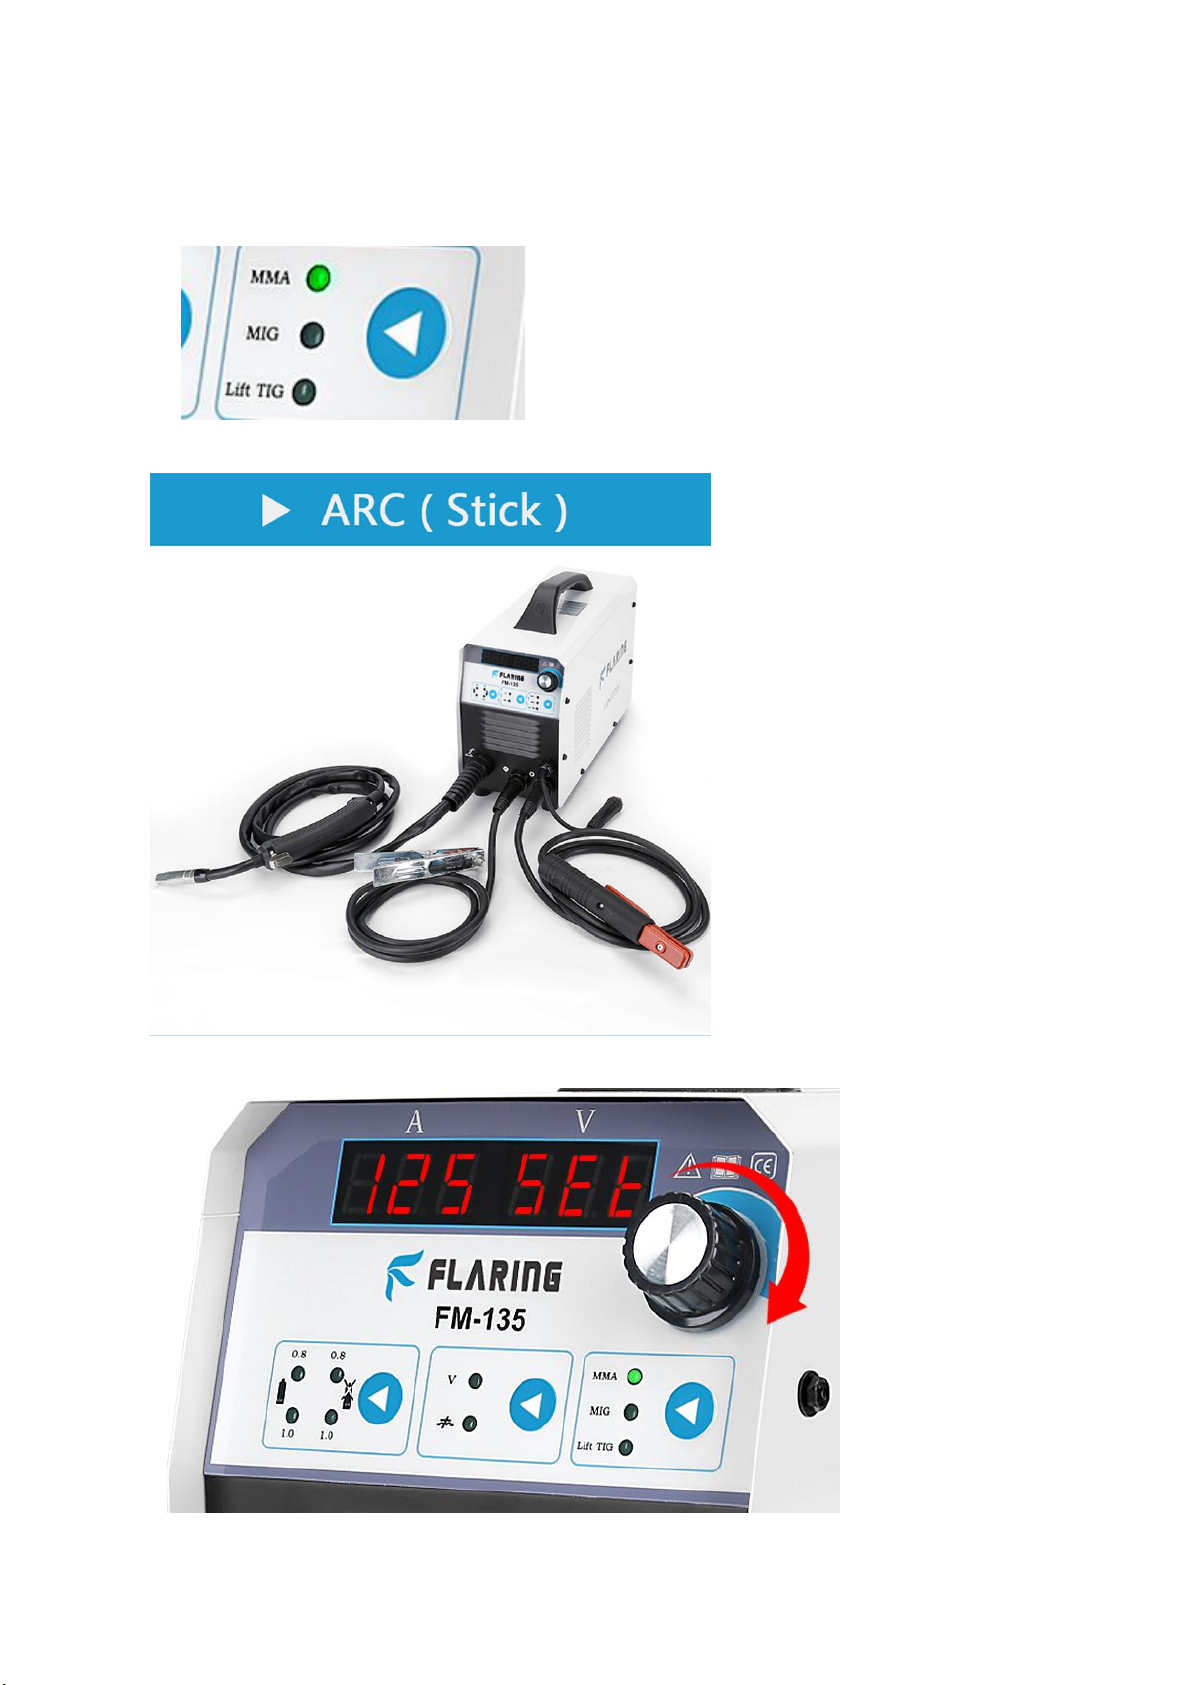
1. MMA mode
If you want to repair some broken fences or fix brackets, you like to use traditional welding rods for operation, try
FLARING FM-135D MMA mode for welding.
1、 Select “MMA” process.
2、 Connect welding holder and ground clamp.
3、To adjust the current, only the current can be adjusted.
Note:
1) The welding rod specification supported by FLARING FM-135D is below 3.2(1/8in), usually 2.5(3/32in) and
Page 7

7
3.2(1/8in). European style generally uses E6013, American style generally uses E7018, and stainless steel
generally uses ER308.
2) It supports welding of 1-5mm(1/64-7/32in) carbon steel and 1-3.2mm(1/64-1/8in) stainless steel. Aluminum
can not be welded. For carbon steel, please use carbon steel electrode. For stainless steel, please use
stainless steel electrode.
3) Connect the ground clamp to clean bare metal. No rust, paint or other coatings, and ensure good electrical
conductivity.
4) The ideal distance between the welding rod and the welding object is 1-2mm(1/64-5/64in), to ensure that the
welding rod and the workpiece are in continuous and stable contact. The welding rod should not be too high
or pressed too low to avoid arc breaking and adhesion.
5) It is normal for novices to have adhesion during the welding process, and you can try to friction arc to avoid
adhesion.
6) Suitable for ordinary welding rods, such as 7018, 6013, etc., but not suitable for special welding rods, such as
7010, 7011.
Possible problems
1) There is no arc, check the ground wire to connect the workpiece to ensure that there is no rust, paint or other
coatings on the workpiece.
2) There is no arc, check the direct distance between the welding rod and the welding object, the ideal distance
is 1-2 mm; check whether the welding object has rust or oil stains, it is recommended to polish with sandpaper
or a grinder.
3) When welding, the spatter is very big, and it feels very difficult to weld. Please try to change the polarity
connection of the ground wire clamp and the welding clamp with the machine.
4) During the welding process, if the time exceeds 3 minutes, overcurrent protection may occur. You need to stop
working for a few minutes, let the machine cool down for a period of time, and automatically recover. If the air
cools for more than 10 minutes, the machine does not automatically recover, please shut down and restart.
5) If you have any problems that cannot be solved, please contact us at [email protected] .
2、MIG mode
FLARING FM-135D provides two welding modes: gas shielded welding and self-shielded welding with fluxed
wire. If you are working at home or in a studio, in order to ensure a better welding effect, it is recommended that you
use the gas welding mode; if you need to go out to work, carry gas cylinders and other inconvenient situations, you
can use the Self-protected welding method.
A)Gas shielded welding mode
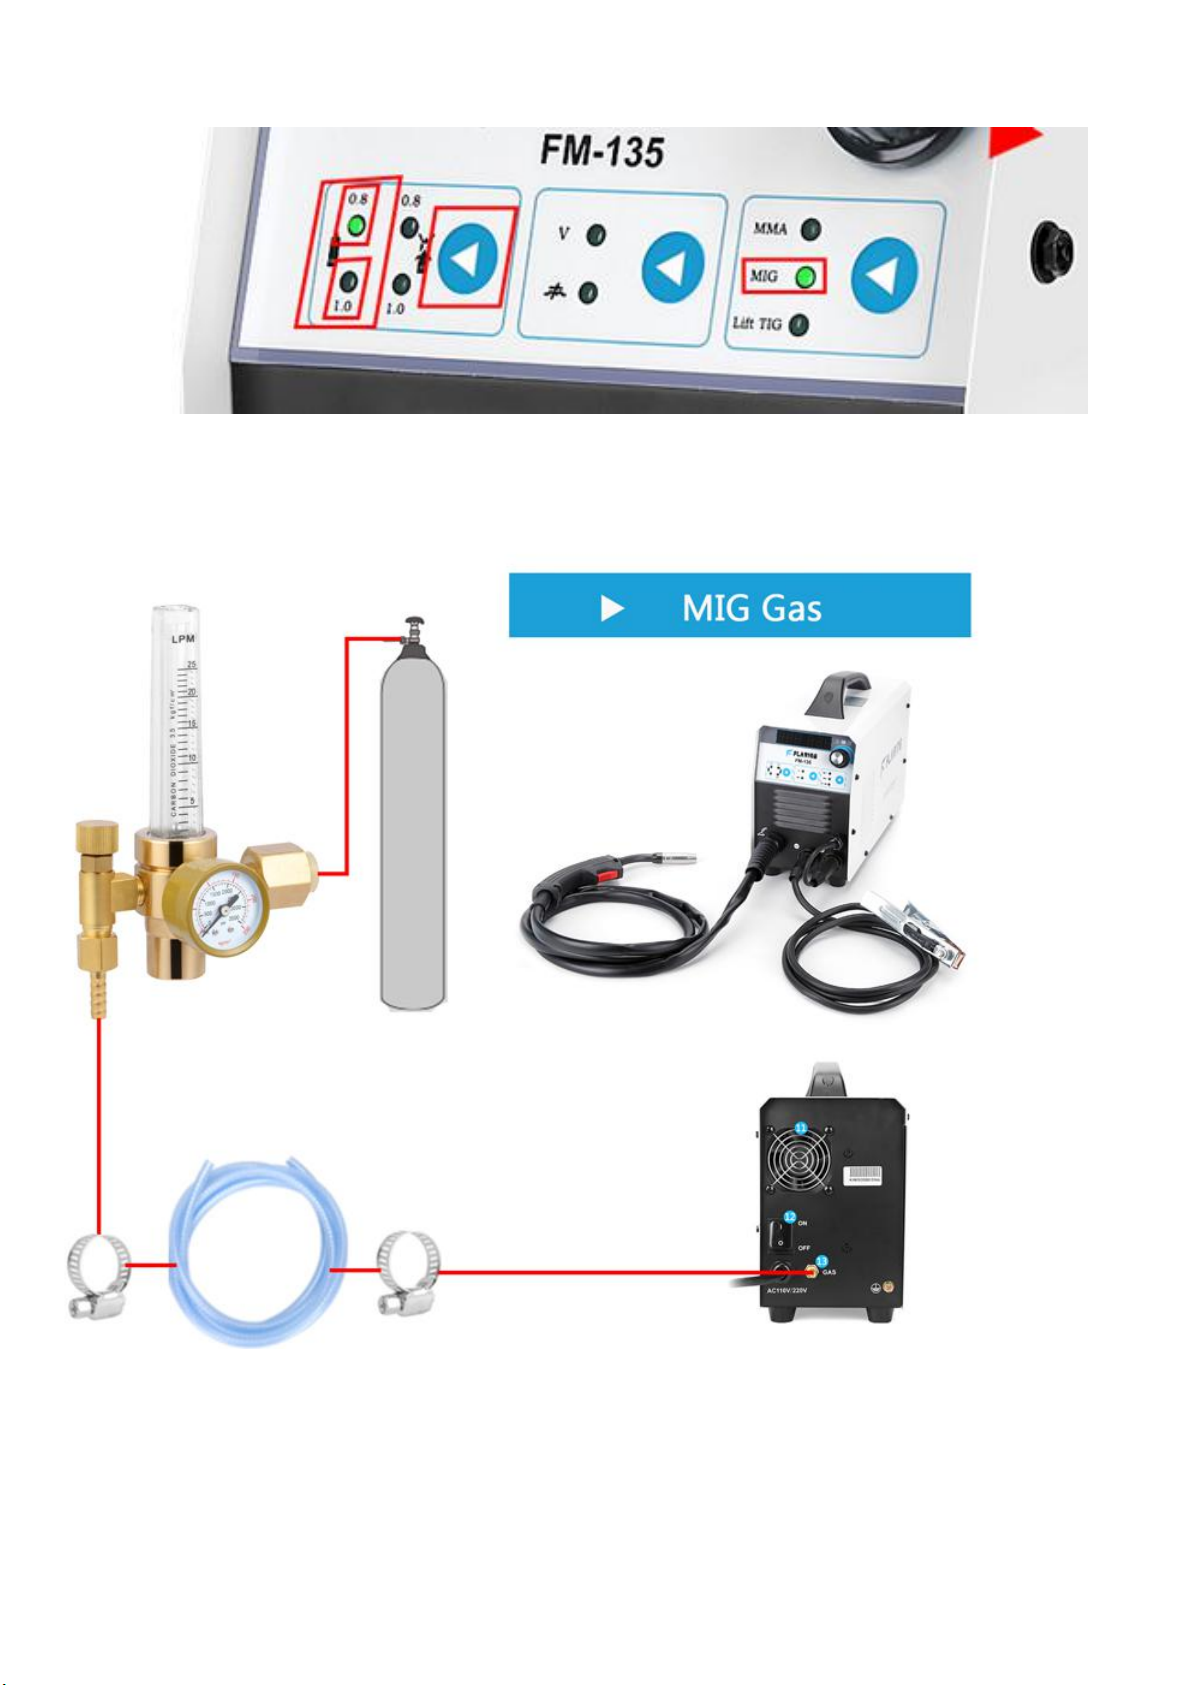
1、 Select “MIG ” process.
2、 Set polarity for MIG Solid wire(gas)
FLARING FM-135D Excellent support for welding wires of 0.8mm and 1.0mm in diameter, and automatically and
Page 8
8
intelligently match the best welding parameters according to different specifications of welding wires to achieve the
best results.
3、Connect MIG gun and ground clamp.
Page 9
9
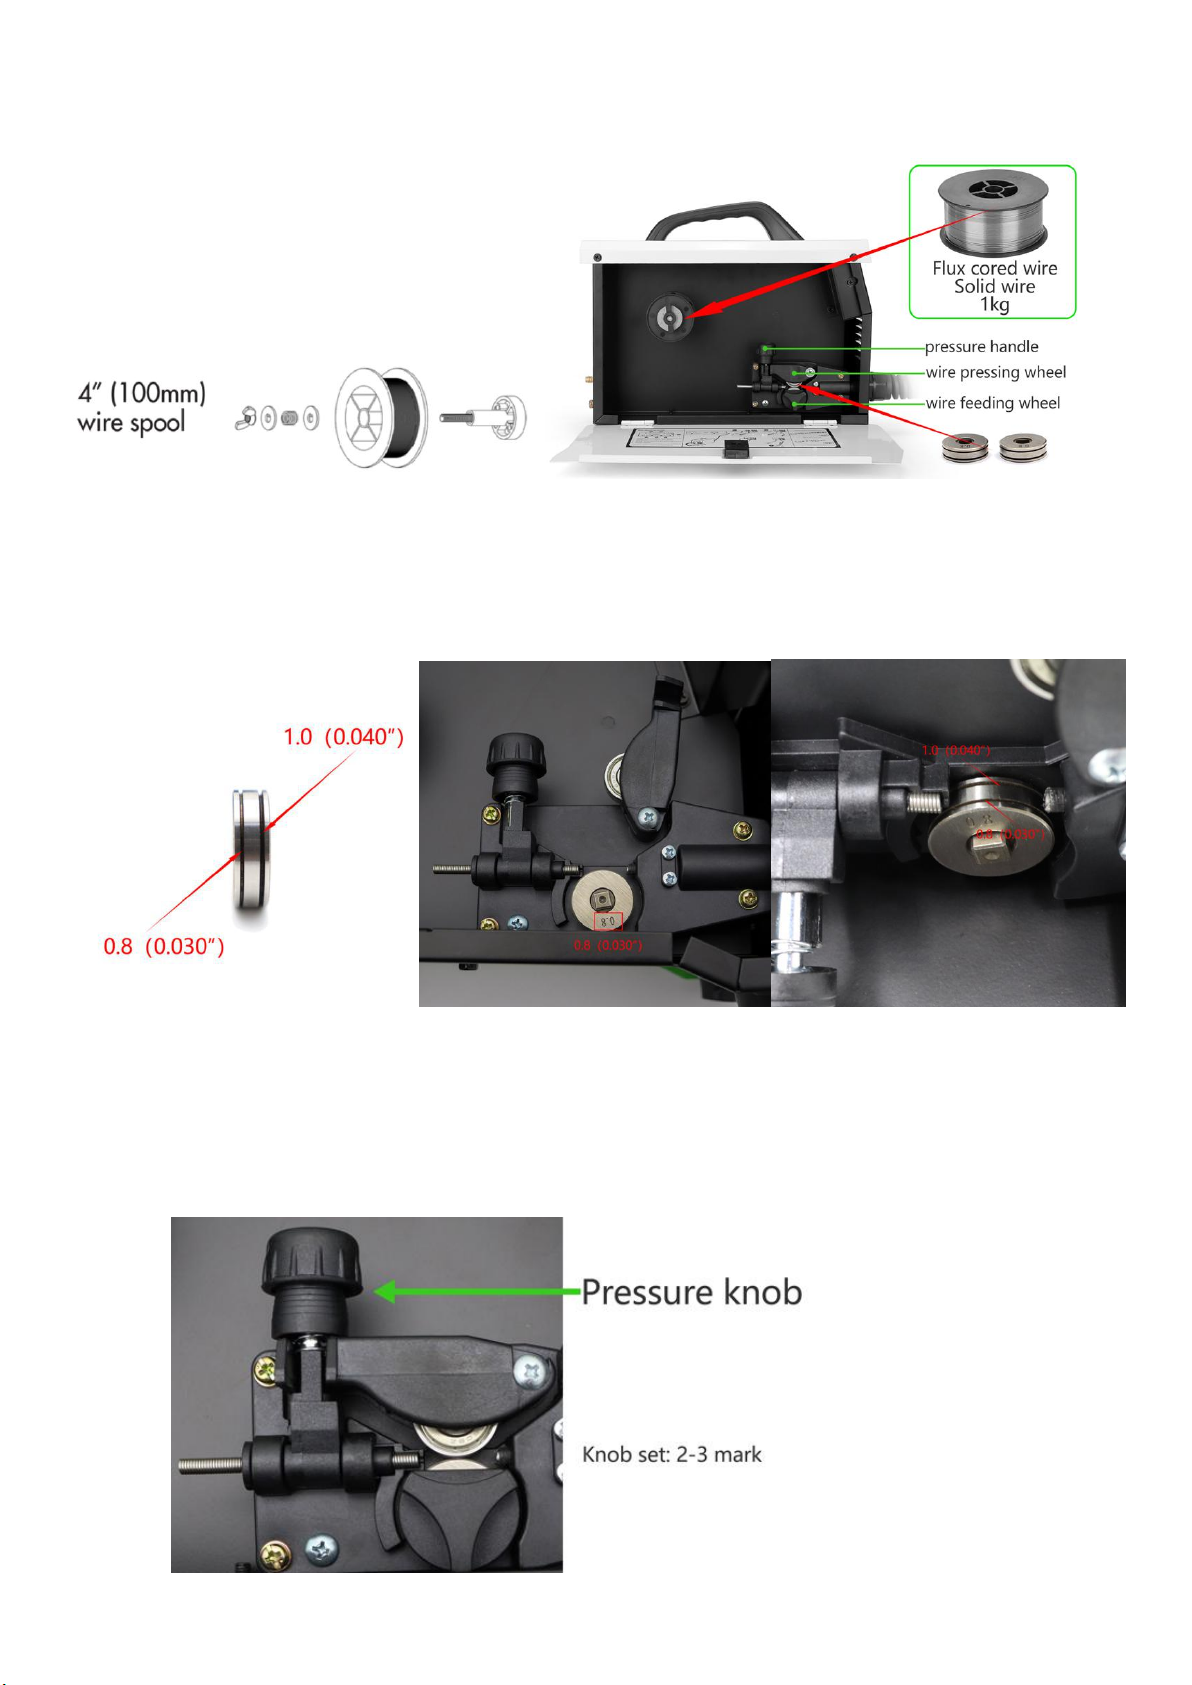
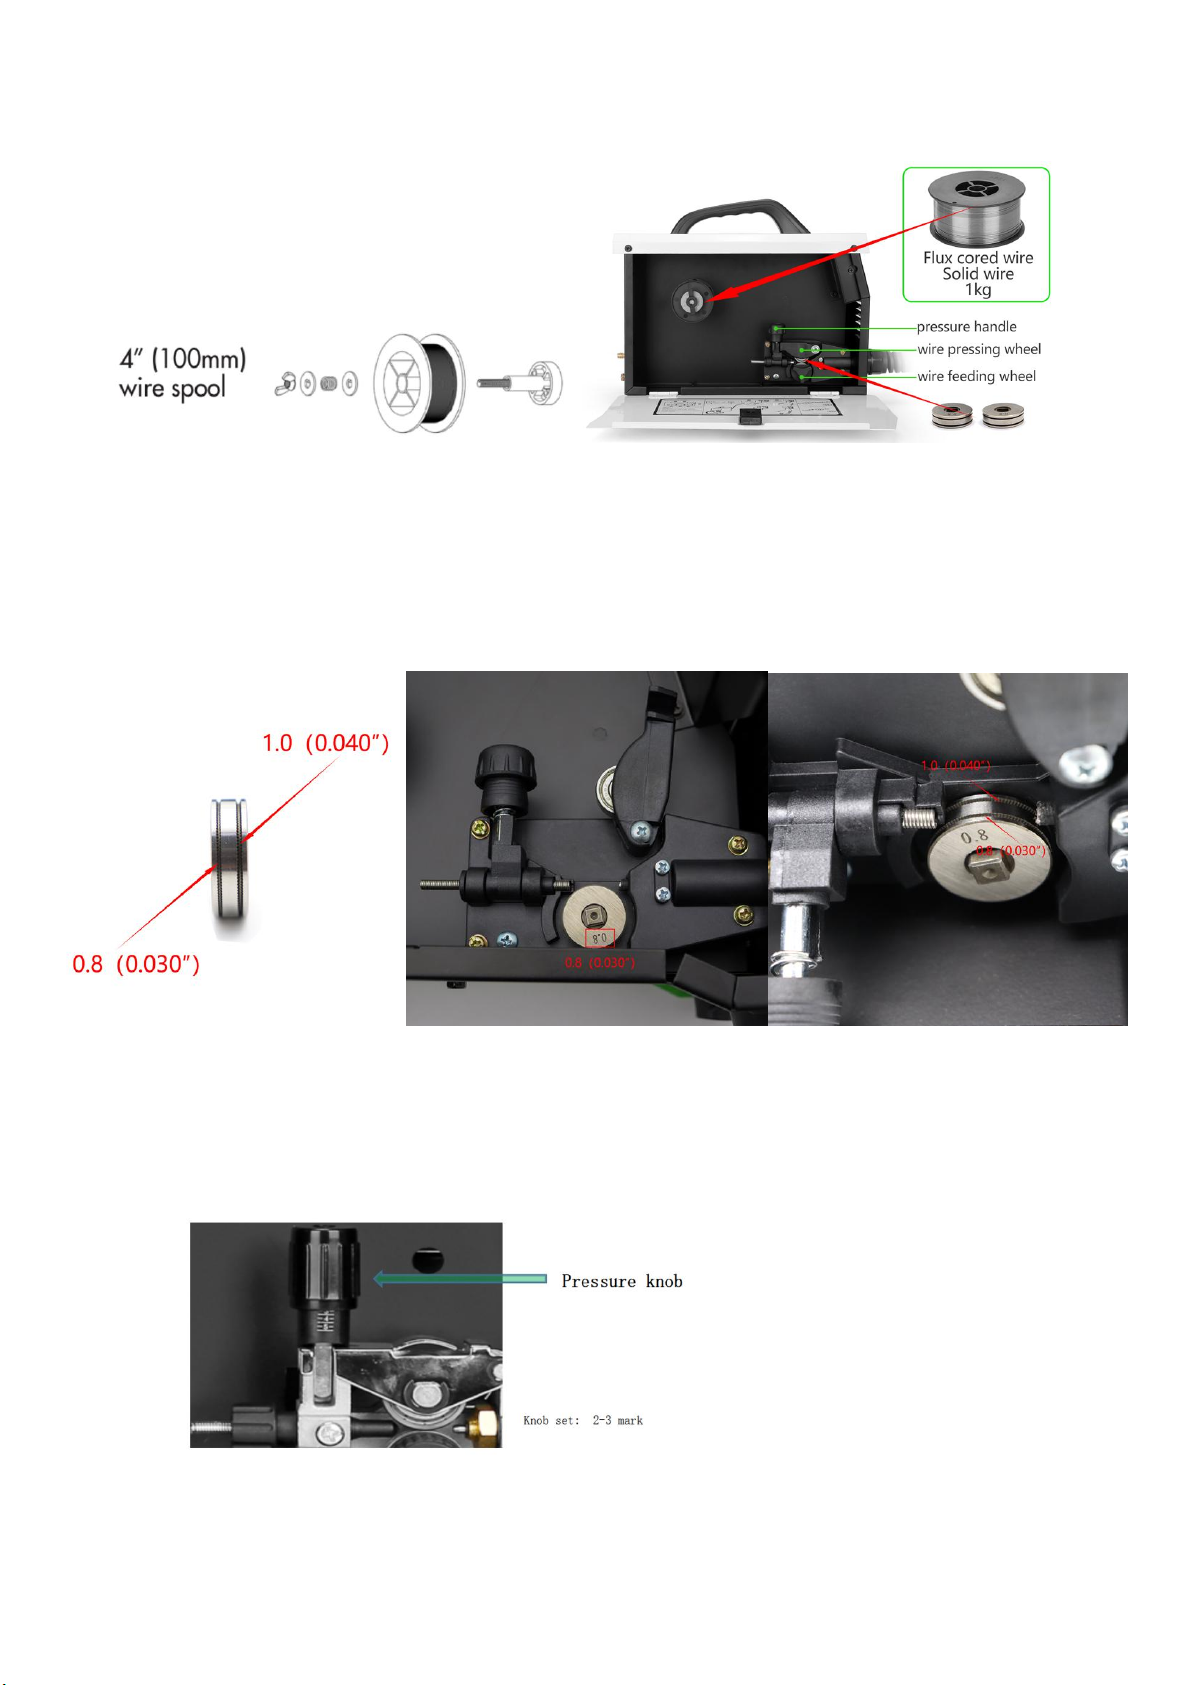
4、Install wire spool
0.030”(0.8mm)/0.040”(1.0mm)diameter
4”(100mm 1kg)wire spool
5、Set drive roll
Face the side marked 0.030” away from the machine.
Remarks: 1. There are two grooves on one wire feed wheel, one side is 0.030” (0.8mm) and the other side is
0.040” (1.0mm) to match the corresponding wire diameter.
2. Gas welding requires the use of V-type wire feed wheels, which are suitable for ordinary carbon steel
welding wire and stainless steel welding wire, and need to use CO2 gas or CO2 and Argon gas mixture.
6、Feed wire and set pressure
The pressure should not be too loose, too loose will cause the welding wire to slip and the wire feeding is
unstable, and too tight will cause the welding wire to slip and deform.
Page 10
10
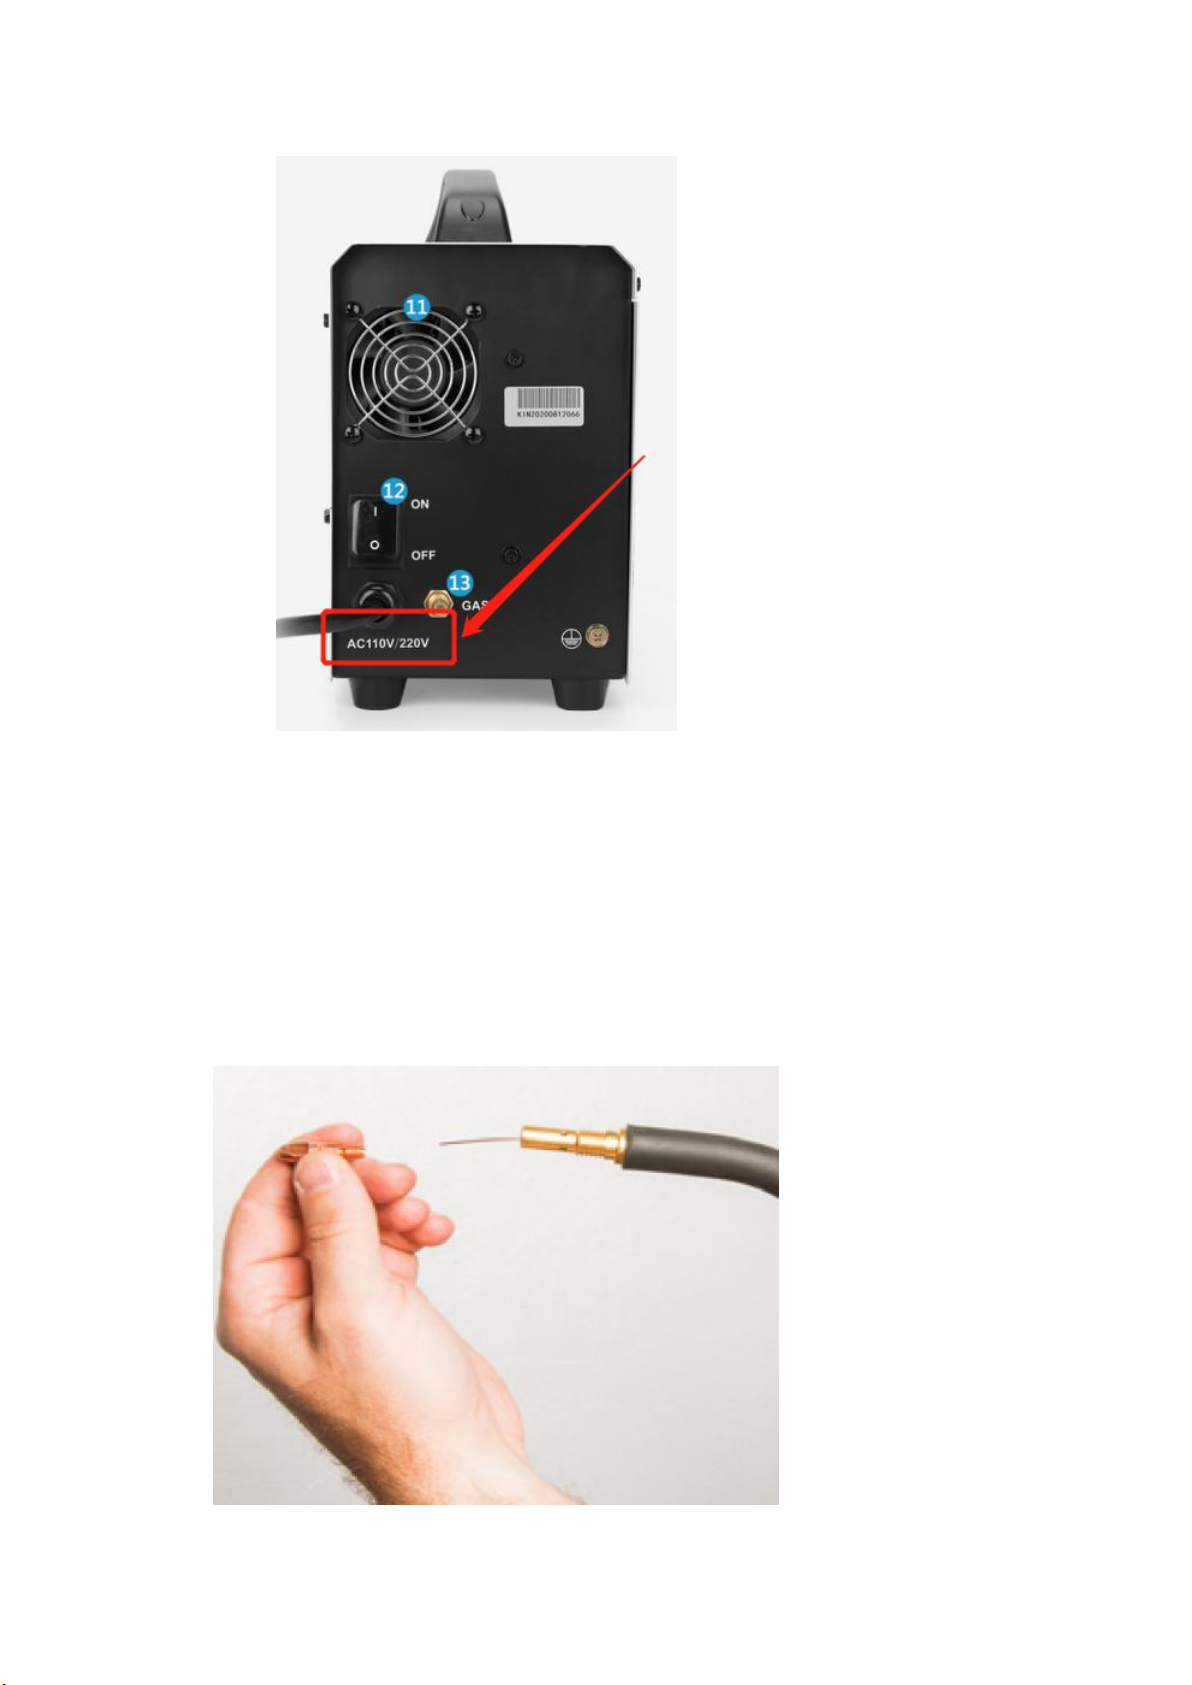
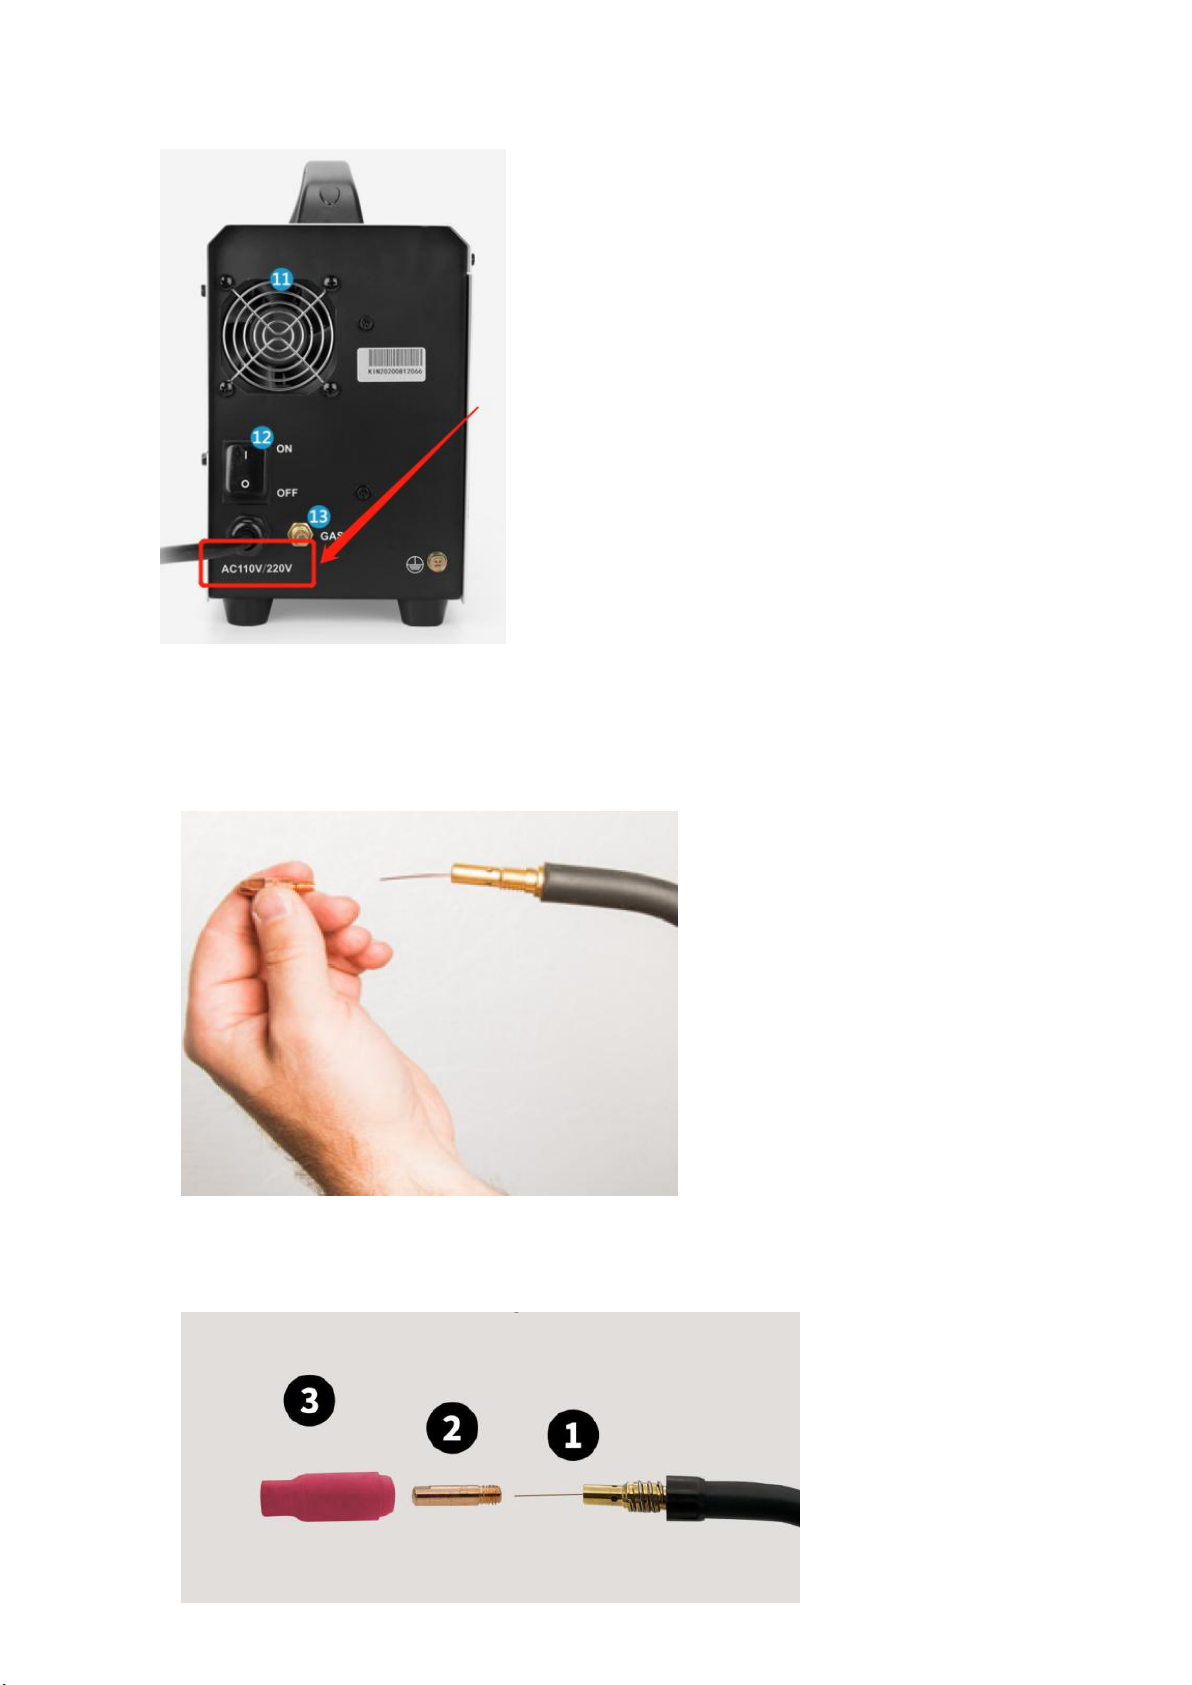
7、Connect to Input Power
Please refer to the digital sign on the rear panel of the machine for the input voltage, the wrong voltage will
damage the machine.
8、Please connect CO2 gas:
1. Attach gas hose to machine.
2. Attach hose and regulator to gas bottle.
9、Remove consumables and depress trigger until wire comes out. Replace consumables.
Press and hold the torch switch wrench for more than 3 seconds to not weld. This is fast wire feeding. Let the
welding wire be quickly delivered to the gun head.
Page 11
11
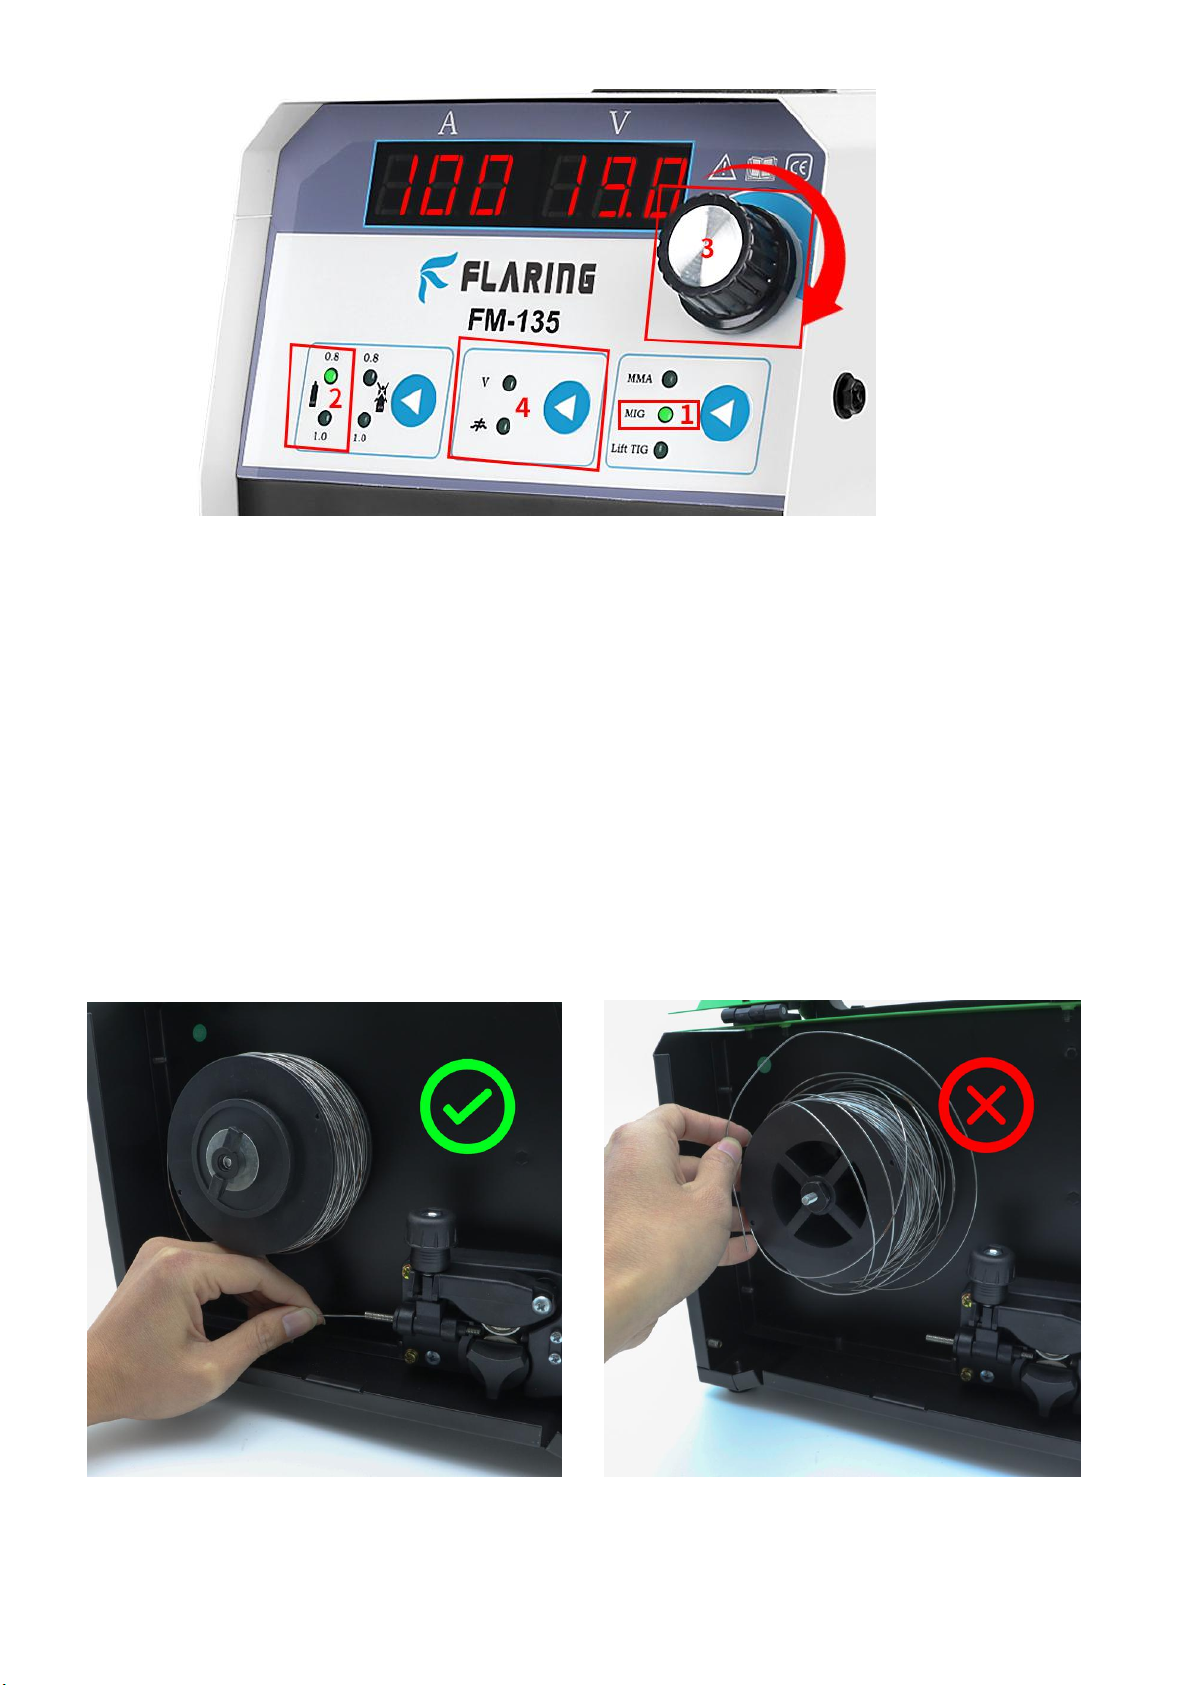
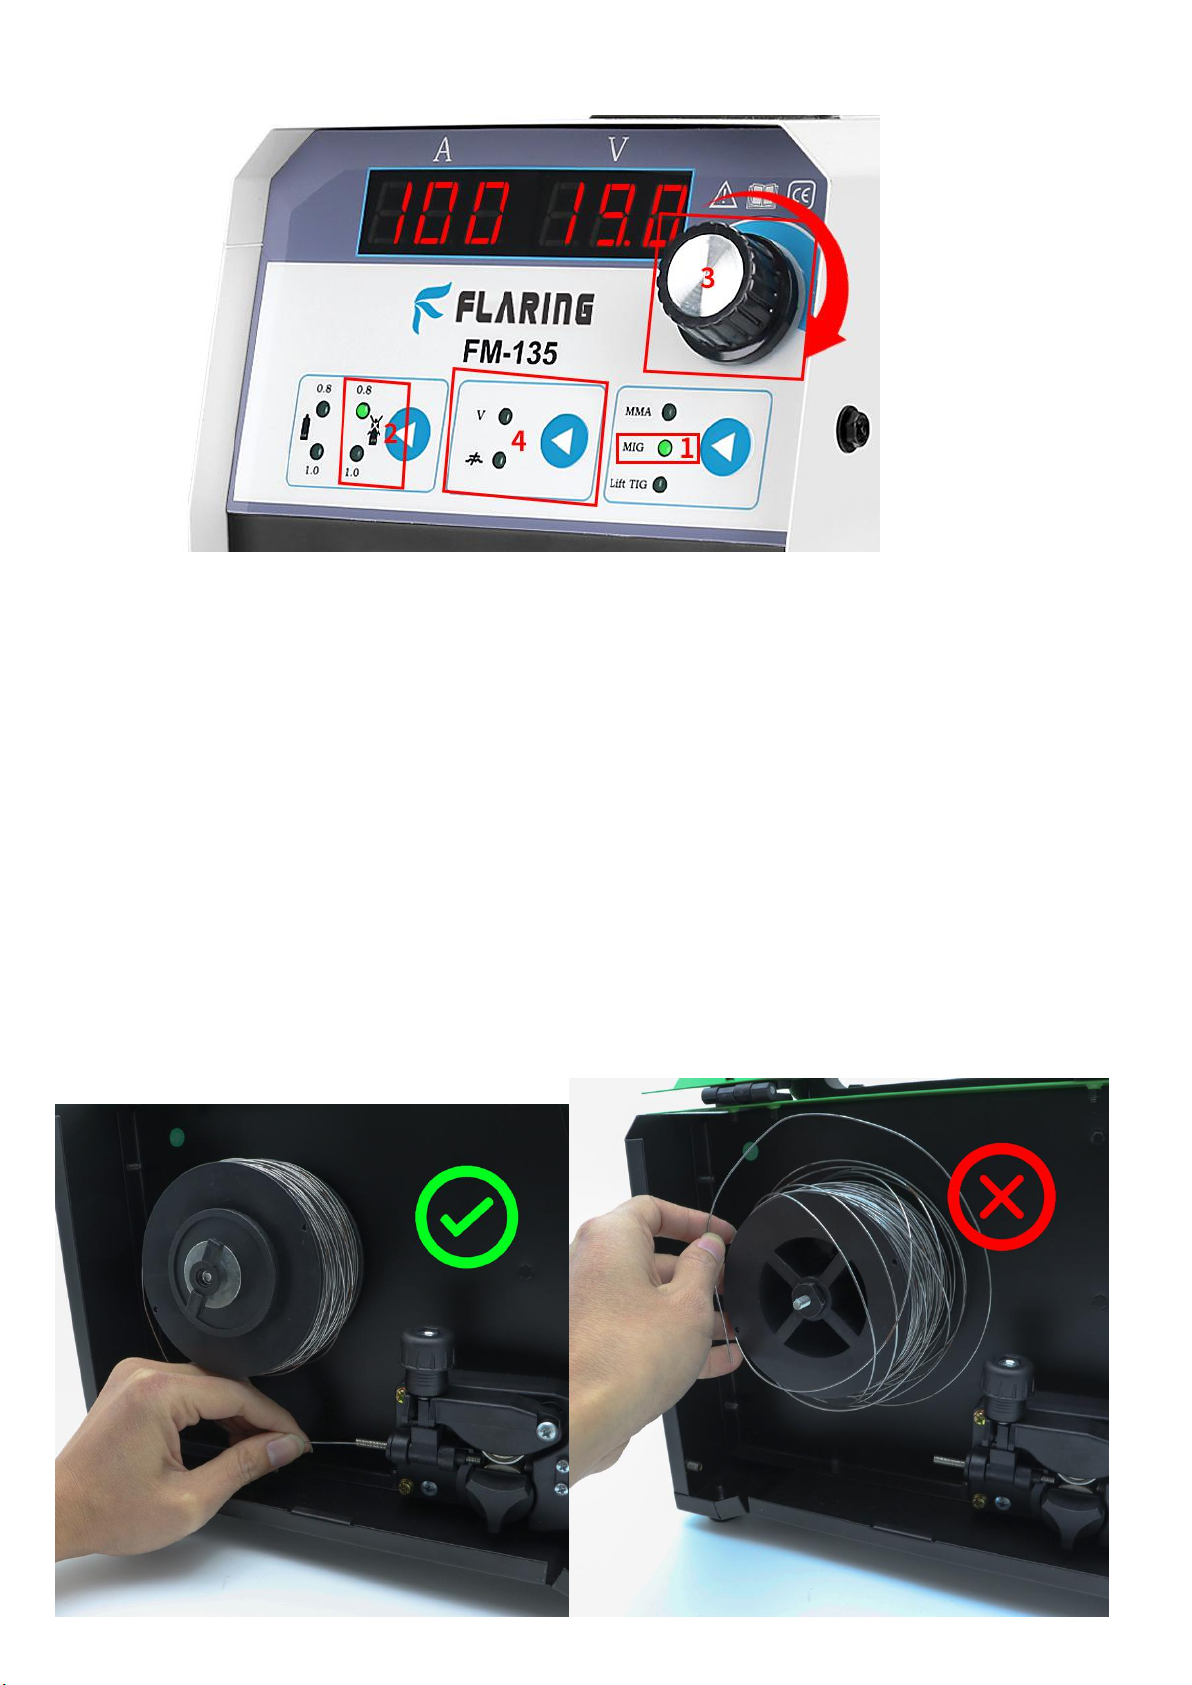
10、Adjust wire feed speed, current and voltage.
1. Choose MIG, MMA, LIFT TIG working mode.
2. Choose welding wire diameter 0.8 or 1.0, choose solid wire welding.
3. The machine has a unified function, so just adjust this knob the the welding current, voltage and wire
feeding speed are adjusted automatically at the same time.
4. “V”,If you are not satisfied with the automatic adjustment of the machine, you can fine-tune the voltage
(when the current and wire feeding speed are unchanged), "inductance", during the welding process, it
feels that the welding pool is not deep enough and the splash is too large, so you can adjust
it appropriately .
11、With contact tip 1/4” from metal, depress trigger completely to initiate arc.
12、To replace the welding wire.
Use the cutting pliers to cut off the front section of the contact tip that is more than the welding wire, loosen the
wire feed mechanism pinch wheel, rotate the welding wire reel clockwise, turn the welding wire back to the wire feed
reel, pay attention to pinch the welding wire with your right hand to avoid the wire bounce.
Page 12
12
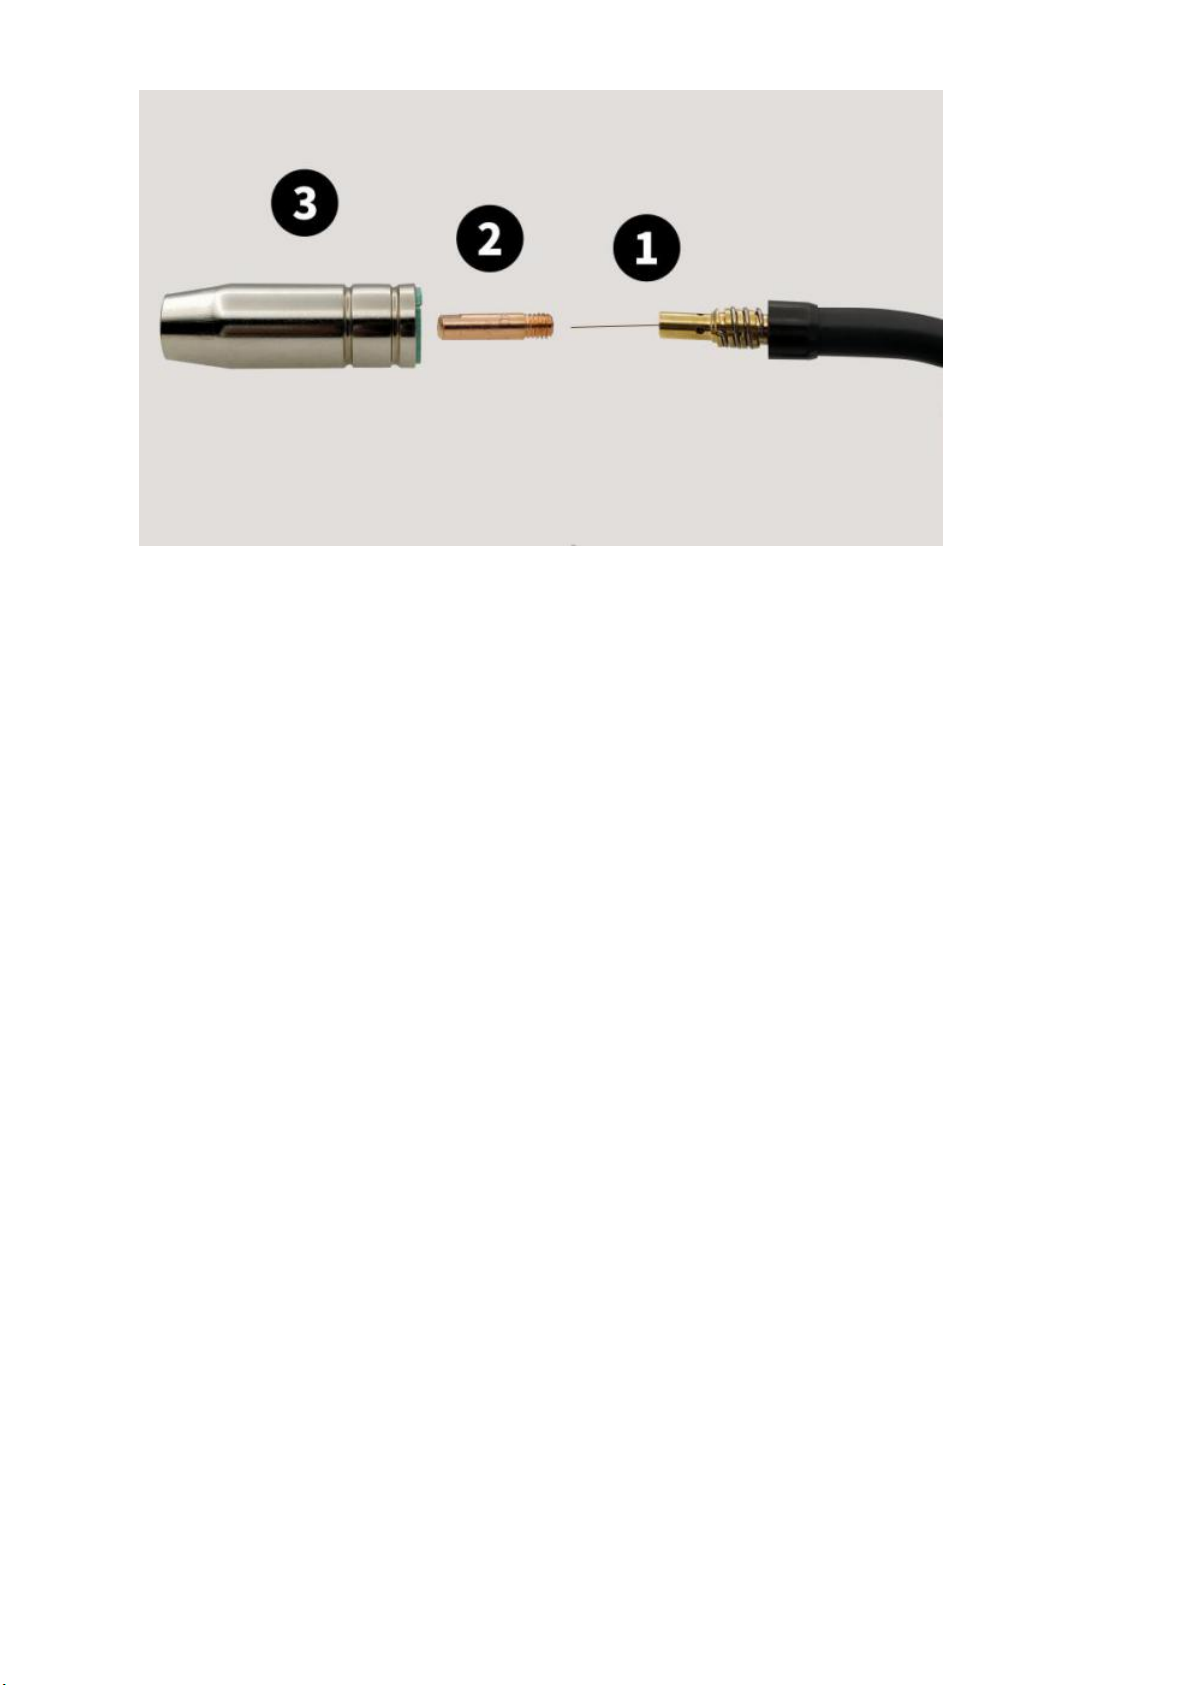
13、Wearing parts of welding gun
Note: 1. Gas diffuser, 2. Conductive nozzle, 3. Nozzle. They are wearing parts and need to be replaced
frequently, please keep inventory.
Note:
1) Please strictly follow the picture instructions to connect, otherwise it will not be possible to solder.
2) Solid core welding wire supports 0.8mm, 1.0mm, 0.6mm(need to purchase welding wire, wire feed wheel and
contact tip).
3) The machine can install 1kg(2.2lb) wire reels.
4) The machine comes with a 1kg(2.2lb) flux-cored welding wire. This mode is not used. Solid welding wire needs to
be purchased separately.
5) Support welding material, carbon steel, stainless steel, aluminum can not be welded.
6) The diameter of the welding wire, the groove of the wire feed wheel and the aperture of the contact tip must
match.
7) The pressure roller of the wire feeding structure should not be too tight or too loose, which will cause the wire
feeding to be unstable.
8) The installation of the wire feeding reel should not be too loose or too tight, which will cause the welding wire of
the wire reel to spring off and the wire feeding is too slow.
Possible problems
1) There is no response when turning on the power, please check the plug connection.
2) There is no response when turning on the power, please open the cover and check whether the internal
connecting wires are loose.
3) The wire feeding is unstable. Please check the wire feeding reel and the wire feeding pressure roller, and the
welding gun should not be wound. Pay attention that the diameter of the welding wire matches the wire feeding
wheel groove and contact tip.
4) No wire feeding, please confirm that the working mode is MIG state, please confirm that the welding gun is
connected well, press the gun switch or no wire feeding, please contact us.
5) During the welding process, if the time exceeds 3 minutes, over-current protection may occur. You need to stop
working for a few minutes, let the machine cool for a period of time, and automatically recover. If the air cools for
more than 10 minutes, the machine does not automatically recover, please shut down and restart.
6) If you have any questions, please contact us at [email protected].
Page 13
13
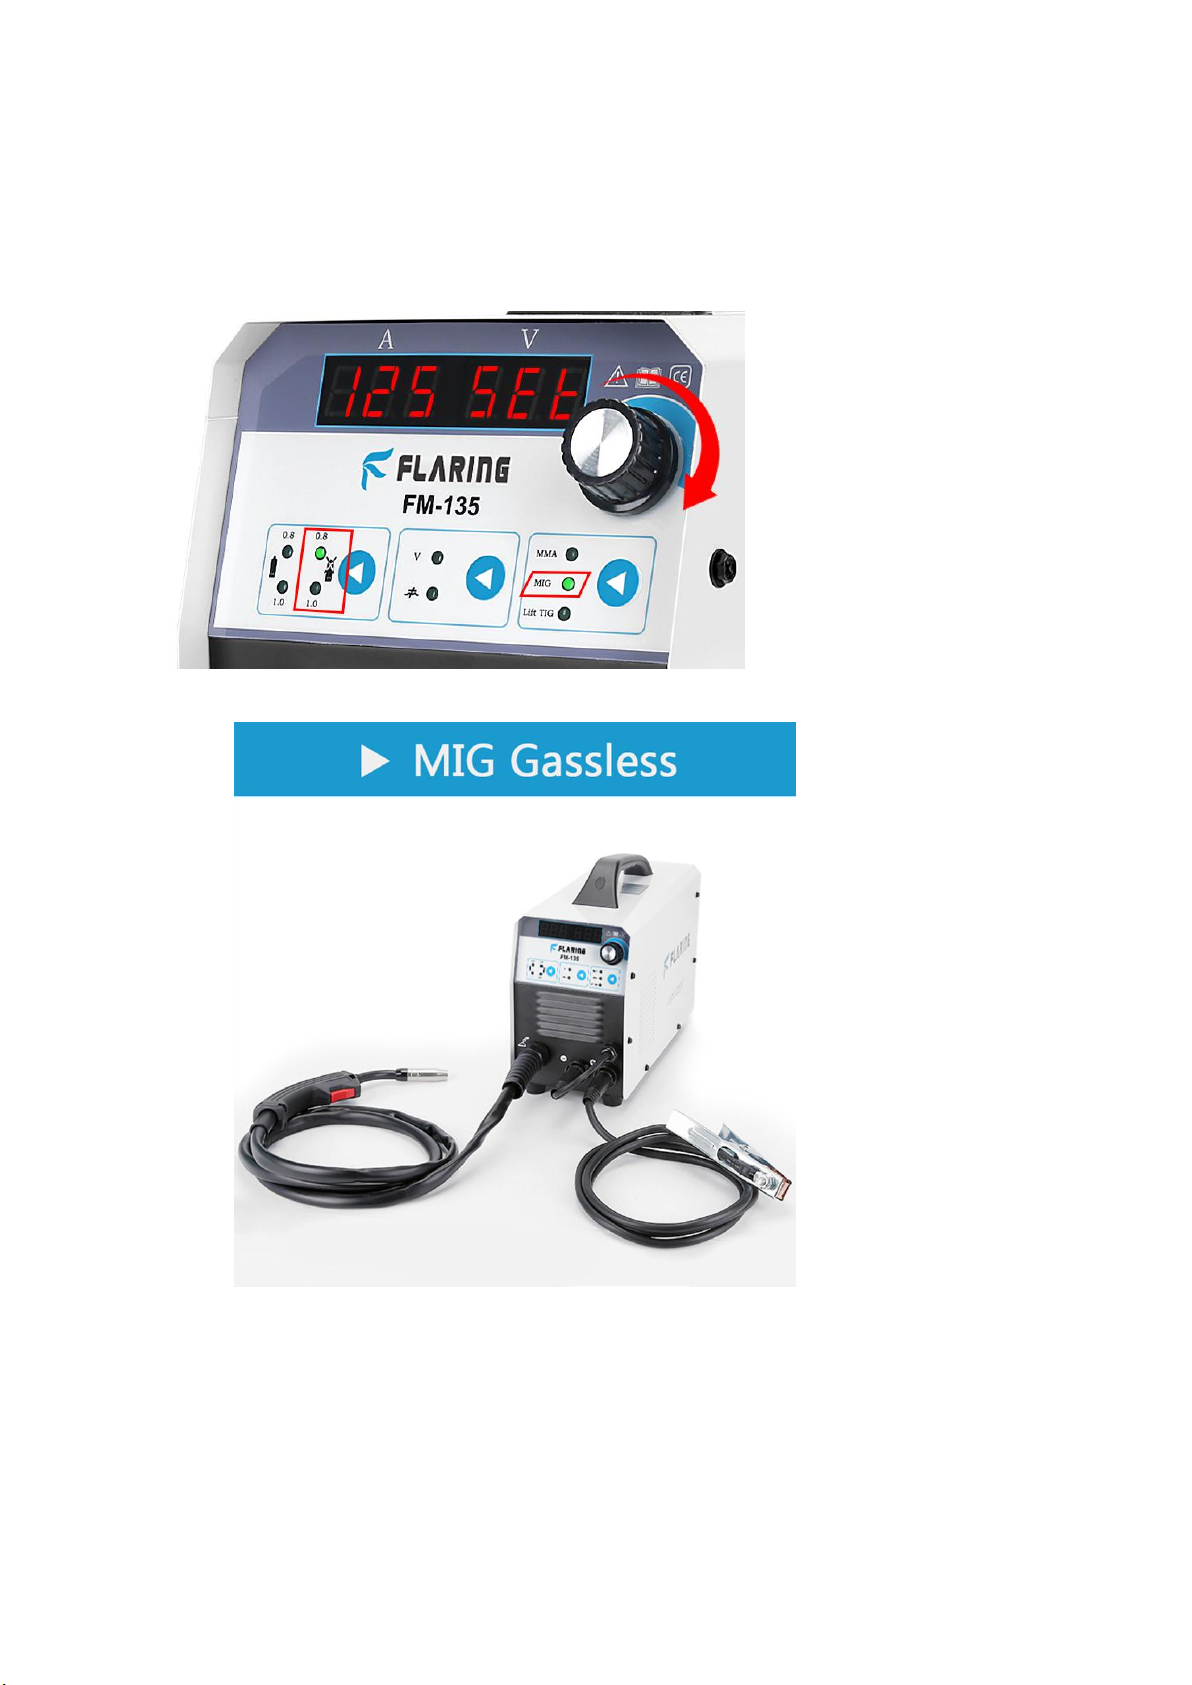
B) Self-protection mode of flux-cored welding wire.
1, Select “MIG” process.
2、Set polarity for MIG flux-cored(gasless).
FLARING FM-135D outstandingly supports 0.8mm and 1.0 mm diameter welding wires, and automatically
and intelligently matches the best welding parameters according to different specifications of welding wires to
achieve the best results.
4、Connect MIG gun and ground clamp.
Flux-cored wire Note: No need to use gas cylinder and gas meter
Page 14
14
5、Install wire spool.
0.030”(0.8mm)/0.040”(1.0mm)diameter,
4”(100mm 1kg)wire spool.
5、Set drive roll.
Face the side marked 0.030” away from the machine.
Remarks: 1. There are two grooves on one wire feed wheel, one side is 0.030” (0.8mm) and the other side is
0.040” (1.0mm) to match the corresponding wire diameter.
2. Gear wire feed wheel, gear wire feed wheel is suitable for flux-cored welding wire, our standard
configuration has 1 piece of 1kg flux-cored welding wire, which can be directly installed and used.
6、Feed wire and set pressure.
Page 15
15
7、Connect to Input Power.
Please refer to the digital sign on the rear panel of the machine for input voltage. Connecting the wrong voltage
will damage the machine.
8、Remove consumables and depress trigger until wire comes out, Replace consumables.
Press and hold the torch switch wrench for more than 3 seconds to not weld. This is fast wire feeding. Let the
welding wire be quickly delivered to the gun head.
9、 Be sure to use porcelain nozzles.
Page 16
16
10、Adjust wire feed speed , current and voltage.
1.Choose MIG, MMA, LIFT TIG working mode.
2.Choose welding wire diameter 0.8mm/1.0mm, choose airless (Flux-cored wire).
3. The machine has a unified function, so just adjust this knob the the welding current, voltage and wire
feeding speed are adjusted automatically at the same time.
4.“V”, If you are not satisfied with the automatic adjustment of the machine, you can fine-tune the voltage
(when the current and wire feeding speed are unchanged), "inductance", during the welding process, it feels
that the welding pool is not deep enough and the splash is too large, so you can adjust it appropriately .
12、With contact tip 1/4” from metal, depress trigger completely to initiate arc.
13、To replace the welding wire.
Use the cutting pliers to cut off the front section of the contact tip that is more than the welding wire, loosen the
wire feed mechanism pinch wheel, rotate the welding wire reel clockwise, turn the welding wire back to the wire feed
reel, pay attention to pinch the welding wire with your right hand to avoid the wire bounce.
Page 17

17
14、Wearing parts of welding gun.
Note: 1. Gas diffuser, 2. Conductive nozzle, 3. Nozzle. They are wearing parts and need to be replaced
frequently, please keep inventory.
Note:
1) Please strictly follow the picture instructions to connect, otherwise it will not be possible to solder.
2) The flux-cored welding wire supports 0.8mm, 1.0mm.
3) The machine can install 1kg(2.2lb) welding wire reels.
4) The machine is equipped with a 1kg(2.2lb) flux cored wire, which can be directly installed and used.
5) Support welding material, carbon steel, aluminum and stainless steel cannot be welded.
6) The diameter of the welding wire, the groove of the wire feed wheel and the aperture of the contact tip must
match.
7) The pressure roller of the wire feeding structure should not be too tight or too loose, which will cause the
wire feeding to be unstable.
8) The installation of the wire feed reel should not be too loose or too tight, which will cause the welding wire of
the wire reel to spring off and the wire feeding too slow.
Possible problems
1) There is no response when turning on the power, please check the plug connection.
2) There is no response when turning on the power, please open the cover and check whether the internal
connecting wires are loose.
3) The wire feeding is unstable. Please check the wire feeding reel and the wire feeding pressure roller, and the
welding gun should not be wound. Pay attention that the diameter of the welding wire matches the wire
feeding wheel groove and contact tip.
4) No wire feeding, please confirm that the working mode is MIG state, please confirm that the welding gun is
connected well, press the gun switch or no wire feeding, please contact us.
5) During the welding process, if the time exceeds 3 minutes, over-current protection may occur. You need to
stop working for a few minutes, let the machine cool for a period of time, and automatically recover. If the air
cools for more than 10 minutes, the machine does not automatically recover, please shut down and restart.
6) If you have any questions, please contact us at [email protected].
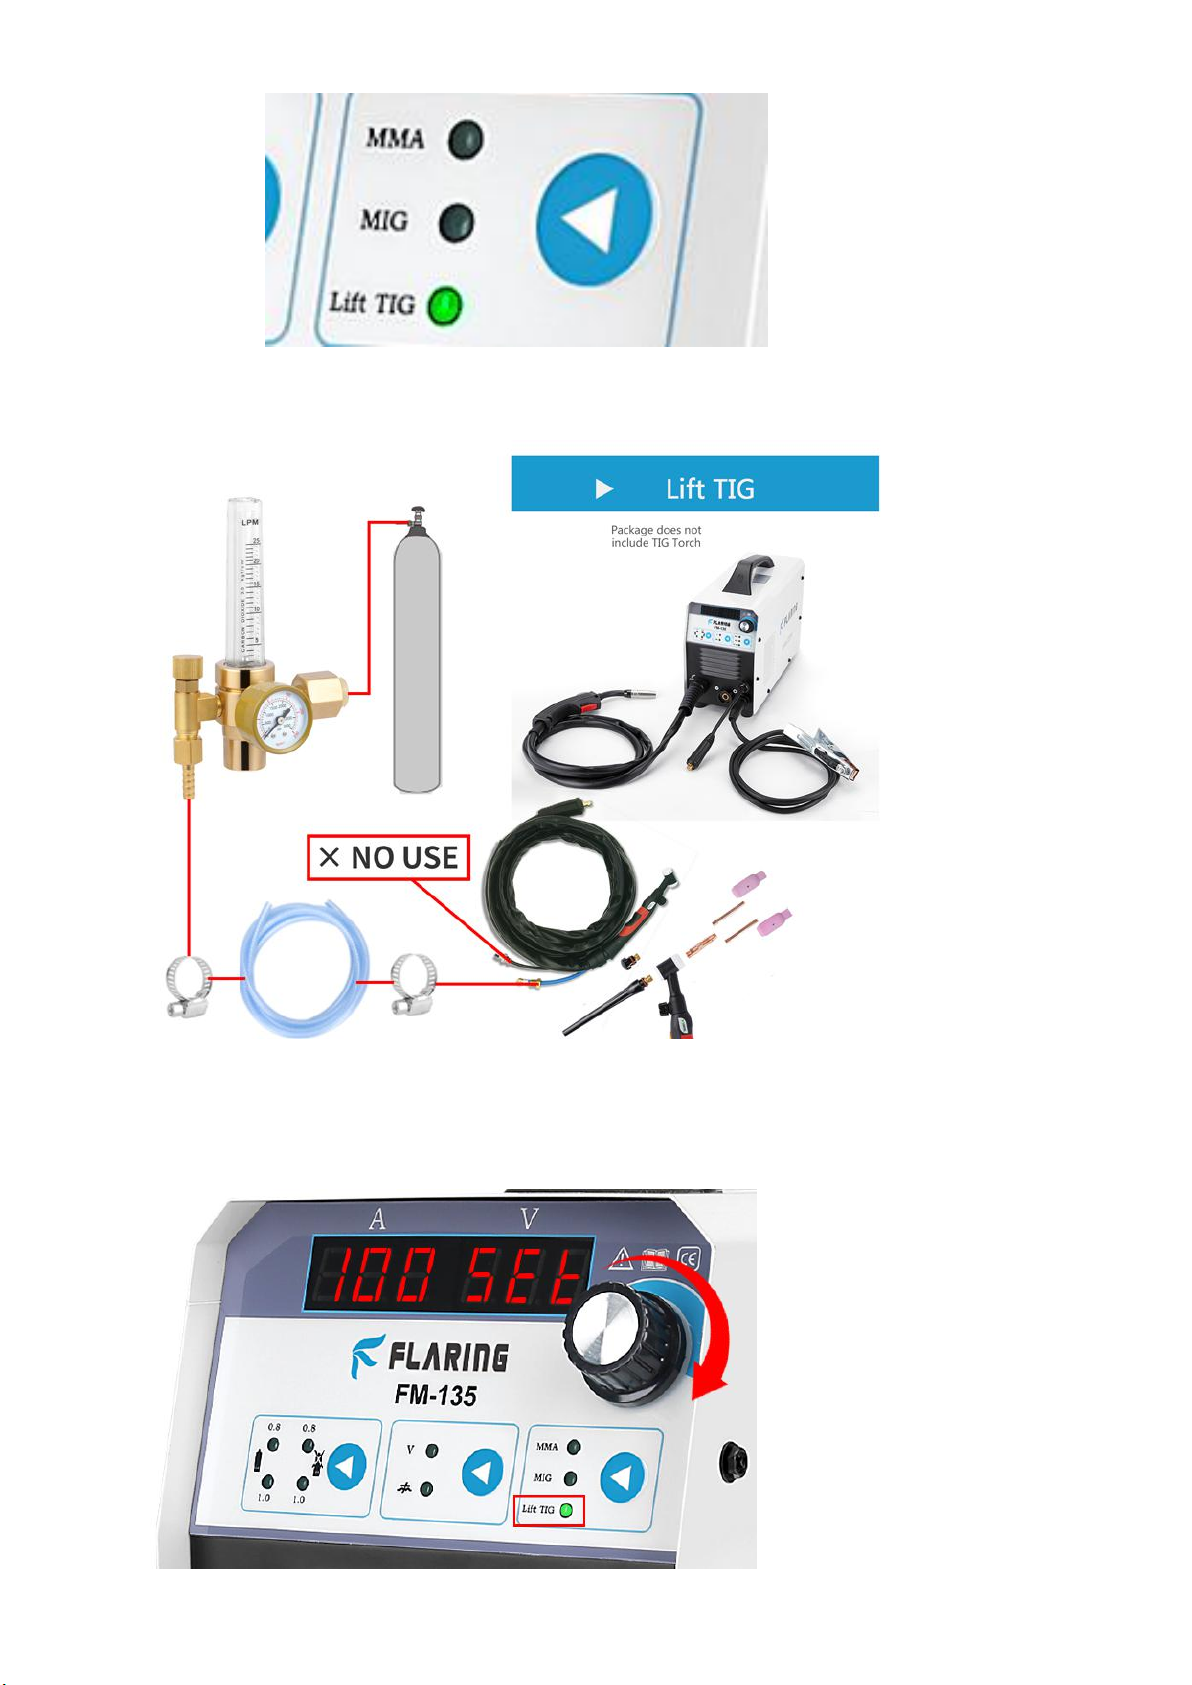
3、LIFT TIG mode:
FLARING FM-135D for thin plates with higher welding process requirements or welding with higher process
requirements, especially for stainless steel welding, you can use the LIFT TIG mode, which requires the use of pure
argon.
Page 18
18
1、 Select “Lift TIG ” process.
2、 How to connect.
、
Remark: TIG welding gun is not included in the package, you need to purchase it separately.
3、 Adjust the current, only the current can be adjusted.
Page 19
19
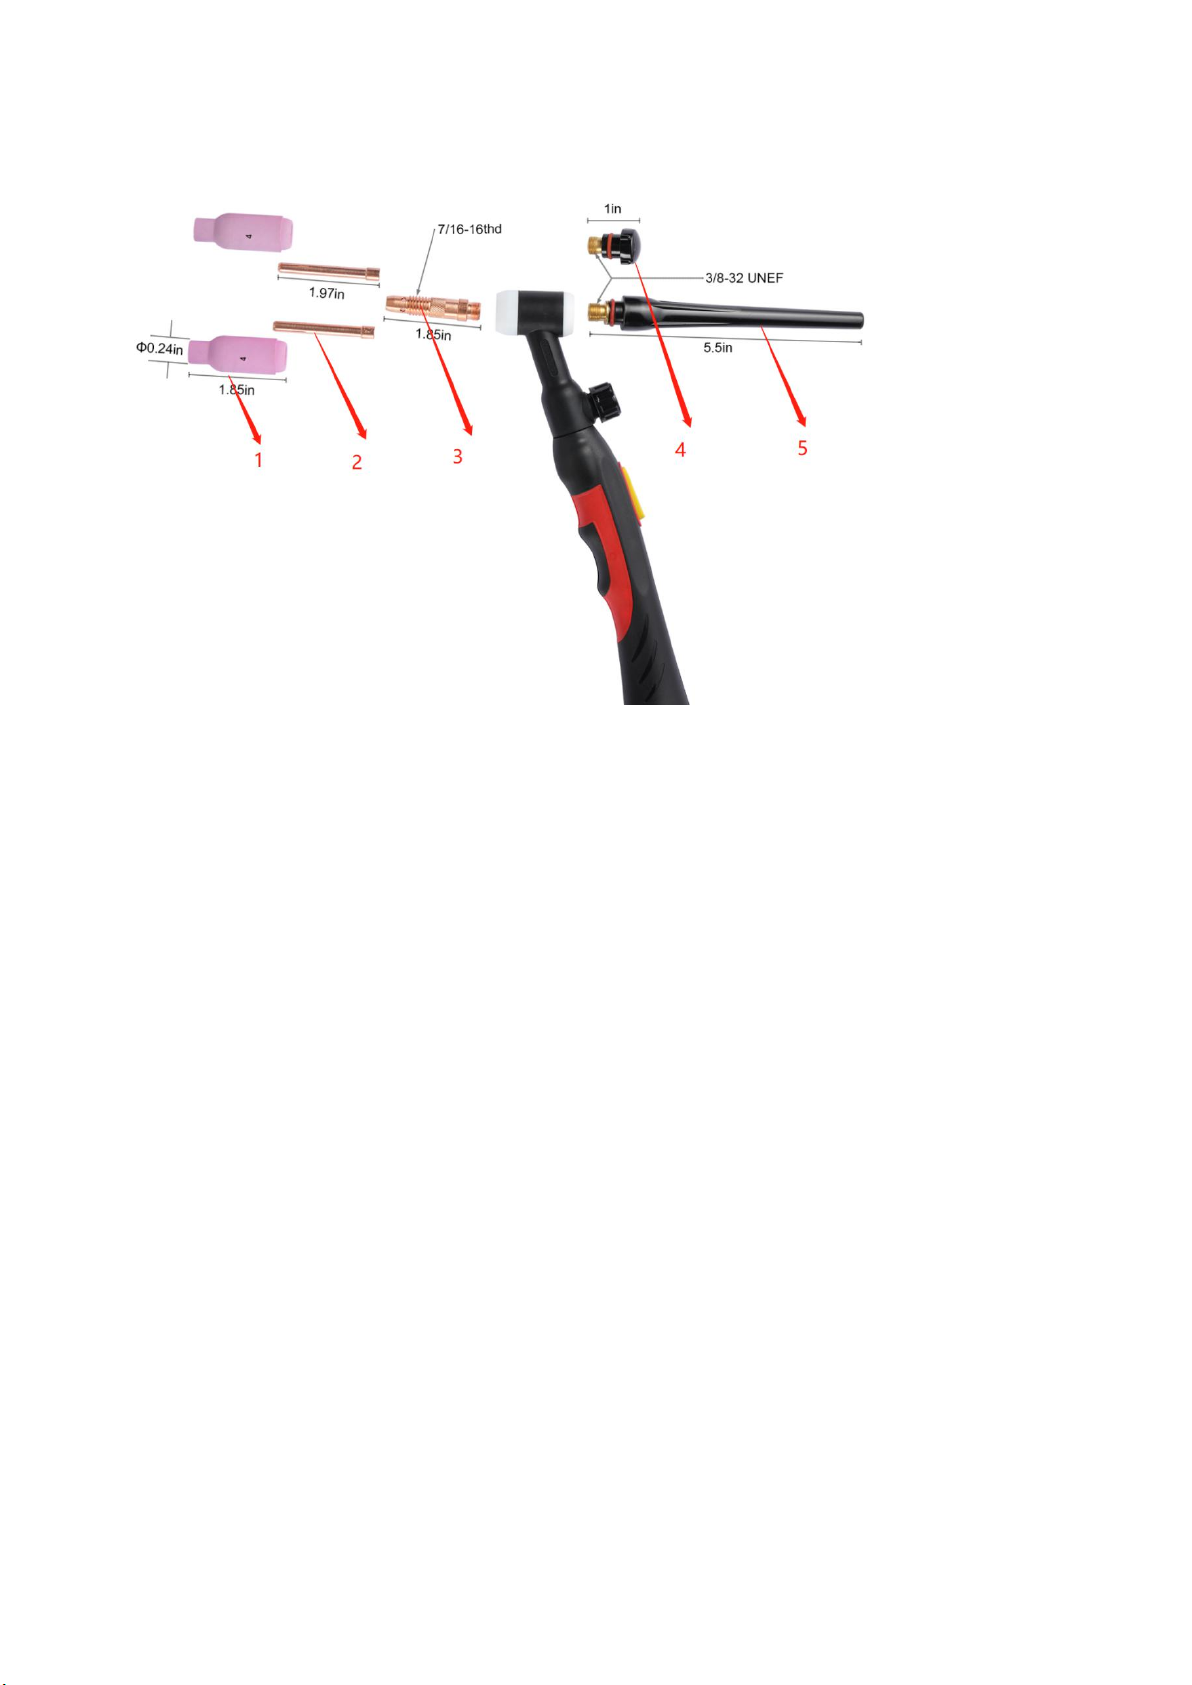
4、 WP17V Structure of welding torch
Note: Tig torch and accessory are not included.
Remark: 1. ceramic nozzel, 2 .tungsten collet, 3. tungsten collet body, 4 .short back cap, 5. long back cap.
The above structure is a wearing part, please keep it in stock.
Note:
1) Please connect according to the picture, otherwise it cannot be welded
2) This machine is not a professional high-frequency arc starting argon arc welding machine, it is only a LIFT TIG
contact arc starting or friction starting.
3) Need to use TIG, wp17v torch, this torch is not included, you need to buy it yourself
4) Support welding material, carbon steel, stainless steel, alloy steel, aluminum can not be welded.
5) This welding mode requires the use of tungsten needles, which need to be purchased separately, and the size
of the tungsten needle must match the collet and collet body of the welding gun, otherwise it cannot be
installed
6) In this mode, argon welding must be used.
possible problems
1) There is no response when starting up, please check the plug connection.
2) There is no response when booting up, please open the cover and check whether the internal connection
wires are loose.
3) During the welding process, if the time exceeds 3 minutes, over-current protection may occur. You need to
stop working for a few minutes, let the machine cool for a period of time, and automatically recover. If the air
cools for more than 10 minutes, the machine does not automatically recover, please shut down and restart.
4) If you have any questions, please contact us at [email protected].
5)Lift tig is different from professional high-frequency tig. Lift tig needs to be welded after contact with arcing.
High-frequency tig does not require contact with arcing. Lift tig is not suitable for spot welding.
Page 20
20
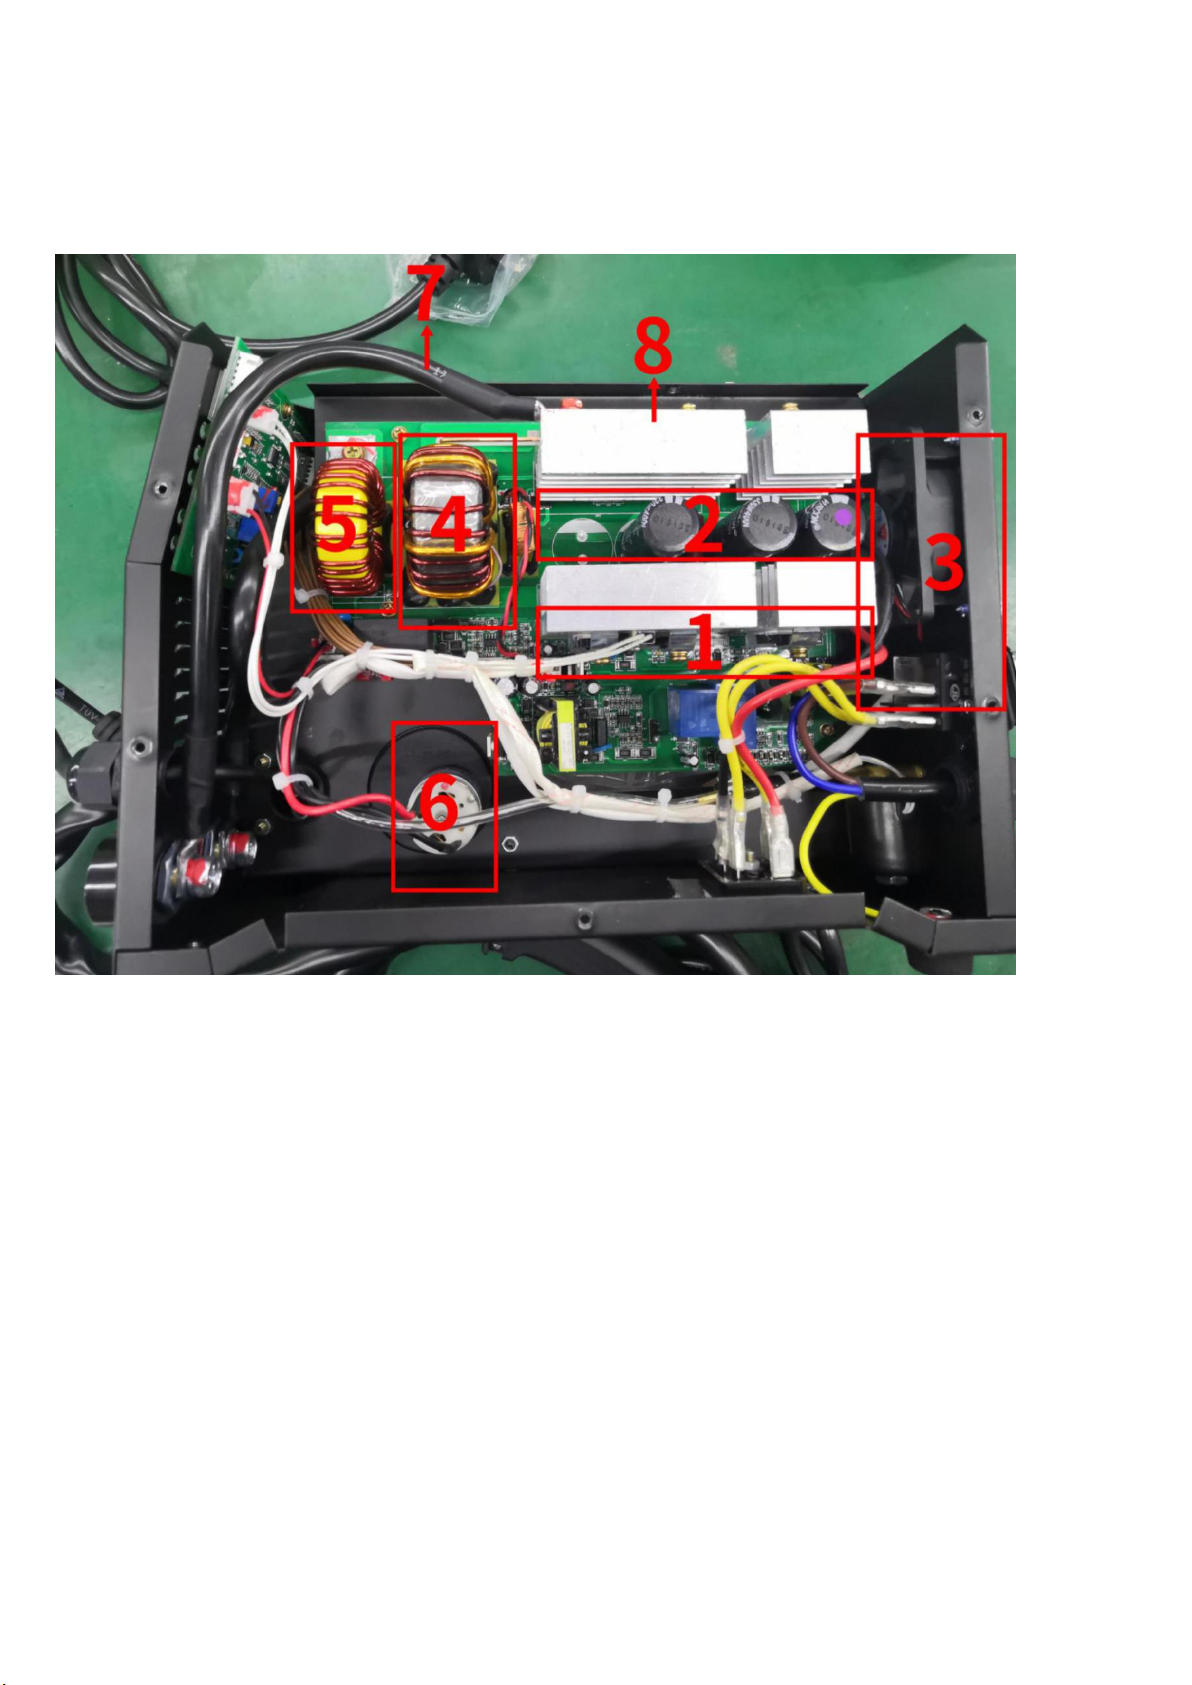
Part 6: Internal diagram of the machine
1. 7 imported transistors, stable and powerful current output.
2. 3 high-power large capacitors, the machine is more stable.
3. Cooling fans, greatly improving the machine load duration.
4. The main transformer of all copper, the power is larger.
5. In addition, an output reactance is added, the output welding current is more stable, the
welding shape is good, and there is less spatter.
6. Metal high-power wire feeding structure, strong wire feeding force and stable wire feeding.
7. The thick output connection wire of all copper, the welding effect is better.
8. Thicker radiator, better heat dissipation effect.
Page 21
21
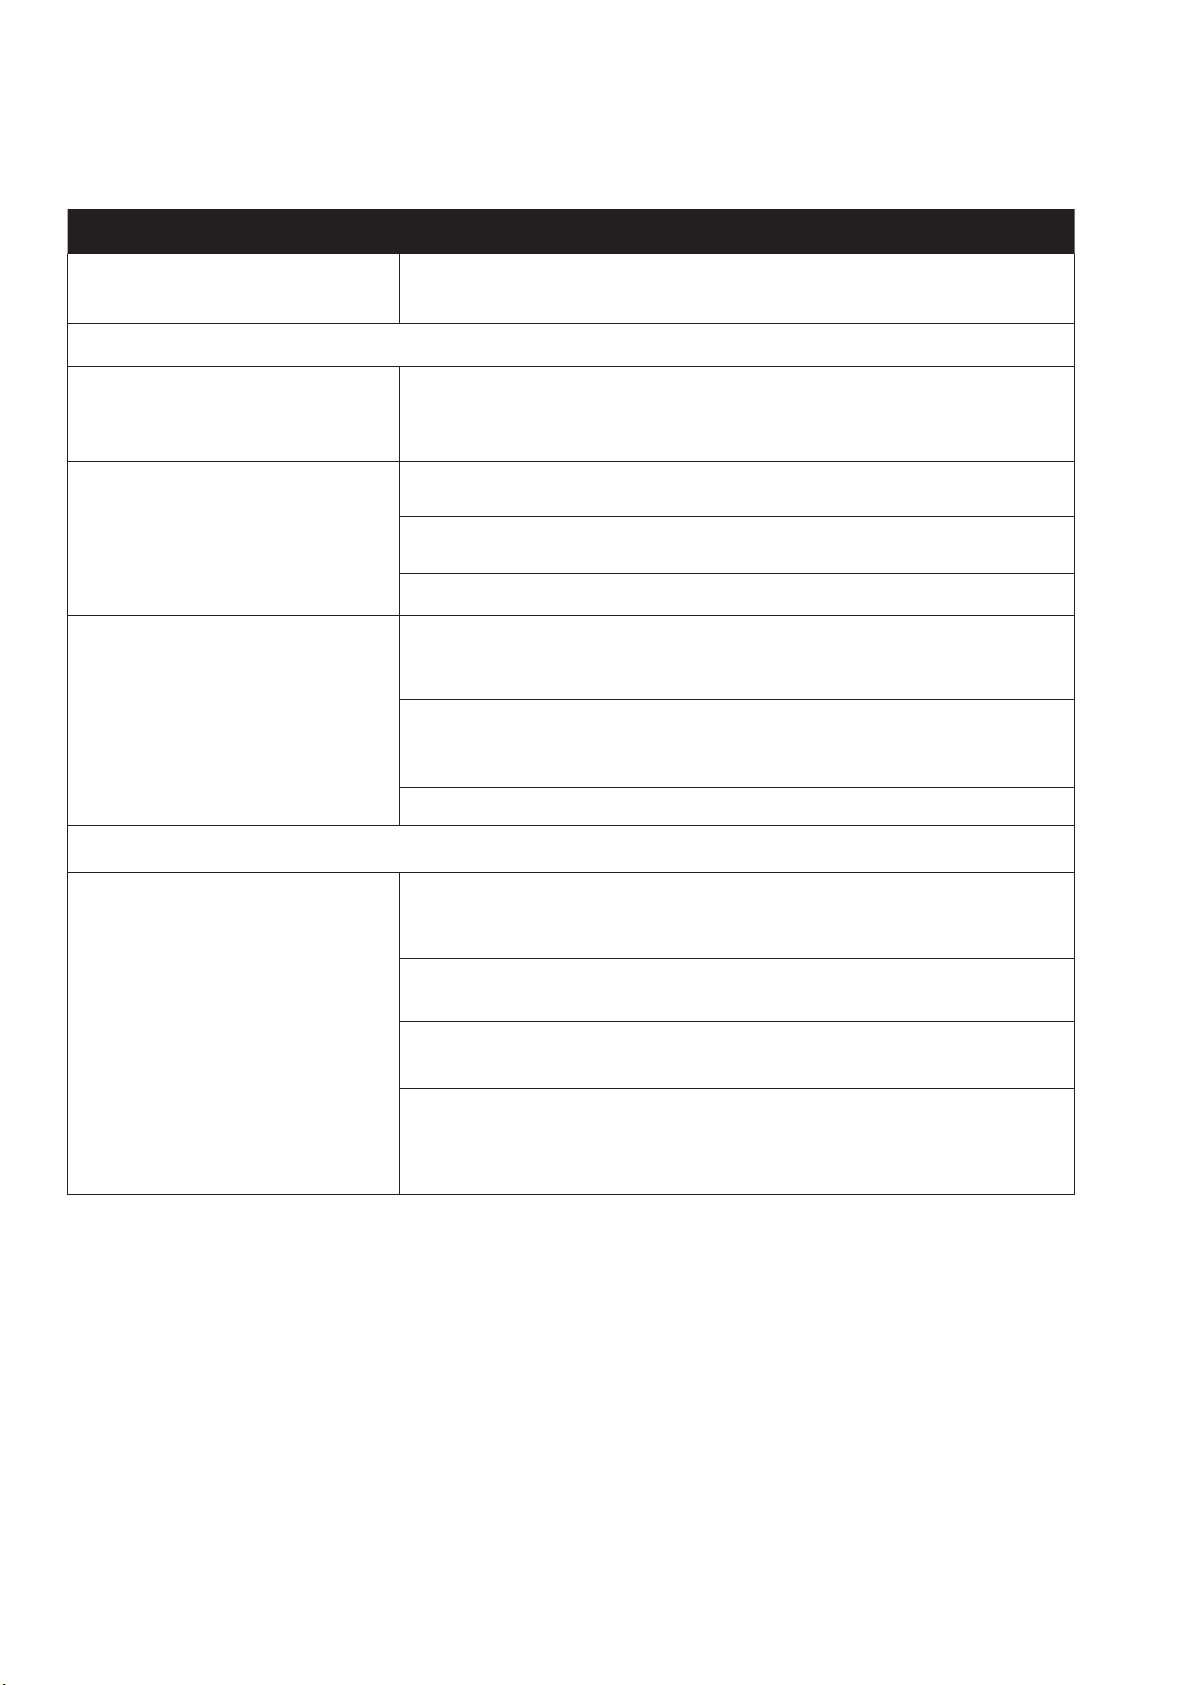
Part 7:Troubleshooting
Observe all Safety Guidelines detailed throughout this manual
PROBLEMS
(SYMPTOMS)
POSSIBLE
CAUSE
OUTPUT PROBLEMS
Major physical or electrical damage
is
evident.
“Do not Plug in machine or turn it on”.
Contact your local Authorized Field Service
Facility.
No wire feed, weld output or gas
flow
when gun trigger is pulled. Fan
does NOT
operate.
1. Make sure correct voltage is applied to
the machine.
2. Make certain that power switch is in
the ON position.
3. Make sure circuit breaker is reset.
No wire feed, weld output or gas
flow when gun trigger is pulled.
Fan operates normally.
1. The thermostat may be tripped due to
overheating. Let machine cool. Weld at
lower duty cycle.
2. Check for obstructions in air flow.
Check Gun Trigger connections. See
Installation section.
3. Gun trigger may be faulty.
FEEDING PROBLEMS
No wire feed when gun trigger is
pulled. Fan runs, gas flows and
machine has
correct open circuit
voltage – weld
output.
1. If the wire drive motor is running make sure that the correct drive rolls are
installed in the machine.
2. Check for clogged cable liner or
contact tip.
3. Check for proper size cable liner and
contact tip.
4. Check if the spool gun switch, located in the wire drive compartment, is set to the
desired location.
Page 22
22
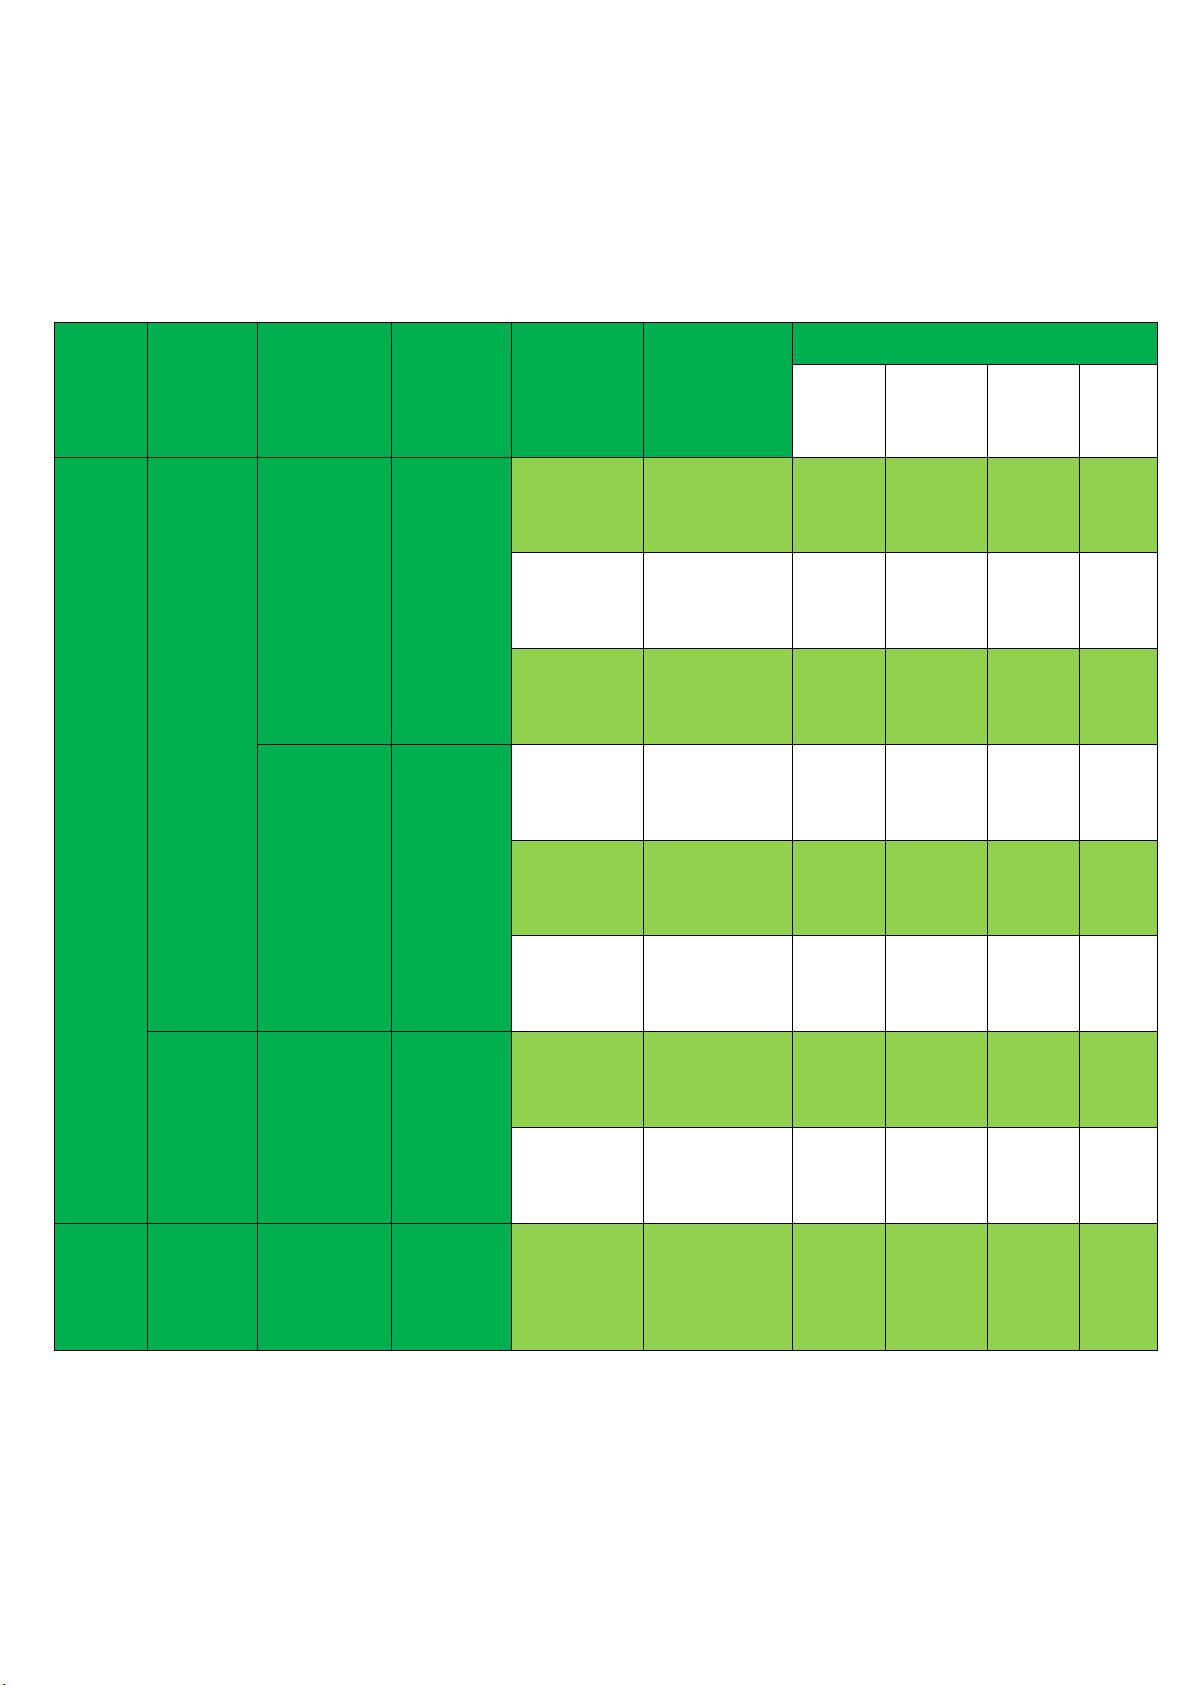
Part 8: Welding parameter settings
FM-135D Welding Parameters
Material
Wire Type
Shielding
Gas
20-30
SCFH
Polarity
Setting
Wire
Size
Settings
Material Thickness-220V
24 Ga.
0.6mm
20 Ga.
0.9mm
18 Ga.
1.2mm
16 Ga.
1.6mm
Mild
Steel
Solid Wire
ER70S-6
C25
75% Ar
25% CO2
DCEP
0.025"
0.6mm
Wire speed
Voltage
Inductance
90
14
3-5
110
14.5
3-5
-
-
0.030"
0.8mm
Wire speed
Voltage
Inductance
-8015
5-10
105
15.5
5-10
-
0.040"
1.0mm
Wire speed
Voltage
Inductance
-8014
5-10
100
16
5-10
125
17
5-10
C100
100% CO2
DCEP
0.025"
0.6mm
Wire speed
Voltage
Inductance
105
14
1-3
110
15
1-3
-
-
0.030"
0.8mm
Wire speed
Voltage
Inductance
-8016
3-6
120
16.5
3-6
130
17.5
3-6
0.040"
1.0mm
Wire speed
Voltage
Inductance
-
-
120
17
3-6
-
Flux-Core
d
E71T-11
None
DCEN
0.030"
0.8mm
Wire speed
Voltage
Inductance
-8013
5-10
80
13.5
5-10
95
14.5
5-10
0.040"
1.0mm
Wire speed
Voltage
Inductance
-
-8014
5-10
80
14.5
5-10
Stainles
s
Steel
ER308L
Tri-Mix
90% He
7.5% Ar
2.5% CO2
DCEP
0.040"
1.0mm
Wire speed
Voltage
Inductance
-9018
5-10
100
18.5
5-10
120
18.5
5-10
 Loading...