

Flame-Broil 5454, 5458 Installation & Operation Instructions

Manufactured by
K & W Mfg. Co. Inc., Corona, California
Installation & Operation Instructions
For Gas Barbecues Models 5454 and 5458

This page intentionally blank

A Note to You
Thank you for buying a Flame-Broil barbecue grill. T o ensure that you enjoy your barbecue equipment for many years,
we developed these instructions. They contain valuable information about how to install, operate and maintain your
barbecue equipment. Please read them carefully .
Keep this booklet and your sales receipt together in a safe place for future reference. It is important for you to save your
sales receipt showing the date of purchase. Proof of purchase will assure you of warranty service.
If you need assistance or service, you can reach us at:
K & W Mfg. Co., Inc.
23107 Temescal Canyon Road
Corona CA 92883-5045
Phone: 951-277-3300
FAX: 951-277-2070
www.k-and-w-mfg.com
Happy Barbecuing!
Limited Warranty
K & W Mfg. Co., Inc. warrants Flame-Broil Barbecue Equipment to be free from defects in design, materials, and
workmanship at the time of manufacture.
For a period of five (5) years following purchase, K & W Mfg. Co., Inc. will repair or replace, at the discretion of
K & W Mfg. Co., Inc., any Flame-Broil Barbecue unit found to be defective by K & W Mfg. Co., Inc. or their authorized
representative. This warranty does not cover the normal wear and tear that occurs from operation of the unit, nor
does it including neglect or abuse. The Flame-Broil Barbecue unit must be installed and operated in accordance
with the installation and operating instructions of K & W Mfg. Co., Inc., and any local area building and fire codes.
K & W Mfg. Co., Inc. shall not be responsible for any indirect, incidental, or other damage.
In order claim remedy under the five-year warranty , the unit must be returned to the factory, at the owner’s expense,
with a copy of the purchase receipt. If the unit is found to be defective, K & W Mfg. Co., Inc. will repair or replace the
unit at their discretion, and return the unit to the owner at the company’s expense.
At any time, K & W Mfg. Co., Inc. will repair or replace any Flame-Broil Barbecue unit, returned to the factory at the
owner’s cost, for a cost of no more that half of the current suggested retail price of the most similar current model.
Unpacking your Barbecue
When you unpack your barbecue unit, you should find:
The main body of the barbecue unit with the burner(s) installed
A drip tray at the bottom of the unit
A box inserted into the inner liner of the barbecue unit. This box should contain:
✔ These instructions
✔ Two small hex-head orifices for converting from natural gas to propane (LP).
✔ Two smaller cooking grills
✔ One larger briquet grate
✔ Three or four bags of stainless steel Broilettes
Page 1
1 Installation
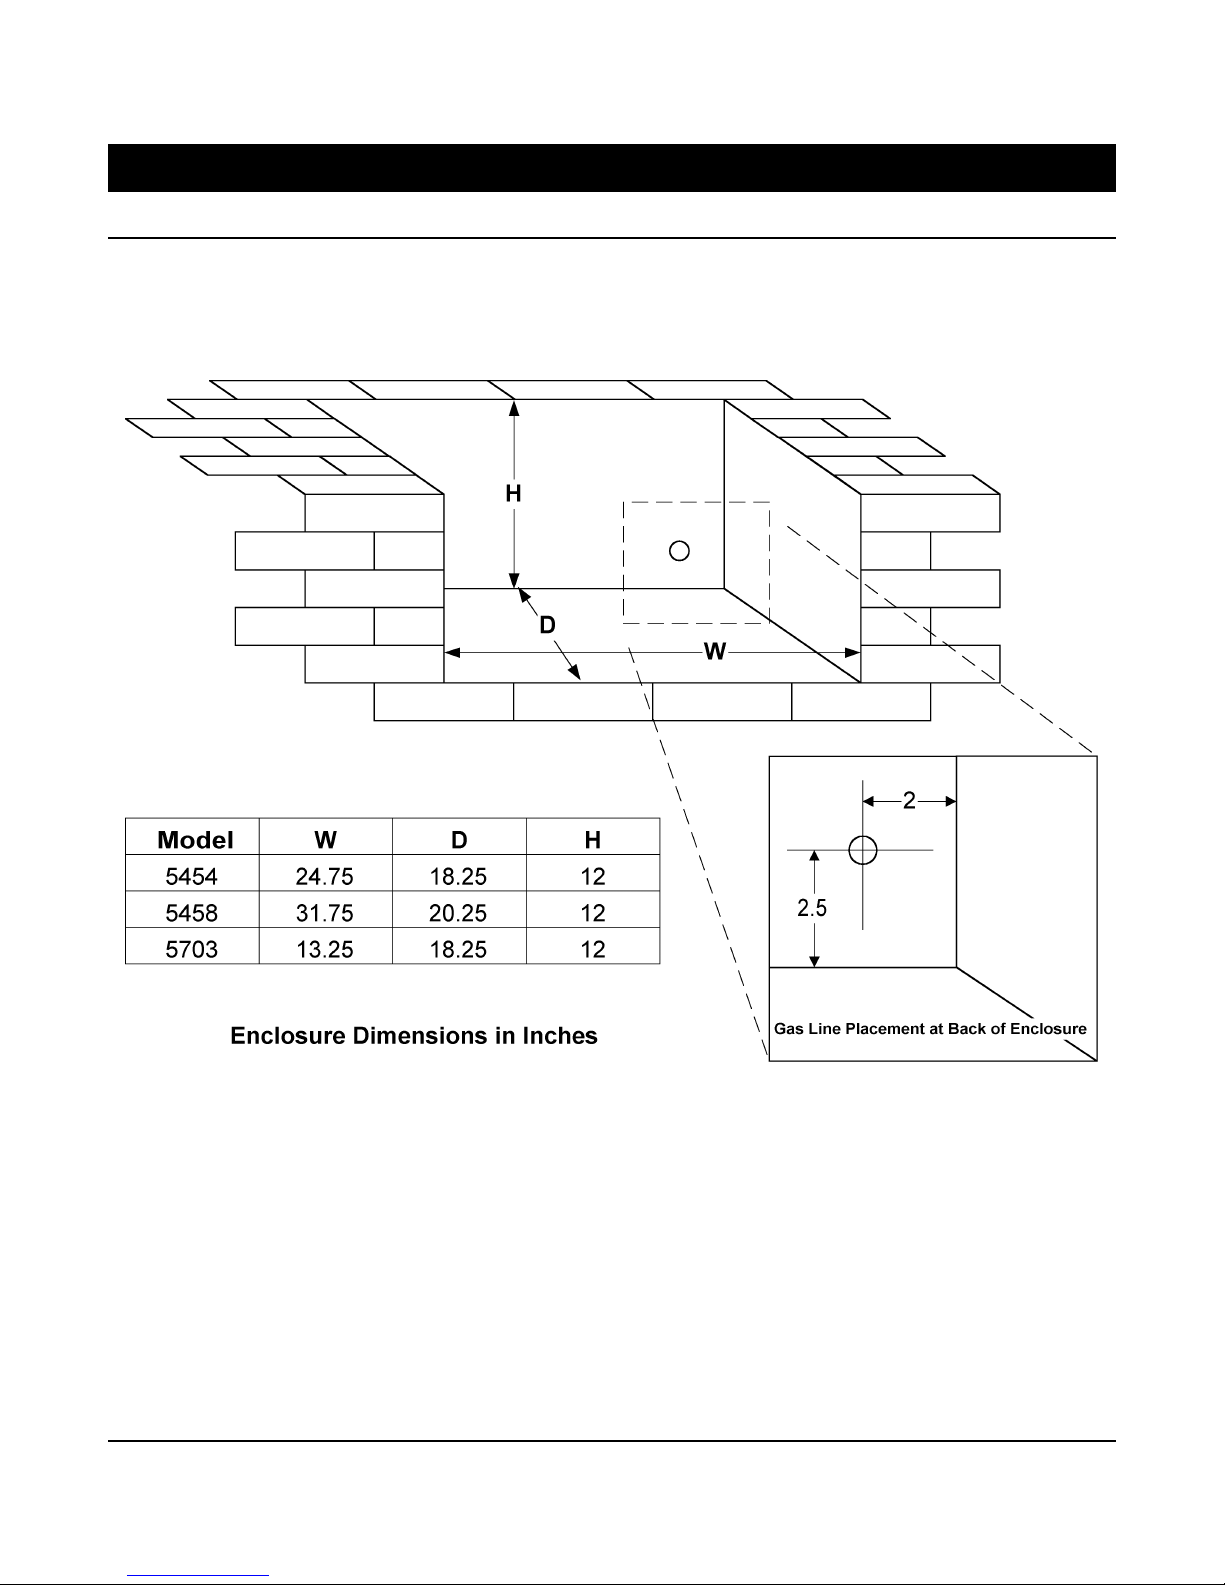
1.1 Setting up your stand or enclosure
Flame-Broil barbecue equipment may be installed in many different types of enclosures or stands. If you are
planning to build a permanent enclosure and/or change your gas plumbing, it is highly recommended that you
check with your local building department concerning building codes and permits. The following diagram will
provide you with the dimensions your equipment needs to fit its enclosure or stand.
1.1.1 Combustible Materials
Our barbecue units are intended for use in masonry or other fireproof locations. They are not insulated. They
should never be in contact with any combustible materials.
While operating your barbecue equipment, you should be at least 2 feet from any combustible house sidings. In
addition, you should never operate your barbecue equipment under a roof overhang or patio cover made from
combustible materials.
1.1.2 Drainage
Allowing water to pool in and around your barbecue equipment will increase the normal wear and tear to the
components, and lower their life expectancy. We recommend that you provide for drainage when building your
enclosure so that water will not pool underneath the barbecue, or inside the enclosure.
Page 2
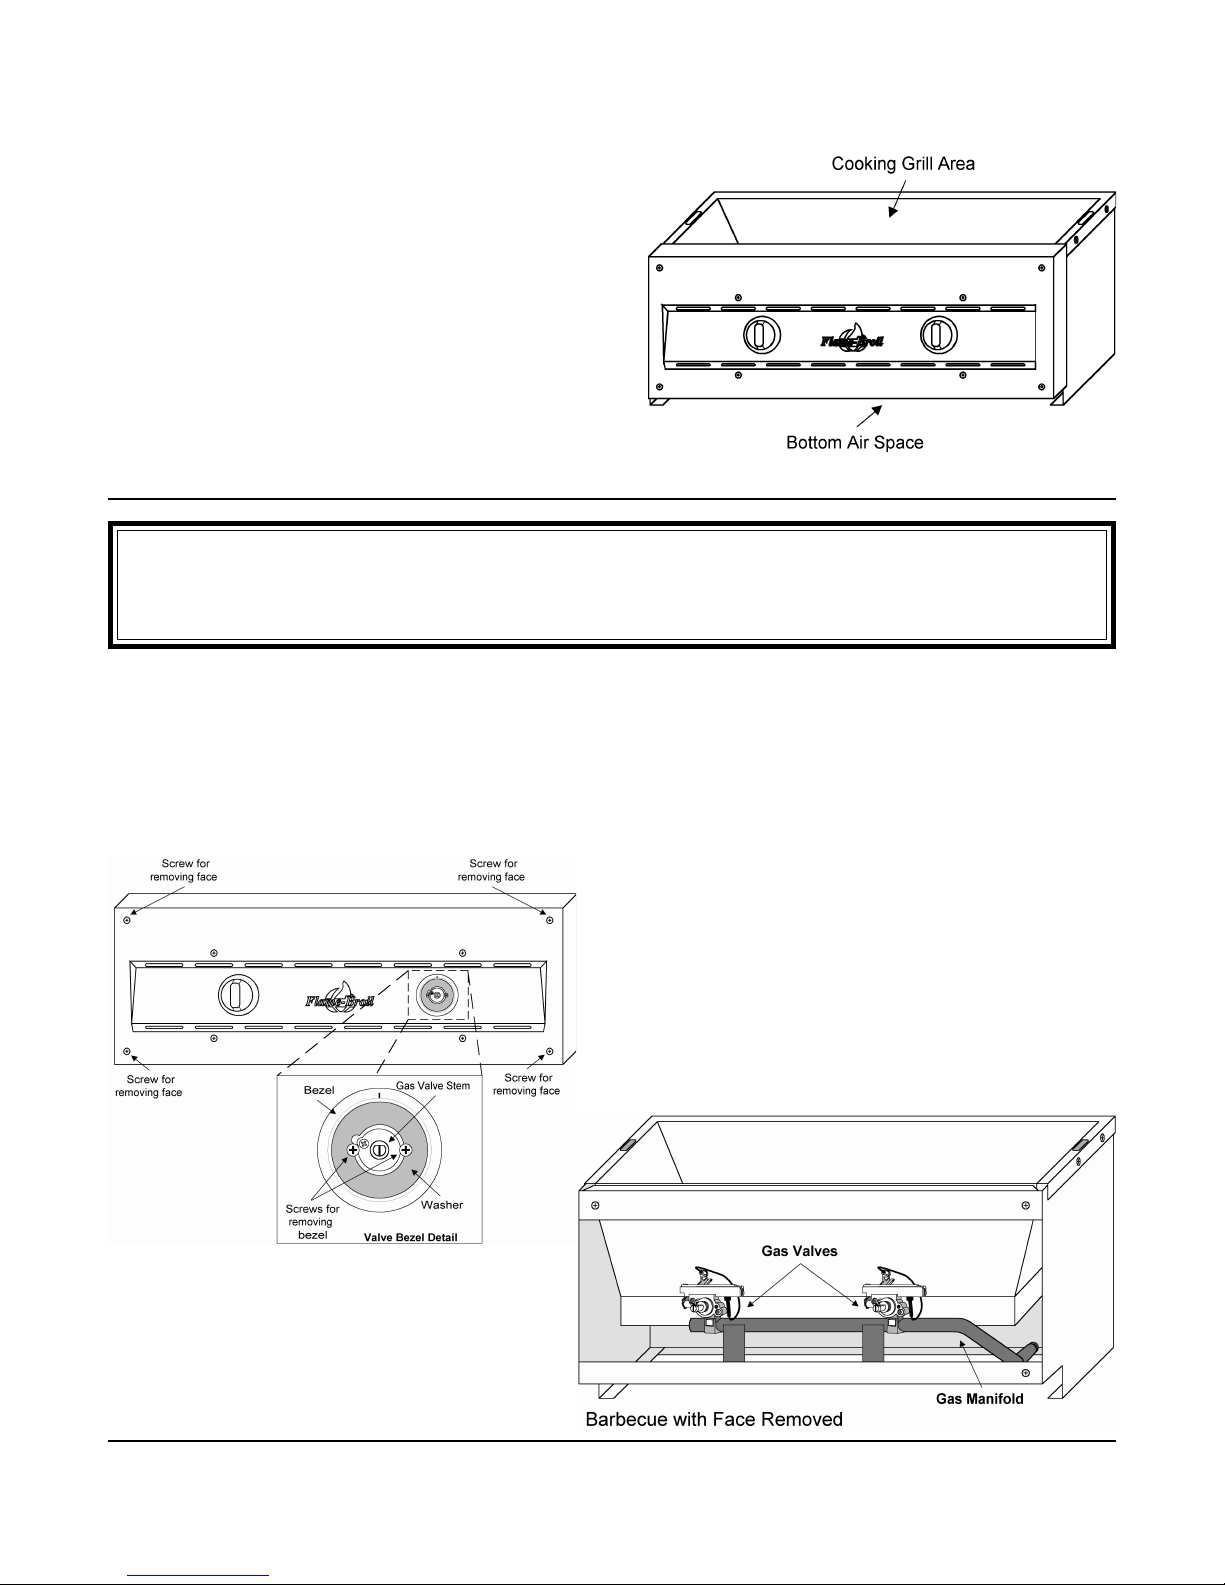
1.1.3 Ventilation
Blockage of fresh airflow into and around your barbecue
equipment will cause overheating, poor combustion and
possible damage to components. There is an air space at
the bottom of the barbecue units, below the face. This air
space must remain open for your barbecue equipment to
operate properly.
Our barbecues are also designed to vent though the cooking
grill area. Therefore, air must be allowed to flow though the
top of the unit. Only use a Flame-Broil barbecue accessory
to cover the cooking grill area.
1.2 Gas Connections
CAUTION: Propane, also known as LP, is a gas that is heavier than the surrounding air . You should not store
your propane bottle in an area that can trap any escaping gas. This means that your storage area must be
vented at the level of the base of your tank.
Please study this connection information carefully. If you do not feel confident about making these connections
yourself, please get help from a professional plumber or gas appliance installer before proceeding.
Be sure to use pipe tape or pipe joint compound approved for gas when making your connections. Check all
connections for leaks with a soapy solution (50% water / 50% detergent) before lighting the barbecue unit for the
first time. Bubbles indicate a leak that must be repaired before proceeding.
We recommend that you remove the face of the unit for
easier access. Be sure to first remove all of the loose
components and accessories from the unit. Next, you
remove the knobs by pulling them straight out from the
valve bezel. The knobs fit tight on the valve stems. You
may need to carefully lever the knobs from their stems with
a screwdriver. Now, you need to remove the bezels.
Remove the two screws that hold each bezel to the face
with a large washer. Then, remove the four screws
retaining the face to the frame. Carefully lift the face away
from the frame.
(Occasionally, we need to add spacers between
the face and the frame to ensure that the cooking
grills will fit correctly. Be sure to save any spacers
you may find there.)
Page 3
 Loading...