

Page 1

C-3 KNOB RECORDER
MANUAL
Version 1.01
FLAME
Page 2

MANUAL FLAME KNOB RECORDER Version 1.01
Contents
1. Short description ................................................................ 3
2. Hardware / Connections ..................................................... 3
2.1 Connection to the modular system (Doepfer bus) 3
2.2 Modul overview 4
3. Handling ............................................................................. 5
3.1 Manual mode (Knob) 5
3.2 Record 5
3.3 Play back 5
3.4 Play funktions (Speed and Offset) 6
3.5 External reset 6
3.6 Save 7
3.7 Initialization 7
3.8 Firmware updates 7
4. Appendix and technical informations .............................. 8
4.1 Technical details 8
4.2 Warrenty 8
4.3 Terms of production 8
4.4 Disposal 8
4.5 Support 8
4.6 Acknowledgment 8
2
Page 3
1. Short description
2. Hardware / Connections
The C3 module is a three-channel module for recording and playing back movements of controllers. Those can be recorded with each channel´s individual knob. The movements will be output as control voltages.
The record time amounts to 102 seconds maximal.
The track can be played once only (one shot) or in loop. The speed of the play back or the output offset is controllable with the pot.
Track one has an additional CV input. The pot 1 can be used here like an offset ruler.
All three tracks have a common reset input. All track data can be stored in internal non-volatil
memory and will be reloaded after power on.
Software updates are possible via backward USB connector.
3
2.1 Connection to the modular system (Doepfer bus)
The module is delivered with a connected
ribbon cable for the Doepfer bus. The red
lead marks -12 volt. Connecting the module
please note the right polarity!
If the module is poled accidentally wrong
safety diodes avoid the immediate destruction of the module but further damages cannot be excepted.
So please pay attention: Check the connection various times before switching on!
-12V
Ground
Ground
Ground
+12V
Page 4

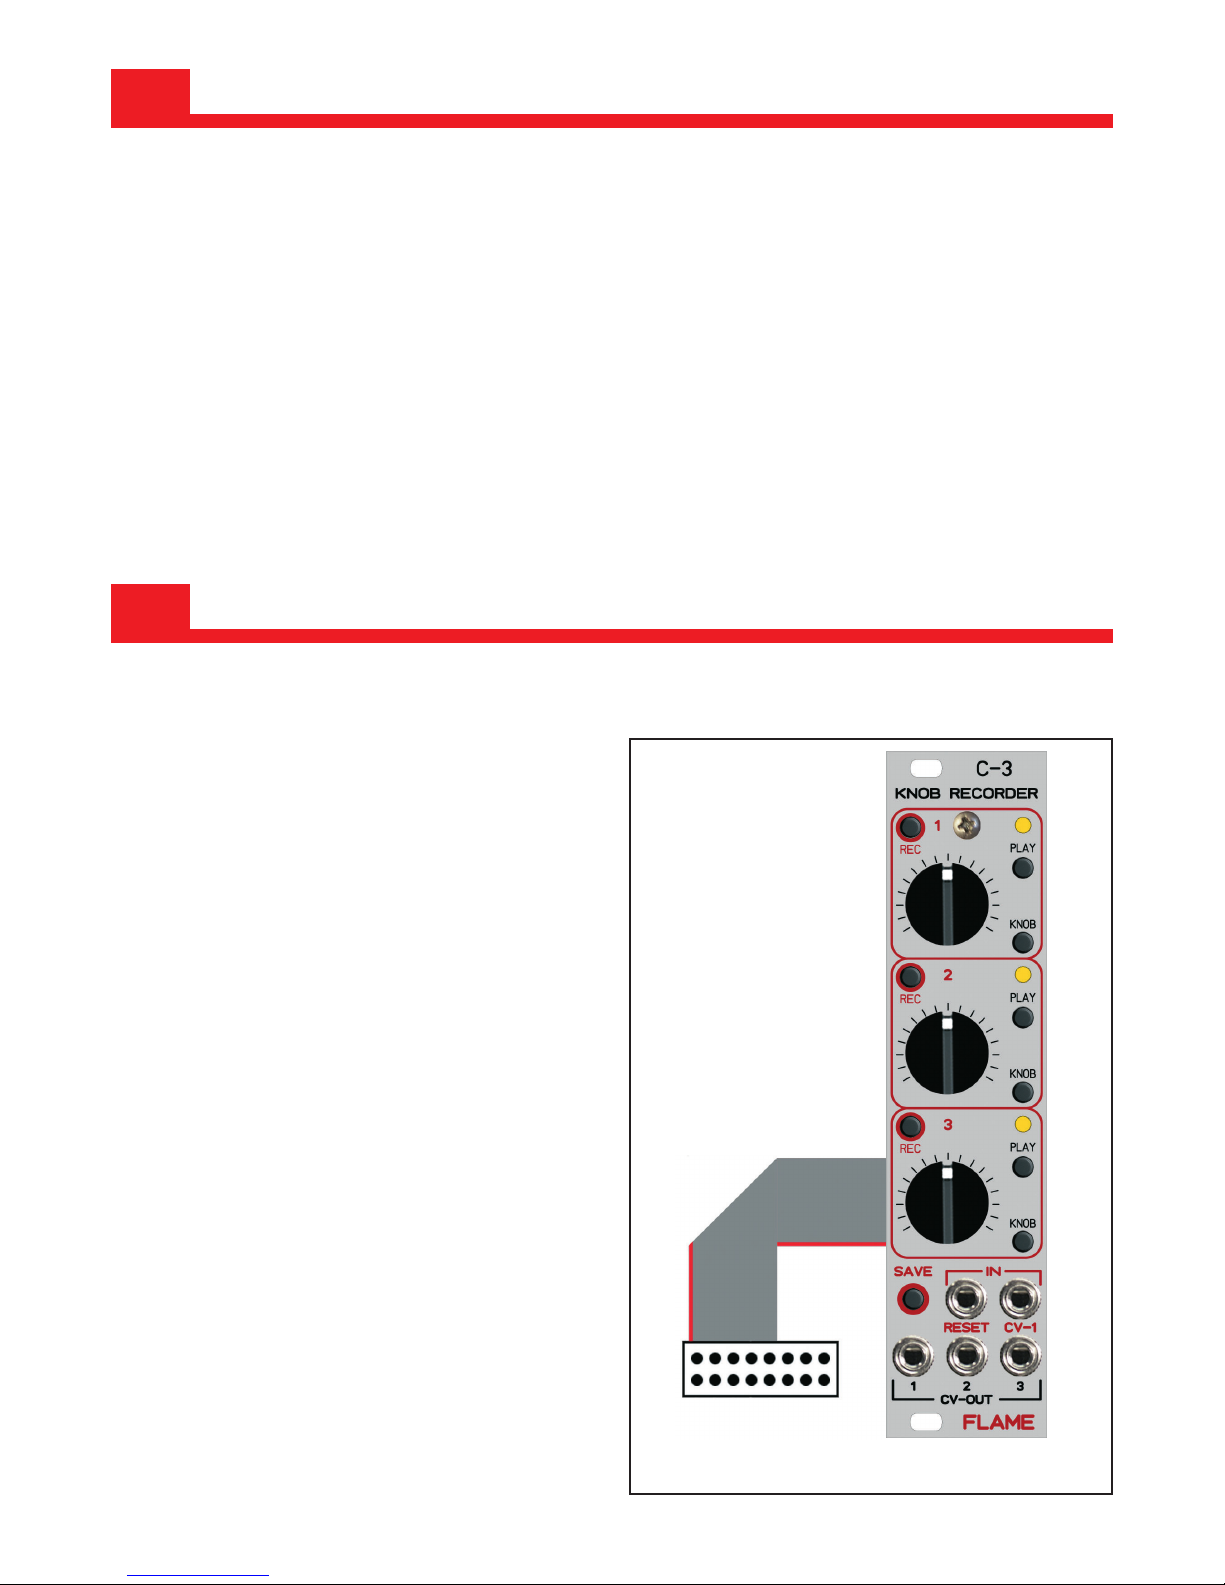
4
Push button RECORD
LED
Push button PLAY
Push button KNOB
Ruler for CV, Speed or Offset
Push button SAVE (Store data)
Input jack RESET (0/+5V)
CV outputs tracks 1-3 (0..+10V)
CV-1 input track 1 (0..+10V)
❶
❶
❸
❸
❷
❹
❹
❺
❺
❻
❻
❼
❼
❽
❽
❷
2.2 Modul overview
➒
➒
Page 5

5
3. Handling
For beginning the record sequence please push the REC button (blinking yellow LED). You can
record the movements of the ruler until you push again the button REC or until up to the maximal record time of 102 seconds. Now the record sequence stops and jumps automatically in the
Play loop mode (yellow LED on).
The voltages of pot one and CV-1 input will be added and also recorded. The output voltage is
limited to +10V.
If ruler one is on position Zero you can record the control voltages of input CV-1, e.g. LFO’s in
the range of 0..+10V. The sample rate is 50Hz (50 values per seconds). Pot one serves like an
offset ruler.
From mode KNOB or PLAY you can start a record sequence anytime.
After power on the module stands in KNOB mode. All LEDs are off. With the pot you can adjust
an output voltage between 0 and +10V. The voltages of pot one and CV-1 input will be added.
Pot one serves like an offset ruler.
You activate the manual mode by pushing the button KNOB.
After a record sequence the play back of the track starts automatically in loop (yellow LED on).
If you are in mode KNOB (LED off) then you can start the play back with pushing the button
PLAY. Please note the both versions of pushing (short or long):
ONE SHOT - Track plays once only: Push the button shortly (< 0,5sec)
PLAY LOOP - Track plays in loop: Push the button longer (> 0,5 sec)
ATTENTION:
Reset can start the track (or tracks) while Play mode is activated (LED on).
3.2 Record
3.1 Manual mode (Knob)
3.3 Play back
Page 6

You can use two switchable functions in Play mode:
- SPEED (the speed of the play back) and
- OFFSET (shifting the CV output up or down).
Toggle between both functions while you hold down the button KNOB and then you press the
button PLAY.
SPEED:
After power on the function SPEED is preselected.
With the ruler you can change the speed of the play back. Turn the pot over the middle position
to activate the speed function. In ruler position Zero you have the half speed and in ruler position maximal you have the fourth speed. The original record speed is about ruler middle position.
OFFSET:
Starting from the middle position you can shift the CV up or down (Offset). The range is - / +5V.
The output is limited to 0..+10V.
ADVICE:
After changing between both functions the value persists. To avoid skips of value the function
gets active only while you turn the pot over the old value (position).
Please note: After the end of the One shot sequence the function SPEED has no effect.
3.4 Play functions (Speed and Offset)
A high impulse on external reset input resets all activated tracks and starts the tracks (like One
shot or loop according to the last manual setting).
ADVICE:
Reset has no effect while mode RECORD or KNOB is activated.
3.5 Reset
6
Page 7

All track data can be stored in internal non-volatil memory and will be reloaded after power on.
Set all three tracks to mode KNOB (all LED’s off) and then push the button SAVE. Now you store
all the recorded data (all LED’s are blinking). LED’s off displays the end of the storage.
Just as well you can store the tracks separately: while hold down button SAVE press the REC
button of the track for save this selected track.
ADVICE:
The storage can take a long time (max. 85 seconds) depending on the different lenght of the
recorded tracks. The loading time (after power on) increases as well with the lenght of the recorded tracks (max 25 seconds).
3.6 Save recorded data
You can make a prospective firmware update/upgrade via USB.
Where required you find further informations on our website.
3.8 Firmware updates
Turning on the module the internal data can be reset to the factory settings. For this purpose
push the button KNOB of track 1 while power on until all three yellow LED’s turn on (after the
LED sequence). Then let loose the button. This procedure set the tracks to zero.
3.7 Initialization (Setting on factory defaults)
7
Page 8

4. Appendix
4.1. Technical details
Connections:
Ribbon cable adapter for Doepfer bus +/-12Volt
Inputs: 1x CV (0..+10V), 1x Reset (0/+5..10V), 1/8th inch mono jacks
Outputs: 3x CV (0..+10V), 1/8th inch mono jacks
Control elements:
10 push buttons
3 knobs for CV, speed, offset
3 LED’s
Resolutions: AD/DA converter: 12bit, Sample rate: 50Hz
Current consumption: + 102mA / - 12mA
Size: Euro rack format 3U / 6HP 30x128,5x33 mm
4.2 Warrenty
Beginning from the date of purchase a 2-year warranty is guaranteed for this device in case of
any manufacturing errors or other functional deficiencies during runtime.The warranty does not
apply in case of:
- damage caused by misuse
- mechanical damage arising from careless treatment (dropping, vigorous shaking, mishandling, etc)
- damage caused by liquids penetrating the device
- heat damage caused by overexposure to sunlight or heating
- electric damage caused by improper connecting
(wrong power supply/ jacks/ MIDI connections/ voltage problems).
If you have any complaints please contact your dealer or send an e-mail to:
service@flame.fortschritt-musik.de
4.3 Terms of production
conformity: CE, RoHS, UL
4.4 Disposal
The device is produced with RoHS-conformity (subject to the regulations of the European Union)
and is free of hazardous substances (like mercury, plumb, cadmium and hexavalent chrome).
But electronical scrap is hazardous waste. Please don't add this to consumer waste. For an
environment friendly disposal of waste please contact your distributor or specialist dealer.
4.3 Support
Updated and additional informations, updates, downloads and more see:
http://flame.fortschritt-musik.de
4.4 Acknowledgment
For help and assistance big thanks to: Schneiders Büro Berlin, Shawn Cleary (Analogue haven,
Los Angeles), Thomas Wagner, Robert Junge, Anne-Kathrin Metzler und Lena Bünger.
8
 Loading...