

Bluetooth Car-Kit
EGO Cup FM
Bedienungsanleitung
User Manual
Manuel de L’utilisateur
Manual de Usuario
Gebruikshandleiding
Manual do Utilizador
Manuale Utente


• Deutsch
• English
• Français
• Español
• Nederlands
• Português
• Italiano


BEDIENUNGSANLEITUNG
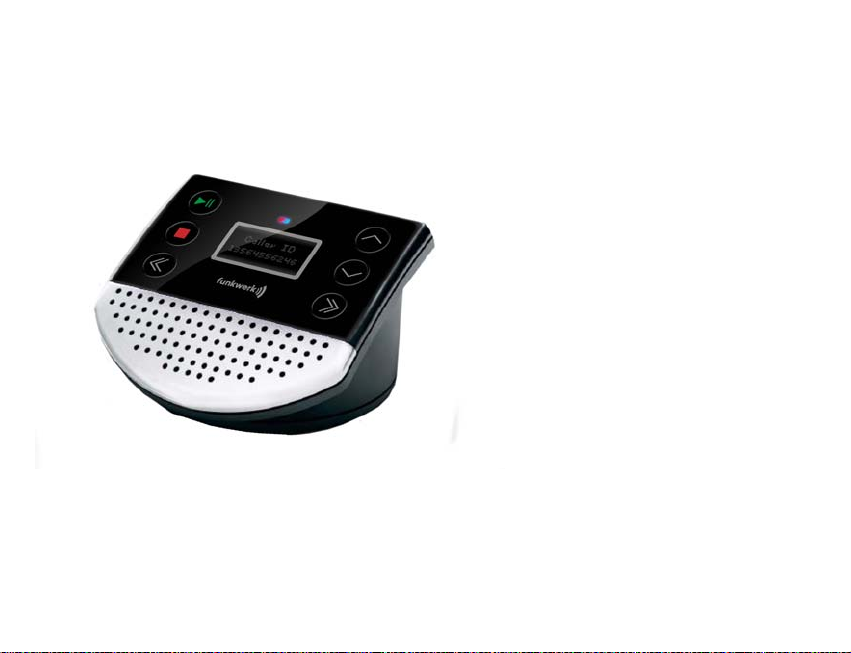
Bluetooth Car-Kit EGO Cup FM
INHALT
1. Lieferumfang / Verpackungsinhalt.........................................................................................................................................................2
2. Erläuterung der Anschlüsse und Tasten................................................................................................................................................ 3
3. Anschluss / Zusammenbau...................................................................................................................................................................4
4. Bedienungsanleitung.............................................................................................................................................................................6
4.1. Ein- und Ausschalten der EGO Cup FM......................................................................................................................................6
4.2. Kopplung und Verbinden der EGO Cup FM mit einem Bluetooth-Gerät (Pairing).......................................................................6
4.2.1. Kopplung der EGO Cup FM mit einem Bluetooth-Gerät / Bluetooth-Mobiltelefon.............................................................6
4.2.2. Verbinden und Trennen der EGO Cup FM von einem Bluetooth-Gerät.............................................................................7
4.2.3. Löschen von Kopplungsinformationen..............................................................................................................................8
4.3. Anruffunktionen........................................................................................................................................................................... 8
4.3.1. Anruf-Grundfunktionen..................................................................................................................................................... 8
4.3.2. Anruf stummschalten (Mute) / Stummschaltung aufheben................................................................................................8
4.3.3. Umleiten von Anrufen auf das Mobiltelefon / vom Mobiltelefon......................................................................................... 8
4.3.4. Erweiterte Anruffunktionen................................................................................................................................................ 9
4.4. A2DP-Funktion..........................................................................................................................................................................10
4.4.1. Verwendung der A2DP-Funktion des Mobiltelefons........................................................................................................10
4.4.2. AVRCP-Funktionen (Fernbedienung)..............................................................................................................................10
4.5. Lautstärkeregelung........................................................................................................
4.6. FM-Sendefunktion..................................................................................................................................................................... 11
4.6.1. Verwenden der FM-Sendefunktion.................................................................................................................................11
4.6.2. Einstellen der FM-Sendefunktion....................................................................................................................................11
5. Zusammenfassung der Funktionen.....................................................................................................................................................12
5.1. LED Statusanzeige...................................................................................................................................................................12
5.2. Tastendruckdauer.....................................................................................................................................................................12
5.3. Funktionen und Tasten.............................................................................................................................................................12
6. Technische Daten...............................................................................................................................................................................18
...........................................................10

Deutsch
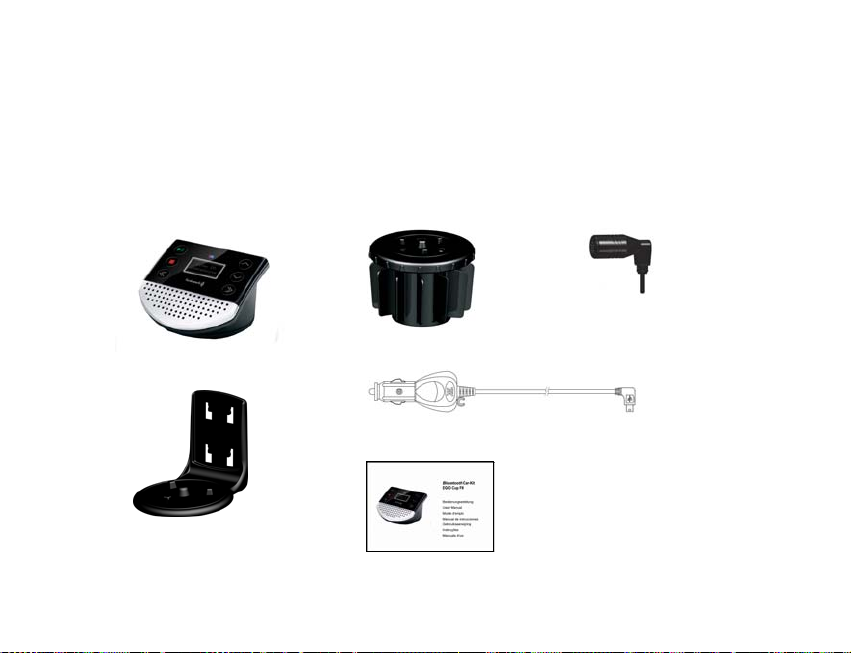
1. Lieferumfang / Verpackungsinhalt
[1] EGO Cup FM
[2] Adapter für Einsatz in den Getränkehalter
[3] Drehbares Mikrofon mit 2,5-mm-Buchse
[4] Herbert-Richter-Systemadapter
[5] Anschlussset für Anschluss an den Zigarettenanzünder des Fahrzeugs (12V)
[6] Bedienungsanleitung
[1] [2]
[4] [5]
[6]
2
[3]
Deutsch
A
A
r
r
A
A
f
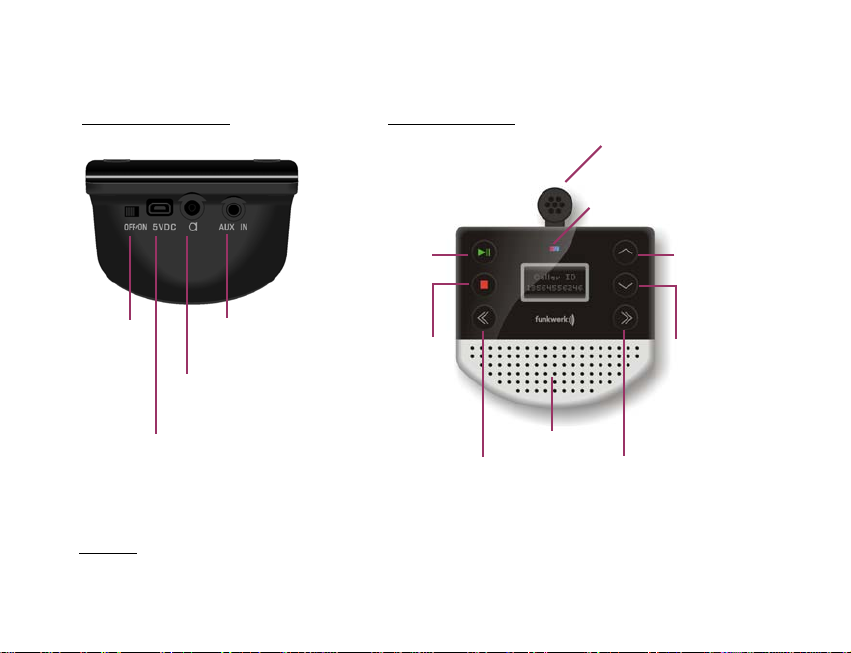
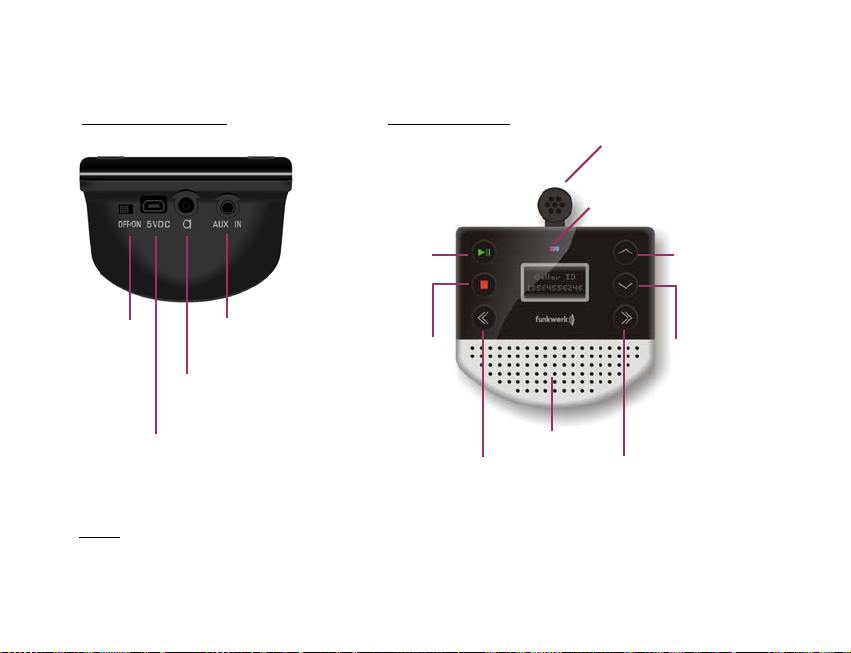
2. Erläuterung der Anschlüsse und Tasten
Anschlüsse (Rückseite)
Ein/AusSchalter
3,5-mm-Mini-StereoAnschluss (zum
Anschließen eines
udiogeräts)*
Mikrofonanschluss
(2,5-mm-Buchse)
Wahlwiederholung de
Wahlwiederholung de
zuletzt angekommenen
Anrufumleitung, Audio-
Verbindung mit Bluetooth-
Gerät herstellen/trennen
nruf beenden, ankommenden
nruf ablehnen, Audio stoppen,
USB-Anschluss – zum Anschließen
an das Fahrzeugladegerät, um den
Akku des Geräts aufzuladen
Die Wiedergabe einer externen Audioquelle, die über den 3,5 mm Buchse angeschlossen ist, erfolgt nur über die FM
*HINWEIS:
Sendefunktion
Tasten (Vorderseite)
nrufannahme,
letzten Rufnummer,
Rufnummer,
Wiedergabe/Pause,
Sprachwahl
aktivieren/abbrechen,
Gerätverbindung trennen
FM-Rückwärtssuche, zur vorherigen
gespeicherten FM-Frequenz springen,
Audio-Rückwärtslau
3
Lautsprecher
Mikrofon
Rote/blaue LED: zeigt den Status der
FM-Vorwärtssuche, zur nächsten
gespeicherten FM-Frequenz springen,
Audio-Vorwärtslauf
Erhöhung der Lautstärke,
Stummschaltung /
Stummschaltung aufheben,
Anklopfen
Verringerung der
Lautstärke, Löschen von
Kopplungen,
Stummschaltung ein/aus,
Konferenzfunktion,
A2DP-Modus verlassen

Deutsch
3. Anschluss / Zusammenbau
Die EGO Cup FM kann leicht im Inneren des Fahrzeugs angebracht werden. Dazu kann entweder der Adapter für den Einsatz im
Getränkehalter oder der Herbert-Richter-Systemadapter verwendet werden.
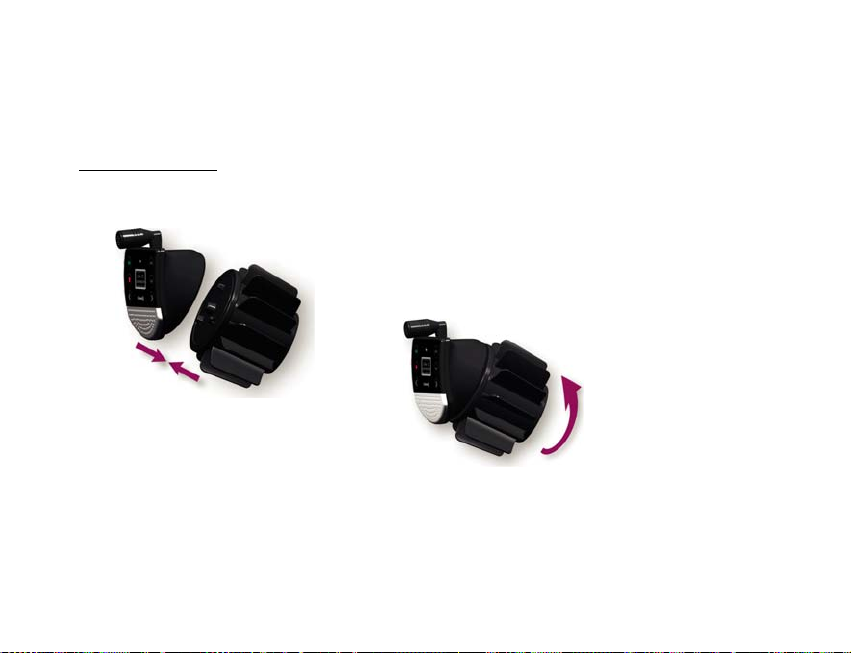
Verwendung des drehbaren Befestigungsadapters
Nun können Sie die komplette Einheit in den Getränkehalter einsetzen und durch etwas Druck fixieren.
Schritt 1:
Schieben Sie die EGO Cup FM auf die Zapfen des
Befestigungsteils.
Schritt 2:
Drehen Sie die EGO Cup FM nach rechts, um den Adapter für
den Getränkehalter zu verriegeln.
4

Deutsch
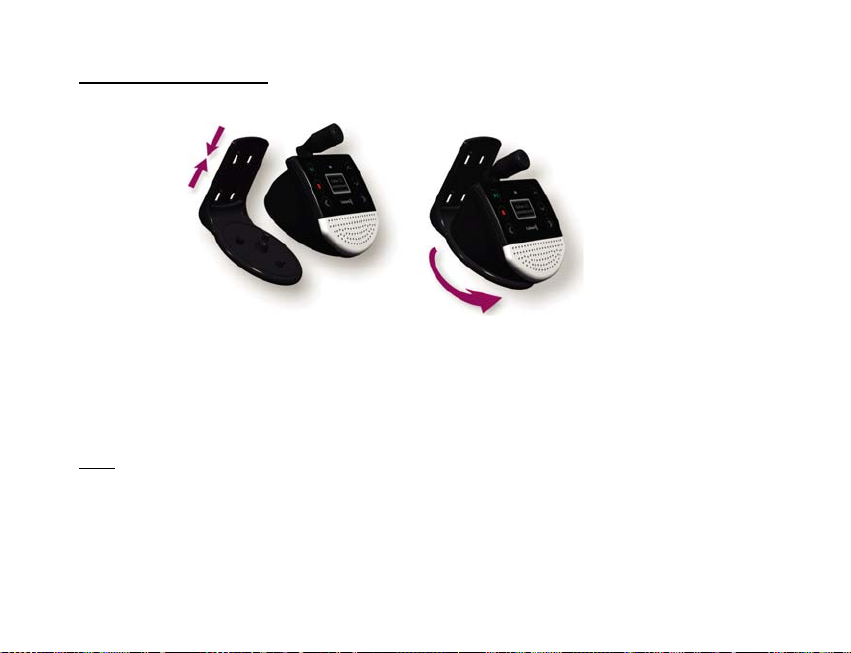
Verwendung des Herbert-Richter-Systemadapters
Schritt 1.
Schieben Sie die EGO Cup FM auf die
Zapfen des Herbert-Richter-Adapters.
Nun können Sie den Adapter mit der EGO Cup FM auf ein entsprechendes Gegenstück in Ihrem Fahrzeug aufsetzen.
Bitte sorgen Sie dafür, dass zwischen der EGO Cup FM und Ihrem Mobiltelefon immer ein Abstand von mindestens 30 cm
HINWEIS:
besteht. Befinden sich die beiden Geräte näher zueinander, besteht die Gefahr, dass sich diese beiden gegenseitig stören und es zu
Übersprechen (Brummgeräuschen) oder Verbindungsabbrüchen kommt.
Schritt 2.
Drehen Sie die EGO Cup FM nach rechts, den HerbertRichter-Adapter zu verriegeln.
5

Deutsch
4. Bedienungsanleitung
4.1. Ein- und Ausschalten der EGO Cup FM
• Einschalten: Schieben Sie den Ein/Aus-Schalter auf „ON“. Sie hören dann einen tiefen Ton, dem ein hoher Ton folgt, und die
blaue LED blinkt einmal in 3 Sekunden. Dadurch wird angezeigt, dass das Gerät eingeschaltet ist. Wenn Sie die EGO Cup FM in
Verbindung mit Bluetooth-Geräten (z. B. Mobiltelefon) verwenden, wechselt das Gerät unmittelbar nach dem Einschalten in den
Kopplungsmodus (Informationen zur Kopplung finden Sie unter 4.2.).
• Ausschalten: Schieben Sie den Ein/Aus-Schalter auf „OFF“. Sie hören dann zwei hohe Töne, denen ein tiefer Ton folgt. Dadurch
wird angezeigt, dass das Gerät ausgeschaltet ist.
4.2. Kopplung und Verbinden der EGO Cup FM mit einem Bluetooth-Gerät (Pairing)
4.2.1. Kopplung der EGO Cup FM mit einem Bluetooth-Gerät / Bluetooth-Mobiltelefon
Bevor Sie Anrufe tätigen und entgegennehmen können, muss die EGO Cup FM mit Ihrem Mobiltelefon gekoppelt werden. Dies ist ein
einmaliger Vorgang, mit dem die EGO Cup FM und das Mobiltelefon miteinander autorisiert werden.
Zur Kopplung gehen Sie wie folgt vor:
1. Positionieren Sie die EGO Cup FM in der Nähe Ihres Bluetooth-fähigen Mobiltelefons und stellen Sie sicher, dass die EGO
Cup FM und das Mobiltelefon eingeschaltet sind.
Hinweis:
Wenn die EGO Cup FM nicht mit einem Bluetooth-Gerät oder Mobiltelefon verbunden wurde, wechselt das Gerät
automatisch in den Kopplungsmodus, sobald Sie es einschalten: Sie hören dann den Signalton für die Kopplung (eine
wechselnde Folge von hohen und tiefen Tönen), die blaue LED blinkt einmal pro Sekunde, und das Bluetooth-Symbol
erscheint auf der LCD-Anzeige und blinkt je einmal in 2 Sekunden.
2. Nachdem Sie entsprechend der Bedienungsanleitung vom Mobiltelefon aus eine Suche nach Bluetooth-Geräten gestartet
haben, wird auf dem Display Ihres Mobiltelefons eine Liste von Bluetooth-Geräten angezeigt, die nach Abschluss des
Suchvorgangs vom Telefon gefunden wurden.
3. Wählen Sie aus der Liste den Eintrag „EGO CUP FM“ aus und leiten Sie die Kopplung ein, indem Sie den Anweisungen
folgen, die auf dem Display Ihres Mobiltelefons angezeigt werden.
6

Deutsch
4. Folgen Sie weiter den Anweisungen, die auf dem Display angezeigt werden, geben Sie den PIN Code „0000“ ein, und
bestätigen Sie die Kopplung zwischen der EGO Cup FM und Ihrem Mobiltelefon. Sobald die Kopplung hergestellt ist, hören
Sie einen hohen Ton und der Name des Mobiltelefons bzw. des Geräts wird angezeigt. Dadurch wird angezeigt, dass die
Kopplung abgeschlossen und die EGO Cup FM mit dem Mobiltelefon verbunden ist.
HINWEIS:
• Wenn Ihr Mobiltelefon anzeigt, dass die Kopplung fehlgeschlagen ist und sich die EGO Cup FM immer noch im Kopplungsmodus
befindet, müssen die Schritte 2–4 wiederholt werden.
• Die EGO Cup FM kann mit bis zu 8 Bluetooth-Geräten gekoppelt werden (einschließlich Mobiltelefone). Diese 8 Kopplungen
werden von der EGO Cup FM gespeichert. Jedes gekoppelte Gerät kann drahtlos mit dem EGO Cup FM kommunizieren,
nachdem eine Bluetooth-Verbindung hergestellt wurde.
• Nach der Kopplung kann es sein, dass Ihr Mobiltelefonname nicht angezeigt wird, da der Name aus mehr als 12 Zeichen
besteht. Wenn dies der Fall ist, wird auf dem Display anstelle des Mobiltelefonnamens das Bluetooth-Symbol angezeigt.
4.2.2. Verbinden und Trennen der EGO Cup FM von einem Bluetooth-Gerät
Damit die EGO Cup FM mit einem Bluetooth-Gerät verwendet werden kann, muss zwischen den beiden Geräten eine Bluetooth-
Verbindung hergestellt sein. Zwei miteinander gekoppelte Bluetooth-Geräte können ohne erneute Kopplung jederzeit wieder
miteinander verbunden werden, auch wenn zwischenzeitlich die Verbindung unterbrochen oder das Gerät ausgeschaltet wurde.
Verbinden der EGO Cup FM mit einem Bluetooth-Mobiltelefon
Eine Bluetooth-Verbindung kann durch die EGO Cup FM oder das Mobiltelefon hergestellt werden.
• Wenn Sie die Verbindung von der EGO Cup FM aus einleiten möchten, gehen Sie wie folgt vor: Positionieren Sie die EGO Cup
FM in die Nähe des Mobiltelefons und drücken Sie dann kurz die Taste
angezeigt und ein hoher Ton ist zu hören, sobald die Verbindung hergestellt wurde.
• Wenn Sie die Verbindung vom Mobiltelefon aus einleiten möchten, gehen Sie wie folgt vor: Positionieren Sie die EGO Cup FM in
die Nähe des Mobiltelefons und folgen Sie dann den Anweisungen der Bedienungsanleitung Ihres Mobiltelefons, um die EGO
Cup FM zu finden und eine Verbindung zu erstellen.
. Das Symbol wird kurz auf der LCD-Anzeige
7
Deutsch
Trennen der EGO Cup FM vom einem Bluetooth-Mobiltelefon
Wenn die EGO Cup FM mit einem Bluetooth-Mobiltelefon verbunden ist, können Sie die Geräte trennen, indem Sie ent weder die Taste
mindestens 3 Sekunden lang gedrückt halten oder indem Sie der Bedienungsanleitung des Mobiltelefons folgen, um die Trennung
vom Mobiltelefon aus vornehmen. Nach der Trennung ist ein tiefer Ton zu hören, die blaue LED blinkt einmal in 3 Sekunden und auf der
LCD-Anzeige wird „EGO CUP FM“ angezeigt.
4.2.3. Löschen von Kopplungsinformationen
Die EGO Cup FM kann mit bis zu 8 Bluetooth-Geräten gekoppelt werden. Um alle Kopplungsinformationen zu löschen, trennen Sie alle
Verbindungen, drücken Sie dann die Taste
mindestens 6 Sekunden lang gedrückt. Ein Symbol auf dem Display zeigt dann an, dass die Kopplungsinformationen gelöscht wurden.
für 6 Sekunden bis das Bluetooth Symbol erscheint und dann die Taste für
4.3. Anruffunktionen
Bevor Sie Anruffunktionen verwenden, stellen Sie sicher, dass sowohl die EGO Cup FM als auch Ihr Mobiltelefon eingeschaltet und
über Bluetooth miteinander verbunden sind.
4.3.1. Anruf-Grundfunktionen
• Anrufannahme oder Wahlwiederholung: Kurz die Taste
• Anruf ablehnen oder beenden: Kurz die Taste
4.3.2. Anruf stummschalten (Mute) / Stummschaltung aufheben
Sie können einen ankommenden Anruf stummschalten, indem Sie gleichzeitig kurz die Tasten
Wenn der ankommende Anruf stummgeschaltet ist, sind alle 3 Sekunden zwei Töne zu hören. Sie können die Stummschaltung eines
ankommenden Anrufs aufheben, indem Sie erneut gleichzeitig kurz die Tasten
4.3.3. Umleiten von Anrufen auf das Mobiltelefon / vom Mobiltelefon
• Umleiten von Anrufen auf das Mobiltelefon: Kurz Taste
• Umleiten von Anrufen vom Mobiltelefon: Kurz Taste
drücken
drücken
und drücken.
und drücken.
drücken
drücken
8

Deutsch
4.3.4. Erweiterte Anruffunktionen
Mobiltelefon - Sprachwahl
Wenn das verbundene Mobiltelefon Sprachwahl (Voice Dial) unterstützt, halten Sie die Taste
die Sprachwahl zu aktivieren. Die blaue LED leuchtet hell ohne zu blinken.
Wenn die Sprachwahl durchgeführt wird, können Sie diese durch kurzes Drücken der Taste
Hinweis:
Bevor Sie die Sprachwahl verwenden können, müssen Sie Voice-Tags (Sprachbefehle) auf Ihrem Mobiltelefon aufzeichnen. In der
Bedienungsanleitung Ihres Mobiltelefons wird umfassend erläutert, wie die Sprachwahl und Voice-Tags eingerichtet werden.
Anklopfen / Konferenzfunktion
Wenn Ihr Mobiltelefon über die Funktionen Anklopfen und Konferenzverbindung verfügt, unterstützt die EGO Cup FM diese Funktionen
wie folgt:
• Wenn ein weiterer Anruf ankommt, während Sie bereits ein Gespräch führen:
- Halten Sie die Taste
- drücken Sie die Taste
• Wenn zwei Anrufe im aktiv sind (ein laufendes Gespräch und eine gehaltene Verbindung):
- Halten Sie die Taste
- Drücken Sie die Taste
- Halten Sie die Taste
mindestens 6 Sekunden gedrückt, um
abbrechen.
den ankommenden Anruf anzunehmen, ODER
aktiven Anruf umzuschalten.
Diese Funktion steht nur dann zur Verfügung, wenn Ihr Mobiltelefon und das Mobilfunknetz diese
(HINWEIS:
Konferenzverbindungsfunktion unterstützt.)
mindestens 3 Sekunden lang gedrückt, um die Verbindung des aktiven Anrufs zu halten und
, um den aktiven Anruf zu beenden und den ankommenden Anruf anzunehmen.
mindestens 3 Sekunden lang gedrückt, um zwischen der gehaltenen Verbindung und dem
, um den aktiven Anruf zu beenden und den ankommenden Anruf anzunehmen.
mindestens 3 Sekunden lang gedrückt, um eine Konferenzschaltung herzustellen
9

Deutsch
4.4. A2DP-Funktion
Die EGO Cup FM unterstützt das Bluetooth-A2DP-Profil, mit dem Musik in hoher Qualität wiedergegeben werden kann. Wenn das
Gerät mit einem Bluetooth-fähigen Multimedia-/Musikwiedergabegerät oder einem Mobiltelefon, das mit A2DP kompatibel ist,
verbunden wird, kann die EGO Cup FM diese Musik wiedergeben.
4.4.1. Verwendung der A2DP-Funktion des Mobiltelefons
Wenn Ihr Mobiltelefon das Bluetooth-A2DP-Profil unterstützt, können Sie eine Audioverbindung zwischen dem Mobiltelefon und der
EGO Cup FM herstellen, um Musik zu hören, die vom Mobiltelefon aus abgespielt wird. Bei den meisten Mobiltelefonen wird die
Audioverbindung automatisch hergestellt werden, wenn Sie beginnen, Musik abzuspielen. Lesen Sie in der Bedienungsanleitung Ihres
Mobiltelefons nach, wie Sie die Audioausgabe auf die Bluetooth Schnittstelle umleiten können.
4.4.2. AVRCP-Funktionen (Fernbedienung)
Die folgenden Funktionen können zur Fernsteuerung Ihres Bluetooth-fähigen Mobiltelefons oder Multimedia-/Musikwiedergabegeräts
verwendet werden, um Musik abzuspielen:
Wiedergabe/Pause: Kurz die Taste
Stopp: Kurz die T ast e
Vorwärts: Kurz die Taste
Rückwärts: Kurz die Taste
drücken und loslassen
drücken und loslassen
drücken und loslassen
drücken und loslassen
4.5. Lautstärkeregelung
Sie können die Lautstärke erhöhen oder verringern, indem Sie die Taste bzw. drücken, während sich die EGO Cup FM im
Verbindungs-, Sprech- oder Wiedergabemodus befindet. Sie können den Vorgang wiederholen, um die Lautstärke wie gewünscht
einzustellen. Diese Lautstärkeregelung funktioniert nicht bei der FM-Sendefunktion, dort wird die Lautstärke am Autoradio eingestellt.
Hinweis:
Meistens synchronisiert sich die Bluetooth-Lautstärkeregelung der EGO Cup FM mit dem Mobiltelefon. Das bedeutet, dass die
Lautstärke der EGO Cup FM von Ihrem Mobiltelefon und umgekehrt gesteuert werden kann. Dies funktioniert jedoch nicht immer, da die
Ausführungen der Mobiltelefonmodelle, die von den verschiedenen Herstellern angeboten werden, unterschiedlich sind .
10
Deutsch
4.6. FM-Sendefunktion
Die EGO Cup FM verfügt über einen FM Sender, mit dem die Telefonate und die Musikwiedergabe auf den Fahrzeuglautsprecher
übertragen werden können. Dafür müssen die EGO Cup FM und Ihr Autoradio auf die gleiche Frequenz eingestellt sein. Dann können
Sie entweder über den Lautsprecher des EGO Cup FM oder über den Fahrzeuglautsprecher Musik in hoher Klangqualität hören.
4.6.1. Verwenden der FM-Sendefunktion
Sie können die FM-Sendefunktion aktivieren, indem Sie gleichzeitig kurz die Tasten
Sie können die FM-Sendefunktion deaktivieren, indem Sie gleichzeitig kurz die Tasten
4.6.2. Einstellen der FM-Sendefunkti on
Die EGO Cup FM hat 6 verschiedene FM Kanäle, deren Sendefrequenzen im Auslieferungszustand wie folgt voreing e stellt sind: F M1:
87,50 MHz, FM2: 91,00 MHz, FM3: 94,50 MHz, FM4: 98,00 MHz, FM5: 101,50 MHz und FM6: 105,00 MHz. Sie können zwischen
diesen Kanälen wechseln, in dem Sie die Taste
Sekunden drücken.
Durch die vielen regionalen Radiosender können diese voreingestellten Frequenzen belegt sein, so dass eine Übertragung auf Ihr
Autoradio nicht möglich ist. Für diesen Fall können Sie die Frequenz des Kanals selbst einstellen:
1. Suchen Sie zunächst über Ihr Autoradio eine Frequenz aus, die nicht durch einen Sender belegt ist.
2. Wählen Sie dann den Kanal auf der EGO Cup FM aus, dessen Frequenz Sie einstellen wollen (FM1 – FM6, siehe oben).
3. Drücken Sie dann die Taste
Signaltöne und im Display wird der FM Kanal anzeigt und dazu die hoch laufende Frequenz. Wenn die von Ihnen
gewünschte Frequenz erreicht wurde, lassen Sie bitte die Taste
4. Um diese Frequenz zu speichern, drücken Sie kurz die Taste .
Wenn Sie die Sendefrequenz eines Kanals nach unten verstellen wollen (niedrigere Frequenz), dann verfahren Sie wie in Schritt 3,
aber drücken Sie statt der Taste
Hinweis:
Während der Verwendung der FM Sendefunktion sollte die EGO Cup FM nicht geladen werden, um Störstrahlung und
Übersprechen in das Autoradio zu vermeiden.
die Taste .
(einen Kanal weiter) oder die Taste (einen Kanal zurück) für mindestens 3
für mindestens 6 Sekunden und halten Sie diese gedrückt. Sie hören dann zwei
und drücken.
und drücken.
los und die Frequenzanzeige bleibt dann stehen.
11
Deutsch
5. Zusammenfassung der Funktionen
5.1. LED Statusanzeige
LED-Muster 1 – Bereitschaftsmodus: Blaue LED blinkt je einmal in 3 Sekunden
LED-Muster 2 – Verbindungsmodus: Blaue LED leuchtet schwach ohne zu blinken
LED-Muster 3 – Anrufmodus: Blaue LED leuchtet hell ohne zu blinken
LED-Muster 4 – Kopplungsmodus: Die blaue LED blinkt einmal pro Sekunde.
LED-Muster 5 – Warnung bei geringer Ausgangsleistung: Die rote LED leuchtet und die blaue LED blinkt je einmal in 20 Sekunden.
LED-Muster 6 – Audiomodus: Blaue LED leuchtet hell ohne zu blinken
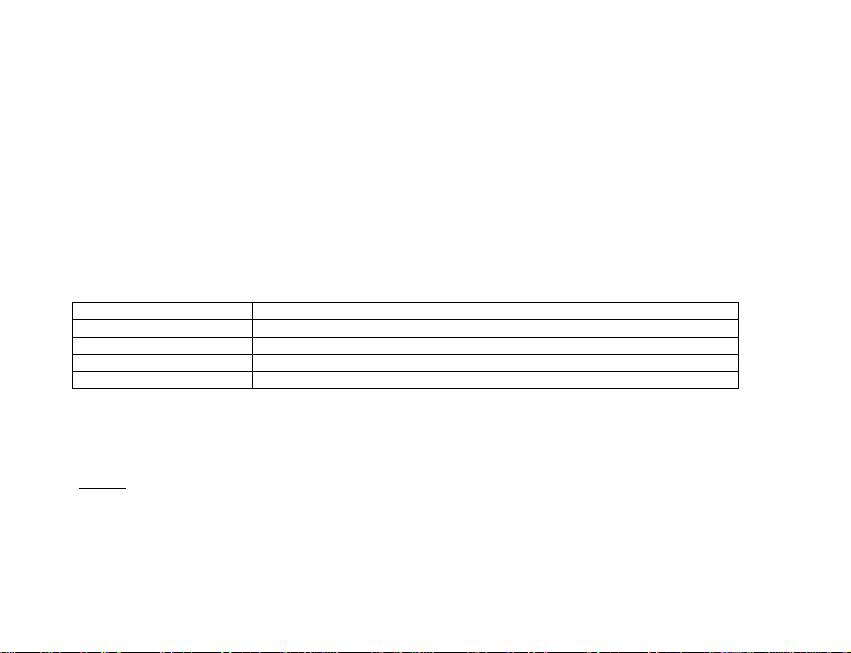
5.2. Tastendruckdauer
Tastendruck Beschreibung
Kurz Taste kurz drücken und loslassen
Lang Taste mindestens 3 Sekunden gedrückt halten und dann loslassen
Sehr lang Taste mindestens 6 Sekunden gedrückt halten und dann loslassen
Gedrückt halten Taste gedrückt halten
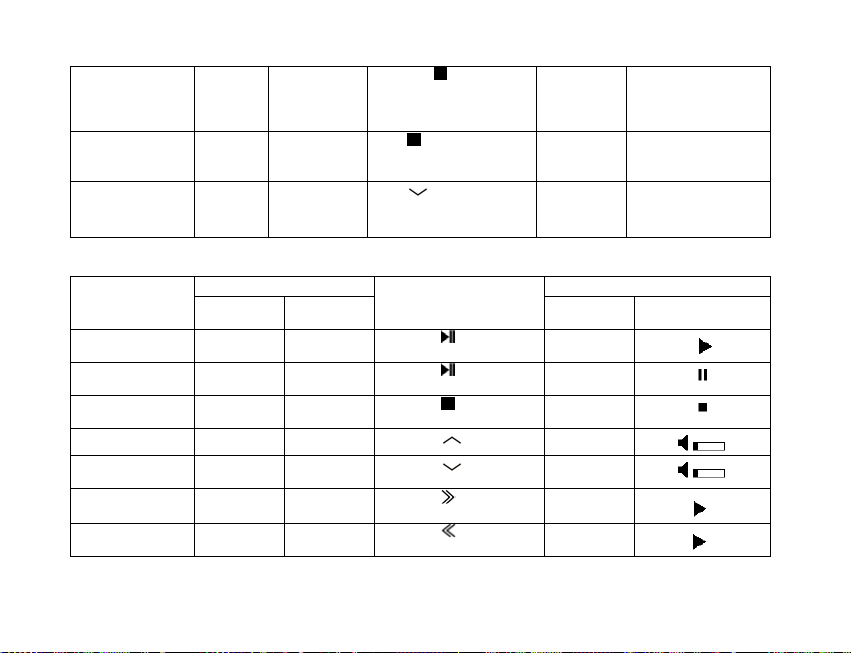
5.3. Funktionen und Tasten
Informationen zur Bedienung der EGO Cup FM finden Sie in den nachstehenden Tabellen (1–7).
Hinweis:
Die EGO Cup FM kann nur mit Bluetooth-Geräten kommunizieren, die vorher gekoppelt worden sind. Bei Geräten, die nur das
Freisprechprofil (HFP) unterstützen, müssen Sie eine Bluetooth-Verbindung zwischen dem EGO Cup FM und Ihrem Mobiltelefon
herstellen, bevor Sie Anrufe tätigen und entgegennehmen können.
12
Deutsch
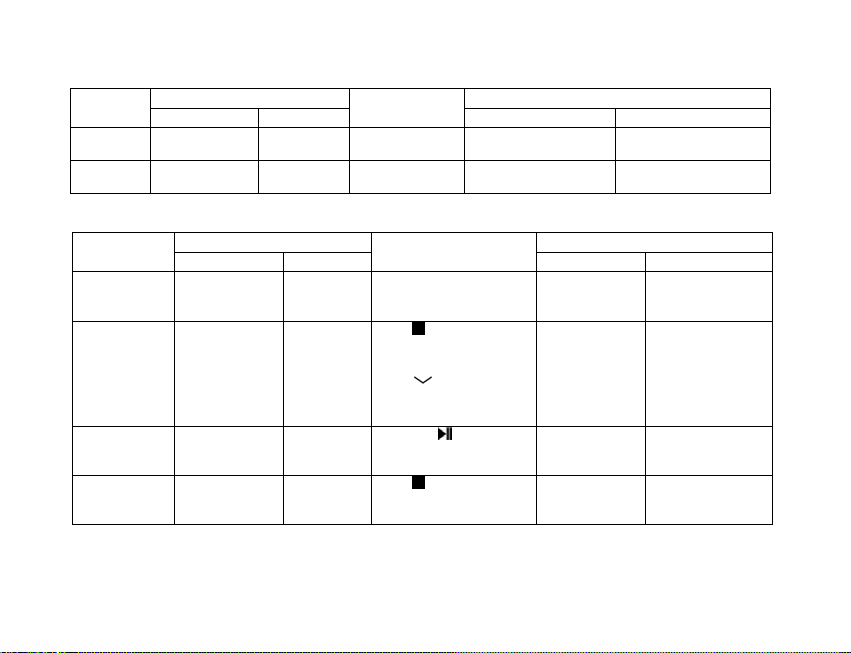
Tabelle 1: Ein-/Ausschalten
FUNKTION
Einschalten Eingeschaltet Ausgeschaltet Ein/Aus-Schalter
Ausschalten Eingeschaltet Bereitschaft Ein/Aus-Schalter auf
Tabelle 2: Kopplung (Pairen) / Verbindung
FUNKTION
Kopplung der EGO
Cup FM mit Mobiltelefon herstellen
Alle
Kopplungsinformationen löschen
EGO Cup FM mit
Mobiltelefon
verbinden
Trennen Bereitschaft
AKTUELLER STATUS EGO CUP FM-ANZEIGE
MOBILTELEFON EGO CUP FM
AKTUELLER STATUS EGO CUP FM-ANZEIGE
MOBILTELEFON EGO CUP FM
Einschalten Kopplungs-
Alle Verbindungen
getrennt
Bereitschaft
(getrennt)
(Verbinden)
modus
Alle
Verbindungen
getrennt
Bereitschaft
(getrennt)
Bereitschaft
(Verbinden)
BEDIENUNG
auf "ON" schieben
"OFF" schieben
BEDIENUNG
Automatisch – keine
Bedienung notwendig
Taste mindestens 6
Sekunden gedrückt halten
und dann loslassen, danach
Taste
mindestens 6
Sekunden gedrückt halten
und dann loslassen
Kurz Taste drücken und
loslassen
Taste mindestens 3
Sekunden gedrückt halten
und dann loslassen
13
AUDIOTON LED-ANZEIGE
Ein tiefer Ton, dem ein
hoher Ton folgt
Zwei hohe Töne, denen
ein tiefer Ton folgt
AUDIOTON LED-ANZEIGE
Ein hoher Ton Blaue LED leuchtet
Ein hoher Ton Blaue LED blinkt je
Ein hoher Ton Blaue LED leuchtet
Ein hoher Ton Blaue LED blinkt je
Blaue LED blinkt je einmal
in 3 Sekunden
Die blaue LED ist
erloschen.
hell ohne zu blinken
einmal in 3 Sekunden
schwach ohne zu
blinken
einmal in 3 Sekunden
Deutsch
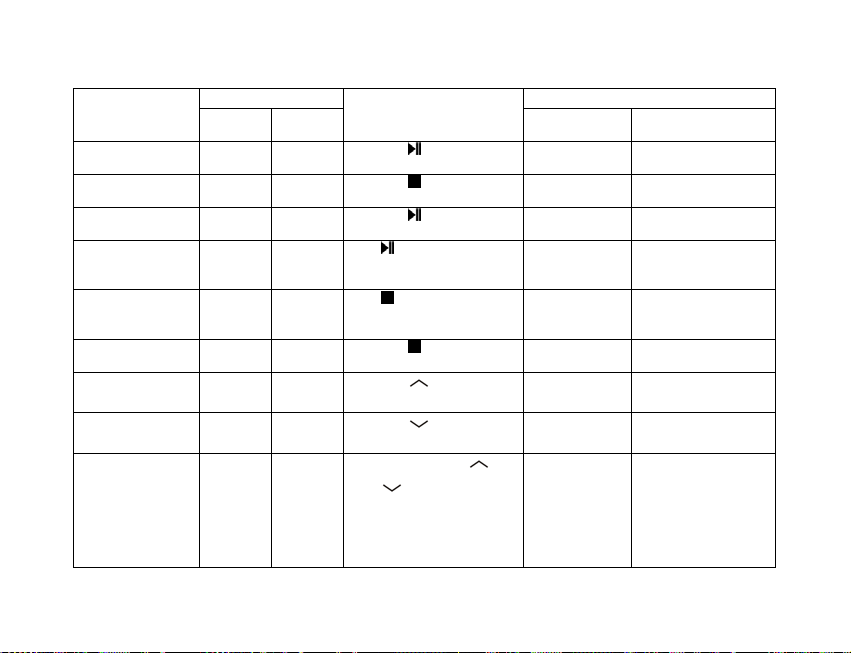
Tabelle 3: Anruf-Grundfunktionen
FUNKTION
Anrufannahme Ankommen
Anruf ablehnen /
beenden
Wahlwiederholung bei
abgehendem Anruf
Wahlwiederholung bei
ankommen dem Anruf
Sprachwahl Verbunden Verbunden Taste mindestens 6
Sprachwahl
abbrechen
Lautstärke erhöhen Verbunden/
Lautstärke verringern Verbunden/
Stummschaltung
(Mute)
AKTUELLER STATUS EGO CUP FM-ANZEIGE
MOBIL-
TELEFON
der Anruf
Verbunden Verbunden Kurz Taste drücken und
Verbunden Verbunden Kurz Taste drücken und
Verbunden Verbunden Taste mindestens 3
Sprachwahl Sprachwahl
Anrufen
Anrufen
Anrufen Anrufen
EGO CUP
FM
Ankommen
der Anruf
Verbunden
/ Anrufen
Verbunden
/ Anrufen
BEDIENUNG
Kurz Taste drücken und
loslassen
loslassen
loslassen
Sekunden gedrückt halten und
dann loslassen
Sekunden gedrückt halten und
dann loslassen
Kurz Taste drücken und
loslassen
Kurz Taste
loslassen
Kurz Taste
loslassen
Gleichzeitig kurz Taste
Taste
loslassen
drücken und
drücken und
drücken und
AUDIOTON LED-ANZEIGE
Ein hoher Ton Blaue LED leuchtet hell
Ein hoher Ton Blaue LED leuchtet
Ein hoher Ton Blaue LED leuchtet hell
Ein hoher Ton Blaue LED leuchtet hell
Ein hoher Ton Blaue LED leuchtet hell
Ein hoher Ton Blaue LED leuchtet
Ein hoher Ton Blaue LED leuchtet hell
Ein hoher Ton Blaue LED leuchtet hell
Ein hoher Ton,
und
dem während der
Stummschaltung
je 2 tiefe Töne in 3
Sekunden folgen
ohne zu blinken
schwach ohne zu blinken
ohne zu blinken
ohne zu blinken
ohne zu blinken
schwach ohne zu blinken
ohne zu blinken
ohne zu blinken
Blaue LED leuchtet hell
ohne zu blinken
14
Deutsch
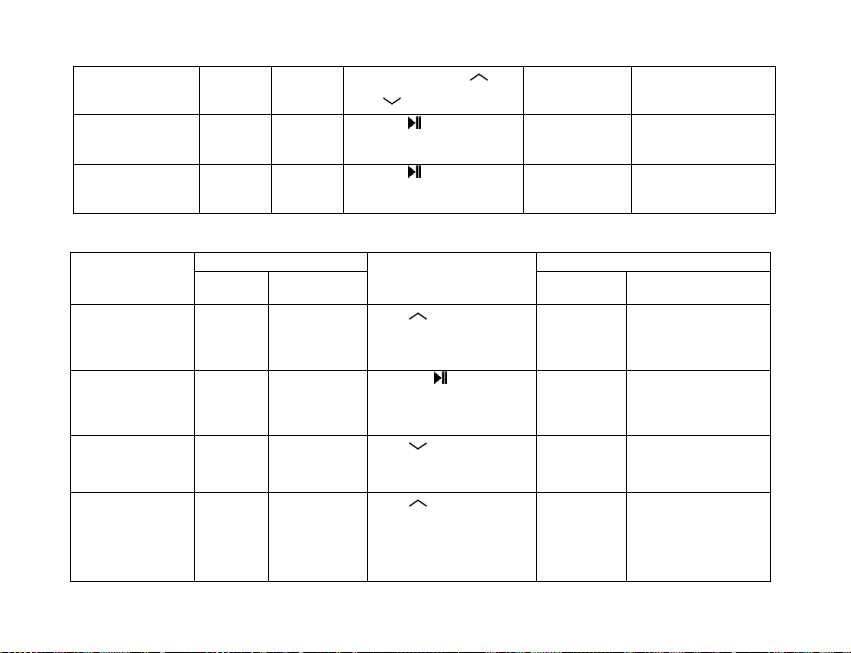
Stummschaltung
aufheben
Anrufumleitung (vom
EGO Cup FM zum
Telefon)
Anrufumleitung (vom
Mobiltelefon zum
EGO Cup FM)
Tabelle 4: Anklopfen und 3-Weg-Verbindung (Konferenzfunktion)
FUNKTION
Aktive Verbindung
halten und ankommenden Anruf
annehmen
Aktiven Anruf
beenden und ankommenden Anruf
annehmen
Ankommenden
Anruf ablehnen
Aktiven Anruf
umschalten und
Verbindung halten
Anrufen Anrufen
Anrufen Anrufen Kurz Taste
Anrufen Bereitschaft
AKTUELLER STATUS EGO CUP FM-ANZEIGE
MOBIL-
TELEFON
Verbinden/
Anrufen
Verbinden/
Anrufen
Verbinden/
Anrufen
Verbindung
wird
gehalten
EGO CUP FM
Ankommender
Anruf
Ankommender
Anruf
Ankommender
Anruf
Verbindung
wird gehalten
Gleichzeitig kurz Taste
drücken und loslassen
Taste
loslassen
Kurz Taste drücken und
loslassen
drücken und
BEDIENUNG
Taste
mindestens 3
Sekunden gedrückt halten
Kurz Taste drücken und
loslassen
Taste
mindestens 3
Sekunden gedrückt halten
und dann loslassen
Taste
mindestens 3
Sekunden gedrückt halten
und dann loslassen
15
Ein hoher Ton Blaue LED leuchtet hell
und
Ein hoher Ton Blaue LED leuchtet hell
Ein hoher Ton Blaue LED leuchtet hell
AUDIOTON LED-ANZEIGE
Ein hoher Ton Blaue LED leuchtet hell
Ein hoher Ton Blaue LED leuchtet hell
Ein hoher Ton Blaue LED leuchtet hell
Ein hoher Ton Blaue LED leuchtet hell
ohne zu blinken
ohne zu blinken
ohne zu blinken
ohne zu blinken
ohne zu blinken
ohne zu blinken
ohne zu blinken
Deutsch
Aktiven Anruf
beenden und
ankommenden Anruf
annehmen
Freigabe aller
gehaltenen Anrufe
Konferenzverbindung Verbindung
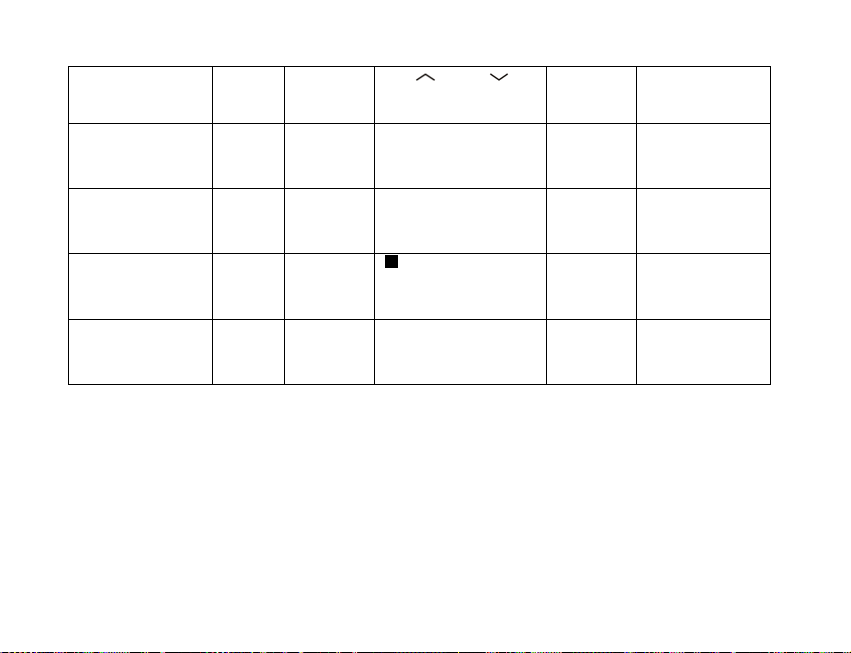
Tabelle 5: Audio-Funktionen (A2DP)
FUNKTION
Wiedergabe A2DP-Modus Kurz Taste drücken und
Pause A2DP-Modus Kurz Taste drücken und
Stopp A2DP-Modus Kurz Taste drücken und
Lautstärke erhöhen A2DP-Modus
Lautstärke
verringern
Vorwärts A2DP-Modus
Rückwärts A2DP-Modus Kurz Taste drücken und
Verbindung
wird
gehalten
Verbindung
wird
gehalten
wird
gehalten
TELEFON
A2DP-Modus
Verbindung
wird gehalten
Ankommender
Anruf
Verbindung
wird gehalten
AKTUELLER STATUS EGO CUP FM-ANZEIGE
MOBIL-
EGO CUP FM
Kurz Taste drücken und
loslassen
Taste mindestens 3
Sekunden gedrückt halten
und dann loslassen
Taste
mindestens 3
Sekunden gedrückt halten
und dann loslassen
BEDIENUNG
loslassen
loslassen
loslassen
Kurz Taste
Kurz Taste
Kurz Taste
loslassen
loslassen
drücken
drücken
drücken und
16
Ein hoher Ton Blaue LED leuchtet hell
Ein hoher Ton Blaue LED leuchtet hell
Ein hoher Ton Blaue LED leuchtet hell
AUDIOTON LED-ANZEIGE
Ein hoher Ton
Ein hoher Ton
Ein hoher Ton
Ein hoher Ton
Ein hoher Ton
Ein hoher Ton
Ein hoher Ton
ohne zu blinken
ohne zu blinken
ohne zu blinken
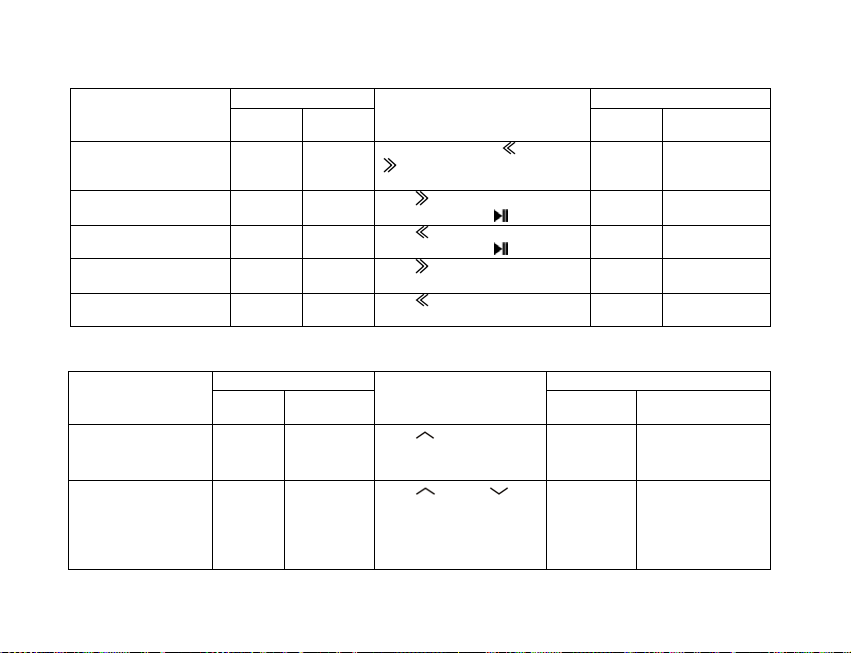
Tabelle 6: FM-Sendefunktion
FUNKTION
FM-Sendefunktion
aktivieren/deaktivieren
FM-Vorwärtssuche /
Frequenz speichern
FM-Rückwärtssuche /
Frequenz speichern
Voreingestellten FM-Kanal
wählen, vorwärts (1–6)
Voreingestellten FM-Kanal
wählen, rückwärts (6–1)
Tabelle 7: Weiteres
FUNKTION
TELEFON
Automatische Verbindung
aktivieren/de-aktivieren
EGO Cup FM Lautsprecher
stummschalten
Deutsch
AKTUELLER STATUS EGO CUP FM-ANZEIGE
MOBIL-
TELEFON
Alle außer
Verbinden Verbinden
Verbinden Verbinden Taste gedrückt halten (6 sec) dann
Verbinden Verbinden
Verbinden Verbinden Taste mindestens 3 Sekunden
AKTUELLER STATUS EGO CUP FM-ANZEIGE
MOBIL-
Bereitschaft
Anrufen
EGO CUP
FM
FM-Suche
EGO CUP
FM
Gleichzeitig kurz Taste und Taste
Taste
zum Speichern Taste kurz drücken
zum Speichern Taste kurz drücken
Taste
gedrückt halten und dann loslassen
gedrückt halten und dann loslassen
Taste
Sekunden gedrückt halten und
dann loslassen
Taste
mindestens 3 Sekunden
gedrückt halten und dann
loslassen
BEDIENUNG
drücken und loslassen
gedrückt halten (6 sec), dann
mindestens 3 Sekunden
BEDIENUNG
mindestens 6
und Taste
AUDIOTON
Ein hoher
Ton
Ein hoher
Ton
Ein hoher
Ton
Ein hoher
Ton
Ein hoher
Ton
AUDIOTON LED/LCD-ANZEIGE
Ein hoher Ton
Ein hoher Ton Blaue LED leuchtet hell
LED-ANZEIGE
Blaue LED blinkt
je einmal in 3
Sekunden
ohne zu blinken
17
Deutsch
EGO Cup FM Lautsprecher wieder
einschalten
Warnung bei geringer
Akkukapazität
Stummschaltungssignal Unverändert - Zwei hohe
Ankommende
Rufnummer anzeigen
Maximale oder minimale
Lautstärke ist erreicht
Anrufen
Unverändert - Ein hoher Ton
Ankommender
Anruf
Unverändert - Wechselnde
Ankommender
Anruf
Taste
und Taste
mindestens 3 Sekunden
gedrückt halten
Taste mindestens 3
Sekunden gedrückt halten und
dann loslassen
alle 60
Sekunden
Töne alle 3
Sekunden
- Ankommende
Folge von
hohen und
tiefen Tönen
6. Technische Daten
Abmessungen : 76 mm x 71 mm x 50 mm
Gewicht : 96 Gramm
Länge Adapterkabel : 0,6 m
Betriebsspannung : 12 V
Temperaturbereich : -20°C bis +70°C (Lagerung)
Unterstützte Bluetooth Profile : Handsfree, A2DP, and AVRCP
Bluetooth Spezifikation : Bluetooth 2.0
18
Die rote LED leuchtet
und die blaue LED
blinkt je einmal in 20
Sekunden.
Die rote LED leuchtet
und die blaue LED
blinkt je einmal in 20
Sekunden.
Rufnummer wird auf
LCD-Anzeige
angezeigt
Blaue LED leuchtet hell
ohne zu blinken

USER MANUAL
Bluetooth Car-Kit EGO Cup FM
CONTENTS
FCC Statement..........................................................................................................................................................................................2
1. Package Contents.................................................................................................................................................................................3
2. Connection & Buttons Explanation........................................................................................................................................................4
3. Installation............................................................................................................................................................................................. 5
4. Operating Instructions...........................................................................................................................................................................7
4.1. Turning On / Off the EGO Cup FM.............................................................................................................................................. 7
4.2. Pairing & Connecting the EGO Cup FM with a Bluetooth Device................................................................................................7
4.2.1. Pairing the EGO Cup FM with a Bluetooth Device / Bluetooth Mobile Phone ................................................................... 7
4.2.2. Connecting / Disconnecting your EGO Cup FM with a Bluetooth Device .......................................................................... 8
4.2.3. Erasing Pairing Information...............................................................................................................................................9
4.3. Call Functions.............................................................................................................................................................................9
4.3.1. Basic Call Operation......................................................................................................................................................... 9
4.3.2. Call Mute / Un-mute..........................................................................................................................................................9
4.3.3. Transferring Call to/from Y our Mobile Phone..................................................................................................................... 9
4.3.4. Advanced Call Functions..................................................................................................................................................9
4.4. A2DP Function..........................................................................................................................................................................10
4.4.1. Using Mobile Phone’s A2DP Function.............................................................................................................................10
4.4.2. AVRCP Operations (Remote-Control).............................................................................................................................11
4.5. Volume Adjustment................................................................................................................................................................... 11
4.6. FM Transmission Function ........................................................................................................................................................11
4.6.1. Using FM Transmission.................................................................................................................................................. 11
4.6.2. FM Transmission Operation............................................................................................................................................12
5. Summary of Functions and Button Operations....................................................................................................................................12
5.1. LED Indicator Patterns.............................................................................................................................................................. 12
5.2. Key Duration.............................................................................................................................................................................13
5.3. Functions and Button Operations.............................................................................................................................................. 13
6. Technical Data....................................................................................................................................................................................19

English
FCC Statement
This device complies with part 15 of the FCC Rules. Operation is subject to the following two conditions:
(1) This device may not cause harmful interference, and
(2) This device must accept any interference received, including interference that may cause undesired operation.
Note: The manufacturer is not responsible for ANY interference, for example RADIO or TV interference, caused by unauthorized
modifications to this equipment. Such modifications could void the user’s authority to operate the equipment.
Federal Communication Commission Interference Statement
This equipment has been tested and found to comply with the limits for a Class B digital device, pursuant to Part 15 of the FCC Rules.
These limits are designed to provide reasonable protection against harmful interference in a residential installation. This equipment
generates, uses and can radiate radio frequency energy and, if not installed and used in accordance with the instructions, may cause
harmful interference to radio communications. However, there is no guarantee that interference will not occur in a particular installation.
If this equipment does cause harmful interference to radio or television reception, which can be determined by turning the equipment off
and on, the user is encouraged to try to correct the interference by one of the following measures:
1. Reorient or relocate the receiving antenna.
2. Increase the separation between the equipment and receiver.
3. Connect the equipment into an outlet on a circuit different from that to which the receiver is connected. Consult t he dealer or an
experienced radio/TV technician for help.
FCC Caution: Any changes or modifications not expressly approved by the party responsible for compliance could void the user‘s
authority to operate this equipment.
RF Exposure Warning:
This equipment must be installed and operated in accordance with provided instructions and the antenna(s) used for this transmitter
must be installed to provide a separation distance of at least 20 cm from all persons and must not be co-located or operating in
conjunction with any other antenna or transmitter. End-users and installers must be provide with antenna installation instructions and
transmitter operating conditions for satisfying RF exposure compliance.
2
English
1. Package Contents
[1] EGO Cup FM
[2] Car-Kit Mounting Rotor (adapter for using cup holder)
[3] Rotateable Microphone with 2.5 mm Jack
[4] Herbert-Richter System Adapter
[5] 12V Car Charger Head with 5-Pin Mini USB Cable (connection kit to the vehicle cigarette lighter)
[6] Multilingual User Manual
[1] [2]
[4] [5]
[6]
3
[3]
English
A
r
2. Connection & Buttons Explanation
Connectors (back side)
ccept call, last numbe
number redial, transfer call,
connect/disconnect with
ON / OFF
switch
3.5 mm stereo mini
connector (to connect
audio out device)*
Microphone connection
(2.5 mm jack)
USB-port – connect to the car
charger to charge the battery of
device
FM-search backward, select backward FM
*NOTE:
An external audio source connected through the 3.5 mm jack can only be played back over the FM transmitter function
Buttons (front side)
redial, last incoming
audio play/pause,
Bluetooth device
End call, reject incoming
call, stop audio,
enter/cancel voice dialling,
disconnect from a device
preset frequencies, audio-backward
Microphone
Red / Blue LED: indicate EGO Cup FM status
Volume down, erase
paired records, mute /
un-mute, conference
call, exit A2DP mode
Speaker
FM-search forward, select forward FM
preset frequencies, audio-forward
Volume up, mute /
un-mute, call waiting
4
English
3. Installation
The EGO Cup FM can be easily mounted inside the car by either using the mounting rotor to fix the EGO Cup FM in the car’s cupholder, or fixing the EGO Cup FM on the Herbert-Richter system adapter.
Using Mounting Rotor
Now you can press the mounting rotor fixed with the EGO Cup FM into the cup-holder of your car.
Step 1:
Press the EGO Cup FM on the hooks of the mounting part
Step 2:
Turn the EGO Cup FM to the right until it is fixed on the
mounting part.
5
English
Using Herbert Richter Adapter
Step 1:
Press the EGO Cup FM on the hooks of the
Herbert-Richter adapter
Now you can adjust the adapter with the EGO Cup FM to an applicable counterpart in your car.
NOTE:
Please make sure to place your mobile phone not too close to the Ego Cup FM (it should be put at least 30 cm / 1 feet from the EGO
Cup FM). If the two devices are placed too close to each other, there is a risk that these two devices will interfere each other so that you
may here static noise or the connection gets lost.
Step 2:
Turn the EGO Cup FM to the right until it is fixed on the
Herbert-Richter adapter
6

English
4. Operating Instructions
4.1. Turning On / Off the EGO Cup FM
• To turn on: switch the ON/OFF switcher to “ON”. You will hear one low tone followed by one high tone and blue LED will
blink once every 3 seconds. This indicates the car-kit is powered on. If you haven’t paired your EGO Cup FM with
Bluetooth devices (e.g.: mobile phone) the EGO Cup FM will enter the pairing mode right after you turn it on (see 4.2. for
detailed pairing procedure).
• To turn off: switch the ON/OFF switcher to “OFF”. You will hear two high tones followed by one low tone. This indicates
4.2. Pairing & Connecting the EGO Cup FM with a Bluetooth Device
4.2.1. Pairing the EGO Cup FM with a Bluetooth Device / Bluetooth Mobile Phone
Before making and answering calls, you must pair your EGO Cup FM with your mobile phone. This is a one-time procedure to authorize
the EGO Cup FM and your mobile phone with each other.
Detailed pairing procedure is as follows:
1. Place your EGO Cup FM close to your Bluetooth enabled mobile phone and ensure your EGO Cup FM and your mobile
2. Following your mobile phone user guide to activate Bluetooth device search on the mobile phone side. On your mobile phone
3. Select “EGO CUP FM” from the list and initiate pairing following your mobile phone’s on-screen prompts.
4. Continue to follow on-screen prompts to enter passkey “0000” and confirm to pair the EGO Cup FM with your mobile phone.
the car-kit is powered off.
phone are powered on.
If your EGO Cup FM hasn’t been paired with any Bluetooth devices / mobile phone before, it will enter the pairing mode
Note:
automatically once you turn it on. You will hear the Pairing Tone (high-low-high-low tones), the blue LED will blink once every
second, and the Bluetooth symbol will appear on the LCD and blink once every 2 seconds.
screen you will see a list of Bluetooth devices found by the mobile phone at the end of the searching process.
Once the pairing procedure is completed, you will hear one high tone and the mobile phone / device name will be displayed. It
indicates that the EGO Cup FM and the mobile phone are paired.
7

English
NOTE:
• If your mobile phone shows that paring is failed and the EGO Cup FM is still in the paring mode, you need to go back to above
steps 2-4 to repeat the paring process.
• The EGO Cup FM can be paired with up to 8 Bluetooth devices (including mobile phones). The corresponding 8 sets of pairing
information are recorded by the EGO Cup FM. Each paired device can wireless communicated with the EGO Cup FM after
setting up a Bluetooth connection.
• Right after the pairing process is successful, it is possible that your mobile phone name cannot be displayed (i.e. because the
name exceeds 12 characters allowed). If this is the case, the Bluetooth symbol will appear on the display instead of the mobile
phone name.
4.2.2. Connecting / Disconnecting your EGO Cup FM with a Bluetooth Device
To use the EGO Cup FM with a Bluetooth device the Bluetooth connection between both devices shall be est ablished in advance. If two
Bluetooth devices have been paired once, you can simply reconnect them, even when the two devices have been disconnected or
turned off in the mean time.
Connecting your EGO Cup FM with a Bluetooth mobile phone
Initiating a request from either the EGO Cup FM or the mobile phone can set up Bluetooth connection.
• If you want to initiate the connection request from the EGO Cup FM: Place the EGO Cup FM close to the Bluetooth mobile
phone, then press
successfully connected.
• If you want to initiate the connection request from the Bluetooth mobile phone: Place the EGO Cup FM close to the Bluetooth
mobile phone and then follow the mobile phone’s user guide to find the EGO Cup FM and send connection request.
Disconnecting your EGO Cup FM from your Bluetooth mobile phone:
When the EGO Cup FM is connected with Bluetooth mobile phone (or in the connected mode), you can disconnect them either by
pressing and holding button for at least 3 seconds or by following the mobile phone’s user guide and initiating discon nection from the
phone side. After disconnecting, you will hear one low tone, then the blue LED will give 1 blink per 3 seconds and you will see “EGO
CUP FM” on the LCD-display.
button briefly. The symbol will appear shortly on the LCD and one high tone will be heard when it’s
8

English
4.2.3. Erasing Pairing Information
This EGO Cup FM can be paired with up to 8 Bluetooth devices. To erase all pairing information stored in the EGO Cup FM, first you
have to disconnect the EGO Cup FM from all connected mobile phones by pressing
symbol appears on the LCD-display, then press and hold
which indicates that all pairing information have been erased.
button for at least 6 seconds. The icon will appear on the screen,
button for at least 6 seconds until the Bluetooth
4.3. Call Functions
Before operating call functions make sure both EGO Cup FM and your mobile phone are powered on and have been connected.
4.3.1. Basic Call Operation
• Answer Call or Redial: Press button
• Reject or End Call: Press button
4.3.2. Call Mute / Un-mute
You can mute an ongoing call by simultaneously quickly pressing the button
When the ongoing call is muted, two tones will be heard every 3 seconds. You can un-mute the ongoing call by simultaneously quickly
pressing again button
4.3.3. Transferring Call to/from Your Mobile Phone
• Transferring calls to your mobile phone: Press button
• Transferring calls from your mobile phone: Press button
4.3.4. Advanced Call Functions
Mobile Phone - Voice Dialing
If the connected mobile phone supports voice dialing, you can press and hold butt on
The blue LED glows brightly without blinking.
When voice dialing is in progress, you can quick press button
and button again.
briefly
briefly
and button .
briefly
briefly
for at least 6 seconds to activate voice dialing.
to cancel voice dialing.
9

English
Note:
Before using voice dialing, you must record voice tags in your mobile phone. Please refer t o your mobile phone manual for detailed
descriptions on how to set up voice dialing and recording voice tags.
Call Waiting / Conference
If your mobile phone has call waiting/conference functions, your EGO Cup FM can support the function by following operations:
• When a new call comes in while you are in talk:
- Press and hold button
- Press button
• When two calls are in progress, one is active and the other is on hold:
- Press and hold button
- Press button
- Press and hold button
for at least 3 seconds to hold active call and accept incoming call, OR
to end active call and answer incoming call.
for at least 3 seconds to toggle hold call and active call.
to end active call and accept hold call.
mobile phone supports the conference call feature!)
for at least 3 seconds to make conference (NOTE: this function is available only if your
4.4. A2DP Function
This EGO Cup FM supports the Bluetooth A2DP Profile to play music in high quality. When connecting with a Bluetooth-enabled
multimedia/music player or a mobile phone with A2DP compatibility, the product allows users to enjoy and remotely play stereo music
from the player.
4.4.1. Using Mobile Phone’s A2DP Function
If your mobile phones support Bluetooth A2DP profile, you can establish an audio connection between the mobile phone and the EGO
Cup FM to enjoy music played by the phone. Most mobile telephones will establish the audio connection automatically when you start
playing music. If your mobile phone does support Bluetooth A2DP profiles but you fail to get an audio connection when you start playing
music, you must follow your phone user guide to establish an Audio connection before playing music.
10

English
4.4.2. AVRCP Operations (Remote-Control)
The following operations can be used for remotely control your Bluetooth capable mobile phone or multimedia/music player to play
music:
Play/Pause: Press and release button
Stop: Press and release button
Forward: Press and release button
Backward : Press and release button
quickly
quickly
quickly
quickly
4.5. Volume Adjustment
You can adjust sound volume up or down by pressing button or , respectively, while the EGO Cup FM is in the connected,
talk, or play mode. You can repeat the above operation until the speaker volume reaches at a desirable level. This volume adjustment
does not work when the EGO Cup FM’s performing FM transmission function. In this case the volume will be controlled from the car
radio.
Note:
Mostly the Bluetooth volume control of the EGO Cup FM will synchronize with the phone. That is, the sound volume of your EGO Cup
FM can be controlled by your phone and vice versa. However, this may not be always true due to variations on implementations chosen
by different mobile phone manufactures.
4.6. FM Transmission Function
This EGO Cup FM supports FM transmission to transfer the call and play music over the car speaker. Therefore you have to set your
EGO Cup FM to a same frequency like your car radio. Then you can enjoy high quality sound both over your EGO Cup FM speaker or
the car speaker.
4.6.1. Using FM Transmission
You can enable FM transmission by simultaneously quick pressing button
You can disable FM transmission by simultaneously quick pressing button
and button .
and button again.
11

English
4.6.2. FM Transmission Operation
The EGO Cup FM has 6 different FM Channels, which have been stored to the following frequencies (factory setting): FM1:
87.50 MHz, FM2: 91.00 MHz, FM3: 94.50 MHz, FM4: 98.00 MHz, FM5: 101.50 MHz and FM6: 105.00 MHz. You can switch between
these channels, by pressing
Because of regional radio stations it may happen that the pre-selected frequencies are occupied and cannot be used for the
transmission to your car radio. In this case you can change the frequency of the channels as follows:
1. Please search with you car radio for a frequency that is not occupied by a radio station
2. Select the FM channel on the EGO Cup FM that should be used with another frequency.
3. Press the
frequency for this channel is increased. If you have reached the desired frequency please release the
4. To store this frequency please press
If you want to lower the frequency of a channel please follow the instructions above but instead of the
button.
Note:
Do not use FM Transmission during the charging, to avoid the radi ation, crosstalk or static noise in the car radio.
button (to choose next channel) or button (to choose previous channel) for at least 3 seconds.
button for at least 6 seconds and keep it pressed. You will hear two tones and the display shows how the
.
button please press the
button.
5. Summary of Functions and Button Operations
5.1. LED Indicator Patterns
LED Pattern 1 – Standby mode: Blue LED blinks once every 3 seconds
LED Pattern 2 – Connect mode: Blue LED glows dimly without blinking
LED Pattern 3 – Call mode: Blue LED glows brightly without blinking
LED Pattern 4 – Pairing mode: Blue LED blinks once every second
LED Pattern 5 – Low power warning: Red LED is ON and blue LED blinks once every 20 seconds
LED Pattern 6 – Audio mode: Blue LED glows brightly without blinking
12

English
5.2. Key Duration
Key Press Description
Short Press and release a button quickly
Long Press and hold a button for at least 3 seconds, then release
Very Long Press and hold a button for at least 6 seconds, then release
Hold Hold button down
5.3. Functions and Button Operations
You can follow the instructions listed on Table 1 – 7 below to operate your EGO Cup FM.
Note:
Your EGO Cup FM can only talk to paired Bluetooth devices. For devices supporting only the Hands-free Profile (HFP), you also need
to establish Bluetooth connection between your EGO Cup FM and your mobile phone before making and answering calls.
Table 1: Power on/off
FUNCTION
Turn On Power On Power Off Move the “OFF/ON”
Turn Off Power On Standby Move the “OFF/ON”
CURRENT STATUS EGO CUP FM INDICATOR
MOBILE
PHONE
EGO CUP FM
OPERATION
switch to “ON”
switch to “OFF”
13
AUDIO TONE LED INDICATOR
One low tone followed
by one high tone
Two high tones
followed by one low
tone
Blue LED blinks once
every 3 seconds
Blue LED is OFF

English
Table 2: Pairing/Connections
FUNCTION
Pair EGO Cup
FM with
mobile phone
Erase all
paired profiles
Connect EGO
Cup FM with
mobile phone
Disconnect Standby
Table 3: Basic Call Functions
FUNCTION
Answer Call Incoming call Incoming call Press and release button
Reject/End
Call
Outgoing
number redial
Incoming call
redial
CURRENT STATUS EGO CUP FM INDICATOR
MOBILE
PHONE
Power on Pairing mode Automatic, no operation needed One high tone Blue LED glows brightly
Disconnected
to all devices
Standby
(disconnected)
(connected)
CURRENT STATUS EGO CUP FM INDICATOR
MOBILE
PHONE
Connected Connected Press and release
Connected Connected Press and release button
Connected Connected Press and hold button for at
EGO CUP FM
Disconnected
to all devices
Standby
(disconnected)
Standby
(connected)
EGO CUP FM
OPERATION
Press button for at least 6
seconds, then release, and then
press and hold
least 6 seconds, then release
Press and release button
quickly
Press and hold button for at
least 3 seconds, then release
quickly
quickly
quickly
least 3 seconds, then release
button for at
OPERATION
button
AUDIO TONE LED INDICATOR
without blinking
One high tone Blue LED blinks once
One high tone Blue LED glows dimly
One high tone Blue LED blinks once
AUDIO TONE LED INDICATOR
One high tone Blue LED glows brightly
One high tone Blue LED glows dimly
One high tone Blue LED glows brightly
One high tone Blue LED glows brightly
every 3 seconds
without blinking
every 3 seconds
without blinking
without blinking
without blinking
without blinking
14

English
Voice Dialing Connected Connected Press and hold button for at
Cancel Voice
Dialing
Volume Up Connected/Call Connected/Call
Volume Down Connected/Call Connected/Call
Mute Call Call
Un-mute Call Call
Transfer Call
(EGO Cup FM
to mobile phone)
Transfer Call
(mobile phone to
EGO Cup FM)
Voice Dialing Voice Dialing Press and release button
Call Call Press and release button
Call Standby Press and release
least 6 seconds, then release
quickly
Press and release button
quickly
Press and release button
quickly
and button at
Press
the same time and release
quickly
and button at the
Press
same time and release quickly
quickly
quickly
button
15
One high tone Blue LED glows brightly
One high tone Blue LED glows dimly
One high tone Blue LED glows brightly
One high tone Blue LED glows brightly
One high tone
followed by 2
low tones every
3 seconds
during mute-call
One high tone Blue LED glows brightly
One high tone Blue LED glows brightly
One high tone Blue LED glows brightly
without blinking
without blinking
without blinking
without blinking
Blue LED glows brightly
without blinking
without blinking
without blinking
without blinking

Table 4: Call Waiting and 3-Way Calling (Conference)
FUNCTION
Hold active call
and answer
incoming call
End active call
and answer
incoming call
Reject incoming
call
Toggle active
call and hold call
End active call
and accept hold
call
Release all held
calls
Conference call Call on
CURRENT STATUS EGO CUP FM INDICATOR
MOBILE
PHONE
Connect/C
all
Connect/C
all
Connect/C
all
Call on
hold
Call on
hold
Call on
hold
hold
EGO CUP
FM
Incoming Call
Incoming Call Press and release button
Incoming Call
Call on hold
Call on hold Press and release button
Incoming Call Press and hold button for at
Call on hold
English
OPERATION
Press and hold
at least 3 seconds
quickly
Press and hold
at least 3 seconds, then release
Press and hold
at least 3 seconds, then release
quickly
least 3 seconds, then release
Press and hold
least 3 seconds, then release
button for
button for
button for
button for at
AUDIO
TONE
One high
tone
One high
tone
One high
tone
One high
tone
One high
tone
One high
tone
One high
tone
LED INDICATOR
Blue LED glows brightly
without blinking
Blue LED glows brightly
without blinking
Blue LED glows brightly
without blinking
Blue LED glows brightly
without blinking
Blue LED glows brightly
without blinking
Blue LED glows brightly
without blinking
Blue LED glows brightly
without blinking
16

English
Table 5: Audio Operations (A2DP)
FUNCTION
Play A2DP Mode Press and release button
Pause A2DP Mode Press and release button
Stop A2DP Mode Press and release button
Volume Up A2DP Mode
Volume Down A2DP Mode
Forward A2DP Mode
Backward A2DP Mode
CURRENT STATUS EGO CUP FM INDICATOR
MOBILE
PHONE
EGO CUP FM
OPERATION
quickly
quickly
quickly
Press and release
quickly
Press and release
quickly
Press and release
quickly
Press and release
quickly
17
AUDIO TONE LCD INDICATOR
One high tone
One high tone
One high tone
One high tone
button
One high tone
button
One high tone
button
One high tone
button

Table 6: FM-Transmission
FUNCTION
Enable / disable
FM transmission
FM searching
forward / set a
frequency
FM searching
backward / set a
frequency
Select FM PreSet channels
forward (1-6)
Select FM PreSet channels
backward (6-1)
Table 7: Others
FUNCTION
Enable/disable
auto connect
feature
MOBILE
PHONE /
PLAYER
All except
Connect Connect
Connect Connect
Connect Connect
Connect Connect
MOBILE
PHONE
Standby
English
CURRENT STATUS EGO CUP FM INDICATOR
EGO CUP FM
Search-FM
CURRENT STATUS EGO CUP FM INDICATOR
EGO CUP FM
OPERATION
and button at the
Press
same time and release quickly
button down then
Hold
press and release
quickly
button down then
Hold
press and release
quickly
Press and hold
at least 3 seconds, then
release
Press and hold
at least 3 seconds, then
release
OPERATION
Press and hold
at least 6 seconds, then
release
button
button
button for
button for
button for
AUDIO TONE LED INDICATOR
One high tone Blue LED blinks once
One high tone
One high tone
One high tone
One high tone
AUDIO
TONE
One high
tone
every 3 seconds
LED / LCD
INDICATOR
18

English
V
Mute EGO Cup
FM speaker
Un-mute EGO
Cup FM speaker
Low Power
Warning
Mute Remind Unchanged - Two high
See incoming
call number
olume maximum or
minimum is reached
Call
Call
Unchanged - One high
Incoming
call
Unchanged - High – low
Incoming call Press and hold button for at
Press and hold
button for at least 3 seconds
Press and hold
button for at least 3 seconds
least 3 seconds, then release
and
and
One high
tone
tone every
60 seconds
tones every
3 seconds
- Incoming call number
tones
Blue LED glows brightly
without blinking
Red LED is ON and
blue LED blinks once
every 20 seconds
Red LED is ON and
blue LED blinks once
every 20 seconds
appears on the LCD
Blue LED glows brightly
without blinking
6. Technical Data
Dimension: 76 mm x 71 mm x 50 mm / 3.0 x 2.8 x 1.9 Inches
Weight: 96 gram / 3.4 oz
Length of cable-adapter: 0.6 m / 23 Inches
Operating voltage: 12V
Operating temperature: -20°C to +70°C / - 4° to 158°F
Supported Bluetooth Profiles: Handsfree, A2DP, and AVRCP
Bluetooth Specification: Bluetooth 2.0
19

MANUEL DE L'UTILISATEUR
Bluetooth Car-Kit EGO Cup FM
SOMMAIRE
1. Contenu de l'emballage.........................................................................................................................................................................2
2. Connexion & Explication des commandes............................................................................................................................................. 3
3. Installation............................................................................................................................................................................................. 4
4. Instructions d'utilisation..........................................................................................................................................................................6
4.1. Mise en marche / à l'arrêt du kit EGO Cup FM............................................................................................................................ 6
4.2. Synchronisation & connexion de l'EGO Cup FM avec un périphérique Bluetooth.......................................................................6
4.2.1. Synchronisation de l'EGO Cup FM avec un périphérique Bluetooth / téléphone portable Bluetooth.................................6
4.2.2. Connexion/déconnexion d'EGO Cup FM et d'un périphérique Bluetooth..........................................................................7
4.2.3. Suppression des informations relatives à la synchronisation............................................................................................8
4.3. Fonctions d'appel........................................................................................................................................................................8
4.3.1. Fonctions basiques d'appel...............................................................................................................................................8
4.3.2. Mise en sourdine / rétablissement du son.........................................................................................................................8
4.3.3. Transfert d'appel de/vers le téléphone portable................................................................................................................8
4.3.4. Fonctions d'appel avancées Téléphone portable - Numérotation vocale .......................................................................... 9
4.4. Fonction A2DP............................................................................................................................................................................9
4.4.1. Utilisation de la fonction A2DP du téléphone portable.....................................................................................................10
4.4.2. Opérations AVRCP (télécommande)............................................................................................................................... 10
4.5. Réglage du volume...................................................................................................................................................................10
4.6. Fonction de transmission FM....................................................................................................................................................10
4.6.1. Utilisation de la transmission FM....................................................................................................................................11
4.6.2. Utilisation de la transmission FM....................................................................................................................................11
5. Résumé des fonctions et de l'utilisation des touches........................................................................................................................... 12
5.1. Configurations des DEL............................................................................................................................................................ 12
5.2. Pressions sur les touches.........................................................................................................................................................12
5.3. Fonctions et utilisation des touches...........................................................................................................................................12
6. Caractéristiques techniques................................................................................................................................................................18

Français
1. Contenu de l'emballage
[1] EGO Cup FM
[2] Hélice de montage du kit auto (adaptateur pour porte-tasse)
[3] Microphone orientable avec connecteur jack 2,5 mm
[4] Adaptateur système Herbert Richter
[5] Chargeur auto 12V avec câble mini USB à 5 broches (kit de branchement sur l'allume-cigares du véhicule)
[6] Manuel de l'utilisateur en plusieurs langues
[1] [2]
[4] [5]
[6]
2
[3]

Français
A
2. Connexion & Explication des commandes
Connexion (dos)
Interrupteur
ON / OFF
Port USB – connexion au chargeur
du véhicule pour charger la batterie
du périphérique
Connexion pour
microphone (jack 2,5
mm)
Miniconnecteur stéréo
3,5 mm (pour périphérique
de sortie audio)*
dernier numéro, rappel
dernier numéro entrant,
connexion/déconnexion
périphérique Bluetooth
déconnexion d'un périphérique
Recherche FM vers l'arrière, sélection vers
l'arrière des fréquences FM pré-sélectionnées,
*NOTE :
Une source audio extérieure connectée via le jack 3,5 mm sera reproductible uniquement via la fonction de l'émetteur FM
Touches (avant)
Prise d'appel, rappel
transfert d'appel,
lecture/pause audio,
Fin d'appel,
refus d'un appel entrant,
arrêt audio, marche/arrêt
numérotation vocale,
3
retour audio
Haut-parleur
Microphone
DEL rouge/bleue : indique l'état de l'EGO
sourdine/rétablissement
du son, appel en attente
Diminution volume,
suppression enregistrements
synchronisés,
sourdine/rétablissement du
son, conférence, sortie du
mode A2DP
Recherche FM vers l'avant, sélection vers
l'avant des fréquences FM présélectionnées, avance audio
ugmentation volume,

Français
3. Installation
Il est facile d'installer le produit EGO Cup FM dans le véhicule soit en utilisant l'hélice de montage pour le fixer dans le porte-tasse, soit
en fixant le produit sur l'adaptateur système Herbert Richter.
Avec l'hélice de montage
Enfoncer l'hélice de montage à laquelle le EGO Cup FM est fixé dans le porte-tasse du véhicule.
Étape 1
Presser l'EGO Cup FM sur les crochets du dispositif de
montage
Étape 2
Pivoter l'EGO Cup FM vers la droite jusqu'à ce qu'il soit fixé
sur le dispositif de montage.
4

Français
Avec l'adaptateur Herbert Richter
Étape 1
Presser l'EGO Cup FM sur les crochets de
l'adaptateur Herbert-Richter
L'adaptateur et l'EGO Cup FM se fixent alors facilement à la pièce correspondante du véhicule.
NOTE :
Veiller à ne pas positionner votre téléphone portable trop près de l'EGO Cup FM (respecter une distance d'au moins 30 cm/1 ft). Si les
deux appareils sont trop proches l'un de l'autre, il existe des risques d'interférence entre les deux susceptibles de provoquer des
parasites ou une perte de la connexion.
Étape 2
Pivoter l'EGO Cup FM vers la droite jusqu'à ce qu'il soit
fixé sur l'adaptateur Herbert Richter
5

Français
4. Instructions d'utilisation
4.1. Mise en marche / à l'arrêt du kit EGO Cup FM
• Pour la mise en marche : positionner l'interrupteur MARCHE/ARRÊT sur “ON”. Vous entendez successivement une note
grave puis une note aigüe, la DEL clignote à intervalles de 3 secondes. Ceci indique que le kit auto est en service. Si le
kit auto EGO Cup FM n'est pas raccordé à des périphériques Bluetooth (par ex. un téléphone portable), il passe en mode
synchronisation dès qu'il est sous tension (les détails de la synchronisation sont décrits dans 4.2.).
• Pour la mise à l'arrêt : positionner l'interrupteur MARCHE/ARRÊT sur “OFF”. Deux notes aigües sont suivies d'une note
4.2. Synchronisation & connexion de l'EGO Cup FM avec un périphérique Bluetooth
4.2.1. Synchronisation de l'EGO Cup FM avec un périphérique Bluetooth / téléphone portable Bluetooth
Avant de passer ou prendre des appels, il est nécessaire de synchroniser votre téléphone portable avec l'EGO Cup FM. Il s'agit d'une
opération unique qui autorise l'EGO Cup FM et votre téléphone portable à fonctionner ensemble.
Procéder comme ceci :
1. Approcher l'EGO Cup FM de votre téléphone portable à fonction Bluetooth et vérifiez que les deux appareils sont en marche.
2. Suivre les instructions du manuel de votre téléphone portable pour activer la recherche de périphériques Bluetooth côté
3. Dans la liste, sélectionner “EGO CUP FM” puis démarrer la synchronisation en suivant les instructions s'affichant sur l'écran
grave. Ceci indique que le kit auto est à l'arrêt.
Si votre EGO Cup FM n'a pas encore été synchronisé avec un périphérique/un téléphone portable Bluetooth , il passe
Note :
automatiquement en mode synchronisation lorsque vous le mettez en marche. La preuve : vous entendez le son de
synchronisation (notes aigüe-grave-aigüe-grave), la DEL bleue clignote toutes les 2 secondes et le symbole Bluetooth
apparaît sur l'affichage LCD et clignote également toutes les 2 secondes.
téléphone. L'écran de votre téléphone portable affiche la liste des périphériques Bluetooth détectés lors de la recherche.
du téléphone portable.
6

Français
4. En suivant toujours les instructions, entrer le code “0000” puis confirmer pour synchroniser l'EGO Cup FM avec votre
téléphone. Lorsque la procédure est terminée, la note aigüe retentit, la DEL bleue est faiblement allumée et le nom du
téléphone/du périphérique est affiché. Cela indique que l'EGO Cup FM et le téléphone portable sont synchronisés.
:
NOTE
• Si le téléphone indique que la synchronisation a échoué et que l'EGO Cup FM demeure en mode synchronisation, revenir aux
étapes 2-4 pour répéter la procédure de synchronisation.
• Il est possible de synchroniser l'EGO Cup FM avec jusqu'à 8 périphériques Bluetooth (téléphones portables compris). Les 8 jeux
d'informations synchronisées correspondants sont enregistrés par l'EGO Cup FM. Tout périphérique synchronisé peut
communiquer sans fil avec l'EGO Cup FM une fois qu'uneune connexion Bluetooth a été établie.
• Il se peut que le nom de votre téléphone ne s'affiche pas immédiatement après la procédure réussie de synchronisation (par ex.
si le nom dépasse les 12 caractères admis). Dans ce cas, le symbole Bluetooth s'affiche au lieu du nom du téléphone portable.
4.2.2. Connexion/déconnexion d'EGO Cup FM et d'un péri phérique Bluetooth
Pour utiliser l'EGO Cup FM avec un périphérique Bluetooth, la connexion Bluetooth doit être établie au préalable entre les deux
périphériques. Lorsque deux périphériques Bluetooth ont déjà été synchronisés, il suffit de les rebrancher, même s'ils ont été
déconnectés ou arrêtés entre temps.
Connexion de l'EGO Cup FM à un téléphone portable Bluetooth
Le fait d'initier une demande depuis l'EGO Cup FM ou le téléphone portable permet d'établir la connexion Bluetooth.
• Pour lancer la demande de connexion depuis l'EGO Cup FM : placer l'EGO Cup FM à proximité du téléphone portable Bluetooth
et appuyer sur
connexion est établie.
• Pour initier une demande de connexion à partir du téléphone portable Bluetooth : placer l'EGO Cup FM à proximité du téléphone
portable Bluetooth puis suivre les instructions du guide de l'utilisateur pour trouver l'EGO Cup FM et envoyer une demande de
connexion.
brièvement. Le symbole apparaît brièvement sur l'affichage LCD et une note aigüe retentit lorsque la
7

Français
Déconnexion de l'EGO Cup FM et du téléphone portable Bluetooth :
Quand l'EGO Cup FM est connecté à un téléphone portable Bluetooth (ou en mode connecté), vous pouvez les déconnecter soit en
appuyant sur pendant au moins 3 secondes, soit en suivant les instructions du guide de l'utilisateur du téléphone portable et en
lançant la déconnexion à partir du téléphone. Après la déconnexion, une note grave retentit puis la DEL bleue clignote toutes les 3
secondes, « EGO CUP FM » apparaît sur l'écran LCD..
4.2.3. Suppression des informations relatives à la synchronisation
Il est possible de synchroniser l'EGO Cup FM avec jusqu'à 8 périphériques Bluetooth. Pour supprimer les informations de
synchronisation stockées dans l'EGO Cup FM, déconnecter tout d'abord ce dernier de tous les téléphones portables raccordés en
appuyant sur la touche
le bouton
synchronisation ont été effacées.
pendant au moins 6 secondes, jusqu'à ce que le symbole Bluetooth s'affiche à l'écran LCD, puis appuyer sur
pendant au moins 6 secondes. L'icône s'affiche, ce qui indique que toutes les informations relatives à la
4.3. Fonctions d'appel
Avant d'utiliser les fonctions d'appel, vérifier que l'EGO Cup FM et le téléphone portable sont en marche et connectés
4.3.1. Fonctions basiques d'appel
• Répondre ou renuméroter : Appuyer sur
• Rejeter ou terminer un appel : Appuyer sur
4.3.2. Mise en sourdine / rétablissement du son
Pour mettre un appel en cours en sourdine, appuyer brièvement et simultanément sur
Une fois l'appel en cours mis en sourdine, deux notes retentissent toues les 3 secondes. Pour supprimer la sourdine d'un appel en
cours, appuyer à nouveau brièvement et simultanément sur
4.3.3. Transfert d'appel de/vers le téléphone portable
• Transférer des appels vers le téléphone portable : Appuyer sur
• Transférer des appels depuis le téléphone portable : Appuyer sur
brièvement
brièvement
et .
et .
brièvement
brièvement
8

Français
4.3.4. Fonctions d'appel avancées
Téléphone portable - Numérotation vocale
Si le téléphone connecté supp orte la numérotation vocale, appuyer sur
La DEL bleue est fortement allumée sans clignoter.
Quand la numérotation vocale est en cours, vous pou vez l'annuler en appuyant brièv ement sur
allumée.
Note :
Avant d'utiliser la numérotat ion vocale, il est nécessaire d'enregistrer les codes de reconnaissance vocale. Consulter le manuel du
téléphone portable pour savoir comment installer la numérotation vocale et enregistrer les codes vocaux.
Mise en attente d'appel / conférence
Si le téléphone portable possède des fonctions d'attente/de conférence, l'EGO Cup FM peut supporter ces fonctions après les opérations
suivantes :
• Un nouvel appel entre au cours d'une conversation :
- Appuyer sur
- Appuyer sur
• Deux appels sont en cours, l'un est actif et l'autre est en attente :
- Appuyer sur
- Appuyer sur
- Appuyer sur
uniquement si le téléphone portable supporte la fonction conférence).
pendant au moins 3 secondes pour conserver l'appel en cours et accepter l'appel entrant, OU
pour terminer l'appel en cours et répondre à l'appel entrant.
pendant au moins 3 secondes pour basculer entre l'appel actif et l'appel en attente.
pour terminer l'appel actif et prendre l'appel en attente.
pendant au moins 3 secondes pour établir une conférence (NOTE : cette fonction est disponible
pendant environ 6 secondes pour activer la numérotation vocale.
. Le DEL bleue est alors fai blement
4.4. Fonction A2DP
L'EGO Cup FM supporte le profil Bluetooth A2DP pour jouer de la musique avec une excellente qualité. S'il est connecté à un lect eur
musique/multimédia Bluetooth ou à un téléphone portable compatible A2DP, ce pr oduit permet de à l'utilisateur de profiter de la
musique en stéréo provenant du lecteur.
9

Français
4.4.1. Utilisation de la fonction A2DP du téléphone portable
Avec les téléphones portables supportant les profils Bluetooth A2DP, une connexion audio est réalisable entre le téléphone et l'EGO
Cup FM pour profiter de la musique reproduite par le téléphone. La plupart des téléphones portables établissent automatiquement la
connexion audio au démarrage de la lecture musicale. Si le téléphone portable supporte les profils Bluetooth A2DP et s'il est impossible
d'établir une connexion audio au démarrage de la lecture musicale, suivre les instructions correspondantes du guide de l'utilisateur du
téléphone portable.
4.4.2. Opérations AVRCP (télécommande)
Les opérations suivantes permettent de télécommander votre téléphone Bluetooth ou votre lecteur média pour la lecture musicale :
Lecture/Pause : Appuyer brièvement sur
Stop : Appuyer brièvement sur
Avance : Appuyer brièvement sur
Retour : Appuyer brièvement sur
puis relâcher
puis relâcher
puis relâcher
puis relâcher
4.5. Réglage du volume
Pour augmenter ou diminuer le volume, appuyer sur ou , lorsque le kit EGO Cup FM est en service, en mode conversation ou
lecture. Répéter l'opération jusqu'à ce que le volume du haut-parleur atteigne le niveau souhaité. Ce réglage de volume ne fonctionne
pas lorsque l'EGO Cup FM est en mode de transmission FM. Dans ce cas, le volume est commandé depuis l'autoradio.
:
Note
Dans la plupart des cas, la commande de volume Bluetooth du kit EGO Cup FM est synchronisée avec le téléphone. Il est alors
possible de commander le volume sonore de votre EGO Cup FM via le téléphone portable ou inversement. Mais ce n'est pas toujours le
cas en raison des différentes configurations choisies par les différents fabricants de téléphones.
4.6. Fonction de transmission FM
L'EGO Cup FM supporte la transmission FM pour transférer l'appel et jouer de la musique via les haut-parleurs du véhicule Pour cela, il
est nécessaire que l'EGO Cup FM soit réglé sur la même fréquence que l'autoradio. Vous profiterez alors pleinement de la qualité
sonore des hauts-parleurs du kit EGO Cup FM ou du véhicule.
10

Français
4.6.1. Utilisation de la transmission FM
Pour activer la transmission FM, appuyer brièvement et simultanément sur et sur .
Pour désactiver la transmission FM, appuyer à nouveau simultanément sur
et sur .
4.6.2. Utilisation de la transmission FM
L'EGO Cup FM présente 6 canaux FM différents qui ont été enregistrés avec les fréquences suivantes (réglages d'usine) : FM1 :
87.50 MHz, FM2 : 91.00 MHz, FM3 : 94.50 MHz, FM4 : 98.00 MHz, FM5 : 101.50 MHz et FM6 : 105.00 MHz. Pour commuter entre ces
canaux, appuyer sur le bouton
Les émetteurs régionaux de radio peuvent occuper des fréquences pré-réglées, celles-ci ne sont alors pas disponibles pour la
(canal suivant) ou sur le bouton (canal précédent) pendant au moins 3 secondes.
transmission vers votre autoradio. Modifier alors les fréquences de canaux de la manière suivante :
1. Avec l'autoradio, chercher une fréquence non occupée par une station de radio.
2. Sur l'EGO Cup FM, sélectionner le canal FM destiné à être utilisé avec une autre fréquence.
3. Appuyer sur le bouton
fréquence destinée à ce canal. Une fois la fréquence souhaitée atteinte, relâcher le bouton
4. Pour enregistrer cette fréquence, appuyer sur
pendant au moins 6 secondes. Deux notes retentissent et l'écran affiche l'augmentation de
.
.
Si vous souhaitez diminuer la fréquence d'un canal, suivre les instructions ci-dessus mais, au lieu d'appuyer sur le bouton
sur
.
, appuyer
Note
:
Ne pas utiliser la transmission FM pendant le chargement pour éviter les radiations, les interféren ces et les parasites dans
l'autoradio
11

Français
5. Résumé des fonctions et de l'utilisation des touches
5.1. Configurations des DEL
Configuration DEL 1 – Mode veille : DEL bleue clignote toutes les 3 secondes
Configuration DEL 2 – Mode connexion : DEL bleue faiblement allumée sans clignoter
Configuration DEL 3 – Mode appel : DEL bleue fortement allumée sans clignoter
Configuration DEL 4 – Mode synchronisation : DEL bleue clignot e une fois par seconde
Configuration DEL 5 – Avertissement faible puissance : DEL rouge allumée et DEL bleue clignote toutes les 20 secondes
Configuration DEL 6 – Mode audio : DEL bleue fortement allumée sans clignoter
5.2. Pressions sur les touches
Courte Appuyer et relâcher rapidement
Longue Appuyer pendant au moins 3 secondes puis relâcher
Très longue Appuyer pendant au moins 6 secondes puis relâcher
Maintien Maintenir la touche enfoncée
5.3. Fonctions et utilisation des touches
Les instructions contenues dans le tableau de la section 1 – 7 vous permettent de faire fonctionner le kit EGO Cup FM.
Note :
L'EGO Cup FM est en mesure de communiquer uniquement avec des périphériques Bluetooth synchronisés. Avec les périphériques qui
supportent uniquement le profil main-libre (HFP), la connexion Bluetooth doit être établie entre le kit auto et le téléphone avant de
passer ou prendre des appels.
Durée Description
12

Tableau 1 : Marche/Arrêt
FONCTION
Mise en
marche
Mise à
l'arrêt
Tableau 2 : Synchronisation / connexions
FONCTION
Synchronisation EGO
Cup FM / téléphone
Suppression
tous profils
synchronisés
Connexion EGO Cup
FM / téléphone
Déconnexion Veille
ETAT ACTUEL INDICATEUR EGO CUP FM
TELEPHONE
PORTABLE
Marche Mise à l'arrêt Placer l'interrupteur
Marche Veille Placer l'interrupteur
EGO CUP FM
ETAT ACTUEL INDICATEUR EGO CUP FM
TELEPHONE
PORTABLE
Marche Mode
Déconnecté
de tous
appareils
Veille
(déconnecté)
(connexion)
Français
OPERATION
MARCHE/ARRÊT sur “MARCHE”
MARCHE/ARRÊT sur "ARRÊT"
EGO CUP FM
synchronisation
Déconnecté de
tous appareils
Veille
(déconnecté)
Veille
(connexion)
Automatique, aucune
opération requise
Appuyer sur pendant au
moins 6 secondes puis
relâcher, appuyer ensuite
sur pendant au moins 6
secondes, puis relâcher
Appuyer sur puis relâcher
rapidement
Appuyer sur pendant au
moins 3 secondes puis
relâcher
13
OPERATION
SIGNAL AUDIO TEMOIN DEL
Un son grave suivi
d'un son aigu
Deux sons aigus
suivis d'un son grave
SIGNAL
AUDIO
Un son aigu DEL bleue fortement
Un son aigu DEL bleue clignote
Un son aigu DEL bleue faiblement
Un son aigu DEL bleue clignote
DEL bleue clignote
toutes les 3 secondes
DEL bleue éteinte
TEMOIN DEL
allumée sans
clignoter
toutes les 3 secondes
allumée sans
clignoter
toutes les 3 secondes

Français
Tableau 3 : Fonctions d'appel de base
FONCTION
Prise d'appel Appel entrant Appel
Refus/fin d'appel Connecté Connecté Appuyer sur puis relâcher
Rappel numéro
sortant
Rappel numéro
entrant
Numérotation vocale Connecté Connecté Appuyer sur pendant a u
Annulation
numérotation vocale
Augmentation volume Connecté /
Baisse volume Connecté /
Sourdine Appel Appel
Annulation sourdine Appel Appel
ETAT ACTUEL INDICATEUR EGO CUP FM
TELEPHONE
PORTABLE
Connecté Connecté Appuyer sur puis relâcher
Connecté Connecté Appuyer sur pendant au
Numérotation
vocale
appel
appel
EGO CUP
FM
entrant
Numérotati
on vocale
Connecté
/appel
Connecté
/appel
OPERATION
Appuyer sur puis relâcher
rapidement
rapidement
rapidement
moins 3 secondes puis relâcher
moins 6 secondes puis relâcher
Appuyer sur puis relâcher
rapidement
Appuyer sur
rapidement
Appuyer sur
rapidement
Appuyer sur
simultanément puis relâcher
rapidement
Appuyer sur
simultanément puis relâcher
rapidement
puis relâcher
puis relâcher
et
et
14
SIGNAL AUDIO TEMOIN DEL
Un son aigu DEL bleue fortement
Un son aigu DEL bleue faiblement
Un son aigu DEL bleue fortement
Un son aigu DEL bleue fortement
Un son aigu DEL bleue fortement
Un son aigu DEL bleue faiblement
Un son aigu DEL bleue fortement
Un son aigu DEL bleue fortement
Un son aigu suivi
de 2 sons graves
toutes les 3
secondes pendant
l'appel en sourdine
Un son aigu DEL bleue fortement
allumée sans clignoter
allumée sans clignoter
allumée sans clignoter
allumée sans clignoter
allumée sans clignoter
allumée sans clignoter
allumée sans clignoter
allumée sans clignoter
DEL bleue fortement
allumée sans clignoter
allumée sans clignoter

Français
r
Transfert d'appel
(EGO Cup FM /
téléphone)
Transfert d'appel
(téléphone / EGO Cup
FM)
Tableau 4 : Mise en attente d'appel et appels 3 voies (conférence)
FONCTION
Mise en attente appel
actuel et réponse appel
entrant
Fin appel en cours et
réponse appel entrant
Refus appel entrant Connecté/appel Appel
Basculement entre
appel actif et appel en
attente
Fin appel actuel et
réponse appel en attente
Libérer tous les appels
en attente
Appel en conférence Appel en attente Appel en
Appel Appel Appuyer sur puis relâcher
Appel Veille Appuyer sur puis relâcher
ETAT ACTUEL INDICATEUR EGO CUP FM
TELEPHONE
PORTABLE
Connecté/appel Appel
Connecté/appel Appel
Appel en attente Appel en
Appel en attente Appel en
Appel en attente Appel
rapidement
rapidement
EGO CUP
FM
entrant
entrant
entrant
attente
attente
entrant
attente
Appuyer sur
moins 3 secondes
Appuyer sur puis relâcher
rapidement
Appuyer sur
moins 3 secondes puis
relâcher
Appuyer sur
moins 3 secondes puis
relâcher
Appuyer sur puis relâcher
rapidement
Appuyer sur pendant au
moins 3 secondes puis relâche
Appuyer sur
moins 3 secondes puis
relâcher
15
OPERATION
pendant au
pendant au
pendant au
pendant au
Un son aigu DEL bleue fortement
Un son aigu DEL bleue fortement
SIGNAL
AUDIO
Un son
aigu
Un son
aigu
Un son
aigu
Un son
aigu
Un son
aigu
Un son
aigu
Un son
aigu
allumée sans clignoter
allumée sans clignoter
TEMOIN DEL
DEL bleue fortement
allumée sans clignoter
DEL bleue fortement
allumée sans clignoter
DEL bleue fortement
allumée sans clignoter
DEL bleue fortement
allumée sans clignoter
DEL bleue fortement
allumée sans clignoter
DEL bleue fortement
allumée sans clignoter
DEL bleue fortement
allumée sans clignoter

Français
Tableau 5 : Utilisation audio (A2DP)
ETAT ACTUEL INDICATEUR EGO CUP FM
FONCTION
Lecture Mode A2DP Appuyer sur puis relâcher
Pause Mode A2DP Appuyer sur puis relâcher
Stop Mode A2DP Appuyer sur puis relâcher
Augmentation
volume
Baisse
volume
Avance Mode A2DP
Retour Mode A2DP
TELEPHONE
PORTABLE /
LECTEUR
Mode A2DP
Mode A2DP
EGO CUP FM
rapidement
rapidement
rapidement
Appuyer sur
rapidement
Appuyer sur
rapidement
Appuyer sur
rapidement
Appuyer sur
rapidement
OPERATION
puis relâcher
puis relâcher
puis relâcher
puis relâcher
16
SIGNAL
AUDIO
Un son aigu
Un son aigu
Un son aigu
Un son aigu
Un son aigu
Un son aigu
Un son aigu
AFFICHAGE
LCD

Tableau 6 : Transmission FM
FONCTION
Activation/désactivat
ion transmission FM
Recherche FM
avant/calage de
fréquence
Recherche FM
arrière/calage de
fréquence
Sélection fréquence
FM pré-sélectionnée
vers l'avant (1-6)
Sélection fréquence
FM pré-sélectionnée
vers l'arrière (6-1)
Tableau 7 : Autres
FONCTION
Activation/désac
tivation autoconnexion
TELEPHONE
PORTABLE /
LECTEUR
Tout sauf
Connexion Connexion
Connexion Connexion
Connexion Connexion
Connexion Connexion
TELEPHONE
PORTABLE
Veille
Français
ETAT ACTUEL INDICATEUR EGO CUP FM
EGO CUP FM
Recherche FM
ETAT ACTUEL INDICATEUR EGO CUP FM
EGO CUP FM
OPERATION
Appuyer sur et
simultanément et relâcher
rapidement
Maintenir
appuyer sur
rapidement
Maintenir
appuyer sur
rapidement
Appuyer sur
moins 3 secondes puis
relâcher
Appuyer sur
moins 3 secondes puis
relâcher
Appuyer sur
moins 6 secondes puis
relâcher
enfoncée et
enfoncée et
OPERATION
17
puis relâcher
puis relâcher
pendant au
pendant au
pendant au
SIGNAL
AUDIO
Un son aigu DEL bleue clignote
Un son aigu
Un son aigu
Un son aigu
Un son aigu
SIGNAL
AUDIO
Un son aigu
TEMOIN DEL
toutes les 3 secondes
TEMOIN DEL /
AFFICHAGE LCD

Français
Mise en sourdine
haut-parleur EGO
Cup FM
Rétablissement du
son haut-parleur
EGO Cup FM
Avertissement
courant faible
Rappel de
sourdine
Affichage
numéro appelant
Volume maximum
/ minimum atteint
Appel
Appel
Inchangé - Un son
Inchangé - Deux sons
Appel entrant Appel entrant Appuyer sur pendant au
Inchangé - Tons aigus –
Appuyer sur
pendant au moins 3 secondes
Appuyer sur
pendant au moins 3 secondes
moins 3 secondes puis
relâcher
et
et
6. Caractéristiques Techniques
Dimensions : 76 mm x 71 mm x 50 mm / 3.0 x 2.8 x 1.9 in.
Poids : 96 gr / 3.4 oz
Longueur du câble adaptateur : 0,6 m / 23 in.
Tension de service : 12V
Température de service : -20°C à +70°C / - 4° à 158°F
Profils Bluetooth supportés : Handsfree, A2DP et AVRCP
Spécification Bluetooth : Bluetooth 2.0
18
Un son aigu DEL bleue fortement
toutes les 60
secondes
toutes les 3
secondes
- Numéro appelant
graves
allumée sans clignoter
DEL rouge allumée et
DEL bleue clignote
toutes les 20 secondes
DEL rouge allumée et
DEL bleue clignote
toutes les 20 secondes
apparaît sur l'affichage
LCD
DEL bleue fortement
allumée sans clignoter

MANUAL DEL USUARIO
Bluetooth Car-Kit EGO Cup FM
CONTENIDOS
1. Contenido del paquete.......................................................................................................................................................................... 2
2. Conexión y explicación de botones.......................................................................................................................................................3
3. Instalación................................................................................................................. ............................................................................ 4
4. Instrucciones de uso..............................................................................................................................................................................6
4.1. Encendido y apagado del EGO Cup FM.....................................................................................................................................6
4.2. Acoplamiento y conexión del EGO Cup FM con un dispositivo Bluetooth...................................................................................6
4.2.1. Acoplamiento del EGO Cup FM con un dispositivo Bluetooth / teléfono móvil Bluetooth..................................................6
4.2.2. Conexión y desconexión del EGO Cup FM al dispositivo Bluetooth ................................................................................. 7
4.2.3. Borrar información de acoplamiento.................................................................................................................................8
4.3. Funciones de llamada.................................................................................................................................................................8
4.3.1. Operaciones de llamada básicas......................................................................................................................................8
4.3.2. Activar / desactivar silenciación de llamadas....................................................................................................................8
4.3.3. Transferencia de llamadas al/del teléfono móvil...............................................................................................................8
4.3.4. Funciones de llamada avanzadas.....................................................................................................................................9
4.4. Función A2DP...........................................................................................................................................................................10
4.4.1. Utilización de la función A2DP del teléfono móvil............................................................................................................10
4.4.2. Operaciones AVRCP (Control remoto)............................................................................................................................ 10
4.5. Ajuste del volumen....................................................................................................................................................................10
4.6. Función de transmisión FM.......................................................................................................................................................11
4.6.1. Utilización de la transmisión FM.....................................................................................................................................11
4.6.2. Utilización de la transmisión FM.....................................................................................................................................11
5. Resumen de funciones y botones ....................................................................................................................................................... 12
5.1. Pautas de indicación por LED ...................................................................................................................................................12
5.2. Duración de la pulsación........................................................................................................................................................... 12
5.3. Funciones y botones.................................................................................................................................................................12
6. Datos Técnicos....................................................................................................................................................................................18

Español
1. Contenido del paquete
[1] EGO Cup FM
[2] Rotor de montaje del kit para automóvil (adaptador para usar el portavasos)
[3] Micrófono giratorio con toma de 2,5 mm
[4] Adaptador de sistema Herbert-Richter
[5] Cargador para el automóvil de 12V con cable mini USB de 5 clavijas
(kit de conexión al encendedor de cigarrillos del vehículo)
[6] Manual del usuario en varios idiomas
[1] [2]
[4] [5]
[6]
[3]
2

Español
–
A
r
r
r
2. Conexión y explicación de botones
Conexión (lateral)
ceptar llamada, remarca
último número, remarca
último número entrante,
reproducir/ pausar audio,
conectar/desconectar a un
ON / OFF
Interruptor
Mini conector estéreo de
3,5 mm (para conectar con
dispositivo de salida de
audio)*
Conexión para micrófono
(toma de 2,5 mm)
Puerto USB
cargador de coche para cargar la
batería del dispositivo
se conecta al
Búsqueda en retroceso, seleccionar frecuencias
anteriores prestablecidas, retroceder audio
*NOTA:
Una fuente externa de audio conectada con la toma de 3,5 mm sólo puede reproducirse mediante la función de transmisión de FM
Botones (frontal)
tranferir llamada,
dispositivo Bluetooth
Finalizar llamada,
rechazar llamada entrante,
parar el audio,
activar/cancelar el marcado
por voz, desconecta
de un dispositivo
3
Micrófono
LED rojo/azul: indica el estado del EGO Cup FM
Bajar volumen, borrar
registros de acople,
activar/desactivar
silenciación,
multiconferencia, salir del
modo A2DP
Altavoz
Búsqueda en avance de FM, seleccionar
frecuencias siguientes prestablecidas,
avanzar audio
Subir volumen,
activar/cancelar
silenciación, llamada
en espera

Español
3. Instalación
El EGO Cup FM puede montarse fácilmente dentro del coche usando el rotor de montaje para fijar el EGO Cup FM al portavasos del
mismo o fijando el EGO Cup FM en el adaptador de sistema Herbert-Richter.
Uso del rotor de montaje
Ya puede meter el rotor de montaje fijado al EGO Cup FM en el portavasos de su coche.
Paso 1.
Meta el EGO Cup FM en los ganchos del soporte
Paso 2.
Gire el EGO Cup FM a la derecha hasta que esté fijo en el
soporte
4

Español
Uso del adaptador Herber Richter
Paso 1.
Meta el EGO Cup FM en los ganchos del
adaptador Herbert-Richter
Ya puede ajustar el adaptador con el EGO Cup FM a un soporte adecuado en su coche.
NOTA:
Asegúrese de que no coloca su teléfono móvil demasiado cerca del EGO Cup FM (debería ponerse al menos a 30 cm / 1 pie del EGO
Cup FM). Si los dos dispositivos se colocan demasiado cerca, existe el riesgo de que estos dos dispositivos interfieran entre sí, de
modo que usted oiría ruido o perdería la conexión.
Paso 2.
Gire el EGO Cup FM a la derecha hasta que esté fijo en el
adaptador Herbert-Richter
5

Español
4. Instrucciones de uso
4.1. Encendido y apagado del EGO Cup FM
• Para encender: ponga el interruptor ON/OFF en "ON". Oirá un pitido grave seguido de uno agudo y el LED azul
parpadeará cada 3 segundos. Esto indica que el kit para automóvil está encendido. Si aún no ha acoplado su EGO Cup
FM con dispositivos Bluetooth (p. ej: teléfono móvil), el EGO Cup FM entrará en modo de acoplamiento justo después de
encenderlo (consulte 4.2 para detalles sobre el procedimiento de acoplamiento).
• Para apagar: ponga el interruptor ON/OFF en "OFF". Oirá dos pitidos agudos seguidos de uno grave. Esto indica que el
4.2. Acoplamiento y conexión del EGO Cup FM con un dispositivo Bluetooth
4.2.1. Acoplamiento del EGO Cup FM con un dispositivo Bluetooth / teléfono móvil Bluetooth
Antes de hacer y recibir llamadas, primero deberá acoplar su EGO Cup FM y su teléfono móvil. Este es un procedimiento de una fase
en el que el EGO Cup FM y su teléfono móvil sea autorizan mutuamente.
Para el acoplamiento, proceda del siguiente modo:
1. Coloque su EGO Cup FM cerca de su teléfono móvil con capacidad Bluetooth y asegúrese de que su EGO Cup FM y su
2. Siga la guía de usuario de su teléfono móvil para activar la búsqueda de dispositivo Bluetooth desde el teléfono móvil. En la
3. Seleccione de la lista “EGO CUP FM” y comience el acoplamiento siguiendo las instrucciones que aparecerán en la pantalla
kit para automóvil está apagado.
teléfono móvil estén encendidos.
Si aún no ha acoplado su EGO Cup FM con ningún dispositivo Bluetooth / teléfono móvil, entrará en modo de
Nota:
acoplamiento cuando lo encienda. Indicación: oirá el pitido de acoplamiento (pitidos agudo-grave-agudo-grave), el LED azul
parpadeará cada segundo y el símbolo de Bluetooth aparecerá en la pantalla LCD y parpadeará cada 2 segundos.
pantalla de su teléfono móvil verá una lista de dispositivos Bluetooth encontrados por el teléfono móvil al final del proceso de
búsqueda.
de su teléfono móvil.
6

Español
4. Prosiga según las instrucciones en pantalla escribiendo la clave "0000" y confirme ésta para acoplar el EGO Cup FM a su
teléfono móvil. Una vez completado el procedimiento, oirá un pitido agudo, el LED azul se iluminará tenuemente y aparecerá
el nombre del teléfono / dispositivo. Esto indica que el EGO Cup FM y el teléfono móvil están acoplados.
:
NOTA
• Si su teléfono móvil indica que el acople ha result ado fallido y el EGO Cup F M sigue en el modo para acople, deberá repet ir los
pasos del 2 al 4 para realizar el acople.
• El EGO Cup FM puede acoplarse hasta a 8 dispositivos Bluetooth (incluidos teléfonos móviles). Los correspondientes 8
registros de acople se guardan en la memoria del EGO Cup FM. Cada dispositivo acoplado puede comunicar inalámbricamente
con el EGO Cup FM estableciendo una conexión Bluetooth.
• Una vez realizado con éxito el acoplamiento, puede que no se visualice el nombre de su teléfono (p. ej. porque el nombre
exceda los 12 caracteres permitidos). En este caso, el símbolo de Bluetooth aparecerá en la pantalla en vez del nombre del
teléfono.
4.2.2. Conexión y desconexión del EGO Cup FM al dispositivo Bluetooth
Para usar el EGO Cup FM con un dispositivo Bluetooth, la conexión Bluetooth entre ambos dispositivos debe haberse establecido con
anterioridad. Si dos dispositivos Bluetooth ya han sido acoplados antes, podrá reconectarlos sencillamente, inclus o aunque los dos
dispositivos se hayan desconectado o apagado en el intermedio.
Conexión de su EGO Cup FM a un teléfono móvil Bluetooth
El inicio de una solicitud desde el EGO Cup FM o el teléfono móvil puede restablecer la conexión Bluetooth.
• Si quiere iniciar la solicitud de conexión desde el EGO Cup FM: coloque el EGO Cup FM cerca de su teléfono móvil Bluetooth y
pulse el botón
correctamente conectado.
• Si quiere iniciar la solicitud de conexión desde el teléfono móvil Bluetooth: coloque el EGO Cup FM cerca de su teléfono móvil
Bluetooth y siga las instrucciones de la guía del usuario del teléfono para hallar el EGO Cup FM y enviar una solicitud de
conexión.
brevemente. El símbolo aparecerá brevemente en la pantalla LCD y se oirá un pitido agudo cuando esté
7

Español
Desconexión del EGO Cup FM de su teléfono móvil Bluetooth:
Cuando el ego cup fm está conectado al teléfono móvil bluetooth (o está en modo conectado), podrá desconectarlo pulsando y
manteniendo pulsado el botón durante al menos 3 segundos, o siguiendo la guía del usuario del teléfono móvil e iniciando la
desconexión desde el teléfono. Tras desconectar, oirá un pitido grave, luego el LED azul parpadeará cada 3 segundos y verá "EGO
Cup FM" en la pantalla LCD..
4.2.3. Borrar información de acoplamiento
Este EGO Cup FM puede acoplarse hasta a 8 dispositivos Bluetooth. Para eliminar toda la información de acoplamiento almacenada
en el EGO Cup FM, primero debe desconectar el EGO Cup FM de todos los teléfonos móviles conectados pulsando el botón
durante, al menos, 6 segundos hasta que el símbolo de Bluetooth aparezca en la pantalla LCD, luego pulse y mantenga pulsado el
durante al menos 6 segundos. El icono aparecerá en la pantalla, lo que indica que la inf ormación de acoplamiento se
botón
ha eliminado.
4.3. Funciones de llamada
Antes de realizar las funciones de llamada, asegúrese de que tanto el EGO Cup FM como su teléfono móvil estén conectados.(
4.3.1. Operaciones de llamada básicas
• Responder llamada o rellamada: Pulse el botón
• Rechazar o finalizar llamada: Pulse el botón
4.3.2. Activar / desactivar silenciación de llamadas
Puede silenciar una llamada entrante pulsando simultáneamente el botón
Cuando la llamada entrante está silenciada, oirá dos pitidos cada 3 segundos. Puede cancelar la silenciación de una llamada entrante
pulsando simultáneamente de nuevo el botón
4.3.3. Transferencia de llamadas al/del teléfono móvil
• Transferencia de llamadas al teléfono móvil: Pulse el botón
• Transferencia de llamadas del teléfono móvil: Pulse el botón
y el botón .
brevemente
brevemente
y el botón .
brevemente
brevemente
8

Español
4.3.4. Funciones de llamada avanzadas
Teléfono móvil - Marcado por voz
Si el teléfono conectado dispone de marcado por voz, puede pulsar y mantener pulsado el botón
para activar el marcado por voz. El LED azul se ilumina intensamente sin parpadear.
Cuando el marcado por voz está en curso, podrá pulsar brevemente el botón para canelar el marcado por voz. El LED azul se
ilumina tenuemente.
Nota:
Para poder usar el marcado por voz, primeramente deberá haber guardado archivos de voz en su teléfono móvil. En el manual de su
teléfono móvil hallará instrucciones más detalladas sobre cómo configurar el marcado por voz y guardar archivos de voz.
Llamada en espera / multiconferencia
Si su teléfono móvil tiene funciones de llamada en espera y multiconferencia, podrá hacer uso de éstas en el EGO Cup FM de la
siguiente manera:
• Cuando entra una llamada nueva mientras está hablando:
- Pulse y mantenga pulsado el botón
entrante, O
- Pulse el botón
• Cuando hay dos llamadas en curso, una estará activa y la otra retenida:
- Pulse y mantenga pulsado el botón
- Pulse el botón
- Pulse y mantenga pulsado el botón
función sólo está disponible si su teléfono móvil admite la función de multiconferencia).
durante al menos 6 segundos
durante al menos 3 segundos para retener la llamada activa y aceptar la
para finalizar la llamada activa y responder a la llamada entrante.
al menos 3 segundos para cambiar entre la llamada activa y la retenida.
para finalizar la llamada activa y aceptar la llamada retenida.
durante al menos 3 segundos para hacer una multiconferencia (NOTA: esta
9

Español
4.4. Función A2DP
Este EGO Cup FM admite el perfil Bluetooth A2DP para reproducir música a alta calidad. Cuando se conecta a un reproduct or
musical/multimedia Bluetootho a un teléfono móvil con compatibilidad A2DP, este producto permite el disfrute y reproducción remota en
estéreo desde un reproductor.
4.4.1. Utilización de la función A2DP del teléfono móvil
Si su teléfono móvil es compatible con perfiles Bluetooth A2DP, podrá establecerse una conexión de audio entre el teléfono móvil y el
EGO Cup FM y disfrutar así de la música que reproduce el teléfono. La mayoría de teléfonos móviles establecerán una conexión de
audio automáticamente cuando empiece a reproducir música. Si, a pesar de ser su teléfono móvil compatible con perfiles Bluetooth
A2DP, no consigue establecer una conexión de audio al reproducir música, deberá consultar la guía del usuario de su teléfono para
establecer una conexión de audio antes de reproducir música.
4.4.2. Operaciones AVRCP (Control remoto)
Las siguientes operaciones sirven para controlar remotamente su teléfono Bluetooth o su reproductor multimedia/de música a la hora
de reproducir música:
Reproducir/pausa: Pulse y suelte el bot ón
Parar: Pulse y suelte el botón
Avance: Pulse y suelte el botón
Retroceso: Pulse y suelte el botón
rápidamente
rápidamente
rápidamente
rápidamente
4.5. Ajuste del volumen
Puede subir o bajar el volumen pulsando los botones o respectivamente, mientras el EGO Cup FM esté en los modos
conectado, conversación o reproducción. Podrá repetir esta operación hasta que en el altavoz tenga el volumen deseado. Este ajuste
de volumen no funciona cuando el EGO Cup FM está realizando una función de transmisión de FM. En este caso, el volumen se
controlará mediante la radio del vehículo.
10

Español
Nota:
Normalmente, el control de volumen Bluetooth del EGO Cup FM se sincroniza con el teléfono. Es decir, el volumen de sonido de su
EGO Cup FM puede controlarse desde su teléfono y viceversa. Sin embargo, es posible que no siempre sea así, debido a las diversas
implementaciones de los distintos fabricantes de teléfonos.
4.6. Función de transmisión FM
Este EGO Cup FM admite la transmisión FM para transferir la llamada y reproducir música por el altavoz del coche. Por eso tiene que
ajustar su EGO Cup FM a la misma frecuencia que la radio de su coche. Así podrá disfrutar de gran calidad de sonido tanto como por
el altavoz de su EGO Cup FM como por el del coche.
4.6.1. Utilización de la transmisión FM
Puede activar la transmisión FM pulsando de manera rápida y simultánea el botón
Puede desactivar la transmisión FM pulsando de manera rápida y simultánea el botón
4.6.2. Utilización de la transmisión FM
El EGO Cup FM tiene 6 canales FM distintos, que se han guardado en las siguientes frecuencias (ajuste de fábrica): FM1:
87.50 MHz, FM2: 91.00 MHz, FM3: 94.50 MHz, FM4: 98.00 MHz, FM5: 101.50 MHz y FM6: 105.00 MHz. Puede cambiar entre estos
canales pulsando el botón
3 segundos.
Debido a cadenas de radio regionales, puede ocurrir que las frecuencias preseleccionadas estén ocupadas y no puedan usarse para la
transmisión a la radio de su vehículo. En este caso, puede cambiar la frecuencia de los canales como sigue:
1. Busque con la radio de su vehículo una frecuencia que no esté ocupada por una cadena de radio
2. Seleccione el canal FM en el EGO Cup FM que debería usarse con otra frecuencia.
3. Pulse el botón
frecuencia para este canal. Si ha alcanzado la frecuencia deseada, suelte el botón
4. Para guardar esta frecuencia, pulse
Si quiere bajar la frecuencia de un canal, siga las instrucciones de arriba pero en vez de pulsar el botón
(para seleccionar el canal siguiente) o el botón (para seleccionar el canal anterior) durante al menos
al menos 6 segundos y manténgalo pulsado. Oirá dos tonos y la pantalla muestra cómo aumenta la
.
11
y el botón .
y el botón de nuevo.
.
, pulse el botón .

Español
Nota:
No use la transmisión FM durante la carga para evitar la radiación, superposición de sonidos o ruido en la radio del coche.
5. Resumen de funciones y botones
5.1. Pautas de indicación por LED
Pauta de LED 1 – modo stand-by: El LED azul parpadea una vez cada 3 segundos
Pauta de LED 2 – modo de conexión: El LED azul se ilumina tenuemente sin parpadear
Pauta de LED 3 – modo de llamada: El LED azul se ilumina intensamente sin parpadear
Pauta de LED 4 – modo de acoplamiento: El LED azul parpadea una vez cada segundo
Pauta de LED 5 – aviso de batería baja: El LED rojo está encendido y el LED azul parpadea una vez cada 20 segundos
Pauta de LED 6 – modo de audio: El LED azul se ilumina intensamente sin parpadear
5.2. Duración de la pulsación
Pulsación de tecla Descripción
Corta Pulse y suelte el botón rápidamente
Larga Pulse y mantenga pulsado el botón durante al menos 3 segundos, luego suelte
Muy larga Pulse y mantenga pulsado el botón durante al menos 6 segundos, luego suelte
Mantener pulsado Mantenga pulsado el botón
5.3. Funciones y botones
Puede seguir las instrucciones de la Tabla 1 – 7 antes de usar su EGO Cup FM.
Nota:
Su EGO Cup FM sólo puede comunicar con dispositivos Bluetooth acoplados. En aquellos dispositivos que admitan sólo el perfil manos
libres (HFP), también necesitará establecer una conexión Bluetooth entre su kit y su teléfono antes de poder hacer y recibir llamadas.
12

Español
Tabla 1: Encendido y apagado
FUNCIÓN
Encender Encendido Apagado Ponga el interruptor
Apagar Encendido Stand-by Ponga el interruptor de
Tabla 2: Acoplamiento/Conexiones
FUNCIÓN
Acoplar el
EGO Cup FM
al teléfono
Borrar todos
los perfiles
acoplados
Conectar el
EGO Cup FM
al teléfono
Desconectar Stand-by
ESTADO ACTUAL INDICADOR EGO CUP FM
TELÉFONO
MÓVIL
ESTADO ACTUAL INDICADOR EGO CUP FM
TELÉFONO
MÓVIL
Encendido Modo de
Desconectado
de todos los
dispositivos
Stand-by
(desconectado)
(conectado)
EGO CUP FM
EGO CUP FM
acoplamiento
Desconectado
de todos los
dispositivos
Stand-by
(desconectado)
Stand-by
(conectado)
OPERACIÓN
de "OFF/ON" en "ON"
"OFF/ON" en "OFF"
OPERACIÓN
Automático, no necesita
intervención
Pulse el botón al menos 6
segundos, luego suéltelo y
después pulse y mantenga
pulsado el botón al
menos 6 segundos. Luego
suelte
Pulse y suelte el botón
rápidamente
Pulse y mantenga pulsado el
botón durante al menos
3 segundos, luego suelte
13
PITIDO DE AUDIO INDICADOR POR LED
Un pitido grave seguido
de uno agudo
Dos pitidos agu-dos
seguidos de uno grave
PITIDO DE AUDIO INDICADOR POR LED
Un pitido agudo El LED azul se ilumina
Un pitido agudo El LED azul parpadea
Un pitido agudo El LED azul se ilumina
Un pitido agudo El LED azul parpadea
El LED azul parpadea
una vez cada 3
segundos
LED azul
DESCONECTADO
intensamente sin
parpadear
una vez cada 3
segundos
tenuemente sin
parpadear
una vez cada 3
segundos

Español
Tabla 3: Funciones básicas de llamada
FUNCIÓN
Responder
llamada
Rechazar/finalizar
llamada
Rellamar al último
número llamado
Rellamar al último
número recibido
Marcado por voz Conectado Conectado Pulse y mantenga pulsado el
Cancelar marcado
por voz
Subir volumen Conectar /
Bajar volumen Conectar /
Silenciar Llamada Llamada
ESTADO ACTUAL INDICADOR EGO CUP FM
TELÉFONO
MÓVIL
Llamada
entrante
Conectado Conectado Pulse y suelte el botón
Conectado Conectado Pulse y suelte el botón
Conectado Conectado Pulse y mantenga pulsado el
Marcado
por voz
llamar
llamar
EGO CUP
FM
Llamada
entrante
Marcado
por voz
Conectar /
llamar
Conectar /
llamar
OPERACIÓN
Pulse y suelte el botón
rápidamente
rápidamente
rápidamente
botón durante al menos 3
segundos, luego suelte
durante al menos 6
botón
segundos, luego suelte
Pulse y suelte el botón
rápidamente
Pulse y suelte el botón
rápidamente
Pulse y suelte el botón
rápidamente
Pulse los botones
la vez y suelte rápidamente
y a
PITIDO DE
AUDIO
Un pitido agudo El LED azul se ilumina
Un pitido agudo El LED azul se ilumina
Un pitido agudo El LED azul se ilumina
Un pitido agudo El LED azul se ilumina
Un pitido agudo El LED azul se ilumina
Un pitido agudo El LED azul se ilumina
Un pitido agudo El LED azul se ilumina
Un pitido agudo El LED azul se ilumina
Un pitido agudo
seguido de 2 pitidos
graves cada 3
segundos durante
la llamada
silenciada
INDICADOR POR LED
intensamente sin parpadear
tenuemente sin parpadear
intensamente sin parpadear
intensamente sin parpadear
intensamente sin parpadear
tenuemente sin parpadear
intensamente sin parpadear
intensamente sin parpadear
El LED azul se ilumina
intensamente sin parpadear
14

Español
Cancelar
silenciación
Transferir llamada
(EGO Cup FM a
teléfono)
Transferir llamada
(teléfono a EGO
Cup FM)
Tabla 4: Llamada en espera y llamada a 3 (Multiconferencia)
FUNCIÓN
Retener llamada
activa y
responder
llamada entrante
Finalizar llamada
activa y responder
llamada entrante
Rechazar
llamada entrante
Alternar entre
llamada activa y
retenida
Finalizar llamada
activa y aceptar
llamada retenida
Llamada Llamada
Llamada Llamada Pulse y suelte el botón
Llamada Stand-by Pulse y suelte el botón
ESTADO ACTUAL INDICADOR EGO CUP FM
TELÉFONO
MÓVIL
Conectar /
llamar
Conectar /
llamar
Conectar /
llamar
Llamada
retenida
Llamada
retenida
Pulse los botones
la vez y suelte rápidamente
rápidamente
rápidamente
EGO CUP FM
Llamada
entrante
Llamada
entrante
Llamada
entrante
Llamada
retenida
Llamada
retenida
Pulse y mantenga pulsado el
botón
3 segundos
Pulse y suelte el botón
rápidamente
Pulse y mantenga pulsado el
botón
3 segundos, luego suelte
Pulse y mantenga pulsado el
botón
3 segundos, luego suelte
Pulse y suelte el botón
rápidamente
y a
OPERACIÓN
durante al menos
durante al menos
durante al menos
15
Un pitido agudo El LED azul se ilumina
Un pitido agudo El LED azul se ilumina
Un pitido agudo El LED azul se ilumina
PITIDO DE
Un pitido
agudo
Un pitido
agudo
Un pitido
agudo
Un pitido
agudo
Un pitido
agudo
intensamente sin parpadear
intensamente sin parpadear
intensamente sin parpadear
AUDIO
El LED azul se ilumina
intensamente sin
parpadear
El LED azul se ilumina
intensamente sin
parpadear
El LED azul se ilumina
intensamente sin
parpadear
El LED azul se ilumina
intensamente sin
parpadear
El LED azul se ilumina
intensamente sin
parpadear
INDICADOR POR LED

Español
Recuperación de
llamadas en
espera
Llamada en
multiconferencia
Tabla 5: Operaciones de audio (A2DP)
FUNCIÓN
Reproducir Modo A2DP Pulse y suelte el botón
Pausa Modo A2DP Pulse y suelte el botón
Parar Modo A2DP Pulse y suelte el botón
Subir
volumen
Bajar
volumen
Avanzar Modo A2DP
Retroceder Modo A2DP
Llamada
retenida
Llamada
retenida
ESTADO ACTUAL INDICADOR EGO CUP FM
TELÉFONO
MÓVIL
Modo A2DP
Modo A2DP
Llamada
entrante
Llamada
retenida
EGO CUP FM
Pulse y mantenga pulsado el
durante al menos 3
botón
segundos, luego suelte
Pulse y mantenga pulsado el
botón
durante al menos
3 segundos, luego suelte
OPERACIÓN
rápidamente
rápidamente
rápidamente
Pulse y suelte el botón
rápidamente
Pulse y suelte el botón
rápidamente
Pulse y suelte el botón
rápidamente
Pulse y suelte el botón
rápidamente
16
Un pitido
agudo
Un pitido
agudo
PITIDO DE
AUDIO
Un pitido
agudo
Un pitido
agudo
Un pitido
agudo
Un pitido
agudo
Un pitido
agudo
Un pitido
agudo
Un pitido
agudo
El LED azul se ilumina
intensamente sin
parpadear
El LED azul se ilumina
intensamente sin
parpadear
INDICADOR EN
PANTALLA

Tabla 6: Transmisión FM
R
FUNCIÓN
Activar / desactivar
la transmisión FM
Búsqueda FM en
avance / ajustar
frecuencia
Búsqueda FM en
retroceso / ajustar
frecuencia
Seleccionar canal de
FM predeterminado
posterior (1-6)
Seleccionar canal de
FM predeterminado
anterior (6-1)
Tabla 7: Otros
FUNCIÓN
Activar/desactivar
conexión
automática
Español
ESTADO ACTUAL INDICADOR EGO CUP FM
TELÉFONO
MÓVIL /
REPRODUCTO
Todos excepto
Conectado Conectado
Conectado Conectado
Conectado Conectado Pulse y mantenga pulsado el
Conectado Conectado Pulse y mantenga pulsado el
ESTADO ACTUAL INDICADOR EGO CUP FM
TELÉFONO
MÓVIL
Stand-by Pulse y mantenga pulsado el
EGO CUP FM
Buscar FM
EGO
CUP FM
botón
segundos, luego suelte
OPERACIÓN
Pulse los botones
vez y suelte rápidamente
Mantenga pulsado el botón
y luego suelte
Mantenga pulsado el botón
y luego suelte rápidamente
durante al menos 3
botón
segundos, luego suelte
durante al menos 3
botón
segundos, luego suelte
OPERACIÓN
durante al menos 6
y a la
rápidamente
Un pitido
agudo
Un pitido
agudo
Un pitido
agudo
Un pitido
agudo
Un pitido
agudo
PITIDO DE
AUDIO
Un pitido
agudo
PITIDO DE
AUDIO
El LED azul parpadea
una vez cada 3
segundos
INDICADOR LED/ EN
INDICADOR POR
LED
PANTALLA
17

Español
A
Silenciar altavoz de
EGO Cup FM
Activar altavoz de
EGO Cup FM
Aviso de batería
baja
Recordatorio de
silenciación
Ver número de
llamada entrante
lcanzado el volumen
máximo o mínimo
Llamada Pulse y mantenga pulsado el
botón
y durante al
Llamada Pulse y mantenga pulsado el
Sin
Sin
Llamada
entrante
Sin
cambiar
cambiar
Llamada
entrante
cambiar
menos 3 segundos
botón
y durante al
menos 3 segundos
- Un pitido
- Dos pitidos
Pulse y mantenga pulsado el
durante al menos 3
botón
segundos, luego suelte
- Pitidos agudo–
Un pitido
agudo
agudo cada 60
segundos
agudo cada 3
segundos
- El número de la llamada
grave
El LED azul se ilumina
intensamente sin
parpadear
El LED rojo está encendido
y el LED azul parpadea
una vez cada 20 segundos
El LED rojo está encendido
y el LED azul parpadea
una vez cada 20 segundos
entrante aparece en
pantalla
El LED azul se ilumina
intensamente sin parpadear
6. Datos Técnicos
Dimensión: 76 mm x 71 mm x 50 mm / 3.0 x 2.8 x 1.9 pulgadas
Peso: 96 gramos / 3.4 oz
Longitud del cable adaptador: 0,6 m / 23 pulgadas
Tensión de funcionamiento: 12V
Temperatura de uso: -20°C a +70°C / - 4° a 158°F
Perfiles Bluetooth compatibles: Handsfree, A2DP, y AVRCP
Especificaciones Bluetooth: Bluetooth 2.0
18

GEBRUIKSHANDLEIDING
Bluetooth Car-Kit EGO Cup FM
INHOUD
1. Leveromvang.........................................................................................................................................................................................2
2. Toelichting verbinding & knoppen.......................................................................................................................................................... 3
3. Installatie............................................................................................................................................................................................... 4
4. Bedieningsinstructies.............................................................................................................................................................................6
4.1. De EGO Cup FM aan / uitzetten.................................................................................................................................................6
4.2. EGO Cup FM pairen met & aansluiten op Bluetooth-apparaat....................................................................................................6
4.2.1. Pairen van de EGO Cup FM met Bluetooth-apparaat / Bluetooth-mobiele telefoon.......................................................... 6
4.2.2. Uw EGO Cup FM aansluiten op/ontkoppelen van een Bluetooth-apparaat.......................................................................7
4.2.3. Informatie over pairen wissen...........................................................................................................................................8
4.3. Oproepfuncties............................................................................................................................................................................8
4.3.1. Algemene oproepbediening..............................................................................................................................................8
4.3.2. Oproep mute / unmute...................................................................................................................................................... 8
4.3.3. Oproepen overzenden naar/van uw mobiele telefoon....................................................................................................... 8
4.3.4. Geavanceerde oproepfuncties..........................................................................................................................................8
4.4. A2DP Functie..............................................................................................................................................................................9
4.4.1. A2DP-functie van de mobiele telefoon gebruiken.............................................................................................................9
4.4.2. AVRCP bediening (afstandsbediening)........................................................................................................................... 10
4.5. Volume-instelling....................................................................................................................................................................... 10
4.6. FM overdrachtsfunctie...............................................................................................................................................................10
4.6.1. Het gebruik van FM overdrachtsfunctie.......................................................................................................................... 10
4.6.2. FM overdrachtsbediening...............................................................................................................................................11
5. Overzicht van functies toetsbediening.......................................................................................
5.1. LED-indicatiepatronen............................................................................................................................................................... 11
5.2. Indrukduur van de toetsen.........................................................................................................................................................12
5.3. Functies en toetsbediening.......................................................................................................................................................12
6. Technische Gegevens......................................................................................................................................................................... 18
..........................................................11

Nederlands
1. Leveromvang
[1] EGO Cup FM
[2] Carkit montage-rotor (adapter voor gebruik van bekerhouder)
[3] Draaibare microfoon met 2,5 mm aansluiting
[4] Herbert-Richter systeemadapter
[5] 12V auto-oplader kop met 5-polige mini USB-kabel (verbindingsset naar sigarettenaansteker van voertuig)
[6] Meertalige gebruikshandleiding
[1] [2]
[4] [5]
[6]
2
[3]

Nederlands
A
f
t
p
2. Toelichting verbinding & knoppen
Verbinding (achterkant)
ccepteert oproep, belt
laatst gekozen nummer o
laatst binnengekomen
oproep, schakelt oproep
door, Play/pauze audio,
ON / OFF
Schakelaar
3,5 mm stereominiconnector (verbindt
audio uitgang met
apparaat)*
Microfoon verbinding
(2,5 mm aansluiting)
USB-poort – verbindt met autooplader om accu of apparaat op te
laden
Zoekt FM achteruit, selecteert vooraf ingestelde
*OPMERKING:
Een externe audiobron die is verbonden via de 3,5 mm jackplug kan alleen worden afgespeeld via de FM zenderfunctie.
Toetsen (voorkant)
verbindt/ontkoppelt
Bluetooth-apparaat
Beëindigt oproep, wijst
binnenkomende oproep af,
stop audio, selecteer
voicedialfunctie
en breekt deze af,
ontkoppelt van een apparaat
FM-frequenties achteruit, audio achteruit
Microfoon
Rode / blauwe LED: Tonen status van EGO
Luidspreker
Zoekt FM vooruit, selecteert vooraf
ingestelde FM-frequenties vooruit, audio
vooruit
Volume omlaag, wist
gepairde records,
schakelt stom / luid,
conferentieoproepfunctie, A2DP
modus verlaten
Volume omhoog,
schakelt stom / luid,
roep in de wacht
o
3

Nederlands
3. Installatie
De EGO Cup FM kan eenvoudig in de auto worden gemonteerd door deze met montagerotor aan de bekerhouder of aan de Herbert
Richter systeemadapter te bevestigen.
Bij gebruik van montage-rotor
Nu kunt u de met de EGO Cup FM verbonden montage-rotor op de bekerhouder van de auto bevestigen.
Stap 1.
Bevestig de EGO Cup FM aan de haken van het
montagedeel.
Stap 2.
Draai de EGO Cup FM naar rechts tot deze op het
montagedeel is bevestigd.
4

Nederlands
Bij gebruik van Herbert-Richter-adapter
Stap 1.
Bevestig de EGO Cup FM aan de haken van
de Herbert-Richter-adapter.
Nu kunt u de adapter met de EGO Cup FM instellen op een geschikte tegenhanger in de auto.
OPMERKING:
Bevestig uw mobiele telefoon niet in de buurt van de Ego Cup FM (minstens 30 cm / 1 feet weg van de EGO Cup FM). Als de twee
apparaten te dicht bij elkaar worden bevestigd, kunnen deze elkaar storen hetgeen kan leiden tot storingen of verlies van de verbinding.
Stap 2.
Draai de EGO Cup FM naar rechts tot deze op de Herbert
Richter adapter is bevestigd.
5

Nederlands
4. Bedieningsinstructies
4.1. De EGO Cup FM aan / uitzetten
• Aanzetten: zet de AAN/UIT schakelaar op “ON”. U hoort een lage toon die wordt gevolgd door een hoge toon en de
blauwe LED knippert elke 3 seconden. Dit duidt erop dat de carkit is ingeschakeld. Als de EGO Cup FM niet is
verbonden met Bluetooth-apparaten (bijvoorbeeld: mobiele telefoon) gaat de EGO Cup FM na inschakelen in de
pairingmodus (zie 4.2 voor details van de pairingprocedure).
• Uitzetten: zet de AAN/UIT schakelaar op “OFF”. U hoort twee hoge tonen gevolgd door een lage toon. Dit duidt erop dat
4.2. EGO Cup FM pairen met & aansluiten op Bluetooth-apparaat
4.2.1. Pairen van de EGO Cup FM met Bluetooth-apparaat / Bluetooth-mobiele telefoon
Alvorens te telefoneren moet u uw EGO Cup FM en mobiele telefoon eerst pairen. Dit moet een keer worden uitgevoerd zodat de EGO
Cup FM en uw mobiele telefoon met elkaar kunnen communiceren.
Gedetailleerde pairingprocedure is als volgt:
1. Positioneer uw EGO Cup FM dicht bij de Bluetooth-mobiele telefoon en controleer of de EGO Cup FM en de mobiele telefoon
2. Lees in de gebruiksaanwijzing van uw mobiele telefoon hoe u de Bluetooth zoekfunctie van uw telefoon kunt activeren. Op
3. Selecteer “EGO CUP FM” uit de lijst en start pairen volgens de aanwijzingen op het scherm van uw mobiele telefoon.
4. Voer de sleutel “0000” in, en bevestig het pairen van de EGO Cup FM met uw mobiele telefoon. Na afsluiten van de
de carkit is uitgeschakeld.
zijn ingeschakeld.
Opmerking:
inschakelen automatisch in de pairingmodus. Indicatie: u hoort de pairingtoon (hoge-lage-hoge-lage tonen), blauwe LED
knippert elke seconde, en het Bluetooth-symbool verschijnt op de LCD en knippert elke 2 seconden.
het display van uw mobiele telefoon ziet u een lijst met Bluetooth apparaten die door de mobiele telefoon zijn gevonden.
pairingprocedure hoort u een hoge toon, de blauwe LED brandt gedimd en de telefoon / apparaatnaam wordt weergegeven.
Dit duit erop dat de Ego Cup FM en de mobiele telefoon zijn gepaired.
Als de EGO Cup FM nog nooit met Bluetooth-apparaten / mobiele telefoons is gepaired, gaat deze na
6

Nederlands
OPMERKING:
• Als uw mobiele telefoon aangeeft dat het pairen is mislukt en de EG O Cup FM nog in pairingmodus is, moet u teruggaan n aar
bovenstaande stappen 2-4 en het pairen herhalen.
• De EGO Cup FM kan worden gepaired met tot 8 Bluetooth-apparaten (inclusief mobiele telefoons). De bijbehorende 8 sets met
pairinginformatie worden geregistreerd door de EGO Cup FM. Elk gepaird apparaat kan na het opbouwen van een Bluetooth
verbinding snoerloos worden verbonden met de EGO Cup FM.
• Onmiddellijk na een succesvolle pairingprocedure is het mogelijk dat uw telefoonnaam niet kan worden weergegeven
(bijvoorbeeld omdat de naam meer dan 12 tekens bevat). In dit geval verschijnt het Bluetooth symbool op het display in plaats
van de telefoonnaam.
4.2.2. Uw EGO Cup FM aansluiten op/ontkoppelen van een Bluetooth-apparaat
Voor gebruik van de Ego Cup FM met een Bluetooth apparaat wordt eerst de Bluetooth verbinding tussen beide apparaten gemaakt.
Als twee Bluetooth apparaten een keer zijn gepaired, kunt u deze eenvoudig weer met elkaar verbinden, zelfs als de twee apparaten
werden ontkoppeld of uitgezet.
Uw EGO Cup FM verbinden met een Bluetooth mobiele telefoon
Voor het maken van een Bluetooth-verbinding is het initiatief van ofwel de EGO Cup FM of de mobiele telefoon nodig.
• Voor het maken van een verbinding vanuit EGO Cup FM: Positioneer de EGO Cup FM in de buurt van de Bluetooth mobiele
telefoon en druk dan kort op de
hoge toon.
• Verbinding maken vanuit de Bluetooth mobiele telefoon: Positioneer de EGO Cup FM in de buurt van de Bluetooth mobiele
telefoon en ga dan volgens de gebruiksaanwijzing van de telefoon te werk om de EGO Cup FM te vinden en de verbinding te
maken.
Uw EGO Cup FM ontkoppelen van uw Bluetooth mobiele telefoon:
Als de EGO Cup FM is verbonden met de Bluetooth mobiele telefoon (of in verbonden modus), kunt u deze ontkoppelen door de
toets minstens 3 seconden ingedrukt te houden of door de gebruiksaanwijzing te volgen van de mobiele telefoon en te ontkoppelen
vanuit de telefoon. Na ontkoppelen hoort u een lage toon, daarna knippert de blauwe LED één keer elke 3 seconden en op het LCDdisplay verschijnt “EGO CUP FM”.
toets. Het symbool verschijnt kort op de LCD en na een succesvolle verbinding klinkt een
7

Nederlands
4.2.3. Informatie over pairen wissen
Deze EGO Cup FM kan worden gepaired met tot 8 Bluetooth-apparaten. Om al de paringinformatie in de EGO Cup FM te wissen, moet
eerst EGO Cup FM van alle verbonden telefoons worden ontkoppeld door
Bluetooth symbool op het LCD-display verschijnt, dan
op het scherm; dit betekent dat alle pairinginformatie is gewist.
knop minstens 6 seconden ingedrukt houden. Het pictogram verschijnt
knop minstens 6 seconden ingedrukt te houden tot het
4.3. Oproepfuncties
Controleer voor het uitvoeren van oproepfuncties of zowel de EGO Cup FM als uw mobiele telefoon zijn ingeschakeld en verbonden.
4.3.1. Algemene oproepbediening
• Oproep beantwoorden of opnieuw kiezen: Druk kort op toets
• Oproep afwijzen of beëindigen: Druk kort op toets
4.3.2. Oproep mute / unmute
Tijdens een gesprek kunt u "mute" inschakelen door gelijktijdig snel indrukken van toets
Als het gesprek is stomgeschakeld klinken elke 3 seconden twee tonen. U kunt "mute" uitschakelen door opnieuw gelijktijdig snel
indrukken van toets
4.3.3. Oproepen overzenden naar/van uw mobiele telefoon
• Oproepen doorschakelen naar uw mobiele telefoon: Druk kort op toets
• Oproepen doorschakelen vanaf uw mobiele telefoon: Druk kort op toets
4.3.4. Geavanceerde oproepfuncties
Mobiele telefoon - Voicedialing
Als de verbonden telefoon voicedialing ondersteunt, kunt u toets
activeren. De blauwe LED brandt helder zonder knipperen.
Als voicedialing is geactiveerd, kunt u kort op toets
en toets .
drukken om voicedialing af te breken. De blauwe LED brandt gedimd.
en toets .
minstens 6 seconden ingedrukt houden om voicedialing te
8

Nederlands
Opmerking:
Voordat u voicedialing kunt gebruiken, moet u de voicetags in uw mobiele telefoon hebben opgenomen. Zie de handleiding van uw
mobiele telefoon voor een nauwkeurig beschrijving over het activeren van voicedialing en het opnemen van voicetags.
Oproep in de wacht / conferentie
Als uw mobiele telefoon beschikt over wachten/conferentie functies, kan uw EGO Cup FM de functie als volgt ondersteunen:
• Als een nieuwe oproep binnenkomt terwijl u in gesprek bent:
- Houd toets
accepteren, OF
- Druk op toets
• Bij twee oproepen is de ene actief en wordt de andere gehouden:
- Houd toets
- Druk op toets
- Houd toets
beschikbaar als uw mobiele telefoon de conferentie-oproepfunctie ondersteunt!)
minstens 3 seconden ingedrukt om de actieve oproep te houden en de binnenkomende oproep te
om actieve oproep te beëindigen en binnenkomende oproep te beantwoorden.
minstens 3 seconden ingedrukt of wissel tussen oproep in de wacht en actieve oproep.
om actieve oproep te beëindigen en oproep in de wacht te accepteren.
minstens 3 seconden ingedrukt voor een conferentie (OPMERKING: deze functie is alleen
4.4. A2DP Functie
Deze EGO Cup FM ondersteunt het Bluetooth A2DP profiel om muziek in hoge kwaliteit af te spelen. Als een Bluetooth-geactiveerd
multimedia-/muziekapparaat of mobiele telefoon met A2DP-ondersteuning wordt verbonden, kan stereomuziek worden beluisterd en
met de afstandsbediening worden geregeld.
4.4.1. A2DP-functie van de mobiele telefoon gebruiken
Als uw mobiele telefoon het Bluetooth A2DP profiel ondersteunt, kunt u een audioverbinding maken tussen de mobiele telefoon en de
EGO Cup FM om muziek van de telefoon te beluisteren. De meeste mobiele telefoons maken de audioverbinding automatisch als u de
muziek start. Als uw mobiele telefoon Bluetooth A2DP profielen ondersteunt, maar geen audioverbinding kan worden opgebouwd als de
muziekweergave wordt gestart, kunt u de gebruiksaanwijzing van uw telefoon raadplegen over het maken van een audioverbinding.
9

Nederlands
4.4.2. AVRCP bediening (afstandsbediening)
Op de volgende wijze kunt u met afstandbediening regelen of uw Bluetooth compatibele mobiele telefoon of multimedia/musicplayer
muziek speelt:
Play/pauze: Druk een keer kort op toets
Stop: Druk een keer kort op toets
Vooruit: Druk een keer kort op toets
Achteruit: Druk een keer kort op toets
4.5. Volume-instelling
U kunt het geluidsvolume verhogen of verlagen door indrukken van toetsen of , respectievelijk terwijl de EGO Cup FM in de
modus staat voor verbonden, spreken of afspelen. U kunt bovenstaande handeling herhalen tot de luidspreker het gewenste volume
heeft bereikt. Deze volume-instelling werkt niet als de Ego Cup FM de FM overdrachtsfunctie uitvoert. In dit geval wordt het volume
geregeld met de autoradio.
:
Opmerking
Meestal wordt de Bluetooth-volumeregeling van de EGO Cup FM gesynchroniseerd met de telefoon. Dit betekent dat het volume van
uw EGO Cup FM kan worden geregeld met uw telefoon en omgekeerd. Dit is echter niet bij alle fabrikanten altijd het geval.
4.6. FM overdrachtsfunctie
Deze EGO Cup FM ondersteunt FM overdracht om de oproep door te schakelen en muziek via de autospeakers te spelen. Daartoe
moet u uw EGO Cup FM op dezelfde frequentie instellen als uw autoradio. Dan kunt u genieten van perfecte geluidskwaliteit zowel via
de EGO Cup FM luidspreker als de autoluidspreker.
4.6.1. Het gebruik van FM overdrachtsfunctie
U kunt FM-overdracht inschakelen door gelijktijdig snel indrukken van toets
U kunt FM-overdracht uitschakelen door gelijktijdig opnieuw snel indrukken van toets
en toets .
en toets .
10

Nederlands
4.6.2. FM overdrachtsbediening
De EGO Cup FM heeft 6 verschillende FM kanalen die zijn opgeslagen op de volgende frequenties (fabrieksinstelling): FM1:
87.50 MHz, FM2: 91.00 MHz, FM3: 94.50 MHz, FM4: 98.00 MHz, FM5: 101.50 MHz en FM6: 105.00 MHz. U kunt tussen deze kanalen
wisselen door
Soms kunnen regionale radiostations deze frequenties bezet houden zodat deze niet kunnen worden gebruikt voor de overdracht naar
uw autoradio. In dit geval kunnen de frequenties van de kanalen als volgt worden gewijzigd:
Voor een lagere kanaalfrequentie, hetzelfde te werk gaan als hierboven beschreven, alleen in plaats van de
Opmerking
Voor het voorkomen van straling, nevensignaaleffecten of ruis in de autoradio, tijdens laden geen FM overdracht gebruiken.
knop (volgende kanaal) of knop (vorige kanaal) minstens 3 seconden ingedrukt te houden.
1. Zoek met uw autoradio een frequentie die onbezet is
2. Kies het FM kanaal op de EGO Cup FM die met een andere frequentie moet worden gebruikt.
3. Houd op de
kanaalfrequentie. Als de gewenste frequentie is bereikt, de
4. Om deze frequentie op te slaan, drukken op
:
knop minstens 6 seconden ingedrukt. U hoort twee tonen en op het display verschijnt de stijgende
.
knop loslaten.
knop, de knop
5. Overzicht van functies toetsbediening
5.1. LED-indicatiepatronen
LED-patroon 1 – stand-by modus: Blauwe LED knippert elke 3 seconden
LED-patroon 2 – verbindingsmodus: Blauwe LED brandt gedimd zonder knipperen
LED-patroon 3 – oproepmodus: Blauwe LED brandt helder zonder knipperen
LED-patroon 4 – pairingmodus: Blauwe LED knippert elke seconde
LED-patroon 5 – waarschuwing weinig voeding: Rode LED is aan en blauwe LED knippert elke 20 seconden
LED-patroon 6 – audiomodus: Blauwe LED brandt helder zonder knipperen
11

Nederlands
5.2. Indrukduur van de toetsen
Indrukduur Beschrijving
Kort Druk een keer kort op toets
Lang Houd toets minstens 3 seconden ingedrukt, daarna loslaten
Zeer lang Houd toets minstens 6 seconden ingedrukt, daarna loslaten
Ingedrukt houden Houd de toets ingedrukt
5.3. Functies en toetsbediening
U kunt onderstaande instructies in tabel 1 – 7 opvolgen om uw EGO Cup FM te bedienen.
Opmerking:
Uw EGO Cup FM kan alleen communiceren met gepairde Bluetooth-apparaten. Voor apparaten die alleen het Handsfree Profile (HFP)
ondersteunen, moet u alvorens te telefoneren ook de Bluetooth-verbinding maken tussen uw carkit en uw telefoon.
Tabel 1: Aan/uit
FUNCTIE
Inschakelen Aan Uit Zet de “OFF/ON”
Uitschakelen Aan Stand-by Zet de “OFF/ON”
STROOMVOORZIENING EGO CUP FM INDICATOR
MOBIELE
TELEFOON
EGO CUP FM
BEDIENING
schakelaar op “ON”
schakelaar op “OFF”
12
AUDIOTOON LED-INDICATOR
Een lage toon gevolgd
door een hoge toon
Twee hoge tonen gevolgd
door een lage toon
Blauwe LED knippert
elke 3 seconden
Blauwe LED is UIT

Tabel 2: Pairing/aansluitingen
FUNCTIE
Pair EGO Cup FM
met telefoon
Alle gepairde
profielen wissen
EGO Cup FM
met telefoon
verbinden
Ontkoppelen Stand-by
Tabel 3: Algemene oproepfuncties
FUNCTIE
Oproep
beantwoorden
Oproep afwijzen /
beëindigen
Uitgaande nummer
opnieuw kiezen
STROOMVOORZIENING EGO CUP FM INDICATOR
MOBIELE
TELEFOON
Aan Pairingmodus Automatisch, geen bediening
Ontkoppeld
van alle
apparaten
Stand-by
(ontkoppeld)
(verbonden)
STROOMVOORZIENING EGO CUP FM INDICATOR
MOBIELE
TELEFOON
Binnenkomend
e oproep
Verbonden Verbonden Druk een keer kort op toets Een hoge toon Blauwe LED brandt
Verbonden Verbonden Druk een keer kort op toets Een hoge toon Blauwe LED brandt
EGO CUP FM
Ontkoppeld
van alle
apparaten
Stand-by
(ontkoppeld)
Stand-by
(verbonden)
EGO CUP FM
Binnenkomend
e oproep
Nederlands
BEDIENING
nodig
Houd knop minstens 6
seconden ingedrukt, laat
deze dan los en houd
knop minstens 6 seconden
ingedrukt, en laat deze dan
los
Druk een keer kort op toets
Houd toets minstens 3
seconden ingedrukt, daarna
loslaten
BEDIENING
Druk een keer kort op toets Een hoge toon Blauwe LED brandt
AUDIOTOON LED-INDICATOR
Een hoge toon Blauwe LED brandt
Een hoge toon Blauwe LED knippert
Een hoge toon Blauwe LED brandt
Een hoge toon Blauwe LED knippert
AUDIOTOON LED-INDICATOR
helder zonder knipperen
elke 3 seconden
gedimd zonder knipperen
elke 3 seconden
helder zonder knipperen
gedimd zonder knipperen
helder zonder knipperen
13

Nederlands
Binnenkomende
oproep opnieuw
kiezen
Voicedialing Verbonden Verbonden Houd toets minstens 6
Voicedialing
afbreken
Volume omhoog Verbonden /
Volume omlaag Verbonden /
Mute Oproep Oproep
Unmute Oproep Oproep
Doorschakeloproep
(EGO Cup FM naar
telefoon)
Doorschakeloproep
(telefoon naar EGO
Cup FM)
Verbonden Verbonden Houd toets minstens 3
Voicedialing Voicedialing Druk een keer kort op toets Een hoge toon Blauwe LED brandt
oproep
oproep
Oproep Oproep Druk een keer kort op toets
Oproep Stand-by Druk een keer kort op toets
Verbonden /
oproep
Verbonden /
oproep
seconden ingedrukt, daarna
loslaten
seconden ingedrukt, daarna
loslaten
Druk een keer kort op toets
Druk een keer kort op toets
Druk gelijktijdig kort op toets
en
Druk gelijktijdig kort op toets
en
14
Een hoge toon Blauwe LED brandt
Een hoge toon Blauwe LED brandt
Een hoge toon Blauwe LED brandt
Een hoge toon Blauwe LED brandt
Een hoge toon
gevolgd door 2
lage tonen elke
3 seconden
tijdens de
"mute" oproep
Een hoge toon Blauwe LED brandt
Een hoge toon Blauwe LED brandt
Een hoge toon Blauwe LED brandt
helder zonder knipperen
helder zonder knipperen
gedimd zonder knipperen
helder zonder knipperen
helder zonder knipperen
Blauwe LED brandt
helder zonder knipperen
helder zonder knipperen
helder zonder knipperen
helder zonder knipperen

Tabel 4: Oproep in de wacht en 3-weg bellen (conferentie)
FUNCTIE
Actieve oproep
houden en
binnenkomende
oproep beantwoorden
Actieve oproep
beëindigen en
binnenkomende
oproep
beantwoorden
Binnenkomende
oproep afwijzen
Wisselen tussen
actieve oproep en
oproep in de wacht
Actieve oproep
beëindigen en oproep
in de wacht
accepteren
Vrijlating alle
vastgehouden
oproepen
Conferentie oproep Oproep in de
STROOMVOORZIENING EGO CUP FM INDICATOR
MOBIELE
TELEFOON
Verbonden /
oproep
Verbonden /
oproep
Verbonden /
oproep
Oproep in de
wacht
Oproep in de
wacht
Oproep in de
wacht
wacht
EGO CUP FM
Binnenkomende
oproep
Binnenkomende
oproep
Binnenkomende
oproep
Oproep in de
wacht
Oproep in de
wacht
Binnenkomende
oproep
Oproep in de
wacht
Nederlands
BEDIENING
Houd toets
3 seconden ingedrukt
Druk een keer kort op
toets
Houd toets
3 seconden ingedrukt,
daarna loslaten
Houd toets
3 seconden ingedrukt,
daarna loslaten
Druk een keer kort op
toets
Houd toets
seconden ingedrukt,
daarna loslaten
Houd toets
3 seconden ingedrukt,
daarna loslaten
15
minstens
minstens
minstens
minstens 3
minstens
AUDIOTOON LED-INDICATOR
Een hoge
toon
Een hoge
toon
Een hoge
toon
Een hoge
toon
Een hoge
toon
Een hoge
toon
Een hoge
toon
Blauwe LED brandt
helder zonder knipperen
Blauwe LED brandt
helder zonder knipperen
Blauwe LED brandt
helder zonder knipperen
Blauwe LED brandt
helder zonder knipperen
Blauwe LED brandt
helder zonder knipperen
Blauwe LED brandt
helder zonder knipperen
Blauwe LED brandt
helder zonder knipperen

Nederlands
Tabel 5: Audiobediening (A2DP)
STROOMVOORZIENING EGO CUP FM INDICATOR
FUNCTIE
Play A2DP-modus Druk een keer kort op toets Een hoge
Pauze A2DP-modus Druk een keer kort op toets Een hoge
Stop A2DP-modus Druk een keer kort op toets Een hoge
Volume
omhoog
Volume
omlaag
Vooruit A2DP-modus
Achteruit A2DP-modus
Tabel 6: FM overdracht
FUNCTIE
FM overdracht
inschakelen/
uitschakelen
MOBIELE
TELEFOON /
PLAYER
A2DP-modus
A2DP-modus
EGO CUP FM
STROOMVOORZIENING EGO CUP FM INDICATOR
MOBIELE
TELEFOON /
PLAYER
Alle behalve
EGO CUP FM
FM zoeken
BEDIENING
Druk een keer kort op toets
Druk een keer kort op toets
Druk een keer kort op toets
Druk een keer kort op toets
BEDIENING
Druk gelijktijdig kort op toets
en
16
AUDIOTOON LCD-INDICATOR
toon
toon
toon
Een hoge
toon
Een hoge
toon
Een hoge
toon
Een hoge
toon
AUDIOTOON LED-INDICATOR
Een hoge
toon
Blauwe LED knippert
elke 3 seconden

Nederlands
FM vooruit zoeken /
frequentie instellen
FM achteruit zoeken
/ frequentie instellen
FM vooraf ingestelde
kanalen vooruit (1-6)
selecteren
FM vooraf ingestelde
kanalen achteruit (6-1)
selecteren
Tabel 7: Overige
FUNCTIE
Automatische
verbindingsfunctie
inschakelen/uitscha
kelen
EGO Cup FM
speaker op mute
zetten
EGO Cup FM
speaker op unmute
zetten
Verbonden Verbonden
Verbonden Verbonden
Verbonden Verbonden
Verbonden Verbonden
STROOMVOORZIENING EGO CUP FM INDICATOR
MOBIELE
TELEFOON
Stand-by
Oproep
Oproep
EGO CUP FM
Houd toets
daarna een keer kort op toets
Houd toets
daarna een keer kort op toets
Houd toets
seconden ingedrukt, daarna
loslaten
Houd toets
seconden ingedrukt, daarna
loslaten
Houd toets
seconden ingedrukt, daarna
loslaten
Houd
minstens 3 seconden
ingedrukt
Houd
minstens 3 seconden
ingedrukt
ingedrukt, druk
ingedrukt, druk
minstens 3
minstens 3
BEDIENING
minstens 6
en knop
en knop
17
Een hoge
toon
Een hoge
toon
Een hoge
toon
Een hoge
toon
AUDIO
TOON
Een hoge
toon
Een hoge
toon
LED / LCD
INDICATOR
Blauwe LED brandt
helder zonder
knipperen

Nederlands
Waarschuwing
weinig voeding
Mute herinnering Onveranderd - Twee hoge
Zie binnenkomende
oproep
Maximum of
minimum volume is
bereikt
Onveranderd - Een hoge
Binnenko
mende
oproep
Onveranderd - Hoge – lage
Binnenkomen
de oproep
Houd toets minstens 3
seconden ingedrukt, daarna
loslaten
toon elke 60
seconden
tonen elke 3
seconden
- Nummer van
tonen
6. Technische Gegevens
Afmetingen: 76 mm x 71 mm x 50 mm / 3.0 x 2.8 x 1.9 Inches
Gewicht: 96 gram / 3.4 oz
Lengte van kabeladapter: 0,6 m / 23 Inches
Werkspanning: 12V
Werktemperatuur: -20°C tot +70°C / - 4° tot 158°F
Ondersteunde Bluetooth profielen: Handsfree, A2DP en AVRCP
Bluetooth specificatie: Bluetooth 2.0
18
Rode LED is aan en
blauwe LED knippert
elke 20 seconden
Rode LED is aan en
blauwe LED knippert
elke 20 seconden
binnenkomende oproep
verschijnt op de LCD
Blauwe LED brandt
helder zonder
knipperen

MANUAL DO UTILIZADOR
Bluetooth Car-Kit EGO Cup FM
CONTEÚDO
1. Conteúdo da embalagem......................................................................................................................................................................2
2. Descrição dos botões & conexão..........................................................................................................................................................3
3. Instalação.............................................................................................................................................................................................. 4
4. Instruções de operação.........................................................................................................................................................................6
4.1. Ligar / desligar o EGO Cup FM................................................................................................................................................... 6
4.2. Emparelhar & conectar o EGO Cup FM com dispositivo Bluetooth.............................................................................................6
4.2.1. Emparelhar o EGO Cup FM com dispositivo Bluetooth / telemóvel Bluetooth..................................................................6
4.2.2. Conectar/desconectar o seu EGO Cup FM com um dispositivo Bluetooth........................................................................7
4.2.3. Informações sobre exclusão do emparelhamento.............................................................................................................8
4.3. Funções de chamada..................................................................................................................................................................8
4.3.1. Operação básica de chamada ..........................................................................................................................................8
4.3.2. Silenciar chamada / reverter silêncio................................................................................................................................8
4.3.3. Transferir chamada de/para o seu telemóvel.................................................................................................................... 8
4.3.4. Funções de chamada avançadas.....................................................................................................................................8
4.4. Função A2DP..............................................................................................................................................................................9
4.4.1. Usar a função A2DP do telemóvel....................................................................................................................................9
4.4.2. Operações AVRCP (controlo remoto).............................................................................................................................10
4.5. Ajustar volume..........................................................................................................................................................................10
4.6. Função de transmissão FM.......................................................................................................................................................10
4.6.1. Usar transmissão FM......................................................................................................................................................10
4.6.2. Operação de transmissão FM.........................................................................................................................................11
5. Resumo de operações de botões e funções........................................................................................................................................11
5.1. Padrões de indicação dos LEDs.............................................................................................
5.2. Quanto tempo premir................................................................................................................................................................12
5.3. Operações de botões e funções...............................................................................................................................................12
6. Dados técnicos.................................................................................................................................................................................... 18
..................................................11

Português
1. Conteúdo da embalagem
[1] EGO Cup FM
[2] Rotor de montagem do kit para carros (adaptador para uso do porta-copos)
[3] Microfone giratório com conector de 2,5 mm
[4] Adaptador de sistema Herbert-Richter
[5] Carregador para carros de 12V com mini cabo USB de 5 pinos (kit de conexão ao isqueiro do carro)
[6] Manual multilingue
[1] [2]
[4] [5]
[6]
2
[3]

Português
p
A
r
A
2. Descrição dos botões & conexão
Conexão (lado traseiro)
Interruptor
ON/OFF
Conexão do microfone
(conector de 2,5 mm)
Porta USB – conexão ao
carregador do carro para carregar
a bateria do equipamento
Conector mini estéreo 3,5
mm (para conectar
dispositivo de saída de
áudio)*
último número marcado,
remarcar número de última
executar/pausar áudio,
conectar/desconectar com
equipamento Bluetooth
desconectar de um dispositivo
Busca de FM para trás, seleccionar frequências
pré-definidas de FM para trás, recuo de áudio
*NOTA:
Uma fonte externa de áudio ligada por um conector de 3,5 mm só poderá ser reproduzida através da função do transmissor de FM.
Botões (lado dianteiro)
ceitar chamada,
chamada recebida,
transferir chamada,
Finalizar chamada,
rejeitar chamada recebida,
parar áudio, entrar/cancela
marcação por voz,
3
Microfone
LED vermelho/azul : indica o status do
EGO Cu
Altifalante
Busca de FM para a frente, seleccionar
frequências pré-definidas de FM para a
frente, avanço de áudio
FM
umentar volume,
definir/reverter modo
silencioso, chamada
em espera
Diminuir volume,
excluir registos
emparelhados,
definir/reverter modo
silencioso, chamada
em conferência, sair do
modo A2DP

Português
3. Instalação
O EGO Cup FM pode ser facilmente montado no carro por meio do rotor de montagem para instalar o EGO Cup FM no porta-copos do
carro, ou instalar o EGO Cup FM no adaptador de sistema Herbert-Richter.
Usar rotor de montagem
Agora, é possível premir o rotor de montagem equipado com o EGO Cup FM no porta-copos do seu carro.
Passo 1.
Premir o EGO Cup FM nos ganchos da peça de montagem
Passo 2.
Girar o EGO Cup FM à direita até fixar o kit para carros na
peça de montagem.
4

Português
Usar adaptador de sistema Herbert-Richter
Passo 1.
Premir o EGO Cup FM nos ganchos do
adaptador Herbert-Richter
Agora, é possível ajustar o adaptador com o EGO Cup FM a alguma superfície aplicável em seu carro.
NOTA:
Favor não colocar o seu telemóvel muito próximo ao EGO Cup FM (a distância mínima entre ambos deve ser de 30 cm). Se a distância
entre os dois dispositivos for menor que a especificada, há o risco de interferência mútua a provocar ruídos de estática e perda de
conexão.
Passo 2.
Girar o EGO Cup FM à direita até fixar o kit para carros no
adaptador Herbert-Richter
5
 Loading...