

Flaem NEBULAIR+ Instructions For Use Manual
A6A7
A4
A1
A2 A3A5A4
C6
C1
B
A
C
C1.1
C1.2
C1.3
C1.4
C1
C2
C2.1
C3
C4
C5
C7
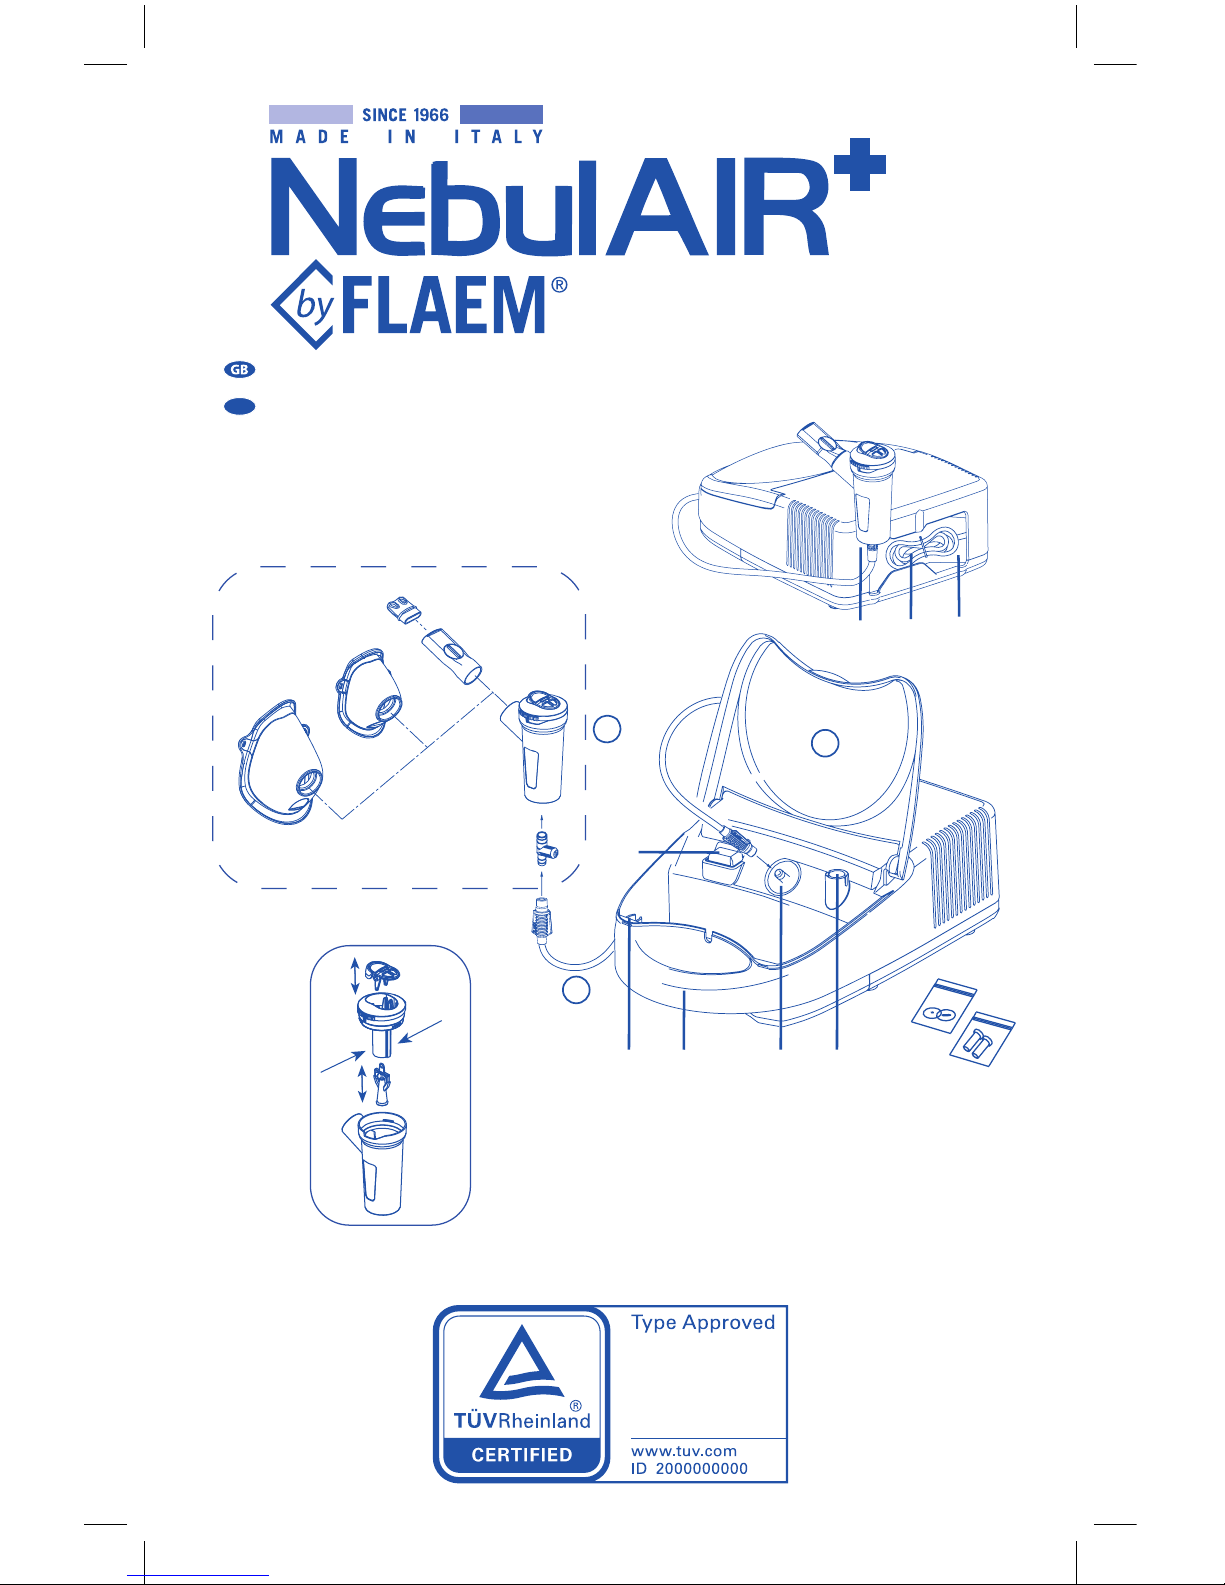
Assembly diagram - Monteringsskjema
INSTRUCTIONS FOR USE MANUAL
BRUKSANVISNING
NO

2

3
Mod. NEBULAIR
AEROSOL THERAPY APPARATUS
We are pleased you have purchased our product and we thank you for your trust in us.
We aim atfully satisfying our customers by oering them state-of-the-art products for
the treatment of respiratory diseases.
Read these instructions carefully and retain them for future reference. Only use
the accessory as described in this manual. This is a medical device to nebulise and
administer medication prescribed or recommended by your doctor.
Please note that the full range of
Flaem products is visible on the website www.aem.it
STANDARD EQUIPMENT INCLUDES:
A
Aerosol apparatus
(main unit)
A1 - On/O switch
A2 - Air intake
A3 - Air lter
A4 - Nebuliser holder
(internal/external)
A5 - Handle for transport
A6 - Cable storage compartment
A7 - Power cable
B Connection tube
(main unit / nebuliser)
C Accessories
C1 - RF7 Dual Speed Plus Nebuliser
C1.1 - Lower part
C1.2 - Nozzle
C1.3 - Upper part
C1.4 - Speed selector with valve
C2 - Mouthpiece with valve
C2.1 - Exhalation valve
C3 - Non-invasive nosepiece
C4 - Paediatric SoftTouch mask
C5 - Adult SoftTouch mask
C6 - Manual nebulisation control
C7 - Filter replacement kit
NebulAIR
+
IMPORTANT WARNINGS
• Before using the product for the rst time, and periodically during its lifetime, check
the integrity of the device structure and of the power cable to make sure there is no
damage. In the event of damage, do not plug in the cable and immediately take the
product to an authorised FLAEM service centre or to your trusted dealer.
• The expected medical life of the accessories is minimum1 year when used 4 times a day.
• Children and people who are not self-sucient must use the device under the close
supervision of an adult who has read this manual.
• Some parts of the device are small enough to be swallowed by children; therefore, keep
the device out of the reach of children.
• Do not use the supplied tubing and cables for anything other than their intended use.
These parts could cause a strangling hazard: pay close attention to children and persons
with particular diculties as they are often unable to accurately evaluate danger.
• The apparatus is unsuitable for use in presence of ammable anaesthetic mixture with
air, oxygen or nitrous oxide.
• Always keep the power supply cable away from hot surfaces.
• Keep the power cable away from animals (for example, rodents) which could damage
the insulation.
• Do not handle the device with wet hands. Do not use the device in damp environments
(for example, while taking a bath or shower). Do not immerse the device in water; in
the event of immersion immediately disconnect the plug. Do not remove or touch the

4
immersed device; unplug the power cable rst. Immediately bring the device to an
authorised FLAEM service centre or to your trusted dealer.
• Use the device only in dust-free conditions, otherwise treatment could be compromised.
• The device casing is not waterproof. Do not wash the device under running water or by
immersion and keep it safe from being sprayed by water or other liquids.
• Do not expose the device to particularly extreme temperatures.
• Do not place the device near sources of heat, in direct sunlight or in excessively hot
rooms.
• Do not obstruct or put objects into the lter or its related housing in the device.
• Never obstruct the air vents located on both sides of the device.
• Always use it on a rigid surface that is clear of obstacles.
• Make sure there is no material obstructing the air vents before each use.
• Do not put any objects in the air vents.
• Repairs must be carried out only by FLAEM authorised personnel. Unauthorised repairs
void the warranty and may be hazardous for the user.
• The average expected duration for the compressor series are: F400: 400 hours, F700:
700 hours, F1000: 1000 hours, F2000: 2000 hours.
• WARNING: Do not modify this device without authorisation from the manufacturer.
• The Manufacturer, the Vendor and the Importer shall be held responsible for safety,
reliability and performance only if: a) the device is used in compliance with the
instructions for use b) the wiring where the device is being used is in compliance with
safety regulations and current laws.
• Interactions: the materials used in contact with medication have been tested with a
vast range of medications. However, in view of the variety and continuous evolution
of pharmaceuticals, interactions cannot be ruled out. We recommend using the
medication as soon as possible once it has been opened and preventing prolonged
exposure in the nebuliser cup.
• The manufacturer must be contacted to report problems and/or unexpected events
related to operation.
OPERATING INSTRUCTIONS
Before each utilisation, wash your hands accurately and clean the device as described
in the paragraph “CLEANING, SANITISATION, DISINFECTION AND STERILISATION”.
The nebuliser cup and accessories are for personal use only to avoid potential risks of
transmitting infection.
During application it is advisable to suitably protect yourself from any dripping.
1. Plug the power cable (A7) into mains socket that is compatible with the device voltage.
The position of the socket must be such that the device can be easily unplugged from the
mains network.
2. Insert the nozzle (C1.2) in the upper part (C1.3) pressing as shown by the 2 arrows in the
"Connection diagram" in point C1. Insert the Speed selector with valve (C1.4) in the upper part (C1.3) as shown in the "Connection diagram" in point C1. Pour the medication
prescribed by the doctor into the lower part (C1.1). Close the nebuliser by turning the
upper part (C1.3) clockwise.
3. Connect accessories as indicated in the “Connection diagram” on the cover.
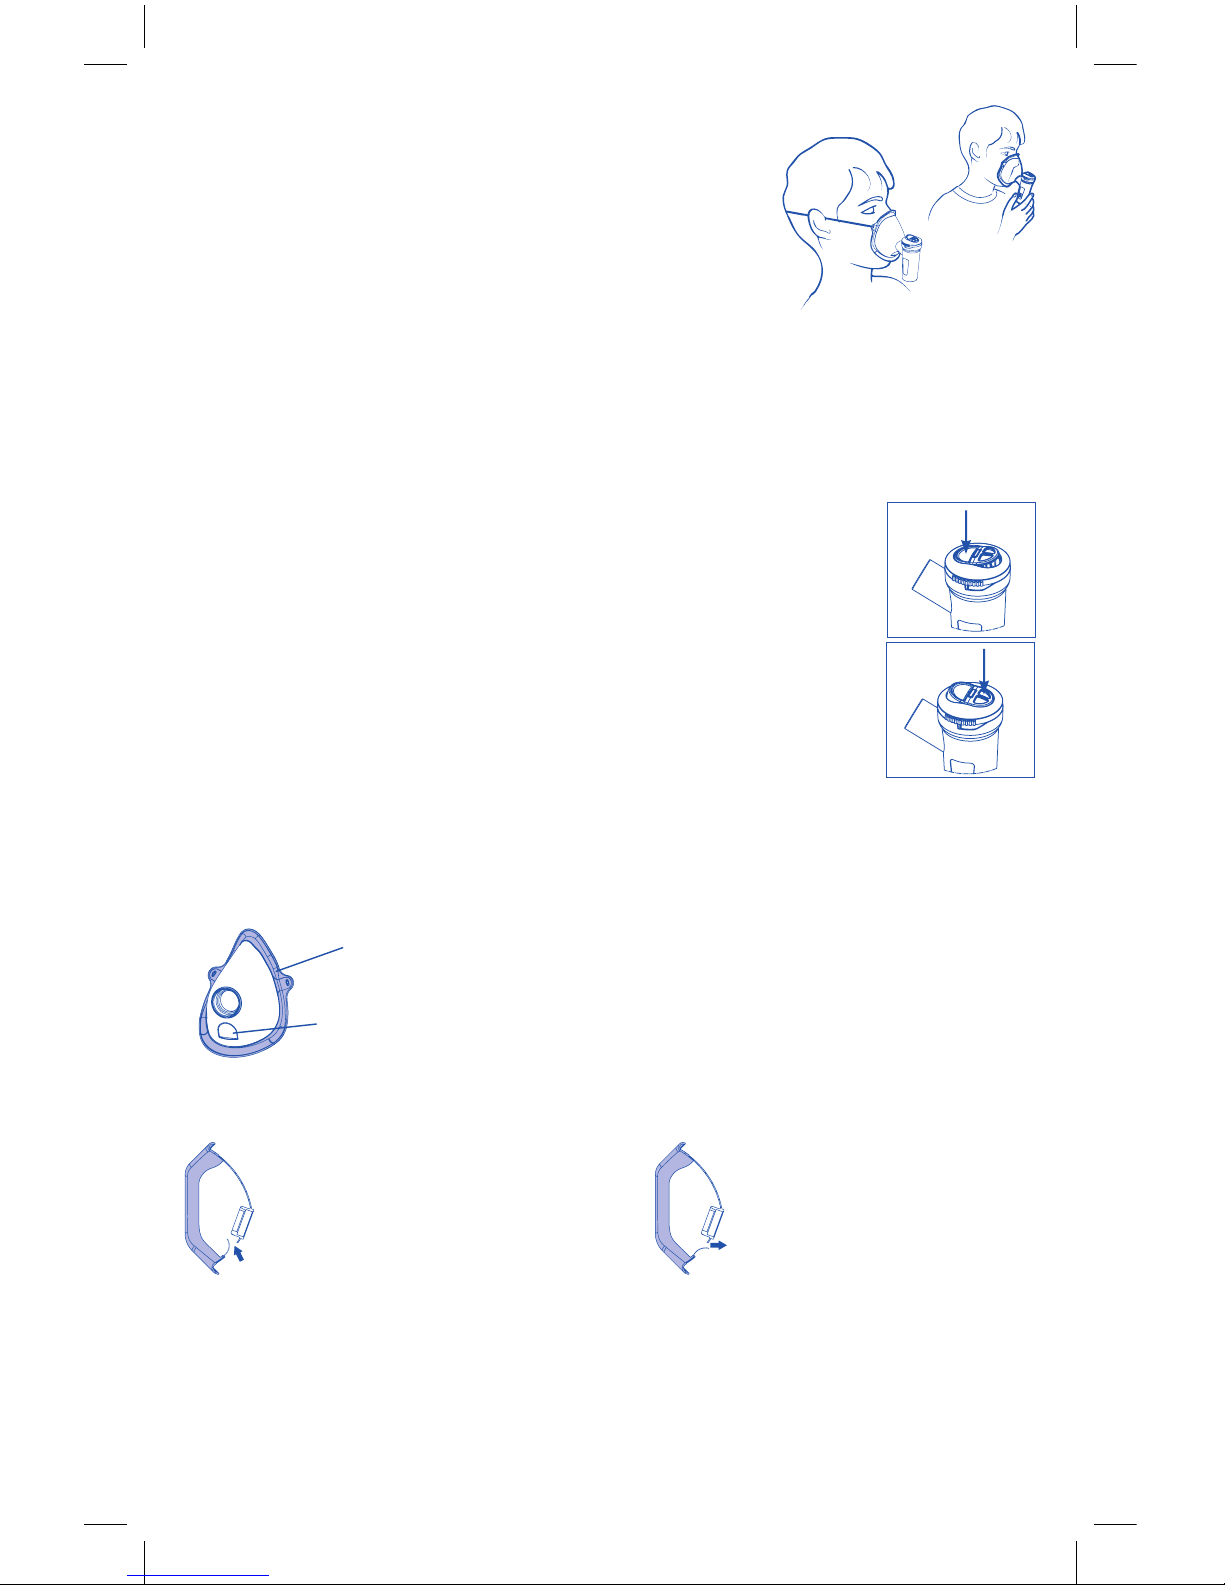
4. Sit comfortably holding the nebuliser in your hand, place the mouthpiece onto your
mouth or alternatively use the nose piece or mask. Should you opt for the mask acces-
5
sory, place it on your face as shown in the picture (with or
without using the elasticated strap).
5. Start the device by means of switch (A1) and breathe deeply in and out. After inhaling, we recommend holding your
breath for an instant to allow the inhaled drops of aerosol
to deposit. Then exhale slowly.
6. Upon completing application, switch o the device and
unplug it.
ATTENTION: If after the therapy session an evident deposit of moisture forms within the
pipe (B), detach the pipe from the nebuliser and dry it with the very ventilation from the
compressor; this operation prevents possible blooms of mould inside the pipe.
SOFTTOUCH MASKS
The SoftTouch masks have an external edge made in
soft, biocompatible material that guarantees optimal
adherence to the face and are also equipped with the
innovative Dispersion Limiting device. These distinctive features allow increased sedimentation of the
medication within the patient's body, also limiting its
dispersion.
During inhalation, the tab that
works as a Dispersion Limiting
device bends toward the inside of
the mask.
During exhalation, the tab
that works as a Dispersion
Limiting device bends toward the outside of the mask.
Soft
biocompatible
material
Dispersion
Limiting device
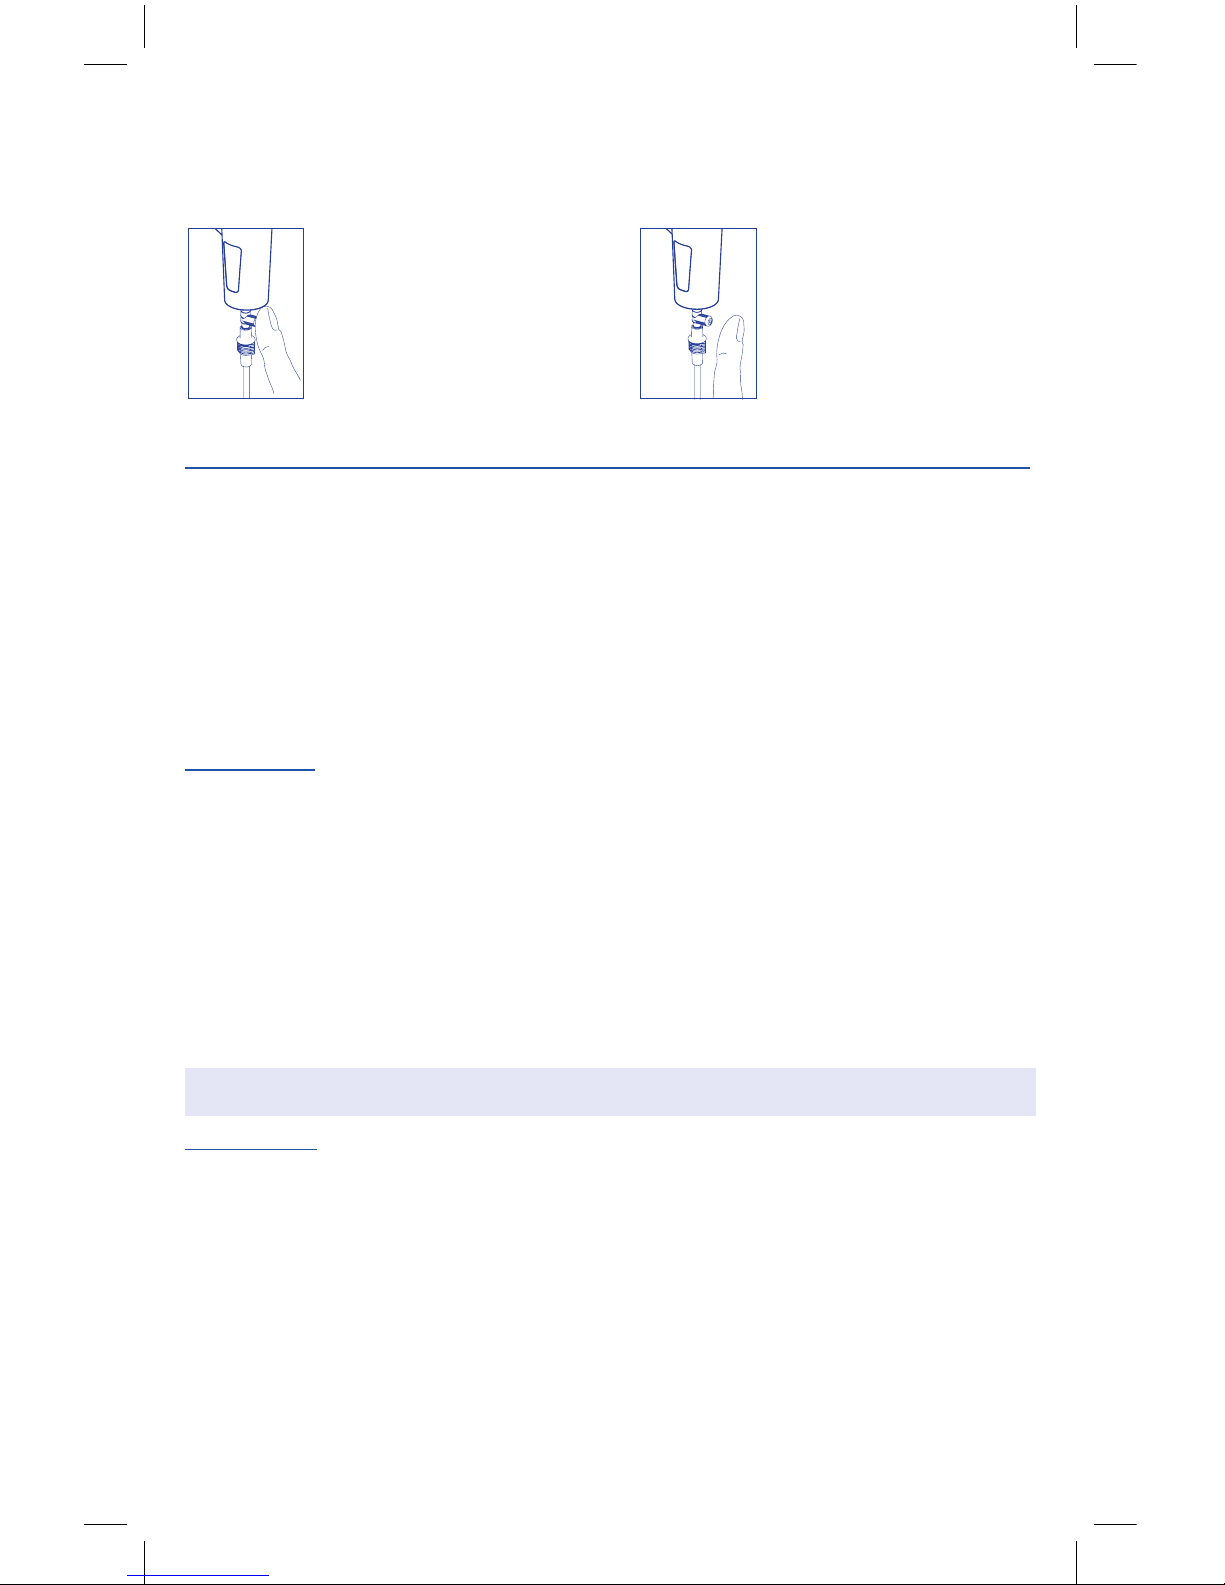
USE METHODS OF THE RF7 DUAL SPEED PLUS NEBULISER WITH SPEED SELECTION
AND VALVULAR SYSTEM
It is professional, quick, recommended to administer all types of
medications, including the costlier ones, even in patients with chronic
diseases. Thanks to the geometry of the RF7 Dual Speed Plus nebuliser
cup internal ducts, we have obtained a recommended, active particle size
to treat even the lower respiratory tract.
For faster inhalation therapy, position the valve speed selector (C1.4)
pressing on the word MAX with your nger.
For more eective inhalation therapy, position the valve speed selector
(C1.4) pressing on the opposite side of the word Max with your nger.
In this case, you have optimal assumption of the medication, minimising
leaks into the surrounding environment, thanks to the valvular system
with which the nebuliser cup, mouthpiece and mask are equipped.
MAX
6
CLEANING, SANITISATION, DISINFECTION, STERILISATION
Switch o the device before any cleaning procedure and unplug the power cable from the socket.
DEVICE AND TUBING EXTERIOR
Use only a damp cloth with antibacterial soap (non-abrasive and with no solvents of any sort).
ACCESSORIES
Open the nebuliser by turning the upper part (C1.3) anticlockwise, remove the nozzle (C1.2)
from the upper part (C1.3) by pressing as shown by the 2 arrows in the "Connection diagram"
in point C1.
Then proceed according to the following instructions.
CLEANING AT HOME - SANITISATION AND DISINFECTION
SANITISATION
Before and after each use, sanitise the nebuliser cup and the accessories, choosing one of the
methods described below.
method A: Sanitise accessories C1.1-C1.2-C1.3-C1.4-C2-C3-C4-C5-C6 under potable hot
water (approximately 40°C) with a gentle, non abrasive dish detergent.
method B: Sanitise accessories C1.1-C1.2-C1.3-C1.4-C2-C3-C4-C5-C6 in the dishwasher
with a hot cycle.
method C: Sanitise accessories C1.1-C1.2-C1.3-C1.4-C2-C3-C4-C5-C6 by immersing them
in a solution of 50% water and 50% white vinegar, then rinse thoroughly under potable hot
water (approximately 40°C).
If you want to also perform the cleaning for DISINFECTION, jump to the DISINFECTION
paragraph.
After having sanitised the accessories, shake them vigorously and place them on a paper
towel. Alternatively, dry them with a jet of hot air (for example, a hair dryer).
DISINFECTION
After sanitising the nebuliser cup and the accessories, disinfect them choosing one of the
methods described below.
method A: Accessories C1.1-C1.2-C1.3-C1.4-C2-C3-C4-C5-C6 can be disinfected.
The disinfectant must be an electrolytic chloroxidizer (active principle: sodium hypochlorite)
specic for disinfecting, which is available in any pharmacy.
Implementation:
- Fill a container big enough to hold all of the parts to disinfect with a solution of potable
water and disinfectant, according to the proportions indicated on the packaging of the
disinfectant.
- Completely immerse each part in the solution, taking care to avoid the formation of air
bubbles on the parts. Leave the parts immersed for the amount of time indicated on the
packaging of the disinfectant associated with the concentration chosen for the solution.
USE OF NEBULIZATION MANUAL CONTROL
To achieve continuous nebulisation action you should not use the manual nebulisation
control (C6), especially in the case of children or persons with reduced physical, sensory, or
mental capabilities. The manual nebulisation control is useful for limiting dispersion of the
medication in the surrounding environment.
To start nebulizing close with
a nger the hole of the nebulizer manual control (C6) and
breathe in gently; we recommend to hold your breath for
a moment so that the inhaled
aerosol droplets can be deposited,
meanwhile, to disable nebulizing, remove your nger
from the hole of the nebulizer manual control to avoid
the waste of drug, optimizing its acquisition. Then exhale slowly.
 Loading...