

Page 1
HoMedics Service Center
1.800.466.3342
8:30 – 5:00 p.m. (EST) M – F
Dirección postal:
HoMedics
Consumer Relations
Service Center Dept. 168
3000 Pontiac Trail
Commerce Township, MI
48390
Correo electrónico:
[email protected]
GARANTÍA LIMITADA POR UN AÑO
HoMedics vende sus productos con la intención de que no tengan defectos de fabricación ni de mano
de obra por un plazo de un año a par
HoMedics garantiza que sus productos no tendrán defectos de material ni de mano de obra bajo
condiciones de uso y servicio normales. Esta garantía se extiende únicamente a consumidores y no a
distribuidores.
Para obtener servicio para su producto HoMedics, envíe por correo el producto y su recibo de compra
fechado (como comprobante de compra), con franqueo pago, a la siguiente dirección:
HoMedics Consumer Relations
Service Center Dept. 168
3000 Pontiac Trail
Commerce Township, MI 48390
No se aceptarán pagos contra entrega.
HoMedics no autoriza a nadie, incluyendo, pero sin limitarse a, distribuidores, posteriores
consumidores compradores del producto a un distribuidor, o compradores remotos, a obligar a
HoMedics de forma alguna más allá de las condiciones aquí establecidas. La garantía de este producto
no cubre daños causados por uso inadecuado o abuso, accidente, conexión de accesorios no
autorizados, alteración del producto, instalación inadecuada, reparaciones o modificaciones no
autorizadas, uso inadecuado de la fuente de energía/electricidad, cortes de energía, caída del producto,
funcionamiento incorrecto o daño de una pieza de funcionamiento debido al no cumplimiento del
mantenimiento recomendado por el fabricante, daños durante el transporte, robo, descuido,
vandalismo, condiciones climáticas, pérdida de uso en el período durante el cual el producto está en
una instalación de reparación o a la espera de piezas o reparación, o cualquier otra condición, sin
importar cual sea, que se encuentre fuera del control de HoMedics.
Esta garantía es válida únicamente si el producto es comprado y operado en el país en el cual se
compró el producto. Un producto que requiera modificaciones o adaptación para habilitar su
funcionamiento en cualquier país que no sea aquél para el que fue diseñado, fabricado, aprobado y/o
autorizado, o la reparación de productos dañados por estas modificaciones no están cubiertos bajo
esta garantía.
LA GARANTÍA AQUÍ ESTABLECIDA SERÁ LA ÚNICA Y EXCLUSIVA GARANTÍA. NO HABRÁ NINGUNA
OTRA GARANTÍA EXPRESA NI IMPLÍCITA, INCLUYENDO NINGUNA GARANTÍA DE COMERCIALIZACIÓN
O APTITUD NI NINGUNA OTRA OBLIGACIÓN POR PARTE DE LA COMPAÑÍA CON RESPECTO A
PRODUCTOS CUBIERTOS POR ESTA GARANTÍA. HOMEDICS NO TENDRÁ RESPONSABILIDAD
ALGUNA POR NINGÚN DAÑO INCIDENTAL, CONSECUENTE NI ESPECIAL. BAJO NINGÚN CONCEPTO
ESTA GARANTÍA REQUERIRÁ MÁS QUE LA REPARACIÓN O CAMBIO DE ALGUNA PIEZA O PIEZAS
QUE SE HALLEN DEFECTUOSAS DENTRO DEL PERÍODO DE VIGENCIA DE ESTA GARANTÍA. NO SE
EFECTUARÁN REEMBOLSOS. SI NO HAY PIEZAS DE REPUESTO DISPONIBLES PARA LOS
MATERIALES DEFECTUOSOS, HOMEDICS SE RESERVA EL DERECHO DE REALIZAR SUSTITUCIONES
EN VEZ DE REPARAR O CAMBIAR.
Esta garantía no se extiende a la compra de productos abiertos, usados, reparados, embalados otra vez
y/o abiertos y vueltos a cerrar, incluyendo entre otras cosas la venta de dichos productos en sitios de
remate por Internet y/o la venta de dichos productos por revendedores o mayoristas. Todas y cada una
de las garantías cesarán y terminarán inmediatamente con respecto a cualquier producto o pieza del
mismo que estén reparados, cambiados, alterados o modificados sin el consentimiento previo explícito
y por escrito de HoMedics.
Esta garantía le proporciona derechos legales específicos. Es posible que usted tenga derechos
adicionales que pueden variar de un país a otro. Debido a las regulaciones de ciertos países, es
posible que algunas de las limitaciones y exclusiones no se apliquen en su caso.
Por más información con respecto a nuestra línea de productos en los EE.UU., visítenos en:
©2008 HoMedics, Inc. y sus compañías afiliadas, reservados todos los derechos.
HoMedics® es una marca registrada de HoMedics, Inc. y sus compañías afiliadas.
SoundSpa™ es una marca registrada de HoMedics Inc. y sus compañías afiliadas.
tir de la fecha de compra original, con las siguientes excepciones.
www.homedics.com
Reservados todos los derechos.
IB-SS5500
El manual en
español
empieza a la
página 13
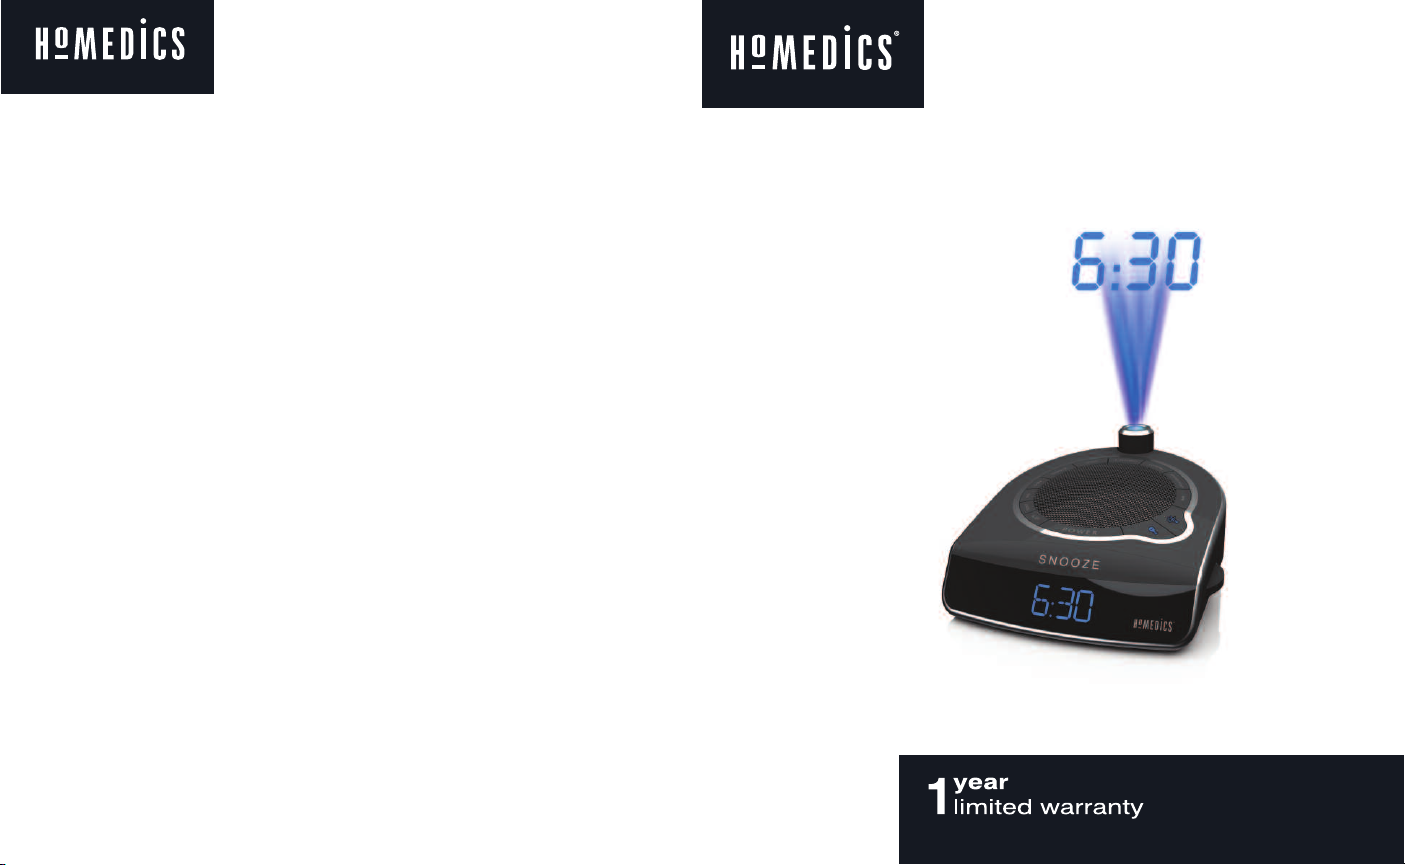
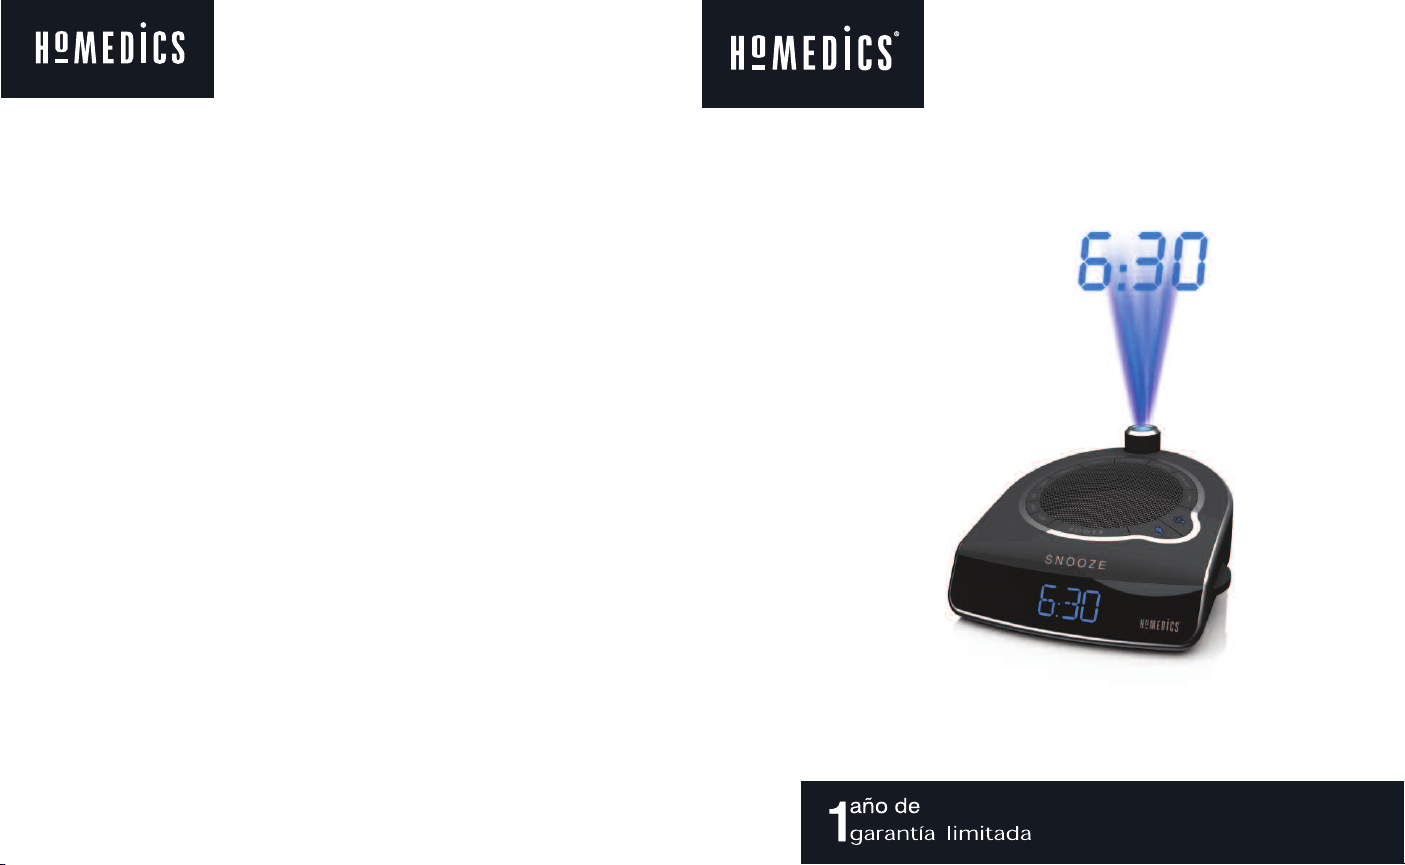
SOUNDSPA SUNRISE
AM/FM Clock Radio
Wake Gently to a Virtual Sunrise
Instruction Manual and
Warranty Information
™
SS-5500
Page 2

CCrreeaattee yyoouurr ppeerrffeecctt sslleeeepp eennvviirroonnmmeenntt..
Thank you for purchasing SoundSpa Sunrise. This, like the entire HoMedics product
line, is built with high-quality craftsmanship to provide you years of dependable service.
We hope that you will find it to be the finest product of its kind.
SoundSpa Sunrise helps you wake gently and feel relaxed. Fall asleep to any of its six
calming sounds, then wake to a virtual sunrise using your own lamp, nature sounds,
radio or alarm. SoundSpa Sunrise can also mask distractions to improve your
concentration while you read, work or study.
IMPORTANT SAFETY INSTRUCTIONS:
When using an electrical appliance, basic precautions should always be
followed, including the following:
READ ALL INSTRUCTIONS BEFORE USING
DANGER
• Always unplug the appliance from the electrical outlet immediately after using and
before cleaning.
• Do not reach for an appliance that has fallen into water. Unplug it immediately.
•
Do not place or store appliance where it can fall or be pulled into a tub or sink. Do not
place in or drop into water or other liquid.
WARNING - To reduce the risk of burns, fire, electric shock or injury to persons:
• Close supervision is necessary when this appliance is used by or near children, invalids or
disabled persons.
• Use this appliance only for its intended use as described in this manual. Do not use
attachments not recommended by HoMedics; specifically any attachments not
provided with the unit.
- To reduce the risk of electric shock:
2
Caution: All
servicing of
this product
must be
performed by
authorized
HoMedics
Service
Personnel
only.
• Never operate this appliance if it has a damaged cord, plug, cable or housing.
If it is not working properly, if it has been dropped or damaged, return
it to HoMedics Service Center for examination and repair.
• Keep cord away from heated surfaces.
• Never drop or insert any object into any opening.
• Do not operate where aerosol (spray) products are being used or where oxygen
is being administered.
• Do not carry this appliance by power cord or use cord as handle.
• To disconnect, remove plug from outlet.
• This appliance is designed for indoor use only. Do not use outdoors.
• Only set on dry surfaces. Do not place on surface wet from water or cleaning
solvents.
SAVE THESE INSTRUCTIONS
Caution – Please read all instructions
carefully before operating.
• Never leave the appliance unattended, especially if children are present.
• Never cover the appliance when it is in operation.
• This unit should not be used by children without adult supervision.
• Always keep the cord away from high temperature and fire.
• Do not lift, carry, hang, or pull the product by the power cord.
• If the adaptor sustains damage, you must stop using this product immediately and
contact the HoMedics Service Center. (See the warranty section for the HoMedics
address.)
3
Page 3
SSoouunnddSSppaa CClloocckk RRaaddiioo FFeeaattuurrees
s
•Dawn simulator using your own lamp
•6 Nature Sounds: Rain Forest, Ocean, Thunder, Summer Night, Rain and Water Fall
•AM/FM radio with alarm and snooze
•Seven gentle-wake options – lamp only, lamp and nature sound, lamp and beep, lamp and radio, nature sound only, radio
only, or beep only
•Easy-to-read clock with blue LED display
•Projection feature projects time on the ceiling in a soothing blue light
•Auto-timer lets you choose how long you listen – 15, 30, 45 or 60 minutes or continuously
•Volume control adjusts the volume of the radio, beep or nature sounds
•Wireless lamp brightness control
AAsssseemmbbllyy aanndd IInnssttrruuccttiioonnss ffoorr UUsse
e
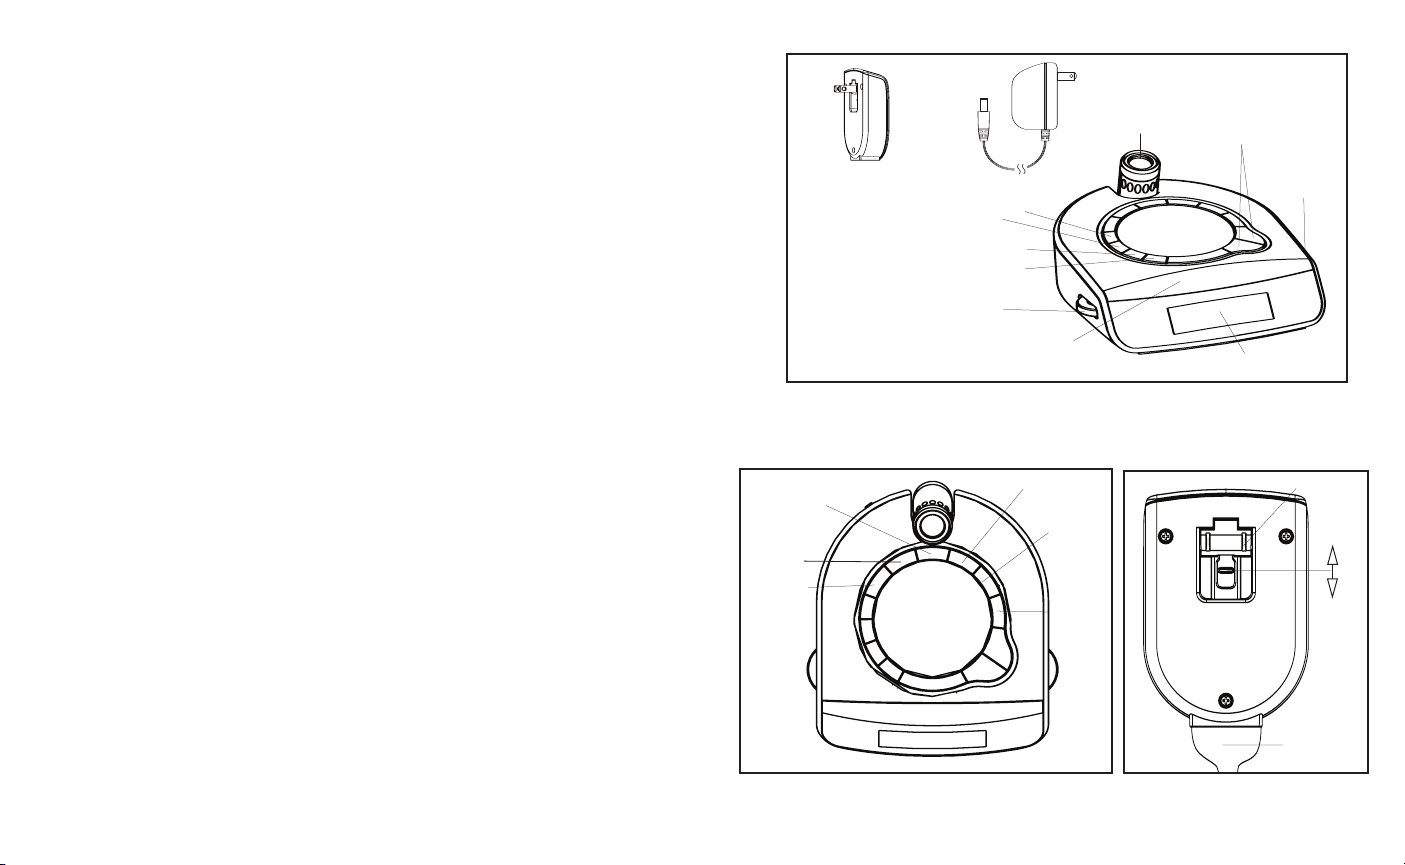
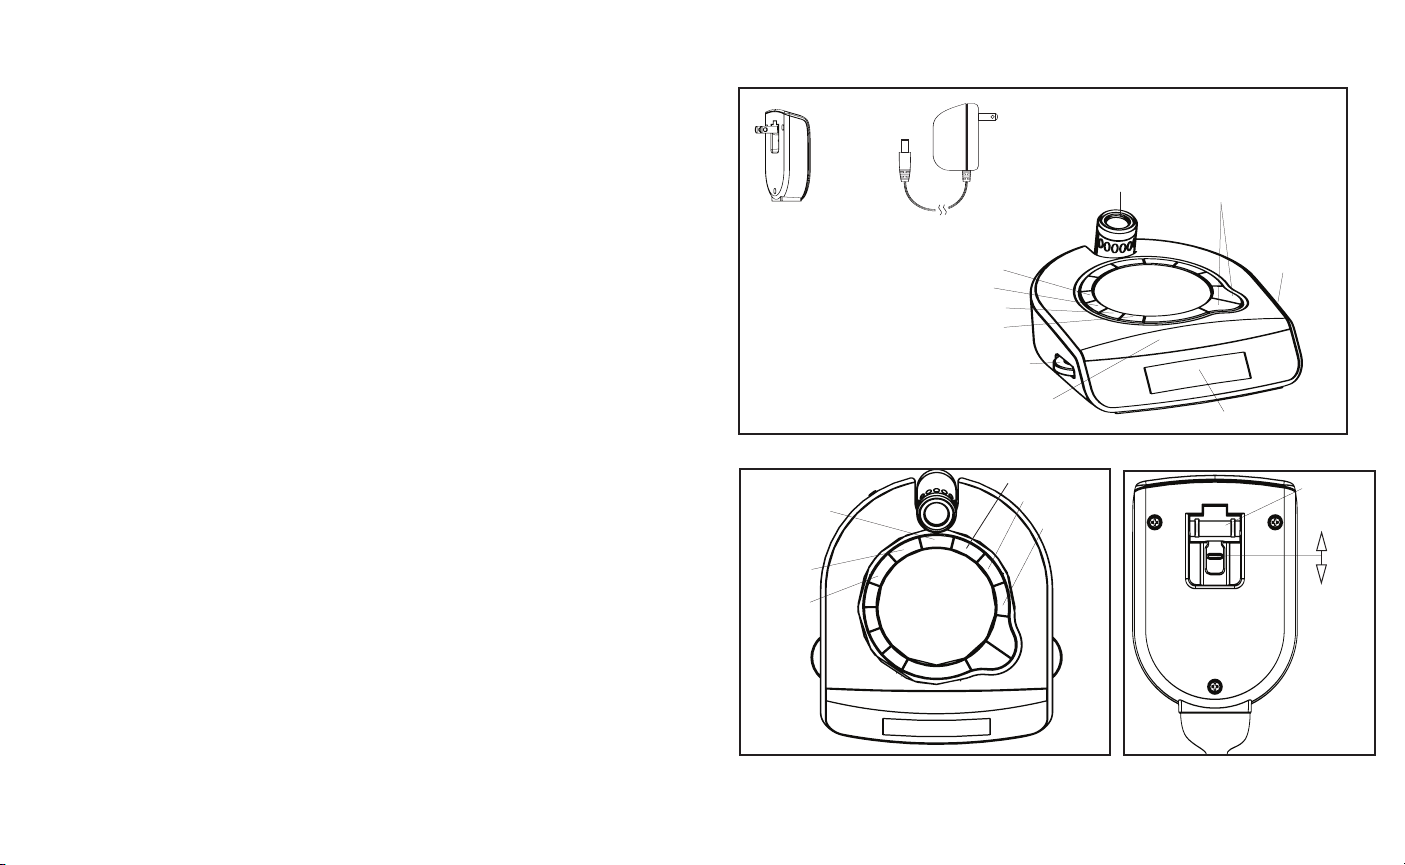
1. Unpack the product and check to make sure everything is included (Fig. 1).
2. This unit is powered by a DC adaptor, which is included.
3. The battery power is designed only to provide MEMORY BACK-UP for the clock and alarm settings. One 9 Volt
battery (not included) should be inserted into the battery compartment if memory back-up is desired (in the event
of power outages or if the unit is unplugged). However, the time will not be illuminated on the clock display. As
soon as the power supply returns, the display will indicate the correct time.
:
NNOOTTEE:
Battery must be installed in order for clock memory back-up to operate. In the event of a power failure or
disconnection, if the battery is not installed, the clock and alarm will need to be re
-set when power is
restored.
4. To install battery, remove compartment cover from the bottom of the unit. Insert one 9 Volt battery into the
compartment following the diagram. Replace cover and snap into place.
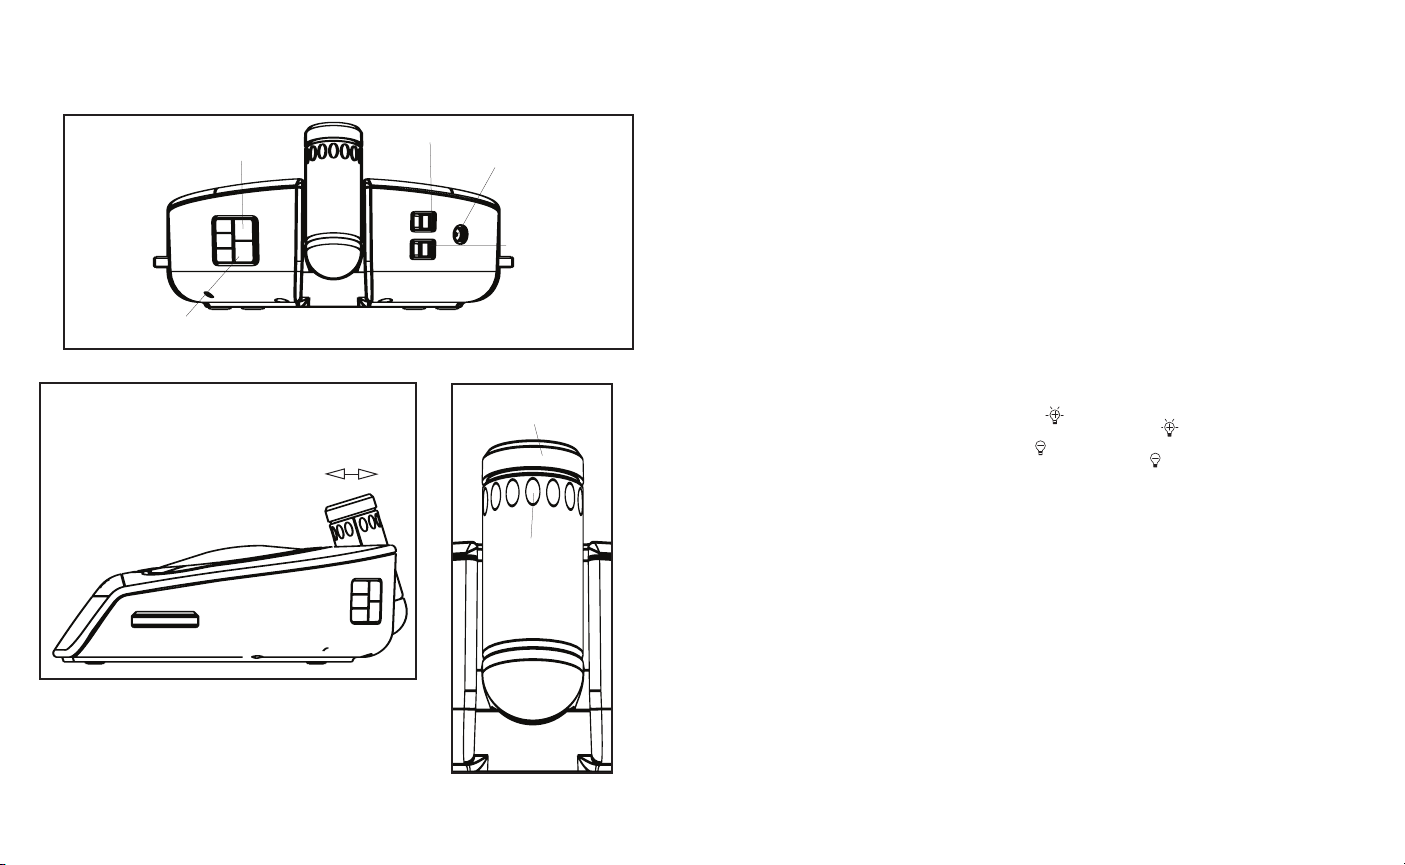
5. Attach the DC adaptor connector to the jack located on the back of the unit (Fig. 4) and insert the adaptor into a
120V household outlet.
6. To use the dawn simulator and to control your lamp from your SoundSpa Sunrise, plug your lamp into the bottom
of the wireless receiver (Fig. 3). Then plug the wireless receiver into a 120V household outlet.
:
NNOOTTEE:
To lock the wireless receiver prongs into place, push up on the locking device. To unlock, push
. 3).
down (Fig
:
NNOOTTEE:
Consult lamp instructions for light bulb specifications. The SoundSpa Sunrise works with most lamps that
use incandescent or CFL dimming light bulbs. Before purchasing CFL bulbs verify they can be used in
lamps with dimming switches.
SSeettttiinngg tthhee CClloocckk
1. Your SoundSpa Sunrise clock is set to a 12 hour clock. If you would prefer a 24 hour clock, press the 12/24
button once (Fig. 4).
2. Press and hold the HOUR button for 2 seconds (Fig. 4). The time will begin to flash
3. While the time is flashing, press the HOUR button until you reach the correct hour. Then press the MINUTE button
(Fig. 4) until you reach the correct minute.
:
NNOOTTEE:
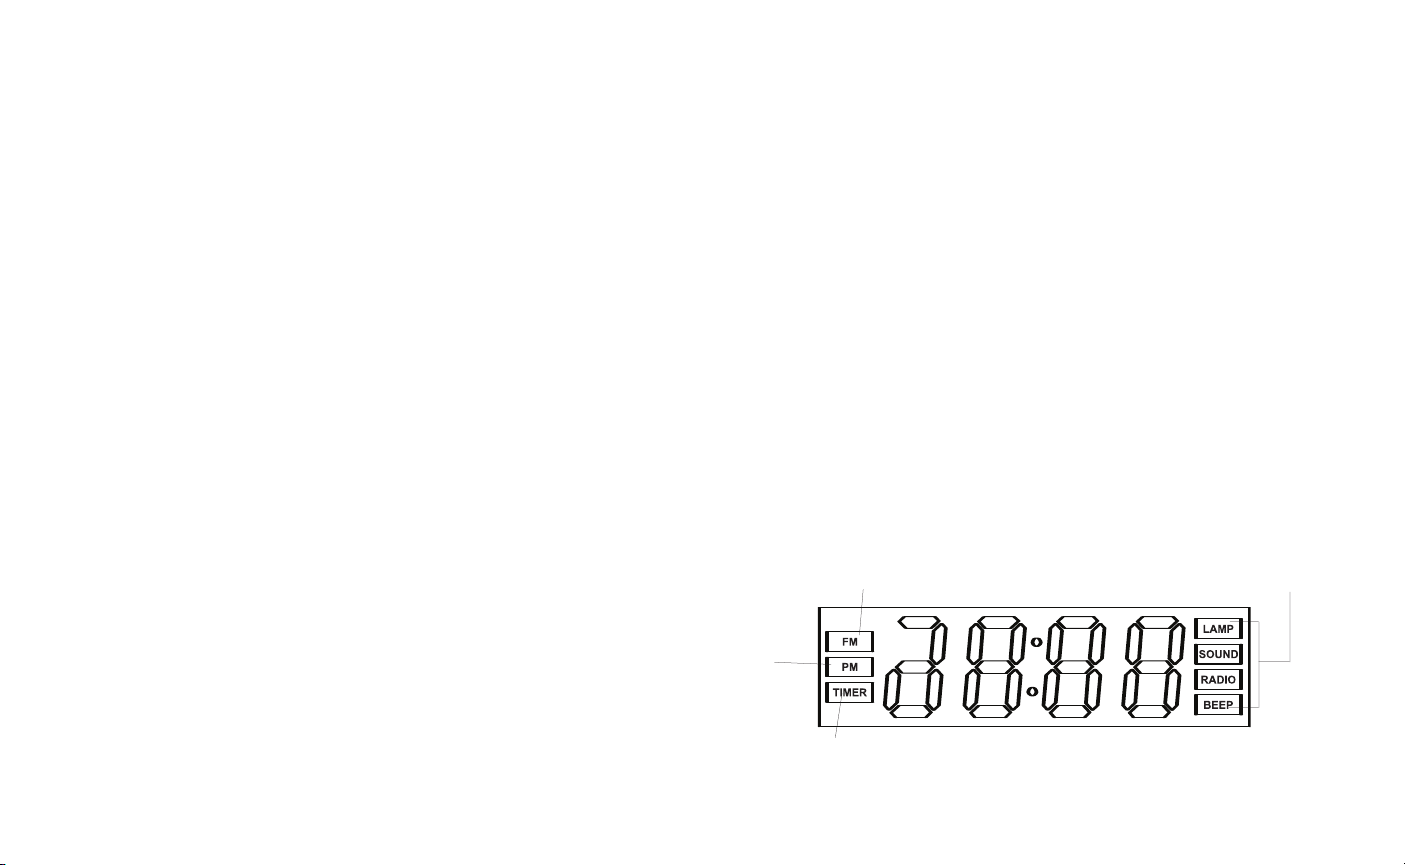
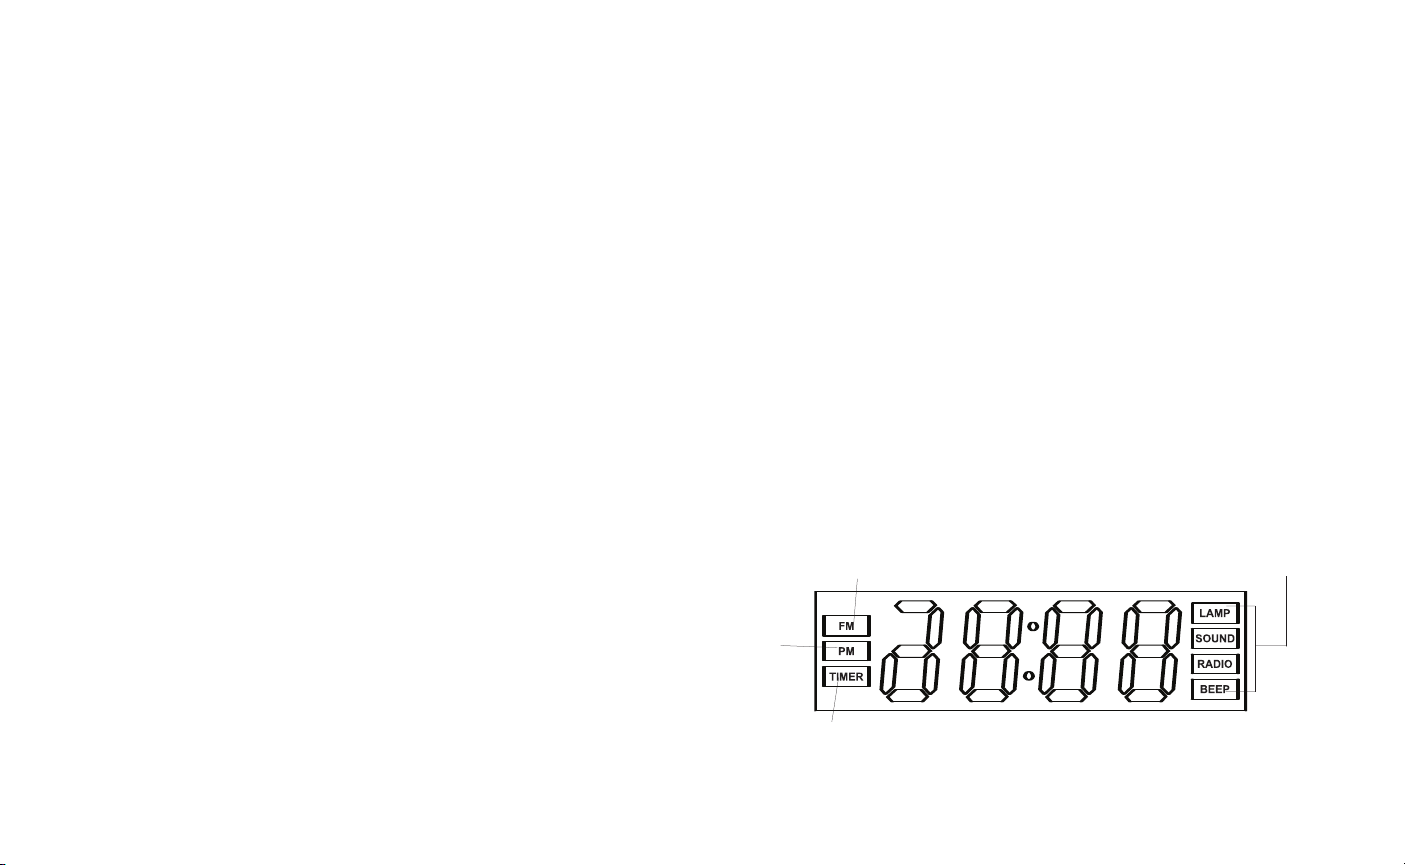
PM indicator will appear on the left side of the clock face for evening hours (Fig. 7). If the PM indicator is
not illuminated, the hour is set to AM. Be sure to set the time for the correct 12-hour period – AM
(morning) or PM (evening).
:
NNOOTTEE:
After 5 seconds, the time will stop flashing and it will be set.
Press the BACKLIGHT HI/LO button (Fig. 4) to choose between high and low clock LED display brightness.
4.
4
FFIIGGUURREE 11
FF IIGGUURREE 22
OCEAN
THUNDER
WIRELESS RECEIVER
RAIN
FOREST
RADIO
TIMER
ALARM SET
ALARM MODE
VOLUME
SNOOZE BUTTON
WATER
FALL
RAIN
SUMMER
NIGHT
5
ADAPTOR
PROJECTOR
FF IIGGUURREE 33
LAMP CONTROL
BUTTONS
TUNER
DISPLAY
PLUG FROM
YOUR LAMP
PRONGS
LOCK
UNLOCK
Page 4
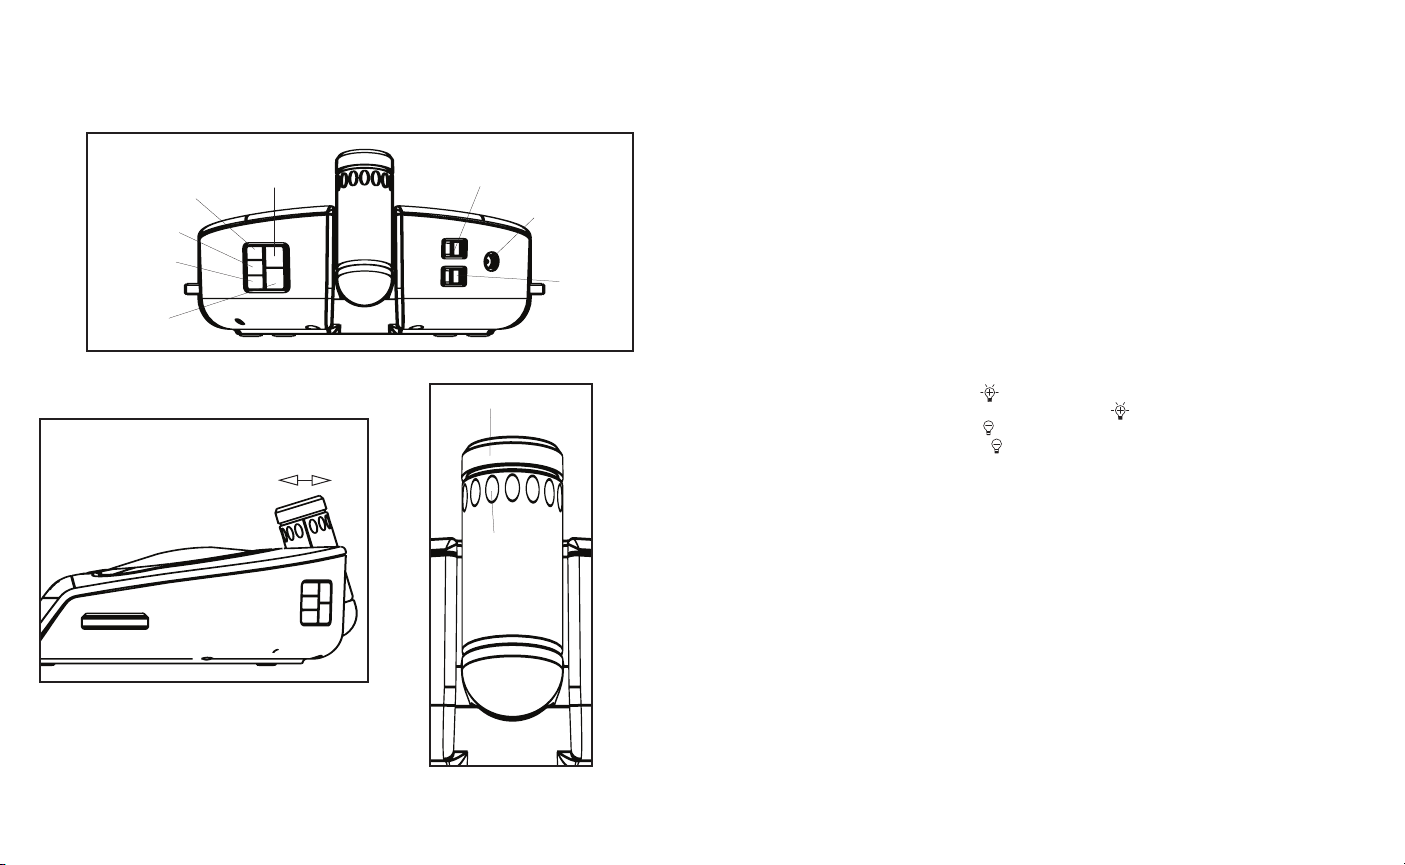
FF IIGGUURREE 44
FF IIGGUURREE 55
12/24
HOUR
MINUTE
PROJECTOR
ON/OFF
BACKLIGHT HI/LO
TIME PROJECTION ANGLE
FF IIGGUURREE 66
FOCUS KNOB
TIME
ROTATION
KNOB
AM/FM
DC JACK
15/30/OFF
LLiisstteenniinngg ttoo NNaattuurree SSoouunndds
1.Select the sound you wish to listen to and press the corresponding button (Fig. 2).
2.To adjust the volume, turn the VOLUME knob (Fig. 1) to your desired level.
3. When finished listening to the sounds, you may turn them off by pressing the POWER button, or switch to the
radio by pressing RADIO (Fig. 1).
:
NNOOTTEE:
When the unit is turned on, it will always default to the last mode used.
LLiisstteenniinngg ttoo tthhee RRaaddiio
1. Press the RADIO button (Fig. 1).
2. Rotate the TUNER (Fig. 1) to select a radio station.
3. To adjust the volume, turn the VOLUME knob (Fig. 1) to your desired level.
4. When finished listening to the radio, you may turn it off by pressing the POWER button, or switch to a nature
sound by pressing the corresponding button (Fig. 1 and 2).
:
NNOOTTEE:
To change between bands, there is an AM/FM switch located on the back of the unit (Fig. 4). When FM
band is selected, a FM Indicator will appear on the left side of the clock face (Fig
is not illuminated, the band is set to AM.
UUssiinngg tthhee LLaammp
1. To turn the lamp on, press the lightbulb once (Fig. 1).
2. To increase the brightness of the lamp, press and hold lightbulb until desired level is reached.
3. To turn the lamp off, press the lightbulb once (Fig. 1).
4. To dim the lamp, press and hold lightbulb until desired level is reached.
5. You may also turn the lamp off by pressing the POWER button once. Pressing the POWER button again will
turn the lamp on (Fig. 1).
:
NNOOTTEE:
p
If radio is on it will mute during lamp adjustment resuming when adjustment is complete.
UUssiinngg tthhee AAuuttoo--TTiimmeer
When the power is ON and you are listening to a nature sound, the radio, or have your lamp illuminated through
the SoundSpa Sunrise wireless receiver, you may set an auto off timer so the sound and/or light will automatically
fade to off in the last 5 minutes of the chosen time.
1. Toggle through the TIMER button (Fig. 1) to find the time of your choice 15, 30, 45 or 60 minutes shows on the
clock face. The TIMER indicator will appear on the left side of the clock face to confirm that it is set (Fig. 7).
2. The time remaining on the auto-timer can be terminated at any time by pressing the POWER button to turn off
the nature sound, radio or lamp.
s
o
. 7). If the FM indicator
r
6 7
Page 5
SSeettttiinngg aanndd UUssiinngg tthhee AAllaarrm
For more information see Fig. 8.
1. Press the AL SET button (Fig. 1) and the time will flash.
2. While the time is flashing, press the HOUR button until you reach the correct hour. Then press the MINUTE
button until you reach the correct minute.
:
NNOOTTEE:
When digits are flashing, press and hold the HOUR or MINUTE button continuously for a fast advance.
:
NNOOTTEE:
The PM function applies to the alarm. If the PM indicator is not displayed on the clock face, the alarm
will be set to AM. (Fig
3. Press AL SET button to set the time, or after 5 seconds the alarm will be set automatically (Fig. 1).
4. To activate the alarm you may choose one of 7 settings. To confirm your setting, the appropriate alarm
indicators will be illuminated on the clock face to the right of the time (Fig. 2).
a.) LAMP-push the AL MODE button once (Fig. 2). To set the Sunrise mode, adjust the 15/30/OFF switch (Fig. 4)
to set lamp to brighten gradually in 15 or 30 minutes or in the OFF position to set lamp to turn on to full
brightness at the set alarm time.
b.) NATURE SOUND-push the AL MODE button twice. The nature sound will be the last sound you listened to.
To change the nature sound press the nature sound button you wish and then press POWER button (Fig. 2)
c.) RADIO-push the AL MODE button 3 times. Use the tuner to adjust the radio to your desired station (Fig. 2).
d.) BEEP-press the AL MODE button 4 times (Fig. 2).
e.) LAMP & NATURE SOUND-press the AL MODE button 5 times (Fig. 2).
f.) LAMP & RADIO-press the AL MODE button 6 times (Fig. 2).
g.) LAMP & BEEP-press the AL MODE button 7 times (Fig. 2).
5. When the alarm sounds, the corresponding alarm indicator (Lamp, Sound, Radio, Beep or combination of these)
blinks. You may take the following actions:
a.) SNOOZE-press the SNOOZE button (Fig. 1). The SoundSpa Sunrise wake feature will be activated in 9 minutes.
See Fig. 8 for options. You may use this feature until you turn the alarm off.
b.) RESET-turn the alarm off by pressing ANY button but the SNOOZE button (Fig. 1). The alarm clock will
automatically reset for the next day in its current mode. The corresponding ALARM indicator (Lamp, Sound,
Radio, Beep or combination of these) will indicate this. If you wish to change the wake mode, follow step 4
under Setting and Using the Alarm.
c.) OFF-to completely turn off the alarm continue to press the AL MODE button until all the of the alarm indicators
(lamp, sound, radio, beep) are off (Fig. 1).
:
NNOOTTEE:
If alarm sounds for 30 minutes continuously it will automatically turn off and reset for the next day.
m
. 7).
MMaaiinntteennaanncce
TToo SSttoorre
You may store the unit in its box or a cool, dry place.
TToo CClleeaan
Wipe off dust with a damp cloth. NEVER use liquids or abrasive cleaner to clean.
Modifications not authorized by the manufacturer may void users authority to operate this device.
NNOOTTEE:
• Reorient or relocate the receiving antenna.
• Increase the separation between the equipment and receiver.
• Connect the equipment into an outlet on a circuit different from that to which the receiver is connected.
• Consult the dealer or an experienced radio/TV technician for help
NNOOTTEE:
e
e
n
:
This equipment has been tested and found to comply with the limits for a Class B digital device,
pursuant to P
against harmful interference in a residential installation. This equipment generates, uses and can
radiate radio frequency energy and, if not installed and used in accordance with the instructions,
may cause harmful interference to radio communications. However, there is no guarantee that
interference will not occur in a particular installation. If this equipment does cause harmful
interference to radio or television reception, which can be determined by turning the equipment off
and on, the user is encouraged to try to correct the interference by one or more of the following
measures:
:
The manufacturer is not responsible for any radio or TV interference caused by unauthorized
modifications to this equipment. Such modifications could void the users authority to operate
the equipment.
AM/FM INDICATOR
art 15 of the FCC Rules. These limits are designed to provide reasonable protection
ALARM MODE
BUTTONS
UUssiinngg tthhee PPrroojjeeccttiioonn FFeeaattuurre
1. To turn the projection feature on or off, press the PROJECTOR ON/OFF button once (Fig. 4). The time is now
projected on the ceiling. To turn projection off press PROJECTOR ON/OFF again.
:
NNOOTTEE:
If the projection feature is off you may press the SNOOZE button (Fig. 1) to trigger 5 seconds
of projection.
2. To turn the angle of the time that appears on the ceiling, rotate the TIME ROTATION KNOB (Fig. 6) until you have
reached your desired result.
:
NNOOTTEE:
The TIME ROTATION KNOB will rotate up to 350 degrees.
To focus the time on the ceiling, rotate the FOCUS KNOB (Fig. 6) until you have reached your desired result.
3.
4. To adjust where time is projected, move projector forward or backward (Fig. 6).
e
8 9
PM
INDICATOR
TIMER INDICATOR
FF IIGGUURREE 77
Page 6

FF IIGGUURREE 88
WWaakkee MMoodde
Lamp Only
e
SSuunnrriisse
MMoodde
No Sunrise
15 or 30
minute
Sunrise
e
e
AAtt aallaarrmm ttiimmee:
• Lamp turns on to full brightness
1155 oorr 3300 mmiinnuutteess bbeeffoorree aallaarrmm ttiimmee:
• Lamp is dimly lit
• Lamp brightens gradually for 15 or 30 minutes until full brightness
:
WWhhaatt hhaappppeennss?
:
?
AAllaarrmm SSeettttiinnggs
Alarm Indicator – Lamp
Sunrise Setting – OFF
Alarm Indicator – Lamp
Sunrise Setting – 15 or 30
s
•Lamp turns off
•Lamp turns on after 9 minutes-full brightness
• Lamp returns to dimly lit
• Lamp brightens gradually for 9 minutes to full brightness
WWhheenn yyoouu ppuusshh SSNNOOOOZZEE:
:
No Sunrise
Nature Sound
Lamp & Nature
Sound
Lamp & Beep
Lamp & Radio
Radio or Beep No Sunrise
15 or 30
minute
Sunrise
No Sunrise
15 or 30
minute
Sunrise
No Sunrise
or
15 or 30
minute
Sunrise
AAtt aallaarrmm ttiimmee:
• Selected Sound plays at the maximum level you choose
55 mmiinnuutteess bbeeffoorree aallaarrmm ttiimmee:
• Selected Sound plays quietly
• Sound gradually increases to the maximum level you choose at alarm time
AAtt aallaarrmm ttiimmee:
• Lamp turns on to full brightness and Sound plays at the maximum level you choose
1155 oorr 3300 mmiinnuutteess bbeeffoorree aallaarrmm ttiimmee:
• Lamp is dimly lit
• Light brightens gradually for 15 or 30 minutes until full brightness at alarm time
55 mmiinnuutteess bbeeffoorree aallaarrmm ttiimmee:
• Sound starts quietly
• Sound gradually increases to the maximum level you choose at alarm time
AAtt aallaarrmm ttiimmee:
• Lamp turns on to full brightness and Beep or Radio sound at maximum level you
choose
1155 oorr 3300 mmiinnuutteess bbeeffoorree aallaarrmm ttiimmee:
• Lamp is dimly lit
• Light brightens gradually for 15 or 30 minutes until full brightness
AAtt aallaarrmm ttiimmee:
• Beep or Radio sound at maximum level you choose
AAtt aallaarrmm ttiimmee:
• Radio or Beep plays at the maximum level you choose
:
:
:
:
:
:
:
:
:
Alarm Indicator – Sound
Alarm Indicator – Sound
Sunrise Setting – 15 or 30
Alarm Indicator – Lamp & Sound
Sunrise Setting – OFF
Alarm Indicator – Lamp & Sound
Sunrise Setting – 15 or 30
Alarm Indicator – Lamp & Beep or
Lamp & Radio
Sunrise Setting – OFF
Alarm Indicator – Lamp & Beep or
Lamp & Radio
Sunrise Setting – 15 or 30
Alarm Indicator – Radio or Beep
Sunrise Setting – OFF
• Sound turns off
• Sound turns on after 9 minutes
• Sound turns off
• Sound plays quietly after 4 minutes
• Sound builds to maximum level you choose for 5 additional minutes
• Lamp & Nature Sound turn off
• Lamp & Nature Sound turn on after 9 minutes
• Lamp returns to dimly lit
• Light brightens gradually for 9 minutes to full brightness
• Sound turns off
• Sound plays quietly after 4 minutes
• Sound builds to maximum level you choose for 5 additional minutes
• Lamp & Beep or Radio turn off
• Lamp & Beep or Radio turn on after 9 minutes
• Lamp returns to dimly lit
• Lamp brightens gradually for 9 minutes to full brightness
• Beep or Radio sound after 9 minutes
• Radio or Beep turn off
• Radio or Beep turn on after 9 minutes
10 11
Page 7
HoMedics Service Center
1.800.466.3342
8:30 – 5:00 p.m. (EST) M – F
Mail To:
HoMedics
Consumer Relations
Service Center Dept. 168
3000 Pontiac Trail
Commerce Township, MI
48390
e-mail:
[email protected]
LIMITED ONE YEAR WARRANTY
HoMedics sells its products with the intent that they are free of defects in manufacture and
workmanship for a period of one year from the date of original purchase, except as noted below.
HoMedics warrants that its products will be free of defects in material and workmanship under
normal use and service. This warranty extends only to consumers and does not extend to
Retailers.
To obtain warranty service on your HoMedics product, mail the product and your dated sales
receipt (as proof of purchase), postpaid, to the following address:
HoMedics Consumer Relations
Service Center Dept. 168
3000 Pontiac Trail
Commerce Township, MI 48390
No COD's will be accepted.
HoMedics does not authorize anyone, including, but not limited to, Retailers, the subsequent
consumer purchaser of the product from a Retailer or remote purchasers, to obligate HoMedics in
any way beyond the terms set forth herein. This warranty does not cover damage caused by
misuse or abuse; accident; the attachment of any unauthorized accessory; alteration to the
product; improper installation; unauthorized repairs or modifications; improper use of
electrical/power supply; loss of power; dropped product; malfunction or damage of an operating
part from failure to provide manufacturer’s recommended maintenance; transportation damage;
theft; neglect; vandalism; or environmental conditions; loss of use during the period the product is
at a repair facility or otherwise awaiting parts or repair; or any other conditions whatsoever that are
beyond the control of HoMedics.
This warranty is effective only if the product is purchased and operated in the country in which the
product is purchased. A product that requires modifications or adoption to enable it to operate in any
other country than the country for which it was designed, manufactured, approved and/or authorized,
or repair of products damaged by these modifications is not covered under this warranty.
THE WARRANTY PROVIDED HEREIN SHALL BE THE SOLE AND EXCLUSIVE WARRANTY. THERE
SHALL BE NO OTHER WARRANTIES EXPRESS OR IMPLIED INCLUDING ANY IMPLIED WARRANTY
OF MERCHANTABILITY OR FITNESS OR ANY OTHER OBLIGATION ON THE PART OF THE
COMPANY WITH RESPECT TO PRODUCTS COVERED BY THIS WARRANTY. HOMEDICS SHALL
HAVE NO LIABILITY FOR ANY INCIDENTAL, CONSEQUENTIAL OR SPECIAL DAMAGES. IN NO
EVENT SHALL THIS WARRANTY REQUIRE MORE THAN THE REPAIR OR REPLACEMENT OF ANY
PART OR PARTS WHICH ARE FOUND TO BE DEFECTIVE WITHIN THE EFFECTIVE PERIOD OF THE
WARRANTY. NO REFUNDS WILL BE GIVEN. IF REPLACEMENT PARTS FOR DEFECTIVE
MATERIALS ARE NOT AVAILABLE, HOMEDICS RESERVES THE RIGHT TO MAKE PRODUCT
SUBSTITUTIONS IN LIEU OF REPAIR OR REPLACEMENT.
This warranty does not extend to the purchase of opened, used, repaired, repackaged and/or
resealed products, including but not limited to sale of such products on Internet auction sites
and/or sales of such products by surplus or bulk resellers. Any and all warranties or guarantees
shall immediately cease and terminate as to any products or parts thereof which are repaired,
replaced, altered, or modified, without the prior express and written consent of HoMedics.
This warranty provides you with specific legal rights. You may have additional rights which may
vary from country to country. Because of individual country regulations, some of the above
limitations and exclusions may not apply to you.
For more information regarding our product line in the USA, please visit: www.homedics.com
©2008 HoMedics, Inc. and its affiliated companies, all rights reserved. HoMedics®is a
registered trademark of HoMedics, Inc. and its affiliated companies. SoundSpa™ is a
trademark of HoMedics, Inc. and its affiliated companies. All rights reserved.
IB-SS5500
SOUNDSPA SUNRISE
Despiértese Suavemente con un Amanecer Virtual
Manual de instrucciones e
Información de garantía
™
Radio Reloj AM/FM
SS-5500
Page 8

CCrreeee ssuu aammbbiieennttee ppeerrffeeccttoo ppaarraa ddoorrmmiirr..
Gracias por comprar el SoundSpa, equipo de relajación acústica de HoMedics. Éste, al igual que toda la
línea de productos HoMedics, está fabricado con mano de obra de alta calidad para brindarle años de
servicio confiable. Esperamos que lo encuentre como el mejor producto de su clase.
SoundSpa ayuda a crear su ambiente perfecto para dormir. Duérmase con cualquiera de sus seis
sonidos calmantes, luego despiértese con los sonidos de la naturaleza, el radio o la alarma.
SoundSpa puede también cubrir las distracciones para mejorar su concentración mientras lee, trabaja o
estudia.
IMPORTANTES INSTRUCCIONES DE SEGURIDAD:
Cuando utiliza un artefacto eléctrico, siempre se deben seguir ciertas
precauciones básicas, incluyendo lo siguiente:
LEA TODAS LAS INSTRUCCIONES ANTES DE USAR
PELIGRO
• Siempre desenchufe el artefacto del tomacorriente inmediatamente después de usarlo y antes
de limpiarlo.
• No intente tomar un artefacto que haya caído al agua. Desenchúfelo de inmediato.
• No coloque ni guarde un artefacto donde pueda caerse o ser tirado hacia una tina o lavamanos.
No lo coloque ni lo deje caer en agua ni en ningún otro líquido.
ADVERTENCIA - Para reducir el riesgo de quemaduras, incendio, choque eléctrico o lesiones
a las personas:
• Es necesaria una supervisión estricta cuando lo usan niños o personas inválidas o incapacitadas o
cuando está próximo a ellos.
• Utilice este artefacto sólo para el uso para el cual está diseñado y como se describe en este manual.
No use accesorios no recomendados por HoMedics, especialmente si no han sido incluidos con la
unidad.
- Para reducir el riesgo de choque eléctrico:
Precaución:
Todo el
servicio de
este producto
debe ser
realizado
únicamente
por Personal
de servicio
autorizado de
HoMedics.
• Nunca haga funcionar este aparato si tiene el cordón, el enchufe, el cable o el armazón dañado.
Si no está funcionando adecuadamente, si se ha caído o dañado, envíelo al Centro de servicio
de HoMedics para que sea examinado y reparado.
• Mantenga el cable alejado de superficies calientes.
• Nunca lo deje caer ni inserte ningún objeto en ninguna abertura.
• No lo haga funcionar donde se utilizan productos de rociado por aerosol o donde se está
administrando oxígeno.
• No lleve este artefacto tomado del cable, ni use el cable como manija.
• Para desconectarlo, quite el enchufe del tomacorriente.
• Este artefacto está diseñado únicamente para usarlo en interiores. No lo use en exteriores.
• Coloque esta unidad sólo sobre superficies secas. No coloque esta unidad sobre superficies
mojadas con agua o solventes para limpieza.
GUARDE ESTAS INSTRUCCIONES
Precaución - Lea todas las instrucciones con atención antes
de poner en funcionamiento.
• Nunca deje el artefacto sin vigilancia, especialmente si hay niños presentes.
• Nunca cubra el artefacto mientras está en funcionamiento.
• Esta unidad no debe ser usada por niños sin la supervisión de un adulto.
• Siempre mantenga el cordón alejado de las temperaturas altas.
No levante, lleve, cuelgue ni tire de la unidad tomándola del cable de corriente.
•
• Si el adaptador se daña, debe suspender el uso de este aparato de inmediato y contactar el
Centro de servicio de HoMedics. (Ver la dirección de Homedics en la Sección de Garantía).
14
15
Page 9
FFuunncciioonneess ddeell RRaaddiioo RReelloojj SSoouunnddSSppa
a
• Simulador de amanecer que usa la lámpara del usuario
• 6 Sonidos naturale: Bosque lluvioso, Océano, Trueno, Noche de verano, Lluvia y Cascada
• Radio AM/FM con alarma y alarma repetida
• Siete opciones de suave amanecer – solo lámpara, lámpara y sonidos de la naturaleza, lámpara y pitidos,
lámpara y radio, sólo sonidos de la naturaleza, sólo radio, o sólo pitidos
• Reloj de fácil lectura con pantalla LCD
• La función de proyección proyecta la hora en el cielorraso con luz azul suave
• El auto-temporizador permite seleccionar la duración de la escucha – 15, 30, 45 or 60 minutos o continuamente
• El control de volumen ajusta el volumen del radio, del pitido o de los sonidos de la naturaleza
• Control inalámbrico de la luminosidad de la lámpara
IInnssttrruucccciioonneess ddee uussoo yy mmoonnttaajje
e
1. Desempaque el producto y asegúrese de que no falte nada (Fig. 1).
2. Esta unidad se alimenta con un adaptador de CC incluido.
3. La corriente de la batería sirve sólo para proporcionar MEMORIA DE RESPALDO para los ajustes del reloj y alarma.
En el compartimiento para la batería se debe colocar sólo una batería de 9 voltios (no incluida), si se desea el
respaldo de la memoria (en el caso de un apagón de corriente o si se desenchufa la unidad). Sin embargo, la hora
no quedará iluminada en la pantalla del reloj. Apenas vuelva la corriente, la pantalla indicará la hora correcta.
AATTEENNCCIIÓÓNN::
Es necesario instalar la batería para hacer funcionar la memoria de respaldo del reloj. En el caso de un
apagón o desconexión, si la batería no ha sido instalada, cuando vuelva la corriente, será necesario
reajustar la hora y la alarma.
4. Para instalar la batería, retire la tapa del compartimiento. Inserte una batería alcalina de 9 voltios en el
compartimiento en el fondo de la unidad, de acuerdo al diagrama. Vuelva a colocar la tapa y presiónela en su lugar.
Enchufe el conector del adaptador de CC al enchufe ubicado al respaldo de la unidad (Fig. 4) y conecte el
5.
adaptador a un tomacorriente doméstico de 120 voltios.
6. Para usar el simulador de amanecer y controlar su lámpara desde su SoundSpa Sunrise, enchufe su lámpara en
el fondo del receptor inalámbrico (Fig. 3). Enchufe el receptor inalámbrico a un tomacorriente doméstico
de 120V.
:
AATTEENNCCIIÓÓNN:
Para bloquear las clavijas del receptor inalámbrico en su lugar, empuje hacia arriba el dispositivo
de bloqueo. Para desbloquear, empuje hacia abajo (Fig. 3).
AATTEENNCCIIÓÓNN::
Consulte las instrucciones de la lámpara para las especificaciones de la bombilla. El SoundSpa
Sunrise trabaja con la mayor parte de lámparas que usan bombillas incandescentes o fluorescentes
compactas (CFL) para reductores de luz. Antes de comprar bombillas CFL, asegúrese de que puedan
utilizarse en lámparas con reductores de luz.
AAjjuussttee ddeell rreellooj
j
1. El reloj de su SoundSpa Sunrise está ajustado para las 12 horas. Si usted prefiere el reloj de 24 horas, presione el
botón 12/24 una vez (Fig. 4).
2. Presione y mantenga presionado el botón “HOUR” por 2 segundos (Fig. 4). La hora empieza a destellar.
3. Con la hora destellando, oprima el botón HOUR hasta alcanzar la hora deseada. Luego oprima el botón MINUTE
(Fig. 4) hasta alcanzar los minutos deseados.
AATTEENNCCIIÓÓNN::
El indicador de PM aparece en el lado izquierdo de la pantalla del reloj para las horas de la tarde (Fig. 7).
Si el indicador de PM no está iluminado, la hora indicada es AM. Asegúrese de ajustar la hora para el
período de 12 horas correcto – AM (mañana) o PM (tarde).
AATTEENNCCIIÓÓNN:
:
Después de 5 segundos, la hora deja de destellar y queda programada.
16
FF IIGGUURRAA 11
RECEPTOR INALÁMBRICO
CONFIGURACIÓN DE ALARMA
FF IIGGUURRAA 22
BOSQUE
LLUVIOSO
OCÉANO
TRUENO
RADIO
TEMPORIZADOR
MODO DE ALARMA
VOLUMEN
BOTÓN DE ALARMA
REPETIDA
ADAPTADOR
CASCADA
LLUVIA
NOCHE DE
VERANO
17
PROYECTOR
FF IIGGUURRAA 33
BOTONES DE
CONTROL
DE LA LÁMPARA
SINTONIA
PANTALLA
CLAVIJAS
BLOQUEAR
DESBLOQUEAR
Page 10
FF IIGGUURRAA 44
ALTO BAJO
(HIGH/LOW)
FM/AM
ENCHUFE CC
4. Presione el botón de BACKLIGHT HI/LO (iluminación de fondo – alta/baja) (Fig. 4) para elegir entre un
brillo alto o bajo de la pantalla LED del reloj.
EEssccuucchhaa ddee ssoonniiddooss nnaattuurraallees
1. Seleccione el sonido que desea escuchar y oprima el botón correspondiente (Fig. 2).
2. Para ajustar el volumen, gire la perilla VOLUME (volumen) (Fig. 1) al nivel deseado.
3. Cuando termine de escuchar el sonido, puede apagar oprimiendo el botón POWER, o cambiar a radio
oprimiendo RADIO (Fig. 1).
AATTEENNCCIIÓÓNN:
:
Cuando se prende la unidad, ésta queda por defecto en el último modo empleado.
s
PROYECTOR
ENCENDIDO/APAGADO
(ON/OFF)
FF IIGGUURRAA 55
ÁNGULO DE PROYECCIÓN DE LA HORA
FF IIGGUURRAA 66
PERILLA DEL
FOCO
PERILLA DE
ROTACIÓN DE
LA HORA
15/30/OFF (apagado)
EEssccuucchhaa ddeell rraaddiio
1. Oprima el botón RADIO (Fig. 1).
2. Gire el TUNER (sintonía) (Fig. 1) para seleccionar la radioemisora.
3. Para ajustar el volumen, gire la perilla VOLUME (volumen) (Fig. 1) al nivel deseado.
4. Cuando termine de escuchar el radio, puede apagar oprimiendo el botón POWER, o cambiar a un sonido
de la naturaleza oprimiendo el botón correspondiente (Fig. 1 y 2).
AATTEENNCCIIÓÓNN:
UUssoo ddee llaa lláámmppaarra
1. Para encender la lámpara, presione la bombilla una vez (Fig. 1).
2. Para aumentar el brillo de la lámpara, presione y sostenga la bombilla hasta alcanzar el nivel deseado.
3. Para apagar la lámpara, presione la bombilla una vez (Fig. 1).
4. Para reducir el brillo de la lámpara, presione y sostenga la bombilla hasta alcanzar el nivel deseado.
5. Usted también puede apagar la lámpara presionando el botón POWER una vez. El oprimir el botón POWER
otra vez enciende la lámpara
AATTEENNCCIIÓÓNN:
UUssoo ddeell aauuttoo--tteemmppoorriizzaaddoor
Cuando el dispositivo está encendido (ON) y usted escucha el sonido de la naturaleza, el radio, o su lámpara
está encendida por medio del receptor inalámbrico del SoundSpa Sunrise, usted puede ajustar el temporizador
de apagado automático para que el sonido y la luz se reduzcan automáticamente hasta apagarse en los últimos
5 minutos de la hora seleccionada.
1. Presione varias veces el botón TIMER (temporizador) (Fig. 1) para encontrar la hora que eligió, 15, 30,
45 ó 60 minutos, en la pantalla del reloj. El indicador TIMER aparece en el lado izquierdo de la pantalla
del reloj para confirmar que el temporizador ha sido programado (Fig. 7).
2. El tiempo que queda en el autotemporizador puede ser eliminado en cualquier momento presionando el botón
POWER para apagar el sonido de la naturaleza, el radio o la lámpara.
o
:
Para cambiar la banda hay un interruptor de AM/FM ubicado en la parte trasera de la unidad
Fig. 4). Cuando la banda FM queda seleccionada, un indicador FM aparece en el lado izquierdo
(
de la pantalla del reloj (Fig. 7). Si el indicador FM no está iluminado, la banda programada es
AM.
a
:
Si el radio está encendido, el audio se corta durante el ajuste de la lámpara y continúa
cuando el ajuste esté terminado.
r
18 19
Page 11
AAjjuussttee yy uussoo ddee llaa aallaarrmma
Para más información ver la Fig. 8.
1. Oprima el botón AL SET dos veces (Fig. 1) y la hora empieza a destellar.
2. Con la hora destellando, oprima el botón HOUR (hora) hasta alcanzar la hora deseada. Luego presione el botón
MINUTE (minutos) hasta alcanzar el minuto correcto.
AATTEENNCCIIÓÓNN:
avance rápido.
AATTEENNCCIIÓÓNN:
el
3. Presione el botón AL SET para ajustar la hora, o después de 5 segundos el despertador queda ajustado
automáticamente (Fig. 1).
4. Para activar la alarma, usted puede escoger una de 7 opciones. Para confirmar su ajuste, los indicadores
apropiados del despertador quedan iluminados en la pantalla del reloj a la derecha de la hora (Fig. 2).
a.) LÁMPARA - Presione el botón AL MODE una vez (Fig. 2). Para ajustar el modo de Sunrise (amanecer), ajuste
b.) SONIDO DE LA NATURALEZA - Presione el botón AL MODE dos veces. El sonido de la naturaleza quedará
c.) RADIO - Presione el botón AL MODE 3 veces. Use el sintonizador para ajustar el radio a su estación deseada (Fig. 2).
d.) PITIDOS - Presione el botón AL MODE 4 veces (Fig. 2).
e.) LÁMPARA Y SONIDO DE NATURALEZA - Presione el botón AL MODE 5 veces (Fig. 2).
f. ) LÁMPARA Y RADIO - Presione el botón AL MODE 6 veces (Fig. 2).
g.) LÁMPARA Y PITIDOS - Presione el botón AL MODE 7 veces (Fig. 2).
5. Cuando suena la alarma, el indicador de alarma correspondiente (Lamp, Sound, Radio, Beep o la combinación de
estos) destella. Usted puede tomar las acciones siguientes:
a.) SNOOZE (alarma repetida) - Oprima el botón SNOOZE (Fig. 1). La función de despertador del SoundSpa Sunrise se
activa en 9 minutos. Vea la Fig. 8 para las opciones. Usted puede usar esta función hasta apagar la alarma.
b.) RESET - Apague la alarma oprimiendo CUALQUIER botón, excepto el botón SNOOZE (Fig. 1). La alarma volverá a
programarse automáticamente para el día siguiente en al modo actual. El indicador ALARM correspondiente
(Lamp, Sound, Radio, Beep o la combinación de estos) lo indicará. Si desea cambiar el modo del despertador,
siga el paso 4 en la sección Ajuste y Uso de la Alarma.
c.) OFF - para apagar completamente la alarma, sigua presionando el botón AL MODE hasta que todos los
indicadores de alarma (lamp, sound, radio, beep) queden apagados (Fig. 1).
AATTEENNCCIIÓÓNN:
el día siguiente.
UUssoo ddee llaa ffuunncciióónn ddee pprrooyyeecccciióón
1. Para encender o apagar la función de proyección, presione una vez el botón PROJECTOR ON/OFF (Fig. 4). La hora
se proyecta entonces en el cielorraso. Para apagar la proyección, presione otra vez el botón PROJECTOR ON/OFF.
2
. Para cambiar el ángulo de visión de la hora que aparece en el cielorraso, gire la PERILLA DE ROTACIÓN DE LA HORA
hasta lograr el resultado deseado (Fig. 6).
AATTEENNCCIIÓÓNN:
3. Para enfocar la hora en el cielorraso, gire la PERILLA DEL ENFOQUE (Fig. 6) hasta lograr el resultado deseado.
4. Para apuntar al lugar donde quiere proyectar la hora, mueva el proyector hacia delante o atrás (Fig. 6)
:
Cuando los dígitos destellan, presione y sostenga el botón HOUR o MINUTE continuamente para un
:
La función PM se aplica a la alarma. Si el indicador PM no aparece en la pantalla de reloj,
despertador queda ajustado en AM. (Fig. 7).
el interruptor 15/30/OFF (Fig. 4) para que el brillo de la lámpara aumente gradualmente en 15 ó 30 minutos o,
en la posición OFF (apagado), para que la lámpara se encienda con el brillo máximo en la hora de ajuste de la
alarma.
programado con el último sonido que usted ha escuchado. Para cambiar el sonido de la naturaleza, presione
el botón de sonido de la naturaleza que usted desea y luego presione el botón POWER (Fig. 2)
:
Si la alarma suena por 30 minutos seguidos, se apaga automáticamente y vuelve a programarse para
:
AATTEENNCCIIÓÓNN:
Si la función de proyección está apagada, usted puede oprimir el botón SNOOZE (alarma repetida)
(Fig. 1) para activar la proyección por 5 segundos.
:
La PERILLA DE ROT
a
n
ACIÓN DE LA HORA gira hasta 350 grados.
MMaanntteenniimmiieenntto
PPaarraa gguuaarrddaar
Puede guardar la unidad en su caja, en un lugar fresco y seco.
PPaarraa lliimmppiiaar
Quite el polvo con un paño húmedo. NUNCA use líquidos o limpiadores abrasivos para limpiar la unidad.
Las modificaciones no autorizadas por el fabricante pueden invalidar el derecho del usuario a operar
este dispositivo.
AATTEENNCCIIÓÓNN:
• Volver a orientar y ubicar la antena receptora.
• Aumentar la distancia entre el equipo y el receptor.
• Conectar el equipo a un tomacorriente eléctrico de un circuito diferente de aquel donde está
conectado el receptor.
• Consultar con el representante o con un técnico experto de radio/TV para recibir ayuda.
AATTEENNCCIIÓÓNN::
INDICADOR
DE PM
INDICADOR DEL TEMPORIZADOR
o
r
r
:
Este equipo ha sido ensayado y probado y se ha comprobado que cumple con los límites de los
dispositivos digitales de la Class B, según la Sección 15 de las Normas FCC. Estos límites han sido
dispuestos proporcionar una protección razonable contra las interferencias dañinas en las
instalaciones domésticas. Este equipo genera, usa y puede irradiar energía de radiofrecuencia y
no se instala y usa según las recomendaciones, puede causar interferencias dañinas a las
comunicaciones radio. Sin embargo, no hay garantías de que dichas interferencias no se produzcan
en una instalación particular. Si este equipo causara interferencias dañinas a la recepción de radio o
televisión, lo que puede determinarse encendiendo y apagando el equipo, se anima el usuario a que
trate de corregir la interferencia con uno o más de los siguientes procedimientos:
El fabricante no es responsable por ninguna interferencia de radio o TV causada por
modificaciones no autorizadas de este equipo. Dichas modificaciones pueden anular el derecho del
usuario al uso de este equipo.
INDICADOR DE AM/FM
FF IIGGUURRAA 77
, si
BOTONES DEL
MODO DE ALARMA
20 21
Page 12

FF IIGGUURRAA 88
MMooddoo ddee
ddeessppee rrttaaddoorr
Sólo lámpara
MMooddoo ddee
aammaanneecceerr
No Amanecer
Amanecer de
15 ó 30
minutos
¿¿QQuuéé ppaassaa?? AAjjuusstteess dd ee AAllaarrmmaa CCuuaannddoo uusstteedd pprreessiioonnaa SS NNOOOOZZEE ((aallaarrmmaa rreeppeettiiddaa))::
AA llaa hhoorr aa ddee llaa aallaarrmmaa::
• La lámpara se enciende con el brillo máximo
1155 óó 3300 mmiinnuuttooss aanntteess ddee llaa hhoo rraa ddee llaa aallaarrmmaa::
• La lámpara está encendida con brillo reducido
•
La lámpara aumenta el brillo gradualmente durante 15 ó 30 minutos hasta el brillo máximo
Indicador de alarma - Lámpara
Ajuste de amanecer – OFF (apagado)
Indicador de alarma - Lámpara
Ajuste de amanecer – 15 ó 30
• La lámpara se apaga
• La lámpara se enciende después de 9 minutos-con el brillo máximo
• La lámpara vuelve al brillo reducido
• La lámpara aumenta el brillo gradualmente durante 9 minutos hasta el brillo máximo
No Amanecer
Sonido de la
Naturaleza
Lámpara y Sonido
de la Naturaleza
Lámpara y Pitidos
Lámpara y Radio
Radio o Pitidos No Amanecer
Amanecer de
15 ó 30
minutos
No Amanecer
Amanecer de
15 ó 30
minutos
No Amanecer
o
Amanecer de
15 ó 30
minutos
AA llaa hhoorr aa ddee llaa aallaarrmmaa::
• El sonido seleccionado se escucha al nivel máximo que usted ha elegido
55 mmiinnuuttooss aanntteess ddee llaa hhoorraa ddee llaa aallaarrmmaa::
• El sonido seleccionado se escucha a nivel bajo
El sonido aumenta gradualmente al nivel máximo que usted ha seleccionado para la hora
•
del despertador
AA llaa hhoorr aa ddee llaa aallaarrmmaa::
• La lámpara se enciende con brillo máximo y se escucha el sonido al nivel máximo que usted
elegido
ha
1155 óó 3300 mmiinnuuttooss aanntteess ddee llaa hhoo rraa ddee llaa aallaarrmmaa::
• La lámpara está encendida con brillo reducido
• La luz aumenta de intensidad gradualmente durante 15 ó 30 minutos hasta el brillo máximo a la hora
de la
alarma
55 mmiinnuuttooss aanntteess ddee llaa hhoorraa ddee llaa aallaarrmmaa::
• Sonido comienza con nivel bajo
• El sonido aumenta gradualmente al nivel máximo que usted ha seleccionado para la hora del despertador
AA llaa hhoorr aa dd ee llaa aallaarrmmaa::
• La lámpara se enciende con brillo máximo y se escucha el pitido o el radio al nivel máximo que
usted ha elegido
1155 óó 3300 mmiinnuuttooss aanntteess ddee llaa hhoo rraa ddee llaa aallaarrmmaa::
• La lámpara está encendida con brillo reducido
• La luz aumenta el brillo gradualmente durante 15 ó 30 minutos hasta el brillo máximo
AA llaa hhoorr aa ddee llaa aallaarrmmaa::
• El pitido o el radio suenan al nivel máximo que usted ha elegido
AA llaa hhoorr aa ddee llaa aallaarrmmaa::
• El radio y el pitido se escuchan al nivel máximo que usted ha elegido
Indicador de alarma - Sonido
Indicador de alarma - Sonido
Ajuste de amanecer – 15 ó 30
Indicador de alarma – Lámpara y Sonido
Ajuste de amanecer – OFF (apagado)
Indicador de alarma – Lámpara y Sonido
Ajuste de amanecer – 15 ó 30
Indicador de alarma – Lámpara y Pitido o
Ajuste de amanecer – OFF (apagado)
Indicador de alarma – Lámpara y Pitido o
Ajuste de amanecer – 15 ó 30
Indicador de alarma – Radio o Pitido
Ajuste de amanecer – OFF (apagado)
Lámpara y Radio
Lámpara y Radio
• El sonido se apaga
• El sonido se enciende después de 9 minutos
• El sonido se apaga
• El sonido se escucha a nivel bajo después de 4 minutos
• El sonido aumenta hasta el nivel máximo que usted ha elegido
durante 5 minutos adicionales
• La lámpara y el Sonido de Naturaleza se apagan
• La lámpara y el Sonido de Naturaleza se encienden después de 9 minutos
• La lámpara vuelve al brillo reducido
• La luz aumenta el brillo gradualmente durante 9 minutos hasta el brillo máximo
• El sonido se apaga
• El sonido se escucha a nivel bajo después de 4 minutos
• El sonido aumenta hasta el nivel máximo que usted ha elegido durante
5 minutos adicionales
• La lámpara y el pitido o el radio se apagan
• La lámpara y el radio o el pitido se encienden después de 9 minutos
• La lámpara vuelve al brillo reducido
• La lámpara aumenta el brillo gradualmente durante 9 minutos hasta el brillo máximo
• El pitido o el radio suenan después de 9 minutos
• El Radio y el Pitido se apagan
• El radio y el pitido se encienden después de 9 minutos
22 23
 Loading...