

Page 1

Page 2
Page 3

.:WELCOME
Congratulations! The FitSense™ FS-1 Speedometer is the world's first accurate pace
and distance watch for walking and running with an optional wireless Internet link. The
FS-1 measures every stride and reports your speed, pace, distance, and calorie burn.
The FS-1 is a fully functional watch and exercise monitor. Its features include:
• Time, day, and date
• Chronograph
• Current Speed and Pace
• Average Pace
• Distance (activity and total)
• Calories
• Heart Rate (using optional heart rate monitor)
• Training Log
• AutoSplitz™
• Pace Zones
• Backlight
• Wireless Connection to your PC and the Internet (using optional Netlink).
GETTING THE MOST OUT OF YOUR FS-1
How can you use your FS-1? The options are limitless. Here are a few suggestions:
• Tracking your Runs or Walks
• Monitoring your Calorie Burn
• Measuring your Courses
• Tracking your Fitness
• Training with Pace
• Automating your Log
Page 4
WATCH
FOOT POD NETLINK (OPTIONAL)
Page 5

.:CONTENTS
.:BEFORE YOU BEGIN................................................... 1
.:FS-1 COMPONENTS..................................................... 1
Watch 1
Foot Pod 3
NetLink (Optional) 5
Heart Rate Monitor (Optional) 6
.:QUICK START............................................................... 7
Mode Functionality 7
Learning New Sensors 8
Calibrating your FS-1 8
Running and Walking with your FS-1 9
Linking to FitSense Interactive (Using Optional Netlink) 10
Displaying Heart Rate on your FS-1 10
.:USING YOUR FS-1...................................................... 11
TIME Mode 11
SPED Mode: Speedometer 12
LOG Mode 15
ODOM Mode: Odometer 16
COMM Mode: Communication 17
CALB Mode: Calibration 19
ALARM Mode 22
.:CARE AND MAINTENANCE....................................... 23
Replacing Batteries 23
Replacing the Rungee Cord 23
.:SPECIFICATIONS.......................................................24
.:REGULATORY INFORMATION.................................. 25
.:CUSTOMER SERVICE................................................ 25
.:LIMITED WARRANTY................................................. 26
Page 6
1
.:BEFORE YOU BEGIN
§ Consult your physician prior to beginning or modifying any exercise program.
§ DO NOT use the FS-1 heart rate monitor if you have a pace maker.
§ DO NOT use FS-1 in an airplane.
§ When exercising with FS-1, be aware of your surroundings and exercise safely.
Remain alert to vehicles, footing and other potential hazards.
.:FS-1 COMPONENTS
WATCH
The FS-1 watch is the window to your activity. It has a revolutionary side-mounted
display. Your activity info is available at a glance without turning your wrist, pressing
buttons, or breaking stride.
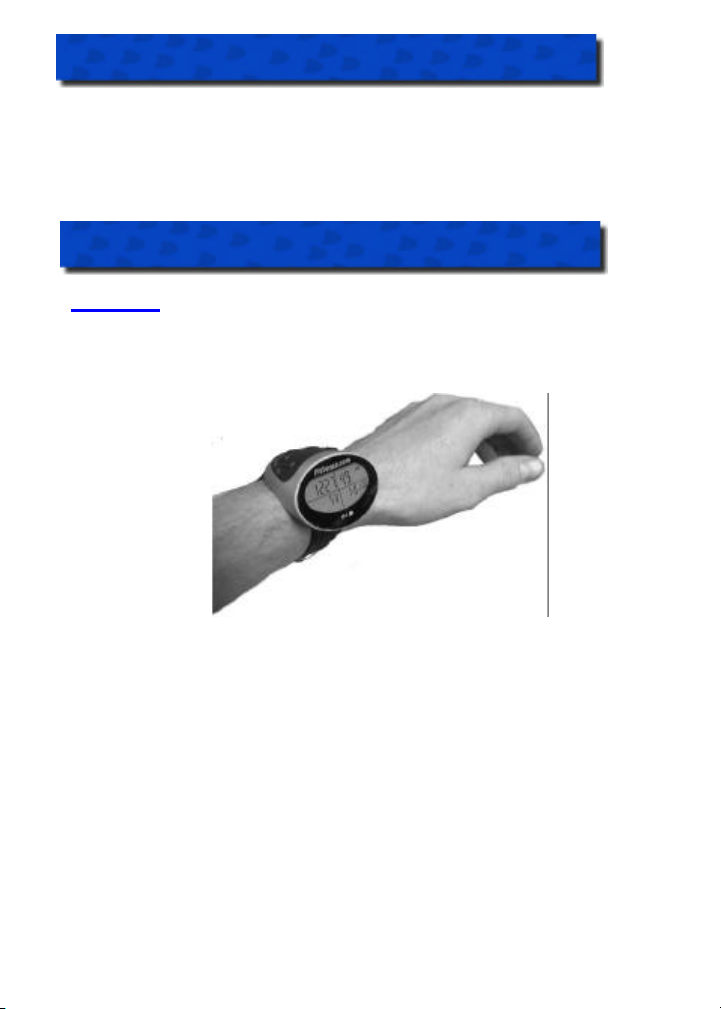
Strap your FS-1 to your wrist with the buttons
pointing up from the top of your wrist.
Page 7
2
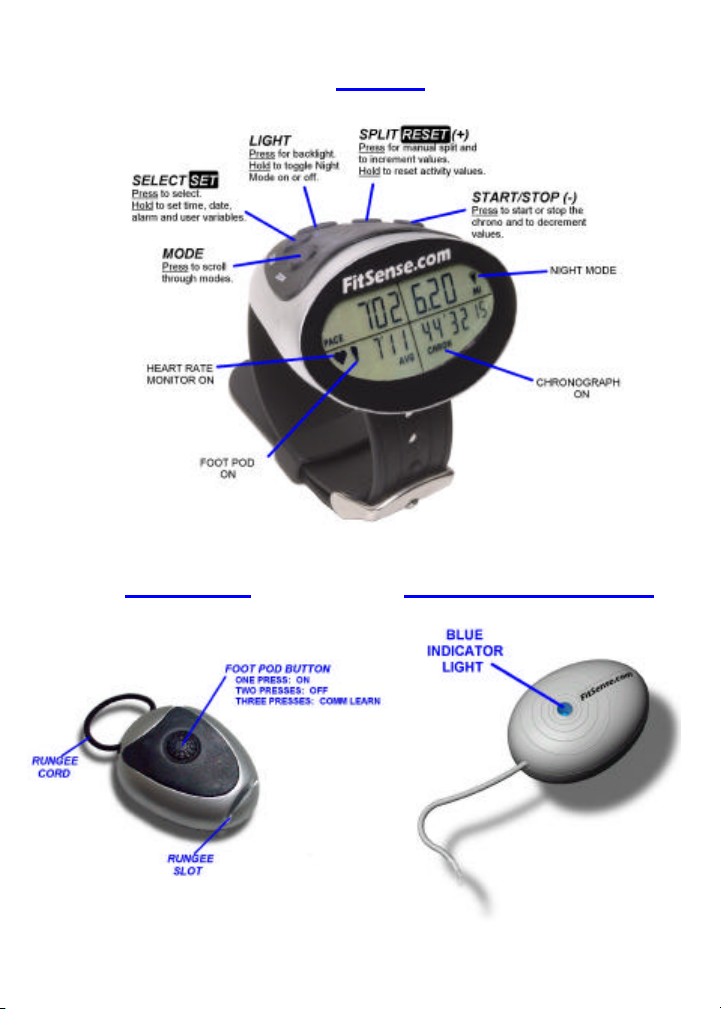
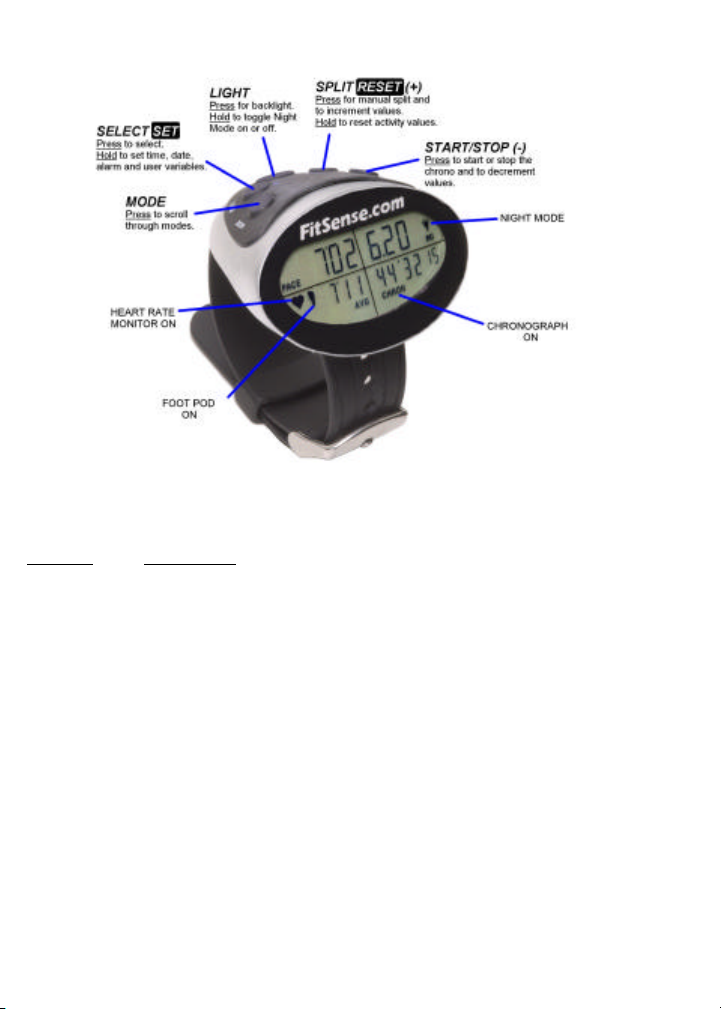
WATCH BUTTONS
Button functions listed in normal font (MODE, SELECT, LIGHT, SPLIT, START/STOP)
are performed by pressing and releasing the button.
BUTTON FUNCTIONS
MODE Cycles through the seven main modes.
If you stay in any mode for more than three seconds, the title screen
will disappear and the mode content screen will appear.
The next press of the MODE button will return you to TIME mode.
SELECT Toggles between "pace display" and "speed display" in SPED mode.
Toggles between track and treadmill calibration in CALB mode.
Accepts selected values and advances to next field while setting.
LIGHT Turns on the light for 3 seconds.
Holding LIGHT for 3 seconds turns on Night Mode.
In Night Mode, pressing any button will turn on the light for 5
seconds.
Holding LIGHT for 3 seconds turns off Night Mode.
SPLIT In SPED mode, with the chronograph running, SPLIT freezes the
screen and records a manual split in the daily chart.
Holding for 3 seconds in TIME mode launches COMM mode.
Page 8
3
.
START Starts and stops the chronograph in SPED mode.
/STOP
Button functions listed in reverse font (SET , RESET) are performed by pressing and
holding the button for 3 seconds.
SET Hold SET in TIME mode to change time.
Hold SET in SPED mode to set weight, view alert interval and
toggle Pace Zones ON and OFF.
Hold SET in ALRM mode to change alarm settings.
RESET Hold RESET in SPED mode to store activity in your log and
clear the display.
Hold RESET in SPED mode when the chronograph is zeroed to
enter the LOG clear menu.
Hold RESET in the LOG clear menu to clear chart data and log data.
Hold RESET in ODOM mode to zero the odometer.
(+) BUTTON Increments values while setting.
(-) BUTTON Decrements values while setting.
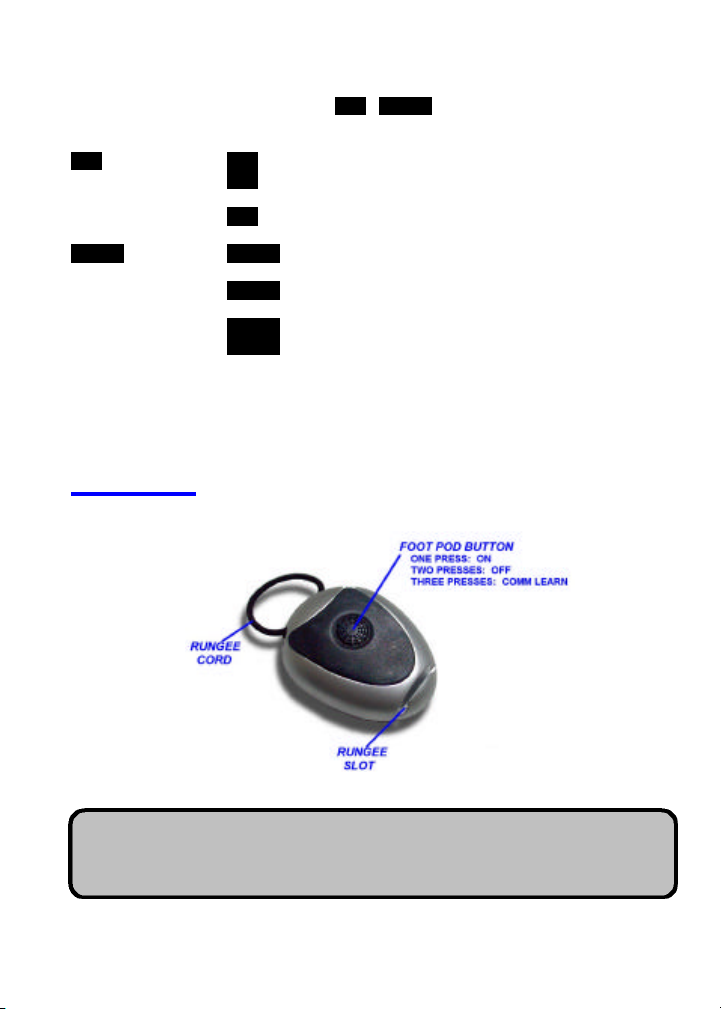
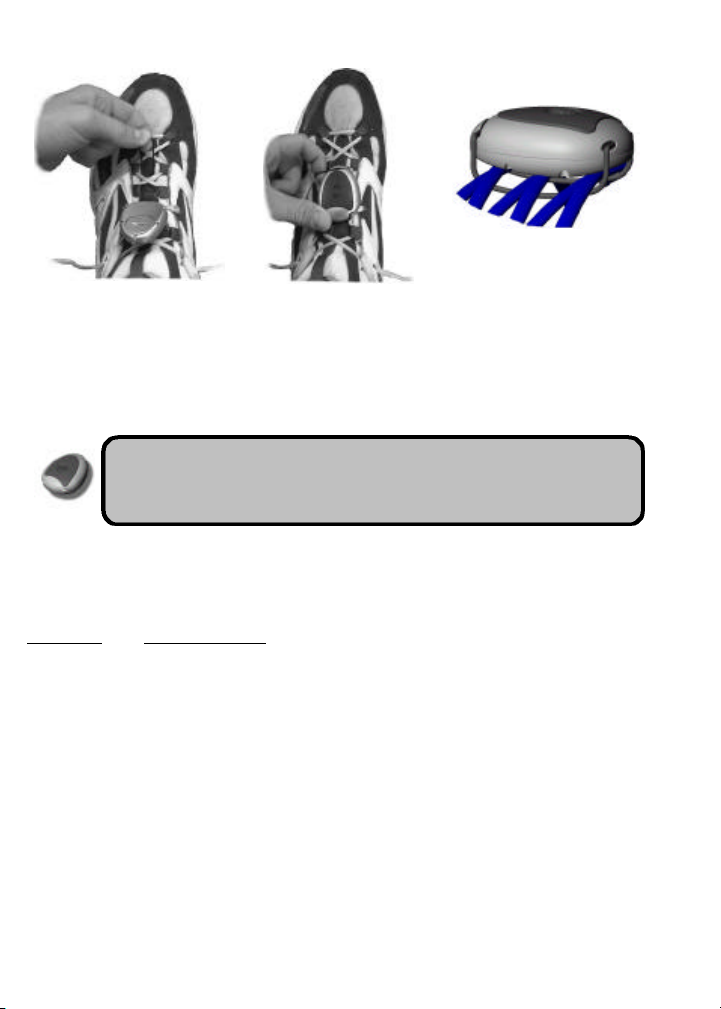
FOOT POD
The FS-1 foot pod may be placed on either your right or left foot
characteristics of your right leg may be different from those of your left leg.
Always keep the foot pod on the same foot.
The stride
Page 9
4
VIEW FROM ABOVE TOE SIDE VIEW
LACE CROSSINGS
Loosen your shoelaces.
Place the rungee cord
beneath 2 or 3 lace
crossings.
The pod may remain attached to your shoe between activities. Also,
the cord may be laced into the shoe and remain there for convenience
and added security.
Snap the rungee
cord into the slot at
the front of the pod.
Tighten your laces
and tie your shoes
comfortably.
The foot pod should be
firmly attached with the
narrow end of the pod
facing your toe. If the pod
is loose, place the cord
beneath another lace
crossing.
FOOT POD BUTTONS
The foot pod has three states (ON, OFF and COMM LEARN) that are controlled by
pressing the rubber button. Unique sounds confirm the state you have entered.
PRESSES WHAT THEY DO
ONE Turns pod ON. When the pod is off, push and hold the button until
TWO Turns pod OFF. Pressing the button twice in quick succession turns
THREE Allows a watch to learn a foot pod ID. Pressing the button three
you hear a beep. On button release, you will hear a single
confirmation beep. The pod is now ready for your activity. When
the foot pod is communicating with the watch, the foot icon on the
watch display will be lit.
the pod off. A descending tone confirms that the foot pod is off.
times in quick succession resets the COMM Address. Three
beeps confirms that the foot pod is in COMM LEARN mode. Now
any FS-1 watch can learn the foot pod's ID. Once the watch
learns a foot pod's ID, the foot pod will return to normal operation.
Page 10
5
SLEEP MODE
If the foot pod is on, but you haven't moved for five minutes, it will turn itself off to
conserve energy. You may hear the descending tone as the pod turns off. Simply
press the button once to turn the pod on. If you are in the middle of an activity, the FS1 will continue to monitor from where you left off.
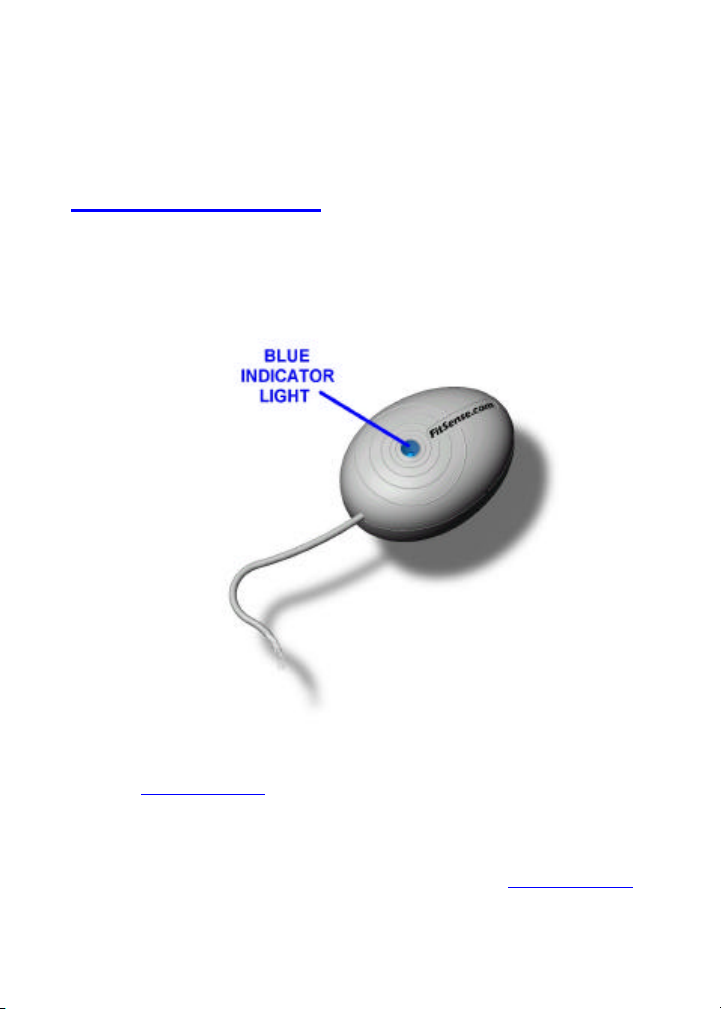
NETLINK (OPTIONAL)
The NetLink connects to your PC serial port and communicates wirelessly to your
watch. The NetLink allows you to store and chart your activities online and to
personalize your watch from the web.
To use the NetLink:
1. Plug the cable into the serial port on your PC.
2. Visit www.fitsense.com to register your watch and download the latest Netlink
software.
3. Place your NetLink in a visible location, preferably on top of your desk. This will let
you see the blue indicator light and will maintain a good wireless connection to
your watch.
4. Follow the on-screen instructions and software manuals at www.fitsense.com.
Page 11

6
HEART RATE MONITOR (OPTIONAL)
The FS-1 Heart Rate Monitor works with your FS-1 watch. See your heart rate and
your speed on the same screen. Chart your heart rate against distance and speed.
To put on the heart rate monitor:
1. Attach the elastic strap to one end of the monitor.
2. Wet the grooved electrodes.
3. With the FitSense logo upright, circle your chest with the strap and attach the
other end to the monitor. Lock the buckle in place.
4. Locate the monitor below your chest muscles so the grooved electrodes make
good contact with your skin.
5. Adjust the strap to a length that is comfortably snug.
Page 12

7
.:QUICK START
.:QUICK START
MODE FUNCTIONALITY
Press the MODE button to scroll through the modes of the watch:
Display Time of Day, Day of Week, and Date
Set Time of Day, Day of Week, and Date
Display Pace, Speed, Calories, Heart Rate, Activity Time, and Distance
Set Weight, Interval Alerts, and Pace Zones
Store walks and runs in LOG
Reset LOG entries and Chart data
Display data from last 28 runs or walks
Display data from last 75 splits
Display total distance and calories
Reset total distance and calories
Learn new sensor IDs
Change COMM address
Download watch data to PC
Setup watch from www.fitsense.com
Calibrate on a track or treadmill for highly
accurate walking and running
Set Calibration Values (CalVals) manually
Display Alarm Time
Turn Alarm ON or OFF
Set Alarm
To advance through the modes, press the MODE button quickly. While in
any other mode other than TIME for more than three seconds, the next press
of the MODE button returns to TIME mode.
Page 13

8
LEARNING NEW SENSORS
.:QUICK START
The watch will listen only to sensors it owns. If you are using a new foot pod or heart
rate monitor (just out of the box or a replacement), the watch needs to learn its ID.
Foot Pod
1. Enter COMM mode on the watch.
2. Press foot pod button three times quickly. You will three confirmation beeps.
3. When the foot icon is displayed in the lower left quadrant of the watch, your
watch has learned the ID of your foot pod
Heart Rate Monitor
1. Enter COMM mode on the watch.
2. Put your heart rate monitor on.
4. When the heart icon is displayed in the lower left quadrant of the watch, your
watch has learned your heart rate monitor ID.
CALIBRATING YOUR FS-1
To achieve the high accuracy that FS-1 offers, you must calibrate on a 400 meter track.
Perform separate walking and running calibrations for accuracy across all speeds.
1. Warm-up by running or walking for five minutes.
2. Turn on your foot pod by holding the button until you hear a beep.
3. Enter CALB mode. Press (-) until "TRAK" is flashing in the upper left quadrant.
Press SELECT to lock in your selection. The chronograph will appear in the lower
right quadrant indicating that you are ready to perform a track calibration.
4. Pick a point on the track. This will be your start and finish line.
5. Back away from the start line about 20 feet. Begin running. When you cross the
start line, press START/STOP.
6. Run around the track one time at your usual pace in the inside lane. Try to keep
an even pace during the calibration.
7. Run past the finish line, pressing START/STOP as you cross the line. This
completes your calibration. "OK" will appear on the screen.
8. Press any button to return to the calibration start screen with TRAK displayed in
the upper left quadrant. Press SELECT and the chronograph will reappear in the
lower right quadrant.
9. Repeat this calibration procedure for walking.
10. Your FS-1 is now calibrated for you. Press MODE to continue.
When the watch is establishing communication with the foot pod, the message
“WAIT” will appear in the upper left hand quadrant. "WAIT" will disappear
when the watch hears from the foot pod and you will be free to continue.
Page 14

9
RUNNING AND WALKING WITH YOUR FS-1
.:QUICK START
See speed, pace, distance and calories while running or walking:
1. Attach the foot pod to your shoe. See FS-1 Components: Foot Pod for a guide to
attachment.
2. Turn on your foot pod by
holding the button until
you hear a beep.
3. On the watch, in TIME
mode, Press MODE once
to enter SPED mode.
4. Make sure that the foot
icon is lit. If it is not, your
foot pod may be off or
your watch may need to
learn the ID of your foot
pod. (See Quick Start:
Learning New Sensors
above.)
5. Press START/STOP to
start the accumulation of
both the chronograph and
your activity totals. Your distance and calories will only accumulate when the
chronograph is running.
6. Begin running or walking. Your current pace or speed will appear in the upper left
quadrant.
7. Press SELECT in SPED mode to switch between pace display (min/mi) and
speed display (MPH).
8. At the end of your activity, press START/STOP to stop the chronograph and stop
accumulating distance and calories.
9. Hold RESET for 3 seconds to zero the readings and store the activity in your
LOG.
Page 15

10
LINKING TO FITSENSE INTERACTIVE (USING
.:QUICK START
OPTIONAL NETLINK)
Keeping track of your activities on your PC and the Internet is easy. At the press of a
button, the details of your activity will link to the NetLink device. Here is a quick
reference guide for offloading your watch:
1. Plug your NetLink device into the serial port on
your PC.
2. Download and install your Netlink software (from
www.fitsense.com) to your PC.
3. Enter COMM mode on the watch. Offloading will
begin automatically.
4. The blue light on the NetLink device will begin
blinking when the NetLink device connects to the
watch. When the PC begins communicating with
your watch, the blue light will stay on
continuously. If the light continues blinking, your
PC software may not be running.
5. Follow the on-screen instructions and software
manuals available at www.fitsense.com.
DISPLAYING HEART RATE ON YOUR FS-1
To see heart rate displayed on the watch:
1. Enter SPED mode.
2. Put on the heart rate monitor as
described above.
3. If the heart icon is not displayed, the
watch may need to learn the ID of
your heart rate monitor. Follow the
instructions in Learning New
Sensors on page 8.
4. While wearing the heart rate
monitor, press SELECT until you
see the heart outline icon in the
lower left quadrant of the watch
display.
5. Once your heart rate monitor has calculated your heart rate, it will display the
value in beats/minute in the lower left quadrant.
Page 16

11
.:USING YOUR FS-1
This section describes the modes of the watch. Pressing the MODE button advances
you through these modes.
TIME MODE
Display Time, Day, and Date
Set Time, Day, and Date
SETTING THE TIME, DAY AND DATE
1. To adjust settings, hold SET. The first settable field will flash.
2. Use (+) and (-) to adjust the fields.
3. Press SELECT to advance to the next field.
4. Press SELECT to exit the last settable field.
5. The settable fields are (in order):
• Hours
• Minutes
• Seconds
• Date
• Day of Week
TIME is the default mode for the watch. If no button is pressed for 3 minutes,
the watch will automatically revert to the TIME mode. While in any other
mode other than TIME mode for more than three seconds, pressing the
MODE button returns to TIME mode. The watch battery will last longer if you
make sure that you turn the chronograph off in SPED mode when you are
not using it.
Time, day and date are also settable from the web at www.fitsense.com.
See COMM Mode: Setting Up your Watch from the Web for details.
Page 17

12
SPED MODE: SPEEDOMETER
Display Pace, Speed, Calories, Heart Rate, Time, and Distance
Set Weight, Interval Alerts, and Pace Zones
Store walks and runs in LOG
Reset LOG entries and Chart Data
STARTING AND STOPPING THE FS-1 FOR AN ACTIVITY
Press START/STOP to start and stop the chronograph and other readings. If the foot
pod is not worn, the chronograph can be used like a normal stopwatch and all other
fields will be blank. If the foot pod is on, distance and calories will accumulate when
the chronograph is running. The foot icon will be lit when the foot pod and watch are
communicating. . The heart icon will be lit when the heart rate monitor and watch are
communicating. The chrono icon will remain lit in any mode while the chronograph is
running.
Before you begin an activity, make sure the:
• foot pod is turned on
• foot icon is on solid
• distance reads 0.00 miles
CHANGING THE SPED DISPLAY
DISPLAY OPTIONS
In SPED mode, your activity distance will always appear in the upper right quadrant
and your elapsed time will appear in the lower right quadrant. You can control the left
side of the display as follows. Press SELECT in SPED mode to switch between "pace
display" (pace in minutes/mile and average pace in minutes/mile) and "speed display"
(speed in mph and calories). Your chosen display will be the new default display.
(FOOT POD ONLY)
Page 18

13
DISPLAY OPTIONS
(FOOT POD AND HEART RATE MONITOR)
If you are wearing a heart rate monitor, you have four display options. Press SELECT
to cycle through the two pace and two speed options (in the figure above, gray
quadrants indicate fields that have changed from the previous display option):
• Pace and Heart Rate
• Pace and Average Pace
• Speed and Heart Rate
• Speed and Calories
MANUAL SPLITS
Pressing SPLIT in SPED mode freezes the display for 9 seconds. The split data (time,
distance and calories) is stored in your LOG for this activity.
RESETTING AND LOGGING YOUR ACTIVITY
After completing an activity, hold RESET for 3 seconds in SPED mode to store the
current activity to your LOG and clear the display. The chrono will zero immediately.
The distance display will zero after the foot pod clears the activity from memory. If the
foot pod is on, this should take approximately 3 seconds. If the foot pod is off, the
distance will zero once the foot pod is turned on. As the watch is resetting, the
distance and pace fields will be blank. Once these fields reappear, you are free to
begin a new activity.
CLEARING YOUR LOG AND CHART
When the chronograph is reset to zero, holding RESET for 3 seconds will bring you to
the activity clear menu. Press SELECT to scroll through the reset choices:
Page 19

14
1. Clear chart data (CLR CHRT). Holding RESET for 3 seconds in CLR CHRT
erases the detailed data (used to create a chart record of your activity at FS
Interactive) from memory. This chart data is also cleared when your FS-1 is
offloaded. If you want to chart your next activity, be sure the chart data is cleared
from memory before you begin running or walking.
2. Clear last activity (CLR LAST). Holding RESET for 3 seconds in CLR LAST
erases the most recent activity from memory.
3. Clear all activities (CLR ALL). Holding RESET for 3 seconds in CLR ALL
erases all activities from memory.
SETTING WEIGHT, INTERVAL ALERTS, AND PACE ZONES
You can customize your FS-1 in SPED mode by changing:
WEIGHT Weight, in pounds, is needed for accurate calorie calculations. The foot
INTERVAL
ALERTS
PACE
ZONES
SPED settings (on the watch):
1. Turn on your foot pod.
2. Hold SET. "WAIT" will flash until the watch communicates with the foot pod.
Then weight (in pounds) will begin flashing. Use (+) and (-) to adjust the fields.
3. Press SELECT to advance to the next field.
4. Press SELECT to exit the last settable field.
5. The fields are (in order):
• Weight (The foot pod must be on to set weight)
• Alert Frequency (Viewable only, settable via FS Interactive)
• Pace Zones (Toggle ON or OFF only, settable via FS Interactive)
pod must be on to set the weight.
Your FS-1 can beep at regular distance intervals for a customized
workout or just to keep you informed. The interval alert options are OFF
(indicated by .00 on the display), beep every 1/4 mile, beep every 1/2
mile, or beep every mile. The alert interval is only settable via FS
Interactive at www.fitsense.com.
You can select an upper and lower pace as an alert during activity. If
zones are set, the chronograph is running, and you are moving, the
watch will beep when you are outside the zone. Pace zones are only
settable via FS Interactive at www.fitsense.com.
PACE ZONES
While the chronograph is running in SPED mode:
• Hold SET to toggle Pace Zones alert ON and OFF.
• Press SELECT to temporarily turn off Pace Zones. If you return to the zone, the
Pace Zone alert will reactivate and will beep when you leave it again. Use this
feature if you will be purposefully or unavoidably outside of the zone (resting
between intervals or climbing a long hill).
Page 20

15
LOG MODE
Display data from last 28 runs or walks
Display data from last 75 auto and manual splits
LOGGING ACTIVITIES
Resetting an activity in SPED mode automatically enters that activity in LOG. The
LOG stores and displays the most recent 28 activities and 75 splits. If you exceed
these capacities, the earliest activities and splits will be overwritten. AutoSplitz™
(stored every mile) and manual splits count toward the split total. To prevent your LOG
from being overwritten, offload frequently.
REVIEWING LOG TOTALS
When you enter LOG mode,
the most recent activity will be
displayed. The LOG entry will
display activity distance,
number and date. After one second, the LOG entry will change to display calories,
distance and time for that entry. Push the (+) and (-) buttons to scroll through your
entries. Hold (+) and (-) to rapidly advance through the entries.
AUTOSPLITZTM
The FS-1 will record the time and distance at
each whole mile. These AutoSplitzTM are
stored in your Splits record. They are also
offloaded to your PC during every Link.
REVIEWING SPLITS
Press SELECT when in LOG mode to review the splits from that entry. Press (+) and
(-) to scroll through the splits in order. Split number, split distance, and split time are
displayed. Press SELECT again to return to the LOG review.
Your split time (total time of the activity at the time of the split) at each mile is recorded
in addition to any manual splits taken during the activity. If you link your data using
NetLink, you can view your pace for each mile and other detailed information.
CLEARING YOUR LOG
To reset your LOG entries or your chart data, return to SPED mode and follow the
instructions listed in SPED MODE: Resetting and Logging Your Activity on page 13.
Page 21

16
ODOM MODE: ODOMETER
Display total distance and calories since date of reset
Reset totals
RESETTING THE ODOMETER
To reset the ODOM hold RESET for 3 seconds. The distance and calories will zero
and the date of the reset will be displayed. The ODOM will roll over at 999 miles and
9999 calories. If you change the date in TIME mode, you may want to reset your
ODOM to reflect the new date.
The ODOM is independent of your LOG. You can reset one without resetting the other.
Page 22

17
COMM MODE: COMMUNICATION
Link watch data to PC
Learn new sensors
Change COMM address
Setup watch from www.fitsense.com
LEARNING A SENSOR
The watch will listen only to sensors it owns. If you are using a new watch, foot pod or
heart rate monitor, the watch needs to learn these sensors.
Foot Pod
1. Enter COMM mode on the watch.
2. Press the foot pod button three times quickly.
3. When the foot icon appears in the lower left quadrant, the watch has learned your
foot pod.
Heart Rate Monitor
1. Enter COMM mode on the watch.
2. Put your heart rate monitor on.
3. When the heart icon appears in the lower left quadrant, the watch has learned the
ID of your heart rate monitor.
OFFLOADING YOUR WATCH (USING OPTIONAL NETLINK)
1. Make sure your Netlink Software is running on your PC and your NetLink device is
plugged into the serial port on your PC.
2. Enter COMM mode.
3. Your watch will automatically connect to the
NetLink device. The blue light on the NetLink
device will begin blinking when it connects to
the watch. When the PC begins
communicating with your watch, the blue
light will stay on continuously. If the light
continues blinking, your PC software may
not be running.
4. "PC” will appear in the lower left quadrant.
5. The entire contents of your LOG including splits, your chart data, and all of your
customized information (including CalVals, weight, etc.) will be sent to the PC. A
normal offload will last 10-30 seconds.
6. The chart data will be cleared from your watch memory after offloading. LOG
data will remain in the watch memory unless you choose to remove it.
Page 23

18
SETTING UP YOUR WATCH FROM THE WEB
Most of the information in the watch (including time, date, alarm, and alerts) is settable
by the PC through the NetLink device.
The watch must be in COMM mode for the NetLink device to communicate with the
watch. When the watch is receiving commands from the NetLink, "PC" will appear in
the lower left quadrant. Details for using the PC to control your watch are covered
online at www.fitsense.com.
CHANGING COMM ADDRESS
Your FS-1 system has a settable COMM address that helps avoid interference from
other FS-1s. If you see strange readings while near another FS-1 system, you may be
experiencing interference. To change the COMM address of your system:
1. Make sure that the foot pod is turned on. If
you want to change the address of your heart
rate monitor, you must be wearing it.
2. Enter COMM mode. The current COMM
address will be displayed in the upper right
quadrant.
3. Hold SET to enter Address Change mode.
4. The current COMM address will be blinking. If a sensor is present, its icon will be
displayed.
5. Use (+) and (-) to change to a new address. You may choose any address from
1-99.
6. The sensor icons will disappear as the addresses of the foot pod and/or heart rate
monitor are being adjusted. When a foot pod or heart rate monitor has
successfully changed its COMM address, its icon will reappear.
7. Press SELECT after you have chosen your desired address. Your new address is
now locked in.
If you change the COMM address when a foot pod is not turned on or
present, the watch will no longer communicate with it. To reestablish
communication, press the foot pod button three times while the watch is in
COMM mode.
Page 24

19
CALB MODE: CALIBRATION
Calibrate FS-1 on a track or treadmill for accurate distance and pace during
walking and running .
Set Calibration Values (CalVals) manually.
To achieve highest accuracy, you must calibrate your FS-1. Calibration only
needs to be performed once for a given athlete. You may want to recalibrate
periodically if you notice drift in your readings or if you move the pod to your
opposite foot.
"TRAK" indicates track calibration, while
"MILL" indicates treadmill calibration.
PERFORMING A TRACK CALIBRATION
Getting Ready
1. Locate a 400 meter outdoor track or a 200 meter indoor track. Most high school
outdoor tracks are 400 meters. Pick any point on the track as your start and finish
line. Be sure to use the inside lane of the track.
2. Warm-up before you calibrate by walking or running for five minutes.
3. Make sure your foot pod is turned on.
4. In CALB mode, press (+) or (-) until "TRAK"
flashes in the upper left quadrant. Press
SELECT and the chronograph will appear in
the lower right quadrant. You are now ready
to perform a track calibration. "WAIT" will be
displayed in the upper left quadrant until the
watch has heard from the foot pod.
For a walking calibration:
1. Move back from the start line about 20 feet. Start walking. When you cross the
starting line, press START/STOP. Maintain an even and natural pace throughout
your walk. Continue past your finish line (one lap of a 400 m track or two laps of a
200 m track) and press START/STOP as you cross the line. The chronograph will
display your time for the calibration. For best results, walk at a normal pace.
2. If the calibration was successful, "OK" will appear in the lower left quadrant of the
display and you are ready to move on. If there was a problem during the
calibration, "Err" will appear in the lower left quadrant. Press START/STOP to
return to the calibration start screen and begin again.
3. If you start a calibration by accident, press START/STOP or MODE to abort.
Page 25

20
Successful Walking
Calibration
For a running calibration:
1. If you have just completed the walking calibration, simply press SELECT to return
to the calibration start screen.
2. Press (-) until "TRAK" is flashing. Press SELECT and the chronograph will
appear in the lower right quadrant. Move back from the start line about 20 feet.
Start running. When you cross the starting line, press START/STOP. Maintain an
even and natural pace throughout your run. Continue past your finish line (one
lap of a 400 m track or two laps of a 200 m track) and press START/STOP as you
cross the line. The chronograph will display your time for the calibration. For best
results, calibrate at your normal long-distance pace.
3. If the calibration was successful, "OK" will appear in the lower left quadrant of the
display. If there was a problem during the calibration, "Err" will flash in the lower
left quadrant of the display. The calibration values stored before the error will not
be changed. Press START/STOP to return to the calibration start screen and
begin again.
4. If you start a calibration by accident, press START/STOP or MODE to abort.
Unsuccessful Walking
Calibration
PERFORMING A TREADMILL CALIBRATION
A treadmill calibration is a convenient alternative to a track calibration. A track
calibration, however, will usually provide more accurate results for road running and
walking.
Getting Ready:
1. In CALB mode, press (-) until "MILL" is
flashing. Press SELECT and the chronograph
will appear in the lower right quadrant. You
are now ready to start the calibration.
2. Warm-up before you calibrate by running or
walking for five minutes.
For a walking calibration:
1. Set the speed of the treadmill to 3.5 mph. Begin walking on the treadmill. When
the belt is up to speed and you feel comfortable, press START/STOP. Continue
walking until the watch beeps (about 30 seconds), signaling the end of the
calibration.
2. If the calibration was successful, "OK" will appear in the lower left quadrant of the
display. If there was a problem during the calibration, "Err" will appear in the lower
Page 26

21
left quadrant. Press SELECT to return to the calibration start screen and begin
again.
3. If you start a calibration by accident, press START/STOP or MODE to abort
For a running calibration:
1. If you have just performed a walking calibration, press SELECT to return to the
calibration start screen. press (-) until "MILL" is flashing. Press SELECT and the
chronograph will appear in the lower right quadrant.
2. Set the speed of the treadmill to 6.5 mph. Begin running on the treadmill. When
the belt is up to speed and you feel comfortable, press START/STOP. Continue
walking until the watch beeps (about 30 seconds), signaling the end of the
calibration.
3. If the calibration was successful, "OK" will appear in the left half of the display. If
there was a problem during the calibration, "Err" will appear in the lower left
quadrant. Press START/STOP to return to the calibration start screen and begin
again.
4. If you start a calibration by accident, press START/STOP or MODE to abort.
YOUR CALIBRATION VALUES ( CALVALS)
Once you have completed a calibration, a CalVal will be calculated based on your
stride profile. This is a number from 1-200 that you can change manually. The default
values are 90 for walking and 70 for running.
View and change your CalVals:
1. Make sure your foot pod is turned on and
the foot icon is lit.
2. In the main CALB screen press (-) until
"SET" is flashing. Press SELECT and the
current walking and running CalVals will
be displayed. Your walk CalVal will be
blinking.
3. Use the (+) and (-) buttons to increment and decrement the walking CalVal.
4. Press SELECT when you have selected the desired value. The running CalVal
will begin blinking.
5. Again use the (+) and (-) buttons to increment and decrement the value.
6. Press SELECT when you have selected the desired value. Your new CalVals are
now set.
7. In the back of this manual there is a form to record your CalVals for future
reference.
Page 27

22
ALARM MODE
Display Alarm Time
Turn Alarm ON or OFF
Set Alarm
TURNING THE ALARM ON AND OFF
Press START/STOP to toggle the alarm on and off.
SETTING THE ALARM
1. Hold SET. The first field will be flashing.
2. Use (+) and (-) to adjust the fields. Time will not advance past midnight or noon.
3. Press SELECT to advance to the next field.
4. Press SELECT to exit the last settable field.
5. The settable fields are (in order):
• Hours (from midnight to noon)
• Minutes
Page 28

23
.:CARE AND MAINTENANCE
Your FS-1 is a precise instrument that should be treated with care.
REPLACING BATTERIES
BATTERY TYPE
Both the foot pod and watch run on a CR 2032 coin cell battery. These batteries are
widely available. In normal use (30 minutes of running or walking per day), the watch
and foot pod batteries will last up to 3 months.
LOW BATTERY ALERT
The watch will alert you if one of your sensor batteries is running low.
You have approximately one day of use left when this message appears on your watch
display. Your logs will be cleared if the battery runs out. Replace the low battery soon.
REMOVING AND REPLACING FOOT POD AND WATCH BATTERIES
To open the foot pod or watch battery door, fit a quarter in the slot and turn counterclockwise. Turn the door until it unlocks and continue turning until the door lifts out of
the hole. Remove the old battery, count to 20 to allow the watch to reset and replace
with a CR-2032. Make sure the writing on the battery is visible. Replace the door by
lining up the arrow with the “open” label, inserting, and turning clockwise until locked in
place. Make sure the o-ring is intact to maintain water resistance. Your LOG will be
cleared when the battery is removed. Be sure to offload your LOG to FS
Interactive often.
Foot Pod Battery Low: FOOT BATT
Heart Rate Monitor Battery Low: HRM BATT
REMOVING AND REPLACING NETLINK BATTERIES
The NetLink uses two AA batteries. On many PCs there will never be a need to
replace these batteries. If they run low, however, your Netlink software will alert you
with a "Change NetLink Batteries" message. Open the battery door and replace the
two batteries, ensuring that they line up with the label on the inside of the case.
REPLACING THE RUNGEE CORD
If the cord in your foot pod breaks, order a new rungee cord at www.fitsense.com, or
use a hair elastic band that has been cut in two. Feed the cord through the hole. Tie
the cord with a square knot. Tighten the knot. You are ready to lace your foot pod into
your shoe as normal.
Page 29

24
.:SPECIFICATIONS
BATTERY TYPE (1) CR-2032 (1) CR-2032 (2) AA (1) CR-2032
WATCH SPECS
DISPLAY RANGES
LOG STORAGE 28 activities
SPLIT CAPACITY 75 total splits (manual + AutoSplitz)
CALIBRATION VALUE (CalVal) RANGE 0-200
COMM ADDRESS RANGE 1-99
TRANSMISSION DISTANCE Up to 10 feet
OPERATING TEMPERATURE RANGE
STORAGE TEMPERATURE RANGE
WATER RESISTANCE Up to 20 meters
DISPLAY Liquid crystal
BATTERY LIFE 3 months 3 months 1 year 1 year
DIMENSIONS
WEIGHT 45 grams 20 grams 175 grams 65 grams
Distance 0.00 to 99.9 miles
Speed 2.5 to 20.0 mph
Calories 0 to 9999 calories
Odometer Distance 0.0 to 999 miles
Heart Rate 30 to 200 bpm
WATCH FOOT POD NET LINK
2.1 x 2.2 x 0.5" 2.0 x 1.6 x 0.6" 3.3 x 2.4 x 1.3" 12.0 x 1.3 x 0.6"
± 0.01 miles
± 0.1 mph
± 1 calorie
± 0.1 miles
± 1 bpm
32 to 104°F
-4 to 122°F
HEART
RATE
MONITOR
Page 30

25
.:REGULATORY INFORMATION
This device complies with part 15 of the FCC Rules. Operation is subject to the
following two conditions:
1. This device may not cause harmful interference, and
2. This device must accept any interference received, including interference that may
cause undesired operation.
Changes or modifications not expressly approved by FitSense Technology
Incorporated coud void the user's FCC granted authority to operate the FS-1.
Note: This equipment has been tested and found to comply with the limits for a Class
B digital device, pursuant to part 15 of the FCC Rules. These limits are designed to
provide reasonable protection against harmful interference in a residential installation.
This equipment generates, uses, and can radiate radio frequency energy and, if not
installed and used in accordance with the instructions, may cause harmful interference
to radio communications. However, there is no guarantee that interference will not
occur in a particular installation. If this equipment does cause harmful interference to
radio or television reception, which can be determined by turning the equipment off and
on, the user is encouraged to try to correct the interference by one or more of the
following measures:
• Reorient or relocate the receiving antenna.
• Increase the separation between the equipment and receiver.
• Connect the equipment into an outlet on a circuit different from that to which the
receiver is connected.
• Consult the dealer or an experienced radio/TV technician for help.
.:CUSTOMER SERVICE
§ Visit www.fitsense.com for answers to frequently asked questions.
§ Contact us at customerservice@fitsense.com or call 1-800-419-3667.
Page 31

26
.:LIMITED WARRANTY
FitSense products come with a 30 day unconditional guarantee. If for any reason you
are not completely satisfied with your FS-1 you may return it to the retailer where it was
purchased with your receipt or send it to FitSense Customer Service.
Your Fitsense FS-1 is warranted against defects in material and workmanship for one
year after purchase. To qualify, you must fill out and return the enclosed WARRANTY
CARD, or register online. Defective products will be repaired or replaced. The warranty
does not cover normal wear, damage, loss or commercial use. The warranty is void if
the unit is disassembled by anyone other than a FitSense Authorized Technician.
For all warranty claims:
Call FitSense at 1-800-419-3667 or visit www.fitsense.com for a return authorization
number. Send your FS-1 system along with your original purchase receipt to:
Please include the following information:
THE FORGOING IS YOUR SOLE REMEDY UNDER THIS LIMITED WARRANTY. IN
NO EVENT WILL FITSENSE TECHNOLOGY INC. BE LIABLE FOR ANY
INCIDENTAL, PUNITIVE OR CONSEQUENTIAL DAMAGES ARISING OUT OF THE
USE OR ABILITY TO USE THE PRODUCT EVEN IF FITSENSE HAS BEEN ADVISED
OF THE POSSIBILITY OF SUCH DAMAGES.
This warranty gives you specific legal rights and you may also have other rights which
vary from state to state.
FitSense Customer Service
212 Worcester Street
Wellesley Hills, MA 02481
• Name
• Address
• Email
• Phone Number
• Date of Purchase
• Description of Problem
• Watch Serial Number (Hold MODE to display the number. The serial
number is the 12 digit value displayed on the screen.)
Page 32

27
.:DISCLAIMER
The FS-1 is not a medical device. This device is provided for feedback on exercise
or routine activity only. FitSense recommends that you consult a physician before
beginning any exercise program or performing strenuous activity.
The FS-1 is covered in whole or in part by the following patents: 5,925,001; 6,018,705;
6,052,654; 6,122,340; and patents pending.
FS-1 INFORMATION
CALIBRATION VALUE
WALKING:________
RUNNING:________
DATE OF PURCHASE:___________
SERIAL NUMBER
(HOLD THE MODE BUTTON TO DISPLAY):
Page 33

FitSense
212 Worcester Street
Wellesley Hills, MA 02481
1-800-419-3667
www.fitsense.com
version1.1
2.08.01
 Loading...