

Page 1

usb turntable
Model Number: E-E030
User Manual
Page 2

After Sales Support TEL: 1300 886 649
1Page
Contents
What Your 1 Year Warranty Means ....................................................................................
Important Safety Instructions .............................................................................................
Precautions ........................................................................................................................
Before Use .........................................................................................................................
Location of Parts ................................................................................................................
Preparation for Use ............................................................................................................
Listening to a Record .........................................................................................................
Audacity Software ..............................................................................................................
Installing the Audacity Software .........................................................................................
Conguring Audacity for Microsoft Windows .....................................................................
Preparing to Export and Save for MP3 Formats ...............................................................
Export and Save for WAV, Ogg or MP3 Formats (After Recording is completed) .............
Recording Operation ..........................................................................................................
General problem for all Windows version............................................................................
Adjustment for Windows 7 and some Vista system only.....................................................
Dividing Tracks ..................................................................................................................
Conguring Audacity for Mac ............................................................................................
FAQ’s .................................................................................................................................
Specications ....................................................................................................................
2
3
5
6
7
8
9
10
13
17
21
24
26
27
28
35
39
45
46
Page 3

After Sales Support TEL: 1300 886 649
2Page
What Your 1 Year Warranty Means
Great care has gone into manufacturing this product and it should therefore provide
you with years of good service when used properly. In the event of product failure
within its intended use over rst year after the date of purchase, we will rectify the
problem as quickly as possible once it has been brought to our attention.
In the unlikely event of such an occurrence, or if you require any information about the
product please contact us via our after sales support services, details of which can be
found in this manual and on the product itself.
Page 4

After Sales Support TEL: 1300 886 649
3Page
When using electrical products, basic precautions should always be followed including:
1. Read Instructions - All the safety and operating instructions should be read before the
product is operated.
2. Retain Instructions - The safety and operating instructions should be retained for future
reference.
3. Pay attention to the Instructions - All warnings on the product and in the operating
instructions should be adhered to.
4. Cleaning - Unplug this product from the wall outlet before cleaning. Do not use liquid
cleaners or aerosol cleaners. Use a damp cloth for cleaning.
5. Attachments - Do not use attachments not recommended by the product manufacturer as
they may cause hazards.
6. Water and Moisture - Do not use this product near water-for example, near a bath tub,
wash bowl, kitchen sink, or laundry tub, in a wet basement, or near a swimming pool, etc.
7. Accessories - Do not place this product on an unstable cart, stand, tripod, bracket,
or table. The product may fall, causing serious injury to a child or an adult, and serious
damage to the product. Use only with a cart, stand, tripod, bracket, or table recommended
by the manufacturer, or sold with the product. Any mounting of the product should follow the
manufacturer’s instructions, and should use a mounting accessory recommended by the
manufacturer.
8. Transporting - A product and cart combination should be moved with care. Quick stops,
excessive force and uneven surfaces may cause the product and cart combination to overturn.
9. Ventilation - Slots and openings in the cabinet are provided for ventilation, to ensure
reliable operation of the product and to protect it from overheating.
These openings must not be blocked or covered. The openings should
never be blocked by placing the product on a bed, sofa, rug, or similar
surface. This product should not be placed in a built-in installation
such as a bookcase or rack unless proper ventilation is provided or the
manufacturer’s instructions have been adhered to.
10. Power Sources - This product should be operated only in accordance to the power rating
of the device. If you are not sure of the type of power supply to your home, consult your
product dealer or local power company. For products intended to operate from battery power,
or other sources, refer to the operating instructions.
11. Power-Cord Protection - Power-supply cords should be routed so that they are not likely
to be walked on or pinched by items placed upon or against them, paying particular attention to
cords at plugs, convenience receptacles, and the point where they exit from the product.
Important Safety Instructions
Page 5

After Sales Support TEL: 1300 886 649
4Page
12. Lightning - For added protection for this product during a lightning storm, or when it is left
unattended and un-used for long periods of time, unplug it from the wall outlet and disconnect
the cable system. This will prevent damage to the product due to lightning and power-line
surges as the cable system is used as the disconnect device. Keep the cord accessible.
13. Overloading - Do not overload wall outlets, extension cords, or integral convenience
receptacles as this can result in a risk of re or electric shock.
14. Object and Liquid Entry - Never push objects of any kind into this product through
openings as they may touch dangerous voltage points or short-out parts that could result in a
re or electric shock. Never spill liquid of any kind on the product.
15. Servicing - Do not attempt to service this product yourself as opening or removing covers
may expose you to dangerous voltage or other hazards. Refer all servicing to qualied service
personnel.
16. Damage Requiring Service - Unplug this product from the wall outlet and refer servicing
to qualied service personnel under the following conditions.
a. If the power-supply cord or plug is damaged.
b. If liquid has spilled, or objects have fallen into the product.
c. If the product has been exposed to rain or water.
d. If the product does not operate normally by following the operating instructions. Adjust
only those controls that are covered by the operating instructions, as un-authorised
adjustments of other controls may result in damage and will often require extensive work
by a qualied technician to restore the product to its normal operation.
e. If the product has been dropped or damaged in any way, and the product exhibits a
distinct change in performance-this indicates a need for service.
17. Replacement Parts - When replacement parts are required, be sure the service technician
has used replacement parts specied by the manufacturer or has the same characteristics as
the original parts. Unauthorized substitutions may result in re, electric shock, or other hazards.
18. Safety Check - Upon completion of any service or repairs to this product, ask the service
technician to perform safety checks to determine that the product is in proper operating
condition.
19. Heat - The product should be situated away from heat sources such as radiators, heat
registers, stoves or other products (including ampliers) that produce heat.
Page 6

After Sales Support TEL: 1300 886 649
5Page
Precautions
Safety Information
CAUTION
1. In order to shut off the power of this product completely, unplug the power cord from the wall
outlet. Be sure to unplug the unit if you do not intend to use it for an extended period of time,
such as a vacation.
2. Use of controls, adjustments and performance of procedures compared with those specied
here, may result in hazardous exposure.
3. If this product develops trouble, contact a qualied service centre, and do not use the product in
defective states.
Safety Precautions
WARNING:
To reduce the risk of re or electric shock, do not expose this appliance to rain or moisture.
CAUTION
RISK OF ELECTRIC SHOCK DO NOT OPEN!
To reduce the risk of electric shock: do not remove cover (or back).
No user serviceable parts inside. Refer servicing to qualied service personnel.
The lighting ash with arrowhead symbol, within an equilateral triangle,
is intended to alert the user to the presence of un-insulated “dangerous voltage
constitutes risk of electric shock to persons.”
The exclamation point within an equilateral triangle is intended to alert the user
to the presence of important operating and maintenance (servicing)
instructions in the literature accompanying the appliance.
(See markings on the back of the unit.)
CAUTION:
To prevent electric shock, match wide blade of plug to wide slot, fully insert.
Page 7

After Sales Support TEL: 1300 886 649
6Page
1. Choose unit installation location carefully. Avoid placing it in direct sunlight or close to a source
of heat. Avoid locations subject to vibrations and excessive dust, cold or moisture. Keep away
from sources that hum, such as transformers or motors.
2. Do not open the cabinet as this might result in damage to the circuit or electrical shock, if a
foreign object should get into the set, contact your dealer.
3. Be sure not to handle the stylus (needle) with dirty ngers.
4. When removing the power plug from the wall outlet, always pull directly on the plug, never pull
the cord.
5. Do not attempt to clean the unit with chemical solvents as this might damage the nish. Use a
clean, dry cloth.
6. In order to shut off the power to this product completely, unplug the power cord from the wall
outlet. Be sure to unplug the unit if you do not use it for an extended period of time, such as a
vacation.
7. Keep this manual in a safe place for future reference.
Before Use
Page 8

After Sales Support TEL: 1300 886 649
7Page
1. POWER SWITCH
2. LARGE CHROME SCREW
3. CUE LEVER
4. SPEED CONTROL SWITCH
5. TONE ARM REST
6. TONE ARM
7. EJECT BUTTON
8. STOP BUTTON
9. PLAY BUTTON
10. TURNTABLE
11. USB JACK
12. LINE OUT
13. AC POWER CORD
Location of Parts
Page 9

After Sales Support TEL: 1300 886 649
8Page
1. Connect the AC power cord to the AC outlet.
2. The transit screw protects the phonograph chassis during transportation. If the speed of your
phonograph seems slow or you hear a rubbing sound, adjust the screw with a coin to correct
the balance of the turntable.
Preparation for Use
Removing old stylus
1. Set a screwdriver at the tip of the stylus and push down in the
direction “A”.
2. Remove the stylus by pulling it forward and down.
Installing a new stylus
1. Hold the tip of the stylus and insert the other edge by pressing in
the direction “B”.
2. Push up in the direction “C” until it locks at the tip.
How to replace the Turntable Stylus (Needle)
Page 10

After Sales Support TEL: 1300 886 649
9Page
1. Connect the AC power cord to the AC outlet.
2. Plug the 2 ends of the LINE OUT Cable into
the auxiliary input (Aux) on your TV, home
entertainment receiver or other music system.
Be sure that the red RCA Cable is inserted
into the red jack and the white RCA Cable is
inserted into the white jack.
3. Press the POWER button in the front of the
unit. Also turn the power on the unit that you
connected with this turntable.
4. Put a record onto the turntable, when playing
a 45rpm record, remember to use the adapter
packed in the poly bag along with the manual.
5. Select player speed (33, 45 or 78rpm)
according to the record you’re playing.
Also remove the white plastic cover. When
the unit is not in use, remember to put on the
plastic cover to protect the stylus.
6. Remove the tone arm-rest holder, lift the
cuelever and move the tone arm gently to the
desired position over the record. Lower the
cuelever slowly, then the record is playing.
7. Adjust the volume on your auxiliary source to
control the volume of the music.
8. Press the STOP button to stop playing.
9. Press the PLAY button to continue playing.
10. When the audio has nished, and the
tone-arm reaches the end of the record,
the tonearm will return to the arm-rest
automatically and return the indicator will light
up. You can also press the EJECT button
when playing the record and the tone arm will
retract back to the arm rest.
When playing a 78rpm record, it will take a
little longer time, approximately 20 seconds,
for the tone arm to return to the tone arm rest.
11. Remember to unplug the mains when not
using the unit.
Listening to a Record
33
45
78
Return
indicator
Page 11

After Sales Support TEL: 1300 886 649
10Page
The provided CD disc contains the following software:
• Audacity-src-1.2.6----------For source codes
• Audacity_for_MAC---------For Macintosh
• Audacity_for_WIN----------For Windows
• AUTORUN.INF
• The GNU General Public License.html
The software is compatible with Window 98, 2000, ME, XP, VISTA and Macintosh.
Audacity Installation and USB Connection
Connect the USB cable to the turntable and to your computer. Connect the AC cord to the turntable.
Press the Power button to turn on the turntable.
1. Please insert the Audacity software disk that comes with your unit. Go to My Computer and
double click the CD ROM Drive.
Audacity Software
Page 12

After Sales Support TEL: 1300 886 649
11Page
2. There are ve folders in the Audacity disk. Select Audacity_for_WIN for Windows system, and
select Audacity_for_MAC for Macintosh system.
3. Double click the Audacity_for_WIN for Windows system, and double click the audacitywin-1.2.6 to install the audacity software.
Page 13

After Sales Support TEL: 1300 886 649
12Page
4. Double click the Audacity_for_MAC for Macintosh system. There are three folders that will
appear as shown below. If your computer is Mac OS X system (Intel CPU), please enter the
Intel folder to install the audacity software. If your computer is Mac OS 9 system, please enter
the Mac OS 9 folder to install the audacity software. If your computer is Mac OS X system
(Power PC CPU), please enter the PPC folder to install the audacity software.
Page 14

After Sales Support TEL: 1300 886 649
13Page
1. The Audacity Setup Wizard will appear. Click on Next to install the software.
2. Click on “I accept the agreement” and click on Next.
Installing the Audacity Software
Page 15

After Sales Support TEL: 1300 886 649
14Page
3. Continue to click on the Next button.
Page 16

After Sales Support TEL: 1300 886 649
15Page
4. Click on the Install button to start installation.
Page 17

After Sales Support TEL: 1300 886 649
16Page
5. Click on Finish to complete installation.
6. You can now open the Audacity software and start recording your files.
(For additional information, visit the Audacity website at http://audacity.sourceforge.net)
Page 18

After Sales Support TEL: 1300 886 649
17Page
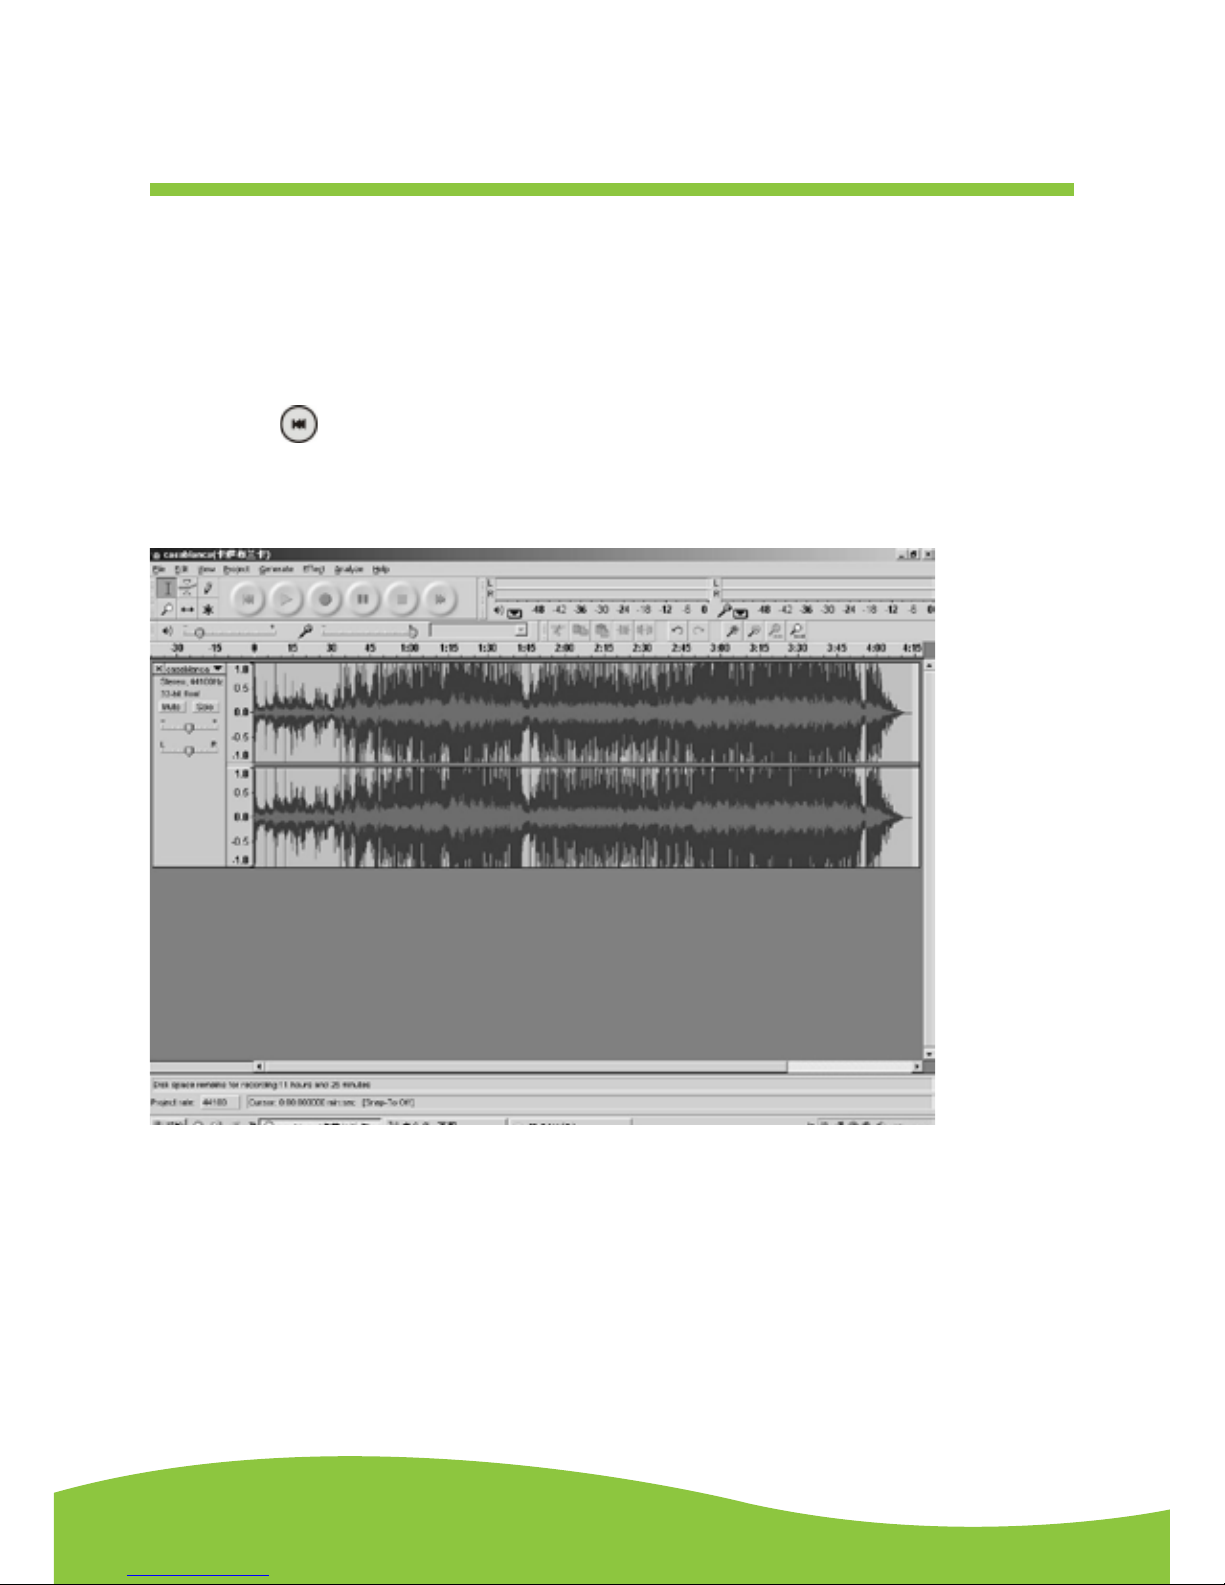
Conguring Audacity for Microsoft Windows
Audacity Interface
Audacity Interface---Settings and controls.
Page 19

After Sales Support TEL: 1300 886 649
18Page
Audacity Control Buttons
Using the attribute controls at the top of the screen to go to beginning, Play, Record, Pause, Stop
and End. Use the File, Edit, View, Project, Generate, Effect and Analyse menus to Save, Export, and
edit the music.
1. Click the ( ) button to skip to the start;
2. Adjust the output volume.
3. Click the ( ) button to play;
4. Click the ( ) button to record;
5. Click the ( ) button to pause the recording;
6. Click the ( ) button to stop the recording;
7. Adjust the input volume;
8. Click the ( ) button to skip to the end.
Page 20

After Sales Support TEL: 1300 886 649
19Page
Audacity Preferences
Click the “Edit” on the Audacity interface, select “Preferences”.
• The screen will open up Audacity Preferences. You can see the Audio I/O, Quality, File
Formats, Spectrograms, Directories, Interface, Keyboard and Mouse tabs in the Audacity
preference interface.
Page 21

After Sales Support TEL: 1300 886 649
20Page
Select the recording device: microphone (USB Audio CODEC)
• Click the “Audio I/O” at the Audacity Preferences interface.
• Click the “Device” and select “microphone (USB Audio CODEC)”.
• Click the “Channels” and select 2 (stereo).
• Click “OK”.
• NOTE: If you couldn’t find the “ microphone (USB Audio CODEC) “ from the Device list, close
the Audacity Software and re-open then try again.
• Adjust the output and input volume.
NOTE: Because of the variation in different operating systems, the input volume control may not
work on some individual Windows versions. Windows Vista is recommended to ensure the
input volume control works properly.
Page 22

After Sales Support TEL: 1300 886 649
21Page
Prepare for MP3 Export--- (Additional software “lame_enc.dll” needs to be installed.)
1. Please make sure that the Audacity disc is still inserted in your computer.
2. Click the “Edit” Tab on the Audacity interface, select “Preferences”.
3. Select the File Formats Tab and click on the Find Library Button.
Preparing to Export and Save for MP3 Formats
Page 23

After Sales Support TEL: 1300 886 649
22Page
4. A dialog box will appear. Click “Yes”.
5. Another box appears to locate the “CD ROM”. You will nd the “lame_enc.dll” software. Click
the software then click Open.
Page 24

After Sales Support TEL: 1300 886 649
23Page
6. Click on the OK Button.
Now the MP3 software set up is complete and you may proceed with the recording and exporting to
MP3 format.
Page 25

After Sales Support TEL: 1300 886 649
24Page
The provided CD disc contains the following software:
• When the song is nished, click the ( ) button on the screen. Then press the “STOP”
button on the turntable.
• You have a music download on your computer now. The music needs to be converted to WAV,
Ogg, or MP3 formats before exporting.
• You may play back the song through your computer.
Simply click the (
) button to play.
• NOTE: You may visit the Audacity website at http://audacity.source forge.net. For more
detailed information and operation, etc.
1. Click the file tab on the audacity interface. Select “Export as WAV” or “Export as Ogg”.
Export As WAV
Export As Ogg
Follow the same steps as above for “Export As MP3”.
Export and Save for WAV, Ogg or MP3 Formats (After
Recording is completed)
Page 26

After Sales Support TEL: 1300 886 649
25Page
2. Once you have chosen to which file format recording should be exported, the interface below
appears. Here you may provide the file name and the location where it will be saved, ie.
desktop. Then click “Save”.
Save as WAV
Save as Ogg
Follow the same steps as above for “Save as MP3”.
Page 27

After Sales Support TEL: 1300 886 649
26Page
Recording Operation
To upload music into the computer:
1. Place the record on the turntable.
2. Move the tone-arm over to the record to start playing.
3. Click the Record( ) button to start recording.
The waves (top and bottom) will show on the interface.
4. At the end of the song, click “Pause” ( ) button on your computer and press the Stop button on
the turntable.
For the next song, replace the album or move tone-arm to another desired song. Press the ( )
button on the turntable to start playing the next song. Immediately press the “Pause” ( ) button
on your computer and the uploading will continue.
5. Repeat steps 3 and 4 until you have finished uploading.
NOTE: Do not click the “Stop” button on the computer while the songs are uploading. Remember
to click “Pause” in between your desired songs. Press “Stop” on the computer only when all your
desired songs have been uploaded.
NOTE: After you have finished uploading, you may play back the songs through your computer. In
Stop Mode, simply click the ( ) button. You cannot hear music during the recording process.
Page 28

After Sales Support TEL: 1300 886 649
27Page
General problem for all Windows version
1. When the turntable is connected, you cannot hear any sound if you need to listen to video or
music. It is because the default playback device has been changed to USB AUDIO CODEC once
the turntable connects to the PC.
SOLUTION: Click “START” and go to Control Panel. Find and click “SOUND” icon then click the
“PLAYBACK” tab and the change the playback device and click OK.
2. If you want to hear the music while downloading onto the computer, go to the Audacity interface.
Click Edit and select “Preference”. Then click “Audio |/O” tab. Follow the setting as shown below
and click OK to confirm.
Deselect the check box to disable its function.
Page 29

After Sales Support TEL: 1300 886 649
28Page
if you do not have the fluctuant wave on the Audacity interface or the sound is distorted when
recording, adjust the recording level as follows:
• Click “Start” at the lower left corner and go to the Control Panel.
Adjustment for Windows 7
and some Vista system only
Page 30

After Sales Support TEL: 1300 886 649
29Page
• In Classic View, double click onto the Sound Icon.
Adjustment for Windows 7
and some Vista system only
Page 31

After Sales Support TEL: 1300 886 649
30Page
• Or in Control Panel Home View, click “Hardware and Sound”. Then click “Sound”.
Adjustment for Windows 7
and some Vista system only
Page 32

After Sales Support TEL: 1300 886 649
31Page
Page 33

After Sales Support TEL: 1300 886 649
32Page
• In the Sound Interface, select “Recording” tab.
• Then, choose a recording device. Herein we recommend you to select Microphone of USB AUDIO
CODEC which is highlighted in the picture and click “Properties”.
Adjustment for Windows 7
and some Vista system only
Page 34

After Sales Support TEL: 1300 886 649
33Page
• Select “Levels” and adjust the Volume Reading. The reading is from 0 to 100. Normally it should
be 3-8. However, you may refer to the Input Level Indicator from the Audacity panel that doesn’t
excess 0. Then click “OK” on the Microphone properties interface and sound interface. Close the
Control Panel.
NOTE: There is no “Levels” tab in the “Sound” panel in some operating system, such as Windows
98, Windows 2000. For Window 7 users and Vista users, the “Levels” tab in the “Sound”
panel is available.
Adjustment for Windows 7
and some Vista system only
Page 35

After Sales Support TEL: 1300 886 649
34Page
Adjustment for Windows 7
and some Vista system only
Input
Level
Indicator
Page 36
After Sales Support TEL: 1300 886 649
35Page
Dividing Tracks
NOTE: Follow the previous instructions to upload the songs, DO NOT click the “Stop“ button when
the first song is finished. Click the “Pause “button on the computer. For the next song, replace the
album or move tone-arm to another desired song. Click the “Pause” button to continue the upload.
Only click the “Stop” button when you have finished uploading into the computer.
When your uploading has completed:
1. Press the ( ) button to return to the beginning of the first song.
2. For example: You have 2 songs uploaded (before exporting). The duration of the first song is from
0:00 – 1:45 / the duration of the second song is from 1:45 – 4:00. (See time bar directly above
waves in interface below.)
(Suggestion: You can also write down the duration of the time that each song takes to upload while
it is playing by watching the wave lengths.)
Page 37

After Sales Support TEL: 1300 886 649
36Page
2. Move the cursor to the wave graphic area, left click the mouse and hold and drag from left to
right. You can see the time bar colour changing to gray (highlighted). Release the mouse when
the highlighted time bar has reached 1:45 (end of the first song).
3. Click “file” menu then select “EXPORT SELECTION AS WAV, Ogg, OR MP3”.
4. The window will pop up a dialog box for you to put the song title (“File name”), where you want to
save it (“Save in”), and file format (“Save as type”).
5. Click “Save” and the first song from 0:00-1:45 is saved on the computer.
Page 38

After Sales Support TEL: 1300 886 649
37Page
See interface example below, saved as WAV format:
Second song to be divided and saved:
1. Move the cursor to the wave graphic area at 1:45 (beginning of the second song). Left click the
mouse and hold then drag from left to right until you reach 4:00 (end of the second song). You
can see the area from 1:45 to 4:00 highlighted.
2. Click the “file” menu then select “EXPORT SELECTION AS WAV, Ogg, OR MP3”.
3. Follow Steps 2, 3 and 4 from Dividing Tracks to divide songs one-by-one.
Page 39

After Sales Support TEL: 1300 886 649
38Page
To Title Additional Songs (for MP3 format only)
During “EXPORT SELECTION AS MP3 “, the software only provides one time to title the song being
saved. All subsequent songs being divided from the same track are with the same title. To change
the titles, follow steps below:
1. Right click on the Music file which will show all its contents.
2 .Select “Properties”, then click on “Summary”.
3. Click on “Title”, and then change it to your desired title.
Page 40

After Sales Support TEL: 1300 886 649
39Page
Conguring Audacity for Mac
Audacity Interface for Mac
Audacity Interface---Settings and controls.
At the top of the main Audacity window, to the right of the play control buttons, you will see the input
and output level metres (labelled L and R). There is an icon under the output level metre that looks
like a microphone. Next to the microphone is a black arrow that points down. Click this arrow and
select Start Monitor. (If you don’t see the input and output level meters, open your Preferences again
as described above.)
Page 41

After Sales Support TEL: 1300 886 649
40Page
Audacity Control Buttons
Using the attribute controls at the top of the screen to go to beginning, Play, Record, Pause, Stop
and End. Use the File, Edit, View, Project, Generate, Effect and Analyse menus to Save, Export,
and edit the music.
1. Click the ( ) button to skip to start;
2. Click the ( ) button to play;
3. Click the ( ) button to record;
4. Click the ( ) button to pause the recording;
5. Click the ( ) button to stop the recording;
6. Click the ( ) button to skip to end;
7. Adjust the output volume.
8. Adjust the input volume.
Page 42

After Sales Support TEL: 1300 886 649
41Page
Audacity Preferences
Click “Audacity” on the Audacity menu, select “Preferences”.
• The screen will open up Audacity Preferences. You can see the Audio I/O, Quality, Import/
Export, Interface, Spectrograms, Directories, Smart Recording, Theme, Keyboard and Mouse.
Page 43

After Sales Support TEL: 1300 886 649
42Page
Select the recording device: Core Audio (USB Audio CODEC)
• Click the “Audio I/O” at the Audacity Preferences interface.
• Click the “Device” and select “Core Audio (USB Audio CODEC)”.
• Click the “Channels” and select 2 (stereo).
• Click the “OK”.
NOTE: If you couldn’t find the “Core Audio (USB Audio CODEC)” from the Device list, close the
Audacity Software and re-open then try again or insure the turntable is connected to the
computer.
Under the Quality tab, set the Default Sample Format to 16 bit. Select OK to save your setting and
close the preferences window.
Page 44

After Sales Support TEL: 1300 886 649
43Page
To set the Smart Recording
Select the Smart Recording in the Audacity Preference menu, and set the Sound Activation Level
(dB) to -36, and then click OK.
At the top of the main Audacity window, to the right of the input and output level meters (labelled L
and R), you will see the input and output volume. The left of the input and output volume is a volume
icon to adjust the output and input volume to maximum.
NOTE: Because of the variation of different operating system, the input volume control may not
work on some individual MAC versions. MAC OXS is recommended to ensure the input volume
control works properly.
Page 45

After Sales Support TEL: 1300 886 649
44Page
Export and Save Files (After Recording is completed)
• When the song is finished, click the ( ) button on the screen. Then press the “STOP” button
on the USB Turntable.
• You have a music upload on your computer now.
• You may play back the song through your computer.
• Simply click the ( ) button to play.
• NOTE: You may visit the Audacity website at http://audacity.sourceforge.net for more detailed
information and operation, etc.
1. Click the file tab on the audacity interface. Select “Export” to save the file.
2. The dialog box will pop-up after clicking Export. It will default to MP3 format, however you will
need to ensure that the correct format is selected.
Page 46

After Sales Support TEL: 1300 886 649
45Page
In case of a trouble with the unit, please look through below and see if you can solve the problem
before calling your dealer.
No Sound:
• If you are not getting any sound into the software application, go back to the preferences as
shown above and make sure you have selected the USB input for the recording device.
• Power Cycle: Close Audacity, turn off the turntable, unplug the USB Cable. Then plug in the
USB Cable, turn on the turntable, and re-open Audacity.
• If you are not able to hear any audio as you play the record, please click on the microphone
drop-down arrow and select Monitor Input. This will enable you to hear the audio from the
turntable, even if you have not record-enabled the Audacity application.
• If you are not seeing the microphone slider, please go to the Preferences menu in Audacity,
click on the Interface tab and make sure that the Enable Mixer Tool bar and Enable Meter Tool
bar options are checked. If they are not, please check them and then press OK.
• Check the microphone slider to make sure that it is at full volume, all the way to the right as
shown in below: If you are not seeing the microphone slider, please go to the previous step and
start again.
FAQ ’s
Page 47

After Sales Support TEL: 1300 886 649
46Page
Poor Sound Quality:
• Check your cartridge connection to make sure it is secured to the tone arm. The cartridge must
be connected to the tone arm whenever using the turntable.
• Make sure that your RCA plugs are plugged into a source or not touching bare metal. If you are
experiencing noise through the USB, you may have interference from the RCA plugs. Ensure
the USB cable is not touching or near any other cables.
• If you experience any odd sounds coming from the recording, try closing all applications,
restarting the computer, and only run Audacity while recording.
• Make sure that you have properly installed and calibrated the tone arm of the turntable.
Specications
Record Player Section
Motor……………………………..……….. DC servo motor
Drive System………………………..….... Belt Drive
Speeds………………………………....… 33-1/3 rpm, 45 rpm and 78 rpm
Wow Flutter………………………….…… Less than 0.25% (WTD)
S/N Ratio…………………….………...…. More than 50 dB
Cartridge Type………………………...…. Ceramic Stereo Cartridge
Stylus……………………………………… 402-M208-165
Output Level……………….………...…… 160-380 mV (5 cm/sec at 1 KHz)
GENERAL
Power Requirements……..…….……… AC 240 V~ 50 Hz
Power Consumption….......................... 5 W
Dimensions (L x D x H)…………..……. 35.6x10.6x34.7 CM (approx)
Weight……………………….……….….. 2.62 kgs
Standard Accessories………………..…. Operating Instruction Booklet
45 rpm Adapter
CD Disc
USB Cable
 Loading...