

Page 1

USER MANUAL
Page 2
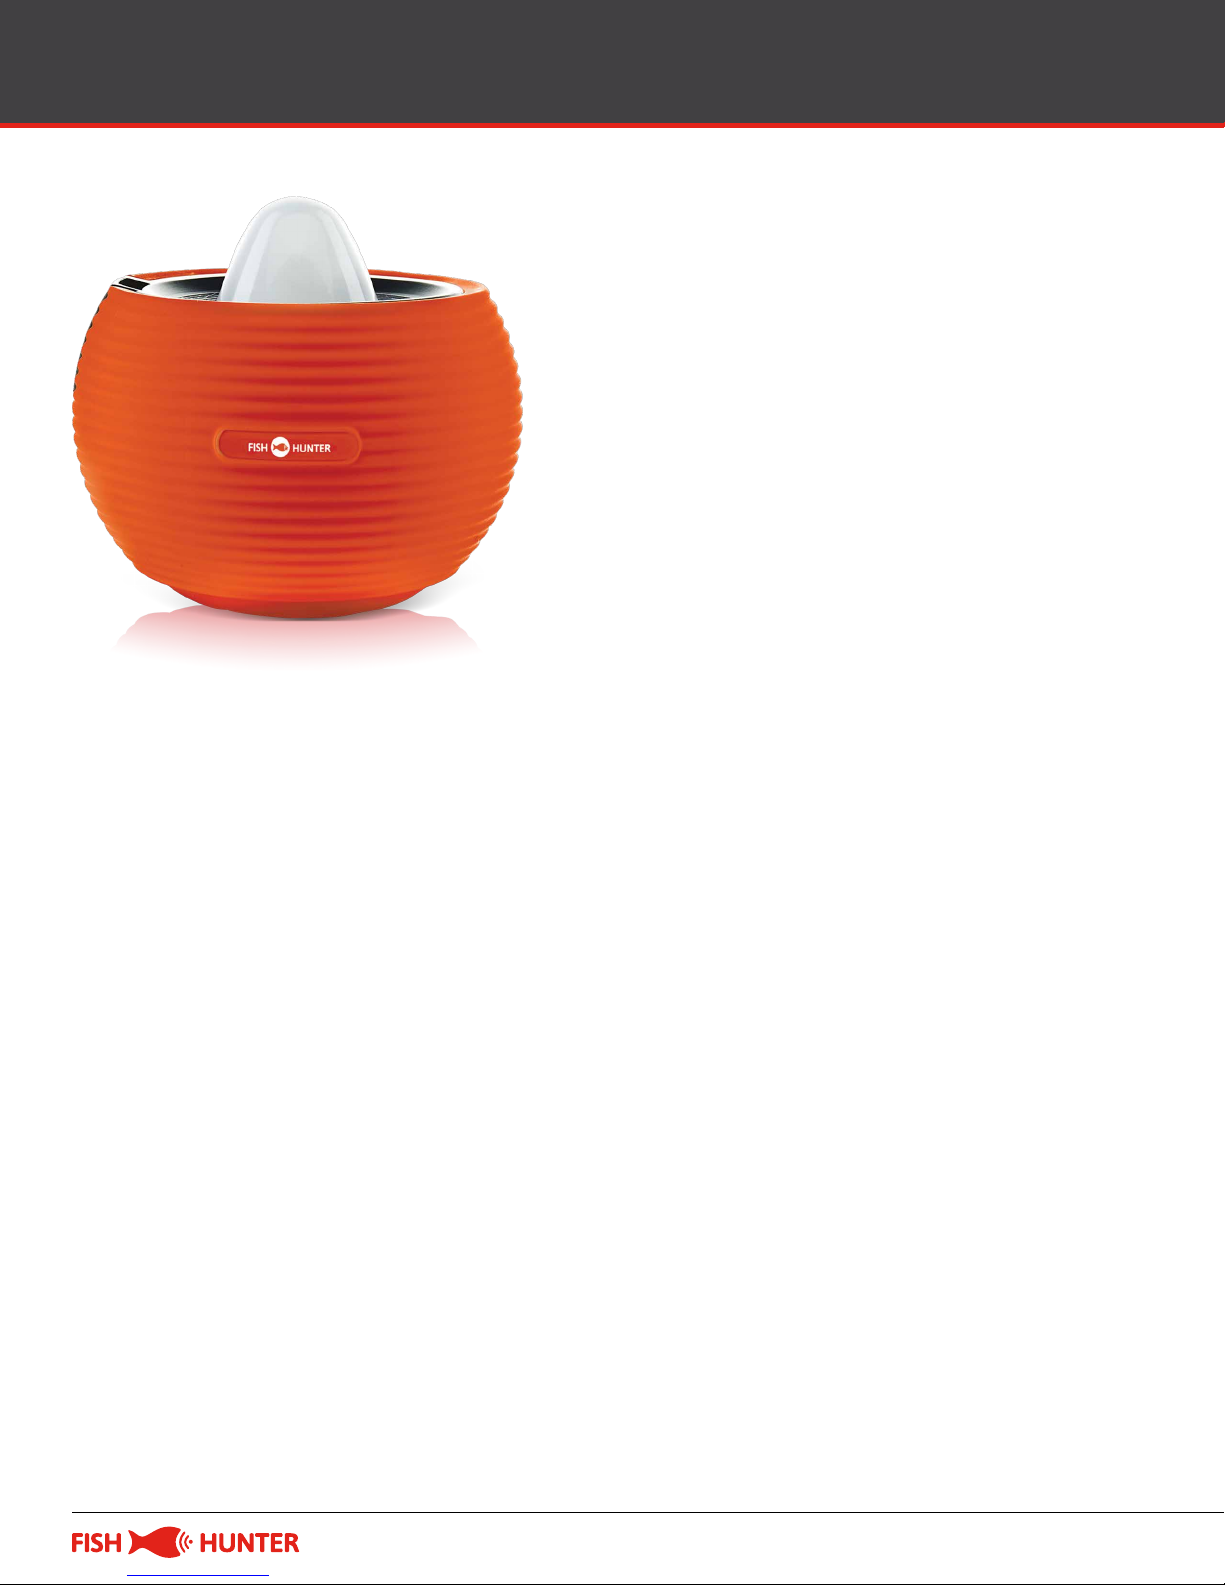
The Fishhunter
Thank you for
purchasing a FishHunter.
This quick start guide will tell you the
main things you need to know to start
using our product.
If you would like more information you can also go
directly to our website where we have videos and
additional content.
www.fishhunter.com
FISHHUNTER.COM / 2
Page 3

The Fishhunter
A military grade fishfinder
Engineered with military grade technology,
FishHunter is a powerful fishfinder for Apple
and Android phones and tablets. The fishfinder
floats on the top of the water and tracks water
temperature, depth and fish locations.
The FishHunter fishfinder connects to your
smartphone/tablet via Bluetooth by using our
free APP, so you don’t need to have a cell tower
connection to use your new fishfinder.
Using our Free app, you will also have the ability
to access and store critical fishing info like you’re
favorite fishing spots, your catch details, share
with friends and enter one of our many free
contests.
You can download our free app from the either the
Google Play store for android users or the Apple
App store for IOS users.
FISHHUNTER.COM / 3
Page 4

The FishHunter
Using your new FishHunter can be easy you
just need to charge it up!
Step 1: Connect the fishfinder to the
charging base
Step 2: Connect USB cable to the charging base
Step 3: Connect USB cord into the charger
Step 4: Check to see 2 charging lights are on.
Step 5: Download app to smartphone/tablet
Step 6: Pair your charged fishfinder with
phone/Tablet.
Step 7: Turn on your fishfinder using the app
FISHHUNTER.COM / 4
Page 5
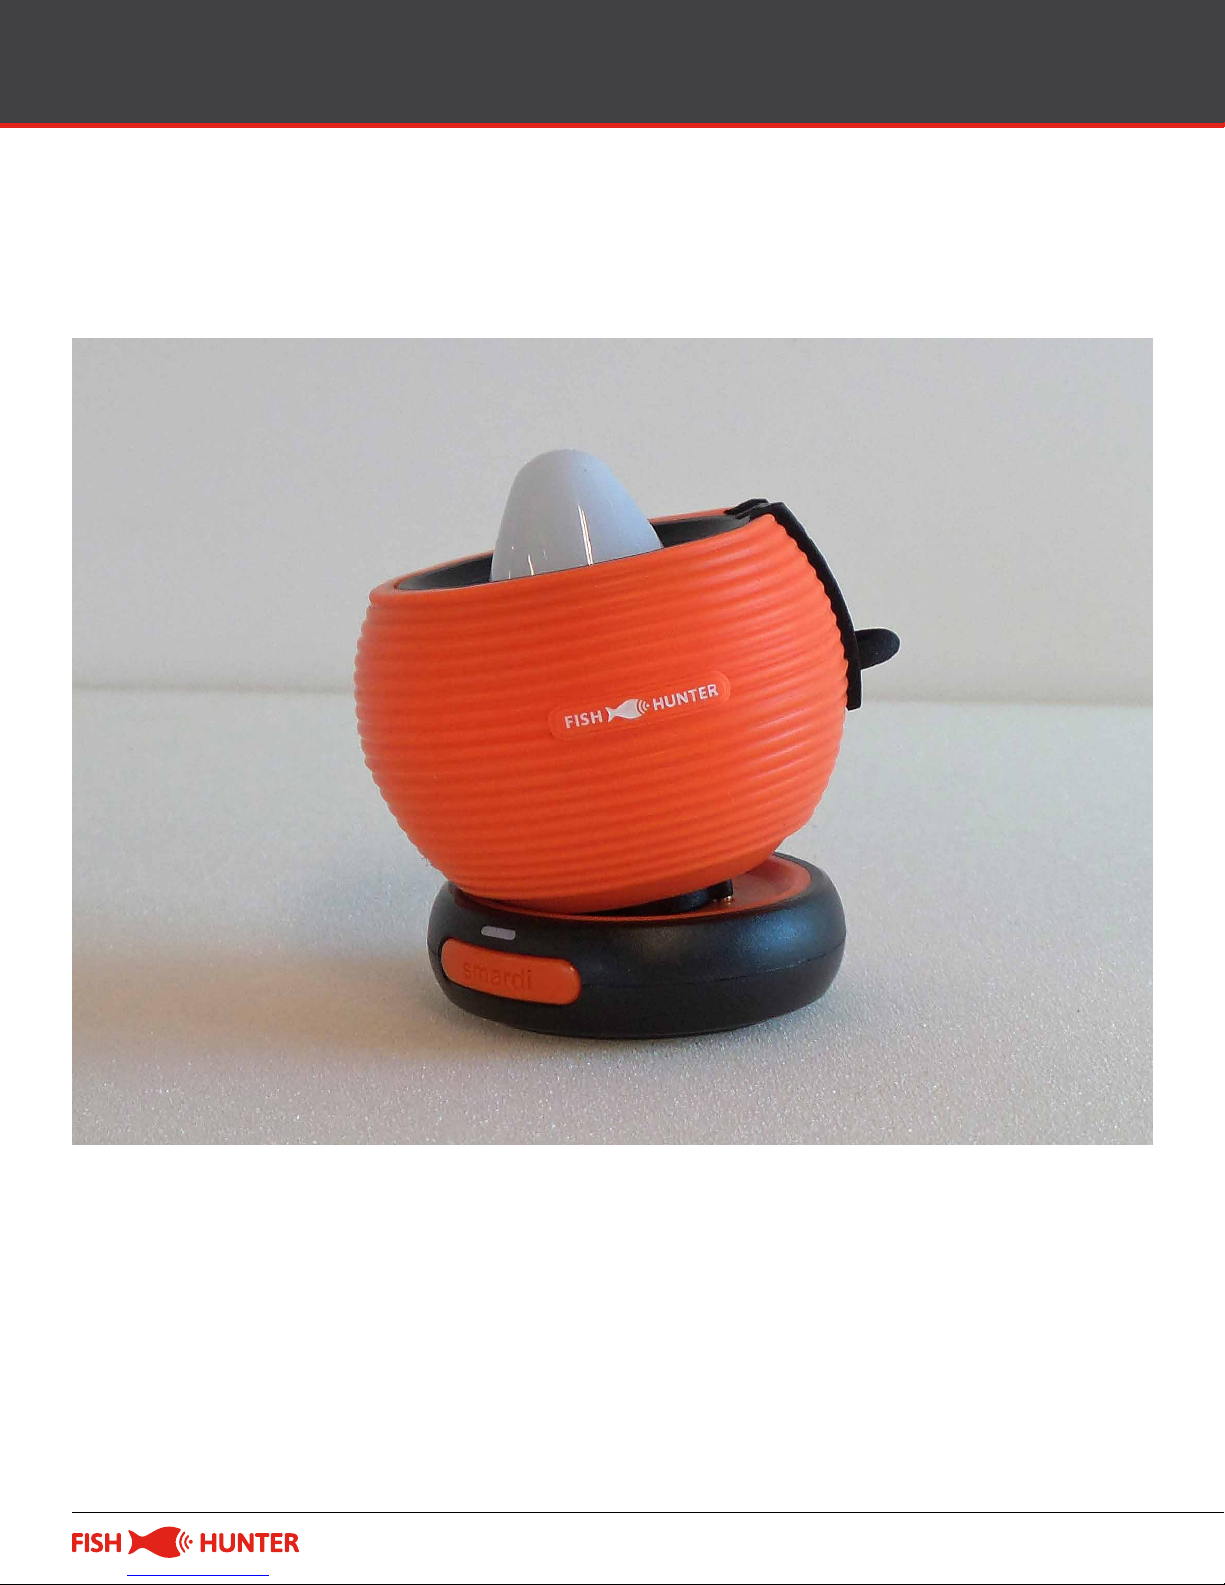
Charging Your FishHunter
Step 1: Connecting the fishfinder and the
charging base
FISHHUNTER.COM / 5
Page 6
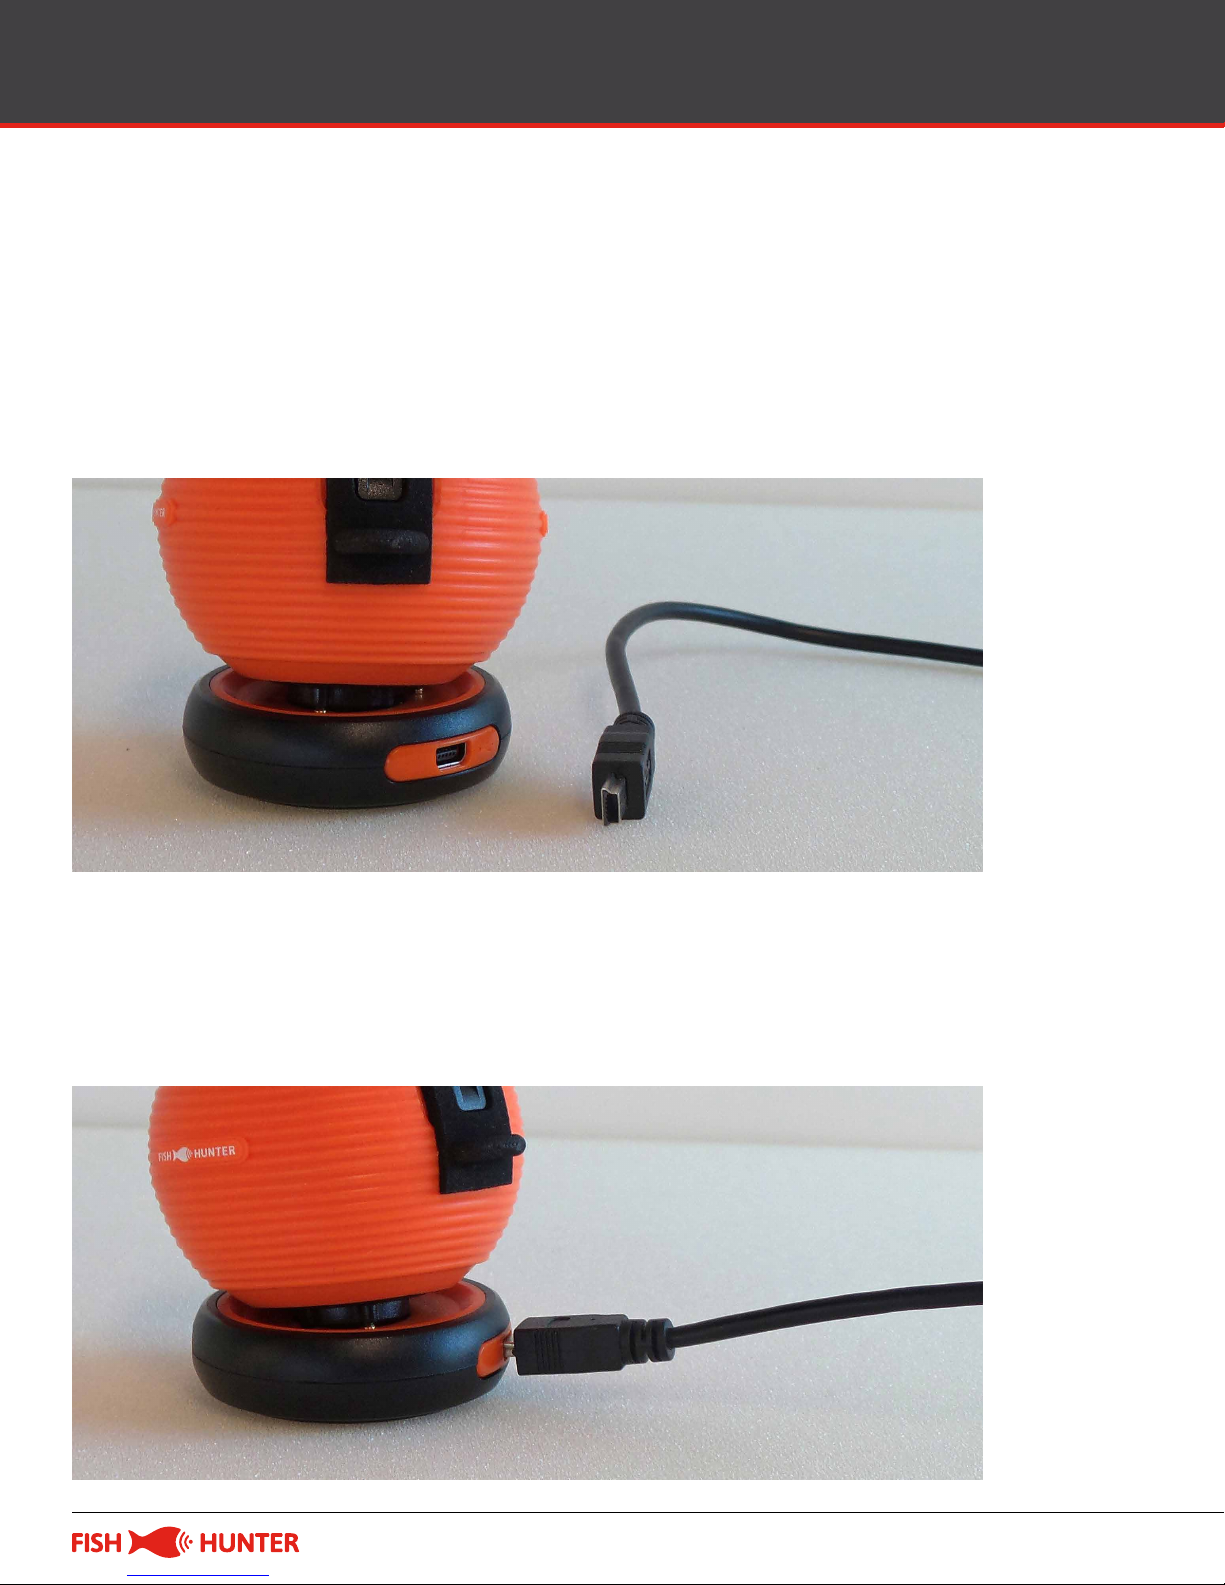
Charging Your FishHunter
Step 2: Connecting the USB Cable to the
charging base
The connection between USB-mini cable and the
charging base is shown below:
Connect the charging base and USB cord by
inserting the cord into the opening on the charging
base as shown below:
FISHHUNTER.COM / 6
Page 7
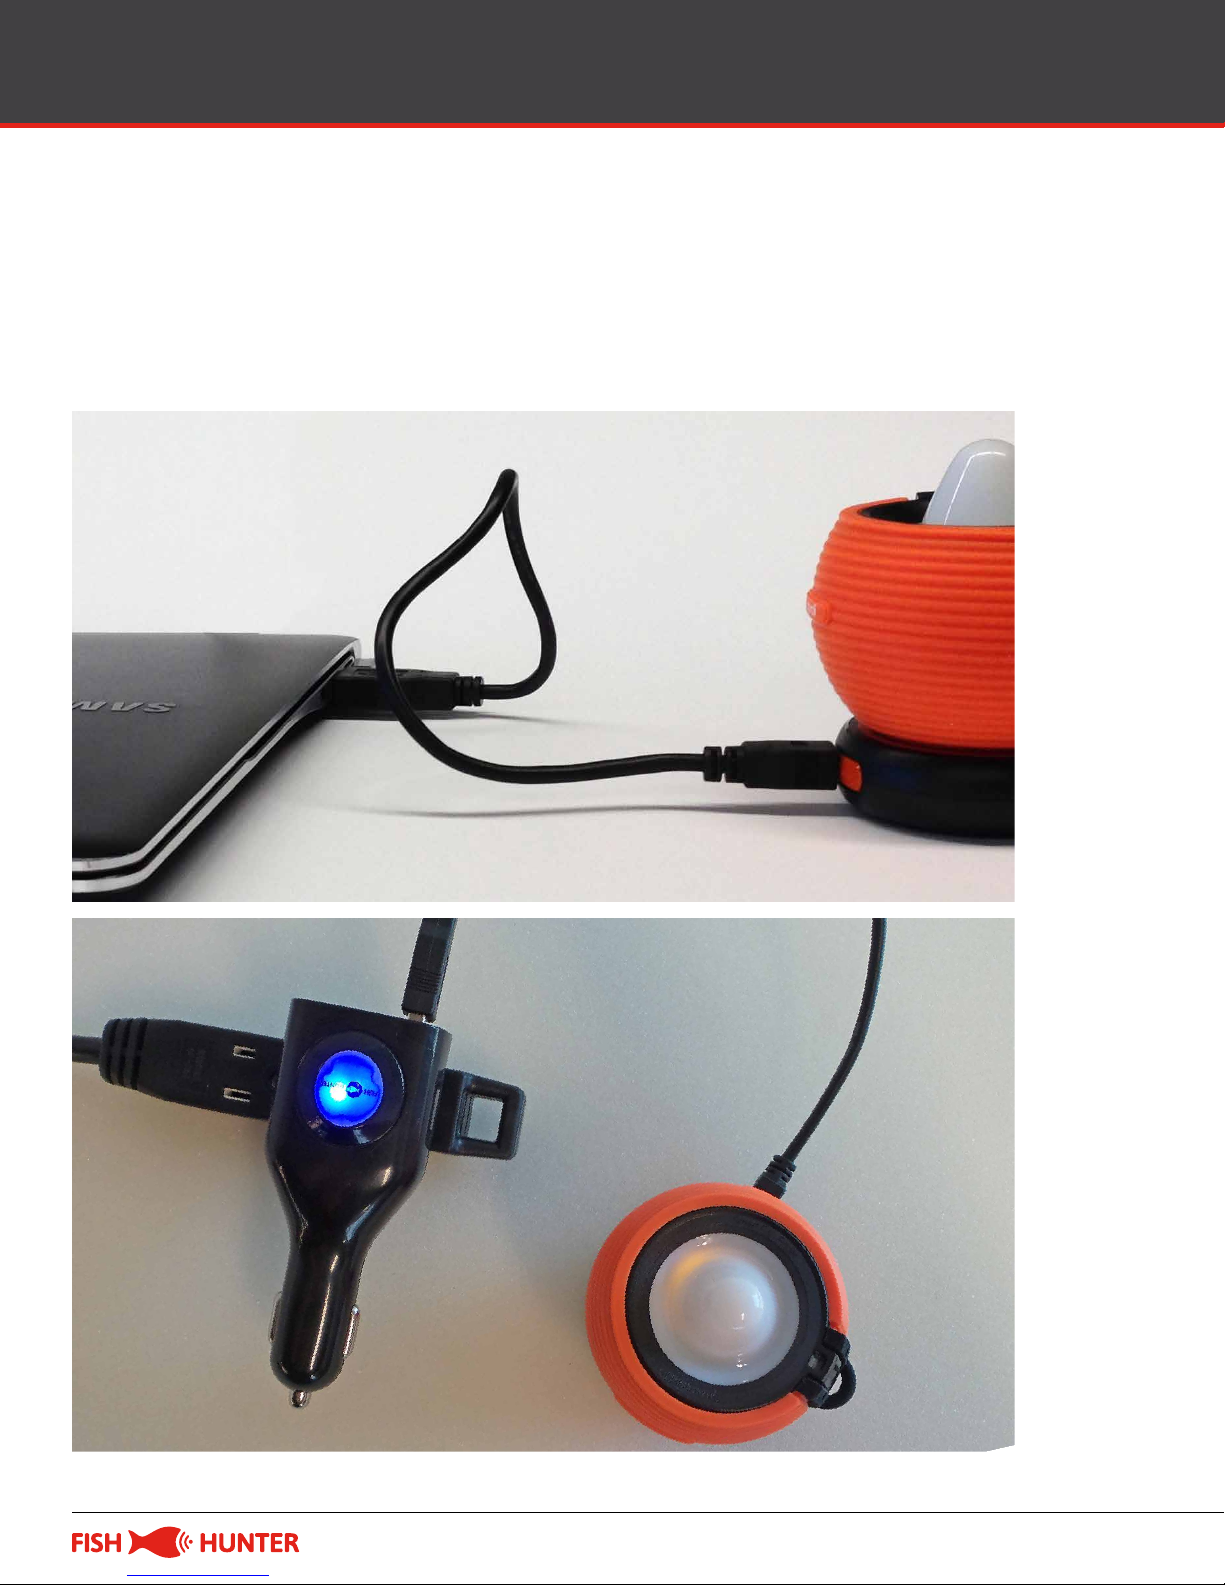
Charging Your FishHunter
Step 3: Connect USB cord into the charger
Connect the other end of the USB cord to the
computer or a USB charger.
FISHHUNTER.COM / 7
Page 8
Charging Your FishHunter
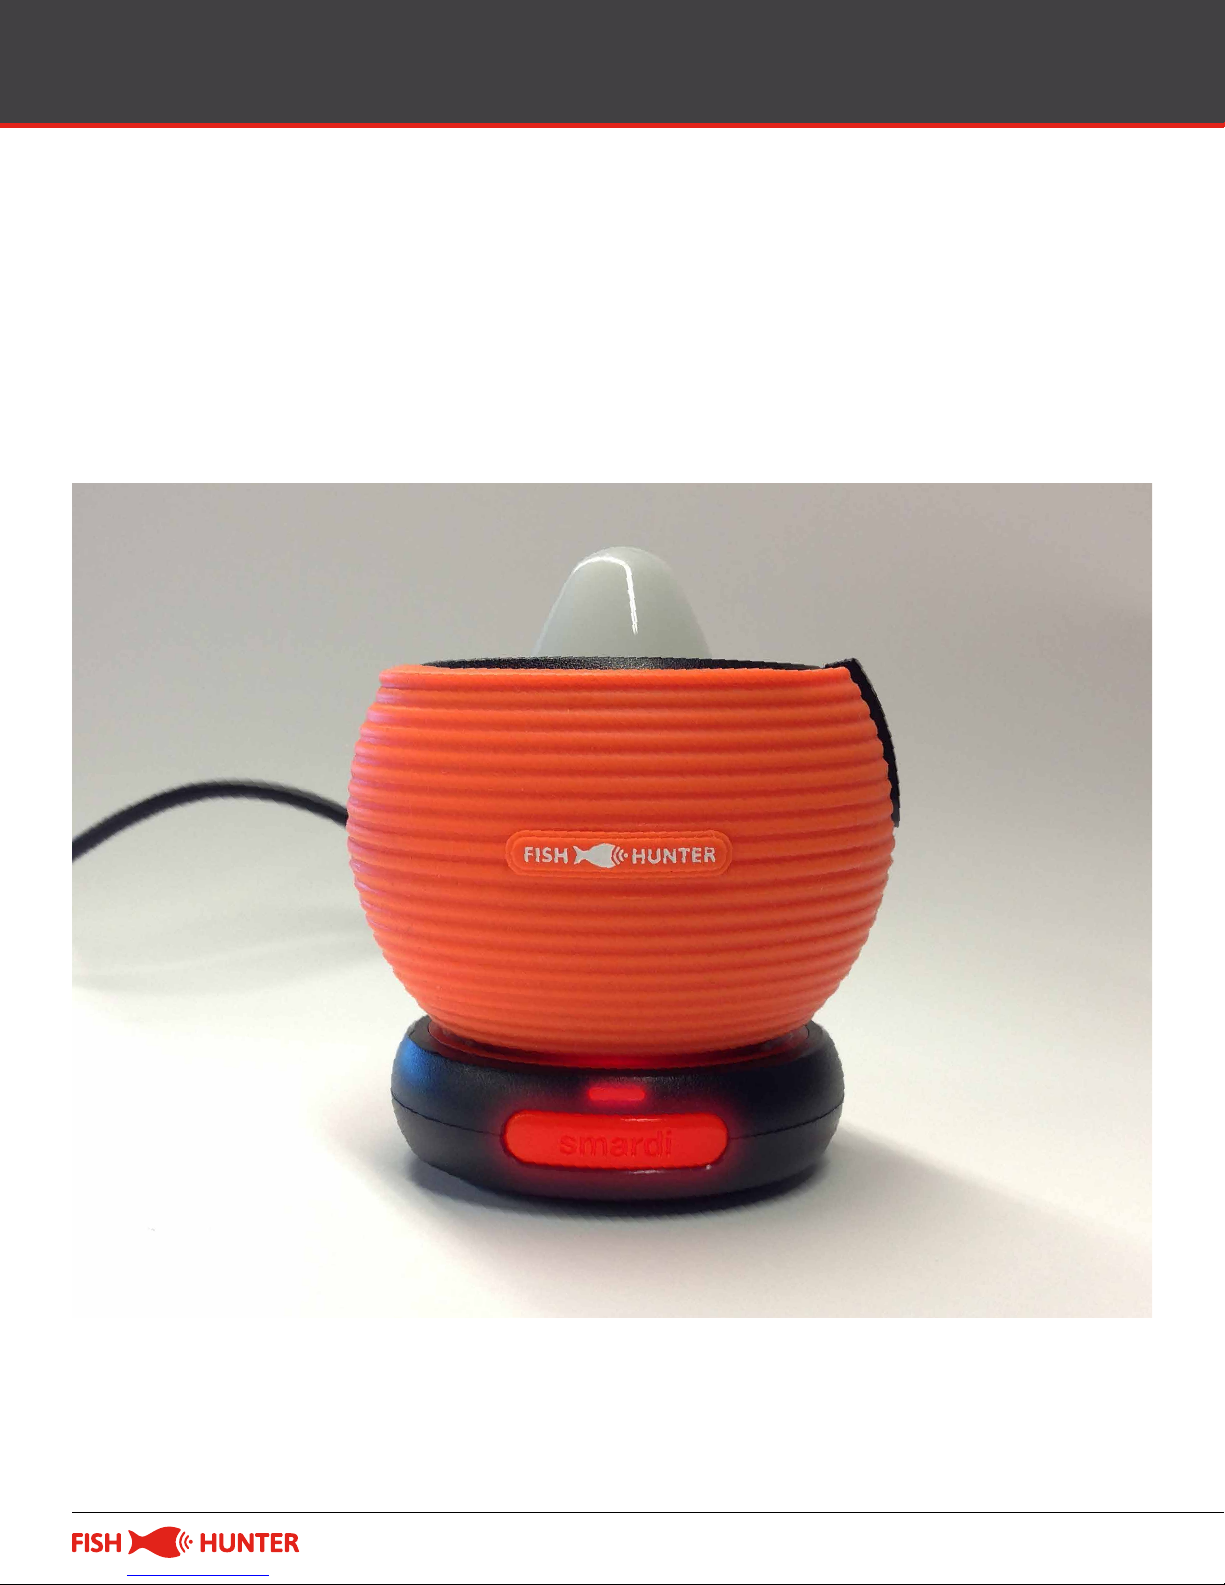
Step 4: Check to see both charging lights are on
You will notice that a red light appears on the
charging base which means that the base has
power and is ready to charge the fishfinder.
FISHHUNTER.COM / 8
Page 9
Charging Your FishHunter
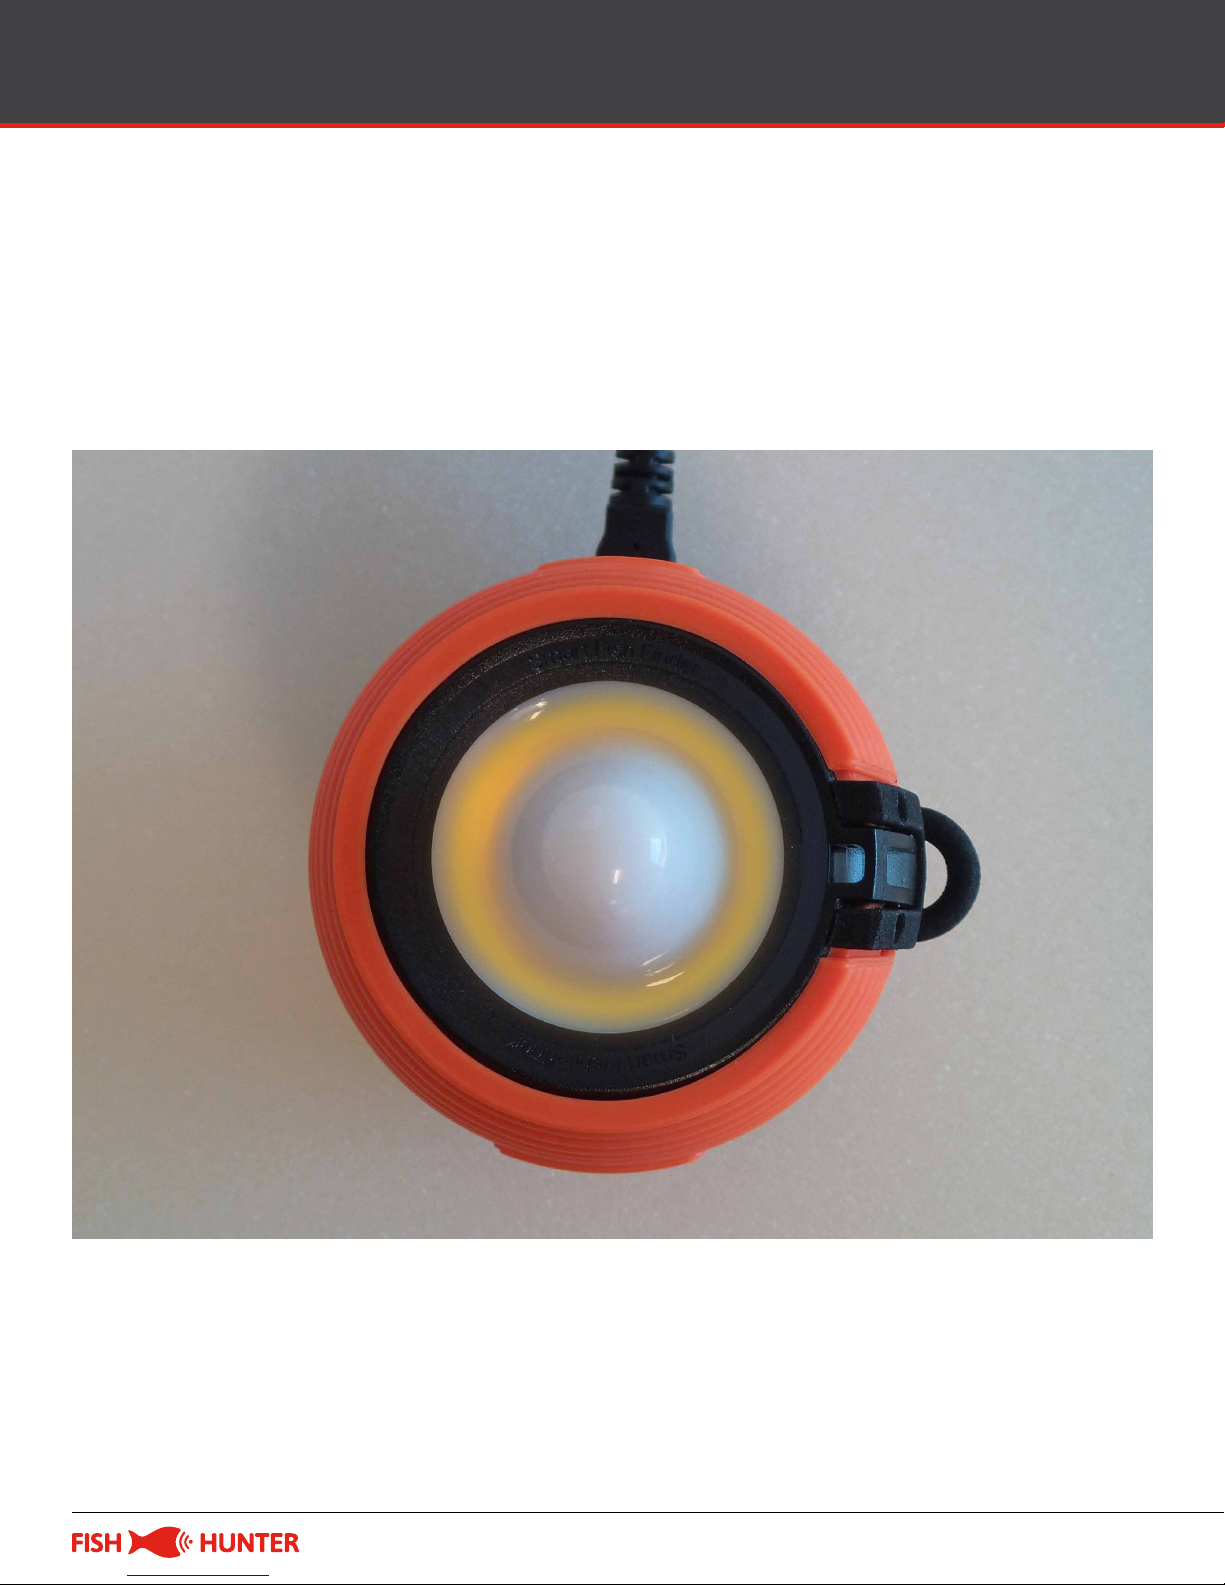
When the fishfinder is attached to the charging
base, the body will lit up yellow while charging is
in progress. This light will turn green when the
charging is complete.
Step 5. Download the “FishHunter Pro”
app to your smartphone/tablet
FISHHUNTER.COM / 9
Page 10

Bluetooth Pair with App
Step 6. Bluetooth pair the app with fishfinder
Important reminders:
• It takes about 2 hours to fully charge your
FishHunter fishfinder.
• Your fishfinder body does not operate in air;
it only works when it is placed on the water
surface. Please deploy it in water before you
begin the following Bluetooth connection
process.
• Your fishfinder connects to your mobile device
using Bluetooth connection. The fishfinder
broadcasts a signal that your phone will pick up
and connect with.
FISHHUNTER.COM / 10
Page 11

The Fishhunter
Step 1: Ensure your fishfinder is fully charged by
following the charging instructions above.
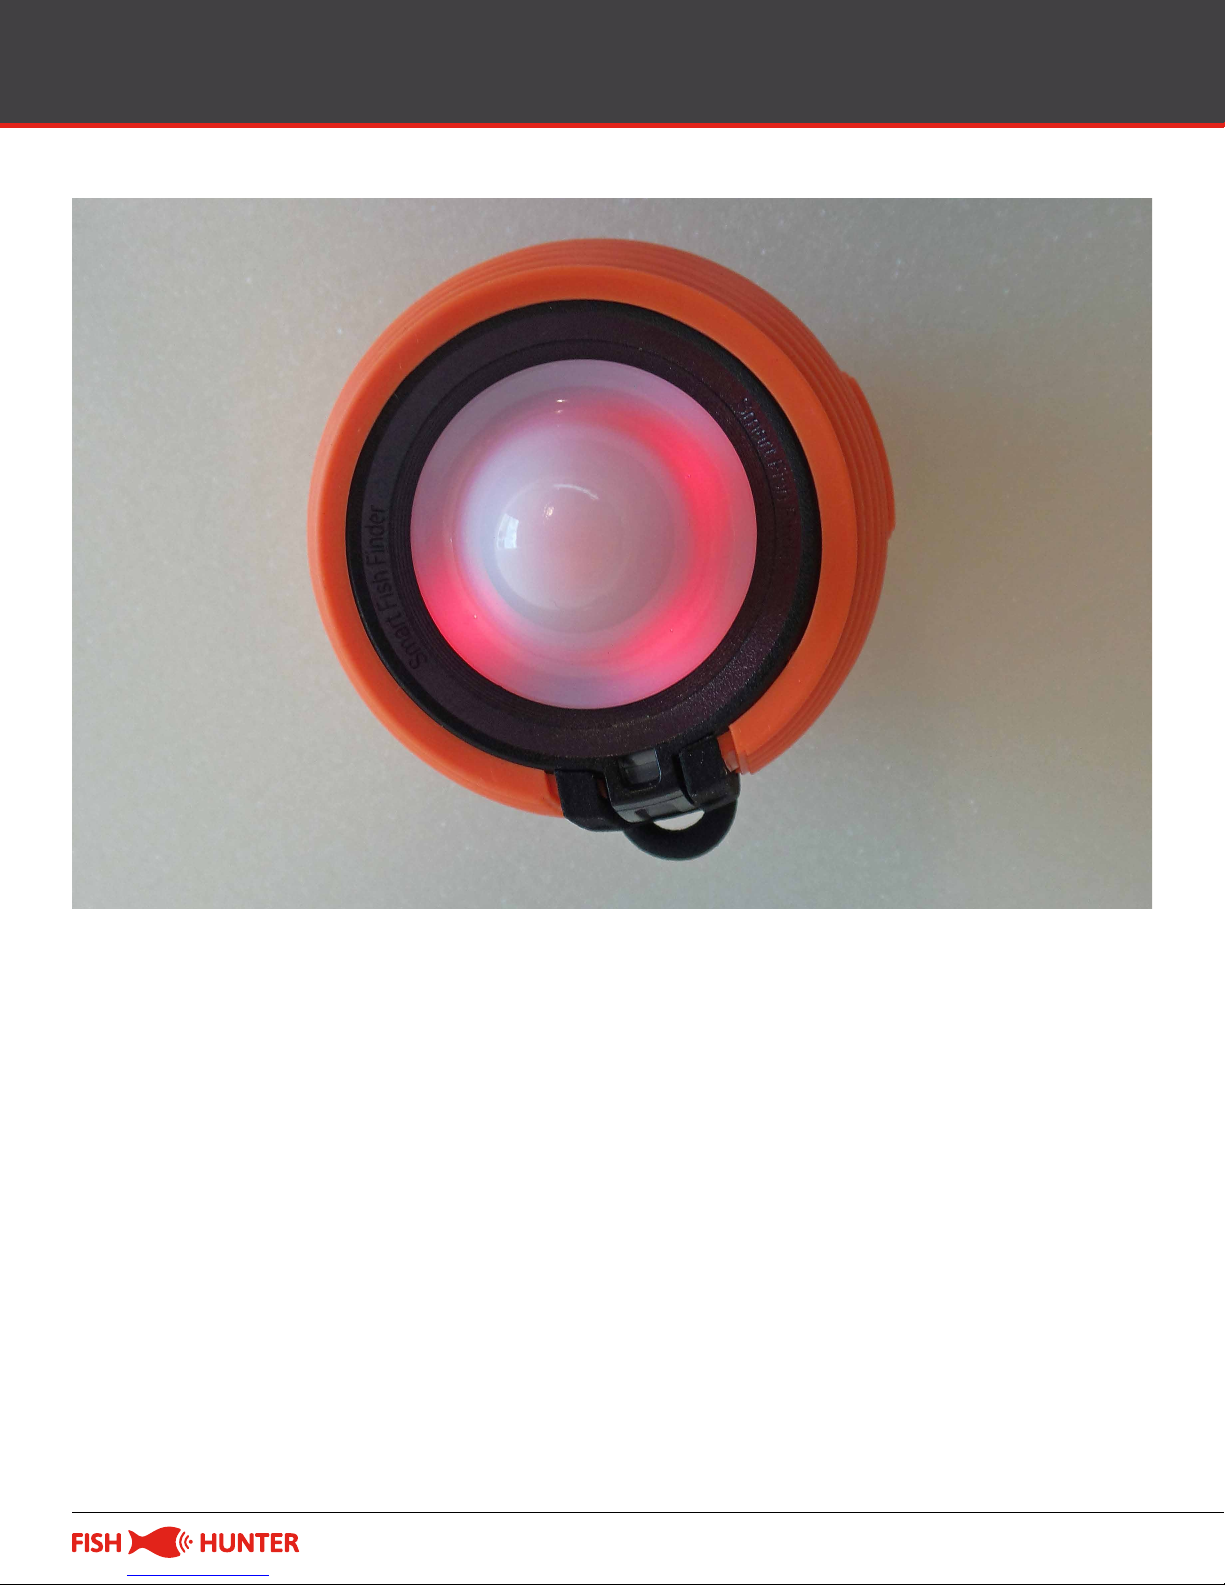
Step 2: Place your fishfinder into water. You will
see that the fishfinder’s red lights are blinking
fast and eventually stay lit to indicate that the
fishfinder is “waking up.” If the red light is not on,
the fishfinder is OFF.
FISHHUNTER.COM / 11
Page 12
Bluetooth Pair with App
Step 3: Open the FishHunter app. If this is the first
time you have opened the app, you will need to
login. Please login.
If you have already logged in, then please go to the
bottom menu and select sonar by pressing on the
fish icon labeled “Sonar”
FISHHUNTER.COM / 12
Page 13
Bluetooth Pair with App
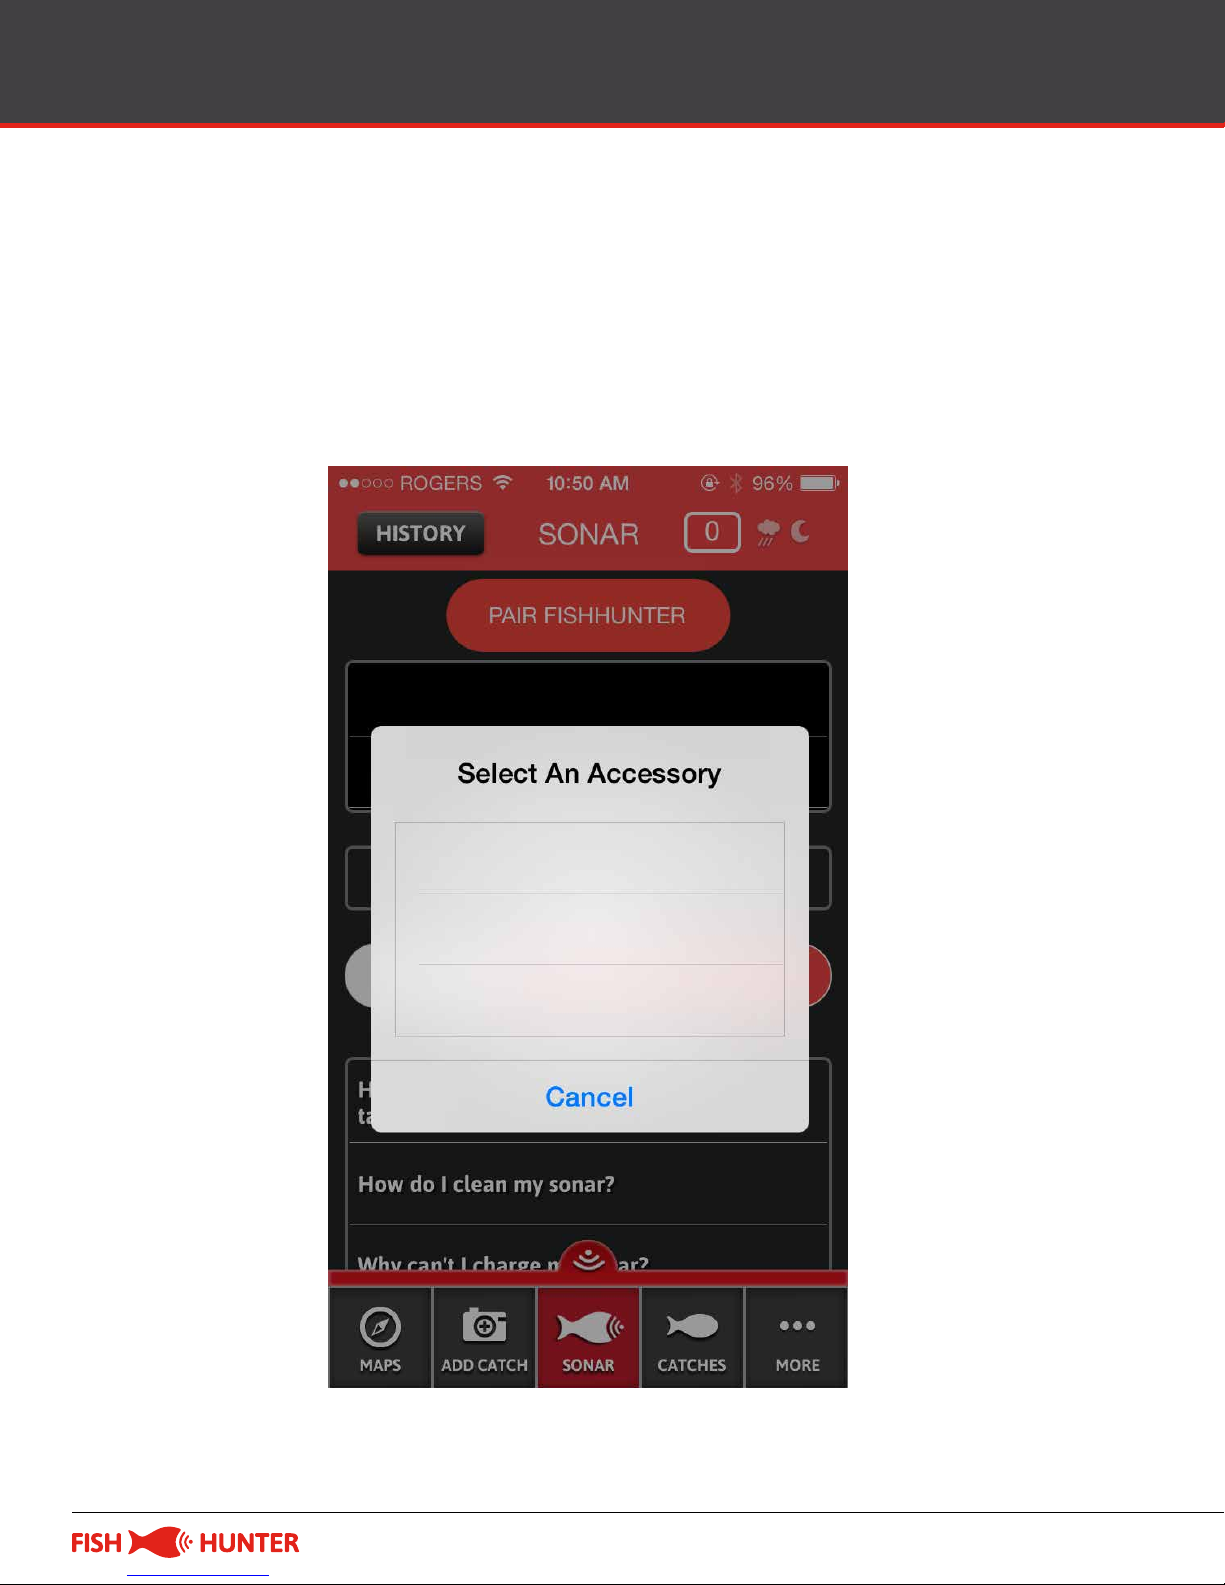
Step 4: Select the “PAIR FISHHUNTER” option.
Please note that the app may prompt you to turn
on your Bluetooth. You should do so before you
continue this process.
FISHHUNTER.COM / 13
Page 14
Bluetooth Pair with App
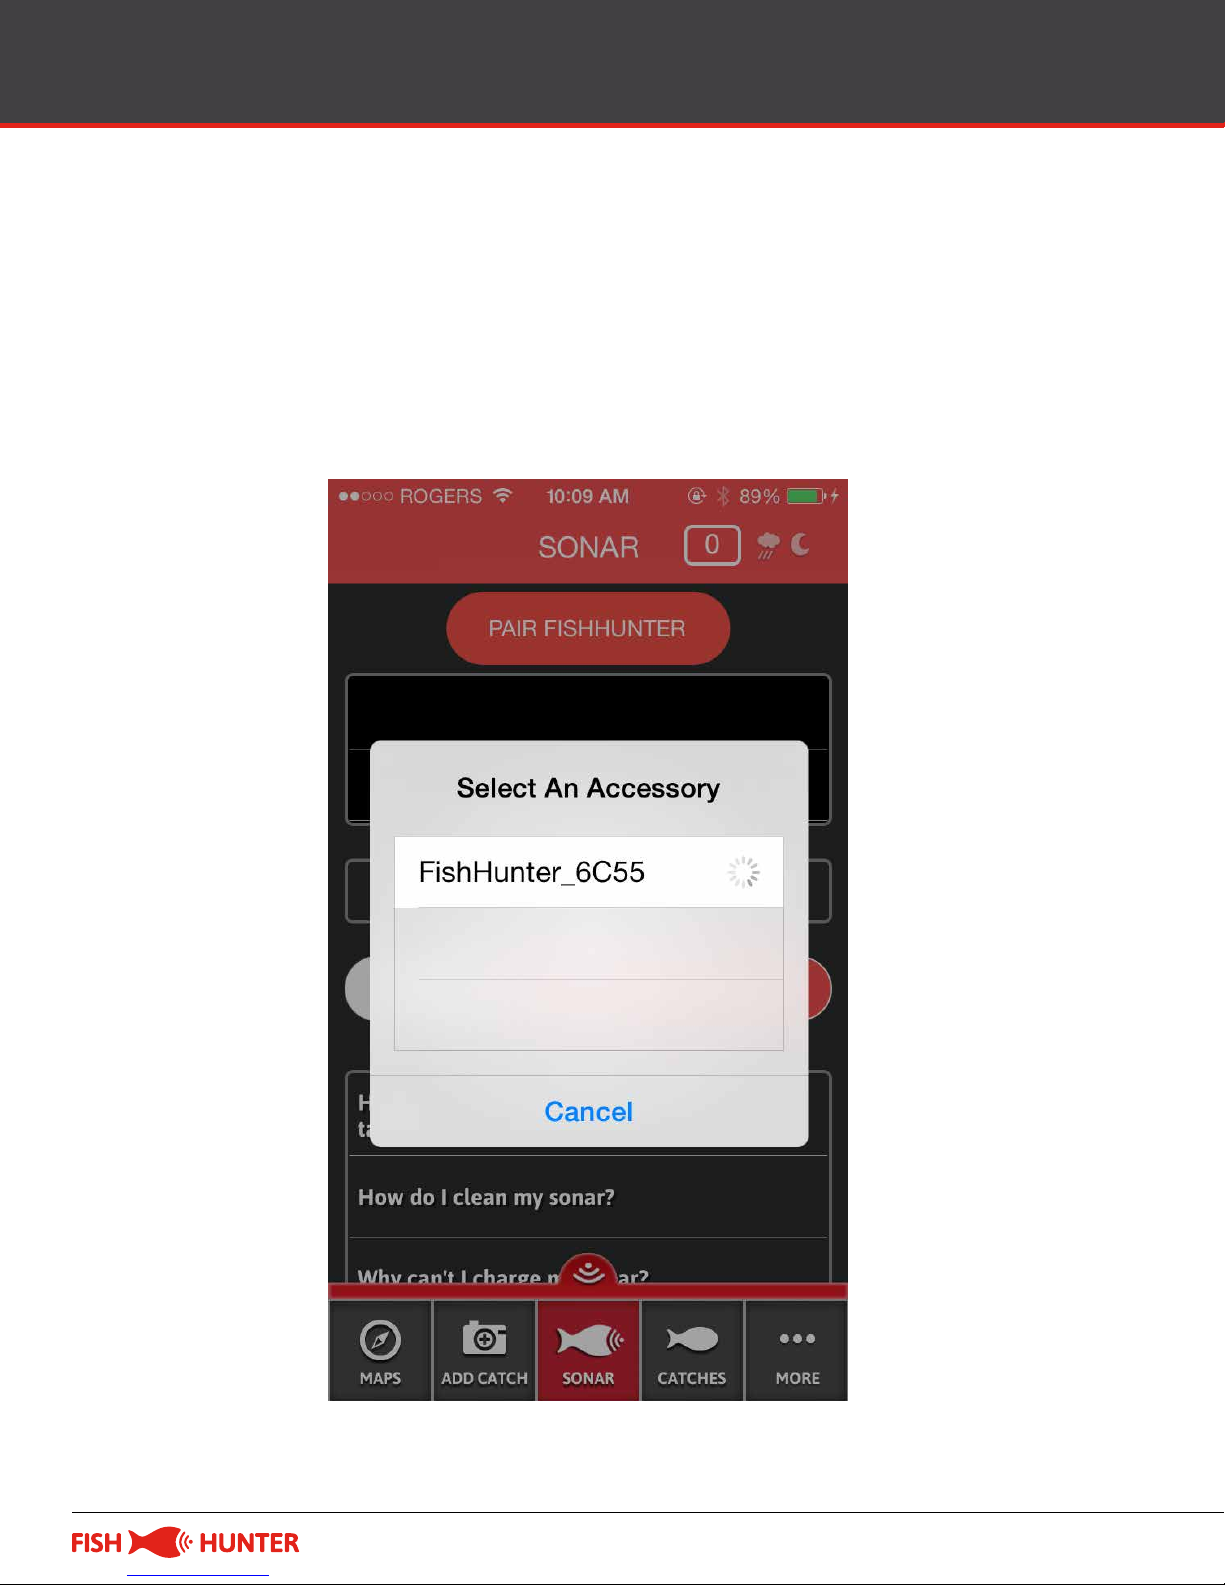
Step 5: The app will scan for available FishHunter
fishfinders within blue tooth range. This step may
have to be repeated a few times depending on your
phone or tablet.
FISHHUNTER.COM / 14
Page 15
Bluetooth Pair with App
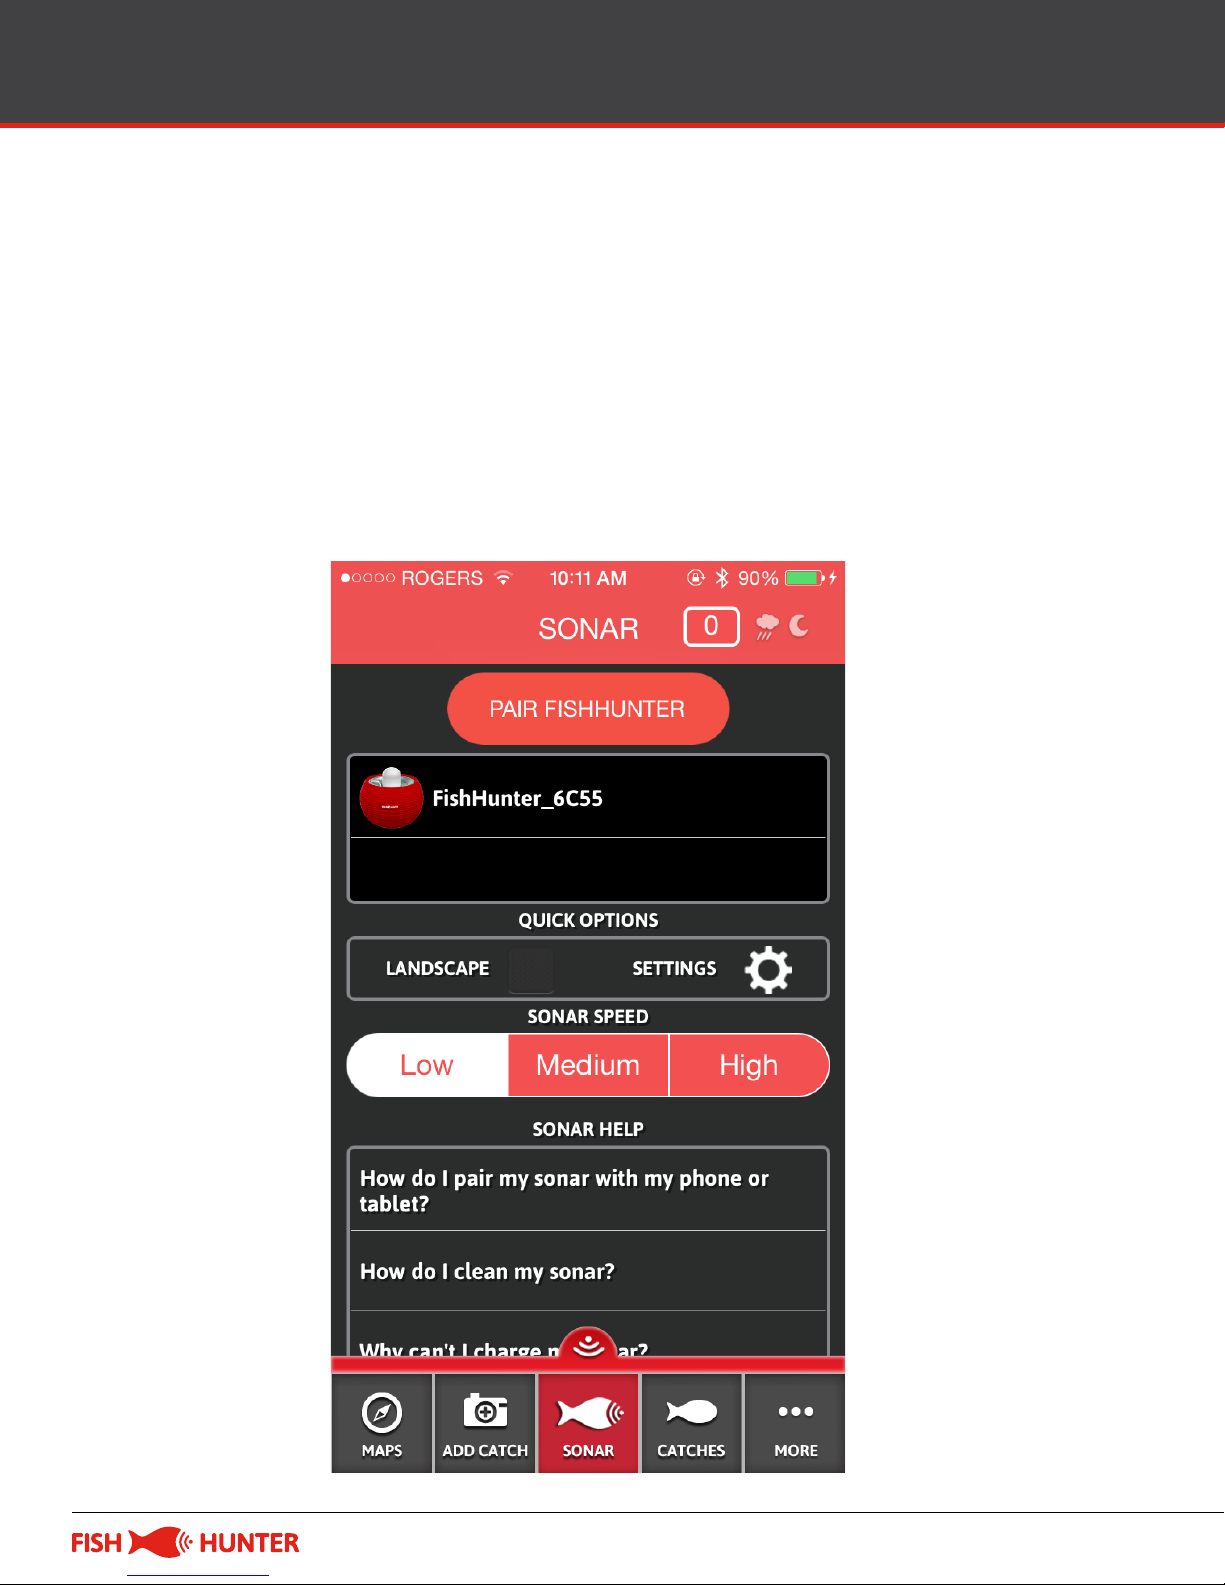
Once your phone finds the FishHunter, it will
populate the app with the device name and
number. Select your FishHunter hardware
by pressing on the screen where you see the
name listed. After the pairing is complete your
FishHunter will appear on the “PAIR SONARS” list.
FISHHUNTER.COM / 15
Page 16
Bluetooth Pair with App
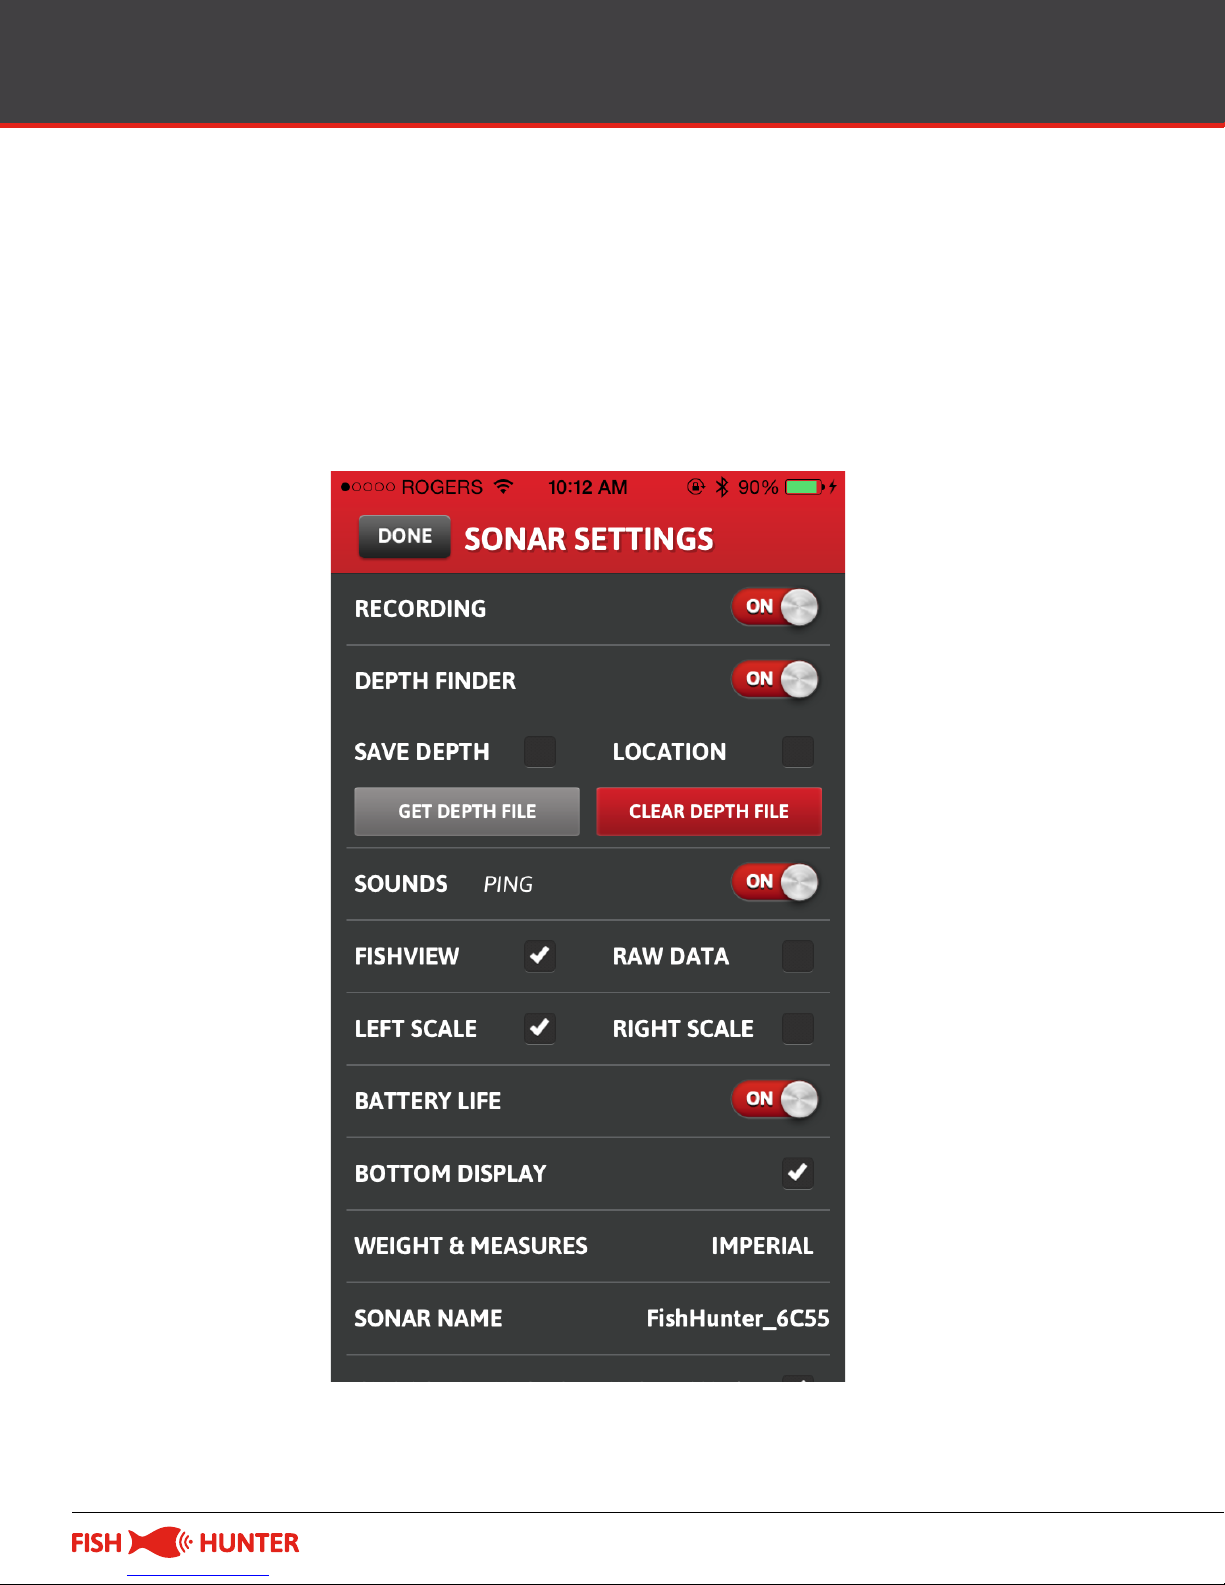
Step 6: Click on your fishfinder name and our app
will open the “SONAR SETTINGS” screen. The
“Sonar Settings” screen will allow you to change
the settings to your preference.
FISHHUNTER.COM / 16
Page 17
Understanding the Display – Raw
1
2
3
4
FISHHUNTER.COM / 17
Page 18

Understanding the Display – Raw
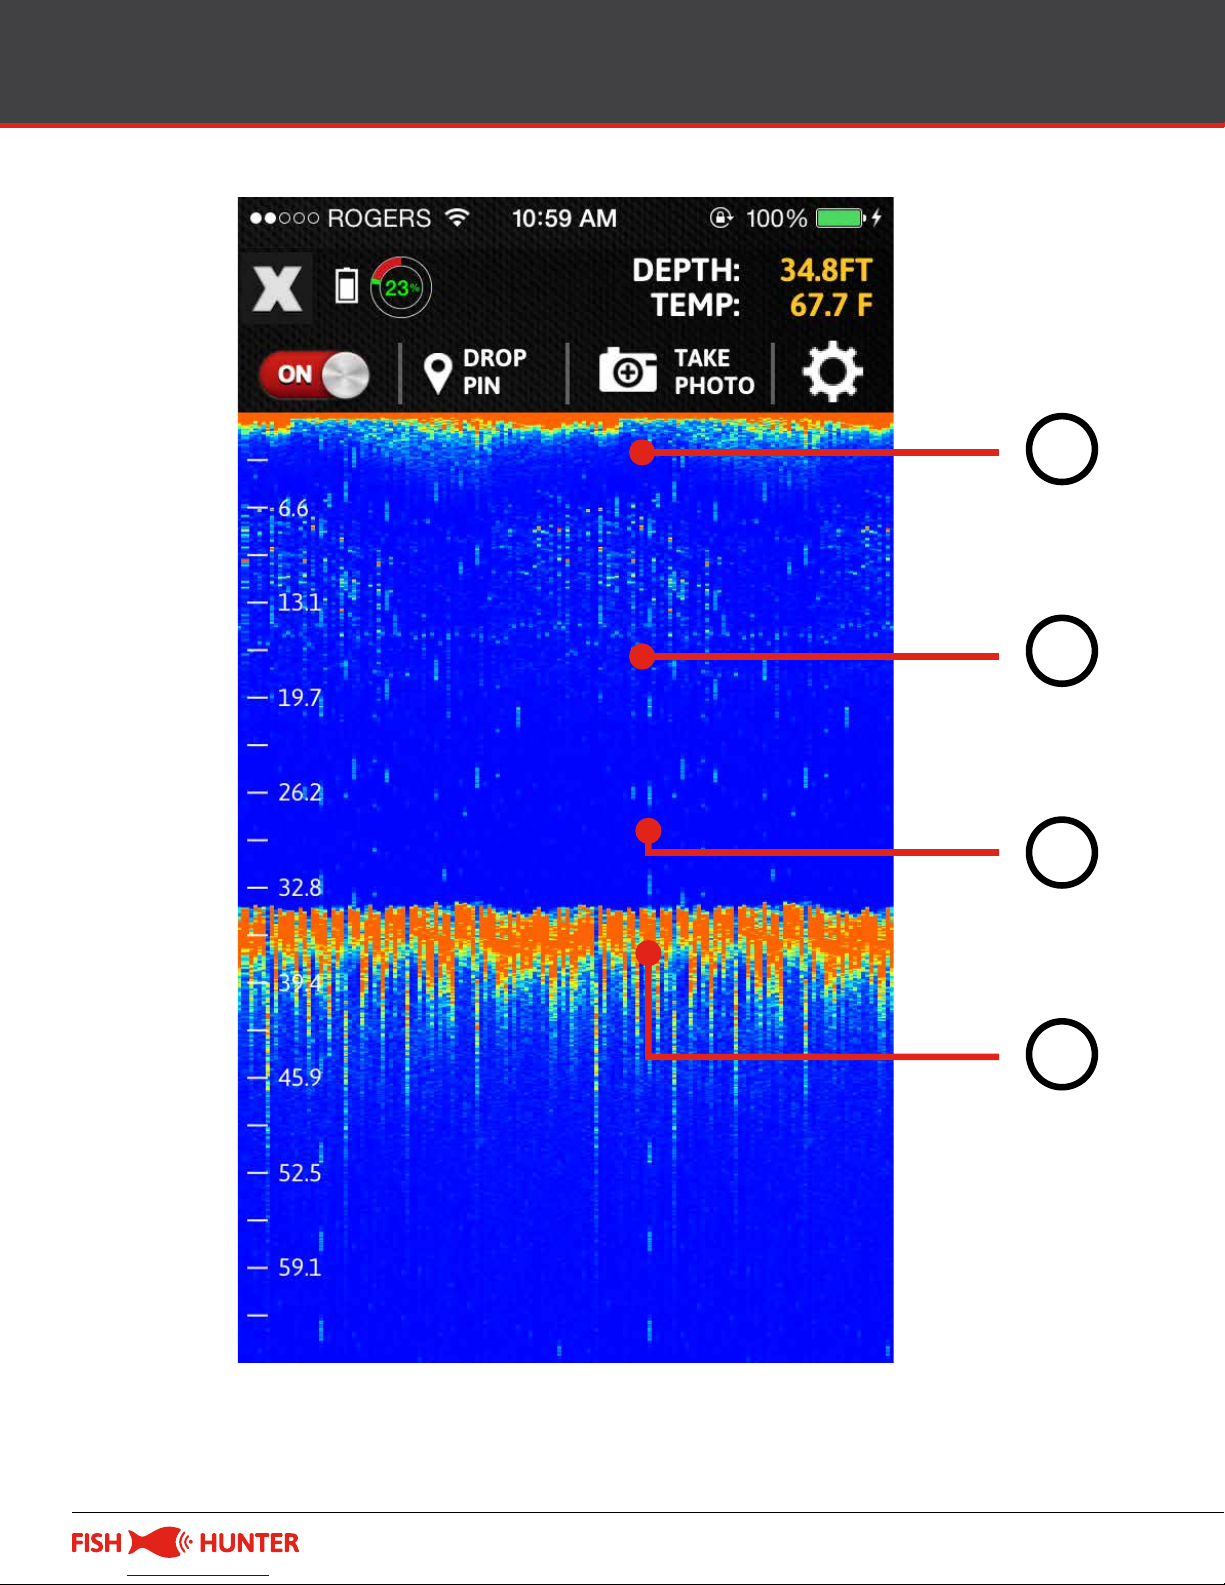
How to read raw view screen?
When Reading sonar data output you are generally
interpreting color variations. In simple terms, the
fishfinder will display more dense material with
darker colors.
We have provided you with a sample screen on the
left here that shows the surface, the water body, a
small “disturbance/object”
in the center of the screen and the bottom contour.
1. Ultrasound transmission line. On the screen,
this would be considered the water surface.
2. BLUE - The color blue means that there is
nothing (no object) there to reflect sound and
therefore is a light color.
3. GREEN - All colors except blue (such as green,
yellow or red) indicate that there is something
in that space. Darker the color the more dense
the material the fishfinder is picking up.
FISHHUNTER.COM / 18
Page 19

Understanding the Display – Raw
4. This shows the variation of color which
indicates a variation of the density of the
material being seen. In this case it is the
bottom of the water.
FISHHUNTER.COM / 19
Page 20
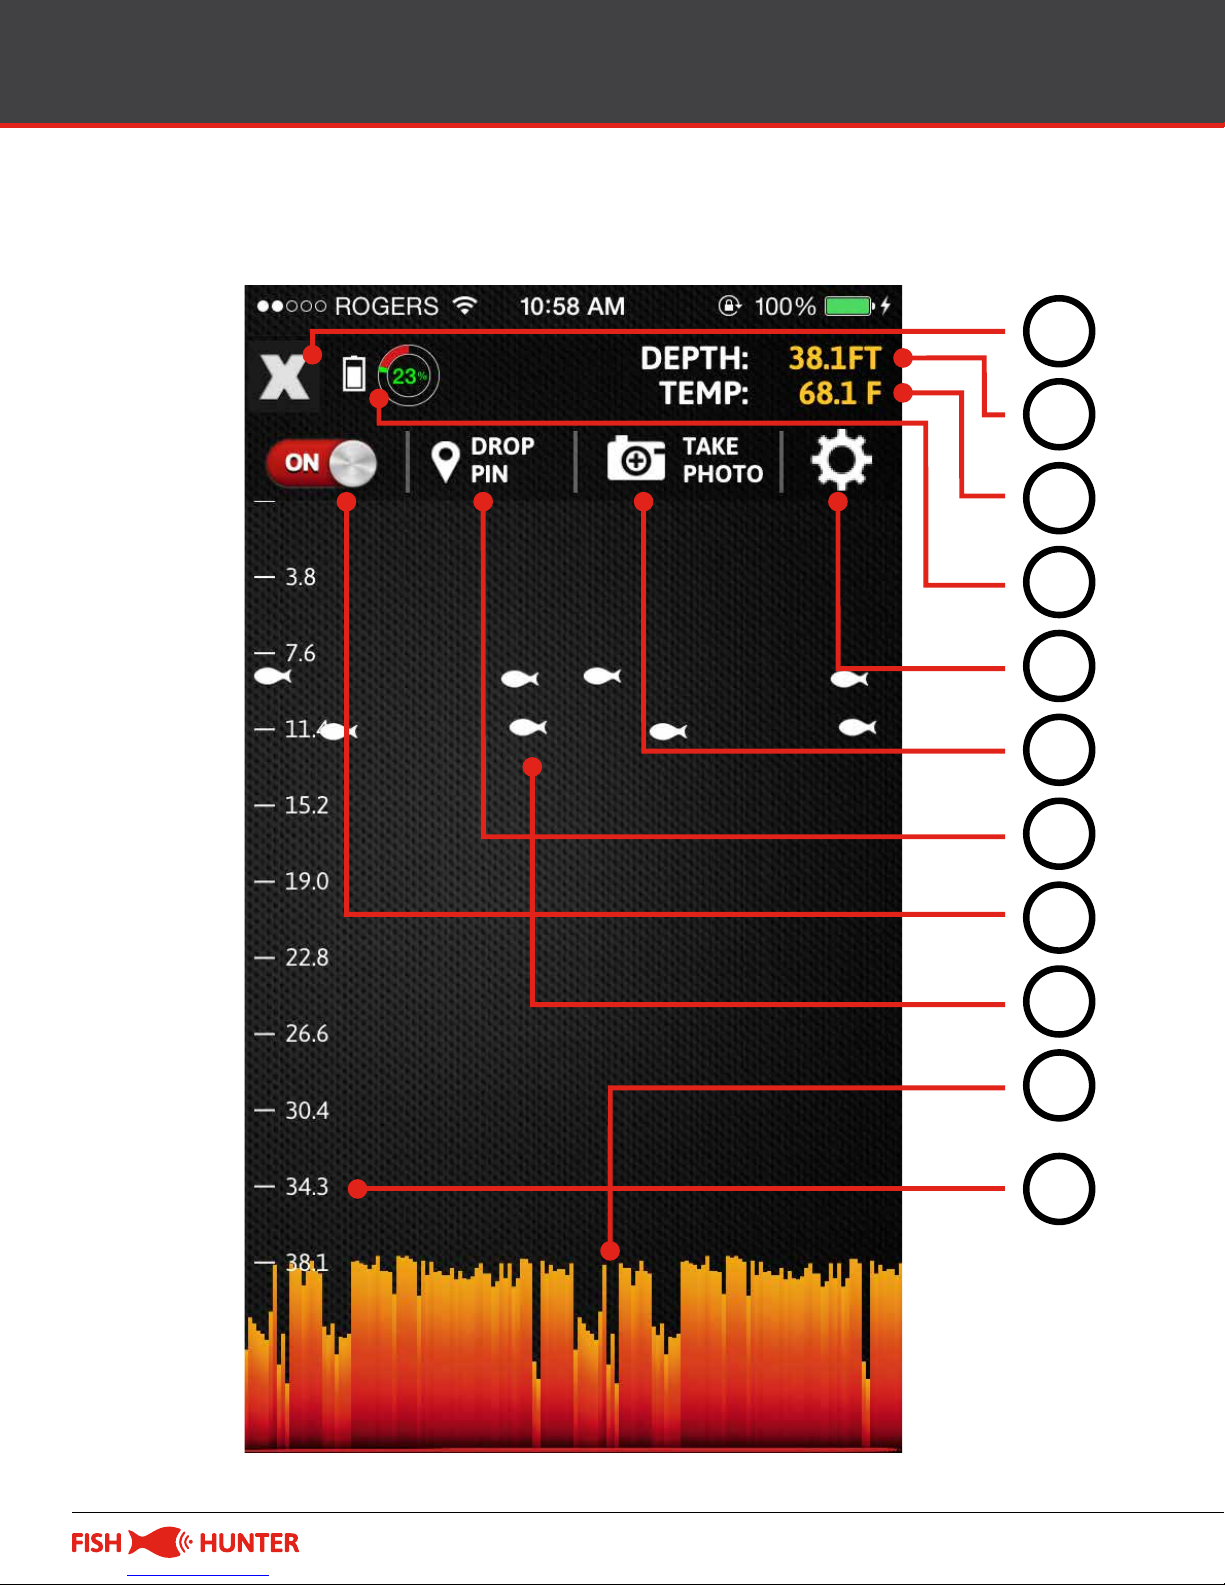
Understanding the Display – Raw
How to read fishview screen:
1
2
3
4
5
6
7
8
9
10
11
FISHHUNTER.COM / 20
Page 21

Understanding the Display – Raw
1. The “X” button lets you go back to the previous
screen (iOS device only).
2. This indicates the water depth.
3. This indicates the water temperature.
4. This shows the battery life of the fishfinder.
5. Clicking on this button allows you to adjust
recording, depth, sounds, left scale/right scale,
raw data/fishview mode, battery life indicator,
bottom display, and unit of measurement
settings.
6. The “Take Photo” option allows you to take a
screenshot of the sonar data on the screen.
7. The “Drop Pin” button allows you to drop a pin
on the map.
8. The “ON” button indicates that the fishfinder
has been turned on. Click on it to turn it off.
FISHHUNTER.COM / 21
Page 22

Understanding the Display – Raw
9. The fish symbol means that there could
potentially be a fish in the indicated area.
10. This area indicates the mapped bottom
of the water body.
11. This ruler helps you determine the depth
of each fish.
FISHHUNTER.COM / 22
Page 23

Fishhunter Fishfinder Care
Please operate this device where the temperature
is between -30ºC and 40º C (-22ºF to 104º F).
Extreme low or high temperature conditions might
temporarily shorten battery life or cause the device
to alter its behavior to regulate its temperature.
Store the device where the temperature is between
-5ºC and 30º C (23ºF to 86º F). Don’t leave the
device in your car, because temperature in parked
cars can exceed this range.
Taking Care of the fishfinder:
1. After retrieving the fishfinder from the water,
simply pull up the rubber skin with your
hands/fingers so that it is back to its original
place. Since the fishfinder is wet, it should be
easy to pull the skin up.
2. Next, rinse the fishfinder with fresh water
(especially if the fishfinder has been deployed
in salty water).
FISHHUNTER.COM / 23
Page 24

Fishhunter Fishfinder Care
3. Make sure the 3 tiny stainless steel pads on
the bottom of the fishfinder are completely
clean and shiny, and do not have any salt
residues on them.
4. Dry the fishfinder completely with a dry towel
before charging or putting it in storage.
FISHHUNTER.COM / 24
Page 25

Warranty
FishHunter Limited Warranty
This product has been manufactured and tested
to the highest quality standards by FishHunter
Inc. This Limited Warranty offered by FishHunter
Inc. covers defects in material or workmanship
in new FishHunter Inc. products. This warranty
extends to the original purchaser only and is
non-transferable. Only consumers purchasing
FishHunter Inc. products from authorized
FishHunter Inc. retailers or resellers or through
the FishHunter Inc. website may obtain coverage
under our limited warranties.
FISHHUNTER.COM / 25
Page 26

Warranty
What is covered?
FishHunter Inc. warrants this product against
defects in material or workmanship as follows:
FishHunter Inc. will replace at no charge for parts
only or, at its option, replace any product or part
of the product that proves defective because of
improper workmanship and/or material, under
normal installation, use, service and maintenance.
If FishHunter Inc. is unable to provide a
replacement and repair is not practical or cannot
be made in a timely fashion, FishHunter Inc. may
elect to refund the purchase price in exchange for
the return of the product.
FISHHUNTER.COM / 26
Page 27

The Fishhunter
How Long Does The Coverage Last?
Our warranty periods are 3 months from the
documented date of purchase, depending on the
type of product and where it was purchased.
What Our Warranty Does Not Cover?
Our warranties do not cover any problem that is
caused by:
A. Conditions, malfunctions or damage not
resulting from
defects in material or workmanship.
B. Conditions, malfunctions or damage resulting
from normal wear and tear, improper
installation, improper maintenance, misuse,
abuse, negligence, accident or alteration.
C. Accessories, connected materials
and products, or related products not
manufactured by FishHunter Inc.
FISHHUNTER.COM / 27
Page 28

The Fishhunter
This limited warranty is void if a product is
returned with removed, damaged or tampered
labels or any alterations (including removal of any
component or external cover).
FISHHUNTER.COM / 28
Page 29

The Fishhunter
How to File a Claim?
FishHunter Inc. will not provide any warranty
coverage unless claims are made in compliance
with all terms of the controlling warranty
statement included with your product, and you
follow proper return procedure. To request
warranty service, you will
need to provide:
1. The sales receipt or other evidence of the
date and place of purchase.
2. A description of the problem.
3. Delivery of the product or the defective part,
postage prepaid and carefully packed and
insured, to FishHunter Inc., 5520 Explorer
Drive, 4th Floor, Mississauga, ON L4W 5L1
FISHHUNTER.COM / 29
Page 30

The Fishhunter
When warranty service is completed, any repaired
or replacement product or part will be returned to
you postage prepaid.
Customers who have a claim can provide
information related to the problem on the Contact
page. The company may request that a customer
provide evidence supporting the claim
Repair or replacement (or, in limited
circumstances, refund of the purchase price)
as provided under this warranty is the exclusive
remedy of the purchaser.
Fishhunter inc. neither assumes nor authorizes
any person to create for it any other obligation or
liability in connection with this product.
The laws of Toronto, in the Province of Ontario
Canada govern FishHunter Inc. and this warranty.
FISHHUNTER.COM / 30
Page 31

CONTACT
5520 Explorer Drive, 4th Floor,
Mississauga, ON L4W 5L1
P. 416-695-1246
F. 416-695-0246
info@fishhunter.com
www.fishhunter.com
 Loading...