

Page 1
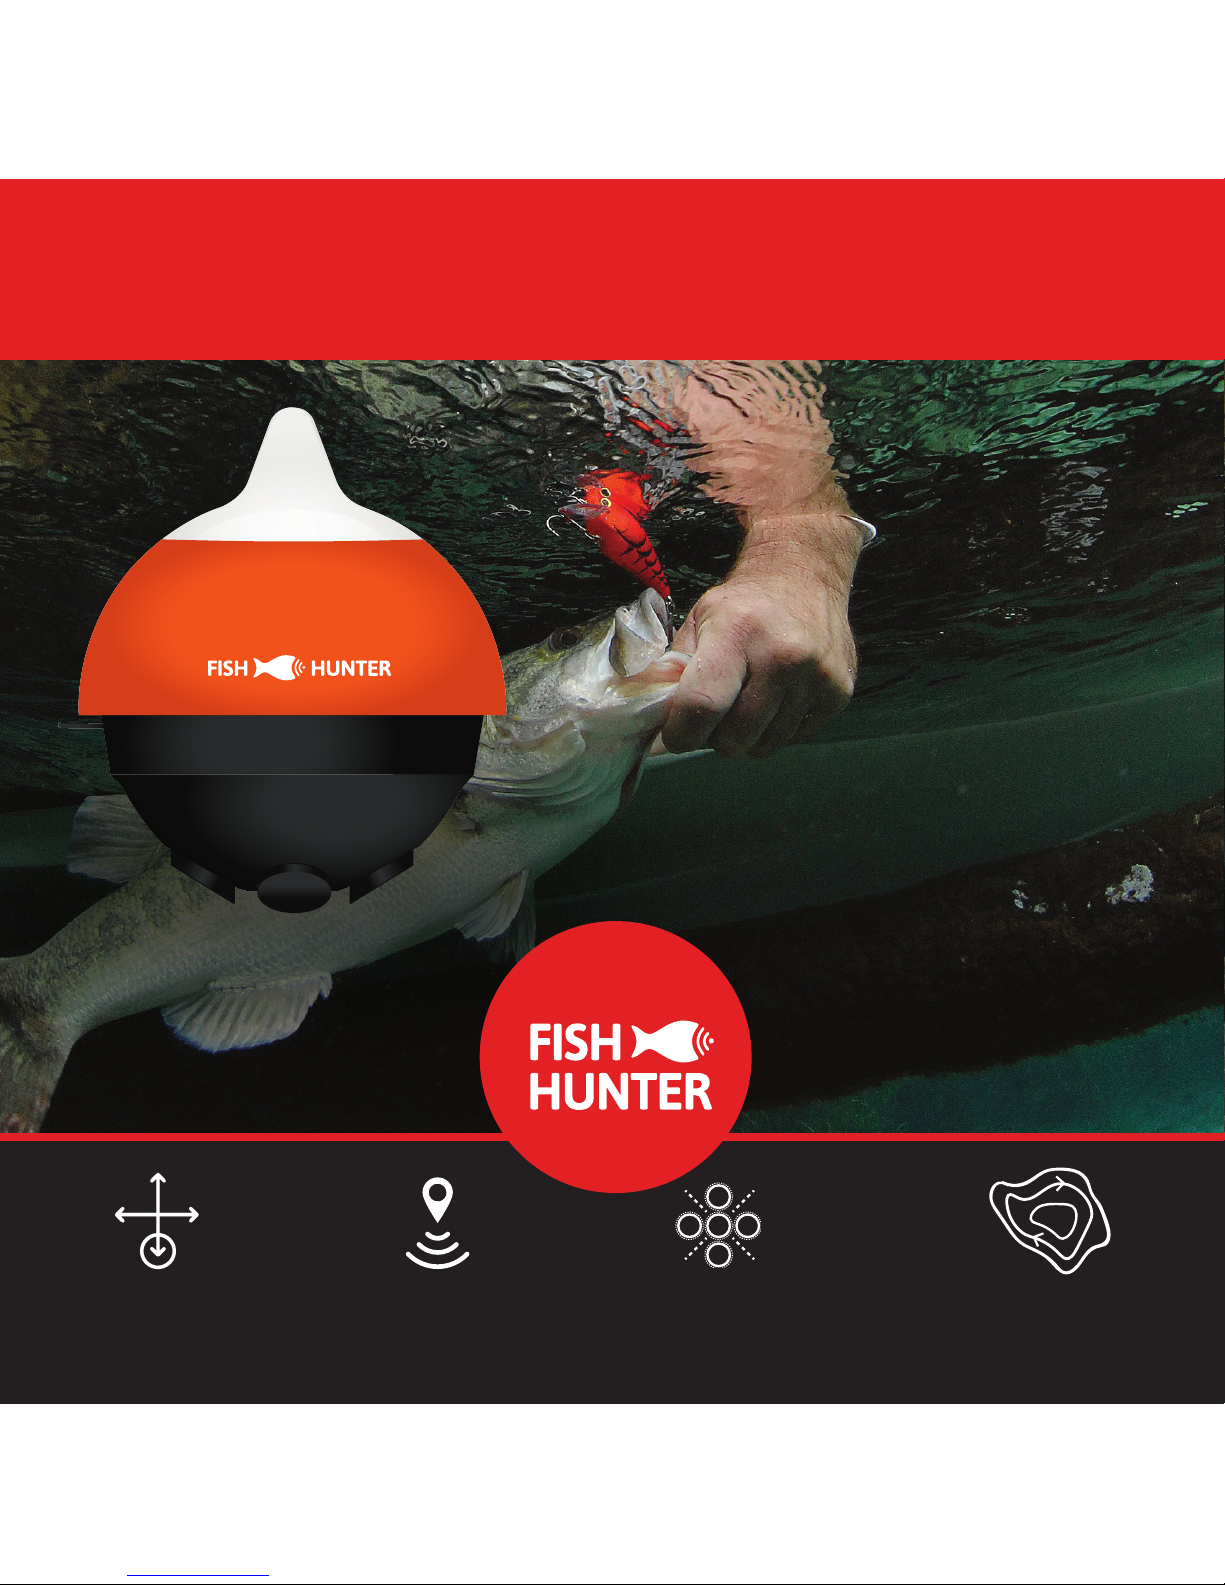
THE MOST POWERFUL,
PORTABLE FISH FINDER
5 Transducer, tri-frequency,
portable wireless fi sh fi nder
that hunts fi sh up to 160ft (50m)
and can be cast or trolled.
5 TRI FREQUENCY
TRANSDUCERS
3D STRUCTURE
MAPPING
DIRECTIONAL
CASTING
BATHYMETRIC
MAPPING
TM
1
2
3
4
5
WELCOME TO
FISHHUNTER™ 3D
Page 2
2
We strive to improve our product each month and
this means this manual is already outdated.
Please go online and download
the most recent version of our manual:
www.fishhunter.com/support
For
TM
Page 3

3
OVERVIEW
FishHunter™ 3D is the most powerful finder ever created for
Apple and Android phones and tablets. The sonar floats on
the surface of the water where it tracks water temperature,
water depth, bottom contour and fish locations. It can be both cast
and trolled behind your boat or placed in your ice hole.
The FishHunter™ 3D wireless fish finder sonar connects to your
smartphone/tablet via Wi-Fi using our free software app, so you
don’t need to have a cell tower connection or use your cellular data
to use your new fish finder.
Using our free FishHunter™ software app, you will also have the
ability to access and store critical fishing information like your
favorite fishing spots, your catch details and share your information
with your friends and other anglers.
IMPORTANT NOTE: We make updates monthly to improve your experience
with FishHunter. Please check to see if there is a NEW manual available.
WWW.FISHHUNTER.COM/SUPPORT
Page 4
4
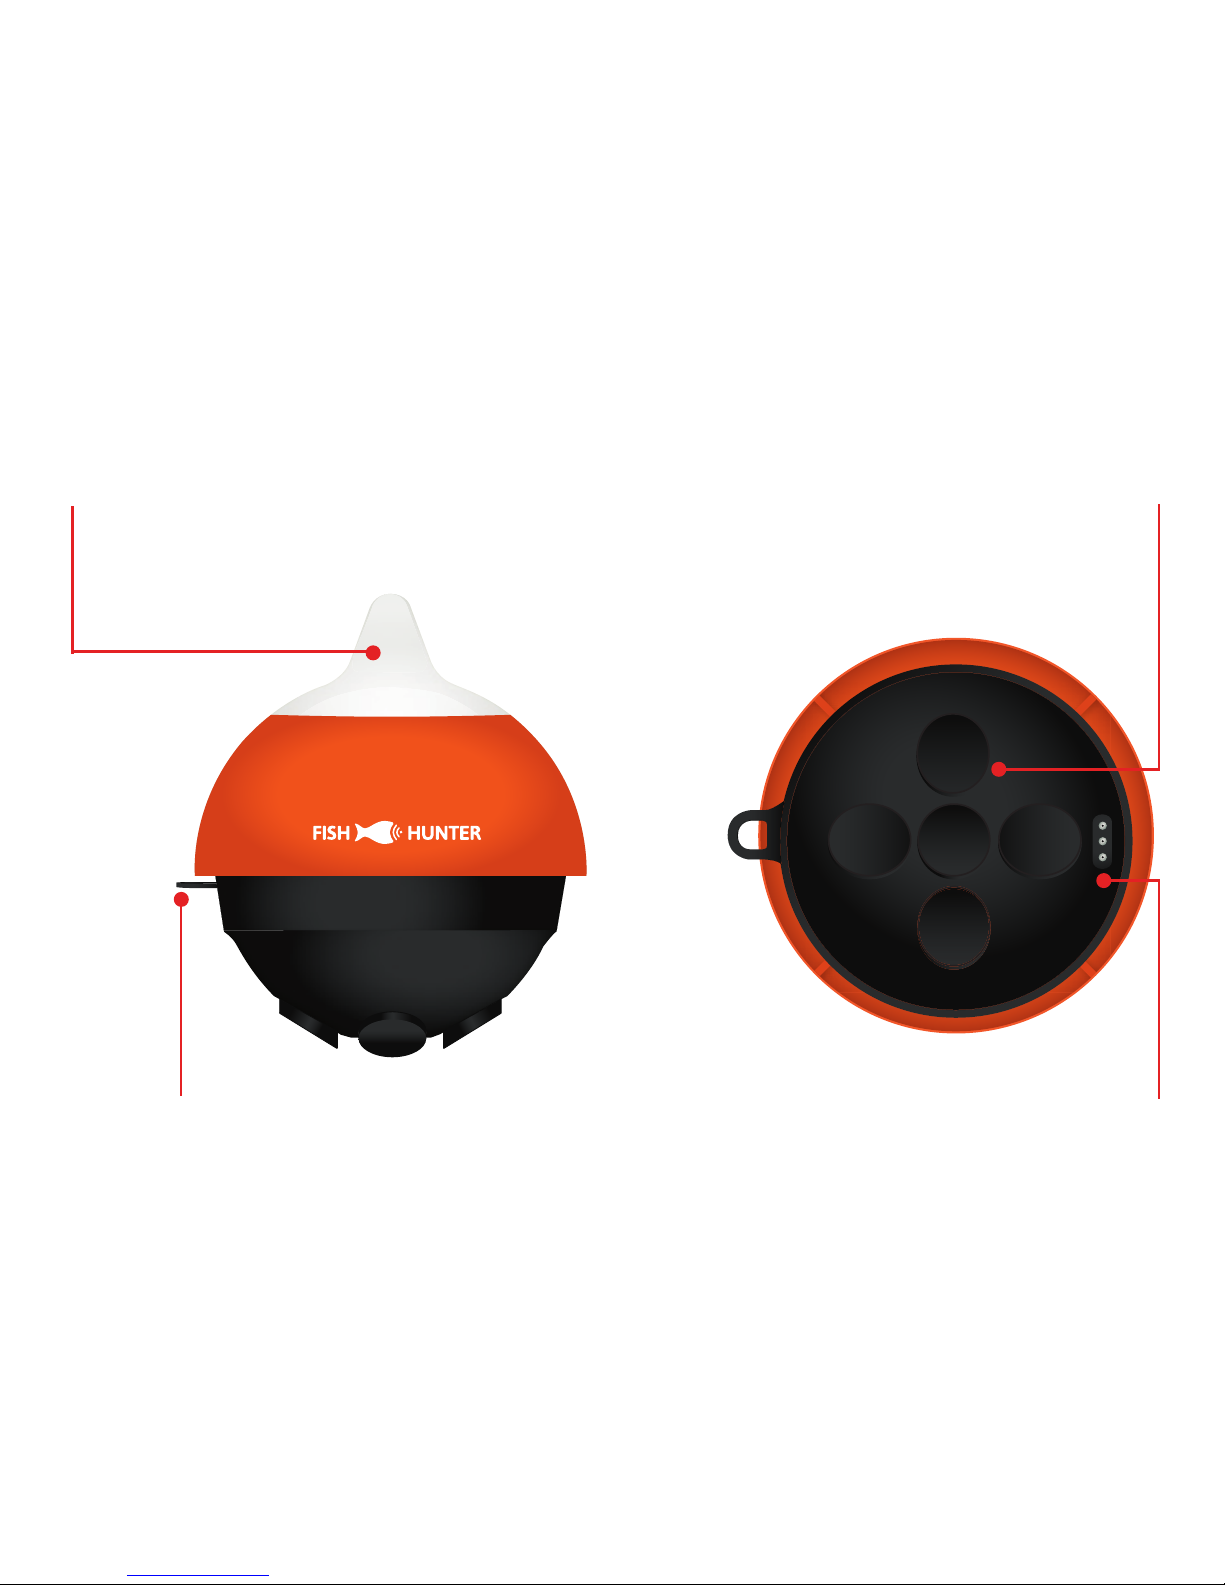
FISHHUNTER™ 3D
FRONT VIEW
Night-time Fish Attraction
Illumination
Towing Point
2
14 5
3
BOTTOM VIEW
5 Tri- Frequency Transducers
( 381KHz, 475 KHz, 695 KHz )
USB Charging Port
Page 5
5
HOW TO BEST USE YOUR FISHHUNTER
STEP 1: Create a BATHYMETRIC MAP of the area
Using BATHYMETRIC MAPPING troll around your favorite fi shing spot to
create a contour map so you can fi nd the changes in bottom depth
STEP 2: Check the bottom structure using 3D STRUCTURE MAP
Once you’ve identifi ed where the depth changes are using your
bathymetric maps, then navigate back to those spots using your
FishHunter app and create a 3D STRUCTURE MAP to see the bottom
structure across those specifi c areas.
STEP 3 : Check the area for fi sh using DIRECTIONAL CASTING
You know you are in the right spot, but are the fi sh here NOW? Cast or toss
your FishHunter sonar into the water and turn on Directional
Casting and use the 5 Transducer view to see if fi sh are present OR
power up 3D Fishing to see our unique underwater view of
3 transducers simultaneously.
STEP 4 : Log your Catch
Record your catches in your catch log book so you can fi nd the exact bait
and location information again in the future.
or 3D FISHING
Page 6
6
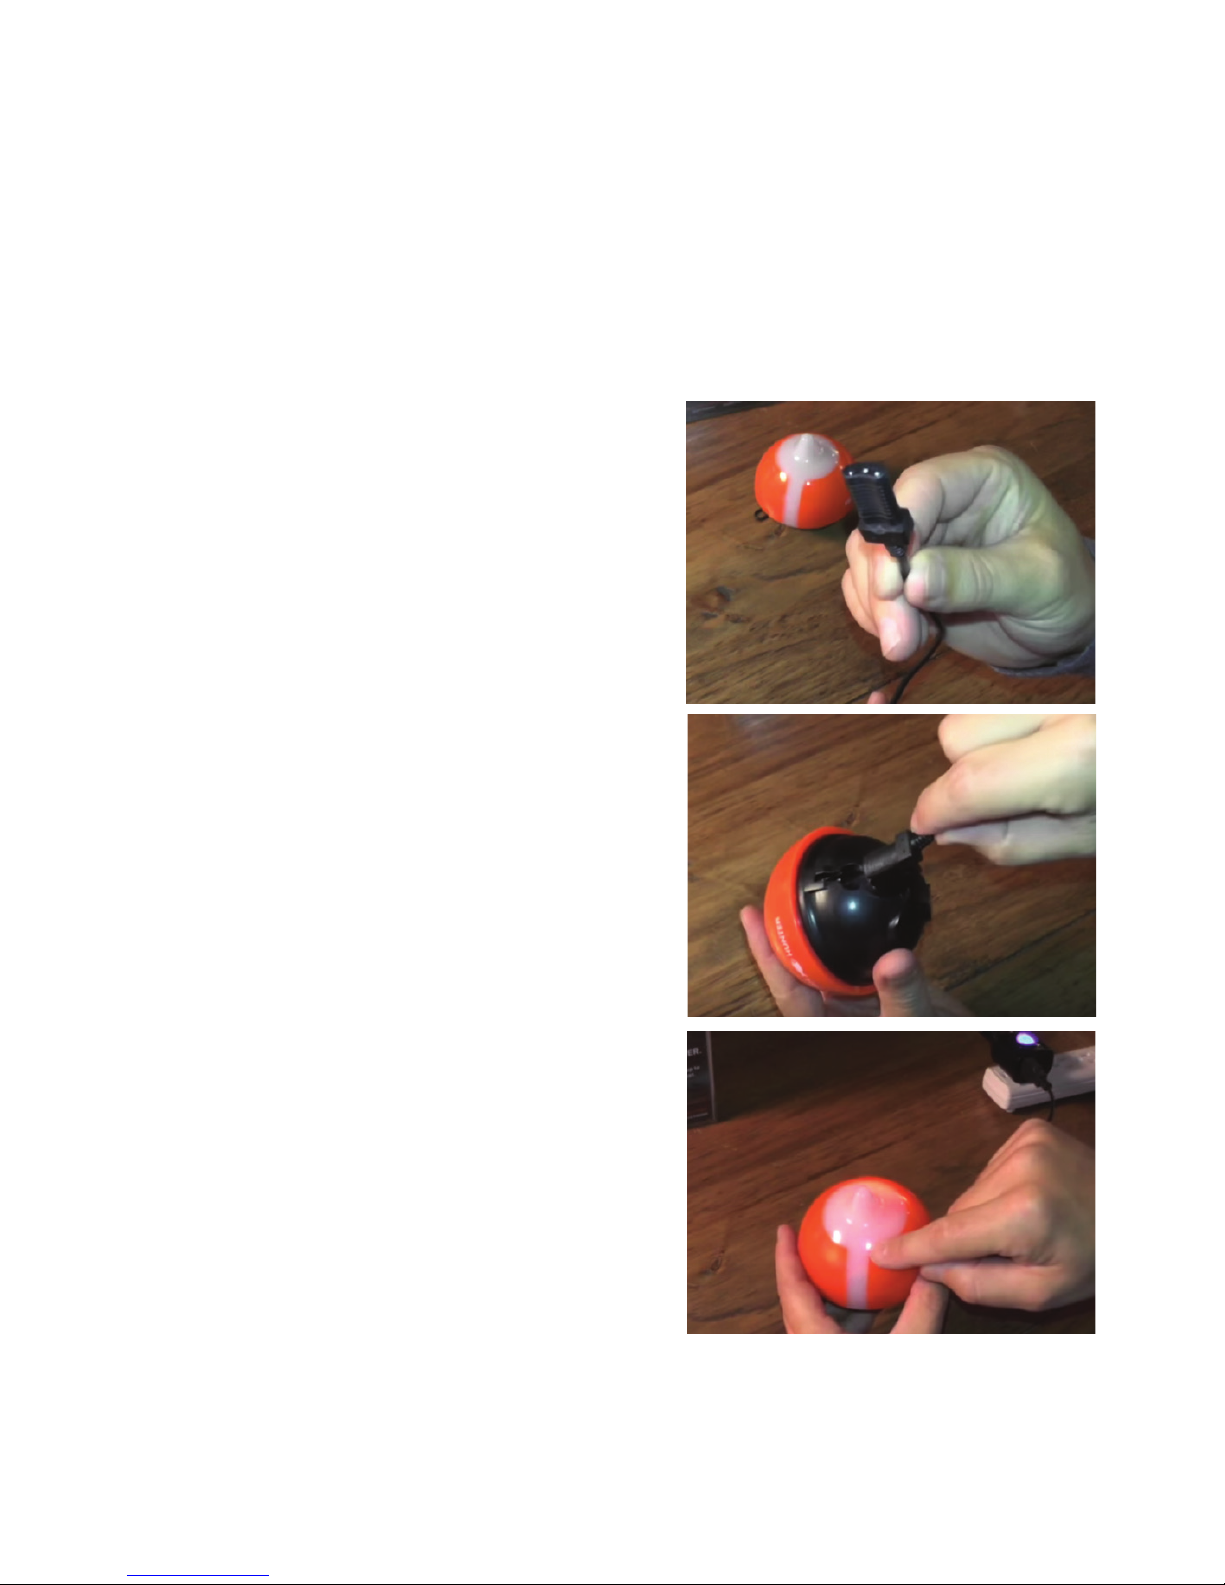
HOW TO CHARGE
Step 2: Locate the 3 pin charging port on
the bottom of the sonar. It is on the
opposite side from the tow point at the
back of the sonar.
Charging your FishHunter can be done
in 4 easy steps:
Step 1: Take the USB charge cord from the
box and hold the end that has 3 pins holes
in it.
Step 3: Push the USB cord into the bottom
of the sonar so that it is in snugly. You will
notice that you MUST slide the charge
cord past the transducer on the bottom of
the sonar which makes it slightly diffi cult
to get the charge chord into the side of the
unit. This is the correct way to ensure a
good connection with your sonar.
Step 4: Plug the USB cord into the charger
or any USB charger. A red light will appear
on the top of the sonar and stay on until
fully charged.
Please see the charging video at:
www.fi shhunter.com/support
Step 1
Step 2, 3
Step 4
Page 7
7
95% OF THE FISH
ARE IN 5% OF THE WATER
KNOW WHERE TO CAST
™
Page 8
8
HOW TO CONNECT
Download the FishHunter App from the Google play store or iOS
app store.
Create an account by opening the app and following the steps
on the screen. Please be sure to do this before you leave your
coverage area.
Ensure you have charged your FishHunter for minimum of 4
hours before first usage.
Attach your FishHunter to the braided line on the end of your
fishing line or tether it to the red leash that was provided in your
box by threading the red leash through the tow point on the front
of your FishHunter OR by attaching the fishing hook onto the
front of your sonar and the end of the red leash provided.
Drop the FishHunter™ into the water.
The sonar will automatically turn on when placed in water and
will begin slowly flashing red from the top of the sonar. If you
don’t see any lights then the FishHunter is not charged.
Open your Wi-Fi settings on your smartphone or tablet.
Refresh the list and select “FishHunter Wi-Fi XXX".
[Note: It may take up to 1 minute to appear]
Wait for your phone/tablet to tell you that you are connected
to “FishHunter Wi-Fi”. You will see a check mark on your
Wi-Fi settings to show you are connected.
( Note: other phones or tablets can cause connection errors.
Ensure their Wi-Fi settings are turned off. )
1
2
3
4
5
6
7
8
Page 9

9
Once connected, open the FishHunter App and go to the
“Sonar” section.
If you are connected to your FishHunter correctly, you will see
the following options:
Directional Casting Bottom Mapping 3D Contour
Bathymetirc Mapping Ice Fishing Flasher Switch Device
The slow red flashing light on your sonar will start flashing
quickly when connected and sending information to your phone
or tablet.
The unit will automatically power down and turn off when not in
the water after a few minutes. If the lights remain on after it is
removed from water, please ensure the charging pins are free
from any water or debris by blowing on them. Additionally, you
can insert and remove the charging cord and that should enable
the sonar to power down after 60 seconds. If the units still
remains on, then double check that your wifi is turned off and
repeat the above.
YOU CAN RESET YOUR SONAR AT ANY TIME BY INSERTING THE
CHARGE CORD INTO THE BOTTOM OF THE UNIT AND REMOVING IT.
9
10
11
Page 10
10
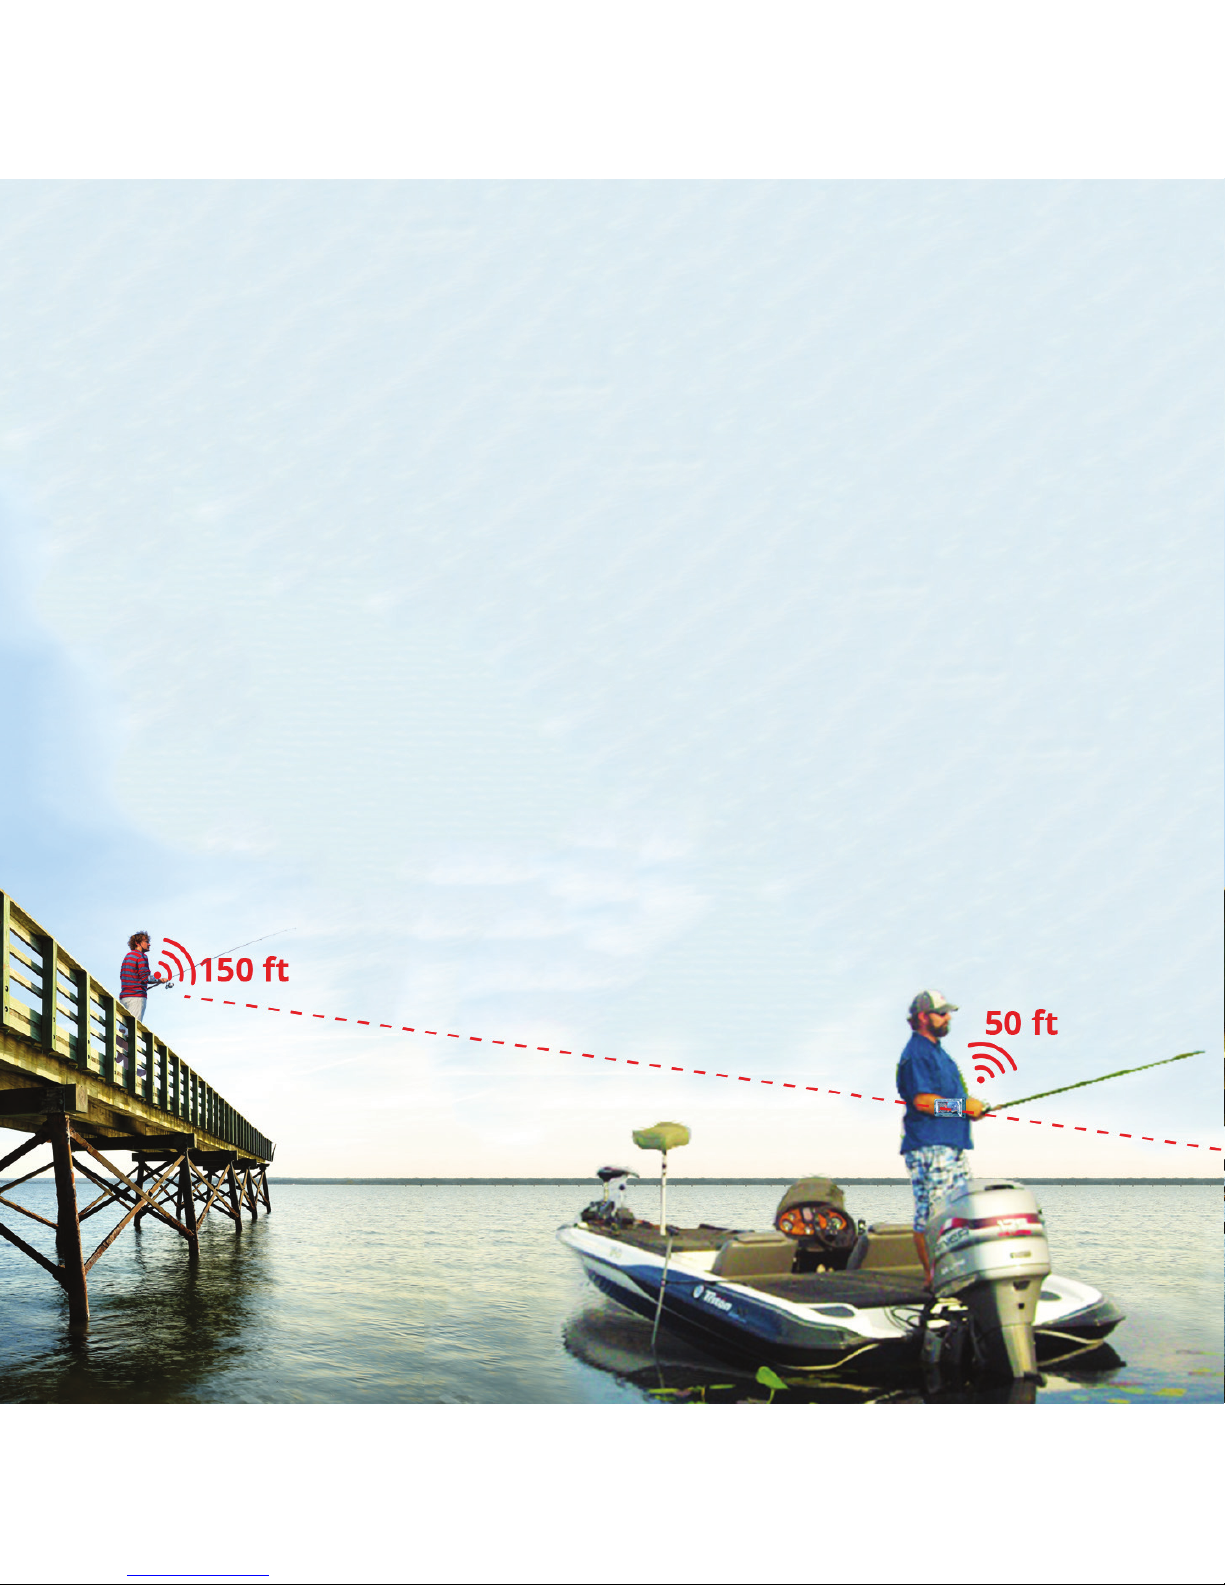
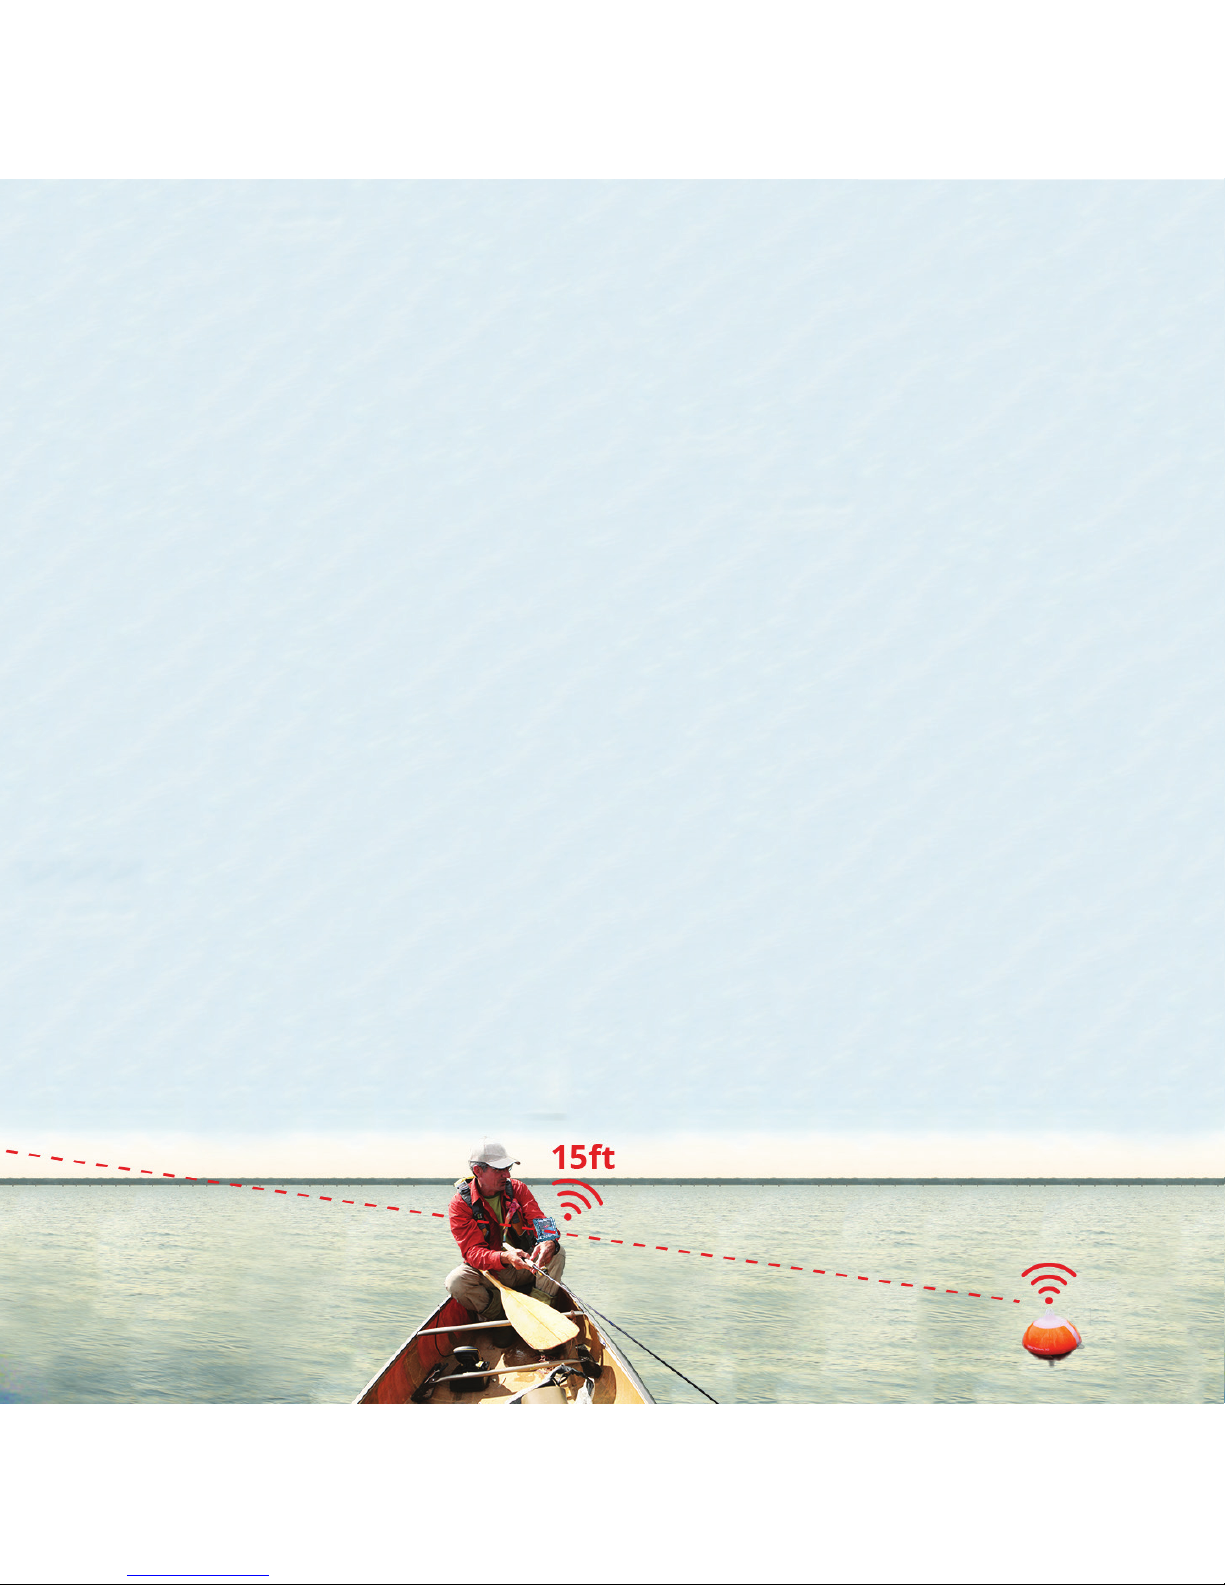
In order for you to get the best possible signal and
connection with your FishHunter, we recommend you
follow the picture below. Your phone/tablet should be
looking down towards the sonar and should be elevated
above the fl oating sonar. Use the FREE armband provided
in your box to ensure a minimum 3 foot elevation to your
fl oating sonar.
For more information visit:
www.fi shhunter.com/wifi -coverage
WI-FI CONNECTIVITY & FISHHUNTER
10
Page 11
11
1. Line of Sight
2. Good Elevation
3. No Obstructions
BEST PRACTICES
Page 12
12
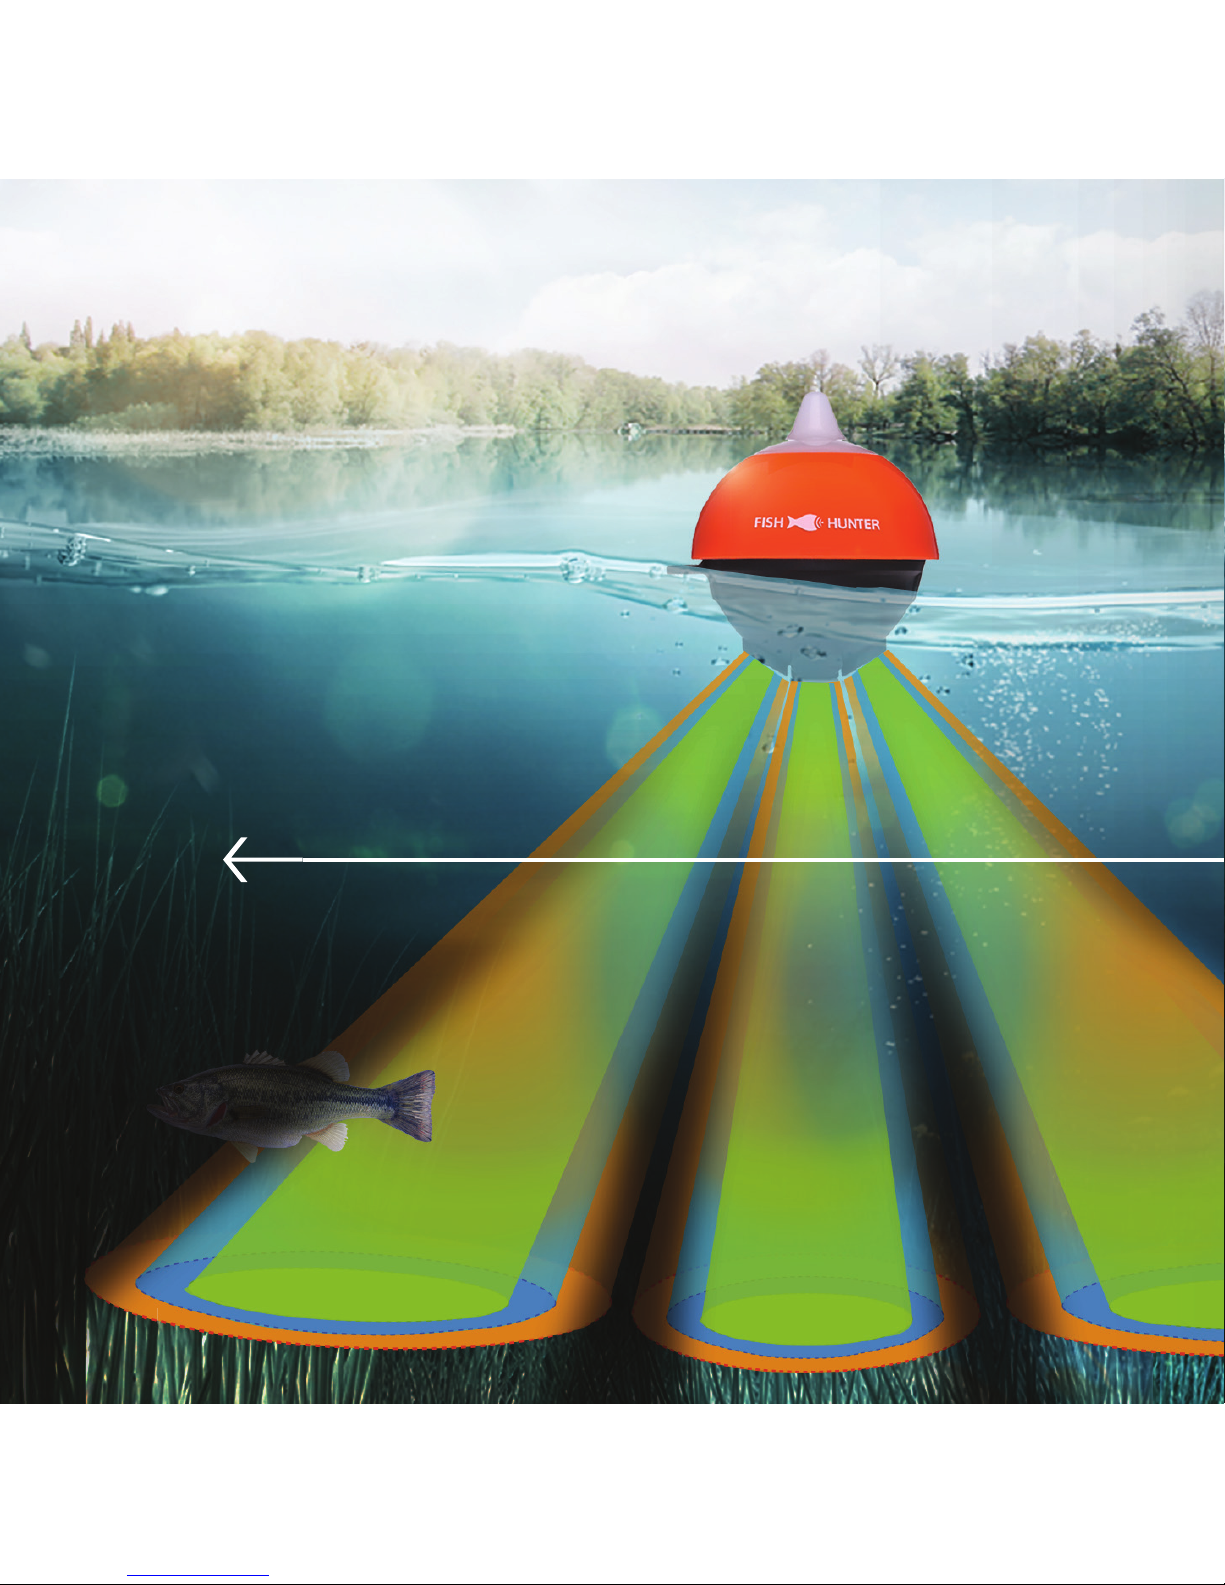
THE WORLD'S ONLY PORTABLE
FISH FINDER WITH 72º COVERAGE
OF COVERAGE ANGLE
72º
12
Page 13
13
FishHunter 3D is the ONLY portable fi sh fi nder that has the
power to give you 72 degrees of coverage of the bottom
contour with incredible resolution. Within seconds you gain
access to detailed information about your favourite spots or
current location to help you catch more fi sh. Take advantage
of this coverage in DIRECTIONAL CASTING and 3D FISHING.
13
3D FISHING
DIRECTIONAL CASTING
Page 14
14
SHALLOW WATER MODE
14
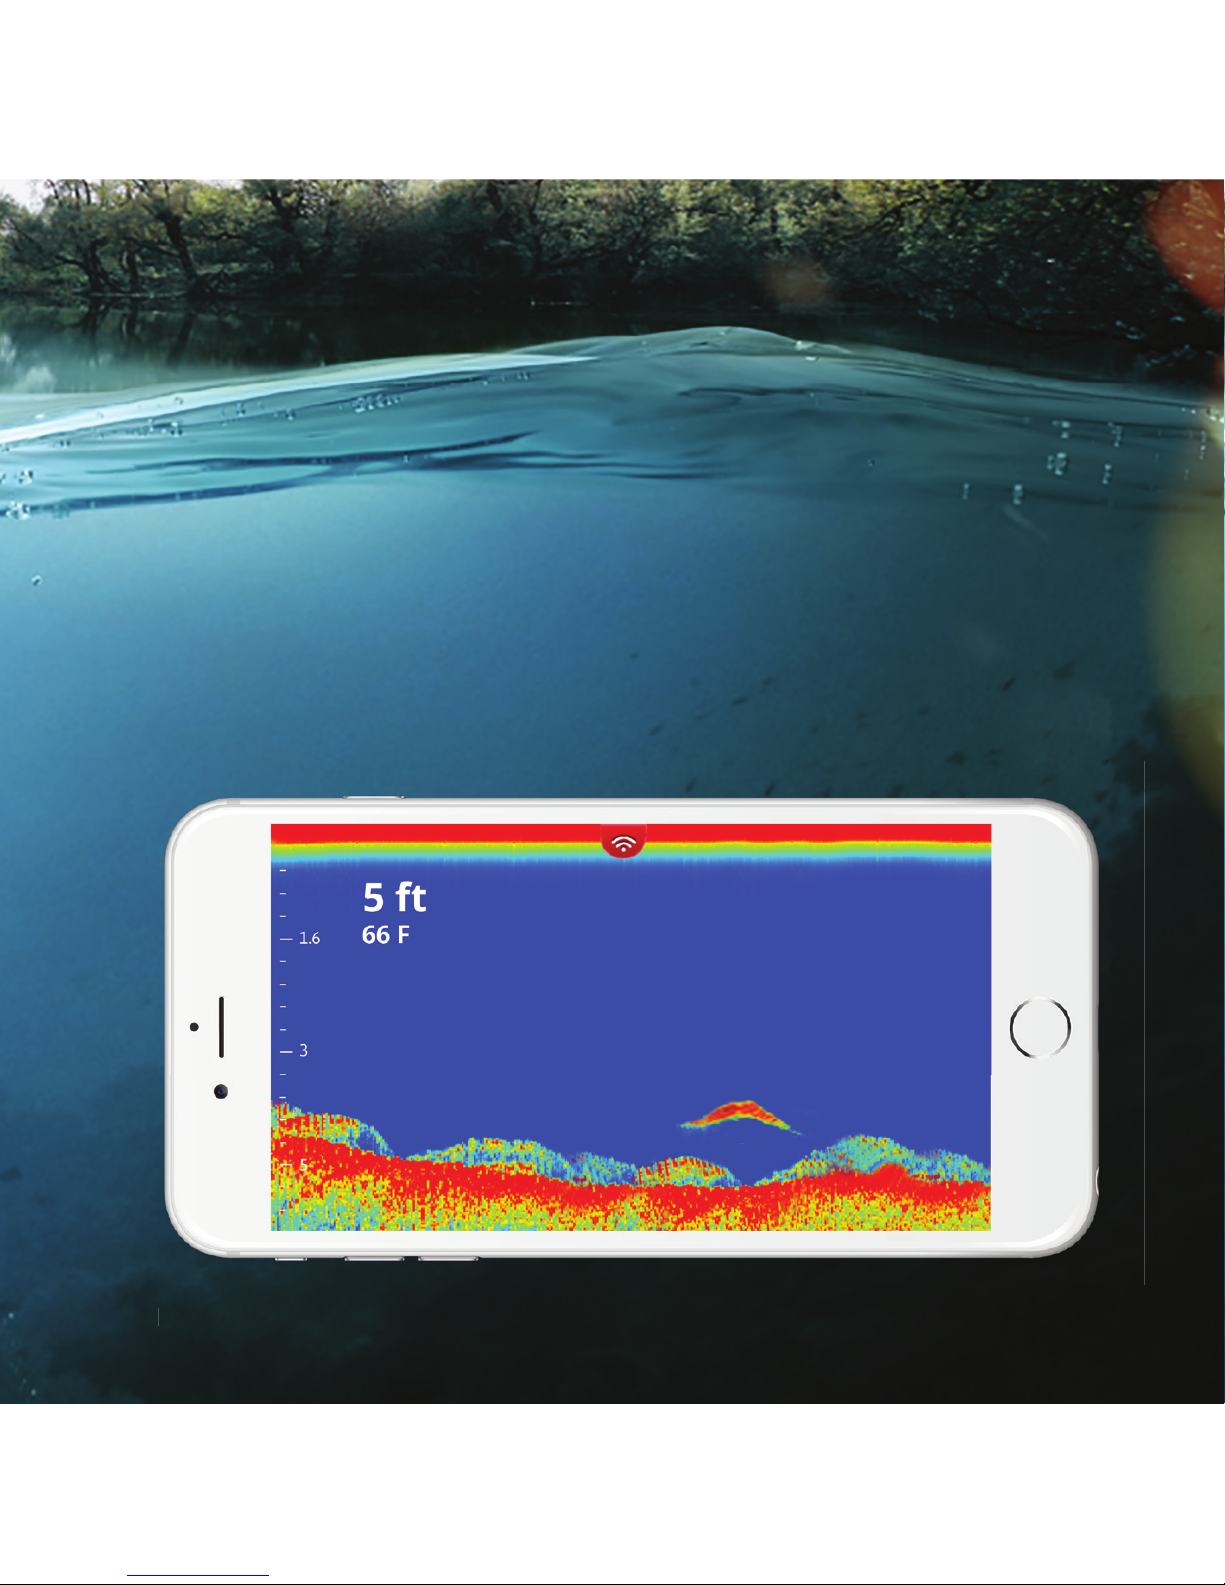
FishHunter is the only wireless portable fi sh fi nder that
comes with a shallow water mode that allows you to get into
water that is only 1.4ft (0.4m) deep. This mode uses our
patent pending tri-frequency technology to allow for the
ideal balance of power and resolution to give you detailed
information about the bottom terrain and ability to locate
the weeds, rocks and drop offs easily.
Page 15
15
SHALLOW WATER STEPS
Place your FishHunter in water for it to turn on.
The sonar will have a red light appear and an additional
slow fl ashing red light to identify that it is on.
On your Smartphone/Tablet open your Wi-Fi settings.
Refresh the list and select "FishHunter Wi-Fi XXX"
( Note: this can take up to 1 minute )
Open the FishHunter app on your smartphone or tablet and go
into the sonar section.
Select your prefered view.
Pull out your side menu.
On the range settings, select Shallow Water.
( Note: you must adjust the power slider to ensure you have the
right amount of power for your area. Failure to adjust power can
cause your FishHunter not to fi nd the bottom correctly. )
You can pull down the top menu to select raw or fi sh view, select
the units of measurement, drop a pin or take a screenshot.
1
2
3
4
5
6
7
8
Page 16
16
DIRECTIONAL CASTING™
16
Page 17
17
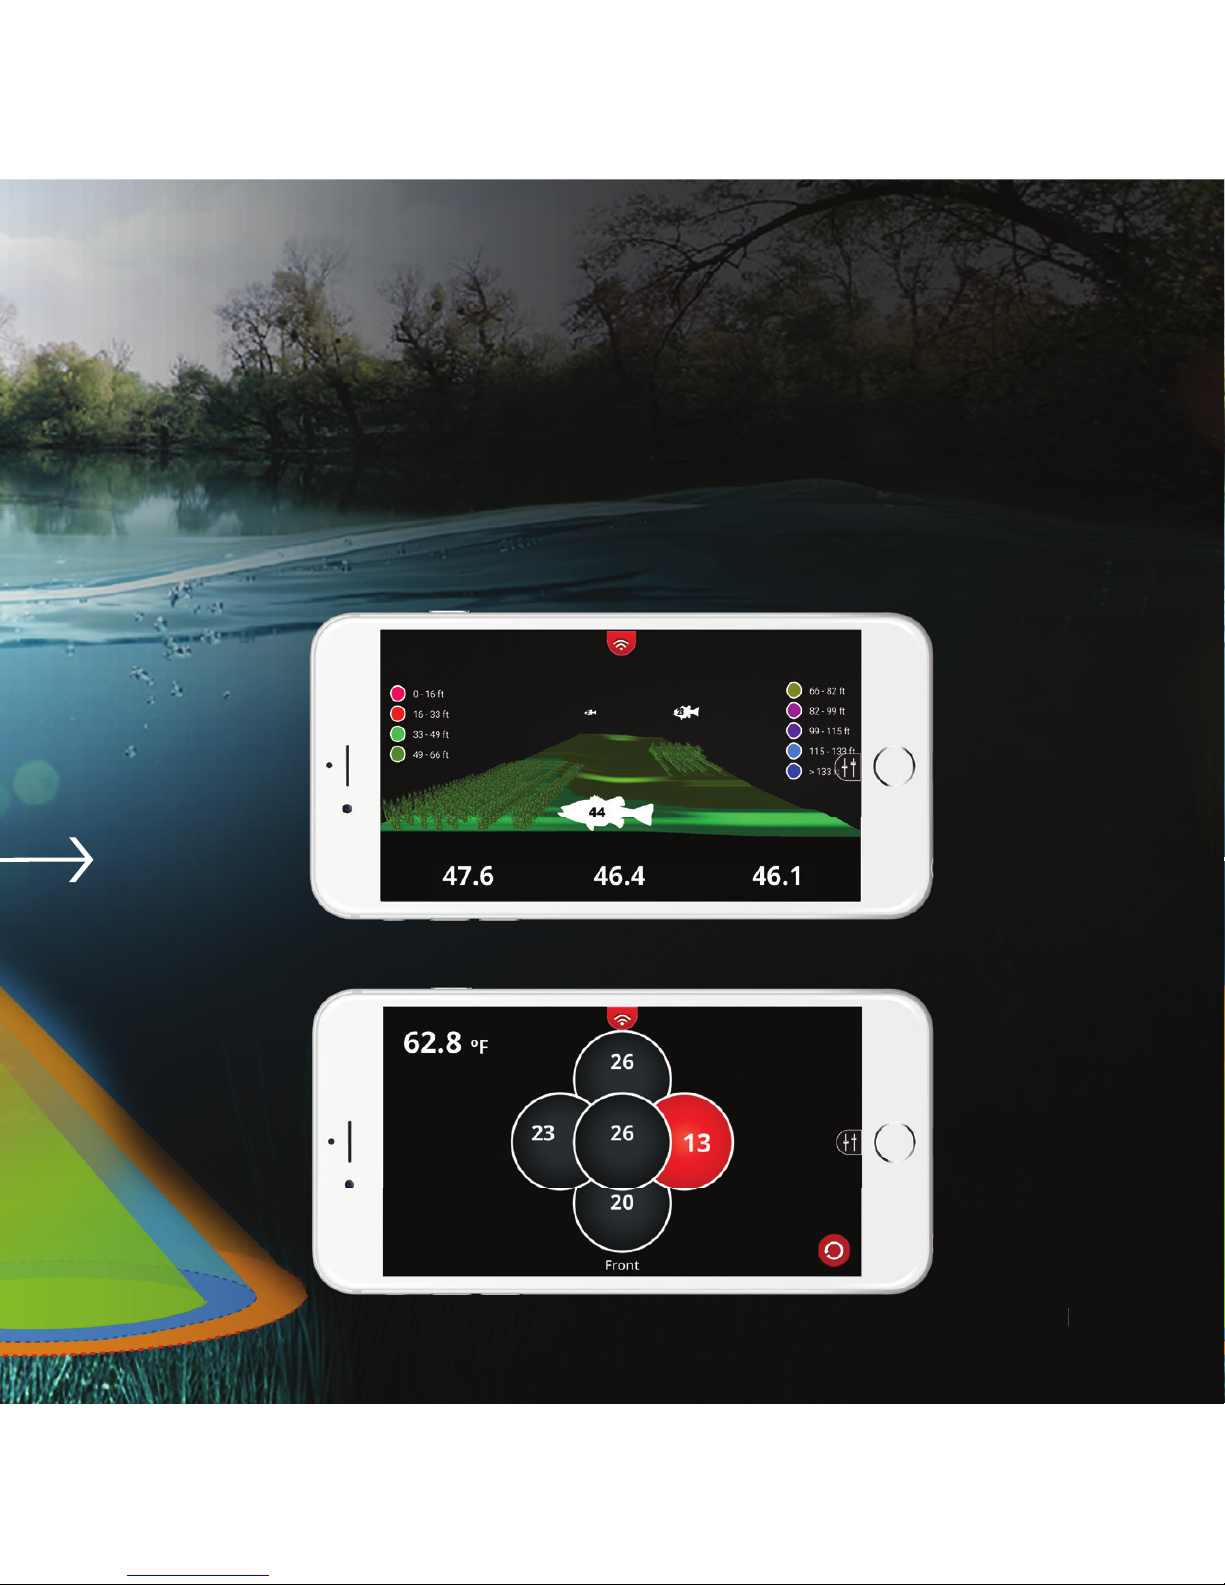
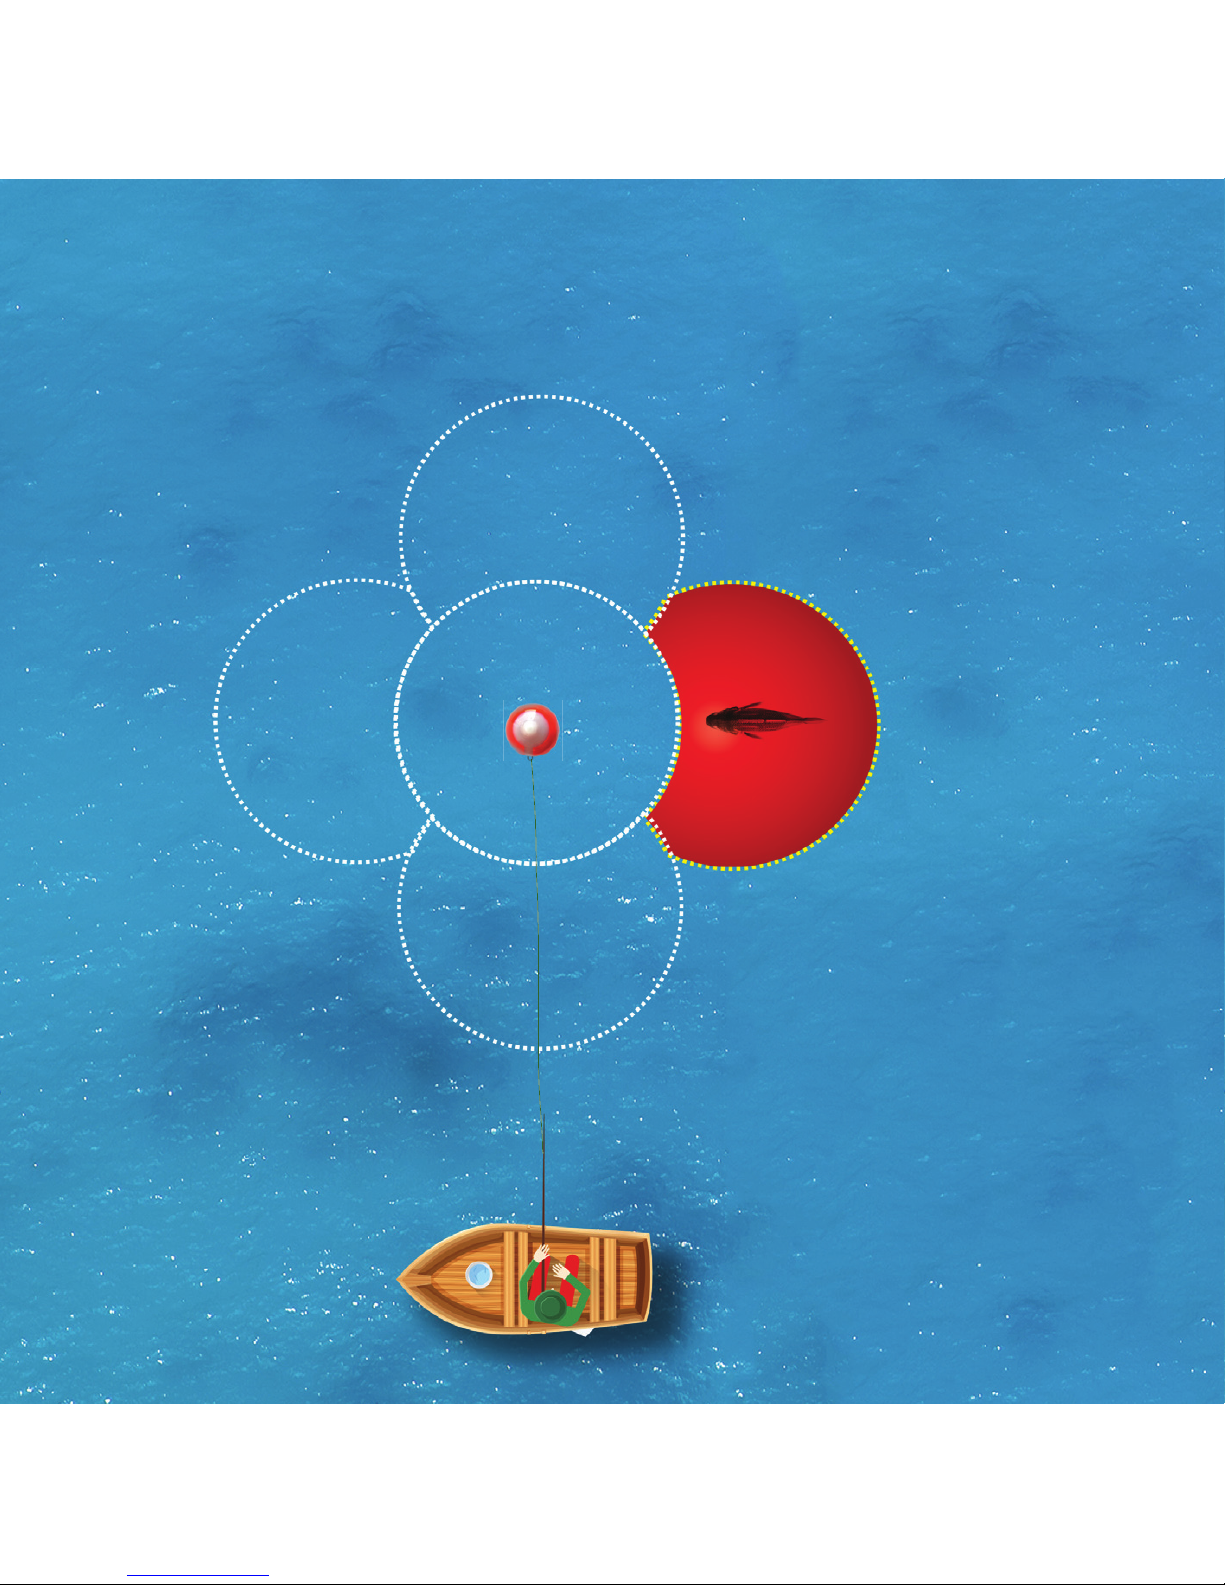
Directional Casting™ powers up all 5 Tri-Frequency
transducers, showing you the depth of the water and where
the fi sh are being detected in relation to your fl oating
FishHunter.
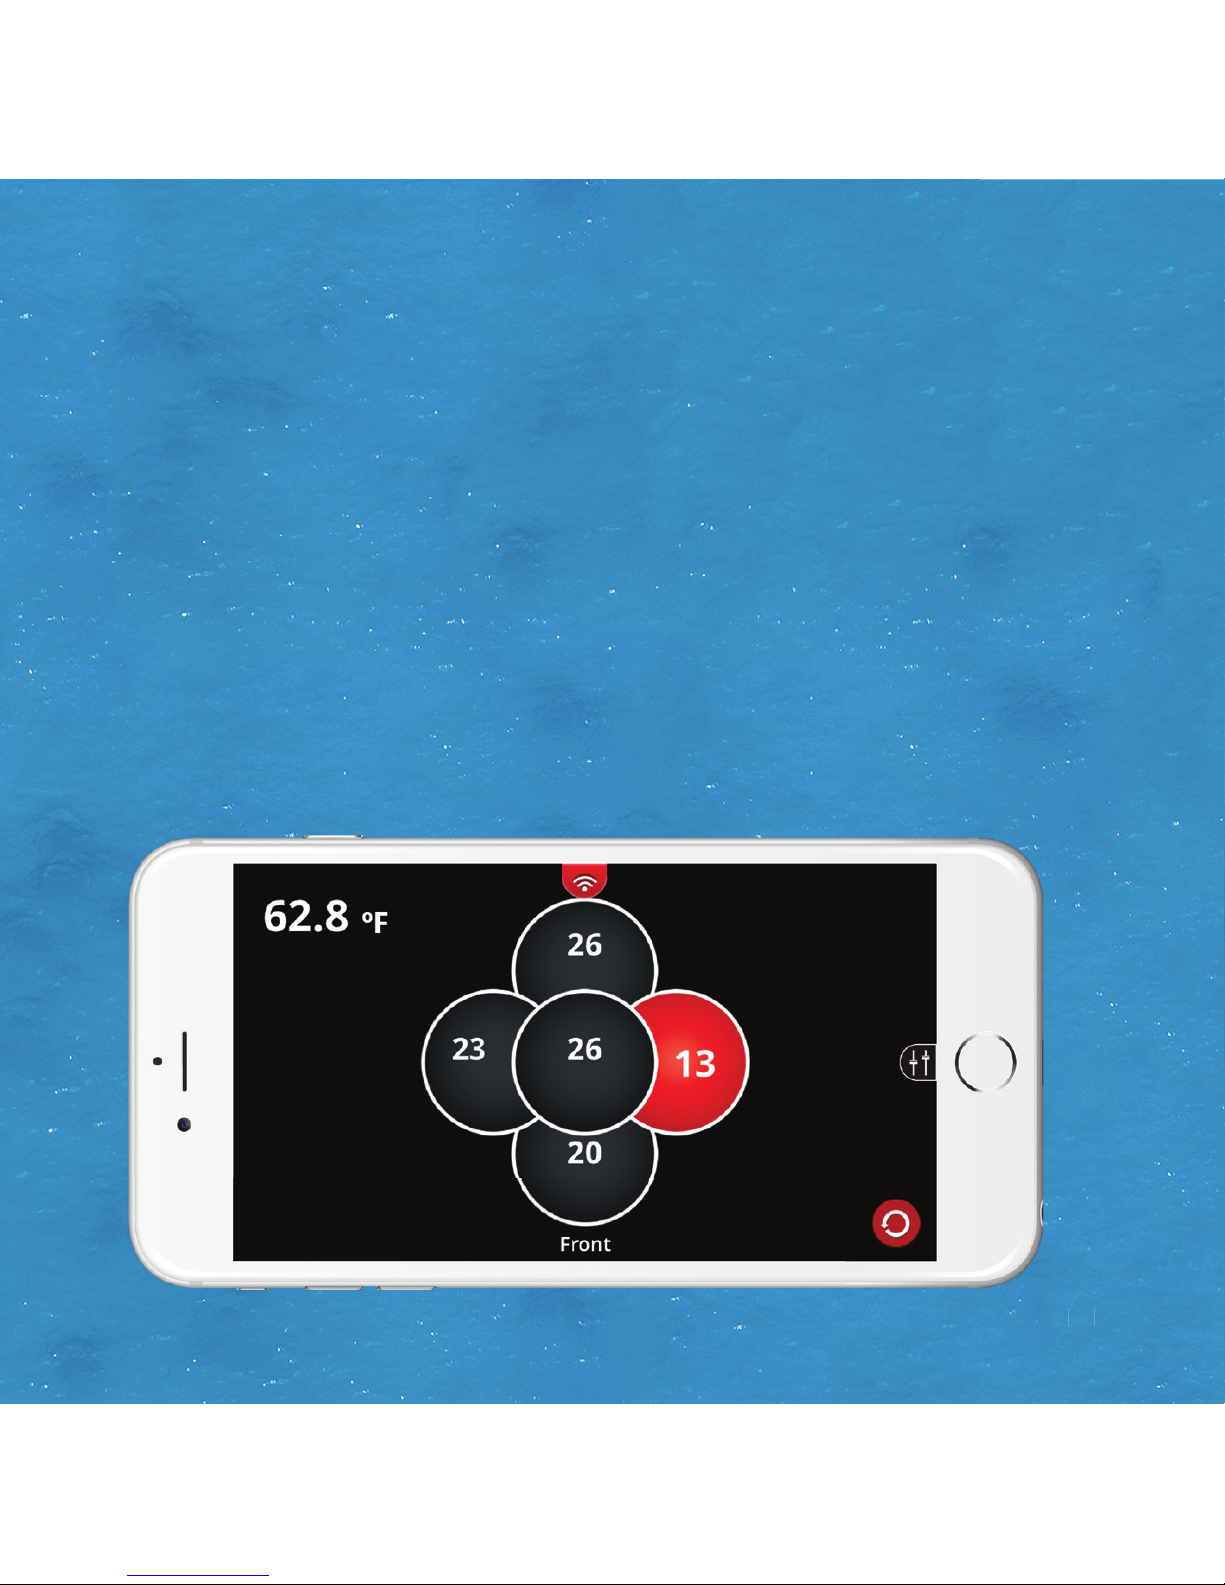
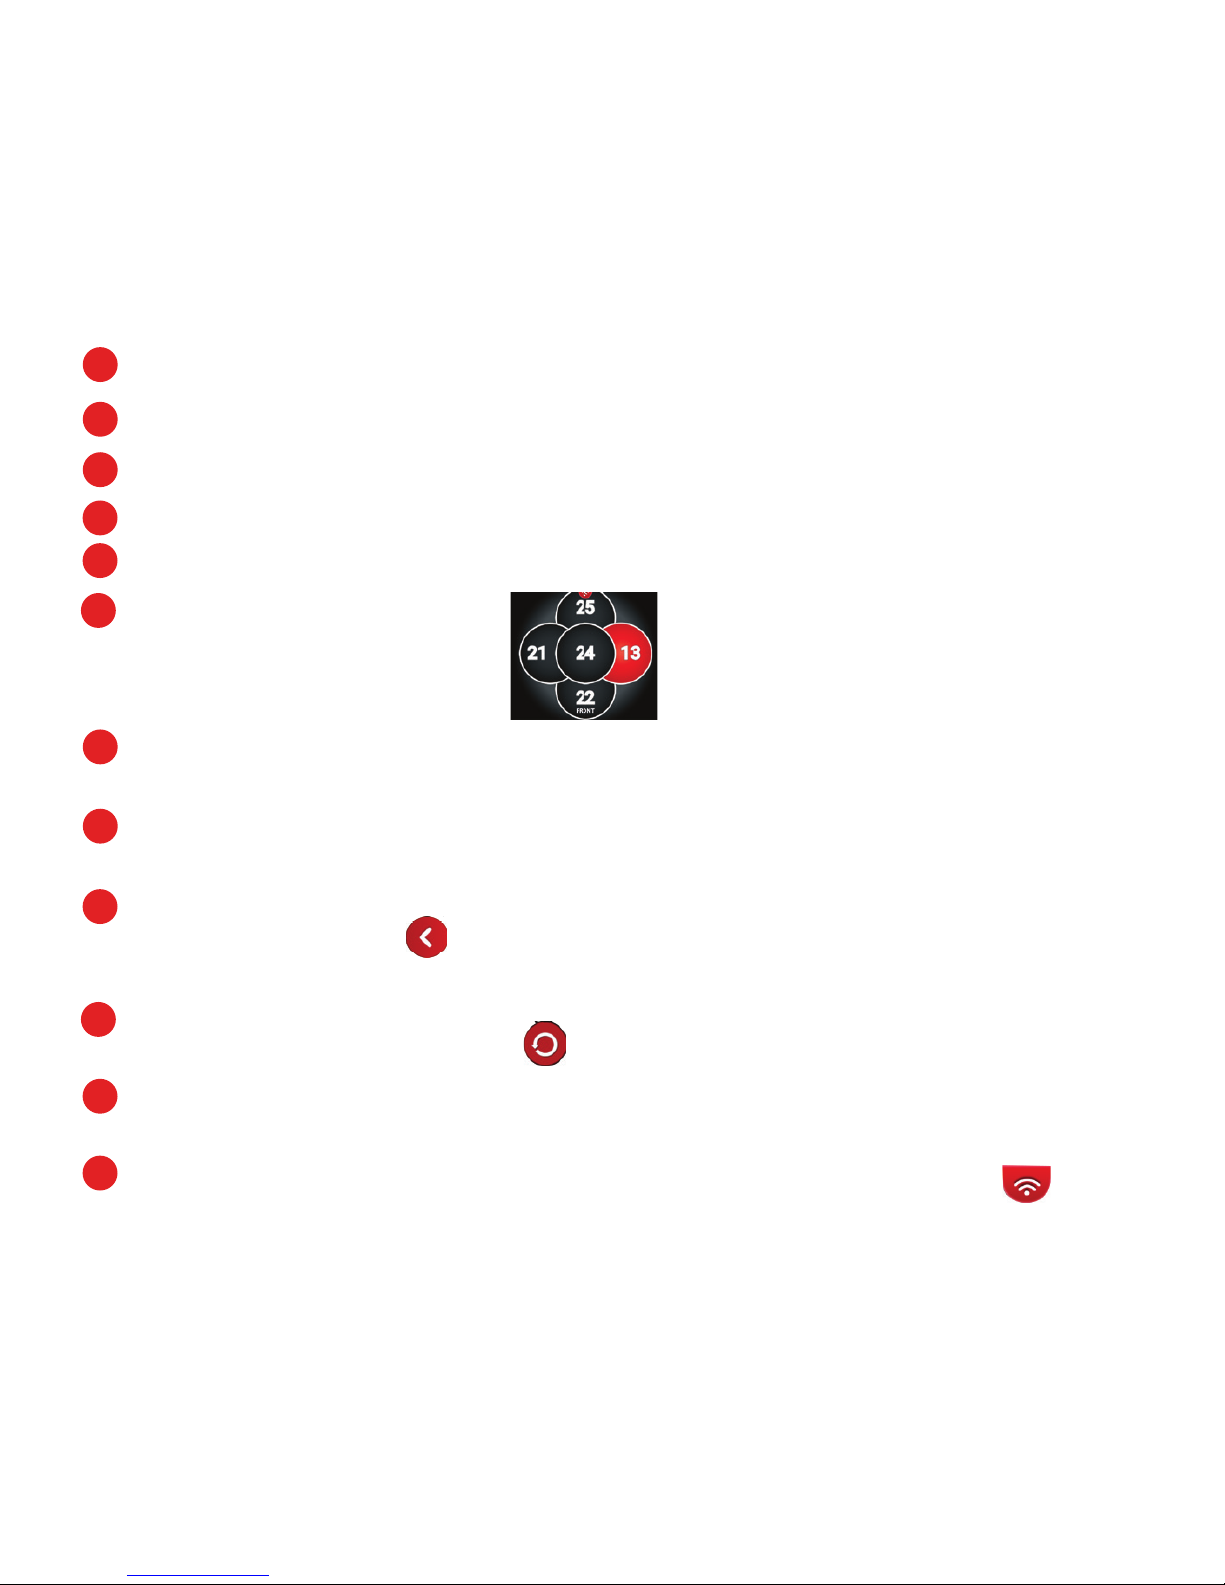
In this example, the right transducer is red, and the
number 13 appears. This indicates fi sh are on the right side
of your FishHunter, at a depth of 13 feet. Now cast in that
direction and increase your chances of catching fi sh. Click
on any of the 5 round icons and you get a split view screen
with the left side showing the depth of any fi sh detected and
the right side showing you the exact bottom contour for the
transducer you selected.
17
Page 18
18
DIRECTIONAL CASTING™
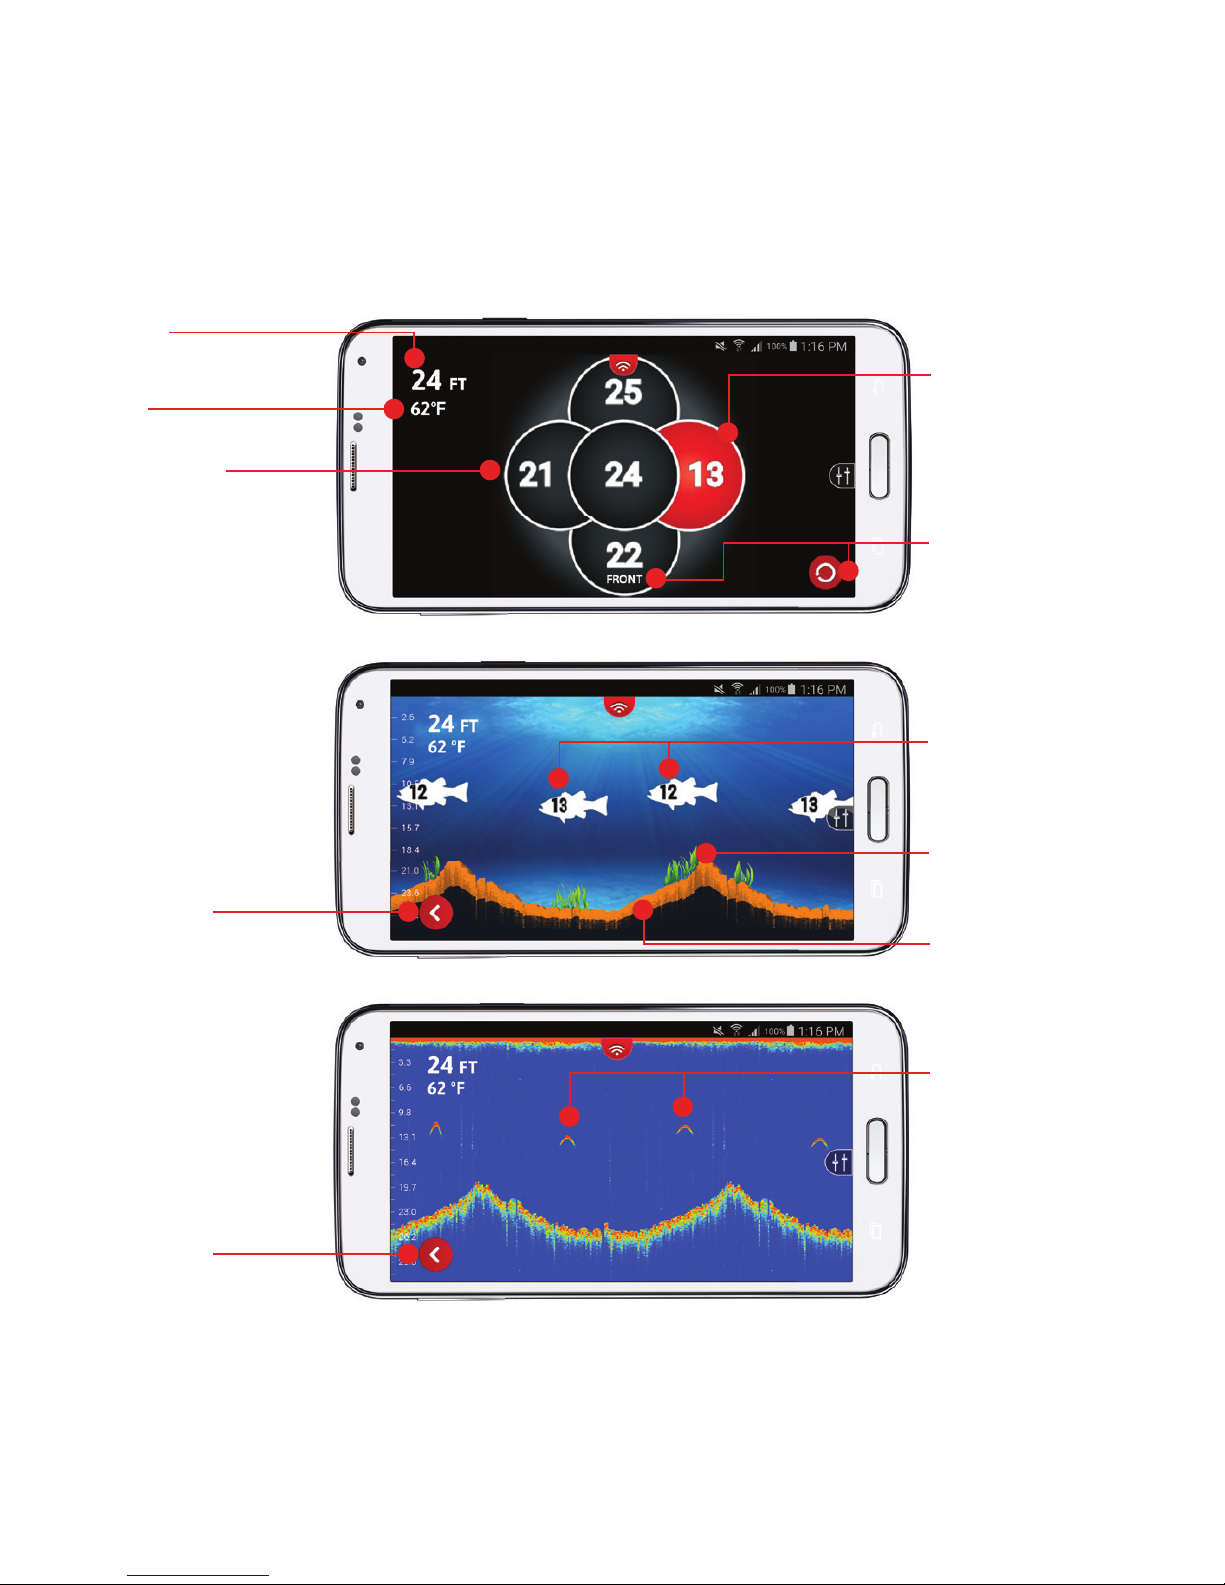
Red circle
indicates fi sh
under that transducer
and its depth (13ft)
Front transducer
can be changed by
pressing the rotating
circle
Weeds
Bottom contour
Fish detected
Fish detected
with depth
Water
temperature
Go back to
"5 Transducer View"
Go back to
"5 Transducer View"
FISH VIEW
5 Transducer View
RAW VIEW
Each circle is
one transducer
Depth to
the bottom
Page 19
19
DIRECTIONAL CASTING STEPS
Place FishHunter in water for it to turn on.
Open your Wi-Fi settings and select FishHunter Wi-Fi XXX
Open the FishHunter app and go into the sonar section
Select DIRECTIONAL CASTING
Set range to the depth you are fi shing in and click the arrow
Now in “5 Transducer View”
with each circle representing
one of fi ve transducers
on the bottom of your sonar.
If one of the circles is red, it means fi sh have been detected below that
transducer with their depth.
You can select any transducer on the screen to get the bottom contour by
pressing on the circle.
You can view a split screen of the bottom countour and 5 transducers by
clicking on the arrow. Click the arrow again to return to “5 transducer
view”
Cast your line towards the area of the sonar that keeps lighting up red on
your screen to catch more fi sh.
To adjust where the front of your sonar is facing simply select the rotation
button on the screen.
You can switch between "Raw View" and "Fish View" from top menu.
1
2
3
4
5
6
7
8
9
10
11
12
Page 20
20
3D STRUCTURE MAPPING
20
Page 21
21
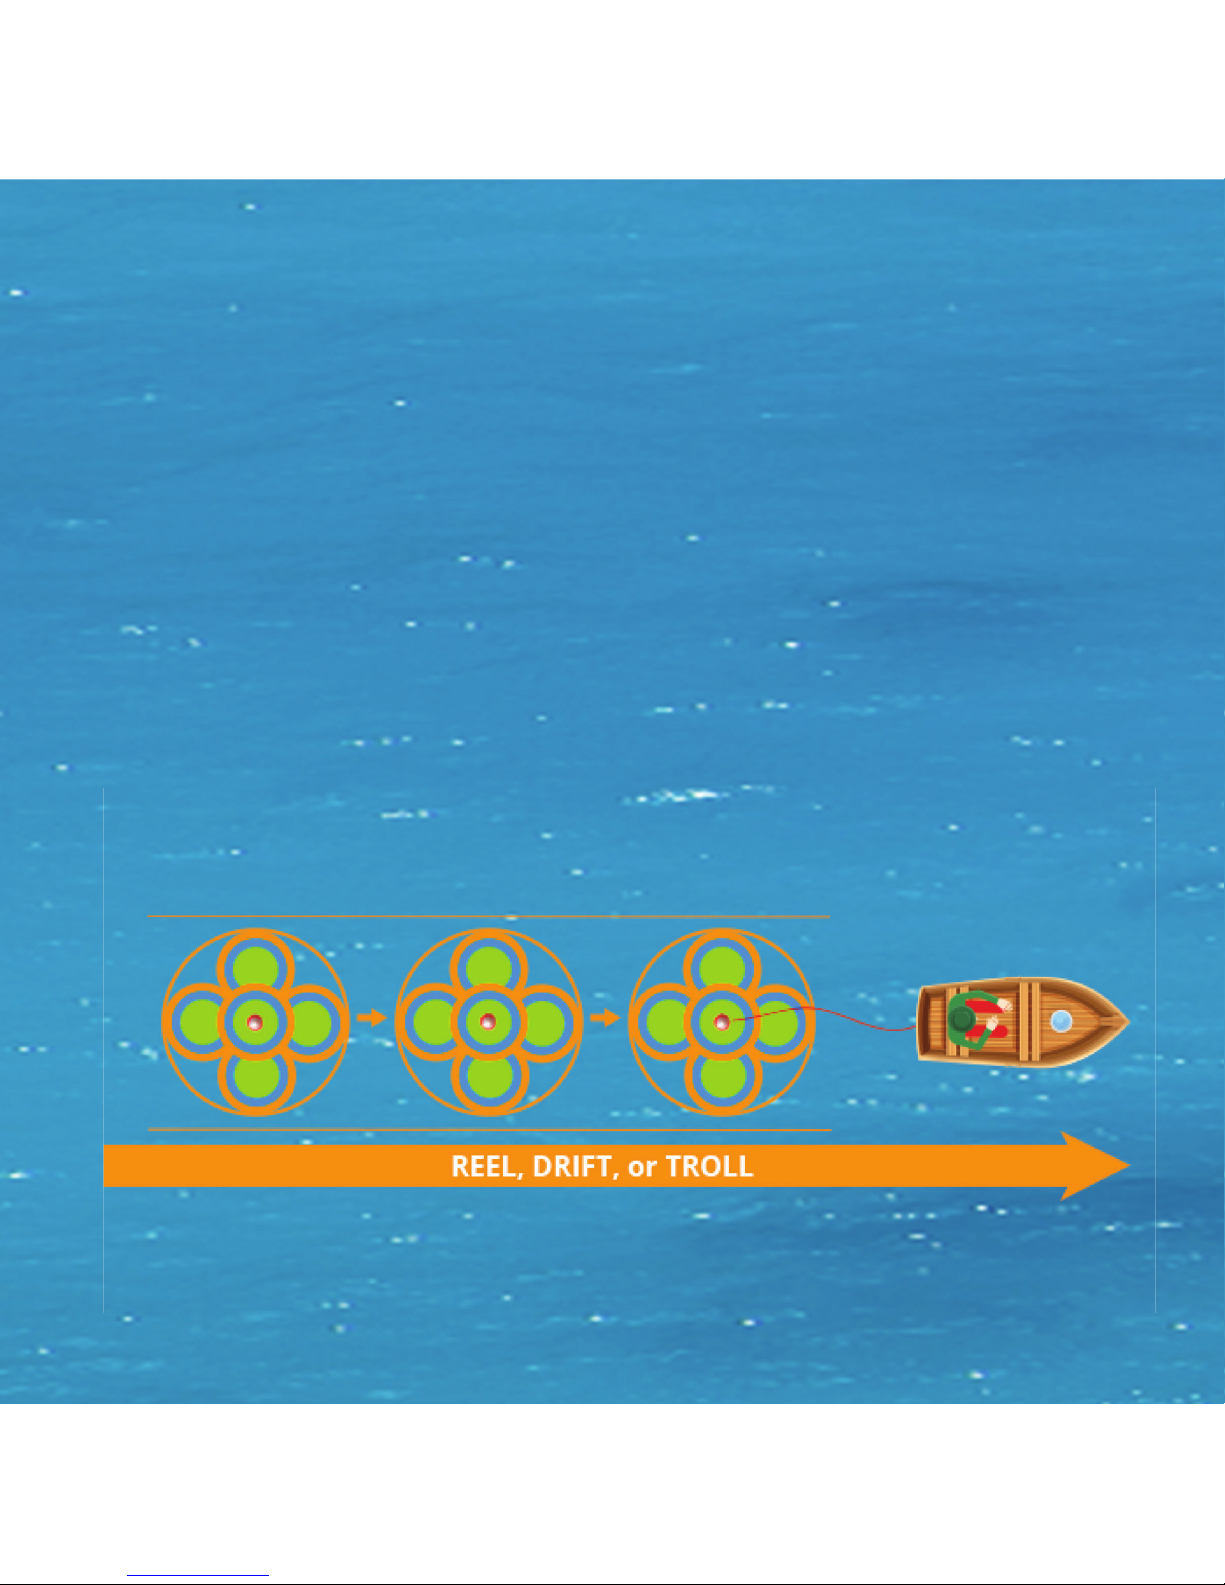
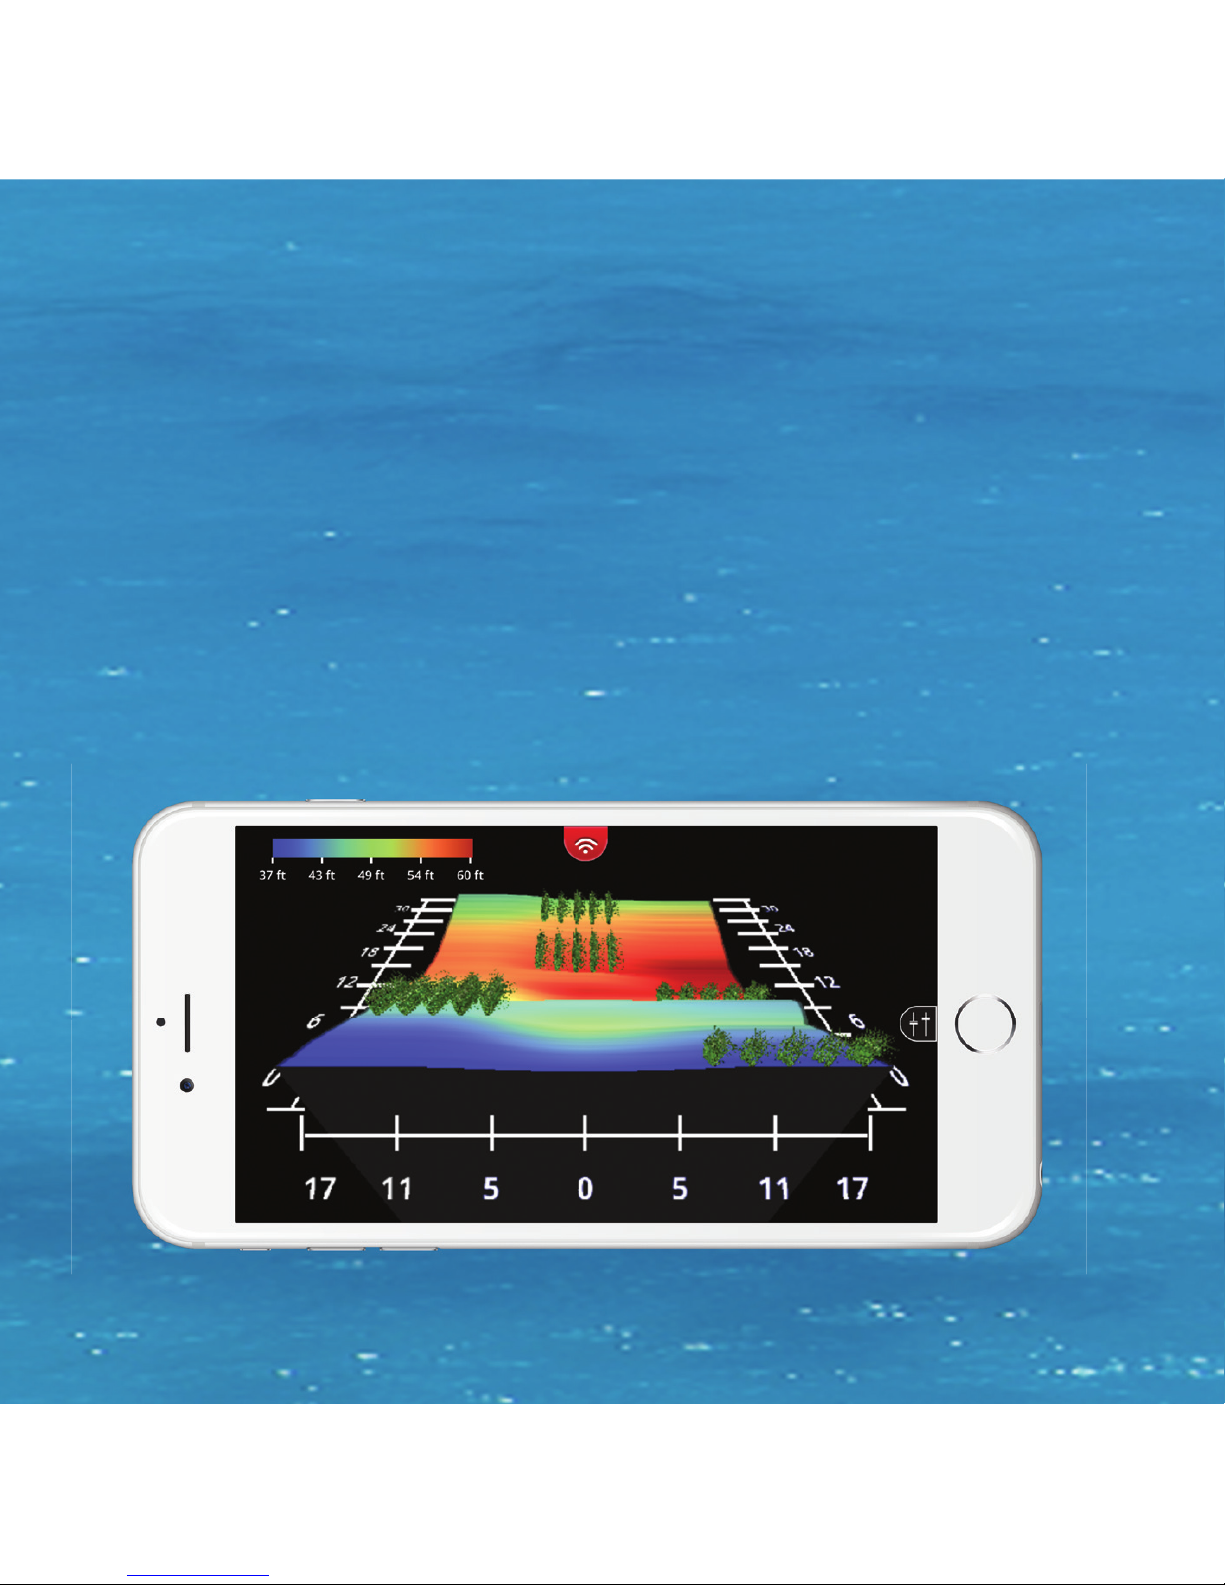
You can create custom 3D Structure Maps of your favorite fi shing
spots by placing the FishHunter in the water and then
reeling/drifting/trolling it over the area you want to measure.
Use the color coded scale to easily see drop offs or toggle on/off
the grid overlay to know exactly where the drop offs are, their
relative depth and distance. Every map has a GPS tag so you can
save the map and fi sh in the same spot next time- no problem.
21
Page 22
22
3D STRUCTURE MAPPING
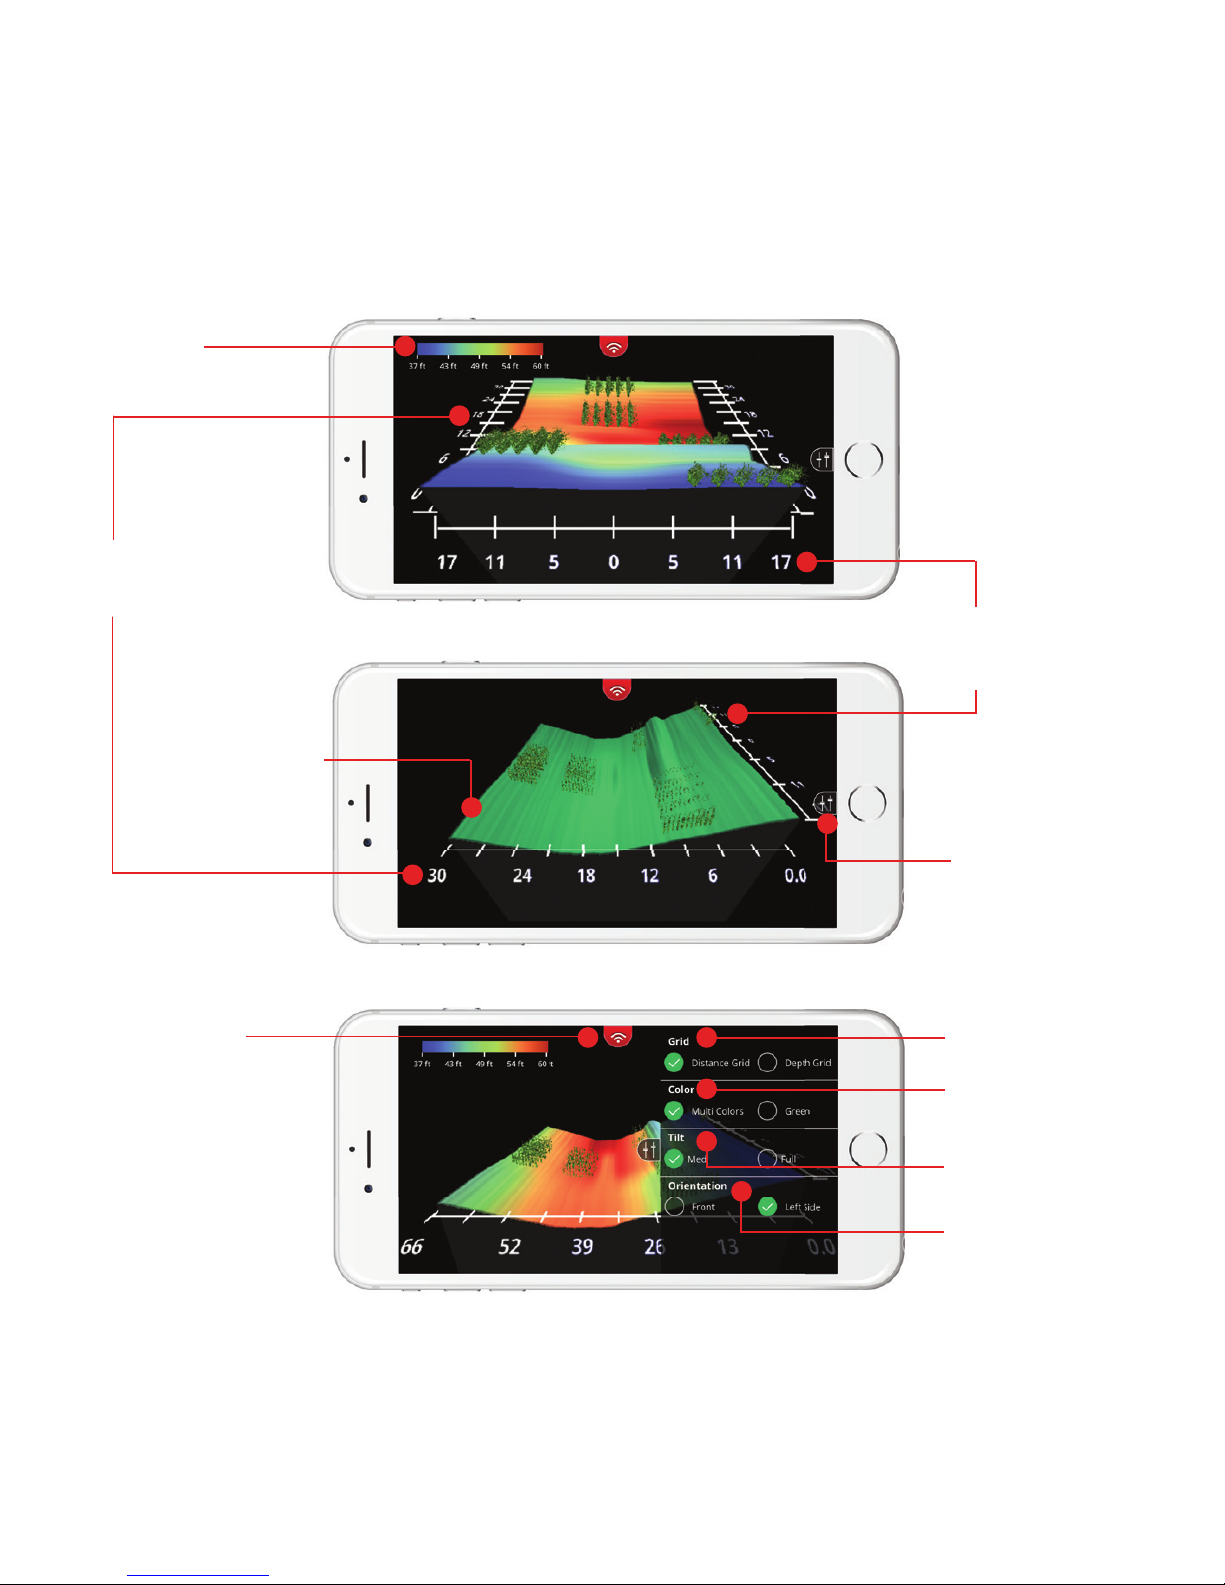
FRONT VIEW
LEFT SIDE VIEW
SIDE MENU
Color
depth scale
Side menu
Turn on/off each
Distance Grid and
Depth Grid
Color option
of the map
Tilt option either
Medium or Full
View orientation
Front or Left Side
Distance away
from you
Distance
across
Side view
bottom map
(single color)
Top Menu
Page 23
23
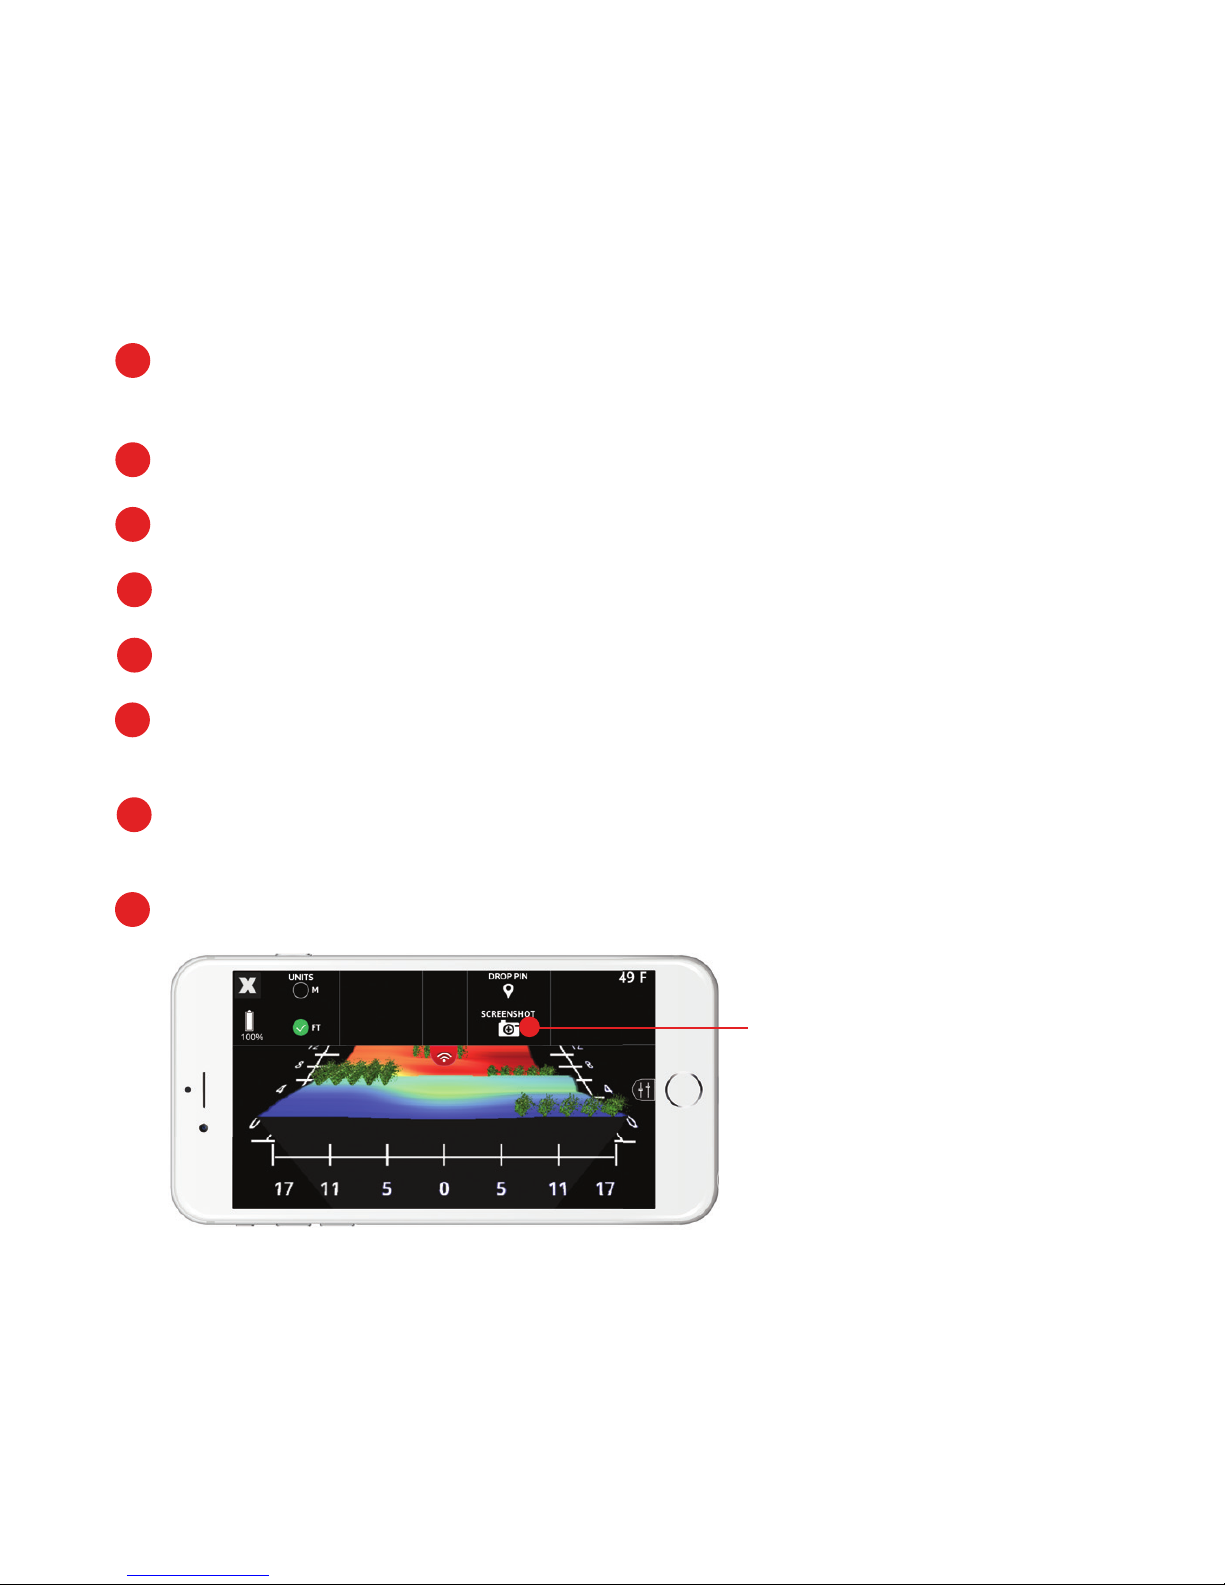
3D STRUCTURE MAPPING STEPS
Place FishHunter in water for it to turn on.
(Note: it must be in 4ft of water or more to work correctly.)
Open your Wi-Fi settings and select "FishHunter Wi-Fi XXX"
Open the FishHunter app and go into the sonar section.
Select the FishHunter sonar icon.
Select “START FISHING”.
Select the “3D Structure Mapping” icon within the FishHunter™
app from your phone/ tablet screen.
Cast/drop FishHunter into the water in the area you would like
to map.
Follow the steps to create and save a Map.
1
2
3
4
5
6
7
8
TOP MENU
You can screenshot your
maps from the top menu.
Note: All 3D Structure Maps are auto-saved and can be found in Maps
section on main sonar screen.
Page 24
24
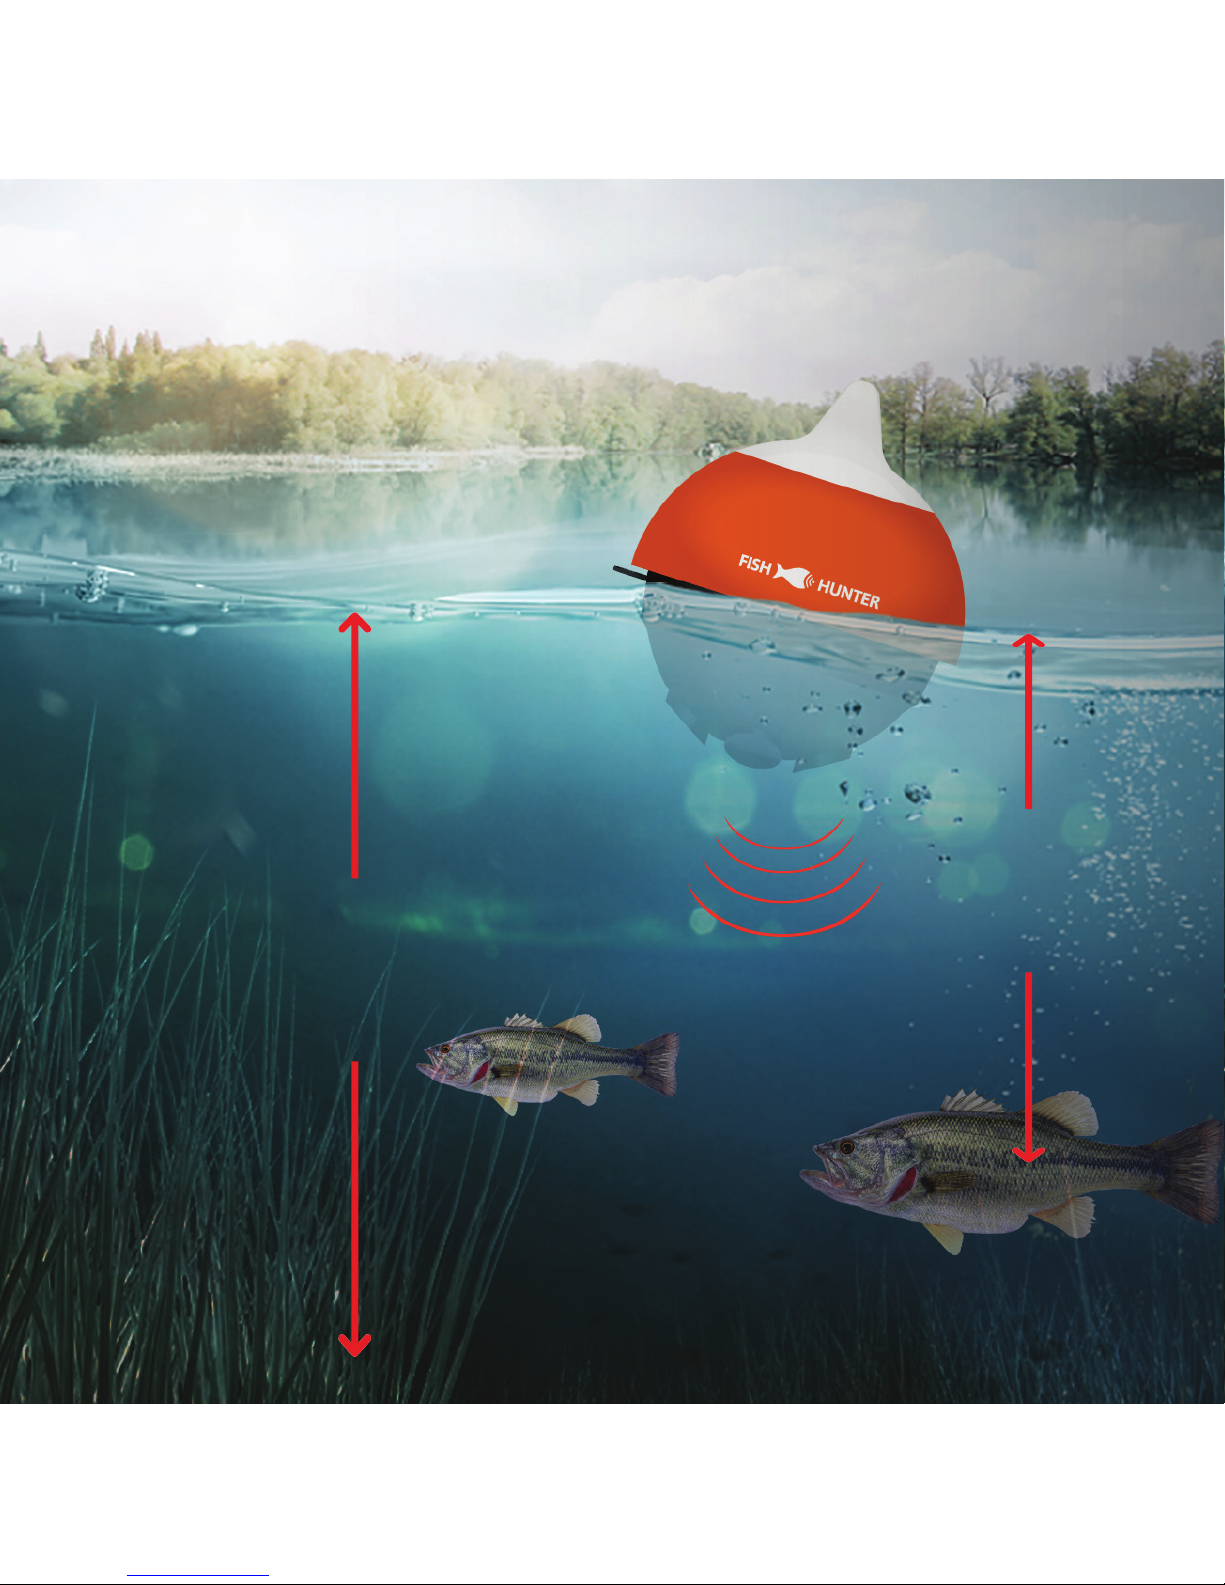
3D FISHING
DEPTH TO
BOTTOM
DEPTH TO
FISH
47.6 ft
44 ft
24
Page 25
25
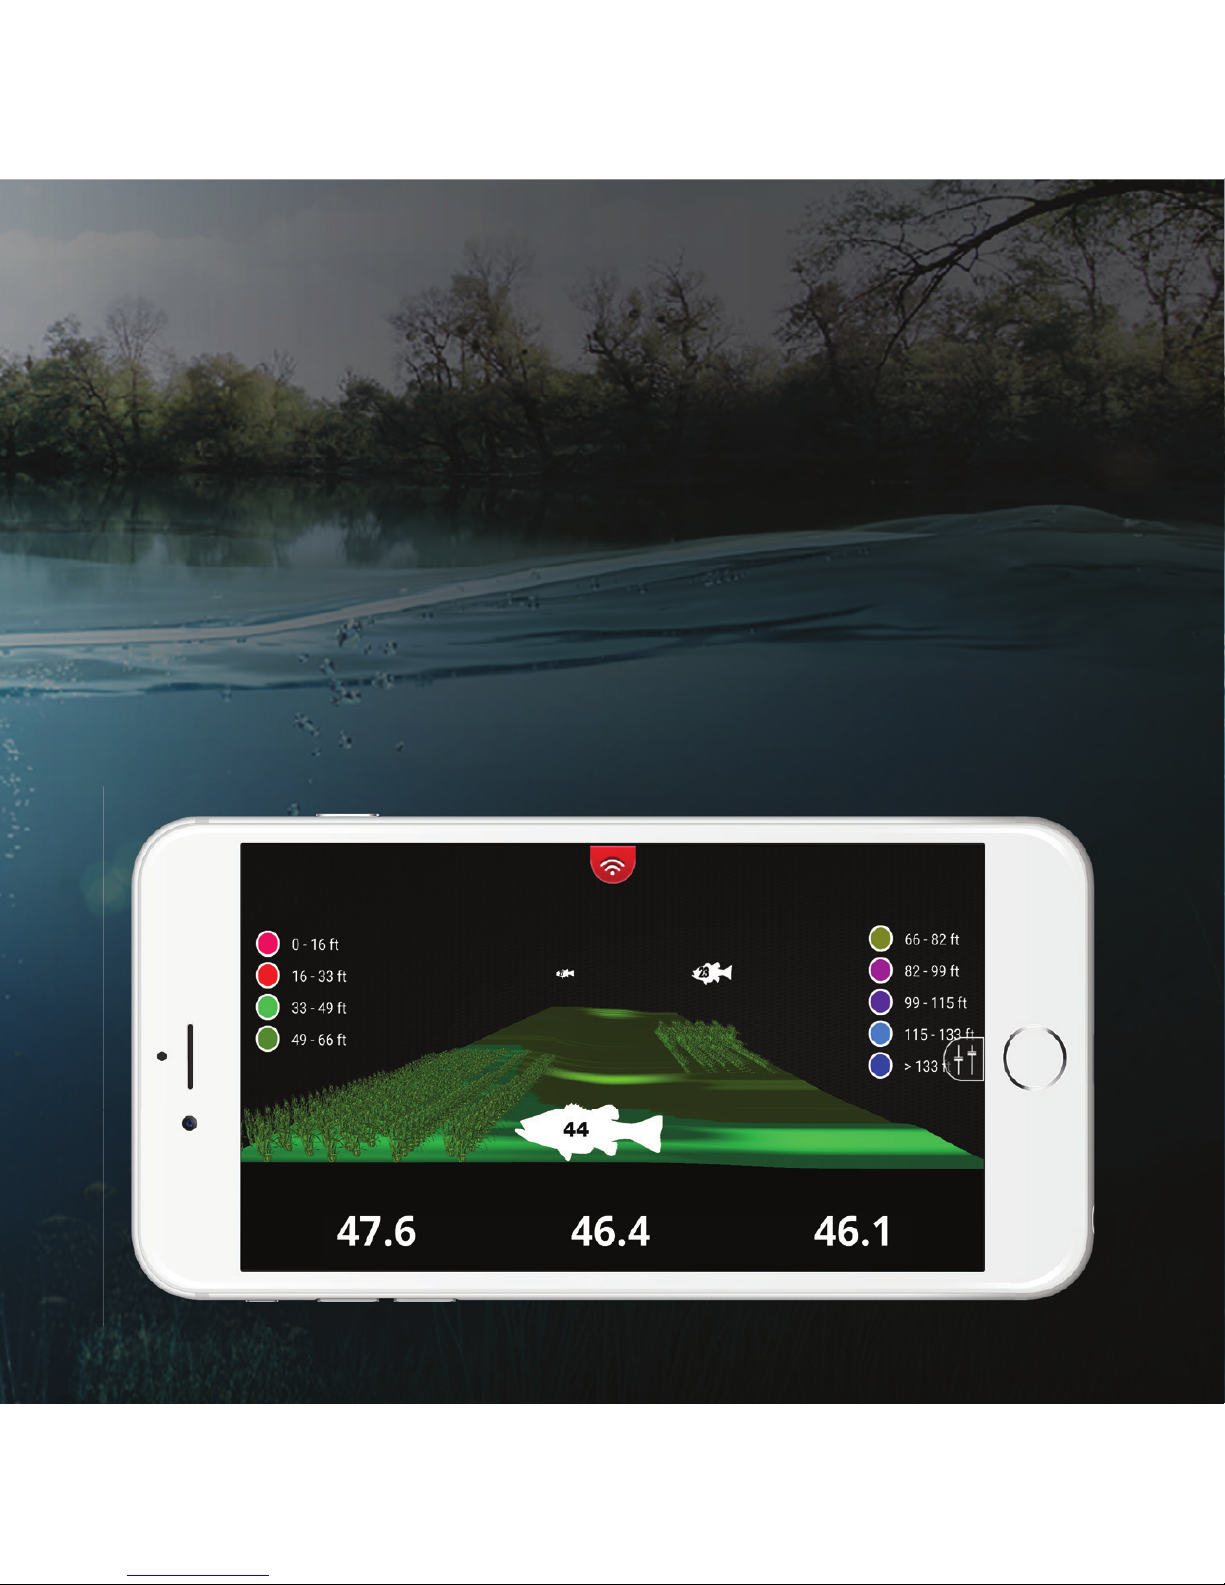
Used to determine bottom contour when in a stationary
position on the surface of the water. 3D software and 5
Tri-Frequency transducers allows us to create “life like”
images of the bottom, so you can quickly evaluate bottom
contour. Knowing the bottom contour when fi shing is critical
to improve your catch rate and our cutting edge 3D
technology provides a detailed view of any underwater
terrain.
25
Page 26
26
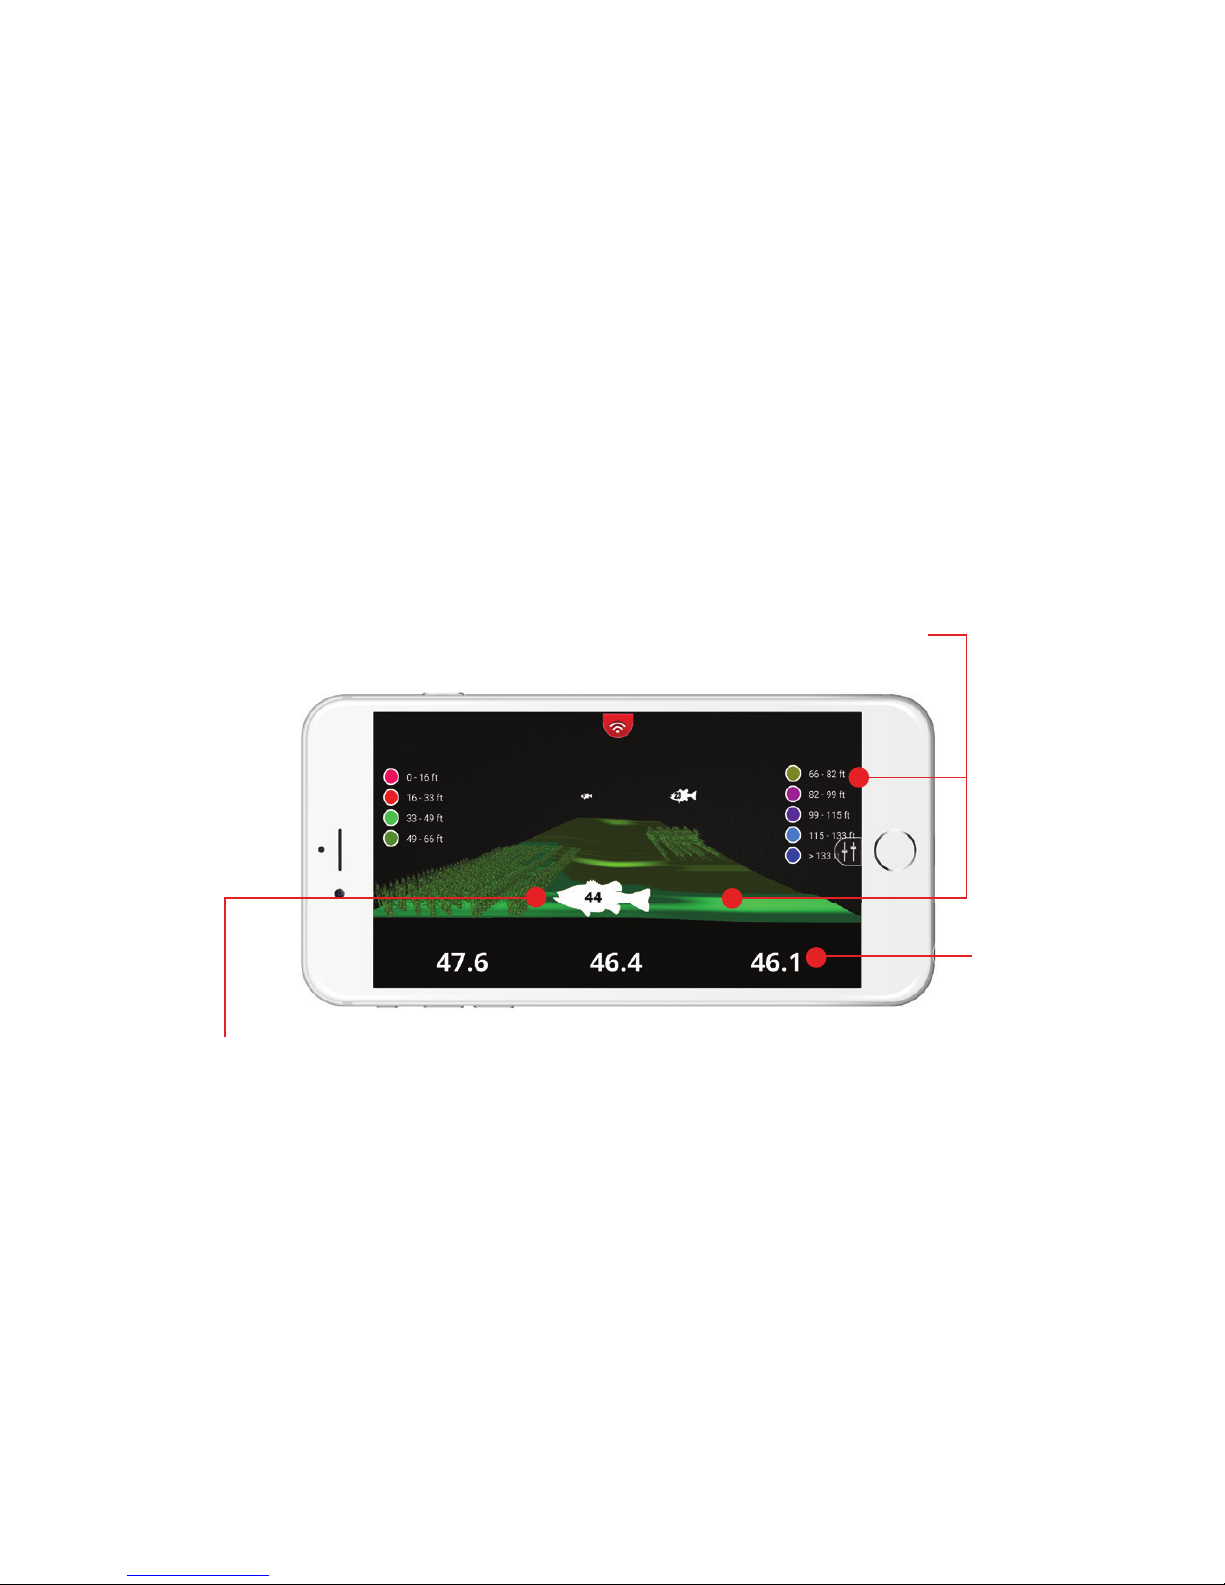
Bottom depth shown
by different colors
COMBINED VIEW - 3D
3D FISHING
Fish with depth
Actual depth
Page 27
27
3D FISHING
Place FishHunter in water for it to turn on.
Open your Wi-Fi settings and select FishHunter XXXX.
Open the FishHunter™ app and go into the sonar section.
Select “3D FISHING”.
Cast/drop FishHunter into the water in the area you would like
to map.
You will now start to receive 3D FISHING data to your device
screen.
1
2
3
4
5
6
Page 28
28
28
Page 29
29
BATHYMETRIC MAPPING
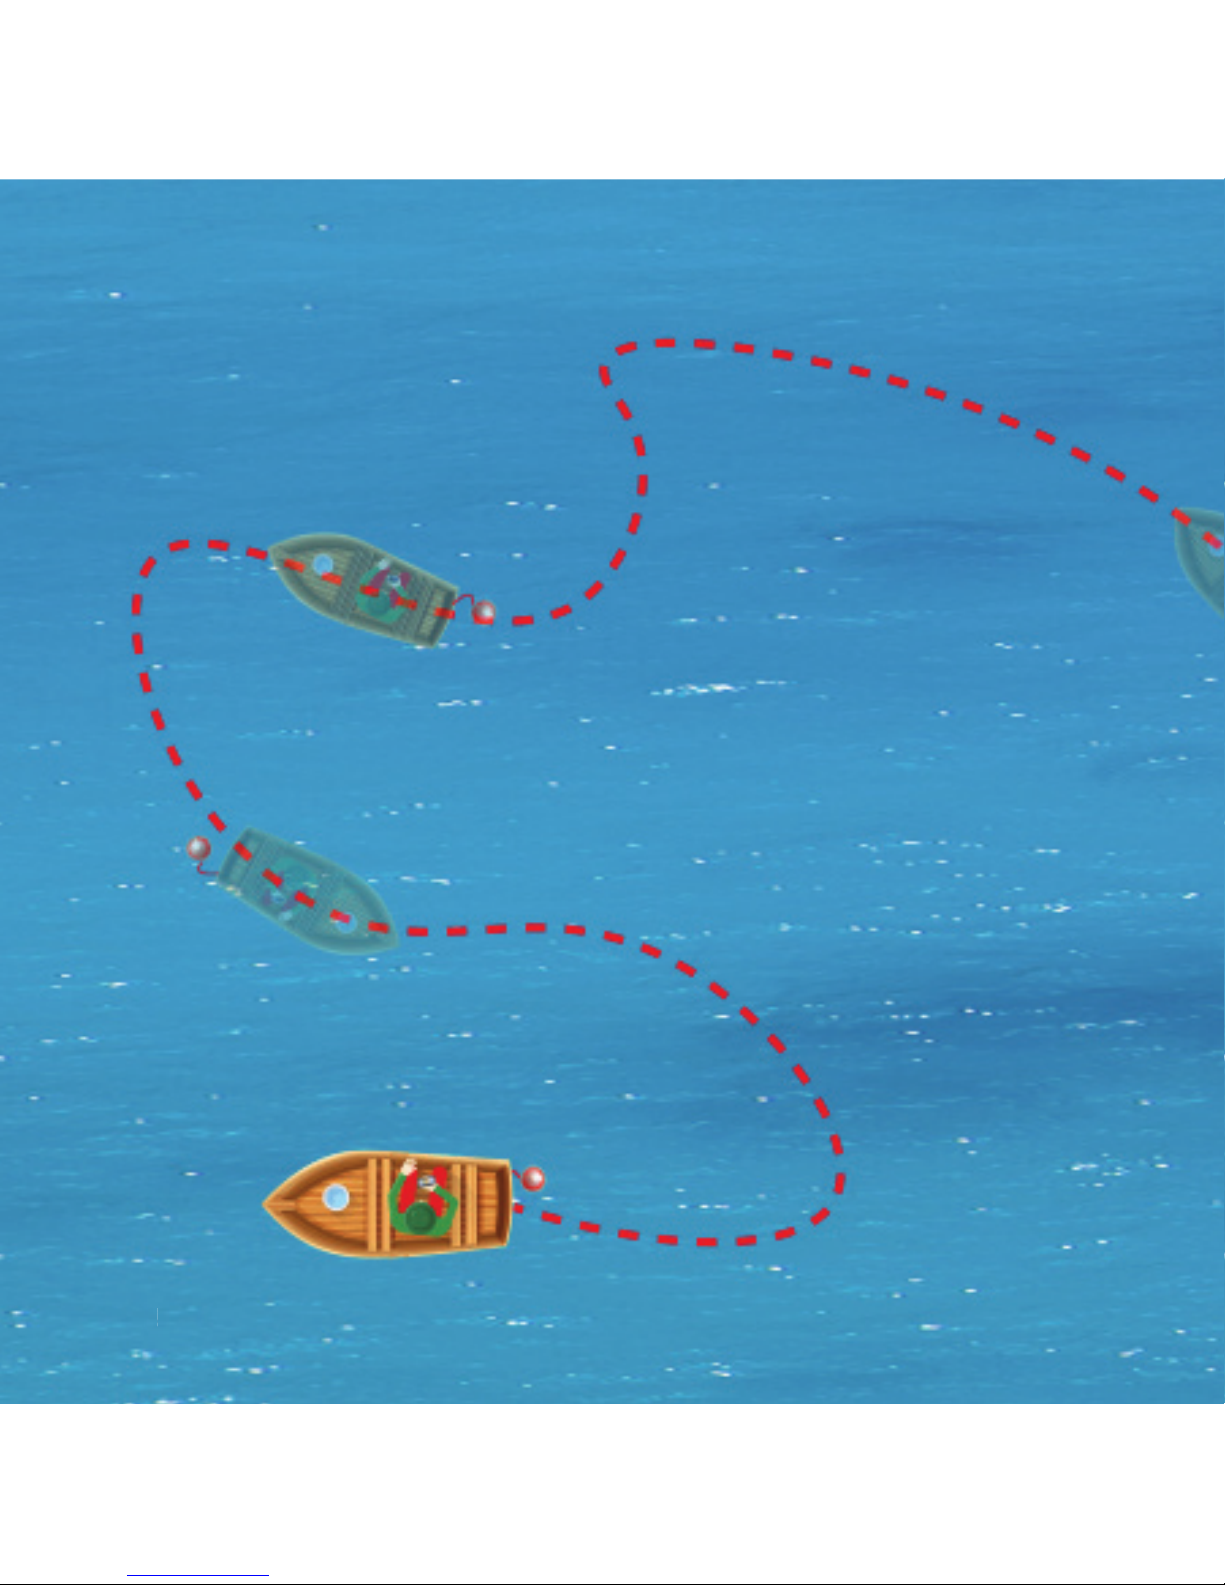
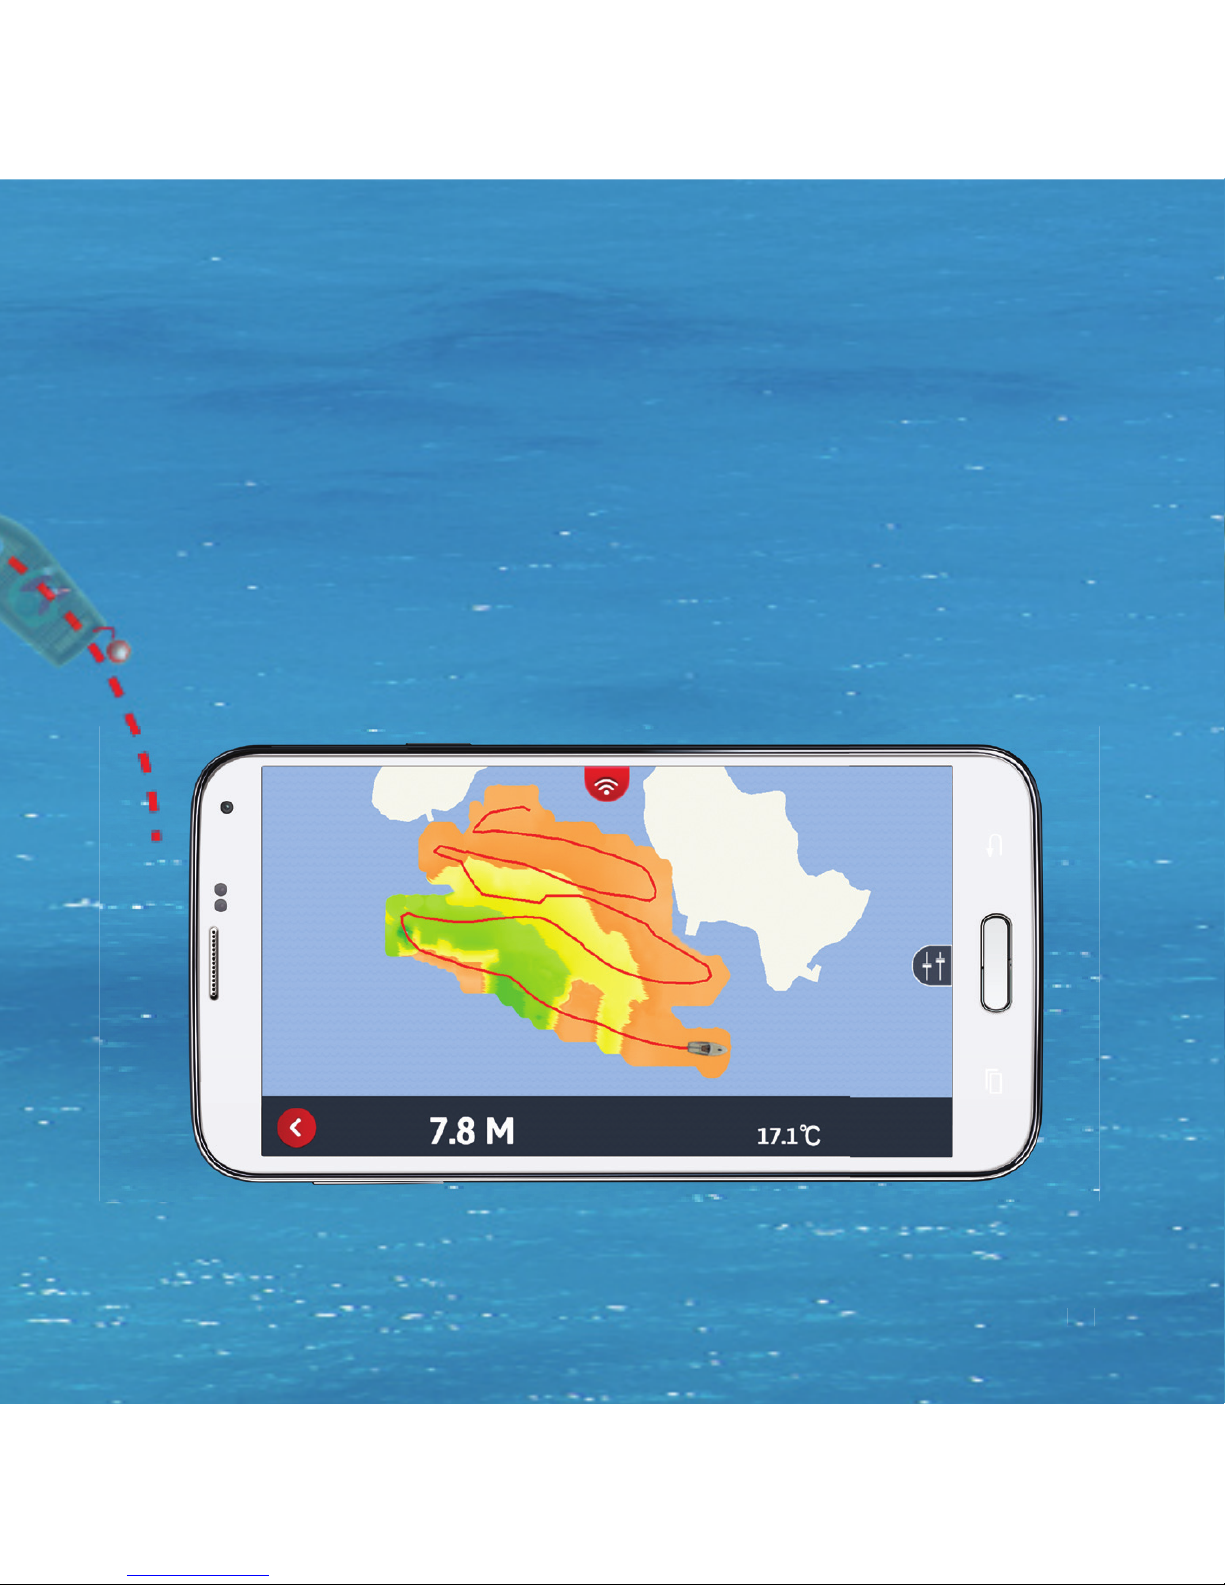
The perfect tool to create a custom map of your entire lake or
favourite fi shing spots. Just troll your FishHunter across the
area that you are interested in mapping and FishHunter starts
to track the depth and bottom contour as it travels around
your lake. Once completed, you can navigate back to any
location on your map, or see the bottom contour sonar display
by pressing anywhere on your map.
29
Page 30
BATHYMETRIC MAPPING
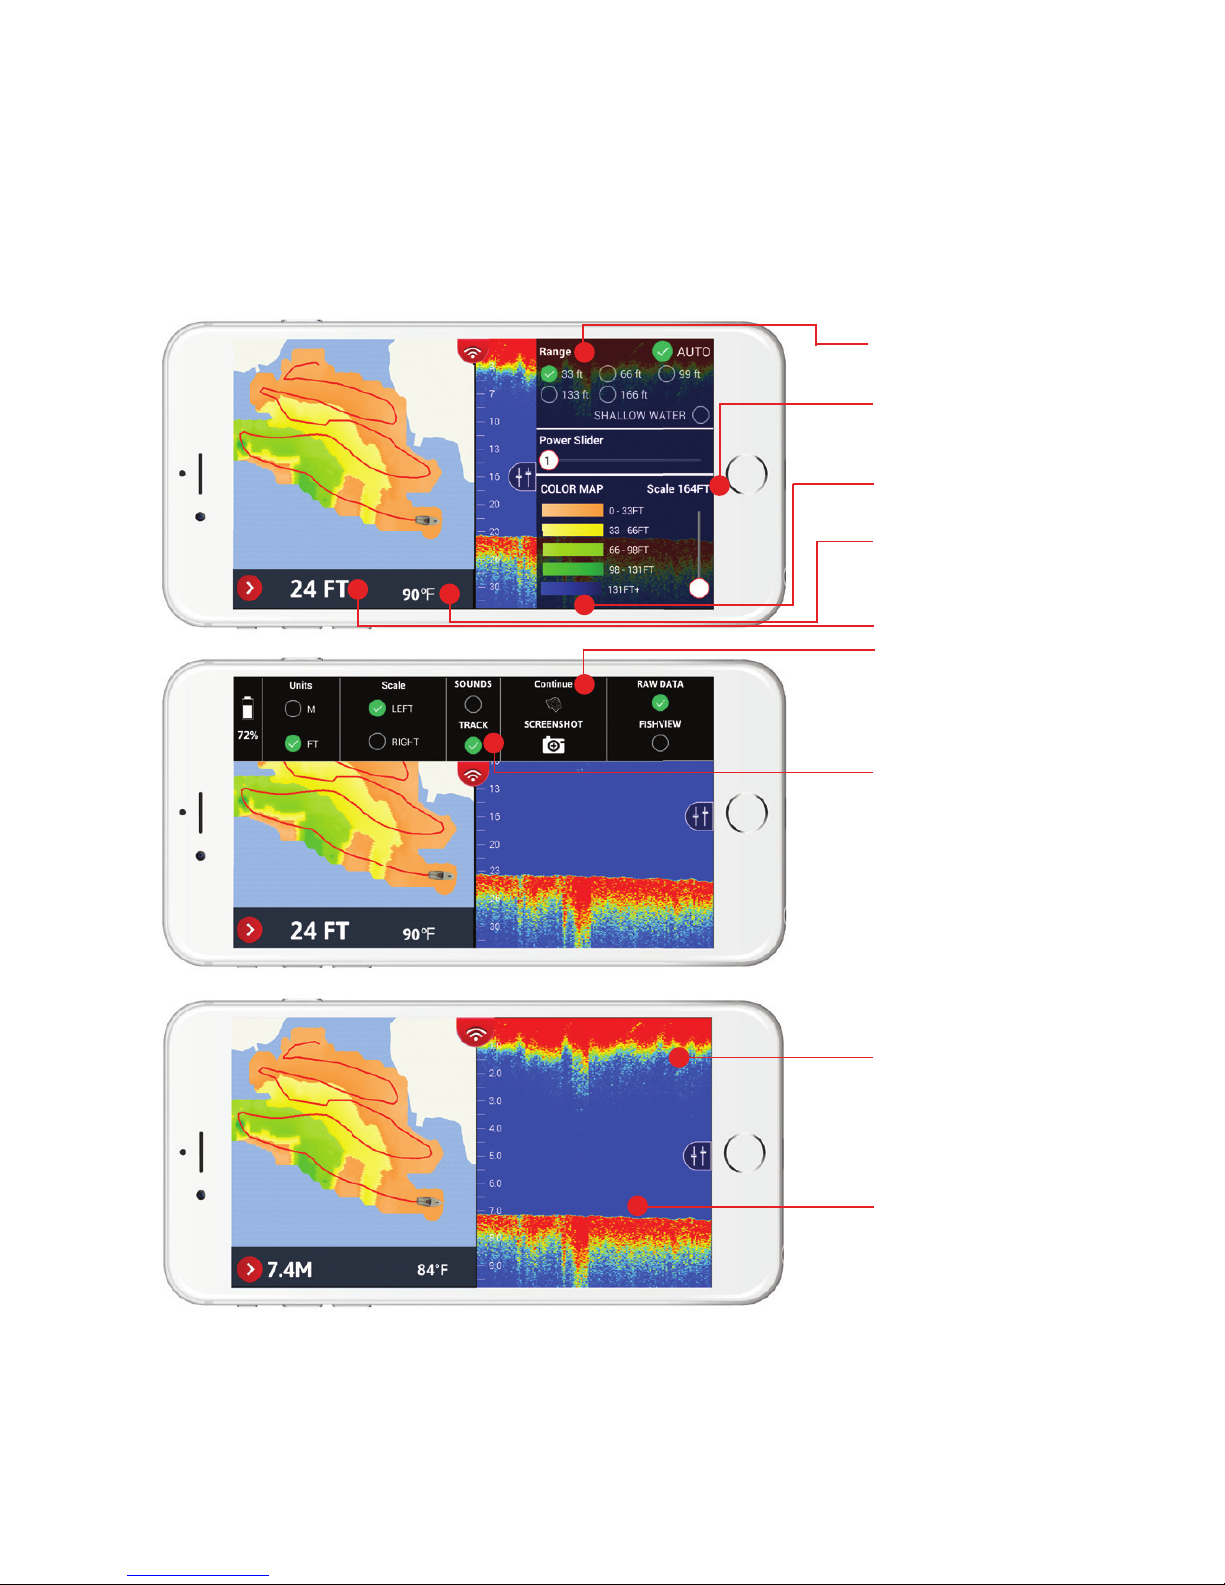
SIDE MENU
TOP MENU
SPLIT VIEW
Depth range
Area covered
Color scale
Depth
Boat location
Surface reverb
(See p.42)
Continue
current map
Bottom contour
Water
Temperature
Page 31
31
BATHYMETRIC MAPPING STEPS
Tether your FishHunter to your boat/kayak/canoe and ensure it
has good line of sight to your smartphone/tablet.
(We recommend the sonar be directly behind your boat and less
than 5ft from your smartphone/tablet.)
Ensure you are connected to the FishHunter Wi-Fi in your
settings.
Open the FishHunter app and go into the Sonar section.
Select MY BATHYMETRIC MAPS.
Select New Map.
The APP will validate your current GPS location and click Next.
The APP will double check the connection to your sonar and
click Next.
Click GO to start recording your map.
Your map will automatically save itself while it is recording and
can be found in MY BATHYMETRIC MAPS.
Visit our website for additional support videos:
www.fishhunter.com/support
1
2
3
4
5
6
7
8
9
Page 32
32
HOW TO ADD TO EXISTING MAP
Tether your FishHunter to your boat/kayak/canoe and ensure it has
good line of sight to your smartphone/tablet.
(We recommend the sonar be directly behind your boat and less
than 5ft from your smartphone/tablet)
Ensure you are connected to the FishHunter Wi-Fi in your settings
Open the FishHunter app and go into the Sonar section
Select MY BATHYMETRIC MAPS
Select the Map (from the list) you would like to add to OR choose it
from the map view
Navigate back to the are you wish to continue mapping (Note: you
must be within 500m of the last recorded position)
Open the top menu
Select Continue
The App will validate your current location and click Next
The App will check the connection to your sonar and click Next
Click Go to continue to record your map
Your map updated map will automatically save itself
1
2
3
4
5
6
7
8
9
10
11
12
Page 33
33
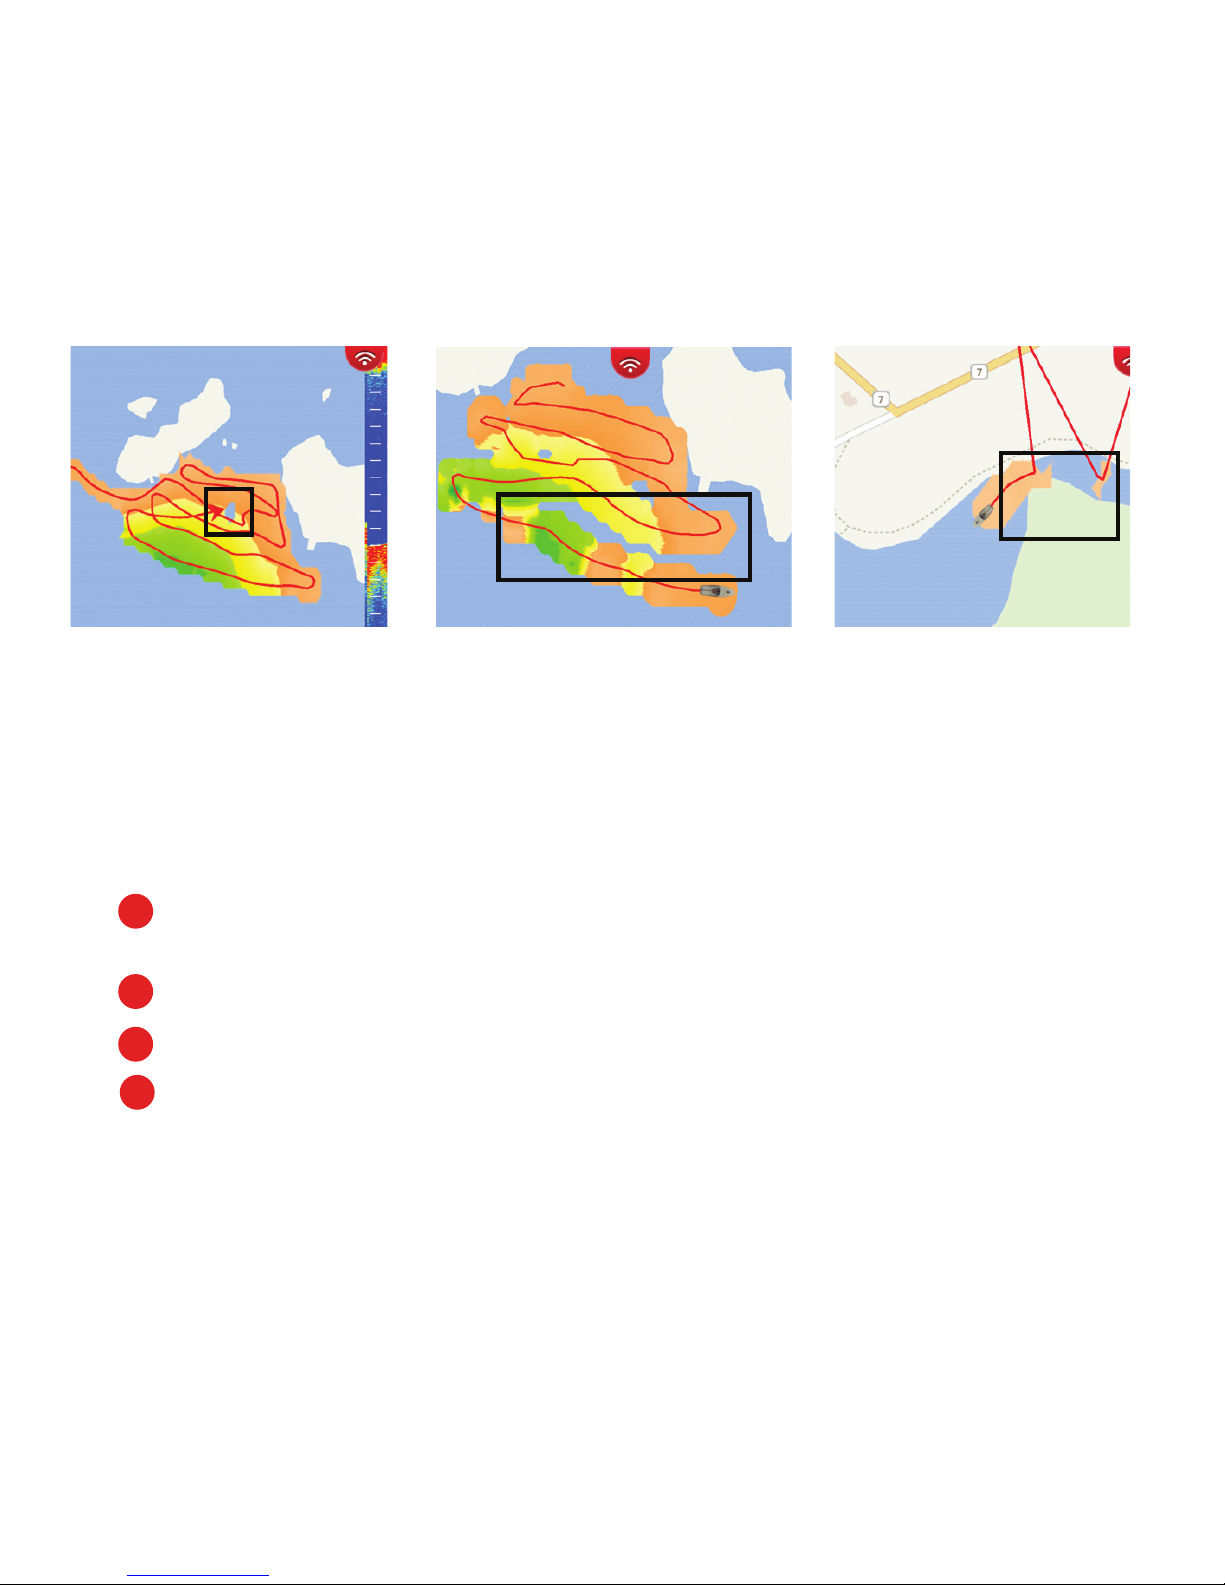
Large part missing
MISSING SECTIONS ON MAP?
STEPS FOR SOLUTION:
Navigate to missing spot
(Note: you must be within 500m of the last recorded position)
Place FishHunter Sonar in water
Follow steps 1-9 of how to add to existing map
Troll over area to retrieve missing data
Visit our website for additional support videos:
www.fi shhunter.com/support
1
2
3
4
Missing spot
Data point
was not recorded
by sonar
Area not captured
(Each pass of the boat
was too far apart)
Sonar and your
device temporarily
lost connection
Missing Connection
Page 34
3434
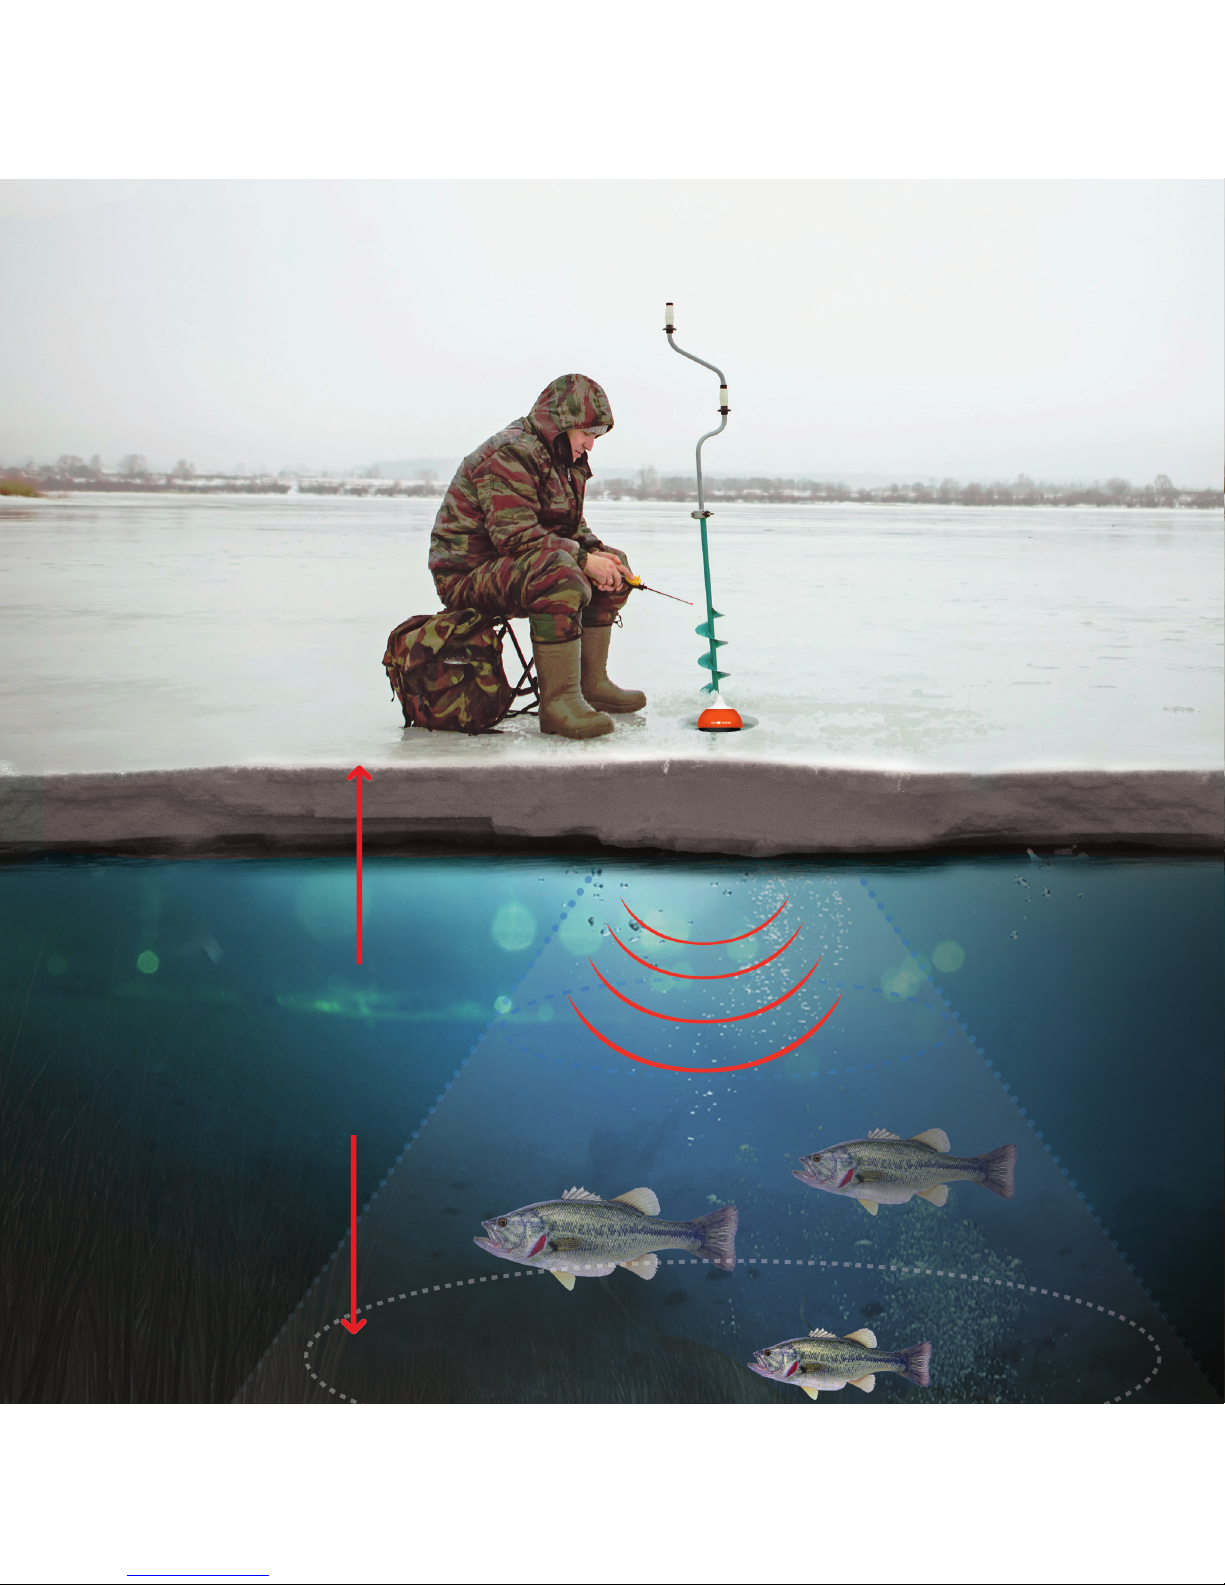
ICE FISHING FLASHER
DEPTH TO
BOTTOM
11 meters
Page 35
35
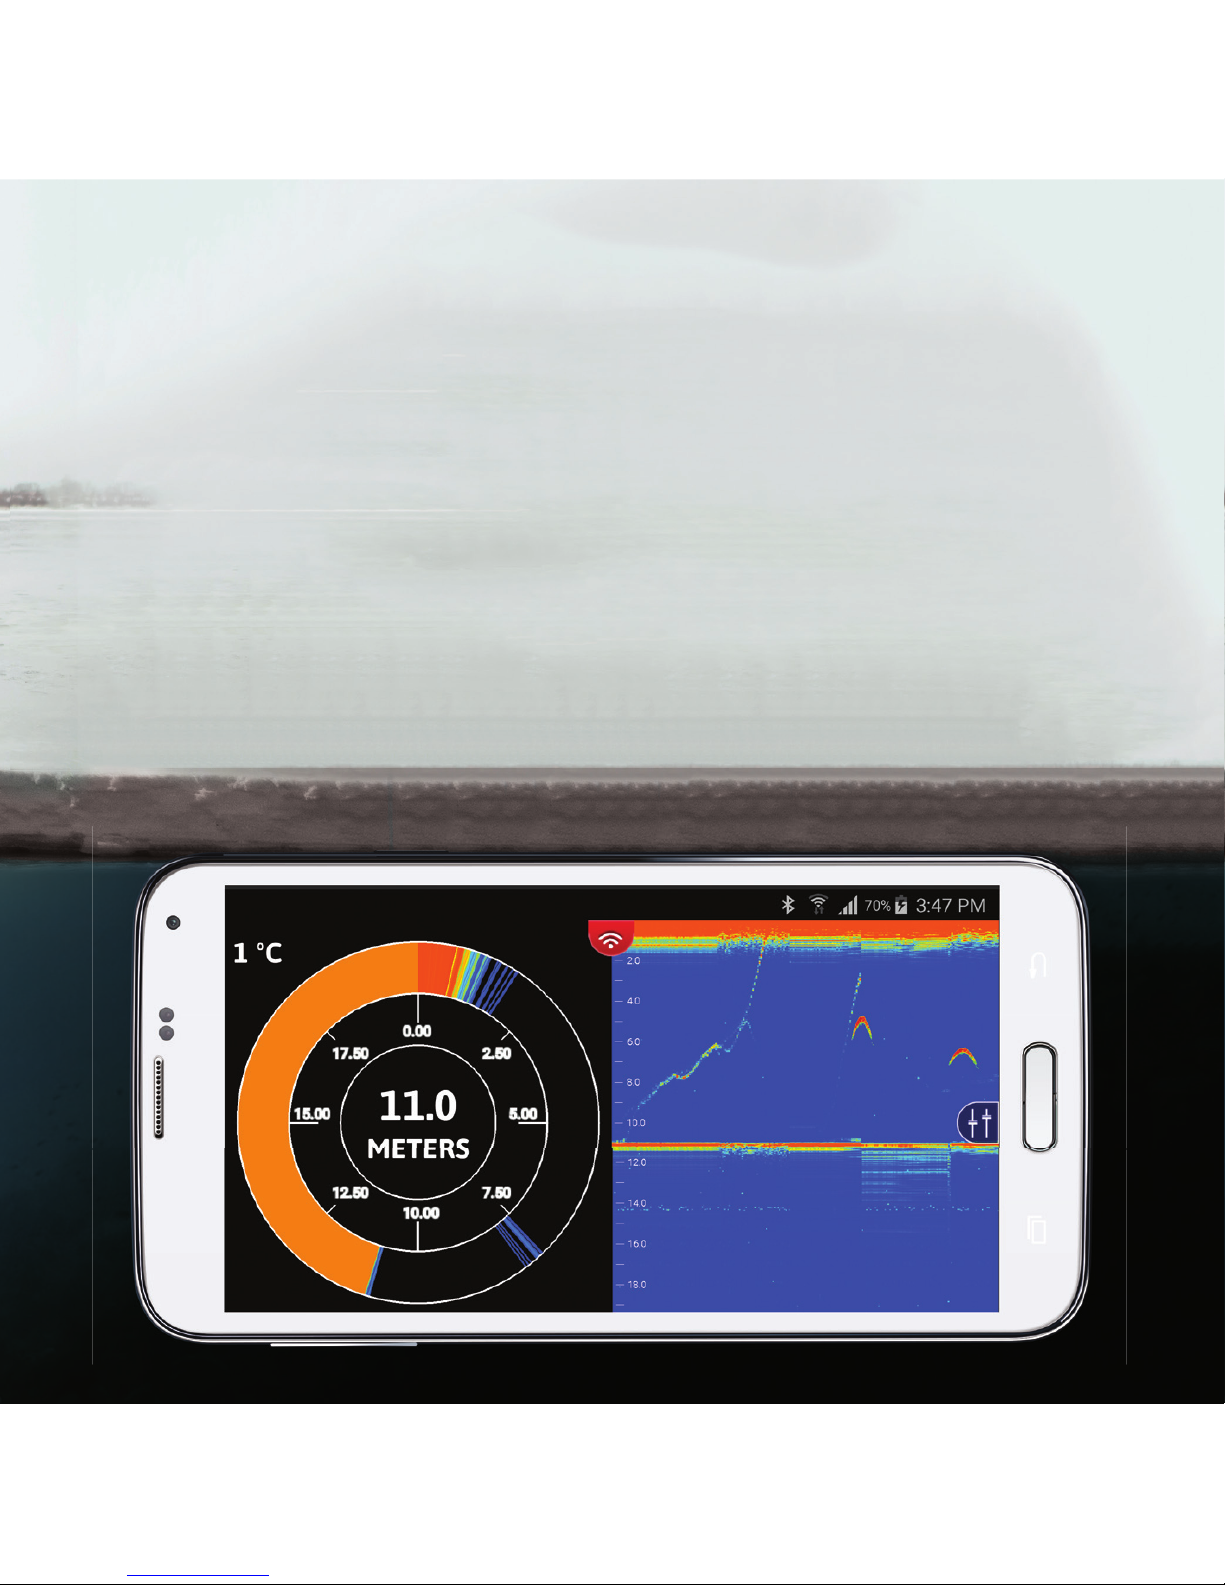
Unlike traditional fl ashers that are required to be
submerged beneath the ice, FishHunter fl oats in the ice
hole on the surface of the water, withstanding weather
conditions as cold as -22 ºF (-30 ºC).
Ice Fishing Flasher View utilizes 2 powerful ultra high
frequencies 475 kHz and 695 KHz, to enable you to see your
jig in real time. Both the SPLIT Screen (Flasher / RAW Data)
and FULL Screen (RAW DATA only) views allow you to see
the bottom, the bottom depth and the temperature right on
your smartphone/tablet.
Page 36
36
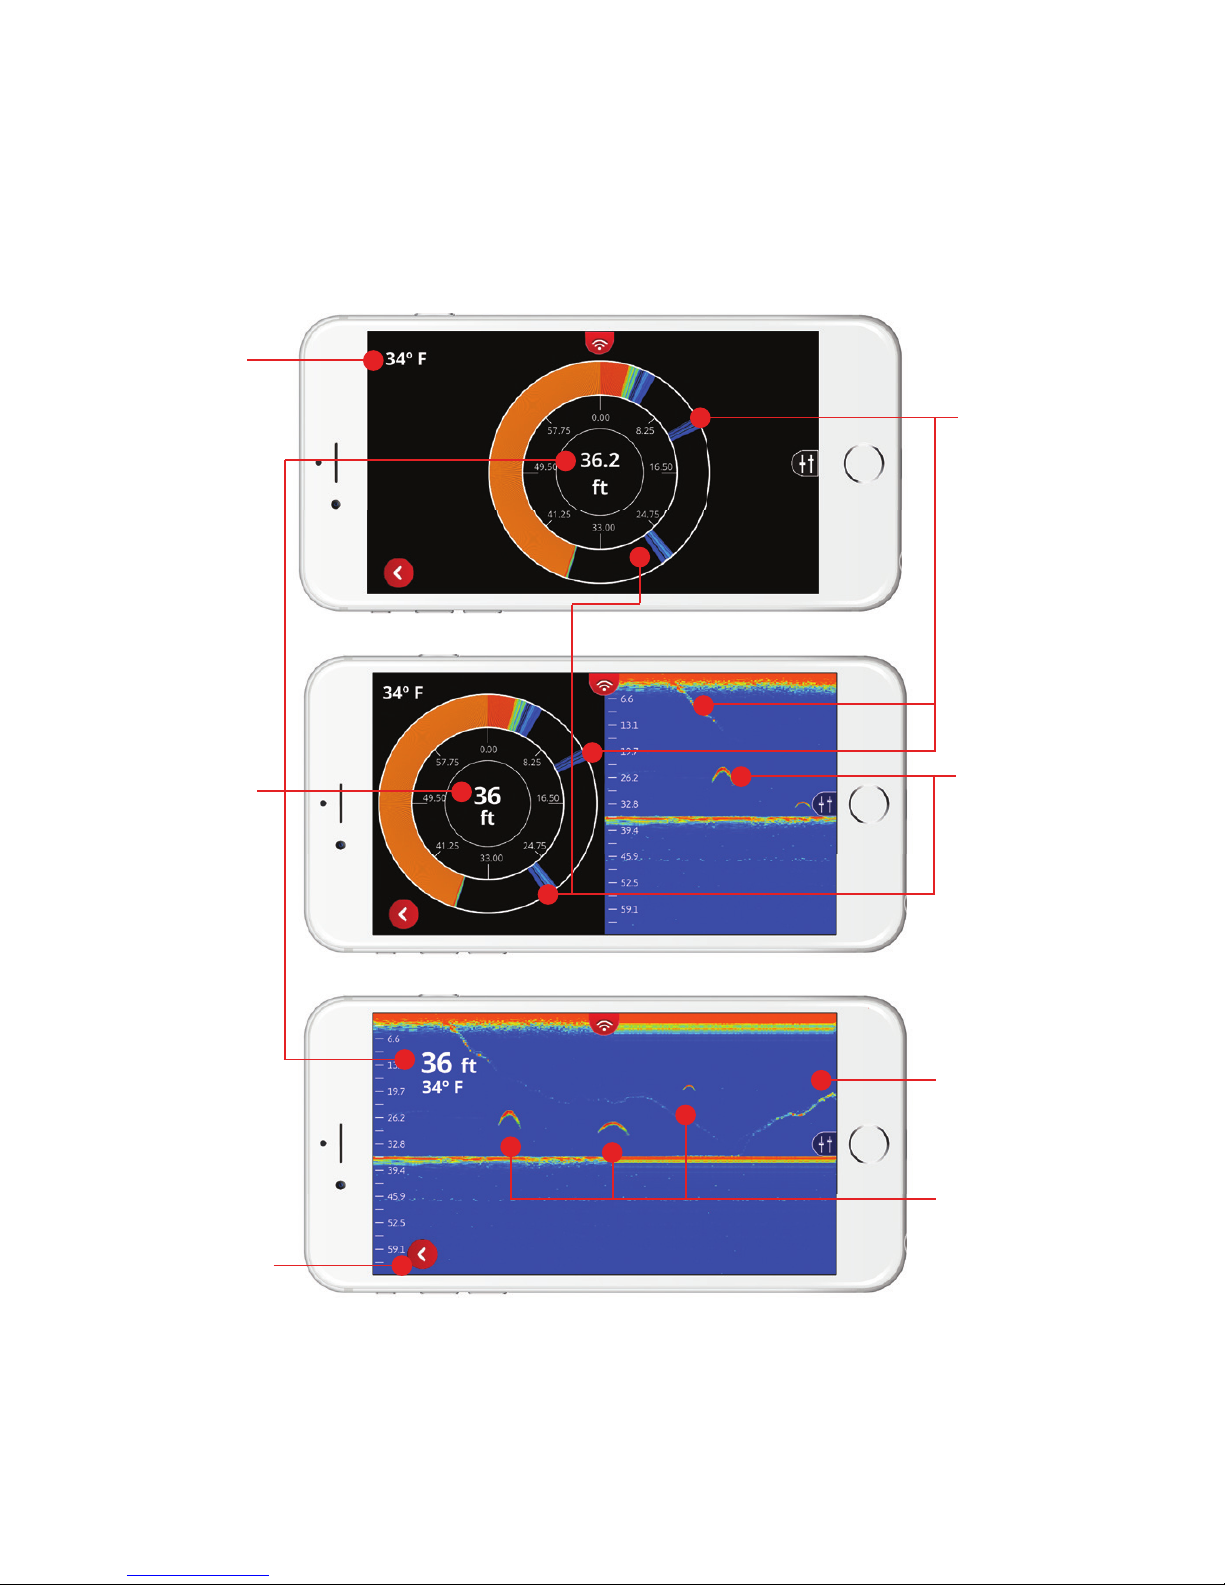
ICE FISHING FLASHER
Fish detected
Fish detected
Depth
Temperature
Bait and jig line
movement
Bait and jig line
movement
FULL FLASHER MODE
SPLIT VIEW
RAW VIEW
Change
View
Page 37
37
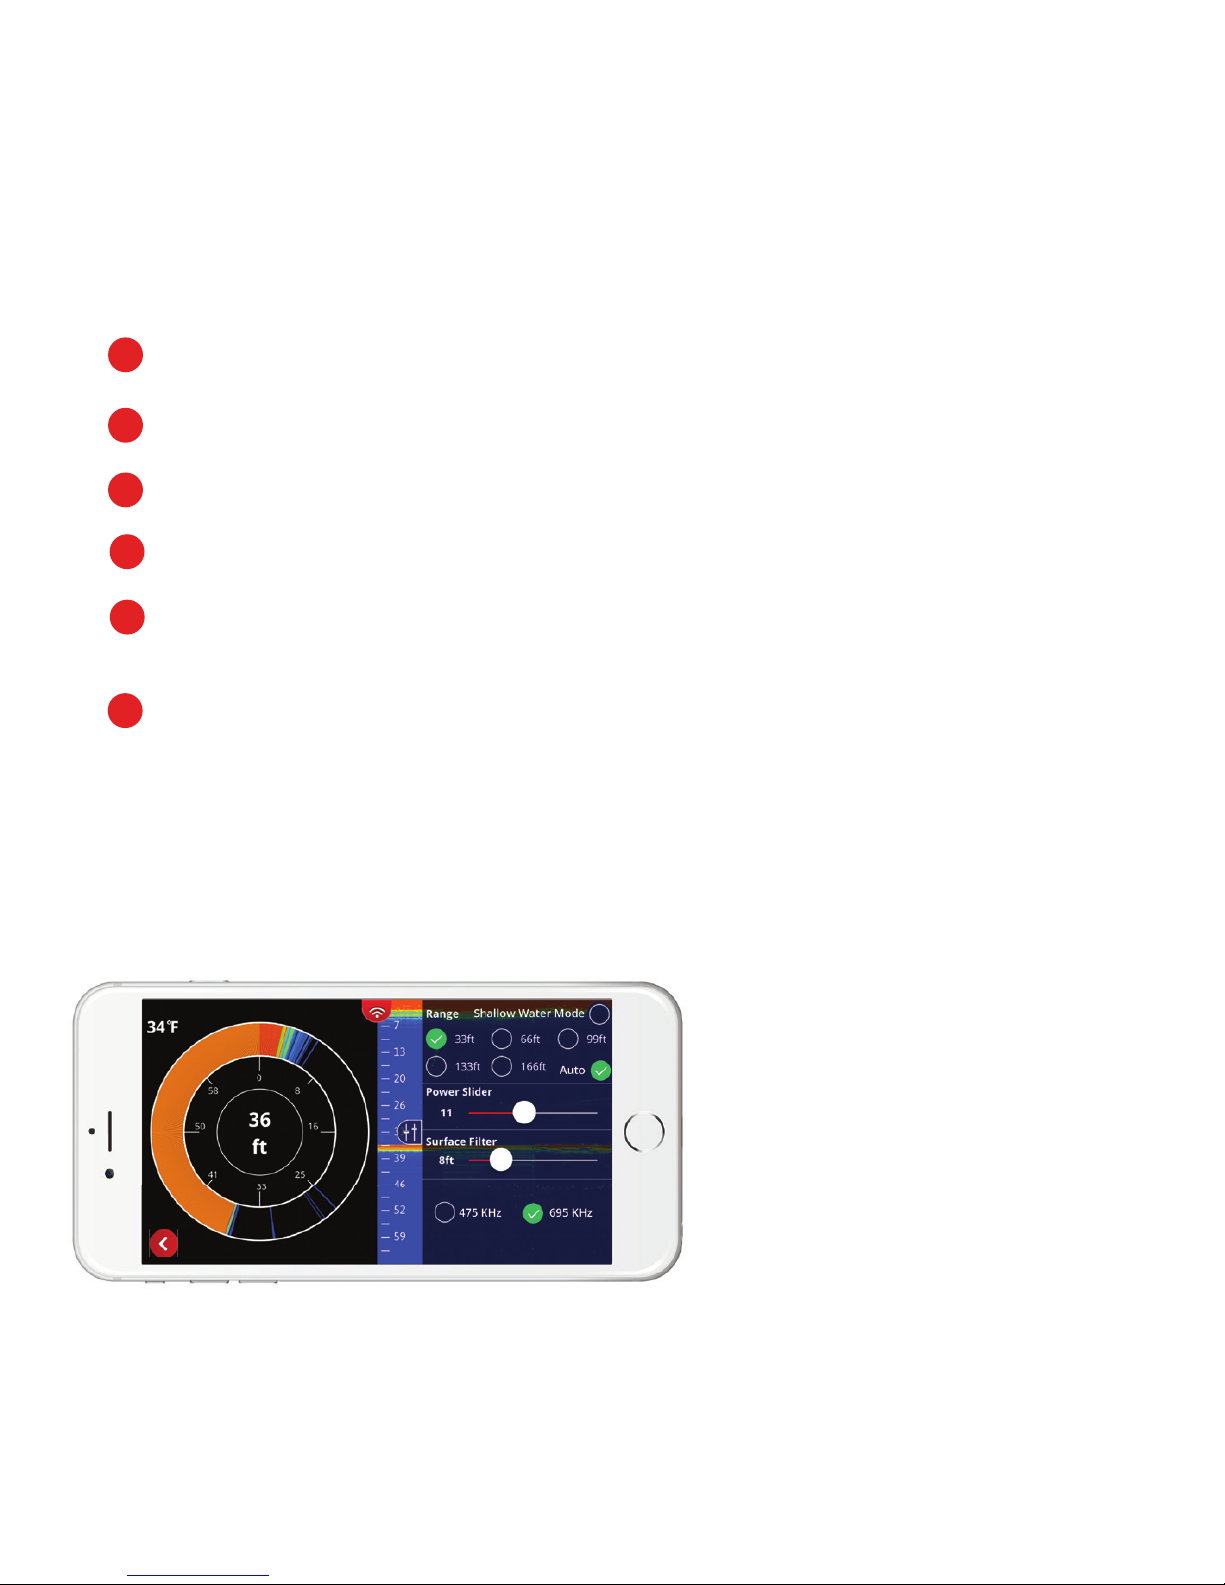
ICE FISHING FLASHER STEPS
Clear any snow debris from your ice hole.
Place FishHunter in the ice hole to turn it on.
Open your Wi-Fi settings and select FishHunter™ XXXX.
Open the FishHunter™ app and go into the sonar section.
Select the Ice Fishing icon within the FishHunter™ app
from your phone/ tablet screen.
You will now start receiving Ice Fishing Flasher data to your
device screen.
1
2
3
4
5
6
SIDE MENU
NOTE:
Surface Filter and Power Slider are
very useful when using
Ice Fishing Flasher mode.
Find more detail about them
on page 42 for Surface Filter
and on page 44 for Power Slider.
Page 38
38
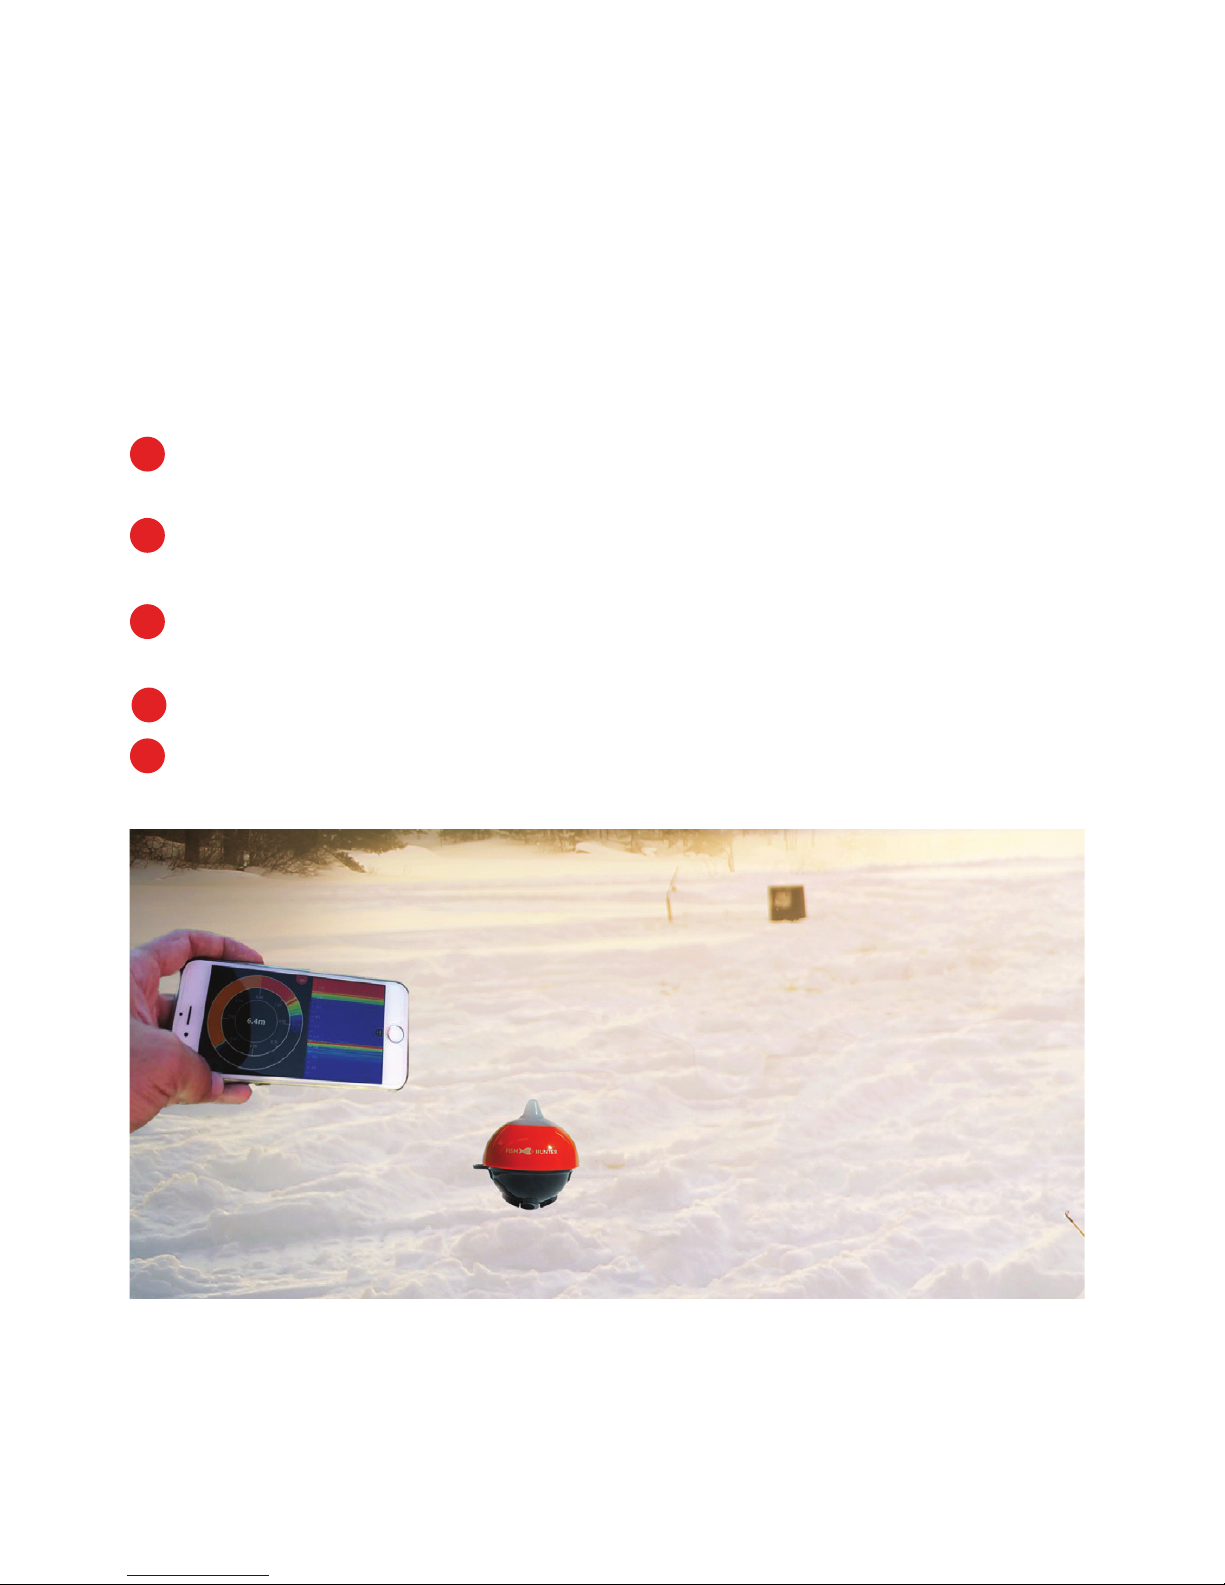
"KNOW WHERE TO DRILL"
The FishHunter is very powerful and you can actually fi nd the
bottom depth in most cases, without having to drill a hole in
through ice.
Clear the snow from the surface of the ice, ensure ice surface is
fl at/smooth.
Plug the charge cord into the bottom of the sonar and remove it.
This will turn on your sonar for about 2 minutes.
Place your FishHunter on the top ice surface making sure it is
sitting fl at on the ice.
Connect to the FishHunter using your Wi-Fi.
Open the app and select "Ice Fishing"
1
2
3
4
5
Page 39
39
MENUS AND SETTINGS
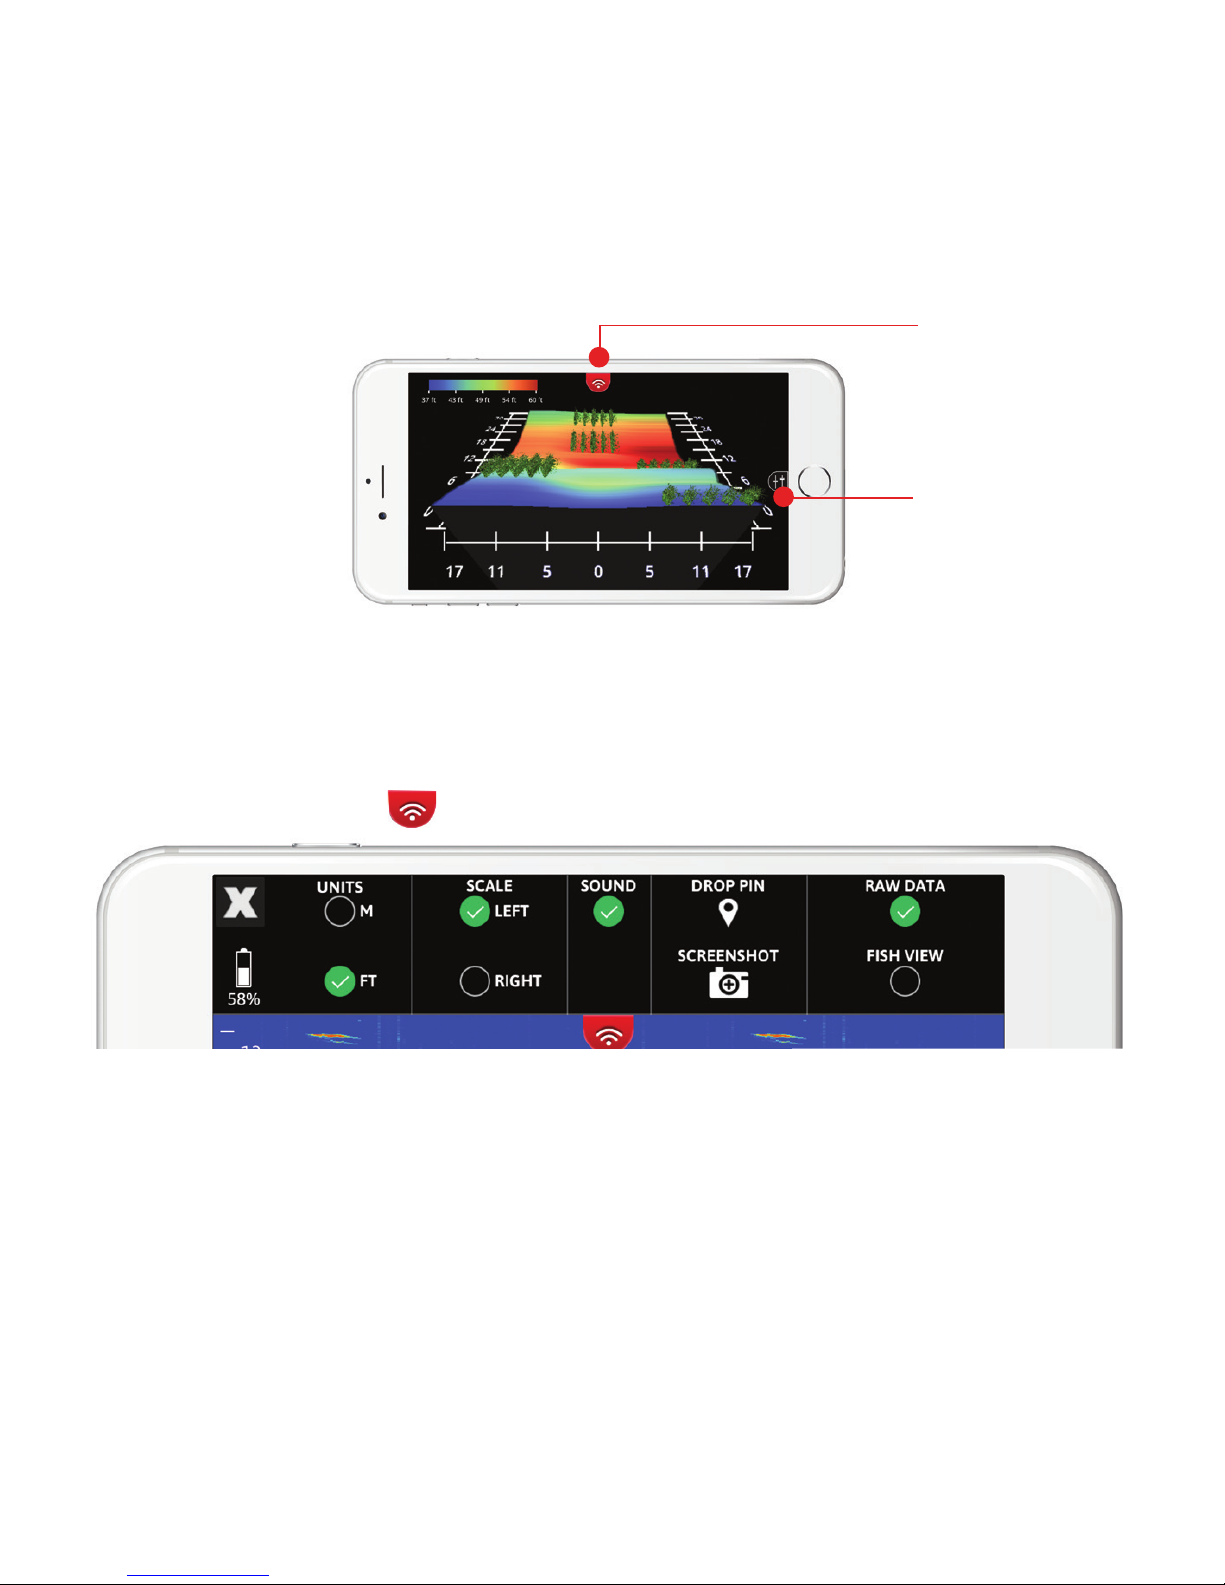
There is one top menu and one side menu located within your
FishHunter App. Each of these menus can be called by
pressing on the small slider like icon on your screen.
TOP MENU OPTIONS
Top Menu
Side Menu
X: Clicking on this icon will take you back to the view options
(for iOS only. For Android, you use the BACK Button)
Battery Life: shows battery charge level of sonar
Unit of Measurement: select the units you wish to display your
depth and temperature in (M:metric or FT: imperial)
Page 40

40
Scale Location: choose between left or right hand side scales
Sound: ability to turn on and off sound for detecting fi sh
Drop pin: will create GPS location and save the information to
that GPS location. Can later be found on the map area of the app.
Screenshot: will take a screen shot of what's on your screen and
save it to your camera roll
Raw View or Fish View: switch between Raw View and Fish View
in some views
SIDE MENU OPTIONS
Shallow Water Mode: will adjust the scale on your screen to be
between 1.4ft-15ft and adjust the settings to give you the best
results when in less than 15ft of water. Please note that you must
adjust the power slider. Failure to adjust the power slider can
result in the FishHunter giving you incorrect bottom values.
Auto Range: the screen will take a few seconds to “fi nd the
bottom” depth for the area and adjust its settings automatically
to balance the gain and pulse width of your sonar to give you the
best results.
Every time you cast the FishHunter into the water the screen
will take a few seconds to “fi nd the bottom” depth for the area
that you are fi shing in. In order to optimize your experience, we
have created an auto ranging function that allows us to
Page 41

41
automatically balance the Gain and Pulse Width of your sonar to
give you the best possible results at each depth you are fishing in.
In most cases leaving it in “Auto” is the best way to use your sonar.
But, if you are taking your FishHunter in and out of the water
repeatedly, like when casting, we suggest that you try manually
setting the depth range to increase the speed of your FishHunter.
You can set the depth manually by going into the side menu and
selecting the depth you will be fishing in. The side menu changes
slightly depending on what view you have the sonar in when you
open the menu.
Select the number of feet or meters for depth: You can manually
select the depth you would like to operate in. This will improve the
speed in finding bottom.
Surface Filter Slider/Ice Thickness Slider:
Whenever you use a fish finder, you will get what is called surface
reverb or surface noise as the sound waves from the transducer
reach the surface of the water.
The Surface Filter allows you to customize how much of the area
on the surface you would like your FishHunter to ignore or include
to give you the most accurate fish detection possible.
The filter is set to the center position by default each time you turn
on the sonar, but as you adjust the slider from left to right you will
see that a number appears on the right hand side of the
Page 42
42
slider. This number (in either imperial or metric) is the ACTUAL
amount of the surface that will NOT be measured by your
FishHunter. In very calm conditions, you can set the Surface
Filter to a very low number to allow you to search for fi sh that
are located very close to the surface. In more
extreme conditions where you have high wind, high waves or
when you are trolling your FishHunter behind a boat motor, you
will want to turn UP the Surface Filter.
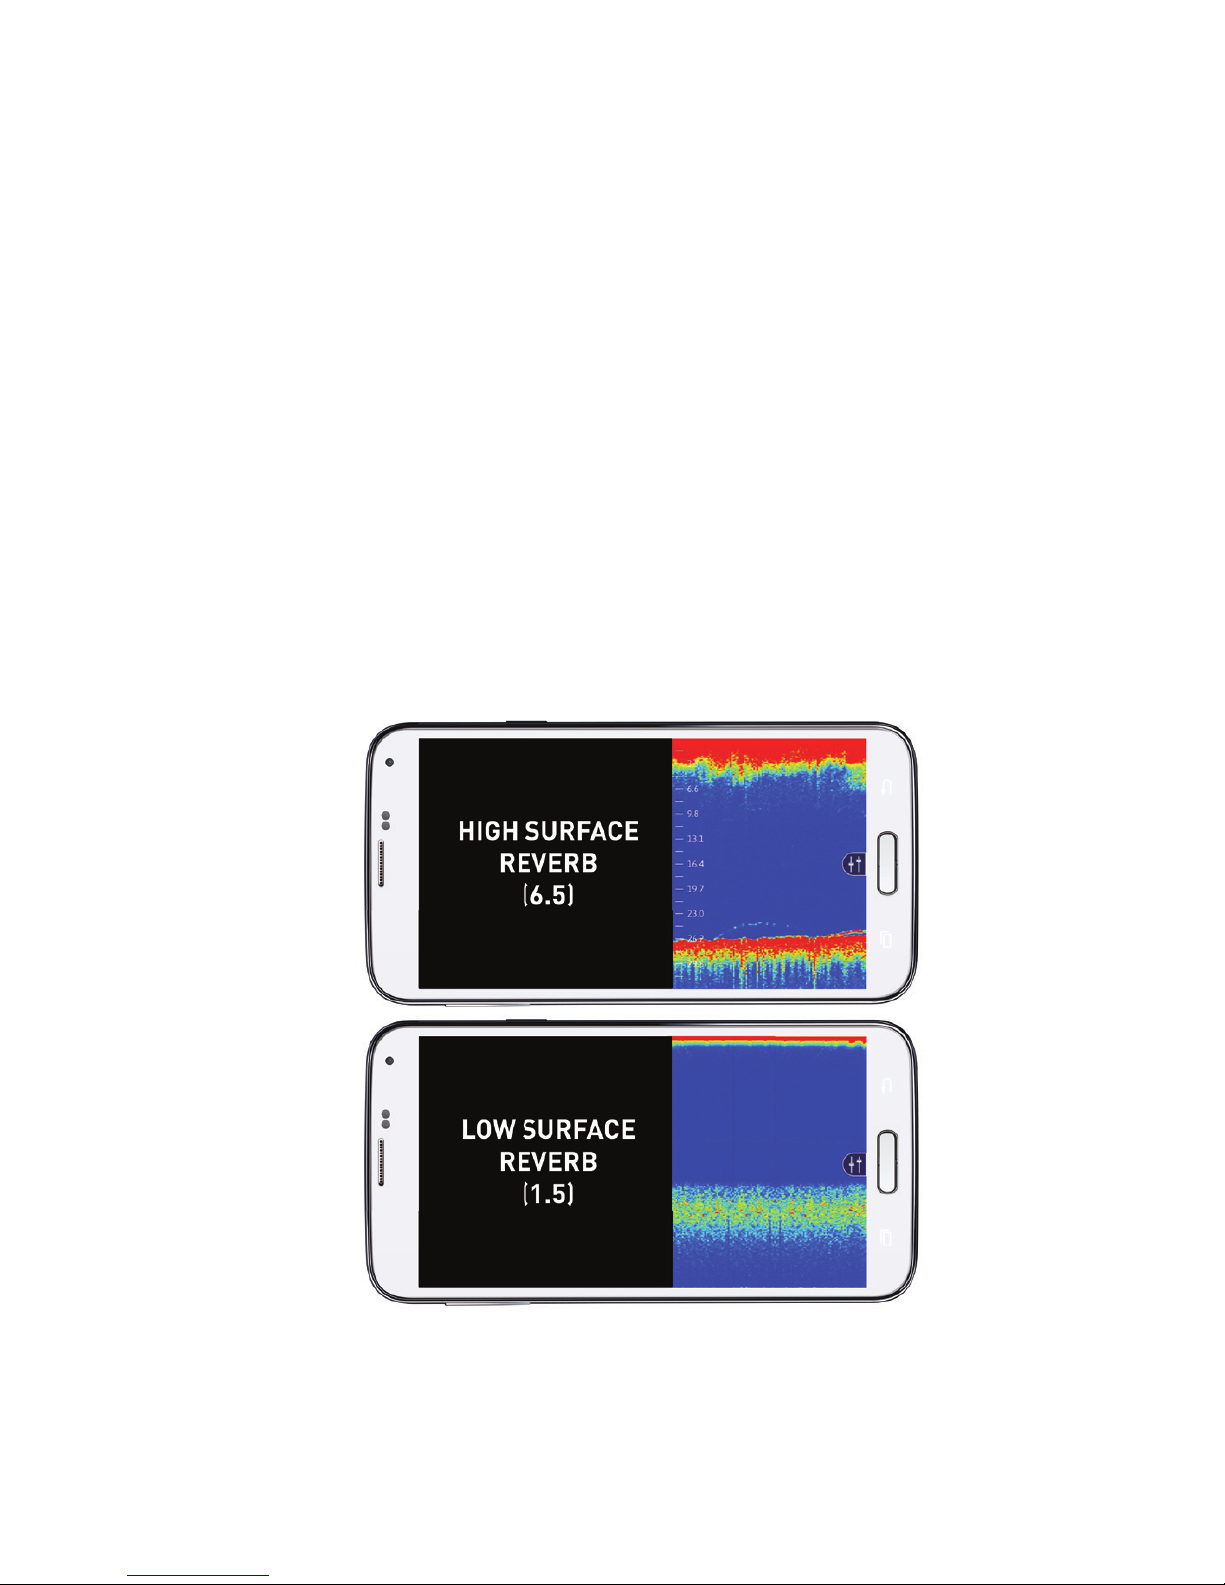
Try to set the Surface Filter to a number that matches where you
see the surface noise stop in the RAW data view on your screen.
in the example below, you would set the top sonar to 6.5ft and
the bottom sonar to 1.5ft to give you the best results.
Page 43
43
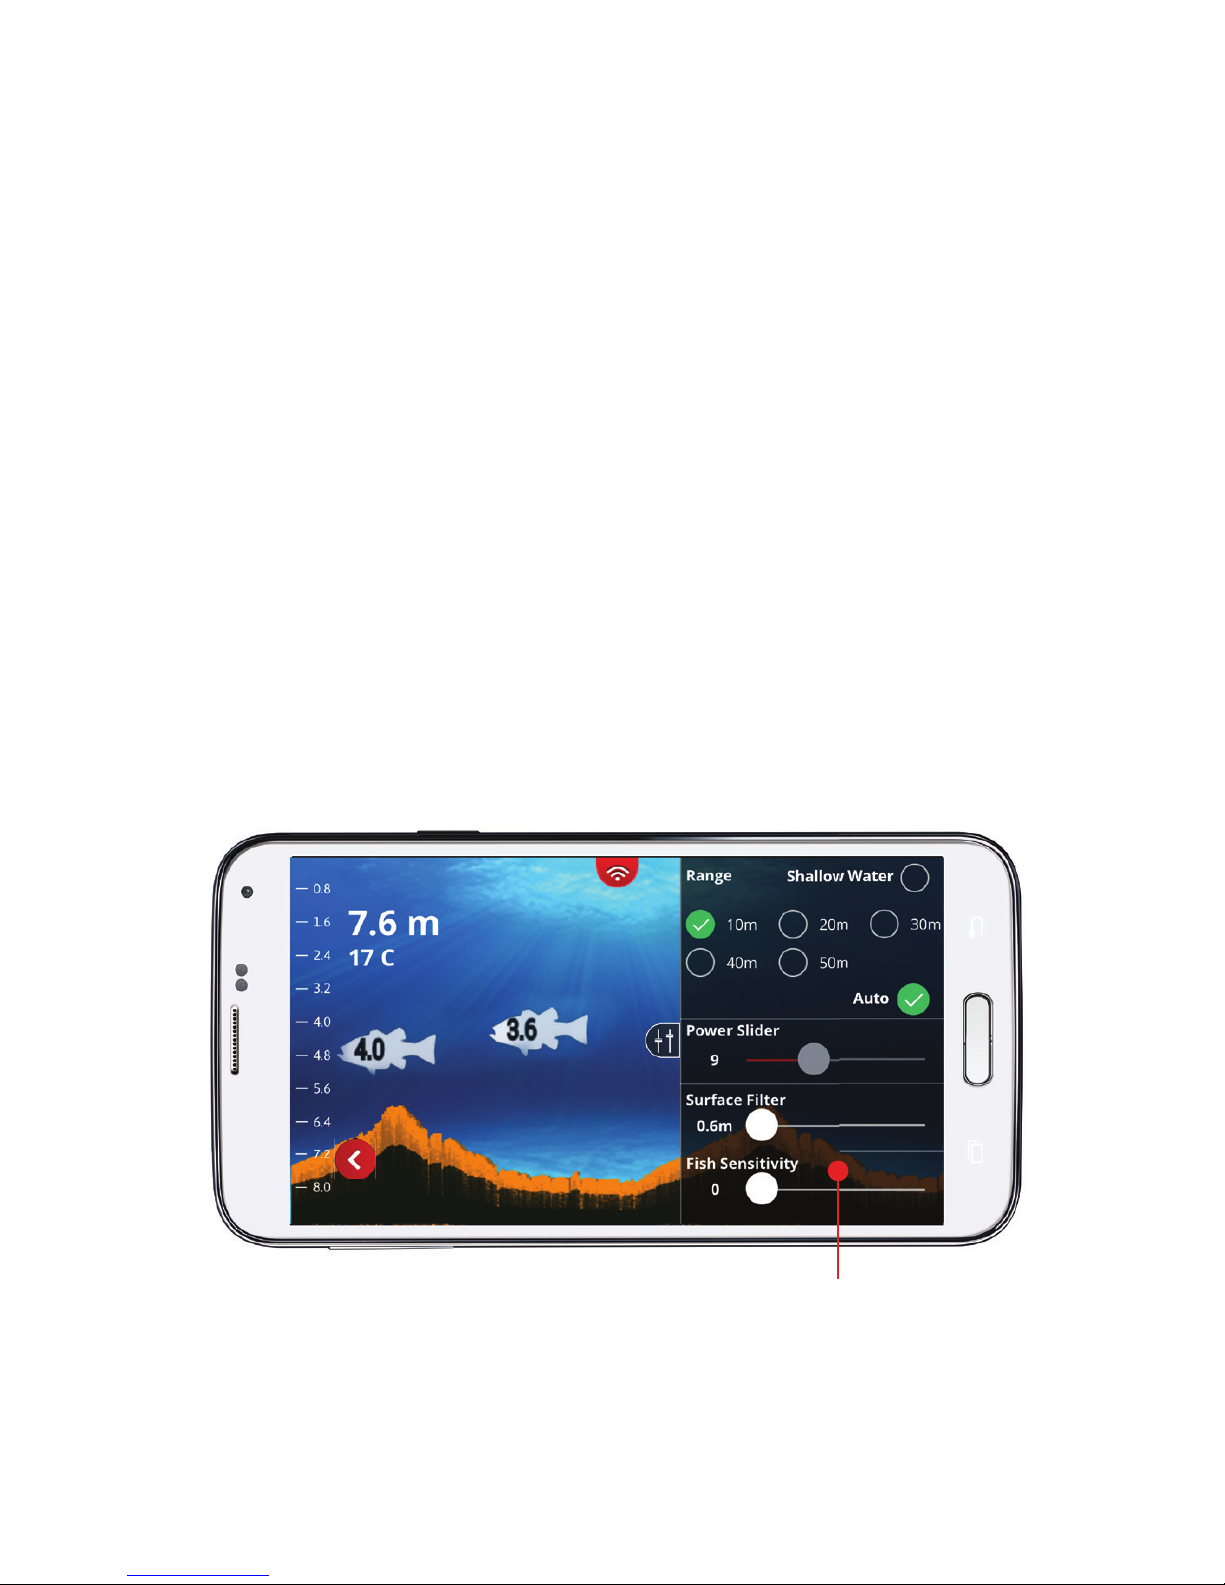
Fish Sensitivity Slider:
The Fish Sensitivity Slider adjusts how sensitive the
FishHunter is at detecting fi sh in the water column/body. As you
move the slider from left to right you can increase the
sensitivity of your FishHunter from 0 to 5, with 5 being the most
sensitive. The Fish Sensitivity Slider can be changed in real time,
so you can see the direct impact each position change has on
having the FishHunter display and notify you of fi sh that have
been found in FISH VIEW. Sometimes, you will want the
FishHunter to detect and display all the fi sh no matter how
small they are, and other times you will want the
FishHunter to detect and display only large fi sh. The Slider
provides you a means to customize the FishHunter to your
fi shing preference.
Fish Sensitivity Slider
Page 44
44
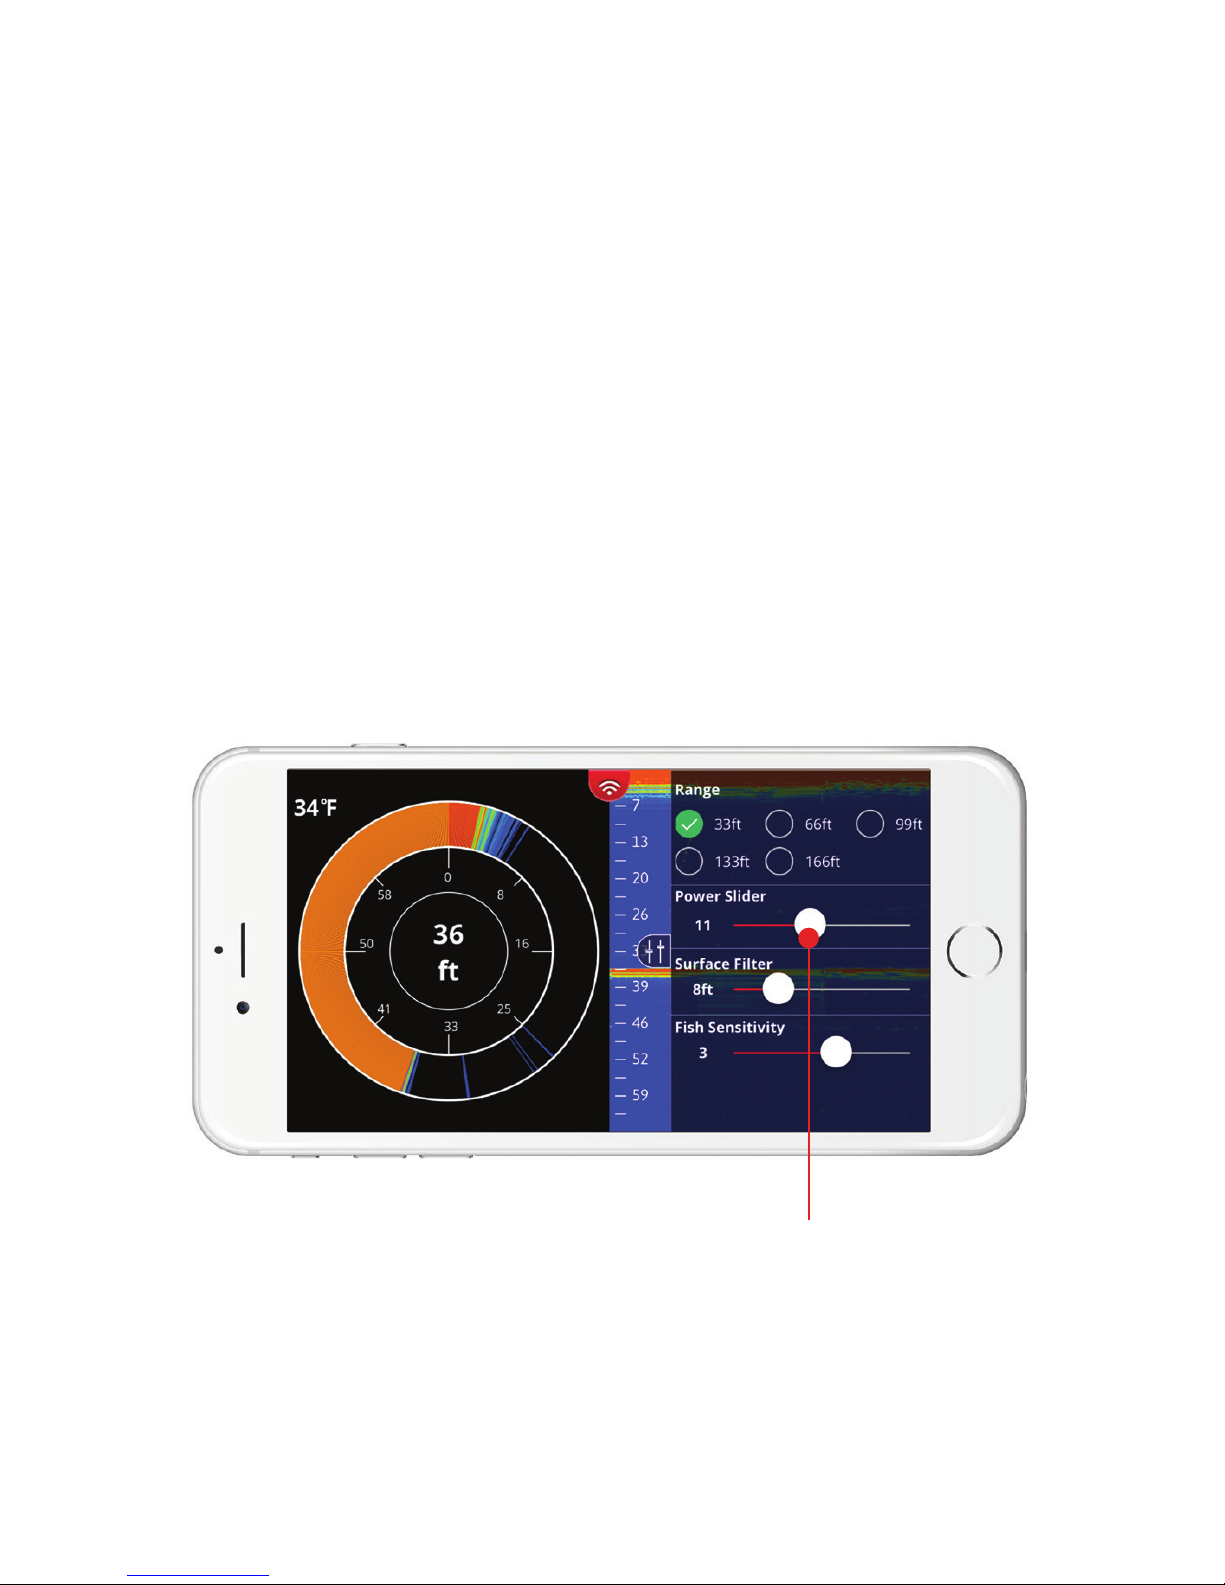
Power Slider
The Power Slider allows you to adjust the gain and pulsewidth
for your FishHunter. In Ice Fishing Flasher mode, the
FishHunter does not know the thickness of the ice, giving you
the ability to adjust the power you want to use when ice fi shing.
Higher power will allow you to see your jig very clearly but lead
to more surface reverb, while less power will lead to minimal
surface reverb but less clarity on tracking your jig. We expect
that you will need to adjust this setting each time you use your
FishHunter in a new area.
Power Slider:
Page 45
45
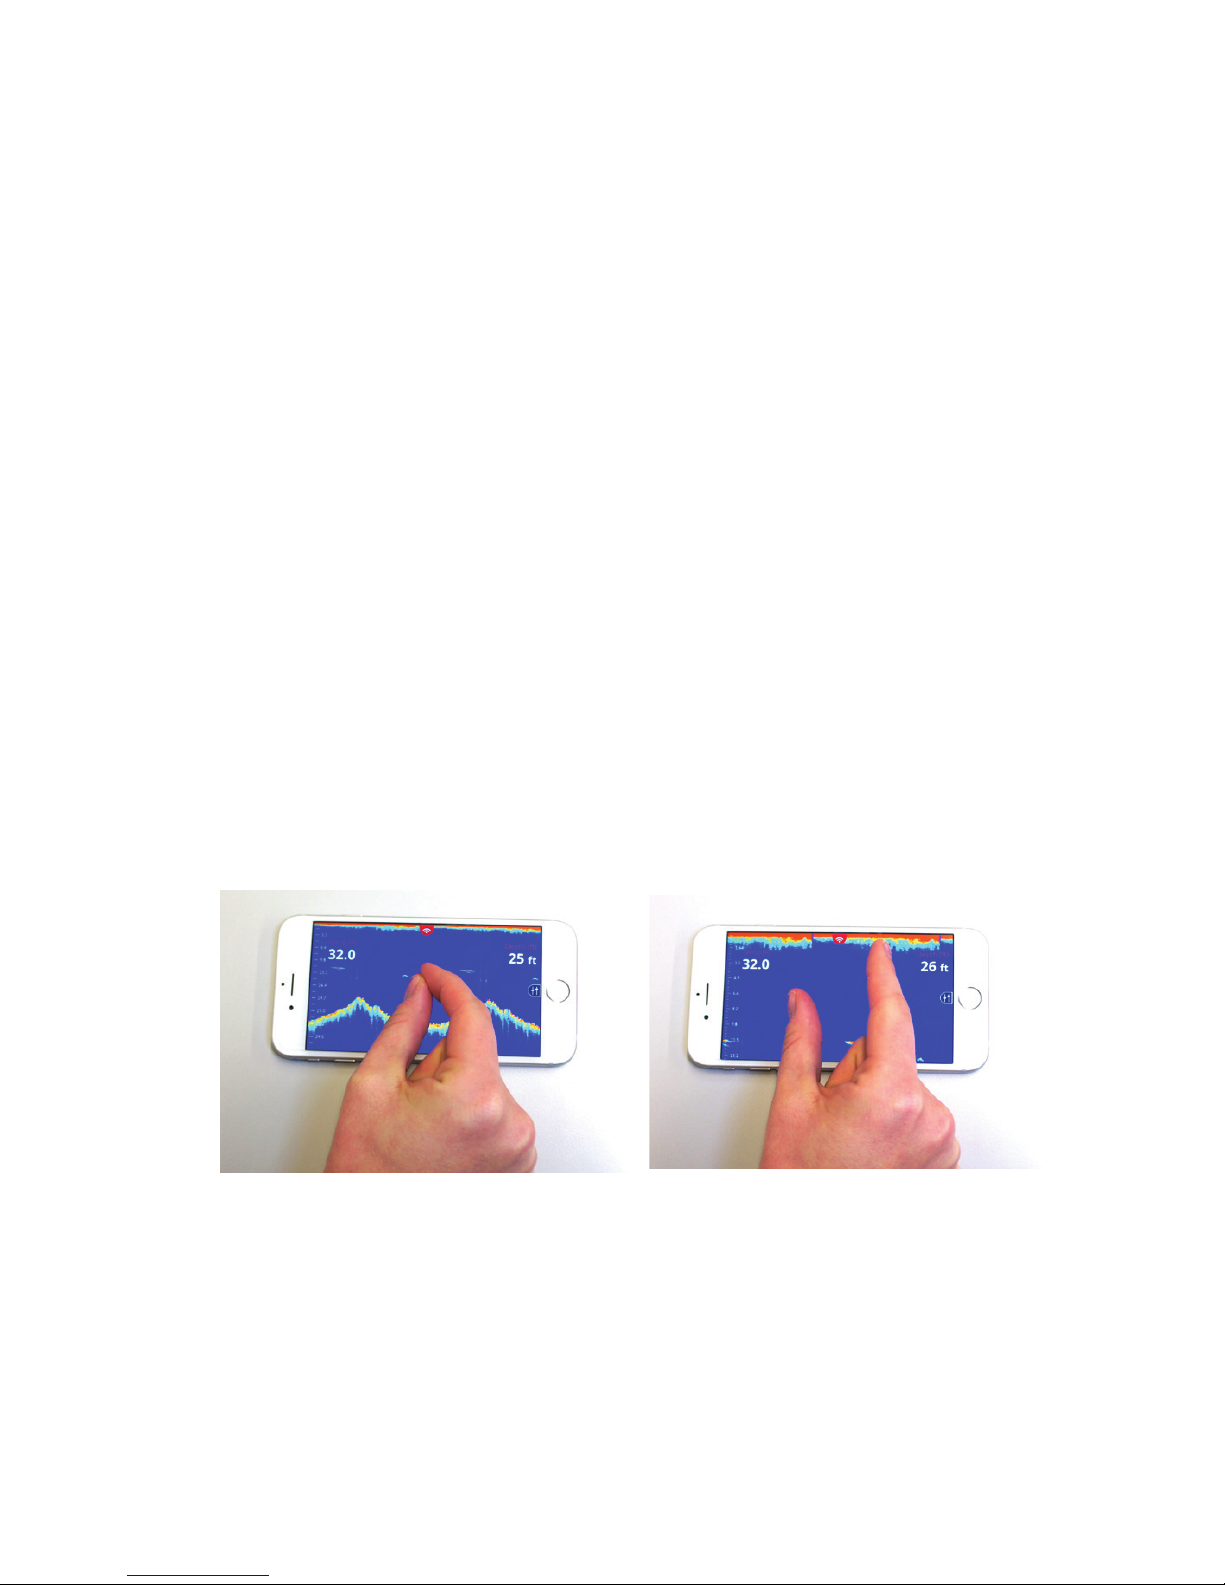
ZOOM FEATURES
This feature within the FishHunter app allows you to look more
closely at the sonar display on your phone. This is useful when you
want to look at the bottom area OR review the top area of the sonar
data to look for fish or other specific artifacts. This feature can be
used anytime you are in the sonar portion of the app, and reviewing
RAW sonar data.
Steps:
1. Review sonar in RAW data view.
2. “Pinch” your fingers together and place on the screen where
you want to zoom.
3. Slowly move fingers apart while touching the screen.
4. Adjust the screen to the place on the screen that you would
like to focus on by taking your finger and “scroll” the screen
to move the screen up and down to get to the correct position.
Note: that when you are Zooming IN/OUT, the scale on the right/
left side in the sonar reading section will also change to match
the Zoom level you have chosen. As you are zoom in the scale will
increase and as you zoom out it will decrease.
Page 46

46
IMPORTANT USAGE TIPS
FishHunter 3D is the World’s most powerful portable fish finder
and it is designed to work in all types of fishing conditions. As
you already know, it comes with 5 very powerful views to support
you in catching more fish and we recommend that you review
how the 5 different views work on our web site:
www.fishhunter.com/directional3d
Casting and reeling from shore:
The FishHunter 3D is 180 grams, so when casting from shore
we recommend that you use a stiff rod and braided line. We have
tested casting the unit with all types and styles of rods and lines
and have had no issues, but better to be safe in your approach
when casting from shore.
1
Page 47

47
Kayak Fishing Usage:
With a range of over 150 ft, you can cast the FishHunter away
from the kayak and fish the broadest possible area. We have
tested casting the unit on all types of rods and lines but do
suggest a braided line for casting.
Drifting:
For drifting we recommend that you use our 15 ft leash to
attach your FishHunter to the back/side of your kayak. As you
drift along, the FishHunter will be giving you a strong
reading for the area located around the floating sonar and
below your kayak. This is perfect when you are not looking to
cast your line far or when you would like to drift your bait line.
Bathymetric Mapping:
Ensure your FishHunter is attached to your kayak within 5 ft
of your device. Ensure your device is elevated (try our fishing
tripod) and has good visibility to the sonar.
Paddling/Pedaling:
When paddling/pedaling the kayak at a slow pace you can use
the 15 ft leash and pull the FishHunter behind the kayak to
allow you to see the terrain below your kayak.
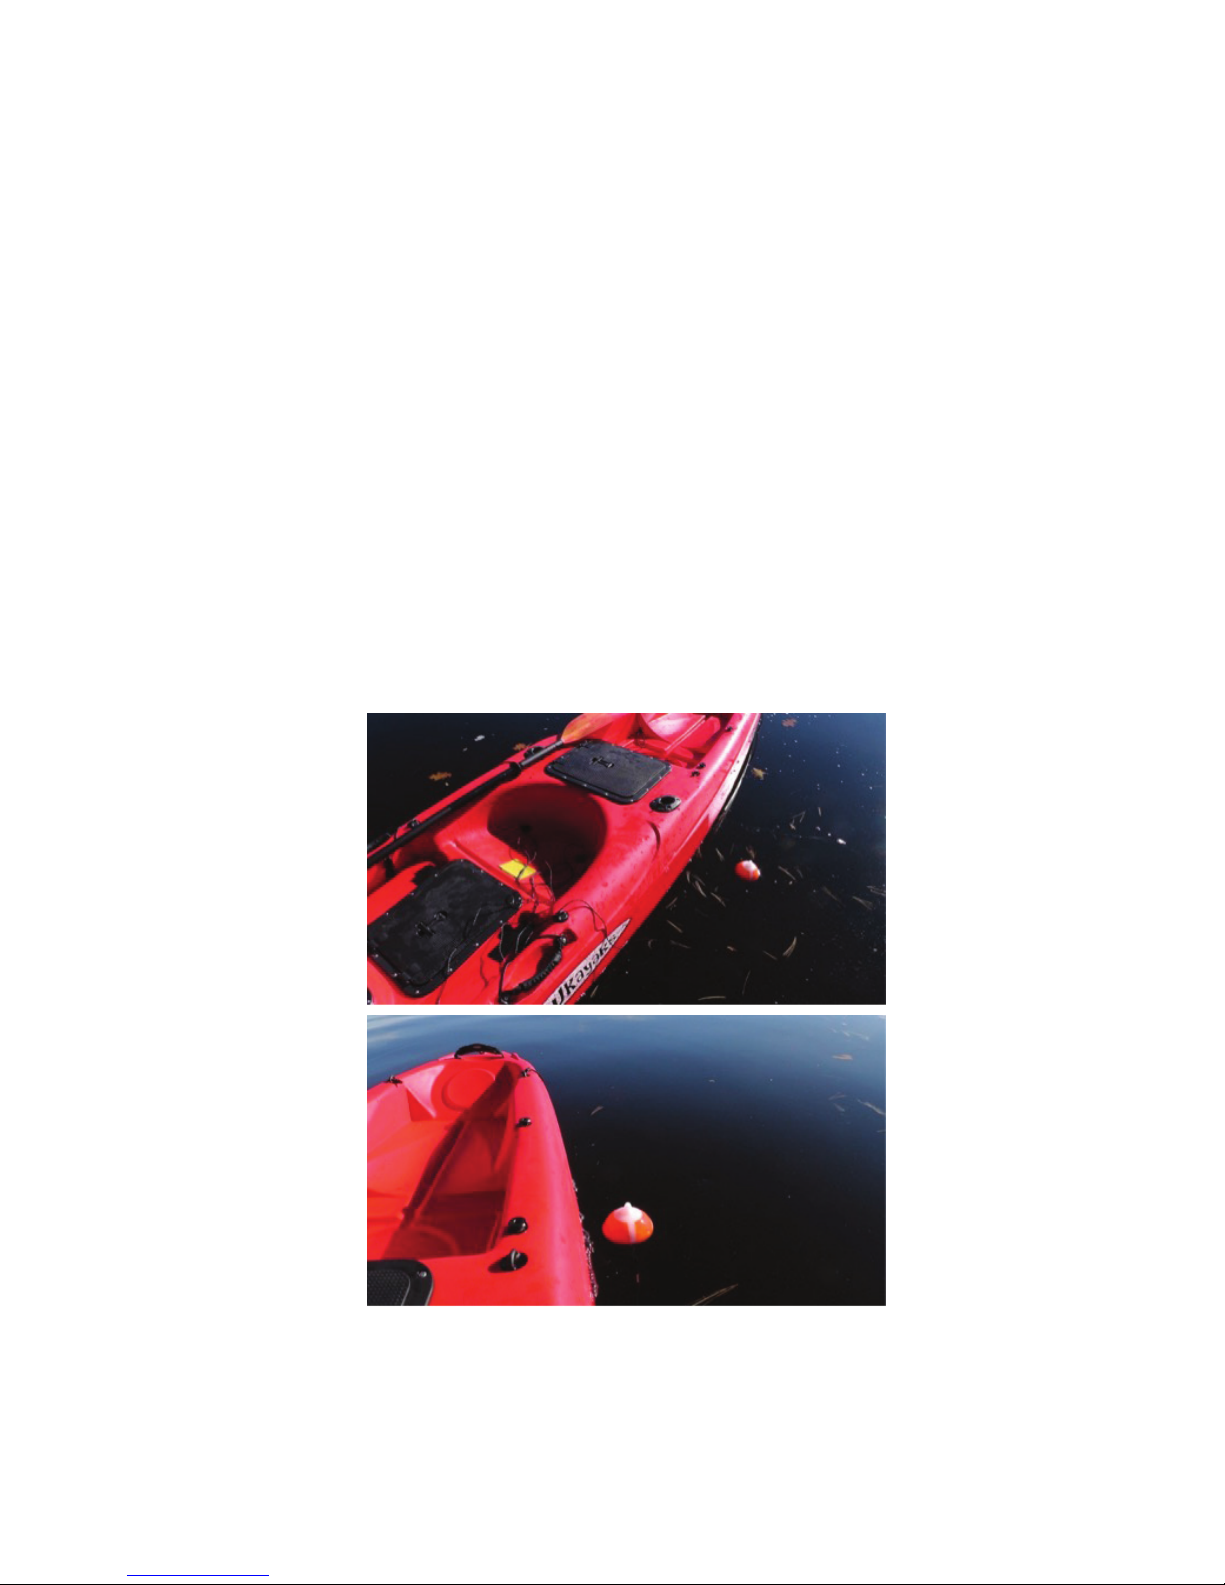
When paddling/pedaling along at a fast pace, you will want to
have the FishHunter located just behind your seat in the kayak.
This will give you the best possible
connection with the sonar and the most consistent screen
speed. (See photos on the next page.)
2
Page 48
48
I. Attach your tether to the side of your kayak
(Note: in the below we have attached it to the kayak handle).
II. Allow enough line to ensure your FishHunter will be behind
your seat. When you are moving along (in this case we have
used about 4 ft of the tether) the FishHunter may bounce off
the side of your kayak from time to time, but that will not impact its performance.
You may notice in the RAW VIEW that you will be able to see
your paddle/pedal strokes in the surface noise. This does not
impact the performance of your sonar and is due to the fact
that the sonar is floating directly behind your kayak.
Page 49

49
You can eliminate this by either moving the FishHunter just
behind your seat as explained above, OR you can switch to
FISH VIEW and use the surface slider to adjust to eliminate the
area where your paddle/pedaling is appearing.
Tin/Metal Boat Fishing:
When reeling into the boat you will notice that in some cases as
the FishHunter gets close to the boat
(under 5 ft) you will start to see the boat in the RAW data or
views screens. This is due to the power of the transducers that
we are using and their reflection off the side of your boat. When
the unit is right beside the boat most of this reflection will
disappear.
Drifting (no motor running):
For drifting we recommend that you use our 15 ft leash to
attach your FishHunter to the top/side of your boat. This will
allow you to have both hands free to focus on
fishing. As you drift along, the FishHunter will be giving you
a strong reading for the area around the floating sonar and
your boat. This is perfect when you want to fish close to your
boat.
With a range of over 150 ft, you can also attach the
FishHunter to a fishing rod and then cast it into the area that
you would like to drift it across. This will allow you to fish a
much broader area and also allow you to cast directly at your
FishHunter.
3
Page 50

50
Trolling- 15 ft Leash Mounting:
The FishHunter has been designed to troll at under 2 miles per
hour for Android and under 1.5 miles per hour for iOS
devices.
The difference in the two devices is due to the difference in the
Wi-Fi chips in the different devices. You will find several
cases where you can troll faster but this is our recommended
range. Trolling speed is impacted by the water conditions and
wave heights. In more rough water the FishHunter will perform
slightly better than perfectly calm water. We recommend that
you use the 15 ft leash that is provided with your FishHunter
to make it easy for you to use your new sonar.
Please note - when trolling the FishHunter in a metal boat you
may see a thin line on your screen, this is just a sound
reflection off of your metal boat. - might think that reflection is
a fish. When this happens, you will see fish continuously on the
screen at the same depth level. Since this situation only occurs
with certain boats and not all, we suggest that you use the
“Fish Sensitivity Slider” to adjust the sensitivity of the fish
finding algorithm we use to present/notify you of fish in the
water.
You will find the “Fish Sensitivity” slider in the side menu, within
the sonar section of the app. Please move the slider to the left to
eliminate FishHunter from seeing your boat as fish.
Page 51
51
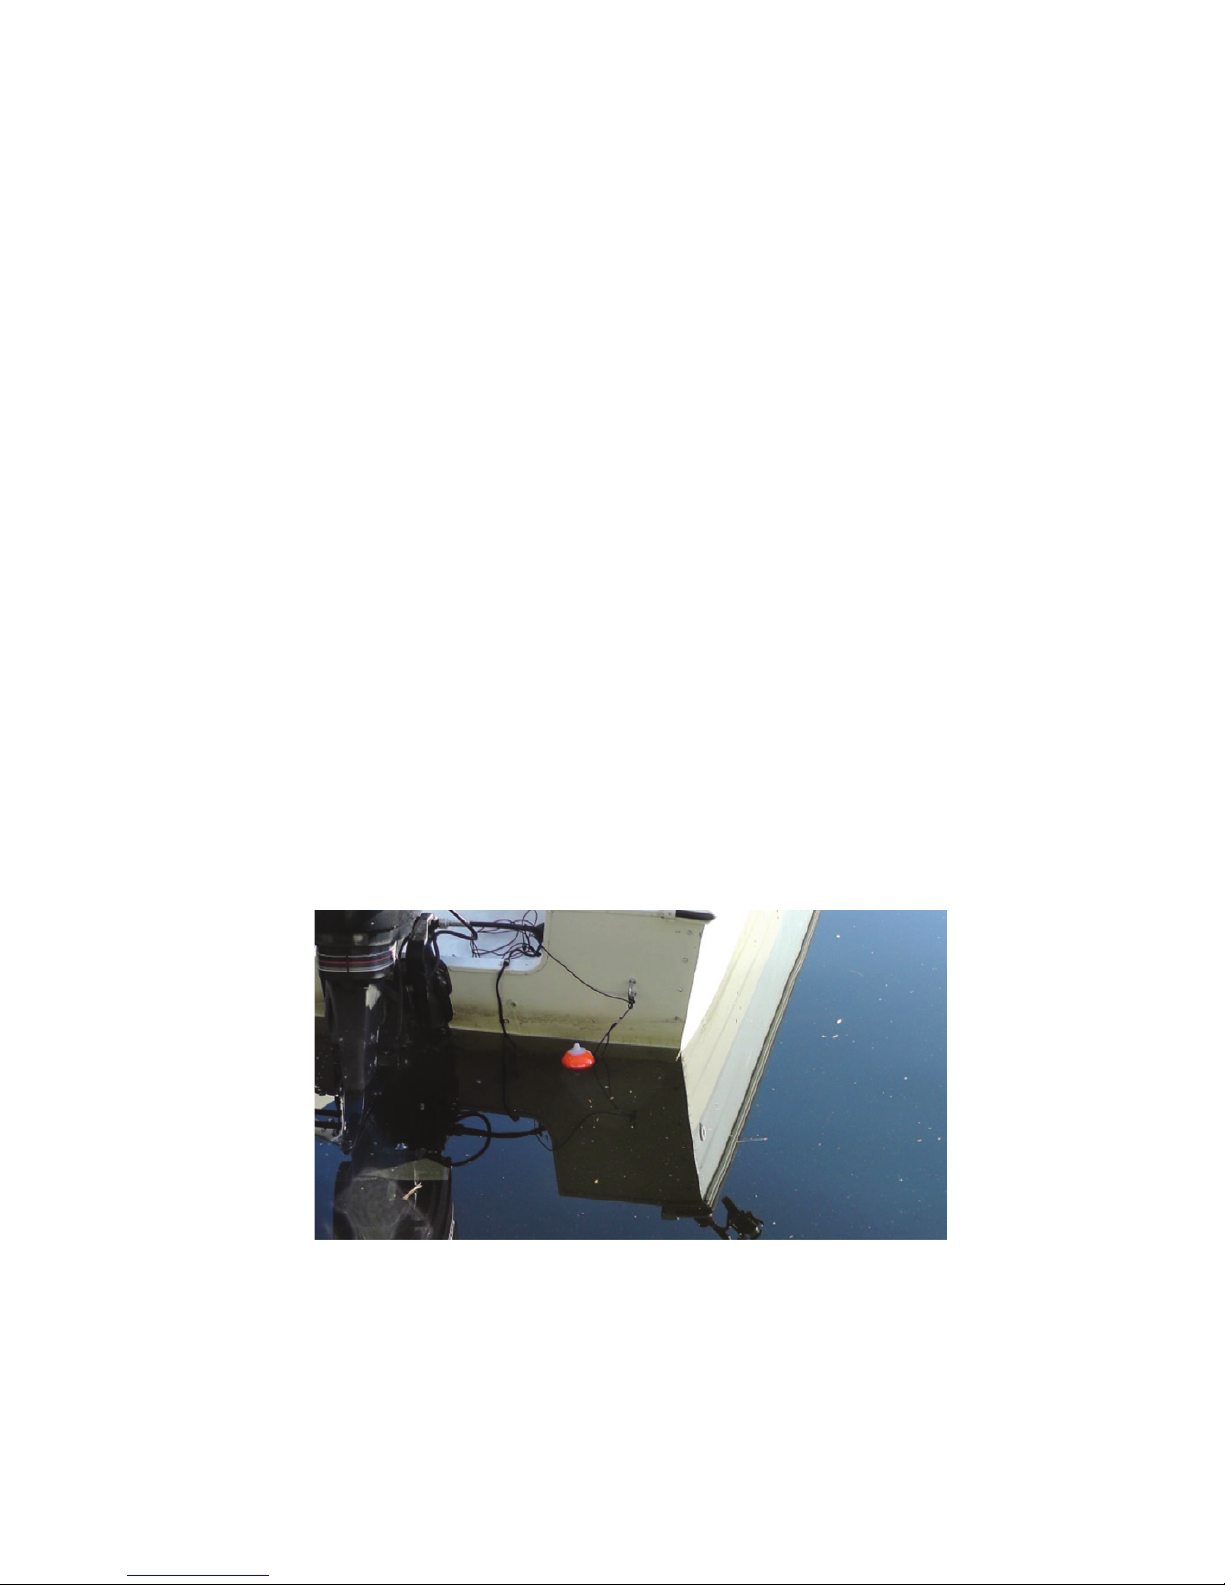
Trolling –Transom Mounting:
If you are having trouble with the connection to your phone or
tablet when trolling using your leash or you would like to try to
troll the FishHunter at a faster rate, you can attach the unit to
the back of the trailer mount of your fishing boat. Please follow
the steps below:
You are going to be attaching the FishHunter to the trailer
mounting bracket on the back of your boat.
You will want the FishHunter to be about 6-10 inches
behind the back of the boat when you are finished, so it
will float freely in the water. The actual length required will
depend on the height of your trailer mounting bracket.
A higher bracket means you will need slightly more line.
The goal here is to have the FishHunter sitting flat on the
water with about 6 inches of line free after it is attached to
boat. This will allow the FishHunter to sit flat in the water
while you are trolling it.
•
•
•
You can watch "Making a Boat Mount" video at:
www.fishhunter.com/support
Page 52

52
WARRANTY
This product has been manufactured and tested to the highest
quality standards by FishHunter™ Inc. This Limited Warranty
offered by FishHunter™ Inc. covers defects in material or
workmanship in new FishHunter™ Inc. products. This warranty
extends to the original purchaser only and is non-transferable.
Only consumers purchasing FishHunter™ Inc. products from
authorized FishHunter™ Inc. retailers or resellers or through the
FishHunter™ Inc. website may obtain coverage under our limited
warranty.
What is covered?
FishHunter™ Inc. warrants this product against defects in material
or workmanship as follows:
FishHunter™ Inc. will replace at no charge for parts only or, at its
option, replace any product or part of the product that proves
defective because of improper workmanship and/or material,
under normal installation, use, service and maintenance. If
FishHunter™ Inc. is unable to provide a replacement and repair is
not practical or cannot be made in a timely fashion, FishHunter™
Inc. may elect to refund the purchase price in exchange for the
return of the product.
How Long Does The Coverage Last?
Our warranty periods are 1 year from the documented date of
purchase.
Page 53

53
What does the warranty not cover?
Our warranties do not cover any problem that is caused by:
1. Conditions, malfunctions or damage not resulting from defects in material or
workmanship.
2. Conditions, malfunctions or damage resulting from normal wear and tear,
3. improper installation, improper maintenance, misuse, abuse, negligence,
4. accident or alteration.
5. Accessories, connected materials and pro ducts, or related products not
6. manufactured by FishHunter™ Inc.
This limited warranty is void if a product is returned with removed,
damaged ortampered labels or any alterations (including removal
of any component or external cover). Repair or Replacement (or, in
limited circumstances, refund of the purchase price) as provided
under this warranty is the exclusive remedy of the purchaser.
FishHunter™ Inc. neither assumes nor authorizes any person to
create for it any obligation or liability in connection with this
product. The law of the Province of Ontario, Canada govern
FishHunter™ Inc. and this warranty.
How do I file a claim?
To request warranty service, please use the link below and
provide a description of the problem you are having. A member
of our Warranty Team will get in touch with you to complete the
warranty claim process. Please ensure you have your proof of
purchase information ready and available. When warranty service
is completed, any repaired or replacement product or part will
be returned to you postage prepaid. FishHunter Inc will provide
warranty coverage with claims made in compliance with the terms
of our warranty.
Claim Warranty online at: www.fishhunter.com/claim-warranty
Page 54

• FishHunter 3D Sonar
• Charger
• USB Charging Cord
• Waterproof Armband
• 15ft leash
FishHunter™ 3D Includes :
FishHunter Inc.
Worldwide Offices
Toronto | Los Angeles | Seoul, Korea
www.fishhunter.com/support
TM
 Loading...